Embed Size (px)
Citation preview
Employee Web Guide
Table of Contents Getting Started ................................................................................................................................ 1 Home Page ...................................................................................................................................... 3 Absence Creation ............................................................................................................................ 7 Managing Absences ...................................................................................................................... 17 Preferred Substitutes .................................................................................................................... 25 Account ......................................................................................................................................... 29 Feedback ....................................................................................................................................... 33 Itinerant Employees ...................................................................................................................... 37 Printable Help ............................................................................................................................... 44
ii
Getting Started Using Aesop Successfully
Create absences online or on the phone
Aesop offers both phone and Web services, so that you can create an absence anytime, anywhere. Online absences can be created as far as one year in advance. As soon as you register an absence, Aesop starts finding a qualified, available substitute for you. Manage your schedule
With Aesop you can track how many absences you have taken and see absences you have already scheduled in the future. You can also track the types of absences you have on record, such as personal or professional development day. Aesop offers an easy way to store all your absence information in one place. Leave notes and attachments for the substitute
By writing notes or attaching documents to your absence, you can assure that your substitute is prepared to handle your duties during your absence. Aesop lets both the district and the employee leave notes, as well as attach Word documents and PDF’s to the absence.
Log on to Aesop
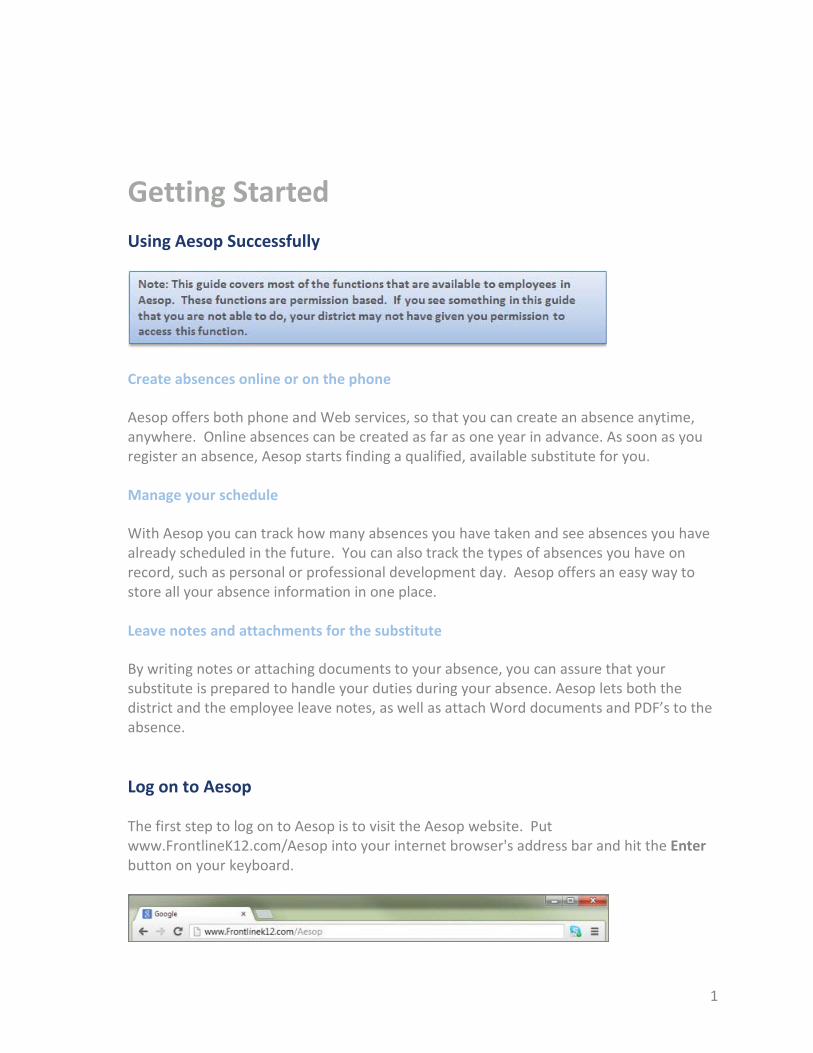
The first step to log on to Aesop is to visit the Aesop website. Put www.FrontlineK12.com/Aesop into your internet browser's address bar and hit the Enter button on your keyboard.
1
Employee Web Guide
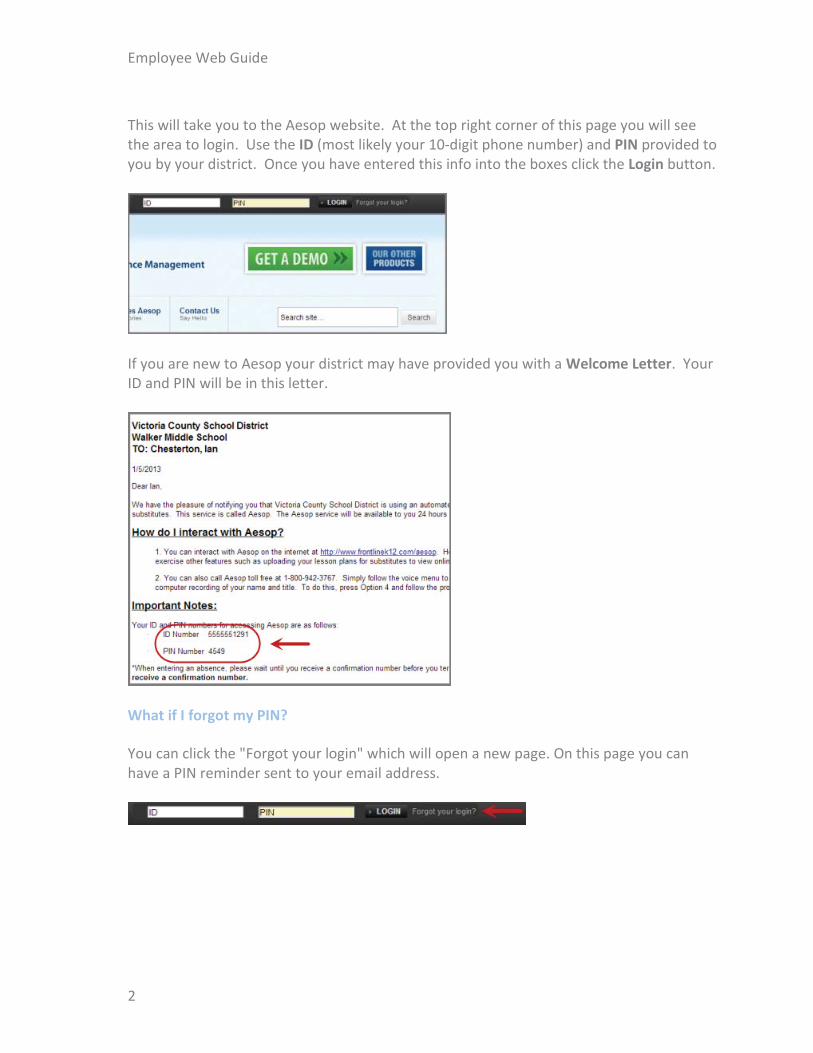
This will take you to the Aesop website. At the top right corner of this page you will see the area to login. Use the ID (most likely your 10-digit phone number) and PIN provided to you by your district. Once you have entered this info into the boxes click the Login button.
If you are new to Aesop your district may have provided you with a Welcome Letter. Your ID and PIN will be in this letter.
What if I forgot my PIN?
You can click the "Forgot your login" which will open a new page. On this page you can have a PIN reminder sent to your email address.
2
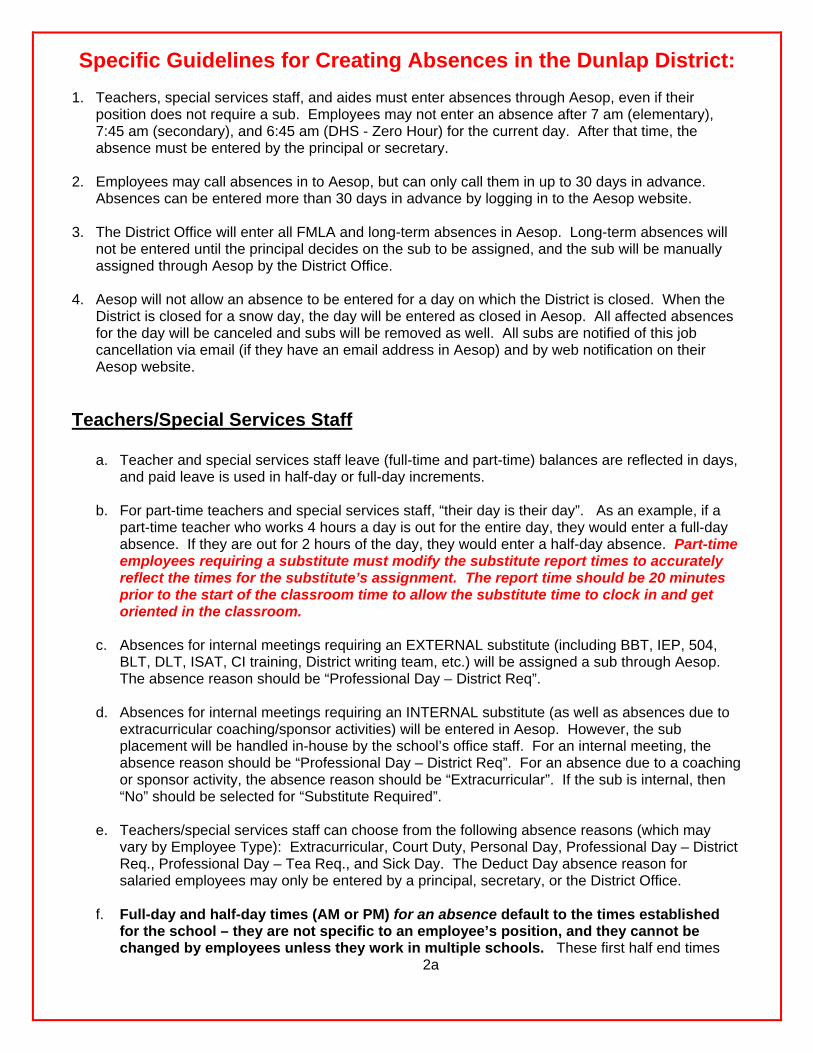
Specific Guidelines for Creating Absences in the Dunlap District: 1. Teachers, special services staff, and aides must enter absences through Aesop, even if their
position does not require a sub. Employees may not enter an absence after 7 am (elementary), 7:45 am (secondary), and 6:45 am (DHS - Zero Hour) for the current day. After that time, the absence must be entered by the principal or secretary.
2. Employees may call absences in to Aesop, but can only call them in up to 30 days in advance.
Absences can be entered more than 30 days in advance by logging in to the Aesop website. 3. The District Office will enter all FMLA and long-term absences in Aesop. Long-term absences will
not be entered until the principal decides on the sub to be assigned, and the sub will be manually assigned through Aesop by the District Office.
4. Aesop will not allow an absence to be entered for a day on which the District is closed. When the
District is closed for a snow day, the day will be entered as closed in Aesop. All affected absences for the day will be canceled and subs will be removed as well. All subs are notified of this job cancellation via email (if they have an email address in Aesop) and by web notification on their Aesop website.
Teachers/Special Services Staff
a. Teacher and special services staff leave (full-time and part-time) balances are reflected in days, and paid leave is used in half-day or full-day increments.
b. For part-time teachers and special services staff, “their day is their day”. As an example, if a part-time teacher who works 4 hours a day is out for the entire day, they would enter a full-day absence. If they are out for 2 hours of the day, they would enter a half-day absence. Part-time employees requiring a substitute must modify the substitute report times to accurately reflect the times for the substitute’s assignment. The report time should be 20 minutes prior to the start of the classroom time to allow the substitute time to clock in and get oriented in the classroom.
c. Absences for internal meetings requiring an EXTERNAL substitute (including BBT, IEP, 504,
BLT, DLT, ISAT, CI training, District writing team, etc.) will be assigned a sub through Aesop. The absence reason should be “Professional Day – District Req”.
d. Absences for internal meetings requiring an INTERNAL substitute (as well as absences due to
extracurricular coaching/sponsor activities) will be entered in Aesop. However, the sub placement will be handled in-house by the school’s office staff. For an internal meeting, the absence reason should be “Professional Day – District Req”. For an absence due to a coaching or sponsor activity, the absence reason should be “Extracurricular”. If the sub is internal, then “No” should be selected for “Substitute Required”.
e. Teachers/special services staff can choose from the following absence reasons (which may
vary by Employee Type): Extracurricular, Court Duty, Personal Day, Professional Day – District Req., Professional Day – Tea Req., and Sick Day. The Deduct Day absence reason for salaried employees may only be entered by a principal, secretary, or the District Office.
f. Full-day and half-day times (AM or PM) for an absence default to the times established
for the school – they are not specific to an employee’s position, and they cannot be changed by employees unless they work in multiple schools. These first half end times
2a

are: 11:24 for Elementary Schools, 11:39 for the Middle and High Schools. The Dunlap High School – Zero Hour half-day time is 10:45, and Bright Futures is 11:00.
g. Substitute report times, however, MUST be modified when necessary to reflect accurate report times for the substitute. The report time should be 20 minutes prior to the start of the classroom time to allow the substitute time to clock in and get oriented in the classroom.
Aides
a. Aide leave balances are reflected in hourly increments, and paid leave is taken for the exact number of hours that the employee is absent.
b. All absences must be entered in Aesop, even if they are unpaid absences. Aides’ paid leave absences entered in Aesop will be entered in the time clock software by the District office by the end of each pay period.
c. Aides should enter their actual absences times, less the unpaid meal break if applicable.
For example, if an employee works 7 hours/day, with work hours from 8:00 – 3:30 including a 30-minute unpaid meal break, they should enter 8:00 – 3:00 as their absence time. This will ensure that 7 hours are deducted in leave time, instead of 7.5 hours. However, the substitute end time must then be modified to reflect the correct end time (e.g., 3:30).
d. For employees whose position requires a substitute, substitute report times MUST be
modified when necessary to reflect accurate report times for the substitute. The report time should be 20 minutes prior to the start of the classroom time to allow the substitute time to clock in and get oriented in the classroom. This is required for part-time employees requiring a substitute and any other employees not working the default school schedule.
e. Aides can choose from the following absence reasons: Extracurricular, Court Duty, Personal
Day, Professional Day – District Req., Professional Day – Tea Req., Sick Leave - Aide, and Unpaid/Hourly.
Employees Assigned to One Position in Multiple Schools or Multiple Positions
Employees assigned to one position in multiple schools/locations will have one Aesop login. When creating an absence, the employee will select the times that he/she will be absent at each school. Approval emails will then be sent to Principals at each school, and the first Principal to approve will approve the entire absence.
Employees Assigned to a Teacher and an Aide Position
Employees assigned to a teacher and an aide position within the District will have a separate Aesop login for each position since the required substitute skills are different for each position. Absences must be entered in both accounts as necessary.
2b
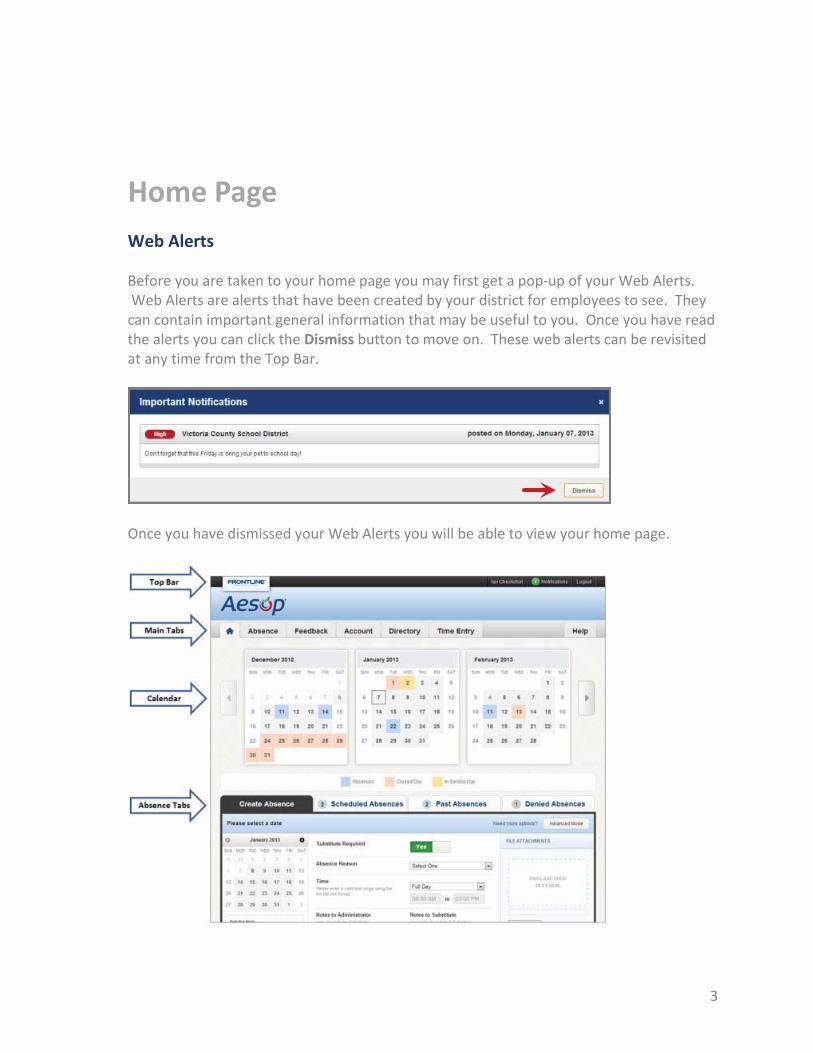
Home Page Web Alerts
Before you are taken to your home page you may first get a pop-up of your Web Alerts. Web Alerts are alerts that have been created by your district for employees to see. They can contain important general information that may be useful to you. Once you have read the alerts you can click the Dismiss button to move on. These web alerts can be revisited at any time from the Top Bar.
Once you have dismissed your Web Alerts you will be able to view your home page.
3
Employee Web Guide
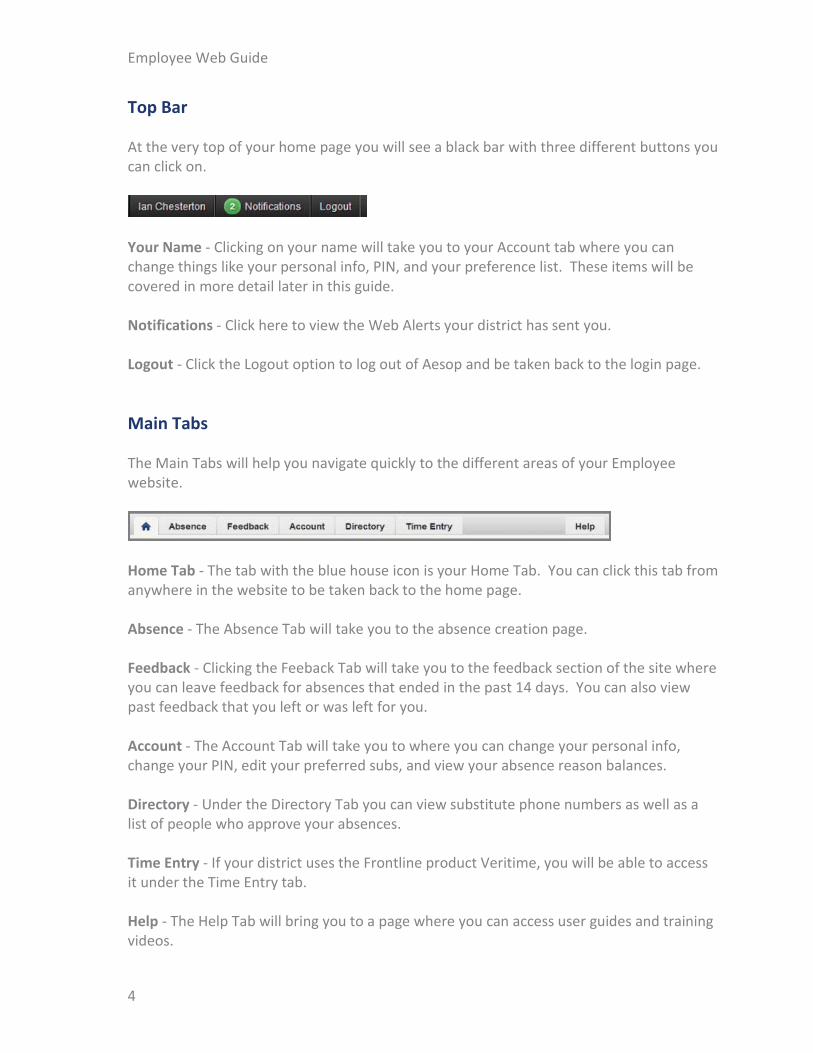
Top Bar
At the very top of your home page you will see a black bar with three different buttons you can click on.
Your Name - Clicking on your name will take you to your Account tab where you can change things like your personal info, PIN, and your preference list. These items will be covered in more detail later in this guide. Notifications - Click here to view the Web Alerts your district has sent you. Logout - Click the Logout option to log out of Aesop and be taken back to the login page.
Main Tabs
The Main Tabs will help you navigate quickly to the different areas of your Employee website.
Home Tab - The tab with the blue house icon is your Home Tab. You can click this tab from anywhere in the website to be taken back to the home page. Absence - The Absence Tab will take you to the absence creation page. Feedback - Clicking the Feeback Tab will take you to the feedback section of the site where you can leave feedback for absences that ended in the past 14 days. You can also view past feedback that you left or was left for you. Account - The Account Tab will take you to where you can change your personal info, change your PIN, edit your preferred subs, and view your absence reason balances. Directory - Under the Directory Tab you can view substitute phone numbers as well as a list of people who approve your absences. Time Entry - If your district uses the Frontline product Veritime, you will be able to access it under the Time Entry tab. Help - The Help Tab will bring you to a page where you can access user guides and training videos.
4
Home Page
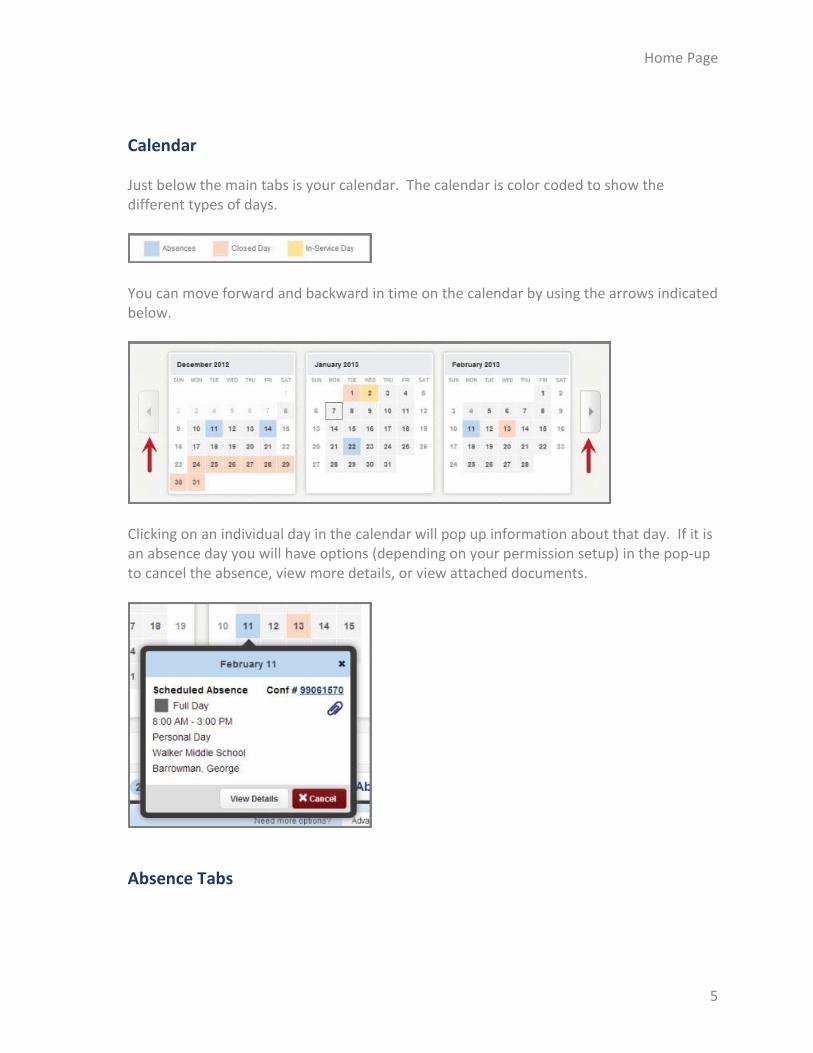
Calendar
Just below the main tabs is your calendar. The calendar is color coded to show the different types of days.
You can move forward and backward in time on the calendar by using the arrows indicated below.
Clicking on an individual day in the calendar will pop up information about that day. If it is an absence day you will have options (depending on your permission setup) in the pop-up to cancel the absence, view more details, or view attached documents.
Absence Tabs
5
Employee Web Guide
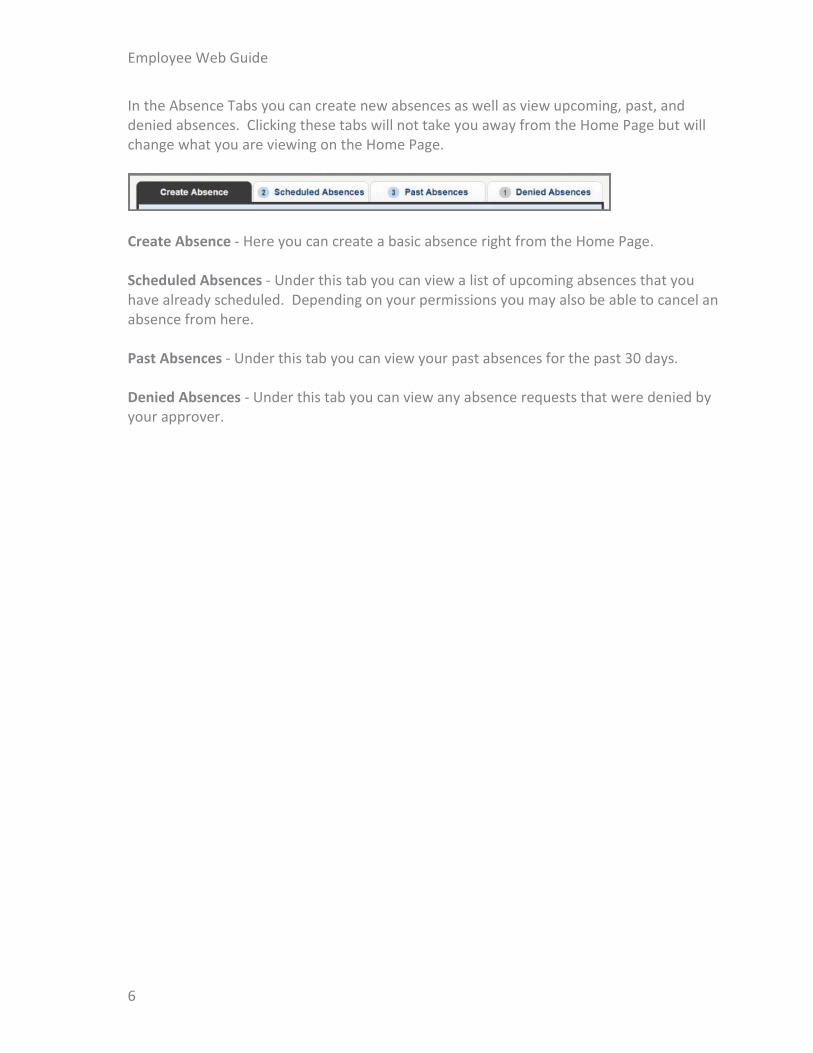
In the Absence Tabs you can create new absences as well as view upcoming, past, and denied absences. Clicking these tabs will not take you away from the Home Page but will change what you are viewing on the Home Page.
Create Absence - Here you can create a basic absence right from the Home Page. Scheduled Absences - Under this tab you can view a list of upcoming absences that you have already scheduled. Depending on your permissions you may also be able to cancel an absence from here. Past Absences - Under this tab you can view your past absences for the past 30 days. Denied Absences - Under this tab you can view any absence requests that were denied by your approver.
6
Absence Creation
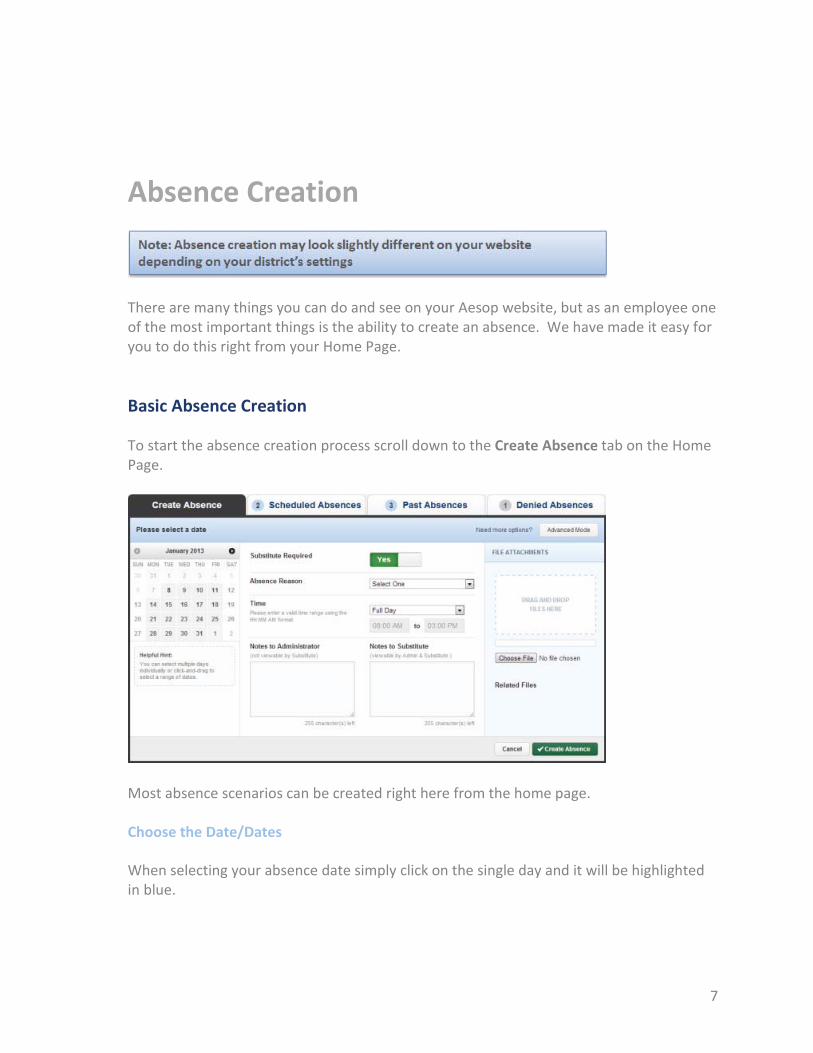
There are many things you can do and see on your Aesop website, but as an employee one of the most important things is the ability to create an absence. We have made it easy for you to do this right from your Home Page.
Basic Absence Creation
To start the absence creation process scroll down to the Create Absence tab on the Home Page.
Most absence scenarios can be created right here from the home page. Choose the Date/Dates
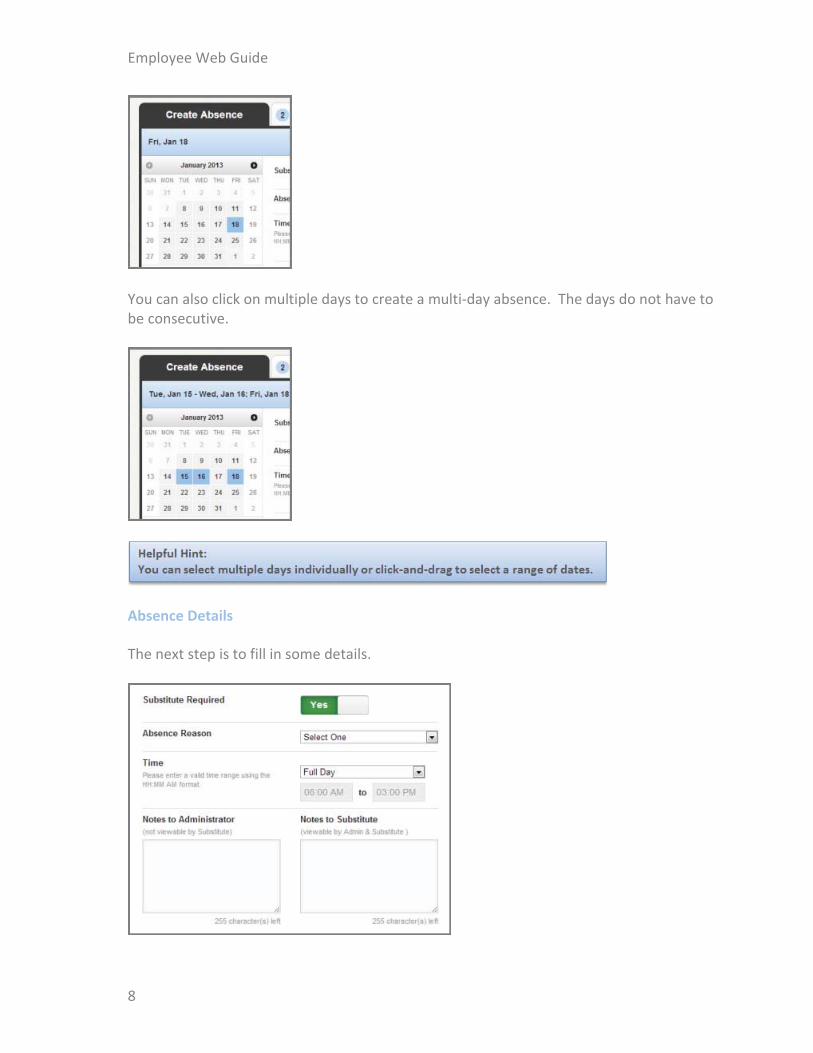
When selecting your absence date simply click on the single day and it will be highlighted in blue.
7
Employee Web Guide
You can also click on multiple days to create a multi-day absence. The days do not have to be consecutive.
Absence Details
The next step is to fill in some details.
8
Absence Creation
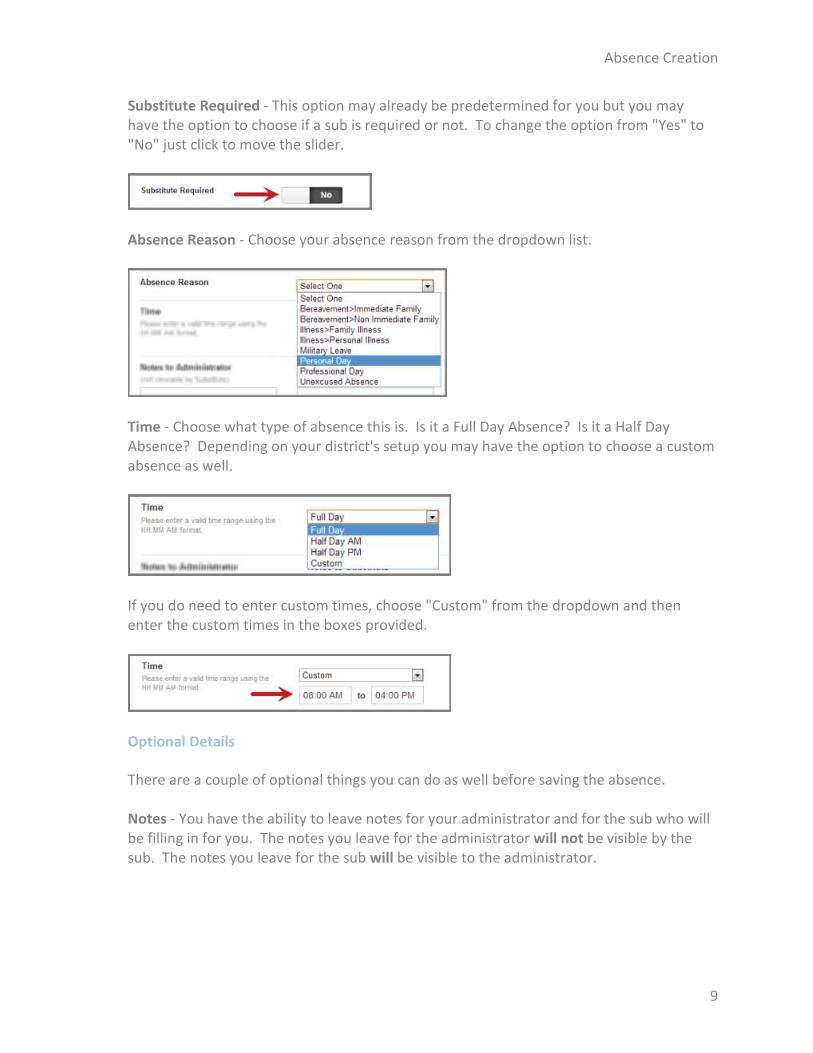
Substitute Required - This option may already be predetermined for you but you may have the option to choose if a sub is required or not. To change the option from "Yes" to "No" just click to move the slider.
Absence Reason - Choose your absence reason from the dropdown list.
Time - Choose what type of absence this is. Is it a Full Day Absence? Is it a Half Day Absence? Depending on your district's setup you may have the option to choose a custom absence as well.
If you do need to enter custom times, choose "Custom" from the dropdown and then enter the custom times in the boxes provided.
Optional Details
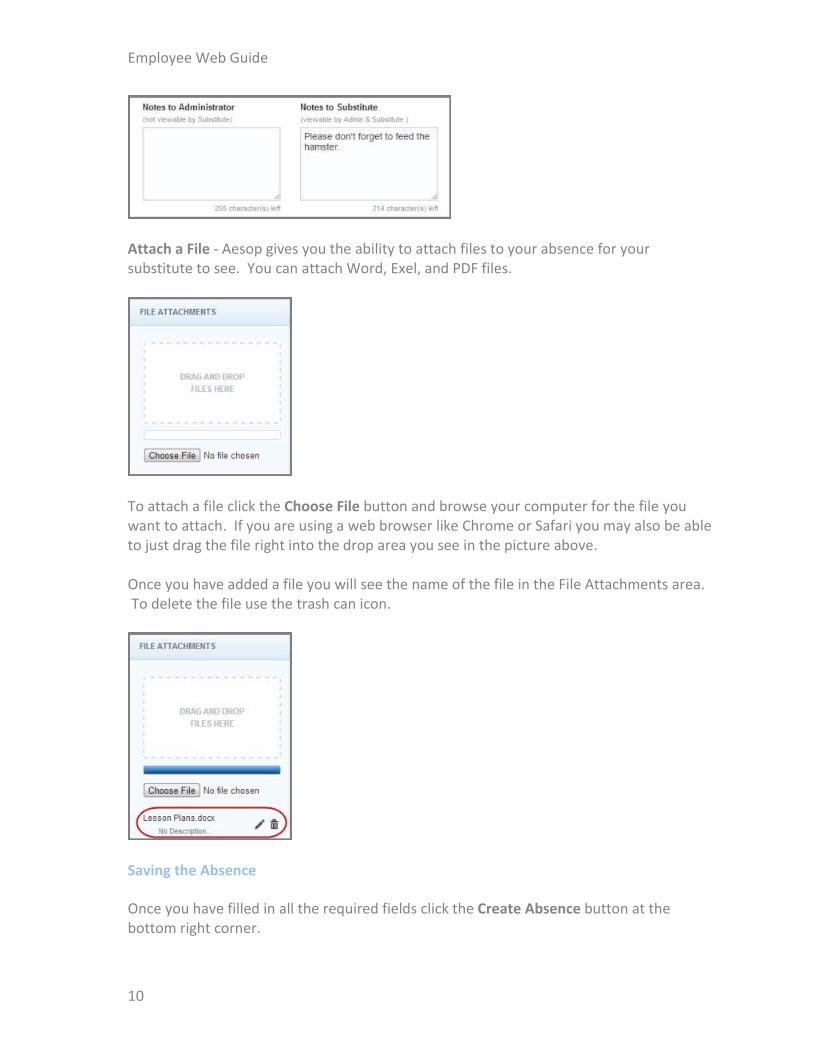
There are a couple of optional things you can do as well before saving the absence. Notes - You have the ability to leave notes for your administrator and for the sub who will be filling in for you. The notes you leave for the administrator will not be visible by the sub. The notes you leave for the sub will be visible to the administrator.
9
Employee Web Guide
Attach a File - Aesop gives you the ability to attach files to your absence for your substitute to see. You can attach Word, Exel, and PDF files.
To attach a file click the Choose File button and browse your computer for the file you want to attach. If you are using a web browser like Chrome or Safari you may also be able to just drag the file right into the drop area you see in the picture above. Once you have added a file you will see the name of the file in the File Attachments area. To delete the file use the trash can icon.
Saving the Absence
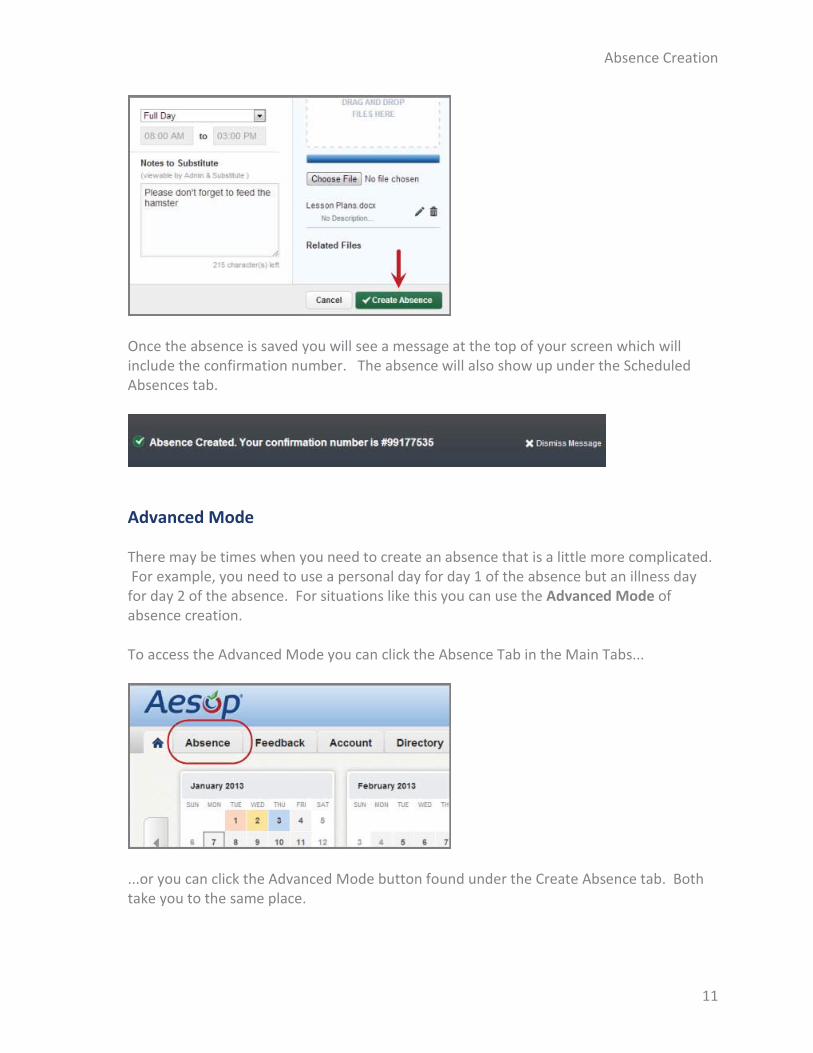
Once you have filled in all the required fields click the Create Absence button at the bottom right corner.
10
Absence Creation
Once the absence is saved you will see a message at the top of your screen which will include the confirmation number. The absence will also show up under the Scheduled Absences tab.
Advanced Mode
There may be times when you need to create an absence that is a little more complicated. For example, you need to use a personal day for day 1 of the absence but an illness day for day 2 of the absence. For situations like this you can use the Advanced Mode of absence creation. To access the Advanced Mode you can click the Absence Tab in the Main Tabs...
...or you can click the Advanced Mode button found under the Create Absence tab. Both take you to the same place.
11

Employee Web Guide
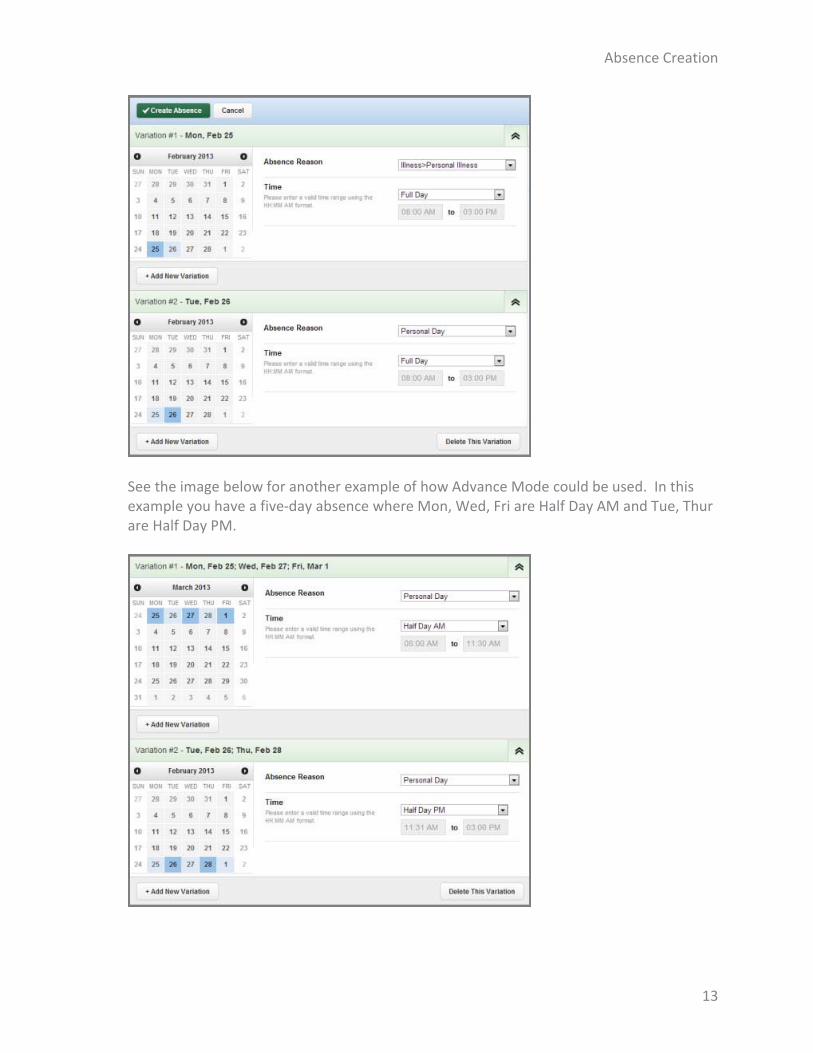
Advanced mode is basically the same as the normal absence creation except for one major difference, and that is the ability to add Variations. What is a Variation? Well, let's walk through it. Let's say you are creating an absence like the one we described above, a different absence reason on each of two days. While in Advanced Mode, fill out the top section like you were creating an absence just for the first day. Once you have done that click the button + Add New Variation.
This will expand the absence creation area with a new section called "Variation #2". In this new area you would enter the information for the second day of the absence. This allows you to use one absence reason for the first day and a completely different absence reason for the second day.
12
Absence Creation
See the image below for another example of how Advance Mode could be used. In this example you have a five-day absence where Mon, Wed, Fri are Half Day AM and Tue, Thur are Half Day PM.
13
Employee Web Guide
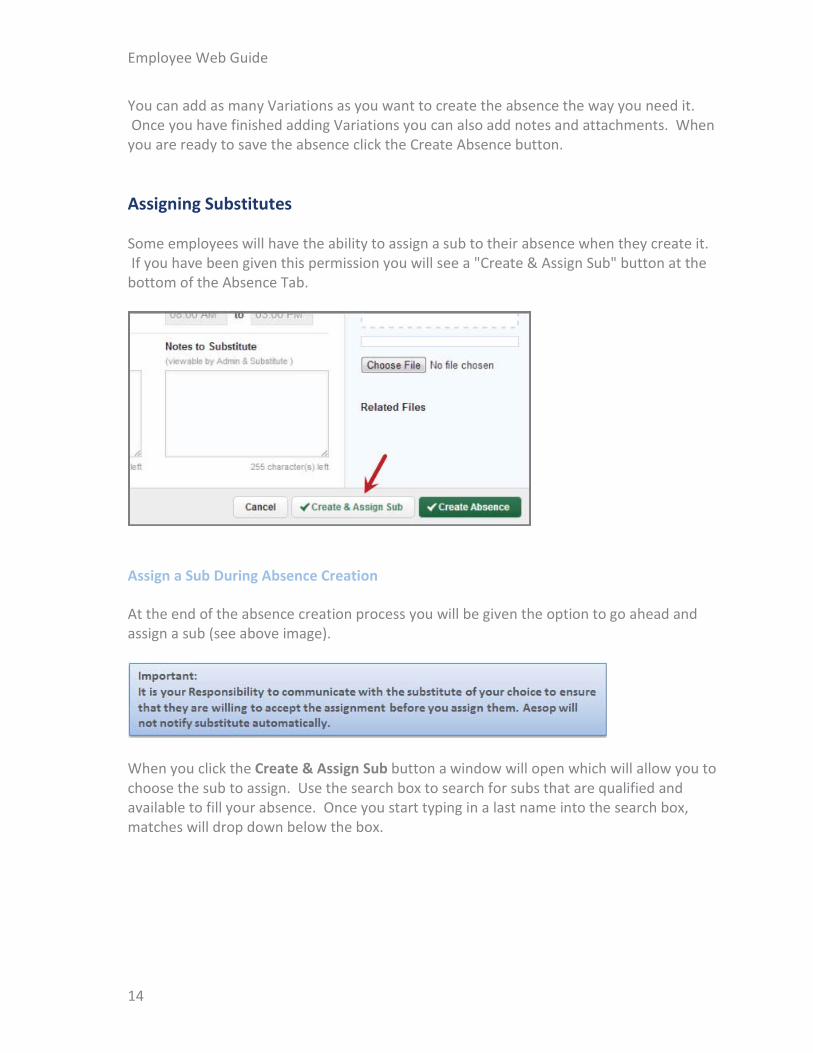
You can add as many Variations as you want to create the absence the way you need it. Once you have finished adding Variations you can also add notes and attachments. When you are ready to save the absence click the Create Absence button.
Assigning Substitutes
Some employees will have the ability to assign a sub to their absence when they create it. If you have been given this permission you will see a "Create & Assign Sub" button at the bottom of the Absence Tab.
Assign a Sub During Absence Creation
At the end of the absence creation process you will be given the option to go ahead and assign a sub (see above image).
When you click the Create & Assign Sub button a window will open which will allow you to choose the sub to assign. Use the search box to search for subs that are qualified and available to fill your absence. Once you start typing in a last name into the search box, matches will drop down below the box.
14
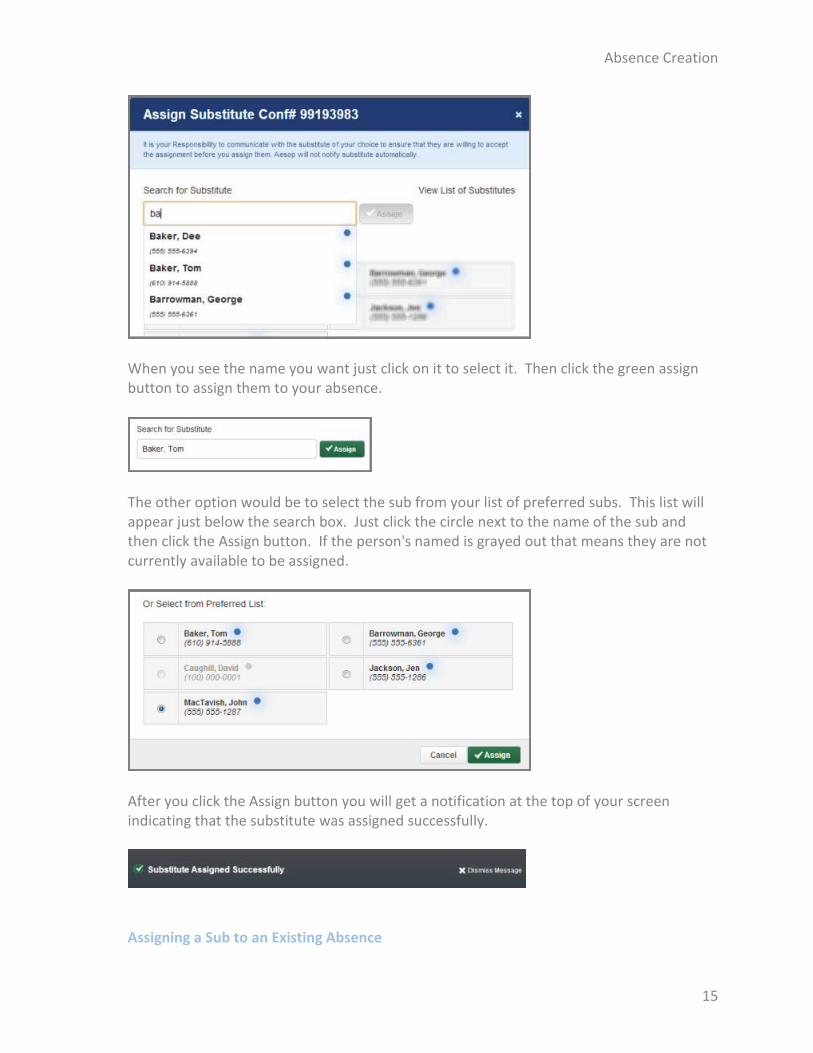
Absence Creation
When you see the name you want just click on it to select it. Then click the green assign button to assign them to your absence.
The other option would be to select the sub from your list of preferred subs. This list will appear just below the search box. Just click the circle next to the name of the sub and then click the Assign button. If the person's named is grayed out that means they are not currently available to be assigned.
After you click the Assign button you will get a notification at the top of your screen indicating that the substitute was assigned successfully.
Assigning a Sub to an Existing Absence
15
Employee Web Guide
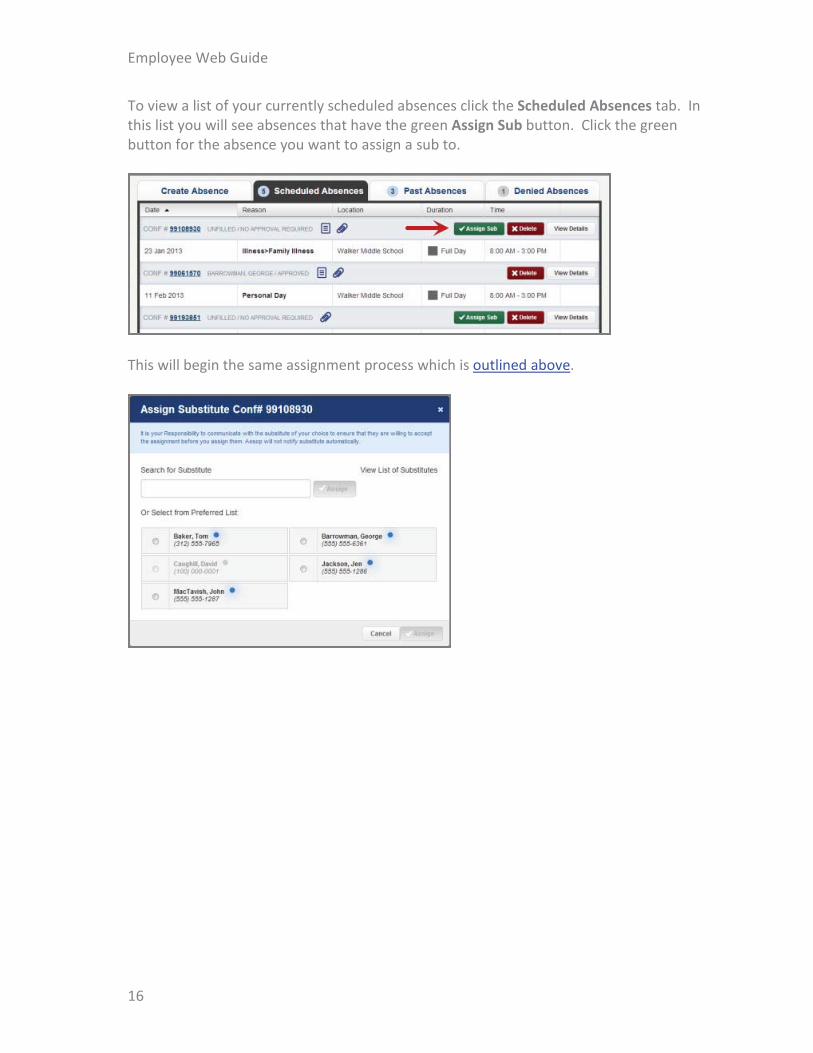
To view a list of your currently scheduled absences click the Scheduled Absences tab. In this list you will see absences that have the green Assign Sub button. Click the green button for the absence you want to assign a sub to.
This will begin the same assignment process which is outlined above.
16
Managing Absences Once you have created absences in Aesop you will be able to view them and even modify them when needed.
Scheduled Absences
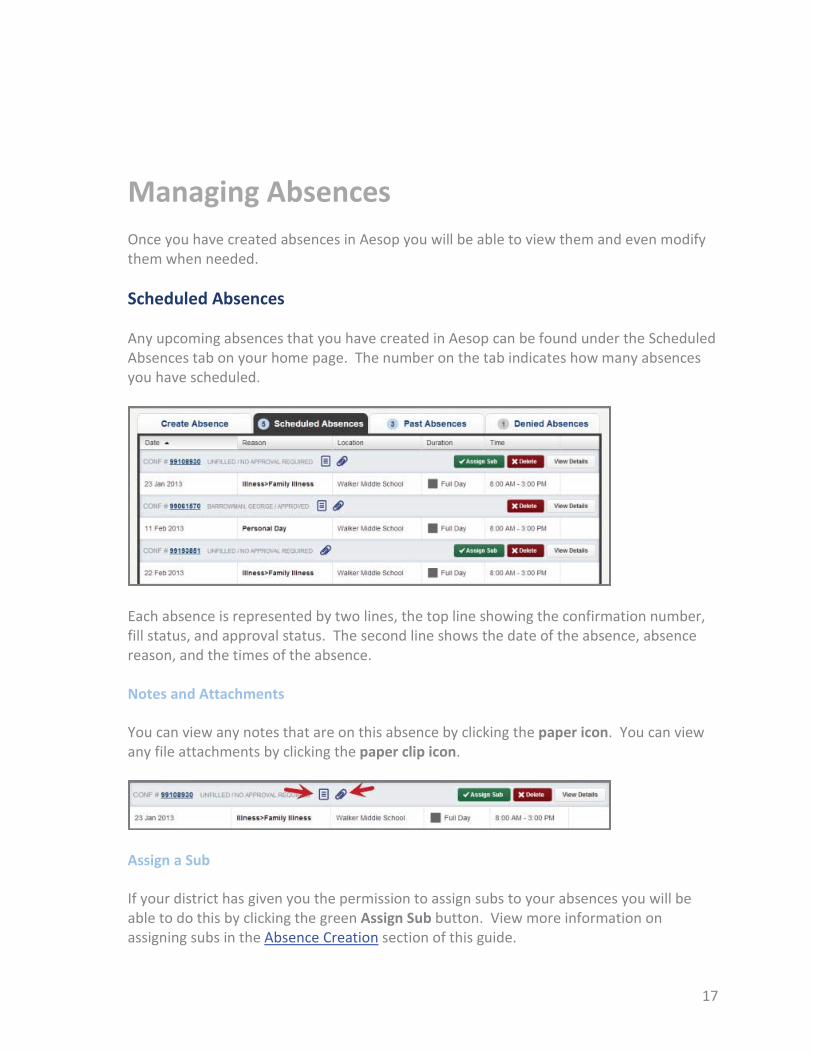
Any upcoming absences that you have created in Aesop can be found under the Scheduled Absences tab on your home page. The number on the tab indicates how many absences you have scheduled.
Each absence is represented by two lines, the top line showing the confirmation number, fill status, and approval status. The second line shows the date of the absence, absence reason, and the times of the absence. Notes and Attachments
You can view any notes that are on this absence by clicking the paper icon. You can view any file attachments by clicking the paper clip icon.
Assign a Sub
If your district has given you the permission to assign subs to your absences you will be able to do this by clicking the green Assign Sub button. View more information on assigning subs in the Absence Creation section of this guide.
17
Employee Web Guide
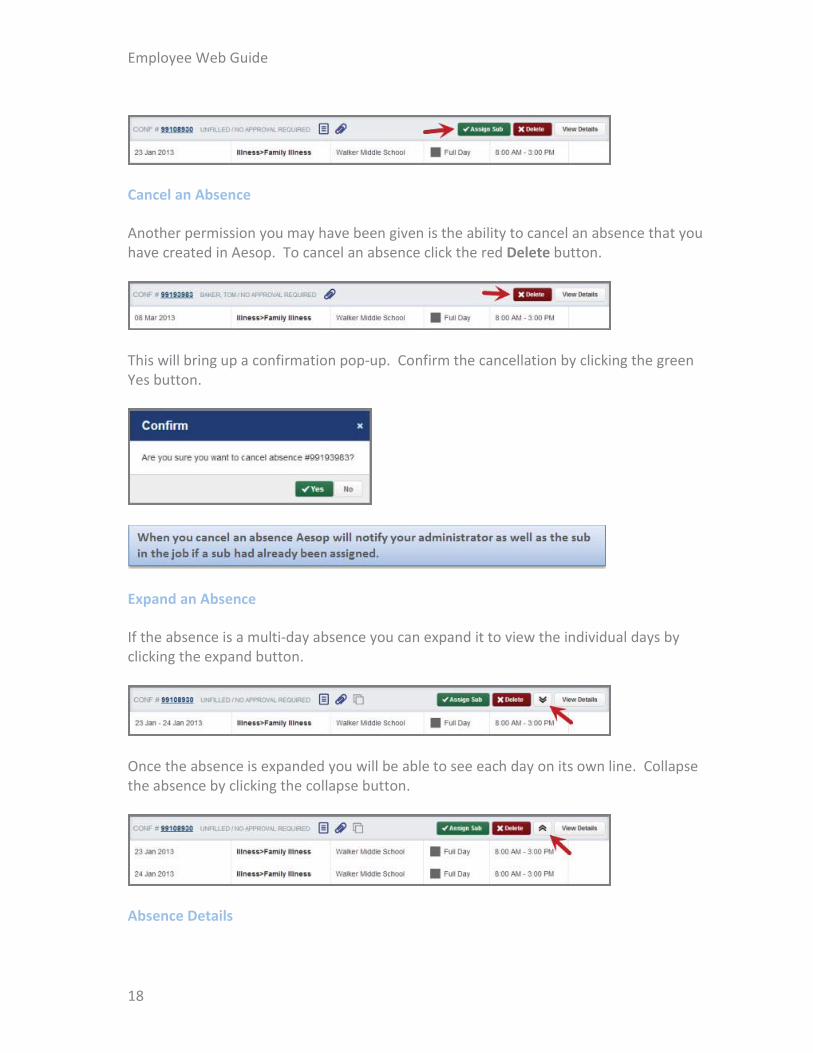
Cancel an Absence
Another permission you may have been given is the ability to cancel an absence that you have created in Aesop. To cancel an absence click the red Delete button.
This will bring up a confirmation pop-up. Confirm the cancellation by clicking the green Yes button.
Expand an Absence
If the absence is a multi-day absence you can expand it to view the individual days by clicking the expand button.
Once the absence is expanded you will be able to see each day on its own line. Collapse the absence by clicking the collapse button.
Absence Details
18

Managing Absences
Under the Scheduled Absences tab you will get a summary view of all of your upcoming absences. If you want to view an absence in more detail click the View Details button.
This will take you to the absence page which shows every detail of the absence.
From this page you can also assign a sub or delete the absence if you have these permissions. Edit an Absence
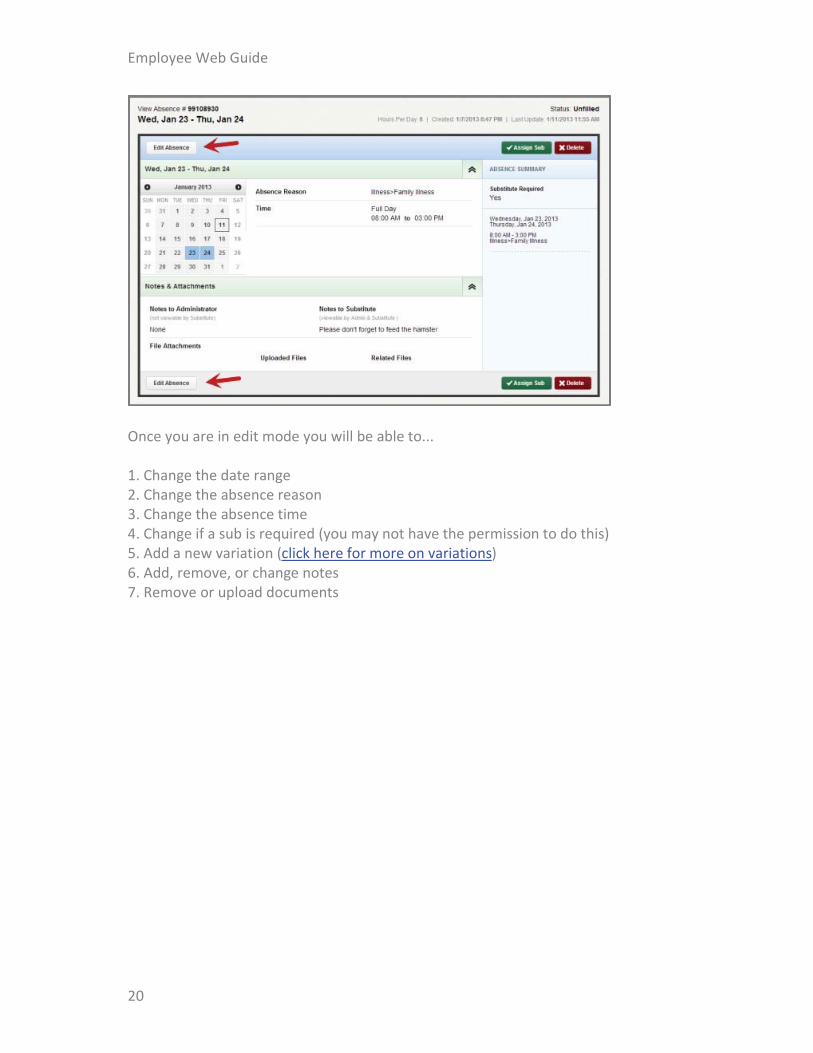
Aesop will allow you to make changes to an absence if the absence has not started yet and if it is still unfilled by a sub. To edit an absence click the Edit Absence button on the absence details page. This button can be found at the top or the bottom of the page.
19
Employee Web Guide
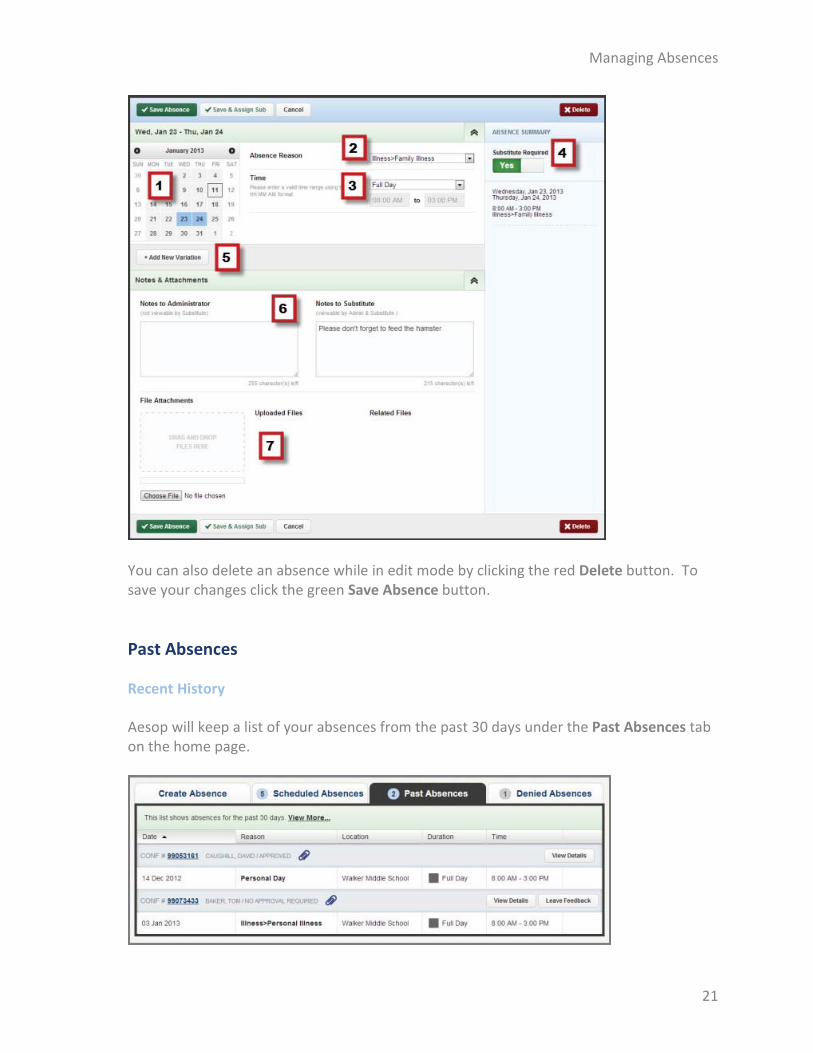
Once you are in edit mode you will be able to... 1. Change the date range 2. Change the absence reason 3. Change the absence time 4. Change if a sub is required (you may not have the permission to do this) 5. Add a new variation (click here for more on variations) 6. Add, remove, or change notes 7. Remove or upload documents
20
Managing Absences
You can also delete an absence while in edit mode by clicking the red Delete button. To save your changes click the green Save Absence button.
Past Absences
Recent History
Aesop will keep a list of your absences from the past 30 days under the Past Absences tab on the home page.
21
Employee Web Guide
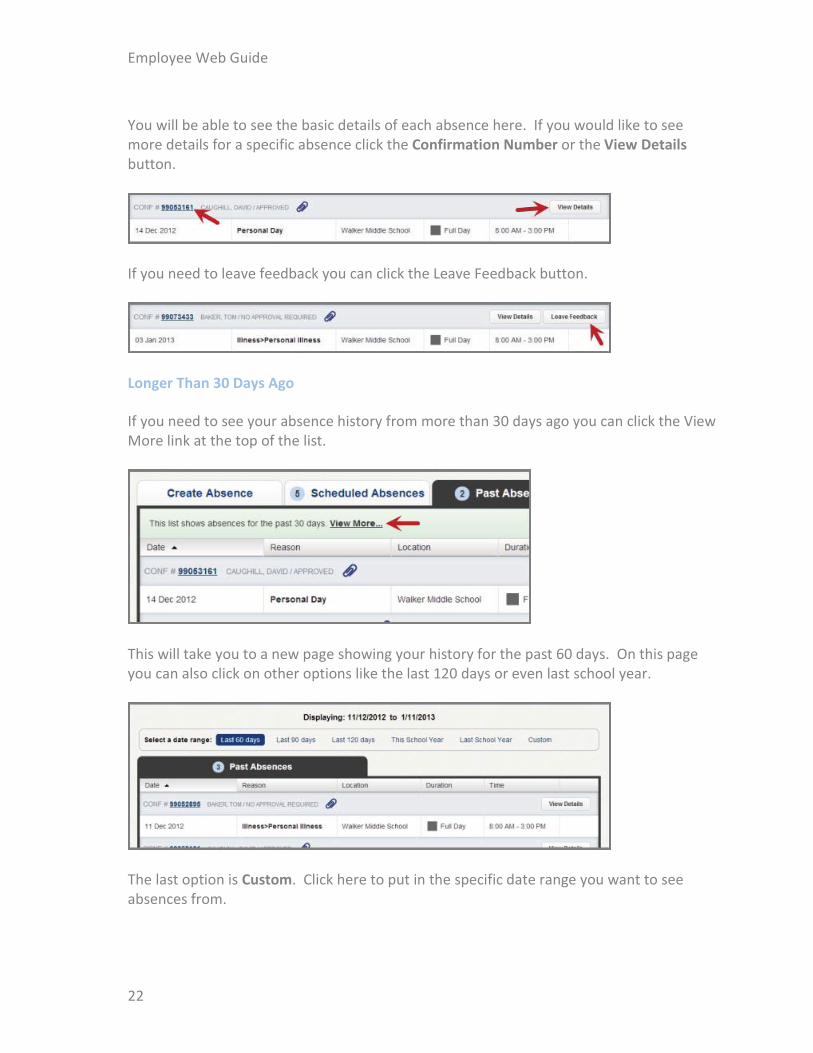
You will be able to see the basic details of each absence here. If you would like to see more details for a specific absence click the Confirmation Number or the View Details button.
If you need to leave feedback you can click the Leave Feedback button.
Longer Than 30 Days Ago
If you need to see your absence history from more than 30 days ago you can click the View More link at the top of the list.
This will take you to a new page showing your history for the past 60 days. On this page you can also click on other options like the last 120 days or even last school year.
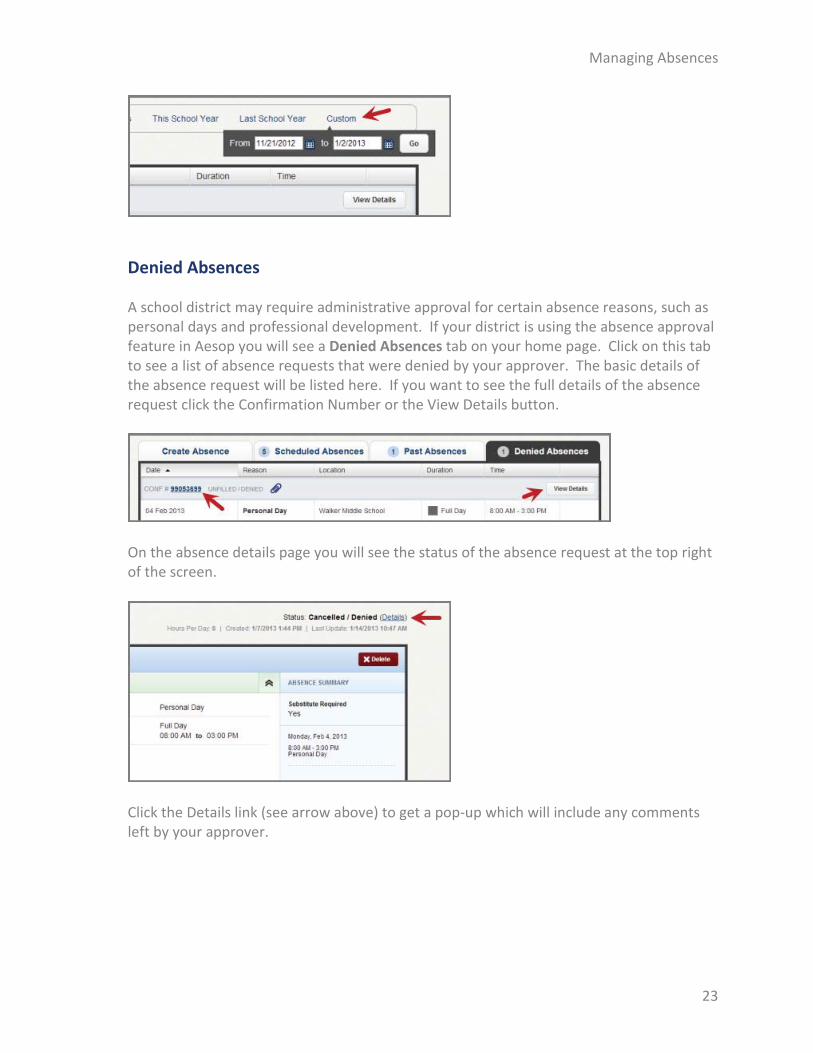
The last option is Custom. Click here to put in the specific date range you want to see absences from.
22
Managing Absences
Denied Absences
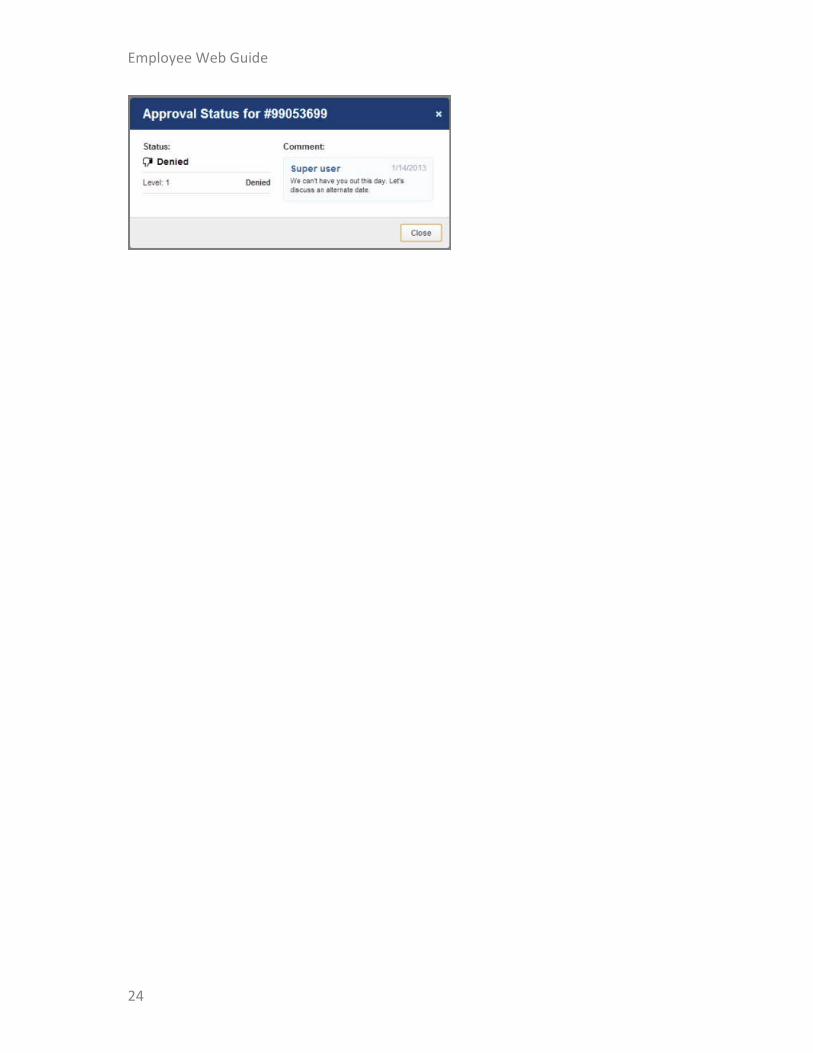
A school district may require administrative approval for certain absence reasons, such as personal days and professional development. If your district is using the absence approval feature in Aesop you will see a Denied Absences tab on your home page. Click on this tab to see a list of absence requests that were denied by your approver. The basic details of the absence request will be listed here. If you want to see the full details of the absence request click the Confirmation Number or the View Details button.
On the absence details page you will see the status of the absence request at the top right of the screen.
Click the Details link (see arrow above) to get a pop-up which will include any comments left by your approver.
23
Employee Web Guide
24
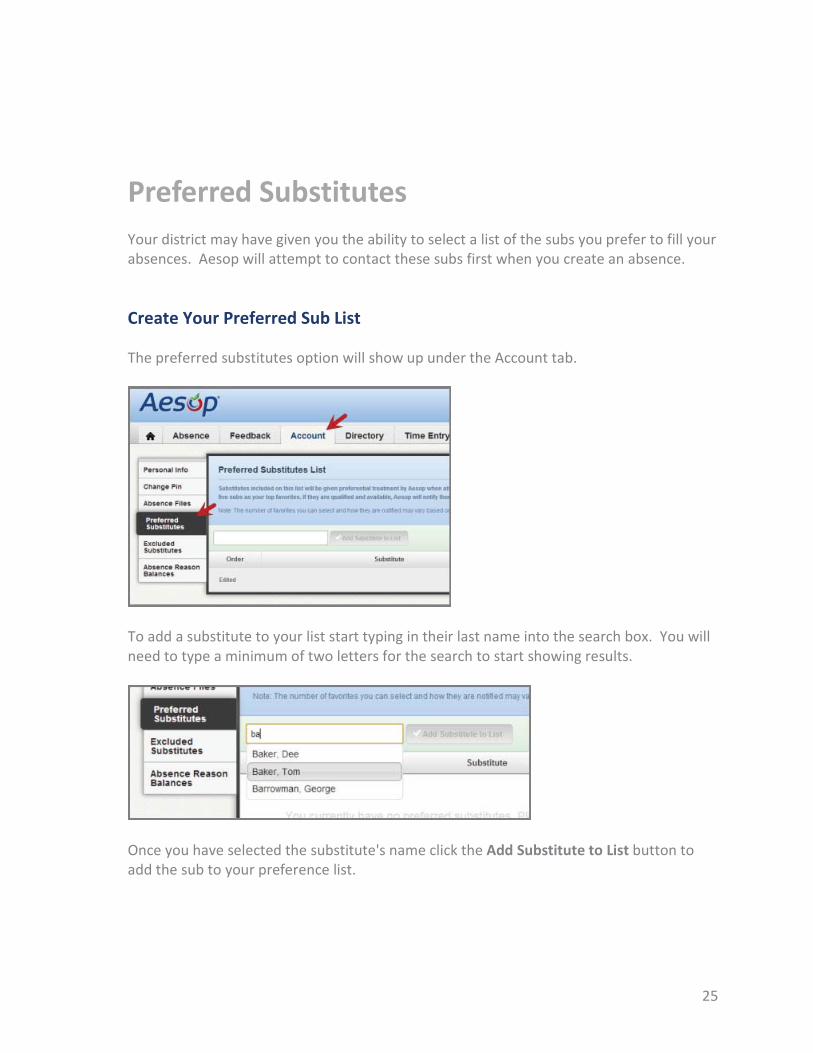
Preferred Substitutes Your district may have given you the ability to select a list of the subs you prefer to fill your absences. Aesop will attempt to contact these subs first when you create an absence.
Create Your Preferred Sub List
The preferred substitutes option will show up under the Account tab.
To add a substitute to your list start typing in their last name into the search box. You will need to type a minimum of two letters for the search to start showing results.
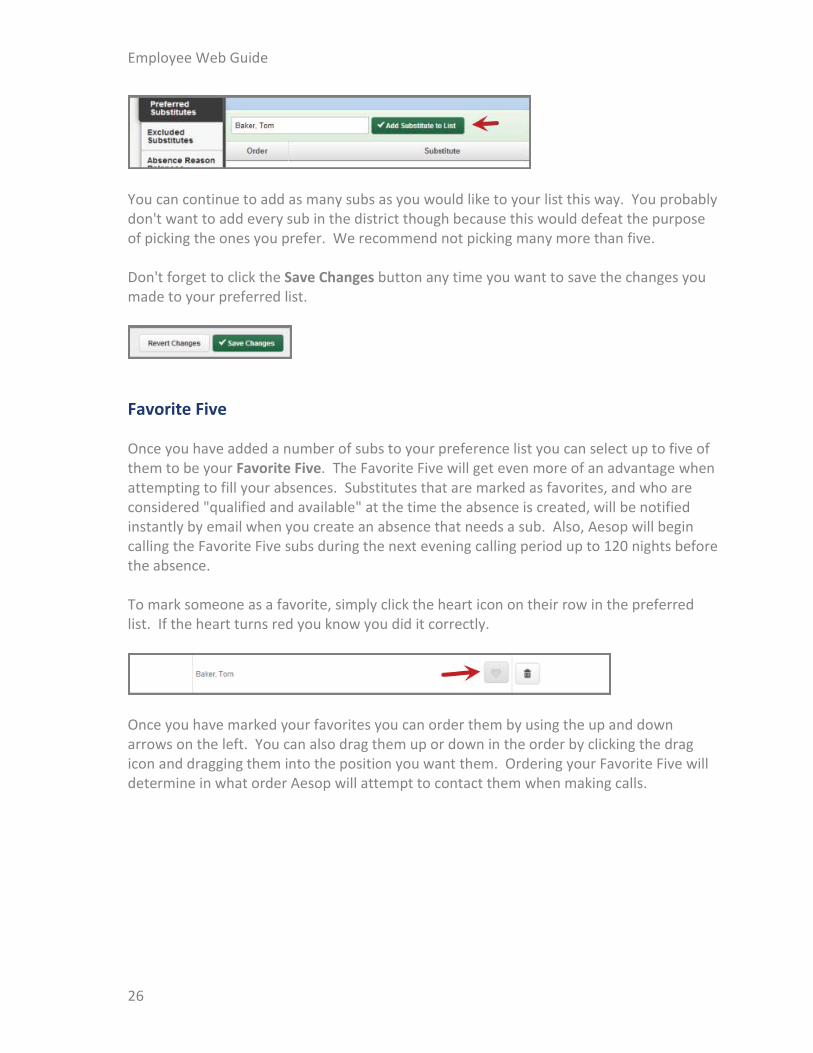
Once you have selected the substitute's name click the Add Substitute to List button to add the sub to your preference list.
25
Employee Web Guide
You can continue to add as many subs as you would like to your list this way. You probably don't want to add every sub in the district though because this would defeat the purpose of picking the ones you prefer. We recommend not picking many more than five. Don't forget to click the Save Changes button any time you want to save the changes you made to your preferred list.
Favorite Five
Once you have added a number of subs to your preference list you can select up to five of them to be your Favorite Five. The Favorite Five will get even more of an advantage when attempting to fill your absences. Substitutes that are marked as favorites, and who are considered "qualified and available" at the time the absence is created, will be notified instantly by email when you create an absence that needs a sub. Also, Aesop will begin calling the Favorite Five subs during the next evening calling period up to 120 nights before the absence. To mark someone as a favorite, simply click the heart icon on their row in the preferred list. If the heart turns red you know you did it correctly.
Once you have marked your favorites you can order them by using the up and down arrows on the left. You can also drag them up or down in the order by clicking the drag icon and dragging them into the position you want them. Ordering your Favorite Five will determine in what order Aesop will attempt to contact them when making calls.
26
Preferred Substitutes
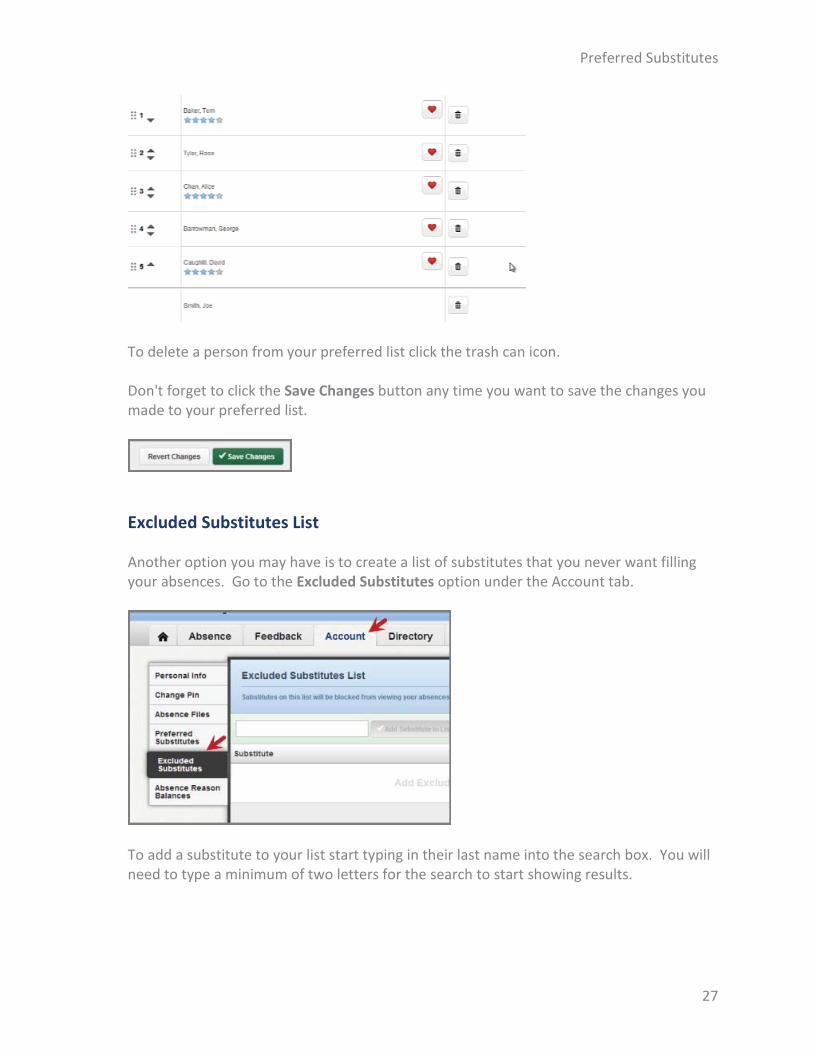
To delete a person from your preferred list click the trash can icon. Don't forget to click the Save Changes button any time you want to save the changes you made to your preferred list.
Excluded Substitutes List
Another option you may have is to create a list of substitutes that you never want filling your absences. Go to the Excluded Substitutes option under the Account tab.
To add a substitute to your list start typing in their last name into the search box. You will need to type a minimum of two letters for the search to start showing results.
27

Employee Web Guide
Once you have selected the substitute's name click the Add Substitute to List button to add the sub to your exclude list.
When you add someone to your exclude list you are preventing them from seeing absences that you create. You can add as many names as you like but we recommend keeping the list relatively small. To remove someone from your exclude list click the trash can icon.
Don't forget to click the Save Changes button any time you want to save the changes you made to your list.
28
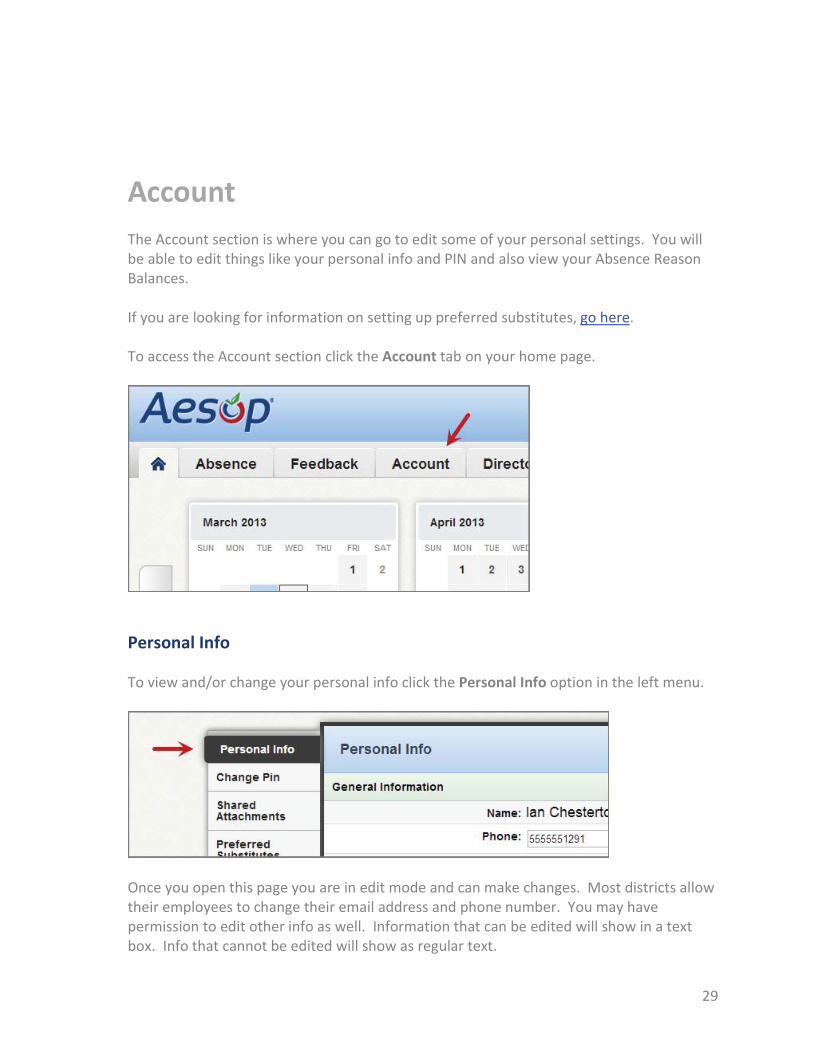
Account The Account section is where you can go to edit some of your personal settings. You will be able to edit things like your personal info and PIN and also view your Absence Reason Balances. If you are looking for information on setting up preferred substitutes, go here. To access the Account section click the Account tab on your home page.
Personal Info
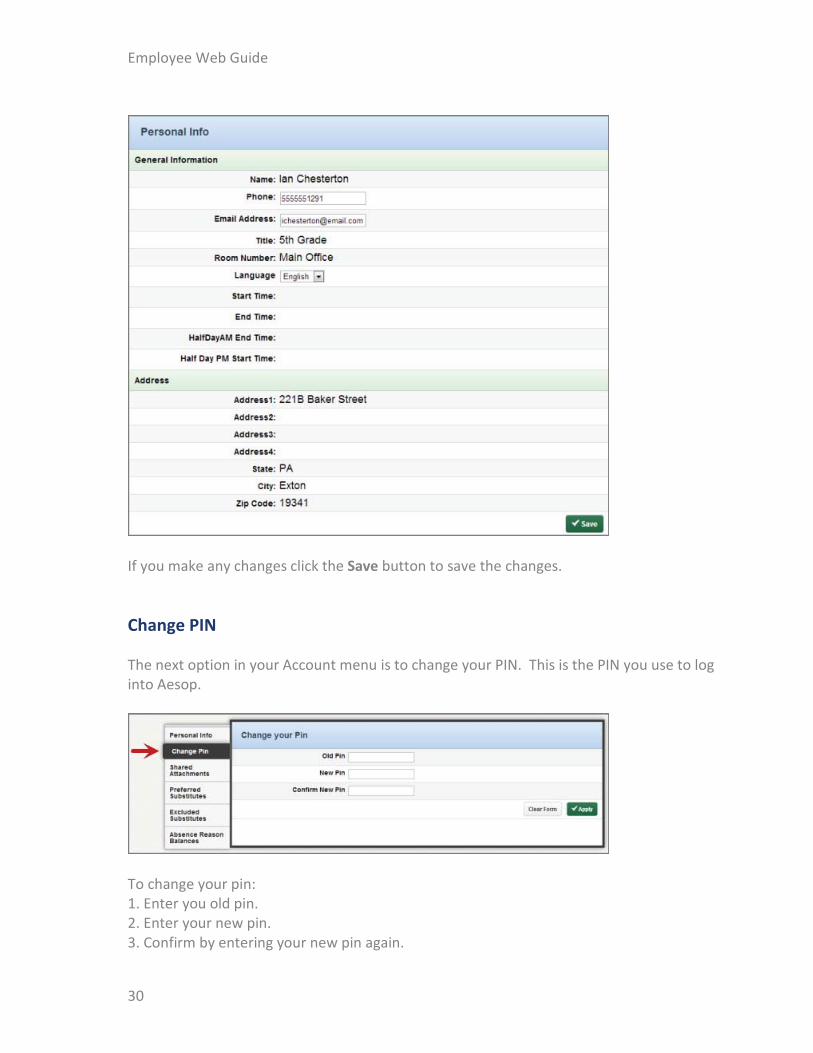
To view and/or change your personal info click the Personal Info option in the left menu.
Once you open this page you are in edit mode and can make changes. Most districts allow their employees to change their email address and phone number. You may have permission to edit other info as well. Information that can be edited will show in a text box. Info that cannot be edited will show as regular text.
29
Employee Web Guide
If you make any changes click the Save button to save the changes.
Change PIN
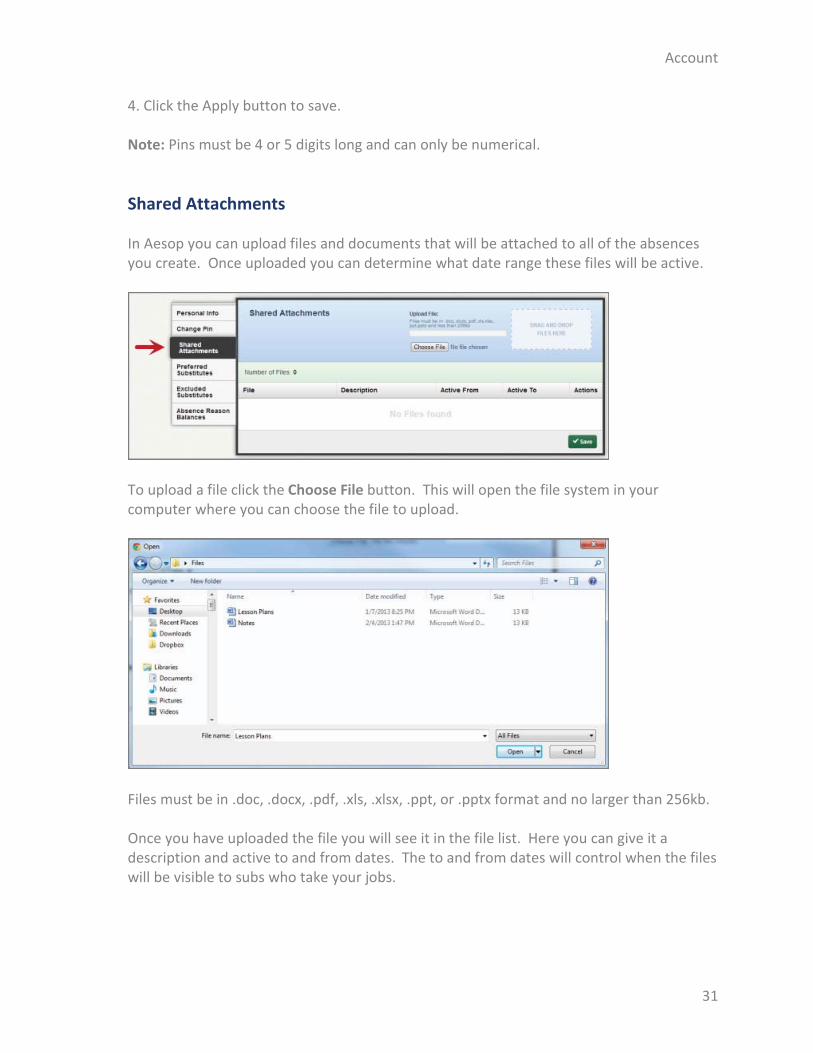
The next option in your Account menu is to change your PIN. This is the PIN you use to log into Aesop.
To change your pin: 1. Enter you old pin. 2. Enter your new pin. 3. Confirm by entering your new pin again.
30
Account
4. Click the Apply button to save. Note: Pins must be 4 or 5 digits long and can only be numerical.
Shared Attachments
In Aesop you can upload files and documents that will be attached to all of the absences you create. Once uploaded you can determine what date range these files will be active.
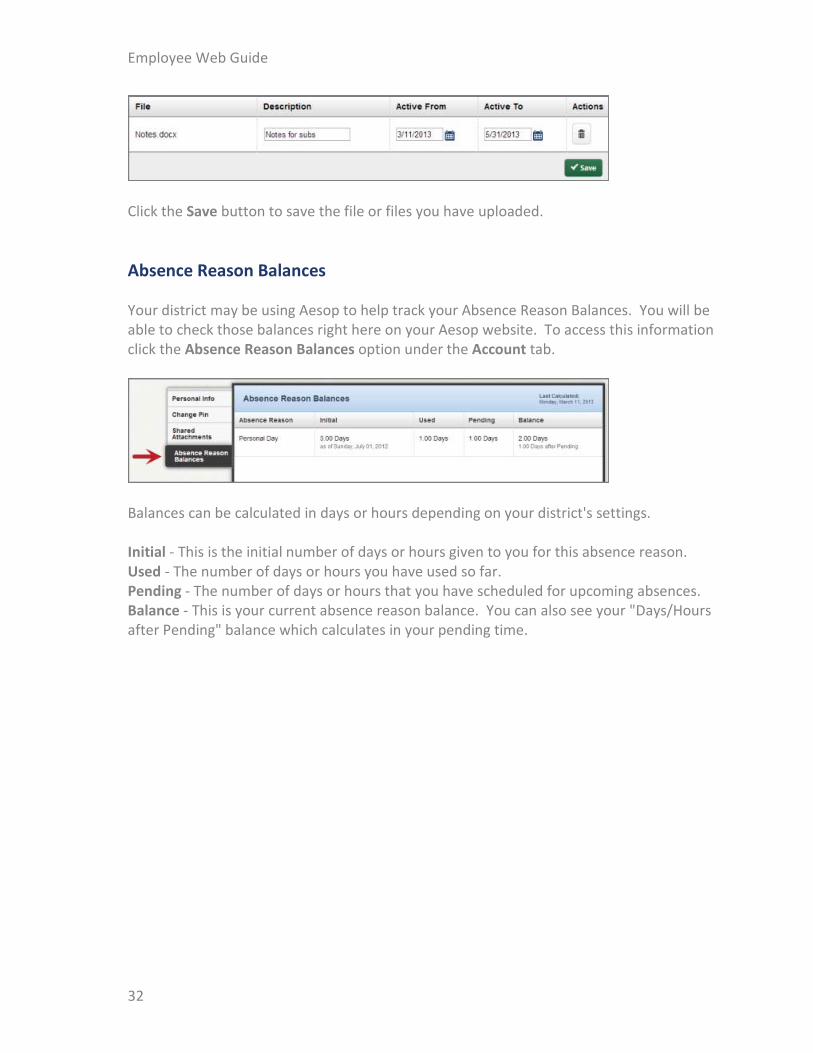
To upload a file click the Choose File button. This will open the file system in your computer where you can choose the file to upload.
Files must be in .doc, .docx, .pdf, .xls, .xlsx, .ppt, or .pptx format and no larger than 256kb. Once you have uploaded the file you will see it in the file list. Here you can give it a description and active to and from dates. The to and from dates will control when the files will be visible to subs who take your jobs.
31
Employee Web Guide
Click the Save button to save the file or files you have uploaded.
Absence Reason Balances
Your district may be using Aesop to help track your Absence Reason Balances. You will be able to check those balances right here on your Aesop website. To access this information click the Absence Reason Balances option under the Account tab.
Balances can be calculated in days or hours depending on your district's settings. Initial - This is the initial number of days or hours given to you for this absence reason. Used - The number of days or hours you have used so far. Pending - The number of days or hours that you have scheduled for upcoming absences. Balance - This is your current absence reason balance. You can also see your "Days/Hours after Pending" balance which calculates in your pending time.
32
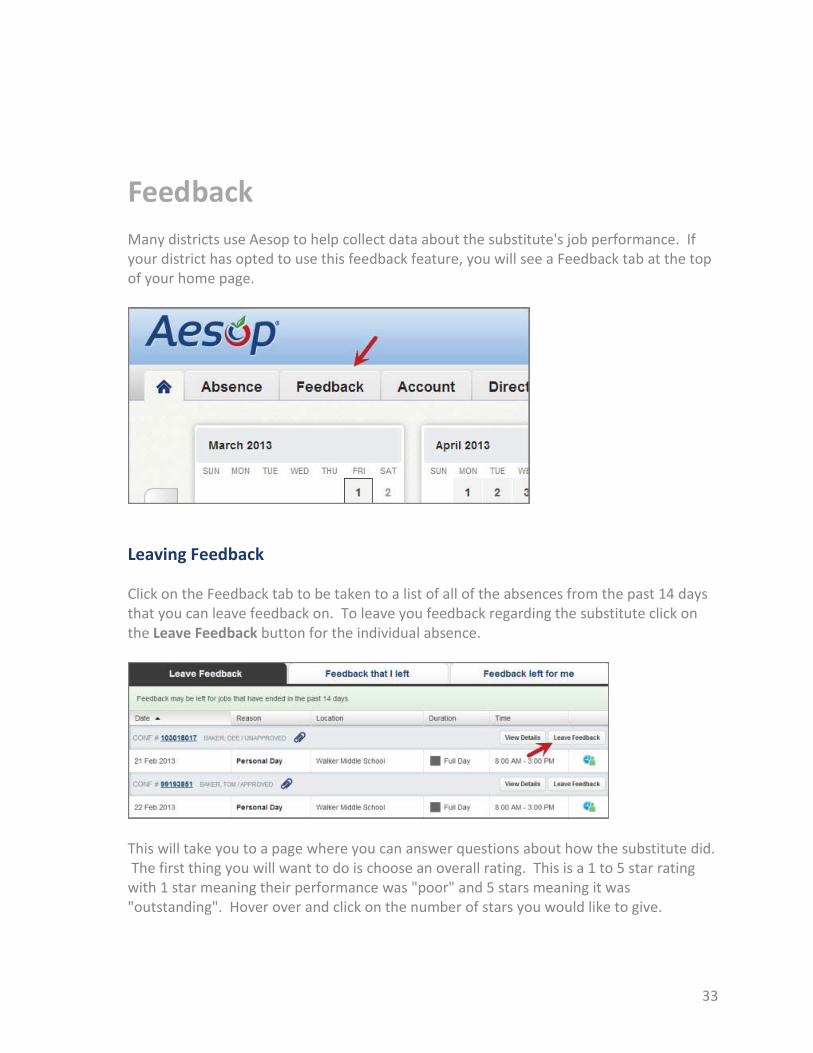
Feedback Many districts use Aesop to help collect data about the substitute's job performance. If your district has opted to use this feedback feature, you will see a Feedback tab at the top of your home page.
Leaving Feedback
Click on the Feedback tab to be taken to a list of all of the absences from the past 14 days that you can leave feedback on. To leave you feedback regarding the substitute click on the Leave Feedback button for the individual absence.
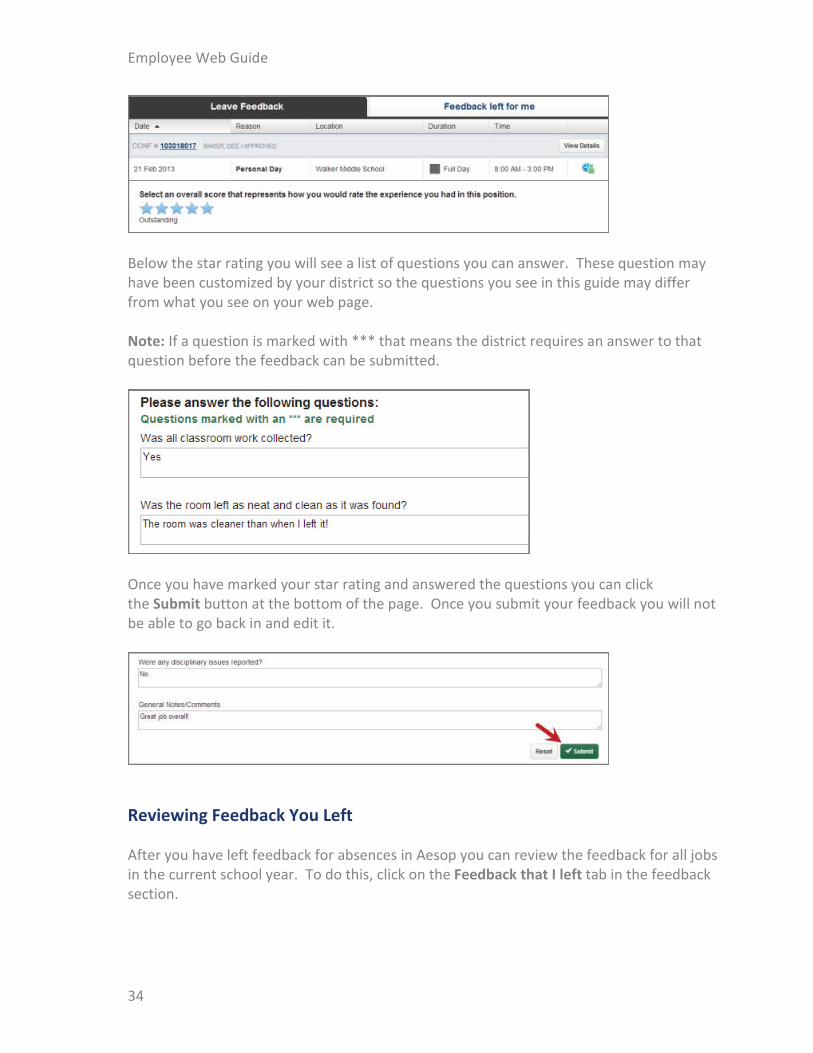
This will take you to a page where you can answer questions about how the substitute did. The first thing you will want to do is choose an overall rating. This is a 1 to 5 star rating with 1 star meaning their performance was "poor" and 5 stars meaning it was "outstanding". Hover over and click on the number of stars you would like to give.
33
Employee Web Guide
Below the star rating you will see a list of questions you can answer. These question may have been customized by your district so the questions you see in this guide may differ from what you see on your web page. Note: If a question is marked with *** that means the district requires an answer to that question before the feedback can be submitted.
Once you have marked your star rating and answered the questions you can click the Submit button at the bottom of the page. Once you submit your feedback you will not be able to go back in and edit it.
Reviewing Feedback You Left
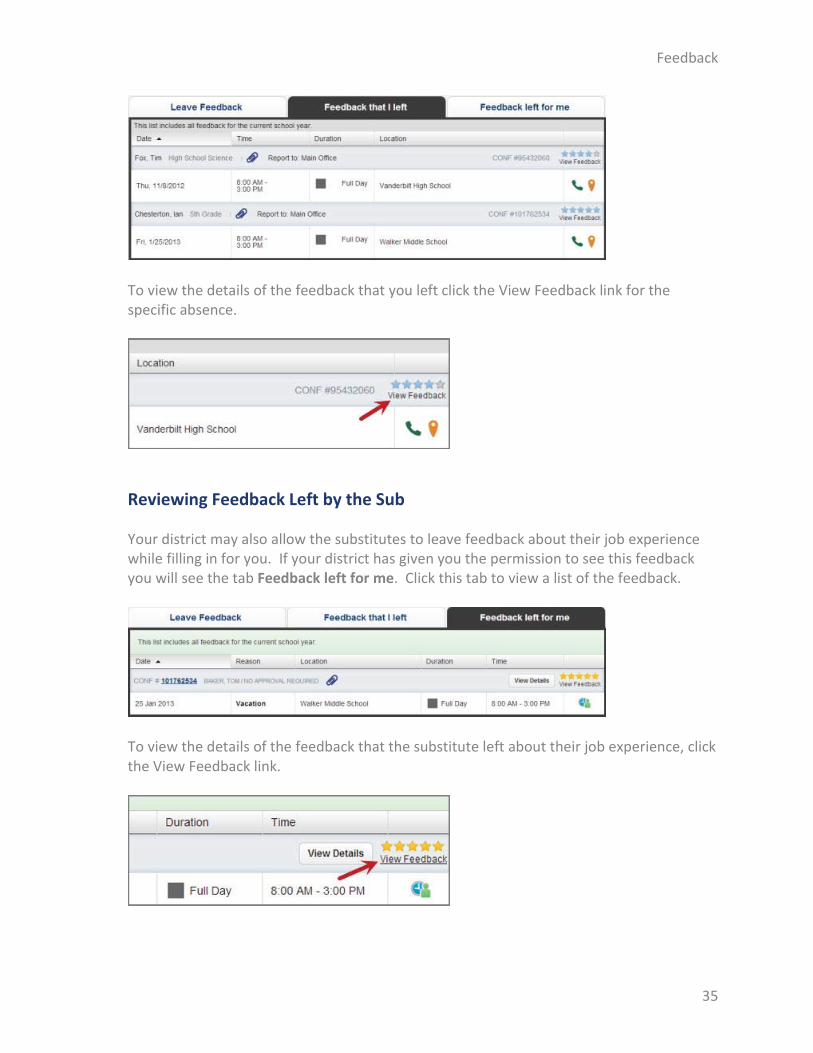
After you have left feedback for absences in Aesop you can review the feedback for all jobs in the current school year. To do this, click on the Feedback that I left tab in the feedback section.
34
Feedback
To view the details of the feedback that you left click the View Feedback link for the specific absence.
Reviewing Feedback Left by the Sub
Your district may also allow the substitutes to leave feedback about their job experience while filling in for you. If your district has given you the permission to see this feedback you will see the tab Feedback left for me. Click this tab to view a list of the feedback.
To view the details of the feedback that the substitute left about their job experience, click the View Feedback link.
35
Employee Web Guide
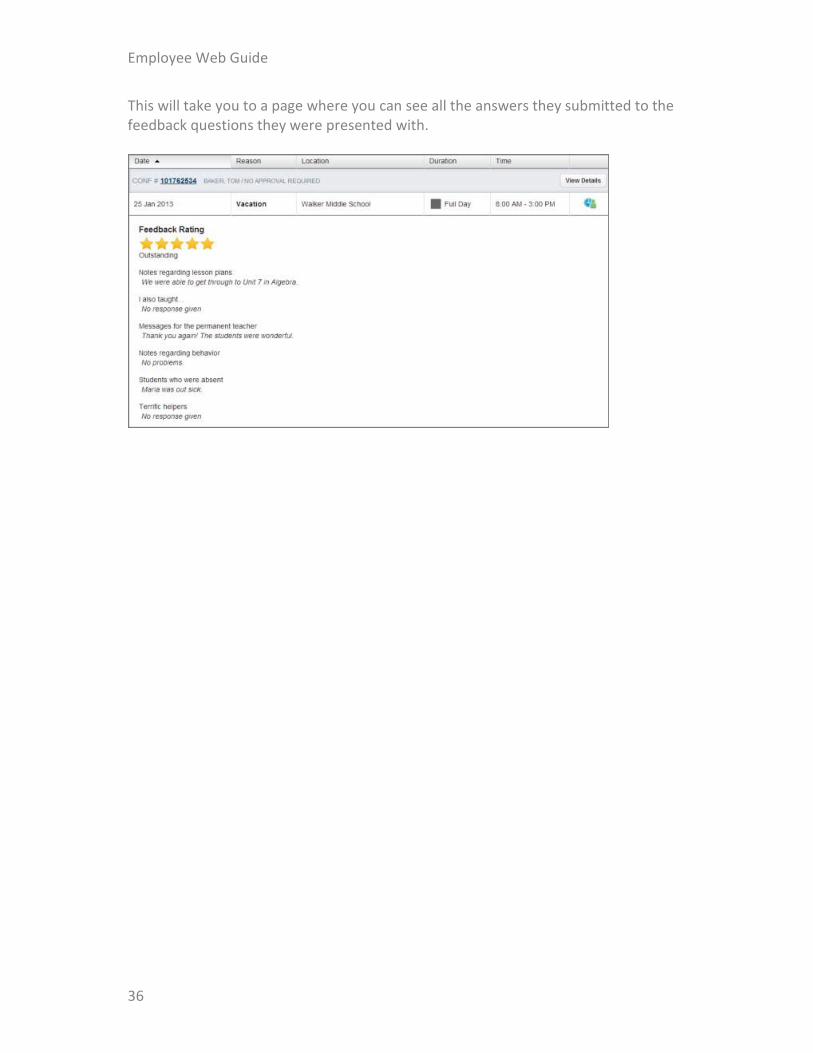
This will take you to a page where you can see all the answers they submitted to the feedback questions they were presented with.
36
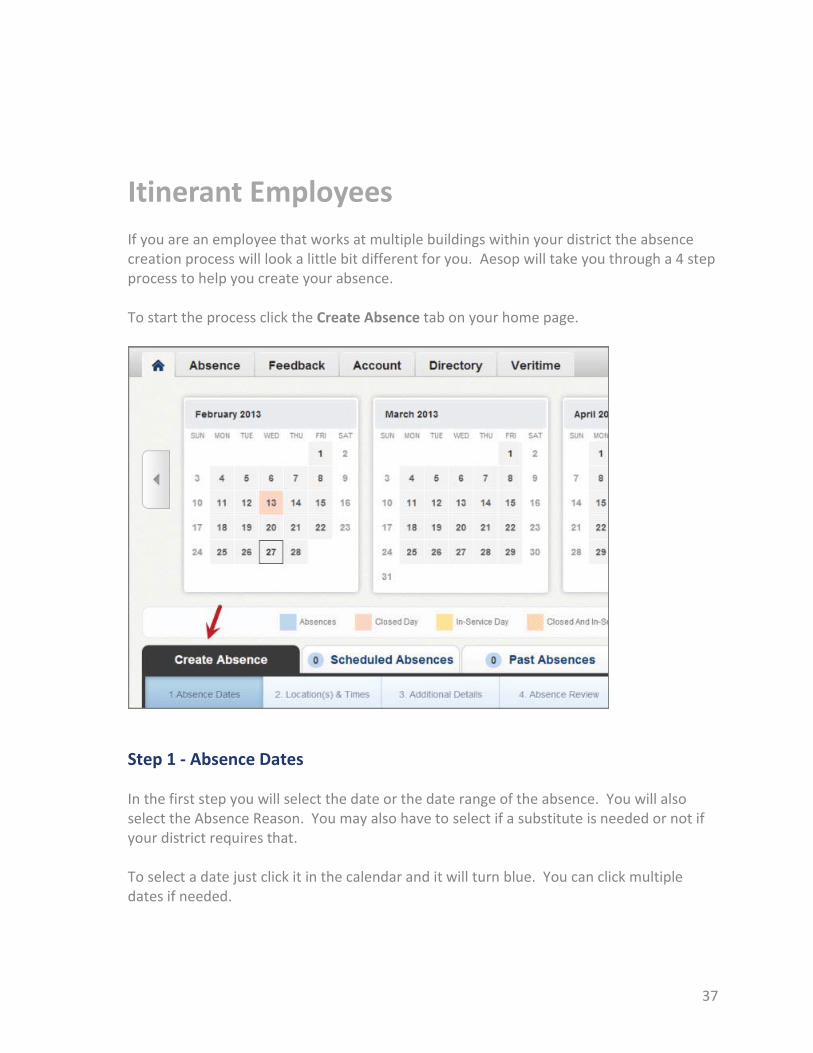
Itinerant Employees If you are an employee that works at multiple buildings within your district the absence creation process will look a little bit different for you. Aesop will take you through a 4 step process to help you create your absence. To start the process click the Create Absence tab on your home page.
Step 1 - Absence Dates
In the first step you will select the date or the date range of the absence. You will also select the Absence Reason. You may also have to select if a substitute is needed or not if your district requires that. To select a date just click it in the calendar and it will turn blue. You can click multiple dates if needed.
37
Employee Web Guide
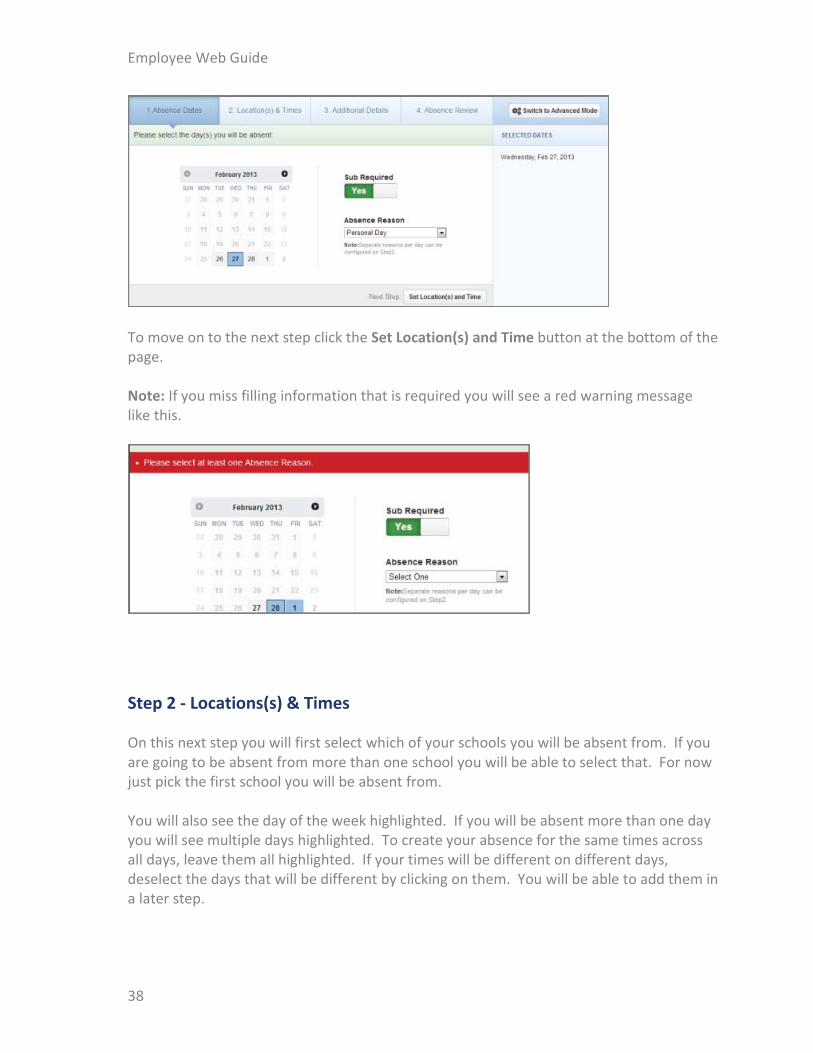
To move on to the next step click the Set Location(s) and Time button at the bottom of the page. Note: If you miss filling information that is required you will see a red warning message like this.
Step 2 - Locations(s) & Times
On this next step you will first select which of your schools you will be absent from. If you are going to be absent from more than one school you will be able to select that. For now just pick the first school you will be absent from. You will also see the day of the week highlighted. If you will be absent more than one day you will see multiple days highlighted. To create your absence for the same times across all days, leave them all highlighted. If your times will be different on different days, deselect the days that will be different by clicking on them. You will be able to add them in a later step.
38
Itinerant Employees
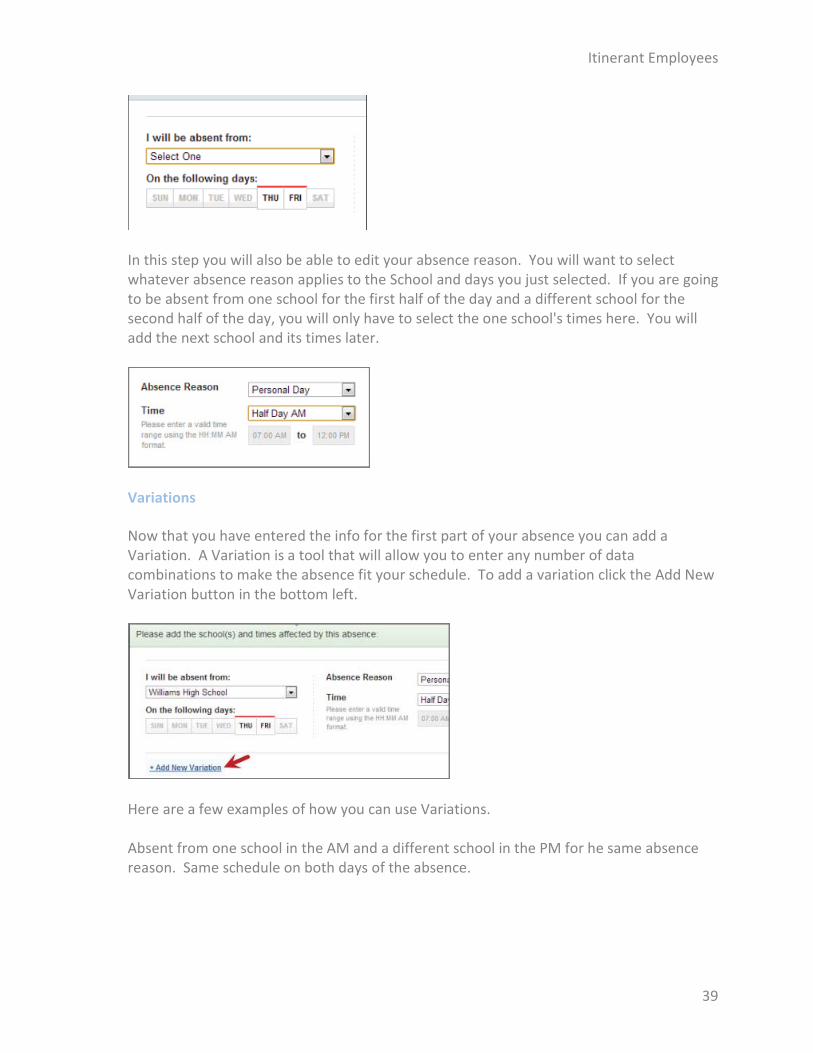
In this step you will also be able to edit your absence reason. You will want to select whatever absence reason applies to the School and days you just selected. If you are going to be absent from one school for the first half of the day and a different school for the second half of the day, you will only have to select the one school's times here. You will add the next school and its times later.
Variations
Now that you have entered the info for the first part of your absence you can add a Variation. A Variation is a tool that will allow you to enter any number of data combinations to make the absence fit your schedule. To add a variation click the Add New Variation button in the bottom left.
Here are a few examples of how you can use Variations. Absent from one school in the AM and a different school in the PM for he same absence reason. Same schedule on both days of the absence.
39
Employee Web Guide
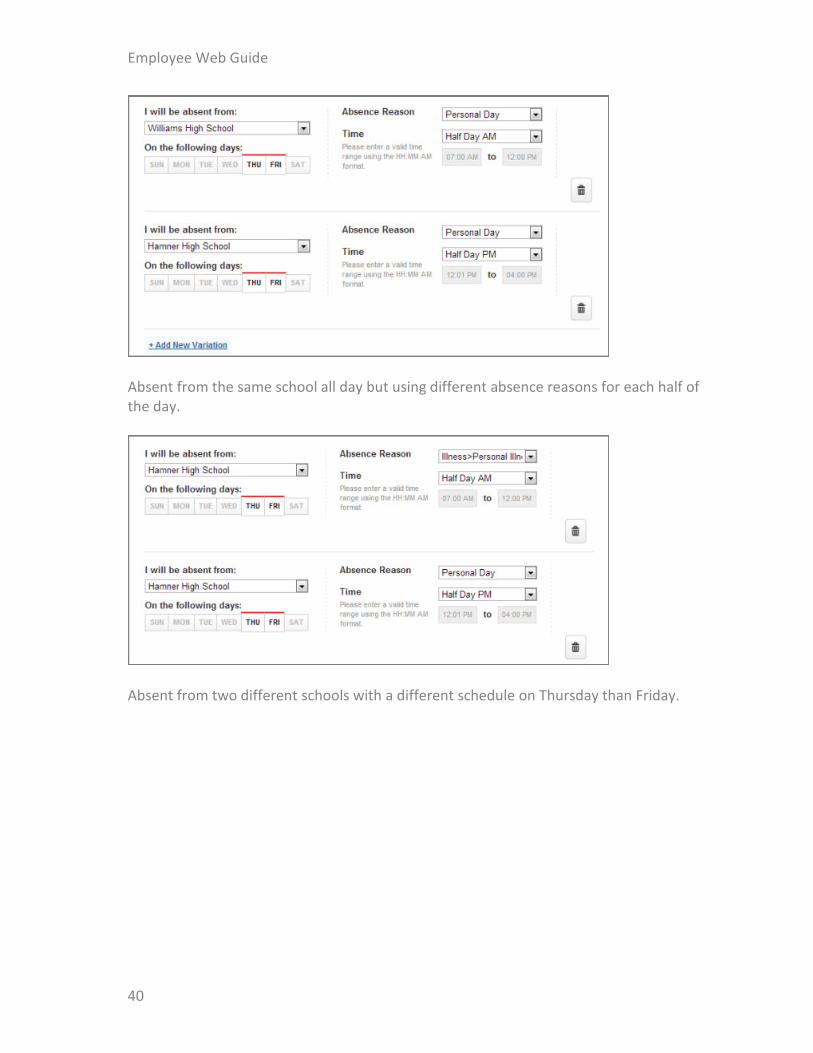
Absent from the same school all day but using different absence reasons for each half of the day.
Absent from two different schools with a different schedule on Thursday than Friday.
40
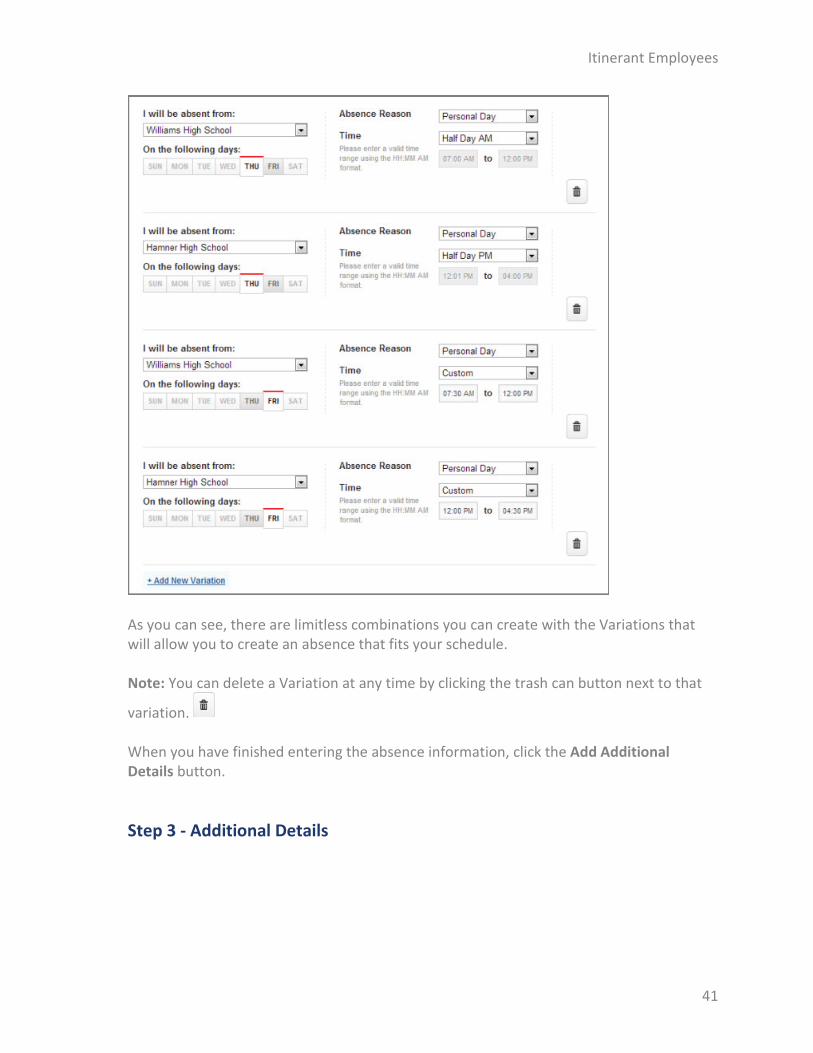
Itinerant Employees
As you can see, there are limitless combinations you can create with the Variations that will allow you to create an absence that fits your schedule. Note: You can delete a Variation at any time by clicking the trash can button next to that
variation. When you have finished entering the absence information, click the Add Additional Details button.
Step 3 - Additional Details
41
Employee Web Guide
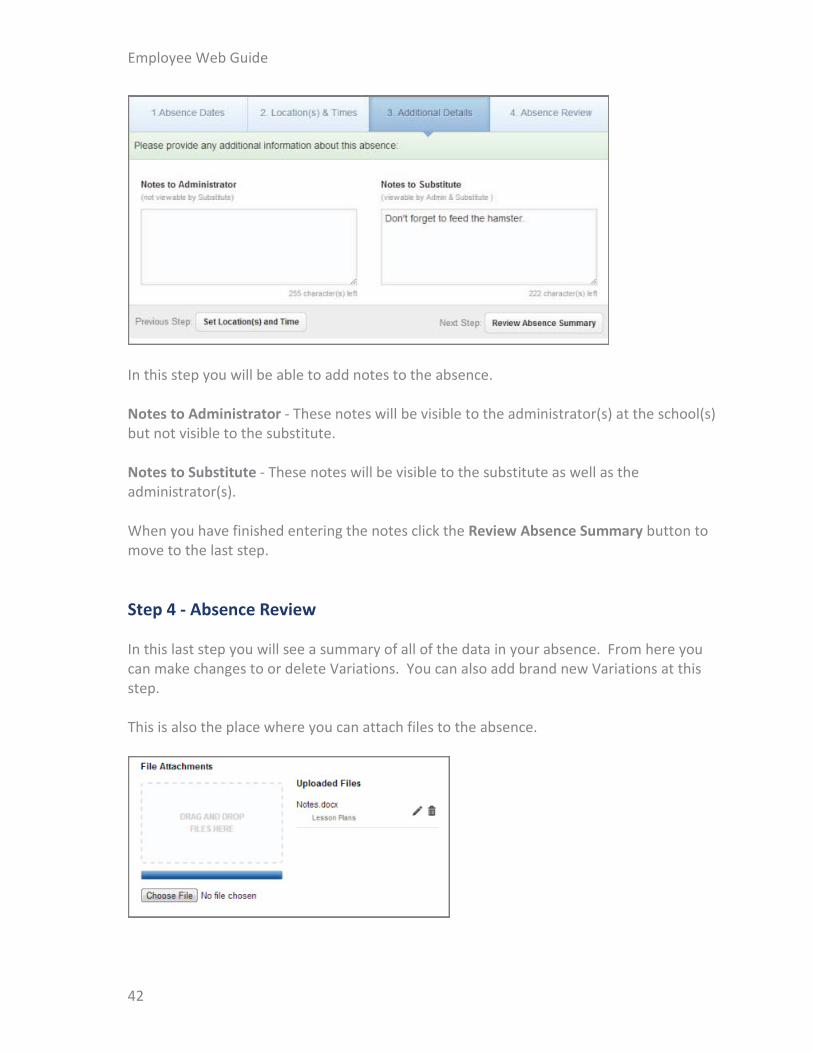
In this step you will be able to add notes to the absence. Notes to Administrator - These notes will be visible to the administrator(s) at the school(s) but not visible to the substitute. Notes to Substitute - These notes will be visible to the substitute as well as the administrator(s). When you have finished entering the notes click the Review Absence Summary button to move to the last step.
Step 4 - Absence Review
In this last step you will see a summary of all of the data in your absence. From here you can make changes to or delete Variations. You can also add brand new Variations at this step. This is also the place where you can attach files to the absence.
42
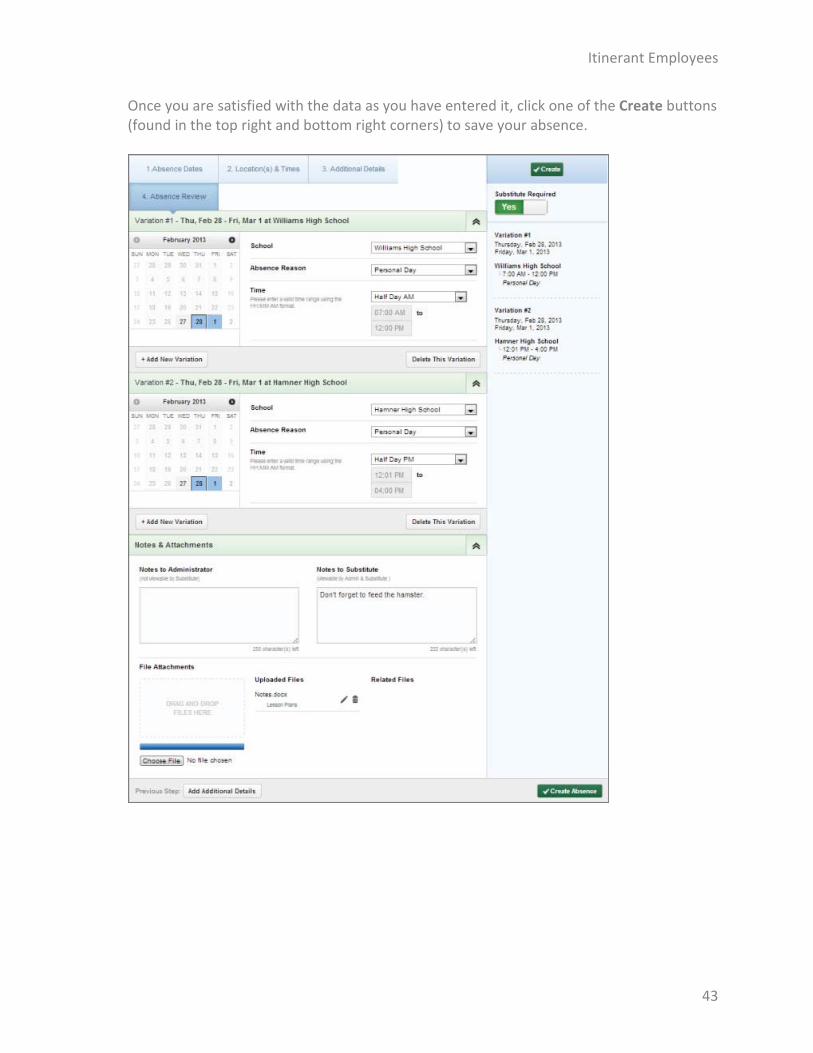
Itinerant Employees
Once you are satisfied with the data as you have entered it, click one of the Create buttons (found in the top right and bottom right corners) to save your absence.
43
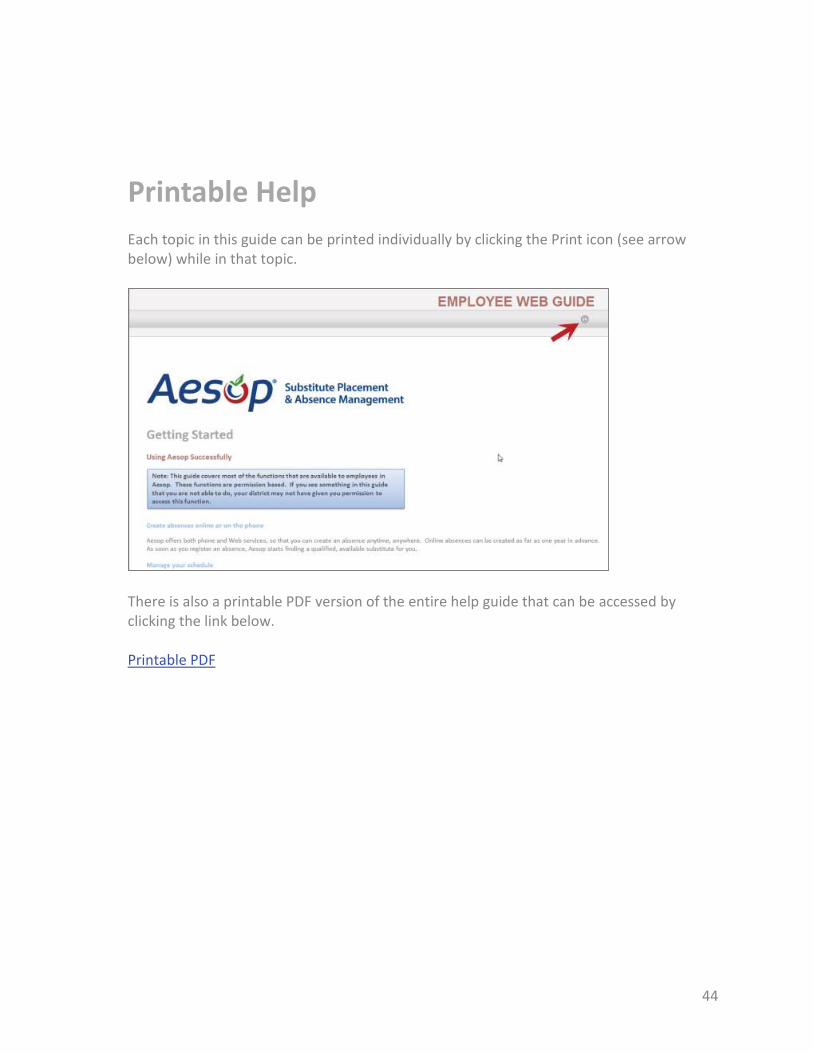
Printable Help Each topic in this guide can be printed individually by clicking the Print icon (see arrow below) while in that topic.
There is also a printable PDF version of the entire help guide that can be accessed by clicking the link below. Printable PDF
44