Embed Size (px)
Citation preview
Paper ID #30553
Engaging Students Through Concrete Beam Fabrication
Prof. Christina McCoy SE, RA, Oklahoma State University
Professor McCoy is a licensed Structural Engineer and Architect. She holds a Bachelor Degree in Archi-tectural Engineering and a Bachelor in Architecture from Oklahoma State University. She holds a Mastersof Science in Architecture from the University of Cincinnati and Masters of Civil Engineering (StructuralEmphasis) from the University of Kansas. She worked in the structural engineering profession for 10years before joining the full-time Architectural Engineering faculty at Oklahoma State University Schoolof Architecture.
Prof. John J Phillips P.E., Oklahoma State University
JOHN PHILLIPS, a registered engineer and associate professor of architectural engineering, practicedas a structural engineer for nine years before returning to his alma mater to teach at Oklahoma StateUniversity. He teaches undergraduate and graduate courses to architecture, architectural engineering,and civil engineering students that include Statics, Analysis I, Foundations, Timbers, Steel, Concrete,Masonry, Steel II, Concrete II, Steel III, Concrete III, and the Comprehensive Design Studio.
c©American Society for Engineering Education, 2020
Engaging Students Through Concrete Beam Fabrication
Abstract
This paper seeks to evaluate the challenges and successes in incorporating a beam fabrication
module into a Concrete 1 engineering design class for Architecture and Architectural
Engineering students. While this class is usually taught in a lecture format, the inclusion of a
hands-on activity aimed to accomplish the following goals:
• Student learning about principles of flexure and shear through hands-on exercises
• Engage students in course material by giving the first-hand experiences with concrete
construction
• Structure task to encourage competition between small groups
• Prompt students to consider multiple solutions to a given problem
• Involve other learning settings to give students a more well-rounded educational
experience
• Help students visualize engineering principles
• Give students an opportunity to apply flexure and shear equations from ACI-318 to a
physical model
The beam fabrication project consisted of three parts:
1) Beam Fabrication, wherein students designed and fabricated reinforcement
configurations, mixed concrete in a lab setting, and cast concrete into forms
2) Beam Testing, wherein students utilized a beam press to apply load to their beams until
failure was reached
3) Beam Report, wherein students produced a report of their experience. The report
included an application of capacity equations for shear and flexure, conclusions
pertaining to failure mechanisms, as well as photos of the project. The report also
included a survey for students to assess the educational goals of the project.
This paper contains a review of past exercises and outlines resources used, parameters of project,
student deliverables, and a survey of learning outcomes.
Introduction and literature review
The idea of incorporating active learning in engineering coursework has been discussed
for over three decades, but instructors continue to seek the perfect balance between engagement
of students through activities and traditional lecture-type delivery of concepts. Before expanding
on the merits of active learning in engineering education, however, let us first define what is
meant by “active learning” in education in general. In 1991 Bonwell [1] described active
learning as “instructional activities involving students in doing things and thinking about what
they are doing.” This definition includes group discussion and targeted note-taking. However,
this paper seeks to narrow the scope of discussion to active learning that particularly focusses on
hands-on activities wherein students build something or use a physical model to understand
engineering principles.
Common types of active learning employed in engineering classrooms may be classified
into 3 types: (1) the use of computer or virtual tools to model and understand an engineering
problem (2) the use of non-building materials to simulate engineering principles (3) the use of
actual building materials to illustrate structural behavior. Each have benefits and challenges. A
brief discussion follows of the implementation of these approaches.
As illustrated in Carlson [2], virtual tools can allow students to explore and test multiple
simulations quite easily. These tools can be very powerful; they can model several solutions to a
given problem with a relatively small amount of effort. Carlson pairs this digital simulation with
the manufacturing process at University of Colorado’s Integrated Teaching and Learning
program. Additionally, virtual tools can provide opportunities for exercises to build upon each
other. However, as recognized by Schmuker in 1998 “…as students become increasingly
competent with computers, their understanding and comprehension of “structural reality” may
suffer.” [3]
The use of non-building materials is probably the most common means to employ active
learning in the classroom. Numerous examples show that this method can use materials that are
familiar and accessible such as cardboard, paper, or wood dowels to show how buildings may
behave. For instance, Meyer describes the utilization of plexiglass to demonstrate steel structure
behavior such as lateral-torsional buckling, flexural buckling, and built-up member behavior. [4]
In addition, Meyer also creates lateral system demonstrators from strips of aluminum and
Styrofoam. Another example of this is Schmuker’s use of the Girder and Panel building set,
which allows the construction of a small-scale building frame out of plastic beams. [3] This
commercially-available children’s toy allows students to visualize in 3D a structural frame.
Schmuker also outlines a “pasta bridge exercise”, wherein students utilize pasta a glue to
construct a bridge. These exercises have clear value in that they bring engineering forms into a
3D model and demonstrate their behavior to students within the classroom. Additionally, these
materials are readily available and relatively inexpensive.
The use of building materials, such as steel, masonry, or concrete has the added benefit of
giving students hands-on experience with the actual materials under investigation. The
disadvantage of this approach is often scale and resources. It is difficult to manipulate these
materials for students who have minimal training and basic tools. Further, resources such as lab
space, materials, and the time investment in working with these materials can present a
challenge. Meyer shows the implementation of this strategy in a steel course by fabricating steel
connections from 1/8” thick plate and loading them to failure. [4] Stahl and DeVries discuss the
advantage to building a large frame and its many uses for full-scale structural testing at the
Milwaukee School of Engineering. [5] Stahl’s paper also transparently outlined the numerous
resources in both time and money that are required for such an instructional strategy. Estes
shows this strategy implemented in a concrete structures course at the United States Military
Academy. [6] This course heavily integrates fabrication labs, wherein a series of eight lab
sessions guides cadets through mixing concrete, constructing beams, and a multitude of standard
material tests. Estes’ paper also cites time and money as a major challenge to this approach.
Anecdotal evidence and surveys from several sources ([3], [2], [6]) indicate positive
student response to all three types of hands-on learning strategies. Students claim to have a
better understanding of engineering principles after having witnessed the behavior in real-time.
Quantifying the success of these strategies by linking them to test scores or professional
performance remains tricky, however. Skill levels of individuals vary, of course, and it is
difficult to link certain successes or shortcomings to the inclusion or exclusion of one exercise.
Unique student needs and course format
ARCH 4123 at Oklahoma State University during the Fall 2019 semester consisted of a
blend of two majors: Architecture (26 students) and Architectural Engineering (6 students), all in
their third or fourth year of a five-year program. This class is the final of a series of three
structural classes (Steel 1, Timbers, Concrete 1) for Architecture Students. Architectural
Engineering students take further classes after this series. These classes are traditionally taught
in a lecture format, with minimal incorporation of active learning1. This is the first class for
students to cover topics of concrete design, and it focusses primarily on ACI 318 for reinforced
concrete design. Much of the first part of the semester covers flexural design in some sense:
rectangular beam design, T-beam design and slab design. Thus, understanding the flexural
failure mode and tension/compression zones is critical. Although the structures courses are
traditionally taught in a lecture format, the students involved are accustomed to learning design
through more active, visual means, as both programs are required to take several architectural
design studios, many of which have been completed by the time they take the ARCH 4123 class.
However, they are not accustomed to spending time in a concrete lab or using testing machinery.
A fabrication activity was previously incorporated into the ARCH 4123 class, however
the format differed. The primary difference was beams were previously unreinforced.
Additionally, students previously constructed their own forms as opposed to using the lab-
provided molds. The shift to this new exercise was made in order to put more focus on the
interaction between concrete and steel reinforcement. In addition, the lab report component was
added to prompt students to reflect and understand what went on during fabrication and testing.
Process – beam fabrication, testing, and report
The entire “lab” consisted of three parts, utilizing two class days. Students had two
“Beam Days”; one was fabrication and the other was testing. The final part was a report, that
was generated by each student group. Students were divided into groups of three. Prior to the
first “Beam Day” they were each given a clothes hangar, purchased from a local dry cleaner, to
be used as reinforcement and told the size of the beam that they were going to be fabricating.
They were asked to come to beam day with their hangers fashioned into beam reinforcement,
ready to place in the molds. As an incentive they were told bonus points would be offered for
the highest-capacity beam. Clothes hangers were used for reinforcement as standard rebar would
1 See Introduction for how this paper defines “active learning.” The class does traditionally include a requirement to
take notes, and students work examples during class time. However, exercises that include fabrication or
construction are typically not the norm.
render the beams highly over-reinforced and would not be as easily manipulated by the students.
See below for a comparison chart between standard #3 rebar and the hangers utilized.
fy (ksi) As (in2) fy x As (kips)
#3 rebar 60 0.11 6.60
Single wire clothes hanger 93 0.00568 0.53
Table 1: Comparison of 60ksi rebar and wire clothes hanger as reinforcement
Students arrived for the first lab day with reinforcement in-hand. Prior to their arrival,
the lab teaching assistant prepared buckets of material for the mix design. Student volunteers
weighed out mix proportions. They oiled their forms. The groups were guided through the
mixing process and given rods and mallets for consolidation. Once the concrete was placed, the
beams were labeled and taken into the fog room. Three cylinders were also made to check the
concrete compressive strength.
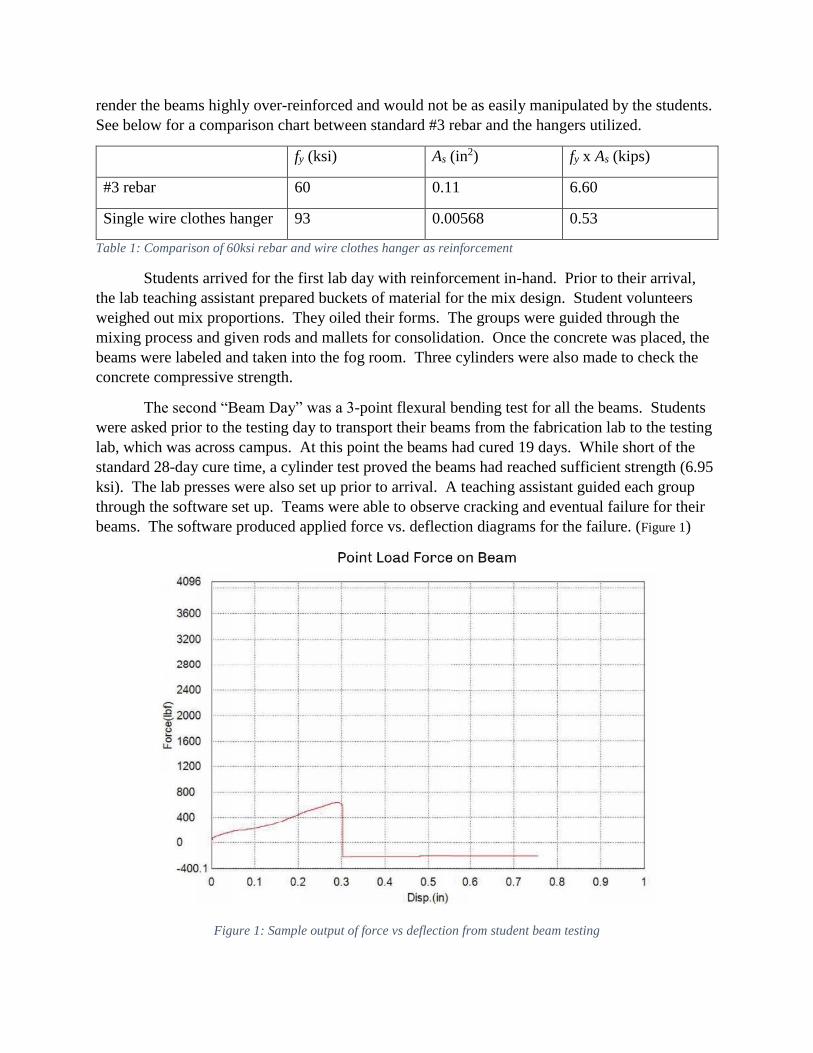
The second “Beam Day” was a 3-point flexural bending test for all the beams. Students
were asked prior to the testing day to transport their beams from the fabrication lab to the testing
lab, which was across campus. At this point the beams had cured 19 days. While short of the
standard 28-day cure time, a cylinder test proved the beams had reached sufficient strength (6.95
ksi). The lab presses were also set up prior to arrival. A teaching assistant guided each group
through the software set up. Teams were able to observe cracking and eventual failure for their
beams. The software produced applied force vs. deflection diagrams for the failure. (Figure 1)
Figure 1: Sample output of force vs deflection from student beam testing
The third component to the beam fabrication activity was not a lab, but rather a report
wherein students were expected to prove their understanding of flexural behavior through
recounting the lab process and comparing results with ACI equations for both shear and flexure.
Facilities and materials
As previously mentioned, a major challenge to utilizing actual building materials is time
and money. The monetary investment in concrete and rebar can become quite large, but the
ARCH 4123 class managed to control costs quite well. Using hangers instead of rebar was one
area of cost savings. The hangers were purchased for $0.13 each from a local dry cleaner. They
were a heavy-gage galvanized hanger, with a cost less than $5.00 to provide one hanger to each
of the 33 students! Concrete materials were generously donated by the Civil Engineering
department. Due to the small scale of the beams (4”x3”x16”) and the fact that students worked
in groups of three ensured the material costs were so minimal, the Civil Engineering department
did not mind donating these materials. Steel forms from the Civil Engineering department were
also lent to our project, allowing us to save time and money by not constructing a one-time use
form for the project.
The small scale of the beam project made the material not only inexpensive but easy to
work with and construct within the given lab time. The first “Beam Day” consisted of mixing
and placing concrete, which easily fit within the 2-hour allotted time slot. The venue for the
second beam day was moved from the Bert Cooper Lab where beams were fabricated, to the
Endeavor Lab. The major motivation for this was to save time, as the Endeavor Lab was able to
provide 6 beam presses where groups could test simultaneously. Testing took only one hour for
all twelve groups.
As mentioned, two separate facilities were used for the beam fabrication project. Bert
Cooper Lab (BCL) is the main lab for Oklahoma State University’s (OSU) Civil Engineering
school, where concrete is mixed and tested daily. The facilities include a mixing room with
drums, and material yard, steel beam forms, trowels and rods, and a fog room for curing.
Collaboration between the Civil and Architecture schools made the use of these facilities
possible. The second facility used was OSU’s Endeavor Lab (EL). Opened in 2018, the
Endeavor Lab was built as a collaboration space for all schools within the College of
Engineering, Architecture and Technology. The beam presses used were Shimazu 100kN
Universal Test Machine, which were utilized for the 3-point beam flexural test, the compression
cylinder test, and a tensile test to attain the strength of the wire hanger “reinforcing.”
Results of Exercise
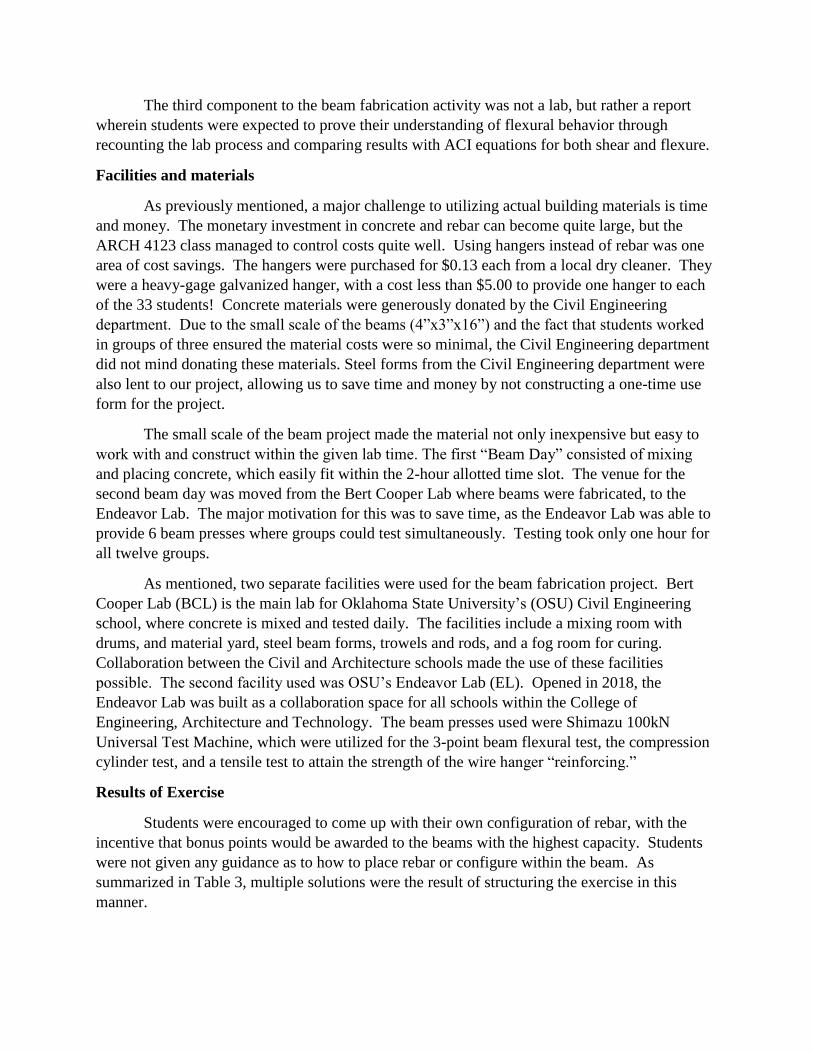
Students were encouraged to come up with their own configuration of rebar, with the
incentive that bonus points would be awarded to the beams with the highest capacity. Students
were not given any guidance as to how to place rebar or configure within the beam. As
summarized in Table 3, multiple solutions were the result of structuring the exercise in this
manner.
Group
Number Rebar Configuration
d
(inches) As (in2)
Point load at
failure (kips)
1
1 strand of 3 twisted wires, sanded wire with
steel wool, hooked ends 2.75 0.01704 2.1
2 2 strands of 2 twisted wires, hooked ends 3 0.02272 2
3 2 strands of 3 twisted wires 2.875 0.03408 4.52
4
2 strands of 3 twisted wires, hooked ends,
chairs at ends 2.5 0.03408 3.6
5 4 straight bars (2 top and 2 bot) and stirrups 3.3125 0.01136 4.2
6
2 strands of 3 twisted wires and 1 strand or
2 twisted wires 3 0.03408 4.2
7 4 straight bars (2 top and 2 bot) and stirrups 3 0.01136 2.4
8 2 strands of 2 twisted wires, hooked ends 3.5 0.02272 2.9
9 2 straight bars and spiral reinforcing 3.25 0.01136 2.2
10 4 straight bars (2 top and 2 bot) and stirrups 2.625 0.01136 2
11
2 strands of 2 twisted wires, hooked ends,
and soldered chairs 3.5 0.02272 5.655
12
1 strand of 2 twisted wire placed as top
reinforcing 1 0.01136 0.643 Table 2: Summary of rebar configurations and failure load by the student groups
Despite the very short span, all beams experienced flexural failure. All failure was
ductile, in that the steel yielded before the concrete in the compression zone crushed. However,
many beams were observed to take load after the concrete in the tension region fell away while
the reinforcing remained intact. This helped to illustrate the relationship between the concrete in
the compression zone and the steel in the tension zone.
Being given minimal guidelines for the lab report (see Appendices for all handouts
distributed in class), the submissions lacked in-depth analysis of what was going on during the
beams. While it seemed students grasped the idea of flexural failure, there were very few solid
connections made between the lab activity and ACI equations. Future attempts at this exercise
will likely try to shift the report to an in-class guided activity where students find useful values
such as tension and compression components within the beam and link them to the load at
failure.
Student survey results
A short survey was given to students at the end of the project. The survey, formatted on a
five-point scale, gave results that overall were very positive towards the exercise. They
appreciated getting first-hand experience with an actual building material, and it was a welcome
break to working numerical examples and lectures. Results from the survey also indicated that
groups were appropriately-sized. The table below summarizes survey results, and excerpts from
student feedback are also provided in the following table.
Results indicate average score with following responses:
(1) strongly disagree (2) disagree (3) no impact (4) agree (5) strongly agree
This project helped me understand the materials included in a concrete mix. 4.50
This project helped me understand what concrete consolidation is. 4.00
This project helped me understand how flexural reinforcement works in a beam. 4.25
This project helped me understand the concepts of shear capacity in a beam. 4.03
I would have preferred to do this project individually. 1.78
I would have preferred to have larger group sizes for this project. 2.00
Including an opportunity for bonus points made me try harder when considering how to
reinforce my beam. 3.34
Including a competition between groups made me try harder when considering how to
reinforce my beam. 3.28
Writing the report help me organize my thoughts and understand beam failure. 3.78
The lecture material prepared me for this lab exercise. 4.09
I enjoyed having hands-on experience with concrete. 4.66 Table 3: Survey results of students. Average scores on a scale of 1-5 are shown.
Quotes from student surveys:
“It was a helpful way for me to visualize concepts that I had previously only seen on paper.”
“The part of the project that I found the most beneficial was seeing how the design of the
reinforcement caused beams of the same size to fail under different loads.”
“This was an interesting lab in that we could see the process of how concrete was made and
seeing how concrete can fail firsthand. There’s a point where drawings and calculations no
longer help in understanding the structure we are trying to prevent from failing. I like more
interactive classes like this.”
From the survey, it can be seen that the highest scoring topics (4.5-4.66) pertained to a
positive overall experience, as well as a greater understanding of a concrete mix. This shows
that although many students were simply standing and watching as the mix was combined in the
lab, they were paying attention in a way that was more impactful than reading about mix design
or hearing it in a lecture.
The next highest tier of scores (4.00-4.25) correlated to understanding how flexural
reinforcing works, preparedness based on lecture material, understanding of shear capacity, and
understanding of consolidation. Since these scores are still relatively high, it can be concluded
that the class overall had a better understanding of all these topics after completing the three-part
lab exercise. This is especially valuable in the topic of shear design, as this topic had only been
introduced at this time, and was not the predominant failure mode for the beams. Despite this,
prompting the students to think about shear failure in this context improved their understanding
of this topic. It should also be noted that a few students commented in the survey that they
wished lecture had provided more guidance as to how to layout reinforcing prior to beam
fabrication. While the request is understandable, the variety in reinforcing configurations also
added a creative component and a wider sample of results. This would not be the case if
lectures had a more prescriptive approach to reinforcement for the lab. The individuals that
requested this may have brought down the score for lecture preparedness slightly, but the overall
score was still strong and there are no plans to modify this approach in future years.
A few midrange scores were also present in the survey (3.28-3.78). Two of these topics
dealt with student motivation to think through the reinforcing configuration. The other topic
scores the value of the lab report component. As discussed previously, future versions of this
exercise might include a lab reflection that includes in-class guidance or more specific directions.
Based on the reports, students were not adept at generating lab reports and may require more
direction. Students did seem adept, however, at generating enthusiasm for the fabrication
component. Based on these scores and anecdotal observations of student attitudes, bonus points
or competition may not be needed in order to encourage students to put in effort to configure the
rebar.
The lowest group of scores from the survey (1.78-2.00) came from questions pertaining
to modifying group sizes. From these results, we can conclude that the students overall felt that
groups of 2-3 people were appropriate for this exercise.
Challenges
While the beam project only took up 2 class periods, the development of the exercise and
coordination between multiple labs took up time. In future years, this is expected to run more
smoothly. The time away from lecture seemed well worth the experience gained by the students.
Beam testing at the new EL helped the second lab day to run very quickly. However, the
students and professor were not familiar with the equipment in the lab. While the lab supervisor
was there to assist, the process seemed a little chaotic at times. In the future, we plan to generate
a short video on how the testing equipment works in order to better prepare students for the lab
experience.
The EL is also a very new building. There was concern on the behalf of the lab
supervisor regarding “making a mess” with the fractured concrete beams. At the last minute he
requested the beams be wrapped in a plastic garbage sack while testing. However, this would
have taken away the visual aspect of the students watching the beams crack and fail. In the
future, a strategy should be discussed before testing day so that all parties are comfortable with
the cleanliness practices used for beam testing.
Conclusion
The beam fabrication exercise was an excellent way to increase student enthusiasm for
the subject matter and illustrate flexural failure in concrete beams. Students proved to be quite
eager to engage in fabrication and get some experience with the material they’d been studying.
It gave students the opportunity to interact with concrete in a hands-on manner and relate the
failure to principles of ACI concrete design. In addition, their ability to visualize failure and
tension/compression interaction was strengthened. In the future, a class-time exercise will be
added to build stronger relationships between these principles and the ACI equations.
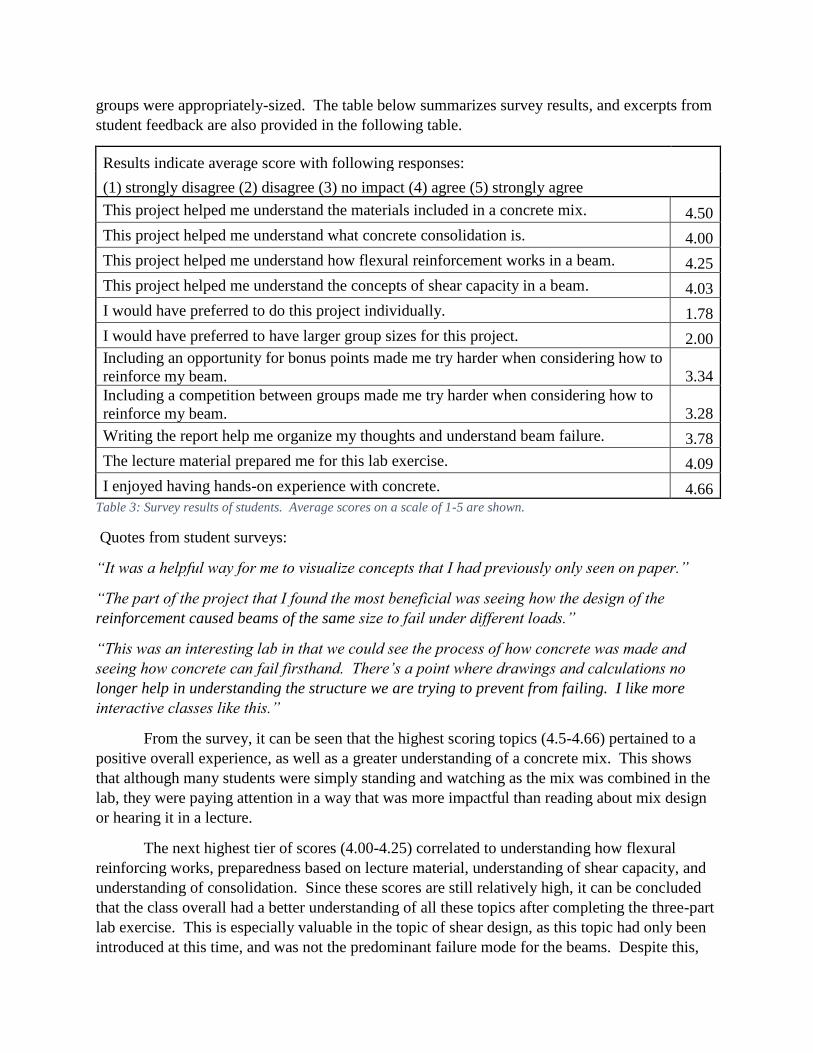
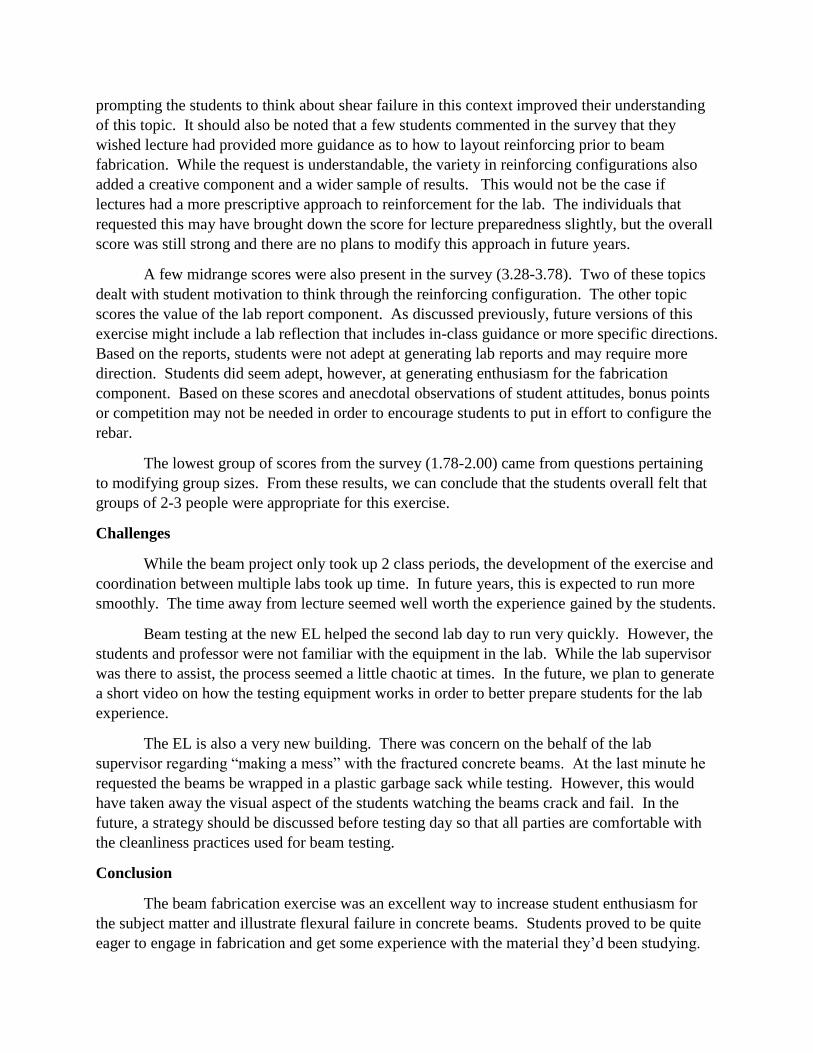
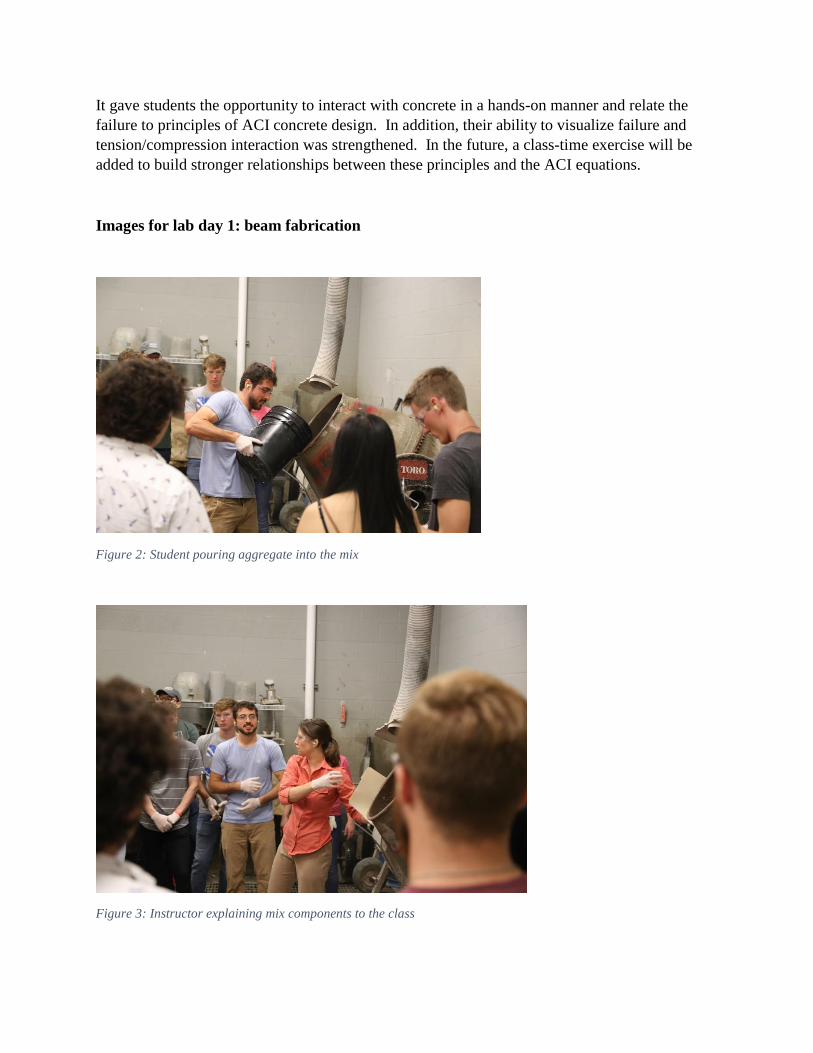
Images for lab day 1: beam fabrication
Figure 2: Student pouring aggregate into the mix
Figure 3: Instructor explaining mix components to the class
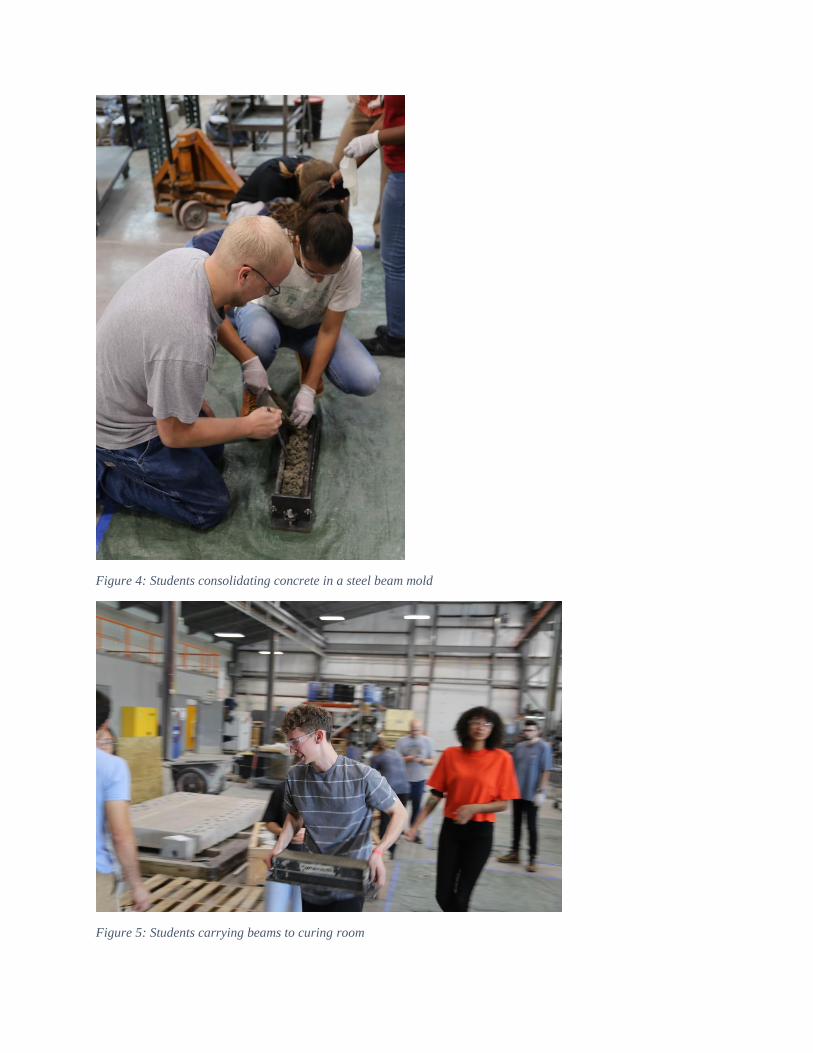
Figure 4: Students consolidating concrete in a steel beam mold
Figure 5: Students carrying beams to curing room
Images for lab day 2: beam testing
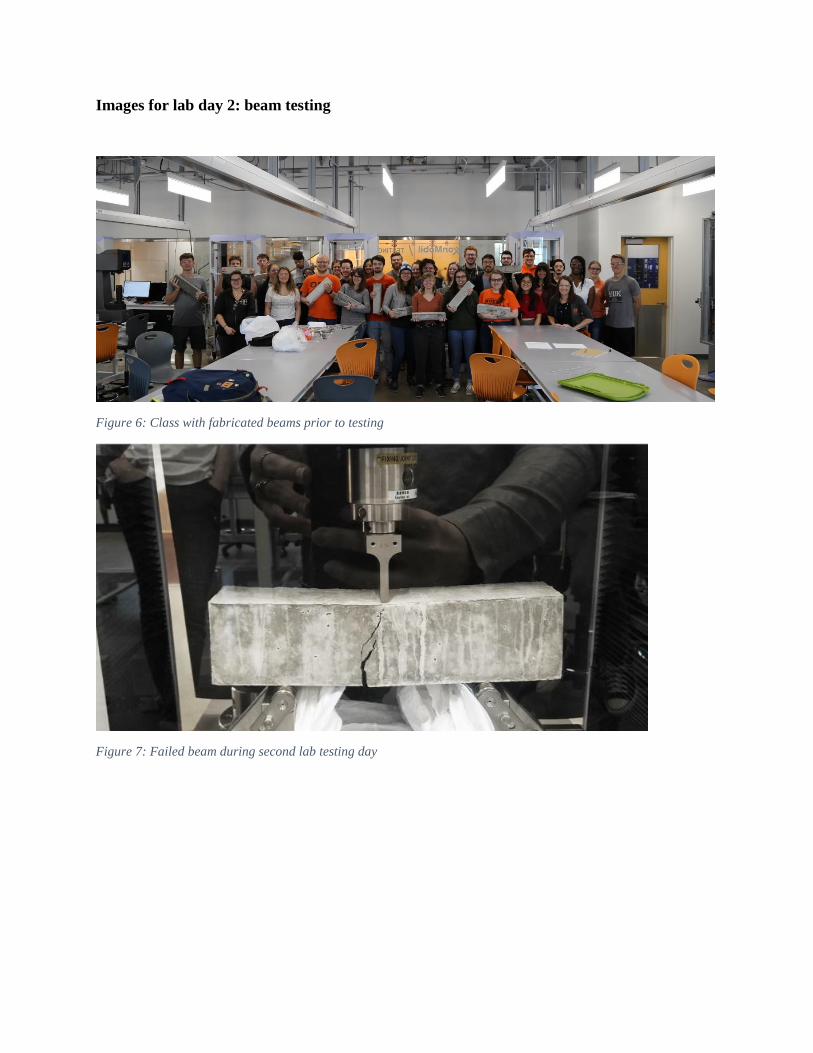
Figure 6: Class with fabricated beams prior to testing
Figure 7: Failed beam during second lab testing day
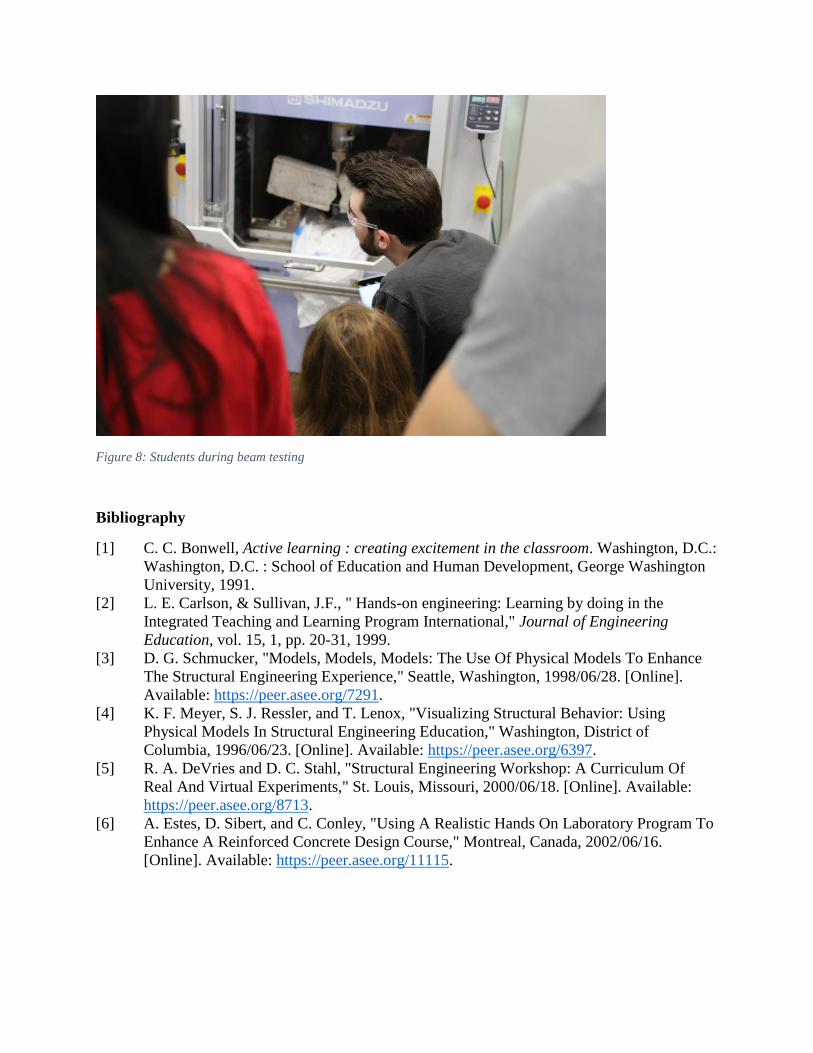
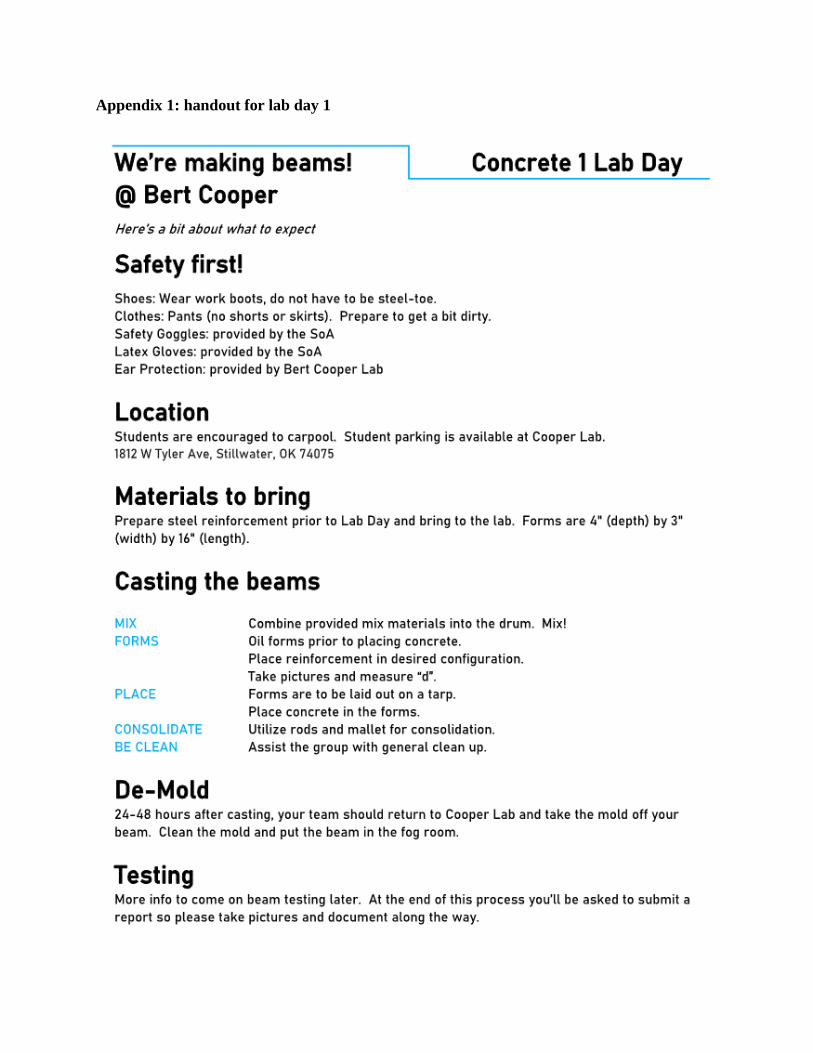
Figure 8: Students during beam testing
Bibliography
[1] C. C. Bonwell, Active learning : creating excitement in the classroom. Washington, D.C.:
Washington, D.C. : School of Education and Human Development, George Washington
University, 1991.
[2] L. E. Carlson, & Sullivan, J.F., " Hands-on engineering: Learning by doing in the
Integrated Teaching and Learning Program International," Journal of Engineering
Education, vol. 15, 1, pp. 20-31, 1999.
[3] D. G. Schmucker, "Models, Models, Models: The Use Of Physical Models To Enhance
The Structural Engineering Experience," Seattle, Washington, 1998/06/28. [Online].
Available: https://peer.asee.org/7291.
[4] K. F. Meyer, S. J. Ressler, and T. Lenox, "Visualizing Structural Behavior: Using
Physical Models In Structural Engineering Education," Washington, District of
Columbia, 1996/06/23. [Online]. Available: https://peer.asee.org/6397.
[5] R. A. DeVries and D. C. Stahl, "Structural Engineering Workshop: A Curriculum Of
Real And Virtual Experiments," St. Louis, Missouri, 2000/06/18. [Online]. Available:
https://peer.asee.org/8713.
[6] A. Estes, D. Sibert, and C. Conley, "Using A Realistic Hands On Laboratory Program To
Enhance A Reinforced Concrete Design Course," Montreal, Canada, 2002/06/16.
[Online]. Available: https://peer.asee.org/11115.
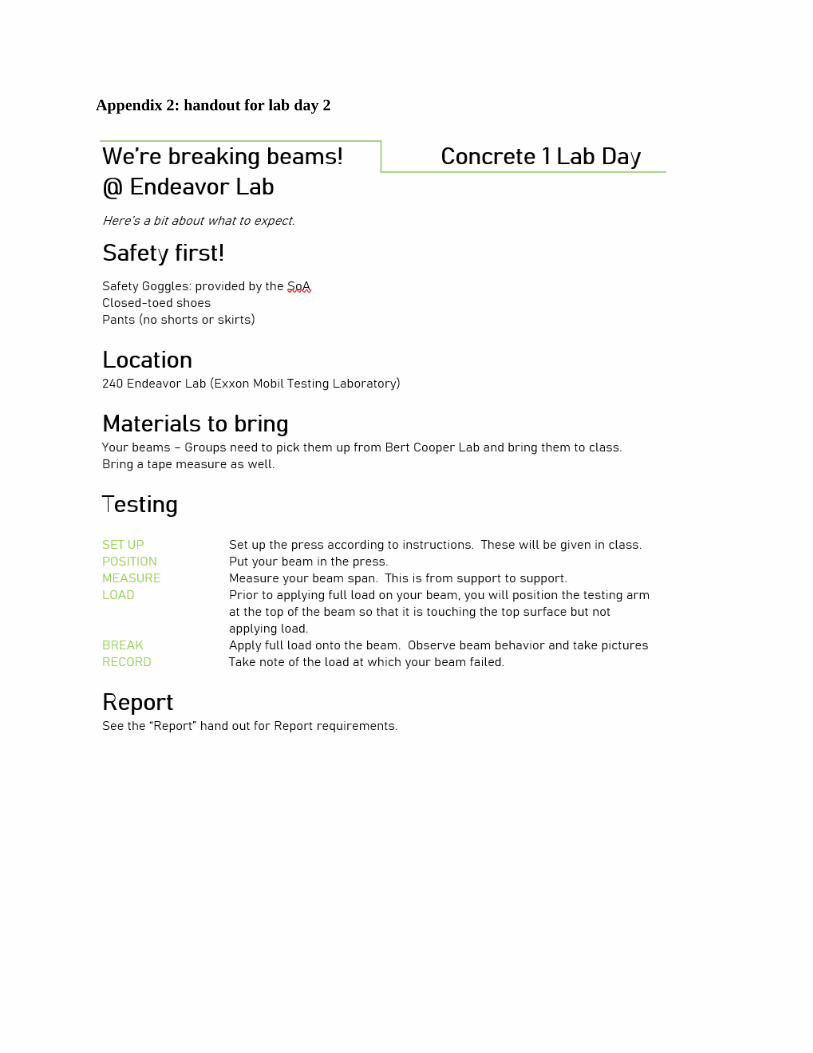
Appendix 1: handout for lab day 1
Appendix 2: handout for lab day 2
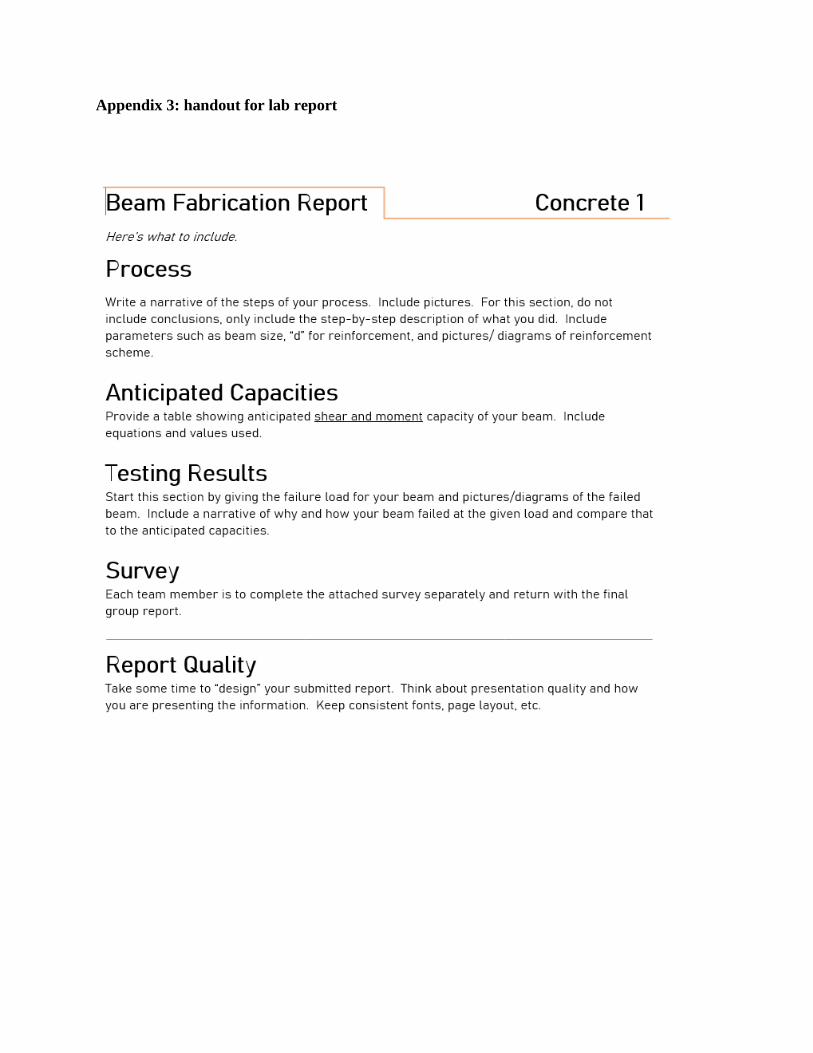
Appendix 3: handout for lab report


![Chapter 3. Focused Ion Beam Fabrication - [email protected]: Home](https://img.pdfslide.net/doc/110x75/61fb34102e268c58cd5b61fc/chapter-3-focused-ion-beam-fabrication-emailprotected-home.jpg)