Embed Size (px)
Citation preview
ENGLISH 4
DEUTSCH 10
FRANÇAIS 17
NEDERLANDS 24
ESPAÑOL 30
ITALIANO 37
PORTUGUÊS 44
�������� 51
TÜRKÇE 58
HQ
T56
2
3
Important
◗ Check if the voltage indicated on the mainsplug corresponds to the mains voltage in yourhome before you connect the appliance.
◗ Make sure that the appliance does not getwet.
◗ This appliance is only designed for trimmingthe human beard.
◗ Keep the appliance out of the reach ofchildren.
Charging
Charge the appliance fully before you start usingit for the first time.
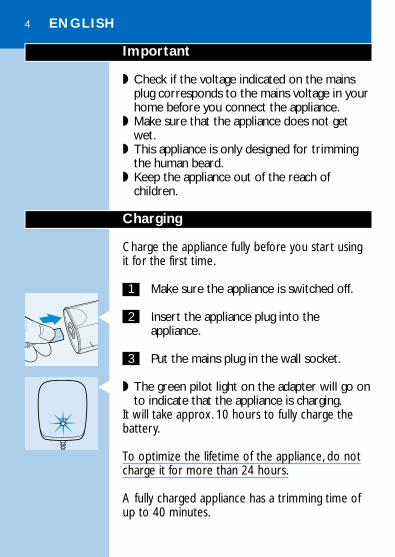
1 Make sure the appliance is switched off.
C 2 Insert the appliance plug into theappliance.
3 Put the mains plug in the wall socket.
C ◗ The green pilot light on the adapter will go onto indicate that the appliance is charging.
It will take approx. 10 hours to fully charge thebattery.
To optimize the lifetime of the appliance, do notcharge it for more than 24 hours.
A fully charged appliance has a trimming time ofup to 40 minutes.
ENGLISH4
CHARGE
B To optimise the lifetime of the rechargeablebattery, we advise you to use the appliance untilthe battery is completely empty when theappliance has been charged for the first time. Donot recharge the appliance in between trimmingsessions. Continue using the appliance until themotor almost stops running during a session.Thenrecharge the battery. Follow this procedure at leasttwice a year.
Trimming
Always comb the beard and/or moustache with afine comb before you start trimming.
Do not move the trimmer too fast. Make smoothand gentle movements.
Trimming with comb attachment
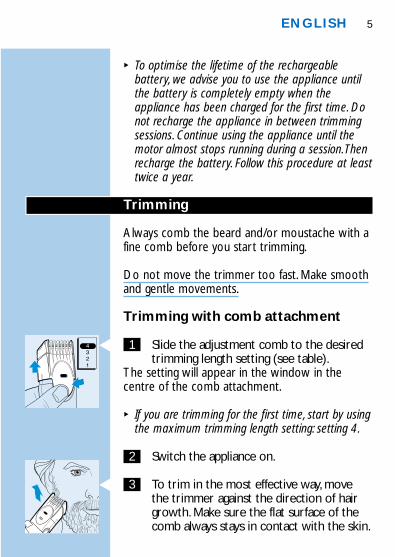
C 1 Slide the adjustment comb to the desiredtrimming length setting (see table).
The setting will appear in the window in thecentre of the comb attachment.
B If you are trimming for the first time, start by usingthe maximum trimming length setting: setting 4.
2 Switch the appliance on.
C 3 To trim in the most effective way, movethe trimmer against the direction of hairgrowth. Make sure the flat surface of thecomb always stays in contact with the skin.
ENGLISH 5
4
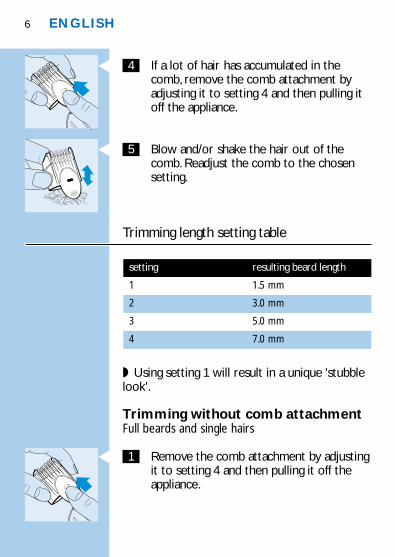
C 4 If a lot of hair has accumulated in thecomb, remove the comb attachment byadjusting it to setting 4 and then pulling itoff the appliance.
C 5 Blow and/or shake the hair out of thecomb. Readjust the comb to the chosensetting.
Trimming length setting table
◗ Using setting 1 will result in a unique 'stubblelook'.
Trimming without comb attachmentFull beards and single hairs
C 1 Remove the comb attachment by adjustingit to setting 4 and then pulling it off theappliance.
ENGLISH6
4
resulting beard length
1.5 mm
3.0 mm
5.0 mm
7.0 mm
setting
1
2
3
4
Never pull at the flexible top of the comb attachment.Always pull at the bottom part.
2 Switch the appliance on.
C 3 Make well-controlled movements.Touchthe hair lightly with the trimmer.
Cleaning
Do not use abrasives, scourers or liquids such asalcohol, petrol or acetone to clean the appliance.
1 Make sure the appliance is switched offand disconnected from the mains.
2 Remove the comb attachment.
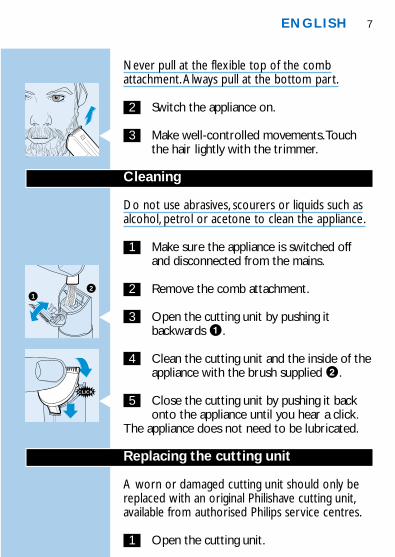
C 3 Open the cutting unit by pushing itbackwards 1.
4 Clean the cutting unit and the inside of theappliance with the brush supplied 2.
C 5 Close the cutting unit by pushing it backonto the appliance until you hear a click.
The appliance does not need to be lubricated.
Replacing the cutting unit
A worn or damaged cutting unit should only bereplaced with an original Philishave cutting unit,available from authorised Philips service centres.
1 Open the cutting unit.
ENGLISH 7
12
CLICK
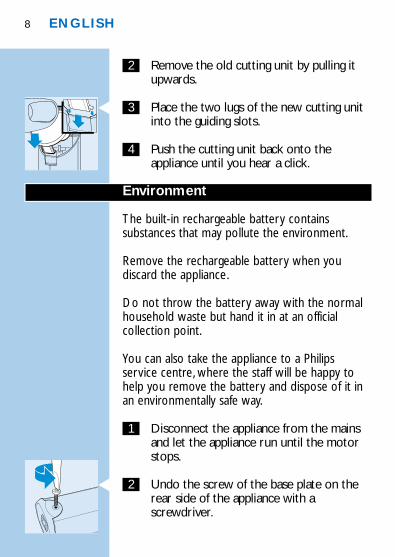
2 Remove the old cutting unit by pulling itupwards.
C 3 Place the two lugs of the new cutting unitinto the guiding slots.
4 Push the cutting unit back onto theappliance until you hear a click.
Environment
The built-in rechargeable battery containssubstances that may pollute the environment.
Remove the rechargeable battery when youdiscard the appliance.
Do not throw the battery away with the normalhousehold waste but hand it in at an officialcollection point.
You can also take the appliance to a Philipsservice centre, where the staff will be happy tohelp you remove the battery and dispose of it inan environmentally safe way.
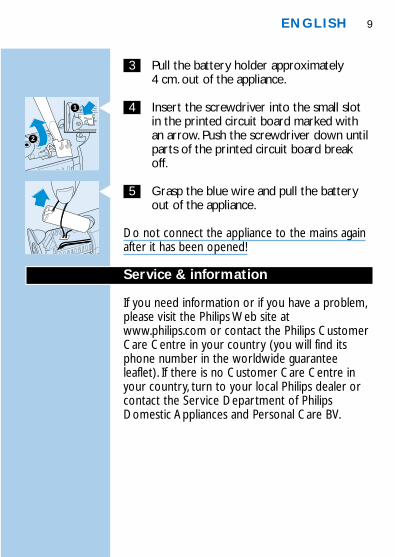
1 Disconnect the appliance from the mainsand let the appliance run until the motorstops.
C 2 Undo the screw of the base plate on therear side of the appliance with ascrewdriver.
ENGLISH8
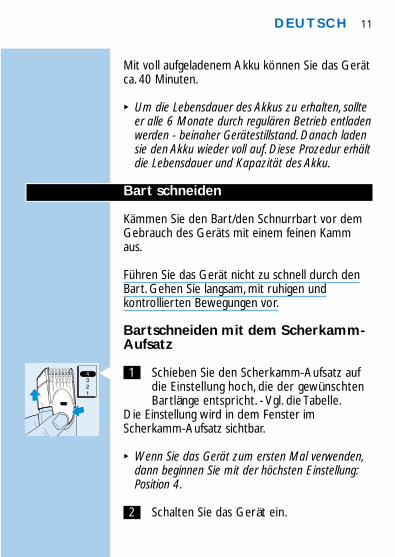
3 Pull the battery holder approximately 4 cm. out of the appliance.
C 4 Insert the screwdriver into the small slotin the printed circuit board marked withan arrow. Push the screwdriver down untilparts of the printed circuit board breakoff.
C 5 Grasp the blue wire and pull the batteryout of the appliance.
Do not connect the appliance to the mains againafter it has been opened!
Service & information
If you need information or if you have a problem,please visit the Philips Web site atwww.philips.com or contact the Philips CustomerCare Centre in your country (you will find itsphone number in the worldwide guaranteeleaflet). If there is no Customer Care Centre inyour country, turn to your local Philips dealer orcontact the Service Department of PhilipsDomestic Appliances and Personal Care BV.
ENGLISH 9
1
2

Wichtig
◗ Prüfen Sie, ob die Spannungsangabe auf demAdapter mit der örtlichen Netzspannungübereinstimmt, bevor Sie das Gerät aufladen.
◗ Achten Sie darauf, dass das Gerät nicht nasswird.
◗ Dieses Gerät ist nur zum Schneiden vonmenschlichen Bärten bestimmt.
◗ Halten Sie das Gerät außer der Reichweitevon Kindern auf.
Akku aufladen
Laden Sie den Akku voll auf, bevor Sie das Gerätzum ersten Mal benutzen.
1 Achten Sie darauf, dass das Gerätausgeschaltet ist.
C 2 Stecken Sie den Gerätestecker in dasGerät.
3 Stecken Sie den Netzstecker in dieSteckdose.
Wenn das Netzkabel dieses Gerätes beschädigtist, wenden Sie sich bitte an Ihren Kundendienst.
C ◗ Die grüne Kontroll-Lampe auf dem Adapterleuchtet auf und zeigt an, dass der Akkugeladen wird.
Der Akku ist nach ca. 10 Stunden voll aufgeladen.
Laden Sie das Gerät nicht länger als 24 Stunden; um eine optimale Lebensdauer desAkkus zu gewährleisten.
DEUTSCH10
CHARGE
Mit voll aufgeladenem Akku können Sie das Gerätca. 40 Minuten.
B Um die Lebensdauer des Akkus zu erhalten, sollteer alle 6 Monate durch regulären Betrieb entladenwerden - beinaher Gerätestillstand. Danach ladensie den Akku wieder voll auf. Diese Prozedur erhältdie Lebensdauer und Kapazität des Akku.
Bart schneiden
Kämmen Sie den Bart/den Schnurrbart vor demGebrauch des Geräts mit einem feinen Kammaus.
Führen Sie das Gerät nicht zu schnell durch denBart. Gehen Sie langsam, mit ruhigen undkontrollierten Bewegungen vor.
Bartschneiden mit dem Scherkamm-Aufsatz
C 1 Schieben Sie den Scherkamm-Aufsatz aufdie Einstellung hoch, die der gewünschtenBartlänge entspricht. - Vgl. die Tabelle.
Die Einstellung wird in dem Fenster imScherkamm-Aufsatz sichtbar.
B Wenn Sie das Gerät zum ersten Mal verwenden,dann beginnen Sie mit der höchsten Einstellung:Position 4.
2 Schalten Sie das Gerät ein.
DEUTSCH 11
4
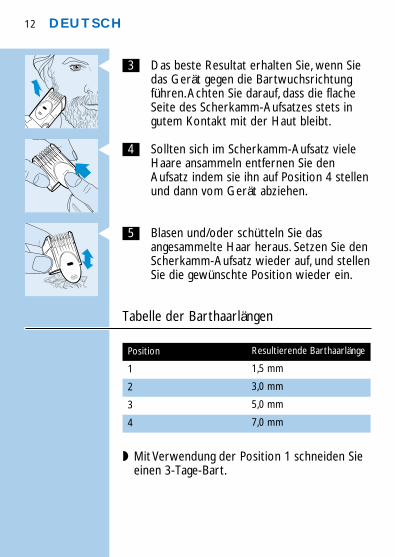
C 3 Das beste Resultat erhalten Sie, wenn Siedas Gerät gegen die Bartwuchsrichtungführen.Achten Sie darauf, dass die flacheSeite des Scherkamm-Aufsatzes stets ingutem Kontakt mit der Haut bleibt.
C 4 Sollten sich im Scherkamm-Aufsatz vieleHaare ansammeln entfernen Sie denAufsatz indem sie ihn auf Position 4 stellenund dann vom Gerät abziehen.
C 5 Blasen und/oder schütteln Sie dasangesammelte Haar heraus. Setzen Sie denScherkamm-Aufsatz wieder auf, und stellenSie die gewünschte Position wieder ein.
Tabelle der Barthaarlängen
◗ Mit Verwendung der Position 1 schneiden Sieeinen 3-Tage-Bart.
DEUTSCH12
4
Resultierende Barthaarlänge
1,5 mm
3,0 mm
5,0 mm
7,0 mm
Position
1
2
3
4
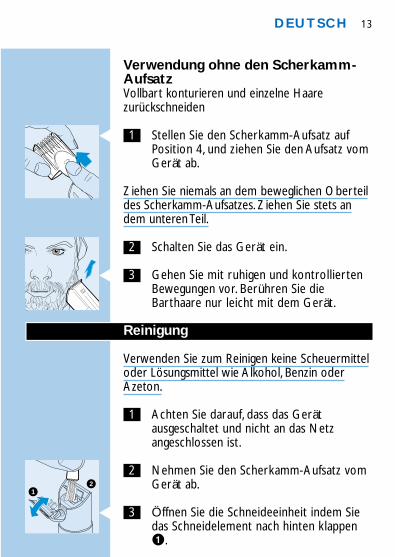
Verwendung ohne den Scherkamm-AufsatzVollbart konturieren und einzelne Haarezurückschneiden
C 1 Stellen Sie den Scherkamm-Aufsatz aufPosition 4, und ziehen Sie den Aufsatz vomGerät ab.
Ziehen Sie niemals an dem beweglichen Oberteildes Scherkamm-Aufsatzes. Ziehen Sie stets andem unteren Teil.
2 Schalten Sie das Gerät ein.
C 3 Gehen Sie mit ruhigen und kontrolliertenBewegungen vor. Berühren Sie dieBarthaare nur leicht mit dem Gerät.
Reinigung
Verwenden Sie zum Reinigen keine Scheuermitteloder Lösungsmittel wie Alkohol, Benzin oderAzeton.
1 Achten Sie darauf, dass das Gerätausgeschaltet und nicht an das Netzangeschlossen ist.
2 Nehmen Sie den Scherkamm-Aufsatz vomGerät ab.
C 3 Öffnen Sie die Schneideeinheit indem Siedas Schneidelement nach hinten klappen1.
DEUTSCH 13
12
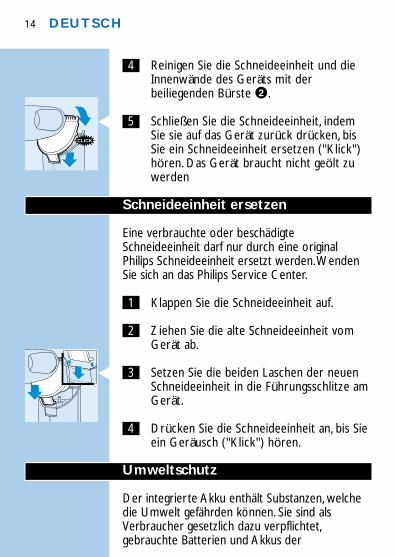
4 Reinigen Sie die Schneideeinheit und dieInnenwände des Geräts mit derbeiliegenden Bürste 2.
C 5 Schließen Sie die Schneideeinheit, indemSie sie auf das Gerät zurück drücken, bisSie ein Schneideeinheit ersetzen ("Klick")hören. Das Gerät braucht nicht geölt zuwerden
Schneideeinheit ersetzen
Eine verbrauchte oder beschädigteSchneideeinheit darf nur durch eine originalPhilips Schneideeinheit ersetzt werden.WendenSie sich an das Philips Service Center.
1 Klappen Sie die Schneideeinheit auf.
2 Ziehen Sie die alte Schneideeinheit vomGerät ab.
C 3 Setzen Sie die beiden Laschen der neuenSchneideeinheit in die Führungsschlitze amGerät.
4 Drücken Sie die Schneideeinheit an, bis Sieein Geräusch ("Klick") hören.
Umweltschutz
Der integrierte Akku enthält Substanzen, welchedie Umwelt gefährden können. Sie sind alsVerbraucher gesetzlich dazu verpflichtet,gebrauchte Batterien und Akkus der
DEUTSCH14
CLICK
Wiederverwertung zuzuführen. Geben Sie sie beieiner öffentlichen Sammelstelle Ihrer Gemeindeoder an einer Verkaufsstelle für entsprechendeGeräte bzw. für Batterien und Akkus ab.
Entfernen Sie die wiederaufladbaren Batterienwenn Sie das Gerät wegwerfen.
Der Akku gehört nicht zum normalen Hausmüll!Sie können das Gerät auch gerne zu einem PhilipsService Center bringen, wo sich unsereMitarbeiter um eine ordnungsgemäße Entsorgungkümmern werden.
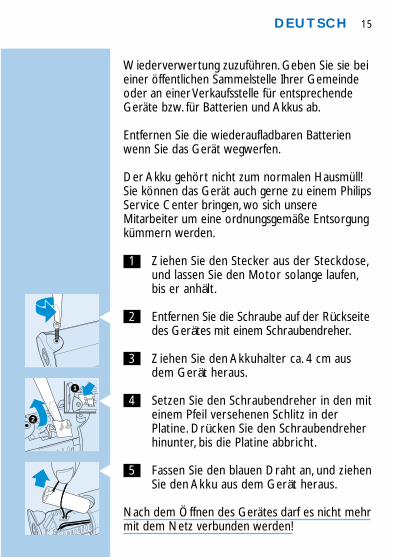
1 Ziehen Sie den Stecker aus der Steckdose,und lassen Sie den Motor solange laufen,bis er anhält.
C 2 Entfernen Sie die Schraube auf der Rückseitedes Gerätes mit einem Schraubendreher.
3 Ziehen Sie den Akkuhalter ca. 4 cm ausdem Gerät heraus.
C 4 Setzen Sie den Schraubendreher in den miteinem Pfeil versehenen Schlitz in derPlatine. Drücken Sie den Schraubendreherhinunter, bis die Platine abbricht.
C 5 Fassen Sie den blauen Draht an, und ziehenSie den Akku aus dem Gerät heraus.
Nach dem Öffnen des Gerätes darf es nicht mehrmit dem Netz verbunden werden!
DEUTSCH 15
1
2
Service und Information
Sollten Sie Informationen benötigen oderProbleme haben, besuchen Sie bitte unsereHomepage www.philips.com oder kontaktierenSie das Philips Service Center in Ihrem Land (dieTelefonnummer entnehmen Sie bitte dembeigefügten Garantieschein). Befindet sich inIhrem Land kein Philips Service Center wendenSie sich bitte an Ihre Kaufstelle oder dem PhilipsDomestic Appliances and Personal Care BV.
DEUTSCH16
Important
◗ Avant de brancher l'appareil, vérifiez que latension indiquée sur l'appareil correspondbien à la tension de votre secteur.
◗ Veillez à ce que l'appareil ne soit pas exposé àl'humidité.
◗ L'appareil a été conçu pour tailler la barbeexclusivement.
◗ Tenez l'appareil hors de portée des enfants.
Charge
Chargez l'appareil complètement avant del'utiliser pour la première fois.
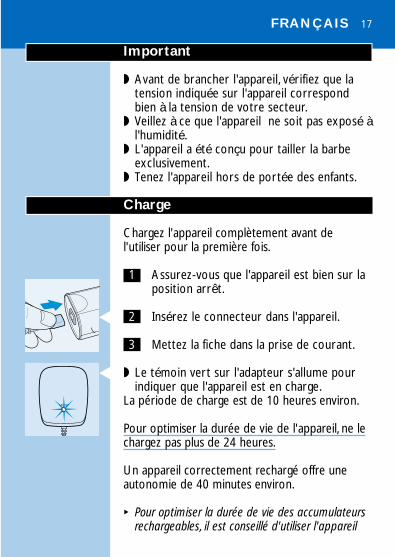
1 Assurez-vous que l'appareil est bien sur laposition arrêt.
C 2 Insérez le connecteur dans l'appareil.
3 Mettez la fiche dans la prise de courant.
C ◗ Le témoin vert sur l'adapteur s'allume pourindiquer que l'appareil est en charge.
La période de charge est de 10 heures environ.
Pour optimiser la durée de vie de l'appareil, ne lechargez pas plus de 24 heures.
Un appareil correctement rechargé offre uneautonomie de 40 minutes environ.
B Pour optimiser la durée de vie des accumulateursrechargeables, il est conseillé d'utiliser l'appareil
FRANÇAIS 17
CHARGE
jusqu'à ce que les accumulateurs soientcomplètement déchargés après avoir chargél'appareil pour la première fois. Ne rechargez pasl'appareil entre les séances de taille. Laissezl'appareil fonctionner jusqu'à ce que le moteurs'arrête pendant une séance. Ensuite rechargezles accumulateurs. Effectuez cette opération aumoins deux fois par an.
Utilisation de la tondeuse
Peignez toujours la barbe et/ou la moustache àl'aide d'un peigne avant de commencer à utiliserla tondeuse.
Ne faites pas des mouvements rapides avec latondeuse. Faites des mouvements uniformes ettout en douceur.
Taille avec guide de coupe (ou sabot)
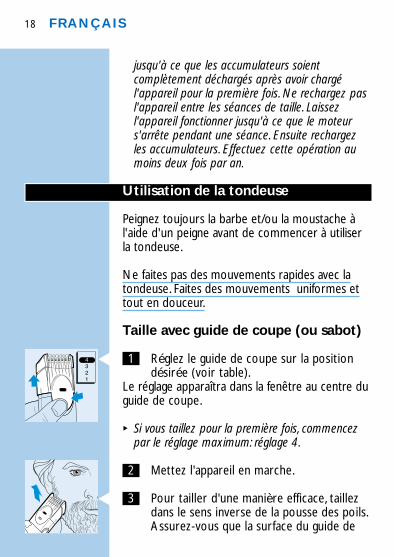
C 1 Réglez le guide de coupe sur la positiondésirée (voir table).
Le réglage apparaîtra dans la fenêtre au centre duguide de coupe.
B Si vous taillez pour la première fois, commencezpar le réglage maximum: réglage 4.
2 Mettez l'appareil en marche.
C 3 Pour tailler d'une manière efficace, taillezdans le sens inverse de la pousse des poils.Assurez-vous que la surface du guide de
FRANÇAIS18
4
coupe est toujours en contact avec lapeau.
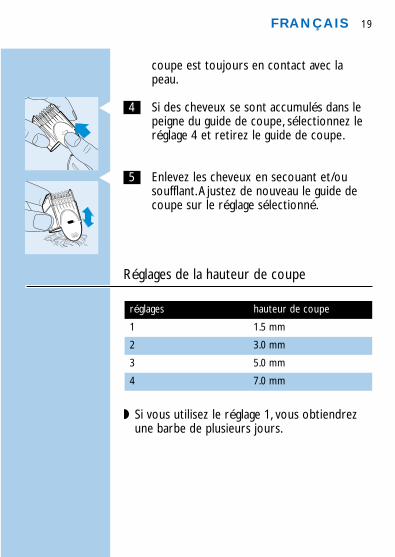
C 4 Si des cheveux se sont accumulés dans lepeigne du guide de coupe, sélectionnez leréglage 4 et retirez le guide de coupe.
C 5 Enlevez les cheveux en secouant et/ousoufflant.Ajustez de nouveau le guide decoupe sur le réglage sélectionné.
Réglages de la hauteur de coupe
◗ Si vous utilisez le réglage 1, vous obtiendrezune barbe de plusieurs jours.
FRANÇAIS 19
4
hauteur de coupe
1.5 mm
3.0 mm
5.0 mm
7.0 mm
réglages
1
2
3
4
Taille sans guide de coupeBarbes et poils rebels
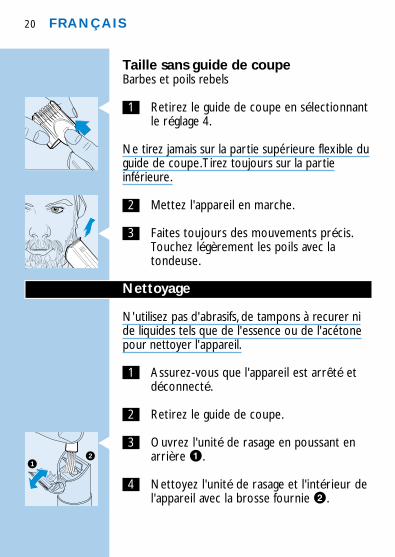
C 1 Retirez le guide de coupe en sélectionnantle réglage 4.
Ne tirez jamais sur la partie supérieure flexible duguide de coupe.Tirez toujours sur la partieinférieure.
2 Mettez l'appareil en marche.
C 3 Faites toujours des mouvements précis.Touchez légèrement les poils avec latondeuse.
Nettoyage
N'utilisez pas d'abrasifs, de tampons à recurer nide liquides tels que de l'essence ou de l'acétonepour nettoyer l'appareil.
1 Assurez-vous que l'appareil est arrêté etdéconnecté.
2 Retirez le guide de coupe.
C 3 Ouvrez l'unité de rasage en poussant enarrière 1.
4 Nettoyez l'unité de rasage et l'intérieur del'appareil avec la brosse fournie 2.
FRANÇAIS20
12
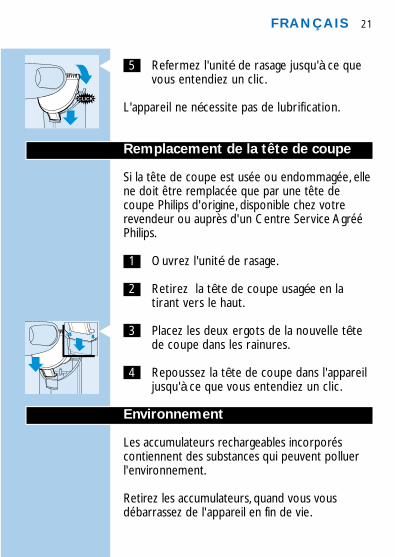
C 5 Refermez l'unité de rasage jusqu'à ce quevous entendiez un clic.
L'appareil ne nécessite pas de lubrification.
Remplacement de la tête de coupe
Si la tête de coupe est usée ou endommagée, ellene doit être remplacée que par une tête decoupe Philips d'origine, disponible chez votrerevendeur ou auprès d'un Centre Service AgrééPhilips.
1 Ouvrez l'unité de rasage.
2 Retirez la tête de coupe usagée en latirant vers le haut.
C 3 Placez les deux ergots de la nouvelle têtede coupe dans les rainures.
4 Repoussez la tête de coupe dans l'appareiljusqu'à ce que vous entendiez un clic.
Environnement
Les accumulateurs rechargeables incorporéscontiennent des substances qui peuvent polluerl'environnement.
Retirez les accumulateurs, quand vous vousdébarrassez de l'appareil en fin de vie.
FRANÇAIS 21
CLICK
Ne jetez pas les accumulateurs dans les orduresménagères mais dans un endroit assigné à ceteffet.
Vous pouvez également déposer votre appareildans un Centre Service Agréé Philips, qui s'enchargera avec plaisir.
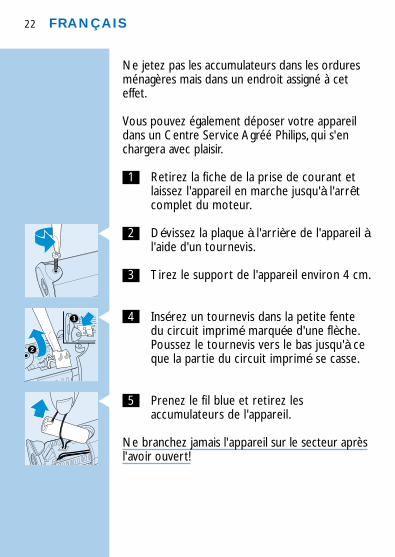
1 Retirez la fiche de la prise de courant etlaissez l'appareil en marche jusqu'à l'arrêtcomplet du moteur.
C 2 Dévissez la plaque à l'arrière de l'appareil àl'aide d'un tournevis.
3 Tirez le support de l'appareil environ 4 cm.
C 4 Insérez un tournevis dans la petite fentedu circuit imprimé marquée d'une flèche.Poussez le tournevis vers le bas jusqu'à ceque la partie du circuit imprimé se casse.
C 5 Prenez le fil blue et retirez lesaccumulateurs de l'appareil.
Ne branchez jamais l'appareil sur le secteur aprèsl'avoir ouvert!
FRANÇAIS22
1
2
Service et informations
Pour plus d'informations, visitez notre Philips Website : www.philips.com ou veuillez contacter leService Consommateurs Philips de votre pays(vous trouverez le numéro de téléphone dans ledépliant sur la garantie internationale). S'il n'y aaucun Service Consommateurs Philips dans votrepays, contactez votre distributeur ou le ServiceDepartment of Philips Domestic Appliances andPersonal Care BV.
FRANÇAIS 23
Belangrijk
◗ Controleer, voordat u het apparaat aansluit, ofhet voltage dat op de stekker is vermeldovereenkomt met de netspanning in uwwoning.
◗ Voorkom dat het apparaat nat wordt.◗ Dit apparaat is uitsluitend bedoeld voor het
bijknippen van baarden bij mensen.◗ Houd het apparaat uit de buurt van kinderen.
Opladen
Laad het apparaat volledig op voordat u het voorde eerste keer gebruikt.
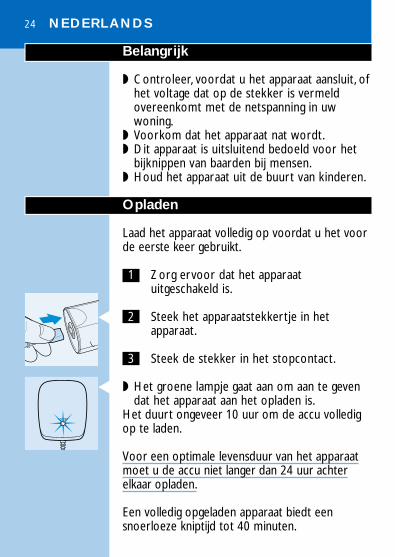
1 Zorg ervoor dat het apparaatuitgeschakeld is.
C 2 Steek het apparaatstekkertje in hetapparaat.
3 Steek de stekker in het stopcontact.
C ◗ Het groene lampje gaat aan om aan te gevendat het apparaat aan het opladen is.
Het duurt ongeveer 10 uur om de accu volledigop te laden.
Voor een optimale levensduur van het apparaatmoet u de accu niet langer dan 24 uur achterelkaar opladen.
Een volledig opgeladen apparaat biedt eensnoerloeze kniptijd tot 40 minuten.
NEDERLANDS24
CHARGE
B Om de levensduur van de accu te verlengen,adviseren we u, nadat u de accu voor de eerstekeer heeft opgeladen, het apparaat te gebruikentot de accu helemaal leeg is. Laad de accu niettussendoor op. Gebruik het apparaat totdat demotor tijdens een knipbeurt bijna ophoudt metdraaien en laad dan pas de accu weer op.Volgdeze procedure ten minste twee keer per jaar
Gebruik van de trimmer
Kam de baard en/of snor altijd door met een fijnekam voordat u met bijknippen begint.
Beweeg het apparaat niet te snel, maar maakrustige, vloeiende bewegingen.
Uw baard bijknippen met opzetkam
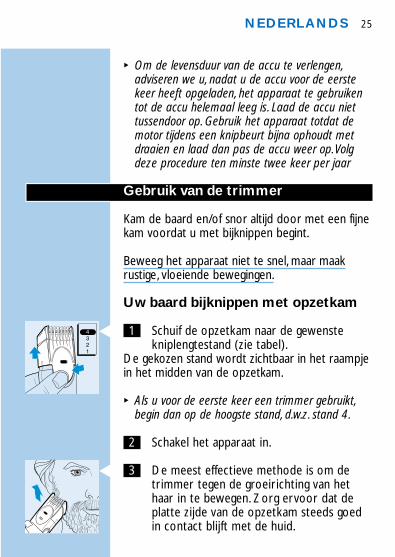
C 1 Schuif de opzetkam naar de gewenstekniplengtestand (zie tabel).
De gekozen stand wordt zichtbaar in het raampjein het midden van de opzetkam.
B Als u voor de eerste keer een trimmer gebruikt,begin dan op de hoogste stand, d.w.z. stand 4.
2 Schakel het apparaat in.
C 3 De meest effectieve methode is om detrimmer tegen de groeirichting van hethaar in te bewegen. Zorg ervoor dat deplatte zijde van de opzetkam steeds goedin contact blijft met de huid.
NEDERLANDS 25
4
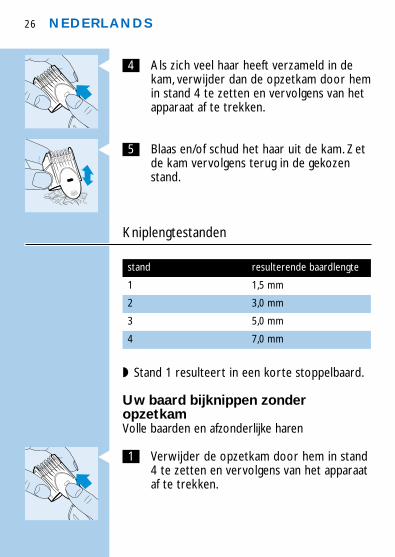
C 4 Als zich veel haar heeft verzameld in dekam, verwijder dan de opzetkam door hemin stand 4 te zetten en vervolgens van hetapparaat af te trekken.
C 5 Blaas en/of schud het haar uit de kam. Zetde kam vervolgens terug in de gekozenstand.
Kniplengtestanden
◗ Stand 1 resulteert in een korte stoppelbaard.
Uw baard bijknippen zonderopzetkamVolle baarden en afzonderlijke haren
C 1 Verwijder de opzetkam door hem in stand4 te zetten en vervolgens van het apparaataf te trekken.
NEDERLANDS26
4
resulterende baardlengte
1,5 mm
3,0 mm
5,0 mm
7,0 mm
stand
1
2
3
4
Trek nooit aan de bovenkant van de opzetkam,maar altijd aan het onderste deel.
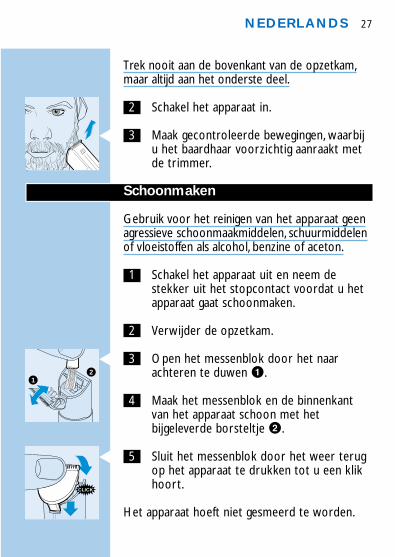
2 Schakel het apparaat in.
C 3 Maak gecontroleerde bewegingen, waarbiju het baardhaar voorzichtig aanraakt metde trimmer.
Schoonmaken
Gebruik voor het reinigen van het apparaat geenagressieve schoonmaakmiddelen, schuurmiddelenof vloeistoffen als alcohol, benzine of aceton.
1 Schakel het apparaat uit en neem destekker uit het stopcontact voordat u hetapparaat gaat schoonmaken.
2 Verwijder de opzetkam.
C 3 Open het messenblok door het naarachteren te duwen 1.
4 Maak het messenblok en de binnenkantvan het apparaat schoon met hetbijgeleverde borsteltje 2.
C 5 Sluit het messenblok door het weer terugop het apparaat te drukken tot u een klikhoort.
Het apparaat hoeft niet gesmeerd te worden.
NEDERLANDS 27
12
CLICK
Vervangen van het messenblok
Een versleten of beschadigd messenblok moetworden vervangen door een origineel Philipsmessenblok dat bij geautoriseerde Philipsservicecentra verkrijgbaar is.
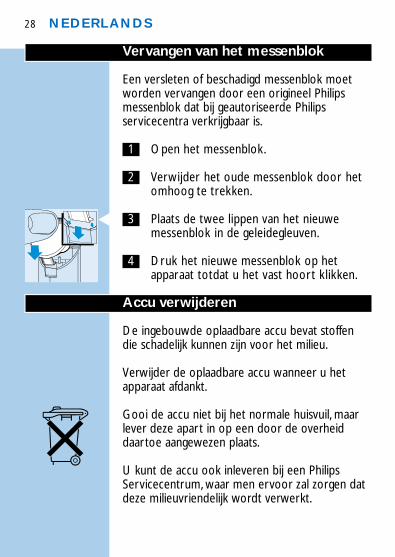
1 Open het messenblok.
2 Verwijder het oude messenblok door hetomhoog te trekken.
C 3 Plaats de twee lippen van het nieuwemessenblok in de geleidegleuven.
4 Druk het nieuwe messenblok op hetapparaat totdat u het vast hoort klikken.
Accu verwijderen
De ingebouwde oplaadbare accu bevat stoffendie schadelijk kunnen zijn voor het milieu.
Verwijder de oplaadbare accu wanneer u hetapparaat afdankt.
Gooi de accu niet bij het normale huisvuil, maarlever deze apart in op een door de overheiddaartoe aangewezen plaats.
U kunt de accu ook inleveren bij een PhilipsServicecentrum, waar men ervoor zal zorgen datdeze milieuvriendelijk wordt verwerkt.
NEDERLANDS28
º
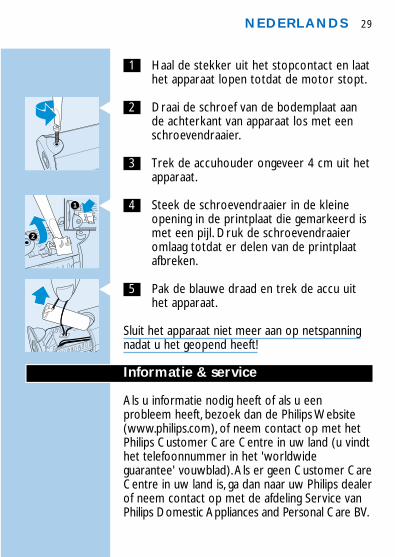
1 Haal de stekker uit het stopcontact en laathet apparaat lopen totdat de motor stopt.
C 2 Draai de schroef van de bodemplaat aande achterkant van apparaat los met eenschroevendraaier.
3 Trek de accuhouder ongeveer 4 cm uit hetapparaat.
C 4 Steek de schroevendraaier in de kleineopening in de printplaat die gemarkeerd ismet een pijl. Druk de schroevendraaieromlaag totdat er delen van de printplaatafbreken.
C 5 Pak de blauwe draad en trek de accu uithet apparaat.
Sluit het apparaat niet meer aan op netspanningnadat u het geopend heeft!
Informatie & service
Als u informatie nodig heeft of als u eenprobleem heeft, bezoek dan de Philips Website(www.philips.com), of neem contact op met hetPhilips Customer Care Centre in uw land (u vindthet telefoonnummer in het 'worldwideguarantee' vouwblad).Als er geen Customer CareCentre in uw land is, ga dan naar uw Philips dealerof neem contact op met de afdeling Service vanPhilips Domestic Appliances and Personal Care BV.
NEDERLANDS 29
1
2
Importante
◗ Antes de enchufar el aparato, compruebe queel voltaje indicado en la clavija de red secorresponde con el de su hogar.
◗ Asegúrese de que el aparato no se moje.◗ Este aparato sólo está diseñado para recortar
la barba humana.◗ Mantenga el aparato lejos del alcance de los
niños.
Carga
Cargue completamente el aparato antes deusarlo por primera vez.
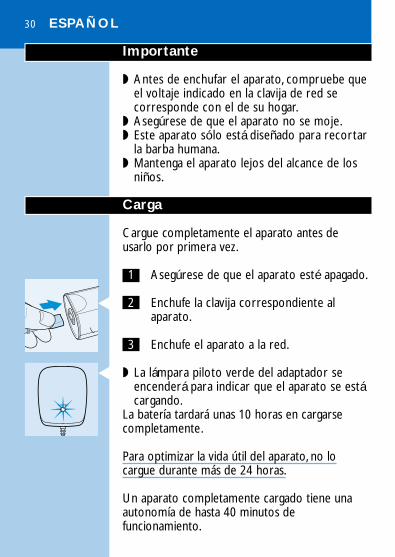
1 Asegúrese de que el aparato esté apagado.
C 2 Enchufe la clavija correspondiente alaparato.
3 Enchufe el aparato a la red.
C ◗ La lámpara piloto verde del adaptador seencenderá para indicar que el aparato se estácargando.
La batería tardará unas 10 horas en cargarsecompletamente.
Para optimizar la vida útil del aparato, no locargue durante más de 24 horas.
Un aparato completamente cargado tiene unaautonomía de hasta 40 minutos defuncionamiento.
ESPAÑOL30
CHARGE
B Para optimizar la vida útil de la bateríarecargable, le aconsejamos que use el aparatohasta que la batería esté completamentedescargada cuando el aparato haya sido cargadopor vez primera. No recargue el aparato entresesiones de recortado. Siga usando el aparatohasta que el motor casi deje de funcionar duranteuna sesión, y luego recargue la batería. Siga esteprocedimiento al menos dos veces al año.
Cómo recortar
Antes de empezar a recortar, peine siempre labarba y/o el bigote con un peine fino.
No mueva el barbero demasiado rápidamenteHaga movimientos lentos y suaves.
Cómo recortar con el accesorio-peine
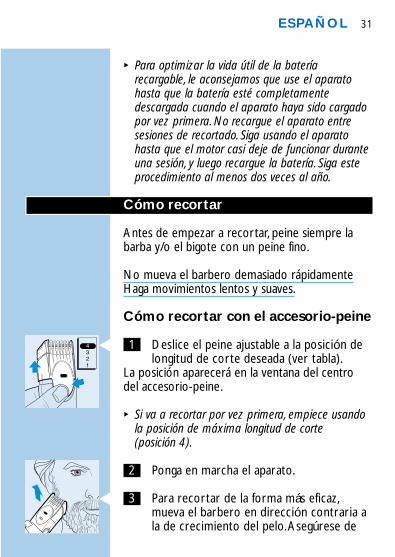
C 1 Deslice el peine ajustable a la posición delongitud de corte deseada (ver tabla).
La posición aparecerá en la ventana del centrodel accesorio-peine.
B Si va a recortar por vez primera, empiece usandola posición de máxima longitud de corte (posición 4).
2 Ponga en marcha el aparato.
C 3 Para recortar de la forma más eficaz,mueva el barbero en dirección contraria ala de crecimiento del pelo.Asegúrese de
ESPAÑOL 31
4
que la superficie plana del peinepermanezca siempre en contacto con lapiel.
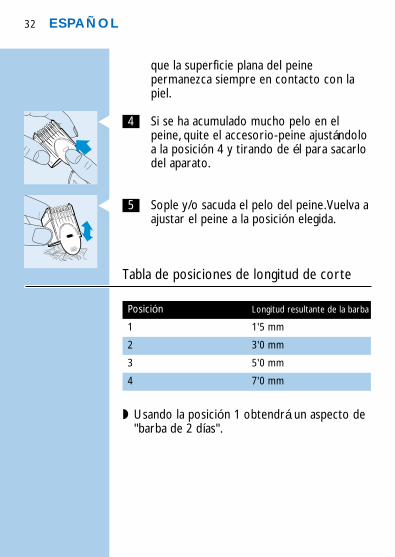
C 4 Si se ha acumulado mucho pelo en elpeine, quite el accesorio-peine ajustándoloa la posición 4 y tirando de él para sacarlodel aparato.
C 5 Sople y/o sacuda el pelo del peine.Vuelva aajustar el peine a la posición elegida.
Tabla de posiciones de longitud de corte
◗ Usando la posición 1 obtendrá un aspecto de"barba de 2 días".
ESPAÑOL32
4
Longitud resultante de la barba
1'5 mm
3'0 mm
5'0 mm
7'0 mm
Posición
1
2
3
4
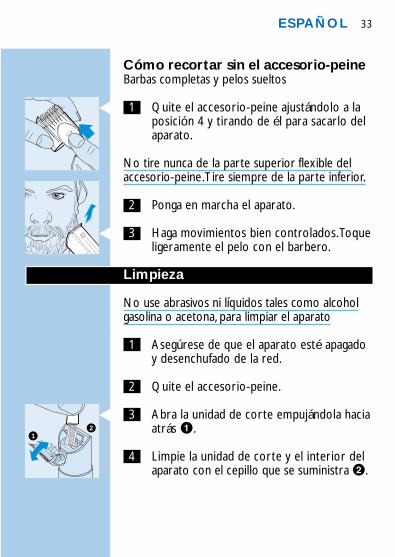
Cómo recortar sin el accesorio-peineBarbas completas y pelos sueltos
C 1 Quite el accesorio-peine ajustándolo a laposición 4 y tirando de él para sacarlo delaparato.
No tire nunca de la parte superior flexible delaccesorio-peine.Tire siempre de la parte inferior.
2 Ponga en marcha el aparato.
C 3 Haga movimientos bien controlados.Toqueligeramente el pelo con el barbero.
Limpieza
No use abrasivos ni líquidos tales como alcoholgasolina o acetona, para limpiar el aparato
1 Asegúrese de que el aparato esté apagadoy desenchufado de la red.
2 Quite el accesorio-peine.
C 3 Abra la unidad de corte empujándola haciaatrás 1.
4 Limpie la unidad de corte y el interior delaparato con el cepillo que se suministra 2.
ESPAÑOL 33
12
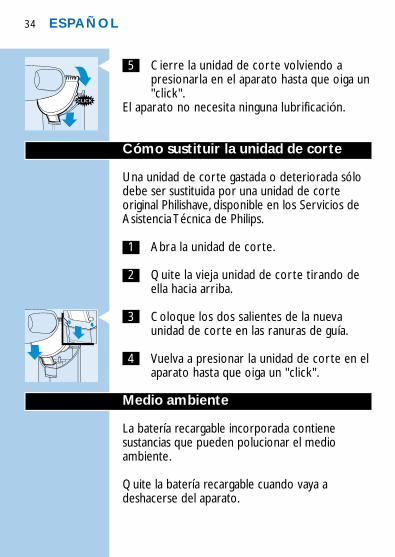
C 5 Cierre la unidad de corte volviendo apresionarla en el aparato hasta que oiga un"click".
El aparato no necesita ninguna lubrificación.
Cómo sustituir la unidad de corte
Una unidad de corte gastada o deteriorada sólodebe ser sustituida por una unidad de corteoriginal Philishave, disponible en los Servicios deAsistencia Técnica de Philips.
1 Abra la unidad de corte.
2 Quite la vieja unidad de corte tirando deella hacia arriba.
C 3 Coloque los dos salientes de la nuevaunidad de corte en las ranuras de guía.
4 Vuelva a presionar la unidad de corte en elaparato hasta que oiga un "click".
Medio ambiente
La batería recargable incorporada contienesustancias que pueden polucionar el medioambiente.
Quite la batería recargable cuando vaya adeshacerse del aparato.
ESPAÑOL34
CLICK
No tire la batería junto con la basura normal delhogar. Llévela a un lugar de recogida oficial.
También puede llevar el aparato a un Servicio deAsistencia Técnica de Philips, cuyo personal leayudará a desmontar la batería y a deshacerse deella de un modo seguro para el medio ambiente.
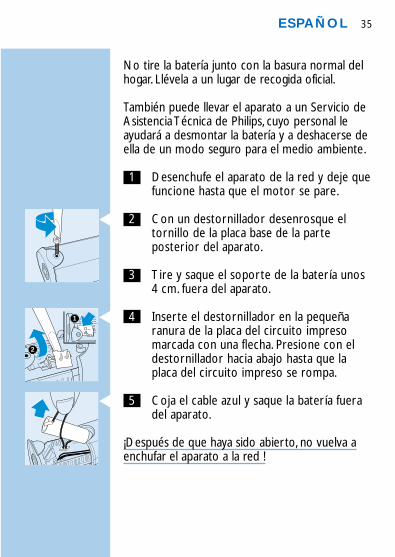
1 Desenchufe el aparato de la red y deje quefuncione hasta que el motor se pare.
C 2 Con un destornillador desenrosque eltornillo de la placa base de la parteposterior del aparato.
3 Tire y saque el soporte de la batería unos4 cm. fuera del aparato.
C 4 Inserte el destornillador en la pequeñaranura de la placa del circuito impresomarcada con una flecha. Presione con eldestornillador hacia abajo hasta que laplaca del circuito impreso se rompa.
C 5 Coja el cable azul y saque la batería fueradel aparato.
¡Después de que haya sido abierto, no vuelva aenchufar el aparato a la red !
ESPAÑOL 35
1
2
Servicio e Información
Si necesita información o si tiene algún problema,visite la página Web de Philips enwww.philips.com o contacte con el ServicioPhilips de Atención al Cliente de su país (hallarásu número de teléfono en el folleto de laGarantía Mundial). Si en su país no hay ServicioPhilips de Atención al Cliente, contacte con sudistribuidor Philips local o con el ServiceDepartment of Philips Domestic Appliances andPersonal Care BV.
ESPAÑOL36

Importante
◗ Prima di collegare l'apparecchio, controllateche la tensione riportata sulla spinacorrisponda a quella della rete locale.
◗ Fate in modo che l'apparecchio non si bagni.◗ Questo apparecchio è adatto solo per tagliare
la barba (non pelo animale).◗ Tenete l'apparecchio fuori dalla portata dei
bambini.
Come caricare l'apparecchio
Caricate completamente l'apparecchio prima diusarlo per la prima volta.
1 Controllate che l'apparecchio sia spento.
C 2 Inserite lo spinotto nell'apparecchio.
3 Inserite la spina nella presa di corrente.
C ◗ Si accenderà la spia verde posta sull'adattoreper indicare che l'apparecchio è sotto carica.
Per caricare completamente la batteria civorranno circa 10 ore.
Per ottimizzare la durata dell'apparecchio, nontenetelo sotto carica per più di 24 ore.
Un rasoio completamente carico haun'autonomia di circa 40 minuti.
B Per ottimizzare la durata della batteriaricaricabile, vi consigliamo di usare l'apparecchio
ITALIANO 37
CHARGE
fino a quando la batteria è completamentescarica dopo averla caricata per la prima volta.Non ricaricate la batteria fra un utilizzo e l'altroma continuate ad usare l'apparecchio fino aquando sta per fermarsi durante la rasatura.Aquesto punto potete ricaricare la batteria.Eseguite questa procedura almeno due volteall'anno.
Come usare il regolabarba
Prima di usare il regolabarba, pettinatevi sempre labarba e/o i baffi con un pettine a denti stretti.
Non muovete il regolabarba troppo velocementeCercate di muovere l'apparecchio in modo lentocon movimenti leggeri.
Come usare il regolabarba con ilpettine
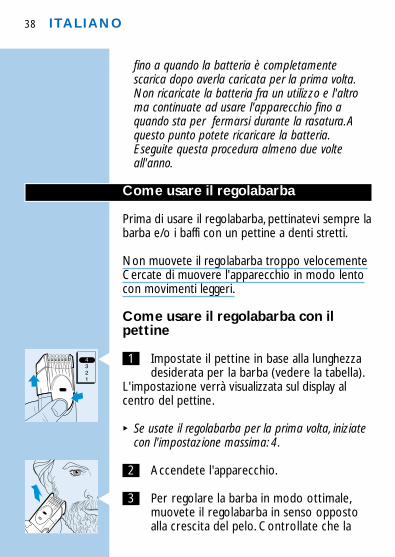
C 1 Impostate il pettine in base alla lunghezzadesiderata per la barba (vedere la tabella).
L'impostazione verrà visualizzata sul display alcentro del pettine.
B Se usate il regolabarba per la prima volta, iniziatecon l'impostazione massima: 4.
2 Accendete l'apparecchio.
C 3 Per regolare la barba in modo ottimale,muovete il regolabarba in senso oppostoalla crescita del pelo. Controllate che la
ITALIANO38
4

parte piatta del pettine sia sempre acontatto con la pelle.
C 4 Nel caso si accumulino molti peli nelpettine, togliete quest'ultimo impostandola regolazione 4, poi estraetelodall'apparecchio.
C 5 Soffiate e/o scuotete i peli per eliminarlidal pettine. Impostate nuovamente ilpettine alla lunghezza desiderata.
Tabella per l'impostazione della lunghezza.
◗ Selezionate l'impostazione 1 per ottenerel'effetto "ispido".
ITALIANO 39
4
lunghezza della barba
1.5 mm
3,0 mm
5,0 mm
7,0 mm
Impostazione
1
2
3
4
Come usare il regolabarba senza ilpettinePer regolare la barba e tagliare i peli isolati
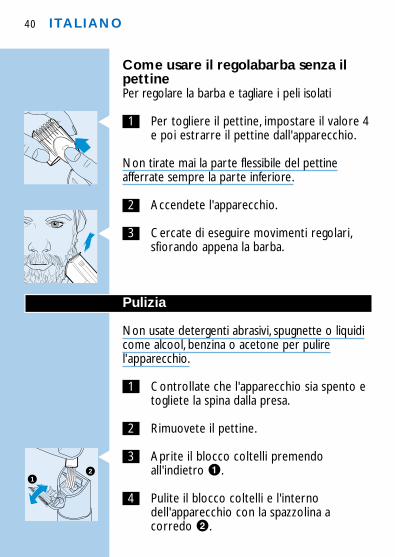
C 1 Per togliere il pettine, impostare il valore 4e poi estrarre il pettine dall'apparecchio.
Non tirate mai la parte flessibile del pettineafferrate sempre la parte inferiore.
2 Accendete l'apparecchio.
C 3 Cercate di eseguire movimenti regolari,sfiorando appena la barba.
Pulizia
Non usate detergenti abrasivi, spugnette o liquidicome alcool, benzina o acetone per pulirel'apparecchio.
1 Controllate che l'apparecchio sia spento etogliete la spina dalla presa.
2 Rimuovete il pettine.
C 3 Aprite il blocco coltelli premendoall'indietro 1.
4 Pulite il blocco coltelli e l'internodell'apparecchio con la spazzolina acorredo 2.
ITALIANO40
12

C 5 Richiudete il blocco coltelli spingendoloall'interno dell'apparecchio fino a quandosentirete un click.
L'apparecchio non richiede nessunalubrificazione.
Come sostituire il blocco coltelli.
Se danneggiato o usurato, il blocco coltelli dovràessere sostituito esclusivamente con un ricambiooriginale Philips, disponibile presso i centri diassistenza autorizzati Philips.
1 Aprite il blocco coltelli.
2 Estraete il blocco coltelli vecchio tirandoloverso l'alto.
C 3 Infilate i due denti del nuovo blocco coltellinelle scanalature guida.
4 Spingete il blocco coltelli nell'apparecchiofino a quando sentirete un click.
Ambiente
La batteria ricaricabile incorporata contienesostanze che possono inquinare l'ambiente.
Quando dovrete gettare l'apparecchio, ricordatedi togliere la batteria ricaricabile.
ITALIANO 41
CLICK
Non gettate la batteria insieme ai normali rifiutidomestici ma depositatela presso un centro diraccolta differenziata.
Potete anche portare l'apparecchio presso unCentro di Assistenza Philips: il personale sarà lietodi aiutarvi a togliere la batteria e ad eliminarlasenza danni per l'ambiente.
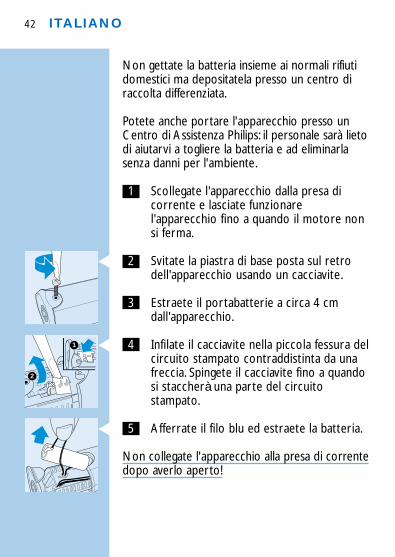
1 Scollegate l'apparecchio dalla presa dicorrente e lasciate funzionarel'apparecchio fino a quando il motore nonsi ferma.
C 2 Svitate la piastra di base posta sul retrodell'apparecchio usando un cacciavite.
3 Estraete il portabatterie a circa 4 cmdall'apparecchio.
C 4 Infilate il cacciavite nella piccola fessura delcircuito stampato contraddistinta da unafreccia. Spingete il cacciavite fino a quandosi staccherà una parte del circuitostampato.
C 5 Afferrate il filo blu ed estraete la batteria.
Non collegate l'apparecchio alla presa di correntedopo averlo aperto!
ITALIANO42
1
2
Assistenza e informazioni
Se avete bisogno di assistenza o di ulterioriinformazioni, vi preghiamo di visitare il nostro sitoweb: www.Philips.com oppure di contattare ilCentro Assistenza Clienti Philips del vostro Paese(per conoscere il numero di telefono, vederel'opuscolo della garanzia). Qualora nel vostroPaese non ci fosse un Centro Assistenza Clienti,rivolgetevi al rivenditore autorizzato Philipsoppure contattate il Service Department ofPhilips Domestic Appliances and Personal Care BV.
ITALIANO 43

Importante
◗ Antes de ligar, verifique se a voltagem indicadana ficha corresponde à corrente eléctrica dasua casa.
◗ Certifique-se que a máquina não entra emcontacto com água.
◗ Esta máquina destina-se unicamente a aparar abarba humana.
◗ Mantenha a máquina fora do alcance dascrianças.
Carga
Ponha a máquina a carregar completamente antesda primeira utilização.
1 Certifique-se que a máquina está desligada.
C 2 Introduza a ficha de ligação no aparador.
3 Ligue a ficha na tomada eléctrica.
C ◗ A luz verde do carregador acende-se paraindicar que a máquina está em carga.
A carga total da bateria demora cerca de 10 horas.
Para optimizar o tempo de vida da bateria, não adeixe em carga durante mais de 24 horas.
Uma máquina com carga total terá um tempo deautonomia de até 40 minutos.
PORTUGUÊS44
CHARGE

B Para optimizar o tempo de vida da bateriarecarregável, aconselha-se a utilização damáquina até que a bateria fique totalmente vaziaquando o aparador tiver sido posto em carga pelaprimeira vez. Não coloque a máquina em cargaentre as sessões de corte. Continue a usar amáquina até o motor parar. Nessa altura, carreguea bateria. Siga este procedimento pelo menosduas vezes por ano.
Aparar
Penteie sempre a barba e/ou o bigode com umpente fino antes de começar a aparar.
Não movimente o aparador muito depressa. Façamovimentos suaves e lentos.
Aparar com o pente acessório
C 1 Regule o pente acessório para ocomprimento desejado (consulte a tabela).
A regulação aparece na janela no centro dopente acessório.
B Se estiver a usar o aparador pela primeira vez,comece pelo comprimento de corte máximo:posição 4.
2 Ligue o aparador.
C 3 Para aparar da forma mais eficaz,movimente a máquina na direcçãocontrária ao crescimento dos pêlos.
PORTUGUÊS 45
4
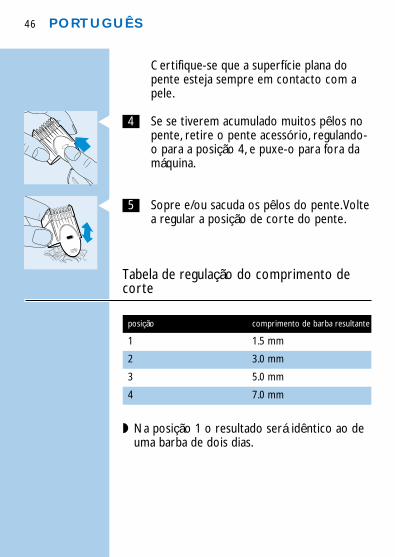
Certifique-se que a superfície plana dopente esteja sempre em contacto com apele.
C 4 Se se tiverem acumulado muitos pêlos nopente, retire o pente acessório, regulando-o para a posição 4, e puxe-o para fora damáquina.
C 5 Sopre e/ou sacuda os pêlos do pente.Voltea regular a posição de corte do pente.
Tabela de regulação do comprimento decorte
◗ Na posição 1 o resultado será idêntico ao deuma barba de dois dias.
PORTUGUÊS46
4
comprimento de barba resultante
1.5 mm
3.0 mm
5.0 mm
7.0 mm
posição
1
2
3
4
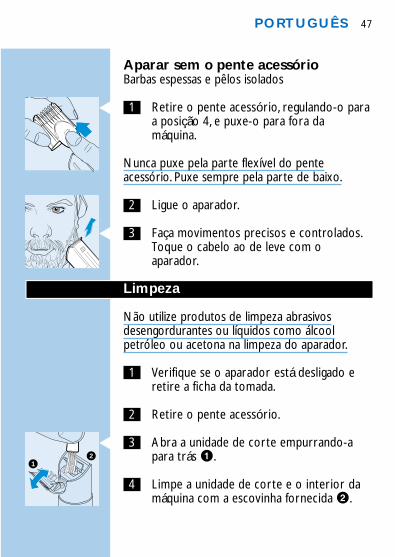
Aparar sem o pente acessórioBarbas espessas e pêlos isolados
C 1 Retire o pente acessório, regulando-o paraa posição 4, e puxe-o para fora damáquina.
Nunca puxe pela parte flexível do penteacessório. Puxe sempre pela parte de baixo.
2 Ligue o aparador.
C 3 Faça movimentos precisos e controlados.Toque o cabelo ao de leve com oaparador.
Limpeza
Não utilize produtos de limpeza abrasivosdesengordurantes ou líquidos como álcoolpetróleo ou acetona na limpeza do aparador.
1 Verifique se o aparador está desligado eretire a ficha da tomada.
2 Retire o pente acessório.
C 3 Abra a unidade de corte empurrando-apara trás 1.
4 Limpe a unidade de corte e o interior damáquina com a escovinha fornecida 2.
PORTUGUÊS 47
12
C 5 Feche a unidade de corte empurrando-apara o interior da máquina até ouvir umclique.
A máquina não precisa de lubrificação.
Substituição da unidade de corte
Uma unidade de corte gasta ou estragada sódeverá ser substituída por uma unidade de cortePhilips de origem que se encontra à venda noscentros de assistência Philips autorizados.
1 Abra a unidade de corte.
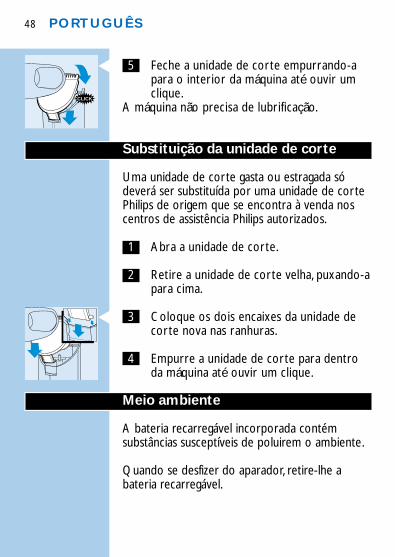
2 Retire a unidade de corte velha, puxando-apara cima.
C 3 Coloque os dois encaixes da unidade decorte nova nas ranhuras.
4 Empurre a unidade de corte para dentroda máquina até ouvir um clique.
Meio ambiente
A bateria recarregável incorporada contémsubstâncias susceptíveis de poluirem o ambiente.
Quando se desfizer do aparador, retire-lhe abateria recarregável.
PORTUGUÊS48
CLICK
Não deite a bateria para o seu lixo domésticonormal. Coloque-a nos contentores próprios parao efeito - ecopontos.
Se quiser, também poderá levar a máquina a umcentro de assistência Philips onde o pessoal seencarregará de retirar a bateria e de se desfazerdela respeitando o meio ambiente.
1 Desligue a máquina da corrente e deixe-aa trabalhar até o motor parar.
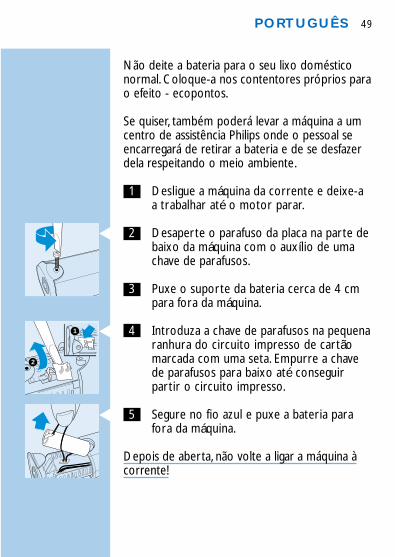
C 2 Desaperte o parafuso da placa na parte debaixo da máquina com o auxílio de umachave de parafusos.
3 Puxe o suporte da bateria cerca de 4 cmpara fora da máquina.
C 4 Introduza a chave de parafusos na pequenaranhura do circuito impresso de cartãomarcada com uma seta. Empurre a chavede parafusos para baixo até conseguirpartir o circuito impresso.
C 5 Segure no fio azul e puxe a bateria parafora da máquina.
Depois de aberta, não volte a ligar a máquina àcorrente!
PORTUGUÊS 49
1
2
Assistência e informações
Se necessitar de informações ou se tiver qualquerproblema, por favor visite o endereço da Philips naWeb em www.philips.com ou contacte o Centrode Assistência ao Cliente Philips do seu país (osnúmeros de telefone encontram-se no folheto dagarantia mundial). Se não existir um dessesCentros no seu País, dirija-se a um agente Philipsou contacte o Departamento de Service daPhilips Domestic Appliances and Personal Care BV.
PORTUGUÊS50
�� ����
◗ ���� ������ �� ��� �� ��� ����,���� �� � ���� ��� ���������� ������ ���������� � ��� ���� ��� �� �� ����� �� ����.
◗ ���� !�� "�� � ��� �� � ������.◗ # ��� �� ���� ��������� �"�� ��� ���
��� � � ����$� ��� ����� � ����.◗ %������ �� ��� �� �� ��� ��" ������.
������
&������ ���� � �� ��� �� ���� ��������������� ��� ��$�� ����.
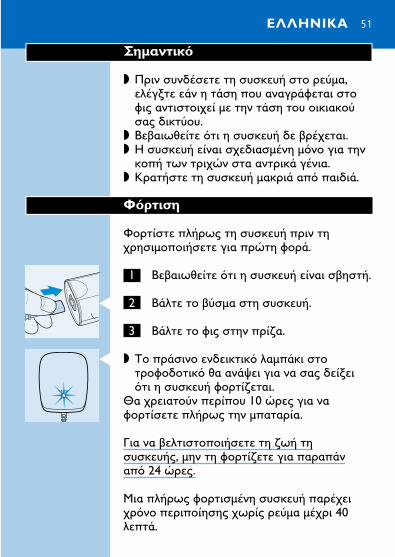
1 ���� !�� "�� � ��� �� ���� ������.
C 2 ���� �� ����� ��� ��� ��.
3 ���� �� ��� ���� ���*�.
C ◗ +� ������� ��� �� " ����� � ������������ " !� ���,� ��� �� ��� ����"�� � ��� �� �����*���.
-� �������� ������ 10 $�� ��� ��������� ���� � ��� ��������.
/�� �� ������������� �� * � ����� ���, ��� �� �����*� ��� ���������" 24 $��.
1�� ���� � ��������� ��� �� �������"�� ���������� � ��� ���� ���� 40����.
�������� 51
CHARGE

B ��� �� �������� �� � �� ������������������ ��������, �������������� �� ��������� � � ���� ��� ��� ������� ������ � ������� ��� ����� ���� ������ �� ���� ����. "��������� � ���� ������ � ���#������. $������ �� ��������� � ����� ����� ��� ����� �� ��� �� ���� �������� ���� #�������. %������������ � �������. &�����' � �� � ��������� �������� ��� ����� � �����.
���� ��������
2���*� ����� �� ���� ��/�� ������ � ���� ��� ���� ������� ���� ������ ������������.
1�� ���� ��� "��� ���� �������. %������� �� ����� ������.
�������� �� �� ������� � !�" �
C 1 +���!���� �� ������� ��� �������� ��!����" �� �� ���� (������� �).
# ��!���� !� �������� ���� �!"�� ��� ���� ��� ���������� ��� �����.
B &� ������������ � ���� �� ���� ����,����� ���'����� � �� �� ��'���� ����: ��'��� 4.
��������52
4
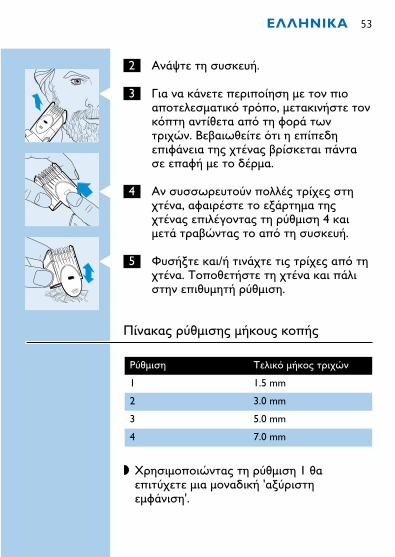
2 6��,� �� ��� ��.
C 3 /�� �� ��� ��������� � ��� ������������� " ��"��, ��� ����� ��� "��� ����!�� ��" �� ���� � �����$�. ���� !�� "�� � ������������ ��� ����� ���� ��� ������ ���� � �� ����.
C 4 6� ���� ������ ����� ����� �������, ������� �� ������� �������� ��������� �� ��!���� 4 ����� ����$���� �� ��" �� ��� ��.
C 5 &����� ��/� ������ ��� ����� ��" ������. +���!���� �� ���� �� �������� ��!����� ��!����.
���� �� ��!����� �� ��� ����
◗ 2���������$���� �� ��!���� 1 !������� ��� ������ � '���������������'.
�������� 53
4
+�� " �� �� ����$�
1.5 mm
3.0 mm
5.0 mm
7.0 mm
;�!����
1
2
3
4
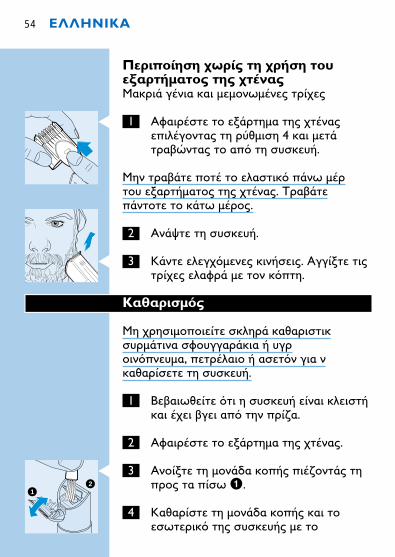
�������� !#�� � !��� ��$���������� � !�" � 1� ��� ���� �� ���� ��� �����
C 1 6������ �� ������� ��� �������������� �� ��!���� 4 �� �������$���� �� ��" �� ��� ��.
1�� ������ ��� �� ����� " ��� ����� ���������� ��� �����. +����������� �� �� ����.
2 6��,� �� ��� ��.
C 3 %��� ���"��� ������. 6����� �������� ����� � ��� "���.
��%������
1� ������������ � ���� �!������ ��������� ��������� �� � ������"�����, ������� � ���"� ��� � �!����� �� ��� ��.
1 ���� !�� "�� � ��� �� ���� ����� �� �� ��� ��" ��� ���*�.
2 6������ �� ������� ��� �����.
C 3 6����� �� ������ ���� ��*����� ������ �� ��� 1.
4 %�!����� �� ������ ���� �� ��� ��� " ��� ��� ��� � ��
��������54
12
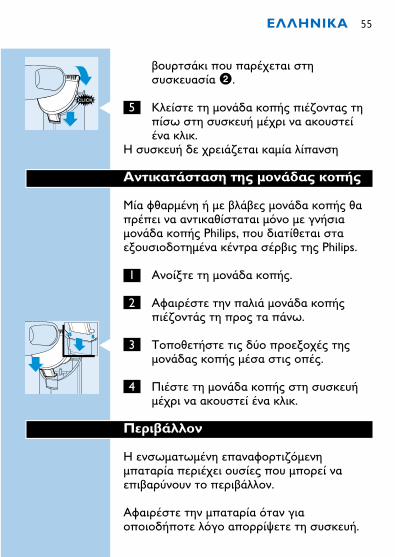
������� � ��� ������� ������ ����� 2.
C 5 %���� �� ������ ���� ��*����� ����� ��� ��� �� ���� �� � ������� �� .
# ��� �� � ����*��� ���� �������
� ���������� � �� �&� ����
1�� �!����� � � ����� ������ ���� !����� �� ���� �!������� �"�� � ������������ ���� Philips, ��� �����!��� ���������������� ���� ����� ��� Philips.
1 6����� �� ������ ����.
2 6������ ��� ����� ������ ������*����� �� ���� �� ��� .
C 3 +���!���� ��� ��� ������� ���������� ���� ��� ���� ���.
4 ���� �� ������ ���� ��� ��� ������ �� � ����� �� �� .
������''�
# �� ��� ��� ���������*"����������� ����� ����� ��� ����� ������������ �� ���������.
6������ ��� �������� "��� ������������� �"�� ������,� �� ��� ��.
�������� 55
CLICK
1�� ���� ��� �������� ��*� � ����"����� � ������� ��� ������� ���� ���� " ����� ��������.
1����� ����� �� ��� �� ��� �� ��� ���� ����� ��� Philips, "��� ������ �� " !� ��� ���!��� �� ���������� �������� �� !� ��� ������,� � ��"������ " ��� ���������.
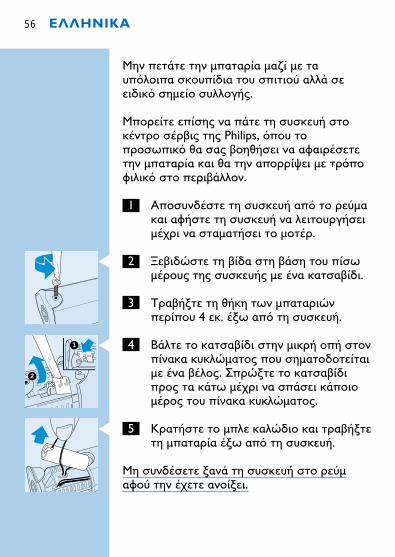
1 6�������� �� ��� �� ��" �� ���� �� ����� �� ��� �� �� �������������� �� ��������� �� ����.
C 2 B���$�� �� ���� ��� ���� ��� ��� ����� ��� ��� ��� � �� ��������.
3 +������ �� !� � � � �������$������� 4 . � ��" �� ��� ��.
C 4 ���� �� �������� ���� �� �� ��� �������� � � �$����� ��� �������������� �� ����. C��$�� �� ������������ �� �� ���� �� ����� ��������� ��� ���� � � �$�����.
C 5 %������ �� ��� ��$��� �� ��������� �������� � ��" �� ��� ��.
1� ������ ���� �� ��� �� ��� ������� ��� �� ������.
��������56
1
2

"��� ��� �'�������
6� ����*�� ���������� � �� �������"�����, ���� ����� ��� ���� ������� ��� Philips ��� ���!����www.philips.com � �� ��� ���� � ��%���� G���������� ����$� ��� Philips��� �$�� ��� (������ �� ���� ������ �� ��� �������� � ����� � ��� "����� "���). 6� �� ������ %����G���������� ����$� ��� �$�� ���,���!��!�� ���� ���� " ��� ������"� ��Philips � �� ��� ���� � �� +���� C����� � H� �� $� C�� �$� �� � � C�� �$����� �� �� &�������� BV ��� Philips.
�������� 57
Önemli
◗ Cihazınızı fişe takmadan önce voltajınülkenizdeki voltajla uygunluğunu kontrolediniz.
◗ Cihazın ıslanmamasına özen gösteriniz.◗ Bu cihaz sadece insan sakalı kesmek için
geliştilmiştir.◗ Cihazı çocuklardan uzak tutunuz.
Kordonsuz Kullanım İçin Şarj Pillerini ŞarjEtmeİlk kullanımdan önce cihazınızı tamamen şarjediniz.
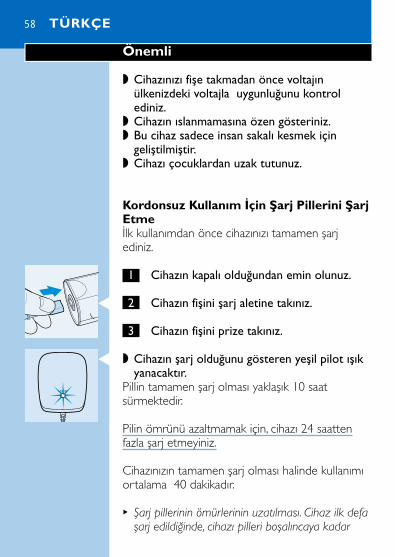
1 Cihazın kapalı olduğundan emin olunuz.
C 2 Cihazın fişini şarj aletine takınız.
3 Cihazın fişini prize takınız.
C ◗ Cihazın şarj olduğunu gösteren yeşil pilot ışıkyanacaktır.
Pillin tamamen şarj olması yaklaşık 10 saatsürmektedir.
Pilin ömrünü azaltmamak için, cihazı 24 saattenfazla şarj etmeyiniz.
Cihazınızın tamamen şarj olması halinde kullanımıortalama 40 dakikadır.
B Şarj pillerinin ömürlerinin uzatılması. Cihaz ilk defaşarj edildiğinde, cihazı pilleri boşalıncaya kadar
TÜRKÇE58
CHARGE

kullanmanızı tavsiye ederiz. seanslar arasındakesinlikle cihazı şarj etmeyiniz. cihazı motoruduruncaya kadar kullanmaya devam ediniz.Ve şarjediniz. Bu prosesi senede en az 2 kez yapınız.
Düzeltme
Düzeltmeye başlamadan önce daima bıyık vesakalı ince bir tarak ile tarayınız.
Düzeltticiyi yavaş hereket ettiriniz.Yavaş ve hafifhereketler yapınız.
Tarak aparatı ile saç kesme
C 1 Tarak ayarını istenilen düzeltme boyunaayarlayınız.(tabloya bakınız.)
Ayarlar tarak aparatının ortasında bulunanpencerede gözükecektir.
B İlk olarak kullanırken maksimum uzunluk ayarıylabaşlayınız:Ayar 4
2 Cihazı çalıştırınız.
C 3 En etkin düzeltme için cihazı sakalın çıkışyönü tersine doğru kullanınız.Tarağın üstkısmının cildinize değdiğinden emin olunuz.
C 4 Tarakda çok miktarda saç birikmiş ise tarakaparatı ayarını 4'e getirip cihazdançıkartarak saçları temizleyiniz.
TÜRKÇE 59
4
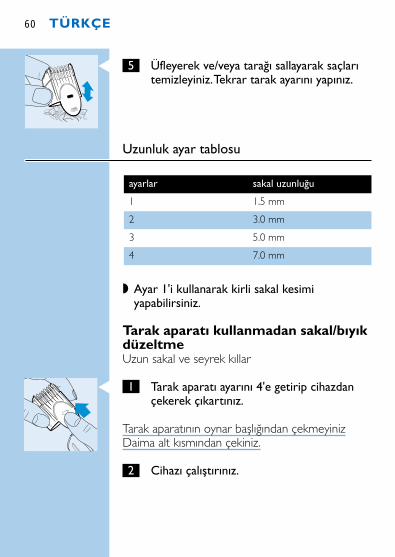
C 5 Üfleyerek ve/veya tarağı sallayarak saçlarıtemizleyiniz.Tekrar tarak ayarını yapınız.
Uzunluk ayar tablosu
◗ Ayar 1'i kullanarak kirli sakal kesimiyapabilirsiniz.
Tarak aparatı kullanmadan sakal/bıyıkdüzeltmeUzun sakal ve seyrek kıllar
C 1 Tarak aparatı ayarını 4'e getirip cihazdançekerek çıkartınız.
Tarak aparatının oynar başlığından çekmeyinizDaima alt kısmından çekiniz.
2 Cihazı çalıştırınız.
TÜRKÇE60
4
sakal uzunluğu
1.5 mm
3.0 mm
5.0 mm
7.0 mm
ayarlar
1
2
3
4
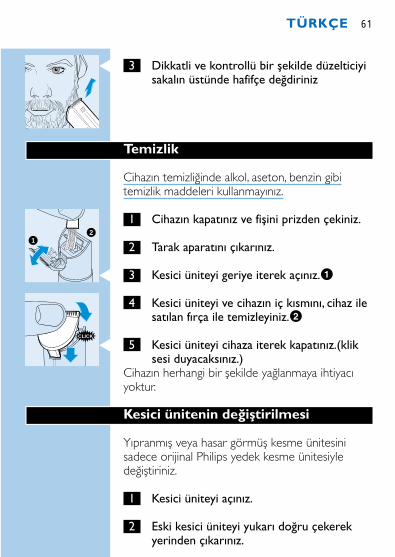
C 3 Dikkatli ve kontrollü bir şekilde düzelticiyisakalın üstünde hafifçe değdiriniz
Temizlik
Cihazın temizliğinde alkol, aseton, benzin gibitemizlik maddeleri kullanmayınız.
1 Cihazın kapatınız ve fişini prizden çekiniz.
2 Tarak aparatını çıkarınız.
C 3 Kesici üniteyi geriye iterek açınız.1
4 Kesici üniteyi ve cihazın iç kısmını, cihaz ilesatılan fırça ile temizleyiniz.2
C 5 Kesici üniteyi cihaza iterek kapatınız.(kliksesi duyacaksınız.)
Cihazın herhangi bir şekilde yağlanmaya ihtiyacıyoktur.
Kesici ünitenin değiştirilmesi
Yıpranmış veya hasar görmüş kesme ünitesinisadece orijinal Philips yedek kesme ünitesiyledeğiştiriniz.
1 Kesici üniteyi açınız.
2 Eski kesici üniteyi yukarı doğru çekerekyerinden çıkarınız.
TÜRKÇE 61
12
CLICK
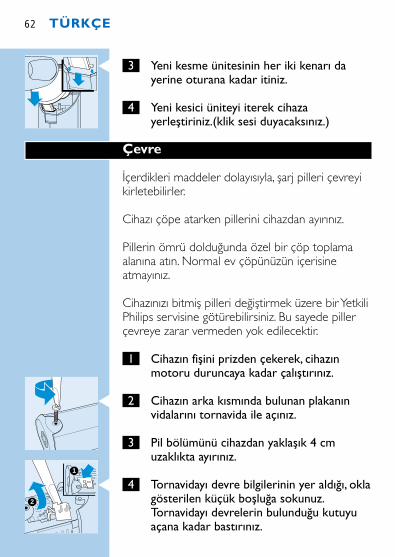
C 3 Yeni kesme ünitesinin her iki kenarı dayerine oturana kadar itiniz.
4 Yeni kesici üniteyi iterek cihazayerleştiriniz.(klik sesi duyacaksınız.)
Çevre
İçerdikleri maddeler dolayısıyla, şarj pilleri çevreyikirletebilirler.
Cihazı çöpe atarken pillerini cihazdan ayırınız.
Pillerin ömrü dolduğunda özel bir çöp toplamaalanına atın. Normal ev çöpünüzün içerisineatmayınız.
Cihazınızı bitmiş pilleri değiştirmek üzere bir YetkiliPhilips servisine götürebilirsiniz. Bu sayede pillerçevreye zarar vermeden yok edilecektir.
1 Cihazın fişini prizden çekerek, cihazınmotoru duruncaya kadar çalıştırınız.
C 2 Cihazın arka kısmında bulunan plakanınvidalarını tornavida ile açınız.
3 Pil bölümünü cihazdan yaklaşık 4 cmuzaklıkta ayırınız.
C 4 Tornavidayı devre bilgilerinin yer aldığı, oklagösterilen küçük boşluğa sokunuz.Tornavidayı devrelerin bulunduğu kutuyuaçana kadar bastırınız.
TÜRKÇE62
1
2
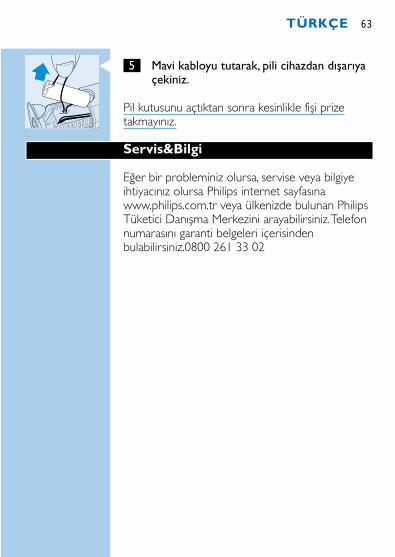
C 5 Mavi kabloyu tutarak, pili cihazdan dışarıyaçekiniz.
Pil kutusunu açtıktan sonra kesinlikle fişi prizetakmayınız.
Servis&Bilgi
Eğer bir probleminiz olursa, servise veya bilgiyeihtiyacınız olursa Philips internet sayfasınawww.philips.com.tr veya ülkenizde bulunan PhilipsTüketici Danışma Merkezini arayabilirsiniz.Telefonnumarasını garanti belgeleri içerisindenbulabilirsiniz.0800 261 33 02
TÜRKÇE 63


4203 000 49052