Embed Size (px)
Citation preview
Instruction Guide
© Training and Organizational Development Office of Human Resource Services University of Florida, Gainesville, FL 32611
Updated: October 9, 2012 Page 1 of 12
Entering a Managerial Budget Using the Excel Spreadsheet
Manager Budget Spreadsheet import requires three files to be downloaded from the General Accounting website at http://www.fa.ufl.edu/forms-and-publications/forms/. The files are:
9.1 General Ledger (Actuals) Journal Upload Workbook 9.1 General Ledger (Actuals) Compiled Macro Sheet 9.1 General Ledger (Actuals) Compiled Macro Sheet
NOTE: Do not open these files directly from the web. Use the following instructions to download them
Download Files
Steps to download files 1. Create a folder on your computer to which you will download the needed files from the General
Accounting website. Navigate to http://www.fa.ufl.edu/forms‐and‐publications/forms. Click on General Accounting link.
Right-click on each file and choose Save Target As to download file 2. Save files to the folder created earlier
Note the excel file names of each file: FA-GA-JEUPLOAD – JRNL1.xlsm FA-GA-JEMACRO1 – jrnlmcro.xla FA-GA-JEMACRO2 – JRNLMCRO.xlam
Entering Information into the Spreadsheet
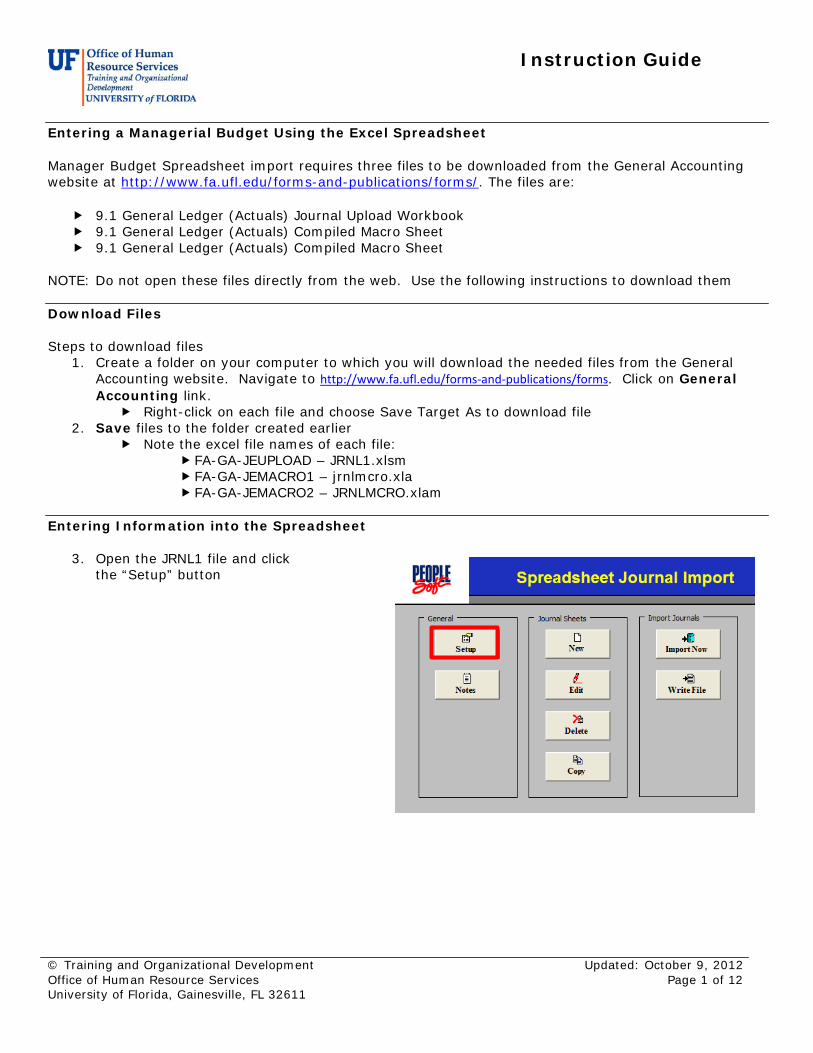
3. Open the JRNL1 file and click the “Setup” button
Instruction Guide
© Training and Organizational Development Office of Human Resource Services University of Florida, Gainesville, FL 32611
Updated: October 9, 2012 Page 2 of 12
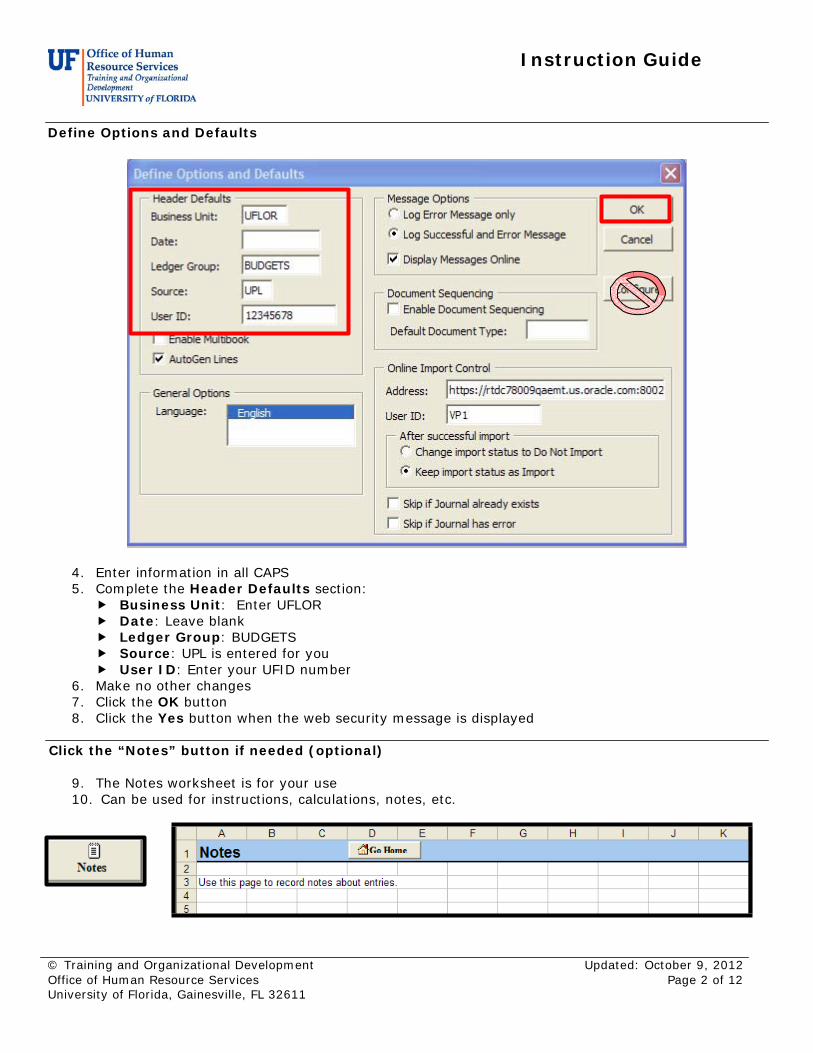
Define Options and Defaults
4. Enter information in all CAPS 5. Complete the Header Defaults section:
Business Unit: Enter UFLOR Date: Leave blank Ledger Group: BUDGETS Source: UPL is entered for you User ID: Enter your UFID number
6. Make no other changes 7. Click the OK button 8. Click the Yes button when the web security message is displayed
Click the “Notes” button if needed (optional)
9. The Notes worksheet is for your use 10. Can be used for instructions, calculations, notes, etc.
Instruction Guide
© Training and Organizational Development Office of Human Resource Services University of Florida, Gainesville, FL 32611
Updated: October 9, 2012 Page 3 of 12
Create a New Journal Sheet
11. Click New button to start a new spreadsheet journal 12. Name the New Journal Sheet the same name as the Journal ID entered 13. Click the OK button
This creates a new journal sheet that is a copy of the template sheet in your system
Worksheet Button Reference
Button Description Return to the Control Worksheet
Open the Import Journals Now page
Header Section Display the New Journal Header page, used to add a new journal
header with its own defaults Select the journal header you wish
Edit a journal header Select the journal header (highlight it) and click the OK button
Copy a journal
Delete a journal
Change the import status of a journal
Line Section Add a journal line
Delete the journal line where the cursor is currently located
Allows you to delete several lines within a range at one time
Copy a block of lines for the journal header displayed at the top of the page
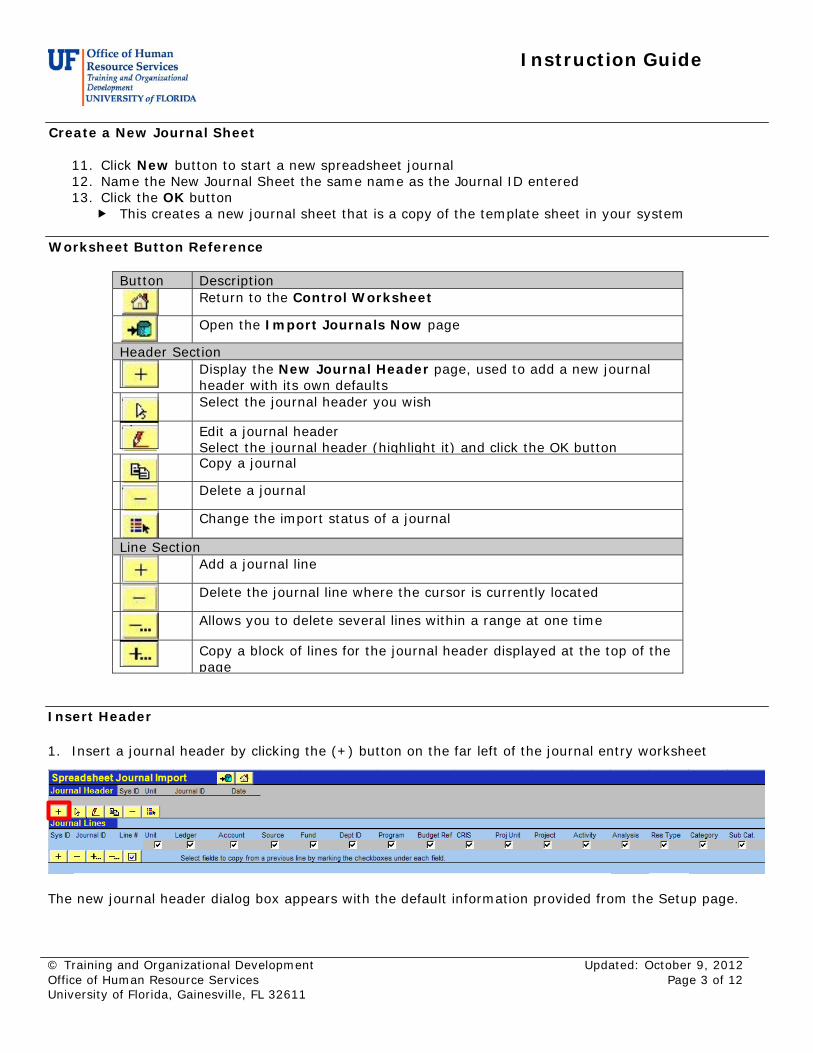
Insert Header
1. Insert a journal header by clicking the (+) button on the far left of the journal entry worksheet
The new journal header dialog box appears with the default information provided from the Setup page.
Instruction Guide
© Training and Organizational Development Office of Human Resource Services University of Florida, Gainesville, FL 32611
Updated: October 9, 2012 Page 4 of 12
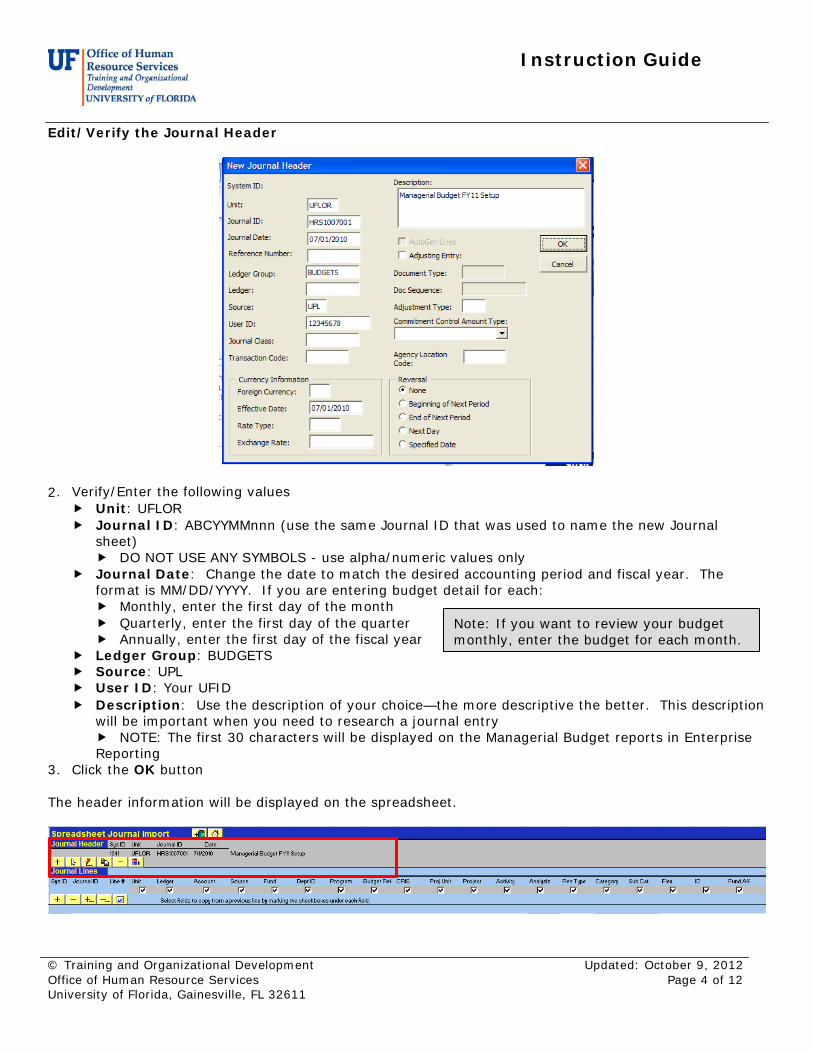
Edit/Verify the Journal Header
2. Verify/Enter the following values Unit: UFLOR Journal ID: ABCYYMMnnn (use the same Journal ID that was used to name the new Journal
sheet) DO NOT USE ANY SYMBOLS - use alpha/numeric values only
Journal Date: Change the date to match the desired accounting period and fiscal year. The format is MM/DD/YYYY. If you are entering budget detail for each: Monthly, enter the first day of the month Quarterly, enter the first day of the quarter Annually, enter the first day of the fiscal year
Ledger Group: BUDGETS Source: UPL User ID: Your UFID
Note: If you want to review your budget monthly, enter the budget for each month.
Description: Use the description of your choice—the more descriptive the better. This description will be important when you need to research a journal entry NOTE: The first 30 characters will be displayed on the Managerial Budget reports in Enterprise Reporting
3. Click the OK button
The header information will be displayed on the spreadsheet.
Instruction Guide
Office of Human Resource Services University of Florida, Gainesville, FL 32611
© Training and Organizational Development
Updated: October 9, 2012 Page 5 of 12
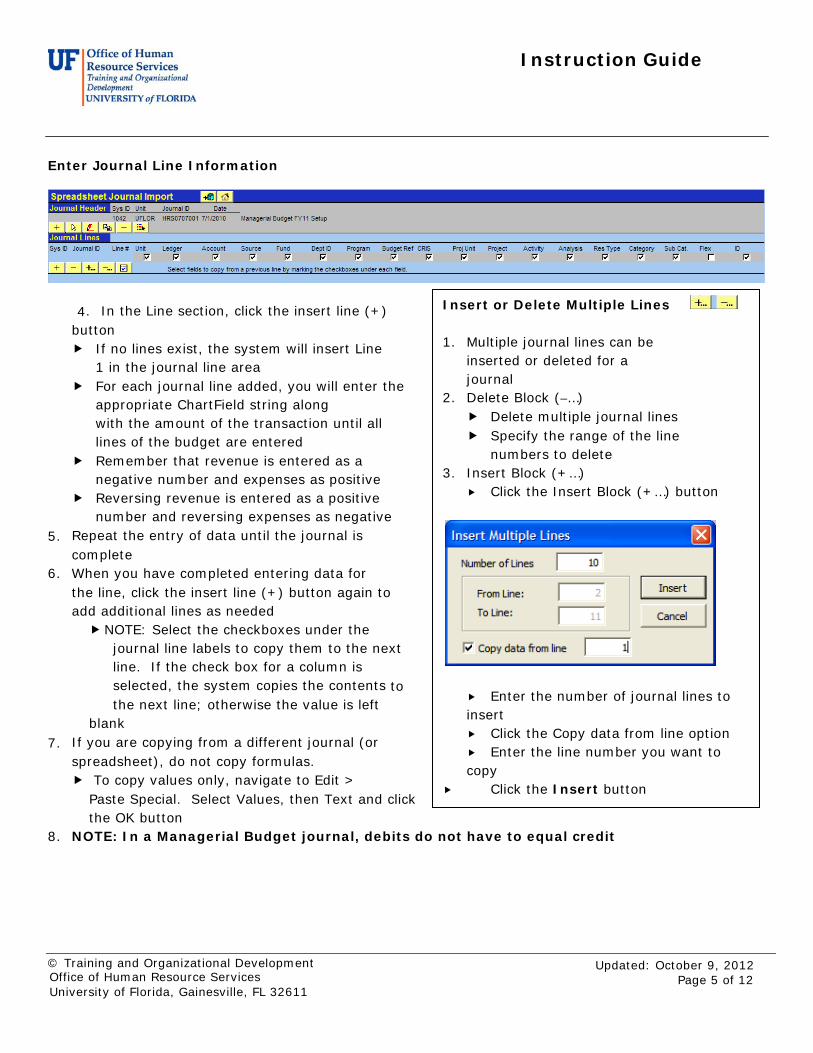
Insert or Delete Multiple Lines
1. Multiple journal lines can be inserted or deleted for a journal
2. Delete Block (–…) Delete multiple journal lines Specify the range of the line
numbers to delete 3. Insert Block (+…)
Click the Insert Block (+…) button
Enter the number of journal lines to insert Click the Copy data from line option Enter the line number you want to copy
Click the Insert button
Enter Journal Line Information
4. In the Line section, click the insert line (+) button If no lines exist, the system will insert Line
1 in the journal line area For each journal line added, you will enter the
appropriate ChartField string along with the amount of the transaction until all lines of the budget are entered
Remember that revenue is entered as a negative number and expenses as positive
Reversing revenue is entered as a positive number and reversing expenses as negative
5. Repeat the entry of data until the journal is complete
6. When you have completed entering data for the line, click the insert line (+) button again to add additional lines as needed NOTE: Select the checkboxes under the
journal line labels to copy them to the next line. If the check box for a column is selected, the system copies the contents to the next line; otherwise the value is left
blank 7. If you are copying from a different journal (or
spreadsheet), do not copy formulas. To copy values only, navigate to Edit >
Paste Special. Select Values, then Text and click the OK button
8. NOTE: In a Managerial Budget journal, debits do not have to equal credit
Instruction Guide
© Training and Organizational Development Office of Human Resource Services University of Florida, Gainesville, FL 32611
Updated: October 9, 2012 Page 6 of 12
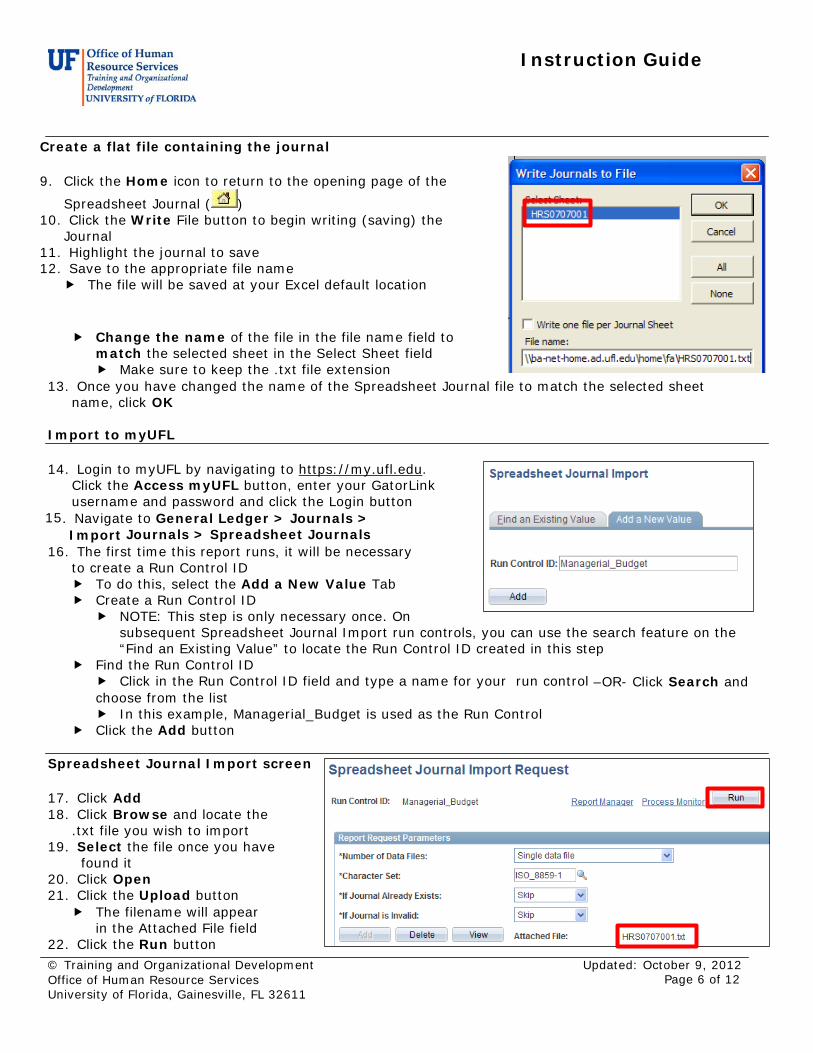
Create a flat file containing the journal
9. Click the Home icon to return to the opening page of the
Spreadsheet Journal ( ) 10. Click the Write File button to begin writing (saving) the
Journal 11. Highlight the journal to save 12. Save to the appropriate file name
The file will be saved at your Excel default location
Change the name of the file in the file name field to
match the selected sheet in the Select Sheet field Make sure to keep the .txt file extension
13. Once you have changed the name of the Spreadsheet Journal file to match the selected sheet name, click OK
Import to myUFL
14. Login to myUFL by navigating to https://my.ufl.edu. Click the Access myUFL button, enter your GatorLink username and password and click the Login button
15. Navigate to General Ledger > Journals > Import Journals > Spreadsheet Journals
16. The first time this report runs, it will be necessary to create a Run Control ID To do this, select the Add a New Value Tab Create a Run Control ID
NOTE: This step is only necessary once. On subsequent Spreadsheet Journal Import run controls, you can use the search feature on the “Find an Existing Value” to locate the Run Control ID created in this step
Find the Run Control ID Click in the Run Control ID field and type a name for your run control –OR- Click Search and choose from the list In this example, Managerial_Budget is used as the Run Control
Click the Add button
Spreadsheet Journal Import screen
17. Click Add 18. Click Browse and locate the
.txt file you wish to import 19. Select the file once you have found it 20. Click Open 21. Click the Upload button
The filename will appear in the Attached File field
22. Click the Run button
Instruction Guide
© Training and Organizational Development Office of Human Resource Services University of Florida, Gainesville, FL 32611
Updated: October 9, 2012 Page 7 of 12
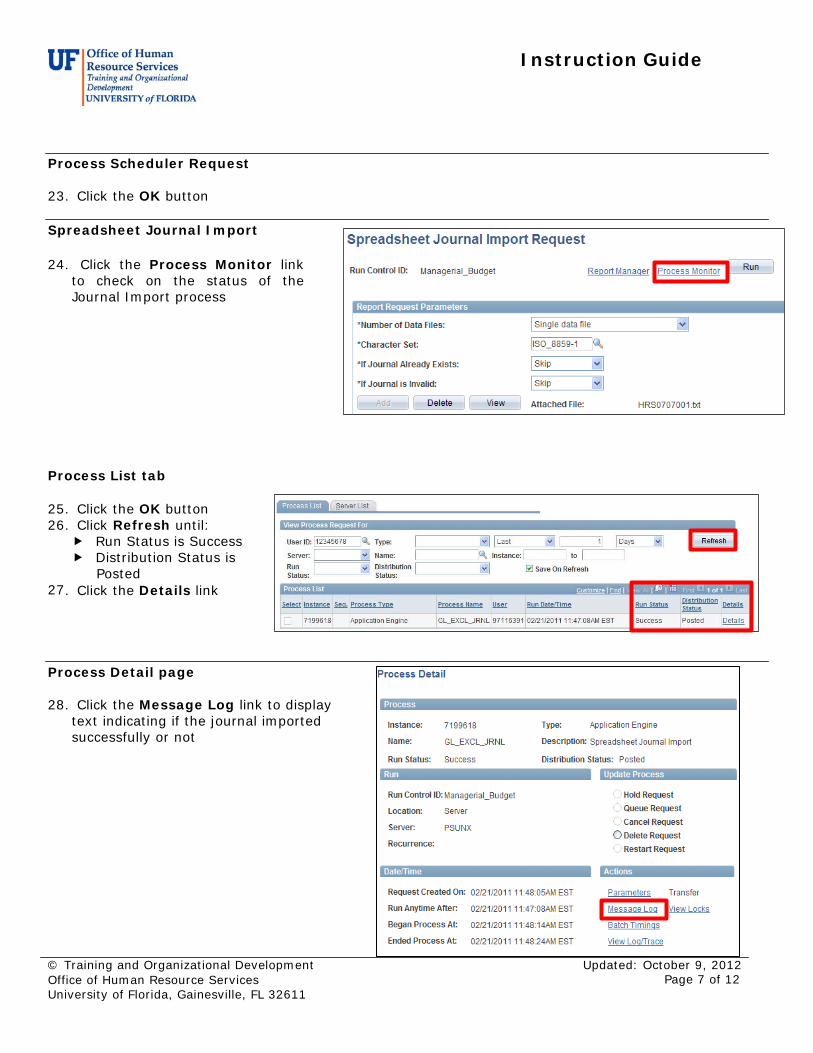
Process Scheduler Request
23. Click the OK button
Spreadsheet Journal Import
24. Click the Process Monitor link to check on the status of the Journal Import process
Process List tab
25. Click the OK button 26. Click Refresh until:
Run Status is Success Distribution Status is
Posted 27. Click the Details link
Process Detail page
28. Click the Message Log link to display text indicating if the journal imported successfully or not
Instruction Guide
© Training and Organizational Development Office of Human Resource Services University of Florida, Gainesville, FL 32611
Updated: October 9, 2012 Page 8 of 12
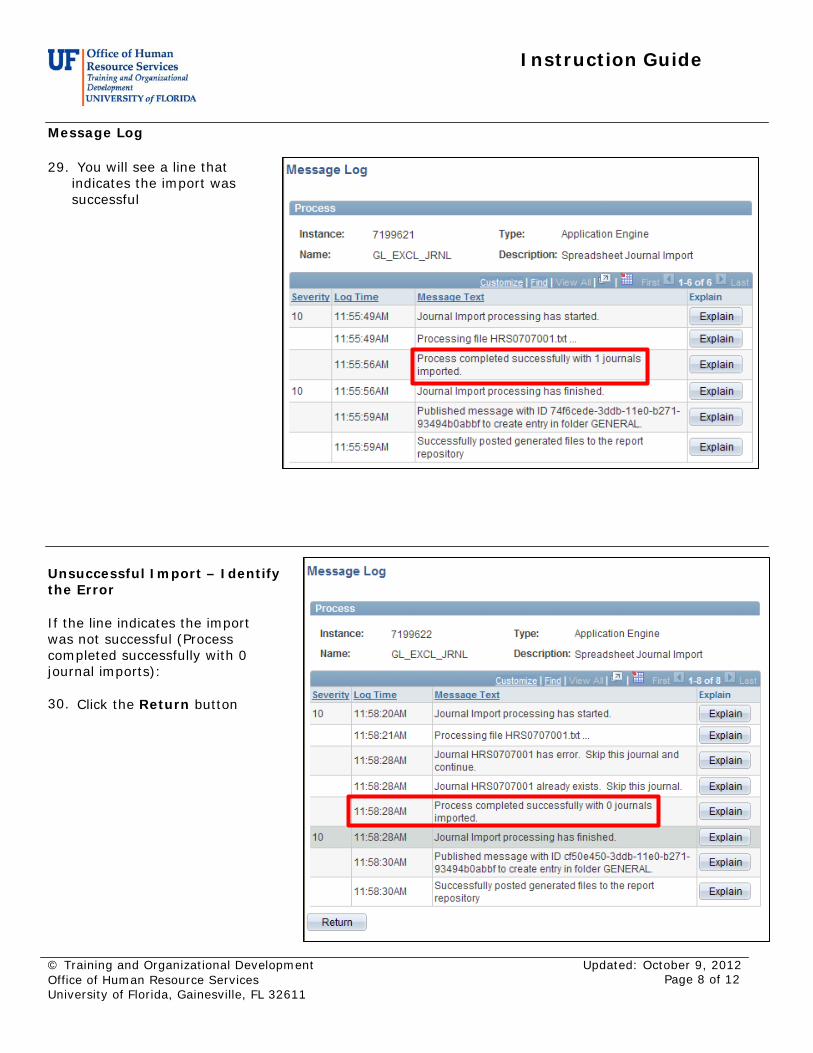
Message Log
29. You will see a line that indicates the import was successful
Unsuccessful Import – Identify the Error
If the line indicates the import was not successful (Process completed successfully with 0 journal imports): 30. Click the Return button
Instruction Guide
© Training and Organizational Development Office of Human Resource Services University of Florida, Gainesville, FL 32611
Updated: October 9, 2012 Page 9 of 12
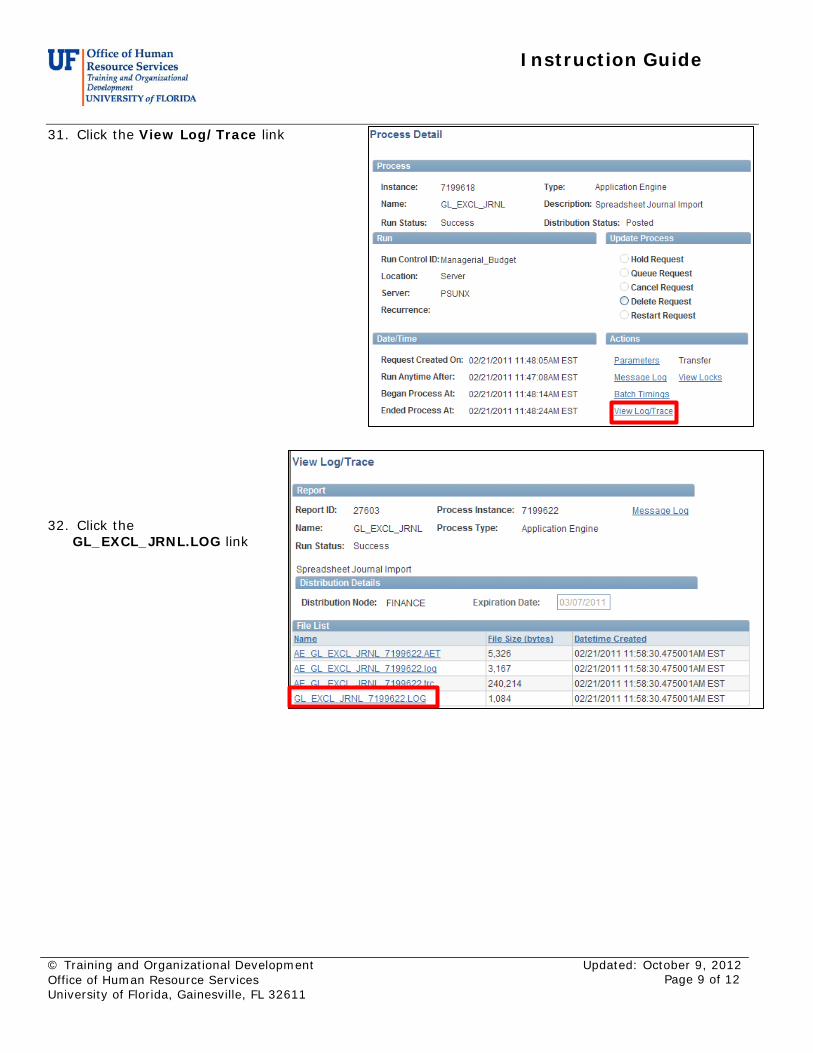
31. Click the View Log/Trace link
32. Click the GL_EXCL_JRNL.LOG link
Instruction Guide
© Training and Organizational Development Office of Human Resource Services University of Florida, Gainesville, FL 32611
Updated: October 9, 2012 Page 10 of
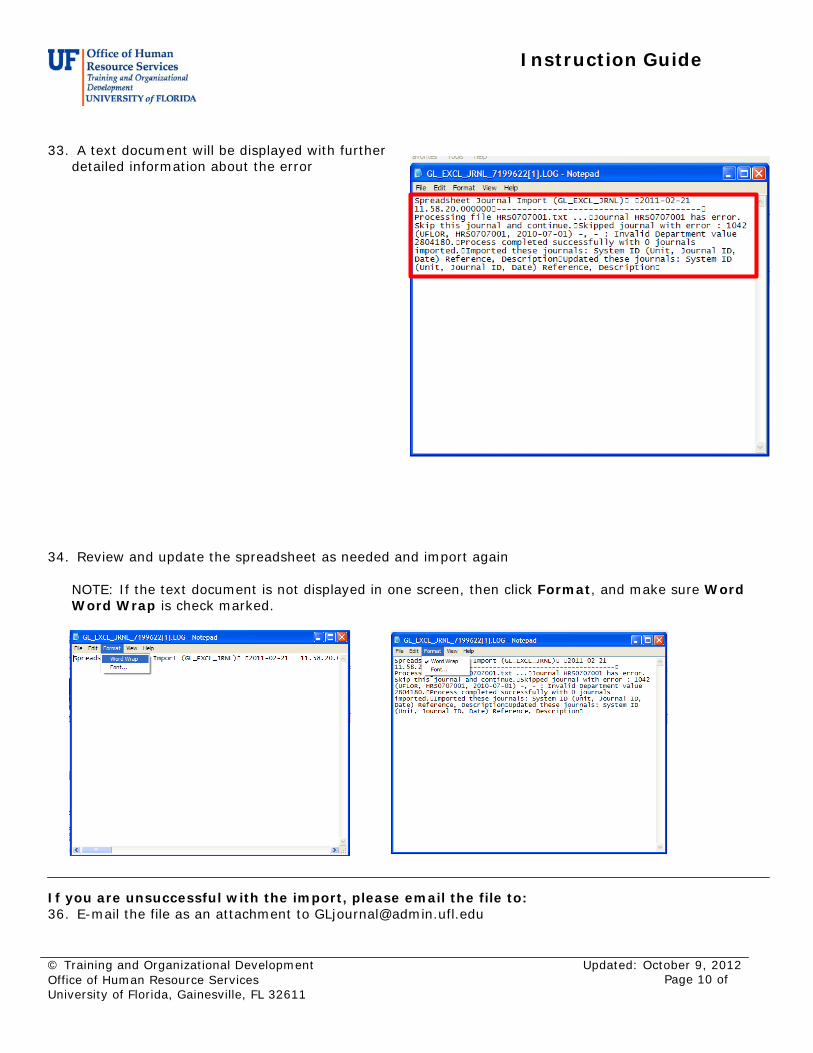
33. A text document will be displayed with further detailed information about the error
34. Review and update the spreadsheet as needed and import again
NOTE: If the text document is not displayed in one screen, then click Format, and make sure Word Word Wrap is check marked.
If you are unsuccessful with the import, please email the file to: 36. E-mail the file as an attachment to [email protected]
Instruction Guide
© Training and Organizational Development Office of Human Resource Services University of Florida, Gainesville, FL 32611
Updated: October 9, 2012 Page 11 of
Save the Managerial Budget
37. Click the Save button to save your journal and then edit the journal (See Searching for a JE simulation and/or Instruction Guide for details on finding the journal).
Edit the Managerial Budget
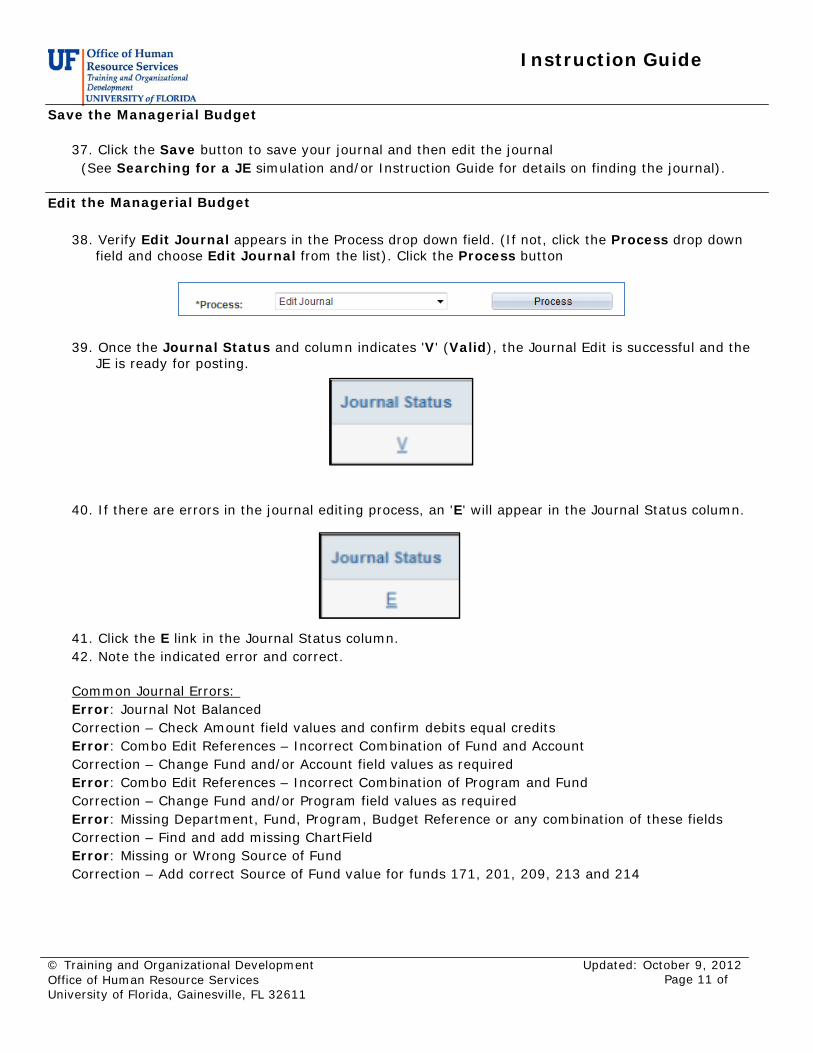
38. Verify Edit Journal appears in the Process drop down field. (If not, click the Process drop down
field and choose Edit Journal from the list). Click the Process button 39. Once the Journal Status and column indicates 'V' (Valid), the Journal Edit is successful and the
JE is ready for posting.
40. If there are errors in the journal editing process, an 'E' will appear in the Journal Status column.
41. Click the E link in the Journal Status column. 42. Note the indicated error and correct.
Common Journal Errors: Error: Journal Not Balanced Correction – Check Amount field values and confirm debits equal credits Error: Combo Edit References – Incorrect Combination of Fund and Account Correction – Change Fund and/or Account field values as required Error: Combo Edit References – Incorrect Combination of Program and Fund Correction – Change Fund and/or Program field values as required Error: Missing Department, Fund, Program, Budget Reference or any combination of these fields Correction – Find and add missing ChartField Error: Missing or Wrong Source of Fund Correction – Add correct Source of Fund value for funds 171, 201, 209, 213 and 214
Instruction Guide
© Training and Organizational Development Office of Human Resource Services University of Florida, Gainesville, FL 32611
Updated: October 9, 2012 Page 12 of
43. After correcting journal error, run Journal Edit again. 44. Once V appears in the Journal Status column, the JE has been corrected, passed Journal Edit and
is now ready for posting.
Post the Managerial Budget
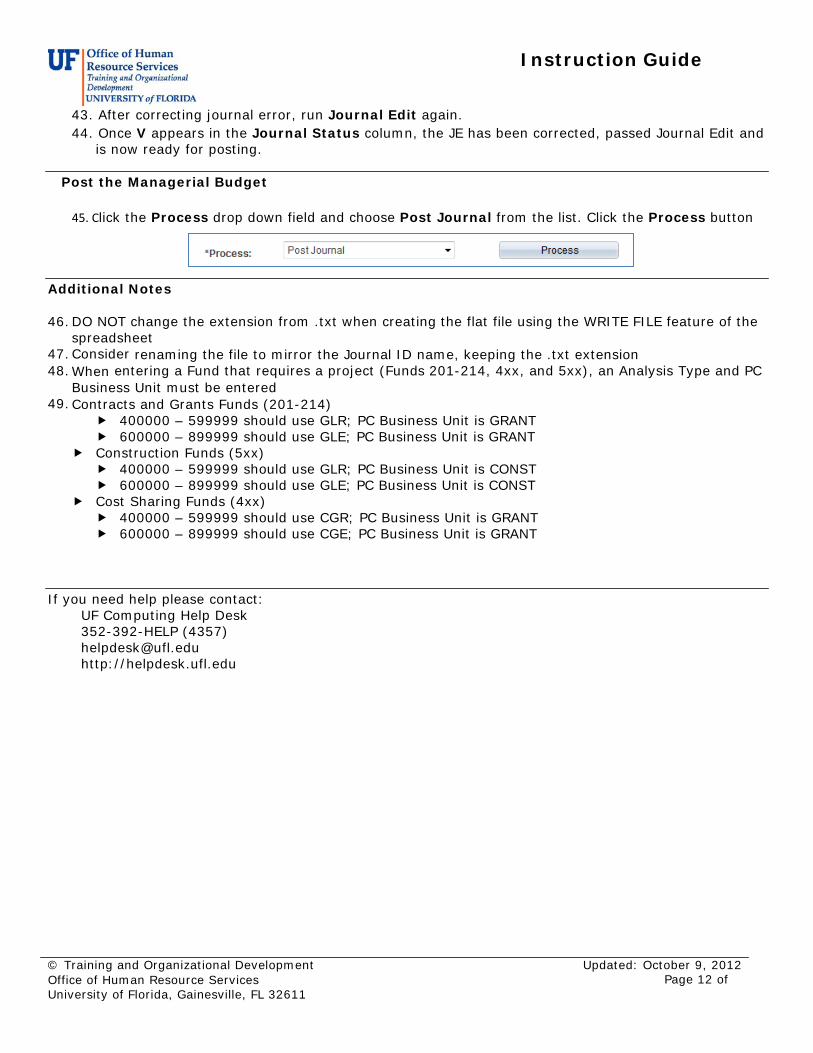
45. Click the Process drop down field and choose Post Journal from the list. Click the Process button
Additional Notes
46. DO NOT change the extension from .txt when creating the flat file using the WRITE FILE feature of the spreadsheet
47. Consider renaming the file to mirror the Journal ID name, keeping the .txt extension 48. When entering a Fund that requires a project (Funds 201-214, 4xx, and 5xx), an Analysis Type and PC
Business Unit must be entered 49. Contracts and Grants Funds (201-214)
400000 – 599999 should use GLR; PC Business Unit is GRANT 600000 – 899999 should use GLE; PC Business Unit is GRANT
Construction Funds (5xx) 400000 – 599999 should use GLR; PC Business Unit is CONST 600000 – 899999 should use GLE; PC Business Unit is CONST
Cost Sharing Funds (4xx) 400000 – 599999 should use CGR; PC Business Unit is GRANT 600000 – 899999 should use CGE; PC Business Unit is GRANT
If you need help please contact: UF Computing Help Desk 352-392-HELP (4357) [email protected] http://helpdesk.ufl.edu