Embed Size (px)
Citation preview

1
ENTERING BUDGET(s) IN SAMIS
Budget Training Children’s Services Council of Broward County
Presented by the Finance Department
2
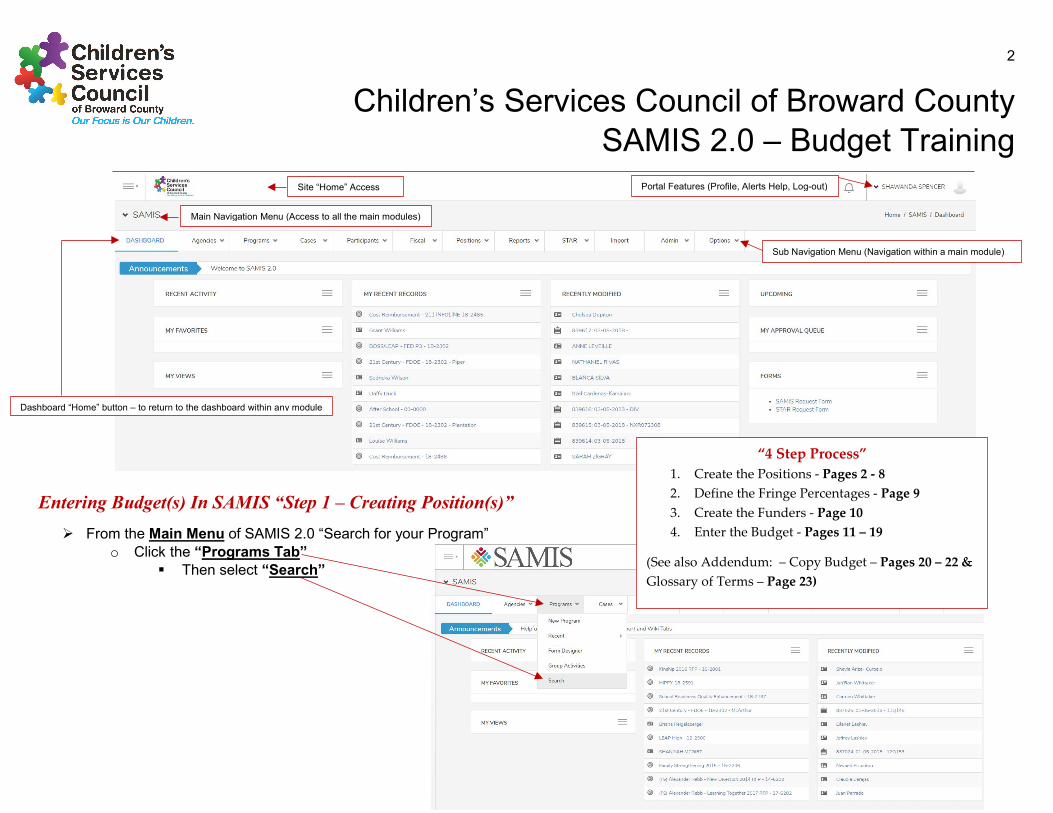
Children’s Services Council of Broward County SAMIS 2.0 – Budget Training
Entering Budget(s) In SAMIS “Step 1 – Creating Position(s)” From the Main Menu of SAMIS 2.0 “Search for your Program”
o Click the “Programs Tab” Then select “Search”
Site “Home” Access Portal Features (Profile, Alerts Help, Log-out)
Main Navigation Menu (Access to all the main modules)
Sub Navigation Menu (Navigation within a main module)
Dashboard “Home” button – to return to the dashboard within any module
“4 Step Process” 1. Create the Positions - Pages 2 - 82. Define the Fringe Percentages - Page 93. Create the Funders - Page 104. Enter the Budget - Pages 11 – 19
(See also Addendum: – Copy Budget – Pages 20 – 22 & Glossary of Terms – Page 23)
3
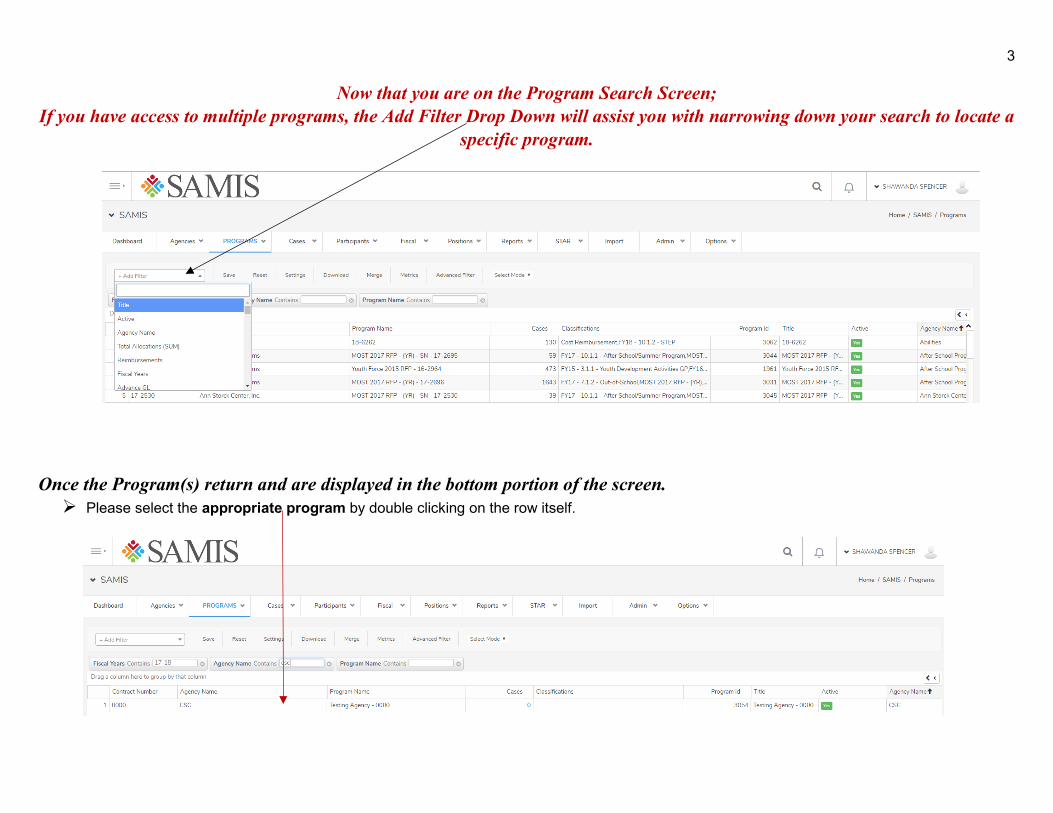
Now that you are on the Program Search Screen; If you have access to multiple programs, the Add Filter Drop Down will assist you with narrowing down your search to locate a
specific program.
Once the Program(s) return and are displayed in the bottom portion of the screen. Please select the appropriate program by double clicking on the row itself.

4
After double clicking on the program, that will bring you to the Splash Page for the “Program” that was selected.
Please select the “Accurate Fiscal Year”
o Then Click on the “View/Detail Drop Down” and Select “Positions” o Then Click “New Position”
(for FY18-19 we are creating all new positions due to the change in the naming protocol)
Please Note: If Positions Were Previously Created to Support This Program They Will Display. To Prevent Duplicate Positions for the
same program it is vital that You Search for Position(s) First, Prior To Creating A New Position. If the Position Does Not Exist

5 Creating “New Position(s) To The Agency” (Please ensure to complete all required fields indicated by the *asterisks*). Please Select the “Appropriate Agency Name” Enter “Position Title” Select Appropriate “Category” (that applies to the Position Title) Please enter the “Expected Hours” (Full-Time – 40, Part-Time – number of hours expected) Please enter the “Position Start Date” (which is the start date of the contract….ie 10/01/2018) “Position End Date” (in this case NO end date should be applied in this field)
Assigning “New Positions(s) To A Program” Select the Appropriate “Program” Enter “Support Start Date”
(Should Be the Contract Start Date 10/01/2018) “Support End Date”
(In this case no end date should be applied) Enter “Program %”
(Which Is the % of Time the Position Is Allocated to The Program)
Enter Staff o If a New Staff Name is known at the time of entry, please
Click the + key to Add A “New Staff” (and follow the instructions on the next page)
o If Staff Name already exist, begin typing the name and then select it from the drop down
o If the Staff Name is not known at the time of entry, please leave blank and
Click Save

6 Adding “New Staff” To A Program” Enter “Agency Employee ID” from your Payroll Records Enter “First Name” Enter “Middle Initial” (optional) Enter “Last Name” Select the “Race” Select the “Ethnicity” Select the “Gender” Select the “Language Spoken” Enter “Currently Active Status of the Staff” (Yes or No) and then Click “Save”
Now That You Have Added the New Staff, The Next Step Is to Assign the New Staff to The Program.

7 Assigning “New Staff” To A Program” Ensure that the Staff Name is displayed in the Name Field (begin typing the name of the staff, and then select the staff name from the list of names displayed)
o Enter the Expected hours in a program (Full-Time – 40, Part-Time – Expected Hours) • Enter the Assignment Start Date
o Click Add Assignment (if applicable to enter additional staff members) Click Save
To Add Additional Positions: Click on The Program Tab, Select Recent Program and Repeat Steps on Pages 4 - 7

8
To Review the Positions That Were Added to The Program Please Click on the Program Tab and Select Search, (to search for your program) Click on The Appropriate Program, (which will bring you to the splash page of that program) On the Splash Page,
o Please click on the View/Detail Drop Down and o Select Positions and o Your Positions Should Display
“Step 1 – Creating Position(s)” – Is Now Complete!!

9 Entering Budget(s) In SAMIS “Step 2 – (Entering Budget Fringe Percentages)”
If the benefit percentage is the same for all positions then you can input a percentage which would calculate across all salaries If the benefit percentage “does not apply” across all positions, then enter whole dollar amounts of the benefits in the budget (step #4)
From the Splash Page of SAMIS (Please ensure that the Contract/Program and Fiscal Year are accurate) Click on the View/Detail Drop Down and Select Budget Fringe Percent
Enter the Appropriate Percentage(s) and then Click Save (please note that FICA is calculated automatically at 7.65% by the system)
(Please note that FICA is calculated automatically at 7.65% by the system)
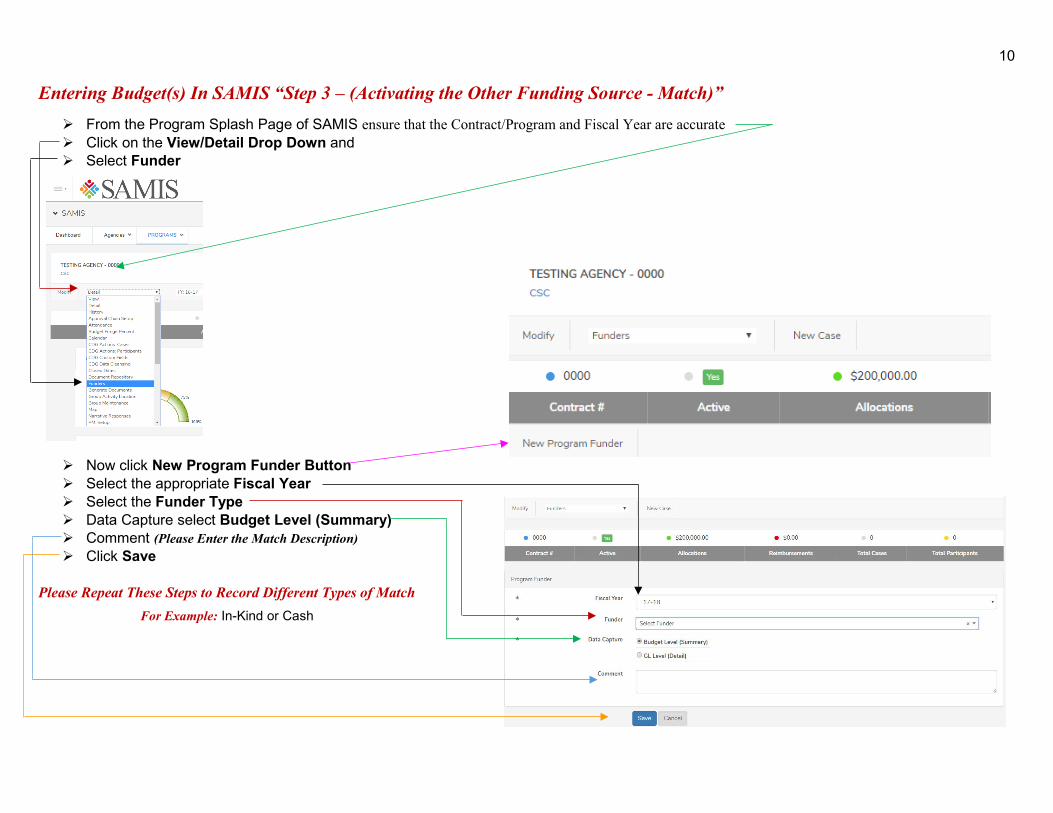
10 Entering Budget(s) In SAMIS “Step 3 – (Activating the Other Funding Source - Match)” From the Program Splash Page of SAMIS ensure that the Contract/Program and Fiscal Year are accurate Click on the View/Detail Drop Down and Select Funder
Now click New Program Funder Button Select the appropriate Fiscal Year Select the Funder Type Data Capture select Budget Level (Summary) Comment (Please Enter the Match Description) Click Save
Please Repeat These Steps to Record Different Types of Match
For Example: In-Kind or Cash

11 Entering Budget(s) In SAMIS “Step 4 – (Creating the Budget)”
From the FISCAL Tab on the Main Menu of SAMIS o Please select My Approval Queue o Then click on New Approval Request Button o Please select the appropriate Fiscal Year o Select the appropriate Agency/Program o Please select Budget in the Area field and then o Click Start Request.
Budget(s) can only be created/edited by the Creator of the Agency Workflow

12 Listed Below is the Summary Page for Your New Budget
Entering - “(Regular Salaries/Wages and Fringe Benefits)”
Please Review the Following for Accuracy:
Agency/Program Name Fiscal Year Contract # Allocation Amount
To Enter Amounts, Please Click on the Individual Lines for the Applicable Expenses.
To Begin: Click on Regular Salaries and Wages
After Clicking on the Regular Salaries and Wages Link,
You Should See the Assigned Positions for the Applicable Program.
To Enter Salaries Against an Assigned Position(s): Please Click on the Position Hyper-Link and follow
the steps on the next page.

13
Step 1: Please Enter the Budgeted Annual Salary
Amount and Benefits in the Gross Column, o Then Click the Calculate Button. This will
automatically populate the amount allocated to FICA and any other benefits; noted with a % rate previously defined in the Cal % Column.
Step 2: If Benefits Were Not Previously Defined in the
Cal % Column, Please Click in the Gross Column to Enter the Budgeted Amounts Manually.
Step 3: Once you have completed entering the amounts in the gross column, for those position(s) previously defined with a %, please continue by manually entering the amounts displaying in the program allocation column into the CSC allocation column (these amounts were populated when you clicked on the calculate button in step 1). All manually entered amounts that were not previously defined in the Cal % column should be entered into both the program and CSC allocation columns.
Step 4: Once You Have Entered All the Data Then Please Confirm that the Totals Agree and then (For Percentage of Time in The Program Less than 100% Please see the Note Listed Below) o Click SAVE Salary Detail.
For those with Multiple Positions. After Saving, Please Click on The Go to Drop Down Box to Proceed to The Next Position
Please Note: Only in This Case If Percentage of Time in The Program Is Less Than 100%, The Gross Column Must Show the Gross At 100% For the Calculation to Be Effective.
To Gross Column Will Be Different but the Program and CSC Allocation Columns Must Agree.

14
The print screen below the drop-down menu lists all the positions assigned to the budget. After entering all the data pertaining to the salaries and benefits, select the BACK to POSITION LIST button, and you will go back to the Salary and Wages summary.
Please Review Positions and Budget Amounts to Ensure That the Totals Agree.
Please Record a Brief Description of the Fringe Benefits that were not previously defined in the Comment Box.

15 Entering - “(Other Expense(s) Line Items)”
Click on the applicable expense title by clicking on the title in blue (for this example: Expenses – Local or Out of Town Staff Travel – 1200)
In the Narrative box please enter a detail
description for the expense category calculation. Enter the Budget Amount into the Calculation
box (you do not have to enter a formula). The Calculation Result and Amount Funded by CSC will be calculated automatically, please do not hit enter and then click Save Expense.
For Multiple Expenses, you may select the next
expense line to enter data by clicking on the After Saving, Go To Drop Down Tab.
Upon completion of all data entry for all expense
line items, Click Save Expense, then Back to Summary to go back to the Budget Summary Page.
1

16
Prior to moving onto the match entry, please ensure that expense totals for All Three Columns agree. Also, ensure that the GRAND TOTALS agree and are accurate for the budget.
Now that the Totals Agree and are Accurate, To Enter the Match Please Click on the Blue Title Labeled Available Summary Funder(s). Then Enter the Total Amount(s)
along with a Detail Description of the Component(s). Upon completion, Click SAVE, to be rerouted back to the
Budget Summary Page.

17
Please review budget totals for all columns to ensure that they equal to the allocation that is located at the top of the page and if applicable, please ensure the accuracy of your Funder Grand Total
If everything is accurate, and you are not ready to forward the budget click Save.
(Save will save the data and it leaves the budget in your queue to be forwarded later) If there is a mistake that requires the budget to be deleted click Delete.
(Delete will delete the budget). The system allows for line item modification; click on the blue hyperlink for the appropriate line item. If totals are accurate, and you are ready to forward the budget to the next person in the approval chain click Forward.
(Forward will save the data and forward the budget out of your queue to the next person for review and/or submission.
Please Note: Once the budget has been forwarded to either the Reviewer and/or Submitter, if a mistake is discovered the Reviewer and/or the Submitter should
click reject, which will send the budget back to the Creator to make the necessary adjustments. The Creator is the only person who can create and/or edit the budget.
!! If no changes are required, please continue to forward the budget until it reaches the Submitter, who will submit the budget to the CSC.!!

18
Entering budget - “(***multiple ways of accessing a pending budget*** - reviewers and/or submitters)”
o From the Main Dashboard, Please Click on the Program Name in Blue
OR
From the Main Dashboard of SAMIS, Please Click on the Fiscal Tab and then Select My Approval Queue

19
Please Note:
When a budget is in Edit mode, that means that it is still on the Agency side of SAMIS and is still able to be rejected by the Agency to allow for corrections.
When it is Submitted, that means that it is on the CSC side and can still be rejected by the CSC to allow for corrections.
When a budget is Approved, no additional corrections are allowed.
To Locate a Budget, Please Use the Audit Trail: (You Can Always Review the Audit Trail of a Created/Submitted/Approved Budget)
o Click on the Fiscal Tab o Select Fiscal Documents o Click on the Fiscal Budget to Open It Up and then o Click on the Audit Trail Button located on the Top Left of Your Screen

20
ADDENDUM
Copy Previous Budget – If the previous year’s budget in SAMIS is similar to your new budget you may copy. Copying a previous budget will copy all budget information including narratives. This is intended to save data entry time. Before a budget can be copied, an allocation for the upcoming year must be input by the CSC. Only positions that are active during the time period of the new budget will be copied and displayed in the new budget. All GL items active at the time of budget creation will be added to the copied budget; GL items appearing on the original budget that are inactive during the time the budget is created will not appear on the copied budget.
To use the Copy function, please see the instructions on Page 21.

21 Entering Budget(s) In SAMIS – (Copying the Budget)”
From the FISCAL Tab on the Main Menu of SAMIS o Please select My Approval Queue o Then click on New Approval Request Button o Please select the appropriate Fiscal Year o Select the appropriate Agency/Program o Please select Budget in the Area field o Select Yes to Copy Previous Budget and then o Click Start Request.
Budget(s) can only be created/edited by the Creator of the Agency Workflow

22
Budget amounts may exceed the program allocation while being edited by the budget creator. However, the CSC allocation total on the budget must be equal to, or less than the program allocation when the budget is forwarded.

23 GLOSSARY of TERMS:
Fiscal Year: The CSC fiscal year (FY) is the 12-month period that runs from October 1 each year through September 30 of the following year. For example, the FY18-19 is the period that covers October 1, 2018 through September 30, 2019.
Budget Period: The budget period is usually similar to the fiscal year.
Contract period: This is the term or duration of the CSC program agreement.
Contract number: A number assigned by the CSC to the contract. This number changes at the start of a new RFP period.
Position: A position is the job held by the employee/staff within the agency.
Position title: This is the title of the job held by the staff. For example, Program Coordinator, Teacher, Youth Counselor, and Administrative Assistant.
Position start date: This is the start date of the fiscal year for which the position was created in SAMIS. For example, we will use 10/1/2018 for all positions created for FY18-19 and 10/1/2019 for positions created for FY19-20 and so on.
Position end date: This field is to be left BLANK at the time the position is created. (Whenever the position is no longer needed by the Agency then this field should be completed.)
Support start date: This is the date the position began in the CSC program and is usually the same date as the contract start date.
Support end date: This is the date the job ends in the CSC program and this field is to be left BLANK at the time the support is assigned. Note that the contract number changes at the start of a new RFP period, therefore positions must be assigned to the program at the start of each new RFP. When the position no longer supports the program, the actual support end date should be put in this field.
Assignment start date: This is the date the individual staff was assigned to the position in the program.
Assignment end date: This field is to be left BLANK at the time the staff is assigned. (When there is a change in staff we should close out the assignment at the date of staff change and assign a new individual/staff name.)
Paraprofessional staff: A paraprofessional staff is a non- degreed staff and includes staff with Associates or lower.
Professional staff: A professional staff is the holder of a professional license, a Bachelor’s degree or higher.
Full-time staff (FT): An employee who is considered full-time to the agency and usually works 40 hours or more per week.
Part-time staff (PT): An employee who is part-time to the agency and usually works 30 hours or less per week.

24