Embed Size (px)
Citation preview
Enterprise Reporter8e6R
SER
DE
del: ER 4.0 / Version No.: 1.01
pplication
U
GUI
MoRelease 4.1.00
Web Client A

ii
8E6 TECHNOLOGIES, ENTERPRISE REPORTER WEB CLIENT USER GUIDE
8E6 ENTERPRISE REPORTER WEB CLIENT USER GUIDE
© 2007 8e6 TechnologiesAll rights reserved.828 W. Taft Ave., Orange, CA 92865, USA
Version 1.01, published April 2007 for software release 4.1.00
Printed in the United States of America
This document may not, in whole or in part, be copied, photo-copied, reproduced, translated, or reduced to any electronic medium or machine readable form without prior written con-sent from 8e6 Technologies.
Every effort has been made to ensure the accuracy of this document. However, 8e6 Technologies makes no warranties with respect to this documentation and disclaims any implied warranties of merchantability and fitness for a particular pur-pose. 8e6 Technologies shall not be liable for any error or for incidental or consequential damages in connection with the furnishing, performance, or use of this manual or the exam-ples herein. Due to future enhancements and modifications of this product, the information described in this documentation is subject to change without notice.
The latest version of this document can be obtained from http://www.8e6.com/docs/er4_wclient.pdf.
Trademarks
Other product names mentioned in this manual may be trade-marks or registered trademarks of their respective companies and are the sole property of their respective manufacturers.
Part# ER4-WCUG_v1.01-0704
8E6 TECHNOLOGIES, ENTERPRISE REPORTER WEB CLIENT USER GUIDE iii

iv
8E6 TECHNOLOGIES, ENTERPRISE REPORTER WEB CLIENT USER GUIDE
CONTENTSINTRODUCTORY SECTION ...............................................1
Enterprise Reporter ....................................................................1
Operations ...................................................................................1
About this User Guide ................................................................2
How to Use this User Guide .......................................................3Conventions ...................................................................................... 3Terminology ...................................................................................... 4
Getting Started ............................................................................8Login window .................................................................................... 8
Log In ........................................................................................ 10Client Screen Navigation .......................................................... 13
Buttons at the Top of the Screen ........................................ 13Buttons in the Navigation Panel .......................................... 13
Using the Client ........................................................................ 14Log Out ..................................................................................... 15Re-login .................................................................................... 16
ADMINISTRATOR SECTION ...........................................17
Introduction ...............................................................................17
Chapter 1: Installation and Maintenance ................................18Environment Requirements ............................................................. 18Client Updates ................................................................................. 19
Chapter 2: Configuring the Client ............................................20Settings ........................................................................................... 20
Category Descriptions .............................................................. 21View Details for a Filter Category........................................ 22Update a Filter Category ..................................................... 22
Category Groupings ................................................................. 23Group Information frame ..................................................... 24
Add a Category Group.................................................. 24
8E6 TECHNOLOGIES, ENTERPRISE REPORTER WEB CLIENT USER GUIDE v
CONTENTS
vi
Rename a Category Group........................................... 24Delete a Category Group.............................................. 25
Group Definitions frame ...................................................... 26Add Categories to a Category Group ........................... 26Delete a Category from a Category Group ................... 27
User Groupings ........................................................................ 28Group Information frame ..................................................... 29
Add a User Group......................................................... 29Rename a User Group.................................................. 29Copy a User Group....................................................... 30Delete a User Group..................................................... 30
Group Definitions frame ...................................................... 31View a List of Users in a User Group............................ 31Define a User Group..................................................... 32Disable a User Group ................................................... 35Delete User(s) from User Group................................... 35
User Permissions ..................................................................... 36Add User ............................................................................. 37User Information frame ....................................................... 38
Add User to a User Group ............................................ 38Remove User from a User Group ................................. 38
Group Information frame ..................................................... 39Update User Group by Adding a User .......................... 39Update User Group by Removing a User ..................... 39
Edit Password, Change Permissions, Delete User ............. 39Change a User’s Password .......................................... 40Change Permissions for Canned Report Access ......... 40Delete a User................................................................ 40
Admin Details ........................................................................... 41Change the Administrator Password................................... 41View, Modify Server Information ......................................... 42
Process List .............................................................................. 45View Details on a Process .................................................. 45Terminate a Process ........................................................... 46
CLIENT USER SECTION ................................................47
Introduction ...............................................................................47
Chapter 1: Installation Requirements .....................................48
8E6 TECHNOLOGIES, ENTERPRISE REPORTER WEB CLIENT USER GUIDE

CONTENTS
Chapter 2: Customizing the Client ..........................................49Settings ........................................................................................... 49
My Account ............................................................................... 50View Users in a User Group................................................ 51Change Password............................................................... 51
Server Statistics ........................................................................ 52Date Scopes........................................................................ 53Web Client Server Startup Time ......................................... 53Server Info........................................................................... 53ER Activity........................................................................... 54Expiration Info ..................................................................... 57
Default Options ......................................................................... 58Set New Defaults ................................................................ 58
Chapter 3: Canned Reports ......................................................60Generate a Canned Report ............................................................. 61Export a Canned Report ................................................................. 64
Chapter 4: Summary and Detail Reports ................................65Summary Drill Down Report View ................................................... 66Detail Drill Down Report View ......................................................... 67Report View Tools and Usage Tips ................................................. 69
Navigation Tips ......................................................................... 69Back button ......................................................................... 69Record navigation field........................................................ 69
Summary Report View Tools and Tips ..................................... 70Filter columns and buttons .................................................. 70Count columns and column arrows..................................... 71Column sorting tips ............................................................. 73Record exportation.............................................................. 74
Detail Report View Tools and Tips ........................................... 75Page link navigation ............................................................ 75Report Type columns .......................................................... 75Column sorting tips ............................................................. 77Page/Object viewing tip....................................................... 77Truncated data viewing tip .................................................. 77Using escape characters in an NT domain query ............... 78
Header Buttons for Customization Options .............................. 79New Drill Down Report button............................................. 79Set Result Limit button ........................................................ 80Modify Report button........................................................... 81
8E6 TECHNOLOGIES, ENTERPRISE REPORTER WEB CLIENT USER GUIDE vii
CONTENTS
viii
Drill Down Report option............................................... 81Custom Report option................................................... 81
Export a Report option ........................................................ 82Export Drill Down Report button ................................... 82Export Custom Report button ....................................... 83
Save Custom Report button................................................ 84Summary Drill Down Report option .............................. 84Detail Drill Down Report option..................................... 85
Report View Components ............................................................... 86Report Fields and Usage .......................................................... 86
Type field............................................................................. 86Date Scope and Date fields ................................................ 87Display and # Records fields............................................... 89Search and Filter String fields ............................................. 89Sort by and Order fields ...................................................... 90Result Set Limit fields.......................................................... 90Break type field ................................................................... 91Format field ......................................................................... 91Data to export field .............................................................. 91For double-break reports only ............................................. 92
Amount shown field ...................................................... 92# Records field.............................................................. 92
For pie and bar charts only ................................................. 93Generate using field...................................................... 93
Output type field .................................................................. 93Hide Un-Identified IPs checkbox ......................................... 93For E-Mail output only / Email Report fields........................ 94Detailed Info field ................................................................ 94
Exporting a Report .......................................................................... 96View and Print Options .................................................................... 98
View and Print Tools ................................................................. 99Sample Report File Formats ................................................... 100
MS-DOS Text.................................................................... 101PDF ................................................................................... 102Rich Text Format............................................................... 103HTML ................................................................................ 104Comma-Delimited Text ..................................................... 105Excel (Chinese)................................................................. 106Excel (English) .................................................................. 107
Chapter 5: Drill Down Reports ...............................................108
8E6 TECHNOLOGIES, ENTERPRISE REPORTER WEB CLIENT USER GUIDE
CONTENTS
Generate a Drill Down Report ....................................................... 109Generate a Single User Group Report .......................................... 110
Chapter 6: Custom Reports ................................................... 111Custom Report Wizard .................................................................. 112
Step 1: Specify Report Option ................................................ 112Step 2: Specify Report Selection ............................................ 114
Summary report ................................................................ 114Detail report....................................................................... 114
Step 3: Specify Date Scope .................................................... 114Step 4: Specify Order Criteria ................................................. 115
Summary report ................................................................ 115Detail report....................................................................... 115
Step 5: View or Save the Report ............................................ 115Save Custom Report .............................................................. 117Wizard Reporting Tips ............................................................ 120
Detail page Break report by Users, Category ................... 120Use wildcards in a Specific Search query ......................... 120
Sample Custom Reports ............................................................... 122Report Format ........................................................................ 123
Top 20 Categories by Page Count.................................... 124Top 20 IPs by Category/IP ................................................ 125Top 20 Users by Category/User........................................ 126Top 20 Users by Page Count............................................ 127Top 20 Categories by User/Category................................ 128Top 20 Sites by User/Site ................................................. 129By User/Category/Site....................................................... 130Top 20 Sites by Category/Site .......................................... 131By Category/Site/IP........................................................... 132By Category/User/Site....................................................... 133
Wall Clock Time Reports ............................................................... 134Generate a Wall Clock Time Report ....................................... 135View the Wall Clock Time Report ........................................... 138Wall Clock Time algorithm ...................................................... 139Use wildcards in a Specific Search query ............................... 140
Saved Custom Reports ................................................................. 141View Information in a Saved Custom Report .......................... 142Edit or Copy a Custom Report ................................................ 143Run a Custom Report ............................................................. 145Delete a Custom Report ......................................................... 145
Event Schedule ............................................................................. 146
8E6 TECHNOLOGIES, ENTERPRISE REPORTER WEB CLIENT USER GUIDE ix
CONTENTS
x
View Details or Edit a Scheduled Event ................................. 147View Details for a Scheduled Event .................................. 148Edit a Scheduled Event..................................................... 148
Add an Event to the Schedule ................................................ 149Delete a Scheduled Event ...................................................... 150
Scheduling a Report to Run .......................................................... 151
TECHNICAL SUPPORT SECTION ..................................152
Tech Support Coverage ..........................................................152Hours ............................................................................................. 152Contact Information ....................................................................... 152
Domestic (United States) ........................................................ 152International ............................................................................ 152E-Mail ..................................................................................... 152Office Locations and Phone Numbers .................................... 153
8e6 Corporate Headquarters (USA).................................. 1538e6 Taiwan........................................................................ 153
Support Procedures ...................................................................... 154
APPENDICES SECTION ...............................................155
Appendix A .............................................................................. 155Evaluation Mode ........................................................................... 155
Client ...................................................................................... 155Evaluation Mode alert box................................................. 155ER Server Statistics window ............................................. 156
Appendix B .............................................................................. 157Lotus Notes Configuration ............................................................. 157
Steps for Former MS Outlook / Express Users ....................... 157Steps for Installing, Configuring Lotus Notes ......................... 158
Step 1: Install Lotus Notes ................................................ 158Step 2: Configure Microsoft Mail Client............................. 158Step 3: Verify Internet Explorer Settings ........................... 158
Appendix C .............................................................................. 159Disable Pop-up Blocking Software ................................................ 159Yahoo! Toolbar Pop-up Blocker .................................................... 159
Add the Client to the White List .............................................. 159Google Toolbar Pop-up Blocker .................................................... 161
8E6 TECHNOLOGIES, ENTERPRISE REPORTER WEB CLIENT USER GUIDE
CONTENTS
Add the Client to the White List .............................................. 161AdwareSafe Pop-up Blocker ......................................................... 162
Disable Pop-up Blocking ........................................................ 162Windows XP SP2 Pop-up Blocker ................................................ 163
Set up Pop-up Blocking .......................................................... 163Use the Internet Options dialog box.................................. 163Use the IE Toolbar ............................................................ 165
Set up the Information Bar.......................................... 166Access the Client ........................................................ 166
Appendix D .............................................................................. 168Glossary ........................................................................................ 168
INDEX .......................................................................169
8E6 TECHNOLOGIES, ENTERPRISE REPORTER WEB CLIENT USER GUIDE xi

CONTENTS
xii
8E6 TECHNOLOGIES, ENTERPRISE REPORTER WEB CLIENT USER GUIDE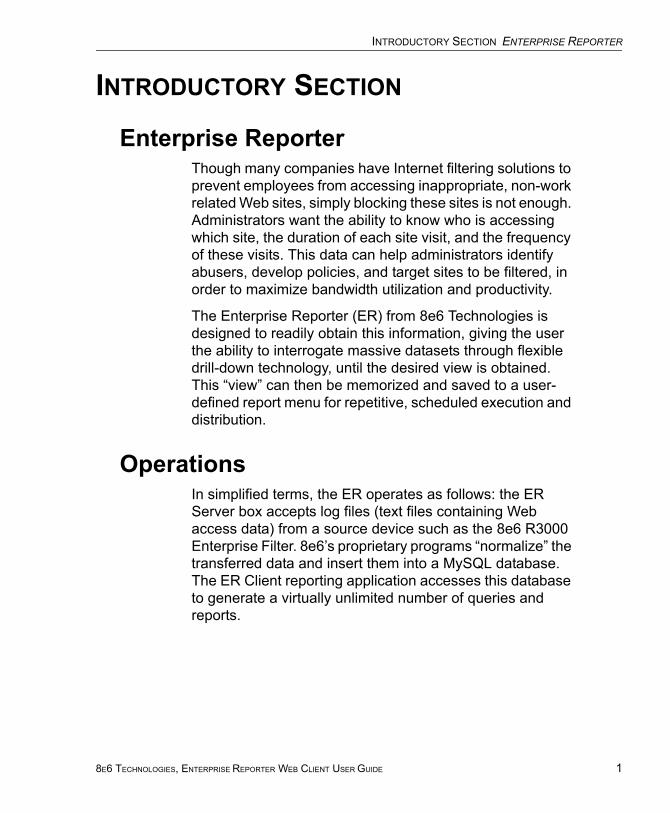
INTRODUCTORY SECTION ENTERPRISE REPORTER
INTRODUCTORY SECTION
Enterprise ReporterThough many companies have Internet filtering solutions to prevent employees from accessing inappropriate, non-work related Web sites, simply blocking these sites is not enough. Administrators want the ability to know who is accessing which site, the duration of each site visit, and the frequency of these visits. This data can help administrators identify abusers, develop policies, and target sites to be filtered, in order to maximize bandwidth utilization and productivity.
The Enterprise Reporter (ER) from 8e6 Technologies is designed to readily obtain this information, giving the user the ability to interrogate massive datasets through flexible drill-down technology, until the desired view is obtained. This “view” can then be memorized and saved to a user-defined report menu for repetitive, scheduled execution and distribution.
OperationsIn simplified terms, the ER operates as follows: the ER Server box accepts log files (text files containing Web access data) from a source device such as the 8e6 R3000 Enterprise Filter. 8e6’s proprietary programs “normalize” the transferred data and insert them into a MySQL database. The ER Client reporting application accesses this database to generate a virtually unlimited number of queries and reports.
8E6 TECHNOLOGIES, ENTERPRISE REPORTER WEB CLIENT USER GUIDE 1
INTRODUCTORY SECTION ABOUT THIS USER GUIDE
2
About this User GuideThe Enterprise Reporter Web Client User Guide addresses the administrators designated to configure the ER Server and ER Client, and the manager(s) given permission by the Client administrator to use the Client.
This user guide is organized into the following sections:
• Introductory Section - This section provides an over-view and information on how to use this user guide to help you access the Client and become familiarized with the application.
• Administrator Section - This section includes informa-tion for administrators to configure the Client application.
• Client User Section - This section includes information on using the Client application to generate reports.
• Technical Support Section - This section contains information on technical support coverage.
• Appendices Section - Appendix A provides information on how to use the ER Client in the evaluation mode, and how to switch to the activated mode. Appendix B includes information on configuring Lotus Notes to work with Client application reports, instead of Microsoft Outlook. Appendix C explains how to disable pop-up blocking software installed on a workstation in order to use the Client. Appendix D includes a glossary of terms used in this user guide.
• Index - This section includes an index of topics and the first page numbers where they appear in this user guide.
8E6 TECHNOLOGIES, ENTERPRISE REPORTER WEB CLIENT USER GUIDE

INTRODUCTORY SECTION HOW TO USE THIS USER GUIDE
How to Use this User Guide
ConventionsThe following icons are used throughout this user guide:
NOTE: The “note” icon is followed by italicized text providing additional information about the current topic.
TIP: The “tip” icon is followed by italicized text giving you hints on how to execute a task more efficiently.
WARNING: The “warning” icon is followed by italicized text cautioning you about making entries in the application, executing certain processes or procedures, or the outcome of specified actions.
8E6 TECHNOLOGIES, ENTERPRISE REPORTER WEB CLIENT USER GUIDE 3
INTRODUCTORY SECTION HOW TO USE THIS USER GUIDE
4
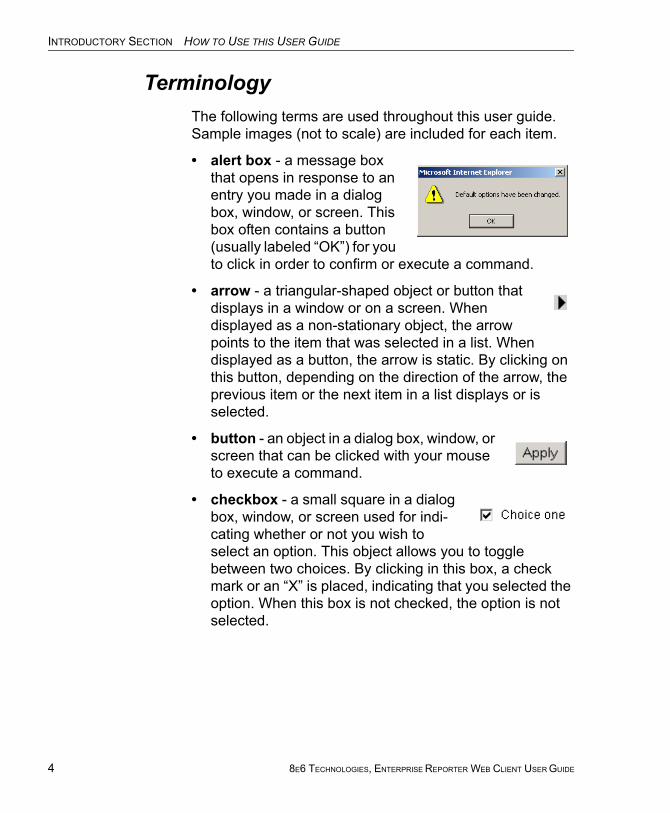
TerminologyThe following terms are used throughout this user guide. Sample images (not to scale) are included for each item.
• alert box - a message box that opens in response to an entry you made in a dialog box, window, or screen. This box often contains a button (usually labeled “OK”) for you to click in order to confirm or execute a command.
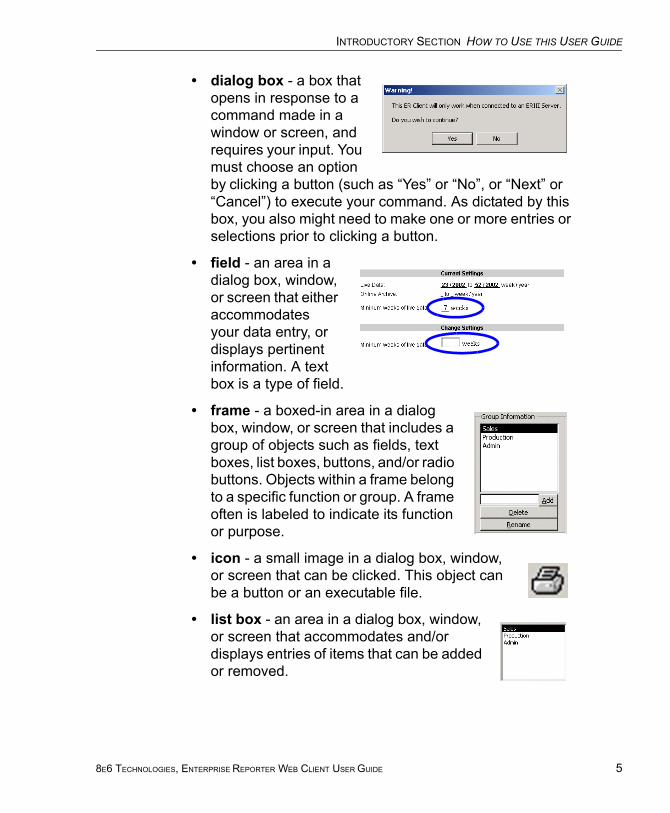
• arrow - a triangular-shaped object or button that displays in a window or on a screen. When displayed as a non-stationary object, the arrow points to the item that was selected in a list. When displayed as a button, the arrow is static. By clicking on this button, depending on the direction of the arrow, the previous item or the next item in a list displays or is selected.
• button - an object in a dialog box, window, or screen that can be clicked with your mouse to execute a command.
• checkbox - a small square in a dialog box, window, or screen used for indi-cating whether or not you wish to select an option. This object allows you to toggle between two choices. By clicking in this box, a check mark or an “X” is placed, indicating that you selected the option. When this box is not checked, the option is not selected.
8E6 TECHNOLOGIES, ENTERPRISE REPORTER WEB CLIENT USER GUIDE
INTRODUCTORY SECTION HOW TO USE THIS USER GUIDE
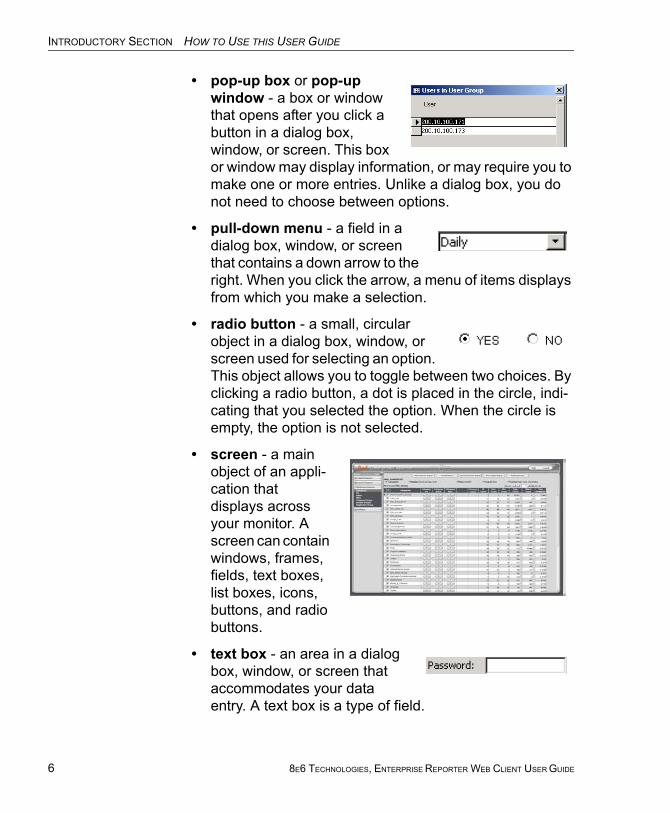
• dialog box - a box that opens in response to a command made in a window or screen, and requires your input. You must choose an option by clicking a button (such as “Yes” or “No”, or “Next” or “Cancel”) to execute your command. As dictated by this box, you also might need to make one or more entries or selections prior to clicking a button.
• field - an area in a dialog box, window, or screen that either accommodates your data entry, or displays pertinent information. A text box is a type of field.
• frame - a boxed-in area in a dialog box, window, or screen that includes a group of objects such as fields, text boxes, list boxes, buttons, and/or radio buttons. Objects within a frame belong to a specific function or group. A frame often is labeled to indicate its function or purpose.
• icon - a small image in a dialog box, window, or screen that can be clicked. This object can be a button or an executable file.
• list box - an area in a dialog box, window, or screen that accommodates and/or displays entries of items that can be added or removed.
8E6 TECHNOLOGIES, ENTERPRISE REPORTER WEB CLIENT USER GUIDE 5
INTRODUCTORY SECTION HOW TO USE THIS USER GUIDE
6
• pop-up box or pop-up window - a box or window that opens after you click a button in a dialog box, window, or screen. This box or window may display information, or may require you to make one or more entries. Unlike a dialog box, you do not need to choose between options.
• pull-down menu - a field in a dialog box, window, or screen that contains a down arrow to the right. When you click the arrow, a menu of items displays from which you make a selection.
• radio button - a small, circular object in a dialog box, window, or screen used for selecting an option. This object allows you to toggle between two choices. By clicking a radio button, a dot is placed in the circle, indi-cating that you selected the option. When the circle is empty, the option is not selected.
• screen - a main object of an appli-cation that displays across your monitor. A screen can contain windows, frames, fields, text boxes, list boxes, icons, buttons, and radio buttons.
• text box - an area in a dialog box, window, or screen that accommodates your data entry. A text box is a type of field.
8E6 TECHNOLOGIES, ENTERPRISE REPORTER WEB CLIENT USER GUIDE
INTRODUCTORY SECTION HOW TO USE THIS USER GUIDE
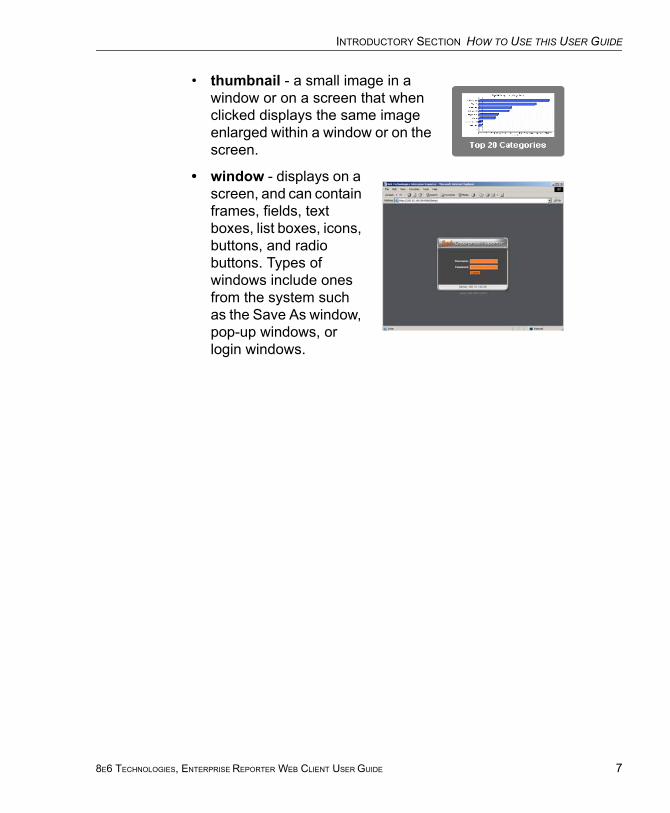
• thumbnail - a small image in a window or on a screen that when clicked displays the same image enlarged within a window or on the screen.
• window - displays on a screen, and can contain frames, fields, text boxes, list boxes, icons, buttons, and radio buttons. Types of windows include ones from the system such as the Save As window, pop-up windows, or login windows.
8E6 TECHNOLOGIES, ENTERPRISE REPORTER WEB CLIENT USER GUIDE 7
INTRODUCTORY SECTION GETTING STARTED
8
Getting StartedThis sub-section helps the Client administrator and Client manager become familiarized with basic log in and log out procedures, and navigating the screen of the ER Client.
Before getting started, the ER Server administrator needs to install the necessary ER hardware and software compo-nents, as described in the following Administrator Section. The ER Client administrator should then set up his/her unique password for accessing the Client. Finally, the Client administrator must set up each designated manager with permissions in order for an authorized user to use the ER Client.
Login window1. From your workstation, launch Internet Explorer to open
an IE browser window.
NOTE: If pop-up blocking software is installed on the workstation, it must be disabled. Information about disabling pop-up blocking software can be found in this Client User Guide in Appendix C: Disable Pop-up Blocking Software.
2. In the Address field of the browser window, type in the URL for either standard site access or secured site access to the Web Client (in which ‘x.x.x.x’ represents the IP address of your ER Server):
http://x.x.x.x:8080
https://x.x.x.x:8443
This action opens the ER Client login window (see Fig. 1:1-1).
NOTE: A maximum of eight users can use the Web Client simul-taneously. However, for optimum results, 8e6 recommends no more than four users generate reports at the same time.
8E6 TECHNOLOGIES, ENTERPRISE REPORTER WEB CLIENT USER GUIDE

INTRODUCTORY SECTION GETTING STARTED
Fig. 1:1-1 Client Login window
This window serves as a portal for the administrator and managers to log into the Client, and gives the Client administrator access to pop-up windows for changing passwords and modifying a set of Server components.
NOTE: In this window, the Server IP address displays at the bottom of the login frame, and the software Version number of the Server displays beneath the frame.
TIP: In any box or window in the Client, press the Tab key on your keyboard to move to the next field. To return to a previous field, press Shift-Tab.
8E6 TECHNOLOGIES, ENTERPRISE REPORTER WEB CLIENT USER GUIDE 9
INTRODUCTORY SECTION GETTING STARTED
10
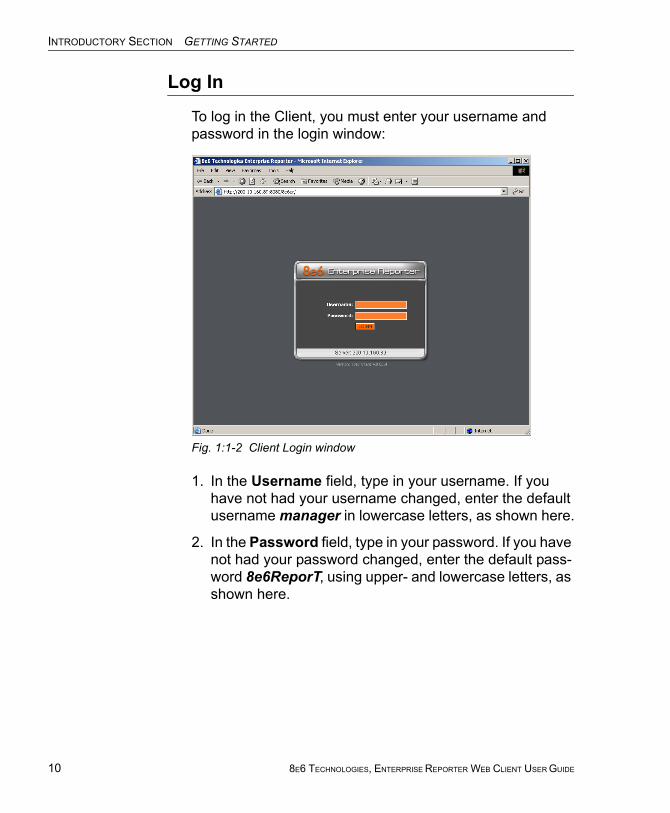
Log In
To log in the Client, you must enter your username and password in the login window:
Fig. 1:1-2 Client Login window
1. In the Username field, type in your username. If you have not had your username changed, enter the default username manager in lowercase letters, as shown here.
2. In the Password field, type in your password. If you have not had your password changed, enter the default pass-word 8e6ReporT, using upper- and lowercase letters, as shown here.
8E6 TECHNOLOGIES, ENTERPRISE REPORTER WEB CLIENT USER GUIDE
INTRODUCTORY SECTION GETTING STARTED
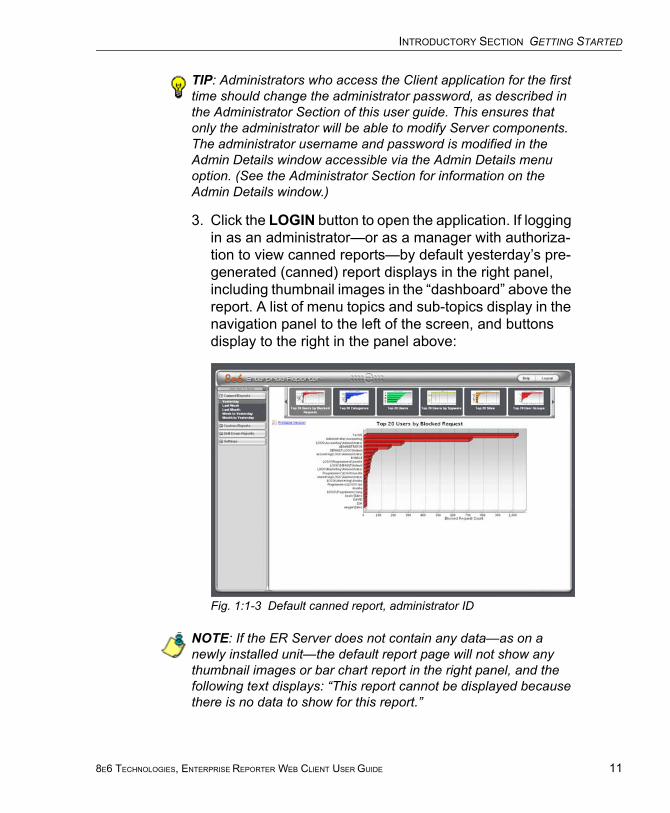
TIP: Administrators who access the Client application for the first time should change the administrator password, as described in the Administrator Section of this user guide. This ensures that only the administrator will be able to modify Server components. The administrator username and password is modified in the Admin Details window accessible via the Admin Details menu option. (See the Administrator Section for information on the Admin Details window.)
3. Click the LOGIN button to open the application. If logging in as an administrator—or as a manager with authoriza-tion to view canned reports—by default yesterday’s pre-generated (canned) report displays in the right panel, including thumbnail images in the “dashboard” above the report. A list of menu topics and sub-topics display in the navigation panel to the left of the screen, and buttons display to the right in the panel above:
Fig. 1:1-3 Default canned report, administrator ID
NOTE: If the ER Server does not contain any data—as on a newly installed unit—the default report page will not show any thumbnail images or bar chart report in the right panel, and the following text displays: “This report cannot be displayed because there is no data to show for this report.”
8E6 TECHNOLOGIES, ENTERPRISE REPORTER WEB CLIENT USER GUIDE 11
INTRODUCTORY SECTION GETTING STARTED
12
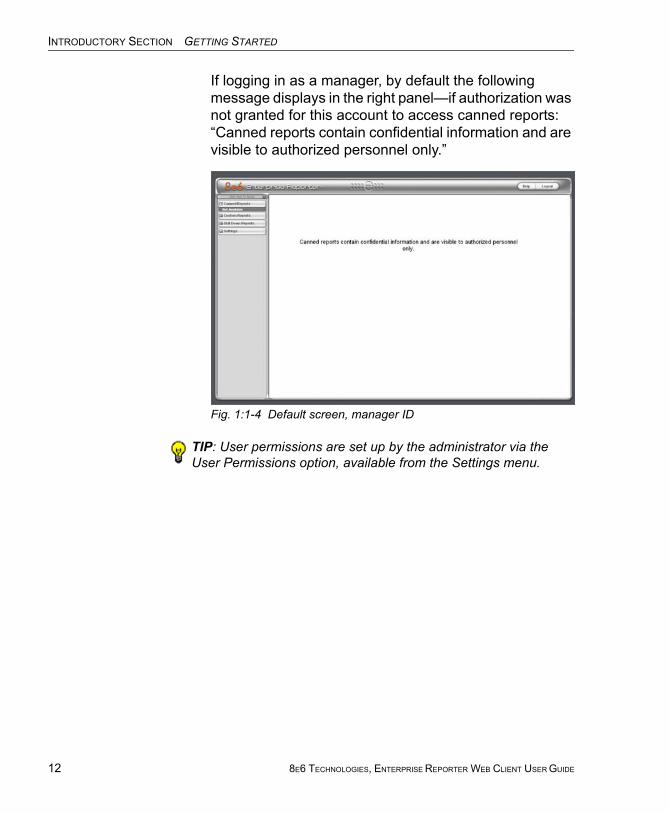
If logging in as a manager, by default the following message displays in the right panel—if authorization was not granted for this account to access canned reports: “Canned reports contain confidential information and are visible to authorized personnel only.”
Fig. 1:1-4 Default screen, manager ID
TIP: User permissions are set up by the administrator via the User Permissions option, available from the Settings menu.
8E6 TECHNOLOGIES, ENTERPRISE REPORTER WEB CLIENT USER GUIDE
INTRODUCTORY SECTION GETTING STARTED
Client Screen Navigation
Buttons at the Top of the Screen
The buttons at the top of the screen let you access the user guide or log out of the Client:
• Help - click this button to launch a separate browser window containing the PDF version of the user guide.
• Logout - click this button to log out of the Client (see Log Out for details on log out procedures).
Buttons in the Navigation Panel
The navigation panel at the left of the screen consists of the following buttons and menu topics for configuring and using the Client to generate reports:
• Canned Reports - click this button to open the Canned Reports menu. Administrators and authorized managers can click any canned report menu option to obtain an overview of end user Internet activity. For managers who are not authorized to view canned reports, the note “Not Available” displays beneath the Canned Reports button.
• Custom Reports - click this button to open the Custom Reports menu. These menu options let you generate, edit, save, and/or run reports customized to your specifi-cations.
• Drill Down Reports - click this button to open the Drill Down Reports menu. These menu options let you drill down into reporting data to identify specific Internet usage criteria.
• Settings - click this button to open the Settings menu. These menu options let you customize the Client applica-tion.
8E6 TECHNOLOGIES, ENTERPRISE REPORTER WEB CLIENT USER GUIDE 13
INTRODUCTORY SECTION GETTING STARTED
14
TIP: Clicking (“Click Here To Resize”) at the top of the navigation panel extends the window in the right panel across the entire screen. Clicking the icon at the top of the navigation panel resizes the window back to its default width in the right panel.
NOTE: More about other buttons, thumbnails, icons, and the navigation panel—and the functions of their corresponding windows and screens—can be found in the Administrator Section and Client User Section of this user guide.
Using the Client
1. Before you can begin using the Client, the ER Server administrator must customize the ER Server for using the Client.
2. Next, the Client administrator should customize the Client application’s settings via the Settings option.
3. Once the ER Server and the Client have been custom-ized, the database can be queried and report views generated for the reporting type of your choice: Canned Report (administrators and authorized managers only), Custom Report, Drill Down Report.
4. A report view can be exported in a specified file format, printed, emailed, and/or saved.
5. A saved report can be scheduled to run at a given time.
8E6 TECHNOLOGIES, ENTERPRISE REPORTER WEB CLIENT USER GUIDE
INTRODUCTORY SECTION GETTING STARTED
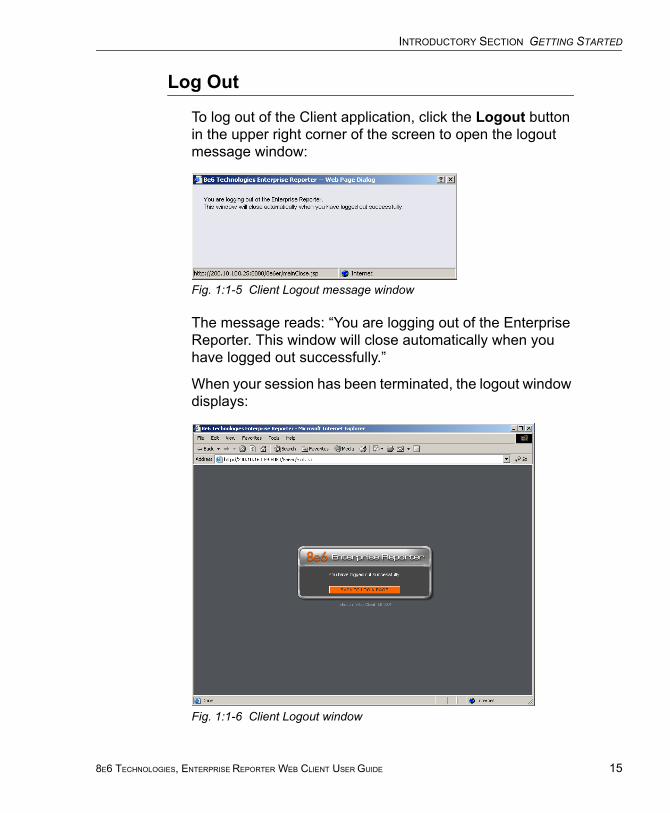
Log Out
To log out of the Client application, click the Logout button in the upper right corner of the screen to open the logout message window:
Fig. 1:1-5 Client Logout message window
The message reads: “You are logging out of the Enterprise Reporter. This window will close automatically when you have logged out successfully.”
When your session has been terminated, the logout window displays:
Fig. 1:1-6 Client Logout window
8E6 TECHNOLOGIES, ENTERPRISE REPORTER WEB CLIENT USER GUIDE 15
INTRODUCTORY SECTION GETTING STARTED
16
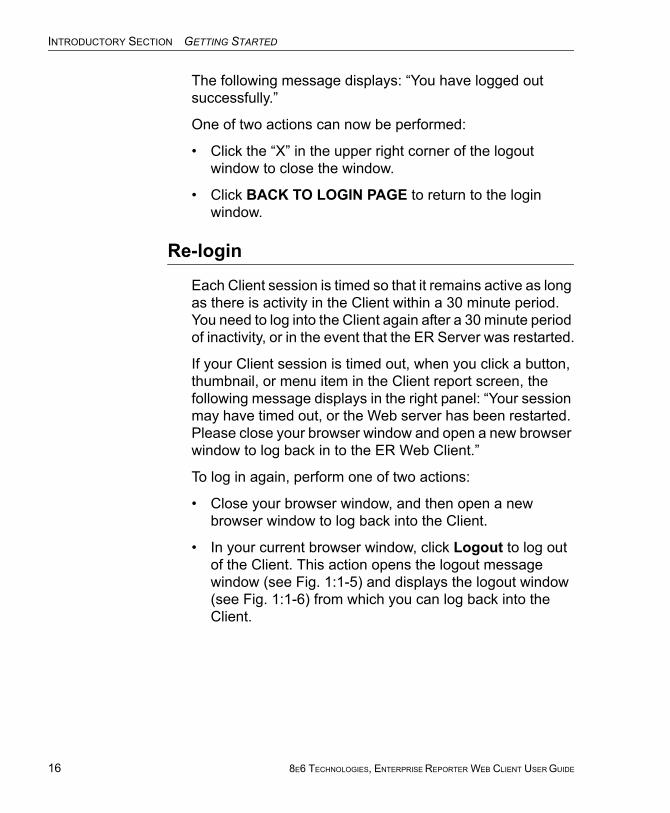
The following message displays: “You have logged out successfully.”
One of two actions can now be performed:
• Click the “X” in the upper right corner of the logout window to close the window.
• Click BACK TO LOGIN PAGE to return to the login window.
Re-login
Each Client session is timed so that it remains active as long as there is activity in the Client within a 30 minute period. You need to log into the Client again after a 30 minute period of inactivity, or in the event that the ER Server was restarted.
If your Client session is timed out, when you click a button, thumbnail, or menu item in the Client report screen, the following message displays in the right panel: “Your session may have timed out, or the Web server has been restarted. Please close your browser window and open a new browser window to log back in to the ER Web Client.”
To log in again, perform one of two actions:
• Close your browser window, and then open a new browser window to log back into the Client.
• In your current browser window, click Logout to log out of the Client. This action opens the logout message window (see Fig. 1:1-5) and displays the logout window (see Fig. 1:1-6) from which you can log back into the Client.
8E6 TECHNOLOGIES, ENTERPRISE REPORTER WEB CLIENT USER GUIDE
ADMINISTRATOR SECTION INTRODUCTION
ADMINISTRATOR SECTION
IntroductionThis section of the user guide provides instructions to administrators on how to set up the Client application for managers to use. Information on generating canned reports is also included.
Before the Client application can be used, the ER Server must be fully configured, and the Structured Query Language (SQL) server must be installed on the network and connected to the Web access logging device(s).
After verifying that the necessary components are installed, configured, and functioning, the Client administrator can begin setting up the Client application for managers.
NOTE: Information about the ER Server can be found in the ER Administrator User Guide:
• The standard Enterprise Reporter version of this document can be obtained from http://www.8e6.com/docs/er4server.pdf.
• The R3000IR version of this document can be obtained from http://www.8e6.com/docs/ir_er4server.pdf.
8E6 TECHNOLOGIES, ENTERPRISE REPORTER WEB CLIENT USER GUIDE 17
ADMINISTRATOR SECTION CHAPTER 1: INSTALLATION AND MAINTENANCE
18
Chapter 1: Installation and Maintenance
Environment RequirementsThe following environment requirements must be fulfilled in order to use the Client:
ER Server
• ER Server must be be fully configured, and the Struc-tured Query Language (SQL) server must be installed on the network and connected to the Web access logging device(s)
Workstation
• Windows 2000 and Windows XP Operating Systems are supported for Web Client usage
• Pentium III class processor or greater
• 512 MG RAM minimum, 1 GB RAM recommended
• 2 GB hard drive space for saving files
• Internet Explorer 6 (or higher), Firefox 1.5, or Safari 2.0 Web browser
• screen resolution settings of 1024 x 768 are recom-mended
• if pop-up blocking software is installed on the worksta-tion, it must be disabled
NOTES: Information about the ER Server can be found in the ER Administrator User Guide.
Information about disabling pop-up blocking software can be found in this Client User Guide in Appendix C: Disable Pop-up Blocking Software.
8E6 TECHNOLOGIES, ENTERPRISE REPORTER WEB CLIENT USER GUIDE
ADMINISTRATOR SECTION CHAPTER 1: INSTALLATION AND MAINTENANCE
Client UpdatesUpdates for the Client are available in ER software releases that are downloaded to the ER Server. Once applied to the ER Server, Client users will be able to obtain all the new features and enhancements currently available.
NOTE: Refer to the Software Update screen sub-section in the ER Administrator User Guide for information about installing soft-ware updates on the ER Server.
8E6 TECHNOLOGIES, ENTERPRISE REPORTER WEB CLIENT USER GUIDE 19
ADMINISTRATOR SECTION CHAPTER 2: CONFIGURING THE CLIENT
20
Chapter 2: Configuring the Client
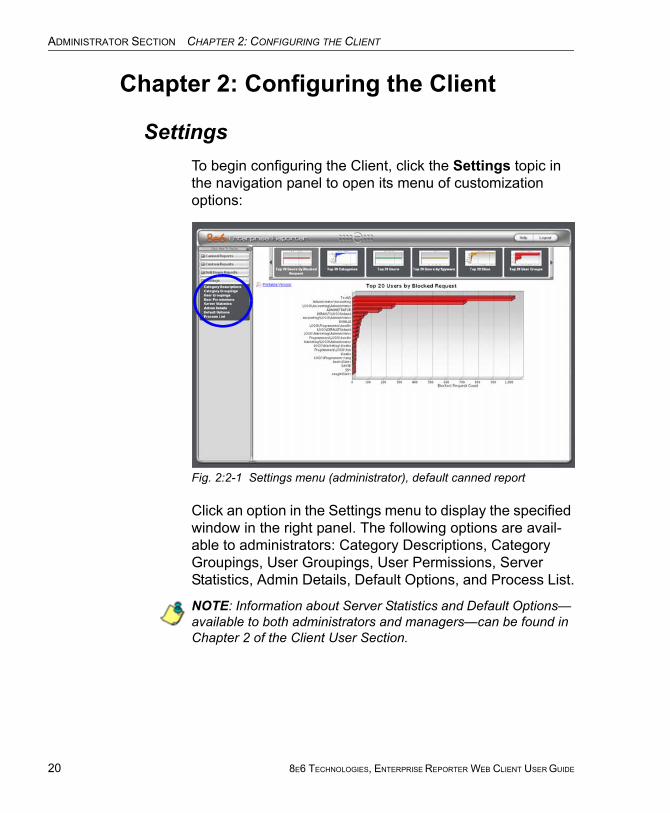
SettingsTo begin configuring the Client, click the Settings topic in the navigation panel to open its menu of customization options:
Fig. 2:2-1 Settings menu (administrator), default canned report
Click an option in the Settings menu to display the specified window in the right panel. The following options are avail-able to administrators: Category Descriptions, Category Groupings, User Groupings, User Permissions, Server Statistics, Admin Details, Default Options, and Process List.
NOTE: Information about Server Statistics and Default Options— available to both administrators and managers—can be found in Chapter 2 of the Client User Section.
8E6 TECHNOLOGIES, ENTERPRISE REPORTER WEB CLIENT USER GUIDE
ADMINISTRATOR SECTION CHAPTER 2: CONFIGURING THE CLIENT
Category Descriptions
The Category Descriptions option is used for viewing and updating category names and descriptions of filtering cate-gories used by the Web access logging device(s).
NOTE: When logs are imported each hour, new categories found by the Server are automatically entered and will display when the Client is accessed. The Server generates a short name for the category and also uses this name as the descriptive “long” name.
To view details on a filter category, or to update a filter cate-gory, click Category Descriptions in the Settings menu to display the Category Information window in the right panel:
Fig. 2:2-2 Category Information window
8E6 TECHNOLOGIES, ENTERPRISE REPORTER WEB CLIENT USER GUIDE 21
ADMINISTRATOR SECTION CHAPTER 2: CONFIGURING THE CLIENT
22
View Details for a Filter Category
In the Category Information window, filter categories display as rows of records. The following information is included for each record: Short Name of the category, its corresponding Descriptive name, and Update button.
In the Record field at the bottom of the window, the number of the selected record displays, along with the total number of records (categories).
TIP: The selected record is designated by an arrow in the white box to the left of a row. To select another record, click the white box in that row to display the arrow. You also can navigate to another record by using the Record navigation field. Click in the box between the arrow buttons and enter a new record number to go to that record. Or click any of the four arrow buttons to advance forward or backward through the list of records. In the order in which they display in the Record field, clicking these buttons moves you to the first record, the record prior to the selected record, the record following the selected record, and the last record.
Update a Filter Category
1. Click the Update button in the Update column for the category you wish to modify. This action opens the Update Category dialog box, displaying the Short Name greyed-out:
Fig. 2:2-3 Update a Filter Category
8E6 TECHNOLOGIES, ENTERPRISE REPORTER WEB CLIENT USER GUIDE
ADMINISTRATOR SECTION CHAPTER 2: CONFIGURING THE CLIENT
2. Edit the Descriptive Name. This description for the filter category displays in the Categories column on the report screen.
TIP: Click Cancel to return to the Category Information window without saving your edits.
3. Click Update to accept your modifications. The update you made displays in the Category Information window.
Category Groupings
The Category Groupings option is used for defining a customized group of filter categories, if you wish to run reports using certain filter categories only.
To create, edit, or delete a category group, click Category Groupings in the Settings menu to display the Category Group Setup window in the right panel:
Fig. 2:2-4 Category Group Setup window
The Category Group Setup window is comprised of two frames used for setting up and maintaining category group-ings: Group Information, and Group Definitions.
8E6 TECHNOLOGIES, ENTERPRISE REPORTER WEB CLIENT USER GUIDE 23
ADMINISTRATOR SECTION CHAPTER 2: CONFIGURING THE CLIENT
24
Group Information frame
The Group Information frame displays to the left in the Cate-gory Group Setup window. In this frame you can add, rename, or delete a category group.
Any category groups that were created display in alphanu-merical order in the list box in this frame.
Add a Category Group
1. In the field to the left of the Add button, type in the name for the category group.
2. Click the Add button to add this entry to the list box above.
NOTE: The category group you added also displays in the Group Name pull-down menu in the Group Definitions frame to the right.
Rename a Category Group
1. Select the category group from the list box by clicking on your choice to highlight it.
2. Click the Rename button to open the Group Rename dialog box:
Fig. 2:2-5 Edit a Category Group Name
3. In the New Name field, enter the new category group name.
TIP: Click Cancel if you wish to return to the Category Group Setup window without saving your modifications.
8E6 TECHNOLOGIES, ENTERPRISE REPORTER WEB CLIENT USER GUIDE
ADMINISTRATOR SECTION CHAPTER 2: CONFIGURING THE CLIENT
4. Click OK to close the Group Rename dialog box and to update the list box in the Group Information frame with your edits.
NOTE: The category group you renamed also displays in the Group Name pull-down menu in the Group Definitions frame to the right.
Delete a Category Group
1. Select the category group from the list box by clicking on your choice to highlight it.
2. Click the Delete button to remove the category group from the list box.
NOTE: The category group you deleted also is removed from the Group Name pull-down menu in the Group Definitions frame to the right.
8E6 TECHNOLOGIES, ENTERPRISE REPORTER WEB CLIENT USER GUIDE 25
ADMINISTRATOR SECTION CHAPTER 2: CONFIGURING THE CLIENT
26
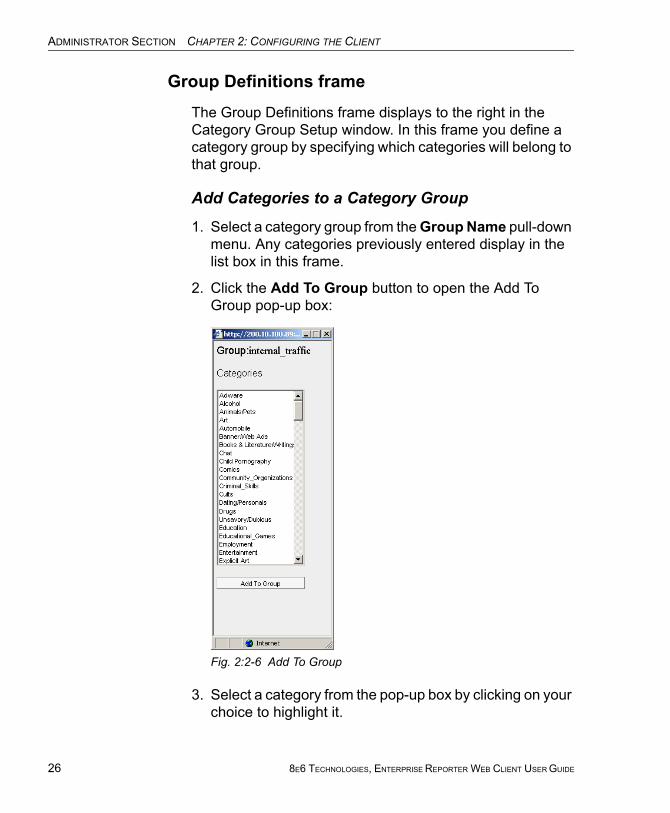
Group Definitions frame
The Group Definitions frame displays to the right in the Category Group Setup window. In this frame you define a category group by specifying which categories will belong to that group.
Add Categories to a Category Group
1. Select a category group from the Group Name pull-down menu. Any categories previously entered display in the list box in this frame.
2. Click the Add To Group button to open the Add To Group pop-up box:
Fig. 2:2-6 Add To Group
3. Select a category from the pop-up box by clicking on your choice to highlight it.
8E6 TECHNOLOGIES, ENTERPRISE REPORTER WEB CLIENT USER GUIDE
ADMINISTRATOR SECTION CHAPTER 2: CONFIGURING THE CLIENT
TIP: To select multiple categories, press the Ctrl key on your keyboard and then click on categories to highlight them.
4. Click the Add To Group button in the pop-up box to specify the selected categories to be added to the Group Definitions frame list box.
5. Click the "X" in the upper right corner of the Add To Group pop-up box to close it, and to add all selected categories to the list box in the Group Definitions frame.
Delete a Category from a Category Group
1. Select a category group from the Group Name pull-down menu to display all categories for that category group in the list box.
2. Select the category to be removed by clicking on your choice to highlight it.
3. Click the Delete Item button to remove the category from the list box for that category group.
8E6 TECHNOLOGIES, ENTERPRISE REPORTER WEB CLIENT USER GUIDE 27
ADMINISTRATOR SECTION CHAPTER 2: CONFIGURING THE CLIENT
28
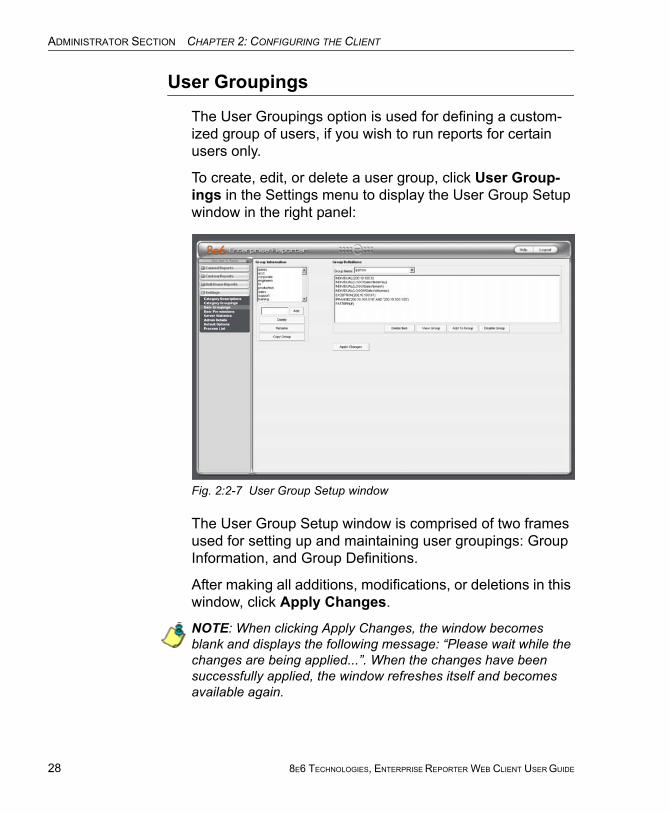
User Groupings
The User Groupings option is used for defining a custom-ized group of users, if you wish to run reports for certain users only.
To create, edit, or delete a user group, click User Group-ings in the Settings menu to display the User Group Setup window in the right panel:
Fig. 2:2-7 User Group Setup window
The User Group Setup window is comprised of two frames used for setting up and maintaining user groupings: Group Information, and Group Definitions.
After making all additions, modifications, or deletions in this window, click Apply Changes.
NOTE: When clicking Apply Changes, the window becomes blank and displays the following message: “Please wait while the changes are being applied...”. When the changes have been successfully applied, the window refreshes itself and becomes available again.
8E6 TECHNOLOGIES, ENTERPRISE REPORTER WEB CLIENT USER GUIDE
ADMINISTRATOR SECTION CHAPTER 2: CONFIGURING THE CLIENT
Group Information frame
The Group Information frame displays to the left in the User Group Setup window. In this frame you can add, rename, copy, or delete a user group.
Any user groups that were created display in the list box in this frame, along with any LDAP user groups imported from the R3000 to the ER Server.
Add a User Group
1. In the field to the left of the Add button, type in the name for the user group.
2. Click the Add button to add this entry to the list box above.
NOTE: The user group you added also displays in the Group Name pull-down menu in the Group Definitions frame to the right.
Rename a User Group
1. Select the user group from the list box by clicking on your choice to highlight it.
2. Click the Rename button to open the Group Rename dialog box:
Fig. 2:2-8 Group Rename dialog box
3. In the New Name field, enter the new user group name.
TIP: Click Cancel if you wish to return to the User Group Setup window without saving your modifications.
8E6 TECHNOLOGIES, ENTERPRISE REPORTER WEB CLIENT USER GUIDE 29
ADMINISTRATOR SECTION CHAPTER 2: CONFIGURING THE CLIENT
30
4. Click OK to close the Group Rename dialog box and to update the list box in the Group Information frame with your edits.
NOTE: The user group you renamed also displays in the Group Name pull-down menu in the Group Definitions frame to the right.
Copy a User Group
The Copy Group feature is useful when importing an LDAP user group from an R3000 server, since imported LDAP user groups cannot be modified, but any copied user group can be modified.
1. Select the user group from the list box by clicking on your choice to highlight it.
2. Click the Copy Group button to add the copied user group name to the list box, with “-Copied” appended to the name.
NOTE: The user group you copied also displays in the Group Name pull-down menu in the Group Definitions frame to the right.
Delete a User Group
1. Select the user group from the list box by clicking on your choice to highlight it.
2. Click the Delete button to remove the user group from the list box.
NOTE: The user group you deleted also is removed from the Group Name pull-down menu in the Group Definitions frame to the right.
8E6 TECHNOLOGIES, ENTERPRISE REPORTER WEB CLIENT USER GUIDE
ADMINISTRATOR SECTION CHAPTER 2: CONFIGURING THE CLIENT
Group Definitions frame
The Group Definitions frame displays to the right in the User Group Setup window. In this frame you can view members of a user group, define any non-imported user group by specifying which users will belong to that group, and indi-cate whether or not to disable a user group.
View a List of Users in a User Group
1. Select a user group from the Group Name pull-down menu. Users set up for that group display in the list box in this frame.
2. To view the entire list of users in the format used on the server, click the the View Group button to open the Users in the ‘user group’ pop-up box:
Fig. 2:2-9 Users in user group pop-up box
Each user included in the user group displays as a sepa-rate row in this pop-up box.
8E6 TECHNOLOGIES, ENTERPRISE REPORTER WEB CLIENT USER GUIDE 31
ADMINISTRATOR SECTION CHAPTER 2: CONFIGURING THE CLIENT
32
NOTE: If you have just copied or created a new user group, the pop-up box does not yet show any users and the following message displays: “Sorry there are no Users in the ‘X’ group at this moment.” (in which ‘X’ represents the group name). Any modifications just made to a user group will not immediately display, since the list of users is updated automatically each hour based on the group definitions and latest usage data. In order to have group definition changes effective immediately, click Apply Changes.
3. Click the "X" in the upper right corner of the pop-up box to close it.
Define a User Group
When defining a user group, you can add and/or exclude users to/from that group—unless the group was imported to the ER Server from an R3000’s LDAP server, since imported user group data cannot be edited. Modifications to a non-imported user group can be made at any time, as necessary.
1. Select a non-imported user group from the Group Name pull-down menu. Users set up for that group display in the list box in this frame.
2. Click the Add To Group button to open the pop-up box where you define users to be added/excluded to/from the group:
8E6 TECHNOLOGIES, ENTERPRISE REPORTER WEB CLIENT USER GUIDE
ADMINISTRATOR SECTION CHAPTER 2: CONFIGURING THE CLIENT
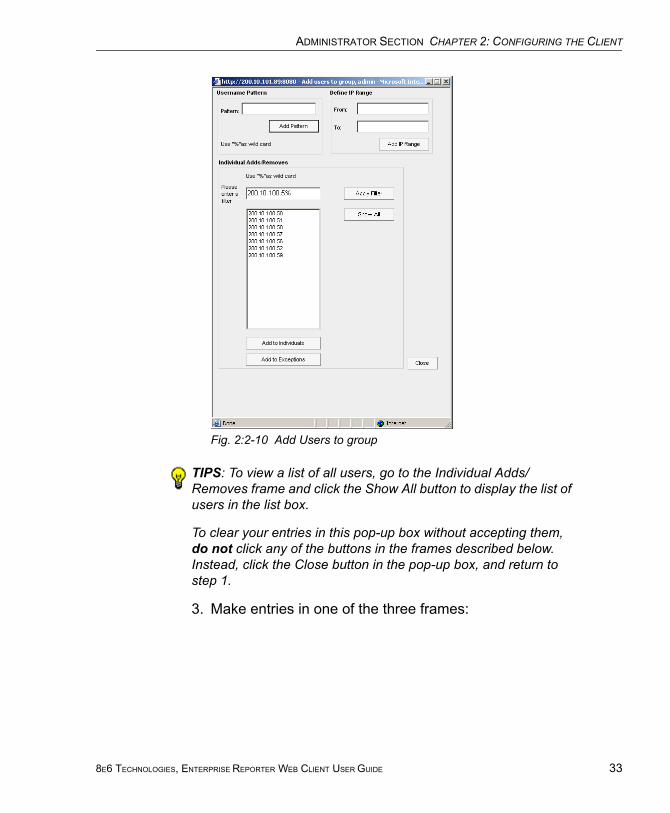
Fig. 2:2-10 Add Users to group
TIPS: To view a list of all users, go to the Individual Adds/ Removes frame and click the Show All button to display the list of users in the list box.
To clear your entries in this pop-up box without accepting them, do not click any of the buttons in the frames described below. Instead, click the Close button in the pop-up box, and return to step 1.
3. Make entries in one of the three frames:
8E6 TECHNOLOGIES, ENTERPRISE REPORTER WEB CLIENT USER GUIDE 33
ADMINISTRATOR SECTION CHAPTER 2: CONFIGURING THE CLIENT
34
• Username Pattern - This frame is used for including users from a specific group (such as “sales”) on the network. In the Pattern field, enter the appropriate characters and wild card “%” to add specified users to the group. For example, type in sales% to add anyone to the group who has a “sales” designation on your network. Click the Add Pattern button to add the pattern.
• Define IP Range - This frame is used for including users based on a range of IP addresses. For example, you might have one range of IP addresses for sales, and another for admin. Enter the IP address range in the From and To fields. Click the Add IP Range button to add the IP address range.
• Individual Adds/Removes - This frame is used for including and/or excluding specified users. Click the Show All button to display a list of all users in the list box. To narrow down the list of users, make an entry in the Please enter a filter field using the “%” wild card, and click the Apply Filter button to only display the users you specified. To select from users in the list box, click on the user(s) to highlight your choice(s). After making all choices, click Add to Individuals to include the selected users to the group, or click Add to Excep-tions to exclude the users from the group.
TIP: In the Individual Adds/Removes frame, if you know which users you would like to add/exclude to/from the group, you can bypass the step for showing all users and making your selections. To use this shortcut, enter the criteria in the Please enter a filter field along with the “%” wild card, and then click the Apply Filter button to display your results in the list box.
4. After you have made your entries, click Close to close the pop-up box.
The following information displays in the Group Definitions frame list box when a selection for the group is made from the Group Name pull-down menu:
8E6 TECHNOLOGIES, ENTERPRISE REPORTER WEB CLIENT USER GUIDE
ADMINISTRATOR SECTION CHAPTER 2: CONFIGURING THE CLIENT
• If an entry was made in the Username Pattern frame, “PATTERN” and the character(s) you entered display(s).
• If entries were made in the IP Range frame, “IP RANGE(‘X.X.X.X’ AND ‘X.X.X.X’)” displays, in which ‘X.X.X.X’ represents the IP address that was entered in the From or To field.
• If entries were made in the Individual Adds/Removes frame, “INDIVIDUAL(...)” and/or “EXCEPTION(...)” displays, in which ‘(...)’ represents specific details about the entry.
NOTE: A combination of any of items above may display in the Group Definitions frame list box, based on entries you made in any of the frames in the pop-up box.
Disable a User Group
1. Select a user group from the Group Name pull-down menu. Users set up for that group display in the list box in this frame.
2. Click the Disable Group button to exclude the user group from reports.
TIPS: This function for specifying which user groups will not be included in reports is useful in conjunction with the Copy Group function—disabling an imported user group but enabling its copied counterpart.
Any user group that is currently disabled can be enabled by selecting the Group Name and clicking Enable Group.
Delete User(s) from User Group
1. Select a user group from the Group Name pull-down menu. Users set up for that group display in the list box in this frame.
2. Click on the user to highlight your selection.
8E6 TECHNOLOGIES, ENTERPRISE REPORTER WEB CLIENT USER GUIDE 35
ADMINISTRATOR SECTION CHAPTER 2: CONFIGURING THE CLIENT
36
TIP: To select multiple users, press the Ctrl key on your keyboard and then click on the users to highlight them.To select a block of users, click the first user, press the Shift key on your keyboard, and then click the last user.
3. Click the Delete Item(s) button to remove the user(s) from the user group.
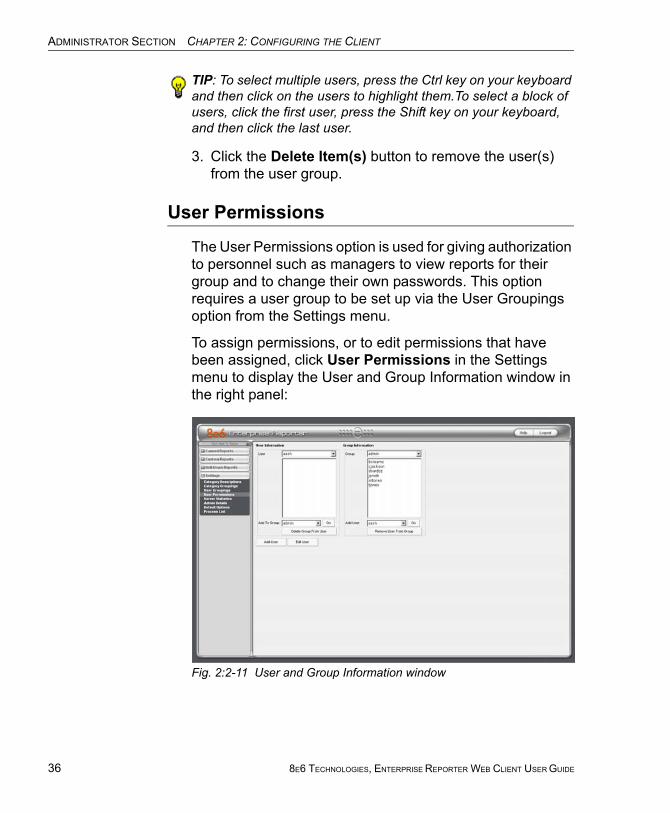
User Permissions
The User Permissions option is used for giving authorization to personnel such as managers to view reports for their group and to change their own passwords. This option requires a user group to be set up via the User Groupings option from the Settings menu.
To assign permissions, or to edit permissions that have been assigned, click User Permissions in the Settings menu to display the User and Group Information window in the right panel:
Fig. 2:2-11 User and Group Information window
8E6 TECHNOLOGIES, ENTERPRISE REPORTER WEB CLIENT USER GUIDE
ADMINISTRATOR SECTION CHAPTER 2: CONFIGURING THE CLIENT
Using the User and Group Information window, you can maintain the list of users and user groups set up to access the Client.
Add User
When adding a user who will be authorized to use the Client, you must first set up the user’s username and pass-word, indicate if the user will be able to access canned reports, then specify the group(s) to which the user will belong.
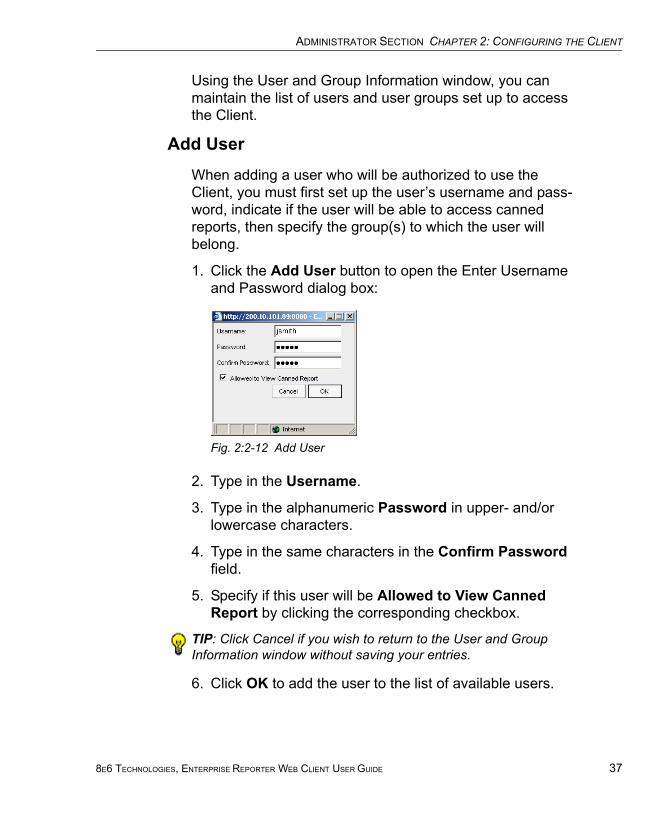
1. Click the Add User button to open the Enter Username and Password dialog box:
Fig. 2:2-12 Add User
2. Type in the Username.
3. Type in the alphanumeric Password in upper- and/or lowercase characters.
4. Type in the same characters in the Confirm Password field.
5. Specify if this user will be Allowed to View Canned Report by clicking the corresponding checkbox.
TIP: Click Cancel if you wish to return to the User and Group Information window without saving your entries.
6. Click OK to add the user to the list of available users.
8E6 TECHNOLOGIES, ENTERPRISE REPORTER WEB CLIENT USER GUIDE 37
ADMINISTRATOR SECTION CHAPTER 2: CONFIGURING THE CLIENT
38
NOTE: The username is added to the User pull-down menu in the User Information frame and also displays in the Add User pull-down menu in the Group Information frame.
You must now add the user to a user group by making entries in either the User Information frame or the Group Information frame. While both frames contain similar contents, each serves a different function. The User Infor-mation frame is used for maintaining a list of authorized users, while the Group Information frame is used for main-taining user groups.
User Information frame
In the User Information frame, you can add a user to a user group, or remove a user from a user group.
Add User to a User Group
1. Select the User from the pull-down menu. If the user has been added to other groups, these groups display in the list box below.
2. From the Add To Group pull-down menu, select the group to which the user should be added.
3. Click Go to add the user to the specified group, and to display the group name in the list box above.
Remove User from a User Group
1. Select the User from the pull-down menu. The user’s group(s) display(s) in the list box below.
2. Select the group from which the user should be removed by clicking on your choice to highlight it.
3. Click the Delete Group From User button to remove the group from user and from the list box.
8E6 TECHNOLOGIES, ENTERPRISE REPORTER WEB CLIENT USER GUIDE
ADMINISTRATOR SECTION CHAPTER 2: CONFIGURING THE CLIENT
Group Information frame
In the Group Information frame, you update user groups by adding or removing users.
Update User Group by Adding a User
1. Select the Group from the pull-down menu. Any users added to this user group display in the list box below.
2. From the Add User pull-down menu, select the user to be added to the group.
3. Click Go to display the user name in the list box above.
Update User Group by Removing a User
1. Select the Group from the pull-down menu. Any users added to this user group display in the list box below.
2. Select the user to be removed from the group by clicking on your choice to highlight it.
3. Click the Remove User From Group button to remove the user from the list box.
Edit Password, Change Permissions, Delete User
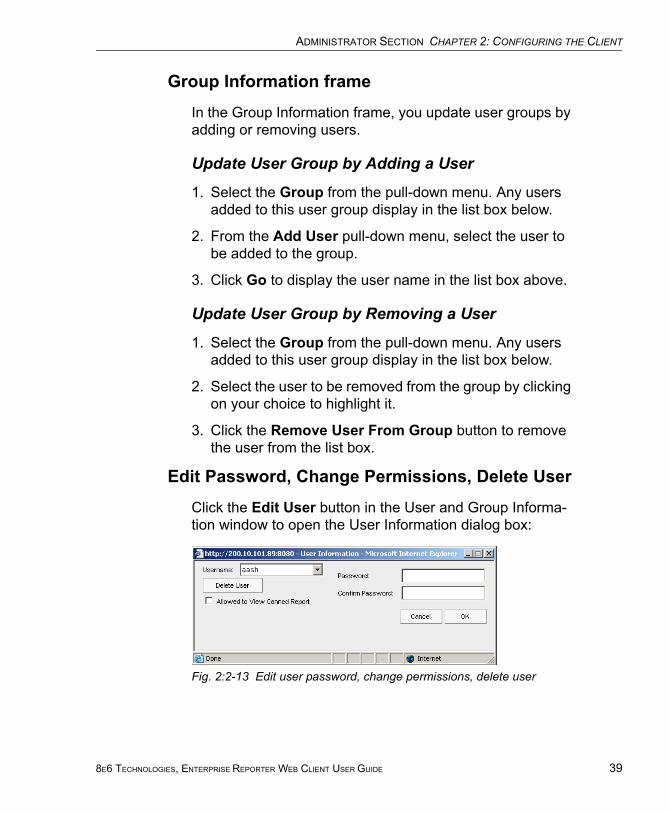
Click the Edit User button in the User and Group Informa-tion window to open the User Information dialog box:
Fig. 2:2-13 Edit user password, change permissions, delete user
8E6 TECHNOLOGIES, ENTERPRISE REPORTER WEB CLIENT USER GUIDE 39
ADMINISTRATOR SECTION CHAPTER 2: CONFIGURING THE CLIENT
40
In this dialog box you can modify a user’s password, change a user’s permissions for accessing canned reports, or delete a user from the user list.
TIP: Click Cancel if you wish to close the dialog box and return to the User and Group Information window without saving any edits.
Change a User’s Password
1. In the User Information dialog box, select the user from the Username pull-down menu.
2. In the Password field, type in the new alphanumeric password in upper- and/or lowercase characters.
3. Press the Tab key on your keyboard to move to the Confirm Password field, and type in the same charac-ters you entered in the Password field.
4. Click OK.
Change Permissions for Canned Report Access
1. In the User Information dialog box, select the user from the Username pull-down menu.
2. Click the Allowed to View Canned Report checkbox to add/remove the check mark from this box.
3. Click OK.
Delete a User
1. In the User Information dialog box, select the user from the Username pull-down menu.
2. Click the Delete User button to delete the user from the user list.
NOTE: The username is removed from the choices in the User pull-down menu in the User Information frame, and from the choices in the Add to User pull-down menu in the Group Informa-tion frame.
8E6 TECHNOLOGIES, ENTERPRISE REPORTER WEB CLIENT USER GUIDE
ADMINISTRATOR SECTION CHAPTER 2: CONFIGURING THE CLIENT
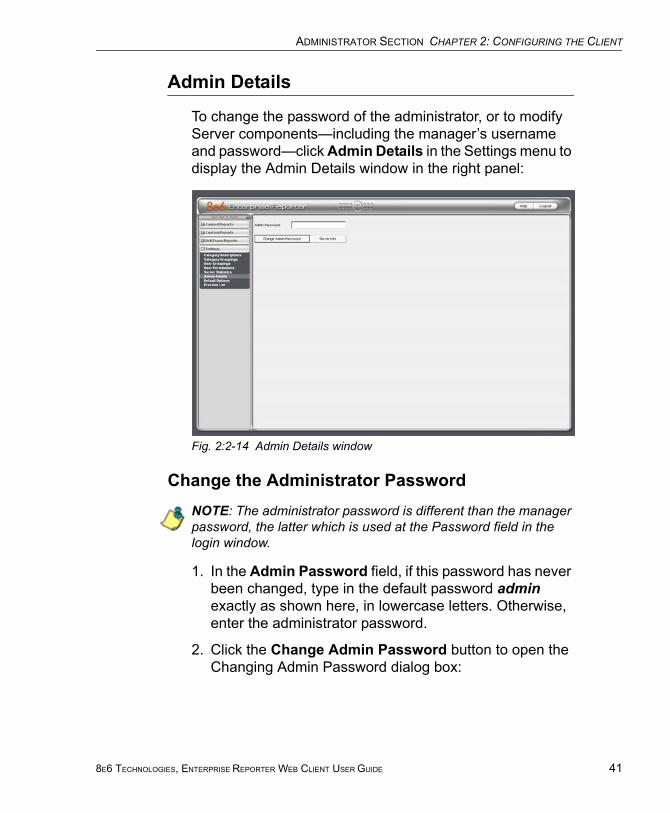
Admin Details
To change the password of the administrator, or to modify Server components—including the manager’s username and password—click Admin Details in the Settings menu to display the Admin Details window in the right panel:
Fig. 2:2-14 Admin Details window
Change the Administrator PasswordNOTE: The administrator password is different than the manager password, the latter which is used at the Password field in the login window.
1. In the Admin Password field, if this password has never been changed, type in the default password admin exactly as shown here, in lowercase letters. Otherwise, enter the administrator password.
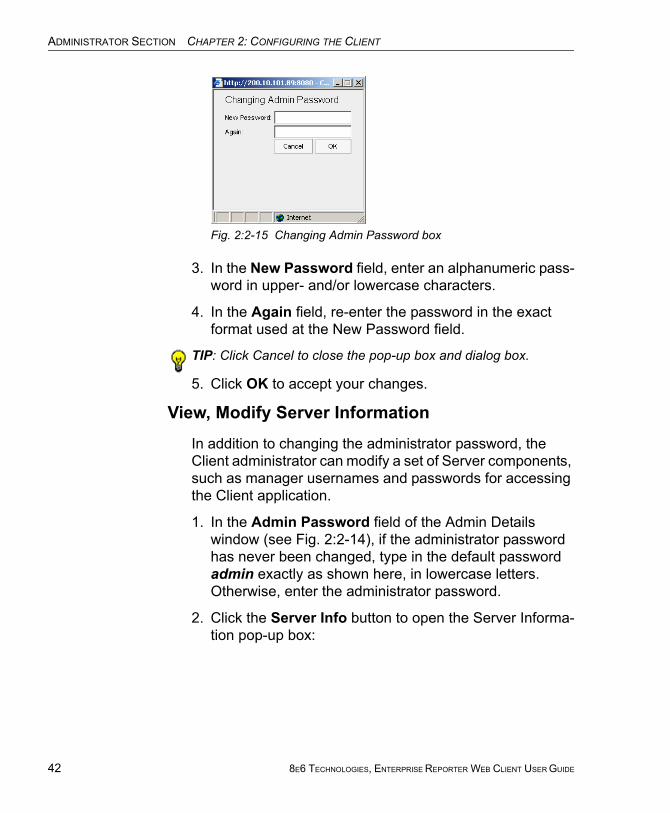
2. Click the Change Admin Password button to open the Changing Admin Password dialog box:
8E6 TECHNOLOGIES, ENTERPRISE REPORTER WEB CLIENT USER GUIDE 41
ADMINISTRATOR SECTION CHAPTER 2: CONFIGURING THE CLIENT
42
Fig. 2:2-15 Changing Admin Password box
3. In the New Password field, enter an alphanumeric pass-word in upper- and/or lowercase characters.
4. In the Again field, re-enter the password in the exact format used at the New Password field.
TIP: Click Cancel to close the pop-up box and dialog box.
5. Click OK to accept your changes.
View, Modify Server Information
In addition to changing the administrator password, the Client administrator can modify a set of Server components, such as manager usernames and passwords for accessing the Client application.
1. In the Admin Password field of the Admin Details window (see Fig. 2:2-14), if the administrator password has never been changed, type in the default password admin exactly as shown here, in lowercase letters. Otherwise, enter the administrator password.
2. Click the Server Info button to open the Server Informa-tion pop-up box:
8E6 TECHNOLOGIES, ENTERPRISE REPORTER WEB CLIENT USER GUIDE
ADMINISTRATOR SECTION CHAPTER 2: CONFIGURING THE CLIENT
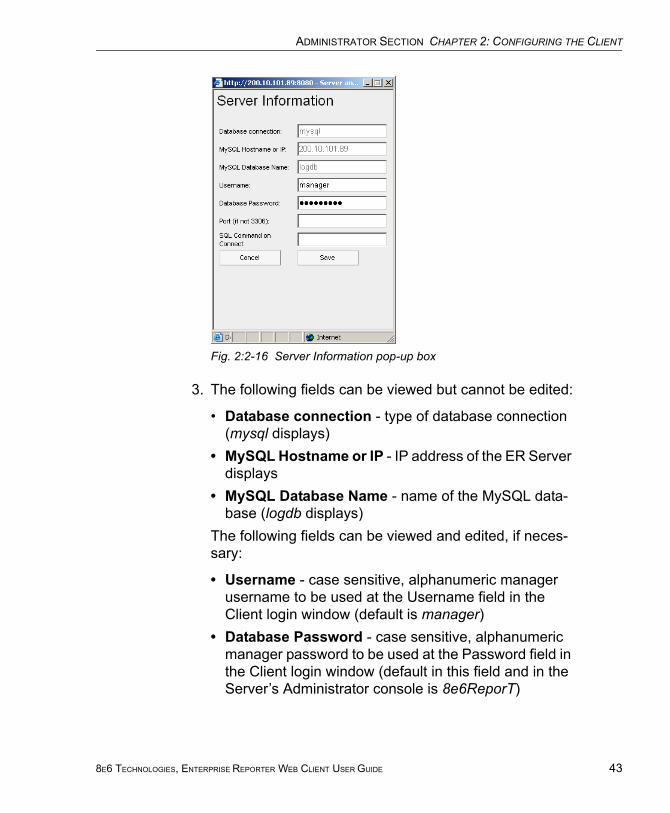
Fig. 2:2-16 Server Information pop-up box
3. The following fields can be viewed but cannot be edited:
• Database connection - type of database connection (mysql displays)
• MySQL Hostname or IP - IP address of the ER Server displays
• MySQL Database Name - name of the MySQL data-base (logdb displays)
The following fields can be viewed and edited, if neces-sary:
• Username - case sensitive, alphanumeric manager username to be used at the Username field in the Client login window (default is manager)
• Database Password - case sensitive, alphanumeric manager password to be used at the Password field in the Client login window (default in this field and in the Server’s Administrator console is 8e6ReporT)
8E6 TECHNOLOGIES, ENTERPRISE REPORTER WEB CLIENT USER GUIDE 43

ADMINISTRATOR SECTION CHAPTER 2: CONFIGURING THE CLIENT
44
WARNING: The password for the ER Client must be the same password entered on the Tools screen in the Administrator console. (On the ER Server, the default password is 8e6ReporT.) If you don’t know the database password, contact the adminis-trator of your ER Server. For more information about the Data-base Password, see the Tools screen sub-section under the Database menu in the Administrator Section of the ER Adminis-trator User Guide.
• Port (if not 3306) - port number (default is blank or zero)
• SQL Command on Connect - SQL command when connection is made (default is blank)
4. Click Save to save your entries, or click Cancel to proceed without saving your entries. Either action closes the Server Information pop-up box and returns you to the Admin Details window.
8E6 TECHNOLOGIES, ENTERPRISE REPORTER WEB CLIENT USER GUIDE
ADMINISTRATOR SECTION CHAPTER 2: CONFIGURING THE CLIENT
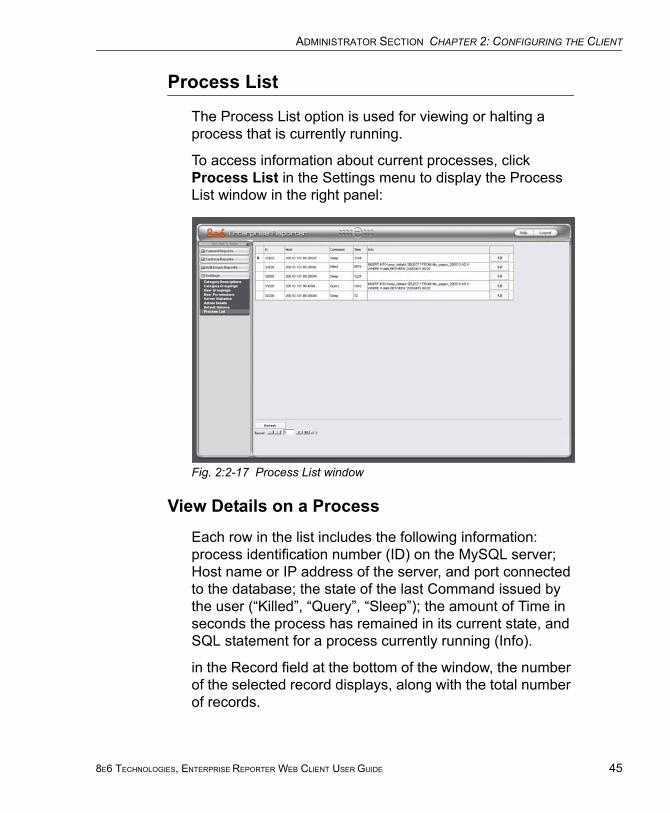
Process List
The Process List option is used for viewing or halting a process that is currently running.
To access information about current processes, click Process List in the Settings menu to display the Process List window in the right panel:
Fig. 2:2-17 Process List window
View Details on a Process
Each row in the list includes the following information: process identification number (ID) on the MySQL server; Host name or IP address of the server, and port connected to the database; the state of the last Command issued by the user (“Killed”, “Query”, “Sleep”); the amount of Time in seconds the process has remained in its current state, and SQL statement for a process currently running (Info).
in the Record field at the bottom of the window, the number of the selected record displays, along with the total number of records.
8E6 TECHNOLOGIES, ENTERPRISE REPORTER WEB CLIENT USER GUIDE 45
ADMINISTRATOR SECTION CHAPTER 2: CONFIGURING THE CLIENT
46
Click the Refresh button to refresh the list of records.
TIP: The selected record is designated by an arrow in the white box to the left of a row. To select another record, click the white box in that row to display the arrow. You also can navigate to another record by using the Record navigation field. Click in the box between the arrow buttons and enter a new record number to go to that record. Or click any of the four arrow buttons to advance forward or backward through the list of records. In the order in which they display in the Record field, clicking these buttons moves you to the first record, the record prior to the selected record, the record following the selected record, and the last record.
Terminate a Process
1. Select the process to be terminated and click Kill. This action opens a dialog box with the message: “Are you sure you want to kill this process?”
WARNING: Be sure that you do not kill the wrong process.
TIP: Click Cancel to resume the process and to close the dialog box.
2. Click OK to terminate the process. After the process is killed, an alert box opens displaying the message: “Process Killed!”
3. Click OK to close the alert box.
8E6 TECHNOLOGIES, ENTERPRISE REPORTER WEB CLIENT USER GUIDE
CLIENT USER SECTION INTRODUCTION
CLIENT USER SECTION
IntroductionThis section of the user guide provides instructions to managers on how to utilize the Client application to generate report views and interpret results.
8E6 TECHNOLOGIES, ENTERPRISE REPORTER WEB CLIENT USER GUIDE 47
CLIENT USER SECTION CHAPTER 1: INSTALLATION REQUIREMENTS
48
Chapter 1: Installation RequirementsThe following components must be installed in order to use the Client:
• Windows 2000 and Windows XP Operating Systems are supported for Web Client usage
• Pentium III class processor or greater
• 512 MG RAM minimum, 1 GB RAM recommended
• 2 GB hard drive space for saving files
• Internet Explorer 6 (or higher) must be installed on a workstation designated to use the Client
• screen resolution settings of 1024 x 768 are recom-mended
• if pop-up blocking software is installed on the worksta-tion, it must be disabled
NOTE: Information about disabling pop-up blocking software can be found in this Client User Guide in Appendix C: Disable Pop-up Blocking Software.
8E6 TECHNOLOGIES, ENTERPRISE REPORTER WEB CLIENT USER GUIDE
CLIENT USER SECTION CHAPTER 2: CUSTOMIZING THE CLIENT
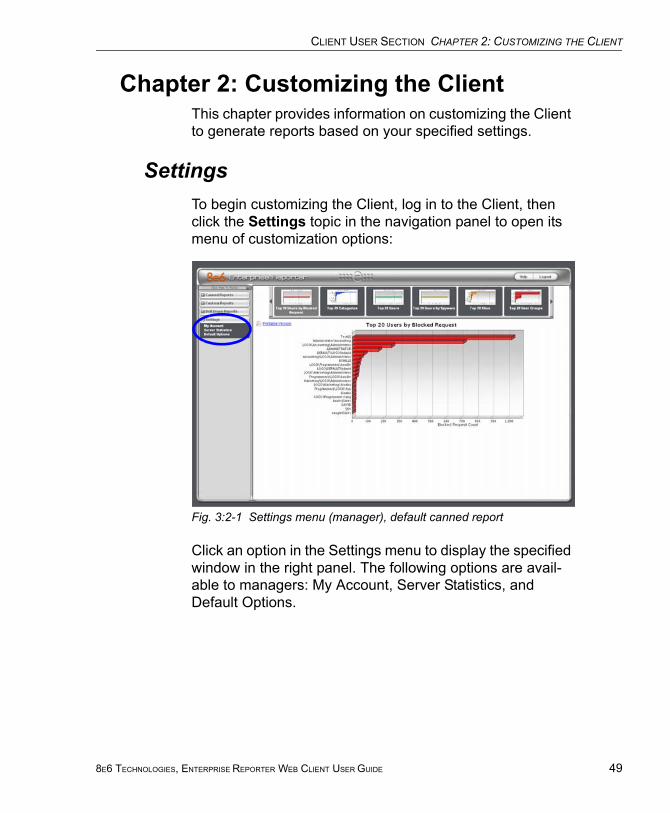
Chapter 2: Customizing the ClientThis chapter provides information on customizing the Client to generate reports based on your specified settings.
SettingsTo begin customizing the Client, log in to the Client, then click the Settings topic in the navigation panel to open its menu of customization options:
Fig. 3:2-1 Settings menu (manager), default canned report
Click an option in the Settings menu to display the specified window in the right panel. The following options are avail-able to managers: My Account, Server Statistics, and Default Options.
8E6 TECHNOLOGIES, ENTERPRISE REPORTER WEB CLIENT USER GUIDE 49
CLIENT USER SECTION CHAPTER 2: CUSTOMIZING THE CLIENT
50
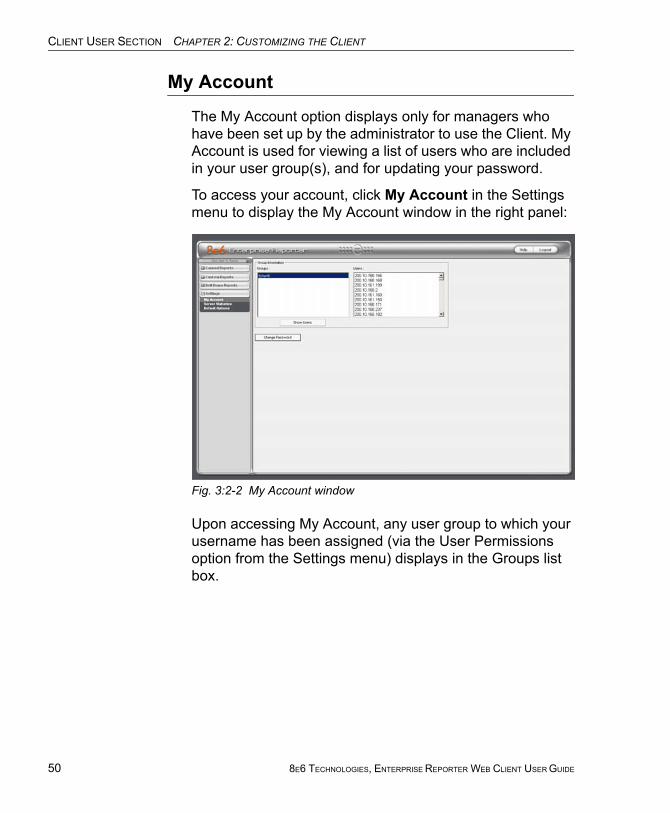
My Account
The My Account option displays only for managers who have been set up by the administrator to use the Client. My Account is used for viewing a list of users who are included in your user group(s), and for updating your password.
To access your account, click My Account in the Settings menu to display the My Account window in the right panel:
Fig. 3:2-2 My Account window
Upon accessing My Account, any user group to which your username has been assigned (via the User Permissions option from the Settings menu) displays in the Groups list box.
8E6 TECHNOLOGIES, ENTERPRISE REPORTER WEB CLIENT USER GUIDE
CLIENT USER SECTION CHAPTER 2: CUSTOMIZING THE CLIENT
View Users in a User Group
To view a list of users in your user group:
1. In the Groups list box, select the user group by clicking on your choice to highlight it.
2. Click the Show Users button to display the users in the Users list box to the right (see Fig. 3:2-2).
TIP: If there is another user group listed that you wish to view, follow the steps above to view the usernames in that user group.
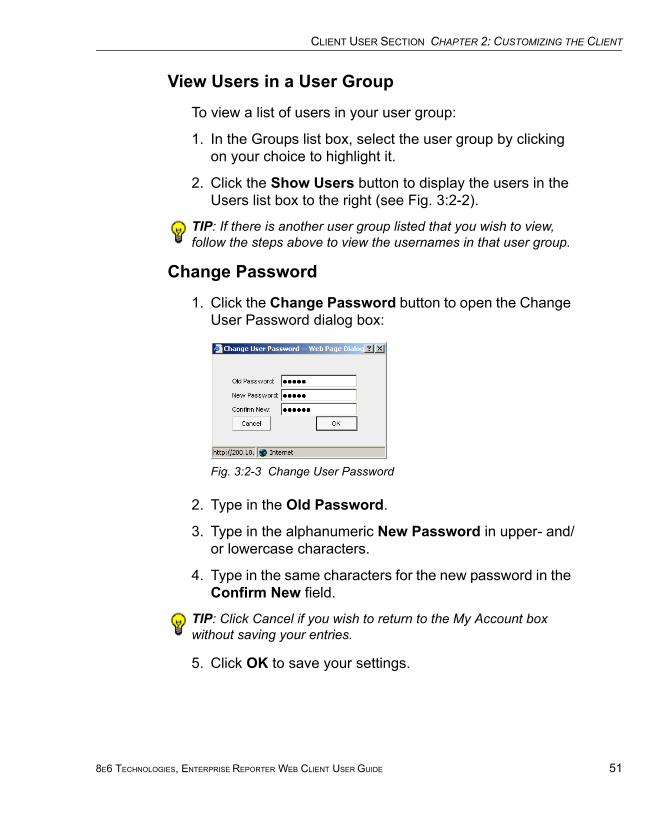
Change Password
1. Click the Change Password button to open the Change User Password dialog box:
Fig. 3:2-3 Change User Password
2. Type in the Old Password.
3. Type in the alphanumeric New Password in upper- and/or lowercase characters.
4. Type in the same characters for the new password in the Confirm New field.
TIP: Click Cancel if you wish to return to the My Account box without saving your entries.
5. Click OK to save your settings.
8E6 TECHNOLOGIES, ENTERPRISE REPORTER WEB CLIENT USER GUIDE 51
CLIENT USER SECTION CHAPTER 2: CUSTOMIZING THE CLIENT
52
Server Statistics
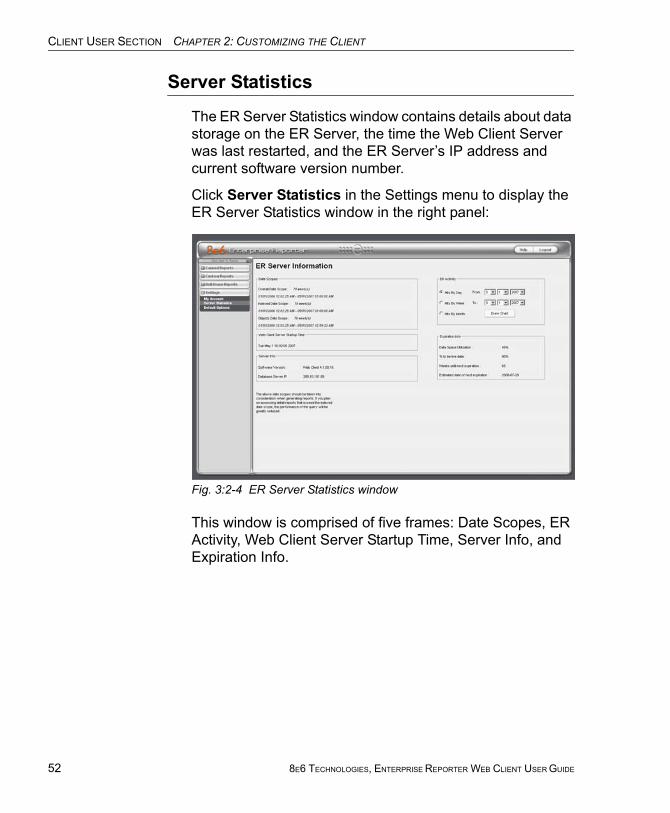
The ER Server Statistics window contains details about data storage on the ER Server, the time the Web Client Server was last restarted, and the ER Server’s IP address and current software version number.
Click Server Statistics in the Settings menu to display the ER Server Statistics window in the right panel:
Fig. 3:2-4 ER Server Statistics window
This window is comprised of five frames: Date Scopes, ER Activity, Web Client Server Startup Time, Server Info, and Expiration Info.
8E6 TECHNOLOGIES, ENTERPRISE REPORTER WEB CLIENT USER GUIDE
CLIENT USER SECTION CHAPTER 2: CUSTOMIZING THE CLIENT
Date Scopes
In the Date Scopes frame, the number of week(s) of data stored on the ER Server, and the date and time range display for the following date scopes:
• Overall Date Scope - this date scope pertains to all data currently stored on the Server, including both live (indexed) and archive (non-indexed) data.
• Indexed Date Scope - this date scope pertains only to live data currently stored on the Server. Live data can include Web pages and objects, and will always include the indexes for these items. Objects include images from Web pages, and items such as JavaScript files and flash files.
• Objects Date Scope - this date scope pertains only to objects currently stored on the Server. If this date scope overlaps the date ranges for indexed and non-indexed data currently stored on the Server, both live and archive items will be included in this date scope.
Web Client Server Startup Time
The Web Client Server Startup Time frame contains the following information pertaining to the last time the Web Client Server was restarted: Day of the week and month name abbreviation, day, military time (HH:MM:SS), and year (YYYY).
NOTE: This information is useful for troubleshooting manually generated reports. If your reports are not displaying, it may be that the Web Client Server has restarted and terminated the report generation process.
Server Info
The Server Info frame contains the following ER Server information: Software Version number and Database Server IP address.
8E6 TECHNOLOGIES, ENTERPRISE REPORTER WEB CLIENT USER GUIDE 53
CLIENT USER SECTION CHAPTER 2: CUSTOMIZING THE CLIENT
54
ER Activity
In the ER Activity frame, specify the type of chart you wish to generate that provides details on the number of hits within a designated time period. A “hit” is any page and/or object an end user accesses as the result of entering a URL in his/her browser window.
By default, the Hits By Day radio button is selected, and in the From and To fields, today’s date displays in the MM, DD, and YYYY format.
1. Specify the time period for the chart you wish to draw by doing the following:
• Click the radio button corresponding to Hits By Day, Hits By Week, or Hits By Month.
• At the From and To fields, make a selection from any of the pull-down menus for month (1-12), day (1-31), or year (2003-2010).
2. Click the Draw Chart button to open a window that displays the chart of your selection in the PDF file format.
The top portion of the chart includes the title of the chart, date range, and a graph illustrating the general Number of Hits for each unit of Time in the specified period.
The bottom portion of the chart includes details spelling out the time measurement (Day, Week, or Month), the exact Number of Hits corresponding to each unit of time, date and time the report was generated (shown in the MM/DD/YYYY HH:MM AM/PM format), and the Total Records.
Depending on the time frame specified, this chart may be several pages in length.
• Hits Per Day - If you selected Hits By Day, days within the date range are plotted on the graph, grouped into equal time intervals. The summary shows the Number of Hits for a specified Day (MM-DD-YYYY).
8E6 TECHNOLOGIES, ENTERPRISE REPORTER WEB CLIENT USER GUIDE

CLIENT USER SECTION CHAPTER 2: CUSTOMIZING THE CLIENT
Fig. 3:2-5 Hits Per Day chart
• Hits Per Week - If you selected Hits By Week, each week within the date range is plotted on the graph. The summary shows the Number of Hits for a specified Week (YYYY-WW). Weeks are numbered 1-52.
Fig. 3:2-6 Hits Per Week chart
8E6 TECHNOLOGIES, ENTERPRISE REPORTER WEB CLIENT USER GUIDE 55
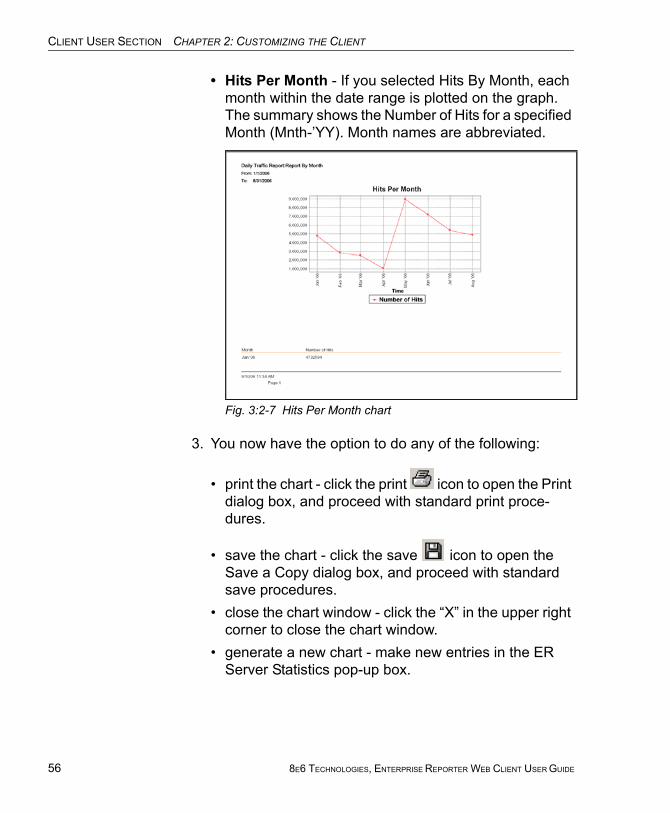
CLIENT USER SECTION CHAPTER 2: CUSTOMIZING THE CLIENT
56
• Hits Per Month - If you selected Hits By Month, each month within the date range is plotted on the graph. The summary shows the Number of Hits for a specified Month (Mnth-’YY). Month names are abbreviated.
Fig. 3:2-7 Hits Per Month chart
3. You now have the option to do any of the following:
• print the chart - click the print icon to open the Print dialog box, and proceed with standard print proce-dures.
• save the chart - click the save icon to open the Save a Copy dialog box, and proceed with standard save procedures.
• close the chart window - click the “X” in the upper right corner to close the chart window.
• generate a new chart - make new entries in the ER Server Statistics pop-up box.
8E6 TECHNOLOGIES, ENTERPRISE REPORTER WEB CLIENT USER GUIDE
CLIENT USER SECTION CHAPTER 2: CUSTOMIZING THE CLIENT
Expiration Info
In the Expiration Info frame, the following data displays:
• Data Space Utilization - the percentage of database storage space currently being used on the ER Server
• % to be live data - the percentage of data that is set to be live data stored on the Server
• Weeks until next expiration - the number of weeks from this week that data on the Server will expire
• Estimated date of next expiration - the date scheduled for the next automatic database expiration
8E6 TECHNOLOGIES, ENTERPRISE REPORTER WEB CLIENT USER GUIDE 57
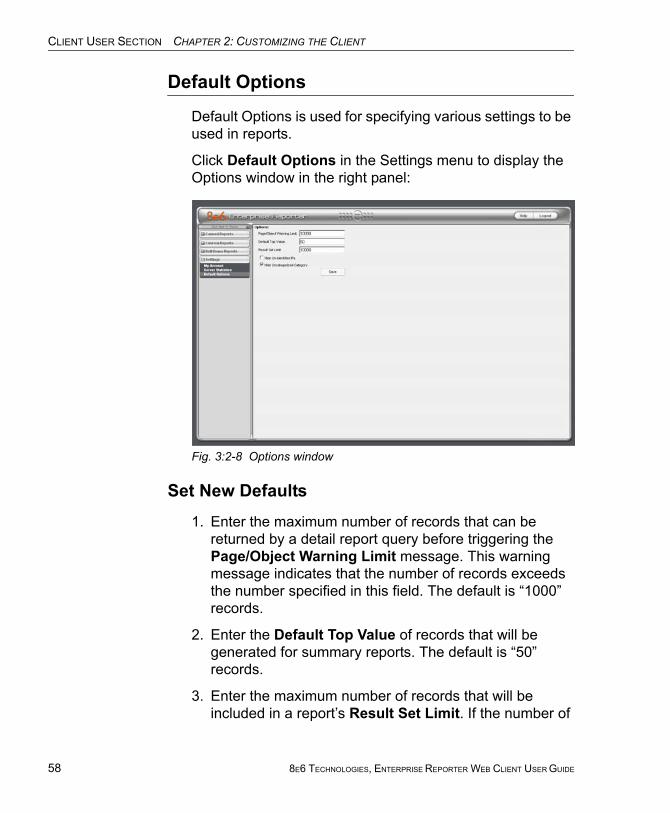
CLIENT USER SECTION CHAPTER 2: CUSTOMIZING THE CLIENT
58
Default Options
Default Options is used for specifying various settings to be used in reports.
Click Default Options in the Settings menu to display the Options window in the right panel:
Fig. 3:2-8 Options window
Set New Defaults
1. Enter the maximum number of records that can be returned by a detail report query before triggering the Page/Object Warning Limit message. This warning message indicates that the number of records exceeds the number specified in this field. The default is “1000” records.
2. Enter the Default Top Value of records that will be generated for summary reports. The default is “50” records.
3. Enter the maximum number of records that will be included in a report’s Result Set Limit. If the number of
8E6 TECHNOLOGIES, ENTERPRISE REPORTER WEB CLIENT USER GUIDE
CLIENT USER SECTION CHAPTER 2: CUSTOMIZING THE CLIENT
records from a query exceeds the limit established in this field, the overflow will be included in the next set of records. The default is “1000” records per set.
4. By default, the Hide Un-Identified IPs checkbox is dese-lected. This indicates that activity on machines not assigned to specific users will be included in reports.
If you wish to exclude activity from machines not assigned to specific users, click in the checkbox to enter a check mark.
NOTE: If the option for including IP addresses of unidentified machines is selected, when reports are generated, activity on these machines is included in a record under the “IP Only” label, or a customized label—if a unique label was created by the administrator of the ER Server.
5. By default, the Hide Uncategorized Category checkbox is selected. This indicates that uncategorized sites will not be displayed or counted in drill down reports.
If you wish to include uncategorized sites in drill down reports, click in the checkbox to remove the check mark.
TIP: Click Cancel to exit without saving your entries.
6. Click the Save button to save your settings and to exit the Options window.
8E6 TECHNOLOGIES, ENTERPRISE REPORTER WEB CLIENT USER GUIDE 59
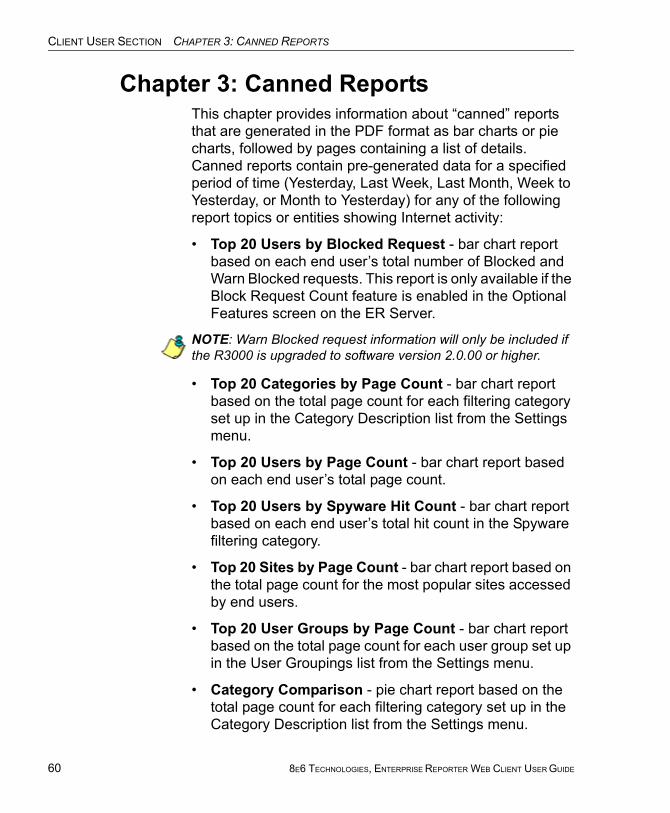
CLIENT USER SECTION CHAPTER 3: CANNED REPORTS
60
Chapter 3: Canned ReportsThis chapter provides information about “canned” reports that are generated in the PDF format as bar charts or pie charts, followed by pages containing a list of details. Canned reports contain pre-generated data for a specified period of time (Yesterday, Last Week, Last Month, Week to Yesterday, or Month to Yesterday) for any of the following report topics or entities showing Internet activity:
• Top 20 Users by Blocked Request - bar chart report based on each end user’s total number of Blocked and Warn Blocked requests. This report is only available if the Block Request Count feature is enabled in the Optional Features screen on the ER Server.
NOTE: Warn Blocked request information will only be included if the R3000 is upgraded to software version 2.0.00 or higher.
• Top 20 Categories by Page Count - bar chart report based on the total page count for each filtering category set up in the Category Description list from the Settings menu.
• Top 20 Users by Page Count - bar chart report based on each end user’s total page count.
• Top 20 Users by Spyware Hit Count - bar chart report based on each end user’s total hit count in the Spyware filtering category.
• Top 20 Sites by Page Count - bar chart report based on the total page count for the most popular sites accessed by end users.
• Top 20 User Groups by Page Count - bar chart report based on the total page count for each user group set up in the User Groupings list from the Settings menu.
• Category Comparison - pie chart report based on the total page count for each filtering category set up in the Category Description list from the Settings menu.
8E6 TECHNOLOGIES, ENTERPRISE REPORTER WEB CLIENT USER GUIDE
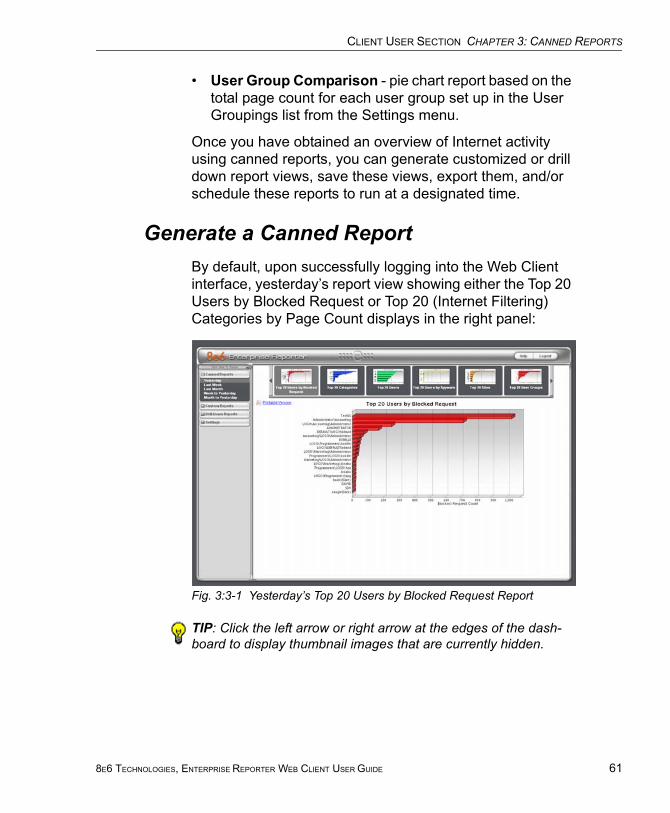
CLIENT USER SECTION CHAPTER 3: CANNED REPORTS
• User Group Comparison - pie chart report based on the total page count for each user group set up in the User Groupings list from the Settings menu.
Once you have obtained an overview of Internet activity using canned reports, you can generate customized or drill down report views, save these views, export them, and/or schedule these reports to run at a designated time.
Generate a Canned ReportBy default, upon successfully logging into the Web Client interface, yesterday’s report view showing either the Top 20 Users by Blocked Request or Top 20 (Internet Filtering) Categories by Page Count displays in the right panel:
Fig. 3:3-1 Yesterday’s Top 20 Users by Blocked Request Report
TIP: Click the left arrow or right arrow at the edges of the dash-board to display thumbnail images that are currently hidden.
8E6 TECHNOLOGIES, ENTERPRISE REPORTER WEB CLIENT USER GUIDE 61
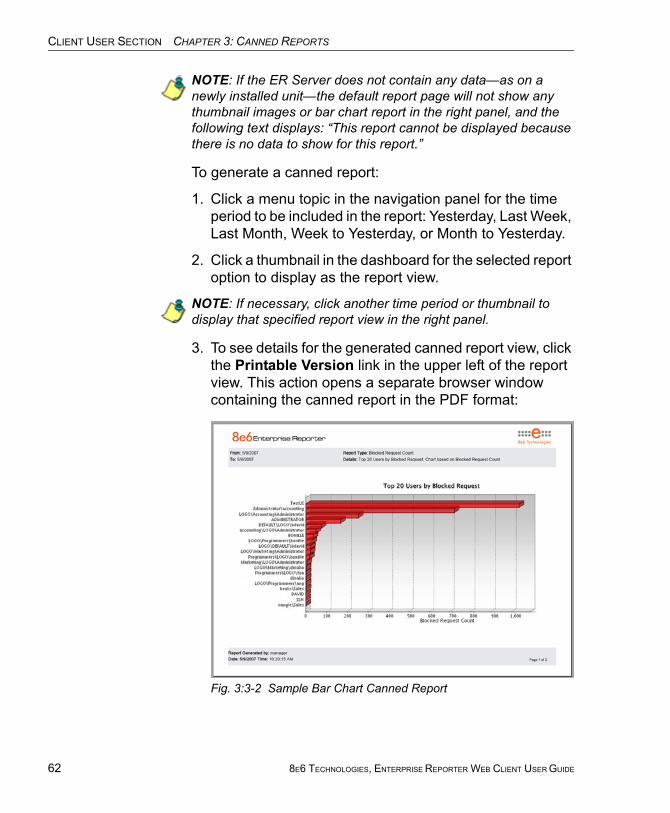
CLIENT USER SECTION CHAPTER 3: CANNED REPORTS
62
NOTE: If the ER Server does not contain any data—as on a newly installed unit—the default report page will not show any thumbnail images or bar chart report in the right panel, and the following text displays: “This report cannot be displayed because there is no data to show for this report.”
To generate a canned report:
1. Click a menu topic in the navigation panel for the time period to be included in the report: Yesterday, Last Week, Last Month, Week to Yesterday, or Month to Yesterday.
2. Click a thumbnail in the dashboard for the selected report option to display as the report view.
NOTE: If necessary, click another time period or thumbnail to display that specified report view in the right panel.
3. To see details for the generated canned report view, click the Printable Version link in the upper left of the report view. This action opens a separate browser window containing the canned report in the PDF format:
Fig. 3:3-2 Sample Bar Chart Canned Report
8E6 TECHNOLOGIES, ENTERPRISE REPORTER WEB CLIENT USER GUIDE
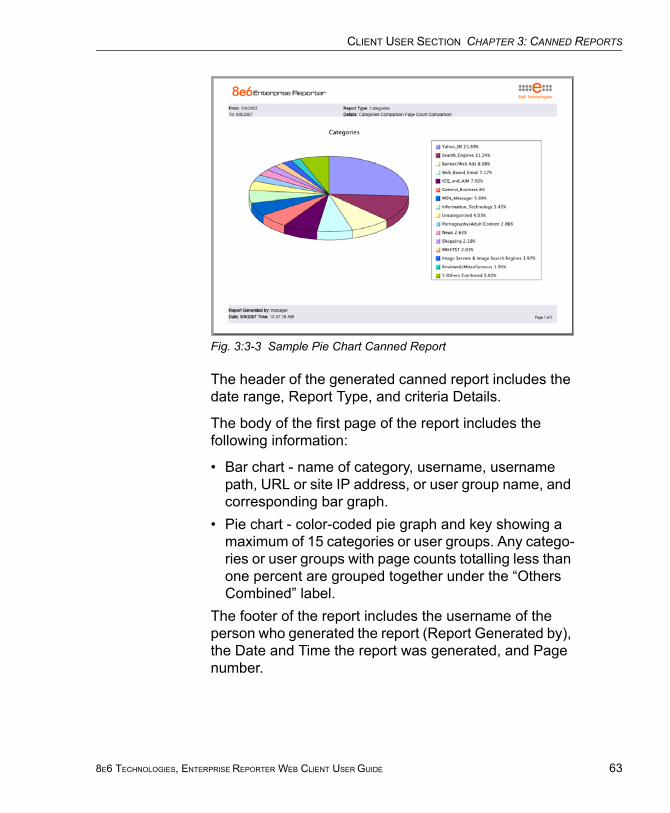
CLIENT USER SECTION CHAPTER 3: CANNED REPORTS
Fig. 3:3-3 Sample Pie Chart Canned Report
The header of the generated canned report includes the date range, Report Type, and criteria Details.
The body of the first page of the report includes the following information:
• Bar chart - name of category, username, username path, URL or site IP address, or user group name, and corresponding bar graph.
• Pie chart - color-coded pie graph and key showing a maximum of 15 categories or user groups. Any catego-ries or user groups with page counts totalling less than one percent are grouped together under the “Others Combined” label.
The footer of the report includes the username of the person who generated the report (Report Generated by), the Date and Time the report was generated, and Page number.
8E6 TECHNOLOGIES, ENTERPRISE REPORTER WEB CLIENT USER GUIDE 63
CLIENT USER SECTION CHAPTER 3: CANNED REPORTS
64
The body of the report is comprised of one or more pages after the bar or pie chart, and includes the following infor-mation:
• Top 20 Users by Blocked Request report - user NAME and corresponding BLOCKED REQUEST COUNT—which includes Blocked and Warn Blocked requests. Total Records and Total Number of Blocked Requests for this Date Scope display at the end of the report.
NOTE: In order for Warn Blocked requests to be included in the report, the R3000 must be upgraded to software version 2.0.00 or higher.
• All other reports - Count columns and corresponding totals for all reports. Grand Total and Count display at the end of the report.
Export a Canned ReportFrom the open PDF file, the canned report can be exported in some of the following ways:
• print the report - click the print icon to open the Print dialog box, and proceed with standard print procedures.
• save the report - click the save icon to open the Save a Copy dialog box, and proceed with standard save procedures.
• email the report file - go to File > Send > Page by E-mail to open an email message window containing the PDF file as an attachment, and proceed with standard email procedures.
• email the report link - go to File > Send > Link by E-mail to open an email message window containing a link to the PDF file, and proceed with standard email proce-dures.
8E6 TECHNOLOGIES, ENTERPRISE REPORTER WEB CLIENT USER GUIDE
CLIENT USER SECTION CHAPTER 4: SUMMARY AND DETAIL REPORTS
Chapter 4: Summary and Detail ReportsThe two basic reports administrators and managers can generate with customizations are the summary report and the detail report. Report views for these reports are imple-mented via the Custom Reports and the Drill Down Reports sections of the Client application.
While summary and detail reports share some common components with canned reports and Wall Clock Time reports, each kind of report also has its own unique compo-nents.
Before you begin generating report views for these reports, we recommend that you review this chapter in order to become familiar with the organization of summary and detail report views, and how report view tools and components are used in creating summary drill down reports and detail drill down reports customized to your specifications.
8E6 TECHNOLOGIES, ENTERPRISE REPORTER WEB CLIENT USER GUIDE 65
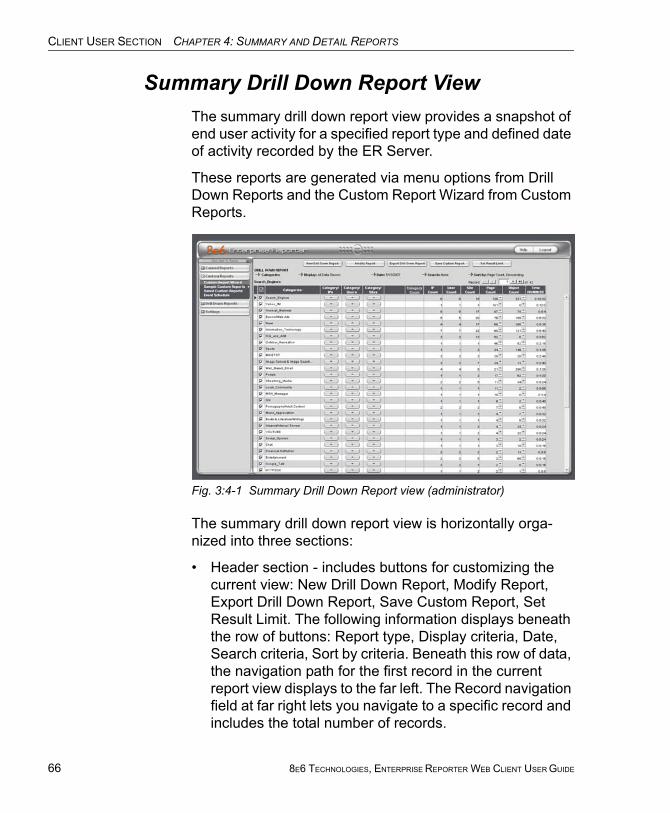
CLIENT USER SECTION CHAPTER 4: SUMMARY AND DETAIL REPORTS
66
Summary Drill Down Report ViewThe summary drill down report view provides a snapshot of end user activity for a specified report type and defined date of activity recorded by the ER Server.
These reports are generated via menu options from Drill Down Reports and the Custom Report Wizard from Custom Reports.
Fig. 3:4-1 Summary Drill Down Report view (administrator)
The summary drill down report view is horizontally orga-nized into three sections:
• Header section - includes buttons for customizing the current view: New Drill Down Report, Modify Report, Export Drill Down Report, Save Custom Report, Set Result Limit. The following information displays beneath the row of buttons: Report type, Display criteria, Date, Search criteria, Sort by criteria. Beneath this row of data, the navigation path for the first record in the current report view displays to the far left. The Record navigation field at far right lets you navigate to a specific record and includes the total number of records.
8E6 TECHNOLOGIES, ENTERPRISE REPORTER WEB CLIENT USER GUIDE
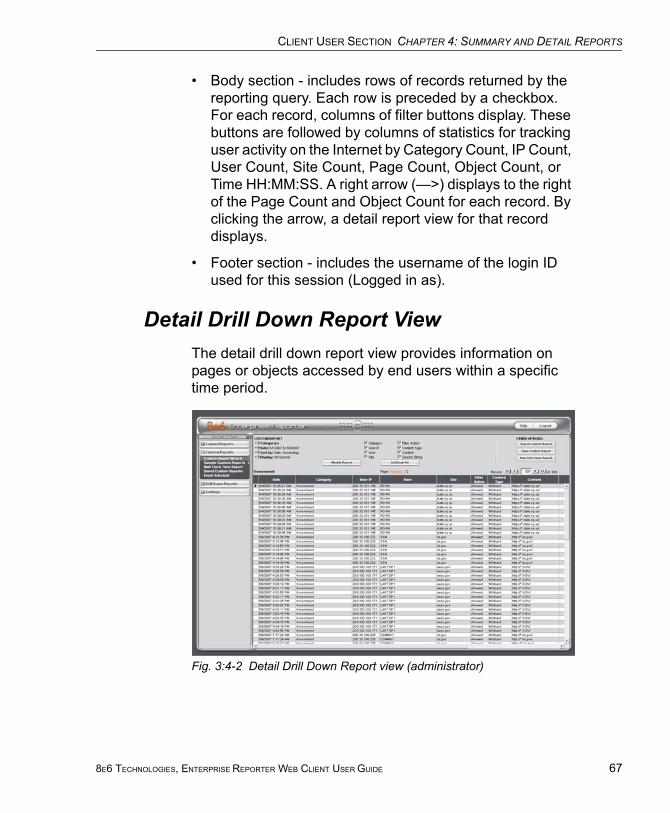
CLIENT USER SECTION CHAPTER 4: SUMMARY AND DETAIL REPORTS
• Body section - includes rows of records returned by the reporting query. Each row is preceded by a checkbox. For each record, columns of filter buttons display. These buttons are followed by columns of statistics for tracking user activity on the Internet by Category Count, IP Count, User Count, Site Count, Page Count, Object Count, or Time HH:MM:SS. A right arrow (—>) displays to the right of the Page Count and Object Count for each record. By clicking the arrow, a detail report view for that record displays.
• Footer section - includes the username of the login ID used for this session (Logged in as).
Detail Drill Down Report ViewThe detail drill down report view provides information on pages or objects accessed by end users within a specific time period.
Fig. 3:4-2 Detail Drill Down Report view (administrator)
8E6 TECHNOLOGIES, ENTERPRISE REPORTER WEB CLIENT USER GUIDE 67
CLIENT USER SECTION CHAPTER 4: SUMMARY AND DETAIL REPORTS
68
Similarly with summary reports, these reports are generated via menu options from Drill Down Reports and the Custom Report Wizard from Custom Reports.
As with the summary report view, the detail report view is also horizontally organized into three sections but includes different content in its header and body:
• Header section - includes the following data: report type, Date, Sort by criteria, and Display information for records. Checkboxes (used for specifying columns to be included in the body of the report) display to the right of this information: Category, User IP, User name, Site, Filter Action, Content Type, Content, Search String. The following buttons display below: Modify Report, UnCheck All / Check All. The following Other Options buttons display to the right: Export Custom Report, Save Custom Report, New Drill Down Report. The navigation path for the first record in the current report view displays below to the far left. The Record navigation field at far right lets you navigate to a specific record and includes the total number of records.
• Body section - includes rows of records returned by the reporting query. The Date and URL columns display for each record, along with any of the following columns specified by populating the corresponding checkbox in the header: Categories, User IP, User name, Site, Filter Action, Content Type, Content criteria, Search String, URL (hyperlink).
• Footer section - includes the username of the login ID used for this session (Logged in as).
8E6 TECHNOLOGIES, ENTERPRISE REPORTER WEB CLIENT USER GUIDE
CLIENT USER SECTION CHAPTER 4: SUMMARY AND DETAIL REPORTS
Report View Tools and Usage TipsUnderstanding report view tools and their functions is para-mount to generating a report containing relevant content, since the usage of these tools determines the results of your query.
As you will learn from the rest of this chapter, report view tools along with report view components help you create the desired report view. This report view can then be exported, saved, and/or scheduled to run at a specified time.
Navigation Tips
Back button
Click the Back button in the toolbar of the browser window to return to a previous page in the current report.
Record navigation field
The total number of records displays to the right of the Record navigation field, located above the rows of records:
This indicator helps you determine how long it will take to generate a report view or to print a report. If there are many records, you may wish to filter your results to reduce the time it will take to process the report.
The selected record is designated by the record number displayed in the Record navigation field, and by an arrow to the left of a record in the body of a report view.
To select another record, do any of the following:
8E6 TECHNOLOGIES, ENTERPRISE REPORTER WEB CLIENT USER GUIDE 69

CLIENT USER SECTION CHAPTER 4: SUMMARY AND DETAIL REPORTS
70
• click the specified row to display the arrow preceding that record, and the record number in the Record navigation field.
• in the Record navigation field, enter a new record number in the white box between the arrow buttons to go to that record.
• in the Record navigation field, click any of the four arrow buttons to advance forward or backward through the list of records. In the order in which they display in the Record field, clicking these buttons moves you to the first record, the record prior to the selected record, the record following the selected record, and the last record.
Summary Report View Tools and Tips
Filter columns and buttons
In a summary drill down report view, filter columns display after the column containing the record name, and precede the Count columns (Category Count, IP Count, User Count, Site Count, Page Count, Object Count, Time HH:MM:SS). Filter columns include an oblong button for each record in the report view.
Clicking a specific filter button for a record gives more in-depth analysis on a given record displayed in the current view.
8E6 TECHNOLOGIES, ENTERPRISE REPORTER WEB CLIENT USER GUIDE

CLIENT USER SECTION CHAPTER 4: SUMMARY AND DETAIL REPORTS
Count columns and column arrows
In a summary drill down report view, columns for specified “item counts” display in the body of the report view. The column for the current report type does not display and therefore cannot be selected.
• Category Count - displays the number of categories a user has visited, or the number of categories included within a given site. Categories are set up for the Web access logging device filter via the Settings menu option. It is possible for a site to be listed in more than one cate-gory, so even if a user has visited only one site, this column may count the user’s visit in two or three catego-ries.
• IP Count - displays the number of sites or categories visited by the IP address on the user’s machine.
• User Count - displays the number of individuals who have visited a specific site or category.
• Site Count - displays the number of sites a user has visited, or the number of sites in a category. This figure is based on the root name of the site. For example, if a user visits www.espn.com, www.msn.com, and www.foxsports.com, that user will have visited three pages. If that same user additionally visits www.espn.com/scores, the total number of sites visited would still count as three—and not as four—because the latter page is on the original ESPN site that was already counted.
8E6 TECHNOLOGIES, ENTERPRISE REPORTER WEB CLIENT USER GUIDE 71
CLIENT USER SECTION CHAPTER 4: SUMMARY AND DETAIL REPORTS
72
• Page Count - displays the total number of pages visited. A user may visit only one site, but visit 20 pages on that site. If a user visits a page with pop-up ads, these items would add to the page count. If a page has banner ads that link to other pages, these items also would factor into the page count. In categories that use a lot of pop-up ads—porn, gambling, and other related sites—the page count usually exceeds the number of objects per page.
By clicking the arrow to the right of any record in this column, the detail report view displays data for all pages accessed, including hyperlinks to those pages. In the detail report view, you have the option to exclude Infor-mation columns for Category, User IP, User name, Site, Filter Action, Content Type, Content criteria, and Search String by clicking the corresponding checkboxes.
• Object Count - displays the number of objects on a Web page. All images, graphics, multimedia items, and text items count as objects. The number of objects on a page is generally higher than the number of pages a user visits.
However, if an advertisement or banner ad (an object on the page) is actually a page from another site, this item would not be classified as an object but as a page, since it comes from a different server.
By clicking the arrow to the right of any record in this column, the detail report view displays data for all objects accessed, including hyperlinks to those objects. In the detail report view, you have the option to include Informa-tion columns for Category, User IP, User name, Site, Filter Action, Content Type, Content criteria, and Search String by clicking the corresponding checkboxes.
8E6 TECHNOLOGIES, ENTERPRISE REPORTER WEB CLIENT USER GUIDE
CLIENT USER SECTION CHAPTER 4: SUMMARY AND DETAIL REPORTS
NOTE: If “Pages only” was specified in the Object Count frame of the Optional Features screen in the Administrator interface, all records of objects accessed by end users will be lost for the time period in which this option was enabled. Even if there were objects accessed by end users during that time period, zeroes (“0”) will display in the Object Count column in the report. See the Optional Features sub-section of the ER Administrator User Guide for information about Object Count frame options.
• Time HH:MM:SS - displays the amount of time a user spent at a given site. Each page detected by a user’s machine adds to the count. If a browser window is opened to a certain page and left there for an extended time period, and that page is refreshed by either the user or a banner ad, the counter starts again and continues as long as Web activity is detected. If that Web page contains an active banner ad that refreshes the page every 10 to 30 seconds, a user could show an incredibly high page count and many minutes, even though only one page was opened by that user.
Column sorting tips
To sort summary report view records in ascending/descending order by a specified column, click that column’s header: Category Count, IP Count, User Count, Site Count, Page Count, Object Count, or Time HH:MM:SS).
Click the same column header again to sort records for that column in the reverse order.
Click another column header to sort records by that speci-fied column.
8E6 TECHNOLOGIES, ENTERPRISE REPORTER WEB CLIENT USER GUIDE 73
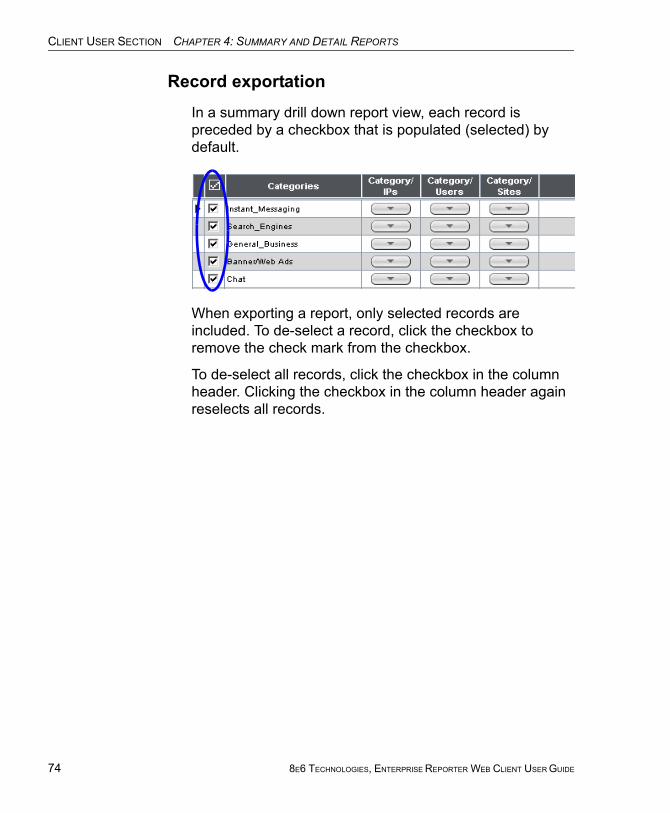
CLIENT USER SECTION CHAPTER 4: SUMMARY AND DETAIL REPORTS
74
Record exportation
In a summary drill down report view, each record is preceded by a checkbox that is populated (selected) by default.
When exporting a report, only selected records are included. To de-select a record, click the checkbox to remove the check mark from the checkbox.
To de-select all records, click the checkbox in the column header. Clicking the checkbox in the column header again reselects all records.
8E6 TECHNOLOGIES, ENTERPRISE REPORTER WEB CLIENT USER GUIDE
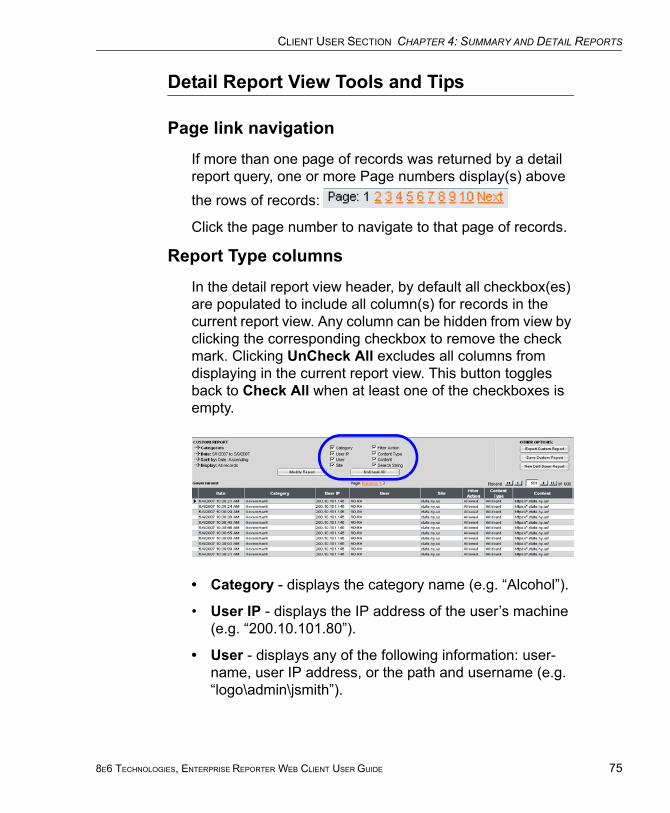
CLIENT USER SECTION CHAPTER 4: SUMMARY AND DETAIL REPORTS
Detail Report View Tools and Tips
Page link navigation
If more than one page of records was returned by a detail report query, one or more Page numbers display(s) above the rows of records:
Click the page number to navigate to that page of records.
Report Type columns
In the detail report view header, by default all checkbox(es) are populated to include all column(s) for records in the current report view. Any column can be hidden from view by clicking the corresponding checkbox to remove the check mark. Clicking UnCheck All excludes all columns from displaying in the current report view. This button toggles back to Check All when at least one of the checkboxes is empty.
• Category - displays the category name (e.g. “Alcohol”).
• User IP - displays the IP address of the user’s machine (e.g. “200.10.101.80”).
• User - displays any of the following information: user-name, user IP address, or the path and username (e.g. “logo\admin\jsmith”).
8E6 TECHNOLOGIES, ENTERPRISE REPORTER WEB CLIENT USER GUIDE 75
CLIENT USER SECTION CHAPTER 4: SUMMARY AND DETAIL REPORTS
76
• Site - displays the URL the user attempted to access (e.g. “coors.com”).
• Filter Action - displays the type of filter action used by the R3000 in creating the record: "Allowed", "Blocked", "Warn Blocked" (for the first warning page that displayed for the end user), "Warn Allowed" (for any subsequent warning page that displayed for the end user), "X-Strike", or "N/A" if the filter action was unclassified at the time the log file was created.
NOTE: “Warn Blocked” and “Warn Allowed” will only display if the R3000 has been upgraded to software version 2.0.00 or higher.
• Content Type - displays the method used by the R3000 in creating the record: “Search KW” (Search Engine Keyword), “URL KW” (URL Keyword), “URL”, “Wildcard”, “Https High” (HTTPS Filtering Level set at High), “X-strike” (X Strikes Blocking), “Pattern” (Proxy Pattern Blocking), or “N/A” if the content was unclassified at the time the log file was created.
• Content - displays criteria used for determining the cate-gorization of the record, or “N/A” if unclassified.
• Search String - displays the full search string the end user typed into a search engine text box in search sites such as Google, Yahoo!, MSN, AOL, Ask.com, YouTube.com, and MySpace.com—if the Search Engine Reporting option is enabled in the Optional Features screen of the Administrator interface.
NOTE: Refer to the Optional Features screen sub-section of the ER Administrator User Guide for information about the Search String feature.
8E6 TECHNOLOGIES, ENTERPRISE REPORTER WEB CLIENT USER GUIDE
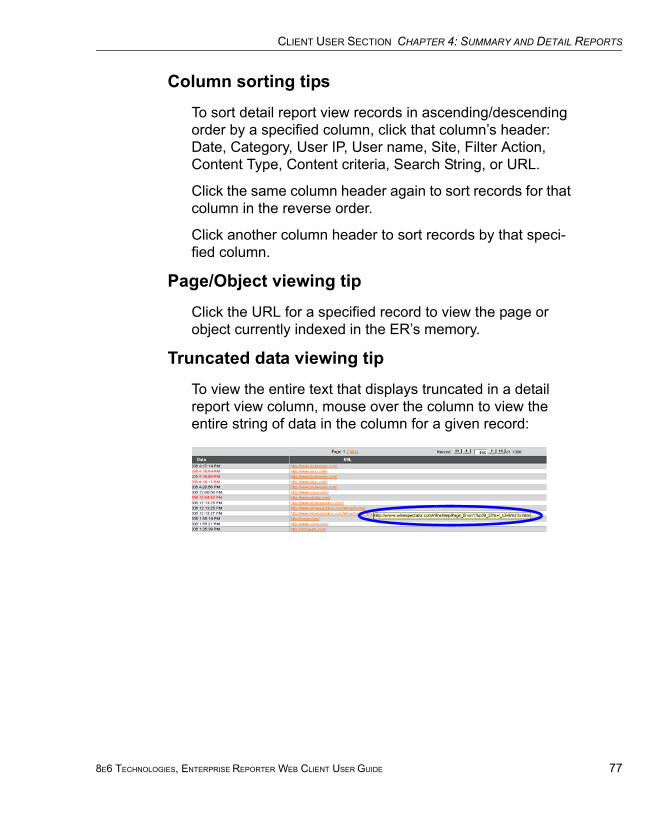
CLIENT USER SECTION CHAPTER 4: SUMMARY AND DETAIL REPORTS
Column sorting tips
To sort detail report view records in ascending/descending order by a specified column, click that column’s header: Date, Category, User IP, User name, Site, Filter Action, Content Type, Content criteria, Search String, or URL.
Click the same column header again to sort records for that column in the reverse order.
Click another column header to sort records by that speci-fied column.
Page/Object viewing tip
Click the URL for a specified record to view the page or object currently indexed in the ER’s memory.
Truncated data viewing tip
To view the entire text that displays truncated in a detail report view column, mouse over the column to view the entire string of data in the column for a given record:
8E6 TECHNOLOGIES, ENTERPRISE REPORTER WEB CLIENT USER GUIDE 77
CLIENT USER SECTION CHAPTER 4: SUMMARY AND DETAIL REPORTS
78
Using escape characters in an NT domain query
When running a query on an NT domain and special charac-ters are present in the search string, escape characters must be included in the username entry.
MySQL recognizes the following escape sequences:
• \' A single quote ( ‘ ) character.• \" A double quote ( “ ) character.• \\ A backslash ( \ ) character.• \% A percentage ( % ) character.• \_ An underscore ( _ ) character.
Example:• Single quote: \'• Original string: John Smith's• New string: John Smith\'s
Scenario 1: If usernames are entered as follows:
CO-Administration\Steve.WilliamsCO-Financial\Susan.Reynolds
In order to find these users via a New Custom Report query in the ER client, you need to add a secondary "\" to all "\" entries in the string, as follows:
CO-Administration\\Steve.WilliamsCO-Financial\\Susan.Reynolds
Scenario 2: If a domain name precedes the username, as in the following entries:
COOP\CO-Administration\Steve.WilliamsCOOP\CO-Financial\Susan.Reynolds
Entries should be as follows:
COOP\\CO-Administration\\Steve.WilliamsCOOP\\CO-Financial\\Susan.Reynolds
8E6 TECHNOLOGIES, ENTERPRISE REPORTER WEB CLIENT USER GUIDE

CLIENT USER SECTION CHAPTER 4: SUMMARY AND DETAIL REPORTS
Header Buttons for Customization Options
Clicking a button in the header of a report view opens a pop-up box that lets you customize the current report view. The following header buttons are available in summary and detail report views: New Drill Down Report, Modify Report, and Save Custom Report.
The Export Drill Down Report and Set Result Limit buttons additionally are available in summary reports, and the Export Custom Report button is exclusively available in detail reports.
NOTE: Information on using the fields in these pop-up boxes can be found in the Report View Components sub-section.
New Drill Down Report button
This option that is available in both summary and detail reports lets you generate a drill down report view for a date range other than the current (default) date.
Fig. 3:4-3 New Drill Down Report pop-up box
Click the Advance Options button to display additional fields in this box that let you modify the way the view is sorted, or enter search criteria:
8E6 TECHNOLOGIES, ENTERPRISE REPORTER WEB CLIENT USER GUIDE 79
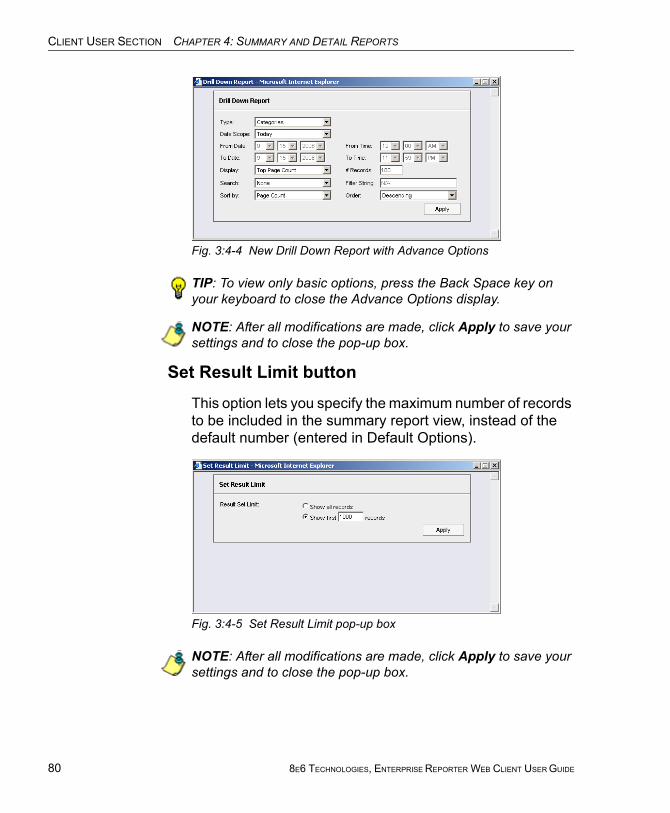
CLIENT USER SECTION CHAPTER 4: SUMMARY AND DETAIL REPORTS
80
Fig. 3:4-4 New Drill Down Report with Advance Options
TIP: To view only basic options, press the Back Space key on your keyboard to close the Advance Options display.
NOTE: After all modifications are made, click Apply to save your settings and to close the pop-up box.
Set Result Limit button
This option lets you specify the maximum number of records to be included in the summary report view, instead of the default number (entered in Default Options).
Fig. 3:4-5 Set Result Limit pop-up box
NOTE: After all modifications are made, click Apply to save your settings and to close the pop-up box.
8E6 TECHNOLOGIES, ENTERPRISE REPORTER WEB CLIENT USER GUIDE
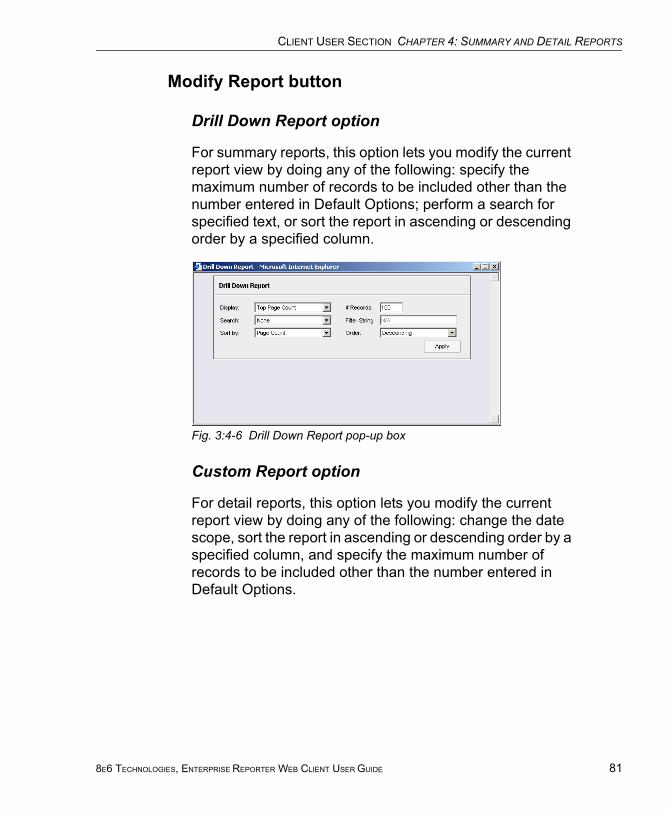
CLIENT USER SECTION CHAPTER 4: SUMMARY AND DETAIL REPORTS
Modify Report button
Drill Down Report option
For summary reports, this option lets you modify the current report view by doing any of the following: specify the maximum number of records to be included other than the number entered in Default Options; perform a search for specified text, or sort the report in ascending or descending order by a specified column.
Fig. 3:4-6 Drill Down Report pop-up box
Custom Report option
For detail reports, this option lets you modify the current report view by doing any of the following: change the date scope, sort the report in ascending or descending order by a specified column, and specify the maximum number of records to be included other than the number entered in Default Options.
8E6 TECHNOLOGIES, ENTERPRISE REPORTER WEB CLIENT USER GUIDE 81
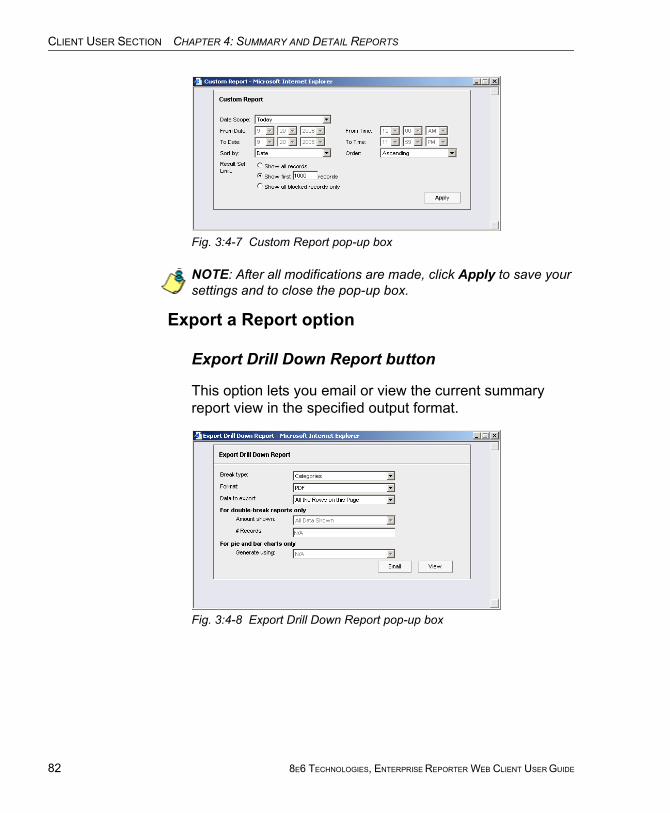
CLIENT USER SECTION CHAPTER 4: SUMMARY AND DETAIL REPORTS
82
Fig. 3:4-7 Custom Report pop-up box
NOTE: After all modifications are made, click Apply to save your settings and to close the pop-up box.
Export a Report option
Export Drill Down Report button
This option lets you email or view the current summary report view in the specified output format.
Fig. 3:4-8 Export Drill Down Report pop-up box
8E6 TECHNOLOGIES, ENTERPRISE REPORTER WEB CLIENT USER GUIDE
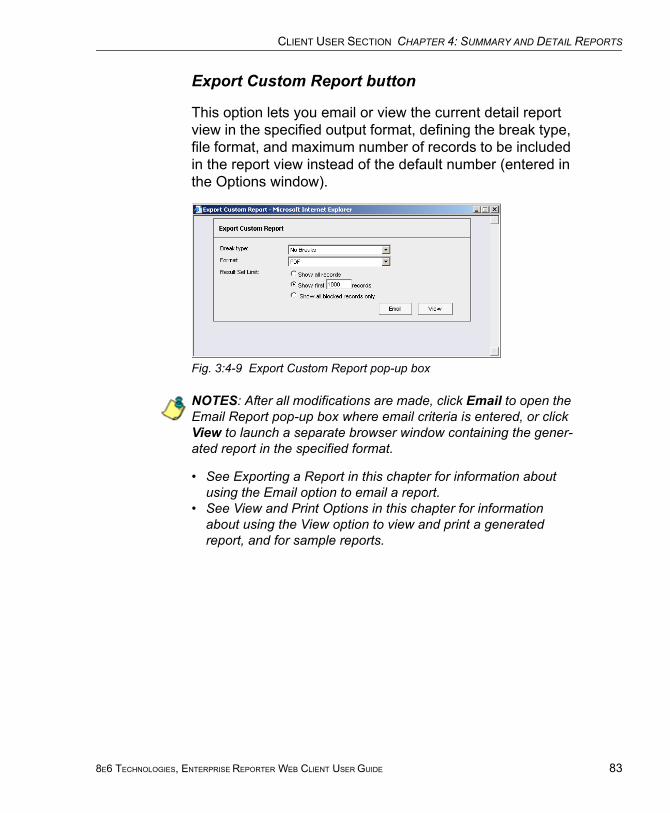
CLIENT USER SECTION CHAPTER 4: SUMMARY AND DETAIL REPORTS
Export Custom Report button
This option lets you email or view the current detail report view in the specified output format, defining the break type, file format, and maximum number of records to be included in the report view instead of the default number (entered in the Options window).
Fig. 3:4-9 Export Custom Report pop-up box
NOTES: After all modifications are made, click Email to open the Email Report pop-up box where email criteria is entered, or click View to launch a separate browser window containing the gener-ated report in the specified format.
• See Exporting a Report in this chapter for information about using the Email option to email a report.
• See View and Print Options in this chapter for information about using the View option to view and print a generated report, and for sample reports.
8E6 TECHNOLOGIES, ENTERPRISE REPORTER WEB CLIENT USER GUIDE 83
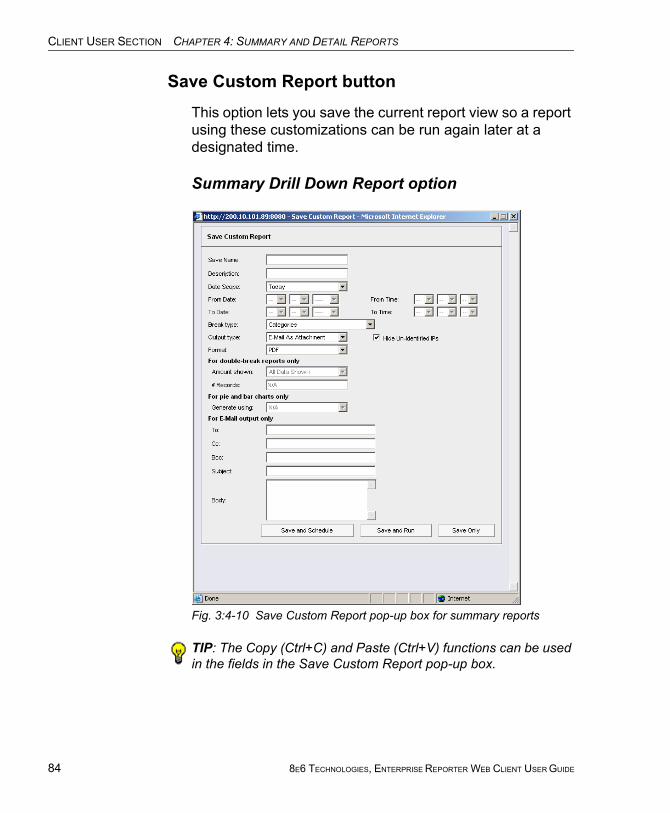
CLIENT USER SECTION CHAPTER 4: SUMMARY AND DETAIL REPORTS
84
Save Custom Report button
This option lets you save the current report view so a report using these customizations can be run again later at a designated time.
Summary Drill Down Report option
Fig. 3:4-10 Save Custom Report pop-up box for summary reports
TIP: The Copy (Ctrl+C) and Paste (Ctrl+V) functions can be used in the fields in the Save Custom Report pop-up box.
8E6 TECHNOLOGIES, ENTERPRISE REPORTER WEB CLIENT USER GUIDE
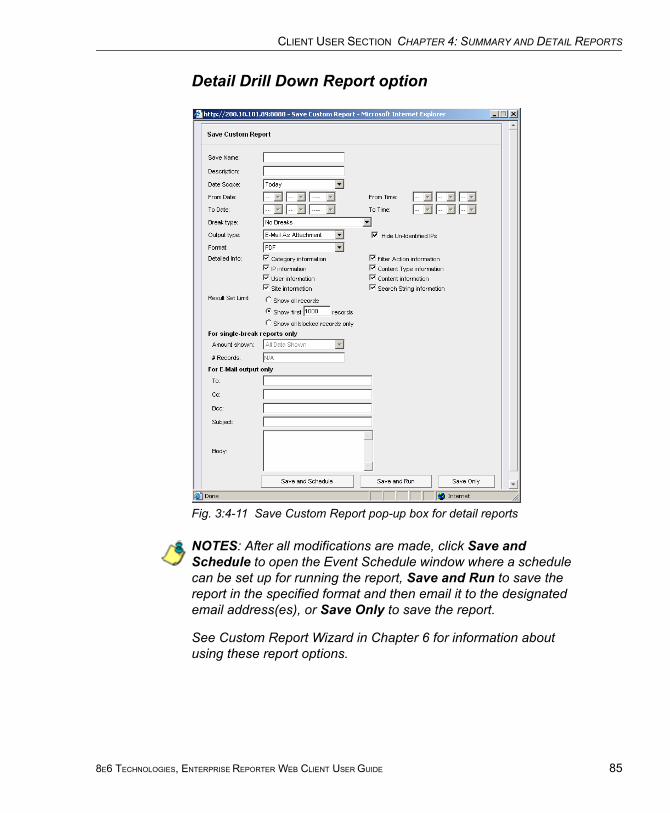
CLIENT USER SECTION CHAPTER 4: SUMMARY AND DETAIL REPORTS
Detail Drill Down Report option
Fig. 3:4-11 Save Custom Report pop-up box for detail reports
NOTES: After all modifications are made, click Save and Schedule to open the Event Schedule window where a schedule can be set up for running the report, Save and Run to save the report in the specified format and then email it to the designated email address(es), or Save Only to save the report.
See Custom Report Wizard in Chapter 6 for information about using these report options.
8E6 TECHNOLOGIES, ENTERPRISE REPORTER WEB CLIENT USER GUIDE 85
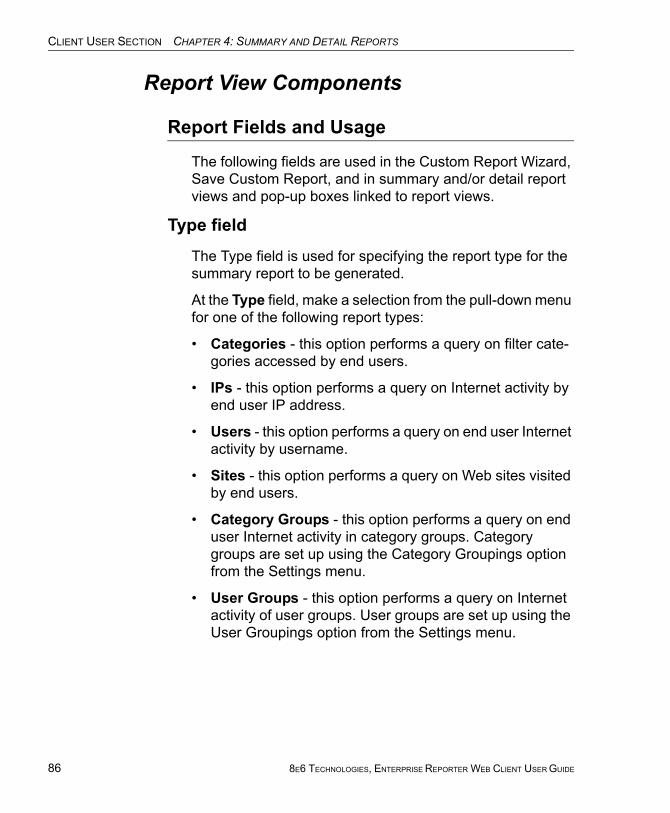
CLIENT USER SECTION CHAPTER 4: SUMMARY AND DETAIL REPORTS
86
Report View Components
Report Fields and Usage
The following fields are used in the Custom Report Wizard, Save Custom Report, and in summary and/or detail report views and pop-up boxes linked to report views.
Type field
The Type field is used for specifying the report type for the summary report to be generated.
At the Type field, make a selection from the pull-down menu for one of the following report types:
• Categories - this option performs a query on filter cate-gories accessed by end users.
• IPs - this option performs a query on Internet activity by end user IP address.
• Users - this option performs a query on end user Internet activity by username.
• Sites - this option performs a query on Web sites visited by end users.
• Category Groups - this option performs a query on end user Internet activity in category groups. Category groups are set up using the Category Groupings option from the Settings menu.
• User Groups - this option performs a query on Internet activity of user groups. User groups are set up using the User Groupings option from the Settings menu.
8E6 TECHNOLOGIES, ENTERPRISE REPORTER WEB CLIENT USER GUIDE
CLIENT USER SECTION CHAPTER 4: SUMMARY AND DETAIL REPORTS
Date Scope and Date fields
The Date Scope field is used for specifying the period of time to be included in the generated report view. Reports can be run for any data saved in the ER Server’s memory.
At the Date Scope field, make a selection from the pull-down menu for the time frame you wish to use in your query (depending on the scope selected, the From Date and To Date fields are used in conjunction with this field):
• Today - this option generates the report view for today only, if logs from the Web access logging device have been received and processed.
• Month to Date - this option generates the report view for the range of days that includes the first day of the current month through today.
• Monthly - selecting this option activates the From Date and To Date pull-down menus where you specify the range of months (1-12) and/or years (2003-2010).
• Year to Date - this option generates the report view for the range of days that includes the first day of the current year through today.
• Daily - selecting this option activates the From Date and To Date pull-down menus where you specify the range of months (1-12), days (1-31), and/or years (2003-2010). The generated report view includes data for the specified days only, if the data for these days are stored on the Server.
• Yesterday - this option generates the report view for yesterday only.
• Month to Yesterday - this option generates the report view for the range of days that includes the first day of the current month through yesterday.
8E6 TECHNOLOGIES, ENTERPRISE REPORTER WEB CLIENT USER GUIDE 87
CLIENT USER SECTION CHAPTER 4: SUMMARY AND DETAIL REPORTS
88
• Year to Yesterday - this option generates the report view for the range of days that includes the first day of the current year through yesterday.
• Last Week - this option generates the report view for all days in the past week, beginning with Sunday and ending with Saturday.
• Last Weekend - this option generates the report view for the past Saturday and Sunday.
• Current Week - this option generates the report view for today and all previous days in the current week, begin-ning with Sunday and ending with Saturday.
• Last Month - this option generates the report view for all days within the past month.
For detail reports, the following fields are additionally avail-able:
• Part of Today - this option generates the report view for today’s time range specified in the From Time and To Time fields. Make a selection for the hour (1-12), minutes (00-59), and AM or PM.
• Part of Yesterday - this option generates the report view for yesterday’s time range specified in the From Time and To Time fields. Make a selection for the hour (1-12), minutes (00-59), and AM or PM.
• Part of Specific Day - this option generates the report view for the specified time range on the specified date. In the From Date and To Date fields, make a selection for the month (1-12), day (1-31), and year (2003-2010). In the From Time and To Time fields, make a selection for the hour (1-12), minutes (00-59), and AM or PM.
8E6 TECHNOLOGIES, ENTERPRISE REPORTER WEB CLIENT USER GUIDE
CLIENT USER SECTION CHAPTER 4: SUMMARY AND DETAIL REPORTS
Display and # Records fields
The Display and # Records fields are used for specifying the number of records from the query you wish to include in the summary report view, and how these records will be sorted.
At the Display field, make a selection from the pull-down menu for the records to be shown on the screen: “All Data Shown”, “Top Category Count”, “Top IP Count”, “Top User Count”, “Top Site Count”, “Top Page Count”, “Top Object Count”, “Top Time”, “Top Hit Count”.
In the # Records field, “N/A” displays greyed-out if “All Data Shown” was selected at the Display field. If any other selec-tion was made at the previous field, the default number saved in the Options window displays in this field. Enter the maximum number of top records to be included in the query.
NOTE: The Default Top Value entry in the Options window is accessible via Default Options in the Settings menu. See the Default Options sub-section in Chapter 2: Customizing the Client for information about the Default Top Value.
Search and Filter String fields
The Search and Filter String fields are used for specifying search criteria in the current summary report view.
At the Search field, make a selection from the pull-down menu for the search term to be used: “None”, “Contains”, “Starts with”, “Ends with”.
In the Filter String field, “N/A” displays greyed-out if “None” was selected at the Search field. If any other selection was made at the previous field, enter text in this field corre-sponding to the type of search term selected.
8E6 TECHNOLOGIES, ENTERPRISE REPORTER WEB CLIENT USER GUIDE 89
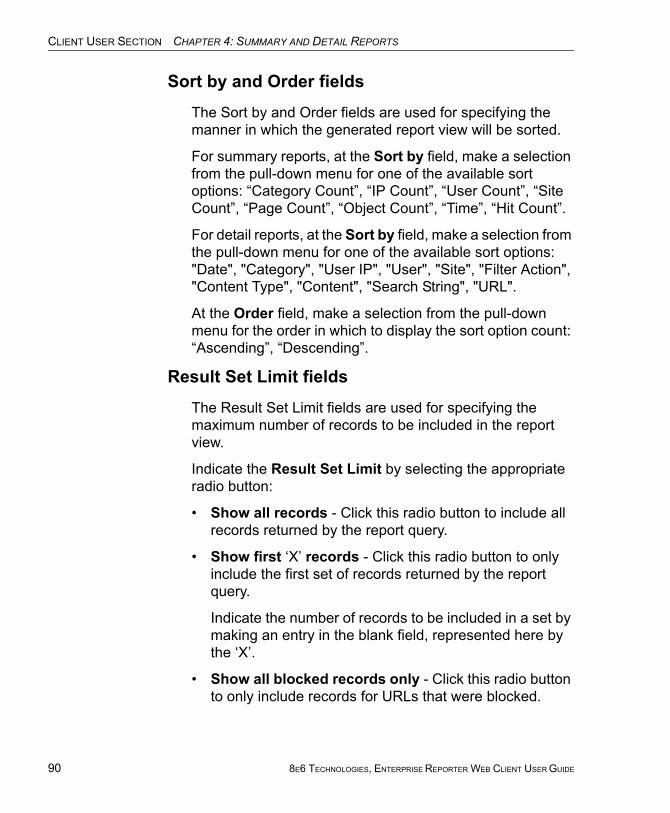
CLIENT USER SECTION CHAPTER 4: SUMMARY AND DETAIL REPORTS
90
Sort by and Order fields
The Sort by and Order fields are used for specifying the manner in which the generated report view will be sorted.
For summary reports, at the Sort by field, make a selection from the pull-down menu for one of the available sort options: “Category Count”, “IP Count”, “User Count”, “Site Count”, “Page Count”, “Object Count”, “Time”, “Hit Count”.
For detail reports, at the Sort by field, make a selection from the pull-down menu for one of the available sort options: "Date", "Category", "User IP", "User", "Site", "Filter Action", "Content Type", "Content", "Search String", "URL".
At the Order field, make a selection from the pull-down menu for the order in which to display the sort option count: “Ascending”, “Descending”.
Result Set Limit fields
The Result Set Limit fields are used for specifying the maximum number of records to be included in the report view.
Indicate the Result Set Limit by selecting the appropriate radio button:
• Show all records - Click this radio button to include all records returned by the report query.
• Show first ‘X’ records - Click this radio button to only include the first set of records returned by the report query.
Indicate the number of records to be included in a set by making an entry in the blank field, represented here by the ‘X’.
• Show all blocked records only - Click this radio button to only include records for URLs that were blocked.
8E6 TECHNOLOGIES, ENTERPRISE REPORTER WEB CLIENT USER GUIDE
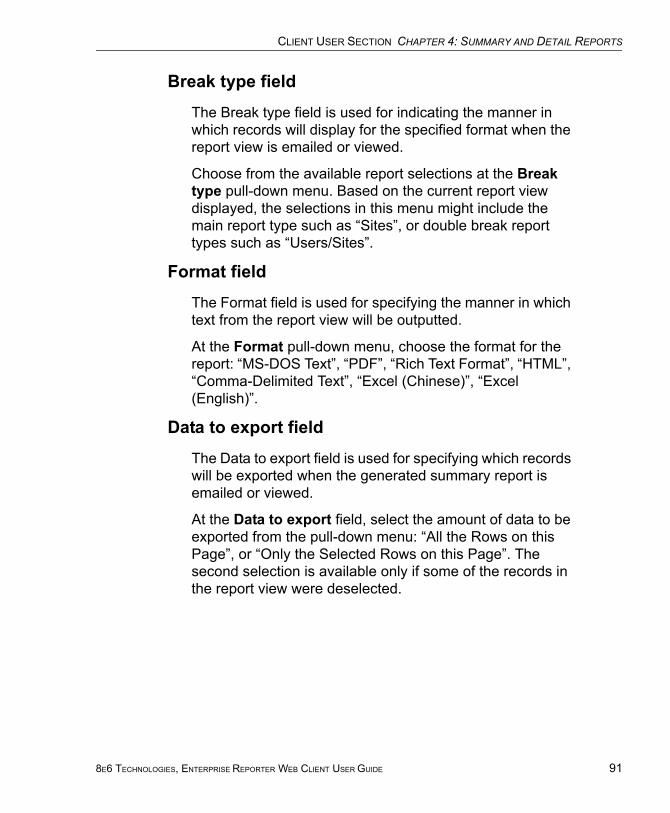
CLIENT USER SECTION CHAPTER 4: SUMMARY AND DETAIL REPORTS
Break type field
The Break type field is used for indicating the manner in which records will display for the specified format when the report view is emailed or viewed.
Choose from the available report selections at the Break type pull-down menu. Based on the current report view displayed, the selections in this menu might include the main report type such as “Sites”, or double break report types such as “Users/Sites”.
Format field
The Format field is used for specifying the manner in which text from the report view will be outputted.
At the Format pull-down menu, choose the format for the report: “MS-DOS Text”, “PDF”, “Rich Text Format”, “HTML”, “Comma-Delimited Text”, “Excel (Chinese)”, “Excel (English)”.
Data to export field
The Data to export field is used for specifying which records will be exported when the generated summary report is emailed or viewed.
At the Data to export field, select the amount of data to be exported from the pull-down menu: “All the Rows on this Page”, or “Only the Selected Rows on this Page”. The second selection is available only if some of the records in the report view were deselected.
8E6 TECHNOLOGIES, ENTERPRISE REPORTER WEB CLIENT USER GUIDE 91

CLIENT USER SECTION CHAPTER 4: SUMMARY AND DETAIL REPORTS
92
For double-break reports only
The Amount shown and # Records fields are used in double-break reports and are deactivated by default.
NOTE: These fields also display in Save Custom Report under the label: For single-break reports only.
Amount shown field
The Amount shown field is used for specifying how the report view will be sorted. By default, “All Data Shown” displays greyed-out and this field becomes activated when a double-break report type is selected at the Break type field.
At the Amount shown field, make a selection from the pull-down menu for an available sort option: “All Data Shown”, Top Category Count”, “Top IP Count”, “Top User Count”, “Top Site Count”, “Top Page Count”, “Top Object Count”, “Top Time”, “Top Hit Count”.
# Records field
The # Records field is used for specifying the number of records that will display for the selected sort option. By default, “N/A” displays greyed-out and this field becomes activated when a Top item Count is selected at the Amount shown field.
In the activated # Records field, the number saved in the Options window displays by default. This number can be edited to indicate the number of records to be included in the exported report.
NOTE: The Default Top Value entry in the Options window is accessible via Default Options in the Settings menu. See the Default Options sub-section in Chapter 2: Customizing the Client for information about the Default Top Value.
8E6 TECHNOLOGIES, ENTERPRISE REPORTER WEB CLIENT USER GUIDE
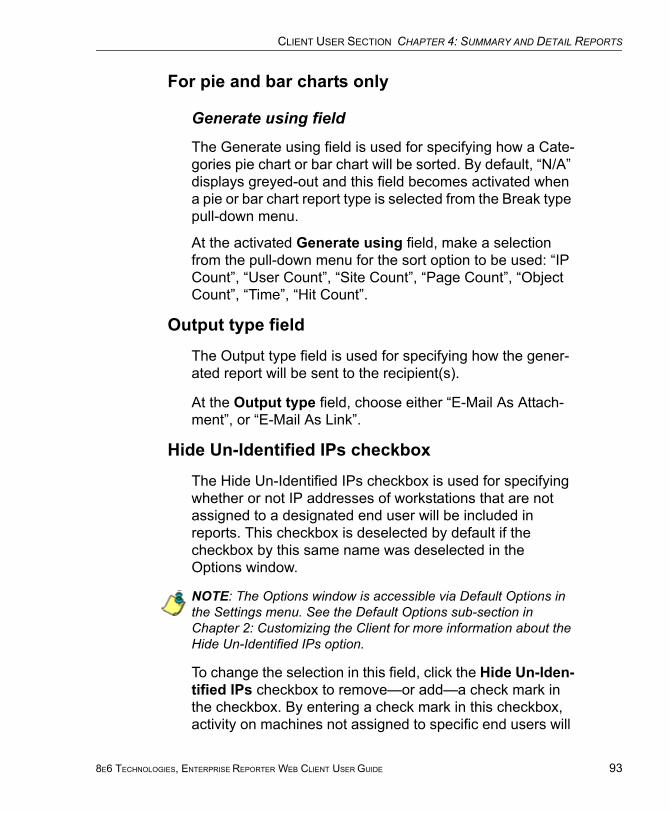
CLIENT USER SECTION CHAPTER 4: SUMMARY AND DETAIL REPORTS
For pie and bar charts only
Generate using field
The Generate using field is used for specifying how a Cate-gories pie chart or bar chart will be sorted. By default, “N/A” displays greyed-out and this field becomes activated when a pie or bar chart report type is selected from the Break type pull-down menu.
At the activated Generate using field, make a selection from the pull-down menu for the sort option to be used: “IP Count”, “User Count”, “Site Count”, “Page Count”, “Object Count”, “Time”, “Hit Count”.
Output type field
The Output type field is used for specifying how the gener-ated report will be sent to the recipient(s).
At the Output type field, choose either “E-Mail As Attach-ment”, or “E-Mail As Link”.
Hide Un-Identified IPs checkbox
The Hide Un-Identified IPs checkbox is used for specifying whether or not IP addresses of workstations that are not assigned to a designated end user will be included in reports. This checkbox is deselected by default if the checkbox by this same name was deselected in the Options window.
NOTE: The Options window is accessible via Default Options in the Settings menu. See the Default Options sub-section in Chapter 2: Customizing the Client for more information about the Hide Un-Identified IPs option.
To change the selection in this field, click the Hide Un-Iden-tified IPs checkbox to remove—or add—a check mark in the checkbox. By entering a check mark in this checkbox, activity on machines not assigned to specific end users will
8E6 TECHNOLOGIES, ENTERPRISE REPORTER WEB CLIENT USER GUIDE 93

CLIENT USER SECTION CHAPTER 4: SUMMARY AND DETAIL REPORTS
94
not be included in report views. Changing this selection will not affect the setting previously saved in the Options window.
For E-Mail output only / Email Report fields
The For E-Mail output only fields and Email Report fields are used for entering email criteria pertinent to the report to be sent to the designated addressee(s).
Specify the following in the For E-Mail output only field or the Email Report pop-up box fields:
• To - enter the email address of each intended report recipient, separating each address by a comma (,) and a space.
• Subject - type in a brief description about the report.
• Cc (optional) - enter the email address of each intended recipient of a carbon copy of this message, separating each address by a comma (,) and a space.
• Bcc (optional) - enter the email address of each intended recipient of a blind carbon copy of this message, sepa-rating each address by a comma (,) and a space.
• Body - type in text pertaining to the report.
Detailed Info field
The Detailed Info field is used for specifying which columns of data will be excluded from detail reports.
In the Detailed Info field, by default all checkboxes corre-sponding to detail report columns are selected. Click the checkbox corresponding to any of the following options to remove the check marks and thereby exclude those columns of information from displaying in the report:
• Category information - click this checkbox to exclude the column that displays the library category name.
8E6 TECHNOLOGIES, ENTERPRISE REPORTER WEB CLIENT USER GUIDE
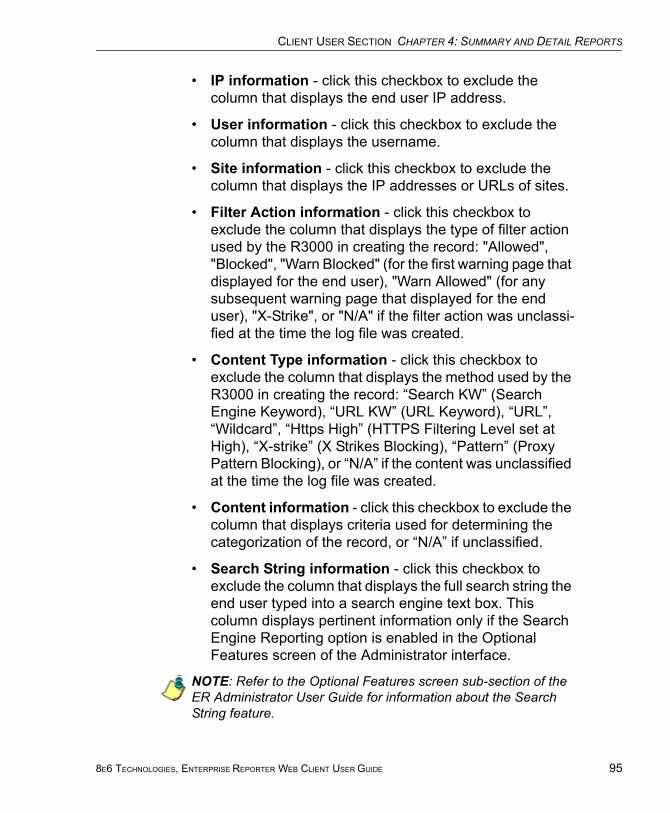
CLIENT USER SECTION CHAPTER 4: SUMMARY AND DETAIL REPORTS
• IP information - click this checkbox to exclude the column that displays the end user IP address.
• User information - click this checkbox to exclude the column that displays the username.
• Site information - click this checkbox to exclude the column that displays the IP addresses or URLs of sites.
• Filter Action information - click this checkbox to exclude the column that displays the type of filter action used by the R3000 in creating the record: "Allowed", "Blocked", "Warn Blocked" (for the first warning page that displayed for the end user), "Warn Allowed" (for any subsequent warning page that displayed for the end user), "X-Strike", or "N/A" if the filter action was unclassi-fied at the time the log file was created.
• Content Type information - click this checkbox to exclude the column that displays the method used by the R3000 in creating the record: “Search KW” (Search Engine Keyword), “URL KW” (URL Keyword), “URL”, “Wildcard”, “Https High” (HTTPS Filtering Level set at High), “X-strike” (X Strikes Blocking), “Pattern” (Proxy Pattern Blocking), or “N/A” if the content was unclassified at the time the log file was created.
• Content information - click this checkbox to exclude the column that displays criteria used for determining the categorization of the record, or “N/A” if unclassified.
• Search String information - click this checkbox to exclude the column that displays the full search string the end user typed into a search engine text box. This column displays pertinent information only if the Search Engine Reporting option is enabled in the Optional Features screen of the Administrator interface.
NOTE: Refer to the Optional Features screen sub-section of the ER Administrator User Guide for information about the Search String feature.
8E6 TECHNOLOGIES, ENTERPRISE REPORTER WEB CLIENT USER GUIDE 95
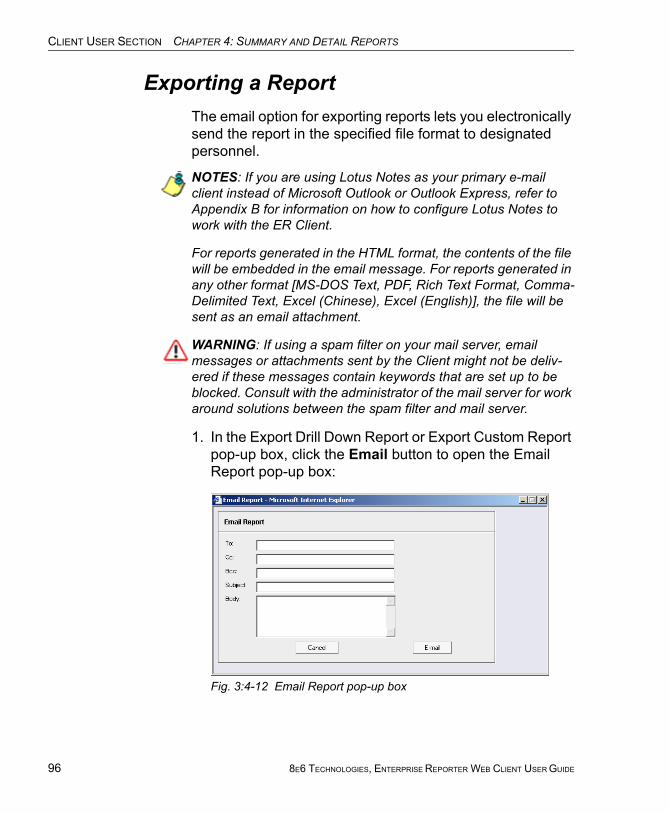
CLIENT USER SECTION CHAPTER 4: SUMMARY AND DETAIL REPORTS
96
Exporting a ReportThe email option for exporting reports lets you electronically send the report in the specified file format to designated personnel.
NOTES: If you are using Lotus Notes as your primary e-mail client instead of Microsoft Outlook or Outlook Express, refer to Appendix B for information on how to configure Lotus Notes to work with the ER Client.
For reports generated in the HTML format, the contents of the file will be embedded in the email message. For reports generated in any other format [MS-DOS Text, PDF, Rich Text Format, Comma-Delimited Text, Excel (Chinese), Excel (English)], the file will be sent as an email attachment.
WARNING: If using a spam filter on your mail server, email messages or attachments sent by the Client might not be deliv-ered if these messages contain keywords that are set up to be blocked. Consult with the administrator of the mail server for work around solutions between the spam filter and mail server.
1. In the Export Drill Down Report or Export Custom Report pop-up box, click the Email button to open the Email Report pop-up box:
Fig. 3:4-12 Email Report pop-up box
8E6 TECHNOLOGIES, ENTERPRISE REPORTER WEB CLIENT USER GUIDE
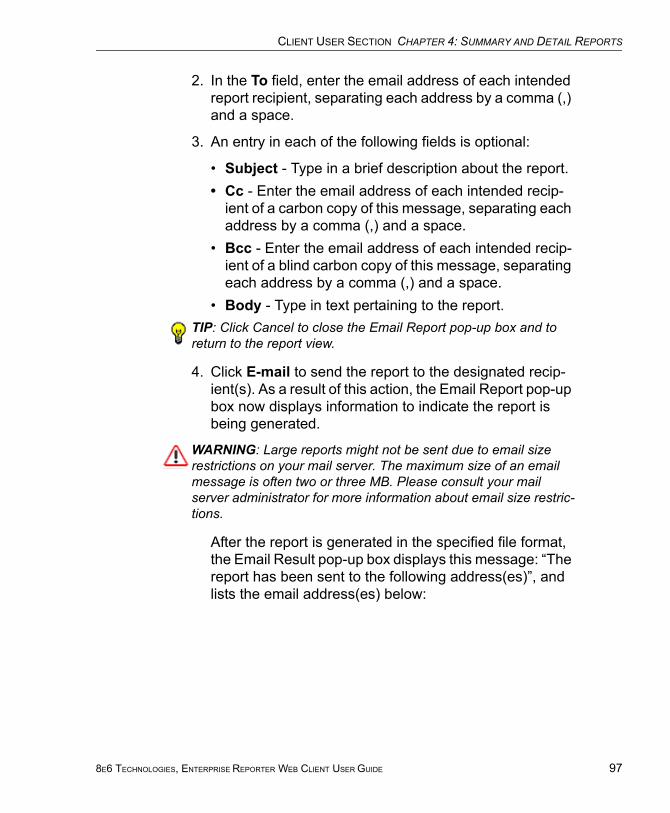
CLIENT USER SECTION CHAPTER 4: SUMMARY AND DETAIL REPORTS
2. In the To field, enter the email address of each intended report recipient, separating each address by a comma (,) and a space.
3. An entry in each of the following fields is optional:
• Subject - Type in a brief description about the report.• Cc - Enter the email address of each intended recip-
ient of a carbon copy of this message, separating each address by a comma (,) and a space.
• Bcc - Enter the email address of each intended recip-ient of a blind carbon copy of this message, separating each address by a comma (,) and a space.
• Body - Type in text pertaining to the report.TIP: Click Cancel to close the Email Report pop-up box and to return to the report view.
4. Click E-mail to send the report to the designated recip-ient(s). As a result of this action, the Email Report pop-up box now displays information to indicate the report is being generated.
WARNING: Large reports might not be sent due to email size restrictions on your mail server. The maximum size of an email message is often two or three MB. Please consult your mail server administrator for more information about email size restric-tions.
After the report is generated in the specified file format, the Email Result pop-up box displays this message: “The report has been sent to the following address(es)”, and lists the email address(es) below:
8E6 TECHNOLOGIES, ENTERPRISE REPORTER WEB CLIENT USER GUIDE 97
CLIENT USER SECTION CHAPTER 4: SUMMARY AND DETAIL REPORTS
98
Fig. 3:4-13 Email Result pop-up box
5. Click the “X” in the upper right corner of the Email Result pop-up box to close it.
View and Print OptionsThe view and print options for exporting reports let you view/print the report in the specified file format. The view option lets you make any necessary adjustments to your report file settings prior to printing the report. To print the report, you must have a printer configured for your workstation.
In the Export Drill Down Report or Export Custom Report pop-up box, click the View button to open a separate browser window and display information to indicate the report is being generated.
After the report is generated in the specified file format, the finished report displays in the browser window.
NOTE: Reports generated in the format for MS-DOS Text, Comma-Delimited Text, or Excel (Chinese or English) will display a single row of text for each record. Reports generated in all other formats (PDF, Rich Text Format, HTML) will display any lengthy string of text wrapped around within a fixed column width for each record.
8E6 TECHNOLOGIES, ENTERPRISE REPORTER WEB CLIENT USER GUIDE
CLIENT USER SECTION CHAPTER 4: SUMMARY AND DETAIL REPORTS
View and Print Tools
In the browser window containing the report, the tools avail-able via the toolbar let you perform some of the following actions on the open report file:
File:
• Save (Ctrl+S) or Save As - save the report file to your local drive
• Print (Ctrl+P) - open the Print dialog box where specifi-cations can be made before printing the report file, such as changing the orientation of the printed page by selecting Portrait (vertical) or Landscape (horizontal).
• Print Preview - view the report file before printing it
• Send > Page by E-mail - send the report file as an email attachment to a designated address
• Send > Link by E-mail - send the report file link to a designated email address
• Send > Shortcut to Desktop - create a shortcut to the report file on your workstation desktop
Edit:
• Select All - highlight the entire text (Ctrl+A), and then Copy (Ctrl+C) and Paste (Ctrl+V) this text in an open file
• Perform a search for text > Find (on This Page) - search for specific text in the file (Ctrl+F)
To close the report file window, click the "X" in the upper right corner of the window.
8E6 TECHNOLOGIES, ENTERPRISE REPORTER WEB CLIENT USER GUIDE 99
CLIENT USER SECTION CHAPTER 4: SUMMARY AND DETAIL REPORTS
100
Sample Report File Formats
The following report file formats are available for emailing and viewing: MS-DOS Text, PDF, Rich Text Format, HTML, Comma-Delimited Text, Excel (Chinese), Excel (English).
NOTES: 8e6 recommends using the PDF and HTML file formats over other file format selections—in particular for detail reports—since these files display and print in a format that is easiest to read. Lengthy text in PDF, HTML, and Rich Text Format files wraps around within the column so all text is captured without displaying truncated.
Comma-Delimited Text and Excel report columns may display with truncated text, but an entire column can be viewed by mani-pulating the column width in the generated report file. These reports can then be printed at a smaller percentage than normal size in order to accommodate all text.
For MS-DOS Text reports, text may display truncated—in parti-cular for lengthy usernames and URLs in detail reports—but an entire column can be viewed by scrolling to the right. Since there is no way to manipulate text in the generated report file, the printed report may display with truncated text. However, the maximum amount of text can be captured by printing the report in the landscape format.
8E6 TECHNOLOGIES, ENTERPRISE REPORTER WEB CLIENT USER GUIDE
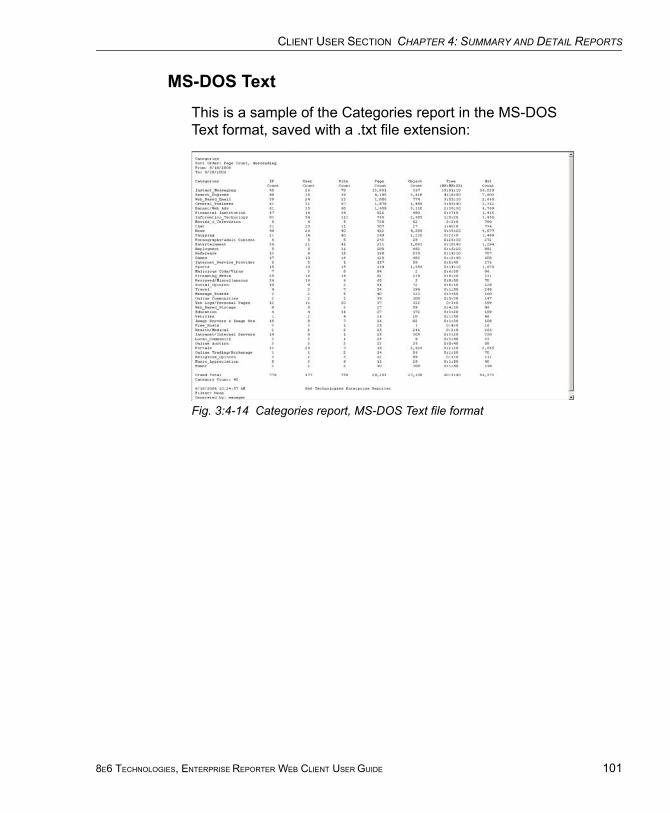
CLIENT USER SECTION CHAPTER 4: SUMMARY AND DETAIL REPORTS
MS-DOS Text
This is a sample of the Categories report in the MS-DOS Text format, saved with a .txt file extension:
Fig. 3:4-14 Categories report, MS-DOS Text file format
8E6 TECHNOLOGIES, ENTERPRISE REPORTER WEB CLIENT USER GUIDE 101
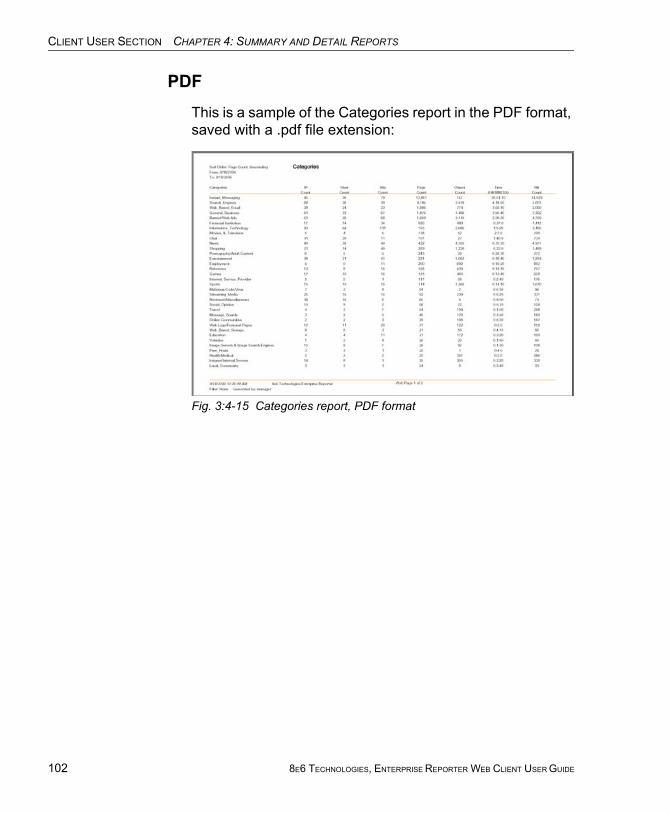
CLIENT USER SECTION CHAPTER 4: SUMMARY AND DETAIL REPORTS
102
This is a sample of the Categories report in the PDF format, saved with a .pdf file extension:
Fig. 3:4-15 Categories report, PDF format
8E6 TECHNOLOGIES, ENTERPRISE REPORTER WEB CLIENT USER GUIDE

CLIENT USER SECTION CHAPTER 4: SUMMARY AND DETAIL REPORTS
Rich Text Format
This is a sample of the Categories report in the Rich Text file Format, saved with a .rtf file extension:
Fig. 3:4-16 Categories report, RTF format
8E6 TECHNOLOGIES, ENTERPRISE REPORTER WEB CLIENT USER GUIDE 103
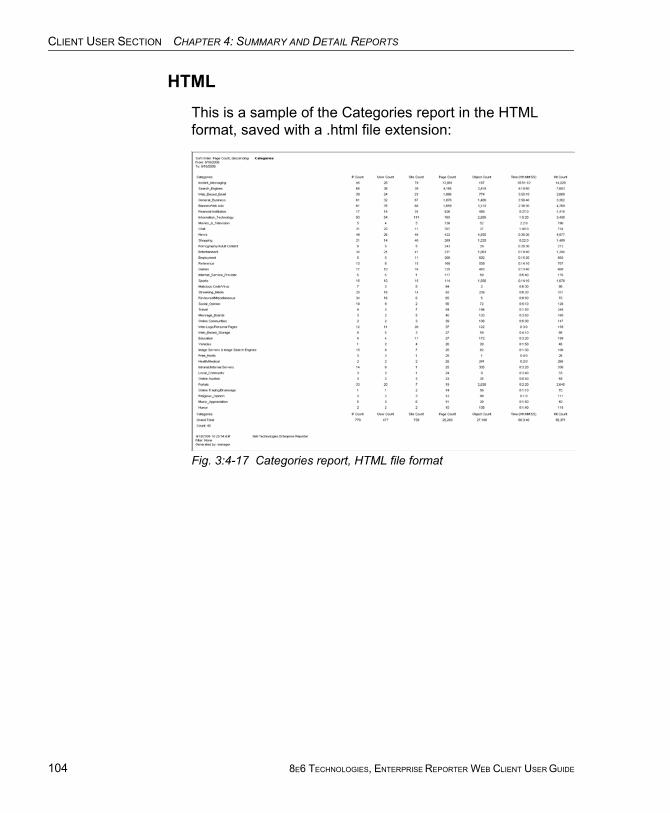
CLIENT USER SECTION CHAPTER 4: SUMMARY AND DETAIL REPORTS
104
HTML
This is a sample of the Categories report in the HTML format, saved with a .html file extension:
Fig. 3:4-17 Categories report, HTML file format
8E6 TECHNOLOGIES, ENTERPRISE REPORTER WEB CLIENT USER GUIDE
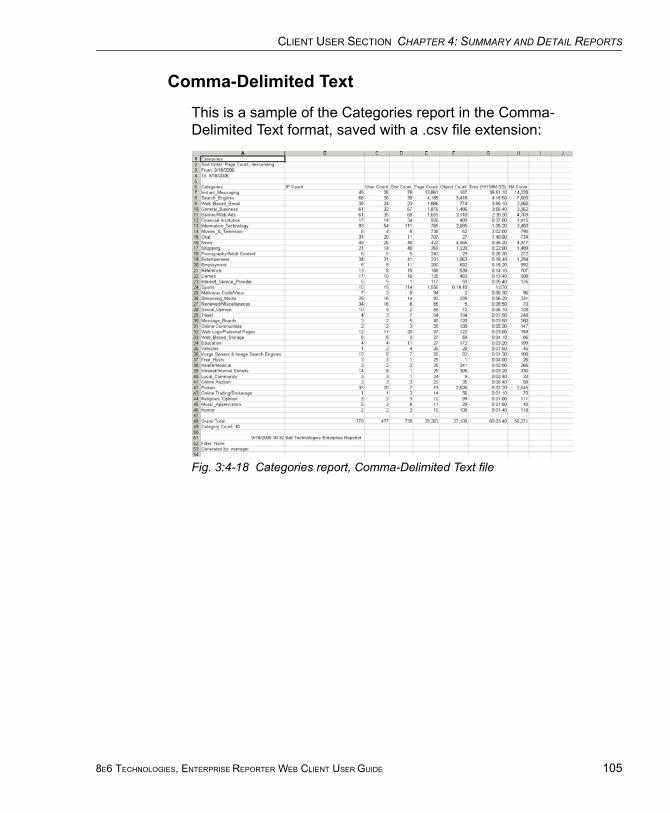
CLIENT USER SECTION CHAPTER 4: SUMMARY AND DETAIL REPORTS
Comma-Delimited Text
This is a sample of the Categories report in the Comma-Delimited Text format, saved with a .csv file extension:
Fig. 3:4-18 Categories report, Comma-Delimited Text file
8E6 TECHNOLOGIES, ENTERPRISE REPORTER WEB CLIENT USER GUIDE 105
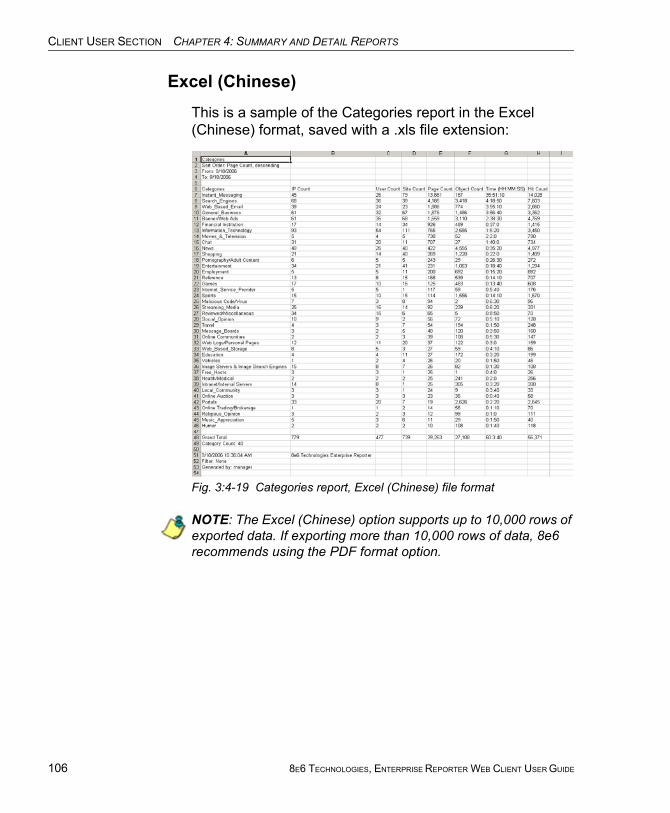
CLIENT USER SECTION CHAPTER 4: SUMMARY AND DETAIL REPORTS
106
Excel (Chinese)
This is a sample of the Categories report in the Excel (Chinese) format, saved with a .xls file extension:
Fig. 3:4-19 Categories report, Excel (Chinese) file format
NOTE: The Excel (Chinese) option supports up to 10,000 rows of exported data. If exporting more than 10,000 rows of data, 8e6 recommends using the PDF format option.
8E6 TECHNOLOGIES, ENTERPRISE REPORTER WEB CLIENT USER GUIDE
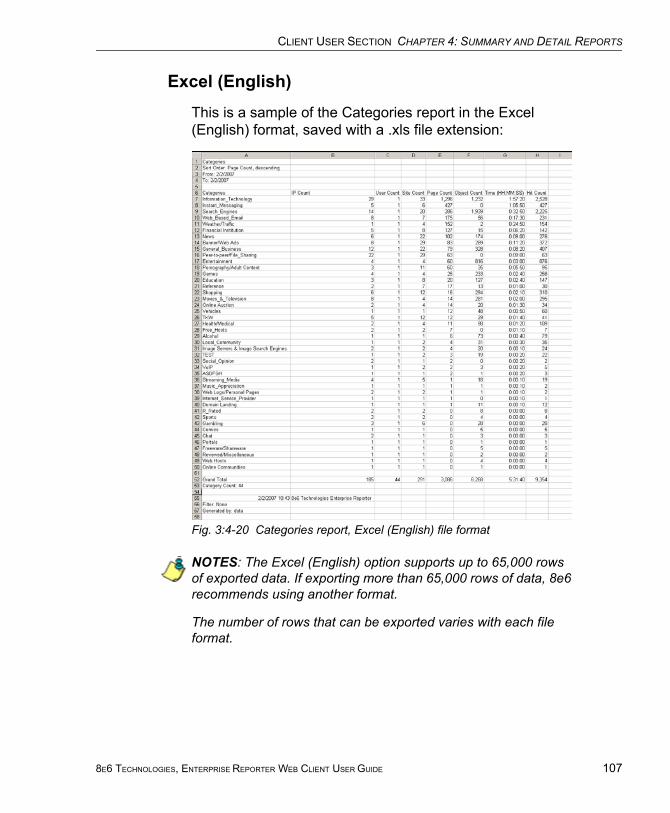
CLIENT USER SECTION CHAPTER 4: SUMMARY AND DETAIL REPORTS
Excel (English)
This is a sample of the Categories report in the Excel (English) format, saved with a .xls file extension:
Fig. 3:4-20 Categories report, Excel (English) file format
NOTES: The Excel (English) option supports up to 65,000 rows of exported data. If exporting more than 65,000 rows of data, 8e6 recommends using another format.
The number of rows that can be exported varies with each file format.
8E6 TECHNOLOGIES, ENTERPRISE REPORTER WEB CLIENT USER GUIDE 107
CLIENT USER SECTION CHAPTER 5: DRILL DOWN REPORTS
108
Chapter 5: Drill Down ReportsThis chapter provides information about generating drill down reports from the Drill Down Reports menu. As explained in the previous chapter, drill down reports let you query the database to access more detailed information about end user Internet activity. The following types of reports can be generated from this menu:
• Categories - includes data in each filter category that was set up for monitoring user activity.
• IPs - includes Internet activity by user IP address.
• Users - includes Internet activity by username.
• Sites - includes activity on Web sites users accessed.
• Category Groups - includes activity by category groups, if category groups previously have been set up via the Settings menu.
• All User Groups - includes activity by all user groups, if user groups previously have been set up via the Settings menu.
• Single User Group - after selecting the user group from a list of available choices, this report shows activity for that user group, if the user group previously has been set up via the Settings menu.
As previously discussed, once you have generated a drill down report view, you can customize your view, save the view, export the view, and/or schedule the report to run at a designated time.
8E6 TECHNOLOGIES, ENTERPRISE REPORTER WEB CLIENT USER GUIDE
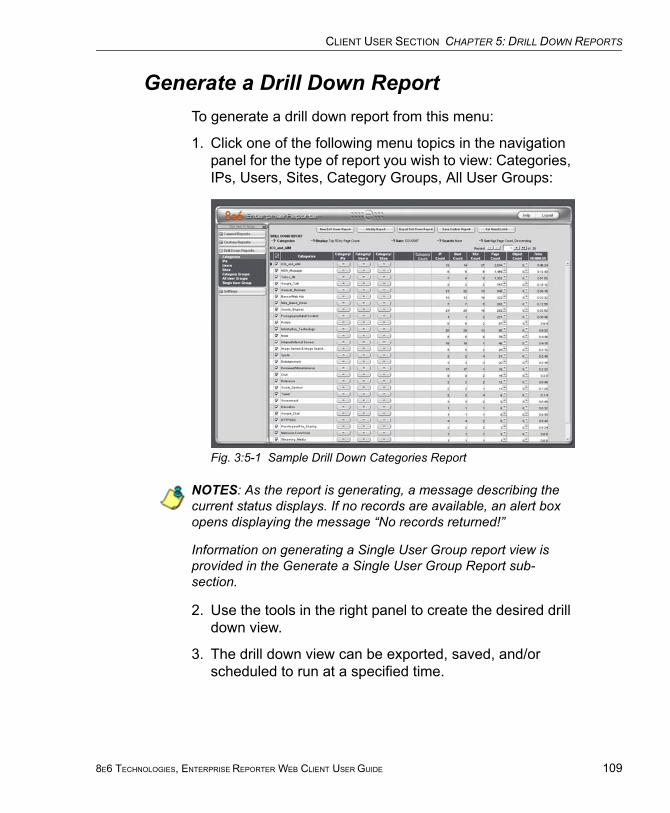
CLIENT USER SECTION CHAPTER 5: DRILL DOWN REPORTS
Generate a Drill Down ReportTo generate a drill down report from this menu:
1. Click one of the following menu topics in the navigation panel for the type of report you wish to view: Categories, IPs, Users, Sites, Category Groups, All User Groups:
Fig. 3:5-1 Sample Drill Down Categories Report
NOTES: As the report is generating, a message describing the current status displays. If no records are available, an alert box opens displaying the message “No records returned!”
Information on generating a Single User Group report view is provided in the Generate a Single User Group Report sub-section.
2. Use the tools in the right panel to create the desired drill down view.
3. The drill down view can be exported, saved, and/or scheduled to run at a specified time.
8E6 TECHNOLOGIES, ENTERPRISE REPORTER WEB CLIENT USER GUIDE 109
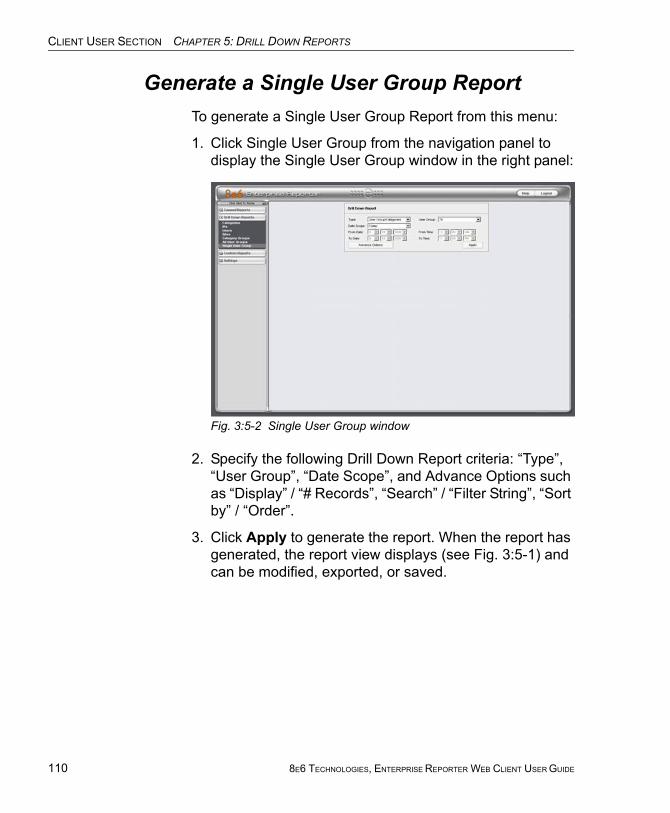
CLIENT USER SECTION CHAPTER 5: DRILL DOWN REPORTS
110
Generate a Single User Group ReportTo generate a Single User Group Report from this menu:
1. Click Single User Group from the navigation panel to display the Single User Group window in the right panel:
Fig. 3:5-2 Single User Group window
2. Specify the following Drill Down Report criteria: “Type”, “User Group”, “Date Scope”, and Advance Options such as “Display” / “# Records”, “Search” / “Filter String”, “Sort by” / “Order”.
3. Click Apply to generate the report. When the report has generated, the report view displays (see Fig. 3:5-1) and can be modified, exported, or saved.
8E6 TECHNOLOGIES, ENTERPRISE REPORTER WEB CLIENT USER GUIDE
CLIENT USER SECTION CHAPTER 6: CUSTOM REPORTS
Chapter 6: Custom ReportsThis chapter provides information about custom reports that can be generated if more specific details are needed about end user Internet activity.
The following options are available from the Custom Reports menu:
• Custom Report Wizard - this option lets you use the wizard to generate a customized report, querying the database for hits, pages, or objects viewed by end users.
• Sample Custom Reports - this option includes “canned” selections of 10 of the most popular reports that you can readily generate in the PDF format.
• Wall Clock Time Reports - this option is available to administrators and authorized managers only. Wall Clock Time Reports use the Wall Clock Time algorithm to calcu-late the amount of time each end user spent accessing a given page or object.
NOTES: Wall Clock Time Reports is only available in the Custom Reports menu if the Wall Clock Time feature is enabled in the Administrator interface. See the ER Administrator User Guide for information about the Wall Clock Time feature.
To include object hits in Wall Clock Time Reports, the “Pages and Objects” selection must be made in the Object Count frame of the Optional Features screen. See Optional Features in the ER Administrator User Guide for more information about this selec-tion.
• Saved Custom Reports - this option lets you view, edit, copy, delete, or run a customized report that was previ-ously saved in the Client.
• Event Schedule - this option is used for creating and maintaining schedules for generating customized reports.
8E6 TECHNOLOGIES, ENTERPRISE REPORTER WEB CLIENT USER GUIDE 111
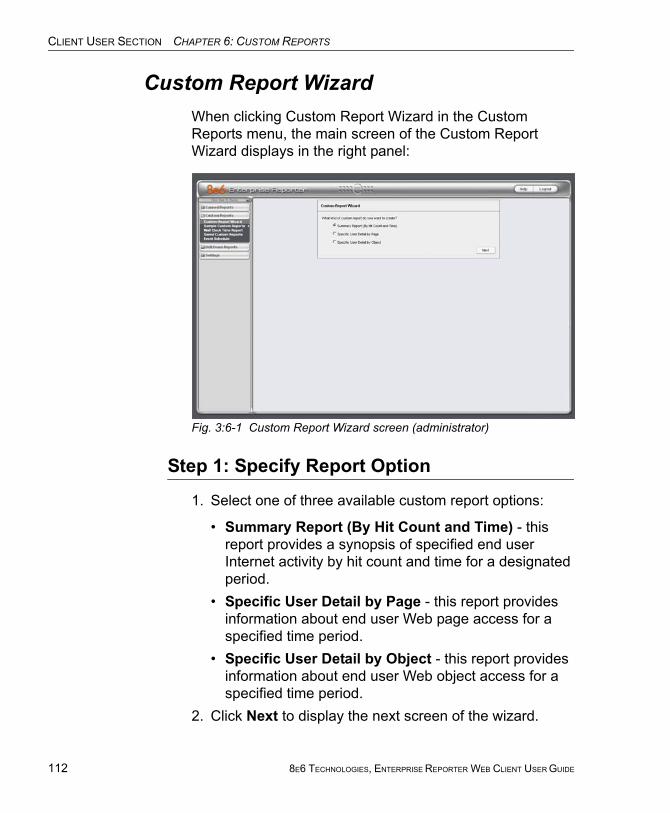
CLIENT USER SECTION CHAPTER 6: CUSTOM REPORTS
112
Custom Report WizardWhen clicking Custom Report Wizard in the Custom Reports menu, the main screen of the Custom Report Wizard displays in the right panel:
Fig. 3:6-1 Custom Report Wizard screen (administrator)
Step 1: Specify Report Option
1. Select one of three available custom report options:
• Summary Report (By Hit Count and Time) - this report provides a synopsis of specified end user Internet activity by hit count and time for a designated period.
• Specific User Detail by Page - this report provides information about end user Web page access for a specified time period.
• Specific User Detail by Object - this report provides information about end user Web object access for a specified time period.
2. Click Next to display the next screen of the wizard.
8E6 TECHNOLOGIES, ENTERPRISE REPORTER WEB CLIENT USER GUIDE
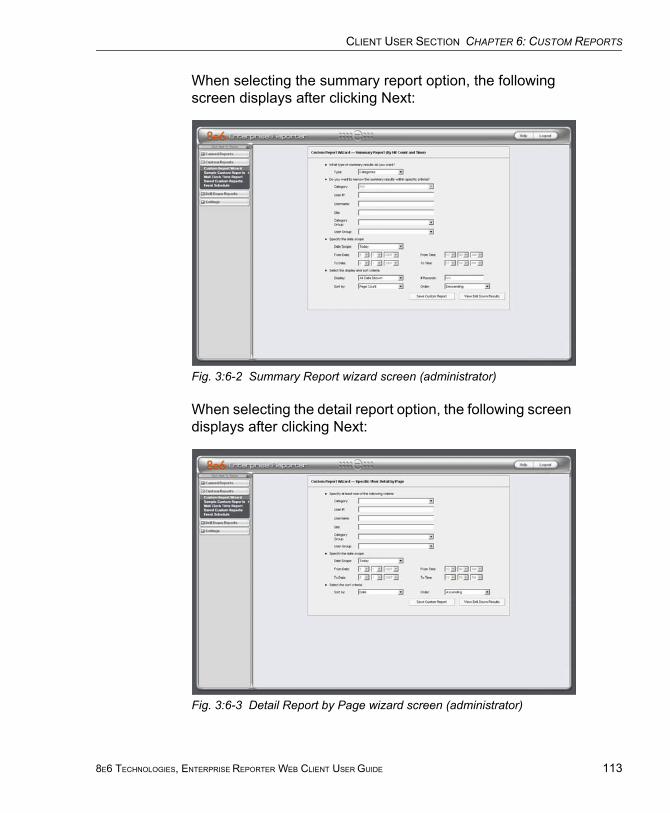
CLIENT USER SECTION CHAPTER 6: CUSTOM REPORTS
When selecting the summary report option, the following screen displays after clicking Next:
Fig. 3:6-2 Summary Report wizard screen (administrator)
When selecting the detail report option, the following screen displays after clicking Next:
Fig. 3:6-3 Detail Report by Page wizard screen (administrator)
8E6 TECHNOLOGIES, ENTERPRISE REPORTER WEB CLIENT USER GUIDE 113
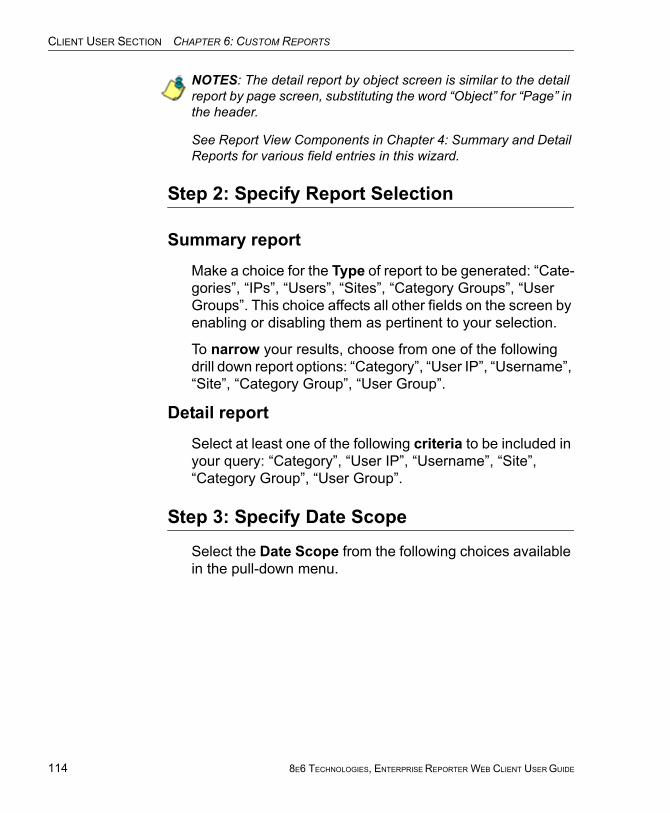
CLIENT USER SECTION CHAPTER 6: CUSTOM REPORTS
114
NOTES: The detail report by object screen is similar to the detail report by page screen, substituting the word “Object” for “Page” in the header.
See Report View Components in Chapter 4: Summary and Detail Reports for various field entries in this wizard.
Step 2: Specify Report Selection
Summary report
Make a choice for the Type of report to be generated: “Cate-gories”, “IPs”, “Users”, “Sites”, “Category Groups”, “User Groups”. This choice affects all other fields on the screen by enabling or disabling them as pertinent to your selection.
To narrow your results, choose from one of the following drill down report options: “Category”, “User IP”, “Username”, “Site”, “Category Group”, “User Group”.
Detail report
Select at least one of the following criteria to be included in your query: “Category”, “User IP”, “Username”, “Site”, “Category Group”, “User Group”.
Step 3: Specify Date Scope
Select the Date Scope from the following choices available in the pull-down menu.
8E6 TECHNOLOGIES, ENTERPRISE REPORTER WEB CLIENT USER GUIDE
CLIENT USER SECTION CHAPTER 6: CUSTOM REPORTS
Step 4: Specify Order Criteria
Summary report
Select the column for which top results should Display and indicate the # Records.
Specify the column the report should Sort by and in which Order.
Detail report
Select the column the report should Sort by and indicate in which Order.
Step 5: View or Save the Report
Specify the next step in the wizard by selecting one of two choices:
• Save Custom Report - click this button to go to the Save Custom Report window.
• View Drill Down Results - click this button to go to the Drill Down Report view, displaying the criteria specified in your query in the report view format.
NOTE: See Save Custom Report in this chapter for information on using the Save Custom Report window, and Chapter 5: Drill Down Reports for information about drill down reports.
8E6 TECHNOLOGIES, ENTERPRISE REPORTER WEB CLIENT USER GUIDE 115
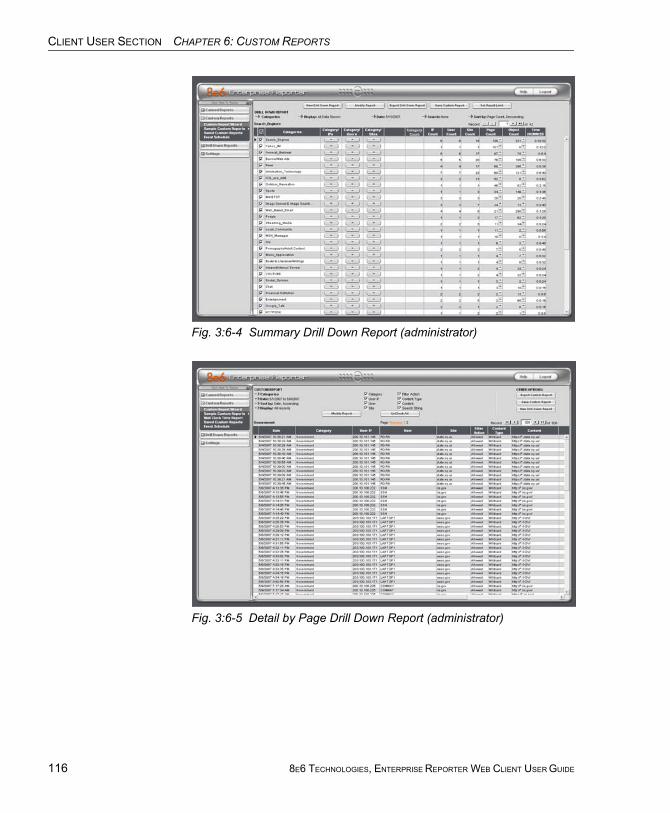
CLIENT USER SECTION CHAPTER 6: CUSTOM REPORTS
116
Fig. 3:6-4 Summary Drill Down Report (administrator)
Fig. 3:6-5 Detail by Page Drill Down Report (administrator)
8E6 TECHNOLOGIES, ENTERPRISE REPORTER WEB CLIENT USER GUIDE
CLIENT USER SECTION CHAPTER 6: CUSTOM REPORTS
Save Custom Report
1. Click the Save Custom Report button to display the Save Custom Report screen:
Fig. 3:6-6 Summary Save Custom Report (administrator)
Fig. 3:6-7 Detail Save Custom Report (administrator)
8E6 TECHNOLOGIES, ENTERPRISE REPORTER WEB CLIENT USER GUIDE 117
CLIENT USER SECTION CHAPTER 6: CUSTOM REPORTS
118
2. In the Save Name field, enter a name for the report. This name will display in the Report Name pull-down menu in the Saved Custom Reports option.
TIP: The Copy (Ctrl+C) and Paste (Ctrl+V) functions can be used in the fields in this screen.
3. In the Description field, enter the report description. This description will display in the Report Description field in the Saved Custom Reports option.
4. Make a selection from pull-down menus for the following fields:
• Date Scope - to change the date scope specified in the report view, make a selection from available choices in the pull-down menus.
• Break type - available selections are based on the type of report specified.
• Output type - choose either E-Mail As Attachment, or E-Mail As Link.
• Format - choose from available output format selec-tions in the pull-down menu.
• Hide Un-Identified IPs - this checkbox is de-selected by default if the checkbox by this same name was de-selected in the Options window.
NOTE: The Options window is accessible via Default Options in the Settings menu. See the Default Options sub-section in Chapter 2: Customizing the Client for more information about the Hide Un-Identified IPs option.
5. For detail reports, specify any of the following options:
• Detailed Info - uncheck any checkbox corresponding to a column that should not be included in the report.
• Result Set Limit - indicate the maximum number of records to be included in the report.
8E6 TECHNOLOGIES, ENTERPRISE REPORTER WEB CLIENT USER GUIDE
CLIENT USER SECTION CHAPTER 6: CUSTOM REPORTS
6. For double/single-break reports only, if a selection was made in the Break type field, specify the top count option to be used in the Amount shown and # Records fields.
7. For summary reports, if the report is being generated for Categories, Category Groups, or User Groups, and a selection was made in the Break type field for a pie or bar chart, the Generate using field lets you select the count column sort option.
8. For E-Mail output only, type in the email address(es) of the recipient(s), and enter any pertinent information to be sent with the report.
9. Specify the next step in the wizard by selecting one of three choices:
• Save and Schedule - click this button to save your entries and to go to the Event Schedule window where the Add Event to Schedule pop-up box opens so you can set up a schedule for running the report.
• Save and Run - click this button to save your entries and to email the generated report to the designated recipient(s). After the report is emailed, the Saved Custom Reports window displays if you need to run this report again or another report.
• Save Only - click this button to save your entries and to go to the Saved Custom Reports window where you can delete, edit, or run this report or another report.
NOTE: See Event Schedule and Saved Custom Reports in this chapter for information on using these options.
8E6 TECHNOLOGIES, ENTERPRISE REPORTER WEB CLIENT USER GUIDE 119
CLIENT USER SECTION CHAPTER 6: CUSTOM REPORTS
120
Wizard Reporting Tips
Detail page Break report by Users, Category
To generate a detail report that includes page hits for the top users who accessed a specific category or category group:
1. Select “Specific User Detail by Page”, and then click Next.
3. Choose the Category or Category Group, and then click Save Custom Report.
3. Specify at least the following criteria: Save Name, Break type “Users”, Amount shown “Top Page Count”, and email To address.
4. Click Save and Run to generate and email the report to the designated email address.
Use wildcards in a Specific Search query
To generate a report for a specific username, user IP address, or site URL, enter the minimum criteria:
1. Select one of the three wizard options, and then click Next.
2. Specify the type of search to be performed by choosing the appropriate field (User IP, Username, or Site) and entering text in the following format: %X% (in which “X” represents the user’s IP address, the username, or the site URL.
Examples:
• User IP: %200.10.100.51%• Username: %jsmith%• Site: %yahoo%
3. Click View Drill Down Results to open the Specific Search pop-up box:
8E6 TECHNOLOGIES, ENTERPRISE REPORTER WEB CLIENT USER GUIDE
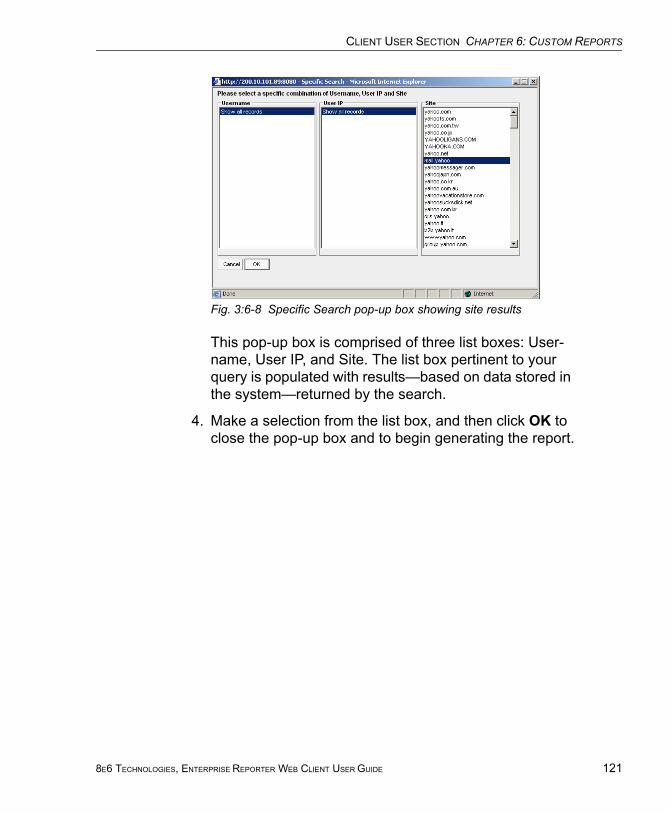
CLIENT USER SECTION CHAPTER 6: CUSTOM REPORTS
Fig. 3:6-8 Specific Search pop-up box showing site results
This pop-up box is comprised of three list boxes: User-name, User IP, and Site. The list box pertinent to your query is populated with results—based on data stored in the system—returned by the search.
4. Make a selection from the list box, and then click OK to close the pop-up box and to begin generating the report.
8E6 TECHNOLOGIES, ENTERPRISE REPORTER WEB CLIENT USER GUIDE 121
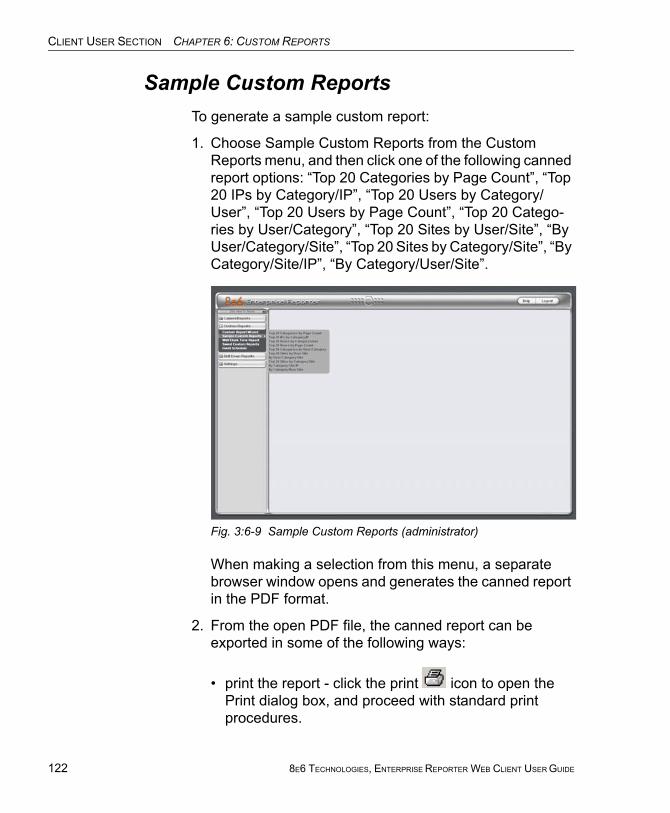
CLIENT USER SECTION CHAPTER 6: CUSTOM REPORTS
122
Sample Custom ReportsTo generate a sample custom report:
1. Choose Sample Custom Reports from the Custom Reports menu, and then click one of the following canned report options: “Top 20 Categories by Page Count”, “Top 20 IPs by Category/IP”, “Top 20 Users by Category/User”, “Top 20 Users by Page Count”, “Top 20 Catego-ries by User/Category”, “Top 20 Sites by User/Site”, “By User/Category/Site”, “Top 20 Sites by Category/Site”, “By Category/Site/IP”, “By Category/User/Site”.
Fig. 3:6-9 Sample Custom Reports (administrator)
When making a selection from this menu, a separate browser window opens and generates the canned report in the PDF format.
2. From the open PDF file, the canned report can be exported in some of the following ways:
• print the report - click the print icon to open the Print dialog box, and proceed with standard print procedures.
8E6 TECHNOLOGIES, ENTERPRISE REPORTER WEB CLIENT USER GUIDE
CLIENT USER SECTION CHAPTER 6: CUSTOM REPORTS
• save the report - click the save icon to open the Save a Copy dialog box, and proceed with standard save procedures.
• email the report file - go to File > Send > Page by E-mail to open an email message window containing the PDF file as an attachment, and proceed with standard email procedures.
• email the report link - go to File > Send > Link by E-mail to open an email message window containing a link to the PDF file, and proceed with standard email procedures.
3. Click the “X” in the upper right corner of the report window to close it.
Report Format
For each report, the header of the reports contain the following information:
• Sort Order: Page Count, descending
• From: / To: today’s date displays
• the name of the report displays
The footer of the reports contain the following information:
• today’s date (MM/DD/YYYY) and time (HH:MM:SS AM/PM) the report was generated
• Page number
• Filter: None
• Generated by: manager’s login ID
8E6 TECHNOLOGIES, ENTERPRISE REPORTER WEB CLIENT USER GUIDE 123
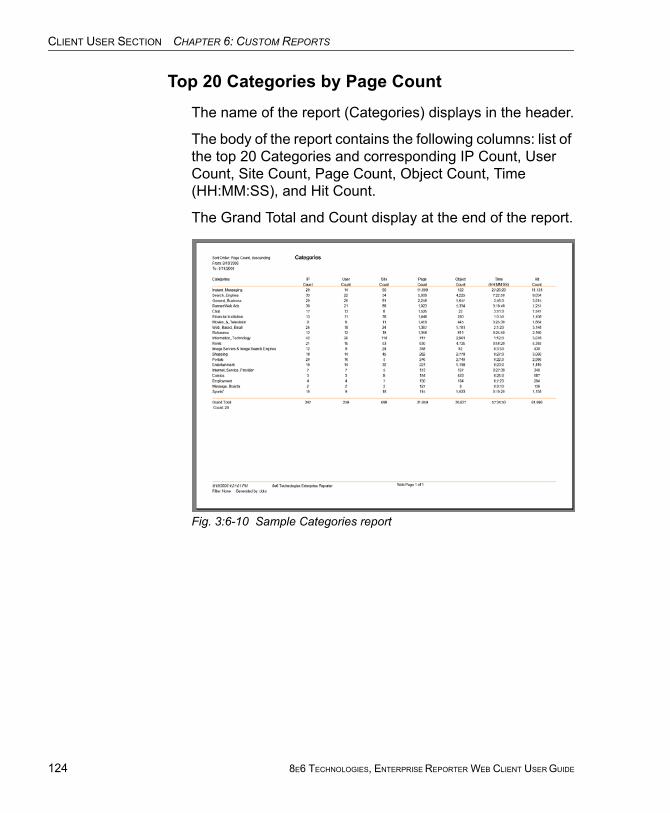
CLIENT USER SECTION CHAPTER 6: CUSTOM REPORTS
124
Top 20 Categories by Page Count
The name of the report (Categories) displays in the header.
The body of the report contains the following columns: list of the top 20 Categories and corresponding IP Count, User Count, Site Count, Page Count, Object Count, Time (HH:MM:SS), and Hit Count.
The Grand Total and Count display at the end of the report.
Fig. 3:6-10 Sample Categories report
8E6 TECHNOLOGIES, ENTERPRISE REPORTER WEB CLIENT USER GUIDE
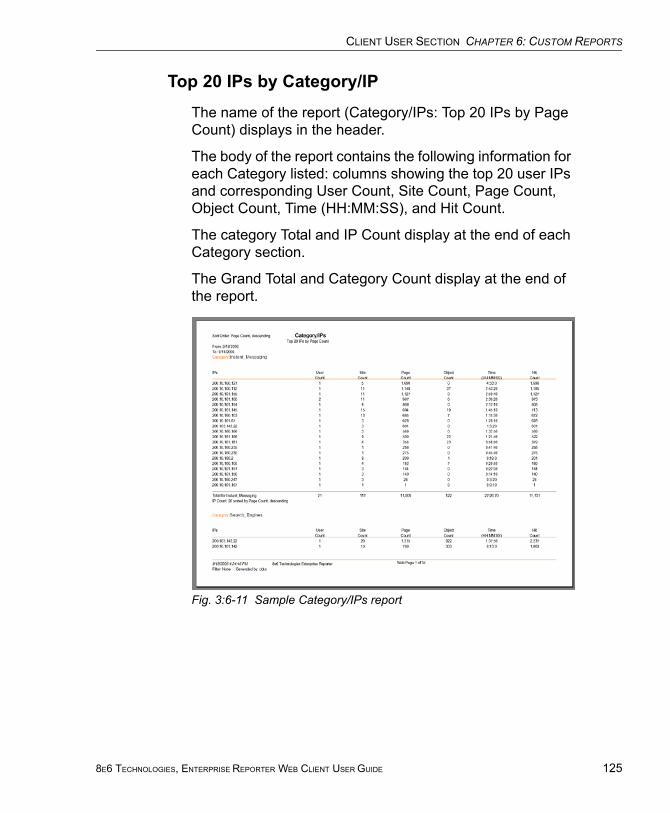
CLIENT USER SECTION CHAPTER 6: CUSTOM REPORTS
Top 20 IPs by Category/IP
The name of the report (Category/IPs: Top 20 IPs by Page Count) displays in the header.
The body of the report contains the following information for each Category listed: columns showing the top 20 user IPs and corresponding User Count, Site Count, Page Count, Object Count, Time (HH:MM:SS), and Hit Count.
The category Total and IP Count display at the end of each Category section.
The Grand Total and Category Count display at the end of the report.
Fig. 3:6-11 Sample Category/IPs report
8E6 TECHNOLOGIES, ENTERPRISE REPORTER WEB CLIENT USER GUIDE 125
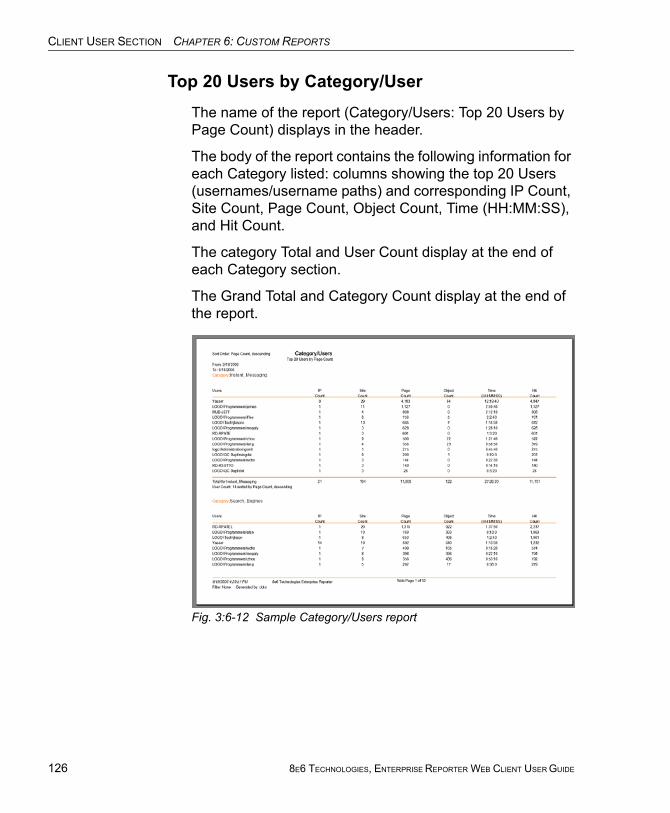
CLIENT USER SECTION CHAPTER 6: CUSTOM REPORTS
126
Top 20 Users by Category/User
The name of the report (Category/Users: Top 20 Users by Page Count) displays in the header.
The body of the report contains the following information for each Category listed: columns showing the top 20 Users (usernames/username paths) and corresponding IP Count, Site Count, Page Count, Object Count, Time (HH:MM:SS), and Hit Count.
The category Total and User Count display at the end of each Category section.
The Grand Total and Category Count display at the end of the report.
Fig. 3:6-12 Sample Category/Users report
8E6 TECHNOLOGIES, ENTERPRISE REPORTER WEB CLIENT USER GUIDE
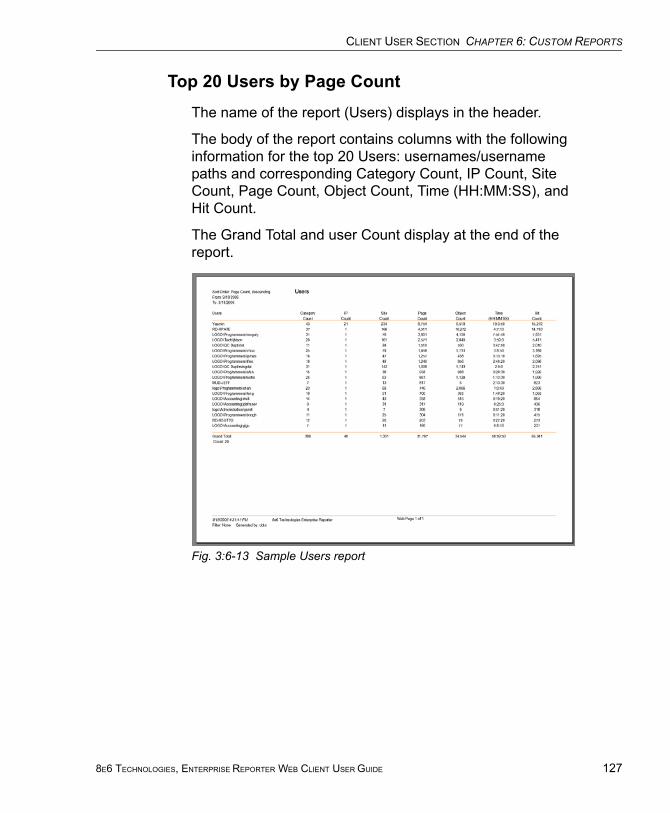
CLIENT USER SECTION CHAPTER 6: CUSTOM REPORTS
Top 20 Users by Page Count
The name of the report (Users) displays in the header.
The body of the report contains columns with the following information for the top 20 Users: usernames/username paths and corresponding Category Count, IP Count, Site Count, Page Count, Object Count, Time (HH:MM:SS), and Hit Count.
The Grand Total and user Count display at the end of the report.
Fig. 3:6-13 Sample Users report
8E6 TECHNOLOGIES, ENTERPRISE REPORTER WEB CLIENT USER GUIDE 127

CLIENT USER SECTION CHAPTER 6: CUSTOM REPORTS
128
Top 20 Categories by User/Category
The name of the report (Users/Categories: Top 20 Catego-ries by Page Count) displays in the header.
The body of the report contains columns with the following information for each User listed: top 20 Categories and corresponding IP Count, Site Count, Page Count, Object Count, Time (HH:MM:SS), and Hit Count.
The user Total and Category Count display at the end of each User section.
The Grand Total and User Count display at the end of the report.
Fig. 3:6-14 Sample User/Categories report
8E6 TECHNOLOGIES, ENTERPRISE REPORTER WEB CLIENT USER GUIDE
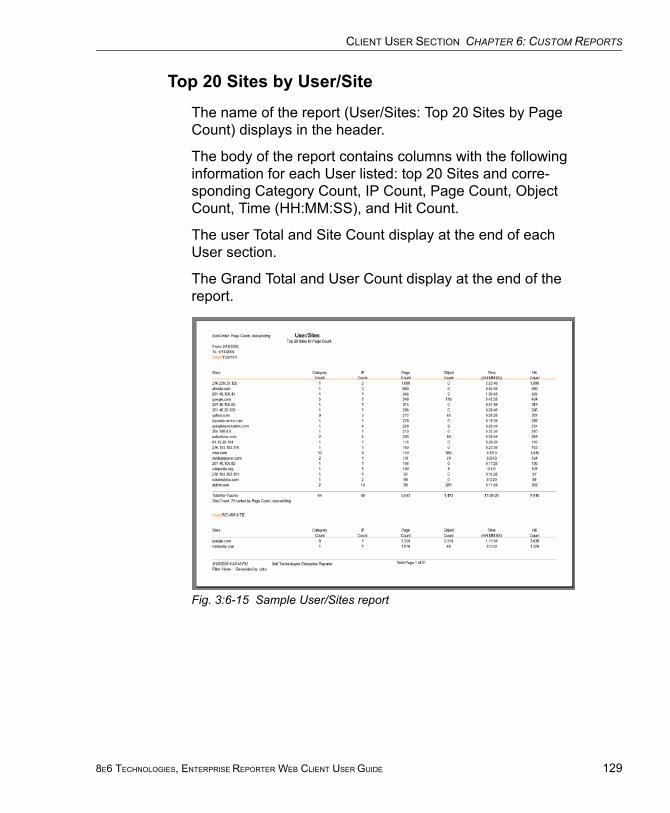
CLIENT USER SECTION CHAPTER 6: CUSTOM REPORTS
Top 20 Sites by User/Site
The name of the report (User/Sites: Top 20 Sites by Page Count) displays in the header.
The body of the report contains columns with the following information for each User listed: top 20 Sites and corre-sponding Category Count, IP Count, Page Count, Object Count, Time (HH:MM:SS), and Hit Count.
The user Total and Site Count display at the end of each User section.
The Grand Total and User Count display at the end of the report.
Fig. 3:6-15 Sample User/Sites report
8E6 TECHNOLOGIES, ENTERPRISE REPORTER WEB CLIENT USER GUIDE 129
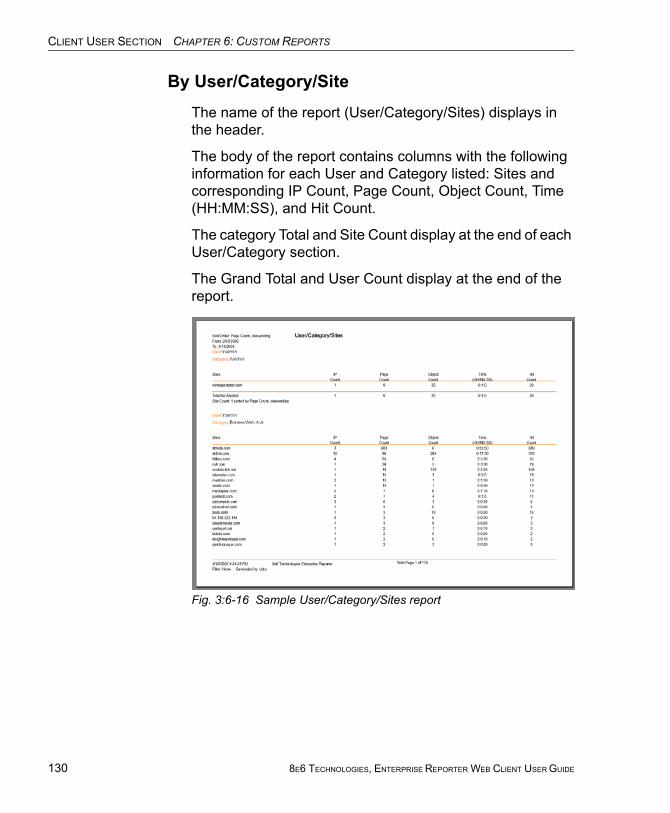
CLIENT USER SECTION CHAPTER 6: CUSTOM REPORTS
130
By User/Category/Site
The name of the report (User/Category/Sites) displays in the header.
The body of the report contains columns with the following information for each User and Category listed: Sites and corresponding IP Count, Page Count, Object Count, Time (HH:MM:SS), and Hit Count.
The category Total and Site Count display at the end of each User/Category section.
The Grand Total and User Count display at the end of the report.
Fig. 3:6-16 Sample User/Category/Sites report
8E6 TECHNOLOGIES, ENTERPRISE REPORTER WEB CLIENT USER GUIDE
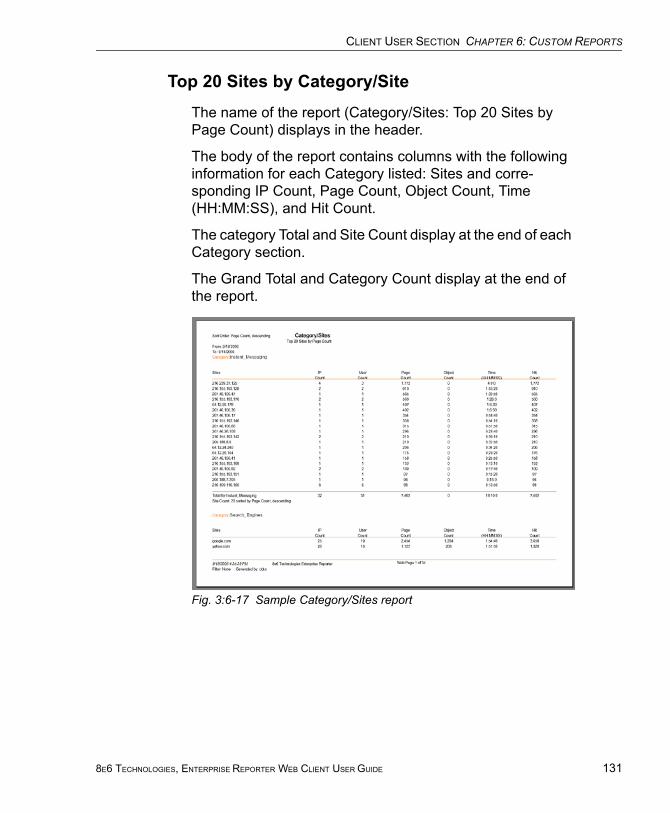
CLIENT USER SECTION CHAPTER 6: CUSTOM REPORTS
Top 20 Sites by Category/Site
The name of the report (Category/Sites: Top 20 Sites by Page Count) displays in the header.
The body of the report contains columns with the following information for each Category listed: Sites and corre-sponding IP Count, Page Count, Object Count, Time (HH:MM:SS), and Hit Count.
The category Total and Site Count display at the end of each Category section.
The Grand Total and Category Count display at the end of the report.
Fig. 3:6-17 Sample Category/Sites report
8E6 TECHNOLOGIES, ENTERPRISE REPORTER WEB CLIENT USER GUIDE 131
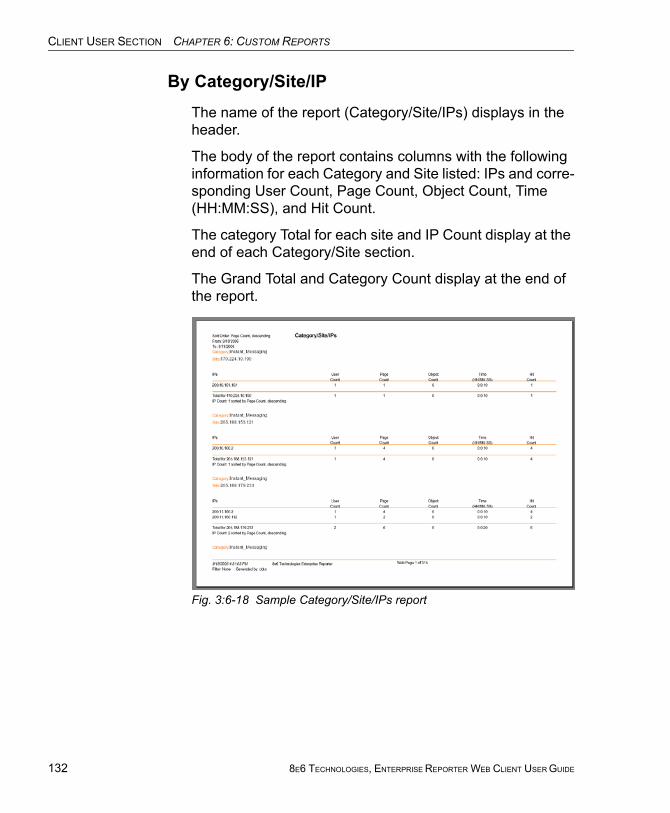
CLIENT USER SECTION CHAPTER 6: CUSTOM REPORTS
132
By Category/Site/IP
The name of the report (Category/Site/IPs) displays in the header.
The body of the report contains columns with the following information for each Category and Site listed: IPs and corre-sponding User Count, Page Count, Object Count, Time (HH:MM:SS), and Hit Count.
The category Total for each site and IP Count display at the end of each Category/Site section.
The Grand Total and Category Count display at the end of the report.
Fig. 3:6-18 Sample Category/Site/IPs report
8E6 TECHNOLOGIES, ENTERPRISE REPORTER WEB CLIENT USER GUIDE
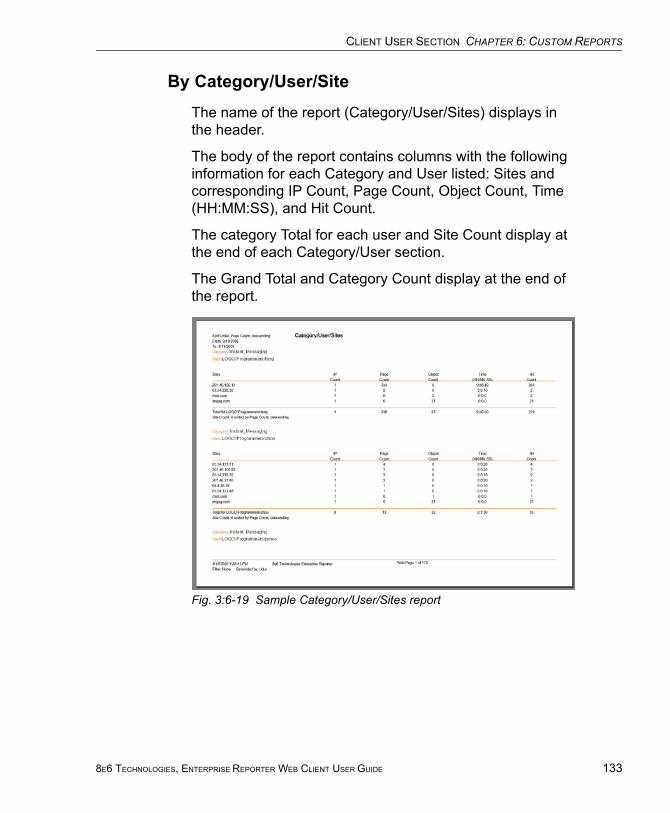
CLIENT USER SECTION CHAPTER 6: CUSTOM REPORTS
By Category/User/Site
The name of the report (Category/User/Sites) displays in the header.
The body of the report contains columns with the following information for each Category and User listed: Sites and corresponding IP Count, Page Count, Object Count, Time (HH:MM:SS), and Hit Count.
The category Total for each user and Site Count display at the end of each Category/User section.
The Grand Total and Category Count display at the end of the report.
Fig. 3:6-19 Sample Category/User/Sites report
8E6 TECHNOLOGIES, ENTERPRISE REPORTER WEB CLIENT USER GUIDE 133
CLIENT USER SECTION CHAPTER 6: CUSTOM REPORTS
134
Wall Clock Time ReportsWall Clock Time Reports are accessible by administrators and authorized managers only and provide textual results of end user Internet usage activity for a specified time period, based on the Wall Clock Time algorithm (see Wall Clock Time algorithm in this sub-section). This algorithm calcu-lates the amount of time an end user spent accessing a given page or object—disregarding the number of seconds from each hit and counting each unique minute of Web time as one minute. Using this algorithm, an end user could never have more than 24 hours of Web time within a given 24-hour period.
NOTE: The Wall Clock Time Report option does not display if the Wall Clock Time feature is disabled in the ER Administrator inter-face. Refer to the Optional Features screen sub-section of the ER Administrator User Guide for information about enabling or disabling the Wall Clock Time feature.
8E6 TECHNOLOGIES, ENTERPRISE REPORTER WEB CLIENT USER GUIDE
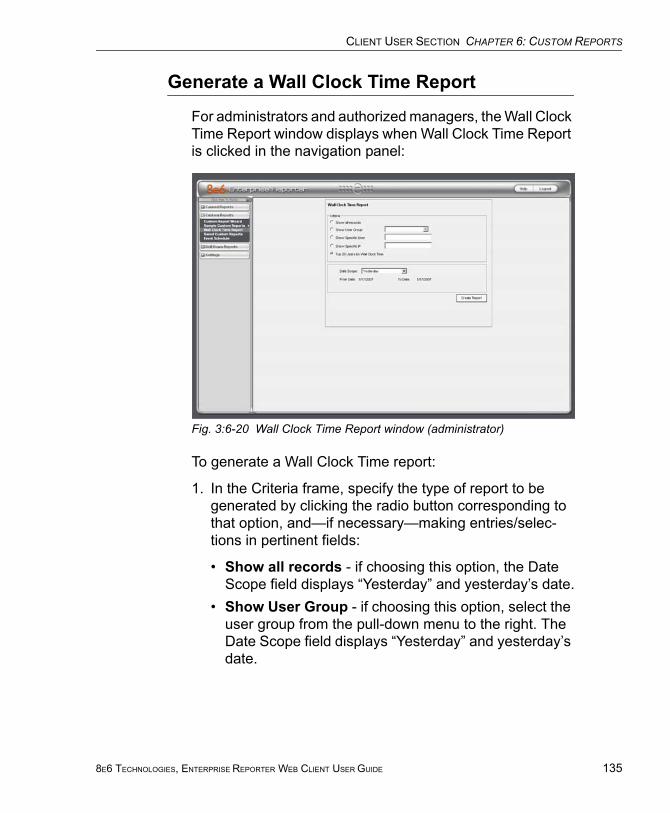
CLIENT USER SECTION CHAPTER 6: CUSTOM REPORTS
Generate a Wall Clock Time Report
For administrators and authorized managers, the Wall Clock Time Report window displays when Wall Clock Time Report is clicked in the navigation panel:
Fig. 3:6-20 Wall Clock Time Report window (administrator)
To generate a Wall Clock Time report:
1. In the Criteria frame, specify the type of report to be generated by clicking the radio button corresponding to that option, and—if necessary—making entries/selec-tions in pertinent fields:
• Show all records - if choosing this option, the Date Scope field displays “Yesterday” and yesterday’s date.
• Show User Group - if choosing this option, select the user group from the pull-down menu to the right. The Date Scope field displays “Yesterday” and yesterday’s date.
8E6 TECHNOLOGIES, ENTERPRISE REPORTER WEB CLIENT USER GUIDE 135
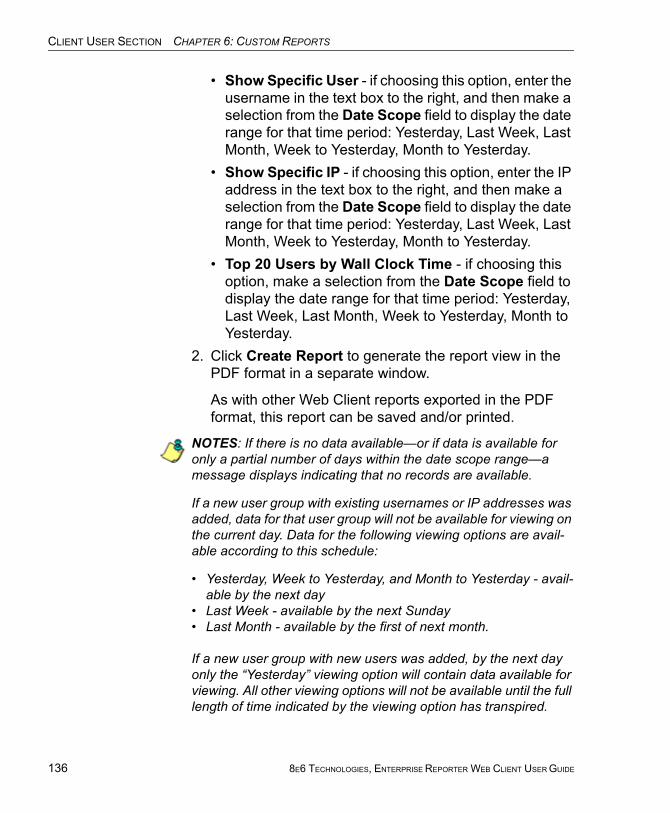
CLIENT USER SECTION CHAPTER 6: CUSTOM REPORTS
136
• Show Specific User - if choosing this option, enter the username in the text box to the right, and then make a selection from the Date Scope field to display the date range for that time period: Yesterday, Last Week, Last Month, Week to Yesterday, Month to Yesterday.
• Show Specific IP - if choosing this option, enter the IP address in the text box to the right, and then make a selection from the Date Scope field to display the date range for that time period: Yesterday, Last Week, Last Month, Week to Yesterday, Month to Yesterday.
• Top 20 Users by Wall Clock Time - if choosing this option, make a selection from the Date Scope field to display the date range for that time period: Yesterday, Last Week, Last Month, Week to Yesterday, Month to Yesterday.
2. Click Create Report to generate the report view in the PDF format in a separate window.
As with other Web Client reports exported in the PDF format, this report can be saved and/or printed.
NOTES: If there is no data available—or if data is available for only a partial number of days within the date scope range—a message displays indicating that no records are available.
If a new user group with existing usernames or IP addresses was added, data for that user group will not be available for viewing on the current day. Data for the following viewing options are avail-able according to this schedule:
• Yesterday, Week to Yesterday, and Month to Yesterday - avail-able by the next day
• Last Week - available by the next Sunday• Last Month - available by the first of next month.
If a new user group with new users was added, by the next day only the “Yesterday” viewing option will contain data available for viewing. All other viewing options will not be available until the full length of time indicated by the viewing option has transpired.
8E6 TECHNOLOGIES, ENTERPRISE REPORTER WEB CLIENT USER GUIDE
CLIENT USER SECTION CHAPTER 6: CUSTOM REPORTS
3. From the open PDF file, the Wall Clock Time report can be exported in some of the following ways:
• print the report - click the print icon to open the Print dialog box, and proceed with standard print procedures.
• save the report - click the save icon to open the Save a Copy dialog box, and proceed with standard save procedures.
• email the report file - go to File > Send > Page by E-mail to open an email message window containing the PDF file as an attachment, and proceed with standard email procedures.
• email the report link - go to File > Send > Link by E-mail to open an email message window containing a link to the PDF file, and proceed with standard email procedures.
4. Click the “X” in the upper right corner of the report window to close it.
8E6 TECHNOLOGIES, ENTERPRISE REPORTER WEB CLIENT USER GUIDE 137
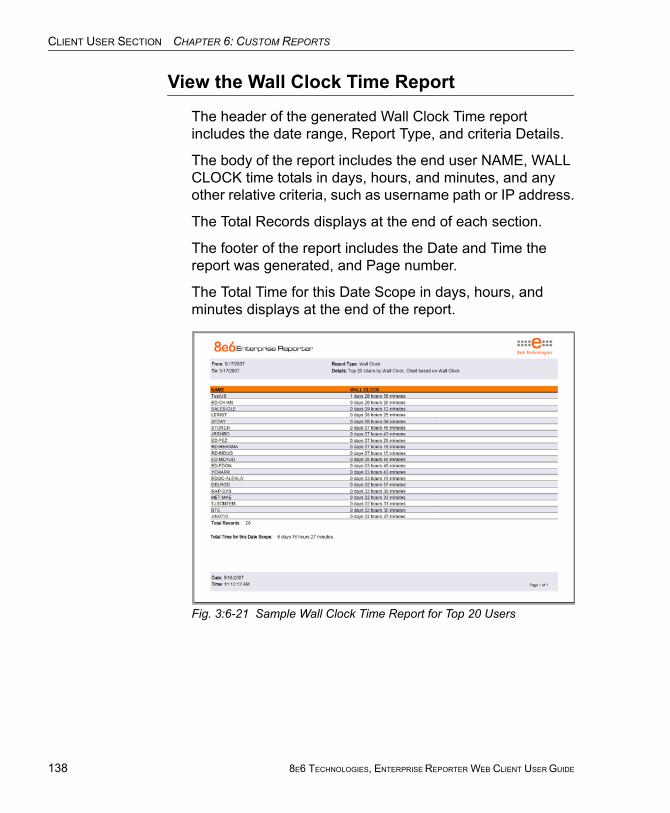
CLIENT USER SECTION CHAPTER 6: CUSTOM REPORTS
138
View the Wall Clock Time Report
The header of the generated Wall Clock Time report includes the date range, Report Type, and criteria Details.
The body of the report includes the end user NAME, WALL CLOCK time totals in days, hours, and minutes, and any other relative criteria, such as username path or IP address.
The Total Records displays at the end of each section.
The footer of the report includes the Date and Time the report was generated, and Page number.
The Total Time for this Date Scope in days, hours, and minutes displays at the end of the report.
Fig. 3:6-21 Sample Wall Clock Time Report for Top 20 Users
8E6 TECHNOLOGIES, ENTERPRISE REPORTER WEB CLIENT USER GUIDE

CLIENT USER SECTION CHAPTER 6: CUSTOM REPORTS
Wall Clock Time algorithm
For each end user included in the report, the number of seconds from the log is dropped, and each unique minute within a given hour counts as one minute.
In the following example, the end user shows a total of seven minutes of Wall Clock Time:
12:00:01 www.8e6.com12:00:10 www.abc.com12:01:00 www.8e6.com12:02:04 www.whitepages.com12:05:58 www.yellowpages.com12:05:58 www.yellowpages.com/714.jsp12:05:59 www.yellowpages.com/phone_number.gif12:07:03 www.google.com12:07:33 www.yahoo.com12:08:23 www.news.com12:08:30 www.usatoday.com12:08:59 www.usatoday.com/usa.gif12:09:00 www.usatoday.com/ca.gif12:09:01 www.yahoo.com12:09:02 http://200.100.10.65:8812:09:03 www.abc.com12:09:04 www.nbc.com
The total for this end user is based on a nine-minute time span that includes 17 entries in the log, and seven unique minute entries: 00, 01, 02, 05, 07, 08, and 09.
8E6 TECHNOLOGIES, ENTERPRISE REPORTER WEB CLIENT USER GUIDE 139
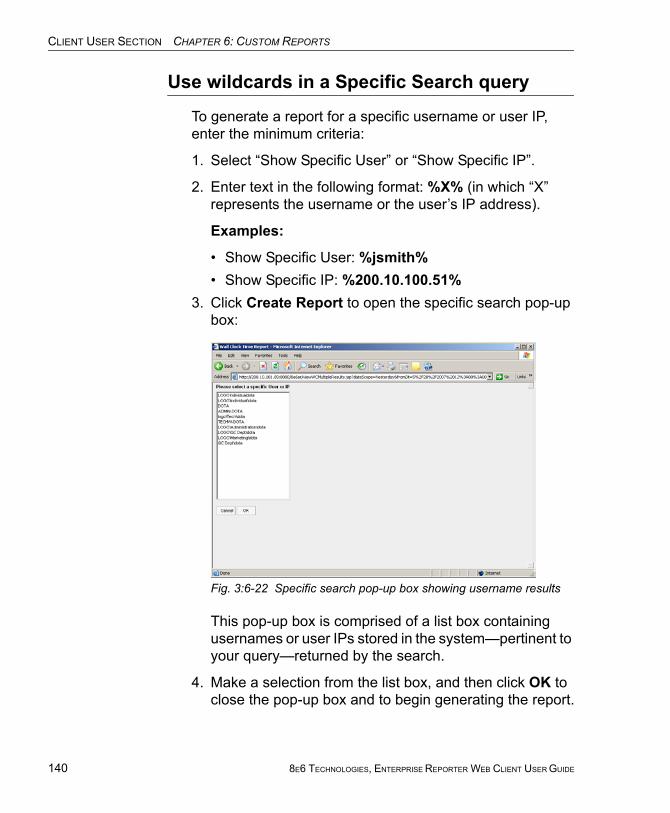
CLIENT USER SECTION CHAPTER 6: CUSTOM REPORTS
140
Use wildcards in a Specific Search query
To generate a report for a specific username or user IP, enter the minimum criteria:
1. Select “Show Specific User” or “Show Specific IP”.
2. Enter text in the following format: %X% (in which “X” represents the username or the user’s IP address).
Examples:
• Show Specific User: %jsmith%• Show Specific IP: %200.10.100.51%
3. Click Create Report to open the specific search pop-up box:
Fig. 3:6-22 Specific search pop-up box showing username results
This pop-up box is comprised of a list box containing usernames or user IPs stored in the system—pertinent to your query—returned by the search.
4. Make a selection from the list box, and then click OK to close the pop-up box and to begin generating the report.
8E6 TECHNOLOGIES, ENTERPRISE REPORTER WEB CLIENT USER GUIDE

CLIENT USER SECTION CHAPTER 6: CUSTOM REPORTS
Saved Custom ReportsThe Saved Custom Reports option lets you view, copy, or edit data in a report you created, run a report, or delete a report.
This window displays when Saved Custom Reports is selected from the Custom Reports menu in the navigation panel:
Fig. 3:6-23 Saved Custom Reports window (administrator)
NOTE: The radio button options in the top frame do not display for managers.
8E6 TECHNOLOGIES, ENTERPRISE REPORTER WEB CLIENT USER GUIDE 141
CLIENT USER SECTION CHAPTER 6: CUSTOM REPORTS
142
View Information in a Saved Custom Report
In the top frame, all report selections display in the Report Name pull-down menu.
If you are logged in as an administrator:
1. Click the radio button corresponding to either option:
• Show All Reports - This selection displays in the Report Name pull-down menu a list of all recorded reports
• Show My Reports - This selection displays in the Report Name pull-down menu only the reports you recorded
NOTE: The radio button options do not display for managers.
2. Make a selection from the Report Name pull-down menu to display the Report Description below this frame, and to populate the General Info, Specific Info, and Output Info frames:
• General Info: Report type; Date Scope; From/To Date; From/To Time (if available)
• Specific Info: Category, User IP, Username, Site, Category Group, User Group, Show Category, Show IP, Show Username, Show Site, Show Filter Action, Show Content Type, Show Content, Show Search String, Break type
• Output Info: Output format, File Type, File Name
8E6 TECHNOLOGIES, ENTERPRISE REPORTER WEB CLIENT USER GUIDE
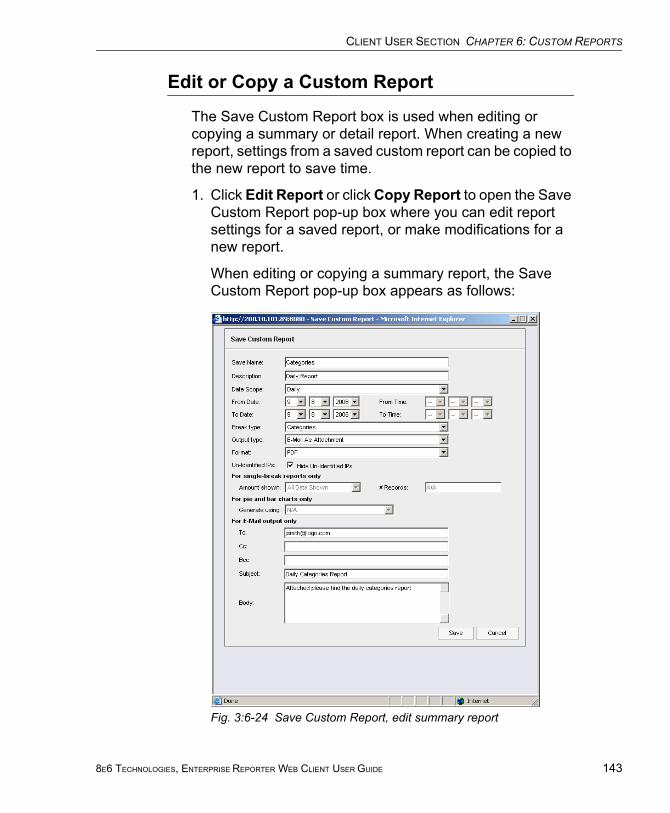
CLIENT USER SECTION CHAPTER 6: CUSTOM REPORTS
Edit or Copy a Custom Report
The Save Custom Report box is used when editing or copying a summary or detail report. When creating a new report, settings from a saved custom report can be copied to the new report to save time.
1. Click Edit Report or click Copy Report to open the Save Custom Report pop-up box where you can edit report settings for a saved report, or make modifications for a new report.
When editing or copying a summary report, the Save Custom Report pop-up box appears as follows:
Fig. 3:6-24 Save Custom Report, edit summary report
8E6 TECHNOLOGIES, ENTERPRISE REPORTER WEB CLIENT USER GUIDE 143
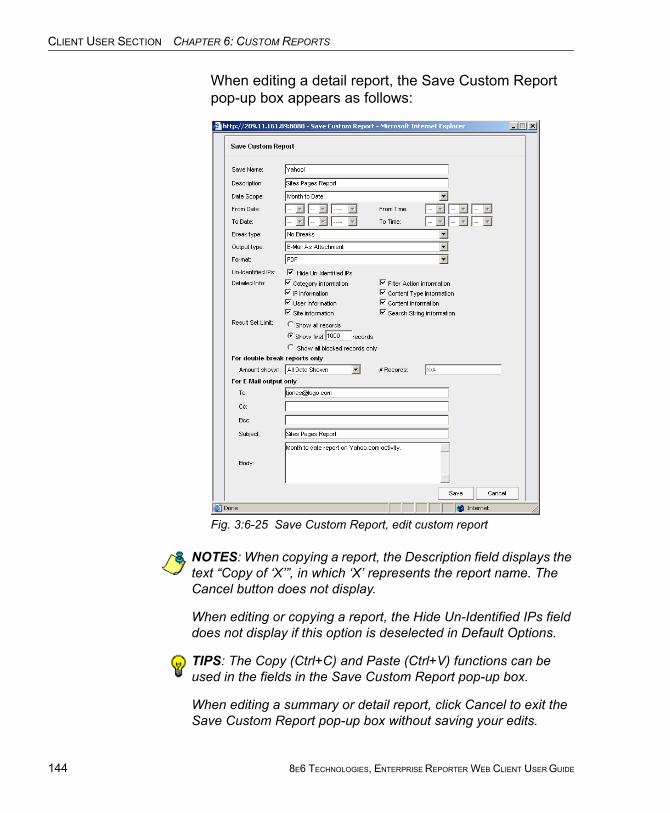
CLIENT USER SECTION CHAPTER 6: CUSTOM REPORTS
144
When editing a detail report, the Save Custom Report pop-up box appears as follows:
Fig. 3:6-25 Save Custom Report, edit custom report
NOTES: When copying a report, the Description field displays the text “Copy of ‘X’”, in which ‘X’ represents the report name. The Cancel button does not display.
When editing or copying a report, the Hide Un-Identified IPs field does not display if this option is deselected in Default Options.
TIPS: The Copy (Ctrl+C) and Paste (Ctrl+V) functions can be used in the fields in the Save Custom Report pop-up box.
When editing a summary or detail report, click Cancel to exit the Save Custom Report pop-up box without saving your edits.
8E6 TECHNOLOGIES, ENTERPRISE REPORTER WEB CLIENT USER GUIDE
CLIENT USER SECTION CHAPTER 6: CUSTOM REPORTS
2. After making your selections and entries, click Save.
TIP: If the Name you entered has already been used, a dialog box opens with the message: “Name already in use, would you like to overwrite? Event Schedules associated with this report will also be deleted.” You can choose to either overwrite the record with the current report criteria by clicking OK, or rename the report by clicking Cancel to close the dialog box without saving your edits.
Run a Custom Report
Click Run Report to open a separate browser window that displays information to indicate the report is being gener-ated.
After being completely generated, the report is emailed to the specified recipient(s).
Delete a Custom Report
To remove the custom report from choices available in the Report Name pull-down menu, and the Event Schedule option:
1. Select the report from the Report Name pull-down menu.
2. Click Delete Report.
NOTE: If a custom report is scheduled to run via the Event Schedule option, deleting the report removes it from the Sched-uled Events box.
8E6 TECHNOLOGIES, ENTERPRISE REPORTER WEB CLIENT USER GUIDE 145
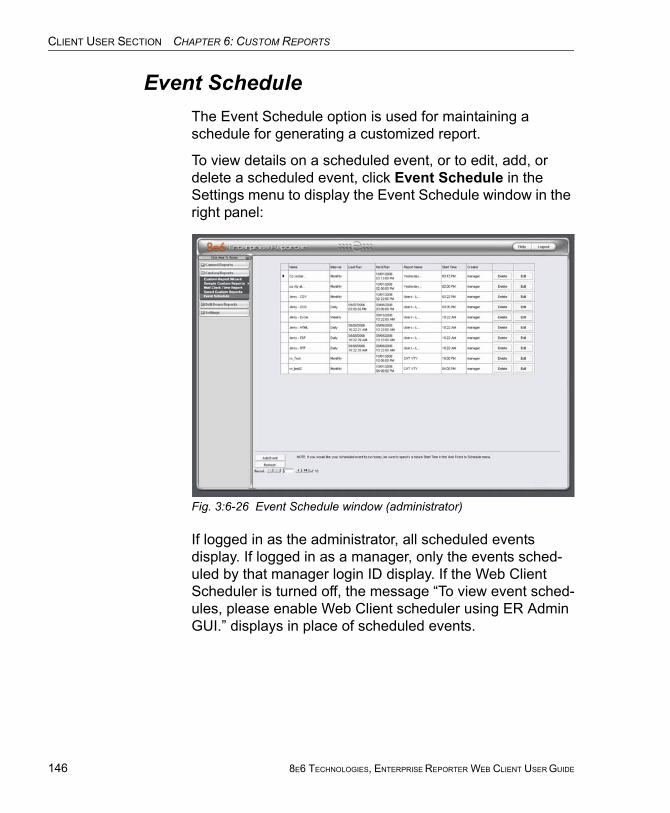
CLIENT USER SECTION CHAPTER 6: CUSTOM REPORTS
146
Event ScheduleThe Event Schedule option is used for maintaining a schedule for generating a customized report.
To view details on a scheduled event, or to edit, add, or delete a scheduled event, click Event Schedule in the Settings menu to display the Event Schedule window in the right panel:
Fig. 3:6-26 Event Schedule window (administrator)
If logged in as the administrator, all scheduled events display. If logged in as a manager, only the events sched-uled by that manager login ID display. If the Web Client Scheduler is turned off, the message “To view event sched-ules, please enable Web Client scheduler using ER Admin GUI.” displays in place of scheduled events.
8E6 TECHNOLOGIES, ENTERPRISE REPORTER WEB CLIENT USER GUIDE
CLIENT USER SECTION CHAPTER 6: CUSTOM REPORTS
NOTE: Refer to these user guide sections for information about the following topics:
• To save reports using the Save Custom Report option, see this chapter and Chapter 5: Drill Down Reports, under the Save Custom Report option sub-sections.
• To enable or disable the Web Client to run scheduled events, see the Web Client Server Management screen sub-section of the ER Administrator User Guide.
View Details or Edit a Scheduled Event
In the Event Schedule window, events display as rows of records. The following information is included for each record: Name assigned to the scheduled event, Interval when the report is scheduled to run, date Last Run, Report Name, Start Time for the report to run, and Creator of the schedule (login username). Delete and Edit buttons display to the left of each row.
In the Record field at the bottom of the window, the number of the selected record displays, along with the total number of records (scheduled events).
Click the Refresh button to refresh the list of records and to scroll to the top of the list.
TIP: The selected record is designated by an arrow in the white box to the left of a row. To select another record, click the white box in that row to display the arrow. You also can navigate to another record by using the Record navigation field. Click in the box between the arrow buttons and enter a new record number to go to that record. Or click any of the four arrow buttons to advance forward or backward through the list of records. In the order in which they display in the Record field, clicking these buttons moves you to the first record, the record prior to the selected record, the record following the selected record, and the last record.
8E6 TECHNOLOGIES, ENTERPRISE REPORTER WEB CLIENT USER GUIDE 147
CLIENT USER SECTION CHAPTER 6: CUSTOM REPORTS
148
View Details for a Scheduled Event
To view additional information on an event, click the Edit button for that event. This action opens the Update Sched-uled Event dialog box:
Fig. 3:6-27 View event details
The following information displays in this dialog box: Name assigned to the scheduled event; selected Report to Run; interval When to Run the report; Day of the Week the report will run if the report is a daily report, or Day of the Month the report will run if the report is a monthly report, Start Time to run, and Server Time details.
Edit a Scheduled Event
1. In the Event Schedule window, click the Edit button for the event you wish to modify. This action opens the Update Scheduled Event dialog box (see Fig. 3:6-27). In this dialog box you can:
• change the Name of the report• make different selections as necessary from the pull-
down menus for Report to Run, When to Run, and/or Day of the Week or Day of the Month
• change the Start Time for running the report
8E6 TECHNOLOGIES, ENTERPRISE REPORTER WEB CLIENT USER GUIDE
CLIENT USER SECTION CHAPTER 6: CUSTOM REPORTS
TIP: Click Cancel if you wish to return to the Event Schedule window without saving your edits.
2. Click the Save button to display the updated criteria in the Event Schedule window.
Add an Event to the Schedule
1. In the Event Schedule window, click the Add Event button to open the Add Event to Schedule dialog box:
Fig. 3:6-28 Add an event
This dialog box also opens when saving a custom report using the Custom Report Wizard, and selecting the Save and Schedule option.
2. Enter a Name for the event.
3. Select the Report to Run from the pull-down menu.
4. Select the frequency When to Run from the pull-down menu (Daily, Weekly, or Monthly).
If Weekly, specify the Day of the Week from the pull-down menu (Sunday - Saturday).
If Monthly, specify the Day of the Month from the pull-down menu (1st - 31st).
5. Select the Start Time for the report: 1 - 12 for the hour, 00 - 59 for the minute, and AM or PM.
8E6 TECHNOLOGIES, ENTERPRISE REPORTER WEB CLIENT USER GUIDE 149
CLIENT USER SECTION CHAPTER 6: CUSTOM REPORTS
150
NOTE: The default Start Time is 8:00 AM. If you wish to run a report today and this time has already passed, be sure to select a future time.
TIP: Click Cancel to return to the Event Schedule window without saving your edits.
6. Click Save to add the scheduled event.
Delete a Scheduled Event
1. In the Event Schedule window, click the Delete button for the event you wish to delete. This action opens a dialog box with the message: “Are you sure you want to delete this event?”
2. Click OK to execute your action and to close the dialog box. This action also opens an alert box with the message: “Event deleted!”
3. Click OK to close the alert box.
8E6 TECHNOLOGIES, ENTERPRISE REPORTER WEB CLIENT USER GUIDE
CLIENT USER SECTION CHAPTER 6: CUSTOM REPORTS
Scheduling a Report to RunOnce a report view has been saved, it can be scheduled to run at a designated time.
To schedule a report to run:
1. Go to the Settings menu in the navigation panel and select Event Schedule.
2. In the Event Schedule window, click Add Event.
3. In the Add Event to Schedule pop-up box, select the Report to Run from the saved custom reports listed in the pull-down menu.
4. Specify criteria for scheduling the event, and then click Save.
8E6 TECHNOLOGIES, ENTERPRISE REPORTER WEB CLIENT USER GUIDE 151

TECHNICAL SUPPORT SECTION TECH SUPPORT COVERAGE
152
TECHNICAL SUPPORT SECTION
Tech Support CoverageFor technical support, visit 8e6 Technologies’s Technical Support Web page at http://www.8e6.com/support.html, or contact us by phone, by e-mail, or in writing.
HoursRegular office hours are from Monday through Friday, 8 a.m. to 5 p.m. PST.
After hours support is available for emergency issues only. Requests for assistance are routed to a senior-level techni-cian through our forwarding service.
Contact Information
Domestic (United States)
1. Call 1-888-786-7999
2. Select option 2
International
1. Call +1-714-282-6111
2. Select option 2
For non-emergency assistance, e-mail us at [email protected]
8E6 TECHNOLOGIES, ENTERPRISE REPORTER WEB CLIENT USER GUIDE
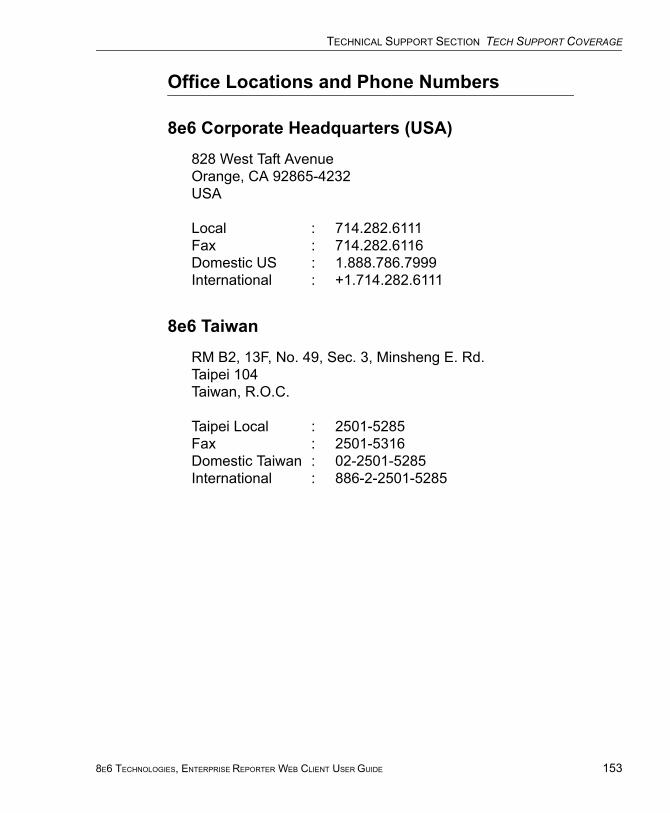
TECHNICAL SUPPORT SECTION TECH SUPPORT COVERAGE
Office Locations and Phone Numbers
8e6 Corporate Headquarters (USA)
828 West Taft AvenueOrange, CA 92865-4232USA
Local : 714.282.6111Fax : 714.282.6116Domestic US : 1.888.786.7999International : +1.714.282.6111
8e6 Taiwan
RM B2, 13F, No. 49, Sec. 3, Minsheng E. Rd.Taipei 104Taiwan, R.O.C.
Taipei Local : 2501-5285Fax : 2501-5316Domestic Taiwan : 02-2501-5285International : 886-2-2501-5285
8E6 TECHNOLOGIES, ENTERPRISE REPORTER WEB CLIENT USER GUIDE 153
TECHNICAL SUPPORT SECTION TECH SUPPORT COVERAGE
154
Support ProceduresWhen you contact our technical support department:
• You will be greeted by a technical professional who will request the details of the problem and attempt to resolve the issue directly.
• If your issue needs to be escalated, you will be given a ticket number for reference, and a senior-level technician will contact you to resolve the issue.
• If your issue requires immediate attention, such as your network traffic being affected or all blocked sites being passed, you will be contacted by a senior-level techni-cian within one hour.
• Your trouble ticket will not be closed until your permission is confirmed.
8E6 TECHNOLOGIES, ENTERPRISE REPORTER WEB CLIENT USER GUIDE
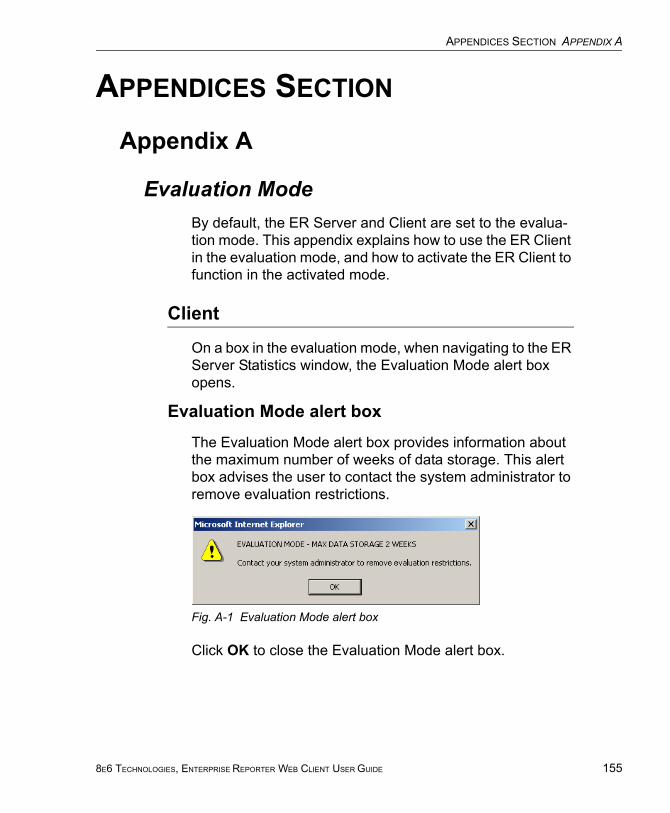
APPENDICES SECTION APPENDIX A
APPENDICES SECTION
Appendix A
Evaluation ModeBy default, the ER Server and Client are set to the evalua-tion mode. This appendix explains how to use the ER Client in the evaluation mode, and how to activate the ER Client to function in the activated mode.
Client
On a box in the evaluation mode, when navigating to the ER Server Statistics window, the Evaluation Mode alert box opens.
Evaluation Mode alert box
The Evaluation Mode alert box provides information about the maximum number of weeks of data storage. This alert box advises the user to contact the system administrator to remove evaluation restrictions.
Fig. A-1 Evaluation Mode alert box
Click OK to close the Evaluation Mode alert box.
8E6 TECHNOLOGIES, ENTERPRISE REPORTER WEB CLIENT USER GUIDE 155
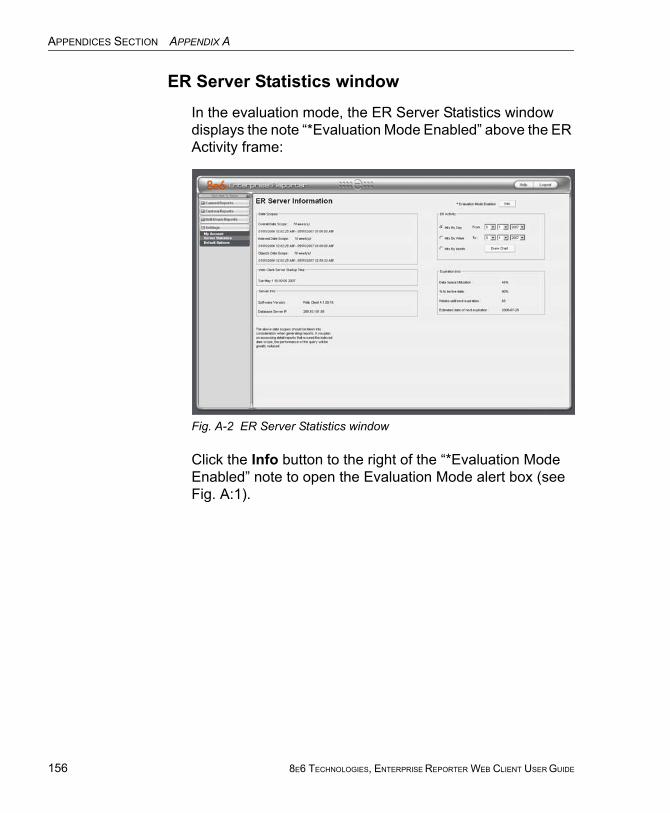
APPENDICES SECTION APPENDIX A
156
ER Server Statistics window
In the evaluation mode, the ER Server Statistics window displays the note “*Evaluation Mode Enabled” above the ER Activity frame:
Fig. A-2 ER Server Statistics window
Click the Info button to the right of the “*Evaluation Mode Enabled” note to open the Evaluation Mode alert box (see Fig. A:1).
8E6 TECHNOLOGIES, ENTERPRISE REPORTER WEB CLIENT USER GUIDE
APPENDICES SECTION APPENDIX B
Appendix B
Lotus Notes ConfigurationThis appendix provides information on configuring the ER Client to use Lotus Notes (4.5 and above) in a Microsoft Windows environment in which Lotus Domino is the primary e-mail server.
Making these configurations ensures that e-mail reports sent from the ER Client are transported via the MAPI client in Outlook Express directly to the IP Address of the Lotus Domino e-mail server. This setup avoids any delays or “hung” reports that may occur if settings point to the Lotus Notes client, since Lotus Notes utilizes the MAPI .DLL differ-ently than mail clients native to the Windows OS.
NOTE: Versions of Lotus Notes prior to 4.5 do not contain the necessary MAPI transport .DLL.
Steps for Former MS Outlook / Express Users
Follow these steps if Microsoft Outlook or Outlook Express was the primary e-mail client used on your system.
1. Delete any current e-mail accounts residing in Outlook or Outlook Express.
2. If Outlook is currently installed with your Microsoft Office system, uninstall Outlook—but not Outlook Express.
8E6 TECHNOLOGIES, ENTERPRISE REPORTER WEB CLIENT USER GUIDE 157
APPENDICES SECTION APPENDIX B
158
Steps for Installing, Configuring Lotus Notes
Step 1: Install Lotus Notes
Install and configure Lotus Notes to connect to your network’s Lotus Domino server.
NOTE: Check with your System Administrator if you are unsure about your settings.
Step 2: Configure Microsoft Mail Client
Make the following configurations for the Microsoft Mail Client from the control panel:
1. When running the Internet Connection and Internet Explorer e-mail client wizard, be sure the e-mail address is set to the “Internet address” of your Lotus Notes account.
NOTE: If this account has not yet been set up in Lotus Domino, create it now, and then run the e-mail client wizard.
2. When the e-mail account wizard requests the server address, use the IP Address only—not the Lotus Name—of your Lotus Domino server.
TIP: These settings also can be generated directly by using the “mail” settings in the Windows control panel. Again, any previous non-Lotus Notes accounts must be deleted.
Step 3: Verify Internet Explorer Settings
1. Open Internet Explorer.
2. Go to Tools > Internet Options > Programs tab.
3. Check your “E-mail” and “Newsgroups” settings to make sure they are set to “Outlook Express”—not Lotus Notes.
8E6 TECHNOLOGIES, ENTERPRISE REPORTER WEB CLIENT USER GUIDE
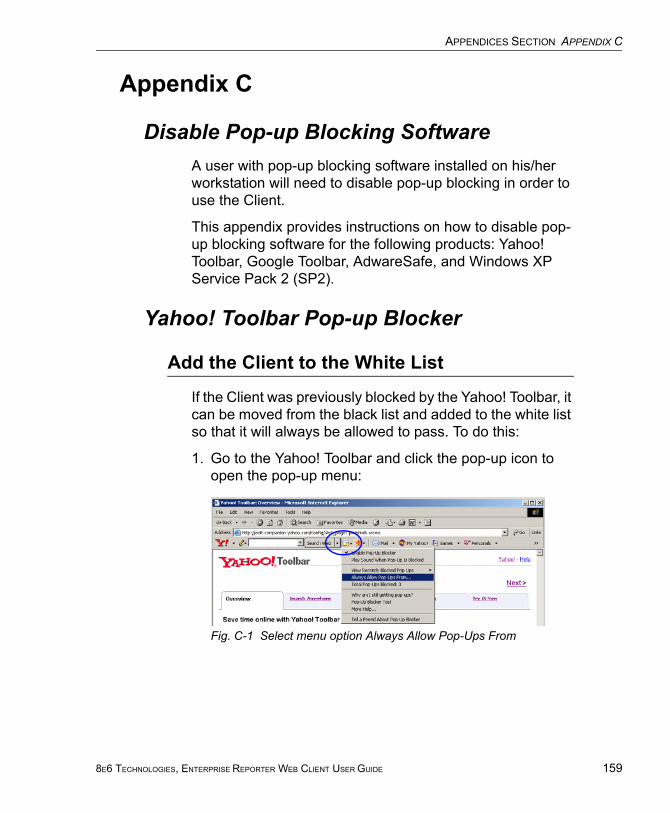
APPENDICES SECTION APPENDIX C
Appendix C
Disable Pop-up Blocking SoftwareA user with pop-up blocking software installed on his/her workstation will need to disable pop-up blocking in order to use the Client.
This appendix provides instructions on how to disable pop-up blocking software for the following products: Yahoo! Toolbar, Google Toolbar, AdwareSafe, and Windows XP Service Pack 2 (SP2).
Yahoo! Toolbar Pop-up Blocker
Add the Client to the White List
If the Client was previously blocked by the Yahoo! Toolbar, it can be moved from the black list and added to the white list so that it will always be allowed to pass. To do this:
1. Go to the Yahoo! Toolbar and click the pop-up icon to open the pop-up menu:
Fig. C-1 Select menu option Always Allow Pop-Ups From
8E6 TECHNOLOGIES, ENTERPRISE REPORTER WEB CLIENT USER GUIDE 159
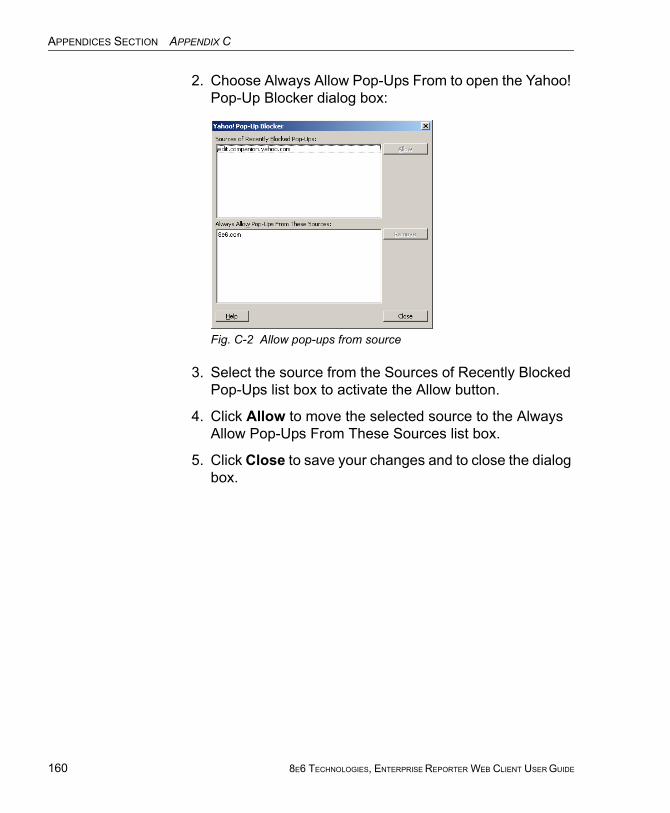
APPENDICES SECTION APPENDIX C
160
2. Choose Always Allow Pop-Ups From to open the Yahoo! Pop-Up Blocker dialog box:
Fig. C-2 Allow pop-ups from source
3. Select the source from the Sources of Recently Blocked Pop-Ups list box to activate the Allow button.
4. Click Allow to move the selected source to the Always Allow Pop-Ups From These Sources list box.
5. Click Close to save your changes and to close the dialog box.
8E6 TECHNOLOGIES, ENTERPRISE REPORTER WEB CLIENT USER GUIDE
APPENDICES SECTION APPENDIX C
Google Toolbar Pop-up Blocker
Add the Client to the White List
To add the Client to the white list so that it will always be allowed to pass, go to the Google Toolbar and click the # blocked icon:
Fig. C-3 # blocked icon enabled
Clicking this icon toggles to the Site pop-ups allowed icon, adding the Client to your white list:
Fig. C-4 Site pop-ups allowed icon enabled
8E6 TECHNOLOGIES, ENTERPRISE REPORTER WEB CLIENT USER GUIDE 161
APPENDICES SECTION APPENDIX C
162
AdwareSafe Pop-up Blocker
Disable Pop-up Blocking
AdwareSafe’s SearchSafe toolbar lets you toggle between enabling pop-up blocking (# popups blocked) and disabling pop-up blocking (Popup protection off) by clicking the pop-up icon.
1. In the IE browser, go to the SearchSafe toolbar and click the icon for # popups blocked to toggle to Popup protec-tion off. This action turns off pop-up blocking.
2. After you are finished using the Client, go back to the SearchSafe toolbar and click the icon for Popup protec-tion off to toggle back to # popups blocked. This action turns on pop-up blocking again.
8E6 TECHNOLOGIES, ENTERPRISE REPORTER WEB CLIENT USER GUIDE
APPENDICES SECTION APPENDIX C
Windows XP SP2 Pop-up BlockerThis sub-section provides information on setting up pop-up blocking and disabling pop-up blocking in Windows XP SP2.
Set up Pop-up Blocking
There are two ways to enable the pop-up blocking feature in the IE browser.
Use the Internet Options dialog box
1. From the IE browser, go to the toolbar and select Tools > Internet Options to open the Internet Options dialog box.
2. Click the Privacy tab:
Fig. C-5 Enable pop-up blocking
3. In the Pop-up Blocker frame, check “Block pop-ups”.
4. Click Apply and then click OK to close the dialog box.
8E6 TECHNOLOGIES, ENTERPRISE REPORTER WEB CLIENT USER GUIDE 163
APPENDICES SECTION APPENDIX C
164
Use the IE Toolbar
In the IE browser, go to the toolbar and select Tools > Pop-up Blocker > Turn On Pop-up Blocker:
Fig. C-6 Toolbar setup
When you click Turn On Pop-up Blocker, this menu selec-tion changes to Turn Off Pop-up Blocker and activates the Pop-up Blocker Settings menu item.
You can toggle between the On and Off settings to enable or disable pop-up blocking.
8E6 TECHNOLOGIES, ENTERPRISE REPORTER WEB CLIENT USER GUIDE
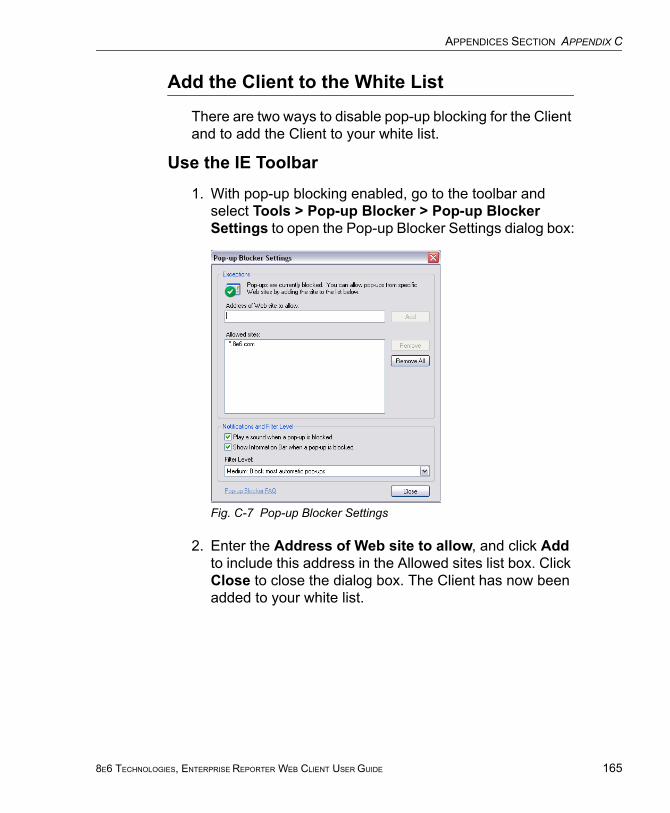
APPENDICES SECTION APPENDIX C
Add the Client to the White List
There are two ways to disable pop-up blocking for the Client and to add the Client to your white list.
Use the IE Toolbar
1. With pop-up blocking enabled, go to the toolbar and select Tools > Pop-up Blocker > Pop-up Blocker Settings to open the Pop-up Blocker Settings dialog box:
Fig. C-7 Pop-up Blocker Settings
2. Enter the Address of Web site to allow, and click Add to include this address in the Allowed sites list box. Click Close to close the dialog box. The Client has now been added to your white list.
8E6 TECHNOLOGIES, ENTERPRISE REPORTER WEB CLIENT USER GUIDE 165
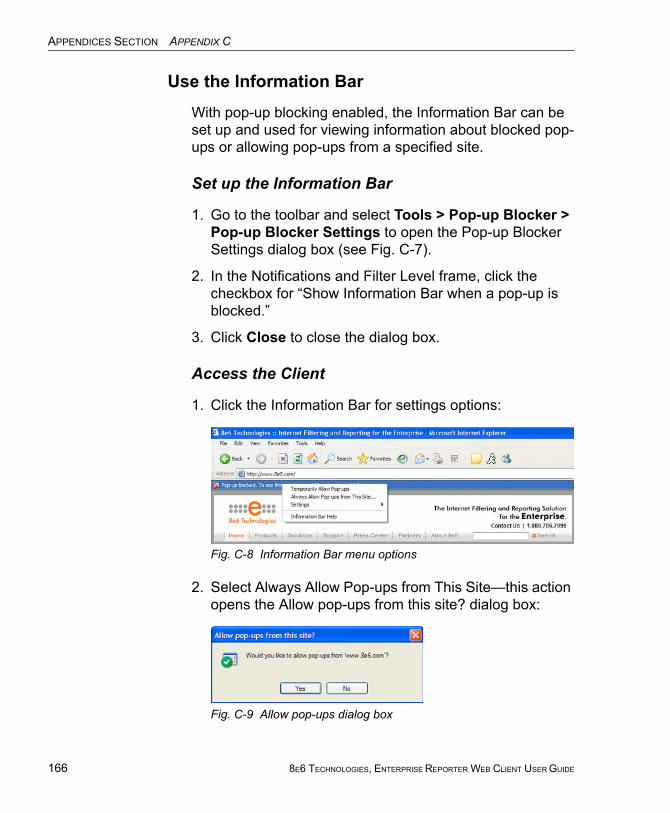
APPENDICES SECTION APPENDIX C
166
Use the Information Bar
With pop-up blocking enabled, the Information Bar can be set up and used for viewing information about blocked pop-ups or allowing pop-ups from a specified site.
Set up the Information Bar
1. Go to the toolbar and select Tools > Pop-up Blocker > Pop-up Blocker Settings to open the Pop-up Blocker Settings dialog box (see Fig. C-7).
2. In the Notifications and Filter Level frame, click the checkbox for “Show Information Bar when a pop-up is blocked.”
3. Click Close to close the dialog box.
Access the Client
1. Click the Information Bar for settings options:
Fig. C-8 Information Bar menu options
2. Select Always Allow Pop-ups from This Site—this action opens the Allow pop-ups from this site? dialog box:
Fig. C-9 Allow pop-ups dialog box
8E6 TECHNOLOGIES, ENTERPRISE REPORTER WEB CLIENT USER GUIDE
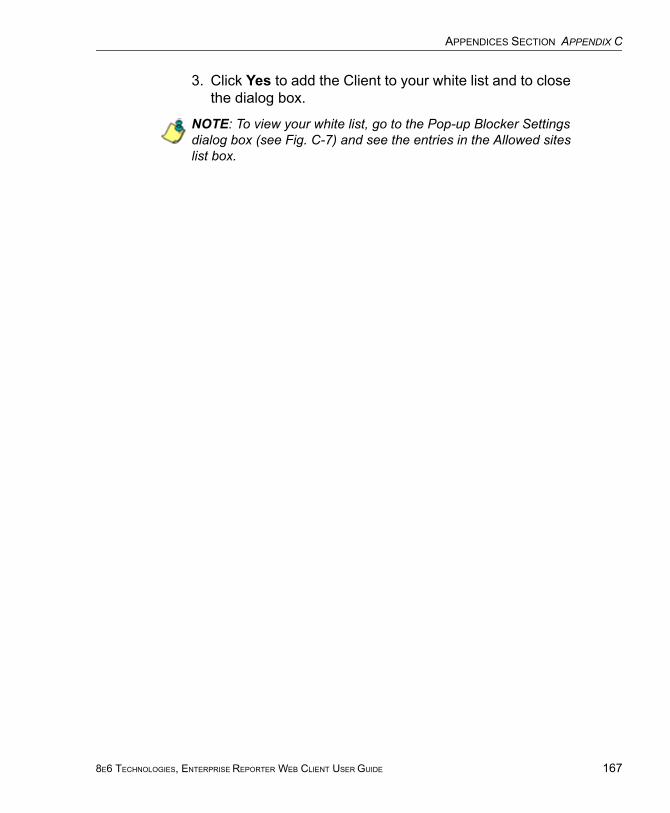
APPENDICES SECTION APPENDIX C
3. Click Yes to add the Client to your white list and to close the dialog box.
NOTE: To view your white list, go to the Pop-up Blocker Settings dialog box (see Fig. C-7) and see the entries in the Allowed sites list box.
8E6 TECHNOLOGIES, ENTERPRISE REPORTER WEB CLIENT USER GUIDE 167
APPENDICES SECTION APPENDIX D
168
Appendix D
GlossaryThis glossary includes definitions for terminology used in this user guide.
hit count - the number of pages and/or objects end users access as the result of entering URLs in a browser window.
object count - the number of objects end users access on a Web page, including images, graphics, multimedia items, and text items. The number of objects on a page is generally higher than the number of pages a user visits.
page count - the number of Web pages end users access, which can exceed the number of objects per page in catego-ries that use a lot of pop-up ads (porn, gambling, and other related sites). A user may visit only one site, but visit 20 pages on that site if the page has pop-up ads or banner ads that link to other pages.
time count - the amount of time end users spend on a given Web page, including the number of times that page is refreshed by either the user or a banner ad.
Wall Clock Time count - the amount of time end users spend on the Internet, based on the Wall Clock Time algo-rithm. For each user, the number of seconds from the log is dropped, and any unique minute within a given hour counts as one minute.
8E6 TECHNOLOGIES, ENTERPRISE REPORTER WEB CLIENT USER GUIDE
INDEX
Symbols# Records 89, 92
AAdmin Details 41Admin Details menu option 11Advance Options 79alert box, terminology 4Amount shown 92arrow, terminology 4
BBack button 69Break type 91button, terminology 4
CCategory Descriptions 21category group
add additional groups 26how to add 24
Category Groupings 23charts
hits per day, week, month 54checkbox, terminology 4Client
change settings 20, 49ER Server Statistics 52how to use 14log in 10log out 15re-login 16
Conventions 3Copy a Custom Report 143count columns 71
8E6 TECHNOLOGIES, ENTERPRISE REPORTER WEB CLIENT USER GUIDE 169
INDEX
170
DData to export field 91Date Scope 87
ER Server Statistics 53Default Options 58Default Top Value 58detail report
generate report view 67Detailed Info 94dialog box, terminology 5disable pop-up blockers 159Display and # Records fields 89Draw Chart button 54
EEdit User button
change passwords 40Email Report 94ER Activity, hits on Server 54ER Server 32escape characters, use of 78evaluation mode 155Event Schedule 146Expiration Info 57Export Custom Report 83Export Drill Down Report 82export reports 74Exporting a Report 96
Ffield, terminology 5filter columns and buttons 70Filter String field 89Firefox 18For double-break reports only 92For E-Mail output only 94For pie and bar charts only 93Format 91frame, terminology 5
8E6 TECHNOLOGIES, ENTERPRISE REPORTER WEB CLIENT USER GUIDE
INDEX
From Date field 87
Ggenerate
drill down report 109ER activity charts 54Single User Group Report 110Wall Clock Time report 135
Generate using 93
HHide Un-Identified IPs 59, 93hit count, definition 168hit, definition 54
Iicon, terminology 5Internet Explorer 8, 18, 48, 158, 162
LLDAP 29, 30, 32list box, terminology 5log
into Client 10out of Client 15
Lotus Notesconfiguration 157
Mmail server 96Modify Report 81mouse
use to view truncated data 77My Account 50
change password 50MySQL 1, 43
8E6 TECHNOLOGIES, ENTERPRISE REPORTER WEB CLIENT USER GUIDE 171
INDEX
172
NNew Drill Down Report 79NT domain query 78
Oobject count, definition 168Order field 90Outlook Express 157Output type 93
Ppage count, definition 168Page links 75Page/Object Warning Limit 58password
change Client administrator password 41create for Client user 37
pop-up blocking, disable 159pop-up box/window, terminology 6Print report 98Process List 45pull-down menu, terminology 6
RR3000 1, 29, 30, 32radio button, terminology 6Record navigation field 22, 46, 69, 147records
exportation 74sort by another column 73, 77
re-login 16report
count columns 71Date Scope field 87delete a custom report 145detail 67double break 91edit a custom report 143
8E6 TECHNOLOGIES, ENTERPRISE REPORTER WEB CLIENT USER GUIDE
INDEX
enter search terms 89ER Activity 54export 74filters 70page numbers 75records 69run a custom report 145sample file formats 100sample, Comma-Delimited Text 105sample, Excel (Chinese) 106sample, Excel (English) 107sample, HTML 104sample, MS-DOS Text 101sample, PDF 102sample, Rich Text Format 103scheduling a report to run 151select record and columns to display 89summary 66type 66view info on a saved custom report 142
Result Set Limit 90
SSafari 18Save Custom Report 84screen, terminology 6search
NT domain with special characters 78Search field 89Server
User Guide 17, 18, 44view statistics using Client 52
Server Info 53Server Info button 42Set Result Limit 80Settings menu option 20, 49Sort by field 90sort records 73, 77spam filter 96Specific Search 120, 140
8E6 TECHNOLOGIES, ENTERPRISE REPORTER WEB CLIENT USER GUIDE 173
INDEX
174
summary reportgenerate report view 66
TTechnical Support section 152terminate a process 46Terminology 4text box, terminology 6thumbnail, terminology 7time count, definition 168timed out session 16To Date field 87Type field
New Summary Report 86
Uupdate
category group 24scheduled event 148user group 29user group, add/remove user 39
user grouphow to add 29
User Groupings 28User Permissions 36
how to add a user to a group 38User Permissions button
change passwords 40
Vview
ER Activity charts 54record data truncated in a column 77
View report 98
WWall Clock Time count, definition 168Wall Clock Time Report 135
8E6 TECHNOLOGIES, ENTERPRISE REPORTER WEB CLIENT USER GUIDE

INDEX
Web access logging device 17, 21, 71, 87Web Client Server Startup Time 53window, terminology 7
8E6 TECHNOLOGIES, ENTERPRISE REPORTER WEB CLIENT USER GUIDE 175

INDEX
176
8E6 TECHNOLOGIES, ENTERPRISE REPORTER WEB CLIENT USER GUIDE