Embed Size (px)
Citation preview

“Purveyors of the finest decking materials”
5612 56th Commerce Park Blvd. Tampa, FL 33610
www.McKinnonMaterials.com
Phone: (813) 622-7031 Fax: (813) 621-9017
Technical Data Guide

1
2
3
4
5
6
7
8
General Information A. Surface Preparation B. Surface Preparation Detail C. Floor Care Recommendations
Epoxy A. Industrial Clear B. Rapid Set Industrial C. Colorquartz D. Aurora Epoxy Dust E. Stone Bond Epoxy
Protective Coatings A. Miracle Glaze/Acrylic Urethane B. High Performance Urethane C. Super Vinyl Supreme
D. Crystal Coat
Acrylic Products A. McKrete
B. Acrylic Paints
Chromastain
Deck Coat Overlay
Stencil Patterns
Product Training
- 2 - Click for McKinnon Materials Video
Click for multiple products brochure

McKinnon Materials, Inc. 5612 56th Commerce Park Blvd.
Tampa FL, 33610 Phone: (813) 622-7031 Fax: (813) 621-9017
General Information & Surface Preparation
I. CONCRETE
Surface preparation is as important as the selection of the correct coating or surfacer to be used. Two general conditions must be met for a successful application:
1. The concrete must be structurally sound
and free of significant defects. 2. The surface must be free of contaminants
that would interfere with adhesion.
A. There are many factors that can affect the strength and/or soundness of concrete. Some of these are: too little aggregate blend, too much water, excess retempering, too much air entraining agent, overworking the surface after the initial set has occurred and poor curing procedures. The results of some of these factors are not necessarily cause for concern when the concrete is not coated or when covered with a surfacer, but they become important when a protective surface is applied.
Overworking after the initial set can cause serious defects that are not obvious until a thick protection, such as glass mat reinforced liner, resin rich slurry coat, or aggregate filled surfacers using novolac resins as the binder is installed. Depending on the timing, such overwork can develop a weak strength line in the concrete from approximately 1/8 inch to ¾ inch below the surface. The thick protection systems shrink somewhat as they cure and place some tensile stress on the concrete. These stresses can fluctuate with large temperature swings. The tensile strength of concrete does not often exceed 350-400 psi, but this is more than enough strength to withstand the stresses described. However, the weak area caused by overworking can have strengths below 150-200 psi and failures can occur there. To ensure a successful application, the surface strength, as measured by a pull-off test, should be at least 250 psi. The pull-off consists of isolating a controlled area of the surface, bonding that area to a measuring device, and deterring the force required to cause tensile failure. An example of such instruments that can be used in the field is the PULL-OFF TESTER manufactured by PROCEQ, SA., of Zurich, Switzerland.
Failure in such a test, at the concrete surface with little or no concrete adhering to the adhesive indicates surface contamination. Failure with a thin line of cement and sand attached to the adhesive indicates low cement paste strength. Failure with significant amount of concrete attached to the adhesive, but at a level below 250 psi may indicate that overworking has occurred.
Any failure below 250 psi is cause for concern. The reason for the low figure must be determined and corrected before applying the protective system.
Other defects affecting the suitability of concrete to be coated are:
1. Poor compressive strength. A minimum of
3000 psi is usually adequate but unusual load factors may require higher values. Even if a surfacer has a compressive strength of 10,000- 12,000 psi, failure can occur in the concrete below if its compression strength is not adequate for the service.
2. Delaminations. These occur for a variety of reasons. They can usually be detected by tapping the surface with a hammer or dragging a heavy chain across the surface. A “hollow” sound indicates delamination.
3. Protrusions such as, mortar spatter fins should be removed by grinding.
4. Spalled areas, pours areas, and voids such as “bird eyes” should be patched with a Portland cement based mortar or with a compatible polymeric patching compound.
Any concrete not meeting the above structurally sound condition must be replaced and properly cured before any protective system is applied.
When air entraining agents are used, long mixing times in the ready mix (long transit times or other “holds” on placement or excessive troweling can cause the entrained air bubbles to coalesce into voids or to collect at the surface to cause porous areas. These areas of porous concrete may require multiple coats of thin film protection to be applied.
3

They can also cause blisters if thick film protection is involved: air trapped wash in these areas under the surfacer of membrane, can expand before the protection cures.
Blisters can usually be controlled:
1. Seal the surface.a. Apply a heavy primer coat and allow it
to at least partially cure beforeproceeding.
2. Apply the primer and the topcoat or surfacer inthe usual manner but choose conditions thatallow cure before the temperature rises.
a. Shield the surface from direct sunlight.b. Install after the maximum daytime
temperature has passed and thetemperature of the concrete and air areboth failing. This may require night-time installation.
B. Surfaces that are structurally sound must still be cleansed of all contaminants to achieve satisfactory performance from the protective coating or surfacer.
1. Abrasive blast cleaning is the preferred method.Several types of abrasive blast cleaningequipment are available that hold dust to aminimum by vacuum collecting the abrasiveand the debris developed during blasting.Heavily contaminated areas may require asscabbler or scarifier to remove thick depositsand some of the structurally sound, butirretrievably contaminated, surface.
2. Where abrasive blast or mechanical cleaning isnot feasible (or not permitted) cleaning canusually be accomplished by acid etching. Mostoften the acid because of its availability andrapid action, ACI (American Concrete Institute)recommends a less active, but safer, organicacid. Both acids can clean concrete well.
The order of cleaning steps is important as some steps are ineffective if the previous steps have not been performed.
a. Blow off dust and debris with oil freecompressed air.
b. Remove water-soluble chemicals, oils,and some animal fats by scrubbingwith a strong alkaline detergent suchas sodium metasilicate or tri-sodiumphosphate solution, follow by flushingwith high pressure water. Heavylayers of oil, grease, asphalt, dirt orother contaminants should be removedby scraping before the detergent is
applied. Animal fats are especially hard to remove. Best results are obtained by scrubbing with a 10% caustic solution in water followed by flushing with high- pressure potable water. c. Acid etch, using 1 volume muriatic
acid mixed with 3-4 volumes of waterat a rate of 2-21/2 gallons per 100square feet. Scrub the acid solutioninto the concrete surface making surenot leave areas not scrubbed. Theaction of the acid will be evidenced byextensive bubbling and the formationof a scum. This action should becontinued for 3-5 minutes beforestopping. Do not allow the surface todry: Flush with large volumes ofpotable water while scrubbing to helpremove the scum and any looseparticles.
d. If acid etching does not producebubbling action over the entire surface,some contamination is present that willalmost certainly interfere withadhesion. This may be a curingcompound, a clear seal coat or somesimilar material. It must be removed.Some type of paint remover may berequired.
Not all of the above steps are always required. The action required depends upon what kind and how much contaminant is present. However, whatever steps are taken, they should be in the order shown above.
The acid, caustic and alkaline detergents described above present hazards to skin and eyes. Wear goggles, rubber gloves and body covering clothes when using them. Read the supplier’s instructions carefully before beginning.
C. After the surface has been acid etched and rinsed, blow off the excess water with oil free compressed air and allow to dry. The surface should have the texture of rough sandpaper.
A final test after preparation is to place a small amount of potable water on the dry surface. The water should spread quickly and uniformly. If it beads or spreads in a non-uniform manner, further preparation is required.
In all cases of doubt as adequate surface preparation, a test patch of approximately 2ft. x 2ft. should be installed, allowed to cure, and tested for adhesion before proceeding.
D. Several common failure modes are related to Vinyl tile should be cleansed thoroughly with a wax
4

properties of the concrete and not directly to the protective system:
1. Cracks: When properly applied, a protectivesystem is strongly bonded to the concrete. Anycracks that develop in the concrete will bereflected in the coating or surfacer.
2. Joints: Control joints and expansion joints areused because some movement of the concrete isexpected. Thick film protection such assurfacers should have a joint at every joint inthe concrete.
3. Blisters and Delaminations: Water in theconcrete can cause these failures. Liquid watercan become vapor as the temperature rises andthe resulting pressure can cause blisters if theprotective system has not cured enough to resistthis pressure. Water collecting at the interfacebetween the concrete and the protective system,after cure, can cause delamination.
The source of this water can be water taken-up in porous areas during cleaning, water remaining in partially cured concrete or ground water percolating upward through the concrete.
A relatively simple test for moisture content of concrete consists of placing a 2ft. x 2ft. sheet of plastic, such as polyethylene or PVC over the surface to be tested, secure the edges and leave for 24 hours. If an objectionable level of moisture is present, condensed moisture is present, condensed moisture is visible. However, at temperatures below 40F, the passage of moisture effective when the slab temperature is at least 40 degrees Fahrenheit.
The moisture content of concrete to be protected by McKinnon epoxy and polyester products must be no greater than 8% for satisfactory performance. This will vary for polymer modified cementitious products and for water based systems: refer to specific instructions for these items.
E. Determining when adequate preparations have been done, whether the concrete is sound enough for a specific installation or whether too much water will cause a failure is best accomplished with experience in making such decisions; there is no substitute.
F. Aged epoxy surfaces should have the gloss removed by sanding, screening or shot blast and wiping with an aggressive compatible solvent such an N-methyl pyrollidone (Mpyrole or equivalent).
removing compound. Because of the wide variety of tile compositions, a test application is recommended before coating a large area.
Wood should be sanded and all debris removed. Because of wide variations in porosity and grain raising, consult McKinnon Materials for guidance.
5

1. SAWCUT SLAB AT EXTENT OF FLOOR
Sawcut slab at all floor perimeters where surfacer will not abut vertical surface. Sawcut ½″ should be at a 90 degree angle to floor, maintaining a ½” depth.
¾″
2 . C HI P O U T C O N C R E T E
Chip out concrete with a chipping hammer. Chip toward saw cut. Vacuum debris. Width of chase should be no less than ¾”, and no more then 1 ½”.
3 . I N ST A L L S URF A C E R ¼″
Prime and trowel surfacer into chase along with rest of floor.
COVE BASE DETAIL
1 . P R E P A R E F L O O R A N D W A L L S Prepare floor area and walls. Refer to Polymerica Technical Bulletin SP-C. ⅛″ Optional
cove strip
2 . P R I M E F L O O R A N D W A L L S
Snap a line along wall at desired height (2”, 4”, 6”). Apply tape above chalk line to ensure a neat edge. Cove strips can be specified to improved appearance of top edge. (see detail) Apply primer according to directions.
3. INTEGRAL MATERIAL APPLICATION
Apply surfacing material to wall and floor in one step using a coving tool. Remove tape before access to area is restricted by floor installation.
Typical surfacer troweled with coving tool
¼″
6

CRACK REPAIR
1. LOCATE CRACKS IN CONCRETE Cracks larger than a ‘hairline’ and any cracks which are indicative of structural movement should be selected for routing. Cracks which are actually joints in the slab are dealt with later in this document.
Surface crack
2. CHIP OUT CONCRETE ¼″ Method a) Chip out concrete with chipping hammer. Chip toward crack. Vacuum debris. Width and depth of chamfer should be no less ¼″ than ¼”.
3. FILL CRACKS WITH COMPOUND Method a) Mix according to directions. Pour neat into the chamfer level just below the surface of adjacent sides. If the floor is to be overlaid with a mortar system, fill chamfer to top as shown.
Method b) Mix according to directions. Pour neat to fill chamfer, continue pouring out a bead 6” wide over top of chamfer, with a thickness of 30-60 mils. Feather edges while it is still wet, set reinforcing fabric into compound.
method “a” method “b”
compound reinforcing fabric
6″ *not to scale
FLOOR DRAIN DETAIL
Trowel Surfacer Trowel Surfacer
New Construction Detail Retrofit Detail
7

Trench
JOINT DETAIL
1 . L O C A T E J OI N T S I N C O NCR E T E Locate all joints to be overlaid. Mark both ends of each joint location on walls, columns, or vertical abutment.
Slab cross section with joint
2. APPLY OV ERLAYMENT OVER JOINT
Apply seamless flooring system over entire surface in accordance with directions. Allow floor to cure out.
Trowel Surfacer
3 . FI L L J O I N T Using the marks as a guide snap lines over joints, and sawcut through overlayment into original joint. Install backer rod (generally at a depth equal to half the joint width) to contain compound. Mix joint compound according to directions. Pour neat into the joint to level just below the surface of adjacent sides.
For non-working or control joints, backer rod is generally not used. Pour joint compound neat into the joint to level just below the surface of adjacent sides.
CONCRETE TRENCH DETAIL
Backer Rod
NOTE: Proper joint design is the responsibility of the facility engineer or architect. Please consult current ACI standard 504R for necessary guidance.
Trowel Surfacer Lining system with reinforcing fabric
Angle iron
1″ radius
Unlined trench Lined trench
8

VERTICAL LINING TERMINATION
Lining System Tank
Compound at isolation joint
Lining System containment curb, pump, pad, or vertical support
SMALL FLOOR PATCH DETAIL
1 . SA W C U T A R E A P E R I M E T E RSnap a chalk line around area to be patched. If possible, make the area rectangular in shape, so that the finished patch will be more aesthetically pleasing. Make saw cuts into the flooring between ¼” to ½”.
2 . CHI P O U T B A D C O N C R E T EUsing a chisel or a chipping hammer, remove the affected material. Start approximately 2” inside of the saw cut, and chip towards outer edge. Working in from the saw cute might damage straight edge. Remove as much substrate as necessary to obtain ¼” to ½”.
3 . I N S T A L L S U R F A C E Mix and apply trowel patching material according to directions. Screed top of surface to that it is level with adjacent surface, and finish trowel. Allow to cure. If sealing is desired, apply duct tape just outside the extent of the surface.
9

BEAN-e-doo Mastic Remover Tip Sheet For nearly a decade, BEAN-e-doo® Mastic Remover has been replacing older mastic removers, usually made from
petroleum based chemistry. The older removers evaporate very quickly, resulting in often offensive odors, and significantly contribute to air pollution and global warming. BEAN e doo Mastic Remover evaporates very slowly, has
a very low, non-offensive odor, and does not contribute to global warming. BEAN-e-doo Mastic Remover’s advancements in mastic removal techniques sometimes requires a different approach to cleaning up. These tips are
designed to help people evaluate which techniques will work best for their project.
BEAN-e-doo Mastic Remover should not be used on wood surfaces. Using BEAN-e-doo might slightly darken a concrete surface.
The condition of the concrete, its surface, age, even the environment are factors that contribute to the simplicity, or complexity of mastic removal. The on-site user of BEAN-e-doo Mastic Remover is in the best position to determine these factors. The tips offered below range from the simple (tight, undamaged, fairly non-porous) concrete to the more complex (porous to very porous, highly cracked, extremely absorbent).
APPLICATION: Pour BEAN-e-doo Mastic Remover undiluted directly on the concrete surface. Do not exceed the recommended coverage. Applying too much BEAN-e-doo does not increase removal time, but does contribute to impeding the complete removal of residue.
Where there are wide cracks or seals, fill with a commercial absorbent like diatomaceous clay (e.g. OilDry™), saw dust, or synthetic absorbent, before pouring BEAN-e-doo on the surface.
Use a long handled brush or broom to ensure BEAN-e-doo covers all the mastic trowel ridges.
Allow BEAN-e-doo to dwell until mastic softens (generally 45 to 60 minutes for asbestos mastic. Dwell time for vinyl and acrylic mastics is longer, in some cases up to 4 hours.)
CLEAN UP: Use a long handled scraper or squeegee to remove softened mastic and excess BEAN•e•doo®. Generally, black mastic will dissolve into a liquid the consistency of very old engine oil, and can be scraped into a puddle. Fill the puddle with a commercial absorbent, and then shovel into receptacle. All other mastics tend to lift as more solid than liquid and can be scrapped into a pile that can be picked up with a shovel.
After picking up the dissolved/lifted mastic, there will still be a slippery, film residue remaining. In most cases, mopping the floor with Franmar Chemical’s Emerge™ will remove the residue. For best results for cleanup, after removing softened mastic, cover floor with a commercial absorbent, sweep up and then follow with a mop rinse using Emerge™. * Testing surface for residues after floor has been mopped: Apply water to various small spots on the substrate. If water turns cloudy white, indicates there is BEAN•e•doo® Mastic Remover on the surface. Remop using a degreaser is recommended. Then retest. Let surface dry before applying new mastic or coating.
In all cases, care should be taken not to over saturate the floor by using too much water.
In extreme cases, and/or for especially difficult floors, scrape up softened mastic, then pick up filmy residue with steam vacuum. Cover floor with a commercial absorbent, sweep up and then follow a mop rinse using Emerge. Let dry before applying new mastic or coating.
* Use of rotary cleaning machines for cleanup are not recommended unless an area has been tested first.
Revision Date 2/1/2006
10
For more info click here

McKinnon Materials, Inc. 5612 56th Commerce Park Blvd.
Tampa FL, 33610 Phone: (813) 622-7031 Fax: (813) 621-9017
SOY-Gel Product Data Sheet For General and Restoration
SOY•Gel™ is an industrial strength and consumer friendly paint, varnish, and urethane remover made with 100% American grown soybeans. The low evaporation rate of SOY-Gel and its gel formulation make it possible to remove several layers of paint in one application. During the removal of lead based paint, lead becomes encapsulated in the gel, preventing airborne lead particles, allowing for safe and easy disposal. SOY-Gel contains no methylene chloride, is not an alkaline based stripper and cleans up easily with water. Unlike more traditional paint strippers SOY-Gel lets you work without the odor. Indoors or outdoors, you can be guaranteed a safe restoration process with SOY-Gel. APPLICATION: SOY-Gel is safe to use on wood, brick, stone, metal, plaster, concrete, and many other surfaces. Do not use on plastic, PVC, rubber or dry wall. SOY•Gel may be used indoors or outdoors. When used outdoors, protect plant and vegetation with a plastic drop cloth. SOY Gel may be used on vertical as well as horizontal projects.
Apply a thick, even layer of SOYGel, generally between 1/16 and 1/8 inch to the coating to be removed by using pouring, brushing, or airless sprayer (piston pumped with tip of 519 or similar). If applying with brush, do not apply as you would paint. Don’t brush or scrape the surface until the stripper has had time to work. Check the progress of the stripping action by using a scraper to see if the coating is softened down to the surface. If not, wait longer and recheck. SOY-Gel will remain wet and working for several hours. Longer is better. Let the stripper do the work. If SOY-Gel is left to sit outdoors, cover with a light plastic drop cloth to prolong the stripper's wet time. Once the coating is softened, remove it with a scraper, industrial wet vacuum, or other stripping tool. Reapply stripper, if necessary. Repeat steps above. After use, clean remaining thin residue with water, using a scrub brush and/or mop or power washer. Ensure to scrape or vacuum excess removed coating and SOY-Gel before using a power washer for final cleaning. Always use care to prevent over spray from getting on surfaces other than the one being prepped. Allow surface to dry before further preparations.
• Flash Point: Above 200°F• pH Level: 6.80 pH of 1/10wt/wt solution in soft water. • Vapor Pressure: Not determined• Odor: Mild Odor• Conditions to avoid: Strong oxidizing agents.• Health Hazards: May cause moderate eye irritation.May cause delayed skin irritation. May be harmful if swallowed in large amounts. • Packaged: Quart, Gallon, 2 1/2 Gallon, Five Gallon,55 Gallon Drum • Coverage:Horizontal - Up to 200 sq. ft. per gallon Vertical - Up to 130 sq. ft. per gallon
Common Uses • Lead-based paint removal• Latex paint removal• Enamel paint removal• Single and Two part epoxies(two part solid count must be lower than 40%) • Urethane removal• Varnish removal• Concrete sealer removal
Revision Date 12/11/2006
11 Click here for more information

McKinnon Materials, Inc. 5612 56th Commerce Park Blvd.
Tampa FL, 33610 Phone: (813) 622-7031 Fax: (813) 621-9017
Floor Care Recommendations
Epoxy and Urethane Systems
The following cleaning recommendations should be practiced weekly or more frequently as needed.
IMPORTANT! Only warm water should be used to clean within the first week.
After the first week use only a non-chlorine cleaner diluted in water. (McKinnon Materials’ E-Z Clean is a good product for this purpose) Sanitizing detergents that contain chlorine or hypochlorite should never be used. Spills must be removed and rinsed at the first opportunity. Sweep or vacuum loose dirt or debris.
McKrete and Deck Coat Overlay
The following cleaning recommendations should be practiced weekly or more frequently as needed.
Hose the deck or patio frequently Clean with a mild detergent (McKinnon Materials’ E-Z Clean is a good product for this purpose; Dawn dish liquid is also highly recommended) Spills must be removed and rinsed at the first opportunity.
Things NOT to do: Do not use muriatic acid to clean this flooring system Do not use any solvent or ammonia based cleaner to clean the flooring system Do not allow animal fats from a grill or stove to come in contact with the floor. Place a mat under the grill to protect the finish.
materials.
12

McKinnon Materials, Inc. 5612 56th Commerce Park Blvd.
Tampa FL, 33610 Phone: (813) 622-7031 Fax: (813) 621-9017
INDUSTRIAL CLEAR EPOXY
Physical Properties Performance Properties Composition: Two part component epoxy
system for use as a sealer, glaze or finish coat for industrial seamless flooring, or a s a binder in aggregate filled trowable or broadcast compounds.
Tensile Strength:
Elongation:
Hardness:
(ASTM D638 8000 PSI)
(ASTM D638 7%)
(ASTM – D2240 shore D) 78
Solids Content: 100% solids Comprehensive Strength:
Impact Strength:
(ASTM D695) 12,000 PSI
Foot lbs per inch of 5 notch ASTM D- 256
Mix Ratio: 3 to 1 Abrasion Resistance Grams weight loss 32mg loss federal test method standard 406 method 1091
Viscosity: @ 77 degrees F cps 1,200
Pot life: @ 77 degrees F approximately 28 minutes
Chemical Resistance
General Information: Reagent Rating Application: See surface preparation Acetic Acid 10% R
Acetone L Bleach R Citric Acid 5% R Crude Oil R Ethyl Alcohol R
R-recommended for continuous Gasoline R service Hydrochloric Acid 15% R
Lactic Acid 5% R L- limited recommendation, Methyl Ethyl Ketone L occasional spills Nitric Acid 5% R
Skydrol R Sodium Hydroxide 50% R Sulfuric Acid 25% R Toluene L Xylene R
Coverage: Build coating depends on the application technique, substrate porosity and intended function, but for most applications, an average thickness of 5 to 15 mills will get 350 to 100 sq ft per gallon
Drying Time: Should be allowed to cure 12-18 hours at normal room temperature for light traffic, and 4-5 days for heavy traffic.

Clean up: Tools and mixing equipment should be thoroughly cleaned prior to gelation of the product. Typical solvents such as xylene and acetone may be used for cleaning.
Click here for photos of this product in use.
McKinnon Materials, Inc. 5612 56th Commerce Park Blvd.
Tampa FL, 33610
Phone: (813) 622-7031 Fax: (813) 621-9017
Rapid Set Clear Industrial Epoxy
Physical Properties Performance Properties
Composition: Two part component epoxy system for use as a sealer, glaze or finish coat for industrial seamless flooring, or as a binder in aggregate filled trowelable or broadcast compounds.
Tensile Strength:
Elongation:
Hardness:
(ASTM D638 8000 PSI)
(ASTM D638 7%)
(ASTM – D2240 shore D) 85
Solids Content: 100% solids Comprehensive Strength:
Impact Strength:
(ASTM D695) 12,600 PSI
Foot lbs per inch of 5 notch ASTM D- 256
Mix Ratio: 3 to 1 Abrasion Resistance Grams weight loss 29mg loss federal test method standard 406 method 1091
Viscosity: @ 77 degrees F cps 1,200
Shelf Life: 12 Months (Unmixed) Color: Clear Flashpoint: Cure: 200 F Resin: No response
Pot life: @ 77 degrees F approximately 15 minutes
Chemical Resistance
General Information: Reagent Rating Application: See surface preparation Acetic Acid 10% R
Acetone L Bleach R
1. Binder Citric Acid 5% R Crude Oil R
2. Finish Coat Ethyl Alcohol R R-recommended for continuous service Gasoline R
Hydrochloric Acid R L- limited recommendation, occasional 15% R spills Lactic Acid 5% L
Methyl Ethyl R Ketone R Nitric Acid 5% R Skydrol R Sodium Hydroxide L 50% R Sulfuric Acid 25% Toluene Xylene

Coverage: Build coating depends on the application technique, substrate porosity and intended function, but for most applications, an average mill thickness of 10 is 150 sq ft per gallon
Drying Time: Should be allowed to cure 6-8 hours at normal room temperature for light traffic, and 2 days for heavy traffic.
Clean up: Tools and mixing equipment should be thoroughly cleaned prior to gelation of the product. Typical solvents such as xylene and acetone may be used for cleaning.
Important note:
Safety
Material Safety Data sheets are available from McKinnon Materials and should be consulted prior to use of the product. This product is intended for the use by professionals only. Keep away from children and those not trained in the use and potential hazards involved.
Warranty:
McKinnon Materials warrants its products to conform to its manufacturing standards. McKinnon Materials will replace or refund the purchase price of non-conforming product at the seller’s option; such remedy being exclusive of all others and sole remedy available to the buyer. Buyer hereby expressly waives to claim to additional damages. Any claim under this warranty must be made in writing within 7 days of discovery of non-compliance and no later than two years from the date of delivery of product. No representative, distributor or applicator of these products is authorized to modify product, product data or warranty.

Colorquartz™Aggregate
Colorquartz aggregate is comprised of tough, color-coated inorganic quartz particles designed for use in variety of demanding architectural applications including epoxy seamless flooring and cement-based swimming pool finishes. Each Colorquartz aggregate granule is ceramically coated by an exclusive 3M process that bonds permanent inorganic pigments to the quartz for color that has been proven to last in the harshest of environments.
General Data Property Measuring Standards & Conditions Results Hardness Bulk Density S-grade T-grade
Moh’s Mineral Scale ASTM C 29
6.5 – 7
104-108 lb./ft³ (packed) 94-98 lb./ft³ (packed)
Moisture Content ASTM C 566 Does not exceed 0.5%
Chemical Resistance Data** Acid Resistance Concentration (%) Reaction Alkaline Resistance Concentration Reaction Acid Material Alkaline Material Nitric Acid 70 None Trisodium Phosphate 40 None Hydrochloric Acid 37 None Sodium Carbonate 40 None Acetic Acid 100 None Ammonium Hydroxide 28 None Sulfuric Acid 96 None Industrial Detergent 1 part to 2 parts water None Chromic Acid 82 None Aluminum Sulfate (90 hours immersions)
25 None
Trichloro-s- triazenentrione
Saturated None
** Liquid immersion was for 18 hours
Sieve Specifications Property Measuring
Standards & Conditions
Results
U.S. Retained
Sieve % Colors
Grade S ASTM D 451 20 0-2 S Grade is available in 12 colors (Spherical Shape) 30 5-17 2063 Red 4013 Brown 7043 Grey
40 47-67 2163 Plum 5013 Black 7133 Smoke 50 20-35 3033 Green 6023 Tan 8043 Blue 70 2-8 3143 Cayman G reen 6073 Buff 9073 White -70 0-1
Grade T ASTM D 451 12 0-5 T Grade is available in 5 colors (trowelable) -40 0-2 2065 Red 5015 Black 9075 White
3145 Cayman G reen 8045 Blue
Important notice to purchaser: All statements, technical information and recommendations contained in this literature are based on tests conducted with 3M approved equipment and are believed to be reliable. However, the accuracy or completeness of the tests are not guaranteed. THE FOLLOWING IS MADE IN LIEU OF ALL WARRANTIES, EXPRESS OR THE IMPLIED, INCLUDING THE IMPLIED WARRANTIES OF MERCHANTABILITY AND FITNESS FOR A PARTICULAR PURPOSE. The seller’s and manufacturer’s only obligation will be to replace the quantity of the product proved to be defective. Neither the seller nor 3M will be liable for any injury, loss or damage, direct or consequential, arising out of the use or the inability to use the product. Before using, the user must determine the suitability of the product for his or her intended use. This notice may not be changed except by an agreement signed by an officer of the seller.

1-866-622-7031 www.mckinnonmaterials.com
Burnt Orange Bronze Yellow Gold Charcoal
Copper Moss Green Bark Brown Slate
Royal Blue Brass Wine Red Pearl
Click for brochure

Pearlescent Metallic Flooring System Introduction
INTRODUCTION
This installation guide is intended to provide guidelines for installation of the Aurora Epoxy Dust pearlescent metallic flooring system. There are no set rules for installing this system as Aurora Epoxy Dust is a clear binder admixture and its use is a creative medium. The only limitations are set by the binder you choose to use it in.
That said, for use as a flooring system, the guidelines set forth are what we have found to be the best practices to achieve the most elegant looking floor in the least time and material expended without sacrificing quality. This is by no means the only way to use Aurora Epoxy Dust. We are continuously experimenting with the use of this creative medium to achieve different effects. Some of those methods will be shared in this installation guide. We encourage all installers to develop their own best practices, but using this installation guide will accelerate your learning curve.
The main basics steps to a successful floor installation are:
1. Surface preparation2. Primer coat3. Aurora Epoxy Dust coat4. Clear epoxy or urethane coat (optional)5. Maintenance floor finish (optional)
We will cover each of the basic steps and some advanced techniques as well.
SURFACE PREPARATION
Surface preparation method is dependent upon the existing condition of the substrate and the
guidelines from the manufacturer of the primer system you use. In general however, surface profiling should be achieved by a floor grinder designed for such preparation. We do not recommend shot blasting unless absolutely necessary since shot blasting can leave corn rows in the floor that may affect the final look. If you must use a shot blaster, keep the profile as light as possible. By the ICRI guidelines (www.icri.org), a CSP-2 or CSP-3 is ideal. The substrate should be as smooth as possible. Not because you don’t want the texture, but because you want the surface to be uniform. This profile is ideal for most coatings.
In addition, address any cracks, pitting, holes, etc. by filling them with your filler of choice and grinding flush. The better job you do in preparing the surface, the better the finished product will be. If you are in need of a quality material to do this, contact us and we can make specific recommendations. When you are done with your surface preparation, the substrate should have all deficiencies corrected, with an adequate surface profile to accept a coating, and vacuumed clean.
APPLY PRIMER
The most important aspect to creating an elegant floor with Aurora Epoxy Dust is to properly prime the floor. This will ensure that there is no out gassing of the 100% solids epoxy coating that the Aurora Epoxy Dust is mixed into. If that happens, you will have noticeable craters in the floor that will not be very forgiving and are not easy to repair and blend in. There are several ways to go about doing this.
Another aspect of the primer is you will want to tint it. This will become important to the final look of the floor as it is possible in some cases

Pearlescent Metallic Flooring System Introduction
depending on the pigment loading and application method that you will see the primer showing through the Aurora Epoxy Dust in some areas. In some cases, this will be intentional if it is part of the look you are trying to achieve. This is not necessarily a bad thing. Some very interesting looking floors have been done this way. However, this one variable can dramatically alter the look of the floor since light passes through the pigments and reflects back, keeping the primer as dark as possible (we prefer black) will allow the primer to absorb much of the light transmission. For this reason, especially if you first experimenting with this product, we recommend you keep it simple and use a black base for your Aurora Epoxy Dust. This will always give you a great look, will make it easier for you to standardize your offerings, and make final color selection for the customer much easier.
One other variable that will give your floor a much more dramatic appeal is to introduce texture into your primer coat. This texture will make the pigment have much more character and is what gives Aurora Epoxy Dust it’s dimension and depth. There are several ways to achieve this.
The first method involves applying a textured concrete overlay (skim coat). The skim coat can be applied with your black pigment or whatever color you wish the primer coat to be and then sealed with an epoxy primer. Alternatively you can skim coat the surface in any color and then seal with a colored epoxy primer. Ultimately you achieve the same thing: a textured surface that is black in color and is sealed.
The second method is to prime the floor with a tinted epoxy primer and broadcast a light amount of very fine silica sand and then back roll the sand into the primer. This is an
effective and easy way to achieve the same effect as the first method, but easier and cheaper. Depending on the size sand you choose, it may have too much texture, which will dictate the final texture of the floor. This may require an additional coat of clear epoxy to achieve a glass smooth surface if you attempting to achieve that.
The last method is the one we prefer, is to use a water based epoxy primer. The primer is tinted black with a water based black pigment. A micronized polymer no-slip additive at the rate of 8 oz per gallon is added into the primer. This no-slip additive is the same as you would use in an exterior film-build acrylic for sealing exterior concrete. It gives the surface enough texture to achieve the desired effects in the Aurora Epoxy Dust coating, but not too much texture that it will leave texture in the surface after the Aurora Epoxy Dust coat is applied. This no-slip additive is available from McKinnon Materials. The water based epoxy primers have the added benefit of long pot-life and being very resistant to out gassing.
APPLYING THE AURORA EPOXY DUST
Once the primer has been applied and you are in your re-coat window, the Aurora Epoxy Dust coat can be applied. If you are using our standard colors, the Aurora Epoxy Dust 16 oz container is designed to be added to 4 gallons of epoxy. The recommended application rate is 60 sq. ft. per gallon. This thickness will ensure that the Aurora Epoxy Dust can work its magic. Once the epoxy is applied, the pigments start to move and create their patina. If the coating is applied too thin, this cannot occur. There is no danger with going thicker, but you are just using more material than isnecessary. It is because of this thickness that is

Pearlescent Metallic Flooring System Introduction
required to achieve the natural effects Aurora Epoxy Dust is known for that 100% solids epoxy is recommended. 100% solids water clear epoxies can be applied at that thickness without problems unlike solvent based epoxies, urethanes, poly-aspartics, and acrylics, which cannot be built more than 8 mils generally.. Poly-ureas and MMA’s are too thick and too short a working time to use effectively. All the above mentioned binders can be used with Aurora Epoxy Dust, but the best results will be obtained with 100% solids epoxies.
It’s best to mix a kit size you are comfortable working with and this will depend on the size of your crew, space configuration, and the working time of the epoxy you are using. Typically, a three to four gallon mix size is easily worked with applicators that have proficiency. Be sure to mix thoroughly to ensure the pigment is equally dispersed.
Application is best done using a 3/16” notched squeegee. Ensure you are using a new notched squeegee. It is important that the cornrows created by the squeegee fill themselves in rather quickly. A new squeegee with sharp notches will leave a relatively narrow line on the floor that will quickly fill itself in. Whereas a worn squeegee blade will have flat notches that will not fill themselves in. The danger is that once applied, there are heavier particles in the pigment that will begin to settle out, and those cornrows will remain visible.
The application is finished by passing a trowel over the surface much like you would finish concrete. You can use spiked shoes and squat down to accomplish this, but that can be fatiguing for large areas. Use of spiked kneeboards can help to alleviate that. In either
case, the spikes should have rounded points to prevent puncturing the primer coat.
Troweling can be accomplished by keeping a low angle and light pressure on the trowel. The intent is to turn over the epoxy. You do not want to move the epoxy as the thickness was already determined by the squeegee. Do not worry about what it looks like. One pass with a trowel and that is it. The less you work it the better. The Aurora Epoxy Dust will begin to take on a natural look on its own. This will start happening within a few minutes to a half hour after it is applied. This is where experimenting will help you tremendously. You will find that you don’t have to work very hard to achieve a great look. If you are having a hard time getting it to look good, you are probably trying too hard. Trowel it once and forget about it.
TOPCOAT
This step is optional. Depending upon the prime method and the degree of texture in the floor that is desired, a topcoat may be necessary. If there is too much texture in the floor, a light sanding to knock down the high spots and another application of 100% solids clear epoxy can be applied. Or you can opt to topcoat with a urethane, especially if a higher degree of chemical and abrasion resistance is desired.
MAINTENANCE
It is recommended a maintenance program be followed for any finished floor. The use of the floor will determine the frequency. For best visual effects on the floor it is recommended that the best optical clarity of the finish be maintained. This is accomplished by applying a water based high solids acrylic floor finish.
Aurora Epoxy Dust Flooring System

Pearlescent Metallic Flooring System Introduction
Choosing a floor finish that can be high speed burnished will allow for the best visual clarity. But the owners have to be willing to adhere to a maintenance program. If no such program exists, and the owners do not anticipate in doing regular buffing, an alternative is to apply a water based acrylic floor finish in a satin or matte finish. This is because a high gloss floor will exhibit wear patterns if not routinely maintained as abrasion of the floor finish will dull the high gloss. By applying a matte finish, the floor is less likely to show wear patterns as the entire floor is already at a lower gloss level. You will not have as much optical clarity which will reduce some of the interesting effects of the Aurora Epoxy Dust system, but it will reduce maintenance costs. Talk to your local janitorial supply houses and see what they recommend.
ADVANCED TECHNIQUES
The basics of installation have been covered. It is not a complicated system, and the finished floor is very unique. Once you have mastered the basics, you can experiment with some advanced techniques. This is by no means a comprehensive collection of techniques, but rather suggestions. Only your imagination can limit the application techniques and uses for our unique pigments.
1. Our recommendation for a black primer coat isn’t the only way a floor can be done. However, this variable will change the look of the floor, especially if you decide to use less pigment loading in your epoxy. If you wish to have more color variation in the floor, you can opt to use less pigment loading in the Aurora Epoxy Dust coat and use a color other than black for the primer coat. This will allow some of the primer color to show through for an
interesting effect. Experimentation will allow you to see the effects that are possible.
2. Colors can be mixed together dry to achieve colors not listed on the color chart. The colors Charcoal and Pearl are great for lightening and darkening the stock colors. In fact, the color Pearl is not a color we recommend as a stand alone color, but it can be used to change the shade of any other color. Conversely, Charcoal is a great stand alone color, but can also be used to darken any of the other colors.
3. Colors can be mixed together wet for very unique effects. This is best accomplished by either pouring two or more colors together on the floor and letting the squeegee mix them together during application. The colors won’t completely mix together but will blend allowing for color movement similar to marble. This can be done with different colors in varying proportions. Another method is to drizzle other colors into the floor after the main color has been applied with a squeegee and using a trowel to blend the colors together. This method is best when only traces or highlight of another color is desired.
4. Using a porcupine roller or spiked roller over the entire floor as the final process can give you a hammered look. This is an especially neat look if you are using a metallic color such as the bronze or copper.
5. Patterns and design elements can be achieved by taping off a design and applying sections of the floor individually. Use a fiber filament tape to define your design element. Don’t remove the tape until the epoxy has cured enough to prevent bleeding. Generally at least 3-4 hours or even overnight is fine. Then reverse tape with fiber filament and masking
Aurora Epoxy Dust Flooring System
Pearlescent Metallic Flooring System
Introduction
paper and apply Aurora Epoxy Dust to the adjacent area(s). For a completely seamless floor, it is best to sand the floor after the Aurora Epoxy Dust coats are complete, paying extra attention to the jointed areas, and re-apply a clear coat over the entire floor.
FINAL THOUGHTS
There is no wrong way to use our flooring system. Experimentation will lead to your own best practices. Be sure to keep subscribed to our newsletter as we will profile contractor projects with pictures and details of the installation, to give you ideas and insight into this creative medium. Likewise, we encourage you to share your completed projects with us if you wish to share with the McKinnon Materials’ community. If you have any questions about our product, please don’t hesitate to contact us so we can further assist you.
McKinnon Materials, Inc. 5612 56th Commerce Park Blvd Tampa, FL 33610 1- (877) 622-7031 www.mckinnonmaterials.com
Aurora Epoxy Dust Flooring System
Pearlescent Metallic Flooring System Product & Technical Data Sheet
PRODUCT DESCRIPTION Aurora Epoxy Dust is a pre-packaged nano-particle pigment that is field blended with a variety of clear coating resin binders.
Available in 12 standard colors. Other colors are available on a custom order basis with minimum order quantities.
Aurora Epoxy Dust is designed for use with 100% solids premium water clear floor epoxies.
WHERE TO USE Aurora Epoxy Dust is designed for use as a floor system, countertop system, or other horizontal surface to create one of a kind unique designs to enhance any architectural image.
Aurora Epoxy Dust is a unique fusions of colorants that are influenced by the systems and substrate they are placed upon. Since it is a field creative medium, laboratory samples are difficult to reproduce. Always refer to jobsite samples for reproducibility in the field. This is a very important aspect when working with dynamic fusion systems creating the unique Aurora Epoxy Dust look.
Ideal for residential use, office complexes, commercial areas, lobbies, or light industrial applications.
ADVANTAGES
Used in 100% solids clear epoxy without compromise to the binders physical properties. Unlimited color variations as colors can be intermixed or custom ordered. Easy to install. The product develops its own patina with little installer effort to develop its look. Multi-dimensional and color hues vary depending on lighting conditions and view angle. Sold in pigment packs to allow greater versatility and user control. Color mixing,
color loading, and primer color all effect the final look.
COVERAGE RATES 60 sq. ft. mixed gallon of 100% solids water clear epoxy binder.
PACKAGING AND COLORS AuroraEpoxyDustColors
Royal Blue Brass Gunmetal Charcoal Moss Green Wine Red Copper Bark Brown Pearl Yellow Gold Burnt Orange Slate
Additional colors are available upon request as well as custom colors provided a minimum production order is placed. Contact McKinnon Materials, Inc. for details.
MIX RATIO
Refer to the Aurora Epoxy Dust installation guide
SHELF LIFE AND STORAGE
Shelf life will be three years from date of manufacture as long as containers remain unopened and when material is stored in a protected environment that is free from moisture, excessive heat and freezing temperatures, and direct sunlight.
OVERVIEW OF INSTALLATION STEPS
Obtain the Aurora Epoxy Dust Installation Guide for detailed instructions.
For best results:
Install a minimum 3’ x 3’ sample on a suitable substrate, preferably a cement based backer board for approval of acceptable color, texture, finish, and
Aurora Epoxy Dust Flooring System

PearlescentMetallicFlooringSystem Product&TechnicalDataSheet
any other critical requirement acceptable to the owner prior to proceeding with the installation.
Verify current versions of product and technical data sheets , material safety data sheets, and installation guidelines at www.mckinnonmaterials.com
Protect materials from excessive heat and cold and regularly check wet film thickness with mil gauge and monitor consumption to ensure correct application thickness and rate are obtained.
LIMITATIONS
Requires good measuring and record keeping when performing custom blends and custom loading to ensure predictable results.
Loading is flexible for less opaque results depending on the desired finish. Careful attention must be made to ensure thorough mixing.
Application technique and texture is required to achieve dimensional depth. Results will be reduced dramatically when applying at less than recommended application rate of the binding sealer.
For interior use only in epoxy binders. Can be used as a pigment in clear binders intended for outdoor use, but will not achieve the same look as in a high build coating.
MAINTENANCE AND CLEANING
For maximum elegance the finished surface should be cleaned regularly and treated with a conventional maintenance finish followed by ordinary buffing or high speed burnishing.
SPECIFICATION ASSISTANCE
Consult McKinnon Materials for specification assistance, detailing, etc. This consultation is highly recommended prior to specification.
TESTING
The technical data contained herein is the result of tests made in McKinnon Material’s laboratories or in
independent laboratories using small scale equipment, following generally accepted trade practices. Although this information is believed to be true and accurate, the use of different equipment for testing under dissimilar conditions or the testing of samples produced under dissimilar conditions may develop dissimilar results.
LIMITED WARANTY
McKinnon Materials warrants to the purchaser of its products that such products are free from manufacturing defect. McKinnon Materials does not warrant or guarantee the workmanship performed by any person or firm installing its products. McKinnon Material’s obligation under this warranty is limited solely to the original purchaser and solely to the remedy of replacement in kind of any product which McKinnon Materials has sold which may prove defective in manufacture within one year from date of installation, provided said product was stored correctly and installed within the products shelf life, by the original purchaser and which McKinnon Materials’ examination shall disclose to McKinnon Materials’ satisfaction to be thus defective.
Caution: Keep out of reach of children.
McKinnon Materials, Inc. 5612 56th Commerce Park Blvd Tampa, FL 33610 Phone (813) 622-7031 Toll Free 1-866-622-7031 Fax (813-621-9017 www.mckinnonmaterials.com
Aurora Epoxy Dust Flooring System

PearlescentMetallicFlooringSystem Installation Guide
Aurora Epoxy Installation Guide
Step By Step Instructions
A. Materials And Tools:
1. Black Primer Epoxy
a. Coverage will be 150 to 200 square feet per gallon.
b. Can also be purchased in White.
c. Primer is available in 3 gallon and 15 gallon kits.
2. Clear Industrial Epoxy
a. Coverage will be 60 to 75 square feet per gallon.
b. Available in 1 gallon, 4 gallon, 20 gallon, and 220 gallon kits.
3. Aurora Dust Concetrate-16 ounce containers
a. Coverage - Will color 4-6 gallons of Industrial Epoxy.
b. 4 gallons of Industrial Epoxy is optimal for effects.
4. Optional Sealers – Listed in order of performance.
a. High Performance Urethane
1. Coverage will be 300 to 600 square feet per gallon.
b. Polyaspartic
1. Coverage will be 200 to 400 square feet per gallon.
c. Acrylic Urethane (Miracle Glaze) 1. Coverage will be 150 to 300 square feet per gallon.
d. Solvent Based Acrylic (Super Vinyl Supreme)
1. Coverage will be 150 to 300 square feet per gallon.
e. Floor Wax
1. Coverage will be 400 to 800 square feet per gallon.

B. Tools
1. Roller Frames
2. Roller Covers (3/8 medium nap, Lint free with solvent resistance cores)
3. Gauged Squeegee
4. Extension handles ( to use with roller frames and squeegee)
5. Floor sanding tool – pole sander/hand held orbital floor buffing machine.
6. Sanding paper or screens for floor machine( 120-150 grit and 200-250 grit)
7. Air compressor or leaf blower
8. Plastic sheet or drop cloth
9. Spiked shoes
10. Roller grid
11. Painters tape or masking tape
12. Mixing sticks and/or drill mixer
13. 3-4 empty clean 5 gallon buckets
C. Properly Prepare Your Surface:
1. The very best surface preparation would be abrasive blasted (blast track or sand blast)
2. Second choice, but just as effective, is surface grinding.
3. Third choice can also provide an adequate surface profile, depending on the condition of yourconcrete, would be acid washing and neutralizing.
4. The ultimate goal of all of the procedures listed above is to remove concrete laitance andsurface contaminants. This provides you with a surface that will readily absorb its new coating.
Improper prep is the #1 reason for job failure.
D. Deciding On Batch Size:
1. How many people do you have?
a. Do not bite off more than you can handle.
1. If you have less than 2 people or if you are too cautious, you can start with a 2 gallonbatch and then increase as your comfort level improves.
b. If you have 2 or more people you can usually start with a 4 gallon kit.

E. Let’s Get Started:
1. First you should address masking areas that you do not wish to coat.
a. Vertical wall surface can be protected by placing a strip of 2 inch masking 1/8 inch above thesurface of the floor. Why 1/8 inch above? This will keep the tape from becoming immersed in the thick flooring epoxy because if the epoxy turns hard you will not be able to get the tape out.
2. Do not be concerned about pushing a wave of epoxy up onto the tape because once the epoxyslides back down the vertical it will be possible to pull the tape tomorrow.
3. If you’re still worried about splatters add a strip of paper.
F. Priming:
1. Spread plastic sheeting or drop cloth on a space approximately 4 ‘ by 4’ (an ounce ofprevention)
2. Place the primer epoxy resin and cure along one edge.
3. Mixing pails and stir device as well as roller frames and covers and handles along the edge aswell.
4. Take a 5 gallon pail and pour in 2 gallons of the primer resin then add 1 gallon of cure and mixwell.
5. Place the roller grid inside the pail with the mixture.
6. Place roller handle into roller frame and install cover. Now after dipping the cover in the primerroll same out on floor. Coverage should be 150-200 square feet per gallon. (Black primer)
7. Allow 6-9 hours to dry. (Optimum curing and/or drying temperature is 75-85 °F.)
G. Next Day Floor Prep And Material Application:
1. Lightly sand primer with 80 or 120 grit sand paper.
2. Tack wipe floor with xylene or alcohol to remove dust. (Tack wipe-rag dipped in solvent thenrung out then wipe floor and repeat until complete.
H. If you decided on a 4 gallon Kit:
1. Spread plastic sheeting or drop cloth on a space approximately 4’ by 4’.
2. Place resin and cure along one side. Place remaining tools around plastic. Mixing pails, stirdevice, roller frames. Handles, covers, gauged squeegee, air blower, spiked shoes, cords, pails, and Aurora dust.
3. Open a three gallon pail of resin and give it a quick stir then open on of the one gallon cans ofcure and pour the resin and cure into one of your 5 gallon mixing pails. Mix for 2 minutes then dump the 16 ounce container of Aurora in and mix 2 more minutes.

4. Start coating floor from the farthest point away from your point of entry (usually along a wall). Pour at least ½ of the pail of material out in a ribbon approximately 8 inches wide
5. Take your gauged squeegee, and while standing directly in front of the material, place the
squeegee in the middle of your ribbon then push until product goes up on tape then pull the squeegee straight out until you are out of product. Medium speed not creeping. Once you are out of the product lift the squeegee and repeat in the same spot. Now move over to the next space. Overlap should be about 4 inches or less. Repeat until entire line is spread out.
6. As soon as the person who is running the squeegee is 3 or 4 feet along, your helper should start
back rolling. Product should be dumped out of bucket as soon as humanly possible because of the laws of mass reaction.
7. Back rolling- you should first dip the dry roller cover into the bucket then role the roller on a
bare spot on the floor then start back rolling the product. Roller speed should be quick but be careful not to throw specks on your wall.
8. Repeat steps until bucket is empty. Total time from mix to empty bucket should be 10 minute
or less.
9. Repeat steps 3,4,5,6,7,8.
10. Once you have either spread your first but definitely after your second pail you will need to somehow disturb the surface of the Aurora.
(Why do you need to disturb the surface? See note at the end of this section)
11. Disturbing the surface of the Aurora can be accomplished by any of the following methods:
a. You can walk out on the surface with spiked shoes on and by either bending over or
crouching down and then with a trowel reach out and trowel the surface ever so slightly. The only downside to this method is that it creates a somewhat mechanical pattern.
b. You can walk out onto the floor with spiked shoes and a squeegee or magic trowel and use
one of these to slightly disturb the surface.
c. You also could walk out onto the floor with spikes shoes and use a stick or just about anything that will disturb the surface.
d. Now we come to the method that we primarily use and that is the leaf blower or
compressor driven air. You simply walk out onto the material with spiked shoes and use the air to make ripples on the surface and that’s all there is to it.
Reason for disturbing the surface is that once you spread the epoxy with Aurora over the floor the Aurora which is primarily a very finely ground pigment will start to settle or migrate downward so what we are doing is stirring the pigment back up to the top so that before the Aurora can resettle again the epoxy will have started its curing process and lock the pigment in striated layers of color. These layers of color are what is responsible in allowing you so sand out objects.

12. Repeat steps until entire surface is covered then just stand back and let the epoxy so its thing.
I. To Seal or not to seal:
a. Why should I put a sealer on?
1. Your first assumption is that epoxies are hard.
a. Yes they are but a great many coatings are more scratch resistant.
b. In order of hardness here are a few:
1. Floor Wax
2. Solvent based acrylic (Super Vinyl Supreme)-Epoxy is equal to
3. Acrylic Urethane ( Miracle Glaze)
4. Polyaspartic
5.High performance urethane
6. Aliphatic moisture cured urethane
The choice is yours!
Click here for pictures of this product.

McKinnon Materials, Inc. 5612 56th Commerce Park Blvd.
Tampa FL, 33610 Phone: (813) 622-7031 Fax: (813) 621-9017
STONE BOND EPOXY
PHYSICAL PROPERTIES:
Composition: Two part epoxy system for use as a binder with Chattahoochee River Rock, or as a sealer over existing Chattahoochee River Rock for applications of Stone Bond Epoxy in cold weather, or high UV concentrations, McKinnon Materials has developed a specific stone bond epoxy for the above applications.
Solids Content: 100% solids
Mix Ratio: 3 to 1
Viscosit y: @ 77 degrees F
Pot Life: @ 77 degrees F approximately 25 minutes
General Information:
Surface Preparation: All surfaces must be dry, clean and free from grease oil or foreign matter. A thorough pressure washing and cleaning is recommended.
Coverage: McKinnon Stone Bond Epoxy coverage, depends on the application technique, substrate porosity, most applications will be 200 sq ft for resealing and when mixed with stone aggregate (ie 50 lb bag) 3 bags to 1 gallon Stone Bond Epoxy approximately 33 sq ft per batch.
Drying Time: Tack free in 7 hours at 77 degrees F. (First 3 hours most critical)
Clean Up: Tools and mixing equipment should be thoroughly cleaned prior to gelation of the product. Typical solvents such as xylene, trowel slick, and acetone may be used for cleaning.
Performance Properties: Tensile Elongation (ASTM D-638) 1-30% Hardness Shore D 75 Tensile Strength (ASTM D-638) 4000-10,000 PSI Heptone Resistance (ASTM D-543) None
Shelf Life: 12 Months (Unmixed). Color: Clear Flash Point: Cure – will burn at 200ºF
Resin – no response
Mixing Instructions: Stone Bond Epoxy is a three to one ratio. Important: DO NOT VARY FROM THIS MIX RATIO.
1. Place one quart of cure in container, add three quarts of resin. (USESEPARATE MEASURING VESSELS FOR EACH COMPONENT.)
2. Mix for two minutes with a flat stirrer, scraping the sides to ensureproper mix. Let stand while loading mixer.
3. Pour into mixer, 150-180 pounds of stone (depending on the size ofstone).
4. Run mixer approximately three minutes until stone is thoroughlysaturated with Stone Bond Epoxy.
Application Instructions: Refer to batch mix sheet for correct ratio of aggregate to epoxy.
1. Remove the mix to the wheelbarrow and dump into place.2. Immediately spread with rake to the correct level.3. Trowel smooth and tight. IMPORTANT: loosely troweled stone will
cause a weak system. Use Trowel Slick as a trowel lube and AVOID excessive amounts on trowels or deck.
Cleaning: Tools may be cleaned with soap and water immediately after application. NOTE: If tools are not cleaned within one half hour after being used, it will be virtually impossible to remove the Stone Bond Epoxy from your tools.
Recommended Thickness: Recommended thickness for the river rock epoxy surface is: ½ inch thick for pool decks, patios, and walkways. For driveways, the river rock should be ¾ inch thick.
Important Note: If the temperature is below 60°F, COLD WEATHER RESIN MUST BE USED.
Safety
Material Safety Data sheets are available from McKinnon Materials and should be consulted prior to use of the product. This product is intended for use by professionals only. Keep away from children and those not trained in the use and potential hazards involved.
Workers should wear gloves and goggles when mixing or applying product. Clean up with soap and warm water. Be sure to follow all label and MSDS cautions.
Warranty
McKinnon Materials warrants its products to conform to its manufacturing standards. McKinnon Materials will replace or refund the purchase price of non-conforming product at the seller’s option; such remedy being exclusive of all others and sole remedy available to the buyer. Buyer hereby expressly waives claim to additional damages. Any claim under this warranty must be made in writing within 7 days of discovery of non-compliance and no later than two years from the date of delivery of product. No representative, distributor or applicator of these products is authorized to modify product, product data or warranty.
Important Notice
These products are sold subject only to the express warranties contained herein. There are no other warranties by McKinnon Materials of any nature whatsoever expressed or implied. Including any warranties of merchantability or fitness for a particular purpose in connection with this product. Buyer agrees that seller assumes no liability for remote or consequential damages of any kind which result from the use or misuse of the product. Information contained herein is based on data believed to be reliable; however it is the buyer’s responsibility to satisfy itself of the product for a particular purpose. Material safety data sheets are available from McKinnon Materials and should be consulted prior to use of the product. This product is intended for use by professionals only. Keep away from children and those not trained in the use of potentially hazardous materials.
Click here for pictures of this product in use.
Click here for brochure.

BASIC INSTALLATION
I. Tools A. Cement Mixer (3 cu.ft. capacity) B. Wheelbarrow (s) C. Iron-tooth rake to spread rock to approximate thickness D. Trowel (for finishing of product) E. Propane Torch (to remove any moisture) F. Hammers G. Chipping Gun (plane down concrete at thresholds) H. Tapcon Drill and Tool
II. Forming MaterialsA. Forming StakesB. 1” x (wood forms) for over pours and steps.C. Cantilever forms (pool edges).D. Form Release (to keep product from sticking to forms)E. Tapcon Screws.
III. PREPARATION FOR DECKA. Must be clean and dry B. Follow existing expansion joints accordingly C. Remove spoiled or flaking concrete D. Build up or channel low lying areas for necessary drainage E. Asphalt or wood surfaces must have coat of epoxy applied prior to installation of river rock
IV. FORMINGA. Wrap product around edges of deck that can be seen.B. Apply light coat of epoxy to vertical edge of substrate.
FORMING PROCEDURES:
Place forming stakes against edge of vertical substrate; this will space out from existing edge allowing product to fill in void between existing edge and form. Place pre-waxed form against stakes and install forming stakes to hold form in place.
FOR STEPS:
Follow above procedure except fasten form with tapcon or concrete nails. While installing river rock, remove spacing stakes as the river rock fills voids. Trowel top to smooth finish and level edge.
FORMING OF CANTILEVER EDGE:
Place a row of duct tape on pool tile. Top edge of tape should follow top edge of pool tile. Apply double face tape to foam then extender to the opposite side of the tape. Apply form adhesive to foam backing and glue backing to extender. Install concrete nails in concrete approximately one foot from edge of pool and space nails about every two feet around pool. If pool has straight edges use strips of 1x2 wood. If pool has curved edges, use strips of 2” masonite. Drill holes through wood backing. Place above mentioned backing strips against foam backing, pull tight and tie wire to nail.
After river rock is installed and hard, remove forms and cut tie wires even with rock edges. River rock dace needs to be ground slightly to smooth edge. After grinding and dust has been removed, apply light coat of epoxy to surface that has been ground.
V. MIXING OF MATERIAL A. Epoxy has a set mix ratio (do not vary). Mix three (3) equal parts resin to one (1) equal part of cure.
Mix vigorously for at least two (2) minutes. B. Place correct poundage of desired pebble in cement mixer and add mixed epoxy. C. Let epoxy and stone mix until all stones have been covered with epoxy.
VI. FINISHING THE PRODUCTA. Place river rock at place of installationB. Spread evenly with rakeC. Trowel to a smooth finish. In order to obtain a smooth finish, trowel must be occasionally cleaned with
a proper solvent (Xylene, Trowel Slick, etc)
FINISHED PRODUCT SHOULD NOT BE WALKED ON UNTIL THE NEXT DAY!!!
CAUTION: Product should not be installed when temperature will not rise above 60°F. On such days, cold weather resin should be used.
BATCH MIXES:
NAME BAGS LBS EPOXY THICKNESS
Apache 3 150 1 gal ½ ″
Black Diamond 3 100 1 gal 8/16 mesh
Black Pearl 3 150 1 gal 3/32 X 3/16”
Cantina Pink 3 150 1 gal ¼ X 1/8”
Coral ¼ x ⅛ 3 150 1 gal ½”
Dark Brown 3/16 3 150 1 gal ½ ″
Dark Brown 5/16 3 150 1 gal ½ ″
Grey Blend 3 150 1 gal 5/16” minus Light Stone
3/16 3 150 1 gal ½ ″
Mini Pearl 3 150 1 gal ⅛ x ¼ ″
Mocha Blend 3/16 3 150 1 gal ½ ″
Mocha Blend 5/16 3 150 1 gal ½ ″
Multi-Colored Flint 1.5 150 1 gal ½ ″
Pearl 3 150 1 gal ⅛ x ¼ ″ Oklahoma Rainbow 3 150 1 gal 5/16” minus
Razorback Red 3 150 1 gal 3/32 X 3/16” Texas Rainbow
5/16 3 150 1 gal ½ ″

Epoxy Aggregate Mixer
Special Features Specifications
5.75 • ½ H.P. Electric Motor Drum Size cu.ft.
• 2 Blade Mixing Action
• Removable/Replaceable Paddles
• Replaceable Top & Bottom Drums
• Strong, Heavy Duty Steel Frame
Height 50"

McKinnon Materials, Inc. 5612 56th Commerce Park Blvd.
Tampa FL, 33610
Phone: (813) 622-7031 Fax: (813) 621-9017
U.V. EPOXY
PHYSICAL PROPERTIES:
Composition:
Two part epoxy system for use as a binder with Chattahoochee River Rock, or as a sealer over existing Chattahoochee River Rock for applications of Stone Bond Epoxy in high UV concentrations.
Solids Content: 100% solids
Mix Ratio: 3 to 1
Viscosity: @ 77 degrees F- 1200cps
Pot Life: @ 77 degrees F approximately 25 minutes
General Information:
Surface Preparation: All surfaces must be dry, clean and free from grease oil or foreign matter. A thorough pressure washing and cleaning is recommended.
Coverage:
McKinnon U.V. Epoxy coverage, depends on the application technique, substrate porosity, most applications will be 150 sq ft for resealing and when mixed with stone aggregate (ie 50 lb bag) 3 bags to 1 gallon U.V. Epoxy approximately 33 sq ft per batch for 5/16 and 40 sq ft for 3/16 and mini. (U.V. Epoxy binder used with white stone)
Drying Time: Tack free in 7 hours at 77 degrees F. (First 3 hours most critical)
Clean Up: Tools and mixing equipment should be thoroughly cleaned prior to gelation of the product. Typical solvents such as xylene, trowel slick, and acetone may be used for cleaning.
Performance Properties:
Tensile Elongation (ASTM D-638) 1-30%
Hardness Shore D 75
Tensile Strength (ASTM D-638) 4000-10,000 PSI
Heptone Resistance (ASTM D-543) None
U.V. Resistant by (ASTM G-151)
Conclusion:

Based on (ASTM G-151) the addition of U.V. inhibitors the product U.V. Epoxy will yield in real world performance 30% to 50% better than epoxy not containing the U.V. Inhibitor.
Shelf Life:
12 Months (Unmixed). Color: Clear
Flash Point: Cure – will burn at 200ºF
Resin – no response
Mixing Instructions:
U.V. Epoxy is a three to one ratio. Important: DO NOT VARY FROM THIS MIX RATIO.
1. Place one quart of cure in container, add three quarts of resin. (USESEPARATE MEASURING VESSELS FOR EACHCOMPONENT.)
2. Mix for two minutes with a flat stirrer, scraping the sides to ensureproper mix. Let stand while loading mixer.
3. Pour into mixer, 150-180 pounds of stone (depending on the size ofstone).
4. Run mixer approximately three minutes until stone is thoroughlysaturated with U.V. Epoxy.
Application Instructions:
Refer to batch mix sheet for correct ratio of aggregate to epoxy.
1. Remove the mix to the wheelbarrow and dump into place.2. Immediately spread with rake to the correct level.3. Trowel smooth and tight. IMPORTANT: loosely troweled stone
will cause a weak system. Use Trowel Slick as a trowel lube andAVOID excessive amounts on trowels or deck.
Cleaning: Tools may be cleaned with soap and water immediately after application. NOTE: If tools are not cleaned within one half hour after being used, it will be virtually impossible to remove the Stone Bond Epoxy from your tools.
Recommended Thickness:
Recommended thickness for the river rock epoxy surface is: ½ inch thick for pool decks, patios, and walkways. For driveways, the river rock should be ¾ inch thick.
Important Note: If the temperature is below 60°F, COLD WEATHER RESIN MUST BE USED.
Safety
Material Safety Data sheets are available from McKinnon Materials and should be consulted prior to use of the product. This product is intended for use by professionals only. Keep away from children and those not trained in the use and potential hazards involved.
Workers should wear gloves and goggles when mixing or applying product. Clean up with soap and warm water. Be sure to follow all label and MSDS cautions.

Warranty
McKinnon Materials warrants its products to conform to its manufacturing standards. McKinnon Materials will replace or refund the purchase price of non- conforming product at the seller’s option; such remedy being exclusive of all others and sole remedy available to the buyer. Buyer hereby expressly waives claim to additional damages. Any claim under this warranty must be made in writing within 7 days of discovery of non-compliance and no later than two years from the date of delivery of product. No representative, distributor or applicator of these products is authorized to modify product, product data or warranty.
Important Notice
These products are sold subject only to the express warranties contained herein. There are no other warranties by McKinnon Materials of any nature whatsoever expressed or implied. Including any warranties of merchantability or fitness for a particular purpose in connection with this product. Buyer agrees that seller assumes no liability for remote or consequential damages of any kind which result from the use or misuse of the product. Information contained herein is based on data believed to be reliable; however it is the buyer’s responsibility to satisfy itself of the product for a particular purpose. Material safety data sheets are available from McKinnon Materials and should be consulted prior to use of the product. This product is intended for use by professionals only. Keep away from children and those not trained in the use of potentially hazardous materials.

McKinnon Materials, Inc. 5612 56
th Commerce Park Blvd.
Tampa FL, 33610
Phone: (813) 622-7031 Fax: (813) 621-9017
STONE BOND EPOXY with Cold Weather Resin
PHYSICAL PROPERTIES:
Composition:
Two part epoxy system for use as a binder with Epoxy Stone, or as a sealer over
existing River Rock for applications of Stone Bond Epoxy in cold weather, or
high UV concentrations, McKinnon Materials has developed a specific stone bond
epoxy for the above applications.
Solids Content: 100% solids
Mix Ratio: 3 to 1
Viscosity: @ 77 degrees F 1100 (CPS)
Pot Life: @ 77 degrees F approximately 15 minutes
General Information:
Surface Preparation: All surfaces must be dry, clean and free from grease, oil or foreign matter. A
thorough pressure washing and cleaning is recommended.
Coverage: McKinnon Stone Bond Epoxy coverage depends on the application technique and
substrate porosity. Most applications will be 150 sq ft for resealing and when
mixed with stone aggregate (3-50lb bags to 1 gallon Stone Bond Epoxy=1
batch)approximately 35 sq ft per batch for 5/16 and 40 sq ft for 3/16 and mini.
Drying Time: Tack free in 4 hours at 77 degrees F. (First 1 hour most critical)
Clean Up:
Tools and mixing equipment should be thoroughly cleaned prior to gelation of the
product. Typical solvents such as xylene, trowel slick, and acetone may be used
for cleaning.
Performance Properties:
Tensile Elongation (ASTM D-638) 1-30%
Hardness Shore D 75
Tensile Strength (ASTM D-638) 4000-10,000
PSI
Heptone Resistance (ASTM D-543) None
Shelf Life:
12 Months (Unmixed). Color: Clear
Flash Point: Cure – will burn at 200ºF
Resin – no response
Mixing Instructions:
Stone Bond Epoxy is a three to one ratio. Important: DO NOT VARY FROM
THIS MIX RATIO.
1. Place one quart of cure in container, add three quarts of resin. (USE
SEPARATE MEASURING VESSELS FOR EACH
COMPONENT.)
2. Mix for two minutes with a flat stirrer, scraping the sides to ensure
proper mix. Let stand while loading mixer.
3. Pour into mixer, 150-180 pounds of stone (depending on the size of
stone).
4. Run mixer approximately three minutes until stone is thoroughly
saturated with Stone Bond Epoxy.

Application Instructions:
Refer to batch mix sheet for correct ratio of aggregate to epoxy.
1. Remove the mix to the wheelbarrow and dump into place.
2. Immediately spread with rake to the correct level.
3. Trowel smooth and tight. IMPORTANT: loosely troweled stone
will cause a weak system. Use Trowel Slick as a trowel lube and
AVOID excessive amounts on trowels or deck.
Cleaning:
Tools may be cleaned with soap and water immediately after application. NOTE:
If tools are not cleaned within one half hour after being used, it will be virtually
impossible to remove the Stone Bond Epoxy from your tools.
Recommended Thickness: Recommended thickness for the river rock epoxy surface is: ½ inch thick for pool
decks, patios, and walkways. For driveways, the river rock should be ¾ inch
thick.
Important Note:
For use in temperatures below 60°F. Using this product in temperatures above 60
degrees F will greatly increase rate of cure.
WHEN USING BELOW 60 DEGREES F WE RECOMMEND PRIMING
WITH EPOXY PRIOR TO INSTALLATION.
Safety
Material Safety Data sheets are available from McKinnon Materials and should be
consulted prior to use of the product. This product is intended for use by
professionals only. Keep away from children and those not trained in the use and
potential hazards involved.
Workers should wear gloves and goggles when mixing or applying product.
Clean up with soap and warm water. Be sure to follow all label and MSDS
cautions.
Warranty
McKinnon Materials warrants its products to conform to its manufacturing
standards. McKinnon Materials will replace or refund the purchase price of non-
conforming product at the seller’s option; such remedy being exclusive of all
others and sole remedy available to the buyer. Buyer hereby expressly waives
claim to additional damages. Any claim under this warranty must be made in
writing within 7 days of discovery of non-compliance and no later than two years
from the date of delivery of product. No representative, distributor or applicator
of these products is authorized to modify product, product data or warranty.
Important Notice
These products are sold subject only to the express warranties contained herein.
There are no other warranties by McKinnon Materials of any nature whatsoever
expressed or implied. Including any warranties of merchantability or fitness for a
particular purpose in connection with this product. Buyer agrees that seller
assumes no liability for remote or consequential damages of any kind which result
from the use or misuse of the product. Information contained herein is based on
data believed to be reliable; however it is the buyer’s responsibility to satisfy itself
of the product for a particular purpose. Material safety data sheets are available
from McKinnon Materials and should be consulted prior to use of the product.
This product is intended for use by professionals only. Keep away from children
and those not trained in the use of potentially hazardous materials.

After river rock is installed and hard, remove forms and cut tie wires even with rock edges. River rock
dace needs to be ground slightly to smooth edge. After grinding and dust has been removed, apply light
coat of epoxy to surface that has been ground.
V. MIXING OF MATERIAL
A. Epoxy has a set mix ratio (do not vary). Mix three (3) equal parts resin to one (1) equal part of
cure. Mix vigorously for at least two (2) minutes.
B. Place correct poundage of desired pebble in cement mixer and add mixed epoxy.
C. Let epoxy and stone mix until all stones have been covered with epoxy.
VI. FINISHING THE PRODUCT
A. Place river rock at place of installation
B. Spread evenly with rake
C. Trowel to a smooth finish. In order to obtain a smooth finish, trowel must be occasionally cleaned
with a proper solvent (Xylene, Trowel Slick, etc)
FINISHED PRODUCT SHOULD NOT BE WALKED ON UNTIL THE NEXT DAY!!!
CAUTION: Product should not be installed when temperature will not rise above 60°F. On such days, cold weather
resin should be used.
BATCH MIXES:
NAME BAGS LBS EPOXY THICKNESS
Mocha Blend 3/16 3 150 1 gal ½ ″
Mocha Blend 5/16 3 150 1 gal ½ ″
Apache 3 150 1 gal ½ ″
Coral ¼ x ⅛ 3 150 1 gal ½ ″
Black Pearl 3 150 1 gal 3/32 X 3/16”
Dark Brown 3/16 3 150 1 gal ½ ″
Dark Brown 5/16 3 150 1 gal ½ ″
Multi-Colored Flint 1.5 150 1 gal ½ ″
Pearl or Mini Pearl 3 150 1 gal ⅛ x ¼ ″
Texas Rainbow 5/16 3 150 1 gal ½ ″
Grey Blend 3 150 1 gal 5/16” minus
Oklahoma Rainbow 3 150 1 gal 5/16” minus

Razorback Red 3 150 1 gal 3/32 X 3/16”
Cantina Pink 3 150 1 gal ¼ X 1/8”
Black Diamond 1 100 1 gal 8/16 mesh
Tan (Golden Pearl) 3 150 1 gal 3/32 X 3/16”
Ozark Brown 3/16 3 150 1 gal 3/32 X 3/16”
Ozark Brown 5/16 3 150 1 gal 3/16 X 5/16”

McKinnon Materials, Inc. 5612 56th Commerce Park Blvd.
Tampa FL, 33610 Phone: (813) 622-7031 Fax: (813) 621-9017
Protective Coatings / Miracle Glaze / Acrylic Urethane
Physical Properties Chemical Resistance
Composition: Two components, conventional solids hydroxyl aliphatic acrylic resin designed to cross-link at room temperature with polyisocyananates to produce high performance coatings.
Reagent Rating
Color: Various Acetic Acid 5% Acetone
RR
Bleach R Citric Acid 30% R Crude Oil R Diesel Fuel R Ethylene Glol R Fatty Acids R
R-recommended for continuous service
Gasoline Hydrochloric Acid 15% Lactic Acid 15%
RRR
L- limited recommendation, occasional spills
Methyl Ethyl Ketone Nitric Acid 5% Skydrol
RRR
Sodium Hydroxide 50% R Sulfuric Acid 25% R Toluene R Ursa R Vinegar R Xylene R
Gloss: Greater than 90 cbo°
Weight/Gallon: 8.0 +/– 0.2 pounds (mixed) This chart is intended as an aid in evaluating the performance of these systems in various chemical exposures @ 75F. The dates is intended as a guide only in severe or combination exposures a sample should be tested under actual or simulated use conditions.
Solids Content: 38% Product data is revised as needed to reflect the most recent technology and field experience. Consult McKinnon Materials for current printing date of literature.
Mix Ratio: IA:6B by volume

Pot Life: 1 hour @ 70 degrees F
% Non-Volatile by Weight 45 +/– 2%
% Non-Volatile by Volume 39 +/– 2%
Viscosity:
*Custom colors availablewith restrictions
22 +/– 5 seconds #2 Zahn
PERFORMANCE PROPERTIES:
Tensile Strength (ASTM D- 638):
5500 psi
Elongation (ASTM D-638): 5%
Adhesion To steel (ASTM D-454) To concrete (ACI COMM #403)
1000 psi 500 psi (concrete fails)
Hardness (ASTM D-2240) 85 (Shore D)
Abrasion Resistance: 0.0353 mg loss (CS 1000 cycles)
Dry Time: Tack Free – Less than 15 minutes Dry Hard – Less than 1 hour Full Cure – 72 hours
SUBSTRATE COLD ROLLED STEEL Pencil Hardness 3H
100 MEK Double Rubs No effects
IMPACT: Direct Indirect
80 80
QUV EXPOSURE: Gloss @ 1000 hrs E @ 1000 hrs
89/77 1.4
PERFORMANCE PROPERTIES:
TECHNICAL INFORMATION Acrylic Urethane is a two component, conventional solids hydroxyl aliphatic acrylic resin designed to cross link at room temperature with polyisocyanates to produce high performance coatings. The high equivalent weight of this resin means that less polysisocyanate is required for cross linking, therefore making coating formulated with Acrylic Urethane very economical. In addition, the following performance characteristics make Acrylic Urethane a worthy competitor in the field of low cost polyurethane coatings.

VERY FAST DRY LONG POT LIFE EXCELLENT HARDNESS GOOD CHEMICAL RESISTANCE EXCELLENT WEATHER RESISTANCE
RESIN SPECIFICATIONS: Viscosity X-Y
Color 1 maximum
Weight/Gallon 8.3 +/-0.1 pounds
Nonvolatile by weight 60+/-1%
Solvent Xylene
Equivalent Weight Solution Nonvolatile
1000 600
COATING PROPERTIES: Tack Free 10 minutes Dry Through 1 hour Dry to Tape 5 hours
SUBSTRATE COLD ROLLED STEEL Gloss (60/20) 102/98
Crosshatch Adhesion 5A
Miracle Glaze is a two component acrylic/urethane system. Part A contains polyisocyanates, xylene and butyl acetate. Part B contains hydro carbons. Workers should wear gloves and goggles when mixing or applying product. Clean up with soap and water. Be sure to follow all label and MSDS cautions.

McKinnon Materials, Inc. 5612 56th Commerce Park Blvd.
Tampa FL, 33610 Phone: (813) 622-7031 Fax: (813) 621-9017
HI PERFORMANCE URETHANE
Product Description: Two component polyester/aliphatic polyurethane floor sealer that exhibits excellent characteristics for abrasion resistance, chemical resistance, flexibility, weathering, and UV stability. Clear and other gloss.
Recommended For: Recommended for auto service centers, warehouses, computer rooms, laboratories, aircraft hangers, cafeterias, exterior tanks, indoor or outdoor service and chemical exposure areas.
Application Method: Lambs wool applicator or high quality 3/8” nap solvent resistant roller.
Primer: Clear or Colored 3:1 Industrial Epoxy
Top Coat: None recommended Recommended Film Thickness:
3-5 mils per coat wet thickness (yields 2-3 mils dry)
Solids by weight: Mixed= 60% (colors); 56% (clear) (+, - 2%) Solids by volume: Mixed= 53%(colors);
53%(clear) (+,- 2%)
Coverage per gallon: 320 to 500 square feet @ 3-5 mils wet thickness
VOC: Less than 3.8 pounds per gallon Chemical Resistance Rating Mix Ratio: 2 part A to 1 part B by volume
Finish characteristics High gloss (>80 at 60 degrees @ Erichsen glossmeter)
Reagent acetic acid 5% C
Shelf Life: 1 year xylene E mek B
Application Temperature: 45 – 90 degrees F methyl alcohol B gasoline D 10% sodium hydroxide E Packaging Information
3 gallon and 15 gallon kits; 3 gal kit= 2 part A (10.5#/gal- colors) or (8.75#/gal-clear) and 1 gallon part B (8.5#/gal) (weights and volumes approximate)
50% sodium hydroxide D 10% sulfuric acid D 10% hydrochloric acid D 20% nitric acid C
Cure Schedule (70%F): Pot Life – 1 ½ gallons by volume…….2-5 hours Tack free (dry to touch)……………….2-4 hours Recoat or topcoat……………………...4-8 hours Light foot traffic………………………14-24 hours Full cure (heavy traffic)……………….3-5 days
ethylene glycol DRating Key: A – not recommended B – 2 hr term splash spill C – 8 hr term splash spill D – 72 hr immersion E – long-term immersion
PERFORMANCE PROPERTIES
Abrasion Resistance Taber Abraser CS-17 calibrase wheel with 1000 gram total load and 500 cycles = 20.0 mg loss
Impact Resistance Gardner Impact, direct & reverse = 160 in.lb. (passed)
Adhesion 360 psi @ elcometer (concrete failure, no delamination)
Flexibility No cracks on a 1/8” mandrel
Viscosit y Mixed = 200-400 cps (typical, most colors)
Hardness Shore D = 72

Safety Warranty
Material Safety Data sheets are available from McKinnon Materials and should be consulted prior to use of the product. This product is intended for use by professionals only. Keep away from children and those not trained in the use and potential hazards involved.
Workers should wear gloves and goggles when mixing or applying product. Clean up with soap and warm water. Be sure to follow all label and MSDS cautions.
McKinnon Materials warrants its products to conform to its manufacturing standards. McKinnon Materials will replace or refund the purchase price of non-conforming product at the seller’s option; such remedy being exclusive of all others and sole remedy available to the buyer. Buyer hereby expressly waives claim to additional damages. Any claim under this warranty must be made in writing within 7 days of discovery of non-compliance and no later than two years from the date of delivery of product. No representative, distributor or applicator of these products is authorized to modify product, product data or warranty.
Important Notice
These products are sold subject only to the express warranties contained herein. There are no other warranties by McKinnon Materials of any nature whatsoever expressed or implied. Including any warranties of merchantability or fitness for a particular purpose in connection with this product. Buyer agrees that seller assumes no liability for remote or consequential damages of any kind which result from the use or misuse of the product. Information contained herein is based on data believed to be reliable; however it is the buyer’s responsibility to satisfy itself of the product for a particular purpose. Material safety data sheets are available from McKinnon Materials and should be consulted prior to use of the product. This product is intended for use by professionals only. Keep away from children and those not trained in the use of potentially hazardous materials.
1) PRODUCT STORAGE: Store product in an area so as to bring the material to normal room temperature before using.Continuous storage should be between 60 and 90 degree F.
2) SURFACE PREPARATION: Surface preparation will vary according to the type of complete system to be applied.For a one or two coat thin build system (3-10 mils dry) we recommend either mechanical scarification or acid etching until a suitable profile is achieved. For a complete system build higher than 10 mils dry, we recommend a fine brush blast (shot blast). All dirt, oil, dust, foreign contaminants and laitance must be removed to assure a trouble free bond to the substrate. A test should be made to determine that the concrete is dry; this can be done by placing a 4’ X 4’ plastic sheet on the substrate and taping down the edges. If after 24 hours, the substrate is still dry below the plastic sheet, then the substrate is dry enough to start coating. The plastic sheet testing is also a good method to determine if any hydrostatic pressure problems exist that may later cause disbonding.
3) PRODUCT MIXING: This product has a two to one mix ratio by volume- merely mix two gallons of part A with 1gallon of part B. After the two parts are combined, mix well with slow speed mixing equipment such as a jiffy mixer until the material is thoroughly mixed and streak free. Avoid whipping air into the coating. Improper mixing may result in product failure.
4) PRODUCT APPLICATION: The mixed material can be applied by brush or roller. Maintain temperatures within therecommended ranges during the application and curing process. Properly prime the substrate. It is best to maintain a wet edge to avoid roller marks. Direct sunlight or high temperatures may cause visible roller marking during application. Too thick of an application may result in solvent entrapment and product failure.
5) RECOAT OR TOPCOATING: Multiple coats of this product are acceptable. If you opt to recoat this product, youmust first be sure that all of the solvents have evaporated from the coating during the curing process. The information on the front side are reliable guidelines to follow. However, it is best to test the coating before recoating or topcoating. This can be done by pressing on the coating with your thumb to verify that no fingerprint impression is left. If no impression is created, then the recoat can be started. Always remember that colder temperatures will require more cure time for the

product before recoating can commence. Before recoating or topcoating, check the coating to insure no contaminants exist. If a blush or contaminants are present on a previous coat, remove with a standard detergent cleaner. When recoating this product with subsequent coats of the urethane, it is advisable to apply the recoat before 24 hour passes. Also, it is advisable to degloss the previous coat to insure a trouble free bond.
6) CLEANUP: Use ketone solvents
7) FLOOR CLEANING: Caution! Some cleaners may affect the color of the floor installed. Test each cleaner in a smallarea, utilizing your cleaning technique. If no ill effects are noted, you can continue to clean with the product and process tested.
8) RESTRICTIONS: Restrict the use of the floor to light traffic and non-harsh chemicals until the coating is fully cured(see technical data under full cure). It is best to let the floor remain dry for the full cure cycle.
NOTICE TO BUYER: DISCLAIMER OF WARRANTIES AND LIMITATIONS ON OUR LIABILITY
We warrant that our products are manufactured to strict quality assurance specifications and that the information supplied by us is accurate to the best of our knowledge. Such information supplied about our products is not a representation or a warranty. It is supplied on the condition that you shall make your own tests to determine the suitability of our product for your particular purpose. Listed physical properties are typical and should not be construed as specifications. NO WARRANTY IS MADE, EXPRESSED OR IMPLIED, REGARDING SUCH OTHER INFORMATION, THE DATA ON WHICH IT IS BASED, OR THE RESULTS YOU WILL OBTAIN FROM ITS USE. N0 WARRANTY IS MADE, EXPRESSED OR IMPLIED, THAT OUR PRODUCT SHALL BE MERCHANTABLE OR THAT OUR PRODUCT SHALL BE FIT FOR ANY PARTICULAR PURPOSE. NO WARRANTY IS MADE THAT THE USE OF SUCH INFORMATION OR OUR PRODUCT WILL NOT INFRINGE UPON ANY PATENT. We shall have no liability for incidental or consequential damages, direct or indirect. Our liability is limited to the net selling price of our product or the replacement of our product, at our option. Acceptance of delivery of our product means that you have accepted the terms of this warranty whether or not purchase orders or other documents state terms that vary from this warranty. No representative is authorized to make any representation or warranty or assume any other liability on our behalf with any sale of our products. Our products contain chemicals that may CAUSE SERIOUS PHYSICAL INJURY. BEFORE USING, READ THE MATERIAL SAFETY DATA SHEET AND FOLLOW ALL PRECAUTIONS TO PREVENT BODILY HARM.

McKinnon Materials, Inc. 5612 56th Commerce Park Blvd.
Tampa FL, 33610 Phone: (813) 622-7031 Fax: (813) 621-9017
Super Vinyl Supreme
Physical Properties Safety:
Composition: Solvent based acrylic, used as a sealer on ceramic and acrylic based products such as McKrete.
DANGER! EXTREMELY FLAMMABLE – CONTAINS XYLENE. Keep away from heat sparks and flame. To avoid breathing vapors or spray mist. Open windows and doors or other means to ensure fresh air entry during application and drying. If you experience eye watering, headaches, or dizziness, increase fresh air or wear respiratory protection (MOSH/MSHA TC23C or equivalent) or leave the area. Close container after each use and avoid contact with skin.
Color: Clear Warranty
McKinnon Materials warrants its products to conform to its manufacturing standards. McKinnon Materials will replace or refund the purchase price of non-conforming product at the seller’s option; such remedy being exclusive of all others and sole remedy available to the buyer. Buyer hereby expressly waives claim to additional damages. Any claim under this warranty must be made in writing within 7 days of discovery of non-compliance and no later than two years from the date of delivery of product. No representative, distributor or applicator of these products is authorized to modify product, product data or warranty.
Gloss: Sheen Important Notice
These products are sold subject only to the express warranties contained herein. There are no other warranties by McKinnon Materials of any nature whatsoever expressed or implied. Including any warranties of merchantability or fitness for a particular purpose in connection with this product. Buyer agrees that seller assumes no liability for remote or consequential damages of any kind which result from the use or misuse of the product. Information contained herein is based on data believed to be reliable; however it is the buyer’s responsibility to satisfy itself of the product for a particular purpose. Material safety data sheets are available from McKinnon Materials and should be consulted prior to use of the product. This product is intended for use by professionals only. Keep away from children and those not trained in the use of potentially hazardous materials.
Solids by weight: 36%
Viscosit y: #2 Zahn 21-22 sec
VOC: 600 grams (5 lbs/GL)

General Information:
Dry time @ 70 degrees: Dry to touch approximately 1 hour depending upon temperature in humidity
Product Advantages: Resists tire marks Resists mildew
Application: Recommend roll on or spray. When applying with a short nap roller (3/8” nap) DO NOT APPLY excessive pressure on the roller, roll with light to medium pressure. Apply vinyl supreme top coat evenly, do not leave puddles or roller marks. Do not apply to areas where standing water is evident.
Caution: DO NOT apply in temperatures below 50 degrees F to a damp surface or excessively hot surfaces, for example direct sunlight on a hot day, drying may occur too rapidly, causing trapped vapors to bubble. If this occurs, we recommend application during a cooler time of day. Keep away from children. Keep away from direct heat and open flame.

Product Description Single component, 100% acrylic floor sealer that exhibits excellent characteristics for abrasion, flexibility, adhesion, chemical resistance, weathering, and UV stability.
Appearance Clear gloss Recommended for: Residential or commercial, interior or exterior service; decks, driveways,
patios, pavers, and all deck coat overlays Application Method Can be applied by roller, brush, sprayer, or lambs wool applicator, or
pump-up sprayer or high pressure sprayer (pump-up sprayer should be used only when coating a porous surface).
Typical Properties Coverage Total Solids % VOC Shelf life Ph Viscosity Finish characteristics 12-13 months exposure Application temp
150 to 300 sq ft per gallon 32% 89 grams per liter (.7427 lbs per gallon) 1 year + 8.0 – 9.0 500 cps high gloss, 77 at 60 degrees (Erichsen glossmeter) In progress Above 50°F
Chemical Resistance
Water Formula 409 Gasoline Brake Fluid Transmission Fluid MEK Xylene Methyl Alcohol 20% Nitric acid 50% Sodium Hydroxide Resistance Properties (hot tire test)
Rating
10 94610 379910 10
Rating Key
Contact was maintained for 30 minutes; 10 is best down to 1
Surface Preparation Surface to be coated should be clean and dry. Re-coat or top coating Multiple coats of this product are acceptable. If you opt to recoat this
product, you must allow the first coat to dry (to touch). Product Storage Short-term: (Immediately prior to use) 40°F to site temp
Continuous storage should be above 40°F Clean up Soap and water Safety Material Safety Data Sheets are available upon request form McKinnon
Materials. This product is intended for use by both professionals and amateurs. Keep away from children.
McKinnon Materials, Inc. 5612 56th Commerce Park Blvd.
Tampa FL, 33610 Phone: (813) 622-7031 Fax: (813) 621-9017
Crystal Coat
3

Warranty McKinnon Materials warrants its products to conform to its manufacturing standards. McKinnon Materials will replace or refund the purchase price of non-conforming product at the seller’s option; such remedy being exclusive of all others and sole remedy available to the buyer. Buyer hereby expressly waives claim to additional damages. Any claim under this warranty must be made in writing within 7 days of discovery of non-compliance and no later than two years from the date of delivery of product. No representative, distributor or applicator of these products is authorized to modify product, product data or warranty.
Important Notice These products are sold subject only to the express warranties contained herein. There are no other warranties by McKinnon Materials of any nature whatsoever expressed or implied. Including any warranties of merchantability or fitness for a particular purpose in connection with this product. Buyer agrees that seller assumes no liability for remote or consequential damages of any kind which result from the used or misuse of the product. Information contained herein is based on data believed to be reliable; however, it is the buyer’s responsibility to satisfy itself of the product for a particular purpose.

McKinnon Materials, Inc. 5612 56th Commerce Park Blvd.
Tampa FL, 33610 Phone: (813) 622-7031 Fax: (813) 621-9017
McKrete
PHYSICAL PROPERTIES
McKrete is a cementitious acrylic compound, combines with water based epoxies and polyocrylates to create functional, durable floor systems for exterior and interior systems.
PERFORMANCE PROPERTIES:
Unmodified Cement
Design McKrete
Unmodified Cement
Design McKrete
Tensile Strength 235 614
Impact Strength (in LB) 6 18 (PSI) 28- Day Air Cure
28-Day Air Cure 615 28- Day Wet Cure 7 28-Day Wet Cure Comprehensive
2390 5796 Wet Curing Conditions
Strength (PSI) 1 day at 25C and 90% Relative 28-Day Air Cure 5795 humidity 28-Day Wet Cure 6 day water immersion at 25C
7 days at 25C and 50% Relative humidity 7 day water immersion at 25 C 7 days at 25 and 50% Relative humidity
Flexural Strength 610 1586 28-Day Air Cure
28-Day Wet Cure 1070 Shear Bond Adhesion (PSI) 28-Day Air Cure 28-Day Wet Cure
45 (A) 185 (A)
649 (C)
Adhesive failure indicated by (A) Cohesive failure indicated by (C)
NOTE: 1 – 50 lb bag of dry mix with 18 cups of additive will cover approximately 200-250 square feet of deck for a 70% spray system.
NOTE: 1 – 50 lb bag of dry mix with 18 cups of additive will cover approximately 100 square feet of deck for a marbleized or 100% coverage.
Click here for pictures of this product.
Click for brochure.

McKrete Tinting Chart
Values are for tinting 1 bag of McKrete
(Please Note: If you are planning to tint more than one bag, McKinnon Materials, Inc. strongly recommends tinting all of the additive at the same time to prevent color/shade variance between bags)
Buff Beige Gull Gray Peach Mauve Terracotta
White
12oz
12oz
12oz
16oz
12oz
6oz
Yellow 1oz 2oz 12 drops
Brown 2oz
Red 4 drops 1/4oz 1oz 3oz
Black 4 drops
20 drops
Blue 1/4oz
Bright Red 1/4oz 1oz
Bright Yellow
1-1/2oz
***White, Yellow, Brown, Red, Black, Blue, Bright Red, and Bright Yellow, Color Concentrates are sold in quart size only.
Note: The above values are intended as starting points only!!

DESIGN MCKRETE™ INSTALLATION DECK PREPARATION:
A. Clean all foreign matter off deck (mastic, oil, grease, dirt, etc.)
B. Clean and acid etch with McKinnon Materials’ Etch & Degreaser (E&D).
1. DO NOT wet deck prior to etching, pour directly on dry concrete. 2. Use a 1:1 or a 3:1 mix, depending on condition of concrete. 3. Check PH level of concrete: needs to be no higher than 9 on a PH scale. 4. High pressure wash deck: It is very important to neutralize all acid.
INSTALLATION:
A. Secure all areas around the deck to be installed so no overspray will drift onto
undesired areas.
B. If a scratch coat is desired:
1. Mix a thin solution and pour onto the damp concrete. Use a trowel to
spread out evenly. 2. Let dry thoroughly. 3. If you are using McKrete™ to regrade or fill holes, use the special additive.
Stir this additive for approximately 3 minutes and pour it out of the bucket. 4. Mix 18-20 cups of additive to 1 bag of dry mix. 5. With regular additive, mix 5 minutes, let stand 5 minutes, re-stir and use. 6. Spray approximately 18” to 24” above deck with 15lbs of pressure.
Always spray on damp deck. 7. Troweler follows sprayer and should begin troweling before the McKrete™
turns dull looking. 8. Troweler will also carry a clean wet sponge to clean trowel. 9. Check for dryness in the shady areas. If you can’t indent the material with
a thumbnail; it is dry. 10. Lightly scrape or with a fluted brick, remove all surface imperfections and
blow off the loose material. SEALING THE DECK:
A, Seal the deck with any of the sealers listed in the section described as SEALERS for use with McKrete™.

TYPICAL PHYSICAL STRENGTH PROPERTIES OF MCKRETE™
Tensile Strength (PSI)
Unmodified Cement McKrete
28 Day Air Cure 235 614 28 Day Wet Cure1 615
Compressive Strength (PSI) 28 Day Air Cure 2390 5796 28 Day Wet Cure 5795
Flexural Strength 28 Day Air Cure 610 1586 28 Day Wet Cure 1070
Shear Bond Adhesion (PSI)2
28 Day Air Cure 45 (A) 649 (C) 28 Day Wet Cure 185(A)
Impact Strength (IN-LB) 28 Day Air Cure 6 18 28 Day Wet Cure 7
1 1 Wet Curing Conditions 1 Day at 25° C and 90% Relative Humidity 6 Days Water Immersion at 25° C 7 Days at 25° C and 50% Relative Humidity 7 Days at Water Immersion at 25° C 7 Days at 25° C and 50% Relative Humidity
2 Adhesive Failure Indicated by (A) Cohesive Failure Indicated by (C)

PLUS FACTORS
WHY MARBLEIZED MCKRETE™ BY MCKINNON MATERIALS?
1. Available in many colors.
2. Customized to meet individual desires.
3. More versatile than marble itself.
4. More hiding power than regular epoxy systems.
5. Patented system only available at McKinnon Materials.
6. Practical to install.
7. Can be installed on vertical or horizontal surfaces.
8. Fire resistant.
9. Low maintenance.
10. Stain resistant.
11. Indoor or outdoor installations.
12. Ideal for commercial applications as well as pool decks, patios,
driveways, basement floors, walls, tile floors, foyers and walkways.
13. Beautiful surface covering for concrete.

INSTRUCTIONS FOR MARBLEIZED MCKRETE™ PREPARATION:
All decks must be acid etched and degreased with McKinnon Materials’ Etch & Degreaser, then neutralized with baking soda mixed with water. Pressure wash, make sure concrete is clean. Keep concrete damp during installation (no puddles). Proper preparation is very important for a successful job.
1. After thoroughly stirring the McKrete™ Additive, measure out 18-20 cups
and pour into a clean, dry 5 gallon bucket. Add a 50 lb. bag of dry mix to additive slowly. Mix for approximately.
2. Let mix sit for 5 minutes, remix for 1 minute with a drill and use.
INSTALLATION:
1. Fill in low areas and cracks with above mix as needed. Bad cracks may take
special treatment. If a different color than that of concrete is desired, then a scratch coat of colored material should be troweled on. After the scratch coat has dried, lightly scrape, sweep, and blow off with blower. Tape off desired pattern using grout tape or stencils. CAUTION – NEVER ATTEMPT TO INSTALL A MARBLEIZED JOB WITHOUT GROUTLINES !!!
2. For every 100 square feet of deck, save 1 quart of the mix. Adding KOLOR-
KOTE Concentrate.
3. Fill hopper with uncolored mix, spray covering 100% on the damp concrete. Spray no more than you can handle, depending on the drying time. While this spray is wet, change hoppers and lightly spray some of the colored mixture at the rate of about 1 quart per every 100 square feet. Both the sprayer and the troweler must wear golf shoes. Lightly trowel using a swirling motion to bleed the colored mix into the regular mix to achieve a “marble vein” effect. Over-troweling will bleed the color out.
4. Check for dryness in shading areas. If you cannot indent the surface with
your thumbnail, it is dry enough to seal.
5. At this point, pull the grout tape up, lightly scrape to remove any burrs or loose material, sweep and blow clean with a blower.
6. Spray or roll one of the clear sealers as described in the McKrete™
SEALERS SECTION. Use a thin coat, allow to dry, then apply a second thin coat (make sure you allow time for the first coat to dry before you apply the second coat). Allow 24 hours before foot traffic and two days for automobile or heavy traffic. This, of course, depends on temperatures.
SEALERS FOR USE WITH MCKRETE™ McKrete™ is the most versatile decorative decking material on the market today. Due to its versatility, there is a wide selection of sealers available for use with it. The following list of sealers, their use, application procedure and properties. Remember that you should never apply any McKrete™ product when the temperature is below 50°F.
1. KOLOR KOTE:
A. WATER BASE: A water base paint-like material used to seal McKrete™
when the entire surface is to be the same color. KOLOR KOTE may be rolled, but it is strongly recommended that you spray it on with an airless sprayer. It must be applied in very thin coats. Each coat must be completely dry before applying the next coat. Otherwise the KOLOR KOTE may crack or blister. Drying time is dependent on temperature and humidity.
B. SOLVENT BASE: This solvent base paint-like material is recommended for use when doing commercial applications or very high traffic areas, going over Kool Deck and dealing with problem concrete. The application techniques and drying tine are the same as water base. Due to its components: solvent base KOLOR KOTE has better, stronger adhesive qualities, for theses surfaces.
2. CLEAR SEALERS:
A. CRYSTAL COAT: A clear, water base sealer used where the color of the McKrete™ is to show through as with brick or marble. Application and drying time is the same as KOLOR KOTE.
B. VINYL SUPREME: A solvent base clear sealer that is somewhat harder than
CRYSTAL COAT. It can be rolled or sprayed on. When rolled, it is helpful to use a smooth foam roller cover. When sprayed, you will want to thin each gallon with 10 fluid ounces of fast evaporating acetone. Apply in 2 or more very thin coats. Let each coat dry just enough so that it isn’t sticky when you walk on it before applying the next coat. If you put down too thick a coat or do not let the McKrete™ dry before dealing, the product will blister and come up. VINYL SUPREME great for use on medium traffic areas like pool decks, residential sidewalks, etc. It is the clear sealer of choice for all decks and floors except for heavy duty traffic areas.

3. URETHANES:
A. ALIPHATIC URETHANE: The hardest clear sealer available. Ideal for use in commercial applications, driveways of all kinds, shops, garages, kitchens, family rooms, etc. Application is the same as that of VINYL SUPREME.
B. HIGH PERFORMANCE URETHANE: A two component (2:1) aliphatic urethane that does not rely on moisture for drying, which makes it important in arid areas, such as found in Arizona, Palm Springs, New Mexico, etc. Can also be tinted as desired. High in solids and may be applied in one coat with a squeegee, roller or spray equipment. HIGH PERFORMANCE URETHANE is as hard as ALIPHATIC URETHANE.
4. MIRACLE GLAZE: A two component acrylic sealer.
HAZARDS OF XYLENE BASED MATERIALS: Xylene is a flammable material. It is found in both URETHANES, VINYL SUPREME and SOLVENT BASED KOLOR KOTE. Use of a cartridge type respirator is recommended when applying these coatings. It is essential that all sparks and flames be eliminated from the working area. Allow at least a few days ventilation for food preparation areas before exposure to food products.
We hope that this information will be of assistance to help you determine which product you require for a particular job. If you have any questions, please give us a call.

KOLOR-KOTE CONCRETE FINISHER ------------------------------By McKinnon Materials
A Decorative Penetrative System for Concrete
PATIOS, WALKS DRIVEWAYS, BLOCK, STUCCO, CONCRETE, ROOFS, TENNIS AND SHUFFLEBOARD COURTS, APARTMENTS, CONDOMINIUMS, MOTELS & POOLS.
GENERAL INFORMATION AND PREPARTION FOR APPLICATION
CONCRETE FLOORS, WALKS, ETC.
All old paint, oil and grease must be removed with the proper remover. Muriatic acid will not remove paint, oil or grease. Most concrete must be etched, as a porous surface is required. Etching should be done by applying a solution of one part muriatic acid and one part water or McKinnon Materials’ Etch & Degreaser with a plastic sprinkling can. THIS IS THE ONLY WAY. Muriatic acid reacts almost immediately upon contact with the alkaline concrete resulting in a rapid loss of strength. This proportion is based on acid of 20 strength. If weaker acid is used, increase strength proportionately. On extremely hard, polished concrete a stronger solution is necessary. The acid solution will neutralize in about ten (10) minutes. Rinse thoroughly with plenty of water using a hose if possible. This rinsing rarely effect grass or shrubs. Concrete properly etched, will have a “sandpaper” feel when rubbed. If not, repeat the operation. Concrete must be allowed to dry thoroughly.
All recommendations, statements, and technical date contained herein are based on tests we believe to be reliable and correct, but accuracy and completeness of said tests are not guaranteed and are not to be construed as a warranty, either expressed or implied. User shall rely on his/her own information and testing to determine suitability of the product for the intended use and user assumes all risk and liability resulting from use of products. Seller’s and manufacturer’s sole responsibility shall be to replace that portion of the product of this manufacturer which proves to be defective. Neither seller nor manufacturer shall be liable to the buyer or any third person for any injury, loss, or damages directly or indirectly resulting from the use of, or inability to use, the product. Recommendations or statements other than those contained in written agreement signed by an officer of the manufacturer shall not be binding upon the manufacturer or seller.

McKinnon Materials, Inc. 5612 56th Commerce Park Blvd.
Tampa FL, 33610 Phone: (813) 622-7031 Fax: (813) 621-9017
Acrylic Paints / Concrete Sealer
PHYSICAL PROPERTIES: Composition: McKinnon Materials Concrete Sealer is a deep penetration solvent based water
repellent sealer for use on concrete driveways garages, pool decks, patios, vertical block, split face block masonry walls and any other concrete and masonry surface that needs protection and beautification. Our sealer has a unique formulation of silicone/acrylic which allows for deep penetration into concrete to give a very long lasting color and protection. Although a water based version is carried in our product line, solvent based sealer is recommended for penetration into concrete and acrylic surfaces.
Solids Content: 27%/volume
Solids Weight: 44%/volume
Coverage: 100 to 250 sq ft per gallon, depending upon porosity and texture of surface
VOC Content: Less than 600 gpl/5 lb/gl
General Information:
Application: Apply with roller, spray or brush. Work the coating into the surface to prevent penetration bubbles. For most applications two coats are recommended. May be recoated in 12 hours under good drying conditions.
Surface Preparation: All surfaces to be sealed must be free of dirt, dust, oil grease mod and mildew, curing compounds and other sealers. Oil and grease should be scrubbed clean with a detergent or trisodium phosphate diluted in water. Mildew should be killed with chlorine. Best results will be obtained with additional pressure cleaning. New or bare concrete should be etched with muriatic acid (1 part acid 2 parts water allows acid solution to react for 15-20 minutes on the surface. Do not allow the solution to dry out
Smooth trowelled concrete must be etched until a grit sand paper like feel is obtained. Etching opens up the pores of the concrete to allow penetration of the stain. Concrete should then be thoroughly pressure washed or rinsed thoroughly with water and allowed to completely dry (24 hours min.) before staining
McKinnon Materials concrete sealer may be applied over most xylene based acrylic stains if they are firmly bonded to the surface. A small test patch is recommended. Our concrete sealer will not adhere satisfactory to epoxies, polyeurethanes, alkyds, water based floor paints, silicate sealers, curing compounds, and membranes surface hardeners. A test patch adhesion is recommended prior to recoating.
Drying Time: Dry to touch in, approximately 15 minutes. Recoat and light traffic 12 hours, vehicles 72 hours. Dry times are for 75 degree F temperatures and medium humidity’s. Low temperatures will extend drying and curing time. Moisture and dew on the surface will stop the curing until the surface dries again.
Performance Properties: AIM Category Water Repellant Sealer G-23-F 2000 hrs TT-C555B No effect Light Stability Excellent Abrasion Resistance Excellent Gasoline Resistance Limited

Chemical Resistance Good-Avoid strong cleaner, degreasers Limitations: Do not apply when air or surface temperatures exceed 90F or lap marking/bubbling
may occur. Do not apply to wet or damp concrete. Excessive moisture in the concrete will inhibit the penetration of the stain and cause improper curing. Flaking or lifting of the stain may later occur. Do not apply when it may rain or if dew may condense on the surface before paint will have chance to dry. Allow for slow drying during cold weather and high humidity. Resistance to oil and grease, and most household and pool chemicals; but gasoline will soften the coating. If gasoline is spilled, allow it to evaporate rather than wiping up—the coating will then recover and harden. Also, note that muratic acid and concentrated bleach may cause some discoloration and should be rinsed off immediately. Do not apply over stamped concrete installed prior to 1997. Stamped concrete is usually put down with form oils, hardeners, silicate sealers, waxes, polyurethane clears and stains. All or any of these will cause adhesion problems. A test patch and adhesion test is recommended. Follow instructions for previously coated concrete. Not for use below grade or in areas subjected to hydrostatic pressure.
Safety
Material Safety Data sheets are available from McKinnon Materials and should be consulted prior to use of the product. This product is intended for use by professionals only. Keep away from children and those not trained in the use and potential hazards involved.
Workers should wear gloves and goggles when mixing or applying product. Clean up with soap and warm water. Be sure to follow all label and MSDS cautions.
Warranty
McKinnon Materials warrants its products to conform to its manufacturing standards. McKinnon Materials will replace or refund the purchase price of non-conforming product at the seller’s option; such remedy being exclusive of all others and sole remedy available to the buyer. Buyer hereby expressly waives claim to additional damages. Any claim under this warranty must be made in writing within 7 days of discovery of non-compliance and no later than two years from the date of delivery of product. No representative, distributor or applicator of these products is authorized to modify product, product data or warranty.
Important Notice
These products are sold subject only to the express warranties contained herein. There are no other warranties by McKinnon Materials of any nature whatsoever expressed or implied. Including any warranties of merchantability or fitness for a particular purpose in connection with this product. Buyer agrees that seller assumes no liability for remote or consequential damages of any kind which result from the use or misuse of the product. Information contained herein is based on data believed to be reliable; however it is the buyer’s responsibility to satisfy itself of the product for a particular purpose. Material safety data sheets are available from McKinnon Materials and should be consulted prior to use of the product. This product is intended for use by professionals only. Keep away from children and those not trained in the use of potentially hazardous materials.

McKinnon Materials, Inc. 5612 56th Commerce Park Blvd.
Tampa FL, 33610 Phone: (813) 622-7031 Fax: (813) 621-9017
Chromastain/ Chromastain Reducer
Environmentally friendly water-based stain designed specifically for acrylic concrete overlay systems in addition to concrete surfaces; penetrates the acrylic concrete, adheres to the surface, and is self sealing; may be applied up to three times on the same area; extremely user friendly and can be sprayed as well as rolled or sponged onto surfaces.
PERFORMANCE PROPERTIES:
Appearance Stain: Red, Yellow, Green, Brown, Black; Reducer: white Chemical Description Pure Acrylic Latex
Typical Properties Physical Form White Total Solids % 11.1 – 12.5 Specific Gravity 1.05 Density, #/gal 8.45 Tg, ◦C (onset) 42 Ph, 20◦C 7.0 – 9.0 Viscosity at 22◦C, cps 50 - 400
Applications An acrylic latex stain solution intended to be used to stain or color the surface of any porous substrate such as, but not limited to, wood, concrete acrylic, modified coatings (overlays, acrylic deck overlays, acrylic modified concrete, paint)
Safety Handling Chromastain may contain traces of residual monomers, therefore adequate ventilation should be employed.
Characteristics 1. Water blush resistance2. Early water and moisture resistance3. Good exterior weatherability and U.V. resistance4. Very good adhesion and penetration of concrete substrates.
Packaging 5 gal plastic pail 1 gal plastic or metal can Instructions for use:
1. Chromastain™ is formulated to be user friendly. It is designed tobe used full strength straight out of the bottle, or if you wish tolighten the stain color you can use the bottle marked “reducer” todo so. You can also achieve other colors by combining any of thecolors.
2. Application Method:(You can use any of the following methods):
a. Use the included sprayer to spray the color, or a pump upsprayer, or any other type of spray equipment.
b. Sponge to place the stainc. Rag the color ond. Brush or roller can be used to apply color
3. Using on a full-scale job:
Click here for photos of products
Click for brochure Click for instructional video

McKinnon Materials, Inc. 5612 56th Commerce Park Blvd.
Tampa FL, 33610 Phone: (813) 622-7031 Fax: (813) 621-9017
Deck Coat Overlay
PHYSICAL PROPERTIES: Composition: A technically advanced, one component acrylic/polymer modified scientific blend of
cements, select graded silica, and special additives. Characteristics:
Boiling Point: N/A
Vapor Pressure: N/A
Solubility in Water: 1%
Appearance and Odor: White powder. No odor.
Specific Gravity: 2.5
Flammable Limits: N/A
Stability: Stable
Hazardous Decomposition: CO, CO2, Silicon tetra fluoride (with hydrofluoric acid)
Hazardous Pol ymerization: Will Not Occur
Performance Properties:
Comprehensive Strength ASTM C-109
28-Day Air Cure 3750psi
Flexural Strength ASTM C-348
28-Day Air Cure 775psi
Tensile Strength ASTM D-190
28-Day Air Cure 375psi
Bucket Life @ 72°F Approx 3 hrs
Dry Time @ 72°F At ¼ inch thick Approx 12 hrs
Limitations: Do not apply when the temperature, materials, or substrates are below 55°F. Do not apply under rainy conditions. Do not use for installations requiring acid and industrial chemical resistance.
Mixing: Pour approximately 5-6 quarts of water in a clean pail, then pour the powder slowly while stirring to avoid lumps. Mix until free of lumps, let stand for 2-3 minutes, then remix. Add universal colorant at this time if an internal color is desired. McKrete Overlay can be mixed with standard, universal colorants.
Coverage: Approximately 35 sq.ft. at ¼ inch. Note: coverage will vary depending on smoothness of substrate and texture of finish desired.

General Data:
Preparatory Work: All surfaces must be structurally sound and free of grease, oil, dirt, mildew, dust, wax, curing compounds.
Expansion Joints: Do Not fill existing expansion and control joints.
Safet y: Caution, may cause eye, skin or lung injury. Contains free silica. Prolonged exposure to dust may cause delayed lung disease. Eliminate exposure to dust. Use NIOSH approved mask for silica. Avoid contact with skin when possible, and wash exposed areas.
Safety
Material Safety Data sheets are available from McKinnon Materials and should be consulted prior to use of the product. This product is intended for use by professionals only. Keep away from children and those not trained in the use and potential hazards involved.
Workers should wear gloves and goggles when mixing or applying product. Clean up with soap and warm water. Be sure to follow all label and MSDS cautions.
Warranty
McKinnon Materials warrants its products to conform to its manufacturing standards. McKinnon Materials will replace or refund the purchase price of non-conforming product at the seller’s option; such remedy being exclusive of all others and sole remedy available to the buyer. Buyer hereby expressly waives claim to additional damages. Any claim under this warranty must be made in writing within 7 days of discovery of non-compliance and no later than two years from the date of delivery of product. No representative, distributor or applicator of these products is authorized to modify product, product data or warranty.
Important Notice
These products are sold subject only to the express warranties contained herein. There are no other warranties by McKinnon Materials of any nature whatsoever expressed or implied. Including any warranties of merchantability or fitness for a particular purpose in connection with this product. Buyer agrees that seller assumes no liability for remote or consequential damages of any kind which result from the use or misuse of the product. Information contained herein is based on data believed to be reliable; however it is the buyer’s responsibility to satisfy itself of the product for a particular purpose. Material safety data sheets are available from McKinnon Materials and should be consulted prior to use of the product. This product is intended for use by professionals only. Keep away from children and those not trained in the use of potentially hazardous materials.
Click here for pictures of Deck Coat overlay

European Fan
Octagon Square
Bishop’s Hat Antique Brick
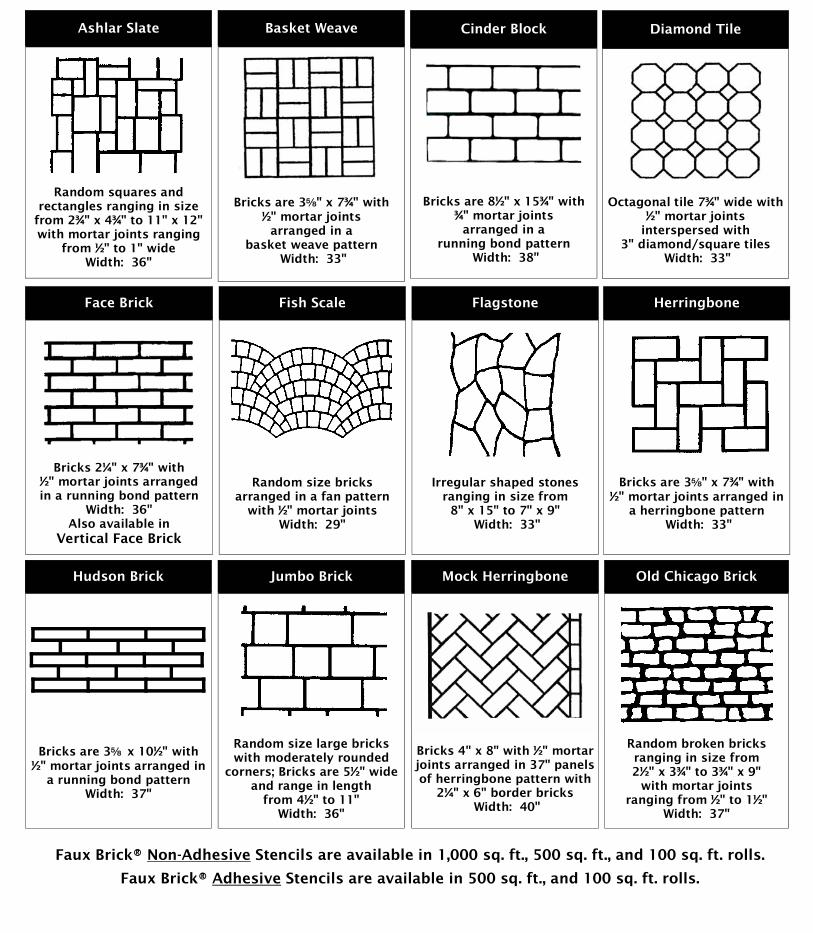
Old Chicago Brick
Random broken bricks ranging in size from 2½" x 3¾" to 3¾" x 9"
with mortar joints ranging from ½" to 1½"
Width: 37"
Jumbo Brick
Random size large bricks with moderately rounded
corners; Bricks are 5½" wide and range in length
from 4½" to 11" Width: 36"
Herringbone
Bricks are 3e" x 7¾" with ½" mortar joints arranged in
a herringbone pattern Width: 33"
Diamond Tile
Octagonal tile 7¾" wide with ½" mortar joints
interspersed with 3" diamond/square tiles
Width: 33"
Basket Weave
Bricks are 3e" x 7¾" with ½" mortar joints
arranged in a basket weave pattern
Width: 33"
Fish Scale
Random size bricks arranged in a fan pattern
with ½" mortar joints Width: 29"
Flagstone
Irregular shaped stones ranging in size from
8" x 15" to 7" x 9" Width: 33"
Cinder Block
Bricks are 8½" x 15¾" with ¾" mortar joints
arranged in a running bond pattern
Width: 38"
Mock Herringbone
Bricks 4" x 8" with ½" mortar joints arranged in 37" panels of herringbone pattern with
2¼" x 6" border bricks Width: 40"
Hudson Brick
Bricks are 3e x 10½" with ½" mortar joints arranged in
a running bond pattern Width: 37"
Ashlar Slate
Random squares and rectangles ranging in size
from 2¾" x 4¾" to 11" x 12" with mortar joints ranging
from ½" to 1" wide Width: 36"
STENCIL PATTERNS
Face Brick
Bricks 2¼" x 7¾" with ½" mortar joints arranged in a running bond pattern
Width: 36" Also available in
Vertical Face Brick
Faux Brick® Non-Adhesive Stencils are available in 1,000 sq. ft., 500 sq. ft., and 100 sq. ft. rolls.
Faux Brick® Adhesive Stencils are available in 500 sq. ft., and 100 sq. ft. rolls.

Large Circle
Brick circle available in 6'8" diameter with ½" mortar joints
Cobble Header
Irregular stones varying from 4" x 8" to 5" x 8" arranged in single file for borders with ½" to 1" mortar joints
Available in 300 linear ft.
Soldier Course
Bricks are 3e" x 7¾" arranged in single file for borders with ½" mortar joints - Available in 300 and 1,340 linear ft.
Stacked Bond
Bricks are 3.9" x 7¾" with ½" mortar joints
arranged in a stacked bond pattern
Width: 33"
Square Tile
Tiles are 5½" square with ½" mortar joints arranged in
a stacked bond pattern Width: 36"
Old English Cobblestone
Random shaped stones with highly rounded corners
ranging from 3¼" x 3½" to 7" x 8¼" with irregular
mortar joints Width: 33"
Silverdale
Random squares and rectangles ranging in size from 5" x 5" to 11" x 13½"
with ¾" mortar joints Width: 36"
Pinwheel
Bricks are 8.3" x 3.9" arranged in a
pinwheel pattern with ½" mortar joints
Width: 39.6"
Cobble Circle
Cobblestone circle available in 5'4" diameter with
irregular mortar joints
Random Blue Stone
Random size stones ranging from 5" x 5" to 5" x 10" with ½"
mortar joints, with rounded corners, straight longitudinal mortar joints and irregularly curved lateral mortar joints
Width: 33"
Running Bond
Bricks are 4" x 7¾" with ½" mortar joints
arranged in a running bond pattern
Width: 36"
Rustic Brick
Bricks are 5½" x 9" with irregular/curved mortar
joints arranged in a running bond pattern
(simulates old or used brick) Width: 36"
5812 Hwy. 494, Natchitoches, LA 71457 Ph. 318-379-2000 • Fax 318-379-1000 • Toll Free 888-328-9321 Website: www.artcrete.com • Email: [email protected]

We understand that knowing how to effectively use decorative flooring products is as important as having the
right product. That’s why we offer a 2 -1/2 to 3 Days, Hands on Workshop!
This multi-faceted training program includes instruction on the how, why and why not of:
Epoxy Bonded Stone Acrylic Overlays / Decorative Concrete Industrial Flooring /Paint Chip Flooring Dyes & Staining Techniques
WHO SHOULD ATTEND?
This training is ideal for… Beginners or Not so Experienced
Hit the ground running! Even if you’ve already started using our products, this workshop will bring
you up to speed faster than you thought possible…without the frustration and mistakes!
“Stuck- in- a-Rut”
You’re working harder instead of smarter. You know there are easier and better ways but don’t have the time or knowledge to sift through the information and find the tricks and shortcuts
yourself. This seminar is for you!
Sales Persons An understanding of what the products do and which will offer the best solution for the customer with what they have to work with is necessary for the person estimating and purchasing materials
for the jobs. This seminar covers all the points applicable to your sales staff, too.

Learn by doing with hands on lab training that reinforces key concepts and techniques. Our limited class sizes and personalized training offer the perfect combination of product training, whether you are starting a new business or want to add additional services to your business. Our training is guaranteed to deliver the results you demand! Our seminars, while covering a wide range of topics, are tailored to your unique needs for maximum results: Learn workable solutions for flooring issues and obstacles. Discover new and advanced techniques for creating surfaces that mimic nature such as granite,
wood & marble and much more! Gain a better understanding of the different technologies from decorative applications to
industrial to conceptual abstracts. Learn how to calculate the materials necessary for a project. Create samples in class that you can use to market your new services. Attain key critical techniques that will save you time and money when bidding a project. Find out the do’s and don’ts of the application process and how to avoid costly mistakes that
could cost you time and money.
You will receive a practical, comprehensive workbook that summarizes the key points covered, as well as, being a quick reference manual. Along with a certificate of completion, you will also
receive free technical support. Enroll today! $250 for the first three people (not each person) and $50 per person for the fourth and each additional person. Training fees and expenses related to them may be tax deductible.
Don’t miss out on the training that pays for itself over anD over!

Stone Bonded Epoxy Training Covers: 1. River Rock
A. Definition: What is it? It’s history…how, when and who? B. Is the rock, just rock? C. Where does it come from?
1. Where and how is it processed and why the need for special processing?
2. How is the stone shipped? a. Direct ship from quarry b. Shipped from Tampa c. Who decides and why? d. Saving you money is our business. e. How many colors, sizes and blends are there?
2. Epoxy – the other part of the mix
Why use epoxy? What purpose does it serve?
Special formulas of epoxies and their individual uses
Most common problems you may encounter with epoxy
3. Estimating material for project
Difference in estimating 3/16 rock and 5/16 rock
What is a batch? A batch is the same as a mixed load.
3/16 equation is Job size ÷40 = # of batches
(a batch is 1 Gal of mixed epoxy and 3 bags of stone)
1. Fictional job, size 200 sq ft 200 ÷ 40 = 5 Batches which converts to 5 Gal of epoxy then 5 X 3 = 15 Bags of stone
5/16 equation is job size÷36= # of batches
1. Fictional job, size 200 sq ft 200 ÷ 36 = 5.5 Batches which converts to 5.5 Gal of epoxy then 5.5 X 3 = 16.5 Bags of stone Now for the “gemie factor” - (always round up to the next whole number) and then add 1 batch, so 5.5 batches becomes 6 + 1 = 7 batches should be on hand to do 200 sq ft.

4. Forming up Steps (done in miniature in class)
How to construct forms in a way that is…
Fast and easy to erect
Properly mix and place epoxy bonded stone into forms
5. Forming Walkways & Decks
A. Straight run B. Capping edges C. Forming on a curve D. Trim and Logos
6. Installing Rock
A. Spreading rock the old way – rake B. Spreading rock with gauged spreader C. Troweling Rock
1. Knee Board 2. Who needs trowel tray 3. Trowel Slick
This ends the section on Epoxy Bonded Stone, approximate running time 1.25 days to 1.50 days.
Industrial Epoxy Training Covers: 7. Types of Industrial Epoxy
A. Clear Industrial Epoxy
1. Uses 2. Color Options 3. How it is applied
B. Rapid Set Industrial Epoxy
1. Uses 2. Color Options 3. How it is applied
C. Quick Set Industrial Epoxy
1. Uses

2. Color Options 3. How it is applied
D. Rubber Epoxy
1. Uses 2. Color Options 3. How it is applied
E. EZ Coat Epoxy
1. Uses 2. How it is applied
F. Primer Epoxy
1. Uses 2. How it is applied
G. Vertical Epoxy
1. Uses 2 How to make it 3. How it is applied
8. Topical Additives for Epoxy
A. Quartz Colored
1. Types of application
a. Broadcast b. Trowel Down
B. Paint Chips
1. Sizes and Colors 2. How much is enough 3. More chips, more money
C. Non-Skid Grit
1. What is it 2. Size – Large and small 3. Uses
9. Top Coats (usually done at end of class, because of sealing McKrete samples)
A. How many topcoats are there B. How to select the correct topcoat C. Coverage rates and cost per square foot

M cKre te™ Training Covers: 10. McKrete™
A. What is McKrete™
1. What makes it different 2. What is milk 3. First chance at color
B. Tools of the Trade
1. Stencils 2. Grout Tape 3. Trowel 4. Broom 5. Sponge 6. Rag 7. Hopper Gun and Compressor, types and usage
C. Mixing McKrete™
1. How to 2 How much
D. Types of Finishes we will do
1. Scratch Coat 2. 70% Knock Down 3. Spec Tone 4. Orange Peel 5. Marbleized 6. Simulated Wood 7. Simulated Flagstone

11.
Chro
Chro ma sta in ™ Training Covers:
mastain™
A.
Colors – Sierra Black, Royal Blue, Mesa Brown, Orchard Orange, Rustic Yellow, Forest Green and Heart Red
B.
What is Cross Linking Acrylic
C.
What is Translucent Pigment
D.
Self Sealing
E.
Use of stain on McKrete™ boards
Sealers Training Covers:
12. Sealers
A. When and How to use the different types
1. Crystal Coat
2. Super Vinyl Supreme
3. Miracle Glaze
4. Rapid Set Industrial Epoxy
5. Water Based Urethanes
6. Single Component Urethanes
7. Two Component High Performance Urethanes
Now let’s seal some samples. This completes our course.
Thank you.
Buster