Embed Size (px)
Citation preview
enVision Math (Pearson)
Table of Contents:
1. Creating a New Teacher Log-In
2. How to Build a Class and Add Students Already in the Database to It
3. How to Add New Students to Database
4. How to Print Letters For My Class and Students’ Parents with the Students’ Log-In Information
5. How to View and Assign Lessons for the Math Textbook
6. How to View and Modify Assignments You Have Created
7. How to Assign a Pre-Existing Test
8. How to Create and Assign a Custom Test
9. How to View and Assign a Leveled Reading Book
10. How to Use My Online Teacher Edition Book

Creating a New Teacher Log-In
Go to https://www.pearsonsuccessnet.com/.
For a teacher that is new to the school, click on register:
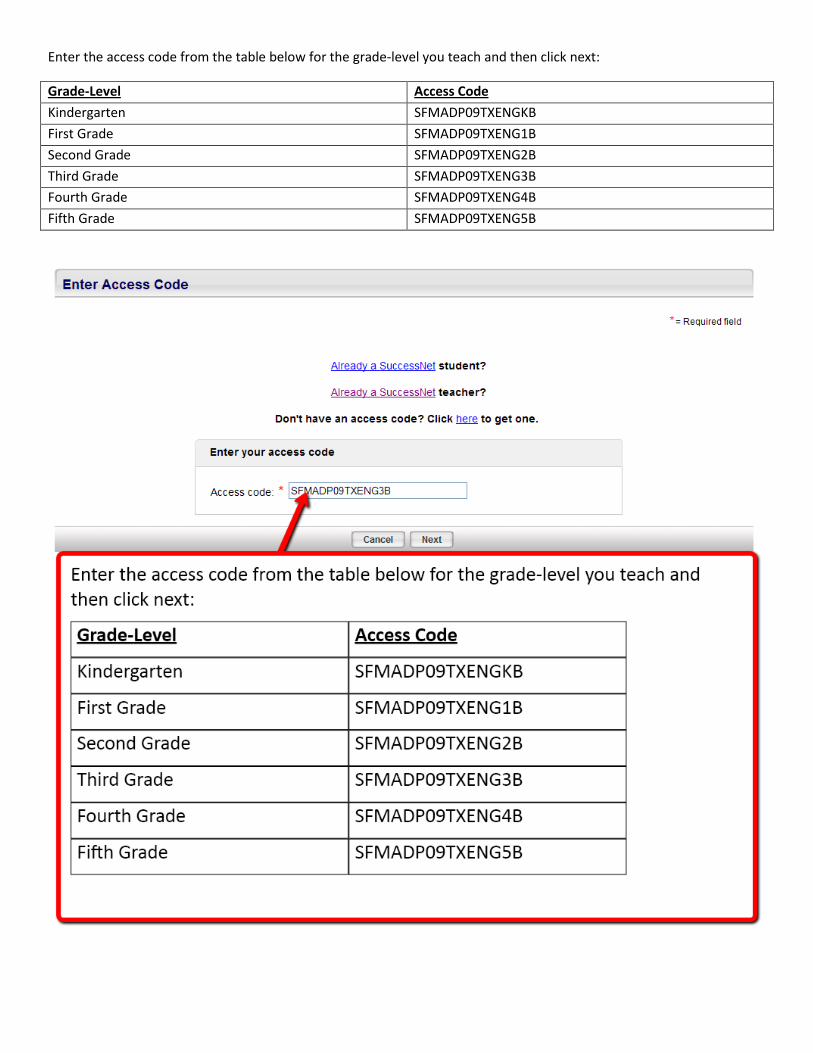
Enter the access code from the table below for the grade-level you teach and then click next:
Grade-Level Access Code
Kindergarten SFMADP09TXENGKB
First Grade SFMADP09TXENG1B
Second Grade SFMADP09TXENG2B
Third Grade SFMADP09TXENG3B
Fourth Grade SFMADP09TXENG4B
Fifth Grade SFMADP09TXENG5B

Enter the school’s zip code (78681) first because Great Oaks Elementary will only appear as an option after you have done so. Fill in all of your personal information. Do not skip any of the spaces marked with an asterisk. Click register when you have completed this page:
Once you have finished registration, you will be taken back to the log-in screen.

Building a Class and Adding Students Already in the Database to It
Go to https://www.pearsonsuccessnet.com/.
Enter your user name and password in the empty spaces and click log in:
To build a new class, scroll over the classes tab and then select build new classes:

Name your class and select every textbook in the list even if you do not teach bilingual or Spanish students and then
click save:
To add students to the class you just created, click on view under the roster column:
Most students have already been added, so choose the select from school roster option:

Select the grade you teach and click search:
Put a check mark next to all of the students within this class and then click save:

The user name of every student is the campus number (128 for Great Oaks) and the student’s 6-digit ID. The password
for every student is their 6-digit ID.
For example, a student that has the 6-digit ID of 123456 would have the user name 128123456 and a password of
123456:
If you could not find all of your students, then they have probably not been added yet. This is something that you need
to do, which is explained in the next section.

How to Add New Students
If you could not find all of your students, then they have likely not been added yet. This is something that you need to
do.
On the home menu bar, scroll over the classes tab and then select manage classes:
Look for the class that you would like to add the new student to and then click on view under the roster column:

To add a new student that is not on the school roster, select add a student:
The user name of every student is the campus number (128 for Great Oaks) and the student’s 6-digit ID. The password
for every student is their 6-digit ID. Please try to keep this pattern the same for new student you add to your roster.
For example, a student that has the 6-digit ID of 123456 should be given the user name 128123456 and a password of
123456:

Once you have saved, the new student will be added to your roster automatically:

How to Print Letters For My Class and Students’ Parents with the Students’ Log-In Information
Once you have finished adding students to your roster, you can select all or some of the students and print a parent
letter that will contain their user name and password:
You can keep one copy for your own records and send one home:

How to View and Assign Lessons for the Math Textbook
To create a lesson, go to the home page and click on the Premium button alongside the envision Math textbook cover or
scroll over the content tab and select table of contents:
Select the topic you are coving in your class from the table of contents page:

Before you make an assignment you might want to see what information the topic is covering to make sure that it is
appropriate for your class. On the left side of the page you will notice a table of contents that will allow you to view
specific lessons on that topic. On the right side you will notice a navigation bar that allows you to view the information
pertaining to each specific lesson. This is where you will want to verify the assignment is appropriate for your class:
The first item you will want to use on the navigation bar is the information button to see what specific TEKS the lesson
covers:
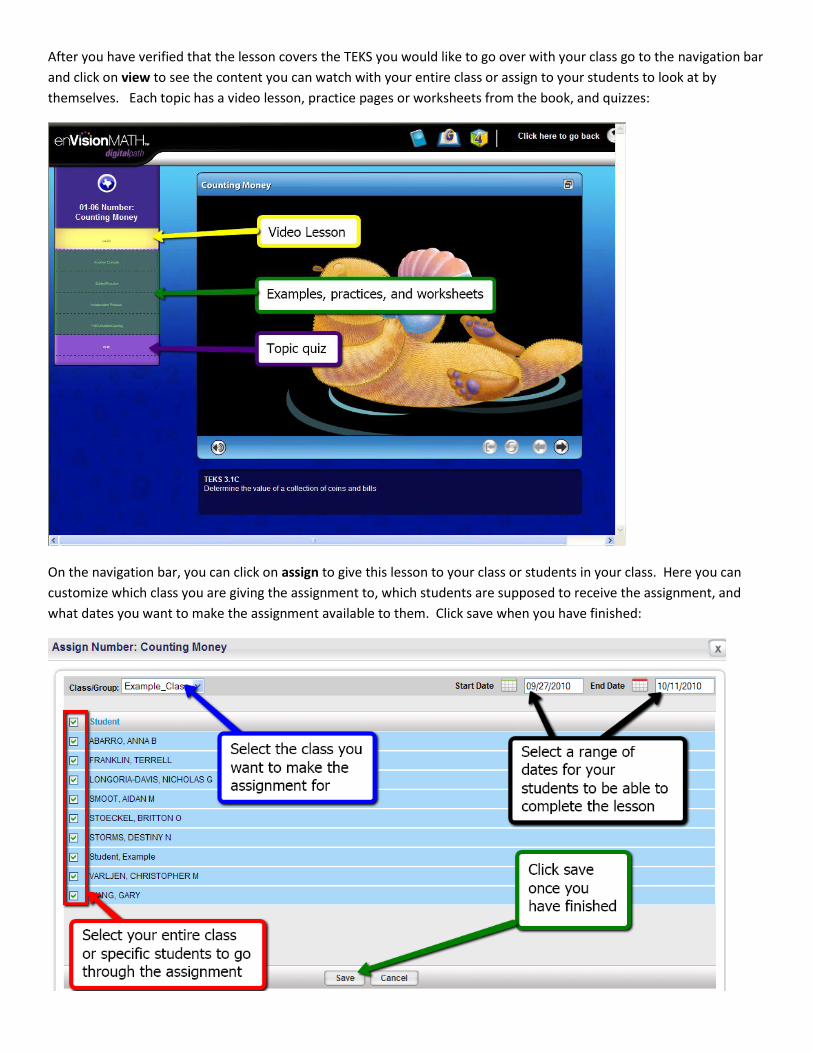
After you have verified that the lesson covers the TEKS you would like to go over with your class go to the navigation bar
and click on view to see the content you can watch with your entire class or assign to your students to look at by
themselves. Each topic has a video lesson, practice pages or worksheets from the book, and quizzes:
On the navigation bar, you can click on assign to give this lesson to your class or students in your class. Here you can
customize which class you are giving the assignment to, which students are supposed to receive the assignment, and
what dates you want to make the assignment available to them. Click save when you have finished:

How to View and Modify Assignments You Have Created
Scroll over the planning tab and select assignments on the home menu bar.
Click on the assignment. From here you will be given the options to Edit/Score, Delete, View Content, and View
Information:
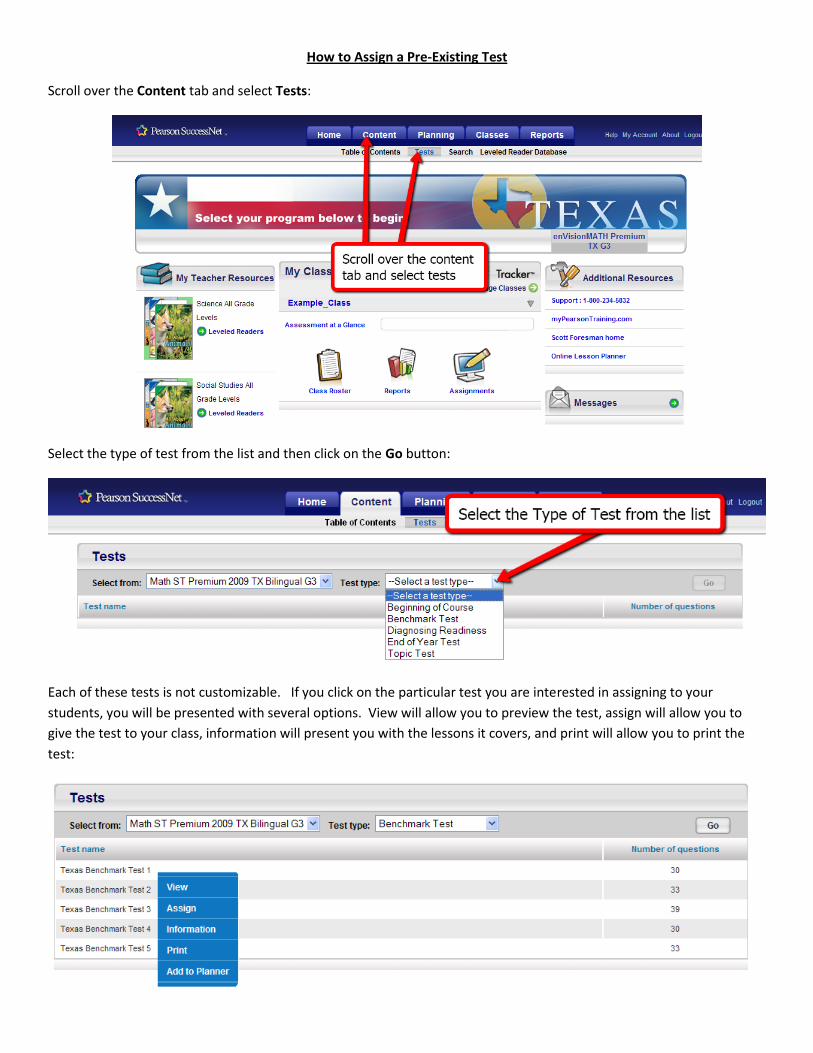
How to Assign a Pre-Existing Test
Scroll over the Content tab and select Tests:
Select the type of test from the list and then click on the Go button:
Each of these tests is not customizable. If you click on the particular test you are interested in assigning to your
students, you will be presented with several options. View will allow you to preview the test, assign will allow you to
give the test to your class, information will present you with the lessons it covers, and print will allow you to print the
test:
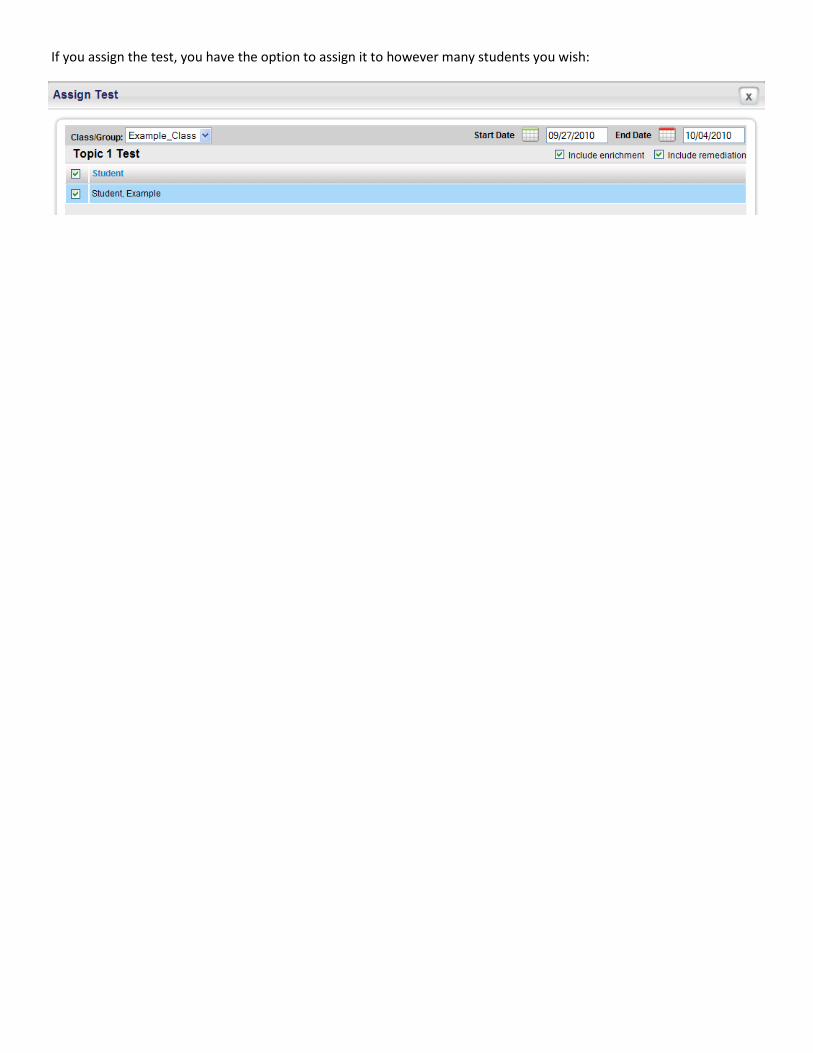
If you assign the test, you have the option to assign it to however many students you wish:
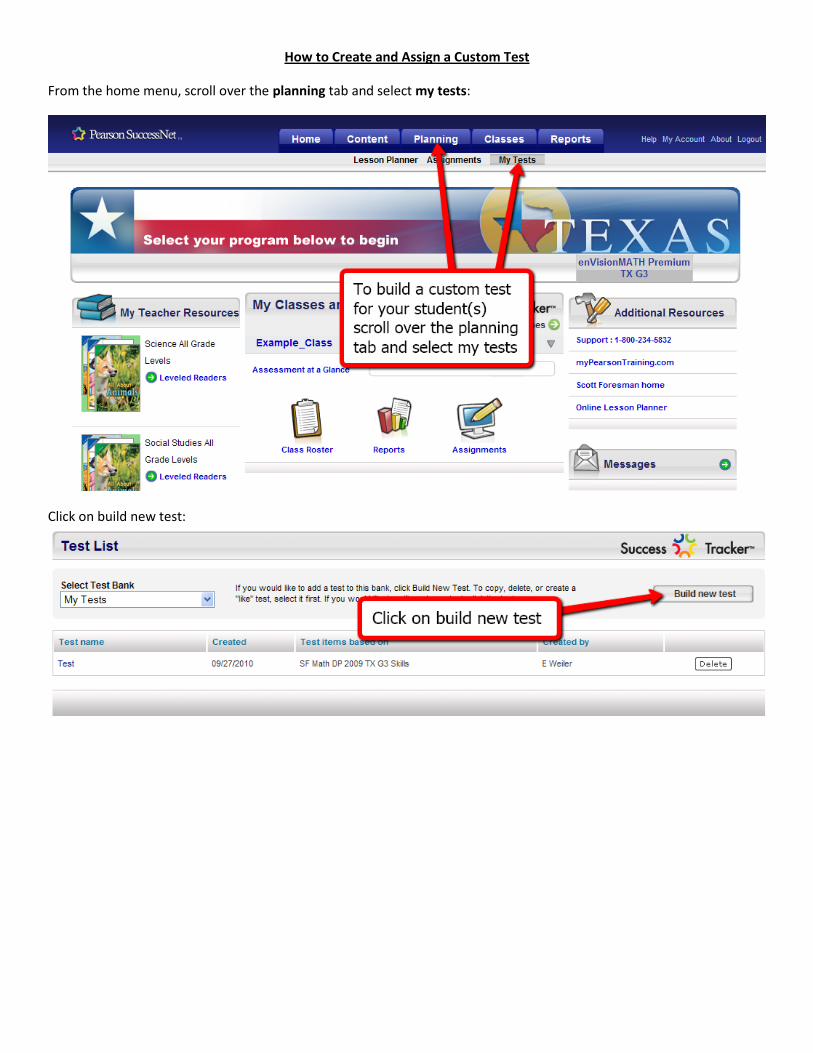
How to Create and Assign a Custom Test
From the home menu, scroll over the planning tab and select my tests:
Click on build new test:
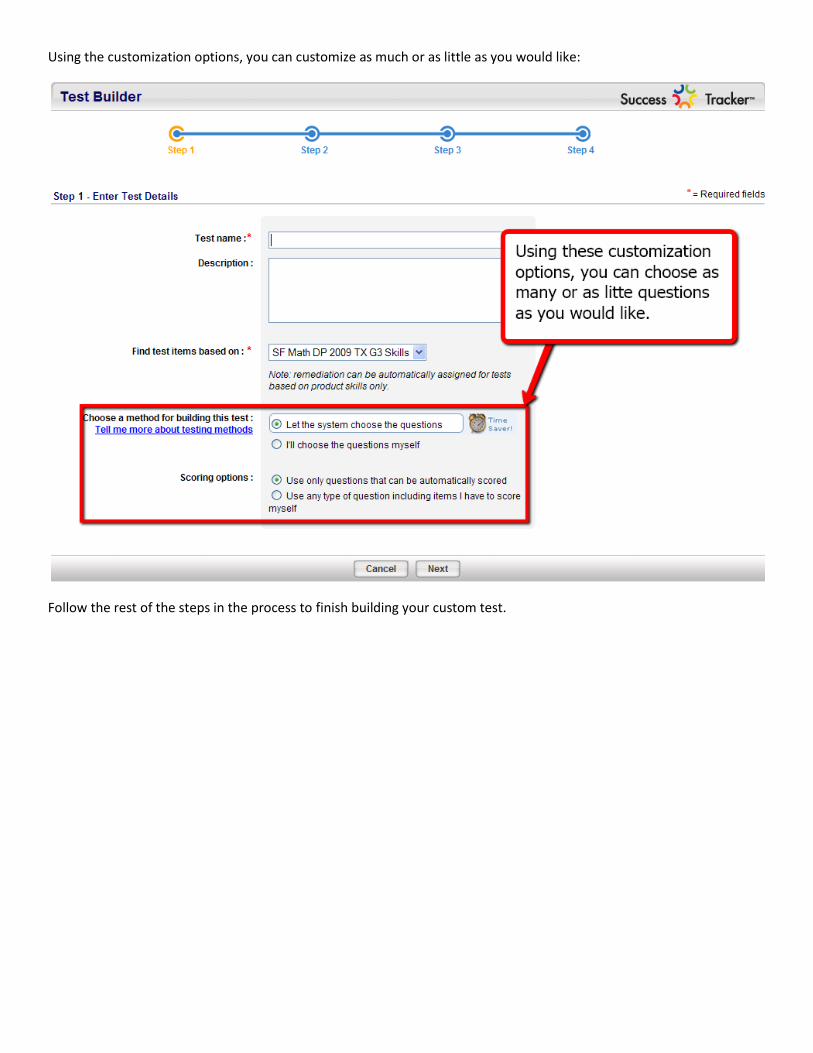
Using the customization options, you can customize as much or as little as you would like:
Follow the rest of the steps in the process to finish building your custom test.

How to View and Assign a Leveled-Reading Book
From the home menu bar, scroll over content and select the leveled reader database:
Select the criteria you would like to search by and click search:

All of the books in the database that meet your criteria will appear. Select the title you would like to assign to your
students:
Either click on the title to view the book and/or assign it to your class:
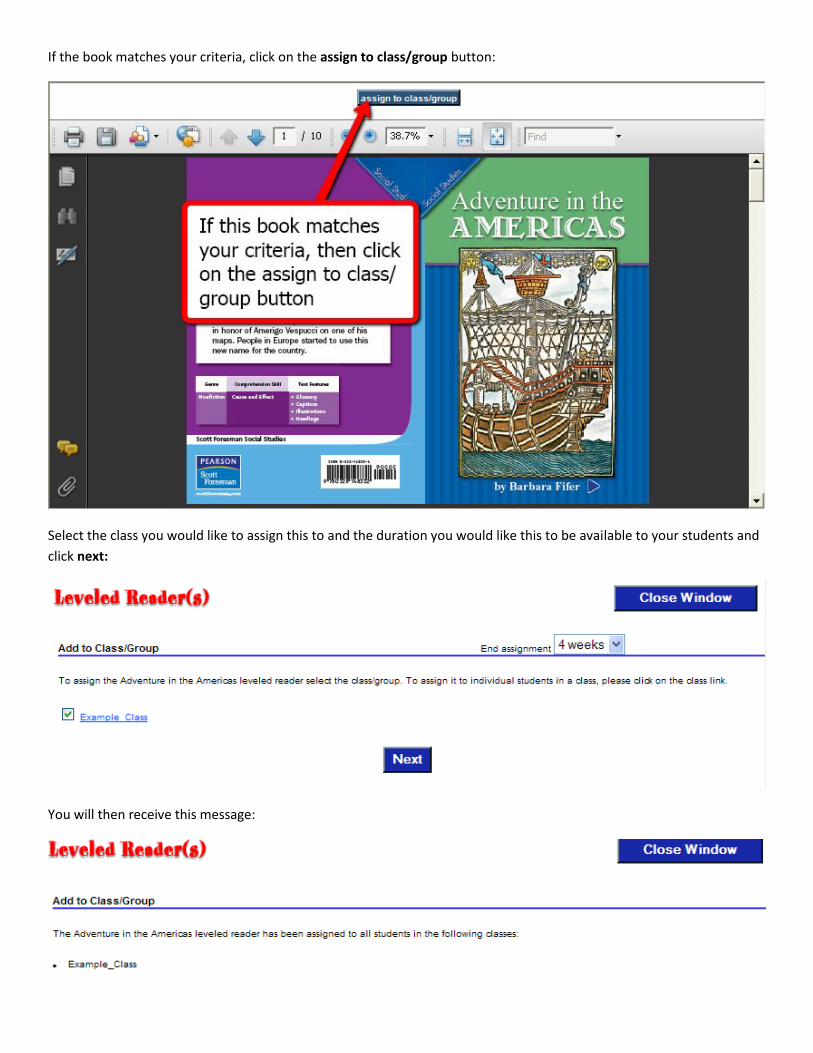
If the book matches your criteria, click on the assign to class/group button:
Select the class you would like to assign this to and the duration you would like this to be available to your students and
click next:
You will then receive this message:

How to Use My Online Teacher Edition Book
On the navigation bar, click on teacher’s edition to access to your entire teacher’s edition textbook and then select click
here to open your book in the window that opens. From here you can navigate your entire book, search your book for
specific topics, look at the TEKS for each chapter, access the glossary that has visuals for each of the vocabulary words,
and use eTools which can be your virtual manipulative for each of your lessons:
Your search button will allow you to navigate the entire book with keywords you would like to focus on and given you
the page(s) that word combination appears on:

The State Standards button will show you what TEKS the chapter covers:
The glossary button will allow you to search for vocabulary words contained in the book and provide you an animated
explanation of the term:

The eTools button will provide you with virtual manipulatives:
Main Menu
Example


![[PPT]Business Math - Pearson Educationwps.prenhall.com/wps/media/objects/5260/5386895/Power... · Web viewTitle Business Math Author User Last modified by Michelle Churma Created](https://img.pdfslide.net/doc/110x75/5b02243e7f8b9a54578f4050/pptbusiness-math-pearson-viewtitle-business-math-author-user-last-modified-by.jpg)