Embed Size (px)
Citation preview

Epi Info™ Web Survey System Integrated Package Deployment
Revision Date: 9/6/2016 Page 1 of 52
EPI INFO™ WEB SURVEY SYSTEM
INTEGRATED PACKAGE DEPLOYMENT
Version 1.10
9/6/2016

Epi Info™ Web Survey System Integrated Package Deployment
Revision Date: 9/6/2016 Page 2 of 52
VERSION HISTORY
Version #
Implemented
By
Revision
Date
Comments
1.0 Sachin Agnihotri 09/18/2012 Version 1.0 of the document
1.1 David Nitschke 10/15/2012 Edits applied for eClearance
1.2 David Nitschke 11/09/2012 Edits applied for eClearance and approval received. Document is Cleared for distribution.
1.3 Sachin Agnihotri 04/08/2013 Updates for changes in Version 1.1.4.0 of the system.
1.4 Sachin Agnihotri 07/29/2013 Update for changes in Version 1.2.0.0 of the system
1.5 Sachin Agnihotri 09/19/2013 Instructions for upgrading an existing instance of the system
1.6 Sachin Agnihotri 01/07/2014 Updated made to Conventions and Error Messages section
1.7 Sachin Agnihotri 03/12/2014 Updated connection string section
1.8 Sachin Agnihotri 10/15/2014 V1.3.0.0 settings and updates for user interface customization
1.9 Coryne Tasca 3/21/2016 Updated formatting for accessibility standards (508)
1.10 Sachin Agnihotri 9/6/2016 V1.4.0.0 release and update guidelines
Epi Info™ Web Survey System Integrated Package Deployment
Revision Date: 9/6/2016 Page 3 of 52
TABLE OF CONTENTS
1 INTRODUCTION .................................................................................................................... 4
1.1 Purpose .................................................................................................................... 4
1.2 Audience .................................................................................................................. 4
2 SYSTEM DESCRIPTION ...................................................................................................... 4
2.1 Key Features ........................................................................................................... 4
2.2 Inventory .................................................................................................................. 4
2.3 Environment ............................................................................................................ 5
2.4 System Operations ................................................................................................. 6
2.5 System Architecture ............................................................................................... 6
3 APPLICATION INSTALLATION ........................................................................................ 7
3.1 First-Time Users ..................................................................................................... 7
3.2 Access Controls ...................................................................................................... 7
3.2.1 Database ............................................................................................................... 7
3.2.2 Application and Services ..................................................................................... 8
3.3 Installation ................................................................................................................ 8
3.4 Configuration ........................................................................................................... 8
3.4.1 Database Configuration ....................................................................................... 8
3.4.2 Application and Services Configuration ............................................................ 13
3.5 Starting the System .............................................................................................. 29
4 APPLICATION UPGRADE ................................................................................................. 32
4.1 Access Controls .................................................................................................... 32
4.1.1 Database ............................................................................................................. 32
4.1.2 Application and services .................................................................................... 32
4.2 Installing The Upgraded Version ........................................................................ 32
4.3 Configuration ......................................................................................................... 33
4.3.1 Prerequisite ........................................................................................................ 33
4.3.2 Database Configuration ..................................................................................... 33
4.3.3 Application and Services Configuration ............................................................ 36
5 SYSTEM USAGE .................................................................................................................. 39
5.1 Instructions ............................................................................................................ 39
5.2 Conventions and Error Messages...................................................................... 39
5.2.1 Epi Info Web Survey Manager Service Test ..................................................... 39
5.2.2 Organization Account Creation Test ................................................................. 40
5.2.3 Database Connection String Test ....................................................................... 41
5.2.4 Application’s Database Connection String Test ................................................ 42
5.2.5 Epi Info Web Survey Test.................................................................................. 43
Epi Info™ Web Survey System Integrated Package Deployment
Revision Date: 9/6/2016 Page 4 of 52
1 INTRODUCTION
1.1 PURPOSE
The vision of the Epi Info™ Web Survey system is to use the Epi Info 7 application to create online surveys to help the public health community conduct surveys, gather useful information for analysis, and to further support the mission of public health by facilitating public health data collection in geographically distributed locations, as well as enabling a targeted participant pool.
1.2 AUDIENCE
The audience for this document includes system administrators, database administrators, and information technology personnel who will be configuring the system on web and database servers.
2 SYSTEM DESCRIPTION
2.1 KEY FEATURES
The Epi Info Web Survey system enables the following functionalities on the web:
- Capability to deploy on the web: Provides a service to allow publishing a survey created using Epi Info 7 on the web.
- Enable survey on the web: Provides a means to dynamically present the survey participant with the survey on the web that has been created and published from Epi Info 7.
- Support data collection: Supports data collection by supporting surveys created using the following controls: Label, single line text box, multi-line text box, numeric text box, date/time picker, check box, drop-down list and group box.
- Support logic control in surveys: Enables data entry for surveys on the web by supporting skip logic and navigation logic. It also has the ability to hide, unhide, highlight, un-highlight, enable and disable survey questions when certain conditions/criteria are met.
- Support flexible participation: Allows survey participants access to the survey, complete the survey in one session, or save the responses to complete and submit the survey at a later time.
- Capability to download data: Provides a service to download the survey responses into Epi Info 7 for analysis.
2.2 INVENTORY
The integrated deployment package consists of a compressed folder structure having two main parts: 1) database and 2) application and services. The database scripts are present in the Database folder. All files for the Application and Services part are provided in ApplicationAndServices folder. The other supporting content provided in the package comprise of documents in Documents folder, a
Epi Info™ Web Survey System Integrated Package Deployment
Revision Date: 9/6/2016 Page 5 of 52
security utility in EpiInfoWebSecurity folder and an Admin utility in SurveyManagerAdminClient folder.
2.3 ENVIRONMENT
Below is a list of hardware and software requirements, and operational activities needed for the deployment of the Epi Info Web Survey system:
Hardware:
o Web server: Windows server 2008 or Windows Server 2008 R2
o Database server: Windows Server 2008 or Windows Server 2008 R2
Software:
o Web server:
� Internet Information Services (IIS) 7.0 / 7.5
� .NET 4.5
� ASP.NET MVC 4
o Database server
� SQL Server 2008/2012
o SMTP Server
� The application would need to know the name of an SMTP server within the network that it can use.
o Survey Manager Admin Client
� Survey Manager Admin client is included in the installation package. While the Survey Manager Admin client can be installed on a different machine than the web server, the installation of the Epi Info Web Survey system is a lot easier with Survey Manager Admin Client installed on the server as well.
Operational activities:
o A system engineer, IT engineer with administrative access on the web server configures the application.
o A database administrator with administrative access on the database server configures the database.
Note: ASP.NET MVC 4 is the recommended version of ASP.NET MVC framework but is not a prerequisite for installation. All the assemblies that are needed by the application or that are specific to ASP.NET MVC 4 are packaged with the application.
Epi Info™ Web Survey System Integrated Package Deployment
Revision Date: 9/6/2016 Page 6 of 52
2.4 SYSTEM OPERATIONS
The system will be used for:
• publishing surveys;
• conducting online surveys; and
• downloading the survey responses.
Depending on the nature of the survey and how it is conducted, the system could have a surge in web server traffic.
2.5 SYSTEM ARCHITECTURE
The Epi Info Web Survey system has the following components:
- Epi Info Web Survey Manager Service: This web service:
o securely publishes a survey to the web from the Epi Info 7 Form Designer;
o stores the meta-data for creation of the survey to the database; and
o securely downloads the survey responses to the Epi Info 7 Enter module.
- Epi Info Web Survey Web Application: The web application dynamically
renders the web survey for the survey participant to access and complete.
Surveys may be completed in one session or saved and completed another time.
- Epi Info Web Survey Data Service: This data service provides the web
application with the meta-data to render the survey to the web. It also manages
the data collected from survey participants.
- Epi Info Web Survey Database: The system uses a relational database to
manage:
o organizations that conduct surveys;
o surveys published by the organizations; and
o responses provided by the survey participants.
The diagram below summarizes these components and their interactions.

Epi Info™ Web Survey System Integrated Package Deployment
Revision Date: 9/6/2016 Page 7 of 52
Figure 1: Overview of Epi Info Web Survey System
3 APPLICATION INSTALLATION
3.1 FIRST-TIME USERS
In order to use the Epi Info Web Survey system, an Administration Key must be created and encrypted as described later in this document. The Administration key is needed by the Epi Info Survey Manager Admin Client to:
• configure the application;
• create and manage organization accounts; and
• update survey information.
To perform any above mentioned operation, Survey Manage Admin client has to be installed either on System Administrator’s machine or on the web server. More information on Survey Manager Admin Client can be found in EIWS Admin Client Help document.
3.2 ACCESS CONTROLS
3.2.1 Database
The person creating and configuring the database should have full administrative access on the database server and rights and privileges to create a database, create database users, and grant access to the database.
Epi Info™ Web Survey System Integrated Package Deployment
Revision Date: 9/6/2016 Page 8 of 52
3.2.2 Application and Services
The person installing and configuring the application and services should have administrative access on the web server and should have full access and privileges to create a web application in Internet Information Services (IIS).
3.3 INSTALLATION
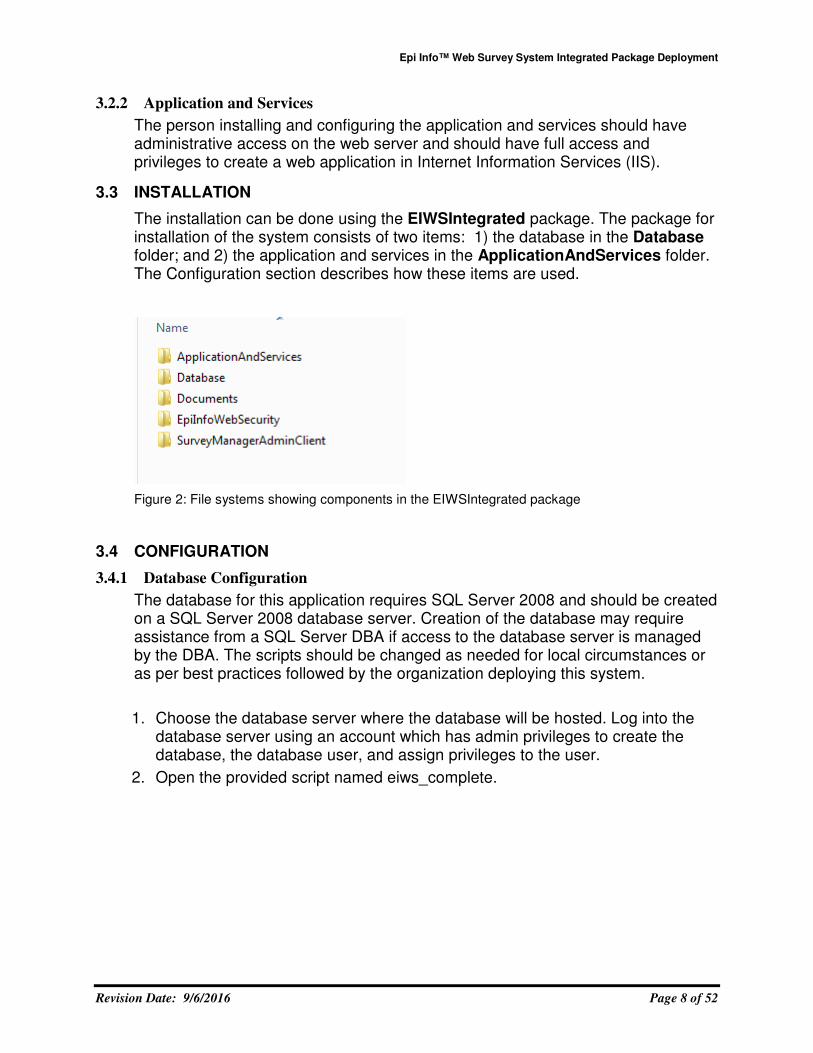
The installation can be done using the EIWSIntegrated package. The package for installation of the system consists of two items: 1) the database in the Database folder; and 2) the application and services in the ApplicationAndServices folder. The Configuration section describes how these items are used.
Figure 2: File systems showing components in the EIWSIntegrated package
3.4 CONFIGURATION
3.4.1 Database Configuration
The database for this application requires SQL Server 2008 and should be created on a SQL Server 2008 database server. Creation of the database may require assistance from a SQL Server DBA if access to the database server is managed by the DBA. The scripts should be changed as needed for local circumstances or as per best practices followed by the organization deploying this system.
1. Choose the database server where the database will be hosted. Log into the database server using an account which has admin privileges to create the database, the database user, and assign privileges to the user.
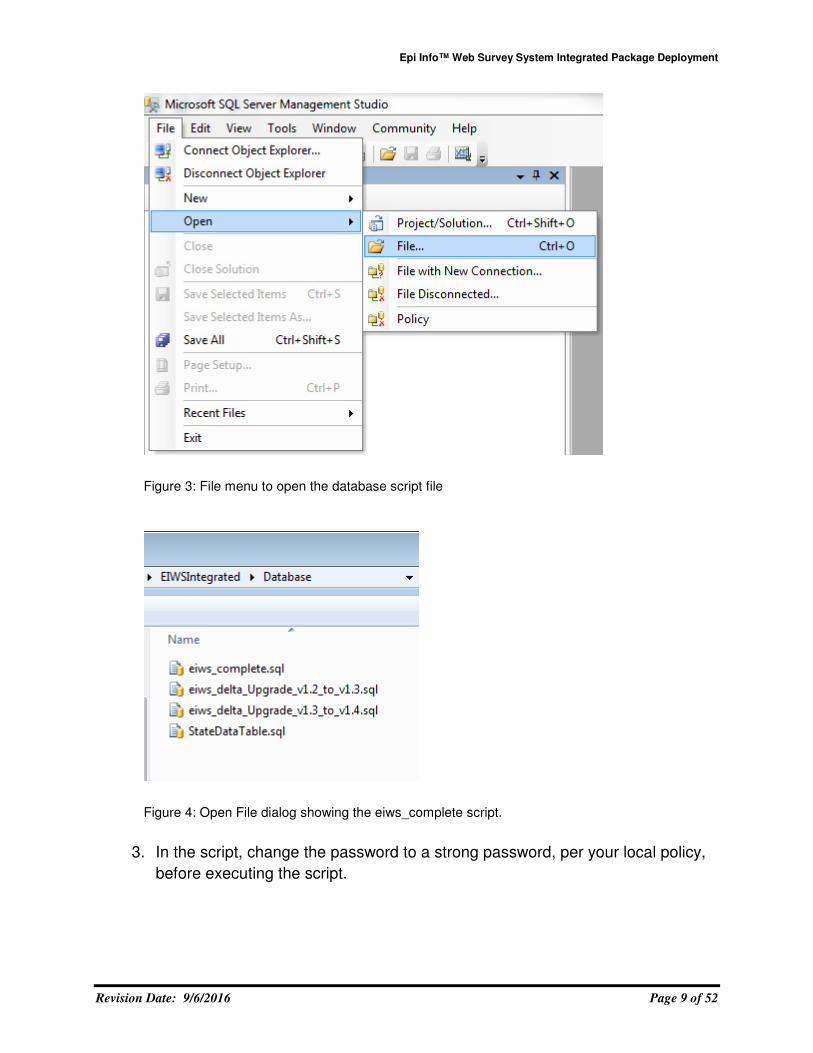
2. Open the provided script named eiws_complete.
Epi Info™ Web Survey System Integrated Package Deployment
Revision Date: 9/6/2016 Page 9 of 52
Figure 3: File menu to open the database script file
Figure 4: Open File dialog showing the eiws_complete script.
3. In the script, change the password to a strong password, per your local policy,
before executing the script.

Epi Info™ Web Survey System Integrated Package Deployment
Revision Date: 9/6/2016 Page 10 of 52
Figure 5: Change the password in the database script
4. Execute the script to create the database, metadata, application user account
and appropriate privileges.
Note: If you receive an error at this point, check to see if your hard-coded
paths (tied directly to your machine) have the appropriate path and version of
SQL. For example: C:\Program Files\Microsoft SQL
Server\MSSQL11.MSSQLSERVER\MSSQL
Epi Info™ Web Survey System Integrated Package Deployment
Revision Date: 9/6/2016 Page 11 of 52
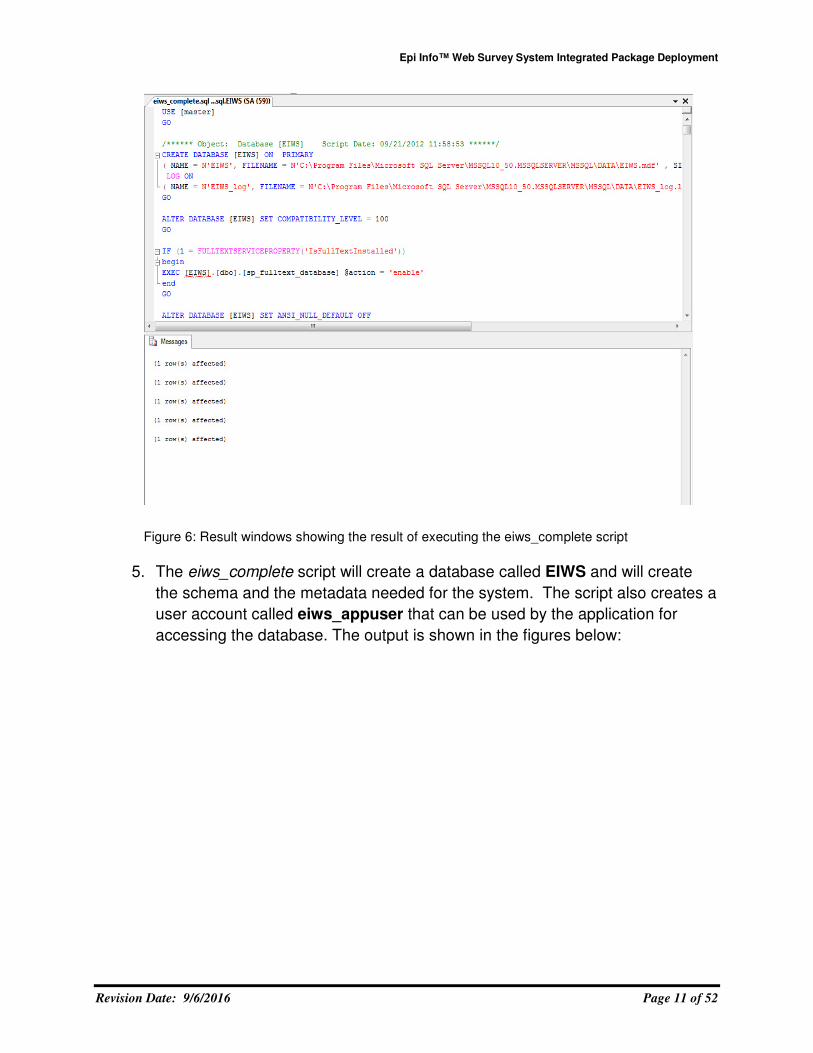
Figure 6: Result windows showing the result of executing the eiws_complete script
5. The eiws_complete script will create a database called EIWS and will create
the schema and the metadata needed for the system. The script also creates a
user account called eiws_appuser that can be used by the application for
accessing the database. The output is shown in the figures below:
Epi Info™ Web Survey System Integrated Package Deployment
Revision Date: 9/6/2016 Page 12 of 52
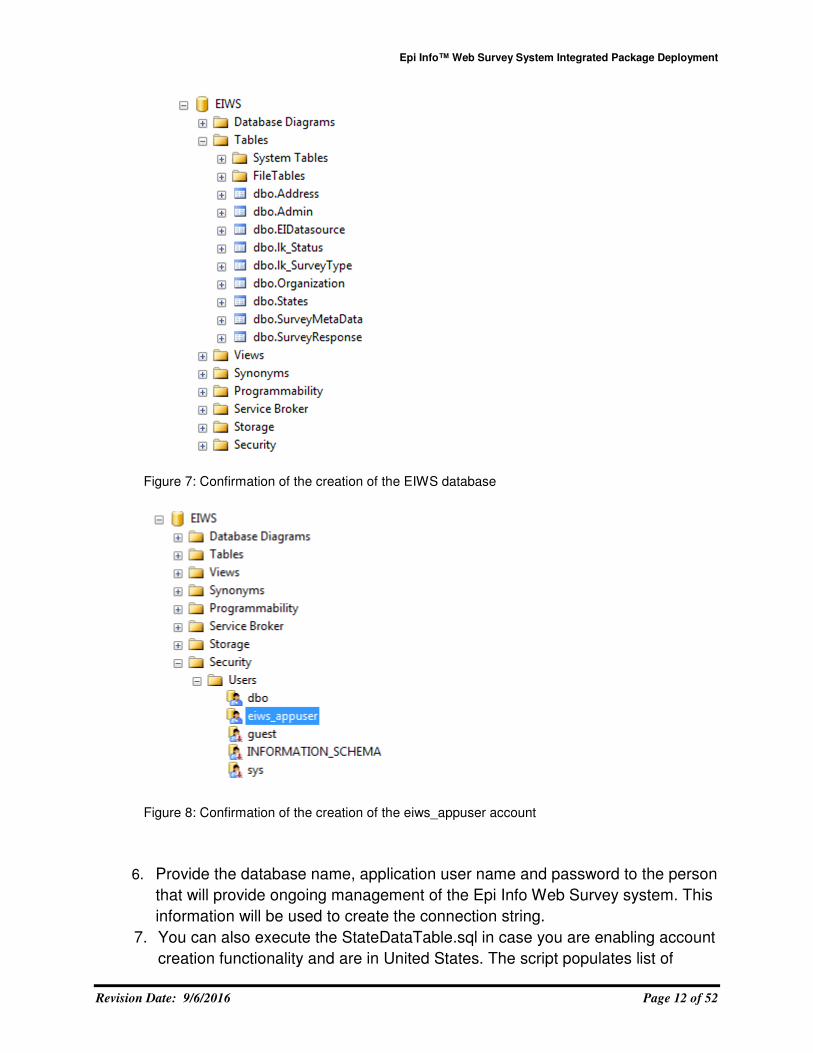
Figure 7: Confirmation of the creation of the EIWS database
Figure 8: Confirmation of the creation of the eiws_appuser account
6. Provide the database name, application user name and password to the person
that will provide ongoing management of the Epi Info Web Survey system. This
information will be used to create the connection string.
7. You can also execute the StateDataTable.sql in case you are enabling account
creation functionality and are in United States. The script populates list of
Epi Info™ Web Survey System Integrated Package Deployment
Revision Date: 9/6/2016 Page 13 of 52
states in United States in the States table to be used by Epi Info Web Survey
system as part of User centric account creation option.
3.4.2 Application and Services Configuration
The application and services configuration results the Epi Info Web Survey Web application, the Epi Info Web Survey Manager Service, and the Epi Info Web Survey Data Service being configured as a single integrated application on the Internet Information Services (IIS).
The steps below assume that the EpiInfoWebSurvey web site is being configured as an application under the default web site. This may not always be the case depending on your local policies. If needed, the site can be configured as its own web site.
1. Create a folder called “EpiInfoWebSurvey” under “inetpub\wwwroot”. Copy the
contents of the folder “EIWSIntegrated\ApplicationAndServices” (and not the
folder itself) to the “inetpub\wwwroot\EpiInfoWebSurvey” folder.
2. Create an application named “EpiInfoWebSurvey” in IIS.
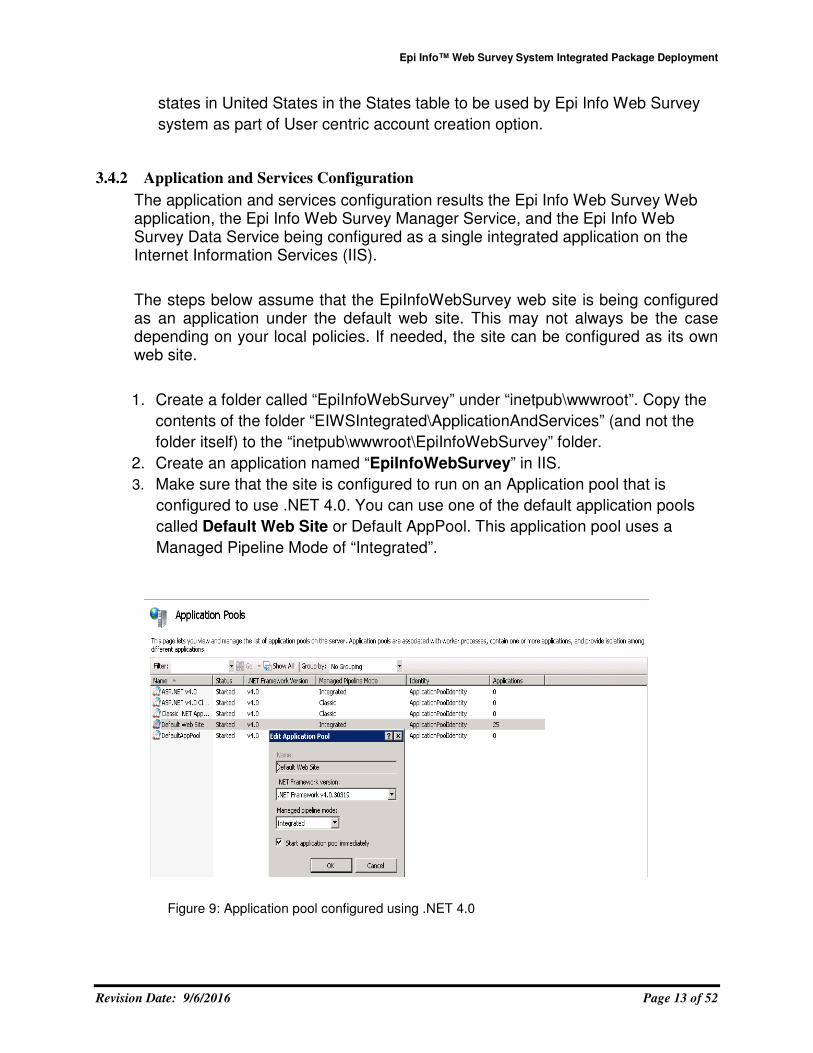
3. Make sure that the site is configured to run on an Application pool that is
configured to use .NET 4.0. You can use one of the default application pools
called Default Web Site or Default AppPool. This application pool uses a
Managed Pipeline Mode of “Integrated”.
Figure 9: Application pool configured using .NET 4.0
Epi Info™ Web Survey System Integrated Package Deployment
Revision Date: 9/6/2016 Page 14 of 52
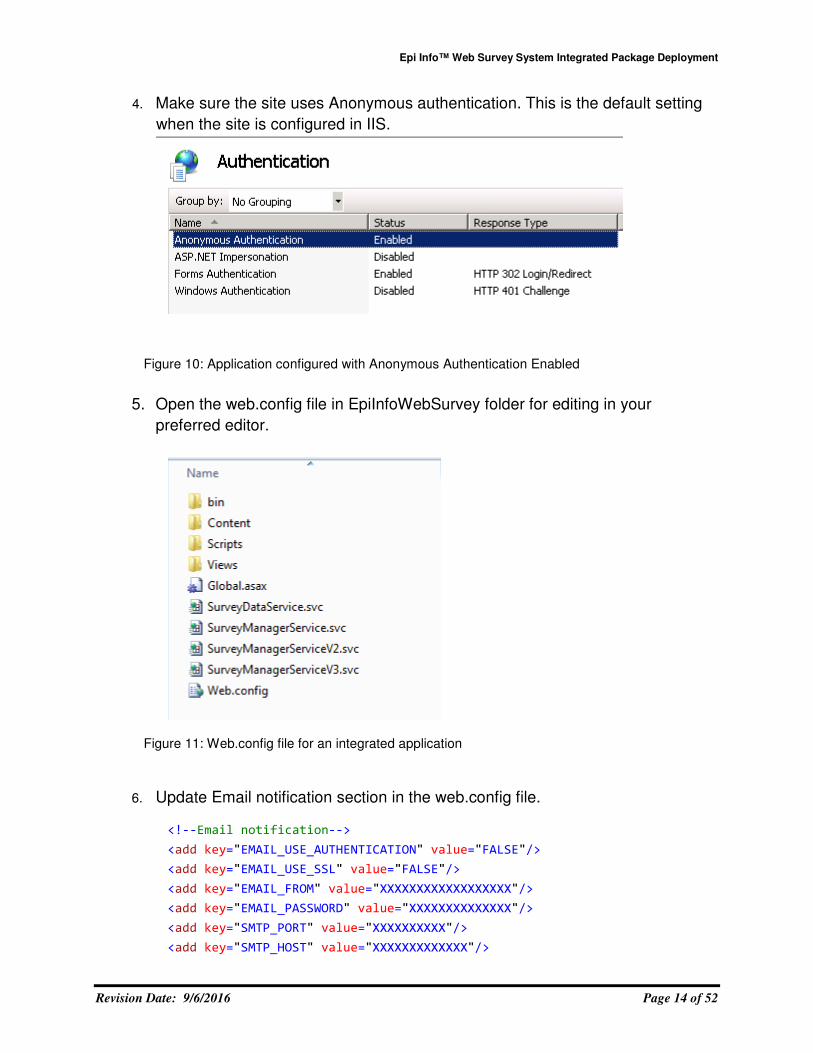
4. Make sure the site uses Anonymous authentication. This is the default setting
when the site is configured in IIS.
Figure 10: Application configured with Anonymous Authentication Enabled
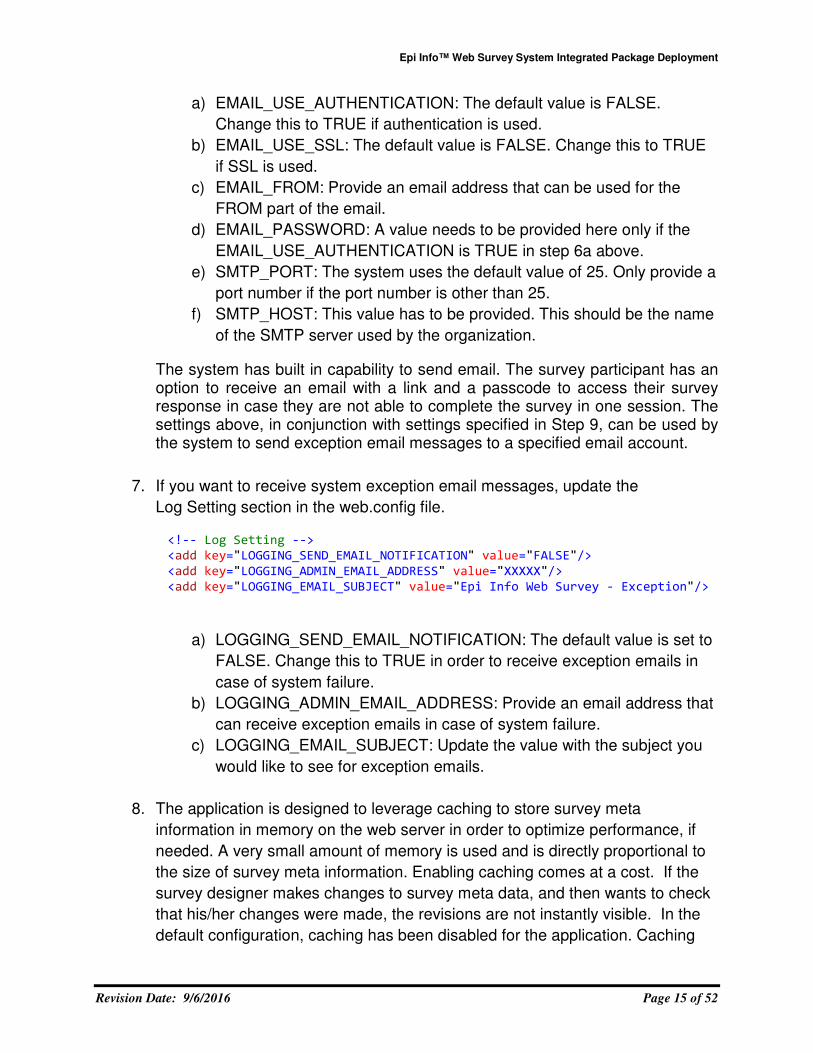
5. Open the web.config file in EpiInfoWebSurvey folder for editing in your
preferred editor.
Figure 11: Web.config file for an integrated application
6. Update Email notification section in the web.config file.
<!--Email notification-->
<add key="EMAIL_USE_AUTHENTICATION" value="FALSE"/>
<add key="EMAIL_USE_SSL" value="FALSE"/>
<add key="EMAIL_FROM" value="XXXXXXXXXXXXXXXXXX"/>
<add key="EMAIL_PASSWORD" value="XXXXXXXXXXXXXX"/>
<add key="SMTP_PORT" value="XXXXXXXXXX"/>
<add key="SMTP_HOST" value="XXXXXXXXXXXXX"/>
Epi Info™ Web Survey System Integrated Package Deployment
Revision Date: 9/6/2016 Page 15 of 52
a) EMAIL_USE_AUTHENTICATION: The default value is FALSE.
Change this to TRUE if authentication is used.
b) EMAIL_USE_SSL: The default value is FALSE. Change this to TRUE
if SSL is used.
c) EMAIL_FROM: Provide an email address that can be used for the
FROM part of the email.
d) EMAIL_PASSWORD: A value needs to be provided here only if the
EMAIL_USE_AUTHENTICATION is TRUE in step 6a above.
e) SMTP_PORT: The system uses the default value of 25. Only provide a
port number if the port number is other than 25.
f) SMTP_HOST: This value has to be provided. This should be the name
of the SMTP server used by the organization.
The system has built in capability to send email. The survey participant has an option to receive an email with a link and a passcode to access their survey response in case they are not able to complete the survey in one session. The settings above, in conjunction with settings specified in Step 9, can be used by the system to send exception email messages to a specified email account.
7. If you want to receive system exception email messages, update the
Log Setting section in the web.config file.
<!-- Log Setting -->
<add key="LOGGING_SEND_EMAIL_NOTIFICATION" value="FALSE"/>
<add key="LOGGING_ADMIN_EMAIL_ADDRESS" value="XXXXX"/>
<add key="LOGGING_EMAIL_SUBJECT" value="Epi Info Web Survey - Exception"/>
a) LOGGING_SEND_EMAIL_NOTIFICATION: The default value is set to
FALSE. Change this to TRUE in order to receive exception emails in
case of system failure.
b) LOGGING_ADMIN_EMAIL_ADDRESS: Provide an email address that
can receive exception emails in case of system failure.
c) LOGGING_EMAIL_SUBJECT: Update the value with the subject you
would like to see for exception emails.
8. The application is designed to leverage caching to store survey meta
information in memory on the web server in order to optimize performance, if
needed. A very small amount of memory is used and is directly proportional to
the size of survey meta information. Enabling caching comes at a cost. If the
survey designer makes changes to survey meta data, and then wants to check
that his/her changes were made, the revisions are not instantly visible. In the
default configuration, caching has been disabled for the application. Caching
Epi Info™ Web Survey System Integrated Package Deployment
Revision Date: 9/6/2016 Page 16 of 52
setting can be customized as per local policies or per your needs. Below are
the settings for caching:
<!--Caching-->
<add key="CACHE_IS_ON" value="FALSE"/>
<add key="CACHE_DURATION" value="20"/>
<add key="CACHE_SLIDING_EXPIRATION" value="TRUE"/>
a) CACHE_IS_ON: Default value of “FALSE” indicates the application is
not caching any information on the server. Changing the value to
“TRUE” will turn on caching for the application allowing the application
to store survey meta data on the server for a given survey.
b) CACHE_DURATION: Duration for the cache is set to 20 minutes. The
value can be changed to increase or decrease the duration the cache
is maintained.
c) CACHE_SLIDING_EXPIRATION: The default value of “TRUE”
indicates that the cache is set to expire at the defined duration on a
sliding scale. If the site is accessed by any user during the defined
duration, the sliding scale is again reset. To change the cache to
expire at an absolute duration defined by the CACHE_DURATION
value, the value for CACHE_SLIDING_EXPIRATION can be changed
to “FALSE”.
With CACHE_IS_ON set to “FALSE” the value for CACHE_DURATION and CACHE_SLIDING_EXPIRATION are not applicable. The application will work without caching and still perform well.
9. Update the Integrated Epi Info Web Survey Manager Service settings.
<!--Integrated SurveyManagerService Settings-->
<add key="URL" value="http://SERVER_NAME/<APPLICATION_NAME/Home/"/>
<add key="AdminKey" value="A/kTiX1HhAef9pdWIbGCKslNOcEvoxqUrSWahJoB7uGN3+/Y
ROi4alwj9UWZLmXy"/>
a) URL: Update the SERVER_NAME and APPLICATION_NAME marked
in yellow in the value for the URL
i. SERVER_NAME is the Domain Name Server (DNS) name of
the web server where the application is hosted.
ii. APPLICATION_NAME is the application name created in IIS.
b) AdminKey: Provide the encrypted value of the GUID that will be used
as the AdminKey.
i. Create a GUID using one of the online sites that creates GUID
strings such as Microsoft’s GuidGen Tool
(http://www.guidgen.com).
ii. Encrypt the GUID using Epi Info Web Survey Manager Admin
Client
Epi Info™ Web Survey System Integrated Package Deployment
Revision Date: 9/6/2016 Page 17 of 52
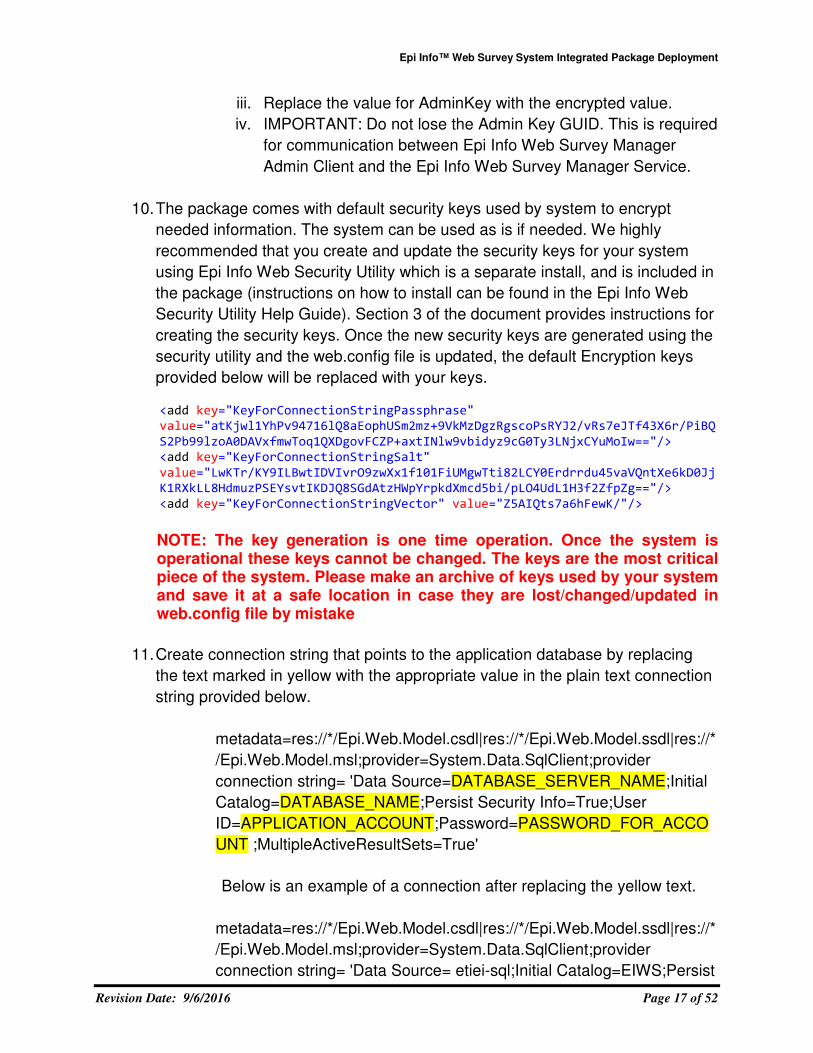
iii. Replace the value for AdminKey with the encrypted value.
iv. IMPORTANT: Do not lose the Admin Key GUID. This is required
for communication between Epi Info Web Survey Manager
Admin Client and the Epi Info Web Survey Manager Service.
10. The package comes with default security keys used by system to encrypt
needed information. The system can be used as is if needed. We highly
recommended that you create and update the security keys for your system
using Epi Info Web Security Utility which is a separate install, and is included in
the package (instructions on how to install can be found in the Epi Info Web
Security Utility Help Guide). Section 3 of the document provides instructions for
creating the security keys. Once the new security keys are generated using the
security utility and the web.config file is updated, the default Encryption keys
provided below will be replaced with your keys.
<add key="KeyForConnectionStringPassphrase"
value="atKjwl1YhPv94716lQ8aEophUSm2mz+9VkMzDgzRgscoPsRYJ2/vRs7eJTf43X6r/PiBQ
S2Pb99lzoA0DAVxfmwToq1QXDgovFCZP+axtINlw9vbidyz9cG0Ty3LNjxCYuMoIw=="/>
<add key="KeyForConnectionStringSalt"
value="LwKTr/KY9ILBwtIDVIvrO9zwXx1f101FiUMgwTti82LCY0Erdrrdu45vaVQntXe6kD0Jj
K1RXkLL8HdmuzPSEYsvtIKDJQ8SGdAtzHWpYrpkdXmcd5bi/pLO4UdL1H3f2ZfpZg=="/>
<add key="KeyForConnectionStringVector" value="Z5AIQts7a6hFewK/"/>
NOTE: The key generation is one time operation. Once the system is operational these keys cannot be changed. The keys are the most critical piece of the system. Please make an archive of keys used by your system and save it at a safe location in case they are lost/changed/updated in web.config file by mistake
11. Create connection string that points to the application database by replacing
the text marked in yellow with the appropriate value in the plain text connection
string provided below.
metadata=res://*/Epi.Web.Model.csdl|res://*/Epi.Web.Model.ssdl|res://*
/Epi.Web.Model.msl;provider=System.Data.SqlClient;provider
connection string= 'Data Source=DATABASE_SERVER_NAME;Initial
Catalog=DATABASE_NAME;Persist Security Info=True;User
ID=APPLICATION_ACCOUNT;Password=PASSWORD_FOR_ACCO
UNT ;MultipleActiveResultSets=True'
Below is an example of a connection after replacing the yellow text.
metadata=res://*/Epi.Web.Model.csdl|res://*/Epi.Web.Model.ssdl|res://*
/Epi.Web.Model.msl;provider=System.Data.SqlClient;provider
connection string= 'Data Source= etiei-sql;Initial Catalog=EIWS;Persist

Epi Info™ Web Survey System Integrated Package Deployment
Revision Date: 9/6/2016 Page 18 of 52
Security Info=True;User ID=eiws_appuser;Password=
h74$H4d@m23&Bw=GXH8%-MuH5h;MultipleActiveResultSets=True'
Note:
i. The entire block, starting from “metadata” and ending with
“=True” comprises the connection string. Use the complete
string provided above and not just the subpart that says
“connection string”.
ii. The connection string subpart is wrapped in single quotes. In
other words, the phrase connection string= is followed by an
opening single quote (apostrophe) and at the end of the
connection string subpart following =True there is the closing
single quote.
iii. Check the Data Source name with your DBA team in case the
application is deployed in a DMZ. In such cases, the Data
Source may also include a port number.
iv. When copying this connection string from the PDF document to
your chosen editor, additional spaces may get created at line
breaks resulting in the application unable to communicate with
the database. In particular, please note that there are no spaces
in the three metadata element strings which are separated by a
vertical bar or pipe symbol ( | ). For example:
res://*/Epi.Web.Model.msl
v. In the connection string, the phrases “Data Source”, “Initial
Catalog”, “Persist Security Info” and “User ID” all have a single
space between the words.
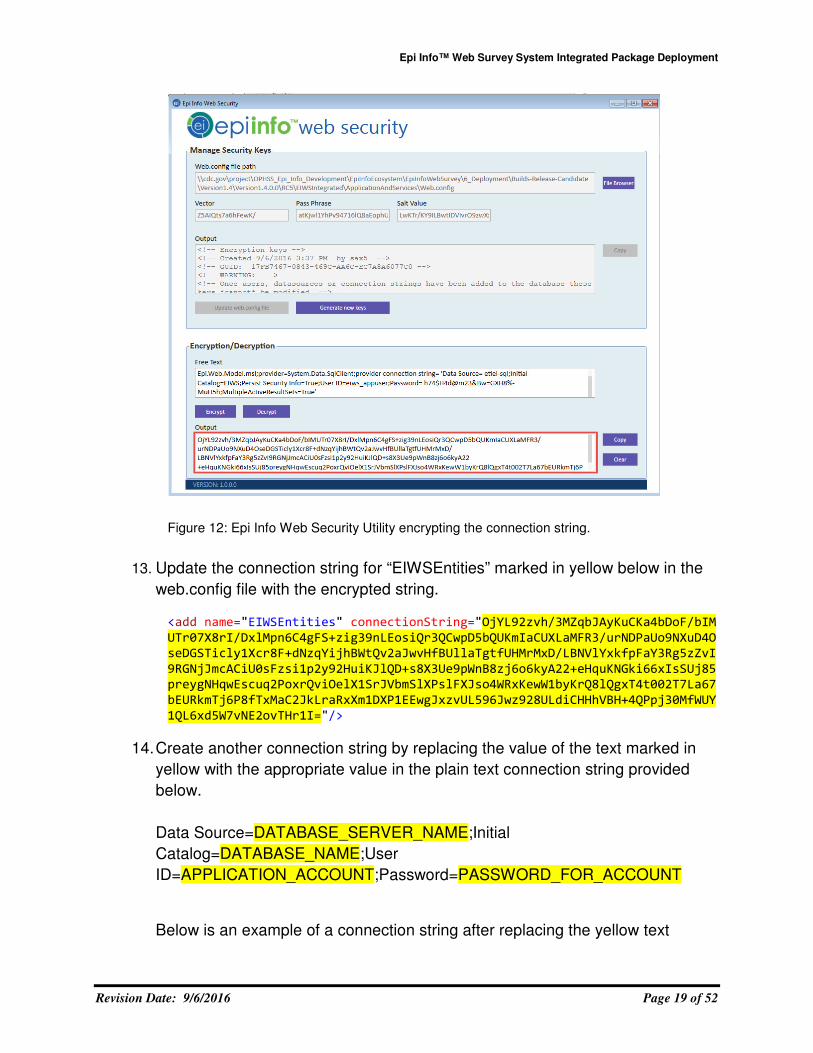
12. After creating the plain text connection string, encrypt the connection string
using the Epi Info Web Security Utility. Section 5 of “Epi Info Web Security
Utility Help guide” describes how the connection string can be encrypted. Make
a note of the encrypted connection string in a file in order to use it in the next
step.
Epi Info™ Web Survey System Integrated Package Deployment
Revision Date: 9/6/2016 Page 19 of 52
Figure 12: Epi Info Web Security Utility encrypting the connection string.
13. Update the connection string for “EIWSEntities” marked in yellow below in the
web.config file with the encrypted string.
<add name="EIWSEntities" connectionString="OjYL92zvh/3MZqbJAyKuCKa4bDoF/bIM
UTr07X8rI/DxlMpn6C4gFS+zig39nLEosiQr3QCwpD5bQUKmIaCUXLaMFR3/urNDPaUo9NXuD4O
seDGSTicly1Xcr8F+dNzqYijhBWtQv2aJwvHfBUllaTgtfUHMrMxD/LBNVlYxkfpFaY3Rg5zZvI
9RGNjJmcACiU0sFzsi1p2y92HuiKJlQD+s8X3Ue9pWnB8zj6o6kyA22+eHquKNGki66xIsSUj85
preygNHqwEscuq2PoxrQviOelX1SrJVbmSlXPslFXJso4WRxKewW1byKrQ8lQgxT4t002T7La67
bEURkmTj6P8fTxMaC2JkLraRxXm1DXP1EEwgJxzvUL596Jwz928ULdiCHHhVBH+4QPpj30MfWUY
1QL6xd5W7vNE2ovTHr1I="/>
14. Create another connection string by replacing the value of the text marked in
yellow with the appropriate value in the plain text connection string provided
below.
Data Source=DATABASE_SERVER_NAME;Initial
Catalog=DATABASE_NAME;User
ID=APPLICATION_ACCOUNT;Password=PASSWORD_FOR_ACCOUNT
Below is an example of a connection string after replacing the yellow text
Epi Info™ Web Survey System Integrated Package Deployment
Revision Date: 9/6/2016 Page 20 of 52
Data Source=etiei-sql;Initial Catalog=EIWS;User ID=eiws_appuser;Password=h74$H4d@m23&Bw=GXH8%-MuH5h
Encrypt the connection string above as done previously for the EIWSEntities
connection string and update the connection string for “EIWSADO” marked in
yellow below in the web.config file with the encrypted string.
<add name="EIWSADO" connectionString="TXTToS5W9+YIuXtIix/w+VEhNtJfnp+eY/le+
iEA3Ptjhy9NnnaOHVIqIcy8EiP8WSscBPUM9jtmoB/u6pAiCgn+DhSnlMYKszq84Lvzs2PQVBav
hLvXX1TVEWINtjuhN4FvsfyjPngk9uV7HxlhUA=="/>
15. A user participating in a survey has an option to Exit the survey at any time in
case they are not interested in the survey or for any reason by clicking on “Exit
Survey” button in the survey. The default behavior of the application is to
redirect the user to the home page of the survey where they have the option to
start the survey again. This may not be a desired behavior. To avoid this
behavior the system provides an option to redirect the user to a web page or
web site you may like them to visit even if they exit the survey. This can be your
organizations web site. If you like the user to visit a specific page after they exit
the survey then update the value in the configuration file for the following node
with the URL you want the user to visit. If no URL is provided the default
behavior of application will work as designed.
<add key="ExitURL" value=""/>
16. Provide the following information about the Epi Info Web Survey Manager
Service to the Administrator managing the system.
a) URL for the Survey Manager Service
http://SERVER_NAME/APPLICATION_NAME/SurveyManagerS
erviceV3.svc
Update the SERVER_NAME and APPLICATION_NAME, marked in yellow, in the value for the URL.
i. SERVER_NAME is the Domain Name Server (DNS)
name of the web server where the application is hosted.
ii. APPLICATION_NAME is the application name created in
IIS.
b) Windows Authentication value is No
c) Binding Protocol used is Basic
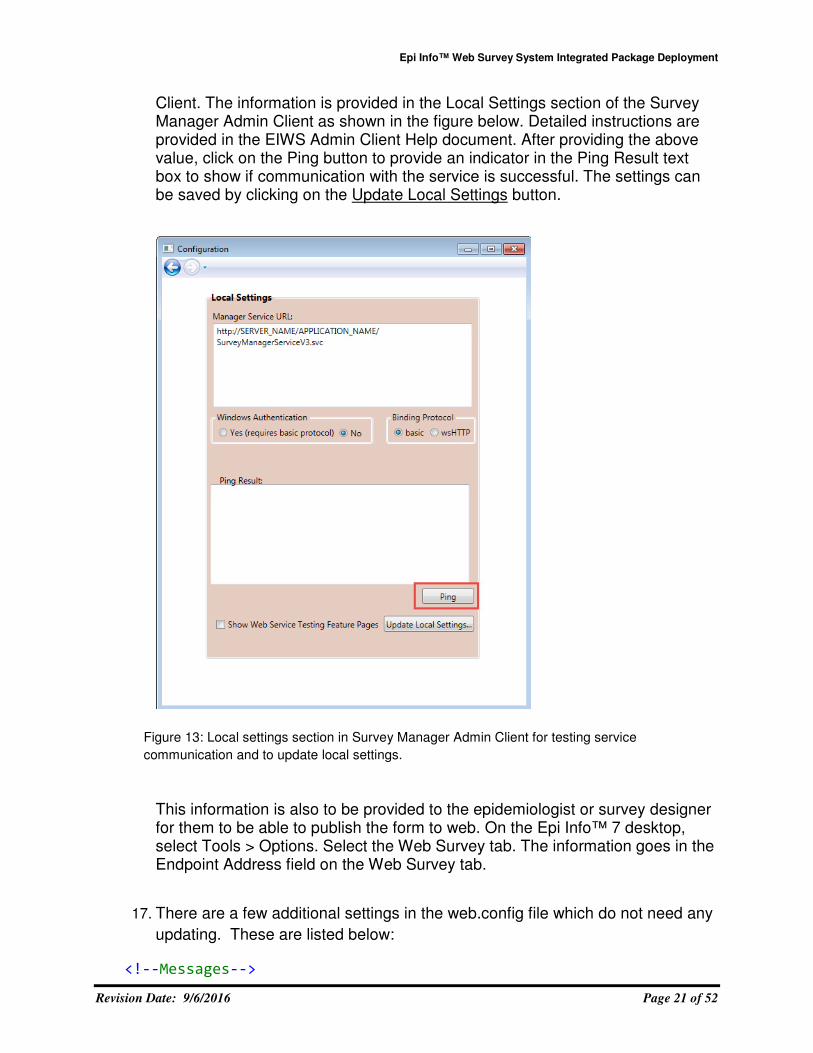
The information provided above is to be used by the Administrator to access the Epi Info Web Survey Manager Service from the Survey Manager Admin
Epi Info™ Web Survey System Integrated Package Deployment
Revision Date: 9/6/2016 Page 21 of 52
Client. The information is provided in the Local Settings section of the Survey Manager Admin Client as shown in the figure below. Detailed instructions are provided in the EIWS Admin Client Help document. After providing the above value, click on the Ping button to provide an indicator in the Ping Result text box to show if communication with the service is successful. The settings can be saved by clicking on the Update Local Settings button.
Figure 13: Local settings section in Survey Manager Admin Client for testing service
communication and to update local settings.
This information is also to be provided to the epidemiologist or survey designer for them to be able to publish the form to web. On the Epi Info™ 7 desktop, select Tools > Options. Select the Web Survey tab. The information goes in the Endpoint Address field on the Web Survey tab.
17. There are a few additional settings in the web.config file which do not need any
updating. These are listed below:
<!--Messages-->
Epi Info™ Web Survey System Integrated Package Deployment
Revision Date: 9/6/2016 Page 22 of 52
<add key="SURVEY_NOT_EXISTS" value="The Survey does not exist. Please check the s
urvey link and try again."/>
<add key="SURVEY_SUBMITED_MESSAGE" value="This survey has been submitted."/>
<add key="SURVEY_CLOSED_MESSAGE" value="This survey is currently closed. Please c
ontact the author of this survey for further assistance."/>
<add key="SURVEY_SUBMISSION_MESSAGE" value="Thank you! Your survey has been submi
tted."/>
<!--Messages-->
<!-- Package Type -->
<add key="INTEGRATED_SERVICE_MODE" value="TRUE"/>
<!-- Package Type -->
<!--Omniture settings-->
<add key="OMNITURE_IS_ENABLED" value="FALSE"/>
<!--Omniture settings-->
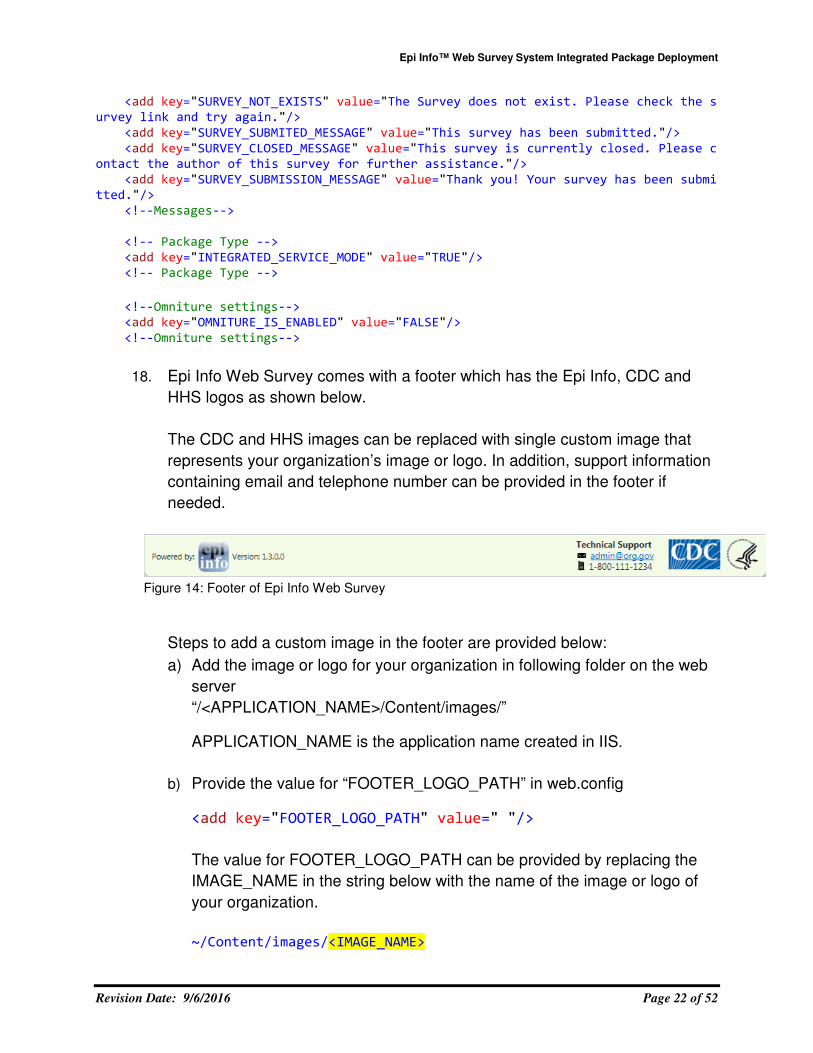
18. Epi Info Web Survey comes with a footer which has the Epi Info, CDC and
HHS logos as shown below.
The CDC and HHS images can be replaced with single custom image that
represents your organization’s image or logo. In addition, support information
containing email and telephone number can be provided in the footer if
needed.
Figure 14: Footer of Epi Info Web Survey
Steps to add a custom image in the footer are provided below:
a) Add the image or logo for your organization in following folder on the web
server
“/<APPLICATION_NAME>/Content/images/”
APPLICATION_NAME is the application name created in IIS.
b) Provide the value for “FOOTER_LOGO_PATH” in web.config
<add key="FOOTER_LOGO_PATH" value=" "/>
The value for FOOTER_LOGO_PATH can be provided by replacing the
IMAGE_NAME in the string below with the name of the image or logo of
your organization.
~/Content/images/<IMAGE_NAME>
Epi Info™ Web Survey System Integrated Package Deployment
Revision Date: 9/6/2016 Page 23 of 52
Note: The package come with value of “FOOTER_LOGO_PATH” as
empty which results in displaying default CDC logos or images. The
recommended size for image or logo of your organization is 42 x 42 in
case you want to replace the default image or logos.
Steps to include support information in the footer are provided below:
a) Set the value for “TECHNICAL_SUPPORT_IS_ENABLED” in web.config
to “TRUE”. The package is provided with technical support information
disabled.
<add key="TECHNICAL_SUPPORT_IS_ENABLED" value="FALSE"/>
Provide the information needed in step (b) and (c) if the value is set to “true”.
b) Update the value for “TECHNICAL_SUPPORT_EMAIL” with the
appropriate email address
<add key="TECHNICAL_SUPPORT_EMAIL" value=" "/>
c) Update the value for “TECHNICAL_SUPPORT_PHONE” with the
appropriate phone number.
<add key="TECHNICAL_SUPPORT_PHONE" value=" "/>
19. Epi Info Web Survey Home page or the first launch page of the survey can be
configured to show a larger image or logo of your organization in the body of
the page.
Steps to enable a larger custom image or logo are provided below:
a) Add the image or logo for your organization in following folder on the web
server
“/<APPLICATION_NAME>/Content/images/”
APPLICATION_NAME is the application name created in IIS.
b) Set the value for “SHOW_HOME_LOGO” to “TRUE”. The package is
provided with this value being empty.
<add key="SHOW_HOME_LOGO" value=""/>
c) Update the value for “HOME_LOGO_PATH” in web.config file
Epi Info™ Web Survey System Integrated Package Deployment
Revision Date: 9/6/2016 Page 24 of 52
<add key="HOME_LOGO_PATH" value=" "/>
The value for HOME_LOGO_PATH can be provided by replacing the
IMAGE_NAME in the string below with the name of the image or logo of your
organization.
~/Content/images/<IMAGE_NAME>
Note: The package comes with value of “HOME_LOGO_PATH” as empty
resulting in no image shown in the body of the home or launch page. The
recommended size for larger image or logo of your organization is a width of
300 pixels.
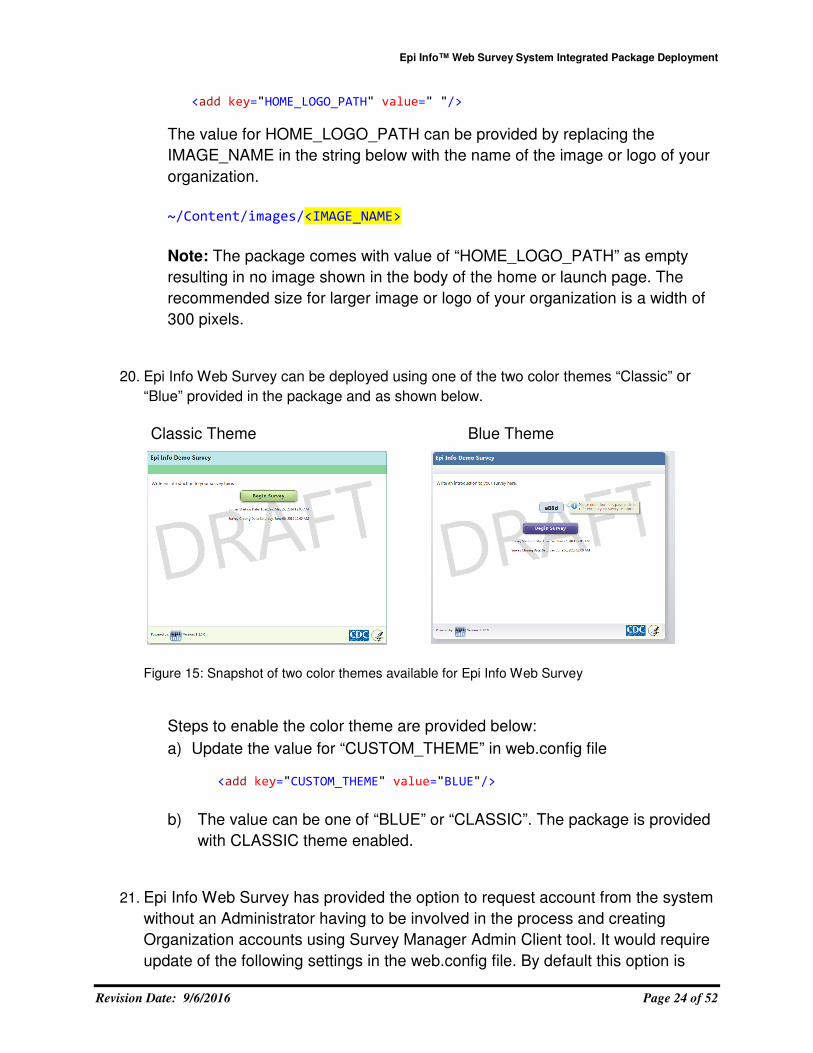
20. Epi Info Web Survey can be deployed using one of the two color themes “Classic” or
“Blue” provided in the package and as shown below.
Classic Theme Blue Theme
Figure 15: Snapshot of two color themes available for Epi Info Web Survey
Steps to enable the color theme are provided below:
a) Update the value for “CUSTOM_THEME” in web.config file
<add key="CUSTOM_THEME" value="BLUE"/>
b) The value can be one of “BLUE” or “CLASSIC”. The package is provided
with CLASSIC theme enabled.
21. Epi Info Web Survey has provided the option to request account from the system
without an Administrator having to be involved in the process and creating
Organization accounts using Survey Manager Admin Client tool. It would require
update of the following settings in the web.config file. By default this option is
Epi Info™ Web Survey System Integrated Package Deployment
Revision Date: 9/6/2016 Page 25 of 52
turned off in the provided package and should be configured only if you plan to
make use of this option.
<add key="ACCOUNT_TYPE" value=""/> <!--
Can have two values (USER OR ORGANIZATION) -->
<add key="ENDPOINT_ADDRESS" value="http://SERVER_NAME/APPLICATION_NAME/Surve
yManagerService.svc"/>
<add key="NOTIFY_ADMIN_IS_ENABLED" value="False"/>
<add key="SYSTEM_ADMIN_EMAIL" value="[email protected]"/> <!--
Email address included in the body of the email for account creation -->
<add key="NOTIFY_ADMIN_EMAIL" value="[email protected]" /> <!--
Email address to which notifications go out-->
If you plan to use this feature update the settings as per direction provided
below
a) ACCOUNT_TYPE: Possible values are “USER” or “ORGANIZATION”.
Depending on the option chosen the account creation form will change.
Below are the screenshots for the states of Account creation page
namely no account type, User centric account type and Organization
centric account.
b) ENDPOINT_ADDRESS: This should match the URL of Survey
Manage Service created in Step 16 above.
c) NOTIFY_ADMIN_IS_ENABLED: Set the value to true if an admin
should be notified every time an account is created in the system else
leave it False.
d) SYSTEM_ADMIN_EMAIL: This is the email address of the admin that
can be contacted in case there is a problem with the system. This
email address is included in the body of the email sent out at time of
account creation
e) NOTIFY_ADMIN_EMAIL: This is the email address of the Admin that
needs to be informed whenever an account is created in case
NOTIFY_ADMIN_IS_ENABLED is true.
The Account creation page can be accessed by following URL: http://SERVER_NAME/APPLICATION_NAME/Account.
Update the SERVER_NAME and APPLICATION_NAME marked in yellow in the value for the URL
i. SERVER_NAME is the Domain Name Server (DNS) name of
the web server where the application is hosted.
ii. APPLICATION_NAME is the application name created in IIS.
Shown below are screenshots for the three possible state of Account creation page depending on the configuration namely no account type specified, User centric account type and Organization centric account type.
Epi Info™ Web Survey System Integrated Package Deployment
Revision Date: 9/6/2016 Page 26 of 52
Figure 16: The state of Account creation page when account creation option is not enabled.
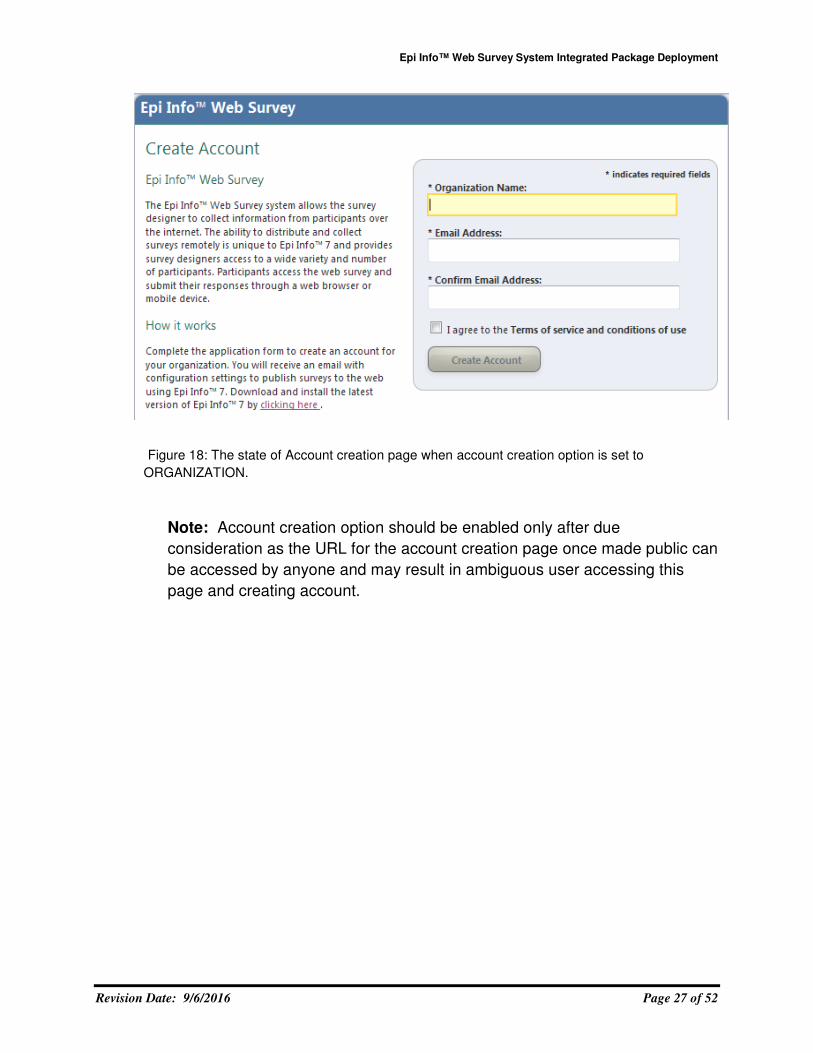
Figure 17: The state of Account creation page when account creation option is set to USER.
Epi Info™ Web Survey System Integrated Package Deployment
Revision Date: 9/6/2016 Page 27 of 52
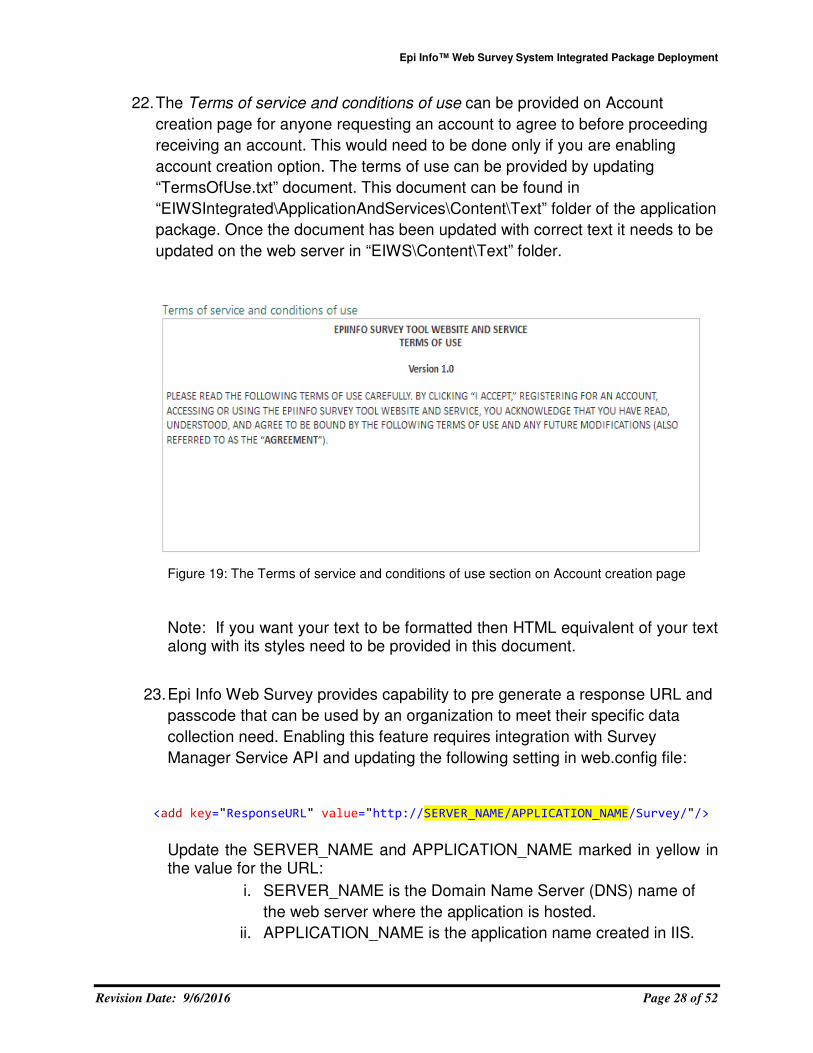
Figure 18: The state of Account creation page when account creation option is set to
ORGANIZATION.
Note: Account creation option should be enabled only after due
consideration as the URL for the account creation page once made public can
be accessed by anyone and may result in ambiguous user accessing this
page and creating account.
Epi Info™ Web Survey System Integrated Package Deployment
Revision Date: 9/6/2016 Page 28 of 52
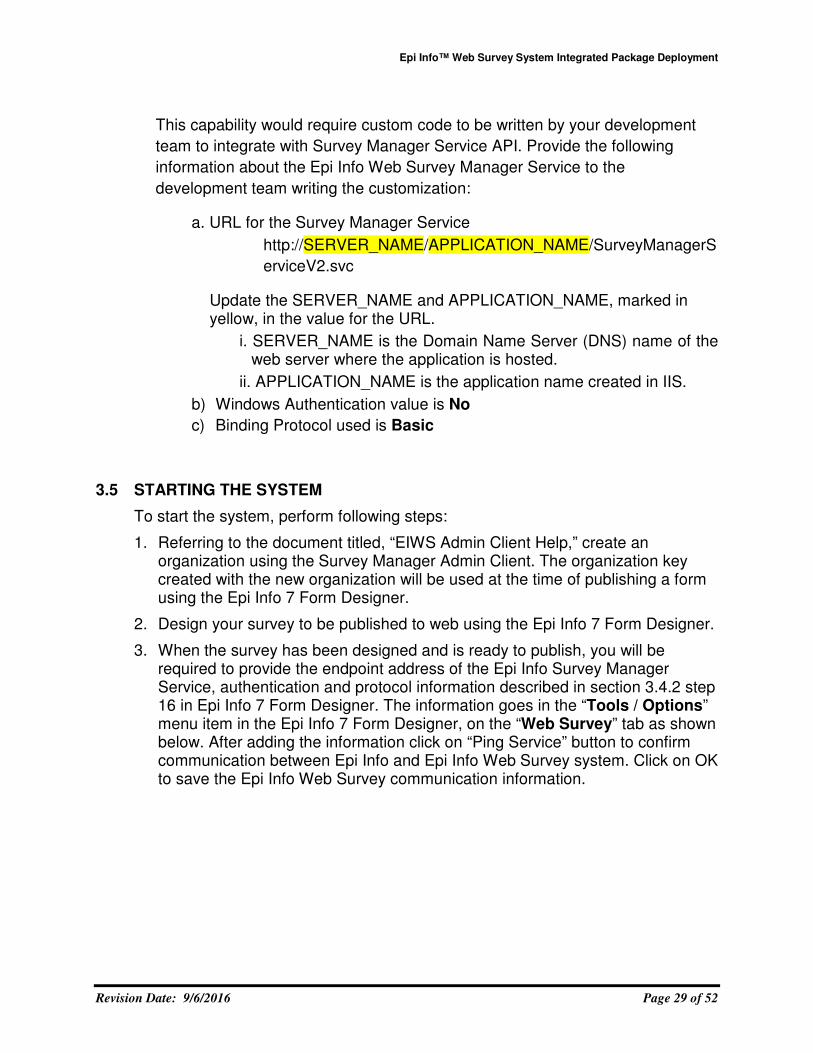
22. The Terms of service and conditions of use can be provided on Account
creation page for anyone requesting an account to agree to before proceeding
receiving an account. This would need to be done only if you are enabling
account creation option. The terms of use can be provided by updating
“TermsOfUse.txt” document. This document can be found in
“EIWSIntegrated\ApplicationAndServices\Content\Text” folder of the application
package. Once the document has been updated with correct text it needs to be
updated on the web server in “EIWS\Content\Text” folder.
Figure 19: The Terms of service and conditions of use section on Account creation page
Note: If you want your text to be formatted then HTML equivalent of your text along with its styles need to be provided in this document.
23. Epi Info Web Survey provides capability to pre generate a response URL and
passcode that can be used by an organization to meet their specific data
collection need. Enabling this feature requires integration with Survey
Manager Service API and updating the following setting in web.config file:
<add key="ResponseURL" value="http://SERVER_NAME/APPLICATION_NAME/Survey/"/>
Update the SERVER_NAME and APPLICATION_NAME marked in yellow in the value for the URL:
i. SERVER_NAME is the Domain Name Server (DNS) name of
the web server where the application is hosted.
ii. APPLICATION_NAME is the application name created in IIS.
Epi Info™ Web Survey System Integrated Package Deployment
Revision Date: 9/6/2016 Page 29 of 52
This capability would require custom code to be written by your development
team to integrate with Survey Manager Service API. Provide the following
information about the Epi Info Web Survey Manager Service to the
development team writing the customization:
a. URL for the Survey Manager Service
http://SERVER_NAME/APPLICATION_NAME/SurveyManagerS
erviceV2.svc
Update the SERVER_NAME and APPLICATION_NAME, marked in yellow, in the value for the URL.
i. SERVER_NAME is the Domain Name Server (DNS) name of the web server where the application is hosted.
ii. APPLICATION_NAME is the application name created in IIS.
b) Windows Authentication value is No
c) Binding Protocol used is Basic
3.5 STARTING THE SYSTEM
To start the system, perform following steps:
1. Referring to the document titled, “EIWS Admin Client Help,” create an organization using the Survey Manager Admin Client. The organization key created with the new organization will be used at the time of publishing a form using the Epi Info 7 Form Designer.
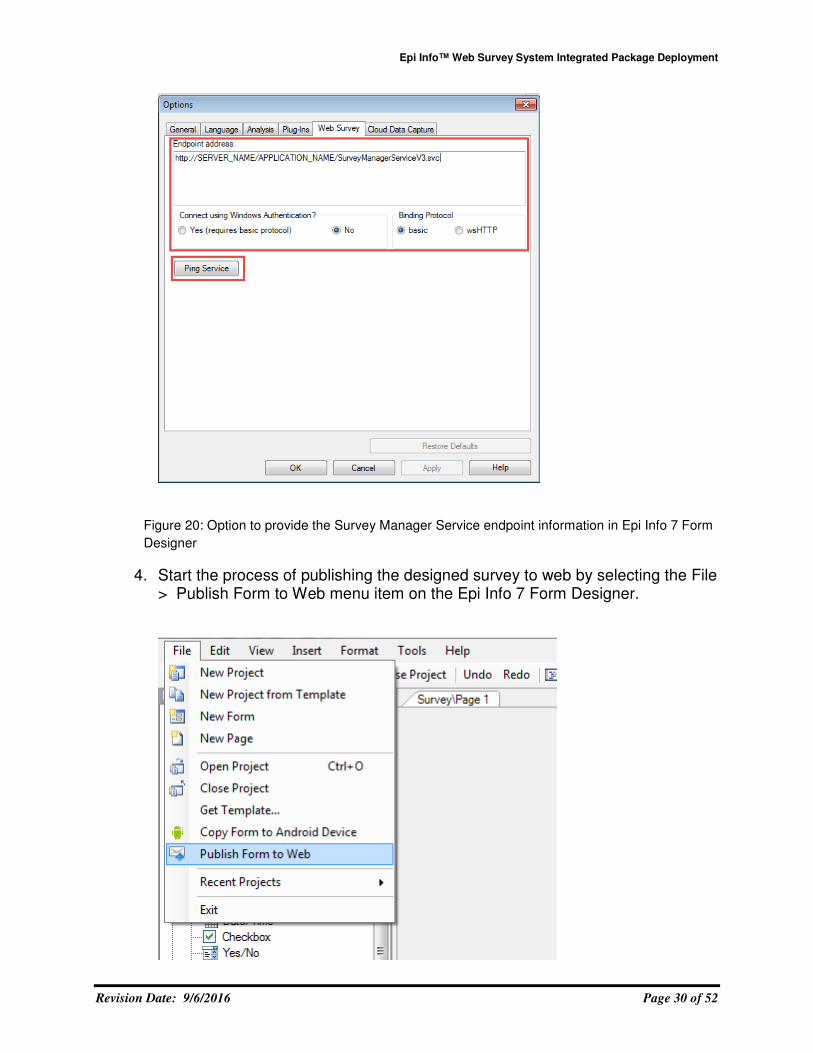
2. Design your survey to be published to web using the Epi Info 7 Form Designer.
3. When the survey has been designed and is ready to publish, you will be required to provide the endpoint address of the Epi Info Survey Manager Service, authentication and protocol information described in section 3.4.2 step 16 in Epi Info 7 Form Designer. The information goes in the “Tools / Options” menu item in the Epi Info 7 Form Designer, on the “Web Survey” tab as shown below. After adding the information click on “Ping Service” button to confirm communication between Epi Info and Epi Info Web Survey system. Click on OK to save the Epi Info Web Survey communication information.
Epi Info™ Web Survey System Integrated Package Deployment
Revision Date: 9/6/2016 Page 30 of 52
Figure 20: Option to provide the Survey Manager Service endpoint information in Epi Info 7 Form
Designer
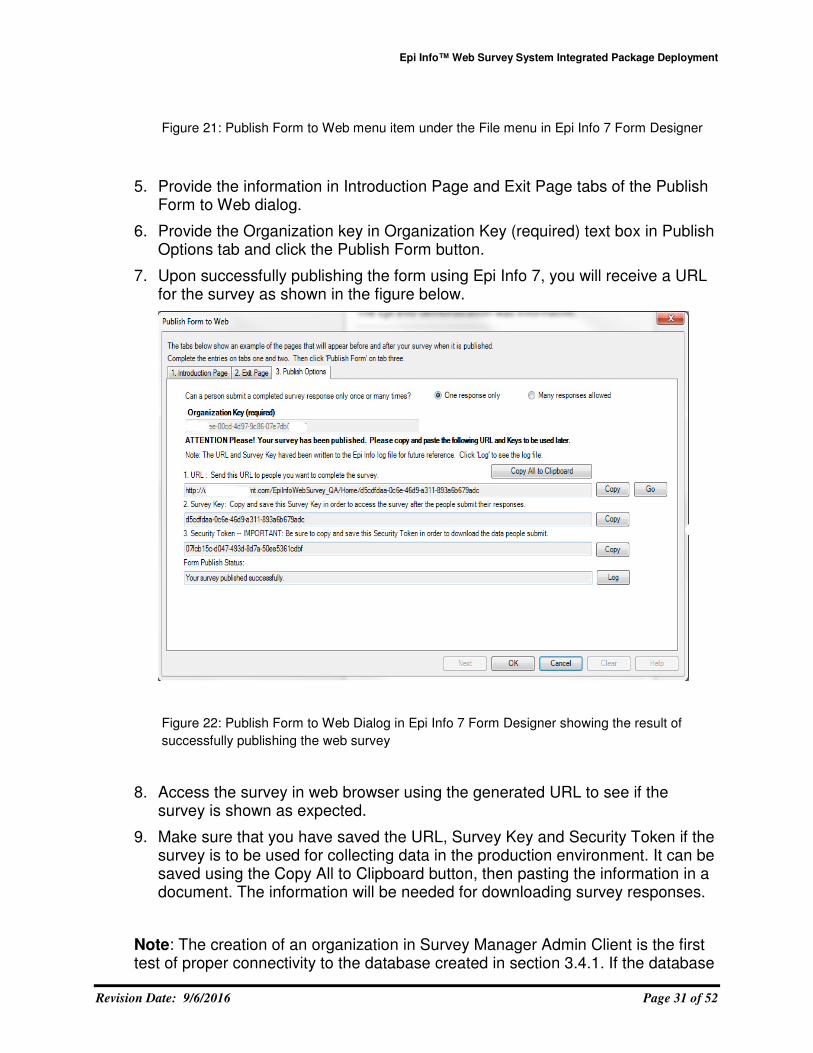
4. Start the process of publishing the designed survey to web by selecting the File > Publish Form to Web menu item on the Epi Info 7 Form Designer.
Epi Info™ Web Survey System Integrated Package Deployment
Revision Date: 9/6/2016 Page 31 of 52
Figure 21: Publish Form to Web menu item under the File menu in Epi Info 7 Form Designer
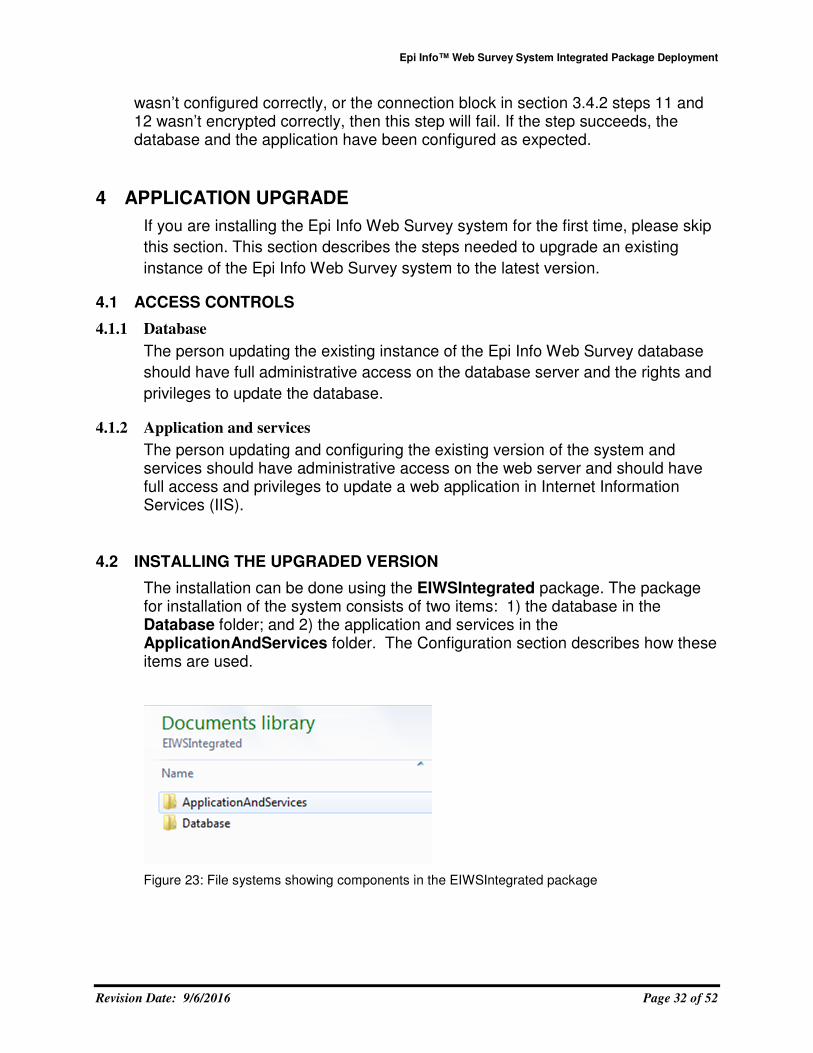
5. Provide the information in Introduction Page and Exit Page tabs of the Publish Form to Web dialog.
6. Provide the Organization key in Organization Key (required) text box in Publish Options tab and click the Publish Form button.
7. Upon successfully publishing the form using Epi Info 7, you will receive a URL for the survey as shown in the figure below.
Figure 22: Publish Form to Web Dialog in Epi Info 7 Form Designer showing the result of
successfully publishing the web survey
8. Access the survey in web browser using the generated URL to see if the survey is shown as expected.
9. Make sure that you have saved the URL, Survey Key and Security Token if the survey is to be used for collecting data in the production environment. It can be saved using the Copy All to Clipboard button, then pasting the information in a document. The information will be needed for downloading survey responses.
Note: The creation of an organization in Survey Manager Admin Client is the first test of proper connectivity to the database created in section 3.4.1. If the database
Epi Info™ Web Survey System Integrated Package Deployment
Revision Date: 9/6/2016 Page 32 of 52
wasn’t configured correctly, or the connection block in section 3.4.2 steps 11 and 12 wasn’t encrypted correctly, then this step will fail. If the step succeeds, the database and the application have been configured as expected.
4 APPLICATION UPGRADE
If you are installing the Epi Info Web Survey system for the first time, please skip
this section. This section describes the steps needed to upgrade an existing
instance of the Epi Info Web Survey system to the latest version.
4.1 ACCESS CONTROLS
4.1.1 Database
The person updating the existing instance of the Epi Info Web Survey database
should have full administrative access on the database server and the rights and
privileges to update the database.
4.1.2 Application and services
The person updating and configuring the existing version of the system and services should have administrative access on the web server and should have full access and privileges to update a web application in Internet Information Services (IIS).
4.2 INSTALLING THE UPGRADED VERSION
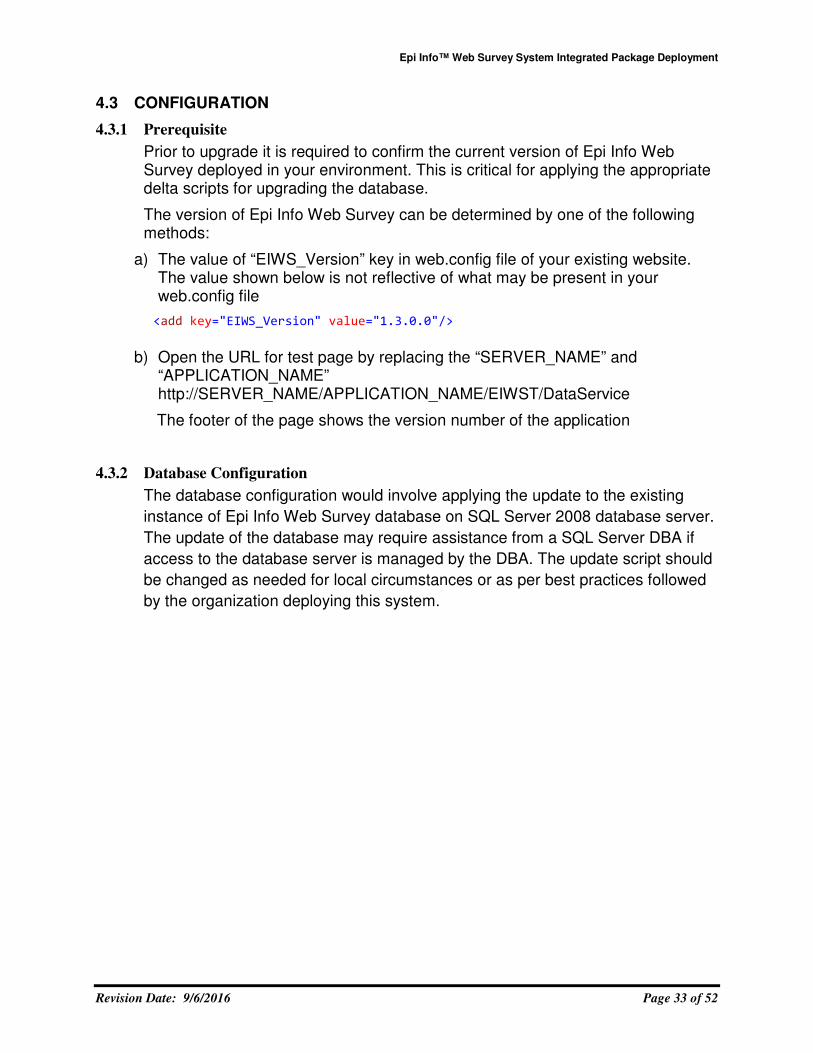
The installation can be done using the EIWSIntegrated package. The package for installation of the system consists of two items: 1) the database in the Database folder; and 2) the application and services in the ApplicationAndServices folder. The Configuration section describes how these items are used.
Figure 23: File systems showing components in the EIWSIntegrated package
Epi Info™ Web Survey System Integrated Package Deployment
Revision Date: 9/6/2016 Page 33 of 52
4.3 CONFIGURATION
4.3.1 Prerequisite
Prior to upgrade it is required to confirm the current version of Epi Info Web Survey deployed in your environment. This is critical for applying the appropriate delta scripts for upgrading the database.
The version of Epi Info Web Survey can be determined by one of the following methods:
a) The value of “EIWS_Version” key in web.config file of your existing website. The value shown below is not reflective of what may be present in your web.config file
<add key="EIWS_Version" value="1.3.0.0"/>
b) Open the URL for test page by replacing the “SERVER_NAME” and “APPLICATION_NAME” http://SERVER_NAME/APPLICATION_NAME/EIWST/DataService
The footer of the page shows the version number of the application
4.3.2 Database Configuration
The database configuration would involve applying the update to the existing
instance of Epi Info Web Survey database on SQL Server 2008 database server.
The update of the database may require assistance from a SQL Server DBA if
access to the database server is managed by the DBA. The update script should
be changed as needed for local circumstances or as per best practices followed
by the organization deploying this system.
Epi Info™ Web Survey System Integrated Package Deployment
Revision Date: 9/6/2016 Page 34 of 52
1. Choose the database server where the Epi Info Web Survey database is
hosted. Log into the database server using an account which has admin
privileges to update the database, manage database users and assign
privileges to the users.
2. Make a backup of the Epi Info Web Survey database before attempting to apply the needed updates.
3. Determine the scripts to run for upgrade
(a) If upgrading from version 1.2 to version 1.4, you will have to run “eiws_delta_Upgrade_v1.2_to_v1.3.sql” and “eiws_delta_Upgrade_v1.3_to_v1.4.sql” delta scripts
(b) If upgrading from version 1.3 to version 1.4, you will have to run only “eiws_delta_Upgrade_v1.3_to_v1.4.sql” delta script
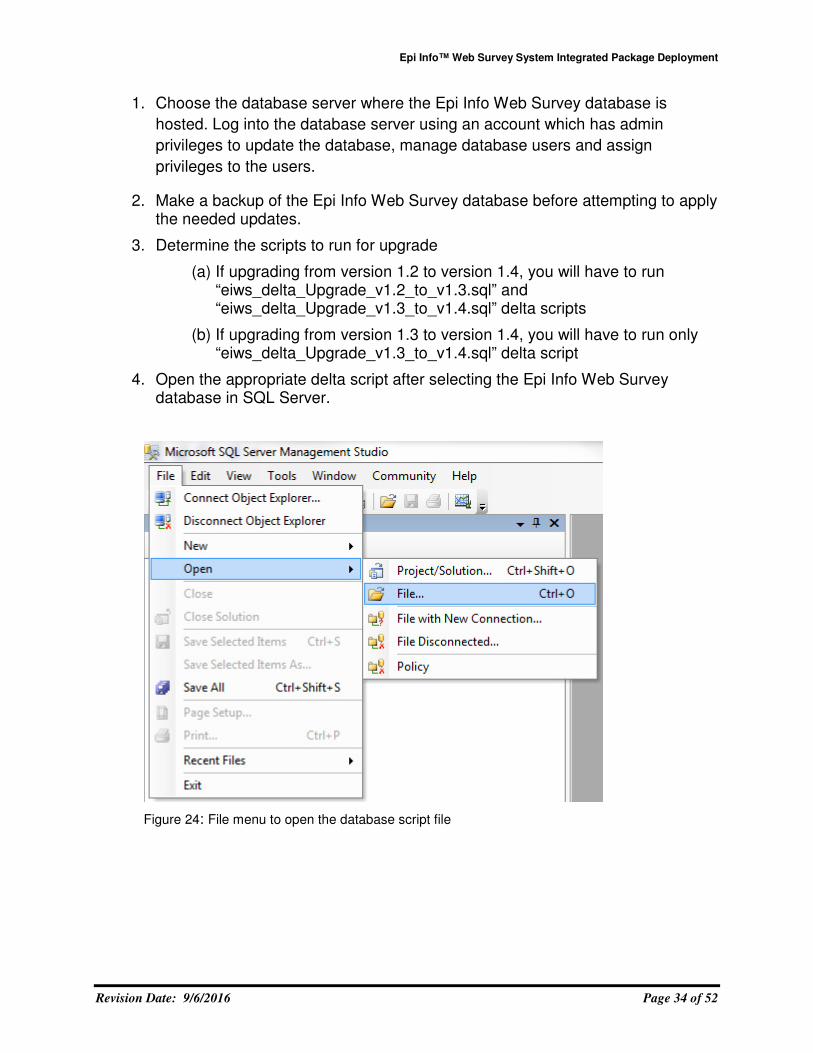
4. Open the appropriate delta script after selecting the Epi Info Web Survey database in SQL Server.
Figure 24: File menu to open the database script file
Epi Info™ Web Survey System Integrated Package Deployment
Revision Date: 9/6/2016 Page 35 of 52
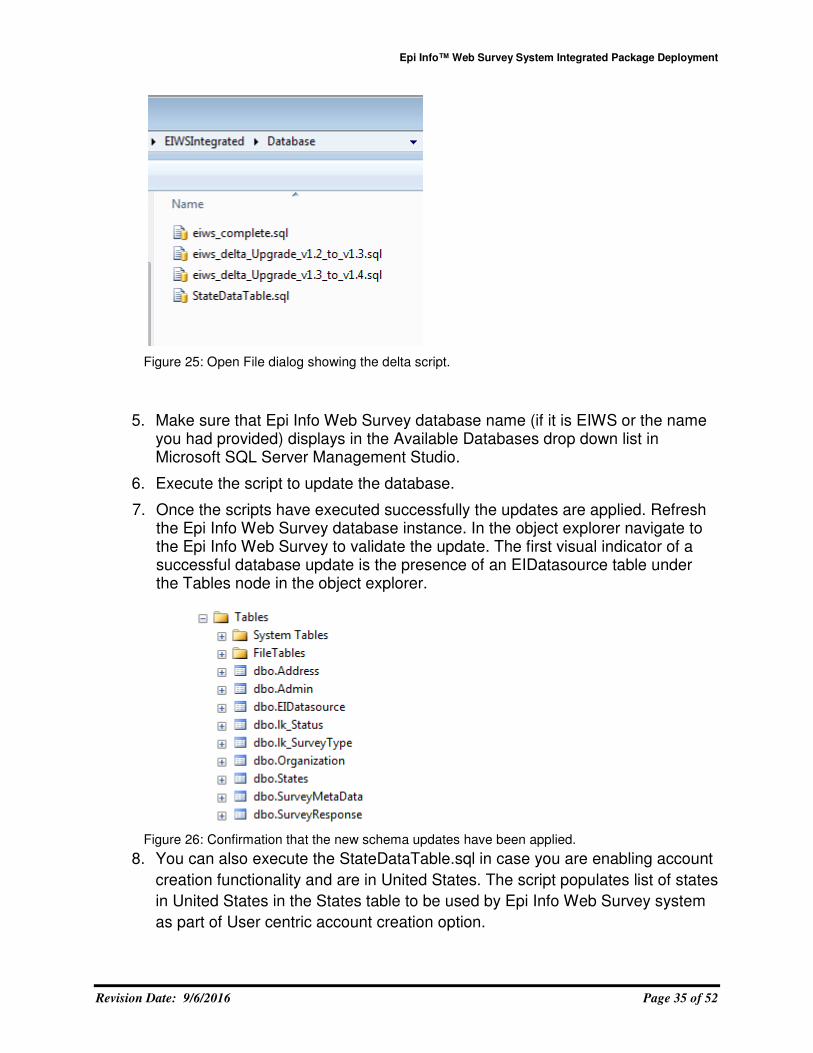
Figure 25: Open File dialog showing the delta script.
5. Make sure that Epi Info Web Survey database name (if it is EIWS or the name you had provided) displays in the Available Databases drop down list in Microsoft SQL Server Management Studio.
6. Execute the script to update the database.
7. Once the scripts have executed successfully the updates are applied. Refresh the Epi Info Web Survey database instance. In the object explorer navigate to the Epi Info Web Survey to validate the update. The first visual indicator of a successful database update is the presence of an EIDatasource table under the Tables node in the object explorer.
Figure 26: Confirmation that the new schema updates have been applied.
8. You can also execute the StateDataTable.sql in case you are enabling account
creation functionality and are in United States. The script populates list of states
in United States in the States table to be used by Epi Info Web Survey system
as part of User centric account creation option.
Epi Info™ Web Survey System Integrated Package Deployment
Revision Date: 9/6/2016 Page 36 of 52
4.3.3 Application and Services Configuration
The steps below assume that the EpiInfoWebSurvey web site was previously configured as an application under the default web site.
1. Navigate to the folder called “EpiInfoWebSurvey” under “inetpub\wwwroot”
2. Make a backup of all contents in the EpiInfoWebSurvey folder before making any changes.
3. Make sure the web.config file of the backed up EpiInfoWebSurvey folder is immediately available for reference as it will be needed for updating the content of the new web.config file.
4. Delete the content of the EpiInfoWebSurvey folder under “inetpub\wwwroot” after making the backup.
5. From the EIWSIntegrated package, copy the content of the folder “EIWSIntegrated\ApplicationAndServices” to “inetpub\wwwroot\EpiInfoWebSurvey” folder.
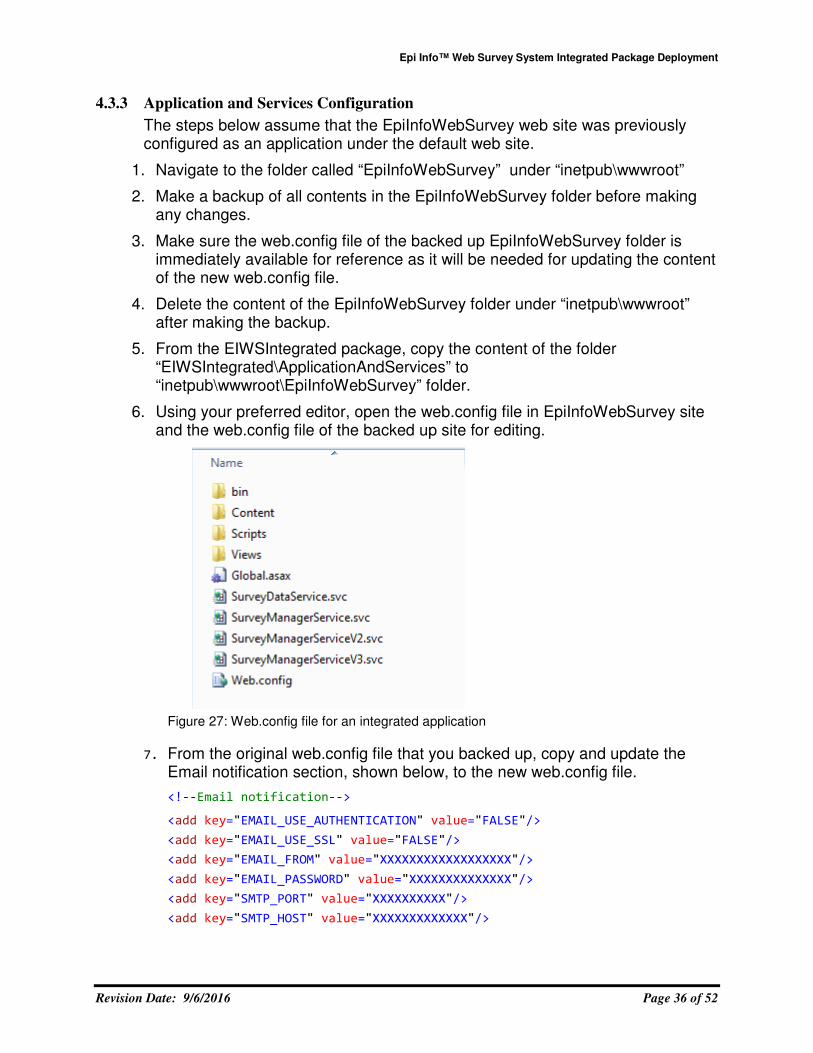
6. Using your preferred editor, open the web.config file in EpiInfoWebSurvey site and the web.config file of the backed up site for editing.
Figure 27: Web.config file for an integrated application
7. From the original web.config file that you backed up, copy and update the Email notification section, shown below, to the new web.config file.
<!--Email notification-->
<add key="EMAIL_USE_AUTHENTICATION" value="FALSE"/>
<add key="EMAIL_USE_SSL" value="FALSE"/>
<add key="EMAIL_FROM" value="XXXXXXXXXXXXXXXXXX"/>
<add key="EMAIL_PASSWORD" value="XXXXXXXXXXXXXX"/>
<add key="SMTP_PORT" value="XXXXXXXXXX"/>
<add key="SMTP_HOST" value="XXXXXXXXXXXXX"/>
Epi Info™ Web Survey System Integrated Package Deployment
Revision Date: 9/6/2016 Page 37 of 52
8. From the original web.config file that you backed up, copy and update the Log Setting section, shown below, to the new web.config file.
<!-- Log Setting -->
<add key="LOGGING_SEND_EMAIL_NOTIFICATION" value="FALSE"/>
<add key="LOGGING_ADMIN_EMAIL_ADDRESS" value="XXXXX"/>
<add key="LOGGING_EMAIL_SUBJECT" value="Epi Info Web Survey - Exception"/>
8. From the original web.config file that you backed up, copy and update the URL
and AdminKey in the Integrated SurveyManagerService Settings section,
shown below, to the new web.config file.
<!--Integrated SurveyManagerService Settings-->
<add key="URL" value="http://SERVER_NAME/<APPLICATION_NAME/Home/"/>
<add key="AdminKey" value="A/kTiX1HhAef9pdWIbGCKslNOcEvoxqUrSWahJoB7uGN3
+/YROi4alwj9UWZLmXy"/>
9. From the original web.config file that you backed up, copy and update the
settings in User Interface section in case they are different.
<!--User Interface Start-->
<add key="CUSTOM_THEME" value="CLASSIC"/> <!--BLUE or CLASSIC-->
<add key="TECHNICAL_SUPPORT_IS_ENABLED" value="FALSE"/>
<add key="TECHNICAL_SUPPORT_EMAIL" value=""/>
<add key="TECHNICAL_SUPPORT_PHONE" value=""/>
<add key="FOOTER_LOGO_PATH" value=""/>
<add key="SHOW_HOME_LOGO" value="FALSE"/>
<add key="HOME_LOGO_PATH" value=""/>
<add key="ExitURL" value="" />
10. User Interface settings section has a setting for ExitURL that may not be
present in your backed up web.config file. If you want to use this feature Step
15 of Section 3.4.2. This setting without any value preserves application’s
default behavior.
<add key="ExitURL" value="" />
11. From the original web.config file that you backed up, copy and update the
Account creation settings if you are using this feature.
<!--Account Creation Start-->
<add key="ACCOUNT_TYPE" value=""/> <add key="BINDING_PROTOCOL" value="Basic"/>
<add key="WINDOW_AUTHENTICATION" value="No"/>
<add key="ENDPOINT_ADDRESS"
value="http://SERVER_NAME/APPLICATION_NAME/SurveyManagerService.svc"/>
<add key="NOTIFY_ADMIN_IS_ENABLED" value="False"/>
<add key="APPLICANT_VALIDATION_IS_ENABLED" value="False"/>
<add key="SYSTEM_ADMIN_EMAIL" value="[email protected]"/>
Epi Info™ Web Survey System Integrated Package Deployment
Revision Date: 9/6/2016 Page 38 of 52
<add key="NOTIFY_ADMIN_EMAIL" value="[email protected]" />
<add key="EPI_INFO_DOWNLOAD_URL" value=http://wwwn.cdc.gov/epiinfo/7/”/>
12. From the original web.config file that you backed up, copy and update
ResponseURL value in case this feature is being used for custom
implementation
<!--Pre-Filled Responses Start: For custom implementation only-->
<add key="ResponseURL" value="http://SERVER_NAME/APPLICATION_NAME/Survey/"/>
13. Important! Version 1.4.0.0 of Epi Info Web Survey has introduced the concept
of customized encryption keys used by the system. Please remove these keys
in the web.config file if upgrading from version prior to Version 1.4.0.0 to avoid
any incompatibilities.
<!-- Encryption Keys -->
<add key="KeyForConnectionStringPassphrase"
value="atKjwl1YhPv94716lQ8aEophUSm2mz+9VkMzDgzRgscoPsRYJ2/vRs7eJTf43X6r/PiBQ
S2Pb99lzoA0DAVxfmwToq1QXDgovFCZP+axtINlw9vbidyz9cG0Ty3LNjxCYuMoIw==" />
<add key="KeyForConnectionStringSalt"
value="LwKTr/KY9ILBwtIDVIvrO9zwXx1f101FiUMgwTti82LCY0Erdrrdu45vaVQntXe6kD0Jj
K1RXkLL8HdmuzPSEYsvtIKDJQ8SGdAtzHWpYrpkdXmcd5bi/pLO4UdL1H3f2ZfpZg==" />
<add key="KeyForConnectionStringVector" value="Z5AIQts7a6hFewK/" />
14. From the original web.config file that you backed up, copy and update the
EIWSEntities, shown below, to the new web.config file.
<add name="EIWSEntities" connectionString="OjYL92zvh/3MZqbJAyKuCKa4bDoF/bIMU
Tr07X8rI/DxlMpn6C4gFS+zig39nLEosiQr3QCwpD5bQUKmIaCUXLaMFR3/urNDPaUo9NXuD4Ose
DGSTicly1Xcr8F+dNzqYijhBWtQv2aJwvHfBUllaTgtfUHMrMxD/LBNVlYxkfpFaY3Rg5zZvI9RG
NjJmcACiU0sFzsi1p2y92HuiKJlQD+s8X3Ue9pWnB8zj6o6kyA22+eHquKNGki66xIsSUj85prey
gNHqwEscuq2PoxrQviOelX1SrJVbmSlXPslFXJso4WRxKewW1byKrQ8lQgxT4t002T7La67bEURk
mTj6P8fTxMaC2JkLraRxXm1DXP1EEwgJxzvUL596Jwz928ULdiCHHhVBH+4QPpj30MfWUY1QL6xd
5W7vNE2ovTHr1I="/>
15. Update the value of EIWSADO according to the instructions in Step 13 of
Section 3.4.2
<add name="EIWSADO" connectionString="TXTToS5W9+YIuXtIix/w+VEhNtJfnp+eY/le+
iEA3Ptjhy9NnnaOHVIqIcy8EiP8WSscBPUM9jtmoB/u6pAiCgn+DhSnlMYKszq84Lvzs2PQVBav
hLvXX1TVEWINtjuhN4FvsfyjPngk9uV7HxlhUA=="/>
16. This should complete the Epi Info Web Survey site upgrade.
17. You may see some new settings as compared to those present in the
web.config file of the backed up version. Refer to Section 3.4.2 on Application
Epi Info™ Web Survey System Integrated Package Deployment
Revision Date: 9/6/2016 Page 39 of 52
and Services configuration to customize the new settings. All the settings
applicable to the latest version are listed in Appendix B at the end of this
document.
5 SYSTEM USAGE
5.1 INSTRUCTIONS
The Epi Info Web Survey system is used with Epi Info 7 to publish surveys created in the Epi Info 7 Form Designer. The process of publishing an Epi Info 7 survey creates a URL to access the survey on the web. This URL can be distributed to respondents by email, posted on a website, posted to a blog or social media sites, or by any other means. A survey participant completes the survey by opening the provided URL in their browser. The responses can be downloaded to Epi Info 7 any time after the first participant completes and submits a response.
5.2 CONVENTIONS AND ERROR MESSAGES
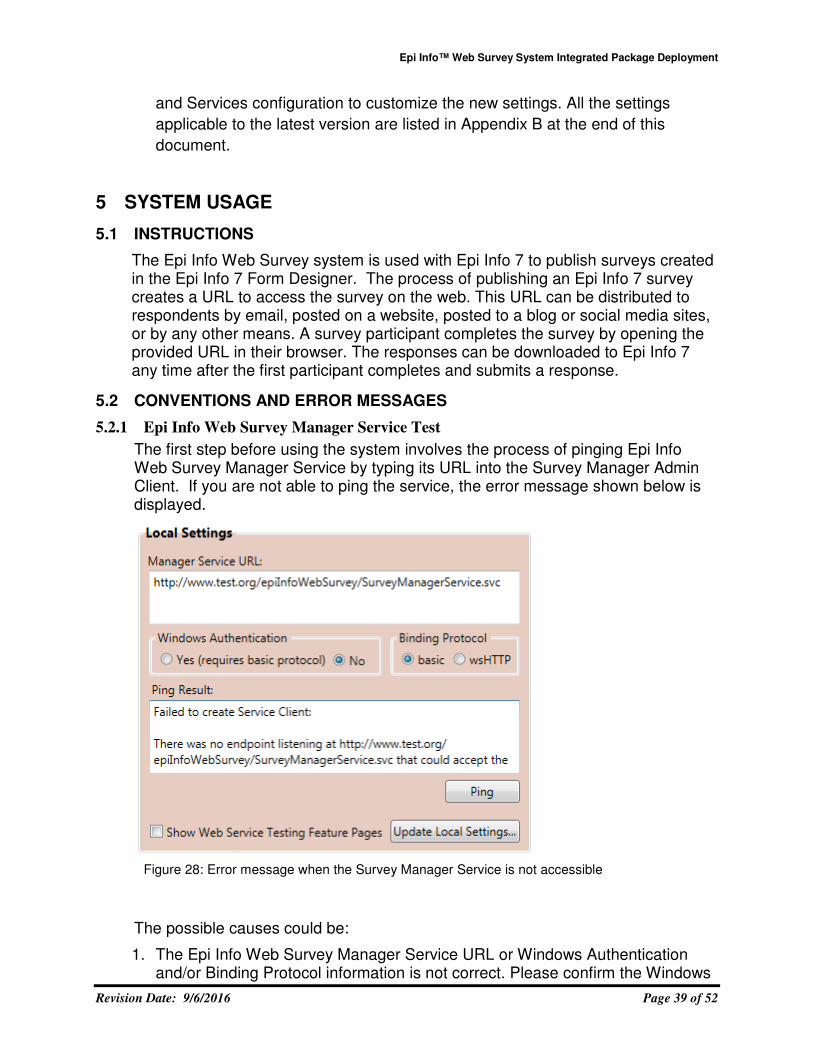
5.2.1 Epi Info Web Survey Manager Service Test
The first step before using the system involves the process of pinging Epi Info Web Survey Manager Service by typing its URL into the Survey Manager Admin Client. If you are not able to ping the service, the error message shown below is displayed.
Figure 28: Error message when the Survey Manager Service is not accessible
The possible causes could be:
1. The Epi Info Web Survey Manager Service URL or Windows Authentication and/or Binding Protocol information is not correct. Please confirm the Windows
Epi Info™ Web Survey System Integrated Package Deployment
Revision Date: 9/6/2016 Page 40 of 52
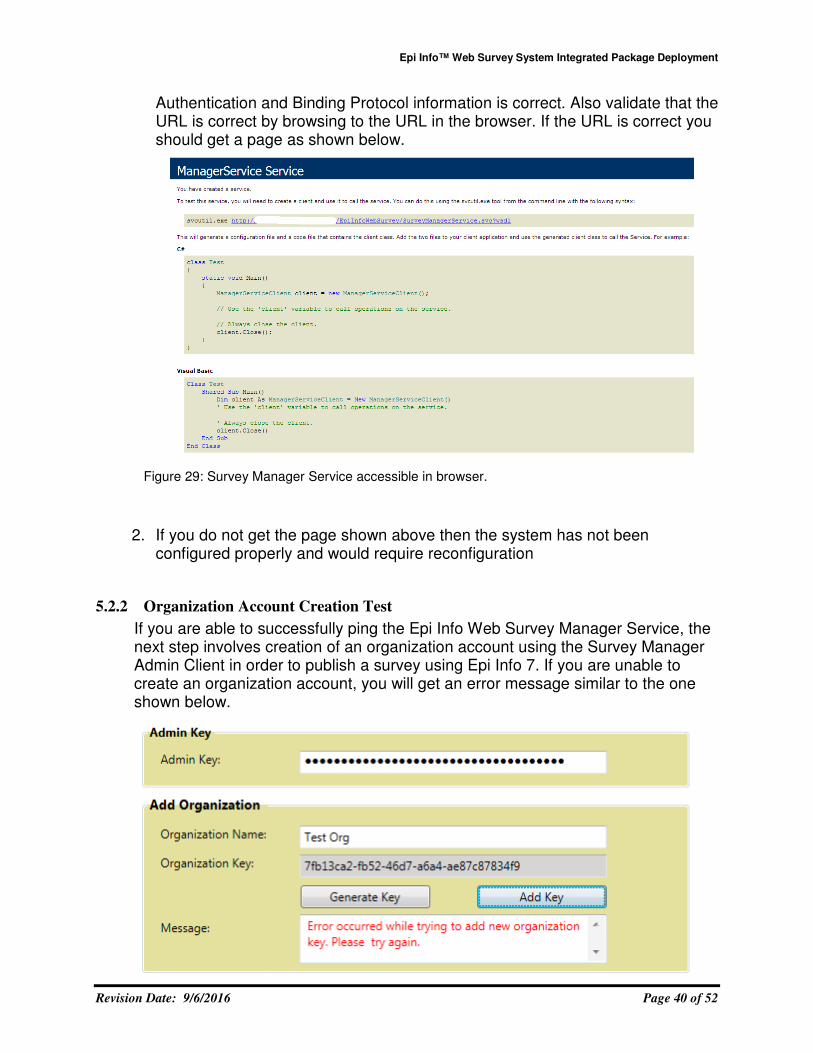
Authentication and Binding Protocol information is correct. Also validate that the URL is correct by browsing to the URL in the browser. If the URL is correct you should get a page as shown below.
Figure 29: Survey Manager Service accessible in browser.
2. If you do not get the page shown above then the system has not been configured properly and would require reconfiguration
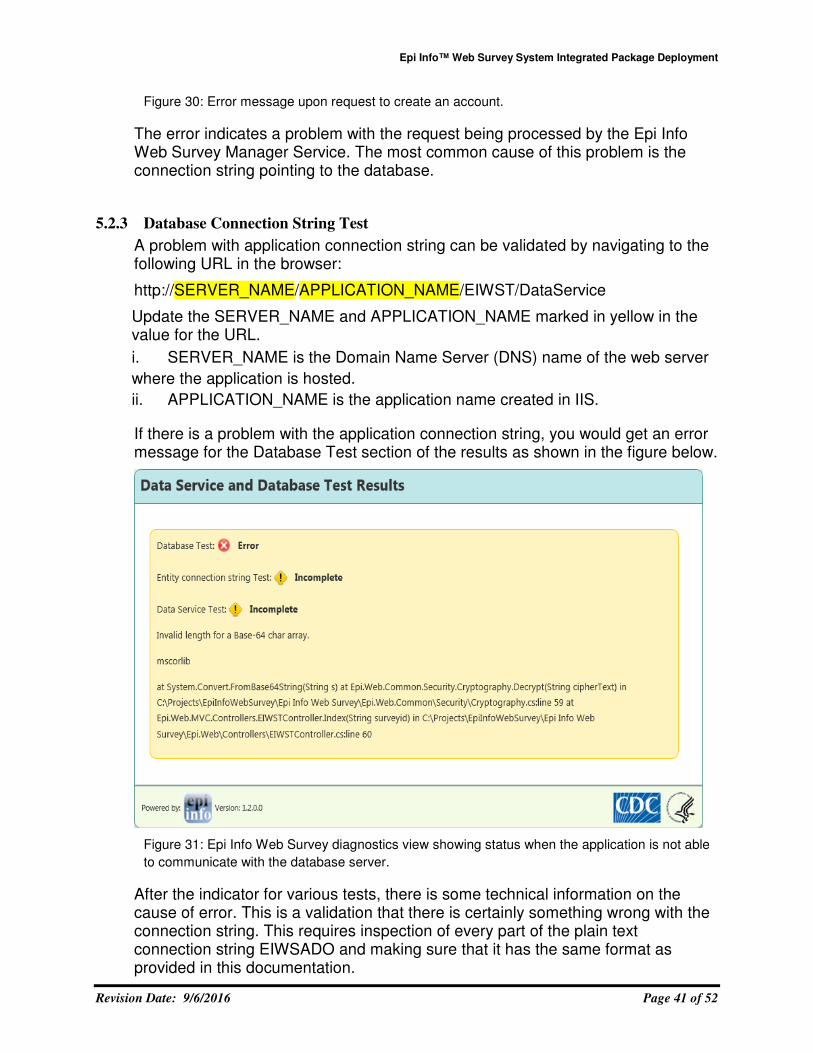
5.2.2 Organization Account Creation Test
If you are able to successfully ping the Epi Info Web Survey Manager Service, the next step involves creation of an organization account using the Survey Manager Admin Client in order to publish a survey using Epi Info 7. If you are unable to create an organization account, you will get an error message similar to the one shown below.
Epi Info™ Web Survey System Integrated Package Deployment
Revision Date: 9/6/2016 Page 41 of 52
Figure 30: Error message upon request to create an account.
The error indicates a problem with the request being processed by the Epi Info Web Survey Manager Service. The most common cause of this problem is the connection string pointing to the database.
5.2.3 Database Connection String Test
A problem with application connection string can be validated by navigating to the following URL in the browser:
http://SERVER_NAME/APPLICATION_NAME/EIWST/DataService
Update the SERVER_NAME and APPLICATION_NAME marked in yellow in the value for the URL.
i. SERVER_NAME is the Domain Name Server (DNS) name of the web server
where the application is hosted.
ii. APPLICATION_NAME is the application name created in IIS.
If there is a problem with the application connection string, you would get an error message for the Database Test section of the results as shown in the figure below.
Figure 31: Epi Info Web Survey diagnostics view showing status when the application is not able
to communicate with the database server.
After the indicator for various tests, there is some technical information on the cause of error. This is a validation that there is certainly something wrong with the connection string. This requires inspection of every part of the plain text connection string EIWSADO and making sure that it has the same format as provided in this documentation.
Epi Info™ Web Survey System Integrated Package Deployment
Revision Date: 9/6/2016 Page 42 of 52
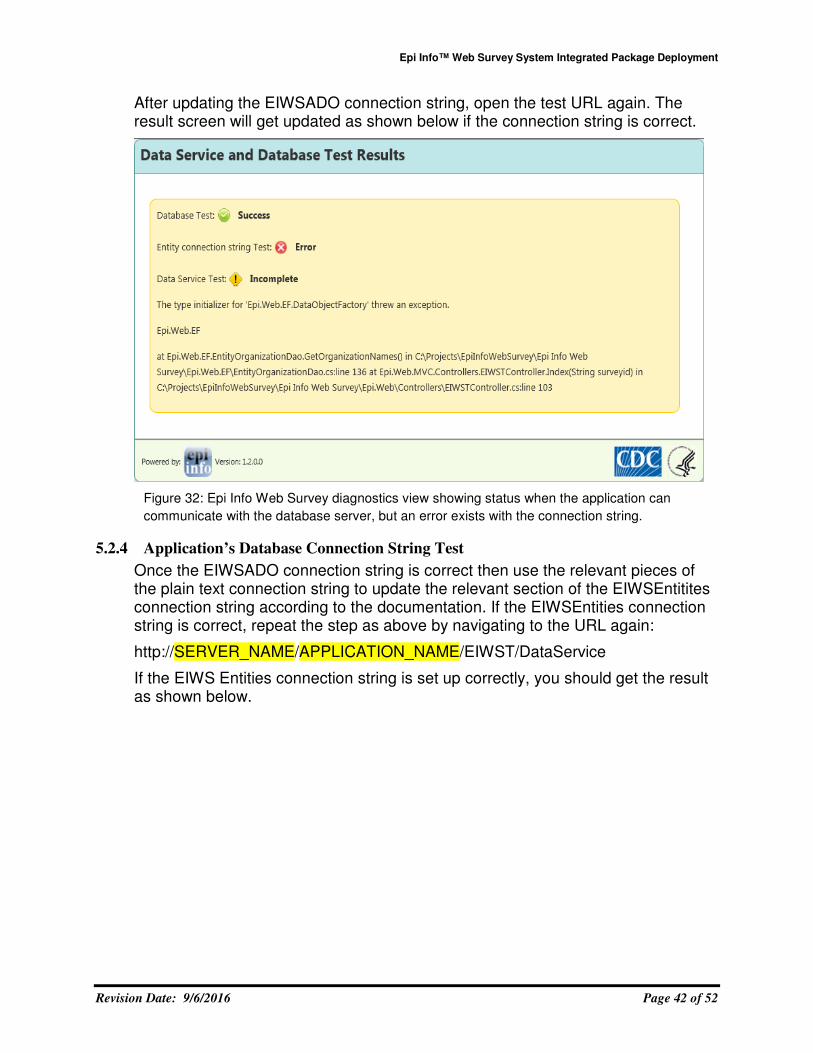
After updating the EIWSADO connection string, open the test URL again. The result screen will get updated as shown below if the connection string is correct.
Figure 32: Epi Info Web Survey diagnostics view showing status when the application can
communicate with the database server, but an error exists with the connection string.
5.2.4 Application’s Database Connection String Test
Once the EIWSADO connection string is correct then use the relevant pieces of the plain text connection string to update the relevant section of the EIWSEntitites connection string according to the documentation. If the EIWSEntities connection string is correct, repeat the step as above by navigating to the URL again:
http://SERVER_NAME/APPLICATION_NAME/EIWST/DataService
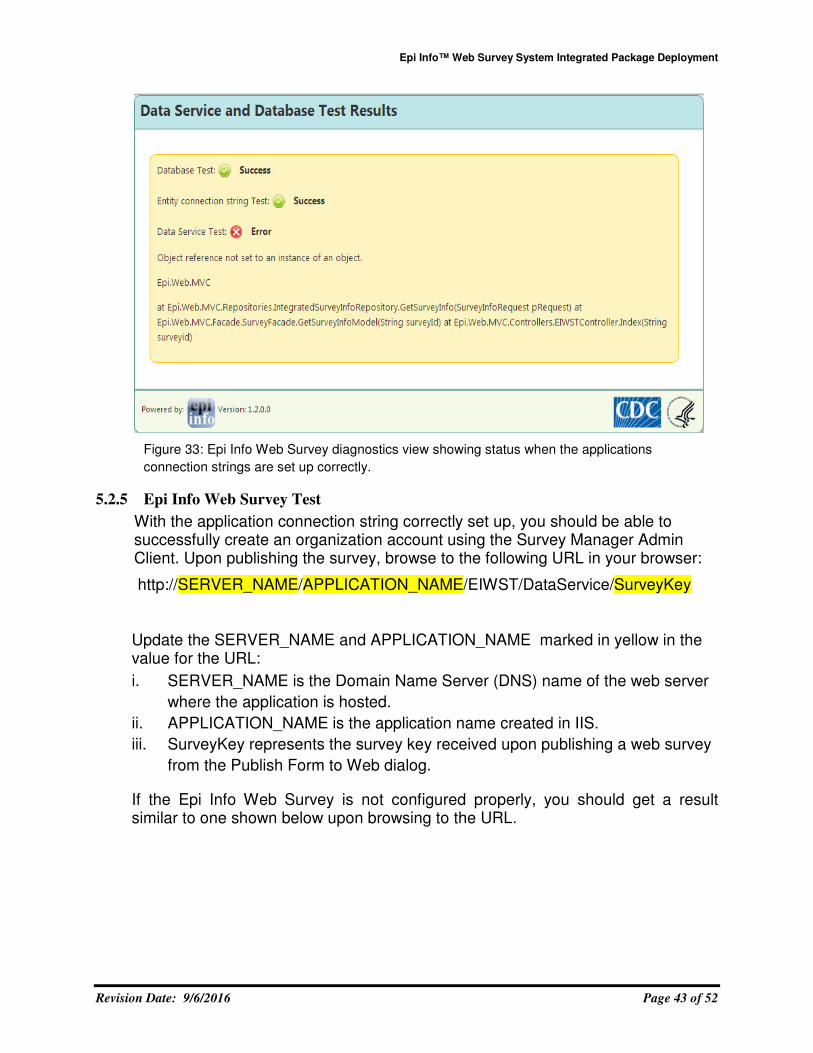
If the EIWS Entities connection string is set up correctly, you should get the result as shown below.
Epi Info™ Web Survey System Integrated Package Deployment
Revision Date: 9/6/2016 Page 43 of 52
Figure 33: Epi Info Web Survey diagnostics view showing status when the applications
connection strings are set up correctly.
5.2.5 Epi Info Web Survey Test
With the application connection string correctly set up, you should be able to successfully create an organization account using the Survey Manager Admin Client. Upon publishing the survey, browse to the following URL in your browser:
http://SERVER_NAME/APPLICATION_NAME/EIWST/DataService/SurveyKey
Update the SERVER_NAME and APPLICATION_NAME marked in yellow in the value for the URL:
i. SERVER_NAME is the Domain Name Server (DNS) name of the web server
where the application is hosted.
ii. APPLICATION_NAME is the application name created in IIS.
iii. SurveyKey represents the survey key received upon publishing a web survey
from the Publish Form to Web dialog.
If the Epi Info Web Survey is not configured properly, you should get a result similar to one shown below upon browsing to the URL.
Epi Info™ Web Survey System Integrated Package Deployment
Revision Date: 9/6/2016 Page 44 of 52
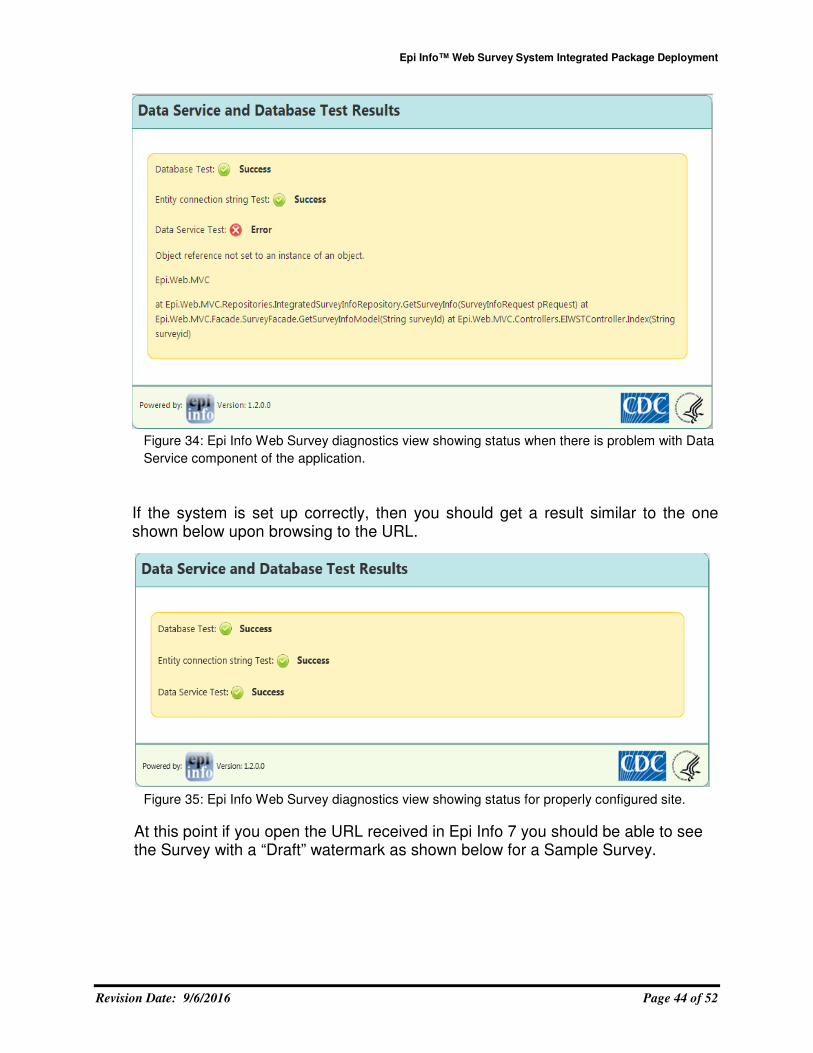
Figure 34: Epi Info Web Survey diagnostics view showing status when there is problem with Data
Service component of the application.
If the system is set up correctly, then you should get a result similar to the one shown below upon browsing to the URL.
Figure 35: Epi Info Web Survey diagnostics view showing status for properly configured site.
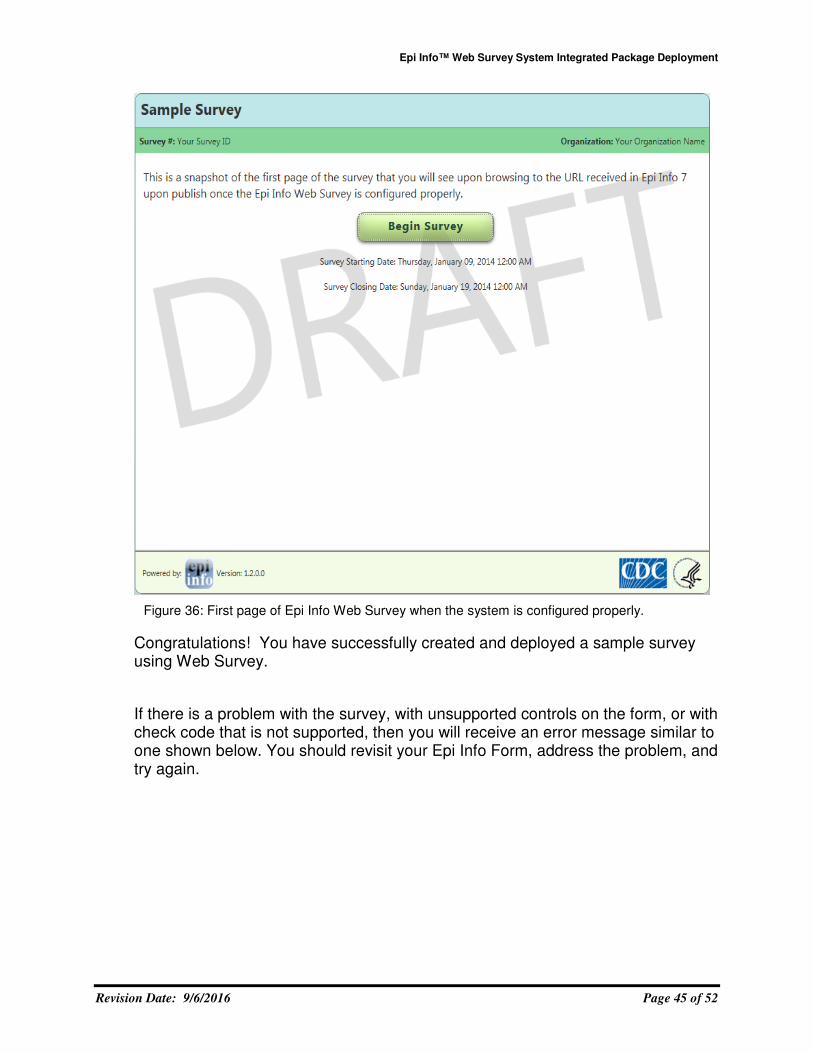
At this point if you open the URL received in Epi Info 7 you should be able to see the Survey with a “Draft” watermark as shown below for a Sample Survey.
Epi Info™ Web Survey System Integrated Package Deployment
Revision Date: 9/6/2016 Page 45 of 52
Figure 36: First page of Epi Info Web Survey when the system is configured properly.
Congratulations! You have successfully created and deployed a sample survey using Web Survey.
If there is a problem with the survey, with unsupported controls on the form, or with check code that is not supported, then you will receive an error message similar to one shown below. You should revisit your Epi Info Form, address the problem, and try again.

Epi Info™ Web Survey System Integrated Package Deployment
Revision Date: 9/6/2016 Page 46 of 52
Figure 37: System error when the system is not configured properly.

Epi Info™ Web Survey System Integrated Package Deployment
Revision Date: 9/6/2016 Page 47 of 52
APPENDIX A: REFERENCES
The following table summarizes the documents referenced in this document.
Document Name and Version
Description Location
EIWS Admin Client Help
This document describes the Epi Info Web Survey Manager Admin Client and how to use it.
/EIWSIntegrated/Documents
Epi Info™ Web Survey System Integrated Package Deployment
Revision Date: 9/6/2016 Page 48 of 52
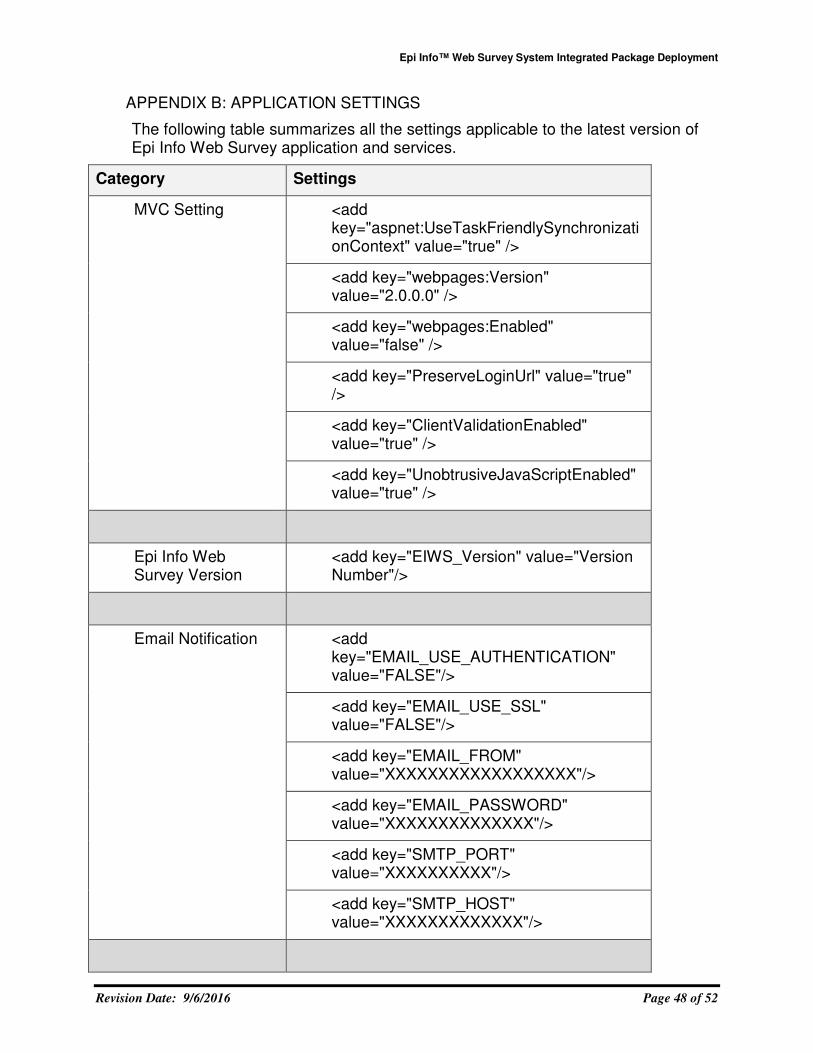
APPENDIX B: APPLICATION SETTINGS
The following table summarizes all the settings applicable to the latest version of Epi Info Web Survey application and services.
Category Settings
MVC Setting <add key="aspnet:UseTaskFriendlySynchronizationContext" value="true" />
<add key="webpages:Version" value="2.0.0.0" />
<add key="webpages:Enabled" value="false" />
<add key="PreserveLoginUrl" value="true" />
<add key="ClientValidationEnabled" value="true" />
<add key="UnobtrusiveJavaScriptEnabled" value="true" />
Epi Info Web Survey Version
<add key="EIWS_Version" value="Version Number"/>
Email Notification <add key="EMAIL_USE_AUTHENTICATION" value="FALSE"/>
<add key="EMAIL_USE_SSL" value="FALSE"/>
<add key="EMAIL_FROM" value="XXXXXXXXXXXXXXXXXX"/>
<add key="EMAIL_PASSWORD" value="XXXXXXXXXXXXXX"/>
<add key="SMTP_PORT" value="XXXXXXXXXX"/>
<add key="SMTP_HOST" value="XXXXXXXXXXXXX"/>
Epi Info™ Web Survey System Integrated Package Deployment
Revision Date: 9/6/2016 Page 49 of 52
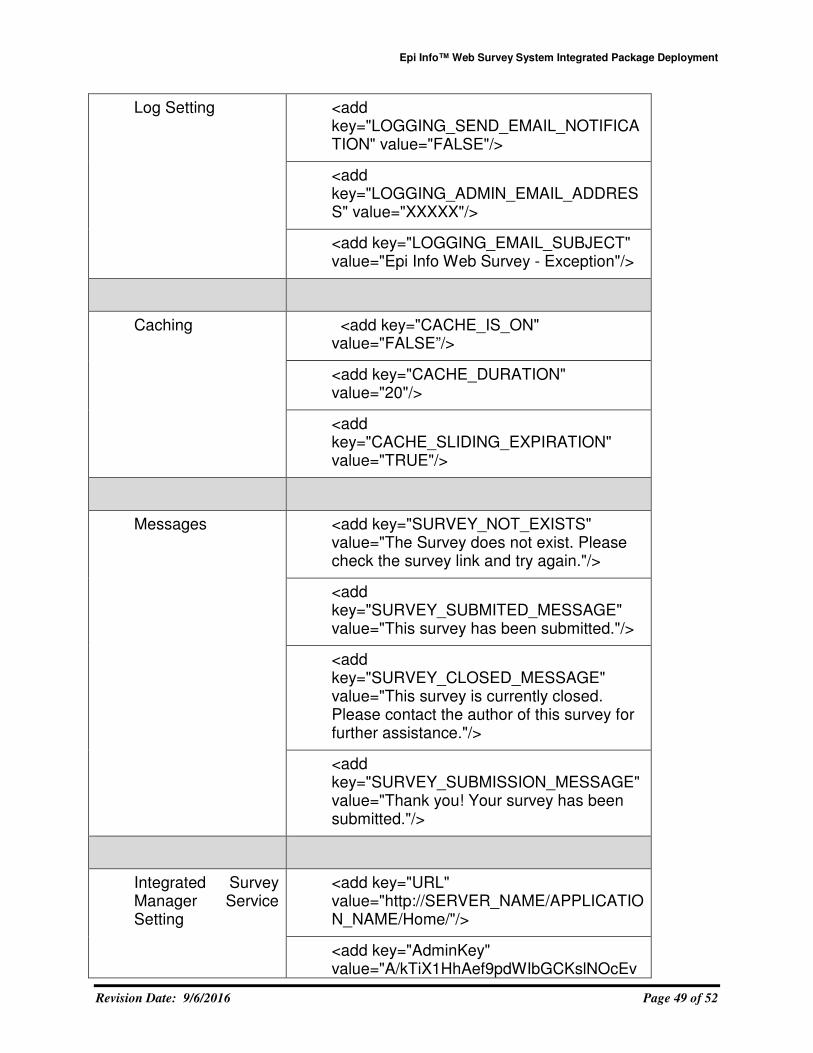
Log Setting <add key="LOGGING_SEND_EMAIL_NOTIFICATION" value="FALSE"/>
<add key="LOGGING_ADMIN_EMAIL_ADDRESS" value="XXXXX"/>
<add key="LOGGING_EMAIL_SUBJECT" value="Epi Info Web Survey - Exception"/>
Caching <add key="CACHE_IS_ON" value="FALSE”/>
<add key="CACHE_DURATION" value="20"/>
<add key="CACHE_SLIDING_EXPIRATION" value="TRUE"/>
Messages <add key="SURVEY_NOT_EXISTS" value="The Survey does not exist. Please check the survey link and try again."/>
<add key="SURVEY_SUBMITED_MESSAGE" value="This survey has been submitted."/>
<add key="SURVEY_CLOSED_MESSAGE" value="This survey is currently closed. Please contact the author of this survey for further assistance."/>
<add key="SURVEY_SUBMISSION_MESSAGE" value="Thank you! Your survey has been submitted."/>
Integrated Survey Manager Service Setting
<add key="URL" value="http://SERVER_NAME/APPLICATION_NAME/Home/"/>
<add key="AdminKey" value="A/kTiX1HhAef9pdWIbGCKslNOcEv
Epi Info™ Web Survey System Integrated Package Deployment
Revision Date: 9/6/2016 Page 50 of 52
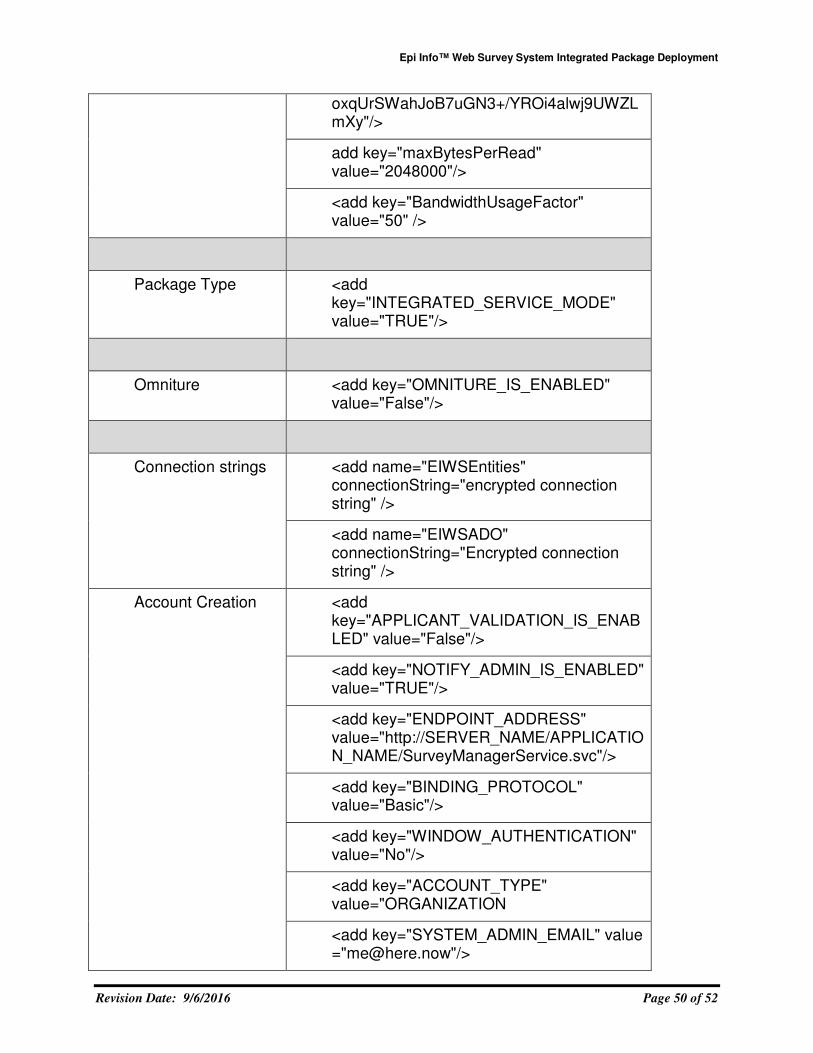
oxqUrSWahJoB7uGN3+/YROi4alwj9UWZLmXy"/>
add key="maxBytesPerRead" value="2048000"/>
<add key="BandwidthUsageFactor" value="50" />
Package Type <add key="INTEGRATED_SERVICE_MODE" value="TRUE"/>
Omniture <add key="OMNITURE_IS_ENABLED" value="False"/>
Connection strings <add name="EIWSEntities" connectionString="encrypted connection string" />
<add name="EIWSADO" connectionString="Encrypted connection string" />
Account Creation <add key="APPLICANT_VALIDATION_IS_ENABLED" value="False"/>
<add key="NOTIFY_ADMIN_IS_ENABLED" value="TRUE"/>
<add key="ENDPOINT_ADDRESS" value="http://SERVER_NAME/APPLICATION_NAME/SurveyManagerService.svc"/>
<add key="BINDING_PROTOCOL" value="Basic"/>
<add key="WINDOW_AUTHENTICATION" value="No"/>
<add key="ACCOUNT_TYPE" value="ORGANIZATION
<add key="SYSTEM_ADMIN_EMAIL" value="[email protected]"/>
Epi Info™ Web Survey System Integrated Package Deployment
Revision Date: 9/6/2016 Page 51 of 52
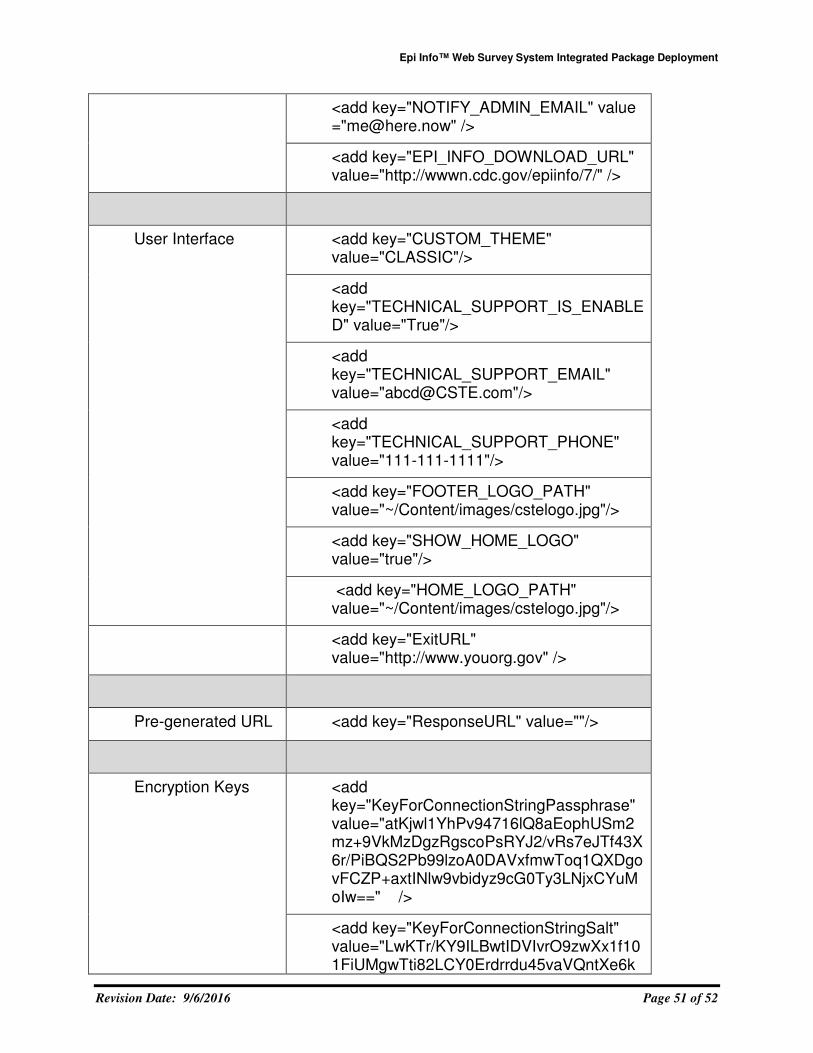
<add key="NOTIFY_ADMIN_EMAIL" value="[email protected]" />
<add key="EPI_INFO_DOWNLOAD_URL" value="http://wwwn.cdc.gov/epiinfo/7/" />
User Interface <add key="CUSTOM_THEME" value="CLASSIC"/>
<add key="TECHNICAL_SUPPORT_IS_ENABLED" value="True"/>
<add key="TECHNICAL_SUPPORT_EMAIL" value="[email protected]"/>
<add key="TECHNICAL_SUPPORT_PHONE" value="111-111-1111"/>
<add key="FOOTER_LOGO_PATH" value="~/Content/images/cstelogo.jpg"/>
<add key="SHOW_HOME_LOGO" value="true"/>
<add key="HOME_LOGO_PATH" value="~/Content/images/cstelogo.jpg"/>
<add key="ExitURL" value="http://www.youorg.gov" />
Pre-generated URL <add key="ResponseURL" value=""/>
Encryption Keys <add key="KeyForConnectionStringPassphrase" value="atKjwl1YhPv94716lQ8aEophUSm2mz+9VkMzDgzRgscoPsRYJ2/vRs7eJTf43X6r/PiBQS2Pb99lzoA0DAVxfmwToq1QXDgovFCZP+axtINlw9vbidyz9cG0Ty3LNjxCYuMoIw==" />
<add key="KeyForConnectionStringSalt" value="LwKTr/KY9ILBwtIDVIvrO9zwXx1f101FiUMgwTti82LCY0Erdrrdu45vaVQntXe6k

Epi Info™ Web Survey System Integrated Package Deployment
Revision Date: 9/6/2016 Page 52 of 52
D0JjK1RXkLL8HdmuzPSEYsvtIKDJQ8SGdAtzHWpYrpkdXmcd5bi/pLO4UdL1H3f2ZfpZg==" />
<add key="KeyForConnectionStringVector" value="Z5AIQts7a6hFewK/" />


![interoperability.blob.core.windows.netinteroperability.blob.core.windows.net/files/MS-PRIMEPF… · Web view[MS-PRIMEPF]: Deployment Package Format. Intellectual Property Rights](https://img.pdfslide.net/doc/110x75/5a78833a7f8b9a7b698c1e3f/web-viewms-primepf-deployment-package-format-intellectual-property-rights.jpg)


![Deployment Package – Software Requirements Analysis€¦ · Web viewThe word deployment is sometimes used to mean the same thing [crm.com]. The importance of having this process](https://img.pdfslide.net/doc/110x75/5fc75810c2a2c80ee8535973/deployment-package-a-software-requirements-analysis-web-view-the-word-deployment.jpg)