Embed Size (px)
Citation preview
SeeBeyond Proprietary and Confidential
ePortal Composer User’s Guide
Release 5.0.3
ePortal Composer User’s Guide 2 SeeBeyond Proprietary and Confidential
The information contained in this document is subject to change and is updated periodically to reflect changes to the applicable software. Although every effort has been made to ensure the accuracy of this document, SeeBeyond Technology Corporation (SeeBeyond) assumes no responsibility for any errors that may appear herein. The software described in this document is furnished under a License Agreement and may be used or copied only in accordance with the terms of such License Agreement. Printing, copying, or reproducing this document in any fashion is prohibited except in accordance with the License Agreement. The contents of this document are designated as being confidential and proprietary; are considered to be trade secrets of SeeBeyond; and may be used only in accordance with the License Agreement, as protected and enforceable by law. SeeBeyond assumes no responsibility for the use or reliability of its software on platforms that are not supported by SeeBeyond.
SeeBeyond, e*Gate, and e*Way are the registered trademarks of SeeBeyond Technology Corporation in the United States and select foreign countries; the SeeBeyond logo, e*Insight, and e*Xchange are trademarks of SeeBeyond Technology Corporation. The absence of a trademark from this list does not constitute a waiver of SeeBeyond Technology Corporation's intellectual property rights concerning that trademark. This document may contain references to other company, brand, and product names. These company, brand, and product names are used herein for identification purposes only and may be the trademarks of their respective owners.
© 2003-2004 by SeeBeyond Technology Corporation. All Rights Reserved. This work is protected as an unpublished work under the copyright laws.©2001, the JA-SIG Collaborative. This product includes software developed by the JA-SIG Collaborative (http://www.jasig.org).©2001-2002, the HSQL Development Group. All Rights Reserved.
This work is confidential and proprietary information of SeeBeyond and must be maintained in strict confidence.
Version 20040226150241.
Contents
ePortal Composer User’s Guide 3 SeeBeyond Proprietary and Confidential
Contents
List of Figures 6
List of Tables 9
Chapter 1
Introduction 10Document Purpose and Scope 10
Intended Audience 10
Organization of Information 11
Writing Conventions 11Additional Conventions 11
SeeBeyond Web Site 12
Chapter 2
About ePortal 13Introduction to ePortal 13
About Channels 14Authentication 15Web-based Portal Administration and Management 15Personalization 15
ePortal Tool Buttons 17
Chapter 3
Installing ePortal 18System Requirements 18
Prerequisites for Installation 18Web Server 19Application Components 19
Installing ePortal via the Enterprise Manager 19Uploading ePortal 19
Contents
ePortal Composer User’s Guide 4 SeeBeyond Proprietary and Confidential
Downloading and Extracting the ePortal Files 20
Configuring ePortal 20Setting Up the Integration Server 21Setting Up Authentication 21Editing the ePortal Properties File 25Configuring ePortal for LDAP 26
Setting Integration Server Properties for LDAP 26Configuring ePortal and LDAP for the Integration Server 28
Deploying ePortal 34Deploying ePortal Files 35Validating the Installation 35Running ePortal 36
Configuring and Deploying ePortal on WebSphere 36Configuring the ePortal.war File 37Configuring and Deploying ePortal on WebSphere 38
Chapter 4
ePortal Administration 56Overview 56
Basic Administration Operations 57
Managing Channels 58Publishing a New Channel 58
Channel Types 58Publishing a New Channel 58
Publishing a Search Channel 64Creating a Channel for the Search Module 64
Modifying a Channel 65
Managing Groups 66About Groups 67
The ePortal Group Hierarchy 67The Group Manager Channel 68
Group Manager Detail View 68Creating and Updating Groups 68Adding Members to a Group 71
Group Manager Edit View 71Editing a Group’s Information 72
Searching Groups 72Managing Categories 72
Adding a New Category 73Modifying Categories 74
Managing Permissions 75About Permissions 75Permissions Manager Startup Page 76
Assigning Permissions Options 77Assigning Permissions to Groups 77Assigning Permissions to Categories 81
Contents
ePortal Composer User’s Guide 5 SeeBeyond Proprietary and Confidential
Chapter 5
User Personalization 83Overview 83
Personalizing a View 84Adding a Channel to a View 85Adding a Tab to a Channel View 86Modifying a Tab 87Adding a Column to a Channel View 88Modifying a Column 88Changing the Skin of a Channel View 88
Using the ePortal Search Engine 89Creating a Layout for the Search Facility 92
Index 97
List of Figures
ePortal Composer User’s Guide 6 SeeBeyond Proprietary and Confidential
List of Figures
Figure 1 ePortal Within the ICAN Suite 14
Figure 2 Personalized Channels 16
Figure 3 User Management Context Menu 22
Figure 4 Adding the administration Role to the Administrator User 23
Figure 5 Adding Users in Enterprise Designer 24
Figure 6 Adding Roles in Enterprise Designer 24
Figure 7 User Management List for ePortal 25
Figure 8 Security Realm Configuration Properties 27
Figure 9 SunOne Directory Server Properties 28
Figure 10 Administrative Console Window 38
Figure 11 Global Security Window 39
Figure 12 LTPA Window 40
Figure 13 LTPA Single Signon (SSO) Window 40
Figure 14 LDAP User Registry Window for Active Directory 41
Figure 15 LDAP User Registry Window for SunOne 42
Figure 16 LDAP User Registry Window for Advanced LDAP Settings 43
Figure 17 Global Security Window (Save) 43
Figure 18 Preparing for the Application Installation Window 44
Figure 19 Generate Default Binding Window 44
Figure 20 Deploying on WebSphere: Step 1 Window 45
Figure 21 Deploying on WebSphere: Step 2 Window 45
Figure 22 Deploying on WebSphere: Step 3 Window 46
Figure 23 Deploying on WebSphere: Step 4 Window 46
Figure 24 Save To Master Configuration 47
Figure 25 Save Window 47
Figure 26 Enterprise Applications Window 48
Figure 27 Configuration Tab 48
Figure 28 Session Management Link 49
Figure 29 Session Management Parameters 50
Figure 30 Configuration Tab 51
Figure 31 Preparing for the Application Installation Page (Search 1) 51
Figure 32 Preparing for the Application Installation Page (Search 2) 52
List of Figures
ePortal Composer User’s Guide 7 SeeBeyond Proprietary and Confidential
Figure 33 Installing Search Engine: Step 1 Window 52
Figure 34 Installing Search Engine: Step 2 Window 53
Figure 35 Installing Search Engine: Step 3 Window 53
Figure 36 Installing Search Engine: Step 4 Window 54
Figure 37 Install Operation Window 55
Figure 38 Save to Master Configuration 55
Figure 39 Administrator Startup/Channel Manager Window 57
Figure 40 Publishing a Channel 59
Figure 41 Specifying an In-line Frame 59
Figure 42 Specifying general channel settings 60
Figure 43 Setting In-line Frame Parameters 61
Figure 44 Setting channel controls 62
Figure 45 Assigning a Category 62
Figure 46 Assigning a Group 63
Figure 47 Reviewing Channel Parameters 64
Figure 48 Modifying a Channel 65
Figure 49 Editing a Channel 66
Figure 50 Detail View: Selecting a Group to View 68
Figure 51 Accessing Group Information in Detail View 69
Figure 52 Creating a New Group 70
Figure 53 Modifying a Group 70
Figure 54 Group Manager Buttons in Edit View 71
Figure 55 Creating a Category 1 73
Figure 56 Creating a Category 2 74
Figure 57 Permissions Manager Startup 76
Figure 58 Permissions: Selecting Marked Groups 78
Figure 59 Permissions: Assigning 79
Figure 60 Permissions: Adding 80
Figure 61 Permissions: Grant/Deny Switches 81
Figure 62 User Preferences Page 84
Figure 63 “New Channel “Link 85
Figure 64 Channel Categories List 85
Figure 65 Adding Channels 86
Figure 66 Creating a Tab 87
Figure 67 Choosing a Skin 89
Figure 68 ePortal Composer Search Facility: Upload 90
Figure 69 ePortal Composer Search Facility: Query 91
Figure 70 ePortal Composer Search Facility: Query Results 91
List of Figures
ePortal Composer User’s Guide 8 SeeBeyond Proprietary and Confidential
Figure 71 User Preferences: Search: Adding a New Channel 92
Figure 72 User Preferences: Search, Selecting a Category 92
Figure 73 User Preferences: Search, Selecting a Channel 93
Figure 74 User Preferences: Search, Setting the Frame Height 93
Figure 75 User Preferences: Search, Adding the Search Tab 94
Figure 76 User Preferences: Search: Naming and Placing the Search Tab 94
Figure 77 User Preferences: Search, Defining Search as the Default Tab 95
Figure 78 User Preferences: Search, Reviewing the Search Page Layout 96
List of Tables
ePortal Composer User’s Guide 9 SeeBeyond Proprietary and Confidential
List of Tables
Table 1 Writing Conventions 11
Table 2 Detail and Edit View Tools Buttons 17

ePortal Composer User’s Guide 10 SeeBeyond Proprietary and Confidential
Chapter 1
Introduction
This chapter provides a brief introduction to the purpose, scope, and organization of the document.
This Chapter Includes
“Document Purpose and Scope” on page 10
“Intended Audience” on page 10
“Organization of Information” on page 11
“Writing Conventions” on page 11
“SeeBeyond Web Site” on page 12
1.1 Document Purpose and ScopeThis user’s guide explains how to install, set up, and use ePortal to create, manage, and personalize Web channels. The document assumes that you have installed either SeeBeyond’s eGate Integrator and its Integration Server/Logical Host or a compatible application server, for example, WebSphere.
1.2 Intended AudienceThis guide is intended for experienced computer users who have the responsibility of helping to set up and maintain a fully functioning ICAN Suite system. This person must also understand any operating systems on which eGate can be installed, for example, Windows and UNIX, and must be thoroughly familiar with Web browsers and Windows-style operations.
Chapter 1 Section 1.3Introduction Organization of Information
ePortal Composer User’s Guide 11 SeeBeyond Proprietary and Confidential
1.3 Organization of InformationThis user’s guide provides the following information:
Hardware, software, and database requirements
Installation instructions for a variety of operating systems
An overview of ePortal’s application architecture
A description and explanation of ePortal’s features
How to use ePortal to create and administer channels
How to set user preferences
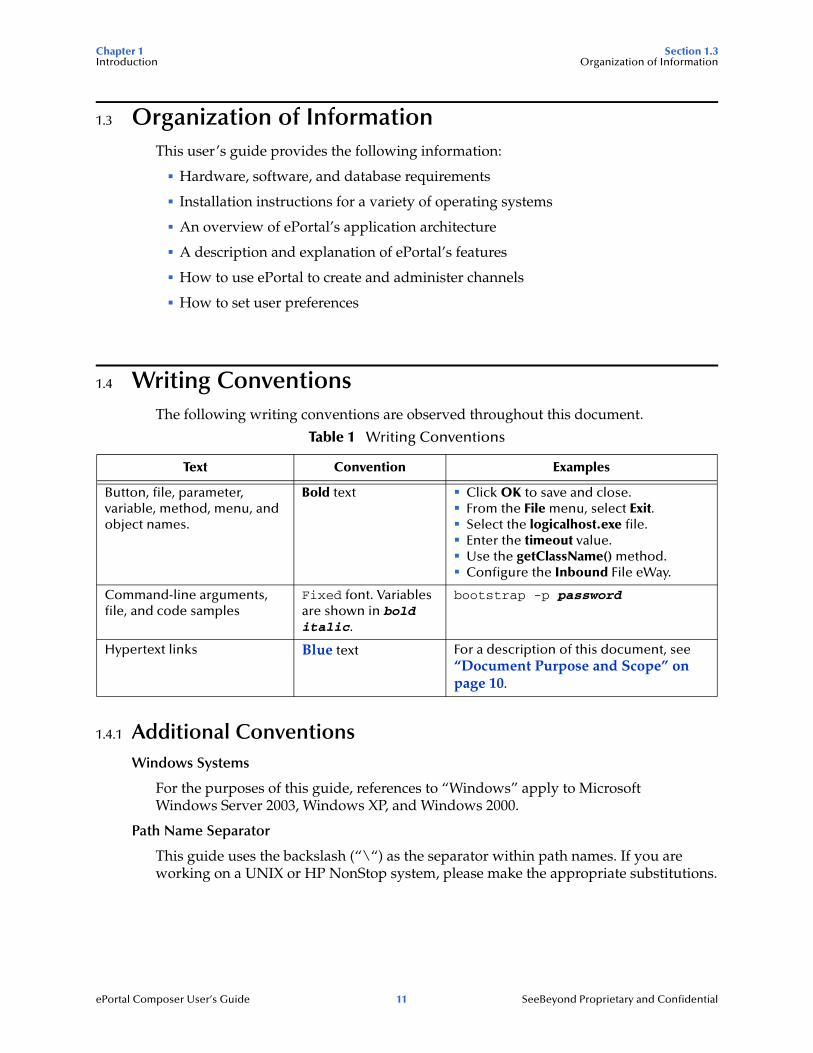
1.4 Writing ConventionsThe following writing conventions are observed throughout this document.
1.4.1 Additional ConventionsWindows Systems
For the purposes of this guide, references to “Windows” apply to Microsoft Windows Server 2003, Windows XP, and Windows 2000.
Path Name Separator
This guide uses the backslash (“\“) as the separator within path names. If you are working on a UNIX or HP NonStop system, please make the appropriate substitutions.
Table 1 Writing Conventions
Text Convention Examples
Button, file, parameter, variable, method, menu, and object names.
Bold text Click OK to save and close.From the File menu, select Exit.Select the logicalhost.exe file.Enter the timeout value.Use the getClassName() method.Configure the Inbound File eWay.
Command-line arguments, file, and code samples
Fixed font. Variables are shown in bold italic.
bootstrap -p password
Hypertext links Blue text For a description of this document, see “Document Purpose and Scope” on page 10.

Chapter 1 Section 1.5Introduction SeeBeyond Web Site
ePortal Composer User’s Guide 12 SeeBeyond Proprietary and Confidential
1.5 SeeBeyond Web SiteThe SeeBeyond Web site is your best source for up-to-the-minute product news and technical support information. The site’s URL is:
http://www.seebeyond.com
ePortal Composer User’s Guide 13 SeeBeyond Proprietary and Confidential
Chapter 2
About ePortal
This chapter provides an overview of ePortal and its features.
This Chapter Includes
“Introduction to ePortal” on page 13
“ePortal Tool Buttons” on page 17
2.1 Introduction to ePortalePortal Composer (ePortal), SeeBeyond’s Web portal application program, provides a set of Web-based tools that enable the Web developer/administrator to create Web portals. These portals unify business information and personalize the portal experience based on a user’s profile.
A portal allows the organization to present a single, unified view of enterprise data and applications to employees, customers, and partners. Multiple URLs can be assigned to channels, which are aggregated within the portal and then collectively presented to users.
Through a Web portlet, called a channel, ePortal enables users to simultaneously view multiple eVision applications, other ICAN-generated user interfaces, and specified Web-enabled enterprise content.
ePortal leverages the ICAN Suite by enabling enterprise-wide access to business processes from a single point of entry, a portal. A portal is a Web site that serves as a gateway for Web-based services and applications.
In the ICAN Suite, business processes can be monitored in real-time with Enterprise Manager, and eVision Web applications can be executed, both within their individual channels. How ePortal is integrated within the ICAN Suite shown in Figure 1 on page 14.
Chapter 2 Section 2.1About ePortal Introduction to ePortal
ePortal Composer User’s Guide 14 SeeBeyond Proprietary and Confidential
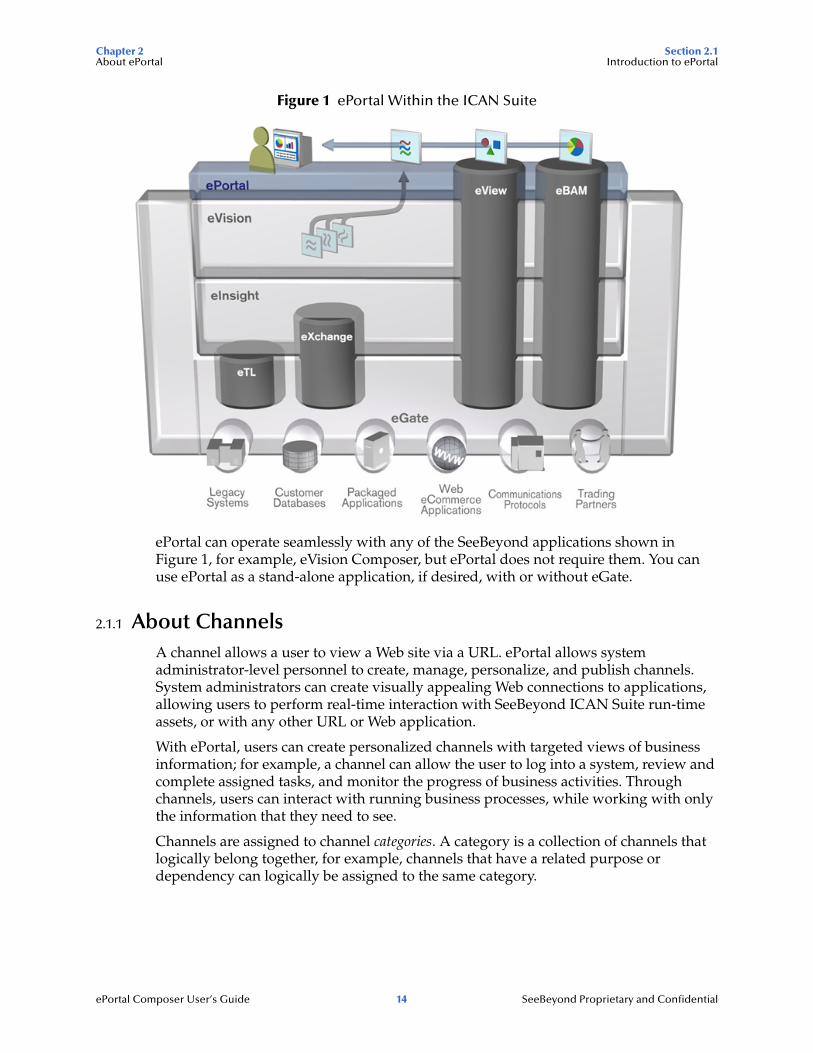
Figure 1 ePortal Within the ICAN Suite
ePortal can operate seamlessly with any of the SeeBeyond applications shown in Figure 1, for example, eVision Composer, but ePortal does not require them. You can use ePortal as a stand-alone application, if desired, with or without eGate.
2.1.1 About ChannelsA channel allows a user to view a Web site via a URL. ePortal allows system administrator-level personnel to create, manage, personalize, and publish channels. System administrators can create visually appealing Web connections to applications, allowing users to perform real-time interaction with SeeBeyond ICAN Suite run-time assets, or with any other URL or Web application.
With ePortal, users can create personalized channels with targeted views of business information; for example, a channel can allow the user to log into a system, review and complete assigned tasks, and monitor the progress of business activities. Through channels, users can interact with running business processes, while working with only the information that they need to see.
Channels are assigned to channel categories. A category is a collection of channels that logically belong together, for example, channels that have a related purpose or dependency can logically be assigned to the same category.
Chapter 2 Section 2.1About ePortal Introduction to ePortal
ePortal Composer User’s Guide 15 SeeBeyond Proprietary and Confidential
2.1.2 AuthenticationePortal can authenticate users via the Enterprise Designer’s authentication features or via Lightweight Directory Access Protocol (LDAP). Other applications in the same realm may not require a user to log in again.
The Enterprise Designer enables authentication of user IDs and passwords when users log into ePortal. User attributes such as log-in ID, password (credential), and roles. For more information, see “Setting Up Authentication” on page 21.
For information on how to set up authentication using LDAP, see the appropriate LDAP documentation.
2.1.3 Web-based Portal Administration and ManagementUnder categories, administrators can orchestrate channel access using the groups, users, and roles defined in the Enterprise Designer or via LDAP.
ePortal provides Web-based wizards that guide the system administrator through the process of channel configuration and management, for example:
The channel administrator creates channels to be made accessible in the portal. A channel can access content from any available URL source.
The system administrator assigns the channel to a category.
ePortal supports any combination of URLs and simplifies the end-user’s access to application resources, Web content, workflow, e-mail, content management systems, and packaged applications such as ERP and CRM.
2.1.4 PersonalizationUsers are allowed personalization privileges that enable them to specify the channels they want to see in a channel layout. However, system administrators can restrict access to the personalization tools so that only administration-level personnel can create channel layouts and configure channel options.
Chapter 2 Section 2.1About ePortal Introduction to ePortal
ePortal Composer User’s Guide 16 SeeBeyond Proprietary and Confidential
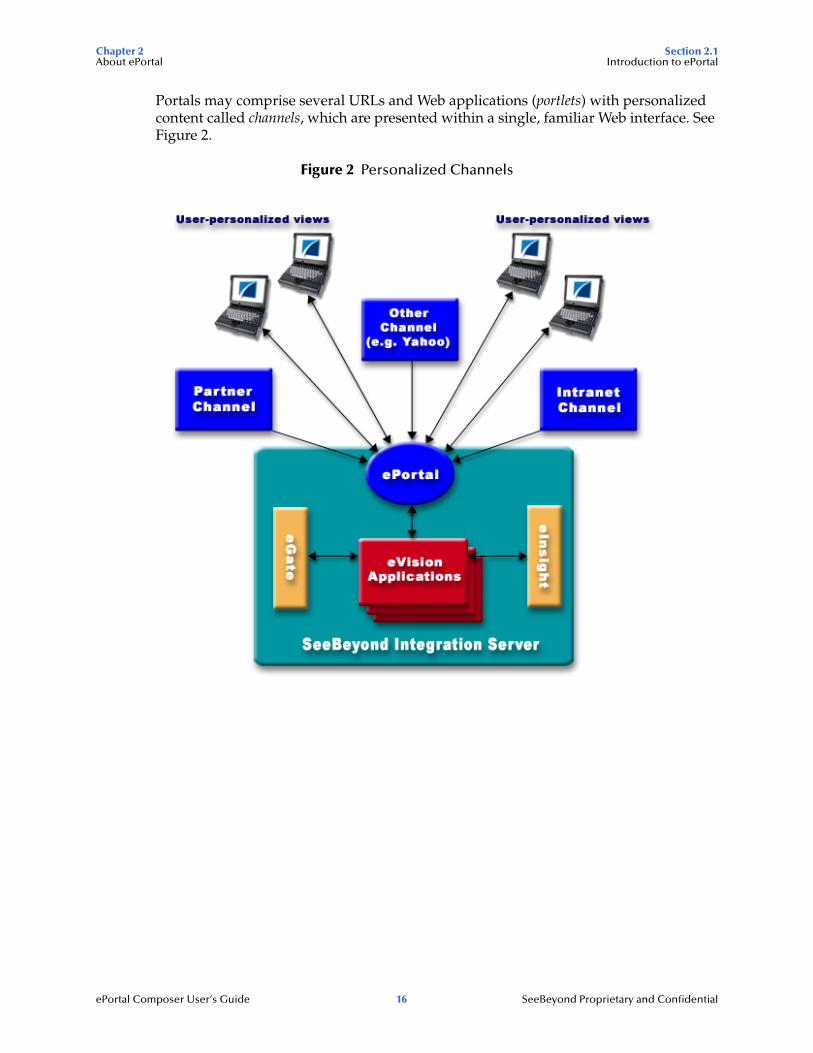
Portals may comprise several URLs and Web applications (portlets) with personalized content called channels, which are presented within a single, familiar Web interface. See Figure 2.
Figure 2 Personalized Channels
Chapter 2 Section 2.2About ePortal ePortal Tool Buttons
ePortal Composer User’s Guide 17 SeeBeyond Proprietary and Confidential
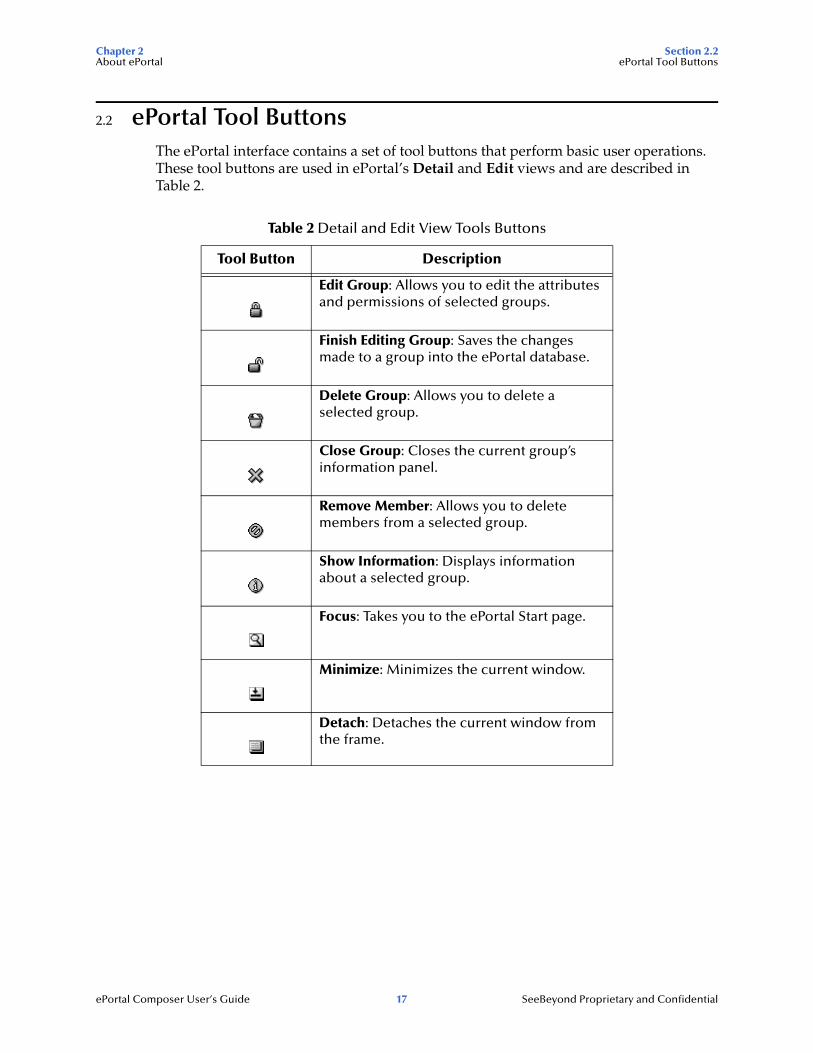
2.2 ePortal Tool ButtonsThe ePortal interface contains a set of tool buttons that perform basic user operations. These tool buttons are used in ePortal’s Detail and Edit views and are described in Table 2.
Table 2 Detail and Edit View Tools Buttons
Tool Button Description
Edit Group: Allows you to edit the attributes and permissions of selected groups.
Finish Editing Group: Saves the changes made to a group into the ePortal database.
Delete Group: Allows you to delete a selected group.
Close Group: Closes the current group’s information panel.
Remove Member: Allows you to delete members from a selected group.
Show Information: Displays information about a selected group.
Focus: Takes you to the ePortal Start page.
Minimize: Minimizes the current window.
Detach: Detaches the current window from the frame.
ePortal Composer User’s Guide 18 SeeBeyond Proprietary and Confidential
Chapter 3
Installing ePortal
This chapter explains how to install, configure, and deploy ePortal, including its supporting run-time components.
This Chapter Includes
“System Requirements” on page 18
“Prerequisites for Installation” on page 18
“Installing ePortal via the Enterprise Manager” on page 19
“Configuring ePortal” on page 20
“Deploying ePortal” on page 34
3.1 System RequirementsePortal supports the following operating systems:
Windows XP, Windows 2000, and Windows Server 2003
HP Tru64 V5.1A
HP-UX 11.0 and 11i (RISC)
IBM AIX 5.1 and 5.2
Red Hat Linux 8 (Intel)
Red Hat Linux Advanced Server 2.1 (Intel)
Sun Solaris 8 and 9
3.2 Prerequisites for InstallationThis section provides a list of the application, configuration, and run-time components required for the ePortal installation.
Chapter 3 Section 3.3Installing ePortal Installing ePortal via the Enterprise Manager
ePortal Composer User’s Guide 19 SeeBeyond Proprietary and Confidential
3.2.1 Web ServerePortal must be installed via the Enterprise Manager. You can run ePortal on a system with eGate and its Integration Server or on a WebSphere application server.
Note: To install ePortal on system running a SeeBeyond Integration Server, your site must have an active installation of eGate.
3.2.2 Application ComponentsTo install ePortal, you need the following application components:
An installed license for eGate and ePortal
ePortal.ear (enterprise archive file)
search.war (ePortal search facility Web archive file)
ePortal.properties (configuration file for ePortal run-time properties)
3.3 Installing ePortal via the Enterprise ManagerDuring the eGate Integrator installation process, the SeeBeyond Enterprise Manager, a Web-based application, is used to select and upload ePortal (the .sar file for ePortal) from the installation CD-ROM to the Repository.
When the Repository is running on a UNIX operating system, ePortal is installed using the Enterprise Manager, on a computer running Windows connected to the Repository server.
3.3.1 Uploading ePortalYou can upload ePortal during the eGate installation or separately, if desired. If you are installing eGate and ePortal at the same time, follow the instructions in the SeeBeyond ICAN Suite Installation Guide, for installing eGate, and upload ePortal.sar after uploading eGate.sar.
If you are not installing eGate, the instructions for using the Enterprise Manager in the SeeBeyond ICAN Suite Installation Guide still apply to installing ePortal.
To install ePortal with eGate installation
1 During the procedures for uploading files to the Repository using the Enterprise Manager, after uploading the eGate.sar file, select and upload the following file:
ePortal.sar
2 If you are installing eGate, continue as instructed in the SeeBeyond ICAN Suite Installation Guide.
Note: ePortal is also supported by SeeBeyond’s eInsight ESB.
Chapter 3 Section 3.4Installing ePortal Configuring ePortal
ePortal Composer User’s Guide 20 SeeBeyond Proprietary and Confidential
To install ePortal alone
1 Using your browser, connect to the Repository.
2 During the procedures for uploading files to the Repository using the Enterprise Manager, select and upload the following file:
ePortal.sar
3 When the upload is finished, you can exit the browser.
3.3.2 Downloading and Extracting the ePortal Files1 After the upload is finished, click the DOWNLOADS tab.
2 On the DOWNLOADS page, click ePortal.
3 On the File Download dialog box, click Save and save the ePortal.zip file to a temporary directory.
4 Extract (unzip) the contents of the ePortal.zip file to the root directory (for example, C:\).
This operation creates the following directory:
C:\ePortal
This directory contains the following files:
search.war
ePortal.ear
ePortal.properties
UNIX installation
UNIX installation requires the same steps as explained in these procedures. To finish installing ePortal on UNIX, take the additional step of copying the ePortal directory to the desired location on the UNIX machine.
You configure and deploy ePortal on UNIX in the same way as you do on Windows.
WebSphere installation
See “Configuring and Deploying ePortal on WebSphere” on page 36 for instructions on how to install, configure, and deploy ePortal on WebSphere.
3.4 Configuring ePortalConfiguring ePortal after initial installation requires the following operations:
Setting up the Integration Server or WebSphere application server
Setting up authentication features
Editing the ePortal.properties file
Chapter 3 Section 3.4Installing ePortal Configuring ePortal
ePortal Composer User’s Guide 21 SeeBeyond Proprietary and Confidential
If you are using LDAP, you must configure ePortal accordingly. This section explains how to do these operations.
3.4.1 Setting Up the Integration ServerIf you are using the Integration Server, follow the procedures in this section. If you are using the WebSphere application server, see the appropriate documentation for setting up the WebSphere server.
For complete details on how to set up an Integration Server in eGate, see the eGate Integrator Tutorial.
To set up the Integration Server
1 Using the Enterprise Designer’s Environment Explorer, create an Environment under the desired Repository.
Note: ePortal does not require a Deployment Profile.
2 Create a Logical Host under that Environment.
3 Create an Integration Server under that Logical Host.
3.4.2 Setting Up AuthenticationThe ePortal run-time environment requires that you define the following users:
Administrator
guest
template
You must define these users in the Enterprise Designer Environment where ePortal is running. The users you have defined provide the initial channel templates at log-in. The Administrator user is already defined in the eGate system, but not the roles. In addition, you must create the guest and template users.
These users must have the following roles:
Administrator: administration (note character case) and all roles
guest and template: all role
Note: You can create additional users before or after ePortal is installed and operating on a Logical Host. For the new user and role definitions to take effect after installation, you must restart the Logical Host, or while the Logical Host is running, right-click the Environment name in the Environment Explorer, and on the pop-up menu, click Apply. You are logged off ePortal automatically and must log back on again to allow your changes to show up in the application.
Chapter 3 Section 3.4Installing ePortal Configuring ePortal
ePortal Composer User’s Guide 22 SeeBeyond Proprietary and Confidential
Using LDAP and the Integration Server
If you are using the Integration Server and Lightweight Directory Access Protocol (LDAP), you must use LDAP to set up the authentication features, that is, users and roles are set up in LDAP and not via the Enterprise Designer. See the appropriate LDAP documentation for information on how to set up authentication using LDAP.
See “Setting Integration Server Properties for LDAP” on page 26 for details on how to set the Integration Server properties for LDAP.
Using the WebSphere application server
If you are using the WebSphere application server to run ePortal, you must set up your authentication for ePortal using LDAP. See the appropriate LDAP documentation for information on how to set up authentication using LDAP.
See “Configuring and Deploying ePortal on WebSphere” on page 36 for more information on how to install, configure, and deploy ePortal on WebSphere.
To add the administration role to the Administrator user
1 In the Environment tree, click the Environment (the Environment name) that you created for ePortal.
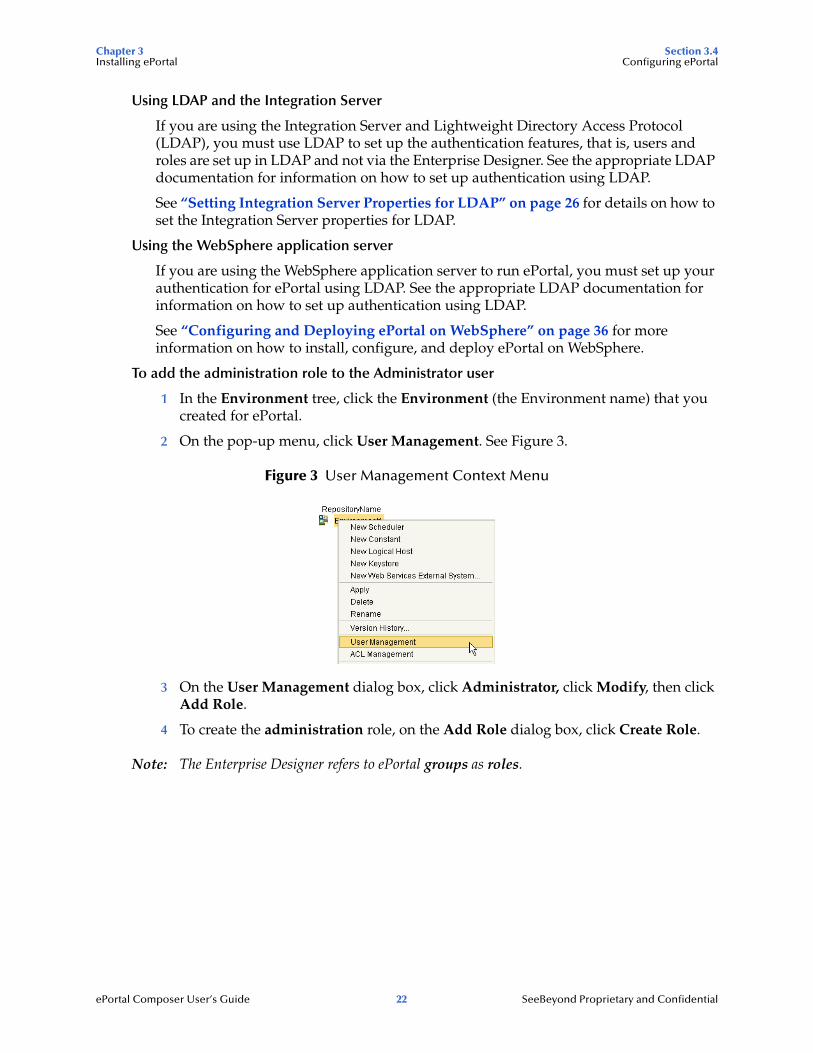
2 On the pop-up menu, click User Management. See Figure 3.
Figure 3 User Management Context Menu
3 On the User Management dialog box, click Administrator, click Modify, then click Add Role.
4 To create the administration role, on the Add Role dialog box, click Create Role.
Note: The Enterprise Designer refers to ePortal groups as roles.
Chapter 3 Section 3.4Installing ePortal Configuring ePortal
ePortal Composer User’s Guide 23 SeeBeyond Proprietary and Confidential
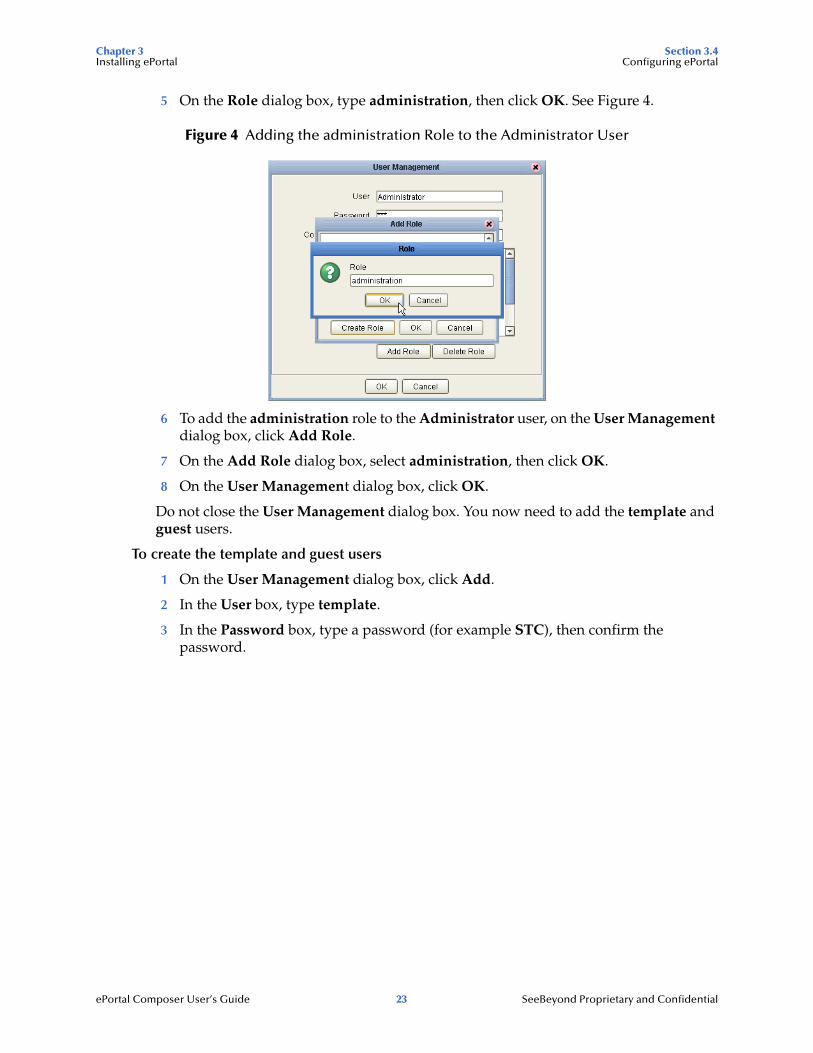
5 On the Role dialog box, type administration, then click OK. See Figure 4.
Figure 4 Adding the administration Role to the Administrator User
6 To add the administration role to the Administrator user, on the User Management dialog box, click Add Role.
7 On the Add Role dialog box, select administration, then click OK.
8 On the User Management dialog box, click OK.
Do not close the User Management dialog box. You now need to add the template and guest users.
To create the template and guest users
1 On the User Management dialog box, click Add.
2 In the User box, type template.
3 In the Password box, type a password (for example STC), then confirm the password.
Chapter 3 Section 3.4Installing ePortal Configuring ePortal
ePortal Composer User’s Guide 24 SeeBeyond Proprietary and Confidential
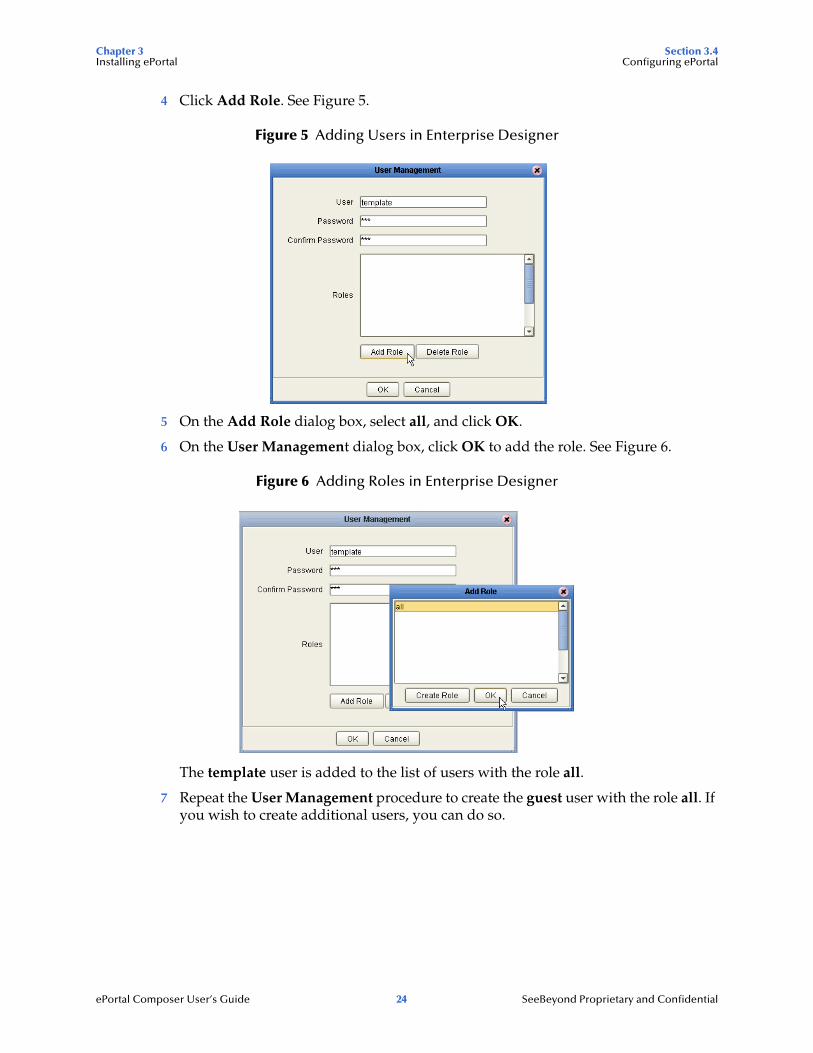
4 Click Add Role. See Figure 5.
Figure 5 Adding Users in Enterprise Designer
5 On the Add Role dialog box, select all, and click OK.
6 On the User Management dialog box, click OK to add the role. See Figure 6.
Figure 6 Adding Roles in Enterprise Designer
The template user is added to the list of users with the role all.
7 Repeat the User Management procedure to create the guest user with the role all. If you wish to create additional users, you can do so.
Chapter 3 Section 3.4Installing ePortal Configuring ePortal
ePortal Composer User’s Guide 25 SeeBeyond Proprietary and Confidential
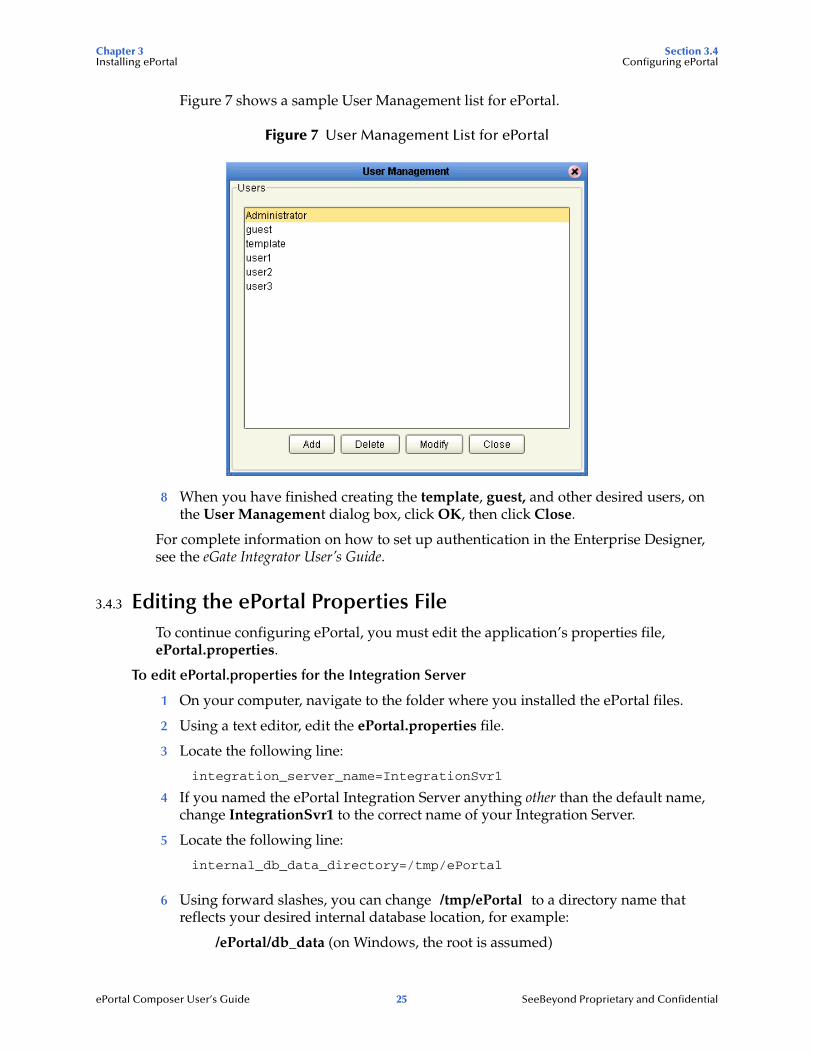
Figure 7 shows a sample User Management list for ePortal.
Figure 7 User Management List for ePortal
8 When you have finished creating the template, guest, and other desired users, on the User Management dialog box, click OK, then click Close.
For complete information on how to set up authentication in the Enterprise Designer, see the eGate Integrator User’s Guide.
3.4.3 Editing the ePortal Properties FileTo continue configuring ePortal, you must edit the application’s properties file, ePortal.properties.
To edit ePortal.properties for the Integration Server
1 On your computer, navigate to the folder where you installed the ePortal files.
2 Using a text editor, edit the ePortal.properties file.
3 Locate the following line:
integration_server_name=IntegrationSvr1
4 If you named the ePortal Integration Server anything other than the default name, change IntegrationSvr1 to the correct name of your Integration Server.
5 Locate the following line:
internal_db_data_directory=/tmp/ePortal
6 Using forward slashes, you can change /tmp/ePortal to a directory name that reflects your desired internal database location, for example:
/ePortal/db_data (on Windows, the root is assumed)
Chapter 3 Section 3.4Installing ePortal Configuring ePortal
ePortal Composer User’s Guide 26 SeeBeyond Proprietary and Confidential
Note: ePortal creates its own internal database during the first time it runs.
7 Save the ePortal properties file.
Important: Do not edit any of the rest of the lines in the file.
8 Make sure the Integration Server and Logical Host are running.
Note: For WebSphere, make sure the application server is running.
9 Using Windows, copy the ePortal.properties file to the Logical Host and drop it into the following directory:
<drive>:\<install_directory>\logicalhost\stcis\lib\endorsed
Where:
drive and install_directory are the installation drive and directory for the ICAN Suite
To edit ePortal.properties for WebSphere
Follow the previous procedure, but omit step 3.
3.4.4 Configuring ePortal for LDAPThis section explains how to set the configuration properties that allow you to run ePortal with LDAP.
Setting Integration Server Properties for LDAP
You must set the properties of the Integration Server to be compatible with LDAP. To allow the Enterprise Designer to authenticate via LDAP, you must change the default security realm type to the appropriate realm type. You must also set properties for the desired realm.
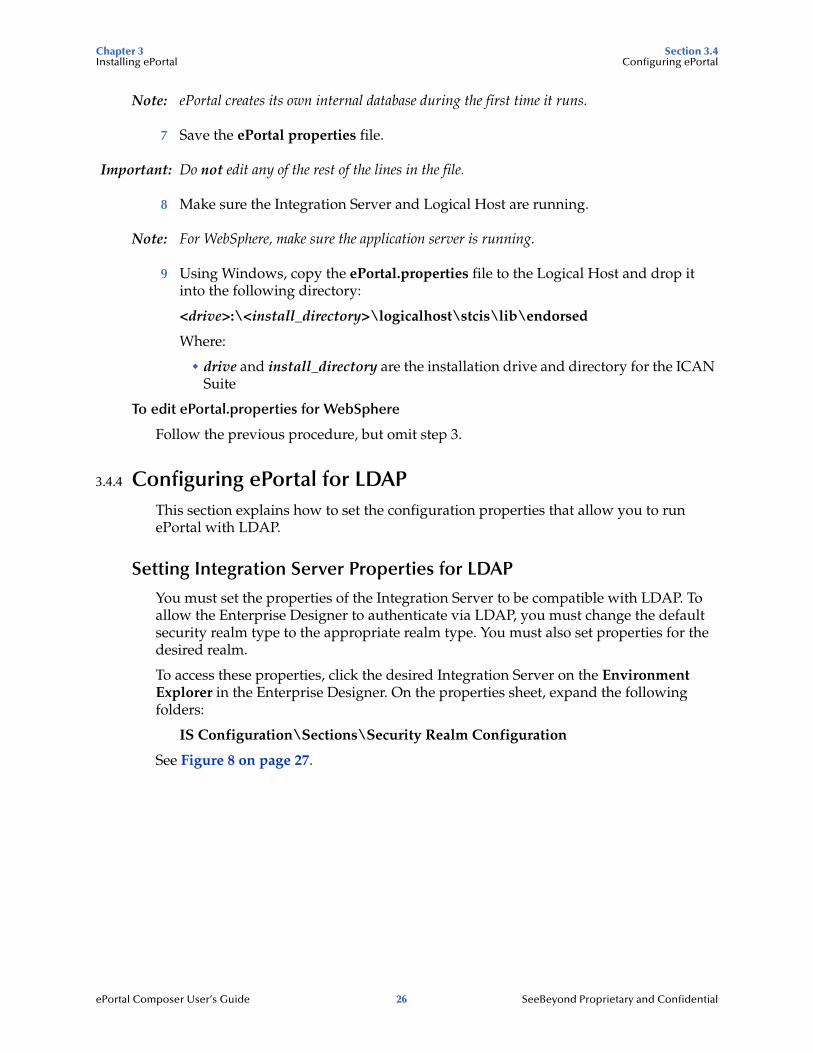
To access these properties, click the desired Integration Server on the Environment Explorer in the Enterprise Designer. On the properties sheet, expand the following folders:
IS Configuration\Sections\Security Realm Configuration
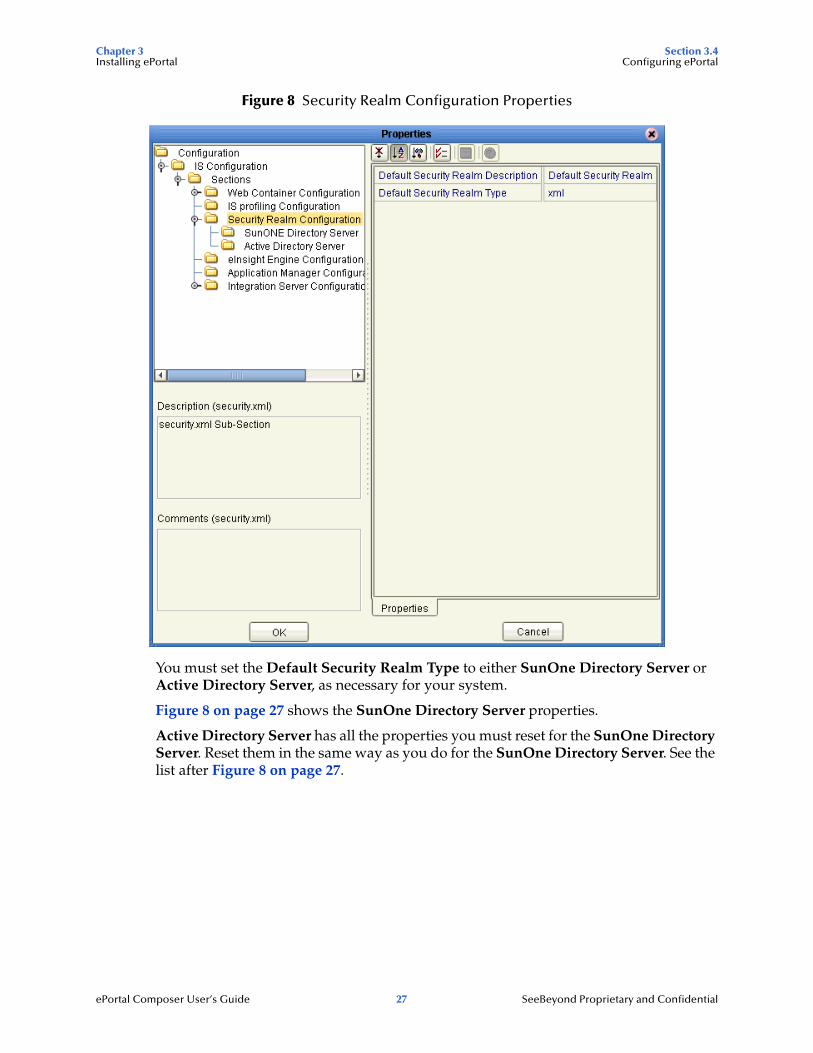
See Figure 8 on page 27.
Chapter 3 Section 3.4Installing ePortal Configuring ePortal
ePortal Composer User’s Guide 27 SeeBeyond Proprietary and Confidential
Figure 8 Security Realm Configuration Properties
You must set the Default Security Realm Type to either SunOne Directory Server or Active Directory Server, as necessary for your system.
Figure 8 on page 27 shows the SunOne Directory Server properties.
Active Directory Server has all the properties you must reset for the SunOne Directory Server. Reset them in the same way as you do for the SunOne Directory Server. See the list after Figure 8 on page 27.
Chapter 3 Section 3.4Installing ePortal Configuring ePortal
ePortal Composer User’s Guide 28 SeeBeyond Proprietary and Confidential
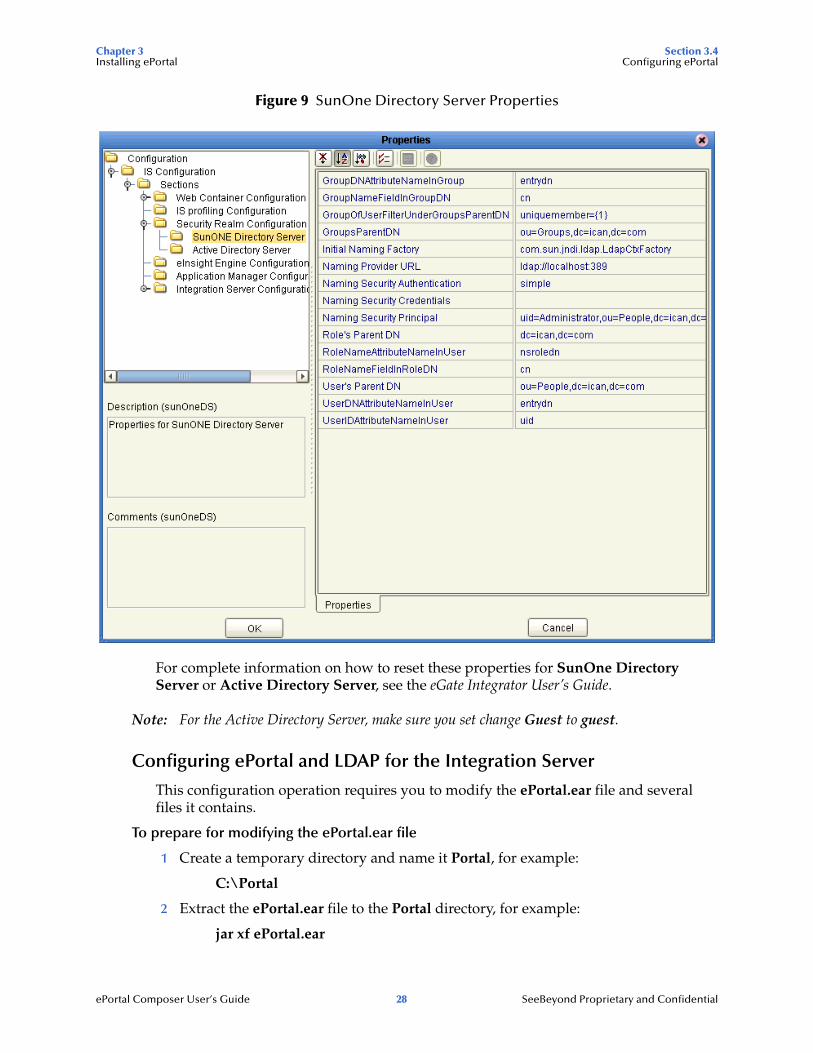
Figure 9 SunOne Directory Server Properties
For complete information on how to reset these properties for SunOne Directory Server or Active Directory Server, see the eGate Integrator User’s Guide.
Note: For the Active Directory Server, make sure you set change Guest to guest.
Configuring ePortal and LDAP for the Integration Server
This configuration operation requires you to modify the ePortal.ear file and several files it contains.
To prepare for modifying the ePortal.ear file
1 Create a temporary directory and name it Portal, for example:
C:\Portal
2 Extract the ePortal.ear file to the Portal directory, for example:
jar xf ePortal.ear
Chapter 3 Section 3.4Installing ePortal Configuring ePortal
ePortal Composer User’s Guide 29 SeeBeyond Proprietary and Confidential
The result of the extraction is several files, including ePortal.war.
3 Create a temporary directory inside Portal and name it Install, for example:
C:\Portal\Install
4 Extract the ePortal.war file to the install directory, for example:
jar xf ePortal.war
5 Navigate to the \Install\WEB-INF\lib directory.
6 Under the WEB-INF\lib directory, create a temporary directory and name it temp, as follows:
mkdir temp
7 From the \Install\WEB-INF\lib directory, extract the ePortal.jar file to the temp directory.
8 Delete the ePortal.jar file from \Install\WEB-INF\lib directory.
del ePortal.jar
9 Delete the Install\WEB-INF\lib\tmp\META-INF directory.
10 Navigate to the \Install\WEB-INF\lib\temp\properties directory.
11 In the \Install\WEB-INF\lib\temp\properties directory, replace all the portal.properties file content with all the portal.ldapRealm.properties file content.
12 In the \Install\WEB-INF\lib\temp\groups directory, replace all the compositeGroupServices.xml file content with all the compositeGroupServices.ldapRealm.xml file content.
If you are doing an Active Directory installation, skip these procedures and instead complete the procedure on page 31. Complete the following procedure only if you are doing a SunOne Directory installation:
To modify the ldap.properties file for SunOne Directory
1 Navigate to the \Install\WEB-INF\lib\temp\properties directory and open the in the ldap.properties file using a text editor.
You only need to edit the SunOne Directory-related fields.
2 Provide the SunOne server IP address and port number, for example:
ldap.host=192.168.1.2
ldap.port=389
3 Provide the SunOne server directory context to search for users, for example:
ldap.baseDN=ou=People,dc=ican,dc=com
4 Provide the SunOne server attribute used to search for a user, for example:
ldap.uidAttribute=uid
Chapter 3 Section 3.4Installing ePortal Configuring ePortal
ePortal Composer User’s Guide 30 SeeBeyond Proprietary and Confidential
5 If your directory server permits anonymous binds, leave the following SunOne server lines unchanged:
#ldap.managerDN=uid=Administrator,ou=People,dc=ican,dc=com
ldap.managerDN=
ldap.managerPW=
6 If your directory server does not permit anonymous binds, uncomment the first SunOne server line and provide your values, for example:
ldap.managerDN=uid=Administrator,ou=People,dc=ican,dc=com
ldap.managerDN=
ldap.managerPW=
7 Navigate to the \Install\WEB-INF\lib\temp\properties directory, and open the PersonDirs.xml file using a text editor.
You only need to edit the SunOne Directory-related fields.
8 Provide the SunOne server IP address, port number, ou, and dc values in the url field, for example:
<url>ldap://192.168.1.2:389/ou=People,dc=ican,dc=com</url>
9 Provide the SunOne server uidquery value, for example:
<uidquery>(uid={0})</uidquery>
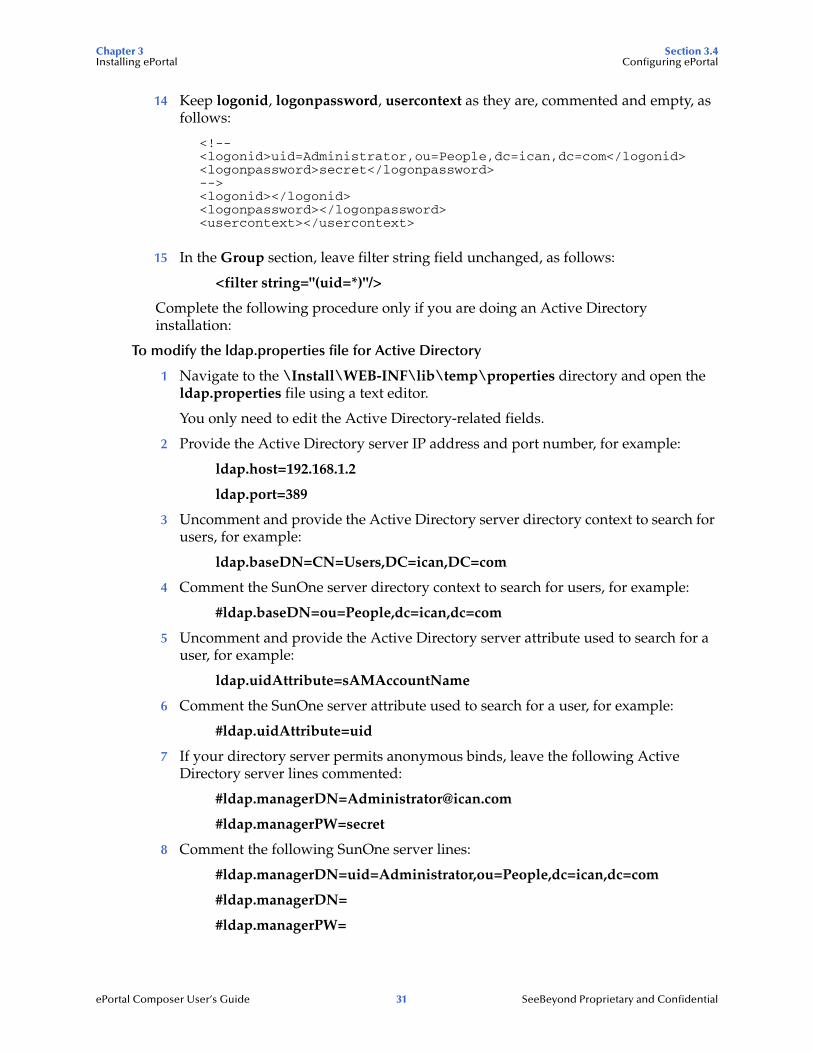
10 Keep logonid, logonpassword, usercontext as they are, commented and empty, as follows:
<!--<logonid>uid=Administrator,ou=People,dc=ican,dc=com</logonid><logonpassword>secret</logonpassword>--><logonid></logonid><logonpassword></logonpassword><usercontext></usercontext>
11 Navigate to the \Install\WEB-INF\lib\temp\groups directory, and open the LDAPGroupStoreConfig.xml file using a text editor.
You only need to edit the SunOne Directory-related fields.
12 Provide the SunOne server IP address, port number, ou, and dc for the url field, for example:
<url>ldap://192.168.1.2:389/ou=People,dc=ican,dc=com</url>
13 Provide the SunOne server keyfield and namefield values.
Chapter 3 Section 3.4Installing ePortal Configuring ePortal
ePortal Composer User’s Guide 31 SeeBeyond Proprietary and Confidential
14 Keep logonid, logonpassword, usercontext as they are, commented and empty, as follows:
<!--<logonid>uid=Administrator,ou=People,dc=ican,dc=com</logonid><logonpassword>secret</logonpassword>--><logonid></logonid><logonpassword></logonpassword><usercontext></usercontext>
15 In the Group section, leave filter string field unchanged, as follows:
<filter string="(uid=*)"/>
Complete the following procedure only if you are doing an Active Directory installation:
To modify the ldap.properties file for Active Directory
1 Navigate to the \Install\WEB-INF\lib\temp\properties directory and open the ldap.properties file using a text editor.
You only need to edit the Active Directory-related fields.
2 Provide the Active Directory server IP address and port number, for example:
ldap.host=192.168.1.2
ldap.port=389
3 Uncomment and provide the Active Directory server directory context to search for users, for example:
ldap.baseDN=CN=Users,DC=ican,DC=com
4 Comment the SunOne server directory context to search for users, for example:
#ldap.baseDN=ou=People,dc=ican,dc=com
5 Uncomment and provide the Active Directory server attribute used to search for a user, for example:
ldap.uidAttribute=sAMAccountName
6 Comment the SunOne server attribute used to search for a user, for example:
#ldap.uidAttribute=uid
7 If your directory server permits anonymous binds, leave the following Active Directory server lines commented:
#ldap.managerPW=secret
8 Comment the following SunOne server lines:
#ldap.managerDN=uid=Administrator,ou=People,dc=ican,dc=com
#ldap.managerDN=
#ldap.managerPW=
Chapter 3 Section 3.4Installing ePortal Configuring ePortal
ePortal Composer User’s Guide 32 SeeBeyond Proprietary and Confidential
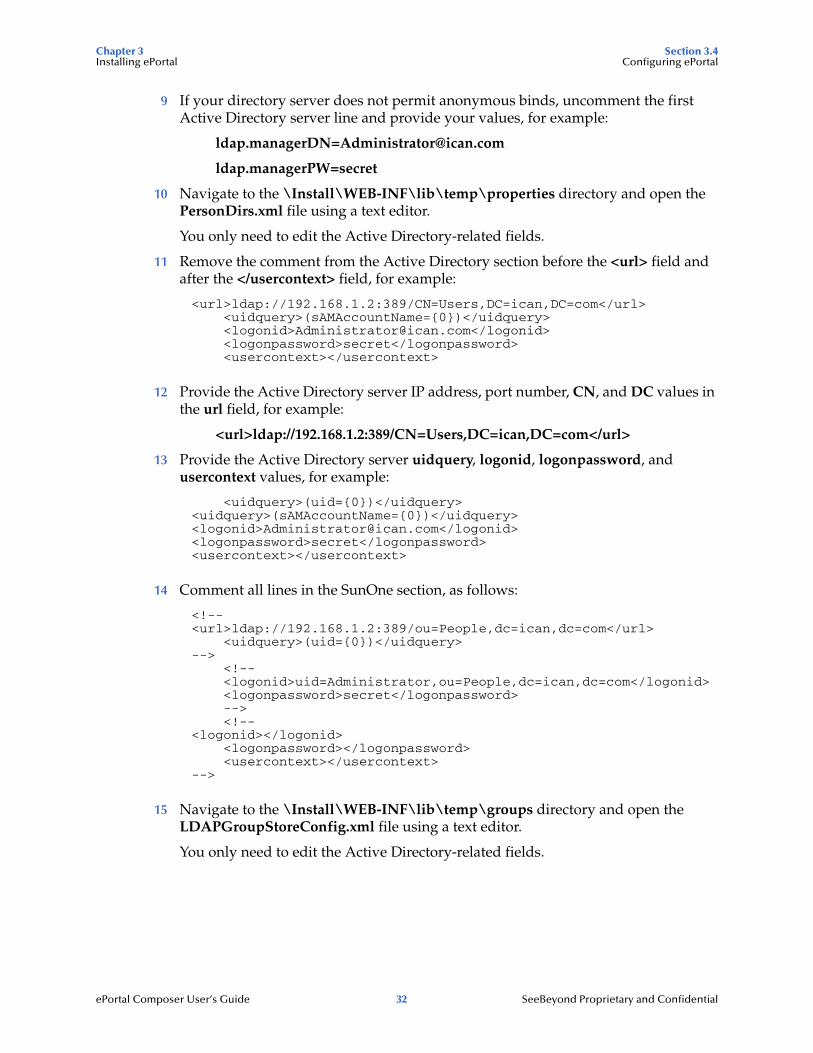
9 If your directory server does not permit anonymous binds, uncomment the first Active Directory server line and provide your values, for example:
ldap.managerPW=secret
10 Navigate to the \Install\WEB-INF\lib\temp\properties directory and open the PersonDirs.xml file using a text editor.
You only need to edit the Active Directory-related fields.
11 Remove the comment from the Active Directory section before the <url> field and after the </usercontext> field, for example:
<url>ldap://192.168.1.2:389/CN=Users,DC=ican,DC=com</url><uidquery>(sAMAccountName={0})</uidquery><logonid>[email protected]</logonid><logonpassword>secret</logonpassword><usercontext></usercontext>
12 Provide the Active Directory server IP address, port number, CN, and DC values in the url field, for example:
<url>ldap://192.168.1.2:389/CN=Users,DC=ican,DC=com</url>
13 Provide the Active Directory server uidquery, logonid, logonpassword, and usercontext values, for example:
<uidquery>(uid={0})</uidquery><uidquery>(sAMAccountName={0})</uidquery><logonid>[email protected]</logonid><logonpassword>secret</logonpassword><usercontext></usercontext>
14 Comment all lines in the SunOne section, as follows:
<!--<url>ldap://192.168.1.2:389/ou=People,dc=ican,dc=com</url>
<uidquery>(uid={0})</uidquery>-->
<!--<logonid>uid=Administrator,ou=People,dc=ican,dc=com</logonid><logonpassword>secret</logonpassword>--><!--
<logonid></logonid><logonpassword></logonpassword><usercontext></usercontext>
-->
15 Navigate to the \Install\WEB-INF\lib\temp\groups directory and open the LDAPGroupStoreConfig.xml file using a text editor.
You only need to edit the Active Directory-related fields.
Chapter 3 Section 3.4Installing ePortal Configuring ePortal
ePortal Composer User’s Guide 33 SeeBeyond Proprietary and Confidential
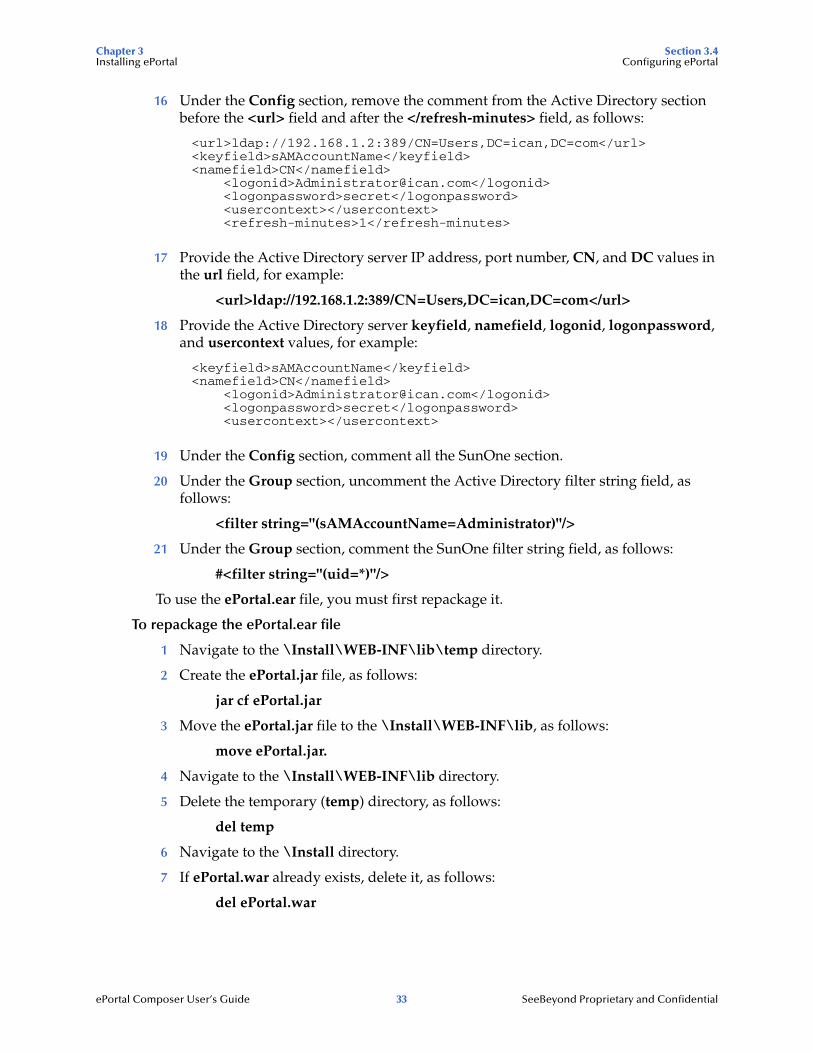
16 Under the Config section, remove the comment from the Active Directory section before the <url> field and after the </refresh-minutes> field, as follows:
<url>ldap://192.168.1.2:389/CN=Users,DC=ican,DC=com</url><keyfield>sAMAccountName</keyfield><namefield>CN</namefield>
<logonid>[email protected]</logonid><logonpassword>secret</logonpassword><usercontext></usercontext><refresh-minutes>1</refresh-minutes>
17 Provide the Active Directory server IP address, port number, CN, and DC values in the url field, for example:
<url>ldap://192.168.1.2:389/CN=Users,DC=ican,DC=com</url>
18 Provide the Active Directory server keyfield, namefield, logonid, logonpassword, and usercontext values, for example:
<keyfield>sAMAccountName</keyfield><namefield>CN</namefield>
<logonid>[email protected]</logonid><logonpassword>secret</logonpassword><usercontext></usercontext>
19 Under the Config section, comment all the SunOne section.
20 Under the Group section, uncomment the Active Directory filter string field, as follows:
<filter string="(sAMAccountName=Administrator)"/>
21 Under the Group section, comment the SunOne filter string field, as follows:
#<filter string="(uid=*)"/>
To use the ePortal.ear file, you must first repackage it.
To repackage the ePortal.ear file
1 Navigate to the \Install\WEB-INF\lib\temp directory.
2 Create the ePortal.jar file, as follows:
jar cf ePortal.jar
3 Move the ePortal.jar file to the \Install\WEB-INF\lib, as follows:
move ePortal.jar.
4 Navigate to the \Install\WEB-INF\lib directory.
5 Delete the temporary (temp) directory, as follows:
del temp
6 Navigate to the \Install directory.
7 If ePortal.war already exists, delete it, as follows:
del ePortal.war
Chapter 3 Section 3.5Installing ePortal Deploying ePortal
ePortal Composer User’s Guide 34 SeeBeyond Proprietary and Confidential
8 Create a new ePortal.war file, as follows:
jar cf ePortal.war
9 Move the ePortal.war file to the \Portal directory.
10 Navigate to \Portal.
11 Delete the \Install directory.
12 Create a new ePortal.ear file using the following command:
jar cf ePortal.ear
13 Deploy the ePortal.ear file to the Integration Server. See “Deploying ePortal” on page 34 for details.
3.5 Deploying ePortalePortal can run under one of the following environments:
SeeBeyond Integration Server, authenticating using either the Enterprise Designer or LDAP
WebSphere application server authenticating using LDAP only
To deploy ePortal under the Integration Server environment, you must use the Enterprise Designer. For complete instructions on how to use the Enterprise Designer, see the eGate Integrator User’s Guide and eGate Integrator System Administration Guide.
Running the Logical Host on Windows
Before you can deploy ePortal on the Integration Server, you must first start the Logical Host. See the eGate Integrator Tutorial for complete instructions on how to run the Logical Host.
This is the default deployment.
Deploying on the WebSphere application server
If you are using the WebSphere application server to run ePortal, you must deploy ePortal using WebSphere. See “Configuring and Deploying ePortal on WebSphere” on page 36 for details.
Chapter 3 Section 3.5Installing ePortal Deploying ePortal
ePortal Composer User’s Guide 35 SeeBeyond Proprietary and Confidential
3.5.1 Deploying ePortal FilesTo deploy the ePortal application files do the following:
1 Copy the ePortal.ear and search.war files to the Logical Host deployment directory, for example:
<drive>:\<install_directory>\logicalhost\stcis\deploy\new\<integration_server>
Where:
drive and install_directory are the installation drive and directory for the ICAN Suite
integration_server is the name of your Integration Server
Note: There can be more than one Integration Server running on the Logical Host. Make sure you navigate to the specific Integration Server that you specified for ePortal.
2 Watch the ePortal.ear and search.war files in the directory.
If you completed all of the preceding procedures correctly, the two files disappear, one after the other. Depending on the host machine speed, this action may take a few moments.
3.5.2 Validating the InstallationThis procedure verifies that the ePortal application, the Logical Host, and the ePortal database are all running. In addition, it confirms that ePortal has been successfully installed, configured. and deployed.
To validate the ePortal installation
1 Check the following directories:
<drive>:\<install_directory>\logicalhost\stcis\repository\applications\<integration_server>\EAR and \WAR
Where:
drive and install_directory are the installation drive and directory for the ICAN Suite
integration_server is the name of your Integration Server
This is the deployed location of the ePortal.ear and search.war files. If these files are not present, repeat the installation and/or troubleshoot as necessary.
2 Start your browser.
3 On the Address line, type the following URL:
http://<localhost>:<port>/ePortal/
Chapter 3 Section 3.6Installing ePortal Configuring and Deploying ePortal on WebSphere
ePortal Composer User’s Guide 36 SeeBeyond Proprietary and Confidential
Where:
localhost is the name of the host machine
port is the port number assigned to the Integration Server on the Logical Host, for example:
http://localhost:18004/ePortal/
The port 18004 is the default installation port number.
In a successful installation, the ePortal login window appears.
4 On the login window, log in as Administrator as follows:
username: Administrator
password: STC
If you want to change the ePortal port number, you can do so using the Integration Server properties sheet in the Enterprise Designer.
To change the ePortal port number
1 On the Enterprise Designer’s Environment Explorer, open the desired Integration Server’s properties sheet.
2 Expand the folders in the left pane as follows:
IS Configuration\Sections\Web Container Configuration\Web Server Configurations\Default Web Server
3 In the right pane, under Connector Port, enter the desired port number.
4 Close the properties sheet.
See “Setting Integration Server Properties for LDAP” on page 26 for more information on this properties sheet.
3.5.3 Running ePortal To run ePortal in subsequent sessions
1 Start the Logical Host.
2 Log into ePortal. See “Validating the Installation” on page 35.
Note: Once the .war files have been deployed, you do not need to redeploy them to start the Logical Host.
3.6 Configuring and Deploying ePortal on WebSphereThis section explains how to configure and deploy ePortal on the WebSphere application server (including the SunOne Directory and Active Directory servers). Authentication on WebSphere requires LDAP, so the configuration instructions include setting LDAP properties.
Chapter 3 Section 3.6Installing ePortal Configuring and Deploying ePortal on WebSphere
ePortal Composer User’s Guide 37 SeeBeyond Proprietary and Confidential
3.6.1 Configuring the ePortal.war FileThis section explains how to edit the ePortal.war file to make it compatible with WebSphere.
To configure the ePortal.war file for WebSphere
1 Complete the procedure on page 28.
2 Edit the ePortal.properties file and make any needed configuration changes.
3 Make sure that the location of the database is explicit, for example:
C:/edesigner/ePortal/data_db
4 Copy the modified ePortal.propertes file to the \Install\WEB-INF\lib\temp directory.
5 Navigate to \Install\WEB-INF\lib\temp.
6 Create the ePortal.jar jar file, as follows:
jar cf ePortal.jar
7 Move the ePortal.jar file to the \Install\WEB-INF\lib, as follows:
move ePortal.jar
8 Navigate to the \Install\WEB-INF\lib directory.
9 Delete the temporary (temp) directory, as follows:
del temp
10 Navigate to the \Install directory.
11 If ePortal.war exists, delete it, as follows:
del ePortal.war
12 Create a new ePortal.war file, as follows:
jar cf ePortal.war
13 Move the ePortal.war file to the \Portal directory.
14 Navigate to \Portal.
15 Delete the \Install directory.
16 Create a new ePortal.ear file using the following command:
jar cf ePortal.ear
17 Deploy the ePortal.ear file to the WebSphere application server.
The rest of this section explains how to configure and deploy ePortal on the WebSphere application server.
Chapter 3 Section 3.6Installing ePortal Configuring and Deploying ePortal on WebSphere
ePortal Composer User’s Guide 38 SeeBeyond Proprietary and Confidential
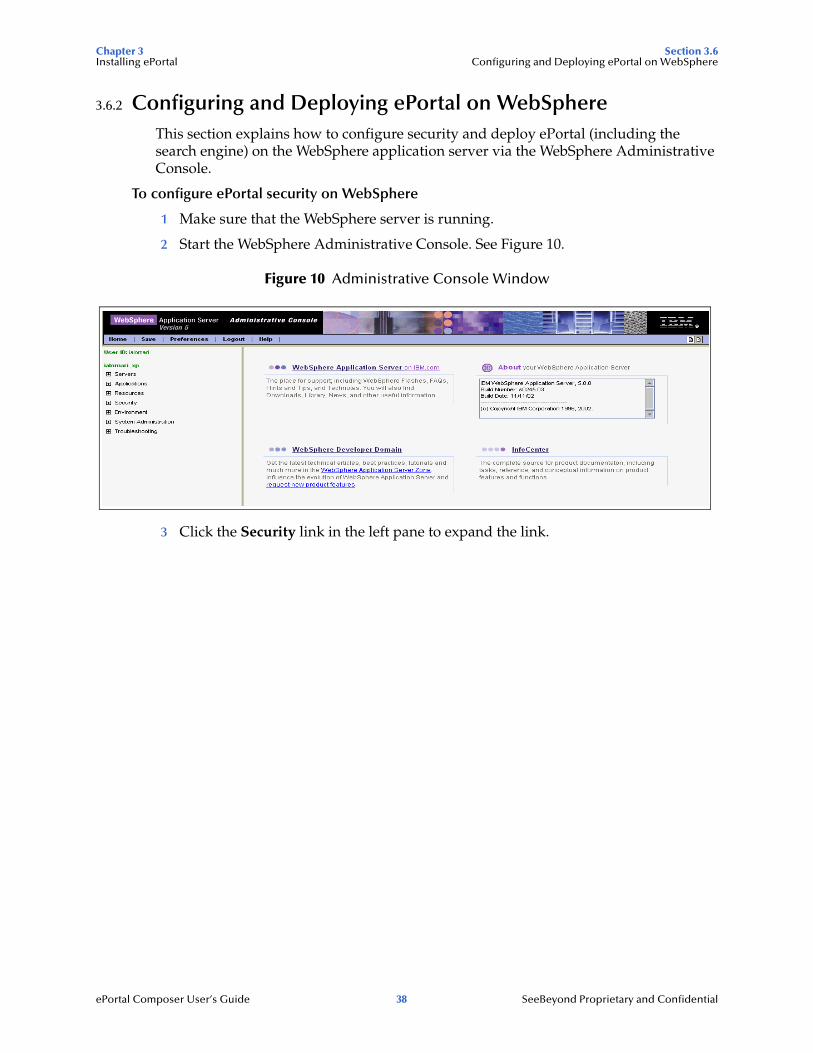
3.6.2 Configuring and Deploying ePortal on WebSphereThis section explains how to configure security and deploy ePortal (including the search engine) on the WebSphere application server via the WebSphere Administrative Console.
To configure ePortal security on WebSphere
1 Make sure that the WebSphere server is running.
2 Start the WebSphere Administrative Console. See Figure 10.
Figure 10 Administrative Console Window
3 Click the Security link in the left pane to expand the link.
Chapter 3 Section 3.6Installing ePortal Configuring and Deploying ePortal on WebSphere
ePortal Composer User’s Guide 39 SeeBeyond Proprietary and Confidential
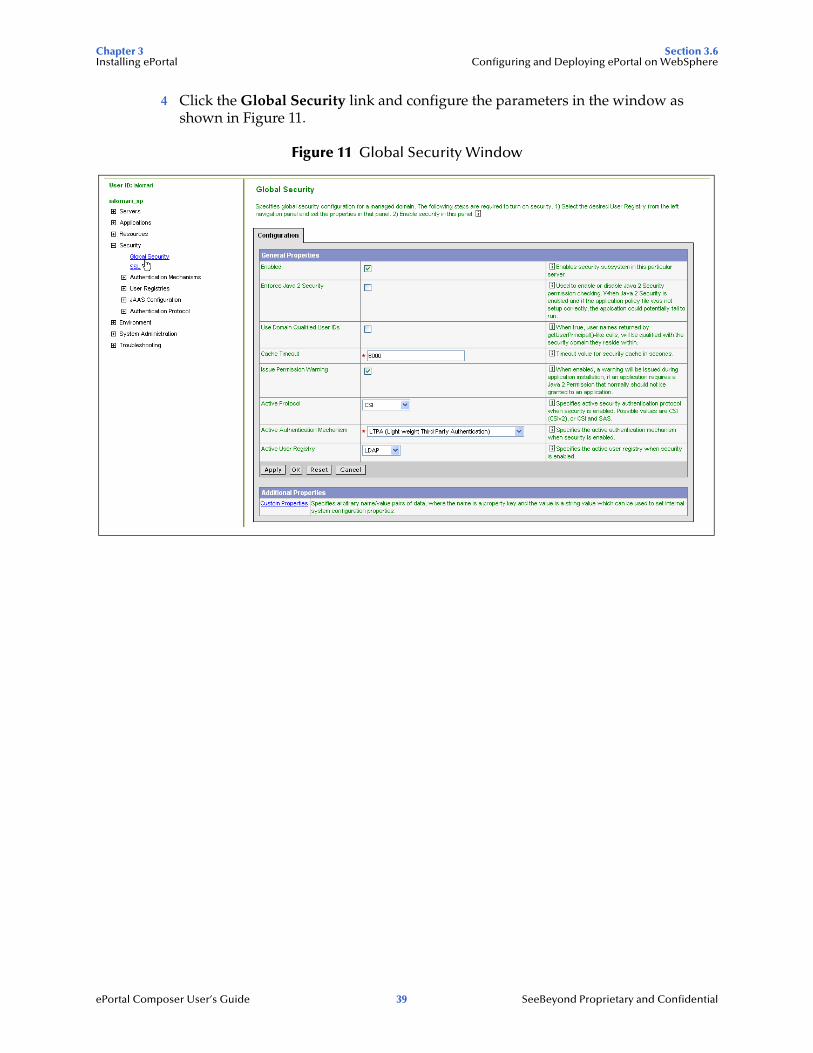
4 Click the Global Security link and configure the parameters in the window as shown in Figure 11.
Figure 11 Global Security Window
Chapter 3 Section 3.6Installing ePortal Configuring and Deploying ePortal on WebSphere
ePortal Composer User’s Guide 40 SeeBeyond Proprietary and Confidential
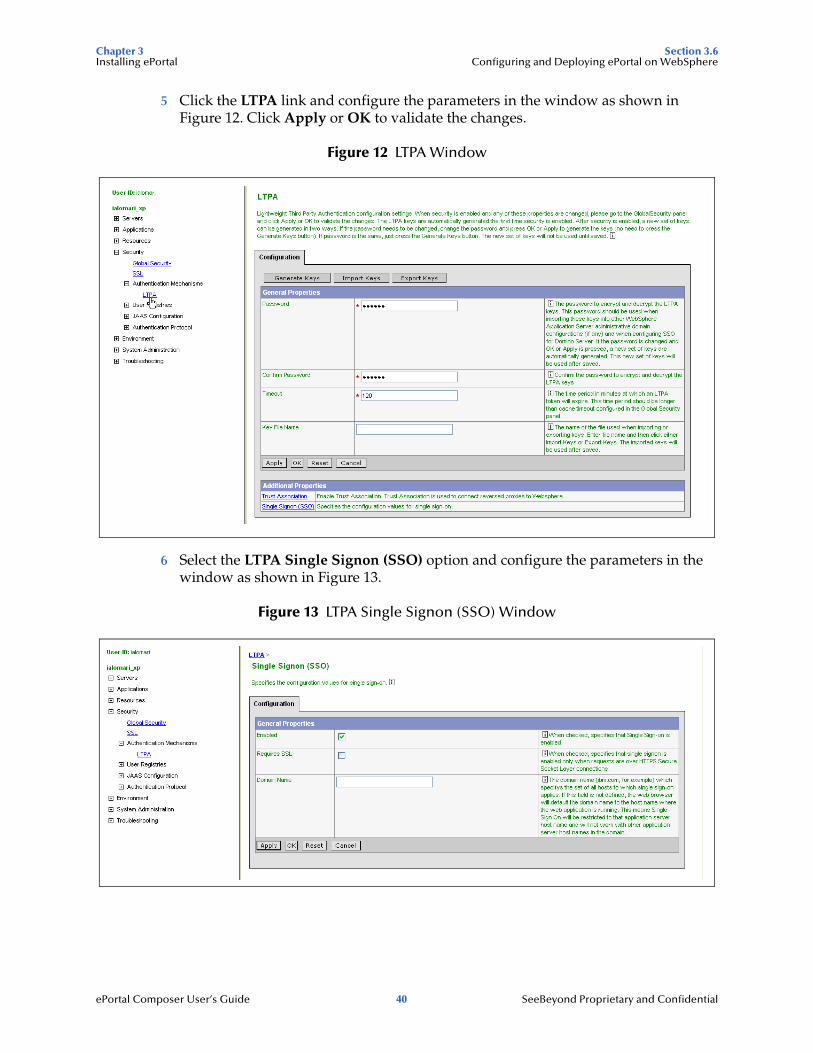
5 Click the LTPA link and configure the parameters in the window as shown in Figure 12. Click Apply or OK to validate the changes.
Figure 12 LTPA Window
6 Select the LTPA Single Signon (SSO) option and configure the parameters in the window as shown in Figure 13.
Figure 13 LTPA Single Signon (SSO) Window
Chapter 3 Section 3.6Installing ePortal Configuring and Deploying ePortal on WebSphere
ePortal Composer User’s Guide 41 SeeBeyond Proprietary and Confidential
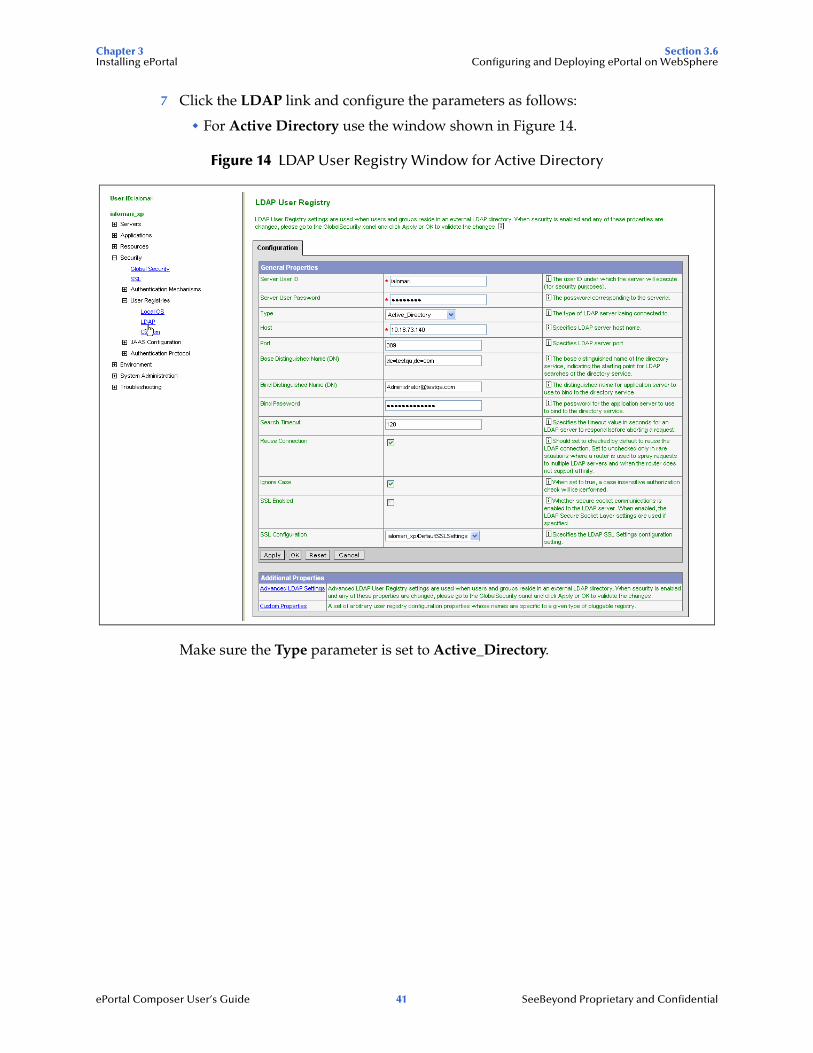
7 Click the LDAP link and configure the parameters as follows:
For Active Directory use the window shown in Figure 14.
Figure 14 LDAP User Registry Window for Active Directory
Make sure the Type parameter is set to Active_Directory.
Chapter 3 Section 3.6Installing ePortal Configuring and Deploying ePortal on WebSphere
ePortal Composer User’s Guide 42 SeeBeyond Proprietary and Confidential
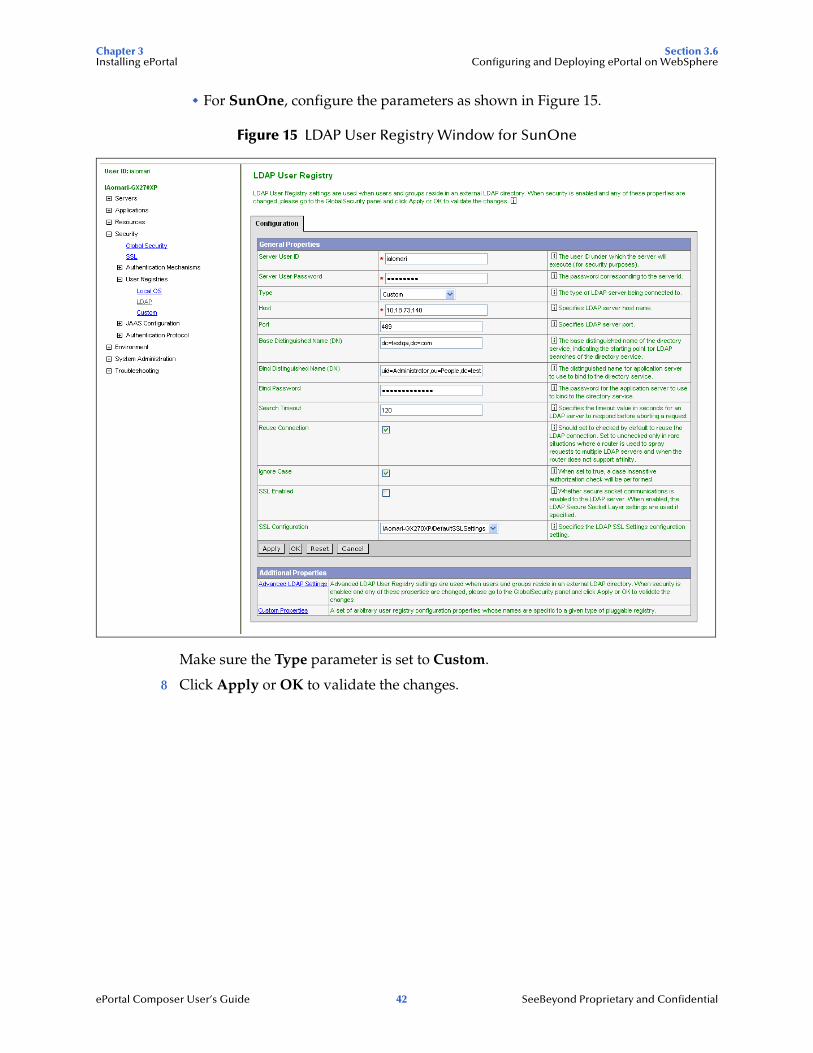
For SunOne, configure the parameters as shown in Figure 15.
Figure 15 LDAP User Registry Window for SunOne
Make sure the Type parameter is set to Custom.
8 Click Apply or OK to validate the changes.
Chapter 3 Section 3.6Installing ePortal Configuring and Deploying ePortal on WebSphere
ePortal Composer User’s Guide 43 SeeBeyond Proprietary and Confidential
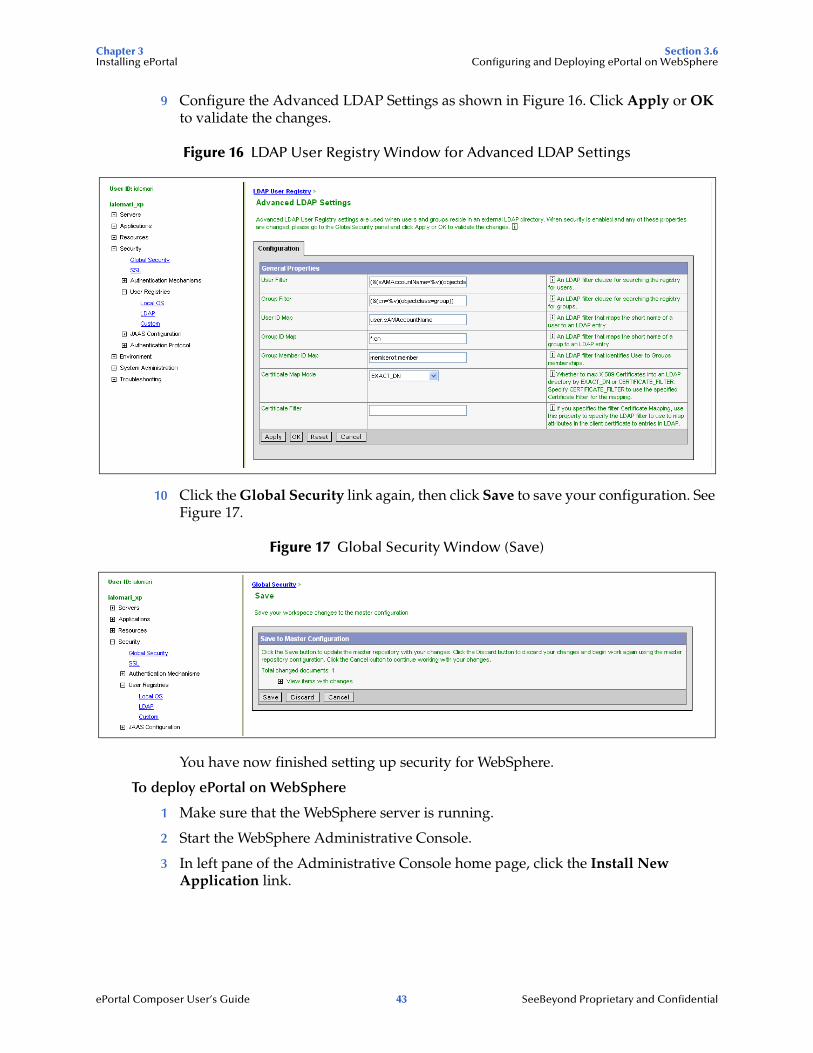
9 Configure the Advanced LDAP Settings as shown in Figure 16. Click Apply or OK to validate the changes.
Figure 16 LDAP User Registry Window for Advanced LDAP Settings
10 Click the Global Security link again, then click Save to save your configuration. See Figure 17.
Figure 17 Global Security Window (Save)
You have now finished setting up security for WebSphere.
To deploy ePortal on WebSphere
1 Make sure that the WebSphere server is running.
2 Start the WebSphere Administrative Console.
3 In left pane of the Administrative Console home page, click the Install New Application link.
Chapter 3 Section 3.6Installing ePortal Configuring and Deploying ePortal on WebSphere
ePortal Composer User’s Guide 44 SeeBeyond Proprietary and Confidential
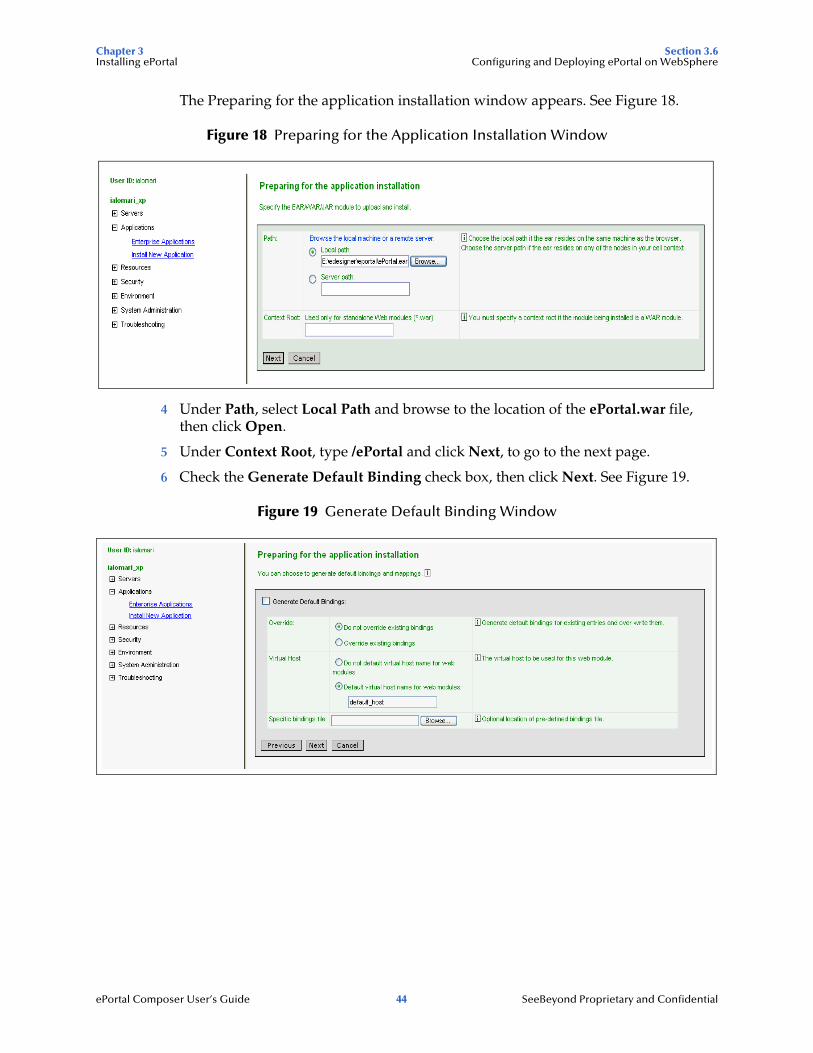
The Preparing for the application installation window appears. See Figure 18.
Figure 18 Preparing for the Application Installation Window
4 Under Path, select Local Path and browse to the location of the ePortal.war file, then click Open.
5 Under Context Root, type /ePortal and click Next, to go to the next page.
6 Check the Generate Default Binding check box, then click Next. See Figure 19.
Figure 19 Generate Default Binding Window
Chapter 3 Section 3.6Installing ePortal Configuring and Deploying ePortal on WebSphere
ePortal Composer User’s Guide 45 SeeBeyond Proprietary and Confidential
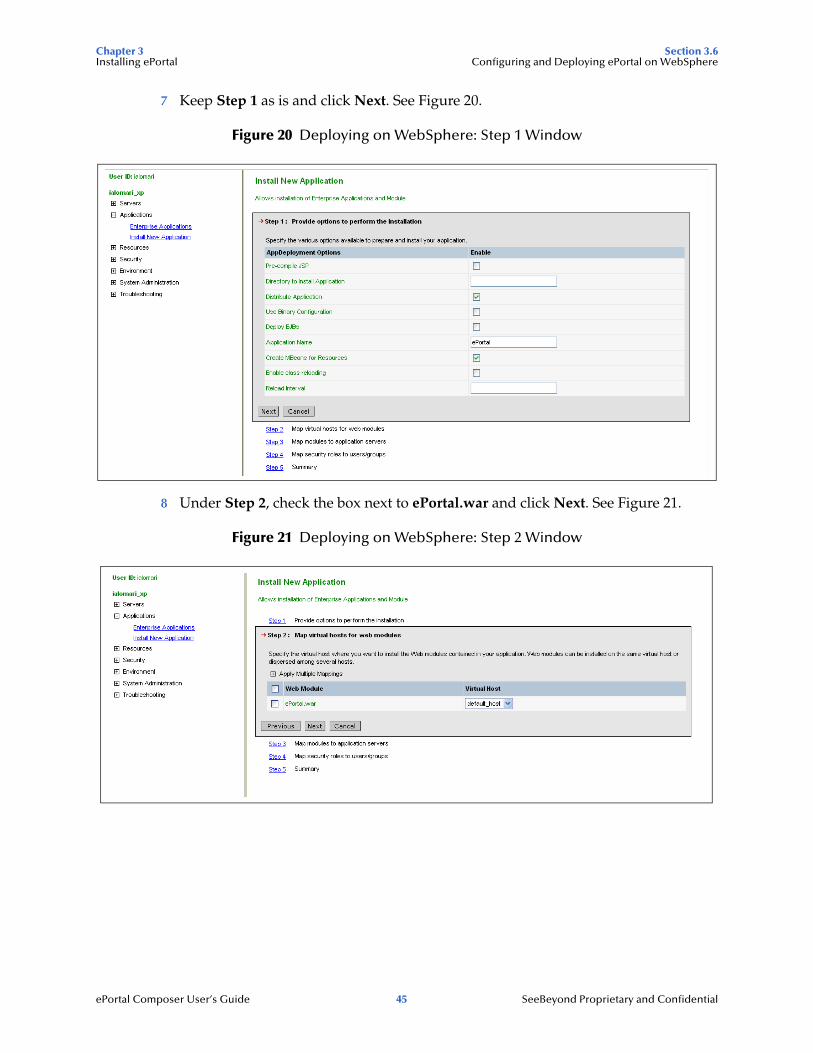
7 Keep Step 1 as is and click Next. See Figure 20.
Figure 20 Deploying on WebSphere: Step 1 Window
8 Under Step 2, check the box next to ePortal.war and click Next. See Figure 21.
Figure 21 Deploying on WebSphere: Step 2 Window
Chapter 3 Section 3.6Installing ePortal Configuring and Deploying ePortal on WebSphere
ePortal Composer User’s Guide 46 SeeBeyond Proprietary and Confidential
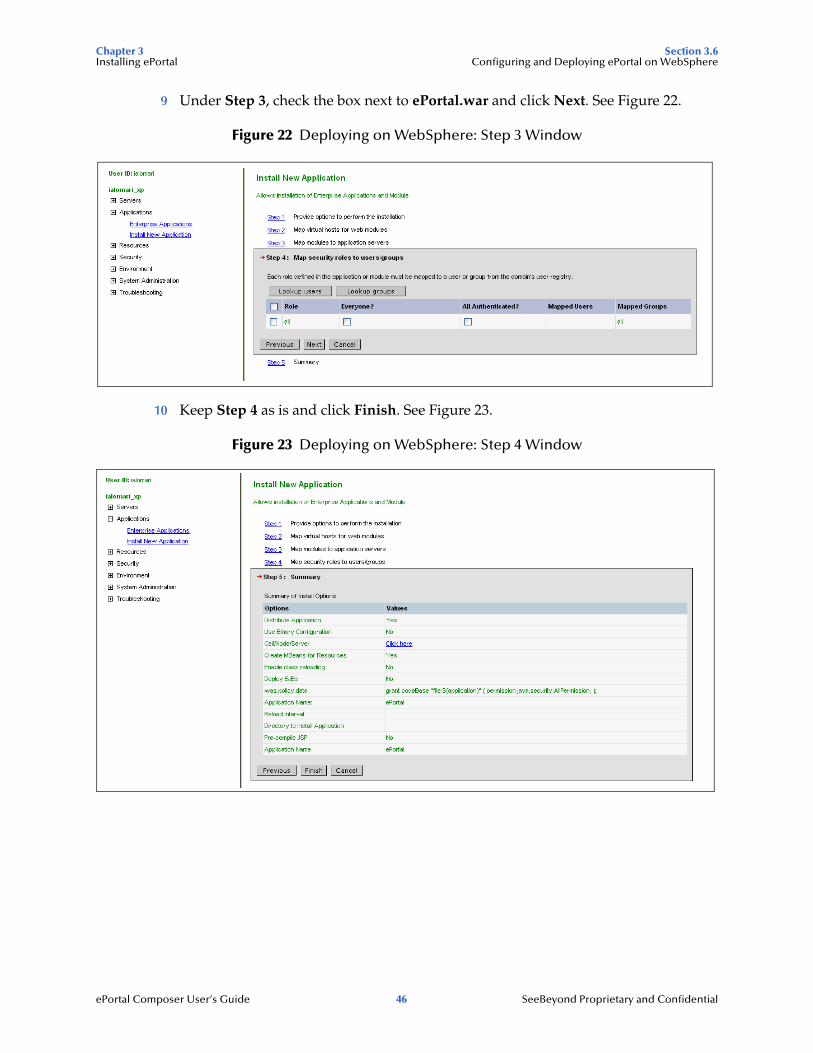
9 Under Step 3, check the box next to ePortal.war and click Next. See Figure 22.
Figure 22 Deploying on WebSphere: Step 3 Window
10 Keep Step 4 as is and click Finish. See Figure 23.
Figure 23 Deploying on WebSphere: Step 4 Window
Chapter 3 Section 3.6Installing ePortal Configuring and Deploying ePortal on WebSphere
ePortal Composer User’s Guide 47 SeeBeyond Proprietary and Confidential
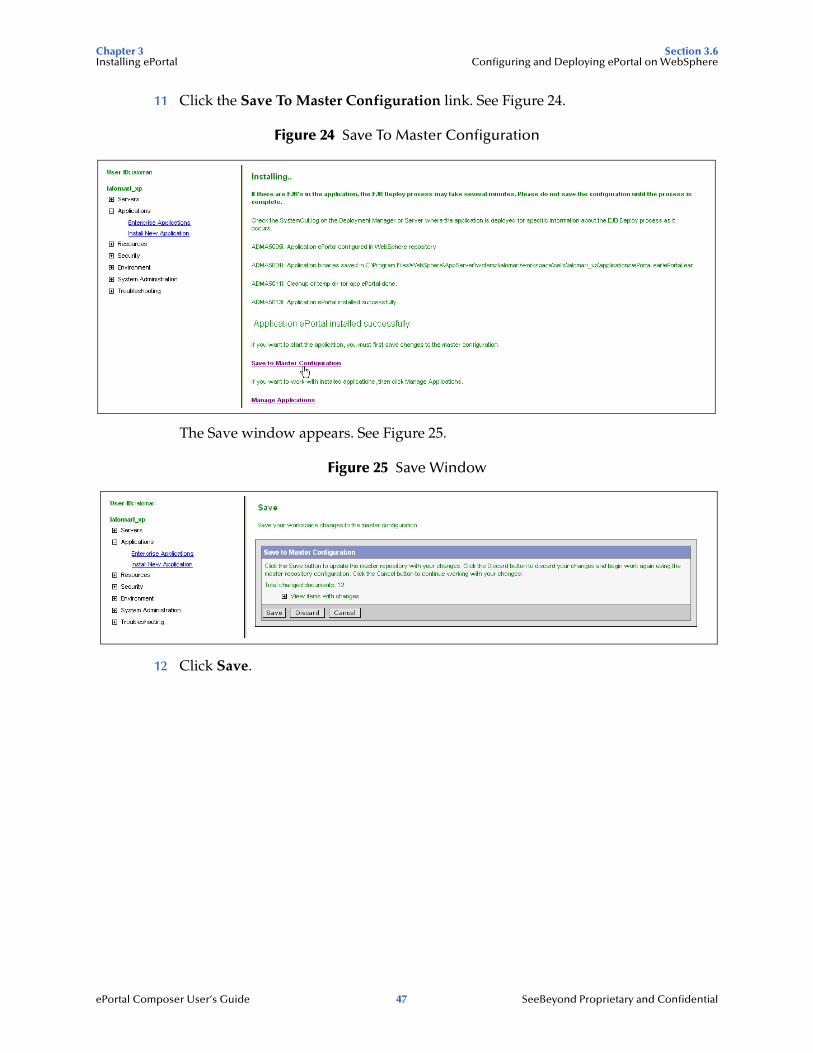
11 Click the Save To Master Configuration link. See Figure 24.
Figure 24 Save To Master Configuration
The Save window appears. See Figure 25.
Figure 25 Save Window
12 Click Save.
Chapter 3 Section 3.6Installing ePortal Configuring and Deploying ePortal on WebSphere
ePortal Composer User’s Guide 48 SeeBeyond Proprietary and Confidential
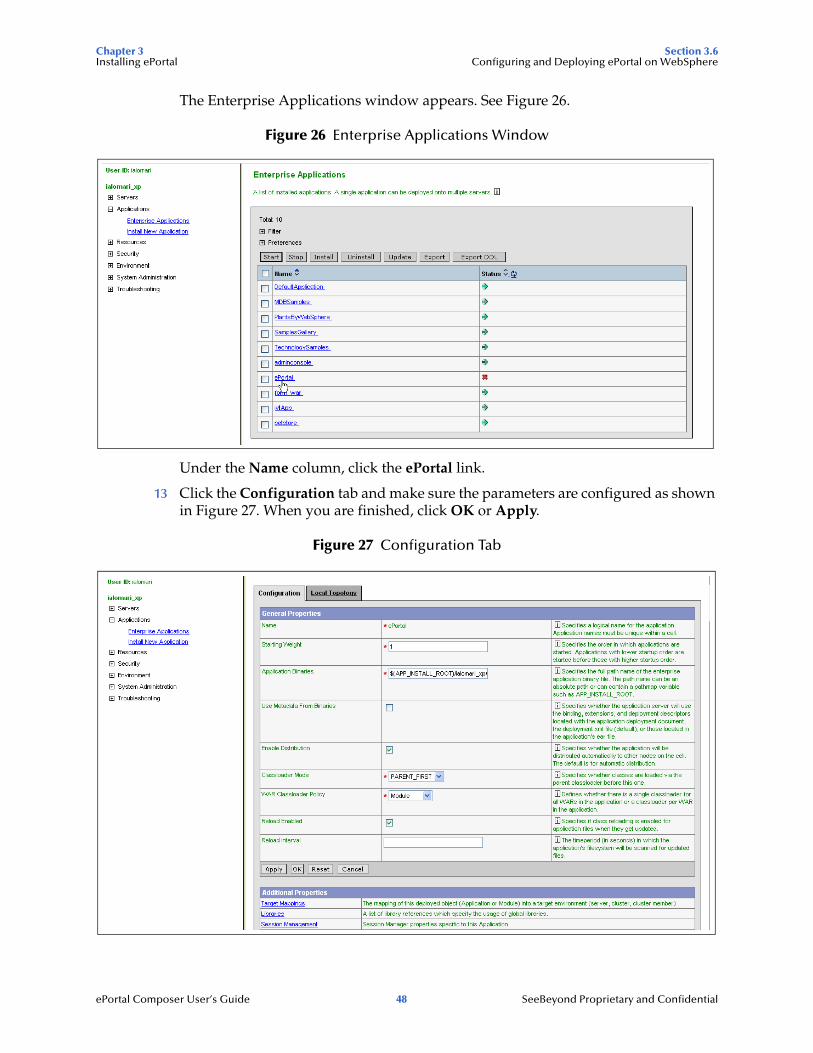
The Enterprise Applications window appears. See Figure 26.
Figure 26 Enterprise Applications Window
Under the Name column, click the ePortal link.
13 Click the Configuration tab and make sure the parameters are configured as shown in Figure 27. When you are finished, click OK or Apply.
Figure 27 Configuration Tab
Chapter 3 Section 3.6Installing ePortal Configuring and Deploying ePortal on WebSphere
ePortal Composer User’s Guide 49 SeeBeyond Proprietary and Confidential
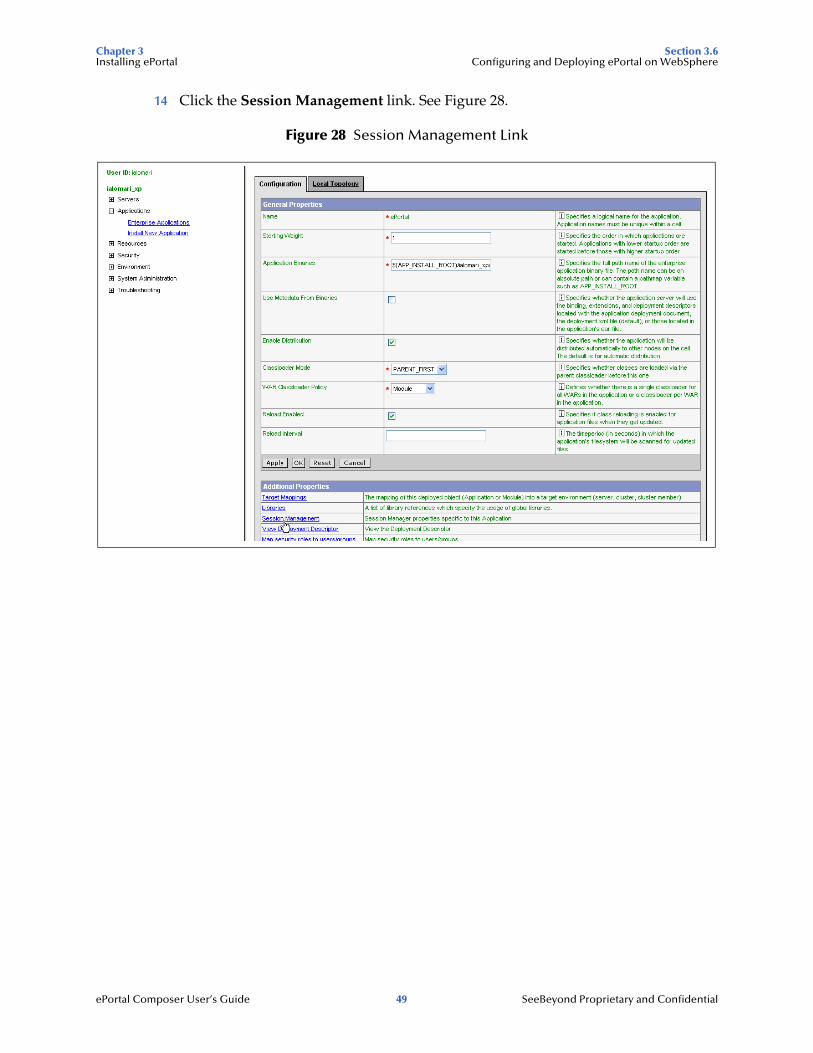
14 Click the Session Management link. See Figure 28.
Figure 28 Session Management Link
Chapter 3 Section 3.6Installing ePortal Configuring and Deploying ePortal on WebSphere
ePortal Composer User’s Guide 50 SeeBeyond Proprietary and Confidential
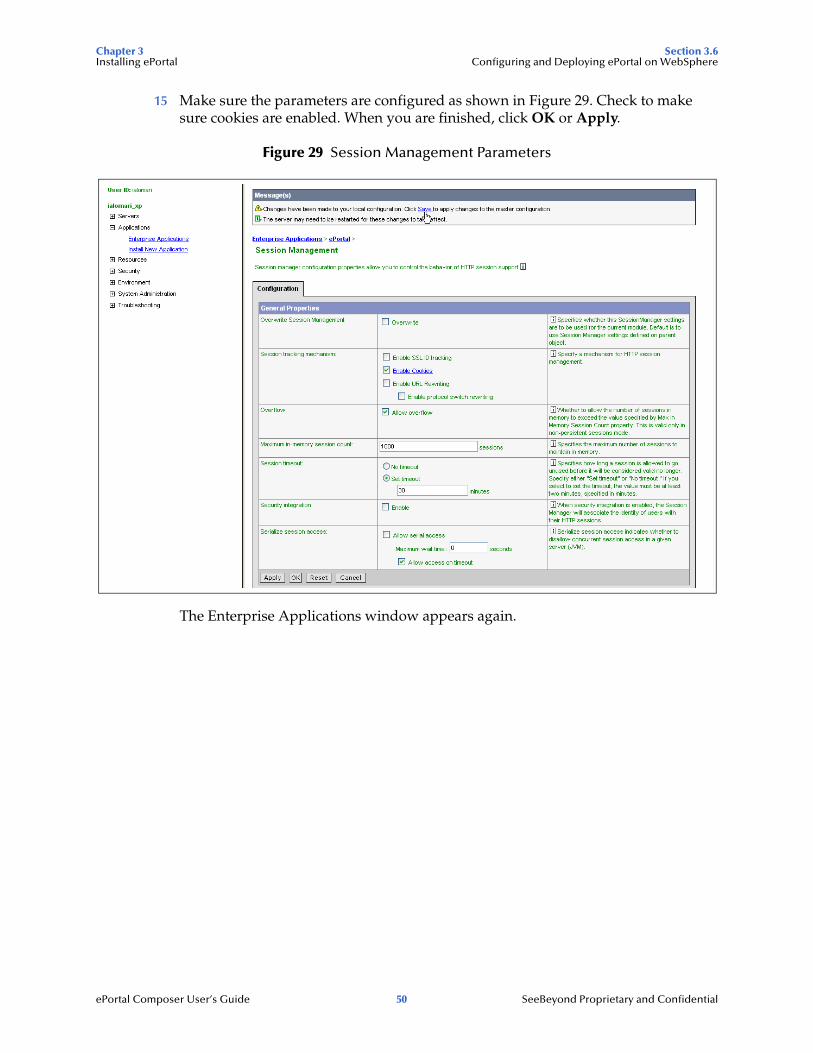
15 Make sure the parameters are configured as shown in Figure 29. Check to make sure cookies are enabled. When you are finished, click OK or Apply.
Figure 29 Session Management Parameters
The Enterprise Applications window appears again.
Chapter 3 Section 3.6Installing ePortal Configuring and Deploying ePortal on WebSphere
ePortal Composer User’s Guide 51 SeeBeyond Proprietary and Confidential
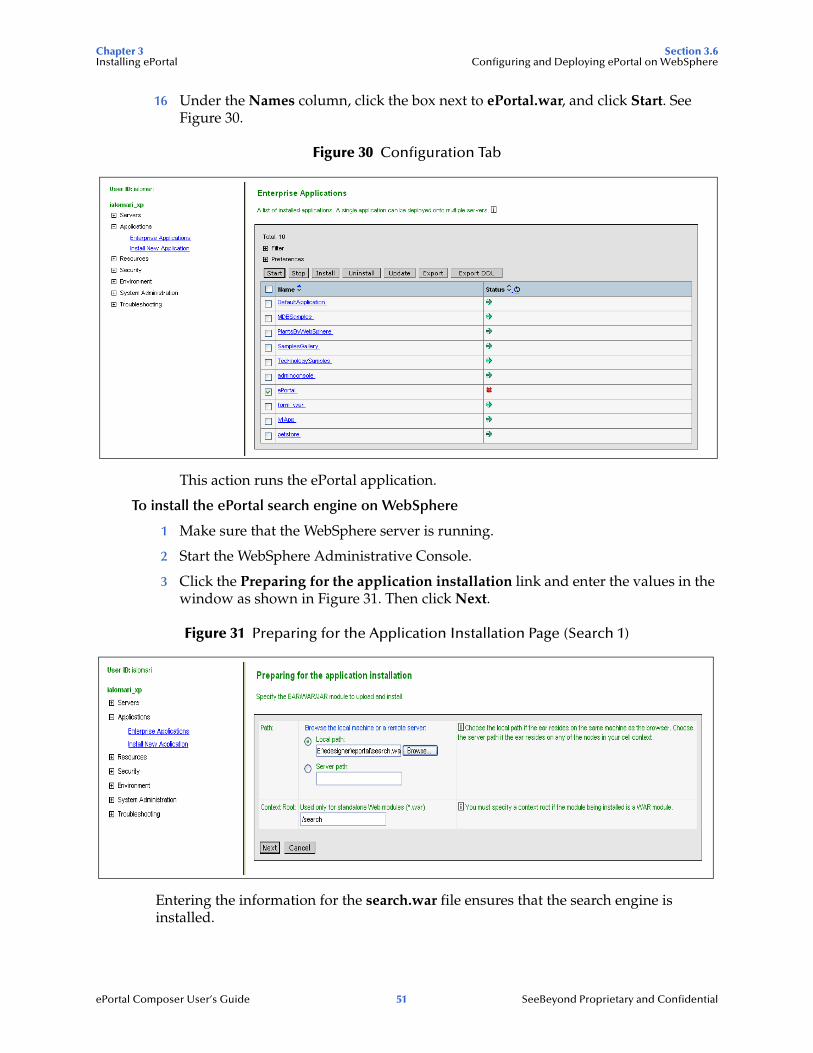
16 Under the Names column, click the box next to ePortal.war, and click Start. See Figure 30.
Figure 30 Configuration Tab
This action runs the ePortal application.
To install the ePortal search engine on WebSphere
1 Make sure that the WebSphere server is running.
2 Start the WebSphere Administrative Console.
3 Click the Preparing for the application installation link and enter the values in the window as shown in Figure 31. Then click Next.
Figure 31 Preparing for the Application Installation Page (Search 1)
Entering the information for the search.war file ensures that the search engine is installed.
Chapter 3 Section 3.6Installing ePortal Configuring and Deploying ePortal on WebSphere
ePortal Composer User’s Guide 52 SeeBeyond Proprietary and Confidential
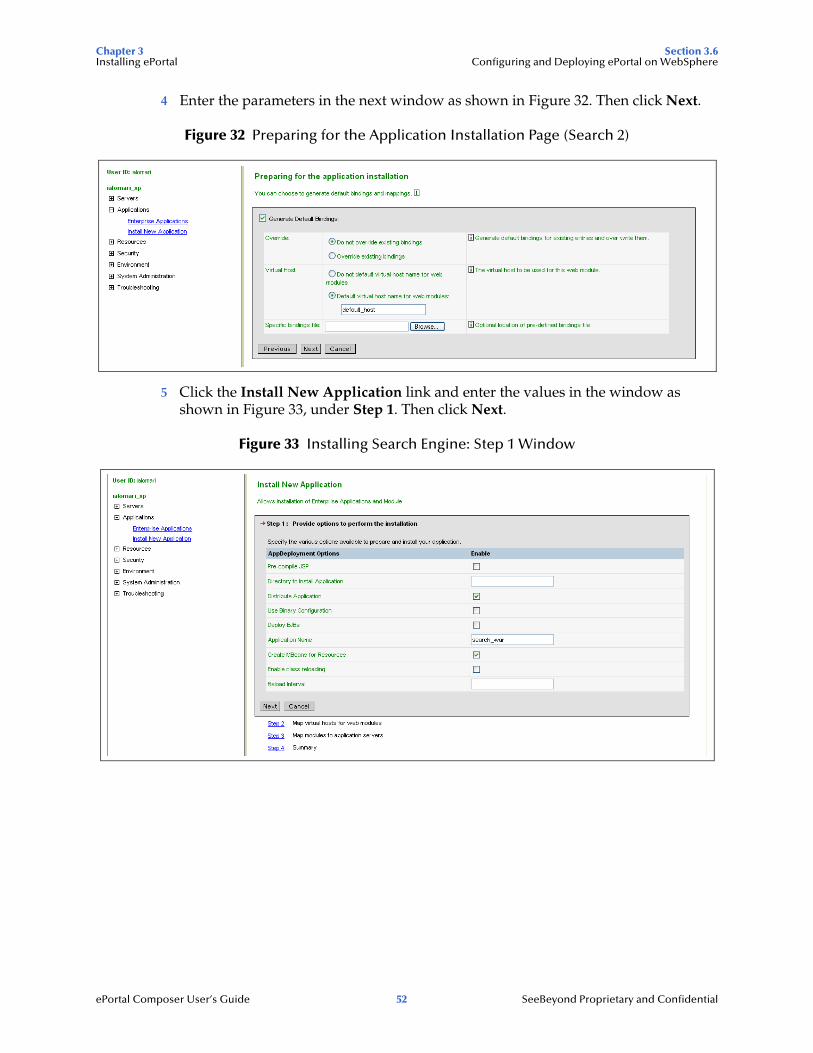
4 Enter the parameters in the next window as shown in Figure 32. Then click Next.
Figure 32 Preparing for the Application Installation Page (Search 2)
5 Click the Install New Application link and enter the values in the window as shown in Figure 33, under Step 1. Then click Next.
Figure 33 Installing Search Engine: Step 1 Window
Chapter 3 Section 3.6Installing ePortal Configuring and Deploying ePortal on WebSphere
ePortal Composer User’s Guide 53 SeeBeyond Proprietary and Confidential
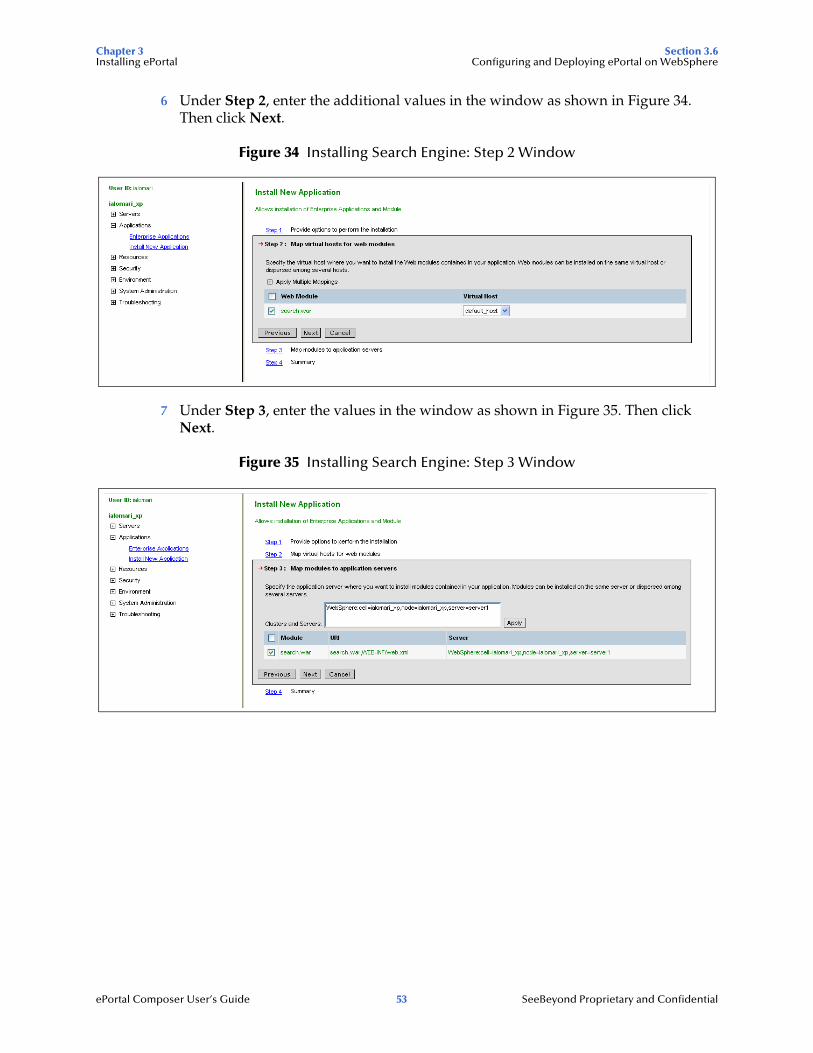
6 Under Step 2, enter the additional values in the window as shown in Figure 34. Then click Next.
Figure 34 Installing Search Engine: Step 2 Window
7 Under Step 3, enter the values in the window as shown in Figure 35. Then click Next.
Figure 35 Installing Search Engine: Step 3 Window
Chapter 3 Section 3.6Installing ePortal Configuring and Deploying ePortal on WebSphere
ePortal Composer User’s Guide 54 SeeBeyond Proprietary and Confidential
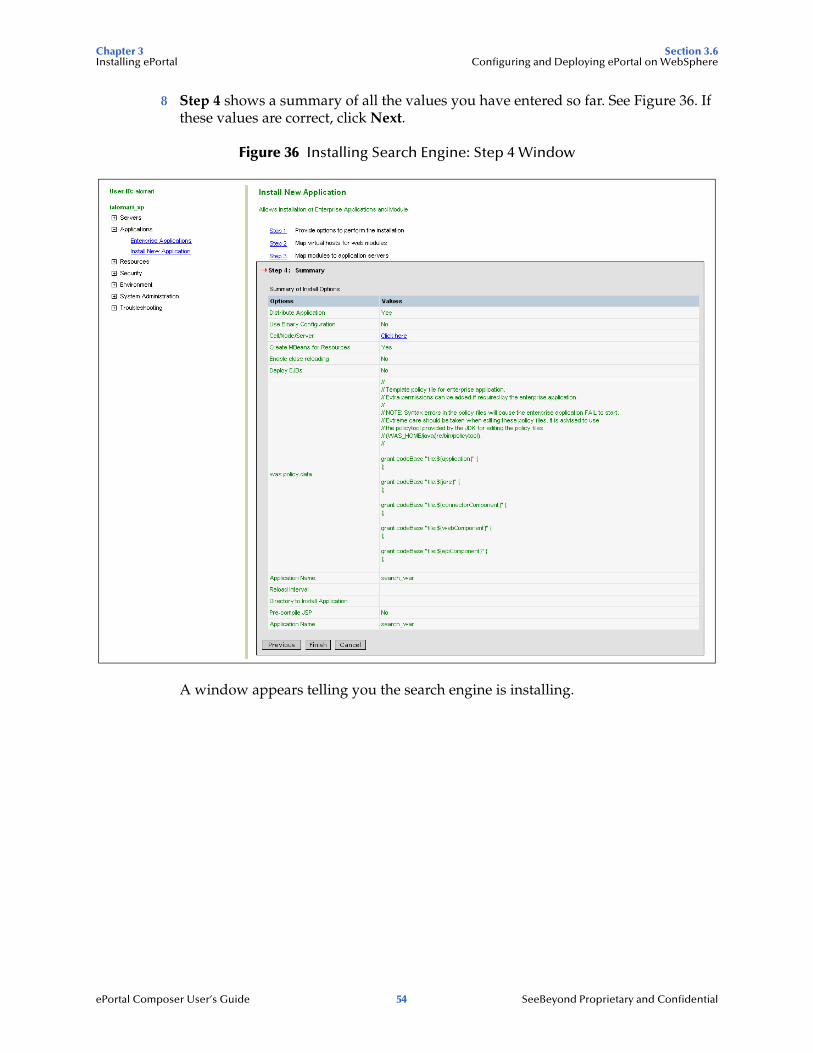
8 Step 4 shows a summary of all the values you have entered so far. See Figure 36. If these values are correct, click Next.
Figure 36 Installing Search Engine: Step 4 Window
A window appears telling you the search engine is installing.
Chapter 3 Section 3.6Installing ePortal Configuring and Deploying ePortal on WebSphere
ePortal Composer User’s Guide 55 SeeBeyond Proprietary and Confidential
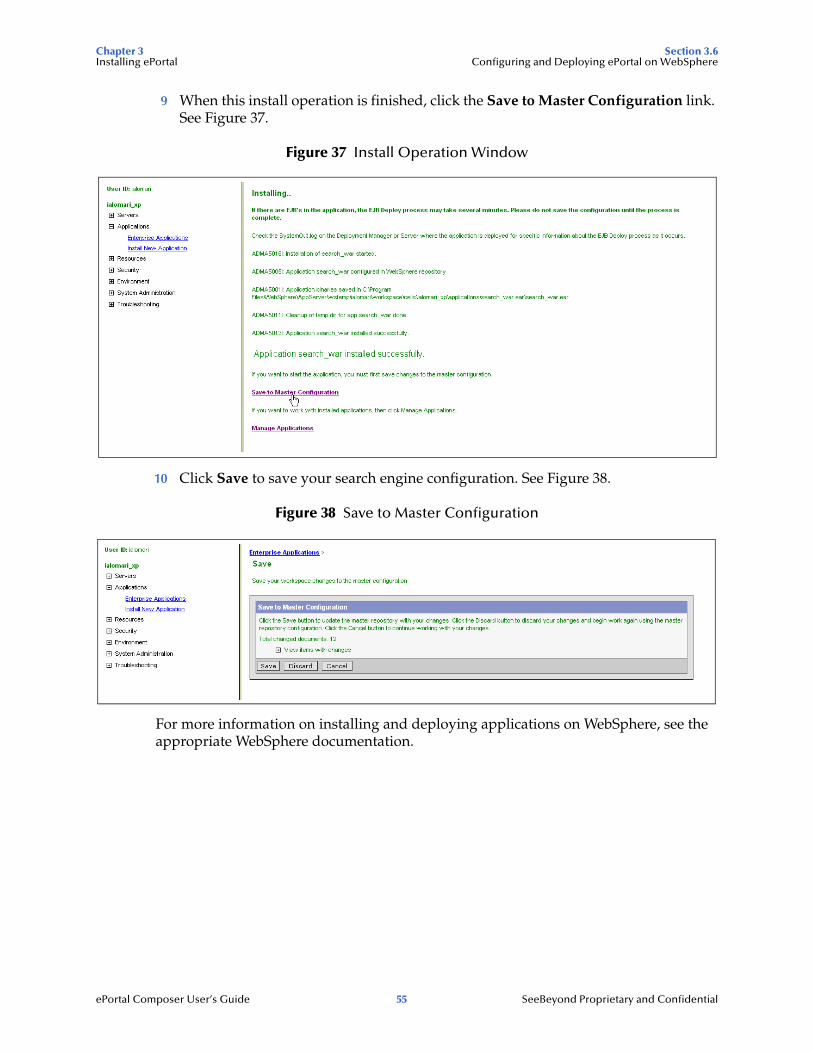
9 When this install operation is finished, click the Save to Master Configuration link. See Figure 37.
Figure 37 Install Operation Window
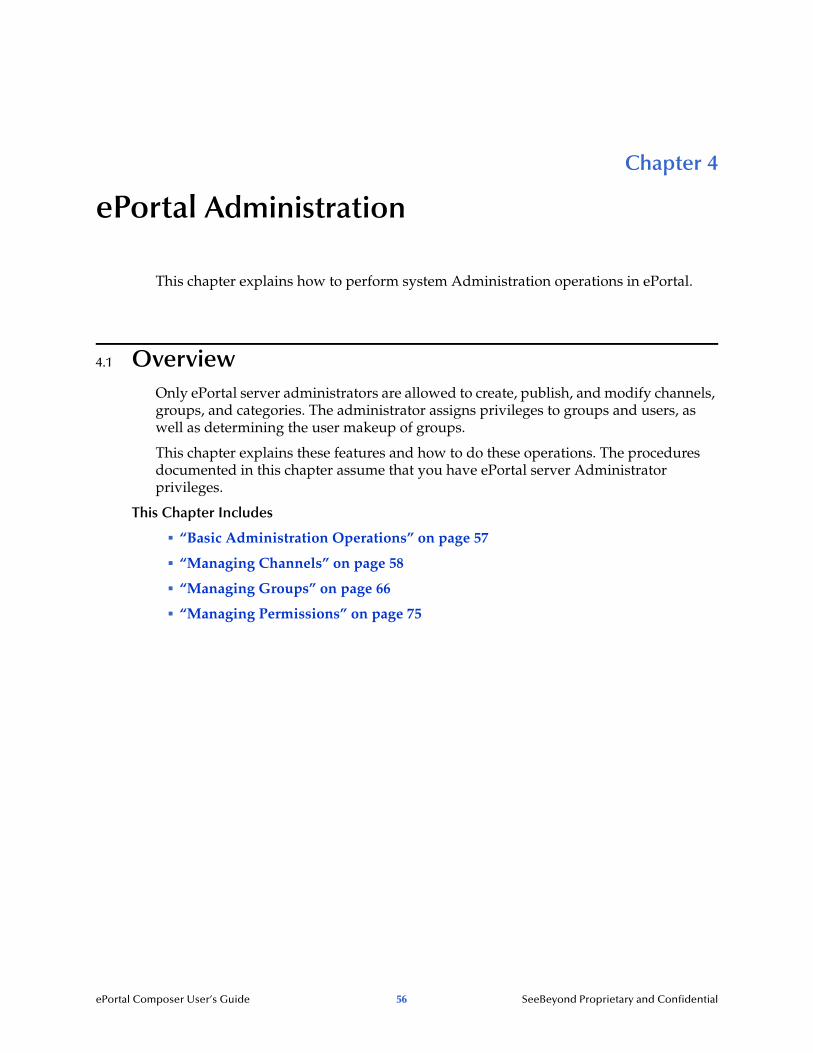
10 Click Save to save your search engine configuration. See Figure 38.
Figure 38 Save to Master Configuration
For more information on installing and deploying applications on WebSphere, see the appropriate WebSphere documentation.
ePortal Composer User’s Guide 56 SeeBeyond Proprietary and Confidential
Chapter 4
ePortal Administration
This chapter explains how to perform system Administration operations in ePortal.
4.1 OverviewOnly ePortal server administrators are allowed to create, publish, and modify channels, groups, and categories. The administrator assigns privileges to groups and users, as well as determining the user makeup of groups.
This chapter explains these features and how to do these operations. The procedures documented in this chapter assume that you have ePortal server Administrator privileges.
This Chapter Includes
“Basic Administration Operations” on page 57
“Managing Channels” on page 58
“Managing Groups” on page 66
“Managing Permissions” on page 75
Chapter 4 Section 4.2ePortal Administration Basic Administration Operations
ePortal Composer User’s Guide 57 SeeBeyond Proprietary and Confidential
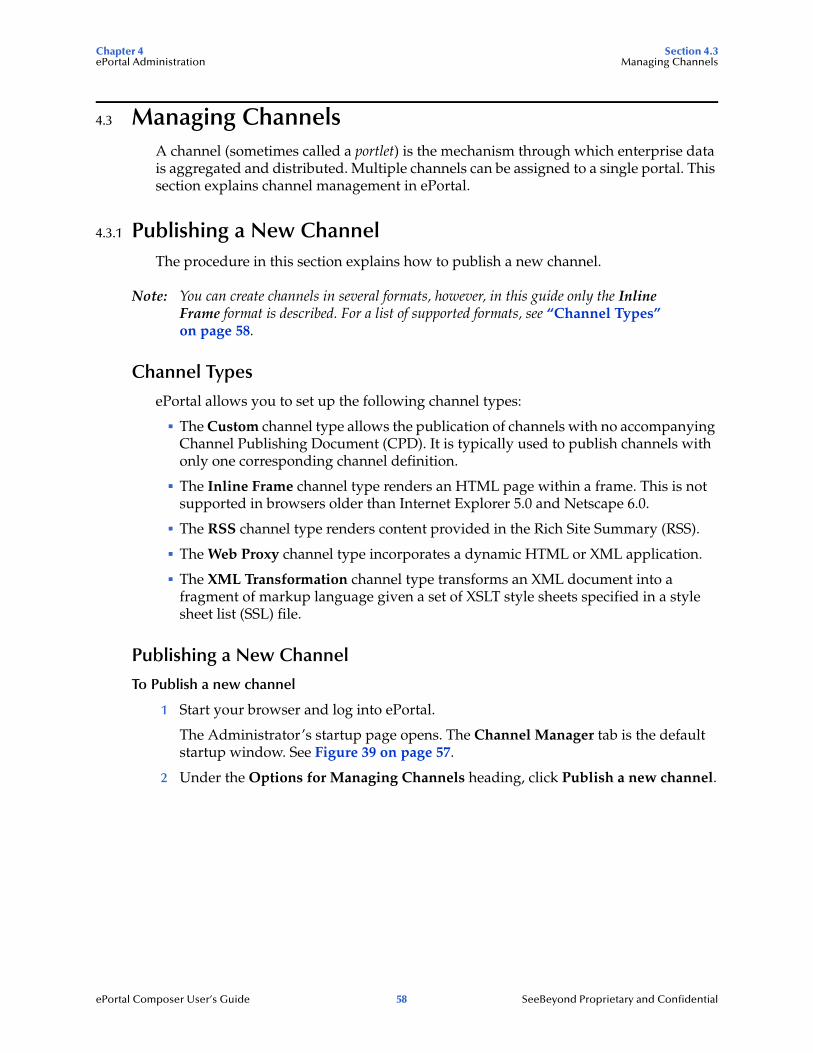
4.2 Basic Administration OperationsWhen you log in to ePortal, you see the window shown in Figure 39.
Figure 39 Administrator Startup/Channel Manager Window
This window has tabs that allow you to do the following operations:
Channel Manager
Group Manager
Permission Manager
This chapter explains these basic ePortal operations.
Logging in as template or guest
By logging in as template or guest, the system administrator can change the look of log-in pages or customize the template for portal view pages, as follows:
guest: Allows you to create a universal default log-in page for all users.
template: Allows you to create a universal default portal view page for all users.
Users can change these defaults, as desired. If the administrator does not create any defaults, the initial log-in page contains only the log-in box (the rest is blank), and the initial portal view pages are blank.
Chapter 4 Section 4.3ePortal Administration Managing Channels
ePortal Composer User’s Guide 58 SeeBeyond Proprietary and Confidential
4.3 Managing ChannelsA channel (sometimes called a portlet) is the mechanism through which enterprise data is aggregated and distributed. Multiple channels can be assigned to a single portal. This section explains channel management in ePortal.
4.3.1 Publishing a New ChannelThe procedure in this section explains how to publish a new channel.
Note: You can create channels in several formats, however, in this guide only the Inline Frame format is described. For a list of supported formats, see “Channel Types” on page 58.
Channel Types
ePortal allows you to set up the following channel types:
The Custom channel type allows the publication of channels with no accompanying Channel Publishing Document (CPD). It is typically used to publish channels with only one corresponding channel definition.
The Inline Frame channel type renders an HTML page within a frame. This is not supported in browsers older than Internet Explorer 5.0 and Netscape 6.0.
The RSS channel type renders content provided in the Rich Site Summary (RSS).
The Web Proxy channel type incorporates a dynamic HTML or XML application.
The XML Transformation channel type transforms an XML document into a fragment of markup language given a set of XSLT style sheets specified in a style sheet list (SSL) file.
Publishing a New Channel
To Publish a new channel
1 Start your browser and log into ePortal.
The Administrator’s startup page opens. The Channel Manager tab is the default startup window. See Figure 39 on page 57.
2 Under the Options for Managing Channels heading, click Publish a new channel.
Chapter 4 Section 4.3ePortal Administration Managing Channels
ePortal Composer User’s Guide 59 SeeBeyond Proprietary and Confidential
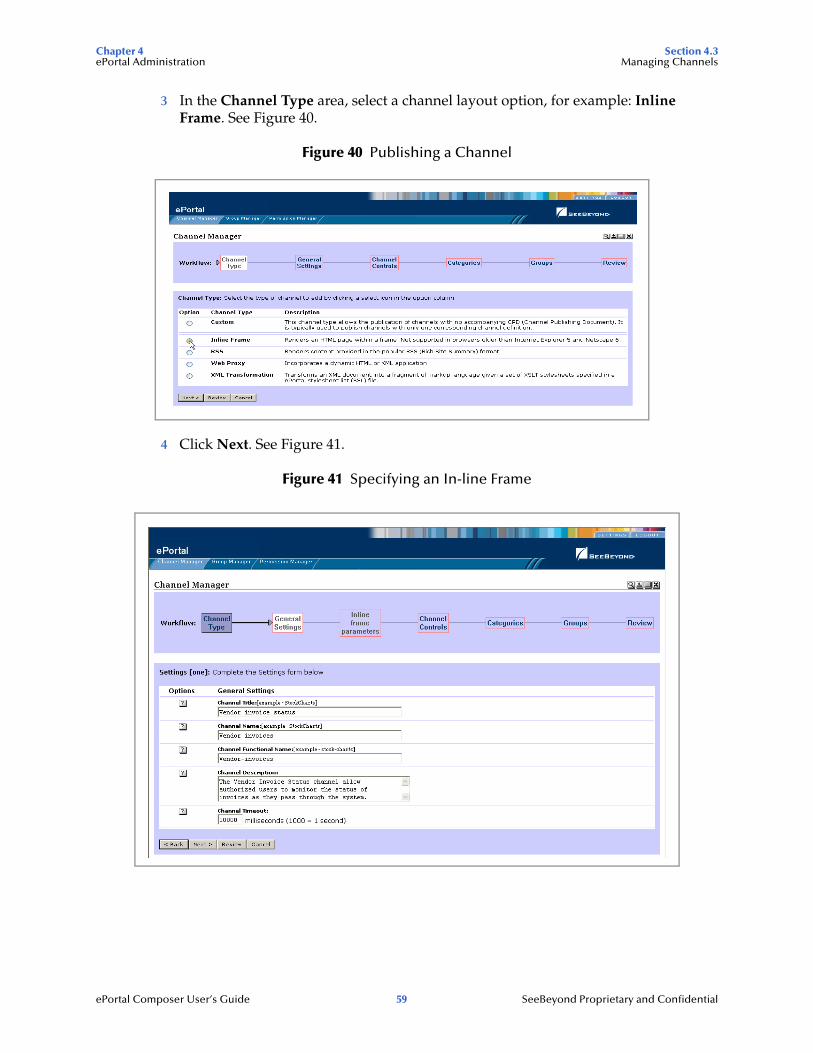
3 In the Channel Type area, select a channel layout option, for example: Inline Frame. See Figure 40.
Figure 40 Publishing a Channel
4 Click Next. See Figure 41.
Figure 41 Specifying an In-line Frame
Chapter 4 Section 4.3ePortal Administration Managing Channels
ePortal Composer User’s Guide 60 SeeBeyond Proprietary and Confidential
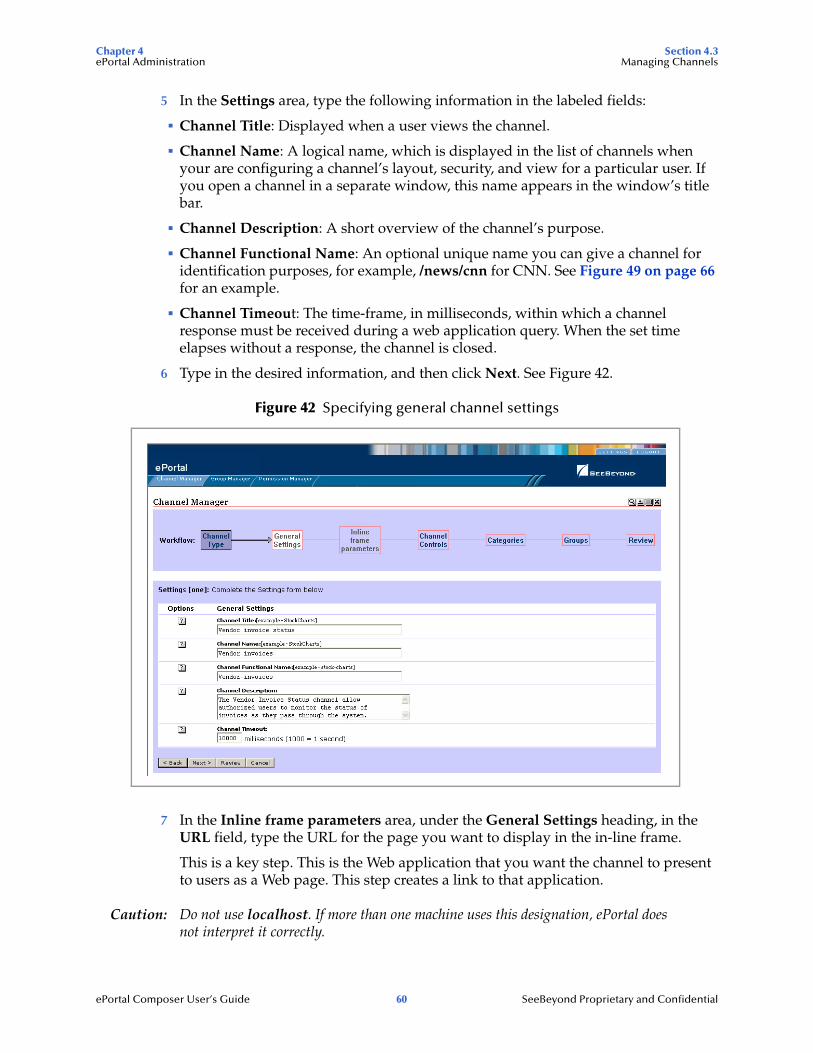
5 In the Settings area, type the following information in the labeled fields:
Channel Title: Displayed when a user views the channel.
Channel Name: A logical name, which is displayed in the list of channels when your are configuring a channel’s layout, security, and view for a particular user. If you open a channel in a separate window, this name appears in the window’s title bar.
Channel Description: A short overview of the channel’s purpose.
Channel Functional Name: An optional unique name you can give a channel for identification purposes, for example, /news/cnn for CNN. See Figure 49 on page 66 for an example.
Channel Timeout: The time-frame, in milliseconds, within which a channel response must be received during a web application query. When the set time elapses without a response, the channel is closed.
6 Type in the desired information, and then click Next. See Figure 42.
Figure 42 Specifying general channel settings
7 In the Inline frame parameters area, under the General Settings heading, in the URL field, type the URL for the page you want to display in the in-line frame.
This is a key step. This is the Web application that you want the channel to present to users as a Web page. This step creates a link to that application.
Caution: Do not use localhost. If more than one machine uses this designation, ePortal does not interpret it correctly.
Chapter 4 Section 4.3ePortal Administration Managing Channels
ePortal Composer User’s Guide 61 SeeBeyond Proprietary and Confidential
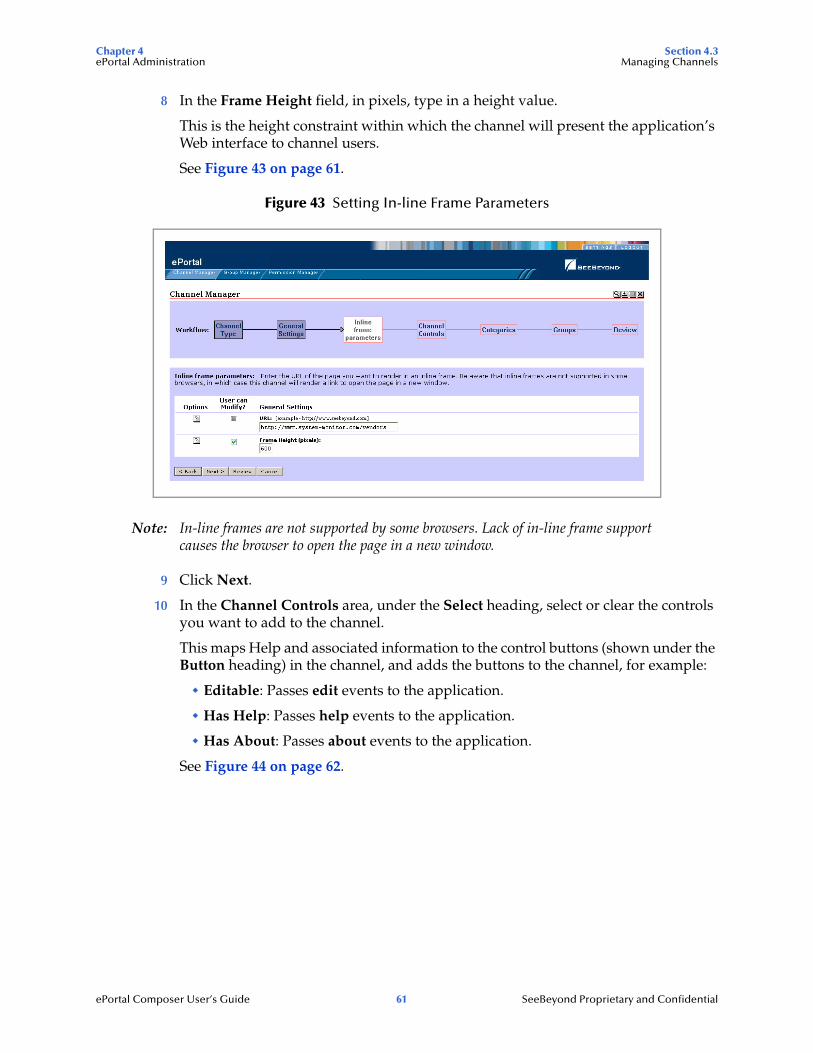
8 In the Frame Height field, in pixels, type in a height value.
This is the height constraint within which the channel will present the application’s Web interface to channel users.
See Figure 43 on page 61.
Figure 43 Setting In-line Frame Parameters
Note: In-line frames are not supported by some browsers. Lack of in-line frame support causes the browser to open the page in a new window.
9 Click Next.
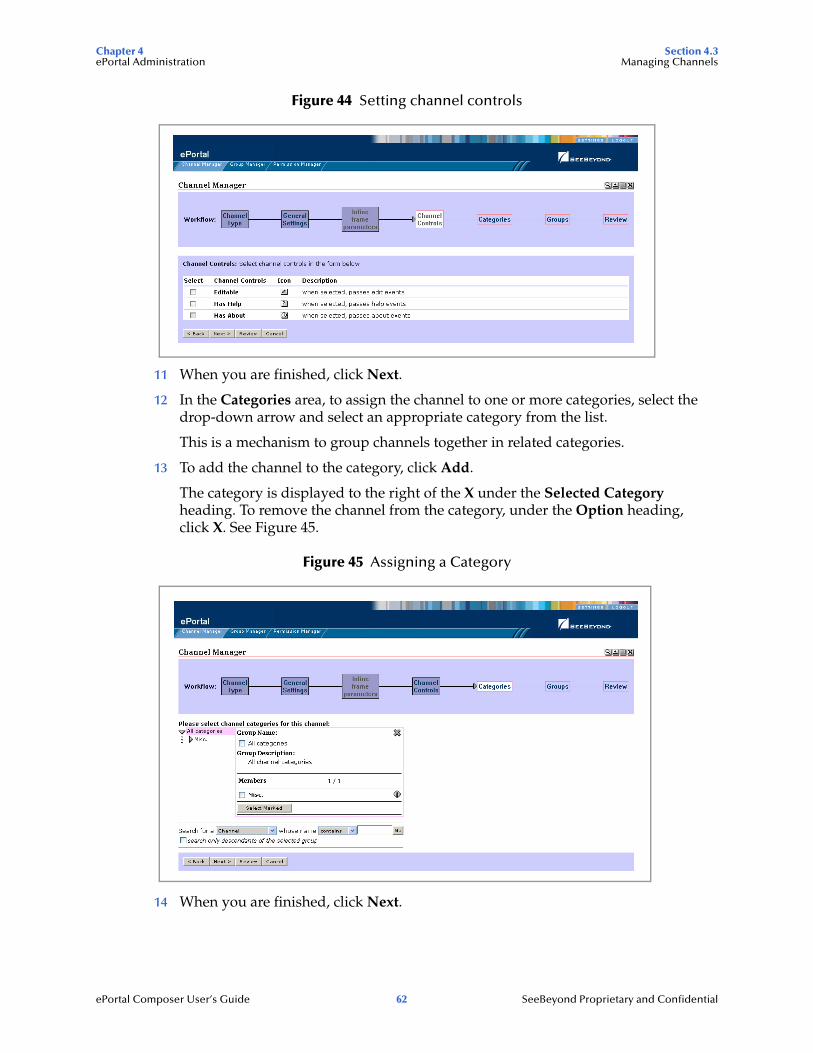
10 In the Channel Controls area, under the Select heading, select or clear the controls you want to add to the channel.
This maps Help and associated information to the control buttons (shown under the Button heading) in the channel, and adds the buttons to the channel, for example:
Editable: Passes edit events to the application.
Has Help: Passes help events to the application.
Has About: Passes about events to the application.
See Figure 44 on page 62.
Chapter 4 Section 4.3ePortal Administration Managing Channels
ePortal Composer User’s Guide 62 SeeBeyond Proprietary and Confidential
Figure 44 Setting channel controls
11 When you are finished, click Next.
12 In the Categories area, to assign the channel to one or more categories, select the drop-down arrow and select an appropriate category from the list.
This is a mechanism to group channels together in related categories.
13 To add the channel to the category, click Add.
The category is displayed to the right of the X under the Selected Category heading. To remove the channel from the category, under the Option heading, click X. See Figure 45.
Figure 45 Assigning a Category
14 When you are finished, click Next.
Chapter 4 Section 4.3ePortal Administration Managing Channels
ePortal Composer User’s Guide 63 SeeBeyond Proprietary and Confidential
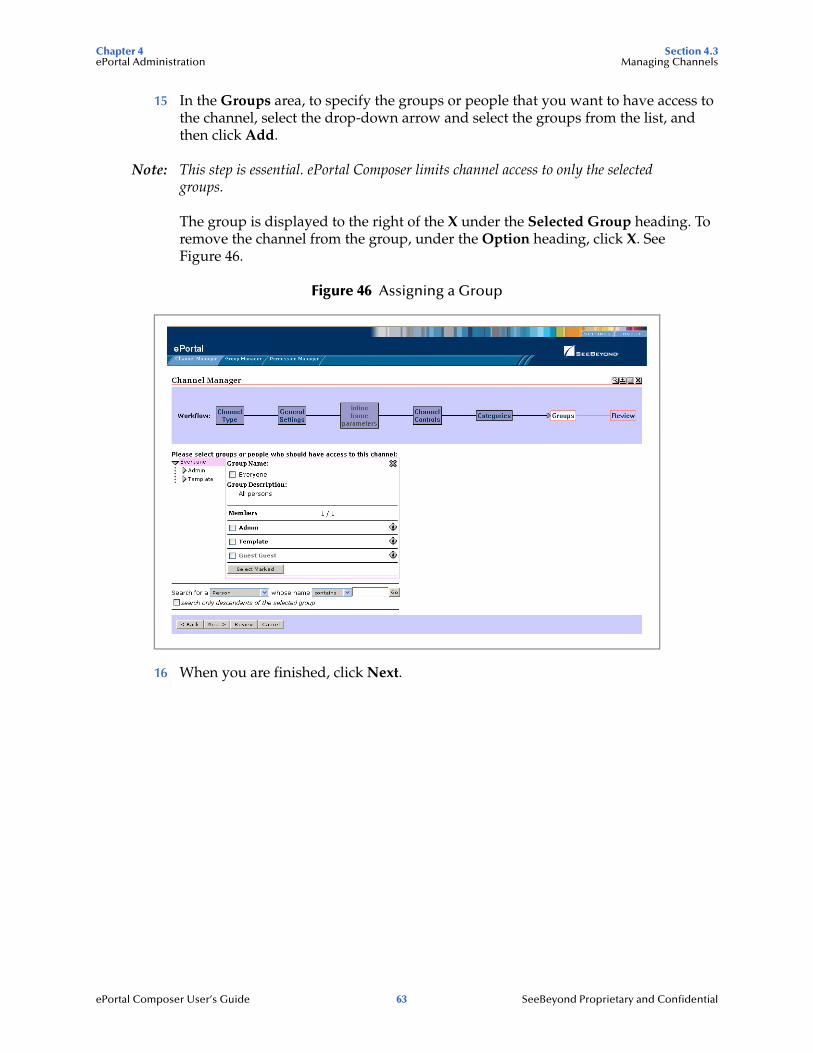
15 In the Groups area, to specify the groups or people that you want to have access to the channel, select the drop-down arrow and select the groups from the list, and then click Add.
Note: This step is essential. ePortal Composer limits channel access to only the selected groups.
The group is displayed to the right of the X under the Selected Group heading. To remove the channel from the group, under the Option heading, click X. See Figure 46.
Figure 46 Assigning a Group
16 When you are finished, click Next.
Chapter 4 Section 4.3ePortal Administration Managing Channels
ePortal Composer User’s Guide 64 SeeBeyond Proprietary and Confidential
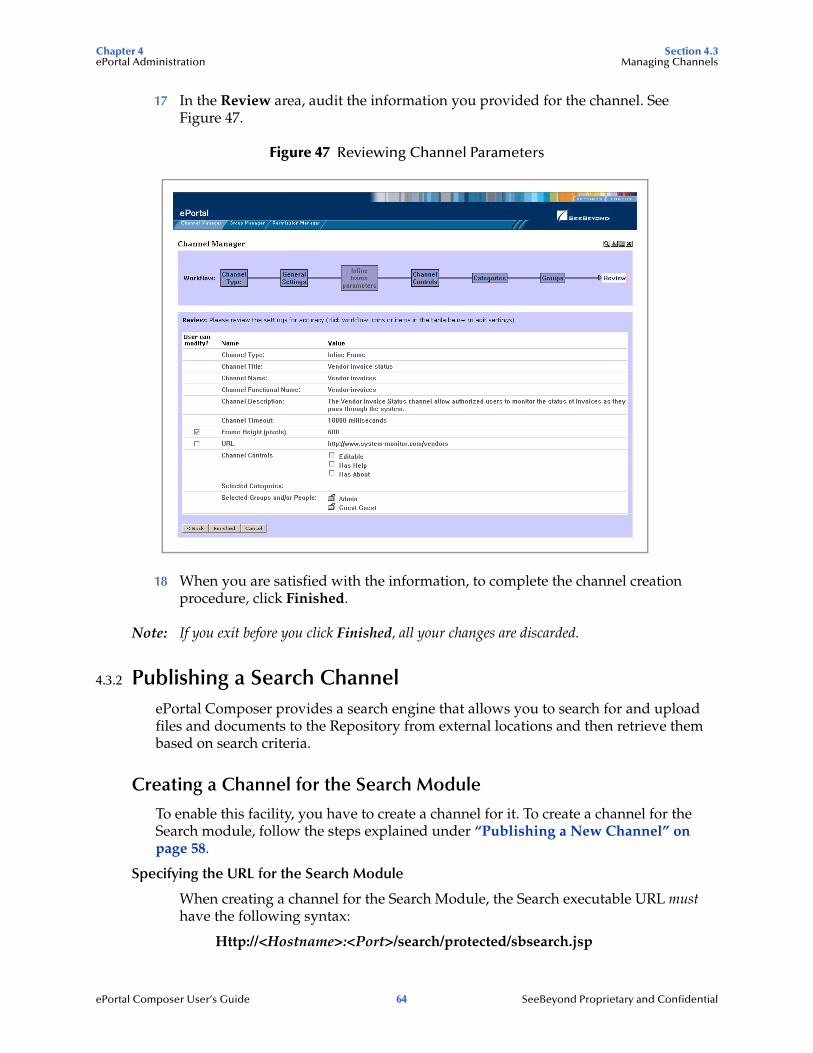
17 In the Review area, audit the information you provided for the channel. See Figure 47.
Figure 47 Reviewing Channel Parameters
18 When you are satisfied with the information, to complete the channel creation procedure, click Finished.
Note: If you exit before you click Finished, all your changes are discarded.
4.3.2 Publishing a Search ChannelePortal Composer provides a search engine that allows you to search for and upload files and documents to the Repository from external locations and then retrieve them based on search criteria.
Creating a Channel for the Search Module
To enable this facility, you have to create a channel for it. To create a channel for the Search module, follow the steps explained under “Publishing a New Channel” on page 58.
Specifying the URL for the Search Module
When creating a channel for the Search Module, the Search executable URL must have the following syntax:
Http://<Hostname>:<Port>/search/protected/sbsearch.jsp
Chapter 4 Section 4.3ePortal Administration Managing Channels
ePortal Composer User’s Guide 65 SeeBeyond Proprietary and Confidential
Where:
hostname is the name of the computer on which you installed the ePortal executables.
port is the port number for ePortal, for example: 18004.
Caution: Do not use localhost. If more than one machine uses this designation, ePortal does not interpret it correctly.
For a complete explanation of ePortal’s search feature, see “Using the ePortal Search Engine” on page 89.
4.3.3 Modifying a ChannelePortal allows you to edit or remove any existing channel.
To edit or remove a channel
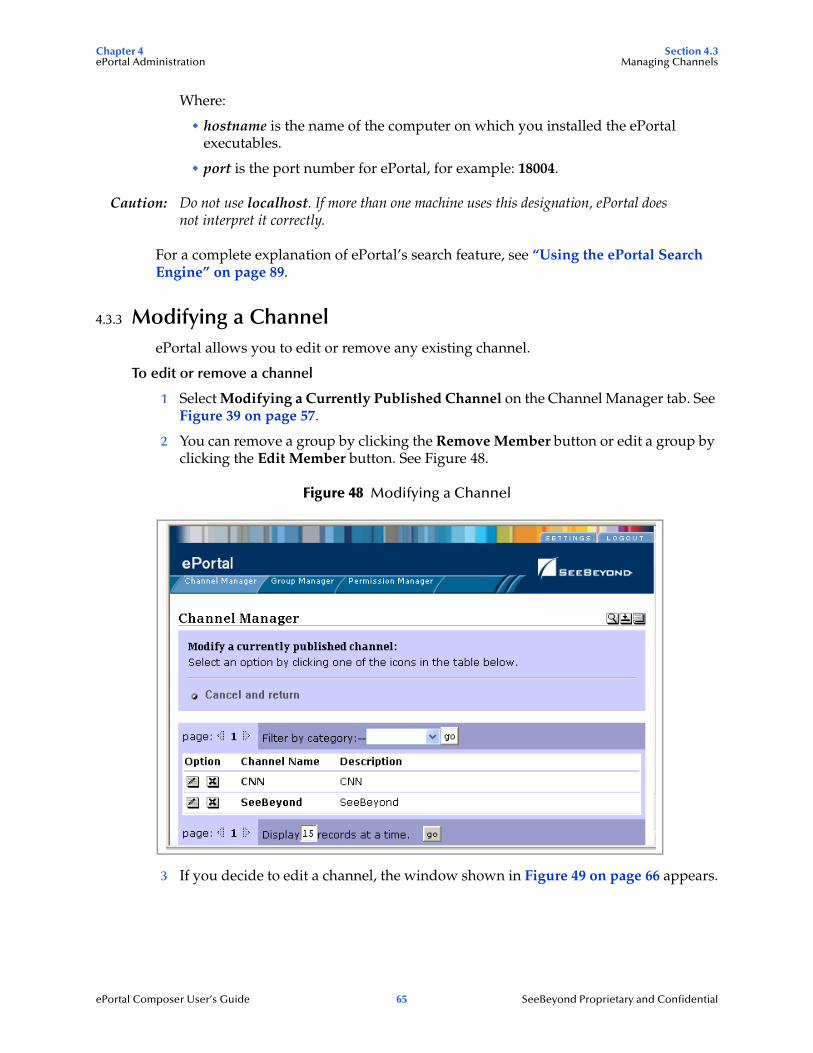
1 Select Modifying a Currently Published Channel on the Channel Manager tab. See Figure 39 on page 57.
2 You can remove a group by clicking the Remove Member button or edit a group by clicking the Edit Member button. See Figure 48.
Figure 48 Modifying a Channel
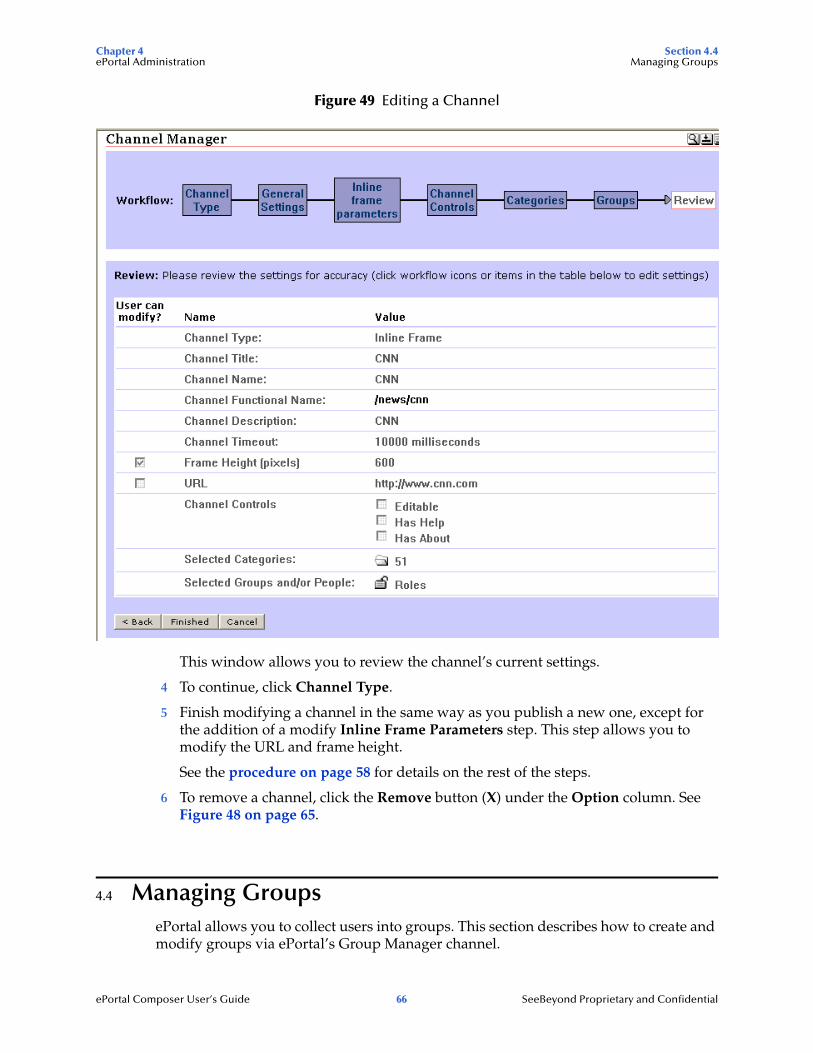
3 If you decide to edit a channel, the window shown in Figure 49 on page 66 appears.
Chapter 4 Section 4.4ePortal Administration Managing Groups
ePortal Composer User’s Guide 66 SeeBeyond Proprietary and Confidential
Figure 49 Editing a Channel
This window allows you to review the channel’s current settings.
4 To continue, click Channel Type.
5 Finish modifying a channel in the same way as you publish a new one, except for the addition of a modify Inline Frame Parameters step. This step allows you to modify the URL and frame height.
See the procedure on page 58 for details on the rest of the steps.
6 To remove a channel, click the Remove button (X) under the Option column. See Figure 48 on page 65.
4.4 Managing GroupsePortal allows you to collect users into groups. This section describes how to create and modify groups via ePortal’s Group Manager channel.
Chapter 4 Section 4.4ePortal Administration Managing Groups
ePortal Composer User’s Guide 67 SeeBeyond Proprietary and Confidential
4.4.1 About GroupsThe
In the portal context, a group is a collection of channels, groups, and sub-groups that logically go together, based on a related purpose or interdependencies. Groups are structured in a hierarchy that is defined and maintained by the system administrator. The Group Manager channel allows the administrator to manipulate groups and group members, and specify their permissions. By default, the administrator is automatically granted unlimited permissions.
Note: For more information on assigning permissions, see “Managing Permissions” on page 75.
The Group Manager channel allows you to:
Create and delete groups
View group information
Edit groups (rename, modify descriptions)
Assign permissions to groups
Add and remove group members
View group member information
Search for channels, persons, and groups of channels and/or persons
When you start the Group Manager channel as the administrator, all root groups are displayed. The Group Manager channel provides views of existing groups and a includes an editing mechanism that allows you to define attributes and specify permissions for new and existing groups. A group’s details can be reviewed and edited.
The root group is a special group that is the parent of all groups of a particular type. Root groups are also used by the search function to determine the types of groups that can be searched. In a typical implementation, the root group contains the channel definitions for all other groups.
The ePortal Group Hierarchy
In ePortal, groups are structured in a simple hierarchy as follows:
Channels and sub-groups of channels
Roles and sub-groups of roles
For more information, see “Creating and Updating Groups” on page 68.
Chapter 4 Section 4.4ePortal Administration Managing Groups
ePortal Composer User’s Guide 68 SeeBeyond Proprietary and Confidential
The Group Manager Channel
The Group Manager channel provides the following views of groups and group information:
Detail view displays information about a selected group.
Edit view allows you to update a group’s information.
Add Members view allows you to add members to a group.
Assign Permissions view allows you to assign permissions to groups.
The Search facility allows you to search Groups for information based on keyword.
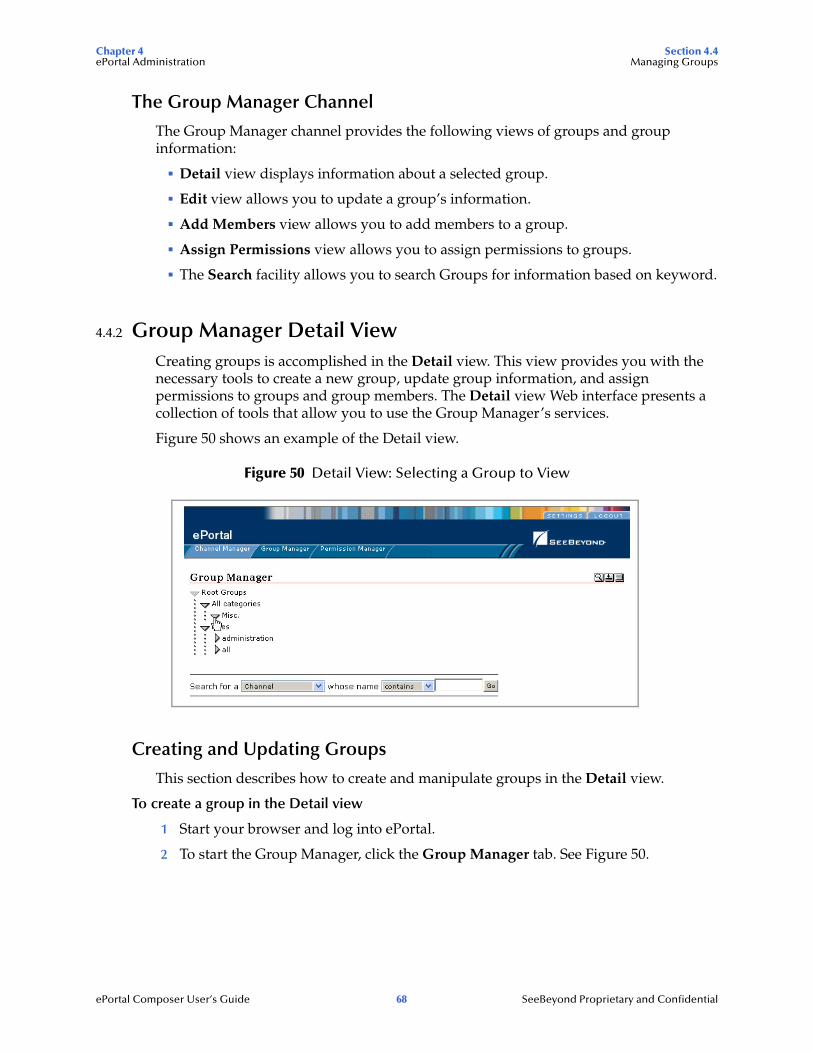
4.4.2 Group Manager Detail ViewCreating groups is accomplished in the Detail view. This view provides you with the necessary tools to create a new group, update group information, and assign permissions to groups and group members. The Detail view Web interface presents a collection of tools that allow you to use the Group Manager’s services.
Figure 50 shows an example of the Detail view.
Figure 50 Detail View: Selecting a Group to View
Creating and Updating Groups
This section describes how to create and manipulate groups in the Detail view.
To create a group in the Detail view
1 Start your browser and log into ePortal.
2 To start the Group Manager, click the Group Manager tab. See Figure 50.
Chapter 4 Section 4.4ePortal Administration Managing Groups
ePortal Composer User’s Guide 69 SeeBeyond Proprietary and Confidential
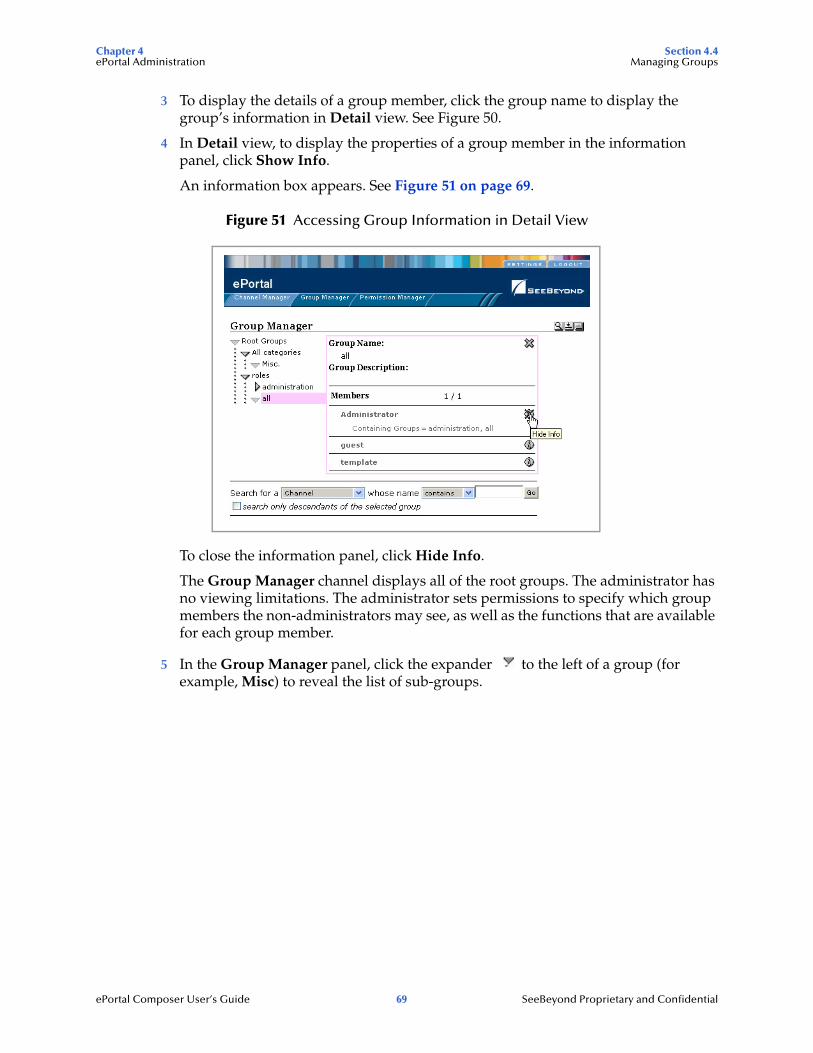
3 To display the details of a group member, click the group name to display the group’s information in Detail view. See Figure 50.
4 In Detail view, to display the properties of a group member in the information panel, click Show Info.
An information box appears. See Figure 51 on page 69.
Figure 51 Accessing Group Information in Detail View
To close the information panel, click Hide Info.
The Group Manager channel displays all of the root groups. The administrator has no viewing limitations. The administrator sets permissions to specify which group members the non-administrators may see, as well as the functions that are available for each group member.
5 In the Group Manager panel, click the expander to the left of a group (for example, Misc) to reveal the list of sub-groups.
Chapter 4 Section 4.4ePortal Administration Managing Groups
ePortal Composer User’s Guide 70 SeeBeyond Proprietary and Confidential
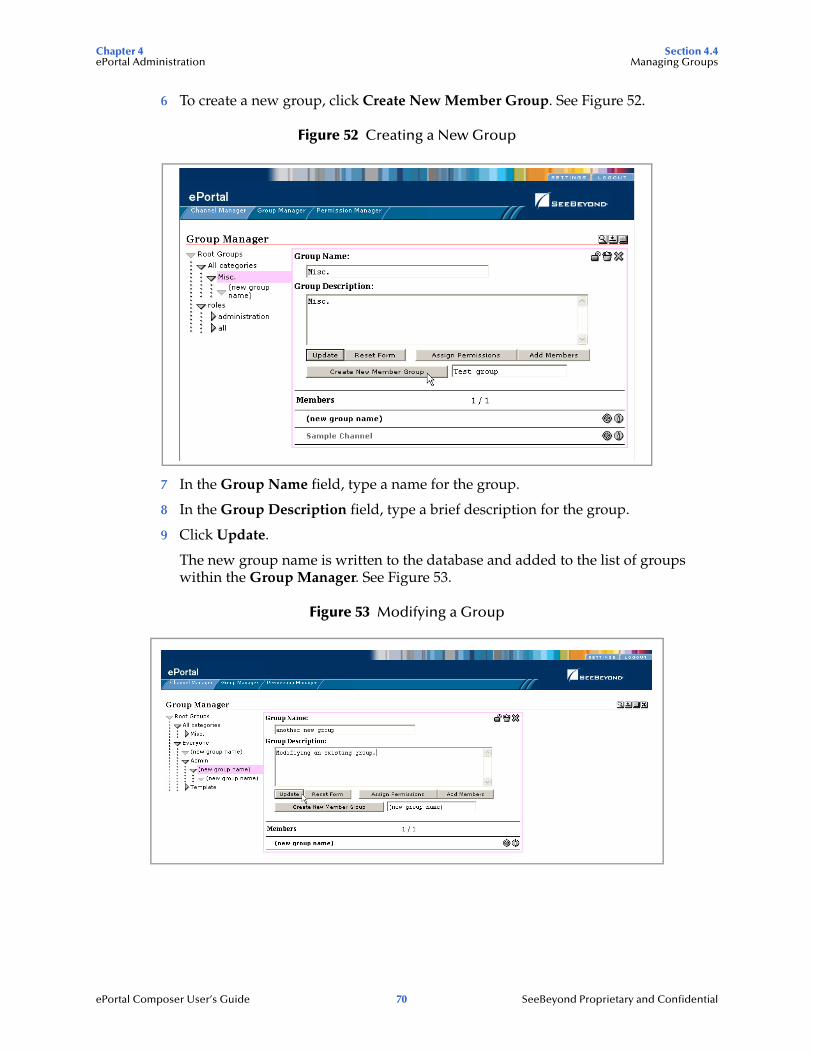
6 To create a new group, click Create New Member Group. See Figure 52.
Figure 52 Creating a New Group
7 In the Group Name field, type a name for the group.
8 In the Group Description field, type a brief description for the group.
9 Click Update.
The new group name is written to the database and added to the list of groups within the Group Manager. See Figure 53.
Figure 53 Modifying a Group
Chapter 4 Section 4.4ePortal Administration Managing Groups
ePortal Composer User’s Guide 71 SeeBeyond Proprietary and Confidential
Adding Members to a Group
To add a member to a group in the Detail view
1 Start your browser and log into ePortal.
2 On the Administrator’s startup page, click the Group Manager tab.
3 To expand the list to view the existing groups, click the expander on the left of the all label.
4 To view the group you want to modify, click the expander on the left of the group name.
5 In the expanded list, select the group you want to modify.
6 In the Detail view, click Add Members to launch the Add Members view.
7 In the Add Members view, select a group member, select the appropriated check box aligned with the group, and then click Select Marked.
8 The view is updated by placing a permanent “X” alongside the selected members.
9 To finish, click Done with Selection.
All selected groups on the list are now members of the parent group.
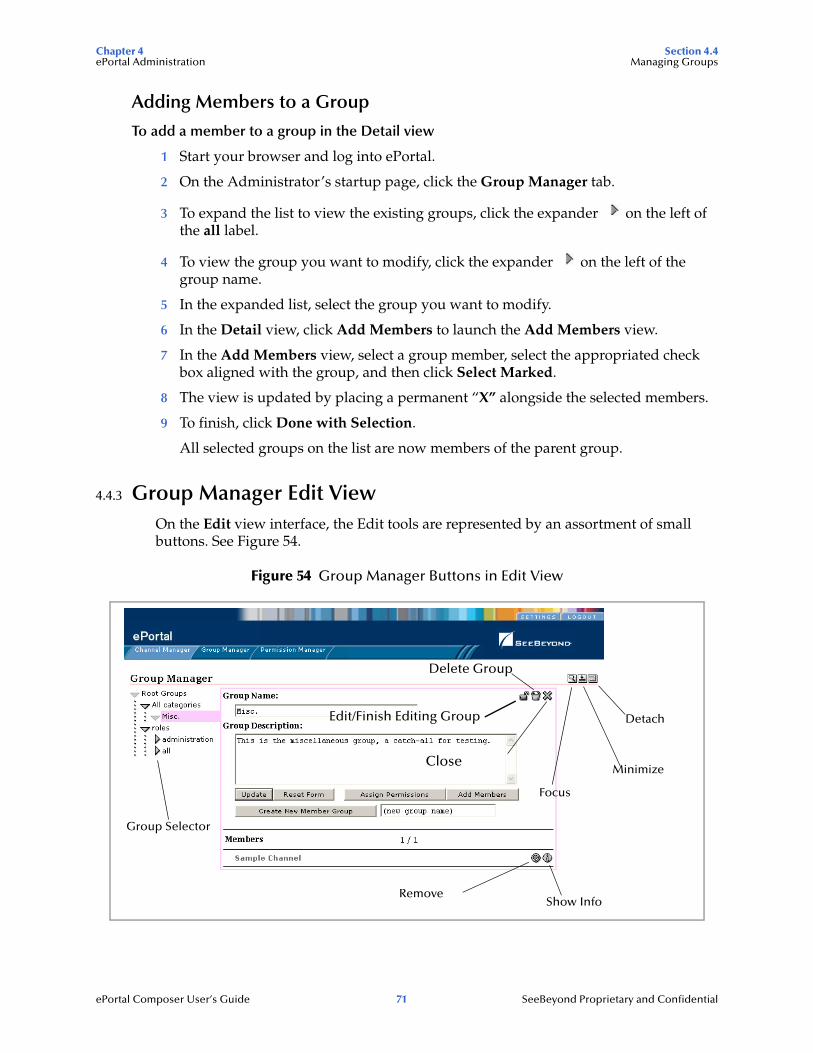
4.4.3 Group Manager Edit ViewOn the Edit view interface, the Edit tools are represented by an assortment of small buttons. See Figure 54.
Figure 54 Group Manager Buttons in Edit View
Show InfoRemove
Detach
Minimize
Focus
Close
Group Selector
Delete Group
Edit/Finish Editing Group

Chapter 4 Section 4.4ePortal Administration Managing Groups
ePortal Composer User’s Guide 72 SeeBeyond Proprietary and Confidential
For a complete explanation of the buttons in the Edit view, see Table 2 on page 17. This section explains how to create and manipulate groups in the Detail view.
Editing a Group’s Information
The Edit view allows you to modify groups and group information, for example:
To change the group name and description, click Update.
To create a member group within a group, type the name of the new group in the f (new group name) field, and then click Create New Member Group.
To add existing group members to a group, click Add Members.
To assign permissions to the group, click Assign Permissions. This action launches the Permissions Manager channel. See “Managing Permissions” on page 75 for details on this feature.
To delete a group, click the Remove (X) button. This action physically deletes the group and removes references to it from all other groups.
4.4.4 Searching Groups
You can search for any entity type that is contained in a root group and for any group of such entities. To search for particular groups, you search based on arguments, for example:
To search for a Group of Persons (the first argument), change the second argument to contains or starts with and the third argument to administrators.
To search within the current group only, select the Search only descendants of the selected group check box.
When you click Go, a new Search results element will be created that contains an element for each member in the results.
4.4.5 Managing CategoriesWhen you create a channel, you must assign it to a channel category. In this context, a category is a logical collection of channels that “go together” for example, having a similar or related purpose.
Channels exist within categories that the ePortal administrator can create and modify. The top-level (master) category is called All categories. All individuals with any level of access to the channel are members of the All categories master category container. The Group Manager page provides a view of existing categories and a mechanism for the administrator to manipulate a category’s members and permissions.
Note: For more information on assigning permissions, see “Managing Permissions” on page 75.
Like groups, a category can contains other categories as well as groups, sub-groups, and channels. This section explains how to manage channel categories.
Chapter 4 Section 4.4ePortal Administration Managing Groups
ePortal Composer User’s Guide 73 SeeBeyond Proprietary and Confidential
Adding a New Category
To add a new category
1 On the Administrator’s startup page, select the Group Manager tab.
2 To expand the list to view the existing categories, click the expansion arrow to the left of the All categories label.
3 If necessary, click the expansion arrow to the left of the category, for example: All categories. You only need to do this step if you want to expand and show all the categories.
Note: You must create your first category under All categories.
4 Click the name of the category under which you want to create the new category, for example, All categories.
A box appears, allowing you to begin creating a new category. See Figure 55.
Figure 55 Creating a Category 1
5 Click the Edit Group button to expand the box. See Figure 56 on page 74.
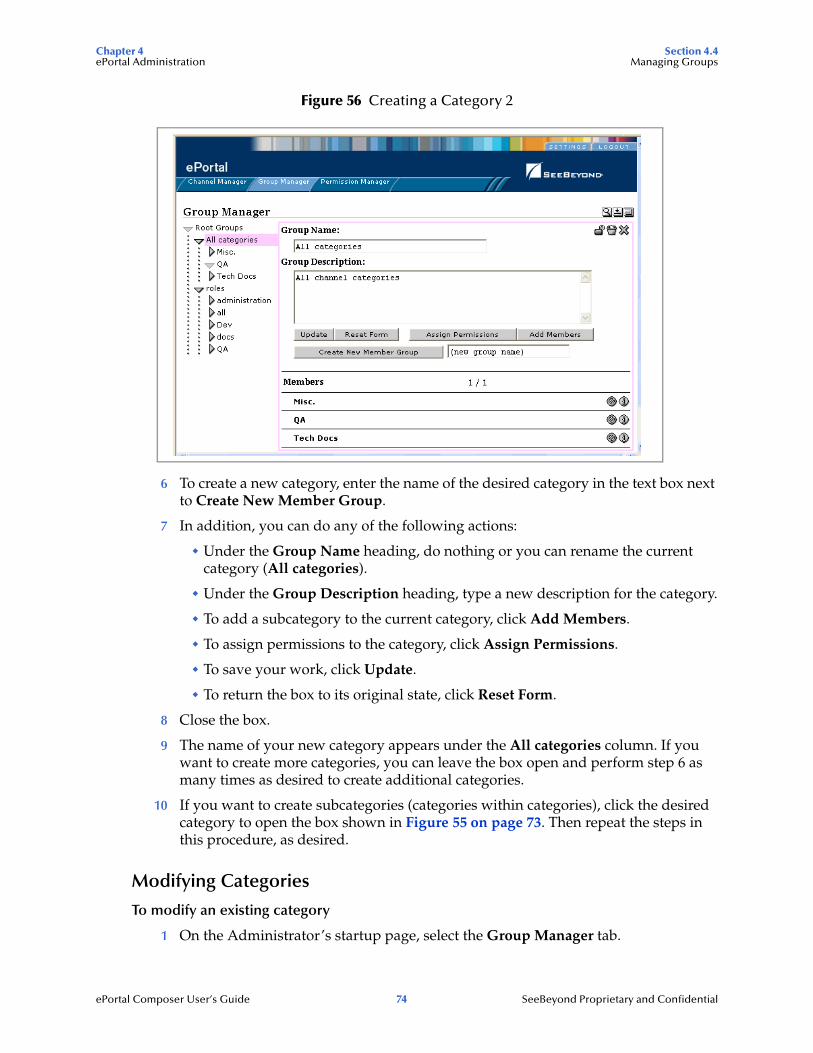
Chapter 4 Section 4.4ePortal Administration Managing Groups
ePortal Composer User’s Guide 74 SeeBeyond Proprietary and Confidential
Figure 56 Creating a Category 2
6 To create a new category, enter the name of the desired category in the text box next to Create New Member Group.
7 In addition, you can do any of the following actions:
Under the Group Name heading, do nothing or you can rename the current category (All categories).
Under the Group Description heading, type a new description for the category.
To add a subcategory to the current category, click Add Members.
To assign permissions to the category, click Assign Permissions.
To save your work, click Update.
To return the box to its original state, click Reset Form.
8 Close the box.
9 The name of your new category appears under the All categories column. If you want to create more categories, you can leave the box open and perform step 6 as many times as desired to create additional categories.
10 If you want to create subcategories (categories within categories), click the desired category to open the box shown in Figure 55 on page 73. Then repeat the steps in this procedure, as desired.
Modifying Categories
To modify an existing category
1 On the Administrator’s startup page, select the Group Manager tab.
Chapter 4 Section 4.5ePortal Administration Managing Permissions
ePortal Composer User’s Guide 75 SeeBeyond Proprietary and Confidential
2 To expand the list to view the existing categories, click the expansion arrow to the left of the All categories label.
3 To view the category you want to modify, click the expansion arrow to the left of the category name.
4 Click the category name that you want to modify.
5 Do any of the following actions listed in step 7 in the procedure on page 73.
6 When you are finished, close the box.
To add groups and people to an existing category
1 On the Administrator’s startup page, select the Group Manager tab. To expand the
list to view the existing categories, click the expansion arrow to the left of the All categories label.
2 To access the category you want to modify, click the expansion arrow to the left of the category’s name, for example: Misc.
3 Click Add Members.
4 Check the category to which you want to add groups or people.
5 Select the groups and people you want to add to the category.
6 When you are finished, close the box.
4.5 Managing PermissionsePortal allows you to assign channel-use permissions to groups and categories. This section explains how the Administrator can assign these permissions via ePortal Composer’s Permissions Manager channel.
4.5.1 About PermissionsGroup members may have channel-use permissions assigned to them directly, or permissions can be inherited from the hierarchy of group memberships. The ePortal group mechanism allows multiple instances of permission inheritance.
By definition, the Administrator user has all permissions. Only the Administrator is allowed to assign channel-use permissions to groups and categories.
Permissions in ePortal operate as follows:
You assign a permission to a principal to work with a target. A principal can be either:
User
Group of users
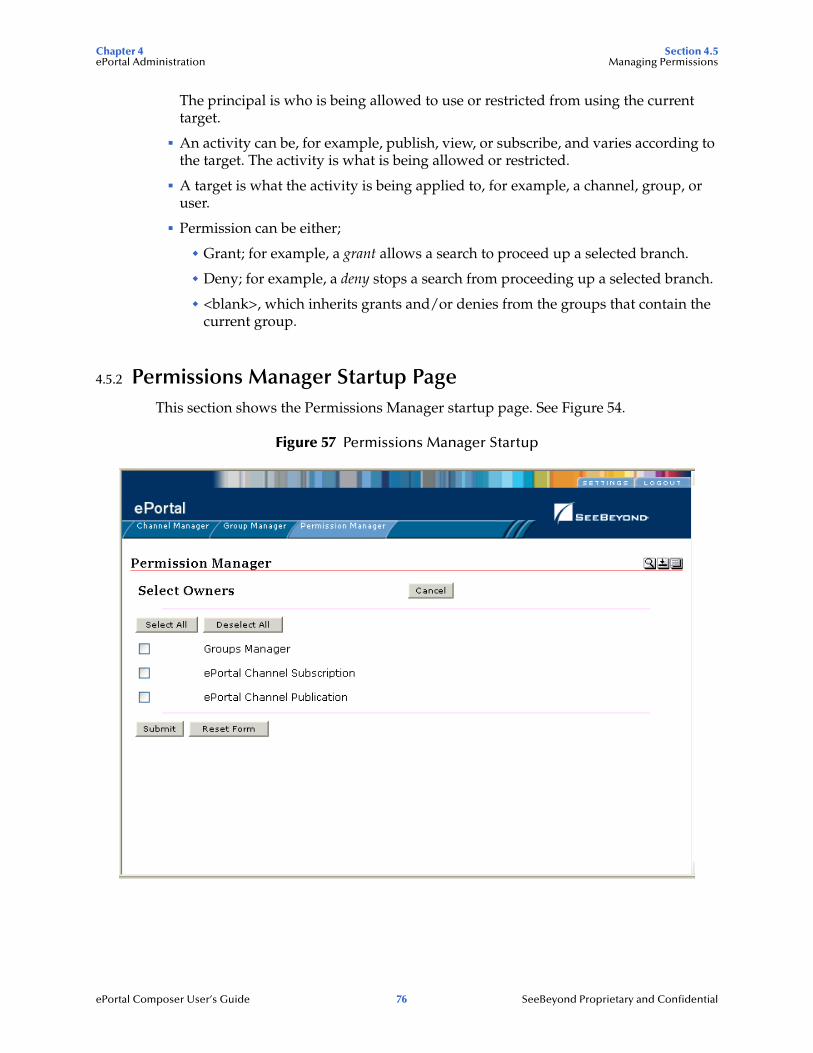
Chapter 4 Section 4.5ePortal Administration Managing Permissions
ePortal Composer User’s Guide 76 SeeBeyond Proprietary and Confidential
The principal is who is being allowed to use or restricted from using the current target.
An activity can be, for example, publish, view, or subscribe, and varies according to the target. The activity is what is being allowed or restricted.
A target is what the activity is being applied to, for example, a channel, group, or user.
Permission can be either;
Grant; for example, a grant allows a search to proceed up a selected branch.
Deny; for example, a deny stops a search from proceeding up a selected branch.
<blank>, which inherits grants and/or denies from the groups that contain the current group.
4.5.2 Permissions Manager Startup PageThis section shows the Permissions Manager startup page. See Figure 54.
Figure 57 Permissions Manager Startup
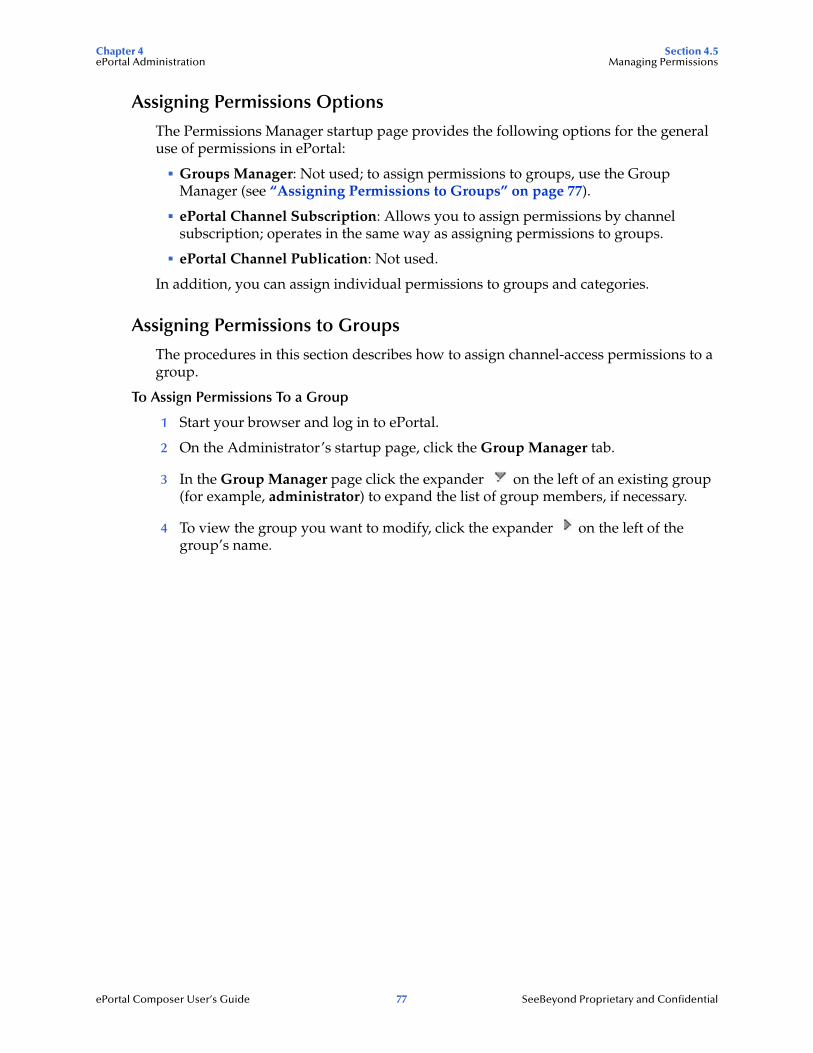
Chapter 4 Section 4.5ePortal Administration Managing Permissions
ePortal Composer User’s Guide 77 SeeBeyond Proprietary and Confidential
Assigning Permissions Options
The Permissions Manager startup page provides the following options for the general use of permissions in ePortal:
Groups Manager: Not used; to assign permissions to groups, use the Group Manager (see “Assigning Permissions to Groups” on page 77).
ePortal Channel Subscription: Allows you to assign permissions by channel subscription; operates in the same way as assigning permissions to groups.
ePortal Channel Publication: Not used.
In addition, you can assign individual permissions to groups and categories.
Assigning Permissions to Groups
The procedures in this section describes how to assign channel-access permissions to a group.
To Assign Permissions To a Group
1 Start your browser and log in to ePortal.
2 On the Administrator’s startup page, click the Group Manager tab.
3 In the Group Manager page click the expander on the left of an existing group (for example, administrator) to expand the list of group members, if necessary.
4 To view the group you want to modify, click the expander on the left of the group’s name.
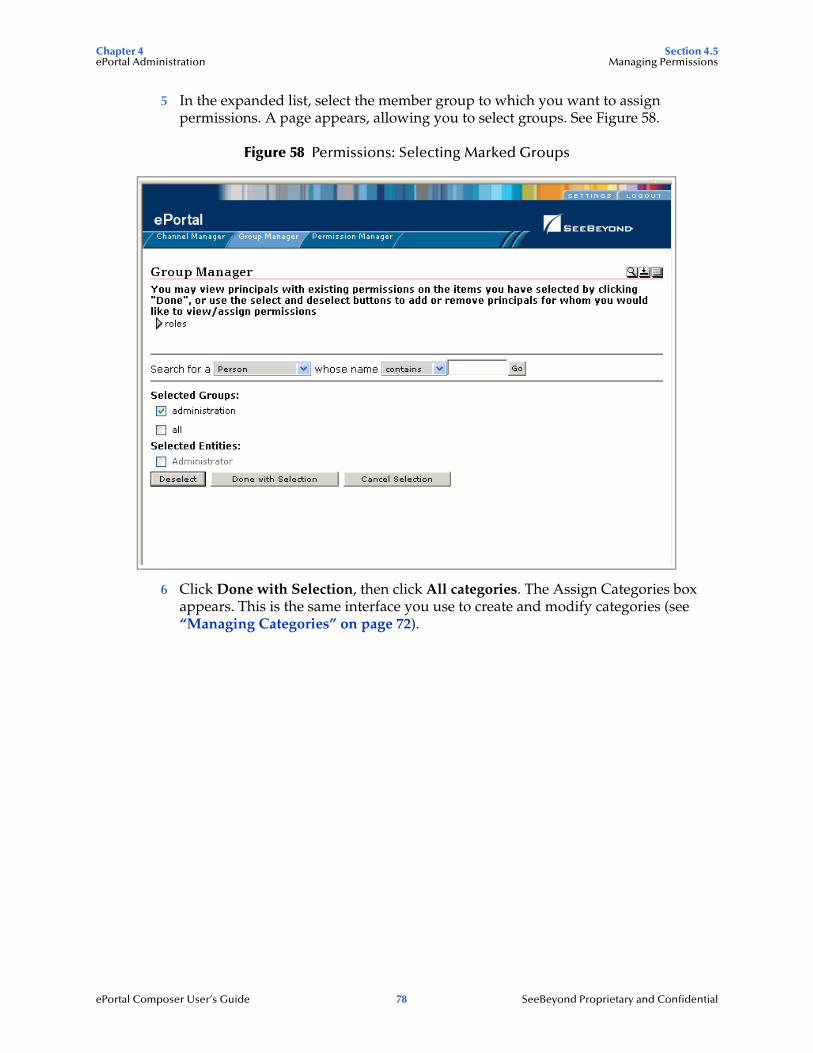
Chapter 4 Section 4.5ePortal Administration Managing Permissions
ePortal Composer User’s Guide 78 SeeBeyond Proprietary and Confidential
5 In the expanded list, select the member group to which you want to assign permissions. A page appears, allowing you to select groups. See Figure 58.
Figure 58 Permissions: Selecting Marked Groups
6 Click Done with Selection, then click All categories. The Assign Categories box appears. This is the same interface you use to create and modify categories (see “Managing Categories” on page 72).
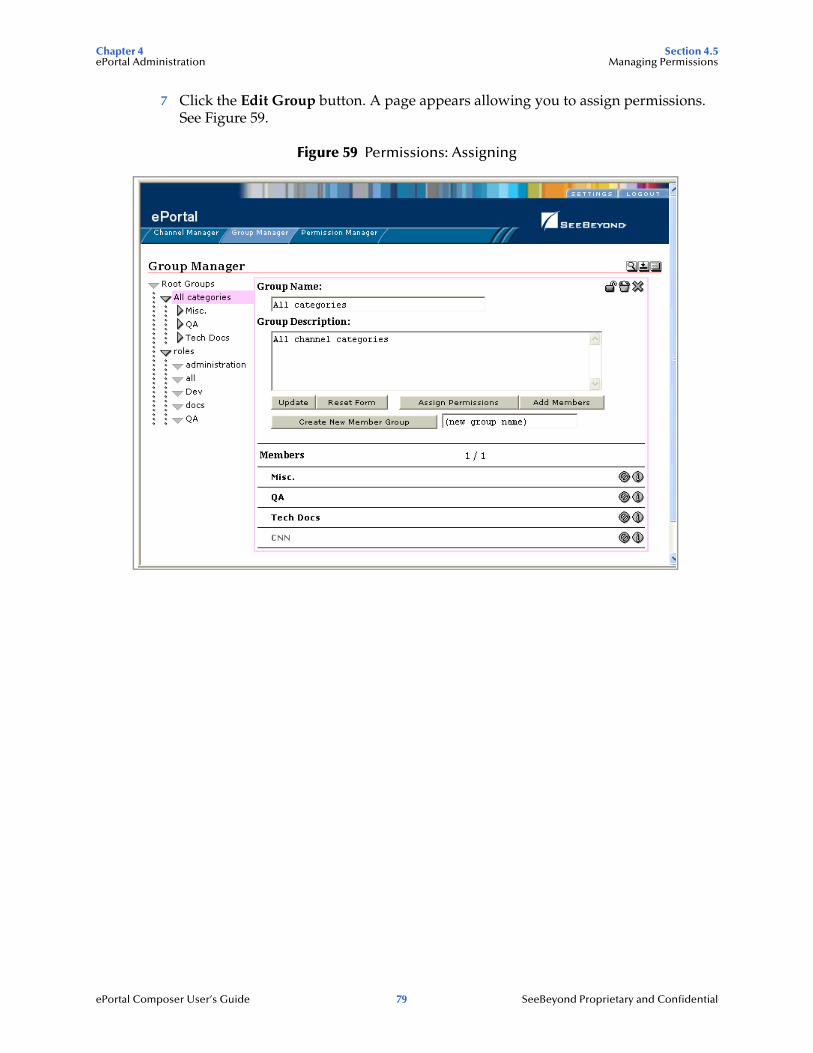
Chapter 4 Section 4.5ePortal Administration Managing Permissions
ePortal Composer User’s Guide 79 SeeBeyond Proprietary and Confidential
7 Click the Edit Group button. A page appears allowing you to assign permissions. See Figure 59.
Figure 59 Permissions: Assigning
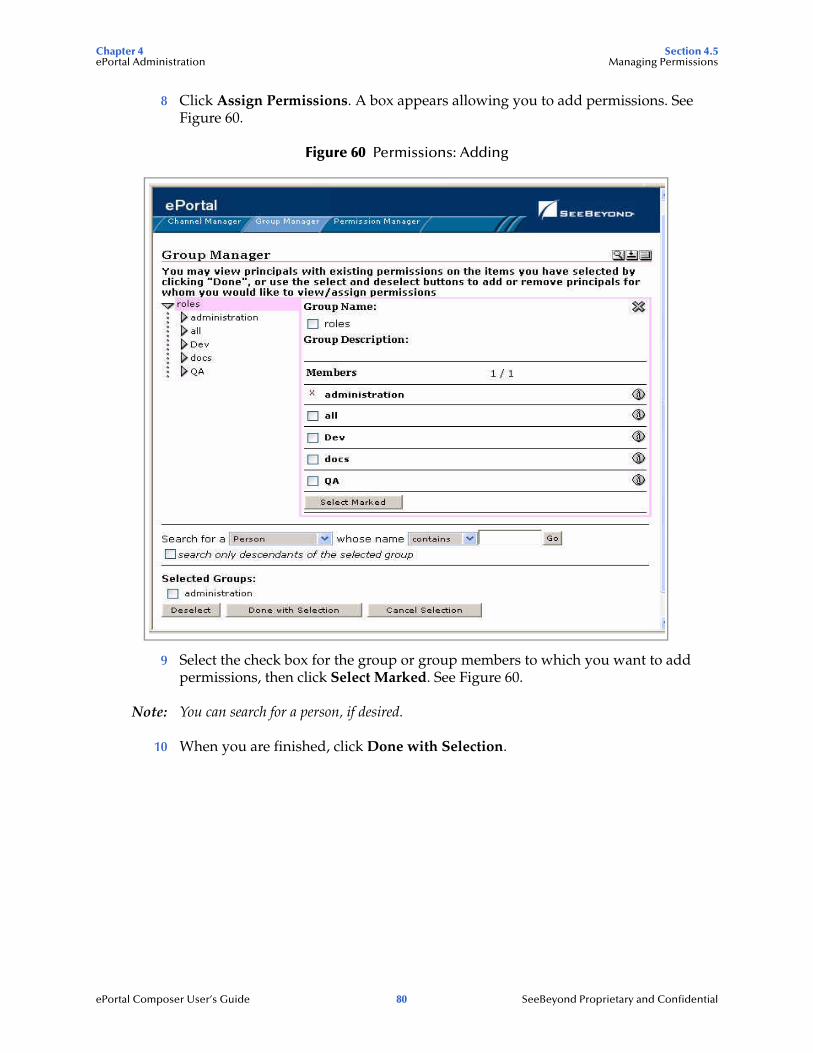
Chapter 4 Section 4.5ePortal Administration Managing Permissions
ePortal Composer User’s Guide 80 SeeBeyond Proprietary and Confidential
8 Click Assign Permissions. A box appears allowing you to add permissions. See Figure 60.
Figure 60 Permissions: Adding
9 Select the check box for the group or group members to which you want to add permissions, then click Select Marked. See Figure 60.
Note: You can search for a person, if desired.
10 When you are finished, click Done with Selection.
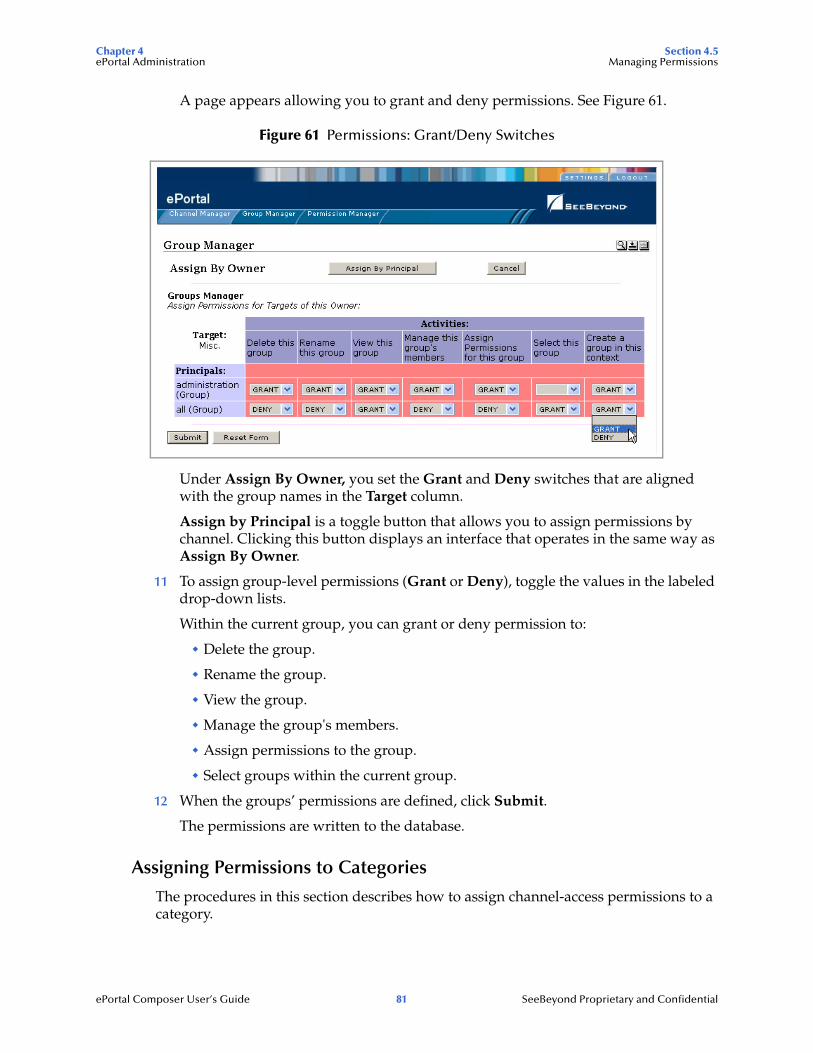
Chapter 4 Section 4.5ePortal Administration Managing Permissions
ePortal Composer User’s Guide 81 SeeBeyond Proprietary and Confidential
A page appears allowing you to grant and deny permissions. See Figure 61.
Figure 61 Permissions: Grant/Deny Switches
Under Assign By Owner, you set the Grant and Deny switches that are aligned with the group names in the Target column.
Assign by Principal is a toggle button that allows you to assign permissions by channel. Clicking this button displays an interface that operates in the same way as Assign By Owner.
11 To assign group-level permissions (Grant or Deny), toggle the values in the labeled drop-down lists.
Within the current group, you can grant or deny permission to:
Delete the group.
Rename the group.
View the group.
Manage the group's members.
Assign permissions to the group.
Select groups within the current group.
12 When the groups’ permissions are defined, click Submit.
The permissions are written to the database.
Assigning Permissions to Categories
The procedures in this section describes how to assign channel-access permissions to a category.
Chapter 4 Section 4.5ePortal Administration Managing Permissions
ePortal Composer User’s Guide 82 SeeBeyond Proprietary and Confidential
To assign permissions to a category
1 Start your browser and log in to ePortal.
1 On the Administrator’s startup page, select the Permission Manager tab.
2 To expand the list to view the existing categories, click the expansion arrow to the left of the Everyone label.
3 To view the category you want to modify, click the expansion arrow to the left of the category’s name.
4 From the expanded list, click the category or sub-category you want to modify.
5 Click Assign Permissions.
6 Select the groups to which you want to assign permissions.
7 To add or remove names, click Select and Deselect.
8 When you are finished selecting names, click Done.
9 To assign category-level permissions (Grant or Deny), toggle the values in the drop-down lists.
You can grant or deny permission to do the following actions in the context of the current category:
Delete the group.
Rename the group.
View the group.
Manage the group’s members.
Assign permissions for the group.
Select a group within the current category.
10 When the permissions are set, click Submit.
ePortal Composer User’s Guide 83 SeeBeyond Proprietary and Confidential
Chapter 5
User Personalization
This chapter explains how an ePortal user can personalize a portal view. Through personalization, you can create different views of business information.
5.1 OverviewWhen a new user logs into ePortal prior to personalization, only these options are available: Settings and Logout. Initially, a new user has no layouts or channel options configured for their personal view. A layout refers to the placement of objects on a user’s view of a particular channel.
Settings operations include:
Adding tabs
Adding channels
Adding columns
By default, all users are allowed personalization privileges. However, ePortal system administrators may choose to restrict access to the personalization tools via group management features.
System administrators can also personalize their portal views by clicking Settings. They have three additional tab options to work with, Channel Manager, Group Manager, and Permissions Manager. Setting user preferences for these tabs operates in the same way as setting preferences for any tab.
This chapter explains how to use these user personalization features.
This Chapter Includes
“Personalizing a View” on page 84
“Using the ePortal Search Engine” on page 89
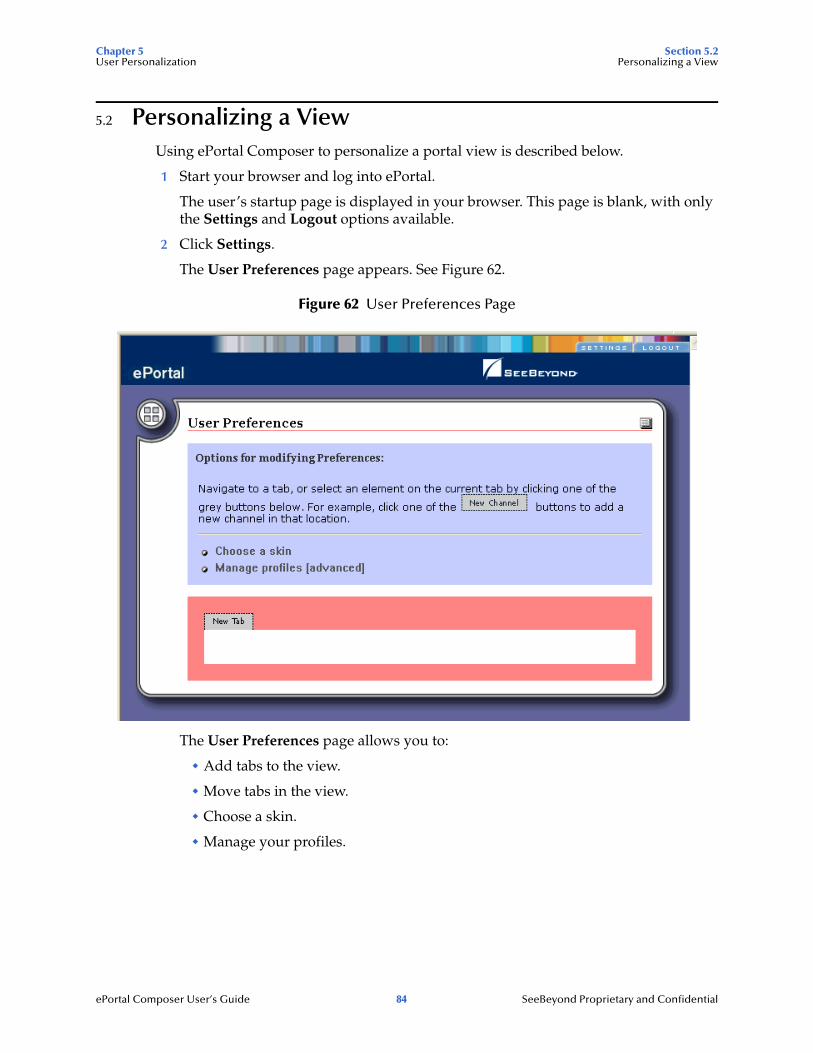
Chapter 5 Section 5.2User Personalization Personalizing a View
ePortal Composer User’s Guide 84 SeeBeyond Proprietary and Confidential
5.2 Personalizing a ViewUsing ePortal Composer to personalize a portal view is described below.
1 Start your browser and log into ePortal.
The user’s startup page is displayed in your browser. This page is blank, with only the Settings and Logout options available.
2 Click Settings.
The User Preferences page appears. See Figure 62.
Figure 62 User Preferences Page
The User Preferences page allows you to:
Add tabs to the view.
Move tabs in the view.
Choose a skin.
Manage your profiles.
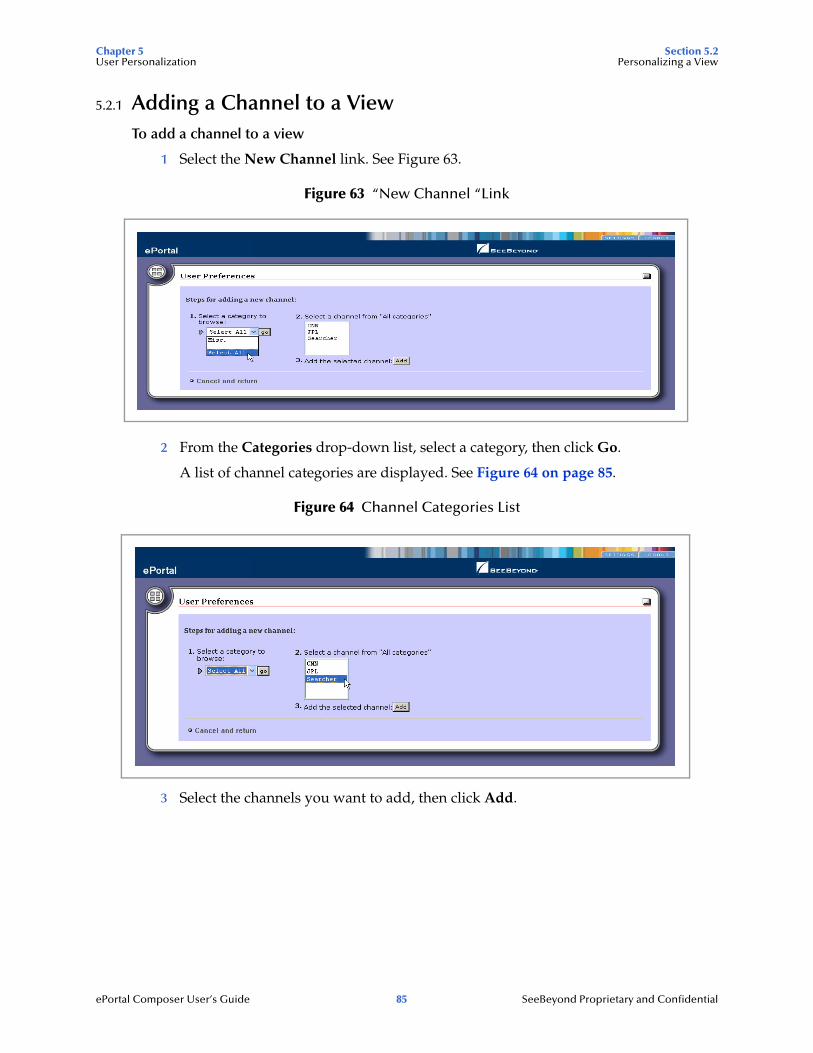
Chapter 5 Section 5.2User Personalization Personalizing a View
ePortal Composer User’s Guide 85 SeeBeyond Proprietary and Confidential
5.2.1 Adding a Channel to a ViewTo add a channel to a view
1 Select the New Channel link. See Figure 63.
Figure 63 “New Channel “Link
2 From the Categories drop-down list, select a category, then click Go.
A list of channel categories are displayed. See Figure 64 on page 85.
Figure 64 Channel Categories List
3 Select the channels you want to add, then click Add.
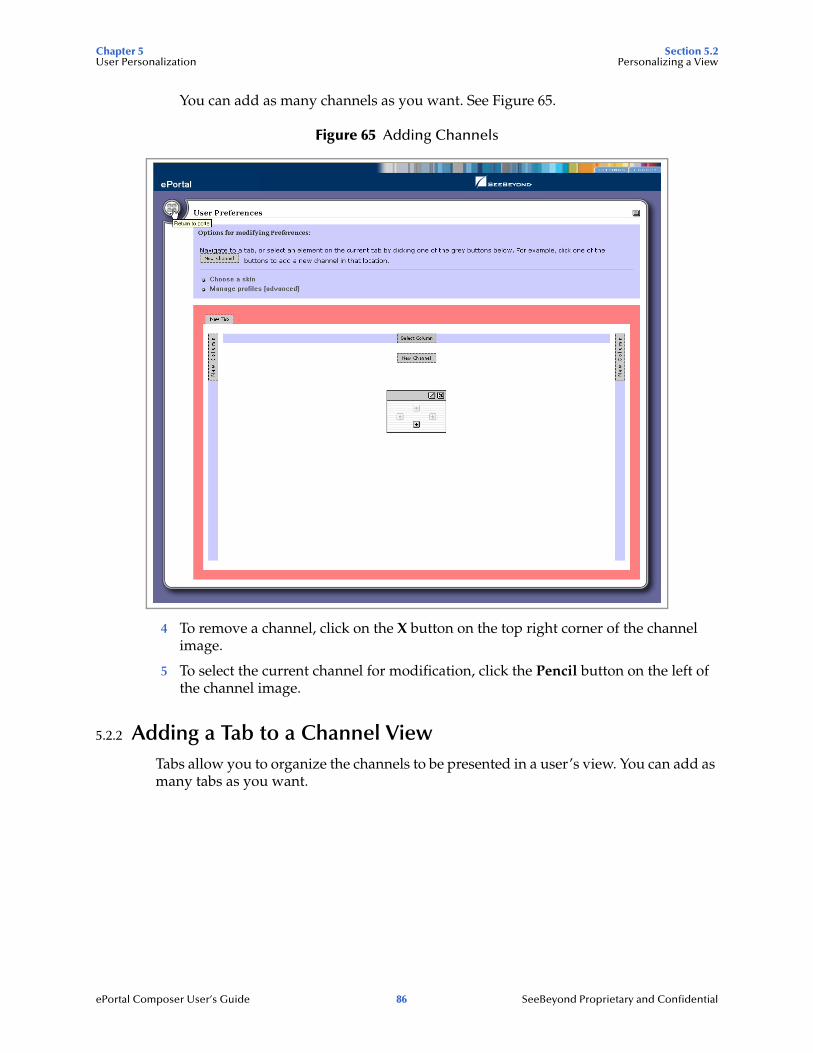
Chapter 5 Section 5.2User Personalization Personalizing a View
ePortal Composer User’s Guide 86 SeeBeyond Proprietary and Confidential
You can add as many channels as you want. See Figure 65.
Figure 65 Adding Channels
4 To remove a channel, click on the X button on the top right corner of the channel image.
5 To select the current channel for modification, click the Pencil button on the left of the channel image.
5.2.2 Adding a Tab to a Channel ViewTabs allow you to organize the channels to be presented in a user’s view. You can add as many tabs as you want.
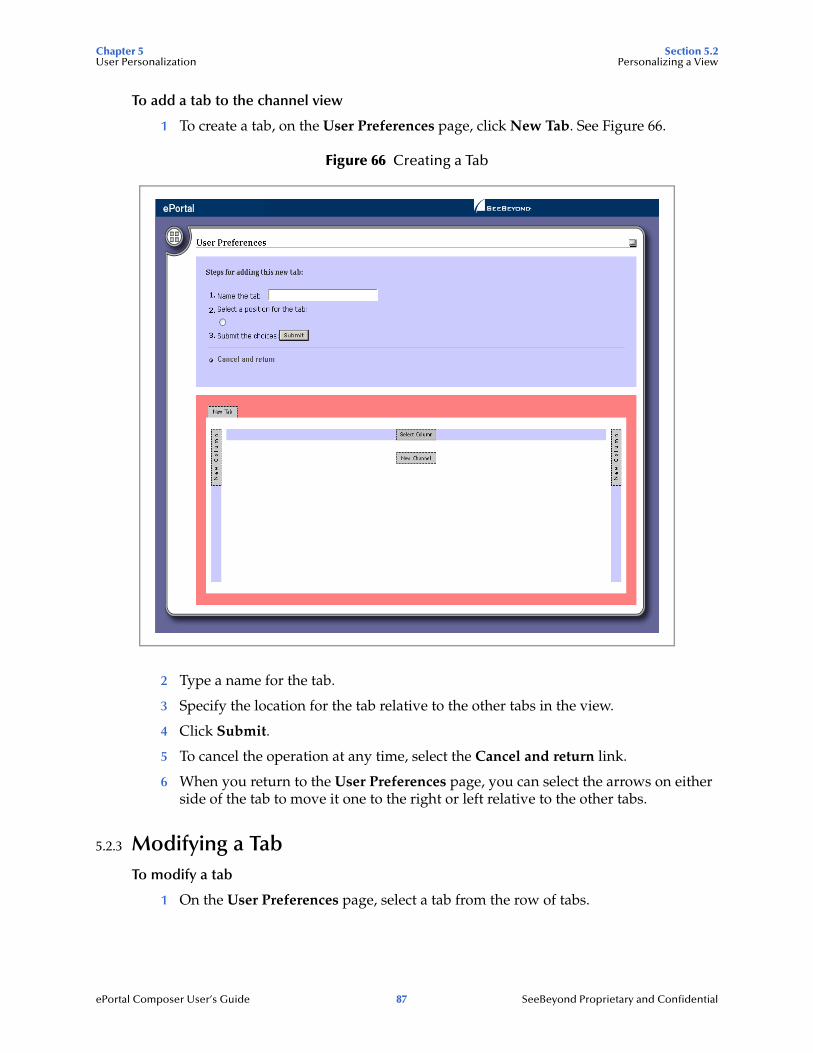
Chapter 5 Section 5.2User Personalization Personalizing a View
ePortal Composer User’s Guide 87 SeeBeyond Proprietary and Confidential
To add a tab to the channel view
1 To create a tab, on the User Preferences page, click New Tab. See Figure 66.
Figure 66 Creating a Tab
2 Type a name for the tab.
3 Specify the location for the tab relative to the other tabs in the view.
4 Click Submit.
5 To cancel the operation at any time, select the Cancel and return link.
6 When you return to the User Preferences page, you can select the arrows on either side of the tab to move it one to the right or left relative to the other tabs.
5.2.3 Modifying a TabTo modify a tab
1 On the User Preferences page, select a tab from the row of tabs.
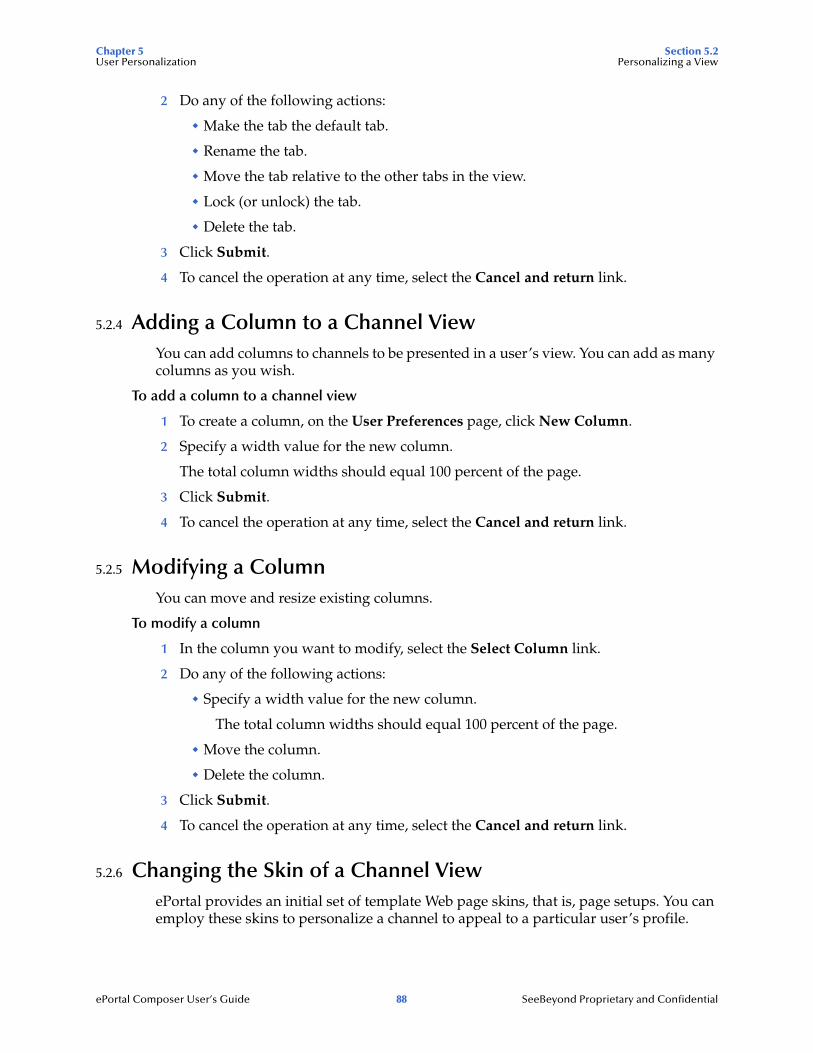
Chapter 5 Section 5.2User Personalization Personalizing a View
ePortal Composer User’s Guide 88 SeeBeyond Proprietary and Confidential
2 Do any of the following actions:
Make the tab the default tab.
Rename the tab.
Move the tab relative to the other tabs in the view.
Lock (or unlock) the tab.
Delete the tab.
3 Click Submit.
4 To cancel the operation at any time, select the Cancel and return link.
5.2.4 Adding a Column to a Channel ViewYou can add columns to channels to be presented in a user’s view. You can add as many columns as you wish.
To add a column to a channel view
1 To create a column, on the User Preferences page, click New Column.
2 Specify a width value for the new column.
The total column widths should equal 100 percent of the page.
3 Click Submit.
4 To cancel the operation at any time, select the Cancel and return link.
5.2.5 Modifying a ColumnYou can move and resize existing columns.
To modify a column
1 In the column you want to modify, select the Select Column link.
2 Do any of the following actions:
Specify a width value for the new column.
The total column widths should equal 100 percent of the page.
Move the column.
Delete the column.
3 Click Submit.
4 To cancel the operation at any time, select the Cancel and return link.
5.2.6 Changing the Skin of a Channel ViewePortal provides an initial set of template Web page skins, that is, page setups. You can employ these skins to personalize a channel to appeal to a particular user’s profile.
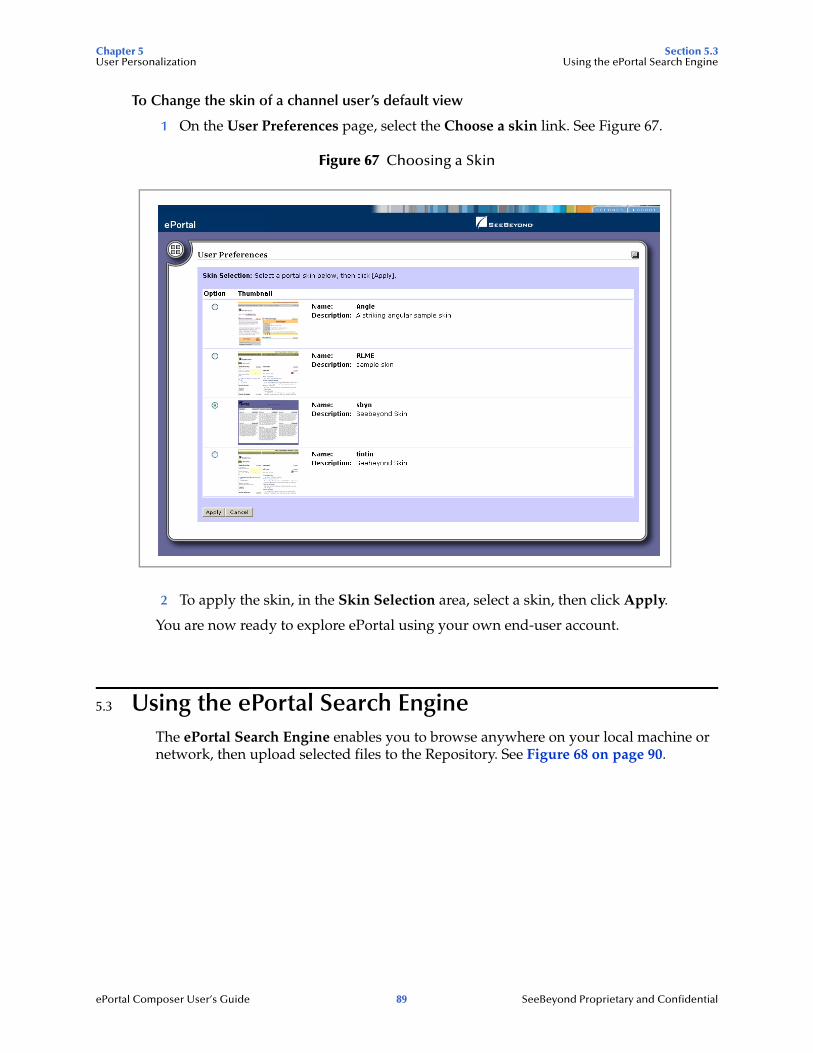
Chapter 5 Section 5.3User Personalization Using the ePortal Search Engine
ePortal Composer User’s Guide 89 SeeBeyond Proprietary and Confidential
To Change the skin of a channel user’s default view
1 On the User Preferences page, select the Choose a skin link. See Figure 67.
Figure 67 Choosing a Skin
2 To apply the skin, in the Skin Selection area, select a skin, then click Apply.
You are now ready to explore ePortal using your own end-user account.
5.3 Using the ePortal Search EngineThe ePortal Search Engine enables you to browse anywhere on your local machine or network, then upload selected files to the Repository. See Figure 68 on page 90.
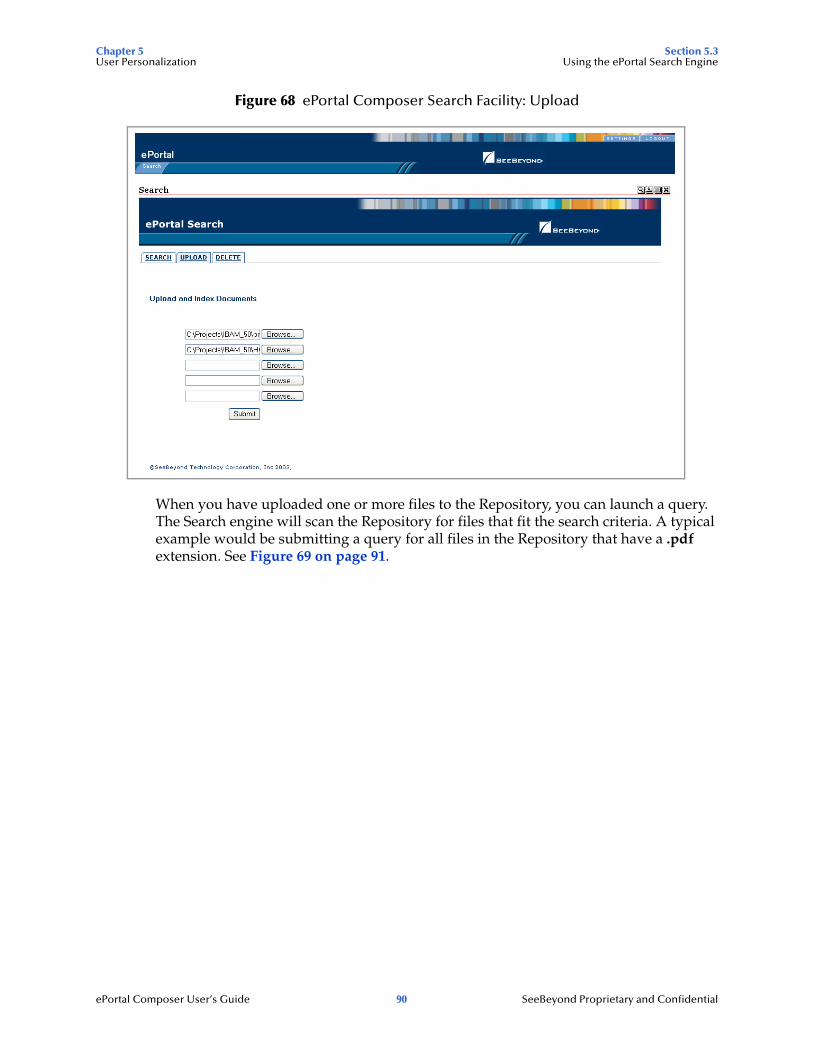
Chapter 5 Section 5.3User Personalization Using the ePortal Search Engine
ePortal Composer User’s Guide 90 SeeBeyond Proprietary and Confidential
Figure 68 ePortal Composer Search Facility: Upload
When you have uploaded one or more files to the Repository, you can launch a query. The Search engine will scan the Repository for files that fit the search criteria. A typical example would be submitting a query for all files in the Repository that have a .pdf extension. See Figure 69 on page 91.
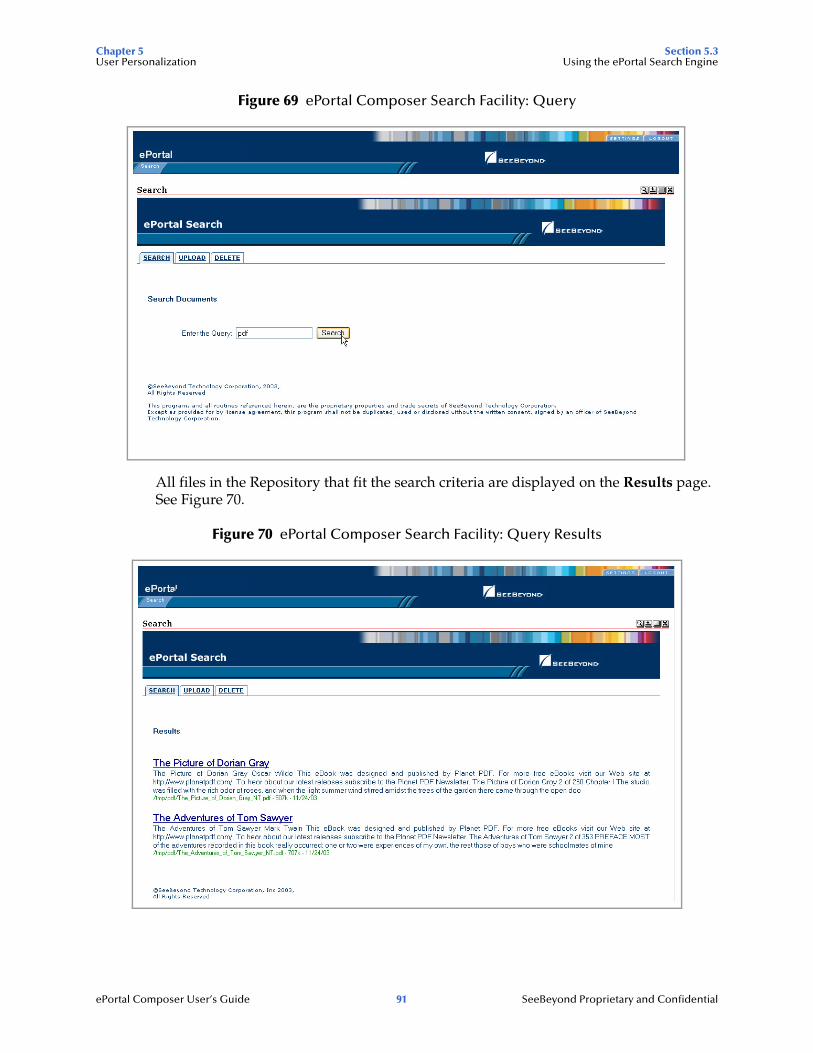
Chapter 5 Section 5.3User Personalization Using the ePortal Search Engine
ePortal Composer User’s Guide 91 SeeBeyond Proprietary and Confidential
Figure 69 ePortal Composer Search Facility: Query
All files in the Repository that fit the search criteria are displayed on the Results page. See Figure 70.
Figure 70 ePortal Composer Search Facility: Query Results

Chapter 5 Section 5.3User Personalization Using the ePortal Search Engine
ePortal Composer User’s Guide 92 SeeBeyond Proprietary and Confidential
5.3.1 Creating a Layout for the Search FacilityThis section describes how to create a layout for the ePortal Search Facility.
To create a new search layout
1 Start your browser and log into ePortal.
2 To initialize a new ePortal page layout, click Settings.
The User Preferences startup page for adding a new page layout appears. See Figure 71.
Figure 71 User Preferences: Search: Adding a New Channel
3 On the User Preferences page, select a category to browse, then click Go. See Figure 72.
Figure 72 User Preferences: Search, Selecting a Category
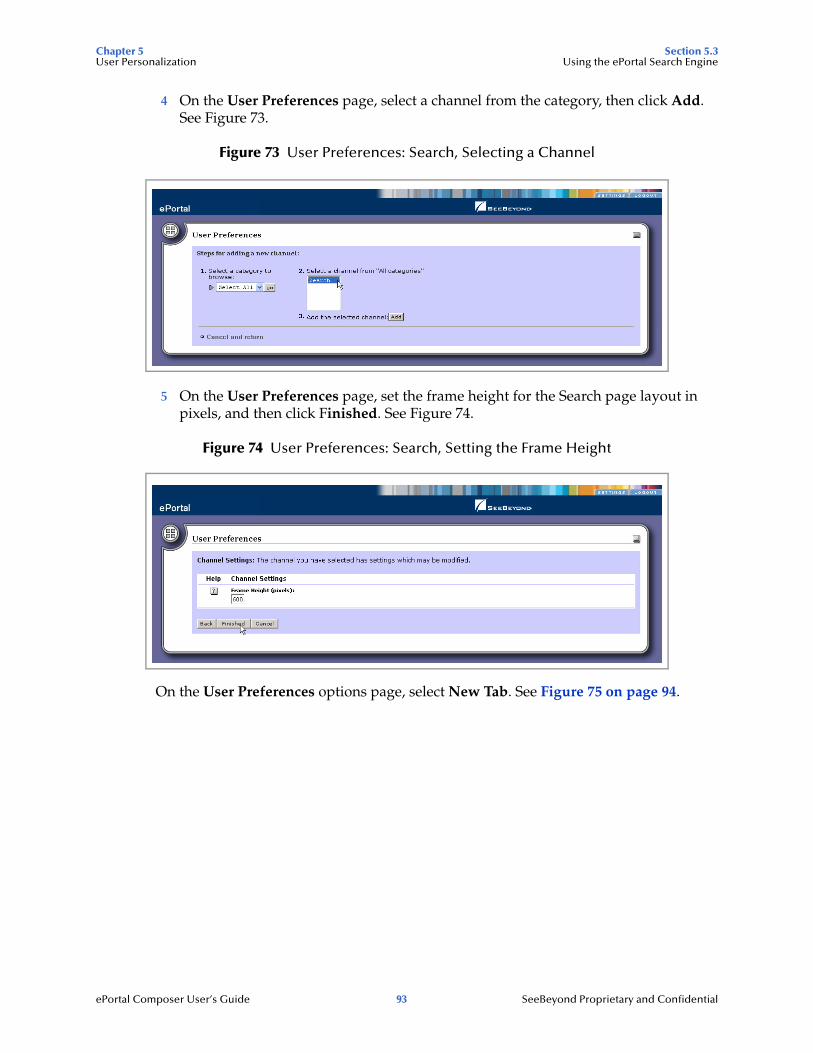
Chapter 5 Section 5.3User Personalization Using the ePortal Search Engine
ePortal Composer User’s Guide 93 SeeBeyond Proprietary and Confidential
4 On the User Preferences page, select a channel from the category, then click Add. See Figure 73.
Figure 73 User Preferences: Search, Selecting a Channel
5 On the User Preferences page, set the frame height for the Search page layout in pixels, and then click Finished. See Figure 74.
Figure 74 User Preferences: Search, Setting the Frame Height
On the User Preferences options page, select New Tab. See Figure 75 on page 94.
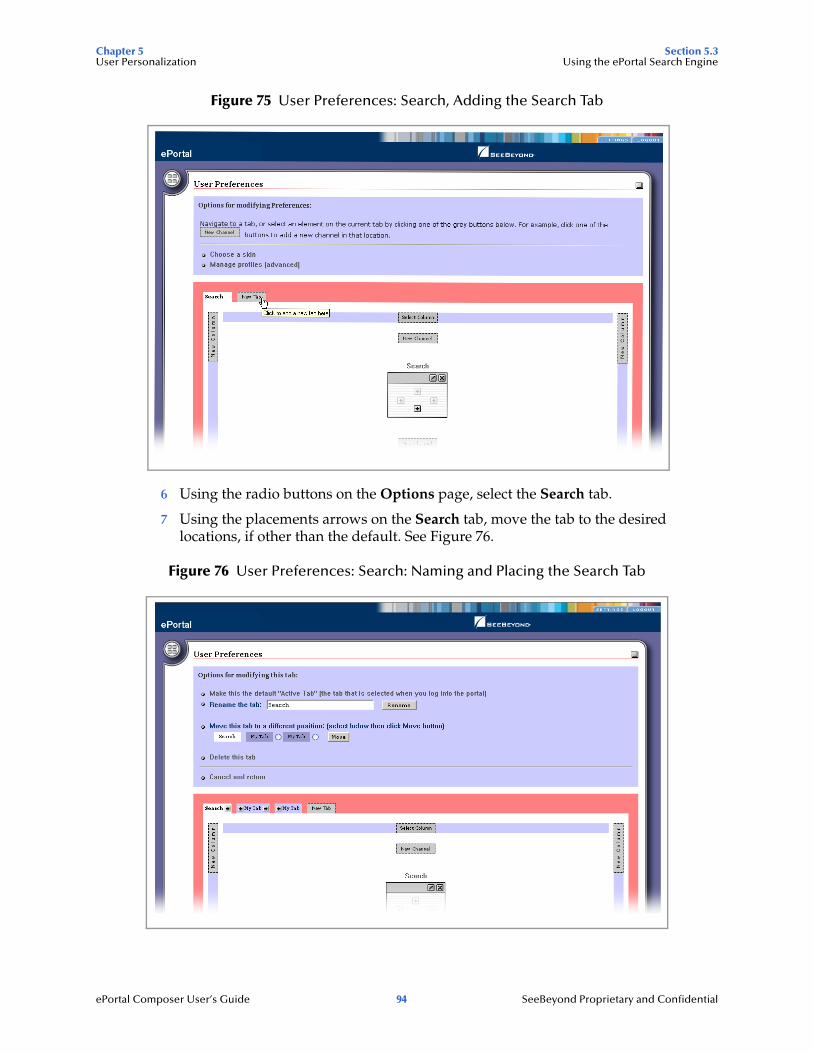
Chapter 5 Section 5.3User Personalization Using the ePortal Search Engine
ePortal Composer User’s Guide 94 SeeBeyond Proprietary and Confidential
Figure 75 User Preferences: Search, Adding the Search Tab
6 Using the radio buttons on the Options page, select the Search tab.
7 Using the placements arrows on the Search tab, move the tab to the desired locations, if other than the default. See Figure 76.
Figure 76 User Preferences: Search: Naming and Placing the Search Tab
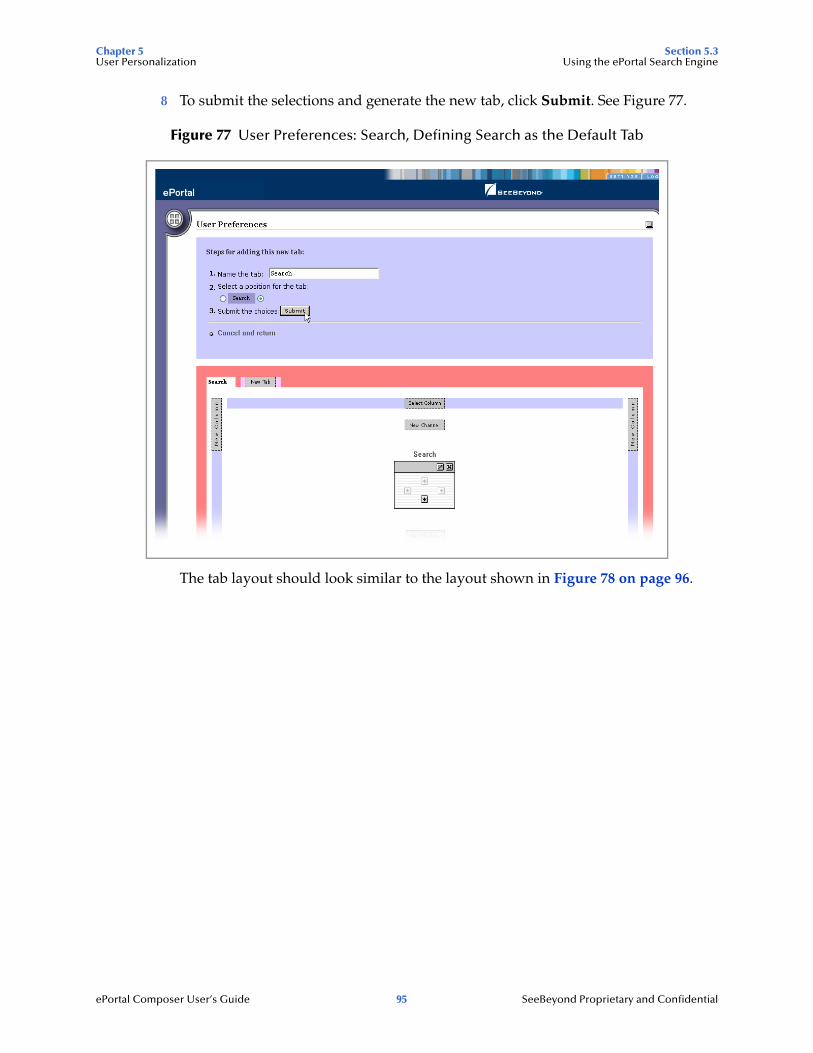
Chapter 5 Section 5.3User Personalization Using the ePortal Search Engine
ePortal Composer User’s Guide 95 SeeBeyond Proprietary and Confidential
8 To submit the selections and generate the new tab, click Submit. See Figure 77.
Figure 77 User Preferences: Search, Defining Search as the Default Tab
The tab layout should look similar to the layout shown in Figure 78 on page 96.

Chapter 5 Section 5.3User Personalization Using the ePortal Search Engine
ePortal Composer User’s Guide 96 SeeBeyond Proprietary and Confidential
Figure 78 User Preferences: Search, Reviewing the Search Page Layout
Index
ePortal Composer User’s Guide 97 SeeBeyond Proprietary and Confidential
Index
Symbols. 82
Aabout events 61add a column to a channel view 88adding a new tab 94application architecture 11apply a skin 89assign channel access permissions 77, 81assign channel to a category 62assign permission to a group 81assigning permissions 82
Bbrowsing a category 92business processes 13
Ccategory
adding 73adding groups and people 75modifying 74
channel 13channel categories 85channel creation procedure 64channel description 60channel functional name 60channel name 60channel options 83channel presentation 86channel time-out 60channel title 60channel types
Custom 58Inline Frame 58Rich Site Summary (RSS) 58Web Proxy 58XML Transformation 58
Channels 72channels 16
choosing a skin 89configuring on WebSphere 36conventions
path name separator 11Windows 11
create a tab 87create and manage channels 58creating a channel for the search facility 92
Ddelete a group 81, 82deploying on WebSphere 36document
conventions 11
Eedit events 61Editable 61ePortal login screen 36ePortal Search Engine 89ePortal search facility 19eportal.properties file 19, 20ePortal.sar 19, 20existing 88extraction 20
Ggroup hierarchy 67
HHas Help 61height constraint 61help events 61
Iin 86inline frame 60inline frame parameters 60Installing on Windows and Unix 19
Llaunching a query 90layouts 83license 19Logical Host
Starting Manually on Windows 34
Index
ePortal Composer User’s Guide 98 SeeBeyond Proprietary and Confidential
Mmanage a group 81, 82milliseconds 60modify a column 88modify the current channel 86
Oorganize the channels 86
Ppermission 81permissions 74, 82permissions, managing 75personalize a portal 83publish a new channel 58
Qquery documents and files 90
Rremove a channel 86remove a channel from the category 62rename a group 81, 82
Sscanning the Repository 90search facility query results 91search.war 20SeeBeyond Web site 12select a group 81setting the frame height in pixels 93SETTINGS tab 92sub-group 70
Ttemplate Web page skins 88
Uuploading files to the Repository 89User Preferences 92User Preferences page 84user profile. 88
VValidate the Installation 35view a group 81, 82
WWeb archive file 19Web channels 10WebSphere configuration and deployment 36writing conventions 11