Embed Size (px)
Citation preview

1
A
DeathlyProblem
Area 4Maravek the Necromancer does
not have Undying. Marvek and each hero can each be affected by up to one Shadowbind Amulet (represented in this scenario by spare fatigue tokens). When a figure is killed and affected by a Shadowbind Amulet, its newly created shadow form is immediately placed in the same space its original form occupied before it was killed.
All shadow form heroes and mon-sters are controlled by the overlord and act on his turn. Shadow form heroes can only preform Advance actions.
This scenario requires only Descent: Journeys in the Dark. Also, if a hero is killed, he respawns on the nearest activated glyph. If two Glyps are equally distant from where the hero was killed, the hero chooses at which glyph to respawn.Heroes that are killed do not move to Town and cannot take Town actions (shop, sell, or train).
Mercy!!!
Claustrophobia
When a hero is killed, he is re-moved from the board. At the be-ginning of this next turn, he is au-tomatically placed on any activated glyph (player’s choice). Heroes that are killed do not move to Town and cannot take Town actions (shop, sell, or train).
This errata is for the Quest Compendium: Volume One for board game Descent: Journeys in the Dark. The following scenarios appear in this document with revised or clarified rules, but didn’t have errata that re-quired the inclusion of a updated map: “Mercy!!!,” “A Deathly Problem,” “Claustrophobia,” and “The Blood Arena of Dawnsmoor.” On the other hand, the scenario “Shadows Hide the Truth” only includes an updated map—no additional text was necessary.

2
The
BloodArena of
Dawnsmoor
BloodFeud
Area 3If both the Carrock Dragon
and the Giant of the Broken Hills are still alive after Area 3 has been revealed, any wound tokens already placed next to them do count as inflicted wounds.
Additional Rules As soon as Area 3 is revealed,
the dueling monster (either the Carrock Dragon or the Giant of the Broken Hills) that is closest to death is immediately killed by the other dueling monster. If there is a tie, the Overlord chooses which dueling monster is killed. The re-maining dueling monster is then rejuvenated to full health and gains bonuses to its health and armor according to rules on page 23 of the Quest Compendium.
Area 7The encounter markers in this
area represent the victory podium. If a hero enter enters either of the spaces, the heroes win.
Area 1
Area 2
Area 3
Start Area

3
The
BrokenBridge
In addition to the required listed products, this scenario also requires The Road to Legend expansion.
It is recommended that the dungeon tiles for this scenario be set up on top of a battle grid (with appropriately scaled squares). Alternatively, you can use the large fold-out map water map included with The Sea of Blood expansion.
The second sentence under “Special Monster Rules” should read:
As soon as the heroes reveal Area 1, also reveal Areas 2, 3, 4, and 6. Do not reveal Areas 5 and 7. The descriptive text for each area should only be read aloud by the overlord as the heroes enter each area.
The second paragraph under “Dwellers in the Chasm” should read:
Any other monster in this sce-nario with the Fly ability that moves adjacent to any square in Area 3 also gains the Soar abil-ity, as described in The Road to Legend (ignoring the first sentence of its description that says Soar is only used in outdoor encounters). Heroes cannot have Soar.
Pit Spaces The paragraph under “Pit
Spaces” should read:
All pit spaces in this scenario represent a great, bottomless chasm that swirls with magical wind vor-texes. If a monster enters a pit space, it is immediately killed unless it has Fly. If a hero who doesn’t have Fly enters a pit space, he must roll a power die:
On an enhancement, the hero falls a short distance and suffers 2 wounds (ignoring armor), then he moves to an adjacent space of his choice. If that space is also a pit space, he must roll again.
On a surge, the hero immedi-ately moves to an adjacent space of his choice. If that space is also a pit space, he must roll again.
On a blank, the hero falls into the chasm and is immediately killed.
Any effect that causes a pit space to be added to the map, such as the overlord cards Spiked Pit and Poison Spikes, add pit spaces normally. However, those pit spaces function as described above. Ignore other effects de-scribed on those cards.
Area 1While any hero figure is in
Area 1, the overlord may, at the start of each of his turns, place two Bane Spiders and one Master
Bane Spider in any of the shaded squares. These Bane Spiders are not treated as spawned monsters, so they can be placed within line of sight of the heroes.
Area 3This entire area is a bottom-
less chasm: treat this space as if it were filled with single-square pit markers. Figures can see, attack, or jump across the chasm, and any figure with Fly can move across it normally.
The DragonThe second paragraph under
“The Dragon Virricrakk” should read :
Virricrakk is a Master Dragon with 20 extra wounds, Fly, and Knockback.
Killing Queen Irinn unlocks the red rune-locked door.
The paragraph under “The Way Out” should read:
Once the heroes enter the por-tal, they are transported to Prince Renik’s throne and are victorious.

Area 1
Area 2 Area 4
Area 3
Area 6
Area 7
Area 5
Start Area
4
5
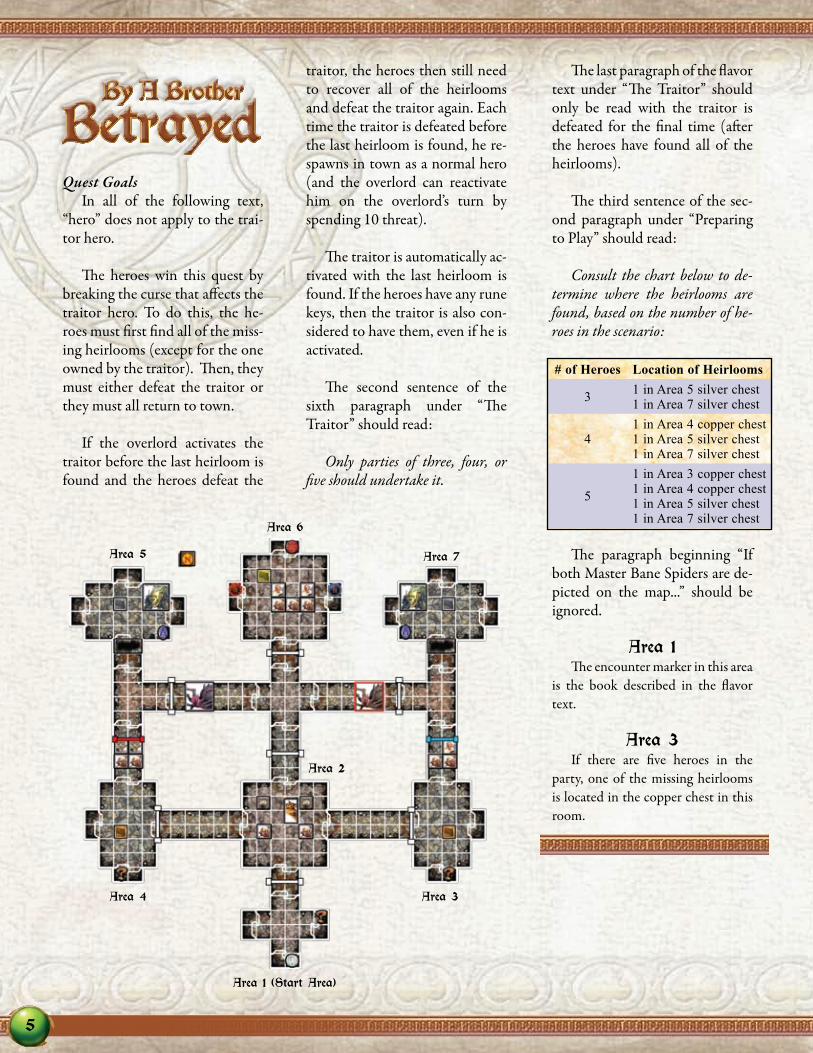
Quest GoalsIn all of the following text,
“hero” does not apply to the trai-tor hero.
The heroes win this quest by breaking the curse that affects the traitor hero. To do this, the he-roes must first find all of the miss-ing heirlooms (except for the one owned by the traitor). Then, they must either defeat the traitor or they must all return to town.
If the overlord activates the traitor before the last heirloom is found and the heroes defeat the
By A Brother
Betrayedtraitor, the heroes then still need to recover all of the heirlooms and defeat the traitor again. Each time the traitor is defeated before the last heirloom is found, he re-spawns in town as a normal hero (and the overlord can reactivate him on the overlord’s turn by spending 10 threat).
The traitor is automatically ac-tivated with the last heirloom is found. If the heroes have any rune keys, then the traitor is also con-sidered to have them, even if he is activated.
The second sentence of the sixth paragraph under “The Traitor” should read:
Only parties of three, four, or five should undertake it.
Area 1 (Start Area)
Area 2
Area 3Area 4
Area 5
Area 6
Area 7
The last paragraph of the flavor text under “The Traitor” should only be read with the traitor is defeated for the final time (after the heroes have found all of the heirlooms).
The third sentence of the sec-ond paragraph under “Preparing to Play” should read:
Consult the chart below to de-termine where the heirlooms are found, based on the number of he-roes in the scenario:
The paragraph beginning “If both Master Bane Spiders are de-picted on the map...” should be ignored.
Area 1The encounter marker in this area
is the book described in the flavor text.
Area 3If there are five heroes in the
party, one of the missing heirlooms is located in the copper chest in this room.
# of Heroes Location of Heirlooms
3 1 in Area 5 silver chest1 in Area 7 silver chest
41 in Area 4 copper chest1 in Area 5 silver chest1 in Area 7 silver chest
5
1 in Area 3 copper chest1 in Area 4 copper chest1 in Area 5 silver chest1 in Area 7 silver chest

6
DemonicPossession
Area 5While possessing the demon,
a hero cannot take Battle, Ready, or Run actions, he may only take Advance actions. In addition to its other abilities, the possessed demon may destroy rubble tokens (or any other obstacle blocking his path) by spending one movement per square that the obstacle occupies.
Even though multiple heroes can possess the demon at the same time, the demon only gets one ac-tivation per hero turn, so all he-roes possessing the demon must agree on how the demon acts.
The seventh paragraph under “Possessing the Demon” should read:
If the demon is killed in any area except Area 7 while under the heroes’ control, the heroes imme-diately lose 4 conquest tokens, (re-gardless of how many heroes were possessing the demon). Then, treat the demon as if it had just succeed-ed at an Undying roll and return it to the overlord’s control. In other words, leave the demon’s figure in its original position and remove all wound tokens and any status tokens on it.
Next, the overlord may imme-diately spawn two Master Sorcerers following all the rules for spawning monsters. Finally, all heroes that were possessing the demon then place their hero figures on or adja-cent to the nearest activated glyph.
If two glyphs are equally distant from where the hero was killed, the hero chooses at which glyph to respawn.
Remember, while the demon is under the overlord’s control it is immune to the attacks and effects of other monsters and cannot pass through the rift. (In other words, the overlord cannot have the other monsters attempt to kill the demon or move it out of reach before the heroes can repossess it.
Area 7The first paragraph after the de-
scriptive text should read:
Only demons and master mon-sters can pass through the rift...
The second paragraph after the descriptive text should read:
Sachar Aamah is a Master Demon with 15 extra wounds, 3 ex-tra armor, Command, Knockback, and Rapid Shot. Sachar Aamah cannot be possessed using the de-monform crystals.”
Area 1
Area 2 Area 3
Area 4
Area 5
Area 6
Area 7
The Rift
Start Area

7
This scenario requires Descent: Journeys in the Dark, The Well of Darkness, The Altar of Despair, and The Road to Legend.
Quest GoalsAll six cubes for this scenario
can be built at once using one copy of each of the products listed above. To build all six cubes, you will need to use the four-way intersection tile from The Road to Legend that has a pre-printed pit space. The space should be ignored for this scenario and treated as normal floor space.
You will also need to use the four-way intersection from The Altar of Despair with printed corrupted ter-rain - we recommend using this (and three corrupted endcaps) for cube 6 and playing with the rules for cor-rupted terrain.
The first description under “Quest Goals” should read:
Your goal is to seal the Chaos Cube by defeating the vile demon, Oktakoron. You begin with 8 con-quest tokens. If you run out of con-quest tokens, Oktakoron is victori-ous and all of reality is destroyed.
Chaos Cube PhasesWhen a hero shifts from one
cube to the next, he is not con-sidered to be moving or enter-ing a new space. This means any order tokens “come with” the heroes when they shift to a new cube. This also means that heroes
shifting into Cube 6 are not af-fected by Oktakoron’s Aura 2 ability until they actually spend movement points to enter squares adjacent to him.
Movement, Line of Sight, and Monster Spawning
All six cubes are considered re-vealed at the start of the scenario. However, the overlord should still read the description for each cube as the heroes enter them.
It is possible for a large fig-ure (such as a giant) to stand on two cube faces at the same time. However, all figures must always fully occupy squares on the actual dungeon tiles.
A figure can draw line of sight to any square except for the four squares on the cube face directly opposite to the cube face in which it is standing. Other figures and ob-stacles block line of sight normally.
The second paragraph under the descriptions for “Cube 2-5” should read:
Instead of playing a spawn card on his turn, the overlord may in-stead use one of the following special spawning rules for Cube 2, 3, or 4.
Please refer to the following chart for special spawning rules:
There can never be more than one Golem in play in any cube, and there can never be more than one Giant in play in any cube. The over-lord can never spawn any monster in Cube 1 or Cube 6.
TreacheryThe treachery values for this sce-
nario should be 2 Event, 4 Trap, and 2 Monster.
ChestsWhen a chest is opened, each
hero gets one treasure, then rolls a white die and gets the result based on the range value rolled. In both cases, what the hero gets is based on the cube he is currently occupying, not where the chest is opened.
Example: Sir Valadir is in Cube 2 and Mad Carthos is in Cube 3. Mad Carthos opens the silver chest in Cube 3 and gets a silver treasure, then rolls a white die and gets a result of 1 range, which grants him 200 coins. Because Sir Valadir is in Cube 2, (a copper chest cube) he gets a copper treasure, then rolls a white die and gets a result of 3 range, which grants him a potion of his choice.
The
ChaosCube
Cube Spawning Rule
2 Spend 3 threat to spawn 2 Beastmen
3 Spend 4 threat to spawn 2 Dark Priests
4 Spend 6 threat to spawn 1 Golem (limit 1 Golem in play)
5 Spend 10 threat to spawn 1 Giant (limit 1 Giant in play)
Cubes Chest Result
1 & 2 Copper1: 100 Coins2: 1 Conquest Token3: Choice of PotionX: 1 Curse
3 & 4 Silver1: 200 Coins2: 1 Conquest Token3: Choice of 2 PotionsX: 1 Curse
5 & 6 Gold1: 300 Coins2: 1 Conquest Token3: Choice of 2 PotionsX: 2 Curses

8
The Broken Bridge
Cube 2Slather is a Master Beastman
with 8 extra wounds, 1 extra armor, and Knockback.
Cube 3Yithir is a Master Dark Priest
with 9 extra wounds, 1 extra armor, Shadowcloak, and Knockback.
Cube 4Rom is a Master Golem with 12
extra wounds, 1 extra armor, Berserk, and Knockback.
Cube 5Fi is a Master Giant with 19
extra wounds, 2 extra armor, and Knockback.
Cube 6Oktakoron is a Master Demon
with 29 extra wounds, 1 extra armor, Aura 2, and Knockback.
The paragraph under “Exiting Cube 6” should read:
When the heroes defeat Oktakoron they are teleported out of the cube and are victorious.
Cube 6
Cube 4Cube 3
Cube 5
Cube 2Cube 1
9
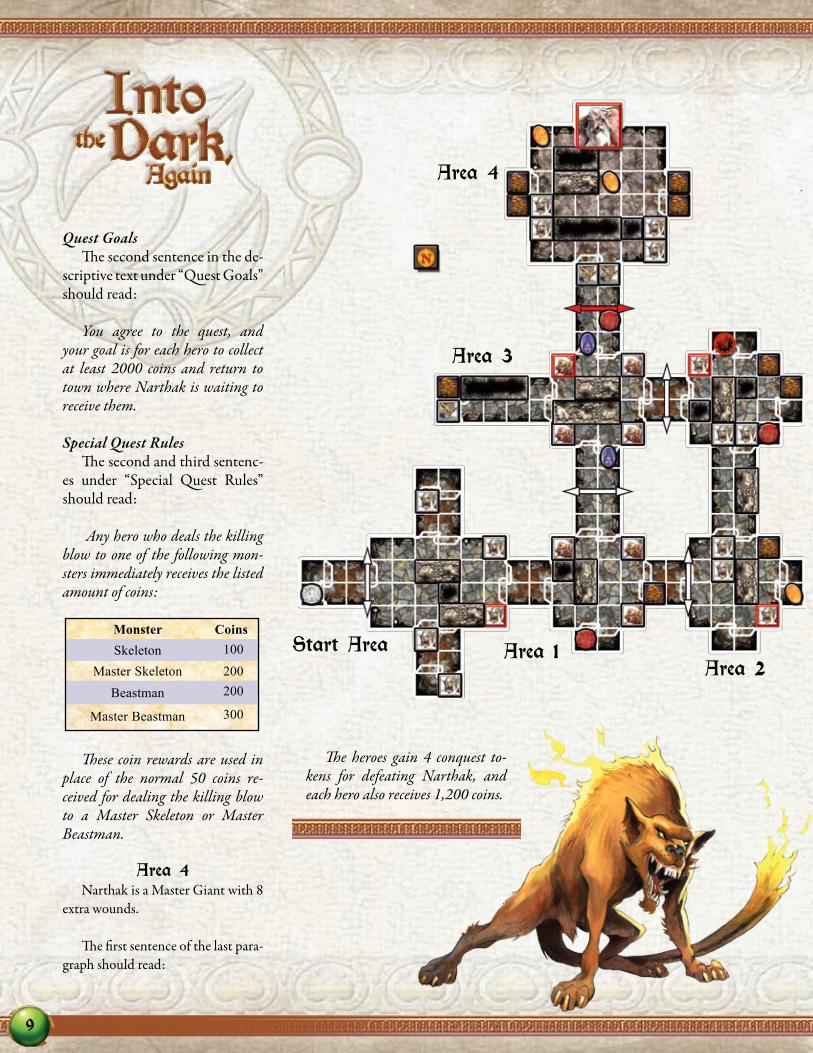
Intothe Dark,
Again
Quest GoalsThe second sentence in the de-
scriptive text under “Quest Goals” should read:
You agree to the quest, and your goal is for each hero to collect at least 2000 coins and return to town where Narthak is waiting to receive them.
Special Quest RulesThe second and third sentenc-
es under “Special Quest Rules” should read:
Any hero who deals the killing blow to one of the following mon-sters immediately receives the listed amount of coins:
These coin rewards are used in place of the normal 50 coins re-ceived for dealing the killing blow to a Master Skeleton or Master Beastman.
Area 4Narthak is a Master Giant with 8
extra wounds.
The first sentence of the last para-graph should read:
The heroes gain 4 conquest to-kens for defeating Narthak, and each hero also receives 1,200 coins.
Area 1Start AreaArea 2
Area 3
Area 4
Monster CoinsSkeleton 100
Master Skeleton 200Beastman 200
Master Beastman 300

10
The Siege of
Tamalir Part One
Start Area
Area 1
Area 4
Area 3
ShadowsHide the
Truth
Start Area
Area 1
Area 2
Area 3
Area 2

![Demon Hunter's Handbook - watermark.rpgnow.comwatermark.rpgnow.com/pdf_previews/2670-sample.pdf · Demon Hunter’s Handbook [GMG4320] If you like this book, be sure to look for](https://img.pdfslide.net/doc/110x75/5a7f6e847f8b9a571e8bae05/demon-hunters-handbook-hunters-handbook-gmg4320-if-you-like-this-book-be.jpg)