Embed Size (px)
Citation preview
Table of Contents 1. GENERAL ................................................................................................................................ 4
1.1. THE LAYOUT OF ERPLY ACCOUNTING .................................................................................. 4 1.2. KEY COMBINATIONS ............................................................................................................. 4 1.3. MAIN PAGE AND ITS FUNCTIONS ............................................................................................ 5 1.4. USING ERPLY ACCOUNTING ON A TABLET COMPUTER .......................................................... 5
2. SETTINGS ................................................................................................................................ 6 2.1. MAIN SETTINGS, ADMINISTRATING AND ADDING AN ORGANISATION ......................................... 6 2.2. INVOICE CUSTOMIZATION ...................................................................................................... 7 2.3. USERS ................................................................................................................................. 8 2.4. ERPLY (SETTINGS) ............................................................................................................. 8
2.4.1. Configuring ERPLY in ERPLY Accounting ................................................................. 8 2.4.2. Configuring the card terminal for ERPLY users .......................................................... 9
2.5. TIME TRACKING (SETTINGS) ............................................................................................... 10 2.6. LOCKING AN ACCOUNTING PERIOD IN ERPLY ACCOUNTING ................................................ 10 2.7. USER SETTINGS ................................................................................................................ 11
3. CUSTOMERS, SUPPLIERS, ITEMS ..................................................................................... 11 3.1. CUSTOMERS AND SUPPLIERS ............................................................................................. 11 3.2. PURCHASE AND SALES ITEMS (PRODUCTS AND SERVICES) ................................................. 12
4. ACCOUNTING ....................................................................................................................... 14 4.1. ACCOUNTING JOURNALS .................................................................................................... 14 4.2. ACCOUNTS AND SYSTEM ACCOUNTS .................................................................................. 14 4.3. AUTOMATIC TRANSACTIONS ............................................................................................... 15 4.4. VALUE ADDED TAX AND SALES TAX ..................................................................................... 17
5. SALES AND PURCHASE INVOICES, EXPENSE CLAIMS, PRICE OFFERS ..................... 17 5.1. GENERAL INFORMATION ..................................................................................................... 17 5.2. FIELDS ON THE INVOICE ...................................................................................................... 18 5.3. ENTERING INVOICES ........................................................................................................... 19 5.4. ENTERING AN EXPENSE CLAIM ........................................................................................... 20 5.5. SENDING INVOICES ............................................................................................................ 20 5.6. MANAGING INVOICES .......................................................................................................... 21 5.7. SYNCHRONISING ERPLY INVOICES .................................................................................... 22 5.8. ACCOUNTING WITH TOGGL TIME ENTRIES ............................................................................ 22
6. RECEIVABLES AND PAYABLES ......................................................................................... 23 6.1. GENERAL INFORMATION ..................................................................................................... 23 6.2. RECEIVABLES AND PAYABLES OF THE INVOICES .................................................................. 23 6.3. CALCULATION OF PAYMENTS IN ACCOUNTING AND IN CUSTOMER BALANCES ......................... 24 6.4. BANK IMPORT AND CREATING THE TRANSACTION FILE .......................................................... 25
6.4.1. Importing a bank file .................................................................................................. 25 6.4.2. Bank import for ERPLY users ................................................................................... 26 6.4.3. Bank import FAQ ...................................................................................................... 27
7. FIXED ASSETS ...................................................................................................................... 28 7.1. ADDING FIXED ASSETS ...................................................................................................... 28 7.2. FIXED ASSETS FAQ ........................................................................................................... 29
8. STARTING - INITIAL DATA ................................................................................................... 30 8.1. MAIN INFORMATION ............................................................................................................ 30
8.2. ENTERING THE INITIAL BALANCES OF THE ACCOUNTS .......................................................... 31 8.3. CUSTOMERS' AND SUPPLIERS' INITIAL BALANCES ................................................................. 32
9. REPORTS .............................................................................................................................. 33 9.1. GENERAL INFORMATION ..................................................................................................... 33 9.2. SALES, PURCHASES, ITEMS ................................................................................................ 34 9.3. VAT REPORT ..................................................................................................................... 34 9.4. FINANCIAL REPORTS - BALANCE SHEET, PROFIT & LOSS STATEMENT AND CASH FLOW STATEMENT .............................................................................................................................. 35 9.5. MAIN ACCOUNTING REPORTS - GENERAL LEDGER, TRANSACTIONS ...................................... 36 9.6. CUSTOMERS, SUPPLIERS ................................................................................................... 36 9.7. MANAGING MONEY ............................................................................................................ 36 9.8. OPENING CSV FILES .......................................................................................................... 37

1. General
1.1. The layout of ERPLY Accounting ERPLY Accounting has two main layouts – one for tablet computers and the other for regular computers. Read more about the tablet layout in chapter 1.4. ERPLY Accounting is designed to complete all actions in one browser window. After logging in the page is not reloaded, all actions are completed within the ERPLY Accounting window, which is why confirmation is always required when leaving the page. Choices in the upper right corner of the page:
● user settings – configure user settings, including user language ● list of authorised organisations – option to view all organisations and adding a new one ● logout
Operations in ERPLY Accounting are divided into two:
1. actions that open in the same browser window (user settings, new articles, customers etc.);
2. actions that open in a new tab (most modules; look at picture below).
Opening new tabs gives a better overview of actions in situations where you need to see multiple reports at once. Being able to open only one module at a time would make this harder to do.
1.2. Key combinations ERPLY Accounting offers several key combinations to use. Ctrl+o ("o" meaning "open") opens a new module. The combination opens the following window:
A list of other general combinations:
● ctrl+m – move to dashboard ● ctrl+s – save ● ctrl+d – for use in tables (invoices etc.), enables deleting the active row

● ctrl+v – main function for importing systemised data from Excel, Google Docs etc. to ERPLY Accounting by pasting.
● ENTER – saves completed actions in browser window ● ESC – closes window
1.3. Main page and its functions The main page of ERPLY Accounting is designed to enhance communication within the entire application. The key combination ctrl+m is used to return to the main page which looks like this:
The main purpose of the dashboard is to solve the main accounting problems, starting from sales and purchase invoices and following with other incomes and outgoings. Dashboard is divided into three groups: Incomes, Current Situation and Purchases & Expenses.
1.4. Using ERPLY Accounting on a tablet computer
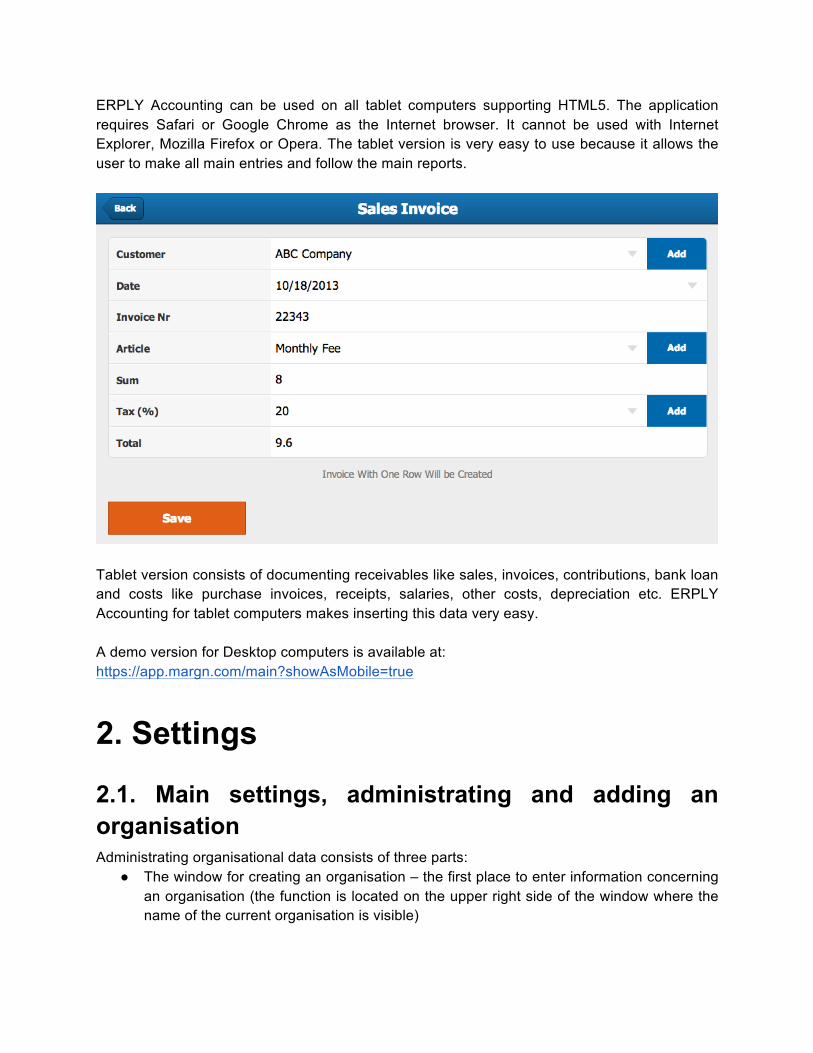
ERPLY Accounting can be used on all tablet computers supporting HTML5. The application requires Safari or Google Chrome as the Internet browser. It cannot be used with Internet Explorer, Mozilla Firefox or Opera. The tablet version is very easy to use because it allows the user to make all main entries and follow the main reports.
Tablet version consists of documenting receivables like sales, invoices, contributions, bank loan and costs like purchase invoices, receipts, salaries, other costs, depreciation etc. ERPLY Accounting for tablet computers makes inserting this data very easy. A demo version for Desktop computers is available at: https://app.margn.com/main?showAsMobile=true
2. Settings
2.1. Main settings, administrating and adding an organisation Administrating organisational data consists of three parts:
● The window for creating an organisation – the first place to enter information concerning an organisation (the function is located on the upper right side of the window where the name of the current organisation is visible)

● Organisation Settings (Settings -> Organisation Data) – the module that specifies the main conditions of the organisation such as default overdue charge, days to deadline etc;
● General Information about the organisation – settings -> Organisation Data -> General Info.
When adding a new organisation, the "General Information" window opens. Additional data includes:
● Currency – check the Organisation Data. ● Language – necessary to translate user interface and chart of accounts. ● Reference number – if you have one, you can enter it. ● Liable to VAT? – check the Organisation Data.
After adding an organisation, everything is set by default. To read more about setting up your account, go to chapter 8. Organisation settings (Settings -> Organisation Data) is where most settings concerning the organisation are stored. The main settings are:
● Language – the chosen language is used in invoices by default. ● Currency – main currency of the organisation. ERPLY Accounting allows changing the
currency but note that past transactions will not be recalculated. ● Overdue charge – the percentage of overdue charge (appointed invoices). ● Days left to due date – number of days until due date of the invoice which will be applied
to the customer by default. ● First invoice No – used only once. ● Liable to VAT? – if your organisation is liable to VAT or to sales tax (US), the main
percentage of VAT is printed on invoices by default. On sales, the VAT percentage is zero by default.
● Date format – possibility to change the date format ERPLY Accounting uses. ● Text in invoice e-mail – text added to the e-mail when sending the invoice.
From organisation settings you can navigate into General Info, which stores the contact information of the organisation. Locking an accounting period in ERPLY Accounting Locking periods is necessary to confirm transactions during a selected time period and prevent additional changes being made. Read more from 2.6.
2.2. Invoice customization ERPLY Accounting enables invoice customization to the individual needs of the organisation. The module is located in Settings -> Invoice Customization. The following components can be changed:

● The logo on the invoice ● The footer of the invoice ● The layout of the rows, width and colour of the elements etc.
When creating an invoice, additional printable information can be applied. This information will be added to the invoice during the printing process. Automatically, the name, the registration number, VAT value and address of the company are placed on the invoice by ERPLY Accounting. This can be changed in Settings -> Organisation Data -> General Info.
2.3. Users Every organisation can add new users if their price list enables to do so. The module is located in Settings -> Users. Authorising the users After authorisation, an automatic email is not sent to the user. If authorising an email that is not found in the ERPLY Accounting users list yet, the authorisation will be confirmed after registration of the ERPLY Accounting account. The limits of adding new users are defined by the organisation’s price plan. Admin rights The person who creates the organisation is by default the administrator and the only one who can remove authorised users. The administrator can give admin rights to other users. Removing users The authorisation of users can be removed only when at least one administrator is left. The authorisations can be removed only by an administrator.
2.4. ERPLY (settings)
2.4.1. Configuring ERPLY in ERPLY Accounting To integrate ERPLY Accounting and ERPLY, some of your ERPLY account data is needed. The module is located in Settings -> ERPLY Settings. To integrate ERPLY with ERPLY Accounting the fields shown in the following picture need to be filled.

For authentication, the ERPLY username, password and ERPLY organisation code is needed. ERPLY Accounting will place the selected item on all imported invoices. This is why the item's Expense Account (and Assets Account if the type of the item is Goods and Products) plays a big role in arranging the accounting of the organisation. If the initial synchronising data is entered, ERPLY Accounting enables synchronising ERPLY Invoices, Customers, Suppliers and Receivables.
2.4.2. Configuring the card terminal for ERPLY users Let's look at a situation where a savings account is used for transactions with the terminal.
● To use card payments, you need to create a separate account in the chart of accounts. It
has to be a bank card system account. First, create a new account for this (Accounting -> Chart of Accounts) and then go to Settings -> Initial Data -> System Accounts and
change bank card account to the account that you created. If the Savings Account has been assigned as a Bank System Account, all payments synchronized from ERPLY that have a type of card payments, will be deposited to this account.
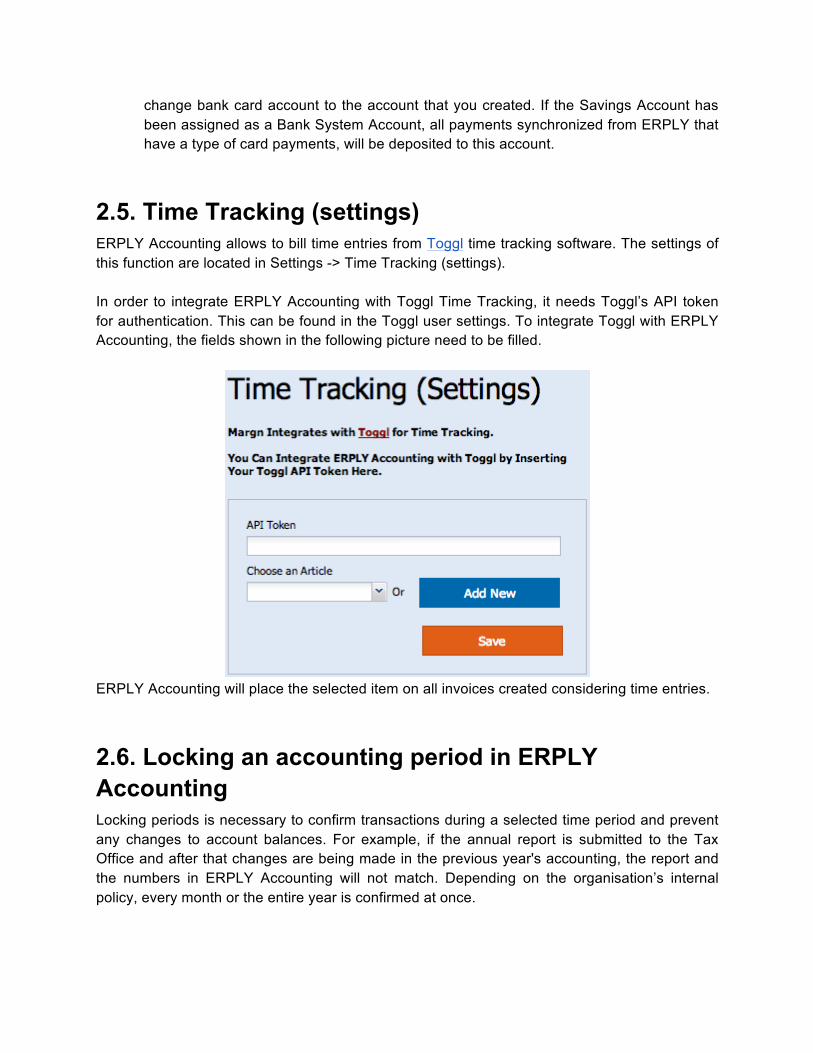
2.5. Time Tracking (settings) ERPLY Accounting allows to bill time entries from Toggl time tracking software. The settings of this function are located in Settings -> Time Tracking (settings). In order to integrate ERPLY Accounting with Toggl Time Tracking, it needs Toggl’s API token for authentication. This can be found in the Toggl user settings. To integrate Toggl with ERPLY Accounting, the fields shown in the following picture need to be filled.
ERPLY Accounting will place the selected item on all invoices created considering time entries.
2.6. Locking an accounting period in ERPLY Accounting Locking periods is necessary to confirm transactions during a selected time period and prevent any changes to account balances. For example, if the annual report is submitted to the Tax Office and after that changes are being made in the previous year's accounting, the report and the numbers in ERPLY Accounting will not match. Depending on the organisation’s internal policy, every month or the entire year is confirmed at once.
In ERPLY Accounting, the locking of periods is done using an end date – a date from which all the previous dates are locked. This can be found under "Company Settings". If ERPLY Accounting imports transactions from ERPLY, the transactions from before this date will be set aside by default. These transactions can be set on the date of the lockingby ticking the option under "Organisation Settings". NB! If the date of the locking is changed, the changes made will not take effect before renewing/refreshing? the page.
2.7. User Settings Under User Settings, the User Language, Name and the Conditions according to which ERPLY Accounting communicates to the User can be changed.
● User Language – the language in which ERPLY Accounting is displayed. Possible options are Estonian and English.
● Ticking the box "are you an accountant?" – only accountants are shown the account numbers.
● Ticking the box "show invoice information?" – when this box is ticked, additional information is always shown when opening/changing an invoice.
3. Customers, Suppliers, Items
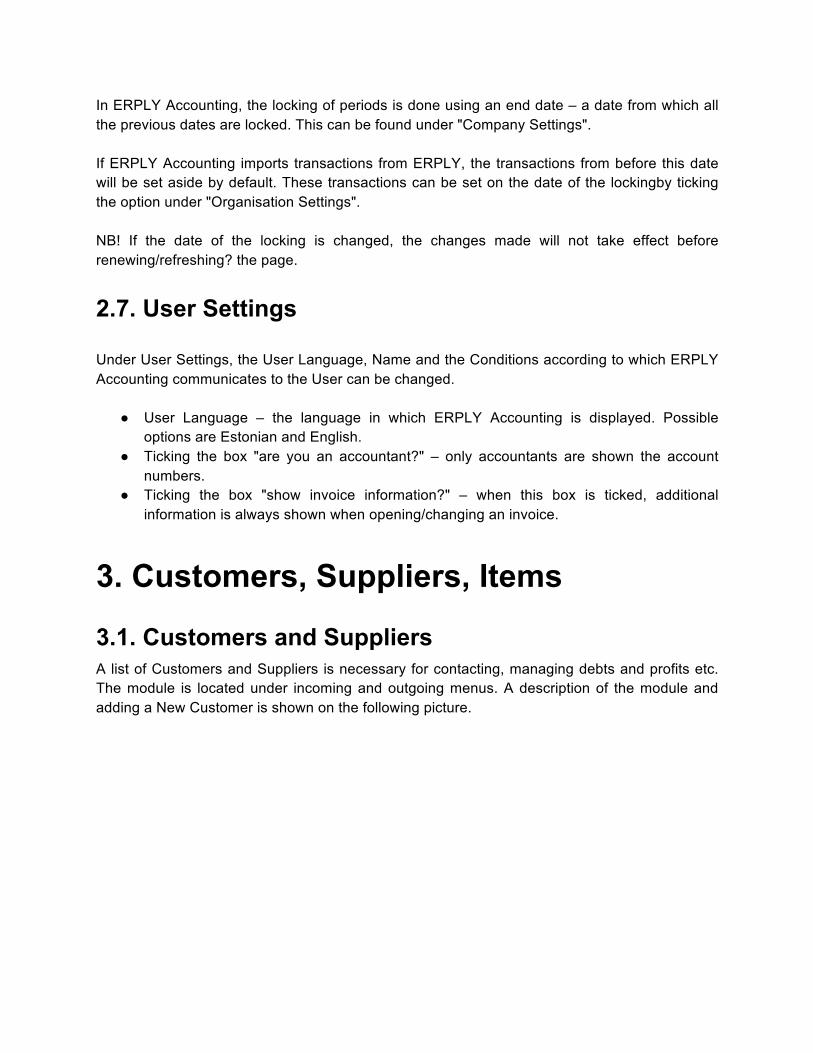
3.1. Customers and Suppliers A list of Customers and Suppliers is necessary for contacting, managing debts and profits etc. The module is located under incoming and outgoing menus. A description of the module and adding a New Customer is shown on the following picture.
Transactions related to a contact can be filtered in Sales and Purchase reports.
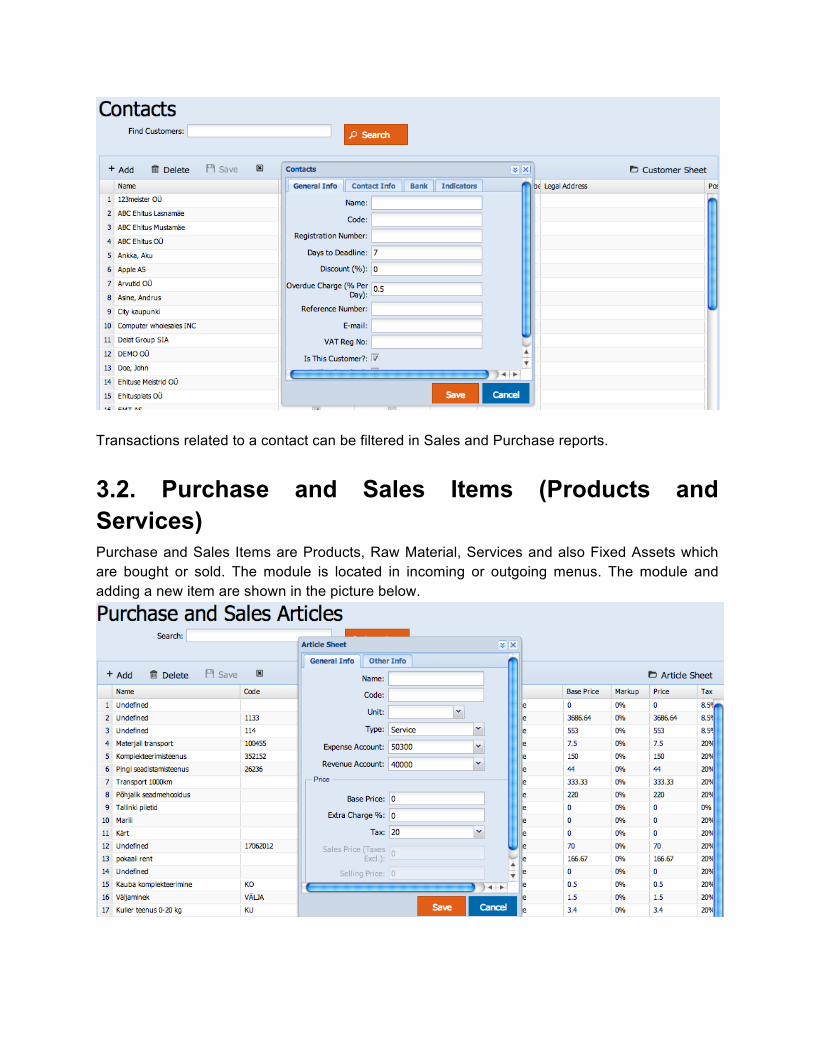
3.2. Purchase and Sales Items (Products and Services) Purchase and Sales Items are Products, Raw Material, Services and also Fixed Assets which are bought or sold. The module is located in incoming or outgoing menus. The module and adding a new item are shown in the picture below.

Every invoice row is connected with an item. If the item is manually entered, not selected, a new item is created automatically. When calculating an item’s price, the following aspects need to be taken into consideration:
● ERPLY accounting doesn't change the Base Price automatically ● The price of the item on the invoice = Base Price * (1+Markup)
The three most important criteria of the item are Expense Account, Base Price and Type. Please note that changing any of these will change the accounting settings for this item. The Expense Account and Type of Item are connected. By default, the item’s type is Service and its Expense Account is service costs.

4. Accounting
4.1. Accounting Journals This module can be used to view old or enter new Journal Entries. New Journals can be entered by opening this module from the Accounting Menu or using the key combination ctrl+o and choosing Manual Journal. Existing transactions are listed in the Ledger and Transactions list. The layout of the module is shown in the following picture.
Creating Manual Journals The Manual Journals module enables making regular accounting transactions in a common way: Account -> Description -> Debit/Credit sum. Deleting manual journals Journals can be deleted from the transactions list (Accounting -> Transactions) or straight from the journal. When deleting invoices, payments etc., journals are deleted automatically.
4.2. Accounts and System Accounts
The accounts are bookkeeping accounts from which the accounting of the entire organisation is built upon. In the chart of the accounts module you can add, change or delete accounts. The module is located in the Accounting Menu, Settings -> Initial Data or by pressing ctrl+o and "Accounts". By creating a new organisation, ERPLY Accounting automatically creates the default chart of accounts and attaches the System Accounts. Entering a new account You can add accounts one by one by opening a corresponding window where you can insert data. When adding accounts, pay attention to account types. Changing an account All data concerning the Account except for the value of balance can be changed. NB! Changing the description of the Account does not change the descriptions of the transactions connected with the account. Deleting an account An account can be deleted if no transactions or system accounts are connected to it and the account is not assigned as an expense account to a Sales or a Purchase Item. System Accounts are the link between the bookkeeping and automatically created accounting transactions. System accounts are the accounts that ERPLY accounting can automatically assign when creating invoices, adding payments etc. System accounts cannot be deleted but the account associated with it can be changed. To view and edit system accounts, go to Settings -> Initial Data -> System Accounts.
4.3. Automatic transactions ERPLY Accounting conducts several transactions automatically. These are transactions concerning Invoices, Fixed Assets and Payables. This chapter describes how and where ERPLY Accounting chooses accounts for these transactions. There are three types of transactions when creating invoices:
1. separate transaction with every invoice row 2. rounding invoice transaction (when editing tax sum) 3. rounding invoice transaction (when editing rounding section under the extra information
bar) Rounding transactions ERPLY Accounting needs the following accounts for rounding:
● revenues from rounding ● expenses from rounding
● receivables / payables Rounding sales invoice
Rounded sum > 0 Rounded sum < 0
Debit Receivables Expenses from rounding
Credit Revenues from rounding Receivables
Rounding purchase invoices
Rounded sum > 0 Rounded sum < 0
Debit Expenses from rounding Payables
Credit Payables Expenses from rounding
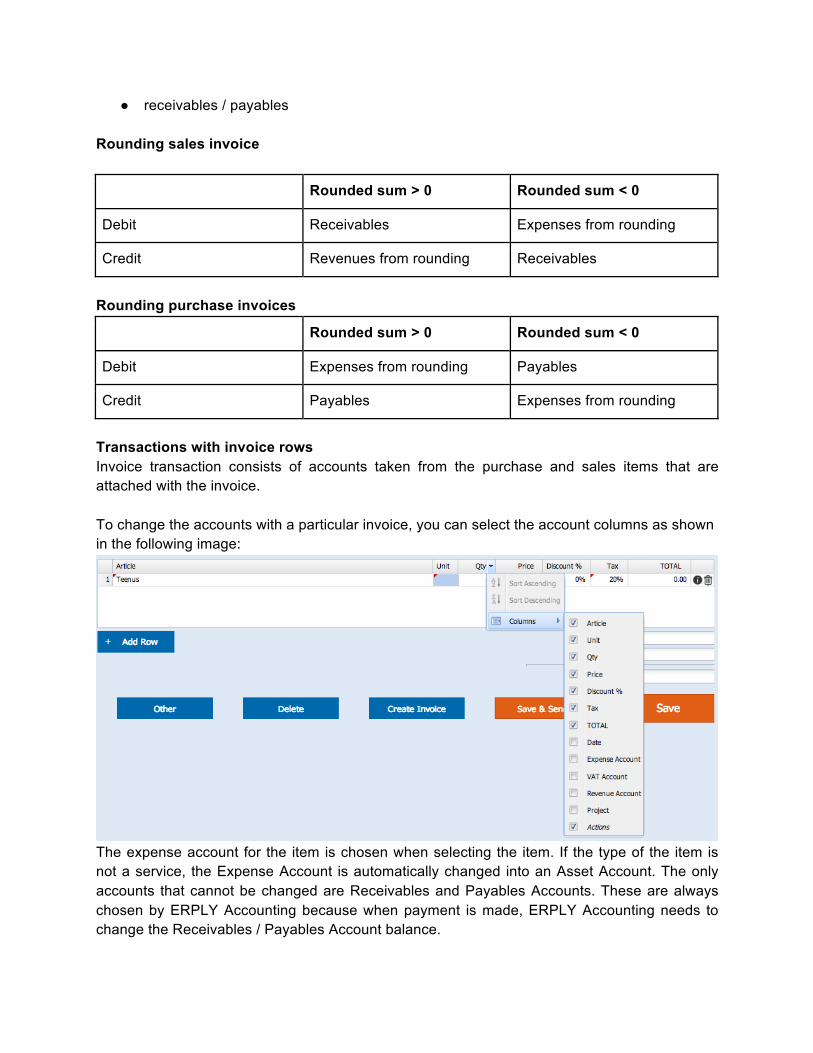
Transactions with invoice rows Invoice transaction consists of accounts taken from the purchase and sales items that are attached with the invoice. To change the accounts with a particular invoice, you can select the account columns as shown in the following image:
The expense account for the item is chosen when selecting the item. If the type of the item is not a service, the Expense Account is automatically changed into an Asset Account. The only accounts that cannot be changed are Receivables and Payables Accounts. These are always chosen by ERPLY Accounting because when payment is made, ERPLY Accounting needs to change the Receivables / Payables Account balance.

4.4. Value Added Tax and sales tax All VAT-related transactions are made using one account - the VAT Debt Account. More specifically, VAT related data can be seen in VAT Report. To see and manage VAT information, go to Reports -> VAT Report. VAT Report is divided into two sections: general information that consists of summary data and table which describes from where the summary data was gathered. If you would like to add, change or delete tax rates, go to Settings -> Tax Rates. From there, you can edit three columns: description, per cent and type. Note that automatically, ERPLY Accounting uses the main tax rate. Organisation is not liable to VAT, how should transactions be entered? If the organisation is not liable to VAT, it should be set in Settings -> Organisation Data. In this case the VAT percentage on the invoice is always 0%. When creating a purchase invoice, VAT is automatically added for making it easier to insert invoices. ERPLY users need to go to Settings -> ERPLY Settings and synchronise services and VAT rates. This synchronises the VAT types used in ERPLY.
5. Sales and Purchase Invoices, Expense Claims, Price Offers
5.1. General information ERPLY accounting enables entering Sales Invoices, Purchase Invoices, Expense Claims and Price Offers.
● Sales Invoice – sales document for managing receivables. ● Purchase Invoice – describes purchases from the suppliers. ● Expense Claim – a simplified Purchase Invoice that allows taking purchases that have
been immediately paid for in cash or by card into an account. ● Price Offer – allows composing documents separately from the accounting.
There are three options for entering the invoices:
● Regular entry; ● Synchronisation with ERPLY Invoices; ● Billing Toggl time entries.
The functions for entering a new invoice are located in the Main Menu, in the Invoices Menu and by pressing ctrl+o.
5.2. Fields on the invoice
Every invoice consists of the following information: ● Customer/Supplier – only name is needed to create a document. If a contact that is not
yet listed is entered, a new contact with that name is automatically created by ERPLY Accounting. NB! The contact information cannot be changed after a payment is made for the invoice.
● Invoice number – according to the serial number of the invoice in the "Organisation Information", a number is automatically added to every invoice
● Reference Number – a 2-20 digit number for referring invoices. The last digit is a control digit calculated by the previous ones.
● Invoice date – the date on which the invoice is issued. All transactions concerning an invoice have an invoice date by default. The date of a transaction can be changed in the field "Transaction Date".
● Currency – by default the invoice currency is organisation currency. ● Due date – due date is by default the contact’s days to deadline. ● Date of transaction – date on which all accounting entries will be made. By default, the
value is invoice date. ● Overdue charge – overdue charge is charged by the day and is listed on the invoice.
ERPLY accounting does not calculate with penalty percentage. ● Language – the languages of the invoice. Languages can be added in the invoice
customization module. ● Info – information column is not shown on the invoice. ● Printed info – printed information is shown on the invoice directly before the rows.
Every row on the invoice contains the following information:
● Name of the item – this can be chosen from the list of items. If a name that is not yet listed is entered, a new item is automatically created.
● Unit of the item – the unit is always listed next to the name of the item. ● Quantity – the quantity is always listed 1 by default. ● Price – on a Sales Invoice, the price is always listed as the item's Base Price*(1 +
Overdue) ● On a Purchase Invoice, the items’ Base Price is the price by default. ● Discount – the percentage is the overall discount of the invoice by default. ● Tax – tax value is taken from the items. ● Total = quantity * price * (1 - discount) * (1 + tax per cent) ● Expense Account – the default Expense Account is the Service Expenses System
Account. After selecting an item, the account is changed by the item’s Expense Account. ● Tax Account – account used to manage tax. Field is hidden by default. To show this, go
to the table’s header, take rows and check the corresponding row.
● Revenue account – account used to manage revenue with invoice row. Field is hidden by default. To show this, go to the table’s header, take rows and check the corresponding row.
● Project – every invoice row can have a separate project. Field is hidden by default. To show this, go to table’s header, take rows and check the corresponding row.
● Time of entry – the time of entry will be set automatically on entering a new row.
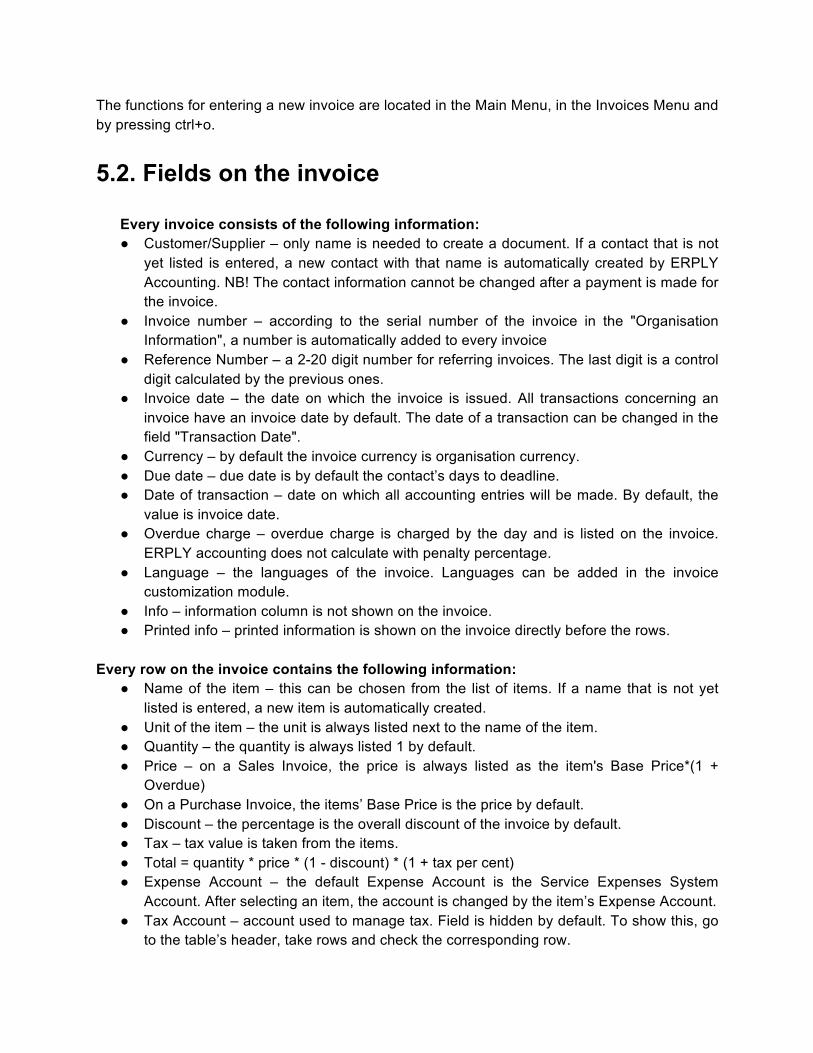
5.3. Entering invoices Entering invoices is extremely simple. The typical view of this action is shown in the picture below.
If the customers and suppliers have previously been entered to the system, the recommended procedure is as follows:
1. When creating an invoice, the customer field is focused. If a customer has been chosen, in case of a Sales Invoice you will be directed to the first invoice row. In case of Purchase Invoice, after selecting the supplier, the invoice number is automatically highlighted.
2. When choosing the items, search the items list and choose with ENTER. This will activate the table field and from then you can navigate with arrows. Arrow down creates a new row and pressing Enter activates the field’s value so that you can change it.
3. When all items have been added and their prices checked, press ctrl+s to save.

4. After saving, a window opens where a payment can be assigned to the invoice and copying, printing or adding a new invoice is possible.
5.4. Entering an Expense Claim Expense Claims are meant for all kind of expenses when a check is issued after the purchase and the payment is made in the store. The module looks like the picture below.
The limitation of an Expense Claim is that only one row from the receipt can be entered. This is meant for describing expense documents that are not directly related to the organisation's everyday business processes. For example, if the primary industry of the organisation is consulting and when monitoring the consulting expenses, the room rental and equipment rental should be kept apart, then the total bill with room and equipment rent, catering etc. expenses should not be entered in the Expense Claim. But the consultants’ bus tickets etc. should be described using the Expense Claims.
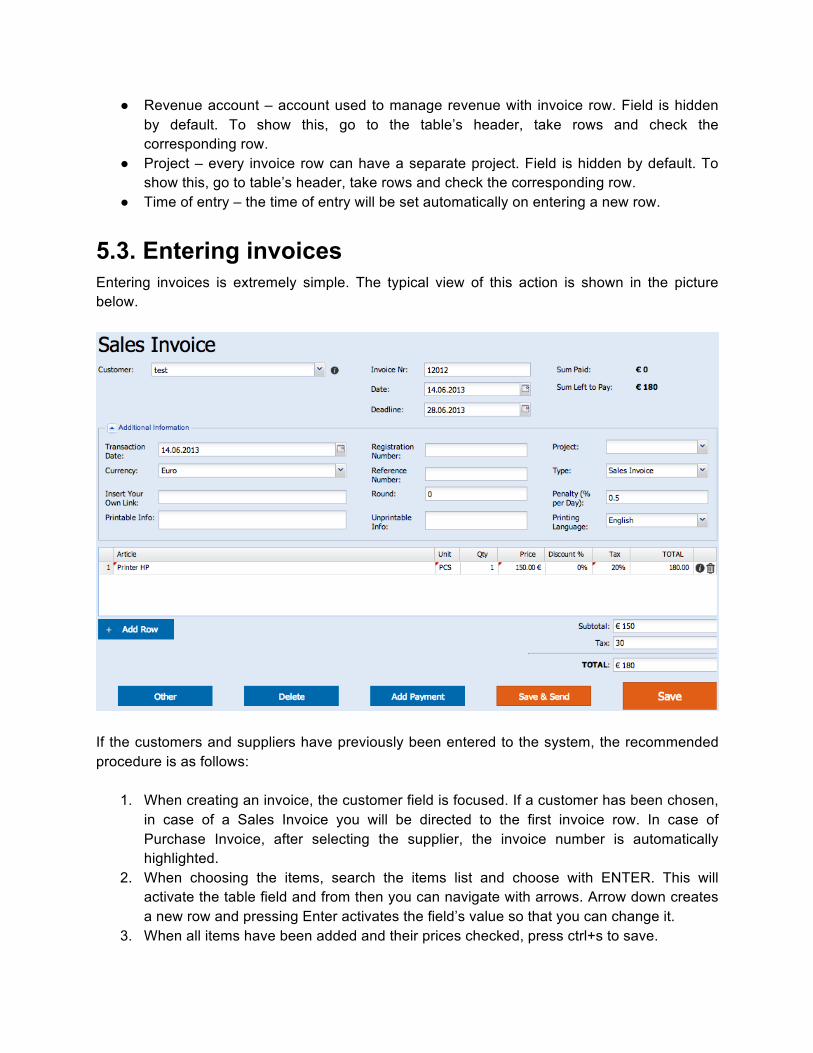
5.5. Sending invoices To send an invoice, it has to be saved with "Save and send" (or you can download it as PDF from the pop-up window that appears after saving). After that, the next window with all the forwarding options opens. This is shown on the image below.
Several options exist to forward invoices to desired parties:
● Send an e-mail straight from ERPLY Accounting; ● Send an e-mail using a personal mailing system; ● Copy a link; ● Save invoice in PDF format.
When sending an e-mail directly from ERPLY Accounting, the text found in "Organisation Settings" will be set as the body of the letter.
5.6. Managing invoices Invoices can be managed in the Purchase and Sales Reports and Unpaid Sales Invoice module or Unpaid Purchase Invoice module. When managing invoices, several questions need to be answered: Which Sales Invoices are unpaid? Unpaid Sales Invoices are incomes -> Unpaid Sales Invoices. You can also find them in the Sales Report when selecting ‘Show only unpaid’ from the ‘Which to show’ selection.
Which Purchase Invoices are unpaid? Unpaid Sales Invoices are purchases & expenses -> Unpaid Sales Invoices. You can also find them in the sales report when selecting ‘Show only unpaid’ from the ‘Which to show’ selection. Where can I view last month's sale? Last month's sale is visible in the Sales Report. Where and how can I erase old invoices? Invoices can be deleted in the Sales and Purchase Reports or by selecting an invoice and pressing ‘Delete’. In order to delete invoices, payments must be deleted before the invoice. How to copy an invoice? Invoices can be copied from the Sales and Purchase Reports.
5.7. Synchronising ERPLY Invoices If ERPLY Accounting account is integrated with ERPLY, the Sales Invoice buttons are replaced with "ERPLY sync" button. All purchase, Sales Invoices and Receivables that have been deleted, edited or added from the last synchronisation moment will be synchronised. ERPLY Accounting synchronises the following data:
● Deleted invoices – all invoices and transactions from the time between the last synchronisation and the current moment that exist in ERPLY Accounting are deleted;
● Deleted payments –- if there are payments that have been deleted without deleting the invoice as well, these will also be deleted;
● Changed Sales and Purchase Invoices – all invoices changed since the last synchronisation will be synchronised;
● New Sales and Purchase Invoices – all invoices created since the last synchronisation will be synchronised;
● New and edited payments from the last synchronisation moment. ERPLY Accounting synchronises the invoices as follows:
● For every ERPLY invoice, a new invoice is created in ERPLY Accounting. ● When adding sales invoices, ERPLY Accounting automatically sets a warehouse item to
the invoice (to change this, go to Settings -> ERPLY Settings). Cost of goods sold will be added to the transaction automatically.
● When adding purchase invoices, ERPLY Accounting adds a warehouse item to the invoice when the invoice net total is equal to the invoice inventory value. If the value is not equal, ERPLY Accounting synchronises all purchase invoice rows and adds services automatically.
● When synchronising payments, ERPLY Accounting differentiates between five types of payments: cheque, cash, bank transfer, gift card and bank card payments. With all of these types, ERPLY Accounting changes the payment account.
5.8. Accounting with Toggl time entries With ERPLY Accounting, you can bill your Toggl time entries. To bill time entries, go to Incomes -> Time Tracking. Select the entries you would like to bill and click one of the options:
● find an existing invoice and add time entries;

● create a new invoice and add all chosen time entries; ● create a new invoice with one row that represents the total of all chosen time entries.
6. Receivables and Payables
6.1. General information Managing receivables and payables in ERPLY Accounting is quite flexible, making it possible to do the following:
● entering several payments to one invoice; ● adding prepayments automatically when they are made; ● monitoring profits and losses following a change in the currency value.
ERPLY Accounting enables entering the transactions in three ways: by uploading the bank statement, by choosing the invoice from the list and describing the transactions or by looking up the invoices one by one and entering the transactions linked to them. Existing payments cannot be changed. To change the payment, delete it and add a new one.
6.2. Receivables and Payables of the invoices The receivables and payables can be described in the Unpaid Sales and Purchase invoices module which is located in the Money and Invoice submenus. In case of an Unpaid Sales invoice, the layout of the module looks like this:
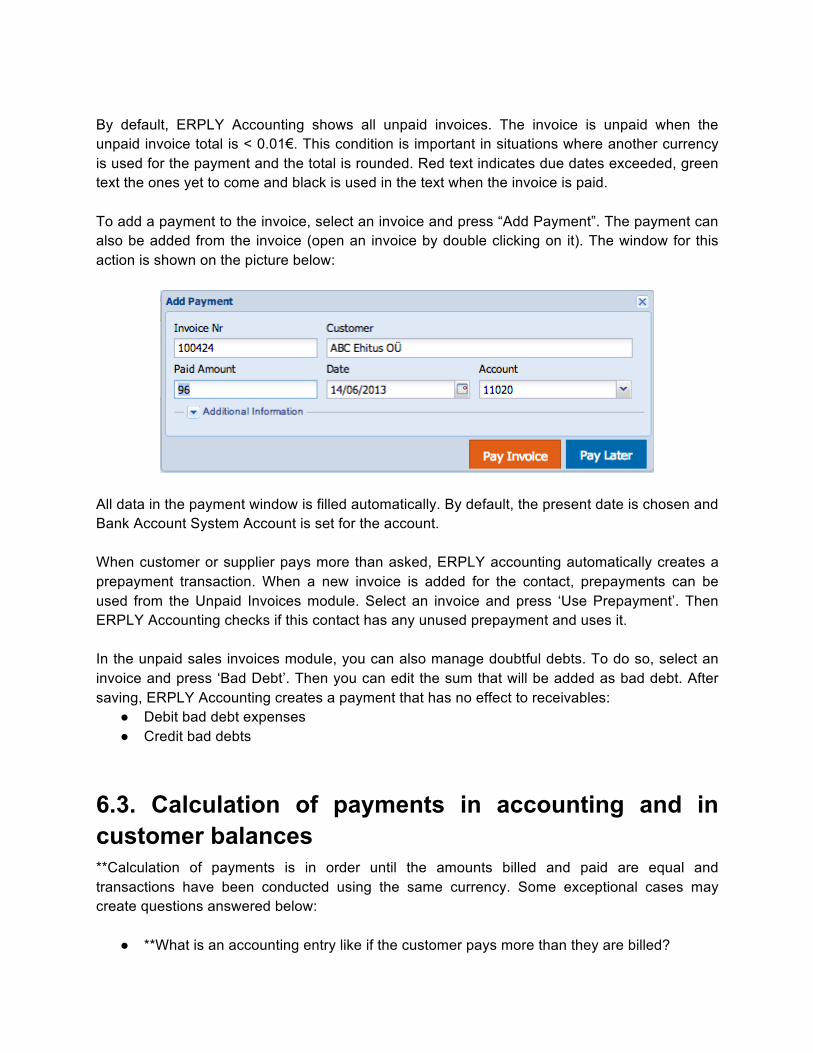
By default, ERPLY Accounting shows all unpaid invoices. The invoice is unpaid when the unpaid invoice total is < 0.01€. This condition is important in situations where another currency is used for the payment and the total is rounded. Red text indicates due dates exceeded, green text the ones yet to come and black is used in the text when the invoice is paid. To add a payment to the invoice, select an invoice and press “Add Payment”. The payment can also be added from the invoice (open an invoice by double clicking on it). The window for this action is shown on the picture below:
All data in the payment window is filled automatically. By default, the present date is chosen and Bank Account System Account is set for the account. When customer or supplier pays more than asked, ERPLY accounting automatically creates a prepayment transaction. When a new invoice is added for the contact, prepayments can be used from the Unpaid Invoices module. Select an invoice and press ‘Use Prepayment’. Then ERPLY Accounting checks if this contact has any unused prepayment and uses it. In the unpaid sales invoices module, you can also manage doubtful debts. To do so, select an invoice and press ‘Bad Debt’. Then you can edit the sum that will be added as bad debt. After saving, ERPLY Accounting creates a payment that has no effect to receivables:
● Debit bad debt expenses ● Credit bad debts
6.3. Calculation of payments in accounting and in customer balances **Calculation of payments is in order until the amounts billed and paid are equal and transactions have been conducted using the same currency. Some exceptional cases may create questions answered below:
● **What is an accounting entry like if the customer pays more than they are billed?
● Is it possible to enter Payables in other currencies than the main currency? ● If the customer pays more than they are billed, how is the customer's balance changed?
As previously mentioned, ERPLY Accounting can add as many payments to the invoice as needed. So it is possible that the total paid is more than what is billed, less than necessary or the correct amount. The most complex of these situations is when the customer pays more than they are billed. If the customer pays more than they are billed, the surplus will be marked as prepayment. A payment is made increasing the customer’s prepayment when adding payment to Sales Invoice and advances to suppliers when adding payment to Purchase Invoices.
6.4. Bank import and creating the transaction file ERPLY Accounting enables uploading bank statements from the following banks: JPM Chase, Wells Fargo and Barclays. After the upload, ERPLY Accounting verifies all payments and connects them with the invoices, or when the invoice reference is not found then with accounts.
6.4.1. Importing a bank file The import module is accessible in the Dashboard. After choosing the file, ERPLY Accounting checks the data and sends it back in a processed form. The processing of every Bank Receivable and Payable consists of the following steps:
● Is the name of the payer on the transaction and is there a contact (customer/supplier) and any unpaid Sales or Purchase Invoices corresponding to it?
● If all previous questions have been given a negative answer, the transaction is placed under Other income or Outgoing (interest expenses, bank expenses, salary payments etc – all transactions that are not connected to invoices).
The supported banks are currently:
● JPM Chase (US) ● Wells Fargo (US) ● Barclays (UK) ● Oak Ridge (US) ● OCBC (Singapore) ● Banorte (Mexico) ● ERPLY Accounting default format
The returning data looks similar to this:

● Green/red icon shows if the transaction is correct. By default, the icons are set red if ERPLY Accounting is not sure about the payment type and account.
● The type determines the type of transaction – linked either to the invoices or other types
of Receivables and Payables. Both the Payables and Receivables have two types: one linked with the invoices and the other not linked with the invoices. All transactions not linked with invoices need a corresponding account from the chart of accounts. If the type is changed from other incomes or outgoings to invoice payment, ERPLY Accounting redirects to the invoice search tab where you can search for invoice(s) that was(were) paid.
● When ERPLY Accounting did not match a payment with the invoice but it is an invoice
payment, you can find the corresponding invoice when selecting ‘Payment’ and then pressing ‘Find Invoices that were paid”.
● Debit and credit accounts are for other accounts, the ones not linked with invoices. In
case of other receivables, the Credit Account is by default set to the Other Expenses System Account. The system accounts can be changed in Settings -> Organisation Data -> System Accounts.
6.4.2. Bank import for ERPLY users It is important to note that the sales are and will stay in ERPLY. So if ERPLY Accounting synchronises ERPLY documents, the receivables of Sales Invoices will be synchronised as well. Managing the Receivables is done mutually – if the Receivable is entered to ERPLY, it will be synced to ERPLY Accounting and vice versa: if you add a payment to an ERPLY invoice in ERPLY Accounting, ERPLY Accounting also adds the payment to ERPLY. So the bank imports can be entered in both ERPLY and ERPLY Accounting. Solution 2: Enter the Receivables to ERPLY 1. Enter the Receivables to ERPLY manually

2. Synchronise ERPLY Accounting with ERPLY 3. Upload the bank statement to ERPLY Accounting. Pay attention to the Sales Invoice payments which should not be matched and saved. Solution 3: Enter all Bank Incomes in ERPLY accounting 1. Manage all Cash Register and Bank incomes in ERPLY. 2. Synchronise ERPLY Accounting with ERPLY. 3. Upload the bank statement to ERPLY Accounting. Connect the payments with the invoices and save – when adding payments to ERPLY Invoices, the payment is also added in ERPLY.
6.4.3. Bank import FAQ How to manage multiple bank accounts? 1) Add all bank accounts to the chart of accounts (Accounting -> Chart of Accounts). 2) After uploading a bank statement, change the account from the top of Bank Import module. Where can I view payments that I have added? The payments can be viewed from different reports connected to money. Reports -> money in and out (all payments) Reports -> receivables report (all incoming amounts) Reports -> payables report (all outgoing amounts) Incomes -> receivables report (all incoming amounts) Purchases & Expenses -> payables report (all outgoing amounts) Why have some Sales and Purchase Invoice transactions not been validated? There are multiple reasons why ERPLY Accounting couldn’t match a payment with the invoice. 1) When parsing a bank statement, ERPLY accounting might not be able to parse the customer/supplier name and therefore cannot perform the search. 2) When ERPLY Accounting is able to parse a name from the bank statement description, it might not find the corresponding customer/supplier from ERPLY Accounting. For example if supplier is named “Ltd, X” in ERPLY Accounting and “X Ltd” on the bank statement, the name query returns no results. 3) When ERPLY Accounting is able to match the invoice, the payment can still be marked as red when it is paid incorrectly (paid sum does not match with the sum of the invoice sum left to pay) or this customer/supplier has more than one invoice left unpaid (then ERPLY Accounting does not know if the connected invoice is the matched one). ERPLY Accounting has not found a reference to an invoice conducting the bank import. How to connect to the correct invoice? Mark the row by clicking on it and press "Find Invoice(s) that were paid". The other option is to change the type of the row. Then ERPLY Accounting directs you to the invoice search list where you can find the correct invoice(s), select it(them) and then press the "Choose" button.

Can I save half of the bank statement? Currently, when you upload a bank statement to ERPLY Accounting, it does not save all the data as unconfirmed payments. The solution for this is being developed. Right now, you can save only green rows and with this save only half of the statement. But when uploading the statement again, ERPLY Accounting has no idea which payments have already been saved and which have not. How to do a bank import in case of using multiple banks? For multiple banks, different accounts must be created – a separate one for each bank. If the company uses card payments, please read the respective chapter in the manual. When the accounts have been created for each bank account, the import can be done separately with each account. First, upload the bank statement and then change the account from the top of the module. There is no separate invoice created for an expense (e.g. for rent). How to manage such expenses in the bank import? When processing a bank statement, there is a separate button for such expenses. Select a payment that represents the outgoing amount. Then on the right, you can see a button “Insert Expense Claim”. When pressing it, you will be redirected to the expense claim tab. Several invoices were paid at once. How to proceed? Select the payment and find the invoices that were paid. Several invoices can be chosen at once. ERPLY Accounting divides the totals between all the invoices by default and will ask for confirmation if this is how they were paid.
7. Fixed Assets
7.1. Adding Fixed Assets Purchase new fixed assets Add fixed assets from the outgoings menu. Add fixed assets initial values Let’s assume we would like to add a company’s initial balances in 31/12. 1) Add fixed assets from the outgoings menu. You can do it with one invoice or with separate ones. Common practise is to change the name of supplier to the organisation’s name. When adding price values, you should add the purchase price as this is the value that it should have in the balance sheet.

After adding all fixed assets to separate rows, change the tax field to zero (if it not zero) as this is not purchasing fixed assets. Change invoice date to 31/12 and save. After saving, you can add a payment to this invoice with the date of 31/12. The payment account can be bank, for example. The bank account balance will be correct after changing account balances values for 31/12. At this point, you have added all the fixed assets and now you should change their depreciation value. 2) Go to Calculate Depreciation from the Accounting Menu or Outgoings and enter the cumulative Depreciation amount to each row. This means that if you have a computer with the purchase value of 1200$ and current value of 500$ then the cumulative depreciation value is 700$. When you created the purchase invoice for the fixed assets, you added the computer with the value of 1200$. So your balance sheet is not correct at this point. You can change the depreciation value for each row by just changing the sum in the table. And before saving, double check if the date for the depreciation is changed to 31/12.
7.2. Fixed Assets FAQ What to do if the Fixed Asset is not purchased? If the Fixed Asset is not purchased, you can register it by issuing a Purchase Invoice on which your company is marked as the supplier. This way, the payment can be made with the suitable account (for example revenue from creating fixed assets). How often should I calculate depreciation? When using our technique for calculating the depreciation, it is reasonable to do it once a month or once a year to simplify the calculating process. How is depreciation calculated and what is the calculation formula? Depreciation is calculated with a linear method. For example, let’s assume that a computer is unusable after four years of usage. So 25% of the value of the computer decreased within a year. For a computer costing 1000$, the depreciation cost is 250$ per year. This is the case if after four years the residual value is 0. If the residual value in four years is 200$ (meaning in four years the computer can be sold for 200$ - then the value after four years isn’t zero) then the yearly depreciation cost will be (1000-200/4=200$. This is the formula for the calculation: **(original cost – residual value) / serviceable life in years. Since the yearly expense amount is 200$, it will 16.67$ per month.
How are the accounts chosen to the entries? The entry is composed on the basis of depreciation and the system account of depreciation. This can be changed in Settings -> Initial Data -> System Accounts. Where can I see depreciation transactions? The conducted transactions are divided between three reports: Transactions, General Ledger and Items report. In the latter, the type must be set as Inventory Items. The search is easier to carry out if the type is set as "Depreciation Transactions" in the Transactions Report. How can I change and delete Transactions? Transactions can be changed and deleted by choosing the Transaction from the Transactions module or the General Ledger. NB: Please note that when changing the Transactions, the item row is not changed and the item report will show the sum of the transaction wrong.
8. Starting - initial data
8.1. Main information Setting up a business in ERPLY Accounting is made as easy as possible for the customer. It is still recommended to premeditate the business currently in action and entering the data necessary for the business first. By creating a new organisation, ERPLY Accounting does the following:
● creates a new Chart of Accounts; ● adds default settings to the organisation – to change them, go settings -> Organisation
Data. The following information should be entered:
● The initial balances of the accounts – the balances need to be set on a specific date ● The initial balances of the customers – here any customer debt and the total of the
debt must be fixated. The order of entering the balances can be: 1) enter the customers; 2) create an account corresponding to the debt balance.
● The initial balances of the suppliers – the balances can be entered similarly to the customers' beginning balances.
The exact time of fixating the beginning data must be marked. Depending on the situation of the organisation, it needs to be noted when marking the date if the organisation is already active and from what period of time the data is transferred. It is common to change software with the change of annual year (most commonly with the date 31/12). A starting organisation can set up after establishing the organisation. If an organisation is able to fixate all data and manage
possible correcting transactions that remain in between the beginning of the year and the date of fixation, it is possible to change accounting software in the middle of the year. If the accounting software is changed in the middle of the year and all starting balances are fixated on 01.01., all transactions conducted on the new financial year must be entered. The order of entering the data is as follows:
1. Firstly enter the initial balances of the customers and suppliers. 2. Add fixed assets if you have any of them. Read more from previous chapter. 3. Secondly enter the initial balances of all remaining accounts. 4. Finally check if everything is correct.
Other information to be checked:
● Projects – entering the projects if you need and have any. ● System accounts – all accounts used for the accounts that are connected to the
transactions that ERPLY Accounting needs to choose from the system (default Bank Account etc.)
8.2. Entering the initial balances of the accounts Go to Settings -> Initial Data -> System Accounts. As previously mentioned, the initial balances should be entered after entering the customers' and suppliers' initial balances. This way, errors can be prevented with the following accounts:
● Revenues ● VAT ● Receivables from Sales ● Debts to Suppliers ● Expenses from Purchase Invoices
If the data is entered at the end of the year, the sales profit and expenses that arise from entering the customers' and suppliers' initial balances must be entered into the profit of the financial year. In the initial balances, credit and debit balances are not separated. Enter all the balances in the correct balance value. In addition, ERPLY Accounting does not calculate the value of the equity capital, this needs to be inserted into the correct accounts as well. When saving the initial balances, ERPLY Accounting asks for confirmation whether assets do not equal liabilities. This is the only situation where the user can voluntarily save an incorrect balance sheet. In case of a starting organisation, the first accounts setup with a 2500€ deposit is as follows:
● The bank account : 2500;

● Stocks or Holdings denomination: 2500. When entering the initial balances, transaction is made where all the balances are united on the marked date. When opening the module, the account balances of the picked date are shown. This means that if the business has been described in ERPLY Accounting for a certain time period, the initial balances module is no more the correct way to enter the initial account balances. In this case, it is recommended to use the regular accounting module.
8.3. Customers' and suppliers' initial balances Entering the customers' and suppliers' initial balances are two different modules but have the same functions. Information from this chapter can be used for entering both customers' and suppliers' initial balances and is also helpful if you need to import multiple invoices at once. Balances must be fixed from the moment the organisation wishes to enter the initial balances. The following information is needed:
● Which customers are in debt and what is the debt total? ● Which suppliers are owed and what is the total? ● Which customers have prepayments and what is the total? ● Which suppliers have been paid in advance and what is the total?
Fixing prepayments is more complex, read more below. To fix debts, invoices must be entered for the corresponding amount. This can be done one by one or by entering several accounts at once in the Invoice Importing module. The module is located in Settings -> Initial Data. Importing module looks like this:
When importing the initial balances, the key combination ctrl+v can be used to paste information such as the customer's debt list from Excel, Google Docs or other sources. This can be done by preparing the data in Excel, Google docs etc. by listing the data and checking its format. When preparing the data, remember that ERPLY Accounting enables to change the size of columns and rows.
● Copy the data and paste it to ERPLY Accounting by using the key combination ctrl+v.
● Double check the data to make sure it is correct. ● Save.
When pasting, attention must be paid to list values and numbers. Number field
● The decimal points must be marked with a point, not a comma; ● if the entered value does not correspond with the number format and the restrictions (e.g.
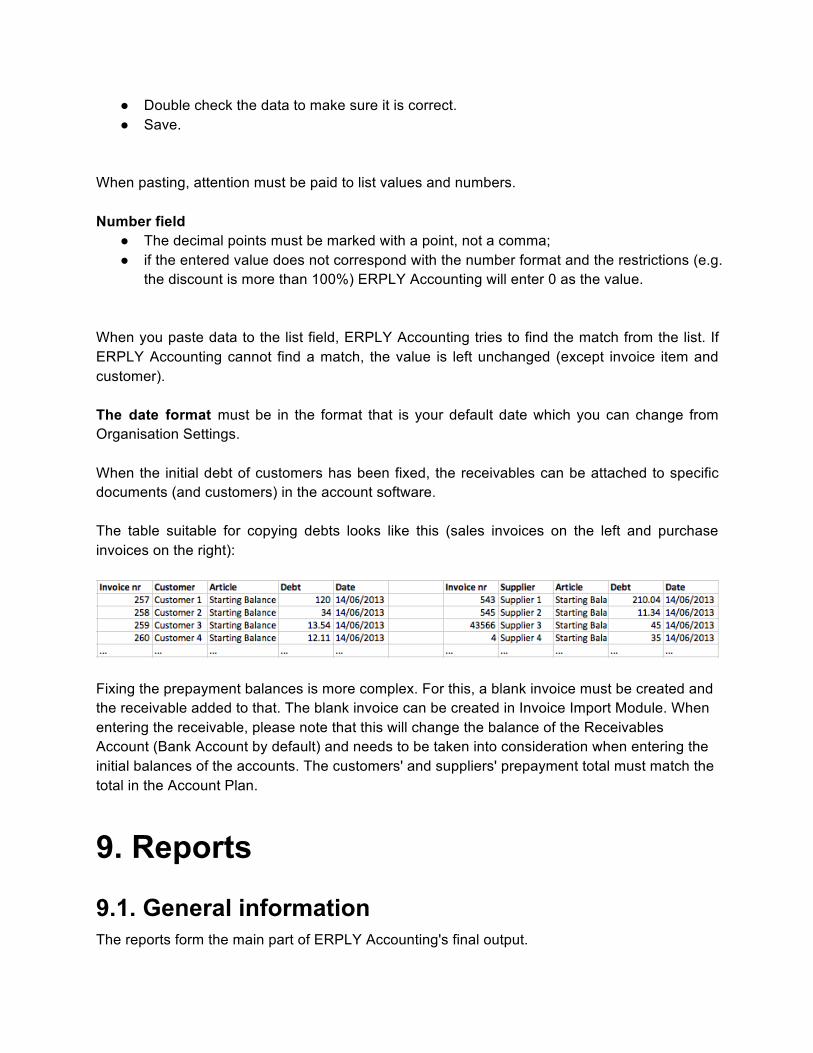
the discount is more than 100%) ERPLY Accounting will enter 0 as the value. When you paste data to the list field, ERPLY Accounting tries to find the match from the list. If ERPLY Accounting cannot find a match, the value is left unchanged (except invoice item and customer). The date format must be in the format that is your default date which you can change from Organisation Settings. When the initial debt of customers has been fixed, the receivables can be attached to specific documents (and customers) in the account software. The table suitable for copying debts looks like this (sales invoices on the left and purchase invoices on the right):
Fixing the prepayment balances is more complex. For this, a blank invoice must be created and the receivable added to that. The blank invoice can be created in Invoice Import Module. When entering the receivable, please note that this will change the balance of the Receivables Account (Bank Account by default) and needs to be taken into consideration when entering the initial balances of the accounts. The customers' and suppliers' prepayment total must match the total in the Account Plan.
9. Reports
9.1. General information The reports form the main part of ERPLY Accounting's final output.

The reports module is located on the main page. Press the Reports icon or select a report from the Reports drop down menu.
● The Reports open in the form of a table. ● The Sales and Purchase Report consists of a table and additional graphs. ● The report can be opened as a PDF or CSV file (more information in chapter 9.8). ● Double clicking on a row of the table opens an Entry (except for receivables, payables
and items report).
9.2. Sales, Purchases, Items Sales and Purchase Reports composition is identical. The report can be opened from the Reports Module or the Reports drop down menu. On the top of the table there is a graph that shows the sales/purchases on the specific time range. To see and manage unpaid invoices, go to incomes/outgoings menu. Items Report gives an overview of a certain item in the accounting entries. As all reports, this can be found in the reports menu. In addition, the Items Report enables viewing the depreciation items (Fixed Assets which have been depreciated in the depreciation module). This can be done by setting the type as Inventory Items.
9.3. VAT report The VAT report in ERPLY Accounting summons up four types of transactions:
● Sales Invoices; ● Purchase Invoices; ● other receivables with tax differing from 0; ● other payables with tax differing from 0.
The VAT report in ERPLY Accounting is composed using all the documents in the specific time period. The date is set as the date of the entry. The module looks like this:

Descriptions of the fields:
● Sales – the sales totals with different VAT percentages; ● Purchases – the purchases with different VAT percentages; ● Total – the difference between Sales and Purchase; ● VAT total – the total of VAT to be paid to Tax Office.
After the summary, there is a list of the items that the summary contains.
9.4. Financial reports - balance sheet, profit & loss statement and cash flow statement Balance sheet ERPLY Accounting composes the balance sheet according to the balance types set in the Chart of Accounts. The balance sheet can be selected from the reports, Accounting Menu or by using the key combination ctrl+o and "Balance". Income Sheet ERPLY accounting composes the Income Sheet according to the Income types set in the Chart of Accounts. The profit report can be selected from the Reports, Accounting Menu or by using the key combination ctrl+o and “Income Sheet”. Cash Flow Statement ERPLY Accounting composes the Cash Flow Statement according to the type of Cash Flow set in the Account Plan. The Cash Flow Statement can be selected from the reports, Accounting Menu or by using the key combination ctrl+o and “Cash Flow Statement”.

Account Balances Account Balances gives an overview of the balances of different accounts on a given date. The Balance report can be selected from the Reports, Accounting Menu or by using the key combination ctrl+o and "Account Balances".
9.5. Main accounting reports - General Ledger, Transactions General Ledger General Ledger enables an overview of the Transaction connected to the Accounts on a given time period. In the General Ledger the Transactions are divided between the accounts and ERPLY Accounting calculates the present account balance for every row. The General Ledger can be found from the Reports, Accounting Menu or by using the key combination ctrl+o and “General Ledger". Transactions Transactions can be viewed in the module named “Transactions”. The Transactions module can be found from the Reports, Accounting Menu or by using the key combination ctrl+o and “Transactions".
9.6. Customers, Suppliers The customers' and suppliers' report gives an overview of the turnover of a specific customer or supplier – total of the sale/purchase, amounts paid, prepayments. The report can be found in the drop down menu. By selecting a customer/supplier, all entries connected to the selected customer/supplier are visible.
9.7. Managing Money Since Cash Flow is directly connected to Transactions’ entries in ERPLY Accounting, money related transactions can be seen from the General Ledger (Reports -> General Ledger). All money related reports can be found in the Reports menu:
● Cash Flow Statement - gives an overview of the factors that have influenced the capital changes. More information on Cash Flow report can be found in chapter 9.4)
● Money In and Out – Composes of all the transactions and sorts them by time. Unlike in the other reports, the Money In and Out module enables viewing the account balance.
● Unpaid Sales Invoices – enables searching for all sales invoices, shows unpaid invoices by default
● Unpaid Purchase Invoices – enables searching for all Purchase Invoices, shows all unpaid invoices by default
● Receivables Report – from Receivables Report you can see all the received payments. ● Payables Report – from Payables Report you can see all the payments paid out from
your money accounts.
9.8. Opening CSV files CSV means comma separated values. Comma-separated means that the separator between the columns is a comma. Occasionally, other separators like semicolon or tab are used. When importing a CSV file to a table calculation software (e.g. Excel), the separator used in the CSV file needs to be selected to make the file readable. Opening a CSV file in MS Excel: File > Import… > CSV file Then the desired file must be selected. You will be asked if a separator (e.g. comma) is used or the columns are fixed with spaces. Mostly a comma or a semicolon is used in CSV files, in which case choose Delimited (with a separator). In the next dialogue window, a separator must be selected: tab, semicolon, comma etc. A fragment of the document is shown and by choosing the different separators, a preview is visible. The separator (delimiter) that aligns the document in correct columns must be chosen. To open the document press Finish. A video tutorial on how to load a CSV file to MS Excel can be found here. Opening a CSV file in OpenOffice: Open… > choose file Then a window is opened where similarly to the process in MS Excel, the separator must be chosen. All other separators not used in the document must be unticked. Opening CSV in Google Docs: 1) After opening the spreadsheet go to: File > Import… > Choose File After choosing the file, it becomes visible in the Preview window. Unlike in the previous two programs, Automatic function exists in Google Docs that most likely will find the correct separator and only Import must be pressed. If Google Docs does not display the document
correctly, the separator must be manually set in the file's import wizard: File > Import > Choose File. Then from under the Separator character Automatic, Comma or Custom, etc. 2) On Google Docs main page choose: Upload > Files and the desired file. The file will appear in the My Drive list. When opening the file, Google Docs recognises the separator automatically and displays the document correctly. If for some reason, it is not displayed correctly (an uncommon separator is used), the separator can be set manually by using the file import (shown in the previous section).


![Accounting] Vedika Software - Accounting User Guide (1998)](https://img.pdfslide.net/doc/110x75/546b5df0af795985298b4b6b/accounting-vedika-software-accounting-user-guide-1998.jpg)