Embed Size (px)
Citation preview
ESSENTIALS Quick Information to Get You Started

2
© 2009 Autodesk, Inc. All Rights Reserved. Except as otherwise permitted by Autodesk, Inc., this publication, or parts thereof, may not be reproduced in any form, by any method, for any purpose.
Certain materials included in this publication are reprinted with the permission of the copyright holder.
Trademarks
The following are registered trademarks or trademarks of Autodesk, Inc., and/or its subsidiaries and/or affiliates in the USA and other countries: 3DEC (design/logo), 3December, 3December.com, 3ds Max, Algor, Alias, Alias (swirl design/logo), AliasStudio, Alias|Wavefront (design/logo), ATC, AUGI, AutoCAD, AutoCAD Learning Assistance, AutoCAD LT, AutoCAD Simulator, AutoCAD SQL Extension, AutoCAD SQL Interface, Autodesk, Autodesk Envision, Autodesk Intent, Autodesk Inventor, Autodesk Map, Autodesk MapGuide, Autodesk Streamline, AutoLISP, AutoSnap, AutoSketch, AutoTrack, Backburner, Backdraft, Built with ObjectARX (logo), Burn, Buzzsaw, CAiCE, Civil 3D, Cleaner, Cleaner Central, ClearScale, Colour Warper, Combustion, Communication Specification, Constructware, Content Explorer, Dancing Baby (image), DesignCenter, Design Doctor, Designer's Toolkit, DesignKids, DesignProf, DesignServer, DesignStudio, Design Web Format, Discreet, DWF, DWG, DWG (logo), DWG Extreme, DWG TrueConvert, DWG TrueView, DXF, Ecotect, Exposure, Extending the Design Team, Face Robot, FBX, Fempro, Fire, Flame, Flint, FMDesktop, Freewheel, GDX Driver, Green Building Studio, Heads-up Design, Heidi, HumanIK, IDEA Server, i-drop, ImageModeler, iMOUT, Incinerator, Inferno, Inventor, Inventor LT, Kaydara, Kaydara (design/logo), Kynapse, Kynogon, LandXplorer, Lustre, MatchMover, Maya, Mechanical Desktop, Moldflow, Moonbox, MotionBuilder, Movimento, MPA, MPA (design/logo), Moldflow Plastics Advisers, MPI, Moldflow Plastics Insight, MPX, MPX (design/logo), Moldflow Plastics Xpert, Mudbox, Multi-Master Editing, Navisworks, ObjectARX, ObjectDBX, Open Reality, Opticore, Opticore Opus, Pipeplus, PolarSnap, PortfolioWall, Powered with Autodesk Technology, Productstream, ProjectPoint, ProMaterials, RasterDWG, RealDWG, Real-time Roto, Recognize, Render Queue, Retimer,Reveal, Revit, Showcase, ShowMotion, SketchBook, Smoke, Softimage, Softimage|XSI (design/logo), Sparks, SteeringWheels, Stitcher, Stone, StudioTools, Topobase, Toxik, TrustedDWG, ViewCube, Visual, Visual LISP, Volo, Vtour, Wire, Wiretap, WiretapCentral, XSI, and XSI (design/logo).
All other brand names, product names or trademarks belong to their respective holders.
Disclaimer
THIS PUBLICATION AND THE INFORMATION CONTAINED HEREIN IS MADE AVAILABLE BY AUTODESK, INC. "AS IS." AUTODESK, INC. DISCLAIMS ALL WARRANTIES, EITHER EXPRESS OR IMPLIED, INCLUDING BUT NOT LIMITED TO ANY IMPLIED WARRANTIES OF MERCHANTABILITY OR FITNESS FOR A PARTICULAR PURPOSE REGARDING THESE MATERIALS.
Published by: Autodesk, Inc. 111 Mclnnis Parkway San Rafael, CA 94903, USA
3
Project Cooper Essentials
Contents 1. UNDERSTAND YOUR WORKSPACE ..........................................................................................................4
Pan and Zoom 4
The Grid 5
Units of Measurement 6
Drawing Size 6
Options Settings 8
Palettes 9
2. ENSURE ACCURACY .......................................................................................................................... 10
Dimensions 10
Temporary Measurements 11
Snaps and Alignment Guides 12
3. DRAW AND EDIT .............................................................................................................................. 14
Symbols 14
Grips 16
Insert Pictures 18
Copy, Cut, and Paste 19
Erase 20
4. SET PROPERTIES .............................................................................................................................. 21
Layers 21
Fills 23
Line Properties 24
Transparency 25
Draw Order 25
5. SHARE DRAWINGS ........................................................................................................................... 26
Save Drawings 26
Print 27
6. WINDOWS 7 ................................................................................................................................... 28
Touch Support 28
4
1. Understand Your Workspace Before you draw, set up your workspace to save time and ensure good results.
With Project Cooper, you can create accurate 2D drawings quickly and easily. This guide offers some quick information to help you get started fast.
Pan and Zoom Move the paper—or move in for a closer view— as you work.
When you work with pencil and paper, you frequently need to move to different areas as you draw. In Project Cooper, you can do the same thing by panning and zooming.
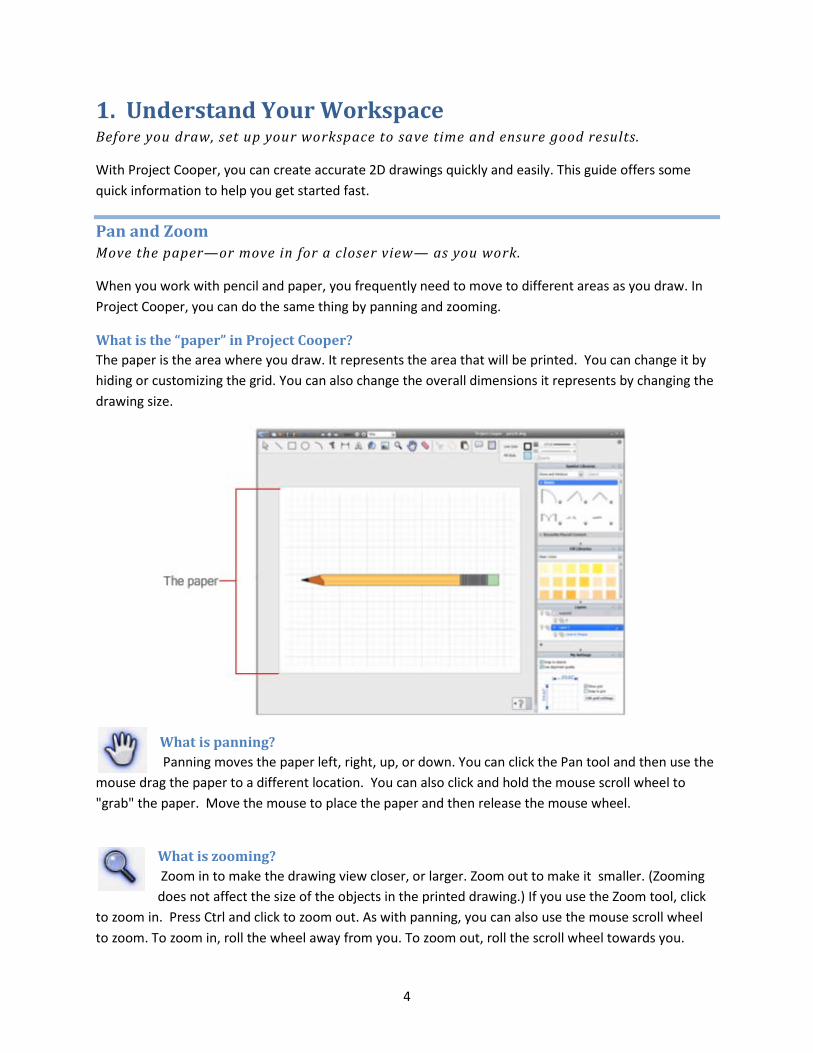
What is the “paper” in Project Cooper? The paper is the area where you draw. It represents the area that will be printed. You can change it by hiding or customizing the grid. You can also change the overall dimensions it represents by changing the drawing size.
What is panning? Panning moves the paper left, right, up, or down. You can click the Pan tool and then use the
mouse drag the paper to a different location. You can also click and hold the mouse scroll wheel to "grab" the paper. Move the mouse to place the paper and then release the mouse wheel.
What is zooming? Zoom in to make the drawing view closer, or larger. Zoom out to make it smaller. (Zooming does not affect the size of the objects in the printed drawing.) If you use the Zoom tool, click
to zoom in. Press Ctrl and click to zoom out. As with panning, you can also use the mouse scroll wheel to zoom. To zoom in, roll the wheel away from you. To zoom out, roll the scroll wheel towards you.
5
The Grid Hide or modify the grid to make drawing precisely easier.
What is the grid? The grid is like graph paper. You can set its horizontal and vertical lines to specific intervals. For increased accuracy, turn on grid snaps to make the lines you draw lock in, or snap, to points on the grid.
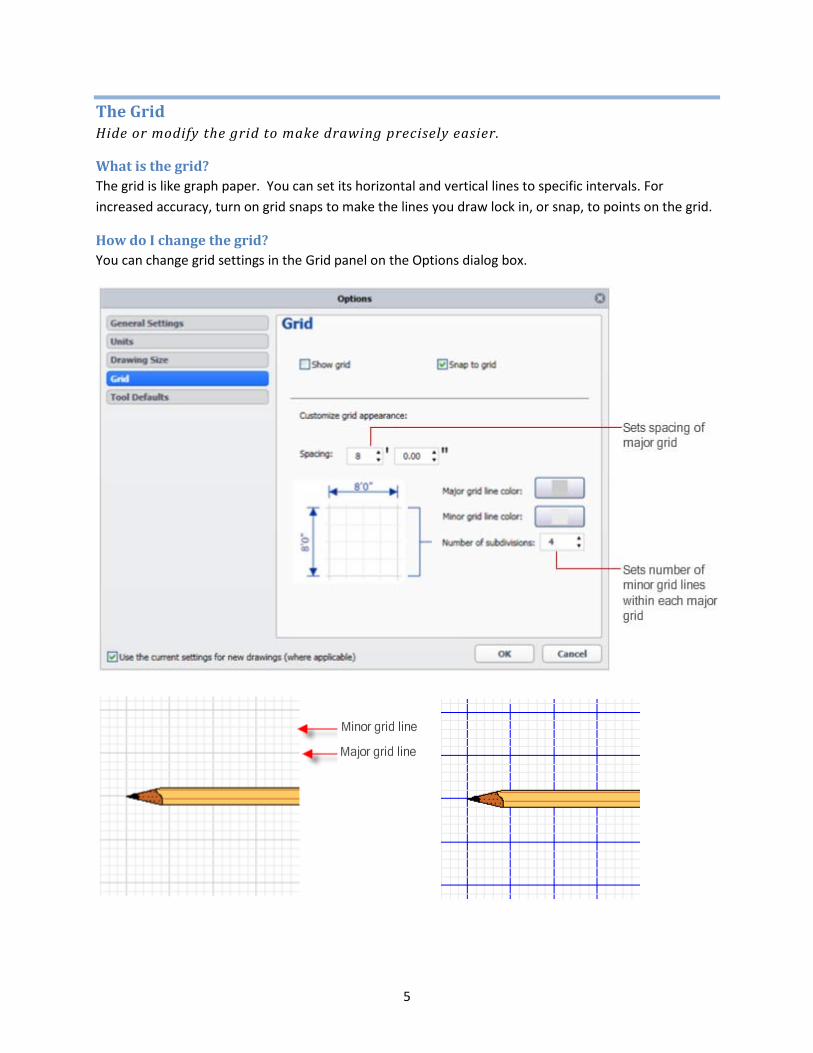
How do I change the grid? You can change grid settings in the Grid panel on the Options dialog box.
6
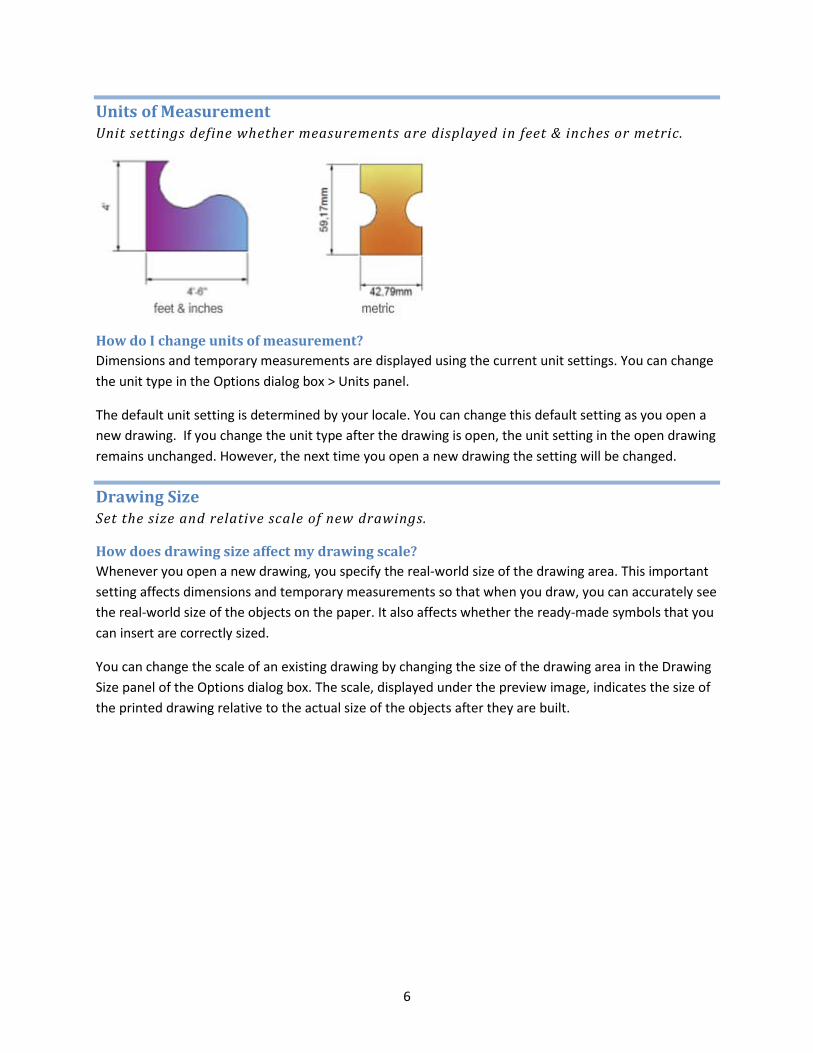
Units of Measurement Unit settings define whether measurements are displayed in feet & inches or metric.
How do I change units of measurement? Dimensions and temporary measurements are displayed using the current unit settings. You can change the unit type in the Options dialog box > Units panel.
The default unit setting is determined by your locale. You can change this default setting as you open a new drawing. If you change the unit type after the drawing is open, the unit setting in the open drawing remains unchanged. However, the next time you open a new drawing the setting will be changed.
Drawing Size Set the size and relative scale of new drawings.
How does drawing size affect my drawing scale? Whenever you open a new drawing, you specify the real-world size of the drawing area. This important setting affects dimensions and temporary measurements so that when you draw, you can accurately see the real-world size of the objects on the paper. It also affects whether the ready-made symbols that you can insert are correctly sized.
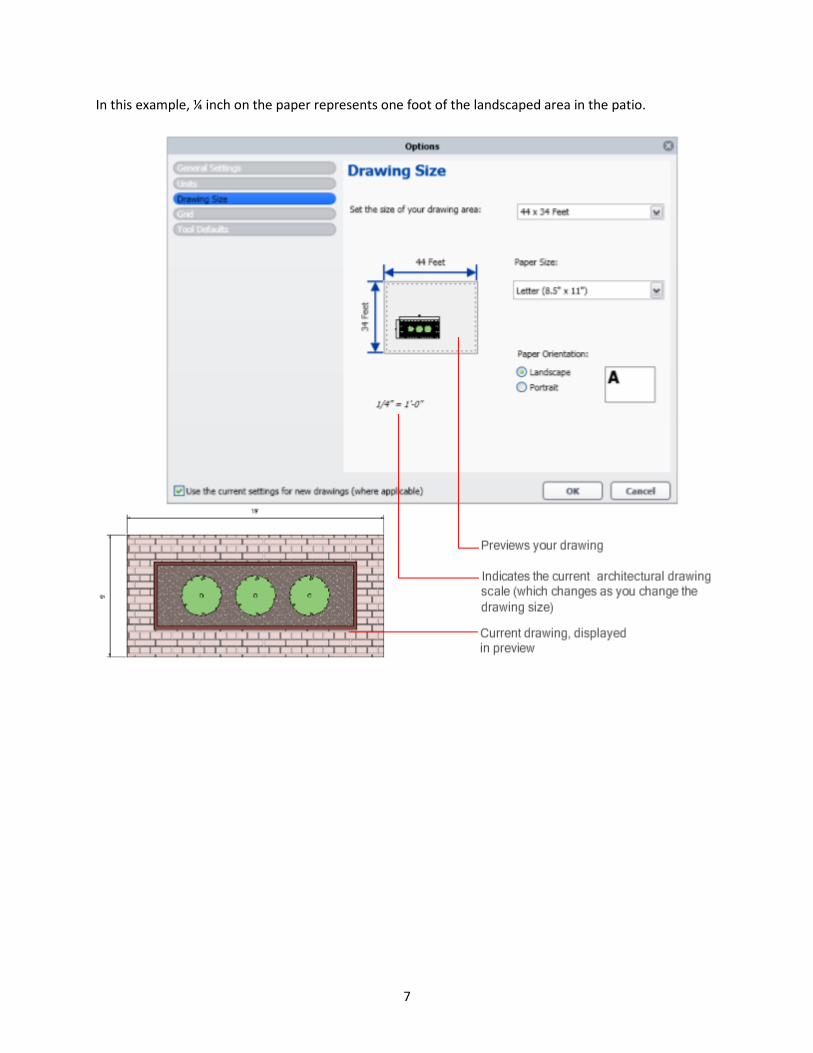
You can change the scale of an existing drawing by changing the size of the drawing area in the Drawing Size panel of the Options dialog box. The scale, displayed under the preview image, indicates the size of the printed drawing relative to the actual size of the objects after they are built.
7
In this example, ¼ inch on the paper represents one foot of the landscaped area in the patio.
8
Options Settings Use the Options dialog box to change your drawing settings.
The Options dialog box provides settings that customize your workspace. They include:
• General Settings – Startup, graphic display, and Touch Input (Microsoft Windows 7)
• Units - Are measurements displayed as metric or feet & inches?
• Drawing Size - Define the scale of your drawing based on the real-world size the subject
• Grid - Customize your “graph paper”
• Tool Defaults – Modify how the Doodle tool works
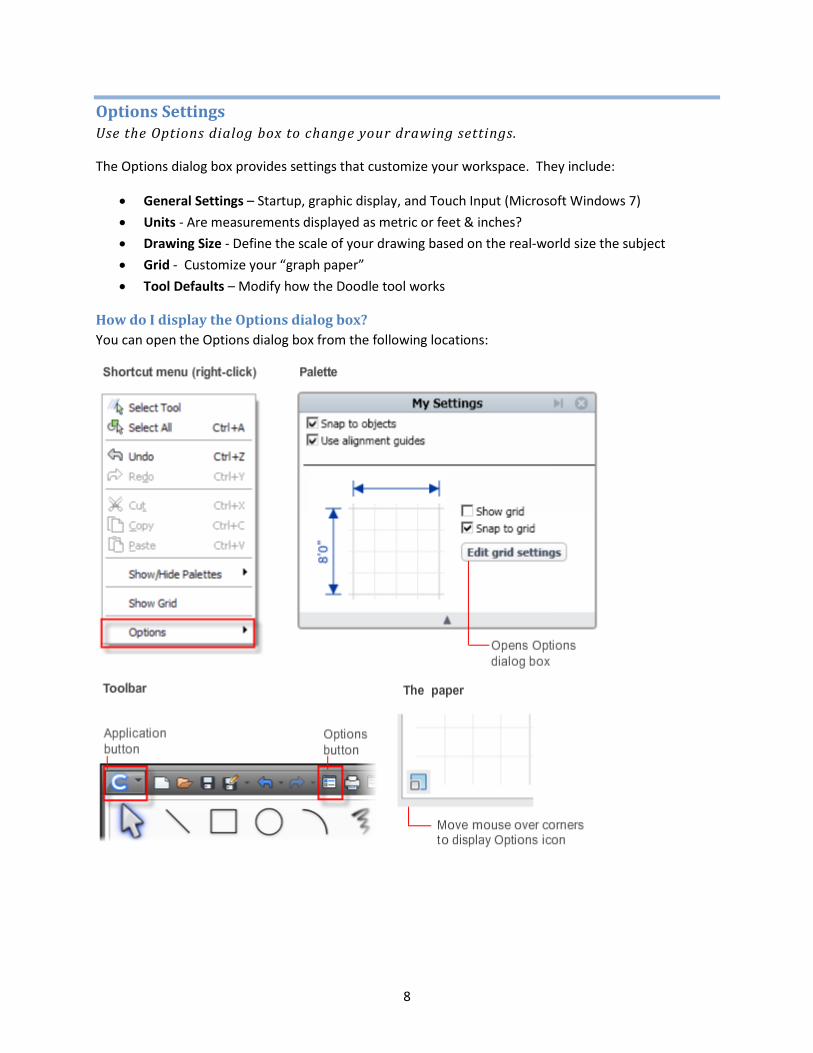
How do I display the Options dialog box? You can open the Options dialog box from the following locations:
9
Palettes Palettes provide convenient access to the content and settings that you use most often.
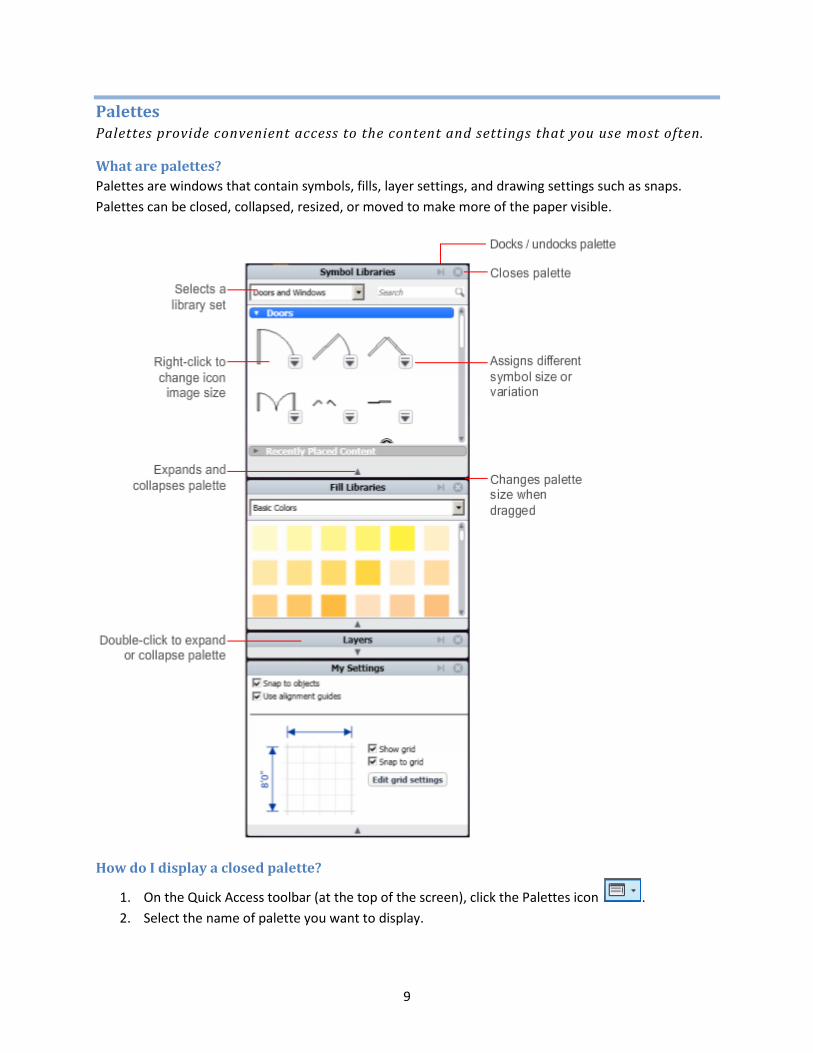
What are palettes? Palettes are windows that contain symbols, fills, layer settings, and drawing settings such as snaps. Palettes can be closed, collapsed, resized, or moved to make more of the paper visible.
How do I display a closed palette?
1. On the Quick Access toolbar (at the top of the screen), click the Palettes icon . 2. Select the name of palette you want to display.
10
2. Ensure Accuracy Use dimensions, snaps, and alignment guides to measure and position objects.
Dimensions Add measurement information to your drawings.
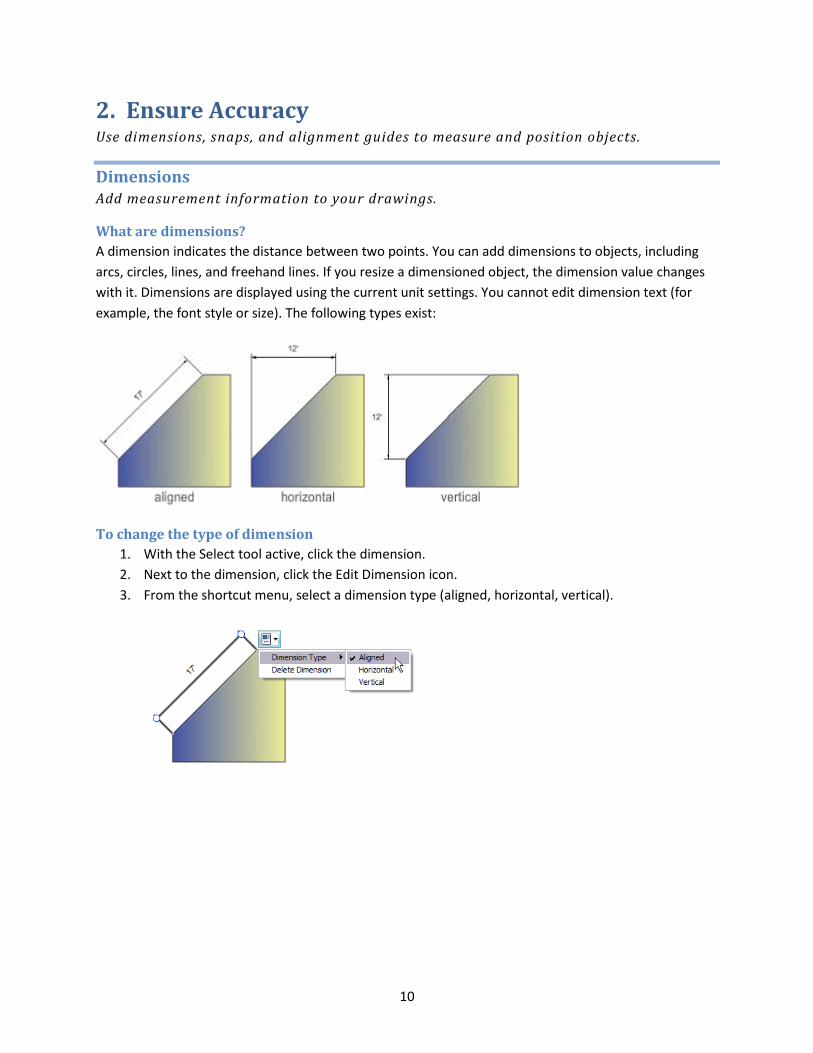
What are dimensions? A dimension indicates the distance between two points. You can add dimensions to objects, including arcs, circles, lines, and freehand lines. If you resize a dimensioned object, the dimension value changes with it. Dimensions are displayed using the current unit settings. You cannot edit dimension text (for example, the font style or size). The following types exist:
To change the type of dimension 1. With the Select tool active, click the dimension. 2. Next to the dimension, click the Edit Dimension icon. 3. From the shortcut menu, select a dimension type (aligned, horizontal, vertical).
11
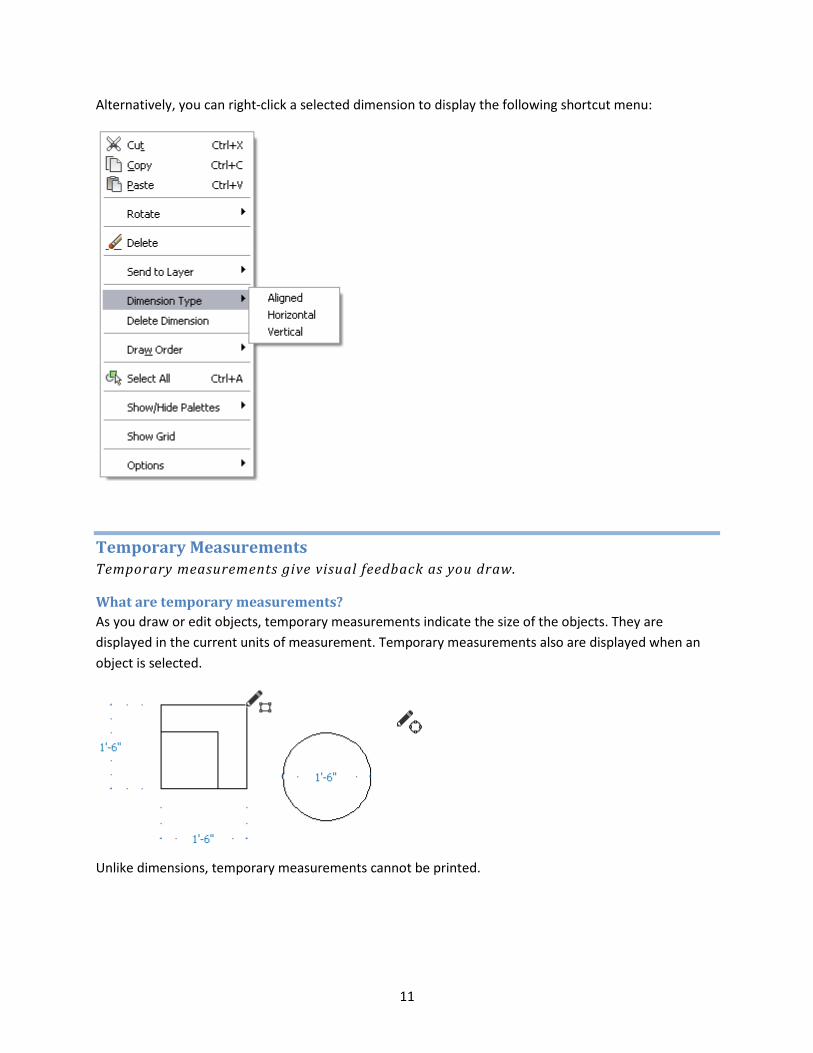
Alternatively, you can right-click a selected dimension to display the following shortcut menu:
Temporary Measurements Temporary measurements give visual feedback as you draw.
What are temporary measurements? As you draw or edit objects, temporary measurements indicate the size of the objects. They are displayed in the current units of measurement. Temporary measurements also are displayed when an object is selected.
Unlike dimensions, temporary measurements cannot be printed.
12
Snaps and Alignment Guides Use snaps and alignment guides to accurately position objects on the paper.
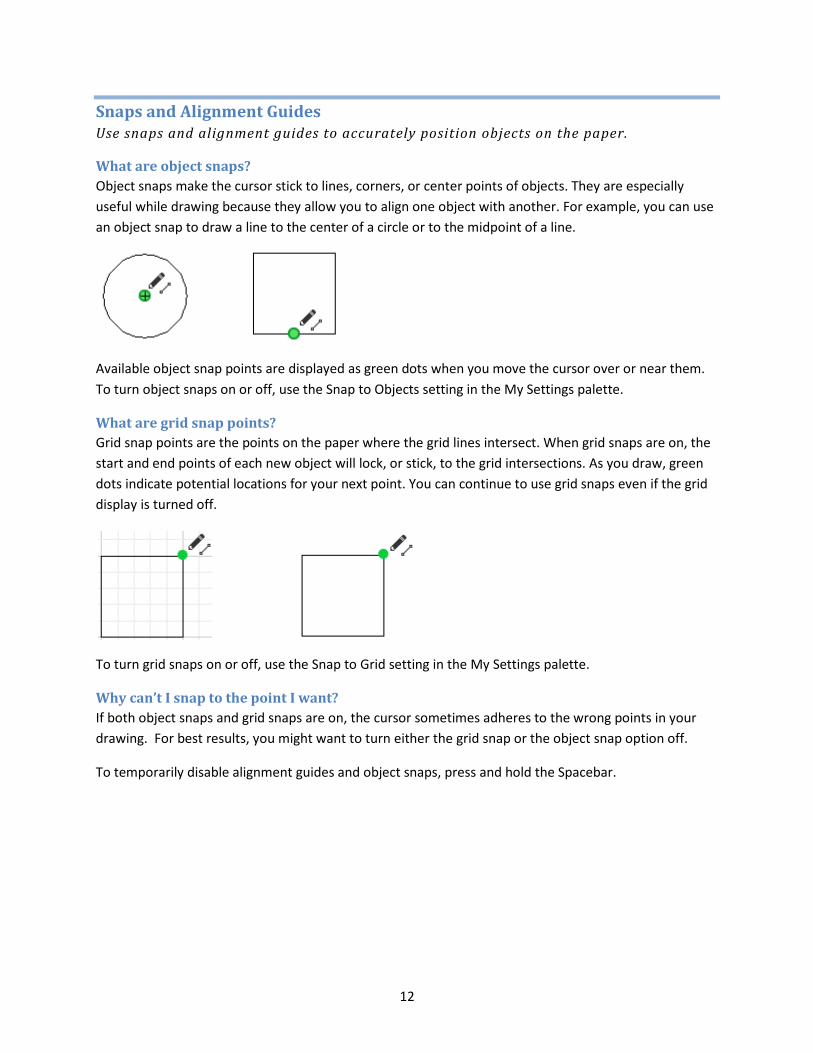
What are object snaps? Object snaps make the cursor stick to lines, corners, or center points of objects. They are especially useful while drawing because they allow you to align one object with another. For example, you can use an object snap to draw a line to the center of a circle or to the midpoint of a line.
Available object snap points are displayed as green dots when you move the cursor over or near them. To turn object snaps on or off, use the Snap to Objects setting in the My Settings palette.
What are grid snap points? Grid snap points are the points on the paper where the grid lines intersect. When grid snaps are on, the start and end points of each new object will lock, or stick, to the grid intersections. As you draw, green dots indicate potential locations for your next point. You can continue to use grid snaps even if the grid display is turned off.
To turn grid snaps on or off, use the Snap to Grid setting in the My Settings palette.
Why can’t I snap to the point I want? If both object snaps and grid snaps are on, the cursor sometimes adheres to the wrong points in your drawing. For best results, you might want to turn either the grid snap or the object snap option off.
To temporarily disable alignment guides and object snaps, press and hold the Spacebar.
13
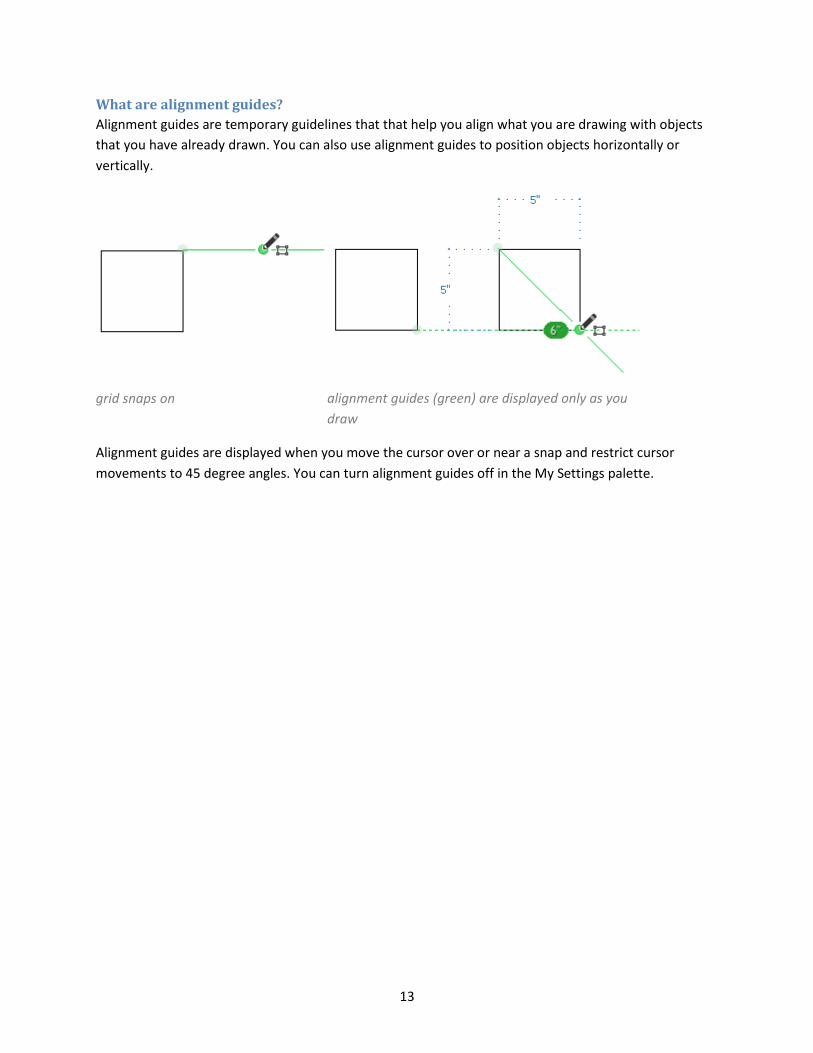
What are alignment guides? Alignment guides are temporary guidelines that that help you align what you are drawing with objects that you have already drawn. You can also use alignment guides to position objects horizontally or vertically.
grid snaps on alignment guides (green) are displayed only as you draw
Alignment guides are displayed when you move the cursor over or near a snap and restrict cursor movements to 45 degree angles. You can turn alignment guides off in the My Settings palette.

14
3. Draw and Edit Add ready-made objects to your drawings, or change the objects you already created.
Symbols Enhance your drawing with ready-made symbols.
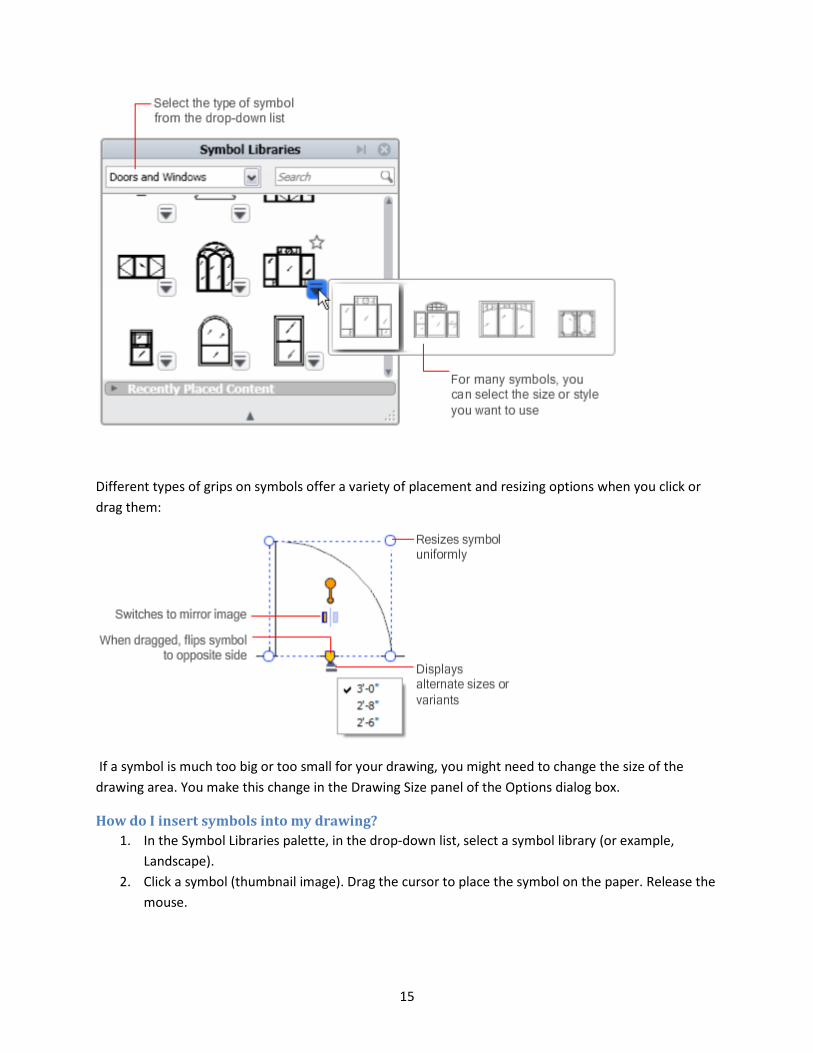
What are symbols? In addition to creating your own shapes using the tools on the toolbar, you can use premade symbols. Symbols are scale drawings of items such as windows, doors, furniture, fixtures, or plants. They are treated as single objects that you can insert into your drawing.
Using symbols saves you time: you don't have to create them from scratch and you can reuse them as many times as you want.
Many symbols are available in several sizes. You can select a size before you insert the symbol or drag a corner grip to manually resize the symbol after you insert it.
15
Different types of grips on symbols offer a variety of placement and resizing options when you click or drag them:
If a symbol is much too big or too small for your drawing, you might need to change the size of the drawing area. You make this change in the Drawing Size panel of the Options dialog box.
How do I insert symbols into my drawing? 1. In the Symbol Libraries palette, in the drop-down list, select a symbol library (or example,
Landscape). 2. Click a symbol (thumbnail image). Drag the cursor to place the symbol on the paper. Release the
mouse.
16
Grips Grips help you move and edit objects.
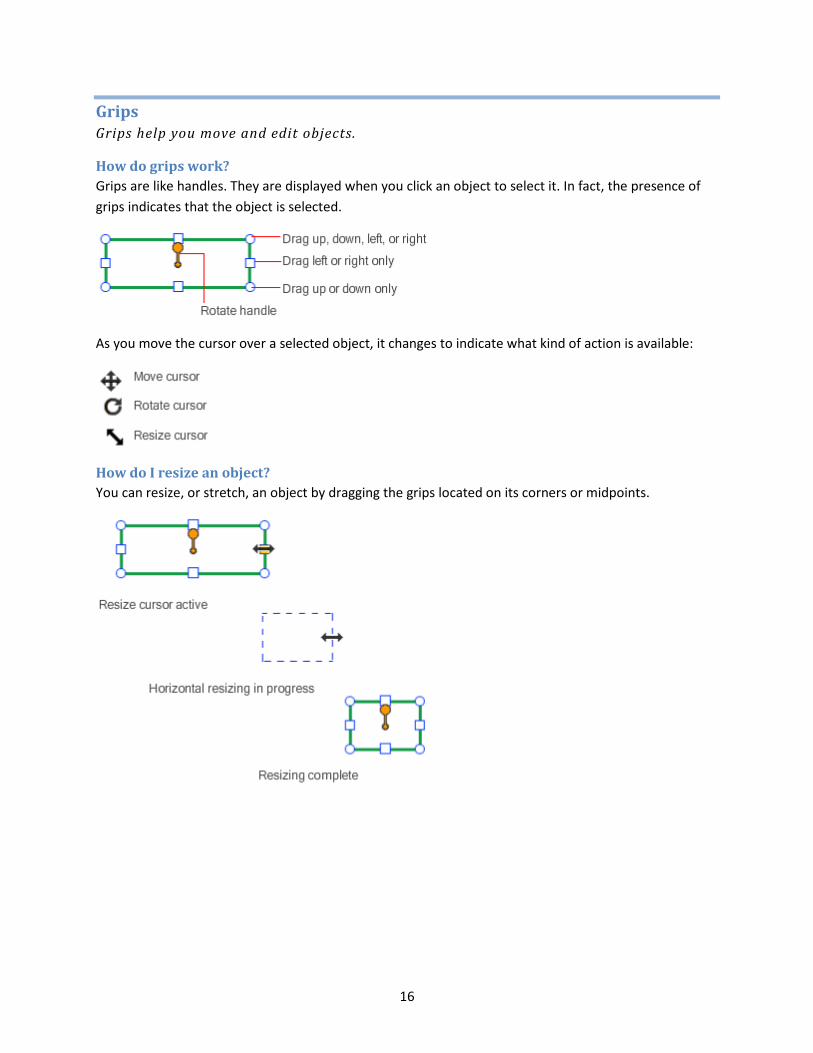
How do grips work? Grips are like handles. They are displayed when you click an object to select it. In fact, the presence of grips indicates that the object is selected.
As you move the cursor over a selected object, it changes to indicate what kind of action is available:
How do I resize an object? You can resize, or stretch, an object by dragging the grips located on its corners or midpoints.

17
How do I move an object? When the Move cursor is displayed, you can drag the object to move it.
18
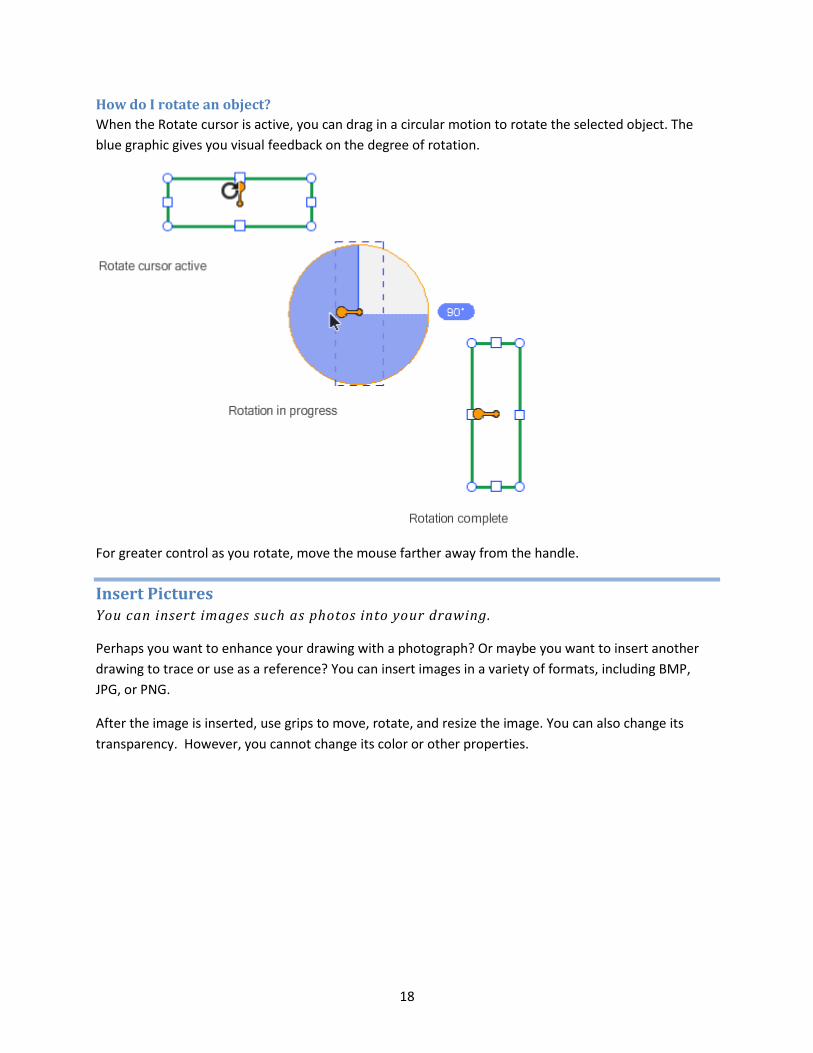
How do I rotate an object? When the Rotate cursor is active, you can drag in a circular motion to rotate the selected object. The blue graphic gives you visual feedback on the degree of rotation.
For greater control as you rotate, move the mouse farther away from the handle.
Insert Pictures You can insert images such as photos into your drawing.
Perhaps you want to enhance your drawing with a photograph? Or maybe you want to insert another drawing to trace or use as a reference? You can insert images in a variety of formats, including BMP, JPG, or PNG.
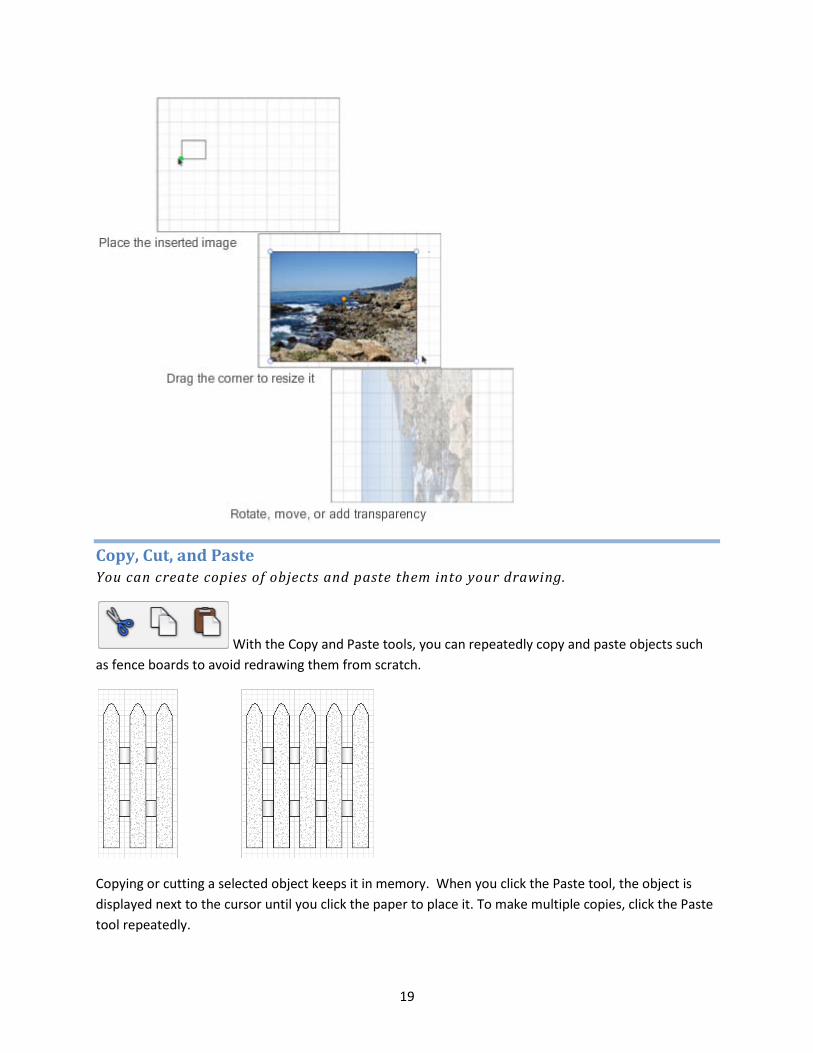
After the image is inserted, use grips to move, rotate, and resize the image. You can also change its transparency. However, you cannot change its color or other properties.
19
Copy, Cut, and Paste You can create copies of objects and paste them into your drawing.
With the Copy and Paste tools, you can repeatedly copy and paste objects such as fence boards to avoid redrawing them from scratch.
Copying or cutting a selected object keeps it in memory. When you click the Paste tool, the object is displayed next to the cursor until you click the paper to place it. To make multiple copies, click the Paste tool repeatedly.
20
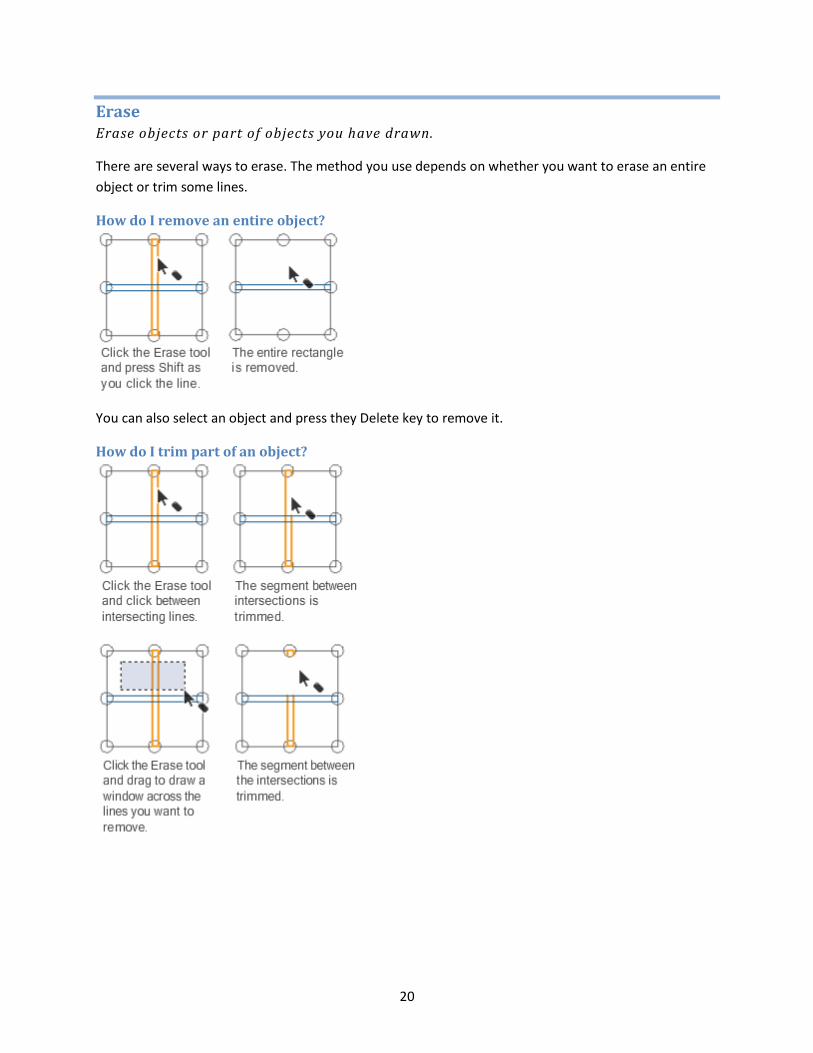
Erase Erase objects or part of objects you have drawn.
There are several ways to erase. The method you use depends on whether you want to erase an entire object or trim some lines.
How do I remove an entire object?
You can also select an object and press they Delete key to remove it.
How do I trim part of an object?
21
4. Set Properties Organize objects by layer, or change other properties such as color or draw order.
Layers You can organize the objects you draw on layers.
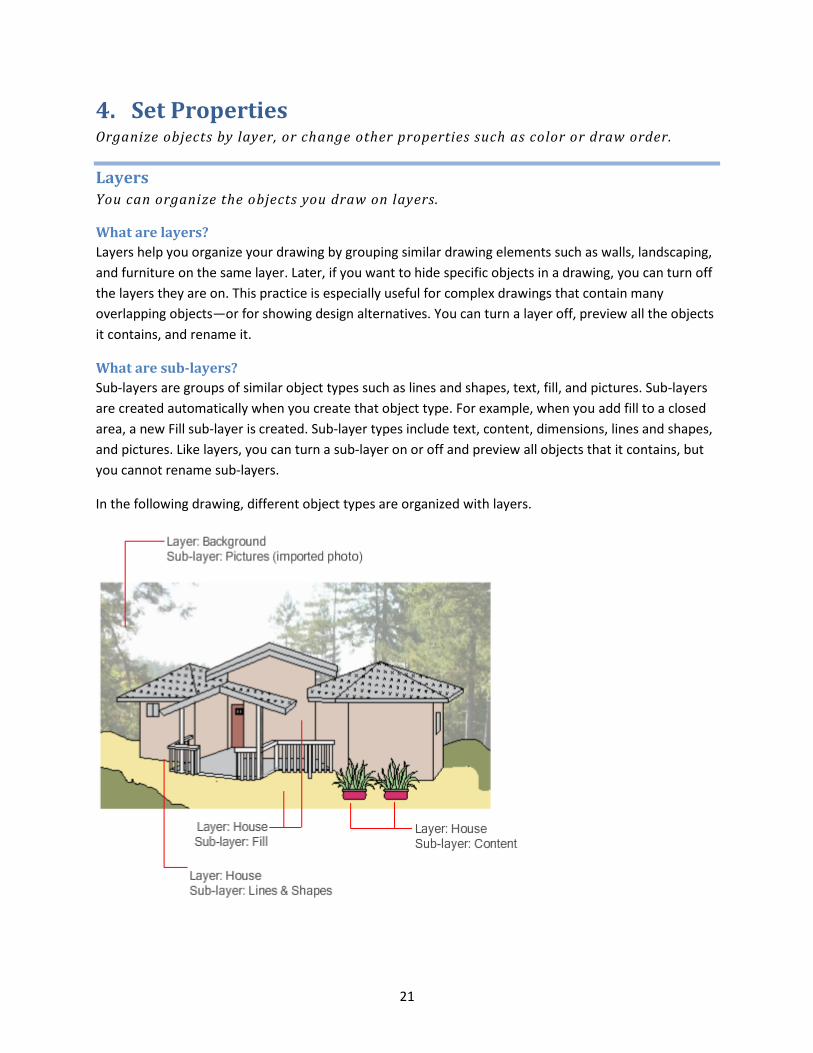
What are layers? Layers help you organize your drawing by grouping similar drawing elements such as walls, landscaping, and furniture on the same layer. Later, if you want to hide specific objects in a drawing, you can turn off the layers they are on. This practice is especially useful for complex drawings that contain many overlapping objects—or for showing design alternatives. You can turn a layer off, preview all the objects it contains, and rename it.
What are sub-layers? Sub-layers are groups of similar object types such as lines and shapes, text, fill, and pictures. Sub-layers are created automatically when you create that object type. For example, when you add fill to a closed area, a new Fill sub-layer is created. Sub-layer types include text, content, dimensions, lines and shapes, and pictures. Like layers, you can turn a sub-layer on or off and preview all objects that it contains, but you cannot rename sub-layers.
In the following drawing, different object types are organized with layers.
22
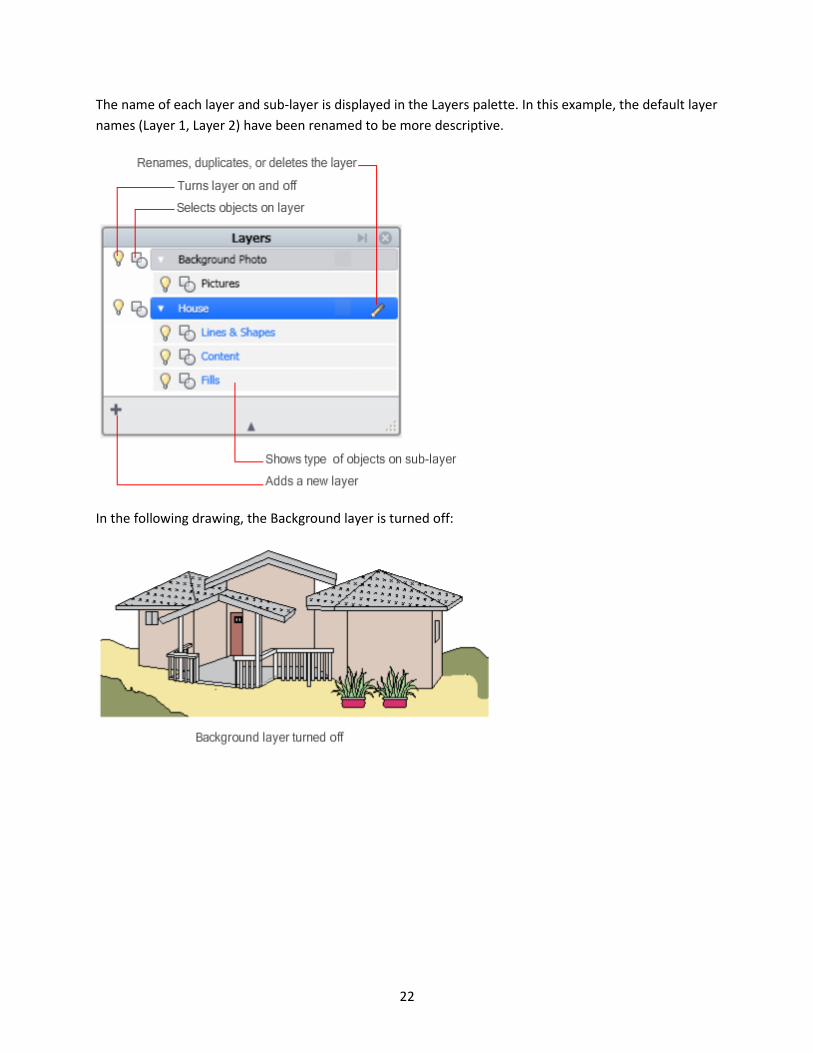
The name of each layer and sub-layer is displayed in the Layers palette. In this example, the default layer names (Layer 1, Layer 2) have been renamed to be more descriptive.
In the following drawing, the Background layer is turned off:
23
To further simplify a drawing, you can turn off all layers except for the Lines & Shapes sub-layers:
You can create and name up to 10 layers. In the Layers palette, you can also do the following:
To do this: Click this button:
Create a new Layer Create New Layer
Turn a layer on or off Layer On/Off
Select all objects on a layer Selection button
Select objects on several layers Press Shift + Selection button
Move selected objects to this layer Select objects and click button
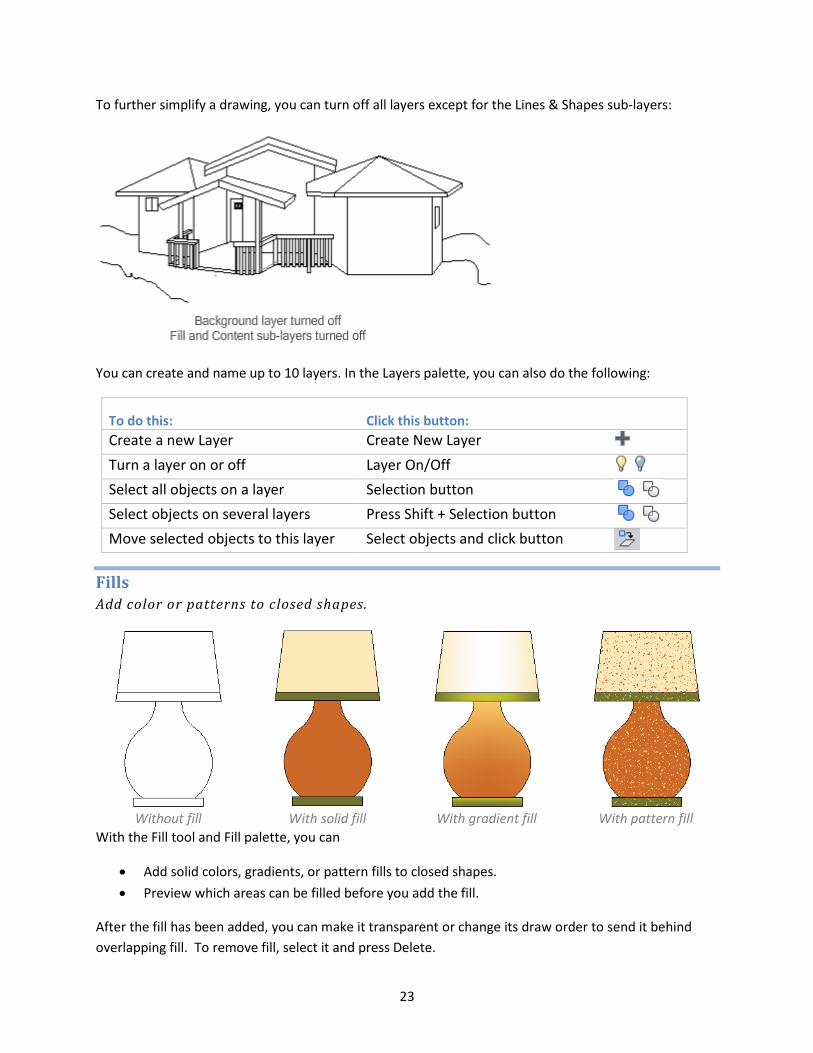
Fills Add color or patterns to closed shapes.
Without fill With solid fill With gradient fill With pattern fill
With the Fill tool and Fill palette, you can
• Add solid colors, gradients, or pattern fills to closed shapes.
• Preview which areas can be filled before you add the fill.
After the fill has been added, you can make it transparent or change its draw order to send it behind overlapping fill. To remove fill, select it and press Delete.
24
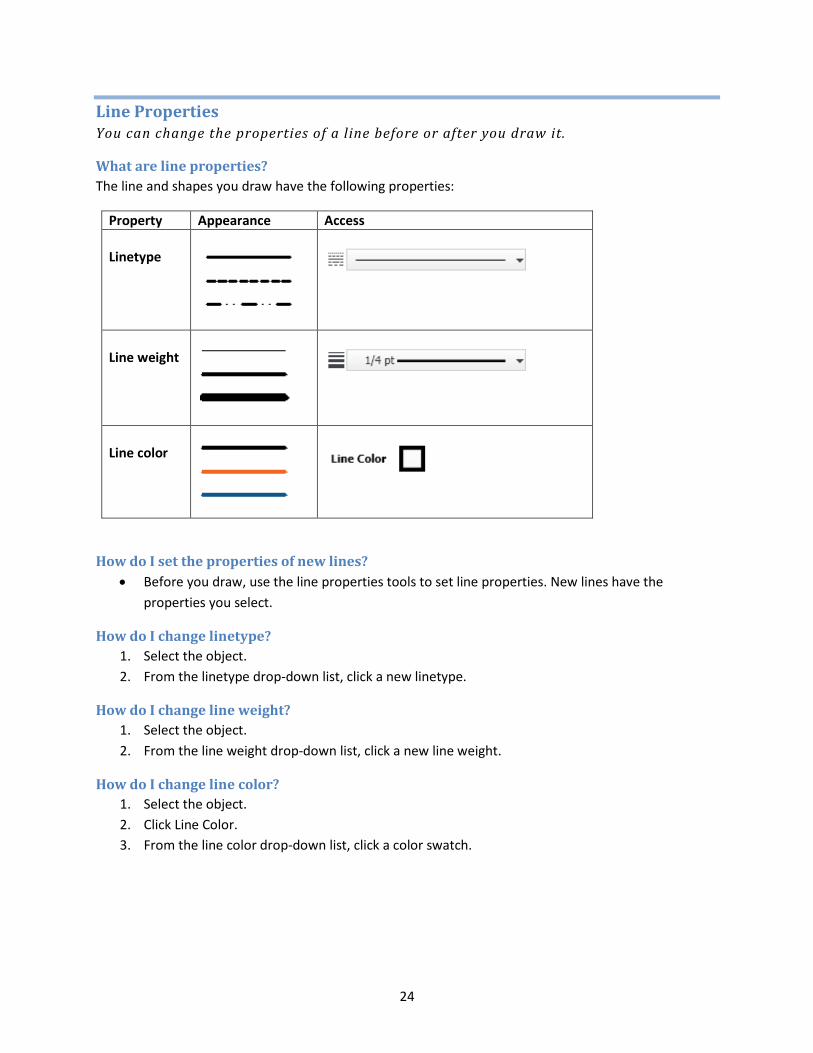
Line Properties You can change the properties of a line before or after you draw it.
What are line properties? The line and shapes you draw have the following properties:
Property Appearance Access Linetype
Line weight
Line color
How do I set the properties of new lines? • Before you draw, use the line properties tools to set line properties. New lines have the
properties you select.
How do I change linetype? 1. Select the object. 2. From the linetype drop-down list, click a new linetype.
How do I change line weight? 1. Select the object. 2. From the line weight drop-down list, click a new line weight.
How do I change line color? 1. Select the object. 2. Click Line Color. 3. From the line color drop-down list, click a color swatch.
25
Transparency You can change the opacity of line or fills.
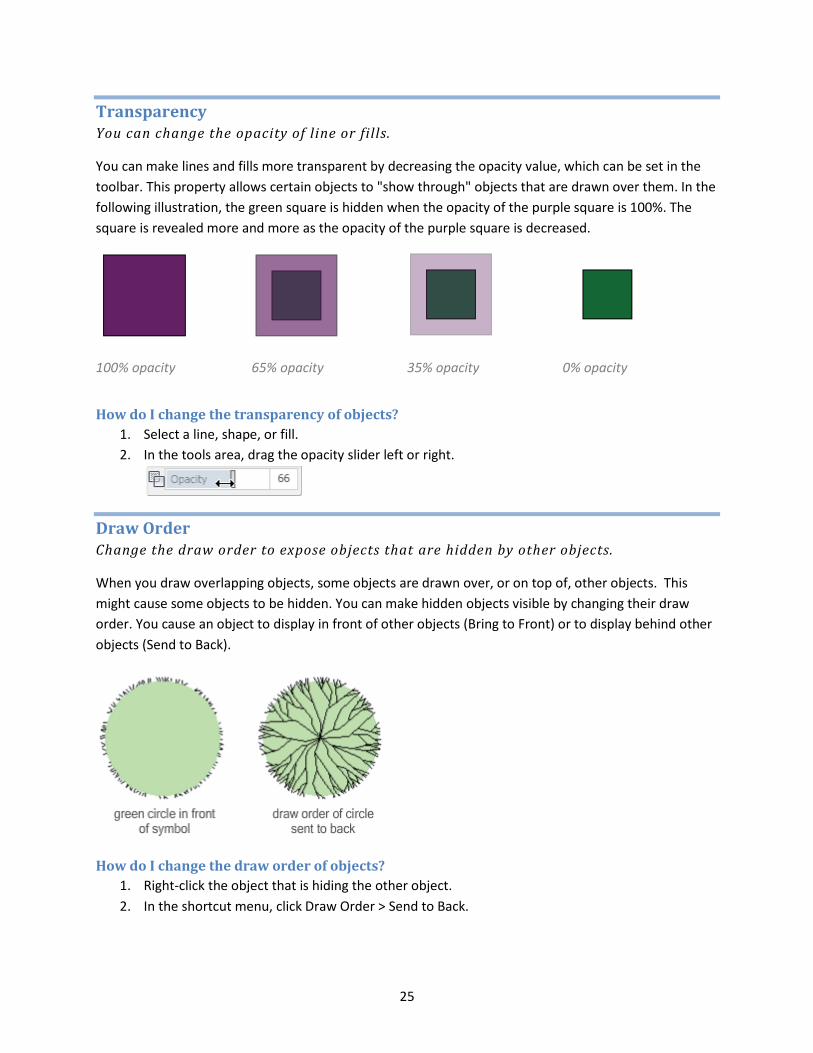
You can make lines and fills more transparent by decreasing the opacity value, which can be set in the toolbar. This property allows certain objects to "show through" objects that are drawn over them. In the following illustration, the green square is hidden when the opacity of the purple square is 100%. The square is revealed more and more as the opacity of the purple square is decreased.
100% opacity 65% opacity 35% opacity 0% opacity
How do I change the transparency of objects? 1. Select a line, shape, or fill. 2. In the tools area, drag the opacity slider left or right.
Draw Order Change the draw order to expose objects that are hidden by other objects.
When you draw overlapping objects, some objects are drawn over, or on top of, other objects. This might cause some objects to be hidden. You can make hidden objects visible by changing their draw order. You cause an object to display in front of other objects (Bring to Front) or to display behind other objects (Send to Back).
How do I change the draw order of objects? 1. Right-click the object that is hiding the other object. 2. In the shortcut menu, click Draw Order > Send to Back.
26
5. Share Drawings Save finished projects in different file formats, or print them.
Save Drawings You can save drawings in variety of formats.
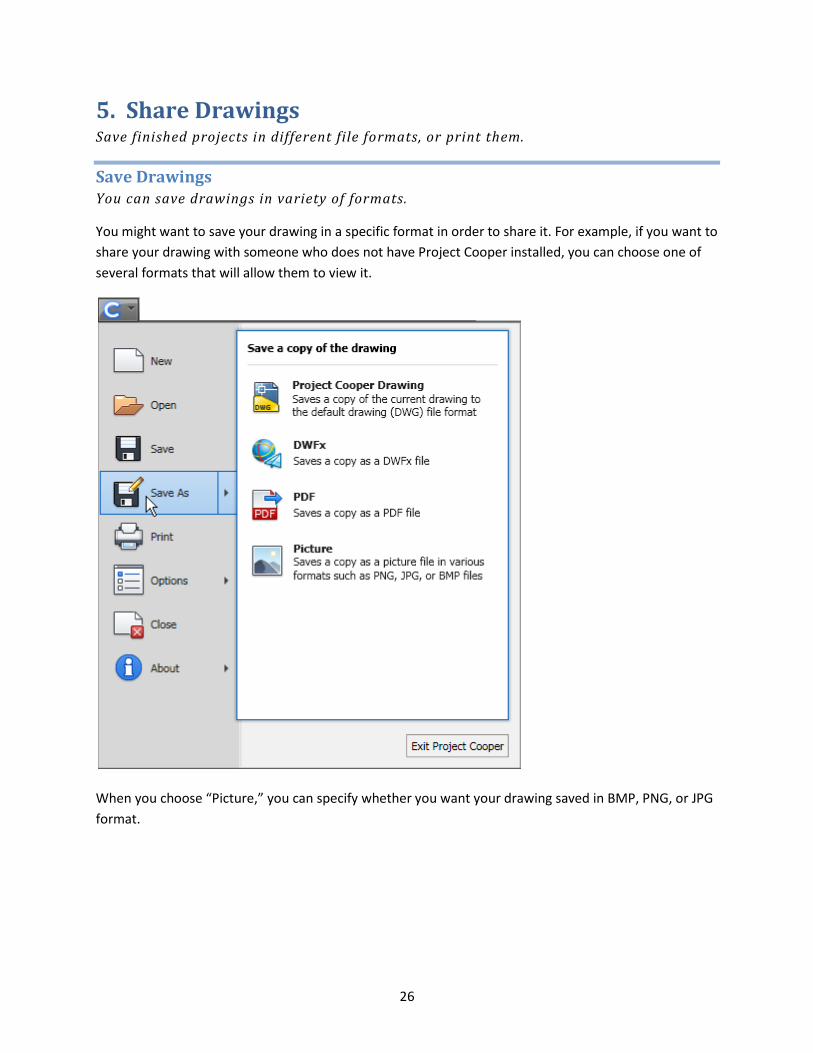
You might want to save your drawing in a specific format in order to share it. For example, if you want to share your drawing with someone who does not have Project Cooper installed, you can choose one of several formats that will allow them to view it.
When you choose “Picture,” you can specify whether you want your drawing saved in BMP, PNG, or JPG format.
27
Print You can print your drawings using several setup options.
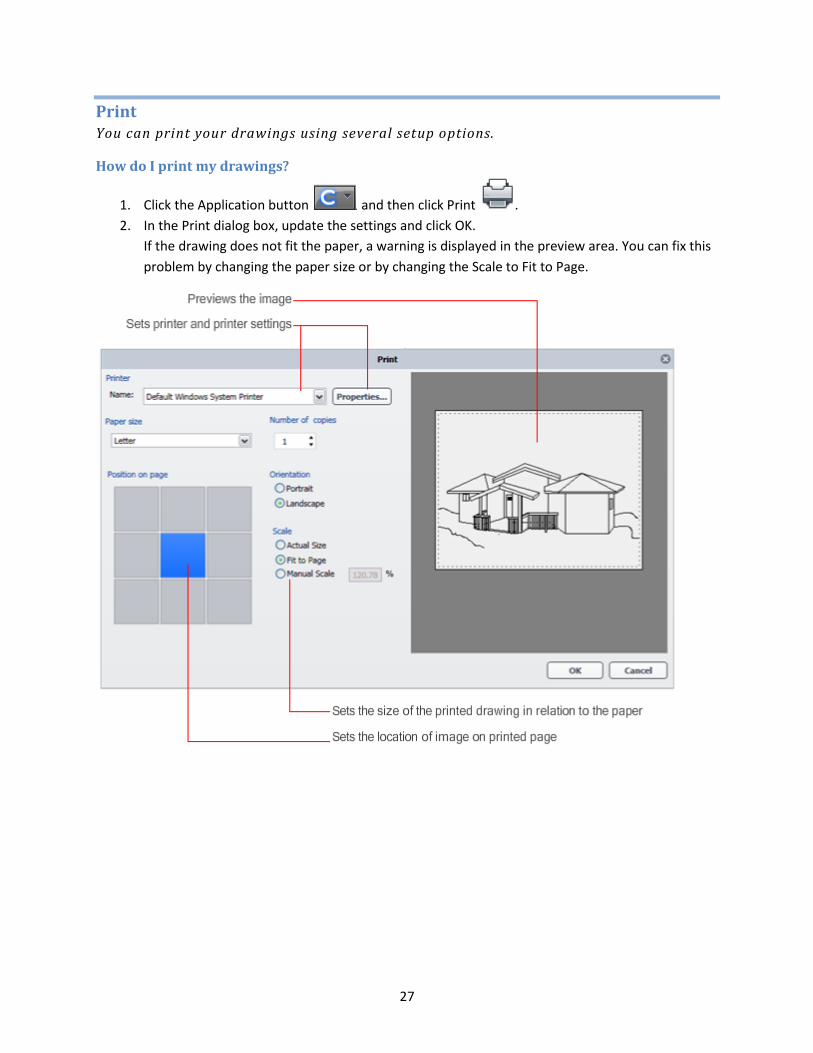
How do I print my drawings?
1. Click the Application button and then click Print . 2. In the Print dialog box, update the settings and click OK.
If the drawing does not fit the paper, a warning is displayed in the preview area. You can fix this problem by changing the paper size or by changing the Scale to Fit to Page.
28
6. Windows 7 Use Project Cooper with touch-screen technology.
Touch Support If you have Microsoft® Windows® 7, you might be able to use touch screen technology.
With a touch screen, you can use a number of movements and gestures to accomplish such operations as panning, zooming, rotation, selection, and dragging.
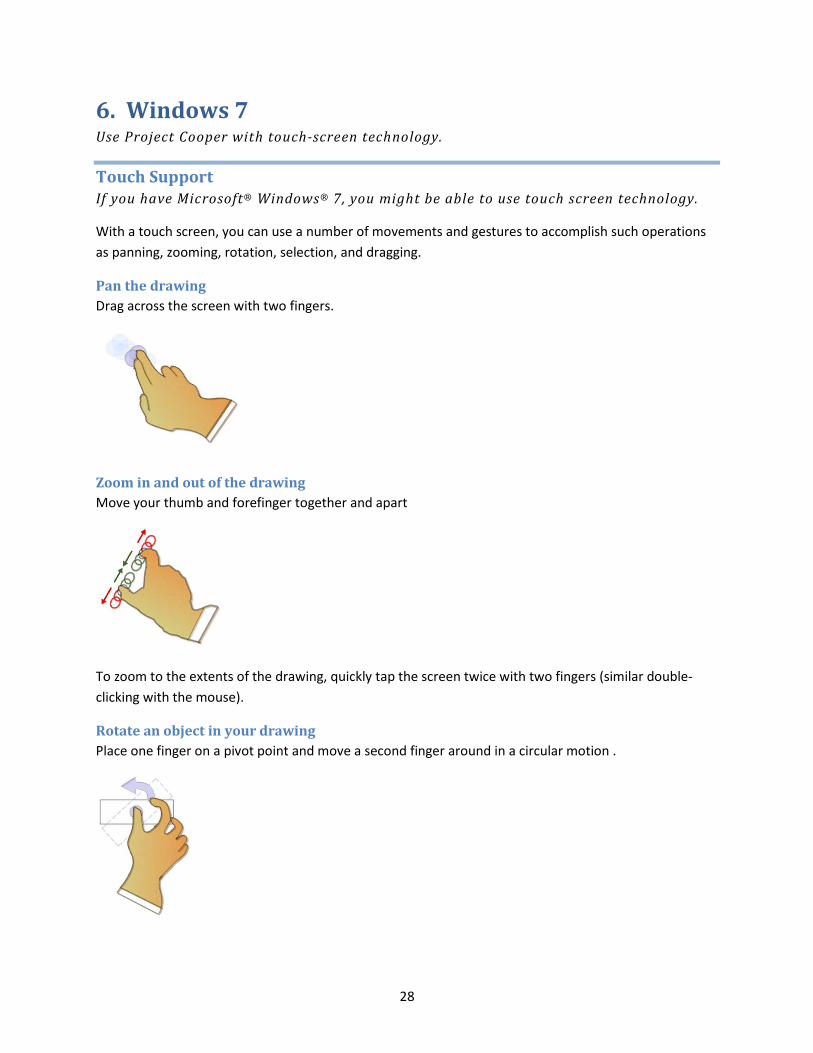
Pan the drawing Drag across the screen with two fingers.
Zoom in and out of the drawing Move your thumb and forefinger together and apart
To zoom to the extents of the drawing, quickly tap the screen twice with two fingers (similar double-clicking with the mouse).
Rotate an object in your drawing Place one finger on a pivot point and move a second finger around in a circular motion .
29
Display a shortcut menu Press the screen with one finger and tap once with the second finger.
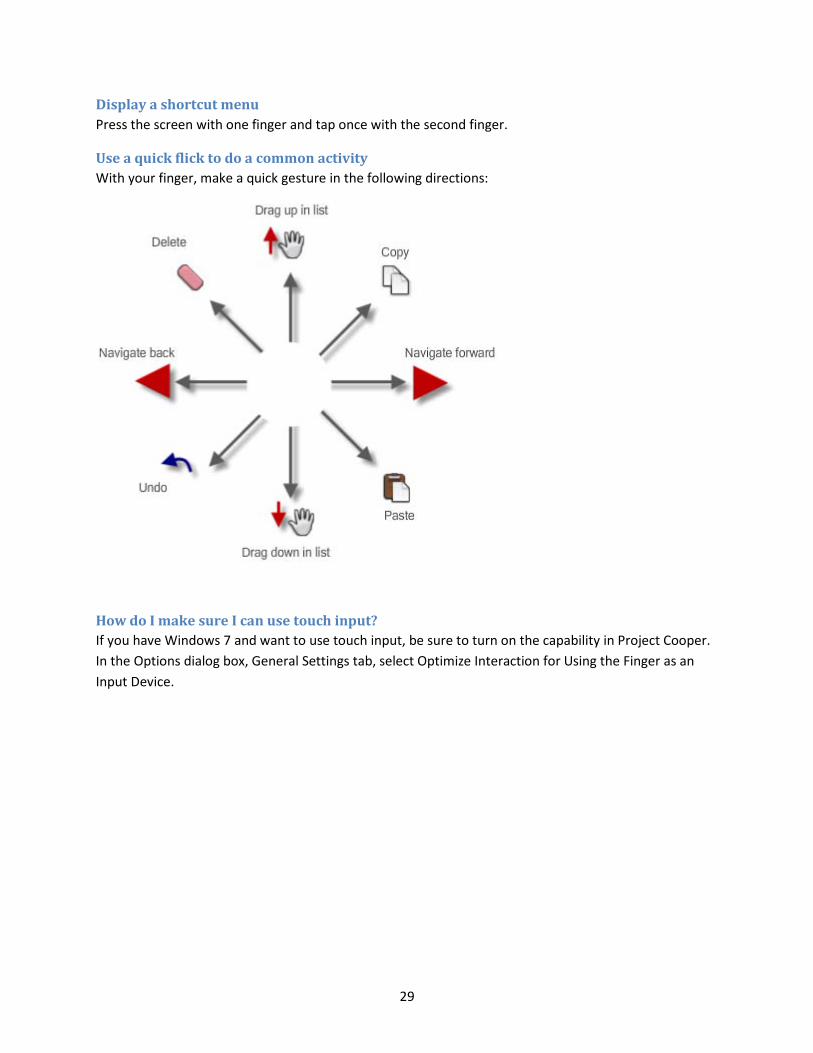
Use a quick flick to do a common activity With your finger, make a quick gesture in the following directions:
How do I make sure I can use touch input? If you have Windows 7 and want to use touch input, be sure to turn on the capability in Project Cooper. In the Options dialog box, General Settings tab, select Optimize Interaction for Using the Finger as an Input Device.