Embed Size (px)
Citation preview
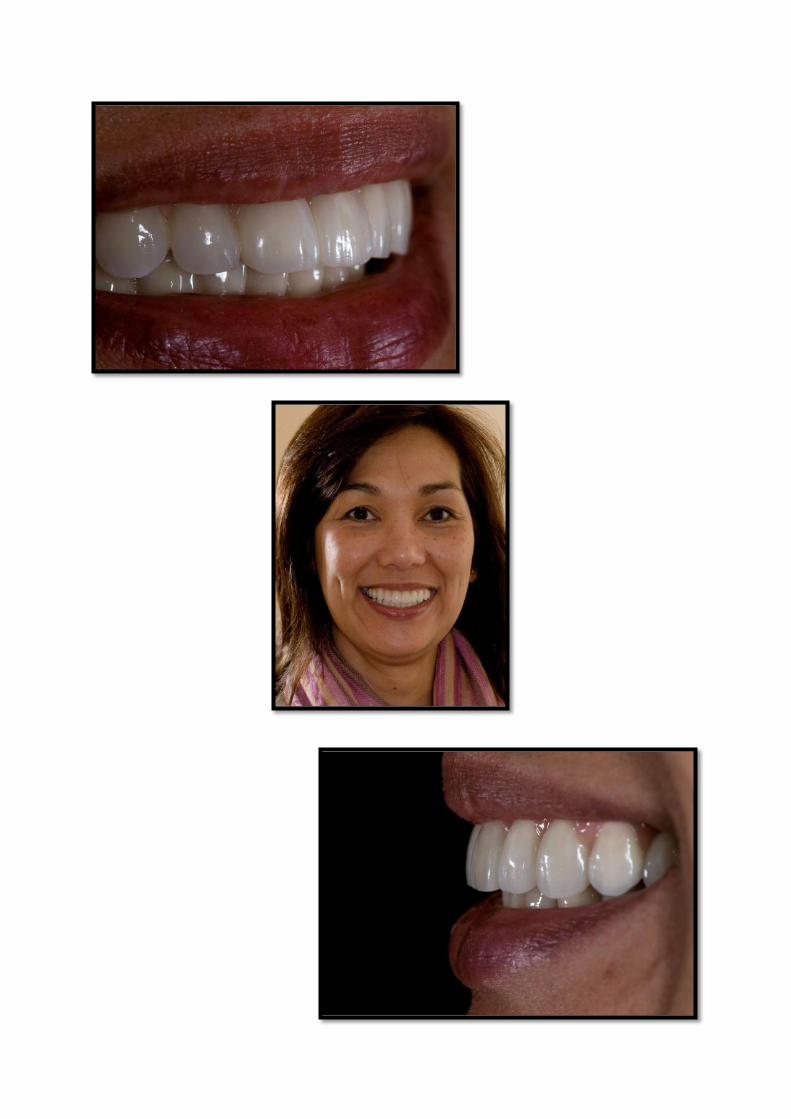
EW Case report This vivacious and youthful lady attended the surgery to explore the possibilities of replacing her partial upper and lower dentures with a fixed option. She enjoys life , and felt very much that her ‘loose teeth’ impacted on her sporting activities, and also decreased confidence socially. She was unhappy with the shape, colour and general position of her teeth. She felt she had the teeth of an ‘older woman’. In addition, the teeth were uncomfortable, and limited her choice of foods. Although the medical history was clear, the tooth loss was related to periodontal issues, and there was a strong family history of this, especially on the female side. One of the chief concerns was that her husband had never seen her without her teeth in 20 years, and she felt she would very much prefer if we could offer a solution that would continue this
Due to her embarrassment, she preferred not to have too many photographs recorded at this stage.
We followed a comprehensive examination protocol of discussion of needs, expectations, extra and intra oral examination, a comprehensive periodontal and dental charting and full mouth peri-apicals as well as a panoramic radiograph. We discussed the options available, and decided upon an implant based solution for both arches.
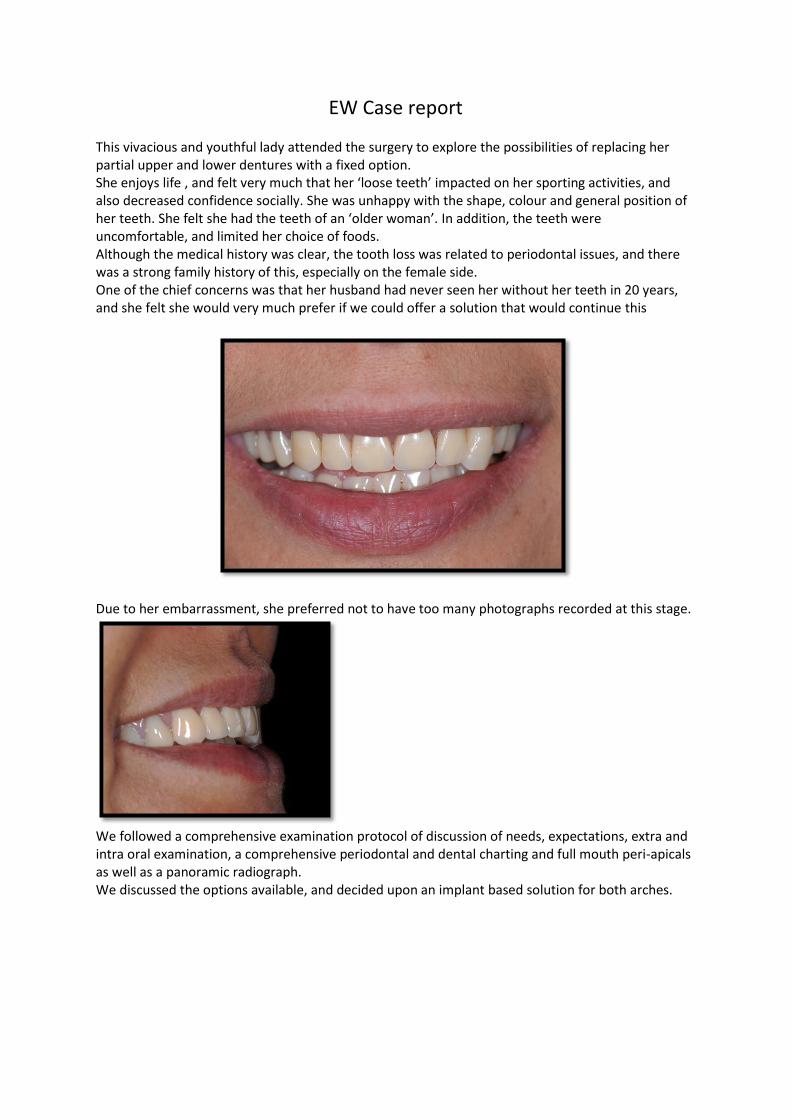
Implant Planning
We discussed the options for different regimes for fixed implant therapy. The lower left pre-molars were periodontally involved, and our periodontal specialist gave them a questionable/hopeless prognosis. The lower right four and five were non-vital and grade 2- mobile. In the upper arch, the upper left canine was a sound tooth. We did discuss keeping this tooth, but, although bone height was good, there was a pronounced concavity. The patient did not want any advanced grafting techniques, and so we decided to follow an ‘All-on –Four’ based protocol, based on the evidence of Malo, which necessitated its sacrifice. We discussed with the patient the possibility for immediate loading, but explained that all four implants in each jaw needed to be optimally placed to proceed. Given the key desire to maintain the patients dignity by not leaving her without teeth at any stage, we decided to construct upper and lower processed full dentures. This would allow for in-surgery conversion to a fixed provisional, or, should implant placement torques be unsuitable, conventional provisional fixed dentures, following the loss of remaining teeth. We also took the decision to place and provisionalise the upper arch first, and then follow this with the lower arch.
Provisional construction Even at this early stage we made the effort to optimise the aesthetics, as the patient was going to have the provisional restorations, either fixed or removable, for at least three months.
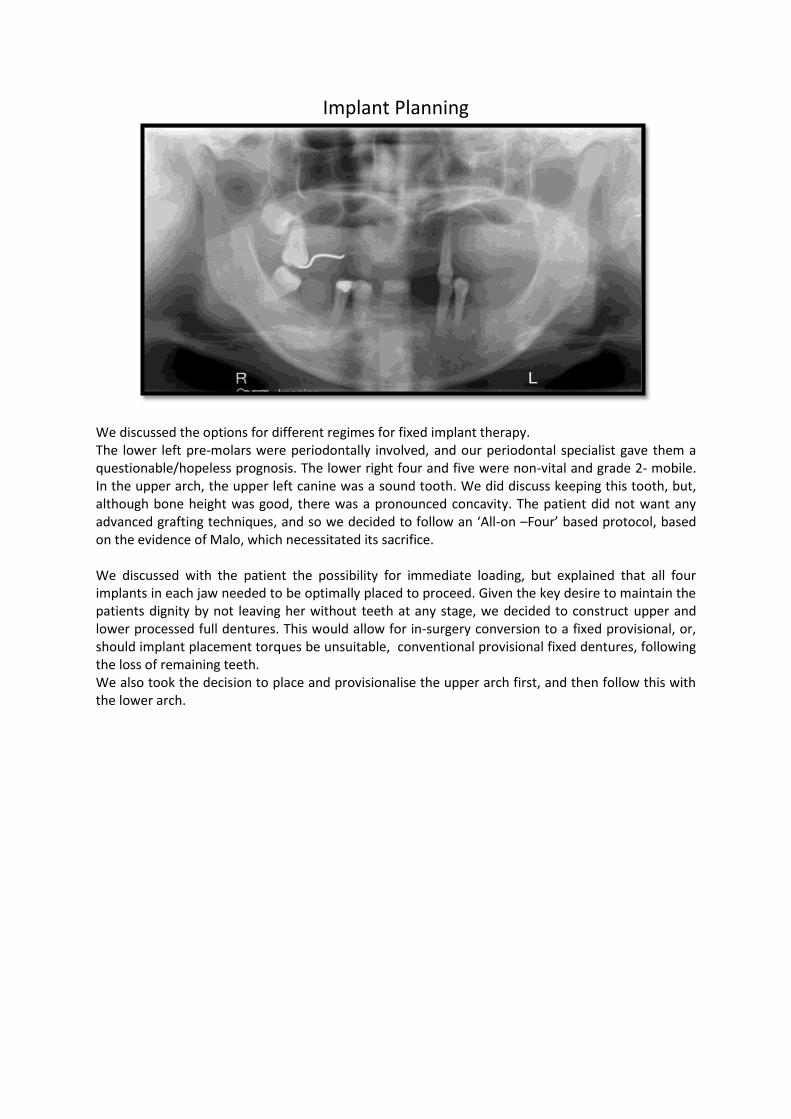
From the primary impression, we got a special tray fabricated, and a wax bite block. In the surgery an initial set-up of the anterior teeth was undertaken with the patient on the bite block.. This protocol allows a more predictable transfer of the incisal tip position, mid-line position, and the inclination of the mid-line to the technician. This view shows how we have tried to reflect the shape of the lower lip, and it can be seen how the right canine reflects the dip in the lower right lip. At rest we have 2.5-3mm of incisor visible to give a youthful appearance.
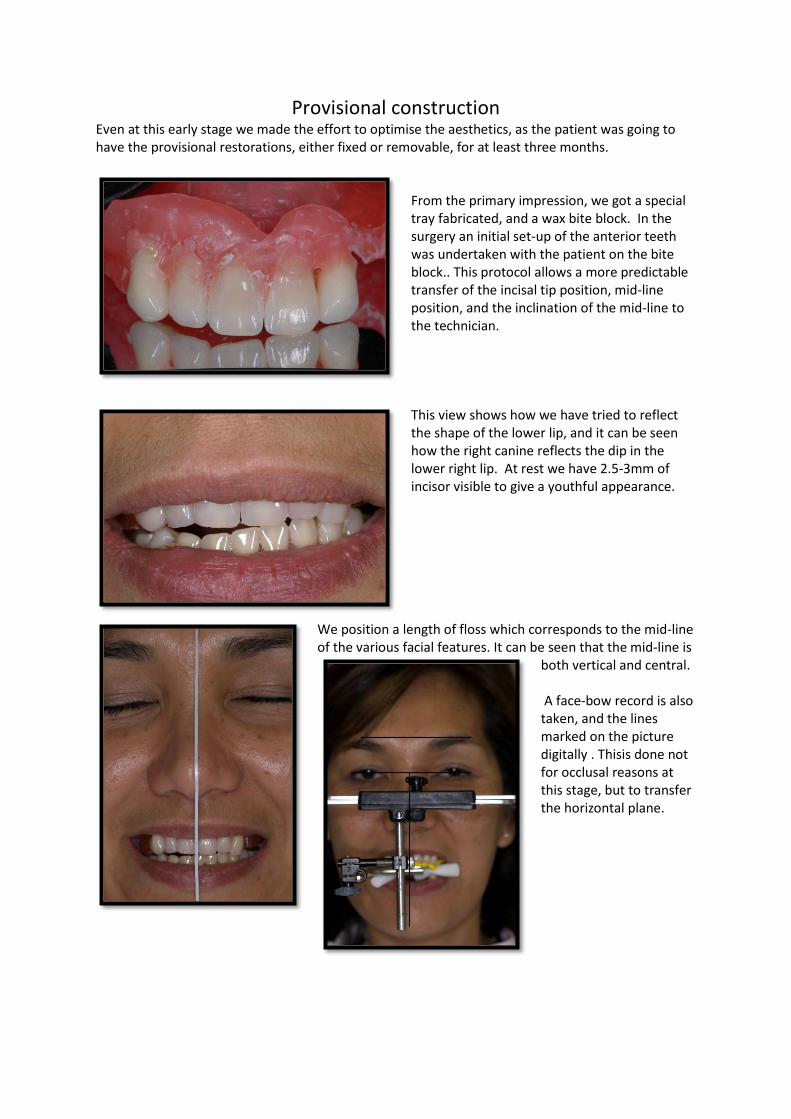
We position a length of floss which corresponds to the mid-line of the various facial features. It can be seen that the mid-line is
both vertical and central. A face-bow record is also taken, and the lines marked on the picture digitally . Thisis done not for occlusal reasons at this stage, but to transfer the horizontal plane.
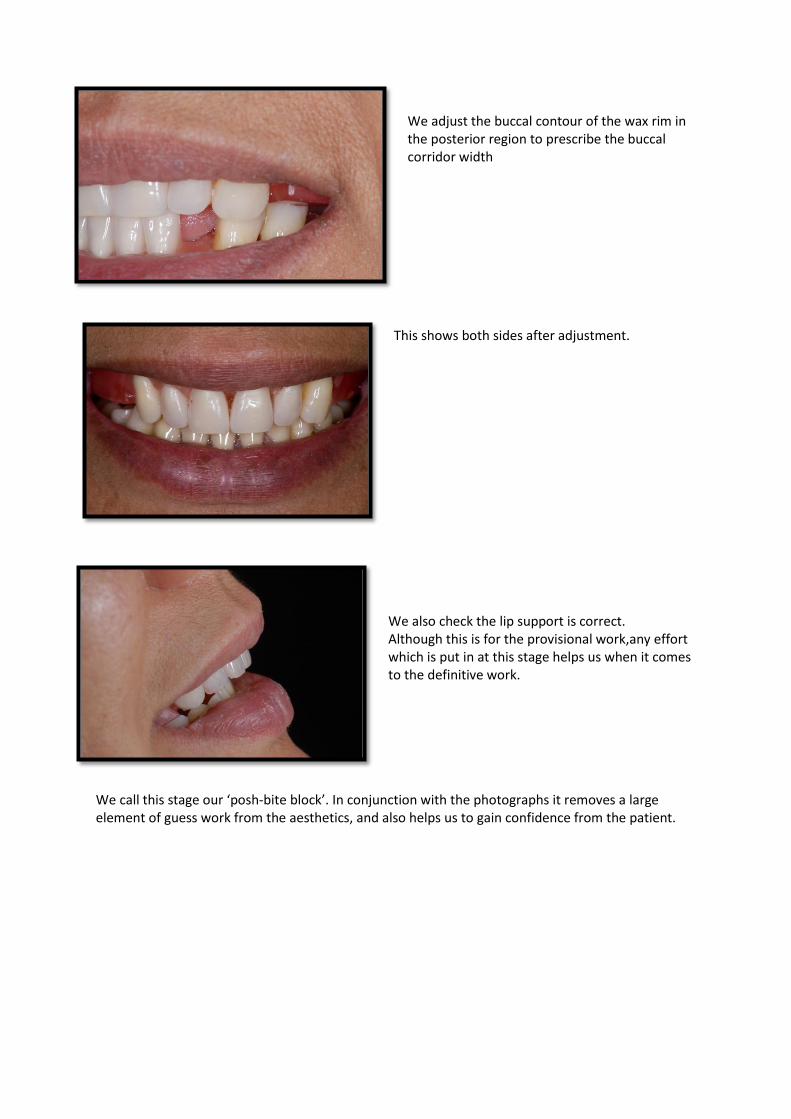
We adjust the buccal contour of the wax rim in the posterior region to prescribe the buccal corridor width
This shows both sides after adjustment.
We also check the lip support is correct. Although this is for the provisional work,any effort which is put in at this stage helps us when it comes to the definitive work.
We call this stage our ‘posh-bite block’. In conjunction with the photographs it removes a large element of guess work from the aesthetics, and also helps us to gain confidence from the patient.
Wax Trial
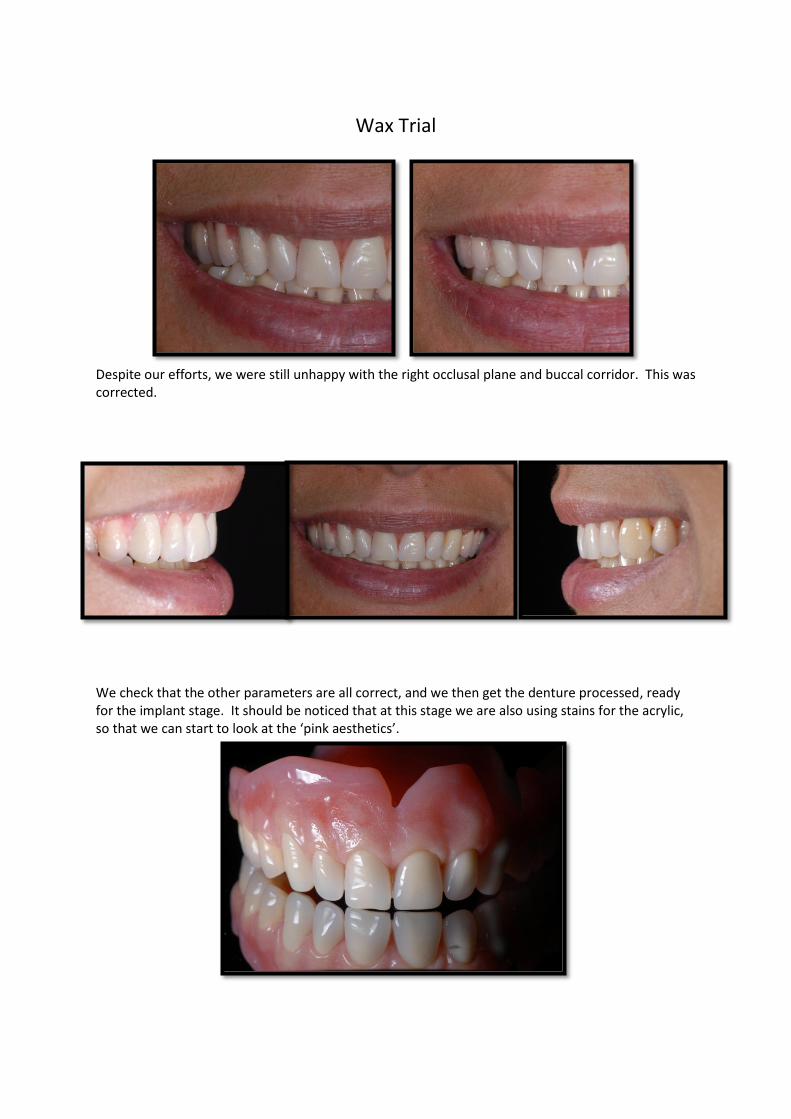
Despite our efforts, we were still unhappy with the right occlusal plane and buccal corridor. This was corrected.
We check that the other parameters are all correct, and we then get the denture processed, ready for the implant stage. It should be noticed that at this stage we are also using stains for the acrylic, so that we can start to look at the ‘pink aesthetics’.
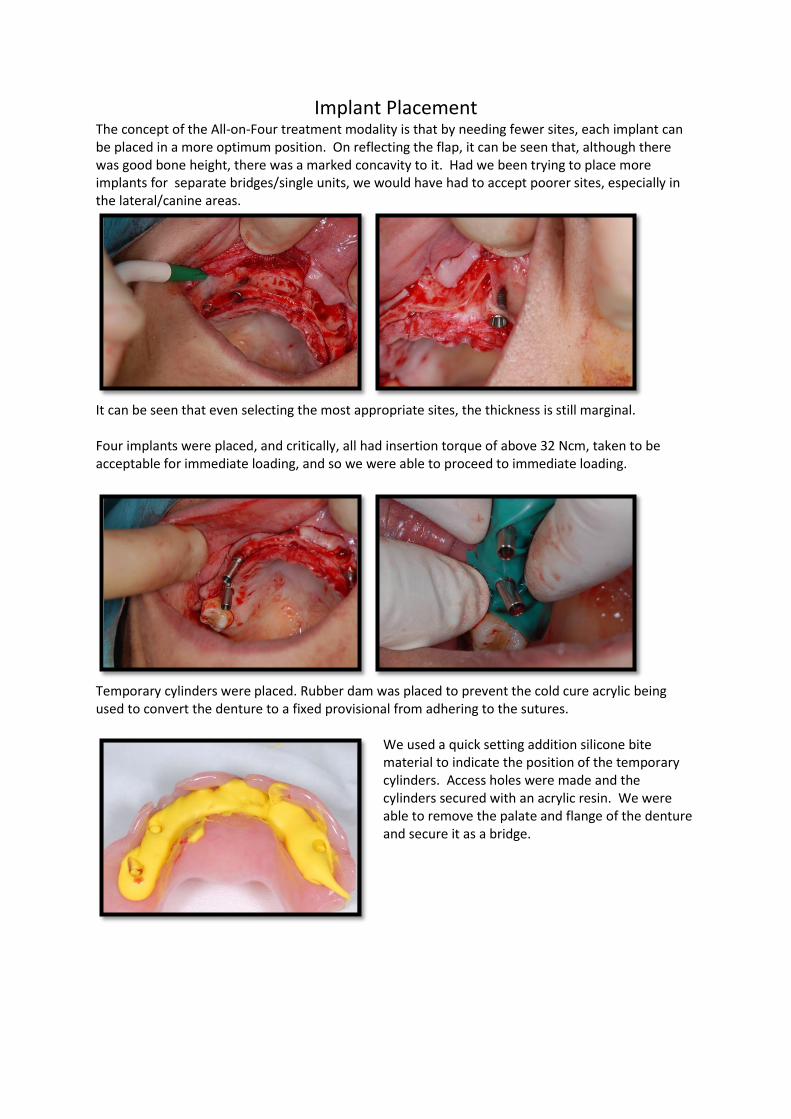
Implant Placement The concept of the All-on-Four treatment modality is that by needing fewer sites, each implant can be placed in a more optimum position. On reflecting the flap, it can be seen that, although there was good bone height, there was a marked concavity to it. Had we been trying to place more implants for separate bridges/single units, we would have had to accept poorer sites, especially in the lateral/canine areas.
It can be seen that even selecting the most appropriate sites, the thickness is still marginal. Four implants were placed, and critically, all had insertion torque of above 32 Ncm, taken to be acceptable for immediate loading, and so we were able to proceed to immediate loading.
Temporary cylinders were placed. Rubber dam was placed to prevent the cold cure acrylic being used to convert the denture to a fixed provisional from adhering to the sutures.
We used a quick setting addition silicone bite material to indicate the position of the temporary cylinders. Access holes were made and the cylinders secured with an acrylic resin. We were able to remove the palate and flange of the denture and secure it as a bridge.
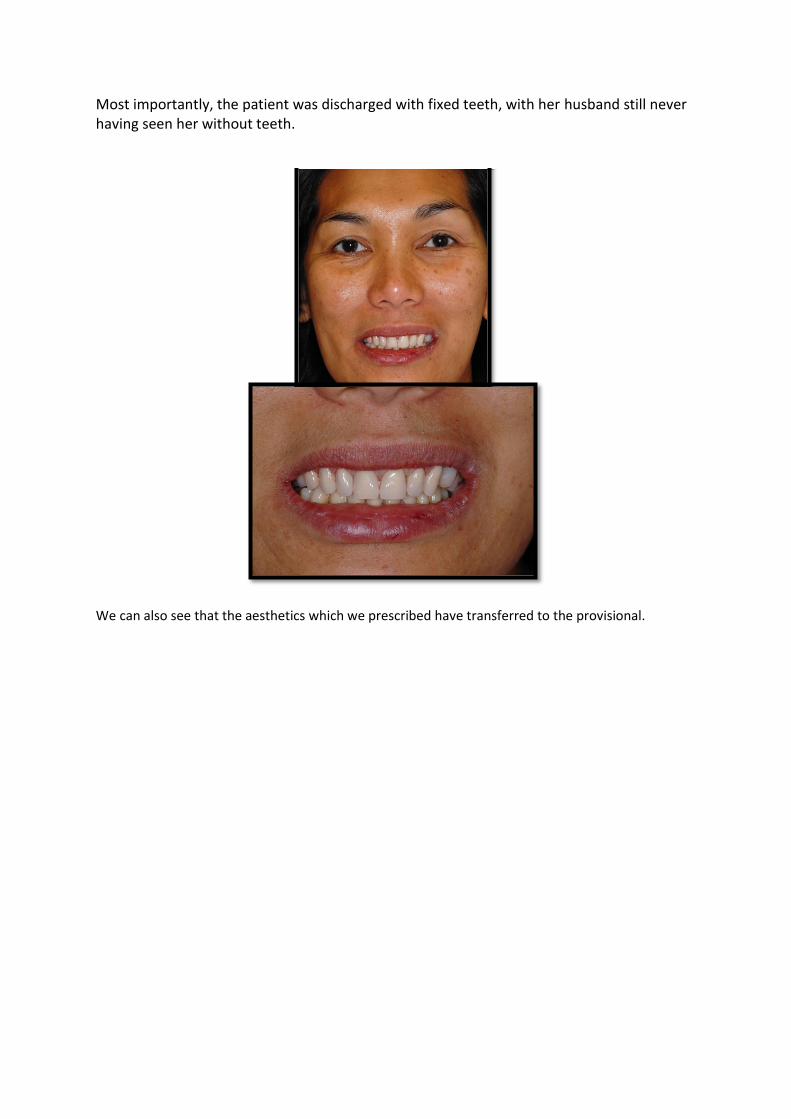
Most importantly, the patient was discharged with fixed teeth, with her husband still never having seen her without teeth.
We can also see that the aesthetics which we prescribed have transferred to the provisional.
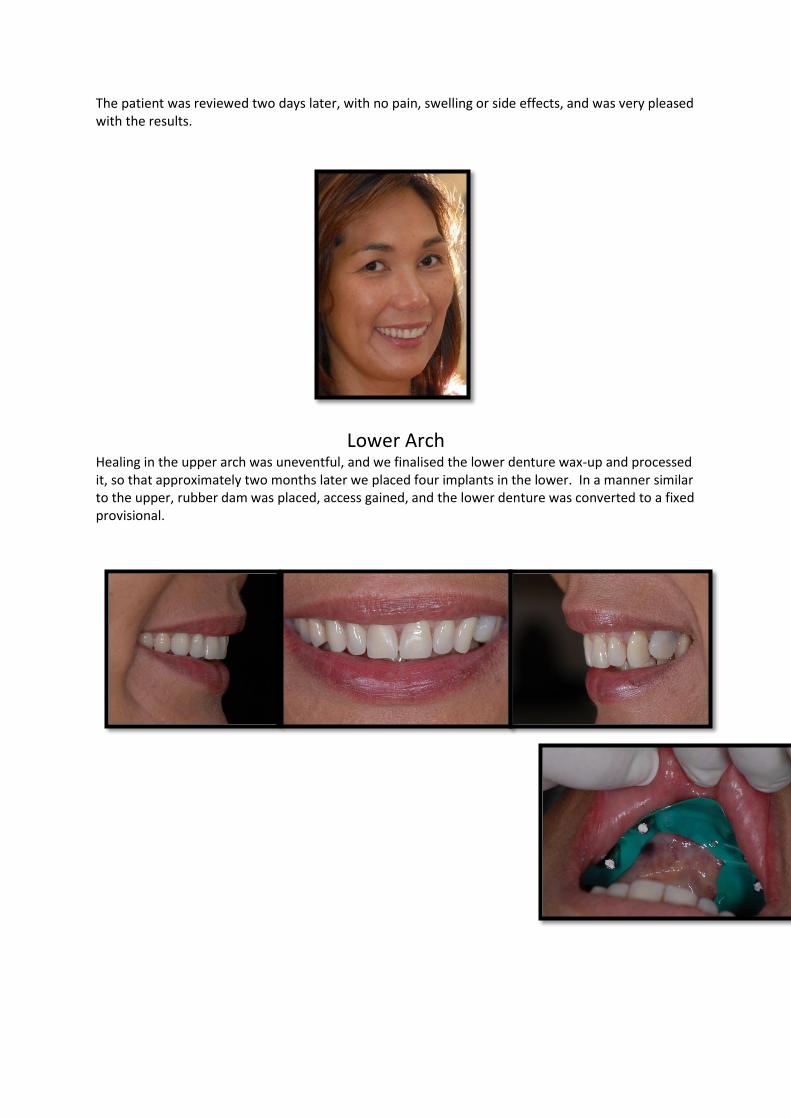
The patient was reviewed two days later, with no pain, swelling or side effects, and was very pleased with the results.
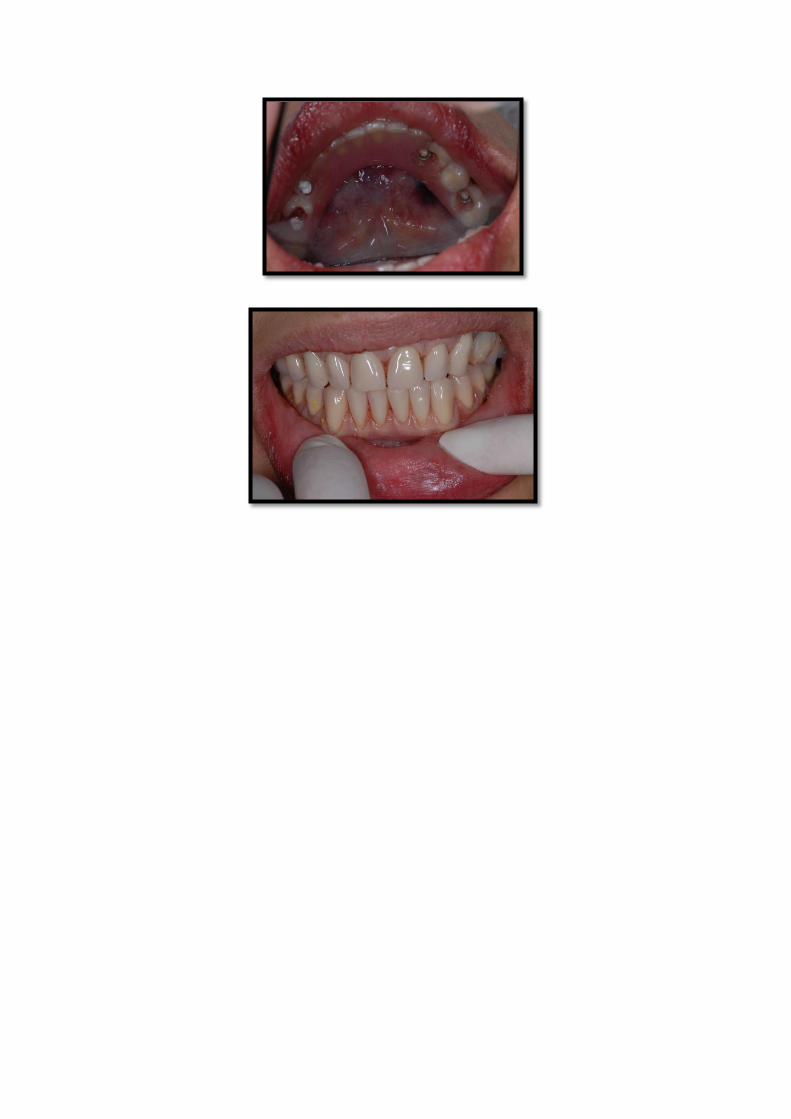
Lower Arch Healing in the upper arch was uneventful, and we finalised the lower denture wax-up and processed it, so that approximately two months later we placed four implants in the lower. In a manner similar to the upper, rubber dam was placed, access gained, and the lower denture was converted to a fixed provisional.
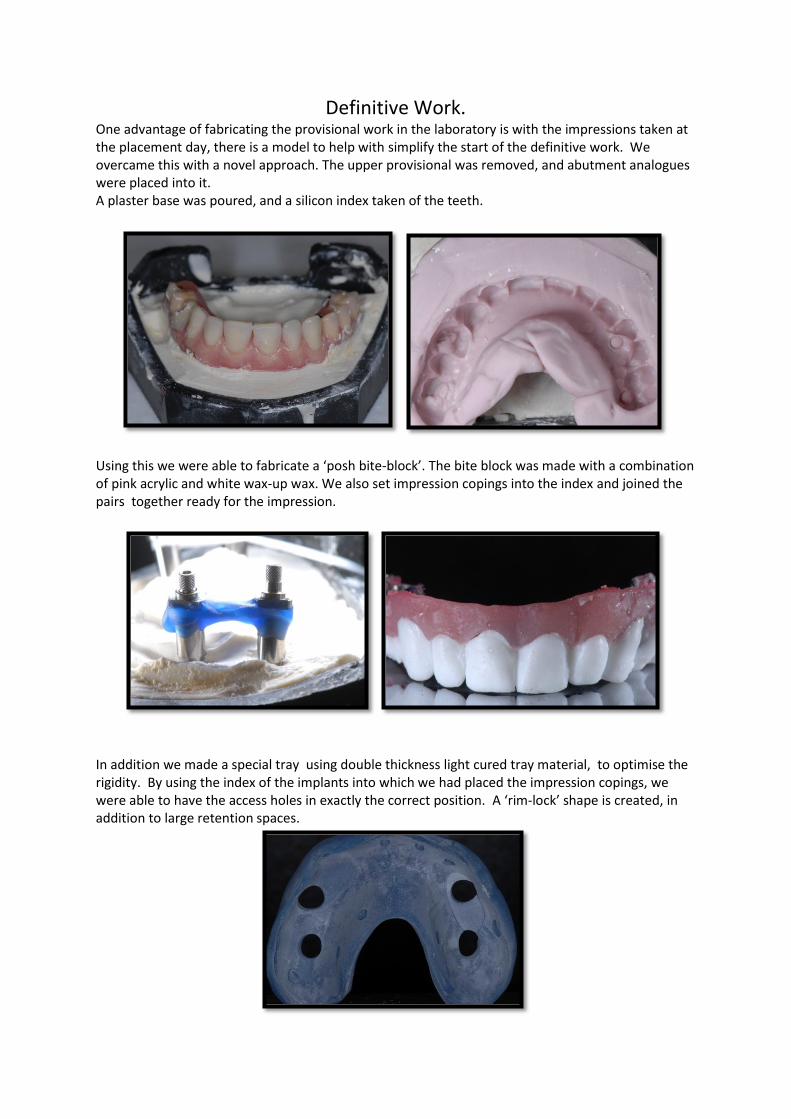
Definitive Work. One advantage of fabricating the provisional work in the laboratory is with the impressions taken at the placement day, there is a model to help with simplify the start of the definitive work. We overcame this with a novel approach. The upper provisional was removed, and abutment analogues were placed into it. A plaster base was poured, and a silicon index taken of the teeth.
Using this we were able to fabricate a ‘posh bite-block’. The bite block was made with a combination of pink acrylic and white wax-up wax. We also set impression copings into the index and joined the pairs together ready for the impression.
In addition we made a special tray using double thickness light cured tray material, to optimise the rigidity. By using the index of the implants into which we had placed the impression copings, we were able to have the access holes in exactly the correct position. A ‘rim-lock’ shape is created, in addition to large retention spaces.
Impressions and Initial Bite
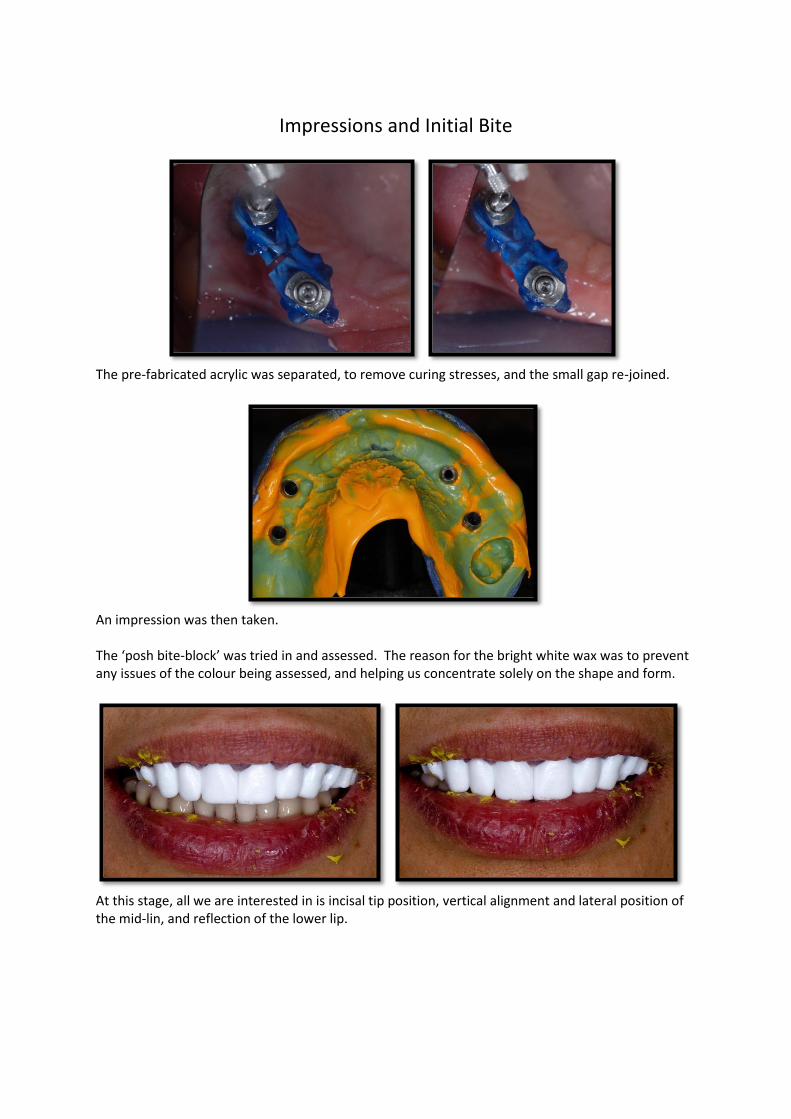
The pre-fabricated acrylic was separated, to remove curing stresses, and the small gap re-joined.
An impression was then taken. The ‘posh bite-block’ was tried in and assessed. The reason for the bright white wax was to prevent any issues of the colour being assessed, and helping us concentrate solely on the shape and form.
At this stage, all we are interested in is incisal tip position, vertical alignment and lateral position of the mid-lin, and reflection of the lower lip.
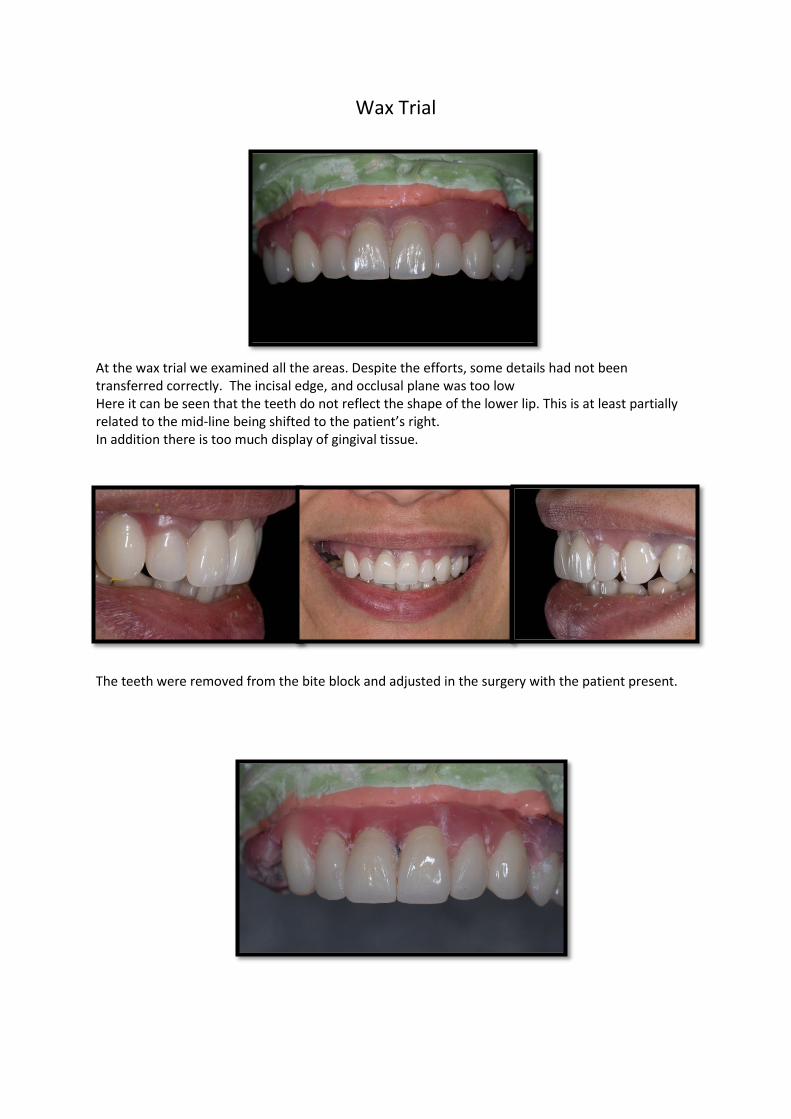
Wax Trial
At the wax trial we examined all the areas. Despite the efforts, some details had not been transferred correctly. The incisal edge, and occlusal plane was too low Here it can be seen that the teeth do not reflect the shape of the lower lip. This is at least partially related to the mid-line being shifted to the patient’s right. In addition there is too much display of gingival tissue.
The teeth were removed from the bite block and adjusted in the surgery with the patient present.
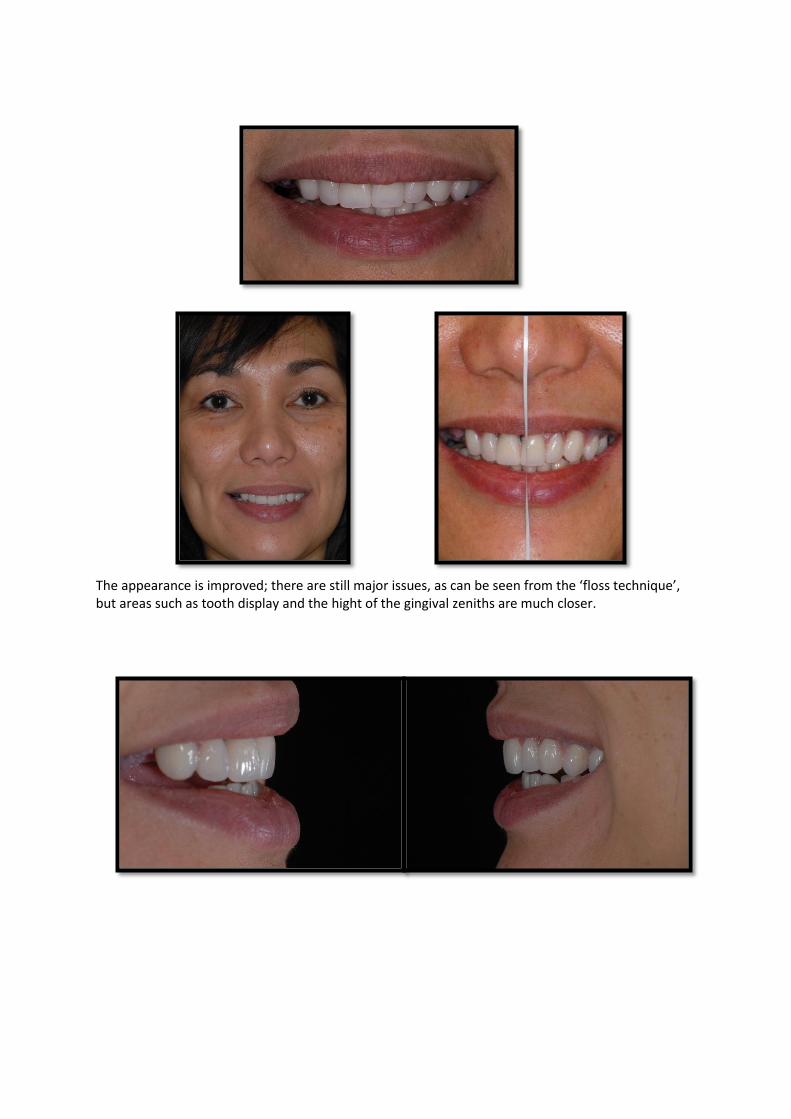
The appearance is improved; there are still major issues, as can be seen from the ‘floss technique’, but areas such as tooth display and the hight of the gingival zeniths are much closer.
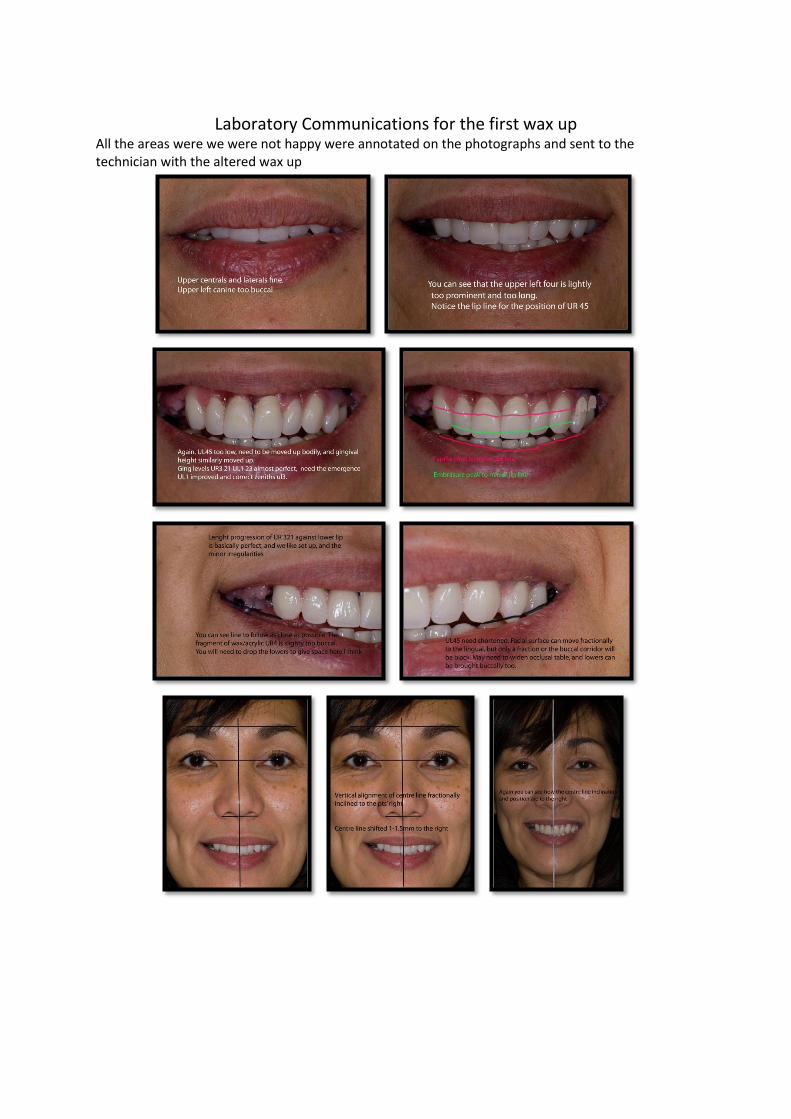
Laboratory Communications for the first wax up All the areas were we were not happy were annotated on the photographs and sent to the technician with the altered wax up
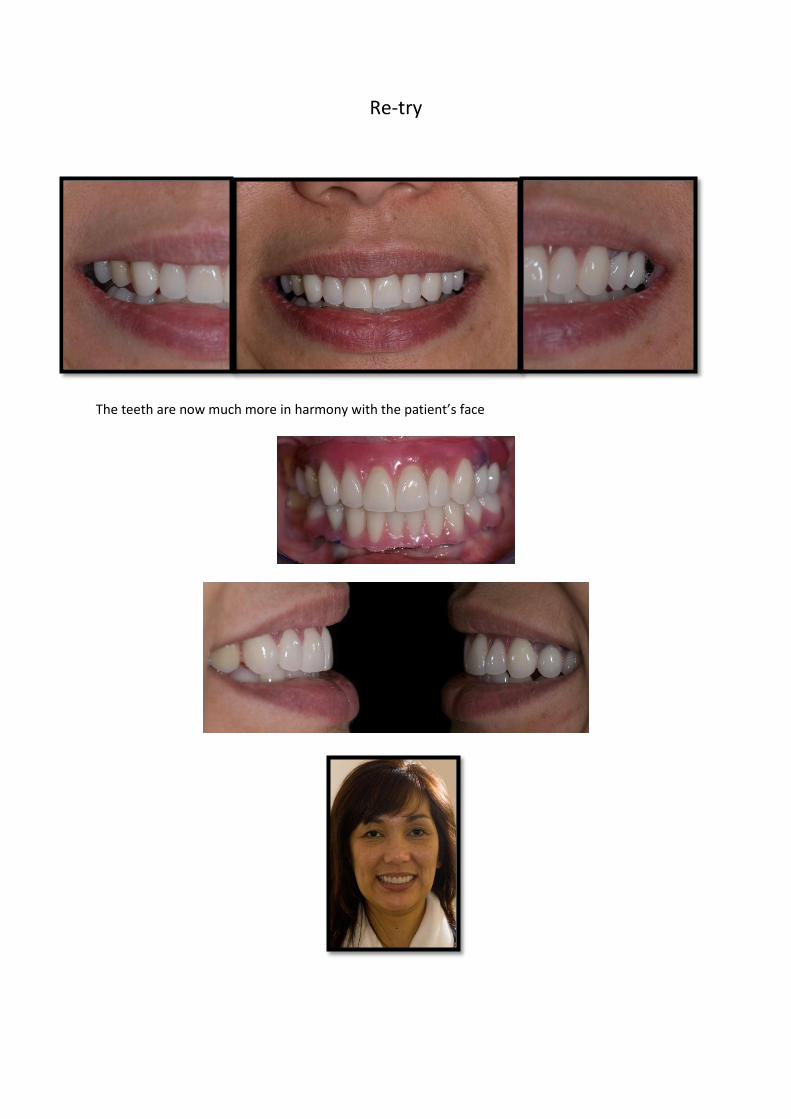
Re-try
The teeth are now much more in harmony with the patient’s face
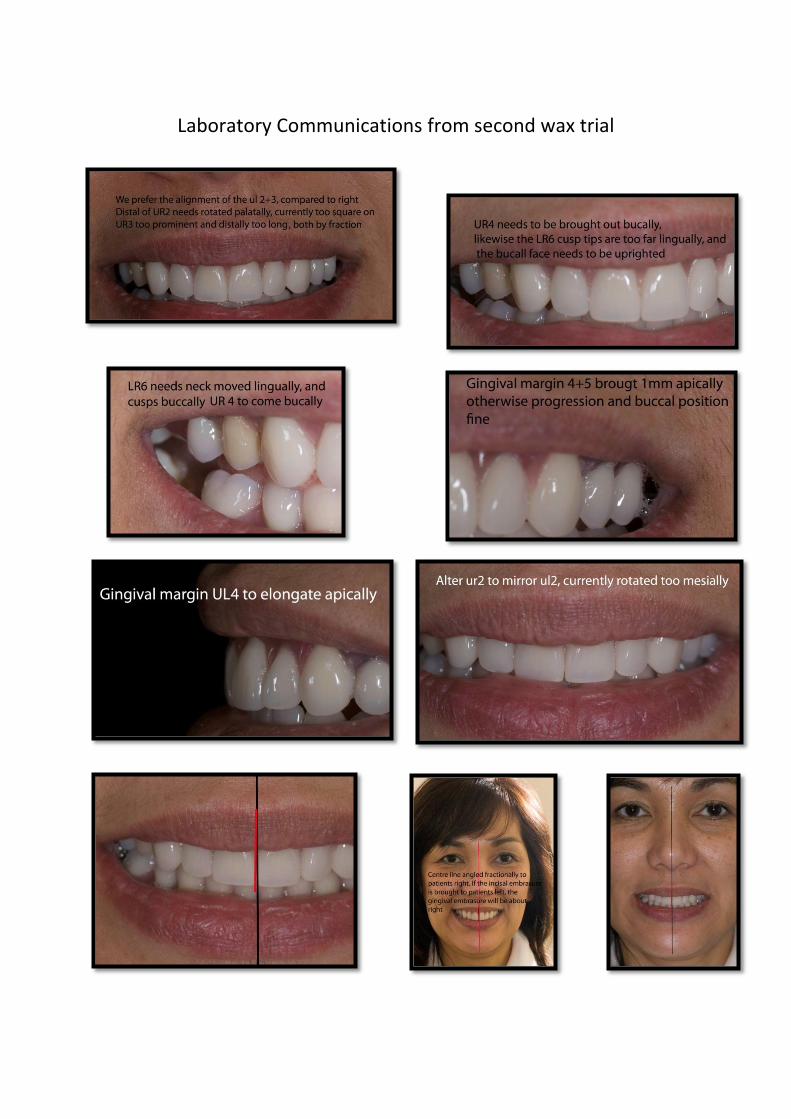
Laboratory Communications from second wax trial
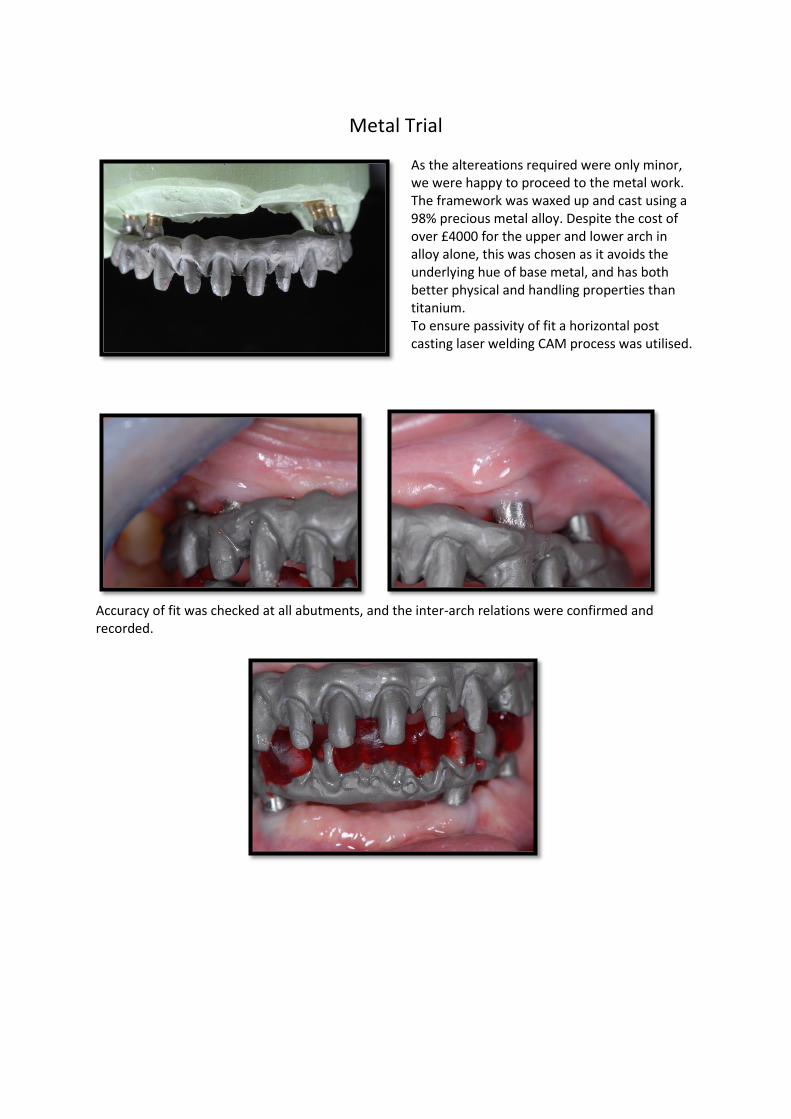
Metal Trial
As the altereations required were only minor, we were happy to proceed to the metal work. The framework was waxed up and cast using a 98% precious metal alloy. Despite the cost of over £4000 for the upper and lower arch in alloy alone, this was chosen as it avoids the underlying hue of base metal, and has both better physical and handling properties than titanium. To ensure passivity of fit a horizontal post casting laser welding CAM process was utilised.
Accuracy of fit was checked at all abutments, and the inter-arch relations were confirmed and recorded.
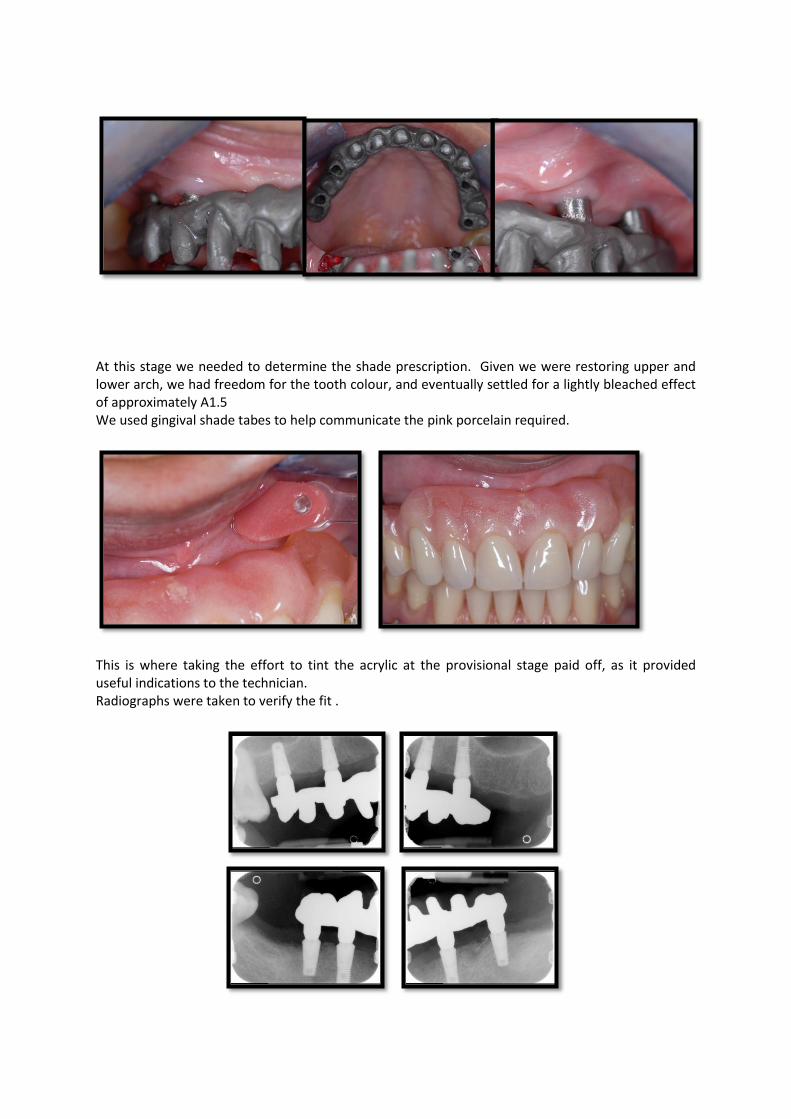
At this stage we needed to determine the shade prescription. Given we were restoring upper and lower arch, we had freedom for the tooth colour, and eventually settled for a lightly bleached effect of approximately A1.5 We used gingival shade tabes to help communicate the pink porcelain required.
This is where taking the effort to tint the acrylic at the provisional stage paid off, as it provided useful indications to the technician. Radiographs were taken to verify the fit .
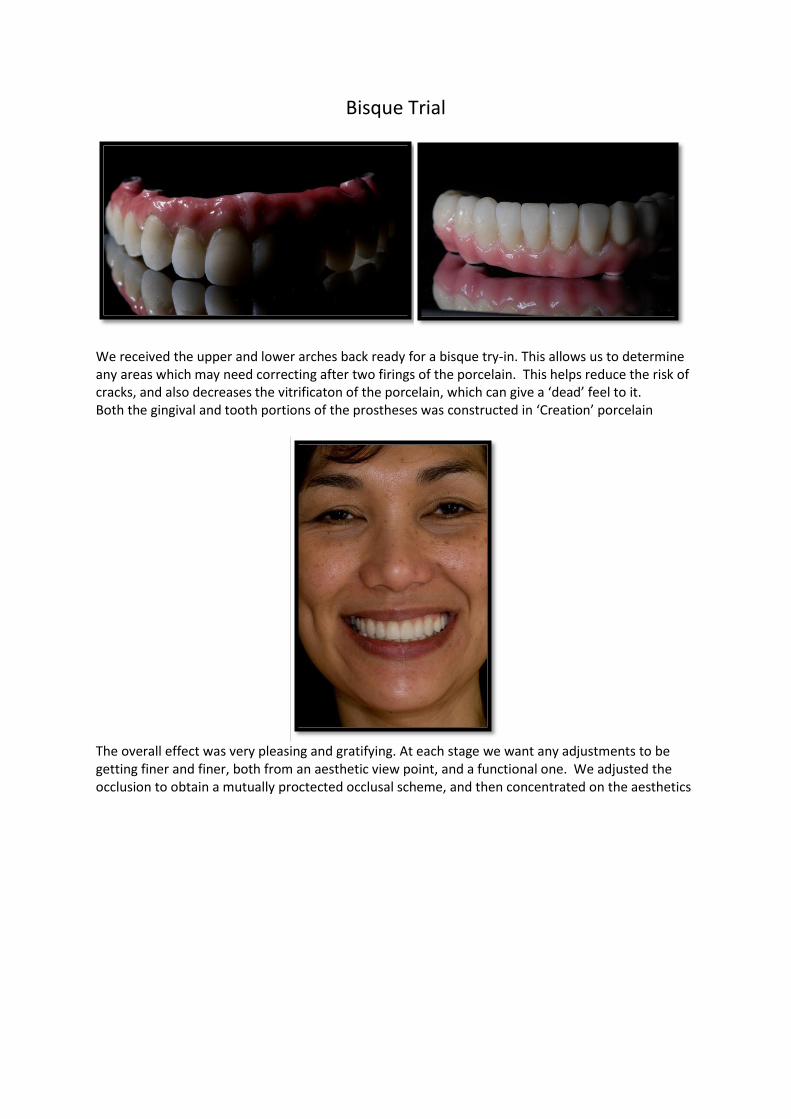
Bisque Trial
We received the upper and lower arches back ready for a bisque try-in. This allows us to determine any areas which may need correcting after two firings of the porcelain. This helps reduce the risk of cracks, and also decreases the vitrificaton of the porcelain, which can give a ‘dead’ feel to it. Both the gingival and tooth portions of the prostheses was constructed in ‘Creation’ porcelain
The overall effect was very pleasing and gratifying. At each stage we want any adjustments to be getting finer and finer, both from an aesthetic view point, and a functional one. We adjusted the occlusion to obtain a mutually proctected occlusal scheme, and then concentrated on the aesthetics
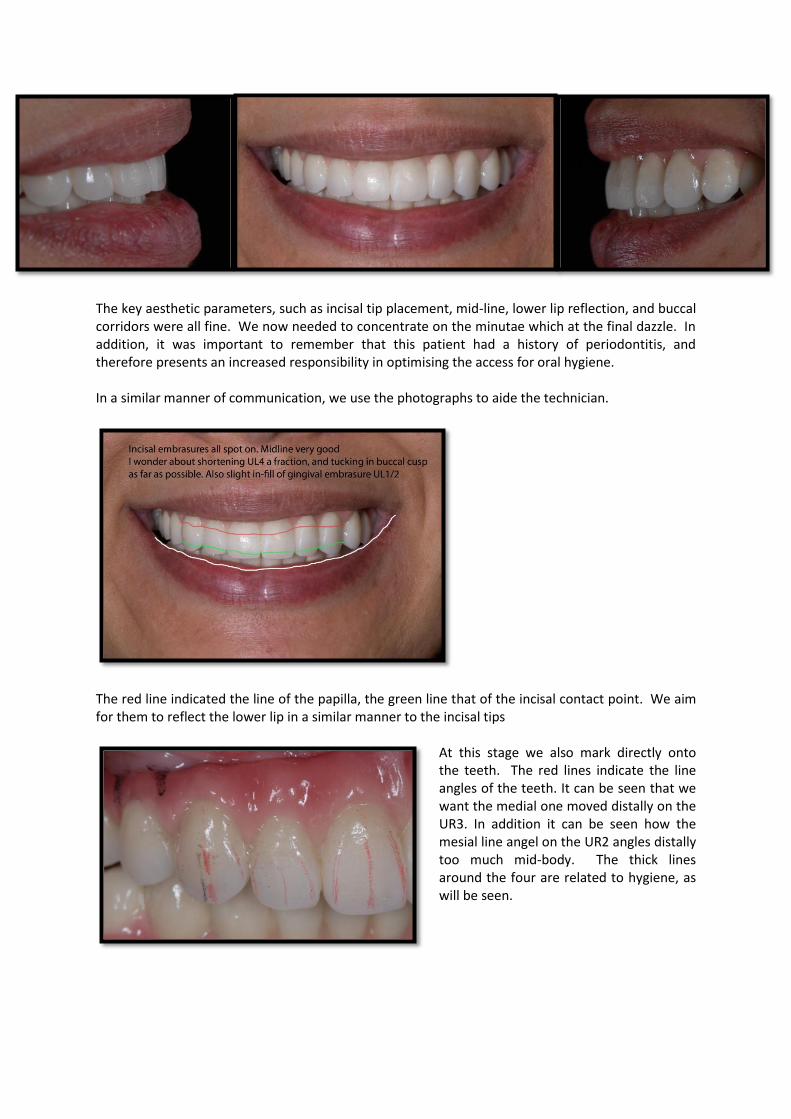
The key aesthetic parameters, such as incisal tip placement, mid-line, lower lip reflection, and buccal corridors were all fine. We now needed to concentrate on the minutae which at the final dazzle. In addition, it was important to remember that this patient had a history of periodontitis, and therefore presents an increased responsibility in optimising the access for oral hygiene. In a similar manner of communication, we use the photographs to aide the technician.
The red line indicated the line of the papilla, the green line that of the incisal contact point. We aim for them to reflect the lower lip in a similar manner to the incisal tips
At this stage we also mark directly onto the teeth. The red lines indicate the line angles of the teeth. It can be seen that we want the medial one moved distally on the UR3. In addition it can be seen how the mesial line angel on the UR2 angles distally too much mid-body. The thick lines around the four are related to hygiene, as will be seen.
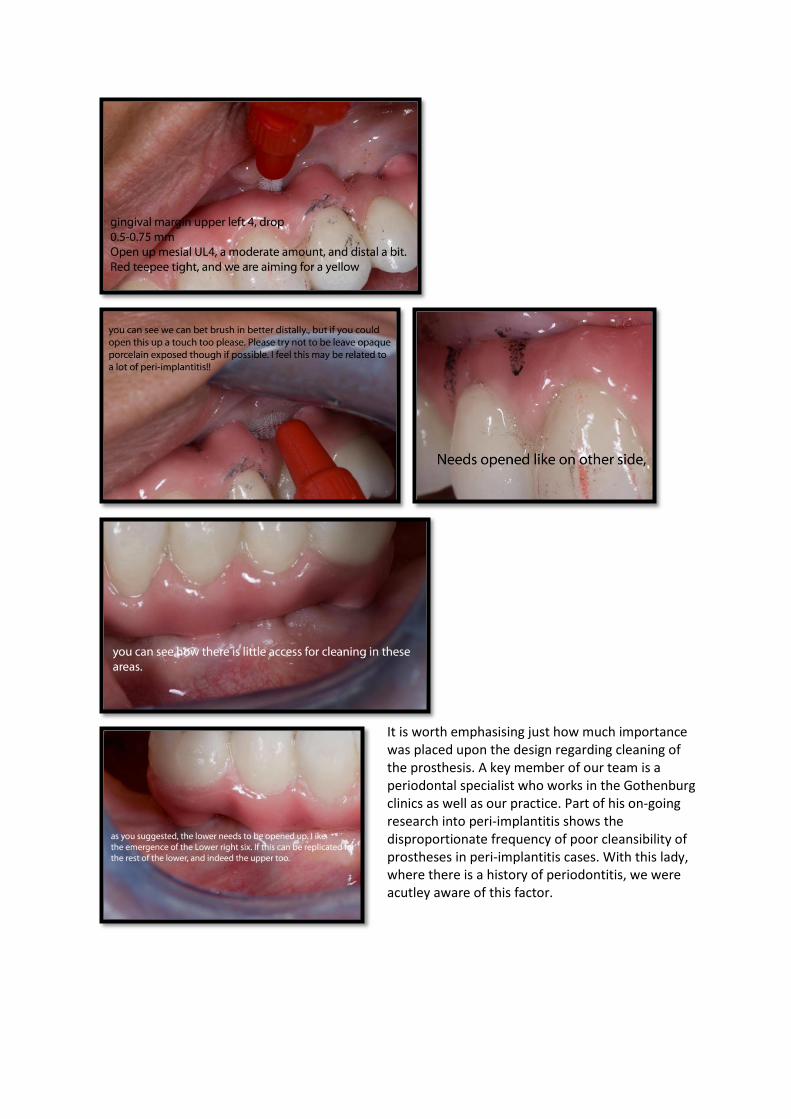
It is worth emphasising just how much importance was placed upon the design regarding cleaning of the prosthesis. A key member of our team is a periodontal specialist who works in the Gothenburg clinics as well as our practice. Part of his on-going research into peri-implantitis shows the disproportionate frequency of poor cleansibility of prostheses in peri-implantitis cases. With this lady, where there is a history of periodontitis, we were acutley aware of this factor.
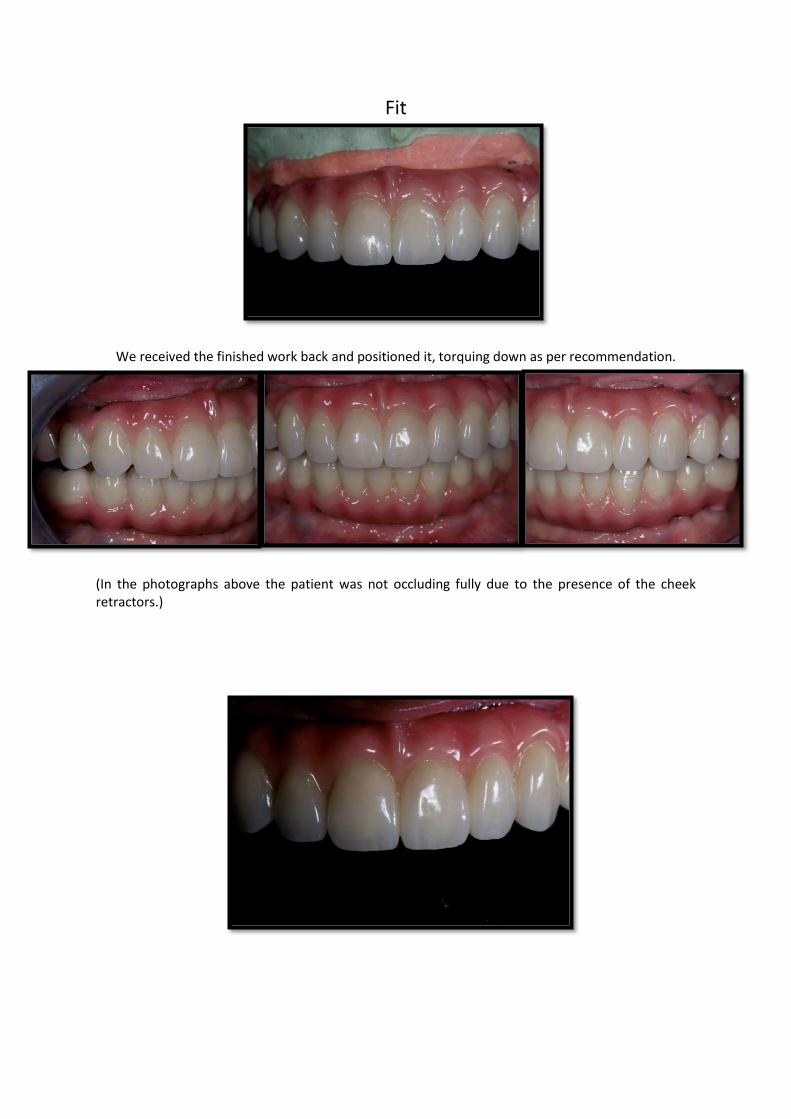
Fit
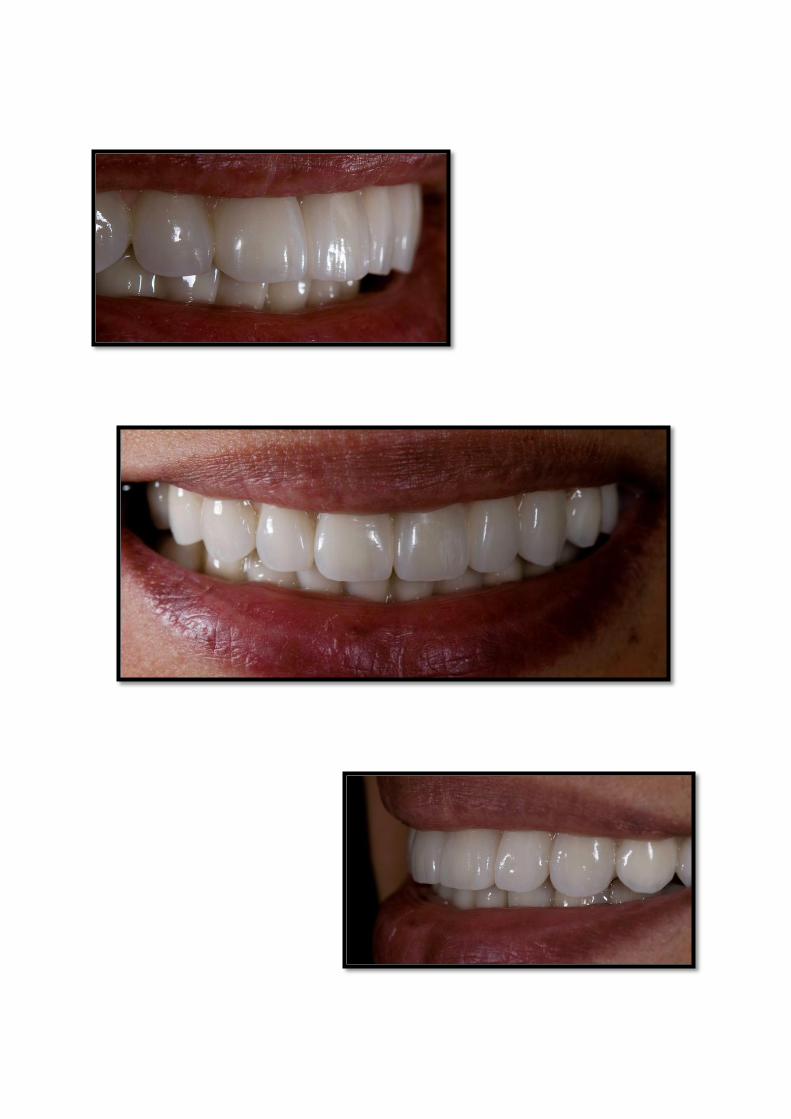
We received the finished work back and positioned it, torquing down as per recommendation.
(In the photographs above the patient was not occluding fully due to the presence of the cheek retractors.)
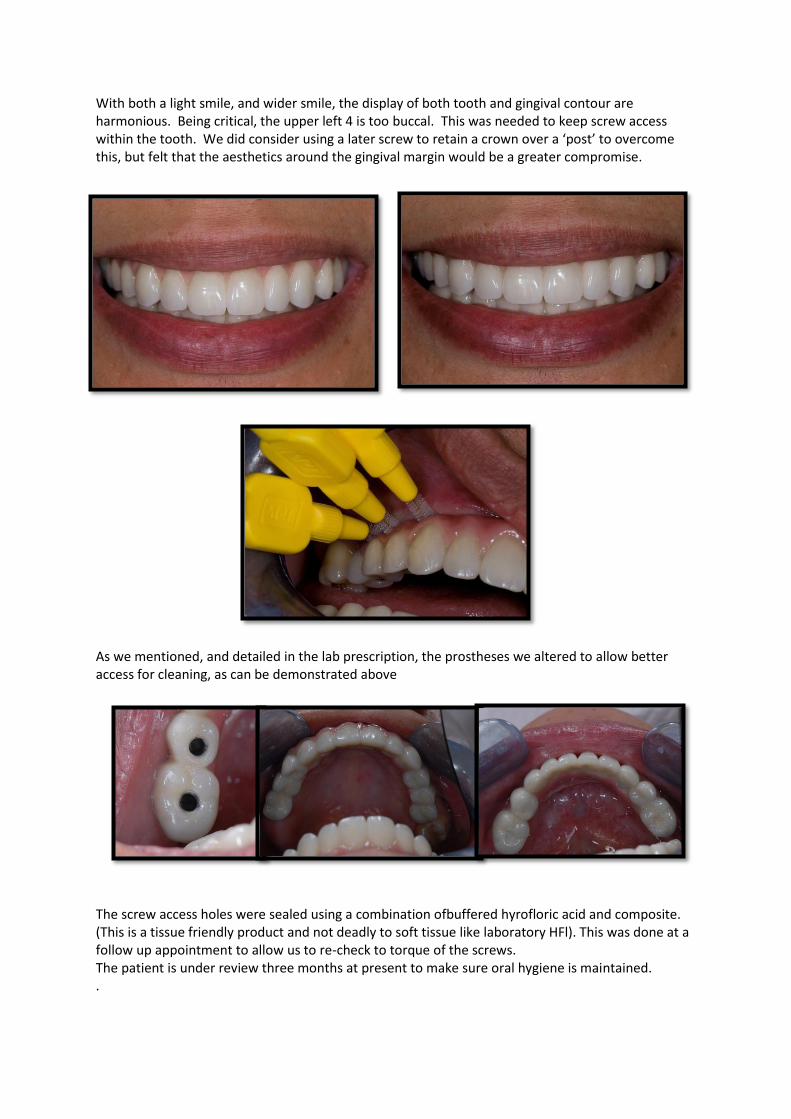
With both a light smile, and wider smile, the display of both tooth and gingival contour are harmonious. Being critical, the upper left 4 is too buccal. This was needed to keep screw access within the tooth. We did consider using a later screw to retain a crown over a ‘post’ to overcome this, but felt that the aesthetics around the gingival margin would be a greater compromise.
As we mentioned, and detailed in the lab prescription, the prostheses we altered to allow better access for cleaning, as can be demonstrated above
The screw access holes were sealed using a combination ofbuffered hyrofloric acid and composite. (This is a tissue friendly product and not deadly to soft tissue like laboratory HFl). This was done at a follow up appointment to allow us to re-check to torque of the screws. The patient is under review three months at present to make sure oral hygiene is maintained. .