Embed Size (px)
Citation preview

California State University, Northridge Information Technology Training Guide
Prepared by Tina Actis-Purtee, User Support Services June 13, 2006 ITR’s Technology training guides are the property of California State University, Northridge. They are intended for non-profit educational use only. Please do not use this material without citing the source.
Excel 2003 Basic Macros in Excel
Table Of Contents 1. Introduction 2. What are Macros? 3. Recording Macros
• Absolute Vs. Relative
• Creating an Absolute Macro
• Creating a Relative Reference 4. Running Macros 5. Assigning Macros
• to your Toolbar
• to an Icon Button
• to the Menu Bar
• To an Object
6. Deleting Macros 7. Viewing your Macro Option 8. Class Exercise
Introduction Find out what a macro can do for you. Save yourself time, energy, keystrokes and headaches. Learn how Macros can help you perform frequently repeated tasks quicker and easier. This guide will take you through the process of:
• Understanding what macros are and what they can do for you.
• Recording macros
• Running macros
• Deleting macros
• Assigning frequently used macros to an icon button
California State University, Northridge Information Technology Training Guide
Prepared by Tina Actis-Purtee, User Support Services June 13, 2006 ITR’s Technology training guides are the property of California State University, Northridge. They are intended for non-profit educational use only. Please do not use this material without citing the source.
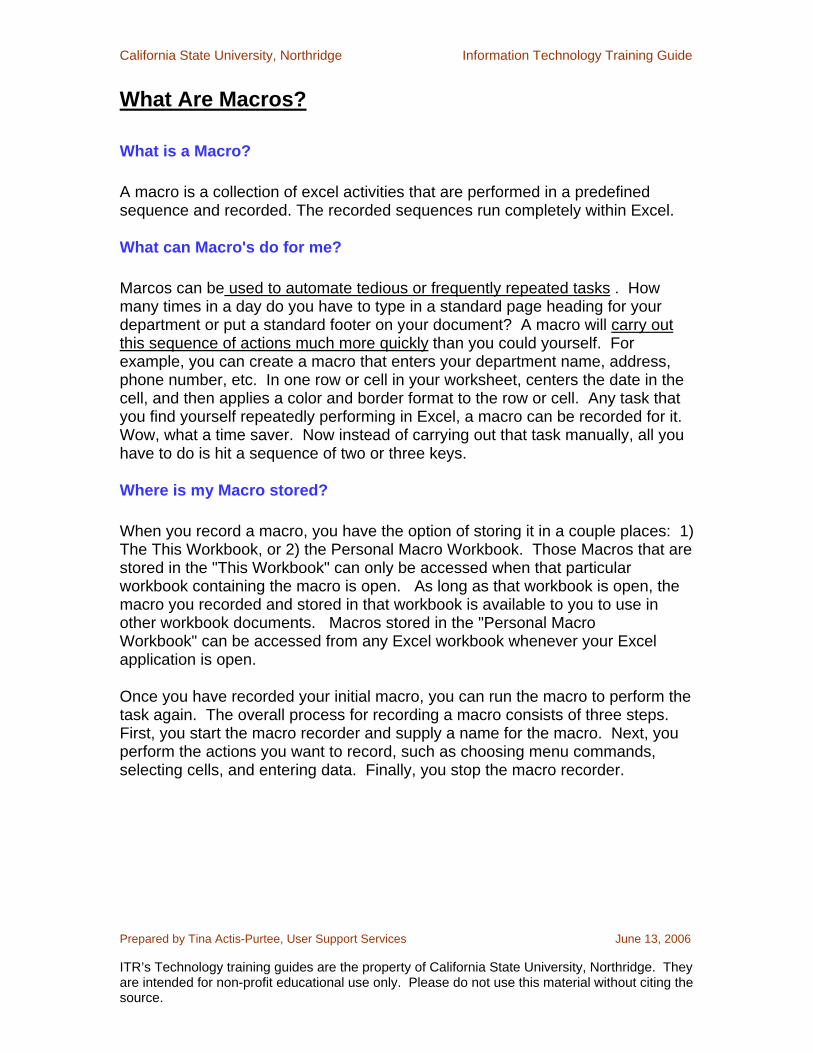
What Are Macros?
What is a Macro?
A macro is a collection of excel activities that are performed in a predefined sequence and recorded. The recorded sequences run completely within Excel.
What can Macro's do for me?
Marcos can be used to automate tedious or frequently repeated tasks . How many times in a day do you have to type in a standard page heading for your department or put a standard footer on your document? A macro will carry out this sequence of actions much more quickly than you could yourself. For example, you can create a macro that enters your department name, address, phone number, etc. In one row or cell in your worksheet, centers the date in the cell, and then applies a color and border format to the row or cell. Any task that you find yourself repeatedly performing in Excel, a macro can be recorded for it. Wow, what a time saver. Now instead of carrying out that task manually, all you have to do is hit a sequence of two or three keys.
Where is my Macro stored?
When you record a macro, you have the option of storing it in a couple places: 1) The This Workbook, or 2) the Personal Macro Workbook. Those Macros that are stored in the "This Workbook" can only be accessed when that particular workbook containing the macro is open. As long as that workbook is open, the macro you recorded and stored in that workbook is available to you to use in other workbook documents. Macros stored in the "Personal Macro Workbook" can be accessed from any Excel workbook whenever your Excel application is open.
Once you have recorded your initial macro, you can run the macro to perform the task again. The overall process for recording a macro consists of three steps. First, you start the macro recorder and supply a name for the macro. Next, you perform the actions you want to record, such as choosing menu commands, selecting cells, and entering data. Finally, you stop the macro recorder.
California State University, Northridge Information Technology Training Guide
Prepared by Tina Actis-Purtee, User Support Services June 13, 2006 ITR’s Technology training guides are the property of California State University, Northridge. They are intended for non-profit educational use only. Please do not use this material without citing the source.
Recording Macros
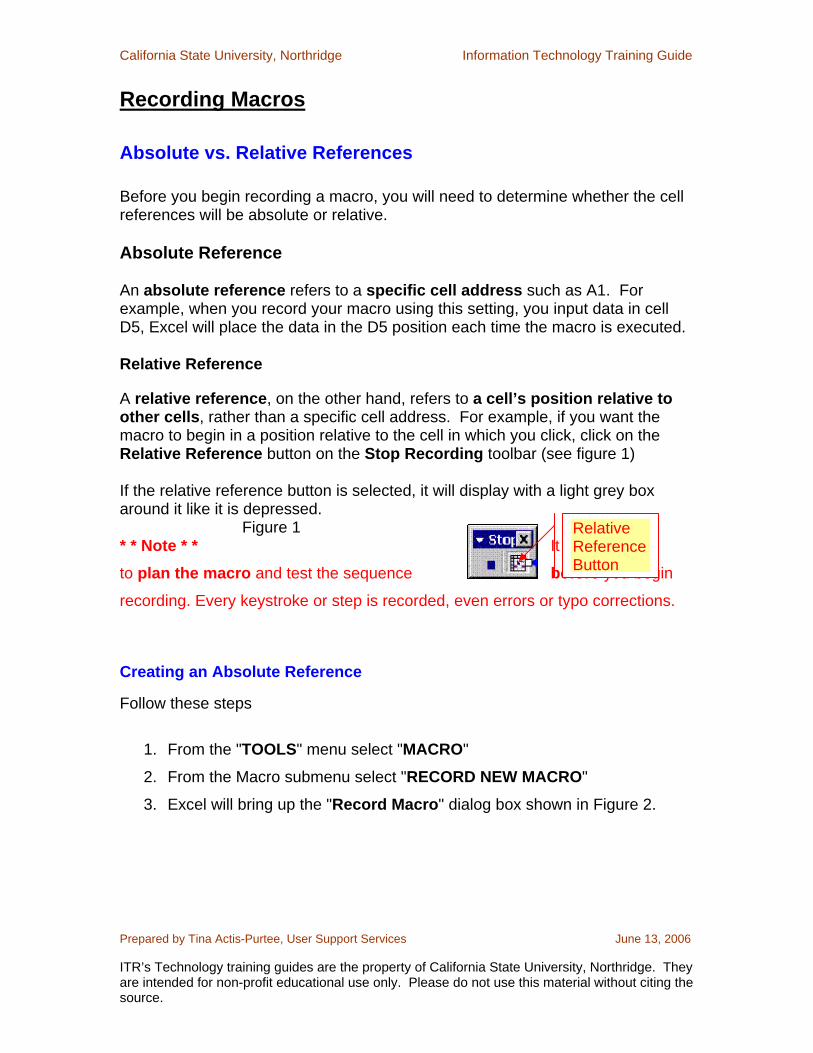
Absolute vs. Relative References
Before you begin recording a macro, you will need to determine whether the cell references will be absolute or relative.
Absolute Reference
An absolute reference refers to a specific cell address such as A1. For example, when you record your macro using this setting, you input data in cell D5, Excel will place the data in the D5 position each time the macro is executed.
Relative Reference A relative reference, on the other hand, refers to a cell’s position relative to other cells, rather than a specific cell address. For example, if you want the macro to begin in a position relative to the cell in which you click, click on the Relative Reference button on the Stop Recording toolbar (see figure 1)
If the relative reference button is selected, it will display with a light grey box around it like it is depressed. Figure 1 * * Note * * It is important
to plan the macro and test the sequence before you begin
recording. Every keystroke or step is recorded, even errors or typo corrections.
Creating an Absolute Reference
Follow these steps
1. From the "TOOLS" menu select "MACRO"
2. From the Macro submenu select "RECORD NEW MACRO"
3. Excel will bring up the "Record Macro" dialog box shown in Figure 2.
Relative Reference Button

California State University, Northridge Information Technology Training Guide
Prepared by Tina Actis-Purtee, User Support Services June 13, 2006 ITR’s Technology training guides are the property of California State University, Northridge. They are intended for non-profit educational use only. Please do not use this material without citing the source.
Excel displays the Record Macros dialog box shown.
Figure 2 – Record Macro Dialog Box
4. In the "Macro Name" field type the name of the macro.
* * Note * * The name you choose must be one word. Excel does not allow spaces. For example, formatmacro is acceptable, while format macros is not. You can use the underscore (_) to separate words. For example format_macro is acceptable.
5. Next, in the "Shortcut key" field assign a key stroke combination to the macro by entering a letter in the shortcut Key edit box. (The letter should be an uppercase letter so as not to interfere with already existing Excel macros)
6. In the "Store Macro in" field, use the arrow to the right of this field to choose where you want to store this macro.
• If you store it in the "Personal Macro Workbook" it will be
available to you to use in any Excel worksheet or workbook. • If you choose "This Workbook", it will only be available when
this workbook is open.
7. In the "Description" field, after the default message in the box, type a description of the macro. This is useful to help remind you of what the content of that macro is.
“Macro Name” field
“Shortcut Key” field
“Description” field
“Store Macro in” field

California State University, Northridge Information Technology Training Guide
Prepared by Tina Actis-Purtee, User Support Services June 13, 2006 ITR’s Technology training guides are the property of California State University, Northridge. They are intended for non-profit educational use only. Please do not use this material without citing the source.
8. To begin recording, click O.K. Excel places you in recording mode and
displays the Stop Recording toolbar.
You are now ready to begin recording the macro. From this point forward, each click or your mouse or data entered from your keyboard will be recorded.
9. Move your mouse pointer to the cell in which you want your macro to appear each time. Single click in this cell location
10. Proceed with inputting the commands you wish to record; i.e. text, formatting, formula's etc.
* * NOTE * *
A macro can be a series of commands (i.e. setting up the page format you want, font type, size, etc), text information (i.e. select cell A2 & type: California State University, Northridge) or numeric or formula information (cell A4 = 450)
11. When you have entered the last step of the macro, click the Stop Recording button on the Stop Recording toolbar (see figure 3)
Figure 3
Or from the Tools menu choose Macro and then Stop Recording. This step is important; if you do not stop the macro recorder, Excel continues to record your actions indefinitely.
Excel records the macro and places it in the workbook choice you selected.
Creating a Relative Reference
1. Repeat step 1 through 8 above.
2. Click the Relative Reference button (see Figure 1) on the Stop Recording toolbar. When you do this, the button appears depressed, indicating that you will be recording relative references.
Stop Recording Toolbar
Stop Recording Icon

California State University, Northridge Information Technology Training Guide
Prepared by Tina Actis-Purtee, User Support Services June 13, 2006 ITR’s Technology training guides are the property of California State University, Northridge. They are intended for non-profit educational use only. Please do not use this material without citing the source.
** Caution ** LOOK at the button first, if it appears to be depressed already, DO NOT click on it again.
3. Proceed with inputting the commands you wish to record; i.e. text, formatting, formula's.
4. When done entering the commands, press the Enter key. 5. Click the Stop Recording button.
Running Macros
Since the purpose of creating a macro is to simplify lengthy procedures by automating them, running a macro is quick and easy. Where you begin the macro will depend on the nature of the macro and whether the cell references are absolute or relative.
When you open a workbook containing a macro, Excel may display the following dialog box: (Figure 4 below)
Figure 4
The purpose of this dialog box is to offer protection from a computer virus that may be attached to a macro. It is important that you have confidence in the source of the macro before you enable it. If you want to display the source of the macro before running it, click on Display Macros.
If you are confident that the Marco does not contain a virus, click on "Enable Macros". If you believe the macro contains a virus, click on “Disable Macros” or "Do Not Open".
California State University, Northridge Information Technology Training Guide
Prepared by Tina Actis-Purtee, User Support Services June 13, 2006 ITR’s Technology training guides are the property of California State University, Northridge. They are intended for non-profit educational use only. Please do not use this material without citing the source.
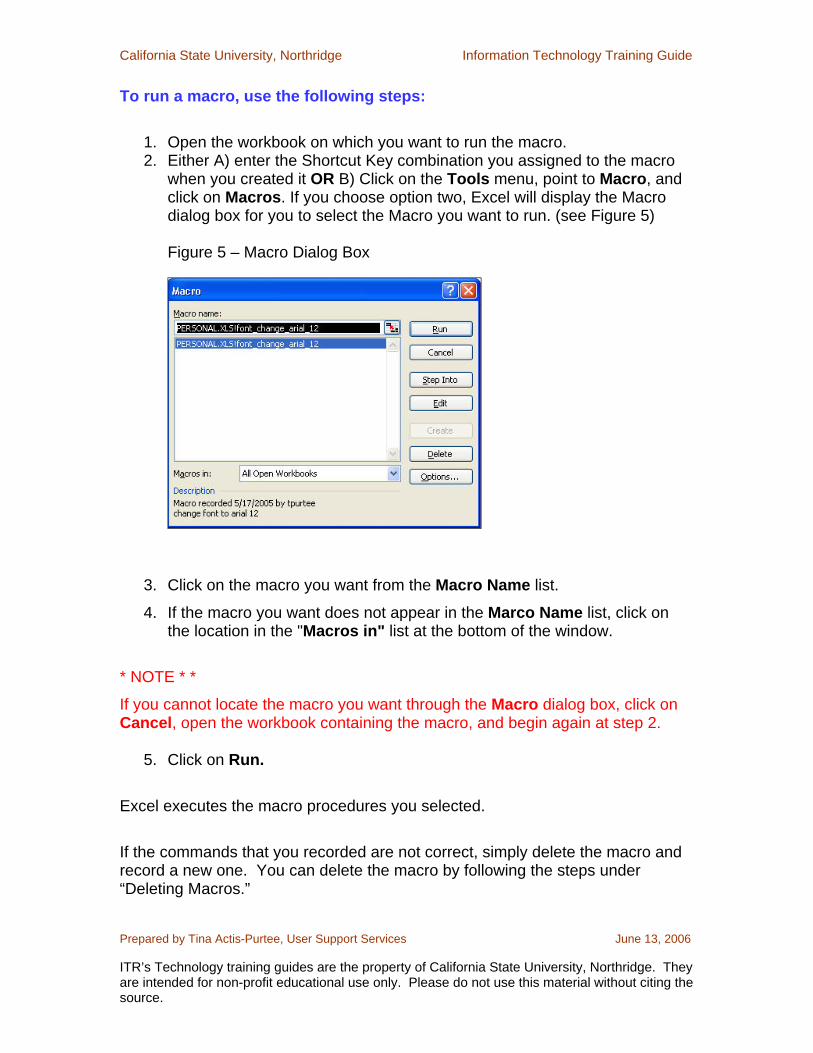
To run a macro, use the following steps:
1. Open the workbook on which you want to run the macro. 2. Either A) enter the Shortcut Key combination you assigned to the macro
when you created it OR B) Click on the Tools menu, point to Macro, and click on Macros. If you choose option two, Excel will display the Macro dialog box for you to select the Macro you want to run. (see Figure 5)
Figure 5 – Macro Dialog Box
3. Click on the macro you want from the Macro Name list.
4. If the macro you want does not appear in the Marco Name list, click on the location in the "Macros in" list at the bottom of the window.
* NOTE * *
If you cannot locate the macro you want through the Macro dialog box, click on Cancel, open the workbook containing the macro, and begin again at step 2.
5. Click on Run.
Excel executes the macro procedures you selected.
If the commands that you recorded are not correct, simply delete the macro and record a new one. You can delete the macro by following the steps under “Deleting Macros.”
California State University, Northridge Information Technology Training Guide
Prepared by Tina Actis-Purtee, User Support Services June 13, 2006 ITR’s Technology training guides are the property of California State University, Northridge. They are intended for non-profit educational use only. Please do not use this material without citing the source.
Customize Your Macros
Assigning Macros to your Toolbar
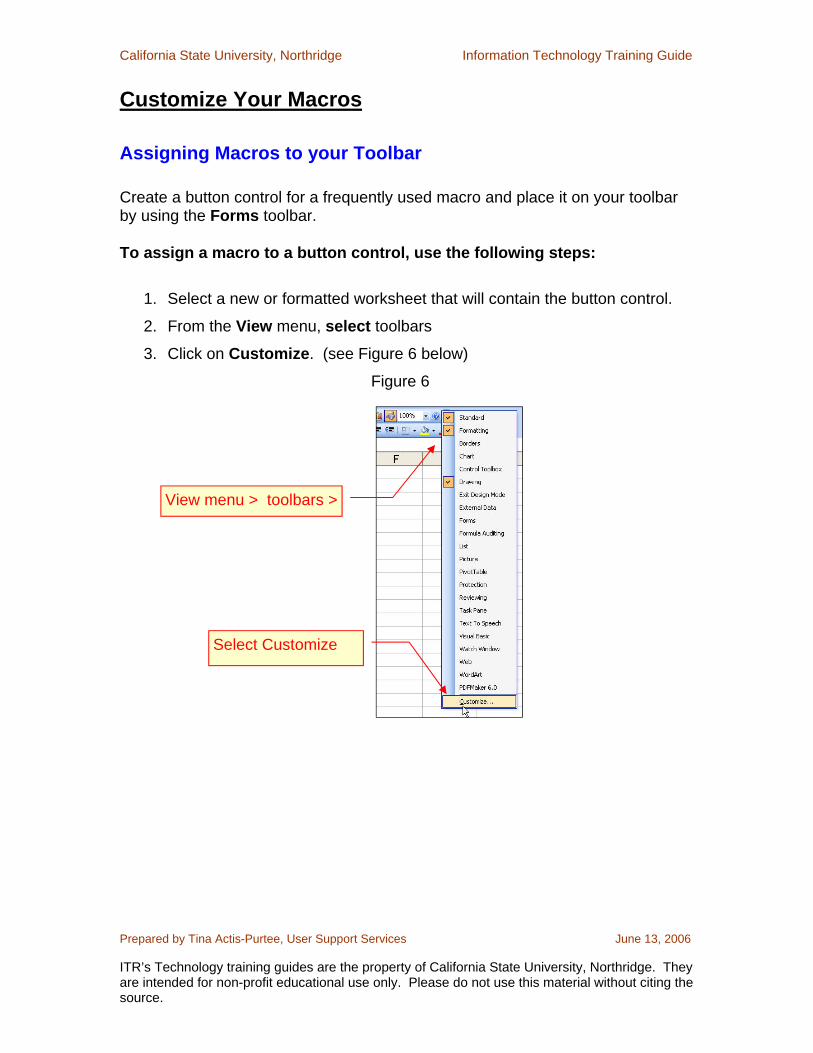
Create a button control for a frequently used macro and place it on your toolbar by using the Forms toolbar.
To assign a macro to a button control, use the following steps:
1. Select a new or formatted worksheet that will contain the button control.
2. From the View menu, select toolbars
3. Click on Customize. (see Figure 6 below)
Figure 6
View menu > toolbars >
Select Customize
California State University, Northridge Information Technology Training Guide
Prepared by Tina Actis-Purtee, User Support Services June 13, 2006 ITR’s Technology training guides are the property of California State University, Northridge. They are intended for non-profit educational use only. Please do not use this material without citing the source.
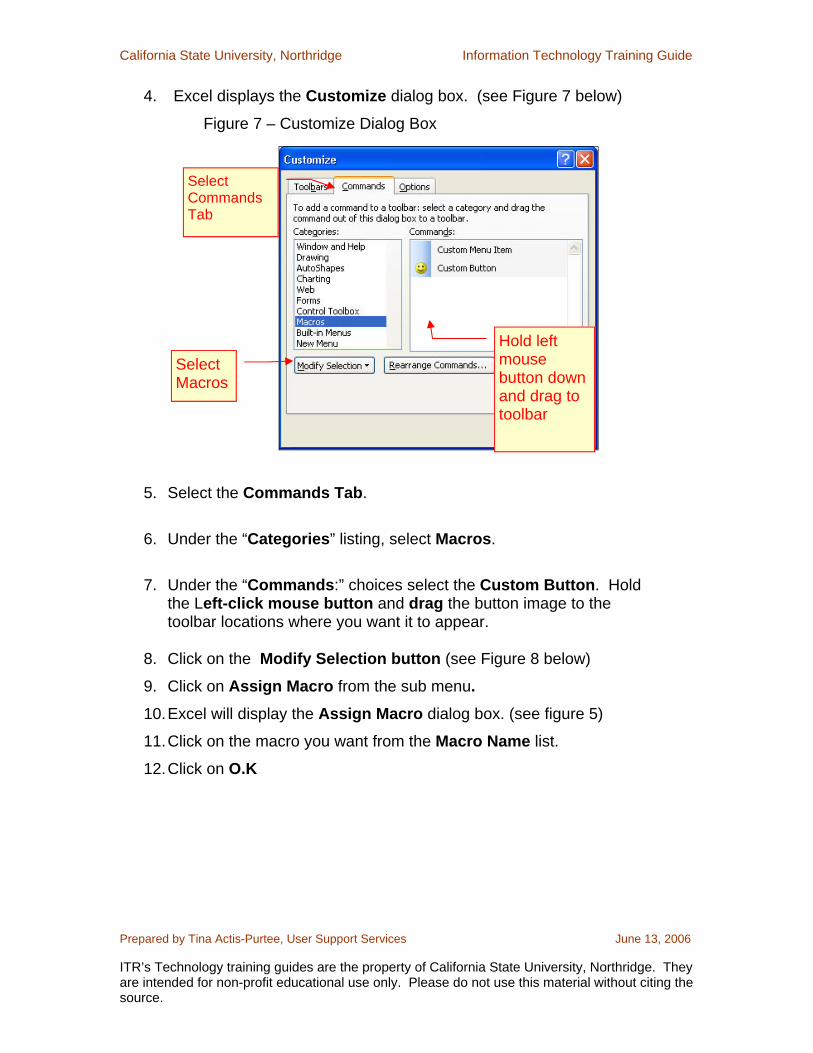
4. Excel displays the Customize dialog box. (see Figure 7 below) Figure 7 – Customize Dialog Box
5. Select the Commands Tab.
6. Under the “Categories” listing, select Macros.
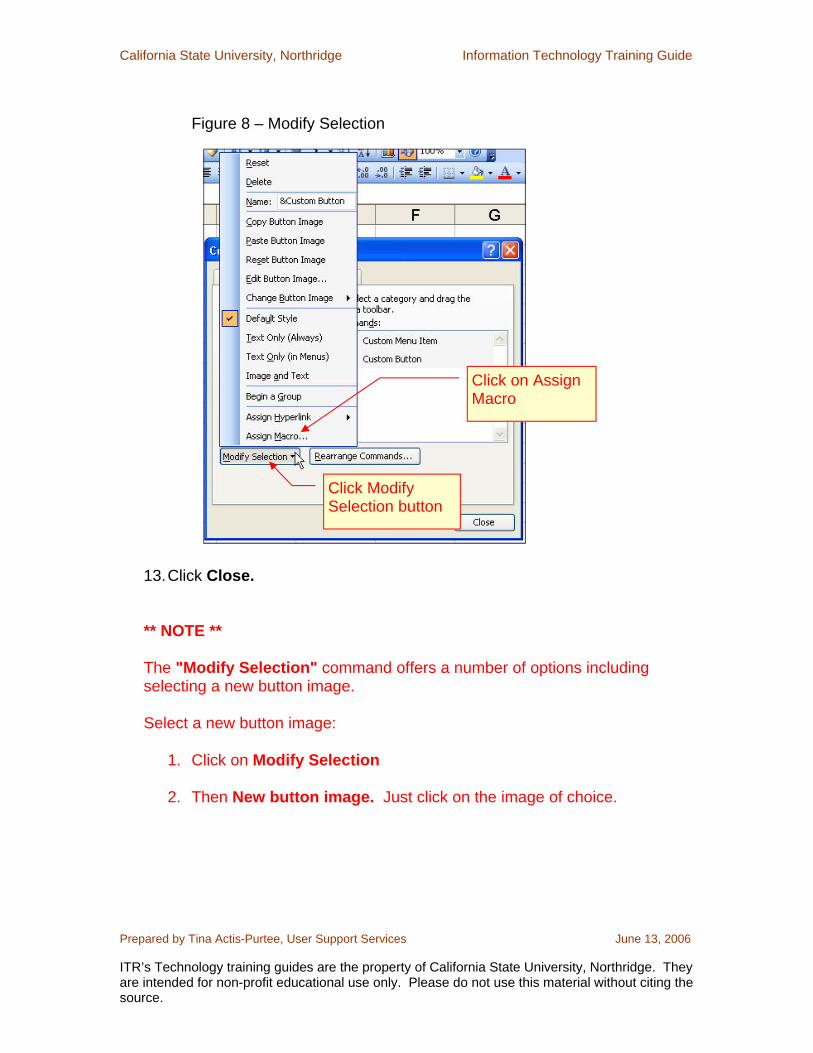
7. Under the “Commands:” choices select the Custom Button. Hold the Left-click mouse button and drag the button image to the toolbar locations where you want it to appear.
8. Click on the Modify Selection button (see Figure 8 below)
9. Click on Assign Macro from the sub menu. 10. Excel will display the Assign Macro dialog box. (see figure 5)
11. Click on the macro you want from the Macro Name list.
12. Click on O.K
Hold left mouse button down and drag to toolbar
Select Commands Tab
Select Macros
California State University, Northridge Information Technology Training Guide
Prepared by Tina Actis-Purtee, User Support Services June 13, 2006 ITR’s Technology training guides are the property of California State University, Northridge. They are intended for non-profit educational use only. Please do not use this material without citing the source.
Figure 8 – Modify Selection
13. Click Close.
** NOTE **
The "Modify Selection" command offers a number of options including selecting a new button image.
Select a new button image:
1. Click on Modify Selection
2. Then New button image. Just click on the image of choice.
Click Modify Selection button
Click on Assign Macro
California State University, Northridge Information Technology Training Guide
Prepared by Tina Actis-Purtee, User Support Services June 13, 2006 ITR’s Technology training guides are the property of California State University, Northridge. They are intended for non-profit educational use only. Please do not use this material without citing the source.
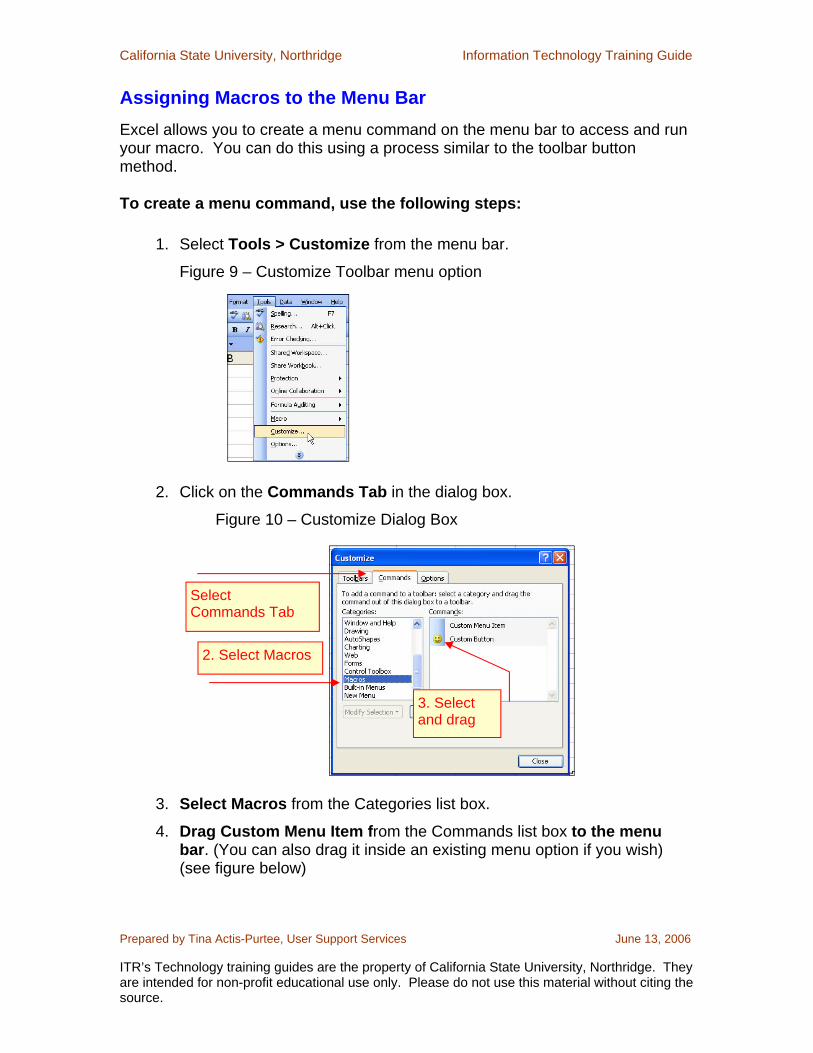
Assigning Macros to the Menu Bar Excel allows you to create a menu command on the menu bar to access and run your macro. You can do this using a process similar to the toolbar button method.
To create a menu command, use the following steps:
1. Select Tools > Customize from the menu bar.
Figure 9 – Customize Toolbar menu option
2. Click on the Commands Tab in the dialog box.
Figure 10 – Customize Dialog Box
3. Select Macros from the Categories list box.
4. Drag Custom Menu Item from the Commands list box to the menu bar. (You can also drag it inside an existing menu option if you wish) (see figure below)
Select Commands Tab
2. Select Macros
3. Select and drag

California State University, Northridge Information Technology Training Guide
Prepared by Tina Actis-Purtee, User Support Services June 13, 2006 ITR’s Technology training guides are the property of California State University, Northridge. They are intended for non-profit educational use only. Please do not use this material without citing the source.
Figure 11 – Custom Menu Item
To rename the menu command and assign it a macro:
1. Right-click on the new Custom Menu Item command
2. Change the contents of the Name text box to the Macro action.
Figure 12
3. While still in the short cut menu, select the Assign Macro option at the bottom of the menu.
The Assign Macro dialog box appears. (Figure 13)
Name text box

California State University, Northridge Information Technology Training Guide
Prepared by Tina Actis-Purtee, User Support Services June 13, 2006 ITR’s Technology training guides are the property of California State University, Northridge. They are intended for non-profit educational use only. Please do not use this material without citing the source.
Figure 13 – Assign Macro Dialog Box
4. In the Assign Macro dialog box, select the appropriate macro.
5. Click OK
6. Close the Customize dialog box.
To run the macro from the new menu item, simply click on the new menu item.
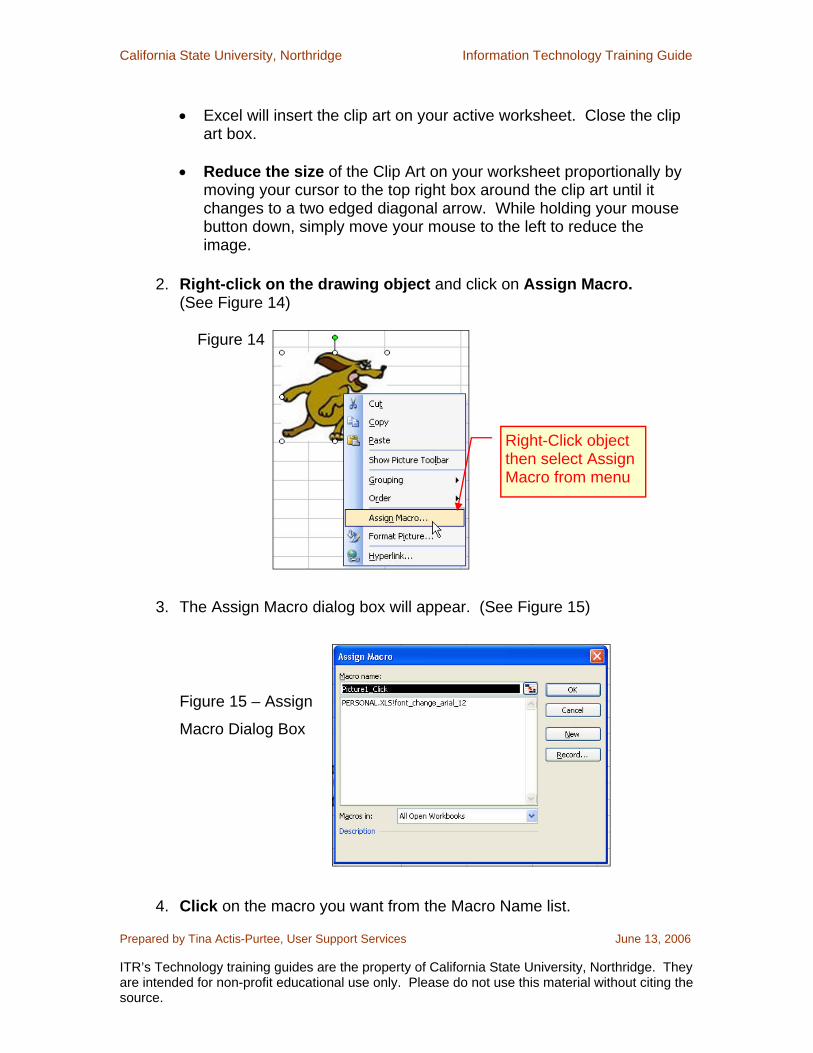
Assigning Macros to a Drawing Object
Excel allows you to assign the macro to a drawing object, enabling you to execute the macro each time you click on the drawing object.
To assign a macro to a drawing object, use the following steps:
1. Insert your drawing object on your worksheet. (to do this follow the steps listed below)
• From the Insert pull down menu select Picture then Clip Art or
From File. • Find and Click on the selected item.
• Once the clip art is selected, a dialog box will appear to the right of the picture, click on the first icon in this box. It is the Insert Clip icon.
California State University, Northridge Information Technology Training Guide
Prepared by Tina Actis-Purtee, User Support Services June 13, 2006 ITR’s Technology training guides are the property of California State University, Northridge. They are intended for non-profit educational use only. Please do not use this material without citing the source.
• Excel will insert the clip art on your active worksheet. Close the clip
art box.
• Reduce the size of the Clip Art on your worksheet proportionally by moving your cursor to the top right box around the clip art until it changes to a two edged diagonal arrow. While holding your mouse button down, simply move your mouse to the left to reduce the image.
2. Right-click on the drawing object and click on Assign Macro. (See Figure 14)
Figure 14
3. The Assign Macro dialog box will appear. (See Figure 15)
Figure 15 – Assign
Macro Dialog Box
4. Click on the macro you want from the Macro Name list.
Right-Click object then select Assign Macro from menu

California State University, Northridge Information Technology Training Guide
Prepared by Tina Actis-Purtee, User Support Services June 13, 2006 ITR’s Technology training guides are the property of California State University, Northridge. They are intended for non-profit educational use only. Please do not use this material without citing the source.
• If you do not see the macro you want in the Macro Name list, click on Cancel, open the workbook containing the macro, and begin again at step 1.
5. Click O.K.
• Excel assigns the macro you selected to the drawing object. You can run the macro by clicking on the drawing object.
Deleting the drawing object
To delete the drawing object,
1. Hold down the Alt key while clicking on the object to select it,
2. Now press the Delete key
Deleting Macros
Deleting Macros When you no longer have a need for a macro, you can easily delete it from the Macros dialog box.
To delete a macro, use the following steps:
1. Open the workbook containing the macro you want to delete. 2. Click on the Tools menus, point to Macro, and click on Macros. 3. Click on the macro you want to delete in the Macro name list. 4. Click on Delete.
Excel will ask if you want to delete the macro.
5. Click on Yes.
Excel deletes the macro and closes the Macros dialog box.
** NOTE ** If you attempt to delete a macro in the Personal Macro Workbook, Excel displays a dialog box stating that you cannot complete this operation on a hidden workbook.

California State University, Northridge Information Technology Training Guide
Prepared by Tina Actis-Purtee, User Support Services June 13, 2006 ITR’s Technology training guides are the property of California State University, Northridge. They are intended for non-profit educational use only. Please do not use this material without citing the source.
Unhide the Personal Macro Workbook by:
1. Click on the Window menu, 2. Select Unhide, 3. Select Personal, and click OK. 4. Use the Window menu to hide the Personal Macro Workbook when you
are finished.
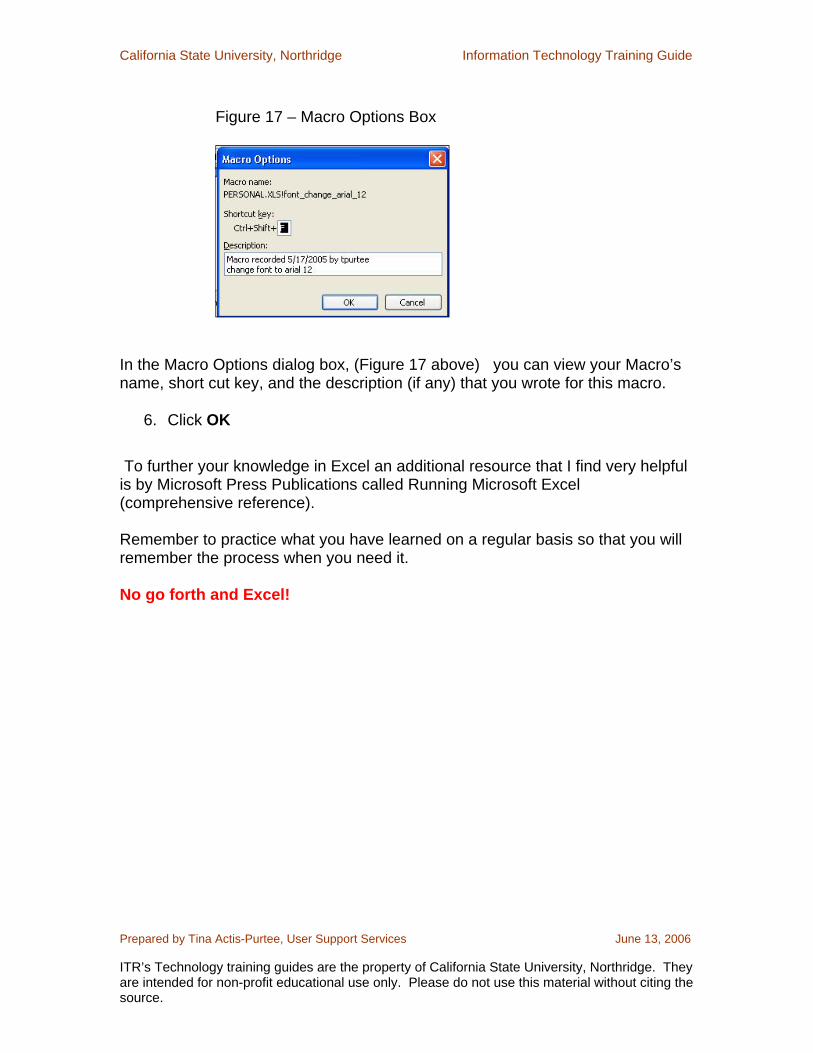
Viewing Macro Options
Viewing your Macro Options 1. From the Tools pull down menu, select Macro, then on the sub menu
select Macros. 2. Excel will display the Macro window (Figure 16 below)
Figure 16 – Macro Dialog Box
3. Single click on the Macro you wish to view.
4. Click the Options button in the Macro box.
5. Excel will pop up a Macro Options window (Figure 17)
California State University, Northridge Information Technology Training Guide
Prepared by Tina Actis-Purtee, User Support Services June 13, 2006 ITR’s Technology training guides are the property of California State University, Northridge. They are intended for non-profit educational use only. Please do not use this material without citing the source.
Figure 17 – Macro Options Box
In the Macro Options dialog box, (Figure 17 above) you can view your Macro’s name, short cut key, and the description (if any) that you wrote for this macro.
6. Click OK
To further your knowledge in Excel an additional resource that I find very helpful is by Microsoft Press Publications called Running Microsoft Excel (comprehensive reference). Remember to practice what you have learned on a regular basis so that you will remember the process when you need it. No go forth and Excel!