Embed Size (px)
Citation preview
EXCHANGE ONLINE
PROTECTION SPAM OVERVIEW
Tech Tips, Tricks and Tools by MessageOps
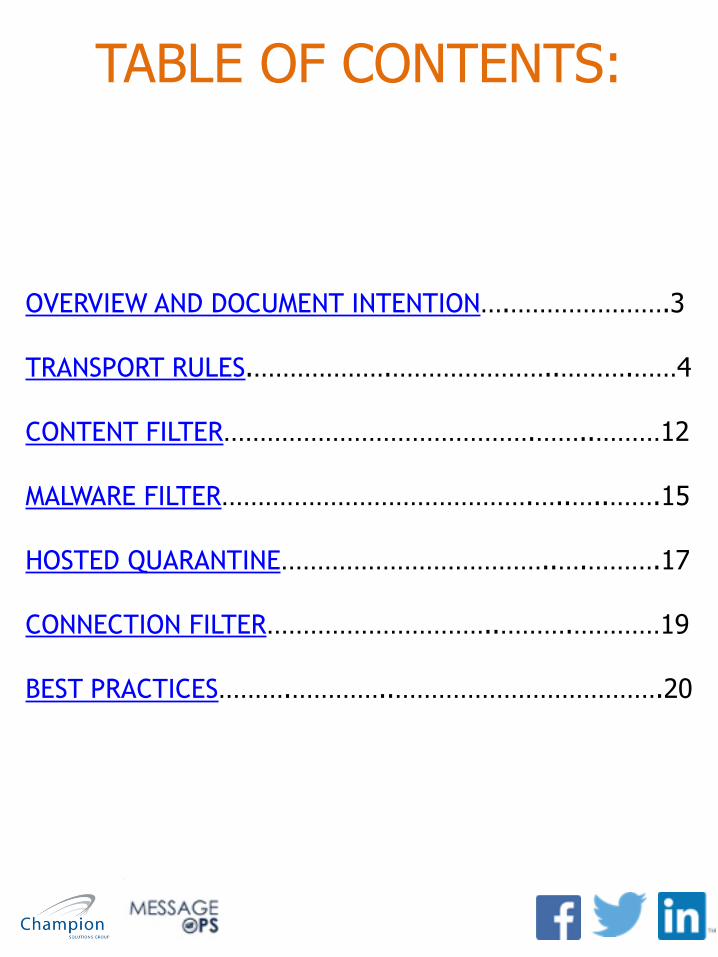
OVERVIEW AND DOCUMENT INTENTION….………………….3 !TRANSPORT RULES.……………….…………………..……….……4 CONTENT FILTER…………………………………….……..………12 MALWARE FILTER…………………………………….…..…..…….15 HOSTED QUARANTINE………………………………..….……….17 !CONNECTION FILTER…………………………..……….…………19 !BEST PRACTICES……….…………..……………………………….20
TABLE OF CONTENTS:
// Page 4
OVERVIEW AND DOCUMENT INTENTION
This document is designed to provide an in-depth look at the Exchange Online Protection (EOP) email filtering service that is provided for the Exchange Online service within Office 365. After reading this document, you will know how to do the following:
1.Create and manage Transport Rules
2.Apply email content filtering settings
3.Update and control malware notifications
4.Setup and configure the quarantine service in Office 365
5.Understand the Connection Filter
6.Learn some Best Practices Tips
Within this document, you will find links to expand on the topics covered, as well as examples which help outline and better explain the functions within EOP. This document is not designed to be an All-In-One resource for EOP, but to provide fundamental understanding and to arm you with the knowledge you will need to build a successful filtering solution with Exchange Online Protection.
This document also assumes you have a basic understanding of the Exchange Administration Center within Office 365. You have logged into the Office 365 Portal, have navigated through the Exchange Admin Center, and are ready to begin understanding mail flow and spam settings within Office 365.
// Page 4
TRANSPORT RULESTransport Rules within Office 365 is the definitive way to control the fundamentals of email flow. They provide an amazing level of functionality, from customizing headers and footers for emails, scanning emails for key words for incidents, redirecting specific emails for specialized connectors, and creating a robust level of availability for your departments.
Transport Rules are broken down into Conditions and Actions. When the rule does perform its action, it is based upon the conditions specified for it. Multiple conditions are treated with the ‘AND’ operator, so including multiples will mean the email has to match all conditions.
The Transport Rules are organization wide. That is to say, they are processed when an email is accepted by Exchange Online and before they are delivered to a mailbox. This is also something to keep in mind, for example, you cannot create a Transport Rule to whitelist an IP Address if the IP Address is blacklisted. Why? The connection from the IP Address is refused, therefore the email is never accepted and a Transport Rule has no object upon which it can perform its action.
Understanding Transport Rules are critical to managing mail flow for Office 365, and when it comes to Exchange Online Protection, Transport Rules are one of your main weapons in the battle against SPAM.
// Page 4
TRANSPORT RULES
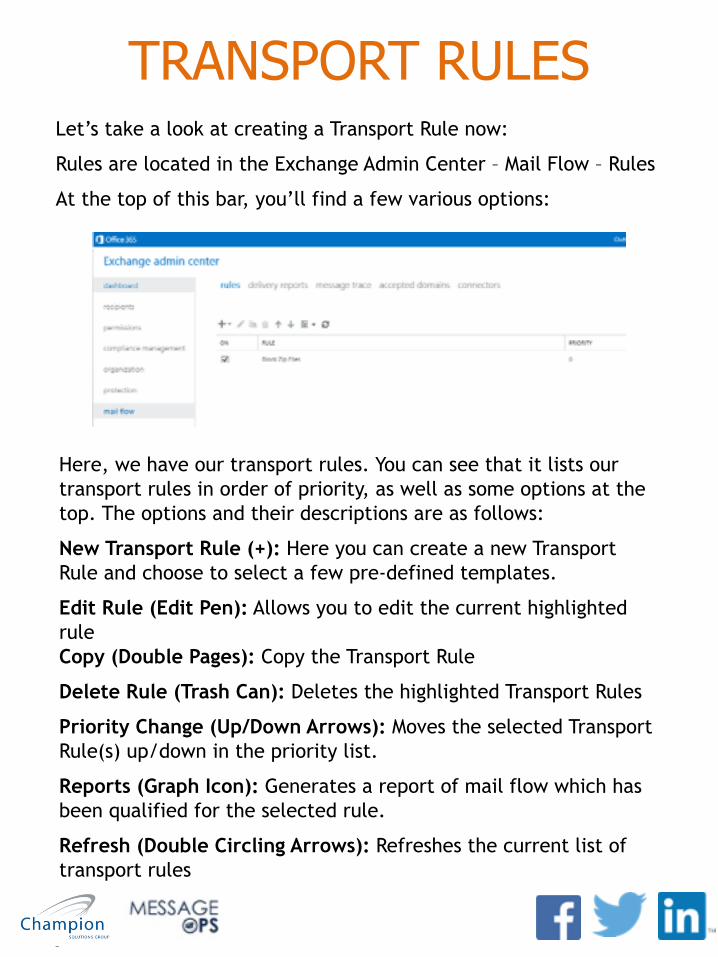
Here, we have our transport rules. You can see that it lists our transport rules in order of priority, as well as some options at the top. The options and their descriptions are as follows:
New Transport Rule (+): Here you can create a new Transport Rule and choose to select a few pre-defined templates.
Edit Rule (Edit Pen): Allows you to edit the current highlighted rule Copy (Double Pages): Copy the Transport Rule
Delete Rule (Trash Can): Deletes the highlighted Transport Rules
Priority Change (Up/Down Arrows): Moves the selected Transport Rule(s) up/down in the priority list.
Reports (Graph Icon): Generates a report of mail flow which has been qualified for the selected rule.
Refresh (Double Circling Arrows): Refreshes the current list of transport rules
Let’s take a look at creating a Transport Rule now:
Rules are located in the Exchange Admin Center – Mail Flow – Rules
At the top of this bar, you’ll find a few various options:
// Page 4
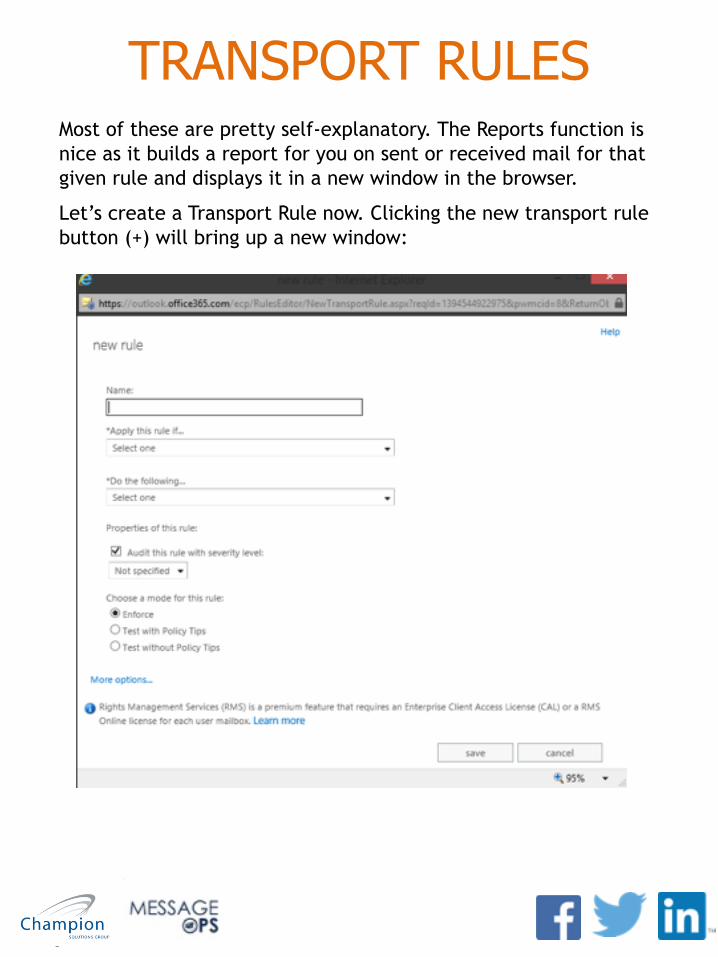
TRANSPORT RULESMost of these are pretty self-explanatory. The Reports function is nice as it builds a report for you on sent or received mail for that given rule and displays it in a new window in the browser.
Let’s create a Transport Rule now. Clicking the new transport rule button (+) will bring up a new window:
// Page 4
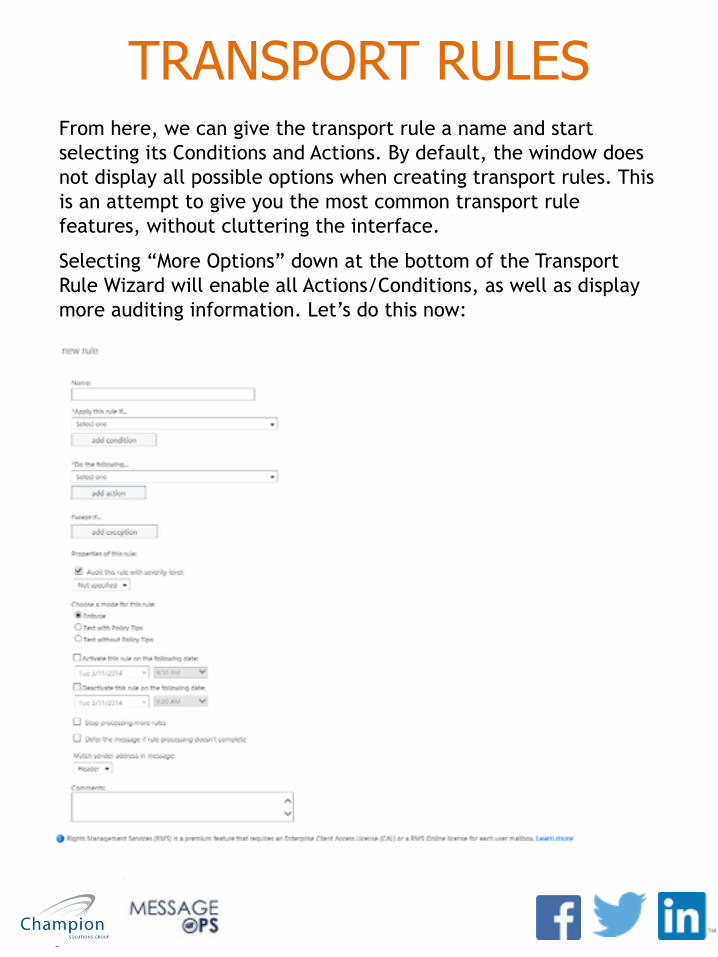
TRANSPORT RULESFrom here, we can give the transport rule a name and start selecting its Conditions and Actions. By default, the window does not display all possible options when creating transport rules. This is an attempt to give you the most common transport rule features, without cluttering the interface.
Selecting “More Options” down at the bottom of the Transport Rule Wizard will enable all Actions/Conditions, as well as display more auditing information. Let’s do this now:
// Page 4
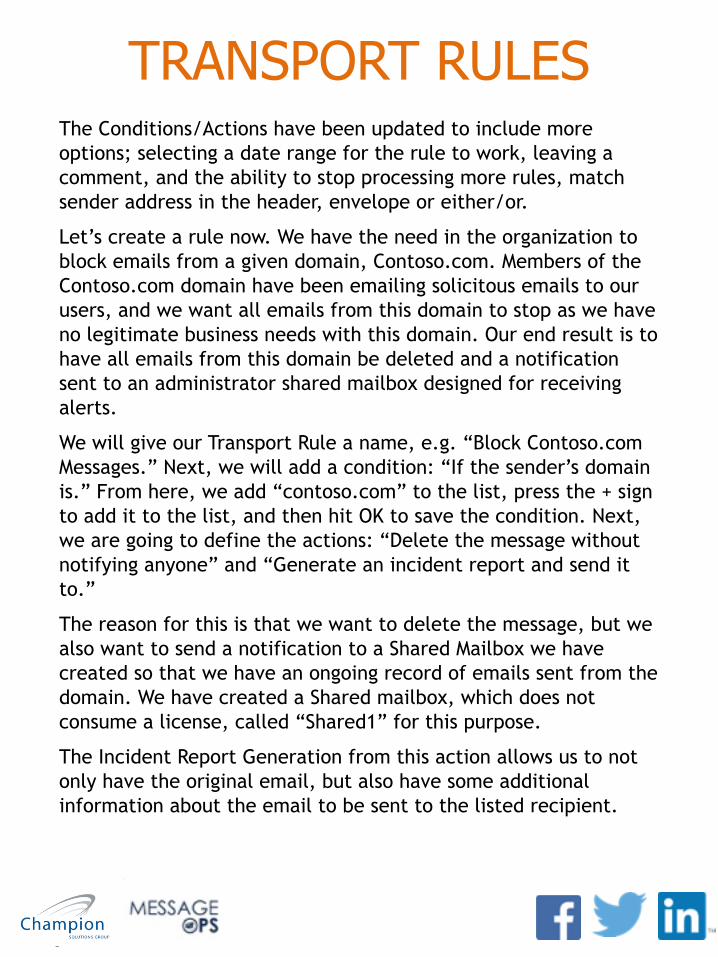
TRANSPORT RULESThe Conditions/Actions have been updated to include more options; selecting a date range for the rule to work, leaving a comment, and the ability to stop processing more rules, match sender address in the header, envelope or either/or.
Let’s create a rule now. We have the need in the organization to block emails from a given domain, Contoso.com. Members of the Contoso.com domain have been emailing solicitous emails to our users, and we want all emails from this domain to stop as we have no legitimate business needs with this domain. Our end result is to have all emails from this domain be deleted and a notification sent to an administrator shared mailbox designed for receiving alerts.
We will give our Transport Rule a name, e.g. “Block Contoso.com Messages.” Next, we will add a condition: “If the sender’s domain is.” From here, we add “contoso.com” to the list, press the + sign to add it to the list, and then hit OK to save the condition. Next, we are going to define the actions: “Delete the message without notifying anyone” and “Generate an incident report and send it to.”
The reason for this is that we want to delete the message, but we also want to send a notification to a Shared Mailbox we have created so that we have an ongoing record of emails sent from the domain. We have created a Shared mailbox, which does not consume a license, called “Shared1” for this purpose.
The Incident Report Generation from this action allows us to not only have the original email, but also have some additional information about the email to be sent to the listed recipient.

// Page 4
TRANSPORT RULES
Now, if we wanted to specify any exclusions to this rule, we can add an Exception. We’ll add an Exception now for Bob from Contoso.com, as he is someone we do trust to send emails.
Now, we want this rule to run all of the time, so we will not set a date range. We also do not want any other Transport Rules to interfere with this rule. This email should come into Exchange Online, be caught by this Transport Rule, and not have the possibility of being affected by other rules it may condition for. Therefore, we select the Option to “Stop processing more rules.” This means no more Transport Rules will be applied if their scope includes this email. This can be critical where a Transport Rule may “overlap” another rule.
// Page 4
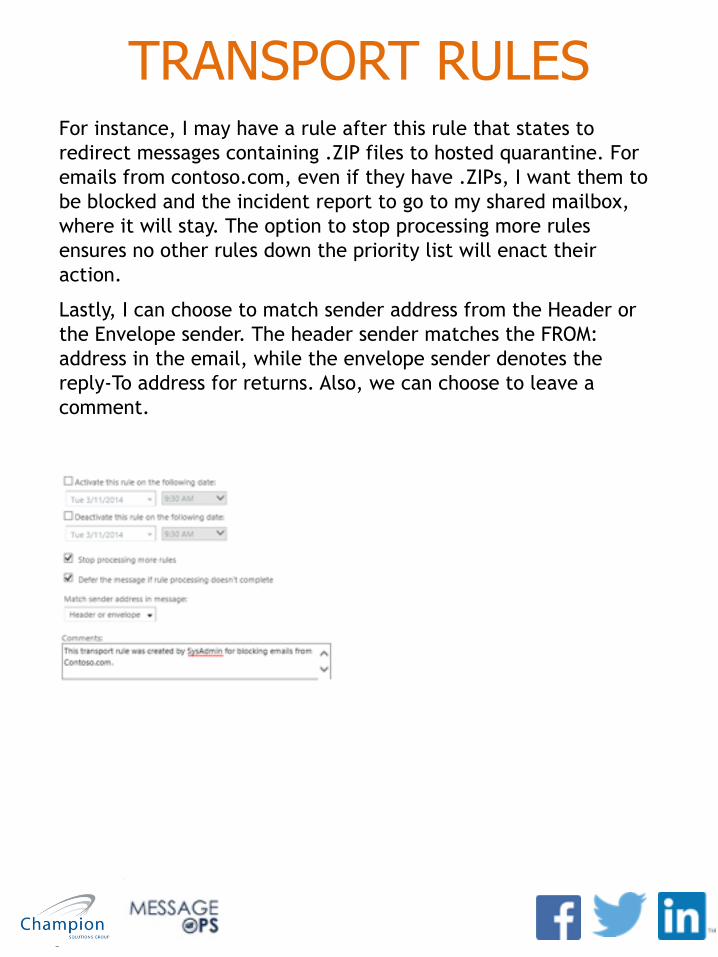
TRANSPORT RULESFor instance, I may have a rule after this rule that states to redirect messages containing .ZIP files to hosted quarantine. For emails from contoso.com, even if they have .ZIPs, I want them to be blocked and the incident report to go to my shared mailbox, where it will stay. The option to stop processing more rules ensures no other rules down the priority list will enact their action.
Lastly, I can choose to match sender address from the Header or the Envelope sender. The header sender matches the FROM: address in the email, while the envelope sender denotes the reply-To address for returns. Also, we can choose to leave a comment.
// Page 4
TRANSPORT RULES
When creating Transport Rules, we should understand that the priority should be treated as an escalation path for emails. Our general rules like Disclaimers should be at the top of the priority list, as we state we want these types of actions to apply to all emails. When we start to drill down into some of the spam actions, we would want them to act on top of each other. Here is a good example:
1.Transport Rule #1 sends suspicious emails from contoso.com to Junk Folder
2.Transport Rule #2 sends emails with .ZIP files to hosted quarantine.
a.Therefore, if an email from contoso.com comes in, AND it has a .ZIP file, it will be routed to Hosted quarantine, and not just not the junk folder
3.Transport Rule #3: If the email contains malware, immediately delete the message and notify the Administrator
a.Now, if that same email with the .ZIP file has malware detected in it, transport rule #3 steps in and deletes the email.
We would want all of the Transport Rules to work together like this. Work together and in tandem, a logical stack of escalating actions. There are many conditions and actions for the Transport Rules, and it would be difficult to get into all of them. However, keep in mind how they work, and how Transport Rules can be critical to managing mail flow.
// Page 4
CONTENT FILTERThe content filter in Exchange Online is used to analyze the body of an email, identify possible spam conditions, and apply a spam action to the email. An Exchange Online organization can have many content filters, all looking for different conditions and each applying their own actions.
The difference between Transport Rules and Content Filter is that the Content Filter has a few actions which are specific to it and controlling SPAM.
The Content Filter is located in the EAC – Protection – Content Filter
Content Filters all have 3 parts:
1.Action: What should the Content Filter do with the emails that it is conditioned to find? Send them to Junk? Hosted quarantine? Redirect to another user? Redirect to Junk Folder is the default
2. International Spam : Emails can be scoped for written in a language or sent from a specific country
3.Advanced Options: These contain options for blocking messages from bulk senders, SPF failures, embedded object tags in HTML, etc.
// Page 4
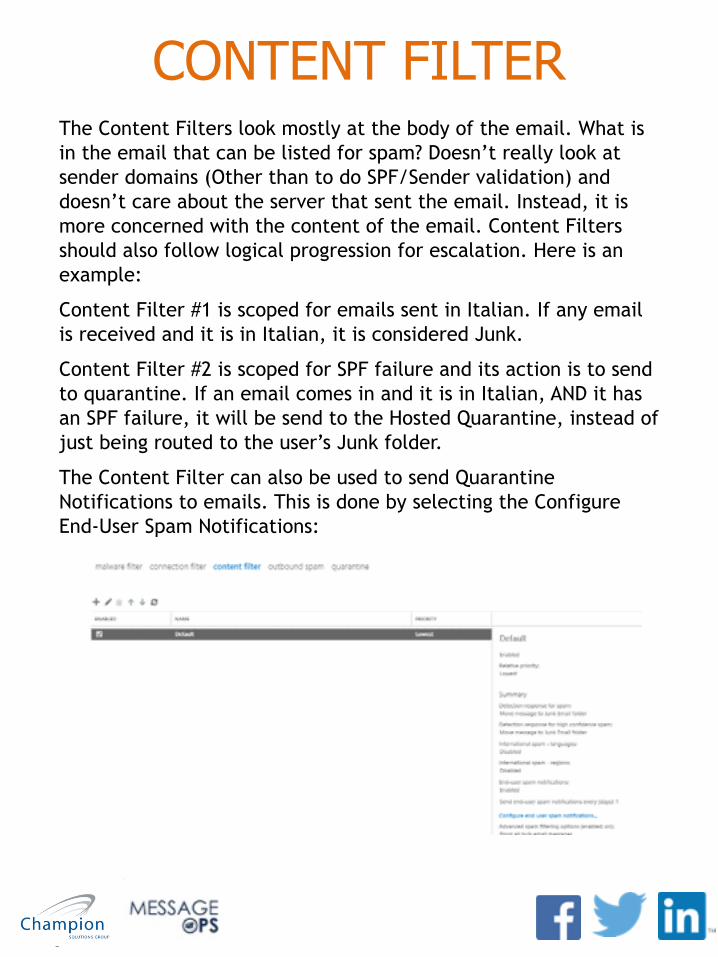
CONTENT FILTERThe Content Filters look mostly at the body of the email. What is in the email that can be listed for spam? Doesn’t really look at sender domains (Other than to do SPF/Sender validation) and doesn’t care about the server that sent the email. Instead, it is more concerned with the content of the email. Content Filters should also follow logical progression for escalation. Here is an example:
Content Filter #1 is scoped for emails sent in Italian. If any email is received and it is in Italian, it is considered Junk.
Content Filter #2 is scoped for SPF failure and its action is to send to quarantine. If an email comes in and it is in Italian, AND it has an SPF failure, it will be send to the Hosted Quarantine, instead of just being routed to the user’s Junk folder.
The Content Filter can also be used to send Quarantine Notifications to emails. This is done by selecting the Configure End-User Spam Notifications:
// Page 4
CONTENT FILTERIf the Content Filter is scoped to send items to the Hosted Quarantine, you can configure it to automatically notify users when an email sent to them is instead redirected to Hosted Quarantine. You can have this email be sent out within the length of time specified, 1-7 days.
Keep in mind that only emails caught by the Content Filter and send to quarantine this way will generate the end user spam notifications. Emails sent to hosted quarantine from a Transport Rule cannot be setup to generate an end user notification. You can generate a notification, but it is to a specific recipient, and not dynamically to the recipient.
// Page 4
MALWARE FILTER
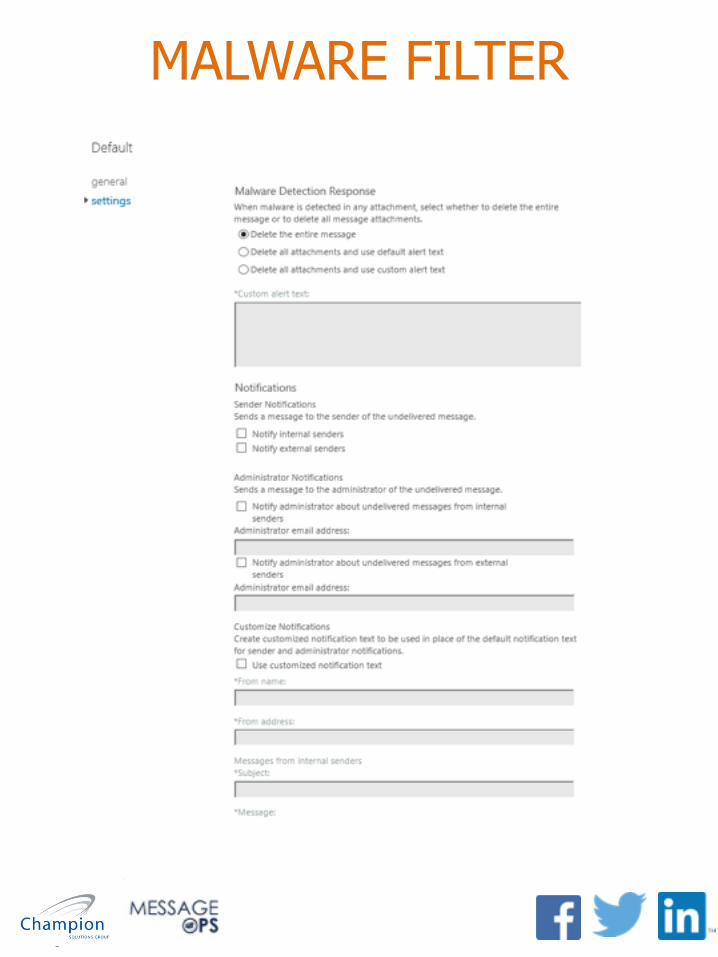
The Malware Filter in Exchange online is always active. It scans all emails inbound and outbound. Emails at rest are not actively scanned, but anytime an email enters or exits the system, it will be scanned for malware. The Malware Filter uses 3 heuristic engines which are updated every 15 minutes or sooner.
The Malware Filter does not have a lot of customization to it. You can choose to customize the following:
1.Attachment Action:
a.Delete Entire Message
b.Delete All Attachments with Default Alert
c.Delete All Attachments with Custom Alert
2.Notifications:
a.Notify Internal Senders
b.Notify External Senders
3.Admin Notification
4.Customize the Notifications for Custom Alerts:
a.From Name/Email
b.Subject
c.Message to be sent
!!
// Page 4
MALWARE FILTER
// Page 4
HOSTED QUARANTINE
The Hosted Quarantine Service in Office 365 offers a place to hold emails that have been deemed unsafe or suspicious. By default, nothing routes to Hosted Quarantine. Transport Rules and Content Filters must be configured with Quarantine Actions for emails to start filtering into this service. The hosted Quarantine is located in the EAC – Protection – Quarantine.
It is Microsoft’s recommendation to use the Junk Folder in the users’ mailbox to handle non-threatening spam. It exists for a reason, and it is possible that false positives do happen. Users have the ability to manage their own personal/block lists specific to their mailboxes. If emails come into the junk folder, they have the option themselves to whitelist that particular sender or domain. Most junk should be handled this way, as it saves time for the administrator from having to analyze every email that comes in that gets marked as Junk.
// Page 4
HOSTED QUARANTINE
Administrators can choose to delete or release the email back to the user, or another recipient, from the hosted quarantine console. Following our escalating logic path, emails that contain items or users we do not trust should end up here (.ZIP attachments are classic examples). Perhaps, you want to analyze every .ZIP that comes into the organization and release accordingly. Routing the .ZIPs to the hosted quarantine will help you achieve this goal.
Normally, users cannot access the Hosted Quarantine service themselves, as it requires setting up RBAC, educating the user, and allowing them access to all quarantine messages. A better alternative is the end user spam notification emails, however this carries the limitation that it is only for emails caught by the Content Filter, and not by the Transport Rules. At this time, the Content Filter cannot be scoped against .ZIP attachments.
// Page 4
CONNECTION FILTER
The Connection Filter in Exchange Online is used to filter emails based on IP addresses. It is important to understand that Exchange Online Protections blocks roughly over 85% of all spam based on IP Address. That is to say, that out of all of the emails Exchange Online handles, 85% of it is spam that never even makes it past the IP connection stage.
As stated earlier, it’s important to understand where the Connection Filter comes in to play. The IP address is one of the first things looked at for determining possible Spam. If we have an IP Address that may be listed as spam, or is showing up on Spamhaus blacklists, we may need to forcibly whitelist that IP Address so that our O365 Company can accept email for the IP Address.
Creating an allow Transport Rule for an IP Address does not necessarily work, as the email may never be accepted for a Transport Rule to act upon, as it never makes it past the IP connection.
IPs here can be whitelisted or blacklisted, depending on the company needs.
!!
// Page 4
BEST PRACTICES
The following are considered ‘Best Practices’. There is no offer of warranty or guarantee for the results that may result from you using these methods, however, they are straight forward and easy to understand, so you should be able to adopt them to match your own.
Transport Rules:
Remember to create a path of escalation for emails when it comes to dealing with spam and malicious content. Regular emails that are considered “safe”, but an annoyance to the user due to their spam nature, should be routed to the user’s junk folder for further determination. Emails considered “harmful” should be routed to Quarantine or another recipient mailbox. Letting the end user decide what to do with a .ZIP file may be too risky, especially if some of your recipients have access to sensitive data. Sending to hosted quarantine gives the administrator the first chance to review the email, and if appropriate, release it to the user.
!!!!
// Page 4
BEST PRACTICES
Connection Filter:
These should be used sparingly, especially in the world of shared/hosted services who may be sharing one IP address. A good rule of thumb is if you whitelist an IP address via the connection filter, you should create a transport rule to cover it. e.g.
Condition: if email was received from IP address 1.1.1.1,
Action: redirect the message to quarantine,
Exception: except if the sender’s domain contains “Fabrikam.com.”
Content Filter:
A good practice is to use the SPF failure. A domain that fails SPF is certainly not in the right configuration state at best and should review their emailing practices. At the minimum, you should route these to Junk where they can be reviewed by the end user. If it fails SPF and it contains malicious content or attachments, it should be considered to be sent to the hosted quarantine.