Embed Size (px)
Citation preview

e*Xchange Partner Manager User’s Guide
Release 5.0.5 for Schema Run-time Environment (SRE)
Copyright © 2005, 2010, Oracle and/or its affiliates. All rights reserved.
This software and related documentation are provided under a license agreement containing restrictions on use and disclosure and are protected by intellectual property laws. Except as expressly permitted in your license agreement or allowed by law, you may not use, copy, reproduce, translate, broadcast, modify, license, transmit, distribute, exhibit, perform, publish, or display any part, in any form, or by any means. Reverse engineering, disassembly, or decompilation of this software, unless required by law for interoperability, is prohibited.
The information contained herein is subject to change without notice and is not warranted to be error-free. If you find any errors, please report them to us in writing.
If this is software or related software documentation that is delivered to the U.S. Government or anyone licensing it on behalf of the U.S. Government, the following notice is applicable:
U.S. GOVERNMENT RIGHTS Programs, software, databases, and related documentation and technical data delivered to U.S. Government customers are "commercial computer software" or "commercial technical data" pursuant to the applicable Federal Acquisition Regulation and agency-specific supplemental regulations. As such, the use, duplication, disclosure, modification, and adaptation shall be subject to the restrictions and license terms set forth in the applicable Government contract, and, to the extent applicable by the terms of the Government contract, the additional rights set forth in FAR 52.227-19, Commercial Computer Software License (December 2007). Oracle USA, Inc., 500 Oracle Parkway, Redwood City, CA 94065.
This software or hardware is developed for general use in a variety of information management applications. It is not developed or intended for use in any inherently dangerous applications, including applications which may create a risk of personal injury. If you use this software or hardware in dangerous applications, then you shall be responsible to take all appropriate fail-safe, backup, redundancy, and other measures to ensure the safe use. Oracle Corporation and its affiliates disclaim any liability for any damages caused by use of this software or hardware in dangerous applications.
Oracle and Java are registered trademarks of Oracle and/or its affiliates. Other names may be trademarks of their respective owners.
AMD, Opteron, the AMD logo, and the AMD Opteron logo are trademarks or registered trademarks of Advanced Micro Devices. Intel and Intel Xeon are trademarks or registered trademarks of Intel Corporation. All SPARC trademarks are used under license and are trademarks or registered trademarks of SPARC International, Inc. UNIX is a registered trademark licensed through X/Open Company, Ltd.
This software or hardware and documentation may provide access to or information on content, products, and services from third parties. Oracle Corporation and its affiliates are not responsible for and expressly disclaim all warranties of any kind with respect to third-party content, products, and services. Oracle Corporation and its affiliates will not be responsible for any loss, costs, or damages incurred due to your access to or use of third-party content, products, or services.
Version 20100720162105.
e*Xchange Partner Manager User’s Guide 2
Contents
Contents
List of Tables 9
List of Figures 12
Chapter 1
Intended Audience 16
Compatible Systems 16
Organization of Information 17
Writing Conventions 18
Supporting Documents 19
Oracle eBusiness Integration Suite 19Oracle eBusiness Integration Suite Components 20
eBusiness Integration Solutions 21e*Gate Integrator Components 22
Introducing e*Xchange Partner Manager 22
Introducing eSecurity Manager 24Where the eSM fits into e*Xchange 24Features 25Sending and Receiving a Digitally Signed Message 26eSM Outbound Event Processing Overview 26eSM Inbound Event Processing Overview 28
Chapter 2
Supported Browsers 31
User Permissions: An Overview 31
Logging In to the e*Xchange Partner Manager Web Interface 32Logging In for the First Time 33Logging In If the URL Changes 37
System Administration 38System Defaults 39Code Tables 43Connections 46
User Administration 53
e*Xchange Partner Manager User’s Guide 3
Contents
Working With Users 55Working With Groups 58
Changing Your Password 61
Editing the epm.std File 62
Extending the Session Inactivity Setting 65
Chapter 3
What Are Access Control Permissions? 66
Chapter 4
Profile Management 71
Supported Communications Protocols 72
Setting Up Company Information 72
Setting Up Trading Partner Information 78
Setting Up B2B Protocol Information 87
Copying Components 102
Setting Up Message Profile Information 104Entering Return Message Information 104
Chapter 5
Template Libraries 105
X12 Header and Trailer Segment Values 105
X12 Delimiters 108
Transfer Modes in X12 108Fast Batch Settings 109
Communications Protocols for X12 109
Setting Up X12 Message Profile Information 110Setup Sequence 110Large Message Support for X12 110Setting Up a Message Profile 110
About Return Message Profiles for X12 128
HIPAA Translation ETDs 129Translating from a Proprietary Format to HIPAA 130Tracking Responses to 276 HIPAA Transactions 131Modifying the Unique ID for 276 and 277 Transactions 131
Error Handling in X12 133
e*Xchange Partner Manager User’s Guide 4
Contents
Chapter 6
Setting Up NCPDP-HIPAA Message Profile Information 134Setup Sequence 134Setting Up a Message Profile 134
Chapter 7
UN/EDIFACT Delimiters 149Inbound 150Outbound 150Default UN/EDIFACT Delimiters 150
Transfer Modes in UN/EDIFACT 150Fast Batch Settings 151
Communications Protocols for UN/EDIFACT 151
Setting Up UN/EDIFACT Message Profile Information 152Setup Sequence 152Setting Up a Message Profile 152
UN/EDIFACT Message Profile Parameter Values 164Version 3 Batch 164Version 4 Batch 171Version 4 Interactive 178
About Return Message Profiles for UN/EDIFACT 184
Chapter 8
Communications Protocols for RosettaNet 185HTTP and HTTPS 186SMTP 186
Security in RosettaNet 186Non-Repudiation 186Digital Signatures (RNIF 1.1 and 2.0) 187Encryption (RNIF 2.0 Only) 187
Encryption of Inbound Messages 187Encryption of Outbound Messages 188
Setting Up RosettaNet Message Profile Information 188Setup Sequence 188Setting Up a Message Profile 188
RosettaNet Message Profile Parameter Values 198RNIF 1.1 198RNIF 2.0 202
About Return Message Profiles for RosettaNet 206Setup Sequence 206Defining Message Profiles for All Conditions 206Additional Information for RosettaNet 1.1 207
Debug Mode in RosettaNet 2.0 207
e*Xchange Partner Manager User’s Guide 5
Contents
RosettaNet Message Processing 208RNIF 1.1 208
Inbound RNIF 1.1 Message Processing 208Outbound RNIF 1.1 Message Processing 209
RNIF 2.0 209Inbound RNIF 2.0 Message Processing 209Outbound RNIF 2.0 Message Processing 210
Acknowledgment Monitoring 211RNIF 1.1 211RNIF 2.0 211
RosettaNet Error Handling 212RNIF 1.1 212
Inbound RNIF 1.1 Error Handling 212Outbound RNIF 1.1 Error Handling 213
RNIF 2.0 213Inbound RNIF 2.0 Error Handling 213Outbound RNIF 2.0 Error Handling 214
Chapter 9
Setting Up CIDX Message Profile Information 215Setup Sequence 215Setting Up a Message Profile 215
CIDX Message Profile Parameter Values 224
Chapter 10
About the Contacts Feature 228
Working With Contacts 229Deleting Contact Information 232Copying Contacts 232
Chapter 11
Using the Message Tracking Feature 235Entering General Search Criteria 236Choosing the Messages to View 237Viewing the Message Details 238
Resending a Message 244
Reviewing Message Access (Audit Feature) 246Viewing Access Via Enveloped Message ID 250
Message Tracking: Notes and Tips On Viewing Messages 251
Chapter 12
Logging In to the e*Xchange Repository Manager 252
e*Xchange Partner Manager User’s Guide 6
Contents
Export/Import from the e*Xchange Repository Manager 253Running the Export Feature 253Before Importing 255Running the Import Feature 256
Archive/De-Archive from the e*Xchange Repository Manager 257Archiving 257De-Archiving 258
Changes to Settings During Archiving 258Changes to Logging and Constraints 258Restoring the Settings 260
Running the Archive Feature 261Viewing the Archive Log 264Running the De-Archive Feature 265
Appendix A
Troubleshooting the e*Xchange Repository Manager 267
Troubleshooting the e*Xchange Web Interface 269Troubleshooting the e*Xchange Web Interface with DB2 UDB 269Troubleshooting the e*Xchange Web Interface with Oracle 270Troubleshooting Tips for All Database Types 272Troubleshooting Tips for HIPAA 274
Appendix B
Overview 276
Validation Rules Builder Files 276
Limitations 278
Prerequisites for Running the Validation Rules Builder 279
Third-Party Implementation Guide Editors 279
Using the Validation Rules Builder 280Creating Input Data Files 280Verifying Processing Properties 280Setting Up a Repetition Delimiter 286Working With Unique IDs 286
Setting Up the Unique ID 286Additional Notes on Unique IDs 288Specifying Values Within Loops 288
Starting the Validation Rules Builder 289Memory Errors 290Using the Debug Flag 291
Verifying ETD and Collaboration Rules Files 291
Troubleshooting Tips 292General Validation Rules Builder Error Messages 292Validation Rules Builder Error Messages for UN/EDIFACT 294
e*Xchange Partner Manager User’s Guide 7
Contents
Appendix C
e*Xchange Tables 297ES_MTRK_INB 297ES_MTRK_OUTB 299ES_WAITING_ACK 301ES_MTRK_ERROR 302ES_MTRK_OUTB_DATA 303ES_MTRK_EXT_HDR 304ES_MTRK_AUDIT 304ES_MSG_STORAGE 305ES_MTRK_EXT_DET 306ES_OUT_QUEUE 306ES_MTRK_INB_DATA 307ES_EXT_HDR 307ES_EXT_DETAIL 308ES_EXT_DATA 309ES_MSG_ASCII 309ES_TPIC 310ES_TPTS 311ES_MSG_SECURITY 312ES_TPCAT 313ES_TPH 313ES_COMPANY 314ES_MSG_BINARY 314
Diagram of Message Tracking Tables 315
Glossary 317
Index 325
e*Xchange Partner Manager User’s Guide 8
List of Tables
List of Tables
Table 1 System Defaults: Fields 41
Table 2 Code Tables: Fields 45
Table 3 Connections - Adding: Fields 48
Table 4 Users - Adding: Fields 56
Table 5 Groups - Adding: Fields 60
Table 6 Trading Partner Profile Access Permission Types 67
Table 7 Supported Communications Protocols 72
Table 8 Company - Adding, Editing, Copying: Fields 74
Table 9 Trading Partner - Adding, Editing, Copying: Fields 80
Table 10 B2B Protocol, General Section 93
Table 11 B2B Protocol, Transport Component Section 94
Table 12 B2B Protocol, Message Security Section (Outbound) 95
Table 13 B2B Protocol, Message Security Section (Inbound) 96
Table 14 Interchange Header and Footer Values (X12 Version 4010) 106
Table 15 Functional Group Header and Footer Values 107
Table 16 Transaction Set Header And Footer Values 107
Table 17 Message Profile, General Section (X12): Fields 116
Table 18 Message Profile, Interchange Control Envelope Section (X12): Fields 119
Table 19 Message Profile, Functional Group Envelope Section (X12): Fields 121
Table 20 Message Profile, Transaction Set Section (X12): Fields 122
Table 21 Message Profile, AS2 Section: Fields 122
Table 22 Error Handling for X12 Messages 133
Table 23 Message Profile, General Section (NCPDP): Fields 139
Table 24 Message Profile, Transaction Header Section (NCPDP): Fields 141
Table 25 Message Profile, Transmission Header Section (NCPDP): Fields 142
Table 26 Message Profile, AS2 Section (NCPDP): Fields 142
Table 27 UN/EDIFACT Default Delimiters 150
Table 28 Cross-References to UN/EDIFACT Parameter Values 159
Table 29 Message Profile, General Section (UN/EDIFACT 3B): Fields 164
Table 30 Message Profile, Interchange Control Envelope Section (UN/EDIFACT 3B): Fields 166
Table 31 Message Profile, Functional Group Envelope Section (UN/EDIFACT 3B): Fields 168
Table 32 Message Profile, Message Envelope Section (UN/EDIFACT 3B): Fields 169
Table 33 Message Profile, AS2 Section (UN/EDIFACT): Fields 170
Table 34 Message Profile, General Section (UN/EDIFACT 4B): Fields 171
Table 35 Message Profile, Interchange Control Envelope Section (UN/EDIFACT 4B): Fields 173
Table 36 Message Profile, Functional Group Envelope Section (UN/EDIFACT 4B): Fields 176
e*Xchange Partner Manager User’s Guide 9
List of Tables
Table 37 Message Profile, Message Envelope Section (UN/EDIFACT 4B): Fields 177
Table 38 Message Profile, General Section (UN/EDIFACT 4I): Fields 178
Table 39 Message Profile, Interchange Control Envelope Section (UN/EDIFACT 4I): Fields 180
Table 40 Message Profile, Message Envelope Section (UN/EDIFACT 4I): Fields 183
Table 41 Message Profile, General Section (RNIF 1.1): Fields 199
Table 42 Message Profile, Preamble Section (RNIF 1.1): Fields 200
Table 43 Message Profile, Service Header Section (RNIF 1.1): Fields 200
Table 44 Message Profile, General Section (RNIF 2.0): Fields 202
Table 45 Message Profile, Delivery Header Section (RNIF 2.0): Fields 204
Table 46 Message Profile, Service Header Section (RNIF 2.0): Fields 205
Table 47 RNIF 2.0 Outbound Error Handling 214
Table 48 Message Profile, General Section (CIDX 2.0.1): Fields 224
Table 49 Message Profile, Preamble Section (CIDX 2.0.1): Fields 226
Table 50 Message Profile, Service Header Section (CIDX 2.0.1): Fields 226
Table 51 Contacts Adding: Fields 230
Table 52 Review Message Access, Search Criteria: Fields 249
Table 53 Export/Import Manager, Export Tab 254
Table 54 Export/Import Manager, Import Tab 257
Table 55 Changes to e*Xchange Operation During Archiving 259
Table 56 Archive/De-Archive Manager, Archive Tab 262
Table 57 Archive/De-Archive Manager, De-Archive Tab 266
Table 58 Validation Rules Builder Files 276
Table 59 ValidationBuilder.properties Parameters 283
Table 60 Unique ID Examples 287
Table 61 Unique ID Examples Using Values Within Loops 288
Table 62 Validation Rules Builder Error Messages 292
Table 63 Sample UN/EDIFACT VRB Error String 294
Table 64 Validation Rules Builder Error Messages for UN/EDIFACT 295
Table 65 ES_MTRK_INB 297
Table 66 ES_MTRK_OUTB 299
Table 67 ES_WAITING_ACK 301
Table 68 ES_MTRK_ERROR 302
Table 69 ES_MTRK_OUTB_DATA 303
Table 70 ES_MTRK_EXT_HDR 304
Table 71 ES_MTRK_AUDIT 304
Table 72 ES_MSG_STORAGE 305
Table 73 ES_MTRK_EXT_DET 306
Table 74 ES_OUT_QUEUE 306
Table 75 ES_MTRK_INB_DATA 307
Table 76 ES_EXT_HDR 307
Table 77 ES_EXT_DETAIL 308
Table 78 ES_EXT_DATA 309
Table 79 ES_MSG_ASCII 309
e*Xchange Partner Manager User’s Guide 10
List of Tables
Table 80 ES_TPIC 310
Table 81 ES_TPTS 311
Table 82 ES_MSG_SECURITY 312
Table 83 ES_TPCAT 313
Table 84 ES_TPH 313
Table 85 ES_COMPANY 314
Table 86 ES_MSG_BINARY 314
e*Xchange Partner Manager User’s Guide 11
List of Figures
List of Figures
Figure 1 Oracle eBusiness Integration Suite 21
Figure 2 e*Xchange Partner Manager 23
Figure 3 eSecurity Manager 25
Figure 4 eSM Outbound Event Processing 27
Figure 5 eSM Inbound Event Processing 29
Figure 6 e*Xchange Web Interface Login Page 33
Figure 7 Database Connection Information 34
Figure 8 Database Connection Information: Test Connection Result 35
Figure 9 Database Connection Information: Reset Login Result 36
Figure 10 e*Xchange Partner Manager Web Interface Main Page 37
Figure 11 System Administration Main Page 39
Figure 12 System Defaults - Viewing 40
Figure 13 System Defaults - Editing 41
Figure 14 Code Tables - Viewing 44
Figure 15 Code Tables - Adding 45
Figure 16 Code Tables - Editing 46
Figure 17 Connections - Viewing 47
Figure 18 Connections - Adding 48
Figure 19 Choose Database Type 49
Figure 20 Specify Database Information (Oracle) 49
Figure 21 Connections - Editing 51
Figure 22 Connections - Copying 52
Figure 23 User Administration Main Page 54
Figure 24 Users - Viewing 55
Figure 25 Users - Adding 56
Figure 26 Users - Editing 57
Figure 27 Groups - Viewing 58
Figure 28 Groups - Adding 59
Figure 29 Groups - Editing 60
Figure 30 Change Password 62
Figure 31 Default Entries in epm.std File 63
Figure 32 Sample epm.std File 64
Figure 33 The web.xml File 65
Figure 34 Security Management Page 68
Figure 35 Add Access Permission Page 69
Figure 36 Company Page 73
e*Xchange Partner Manager User’s Guide 12

List of Figures
Figure 37 Company - Adding 74
Figure 38 Company Page Showing Company Information 75
Figure 39 Company - Editing 76
Figure 40 Copy Type (Copying a Company) 77
Figure 41 Company - Copying 77
Figure 42 Trading Partner Page 79
Figure 43 Trading Partner - Adding 80
Figure 44 Trading Partner Page Showing Trading Partner Information 81
Figure 45 Trading Partner - Editing 82
Figure 46 Copy Type (Copying a Trading Partner) 83
Figure 47 Trading Partner - Copying 84
Figure 48 Copy Type (Copying a Trading Partner) 85
Figure 49 Copy Setup (Copying a Trading Partner to Another Company) 85
Figure 50 B2B Protocol Page 88
Figure 51 B2B Protocol - Adding 89
Figure 52 B2B Protocol - Adding (General section) 90
Figure 53 B2B Protocol - Adding (Transport Component section) 91
Figure 54 B2B Protocol - Adding (Message Security section) (outbound) 92
Figure 55 B2B Protocol - Editing (General page) 97
Figure 56 Copy Type (Copying a B2B Protocol) 98
Figure 57 B2B Protocol - Copying 99
Figure 58 B2B Protocol - Copying (General page) 100
Figure 59 Copy Type (Copying a B2B Protocol) 101
Figure 60 Copy Setup (Copying a B2B Protocol to Another Trading Partner) 101
Figure 61 Message Profile Page 111
Figure 62 Message Profile - Adding (General section) (X12) 112
Figure 63 Message Profile - Adding (Interchange Control Envelope section) (X12) 113
Figure 64 Message Profile - Adding (Functional Group Envelope section) (X12) 114
Figure 65 Message Profile - Adding (Transaction Set section) (X12) 115
Figure 66 Message Profile - Adding (AS2 section) (X12) 116
Figure 67 Message Profile - Editing (General section) (X12) 124
Figure 68 Copy Type (Copying a Message Profile) 125
Figure 69 Message Profile - Copying (General section) (X12) 125
Figure 70 Copy Type (Copying a Message Profile) 126
Figure 71 Copy Setup (Copying a Message Profile to Another B2B Protocol) 127
Figure 72 HIPAA Transactions tsc File Shown in Text Editor 130
Figure 73 Translation Structure Name in .ssc File 131
Figure 74 Segments Used for Unique ID in HIPAA 276 and 277 Transactions 132
Figure 75 Message Profile Page 135
Figure 76 Message Profile - Adding (General section) (NCPDP-HIPAA) 136
Figure 77 Message Profile - Adding (Transaction Header section) (NCPDP-HIPAA) 137
Figure 78 Message Profile - Adding (Transmission Header section) (NCPDP) 138
Figure 79 Message Profile - Adding (AS2 section) (NCPDP-HIPAA) 139
e*Xchange Partner Manager User’s Guide 13
List of Figures
Figure 80 Message Profile - Editing (General section) (NCPDP-HIPAA) 144
Figure 81 Copy Type (Copying a Message Profile) 145
Figure 82 Message Profile - Copying (General section) (NCPDP) 145
Figure 83 Copy Type (Copying a Message Profile) 146
Figure 84 Copy Setup (Copying a Message Profile to Another B2B Protocol) 147
Figure 85 Message Profile Page 153
Figure 86 Message Profile - Adding (General section) (UN/EDIFACT) (4B) 154
Figure 87 Message Profile - Adding (Interchange Control Envelope section) (UN/EDIFACT) 155
Figure 88 Message Profile - Adding (Functional Group Envelope section) (UN/EDIFACT) 156
Figure 89 Message Profile - Adding (Message Envelope section) (UN/EDIFACT) 157
Figure 90 Message Profile - Adding (AS2 section) (UN/EDIFACT) 158
Figure 91 Message Profile - Editing (General section) (UN/EDIFACT) 159
Figure 92 Copy Type (Copying a Message Profile) 160
Figure 93 Message Profile - Copying (General section) (UN/EDIFACT) 160
Figure 94 Copy Type (Copying a Message Profile) 162
Figure 95 Copy Setup (Copying a Message Profile to Another B2B Protocol) 162
Figure 96 Message Profile Page 189
Figure 97 Message Profile - Adding (General section) (RosettaNet) (1.1) 190
Figure 98 Message Profile - Adding (Preamble section) (RNIF 1.1) 191
Figure 99 Message Profile - Adding (Delivery Header section) (RNIF 2.0) 192
Figure 100 Message Profile - Adding (Service Header section) (RNIF 2.0) 193
Figure 101 Message Profile - Editing (General) (RosettaNet) (2.0) 194
Figure 102 Copy Type (Copying a Message Profile) 195
Figure 103 Message Profile - Copying (General) (RosettaNet 2.0) 195
Figure 104 Copy Type (Copying a Message Profile) 196
Figure 105 Copy Setup (Copying a Message Profile to Another B2B Protocol) 197
Figure 106 Message Profile Page 216
Figure 107 Message Profile - Adding (General section) (CIDX) 217
Figure 108 Message Profile - Adding (Preamble section) (CIDX 2.0.1) 218
Figure 109 Message Profile - Adding (Service Header section) (CIDX 2.0.1) 219
Figure 110 Message Profile - Editing (General) (CIDX) 220
Figure 111 Copy Type (Copying a Message Profile) 221
Figure 112 Message Profile - Copying (General) (CIDX) 221
Figure 113 Copy Type (Copying a Message Profile) 222
Figure 114 Copy Setup (Copying a Message Profile to Another B2B Protocol) 222
Figure 115 Contacts Viewing Page 229
Figure 116 Contacts Adding Page 230
Figure 117 Contacts Editing Page 231
Figure 118 Contacts Viewing Page (Trading Partner) 233
Figure 119 Contacts Adding Page (Trading Partner) 234
Figure 120 TP Profile Selection 236
Figure 121 Message Profile Selection 237
Figure 122 Message Details 238
e*Xchange Partner Manager User’s Guide 14
List of Figures
Figure 123 Message Tracking: Specify Sort Columns Page 239
Figure 124 Changing the Display on the Message Tracking Details Page 239
Figure 125 Message Tracking: “View Error Data” Window 240
Figure 126 Message Tracking: “View Raw Message” Window 241
Figure 127 Message Tracking: “View Original Message” Window 241
Figure 128 Message Tracking: “View Enveloped Message” Window 242
Figure 129 Message Tracking: “View Enveloped Message” Window (Large Message) 242
Figure 130 Message Tracking: “View Acknowledgment Message” Window 243
Figure 131 Message Tracking: “View Extended Attributes” Window 243
Figure 132 Message Tracking: “View Original Message” Window with Resend 245
Figure 133 Message Tracking: Resend Verification Message 246
Figure 134 Review Message Access: Search Criteria 247
Figure 135 Review Message Access: Results 248
Figure 136 Sample List Sorted by Timestamp, Ascending Order 248
Figure 137 Sample List Sorted by Timestamp, Descending Order 249
Figure 138 e*Xchange Repository Manager 253
Figure 139 Export/Import Manager, Export Tab 254
Figure 140 Export/Import Manager, Import Tab 256
Figure 141 Archiving Error Message 258
Figure 142 Archive/De-Archive Manager, Archive Tab 262
Figure 143 Sample Archive Log 264
Figure 144 Sample Archive Log Showing Database Constraints Error 265
Figure 145 Archive/De-Archive Manager, De-Archive Tab 266
Figure 146 Oracle JDBC Driver Error 268
Figure 147 Error in Import Log File 268
Figure 148 Error 500 in Message Tracking 270
Figure 149 Cannot Connect to the Database Server: Logon Error 271
Figure 150 Classes12.zip missing from classpath: Tomcat Error 271
Figure 151 Wrong classes12.zip version: Tomcat Error 272
Figure 152 Tools.jar Missing from classpath 272
Figure 153 Default Port Is In Use (Tomcat Window) 273
Figure 154 Java Exception: Collaboration Rule Not Found in the Registry 274
Figure 155 ValidationBuilder.properties Default File After Installation 282
Figure 156 Customized ValidationBuilder.properties File 282
Figure 157 Running the Validation Rules Builder 290
Figure 158 Sample Output Files 290
Figure 159 Using the Validation Rules Builder Additional Memory Parameters 291
Figure 160 e*Xchange Database Structure (1 of 2) 315
Figure 161 e*Xchange Database Structure (2 of 2) 316
e*Xchange Partner Manager User’s Guide 15
Chapter 1
Introduction
This user’s guide provides instructions and background information for all users of the e*Xchange Partner Manager application. It covers setting up and maintaining information, and performing various other activities, in the following GUI applications:
e*Xchange Web Interface
e*Xchange Repository Manager
For information on implementation of e*Xchange projects, and setting up e*Gate components to create a running e*Xchange schema, refer to the e*Xchange Partner Manager Implementation Guide.
1.1 Intended AudienceThis book assumes the reader is familiar with the Microsoft Windows operating system and standard graphical user interface (GUI) concepts. It also assumes familiarity with the eBusiness protocols used by your company and your trading partners.
Some parts of the book are for all users, and some parts are intended only for the administrator or other person who will be performing certain setup procedures. A user with restricted security rights cannot access certain parts of the user interface. However, this book covers setup and use of all the user interfaces associated with e*Xchange, and provides procedures for all users.
1.2 Compatible SystemsWindows Systems—When this document references Windows, such statements apply to both Windows platforms.
UNIX Systems—This guide uses the backslash (“\”) as the separator within path names. If you are working on a UNIX system, please make the appropriate substitutions.
Note: For a full list of supported operating systems, refer to the readme.txt file provided on the e*Gate Integrator installation CD-ROM.
e*Xchange Partner Manager User’s Guide 16
Chapter 1 Section 1.3Introduction Organization of Information
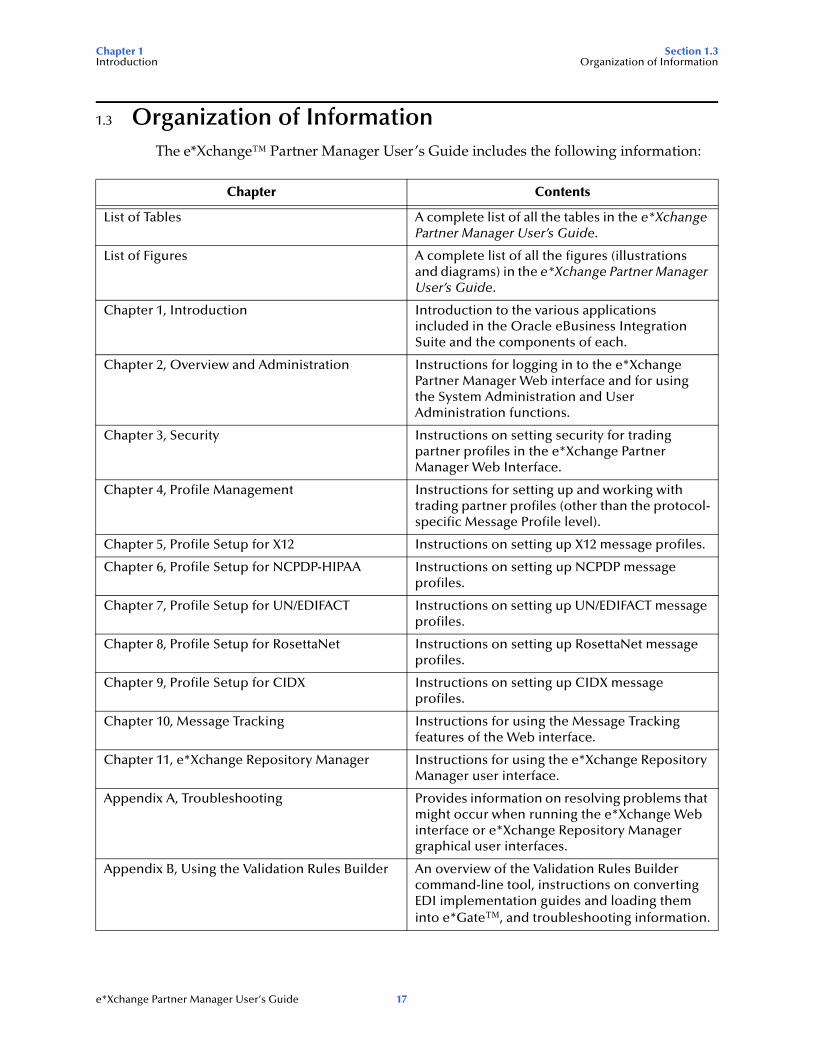
1.3 Organization of InformationThe e*Xchange™ Partner Manager User’s Guide includes the following information:
Chapter Contents
List of Tables A complete list of all the tables in the e*Xchange Partner Manager User’s Guide.
List of Figures A complete list of all the figures (illustrations and diagrams) in the e*Xchange Partner Manager User’s Guide.
Chapter 1, Introduction Introduction to the various applications included in the Oracle eBusiness Integration Suite and the components of each.
Chapter 2, Overview and Administration Instructions for logging in to the e*Xchange Partner Manager Web interface and for using the System Administration and User Administration functions.
Chapter 3, Security Instructions on setting security for trading partner profiles in the e*Xchange Partner Manager Web Interface.
Chapter 4, Profile Management Instructions for setting up and working with trading partner profiles (other than the protocol-specific Message Profile level).
Chapter 5, Profile Setup for X12 Instructions on setting up X12 message profiles.
Chapter 6, Profile Setup for NCPDP-HIPAA Instructions on setting up NCPDP message profiles.
Chapter 7, Profile Setup for UN/EDIFACT Instructions on setting up UN/EDIFACT message profiles.
Chapter 8, Profile Setup for RosettaNet Instructions on setting up RosettaNet message profiles.
Chapter 9, Profile Setup for CIDX Instructions on setting up CIDX message profiles.
Chapter 10, Message Tracking Instructions for using the Message Tracking features of the Web interface.
Chapter 11, e*Xchange Repository Manager Instructions for using the e*Xchange Repository Manager user interface.
Appendix A, Troubleshooting Provides information on resolving problems that might occur when running the e*Xchange Web interface or e*Xchange Repository Manager graphical user interfaces.
Appendix B, Using the Validation Rules Builder An overview of the Validation Rules Builder command-line tool, instructions on converting EDI implementation guides and loading them into e*Gate™, and troubleshooting information.
e*Xchange Partner Manager User’s Guide 17
Chapter 1 Section 1.4Introduction Writing Conventions
1.4 Writing ConventionsThe writing conventions listed in this section are observed throughout this document.
Hypertext Links
When you are using this guide online, cross-references are also hypertext links and appear in blue text as shown below. Click the blue text to jump to the section.
For information on these and related topics, see “Parameter, Function, and Command Names” on page 19.
Command Line
Text to be typed at the command line is displayed in Courier as shown below.
java -jar ValidationBuilder.jar
Variables within a command line are set in the same font and bold italic as shown below.
stcregutil -rh host-name -rs schema-name -un user-name-up password -ef output-directory
Code and Samples
Computer code and samples (including printouts) on a separate line or lines are set in Courier as shown below.
Configuration for BOB_Promotion
However, when these elements (or portions of them) or variables representing several possible elements appear within ordinary text, they are set in italics as shown below.
path and file-name are the path and file name specified as arguments to -fr in the stcregutil command line.
Notes and Cautions
Points of particular interest or significance to the reader are introduced with Note, Caution, or Important, and the text is displayed in italics, for example:
Note: The Actions menu is only available when a Properties window is displayed.
Appendix C, e*Xchange Partner Manager Database Tables
An explanation of the e*Xchange message tracking database tables, with information on each column in each table.
Glossary Definitions of technical terms specific to the e*Xchange Partner Manager, as well as some industry terms.
Index An index to the guide.
Chapter Contents
e*Xchange Partner Manager User’s Guide 18
Chapter 1 Section 1.5Introduction Supporting Documents
User Input
The names of items in the user interface such as icons or buttons that you click or select appear in bold as shown below.
Click Apply to save, or OK to save and close.
File Names and Paths
When names of files are given in the text, they appear in bold as shown below.
Use a text editor to open the ValidationBuilder.properties file.
When file paths and drive designations are used, with or without the file name, they appear in bold as shown below.
In the Open field, type D:\setup\setup.exe where D: is your CD-ROM drive.
Parameter, Function, and Command Names
When names of parameters, functions, and commands are given in the body of the text, they appear in bold as follows:
The default parameter localhost is normally only used for testing.
The Monk function iq-put places an Event into an IQ.
You can use the stccb utility to start the Control Broker.
1.5 Supporting DocumentsThe following documents support the e*Xchange Partner Manager. You can find these documents in the \<eGate>\client\docs folder for your e*Gate installation, or on the \docs folder on the installation CD.
e*Xchange Partner Manager Implementation Guide
e*Xchange Partner Manager Installation Guide
e*Gate Integrator User’s Guide
e*Gate Integrator Release Notes
HIPAA ETD Library User’s Guide
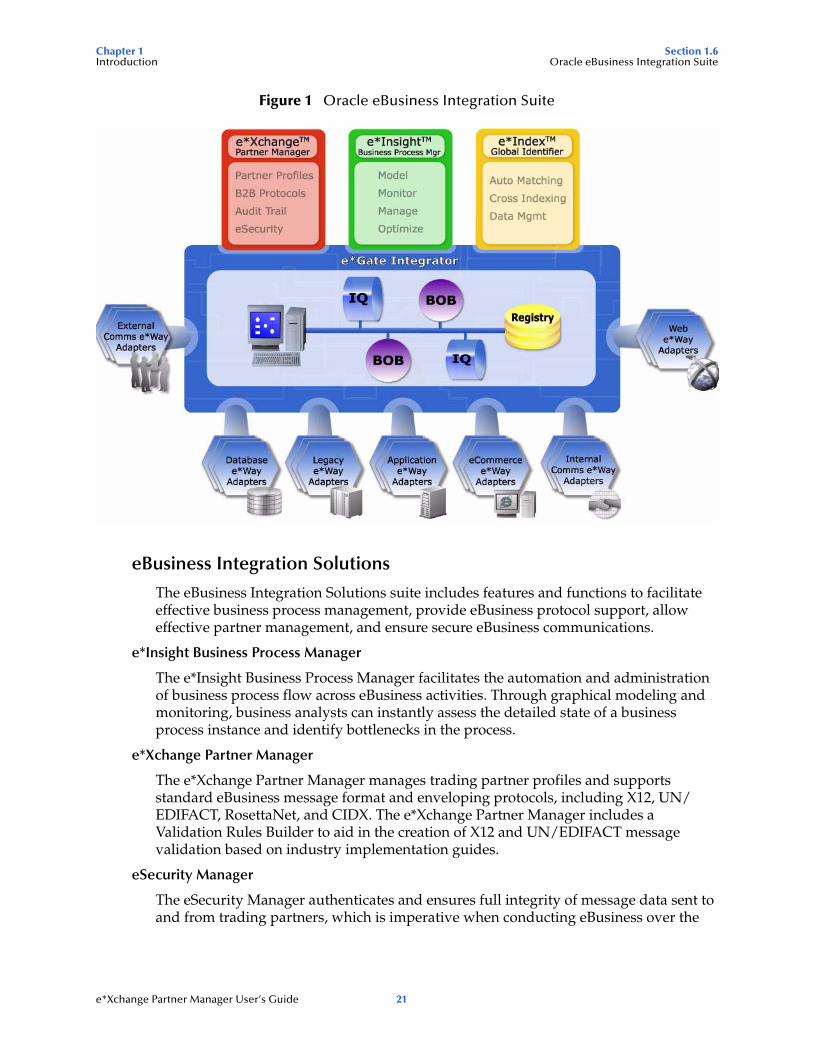
1.6 Oracle eBusiness Integration SuiteThis section provides an overview of the Oracle eBusiness Integration Suite and its parts. It also provides a detailed overview of the e*Xchange Partner Manager and eSecurity Manager components.
One of the biggest challenges today in conducting eBusiness is dealing with complex and dynamic partner relationships and coordinating control of the various activities participating in the eBusiness process. Both organizations and their trading partners are
e*Xchange Partner Manager User’s Guide 19
Chapter 1 Section 1.6Introduction Oracle eBusiness Integration Suite
faced with the problem of managing disparate component applications and aligning proprietary software requirements. In addition, organizations and their trading partners must agree on data exchange and security standards.
The Oracle eBusiness Integration Suite merges traditional Enterprise Application Integration (EAI) and Business-to-Business (B2B) interactions into a multi-enterprise eBusiness Integration (eBI) product suite. This suite allows you to:
leverage your existing technology and applications
create an eApplication consisting of component applications that are managed by your organization or your trading partners
rapidly execute eBusiness strategies
create and manage virtual organizations across the entire value chain
rapidly implement industry standard business protocols
quickly and easily establish new, or update existing, business partners
automatically secure transmissions sent over the public domain
This suite also provides:
extensive and flexible back-office connectivity
powerful data transformation and mapping facilities
content-based routing
unparalleled scalability based on a fully distributed architecture
1.6.1. Oracle eBusiness Integration Suite ComponentsThe Oracle eBusiness Integration Suite includes the following components and sub-components:
eBusiness Integration Solutions:
e*Insight™ Business Process Manager
e*Xchange Partner Manager
eSecurity Manager
e*Index Global Identifier
e*Gate™ Integrator:
e*Way™ Intelligent Adapters
IQ™ Intelligent Queues
Business Object Brokers (BOBs)
e*Xchange Partner Manager User’s Guide 20
Chapter 1 Section 1.6Introduction Oracle eBusiness Integration Suite
Figure 1 Oracle eBusiness Integration Suite
eBusiness Integration Solutions
The eBusiness Integration Solutions suite includes features and functions to facilitate effective business process management, provide eBusiness protocol support, allow effective partner management, and ensure secure eBusiness communications.
e*Insight Business Process Manager
The e*Insight Business Process Manager facilitates the automation and administration of business process flow across eBusiness activities. Through graphical modeling and monitoring, business analysts can instantly assess the detailed state of a business process instance and identify bottlenecks in the process.
e*Xchange Partner Manager
The e*Xchange Partner Manager manages trading partner profiles and supports standard eBusiness message format and enveloping protocols, including X12, UN/EDIFACT, RosettaNet, and CIDX. The e*Xchange Partner Manager includes a Validation Rules Builder to aid in the creation of X12 and UN/EDIFACT message validation based on industry implementation guides.
eSecurity Manager
The eSecurity Manager authenticates and ensures full integrity of message data sent to and from trading partners, which is imperative when conducting eBusiness over the
e*Xchange Partner Manager User’s Guide 21
Chapter 1 Section 1.7Introduction Introducing e*Xchange Partner Manager
public domain. The eSecurity Manager uses public key infrastructure (PKI) to ensure origin authentication of the sender.
e*Index Global Identifier
e*Index Global Identifier (e*Index) is a global cross-indexing application that provides a complete solution for automated person-matching across disparate source systems, simplifying the process of sharing member data between systems.
e*Index centralizes information about the people who participate throughout your business enterprise. The application provides accurate identification and cross-referencing of member information in order to maintain the most current information about each member. e*Index creates a single, consistent view of all member data by providing an automatic, common identification process regardless of the location or system from which the data originates.
e*Gate Integrator Components
The e*Gate Integrator enables the flow of information across an extended enterprise by providing comprehensive connectivity to applications and datastores across a network. e*Gate is based on a distributed architecture with an open design that deploys flexible load balancing options. e*Gate processes events according to user-defined business logic and integrates business processes between applications, ensuring end-to-end data flow into back-office systems.
e*Way Intelligent Adapters
e*Way Intelligent Adapters provide specialized application connectivity and also provide support for robust data processing such as business collaborations, transformation logic, and publish/subscribe relationships. e*Way adapters are multi-threaded to enable high-performance distributed processing capabilities. This multi-threaded processing allows for ultimate deployment flexibility and load balancing.
IQ Intelligent Queues
IQ Intelligent Queues are open queue services that provide robust data transport with guaranteed once-only message delivery.
Business Object Brokers
Business Object Brokers (BOBs) enable routing and load balancing between queues for implementing multi-step business processes.
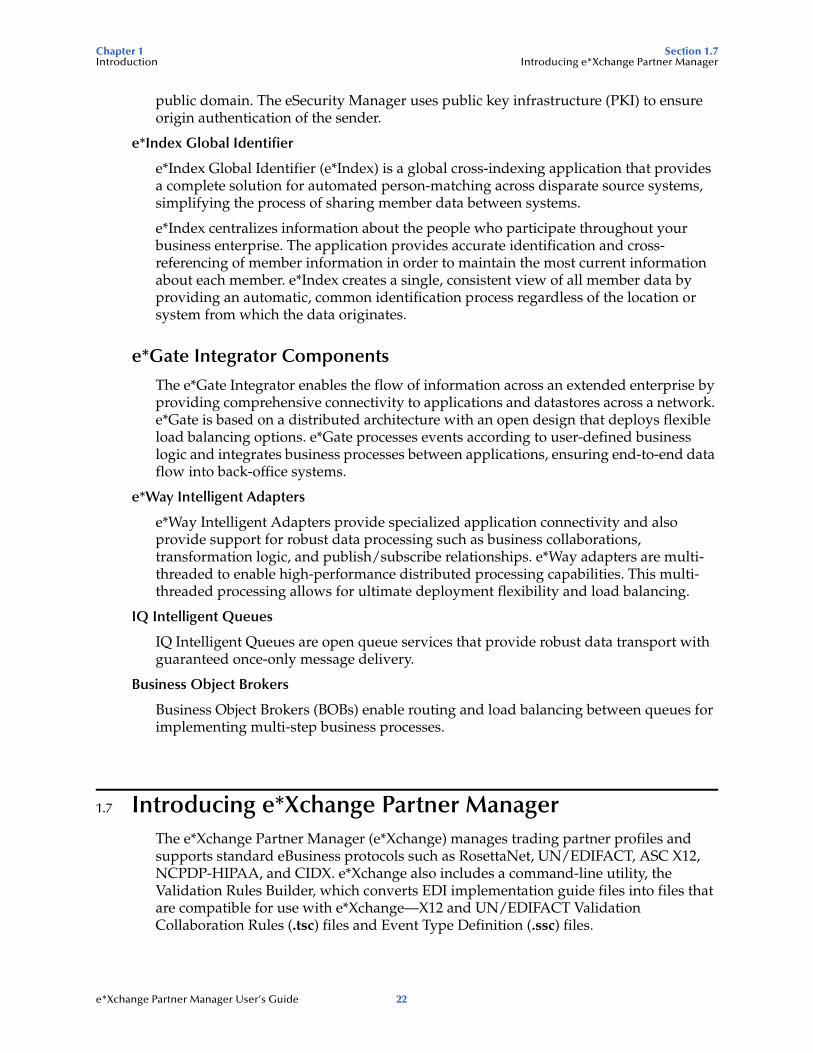
1.7 Introducing e*Xchange Partner ManagerThe e*Xchange Partner Manager (e*Xchange) manages trading partner profiles and supports standard eBusiness protocols such as RosettaNet, UN/EDIFACT, ASC X12, NCPDP-HIPAA, and CIDX. e*Xchange also includes a command-line utility, the Validation Rules Builder, which converts EDI implementation guide files into files that are compatible for use with e*Xchange—X12 and UN/EDIFACT Validation Collaboration Rules (.tsc) files and Event Type Definition (.ssc) files.
e*Xchange Partner Manager User’s Guide 22
Chapter 1 Section 1.7Introduction Introducing e*Xchange Partner Manager
Specifically, e*Xchange Partner Manager provides the following functionality:
Receives, processes, and routes inbound and outbound messages in batch, fast batch, and interactive transmission modes.
Validates messages based on libraries of Event Type Definitions (ETDs; templates of data to be exchanged, including fields, field sequences, and delimiters) and Collaboration scripts that conform to eBusiness protocols such as X12, UN/EDIFACT, RosettaNet, and CIDX.
Stores trading partner information, messages, acknowledgments, and errors in a database.
Automatically generates and reconciles acknowledgments.
Handles and reports errors.
Allows users to define trading partner profiles.
Allows users to view messages.
Allows users to resend messages from the Message Tracking feature.
Allows tracking of access to messages (audit tracking)
Automatically supports message enveloping as specified by the supported standards.
See Figure 2 for a graphical representation of e*Xchange Partner Manager.
Figure 2 e*Xchange Partner Manager
End-to-End Supply Chain
Custom
ersSupp
liers
eSec
urity
Man
ager
encr
yptio
n, a
uthe
ntic
atio
n, n
on-r
epud
iatio
n
e*Xc
hang
e Pa
rtne
r Man
ager
eBus
ines
s pr
otoc
ols
e*Xchange Partner Manager
eBusiness protocols
eSecurity Manager
encryption, authentication, non-repudiation
e*Gate Integrator
BOB BOB
e*Way e*Way e*Way
BOB BOB
DB ERP Legacy
e*Xchange Partner Manager User’s Guide 23
Chapter 1 Section 1.8Introduction Introducing eSecurity Manager
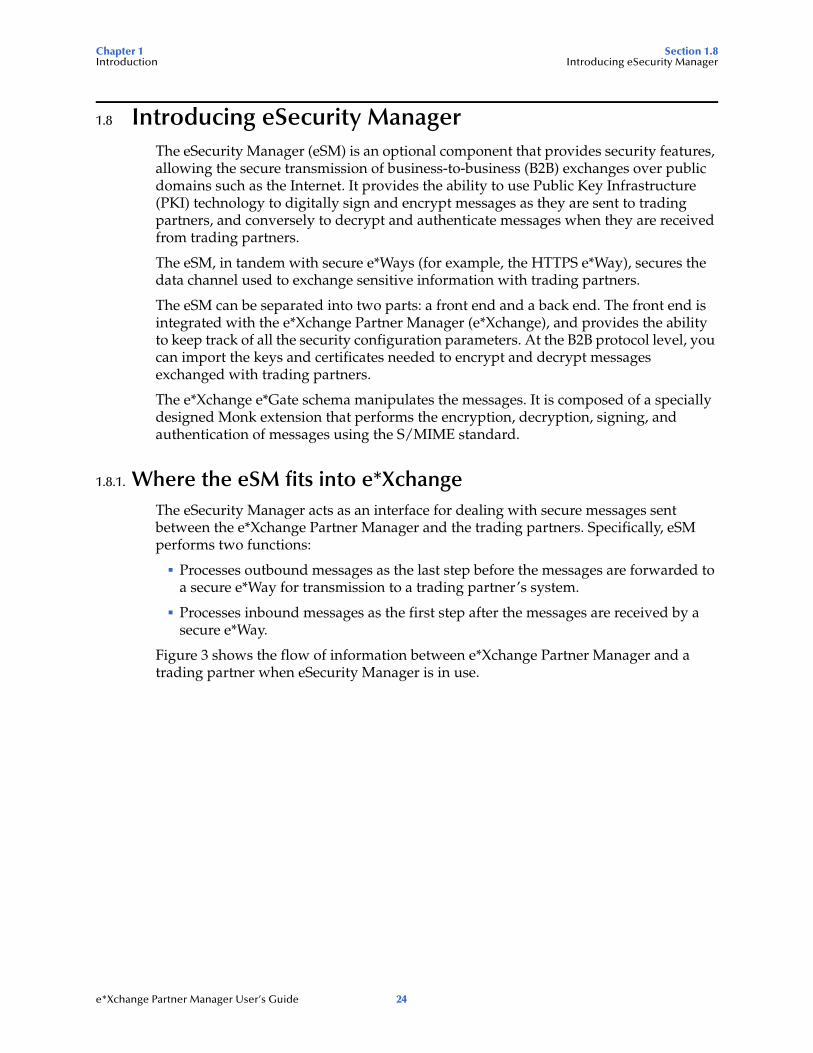
1.8 Introducing eSecurity ManagerThe eSecurity Manager (eSM) is an optional component that provides security features, allowing the secure transmission of business-to-business (B2B) exchanges over public domains such as the Internet. It provides the ability to use Public Key Infrastructure (PKI) technology to digitally sign and encrypt messages as they are sent to trading partners, and conversely to decrypt and authenticate messages when they are received from trading partners.
The eSM, in tandem with secure e*Ways (for example, the HTTPS e*Way), secures the data channel used to exchange sensitive information with trading partners.
The eSM can be separated into two parts: a front end and a back end. The front end is integrated with the e*Xchange Partner Manager (e*Xchange), and provides the ability to keep track of all the security configuration parameters. At the B2B protocol level, you can import the keys and certificates needed to encrypt and decrypt messages exchanged with trading partners.
The e*Xchange e*Gate schema manipulates the messages. It is composed of a specially designed Monk extension that performs the encryption, decryption, signing, and authentication of messages using the S/MIME standard.
1.8.1. Where the eSM fits into e*XchangeThe eSecurity Manager acts as an interface for dealing with secure messages sent between the e*Xchange Partner Manager and the trading partners. Specifically, eSM performs two functions:
Processes outbound messages as the last step before the messages are forwarded to a secure e*Way for transmission to a trading partner’s system.
Processes inbound messages as the first step after the messages are received by a secure e*Way.
Figure 3 shows the flow of information between e*Xchange Partner Manager and a trading partner when eSecurity Manager is in use.
e*Xchange Partner Manager User’s Guide 24
Chapter 1 Section 1.8Introduction Introducing eSecurity Manager
Figure 3 eSecurity Manager
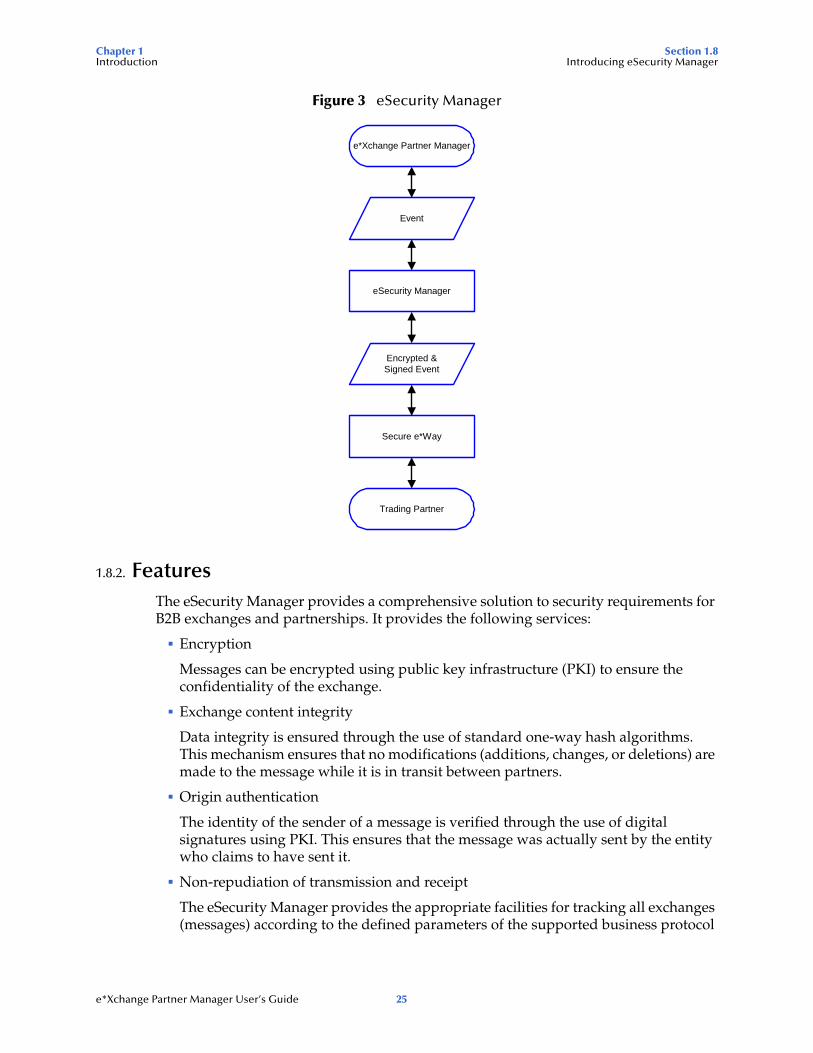
1.8.2. FeaturesThe eSecurity Manager provides a comprehensive solution to security requirements for B2B exchanges and partnerships. It provides the following services:
Encryption
Messages can be encrypted using public key infrastructure (PKI) to ensure the confidentiality of the exchange.
Exchange content integrity
Data integrity is ensured through the use of standard one-way hash algorithms. This mechanism ensures that no modifications (additions, changes, or deletions) are made to the message while it is in transit between partners.
Origin authentication
The identity of the sender of a message is verified through the use of digital signatures using PKI. This ensures that the message was actually sent by the entity who claims to have sent it.
Non-repudiation of transmission and receipt
The eSecurity Manager provides the appropriate facilities for tracking all exchanges (messages) according to the defined parameters of the supported business protocol
eSecurity Manager
Secure e*Way
Event
Encrypted &Signed Event
Trading Partner
e*Xchange Partner Manager
e*Xchange Partner Manager User’s Guide 25
Chapter 1 Section 1.8Introduction Introducing eSecurity Manager
(for example, X12, UN/EDIFACT, RosettaNet, and CIDX) for the purpose of ensuring indisputable confirmation of both transmission and receipt.
Key management
Because all the above security functions are supported through the use of PKI, the e*Xchange Partner Manager also provides appropriate facilities for storing your own private key and the public keys for each trading partner.
1.8.3. Sending and Receiving a Digitally Signed MessageThe following steps describe how to send and receive a digitally signed message.
1 The message is put through a “hash” function; that is, a function that creates a short, unique mathematical representation of the original message called the message digest (for example, MD5 or SHA).
2 The message digest is encrypted using the sender’s private key to create a digital signature.
3 The original message and the digital signature are sent together as a signed message to the recipient.
4 The recipient takes the message portion of the signed message and puts it through the same hash function used by the sender to create a message digest.
5 The recipient takes the digital signature portion of the signed message and decrypts it using the sender’s public key to create another copy of the message digest.
6 The recipient compares the message digests from steps 4 and 5. If they are equal, the message has arrived unaltered and was sent by the trading partner who holds the private key corresponding to the public key we have for the trading partner. In this way the authenticity of both the sender and the message can be verified.
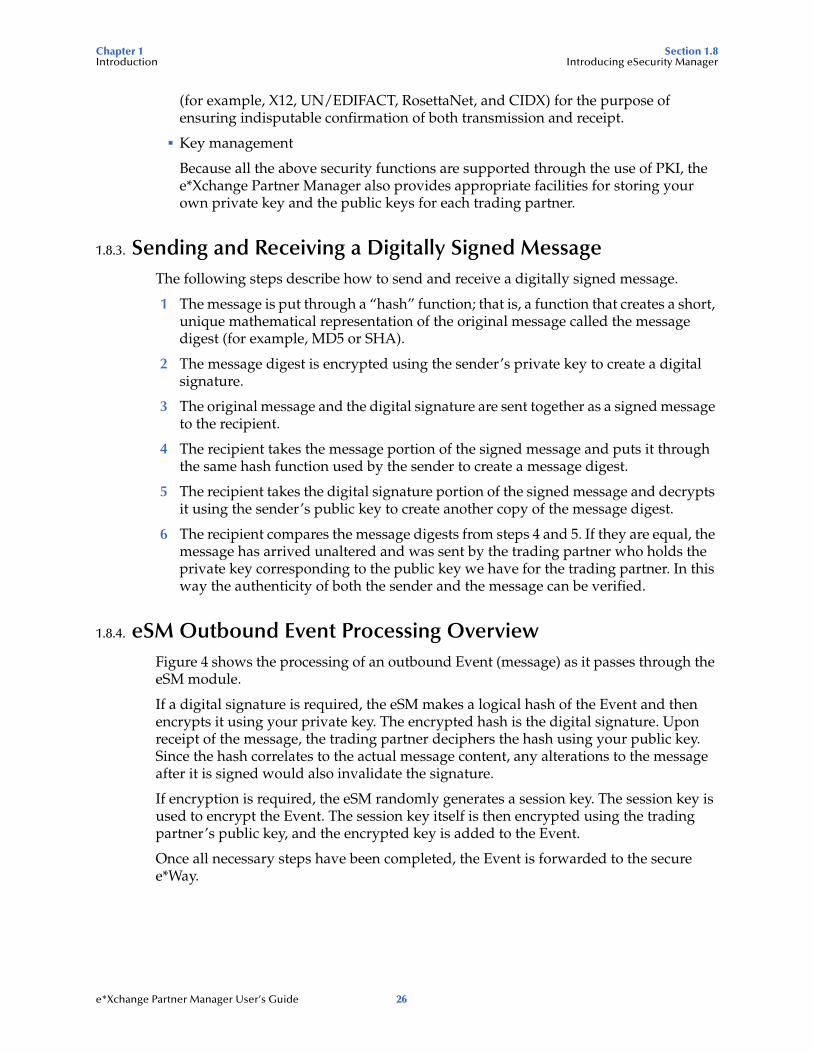
1.8.4. eSM Outbound Event Processing OverviewFigure 4 shows the processing of an outbound Event (message) as it passes through the eSM module.
If a digital signature is required, the eSM makes a logical hash of the Event and then encrypts it using your private key. The encrypted hash is the digital signature. Upon receipt of the message, the trading partner deciphers the hash using your public key. Since the hash correlates to the actual message content, any alterations to the message after it is signed would also invalidate the signature.
If encryption is required, the eSM randomly generates a session key. The session key is used to encrypt the Event. The session key itself is then encrypted using the trading partner’s public key, and the encrypted key is added to the Event.
Once all necessary steps have been completed, the Event is forwarded to the secure e*Way.
e*Xchange Partner Manager User’s Guide 26
Chapter 1 Section 1.8Introduction Introducing eSecurity Manager
Figure 4 eSM Outbound Event Processing
Hash Event
Retrieve private keyfrom PKI database
Sign Event?
Encrypt Event?
Retrieve partner's public keycertificate from PKI database
Encrypt session key withpartner's public key
Encrypt hashed Event using originator's private keyto create a digital signature
Add digital signature & originator'spublic key to outbound Event
Forward outboundEvent to secure e*Way
Randomly generate session key
Use session key toblock encrypt the Event
Add PKI encrypted sessionkey to block encrypted Event
No
No
Yes
Yes
PKI database
eSM receives outbound Event from e*Xchange
e*Xchange Partner Manager User’s Guide 27
Chapter 1 Section 1.8Introduction Introducing eSecurity Manager
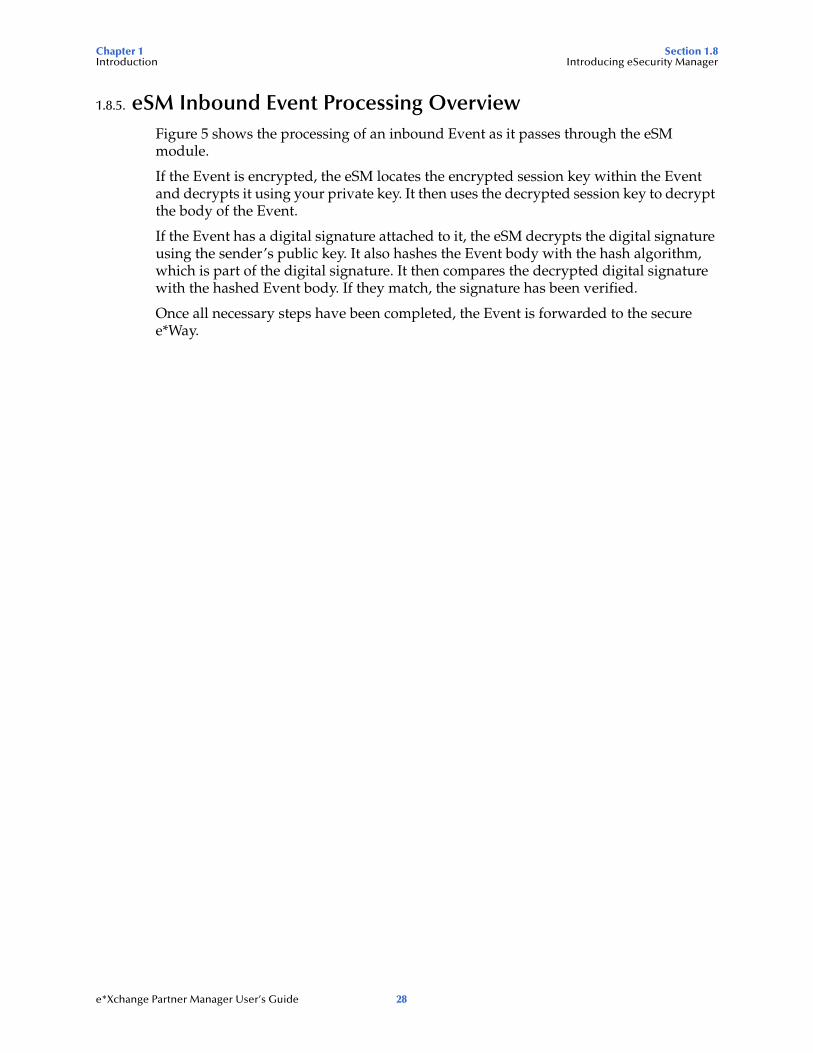
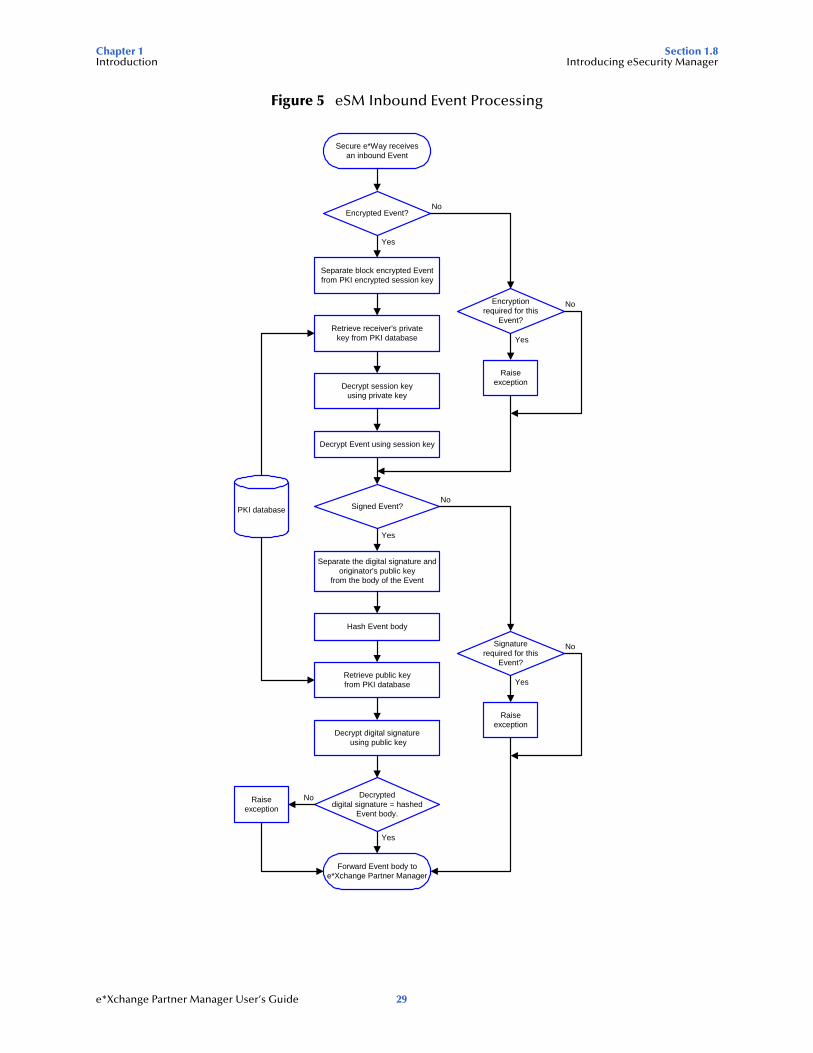
1.8.5. eSM Inbound Event Processing OverviewFigure 5 shows the processing of an inbound Event as it passes through the eSM module.
If the Event is encrypted, the eSM locates the encrypted session key within the Event and decrypts it using your private key. It then uses the decrypted session key to decrypt the body of the Event.
If the Event has a digital signature attached to it, the eSM decrypts the digital signature using the sender’s public key. It also hashes the Event body with the hash algorithm, which is part of the digital signature. It then compares the decrypted digital signature with the hashed Event body. If they match, the signature has been verified.
Once all necessary steps have been completed, the Event is forwarded to the secure e*Way.
e*Xchange Partner Manager User’s Guide 28
Chapter 1 Section 1.8Introduction Introducing eSecurity Manager
Figure 5 eSM Inbound Event Processing
Secure e*Way receivesan inbound Event
Retrieve receiver's privatekey from PKI database
Signed Event?PKI database
Forward Event body toe*Xchange Partner Manager
Hash Event body
Decrypt digital signature using public key
Separate the digital signature andoriginator's public key
from the body of the Event
Decrypteddigital signature = hashed
Event body.
Retrieve public keyfrom PKI database
Raiseexception
Encrypted Event?
Encryptionrequired for this
Event?
Raiseexception
Yes
No
No
Yes
Separate block encrypted Eventfrom PKI encrypted session key
Decrypt session keyusing private key
Decrypt Event using session key
Yes
No
Signaturerequired for this
Event?
Raiseexception
Yes
No
Yes
No
e*Xchange Partner Manager User’s Guide 29
Chapter 2
Overview and Administration
e*Xchange Partner Manager user interface is browser-based so that you can set up and maintain trading partner profiles over the Web.
From the Web interface you can complete the activities listed below.
Profile Management; you can add, edit, or delete any of the four layers that comprise a trading partner profile:
Company layer
Trading partner layer
B2B protocol layer (inbound or outbound)
Message profile layer
In addition, for each of these layers, you can:
Set or change security
Add, edit, or delete contacts
Message Tracking; you can:
View any messages that have been processed by e*Xchange
Use the various search fields to narrow down your search before viewing message details
For any message, view an error list, extended attributes, or actual text of the original message, enveloped message, or acknowledgment message.
Resend certain messages that have not been sent due to errors.
View a list of users who have viewed specific messages (audit tracking feature).
System Administration; you can:
Set system defaults
Add or modify values to system code tables
Configure database connections for the Web interface
User Administration; you can:
Add users
Expire and reinstate user access rights
Create user groups
e*Xchange Partner Manager User’s Guide 30
Chapter 2 Section 2.1Overview and Administration Supported Browsers
Assign users to user groups
Having a Web-based user interface offers significant advantages. The Web interface is a three-tiered application that allows access from anywhere in the world. It is a “thin client” application and also reduces the complexities of working through firewalls and DMZs (De-Militarized Zones).
Note: In the Web interface, an asterisk (*) on a field indicates that it is a required field.
2.1 Supported BrowsersThe e*Xchange Partner Manager Web interface works with the following browser versions:
Microsoft Internet Explorer 5.0
Microsoft Internet Explorer 5.5
2.2 User Permissions: An OverviewThere is only one user for the e*Xchange Web interface at the database level; the schema/database owner. This user is assigned to all default application administration groups. The schema/database owner can set up additional users via the Web interface. These users are only created at the application level, and have no default database access privileges. When a new user logs in to the application, the application logs into the database as the schema owner and authenticates the new username and password from user information stored in the database tables.
The schema/database owner username and password are stored in the database connection definition file, epm.std. The default location for this file is \eXchange\tomcat-3.2.1\webapps\stcepmweb\web-inf. It is in XML format. Each database connection is described by a set of XML tags. The <username> and <password> tags store the encrypted version of the schema/database owner username and password. After initial installation, the value for each of these two tags is set to a default of six asterisks (******). When the connection is called for the first time from the Web interface, the user is asked to enter the schema owner’s username and password information. e*Xchange encrypts this information and stores it in the epm.std file. Once those encrypted values are set up, any application users that have been defined in the database can log in to the Web interface directly. When each user logs on, e*Xchange verifies the username and password against the user information stored in the database tables.
This approach provides tight security for the information stored in the e*Xchange schema/database. It also reduces the database-level privileges required for the schema/database owner. For Oracle, this allows for more than one schema per database instance.
e*Xchange Partner Manager User’s Guide 31
Chapter 2 Section 2.3Overview and Administration Logging In to the e*Xchange Partner Manager Web Interface
When installing a second schema, make sure that tablespace names and locations are unique for the new schema.
2.3 Logging In to the e*Xchange Partner Manager Web Interface
To run the e*Xchange Partner Manager Web interface, you must specify your login ID, password, and the database instance you want to use.
To log in to the e*Xchange Partner Manager Web interface
1 Start Tomcat (run the file \eXchange\tomcat-3.2.1\bin\startup.bat).
Note: If you are using DB2 UDB, the e*Xchange e*Gate schema and the Web interface cannot run on the same machine. This is because the Web interface uses JDBC and the e*Xchange e*Gate schema uses ODBC. If you have already installed both on the same machine, refer to the e*Xchange Installation Guide, Chapter 12, Installing the Web Interface and e*Gate schema for e*Xchange, for a workaround.
2 Start your browser and go to the http://localhost/stcepmweb/login_form.jsp page.
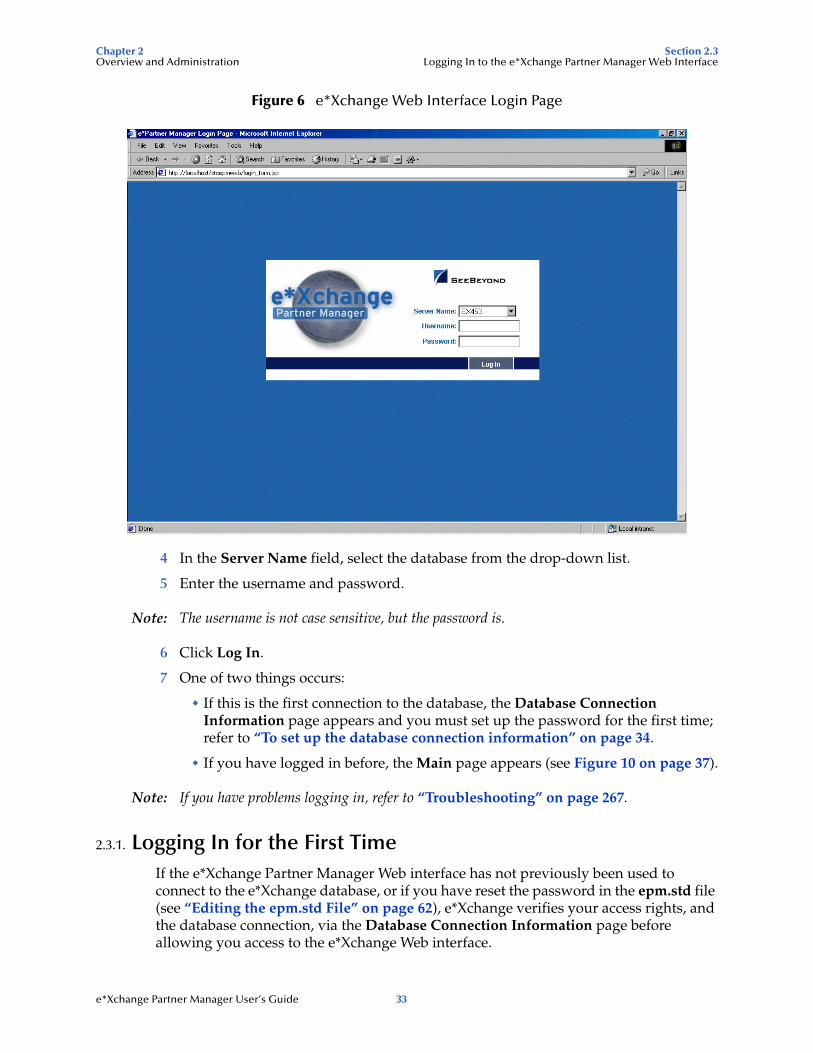
3 The e*Xchange Partner Manager login page appears (see Figure 6).
e*Xchange Partner Manager User’s Guide 32
Chapter 2 Section 2.3Overview and Administration Logging In to the e*Xchange Partner Manager Web Interface
Figure 6 e*Xchange Web Interface Login Page
4 In the Server Name field, select the database from the drop-down list.
5 Enter the username and password.
Note: The username is not case sensitive, but the password is.
6 Click Log In.
7 One of two things occurs:
If this is the first connection to the database, the Database Connection Information page appears and you must set up the password for the first time; refer to “To set up the database connection information” on page 34.
If you have logged in before, the Main page appears (see Figure 10 on page 37).
Note: If you have problems logging in, refer to “Troubleshooting” on page 267.
2.3.1. Logging In for the First TimeIf the e*Xchange Partner Manager Web interface has not previously been used to connect to the e*Xchange database, or if you have reset the password in the epm.std file (see “Editing the epm.std File” on page 62), e*Xchange verifies your access rights, and the database connection, via the Database Connection Information page before allowing you access to the e*Xchange Web interface.
e*Xchange Partner Manager User’s Guide 33
Chapter 2 Section 2.3Overview and Administration Logging In to the e*Xchange Partner Manager Web Interface
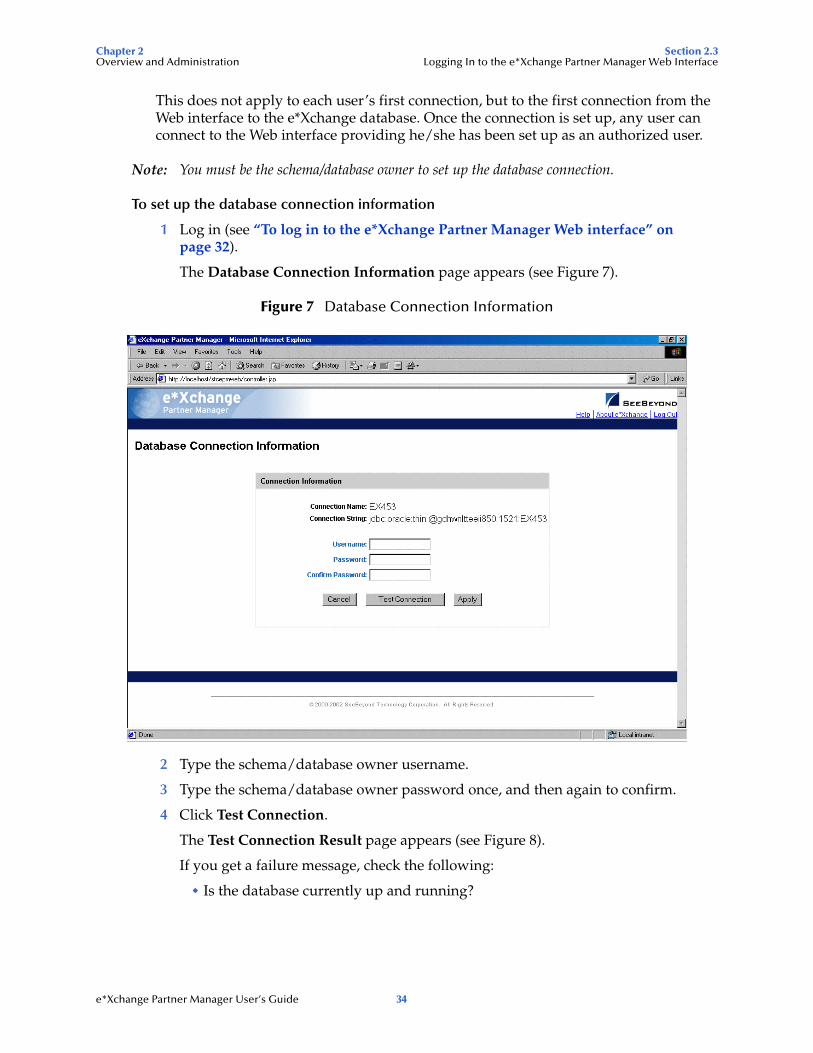
This does not apply to each user’s first connection, but to the first connection from the Web interface to the e*Xchange database. Once the connection is set up, any user can connect to the Web interface providing he/she has been set up as an authorized user.
Note: You must be the schema/database owner to set up the database connection.
To set up the database connection information
1 Log in (see “To log in to the e*Xchange Partner Manager Web interface” on page 32).
The Database Connection Information page appears (see Figure 7).
Figure 7 Database Connection Information
2 Type the schema/database owner username.
3 Type the schema/database owner password once, and then again to confirm.
4 Click Test Connection.
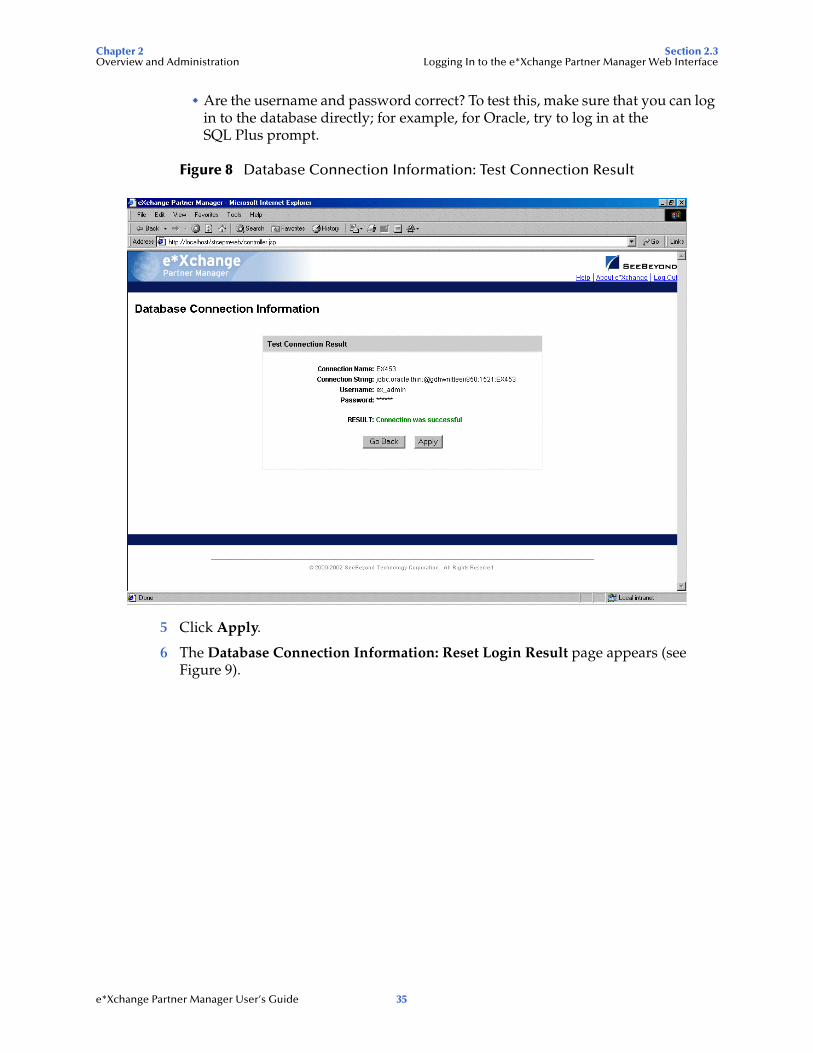
The Test Connection Result page appears (see Figure 8).
If you get a failure message, check the following:
Is the database currently up and running?
e*Xchange Partner Manager User’s Guide 34
Chapter 2 Section 2.3Overview and Administration Logging In to the e*Xchange Partner Manager Web Interface
Are the username and password correct? To test this, make sure that you can log in to the database directly; for example, for Oracle, try to log in at the SQL Plus prompt.
Figure 8 Database Connection Information: Test Connection Result
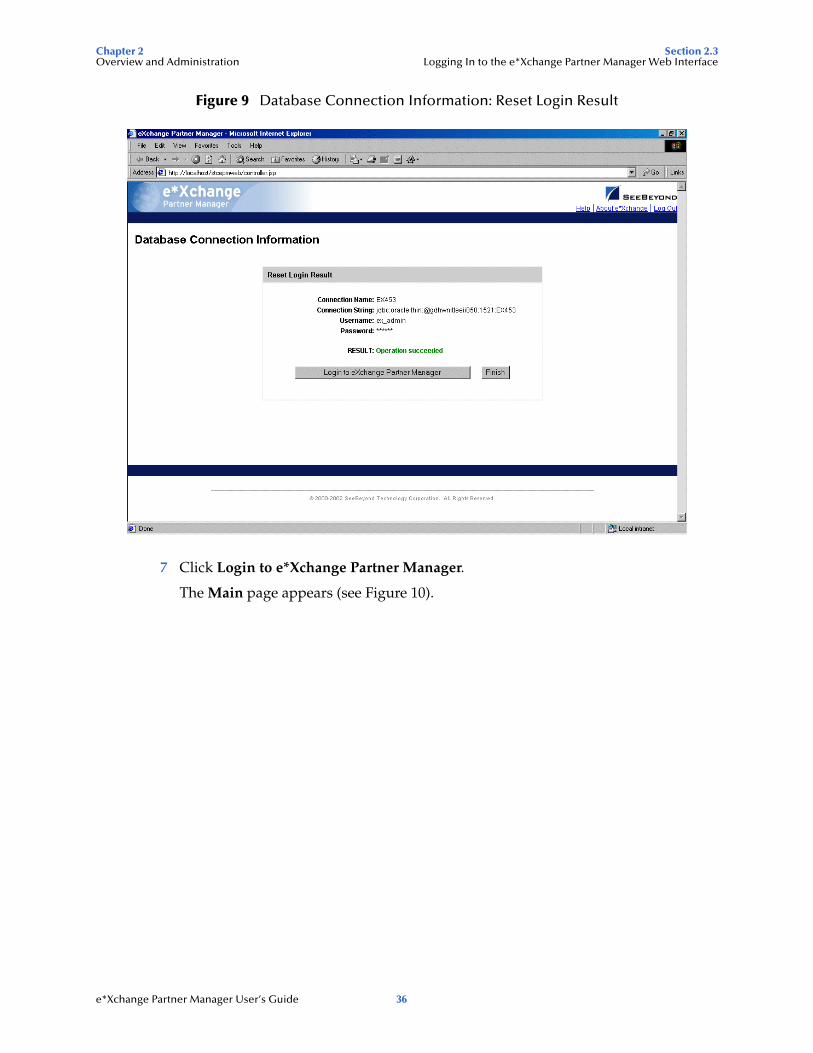
5 Click Apply.
6 The Database Connection Information: Reset Login Result page appears (see Figure 9).
e*Xchange Partner Manager User’s Guide 35
Chapter 2 Section 2.3Overview and Administration Logging In to the e*Xchange Partner Manager Web Interface
Figure 9 Database Connection Information: Reset Login Result
7 Click Login to e*Xchange Partner Manager.
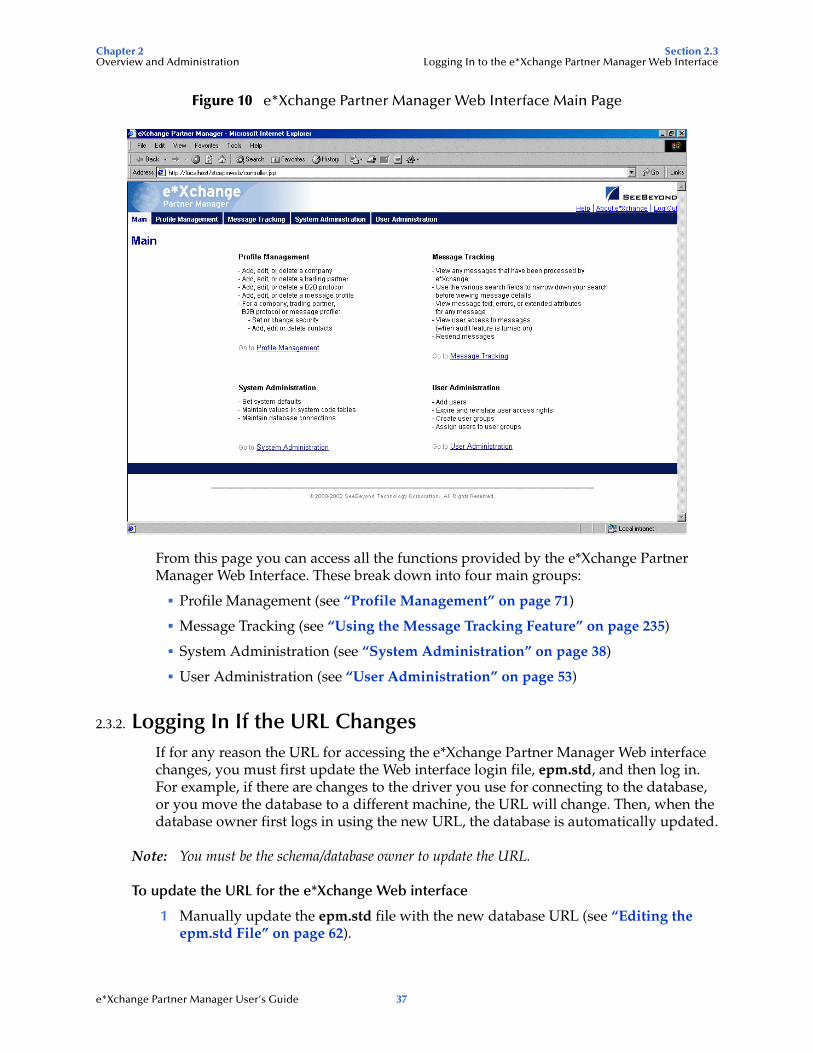
The Main page appears (see Figure 10).
e*Xchange Partner Manager User’s Guide 36
Chapter 2 Section 2.3Overview and Administration Logging In to the e*Xchange Partner Manager Web Interface
Figure 10 e*Xchange Partner Manager Web Interface Main Page
From this page you can access all the functions provided by the e*Xchange Partner Manager Web Interface. These break down into four main groups:
Profile Management (see “Profile Management” on page 71)
Message Tracking (see “Using the Message Tracking Feature” on page 235)
System Administration (see “System Administration” on page 38)
User Administration (see “User Administration” on page 53)
2.3.2. Logging In If the URL ChangesIf for any reason the URL for accessing the e*Xchange Partner Manager Web interface changes, you must first update the Web interface login file, epm.std, and then log in. For example, if there are changes to the driver you use for connecting to the database, or you move the database to a different machine, the URL will change. Then, when the database owner first logs in using the new URL, the database is automatically updated.
Note: You must be the schema/database owner to update the URL.
To update the URL for the e*Xchange Web interface
1 Manually update the epm.std file with the new database URL (see “Editing the epm.std File” on page 62).
e*Xchange Partner Manager User’s Guide 37
Chapter 2 Section 2.4Overview and Administration System Administration
<url>jdbc:oracle:thin:@dell850:1521:EX453</url>
2 Save and close the file.
3 Log in as the e*Xchange schema/database owner.
The value for the URL is automatically updated in the STC_CONFIG table in the e*Xchange database.
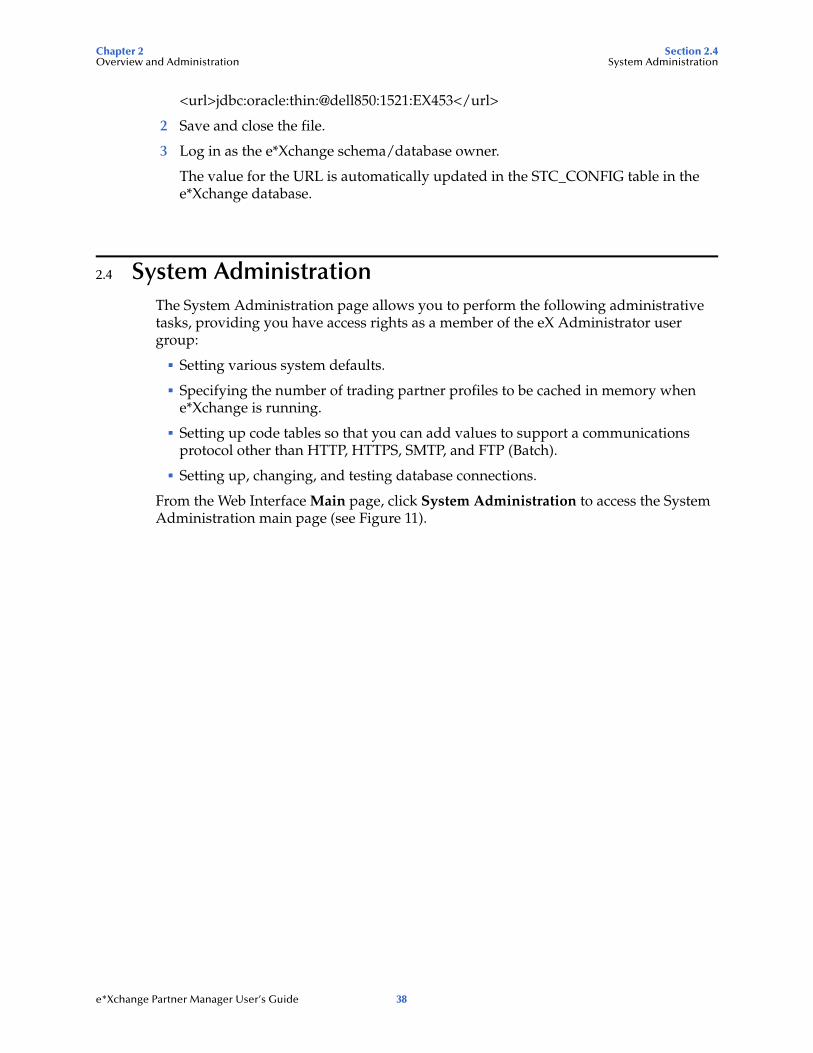
2.4 System AdministrationThe System Administration page allows you to perform the following administrative tasks, providing you have access rights as a member of the eX Administrator user group:
Setting various system defaults.
Specifying the number of trading partner profiles to be cached in memory when e*Xchange is running.
Setting up code tables so that you can add values to support a communications protocol other than HTTP, HTTPS, SMTP, and FTP (Batch).
Setting up, changing, and testing database connections.
From the Web Interface Main page, click System Administration to access the System Administration main page (see Figure 11).
e*Xchange Partner Manager User’s Guide 38
Chapter 2 Section 2.4Overview and Administration System Administration
Figure 11 System Administration Main Page
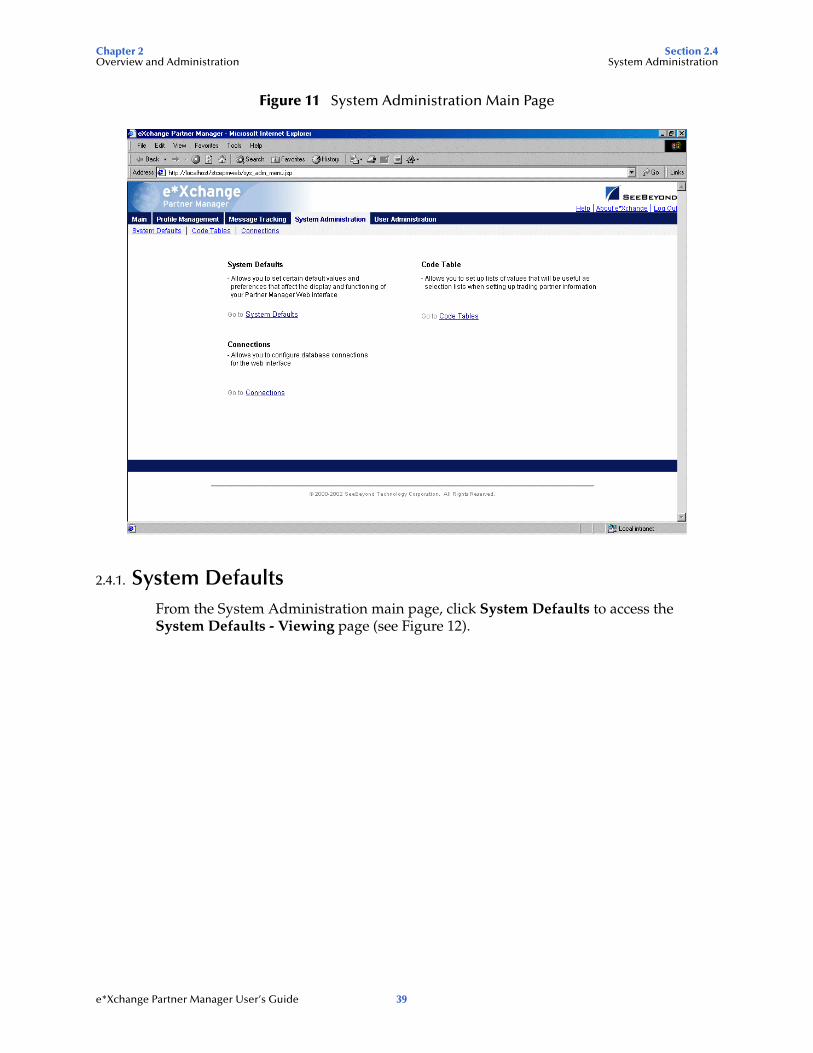
2.4.1. System DefaultsFrom the System Administration main page, click System Defaults to access the System Defaults - Viewing page (see Figure 12).
e*Xchange Partner Manager User’s Guide 39

Chapter 2 Section 2.4Overview and Administration System Administration
Figure 12 System Defaults - Viewing
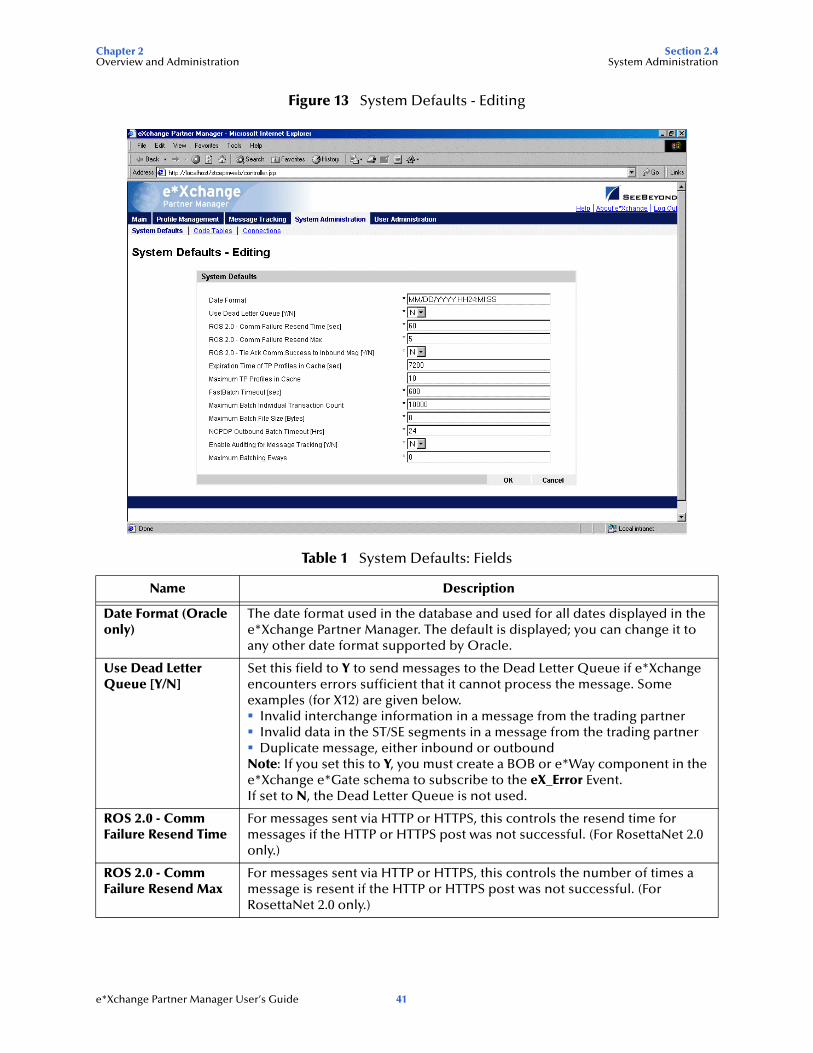
To change system defaults
If you need to change any of the default settings, follow the steps below.
1 From the System Defaults - Viewing page, click Edit to access the System Defaults - Editing page (see Figure 13).
Note: You can only access this page if you are a member of the eX Administrator user group.
2 Change the values as needed.
For more information on specific fields, refer to Table 1.
3 Click OK to save the changes.
e*Xchange Partner Manager User’s Guide 40
Chapter 2 Section 2.4Overview and Administration System Administration
Figure 13 System Defaults - Editing
Table 1 System Defaults: Fields
Name Description
Date Format (Oracle only)
The date format used in the database and used for all dates displayed in the e*Xchange Partner Manager. The default is displayed; you can change it to any other date format supported by Oracle.
Use Dead Letter Queue [Y/N]
Set this field to Y to send messages to the Dead Letter Queue if e*Xchange encounters errors sufficient that it cannot process the message. Some examples (for X12) are given below.
Invalid interchange information in a message from the trading partnerInvalid data in the ST/SE segments in a message from the trading partnerDuplicate message, either inbound or outbound
Note: If you set this to Y, you must create a BOB or e*Way component in the e*Xchange e*Gate schema to subscribe to the eX_Error Event.If set to N, the Dead Letter Queue is not used.
ROS 2.0 - Comm Failure Resend Time
For messages sent via HTTP or HTTPS, this controls the resend time for messages if the HTTP or HTTPS post was not successful. (For RosettaNet 2.0 only.)
ROS 2.0 - Comm Failure Resend Max
For messages sent via HTTP or HTTPS, this controls the number of times a message is resent if the HTTP or HTTPS post was not successful. (For RosettaNet 2.0 only.)
e*Xchange Partner Manager User’s Guide 41
Chapter 2 Section 2.4Overview and Administration System Administration
ROS 2.0 - Tie Ack Comm Success to Inbound Message [Y/N]
If you set this to Y, e*Xchange Partner Manager stores incoming messages sent by HTTP or HTTPS, sends the acknowledgment back to the trading partner, and waits to ensure that the HTTP or HTTPS post was successful before sending the message on to the internal system. (For RosettaNet 2.0 only.)
Expiration Time of TP Profiles in Cache [sec]
The amount of time, in seconds, for which a trading profile held in memory cache is used before being refreshed. Default: 7200 seconds (2 hours).
If you want TP profiles to be refreshed every time the profile is accessed, not cached in memory at all, set this value to 0.If you do not want TP profiles to be refreshed at all once cached in memory for the session, set this value to -1.
Maximum TP Profiles in Cache
The maximum number of trading partner profiles to be held in memory. If a greater number of trading partner profiles is accessed during one session, the profile that has been in memory longest is discarded. Caching of trading partner profiles speeds up performance by reducing interaction with the database. Default: 10.If you want all profiles to be stored in cache, with no upper limit, set this value to 0 and ensure that a valid expiration time is set for Expiration Time of TP Profiles in Cache.
FastBatch Timeout [sec]
The maximum amount of time, in seconds, that items for a batch are held before being sent out.As soon as e*Xchange receives all the messages for a batch, the batch is sent out. However, if one or more messages for a specific batch does not reach e*Xchange for any reason (for example, because of errors), the incomplete batch is sent out when the FastBatch Timeout value is reached.
Maximum Batch Individual Transaction Count
For batched transactions only: The maximum number of transactions of one type (for example, X12 version 4010 850) that can be sent in one batch.Note: Maximum Batch Individual Transaction Count and Maximum Batch File Size work together to ensure batches are not too large. The first of these limits that is reached determines the maximum batch size.
Maximum Batch File Size
For batched transactions only: The maximum total file size for one batch.Note: Maximum Batch Individual Transaction Count and Maximum Batch File Size work together to ensure batches are not too large. The first of these limits that is reached determines the maximum batch size.
Table 1 System Defaults: Fields (Continued)
Name Description
e*Xchange Partner Manager User’s Guide 42
Chapter 2 Section 2.4Overview and Administration System Administration
2.4.2. Code Tablese*Xchange Partner Manager provides various drop-down selection lists for your use when setting up communications protocol parameters. The items available for selection from these lists are determined by the code tables.
Some code table values are provided with e*Xchange. In addition, you can add a new code table, edit an existing code table, or delete a code table (if user-defined).
To have access to these functions, you must be a member of the eX Administrator user group.
Note: To add support of a communications protocol, you must make changes to the e*Xchange e*Gate schema as well as adding a new code table. For more information, refer to the Advanced Configuration chapter of the e*Xchange Implementation Guide.
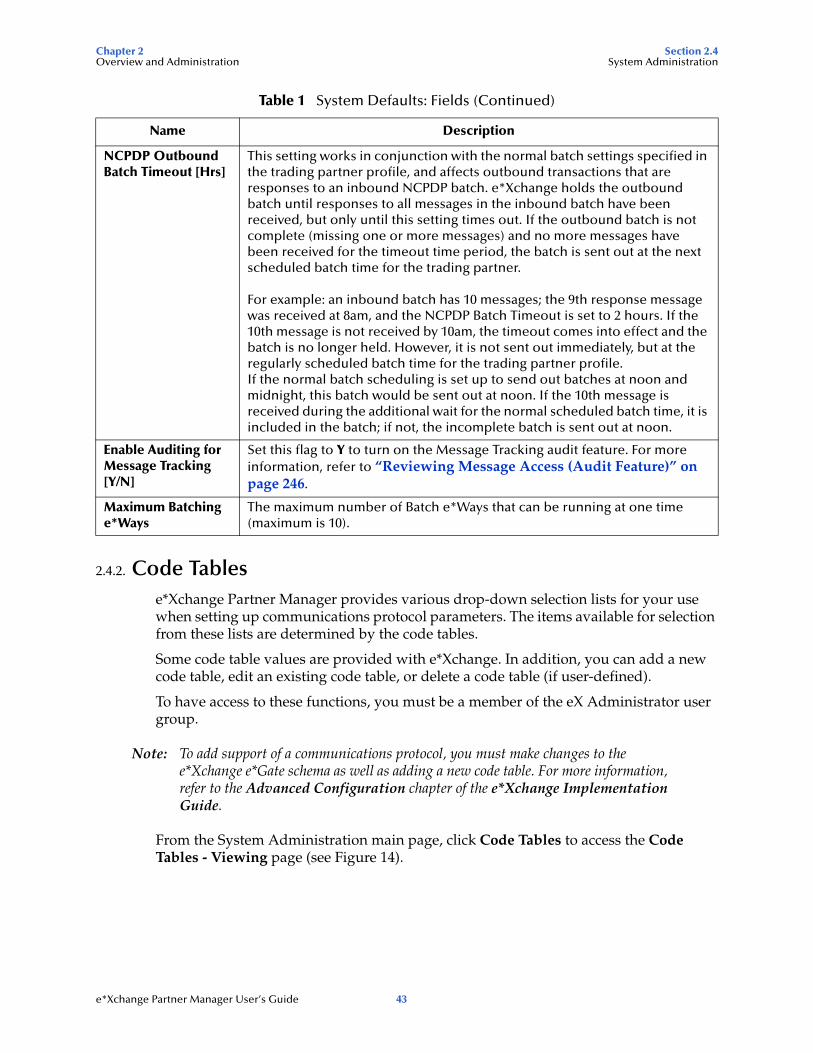
From the System Administration main page, click Code Tables to access the Code Tables - Viewing page (see Figure 14).
NCPDP Outbound Batch Timeout [Hrs]
This setting works in conjunction with the normal batch settings specified in the trading partner profile, and affects outbound transactions that are responses to an inbound NCPDP batch. e*Xchange holds the outbound batch until responses to all messages in the inbound batch have been received, but only until this setting times out. If the outbound batch is not complete (missing one or more messages) and no more messages have been received for the timeout time period, the batch is sent out at the next scheduled batch time for the trading partner.
For example: an inbound batch has 10 messages; the 9th response message was received at 8am, and the NCPDP Batch Timeout is set to 2 hours. If the 10th message is not received by 10am, the timeout comes into effect and the batch is no longer held. However, it is not sent out immediately, but at the regularly scheduled batch time for the trading partner profile.If the normal batch scheduling is set up to send out batches at noon and midnight, this batch would be sent out at noon. If the 10th message is received during the additional wait for the normal scheduled batch time, it is included in the batch; if not, the incomplete batch is sent out at noon.
Enable Auditing for Message Tracking [Y/N]
Set this flag to Y to turn on the Message Tracking audit feature. For more information, refer to “Reviewing Message Access (Audit Feature)” on page 246.
Maximum Batching e*Ways
The maximum number of Batch e*Ways that can be running at one time (maximum is 10).
Table 1 System Defaults: Fields (Continued)
Name Description
e*Xchange Partner Manager User’s Guide 43
Chapter 2 Section 2.4Overview and Administration System Administration
Figure 14 Code Tables - Viewing
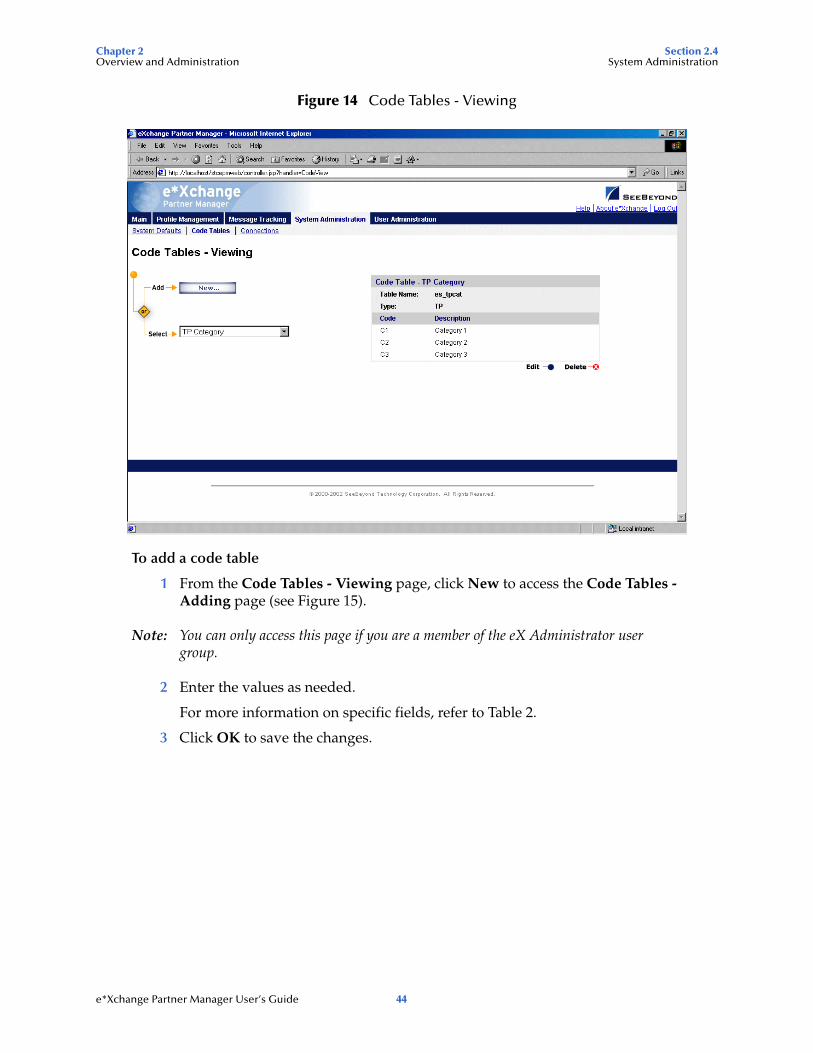
To add a code table
1 From the Code Tables - Viewing page, click New to access the Code Tables - Adding page (see Figure 15).
Note: You can only access this page if you are a member of the eX Administrator user group.
2 Enter the values as needed.
For more information on specific fields, refer to Table 2.
3 Click OK to save the changes.
e*Xchange Partner Manager User’s Guide 44
Chapter 2 Section 2.4Overview and Administration System Administration
Figure 15 Code Tables - Adding
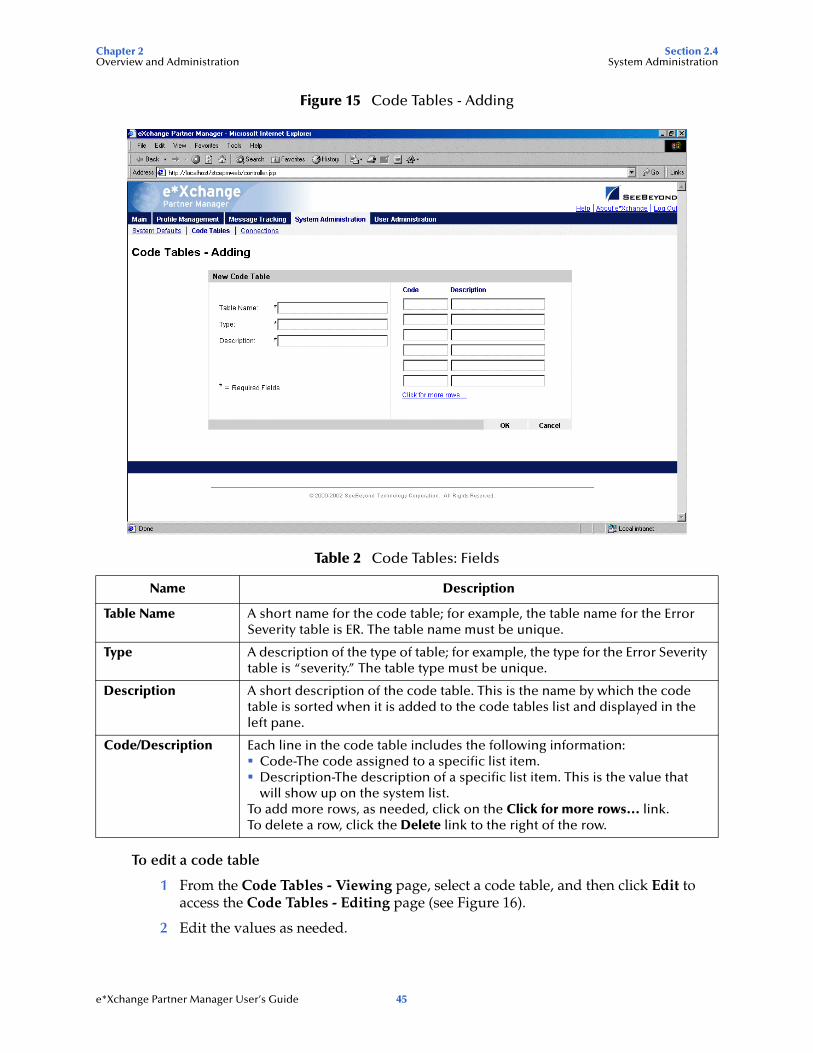
To edit a code table
1 From the Code Tables - Viewing page, select a code table, and then click Edit to access the Code Tables - Editing page (see Figure 16).
2 Edit the values as needed.
Table 2 Code Tables: Fields
Name Description
Table Name A short name for the code table; for example, the table name for the Error Severity table is ER. The table name must be unique.
Type A description of the type of table; for example, the type for the Error Severity table is “severity.” The table type must be unique.
Description A short description of the code table. This is the name by which the code table is sorted when it is added to the code tables list and displayed in the left pane.
Code/Description Each line in the code table includes the following information:Code-The code assigned to a specific list item.Description-The description of a specific list item. This is the value that will show up on the system list.
To add more rows, as needed, click on the Click for more rows... link.To delete a row, click the Delete link to the right of the row.
e*Xchange Partner Manager User’s Guide 45
Chapter 2 Section 2.4Overview and Administration System Administration
For more information on specific fields, refer to Table 2.
3 If you need to delete a row, click the Delete link to the right of the row.
4 Click OK to save the changes.
Figure 16 Code Tables - Editing
2.4.3. ConnectionsYou can set up database connections via the e*Xchange Partner Manager Web interface. When you do this, e*Xchange modifies the epm.std file in the background. The default location for this file is \eXchange\tomcat-3.2.1\webapps\stcepmweb\web-inf.
Each time you change settings via the Web interface, e*Xchange backs up the epm.std file with a different name before making changes to the file.
You can also set up your database connections directly in the epm.std file, as covered in “Editing the epm.std File” on page 62.
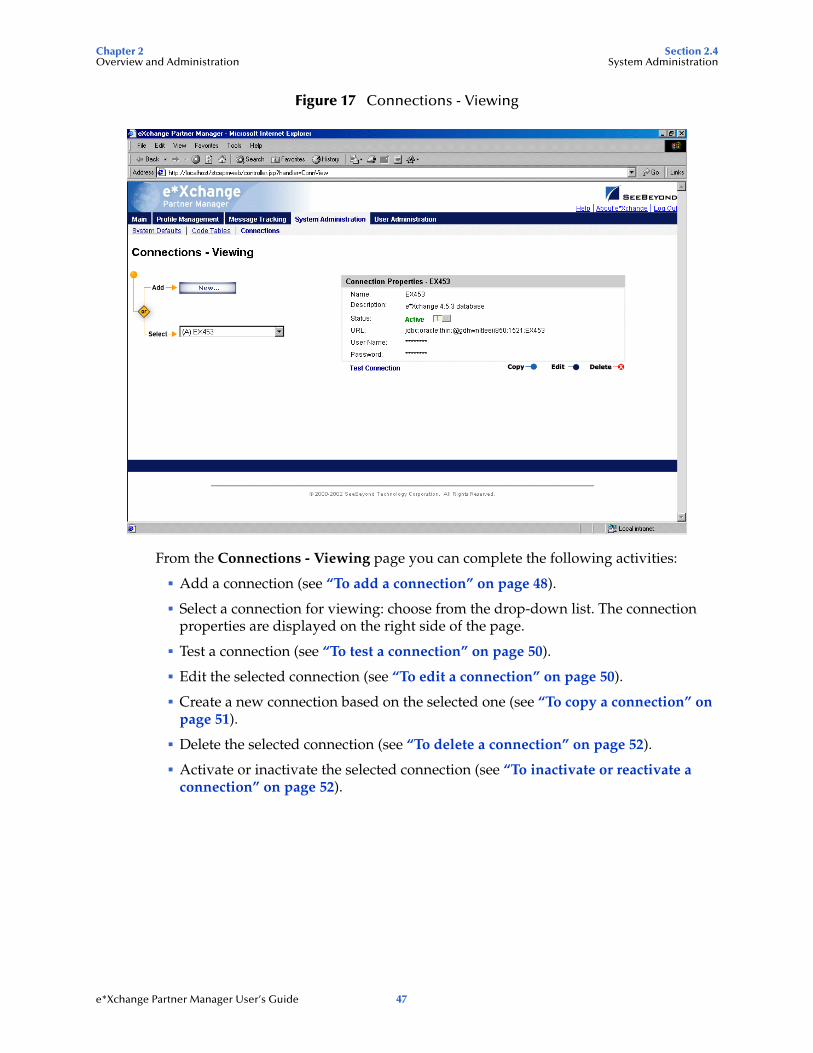
From the System Administration main page, click Connections to access the Connections - Viewing page (see Figure 17).
e*Xchange Partner Manager User’s Guide 46
Chapter 2 Section 2.4Overview and Administration System Administration
Figure 17 Connections - Viewing
From the Connections - Viewing page you can complete the following activities:
Add a connection (see “To add a connection” on page 48).
Select a connection for viewing: choose from the drop-down list. The connection properties are displayed on the right side of the page.
Test a connection (see “To test a connection” on page 50).
Edit the selected connection (see “To edit a connection” on page 50).
Create a new connection based on the selected one (see “To copy a connection” on page 51).
Delete the selected connection (see “To delete a connection” on page 52).
Activate or inactivate the selected connection (see “To inactivate or reactivate a connection” on page 52).
e*Xchange Partner Manager User’s Guide 47
Chapter 2 Section 2.4Overview and Administration System Administration
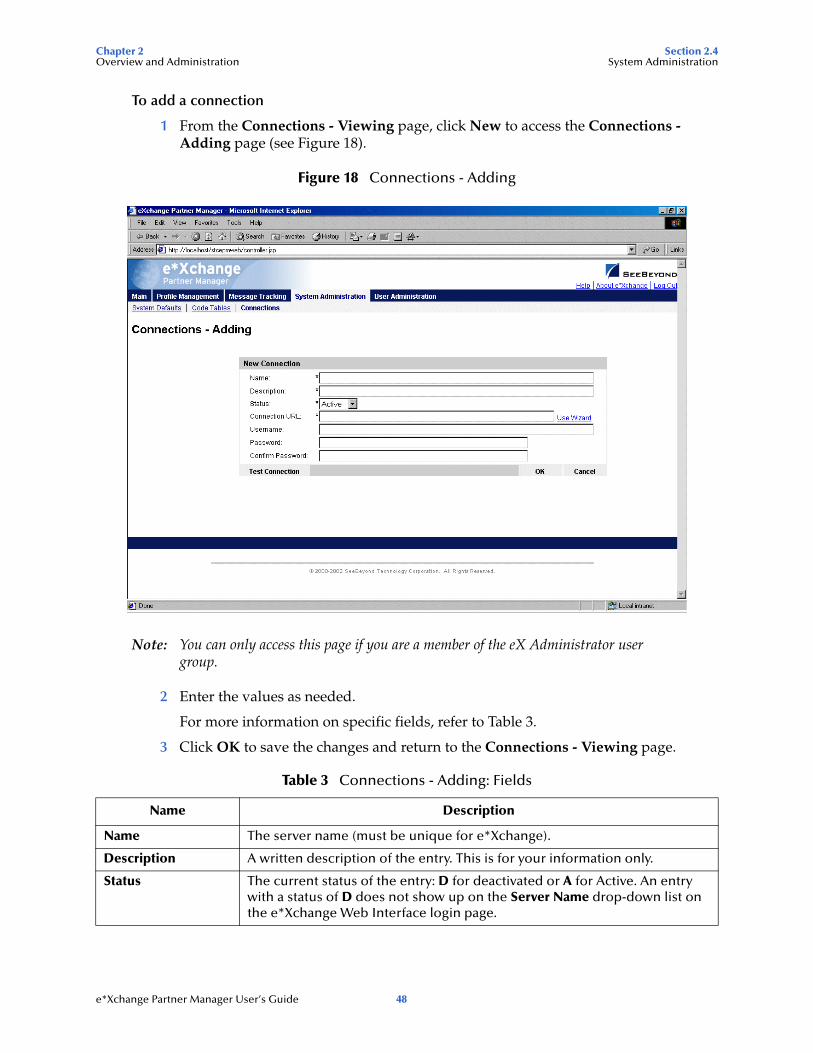
To add a connection
1 From the Connections - Viewing page, click New to access the Connections - Adding page (see Figure 18).
Figure 18 Connections - Adding
Note: You can only access this page if you are a member of the eX Administrator user group.
2 Enter the values as needed.
For more information on specific fields, refer to Table 3.
3 Click OK to save the changes and return to the Connections - Viewing page.
Table 3 Connections - Adding: Fields
Name Description
Name The server name (must be unique for e*Xchange).
Description A written description of the entry. This is for your information only.
Status The current status of the entry: D for deactivated or A for Active. An entry with a status of D does not show up on the Server Name drop-down list on the e*Xchange Web Interface login page.
e*Xchange Partner Manager User’s Guide 48

Chapter 2 Section 2.4Overview and Administration System Administration
Figure 19 Choose Database Type
Figure 20 Specify Database Information (Oracle)
Connection URL The URL for access to the database. This is a string comprised of several elements. Click Use Wizard to access the URL Help pages:1 On the Choose Database Type page, choose the database type (see Figure
19) and then click Next.2 On the Specify Database Information page (see Figure 20 for an example),
enter the following values:For Oracle: Host Name, Port, and SID.For Microsoft SQL Server or Sybase: Host Name, Port, and Database Name.For IBM DB2: Database Name.
3 Click Finish.
Username The user name for database access.
Password The password for database access.
Confirm Password Confirmation of the database access password.
Test Connection Click this link to test the connection to the database. The Test Connection Result dialog box displays the results.
Table 3 Connections - Adding: Fields (Continued)
Name Description
e*Xchange Partner Manager User’s Guide 49

Chapter 2 Section 2.4Overview and Administration System Administration
To test a connection
When you have set up the values for a connection entry, either before or after saving the connection, you should test the entry to make sure the connection works. Follow the instructions below to test after saving.
1 From the Connections - Viewing page, select the connection from the drop-down list.
The connection properties are displayed on the right side of the page.
2 Click Test Connection.
3 A Connection Test Result message appears, stating either Connection was Successful or Connection Failed.
4 Troubleshoot if needed.
If the connection fails, check the following:
Make sure the database is up and running.
Check that the username and password are correct. To test this, make sure that you can log in to the database directly; for example, for Oracle, try to log in at the SQL Plus prompt.
Make sure the host name is correct.
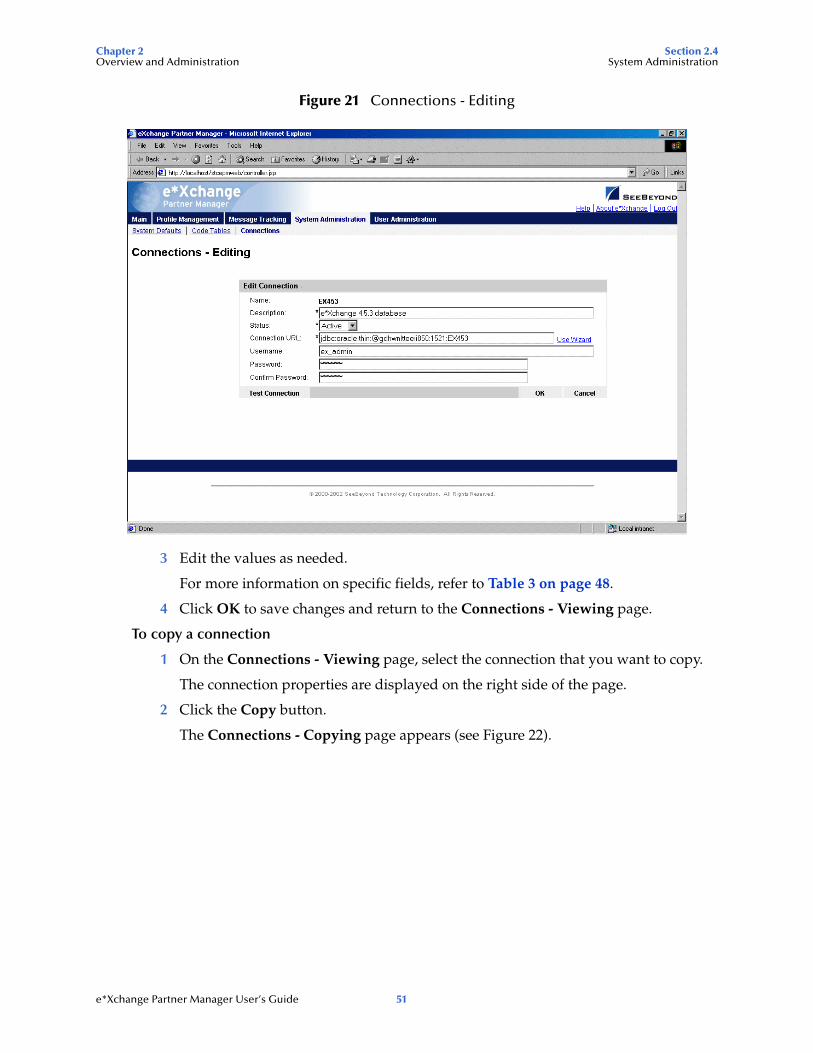
To edit a connection
1 From the Connections - Viewing page, select the connection from the drop-down list.
The connection properties are displayed on the right side of the page.
2 Click the Edit button to access the Connections - Editing page (see Figure 21).
e*Xchange Partner Manager User’s Guide 50
Chapter 2 Section 2.4Overview and Administration System Administration
Figure 21 Connections - Editing
3 Edit the values as needed.
For more information on specific fields, refer to Table 3 on page 48.
4 Click OK to save changes and return to the Connections - Viewing page.
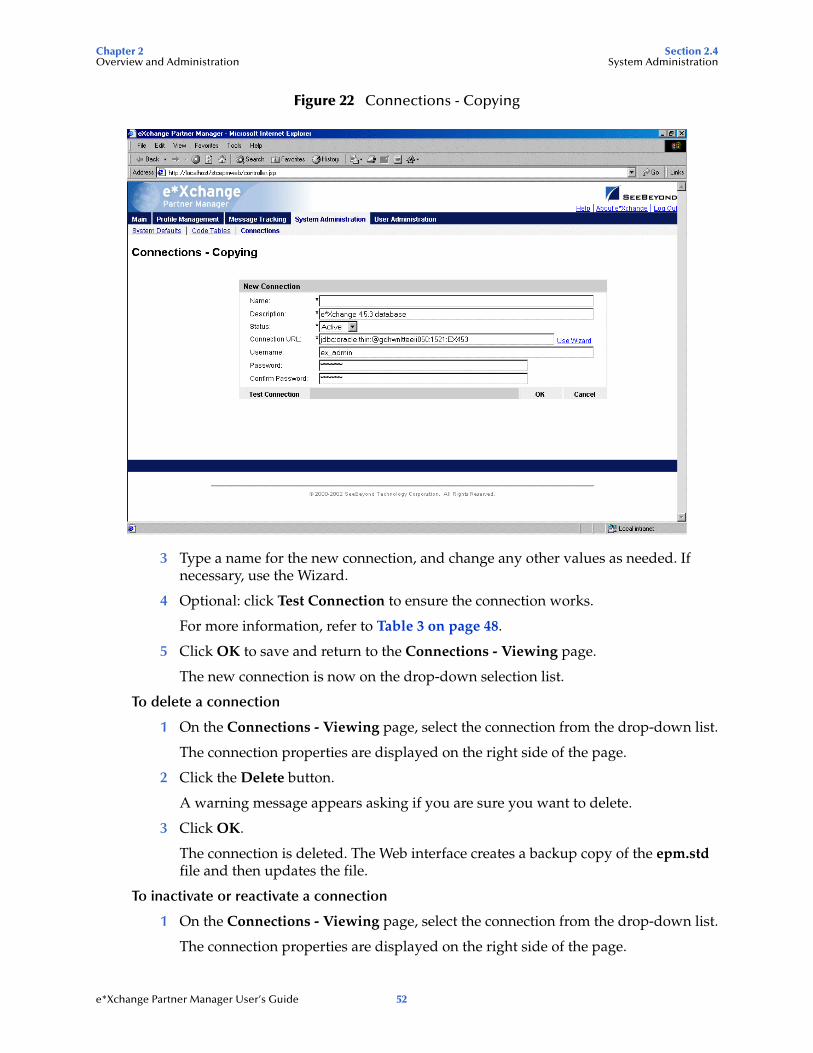
To copy a connection
1 On the Connections - Viewing page, select the connection that you want to copy.
The connection properties are displayed on the right side of the page.
2 Click the Copy button.
The Connections - Copying page appears (see Figure 22).
e*Xchange Partner Manager User’s Guide 51
Chapter 2 Section 2.4Overview and Administration System Administration
Figure 22 Connections - Copying
3 Type a name for the new connection, and change any other values as needed. If necessary, use the Wizard.
4 Optional: click Test Connection to ensure the connection works.
For more information, refer to Table 3 on page 48.
5 Click OK to save and return to the Connections - Viewing page.
The new connection is now on the drop-down selection list.
To delete a connection
1 On the Connections - Viewing page, select the connection from the drop-down list.
The connection properties are displayed on the right side of the page.
2 Click the Delete button.
A warning message appears asking if you are sure you want to delete.
3 Click OK.
The connection is deleted. The Web interface creates a backup copy of the epm.std file and then updates the file.
To inactivate or reactivate a connection
1 On the Connections - Viewing page, select the connection from the drop-down list.
The connection properties are displayed on the right side of the page.
e*Xchange Partner Manager User’s Guide 52
Chapter 2 Section 2.5Overview and Administration User Administration
2 In the Status field, toggle the Active/Inactive graphic to change the status. Values are as follows:
Connection is active: click to inactivate.
Connection is inactive: click to reactivate.
2.5 User Administratione*Xchange controls user access to various features by means of users and groups. Access rights to the user interface can be assigned to specific users. For convenience, you can also create user groups and assign users to them. By granting access to a group, you automatically grant access to all users within that group.
e*Xchange comes with several default user groups:
User Administration
eX Administrator
ePartner Manager Access
Partner Management
The User Administration features allow you to do the following:
Add users
Expire and reinstate user access rights
Create user groups
Assign users to user groups
From the Main page, click User Administration to access the User Administration main page (see Figure 23).
e*Xchange Partner Manager User’s Guide 53

Chapter 2 Section 2.5Overview and Administration User Administration
Figure 23 User Administration Main Page
Some of these selections might not be available to you, as follows:
If you are logged in as the schema owner, the Change Password feature is not available to you. You must change your password in the database itself.
If you are not a member of the User Administrator group, the Maintain Users and Maintain Groups features are not available to you. You do not have sufficient access rights for these activities.
e*Xchange Partner Manager User’s Guide 54
Chapter 2 Section 2.5Overview and Administration User Administration
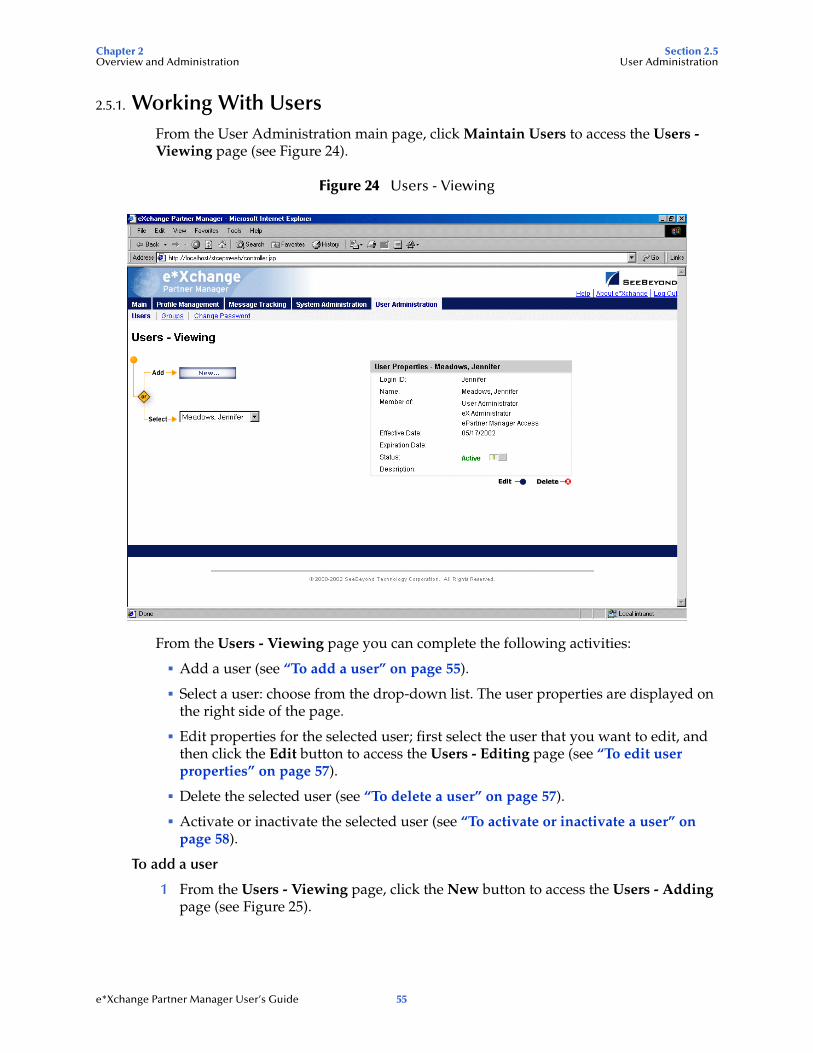
2.5.1. Working With UsersFrom the User Administration main page, click Maintain Users to access the Users - Viewing page (see Figure 24).
Figure 24 Users - Viewing
From the Users - Viewing page you can complete the following activities:
Add a user (see “To add a user” on page 55).
Select a user: choose from the drop-down list. The user properties are displayed on the right side of the page.
Edit properties for the selected user; first select the user that you want to edit, and then click the Edit button to access the Users - Editing page (see “To edit user properties” on page 57).
Delete the selected user (see “To delete a user” on page 57).
Activate or inactivate the selected user (see “To activate or inactivate a user” on page 58).
To add a user
1 From the Users - Viewing page, click the New button to access the Users - Adding page (see Figure 25).
e*Xchange Partner Manager User’s Guide 55
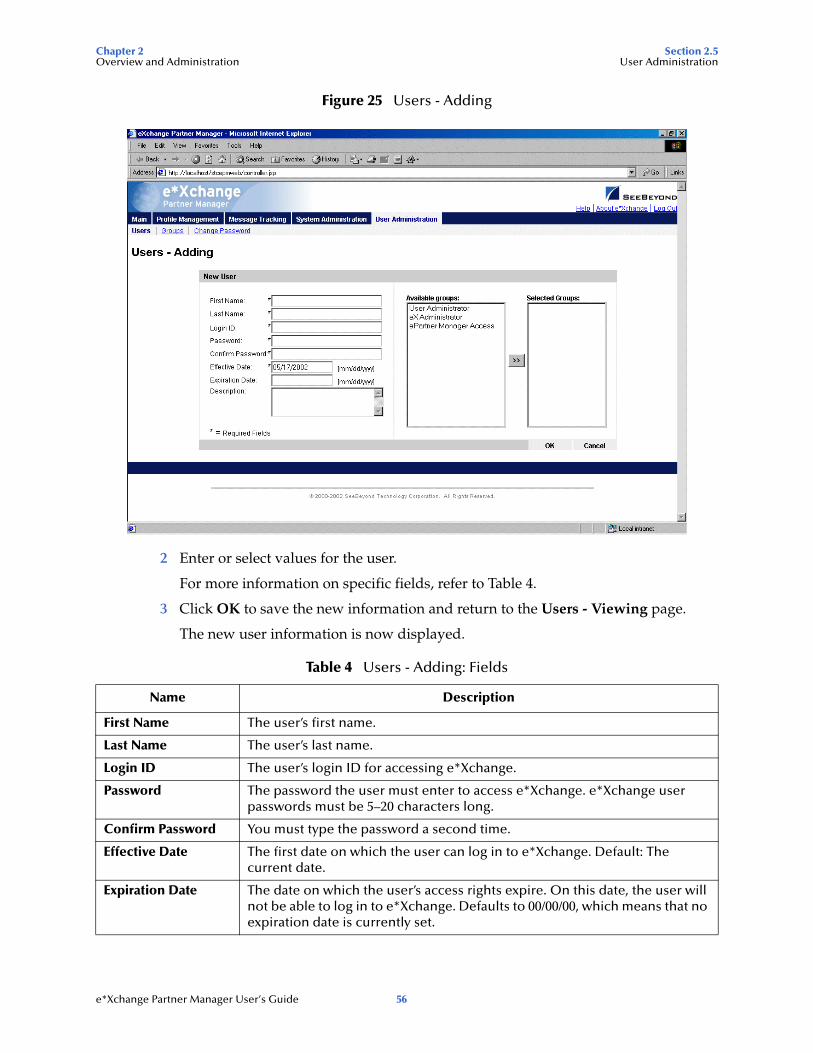
Chapter 2 Section 2.5Overview and Administration User Administration
Figure 25 Users - Adding
2 Enter or select values for the user.
For more information on specific fields, refer to Table 4.
3 Click OK to save the new information and return to the Users - Viewing page.
The new user information is now displayed.
Table 4 Users - Adding: Fields
Name Description
First Name The user’s first name.
Last Name The user’s last name.
Login ID The user’s login ID for accessing e*Xchange.
Password The password the user must enter to access e*Xchange. e*Xchange user passwords must be 5–20 characters long.
Confirm Password You must type the password a second time.
Effective Date The first date on which the user can log in to e*Xchange. Default: The current date.
Expiration Date The date on which the user’s access rights expire. On this date, the user will not be able to log in to e*Xchange. Defaults to 00/00/00, which means that no expiration date is currently set.
e*Xchange Partner Manager User’s Guide 56
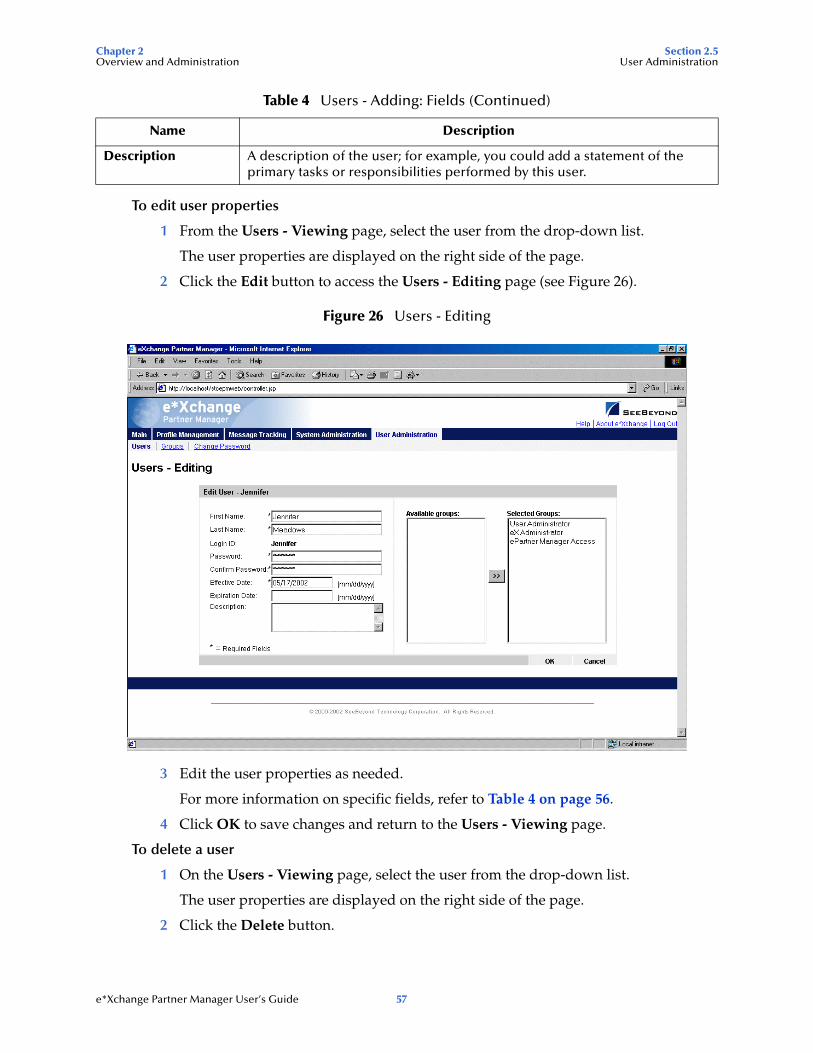
Chapter 2 Section 2.5Overview and Administration User Administration
To edit user properties
1 From the Users - Viewing page, select the user from the drop-down list.
The user properties are displayed on the right side of the page.
2 Click the Edit button to access the Users - Editing page (see Figure 26).
Figure 26 Users - Editing
3 Edit the user properties as needed.
For more information on specific fields, refer to Table 4 on page 56.
4 Click OK to save changes and return to the Users - Viewing page.
To delete a user
1 On the Users - Viewing page, select the user from the drop-down list.
The user properties are displayed on the right side of the page.
2 Click the Delete button.
Description A description of the user; for example, you could add a statement of the primary tasks or responsibilities performed by this user.
Table 4 Users - Adding: Fields (Continued)
Name Description
e*Xchange Partner Manager User’s Guide 57
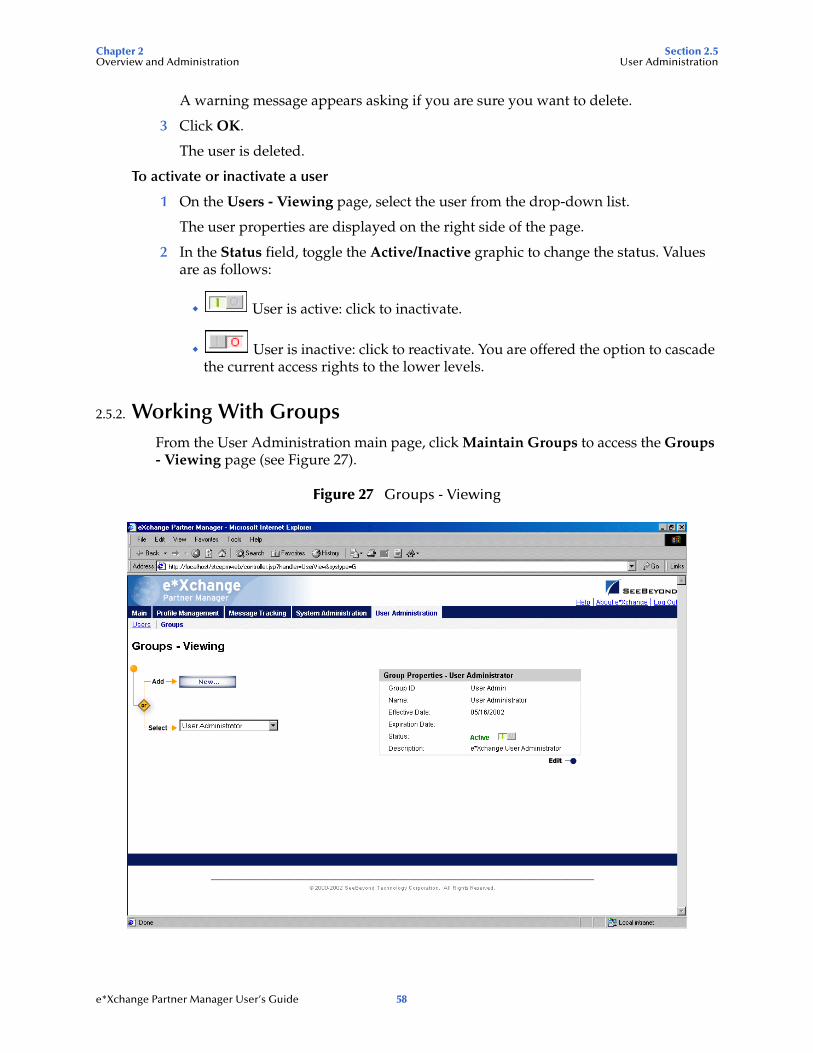
Chapter 2 Section 2.5Overview and Administration User Administration
A warning message appears asking if you are sure you want to delete.
3 Click OK.
The user is deleted.
To activate or inactivate a user
1 On the Users - Viewing page, select the user from the drop-down list.
The user properties are displayed on the right side of the page.
2 In the Status field, toggle the Active/Inactive graphic to change the status. Values are as follows:
User is active: click to inactivate.
User is inactive: click to reactivate. You are offered the option to cascade the current access rights to the lower levels.
2.5.2. Working With GroupsFrom the User Administration main page, click Maintain Groups to access the Groups - Viewing page (see Figure 27).
Figure 27 Groups - Viewing
e*Xchange Partner Manager User’s Guide 58
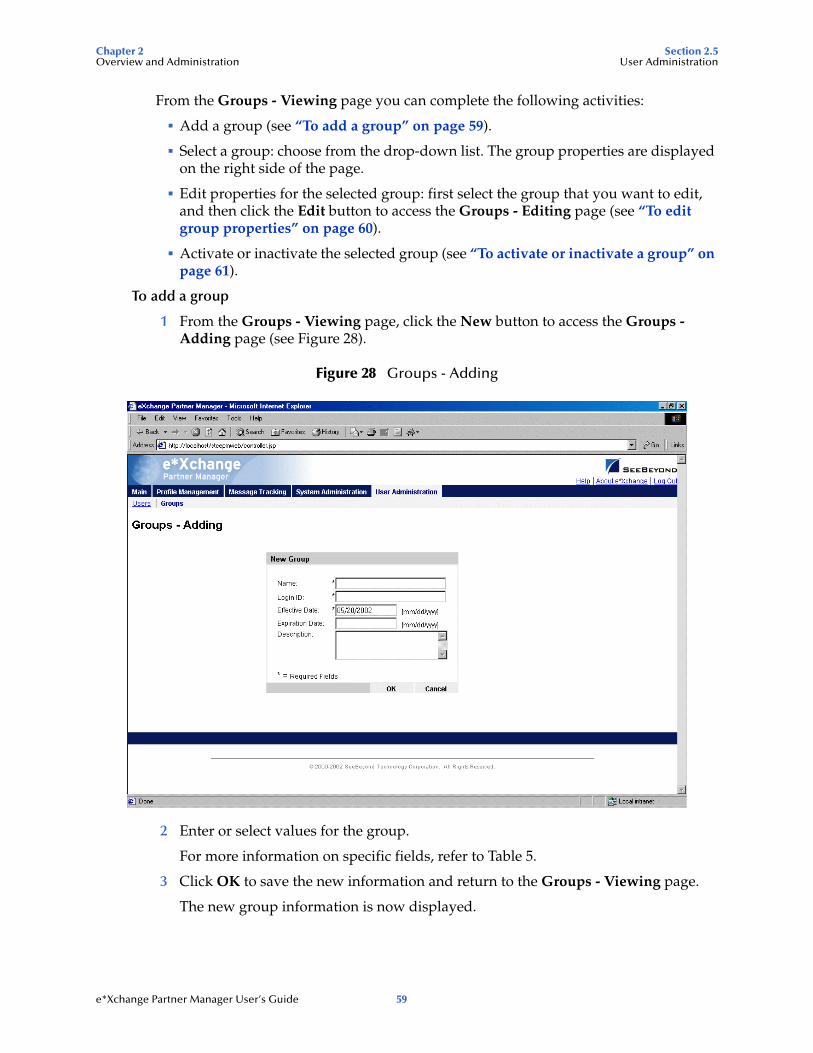
Chapter 2 Section 2.5Overview and Administration User Administration
From the Groups - Viewing page you can complete the following activities:
Add a group (see “To add a group” on page 59).
Select a group: choose from the drop-down list. The group properties are displayed on the right side of the page.
Edit properties for the selected group: first select the group that you want to edit, and then click the Edit button to access the Groups - Editing page (see “To edit group properties” on page 60).
Activate or inactivate the selected group (see “To activate or inactivate a group” on page 61).
To add a group
1 From the Groups - Viewing page, click the New button to access the Groups - Adding page (see Figure 28).
Figure 28 Groups - Adding
2 Enter or select values for the group.
For more information on specific fields, refer to Table 5.
3 Click OK to save the new information and return to the Groups - Viewing page.
The new group information is now displayed.
e*Xchange Partner Manager User’s Guide 59
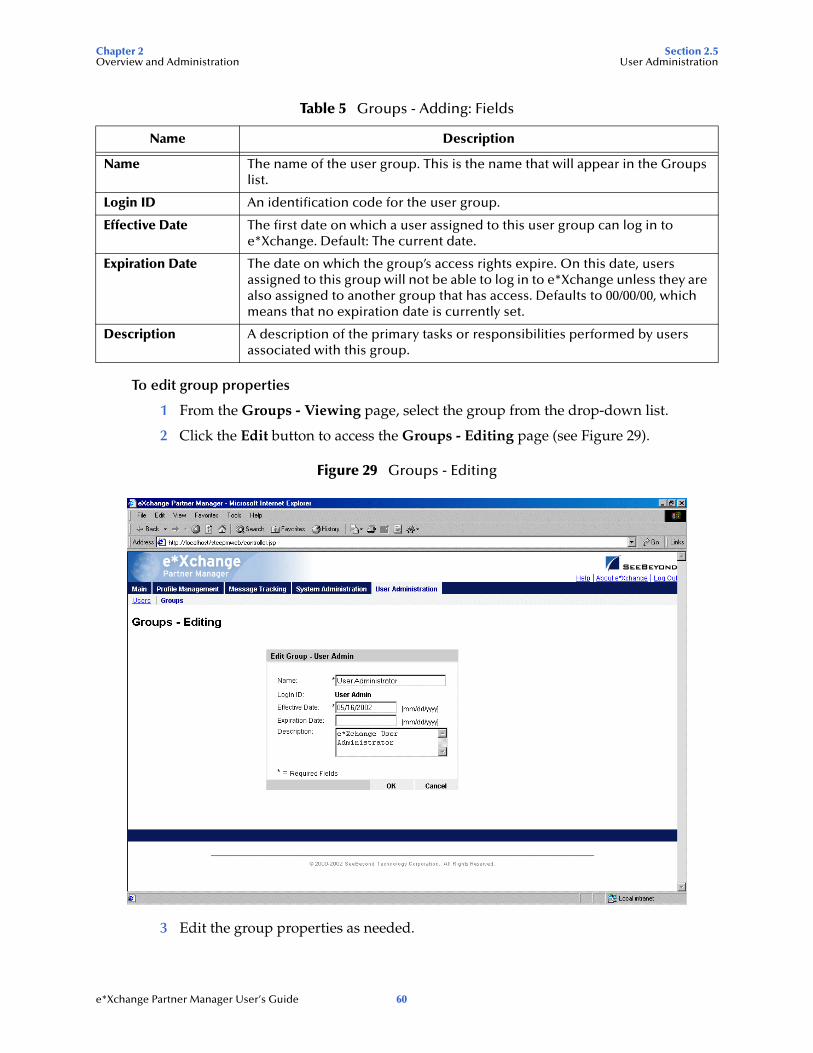
Chapter 2 Section 2.5Overview and Administration User Administration
To edit group properties
1 From the Groups - Viewing page, select the group from the drop-down list.
2 Click the Edit button to access the Groups - Editing page (see Figure 29).
Figure 29 Groups - Editing
3 Edit the group properties as needed.
Table 5 Groups - Adding: Fields
Name Description
Name The name of the user group. This is the name that will appear in the Groups list.
Login ID An identification code for the user group.
Effective Date The first date on which a user assigned to this user group can log in to e*Xchange. Default: The current date.
Expiration Date The date on which the group’s access rights expire. On this date, users assigned to this group will not be able to log in to e*Xchange unless they are also assigned to another group that has access. Defaults to 00/00/00, which means that no expiration date is currently set.
Description A description of the primary tasks or responsibilities performed by users associated with this group.
e*Xchange Partner Manager User’s Guide 60
Chapter 2 Section 2.6Overview and Administration Changing Your Password
4 Click OK to save changes and return to the Groups - Viewing page.
To activate or inactivate a group
1 On the Groups - Viewing page, select the group from the drop-down list.
The group properties are displayed on the right side of the page.
2 In the Status field, toggle the Active/Inactive graphic to change the status. Values are as follows:
Group is active: click to inactivate.
Group is inactive: click to reactivate. You are offered the option to cascade the current access rights to the lower levels.
2.6 Changing Your PasswordIt is a good idea to change your password from time to time.
Note: If you are logged in as the schema owner, this option is not available to you. You must change your password in the database itself.
Follow the procedure below to change your password.
To change your password
1 From the e*Xchange Web Interface Main page, go to User Administration.
2 From the User Administration main page, click Change Password to access the Change Password page (see Figure 30).
e*Xchange Partner Manager User’s Guide 61
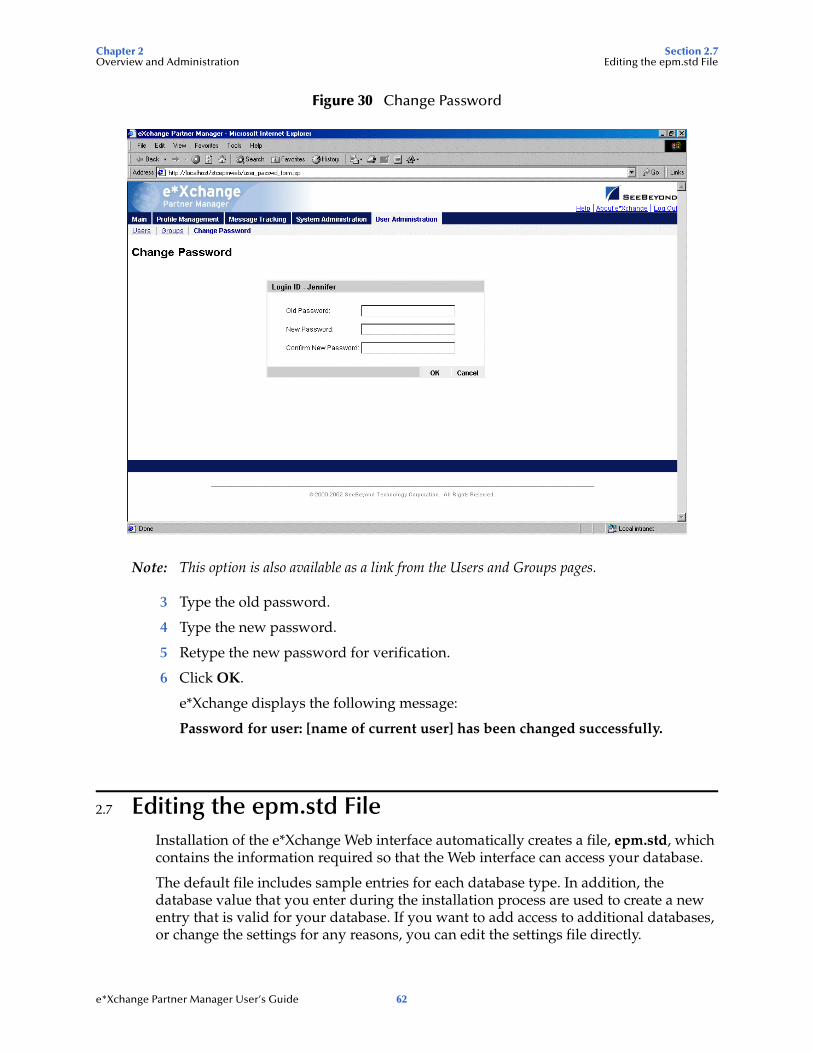
Chapter 2 Section 2.7Overview and Administration Editing the epm.std File
Figure 30 Change Password
Note: This option is also available as a link from the Users and Groups pages.
3 Type the old password.
4 Type the new password.
5 Retype the new password for verification.
6 Click OK.
e*Xchange displays the following message:
Password for user: [name of current user] has been changed successfully.
2.7 Editing the epm.std FileInstallation of the e*Xchange Web interface automatically creates a file, epm.std, which contains the information required so that the Web interface can access your database.
The default file includes sample entries for each database type. In addition, the database value that you enter during the installation process are used to create a new entry that is valid for your database. If you want to add access to additional databases, or change the settings for any reasons, you can edit the settings file directly.
e*Xchange Partner Manager User’s Guide 62
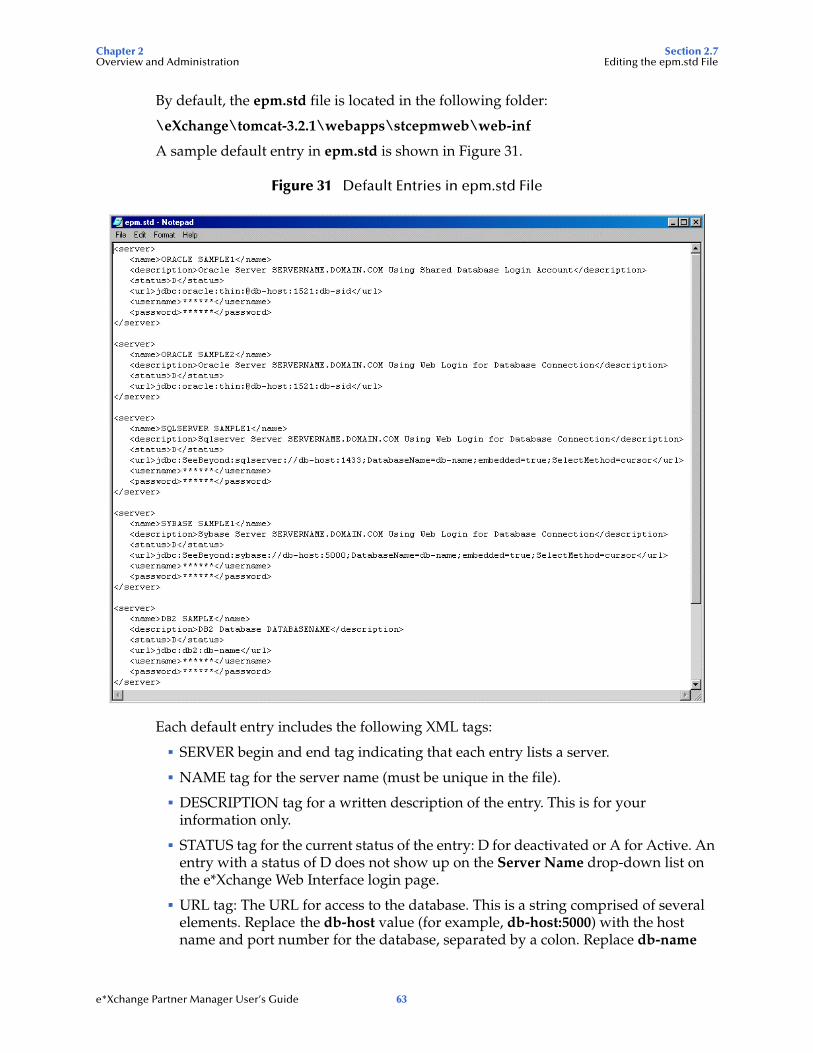
Chapter 2 Section 2.7Overview and Administration Editing the epm.std File
By default, the epm.std file is located in the following folder:
\eXchange\tomcat-3.2.1\webapps\stcepmweb\web-inf
A sample default entry in epm.std is shown in Figure 31.
Figure 31 Default Entries in epm.std File
Each default entry includes the following XML tags:
SERVER begin and end tag indicating that each entry lists a server.
NAME tag for the server name (must be unique in the file).
DESCRIPTION tag for a written description of the entry. This is for your information only.
STATUS tag for the current status of the entry: D for deactivated or A for Active. An entry with a status of D does not show up on the Server Name drop-down list on the e*Xchange Web Interface login page.
URL tag: The URL for access to the database. This is a string comprised of several elements. Replace the db-host value (for example, db-host:5000) with the host name and port number for the database, separated by a colon. Replace db-name
e*Xchange Partner Manager User’s Guide 63
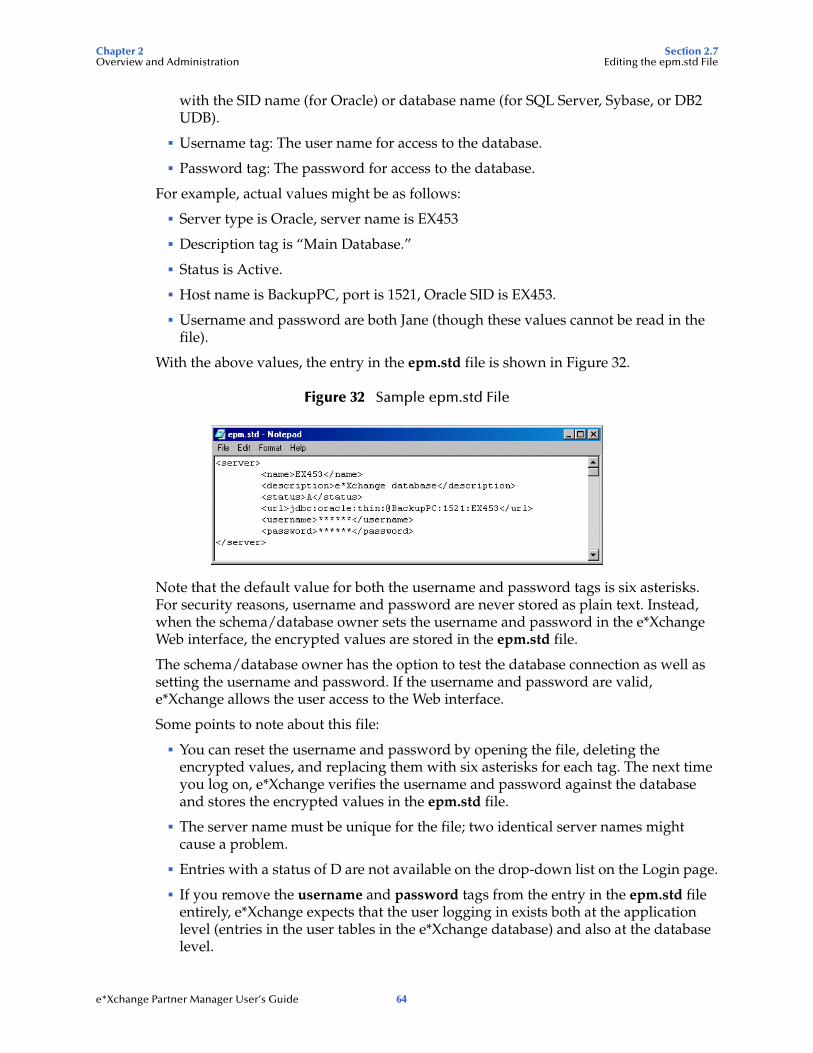
Chapter 2 Section 2.7Overview and Administration Editing the epm.std File
with the SID name (for Oracle) or database name (for SQL Server, Sybase, or DB2 UDB).
Username tag: The user name for access to the database.
Password tag: The password for access to the database.
For example, actual values might be as follows:
Server type is Oracle, server name is EX453
Description tag is “Main Database.”
Status is Active.
Host name is BackupPC, port is 1521, Oracle SID is EX453.
Username and password are both Jane (though these values cannot be read in the file).
With the above values, the entry in the epm.std file is shown in Figure 32.
Figure 32 Sample epm.std File
Note that the default value for both the username and password tags is six asterisks. For security reasons, username and password are never stored as plain text. Instead, when the schema/database owner sets the username and password in the e*Xchange Web interface, the encrypted values are stored in the epm.std file.
The schema/database owner has the option to test the database connection as well as setting the username and password. If the username and password are valid, e*Xchange allows the user access to the Web interface.
Some points to note about this file:
You can reset the username and password by opening the file, deleting the encrypted values, and replacing them with six asterisks for each tag. The next time you log on, e*Xchange verifies the username and password against the database and stores the encrypted values in the epm.std file.
The server name must be unique for the file; two identical server names might cause a problem.
Entries with a status of D are not available on the drop-down list on the Login page.
If you remove the username and password tags from the entry in the epm.std file entirely, e*Xchange expects that the user logging in exists both at the application level (entries in the user tables in the e*Xchange database) and also at the database level.
e*Xchange Partner Manager User’s Guide 64
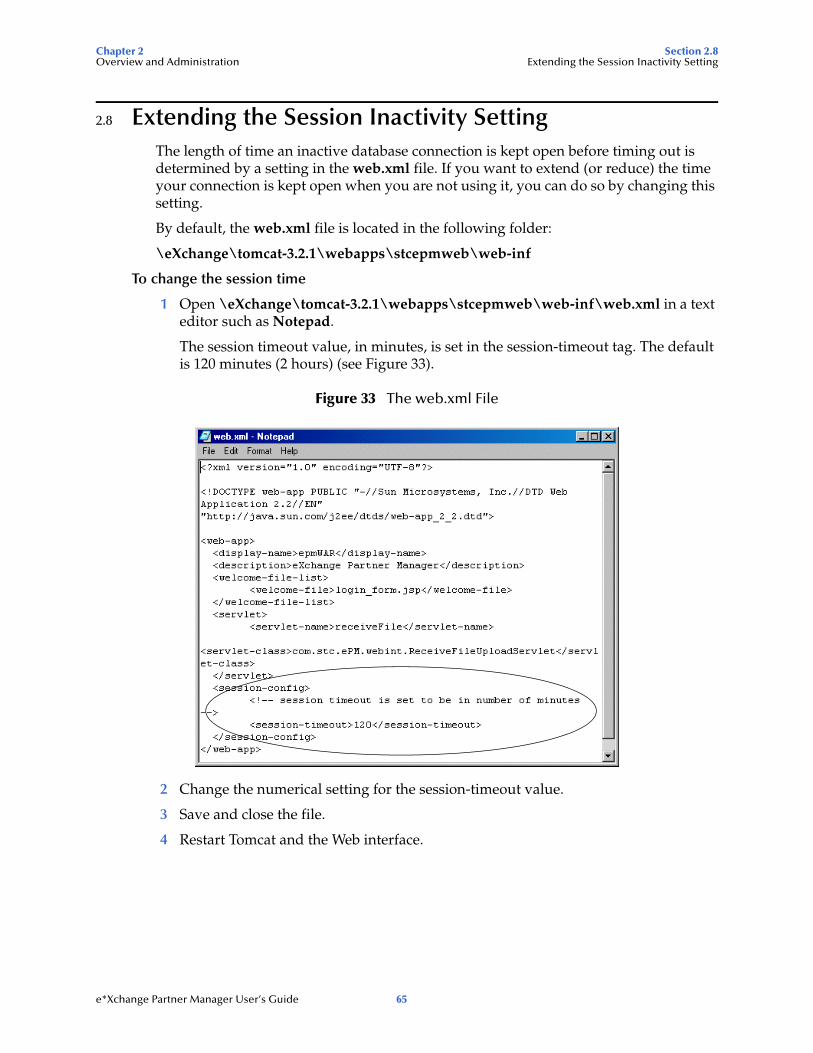
Chapter 2 Section 2.8Overview and Administration Extending the Session Inactivity Setting
2.8 Extending the Session Inactivity SettingThe length of time an inactive database connection is kept open before timing out is determined by a setting in the web.xml file. If you want to extend (or reduce) the time your connection is kept open when you are not using it, you can do so by changing this setting.
By default, the web.xml file is located in the following folder:
\eXchange\tomcat-3.2.1\webapps\stcepmweb\web-inf
To change the session time
1 Open \eXchange\tomcat-3.2.1\webapps\stcepmweb\web-inf\web.xml in a text editor such as Notepad.
The session timeout value, in minutes, is set in the session-timeout tag. The default is 120 minutes (2 hours) (see Figure 33).
Figure 33 The web.xml File
2 Change the numerical setting for the session-timeout value.
3 Save and close the file.
4 Restart Tomcat and the Web interface.
e*Xchange Partner Manager User’s Guide 65
Chapter 3
Security
This chapter provides information on using the user security features in the e*Xchange Partner Manager Web interface.
When adding a company or other component, you can specify the groups or individuals who will have access privileges to the information and what specific access rights they will have. The defining of access privileges is not required, but is recommended to protect the security of your information.
Setup of users and groups is covered in “Overview and Administration” on page 30.
The user security feature for the e*Xchange Partner Manager Web interface works the same at all four levels:
Company
Trading Partner
B2B Protocol
Message Profile
From the Security Management page for a specific component, you can do the following:
Add group or user access to the component
Specify customized access rights for a user or group, including:
Add access
Expire access
Reinstate access that has been expired
3.1 What Are Access Control Permissions?A member of the eX Administrator user group adds companies to e*Xchange and indicates which users and groups can access information associated with each company, and what the specific access rights are (read, add, edit, or full control).
If your administrator has allowed you “Add” access for a particular company, you can add new trading partner components to that company. In addition, you can specify user access rights for all components set up for that company; trading partners, B2B protocols, and message profiles.
e*Xchange Partner Manager User’s Guide 66
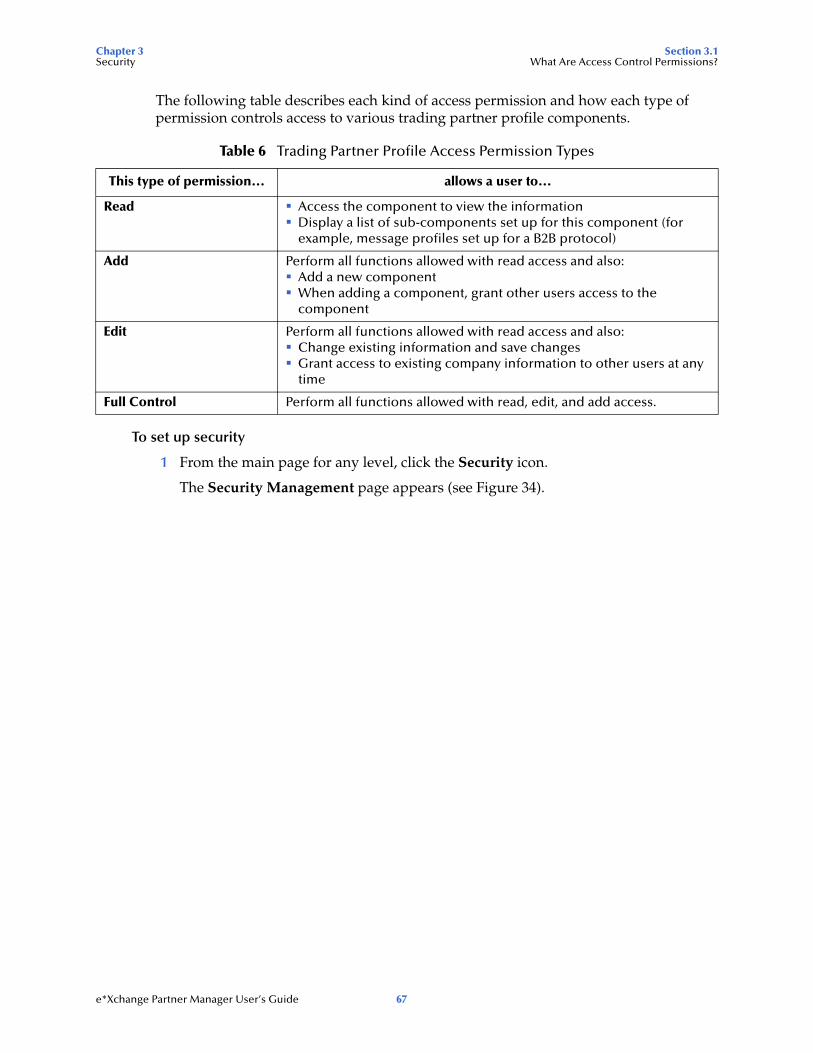
Chapter 3 Section 3.1Security What Are Access Control Permissions?
The following table describes each kind of access permission and how each type of permission controls access to various trading partner profile components.
To set up security
1 From the main page for any level, click the Security icon.
The Security Management page appears (see Figure 34).
Table 6 Trading Partner Profile Access Permission Types
This type of permission... allows a user to...
Read Access the component to view the informationDisplay a list of sub-components set up for this component (for example, message profiles set up for a B2B protocol)
Add Perform all functions allowed with read access and also:Add a new componentWhen adding a component, grant other users access to the component
Edit Perform all functions allowed with read access and also:Change existing information and save changesGrant access to existing company information to other users at any time
Full Control Perform all functions allowed with read, edit, and add access.
e*Xchange Partner Manager User’s Guide 67
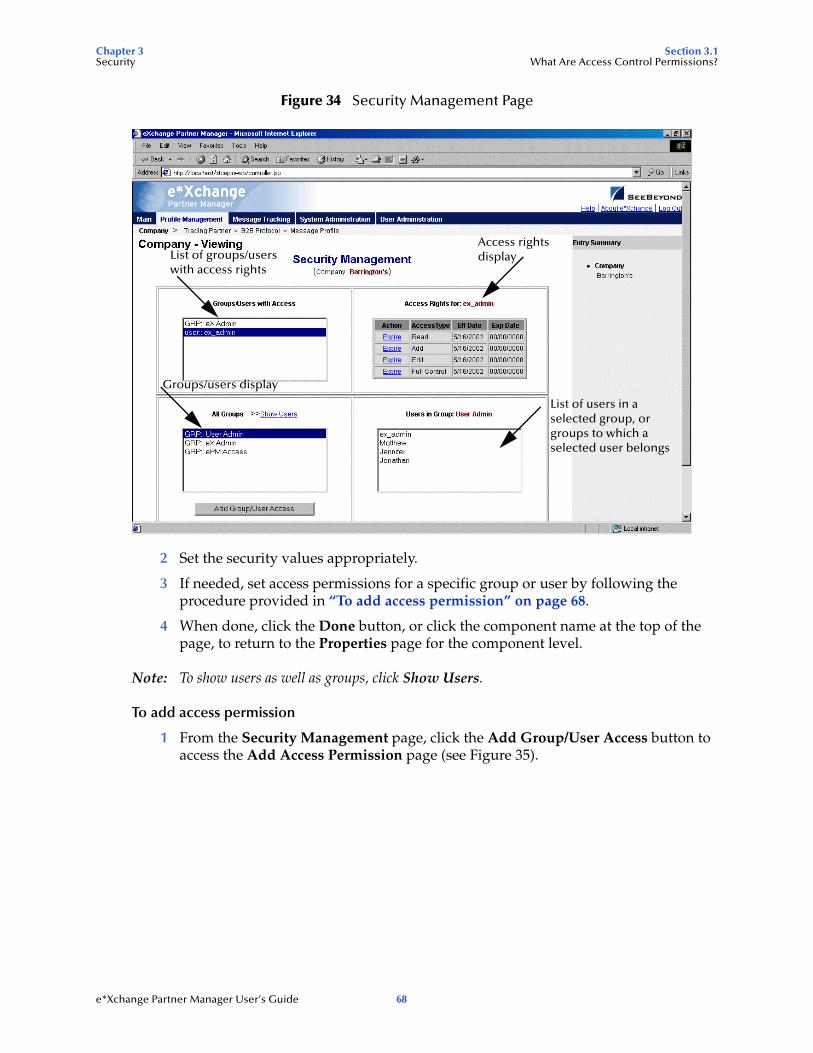
Chapter 3 Section 3.1Security What Are Access Control Permissions?
Figure 34 Security Management Page
2 Set the security values appropriately.
3 If needed, set access permissions for a specific group or user by following the procedure provided in “To add access permission” on page 68.
4 When done, click the Done button, or click the component name at the top of the page, to return to the Properties page for the component level.
Note: To show users as well as groups, click Show Users.
To add access permission
1 From the Security Management page, click the Add Group/User Access button to access the Add Access Permission page (see Figure 35).
List of users in a selected group, or groups to which a selected user belongs
Groups/users display
List of groups/users with access rights
Access rights display
e*Xchange Partner Manager User’s Guide 68
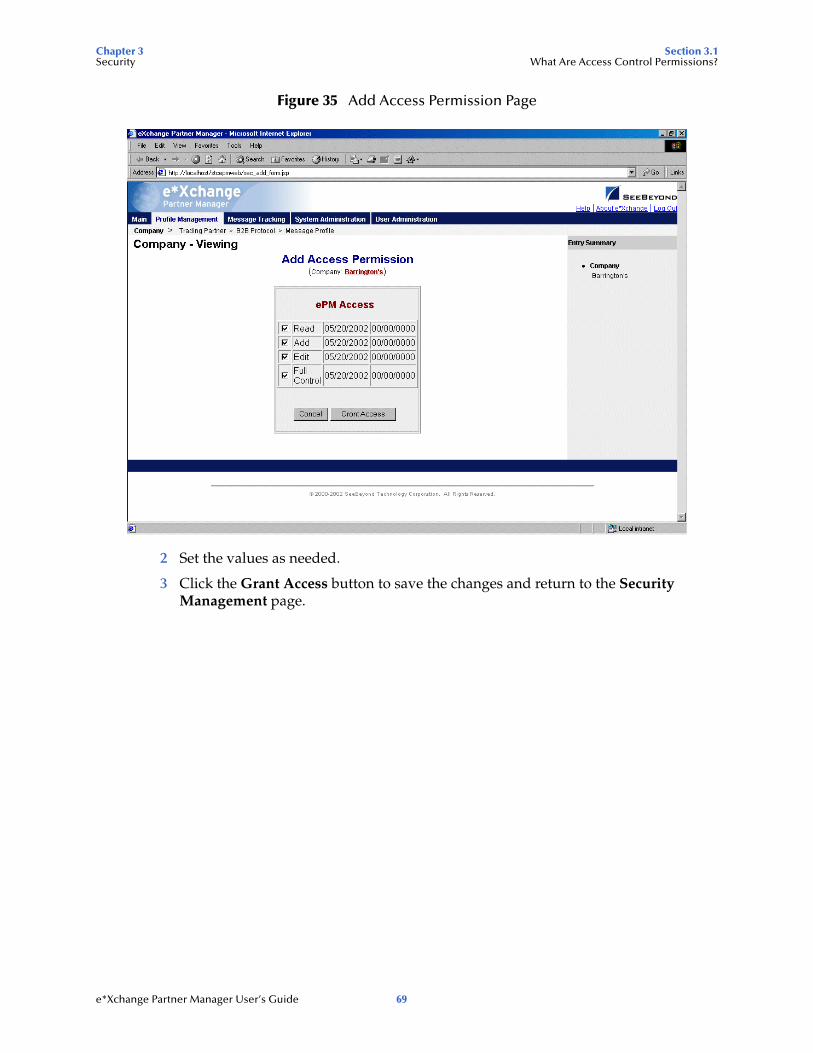
Chapter 3 Section 3.1Security What Are Access Control Permissions?
Figure 35 Add Access Permission Page
2 Set the values as needed.
3 Click the Grant Access button to save the changes and return to the Security Management page.
e*Xchange Partner Manager User’s Guide 69
Chapter 4
Profile Management
The e*Xchange Partner Manager Web interface allows you to set up all the information you need to exchange eBusiness messages with trading partners, via a browser interface.
From the Web interface you can complete the following activities relating to profile management:
Add, edit, or delete a company
Add, edit, or delete a trading partner
Add, edit, or delete an eBusiness protocol (B2B protocol)
Add, edit, or delete a message profile
Set or change security for a company, trading partner, eBusiness protocol, or message profile.
Note: In the Web interface, an asterisk (*) on a field indicates that it is a required field.An at sign (@) indicates that changes made to the field will be applied to all other message profiles within the same B2B protocol automatically.
This chapter provides information on working with the company, trading partner, and eBusiness protocol levels. The message profile level is addressed separately for each eBusiness protocol in the following chapters:
X12—“Profile Setup for X12” on page 105
NCPDP-HIPAA—“Profile Setup for NCPDP-HIPAA” on page 134
UN/EDIFACT—“Profile Setup for UN/EDIFACT” on page 149
RosettaNet—“Profile Setup for RosettaNet” on page 185
CIDX—“Profile Setup for CIDX” on page 215
For information on setting up security at all levels, and for all eBusiness protocols, refer to “Security” on page 66.
e*Xchange Partner Manager User’s Guide 70
Chapter 4 Section 4.1Profile Management Profile Management
4.1 Profile ManagementProfile setup and management is divided into four component levels:
Company (see “Setting Up Company Information” on page 72)
The company component is the highest level of the trading partner profile. It includes the name of the company and any related information that your business requires you to store about the partner company.
The only information required at the company level is the company name.
Trading Partner (see “Setting Up Trading Partner Information” on page 78)
Information about your trading partner. This could be a subdivision of a company, it could be the same as the company, or you could set up your various trading partners under a “dummy” umbrella company.
The only information required at the trading partner level is the trading partner name. Security is automatically inherited from the upper (company) level, although you can change it.
B2B Protocol (see “Setting Up B2B Protocol Information” on page 87)
This level allows you to define eBusiness protocol values that are unique to the trading partner but independent of the message being sent or received. This includes items such as the communications protocol to be used, encryption information (if applicable), and SSL information (if you are using HTTPS).
For each trading partner, you would define one inbound B2B protocol and one outbound, for each message standard version.
B2B protocol attributes are grouped into three sections:
General
Transport Component
Message Security
Message Profile (see “Setting Up Message Profile Information” on page 104)
This level, the final step in trading partner setup, allows you to define the values required so that you can successfully send and receive specific eBusiness messages. This includes items such as the Global Process Code and the Global Partner Role Classification Code for RosettaNet, the Transaction Set ID and Functional ID Code for X12, and the Message Type Identifier for UN/EDIFACT.
You must define one message profile for each type of message you will send to the trading partner and one for each type of message you will receive from the trading partner.
e*Xchange Partner Manager User’s Guide 71
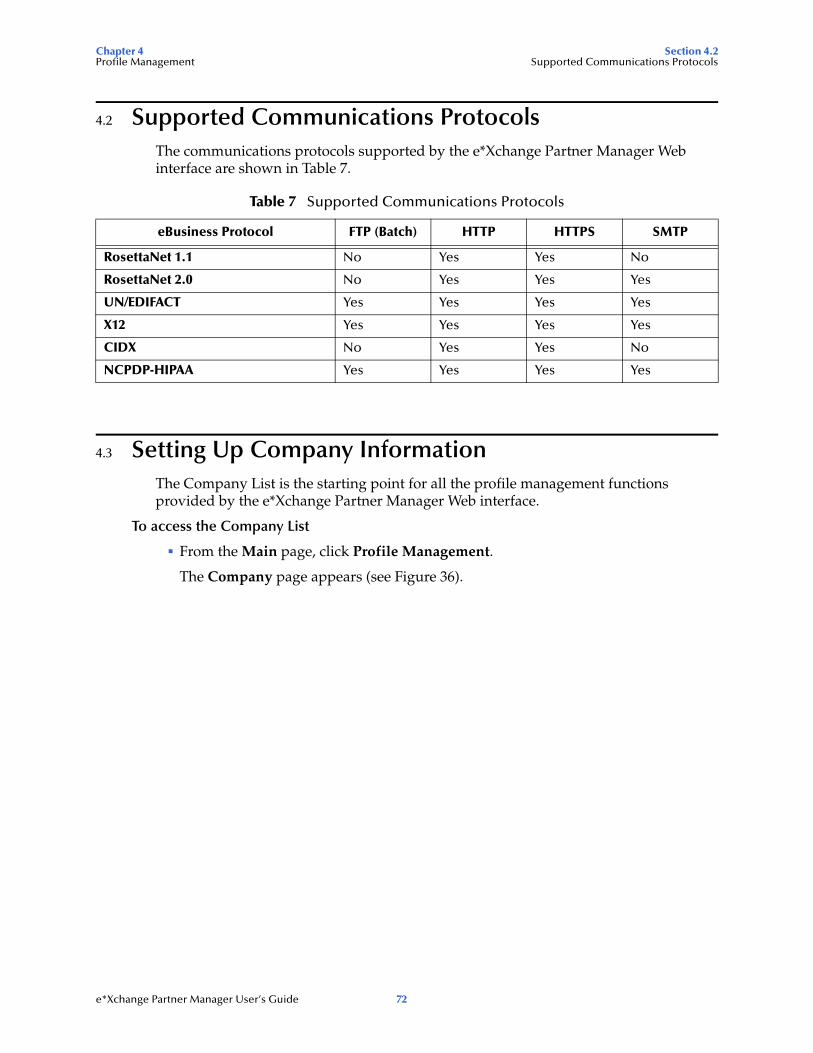
Chapter 4 Section 4.2Profile Management Supported Communications Protocols
4.2 Supported Communications ProtocolsThe communications protocols supported by the e*Xchange Partner Manager Web interface are shown in Table 7.
4.3 Setting Up Company InformationThe Company List is the starting point for all the profile management functions provided by the e*Xchange Partner Manager Web interface.
To access the Company List
From the Main page, click Profile Management.
The Company page appears (see Figure 36).
Table 7 Supported Communications Protocols
eBusiness Protocol FTP (Batch) HTTP HTTPS SMTP
RosettaNet 1.1 No Yes Yes No
RosettaNet 2.0 No Yes Yes Yes
UN/EDIFACT Yes Yes Yes Yes
X12 Yes Yes Yes Yes
CIDX No Yes Yes No
NCPDP-HIPAA Yes Yes Yes Yes
e*Xchange Partner Manager User’s Guide 72
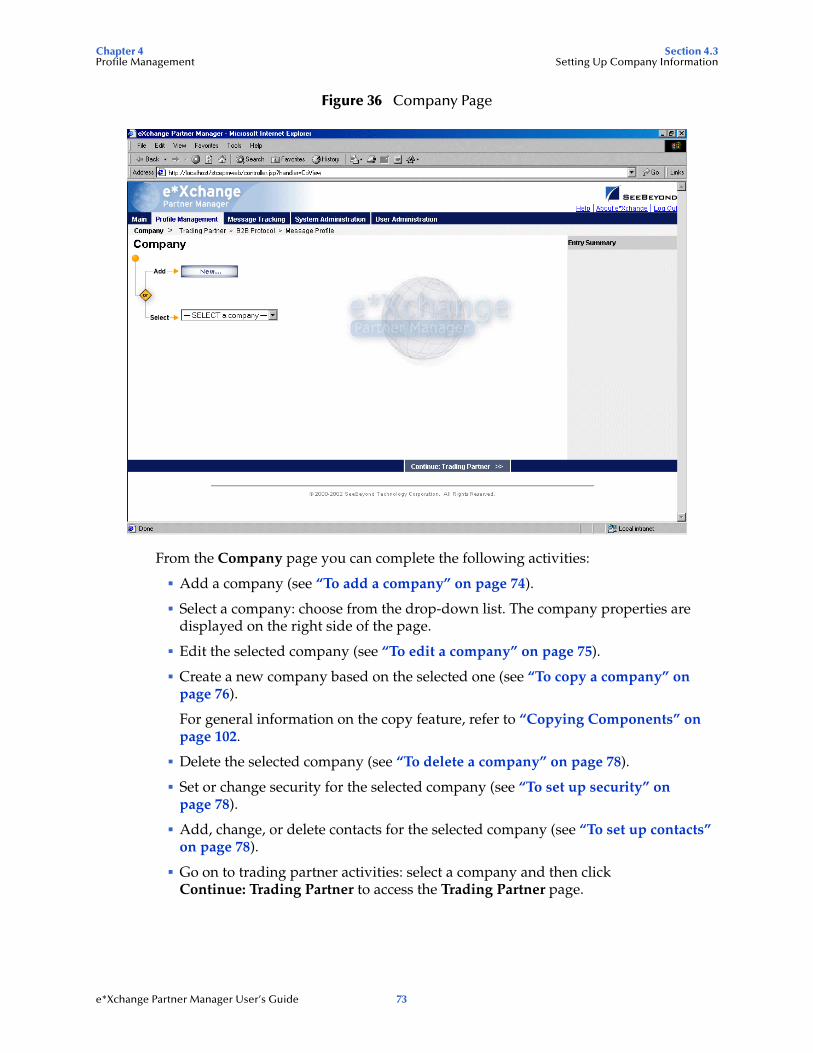
Chapter 4 Section 4.3Profile Management Setting Up Company Information
Figure 36 Company Page
From the Company page you can complete the following activities:
Add a company (see “To add a company” on page 74).
Select a company: choose from the drop-down list. The company properties are displayed on the right side of the page.
Edit the selected company (see “To edit a company” on page 75).
Create a new company based on the selected one (see “To copy a company” on page 76).
For general information on the copy feature, refer to “Copying Components” on page 102.
Delete the selected company (see “To delete a company” on page 78).
Set or change security for the selected company (see “To set up security” on page 78).
Add, change, or delete contacts for the selected company (see “To set up contacts” on page 78).
Go on to trading partner activities: select a company and then click Continue: Trading Partner to access the Trading Partner page.
e*Xchange Partner Manager User’s Guide 73
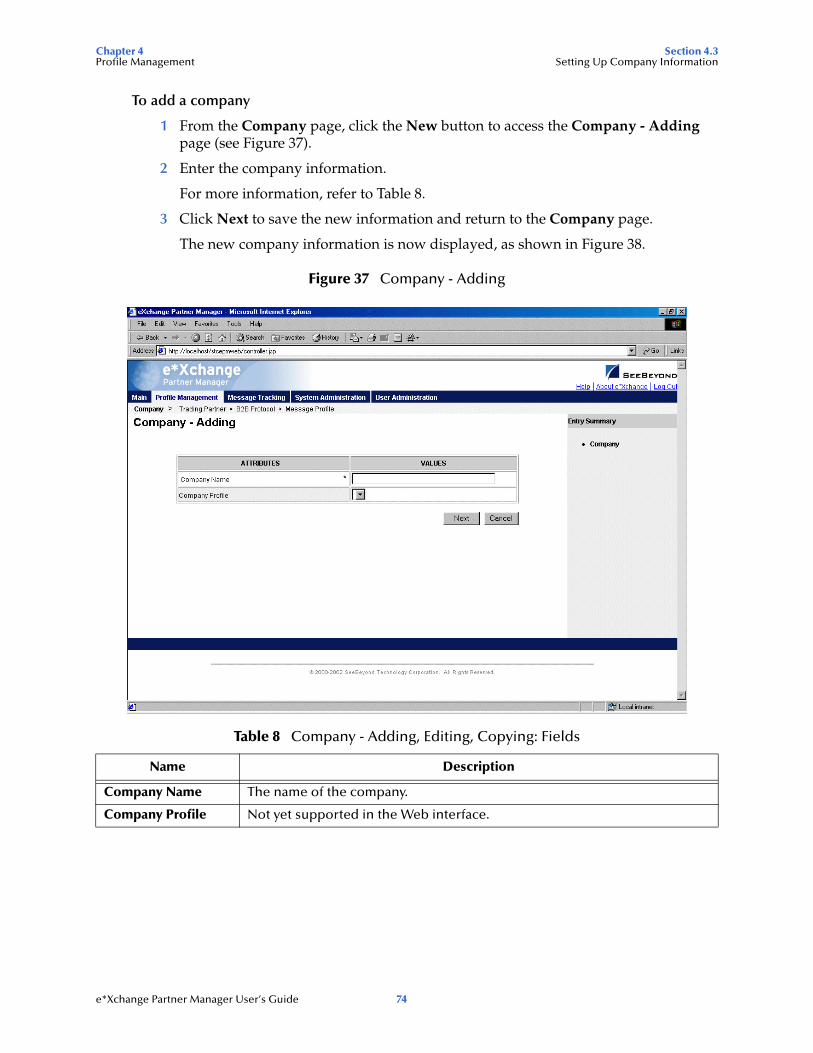
Chapter 4 Section 4.3Profile Management Setting Up Company Information
To add a company
1 From the Company page, click the New button to access the Company - Adding page (see Figure 37).
2 Enter the company information.
For more information, refer to Table 8.
3 Click Next to save the new information and return to the Company page.
The new company information is now displayed, as shown in Figure 38.
Figure 37 Company - Adding
Table 8 Company - Adding, Editing, Copying: Fields
Name Description
Company Name The name of the company.
Company Profile Not yet supported in the Web interface.
e*Xchange Partner Manager User’s Guide 74
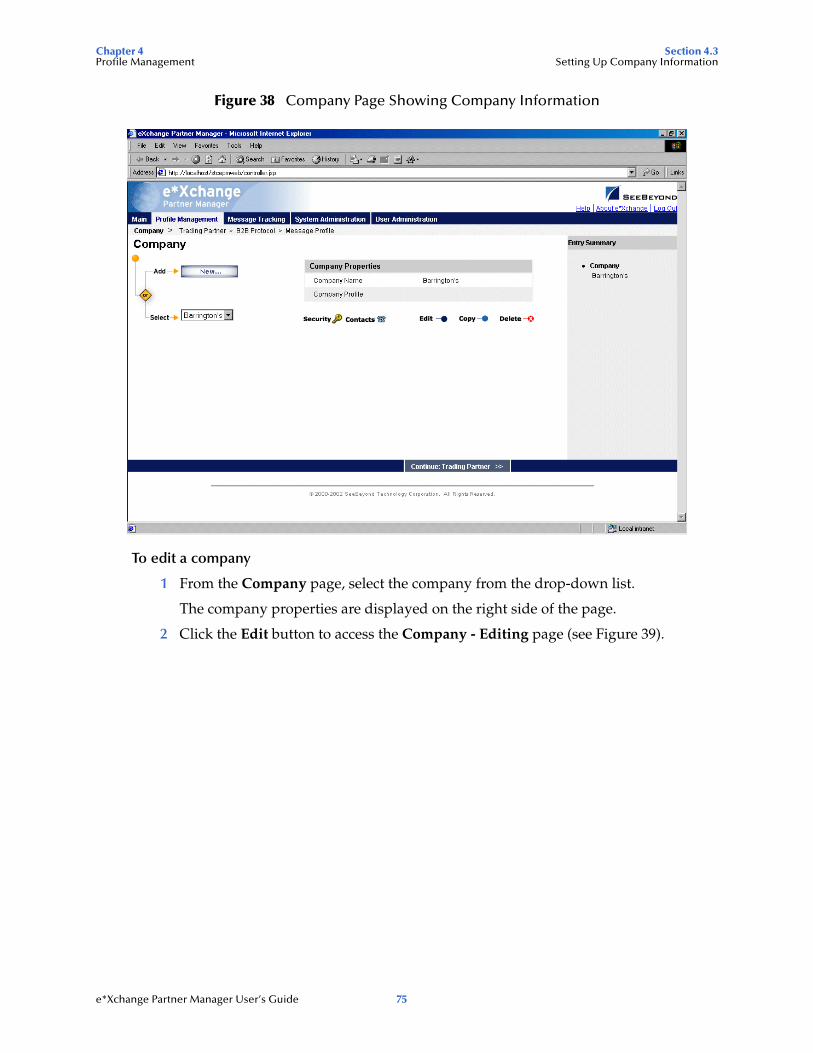
Chapter 4 Section 4.3Profile Management Setting Up Company Information
Figure 38 Company Page Showing Company Information
To edit a company
1 From the Company page, select the company from the drop-down list.
The company properties are displayed on the right side of the page.
2 Click the Edit button to access the Company - Editing page (see Figure 39).
e*Xchange Partner Manager User’s Guide 75
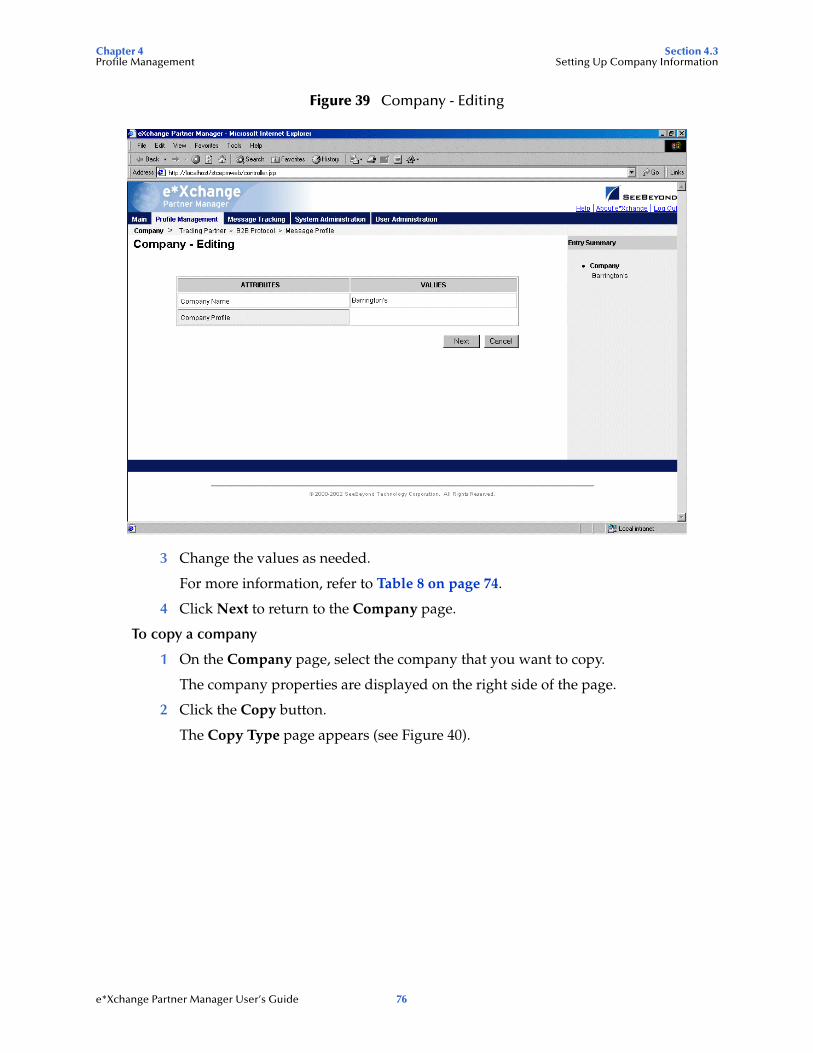
Chapter 4 Section 4.3Profile Management Setting Up Company Information
Figure 39 Company - Editing
3 Change the values as needed.
For more information, refer to Table 8 on page 74.
4 Click Next to return to the Company page.
To copy a company
1 On the Company page, select the company that you want to copy.
The company properties are displayed on the right side of the page.
2 Click the Copy button.
The Copy Type page appears (see Figure 40).
e*Xchange Partner Manager User’s Guide 76
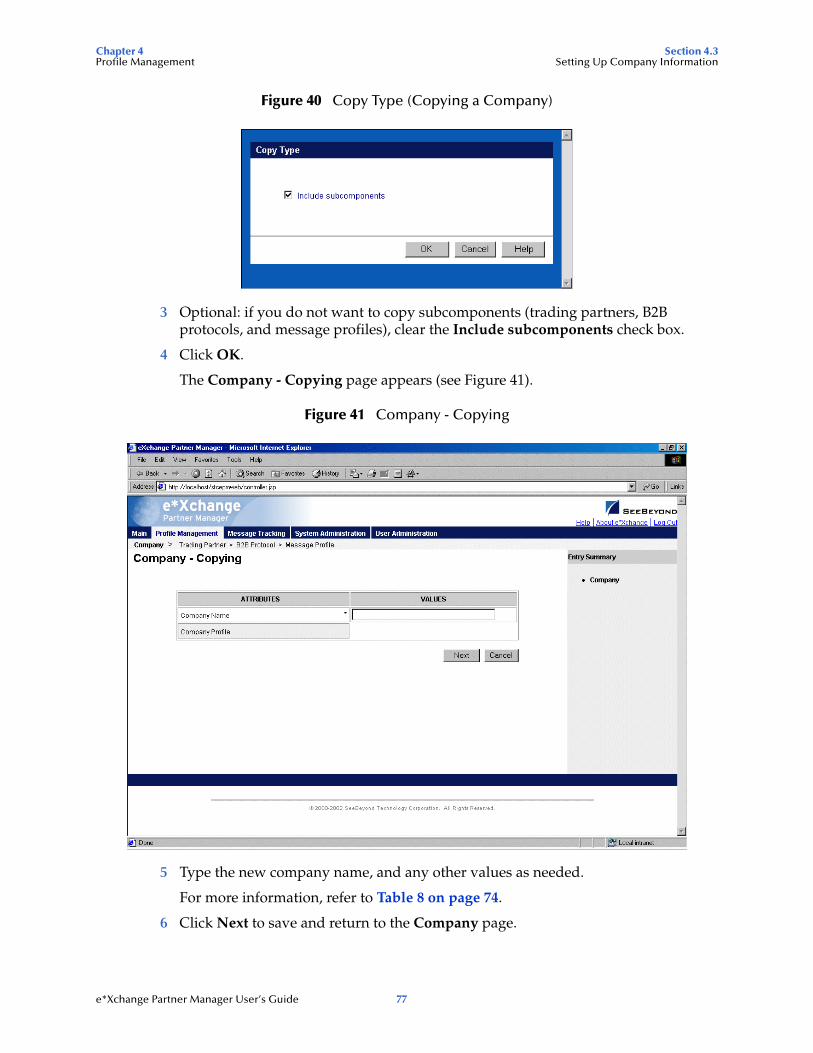
Chapter 4 Section 4.3Profile Management Setting Up Company Information
Figure 40 Copy Type (Copying a Company)
3 Optional: if you do not want to copy subcomponents (trading partners, B2B protocols, and message profiles), clear the Include subcomponents check box.
4 Click OK.
The Company - Copying page appears (see Figure 41).
Figure 41 Company - Copying
5 Type the new company name, and any other values as needed.
For more information, refer to Table 8 on page 74.
6 Click Next to save and return to the Company page.
e*Xchange Partner Manager User’s Guide 77
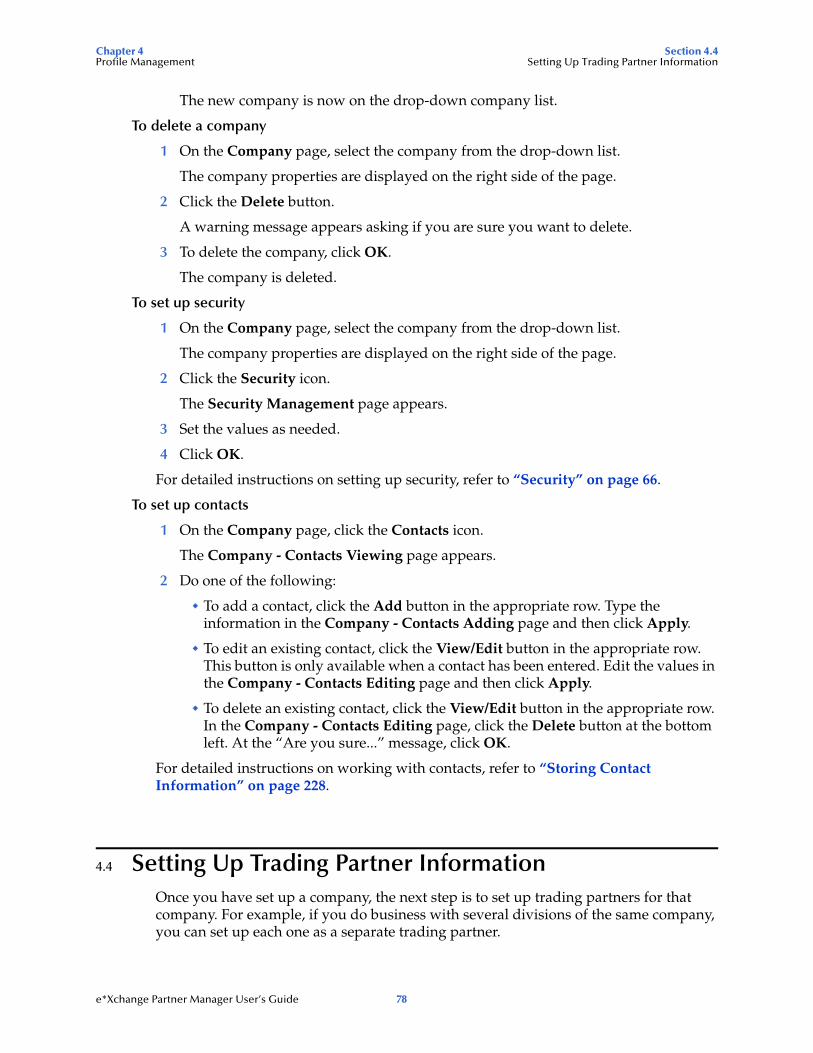
Chapter 4 Section 4.4Profile Management Setting Up Trading Partner Information
The new company is now on the drop-down company list.
To delete a company
1 On the Company page, select the company from the drop-down list.
The company properties are displayed on the right side of the page.
2 Click the Delete button.
A warning message appears asking if you are sure you want to delete.
3 To delete the company, click OK.
The company is deleted.
To set up security
1 On the Company page, select the company from the drop-down list.
The company properties are displayed on the right side of the page.
2 Click the Security icon.
The Security Management page appears.
3 Set the values as needed.
4 Click OK.
For detailed instructions on setting up security, refer to “Security” on page 66.
To set up contacts
1 On the Company page, click the Contacts icon.
The Company - Contacts Viewing page appears.
2 Do one of the following:
To add a contact, click the Add button in the appropriate row. Type the information in the Company - Contacts Adding page and then click Apply.
To edit an existing contact, click the View/Edit button in the appropriate row. This button is only available when a contact has been entered. Edit the values in the Company - Contacts Editing page and then click Apply.
To delete an existing contact, click the View/Edit button in the appropriate row. In the Company - Contacts Editing page, click the Delete button at the bottom left. At the “Are you sure...” message, click OK.
For detailed instructions on working with contacts, refer to “Storing Contact Information” on page 228.
4.4 Setting Up Trading Partner InformationOnce you have set up a company, the next step is to set up trading partners for that company. For example, if you do business with several divisions of the same company, you can set up each one as a separate trading partner.
e*Xchange Partner Manager User’s Guide 78
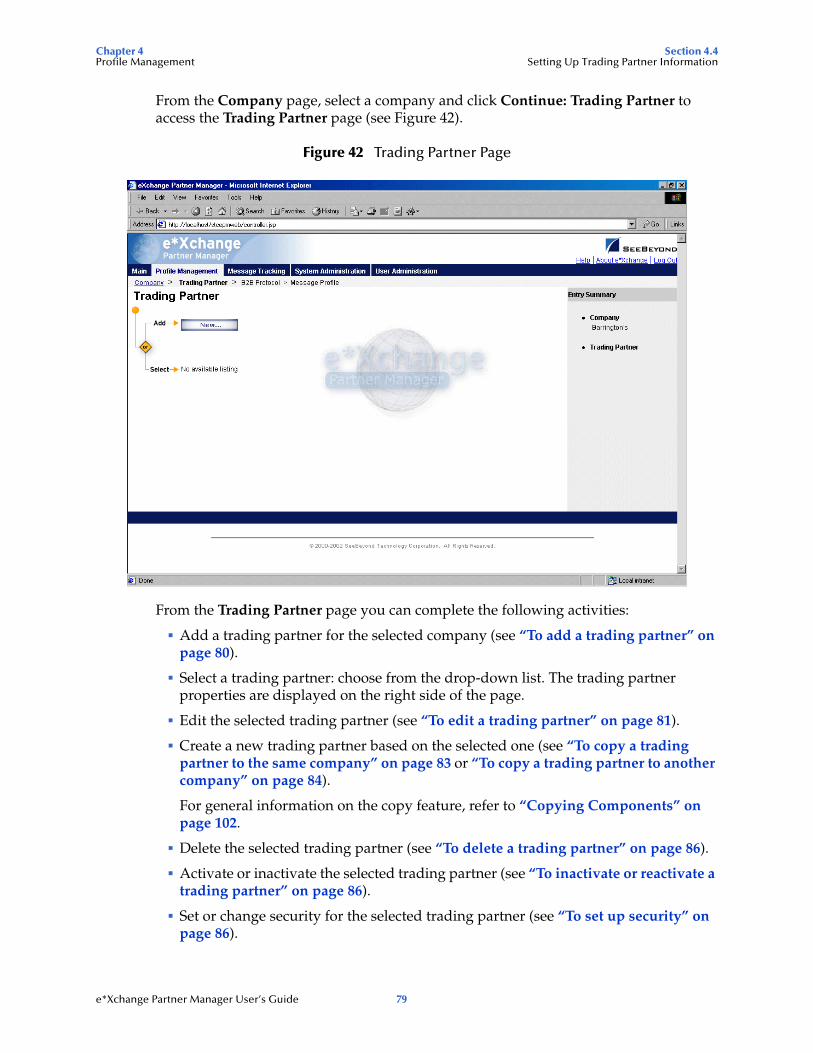
Chapter 4 Section 4.4Profile Management Setting Up Trading Partner Information
From the Company page, select a company and click Continue: Trading Partner to access the Trading Partner page (see Figure 42).
Figure 42 Trading Partner Page
From the Trading Partner page you can complete the following activities:
Add a trading partner for the selected company (see “To add a trading partner” on page 80).
Select a trading partner: choose from the drop-down list. The trading partner properties are displayed on the right side of the page.
Edit the selected trading partner (see “To edit a trading partner” on page 81).
Create a new trading partner based on the selected one (see “To copy a trading partner to the same company” on page 83 or “To copy a trading partner to another company” on page 84).
For general information on the copy feature, refer to “Copying Components” on page 102.
Delete the selected trading partner (see “To delete a trading partner” on page 86).
Activate or inactivate the selected trading partner (see “To inactivate or reactivate a trading partner” on page 86).
Set or change security for the selected trading partner (see “To set up security” on page 86).
e*Xchange Partner Manager User’s Guide 79
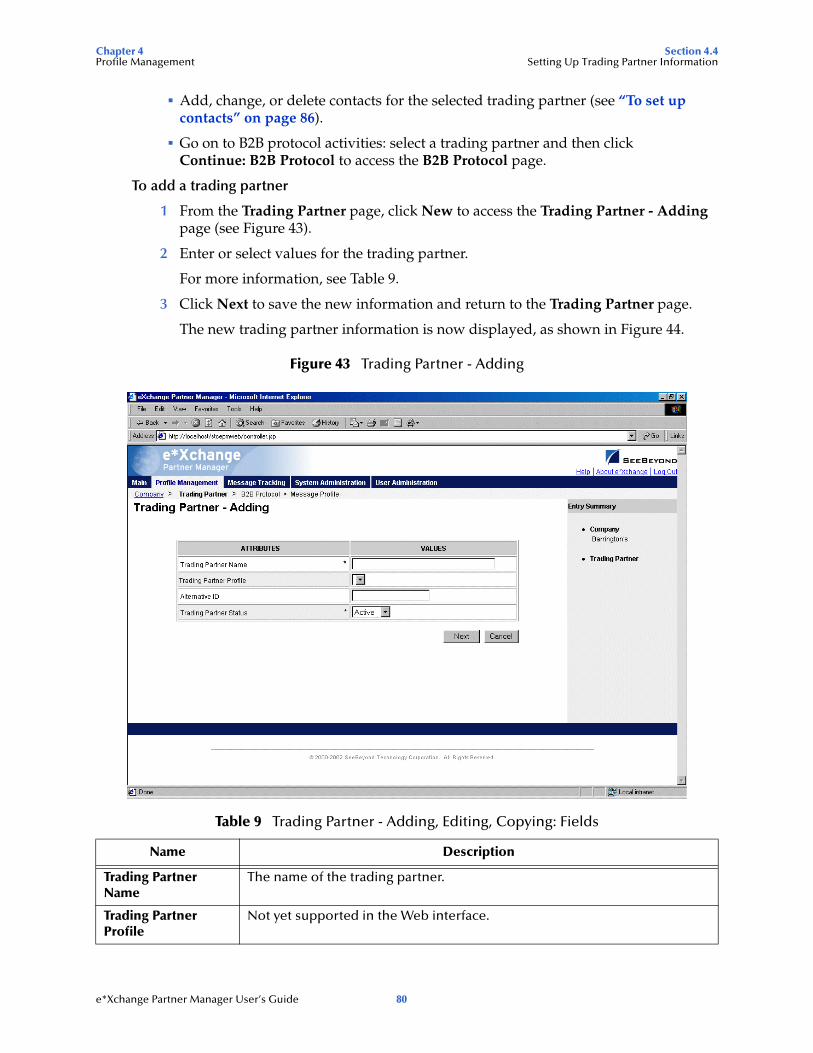
Chapter 4 Section 4.4Profile Management Setting Up Trading Partner Information
Add, change, or delete contacts for the selected trading partner (see “To set up contacts” on page 86).
Go on to B2B protocol activities: select a trading partner and then click Continue: B2B Protocol to access the B2B Protocol page.
To add a trading partner
1 From the Trading Partner page, click New to access the Trading Partner - Adding page (see Figure 43).
2 Enter or select values for the trading partner.
For more information, see Table 9.
3 Click Next to save the new information and return to the Trading Partner page.
The new trading partner information is now displayed, as shown in Figure 44.
Figure 43 Trading Partner - Adding
Table 9 Trading Partner - Adding, Editing, Copying: Fields
Name Description
Trading Partner Name
The name of the trading partner.
Trading Partner Profile
Not yet supported in the Web interface.
e*Xchange Partner Manager User’s Guide 80
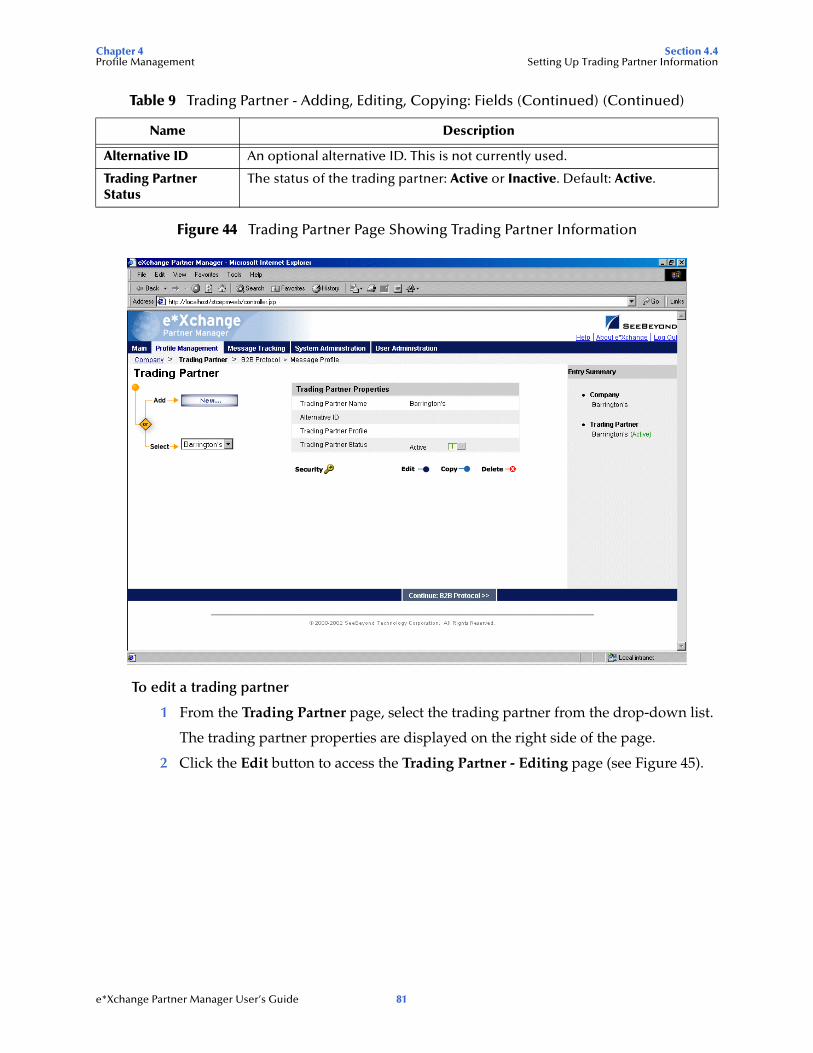
Chapter 4 Section 4.4Profile Management Setting Up Trading Partner Information
Figure 44 Trading Partner Page Showing Trading Partner Information
To edit a trading partner
1 From the Trading Partner page, select the trading partner from the drop-down list.
The trading partner properties are displayed on the right side of the page.
2 Click the Edit button to access the Trading Partner - Editing page (see Figure 45).
Alternative ID An optional alternative ID. This is not currently used.
Trading Partner Status
The status of the trading partner: Active or Inactive. Default: Active.
Table 9 Trading Partner - Adding, Editing, Copying: Fields (Continued) (Continued)
Name Description
e*Xchange Partner Manager User’s Guide 81
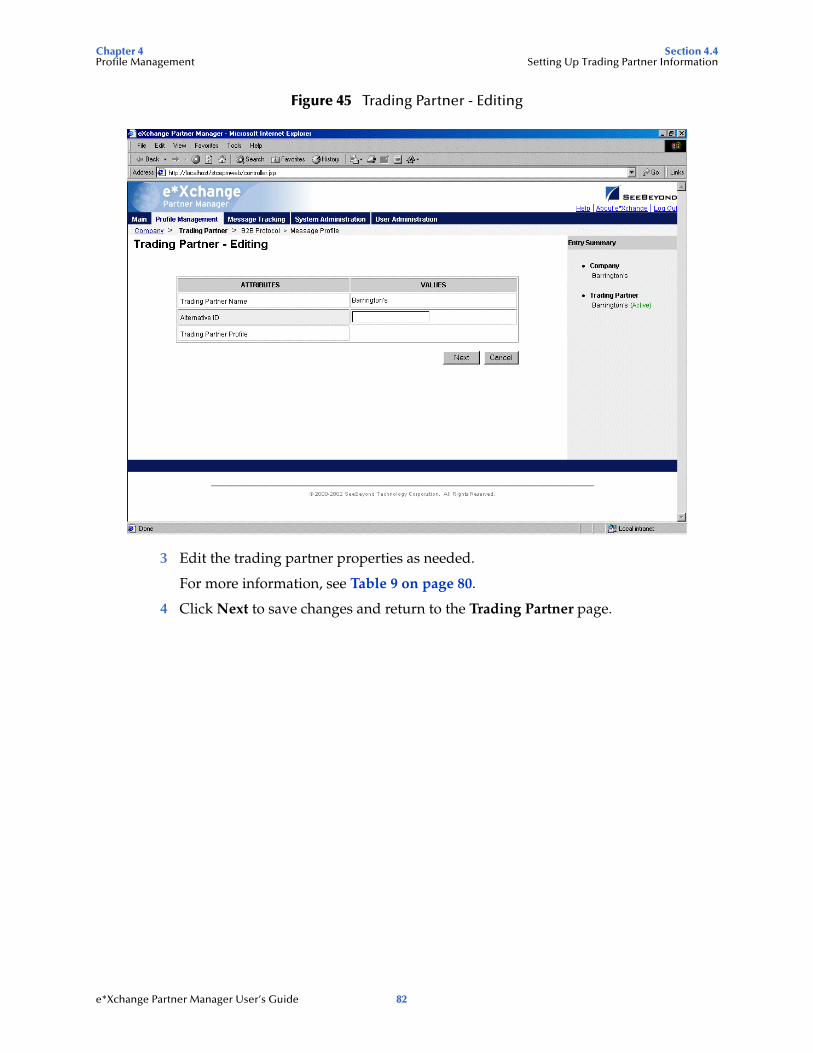
Chapter 4 Section 4.4Profile Management Setting Up Trading Partner Information
Figure 45 Trading Partner - Editing
3 Edit the trading partner properties as needed.
For more information, see Table 9 on page 80.
4 Click Next to save changes and return to the Trading Partner page.
e*Xchange Partner Manager User’s Guide 82
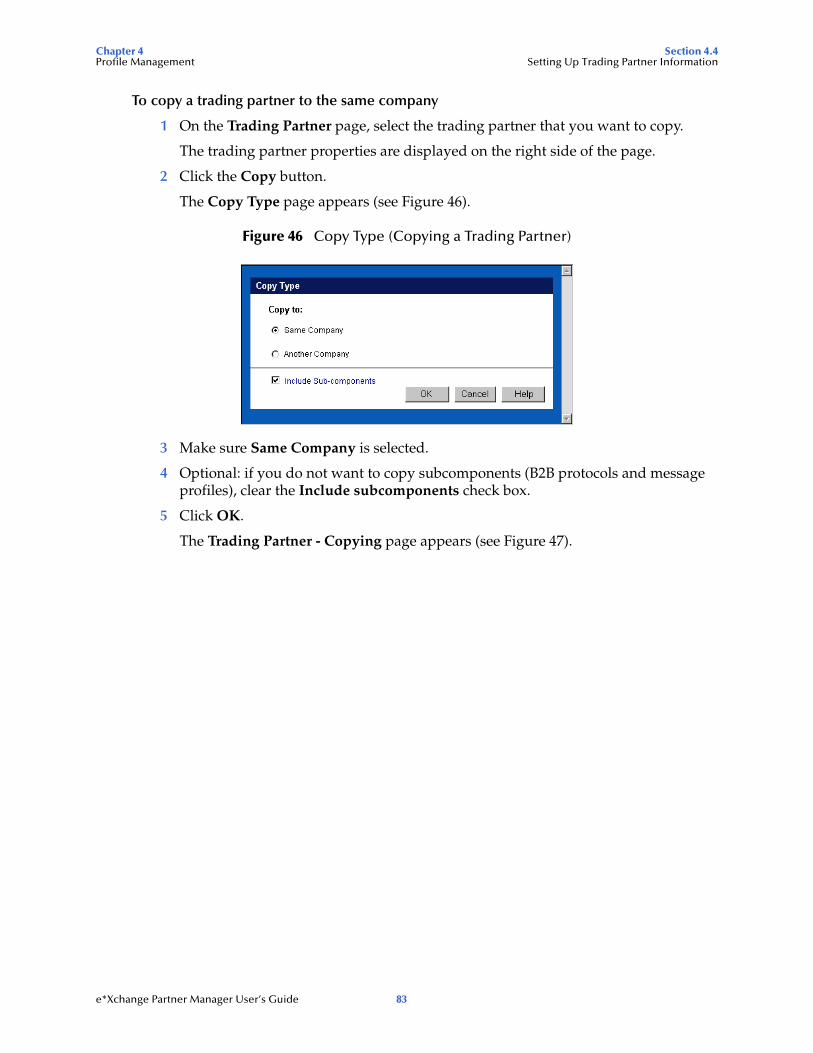
Chapter 4 Section 4.4Profile Management Setting Up Trading Partner Information
To copy a trading partner to the same company
1 On the Trading Partner page, select the trading partner that you want to copy.
The trading partner properties are displayed on the right side of the page.
2 Click the Copy button.
The Copy Type page appears (see Figure 46).
Figure 46 Copy Type (Copying a Trading Partner)
3 Make sure Same Company is selected.
4 Optional: if you do not want to copy subcomponents (B2B protocols and message profiles), clear the Include subcomponents check box.
5 Click OK.
The Trading Partner - Copying page appears (see Figure 47).
e*Xchange Partner Manager User’s Guide 83
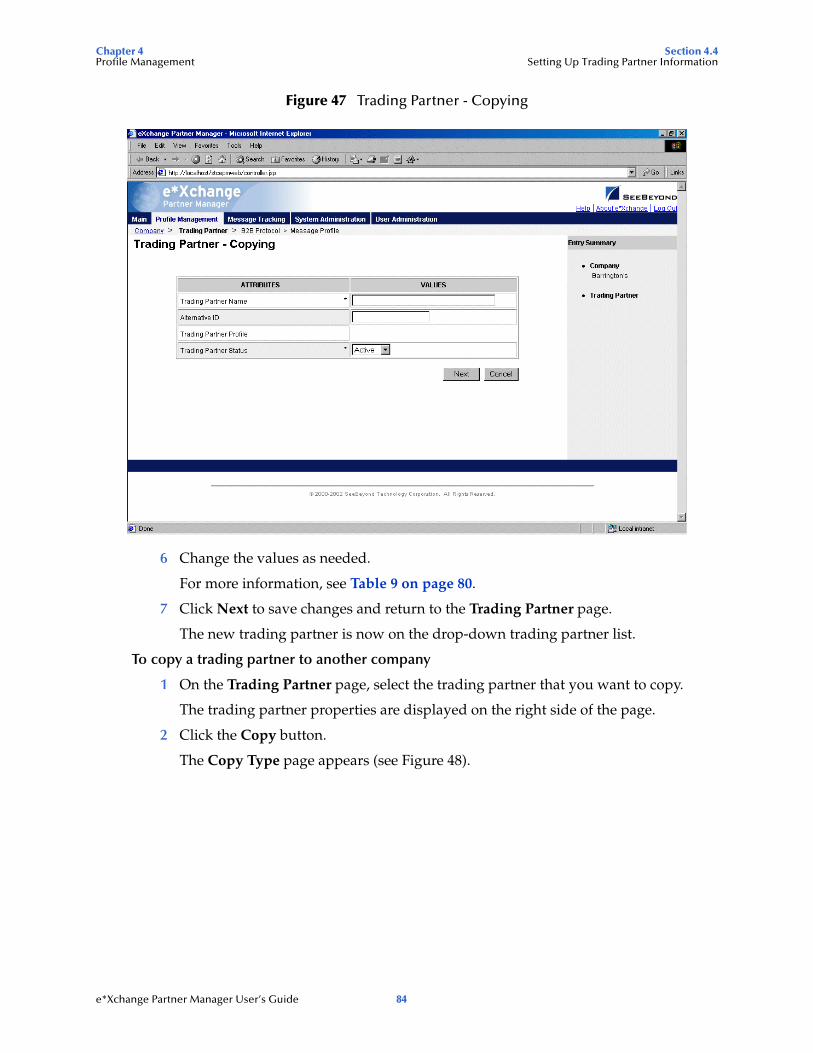
Chapter 4 Section 4.4Profile Management Setting Up Trading Partner Information
Figure 47 Trading Partner - Copying
6 Change the values as needed.
For more information, see Table 9 on page 80.
7 Click Next to save changes and return to the Trading Partner page.
The new trading partner is now on the drop-down trading partner list.
To copy a trading partner to another company
1 On the Trading Partner page, select the trading partner that you want to copy.
The trading partner properties are displayed on the right side of the page.
2 Click the Copy button.
The Copy Type page appears (see Figure 48).
e*Xchange Partner Manager User’s Guide 84
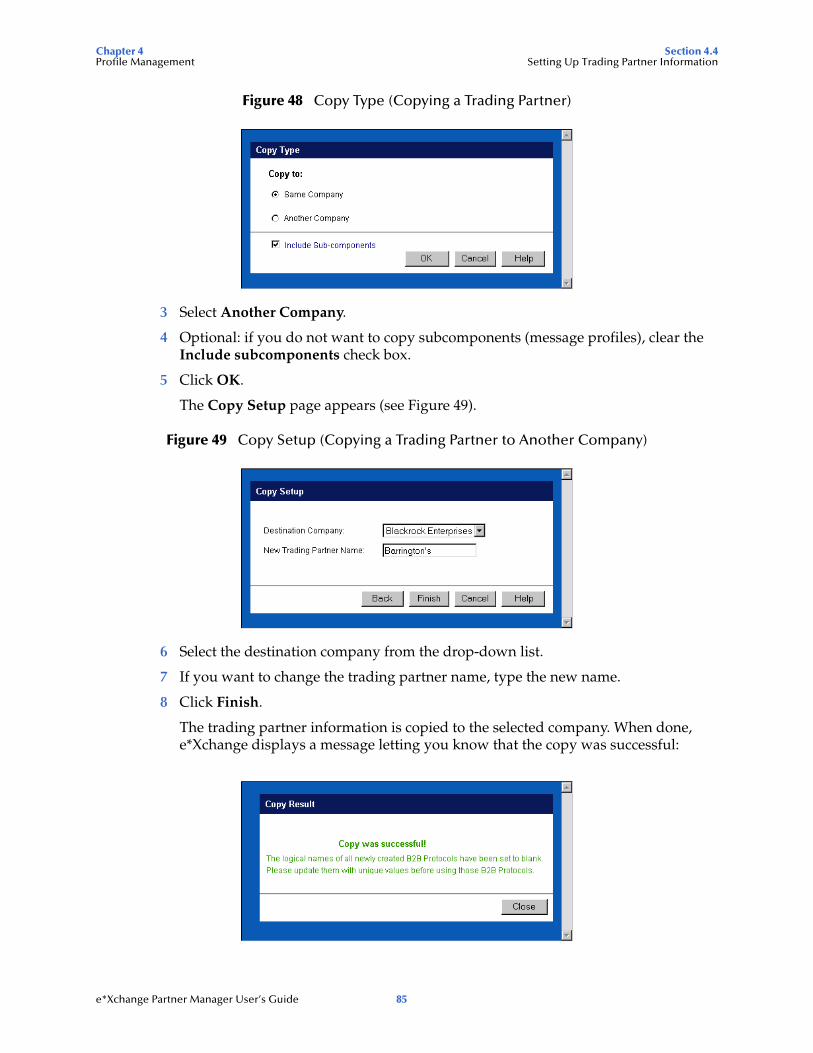
Chapter 4 Section 4.4Profile Management Setting Up Trading Partner Information
Figure 48 Copy Type (Copying a Trading Partner)
3 Select Another Company.
4 Optional: if you do not want to copy subcomponents (message profiles), clear the Include subcomponents check box.
5 Click OK.
The Copy Setup page appears (see Figure 49).
Figure 49 Copy Setup (Copying a Trading Partner to Another Company)
6 Select the destination company from the drop-down list.
7 If you want to change the trading partner name, type the new name.
8 Click Finish.
The trading partner information is copied to the selected company. When done, e*Xchange displays a message letting you know that the copy was successful:
e*Xchange Partner Manager User’s Guide 85
Chapter 4 Section 4.4Profile Management Setting Up Trading Partner Information
To delete a trading partner
1 On the Trading Partner page, select the trading partner from the drop-down list.
The trading partner properties are displayed on the right side of the page.
2 Click the Delete button.
A warning message appears asking if you are sure you want to delete.
3 To delete the profile, click OK.
The trading partner is deleted.
To inactivate or reactivate a trading partner
1 On the Trading Partner page, select the trading partner from the drop-down list.
The trading partner properties are displayed on the right side of the page.
2 In the Trading Partner Status field, toggle the Active/Inactive graphic to change the status. Values are as follows:
Trading partner is active: click to inactivate.
Note: If you attempt to inactivate a trading partner when there are active messages (either in the queue or waiting for acknowledgment) for the trading partner, e*Xchange gives a warning that the messages will be deleted if you continue.
Trading partner is inactive: click to reactivate. You are offered the option to cascade the current access rights to the lower levels.
To set up security
1 On the Trading Partner page, select the trading partner from the drop-down list.
The trading partner properties are displayed on the right side of the page.
2 Click the Security icon.
The Security Management page appears.
3 Set the values as needed.
4 Click OK.
For detailed instructions on setting up security, refer to “Security” on page 66.
To set up contacts
1 On the Trading Partner page, click the Contacts icon.
The Trading Partner - Contacts Viewing page appears.
2 Do one of the following:
To add a contact, click the Add button in the appropriate row. Type the information in the Trading Partner - Contacts Adding page and then click Apply.
e*Xchange Partner Manager User’s Guide 86
Chapter 4 Section 4.5Profile Management Setting Up B2B Protocol Information
To edit an existing contact, click the View/Edit button in the appropriate row. This button is only available when a contact has been entered. Edit the values in the Trading Partner - Contacts Editing page and then click Apply.
To delete an existing contact, click the View/Edit button in the appropriate row. In the Trading Partner - Contacts Editing page, click the Delete button at the bottom left. At the “Are you sure...” message, click OK.
For detailed instructions on working with contacts, refer to “Storing Contact Information” on page 228.
4.5 Setting Up B2B Protocol InformationOnce you have set up a trading partner, the next step is to enter B2B protocol information for that trading partner. For each eBusiness protocol, you must set up the outbound and inbound values separately.
The B2B protocol attributes that you must enter are grouped into three sections:
General
Transport Component
Message Security
From the Trading Partner page, select a trading partner and click Continue: B2B Protocol to access the B2B Protocol page (see Figure 50).
e*Xchange Partner Manager User’s Guide 87
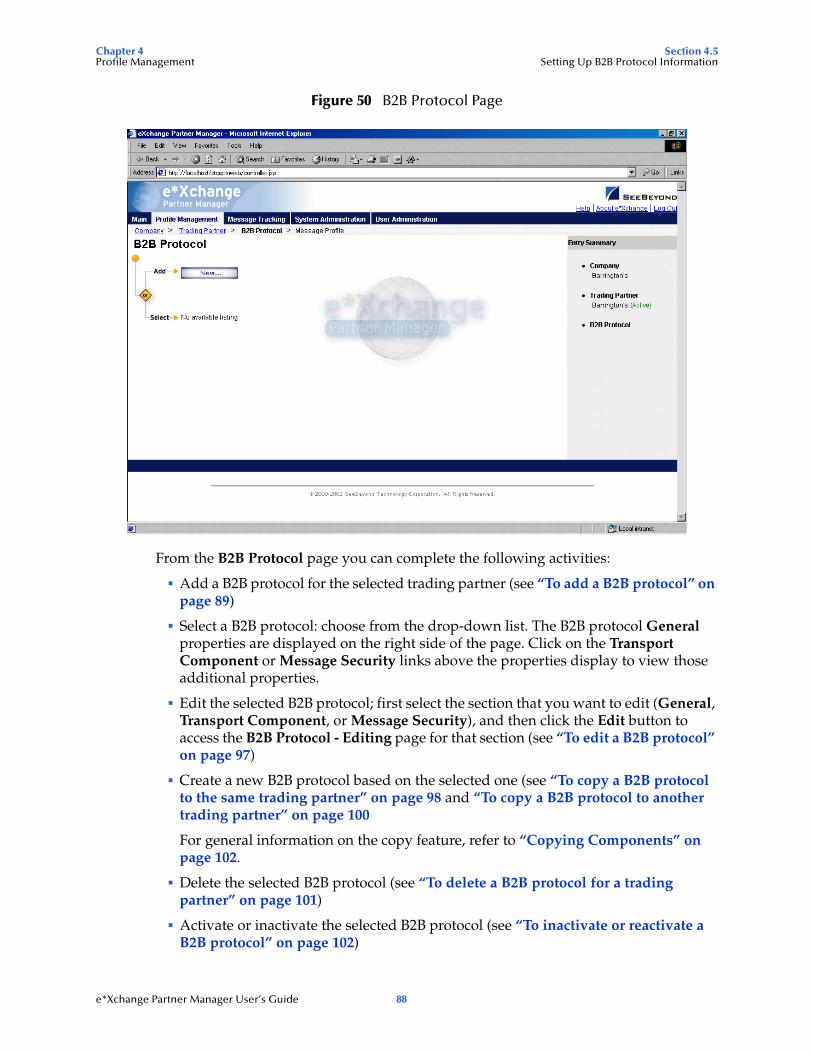
Chapter 4 Section 4.5Profile Management Setting Up B2B Protocol Information
Figure 50 B2B Protocol Page
From the B2B Protocol page you can complete the following activities:
Add a B2B protocol for the selected trading partner (see “To add a B2B protocol” on page 89)
Select a B2B protocol: choose from the drop-down list. The B2B protocol General properties are displayed on the right side of the page. Click on the Transport Component or Message Security links above the properties display to view those additional properties.
Edit the selected B2B protocol; first select the section that you want to edit (General, Transport Component, or Message Security), and then click the Edit button to access the B2B Protocol - Editing page for that section (see “To edit a B2B protocol” on page 97)
Create a new B2B protocol based on the selected one (see “To copy a B2B protocol to the same trading partner” on page 98 and “To copy a B2B protocol to another trading partner” on page 100
For general information on the copy feature, refer to “Copying Components” on page 102.
Delete the selected B2B protocol (see “To delete a B2B protocol for a trading partner” on page 101)
Activate or inactivate the selected B2B protocol (see “To inactivate or reactivate a B2B protocol” on page 102)
e*Xchange Partner Manager User’s Guide 88
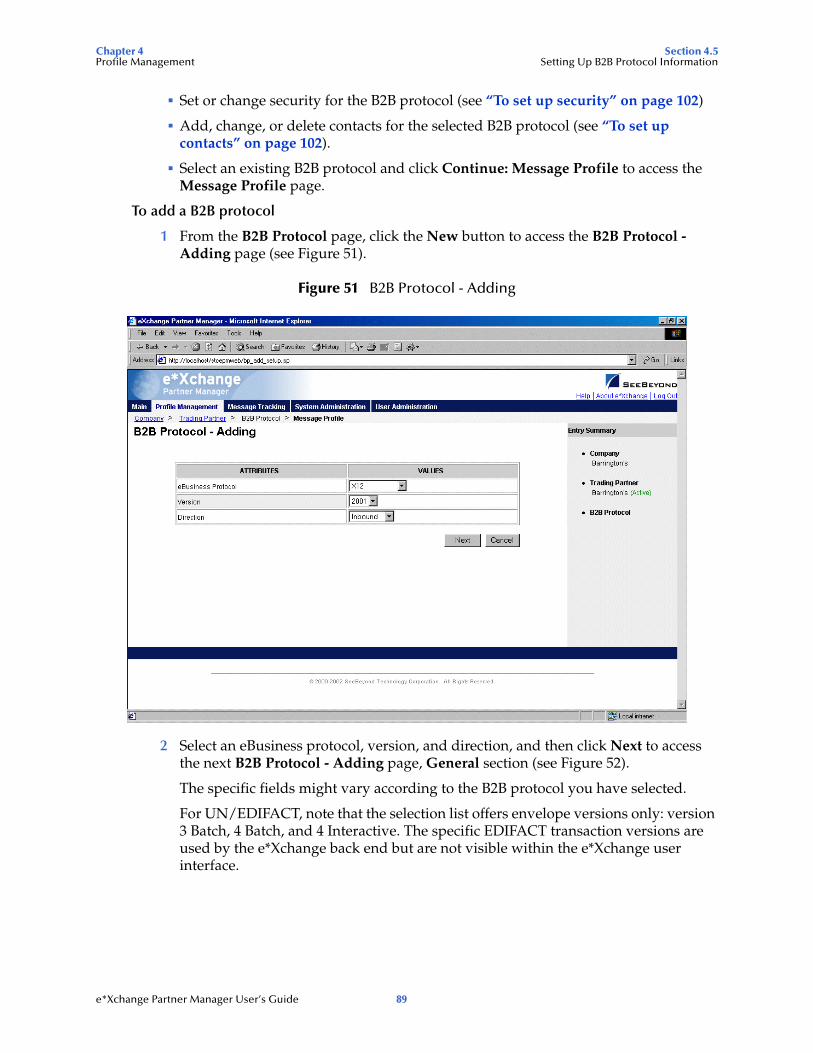
Chapter 4 Section 4.5Profile Management Setting Up B2B Protocol Information
Set or change security for the B2B protocol (see “To set up security” on page 102)
Add, change, or delete contacts for the selected B2B protocol (see “To set up contacts” on page 102).
Select an existing B2B protocol and click Continue: Message Profile to access the Message Profile page.
To add a B2B protocol
1 From the B2B Protocol page, click the New button to access the B2B Protocol - Adding page (see Figure 51).
Figure 51 B2B Protocol - Adding
2 Select an eBusiness protocol, version, and direction, and then click Next to access the next B2B Protocol - Adding page, General section (see Figure 52).
The specific fields might vary according to the B2B protocol you have selected.
For UN/EDIFACT, note that the selection list offers envelope versions only: version 3 Batch, 4 Batch, and 4 Interactive. The specific EDIFACT transaction versions are used by the e*Xchange back end but are not visible within the e*Xchange user interface.
e*Xchange Partner Manager User’s Guide 89
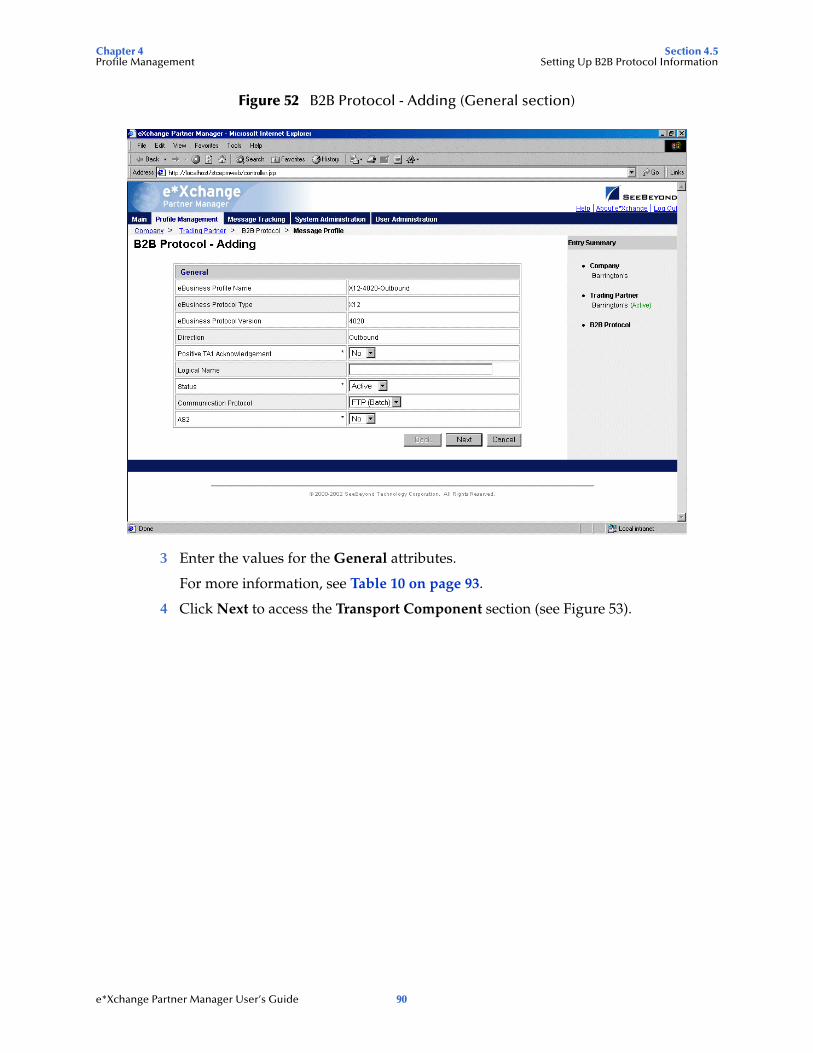
Chapter 4 Section 4.5Profile Management Setting Up B2B Protocol Information
Figure 52 B2B Protocol - Adding (General section)
3 Enter the values for the General attributes.
For more information, see Table 10 on page 93.
4 Click Next to access the Transport Component section (see Figure 53).
e*Xchange Partner Manager User’s Guide 90
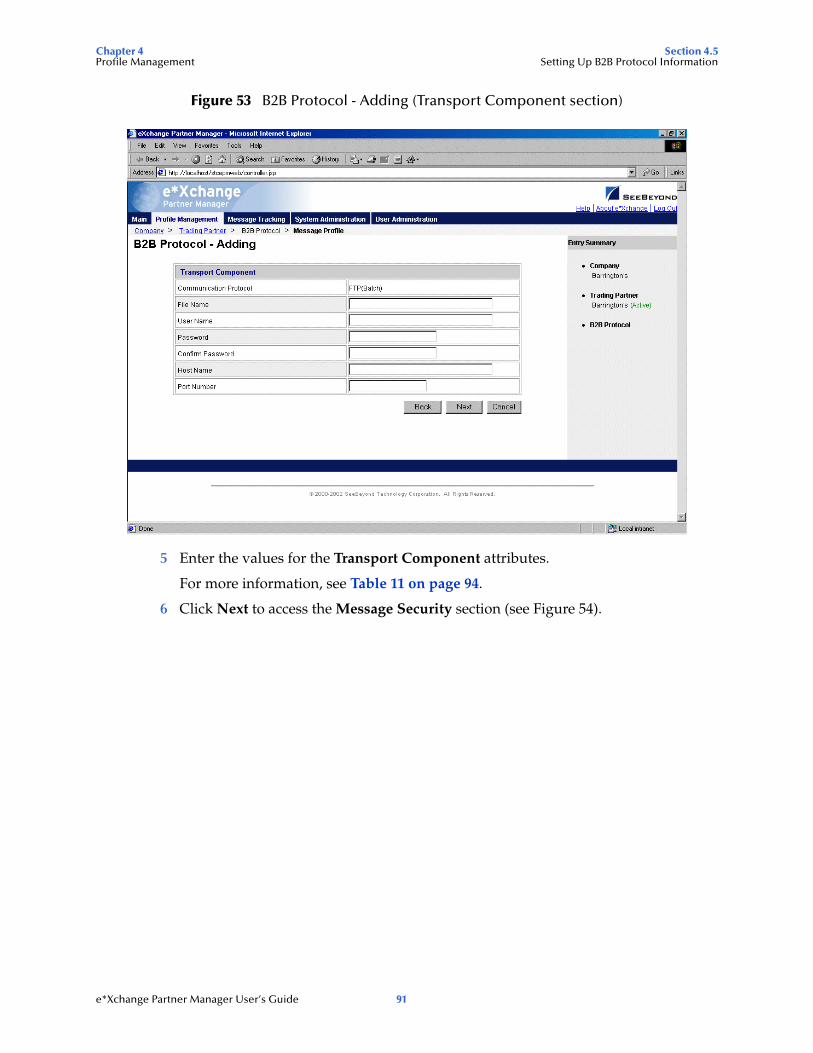
Chapter 4 Section 4.5Profile Management Setting Up B2B Protocol Information
Figure 53 B2B Protocol - Adding (Transport Component section)
5 Enter the values for the Transport Component attributes.
For more information, see Table 11 on page 94.
6 Click Next to access the Message Security section (see Figure 54).
e*Xchange Partner Manager User’s Guide 91
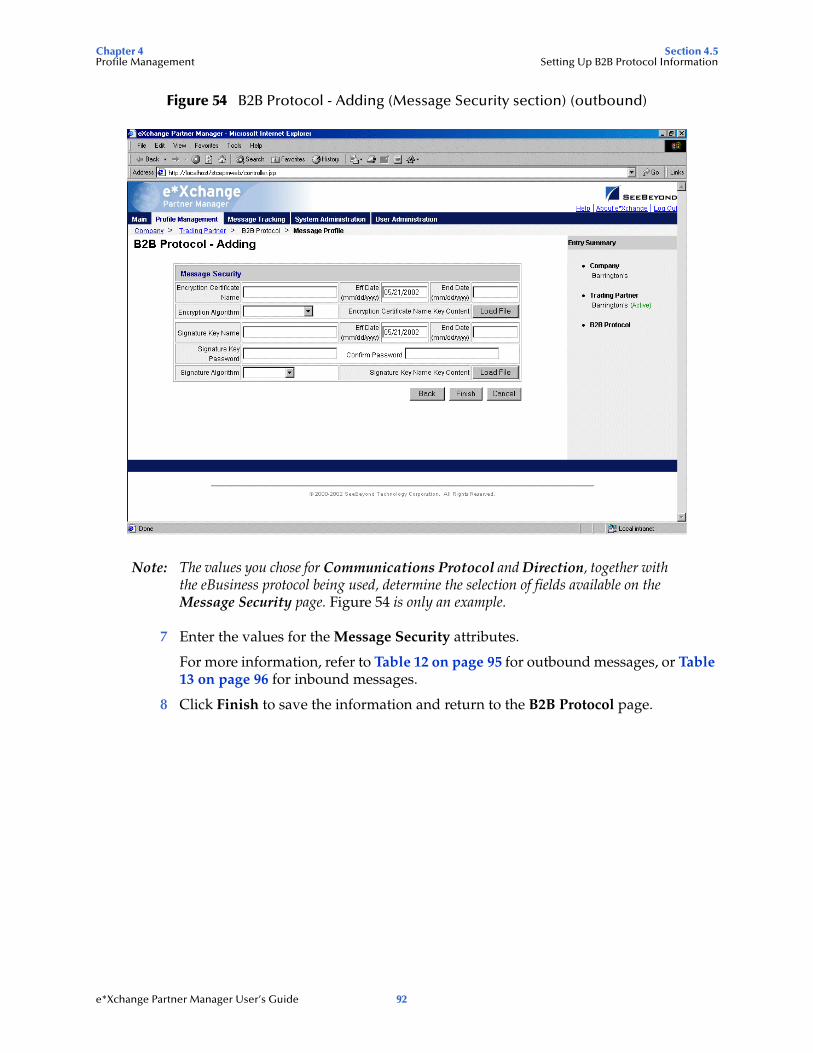
Chapter 4 Section 4.5Profile Management Setting Up B2B Protocol Information
Figure 54 B2B Protocol - Adding (Message Security section) (outbound)
Note: The values you chose for Communications Protocol and Direction, together with the eBusiness protocol being used, determine the selection of fields available on the Message Security page. Figure 54 is only an example.
7 Enter the values for the Message Security attributes.
For more information, refer to Table 12 on page 95 for outbound messages, or Table 13 on page 96 for inbound messages.
8 Click Finish to save the information and return to the B2B Protocol page.
e*Xchange Partner Manager User’s Guide 92
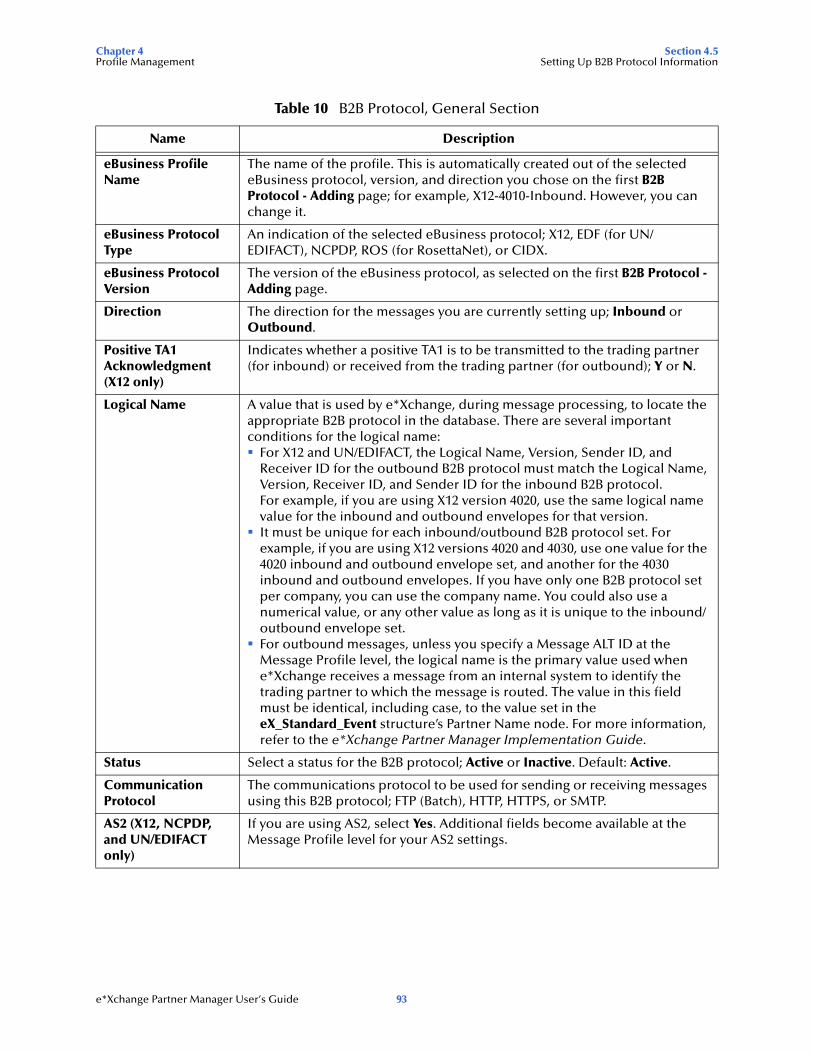
Chapter 4 Section 4.5Profile Management Setting Up B2B Protocol Information
Table 10 B2B Protocol, General Section
Name Description
eBusiness Profile Name
The name of the profile. This is automatically created out of the selected eBusiness protocol, version, and direction you chose on the first B2B Protocol - Adding page; for example, X12-4010-Inbound. However, you can change it.
eBusiness Protocol Type
An indication of the selected eBusiness protocol; X12, EDF (for UN/EDIFACT), NCPDP, ROS (for RosettaNet), or CIDX.
eBusiness Protocol Version
The version of the eBusiness protocol, as selected on the first B2B Protocol - Adding page.
Direction The direction for the messages you are currently setting up; Inbound or Outbound.
Positive TA1 Acknowledgment (X12 only)
Indicates whether a positive TA1 is to be transmitted to the trading partner (for inbound) or received from the trading partner (for outbound); Y or N.
Logical Name A value that is used by e*Xchange, during message processing, to locate the appropriate B2B protocol in the database. There are several important conditions for the logical name:
For X12 and UN/EDIFACT, the Logical Name, Version, Sender ID, and Receiver ID for the outbound B2B protocol must match the Logical Name, Version, Receiver ID, and Sender ID for the inbound B2B protocol.For example, if you are using X12 version 4020, use the same logical name value for the inbound and outbound envelopes for that version.It must be unique for each inbound/outbound B2B protocol set. For example, if you are using X12 versions 4020 and 4030, use one value for the 4020 inbound and outbound envelope set, and another for the 4030 inbound and outbound envelopes. If you have only one B2B protocol set per company, you can use the company name. You could also use a numerical value, or any other value as long as it is unique to the inbound/outbound envelope set.For outbound messages, unless you specify a Message ALT ID at the Message Profile level, the logical name is the primary value used when e*Xchange receives a message from an internal system to identify the trading partner to which the message is routed. The value in this field must be identical, including case, to the value set in the eX_Standard_Event structure’s Partner Name node. For more information, refer to the e*Xchange Partner Manager Implementation Guide.
Status Select a status for the B2B protocol; Active or Inactive. Default: Active.
Communication Protocol
The communications protocol to be used for sending or receiving messages using this B2B protocol; FTP (Batch), HTTP, HTTPS, or SMTP.
AS2 (X12, NCPDP, and UN/EDIFACT only)
If you are using AS2, select Yes. Additional fields become available at the Message Profile level for your AS2 settings.
e*Xchange Partner Manager User’s Guide 93
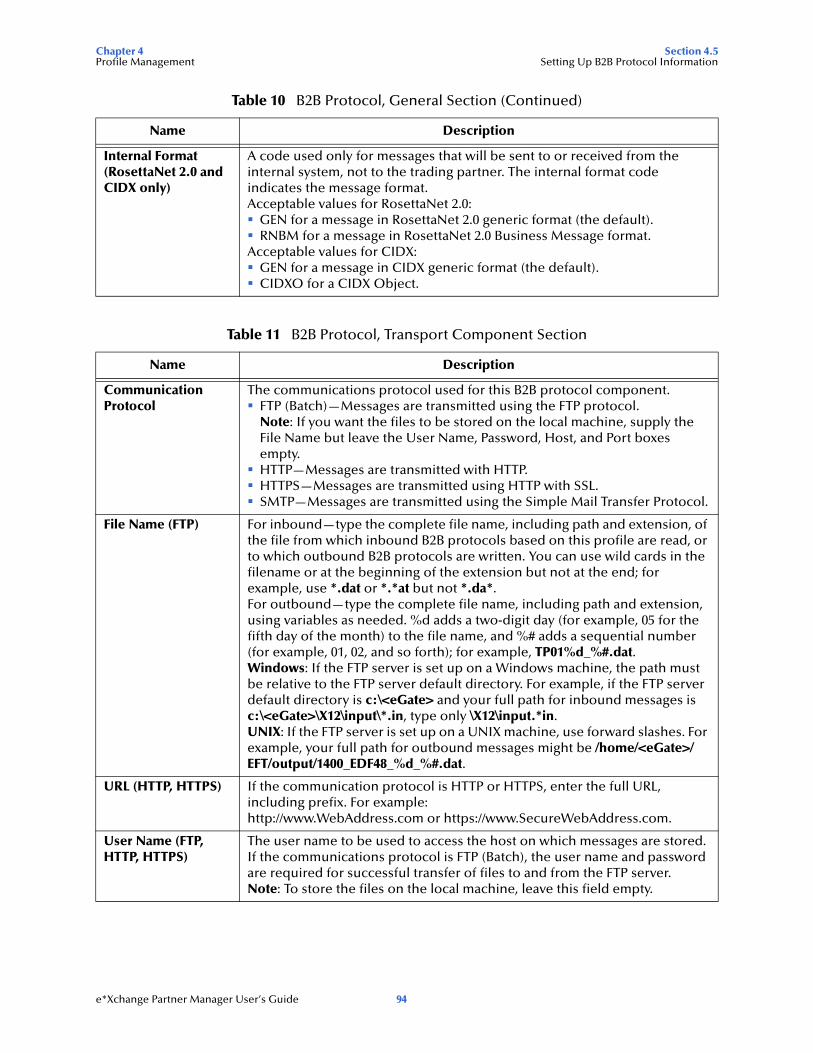
Chapter 4 Section 4.5Profile Management Setting Up B2B Protocol Information
Internal Format (RosettaNet 2.0 and CIDX only)
A code used only for messages that will be sent to or received from the internal system, not to the trading partner. The internal format code indicates the message format. Acceptable values for RosettaNet 2.0:
GEN for a message in RosettaNet 2.0 generic format (the default).RNBM for a message in RosettaNet 2.0 Business Message format.
Acceptable values for CIDX:GEN for a message in CIDX generic format (the default).CIDXO for a CIDX Object.
Table 11 B2B Protocol, Transport Component Section
Name Description
Communication Protocol
The communications protocol used for this B2B protocol component.FTP (Batch)—Messages are transmitted using the FTP protocol.Note: If you want the files to be stored on the local machine, supply the File Name but leave the User Name, Password, Host, and Port boxes empty.HTTP—Messages are transmitted with HTTP.HTTPS—Messages are transmitted using HTTP with SSL.SMTP—Messages are transmitted using the Simple Mail Transfer Protocol.
File Name (FTP) For inbound—type the complete file name, including path and extension, of the file from which inbound B2B protocols based on this profile are read, or to which outbound B2B protocols are written. You can use wild cards in the filename or at the beginning of the extension but not at the end; for example, use *.dat or *.*at but not *.da*.For outbound—type the complete file name, including path and extension, using variables as needed. %d adds a two-digit day (for example, 05 for the fifth day of the month) to the file name, and %# adds a sequential number (for example, 01, 02, and so forth); for example, TP01%d_%#.dat.Windows: If the FTP server is set up on a Windows machine, the path must be relative to the FTP server default directory. For example, if the FTP server default directory is c:\<eGate> and your full path for inbound messages is c:\<eGate>\X12\input\*.in, type only \X12\input.*in.UNIX: If the FTP server is set up on a UNIX machine, use forward slashes. For example, your full path for outbound messages might be /home/<eGate>/EFT/output/1400_EDF48_%d_%#.dat.
URL (HTTP, HTTPS) If the communication protocol is HTTP or HTTPS, enter the full URL, including prefix. For example:http://www.WebAddress.com or https://www.SecureWebAddress.com.
User Name (FTP, HTTP, HTTPS)
The user name to be used to access the host on which messages are stored. If the communications protocol is FTP (Batch), the user name and password are required for successful transfer of files to and from the FTP server.Note: To store the files on the local machine, leave this field empty.
Table 10 B2B Protocol, General Section (Continued)
Name Description
e*Xchange Partner Manager User’s Guide 94
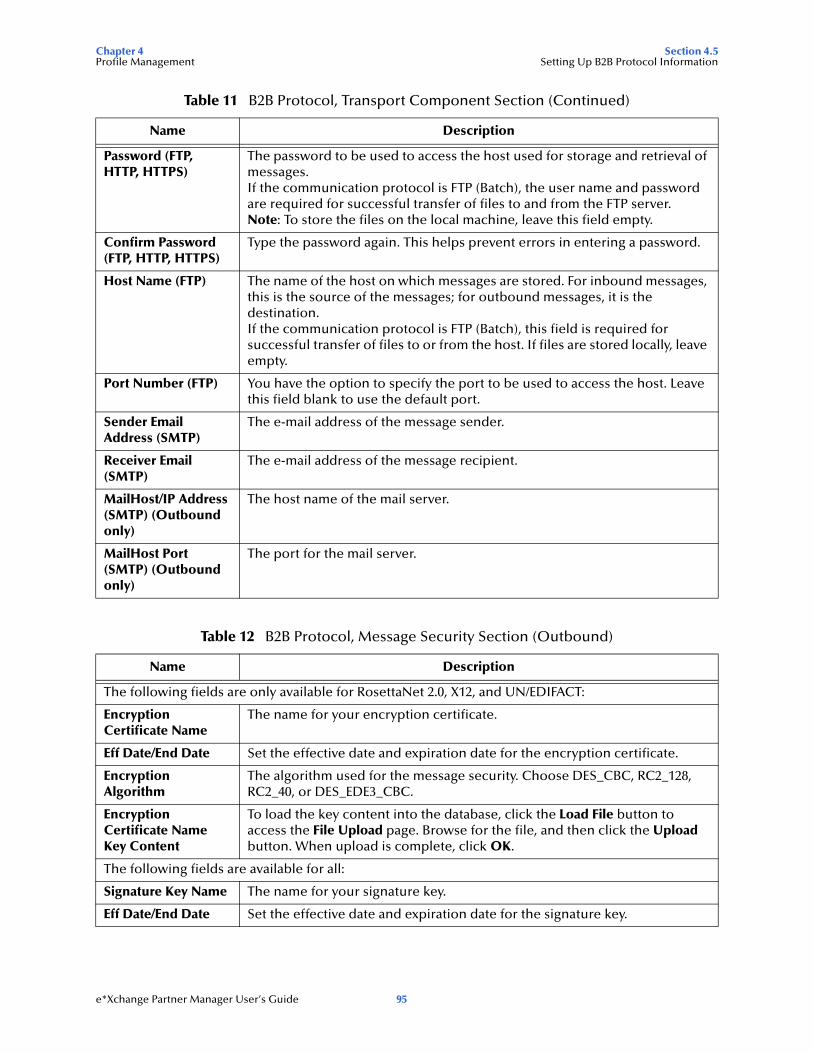
Chapter 4 Section 4.5Profile Management Setting Up B2B Protocol Information
Password (FTP, HTTP, HTTPS)
The password to be used to access the host used for storage and retrieval of messages.If the communication protocol is FTP (Batch), the user name and password are required for successful transfer of files to and from the FTP server.Note: To store the files on the local machine, leave this field empty.
Confirm Password (FTP, HTTP, HTTPS)
Type the password again. This helps prevent errors in entering a password.
Host Name (FTP) The name of the host on which messages are stored. For inbound messages, this is the source of the messages; for outbound messages, it is the destination.If the communication protocol is FTP (Batch), this field is required for successful transfer of files to or from the host. If files are stored locally, leave empty.
Port Number (FTP) You have the option to specify the port to be used to access the host. Leave this field blank to use the default port.
Sender Email Address (SMTP)
The e-mail address of the message sender.
Receiver Email (SMTP)
The e-mail address of the message recipient.
MailHost/IP Address (SMTP) (Outbound only)
The host name of the mail server.
MailHost Port (SMTP) (Outbound only)
The port for the mail server.
Table 12 B2B Protocol, Message Security Section (Outbound)
Name Description
The following fields are only available for RosettaNet 2.0, X12, and UN/EDIFACT:
Encryption Certificate Name
The name for your encryption certificate.
Eff Date/End Date Set the effective date and expiration date for the encryption certificate.
Encryption Algorithm
The algorithm used for the message security. Choose DES_CBC, RC2_128, RC2_40, or DES_EDE3_CBC.
Encryption Certificate Name Key Content
To load the key content into the database, click the Load File button to access the File Upload page. Browse for the file, and then click the Upload button. When upload is complete, click OK.
The following fields are available for all:
Signature Key Name The name for your signature key.
Eff Date/End Date Set the effective date and expiration date for the signature key.
Table 11 B2B Protocol, Transport Component Section (Continued)
Name Description
e*Xchange Partner Manager User’s Guide 95
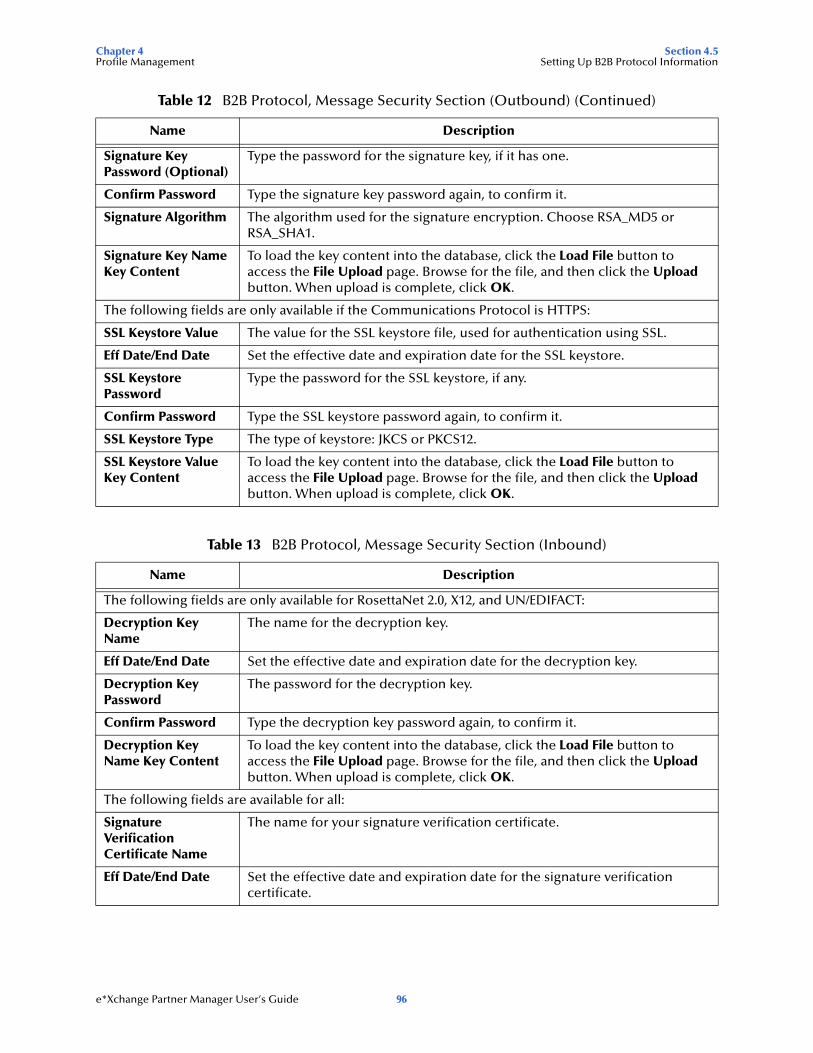
Chapter 4 Section 4.5Profile Management Setting Up B2B Protocol Information
Signature Key Password (Optional)
Type the password for the signature key, if it has one.
Confirm Password Type the signature key password again, to confirm it.
Signature Algorithm The algorithm used for the signature encryption. Choose RSA_MD5 or RSA_SHA1.
Signature Key Name Key Content
To load the key content into the database, click the Load File button to access the File Upload page. Browse for the file, and then click the Upload button. When upload is complete, click OK.
The following fields are only available if the Communications Protocol is HTTPS:
SSL Keystore Value The value for the SSL keystore file, used for authentication using SSL.
Eff Date/End Date Set the effective date and expiration date for the SSL keystore.
SSL Keystore Password
Type the password for the SSL keystore, if any.
Confirm Password Type the SSL keystore password again, to confirm it.
SSL Keystore Type The type of keystore: JKCS or PKCS12.
SSL Keystore Value Key Content
To load the key content into the database, click the Load File button to access the File Upload page. Browse for the file, and then click the Upload button. When upload is complete, click OK.
Table 13 B2B Protocol, Message Security Section (Inbound)
Name Description
The following fields are only available for RosettaNet 2.0, X12, and UN/EDIFACT:
Decryption Key Name
The name for the decryption key.
Eff Date/End Date Set the effective date and expiration date for the decryption key.
Decryption Key Password
The password for the decryption key.
Confirm Password Type the decryption key password again, to confirm it.
Decryption Key Name Key Content
To load the key content into the database, click the Load File button to access the File Upload page. Browse for the file, and then click the Upload button. When upload is complete, click OK.
The following fields are available for all:
Signature Verification Certificate Name
The name for your signature verification certificate.
Eff Date/End Date Set the effective date and expiration date for the signature verification certificate.
Table 12 B2B Protocol, Message Security Section (Outbound) (Continued)
Name Description
e*Xchange Partner Manager User’s Guide 96
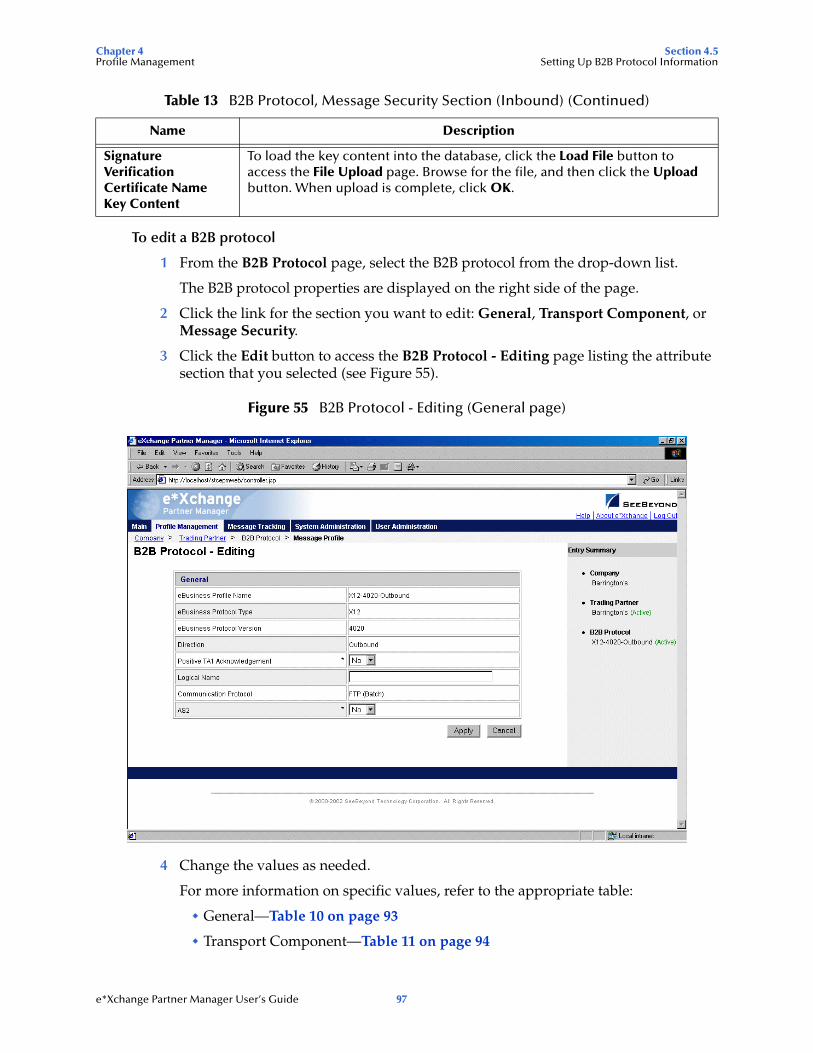
Chapter 4 Section 4.5Profile Management Setting Up B2B Protocol Information
To edit a B2B protocol
1 From the B2B Protocol page, select the B2B protocol from the drop-down list.
The B2B protocol properties are displayed on the right side of the page.
2 Click the link for the section you want to edit: General, Transport Component, or Message Security.
3 Click the Edit button to access the B2B Protocol - Editing page listing the attribute section that you selected (see Figure 55).
Figure 55 B2B Protocol - Editing (General page)
4 Change the values as needed.
For more information on specific values, refer to the appropriate table:
General—Table 10 on page 93
Transport Component—Table 11 on page 94
Signature Verification Certificate Name Key Content
To load the key content into the database, click the Load File button to access the File Upload page. Browse for the file, and then click the Upload button. When upload is complete, click OK.
Table 13 B2B Protocol, Message Security Section (Inbound) (Continued)
Name Description
e*Xchange Partner Manager User’s Guide 97
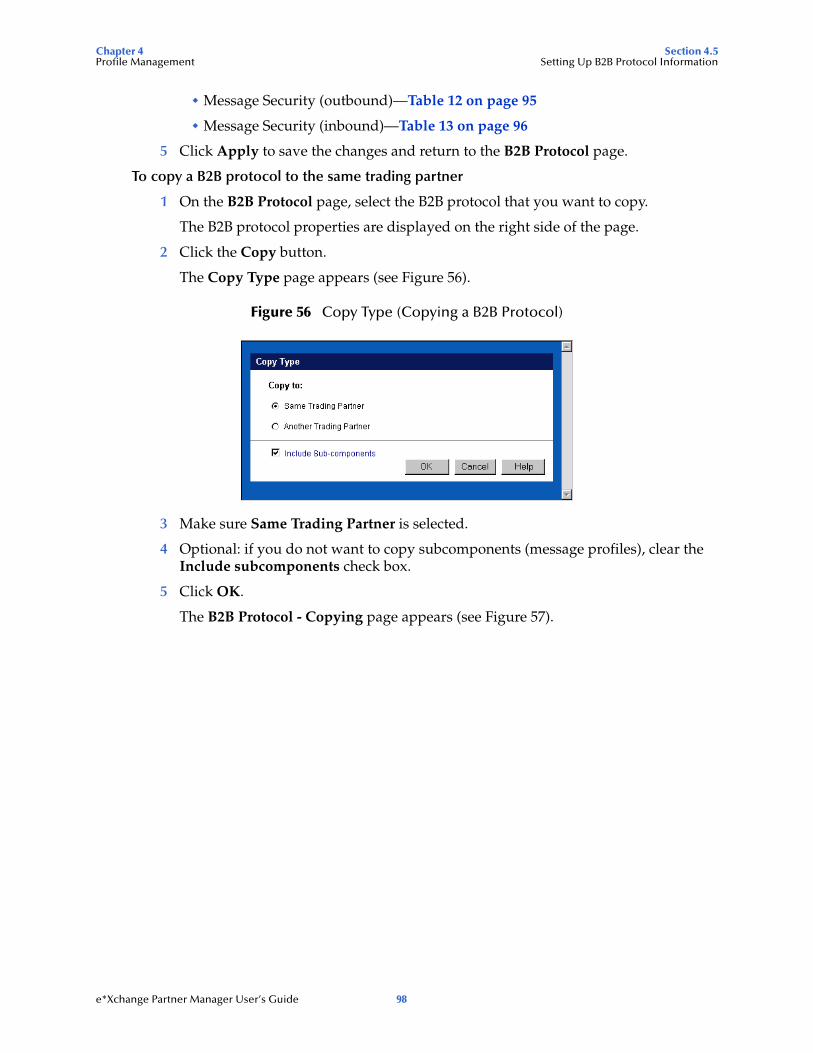
Chapter 4 Section 4.5Profile Management Setting Up B2B Protocol Information
Message Security (outbound)—Table 12 on page 95
Message Security (inbound)—Table 13 on page 96
5 Click Apply to save the changes and return to the B2B Protocol page.
To copy a B2B protocol to the same trading partner
1 On the B2B Protocol page, select the B2B protocol that you want to copy.
The B2B protocol properties are displayed on the right side of the page.
2 Click the Copy button.
The Copy Type page appears (see Figure 56).
Figure 56 Copy Type (Copying a B2B Protocol)
3 Make sure Same Trading Partner is selected.
4 Optional: if you do not want to copy subcomponents (message profiles), clear the Include subcomponents check box.
5 Click OK.
The B2B Protocol - Copying page appears (see Figure 57).
e*Xchange Partner Manager User’s Guide 98
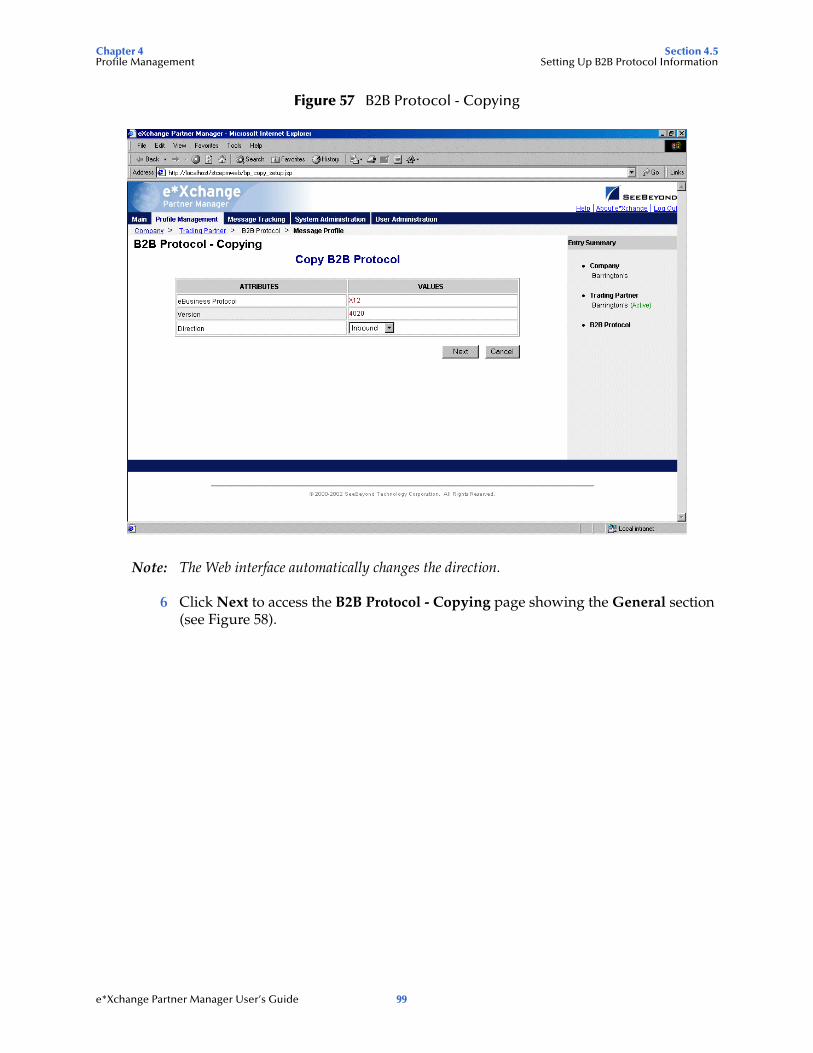
Chapter 4 Section 4.5Profile Management Setting Up B2B Protocol Information
Figure 57 B2B Protocol - Copying
Note: The Web interface automatically changes the direction.
6 Click Next to access the B2B Protocol - Copying page showing the General section (see Figure 58).
e*Xchange Partner Manager User’s Guide 99
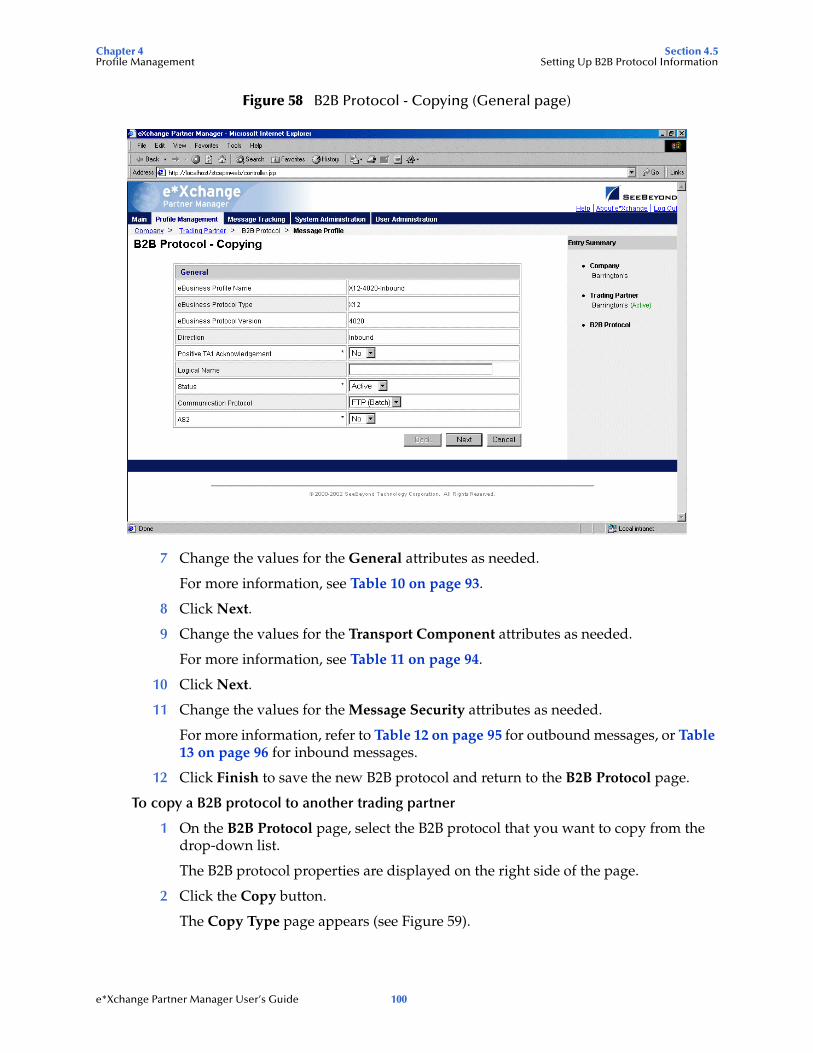
Chapter 4 Section 4.5Profile Management Setting Up B2B Protocol Information
Figure 58 B2B Protocol - Copying (General page)
7 Change the values for the General attributes as needed.
For more information, see Table 10 on page 93.
8 Click Next.
9 Change the values for the Transport Component attributes as needed.
For more information, see Table 11 on page 94.
10 Click Next.
11 Change the values for the Message Security attributes as needed.
For more information, refer to Table 12 on page 95 for outbound messages, or Table 13 on page 96 for inbound messages.
12 Click Finish to save the new B2B protocol and return to the B2B Protocol page.
To copy a B2B protocol to another trading partner
1 On the B2B Protocol page, select the B2B protocol that you want to copy from the drop-down list.
The B2B protocol properties are displayed on the right side of the page.
2 Click the Copy button.
The Copy Type page appears (see Figure 59).
e*Xchange Partner Manager User’s Guide 100
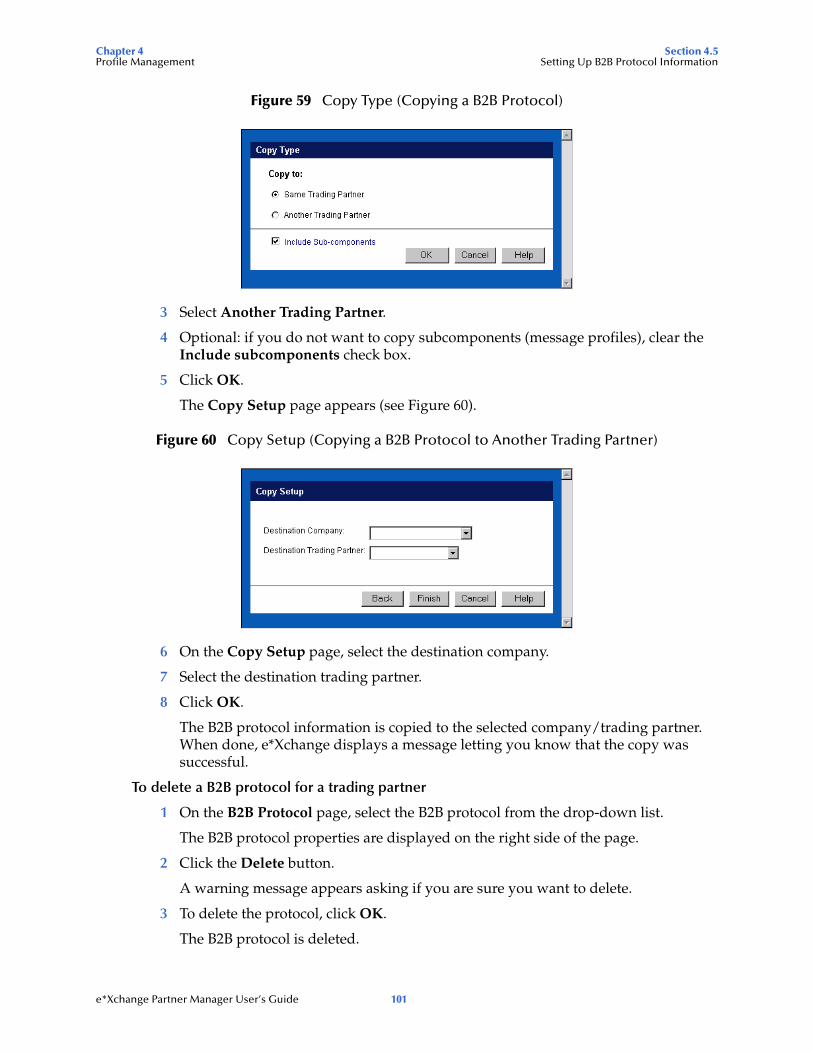
Chapter 4 Section 4.5Profile Management Setting Up B2B Protocol Information
Figure 59 Copy Type (Copying a B2B Protocol)
3 Select Another Trading Partner.
4 Optional: if you do not want to copy subcomponents (message profiles), clear the Include subcomponents check box.
5 Click OK.
The Copy Setup page appears (see Figure 60).
Figure 60 Copy Setup (Copying a B2B Protocol to Another Trading Partner)
6 On the Copy Setup page, select the destination company.
7 Select the destination trading partner.
8 Click OK.
The B2B protocol information is copied to the selected company/trading partner. When done, e*Xchange displays a message letting you know that the copy was successful.
To delete a B2B protocol for a trading partner
1 On the B2B Protocol page, select the B2B protocol from the drop-down list.
The B2B protocol properties are displayed on the right side of the page.
2 Click the Delete button.
A warning message appears asking if you are sure you want to delete.
3 To delete the protocol, click OK.
The B2B protocol is deleted.
e*Xchange Partner Manager User’s Guide 101
Chapter 4 Section 4.6Profile Management Copying Components
To inactivate or reactivate a B2B protocol
1 On the B2B Protocol page, select the B2B protocol from the drop-down list.
The B2B protocol properties are displayed on the right side of the page.
2 In the B2B Protocol Status field, toggle the Active/Inactive graphic to change the status. Values are as follows:
B2B protocol is active: click to inactivate.
B2B protocol is inactive: click to reactivate. You are offered the option to cascade the current access rights to the lower levels.
To set up security
1 On the B2B Protocol page, select the B2B protocol from the drop-down list.
The B2B protocol properties are displayed on the right side of the page.
2 Click the Security icon.
The Security Management page appears.
3 Set the values as needed.
4 Click OK.
For detailed instructions on setting up security, refer to “Security” on page 66.
To set up contacts
1 On the B2B Protocol page, click the Contacts icon.
The B2B Protocol - Contacts Viewing page appears.
2 Do one of the following:
To add a contact, click the Add button in the appropriate row. Type the information in the B2B Protocol - Contacts Adding page and then click Apply.
To edit an existing contact, click the View/Edit button in the appropriate row. This button is only available when a contact has been entered. Edit the values in the B2B Protocol - Contacts Editing page and then click Apply.
To delete an existing contact, click the View/Edit button in the appropriate row. In the B2B Protocol - Contacts Editing page, click the Delete button at the bottom left. At the “Are you sure...” message, click OK.
For detailed instructions on working with contacts, refer to “Storing Contact Information” on page 228.
4.6 Copying ComponentsOnce you have set up some components, e*Xchange allows you to copy the information that you have set up, so that the existing information can be reused in making new components.
e*Xchange Partner Manager User’s Guide 102
Chapter 4 Section 4.6Profile Management Copying Components
e*Xchange provides several copying options that can help you to streamline the setup of your trading partner information.
By copying a component and using that as a basis for a new component, you can reuse information that you have already set up, modifying only those values that are unique for the new component. For example, for a specific trading partner you can set up inbound values at the B2B Protocol level and then copy this information as a basis for the outbound values. Alternatively, if you have two trading partners that use the same eBusiness protocol and the same transactions, you can set up one trading partner, all the way down to the message profiles, and then copy the trading partner and all subcomponents to a new company. You can then modify the values as needed. For example, if you copy the B2B protocol level, be sure to update the Sender ID and Receiver ID.
Copying of components is available at each level as follows:
Company
You can copy only the company itself, or you can include all subcomponents (trading partners, B2B protocols and message profiles that have been set up for that company) at the same time.
You must enter a new company name before saving.
Trading Partner
You can copy to the same company or to a different company.
You must enter a new trading partner name before saving.
When copying to the same company, you have the option to change other trading partner parameters before saving.
You can copy only the trading partner itself, or you can include all subcomponents (B2B protocols and message profiles that have been set up for that trading partner) at the same time.
B2B Protocol
You can copy to the same trading partner or to a different trading partner.
If you are copying to the same trading partner, the new B2B protocol automatically takes the opposite direction (if you are copying the outbound B2B protocol, the values are copied to the inbound B2B protocol).
If you are copying to a different trading partner, the new B2B protocol is the same direction as the one that was copied (for example, inbound to inbound).
When copying to the same trading partner, you have the option to change other B2B protocol parameters before saving.
You have the option to copy only the B2B protocol itself, or to copy all subcomponents (message profiles that have been set up for that B2B protocol) at the same time.
Note: When copying B2B protocols, the Logical Name is not copied, since it must be unique for each inbound/outbound pair at the B2B Protocol level. After copying, you must set the logical name for each new B2B Protocol. In addition, the existing
e*Xchange Partner Manager User’s Guide 103
Chapter 4 Section 4.7Profile Management Setting Up Message Profile Information
Sender ID (ISA06) and Receiver ID (ISA08) are copied when you copy the B2B Protocol. Be sure to update them.
Message Profile
You can copy to the same B2B protocol or to a different B2B protocol.
If you are copying to the same B2B protocol, you must provide a name for the new B2B protocol.
If you are copying to a different Company/Trading Partner/B2B protocol, you can only copy to a trading partner that has B2B protocols already set up for the eBusiness protocol for which the message profiles apply.
When copying to the same B2B profile, you have the option to change other message profile parameters before saving.
4.7 Setting Up Message Profile InformationThe next step is to set up values for individual messages, at the message profile level.
Since the values are considerably different for each eBusiness protocol, message profile setup is addressed in separate chapters, as follows:
X12—“Profile Setup for X12” on page 105
NCPDP-HIPAA—“Profile Setup for NCPDP-HIPAA” on page 134
UN/EDIFACT (versions 3 Batch, 4 Batch, and 4 Interactive)—“Profile Setup for UN/EDIFACT” on page 149
RosettaNet (versions 1.1 and 2.0)—“Profile Setup for RosettaNet” on page 185
CIDX—“Profile Setup for CIDX” on page 215
4.7.1. Entering Return Message InformationYou must specify one or more message profile that will be expected in response to the current message profile. You can select more than one return message profile.
e*Xchange Partner Manager User’s Guide 104
Chapter 5
Profile Setup for X12
This chapter provides information on setting up X12 transactions in the e*Xchange Partner Manager, at the Message Profile level.
The Company, Trading Partner, and B2B Protocol (inbound and outbound) levels must be set up first. For information on setting up these components, refer to “Profile Management” on page 70.
This chapter includes information on the following:
Setting the values for:
Interchange envelope (ISA and IEA segments)
Functional group (GS and GE segments)
Transaction set (ST and SE segments)
Specifying the messaging protocol used to relay the messages
Using the special files provided for HIPAA transactions
Handling errors
5.1 Template LibrariesIf you are using X12, you must install the X12 templates provided with e*Gate Integrator. If you are using HIPAA, install the HIPAA templates. Both of these template libraries are available during e*Gate installation via the “Add-Ons” option. For installation instructions, refer to the X12 ETD Library User’s Guide or the HIPAA ETD Library User’s Guide.
5.2 X12 Header and Trailer Segment ValuesYou must enter values for the X12 header and trailer segments so that e*Xchange can successfully interpret and route messages to and from a trading partner.
Most of the header and trailer segment values are set up in the message profile. Some other values are counted or tracked automatically by e*Xchange, or are provided by e*Gate.
e*Xchange Partner Manager User’s Guide 105
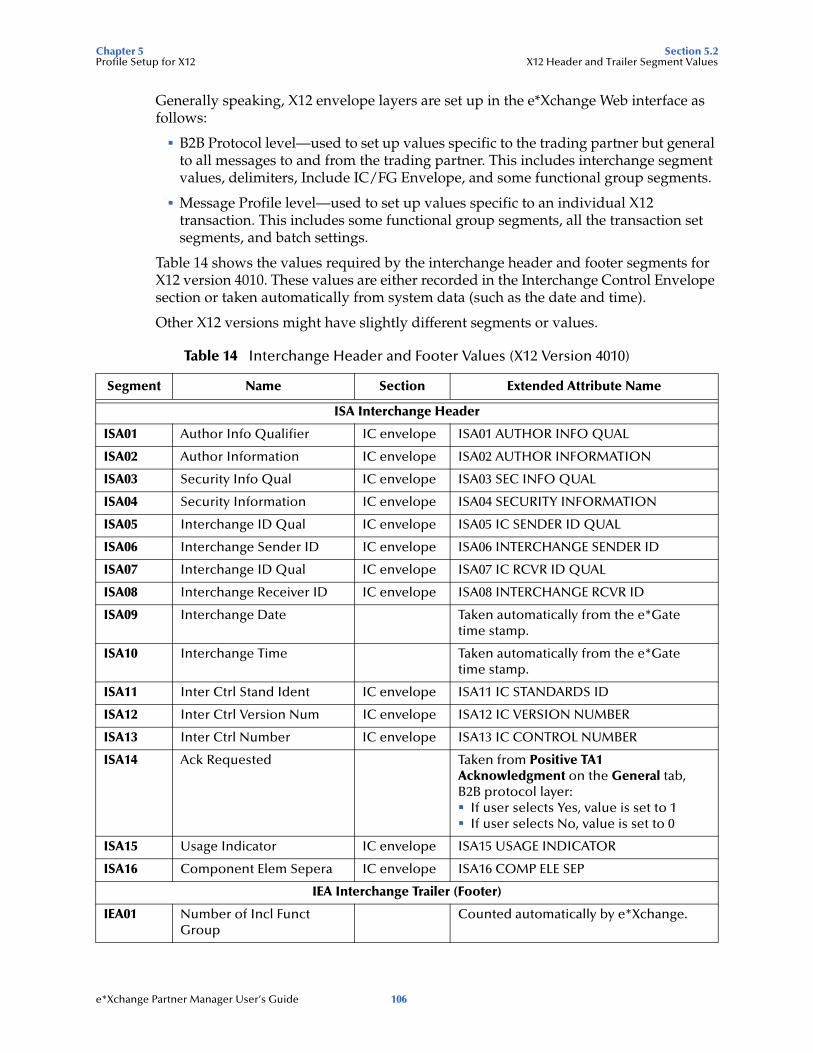
Chapter 5 Section 5.2Profile Setup for X12 X12 Header and Trailer Segment Values
Generally speaking, X12 envelope layers are set up in the e*Xchange Web interface as follows:
B2B Protocol level—used to set up values specific to the trading partner but general to all messages to and from the trading partner. This includes interchange segment values, delimiters, Include IC/FG Envelope, and some functional group segments.
Message Profile level—used to set up values specific to an individual X12 transaction. This includes some functional group segments, all the transaction set segments, and batch settings.
Table 14 shows the values required by the interchange header and footer segments for X12 version 4010. These values are either recorded in the Interchange Control Envelope section or taken automatically from system data (such as the date and time).
Other X12 versions might have slightly different segments or values.
Table 14 Interchange Header and Footer Values (X12 Version 4010)
Segment Name Section Extended Attribute Name
ISA Interchange Header
ISA01 Author Info Qualifier IC envelope ISA01 AUTHOR INFO QUAL
ISA02 Author Information IC envelope ISA02 AUTHOR INFORMATION
ISA03 Security Info Qual IC envelope ISA03 SEC INFO QUAL
ISA04 Security Information IC envelope ISA04 SECURITY INFORMATION
ISA05 Interchange ID Qual IC envelope ISA05 IC SENDER ID QUAL
ISA06 Interchange Sender ID IC envelope ISA06 INTERCHANGE SENDER ID
ISA07 Interchange ID Qual IC envelope ISA07 IC RCVR ID QUAL
ISA08 Interchange Receiver ID IC envelope ISA08 INTERCHANGE RCVR ID
ISA09 Interchange Date Taken automatically from the e*Gate time stamp.
ISA10 Interchange Time Taken automatically from the e*Gate time stamp.
ISA11 Inter Ctrl Stand Ident IC envelope ISA11 IC STANDARDS ID
ISA12 Inter Ctrl Version Num IC envelope ISA12 IC VERSION NUMBER
ISA13 Inter Ctrl Number IC envelope ISA13 IC CONTROL NUMBER
ISA14 Ack Requested Taken from Positive TA1 Acknowledgment on the General tab, B2B protocol layer:
If user selects Yes, value is set to 1If user selects No, value is set to 0
ISA15 Usage Indicator IC envelope ISA15 USAGE INDICATOR
ISA16 Component Elem Sepera IC envelope ISA16 COMP ELE SEP
IEA Interchange Trailer (Footer)
IEA01 Number of Incl Funct Group
Counted automatically by e*Xchange.
e*Xchange Partner Manager User’s Guide 106
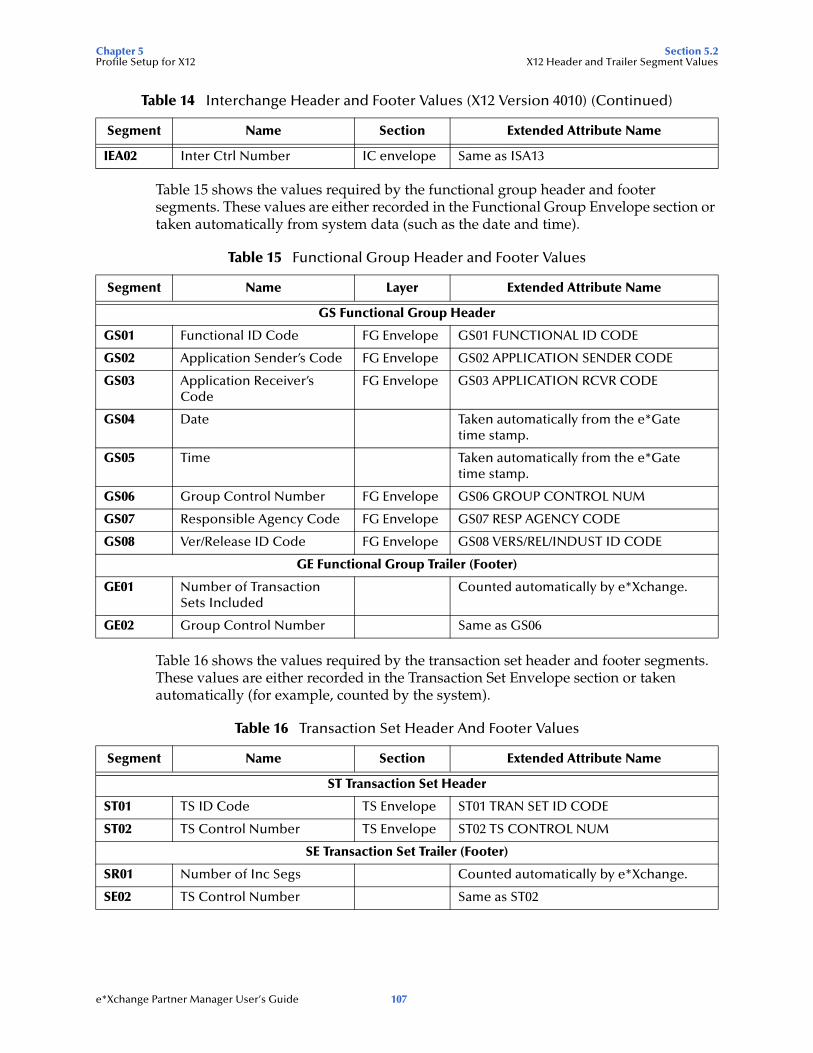
Chapter 5 Section 5.2Profile Setup for X12 X12 Header and Trailer Segment Values
Table 15 shows the values required by the functional group header and footer segments. These values are either recorded in the Functional Group Envelope section or taken automatically from system data (such as the date and time).
Table 16 shows the values required by the transaction set header and footer segments. These values are either recorded in the Transaction Set Envelope section or taken automatically (for example, counted by the system).
IEA02 Inter Ctrl Number IC envelope Same as ISA13
Table 15 Functional Group Header and Footer Values
Segment Name Layer Extended Attribute Name
GS Functional Group Header
GS01 Functional ID Code FG Envelope GS01 FUNCTIONAL ID CODE
GS02 Application Sender’s Code FG Envelope GS02 APPLICATION SENDER CODE
GS03 Application Receiver’s Code
FG Envelope GS03 APPLICATION RCVR CODE
GS04 Date Taken automatically from the e*Gate time stamp.
GS05 Time Taken automatically from the e*Gate time stamp.
GS06 Group Control Number FG Envelope GS06 GROUP CONTROL NUM
GS07 Responsible Agency Code FG Envelope GS07 RESP AGENCY CODE
GS08 Ver/Release ID Code FG Envelope GS08 VERS/REL/INDUST ID CODE
GE Functional Group Trailer (Footer)
GE01 Number of Transaction Sets Included
Counted automatically by e*Xchange.
GE02 Group Control Number Same as GS06
Table 16 Transaction Set Header And Footer Values
Segment Name Section Extended Attribute Name
ST Transaction Set Header
ST01 TS ID Code TS Envelope ST01 TRAN SET ID CODE
ST02 TS Control Number TS Envelope ST02 TS CONTROL NUM
SE Transaction Set Trailer (Footer)
SR01 Number of Inc Segs Counted automatically by e*Xchange.
SE02 TS Control Number Same as ST02
Table 14 Interchange Header and Footer Values (X12 Version 4010) (Continued)
Segment Name Section Extended Attribute Name
e*Xchange Partner Manager User’s Guide 107
Chapter 5 Section 5.3Profile Setup for X12 X12 Delimiters
5.3 X12 DelimitersFor X12, delimiters are set up at the Message Profile level, in the Interchange Control Envelope section.
It is important to note the specific use of delimiters in the extended attributes and how it affects default use of delimiters in messages processed by e*Xchange.
For inbound messages, e*Xchange uses the delimiters specified in the message. Even if other values are specified in the Extended Attributes, these are ignored.
For an outbound message, e*Xchange replaces the delimiters used by the internal application with those specified in the Extended Attributes before forwarding the message to the trading partner.
If the message received from the internal application does not include all the envelope layers, including ISA, GS, GE, and IEA segments, e*Xchange requires the default delimiters:
Tilde (~) as the segment delimiter
Asterisk (*) as the element delimiter
Colon (:) as the composite element delimiter
If the internal application includes the full ISA IEA envelope structure, the message can use the delimiters specified in the ISA segment. e*Xchange uses these delimiters to parse the message. e*Xchange then replaces these delimiters with those specified in the Extended Attributes of the trading partner profile.
5.4 Transfer Modes in X12X12 offers three alternatives in terms of how frequently messages are sent:
Interactive (single-item batching in real time)—messages are sent as soon as they are generated or received. Typically, messages that are used in a real time mode are those that require an immediate response. The sender sends a request message to the receiver and remains connected while the receiver processes the request message and returns a response message.
Batch—messages of all types are sent in groups called batches. In batch mode, the frequency of batch transmission is normally determined by a user-specified time setting.
Fast Batch—messages of a certain type are accumulated and sent to the trading partner as a group of messages, all of the same transaction type, at a preset point. Fast batch has one interchange, one functional group, and a preset number of transactions. The point at which a fast batch is sent is determined by the setting in the Standard Event Structure for the message profile.
e*Xchange Partner Manager User’s Guide 108
Chapter 5 Section 5.5Profile Setup for X12 Communications Protocols for X12
5.4.1. Fast Batch SettingsIf you are using Fast Batch, you must set the following values in the eX_Standard_Event.ssc file:
Set the string value “FB_UNIQUE_ID” (Fast Batch unique ID) in the Name node of the first NameValuePair in the TPAttribute node.
The Fast Batch unique ID is unique for each fast batch, but the same for each message within the fast batch.
Set the fast batch unique value in the Value node of the first NameValuePair in the TPAttribute node.
The actual value for the fast batch unique ID is user-defined.
Set the string value “FB_COUNT” (Number of messages to be included in the batch) in the Name node of the Second NameValuePair in the TPAttribute node.
Set the total fast batch record count in the Value node of the second NameValuePair in the TPAttribute node.
The actual value for the fast batch record count is user-defined.
For an example, refer to the e*Xchange schema Component chapter of the e*Xchange Implementation Guide.
5.5 Communications Protocols for X12The communications protocols supported by e*Xchange for X12 are:
FTP (Batch)
The FTP (Batch) setting at the B2B protocol level indicates use of FTP (file transfer protocol) for transmission of messages. Within e*Gate, this uses the ePM Batch e*Way to transfer files. Files can also be stored on the local machine.
Note: In e*Xchange it is important to distinguish between the two uses of the word Batch—the FTP (Batch) protocol, and the Batch transfer mode for batching of messages.
HTTP
This setting indicates use of the HTTP protocol.
SMTP
This setting indicates use of the Simple Mail Transfer Protocol.
e*Xchange Partner Manager User’s Guide 109

Chapter 5 Section 5.6Profile Setup for X12 Setting Up X12 Message Profile Information
5.6 Setting Up X12 Message Profile InformationOnce you have set up B2B protocol information for a trading partner, the next step is to set up message profiles.
5.6.1. Setup SequencePart of setting up a message profile is to specify the expected response message, if any.
During initial setup, you will find that you cannot select the appropriate response messages because you have not yet created the message profiles for those response messages.
One approach to this is to first set up all message profiles, both inbound and outbound, and then go back into each message profile to select the return messages.
5.6.2. Large Message Support for X12e*Xchange includes a facility for dealing with large outbound messages effectively by breaking them up into manageable portions during processing. Files above a certain size cause errors unless you use the large message feature. For example, you might find that there is a problem with files larger than 60 MB unless you use the large message feature. In some cases larger files might process smoothly, and in some cases smaller files might cause errors, depending on available disk size, memory, message volume, and other factors.
An example is provided for HIPAA 835, including a Collaboration.
To use the large message support feature, specific settings are required at the Message Profile level. You must set the following values in the General section:
Message ALT ID: it must exactly match the value set in the MSG_ALT_ID attribute in the eX_Standard_Event structure.
If you are using large message support, e*Xchange uses the Message ALT ID, rather than the Logical Name, to identify the trading partner.
Validation Collaboration: it must be set to HIPAA_2K_835_Outb_validation.
For more information on X12 large message support, refer to the HIPAA Implementation Guide.
5.6.3. Setting Up a Message ProfileFrom the B2B Protocol page, select a B2B protocol and click Continue: Message Profile to access the Message Profile page (see Figure 61).
e*Xchange Partner Manager User’s Guide 110

Chapter 5 Section 5.6Profile Setup for X12 Setting Up X12 Message Profile Information
Figure 61 Message Profile Page
From the Message Profile page you can complete the following activities:
Add a message profile for the selected B2B protocol (see “To add a message profile” on page 112).
Select a message profile: choose from the drop-down list. The message profile General properties are displayed on the right side of the page. To view additional properties, click on the appropriate link above the properties display (specific property groups vary according to the eBusiness protocol).
Edit the selected message profile; first select the section that you want to edit, and then click the Edit button to access the Message Profile - Editing page (see “To edit a message profile” on page 123).
Create a new message profile based on the selected one (see “To copy a message profile to the same B2B protocol” on page 124 and “To copy a message profile to another B2B protocol” on page 126).
For general information on the copy feature, refer to “Copying Components” on page 102.
Delete the selected message profile (see “To delete a message profile” on page 127).
Activate or inactivate the selected message profile (see “To inactivate or reactivate a message profile” on page 127).
e*Xchange Partner Manager User’s Guide 111
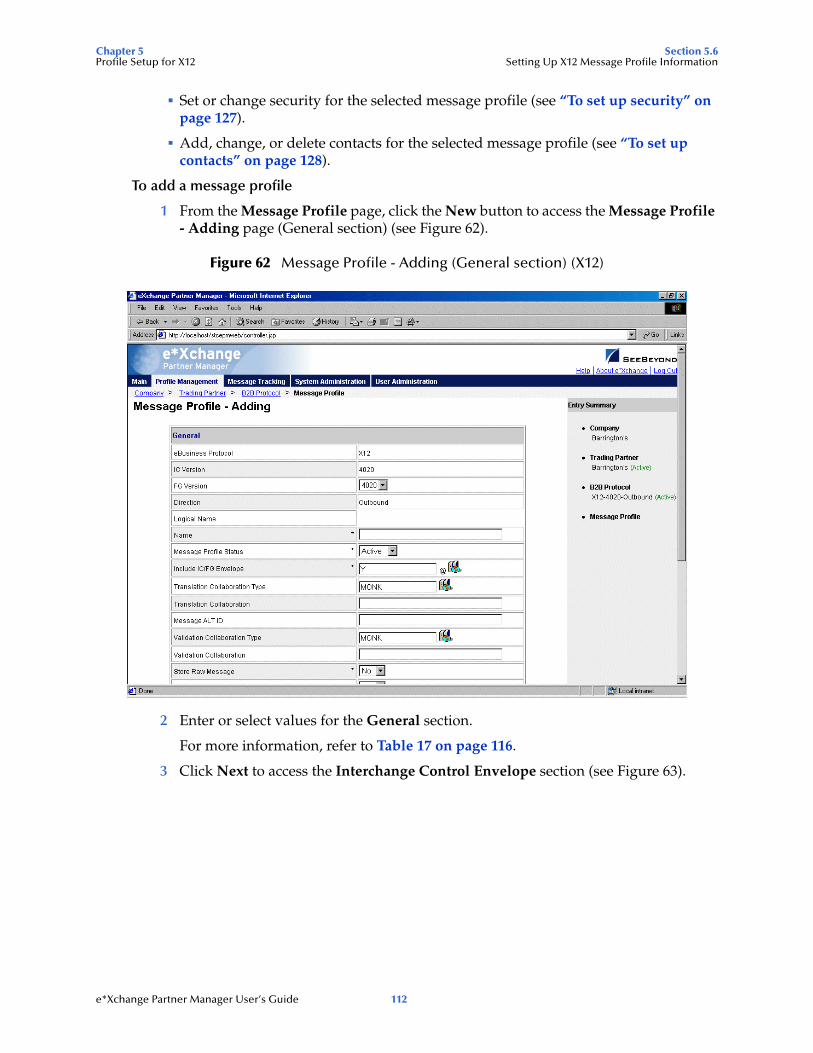
Chapter 5 Section 5.6Profile Setup for X12 Setting Up X12 Message Profile Information
Set or change security for the selected message profile (see “To set up security” on page 127).
Add, change, or delete contacts for the selected message profile (see “To set up contacts” on page 128).
To add a message profile
1 From the Message Profile page, click the New button to access the Message Profile - Adding page (General section) (see Figure 62).
Figure 62 Message Profile - Adding (General section) (X12)
2 Enter or select values for the General section.
For more information, refer to Table 17 on page 116.
3 Click Next to access the Interchange Control Envelope section (see Figure 63).
e*Xchange Partner Manager User’s Guide 112
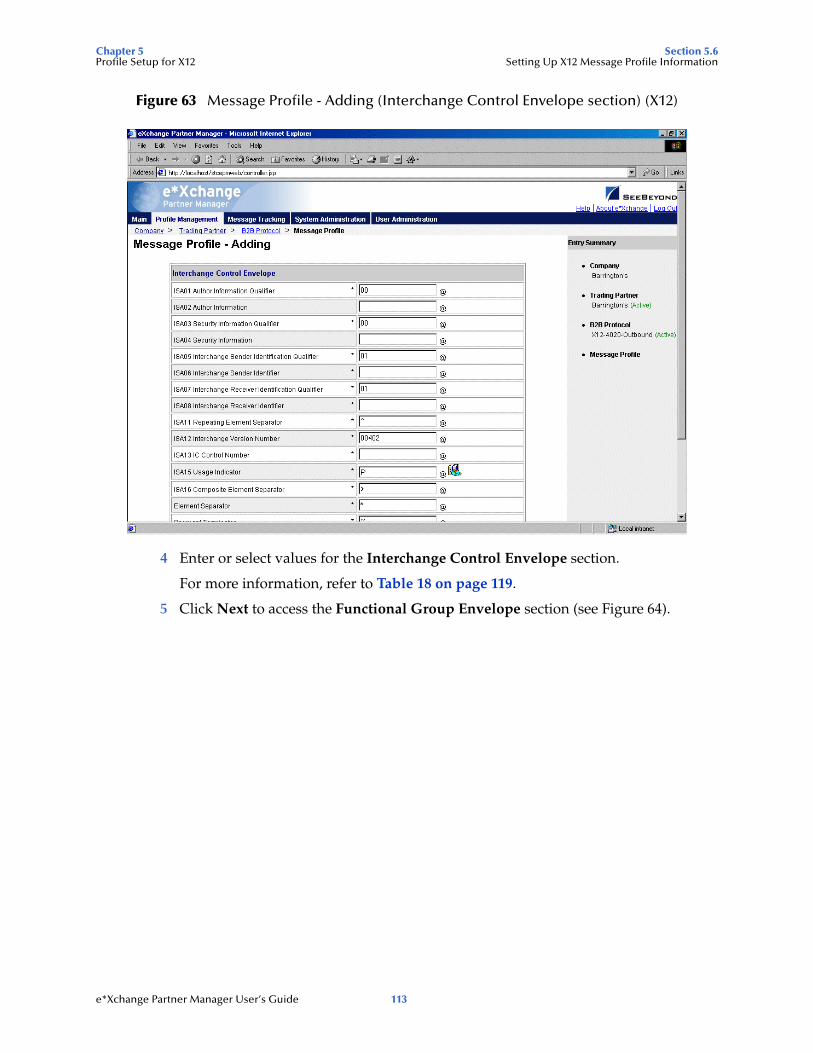
Chapter 5 Section 5.6Profile Setup for X12 Setting Up X12 Message Profile Information
Figure 63 Message Profile - Adding (Interchange Control Envelope section) (X12)
4 Enter or select values for the Interchange Control Envelope section.
For more information, refer to Table 18 on page 119.
5 Click Next to access the Functional Group Envelope section (see Figure 64).
e*Xchange Partner Manager User’s Guide 113
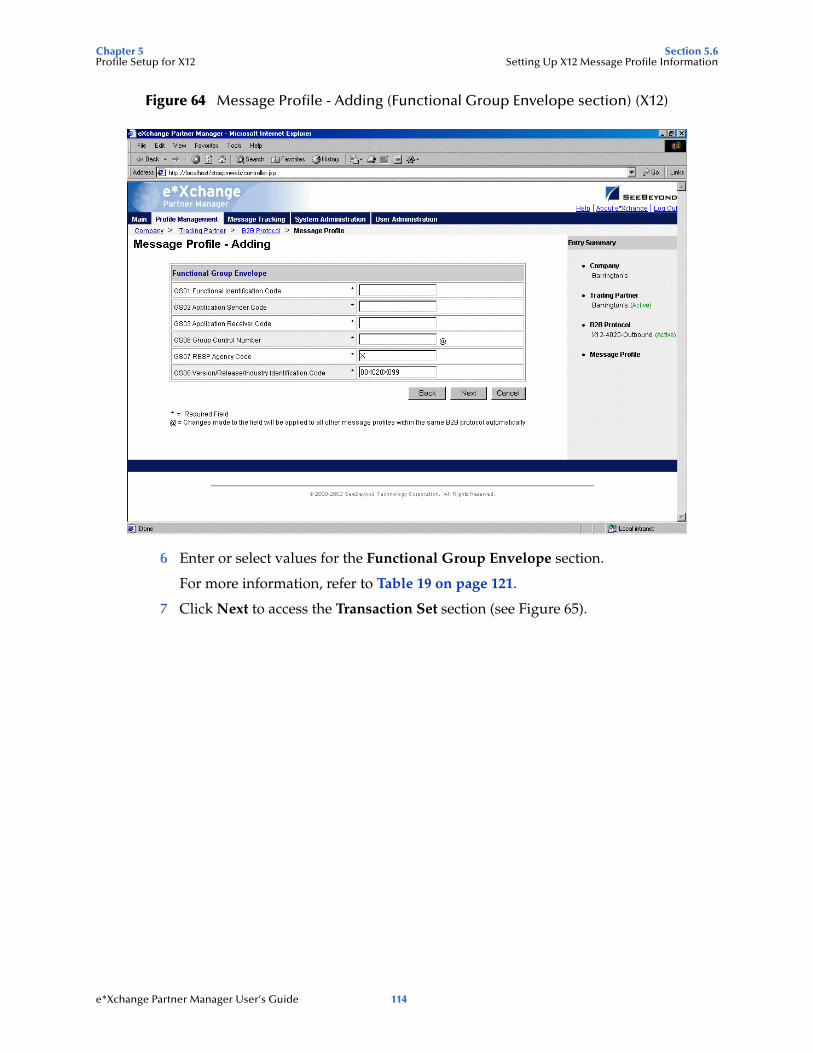
Chapter 5 Section 5.6Profile Setup for X12 Setting Up X12 Message Profile Information
Figure 64 Message Profile - Adding (Functional Group Envelope section) (X12)
6 Enter or select values for the Functional Group Envelope section.
For more information, refer to Table 19 on page 121.
7 Click Next to access the Transaction Set section (see Figure 65).
e*Xchange Partner Manager User’s Guide 114
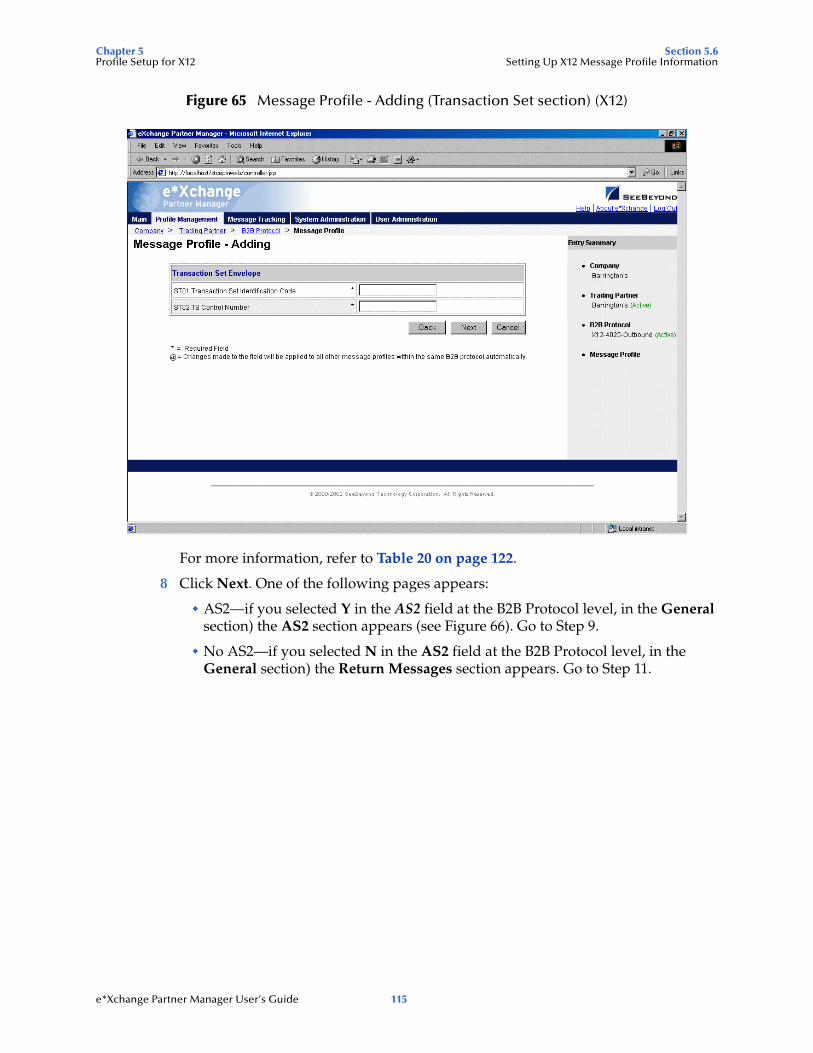
Chapter 5 Section 5.6Profile Setup for X12 Setting Up X12 Message Profile Information
Figure 65 Message Profile - Adding (Transaction Set section) (X12)
For more information, refer to Table 20 on page 122.
8 Click Next. One of the following pages appears:
AS2—if you selected Y in the AS2 field at the B2B Protocol level, in the General section) the AS2 section appears (see Figure 66). Go to Step 9.
No AS2—if you selected N in the AS2 field at the B2B Protocol level, in the General section) the Return Messages section appears. Go to Step 11.
e*Xchange Partner Manager User’s Guide 115
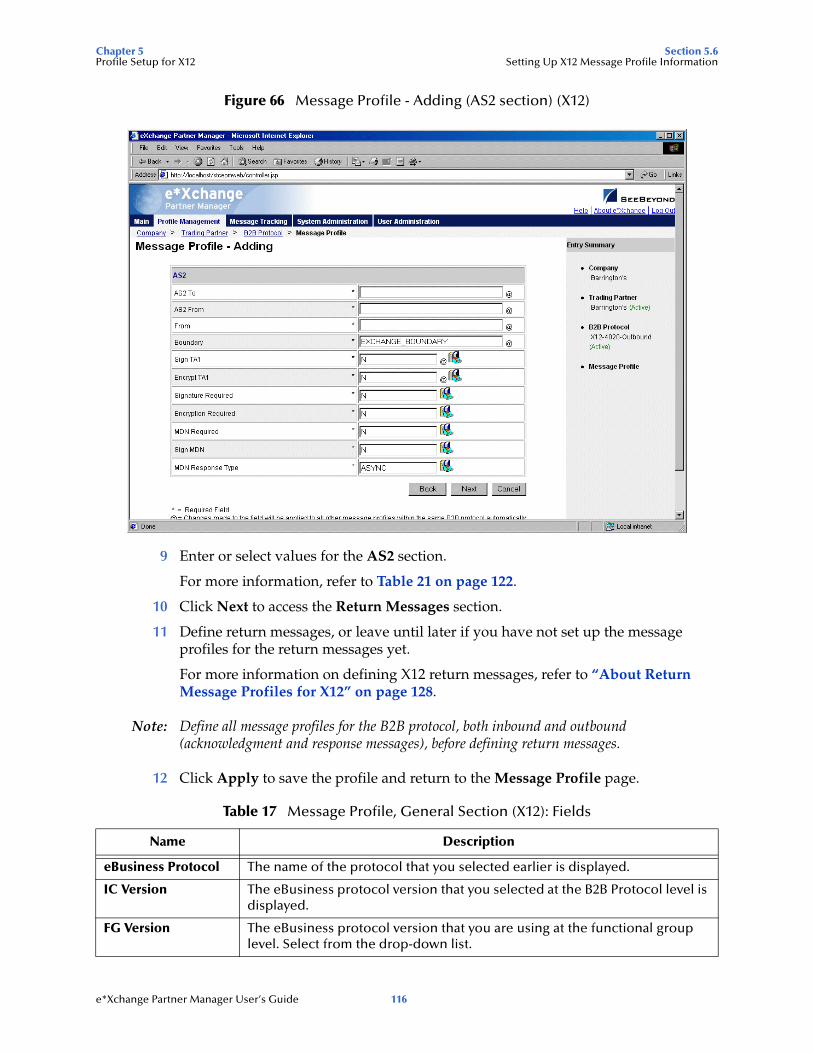
Chapter 5 Section 5.6Profile Setup for X12 Setting Up X12 Message Profile Information
Figure 66 Message Profile - Adding (AS2 section) (X12)
9 Enter or select values for the AS2 section.
For more information, refer to Table 21 on page 122.
10 Click Next to access the Return Messages section.
11 Define return messages, or leave until later if you have not set up the message profiles for the return messages yet.
For more information on defining X12 return messages, refer to “About Return Message Profiles for X12” on page 128.
Note: Define all message profiles for the B2B protocol, both inbound and outbound (acknowledgment and response messages), before defining return messages.
12 Click Apply to save the profile and return to the Message Profile page.
Table 17 Message Profile, General Section (X12): Fields
Name Description
eBusiness Protocol The name of the protocol that you selected earlier is displayed.
IC Version The eBusiness protocol version that you selected at the B2B Protocol level is displayed.
FG Version The eBusiness protocol version that you are using at the functional group level. Select from the drop-down list.
e*Xchange Partner Manager User’s Guide 116

Chapter 5 Section 5.6Profile Setup for X12 Setting Up X12 Message Profile Information
Direction The direction for the message profile, Inbound or Outbound, is displayed.
Logical Name If you specified a logical name at the B2B protocol level, it is displayed.
Name A label for the message profile. It should be descriptive, and unique for the trading partner.
Message Profile Status
The status of the message profile. Choose one of the following values:Active—The message profile is currently active, and can be used.Inactive—The message profile is not active, and cannot be used.
Default: Active.Note: This is only available when adding a message profile. When editing, you can change the status on the Message Profile page (see “To inactivate or reactivate a message profile” on page 127).
Include IC/FG Envelope
Inbound only: If your internal system expects the ISA/IEA and GS/GE segments on incoming transactions, set this value to Y.If your internal system does not use these segments, set to N.If set to N, e*Xchange relays only the ST/SE header and footer with the message.Note: For inbound messages, if your internal system expects the ISA/IEA and GS/GE segments on incoming messages, this flag must be set correctly for the messages to be read successfully.Outbound: This parameter does not affect outbound messages. If the ISA/IEA and GS/GE segments are included on messages coming from the internal system, e*Xchange uses the delimiter information from the ISA segment to parse the message, then uses the delimiters specified in the trading partner profile for the outbound message. If the message coming from the internal system includes only ST/SE enveloping, the delimiters used must be the defaults. Again, in this case, e*Xchange uses the default delimiters to parse the message, then uses the delimiters specified in the trading partner profile for the outbound message.
Translation Collaboration Type
The language for the translation Collaboration. For all eBusiness protocols, translation Collaborations can be either Monk or Java.
Translation Collaboration
If your internal system will be sending messages to e*Xchange in raw data format, or expecting messages from e*Xchange in raw data format, you must specify the translation Collaboration that will be used to translate the messages to and from the appropriate eBusiness Protocol format. Type the file name (no extension).Outbound: If you provide a value in this field for an Outbound profile, e*Xchange also requires a value for Message ALT ID.
Table 17 Message Profile, General Section (X12): Fields (Continued)
Name Description
e*Xchange Partner Manager User’s Guide 117
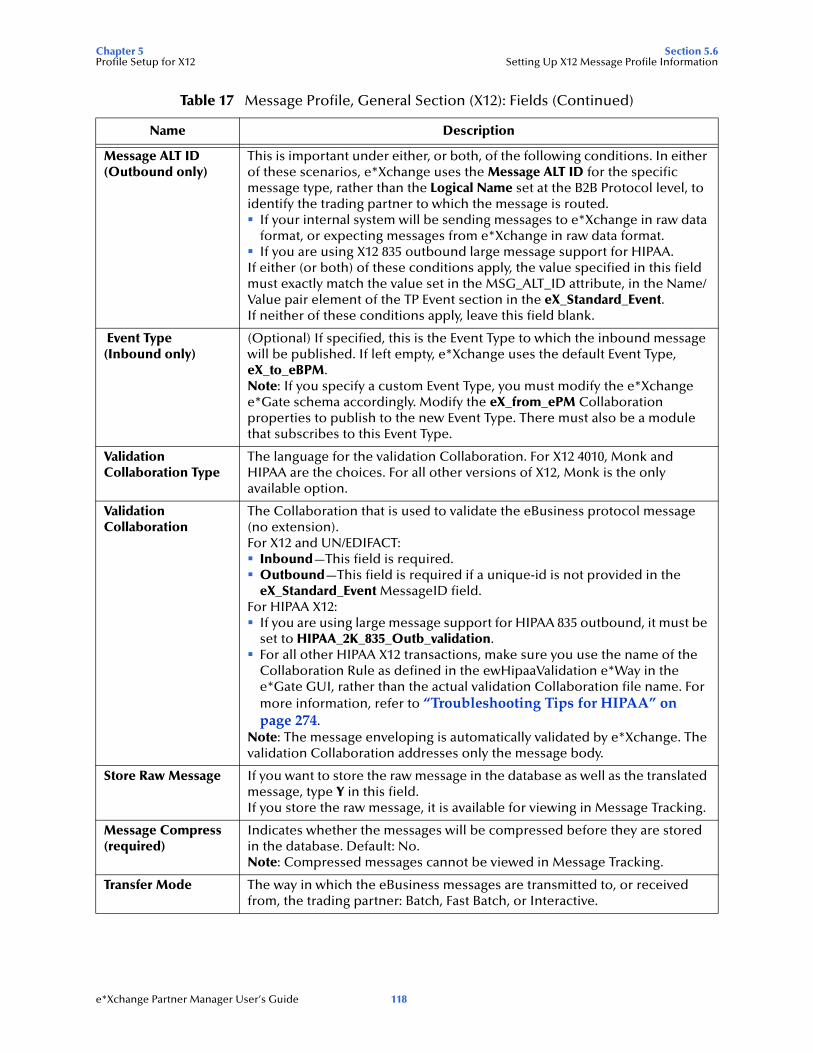
Chapter 5 Section 5.6Profile Setup for X12 Setting Up X12 Message Profile Information
Message ALT ID(Outbound only)
This is important under either, or both, of the following conditions. In either of these scenarios, e*Xchange uses the Message ALT ID for the specific message type, rather than the Logical Name set at the B2B Protocol level, to identify the trading partner to which the message is routed.
If your internal system will be sending messages to e*Xchange in raw data format, or expecting messages from e*Xchange in raw data format.If you are using X12 835 outbound large message support for HIPAA.
If either (or both) of these conditions apply, the value specified in this field must exactly match the value set in the MSG_ALT_ID attribute, in the Name/Value pair element of the TP Event section in the eX_Standard_Event.If neither of these conditions apply, leave this field blank.
Event Type (Inbound only)
(Optional) If specified, this is the Event Type to which the inbound message will be published. If left empty, e*Xchange uses the default Event Type, eX_to_eBPM.Note: If you specify a custom Event Type, you must modify the e*Xchange e*Gate schema accordingly. Modify the eX_from_ePM Collaboration properties to publish to the new Event Type. There must also be a module that subscribes to this Event Type.
Validation Collaboration Type
The language for the validation Collaboration. For X12 4010, Monk and HIPAA are the choices. For all other versions of X12, Monk is the only available option.
Validation Collaboration
The Collaboration that is used to validate the eBusiness protocol message (no extension).For X12 and UN/EDIFACT:
Inbound—This field is required.Outbound—This field is required if a unique-id is not provided in the eX_Standard_Event MessageID field.
For HIPAA X12:If you are using large message support for HIPAA 835 outbound, it must be set to HIPAA_2K_835_Outb_validation.For all other HIPAA X12 transactions, make sure you use the name of the Collaboration Rule as defined in the ewHipaaValidation e*Way in the e*Gate GUI, rather than the actual validation Collaboration file name. For more information, refer to “Troubleshooting Tips for HIPAA” on page 274.
Note: The message enveloping is automatically validated by e*Xchange. The validation Collaboration addresses only the message body.
Store Raw Message If you want to store the raw message in the database as well as the translated message, type Y in this field.If you store the raw message, it is available for viewing in Message Tracking.
Message Compress (required)
Indicates whether the messages will be compressed before they are stored in the database. Default: No.Note: Compressed messages cannot be viewed in Message Tracking.
Transfer Mode The way in which the eBusiness messages are transmitted to, or received from, the trading partner: Batch, Fast Batch, or Interactive.
Table 17 Message Profile, General Section (X12): Fields (Continued)
Name Description
e*Xchange Partner Manager User’s Guide 118
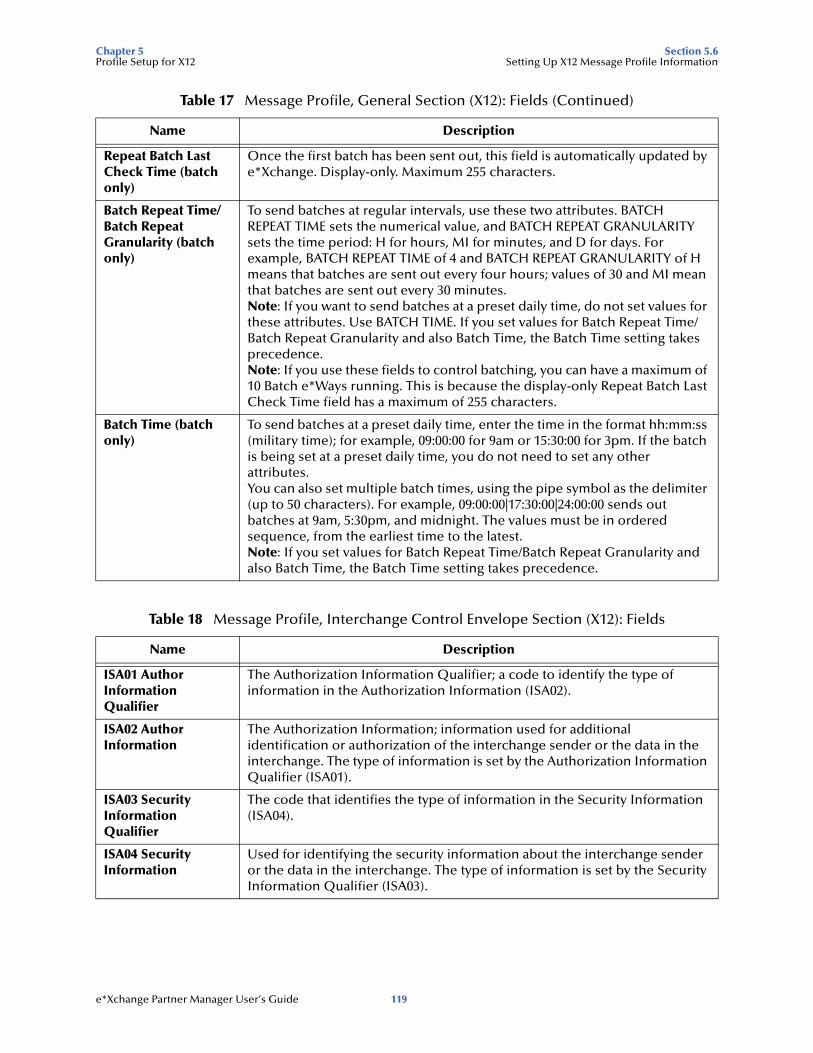
Chapter 5 Section 5.6Profile Setup for X12 Setting Up X12 Message Profile Information
Repeat Batch Last Check Time (batch only)
Once the first batch has been sent out, this field is automatically updated by e*Xchange. Display-only. Maximum 255 characters.
Batch Repeat Time/Batch Repeat Granularity (batch only)
To send batches at regular intervals, use these two attributes. BATCH REPEAT TIME sets the numerical value, and BATCH REPEAT GRANULARITY sets the time period: H for hours, MI for minutes, and D for days. For example, BATCH REPEAT TIME of 4 and BATCH REPEAT GRANULARITY of H means that batches are sent out every four hours; values of 30 and MI mean that batches are sent out every 30 minutes.Note: If you want to send batches at a preset daily time, do not set values for these attributes. Use BATCH TIME. If you set values for Batch Repeat Time/Batch Repeat Granularity and also Batch Time, the Batch Time setting takes precedence.Note: If you use these fields to control batching, you can have a maximum of 10 Batch e*Ways running. This is because the display-only Repeat Batch Last Check Time field has a maximum of 255 characters.
Batch Time (batch only)
To send batches at a preset daily time, enter the time in the format hh:mm:ss (military time); for example, 09:00:00 for 9am or 15:30:00 for 3pm. If the batch is being set at a preset daily time, you do not need to set any other attributes.You can also set multiple batch times, using the pipe symbol as the delimiter (up to 50 characters). For example, 09:00:00|17:30:00|24:00:00 sends out batches at 9am, 5:30pm, and midnight. The values must be in ordered sequence, from the earliest time to the latest.Note: If you set values for Batch Repeat Time/Batch Repeat Granularity and also Batch Time, the Batch Time setting takes precedence.
Table 18 Message Profile, Interchange Control Envelope Section (X12): Fields
Name Description
ISA01 Author Information Qualifier
The Authorization Information Qualifier; a code to identify the type of information in the Authorization Information (ISA02).
ISA02 Author Information
The Authorization Information; information used for additional identification or authorization of the interchange sender or the data in the interchange. The type of information is set by the Authorization Information Qualifier (ISA01).
ISA03 Security Information Qualifier
The code that identifies the type of information in the Security Information (ISA04).
ISA04 Security Information
Used for identifying the security information about the interchange sender or the data in the interchange. The type of information is set by the Security Information Qualifier (ISA03).
Table 17 Message Profile, General Section (X12): Fields (Continued)
Name Description
e*Xchange Partner Manager User’s Guide 119
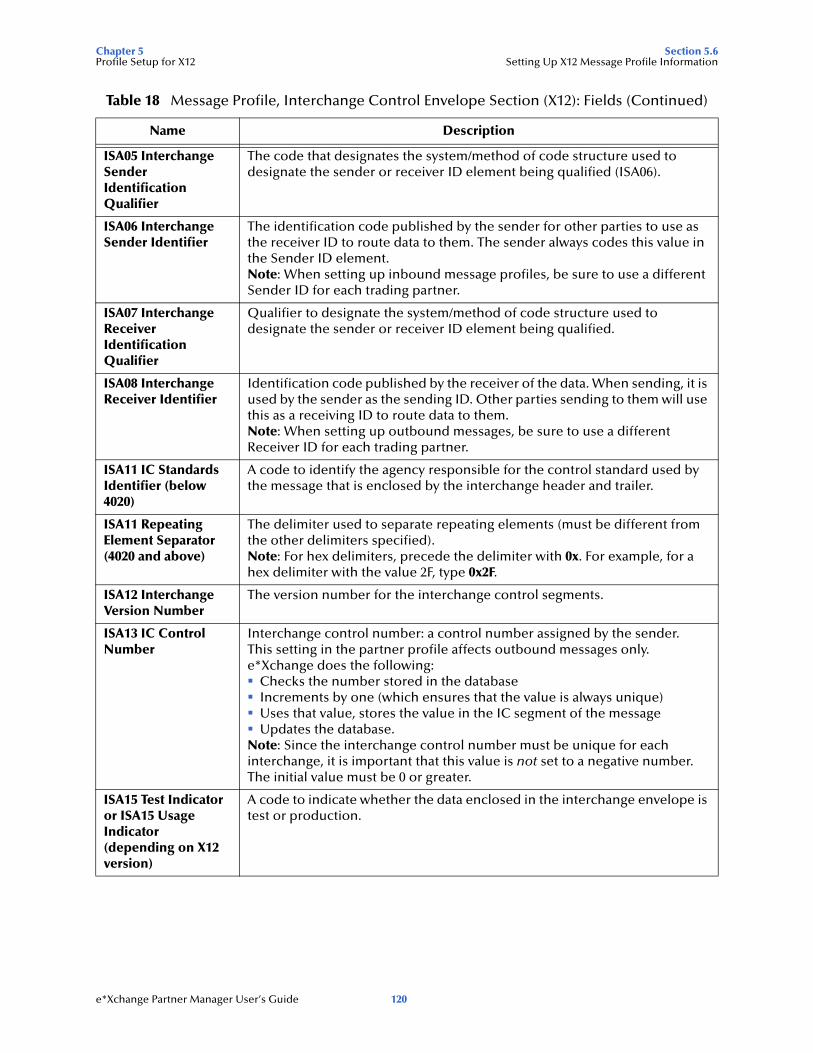
Chapter 5 Section 5.6Profile Setup for X12 Setting Up X12 Message Profile Information
ISA05 Interchange Sender Identification Qualifier
The code that designates the system/method of code structure used to designate the sender or receiver ID element being qualified (ISA06).
ISA06 Interchange Sender Identifier
The identification code published by the sender for other parties to use as the receiver ID to route data to them. The sender always codes this value in the Sender ID element.Note: When setting up inbound message profiles, be sure to use a different Sender ID for each trading partner.
ISA07 Interchange Receiver Identification Qualifier
Qualifier to designate the system/method of code structure used to designate the sender or receiver ID element being qualified.
ISA08 Interchange Receiver Identifier
Identification code published by the receiver of the data. When sending, it is used by the sender as the sending ID. Other parties sending to them will use this as a receiving ID to route data to them.Note: When setting up outbound messages, be sure to use a different Receiver ID for each trading partner.
ISA11 IC Standards Identifier (below 4020)
A code to identify the agency responsible for the control standard used by the message that is enclosed by the interchange header and trailer.
ISA11 Repeating Element Separator (4020 and above)
The delimiter used to separate repeating elements (must be different from the other delimiters specified).Note: For hex delimiters, precede the delimiter with 0x. For example, for a hex delimiter with the value 2F, type 0x2F.
ISA12 Interchange Version Number
The version number for the interchange control segments.
ISA13 IC Control Number
Interchange control number: a control number assigned by the sender.This setting in the partner profile affects outbound messages only.e*Xchange does the following:
Checks the number stored in the databaseIncrements by one (which ensures that the value is always unique)Uses that value, stores the value in the IC segment of the messageUpdates the database.
Note: Since the interchange control number must be unique for each interchange, it is important that this value is not set to a negative number. The initial value must be 0 or greater.
ISA15 Test Indicator or ISA15 Usage Indicator (depending on X12 version)
A code to indicate whether the data enclosed in the interchange envelope is test or production.
Table 18 Message Profile, Interchange Control Envelope Section (X12): Fields (Continued)
Name Description
e*Xchange Partner Manager User’s Guide 120
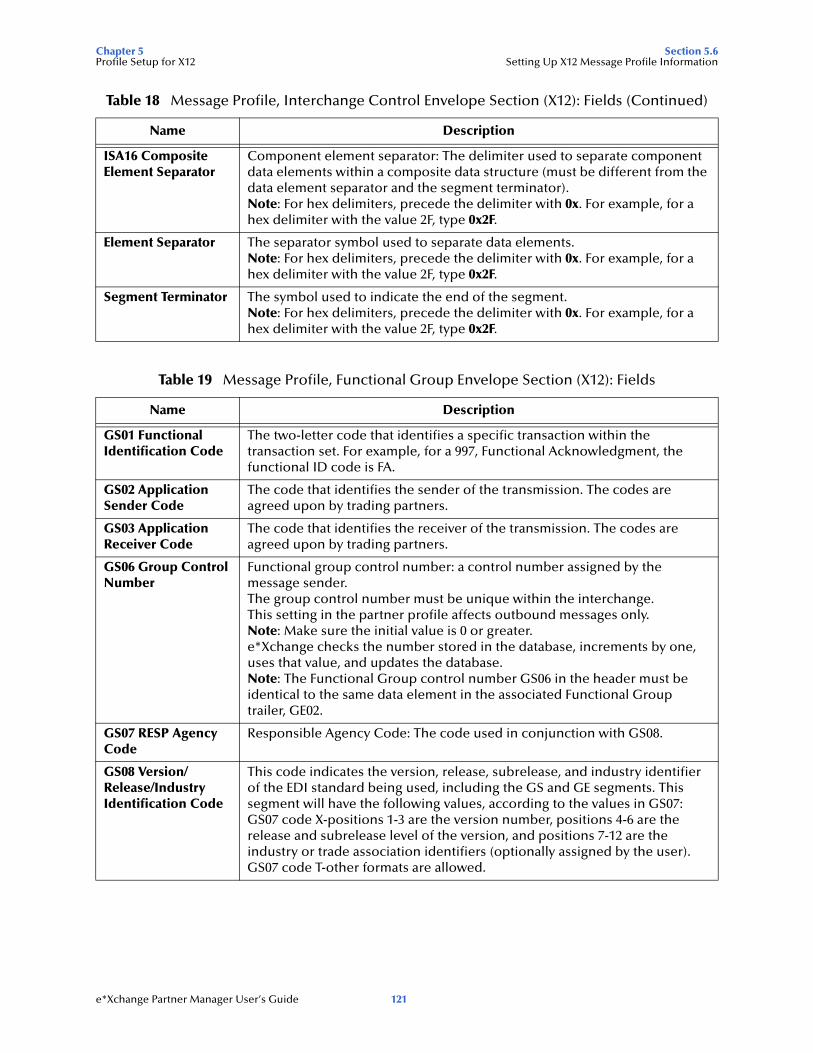
Chapter 5 Section 5.6Profile Setup for X12 Setting Up X12 Message Profile Information
ISA16 Composite Element Separator
Component element separator: The delimiter used to separate component data elements within a composite data structure (must be different from the data element separator and the segment terminator).Note: For hex delimiters, precede the delimiter with 0x. For example, for a hex delimiter with the value 2F, type 0x2F.
Element Separator The separator symbol used to separate data elements.Note: For hex delimiters, precede the delimiter with 0x. For example, for a hex delimiter with the value 2F, type 0x2F.
Segment Terminator The symbol used to indicate the end of the segment.Note: For hex delimiters, precede the delimiter with 0x. For example, for a hex delimiter with the value 2F, type 0x2F.
Table 19 Message Profile, Functional Group Envelope Section (X12): Fields
Name Description
GS01 Functional Identification Code
The two-letter code that identifies a specific transaction within the transaction set. For example, for a 997, Functional Acknowledgment, the functional ID code is FA.
GS02 Application Sender Code
The code that identifies the sender of the transmission. The codes are agreed upon by trading partners.
GS03 Application Receiver Code
The code that identifies the receiver of the transmission. The codes are agreed upon by trading partners.
GS06 Group Control Number
Functional group control number: a control number assigned by the message sender.The group control number must be unique within the interchange.This setting in the partner profile affects outbound messages only.Note: Make sure the initial value is 0 or greater.e*Xchange checks the number stored in the database, increments by one, uses that value, and updates the database.Note: The Functional Group control number GS06 in the header must be identical to the same data element in the associated Functional Group trailer, GE02.
GS07 RESP Agency Code
Responsible Agency Code: The code used in conjunction with GS08.
GS08 Version/Release/Industry Identification Code
This code indicates the version, release, subrelease, and industry identifier of the EDI standard being used, including the GS and GE segments. This segment will have the following values, according to the values in GS07:GS07 code X-positions 1-3 are the version number, positions 4-6 are the release and subrelease level of the version, and positions 7-12 are the industry or trade association identifiers (optionally assigned by the user).GS07 code T-other formats are allowed.
Table 18 Message Profile, Interchange Control Envelope Section (X12): Fields (Continued)
Name Description
e*Xchange Partner Manager User’s Guide 121
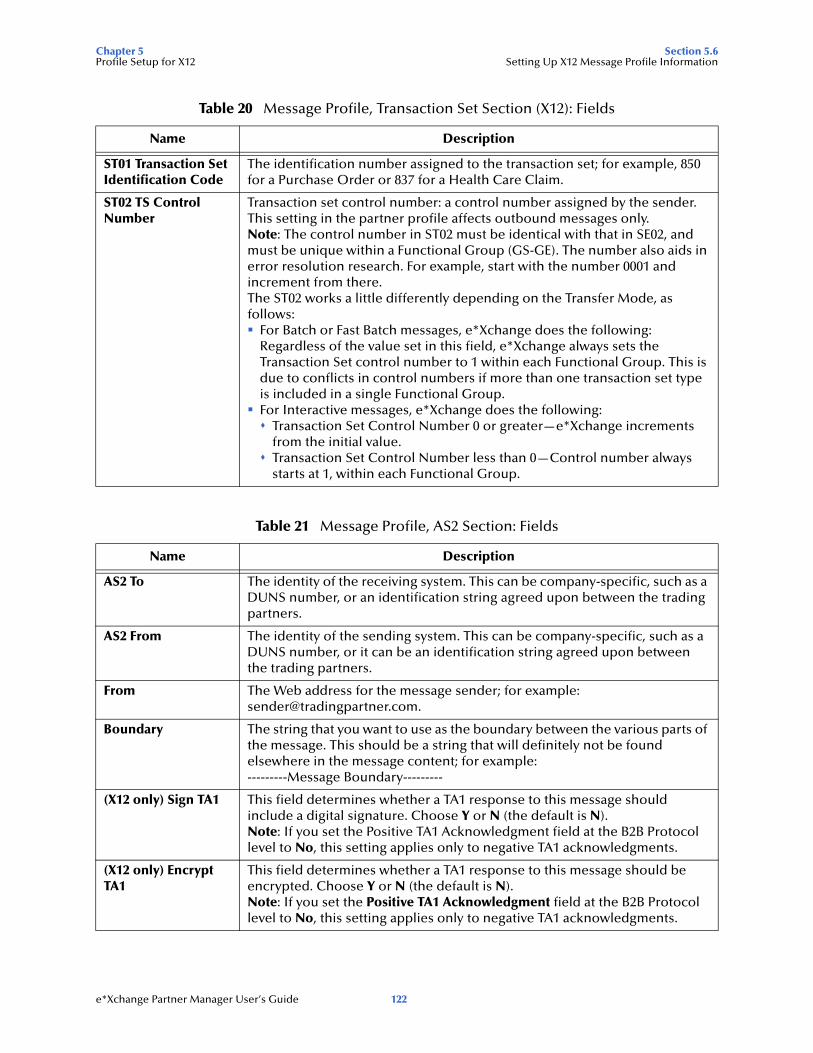
Chapter 5 Section 5.6Profile Setup for X12 Setting Up X12 Message Profile Information
Table 20 Message Profile, Transaction Set Section (X12): Fields
Name Description
ST01 Transaction Set Identification Code
The identification number assigned to the transaction set; for example, 850 for a Purchase Order or 837 for a Health Care Claim.
ST02 TS Control Number
Transaction set control number: a control number assigned by the sender.This setting in the partner profile affects outbound messages only.Note: The control number in ST02 must be identical with that in SE02, and must be unique within a Functional Group (GS-GE). The number also aids in error resolution research. For example, start with the number 0001 and increment from there.The ST02 works a little differently depending on the Transfer Mode, as follows:
For Batch or Fast Batch messages, e*Xchange does the following:Regardless of the value set in this field, e*Xchange always sets the Transaction Set control number to 1 within each Functional Group. This is due to conflicts in control numbers if more than one transaction set type is included in a single Functional Group.For Interactive messages, e*Xchange does the following:
Transaction Set Control Number 0 or greater—e*Xchange increments from the initial value.Transaction Set Control Number less than 0—Control number always starts at 1, within each Functional Group.
Table 21 Message Profile, AS2 Section: Fields
Name Description
AS2 To The identity of the receiving system. This can be company-specific, such as a DUNS number, or an identification string agreed upon between the trading partners.
AS2 From The identity of the sending system. This can be company-specific, such as a DUNS number, or it can be an identification string agreed upon between the trading partners.
From The Web address for the message sender; for example: [email protected].
Boundary The string that you want to use as the boundary between the various parts of the message. This should be a string that will definitely not be found elsewhere in the message content; for example:---------Message Boundary---------
(X12 only) Sign TA1 This field determines whether a TA1 response to this message should include a digital signature. Choose Y or N (the default is N).Note: If you set the Positive TA1 Acknowledgment field at the B2B Protocol level to No, this setting applies only to negative TA1 acknowledgments.
(X12 only) Encrypt TA1
This field determines whether a TA1 response to this message should be encrypted. Choose Y or N (the default is N).Note: If you set the Positive TA1 Acknowledgment field at the B2B Protocol level to No, this setting applies only to negative TA1 acknowledgments.
e*Xchange Partner Manager User’s Guide 122
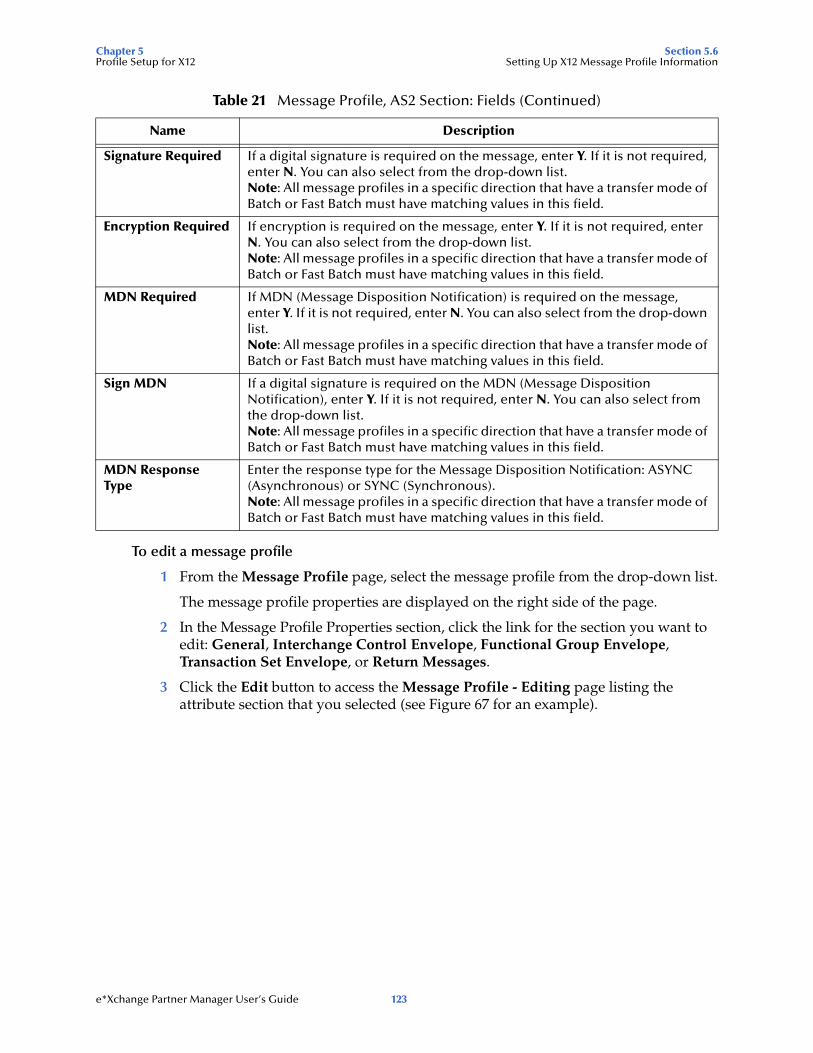
Chapter 5 Section 5.6Profile Setup for X12 Setting Up X12 Message Profile Information
To edit a message profile
1 From the Message Profile page, select the message profile from the drop-down list.
The message profile properties are displayed on the right side of the page.
2 In the Message Profile Properties section, click the link for the section you want to edit: General, Interchange Control Envelope, Functional Group Envelope, Transaction Set Envelope, or Return Messages.
3 Click the Edit button to access the Message Profile - Editing page listing the attribute section that you selected (see Figure 67 for an example).
Signature Required If a digital signature is required on the message, enter Y. If it is not required, enter N. You can also select from the drop-down list.Note: All message profiles in a specific direction that have a transfer mode of Batch or Fast Batch must have matching values in this field.
Encryption Required If encryption is required on the message, enter Y. If it is not required, enter N. You can also select from the drop-down list.Note: All message profiles in a specific direction that have a transfer mode of Batch or Fast Batch must have matching values in this field.
MDN Required If MDN (Message Disposition Notification) is required on the message, enter Y. If it is not required, enter N. You can also select from the drop-down list.Note: All message profiles in a specific direction that have a transfer mode of Batch or Fast Batch must have matching values in this field.
Sign MDN If a digital signature is required on the MDN (Message Disposition Notification), enter Y. If it is not required, enter N. You can also select from the drop-down list.Note: All message profiles in a specific direction that have a transfer mode of Batch or Fast Batch must have matching values in this field.
MDN Response Type
Enter the response type for the Message Disposition Notification: ASYNC (Asynchronous) or SYNC (Synchronous).Note: All message profiles in a specific direction that have a transfer mode of Batch or Fast Batch must have matching values in this field.
Table 21 Message Profile, AS2 Section: Fields (Continued)
Name Description
e*Xchange Partner Manager User’s Guide 123
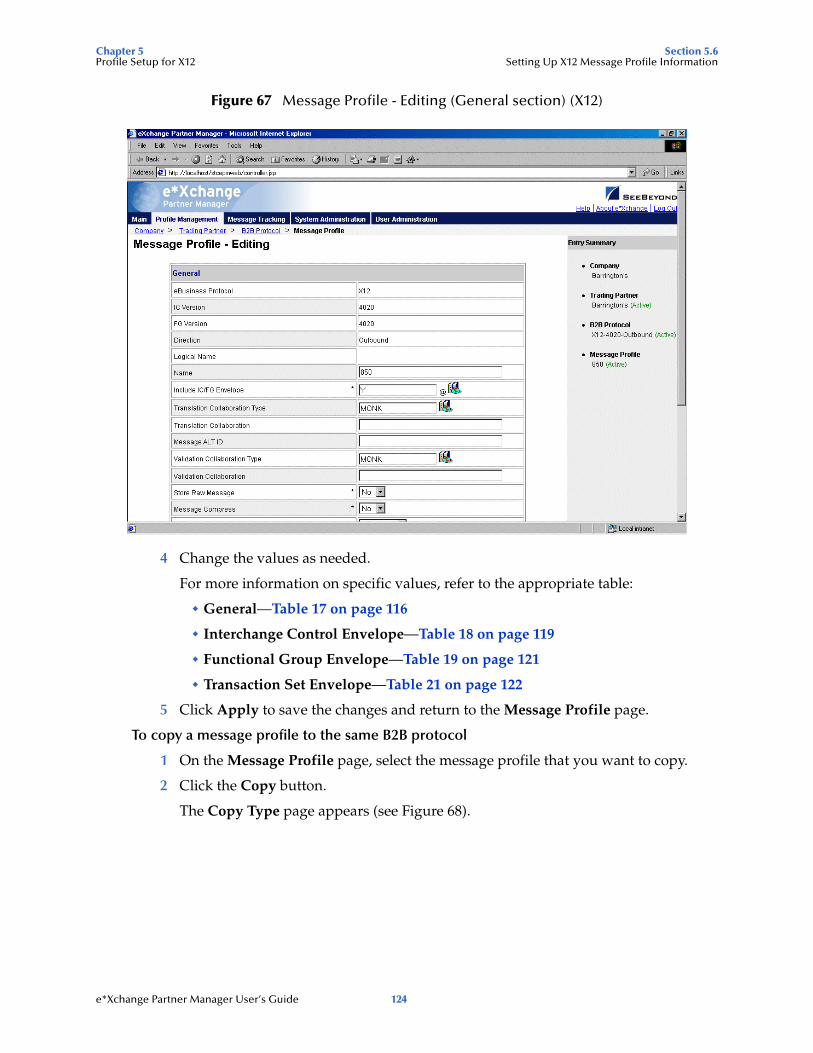
Chapter 5 Section 5.6Profile Setup for X12 Setting Up X12 Message Profile Information
Figure 67 Message Profile - Editing (General section) (X12)
4 Change the values as needed.
For more information on specific values, refer to the appropriate table:
General—Table 17 on page 116
Interchange Control Envelope—Table 18 on page 119
Functional Group Envelope—Table 19 on page 121
Transaction Set Envelope—Table 21 on page 122
5 Click Apply to save the changes and return to the Message Profile page.
To copy a message profile to the same B2B protocol
1 On the Message Profile page, select the message profile that you want to copy.
2 Click the Copy button.
The Copy Type page appears (see Figure 68).
e*Xchange Partner Manager User’s Guide 124
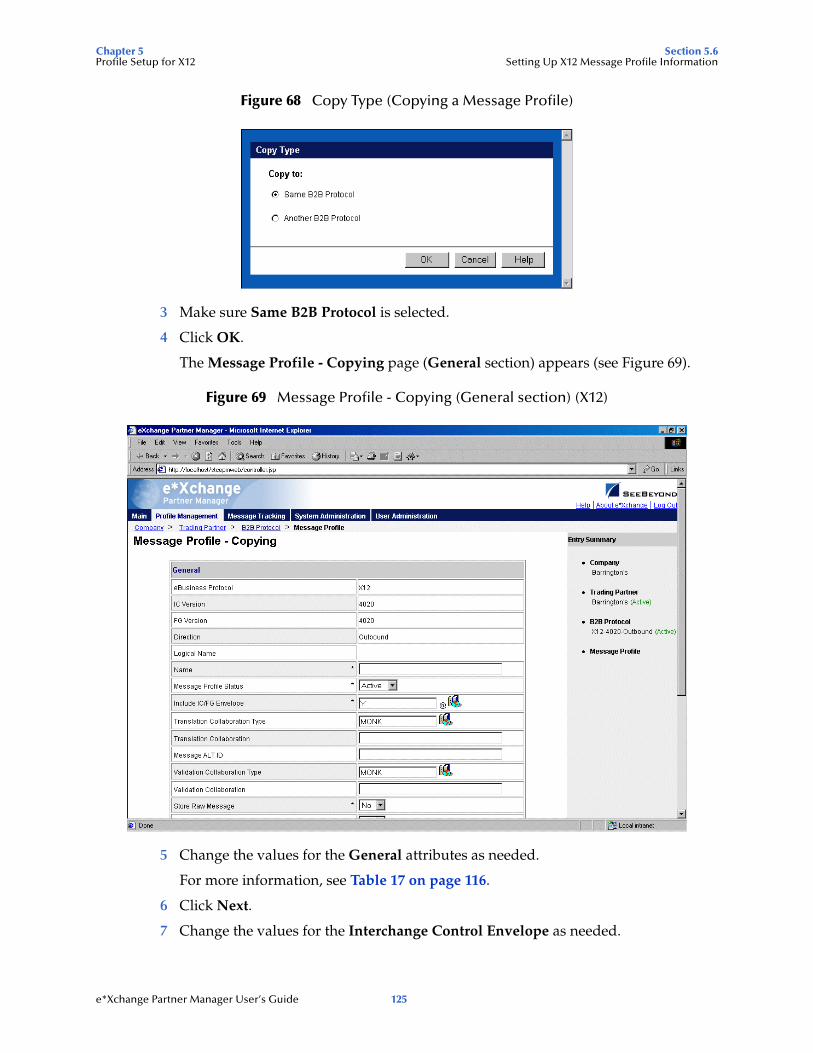
Chapter 5 Section 5.6Profile Setup for X12 Setting Up X12 Message Profile Information
Figure 68 Copy Type (Copying a Message Profile)
3 Make sure Same B2B Protocol is selected.
4 Click OK.
The Message Profile - Copying page (General section) appears (see Figure 69).
Figure 69 Message Profile - Copying (General section) (X12)
5 Change the values for the General attributes as needed.
For more information, see Table 17 on page 116.
6 Click Next.
7 Change the values for the Interchange Control Envelope as needed.
e*Xchange Partner Manager User’s Guide 125
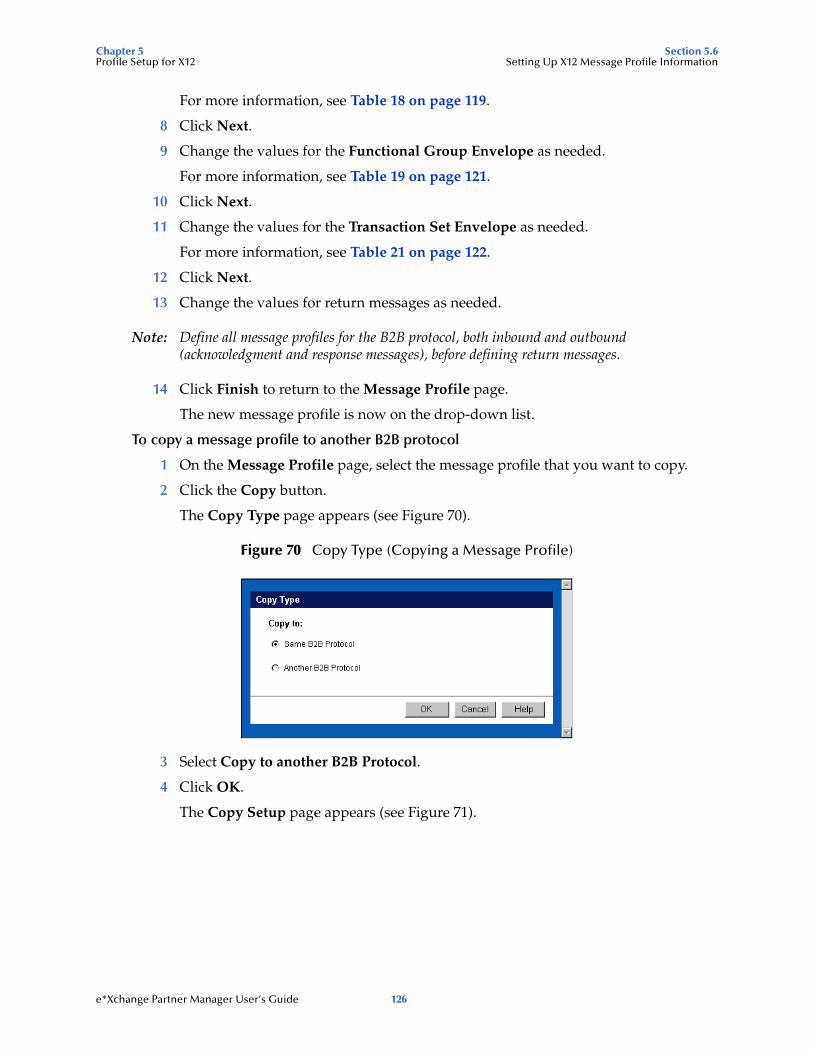
Chapter 5 Section 5.6Profile Setup for X12 Setting Up X12 Message Profile Information
For more information, see Table 18 on page 119.
8 Click Next.
9 Change the values for the Functional Group Envelope as needed.
For more information, see Table 19 on page 121.
10 Click Next.
11 Change the values for the Transaction Set Envelope as needed.
For more information, see Table 21 on page 122.
12 Click Next.
13 Change the values for return messages as needed.
Note: Define all message profiles for the B2B protocol, both inbound and outbound (acknowledgment and response messages), before defining return messages.
14 Click Finish to return to the Message Profile page.
The new message profile is now on the drop-down list.
To copy a message profile to another B2B protocol
1 On the Message Profile page, select the message profile that you want to copy.
2 Click the Copy button.
The Copy Type page appears (see Figure 70).
Figure 70 Copy Type (Copying a Message Profile)
3 Select Copy to another B2B Protocol.
4 Click OK.
The Copy Setup page appears (see Figure 71).
e*Xchange Partner Manager User’s Guide 126

Chapter 5 Section 5.6Profile Setup for X12 Setting Up X12 Message Profile Information
Figure 71 Copy Setup (Copying a Message Profile to Another B2B Protocol)
5 On the Copy Setup page, select the destination company.
6 Select the destination trading partner.
7 Select the destination B2B Protocol.
8 If you want to change the message profile name, type the new name.
9 Click Finish.
The message profile information is copied to the selected B2B protocol. When done, e*Xchange displays a message letting you know that the copy was successful.
To delete a message profile
1 On the Message Profile page, select the message profile from the drop-down list.
2 Click the Delete button.
A warning message appears asking if you are sure you want to delete.
3 To delete the profile, click OK.
The message profile is deleted.
To inactivate or reactivate a message profile
1 On the Message Profile page, select the message profile from the drop-down list.
The message profile properties are displayed on the right side of the page.
2 In the Message Profile Status field, toggle the Active/Inactive graphic to change the status. Values are as follows:
Message profile is active: click to inactivate.
Message profile is inactive: click to reactivate.
To set up security
1 On the Message Profile page, select the message profile from the drop-down list.
The message profile properties are displayed on the right side of the page.
2 Click the Security button.
The Security Management page appears.
e*Xchange Partner Manager User’s Guide 127

Chapter 5 Section 5.7Profile Setup for X12 About Return Message Profiles for X12
3 Set the values as needed.
4 Click OK.
For detailed instructions on setting up security, refer to “Security” on page 66.
To set up contacts
1 On the Message Profile page, click the Contacts icon.
The Company - Contacts Viewing page appears.
2 Do one of the following:
To add a contact, click the Add button in the appropriate row. Type the information in the Company - Contacts Adding page and then click Apply.
To edit an existing contact, click the View/Edit button in the appropriate row. This button is only available when a contact has been entered. Edit the values in the Company - Contacts Editing page and then click Apply.
To delete an existing contact, click the View/Edit button in the appropriate row. In the Company - Contacts Editing page, click the Delete button at the bottom left. At the “Are you sure...” message, click OK.
For detailed instructions on working with contacts, refer to “Storing Contact Information” on page 228.
5.7 About Return Message Profiles for X12e*Xchange allows you to specify one or more return message profiles that will be valid for a specific incoming or outgoing message profile. However, some setup is required before the correct selections are available in the Return Messages section. You must create all message profiles for the trading partner, both inbound and outbound, so that the correct selections will be available to you.
For example, suppose you are using X12 and have a trading partner, ABC Company. You will receive only transaction 850, Purchase Order, from this trading partner. In response you might send 855, Purchase Order Acknowledgment, 856, Ship Notice/Manifest, or 997, Functional Acknowledgment.
To set this up, do the following:
Define outbound message profiles for transactions 997, 855, and 856.
Define the inbound message profile for transaction 850. Because you defined the outbound envelopes first, 997, 855, and 856 are all available for selection in the Return Message section.
e*Xchange Partner Manager User’s Guide 128
Chapter 5 Section 5.8Profile Setup for X12 HIPAA Translation ETDs
5.8 HIPAA Translation ETDse*Xchange installation includes translation files—a version of the HIPAA ETD files that include the GS/GE and ISA/IEA enveloping. These are suitable for use outside e*Xchange when a complete Event structure is required; for example, when translating from X12 to a business application’s proprietary data format.
These files are stored in the following location:
\<eGate>\server\registry\repository\default\monk_scripts\eXchange\HIPAA
The file names have “_xlate” (for May 1999 files) or “_xlat” (for May 2000 files) appended to the file name to indicate that these are the translation files and include the interchange control and functional group header and footer.
Note: These files use dynamic delimiters, and can only be used in translating from X12 to a proprietary format.
May 1999 Files
For the May 1999 HIPAA implementation, the file names are as follows:
X12_270EligibCoverageBenefitInquiry_004010X092_hipaa_xlate.ssc
X12_271EligibCoverageBenefitInfo_004010X092_hipaa_xlate.ssc
X12_276HealthCareClaimStatusRequest_004010X093_hipaa_xlate.ssc
X12_277HCClaimStatusNotification_004010X093_hipaa_xlate.ssc
X12_278HCServicesReviewInfo_004010X094_hipaa_a1_xlate.ssc
X12_278HCServicesReviewInfo_004010X094_hipaa_a3_xlate.ssc
X12_820PaymentOrderRemittanceAdvice_004010X061_hipaa_xlate.ssc
X12_834BenefitEnrollmentandMaint_004010X095_hipaa_xlate.ssc
X12_835HealthCareClaimPaymentAdvice_004010X091_hipaa_xlate.ssc
X12_837HealthCareClaim_004010X098_hipaa_q1_xlate.ssc
X12_837HealthCareClaim_004010X097_hipaa_q2_xlate.ssc
X12_837HealthCareClaim_004010X096_hipaa_q3_xlate.ssc
May 2000 Files
For the May 2000 HIPAA implementation, the file names are as follows:
X12_270EligibCoverageBenefitInquiry_4010X092_00_hipaa_xlat.ssc
X12_271EligibCoverageBenefitInfo_4010X092_00_hipaa_xlat.ssc
X12_276HealthCareClaimStatusRequest_4010X093_00_hipaa_xlat.ssc
X12_277HCClaimStatusNotification_4010X093_00_hipaa_xlat.ssc
X12_278HCServicesReviewInfo_4010X094_00_hipaa_a1_xlat.ssc
X12_278HCServicesReviewInfo_4010X094_00_hipaa_a3_xlat.ssc
e*Xchange Partner Manager User’s Guide 129
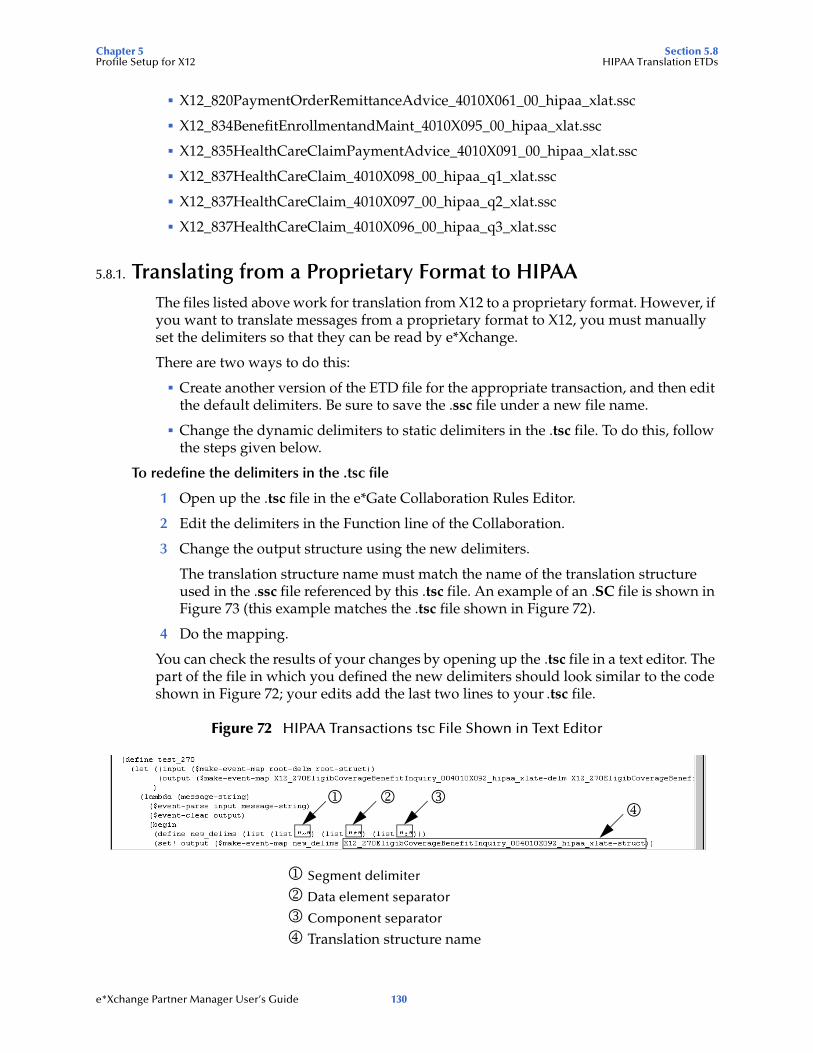
Chapter 5 Section 5.8Profile Setup for X12 HIPAA Translation ETDs
X12_820PaymentOrderRemittanceAdvice_4010X061_00_hipaa_xlat.ssc
X12_834BenefitEnrollmentandMaint_4010X095_00_hipaa_xlat.ssc
X12_835HealthCareClaimPaymentAdvice_4010X091_00_hipaa_xlat.ssc
X12_837HealthCareClaim_4010X098_00_hipaa_q1_xlat.ssc
X12_837HealthCareClaim_4010X097_00_hipaa_q2_xlat.ssc
X12_837HealthCareClaim_4010X096_00_hipaa_q3_xlat.ssc
5.8.1. Translating from a Proprietary Format to HIPAAThe files listed above work for translation from X12 to a proprietary format. However, if you want to translate messages from a proprietary format to X12, you must manually set the delimiters so that they can be read by e*Xchange.
There are two ways to do this:
Create another version of the ETD file for the appropriate transaction, and then edit the default delimiters. Be sure to save the .ssc file under a new file name.
Change the dynamic delimiters to static delimiters in the .tsc file. To do this, follow the steps given below.
To redefine the delimiters in the .tsc file
1 Open up the .tsc file in the e*Gate Collaboration Rules Editor.
2 Edit the delimiters in the Function line of the Collaboration.
3 Change the output structure using the new delimiters.
The translation structure name must match the name of the translation structure used in the .ssc file referenced by this .tsc file. An example of an .SC file is shown in Figure 73 (this example matches the .tsc file shown in Figure 72).
4 Do the mapping.
You can check the results of your changes by opening up the .tsc file in a text editor. The part of the file in which you defined the new delimiters should look similar to the code shown in Figure 72; your edits add the last two lines to your .tsc file.
Figure 72 HIPAA Transactions tsc File Shown in Text Editor
1 2 34
1 Segment delimiter
2 Data element separator
3 Component separator
4 Translation structure name
e*Xchange Partner Manager User’s Guide 130
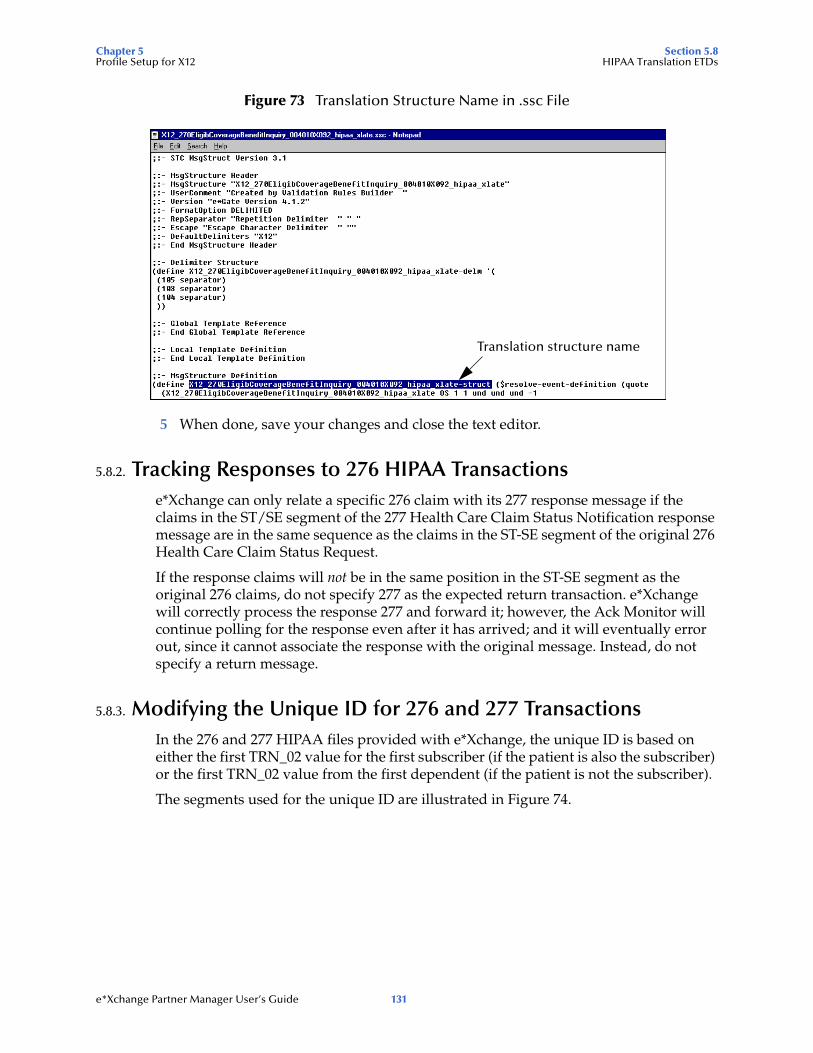
Chapter 5 Section 5.8Profile Setup for X12 HIPAA Translation ETDs
Figure 73 Translation Structure Name in .ssc File
5 When done, save your changes and close the text editor.
5.8.2. Tracking Responses to 276 HIPAA Transactionse*Xchange can only relate a specific 276 claim with its 277 response message if the claims in the ST/SE segment of the 277 Health Care Claim Status Notification response message are in the same sequence as the claims in the ST-SE segment of the original 276 Health Care Claim Status Request.
If the response claims will not be in the same position in the ST-SE segment as the original 276 claims, do not specify 277 as the expected return transaction. e*Xchange will correctly process the response 277 and forward it; however, the Ack Monitor will continue polling for the response even after it has arrived; and it will eventually error out, since it cannot associate the response with the original message. Instead, do not specify a return message.
5.8.3. Modifying the Unique ID for 276 and 277 TransactionsIn the 276 and 277 HIPAA files provided with e*Xchange, the unique ID is based on either the first TRN_02 value for the first subscriber (if the patient is also the subscriber) or the first TRN_02 value from the first dependent (if the patient is not the subscriber).
The segments used for the unique ID are illustrated in Figure 74.
Translation structure name
e*Xchange Partner Manager User’s Guide 131
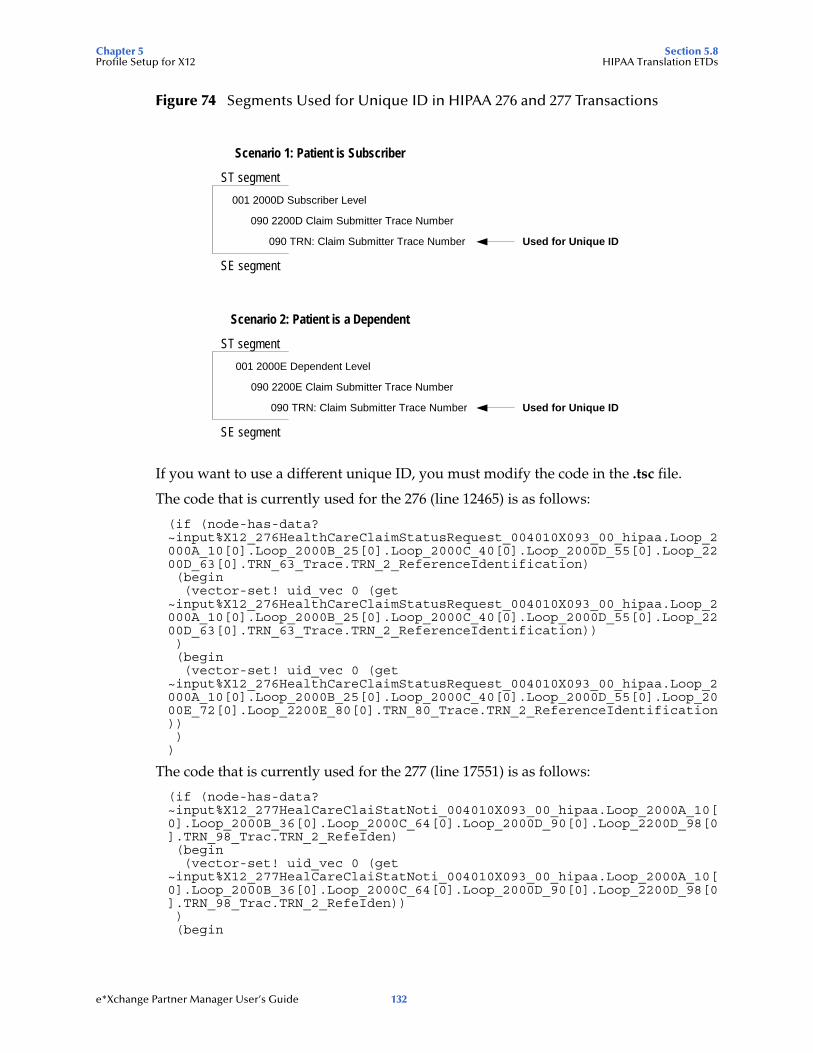
Chapter 5 Section 5.8Profile Setup for X12 HIPAA Translation ETDs
Figure 74 Segments Used for Unique ID in HIPAA 276 and 277 Transactions
If you want to use a different unique ID, you must modify the code in the .tsc file.
The code that is currently used for the 276 (line 12465) is as follows:
(if (node-has-data? ~input%X12_276HealthCareClaimStatusRequest_004010X093_00_hipaa.Loop_2000A_10[0].Loop_2000B_25[0].Loop_2000C_40[0].Loop_2000D_55[0].Loop_2200D_63[0].TRN_63_Trace.TRN_2_ReferenceIdentification) (begin (vector-set! uid_vec 0 (get ~input%X12_276HealthCareClaimStatusRequest_004010X093_00_hipaa.Loop_2000A_10[0].Loop_2000B_25[0].Loop_2000C_40[0].Loop_2000D_55[0].Loop_2200D_63[0].TRN_63_Trace.TRN_2_ReferenceIdentification)) ) (begin (vector-set! uid_vec 0 (get ~input%X12_276HealthCareClaimStatusRequest_004010X093_00_hipaa.Loop_2000A_10[0].Loop_2000B_25[0].Loop_2000C_40[0].Loop_2000D_55[0].Loop_2000E_72[0].Loop_2200E_80[0].TRN_80_Trace.TRN_2_ReferenceIdentification)) ))
The code that is currently used for the 277 (line 17551) is as follows:
(if (node-has-data? ~input%X12_277HealCareClaiStatNoti_004010X093_00_hipaa.Loop_2000A_10[0].Loop_2000B_36[0].Loop_2000C_64[0].Loop_2000D_90[0].Loop_2200D_98[0].TRN_98_Trac.TRN_2_RefeIden) (begin (vector-set! uid_vec 0 (get ~input%X12_277HealCareClaiStatNoti_004010X093_00_hipaa.Loop_2000A_10[0].Loop_2000B_36[0].Loop_2000C_64[0].Loop_2000D_90[0].Loop_2200D_98[0].TRN_98_Trac.TRN_2_RefeIden)) ) (begin
Used for Unique ID
Used for Unique ID
Scenario 1: Patient is Subscriber
ST segment
SE segment
090 2200D Claim Submitter Trace Number
001 2000D Subscriber Level
090 TRN: Claim Submitter Trace Number
Scenario 2: Patient is a Dependent
ST segment
SE segment
090 2200E Claim Submitter Trace Number
001 2000E Dependent Level
090 TRN: Claim Submitter Trace Number
e*Xchange Partner Manager User’s Guide 132
Chapter 5 Section 5.9Profile Setup for X12 Error Handling in X12
(vector-set! uid_vec 0 (get ~input%X12_277HealCareClaiStatNoti_004010X093_00_hipaa.Loop_2000A_10[0].Loop_2000B_36[0].Loop_2000C_64[0].Loop_2000D_90[0].Loop_2000E_119[0].Loop_2200E_127[0].TRN_127_Trac.TRN_2_RefeIden)) ))
5.9 Error Handling in X12If e*Xchange is unable to successfully process an X12 message, the error is handled in one of a number of ways, according to the circumstances.
The various error scenarios and their treatment are shown in Table 22.
Note: e*Xchange can be set up to routinely send a 997 or other acknowledgment in response to an incoming message (in the Return Messages section). However, negative messages are automatically generated where errors are encountered whether or not the Return Messages section has been set up. Additionally, if 997 has been selected as the normal, expected response to an incoming message in the Return Messages section, e*Xchange still only sends out one negative 997 if the message contains errors.
Table 22 Error Handling for X12 Messages
Error Scenario Error Handling
Cannot parse message from external system based on delimiters.
Sends negative TA1, stores the message with only the ISA/IEA segments.
Invalid information in ISA or IEA; missing IEA; extra IEA.
Sends TA1.
Functional error, invalid nodes in ST or SE segments. Sends negative 997, stores message (ST–SE)
Message fails to map data to the validation structure. Sends negative 997, stores message (ST–SE)
Message maps to the structure, but validation detects invalid data in the message.
Sends 997 with appropriate information, stores message.
Cannot retrieve the trading partner profile based on the sender ID, receiver ID, version, and functional ID code values in the functional group.
Sends negative TA1, stores the message with only the ISA/IEA segments.
e*Xchange Partner Manager User’s Guide 133
Chapter 6
Profile Setup for NCPDP-HIPAA
This chapter provides information on setting up NCPDP-HIPAA transactions in the e*Xchange Partner Manager, at the Message Profile level.
The Company, Trading Partner, and B2B Protocol (inbound and outbound) levels must be set up first. For information on setting up these components, refer to “Profile Management” on page 70.
6.1 Setting Up NCPDP-HIPAA Message Profile InformationOnce you have set up B2B protocol information for a trading partner, the next step is to set up message profiles.
6.1.1. Setup SequencePart of setting up a message profile is to specify the expected response message, if any.
During initial setup, you will find that you cannot select the appropriate response messages because you have not yet created the message profiles for those response messages.
One approach to this is to first set up all message profiles, both inbound and outbound, and then go back into each message profile to select the return messages.
6.1.2. Setting Up a Message ProfileFrom the B2B Protocol page, select a B2B protocol and click Continue: Message Profile to access the Message Profile page (see Figure 75).
e*Xchange Partner Manager User’s Guide 134
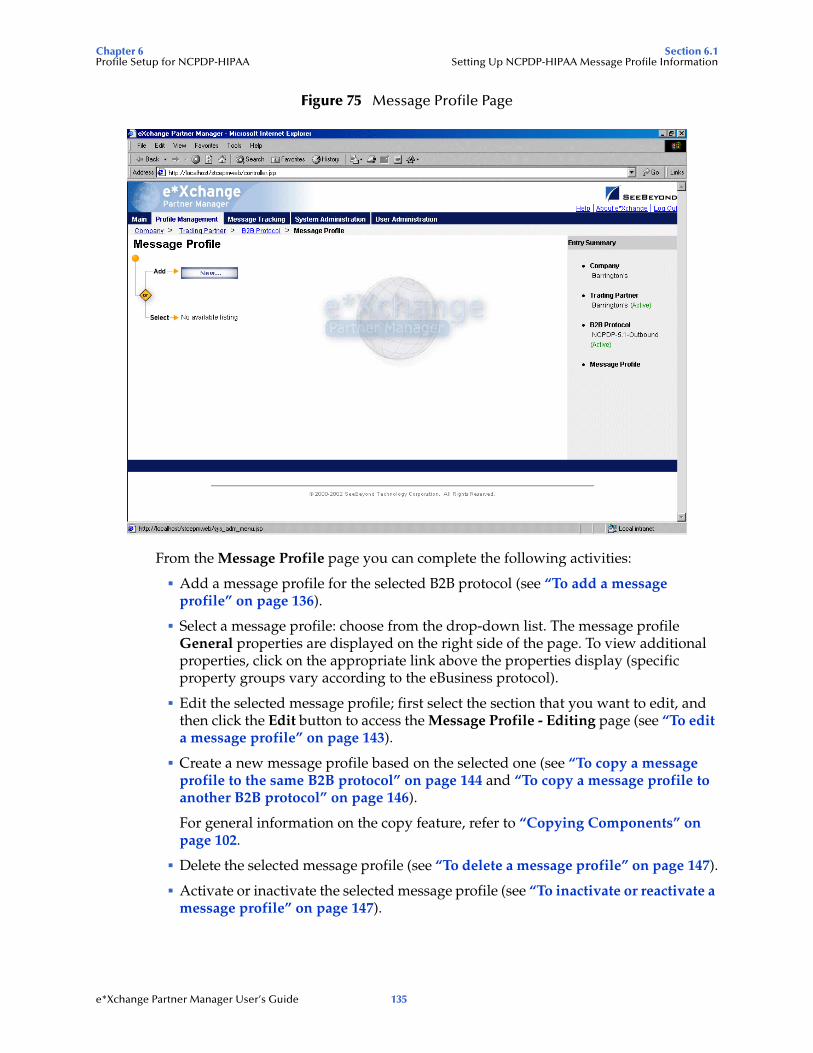
Chapter 6 Section 6.1Profile Setup for NCPDP-HIPAA Setting Up NCPDP-HIPAA Message Profile Information
Figure 75 Message Profile Page
From the Message Profile page you can complete the following activities:
Add a message profile for the selected B2B protocol (see “To add a message profile” on page 136).
Select a message profile: choose from the drop-down list. The message profile General properties are displayed on the right side of the page. To view additional properties, click on the appropriate link above the properties display (specific property groups vary according to the eBusiness protocol).
Edit the selected message profile; first select the section that you want to edit, and then click the Edit button to access the Message Profile - Editing page (see “To edit a message profile” on page 143).
Create a new message profile based on the selected one (see “To copy a message profile to the same B2B protocol” on page 144 and “To copy a message profile to another B2B protocol” on page 146).
For general information on the copy feature, refer to “Copying Components” on page 102.
Delete the selected message profile (see “To delete a message profile” on page 147).
Activate or inactivate the selected message profile (see “To inactivate or reactivate a message profile” on page 147).
e*Xchange Partner Manager User’s Guide 135
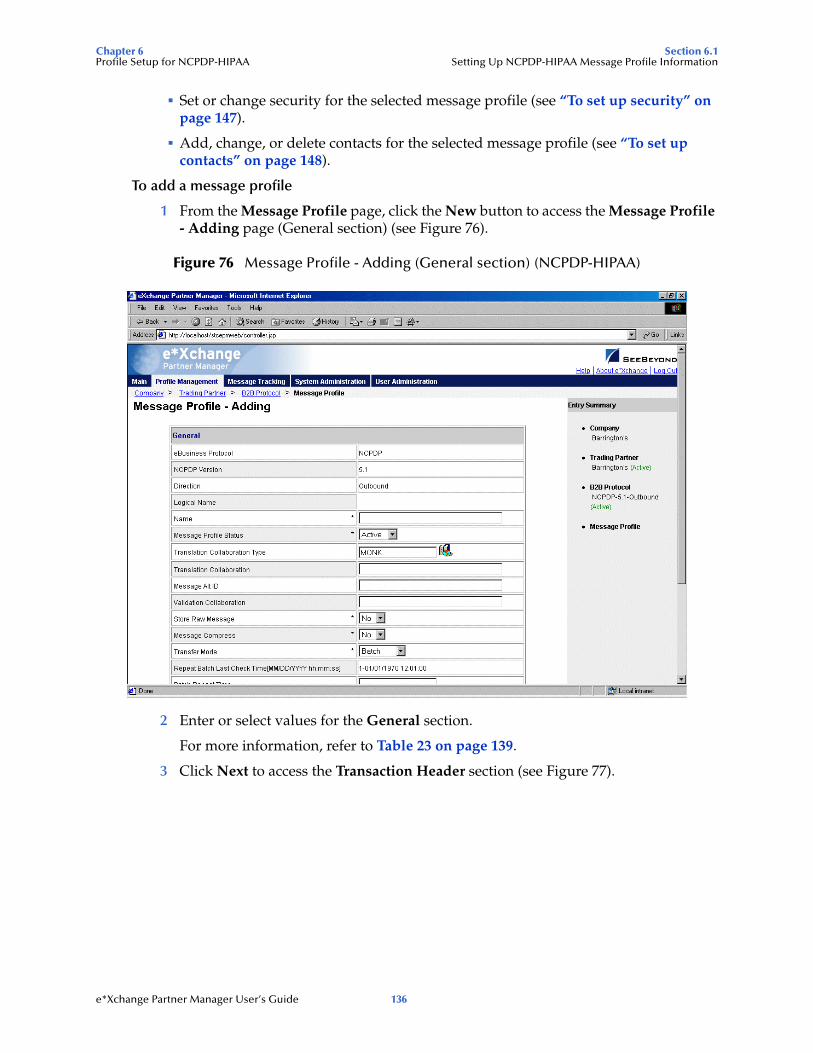
Chapter 6 Section 6.1Profile Setup for NCPDP-HIPAA Setting Up NCPDP-HIPAA Message Profile Information
Set or change security for the selected message profile (see “To set up security” on page 147).
Add, change, or delete contacts for the selected message profile (see “To set up contacts” on page 148).
To add a message profile
1 From the Message Profile page, click the New button to access the Message Profile - Adding page (General section) (see Figure 76).
Figure 76 Message Profile - Adding (General section) (NCPDP-HIPAA)
2 Enter or select values for the General section.
For more information, refer to Table 23 on page 139.
3 Click Next to access the Transaction Header section (see Figure 77).
e*Xchange Partner Manager User’s Guide 136
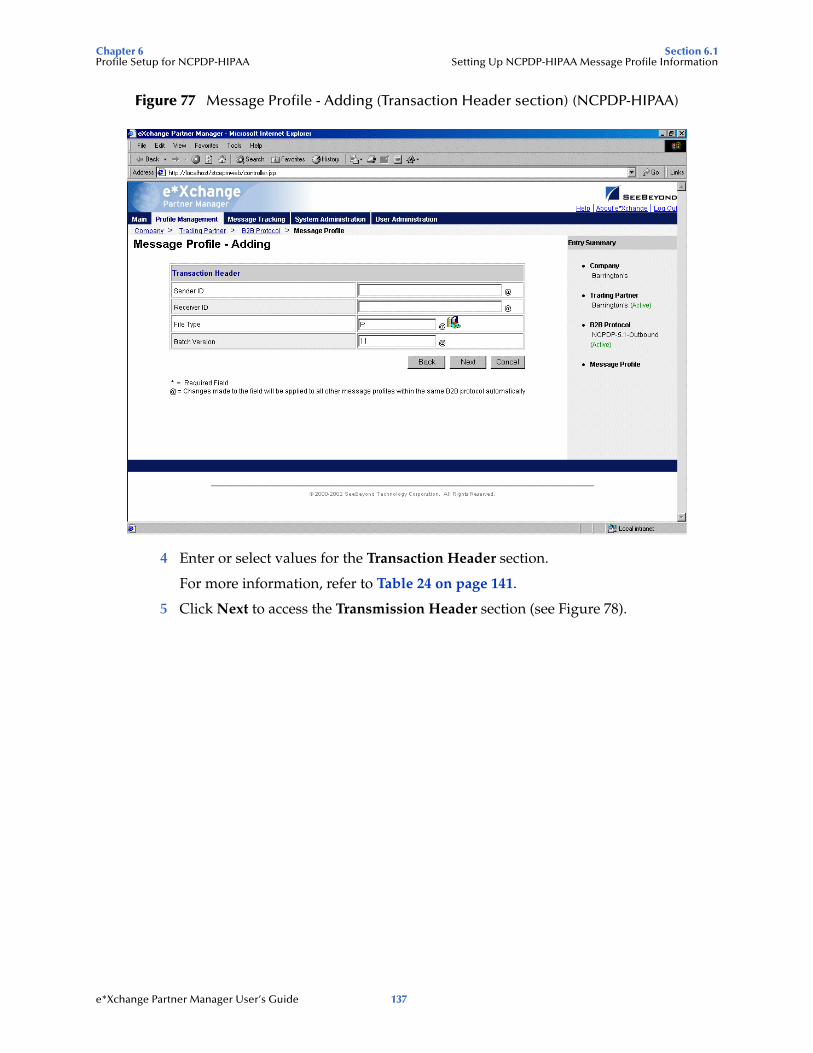
Chapter 6 Section 6.1Profile Setup for NCPDP-HIPAA Setting Up NCPDP-HIPAA Message Profile Information
Figure 77 Message Profile - Adding (Transaction Header section) (NCPDP-HIPAA)
4 Enter or select values for the Transaction Header section.
For more information, refer to Table 24 on page 141.
5 Click Next to access the Transmission Header section (see Figure 78).
e*Xchange Partner Manager User’s Guide 137
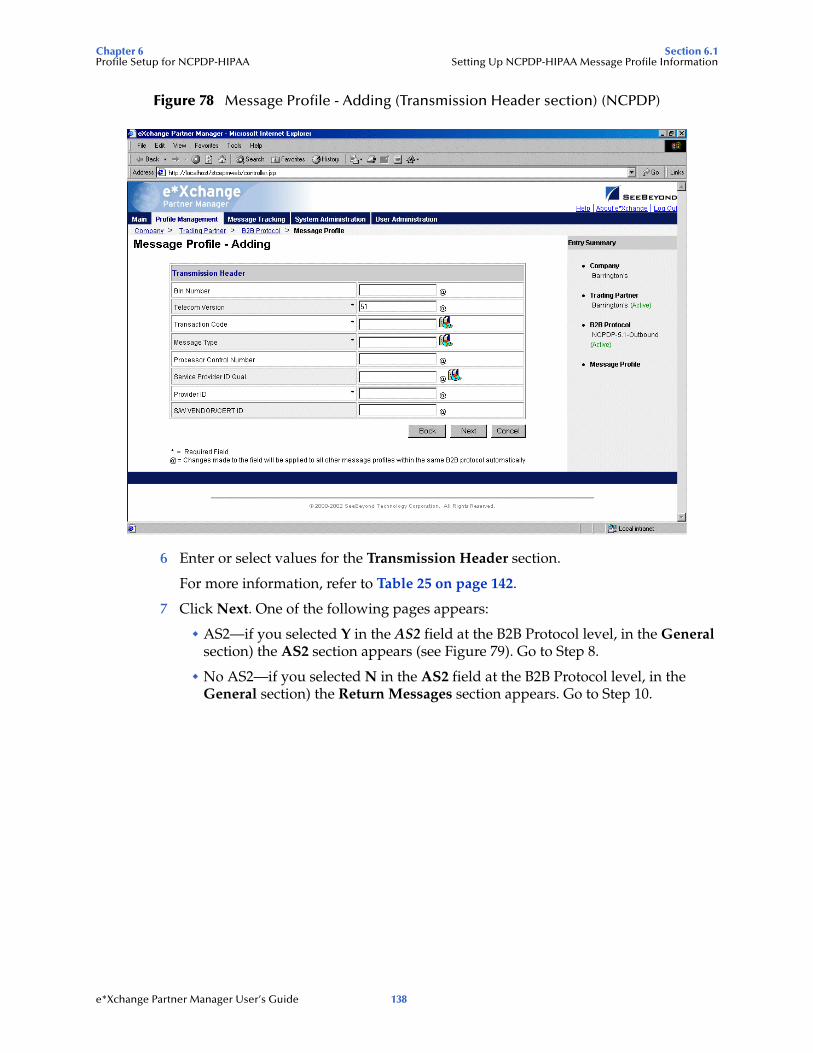
Chapter 6 Section 6.1Profile Setup for NCPDP-HIPAA Setting Up NCPDP-HIPAA Message Profile Information
Figure 78 Message Profile - Adding (Transmission Header section) (NCPDP)
6 Enter or select values for the Transmission Header section.
For more information, refer to Table 25 on page 142.
7 Click Next. One of the following pages appears:
AS2—if you selected Y in the AS2 field at the B2B Protocol level, in the General section) the AS2 section appears (see Figure 79). Go to Step 8.
No AS2—if you selected N in the AS2 field at the B2B Protocol level, in the General section) the Return Messages section appears. Go to Step 10.
e*Xchange Partner Manager User’s Guide 138
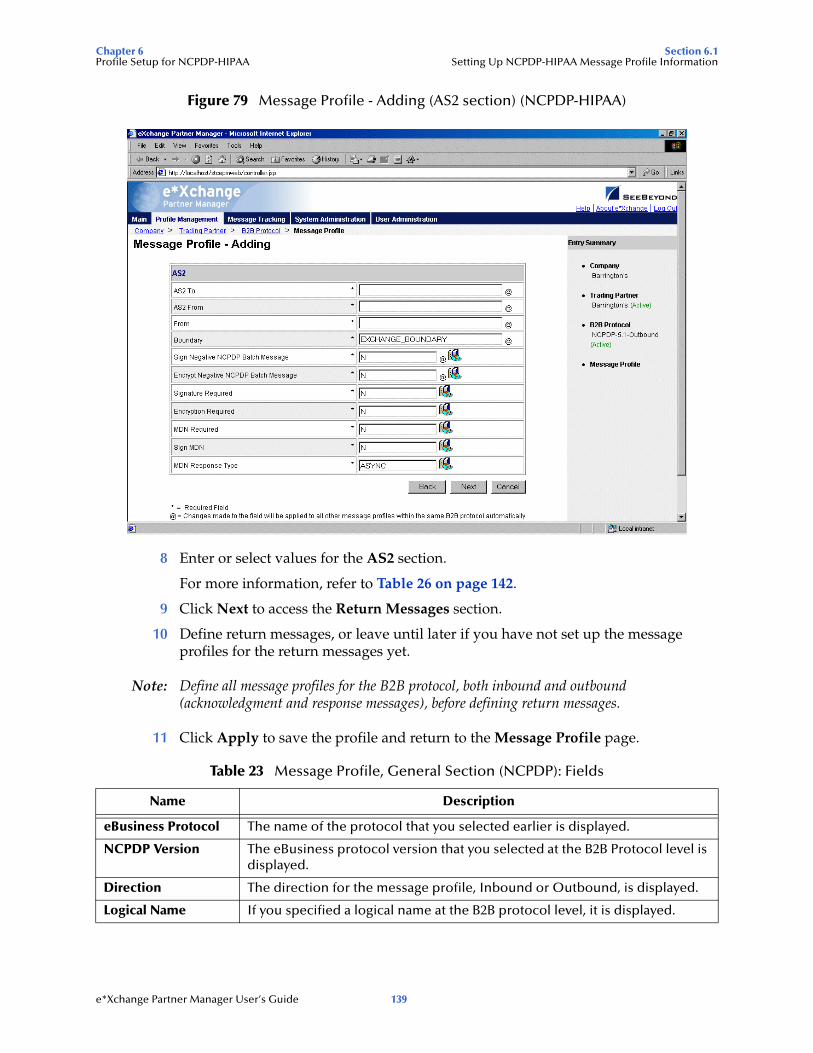
Chapter 6 Section 6.1Profile Setup for NCPDP-HIPAA Setting Up NCPDP-HIPAA Message Profile Information
Figure 79 Message Profile - Adding (AS2 section) (NCPDP-HIPAA)
8 Enter or select values for the AS2 section.
For more information, refer to Table 26 on page 142.
9 Click Next to access the Return Messages section.
10 Define return messages, or leave until later if you have not set up the message profiles for the return messages yet.
Note: Define all message profiles for the B2B protocol, both inbound and outbound (acknowledgment and response messages), before defining return messages.
11 Click Apply to save the profile and return to the Message Profile page.
Table 23 Message Profile, General Section (NCPDP): Fields
Name Description
eBusiness Protocol The name of the protocol that you selected earlier is displayed.
NCPDP Version The eBusiness protocol version that you selected at the B2B Protocol level is displayed.
Direction The direction for the message profile, Inbound or Outbound, is displayed.
Logical Name If you specified a logical name at the B2B protocol level, it is displayed.
e*Xchange Partner Manager User’s Guide 139
Chapter 6 Section 6.1Profile Setup for NCPDP-HIPAA Setting Up NCPDP-HIPAA Message Profile Information
Name A label for the message profile. It should be descriptive, and unique for the trading partner.
Message Profile Status
The status of the message profile. Choose one of the following values:Active—The message profile is currently active, and can be used.Inactive—The message profile is not active, and cannot be used.
Default: Active.Note: This is only available when adding a message profile. When editing, you can change the status on the Message Profile page (see “To inactivate or reactivate a message profile” on page 147).
Translation Collaboration Type
The language for the translation Collaboration. For all eBusiness protocols, translation Collaborations can be either Monk or Java.
Translation Collaboration
If your internal system will be sending messages to e*Xchange in raw data format, or expecting messages from e*Xchange in raw data format, you must specify the translation Collaboration that will be used to translate the messages to and from the appropriate eBusiness Protocol format. Type the file name (no extension).Outbound: If you provide a value in this field for an Outbound profile, e*Xchange also requires values for Message ALT ID and Validation Collaboration.
Message ALT ID(Outbound only)
If your internal system will be sending messages to e*Xchange in raw data format, or expecting messages from e*Xchange in raw data format, e*Xchange uses the Message ALT ID, rather than the Logical Name set at the B2B Protocol level, to identify the trading partner to which the message is to be routed.Because of this, if you are receiving messages from the internal system in raw data format you must specify the Message ALT ID. The value specified in this field must exactly match the value populated in the Name/Value pair element of the TP Event section in the eX_Standard_Event file.If you are not receiving messages from the internal system in raw data format, leave this field blank.
Event Type (Inbound only)
(Optional) If specified, this will be the Event Type to which the inbound message will be published. If left empty, e*Xchange uses the default Event Type, eX_to_eBPM.Note: If you specify a custom Event Type, you must modify the e*Xchange e*Gate schema accordingly. Modify the eX_from_ePM Collaboration properties to publish to the new Event Type. There must also be a module that subscribes to this Event Type.
Validation Collaboration
The Monk Collaboration that is used to validate the eBusiness protocol message.For X12, UN/EDIFACT, and NCPDP:
Inbound—This field is required.Outbound—This field is required if a unique-id is not provided in the eX_Standard_Event MSG_ALT_ID field.
Note: The message enveloping is automatically validated by e*Xchange. The validation Collaboration addresses only the message body.
Table 23 Message Profile, General Section (NCPDP): Fields (Continued)
Name Description
e*Xchange Partner Manager User’s Guide 140
Chapter 6 Section 6.1Profile Setup for NCPDP-HIPAA Setting Up NCPDP-HIPAA Message Profile Information
Store Raw Message If you want to store the raw message in the database as well as the translated message, type Y in this field.If you store the raw message, it will be available for viewing in Message Tracking.
Transfer Mode The way in which the eBusiness messages are transmitted to, or received from, the trading partner. For NCPDP the choices are Batch or Interactive.
Repeat Batch Last Check Time (batch only)
Once the first batch has been sent out, this field is automatically updated by e*Xchange. Display-only. Maximum 255 characters.Default: 1-01/01/1970 12:01:00.
Batch Repeat Time/Batch Repeat Granularity (batch only)
To send batches at regular intervals, use these two attributes. BATCH REPEAT TIME sets the numerical value, and BATCH REPEAT GRANULARITY sets the time period: H for hours, MI for minutes, and D for days. For example, BATCH REPEAT TIME of 4 and BATCH REPEAT GRANULARITY of H means that batches will be sent out every four hours; values of 30 and MI mean that batches will be sent out every 30 minutes.Note: If you want to send batches at a preset daily time, do not set values for these attributes. Use BATCH TIME. If you set values for Batch Repeat Time/Batch Repeat Granularity and also Batch Time, the Batch Time setting takes precedence.Note: If you use these fields to control batching, you can have a maximum of 10 Batch e*Ways running. This is because the display-only Repeat Batch Last Check Time field has a maximum of 255 characters.
Batch Time (batch only)
To send batches at a preset daily time, enter the time in the format hh:mm:ss (military time); for example, 09:00:00 for 9am or 15:30:00 for 3pm. If the batch is being set at a preset daily time, you do not need to set any other attributes.You can also set multiple batch times, using the pipe symbol as the delimiter (up to 50 characters). For example, 09:00:00|17:30:00|24:00:00 sends out batches at 9am, 5:30pm, and midnight. The values must be in ordered sequence, from the earliest time to the latest.Note: If you set values for Batch Repeat Time/Batch Repeat Granularity and also Batch Time, the Batch Time setting takes precedence.
Table 24 Message Profile, Transaction Header Section (NCPDP): Fields
Name Description
Sender ID The identification number for the sender of the data, as assigned by the receiving entity (Processor or Switch). Optional: only applicable if you are batching messages.
Receiver ID The ID assigned by the processor or switch receiving the message file. According to NCPDP guidelines, the Receiver ID reflects valid enrollment between trading partners for batch file submission. Optional: only applicable if you are batching messages.
File Type A code to indicate whether the file is test or production. Optional: only applicable if you are batching messages.
Table 23 Message Profile, General Section (NCPDP): Fields (Continued)
Name Description
e*Xchange Partner Manager User’s Guide 141

Chapter 6 Section 6.1Profile Setup for NCPDP-HIPAA Setting Up NCPDP-HIPAA Message Profile Information
Batch Version The NCPDP Version/Release Number applicable to the batch enveloping. This is a two-character code; for example 11 for batch version 1.1. For detailed information on acceptable values, refer to the NCPDP Data Dictionary. Optional: only applicable if you are batching messages.Only version 1.1 is currently supported.
Table 25 Message Profile, Transmission Header Section (NCPDP): Fields
Name Description
Bin Number (Required for a request message, ignored for a response message)The Bank Information Number for the processor of the message. This is either the Card Issuer ID or the Bank ID Number.
Telecom Version (Required for both request and response messages)The NCPDP Version/Release Number applicable to the message. This is a two-character code; for example, 51 for version 5.1. For detailed information on acceptable values, refer to the NCPDP Data Dictionary.
Transaction Code (Required for both request and response messages)A code identifying the type of transaction; for example, E1 for Eligibility Verification.
Message Type A code to indicate the type of message: REQUEST or RESPONSE.
Processor Control Number
(Required for a request message, ignored for a response message)The control number assigned by the processor.
Service Provider ID Qual
(Optional for both request and response messages)The Service Provider ID Qualifier: The code qualifying the Service Provider ID (next field); for example, 04 for Medicare or 13 for State Issued. Optional.
Provider ID (Optional for both request and response messages)The Service Provider ID: The unique ID that is assigned to the pharmacy or provider. For detailed information on acceptable values, refer to the NCPDP Data Dictionary.
S/W VENDOR/CERT ID
(Required for a request message, ignored for a response message)Software Vendor Certification ID: The ID assigned by the switch or processor to identify the source of the software.
Table 26 Message Profile, AS2 Section (NCPDP): Fields
Name Description
AS2 To The identity of the receiving system. This can be company-specific, such as a DUNS number, or an identification string agreed upon between the trading partners.
AS2 From The identity of the sending system. This can be company-specific, such as a DUNS number, or it can be an identification string agreed upon between the trading partners.
Table 24 Message Profile, Transaction Header Section (NCPDP): Fields (Continued)
Name Description
e*Xchange Partner Manager User’s Guide 142
Chapter 6 Section 6.1Profile Setup for NCPDP-HIPAA Setting Up NCPDP-HIPAA Message Profile Information
To edit a message profile
1 From the Message Profile page, select the message profile from the drop-down list.
The message profile properties are displayed on the right side of the page.
2 In the Message Profile Properties section, click the link for the section you want to edit: General, Transaction Header, Transmission Header, or Return Messages.
3 Click the Edit button to access the Message Profile - Editing page listing the attribute section that you selected (see Figure 80 for an example).
From The Web address for the message sender; for example: [email protected].
Boundary The string that you want to use as the boundary between the various parts of the message. This should be a string that will definitely not be found elsewhere in the message content; for example:---------Message Boundary---------
(NCPDP only) Sign Negative NCPDP Batch Message
In a situation where there is a problem with an inbound NCPDP batch and an error message needs to be sent, this field determines whether the error message includes a digital signature. Choose Y or N (the default is N).
(NCPDP only) Encrypt Negative NCPDP Batch Message
In a situation where there is a problem with an inbound NCPDP batch and an error message needs to be sent, this field determines whether the error message is encrypted. Choose Y or N (the default is N).
Signature Required If a digital signature is required on the message, enter Y. If it is not required, enter N. You can also select from the drop-down list.Note: All message profiles in a specific direction that have a transfer mode of Batch or Fast Batch must have matching values in this field.
Encryption Required If encryption is required on the message, enter Y. If it is not required, enter N. You can also select from the drop-down list.Note: All message profiles in a specific direction that have a transfer mode of Batch or Fast Batch must have matching values in this field.
MDN Required If MDN (Message Disposition Notification) is required on the message, enter Y. If it is not required, enter N. You can also select from the drop-down list.Note: All message profiles in a specific direction that have a transfer mode of Batch or Fast Batch must have matching values in this field.
Sign MDN If a digital signature is required on the MDN (Message Disposition Notification), enter Y. If it is not required, enter N. You can also select from the drop-down list.Note: All message profiles in a specific direction that have a transfer mode of Batch or Fast Batch must have matching values in this field.
MDN Response Type
Enter the response type for the Message Disposition Notification: ASYNC (Asynchronous) or SYNC (Synchronous).Note: All message profiles in a specific direction that have a transfer mode of Batch or Fast Batch must have matching values in this field.
Table 26 Message Profile, AS2 Section (NCPDP): Fields (Continued)
Name Description
e*Xchange Partner Manager User’s Guide 143
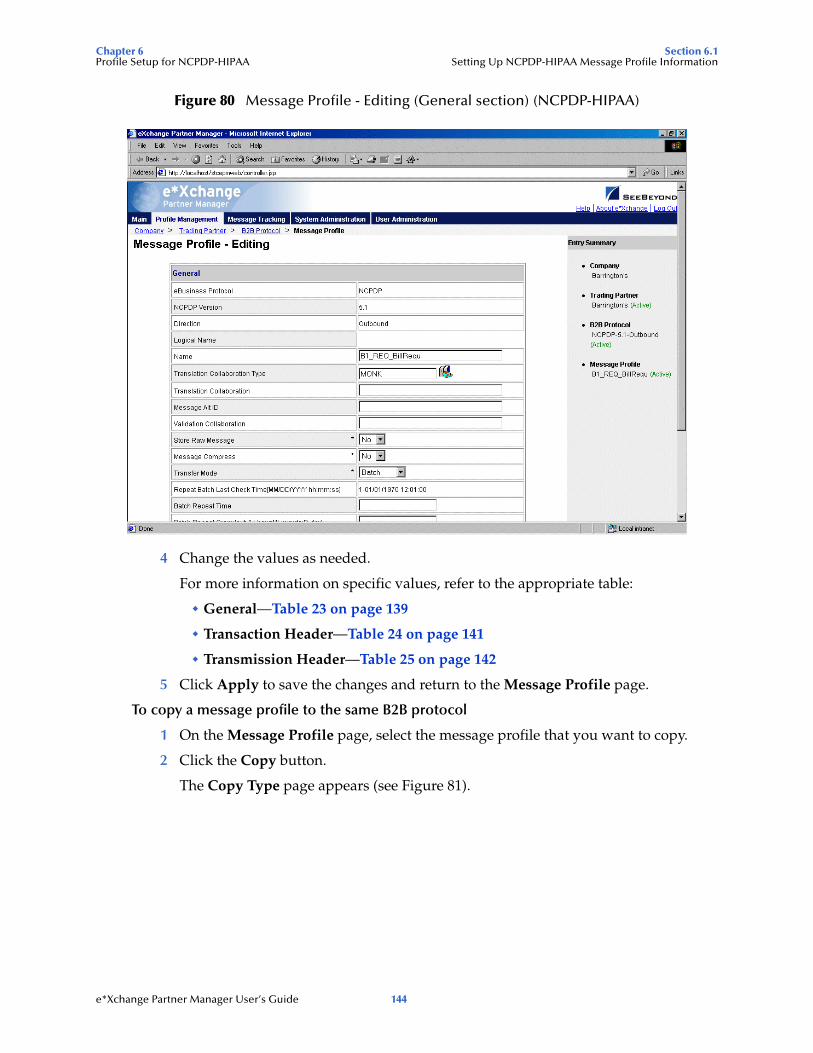
Chapter 6 Section 6.1Profile Setup for NCPDP-HIPAA Setting Up NCPDP-HIPAA Message Profile Information
Figure 80 Message Profile - Editing (General section) (NCPDP-HIPAA)
4 Change the values as needed.
For more information on specific values, refer to the appropriate table:
General—Table 23 on page 139
Transaction Header—Table 24 on page 141
Transmission Header—Table 25 on page 142
5 Click Apply to save the changes and return to the Message Profile page.
To copy a message profile to the same B2B protocol
1 On the Message Profile page, select the message profile that you want to copy.
2 Click the Copy button.
The Copy Type page appears (see Figure 81).
e*Xchange Partner Manager User’s Guide 144
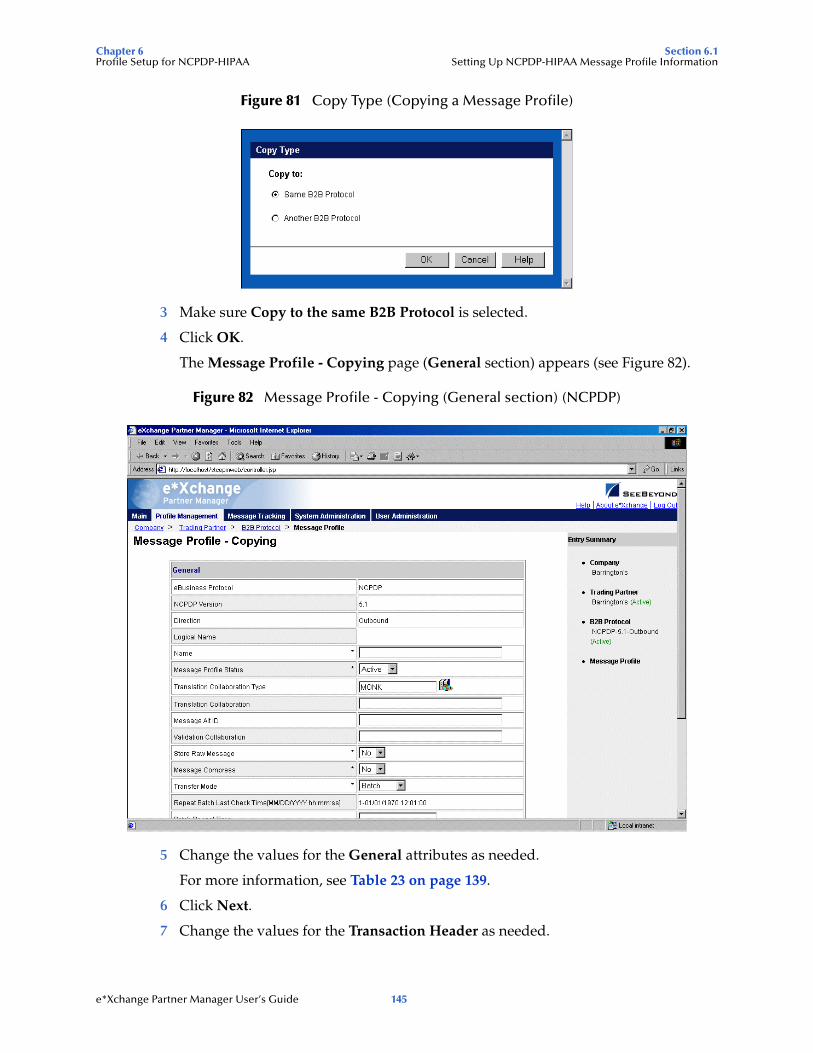
Chapter 6 Section 6.1Profile Setup for NCPDP-HIPAA Setting Up NCPDP-HIPAA Message Profile Information
Figure 81 Copy Type (Copying a Message Profile)
3 Make sure Copy to the same B2B Protocol is selected.
4 Click OK.
The Message Profile - Copying page (General section) appears (see Figure 82).
Figure 82 Message Profile - Copying (General section) (NCPDP)
5 Change the values for the General attributes as needed.
For more information, see Table 23 on page 139.
6 Click Next.
7 Change the values for the Transaction Header as needed.
e*Xchange Partner Manager User’s Guide 145
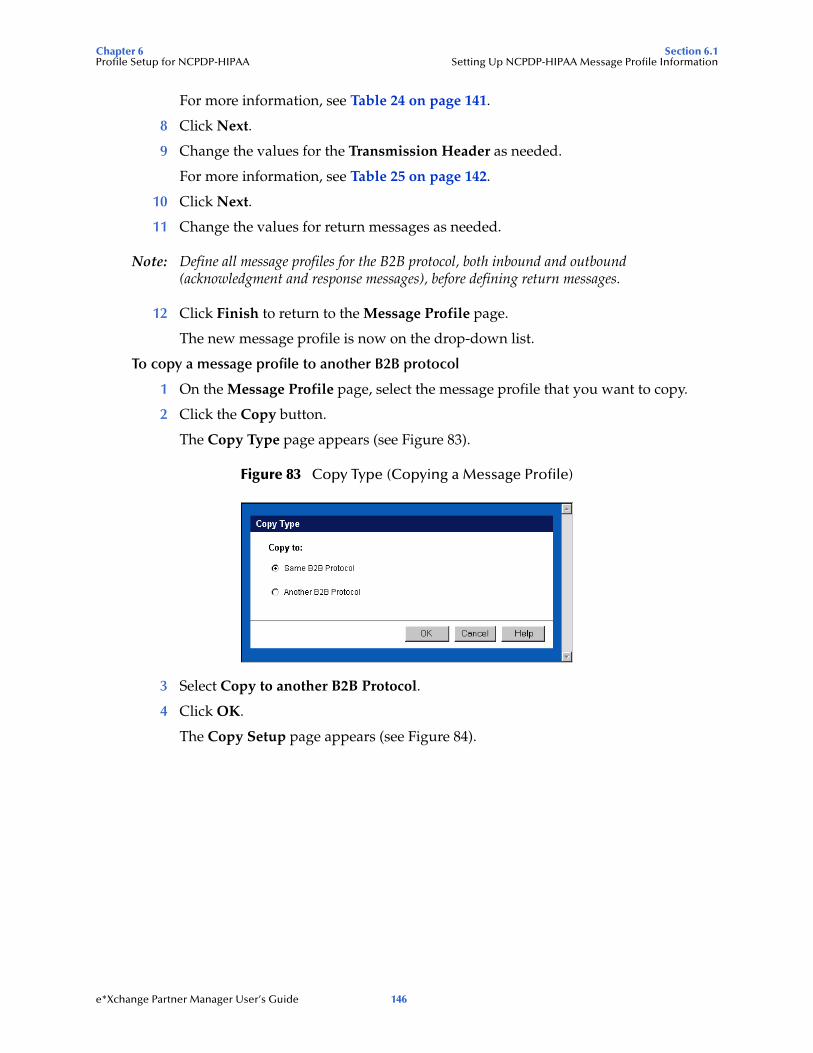
Chapter 6 Section 6.1Profile Setup for NCPDP-HIPAA Setting Up NCPDP-HIPAA Message Profile Information
For more information, see Table 24 on page 141.
8 Click Next.
9 Change the values for the Transmission Header as needed.
For more information, see Table 25 on page 142.
10 Click Next.
11 Change the values for return messages as needed.
Note: Define all message profiles for the B2B protocol, both inbound and outbound (acknowledgment and response messages), before defining return messages.
12 Click Finish to return to the Message Profile page.
The new message profile is now on the drop-down list.
To copy a message profile to another B2B protocol
1 On the Message Profile page, select the message profile that you want to copy.
2 Click the Copy button.
The Copy Type page appears (see Figure 83).
Figure 83 Copy Type (Copying a Message Profile)
3 Select Copy to another B2B Protocol.
4 Click OK.
The Copy Setup page appears (see Figure 84).
e*Xchange Partner Manager User’s Guide 146

Chapter 6 Section 6.1Profile Setup for NCPDP-HIPAA Setting Up NCPDP-HIPAA Message Profile Information
Figure 84 Copy Setup (Copying a Message Profile to Another B2B Protocol)
5 On the Copy Setup page, select the destination company.
6 Select the destination trading partner.
7 Select the destination B2B Protocol.
8 If you want to change the message profile name, type the new name.
9 Click Finish.
The message profile information is copied to the selected B2B protocol. When done, e*Xchange displays a message letting you know that the copy was successful.
To delete a message profile
1 On the Message Profile page, select the message profile from the drop-down list.
2 Click the Delete button.
A warning message appears asking if you are sure you want to delete.
3 To delete the profile, click OK.
The message profile is deleted.
To inactivate or reactivate a message profile
1 On the Message Profile page, select the message profile from the drop-down list.
The message profile properties are displayed on the right side of the page.
2 In the Message Profile Status field, toggle the Active/Inactive graphic to change the status. Values are as follows:
Message profile is active: click to inactivate.
Message profile is inactive: click to reactivate.
To set up security
1 On the Message Profile page, select the message profile from the drop-down list.
The message profile properties are displayed on the right side of the page.
2 Click the Security button.
The Security Management page appears.
e*Xchange Partner Manager User’s Guide 147
Chapter 6 Section 6.1Profile Setup for NCPDP-HIPAA Setting Up NCPDP-HIPAA Message Profile Information
3 Set the values as needed.
4 Click OK.
For detailed instructions on setting up security, refer to “Security” on page 66.
To set up contacts
1 On the Message Profile page, click the Contacts icon.
The Company - Contacts Viewing page appears.
2 Do one of the following:
To add a contact, click the Add button in the appropriate row. Type the information in the Company - Contacts Adding page and then click Apply.
To edit an existing contact, click the View/Edit button in the appropriate row. This button is only available when a contact has been entered. Edit the values in the Company - Contacts Editing page and then click Apply.
To delete an existing contact, click the View/Edit button in the appropriate row. In the Company - Contacts Editing page, click the Delete button at the bottom left. At the “Are you sure...” message, click OK.
For detailed instructions on working with contacts, refer to “Storing Contact Information” on page 228.
e*Xchange Partner Manager User’s Guide 148

Chapter 7
Profile Setup for UN/EDIFACT
This chapter provides information on setting up UN/EDIFACT messages in the e*Xchange Partner Manager, at the Message Profile level.
The Company, Trading Partner, and B2B Protocol (inbound and outbound) levels must be set up first. For information on setting up these components, refer to “Profile Management” on page 70.
For UN/EDIFACT, note that the e*Xchange Web interface selection list at B2B Protocol and Message Profile levels offers envelope versions only: version 3 Batch, 4 Batch, and 4 Interactive. The specific EDIFACT transaction versions are used by the e*Xchange back end but are not visible within the e*Xchange user interface.
This chapter includes information on the following:
Setting the values for:
Interchange envelope (UNB and UNZ segments)
Group (UNG and UNE segments)
Message (UNH and UNT segments)
Specifying the messaging protocol used to relay the messages
Handling errors
Note: If you are using UN/EDIFACT, you must install the UN/EDIFACT templates provided. They are available during e*Gate installation via the “Add-Ons” option. For installation instructions, refer to the UN/EDIFACT ETD Library User’s Guide.
7.1 UN/EDIFACT DelimitersFor UN/EDIFACT, delimiters are set up at the message profile level, in the Interchange Control Envelope section.
It is important to note the specific use of delimiters in the extended attributes and how it affects default use of delimiters in messages processed by e*Xchange.
Treatment of delimiters in the messages and in the partner profile for both inbound and outbound is explained below.
e*Xchange Partner Manager User’s Guide 149
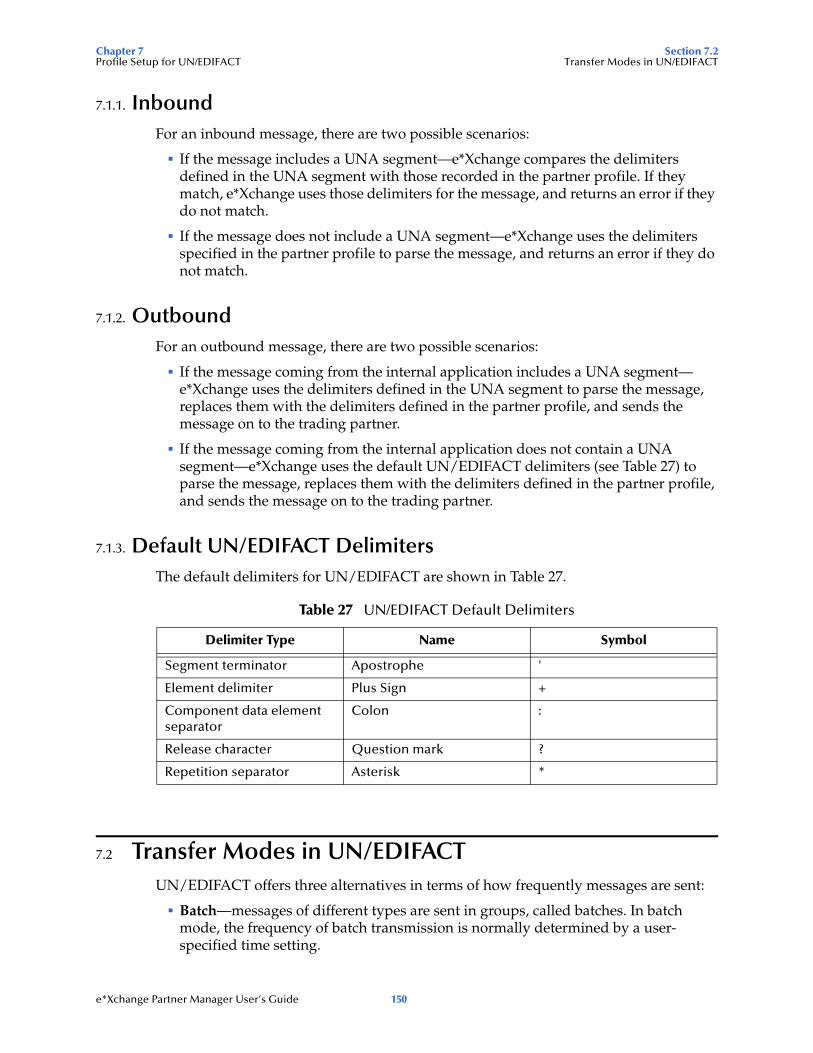
Chapter 7 Section 7.2Profile Setup for UN/EDIFACT Transfer Modes in UN/EDIFACT
7.1.1. InboundFor an inbound message, there are two possible scenarios:
If the message includes a UNA segment—e*Xchange compares the delimiters defined in the UNA segment with those recorded in the partner profile. If they match, e*Xchange uses those delimiters for the message, and returns an error if they do not match.
If the message does not include a UNA segment—e*Xchange uses the delimiters specified in the partner profile to parse the message, and returns an error if they do not match.
7.1.2. OutboundFor an outbound message, there are two possible scenarios:
If the message coming from the internal application includes a UNA segment—e*Xchange uses the delimiters defined in the UNA segment to parse the message, replaces them with the delimiters defined in the partner profile, and sends the message on to the trading partner.
If the message coming from the internal application does not contain a UNA segment—e*Xchange uses the default UN/EDIFACT delimiters (see Table 27) to parse the message, replaces them with the delimiters defined in the partner profile, and sends the message on to the trading partner.
7.1.3. Default UN/EDIFACT DelimitersThe default delimiters for UN/EDIFACT are shown in Table 27.
7.2 Transfer Modes in UN/EDIFACTUN/EDIFACT offers three alternatives in terms of how frequently messages are sent:
Batch—messages of different types are sent in groups, called batches. In batch mode, the frequency of batch transmission is normally determined by a user-specified time setting.
Table 27 UN/EDIFACT Default Delimiters
Delimiter Type Name Symbol
Segment terminator Apostrophe '
Element delimiter Plus Sign +
Component data element separator
Colon :
Release character Question mark ?
Repetition separator Asterisk *
e*Xchange Partner Manager User’s Guide 150
Chapter 7 Section 7.3Profile Setup for UN/EDIFACT Communications Protocols for UN/EDIFACT
Interactive (single-item batching in real time)—messages are sent as soon as they are generated or received. Typically, messages that are used in a real time mode are those that require an immediate response. The sender sends a request message to the receiver and remains connected while the receiver processes the request message and returns a response message.
Note: Do not confuse this term with the FTP (Batch) communications protocol (for more information, see “Communications Protocols for UN/EDIFACT” on page 151).
Fast Batch—messages of a certain type are accumulated and sent to the trading partner as a group of messages, all of the same transaction type, at a preset point. Fast batch has one interchange, one group, and a preset number of messages. The point at which a fast batch is sent is determined by the settings in the Standard Event Structure for the message profile.
7.2.1. Fast Batch SettingsIf you are using Fast Batch, you must set the following values in the eX_Standard_Event.ssc file:
Set the string value “FB_UNIQUE_ID” (Fast Batch unique ID) in the Name node of the first NameValuePair in the TPAttribute node.
The Fast Batch unique ID is unique for each fast batch, but the same for each message within the fast batch.
Set the fast batch unique value in the Value node of the first NameValuePair in the TPAttribute node.
The actual value for the fast batch unique ID is user-defined.
Set the string value “FB_COUNT” (Number of messages to be included in the batch) in the Name node of the Second NameValuePair in the TPAttribute node.
Set the total fast batch record count in the Value node of the second NameValuePair in the TPAttribute node.
The actual value for the fast batch record count is user-defined.
For an example, refer to the e*Xchange schema Component chapter of the e*Xchange Implementation Guide.
7.3 Communications Protocols for UN/EDIFACTThe communications protocols supported by e*Xchange for UN/EDIFACT are:
FTP (Batch)
The FTP (Batch) setting at the B2B protocol level indicates use of File Transfer Protocol for transmission of messages. Within e*Gate, this uses the e*Xchange BATCH e*Way to transfer files. Files can also be stored on the local machine.
e*Xchange Partner Manager User’s Guide 151
Chapter 7 Section 7.4Profile Setup for UN/EDIFACT Setting Up UN/EDIFACT Message Profile Information
HTTP
This setting indicates use of the HTTP protocol.
SMTP
This setting indicates use of the Simple Mail Transfer Protocol.
7.4 Setting Up UN/EDIFACT Message Profile InformationOnce you have set up B2B protocol information for a trading partner, the next step is to set up message profiles.
7.4.1. Setup SequencePart of setting up a message profile is to specify the expected response message, if any.
During initial setup, you will find that you cannot select the appropriate response messages because you have not yet created the message profiles for those response messages.
One approach to this is to first set up all message profiles, both inbound and outbound, and then go back into each message profile to select the return messages.
7.4.2. Setting Up a Message ProfileFrom the B2B Protocol page, select a B2B protocol and click Continue: Message Profile to access the Message Profile page (see Figure 85).
e*Xchange Partner Manager User’s Guide 152

Chapter 7 Section 7.4Profile Setup for UN/EDIFACT Setting Up UN/EDIFACT Message Profile Information
Figure 85 Message Profile Page
From the Message Profile page you can complete the following activities:
Add a message profile for the selected B2B protocol (see “To add a message profile” on page 154).
Select a message profile: choose from the drop-down list. The message profile General properties are displayed on the right side of the page. To view additional properties, click on the appropriate link above the properties display (specific property groups vary according to the eBusiness protocol).
Edit the selected message profile; first select the section that you want to edit, and then click the Edit button to access the Message Profile - Editing page (see “To edit a message profile” on page 158).
Create a new message profile based on the selected one (see “To copy a message profile to the same B2B protocol” on page 159 and “To copy a message profile to another B2B protocol” on page 161).
For general information on the copy feature, refer to “Copying Components” on page 102.
Delete the selected message profile (see “To delete a message profile” on page 162).
Activate or inactivate the selected message profile (see “To inactivate or reactivate a message profile” on page 163).
e*Xchange Partner Manager User’s Guide 153
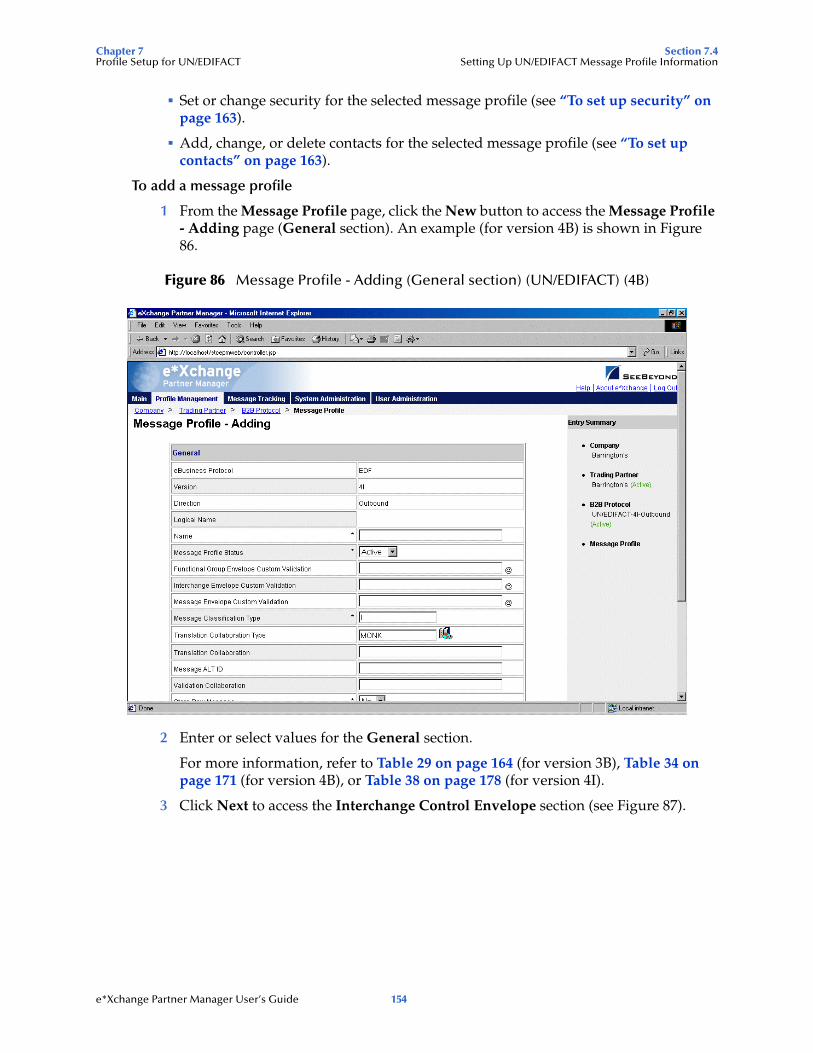
Chapter 7 Section 7.4Profile Setup for UN/EDIFACT Setting Up UN/EDIFACT Message Profile Information
Set or change security for the selected message profile (see “To set up security” on page 163).
Add, change, or delete contacts for the selected message profile (see “To set up contacts” on page 163).
To add a message profile
1 From the Message Profile page, click the New button to access the Message Profile - Adding page (General section). An example (for version 4B) is shown in Figure 86.
Figure 86 Message Profile - Adding (General section) (UN/EDIFACT) (4B)
2 Enter or select values for the General section.
For more information, refer to Table 29 on page 164 (for version 3B), Table 34 on page 171 (for version 4B), or Table 38 on page 178 (for version 4I).
3 Click Next to access the Interchange Control Envelope section (see Figure 87).
e*Xchange Partner Manager User’s Guide 154
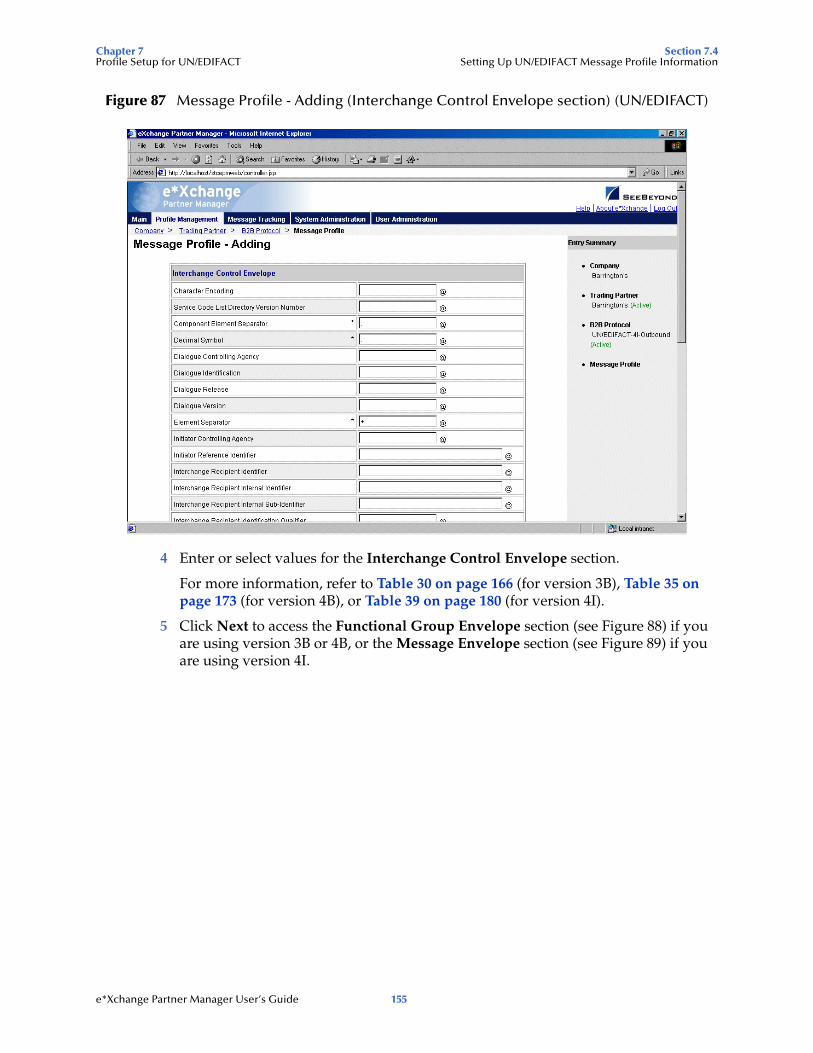
Chapter 7 Section 7.4Profile Setup for UN/EDIFACT Setting Up UN/EDIFACT Message Profile Information
Figure 87 Message Profile - Adding (Interchange Control Envelope section) (UN/EDIFACT)
4 Enter or select values for the Interchange Control Envelope section.
For more information, refer to Table 30 on page 166 (for version 3B), Table 35 on page 173 (for version 4B), or Table 39 on page 180 (for version 4I).
5 Click Next to access the Functional Group Envelope section (see Figure 88) if you are using version 3B or 4B, or the Message Envelope section (see Figure 89) if you are using version 4I.
e*Xchange Partner Manager User’s Guide 155
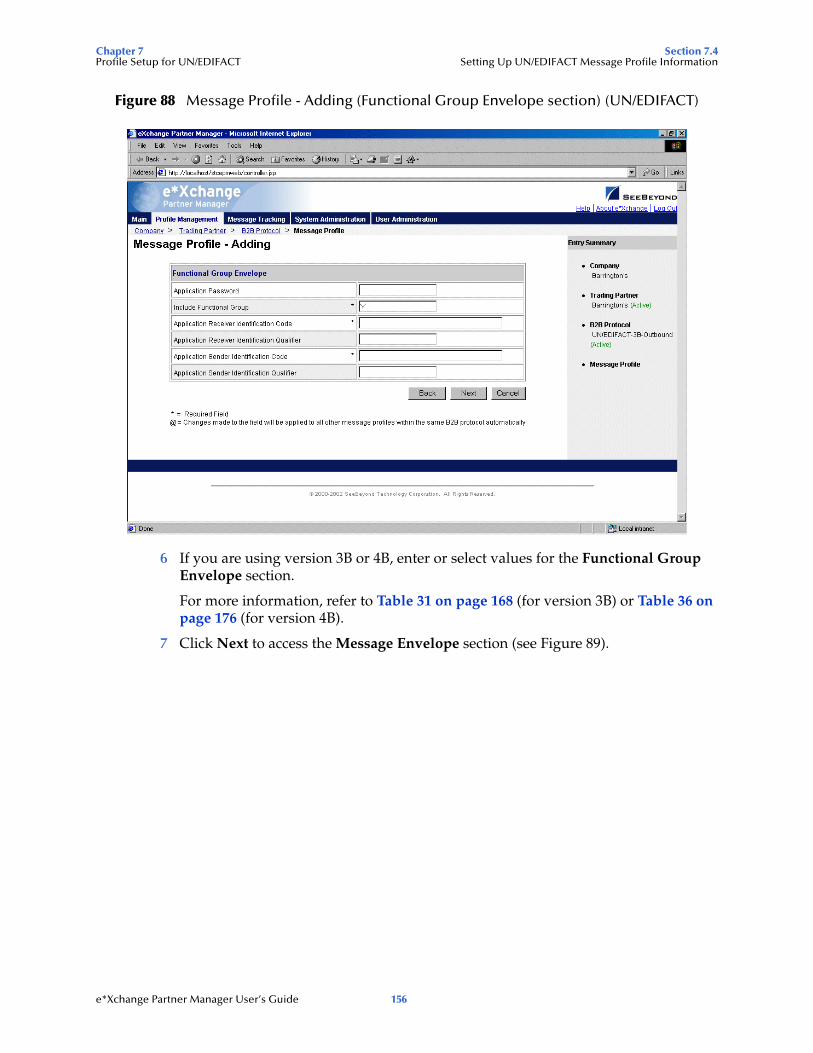
Chapter 7 Section 7.4Profile Setup for UN/EDIFACT Setting Up UN/EDIFACT Message Profile Information
Figure 88 Message Profile - Adding (Functional Group Envelope section) (UN/EDIFACT)
6 If you are using version 3B or 4B, enter or select values for the Functional Group Envelope section.
For more information, refer to Table 31 on page 168 (for version 3B) or Table 36 on page 176 (for version 4B).
7 Click Next to access the Message Envelope section (see Figure 89).
e*Xchange Partner Manager User’s Guide 156
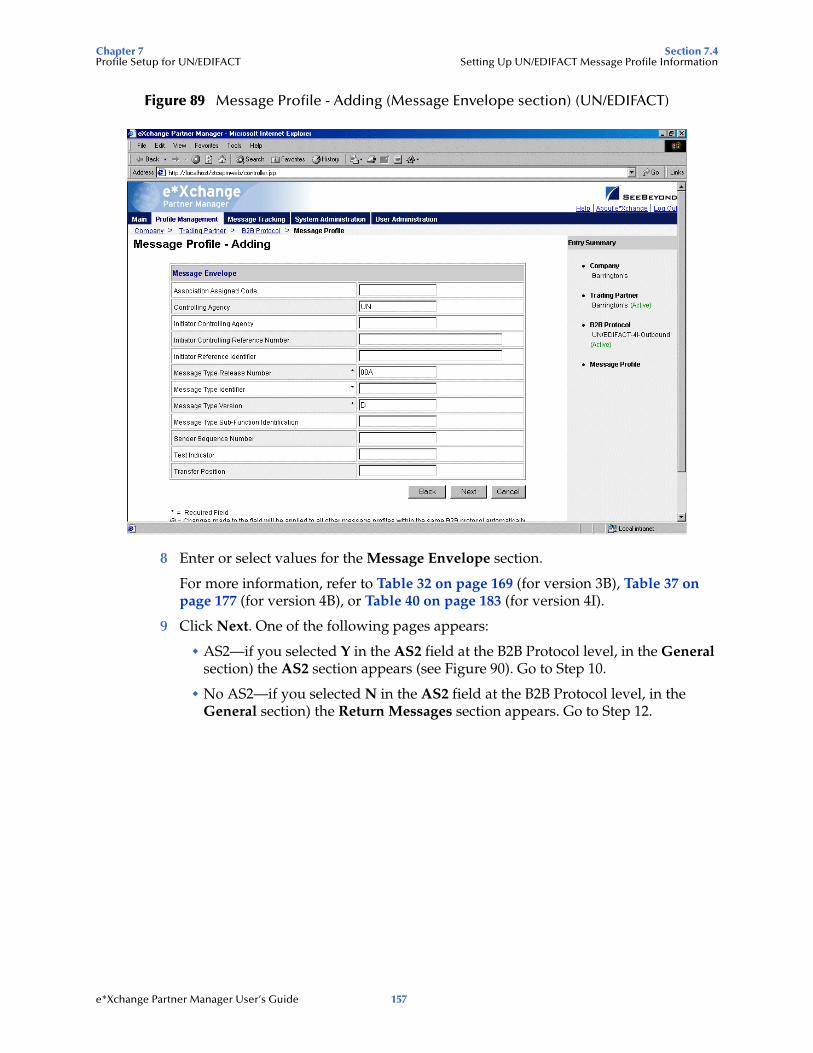
Chapter 7 Section 7.4Profile Setup for UN/EDIFACT Setting Up UN/EDIFACT Message Profile Information
Figure 89 Message Profile - Adding (Message Envelope section) (UN/EDIFACT)
8 Enter or select values for the Message Envelope section.
For more information, refer to Table 32 on page 169 (for version 3B), Table 37 on page 177 (for version 4B), or Table 40 on page 183 (for version 4I).
9 Click Next. One of the following pages appears:
AS2—if you selected Y in the AS2 field at the B2B Protocol level, in the General section) the AS2 section appears (see Figure 90). Go to Step 10.
No AS2—if you selected N in the AS2 field at the B2B Protocol level, in the General section) the Return Messages section appears. Go to Step 12.
e*Xchange Partner Manager User’s Guide 157
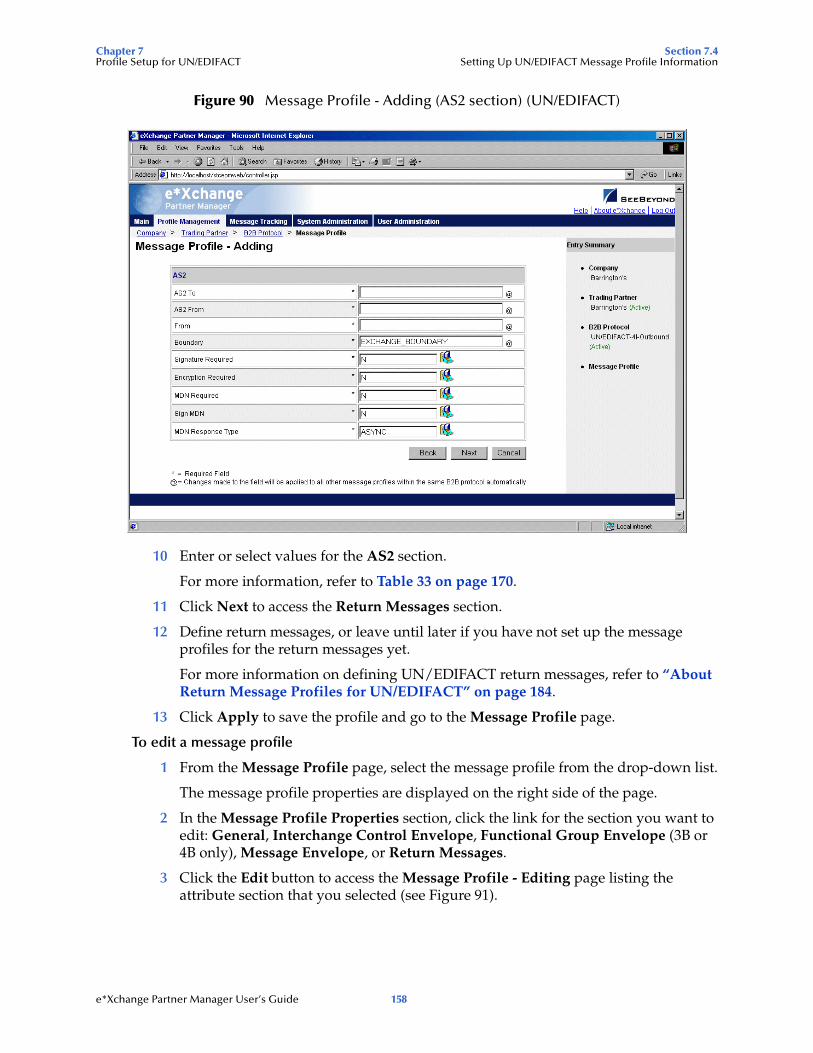
Chapter 7 Section 7.4Profile Setup for UN/EDIFACT Setting Up UN/EDIFACT Message Profile Information
Figure 90 Message Profile - Adding (AS2 section) (UN/EDIFACT)
10 Enter or select values for the AS2 section.
For more information, refer to Table 33 on page 170.
11 Click Next to access the Return Messages section.
12 Define return messages, or leave until later if you have not set up the message profiles for the return messages yet.
For more information on defining UN/EDIFACT return messages, refer to “About Return Message Profiles for UN/EDIFACT” on page 184.
13 Click Apply to save the profile and go to the Message Profile page.
To edit a message profile
1 From the Message Profile page, select the message profile from the drop-down list.
The message profile properties are displayed on the right side of the page.
2 In the Message Profile Properties section, click the link for the section you want to edit: General, Interchange Control Envelope, Functional Group Envelope (3B or 4B only), Message Envelope, or Return Messages.
3 Click the Edit button to access the Message Profile - Editing page listing the attribute section that you selected (see Figure 91).
e*Xchange Partner Manager User’s Guide 158
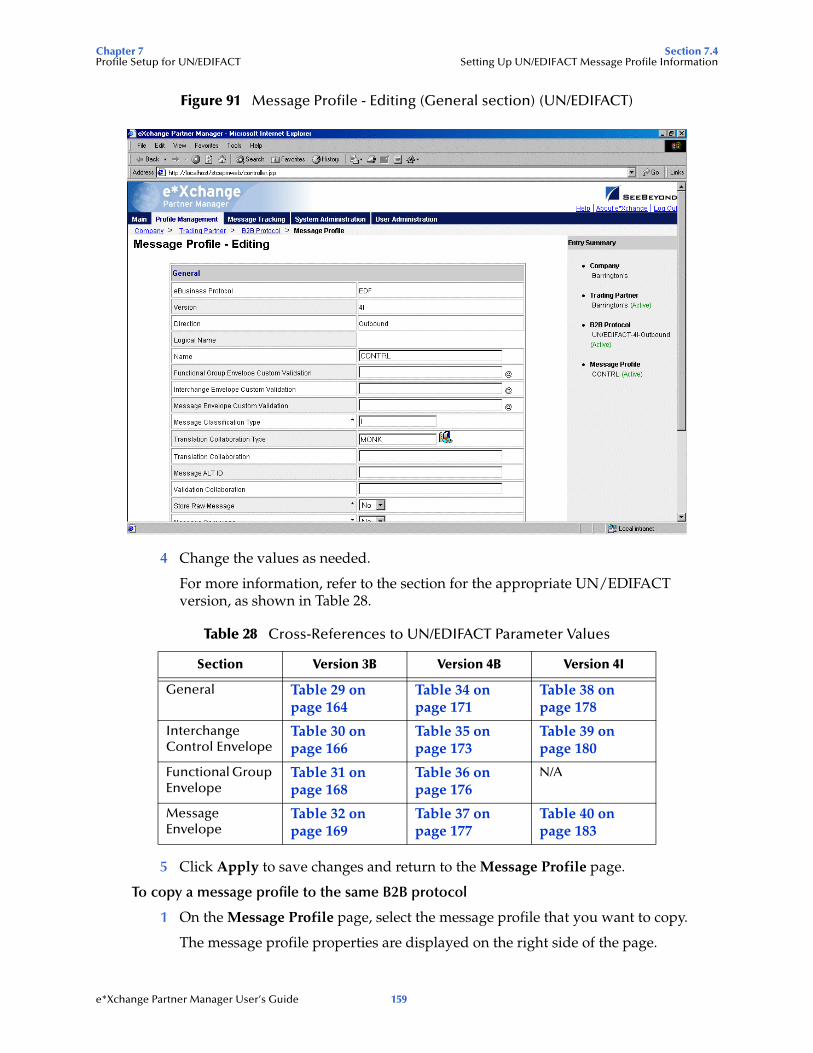
Chapter 7 Section 7.4Profile Setup for UN/EDIFACT Setting Up UN/EDIFACT Message Profile Information
Figure 91 Message Profile - Editing (General section) (UN/EDIFACT)
4 Change the values as needed.
For more information, refer to the section for the appropriate UN/EDIFACT version, as shown in Table 28.
5 Click Apply to save changes and return to the Message Profile page.
To copy a message profile to the same B2B protocol
1 On the Message Profile page, select the message profile that you want to copy.
The message profile properties are displayed on the right side of the page.
Table 28 Cross-References to UN/EDIFACT Parameter Values
Section Version 3B Version 4B Version 4I
General Table 29 on page 164
Table 34 on page 171
Table 38 on page 178
Interchange Control Envelope
Table 30 on page 166
Table 35 on page 173
Table 39 on page 180
Functional Group Envelope
Table 31 on page 168
Table 36 on page 176
N/A
Message Envelope
Table 32 on page 169
Table 37 on page 177
Table 40 on page 183
e*Xchange Partner Manager User’s Guide 159
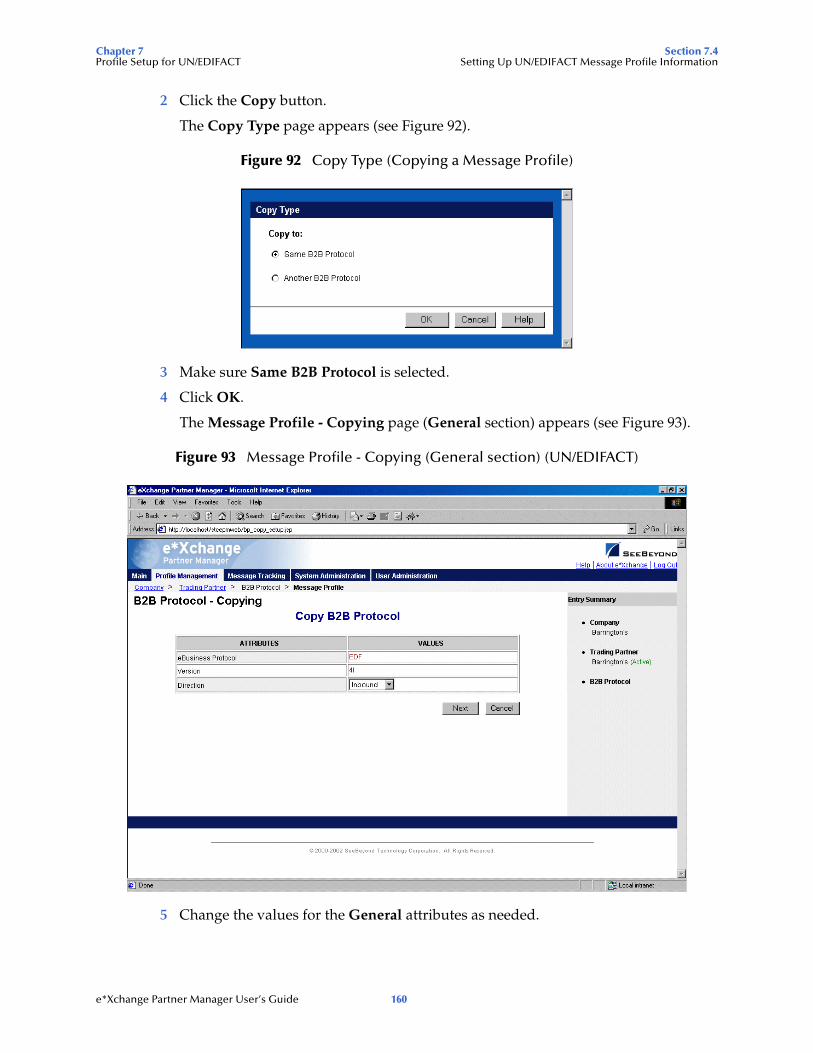
Chapter 7 Section 7.4Profile Setup for UN/EDIFACT Setting Up UN/EDIFACT Message Profile Information
2 Click the Copy button.
The Copy Type page appears (see Figure 92).
Figure 92 Copy Type (Copying a Message Profile)
3 Make sure Same B2B Protocol is selected.
4 Click OK.
The Message Profile - Copying page (General section) appears (see Figure 93).
Figure 93 Message Profile - Copying (General section) (UN/EDIFACT)
5 Change the values for the General attributes as needed.
e*Xchange Partner Manager User’s Guide 160
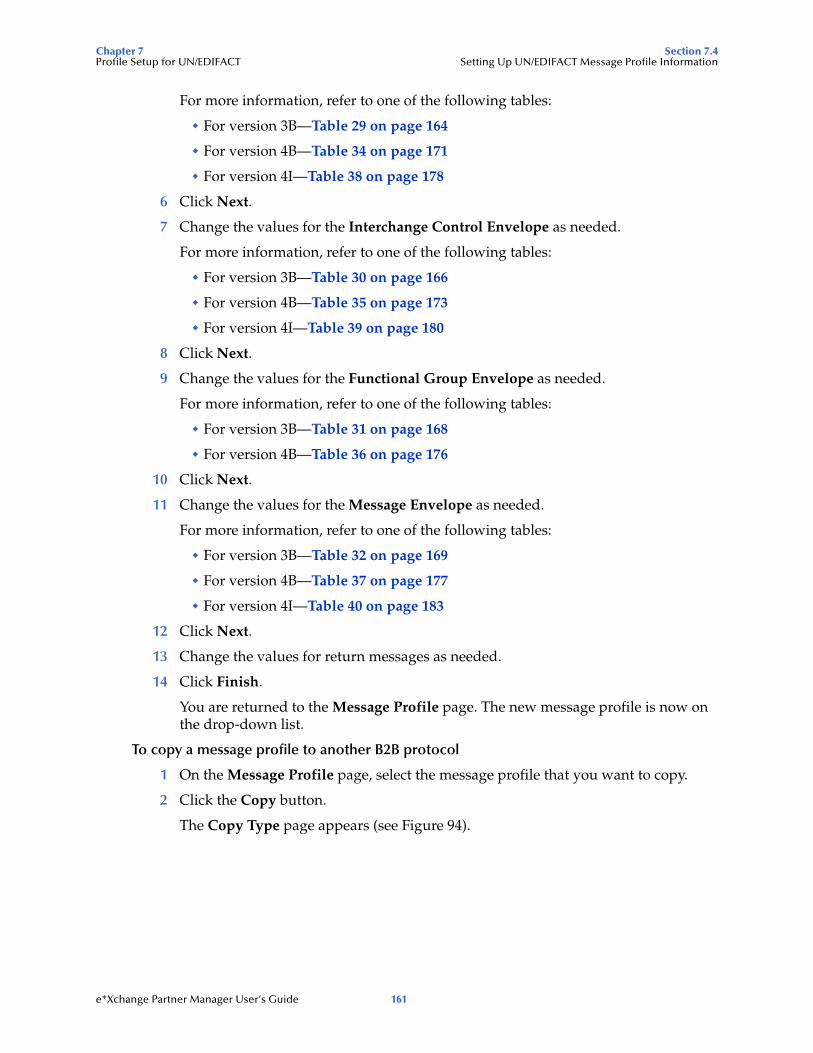
Chapter 7 Section 7.4Profile Setup for UN/EDIFACT Setting Up UN/EDIFACT Message Profile Information
For more information, refer to one of the following tables:
For version 3B—Table 29 on page 164
For version 4B—Table 34 on page 171
For version 4I—Table 38 on page 178
6 Click Next.
7 Change the values for the Interchange Control Envelope as needed.
For more information, refer to one of the following tables:
For version 3B—Table 30 on page 166
For version 4B—Table 35 on page 173
For version 4I—Table 39 on page 180
8 Click Next.
9 Change the values for the Functional Group Envelope as needed.
For more information, refer to one of the following tables:
For version 3B—Table 31 on page 168
For version 4B—Table 36 on page 176
10 Click Next.
11 Change the values for the Message Envelope as needed.
For more information, refer to one of the following tables:
For version 3B—Table 32 on page 169
For version 4B—Table 37 on page 177
For version 4I—Table 40 on page 183
12 Click Next.
13 Change the values for return messages as needed.
14 Click Finish.
You are returned to the Message Profile page. The new message profile is now on the drop-down list.
To copy a message profile to another B2B protocol
1 On the Message Profile page, select the message profile that you want to copy.
2 Click the Copy button.
The Copy Type page appears (see Figure 94).
e*Xchange Partner Manager User’s Guide 161
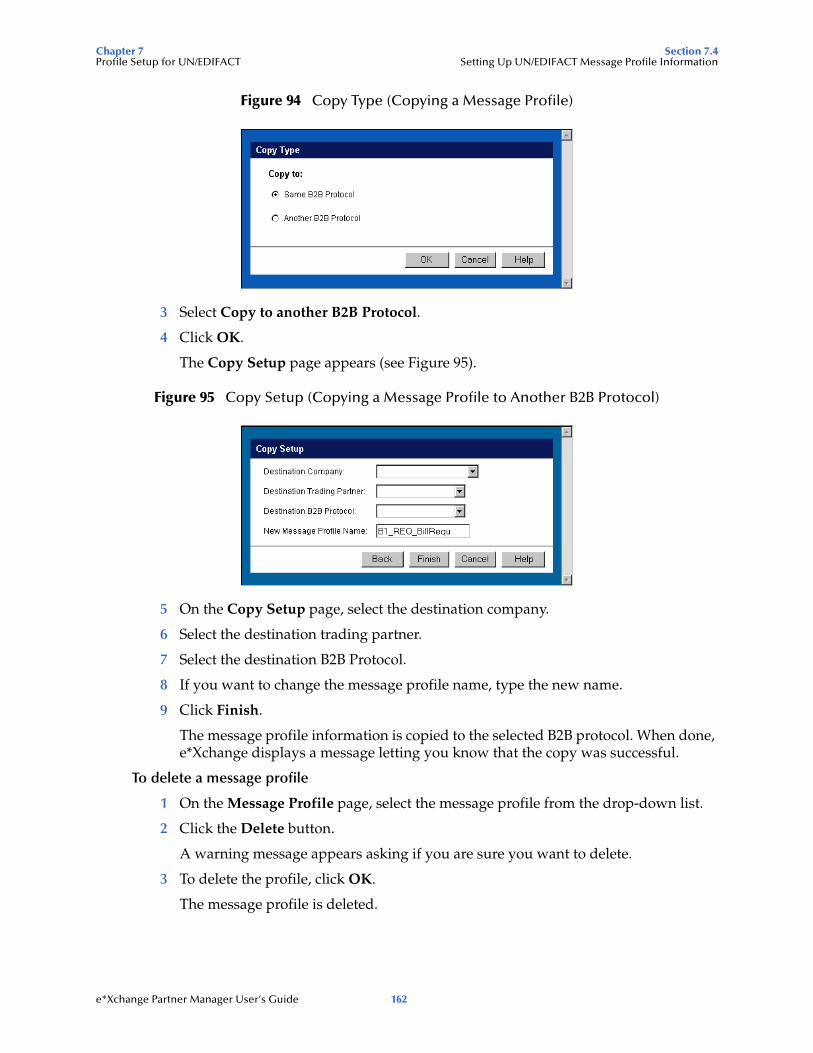
Chapter 7 Section 7.4Profile Setup for UN/EDIFACT Setting Up UN/EDIFACT Message Profile Information
Figure 94 Copy Type (Copying a Message Profile)
3 Select Copy to another B2B Protocol.
4 Click OK.
The Copy Setup page appears (see Figure 95).
Figure 95 Copy Setup (Copying a Message Profile to Another B2B Protocol)
5 On the Copy Setup page, select the destination company.
6 Select the destination trading partner.
7 Select the destination B2B Protocol.
8 If you want to change the message profile name, type the new name.
9 Click Finish.
The message profile information is copied to the selected B2B protocol. When done, e*Xchange displays a message letting you know that the copy was successful.
To delete a message profile
1 On the Message Profile page, select the message profile from the drop-down list.
2 Click the Delete button.
A warning message appears asking if you are sure you want to delete.
3 To delete the profile, click OK.
The message profile is deleted.
e*Xchange Partner Manager User’s Guide 162
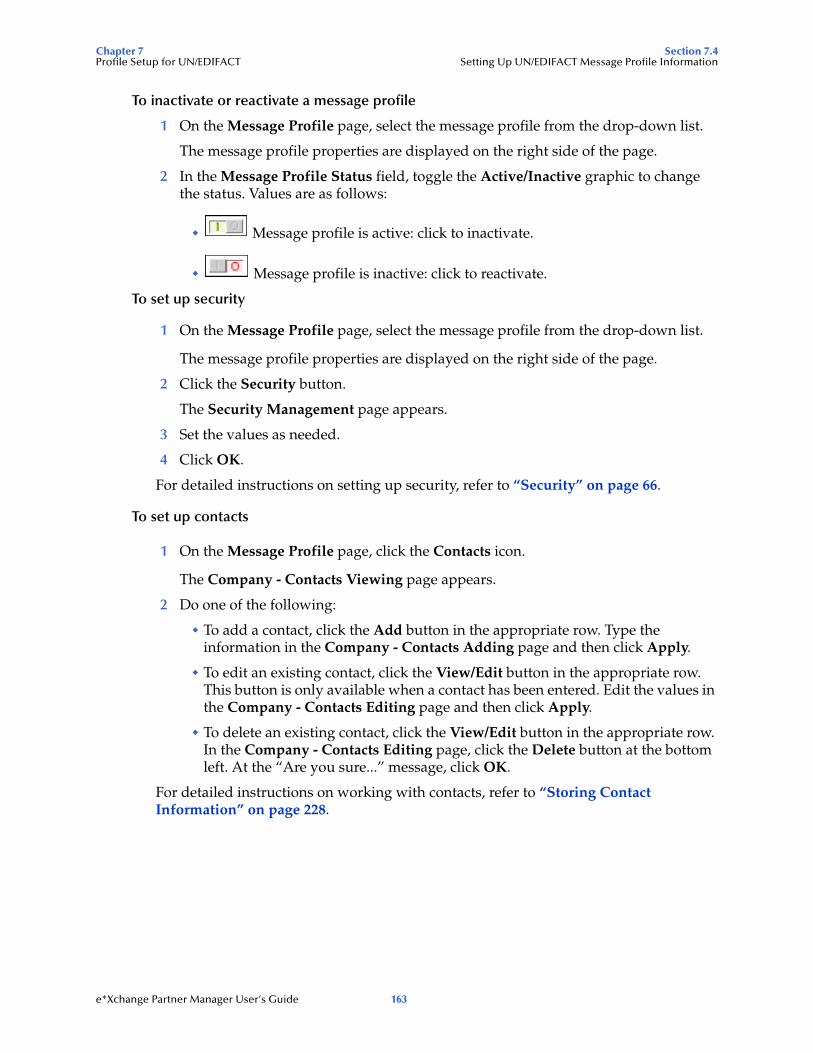
Chapter 7 Section 7.4Profile Setup for UN/EDIFACT Setting Up UN/EDIFACT Message Profile Information
To inactivate or reactivate a message profile
1 On the Message Profile page, select the message profile from the drop-down list.
The message profile properties are displayed on the right side of the page.
2 In the Message Profile Status field, toggle the Active/Inactive graphic to change the status. Values are as follows:
Message profile is active: click to inactivate.
Message profile is inactive: click to reactivate.
To set up security
1 On the Message Profile page, select the message profile from the drop-down list.
The message profile properties are displayed on the right side of the page.
2 Click the Security button.
The Security Management page appears.
3 Set the values as needed.
4 Click OK.
For detailed instructions on setting up security, refer to “Security” on page 66.
To set up contacts
1 On the Message Profile page, click the Contacts icon.
The Company - Contacts Viewing page appears.
2 Do one of the following:
To add a contact, click the Add button in the appropriate row. Type the information in the Company - Contacts Adding page and then click Apply.
To edit an existing contact, click the View/Edit button in the appropriate row. This button is only available when a contact has been entered. Edit the values in the Company - Contacts Editing page and then click Apply.
To delete an existing contact, click the View/Edit button in the appropriate row. In the Company - Contacts Editing page, click the Delete button at the bottom left. At the “Are you sure...” message, click OK.
For detailed instructions on working with contacts, refer to “Storing Contact Information” on page 228.
e*Xchange Partner Manager User’s Guide 163
Chapter 7 Section 7.5Profile Setup for UN/EDIFACT UN/EDIFACT Message Profile Parameter Values
7.5 UN/EDIFACT Message Profile Parameter ValuesThis section lists field descriptions for the UN/EDIFACT values required for setting up a message profile.
Field descriptions are listed separately for each version:
Version 3 Batch—See “Version 3 Batch” on page 164
Version 4 Batch—See “Version 4 Batch” on page 171
Version 4 Interactive—See “Version 4 Interactive” on page 178
7.5.1. Version 3 BatchThis section includes field descriptions for UN/EDIFACT version 3 Batch, for the following Message Profile setup sections:
General section—Table 29 on page 164
Interchange Control Envelope section—Table 30 on page 166
Functional Group Envelope section—Table 31 on page 168
Message Envelope section—Table 32 on page 169
Table 29 Message Profile, General Section (UN/EDIFACT 3B): Fields
Name Description
eBusiness Protocol The name of the protocol that you selected earlier is displayed.
Version The eBusiness protocol version that you selected earlier is displayed.
Direction The direction for the message profile, Inbound or Outbound, is displayed.
Logical Name If you specified a logical name at the B2B protocol level, it is displayed.
Name A label for the message profile. It should be descriptive, and unique for the trading partner.
Message Profile Status
The status of the message profile. Choose one of the following values:Active—The message profile is currently active, and can be used.Inactive—The message profile is not active, and cannot be used.
Default: Active. Note: This is only available when adding a message profile. When editing, you can change the status on the Message Profile page (see “To inactivate or reactivate a message profile” on page 163).
Functional Group Envelope Custom Validation
Not implemented at this time.
Interchange Envelope Custom Validation
Not implemented at this time.
Message Envelope Custom Validation
Not implemented at this time.
e*Xchange Partner Manager User’s Guide 164
Chapter 7 Section 7.5Profile Setup for UN/EDIFACT UN/EDIFACT Message Profile Parameter Values
Message Classification Type
A flag to specify the message type for the message: B for batch, I for interactive.Certain types of UN/EDIFACT messages are not batched.Since this is version 3 Batch, this field defaults to B. Do not change it.
Translation Collaboration Type
The language for the translation Collaboration. For all eBusiness protocols, translation Collaborations can be either Monk or Java.
Translation Collaboration
If your internal system will be sending messages to e*Xchange in raw data format, or expecting messages from e*Xchange in raw data format, you must specify the translation Collaboration that will be used to translate the messages to and from the appropriate eBusiness Protocol format. Type the file name (no extension).Outbound: If you provide a value in this field for an Outbound profile, e*Xchange also requires a value for Message ALT ID.
Message ALT ID(Outbound only)
If your internal system will be sending messages to e*Xchange in raw data format, or expecting messages from e*Xchange in raw data format, e*Xchange uses the Message ALT ID, rather than the Logical Name set at the B2B Protocol level, to identify the trading partner to which the message is to be routed.Because of this, if you are receiving messages from the internal system in raw data format you must specify the Message ALT ID. The value specified in this field must exactly match the value populated in the Name/Value pair element of the TP Event section in the eX_Standard_Event file.If you are not receiving messages from the internal system in raw data format, leave this field blank.
Event Type (Inbound only)
(Optional) If specified, this is the Event Type to which the inbound message is published. If left empty, e*Xchange uses the default Event Type, eX_to_eBPM.Note: If you specify a custom Event Type, you must modify the e*Xchange e*Gate schema accordingly. Modify the eX_from_ePM Collaboration properties to publish to the new Event Type. There must also be a module that subscribes to this Event Type.
Validation Collaboration
The Monk Collaboration that is used to validate the eBusiness protocol message (no extension).For X12 and UN/EDIFACT:
Inbound—This field is required.Outbound—This field is required if a unique-id is not provided in the eX_Standard_Event MSG_ALT_ID field.
Note: The message enveloping is automatically validated by e*Xchange. The validation Collaboration addresses only the message body.
Store Raw Message If you want to store the raw message in the database as well as the translated message, type Y in this field.If you store the raw message, it will be available for viewing in Message Tracking.
Message Compress (required)
Indicates whether the messages will be compressed before they are stored in the database. Default: No.Note: Compressed messages cannot be viewed in Message Tracking.
Table 29 Message Profile, General Section (UN/EDIFACT 3B): Fields (Continued)
Name Description
e*Xchange Partner Manager User’s Guide 165
Chapter 7 Section 7.5Profile Setup for UN/EDIFACT UN/EDIFACT Message Profile Parameter Values
Transfer Mode The way in which the eBusiness messages are transmitted to, or received from, the trading partner: Batch, Fast Batch, or Interactive.
Repeat Batch Last Check Time (Batch transfer mode only)
Once the first batch has been sent out, this field is automatically updated by e*Xchange. Display-only.
Batch Repeat Time/Batch Repeat Granularity (Batch transfer mode only)
To send batches at regular intervals, use these two attributes. BATCH REPEAT TIME sets the numerical value, and BATCH REPEAT GRANULARITY sets the time period: H for hours, MI for minutes, and D for days. For example, BATCH REPEAT TIME of 4 and BATCH REPEAT GRANULARITY of H means that batches are sent out every four hours; values of 30 and MI mean that batches are sent out every 30 minutes.Note: If you want to send batches at a preset daily time, do not set values for these attributes. Use BATCH TIME. If you set values for Batch Repeat Time/Batch Repeat Granularity and also Batch Time, the Batch Time setting takes precedence.Note: If you use these fields to control batching, you can have a maximum of 10 Batch e*Ways running. This is because the display-only Batch Last Send Time field has a maximum of 255 characters.
Batch Time (Batch transfer mode only)
To send batches at a preset daily time, enter the time in the format hh:mm:ss (military time); for example, 09:00:00 for 9am or 15:30:00 for 3pm. If the batch is being set at a preset daily time, you do not need to set any other attributes.You can also set multiple batch times, using the pipe symbol as the delimiter (up to 50 characters). For example, 09:00:00|17:30:00|24:00:00 sends out batches at 9am, 5:30pm, and midnight. The values must be in ordered sequence, from the earliest time to the latest.Note: If you set values for Batch Repeat Time/Batch Repeat Granularity and also Batch Time, the Batch Time setting takes precedence.
Table 30 Message Profile, Interchange Control Envelope Section (UN/EDIFACT 3B): Fields
Name Ref # Description
Acknowledgment Request
UNB 090 0031 An optional one-digit code requesting acknowledgment for the interchange.
Application Reference
UNB 070 0026 An optional value identifying the application area assigned by the sender, to which the messages in the interchange relate; for example, the message type, if all the messages in the interchange are of the same type.Whether or not this field is used, and if so the exact nature of the data, is specified in the trading partner Interchange Agreement.
Communication Agreement Identification
UNB 100 0032 An optional name or code indicating the type of agreement under which the interchange takes place. 1–35 characters.
Table 29 Message Profile, General Section (UN/EDIFACT 3B): Fields (Continued)
Name Description
e*Xchange Partner Manager User’s Guide 166
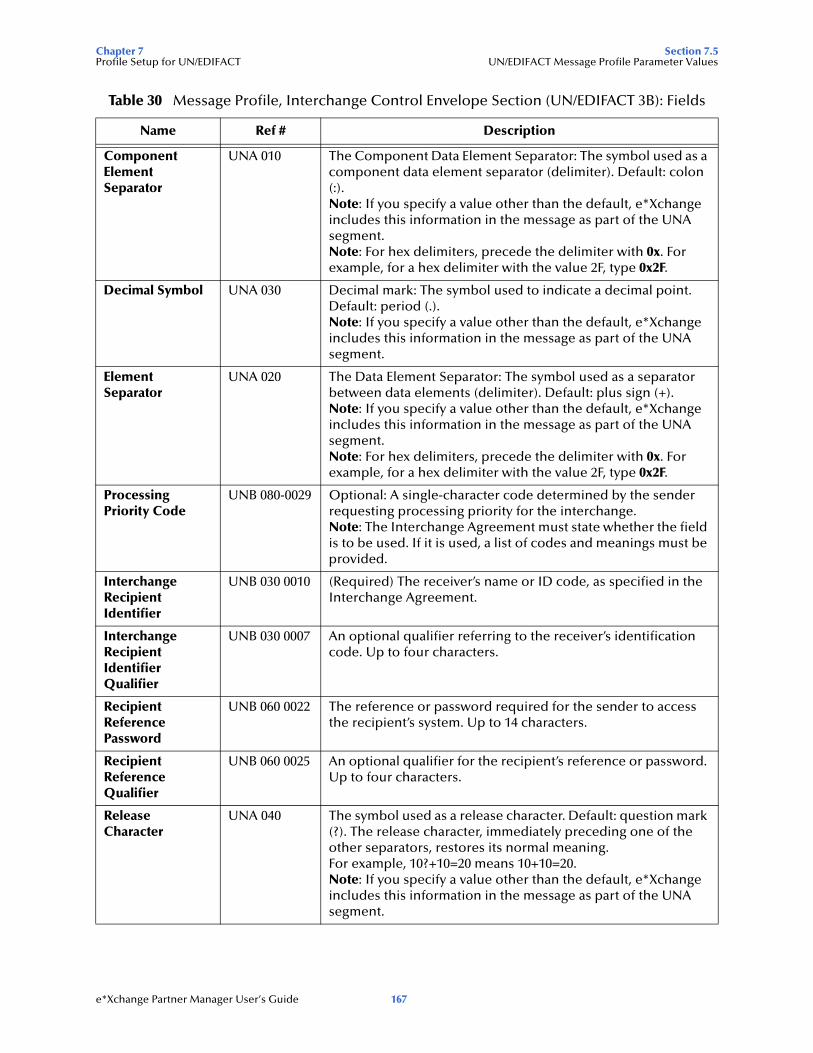
Chapter 7 Section 7.5Profile Setup for UN/EDIFACT UN/EDIFACT Message Profile Parameter Values
Component Element Separator
UNA 010 The Component Data Element Separator: The symbol used as a component data element separator (delimiter). Default: colon (:).Note: If you specify a value other than the default, e*Xchange includes this information in the message as part of the UNA segment.Note: For hex delimiters, precede the delimiter with 0x. For example, for a hex delimiter with the value 2F, type 0x2F.
Decimal Symbol UNA 030 Decimal mark: The symbol used to indicate a decimal point. Default: period (.).Note: If you specify a value other than the default, e*Xchange includes this information in the message as part of the UNA segment.
Element Separator
UNA 020 The Data Element Separator: The symbol used as a separator between data elements (delimiter). Default: plus sign (+).Note: If you specify a value other than the default, e*Xchange includes this information in the message as part of the UNA segment.Note: For hex delimiters, precede the delimiter with 0x. For example, for a hex delimiter with the value 2F, type 0x2F.
Processing Priority Code
UNB 080-0029 Optional: A single-character code determined by the sender requesting processing priority for the interchange.Note: The Interchange Agreement must state whether the field is to be used. If it is used, a list of codes and meanings must be provided.
Interchange Recipient Identifier
UNB 030 0010 (Required) The receiver’s name or ID code, as specified in the Interchange Agreement.
Interchange Recipient Identifier Qualifier
UNB 030 0007 An optional qualifier referring to the receiver’s identification code. Up to four characters.
Recipient Reference Password
UNB 060 0022 The reference or password required for the sender to access the recipient’s system. Up to 14 characters.
Recipient Reference Qualifier
UNB 060 0025 An optional qualifier for the recipient’s reference or password. Up to four characters.
Release Character
UNA 040 The symbol used as a release character. Default: question mark (?). The release character, immediately preceding one of the other separators, restores its normal meaning.For example, 10?+10=20 means 10+10=20. Note: If you specify a value other than the default, e*Xchange includes this information in the message as part of the UNA segment.
Table 30 Message Profile, Interchange Control Envelope Section (UN/EDIFACT 3B): Fields
Name Ref # Description
e*Xchange Partner Manager User’s Guide 167
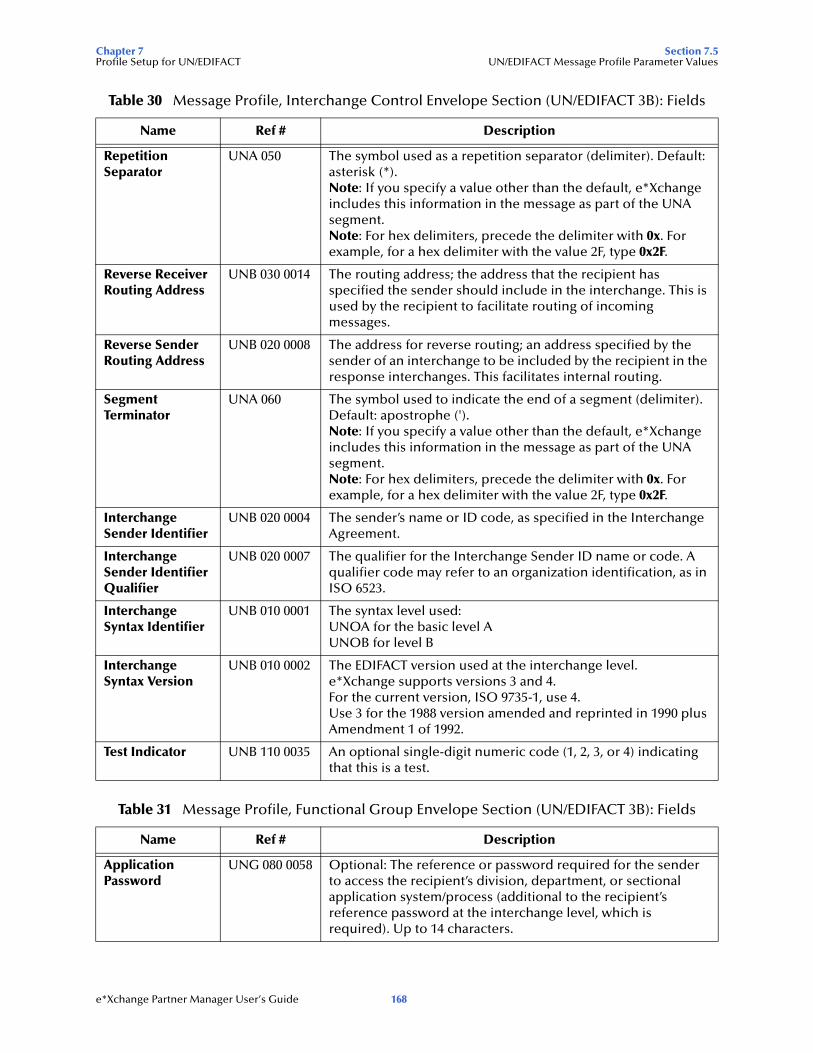
Chapter 7 Section 7.5Profile Setup for UN/EDIFACT UN/EDIFACT Message Profile Parameter Values
Repetition Separator
UNA 050 The symbol used as a repetition separator (delimiter). Default: asterisk (*).Note: If you specify a value other than the default, e*Xchange includes this information in the message as part of the UNA segment.Note: For hex delimiters, precede the delimiter with 0x. For example, for a hex delimiter with the value 2F, type 0x2F.
Reverse Receiver Routing Address
UNB 030 0014 The routing address; the address that the recipient has specified the sender should include in the interchange. This is used by the recipient to facilitate routing of incoming messages.
Reverse Sender Routing Address
UNB 020 0008 The address for reverse routing; an address specified by the sender of an interchange to be included by the recipient in the response interchanges. This facilitates internal routing.
Segment Terminator
UNA 060 The symbol used to indicate the end of a segment (delimiter). Default: apostrophe (').Note: If you specify a value other than the default, e*Xchange includes this information in the message as part of the UNA segment.Note: For hex delimiters, precede the delimiter with 0x. For example, for a hex delimiter with the value 2F, type 0x2F.
Interchange Sender Identifier
UNB 020 0004 The sender’s name or ID code, as specified in the Interchange Agreement.
Interchange Sender Identifier Qualifier
UNB 020 0007 The qualifier for the Interchange Sender ID name or code. A qualifier code may refer to an organization identification, as in ISO 6523.
Interchange Syntax Identifier
UNB 010 0001 The syntax level used:UNOA for the basic level AUNOB for level B
Interchange Syntax Version
UNB 010 0002 The EDIFACT version used at the interchange level.e*Xchange supports versions 3 and 4.For the current version, ISO 9735-1, use 4.Use 3 for the 1988 version amended and reprinted in 1990 plus Amendment 1 of 1992.
Test Indicator UNB 110 0035 An optional single-digit numeric code (1, 2, 3, or 4) indicating that this is a test.
Table 31 Message Profile, Functional Group Envelope Section (UN/EDIFACT 3B): Fields
Name Ref # Description
Application Password
UNG 080 0058 Optional: The reference or password required for the sender to access the recipient’s division, department, or sectional application system/process (additional to the recipient’s reference password at the interchange level, which is required). Up to 14 characters.
Table 30 Message Profile, Interchange Control Envelope Section (UN/EDIFACT 3B): Fields
Name Ref # Description
e*Xchange Partner Manager User’s Guide 168
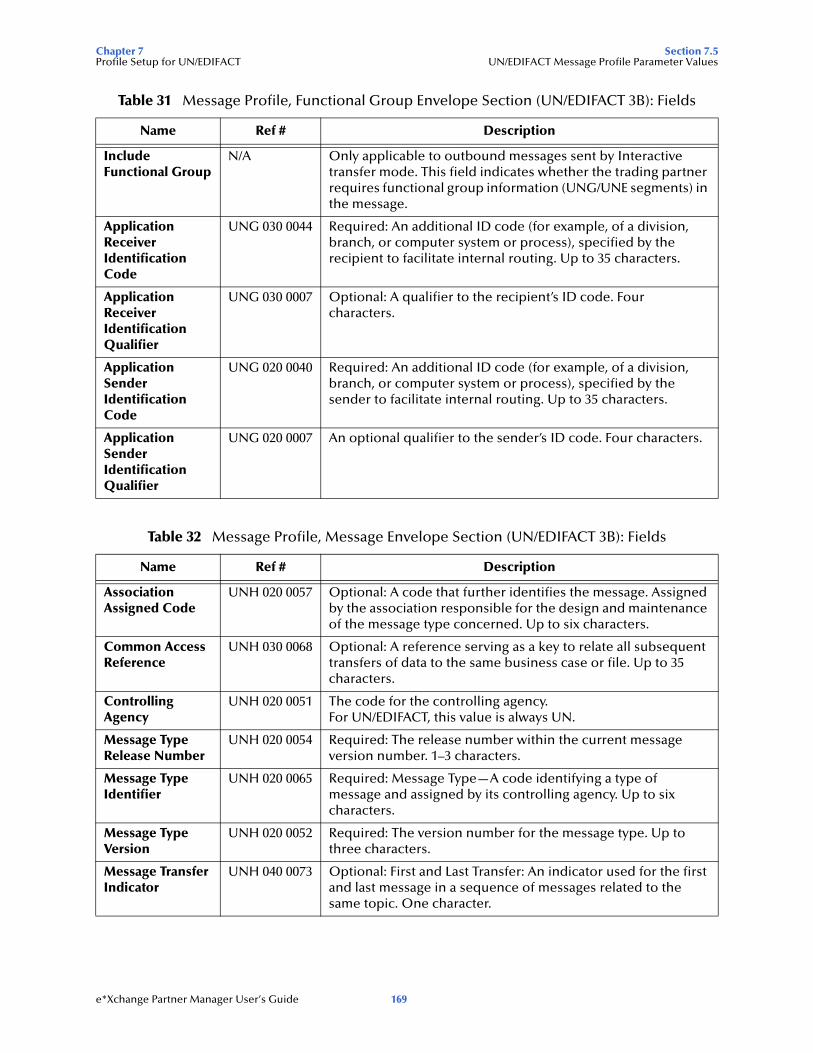
Chapter 7 Section 7.5Profile Setup for UN/EDIFACT UN/EDIFACT Message Profile Parameter Values
Include Functional Group
N/A Only applicable to outbound messages sent by Interactive transfer mode. This field indicates whether the trading partner requires functional group information (UNG/UNE segments) in the message.
Application Receiver Identification Code
UNG 030 0044 Required: An additional ID code (for example, of a division, branch, or computer system or process), specified by the recipient to facilitate internal routing. Up to 35 characters.
Application Receiver Identification Qualifier
UNG 030 0007 Optional: A qualifier to the recipient’s ID code. Four characters.
Application Sender Identification Code
UNG 020 0040 Required: An additional ID code (for example, of a division, branch, or computer system or process), specified by the sender to facilitate internal routing. Up to 35 characters.
Application Sender Identification Qualifier
UNG 020 0007 An optional qualifier to the sender’s ID code. Four characters.
Table 32 Message Profile, Message Envelope Section (UN/EDIFACT 3B): Fields
Name Ref # Description
Association Assigned Code
UNH 020 0057 Optional: A code that further identifies the message. Assigned by the association responsible for the design and maintenance of the message type concerned. Up to six characters.
Common Access Reference
UNH 030 0068 Optional: A reference serving as a key to relate all subsequent transfers of data to the same business case or file. Up to 35 characters.
Controlling Agency
UNH 020 0051 The code for the controlling agency.For UN/EDIFACT, this value is always UN.
Message Type Release Number
UNH 020 0054 Required: The release number within the current message version number. 1–3 characters.
Message Type Identifier
UNH 020 0065 Required: Message Type—A code identifying a type of message and assigned by its controlling agency. Up to six characters.
Message Type Version
UNH 020 0052 Required: The version number for the message type. Up to three characters.
Message Transfer Indicator
UNH 040 0073 Optional: First and Last Transfer: An indicator used for the first and last message in a sequence of messages related to the same topic. One character.
Table 31 Message Profile, Functional Group Envelope Section (UN/EDIFACT 3B): Fields
Name Ref # Description
e*Xchange Partner Manager User’s Guide 169
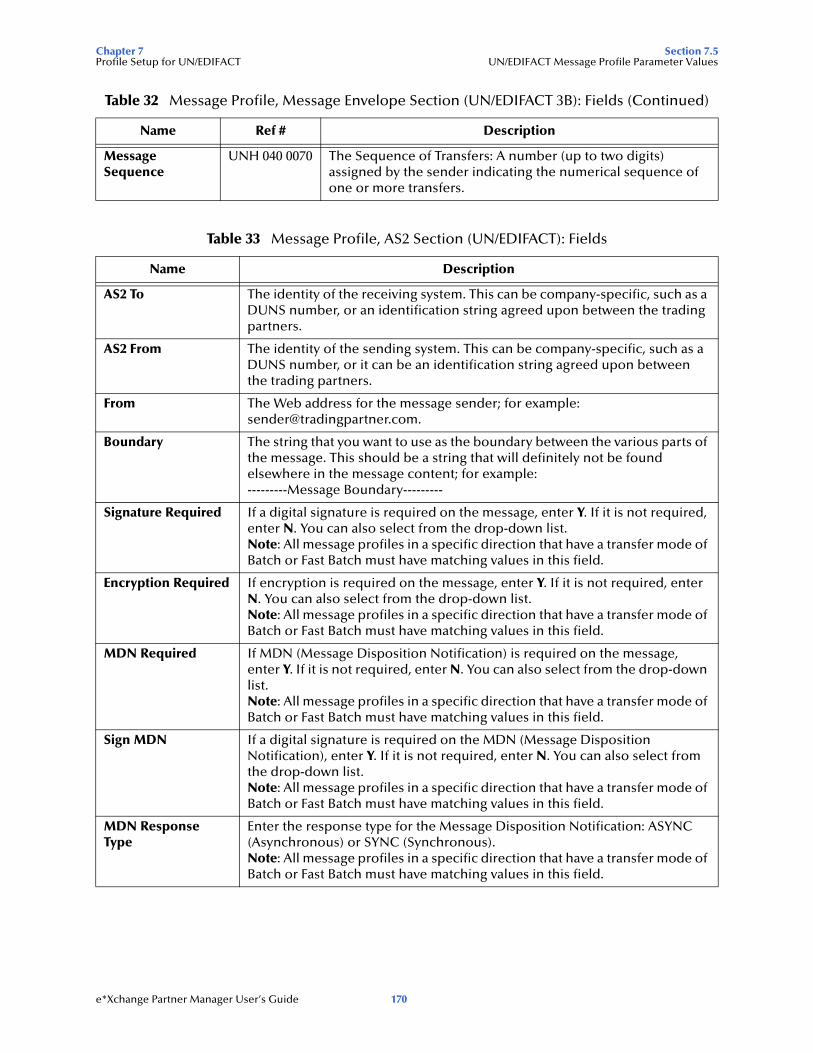
Chapter 7 Section 7.5Profile Setup for UN/EDIFACT UN/EDIFACT Message Profile Parameter Values
Message Sequence
UNH 040 0070 The Sequence of Transfers: A number (up to two digits) assigned by the sender indicating the numerical sequence of one or more transfers.
Table 33 Message Profile, AS2 Section (UN/EDIFACT): Fields
Name Description
AS2 To The identity of the receiving system. This can be company-specific, such as a DUNS number, or an identification string agreed upon between the trading partners.
AS2 From The identity of the sending system. This can be company-specific, such as a DUNS number, or it can be an identification string agreed upon between the trading partners.
From The Web address for the message sender; for example: [email protected].
Boundary The string that you want to use as the boundary between the various parts of the message. This should be a string that will definitely not be found elsewhere in the message content; for example:---------Message Boundary---------
Signature Required If a digital signature is required on the message, enter Y. If it is not required, enter N. You can also select from the drop-down list.Note: All message profiles in a specific direction that have a transfer mode of Batch or Fast Batch must have matching values in this field.
Encryption Required If encryption is required on the message, enter Y. If it is not required, enter N. You can also select from the drop-down list.Note: All message profiles in a specific direction that have a transfer mode of Batch or Fast Batch must have matching values in this field.
MDN Required If MDN (Message Disposition Notification) is required on the message, enter Y. If it is not required, enter N. You can also select from the drop-down list.Note: All message profiles in a specific direction that have a transfer mode of Batch or Fast Batch must have matching values in this field.
Sign MDN If a digital signature is required on the MDN (Message Disposition Notification), enter Y. If it is not required, enter N. You can also select from the drop-down list.Note: All message profiles in a specific direction that have a transfer mode of Batch or Fast Batch must have matching values in this field.
MDN Response Type
Enter the response type for the Message Disposition Notification: ASYNC (Asynchronous) or SYNC (Synchronous).Note: All message profiles in a specific direction that have a transfer mode of Batch or Fast Batch must have matching values in this field.
Table 32 Message Profile, Message Envelope Section (UN/EDIFACT 3B): Fields (Continued)
Name Ref # Description
e*Xchange Partner Manager User’s Guide 170
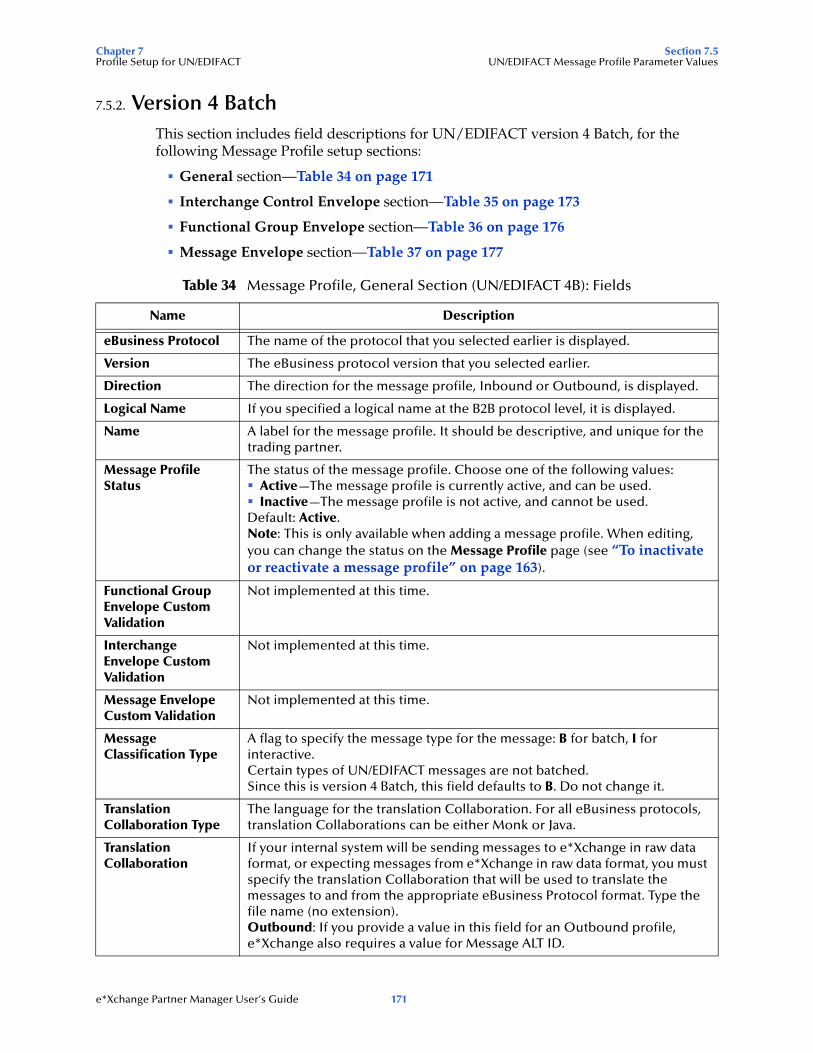
Chapter 7 Section 7.5Profile Setup for UN/EDIFACT UN/EDIFACT Message Profile Parameter Values
7.5.2. Version 4 BatchThis section includes field descriptions for UN/EDIFACT version 4 Batch, for the following Message Profile setup sections:
General section—Table 34 on page 171
Interchange Control Envelope section—Table 35 on page 173
Functional Group Envelope section—Table 36 on page 176
Message Envelope section—Table 37 on page 177
Table 34 Message Profile, General Section (UN/EDIFACT 4B): Fields
Name Description
eBusiness Protocol The name of the protocol that you selected earlier is displayed.
Version The eBusiness protocol version that you selected earlier.
Direction The direction for the message profile, Inbound or Outbound, is displayed.
Logical Name If you specified a logical name at the B2B protocol level, it is displayed.
Name A label for the message profile. It should be descriptive, and unique for the trading partner.
Message Profile Status
The status of the message profile. Choose one of the following values:Active—The message profile is currently active, and can be used.Inactive—The message profile is not active, and cannot be used.
Default: Active.Note: This is only available when adding a message profile. When editing, you can change the status on the Message Profile page (see “To inactivate or reactivate a message profile” on page 163).
Functional Group Envelope Custom Validation
Not implemented at this time.
Interchange Envelope Custom Validation
Not implemented at this time.
Message Envelope Custom Validation
Not implemented at this time.
Message Classification Type
A flag to specify the message type for the message: B for batch, I for interactive.Certain types of UN/EDIFACT messages are not batched.Since this is version 4 Batch, this field defaults to B. Do not change it.
Translation Collaboration Type
The language for the translation Collaboration. For all eBusiness protocols, translation Collaborations can be either Monk or Java.
Translation Collaboration
If your internal system will be sending messages to e*Xchange in raw data format, or expecting messages from e*Xchange in raw data format, you must specify the translation Collaboration that will be used to translate the messages to and from the appropriate eBusiness Protocol format. Type the file name (no extension).Outbound: If you provide a value in this field for an Outbound profile, e*Xchange also requires a value for Message ALT ID.
e*Xchange Partner Manager User’s Guide 171
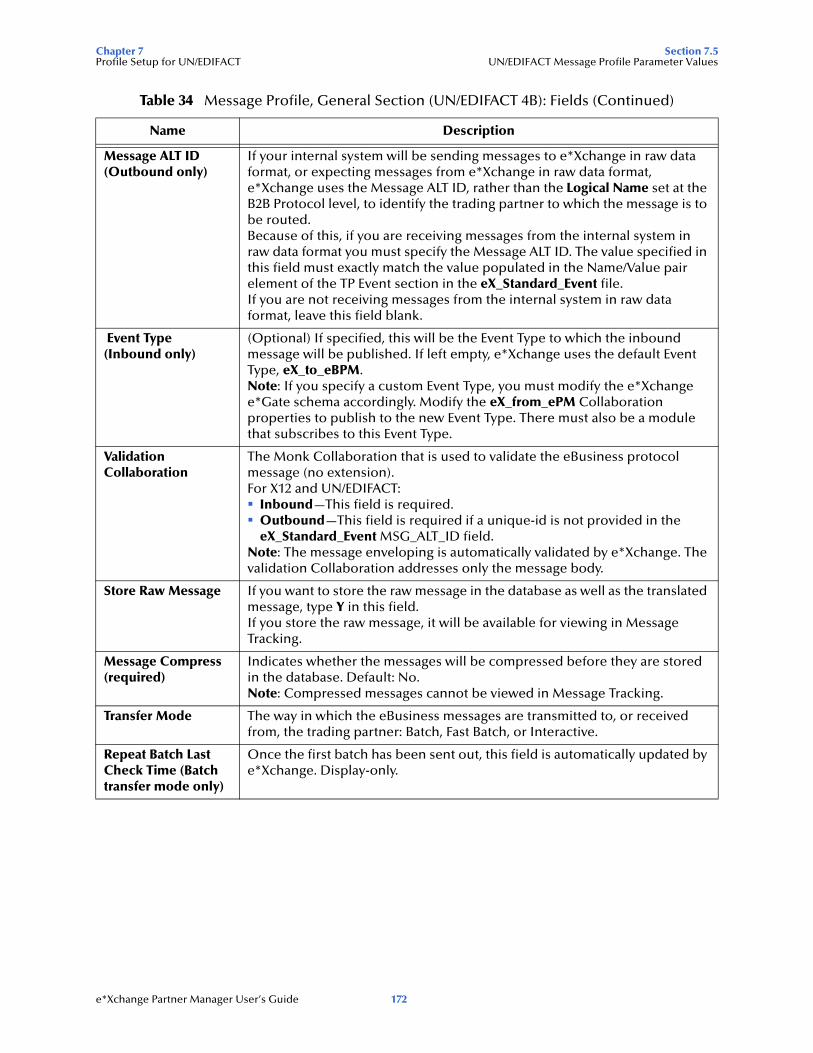
Chapter 7 Section 7.5Profile Setup for UN/EDIFACT UN/EDIFACT Message Profile Parameter Values
Message ALT ID(Outbound only)
If your internal system will be sending messages to e*Xchange in raw data format, or expecting messages from e*Xchange in raw data format, e*Xchange uses the Message ALT ID, rather than the Logical Name set at the B2B Protocol level, to identify the trading partner to which the message is to be routed.Because of this, if you are receiving messages from the internal system in raw data format you must specify the Message ALT ID. The value specified in this field must exactly match the value populated in the Name/Value pair element of the TP Event section in the eX_Standard_Event file.If you are not receiving messages from the internal system in raw data format, leave this field blank.
Event Type (Inbound only)
(Optional) If specified, this will be the Event Type to which the inbound message will be published. If left empty, e*Xchange uses the default Event Type, eX_to_eBPM.Note: If you specify a custom Event Type, you must modify the e*Xchange e*Gate schema accordingly. Modify the eX_from_ePM Collaboration properties to publish to the new Event Type. There must also be a module that subscribes to this Event Type.
Validation Collaboration
The Monk Collaboration that is used to validate the eBusiness protocol message (no extension).For X12 and UN/EDIFACT:
Inbound—This field is required.Outbound—This field is required if a unique-id is not provided in the eX_Standard_Event MSG_ALT_ID field.
Note: The message enveloping is automatically validated by e*Xchange. The validation Collaboration addresses only the message body.
Store Raw Message If you want to store the raw message in the database as well as the translated message, type Y in this field.If you store the raw message, it will be available for viewing in Message Tracking.
Message Compress (required)
Indicates whether the messages will be compressed before they are stored in the database. Default: No.Note: Compressed messages cannot be viewed in Message Tracking.
Transfer Mode The way in which the eBusiness messages are transmitted to, or received from, the trading partner: Batch, Fast Batch, or Interactive.
Repeat Batch Last Check Time (Batch transfer mode only)
Once the first batch has been sent out, this field is automatically updated by e*Xchange. Display-only.
Table 34 Message Profile, General Section (UN/EDIFACT 4B): Fields (Continued)
Name Description
e*Xchange Partner Manager User’s Guide 172
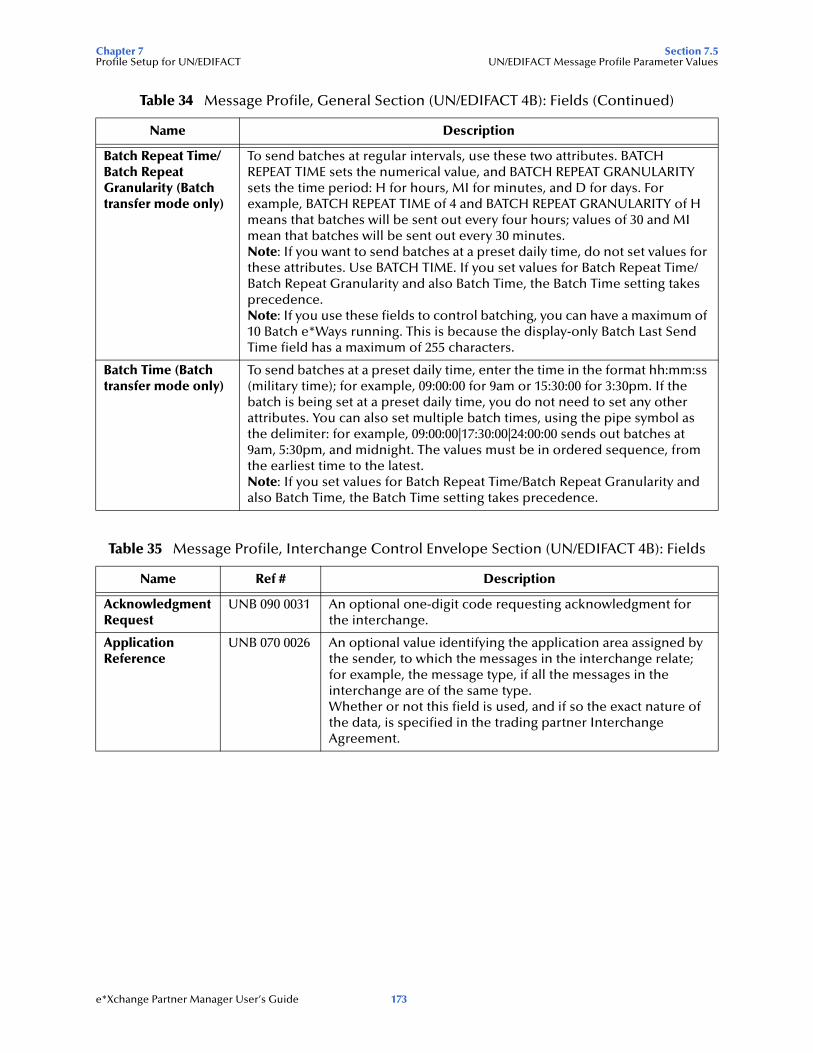
Chapter 7 Section 7.5Profile Setup for UN/EDIFACT UN/EDIFACT Message Profile Parameter Values
Batch Repeat Time/Batch Repeat Granularity (Batch transfer mode only)
To send batches at regular intervals, use these two attributes. BATCH REPEAT TIME sets the numerical value, and BATCH REPEAT GRANULARITY sets the time period: H for hours, MI for minutes, and D for days. For example, BATCH REPEAT TIME of 4 and BATCH REPEAT GRANULARITY of H means that batches will be sent out every four hours; values of 30 and MI mean that batches will be sent out every 30 minutes.Note: If you want to send batches at a preset daily time, do not set values for these attributes. Use BATCH TIME. If you set values for Batch Repeat Time/Batch Repeat Granularity and also Batch Time, the Batch Time setting takes precedence.Note: If you use these fields to control batching, you can have a maximum of 10 Batch e*Ways running. This is because the display-only Batch Last Send Time field has a maximum of 255 characters.
Batch Time (Batch transfer mode only)
To send batches at a preset daily time, enter the time in the format hh:mm:ss (military time); for example, 09:00:00 for 9am or 15:30:00 for 3:30pm. If the batch is being set at a preset daily time, you do not need to set any other attributes. You can also set multiple batch times, using the pipe symbol as the delimiter: for example, 09:00:00|17:30:00|24:00:00 sends out batches at 9am, 5:30pm, and midnight. The values must be in ordered sequence, from the earliest time to the latest.Note: If you set values for Batch Repeat Time/Batch Repeat Granularity and also Batch Time, the Batch Time setting takes precedence.
Table 35 Message Profile, Interchange Control Envelope Section (UN/EDIFACT 4B): Fields
Name Ref # Description
Acknowledgment Request
UNB 090 0031 An optional one-digit code requesting acknowledgment for the interchange.
Application Reference
UNB 070 0026 An optional value identifying the application area assigned by the sender, to which the messages in the interchange relate; for example, the message type, if all the messages in the interchange are of the same type.Whether or not this field is used, and if so the exact nature of the data, is specified in the trading partner Interchange Agreement.
Table 34 Message Profile, General Section (UN/EDIFACT 4B): Fields (Continued)
Name Description
e*Xchange Partner Manager User’s Guide 173
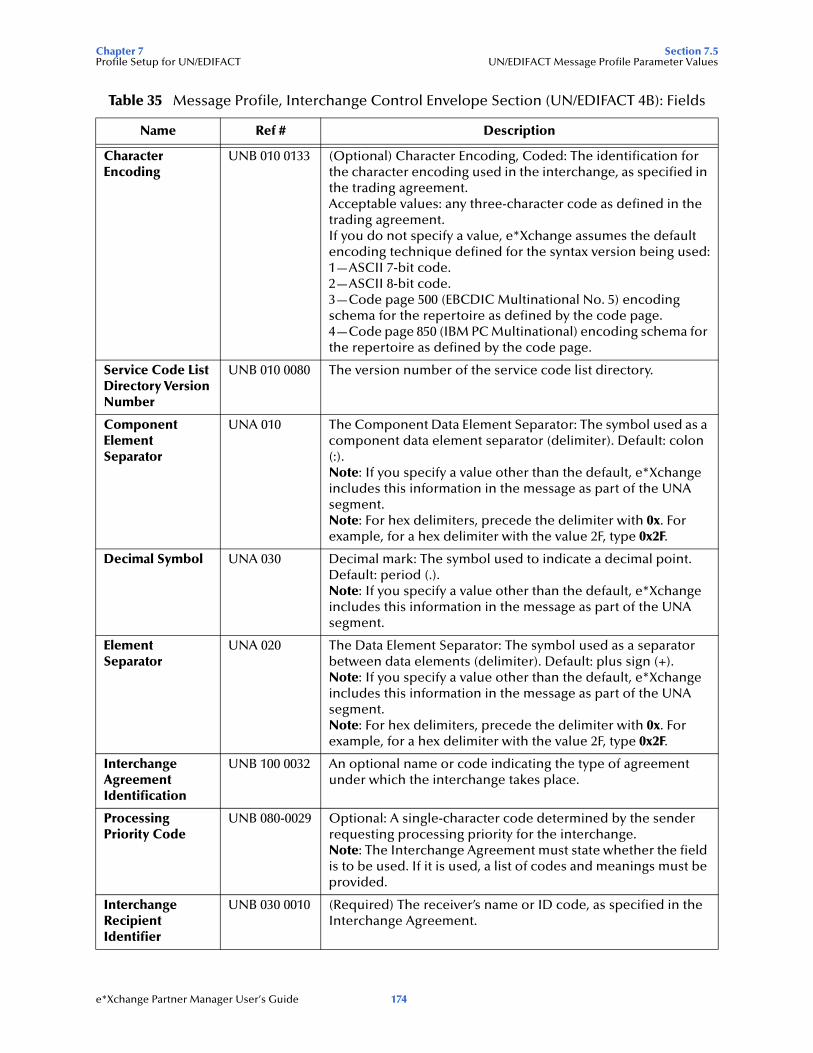
Chapter 7 Section 7.5Profile Setup for UN/EDIFACT UN/EDIFACT Message Profile Parameter Values
Character Encoding
UNB 010 0133 (Optional) Character Encoding, Coded: The identification for the character encoding used in the interchange, as specified in the trading agreement.Acceptable values: any three-character code as defined in the trading agreement.If you do not specify a value, e*Xchange assumes the default encoding technique defined for the syntax version being used:1—ASCII 7-bit code. 2—ASCII 8-bit code. 3—Code page 500 (EBCDIC Multinational No. 5) encoding schema for the repertoire as defined by the code page. 4—Code page 850 (IBM PC Multinational) encoding schema for the repertoire as defined by the code page.
Service Code List Directory Version Number
UNB 010 0080 The version number of the service code list directory.
Component Element Separator
UNA 010 The Component Data Element Separator: The symbol used as a component data element separator (delimiter). Default: colon (:).Note: If you specify a value other than the default, e*Xchange includes this information in the message as part of the UNA segment.Note: For hex delimiters, precede the delimiter with 0x. For example, for a hex delimiter with the value 2F, type 0x2F.
Decimal Symbol UNA 030 Decimal mark: The symbol used to indicate a decimal point. Default: period (.).Note: If you specify a value other than the default, e*Xchange includes this information in the message as part of the UNA segment.
Element Separator
UNA 020 The Data Element Separator: The symbol used as a separator between data elements (delimiter). Default: plus sign (+).Note: If you specify a value other than the default, e*Xchange includes this information in the message as part of the UNA segment.Note: For hex delimiters, precede the delimiter with 0x. For example, for a hex delimiter with the value 2F, type 0x2F.
Interchange Agreement Identification
UNB 100 0032 An optional name or code indicating the type of agreement under which the interchange takes place.
Processing Priority Code
UNB 080-0029 Optional: A single-character code determined by the sender requesting processing priority for the interchange.Note: The Interchange Agreement must state whether the field is to be used. If it is used, a list of codes and meanings must be provided.
Interchange Recipient Identifier
UNB 030 0010 (Required) The receiver’s name or ID code, as specified in the Interchange Agreement.
Table 35 Message Profile, Interchange Control Envelope Section (UN/EDIFACT 4B): Fields
Name Ref # Description
e*Xchange Partner Manager User’s Guide 174
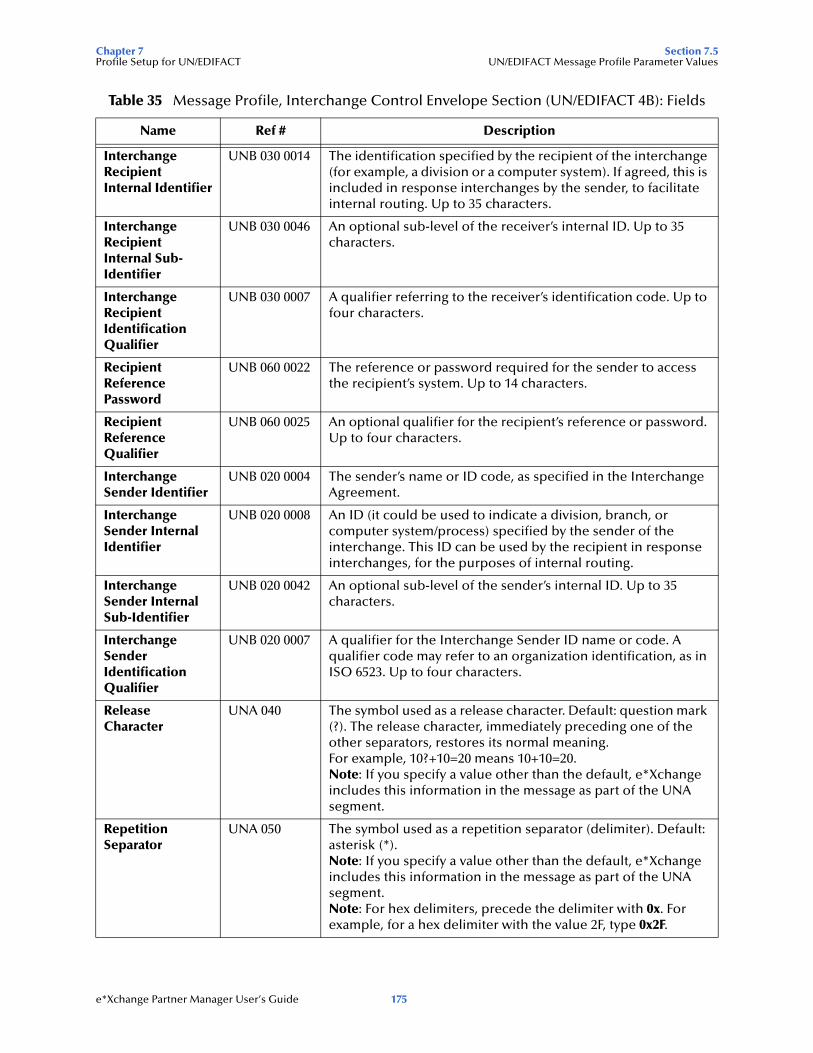
Chapter 7 Section 7.5Profile Setup for UN/EDIFACT UN/EDIFACT Message Profile Parameter Values
Interchange Recipient Internal Identifier
UNB 030 0014 The identification specified by the recipient of the interchange (for example, a division or a computer system). If agreed, this is included in response interchanges by the sender, to facilitate internal routing. Up to 35 characters.
Interchange Recipient Internal Sub-Identifier
UNB 030 0046 An optional sub-level of the receiver’s internal ID. Up to 35 characters.
Interchange Recipient Identification Qualifier
UNB 030 0007 A qualifier referring to the receiver’s identification code. Up to four characters.
Recipient Reference Password
UNB 060 0022 The reference or password required for the sender to access the recipient’s system. Up to 14 characters.
Recipient Reference Qualifier
UNB 060 0025 An optional qualifier for the recipient’s reference or password. Up to four characters.
Interchange Sender Identifier
UNB 020 0004 The sender’s name or ID code, as specified in the Interchange Agreement.
Interchange Sender Internal Identifier
UNB 020 0008 An ID (it could be used to indicate a division, branch, or computer system/process) specified by the sender of the interchange. This ID can be used by the recipient in response interchanges, for the purposes of internal routing.
Interchange Sender Internal Sub-Identifier
UNB 020 0042 An optional sub-level of the sender’s internal ID. Up to 35 characters.
Interchange Sender Identification Qualifier
UNB 020 0007 A qualifier for the Interchange Sender ID name or code. A qualifier code may refer to an organization identification, as in ISO 6523. Up to four characters.
Release Character
UNA 040 The symbol used as a release character. Default: question mark (?). The release character, immediately preceding one of the other separators, restores its normal meaning.For example, 10?+10=20 means 10+10=20. Note: If you specify a value other than the default, e*Xchange includes this information in the message as part of the UNA segment.
Repetition Separator
UNA 050 The symbol used as a repetition separator (delimiter). Default: asterisk (*).Note: If you specify a value other than the default, e*Xchange includes this information in the message as part of the UNA segment.Note: For hex delimiters, precede the delimiter with 0x. For example, for a hex delimiter with the value 2F, type 0x2F.
Table 35 Message Profile, Interchange Control Envelope Section (UN/EDIFACT 4B): Fields
Name Ref # Description
e*Xchange Partner Manager User’s Guide 175
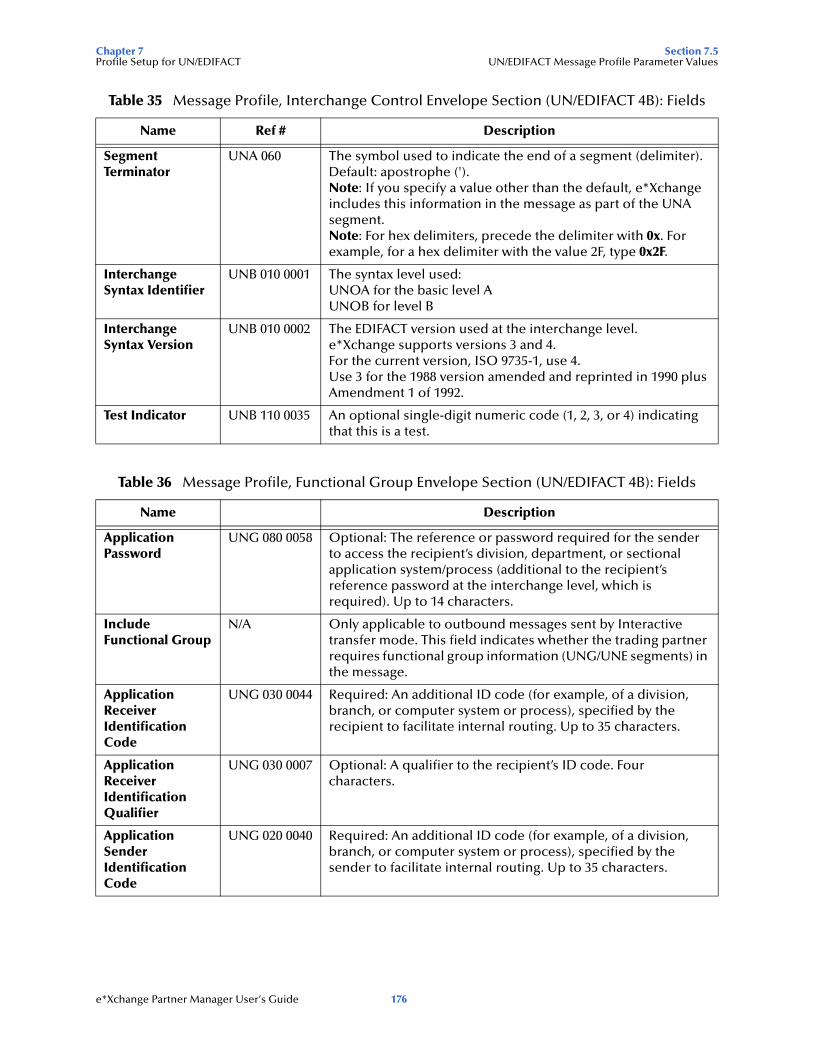
Chapter 7 Section 7.5Profile Setup for UN/EDIFACT UN/EDIFACT Message Profile Parameter Values
Segment Terminator
UNA 060 The symbol used to indicate the end of a segment (delimiter). Default: apostrophe (').Note: If you specify a value other than the default, e*Xchange includes this information in the message as part of the UNA segment.Note: For hex delimiters, precede the delimiter with 0x. For example, for a hex delimiter with the value 2F, type 0x2F.
Interchange Syntax Identifier
UNB 010 0001 The syntax level used:UNOA for the basic level AUNOB for level B
Interchange Syntax Version
UNB 010 0002 The EDIFACT version used at the interchange level.e*Xchange supports versions 3 and 4.For the current version, ISO 9735-1, use 4.Use 3 for the 1988 version amended and reprinted in 1990 plus Amendment 1 of 1992.
Test Indicator UNB 110 0035 An optional single-digit numeric code (1, 2, 3, or 4) indicating that this is a test.
Table 36 Message Profile, Functional Group Envelope Section (UN/EDIFACT 4B): Fields
Name Description
Application Password
UNG 080 0058 Optional: The reference or password required for the sender to access the recipient’s division, department, or sectional application system/process (additional to the recipient’s reference password at the interchange level, which is required). Up to 14 characters.
Include Functional Group
N/A Only applicable to outbound messages sent by Interactive transfer mode. This field indicates whether the trading partner requires functional group information (UNG/UNE segments) in the message.
Application Receiver Identification Code
UNG 030 0044 Required: An additional ID code (for example, of a division, branch, or computer system or process), specified by the recipient to facilitate internal routing. Up to 35 characters.
Application Receiver Identification Qualifier
UNG 030 0007 Optional: A qualifier to the recipient’s ID code. Four characters.
Application Sender Identification Code
UNG 020 0040 Required: An additional ID code (for example, of a division, branch, or computer system or process), specified by the sender to facilitate internal routing. Up to 35 characters.
Table 35 Message Profile, Interchange Control Envelope Section (UN/EDIFACT 4B): Fields
Name Ref # Description
e*Xchange Partner Manager User’s Guide 176
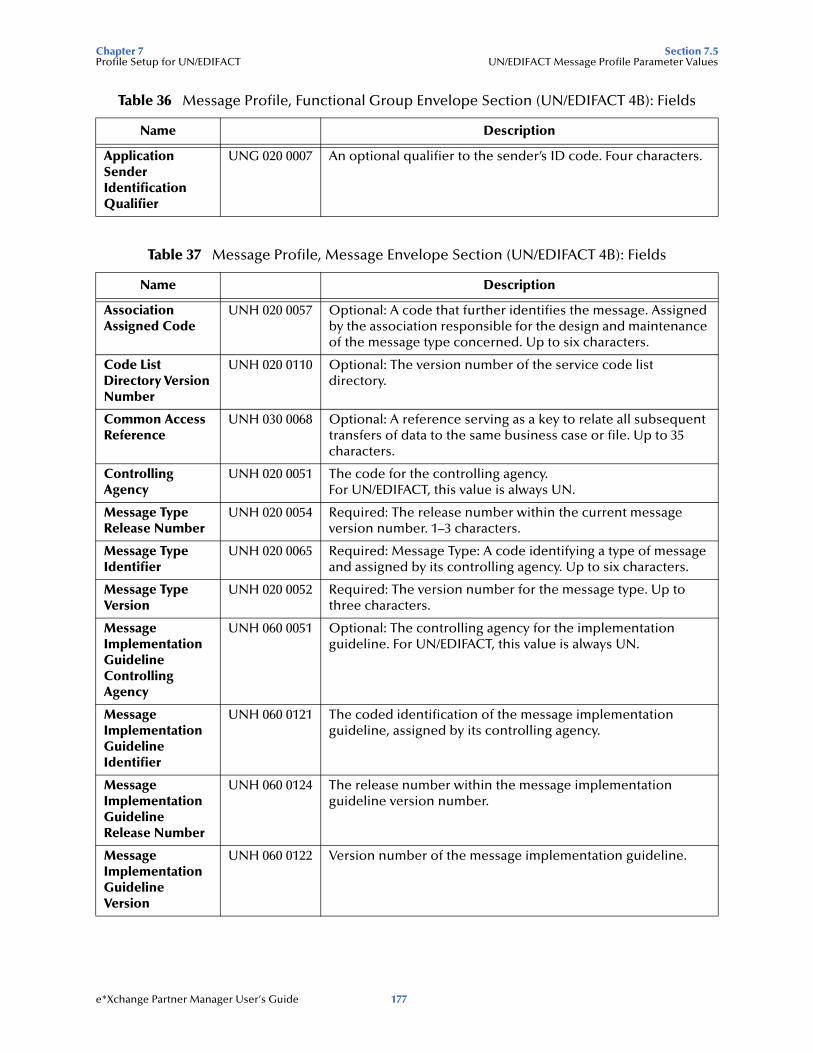
Chapter 7 Section 7.5Profile Setup for UN/EDIFACT UN/EDIFACT Message Profile Parameter Values
Application Sender Identification Qualifier
UNG 020 0007 An optional qualifier to the sender’s ID code. Four characters.
Table 37 Message Profile, Message Envelope Section (UN/EDIFACT 4B): Fields
Name Description
Association Assigned Code
UNH 020 0057 Optional: A code that further identifies the message. Assigned by the association responsible for the design and maintenance of the message type concerned. Up to six characters.
Code List Directory Version Number
UNH 020 0110 Optional: The version number of the service code list directory.
Common Access Reference
UNH 030 0068 Optional: A reference serving as a key to relate all subsequent transfers of data to the same business case or file. Up to 35 characters.
Controlling Agency
UNH 020 0051 The code for the controlling agency.For UN/EDIFACT, this value is always UN.
Message Type Release Number
UNH 020 0054 Required: The release number within the current message version number. 1–3 characters.
Message Type Identifier
UNH 020 0065 Required: Message Type: A code identifying a type of message and assigned by its controlling agency. Up to six characters.
Message Type Version
UNH 020 0052 Required: The version number for the message type. Up to three characters.
Message Implementation Guideline Controlling Agency
UNH 060 0051 Optional: The controlling agency for the implementation guideline. For UN/EDIFACT, this value is always UN.
Message Implementation Guideline Identifier
UNH 060 0121 The coded identification of the message implementation guideline, assigned by its controlling agency.
Message Implementation Guideline Release Number
UNH 060 0124 The release number within the message implementation guideline version number.
Message Implementation Guideline Version
UNH 060 0122 Version number of the message implementation guideline.
Table 36 Message Profile, Functional Group Envelope Section (UN/EDIFACT 4B): Fields
Name Description
e*Xchange Partner Manager User’s Guide 177

Chapter 7 Section 7.5Profile Setup for UN/EDIFACT UN/EDIFACT Message Profile Parameter Values
7.5.3. Version 4 InteractiveThis section includes field descriptions for UN/EDIFACT version 4 Interactive, for the following Message Profile setup sections:
General section—Table 38 on page 178
Interchange Control Envelope section—Table 39 on page 180
Message Envelope section—Table 40 on page 183
Message Scenario Controlling Agency
UNH 070 0051 The code identifying the controlling agency for the message scenario.
Message Scenario Identifier
UNH 070 0127 The code identifying the scenario.
Message Scenario Release Number
UNH 070 0130 The release number within the scenario version number.
Message Scenario Version
UNH 070 0128 Version number of a scenario.
Message Subset Controlling Agency
UNH 050 0051 The code identifying the controlling agency for the message subset.
Message Subset Identifier
UNH 050 0115 Coded identification of a message subset, assigned by its controlling agency.
Message Subset Release Number
UNH 050 0118 The release number within the message subset version number.
Message Subset Version
UNH 050 0116 The version number of the message subset.
Message Transfer Indicator
UNH 040 0073 Optional: First and Last Transfer: An indication used for the first and last message in a sequence of messages related to the same topic. One character.
Message Type Sub-Function Identification
UNH 020 0113 The code identifying a sub-function of a message type.
Table 38 Message Profile, General Section (UN/EDIFACT 4I): Fields
Name Description
eBusiness Protocol The name of the protocol that you selected earlier is displayed.
Version The eBusiness protocol version that you selected earlier is displayed.
Direction The direction for the message profile, Inbound or Outbound, is displayed.
Table 37 Message Profile, Message Envelope Section (UN/EDIFACT 4B): Fields (Continued)
Name Description
e*Xchange Partner Manager User’s Guide 178
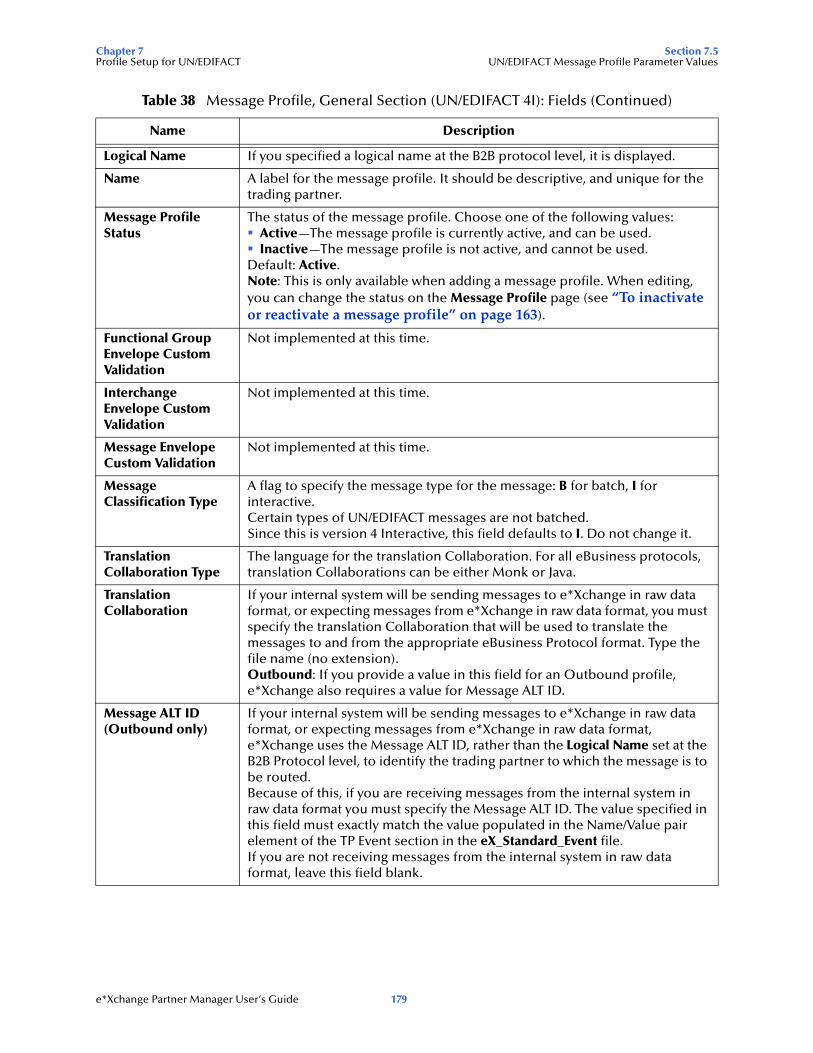
Chapter 7 Section 7.5Profile Setup for UN/EDIFACT UN/EDIFACT Message Profile Parameter Values
Logical Name If you specified a logical name at the B2B protocol level, it is displayed.
Name A label for the message profile. It should be descriptive, and unique for the trading partner.
Message Profile Status
The status of the message profile. Choose one of the following values:Active—The message profile is currently active, and can be used.Inactive—The message profile is not active, and cannot be used.
Default: Active.Note: This is only available when adding a message profile. When editing, you can change the status on the Message Profile page (see “To inactivate or reactivate a message profile” on page 163).
Functional Group Envelope Custom Validation
Not implemented at this time.
Interchange Envelope Custom Validation
Not implemented at this time.
Message Envelope Custom Validation
Not implemented at this time.
Message Classification Type
A flag to specify the message type for the message: B for batch, I for interactive.Certain types of UN/EDIFACT messages are not batched.Since this is version 4 Interactive, this field defaults to I. Do not change it.
Translation Collaboration Type
The language for the translation Collaboration. For all eBusiness protocols, translation Collaborations can be either Monk or Java.
Translation Collaboration
If your internal system will be sending messages to e*Xchange in raw data format, or expecting messages from e*Xchange in raw data format, you must specify the translation Collaboration that will be used to translate the messages to and from the appropriate eBusiness Protocol format. Type the file name (no extension).Outbound: If you provide a value in this field for an Outbound profile, e*Xchange also requires a value for Message ALT ID.
Message ALT ID(Outbound only)
If your internal system will be sending messages to e*Xchange in raw data format, or expecting messages from e*Xchange in raw data format, e*Xchange uses the Message ALT ID, rather than the Logical Name set at the B2B Protocol level, to identify the trading partner to which the message is to be routed.Because of this, if you are receiving messages from the internal system in raw data format you must specify the Message ALT ID. The value specified in this field must exactly match the value populated in the Name/Value pair element of the TP Event section in the eX_Standard_Event file.If you are not receiving messages from the internal system in raw data format, leave this field blank.
Table 38 Message Profile, General Section (UN/EDIFACT 4I): Fields (Continued)
Name Description
e*Xchange Partner Manager User’s Guide 179
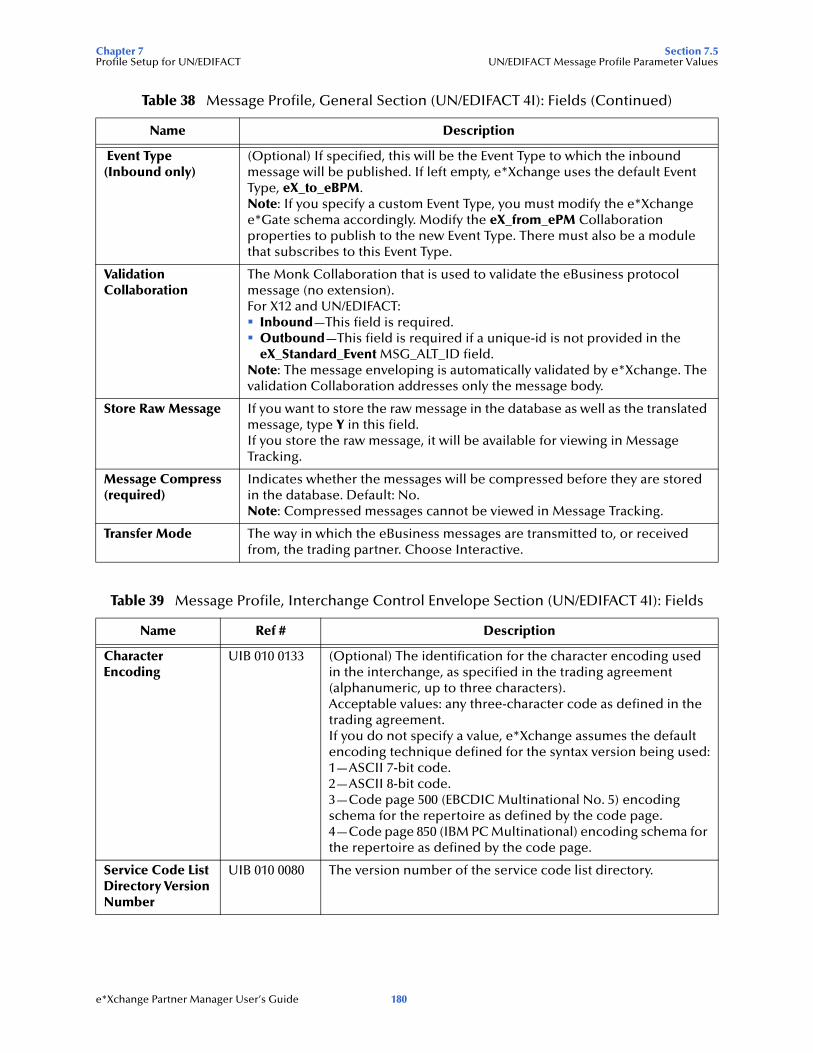
Chapter 7 Section 7.5Profile Setup for UN/EDIFACT UN/EDIFACT Message Profile Parameter Values
Event Type (Inbound only)
(Optional) If specified, this will be the Event Type to which the inbound message will be published. If left empty, e*Xchange uses the default Event Type, eX_to_eBPM.Note: If you specify a custom Event Type, you must modify the e*Xchange e*Gate schema accordingly. Modify the eX_from_ePM Collaboration properties to publish to the new Event Type. There must also be a module that subscribes to this Event Type.
Validation Collaboration
The Monk Collaboration that is used to validate the eBusiness protocol message (no extension).For X12 and UN/EDIFACT:
Inbound—This field is required.Outbound—This field is required if a unique-id is not provided in the eX_Standard_Event MSG_ALT_ID field.
Note: The message enveloping is automatically validated by e*Xchange. The validation Collaboration addresses only the message body.
Store Raw Message If you want to store the raw message in the database as well as the translated message, type Y in this field.If you store the raw message, it will be available for viewing in Message Tracking.
Message Compress (required)
Indicates whether the messages will be compressed before they are stored in the database. Default: No.Note: Compressed messages cannot be viewed in Message Tracking.
Transfer Mode The way in which the eBusiness messages are transmitted to, or received from, the trading partner. Choose Interactive.
Table 39 Message Profile, Interchange Control Envelope Section (UN/EDIFACT 4I): Fields
Name Ref # Description
Character Encoding
UIB 010 0133 (Optional) The identification for the character encoding used in the interchange, as specified in the trading agreement (alphanumeric, up to three characters).Acceptable values: any three-character code as defined in the trading agreement.If you do not specify a value, e*Xchange assumes the default encoding technique defined for the syntax version being used:1—ASCII 7-bit code. 2—ASCII 8-bit code. 3—Code page 500 (EBCDIC Multinational No. 5) encoding schema for the repertoire as defined by the code page. 4—Code page 850 (IBM PC Multinational) encoding schema for the repertoire as defined by the code page.
Service Code List Directory Version Number
UIB 010 0080 The version number of the service code list directory.
Table 38 Message Profile, General Section (UN/EDIFACT 4I): Fields (Continued)
Name Description
e*Xchange Partner Manager User’s Guide 180
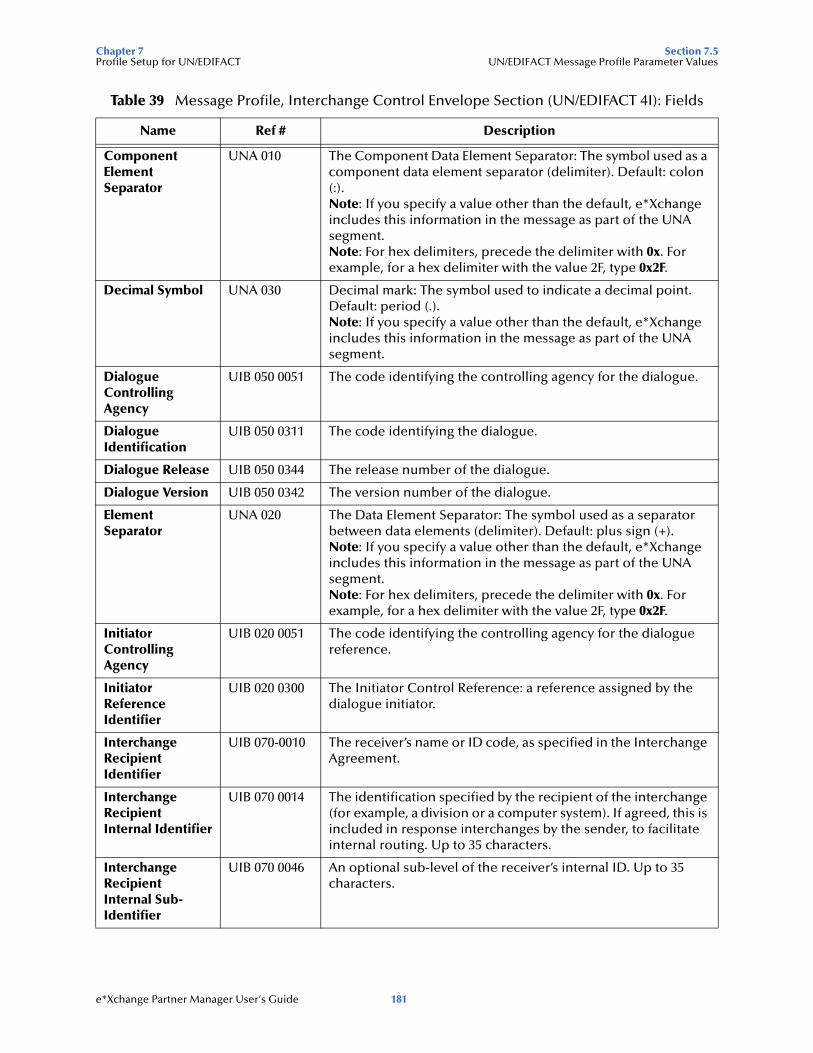
Chapter 7 Section 7.5Profile Setup for UN/EDIFACT UN/EDIFACT Message Profile Parameter Values
Component Element Separator
UNA 010 The Component Data Element Separator: The symbol used as a component data element separator (delimiter). Default: colon (:).Note: If you specify a value other than the default, e*Xchange includes this information in the message as part of the UNA segment.Note: For hex delimiters, precede the delimiter with 0x. For example, for a hex delimiter with the value 2F, type 0x2F.
Decimal Symbol UNA 030 Decimal mark: The symbol used to indicate a decimal point. Default: period (.).Note: If you specify a value other than the default, e*Xchange includes this information in the message as part of the UNA segment.
Dialogue Controlling Agency
UIB 050 0051 The code identifying the controlling agency for the dialogue.
Dialogue Identification
UIB 050 0311 The code identifying the dialogue.
Dialogue Release UIB 050 0344 The release number of the dialogue.
Dialogue Version UIB 050 0342 The version number of the dialogue.
Element Separator
UNA 020 The Data Element Separator: The symbol used as a separator between data elements (delimiter). Default: plus sign (+).Note: If you specify a value other than the default, e*Xchange includes this information in the message as part of the UNA segment.Note: For hex delimiters, precede the delimiter with 0x. For example, for a hex delimiter with the value 2F, type 0x2F.
Initiator Controlling Agency
UIB 020 0051 The code identifying the controlling agency for the dialogue reference.
Initiator Reference Identifier
UIB 020 0300 The Initiator Control Reference: a reference assigned by the dialogue initiator.
Interchange Recipient Identifier
UIB 070-0010 The receiver’s name or ID code, as specified in the Interchange Agreement.
Interchange Recipient Internal Identifier
UIB 070 0014 The identification specified by the recipient of the interchange (for example, a division or a computer system). If agreed, this is included in response interchanges by the sender, to facilitate internal routing. Up to 35 characters.
Interchange Recipient Internal Sub-Identifier
UIB 070 0046 An optional sub-level of the receiver’s internal ID. Up to 35 characters.
Table 39 Message Profile, Interchange Control Envelope Section (UN/EDIFACT 4I): Fields
Name Ref # Description
e*Xchange Partner Manager User’s Guide 181
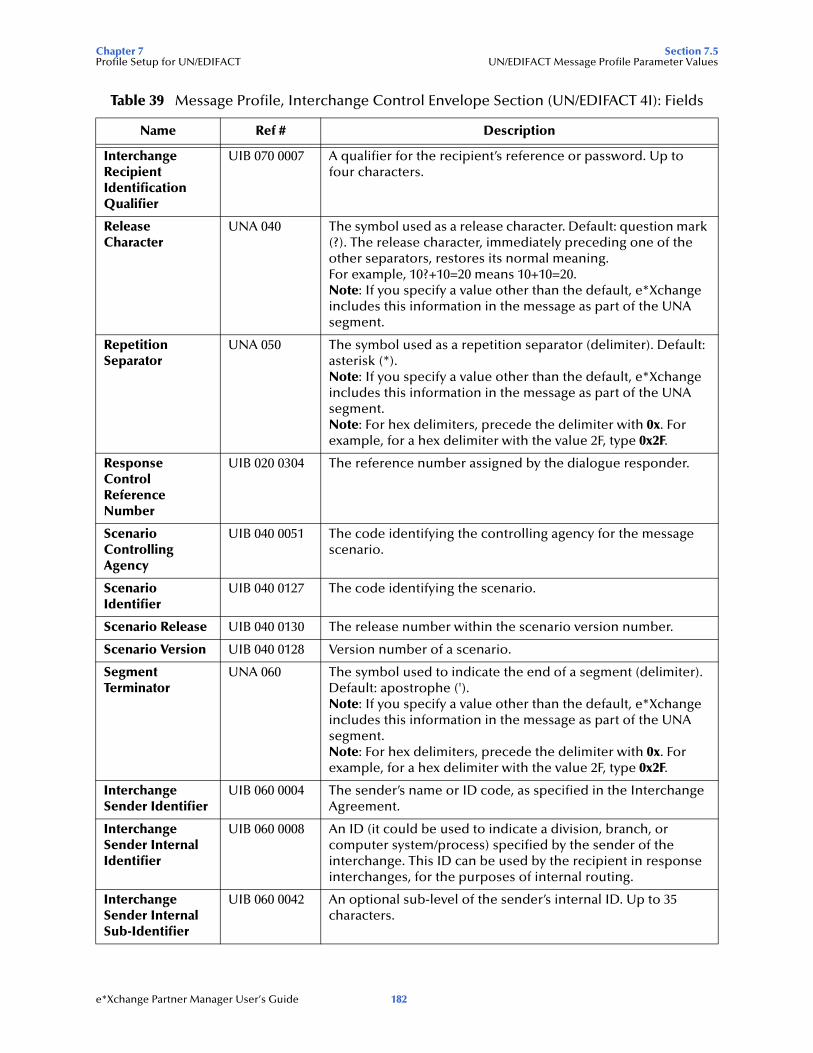
Chapter 7 Section 7.5Profile Setup for UN/EDIFACT UN/EDIFACT Message Profile Parameter Values
Interchange Recipient Identification Qualifier
UIB 070 0007 A qualifier for the recipient’s reference or password. Up to four characters.
Release Character
UNA 040 The symbol used as a release character. Default: question mark (?). The release character, immediately preceding one of the other separators, restores its normal meaning.For example, 10?+10=20 means 10+10=20. Note: If you specify a value other than the default, e*Xchange includes this information in the message as part of the UNA segment.
Repetition Separator
UNA 050 The symbol used as a repetition separator (delimiter). Default: asterisk (*).Note: If you specify a value other than the default, e*Xchange includes this information in the message as part of the UNA segment.Note: For hex delimiters, precede the delimiter with 0x. For example, for a hex delimiter with the value 2F, type 0x2F.
Response Control Reference Number
UIB 020 0304 The reference number assigned by the dialogue responder.
Scenario Controlling Agency
UIB 040 0051 The code identifying the controlling agency for the message scenario.
Scenario Identifier
UIB 040 0127 The code identifying the scenario.
Scenario Release UIB 040 0130 The release number within the scenario version number.
Scenario Version UIB 040 0128 Version number of a scenario.
Segment Terminator
UNA 060 The symbol used to indicate the end of a segment (delimiter). Default: apostrophe (').Note: If you specify a value other than the default, e*Xchange includes this information in the message as part of the UNA segment.Note: For hex delimiters, precede the delimiter with 0x. For example, for a hex delimiter with the value 2F, type 0x2F.
Interchange Sender Identifier
UIB 060 0004 The sender’s name or ID code, as specified in the Interchange Agreement.
Interchange Sender Internal Identifier
UIB 060 0008 An ID (it could be used to indicate a division, branch, or computer system/process) specified by the sender of the interchange. This ID can be used by the recipient in response interchanges, for the purposes of internal routing.
Interchange Sender Internal Sub-Identifier
UIB 060 0042 An optional sub-level of the sender’s internal ID. Up to 35 characters.
Table 39 Message Profile, Interchange Control Envelope Section (UN/EDIFACT 4I): Fields
Name Ref # Description
e*Xchange Partner Manager User’s Guide 182
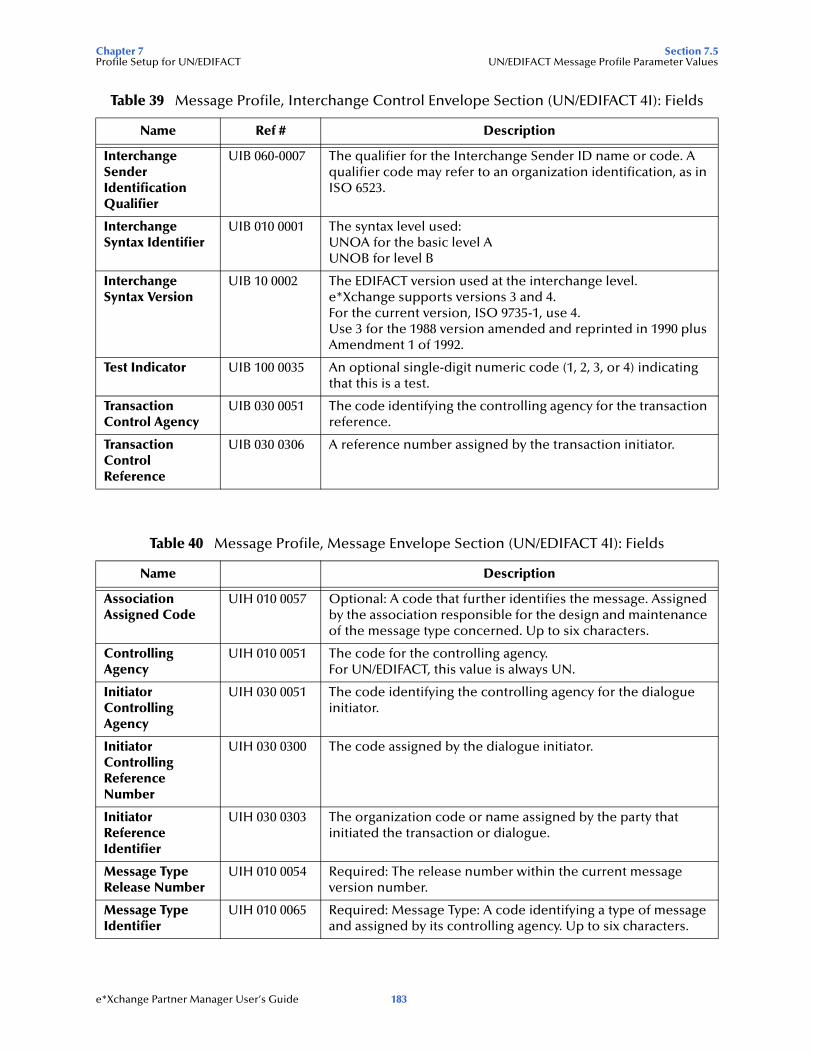
Chapter 7 Section 7.5Profile Setup for UN/EDIFACT UN/EDIFACT Message Profile Parameter Values
Interchange Sender Identification Qualifier
UIB 060-0007 The qualifier for the Interchange Sender ID name or code. A qualifier code may refer to an organization identification, as in ISO 6523.
Interchange Syntax Identifier
UIB 010 0001 The syntax level used:UNOA for the basic level AUNOB for level B
Interchange Syntax Version
UIB 10 0002 The EDIFACT version used at the interchange level.e*Xchange supports versions 3 and 4.For the current version, ISO 9735-1, use 4.Use 3 for the 1988 version amended and reprinted in 1990 plus Amendment 1 of 1992.
Test Indicator UIB 100 0035 An optional single-digit numeric code (1, 2, 3, or 4) indicating that this is a test.
Transaction Control Agency
UIB 030 0051 The code identifying the controlling agency for the transaction reference.
Transaction Control Reference
UIB 030 0306 A reference number assigned by the transaction initiator.
Table 40 Message Profile, Message Envelope Section (UN/EDIFACT 4I): Fields
Name Description
Association Assigned Code
UIH 010 0057 Optional: A code that further identifies the message. Assigned by the association responsible for the design and maintenance of the message type concerned. Up to six characters.
Controlling Agency
UIH 010 0051 The code for the controlling agency.For UN/EDIFACT, this value is always UN.
Initiator Controlling Agency
UIH 030 0051 The code identifying the controlling agency for the dialogue initiator.
Initiator Controlling Reference Number
UIH 030 0300 The code assigned by the dialogue initiator.
Initiator Reference Identifier
UIH 030 0303 The organization code or name assigned by the party that initiated the transaction or dialogue.
Message Type Release Number
UIH 010 0054 Required: The release number within the current message version number.
Message Type Identifier
UIH 010 0065 Required: Message Type: A code identifying a type of message and assigned by its controlling agency. Up to six characters.
Table 39 Message Profile, Interchange Control Envelope Section (UN/EDIFACT 4I): Fields
Name Ref # Description
e*Xchange Partner Manager User’s Guide 183
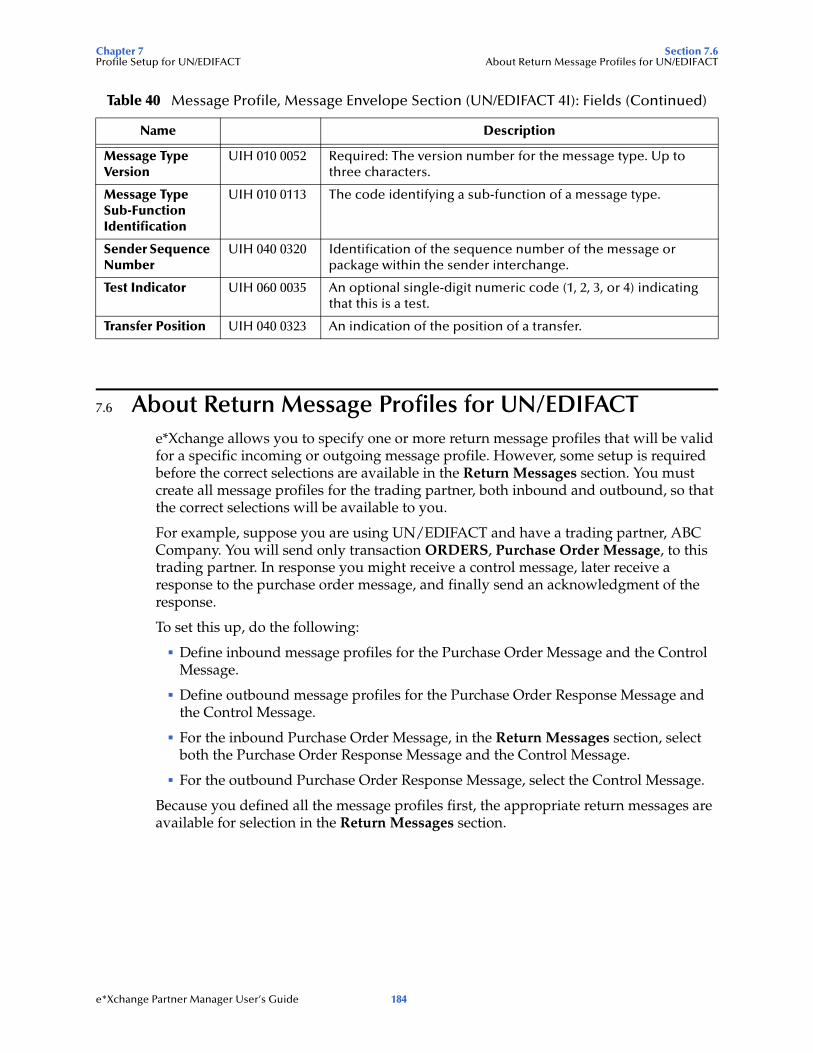
Chapter 7 Section 7.6Profile Setup for UN/EDIFACT About Return Message Profiles for UN/EDIFACT
7.6 About Return Message Profiles for UN/EDIFACTe*Xchange allows you to specify one or more return message profiles that will be valid for a specific incoming or outgoing message profile. However, some setup is required before the correct selections are available in the Return Messages section. You must create all message profiles for the trading partner, both inbound and outbound, so that the correct selections will be available to you.
For example, suppose you are using UN/EDIFACT and have a trading partner, ABC Company. You will send only transaction ORDERS, Purchase Order Message, to this trading partner. In response you might receive a control message, later receive a response to the purchase order message, and finally send an acknowledgment of the response.
To set this up, do the following:
Define inbound message profiles for the Purchase Order Message and the Control Message.
Define outbound message profiles for the Purchase Order Response Message and the Control Message.
For the inbound Purchase Order Message, in the Return Messages section, select both the Purchase Order Response Message and the Control Message.
For the outbound Purchase Order Response Message, select the Control Message.
Because you defined all the message profiles first, the appropriate return messages are available for selection in the Return Messages section.
Message Type Version
UIH 010 0052 Required: The version number for the message type. Up to three characters.
Message Type Sub-Function Identification
UIH 010 0113 The code identifying a sub-function of a message type.
Sender Sequence Number
UIH 040 0320 Identification of the sequence number of the message or package within the sender interchange.
Test Indicator UIH 060 0035 An optional single-digit numeric code (1, 2, 3, or 4) indicating that this is a test.
Transfer Position UIH 040 0323 An indication of the position of a transfer.
Table 40 Message Profile, Message Envelope Section (UN/EDIFACT 4I): Fields (Continued)
Name Description
e*Xchange Partner Manager User’s Guide 184
Chapter 8
Profile Setup for RosettaNet
This chapter provides information on setting up RosettaNet versions 1.1 and 2.0 transactions in the e*Xchange Partner Manager, at the Message Profile level. It includes information on the following:
Setting the values for the various headers of a RosettaNet message:
For RNIF 1.1: Preamble, Service Header
for RNIF 2.0: Preamble, Delivery Header, Service Header
Specifying the communication protocol used to relay the messages.
Handling errors.
The Company, Trading Partner, and B2B Protocol (inbound and outbound) levels must be set up first. For information on setting up these components, refer to “Profile Management” on page 70.
Note: If you are using RosettaNet, you must install the RosettaNet templates provided. They are available during installation via the “Add-Ons” option. For installation instructions and general information on RosettaNet, refer to the RosettaNet ETD Library User’s Guide.
8.1 Communications Protocols for RosettaNetThe communications protocols supported by e*Xchange for RNIF 1.1 are:
HTTP
HTTPS
The communications protocols supported by e*Xchange for RNIF 2.0 are:
HTTP
HTTPS
e*Xchange Partner Manager User’s Guide 185
Chapter 8 Section 8.2Profile Setup for RosettaNet Security in RosettaNet
SMTP
8.1.1. HTTP and HTTPSThe e*Xchange RosettaNet implementation supports the HTTP transfer protocol, both with and without SSL. To use HTTP with SSL (HTTPS), complete the following setup steps:
At the B2B Protocol level, in the Message Security section, enter the signature key information.
At the B2B Protocol level for both inbound and outbound, in the Transport Component section:
Select HTTPS as the communications protocol.
In the URL box, set the URL to begin with https://.
To use HTTP without SSL, complete the following setup steps:
At the B2B Protocol level for both inbound and outbound, in the Transport Component section:
Select HTTP as the communications protocol.
Enter the URL to which the message will be posted, beginning with http://.
8.1.2. SMTPTo use SMTP, complete the following setup steps:
At the B2B Protocol level for both inbound and outbound, in the Transport Component section:
Select SMTP as the communications protocol.
Enter the sender and receiver e-mail addresses and the mailhost IP address and port.
8.2 Security in RosettaNete*Xchange provides several security features for use with RosettaNet.
8.2.1. Non-RepudiationIf non-repudiation of origin is required, set the Non-Repudiation attribute to Y in the General section for each message profile. If non-repudiation is not required, set this flag to N.
e*Xchange Partner Manager User’s Guide 186
Chapter 8 Section 8.2Profile Setup for RosettaNet Security in RosettaNet
8.2.2. Digital Signatures (RNIF 1.1 and 2.0)RNIF 1.1 and 2.0 both use S/MIME for signing RosettaNet business messages.
The RosettaNet PIP indicates whether or not a digital signature is required for a specific message. However, the trading partner agreement can specify that digital signatures are not to be used. If there is a conflict between the PIP and the trading partner agreement regarding the use of digital signatures, the trading partner agreement takes precedence.
If digital signatures are to be used, complete the following setup steps:
Outbound B2B protocol: in the Message Security section, load the Signature Key and enter the Signature Algorithm to be used.
Inbound B2B protocol: in the Message Security section, load the Signature Verification Certificate.
If digital signatures are not to be used, complete the following steps:
Make sure there are no values set in the Message Security section for the inbound and outbound B2B protocols.
Make sure the Non-Repudiation attribute in the General section for all related message profiles is set to N.
8.2.3. Encryption (RNIF 2.0 Only)Encryption is a new feature offered with RNIF 2.0. In e*Xchange, the level of encryption is set as an extended attribute in the message profile, in the General section, Encryption Type attribute.
There are three choices:
0—No encryption
1—encryption of Service Content and any attachments
2—encryption of Service Header, Service Content, and any attachments
The preamble and delivery header are never encrypted, since they contain information necessary to the correct routing of the message.
Encryption of Inbound Messages
For an inbound message, e*Xchange uses the encryption setting from the partner profile to determine which parts of the inbound message have been encrypted. If the message does not have the correct portions encrypted, e*Xchange goes into the error handling process.
For more information on how e*Xchange handles errors with RosettaNet messages, refer to “RosettaNet Error Handling” on page 212.
e*Xchange Partner Manager User’s Guide 187
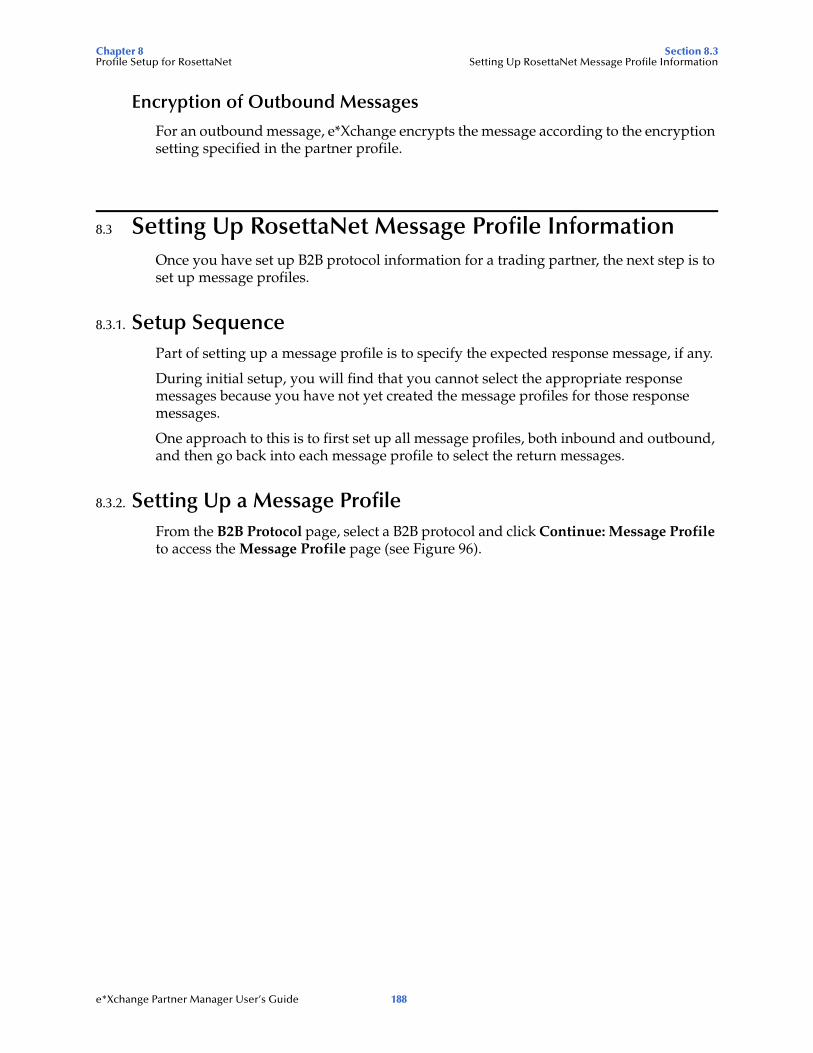
Chapter 8 Section 8.3Profile Setup for RosettaNet Setting Up RosettaNet Message Profile Information
Encryption of Outbound Messages
For an outbound message, e*Xchange encrypts the message according to the encryption setting specified in the partner profile.
8.3 Setting Up RosettaNet Message Profile InformationOnce you have set up B2B protocol information for a trading partner, the next step is to set up message profiles.
8.3.1. Setup SequencePart of setting up a message profile is to specify the expected response message, if any.
During initial setup, you will find that you cannot select the appropriate response messages because you have not yet created the message profiles for those response messages.
One approach to this is to first set up all message profiles, both inbound and outbound, and then go back into each message profile to select the return messages.
8.3.2. Setting Up a Message ProfileFrom the B2B Protocol page, select a B2B protocol and click Continue: Message Profile to access the Message Profile page (see Figure 96).
e*Xchange Partner Manager User’s Guide 188

Chapter 8 Section 8.3Profile Setup for RosettaNet Setting Up RosettaNet Message Profile Information
Figure 96 Message Profile Page
From the Message Profile page you can complete the following activities:
Add a message profile for the selected B2B protocol (see “To add a message profile” on page 190).
Select a message profile: choose from the drop-down list. The message profile General properties are displayed on the right side of the page. To view additional properties, click on the appropriate link above the properties display (specific property groups vary according to the eBusiness protocol).
Edit the selected message profile; first select the section that you want to edit, and then click the Edit button to access the Message Profile - Editing page (see “To edit a message profile” on page 193).
Create a new message profile based on the selected one (see “To copy a message profile to the same B2B protocol” on page 194 and “To copy a message profile to another B2B protocol” on page 196).
For general information on the copy feature, refer to “Copying Components” on page 102.
Delete the selected message profile (see “To delete a message profile” on page 197).
Activate or inactivate the selected message profile (see “To inactivate or reactivate a message profile” on page 197).
e*Xchange Partner Manager User’s Guide 189
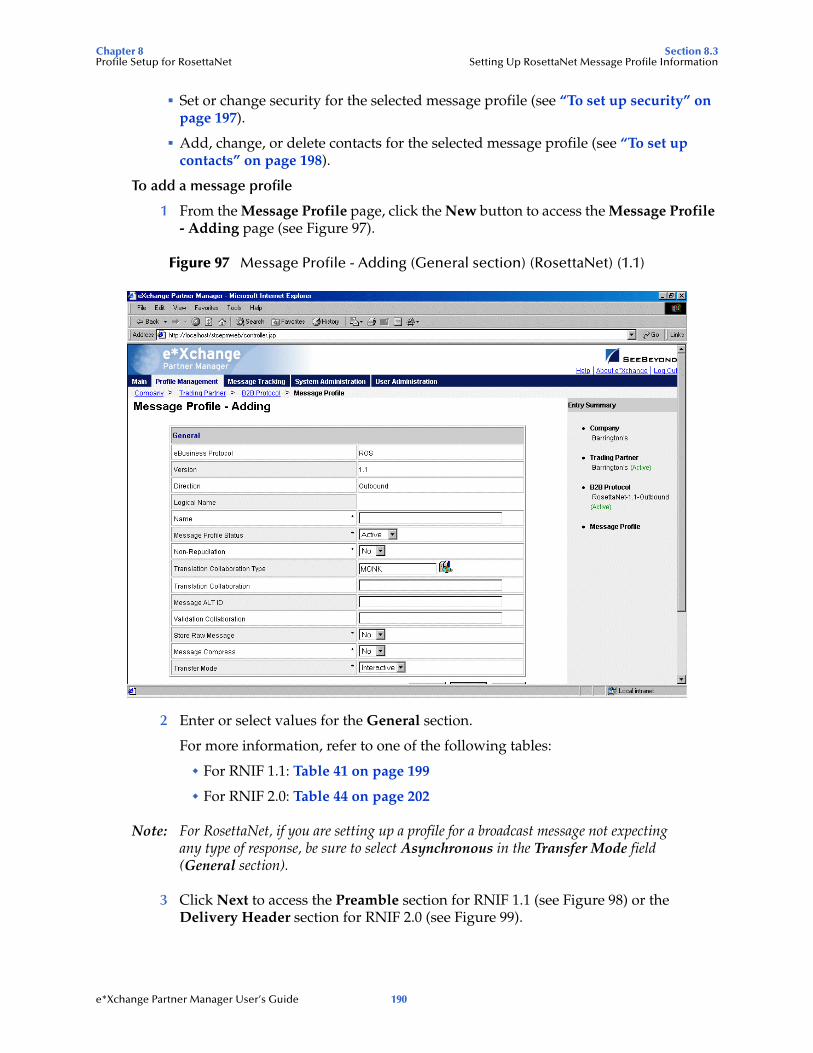
Chapter 8 Section 8.3Profile Setup for RosettaNet Setting Up RosettaNet Message Profile Information
Set or change security for the selected message profile (see “To set up security” on page 197).
Add, change, or delete contacts for the selected message profile (see “To set up contacts” on page 198).
To add a message profile
1 From the Message Profile page, click the New button to access the Message Profile - Adding page (see Figure 97).
Figure 97 Message Profile - Adding (General section) (RosettaNet) (1.1)
2 Enter or select values for the General section.
For more information, refer to one of the following tables:
For RNIF 1.1: Table 41 on page 199
For RNIF 2.0: Table 44 on page 202
Note: For RosettaNet, if you are setting up a profile for a broadcast message not expecting any type of response, be sure to select Asynchronous in the Transfer Mode field (General section).
3 Click Next to access the Preamble section for RNIF 1.1 (see Figure 98) or the Delivery Header section for RNIF 2.0 (see Figure 99).
e*Xchange Partner Manager User’s Guide 190
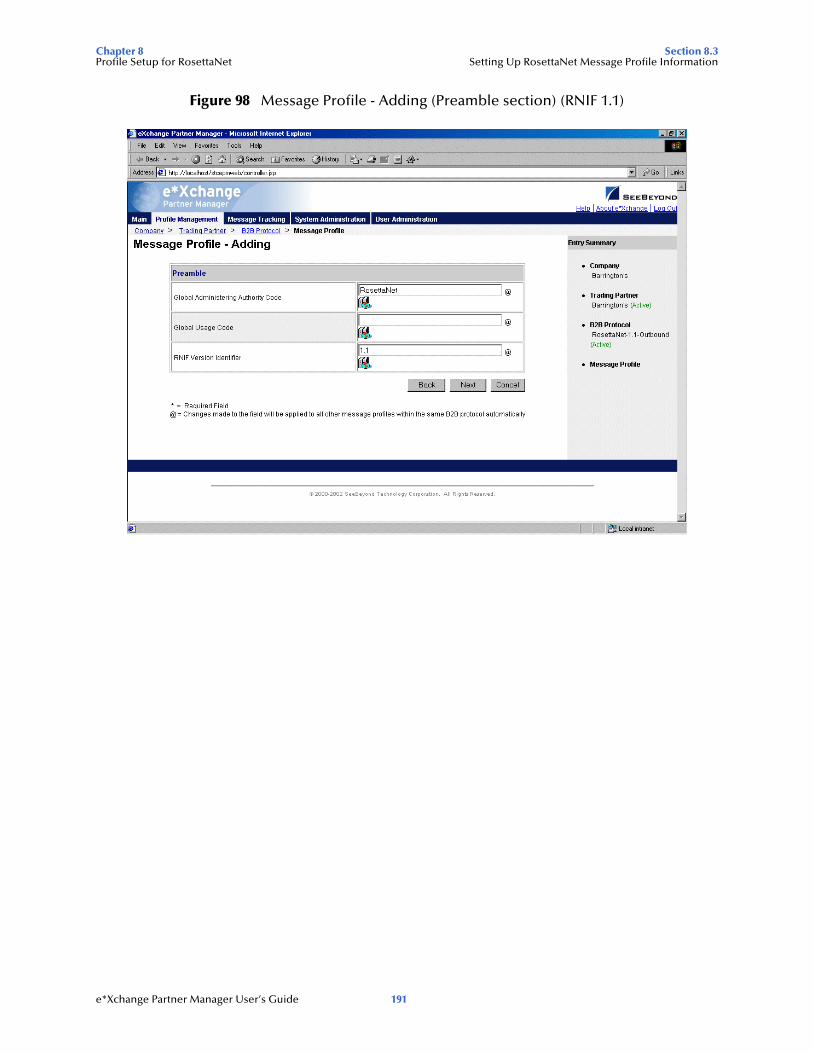
Chapter 8 Section 8.3Profile Setup for RosettaNet Setting Up RosettaNet Message Profile Information
Figure 98 Message Profile - Adding (Preamble section) (RNIF 1.1)
e*Xchange Partner Manager User’s Guide 191
Chapter 8 Section 8.3Profile Setup for RosettaNet Setting Up RosettaNet Message Profile Information
Figure 99 Message Profile - Adding (Delivery Header section) (RNIF 2.0)
4 Enter or select values for the Preamble section (RNIF 1.1) or the Delivery Header section (RNIF 2.0).
For more information, refer to one of the following tables:
For RNIF 1.1: Table 42 on page 200
For RNIF 2.0: Table 45 on page 204
5 Click Next to access the Service Header section (see Figure 100).
e*Xchange Partner Manager User’s Guide 192
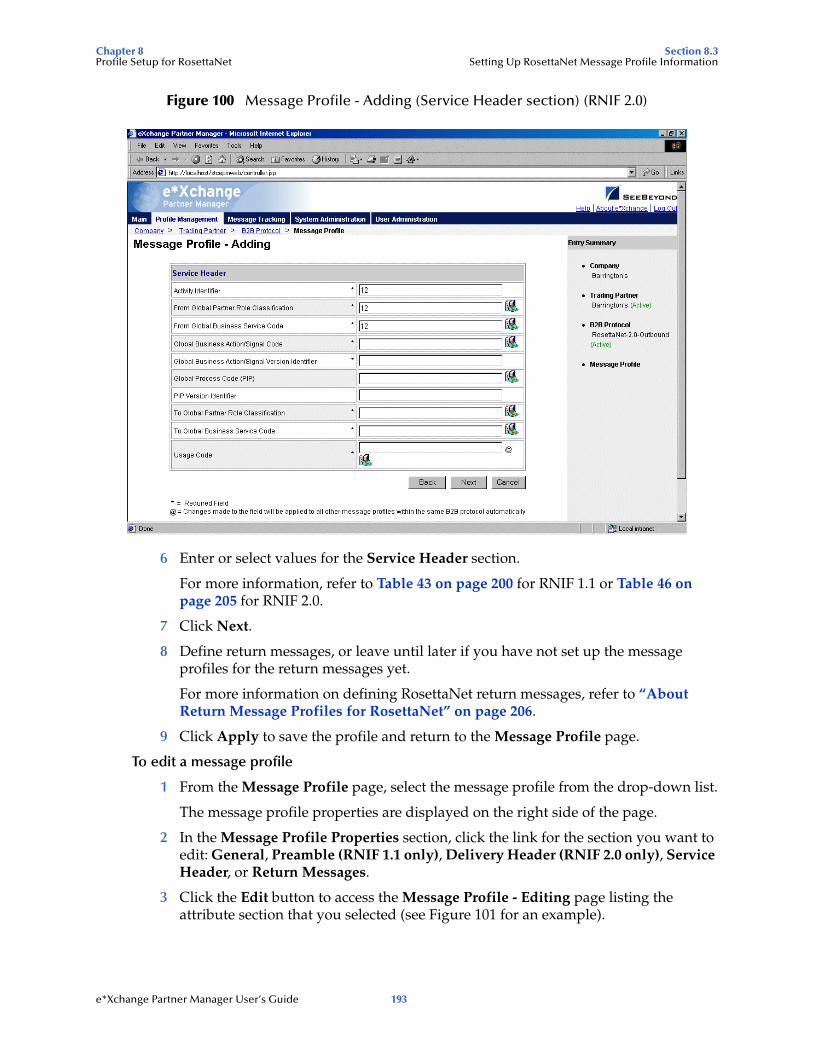
Chapter 8 Section 8.3Profile Setup for RosettaNet Setting Up RosettaNet Message Profile Information
Figure 100 Message Profile - Adding (Service Header section) (RNIF 2.0)
6 Enter or select values for the Service Header section.
For more information, refer to Table 43 on page 200 for RNIF 1.1 or Table 46 on page 205 for RNIF 2.0.
7 Click Next.
8 Define return messages, or leave until later if you have not set up the message profiles for the return messages yet.
For more information on defining RosettaNet return messages, refer to “About Return Message Profiles for RosettaNet” on page 206.
9 Click Apply to save the profile and return to the Message Profile page.
To edit a message profile
1 From the Message Profile page, select the message profile from the drop-down list.
The message profile properties are displayed on the right side of the page.
2 In the Message Profile Properties section, click the link for the section you want to edit: General, Preamble (RNIF 1.1 only), Delivery Header (RNIF 2.0 only), Service Header, or Return Messages.
3 Click the Edit button to access the Message Profile - Editing page listing the attribute section that you selected (see Figure 101 for an example).
e*Xchange Partner Manager User’s Guide 193

Chapter 8 Section 8.3Profile Setup for RosettaNet Setting Up RosettaNet Message Profile Information
Figure 101 Message Profile - Editing (General) (RosettaNet) (2.0)
4 Change the values as needed.
For more information, refer to the section for the appropriate RosettaNet version, in “RosettaNet Message Profile Parameter Values” on page 198.
5 Click Apply to save the changes and return to the Message Profile page.
The new message profile is now on the drop-down list.
To copy a message profile to the same B2B protocol
1 On the Message Profile page, select the message profile that you want to copy.
The message profile properties are displayed on the right side of the page.
2 Click the Copy button.
The Copy Type page appears (see Figure 102).
e*Xchange Partner Manager User’s Guide 194
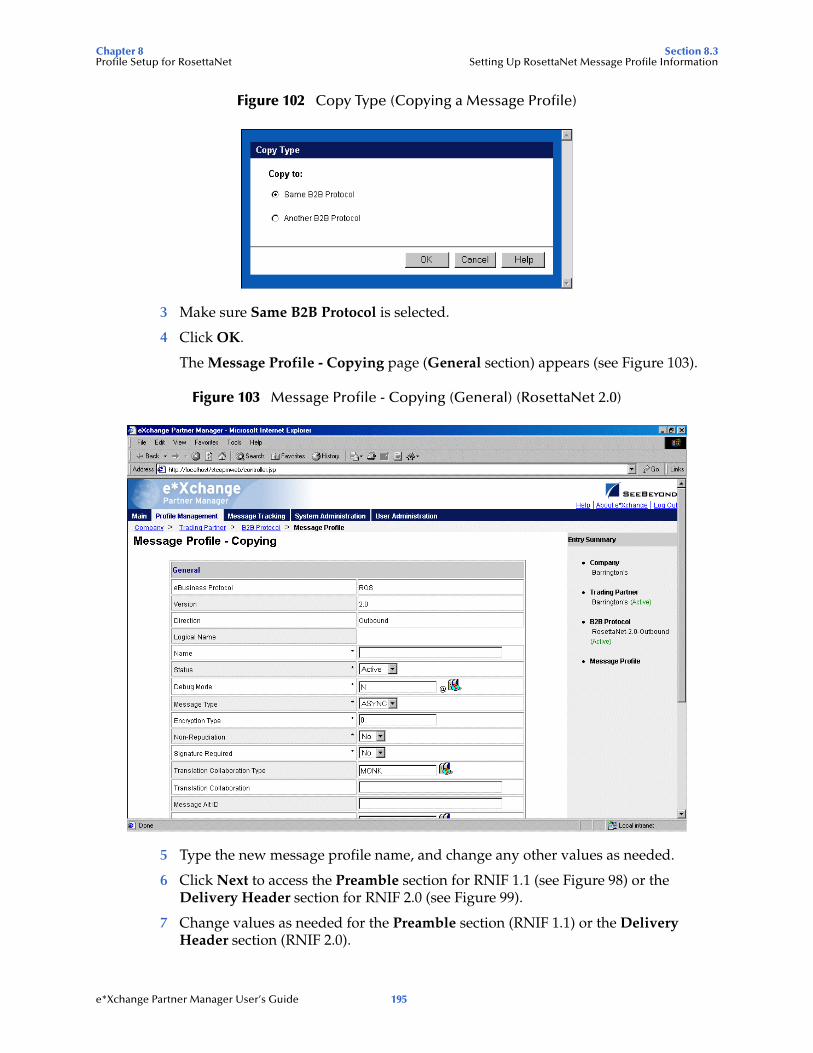
Chapter 8 Section 8.3Profile Setup for RosettaNet Setting Up RosettaNet Message Profile Information
Figure 102 Copy Type (Copying a Message Profile)
3 Make sure Same B2B Protocol is selected.
4 Click OK.
The Message Profile - Copying page (General section) appears (see Figure 103).
Figure 103 Message Profile - Copying (General) (RosettaNet 2.0)
5 Type the new message profile name, and change any other values as needed.
6 Click Next to access the Preamble section for RNIF 1.1 (see Figure 98) or the Delivery Header section for RNIF 2.0 (see Figure 99).
7 Change values as needed for the Preamble section (RNIF 1.1) or the Delivery Header section (RNIF 2.0).
e*Xchange Partner Manager User’s Guide 195
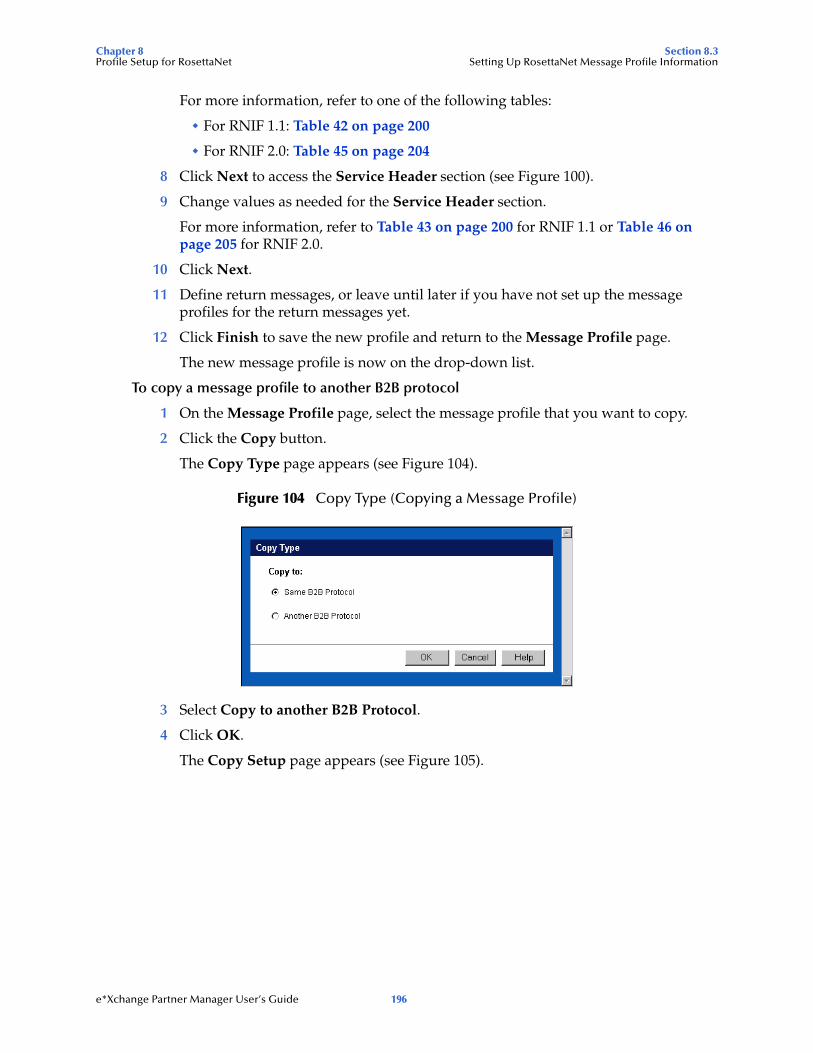
Chapter 8 Section 8.3Profile Setup for RosettaNet Setting Up RosettaNet Message Profile Information
For more information, refer to one of the following tables:
For RNIF 1.1: Table 42 on page 200
For RNIF 2.0: Table 45 on page 204
8 Click Next to access the Service Header section (see Figure 100).
9 Change values as needed for the Service Header section.
For more information, refer to Table 43 on page 200 for RNIF 1.1 or Table 46 on page 205 for RNIF 2.0.
10 Click Next.
11 Define return messages, or leave until later if you have not set up the message profiles for the return messages yet.
12 Click Finish to save the new profile and return to the Message Profile page.
The new message profile is now on the drop-down list.
To copy a message profile to another B2B protocol
1 On the Message Profile page, select the message profile that you want to copy.
2 Click the Copy button.
The Copy Type page appears (see Figure 104).
Figure 104 Copy Type (Copying a Message Profile)
3 Select Copy to another B2B Protocol.
4 Click OK.
The Copy Setup page appears (see Figure 105).
e*Xchange Partner Manager User’s Guide 196
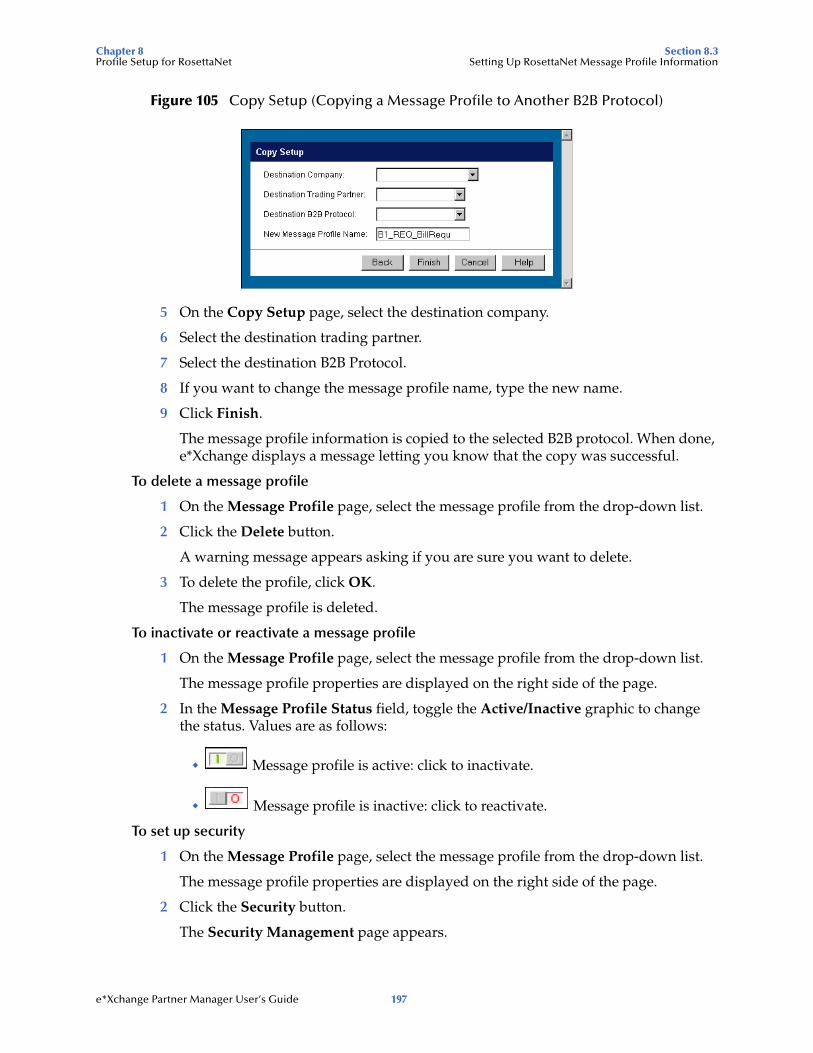
Chapter 8 Section 8.3Profile Setup for RosettaNet Setting Up RosettaNet Message Profile Information
Figure 105 Copy Setup (Copying a Message Profile to Another B2B Protocol)
5 On the Copy Setup page, select the destination company.
6 Select the destination trading partner.
7 Select the destination B2B Protocol.
8 If you want to change the message profile name, type the new name.
9 Click Finish.
The message profile information is copied to the selected B2B protocol. When done, e*Xchange displays a message letting you know that the copy was successful.
To delete a message profile
1 On the Message Profile page, select the message profile from the drop-down list.
2 Click the Delete button.
A warning message appears asking if you are sure you want to delete.
3 To delete the profile, click OK.
The message profile is deleted.
To inactivate or reactivate a message profile
1 On the Message Profile page, select the message profile from the drop-down list.
The message profile properties are displayed on the right side of the page.
2 In the Message Profile Status field, toggle the Active/Inactive graphic to change the status. Values are as follows:
Message profile is active: click to inactivate.
Message profile is inactive: click to reactivate.
To set up security
1 On the Message Profile page, select the message profile from the drop-down list.
The message profile properties are displayed on the right side of the page.
2 Click the Security button.
The Security Management page appears.
e*Xchange Partner Manager User’s Guide 197
Chapter 8 Section 8.4Profile Setup for RosettaNet RosettaNet Message Profile Parameter Values
3 Set the values as needed.
4 Click OK.
For detailed instructions on setting up security, refer to “Security” on page 66.
To set up contacts
1 On the Message Profile page, click the Contacts icon.
The Company - Contacts Viewing page appears.
2 Do one of the following:
To add a contact, click the Add button in the appropriate row. Type the information in the Company - Contacts Adding page and then click Apply.
To edit an existing contact, click the View/Edit button in the appropriate row. This button is only available when a contact has been entered. Edit the values in the Company - Contacts Editing page and then click Apply.
To delete an existing contact, click the View/Edit button in the appropriate row. In the Company - Contacts Editing page, click the Delete button at the bottom left. At the “Are you sure...” message, click OK.
For detailed instructions on working with contacts, refer to “Storing Contact Information” on page 228.
8.4 RosettaNet Message Profile Parameter ValuesThis section lists field descriptions for the RosettaNet values required for setting up a message profile.
Field descriptions are listed separately for each version:
RNIF 1.1—See “RNIF 1.1” on page 198
RNIF 2.0—See “RNIF 2.0” on page 202
8.4.1. RNIF 1.1This section includes field descriptions for RosettaNet version 1.1 messages, for the following Message Profile setup sections:
General section—Table 41 on page 199
Preamble section—Table 42 on page 200
Service Header section—Table 43 on page 200
e*Xchange Partner Manager User’s Guide 198
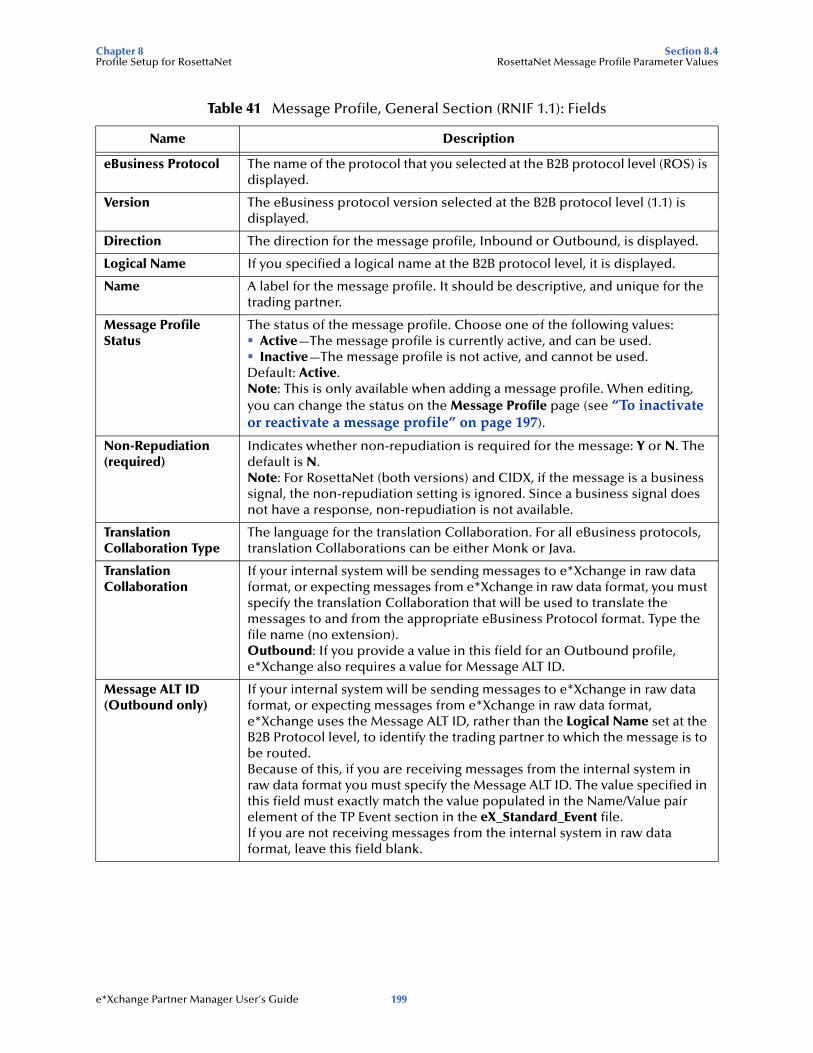
Chapter 8 Section 8.4Profile Setup for RosettaNet RosettaNet Message Profile Parameter Values
Table 41 Message Profile, General Section (RNIF 1.1): Fields
Name Description
eBusiness Protocol The name of the protocol that you selected at the B2B protocol level (ROS) is displayed.
Version The eBusiness protocol version selected at the B2B protocol level (1.1) is displayed.
Direction The direction for the message profile, Inbound or Outbound, is displayed.
Logical Name If you specified a logical name at the B2B protocol level, it is displayed.
Name A label for the message profile. It should be descriptive, and unique for the trading partner.
Message Profile Status
The status of the message profile. Choose one of the following values:Active—The message profile is currently active, and can be used.Inactive—The message profile is not active, and cannot be used.
Default: Active.Note: This is only available when adding a message profile. When editing, you can change the status on the Message Profile page (see “To inactivate or reactivate a message profile” on page 197).
Non-Repudiation (required)
Indicates whether non-repudiation is required for the message: Y or N. The default is N.Note: For RosettaNet (both versions) and CIDX, if the message is a business signal, the non-repudiation setting is ignored. Since a business signal does not have a response, non-repudiation is not available.
Translation Collaboration Type
The language for the translation Collaboration. For all eBusiness protocols, translation Collaborations can be either Monk or Java.
Translation Collaboration
If your internal system will be sending messages to e*Xchange in raw data format, or expecting messages from e*Xchange in raw data format, you must specify the translation Collaboration that will be used to translate the messages to and from the appropriate eBusiness Protocol format. Type the file name (no extension).Outbound: If you provide a value in this field for an Outbound profile, e*Xchange also requires a value for Message ALT ID.
Message ALT ID(Outbound only)
If your internal system will be sending messages to e*Xchange in raw data format, or expecting messages from e*Xchange in raw data format, e*Xchange uses the Message ALT ID, rather than the Logical Name set at the B2B Protocol level, to identify the trading partner to which the message is to be routed.Because of this, if you are receiving messages from the internal system in raw data format you must specify the Message ALT ID. The value specified in this field must exactly match the value populated in the Name/Value pair element of the TP Event section in the eX_Standard_Event file.If you are not receiving messages from the internal system in raw data format, leave this field blank.
e*Xchange Partner Manager User’s Guide 199
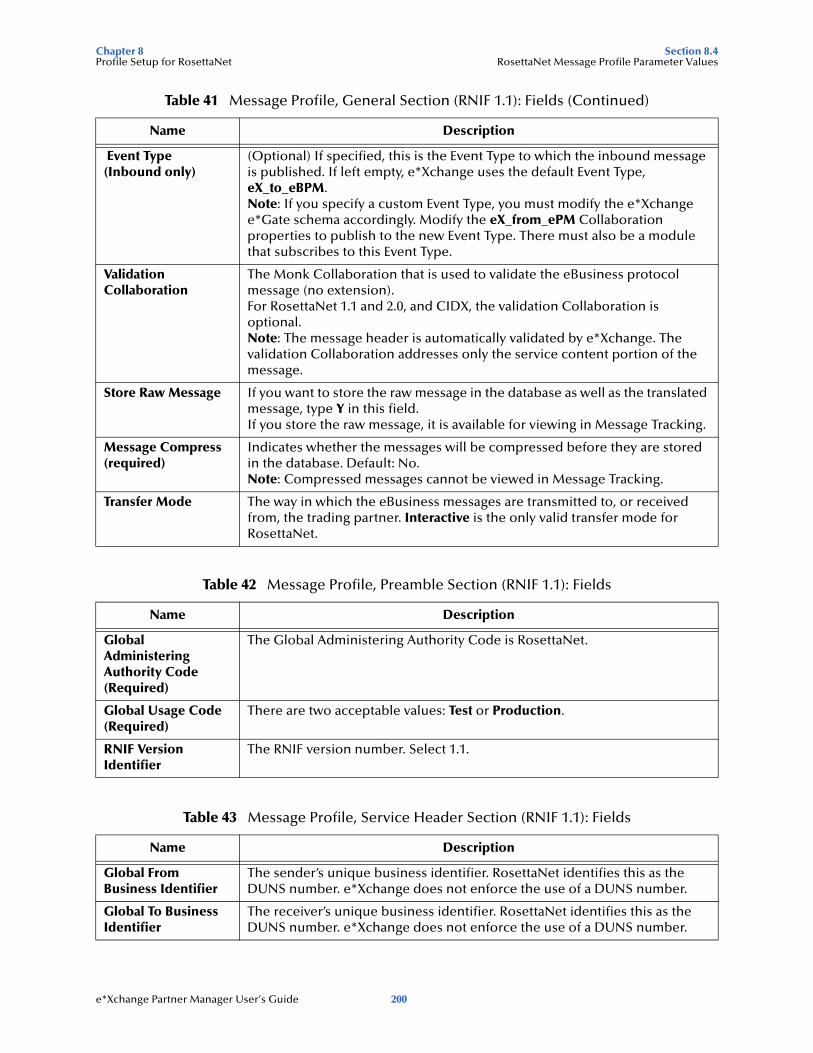
Chapter 8 Section 8.4Profile Setup for RosettaNet RosettaNet Message Profile Parameter Values
Event Type (Inbound only)
(Optional) If specified, this is the Event Type to which the inbound message is published. If left empty, e*Xchange uses the default Event Type, eX_to_eBPM.Note: If you specify a custom Event Type, you must modify the e*Xchange e*Gate schema accordingly. Modify the eX_from_ePM Collaboration properties to publish to the new Event Type. There must also be a module that subscribes to this Event Type.
Validation Collaboration
The Monk Collaboration that is used to validate the eBusiness protocol message (no extension).For RosettaNet 1.1 and 2.0, and CIDX, the validation Collaboration is optional.Note: The message header is automatically validated by e*Xchange. The validation Collaboration addresses only the service content portion of the message.
Store Raw Message If you want to store the raw message in the database as well as the translated message, type Y in this field.If you store the raw message, it is available for viewing in Message Tracking.
Message Compress (required)
Indicates whether the messages will be compressed before they are stored in the database. Default: No.Note: Compressed messages cannot be viewed in Message Tracking.
Transfer Mode The way in which the eBusiness messages are transmitted to, or received from, the trading partner. Interactive is the only valid transfer mode for RosettaNet.
Table 42 Message Profile, Preamble Section (RNIF 1.1): Fields
Name Description
Global Administering Authority Code (Required)
The Global Administering Authority Code is RosettaNet.
Global Usage Code (Required)
There are two acceptable values: Test or Production.
RNIF Version Identifier
The RNIF version number. Select 1.1.
Table 43 Message Profile, Service Header Section (RNIF 1.1): Fields
Name Description
Global From Business Identifier
The sender’s unique business identifier. RosettaNet identifies this as the DUNS number. e*Xchange does not enforce the use of a DUNS number.
Global To Business Identifier
The receiver’s unique business identifier. RosettaNet identifies this as the DUNS number. e*Xchange does not enforce the use of a DUNS number.
Table 41 Message Profile, General Section (RNIF 1.1): Fields (Continued)
Name Description
e*Xchange Partner Manager User’s Guide 200

Chapter 8 Section 8.4Profile Setup for RosettaNet RosettaNet Message Profile Parameter Values
From Global Business Service Code
The sender’s Global Business Service Code, which is the RosettaNet code for the business service: for example, Product Information Distributor Service, Seller Service, Product Supplier Service, or Buyer Service.Click on the Attributes List icon to select from a list of valid values.
From Global Partner Classification Code (Required)
The RosettaNet classification code identifying the sender’s function in the supply chain: for example, Carrier, Distributor, Manufacturer, or Retailer.Click on the Attributes List icon to select from a list of valid values.
From Global Partner Role Classification Code (Required)
The sender’s partner role classification code. This is the code for the partner role that uses product information to create or update enterprise systems and online promotion systems such as electronic catalog systems. Examples of valid codes are Buyer, Seller, Customer Manager, Supplier, and Shipment Information User.Click on the Attributes List icon to select from a list of valid values.
Global Business Action/Signal Code (Required)
If the message is a business action: The Global Business Action Code, such as Return Product Request Action, Financing Request Action, or Remittance Advice Notification Action.If the message is a signal: The Global Business Signal Code, such as General Exception or Receipt Acknowledge.Click on the Attributes List icon to select from a list of valid values.
Global Document Function Code (Required)
The code that indicates the type of document: either Request or Response. For example, for an OA1, Failure Notification, it should be set to Request.Click on the Attributes List icon to select from a list of valid values.
Global Process Code The plain language name for the RosettaNet code assigned to the process; for example, Distribute New Product Information, or Query Price and Availability.Click on the Attributes List icon to select from a list of valid values.
Global Process Ind Code
The RosettaNet code assigned to the process; for example, 2A1 or 3A2.Click on the Attributes List icon to select from a list of valid values.
Global Tran Code The RosettaNet Global Transaction Code. Examples: Process Return Product Request, Confirm Financing, or Create Remittance Advice.Click on the Attributes List icon to select from a list of valid values.
Signature INST Identifier
Not used.
To Global Business Service Code
The receiver’s Global Business Service Code, which is the RosettaNet code for the business service: for example, Product Information Distributor Service, Seller Service, Product Supplier Service, or Buyer Service.Click on the Attributes List icon to select from a list of valid values.
To Global Partner Classification Code (Required)
The RosettaNet classification code identifying the receiver’s function in the supply chain: for example, Carrier, Distributor, Manufacturer, or Retailer.Click on the Attributes List icon to select from a list of valid values.
Table 43 Message Profile, Service Header Section (RNIF 1.1): Fields (Continued)
Name Description
e*Xchange Partner Manager User’s Guide 201
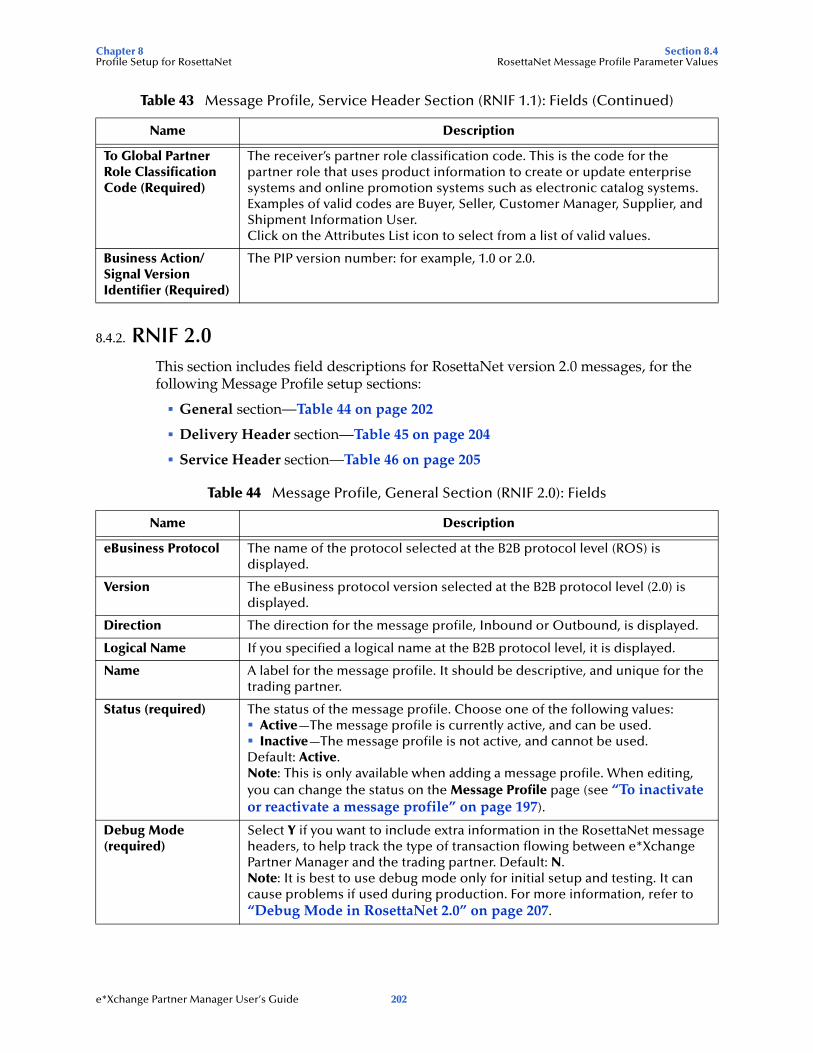
Chapter 8 Section 8.4Profile Setup for RosettaNet RosettaNet Message Profile Parameter Values
8.4.2. RNIF 2.0This section includes field descriptions for RosettaNet version 2.0 messages, for the following Message Profile setup sections:
General section—Table 44 on page 202
Delivery Header section—Table 45 on page 204
Service Header section—Table 46 on page 205
To Global Partner Role Classification Code (Required)
The receiver’s partner role classification code. This is the code for the partner role that uses product information to create or update enterprise systems and online promotion systems such as electronic catalog systems. Examples of valid codes are Buyer, Seller, Customer Manager, Supplier, and Shipment Information User.Click on the Attributes List icon to select from a list of valid values.
Business Action/Signal Version Identifier (Required)
The PIP version number: for example, 1.0 or 2.0.
Table 44 Message Profile, General Section (RNIF 2.0): Fields
Name Description
eBusiness Protocol The name of the protocol selected at the B2B protocol level (ROS) is displayed.
Version The eBusiness protocol version selected at the B2B protocol level (2.0) is displayed.
Direction The direction for the message profile, Inbound or Outbound, is displayed.
Logical Name If you specified a logical name at the B2B protocol level, it is displayed.
Name A label for the message profile. It should be descriptive, and unique for the trading partner.
Status (required) The status of the message profile. Choose one of the following values:Active—The message profile is currently active, and can be used.Inactive—The message profile is not active, and cannot be used.
Default: Active.Note: This is only available when adding a message profile. When editing, you can change the status on the Message Profile page (see “To inactivate or reactivate a message profile” on page 197).
Debug Mode (required)
Select Y if you want to include extra information in the RosettaNet message headers, to help track the type of transaction flowing between e*Xchange Partner Manager and the trading partner. Default: N.Note: It is best to use debug mode only for initial setup and testing. It can cause problems if used during production. For more information, refer to “Debug Mode in RosettaNet 2.0” on page 207.
Table 43 Message Profile, Service Header Section (RNIF 1.1): Fields (Continued)
Name Description
e*Xchange Partner Manager User’s Guide 202
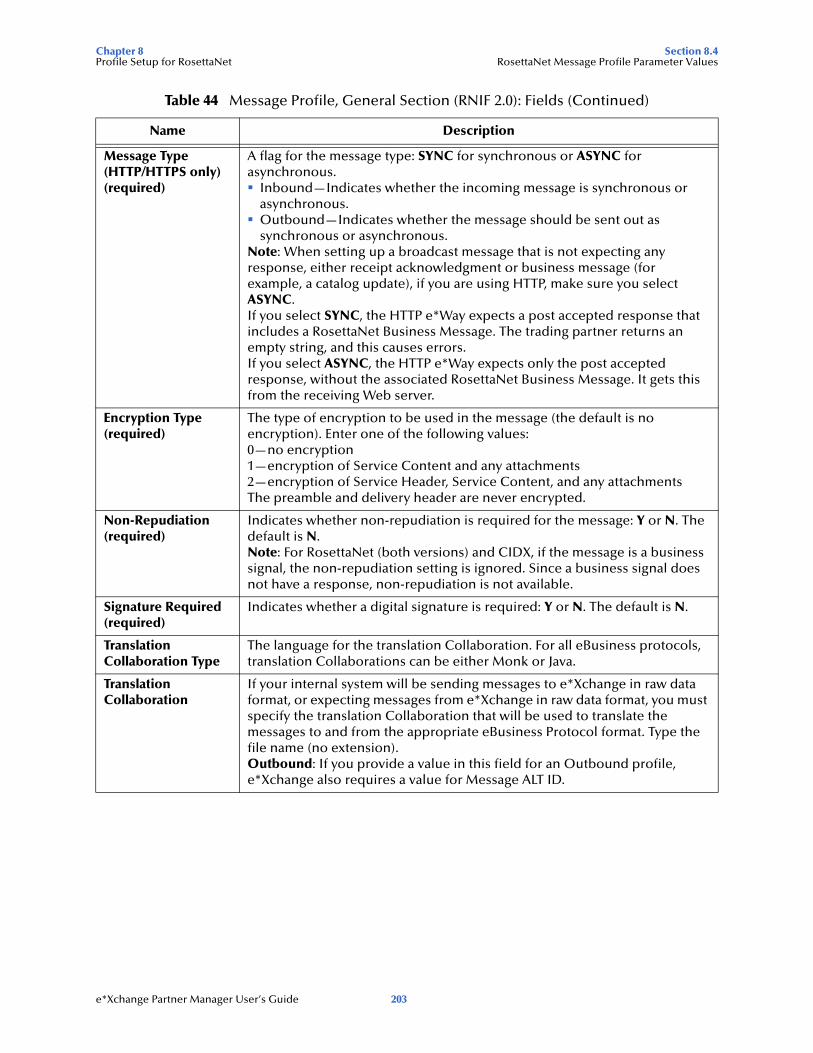
Chapter 8 Section 8.4Profile Setup for RosettaNet RosettaNet Message Profile Parameter Values
Message Type (HTTP/HTTPS only) (required)
A flag for the message type: SYNC for synchronous or ASYNC for asynchronous.
Inbound—Indicates whether the incoming message is synchronous or asynchronous.Outbound—Indicates whether the message should be sent out as synchronous or asynchronous.
Note: When setting up a broadcast message that is not expecting any response, either receipt acknowledgment or business message (for example, a catalog update), if you are using HTTP, make sure you select ASYNC.If you select SYNC, the HTTP e*Way expects a post accepted response that includes a RosettaNet Business Message. The trading partner returns an empty string, and this causes errors.If you select ASYNC, the HTTP e*Way expects only the post accepted response, without the associated RosettaNet Business Message. It gets this from the receiving Web server.
Encryption Type (required)
The type of encryption to be used in the message (the default is no encryption). Enter one of the following values:0—no encryption1—encryption of Service Content and any attachments2—encryption of Service Header, Service Content, and any attachmentsThe preamble and delivery header are never encrypted.
Non-Repudiation (required)
Indicates whether non-repudiation is required for the message: Y or N. The default is N.Note: For RosettaNet (both versions) and CIDX, if the message is a business signal, the non-repudiation setting is ignored. Since a business signal does not have a response, non-repudiation is not available.
Signature Required (required)
Indicates whether a digital signature is required: Y or N. The default is N.
Translation Collaboration Type
The language for the translation Collaboration. For all eBusiness protocols, translation Collaborations can be either Monk or Java.
Translation Collaboration
If your internal system will be sending messages to e*Xchange in raw data format, or expecting messages from e*Xchange in raw data format, you must specify the translation Collaboration that will be used to translate the messages to and from the appropriate eBusiness Protocol format. Type the file name (no extension).Outbound: If you provide a value in this field for an Outbound profile, e*Xchange also requires a value for Message ALT ID.
Table 44 Message Profile, General Section (RNIF 2.0): Fields (Continued)
Name Description
e*Xchange Partner Manager User’s Guide 203
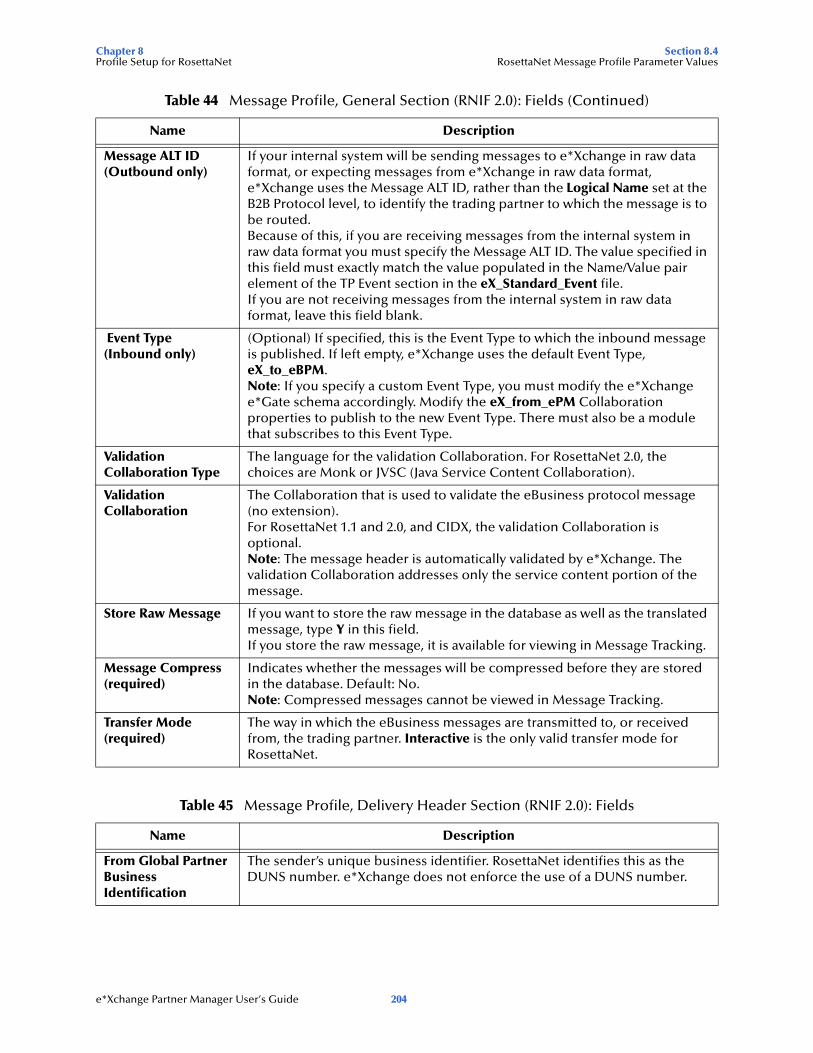
Chapter 8 Section 8.4Profile Setup for RosettaNet RosettaNet Message Profile Parameter Values
Message ALT ID(Outbound only)
If your internal system will be sending messages to e*Xchange in raw data format, or expecting messages from e*Xchange in raw data format, e*Xchange uses the Message ALT ID, rather than the Logical Name set at the B2B Protocol level, to identify the trading partner to which the message is to be routed.Because of this, if you are receiving messages from the internal system in raw data format you must specify the Message ALT ID. The value specified in this field must exactly match the value populated in the Name/Value pair element of the TP Event section in the eX_Standard_Event file.If you are not receiving messages from the internal system in raw data format, leave this field blank.
Event Type (Inbound only)
(Optional) If specified, this is the Event Type to which the inbound message is published. If left empty, e*Xchange uses the default Event Type, eX_to_eBPM.Note: If you specify a custom Event Type, you must modify the e*Xchange e*Gate schema accordingly. Modify the eX_from_ePM Collaboration properties to publish to the new Event Type. There must also be a module that subscribes to this Event Type.
Validation Collaboration Type
The language for the validation Collaboration. For RosettaNet 2.0, the choices are Monk or JVSC (Java Service Content Collaboration).
Validation Collaboration
The Collaboration that is used to validate the eBusiness protocol message (no extension).For RosettaNet 1.1 and 2.0, and CIDX, the validation Collaboration is optional.Note: The message header is automatically validated by e*Xchange. The validation Collaboration addresses only the service content portion of the message.
Store Raw Message If you want to store the raw message in the database as well as the translated message, type Y in this field.If you store the raw message, it is available for viewing in Message Tracking.
Message Compress (required)
Indicates whether the messages will be compressed before they are stored in the database. Default: No.Note: Compressed messages cannot be viewed in Message Tracking.
Transfer Mode (required)
The way in which the eBusiness messages are transmitted to, or received from, the trading partner. Interactive is the only valid transfer mode for RosettaNet.
Table 45 Message Profile, Delivery Header Section (RNIF 2.0): Fields
Name Description
From Global Partner Business Identification
The sender’s unique business identifier. RosettaNet identifies this as the DUNS number. e*Xchange does not enforce the use of a DUNS number.
Table 44 Message Profile, General Section (RNIF 2.0): Fields (Continued)
Name Description
e*Xchange Partner Manager User’s Guide 204
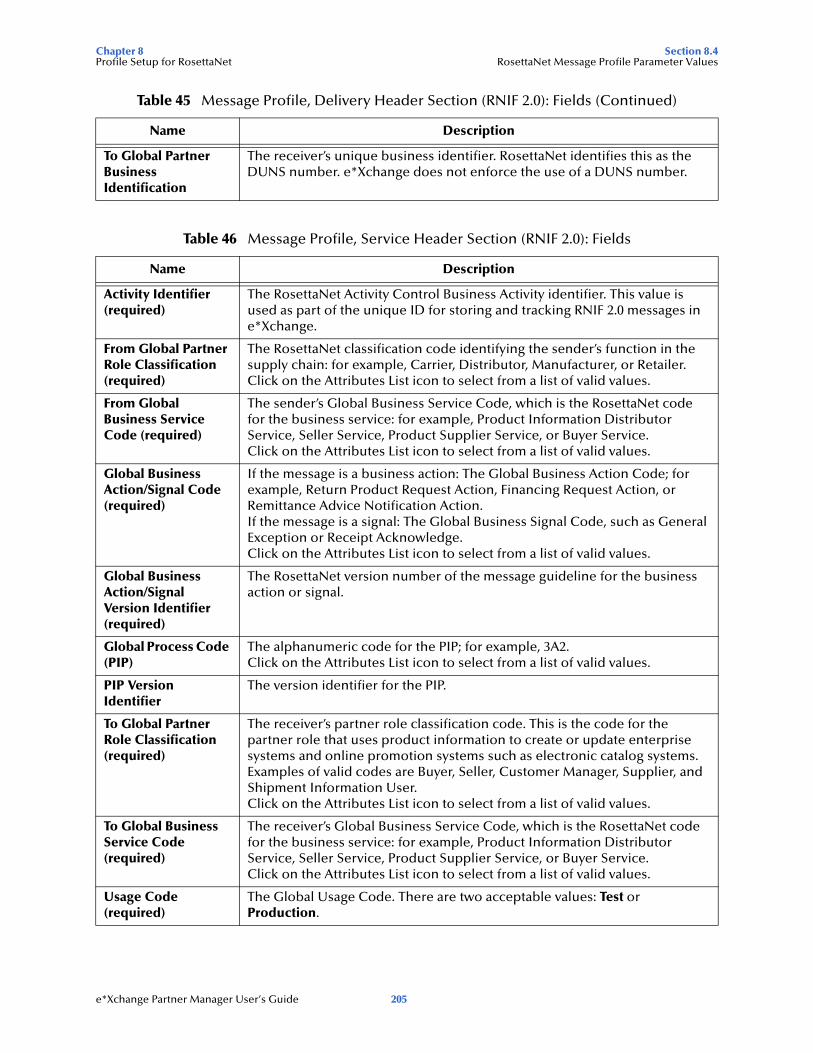
Chapter 8 Section 8.4Profile Setup for RosettaNet RosettaNet Message Profile Parameter Values
To Global Partner Business Identification
The receiver’s unique business identifier. RosettaNet identifies this as the DUNS number. e*Xchange does not enforce the use of a DUNS number.
Table 46 Message Profile, Service Header Section (RNIF 2.0): Fields
Name Description
Activity Identifier (required)
The RosettaNet Activity Control Business Activity identifier. This value is used as part of the unique ID for storing and tracking RNIF 2.0 messages in e*Xchange.
From Global Partner Role Classification (required)
The RosettaNet classification code identifying the sender’s function in the supply chain: for example, Carrier, Distributor, Manufacturer, or Retailer.Click on the Attributes List icon to select from a list of valid values.
From Global Business Service Code (required)
The sender’s Global Business Service Code, which is the RosettaNet code for the business service: for example, Product Information Distributor Service, Seller Service, Product Supplier Service, or Buyer Service.Click on the Attributes List icon to select from a list of valid values.
Global Business Action/Signal Code (required)
If the message is a business action: The Global Business Action Code; for example, Return Product Request Action, Financing Request Action, or Remittance Advice Notification Action.If the message is a signal: The Global Business Signal Code, such as General Exception or Receipt Acknowledge.Click on the Attributes List icon to select from a list of valid values.
Global Business Action/Signal Version Identifier (required)
The RosettaNet version number of the message guideline for the business action or signal.
Global Process Code (PIP)
The alphanumeric code for the PIP; for example, 3A2.Click on the Attributes List icon to select from a list of valid values.
PIP Version Identifier
The version identifier for the PIP.
To Global Partner Role Classification (required)
The receiver’s partner role classification code. This is the code for the partner role that uses product information to create or update enterprise systems and online promotion systems such as electronic catalog systems. Examples of valid codes are Buyer, Seller, Customer Manager, Supplier, and Shipment Information User.Click on the Attributes List icon to select from a list of valid values.
To Global Business Service Code (required)
The receiver’s Global Business Service Code, which is the RosettaNet code for the business service: for example, Product Information Distributor Service, Seller Service, Product Supplier Service, or Buyer Service.Click on the Attributes List icon to select from a list of valid values.
Usage Code (required)
The Global Usage Code. There are two acceptable values: Test or Production.
Table 45 Message Profile, Delivery Header Section (RNIF 2.0): Fields (Continued)
Name Description
e*Xchange Partner Manager User’s Guide 205
Chapter 8 Section 8.5Profile Setup for RosettaNet About Return Message Profiles for RosettaNet
8.5 About Return Message Profiles for RosettaNetThis section provides additional information and tips for defining RosettaNet return messages.
8.5.1. Setup Sequencee*Xchange allows you to specify one or more return message profiles that will be valid for a specific incoming or outgoing message profile. However, some setup is required before the correct selections are available in the Return Messages section. You must create all message profiles for the trading partner, both inbound and outbound, so that the correct selections will be available to you.
For example, suppose you are using RNIF 1.1 and have a trading partner, ABC Company. You will receive only a 3A2, Price and Availability Query, from this trading partner. In response you send a 3A2 Price and Availability Response. Receipt Acknowledgment signals are sent out upon receipt of message in either direction.
To set this up, do the following:
Define outbound message profiles for 3A2 Price and Availability Response and Acknowledgment Signal.
Define inbound message profiles for 3A2 Price and Availability Query Action and Acknowledgment Signal. Because you defined the outbound message profile first, the 3A2 Price and Availability Response and the Acknowledgment Signal are available for selection in the Return Messages section.
Go back to the outbound message profile for 3A2 Price and Availability Response. You will now be able to select Acknowledgment Signal as the expected response.
8.5.2. Defining Message Profiles for All ConditionsWhen you are setting up RosettaNet message profiles, it is very important that you define all the action messages that might be possible, under any circumstances including error conditions, for both inbound and outbound. These message profile definitions are required for any positive action messages received or generated by e*Xchange. The exception action messages are also required for error handling conditions at various levels (for outbound) or for receiving exception action messages (for inbound).
Note: Even though Negative Ack eBusiness messages must be defined in each direction for each trading partner, do not select these as an expected response. Only select response eBusiness messages that occur in the Go path of an eBusiness message exchange. For RosettaNet, you should never select a RosettaNet Receipt Ack Exception as the expected return message.
Each version, 1.1 and 2.0, has a different set of action messages. Be sure you define all possible outcomes for the version you are using, as follows:
RNIF 1.1:
e*Xchange Partner Manager User’s Guide 206
Chapter 8 Section 8.6Profile Setup for RosettaNet Debug Mode in RosettaNet 2.0
Receipt Acknowledgment
Receipt Acknowledgment Exception
Acceptance Acknowledgment
Acceptance Acknowledgment Exception
General Exception
Failure Notification
RNIF 2.0:
Receipt Acknowledgment
Receipt Acknowledgment Exception
Failure Notification
8.5.3. Additional Information for RosettaNet 1.1For RosettaNet 1.1, if the inbound Action Message requires an Acceptance Acknowledgment, you must set up the internal system so that it responds properly. e*Xchange does not generate an Acceptance Acknowledgment or Acceptance Acknowledgment Exception automatically. It generates only the Receipt Acknowledgment and Receipt Acknowledgment Exception business signals and the Failure Notification action message.
Since the business content must be validated before an Acceptance Acknowledgment is generated, it must be originated by an internal application and sent to e*Xchange to be forwarded to the trading partner.
8.6 Debug Mode in RosettaNet 2.0The Message Profile General Settings for RosettaNet 2.0 include a Debug Mode flag. Acceptable values are Y or N.
If debug mode is turned on, extra information is included in the RosettaNet 2.0 message headers to help track the type of transaction flowing between e*Xchange Partner Manager and the trading partner.
It is recommended that this only be used for initial setup and testing. With debug headers, the trading partner receiving a message can send an exception to e*Xchange, or e*Xchange send an exception to the trading partner, even if the service header was not successfully read. Additionally, debug mode only applies to RosettaNet business actions, not business signals.
Additionally, it should not be used in production mode for security reasons.
If Y is selected, e*Xchange includes the following extra values in the standard event TP Attribute section for all outbound RosettaNet 2.0 messages:
PIP_CODE
e*Xchange Partner Manager User’s Guide 207
Chapter 8 Section 8.7Profile Setup for RosettaNet RosettaNet Message Processing
PIP_INSTANCE_ID
ACTIVITY_CODE
ACTION_CODE
ACTION_INSTANCE_ID
PARTNER_ID
The e*Way that communicates with the trading partner (HTTP/HTTPS or SMTP) checks for the DEBUG_MODE flag in the standard event. If the flag exists, e*Xchange checks the value. If the value is Y, extra headers are included in the message being sent to the trading partner.
If DEBUG_MODE = Y, e*Xchange includes the flag x-RN-Debug-Mode: Yes
and looks for the following optional TP attributes in the standard event:
PIP_CODE—if present, will include X-RN-PIP-Code
PIP_INSTANCE_ID—if present, will include X-RN-PIP-Instance-ID
ACTIVITY_CODE—if present, will include X-RN-Activity-Code
ACTION_CODE—if present, will include X-RN-Action-Code
ACTION_INSTANCE_ID—if present, will include X-RN-Action-Instance-ID
PARTNER_ID—if present, will include X-RN-Partner-ID
8.7 RosettaNet Message ProcessingThis section outlines the sequence of events that occurs when a RosettaNet message is processed by e*Xchange. It is broken down as follows:
RNIF 1.1: Inbound and Outbound
RNIF 2.0: Inbound and Outbound
8.7.1. RNIF 1.1
Inbound RNIF 1.1 Message Processing
e*Xchange follows the following sequence of actions in processing an inbound RNIF 1.1 message:
1 Identifies the trading partner profile.
2 If non-repudiation is required for the message, attempts to verify the signature using the trading partner’s public key.
3 Validates the Preamble.
4 Validates the Service Header.
e*Xchange Partner Manager User’s Guide 208
Chapter 8 Section 8.7Profile Setup for RosettaNet RosettaNet Message Processing
5 Conditional: If a validation Collaboration (tsc file) is specified in the partner profile, validates the Service Content.
6 Stores the message in the database.
7 Establishes message tracking in the database.
8 Conditional: If a Receipt Acknowledgment to the message is required, sends the Receipt Acknowledgment.
9 If the message is an action message, forwards it to the internal application.
If there is an error with any of the above steps, e*Xchange generates an error and invokes the error handling routine. For more information on error handling, refer to “Inbound RNIF 1.1 Error Handling” on page 212.
Outbound RNIF 1.1 Message Processing
e*Xchange follows the following sequence of actions in processing an outbound RNIF 1.1 message:
1 Identifies the trading partner for the message.
2 Validates the message content if a validation Collaboration is specified.
3 Sets the header information based on partner profile.
4 Saves the message in the database.
5 Establishes message tracking in the database.
6 Adds a signature to the message if necessary.
7 Forwards the message to the trading partner.
8.7.2. RNIF 2.0
Inbound RNIF 2.0 Message Processing
e*Xchange follows the following sequence of actions in processing an inbound RNIF 2.0 message:
1 Parses the message and outputs a populated RosettaNet event message.
2 Loads the message profile.
3 If the trading partner profile indicates that a signature is required, checks that the signature is there.
4 For a response message, loads the message tracking attributes of the associated request message.
5 Validates the Preamble.
6 Validates the Delivery Header.
7 Validates the Service Header.
8 Validates the Service Content.
e*Xchange Partner Manager User’s Guide 209
Chapter 8 Section 8.7Profile Setup for RosettaNet RosettaNet Message Processing
9 If there are no errors in any of the prior steps, sends the receipt acknowledgment if one is expected.
10 Checks for message duplication.
11 Stores the message in the database.
12 Establishes message tracking in the database.
13 For a response message, associates it with the request message.
14 Forwards the message to the internal application.
If there is an error with any of the above steps, e*Xchange generates an error and invokes the error handling routine. For more information on error handling, refer to “Inbound RNIF 2.0 Error Handling” on page 213.
Outbound RNIF 2.0 Message Processing
e*Xchange follows the following sequence of actions in processing an outbound RNIF 2.0 message:
1 Validates the outbound header to ensure all the information needed to identify the envelope is present. At this level, e*Xchange just checks that the fields are populated; it does not look at the actual values.
2 Checks for duplicates and creates an error if found.
3 Loads the message profile.
4 For a response message, loads the message tracking attributes of the associated request message.
5 Populates the Preamble with attributes from the database.
6 Populates the Delivery Header with attributes from the database.
7 Populates the Service Header with attributes from the database.
8 Validates the service content if a validation Collaboration is specified.
9 Packs the message into a RosettaNet Business Message string.
10 Optional: Encrypts the message if encryption is specified in the trading partner profile.
11 Optional: Adds a digital signature if digital signatures are specified in the trading partner profile.
12 Stores the business message in the database.
13 Creates appropriate rows in the Message Tracking tables and in the database for the ack monitor.
14 Associates the response message with the request message.
15 Sets the standard event attributes and forwards the message to the trading partner.
If there is an error with any of the above steps, e*Xchange generates an error and invokes the error handling routine. For more information on error handling, refer to “Outbound RNIF 2.0 Error Handling” on page 214.
e*Xchange Partner Manager User’s Guide 210
Chapter 8 Section 8.8Profile Setup for RosettaNet Acknowledgment Monitoring
8.8 Acknowledgment MonitoringThis section outlines the steps e*Xchange takes to monitor the sending and receiving of message acknowledgments. It is broken down as follows:
RNIF 1.1
RNIF 2.0
Important: It is a common error to change the status of a trading partner profile to Inactive while there are still messages associated with it that are waiting to be processed. If you change the status to Inactive, the Ack Monitor cannot find the active trading partner profile and therefore cannot process the message correctly. Before changing the status of a profile to Inactive, be sure that all messages associated with the profile have been processed.
8.8.1. RNIF 1.1An outbound message might require multiple responses; for example, a Receipt Acknowledgment and an action response. The expected responses are specified in the Properties dialog box for the message profile, in the Return Messages section. They can be also specified in the data. The expected responses to an outbound message are flagged in the database and monitored by the Ack Monitor.
The Ack Monitor monitors the database for any overdue responses. When it detects that a response is overdue, it checks the maximum retry count for the message, and then takes one of the following actions:
If the maximum retry count has not been reached, the Ack Monitor retrieves the original message, increments the Attempt Count in the message, and resends it to the trading partner through e*Xchange.
If the maximum retry count has been reached, the Ack Monitor sends a RosettaNet Failure Notification to the trading partner and a failure Event to the internal application. A “response overdue” error is assigned to the original message in the database and all its expected responses are canceled.
8.8.2. RNIF 2.0With RNIF 2.0, the processing logic for the Ack Monitor is similar to that of RNIF 1.1. However, in 2.0 there is no need to change the attempt count field and pack the message again before resending the message.
The Ack Monitor consults the database and creates a list of messages with overdue responses. It then processes each message in turn. For a RosettaNet message, it calls the RosettaNet 2.0 Ack Monitor, eX-ROS20-Ack-Mon, which does the following:
1 Retrieves the original message.
2 Loads the message profile for the original message.
3 Loads the message tracking attributes for the original message.
e*Xchange Partner Manager User’s Guide 211
Chapter 8 Section 8.9Profile Setup for RosettaNet RosettaNet Error Handling
4 If the maximum number of retries for the message has already been reached:
Logs an error in Message Tracking
Creates a 0A1 Failure Notification
Packs the 0A1 Notification into a RosettaNet Business Message.
Sends the 0A1 message to the trading partner
Sends a failure message to the internal system
5 If the maximum number of retries has not been reached:
Resends the message to the trading partner
Updates the Last Send Time and Send Count in the database, and sets a value for the next send time
If there is an error with any of the above steps, e*Xchange generates an error and invokes the error handling routine. For more information on error handling, refer to “RosettaNet Error Handling” on page 212.
8.9 RosettaNet Error HandlingThis section outlines the sequence of events that occurs when a e*Xchange encounters a problem with a RosettaNet message. It is broken down as follows:
RNIF 1.1: Inbound and Outbound
RNIF 2.0: Inbound and Outbound
In any error situation, e*Xchange always does the following:
Journals the message
Sends the message to the error queue, where it can be picked up for further handling
Sends an Alert message to the Schema Manager
8.9.1. RNIF 1.1If e*Xchange is unable to successfully map a message to the RosettaNet structure, it generates an error which is recorded in the journal file (the specific file name and location is as specified in the ePM e*Way configuration). e*Xchange also sends an alert notification to the Schema Manager. You can view the journal file from within e*Gate.
Inbound RNIF 1.1 Error Handling
If an inbound message fails content validation, the message is logged in the database at the message level with the error flag set. A Receipt Acknowledgment Exception (or General Exception if the message is not expecting a Receipt Acknowledgment) is sent out to the trading partner.
e*Xchange Partner Manager User’s Guide 212

Chapter 8 Section 8.9Profile Setup for RosettaNet RosettaNet Error Handling
After the data passes validation, any processing failure causes e*Xchange to send a General Exception to the trading partner if the message expects an action response (for example, a 3A2 query message), or a Failure Notification if the message does not expect an action response (for example, a 3A2 response message).
Outbound RNIF 1.1 Error Handling
If e*Xchange fails on an outbound message, a failure Event is sent to the internal application.
8.9.2. RNIF 2.0
Inbound RNIF 2.0 Error Handling
For an inbound RNIF 2.0 message, e*Xchange generates errors if any of the following conditions occurs:
The service header cannot be parsed
A duplicate message is received
An unexpected message is received
If the error occurs when e*Xchange has not yet sent out an acknowledgment message, a Receipt Acknowledgment Exception is sent to the trading partner.
If the error occurs when e*Xchange has already sent out an acknowledgment message, a generic exception is sent to the trading partner.
Under any of the above conditions, if a receipt acknowledgment has not already been sent, e*Xchange sends a negative acknowledgment instead of a receipt acknowledgment.
If the data has not yet been stored in the database, e*Xchange saves the data with the associated error. If it has already been stored in the database, e*Xchange associates the error with the saved message.
Note: For a RosettaNet inbound message, once the Service Header has been successfully parsed, that means all other values within the message have also been successfully loaded.
e*Xchange Partner Manager User’s Guide 213
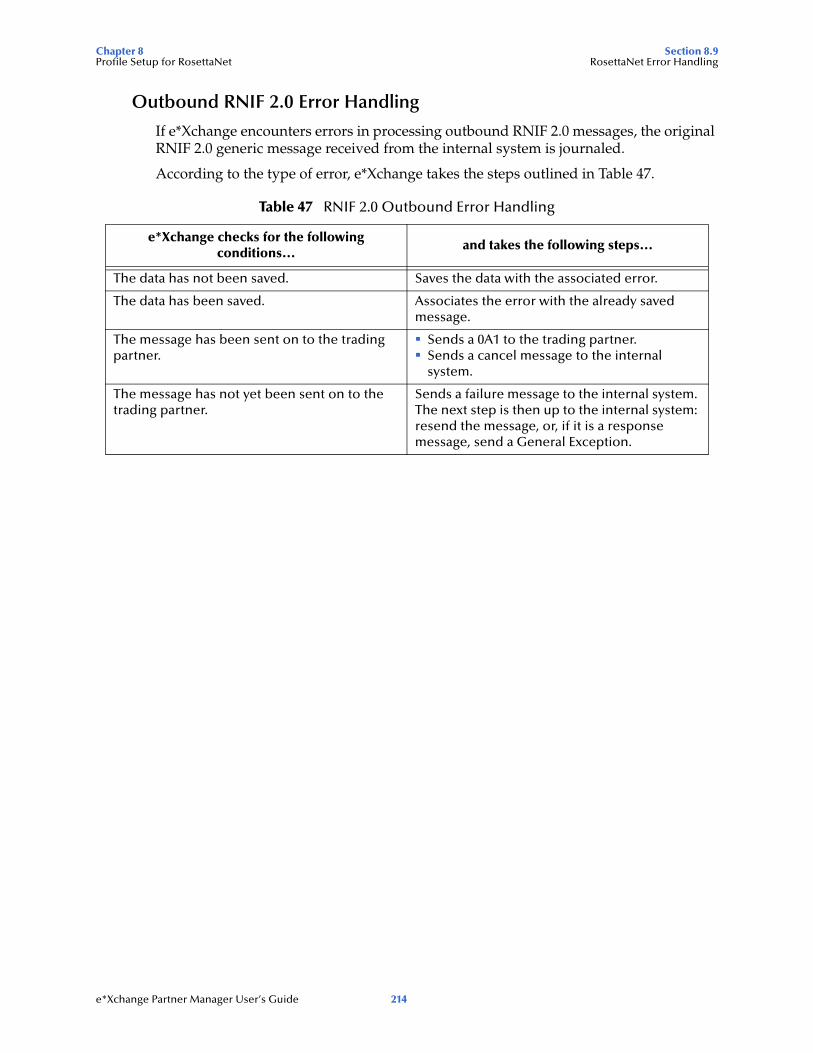
Chapter 8 Section 8.9Profile Setup for RosettaNet RosettaNet Error Handling
Outbound RNIF 2.0 Error Handling
If e*Xchange encounters errors in processing outbound RNIF 2.0 messages, the original RNIF 2.0 generic message received from the internal system is journaled.
According to the type of error, e*Xchange takes the steps outlined in Table 47.
Table 47 RNIF 2.0 Outbound Error Handling
e*Xchange checks for the following conditions...
and takes the following steps...
The data has not been saved. Saves the data with the associated error.
The data has been saved. Associates the error with the already saved message.
The message has been sent on to the trading partner.
Sends a 0A1 to the trading partner.Sends a cancel message to the internal system.
The message has not yet been sent on to the trading partner.
Sends a failure message to the internal system. The next step is then up to the internal system: resend the message, or, if it is a response message, send a General Exception.
e*Xchange Partner Manager User’s Guide 214
Chapter 9
Profile Setup for CIDX
This chapter provides information on setting up CIDX version 2.0.1 transactions in the e*Xchange Partner Manager, at the Message Profile level.
The Company, Trading Partner, and B2B Protocol (inbound and outbound) levels must be set up first. For information on setting up these components, refer to “Profile Management” on page 70.
9.1 Setting Up CIDX Message Profile InformationOnce you have set up B2B protocol information for a trading partner, the next step is to set up message profiles.
9.1.1. Setup SequencePart of setting up a message profile is to specify the expected response message, if any.
During initial setup, you will find that you cannot select the appropriate response messages because you have not yet created the message profiles for those response messages.
One approach to this is to first set up all message profiles, both inbound and outbound, and then go back into each message profile to select the return messages.
Note: When setting up a CIDX profile, be especially careful that the Failure Notification transaction is configured correctly. If a situation occurs where both you and your trading partner have an error in the Failure Notification transaction, one Failure Notification from the trading partner can generate another Failure Notification from you, and yours generates another from the Trading Partner, in an infinite loop. If you do encounter this, check the setup of your Failure Notification and correct the error.
9.1.2. Setting Up a Message ProfileFrom the B2B Protocol page, select a B2B protocol and click Continue: Message Profile to access the Message Profile page (see Figure 106).
e*Xchange Partner Manager User’s Guide 215
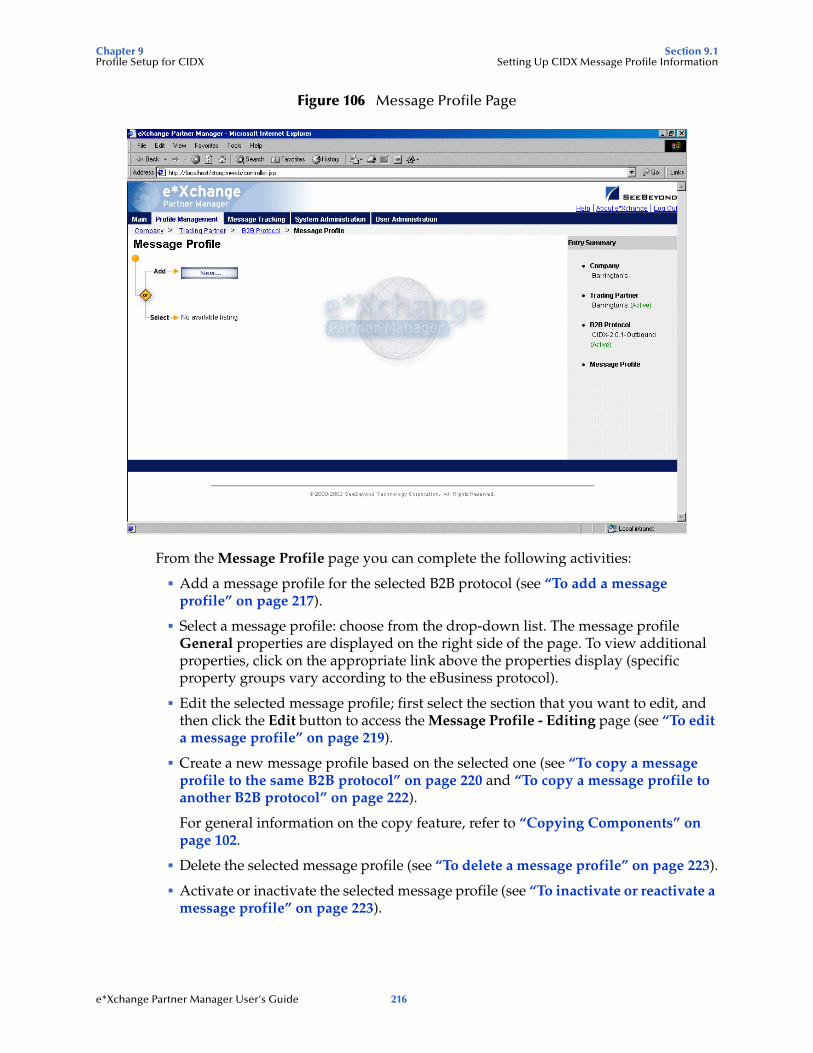
Chapter 9 Section 9.1Profile Setup for CIDX Setting Up CIDX Message Profile Information
Figure 106 Message Profile Page
From the Message Profile page you can complete the following activities:
Add a message profile for the selected B2B protocol (see “To add a message profile” on page 217).
Select a message profile: choose from the drop-down list. The message profile General properties are displayed on the right side of the page. To view additional properties, click on the appropriate link above the properties display (specific property groups vary according to the eBusiness protocol).
Edit the selected message profile; first select the section that you want to edit, and then click the Edit button to access the Message Profile - Editing page (see “To edit a message profile” on page 219).
Create a new message profile based on the selected one (see “To copy a message profile to the same B2B protocol” on page 220 and “To copy a message profile to another B2B protocol” on page 222).
For general information on the copy feature, refer to “Copying Components” on page 102.
Delete the selected message profile (see “To delete a message profile” on page 223).
Activate or inactivate the selected message profile (see “To inactivate or reactivate a message profile” on page 223).
e*Xchange Partner Manager User’s Guide 216
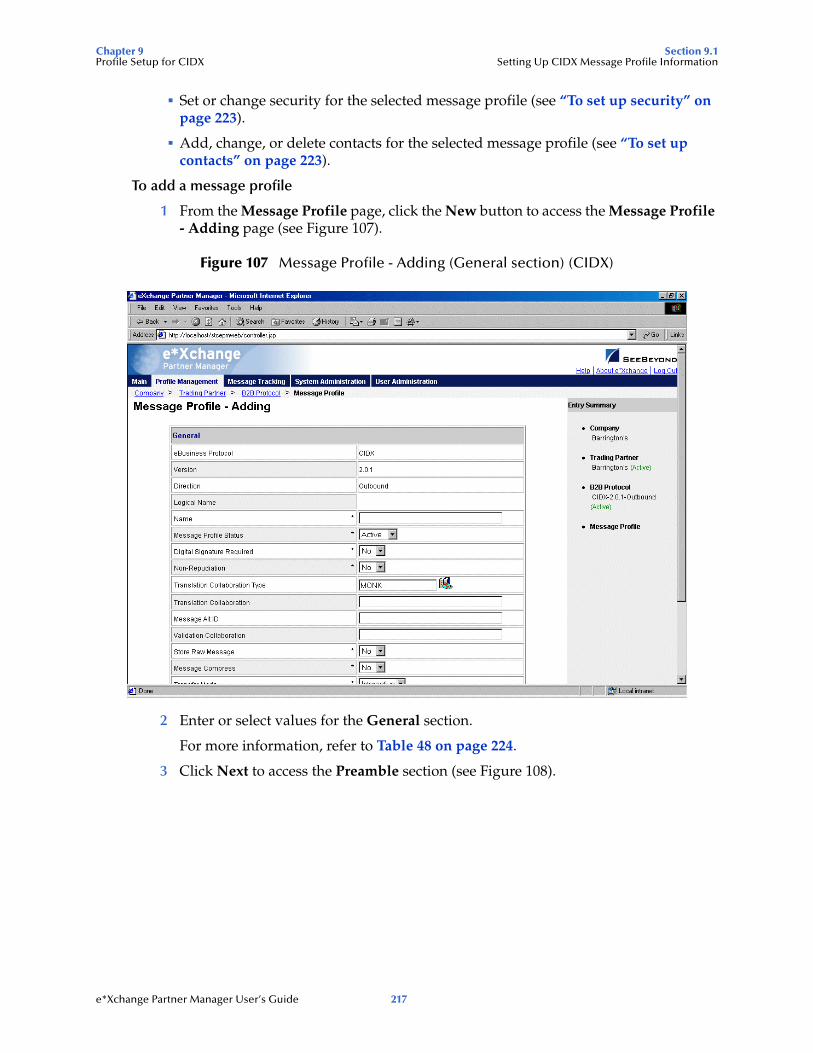
Chapter 9 Section 9.1Profile Setup for CIDX Setting Up CIDX Message Profile Information
Set or change security for the selected message profile (see “To set up security” on page 223).
Add, change, or delete contacts for the selected message profile (see “To set up contacts” on page 223).
To add a message profile
1 From the Message Profile page, click the New button to access the Message Profile - Adding page (see Figure 107).
Figure 107 Message Profile - Adding (General section) (CIDX)
2 Enter or select values for the General section.
For more information, refer to Table 48 on page 224.
3 Click Next to access the Preamble section (see Figure 108).
e*Xchange Partner Manager User’s Guide 217

Chapter 9 Section 9.1Profile Setup for CIDX Setting Up CIDX Message Profile Information
Figure 108 Message Profile - Adding (Preamble section) (CIDX 2.0.1)
4 Enter or select values for the Preamble section.
For more information, refer to Table 49 on page 226.
5 Click Next to access the Service Header section (see Figure 109).
e*Xchange Partner Manager User’s Guide 218
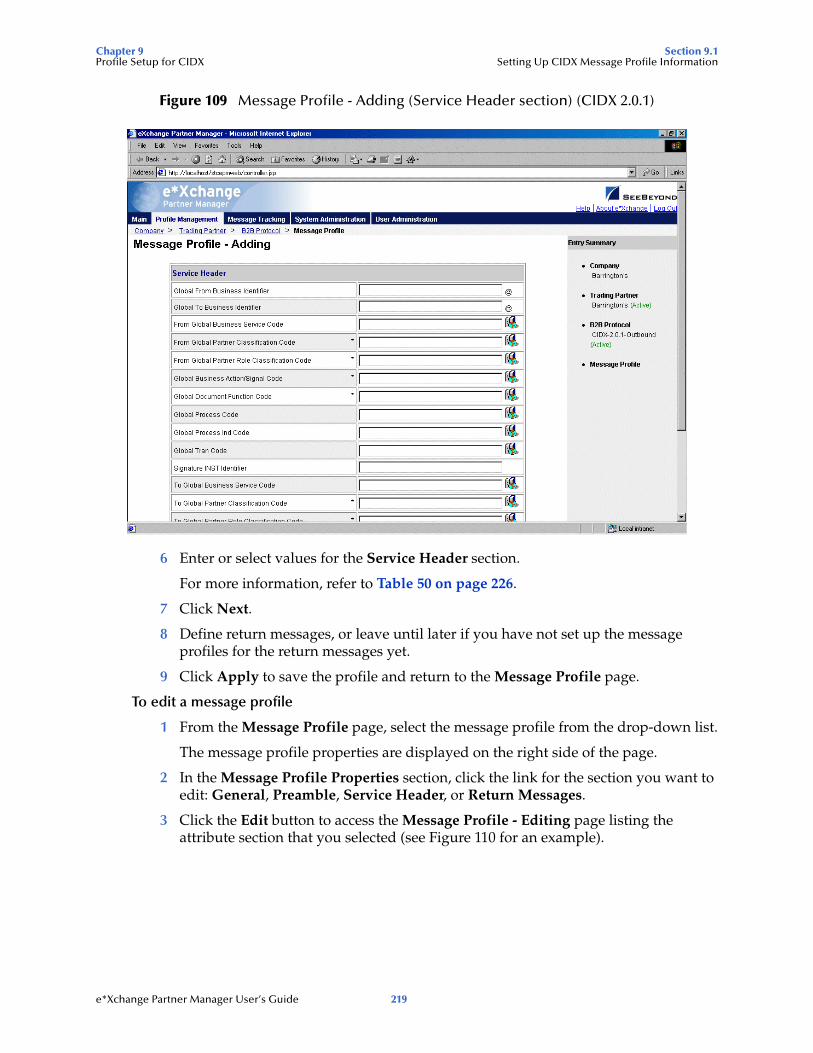
Chapter 9 Section 9.1Profile Setup for CIDX Setting Up CIDX Message Profile Information
Figure 109 Message Profile - Adding (Service Header section) (CIDX 2.0.1)
6 Enter or select values for the Service Header section.
For more information, refer to Table 50 on page 226.
7 Click Next.
8 Define return messages, or leave until later if you have not set up the message profiles for the return messages yet.
9 Click Apply to save the profile and return to the Message Profile page.
To edit a message profile
1 From the Message Profile page, select the message profile from the drop-down list.
The message profile properties are displayed on the right side of the page.
2 In the Message Profile Properties section, click the link for the section you want to edit: General, Preamble, Service Header, or Return Messages.
3 Click the Edit button to access the Message Profile - Editing page listing the attribute section that you selected (see Figure 110 for an example).
e*Xchange Partner Manager User’s Guide 219
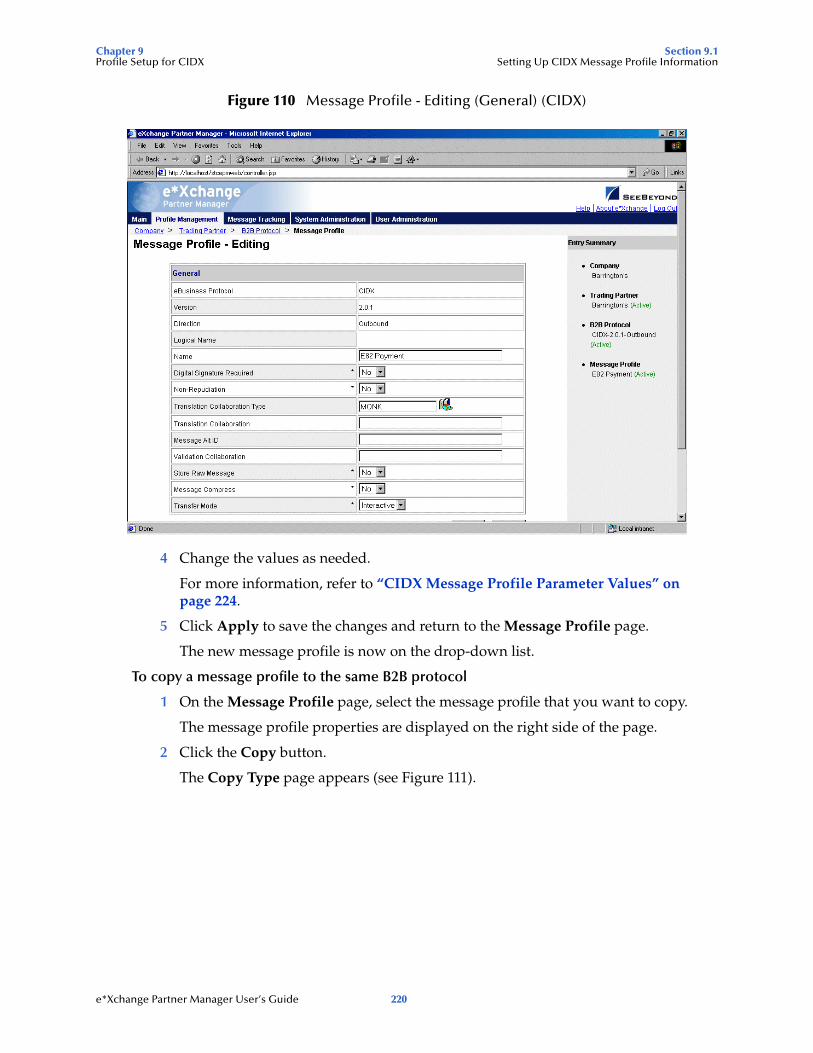
Chapter 9 Section 9.1Profile Setup for CIDX Setting Up CIDX Message Profile Information
Figure 110 Message Profile - Editing (General) (CIDX)
4 Change the values as needed.
For more information, refer to “CIDX Message Profile Parameter Values” on page 224.
5 Click Apply to save the changes and return to the Message Profile page.
The new message profile is now on the drop-down list.
To copy a message profile to the same B2B protocol
1 On the Message Profile page, select the message profile that you want to copy.
The message profile properties are displayed on the right side of the page.
2 Click the Copy button.
The Copy Type page appears (see Figure 111).
e*Xchange Partner Manager User’s Guide 220
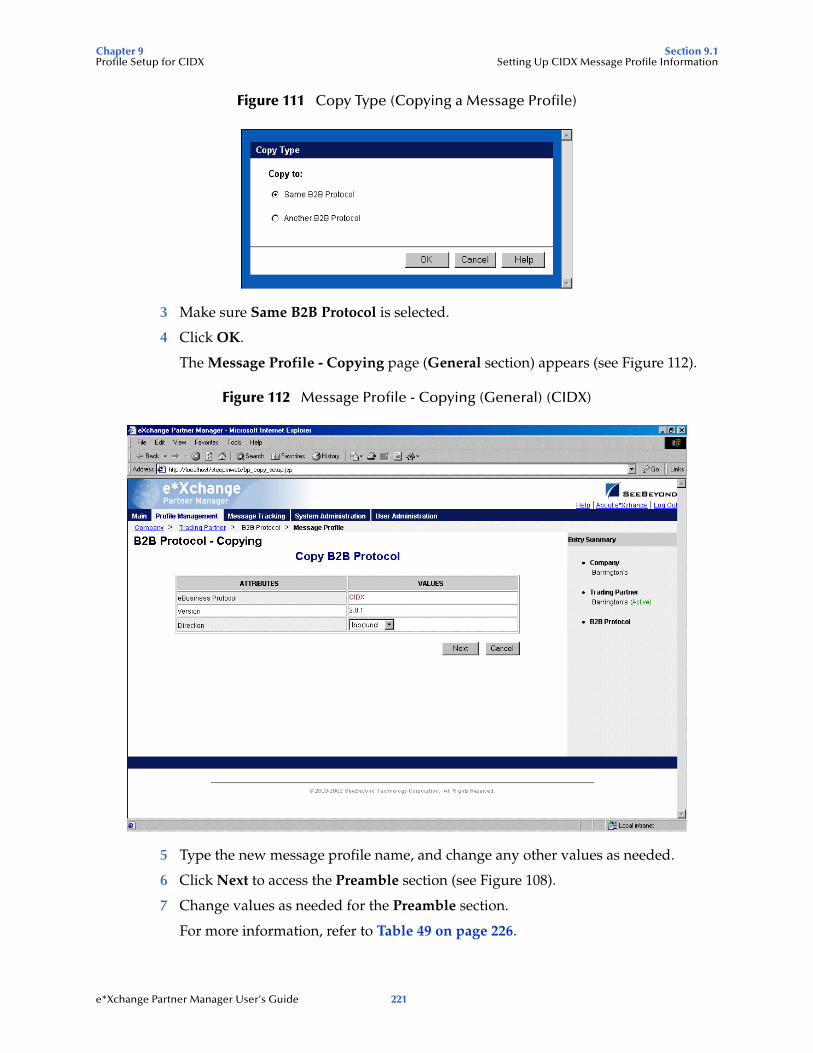
Chapter 9 Section 9.1Profile Setup for CIDX Setting Up CIDX Message Profile Information
Figure 111 Copy Type (Copying a Message Profile)
3 Make sure Same B2B Protocol is selected.
4 Click OK.
The Message Profile - Copying page (General section) appears (see Figure 112).
Figure 112 Message Profile - Copying (General) (CIDX)
5 Type the new message profile name, and change any other values as needed.
6 Click Next to access the Preamble section (see Figure 108).
7 Change values as needed for the Preamble section.
For more information, refer to Table 49 on page 226.
e*Xchange Partner Manager User’s Guide 221
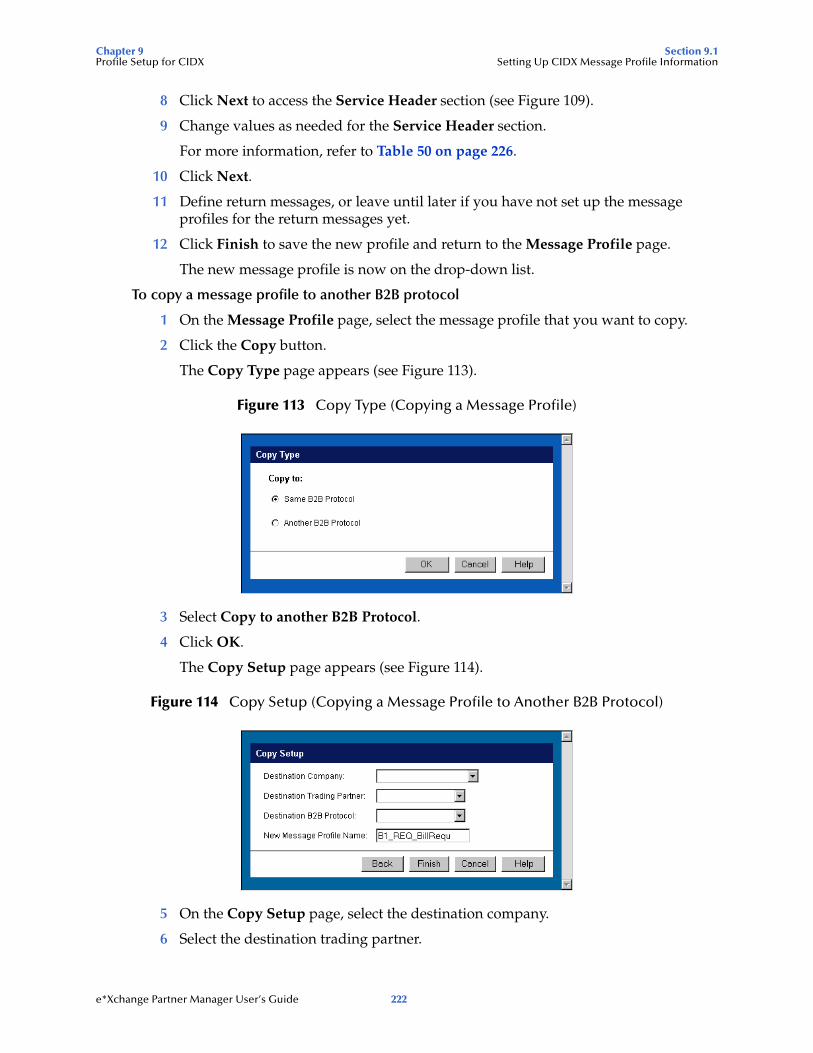
Chapter 9 Section 9.1Profile Setup for CIDX Setting Up CIDX Message Profile Information
8 Click Next to access the Service Header section (see Figure 109).
9 Change values as needed for the Service Header section.
For more information, refer to Table 50 on page 226.
10 Click Next.
11 Define return messages, or leave until later if you have not set up the message profiles for the return messages yet.
12 Click Finish to save the new profile and return to the Message Profile page.
The new message profile is now on the drop-down list.
To copy a message profile to another B2B protocol
1 On the Message Profile page, select the message profile that you want to copy.
2 Click the Copy button.
The Copy Type page appears (see Figure 113).
Figure 113 Copy Type (Copying a Message Profile)
3 Select Copy to another B2B Protocol.
4 Click OK.
The Copy Setup page appears (see Figure 114).
Figure 114 Copy Setup (Copying a Message Profile to Another B2B Protocol)
5 On the Copy Setup page, select the destination company.
6 Select the destination trading partner.
e*Xchange Partner Manager User’s Guide 222
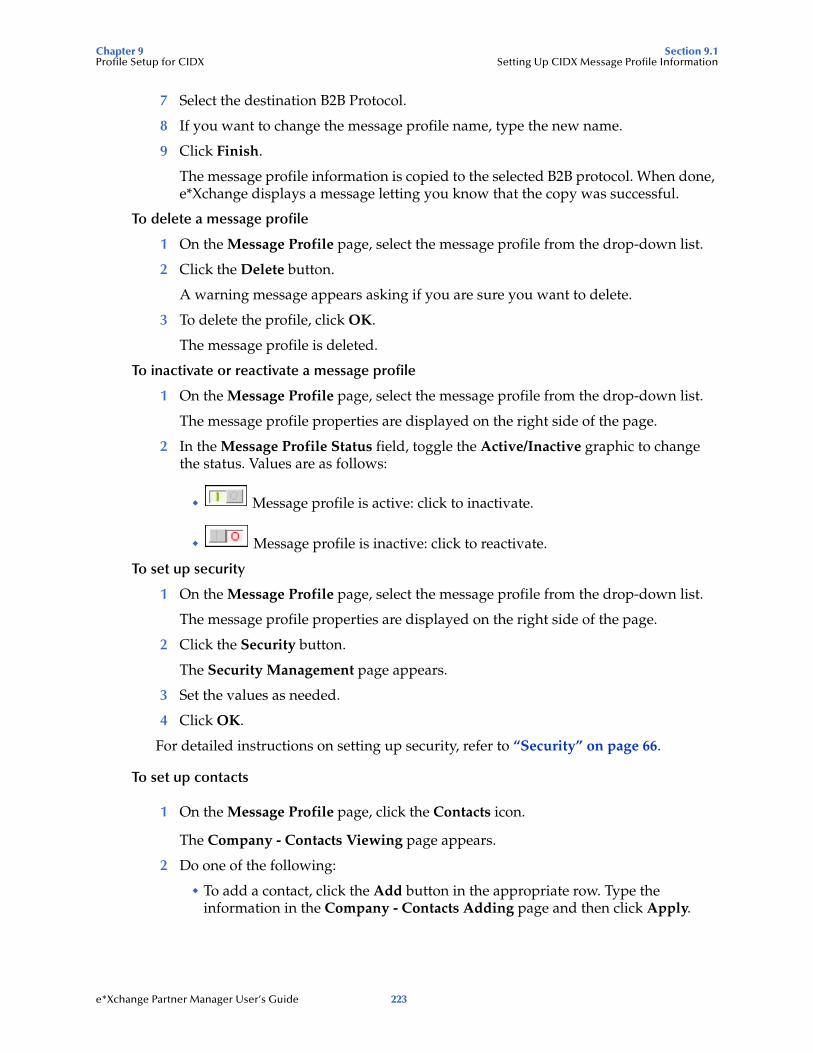
Chapter 9 Section 9.1Profile Setup for CIDX Setting Up CIDX Message Profile Information
7 Select the destination B2B Protocol.
8 If you want to change the message profile name, type the new name.
9 Click Finish.
The message profile information is copied to the selected B2B protocol. When done, e*Xchange displays a message letting you know that the copy was successful.
To delete a message profile
1 On the Message Profile page, select the message profile from the drop-down list.
2 Click the Delete button.
A warning message appears asking if you are sure you want to delete.
3 To delete the profile, click OK.
The message profile is deleted.
To inactivate or reactivate a message profile
1 On the Message Profile page, select the message profile from the drop-down list.
The message profile properties are displayed on the right side of the page.
2 In the Message Profile Status field, toggle the Active/Inactive graphic to change the status. Values are as follows:
Message profile is active: click to inactivate.
Message profile is inactive: click to reactivate.
To set up security
1 On the Message Profile page, select the message profile from the drop-down list.
The message profile properties are displayed on the right side of the page.
2 Click the Security button.
The Security Management page appears.
3 Set the values as needed.
4 Click OK.
For detailed instructions on setting up security, refer to “Security” on page 66.
To set up contacts
1 On the Message Profile page, click the Contacts icon.
The Company - Contacts Viewing page appears.
2 Do one of the following:
To add a contact, click the Add button in the appropriate row. Type the information in the Company - Contacts Adding page and then click Apply.
e*Xchange Partner Manager User’s Guide 223
Chapter 9 Section 9.2Profile Setup for CIDX CIDX Message Profile Parameter Values
To edit an existing contact, click the View/Edit button in the appropriate row. This button is only available when a contact has been entered. Edit the values in the Company - Contacts Editing page and then click Apply.
To delete an existing contact, click the View/Edit button in the appropriate row. In the Company - Contacts Editing page, click the Delete button at the bottom left. At the “Are you sure...” message, click OK.
For detailed instructions on working with contacts, refer to “Storing Contact Information” on page 228.
9.2 CIDX Message Profile Parameter ValuesThis section lists field descriptions for the CIDX version 2.0.1 values required for setting up the following Message Profile setup sections:
General section—Table 48 on page 224
Preamble section—Table 49 on page 226
Service Header section—Table 50 on page 226
Table 48 Message Profile, General Section (CIDX 2.0.1): Fields
Name Description
eBusiness Protocol The name of the protocol that you selected at the B2B protocol level (CIDX) is displayed.
Version The eBusiness protocol version selected at the B2B protocol level (2.0.1) is displayed.
Direction The direction for the message profile, Inbound or Outbound, is displayed.
Logical Name If you specified a logical name at the B2B protocol level, it is displayed.
Name A label for the message profile. It should be descriptive, and unique for the trading partner.
Message Profile Status
The status of the message profile. Choose one of the following values:Active—The message profile is currently active, and can be used.Inactive—The message profile is not active, and cannot be used.
Default: Active.Note: This is only available when adding a message profile. When editing, you can change the status on the Message Profile page (see “To inactivate or reactivate a message profile” on page 223).
Digital Signature Required
Indicates whether a digital signature is required: Y or N. The default is N. Select from the drop-down list.
Non-Repudiation (required)
Indicates whether non-repudiation is required for the message: Y or N. The default is N.Note: For RosettaNet (both versions) and CIDX, if the message is a business signal, the non-repudiation setting is ignored. Since a business signal does not have a response, non-repudiation is not available.
e*Xchange Partner Manager User’s Guide 224
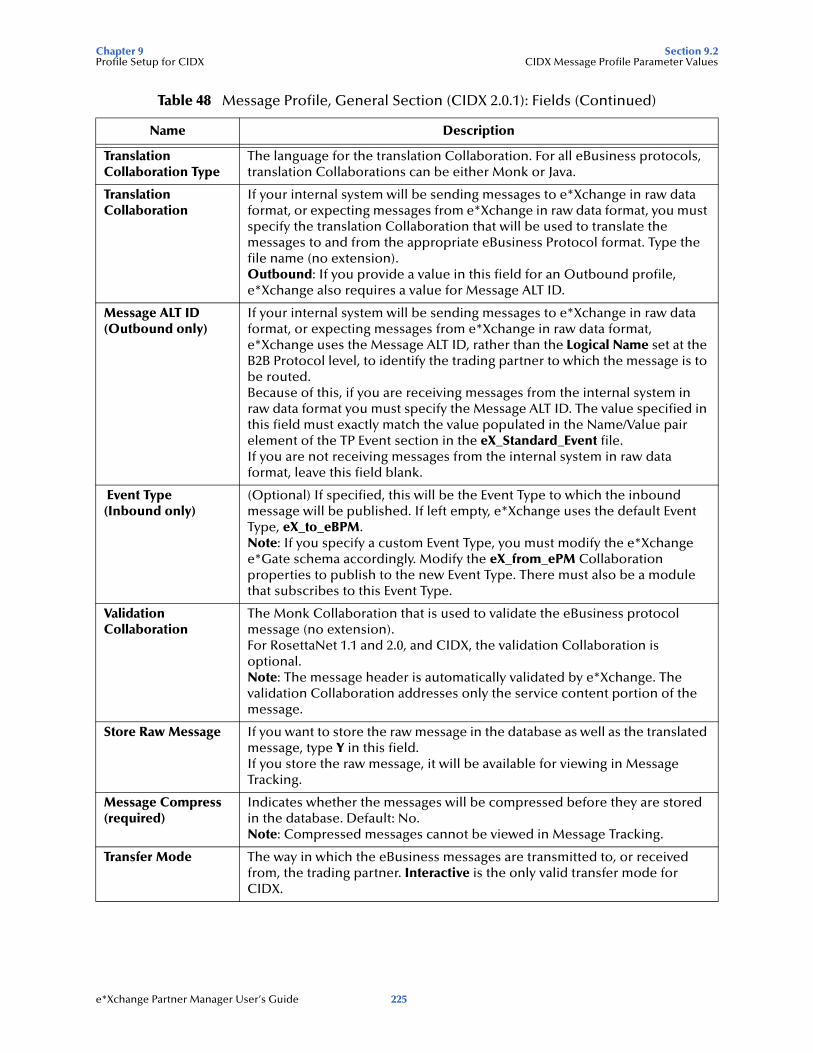
Chapter 9 Section 9.2Profile Setup for CIDX CIDX Message Profile Parameter Values
Translation Collaboration Type
The language for the translation Collaboration. For all eBusiness protocols, translation Collaborations can be either Monk or Java.
Translation Collaboration
If your internal system will be sending messages to e*Xchange in raw data format, or expecting messages from e*Xchange in raw data format, you must specify the translation Collaboration that will be used to translate the messages to and from the appropriate eBusiness Protocol format. Type the file name (no extension).Outbound: If you provide a value in this field for an Outbound profile, e*Xchange also requires a value for Message ALT ID.
Message ALT ID(Outbound only)
If your internal system will be sending messages to e*Xchange in raw data format, or expecting messages from e*Xchange in raw data format, e*Xchange uses the Message ALT ID, rather than the Logical Name set at the B2B Protocol level, to identify the trading partner to which the message is to be routed.Because of this, if you are receiving messages from the internal system in raw data format you must specify the Message ALT ID. The value specified in this field must exactly match the value populated in the Name/Value pair element of the TP Event section in the eX_Standard_Event file.If you are not receiving messages from the internal system in raw data format, leave this field blank.
Event Type (Inbound only)
(Optional) If specified, this will be the Event Type to which the inbound message will be published. If left empty, e*Xchange uses the default Event Type, eX_to_eBPM.Note: If you specify a custom Event Type, you must modify the e*Xchange e*Gate schema accordingly. Modify the eX_from_ePM Collaboration properties to publish to the new Event Type. There must also be a module that subscribes to this Event Type.
Validation Collaboration
The Monk Collaboration that is used to validate the eBusiness protocol message (no extension).For RosettaNet 1.1 and 2.0, and CIDX, the validation Collaboration is optional.Note: The message header is automatically validated by e*Xchange. The validation Collaboration addresses only the service content portion of the message.
Store Raw Message If you want to store the raw message in the database as well as the translated message, type Y in this field.If you store the raw message, it will be available for viewing in Message Tracking.
Message Compress (required)
Indicates whether the messages will be compressed before they are stored in the database. Default: No.Note: Compressed messages cannot be viewed in Message Tracking.
Transfer Mode The way in which the eBusiness messages are transmitted to, or received from, the trading partner. Interactive is the only valid transfer mode for CIDX.
Table 48 Message Profile, General Section (CIDX 2.0.1): Fields (Continued)
Name Description
e*Xchange Partner Manager User’s Guide 225
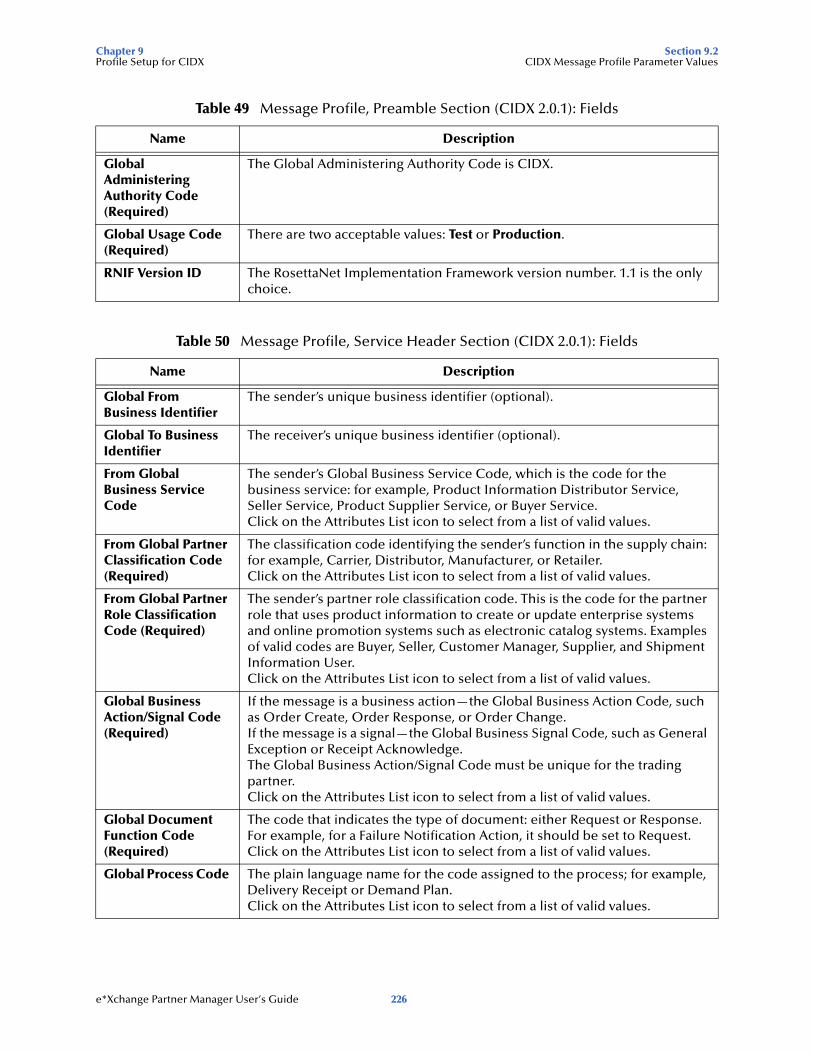
Chapter 9 Section 9.2Profile Setup for CIDX CIDX Message Profile Parameter Values
Table 49 Message Profile, Preamble Section (CIDX 2.0.1): Fields
Name Description
Global Administering Authority Code (Required)
The Global Administering Authority Code is CIDX.
Global Usage Code (Required)
There are two acceptable values: Test or Production.
RNIF Version ID The RosettaNet Implementation Framework version number. 1.1 is the only choice.
Table 50 Message Profile, Service Header Section (CIDX 2.0.1): Fields
Name Description
Global From Business Identifier
The sender’s unique business identifier (optional).
Global To Business Identifier
The receiver’s unique business identifier (optional).
From Global Business Service Code
The sender’s Global Business Service Code, which is the code for the business service: for example, Product Information Distributor Service, Seller Service, Product Supplier Service, or Buyer Service.Click on the Attributes List icon to select from a list of valid values.
From Global Partner Classification Code (Required)
The classification code identifying the sender’s function in the supply chain: for example, Carrier, Distributor, Manufacturer, or Retailer.Click on the Attributes List icon to select from a list of valid values.
From Global Partner Role Classification Code (Required)
The sender’s partner role classification code. This is the code for the partner role that uses product information to create or update enterprise systems and online promotion systems such as electronic catalog systems. Examples of valid codes are Buyer, Seller, Customer Manager, Supplier, and Shipment Information User.Click on the Attributes List icon to select from a list of valid values.
Global Business Action/Signal Code (Required)
If the message is a business action—the Global Business Action Code, such as Order Create, Order Response, or Order Change.If the message is a signal—the Global Business Signal Code, such as General Exception or Receipt Acknowledge.The Global Business Action/Signal Code must be unique for the trading partner.Click on the Attributes List icon to select from a list of valid values.
Global Document Function Code (Required)
The code that indicates the type of document: either Request or Response. For example, for a Failure Notification Action, it should be set to Request.Click on the Attributes List icon to select from a list of valid values.
Global Process Code The plain language name for the code assigned to the process; for example, Delivery Receipt or Demand Plan.Click on the Attributes List icon to select from a list of valid values.
e*Xchange Partner Manager User’s Guide 226

Chapter 9 Section 9.2Profile Setup for CIDX CIDX Message Profile Parameter Values
Global Process Ind Code
The CIDX code assigned to the process; for example, E41 for an Order Create or F15 for a Demand Plan.Click on the Attributes List icon to select from a list of valid values.
Global Tran Code The Global Transaction Code. Examples: Delivery Receipt or Posting Accept Response.Click on the Attributes List icon to select from a list of valid values.
Signature INST Identifier
Not used.
To Global Business Service Code
The receiver’s Global Business Service Code, which is the code for the business service: for example, Product Information Distributor Service, Seller Service, Product Supplier Service, or Buyer Service.Click on the Attributes List icon to select from a list of valid values.
To Global Partner Classification Code (Required)
The classification code identifying the receiver’s function in the supply chain: for example, Carrier, Distributor, Manufacturer, or Retailer.Click on the Attributes List icon to select from a list of valid values.
To Global Partner Role Classification Code (Required)
The receiver’s partner role classification code. This is the code for the partner role that uses product information to create or update enterprise systems and online promotion systems such as electronic catalog systems. Examples of valid codes are Buyer, Seller, Customer Manager, Supplier, and Shipment Information User.Click on the Attributes List icon to select from a list of valid values.
Business Action/Signal Version Identifier (Required)
The PIP version number: for example, 2.0.1.
Table 50 Message Profile, Service Header Section (CIDX 2.0.1): Fields (Continued)
Name Description
e*Xchange Partner Manager User’s Guide 227
Chapter 10
Storing Contact Information
You can use e*Xchange to store information about the people you might need to contact in connection with the processing of messages to and from a specific trading partner.
For example, you could list your support contact at the trading partner’s site. If there is one contact, you might store it at the company or trading partner level; if there is more than one contact you could store the information at different levels. If there is a contact for certain transactions, you could store that information at the inner envelope level.
10.1 About the Contacts FeatureYou can store contact information at the following levels:
Company
Trading Partner
B2B Protocol
Message Profile
You can store information for up to four contacts per component:
Primary Client Contact
Primary Internal Contact
Secondary Client Contact
Secondary Internal Contact
Contact information is optional. You can add it at any point once you have created the component.
When you are setting up contacts for a subcomponent and have already set up contacts at a higher level, you can copy the contact information to the lower level. For example, if you already recorded a contact at the Company level and are setting up a Trading Partner, e*Xchange offers you the option of copying the contact information from the Company level. Just check the Use default contact information check box.
The procedures below explain how to perform various activities relating to contact information. The Contacts page works the same at all levels.
e*Xchange Partner Manager User’s Guide 228
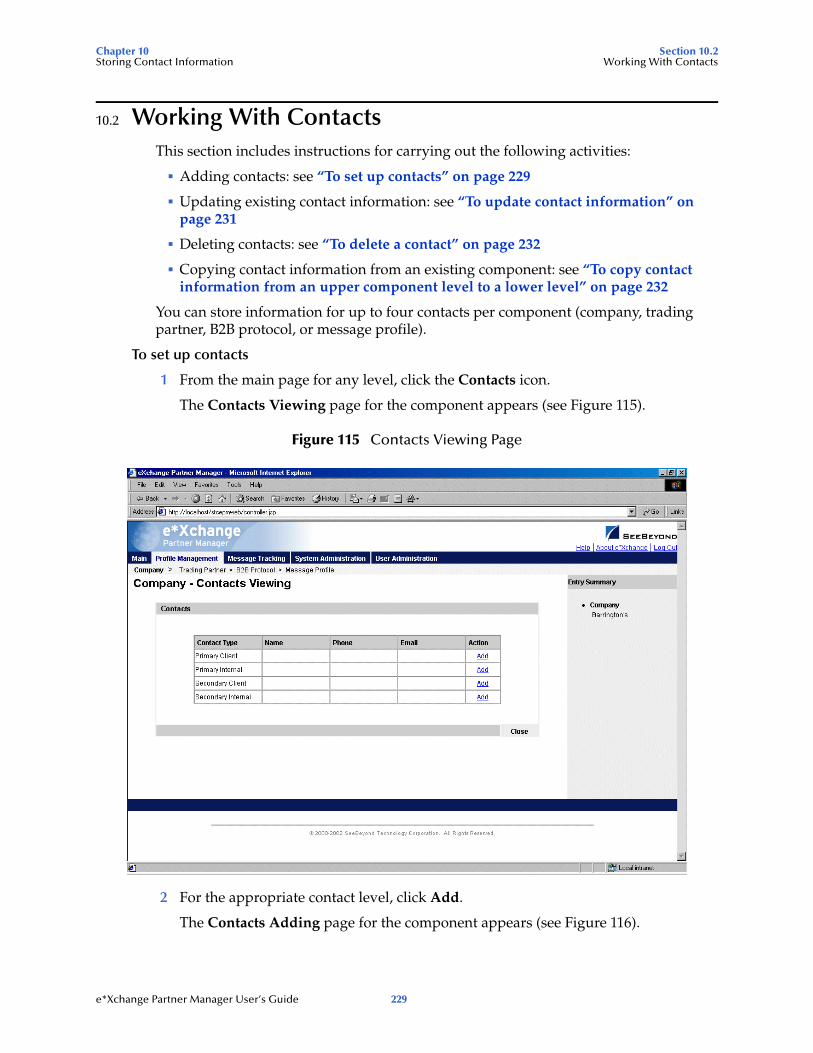
Chapter 10 Section 10.2Storing Contact Information Working With Contacts
10.2 Working With ContactsThis section includes instructions for carrying out the following activities:
Adding contacts: see “To set up contacts” on page 229
Updating existing contact information: see “To update contact information” on page 231
Deleting contacts: see “To delete a contact” on page 232
Copying contact information from an existing component: see “To copy contact information from an upper component level to a lower level” on page 232
You can store information for up to four contacts per component (company, trading partner, B2B protocol, or message profile).
To set up contacts
1 From the main page for any level, click the Contacts icon.
The Contacts Viewing page for the component appears (see Figure 115).
Figure 115 Contacts Viewing Page
2 For the appropriate contact level, click Add.
The Contacts Adding page for the component appears (see Figure 116).
e*Xchange Partner Manager User’s Guide 229
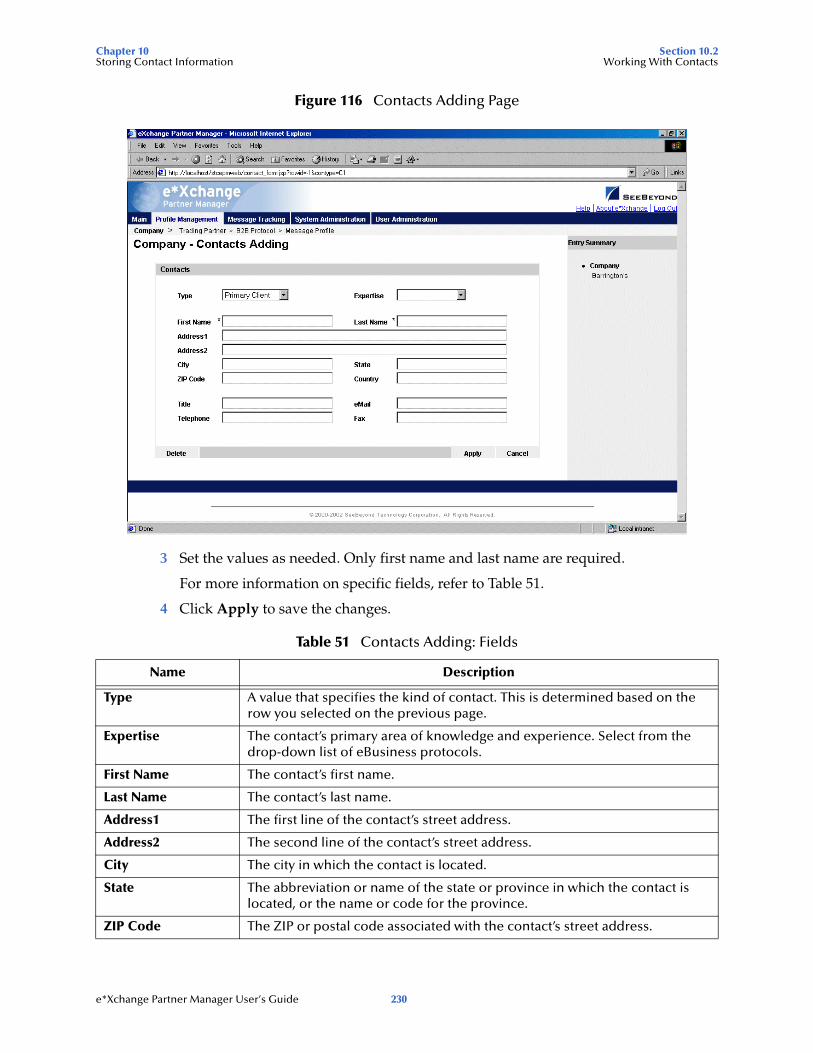
Chapter 10 Section 10.2Storing Contact Information Working With Contacts
Figure 116 Contacts Adding Page
3 Set the values as needed. Only first name and last name are required.
For more information on specific fields, refer to Table 51.
4 Click Apply to save the changes.
Table 51 Contacts Adding: Fields
Name Description
Type A value that specifies the kind of contact. This is determined based on the row you selected on the previous page.
Expertise The contact’s primary area of knowledge and experience. Select from the drop-down list of eBusiness protocols.
First Name The contact’s first name.
Last Name The contact’s last name.
Address1 The first line of the contact’s street address.
Address2 The second line of the contact’s street address.
City The city in which the contact is located.
State The abbreviation or name of the state or province in which the contact is located, or the name or code for the province.
ZIP Code The ZIP or postal code associated with the contact’s street address.
e*Xchange Partner Manager User’s Guide 230
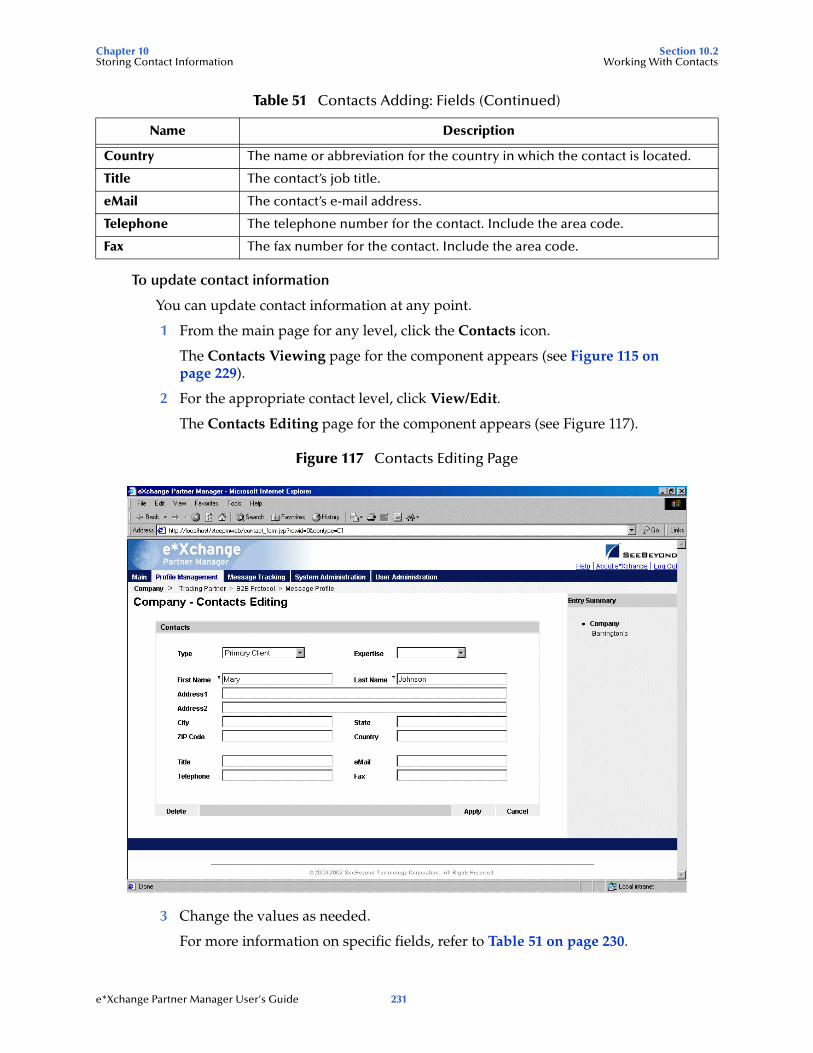
Chapter 10 Section 10.2Storing Contact Information Working With Contacts
To update contact information
You can update contact information at any point.
1 From the main page for any level, click the Contacts icon.
The Contacts Viewing page for the component appears (see Figure 115 on page 229).
2 For the appropriate contact level, click View/Edit.
The Contacts Editing page for the component appears (see Figure 117).
Figure 117 Contacts Editing Page
3 Change the values as needed.
For more information on specific fields, refer to Table 51 on page 230.
Country The name or abbreviation for the country in which the contact is located.
Title The contact’s job title.
eMail The contact’s e-mail address.
Telephone The telephone number for the contact. Include the area code.
Fax The fax number for the contact. Include the area code.
Table 51 Contacts Adding: Fields (Continued)
Name Description
e*Xchange Partner Manager User’s Guide 231

Chapter 10 Section 10.2Storing Contact Information Working With Contacts
4 Click Apply to save the changes.
10.2.1.Deleting Contact InformationYou can delete contacts that are no longer valid or no longer needed.
To delete a contact
1 From the main page for any level, click the Contacts icon.
The Contacts Viewing page for the component appears (see Figure 115 on page 229).
2 For the appropriate contact level, click View/Edit.
The Contacts Editing page for the component appears (see Figure 117 on page 231).
3 Click the Delete button at the bottom left.
4 At the “Are you sure...” prompt, click OK.
5 The contact information is deleted.
10.2.2.Copying ContactsTo save time, you can copy contact information from a component that you have already added to a component directly below it. You can copy contacts:
From a company to a trading partner
From a trading partner to a B2B protocol
From a B2B protocol to a message profile
Once you have copied the information, you can modify it as needed.
To copy contact information from an upper component level to a lower level
1 From the main page for any level (other than Company), click the Contacts icon.
The Contacts Viewing page for the component appears (see Figure 118).
e*Xchange Partner Manager User’s Guide 232
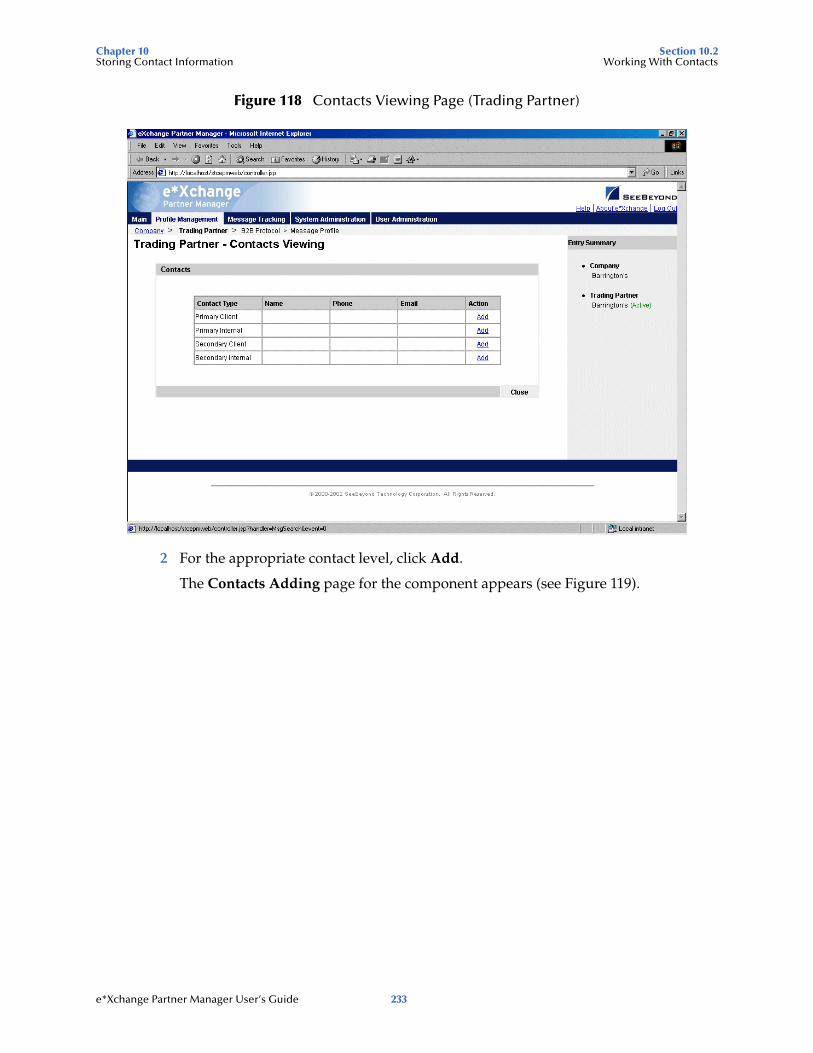
Chapter 10 Section 10.2Storing Contact Information Working With Contacts
Figure 118 Contacts Viewing Page (Trading Partner)
2 For the appropriate contact level, click Add.
The Contacts Adding page for the component appears (see Figure 119).
e*Xchange Partner Manager User’s Guide 233
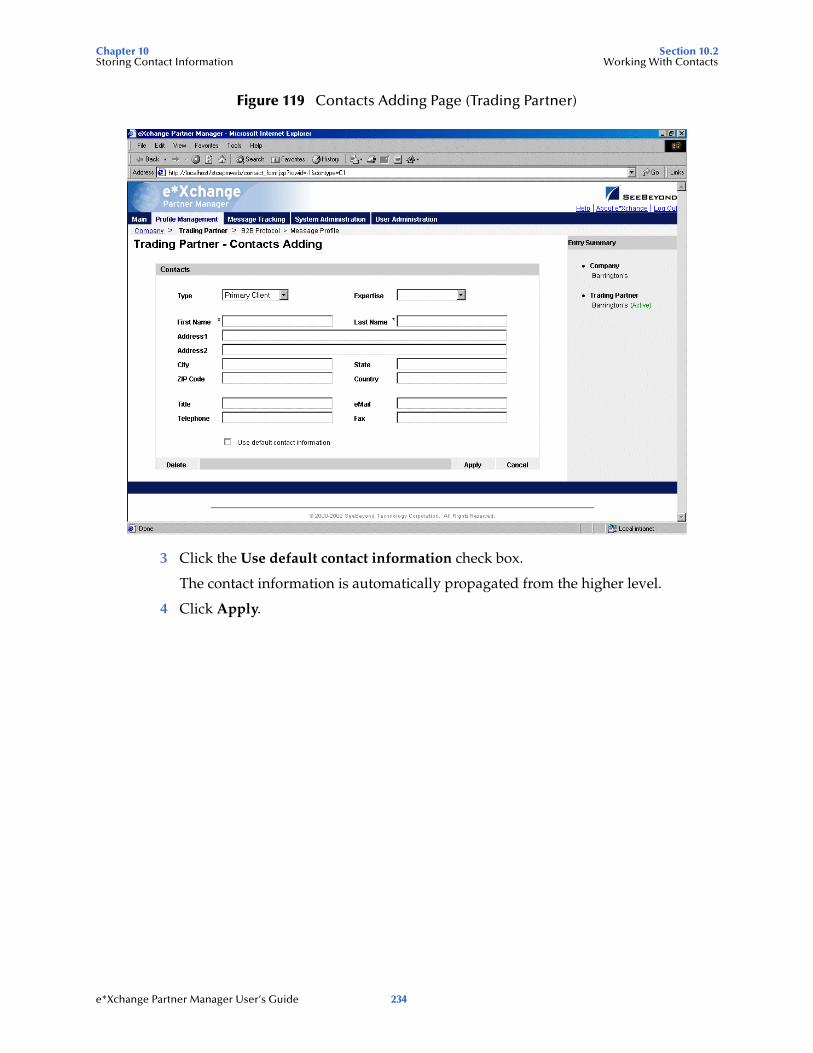
Chapter 10 Section 10.2Storing Contact Information Working With Contacts
Figure 119 Contacts Adding Page (Trading Partner)
3 Click the Use default contact information check box.
The contact information is automatically propagated from the higher level.
4 Click Apply.
e*Xchange Partner Manager User’s Guide 234
Chapter 11
Message Tracking
The e*Xchange Partner Manager Web interface includes Message Tracking features so that you can:
View any messages that have been processed by e*Xchange
Use the various search fields to narrow down your search before viewing message details
For any message, view an error list, extended attributes, or actual text of the original message, enveloped message, or acknowledgment message.
It also includes a message audit feature. When this is turned on, the system maintains, with each message, a list of users that have looked at the message.
11.1 Using the Message Tracking FeatureThe Message Tracking feature allows you to view any messages that have been processed by e*Xchange, including any errors that might be associated with a message. This useful tool helps you to pinpoint the source of an error so that it can be resolved.
You can use the various search fields to narrow down your search before viewing message details. For example, you might want to view all inbound RosettaNet 2.0 messages from a specific trading partner, or all outbound X12 batch message to a specific trading partner.
For any message, you can view message errors (if applicable), extended attributes, or the actual text of the message.
This tool can be used for troubleshooting message errors and monitoring message flow.
Searching for messages is a three-step process:
1 Enter general search criteria to view a list of message profiles that meet the criteria.
2 View the list and select the desired message profiles to view a list of messages that meet the criteria.
3 View the message information as needed.
This section includes the following step-by-step instructions:
Entering general search criteria: see “Entering General Search Criteria” on page 236
e*Xchange Partner Manager User’s Guide 235
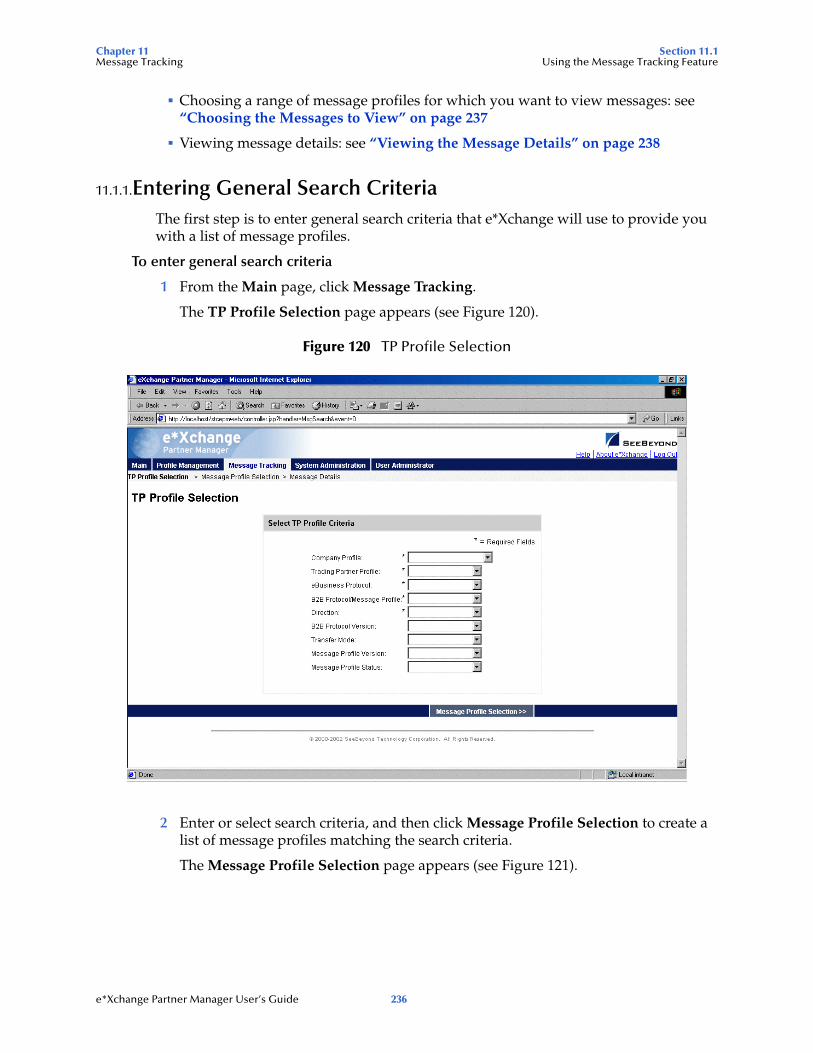
Chapter 11 Section 11.1Message Tracking Using the Message Tracking Feature
Choosing a range of message profiles for which you want to view messages: see “Choosing the Messages to View” on page 237
Viewing message details: see “Viewing the Message Details” on page 238
11.1.1.Entering General Search CriteriaThe first step is to enter general search criteria that e*Xchange will use to provide you with a list of message profiles.
To enter general search criteria
1 From the Main page, click Message Tracking.
The TP Profile Selection page appears (see Figure 120).
Figure 120 TP Profile Selection
2 Enter or select search criteria, and then click Message Profile Selection to create a list of message profiles matching the search criteria.
The Message Profile Selection page appears (see Figure 121).
e*Xchange Partner Manager User’s Guide 236
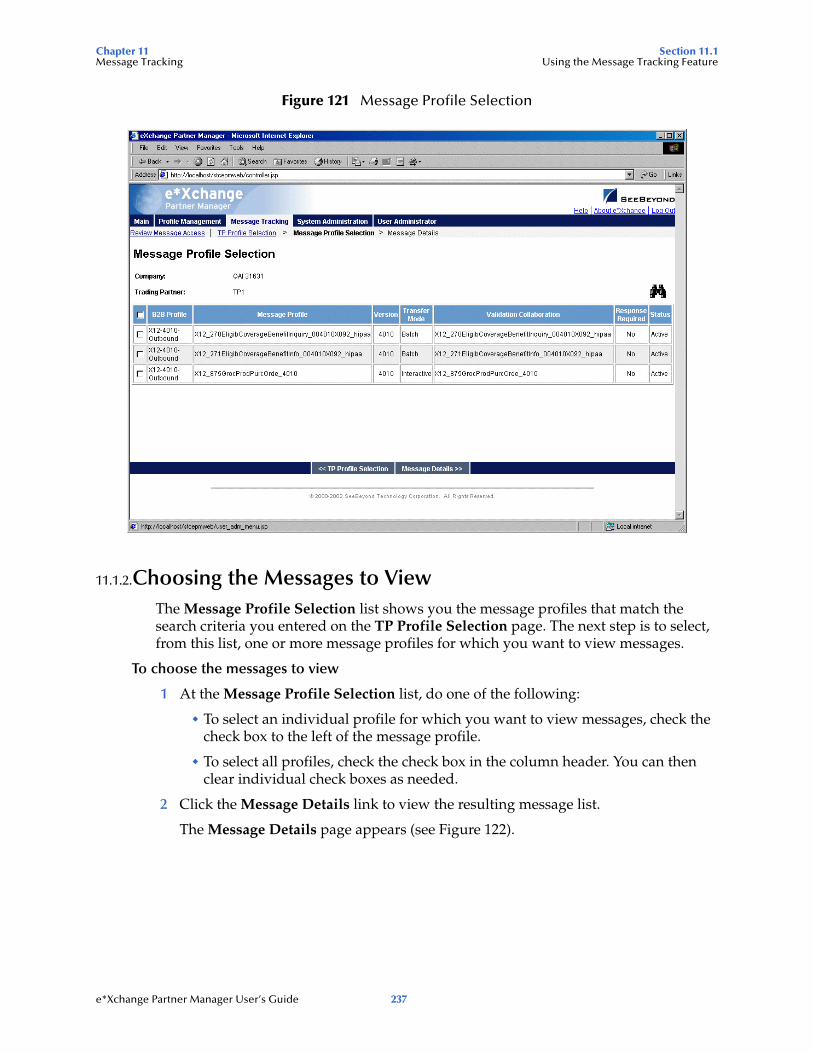
Chapter 11 Section 11.1Message Tracking Using the Message Tracking Feature
Figure 121 Message Profile Selection
11.1.2.Choosing the Messages to ViewThe Message Profile Selection list shows you the message profiles that match the search criteria you entered on the TP Profile Selection page. The next step is to select, from this list, one or more message profiles for which you want to view messages.
To choose the messages to view
1 At the Message Profile Selection list, do one of the following:
To select an individual profile for which you want to view messages, check the check box to the left of the message profile.
To select all profiles, check the check box in the column header. You can then clear individual check boxes as needed.
2 Click the Message Details link to view the resulting message list.
The Message Details page appears (see Figure 122).
e*Xchange Partner Manager User’s Guide 237
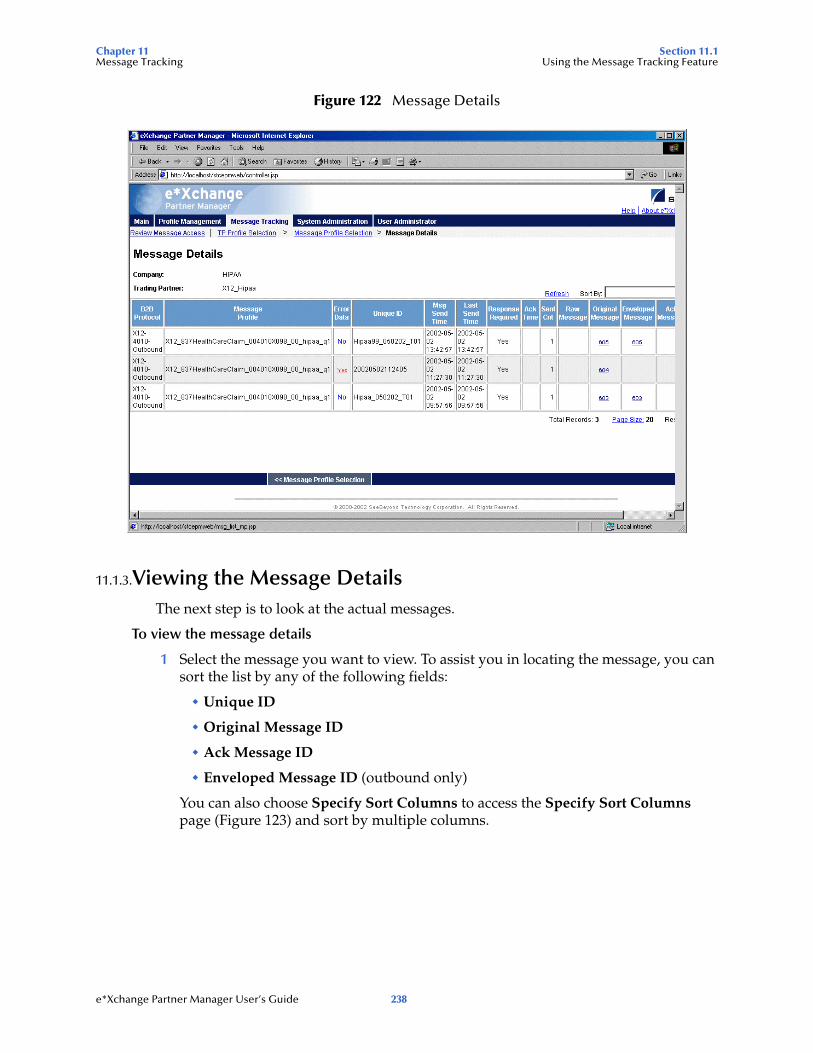
Chapter 11 Section 11.1Message Tracking Using the Message Tracking Feature
Figure 122 Message Details
11.1.3.Viewing the Message DetailsThe next step is to look at the actual messages.
To view the message details
1 Select the message you want to view. To assist you in locating the message, you can sort the list by any of the following fields:
Unique ID
Original Message ID
Ack Message ID
Enveloped Message ID (outbound only)
You can also choose Specify Sort Columns to access the Specify Sort Columns page (Figure 123) and sort by multiple columns.
e*Xchange Partner Manager User’s Guide 238
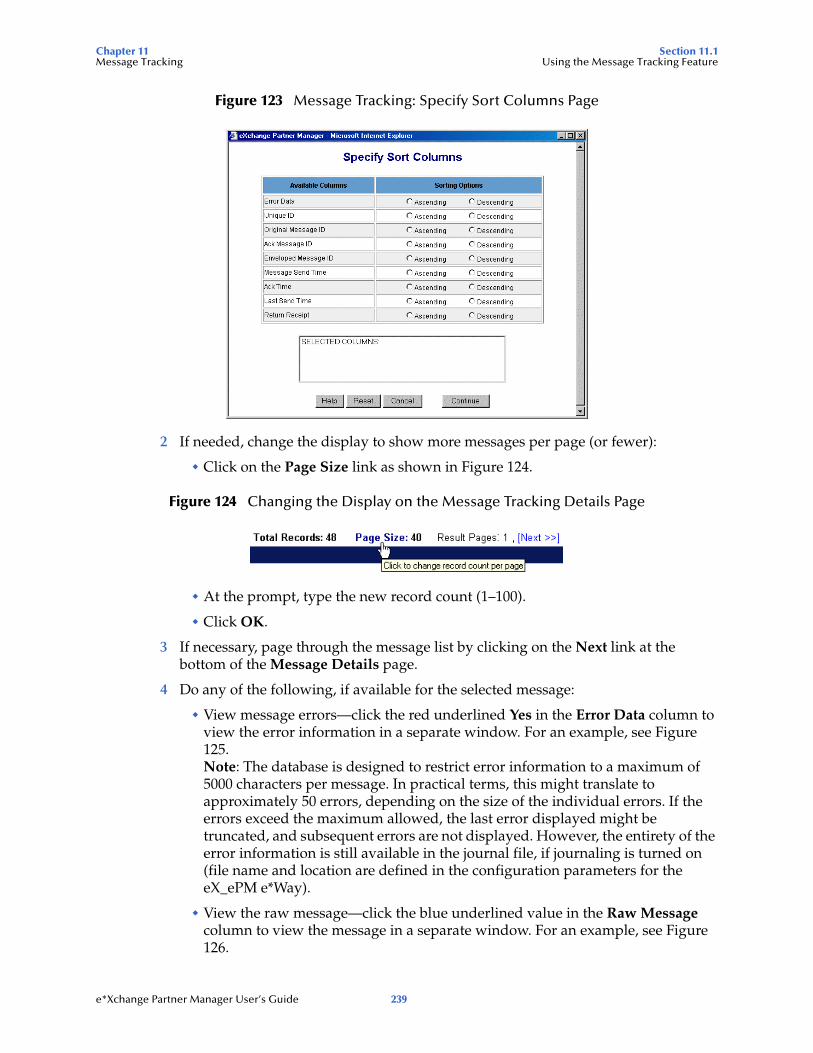
Chapter 11 Section 11.1Message Tracking Using the Message Tracking Feature
Figure 123 Message Tracking: Specify Sort Columns Page
2 If needed, change the display to show more messages per page (or fewer):
Click on the Page Size link as shown in Figure 124.
Figure 124 Changing the Display on the Message Tracking Details Page
At the prompt, type the new record count (1–100).
Click OK.
3 If necessary, page through the message list by clicking on the Next link at the bottom of the Message Details page.
4 Do any of the following, if available for the selected message:
View message errors—click the red underlined Yes in the Error Data column to view the error information in a separate window. For an example, see Figure 125.Note: The database is designed to restrict error information to a maximum of 5000 characters per message. In practical terms, this might translate to approximately 50 errors, depending on the size of the individual errors. If the errors exceed the maximum allowed, the last error displayed might be truncated, and subsequent errors are not displayed. However, the entirety of the error information is still available in the journal file, if journaling is turned on (file name and location are defined in the configuration parameters for the eX_ePM e*Way).
View the raw message—click the blue underlined value in the Raw Message column to view the message in a separate window. For an example, see Figure 126.
e*Xchange Partner Manager User’s Guide 239
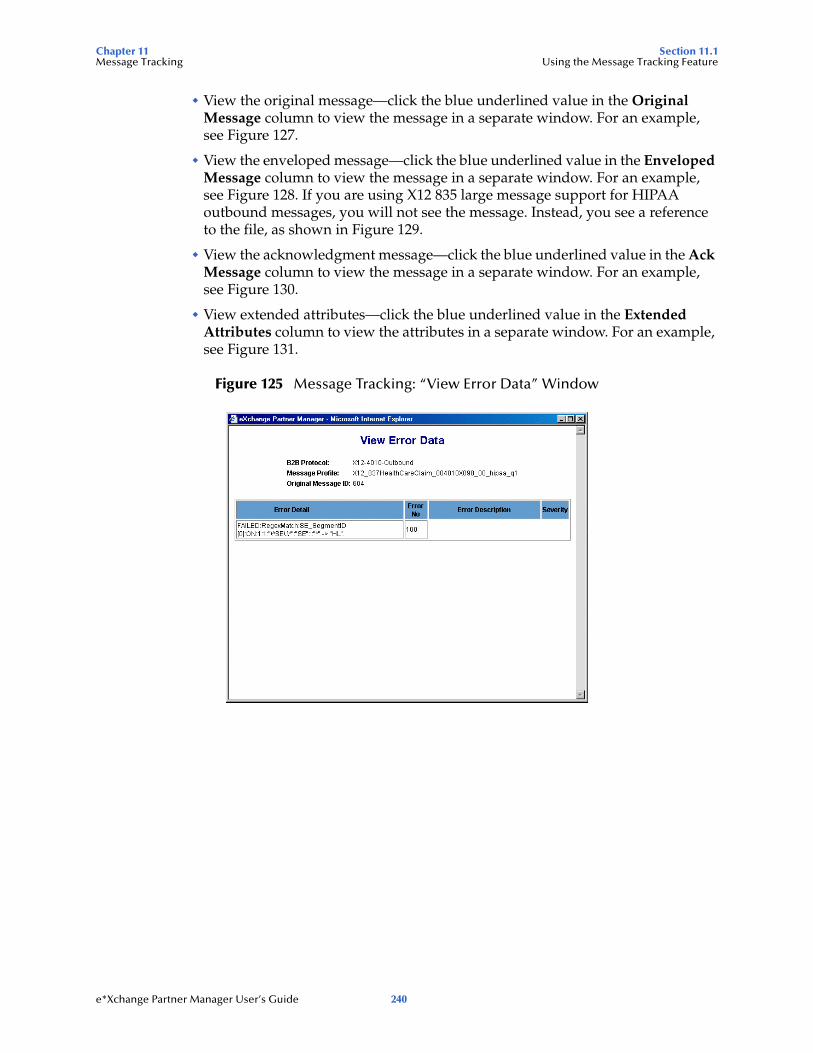
Chapter 11 Section 11.1Message Tracking Using the Message Tracking Feature
View the original message—click the blue underlined value in the Original Message column to view the message in a separate window. For an example, see Figure 127.
View the enveloped message—click the blue underlined value in the Enveloped Message column to view the message in a separate window. For an example, see Figure 128. If you are using X12 835 large message support for HIPAA outbound messages, you will not see the message. Instead, you see a reference to the file, as shown in Figure 129.
View the acknowledgment message—click the blue underlined value in the Ack Message column to view the message in a separate window. For an example, see Figure 130.
View extended attributes—click the blue underlined value in the Extended Attributes column to view the attributes in a separate window. For an example, see Figure 131.
Figure 125 Message Tracking: “View Error Data” Window
e*Xchange Partner Manager User’s Guide 240
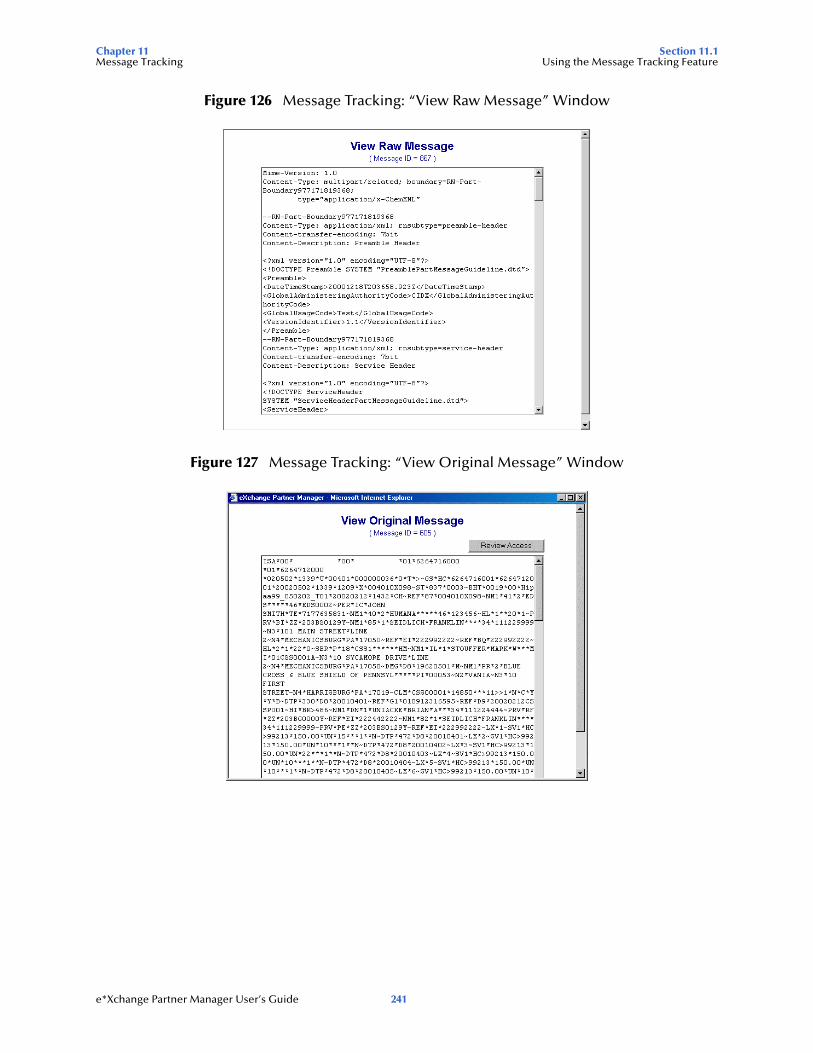
Chapter 11 Section 11.1Message Tracking Using the Message Tracking Feature
Figure 126 Message Tracking: “View Raw Message” Window
Figure 127 Message Tracking: “View Original Message” Window
e*Xchange Partner Manager User’s Guide 241
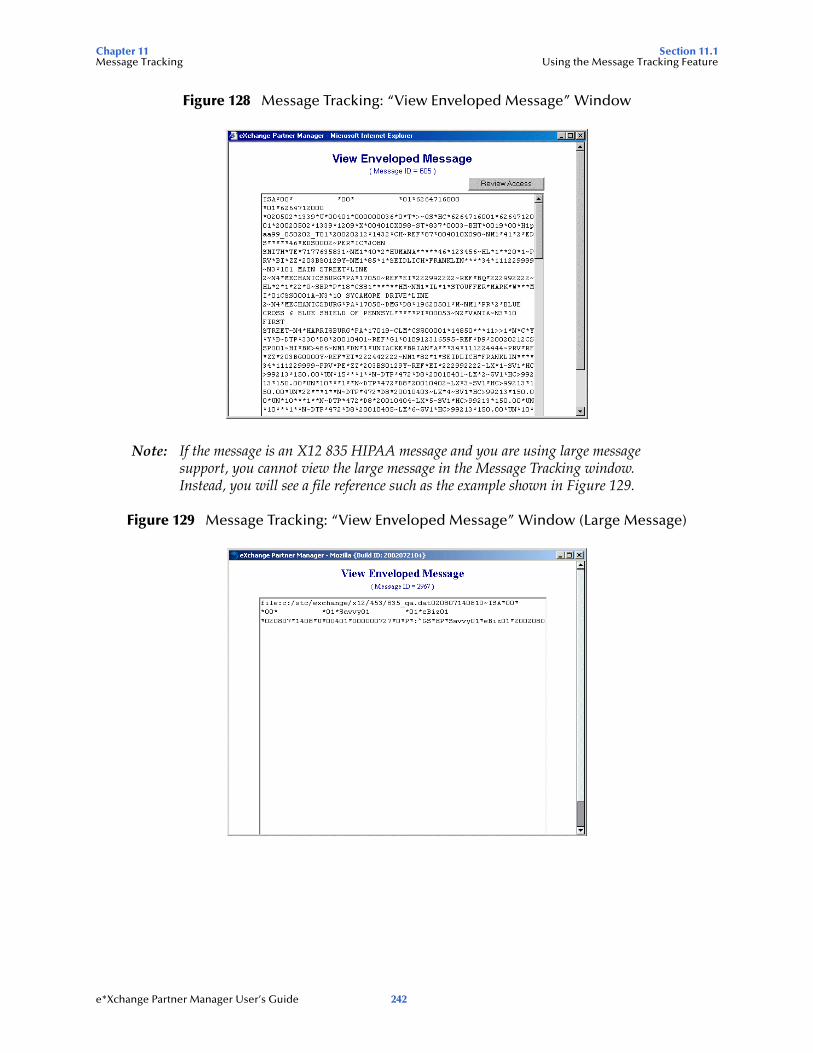
Chapter 11 Section 11.1Message Tracking Using the Message Tracking Feature
Figure 128 Message Tracking: “View Enveloped Message” Window
Note: If the message is an X12 835 HIPAA message and you are using large message support, you cannot view the large message in the Message Tracking window. Instead, you will see a file reference such as the example shown in Figure 129.
Figure 129 Message Tracking: “View Enveloped Message” Window (Large Message)
e*Xchange Partner Manager User’s Guide 242
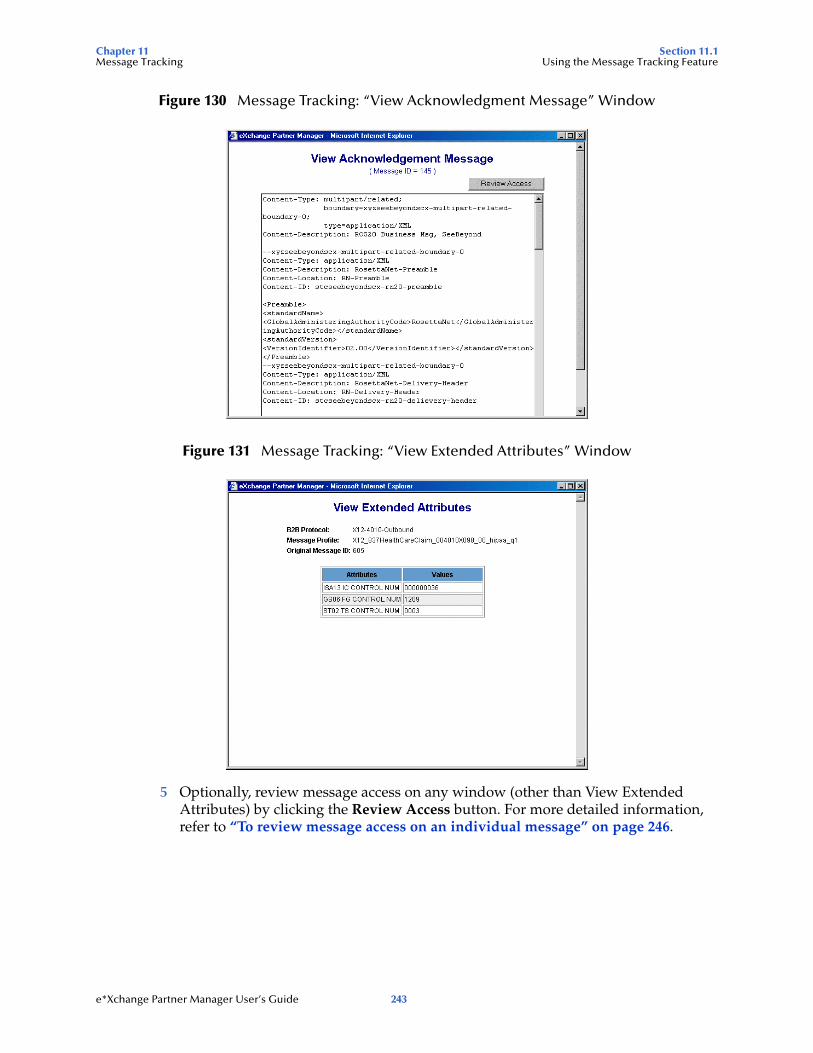
Chapter 11 Section 11.1Message Tracking Using the Message Tracking Feature
Figure 130 Message Tracking: “View Acknowledgment Message” Window
Figure 131 Message Tracking: “View Extended Attributes” Window
5 Optionally, review message access on any window (other than View Extended Attributes) by clicking the Review Access button. For more detailed information, refer to “To review message access on an individual message” on page 246.
e*Xchange Partner Manager User’s Guide 243
Chapter 11 Section 11.2Message Tracking Resending a Message
11.2 Resending a MessageThe e*Xchange Partner Manager Web interface allows you to manually resend a message to a trading partner from within the Message Tracking feature.
Certain conditions must be met, as outlined below.
A message that is not expecting a response can always be resent.
A message that is expecting a single response can be resent providing there is an error on the response and the error is one of the following types:
Response overdue
Hit max re-send limit (or any error beginning with this)
A message that is expecting multiple responses can be resent providing there is an error on each response and each error is one of the following types:
Response overdue
Hit max re-send limit (or any error beginning with this)
A message that is part of a batch cannot be resent unless the resend conditions have been met for the entire batch and the batch is resent.
A message that has already been resent cannot be resent again until the resend process has been completed.
Acknowledgments can be resent.
When a message is resent, the send count and last send time are updated. A manual resend overrides the maximum send count setting.
When a message is resent, it is resent once only, even if the Number of Retries for the message is set to more than one.
To resend a message to a trading partner
1 On the Message Details page, click on the link in the Original Message column for that message.
The View Original Message window appears, as shown in Figure 132.
e*Xchange Partner Manager User’s Guide 244
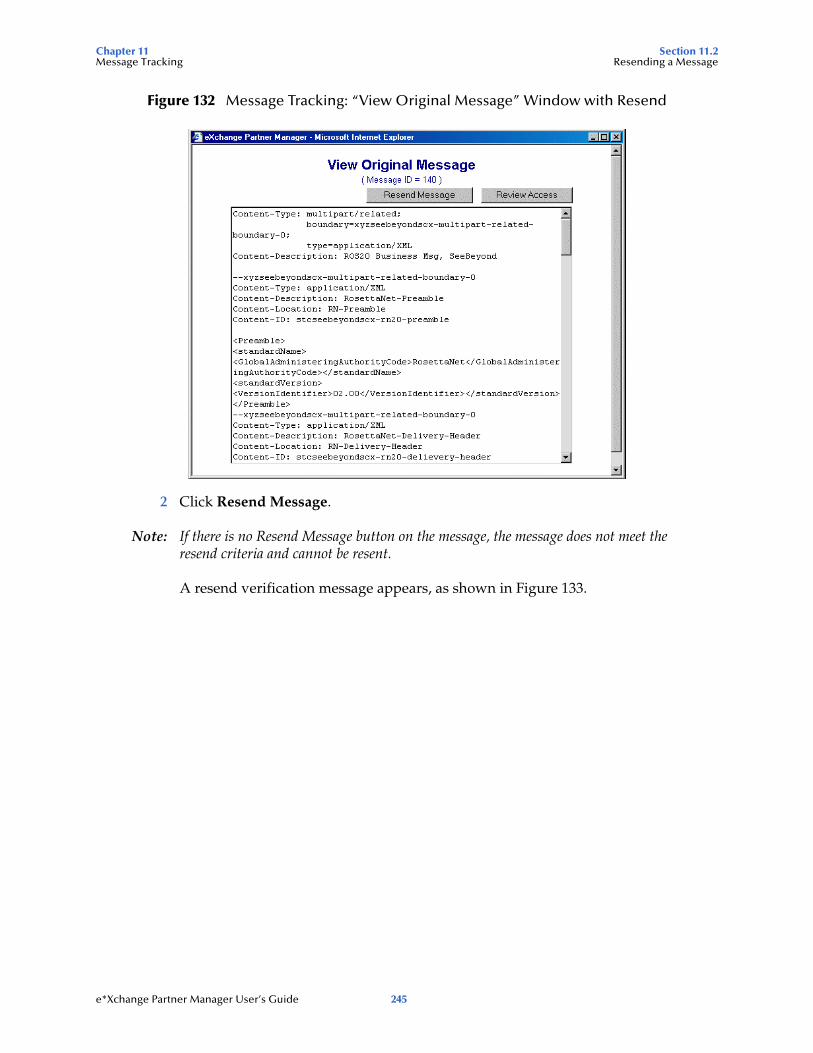
Chapter 11 Section 11.2Message Tracking Resending a Message
Figure 132 Message Tracking: “View Original Message” Window with Resend
2 Click Resend Message.
Note: If there is no Resend Message button on the message, the message does not meet the resend criteria and cannot be resent.
A resend verification message appears, as shown in Figure 133.
e*Xchange Partner Manager User’s Guide 245

Chapter 11 Section 11.3Message Tracking Reviewing Message Access (Audit Feature)
Figure 133 Message Tracking: Resend Verification Message
3 Click OK.
11.3 Reviewing Message Access (Audit Feature)The e*Xchange Partner Manager Web interface includes an optional Message Tracking Audit feature. This feature is turned on or off via the System Defaults page via the Enable Auditing for Message Tracking setting.
When Message Tracking Audit is turned on, an additional option is available in all the Message Tracking screens. You can review the audit log of all users that have accessed a specific message. Information recorded in the audit log includes user ID and timestamp for each time the message was viewed.
When turned on, this feature is available via a Review Message Access link on the following Message Tracking pages:
TP Profile Selection
Message Profile Selection
Message Details
It is also available at the individual message level. From the Message Details page, click any message for which access information is available.
To review message access on an individual message
1 From one of the Message Tracking pages, click the Review Message Access link.
e*Xchange Partner Manager User’s Guide 246
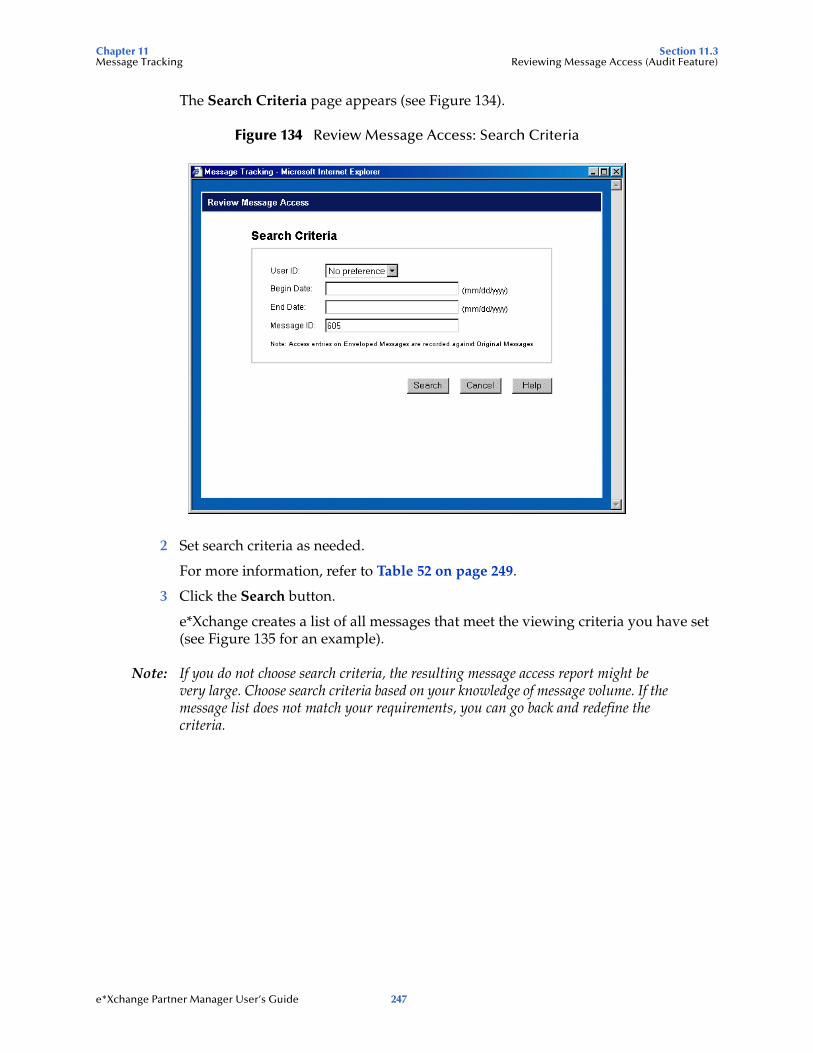
Chapter 11 Section 11.3Message Tracking Reviewing Message Access (Audit Feature)
The Search Criteria page appears (see Figure 134).
Figure 134 Review Message Access: Search Criteria
2 Set search criteria as needed.
For more information, refer to Table 52 on page 249.
3 Click the Search button.
e*Xchange creates a list of all messages that meet the viewing criteria you have set (see Figure 135 for an example).
Note: If you do not choose search criteria, the resulting message access report might be very large. Choose search criteria based on your knowledge of message volume. If the message list does not match your requirements, you can go back and redefine the criteria.
e*Xchange Partner Manager User’s Guide 247

Chapter 11 Section 11.3Message Tracking Reviewing Message Access (Audit Feature)
Figure 135 Review Message Access: Results
4 View the message access list. You can sort the columns as needed:
To sort by a specific column, click the column heading. For example, to sort by timestamp, click the Timestamp column title. A triangle appears in the column heading, indicating that it is the sort column (see Figure 136). By default, columns are sorted in ascending order (lowest values at the top).
Figure 136 Sample List Sorted by Timestamp, Ascending Order
To sort a column in descending order rather than ascending, first click the column heading once to select it as the sort column, and then click it again. The
Column sort indicator (ascending)
e*Xchange Partner Manager User’s Guide 248
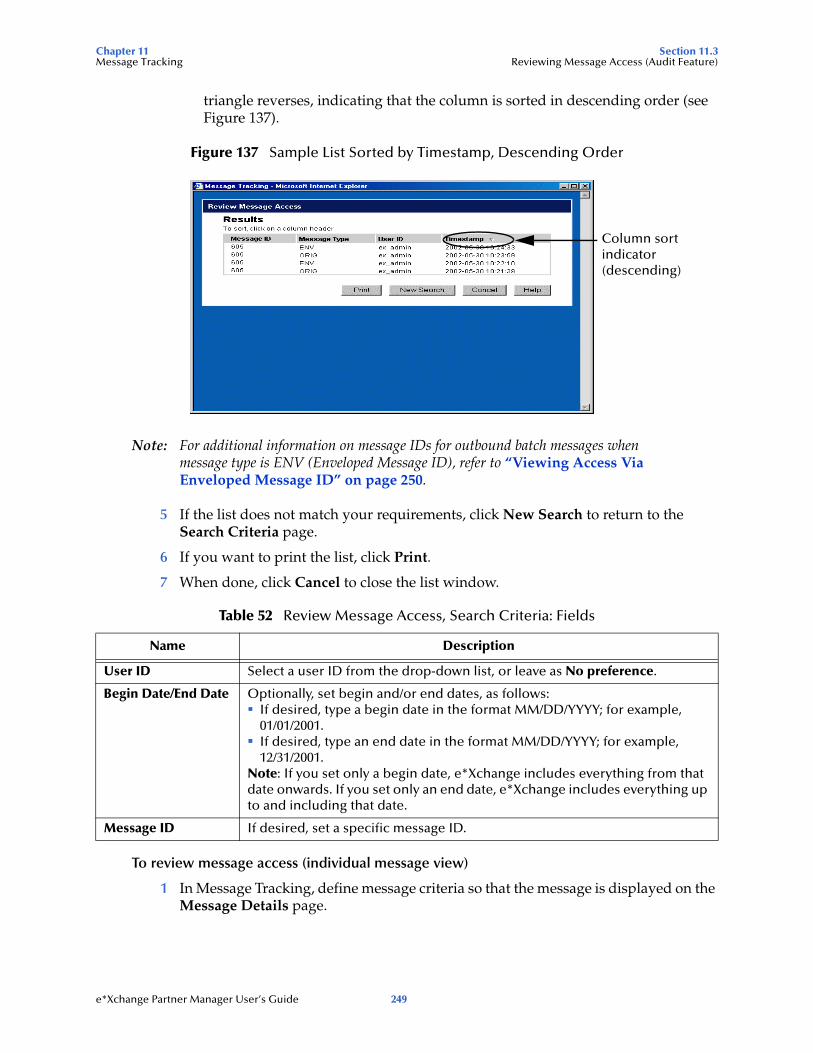
Chapter 11 Section 11.3Message Tracking Reviewing Message Access (Audit Feature)
triangle reverses, indicating that the column is sorted in descending order (see Figure 137).
Figure 137 Sample List Sorted by Timestamp, Descending Order
Note: For additional information on message IDs for outbound batch messages when message type is ENV (Enveloped Message ID), refer to “Viewing Access Via Enveloped Message ID” on page 250.
5 If the list does not match your requirements, click New Search to return to the Search Criteria page.
6 If you want to print the list, click Print.
7 When done, click Cancel to close the list window.
To review message access (individual message view)
1 In Message Tracking, define message criteria so that the message is displayed on the Message Details page.
Table 52 Review Message Access, Search Criteria: Fields
Name Description
User ID Select a user ID from the drop-down list, or leave as No preference.
Begin Date/End Date Optionally, set begin and/or end dates, as follows:If desired, type a begin date in the format MM/DD/YYYY; for example, 01/01/2001.If desired, type an end date in the format MM/DD/YYYY; for example, 12/31/2001.
Note: If you set only a begin date, e*Xchange includes everything from that date onwards. If you set only an end date, e*Xchange includes everything up to and including that date.
Message ID If desired, set a specific message ID.
Column sort indicator (descending)
e*Xchange Partner Manager User’s Guide 249
Chapter 11 Section 11.3Message Tracking Reviewing Message Access (Audit Feature)
For more information, refer to “To enter general search criteria” on page 236 and “To choose the messages to view” on page 237.
2 Select the link in one of the available columns to view the message; for example, to view the original message, click the link in the View Original Message column.
The View Original Message page appears (or another page, according to your selection).
3 Click the Review Access button.
The Review Message Access page appears (see Figure 134).
4 Set search criteria as needed.
For more information, refer to Table 52 on page 249.
5 Click Search.
The results are displayed (see Figure 135).
6 If desired, sort the columns as needed:
To sort by a specific column, click the column heading. For example, to sort by timestamp, click the Timestamp column title. A triangle appears in the column heading, indicating that it is the sort column. By default, columns are sorted in ascending order (lowest values at the top).
To sort a column in descending order rather than ascending, first click the column heading once to select it as the sort column, and then click it again. The triangle reverses, indicating that the column is sorted in descending order.
To print, click Print.
To modify the results list, click New Search to return to the View Message page and change the search criteria.
7 If the list does not match your requirements, click New Search to return to the Search Criteria page.
8 If you want to print the list, click Print.
9 When done, click Cancel to close the list window.
Viewing Access Via Enveloped Message ID
For outbound batch messages, e*Xchange Partner Manager assigns a new Enveloped Message ID each time the message is resent. For example, if a message is sent once and then resent twice, there are three separate Enveloped Message IDs for the same message.
However, whether a user views the original message or the enveloped message, access is always logged against the Original Message ID. This ensures that the access information for a specific message is stored in one place.
Because of this, if you try to review access using the Enveloped Message ID, e*Xchange provides audit information only for the Original Message ID. If you click the Review Access button, e*Xchange uses the corresponding Original Message ID to prepare the access list. This ensures that you see all instances of access to the message.
e*Xchange Partner Manager User’s Guide 250
Chapter 11 Section 11.4Message Tracking Message Tracking: Notes and Tips On Viewing Messages
The Review Message Access Results page displays the Original Message ID in the Message ID column; however, the value in the Message Type column is ENV to indicate that the user viewed the enveloped message rather than the original message.
11.4 Message Tracking: Notes and Tips On Viewing Messages
This section includes some comments and general information that might help you interpret and understand the information you see in Message Tracking.
NCPDP E1 Eligibility Verification messages—because of a limitation in NCPDP, the Request and Response messages are not associated in Message Tracking (unless you perform customization to circumvent this problem). Because of this limitation, you might see timeout errors on outbound Request messages when the responses have already been received.
e*Xchange Partner Manager User’s Guide 251
Chapter 12
e*Xchange Repository Manager
The e*Xchange Repository Manager is a Java-based graphical user interface, provided for import/export and archive/de-archive activities.
Because it is Java-based it has the following advantages:
Can be run on platforms other than Microsoft Windows; for example, UNIX
Supports DB2 UDB databases
The Repository Manager is provided as a separate option during e*Xchange Partner Manager installation.
From this user interface you can complete the following activities:
Archiving of company profiles
Dearchiving of previously archived company profiles
Exporting of company information
Importing of previously exported company information
12.1 Logging In to the e*Xchange Repository ManagerThe Repository Manager is a separate user interface. To log in with e*Xchange Repository Manager installed on Microsoft Windows, follow the steps below.
Note: When you start the Repository Manager, a DOS window opens up as well as the GUI. The Repository Manager requires this DOS window to run in the background; do not close it. When you close the Repository Manager, the DOS window closes automatically.
To log In to the Repository Manager
1 Start the Repository Manager in one of the following ways:
From the Start menu, select Programs, e*Xchange Partner Manager, e*Xchange Repository Manager.
Double-click the e*Xchange Repository Manager icon on your desktop.
2 Enter your database login ID.
3 Enter your database password.
e*Xchange Partner Manager User’s Guide 252
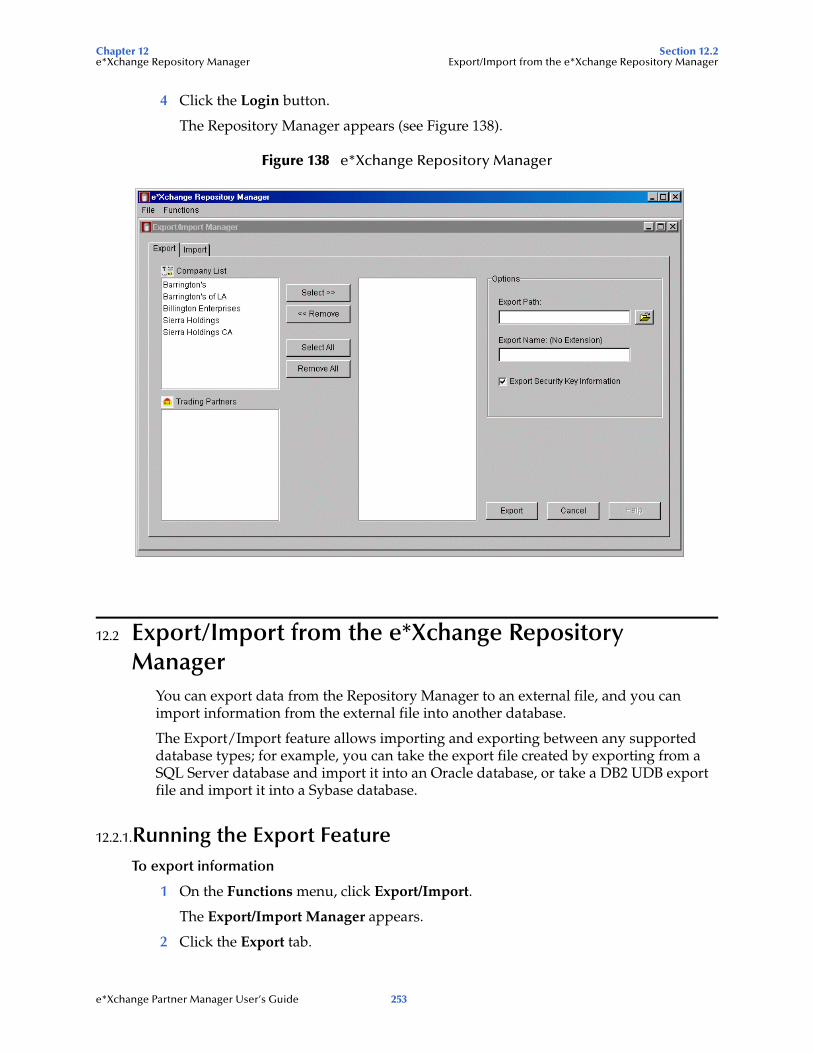
Chapter 12 Section 12.2e*Xchange Repository Manager Export/Import from the e*Xchange Repository Manager
4 Click the Login button.
The Repository Manager appears (see Figure 138).
Figure 138 e*Xchange Repository Manager
12.2 Export/Import from the e*Xchange Repository Manager
You can export data from the Repository Manager to an external file, and you can import information from the external file into another database.
The Export/Import feature allows importing and exporting between any supported database types; for example, you can take the export file created by exporting from a SQL Server database and import it into an Oracle database, or take a DB2 UDB export file and import it into a Sybase database.
12.2.1.Running the Export FeatureTo export information
1 On the Functions menu, click Export/Import.
The Export/Import Manager appears.
2 Click the Export tab.
e*Xchange Partner Manager User’s Guide 253
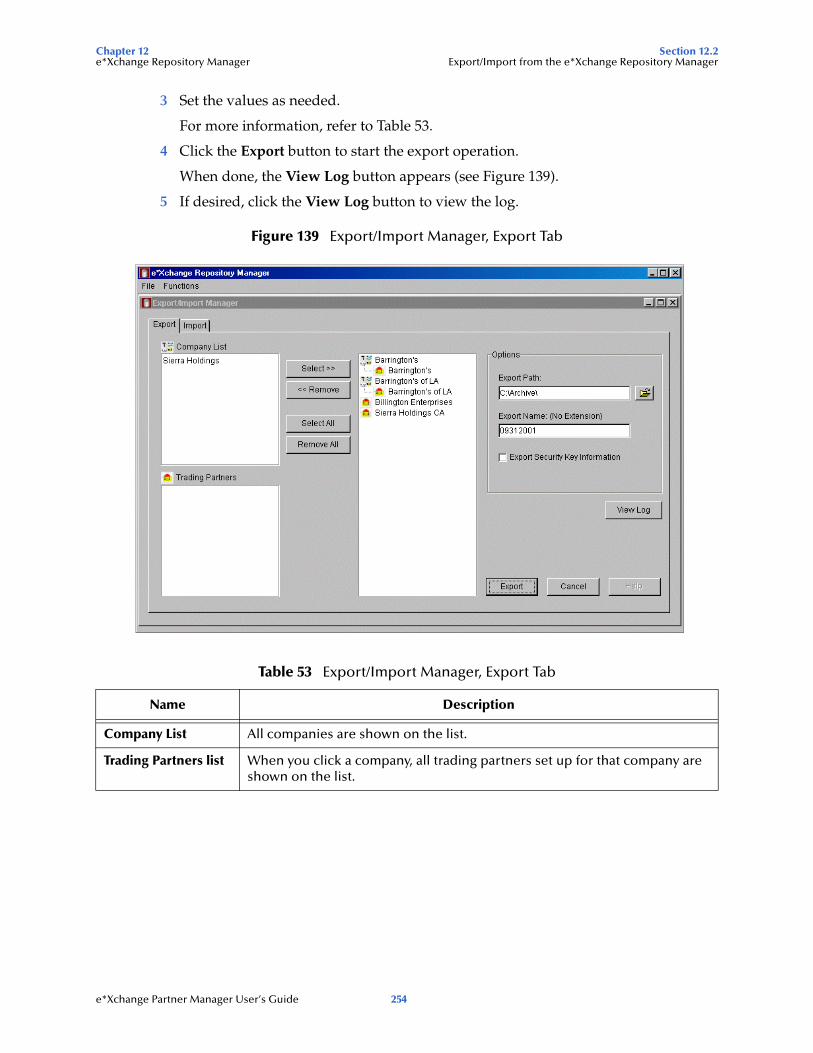
Chapter 12 Section 12.2e*Xchange Repository Manager Export/Import from the e*Xchange Repository Manager
3 Set the values as needed.
For more information, refer to Table 53.
4 Click the Export button to start the export operation.
When done, the View Log button appears (see Figure 139).
5 If desired, click the View Log button to view the log.
Figure 139 Export/Import Manager, Export Tab
Table 53 Export/Import Manager, Export Tab
Name Description
Company List All companies are shown on the list.
Trading Partners list When you click a company, all trading partners set up for that company are shown on the list.
e*Xchange Partner Manager User’s Guide 254
Chapter 12 Section 12.2e*Xchange Repository Manager Export/Import from the e*Xchange Repository Manager
12.2.2.Before ImportingThere are some important points to note before you start the import process:
When you import the information, the associations between messages and responses might not be preserved. When you have imported, check the Return Envelope settings in the Web interface (Message Profile level) to ensure the correct return envelopes are selected.
Selection Buttons Use the selection buttons to create a list of companies/trading partners whose messages you want to export, as follows:
To select a company and all its trading partners, highlight the company in the left pane, and then click Select.To select a trading partner and its parent company, highlight the trading partner on the Trading Partners list and then click Select. To select multiple trading partners, hold down the Shift or Ctrl keys when selecting.To remove a company and all its trading partners from the export list, highlight the company in the right pane and then click Remove.To remove a trading partner from the export list, highlight the trading partner in the right pane and then click Remove. To remove multiple trading partners, hold down the Shift or Ctrl keys when selecting.To select all companies and trading partners for the export list, click Select All.To remove all companies and trading partners from the export list, click Remove All.
Export Path Specify the path for the export file. Click on the icon to the right to access the Browse for Folder dialog box, and then choose a folder.Note: browse to the parent folder, single-click the folder in which you want to store the file, and then click OK.
Export Name (No extension)
Type the name of the export file, without extension. The Repository Manager exports the information to an ASCII file with the extension .exp.
Export Security Key Information
Clear this check box if you do not want security key information to be included in the export file. By default, security key information is exported.Note: Since this is sensitive information, be sure it is acceptable to include it in the export file before doing so.
Export Click this button to start the export operation. When done, the Repository Manager displays an information message.
View Log When the operation is complete, the View Log button appears. Click this button to view the log file.The log file is located in the folder specified in the Export Path and is always named epmExport.log. If for any reason you want to preserve a specific log file, back it up or rename it so that the next export process does not overwrite the file.
Cancel Click this button to cancel the settings and close the dialog box.
Table 53 Export/Import Manager, Export Tab (Continued)
Name Description
e*Xchange Partner Manager User’s Guide 255
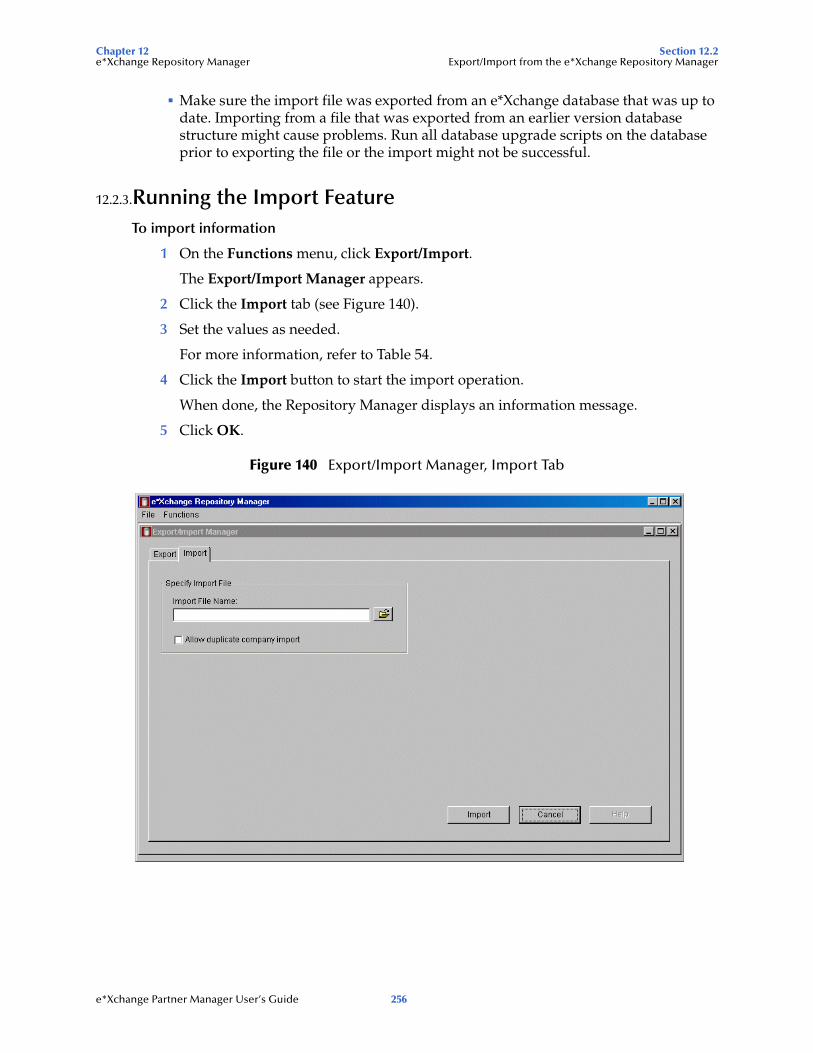
Chapter 12 Section 12.2e*Xchange Repository Manager Export/Import from the e*Xchange Repository Manager
Make sure the import file was exported from an e*Xchange database that was up to date. Importing from a file that was exported from an earlier version database structure might cause problems. Run all database upgrade scripts on the database prior to exporting the file or the import might not be successful.
12.2.3.Running the Import FeatureTo import information
1 On the Functions menu, click Export/Import.
The Export/Import Manager appears.
2 Click the Import tab (see Figure 140).
3 Set the values as needed.
For more information, refer to Table 54.
4 Click the Import button to start the import operation.
When done, the Repository Manager displays an information message.
5 Click OK.
Figure 140 Export/Import Manager, Import Tab
e*Xchange Partner Manager User’s Guide 256
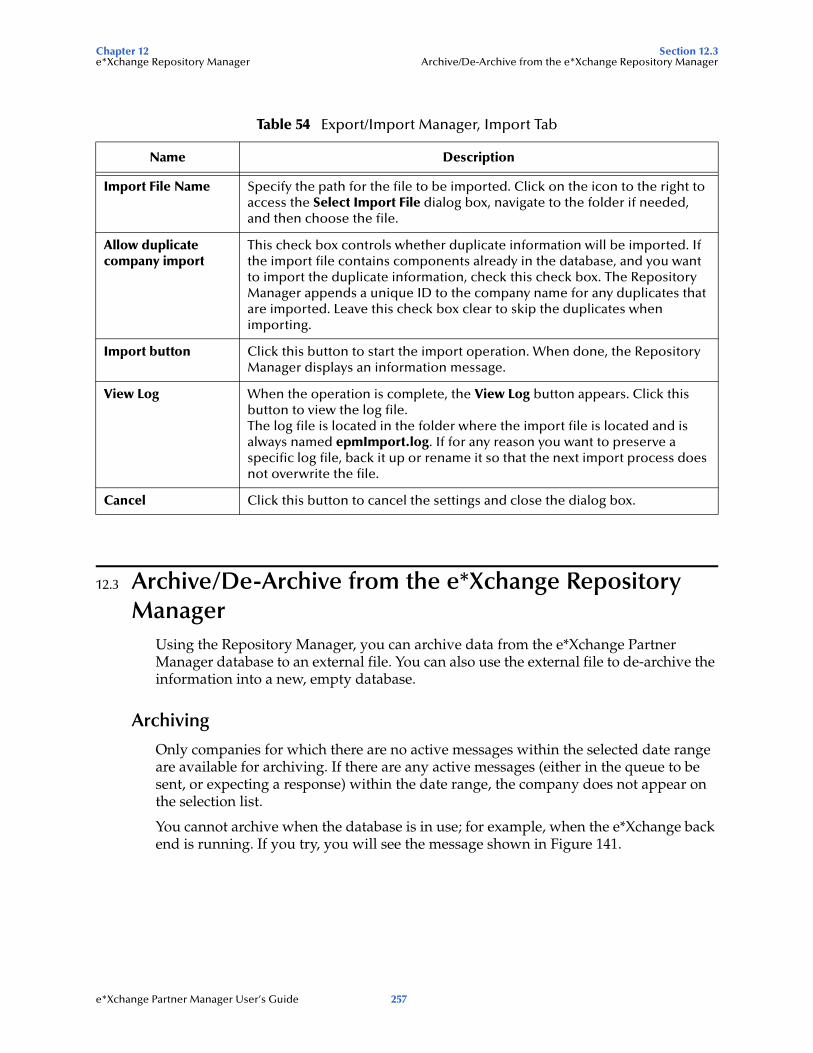
Chapter 12 Section 12.3e*Xchange Repository Manager Archive/De-Archive from the e*Xchange Repository Manager
12.3 Archive/De-Archive from the e*Xchange Repository Manager
Using the Repository Manager, you can archive data from the e*Xchange Partner Manager database to an external file. You can also use the external file to de-archive the information into a new, empty database.
Archiving
Only companies for which there are no active messages within the selected date range are available for archiving. If there are any active messages (either in the queue to be sent, or expecting a response) within the date range, the company does not appear on the selection list.
You cannot archive when the database is in use; for example, when the e*Xchange back end is running. If you try, you will see the message shown in Figure 141.
Table 54 Export/Import Manager, Import Tab
Name Description
Import File Name Specify the path for the file to be imported. Click on the icon to the right to access the Select Import File dialog box, navigate to the folder if needed, and then choose the file.
Allow duplicate company import
This check box controls whether duplicate information will be imported. If the import file contains components already in the database, and you want to import the duplicate information, check this check box. The Repository Manager appends a unique ID to the company name for any duplicates that are imported. Leave this check box clear to skip the duplicates when importing.
Import button Click this button to start the import operation. When done, the Repository Manager displays an information message.
View Log When the operation is complete, the View Log button appears. Click this button to view the log file.The log file is located in the folder where the import file is located and is always named epmImport.log. If for any reason you want to preserve a specific log file, back it up or rename it so that the next import process does not overwrite the file.
Cancel Click this button to cancel the settings and close the dialog box.
e*Xchange Partner Manager User’s Guide 257

Chapter 12 Section 12.3e*Xchange Repository Manager Archive/De-Archive from the e*Xchange Repository Manager
Figure 141 Archiving Error Message
De-Archiving
The Archive/De-Archive feature allows archiving and de-archiving between any supported database types; for example, you can take the file created by archiving from a SQL Server database and de-archive it to an Oracle database, or take the file created by archiving from a DB2 UDB database and de-archive it to a Sybase database.
De-archived data is for reference only since the sequence numbers would not match the sequence numbers in a new database and only those Message Tracking attributes that are used by the de-archived file are available for use.
When you de-archive, e*Xchange always deletes any information already existing in the database. You cannot combine multiple archive files.
The archive file is in compressed format.
Caution: This operation deletes information from your database. As with any major operation affecting your business information, you should back up your data before starting the archiving process. Make a full backup of your e*Xchange database tables using the standard backup procedure for your database.
12.3.1.Changes to Settings During ArchivingIt is important to realize that during the archive process certain logging features are turned off, and constraints dropped, in the interests of getting the archive completed as quickly as possible.
Changes to Logging and Constraints
The changes to the e*Xchange operation during archiving vary according to the type of database you are using. Refer to Table 55 for specific information on activities and tables that are affected during the archiving process.
e*Xchange Partner Manager User’s Guide 258
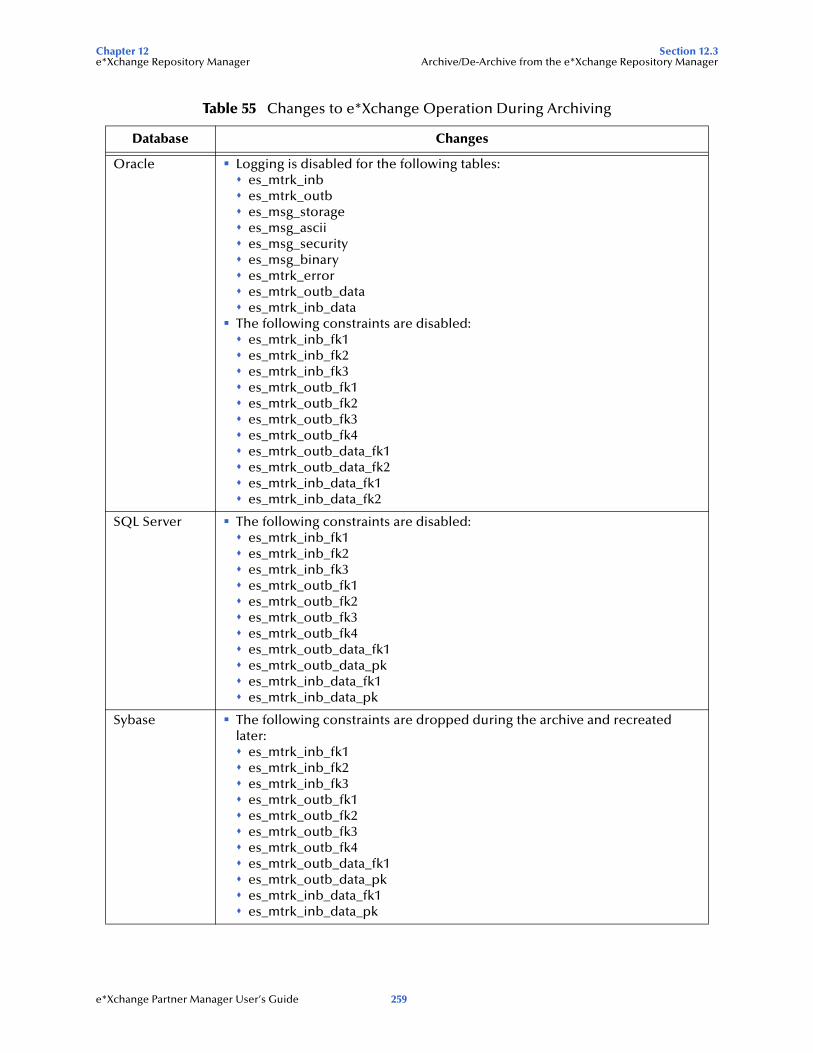
Chapter 12 Section 12.3e*Xchange Repository Manager Archive/De-Archive from the e*Xchange Repository Manager
Table 55 Changes to e*Xchange Operation During Archiving
Database Changes
Oracle Logging is disabled for the following tables:es_mtrk_inbes_mtrk_outbes_msg_storagees_msg_asciies_msg_securityes_msg_binaryes_mtrk_errores_mtrk_outb_dataes_mtrk_inb_data
The following constraints are disabled:es_mtrk_inb_fk1es_mtrk_inb_fk2es_mtrk_inb_fk3es_mtrk_outb_fk1es_mtrk_outb_fk2es_mtrk_outb_fk3es_mtrk_outb_fk4es_mtrk_outb_data_fk1es_mtrk_outb_data_fk2es_mtrk_inb_data_fk1es_mtrk_inb_data_fk2
SQL Server The following constraints are disabled:es_mtrk_inb_fk1es_mtrk_inb_fk2es_mtrk_inb_fk3es_mtrk_outb_fk1es_mtrk_outb_fk2es_mtrk_outb_fk3es_mtrk_outb_fk4es_mtrk_outb_data_fk1es_mtrk_outb_data_pkes_mtrk_inb_data_fk1es_mtrk_inb_data_pk
Sybase The following constraints are dropped during the archive and recreated later:
es_mtrk_inb_fk1es_mtrk_inb_fk2es_mtrk_inb_fk3es_mtrk_outb_fk1es_mtrk_outb_fk2es_mtrk_outb_fk3es_mtrk_outb_fk4es_mtrk_outb_data_fk1es_mtrk_outb_data_pkes_mtrk_inb_data_fk1es_mtrk_inb_data_pk
e*Xchange Partner Manager User’s Guide 259
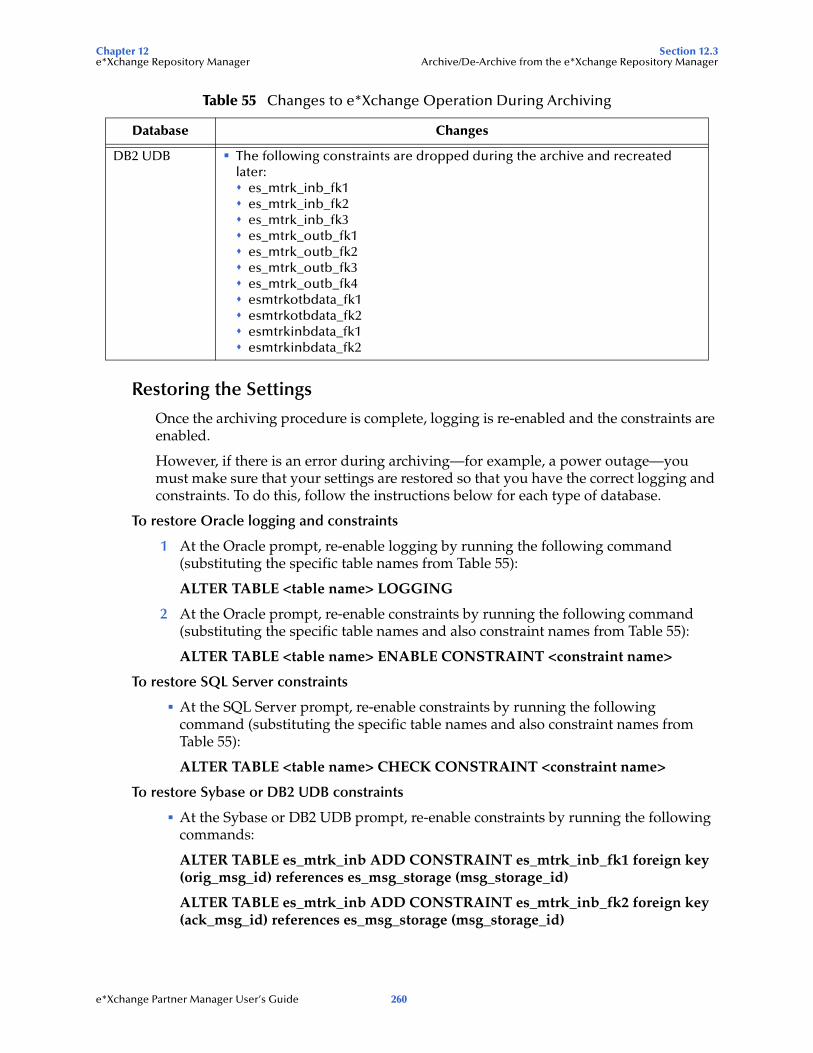
Chapter 12 Section 12.3e*Xchange Repository Manager Archive/De-Archive from the e*Xchange Repository Manager
Restoring the Settings
Once the archiving procedure is complete, logging is re-enabled and the constraints are enabled.
However, if there is an error during archiving—for example, a power outage—you must make sure that your settings are restored so that you have the correct logging and constraints. To do this, follow the instructions below for each type of database.
To restore Oracle logging and constraints
1 At the Oracle prompt, re-enable logging by running the following command (substituting the specific table names from Table 55):
ALTER TABLE <table name> LOGGING
2 At the Oracle prompt, re-enable constraints by running the following command (substituting the specific table names and also constraint names from Table 55):
ALTER TABLE <table name> ENABLE CONSTRAINT <constraint name>
To restore SQL Server constraints
At the SQL Server prompt, re-enable constraints by running the following command (substituting the specific table names and also constraint names from Table 55):
ALTER TABLE <table name> CHECK CONSTRAINT <constraint name>
To restore Sybase or DB2 UDB constraints
At the Sybase or DB2 UDB prompt, re-enable constraints by running the following commands:
ALTER TABLE es_mtrk_inb ADD CONSTRAINT es_mtrk_inb_fk1 foreign key (orig_msg_id) references es_msg_storage (msg_storage_id)
ALTER TABLE es_mtrk_inb ADD CONSTRAINT es_mtrk_inb_fk2 foreign key (ack_msg_id) references es_msg_storage (msg_storage_id)
DB2 UDB The following constraints are dropped during the archive and recreated later:
es_mtrk_inb_fk1es_mtrk_inb_fk2es_mtrk_inb_fk3es_mtrk_outb_fk1es_mtrk_outb_fk2es_mtrk_outb_fk3es_mtrk_outb_fk4esmtrkotbdata_fk1 esmtrkotbdata_fk2 esmtrkinbdata_fk1esmtrkinbdata_fk2
Table 55 Changes to e*Xchange Operation During Archiving
Database Changes
e*Xchange Partner Manager User’s Guide 260
Chapter 12 Section 12.3e*Xchange Repository Manager Archive/De-Archive from the e*Xchange Repository Manager
ALTER TABLE es_mtrk_inb ADD CONSTRAINT es_mtrk_inb_fk3 foreign key (raw_msg_id) references es_msg_storage (msg_storage_id)
ALTER TABLE es_mtrk_outb ADD CONSTRAINT es_mtrk_outb_fk1 foreign key (orig_msg_id) references es_msg_storage (msg_storage_id)
ALTER TABLE es_mtrk_outb ADD CONSTRAINT es_mtrk_outb_fk2 foreign key (env_msg_id) references es_msg_storage (msg_storage_id)
ALTER TABLE es_mtrk_outb ADD CONSTRAINT es_mtrk_outb_fk3 foreign key (ack_msg_id) references es_msg_storage (msg_storage_id)
ALTER TABLE es_mtrk_outb ADD CONSTRAINT es_mtrk_outb_fk4 foreign key (raw_msg_id) references es_msg_storage (msg_storage_id)
12.3.2.Running the Archive FeatureTo archive information
1 On the Functions menu, click Archive/De-archive.
The Archive/De-Archive Manager appears.
2 Click the Archive tab (see Figure 142).
3 Set the values as needed. For more information, refer to Table 56.
Since companies with active messages cannot be archived, changing the date selection might increase or decrease the number of companies available for archiving.
4 Click the Archive button to start the archiving operation.
When done, the Repository Manager displays an information message.
Note: If you have left Delete Message Records selected, the Repository Manager creates the archive file before deleting the message records. However, it does not close the archive file until the deletion operation is also complete. Wait for the entire process to be complete before attempting to do anything with the archive file. In addition, Repository Manager used a background DOS window; you must leave this window open.When you close Repository Manager, the DOS window closes automatically.
5 Click OK.
e*Xchange Partner Manager User’s Guide 261
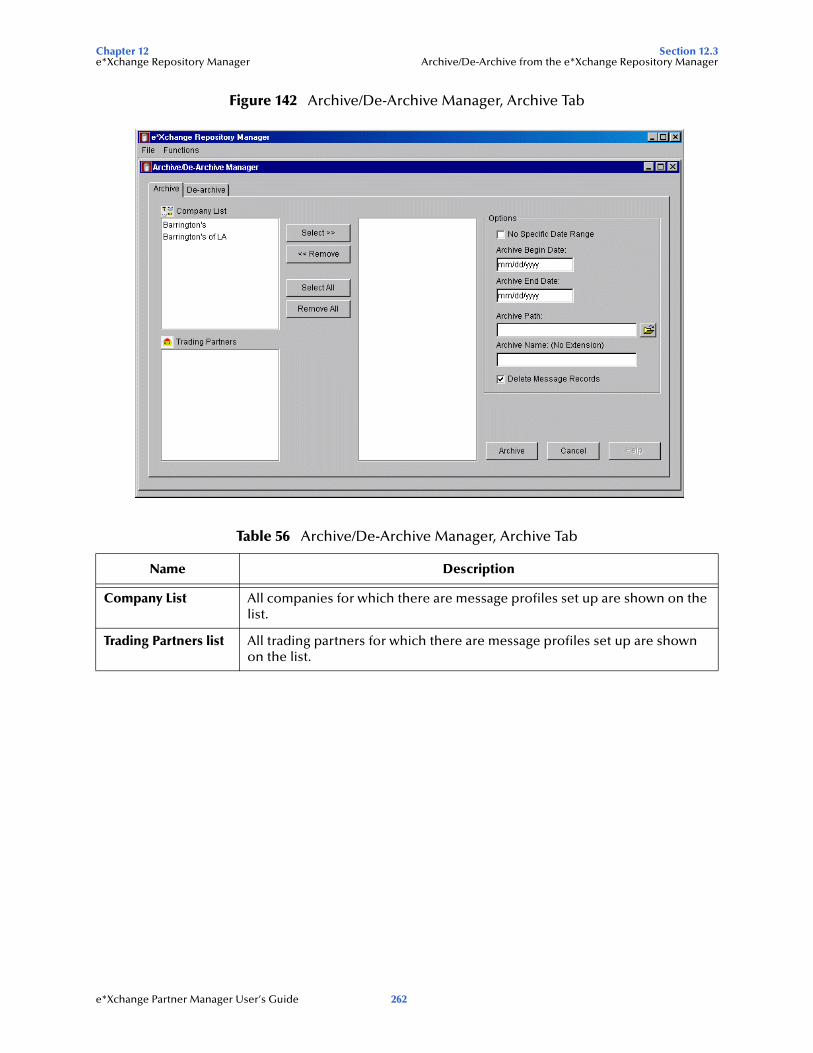
Chapter 12 Section 12.3e*Xchange Repository Manager Archive/De-Archive from the e*Xchange Repository Manager
Figure 142 Archive/De-Archive Manager, Archive Tab
Table 56 Archive/De-Archive Manager, Archive Tab
Name Description
Company List All companies for which there are message profiles set up are shown on the list.
Trading Partners list All trading partners for which there are message profiles set up are shown on the list.
e*Xchange Partner Manager User’s Guide 262
Chapter 12 Section 12.3e*Xchange Repository Manager Archive/De-Archive from the e*Xchange Repository Manager
Selection Buttons Use the selection buttons to create a list of companies/trading partners for message archiving, as follows:
To select a company and all its trading partners, highlight the company in the left pane, and then click Select.To select a trading partner and its parent company, highlight the trading partner on the Trading Partners list and then click Select. You can also select multiple trading partners by holding down the Shift or Ctrl keys when selecting.To remove a company and all its trading partners from the archiving list, highlight the company in the right pane and then click Remove.To remove a trading partner from the archiving list, highlight the trading partner in the right pane and then click Remove. You can also remove multiple trading partners by holding down the Shift or Ctrl keys when selecting.To select all companies and trading partners from the archiving list, click Select All.To remove all companies and trading partners from the archiving list, click Remove All.
No Specific Date Range
To archive all companies and trading partners that do not have active messages, check this check box.Note: Companies or trading partners that have active messages (for example, expecting a response) within the selected date range cannot be archived.
Archive Begin Date/Archive End Date
To specify a date range for archiving, set beginning and ending dates. These values default to a date range that includes all the information in the database.
Archive Path Specify the path for the archive file. Click on the icon to the right to access the Browse for Folder dialog box, and then choose a folder. Do not choose a file name.Note: browse to the parent folder, single-click the folder in which you want to store the file, and then click OK.
Archive Name (No extension)
Type the name of the archive file, without extension. The Repository Manager makes a compressed file with the extension .zip.Note: After archiving, do not change the name of the archive file. If you do, the de-archive process will not work.
Delete Message Records
If you want the archived messages to be deleted from the database, leave this as checked (the default). If you want to leave the messages in the database, clear this check box.
Archive Click this button to start the archiving operation. When done, the Repository Manager displays an information message.
Table 56 Archive/De-Archive Manager, Archive Tab (Continued)
Name Description
e*Xchange Partner Manager User’s Guide 263

Chapter 12 Section 12.3e*Xchange Repository Manager Archive/De-Archive from the e*Xchange Repository Manager
12.3.3.Viewing the Archive LogThe archive log provides details of the archiving activity performed. An example is shown in Figure 143.
Figure 143 Sample Archive Log
Occasionally, there might be a problem with re-enabling the database constraints. For example, this can happen if the database is in use while the archiving process is being done. If this happens, you must remember to manually re-enable the constraints immediately after archiving.
If this problem occurs, you might see a message in the log file similar to the one shown in Figure 144.
View Log When the operation is complete, the View Log button appears. Click this button to view the log file.The log file is located in the folder specified in the Archive Path and is always named epmARC.log. If for any reason you want to preserve a specific log file, back it up or rename it so that the next archive process does not overwrite the file.
Table 56 Archive/De-Archive Manager, Archive Tab (Continued)
Name Description
e*Xchange Partner Manager User’s Guide 264
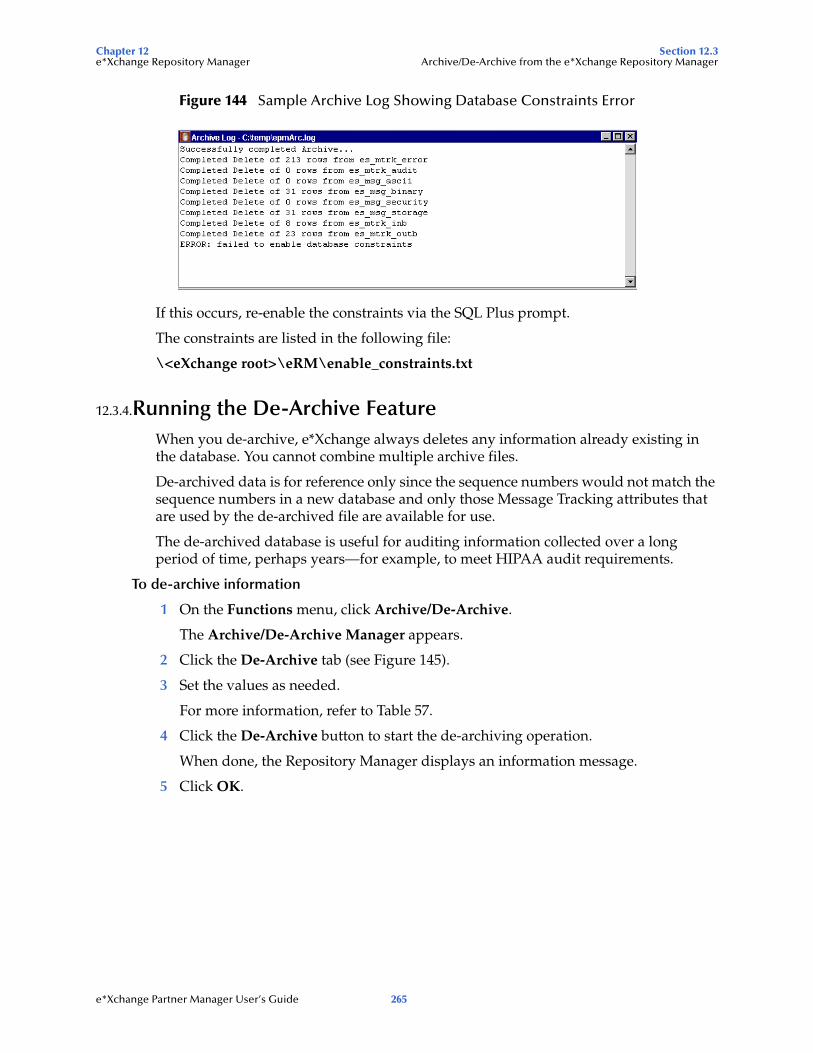
Chapter 12 Section 12.3e*Xchange Repository Manager Archive/De-Archive from the e*Xchange Repository Manager
Figure 144 Sample Archive Log Showing Database Constraints Error
If this occurs, re-enable the constraints via the SQL Plus prompt.
The constraints are listed in the following file:
\<eXchange root>\eRM\enable_constraints.txt
12.3.4.Running the De-Archive FeatureWhen you de-archive, e*Xchange always deletes any information already existing in the database. You cannot combine multiple archive files.
De-archived data is for reference only since the sequence numbers would not match the sequence numbers in a new database and only those Message Tracking attributes that are used by the de-archived file are available for use.
The de-archived database is useful for auditing information collected over a long period of time, perhaps years—for example, to meet HIPAA audit requirements.
To de-archive information
1 On the Functions menu, click Archive/De-Archive.
The Archive/De-Archive Manager appears.
2 Click the De-Archive tab (see Figure 145).
3 Set the values as needed.
For more information, refer to Table 57.
4 Click the De-Archive button to start the de-archiving operation.
When done, the Repository Manager displays an information message.
5 Click OK.
e*Xchange Partner Manager User’s Guide 265
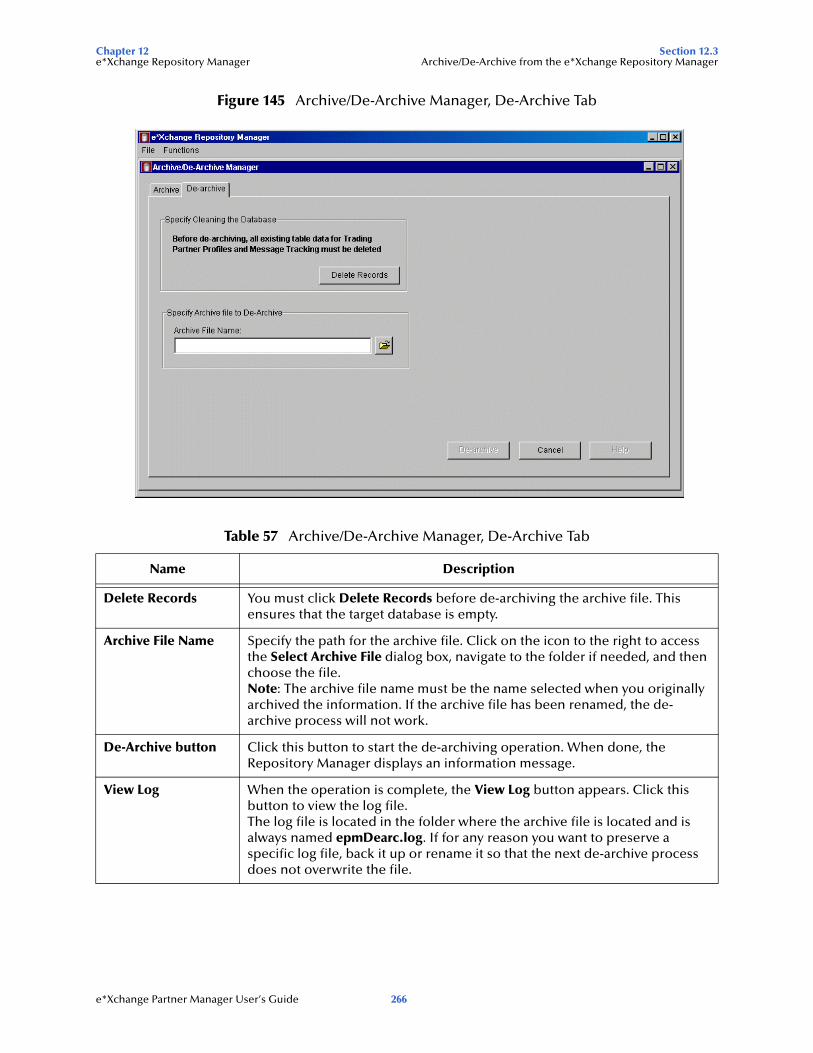
Chapter 12 Section 12.3e*Xchange Repository Manager Archive/De-Archive from the e*Xchange Repository Manager
Figure 145 Archive/De-Archive Manager, De-Archive Tab
Table 57 Archive/De-Archive Manager, De-Archive Tab
Name Description
Delete Records You must click Delete Records before de-archiving the archive file. This ensures that the target database is empty.
Archive File Name Specify the path for the archive file. Click on the icon to the right to access the Select Archive File dialog box, navigate to the folder if needed, and then choose the file.Note: The archive file name must be the name selected when you originally archived the information. If the archive file has been renamed, the de-archive process will not work.
De-Archive button Click this button to start the de-archiving operation. When done, the Repository Manager displays an information message.
View Log When the operation is complete, the View Log button appears. Click this button to view the log file.The log file is located in the folder where the archive file is located and is always named epmDearc.log. If for any reason you want to preserve a specific log file, back it up or rename it so that the next de-archive process does not overwrite the file.
e*Xchange Partner Manager User’s Guide 266

Appendix A
Troubleshooting
This chapter provides information on resolving problems that might occur when running the e*Xchange Web interface or e*Xchange Repository Manager graphical user interfaces.
A.1 Troubleshooting the e*Xchange Repository ManagerThis section lists errors you might encounter when running the e*Xchange Repository Manager.
Problem
Error in log file:
COM.ibm.db2.jdbc.DB2Exception: [IBM][CLI Driver][DB2/NT] SQL4304N Java stored procedure or user-defined function "EX453.DATETOUDB", specific name "SQL010913174148368" could not load Java class "udbtools", reason code "". SQLSTATE=42724
Reason/Resolution
The file udbtools.class must be present on the server in the directory defined by the %DEBTEMPDIR% function environment variable.
Copy this file from \eXchange\eRM\DB2 to the appropriate directory on the server.
Problem
Oracle JDBC driver error when logging on (see Figure 146).
e*Xchange Partner Manager User’s Guide 267
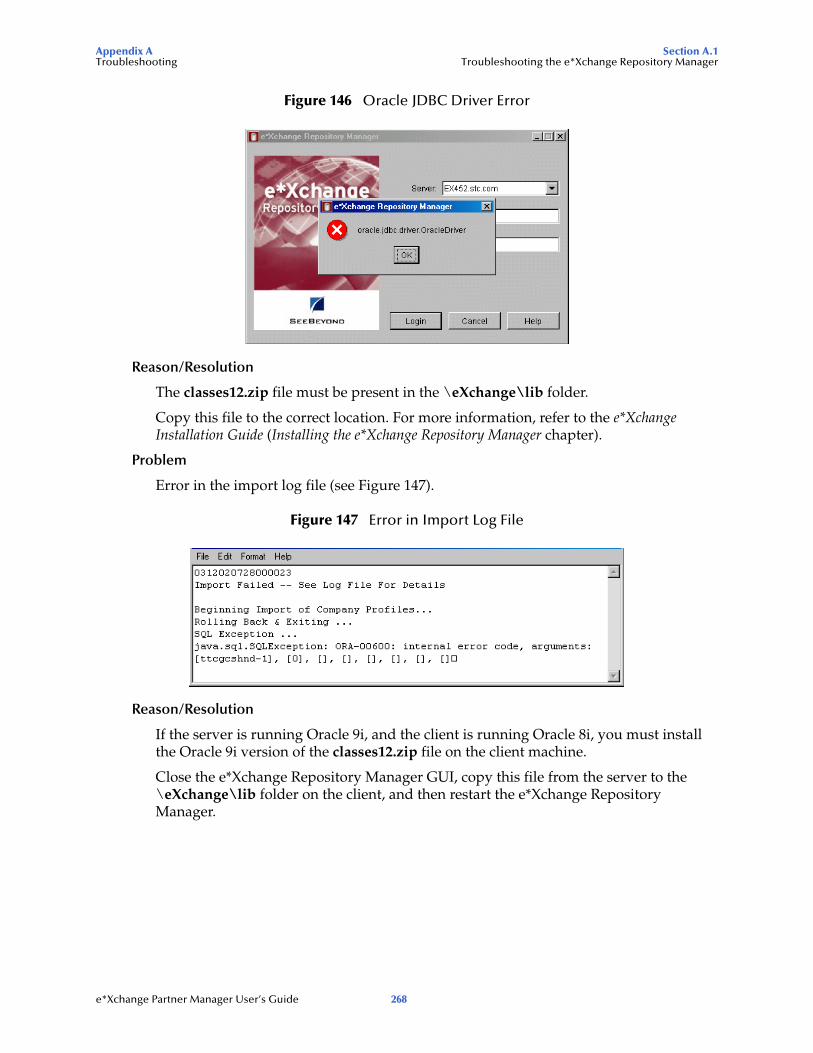
Appendix A Section A.1Troubleshooting Troubleshooting the e*Xchange Repository Manager
Figure 146 Oracle JDBC Driver Error
Reason/Resolution
The classes12.zip file must be present in the \eXchange\lib folder.
Copy this file to the correct location. For more information, refer to the e*Xchange Installation Guide (Installing the e*Xchange Repository Manager chapter).
Problem
Error in the import log file (see Figure 147).
Figure 147 Error in Import Log File
Reason/Resolution
If the server is running Oracle 9i, and the client is running Oracle 8i, you must install the Oracle 9i version of the classes12.zip file on the client machine.
Close the e*Xchange Repository Manager GUI, copy this file from the server to the \eXchange\lib folder on the client, and then restart the e*Xchange Repository Manager.
e*Xchange Partner Manager User’s Guide 268
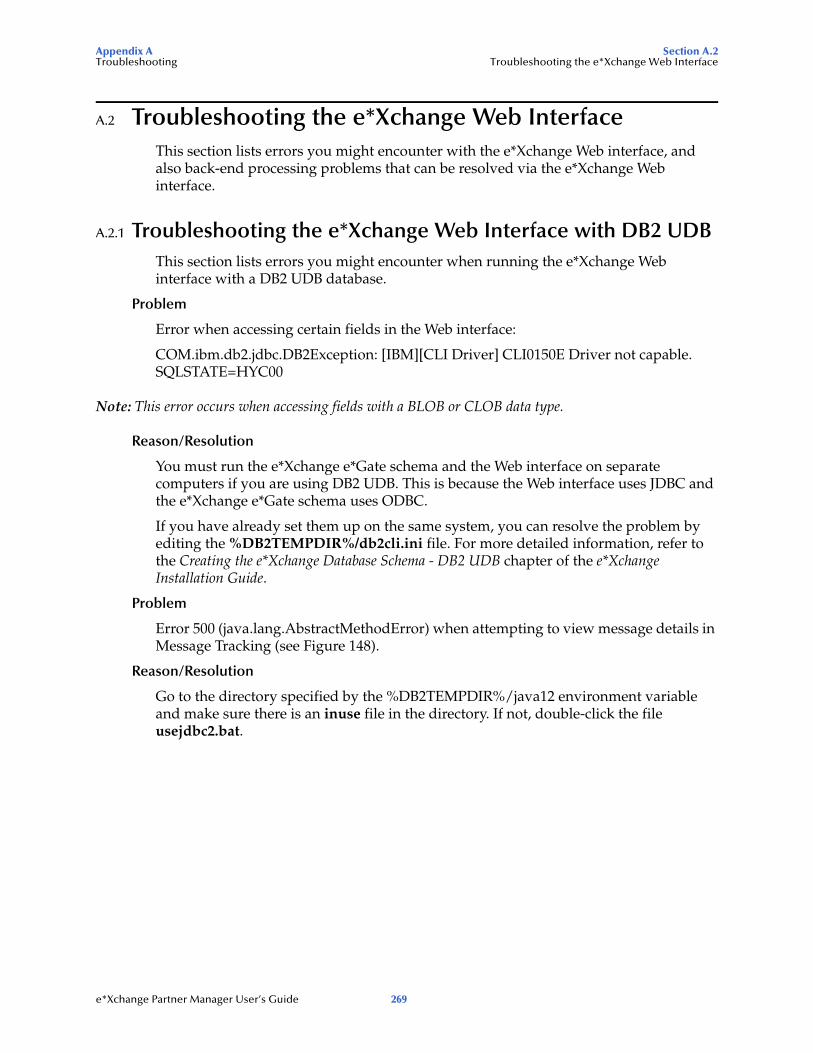
Appendix A Section A.2Troubleshooting Troubleshooting the e*Xchange Web Interface
A.2 Troubleshooting the e*Xchange Web InterfaceThis section lists errors you might encounter with the e*Xchange Web interface, and also back-end processing problems that can be resolved via the e*Xchange Web interface.
A.2.1 Troubleshooting the e*Xchange Web Interface with DB2 UDBThis section lists errors you might encounter when running the e*Xchange Web interface with a DB2 UDB database.
Problem
Error when accessing certain fields in the Web interface:
COM.ibm.db2.jdbc.DB2Exception: [IBM][CLI Driver] CLI0150E Driver not capable. SQLSTATE=HYC00
Note: This error occurs when accessing fields with a BLOB or CLOB data type.
Reason/Resolution
You must run the e*Xchange e*Gate schema and the Web interface on separate computers if you are using DB2 UDB. This is because the Web interface uses JDBC and the e*Xchange e*Gate schema uses ODBC.
If you have already set them up on the same system, you can resolve the problem by editing the %DB2TEMPDIR%/db2cli.ini file. For more detailed information, refer to the Creating the e*Xchange Database Schema - DB2 UDB chapter of the e*Xchange Installation Guide.
Problem
Error 500 (java.lang.AbstractMethodError) when attempting to view message details in Message Tracking (see Figure 148).
Reason/Resolution
Go to the directory specified by the %DB2TEMPDIR%/java12 environment variable and make sure there is an inuse file in the directory. If not, double-click the file usejdbc2.bat.
e*Xchange Partner Manager User’s Guide 269
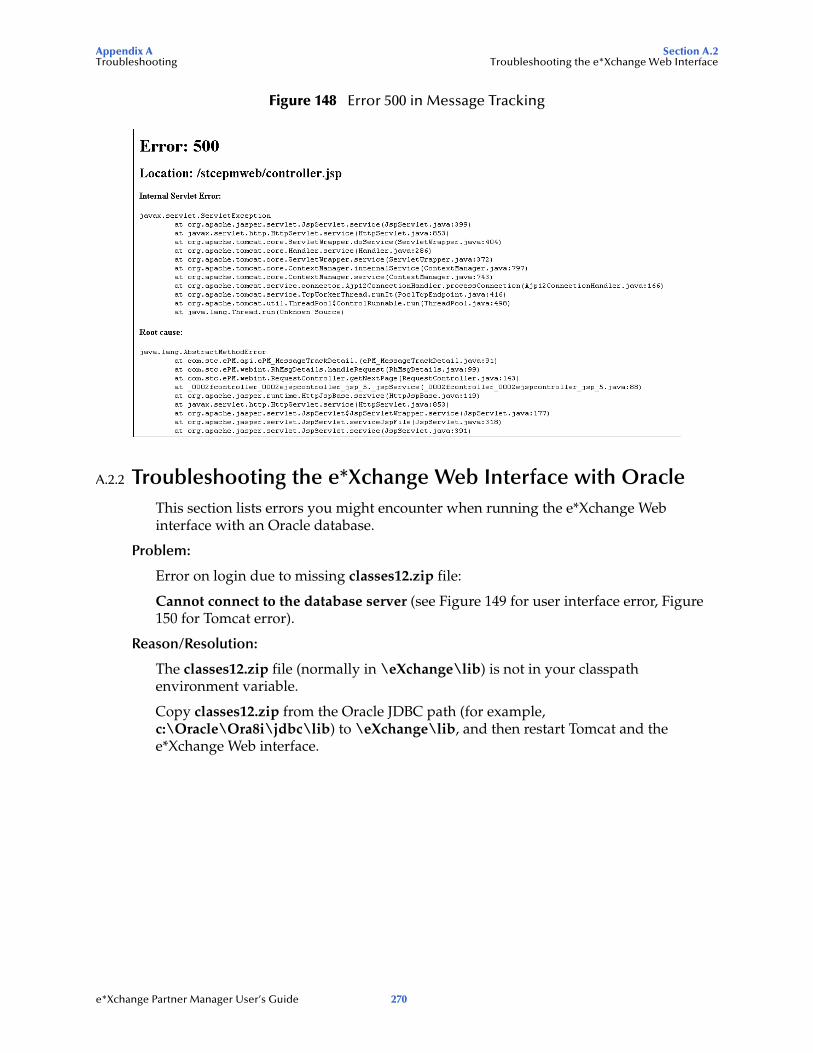
Appendix A Section A.2Troubleshooting Troubleshooting the e*Xchange Web Interface
Figure 148 Error 500 in Message Tracking
A.2.2 Troubleshooting the e*Xchange Web Interface with OracleThis section lists errors you might encounter when running the e*Xchange Web interface with an Oracle database.
Problem:
Error on login due to missing classes12.zip file:
Cannot connect to the database server (see Figure 149 for user interface error, Figure 150 for Tomcat error).
Reason/Resolution:
The classes12.zip file (normally in \eXchange\lib) is not in your classpath environment variable.
Copy classes12.zip from the Oracle JDBC path (for example, c:\Oracle\Ora8i\jdbc\lib) to \eXchange\lib, and then restart Tomcat and the e*Xchange Web interface.
e*Xchange Partner Manager User’s Guide 270
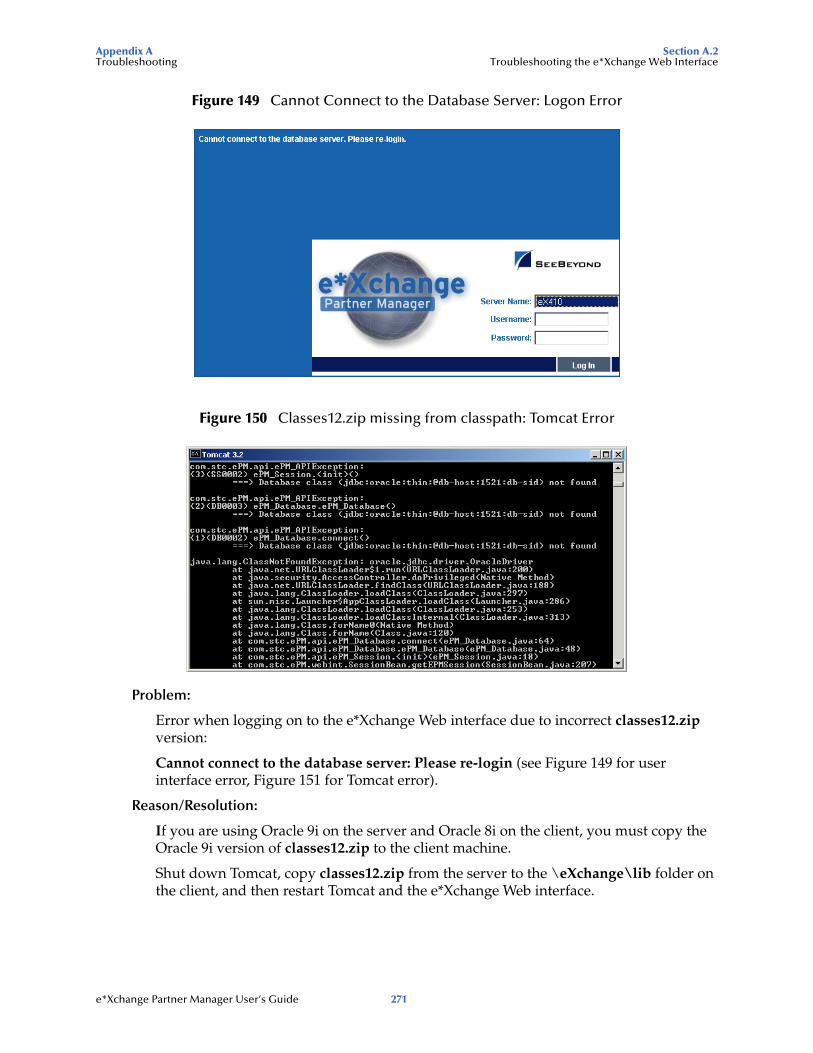
Appendix A Section A.2Troubleshooting Troubleshooting the e*Xchange Web Interface
Figure 149 Cannot Connect to the Database Server: Logon Error
Figure 150 Classes12.zip missing from classpath: Tomcat Error
Problem:
Error when logging on to the e*Xchange Web interface due to incorrect classes12.zip version:
Cannot connect to the database server: Please re-login (see Figure 149 for user interface error, Figure 151 for Tomcat error).
Reason/Resolution:
If you are using Oracle 9i on the server and Oracle 8i on the client, you must copy the Oracle 9i version of classes12.zip to the client machine.
Shut down Tomcat, copy classes12.zip from the server to the \eXchange\lib folder on the client, and then restart Tomcat and the e*Xchange Web interface.
e*Xchange Partner Manager User’s Guide 271
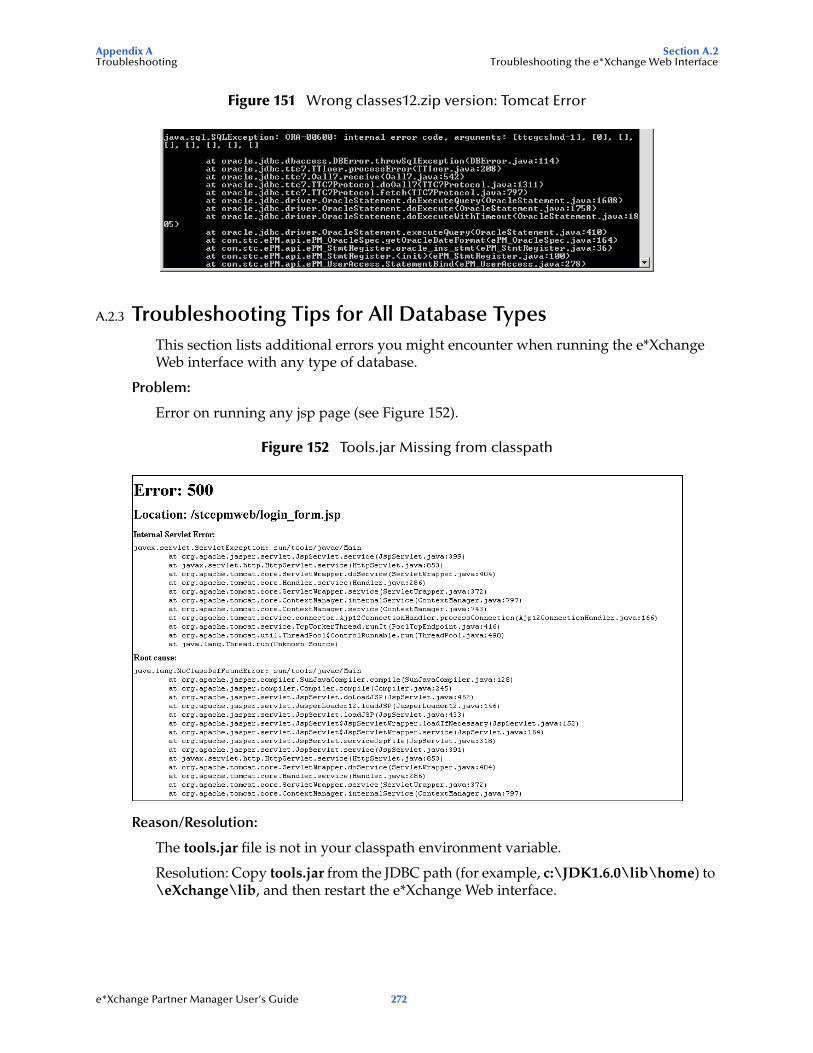
Appendix A Section A.2Troubleshooting Troubleshooting the e*Xchange Web Interface
Figure 151 Wrong classes12.zip version: Tomcat Error
A.2.3 Troubleshooting Tips for All Database TypesThis section lists additional errors you might encounter when running the e*Xchange Web interface with any type of database.
Problem:
Error on running any jsp page (see Figure 152).
Figure 152 Tools.jar Missing from classpath
Reason/Resolution:
The tools.jar file is not in your classpath environment variable.
Resolution: Copy tools.jar from the JDBC path (for example, c:\JDK1.6.0\lib\home) to \eXchange\lib, and then restart the e*Xchange Web interface.
e*Xchange Partner Manager User’s Guide 272
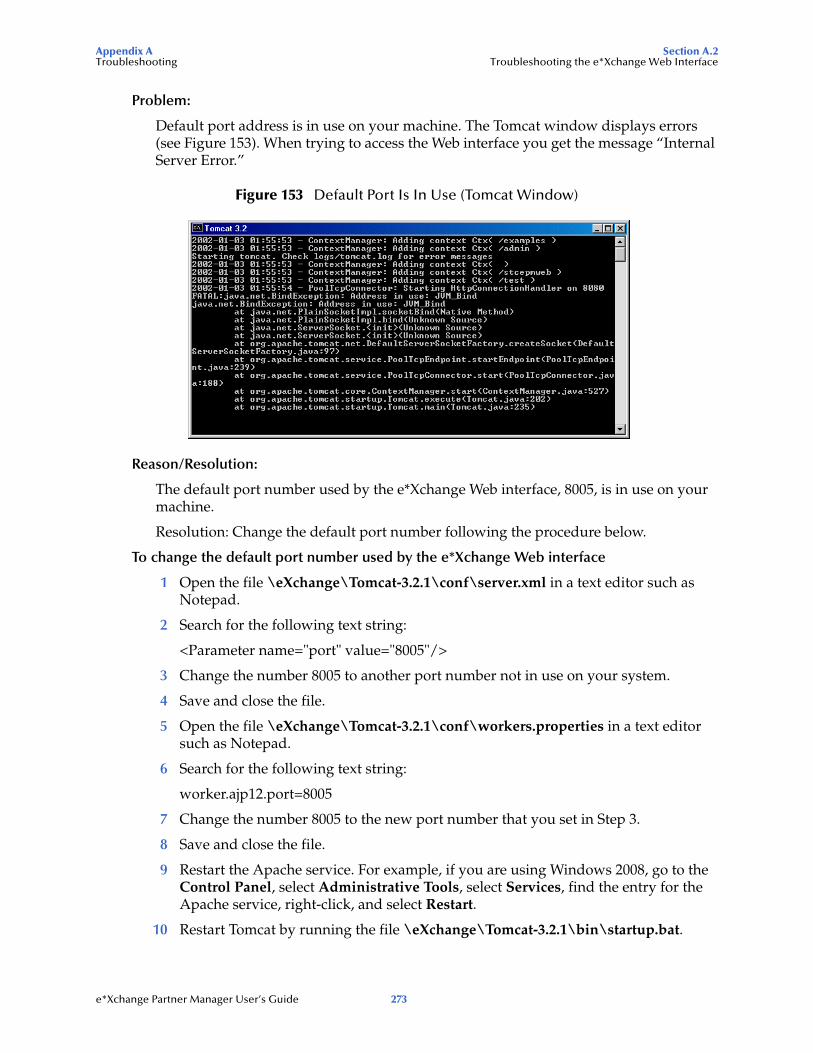
Appendix A Section A.2Troubleshooting Troubleshooting the e*Xchange Web Interface
Problem:
Default port address is in use on your machine. The Tomcat window displays errors (see Figure 153). When trying to access the Web interface you get the message “Internal Server Error.”
Figure 153 Default Port Is In Use (Tomcat Window)
Reason/Resolution:
The default port number used by the e*Xchange Web interface, 8005, is in use on your machine.
Resolution: Change the default port number following the procedure below.
To change the default port number used by the e*Xchange Web interface
1 Open the file \eXchange\Tomcat-3.2.1\conf\server.xml in a text editor such as Notepad.
2 Search for the following text string:
<Parameter name="port" value="8005"/>
3 Change the number 8005 to another port number not in use on your system.
4 Save and close the file.
5 Open the file \eXchange\Tomcat-3.2.1\conf\workers.properties in a text editor such as Notepad.
6 Search for the following text string:
worker.ajp12.port=8005
7 Change the number 8005 to the new port number that you set in Step 3.
8 Save and close the file.
9 Restart the Apache service. For example, if you are using Windows 2008, go to the Control Panel, select Administrative Tools, select Services, find the entry for the Apache service, right-click, and select Restart.
10 Restart Tomcat by running the file \eXchange\Tomcat-3.2.1\bin\startup.bat.
e*Xchange Partner Manager User’s Guide 273
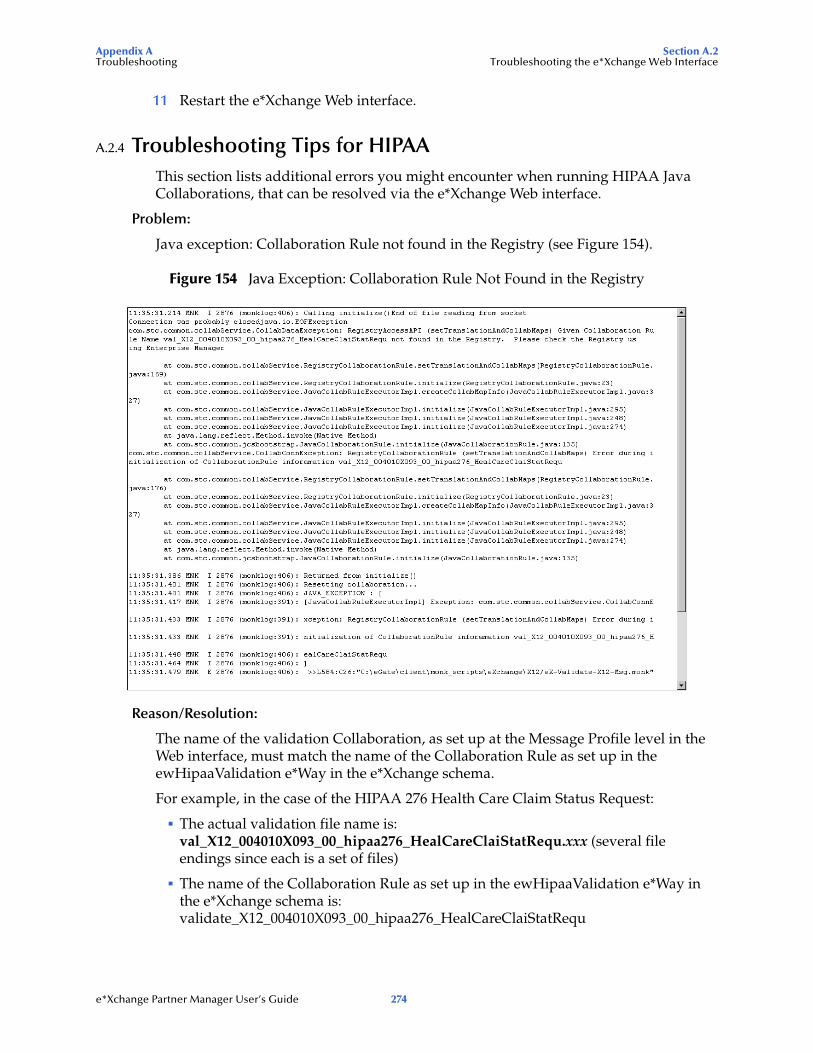
Appendix A Section A.2Troubleshooting Troubleshooting the e*Xchange Web Interface
11 Restart the e*Xchange Web interface.
A.2.4 Troubleshooting Tips for HIPAAThis section lists additional errors you might encounter when running HIPAA Java Collaborations, that can be resolved via the e*Xchange Web interface.
Problem:
Java exception: Collaboration Rule not found in the Registry (see Figure 154).
Figure 154 Java Exception: Collaboration Rule Not Found in the Registry
Reason/Resolution:
The name of the validation Collaboration, as set up at the Message Profile level in the Web interface, must match the name of the Collaboration Rule as set up in the ewHipaaValidation e*Way in the e*Xchange schema.
For example, in the case of the HIPAA 276 Health Care Claim Status Request:
The actual validation file name is: val_X12_004010X093_00_hipaa276_HealCareClaiStatRequ.xxx (several file endings since each is a set of files)
The name of the Collaboration Rule as set up in the ewHipaaValidation e*Way in the e*Xchange schema is: validate_X12_004010X093_00_hipaa276_HealCareClaiStatRequ
e*Xchange Partner Manager User’s Guide 274

Appendix A Section A.2Troubleshooting Troubleshooting the e*Xchange Web Interface
The value set up in the message profile for this message, General section, Validation Collaboration field, must be: validate_X12_004010X093_00_hipaa276_HealCareClaiStatRequ
Resolution: Look at the name of the validation Collaboration in the ewHipaaValidation e*Way and set up the same value in the trading partner profile, Message Profile level for the specific message, in the Web interface.
e*Xchange Partner Manager User’s Guide 275
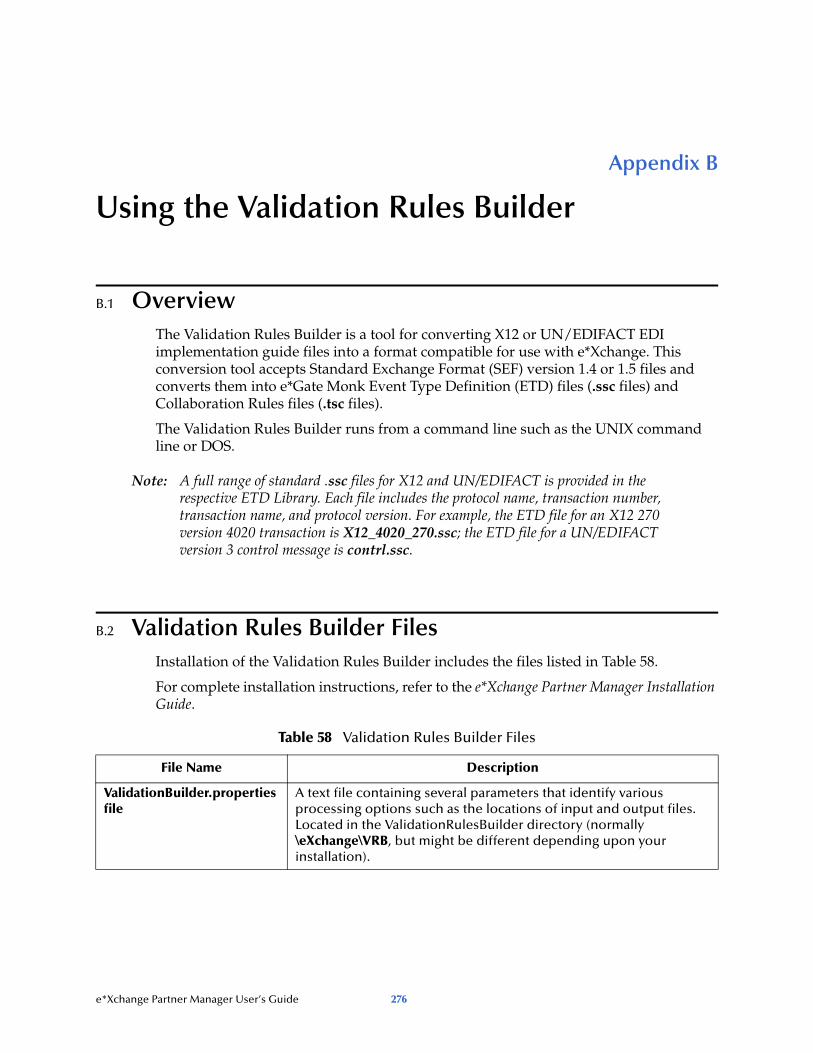
Appendix B
Using the Validation Rules Builder
B.1 OverviewThe Validation Rules Builder is a tool for converting X12 or UN/EDIFACT EDI implementation guide files into a format compatible for use with e*Xchange. This conversion tool accepts Standard Exchange Format (SEF) version 1.4 or 1.5 files and converts them into e*Gate Monk Event Type Definition (ETD) files (.ssc files) and Collaboration Rules files (.tsc files).
The Validation Rules Builder runs from a command line such as the UNIX command line or DOS.
Note: A full range of standard .ssc files for X12 and UN/EDIFACT is provided in the respective ETD Library. Each file includes the protocol name, transaction number, transaction name, and protocol version. For example, the ETD file for an X12 270 version 4020 transaction is X12_4020_270.ssc; the ETD file for a UN/EDIFACT version 3 control message is contrl.ssc.
B.2 Validation Rules Builder FilesInstallation of the Validation Rules Builder includes the files listed in Table 58.
For complete installation instructions, refer to the e*Xchange Partner Manager Installation Guide.
Table 58 Validation Rules Builder Files
File Name Description
ValidationBuilder.properties file
A text file containing several parameters that identify various processing options such as the locations of input and output files. Located in the ValidationRulesBuilder directory (normally \eXchange\VRB, but might be different depending upon your installation).
e*Xchange Partner Manager User’s Guide 276
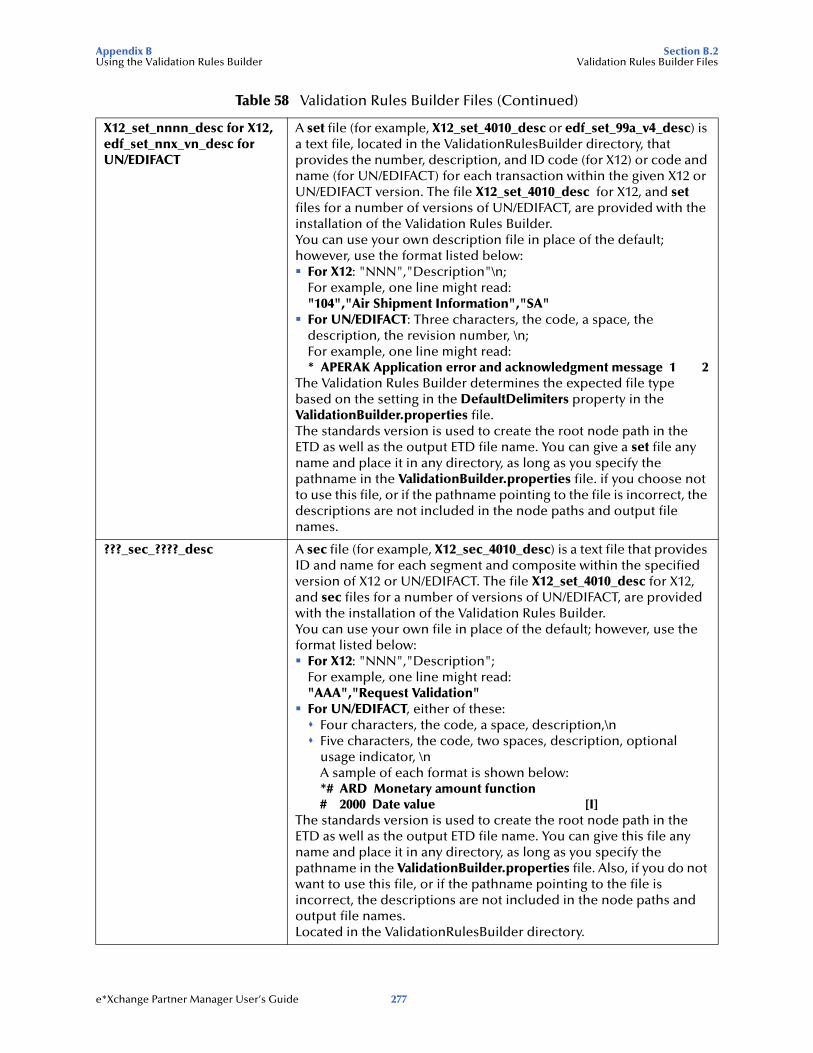
Appendix B Section B.2Using the Validation Rules Builder Validation Rules Builder Files
X12_set_nnnn_desc for X12,edf_set_nnx_vn_desc for UN/EDIFACT
A set file (for example, X12_set_4010_desc or edf_set_99a_v4_desc) is a text file, located in the ValidationRulesBuilder directory, that provides the number, description, and ID code (for X12) or code and name (for UN/EDIFACT) for each transaction within the given X12 or UN/EDIFACT version. The file X12_set_4010_desc for X12, and set files for a number of versions of UN/EDIFACT, are provided with the installation of the Validation Rules Builder.You can use your own description file in place of the default; however, use the format listed below:
For X12: "NNN","Description"\n;For example, one line might read:"104","Air Shipment Information","SA"For UN/EDIFACT: Three characters, the code, a space, the description, the revision number, \n;For example, one line might read:* APERAK Application error and acknowledgment message 1 2
The Validation Rules Builder determines the expected file type based on the setting in the DefaultDelimiters property in the ValidationBuilder.properties file.The standards version is used to create the root node path in the ETD as well as the output ETD file name. You can give a set file any name and place it in any directory, as long as you specify the pathname in the ValidationBuilder.properties file. if you choose not to use this file, or if the pathname pointing to the file is incorrect, the descriptions are not included in the node paths and output file names.
???_sec_????_desc A sec file (for example, X12_sec_4010_desc) is a text file that provides ID and name for each segment and composite within the specified version of X12 or UN/EDIFACT. The file X12_set_4010_desc for X12, and sec files for a number of versions of UN/EDIFACT, are provided with the installation of the Validation Rules Builder.You can use your own file in place of the default; however, use the format listed below:
For X12: "NNN","Description";For example, one line might read:"AAA","Request Validation"For UN/EDIFACT, either of these:
Four characters, the code, a space, description,\nFive characters, the code, two spaces, description, optional usage indicator, \nA sample of each format is shown below:*# ARD Monetary amount function# 2000 Date value [I]
The standards version is used to create the root node path in the ETD as well as the output ETD file name. You can give this file any name and place it in any directory, as long as you specify the pathname in the ValidationBuilder.properties file. Also, if you do not want to use this file, or if the pathname pointing to the file is incorrect, the descriptions are not included in the node paths and output file names.Located in the ValidationRulesBuilder directory.
Table 58 Validation Rules Builder Files (Continued)
e*Xchange Partner Manager User’s Guide 277
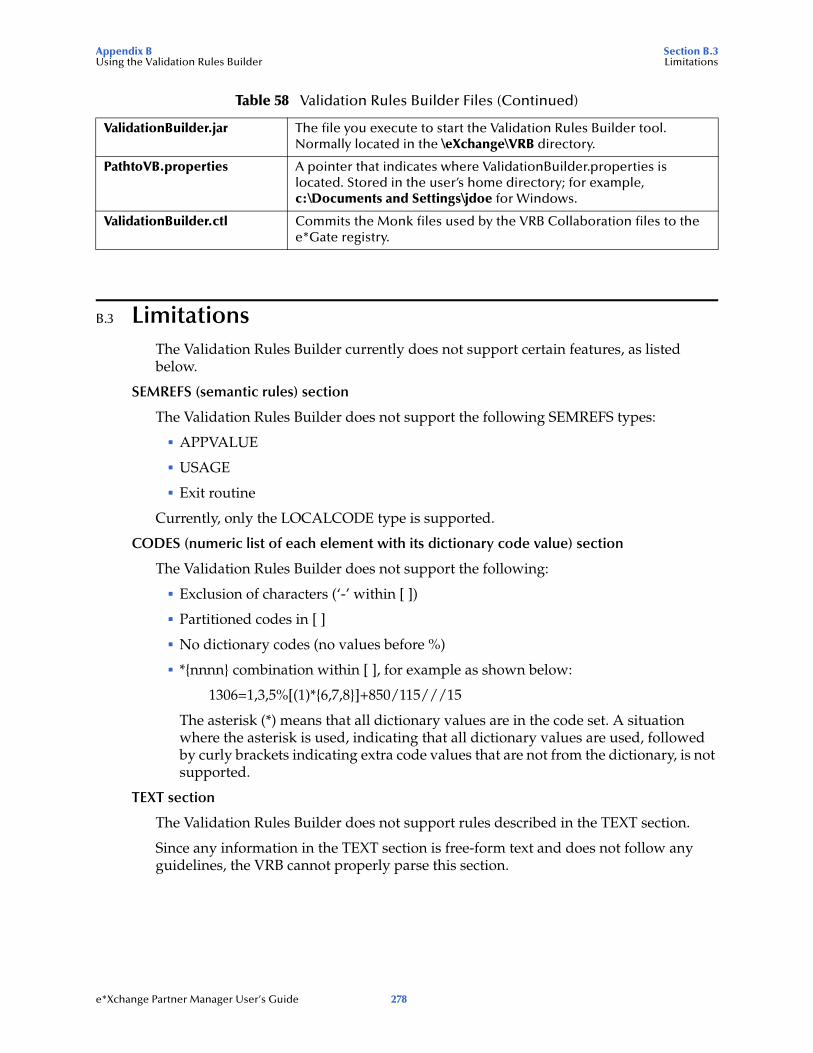
Appendix B Section B.3Using the Validation Rules Builder Limitations
B.3 LimitationsThe Validation Rules Builder currently does not support certain features, as listed below.
SEMREFS (semantic rules) section
The Validation Rules Builder does not support the following SEMREFS types:
APPVALUE
USAGE
Exit routine
Currently, only the LOCALCODE type is supported.
CODES (numeric list of each element with its dictionary code value) section
The Validation Rules Builder does not support the following:
Exclusion of characters (‘-’ within [ ])
Partitioned codes in [ ]
No dictionary codes (no values before %)
*{nnnn} combination within [ ], for example as shown below:
1306=1,3,5%[(1)*{6,7,8}]+850/115///15
The asterisk (*) means that all dictionary values are in the code set. A situation where the asterisk is used, indicating that all dictionary values are used, followed by curly brackets indicating extra code values that are not from the dictionary, is not supported.
TEXT section
The Validation Rules Builder does not support rules described in the TEXT section.
Since any information in the TEXT section is free-form text and does not follow any guidelines, the VRB cannot properly parse this section.
ValidationBuilder.jar The file you execute to start the Validation Rules Builder tool. Normally located in the \eXchange\VRB directory.
PathtoVB.properties A pointer that indicates where ValidationBuilder.properties is located. Stored in the user’s home directory; for example, c:\Documents and Settings\jdoe for Windows.
ValidationBuilder.ctl Commits the Monk files used by the VRB Collaboration files to the e*Gate registry.
Table 58 Validation Rules Builder Files (Continued)
e*Xchange Partner Manager User’s Guide 278
Appendix B Section B.4Using the Validation Rules Builder Prerequisites for Running the Validation Rules Builder
B.4 Prerequisites for Running the Validation Rules BuilderIn addition to the Validation Rules Builder, make sure the following software is installed before you attempt to convert any SEF files.
The Java runtime environment must be installed on the computer from which the Validation Rules Builder program is invoked.
e*Gate Integrator must be installed to verify the output ETD files (.ssc files) and Collaboration Rules files (.tsc files).
B.5 Third-Party Implementation Guide EditorsThird-party implementation guide editors are designed specifically for the purpose of editing and converting electronic implementation guides for various eBusiness protocols to the Standard Exchange Format (SEF). These editors help make it easy to develop, migrate, print, test, and distribute EDI implementation guidelines.
Examples of third-party implementation guides are:
EDISIM, produced by Foresight
SpecBuilder, produced by Edifecs Commerce
When you open a file in one of these implementation guides editors, you must specify the standard being used; for example, X12. You must also specify the version and the transaction set. The third-party tool then opens the implementation guide in a table format.
With the implementation guide open, you can customize it for your own implementation of the standard. You can perform any of the following editing actions:
Add or remove segments
Add or remove loops
Change repetitions
Change the pre-loaded lists of valid coded values
Change the formats for data in a field (data element)
Add conditional rules; for example, “If field A is valued, then field B is required.”
Once any needed editing is done, you can save the file and export it in SEF format.
You can use the third-party editor to create SEF files for all transactions in all standards used by your own company and your trading partners.
Once you have the SEF files, you can use the Validation Rules Builder to convert them to a format that can be read by e*Xchange.
e*Xchange Partner Manager User’s Guide 279
Appendix B Section B.6Using the Validation Rules Builder Using the Validation Rules Builder
B.6 Using the Validation Rules BuilderThe Validation Rules Builder accepts Standard Exchange Format (SEF) version 1.4 or 1.5 files and converts then into e*Gate Integrator Event Type Definition (ETD) files (.ssc files) and Collaboration Rules files (.tsc files).
To convert electronic implementation guides into e*Xchange-compatible event type definitions and Collaboration Rules, you must complete the following steps:
1 Create input SEF files using a third-party implementation guide editor
2 Verify the Validation Rules Builder processing properties
3 Start the Validation Rules Builder
4 Verify the output event type definition and Collaboration Rules files
B.6.1. Creating Input Data FilesYou can reformat EDI implementation guides into SEF format using a third-party implementation guide editor such as Edifecs (an EDI software productivity tool that allows users to reference EDI standards such as X12 and UN/EDIFACT) or EDISIM (a pre-production accelerator tool). Follow these guidelines:
Since the Validation Rules Builder expects input files without ISA/IEA and GS/GE segments, you must remove these segments from the .SETS portion of the input SEF file if they exist.
SEF files produced with EDISIM do not include these segments, by default. However, SEF files produced with other implementation guide editors might include them, in which case you would have to remove them manually. To do this, open up the SEF file in the editor, go to the .SETS section of the file, and delete the ISA (Interchange control header), IEA (Interchange control trailer), GS (Functional Group header), and GE (Functional Group trailer) segments.
You can include more than one transaction type in a single input SEF file. The Validation Rules Builder creates different ETD and Collaboration files for each transaction type.
Copy or save the SEF files to a data directory of your choice.
B.6.2. Verifying Processing PropertiesBefore you start the Validation Rules Builder, you must verify the processing properties it will use to convert your input SEF files.
To verify the Validation Rules Builder properties file
1 Use a text editor to open the ValidationBuilder.properties file (see Figure 155).
2 Set or verify the file names, including paths (see Table 59 on page 283), for the following parameters:
inputFile
e*Xchange Partner Manager User’s Guide 280
Appendix B Section B.6Using the Validation Rules Builder Using the Validation Rules Builder
setDescFile
secDescFile
OutputPath
3 Set or verify the parameters relating to the specific transaction or transactions for which you will be creating validation rules, as needed (see Table 59 on page 283), including the following:
setDescFile and secDescFile—Verify that you are referencing the correct files for the X12 version you are using.
UniqueId—Set the unique ID to a value appropriate for the transaction.
Transactions—Set the value to the transaction or transactions for which you will be creating validation rules.
Verify that the delimiters parameters are set appropriately for your installation.
4 Set or verify the host parameters (see Table 59 on page 283), including the following:
RegistryHost
RegistryPort
UserName
Password
RegistrySchema
5 Save the properties file.
Note: The name of the ValidationBuilder.properties file and the parameters you specify within it are case sensitive. Also, you must use forward slashes (/) for pathnames in the properties file regardless of whether you are running the Validation Rules Builder on Windows or UNIX.
e*Xchange Partner Manager User’s Guide 281
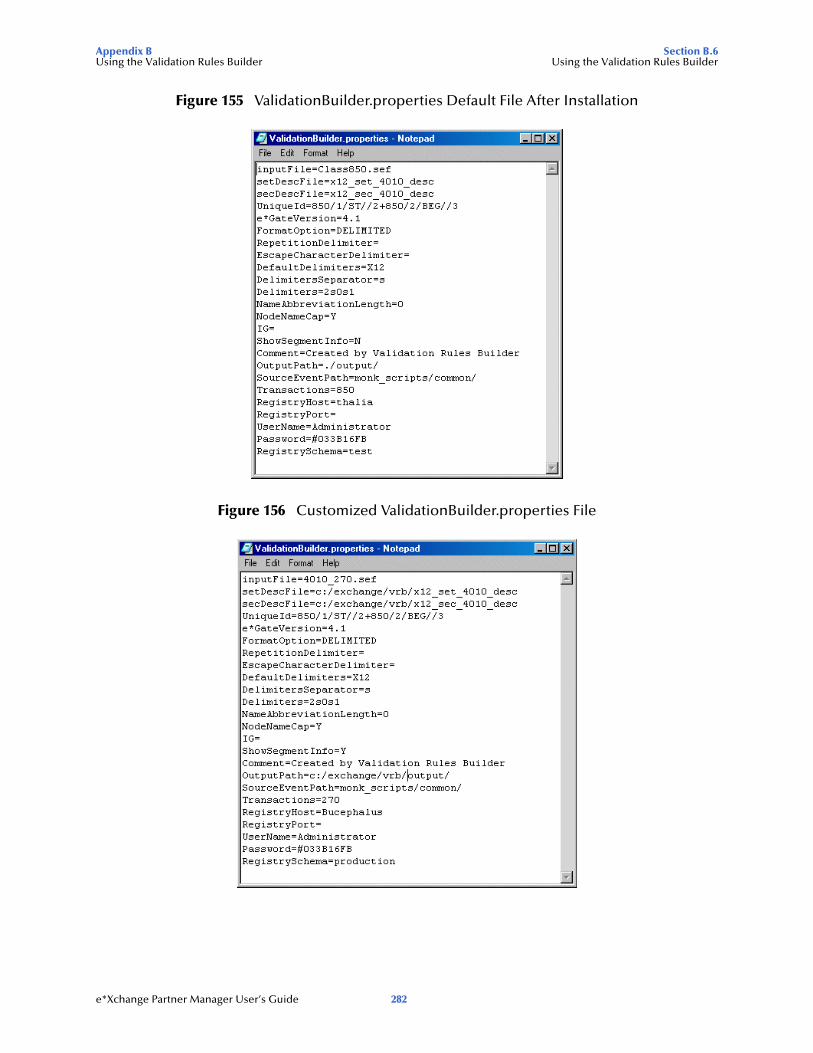
Appendix B Section B.6Using the Validation Rules Builder Using the Validation Rules Builder
Figure 155 ValidationBuilder.properties Default File After Installation
Figure 156 Customized ValidationBuilder.properties File
e*Xchange Partner Manager User’s Guide 282
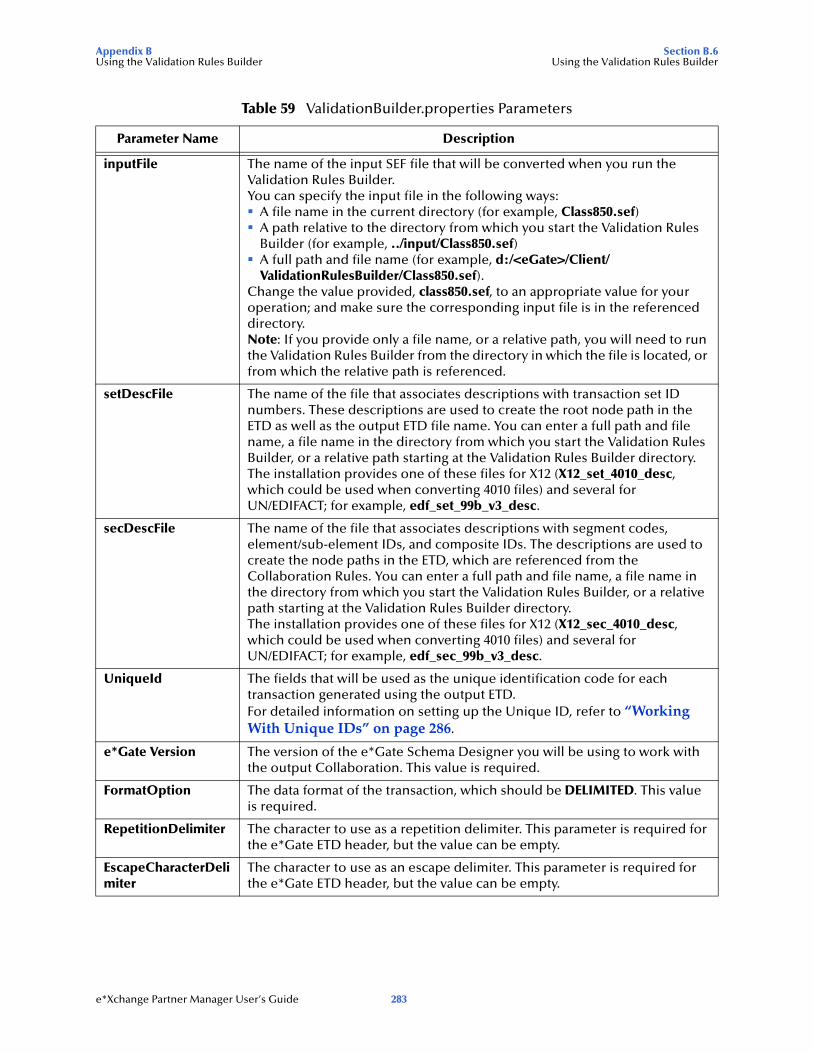
Appendix B Section B.6Using the Validation Rules Builder Using the Validation Rules Builder
Table 59 ValidationBuilder.properties Parameters
Parameter Name Description
inputFile The name of the input SEF file that will be converted when you run the Validation Rules Builder.You can specify the input file in the following ways:
A file name in the current directory (for example, Class850.sef)A path relative to the directory from which you start the Validation Rules Builder (for example, ../input/Class850.sef)A full path and file name (for example, d:/<eGate>/Client/ValidationRulesBuilder/Class850.sef).
Change the value provided, class850.sef, to an appropriate value for your operation; and make sure the corresponding input file is in the referenced directory.Note: If you provide only a file name, or a relative path, you will need to run the Validation Rules Builder from the directory in which the file is located, or from which the relative path is referenced.
setDescFile The name of the file that associates descriptions with transaction set ID numbers. These descriptions are used to create the root node path in the ETD as well as the output ETD file name. You can enter a full path and file name, a file name in the directory from which you start the Validation Rules Builder, or a relative path starting at the Validation Rules Builder directory.The installation provides one of these files for X12 (X12_set_4010_desc, which could be used when converting 4010 files) and several for UN/EDIFACT; for example, edf_set_99b_v3_desc.
secDescFile The name of the file that associates descriptions with segment codes, element/sub-element IDs, and composite IDs. The descriptions are used to create the node paths in the ETD, which are referenced from the Collaboration Rules. You can enter a full path and file name, a file name in the directory from which you start the Validation Rules Builder, or a relative path starting at the Validation Rules Builder directory.The installation provides one of these files for X12 (X12_sec_4010_desc, which could be used when converting 4010 files) and several for UN/EDIFACT; for example, edf_sec_99b_v3_desc.
UniqueId The fields that will be used as the unique identification code for each transaction generated using the output ETD.For detailed information on setting up the Unique ID, refer to “Working With Unique IDs” on page 286.
e*Gate Version The version of the e*Gate Schema Designer you will be using to work with the output Collaboration. This value is required.
FormatOption The data format of the transaction, which should be DELIMITED. This value is required.
RepetitionDelimiter The character to use as a repetition delimiter. This parameter is required for the e*Gate ETD header, but the value can be empty.
EscapeCharacterDelimiter
The character to use as an escape delimiter. This parameter is required for the e*Gate ETD header, but the value can be empty.
e*Xchange Partner Manager User’s Guide 283
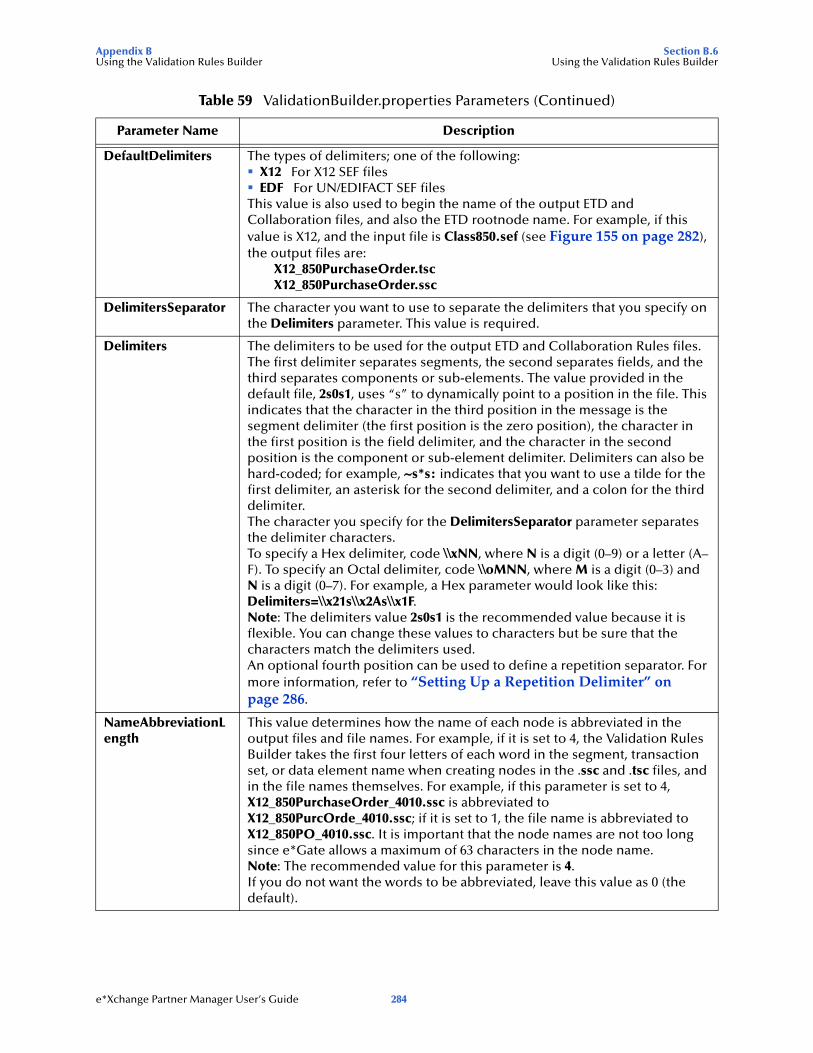
Appendix B Section B.6Using the Validation Rules Builder Using the Validation Rules Builder
DefaultDelimiters The types of delimiters; one of the following:X12 For X12 SEF filesEDF For UN/EDIFACT SEF files
This value is also used to begin the name of the output ETD and Collaboration files, and also the ETD rootnode name. For example, if this value is X12, and the input file is Class850.sef (see Figure 155 on page 282), the output files are:
X12_850PurchaseOrder.tscX12_850PurchaseOrder.ssc
DelimitersSeparator The character you want to use to separate the delimiters that you specify on the Delimiters parameter. This value is required.
Delimiters The delimiters to be used for the output ETD and Collaboration Rules files. The first delimiter separates segments, the second separates fields, and the third separates components or sub-elements. The value provided in the default file, 2s0s1, uses “s” to dynamically point to a position in the file. This indicates that the character in the third position in the message is the segment delimiter (the first position is the zero position), the character in the first position is the field delimiter, and the character in the second position is the component or sub-element delimiter. Delimiters can also be hard-coded; for example, ~s*s: indicates that you want to use a tilde for the first delimiter, an asterisk for the second delimiter, and a colon for the third delimiter.The character you specify for the DelimitersSeparator parameter separates the delimiter characters.To specify a Hex delimiter, code \\xNN, where N is a digit (0–9) or a letter (A–F). To specify an Octal delimiter, code \\oMNN, where M is a digit (0–3) and N is a digit (0–7). For example, a Hex parameter would look like this: Delimiters=\\x21s\\x2As\\x1F.Note: The delimiters value 2s0s1 is the recommended value because it is flexible. You can change these values to characters but be sure that the characters match the delimiters used.An optional fourth position can be used to define a repetition separator. For more information, refer to “Setting Up a Repetition Delimiter” on page 286.
NameAbbreviationLength
This value determines how the name of each node is abbreviated in the output files and file names. For example, if it is set to 4, the Validation Rules Builder takes the first four letters of each word in the segment, transaction set, or data element name when creating nodes in the .ssc and .tsc files, and in the file names themselves. For example, if this parameter is set to 4, X12_850PurchaseOrder_4010.ssc is abbreviated to X12_850PurcOrde_4010.ssc; if it is set to 1, the file name is abbreviated to X12_850PO_4010.ssc. It is important that the node names are not too long since e*Gate allows a maximum of 63 characters in the node name.Note: The recommended value for this parameter is 4.If you do not want the words to be abbreviated, leave this value as 0 (the default).
Table 59 ValidationBuilder.properties Parameters (Continued)
Parameter Name Description
e*Xchange Partner Manager User’s Guide 284
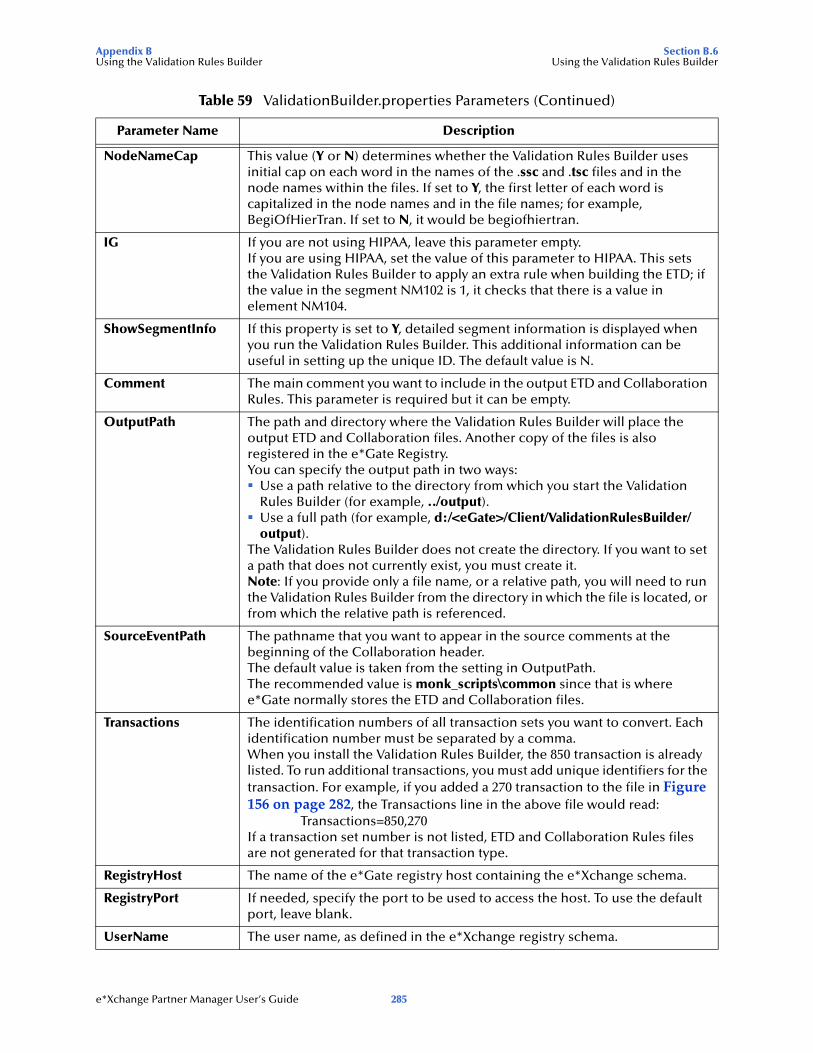
Appendix B Section B.6Using the Validation Rules Builder Using the Validation Rules Builder
NodeNameCap This value (Y or N) determines whether the Validation Rules Builder uses initial cap on each word in the names of the .ssc and .tsc files and in the node names within the files. If set to Y, the first letter of each word is capitalized in the node names and in the file names; for example, BegiOfHierTran. If set to N, it would be begiofhiertran.
IG If you are not using HIPAA, leave this parameter empty.If you are using HIPAA, set the value of this parameter to HIPAA. This sets the Validation Rules Builder to apply an extra rule when building the ETD; if the value in the segment NM102 is 1, it checks that there is a value in element NM104.
ShowSegmentInfo If this property is set to Y, detailed segment information is displayed when you run the Validation Rules Builder. This additional information can be useful in setting up the unique ID. The default value is N.
Comment The main comment you want to include in the output ETD and Collaboration Rules. This parameter is required but it can be empty.
OutputPath The path and directory where the Validation Rules Builder will place the output ETD and Collaboration files. Another copy of the files is also registered in the e*Gate Registry.You can specify the output path in two ways:
Use a path relative to the directory from which you start the Validation Rules Builder (for example, ../output).Use a full path (for example, d:/<eGate>/Client/ValidationRulesBuilder/output).
The Validation Rules Builder does not create the directory. If you want to set a path that does not currently exist, you must create it.Note: If you provide only a file name, or a relative path, you will need to run the Validation Rules Builder from the directory in which the file is located, or from which the relative path is referenced.
SourceEventPath The pathname that you want to appear in the source comments at the beginning of the Collaboration header.The default value is taken from the setting in OutputPath. The recommended value is monk_scripts\common since that is where e*Gate normally stores the ETD and Collaboration files.
Transactions The identification numbers of all transaction sets you want to convert. Each identification number must be separated by a comma.When you install the Validation Rules Builder, the 850 transaction is already listed. To run additional transactions, you must add unique identifiers for the transaction. For example, if you added a 270 transaction to the file in Figure 156 on page 282, the Transactions line in the above file would read:
Transactions=850,270If a transaction set number is not listed, ETD and Collaboration Rules files are not generated for that transaction type.
RegistryHost The name of the e*Gate registry host containing the e*Xchange schema.
RegistryPort If needed, specify the port to be used to access the host. To use the default port, leave blank.
UserName The user name, as defined in the e*Xchange registry schema.
Table 59 ValidationBuilder.properties Parameters (Continued)
Parameter Name Description
e*Xchange Partner Manager User’s Guide 285
Appendix B Section B.6Using the Validation Rules Builder Using the Validation Rules Builder
B.6.3. Setting Up a Repetition DelimiterIf you want to specify a repetition delimiter for an ETD generated by the Validation Rules Builder, you must complete the following two steps:
1 List the repetition delimiter position number or character as the third delimiter in the Delimiters property.
2 List either the position number or delimiter following the RepetitionDelimiter property.
This value must match the third value listed in the Delimiters property, as set in Step 1 above.
For example:
Delimiters=3s0s2s1DelimitersSeparator=sRepetitionDelimiter=2
In the above example, the character at position 2 in the incoming data is the repetition delimiter. The character at position 3 is the segment delimiter, the character at position 0 (the first character) is the field delimiter, and the character at position 1 is the sub-field delimiter.
B.6.4. Working With Unique IDsThis section provides information on setting up unique IDs.
Setting Up the Unique ID
The unique ID is a unique string by which an individual message is referenced in the database.
When setting up the ValidationBuilder.properties file to run the Validation Rules Builder, you must specify the segments from which e*Xchange will take values to composer the unique ID.
The unique ID is composed of a combination of the following, in sequence:
transaction ID—the ID number, for example 850 for a Purchase Order.
segment ordinal (optional)—the numerical position of the segment within the transaction. For example, within an 850 transaction, ST is the first segment, so the segment ordinal would be 1. The segment ordinal can be omitted, in which case e*Xchange will use the first occurrence of an ST segment. If there is more than one
Password The password that will be required for access to the e*Gate registry. The password is associated with the UserName.
RegistrySchema The name of the e*Xchange registry schema.
Table 59 ValidationBuilder.properties Parameters (Continued)
Parameter Name Description
e*Xchange Partner Manager User’s Guide 286
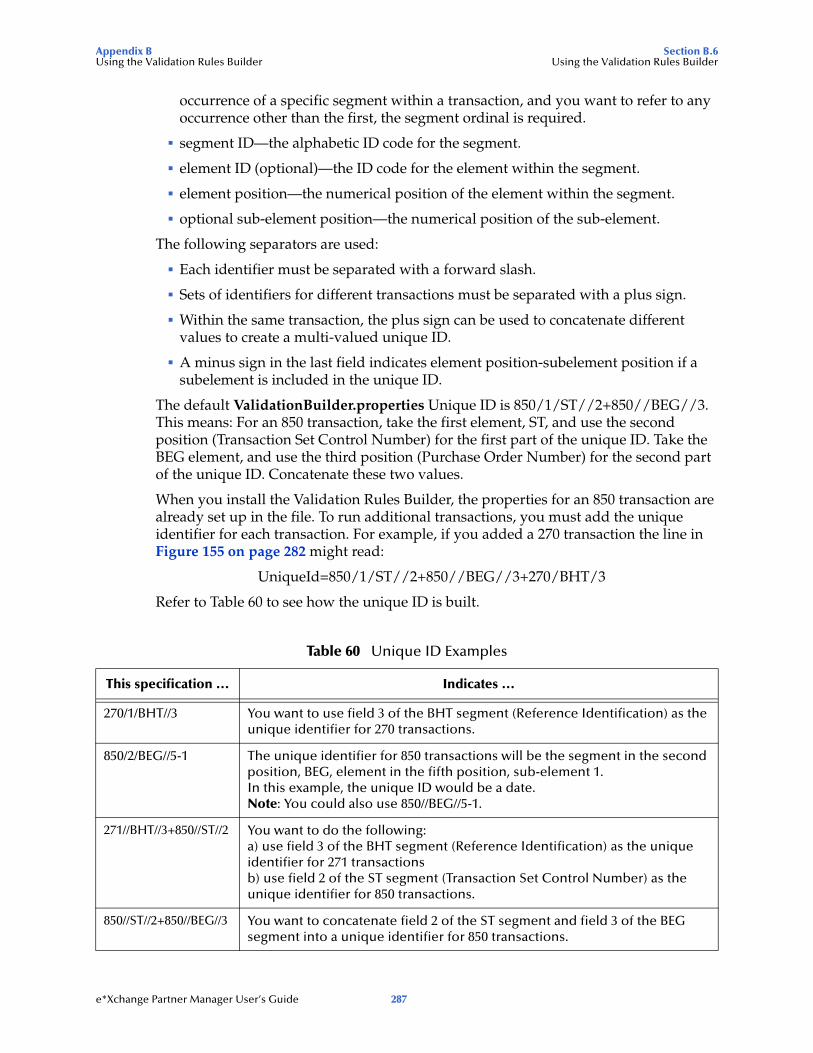
Appendix B Section B.6Using the Validation Rules Builder Using the Validation Rules Builder
occurrence of a specific segment within a transaction, and you want to refer to any occurrence other than the first, the segment ordinal is required.
segment ID—the alphabetic ID code for the segment.
element ID (optional)—the ID code for the element within the segment.
element position—the numerical position of the element within the segment.
optional sub-element position—the numerical position of the sub-element.
The following separators are used:
Each identifier must be separated with a forward slash.
Sets of identifiers for different transactions must be separated with a plus sign.
Within the same transaction, the plus sign can be used to concatenate different values to create a multi-valued unique ID.
A minus sign in the last field indicates element position-subelement position if a subelement is included in the unique ID.
The default ValidationBuilder.properties Unique ID is 850/1/ST//2+850//BEG//3. This means: For an 850 transaction, take the first element, ST, and use the second position (Transaction Set Control Number) for the first part of the unique ID. Take the BEG element, and use the third position (Purchase Order Number) for the second part of the unique ID. Concatenate these two values.
When you install the Validation Rules Builder, the properties for an 850 transaction are already set up in the file. To run additional transactions, you must add the unique identifier for each transaction. For example, if you added a 270 transaction the line in Figure 155 on page 282 might read:
UniqueId=850/1/ST//2+850//BEG//3+270/BHT/3
Refer to Table 60 to see how the unique ID is built.
Table 60 Unique ID Examples
This specification ... Indicates ...
270/1/BHT//3 You want to use field 3 of the BHT segment (Reference Identification) as the unique identifier for 270 transactions.
850/2/BEG//5-1 The unique identifier for 850 transactions will be the segment in the second position, BEG, element in the fifth position, sub-element 1.In this example, the unique ID would be a date.Note: You could also use 850//BEG//5-1.
271//BHT//3+850//ST//2 You want to do the following:a) use field 3 of the BHT segment (Reference Identification) as the unique identifier for 271 transactionsb) use field 2 of the ST segment (Transaction Set Control Number) as the unique identifier for 850 transactions.
850//ST//2+850//BEG//3 You want to concatenate field 2 of the ST segment and field 3 of the BEG segment into a unique identifier for 850 transactions.
e*Xchange Partner Manager User’s Guide 287
Appendix B Section B.6Using the Validation Rules Builder Using the Validation Rules Builder
An example of a unique ID for UN/EDIFACT is:
APERAK/1/UNH//2+GENRAL/1/UNH//1
Additional Notes on Unique IDs
Bear the following points in mind when working with unique IDs:
The maximum length for a unique ID is 150 characters. Extra characters are truncated automatically.
If a specified field in the unique ID is not found in the data file, a timestamp value is used in the unique ID in place of the missing value.
Specifying Values Within Loops
You can also create a unique ID using any or all occurrences of any data element within a defined loop. For example, you can add a new section to an element in the unique ID definition. The new section defines the exact occurrence of the element that will be used to construct the unique id.
You can create a unique ID from any or all occurrences of any data element within a defined loop as follows:
Add a new section to an element in the unique ID definition.
The new section defines the exact occurrence of the element used to construct the unique ID.
Start the new section with @ to create either of the following two unique ID formats:
@ALL—take all occurrences of the element
@LOOP—loopname:occurrence#
In the above example, loopname is the name of a defined loop and occurrence# could be -1 for the last occurrence of the element in the loop, ALL for all occurrences of the element in the loop, or a number to refer to a specific occurrence of the element in the loop.
When occurrence# is defined as a number, if that particular occurrence# is not found in the data file, e*Xchange uses a timestamp value to construct the unique ID. No error is reported.
Refer to Table 61 to see how a unique ID using loop values is built.
Table 61 Unique ID Examples Using Values Within Loops
This specification ... Indicates ...
940/1/ST//1+940/36/N1//4@ALL N1 segment is inside a loop called N1LOOP.This appends all occurrences of element N104 of segment N1 (ordinal=36) of all loops to the unique ID.
e*Xchange Partner Manager User’s Guide 288
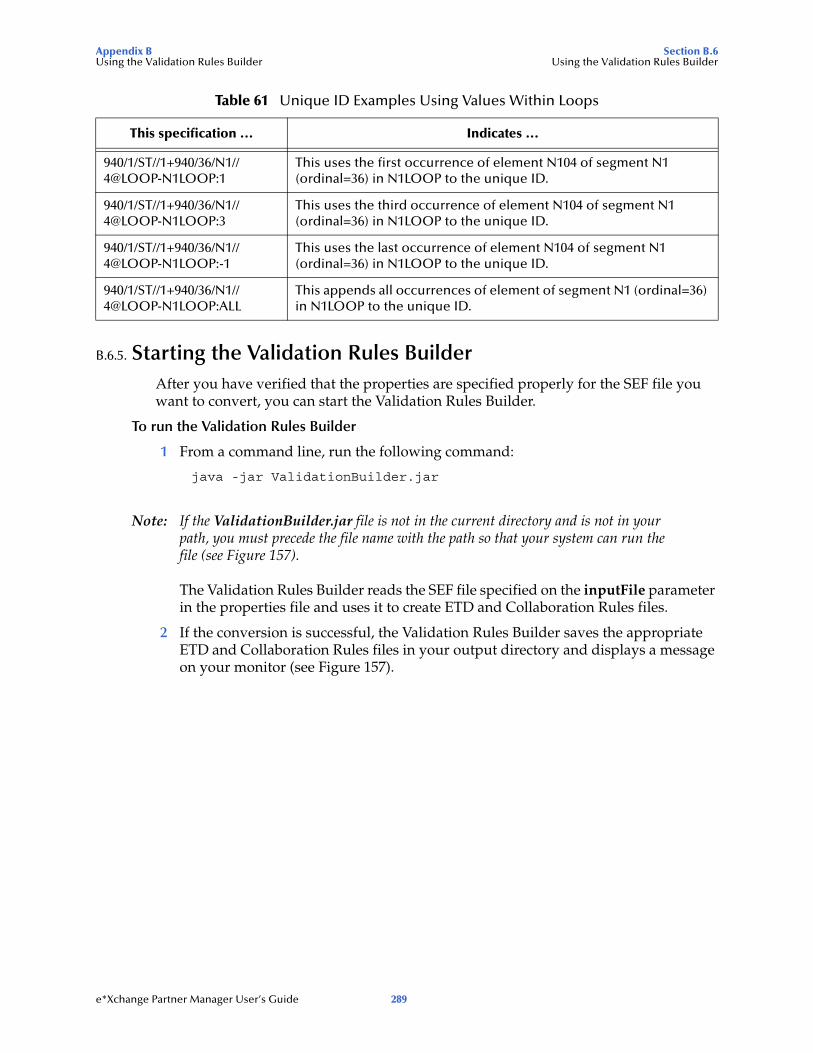
Appendix B Section B.6Using the Validation Rules Builder Using the Validation Rules Builder
B.6.5. Starting the Validation Rules BuilderAfter you have verified that the properties are specified properly for the SEF file you want to convert, you can start the Validation Rules Builder.
To run the Validation Rules Builder
1 From a command line, run the following command:
java -jar ValidationBuilder.jar
Note: If the ValidationBuilder.jar file is not in the current directory and is not in your path, you must precede the file name with the path so that your system can run the file (see Figure 157).
The Validation Rules Builder reads the SEF file specified on the inputFile parameter in the properties file and uses it to create ETD and Collaboration Rules files.
2 If the conversion is successful, the Validation Rules Builder saves the appropriate ETD and Collaboration Rules files in your output directory and displays a message on your monitor (see Figure 157).
940/1/ST//1+940/36/N1//4@LOOP-N1LOOP:1
This uses the first occurrence of element N104 of segment N1 (ordinal=36) in N1LOOP to the unique ID.
940/1/ST//1+940/36/N1//4@LOOP-N1LOOP:3
This uses the third occurrence of element N104 of segment N1 (ordinal=36) in N1LOOP to the unique ID.
940/1/ST//1+940/36/N1//4@LOOP-N1LOOP:-1
This uses the last occurrence of element N104 of segment N1 (ordinal=36) in N1LOOP to the unique ID.
940/1/ST//1+940/36/N1//4@LOOP-N1LOOP:ALL
This appends all occurrences of element of segment N1 (ordinal=36) in N1LOOP to the unique ID.
Table 61 Unique ID Examples Using Values Within Loops
This specification ... Indicates ...
e*Xchange Partner Manager User’s Guide 289
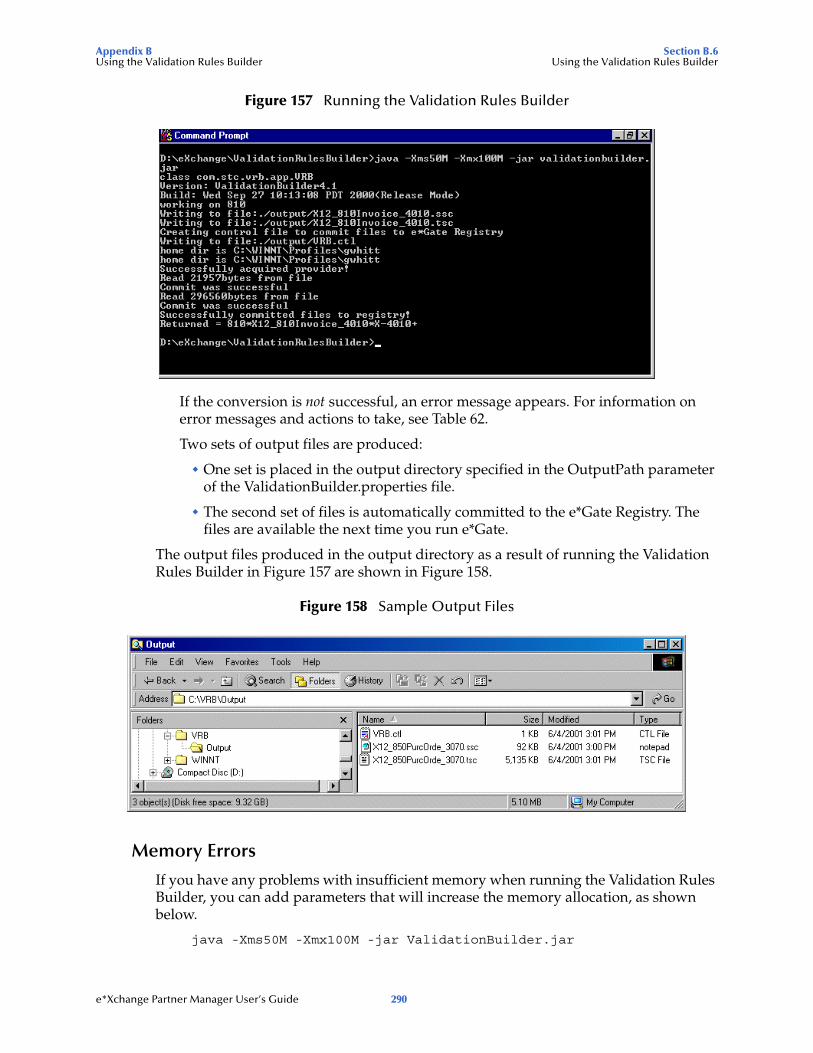
Appendix B Section B.6Using the Validation Rules Builder Using the Validation Rules Builder
Figure 157 Running the Validation Rules Builder
If the conversion is not successful, an error message appears. For information on error messages and actions to take, see Table 62.
Two sets of output files are produced:
One set is placed in the output directory specified in the OutputPath parameter of the ValidationBuilder.properties file.
The second set of files is automatically committed to the e*Gate Registry. The files are available the next time you run e*Gate.
The output files produced in the output directory as a result of running the Validation Rules Builder in Figure 157 are shown in Figure 158.
Figure 158 Sample Output Files
Memory Errors
If you have any problems with insufficient memory when running the Validation Rules Builder, you can add parameters that will increase the memory allocation, as shown below.
java -Xms50M -Xmx100M -jar ValidationBuilder.jar
e*Xchange Partner Manager User’s Guide 290
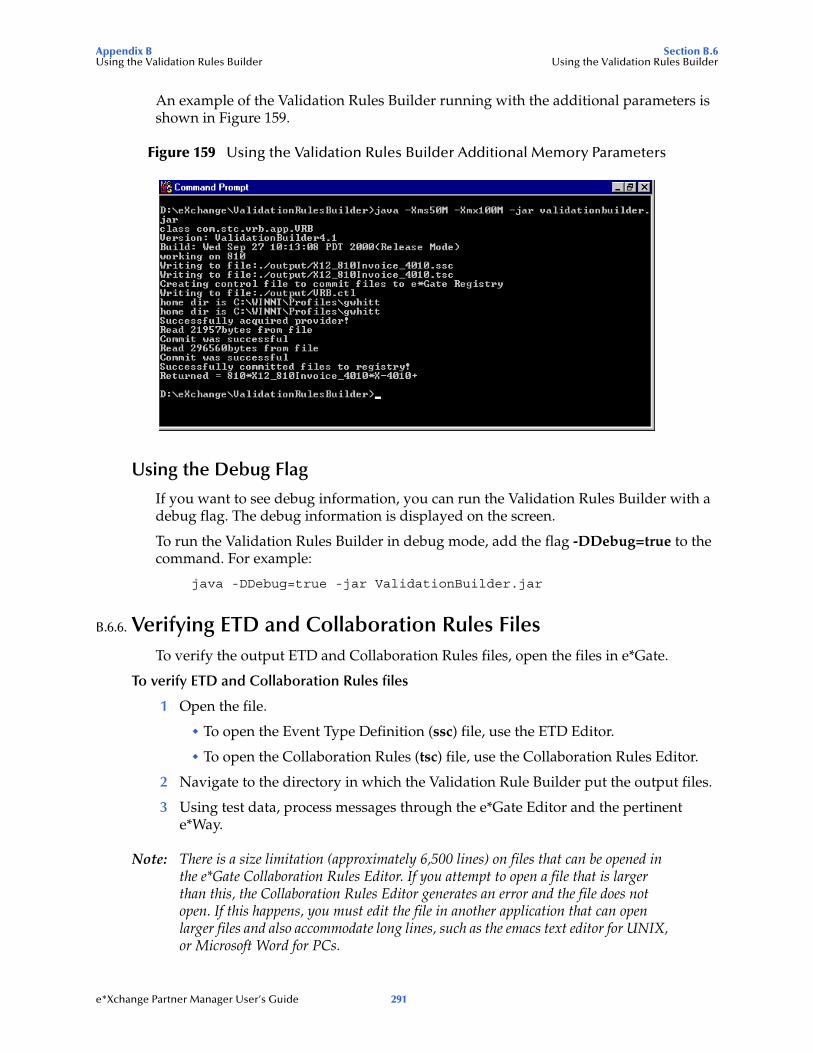
Appendix B Section B.6Using the Validation Rules Builder Using the Validation Rules Builder
An example of the Validation Rules Builder running with the additional parameters is shown in Figure 159.
Figure 159 Using the Validation Rules Builder Additional Memory Parameters
Using the Debug Flag
If you want to see debug information, you can run the Validation Rules Builder with a debug flag. The debug information is displayed on the screen.
To run the Validation Rules Builder in debug mode, add the flag -DDebug=true to the command. For example:
java -DDebug=true -jar ValidationBuilder.jar
B.6.6. Verifying ETD and Collaboration Rules FilesTo verify the output ETD and Collaboration Rules files, open the files in e*Gate.
To verify ETD and Collaboration Rules files
1 Open the file.
To open the Event Type Definition (ssc) file, use the ETD Editor.
To open the Collaboration Rules (tsc) file, use the Collaboration Rules Editor.
2 Navigate to the directory in which the Validation Rule Builder put the output files.
3 Using test data, process messages through the e*Gate Editor and the pertinent e*Way.
Note: There is a size limitation (approximately 6,500 lines) on files that can be opened in the e*Gate Collaboration Rules Editor. If you attempt to open a file that is larger than this, the Collaboration Rules Editor generates an error and the file does not open. If this happens, you must edit the file in another application that can open larger files and also accommodate long lines, such as the emacs text editor for UNIX, or Microsoft Word for PCs.
e*Xchange Partner Manager User’s Guide 291
Appendix B Section B.7Using the Validation Rules Builder Troubleshooting Tips
B.7 Troubleshooting TipsThis section includes information on the error messages generated by the Validation Rules Builder and what to do if you encounter an error.
B.7.1. General Validation Rules Builder Error MessagesYou might encounter one of the error messages described in Table 62 while you are running the Validation Rules Builder.
Table 62 Validation Rules Builder Error Messages
Error Message Reason for Error Action
Empty INI line The .INI section of the input SEF file does not contain any details.
Use your Edifecs or EDISIM tool to add details to the .INI section of the SEF file, and then restart the Validation Rules Builder.
Error parsing There is an invalid entry in either the .CODES or .SEMREFS section of the input SEF file.
Use your Edifecs or EDISIM tool to add details to the .CODES or .SEMREFS sections of the SEF file, and then restart the Validation Rules Builder.
Error parsing location There is an invalid location specified in the .CODES, .SEMREFS, .VALREFS, or .OBJVARS section of the input SEF file.
Use your Edifecs or EDISIM tool to correct the location path according to SEF specifications.
Error parsing n Invalid modifier
A line in the .VALLISTS section of the input SEF file does not begin with an ampersand (&) or quote (‘) character. n represents the invalid leading character found. Example: Error parsing % Invalid modifier
Use your Edifecs or EDISIM tool to correct the .VALLISTS line according to SEF specifications.
Error parsing SemanticRule
There is an invalid semantic rule in the .SEMREFS section of the input SEF file.
Use your Edifecs or EDISIM tool to correct the .SEMREFS semantic rule according to SEF specifications.
Error parsing transaction One of the following is formatted incorrectly in the input SEF file:
a segment in the .SETS sectionan element in the .SEGS sectiona sub-element in the .COMS section.
Use your Edifecs or EDISIM tool to correct the invalid format according to SEF specifications.
Exception in thread “main” java.lang.NoClassDefFoundError: com/stc/common/registry/RegistryControlFile
The eGate.jar file is not in the appropriate location.
Copy the eGate.jar file to the \lib\ext folder for Java; for example, \JRE\1.6.0\lib\ext.
e*Xchange Partner Manager User’s Guide 292
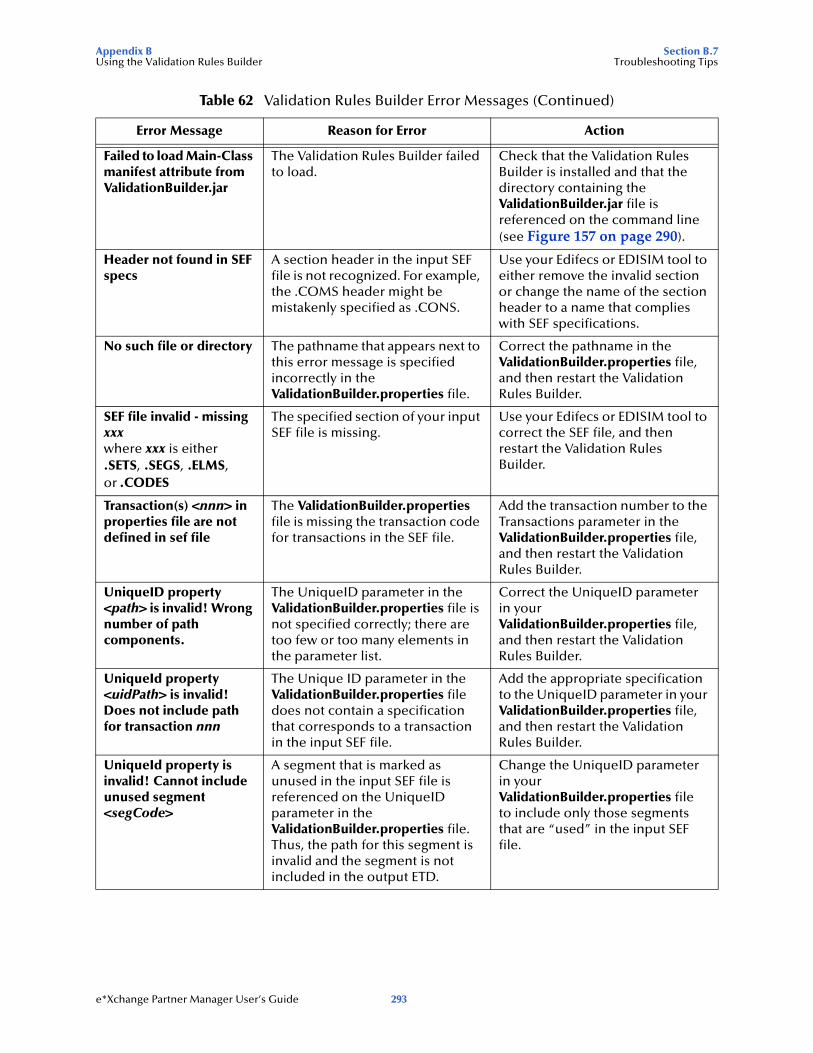
Appendix B Section B.7Using the Validation Rules Builder Troubleshooting Tips
Failed to load Main-Class manifest attribute from ValidationBuilder.jar
The Validation Rules Builder failed to load.
Check that the Validation Rules Builder is installed and that the directory containing the ValidationBuilder.jar file is referenced on the command line (see Figure 157 on page 290).
Header not found in SEF specs
A section header in the input SEF file is not recognized. For example, the .COMS header might be mistakenly specified as .CONS.
Use your Edifecs or EDISIM tool to either remove the invalid section or change the name of the section header to a name that complies with SEF specifications.
No such file or directory The pathname that appears next to this error message is specified incorrectly in the ValidationBuilder.properties file.
Correct the pathname in the ValidationBuilder.properties file, and then restart the Validation Rules Builder.
SEF file invalid - missing xxxwhere xxx is either.SETS, .SEGS, .ELMS, or .CODES
The specified section of your input SEF file is missing.
Use your Edifecs or EDISIM tool to correct the SEF file, and then restart the Validation Rules Builder.
Transaction(s) <nnn> in properties file are not defined in sef file
The ValidationBuilder.properties file is missing the transaction code for transactions in the SEF file.
Add the transaction number to the Transactions parameter in the ValidationBuilder.properties file, and then restart the Validation Rules Builder.
UniqueID property <path> is invalid! Wrong number of path components.
The UniqueID parameter in the ValidationBuilder.properties file is not specified correctly; there are too few or too many elements in the parameter list.
Correct the UniqueID parameter in your ValidationBuilder.properties file, and then restart the Validation Rules Builder.
UniqueId property <uidPath> is invalid! Does not include path for transaction nnn
The Unique ID parameter in the ValidationBuilder.properties file does not contain a specification that corresponds to a transaction in the input SEF file.
Add the appropriate specification to the UniqueID parameter in your ValidationBuilder.properties file, and then restart the Validation Rules Builder.
UniqueId property is invalid! Cannot include unused segment <segCode>
A segment that is marked as unused in the input SEF file is referenced on the UniqueID parameter in the ValidationBuilder.properties file. Thus, the path for this segment is invalid and the segment is not included in the output ETD.
Change the UniqueID parameter in your ValidationBuilder.properties file to include only those segments that are “used” in the input SEF file.
Table 62 Validation Rules Builder Error Messages (Continued)
Error Message Reason for Error Action
e*Xchange Partner Manager User’s Guide 293
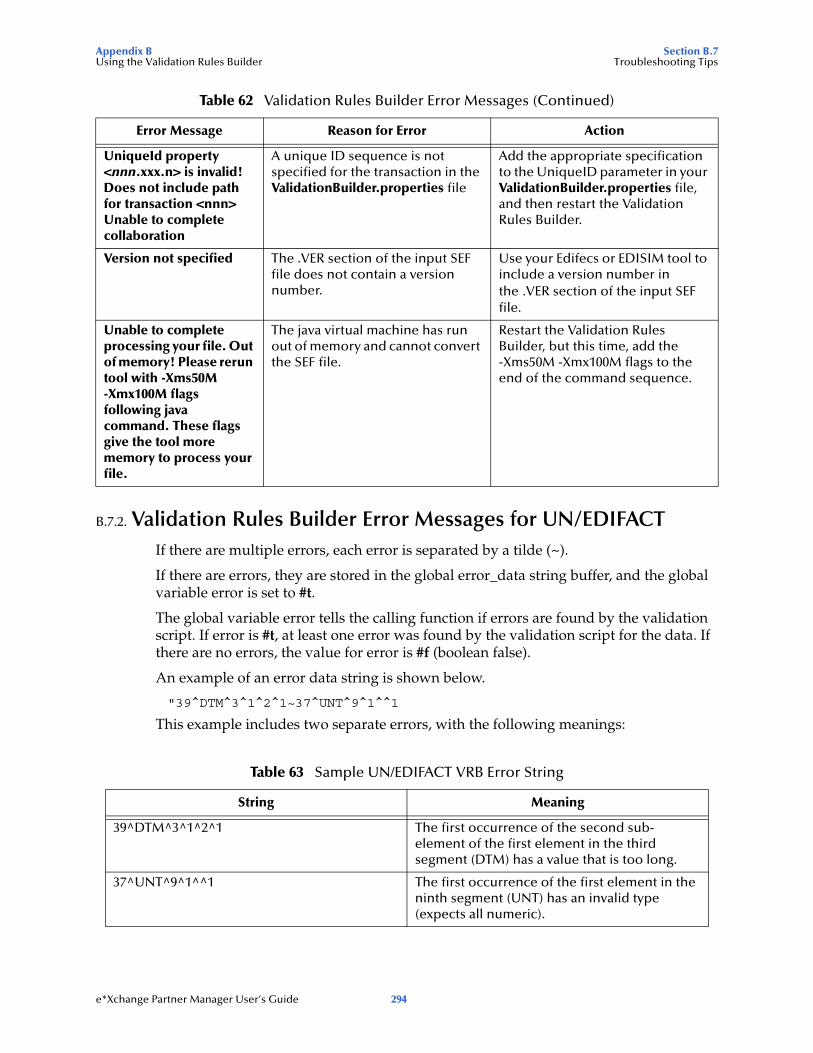
Appendix B Section B.7Using the Validation Rules Builder Troubleshooting Tips
B.7.2. Validation Rules Builder Error Messages for UN/EDIFACTIf there are multiple errors, each error is separated by a tilde (~).
If there are errors, they are stored in the global error_data string buffer, and the global variable error is set to #t.
The global variable error tells the calling function if errors are found by the validation script. If error is #t, at least one error was found by the validation script for the data. If there are no errors, the value for error is #f (boolean false).
An example of an error data string is shown below.
"39^DTM^3^1^2^1~37^UNT^9^1^^1
This example includes two separate errors, with the following meanings:
UniqueId property <nnn.xxx.n> is invalid! Does not include path for transaction <nnn>Unable to complete collaboration
A unique ID sequence is not specified for the transaction in the ValidationBuilder.properties file
Add the appropriate specification to the UniqueID parameter in your ValidationBuilder.properties file, and then restart the Validation Rules Builder.
Version not specified The .VER section of the input SEF file does not contain a version number.
Use your Edifecs or EDISIM tool to include a version number in the .VER section of the input SEF file.
Unable to complete processing your file. Out of memory! Please rerun tool with -Xms50M -Xmx100M flags following java command. These flags give the tool more memory to process your file.
The java virtual machine has run out of memory and cannot convert the SEF file.
Restart the Validation Rules Builder, but this time, add the -Xms50M -Xmx100M flags to the end of the command sequence.
Table 63 Sample UN/EDIFACT VRB Error String
String Meaning
39^DTM^3^1^2^1 The first occurrence of the second sub-element of the first element in the third segment (DTM) has a value that is too long.
37^UNT^9^1^^1 The first occurrence of the first element in the ninth segment (UNT) has an invalid type (expects all numeric).
Table 62 Validation Rules Builder Error Messages (Continued)
Error Message Reason for Error Action
e*Xchange Partner Manager User’s Guide 294
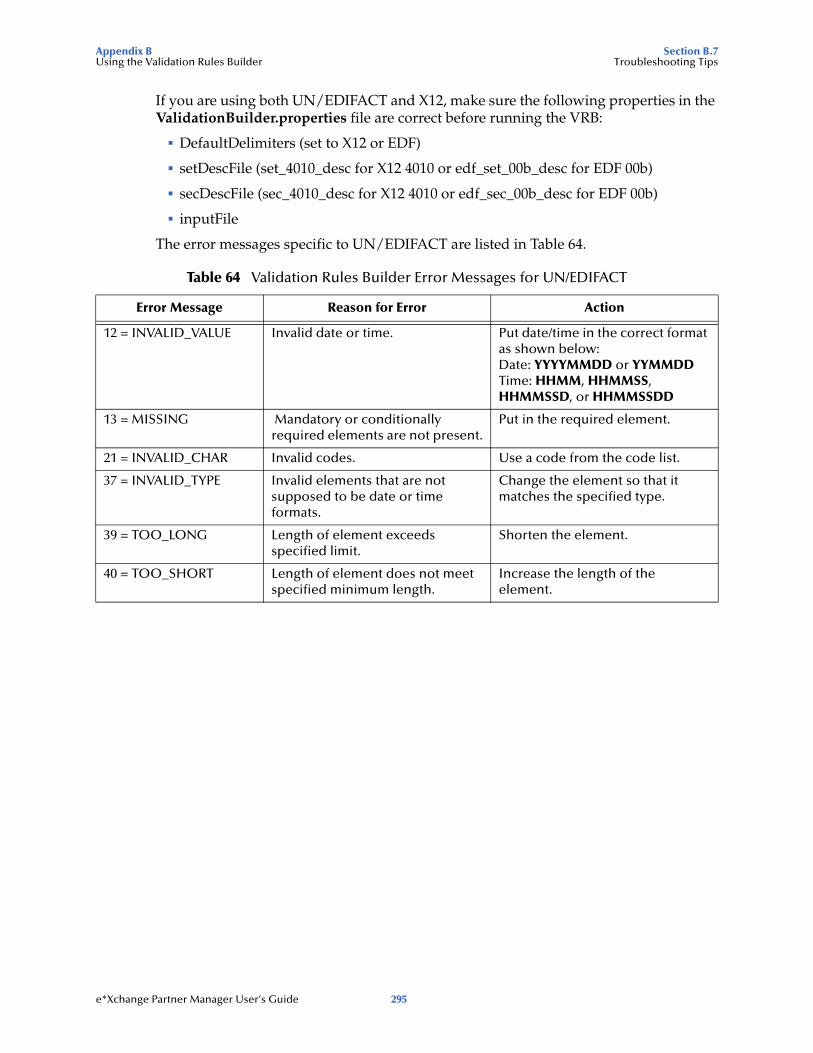
Appendix B Section B.7Using the Validation Rules Builder Troubleshooting Tips
If you are using both UN/EDIFACT and X12, make sure the following properties in the ValidationBuilder.properties file are correct before running the VRB:
DefaultDelimiters (set to X12 or EDF)
setDescFile (set_4010_desc for X12 4010 or edf_set_00b_desc for EDF 00b)
secDescFile (sec_4010_desc for X12 4010 or edf_sec_00b_desc for EDF 00b)
inputFile
The error messages specific to UN/EDIFACT are listed in Table 64.
Table 64 Validation Rules Builder Error Messages for UN/EDIFACT
Error Message Reason for Error Action
12 = INVALID_VALUE Invalid date or time. Put date/time in the correct format as shown below:Date: YYYYMMDD or YYMMDD Time: HHMM, HHMMSS, HHMMSSD, or HHMMSSDD
13 = MISSING Mandatory or conditionally required elements are not present.
Put in the required element.
21 = INVALID_CHAR Invalid codes. Use a code from the code list.
37 = INVALID_TYPE Invalid elements that are not supposed to be date or time formats.
Change the element so that it matches the specified type.
39 = TOO_LONG Length of element exceeds specified limit.
Shorten the element.
40 = TOO_SHORT Length of element does not meet specified minimum length.
Increase the length of the element.
e*Xchange Partner Manager User’s Guide 295
Appendix C
e*Xchange Database Tables
This appendix contains information about the e*Xchange database tables used to generate reports.
Information is provided for each of the following tables:
“ES_MTRK_INB” on page 297
“ES_MTRK_OUTB” on page 299
“ES_WAITING_ACK” on page 301
“ES_MTRK_ERROR” on page 302
“ES_MTRK_OUTB_DATA” on page 303
“ES_MTRK_EXT_HDR” on page 304
“ES_MTRK_AUDIT” on page 304
“ES_MSG_STORAGE” on page 305
“ES_MTRK_EXT_DET” on page 306
“ES_OUT_QUEUE” on page 306
“ES_MTRK_INB_DATA” on page 307
“ES_EXT_HDR” on page 307
“ES_EXT_DETAIL” on page 308
“ES_EXT_DATA” on page 309
“ES_MSG_ASCII” on page 309
“ES_TPIC” on page 310
“ES_TPTS” on page 311
“ES_MSG_SECURITY” on page 312
“ES_TPCAT” on page 313
“ES_TPH” on page 313
“ES_COMPANY” on page 314
“ES_MSG_BINARY” on page 314
To find, for example, application references for the EDIFACT Message Profile, consult the ES_EXT_DETAIL and ES_EXT_DATA tables.
e*Xchange Partner Manager User’s Guide 296
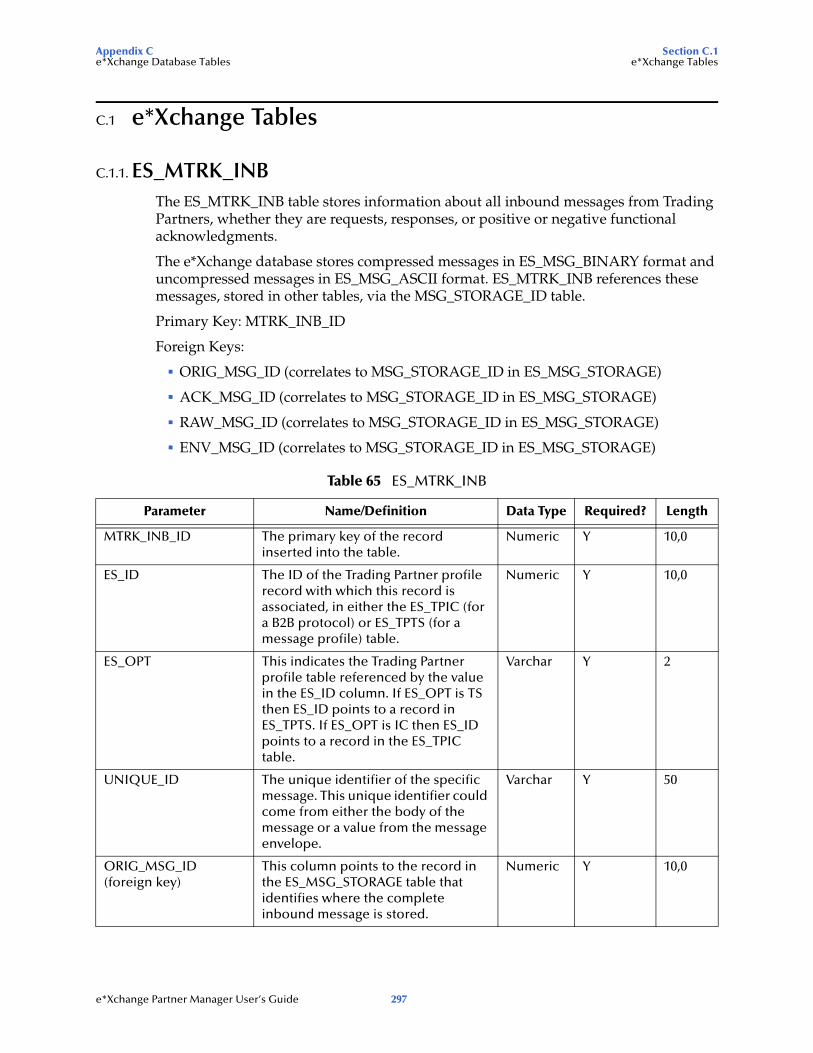
Appendix C Section C.1e*Xchange Database Tables e*Xchange Tables
C.1 e*Xchange Tables
C.1.1. ES_MTRK_INBThe ES_MTRK_INB table stores information about all inbound messages from Trading Partners, whether they are requests, responses, or positive or negative functional acknowledgments.
The e*Xchange database stores compressed messages in ES_MSG_BINARY format and uncompressed messages in ES_MSG_ASCII format. ES_MTRK_INB references these messages, stored in other tables, via the MSG_STORAGE_ID table.
Primary Key: MTRK_INB_ID
Foreign Keys:
ORIG_MSG_ID (correlates to MSG_STORAGE_ID in ES_MSG_STORAGE)
ACK_MSG_ID (correlates to MSG_STORAGE_ID in ES_MSG_STORAGE)
RAW_MSG_ID (correlates to MSG_STORAGE_ID in ES_MSG_STORAGE)
ENV_MSG_ID (correlates to MSG_STORAGE_ID in ES_MSG_STORAGE)
Table 65 ES_MTRK_INB
Parameter Name/Definition Data Type Required? Length
MTRK_INB_ID The primary key of the record inserted into the table.
Numeric Y 10,0
ES_ID The ID of the Trading Partner profile record with which this record is associated, in either the ES_TPIC (for a B2B protocol) or ES_TPTS (for a message profile) table.
Numeric Y 10,0
ES_OPT This indicates the Trading Partner profile table referenced by the value in the ES_ID column. If ES_OPT is TS then ES_ID points to a record in ES_TPTS. If ES_OPT is IC then ES_ID points to a record in the ES_TPIC table.
Varchar Y 2
UNIQUE_ID The unique identifier of the specific message. This unique identifier could come from either the body of the message or a value from the message envelope.
Varchar Y 50
ORIG_MSG_ID (foreign key)
This column points to the record in the ES_MSG_STORAGE table that identifies where the complete inbound message is stored.
Numeric Y 10,0
e*Xchange Partner Manager User’s Guide 297
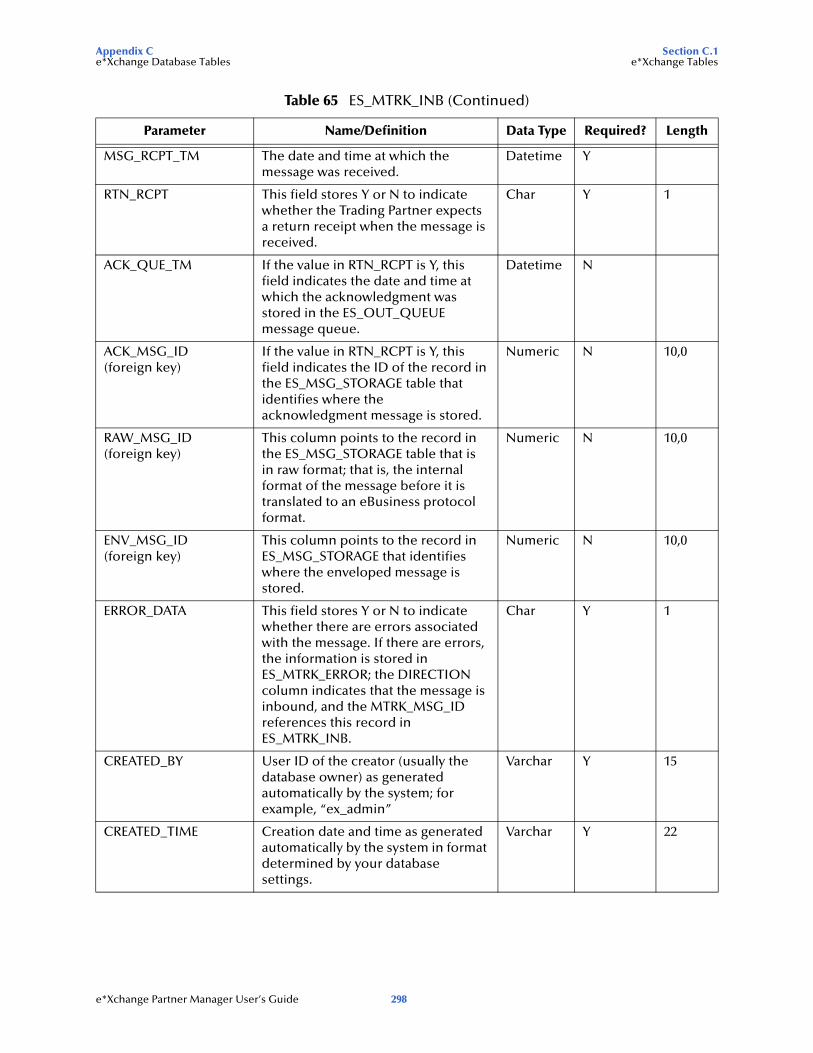
Appendix C Section C.1e*Xchange Database Tables e*Xchange Tables
MSG_RCPT_TM The date and time at which the message was received.
Datetime Y
RTN_RCPT This field stores Y or N to indicate whether the Trading Partner expects a return receipt when the message is received.
Char Y 1
ACK_QUE_TM If the value in RTN_RCPT is Y, this field indicates the date and time at which the acknowledgment was stored in the ES_OUT_QUEUE message queue.
Datetime N
ACK_MSG_ID (foreign key)
If the value in RTN_RCPT is Y, this field indicates the ID of the record in the ES_MSG_STORAGE table that identifies where the acknowledgment message is stored.
Numeric N 10,0
RAW_MSG_ID (foreign key)
This column points to the record in the ES_MSG_STORAGE table that is in raw format; that is, the internal format of the message before it is translated to an eBusiness protocol format.
Numeric N 10,0
ENV_MSG_ID (foreign key)
This column points to the record in ES_MSG_STORAGE that identifies where the enveloped message is stored.
Numeric N 10,0
ERROR_DATA This field stores Y or N to indicate whether there are errors associated with the message. If there are errors, the information is stored in ES_MTRK_ERROR; the DIRECTION column indicates that the message is inbound, and the MTRK_MSG_ID references this record in ES_MTRK_INB.
Char Y 1
CREATED_BY User ID of the creator (usually the database owner) as generated automatically by the system; for example, “ex_admin”
Varchar Y 15
CREATED_TIME Creation date and time as generated automatically by the system in format determined by your database settings.
Varchar Y 22
Table 65 ES_MTRK_INB (Continued)
Parameter Name/Definition Data Type Required? Length
e*Xchange Partner Manager User’s Guide 298
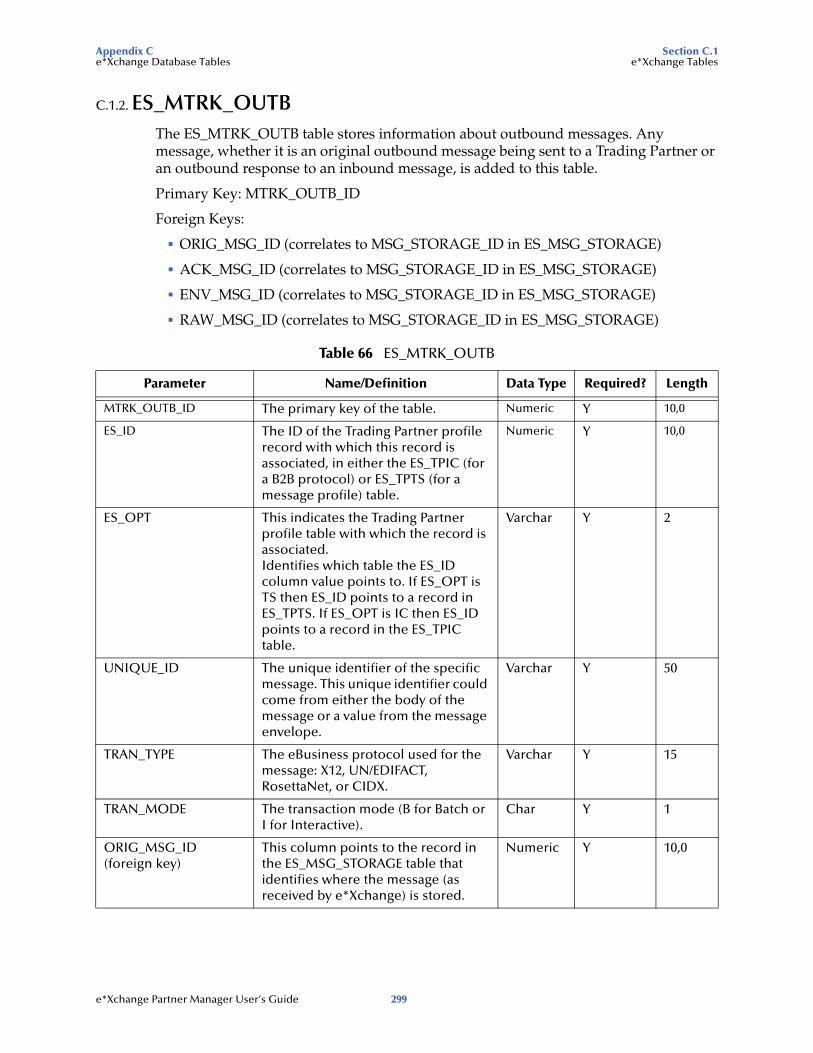
Appendix C Section C.1e*Xchange Database Tables e*Xchange Tables
C.1.2. ES_MTRK_OUTBThe ES_MTRK_OUTB table stores information about outbound messages. Any message, whether it is an original outbound message being sent to a Trading Partner or an outbound response to an inbound message, is added to this table.
Primary Key: MTRK_OUTB_ID
Foreign Keys:
ORIG_MSG_ID (correlates to MSG_STORAGE_ID in ES_MSG_STORAGE)
ACK_MSG_ID (correlates to MSG_STORAGE_ID in ES_MSG_STORAGE)
ENV_MSG_ID (correlates to MSG_STORAGE_ID in ES_MSG_STORAGE)
RAW_MSG_ID (correlates to MSG_STORAGE_ID in ES_MSG_STORAGE)
Table 66 ES_MTRK_OUTB
Parameter Name/Definition Data Type Required? Length
MTRK_OUTB_ID The primary key of the table. Numeric Y 10,0
ES_ID The ID of the Trading Partner profile record with which this record is associated, in either the ES_TPIC (for a B2B protocol) or ES_TPTS (for a message profile) table.
Numeric Y 10,0
ES_OPT This indicates the Trading Partner profile table with which the record is associated.Identifies which table the ES_ID column value points to. If ES_OPT is TS then ES_ID points to a record in ES_TPTS. If ES_OPT is IC then ES_ID points to a record in the ES_TPIC table.
Varchar Y 2
UNIQUE_ID The unique identifier of the specific message. This unique identifier could come from either the body of the message or a value from the message envelope.
Varchar Y 50
TRAN_TYPE The eBusiness protocol used for the message: X12, UN/EDIFACT, RosettaNet, or CIDX.
Varchar Y 15
TRAN_MODE The transaction mode (B for Batch or I for Interactive).
Char Y 1
ORIG_MSG_ID (foreign key)
This column points to the record in the ES_MSG_STORAGE table that identifies where the message (as received by e*Xchange) is stored.
Numeric Y 10,0
e*Xchange Partner Manager User’s Guide 299
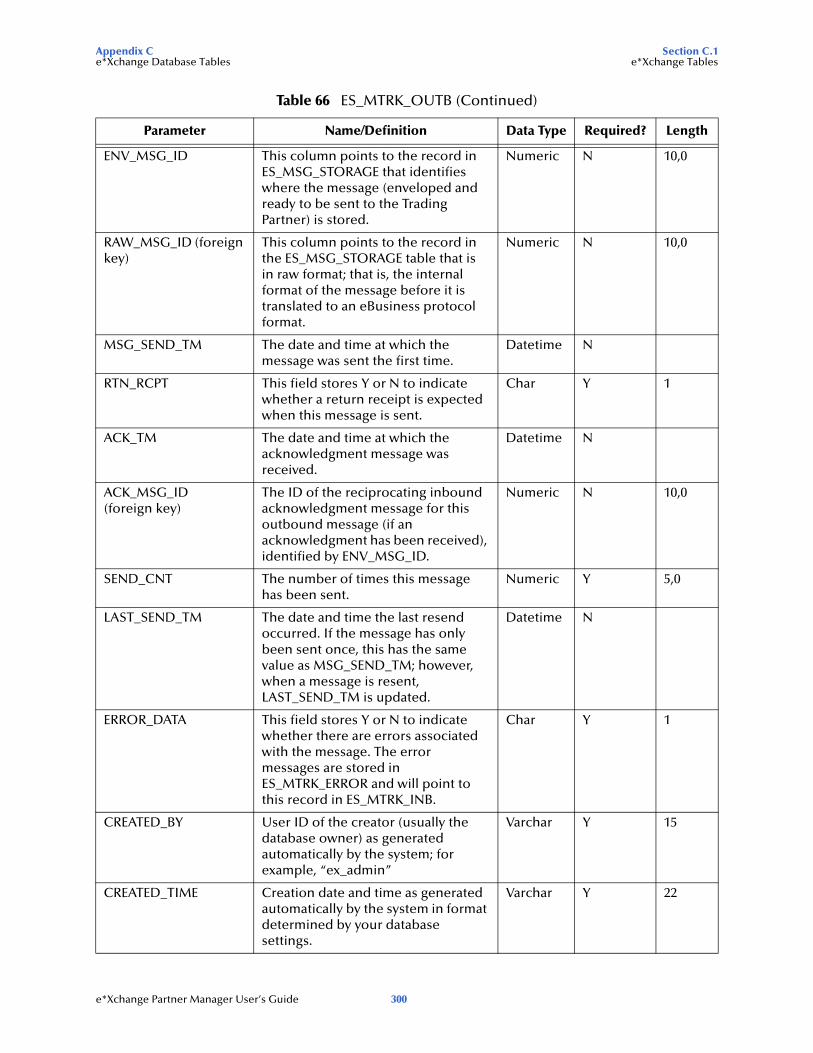
Appendix C Section C.1e*Xchange Database Tables e*Xchange Tables
ENV_MSG_ID This column points to the record in ES_MSG_STORAGE that identifies where the message (enveloped and ready to be sent to the Trading Partner) is stored.
Numeric N 10,0
RAW_MSG_ID (foreign key)
This column points to the record in the ES_MSG_STORAGE table that is in raw format; that is, the internal format of the message before it is translated to an eBusiness protocol format.
Numeric N 10,0
MSG_SEND_TM The date and time at which the message was sent the first time.
Datetime N
RTN_RCPT This field stores Y or N to indicate whether a return receipt is expected when this message is sent.
Char Y 1
ACK_TM The date and time at which the acknowledgment message was received.
Datetime N
ACK_MSG_ID(foreign key)
The ID of the reciprocating inbound acknowledgment message for this outbound message (if an acknowledgment has been received), identified by ENV_MSG_ID.
Numeric N 10,0
SEND_CNT The number of times this message has been sent.
Numeric Y 5,0
LAST_SEND_TM The date and time the last resend occurred. If the message has only been sent once, this has the same value as MSG_SEND_TM; however, when a message is resent, LAST_SEND_TM is updated.
Datetime N
ERROR_DATA This field stores Y or N to indicate whether there are errors associated with the message. The error messages are stored in ES_MTRK_ERROR and will point to this record in ES_MTRK_INB.
Char Y 1
CREATED_BY User ID of the creator (usually the database owner) as generated automatically by the system; for example, “ex_admin”
Varchar Y 15
CREATED_TIME Creation date and time as generated automatically by the system in format determined by your database settings.
Varchar Y 22
Table 66 ES_MTRK_OUTB (Continued)
Parameter Name/Definition Data Type Required? Length
e*Xchange Partner Manager User’s Guide 300
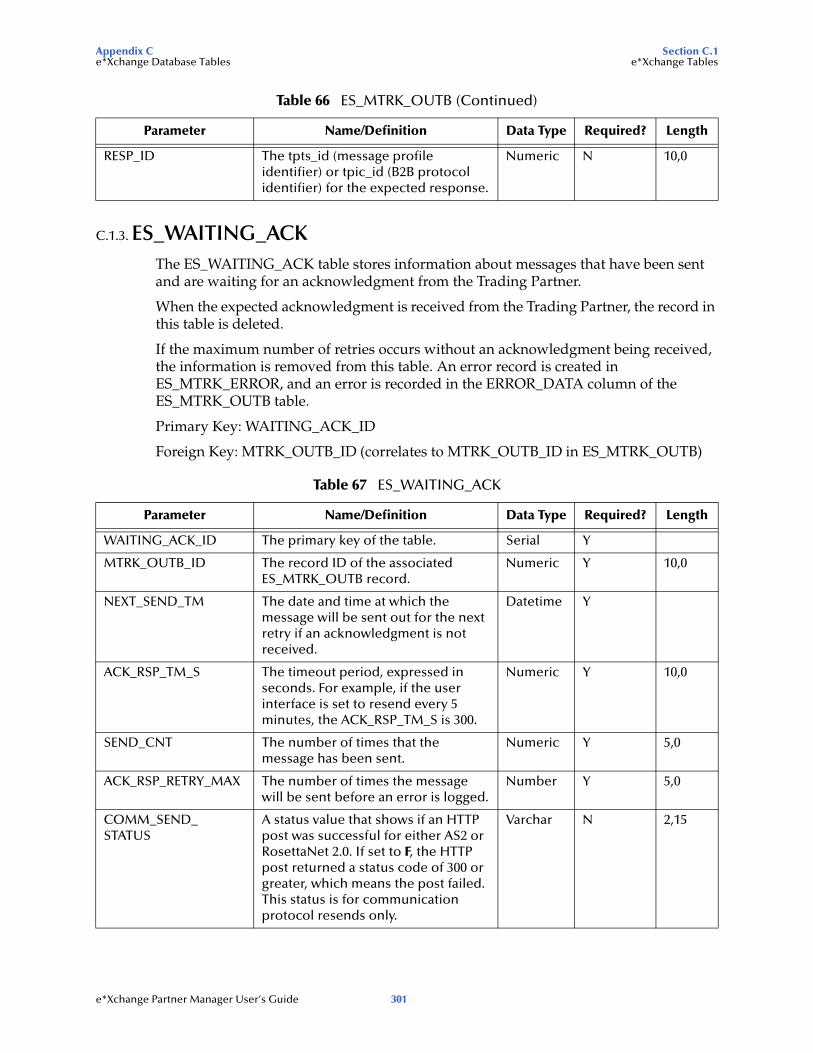
Appendix C Section C.1e*Xchange Database Tables e*Xchange Tables
C.1.3. ES_WAITING_ACKThe ES_WAITING_ACK table stores information about messages that have been sent and are waiting for an acknowledgment from the Trading Partner.
When the expected acknowledgment is received from the Trading Partner, the record in this table is deleted.
If the maximum number of retries occurs without an acknowledgment being received, the information is removed from this table. An error record is created in ES_MTRK_ERROR, and an error is recorded in the ERROR_DATA column of the ES_MTRK_OUTB table.
Primary Key: WAITING_ACK_ID
Foreign Key: MTRK_OUTB_ID (correlates to MTRK_OUTB_ID in ES_MTRK_OUTB)
RESP_ID The tpts_id (message profile identifier) or tpic_id (B2B protocol identifier) for the expected response.
Numeric N 10,0
Table 67 ES_WAITING_ACK
Parameter Name/Definition Data Type Required? Length
WAITING_ACK_ID The primary key of the table. Serial Y
MTRK_OUTB_ID The record ID of the associated ES_MTRK_OUTB record.
Numeric Y 10,0
NEXT_SEND_TM The date and time at which the message will be sent out for the next retry if an acknowledgment is not received.
Datetime Y
ACK_RSP_TM_S The timeout period, expressed in seconds. For example, if the user interface is set to resend every 5 minutes, the ACK_RSP_TM_S is 300.
Numeric Y 10,0
SEND_CNT The number of times that the message has been sent.
Numeric Y 5,0
ACK_RSP_RETRY_MAX The number of times the message will be sent before an error is logged.
Number Y 5,0
COMM_SEND_STATUS
A status value that shows if an HTTP post was successful for either AS2 or RosettaNet 2.0. If set to F, the HTTP post returned a status code of 300 or greater, which means the post failed.This status is for communication protocol resends only.
Varchar N 2,15
Table 66 ES_MTRK_OUTB (Continued)
Parameter Name/Definition Data Type Required? Length
e*Xchange Partner Manager User’s Guide 301
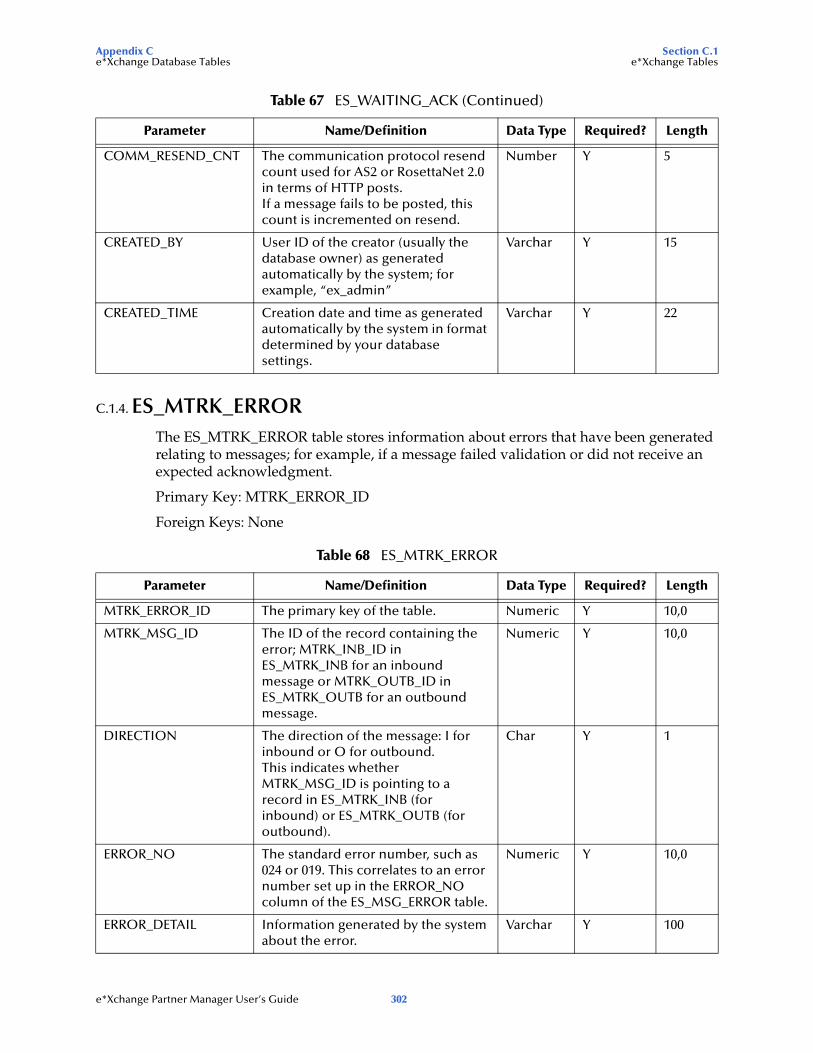
Appendix C Section C.1e*Xchange Database Tables e*Xchange Tables
C.1.4. ES_MTRK_ERRORThe ES_MTRK_ERROR table stores information about errors that have been generated relating to messages; for example, if a message failed validation or did not receive an expected acknowledgment.
Primary Key: MTRK_ERROR_ID
Foreign Keys: None
COMM_RESEND_CNT The communication protocol resend count used for AS2 or RosettaNet 2.0 in terms of HTTP posts.If a message fails to be posted, this count is incremented on resend.
Number Y 5
CREATED_BY User ID of the creator (usually the database owner) as generated automatically by the system; for example, “ex_admin”
Varchar Y 15
CREATED_TIME Creation date and time as generated automatically by the system in format determined by your database settings.
Varchar Y 22
Table 68 ES_MTRK_ERROR
Parameter Name/Definition Data Type Required? Length
MTRK_ERROR_ID The primary key of the table. Numeric Y 10,0
MTRK_MSG_ID The ID of the record containing the error; MTRK_INB_ID in ES_MTRK_INB for an inbound message or MTRK_OUTB_ID in ES_MTRK_OUTB for an outbound message.
Numeric Y 10,0
DIRECTION The direction of the message: I for inbound or O for outbound.This indicates whether MTRK_MSG_ID is pointing to a record in ES_MTRK_INB (for inbound) or ES_MTRK_OUTB (for outbound).
Char Y 1
ERROR_NO The standard error number, such as 024 or 019. This correlates to an error number set up in the ERROR_NO column of the ES_MSG_ERROR table.
Numeric Y 10,0
ERROR_DETAIL Information generated by the system about the error.
Varchar Y 100
Table 67 ES_WAITING_ACK (Continued)
Parameter Name/Definition Data Type Required? Length
e*Xchange Partner Manager User’s Guide 302
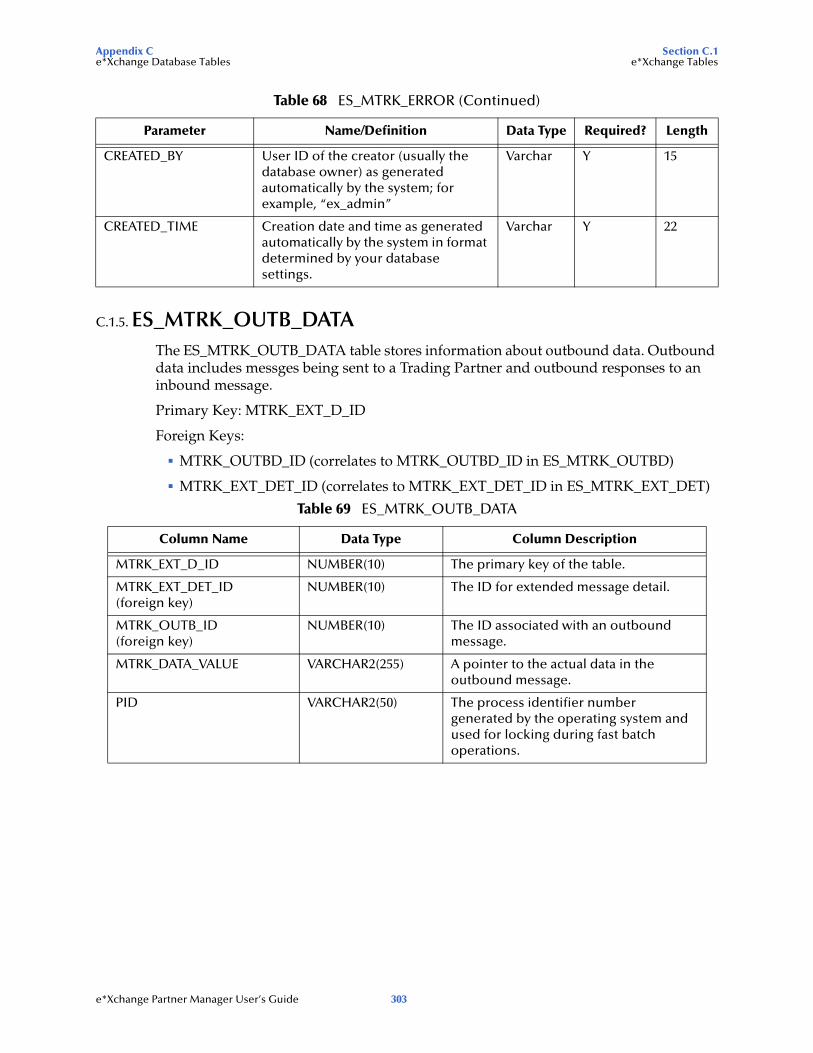
Appendix C Section C.1e*Xchange Database Tables e*Xchange Tables
C.1.5. ES_MTRK_OUTB_DATAThe ES_MTRK_OUTB_DATA table stores information about outbound data. Outbound data includes messges being sent to a Trading Partner and outbound responses to an inbound message.
Primary Key: MTRK_EXT_D_ID
Foreign Keys:
MTRK_OUTBD_ID (correlates to MTRK_OUTBD_ID in ES_MTRK_OUTBD)
MTRK_EXT_DET_ID (correlates to MTRK_EXT_DET_ID in ES_MTRK_EXT_DET)
CREATED_BY User ID of the creator (usually the database owner) as generated automatically by the system; for example, “ex_admin”
Varchar Y 15
CREATED_TIME Creation date and time as generated automatically by the system in format determined by your database settings.
Varchar Y 22
Table 69 ES_MTRK_OUTB_DATA
Column Name Data Type Column Description
MTRK_EXT_D_ID NUMBER(10) The primary key of the table.
MTRK_EXT_DET_ID(foreign key)
NUMBER(10) The ID for extended message detail.
MTRK_OUTB_ID(foreign key)
NUMBER(10) The ID associated with an outbound message.
MTRK_DATA_VALUE VARCHAR2(255) A pointer to the actual data in the outbound message.
PID VARCHAR2(50) The process identifier number generated by the operating system and used for locking during fast batch operations.
Table 68 ES_MTRK_ERROR (Continued)
Parameter Name/Definition Data Type Required? Length
e*Xchange Partner Manager User’s Guide 303

Appendix C Section C.1e*Xchange Database Tables e*Xchange Tables
C.1.6. ES_MTRK_EXT_HDRThe ES_MTRK_EXT_HDR table stores extended header information for messages sent between Trading Partners.
Primary Key: MTRK_EXT_HDR_ID
Foreign Keys: None
C.1.7. ES_MTRK_AUDITThe ES_MTRK_AUDIT table stores information about the message tracking access log.
Primary Key: AUDIT_ID
Foreign Key: MSG_ID (correlates to MSG_STORAGE_ID in ES_MSG_STORAGE)
Table 70 ES_MTRK_EXT_HDR
Column Name Data Type Column Description
MTRK_EXT_HDR_ID NUMBER(10) The primary key of the table.
ES_OPT CHAR(2) The profile type (company or Trading Partner).
TRAN_TYPE VARCHAR(15) The transaction type (X12, UN/EDIFACT, RosettaNet, or CIDX).
VERSION VARCHAR2(20) The version of the transaction type.
DISPLAY_NAME VARCHAR2(30) The display name associated with the transaction type.
DIRECTION CHAR(1) Inbound (I) or Outbound (O).
CREATED_BY CHAR(15) User ID of the creator (usually the database owner) as generated automatically by the system; for example, “ex_admin”
CREATED_TIME VARCHAR2(22) Creation date and time as generated automatically by the system in format determined by your database settings.
Table 71 ES_MTRK_AUDIT
Column Name Data Type Column Description
AUDIT_ID NUMBER(10) The primary key of the table.
MSG_ID(foreign key)
NUMBER(10) The message ID viewed by the user.
MSG_TYPE CHAR(4) Message type (ORIG, ACK, ENV, or RAW)
MTRK_ID NUMBER(10) The message tracking ID.
DIRECTION CHAR(1) Inbound (I) or Outbound (O).
e*Xchange Partner Manager User’s Guide 304
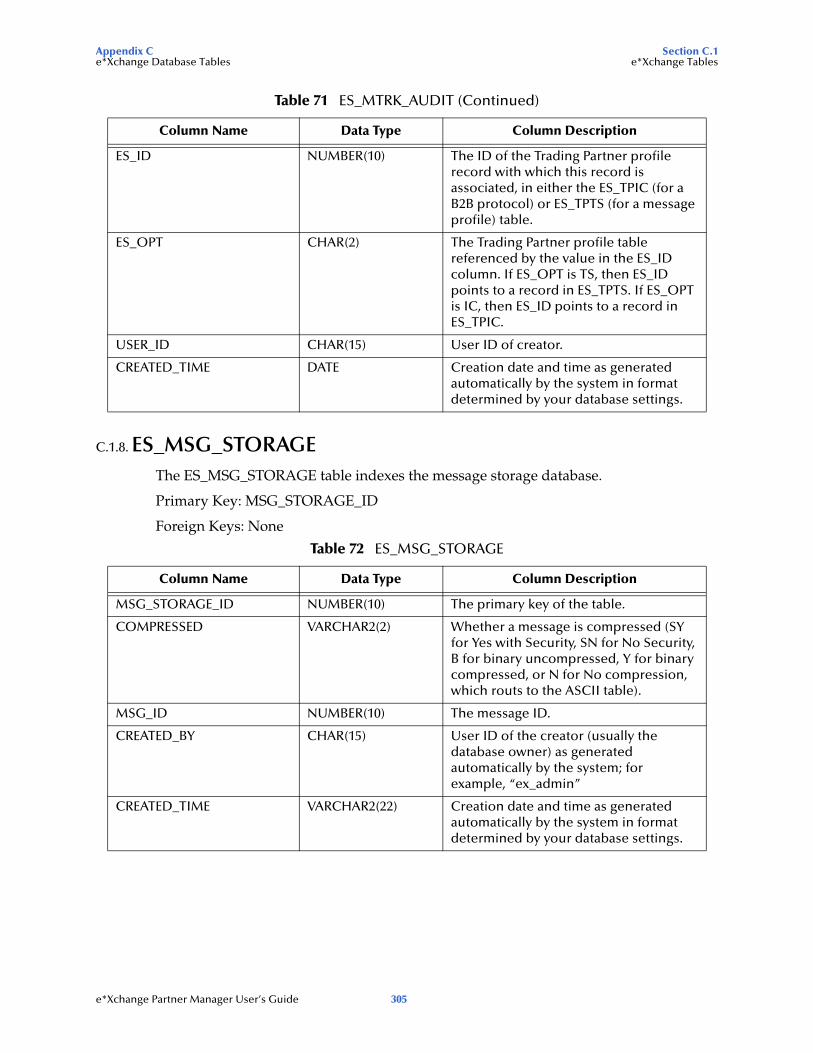
Appendix C Section C.1e*Xchange Database Tables e*Xchange Tables
C.1.8. ES_MSG_STORAGEThe ES_MSG_STORAGE table indexes the message storage database.
Primary Key: MSG_STORAGE_ID
Foreign Keys: None
ES_ID NUMBER(10) The ID of the Trading Partner profile record with which this record is associated, in either the ES_TPIC (for a B2B protocol) or ES_TPTS (for a message profile) table.
ES_OPT CHAR(2) The Trading Partner profile table referenced by the value in the ES_ID column. If ES_OPT is TS, then ES_ID points to a record in ES_TPTS. If ES_OPT is IC, then ES_ID points to a record in ES_TPIC.
USER_ID CHAR(15) User ID of creator.
CREATED_TIME DATE Creation date and time as generated automatically by the system in format determined by your database settings.
Table 72 ES_MSG_STORAGE
Column Name Data Type Column Description
MSG_STORAGE_ID NUMBER(10) The primary key of the table.
COMPRESSED VARCHAR2(2) Whether a message is compressed (SY for Yes with Security, SN for No Security, B for binary uncompressed, Y for binary compressed, or N for No compression, which routs to the ASCII table).
MSG_ID NUMBER(10) The message ID.
CREATED_BY CHAR(15) User ID of the creator (usually the database owner) as generated automatically by the system; for example, “ex_admin”
CREATED_TIME VARCHAR2(22) Creation date and time as generated automatically by the system in format determined by your database settings.
Table 71 ES_MTRK_AUDIT (Continued)
Column Name Data Type Column Description
e*Xchange Partner Manager User’s Guide 305

Appendix C Section C.1e*Xchange Database Tables e*Xchange Tables
C.1.9. ES_MTRK_EXT_DETThe ES_MTRK_EXT_DET table stores extended detail about particular columns.
Primary Key: MTRK_EXT_DET_ID
Foreign Key: MTRK_EXT_HDR_ID (correlates to MTRK_EXT_HDR_ID in ES_MTRK_EXT_HDR)
C.1.10.ES_OUT_QUEUEThe ES_OUT_QUEUE table stores information about outbound messages.
Primary Key: QUEUE_ID
Foreign Keys: None
Table 73 ES_MTRK_EXT_DET
Column Name Data Type Column Description
MTRK_EXT_DET_ID NUMBER(10) The primary key of the table.
MTRK_EXT_HDR_ID(foreign key)
NUMBER(10) This column points to the record in ES_MTRK_EXT_HDR where associated header information is stored.
COL_NAME VARCHAR2(75) The column name.
COL_DSP_NAME VARCHAR2(75) The column name as displayed in the web interface description for this field.
COL_TYPE CHAR(2) The column type. Typically C for Character, but seldom used.
COL_REQ CHAR(1) Whether the column is required (Y or N).
MAX_SIZE NUMBER(3) Maximum column width in characters.
MIN_SIZE NUMBER(3) Minimum column width in characters.
ENABLED CHAR(1) Whether the column is enabled (Y or N).
CREATED_BY CHAR(15) User ID of the creator (usually the database owner) as generated automatically by the system; for example, “ex_admin”
CREATED_TIME VARCHAR2(22) Creation date and time as generated automatically by the system in format determined by your database settings.
Table 74 ES_OUT_QUEUE
Column Name Data Type Column Description
QUEUE_ID NUMBER(10) The primary key.
MSG_STORAGE_ID NUMBER(10) The message storage ID number.
MTRK_OUTB_ID NUMBER(10) The ID number assigned to the message by the outbound queue.
e*Xchange Partner Manager User’s Guide 306
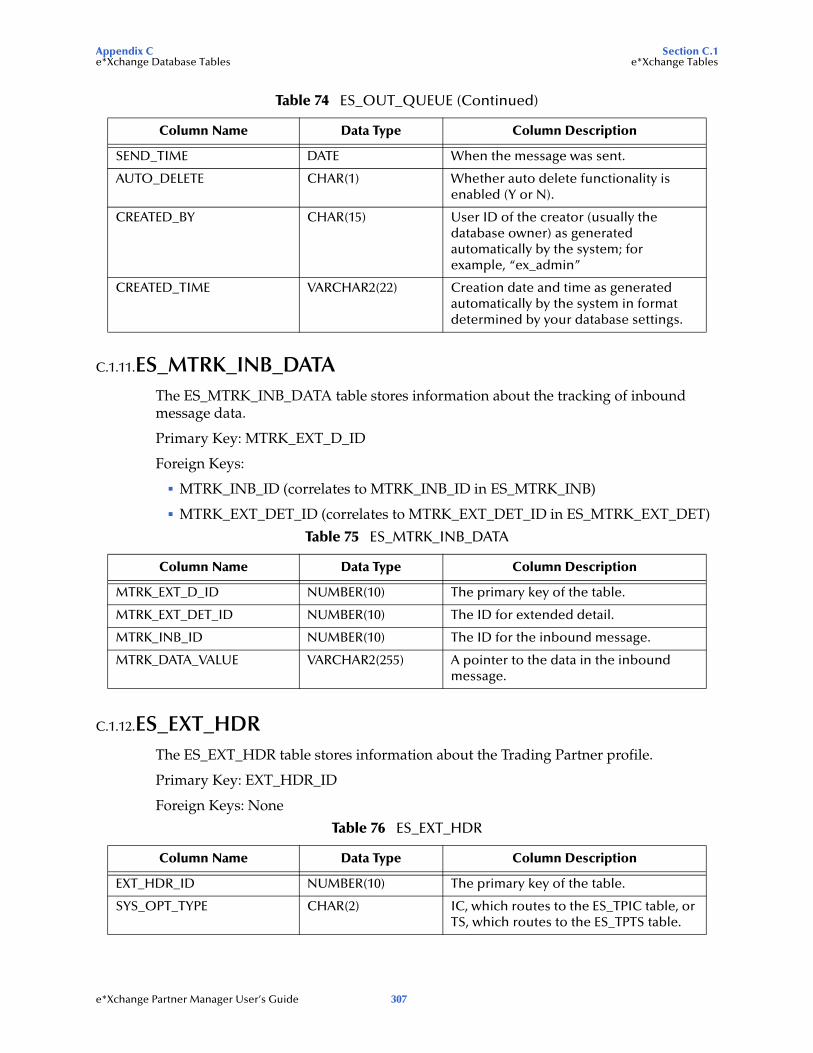
Appendix C Section C.1e*Xchange Database Tables e*Xchange Tables
C.1.11.ES_MTRK_INB_DATAThe ES_MTRK_INB_DATA table stores information about the tracking of inbound message data.
Primary Key: MTRK_EXT_D_ID
Foreign Keys:
MTRK_INB_ID (correlates to MTRK_INB_ID in ES_MTRK_INB)
MTRK_EXT_DET_ID (correlates to MTRK_EXT_DET_ID in ES_MTRK_EXT_DET)
C.1.12.ES_EXT_HDRThe ES_EXT_HDR table stores information about the Trading Partner profile.
Primary Key: EXT_HDR_ID
Foreign Keys: None
SEND_TIME DATE When the message was sent.
AUTO_DELETE CHAR(1) Whether auto delete functionality is enabled (Y or N).
CREATED_BY CHAR(15) User ID of the creator (usually the database owner) as generated automatically by the system; for example, “ex_admin”
CREATED_TIME VARCHAR2(22) Creation date and time as generated automatically by the system in format determined by your database settings.
Table 75 ES_MTRK_INB_DATA
Column Name Data Type Column Description
MTRK_EXT_D_ID NUMBER(10) The primary key of the table.
MTRK_EXT_DET_ID NUMBER(10) The ID for extended detail.
MTRK_INB_ID NUMBER(10) The ID for the inbound message.
MTRK_DATA_VALUE VARCHAR2(255) A pointer to the data in the inbound message.
Table 76 ES_EXT_HDR
Column Name Data Type Column Description
EXT_HDR_ID NUMBER(10) The primary key of the table.
SYS_OPT_TYPE CHAR(2) IC, which routes to the ES_TPIC table, or TS, which routes to the ES_TPTS table.
Table 74 ES_OUT_QUEUE (Continued)
Column Name Data Type Column Description
e*Xchange Partner Manager User’s Guide 307
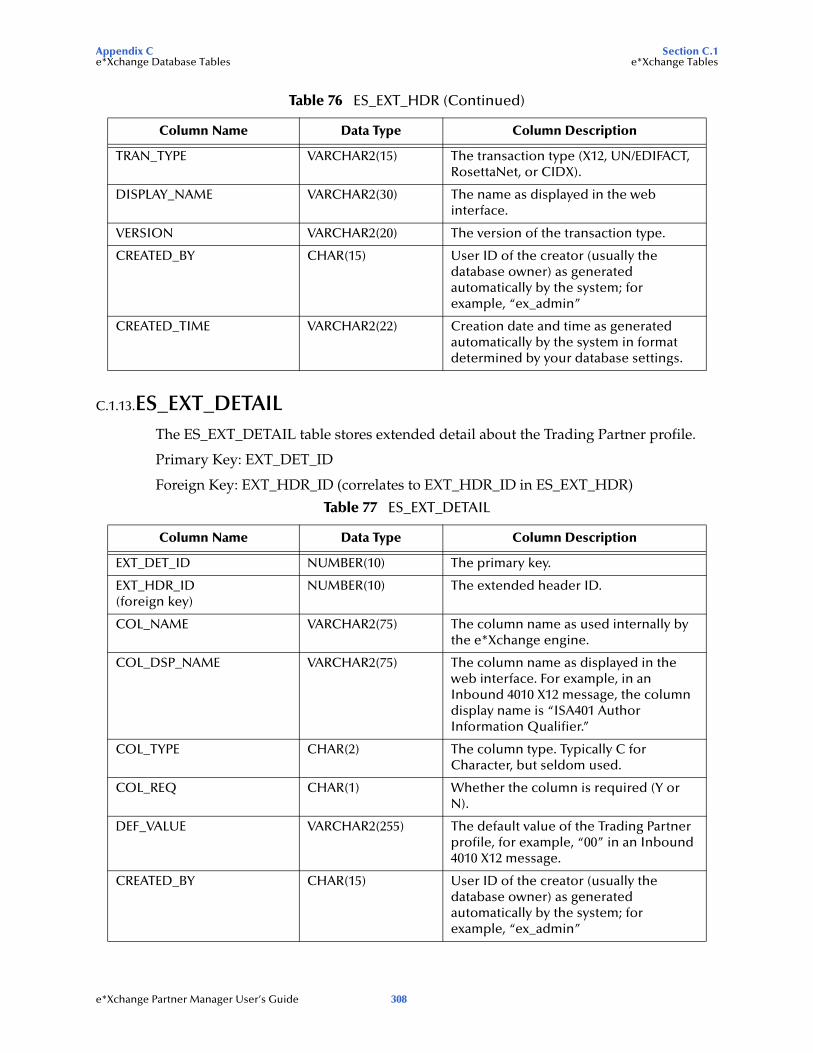
Appendix C Section C.1e*Xchange Database Tables e*Xchange Tables
C.1.13.ES_EXT_DETAILThe ES_EXT_DETAIL table stores extended detail about the Trading Partner profile.
Primary Key: EXT_DET_ID
Foreign Key: EXT_HDR_ID (correlates to EXT_HDR_ID in ES_EXT_HDR)
TRAN_TYPE VARCHAR2(15) The transaction type (X12, UN/EDIFACT, RosettaNet, or CIDX).
DISPLAY_NAME VARCHAR2(30) The name as displayed in the web interface.
VERSION VARCHAR2(20) The version of the transaction type.
CREATED_BY CHAR(15) User ID of the creator (usually the database owner) as generated automatically by the system; for example, “ex_admin”
CREATED_TIME VARCHAR2(22) Creation date and time as generated automatically by the system in format determined by your database settings.
Table 77 ES_EXT_DETAIL
Column Name Data Type Column Description
EXT_DET_ID NUMBER(10) The primary key.
EXT_HDR_ID(foreign key)
NUMBER(10) The extended header ID.
COL_NAME VARCHAR2(75) The column name as used internally by the e*Xchange engine.
COL_DSP_NAME VARCHAR2(75) The column name as displayed in the web interface. For example, in an Inbound 4010 X12 message, the column display name is “ISA401 Author Information Qualifier.”
COL_TYPE CHAR(2) The column type. Typically C for Character, but seldom used.
COL_REQ CHAR(1) Whether the column is required (Y or N).
DEF_VALUE VARCHAR2(255) The default value of the Trading Partner profile, for example, “00” in an Inbound 4010 X12 message.
CREATED_BY CHAR(15) User ID of the creator (usually the database owner) as generated automatically by the system; for example, “ex_admin”
Table 76 ES_EXT_HDR (Continued)
Column Name Data Type Column Description
e*Xchange Partner Manager User’s Guide 308
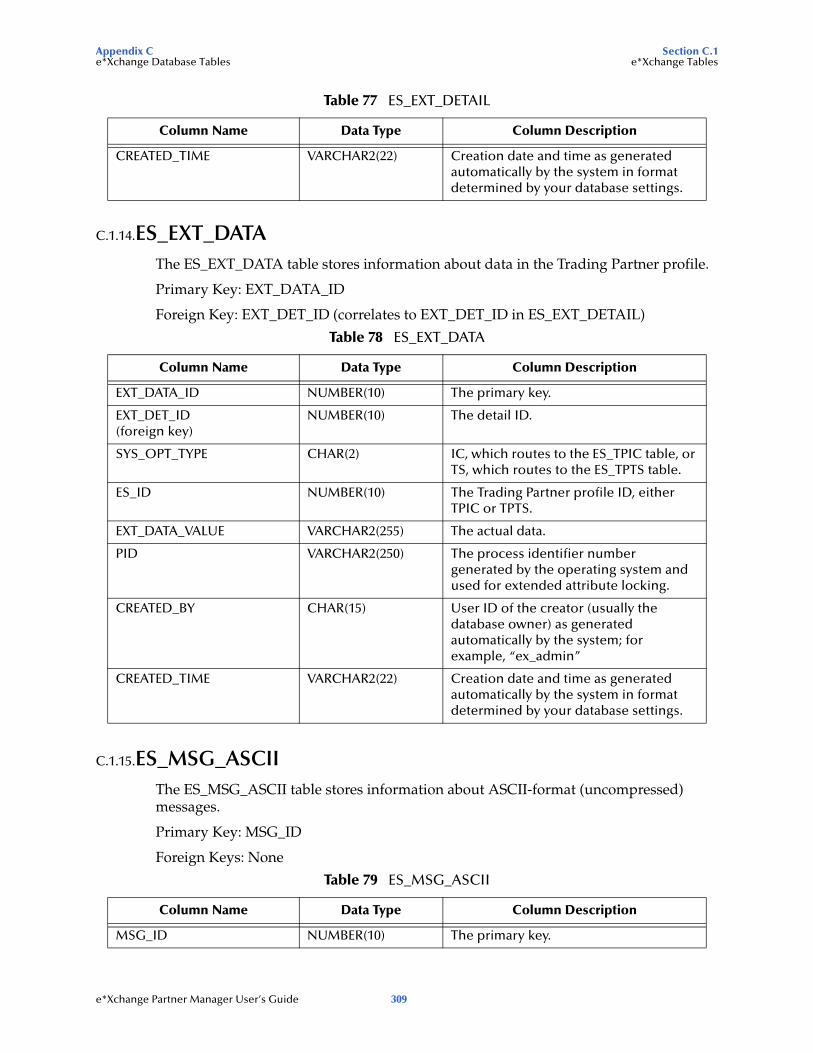
Appendix C Section C.1e*Xchange Database Tables e*Xchange Tables
C.1.14.ES_EXT_DATAThe ES_EXT_DATA table stores information about data in the Trading Partner profile.
Primary Key: EXT_DATA_ID
Foreign Key: EXT_DET_ID (correlates to EXT_DET_ID in ES_EXT_DETAIL)
C.1.15.ES_MSG_ASCIIThe ES_MSG_ASCII table stores information about ASCII-format (uncompressed) messages.
Primary Key: MSG_ID
Foreign Keys: None
CREATED_TIME VARCHAR2(22) Creation date and time as generated automatically by the system in format determined by your database settings.
Table 78 ES_EXT_DATA
Column Name Data Type Column Description
EXT_DATA_ID NUMBER(10) The primary key.
EXT_DET_ID(foreign key)
NUMBER(10) The detail ID.
SYS_OPT_TYPE CHAR(2) IC, which routes to the ES_TPIC table, or TS, which routes to the ES_TPTS table.
ES_ID NUMBER(10) The Trading Partner profile ID, either TPIC or TPTS.
EXT_DATA_VALUE VARCHAR2(255) The actual data.
PID VARCHAR2(250) The process identifier number generated by the operating system and used for extended attribute locking.
CREATED_BY CHAR(15) User ID of the creator (usually the database owner) as generated automatically by the system; for example, “ex_admin”
CREATED_TIME VARCHAR2(22) Creation date and time as generated automatically by the system in format determined by your database settings.
Table 79 ES_MSG_ASCII
Column Name Data Type Column Description
MSG_ID NUMBER(10) The primary key.
Table 77 ES_EXT_DETAIL
Column Name Data Type Column Description
e*Xchange Partner Manager User’s Guide 309
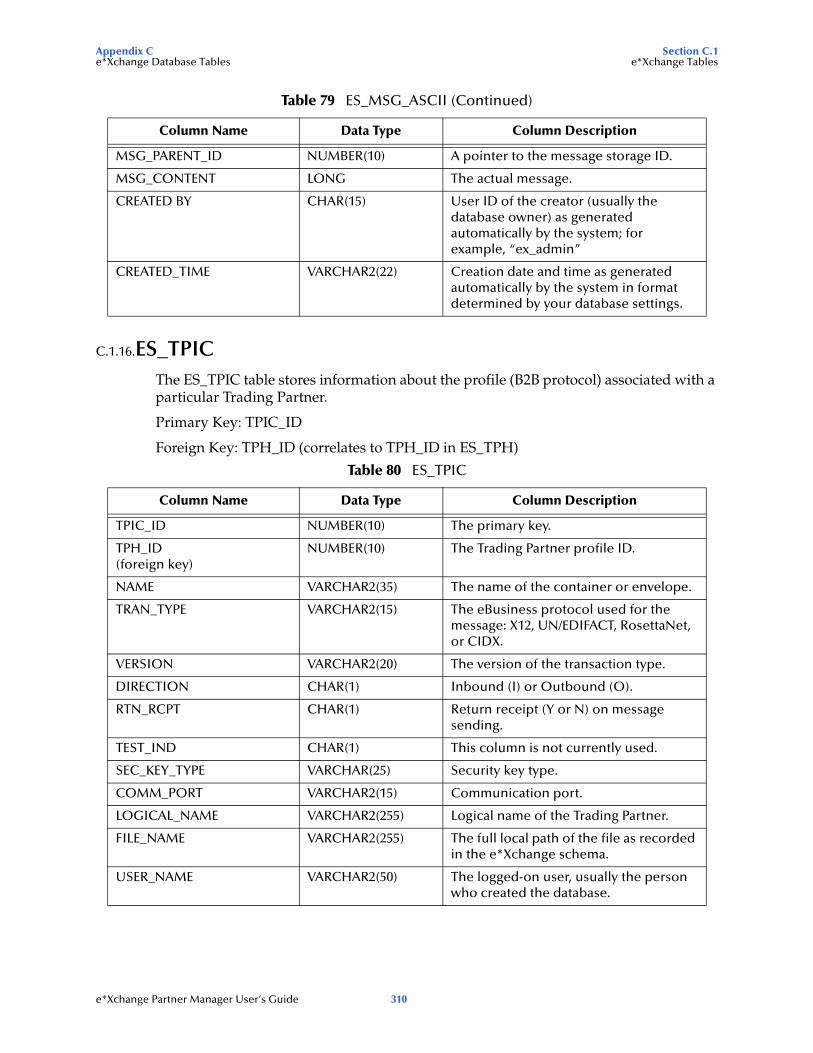
Appendix C Section C.1e*Xchange Database Tables e*Xchange Tables
C.1.16.ES_TPICThe ES_TPIC table stores information about the profile (B2B protocol) associated with a particular Trading Partner.
Primary Key: TPIC_ID
Foreign Key: TPH_ID (correlates to TPH_ID in ES_TPH)
MSG_PARENT_ID NUMBER(10) A pointer to the message storage ID.
MSG_CONTENT LONG The actual message.
CREATED BY CHAR(15) User ID of the creator (usually the database owner) as generated automatically by the system; for example, “ex_admin”
CREATED_TIME VARCHAR2(22) Creation date and time as generated automatically by the system in format determined by your database settings.
Table 80 ES_TPIC
Column Name Data Type Column Description
TPIC_ID NUMBER(10) The primary key.
TPH_ID(foreign key)
NUMBER(10) The Trading Partner profile ID.
NAME VARCHAR2(35) The name of the container or envelope.
TRAN_TYPE VARCHAR2(15) The eBusiness protocol used for the message: X12, UN/EDIFACT, RosettaNet, or CIDX.
VERSION VARCHAR2(20) The version of the transaction type.
DIRECTION CHAR(1) Inbound (I) or Outbound (O).
RTN_RCPT CHAR(1) Return receipt (Y or N) on message sending.
TEST_IND CHAR(1) This column is not currently used.
SEC_KEY_TYPE VARCHAR(25) Security key type.
COMM_PORT VARCHAR2(15) Communication port.
LOGICAL_NAME VARCHAR2(255) Logical name of the Trading Partner.
FILE_NAME VARCHAR2(255) The full local path of the file as recorded in the e*Xchange schema.
USER_NAME VARCHAR2(50) The logged-on user, usually the person who created the database.
Table 79 ES_MSG_ASCII (Continued)
Column Name Data Type Column Description
e*Xchange Partner Manager User’s Guide 310

Appendix C Section C.1e*Xchange Database Tables e*Xchange Tables
C.1.17.ES_TPTSThe ES_TPTS table stores information about Trading Partner message protocol types. It may be considered an “inner envelope” to the “outer envelope” represented by ES_TPIC.
Primary Key: TPTS_ID
Foreign Key: TPIC_ID (correlates to TPIC_ID in ES_TPIC)
PASSWORD VARCHAR2(50) The alphanumeric password automatically generated by FTP configuration settings.
HOST VARCHAR2(50) The name of the computer on which the e*Xchange schema runs.
PORT VARCHAR2(20) The number of the port used for FTP configuration.
STATUS CHAR(1) Active (A) or Inactive (I)
CREATED_BY CHAR(15) User ID of the creator (usually the database owner) as generated automatically by the system; for example, “ex_admin”
CREATED_TIME VARCHAR2(22) Creation date and time as generated automatically by the system in format determined by your database settings.
Table 81 ES_TPTS
Column Name Data Type Column Description
TPTS_ID NUMBER(10) Primary key.
TPIC_ID(foreign key)
NUMBER(10) The B2B protocol ID.
NAME VARCHAR2(100) The user-defined profile name.
ALT_ID VARCHAR2(50) The alternate ID, which can be used to initiate processing in cases where the rest of the message has already been translated.
VERSION VARCHAR2(20) The version of the transaction type.
TRAN_MODE VARCHAR2(15) The transaction mode (B for Batch or I for Interactive).
BUS_COLLAB VARCHAR2(200) The name of the business collaboration.
DB_COLLAB VARCHAR2(200) The name of the database collaboration.
MSG_COMPRESS CHAR(1) Whether the message is compressed (Y or N).
Table 80 ES_TPIC (Continued)
Column Name Data Type Column Description
e*Xchange Partner Manager User’s Guide 311
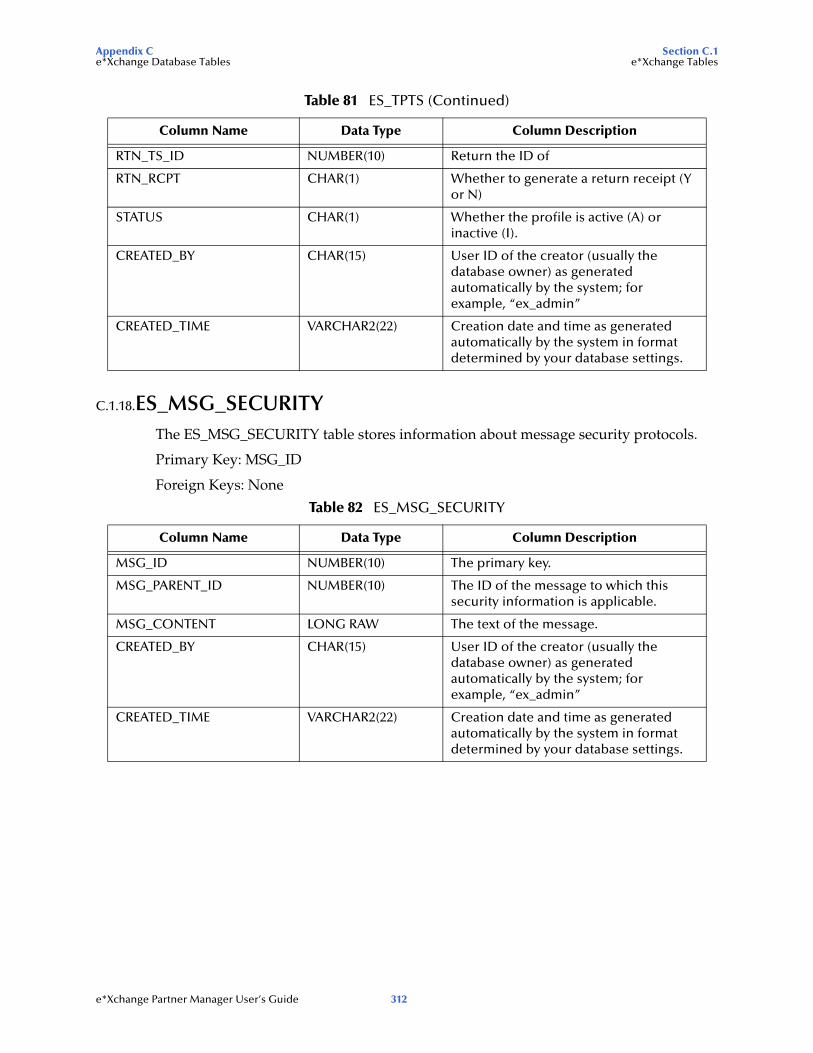
Appendix C Section C.1e*Xchange Database Tables e*Xchange Tables
C.1.18.ES_MSG_SECURITYThe ES_MSG_SECURITY table stores information about message security protocols.
Primary Key: MSG_ID
Foreign Keys: None
RTN_TS_ID NUMBER(10) Return the ID of
RTN_RCPT CHAR(1) Whether to generate a return receipt (Y or N)
STATUS CHAR(1) Whether the profile is active (A) or inactive (I).
CREATED_BY CHAR(15) User ID of the creator (usually the database owner) as generated automatically by the system; for example, “ex_admin”
CREATED_TIME VARCHAR2(22) Creation date and time as generated automatically by the system in format determined by your database settings.
Table 82 ES_MSG_SECURITY
Column Name Data Type Column Description
MSG_ID NUMBER(10) The primary key.
MSG_PARENT_ID NUMBER(10) The ID of the message to which this security information is applicable.
MSG_CONTENT LONG RAW The text of the message.
CREATED_BY CHAR(15) User ID of the creator (usually the database owner) as generated automatically by the system; for example, “ex_admin”
CREATED_TIME VARCHAR2(22) Creation date and time as generated automatically by the system in format determined by your database settings.
Table 81 ES_TPTS (Continued)
Column Name Data Type Column Description
e*Xchange Partner Manager User’s Guide 312
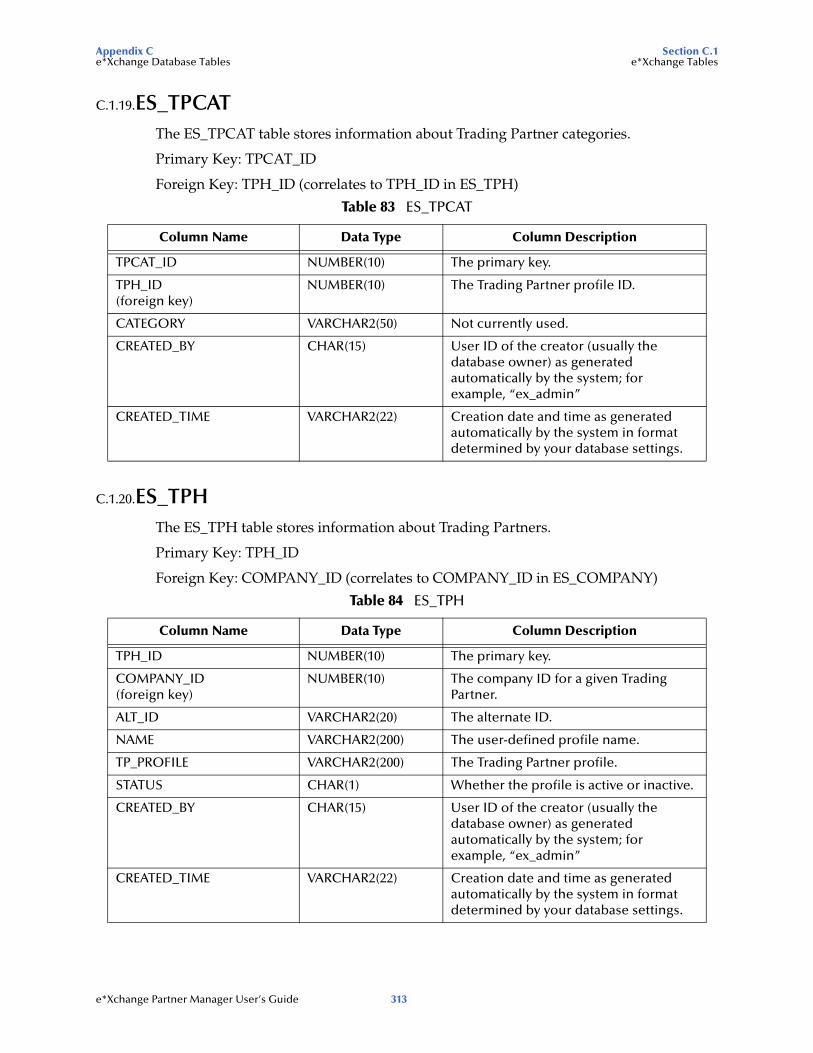
Appendix C Section C.1e*Xchange Database Tables e*Xchange Tables
C.1.19.ES_TPCATThe ES_TPCAT table stores information about Trading Partner categories.
Primary Key: TPCAT_ID
Foreign Key: TPH_ID (correlates to TPH_ID in ES_TPH)
C.1.20.ES_TPHThe ES_TPH table stores information about Trading Partners.
Primary Key: TPH_ID
Foreign Key: COMPANY_ID (correlates to COMPANY_ID in ES_COMPANY)
Table 83 ES_TPCAT
Column Name Data Type Column Description
TPCAT_ID NUMBER(10) The primary key.
TPH_ID(foreign key)
NUMBER(10) The Trading Partner profile ID.
CATEGORY VARCHAR2(50) Not currently used.
CREATED_BY CHAR(15) User ID of the creator (usually the database owner) as generated automatically by the system; for example, “ex_admin”
CREATED_TIME VARCHAR2(22) Creation date and time as generated automatically by the system in format determined by your database settings.
Table 84 ES_TPH
Column Name Data Type Column Description
TPH_ID NUMBER(10) The primary key.
COMPANY_ID(foreign key)
NUMBER(10) The company ID for a given Trading Partner.
ALT_ID VARCHAR2(20) The alternate ID.
NAME VARCHAR2(200) The user-defined profile name.
TP_PROFILE VARCHAR2(200) The Trading Partner profile.
STATUS CHAR(1) Whether the profile is active or inactive.
CREATED_BY CHAR(15) User ID of the creator (usually the database owner) as generated automatically by the system; for example, “ex_admin”
CREATED_TIME VARCHAR2(22) Creation date and time as generated automatically by the system in format determined by your database settings.
e*Xchange Partner Manager User’s Guide 313
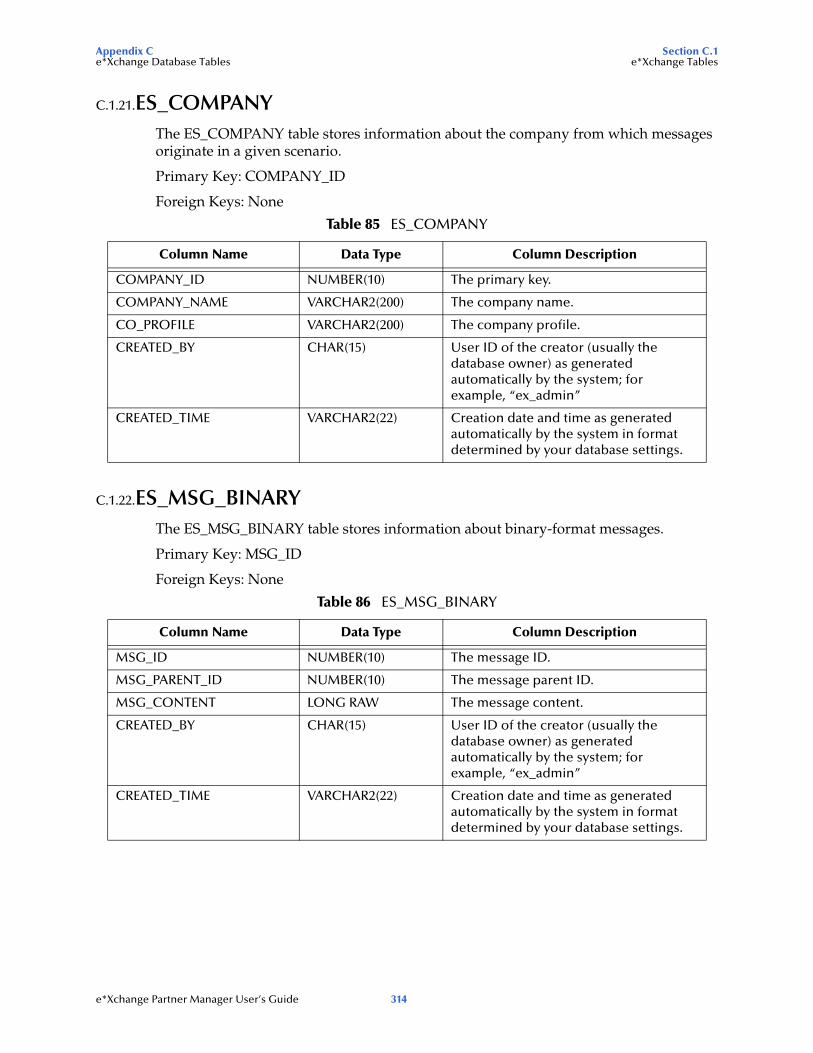
Appendix C Section C.1e*Xchange Database Tables e*Xchange Tables
C.1.21.ES_COMPANYThe ES_COMPANY table stores information about the company from which messages originate in a given scenario.
Primary Key: COMPANY_ID
Foreign Keys: None
C.1.22.ES_MSG_BINARYThe ES_MSG_BINARY table stores information about binary-format messages.
Primary Key: MSG_ID
Foreign Keys: None
Table 85 ES_COMPANY
Column Name Data Type Column Description
COMPANY_ID NUMBER(10) The primary key.
COMPANY_NAME VARCHAR2(200) The company name.
CO_PROFILE VARCHAR2(200) The company profile.
CREATED_BY CHAR(15) User ID of the creator (usually the database owner) as generated automatically by the system; for example, “ex_admin”
CREATED_TIME VARCHAR2(22) Creation date and time as generated automatically by the system in format determined by your database settings.
Table 86 ES_MSG_BINARY
Column Name Data Type Column Description
MSG_ID NUMBER(10) The message ID.
MSG_PARENT_ID NUMBER(10) The message parent ID.
MSG_CONTENT LONG RAW The message content.
CREATED_BY CHAR(15) User ID of the creator (usually the database owner) as generated automatically by the system; for example, “ex_admin”
CREATED_TIME VARCHAR2(22) Creation date and time as generated automatically by the system in format determined by your database settings.
e*Xchange Partner Manager User’s Guide 314
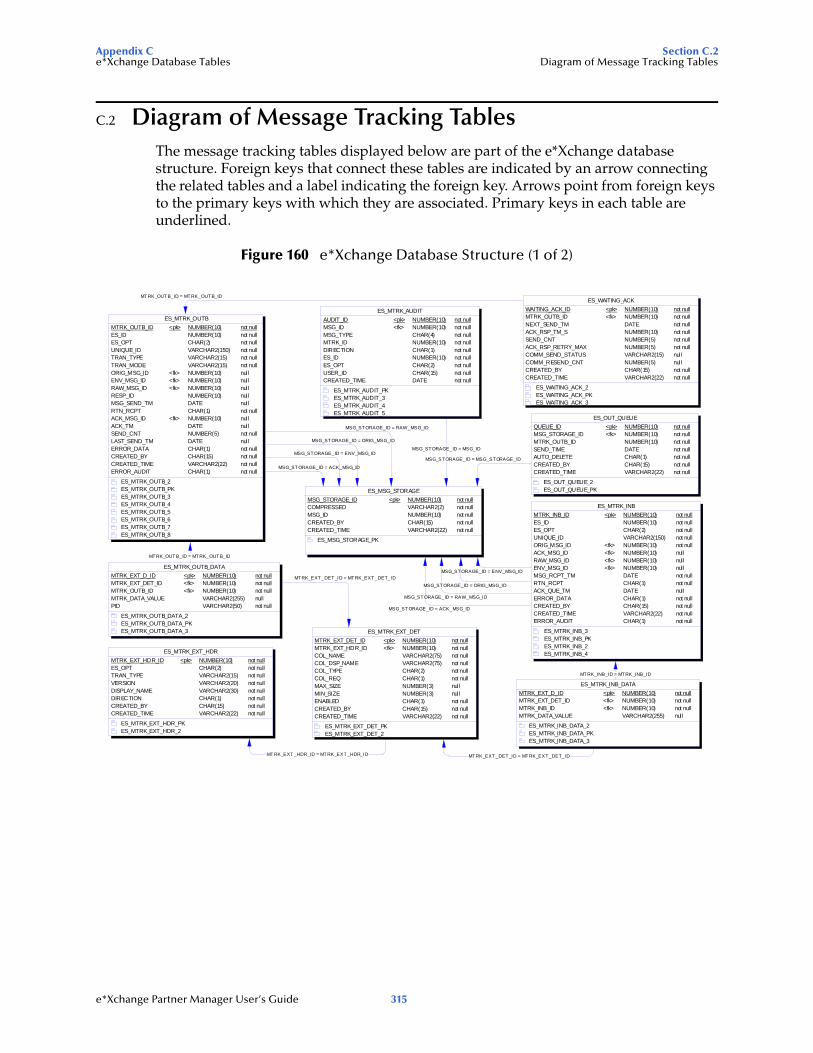
Appendix C Section C.2e*Xchange Database Tables Diagram of Message Tracking Tables
C.2 Diagram of Message Tracking TablesThe message tracking tables displayed below are part of the e*Xchange database structure. Foreign keys that connect these tables are indicated by an arrow connecting the related tables and a label indicating the foreign key. Arrows point from foreign keys to the primary keys with which they are associated. Primary keys in each table are underlined.
Figure 160 e*Xchange Database Structure (1 of 2)
MTRK_OUT B_ID = MTRK_OUTB_ID
MTRK_EXT_DET_ID = MTRK_EXT_DET_ID
MTRK_INB_ID = MTRK_INB_ID
MTRK_EXT_DET_ID = MTRK_EXT_DET_ID
MSG_STORAGE_ID = MSG_ID
MTRK_EXT _HDR_ID = MTRK_EXT_HDR_ID
MSG_STORAGE_ID = MSG_STORAGE_ID
MT RK_OUTB_ID = MTRK_OUTB_ID
MSG_STORAGE_ID = ENV_MSG_ID
MSG_STORAGE_ID = RAW_MSG_ID
MSG_STORAGE_ID = ACK_MSG_ID
MSG_STORAGE_ID = ORIG_MSG_ID
MSG_STORAGE_ID = RAW_MSG_ID
MSG_STORAGE_ID = ACK_MSG_ID
MSG_STORAGE_ID = ENV_MSG_ID
MSG_STORAGE_ID = ORIG_MSG_ID
ES_MSG_STORAGEMSG_STORAGE_ID <pk> NUMBER(10) not nullCOMPRESSED VARCHAR2(2) not nullMSG_ID NUMBER(10) not nullCREATED_BY CHAR(15) not nullCREATED_TIME VARCHAR2(22) not null
ES_MSG_STORAGE_PK
ES_MTRK_OUTBMTRK_OUTB_ID <pk> NUMBER(10) not nullES_ID NUMBER(10) not nullES_OPT CHAR(2) not nullUNIQUE_ID VARCHAR2(150) not nullTRAN_TYPE VARCHAR2(15) not nullTRAN_MODE VARCHAR2(15) not nullORIG_MSG_ID <fk> NUMBER(10) nullENV_MSG_ID <fk> NUMBER(10) nullRAW_MSG_ID <fk> NUMBER(10) nullRESP_ID NUMBER(10) nullMSG_SEND_TM DATE nullRTN_RCPT CHAR(1) not nullACK_MSG_ID <fk> NUMBER(10) nullACK_TM DATE nullSEND_CNT NUMBER(5) not nullLAST_SEND_TM DATE nullERROR_DATA CHAR(1) not nullCREATED_BY CHAR(15) not nullCREATED_TIME VARCHAR2(22) not nullERROR_AUDIT CHAR(1) not null
ES_MTRK_OUTB_2ES_MTRK_OUTB_PKES_MTRK_OUTB_3ES_MTRK_OUTB_4ES_MTRK_OUTB_5ES_MTRK_OUTB_6ES_MTRK_OUTB_7ES_MTRK_OUTB_8
ES_WAITING_ACKWAITING_ACK_ID <pk> NUMBER(10) not nullMTRK_OUTB_ID <fk> NUMBER(10) not nullNEXT_SEND_TM DATE not nullACK_RSP_TM_S NUMBER(10) not nullSEND_CNT NUMBER(5) not nullACK_RSP_RETRY_MAX NUMBER(5) not nullCOMM_SEND_STATUS VARCHAR2(15) nullCOMM_RESEND_CNT NUMBER(5) nullCREATED_BY CHAR(15) not nullCREATED_TIME VARCHAR2(22) not null
ES_WAITING_ACK_2ES_WAITING_ACK_PKES_WAITING_ACK_3
ES_MTRK_INBMTRK_INB_ID <pk> NUMBER(10) not nullES_ID NUMBER(10) not nullES_OPT CHAR(2) not nullUNIQUE_ID VARCHAR2(150) not nullORIG_MSG_ID <fk> NUMBER(10) not nullACK_MSG_ID <fk> NUMBER(10) nullRAW_MSG_ID <fk> NUMBER(10) nullENV_MSG_ID <fk> NUMBER(10) nullMSG_RCPT_TM DATE not nullRTN_RCPT CHAR(1) not nullACK_QUE_TM DATE nullERROR_DATA CHAR(1) not nullCREATED_BY CHAR(15) not nullCREATED_TIME VARCHAR2(22) not nullERROR_AUDIT CHAR(1) not null
ES_MTRK_INB_3ES_MTRK_INB_PKES_MTRK_INB_2ES_MTRK_INB_4
ES_MTRK_INB_DATAMTRK_EXT_D_ID <pk> NUMBER(10) not nullMTRK_EXT_DET_ID <fk> NUMBER(10) not nullMTRK_INB_ID <fk> NUMBER(10) not nullMTRK_DATA_VALUE VARCHAR2(255) nul l
ES_MTRK_INB_DATA_2ES_MTRK_INB_DATA_PKES_MTRK_INB_DATA_3
ES_OUT_QUEUEQUEUE_ID <pk> NUMBER(10) not nullMSG_STORAGE_ID <fk> NUMBER(10) not nullMTRK_OUTB_ID NUMBER(10) not nullSEND_TIME DATE not nullAUTO_DELETE CHAR(1) not nullCREATED_BY CHAR(15) not nullCREATED_TIME VARCHAR2(22) not null
ES_OUT_QUEUE_2ES_OUT_QUEUE_PK
ES_MTRK_AUDITAUDIT_ID <pk> NUMBER(10) not nullMSG_ID <fk> NUMBER(10) not nullMSG_TYPE CHAR(4) not nullMTRK_ID NUMBER(10) not nullDIRECTION CHAR(1) not nullES_ID NUMBER(10) not nullES_OPT CHAR(2) not nullUSER_ID CHAR(15) not nullCREATED_TIME DATE not null
ES_MTRK_AUDIT_PKES_MTRK_AUDIT_3ES_MTRK_AUDIT_4ES_MTRK_AUDIT_5
ES_MTRK_EXT_HDRMTRK_EXT_HDR_ID <pk> NUMBER(10) not nullES_OPT CHAR(2) not nullTRAN_TYPE VARCHAR2(15) not nullVERSION VARCHAR2(20) not nullDISPLAY_NAME VARCHAR2(30) not nullDIRECTION CHAR(1) not nullCREATED_BY CHAR(15) not nullCREATED_TIME VARCHAR2(22) not null
ES_MTRK_EXT_HDR_PKES_MTRK_EXT_HDR_2
ES_MTRK_EXT_DETMTRK_EXT_DET_ID <pk> NUMBER(10) not nullMTRK_EXT_HDR_ID <fk> NUMBER(10) not nullCOL_NAME VARCHAR2(75) not nullCOL_DSP_NAME VARCHAR2(75) not nullCOL_TYPE CHAR(2) not nullCOL_REQ CHAR(1) not nullMAX_SIZE NUMBER(3) nul lMIN_SIZE NUMBER(3) nul lENABLED CHAR(1) not nullCREATED_BY CHAR(15) not nullCREATED_TIME VARCHAR2(22) not null
ES_MTRK_EXT_DET_PKES_MTRK_EXT_DET_2
ES_MTRK_OUTB_DATAMTRK_EXT_D_ID <pk> NUMBER(10) not nullMTRK_EXT_DET_ID <fk> NUMBER(10) not nullMTRK_OUTB_ID <fk> NUMBER(10) not nullMTRK_DATA_VALUE VARCHAR2(255) nul lPID VARCHAR2(50) not null
ES_MTRK_OUTB_DATA_2ES_MTRK_OUTB_DATA_PKES_MTRK_OUTB_DATA_3
e*Xchange Partner Manager User’s Guide 315
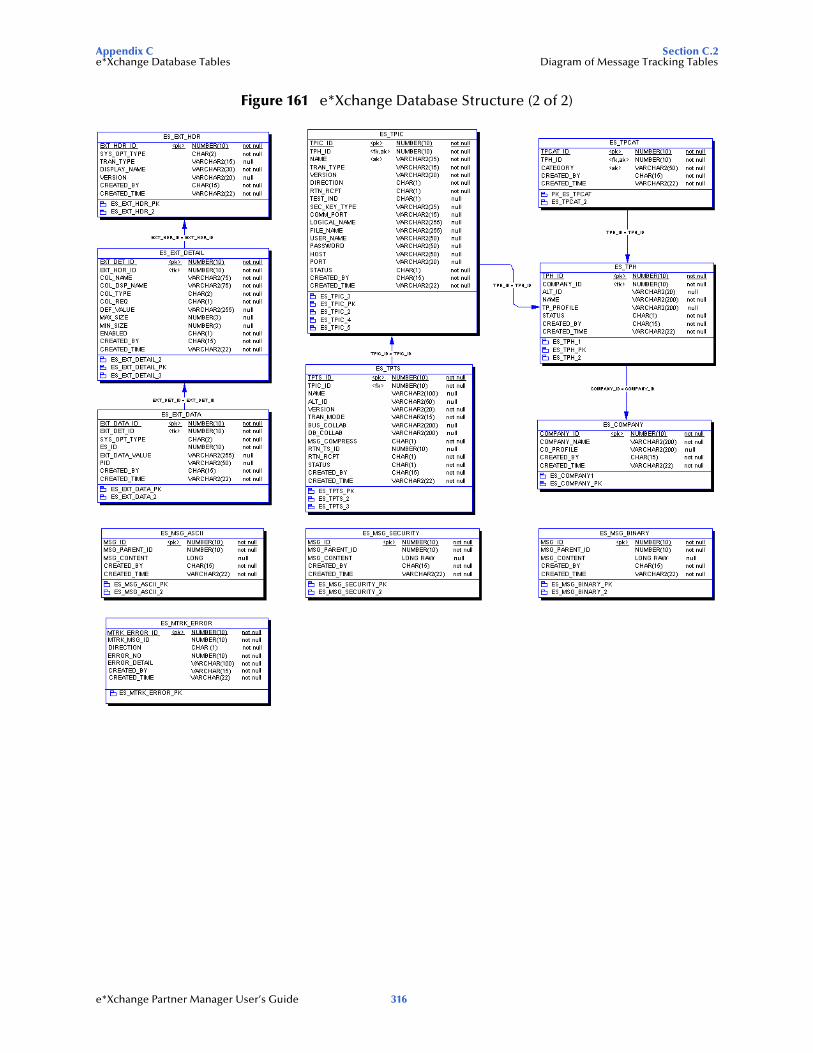
Appendix C Section C.2e*Xchange Database Tables Diagram of Message Tracking Tables
Figure 161 e*Xchange Database Structure (2 of 2)
e*Xchange Partner Manager User’s Guide 316
Glossary
Glossary
access control listA list of information associated with a trading partner profile component (company, trading partner, B2B protocol, or message profile) that specifies which users and user groups have permission to access the components and what specific access rights they have (add, edit, full control, or read).
APIAn acronym for Application Program Interface, which is a set of protocols, routines, and tools for building software applications. The e*Xchange API consists of a set of Monk functions that can be called from custom validation Collaborations to interface with the database.
AS2Applicability Statement 2 (AS2) is a draft security standards defined by the IETF (Internet Engineering Task Force), designed to allow business transactions to move securely over the Internet.
AS2 is based on HTTP, HTTPS, and S/MIME, and has a strong emphasis on the following key aspects of data security:
Privacy
Data integrity
Authenticity
Non-repudiation of origin and receipt
AS2 specifies the means to connect and to deliver, validate, and reply to data, securely and reliably.
For more detailed information on AS2, refer to the Internet Engineering Task Force Web site. This link is current at time of going to press: http://search.ietf.org/internet-drafts/draft-ietf-ediint-as2-11.txt. If that link is no longer current, go to www.ietf.org and search for documents about AS2.
authenticationA process that guarantees that an electronic message came from a particular trading partner based on the electronic signature sent with the message.
B2B protocol levelIn the e*Xchange Web interface, a B2B protocol is the trading partner profile component that you use to enter technical information about the exchange of messages between you and your trading partner. The type of eBusiness protocol you agree to use, such as
e*Xchange Partner Manager User’s Guide 317
Glossary
X12, UN/EDIFACT, RosettaNet, or CIDX, is an example of a B2B protocol characteristic.
CIDXCIDX (Chemical Industry Data eXchange) is an organization whose members have worked together to develop commercial solutions for the chemical industry. As well as other standards, conventions, and processes, CIDX members have developed a set of electronic transactions specifically designed for the buying, selling, and delivery of chemicals, called Chem eStandards.
code tablesThe mechanism used to customize values that appear in e*Xchange drop-down lists.
CollaborationA component of an e*Way or BOB that receives and processes Events and forwards the output to other e*Gate components. Collaborations perform three functions: They subscribe to Events of a known type, they apply business rules to Event data, and they publish output Events to a specified recipient. Collaborations use Monk translation script files with the extension .tsc or Java translation script files with the extension .xts to do the actual data manipulation.
CompanyAn organization with which you conduct electronic business (eBusiness). A company can consist of one or more trading partners. See also Trading partner.
decryption keyThe key used to decrypt an incoming encrypted message. See also key.
digital certificateA digital certificate is an electronic certificate, issued by a certification authority, that establishes your credentials when exchanging eBusiness messages on the Web. Your digital certificate contains your name, a serial number, expiration dates, a copy of your public key (used for encrypting messages and validating digital signatures), and the digital signature of the certificate-issuing authority so that a recipient can verify that the certificate is real. Digital certificates can be kept in registries so that authenticated users can look up the public keys of other users.
DMZDMZ is an acronym for a “demilitarized zone” on the Internet. A DMZ is an area that is common to, or shared between, two different networks—for example, between a VAN (value added network) and the Internet.
A DMZ is sometimes used as a location for secure servers. Putting these in a DMZ allows access by outside entities (with appropriate permission) so that certain types of information can be shared; for example, inventory information. At the same time, it keeps them outside the private network. This has security advantages for the private network, since the information is shared outside of the VAN, it is not necessary to allow access to the VAN itself.
The DMZ is a more secure location than the Internet.
e*Xchange Partner Manager User’s Guide 318
Glossary
eBusiness protocolAn eBusiness protocol is a generally accepted standard for formatting and exchanging electronic messages between trading partners. X12, UN/EDIFACT, RosettaNet, and CIDX are examples of eBusiness protocols.
EDIEDI (Electronic Data Interchange) is a standard format for controlling the exchange of business data. The standard, X12, was developed by the Data Interchange Standards Association (DISA). X12 is used in the United States; a closely related EDI standard, UN/EDIFACT, is used internationally.
An EDI message contains a string of data elements, each representing one piece of information such as a price, product model number, or customer name. Logical groups of elements form segments; for example, several address elements might form an address segment. Elements and segments are separated by delimiters. A logical grouping of elements and segments forming one or more messages is enveloped within header and trailer segments. EDI messages can be encrypted.
e*Xchange Partner Manager (e*Xchange)An application within the Oracle eBusiness Integration Suite that you use to set up and maintain trading partner profiles and view processed messages. e*Xchange also processes inbound and outbound messages according to certain eBusiness protocols and your validation Collaborations.
Error TableThe mechanism used to define error messages that you can use with custom validation Collaborations.
eSecurity Manager (eSM)An add-on to e*Xchange that secures transmission of business-to-business exchanges over public domains such as the Internet.
Event (Message)Data to be exchanged, either within e*Xchange or between e*Xchange and external systems, which has a defined data structure; for example, a known number of fields, with known characteristics and delimiters. Events are classified by type using Event Type Definitions.
Event Type DefinitionAn Event Type template, defining Event fields, field sequences, and delimiters. Event Type Definitions enable e*Xchange systems to identify and transform Event Types. An Event Type Definition is a Monk script file with an extension of .ssc or a Java script file with an extension of .xsc, indicating a message structure script file.
hashHashing is the transformation of a string of characters into a usually shorter, fixed-length value that represents the original string. The hash is a mathematical summary of the original message and is created by a hash function.
e*Xchange Partner Manager User’s Guide 319
Glossary
A cryptographically strong hash function has a number of requirements: It is easy to compute, one-way, and collision-free. This means that it is computationally infeasible to find a message that corresponds to a known hash, or to compose two messages whose hash values are the same.
The fixed-length hash value makes message authentication through the use of digital signatures possible, since only a small number of bytes must be used in a computationally expensive public key operation, rather than the entire message.
The most common cryptographic hash functions in use today are SHA-1 (the Secure Hash Algorithm Standard) and MD5 (Message Digest #5).
HIPAAAn acronymn for the Health Insurance Portability and Accountability Act of 1996. HIPAA transactions conform to the rules mandated by this Act.
implementation guideA document, published for a particular electronic message standard by an industry subcommittee, that describes the structure and content of a specific message type. You can use the Validation Rules Builder to convert electronic versions of ANSI X12 implementation guides to validation Collaborations used by e*Xchange.
keyIn cryptography, a key is a variable value that is applied using an algorithm to a string or block of unencrypted text to produce encrypted text. The length of the key generally determines how difficult it would be for an eavesdropper to “crack” or decrypt the message without knowing the key.
A public-key cryptography system (see PKCS) uses a public and private key pair. The public key is made generally available and is used to encrypt messages being sent to the owner of the key pair. The owner then uses the private key to decrypt the messages.
message logA record of inbound and outbound electronic messages processed by e*Xchange. This is implemented as the message tracking facility in e*Xchange.
MDNMessage Disposition Notification (MDN) is the equivalent of a return receipt; it is a notification, sent to the sender of a message, to say that the message was received. The MDN is generated by the client.
message profileIn the e*Xchange Web interface, a message profile is a set of parameters and other information you enter about each individual type of transaction that you process with e*Xchange. This definition associates the validation Collaborations that are needed to validate each kind of message.
message tracking attributesA set of attributes you can define to identify messages stored in the e*Xchange database. Special message tracking extended attributes can be set up and associated
e*Xchange Partner Manager User’s Guide 320
Glossary
with a specific message type (protocol, version, and direction). Examples of attributes that are set up at the message tracking attribute level are Process Instance ID and Activity Instance ID for RosettaNet and FG and TS control numbers for X12.
message standardThe kind of eBusiness protocol you agree to use to exchange data and information with a particular trading partner. For example, ANSI X12 and RosettaNet are two different message standard.
non-repudiationThe inability of a sender to refute a message—that is, to claim at a later date that the sender was not the originator of the message. This is implemented through the use of a digital signature attached to the message. The signature can be used by the recipient to prove that the sender positively wrote the message, and that its contents were not tampered with after it was signed.
The sender of a message can also obtain irrefutable proof of receipt of the original message. Non-repudiation of receipt is implemented using an acknowledgment to the sender. This acknowledgment contains the digital signature of the message, and is also digitally signed by the receiver of the original message.
PKCSAn acronymn for Public-Key Cryptography System. PKCS is a set of informal intervendor standard protocols developed by RSA Security, the licensers of the RSA public key cryptosystem, for making secure information exchange on the Internet possible. The standards include RSA encryption, password-based encryption, extended certificate syntax, and cryptographic message syntax for S/MIME, RSA’s proposed standard for secure e-mail.
PKIA PKI (public key infrastructure) enables users of a basically unsecure public network such as the Internet to securely and privately exchange data and money through the use of a public and a private cryptographic key pair that is obtained and shared through a trusted authority.
It is a networked system of certification authorities (CAs), registration authorities (RAs), certificate management systems (CMSs), and X.500 directories (specialized distributed databases). It enables two parties unknown to each other to exchange sensitive information and money over an unsecure network.
public key encryptionEncryption using PKCS. See PKCS.
raw data formatIn e*Xchange, any format other than that of a supported eBusiness protocol. If an eBusiness message is received into e*Xchange in raw data format, e*Xchange must translate the information into the appropriate eBusiness protocol format using a translation Collaboration specified in the trading partner profile.
e*Xchange Partner Manager User’s Guide 321
Glossary
RNIFRosettaNet Implementation Framework. There are two versions: 1.1 and 2.0.
SEFSee Standard Exchange Format (SEF).
signature keyThe key used to encode a message signature. The signature key might be the same as the encryption key; but when two different keys are used for different purposes, this is known as a dual-key system. See also key.
S/MIMEAn acronym for Secure/Multipurpose Internet Mail Extensions; it is an Internet e-mail security standard that makes use of public key encryption.
.ssc fileA Monk Event Type Definition file. See Event Type Definition (ETD).
Standard Exchange Format (SEF)The Standard Exchange Format (SEF) is a flat file representation of an EDI implementation guideline. It is a standard that defines how data segments and data elements should be structured so that the message can be understood between trading partners. It also includes validation rules, for example what are the valid values for a data element, or conditions such as if Field A is present then Field B is required.
The purpose of SEF is to put the EDI implementation guidelines in a file in machine readable format so that translators can directly import the file and use the implementation guidelines to translate or map the EDI file. The file can also be used as a means to exchange the implementation guidelines between trading partners, and can be posted on a public bulletin board or on the company's Web site in the Internet to convey to the public the implementation guidelines used by the company.
The SEF format was developed by Foresight Corporation and is now in the public domain. Programs that can directly import SEF files can save users considerable time in developing new translations or maps.
TA1In X12, a TA1 is an interchange acknowledgment. The TA1 acknowledgment verifies the interchange envelopes only. The TA1 is a single segment and is unique in the sense that this single segment is transmitted without the GS/GE envelope structures. A TA1 acknowledgment can be included in an interchange with other functional groups and transactions.
trading partner componentThe trading partner profile component that you use to enter business information about your trading partner. The name of the trading partner, which could be a subdivision of a company, and the people you want to contact are examples of information you enter for a trading partner component.
e*Xchange Partner Manager User’s Guide 322
Glossary
transaction setIn X12, each business grouping of data is called a transaction set. For example, a group of benefit enrollments sent from a sponsor to a payer is considered a transaction set. Each transaction set contains groups of logically related data in units called segments. For example, the N4 segment conveys the city, state, ZIP code, and other geographic information.
A transaction set contains multiple segments, so the addresses of the different parties, for example, can be conveyed from one computer to the other. An analogy would be that the transaction set is like a freight train; the segments are like the train’s cars, and each segment can contain several data elements in the same way that a train car can hold multiple crates.
Specifically, in X12, the transaction set is comprised of segments ST through SE.
.tsc fileA Monk Collaboration Rules file.
UN/EDIFACTUN/EDIFACT stands for United Nations/Electronic Data Interchange for Administration, Commerce and Transport. It is a standard, developed for the electronic exchange of machine-readable information between businesses.
user groupUser groups allow you to grant access permissions to a set of users with similar processing needs without having to specify individual privileges for each user. For example, the User Administrator can set up a group for users who need full access to a specific trading partner profile, but who should not be able to view information about any other profile. The User Administrator assigns each user that meets this criterion to a particular user group. Then, your eX Administrator (or another user who has been granted appropriate privileges) grants access privileges to this user group so that all members of the group can view and modify the desired information.
validation CollaborationA Collaboration that you create to define the syntax and validate the content of electronic business-to-business (B2B) messages. One validation Collaboration is required for each type of electronic message to be processed by e*Xchange. You can use the Validation Rules Builder to automatically generate a validation Collaboration for a specific kind of X12 transaction, according to specific implementation guidelines.
Validation Rules BuilderAn e*Xchange command-line utility for converting electronic EDI implementation guides into files that are compatible for use with e*Xchange. This conversion tool accepts Standard Exchange Format (SEF) version 1.4 or 1.5 files and converts then into e*Gate Integrator Event Type Definition (ETD) and Collaboration Rules files.
value added network (VAN)A private network provider that offers secure electronic data interchange (EDI) services to companies. VANs often offer EDI translation, encryption, secure e-mail, management reporting, and other extra services for their customers.
e*Xchange Partner Manager User’s Guide 323
Glossary
XMLExtensible Markup Language. RosettaNet PIPs are written in XML. XML is different from String in that XML messages can contain both content and information about the content.
.xsc fileA Java Event Type Definition file. See Event Type Definition (ETD).
.xts fileA Java Collaboration Rules file.
e*Xchange Partner Manager User’s Guide 324
Index
Index
Aaccess control permissions 66action items, deleting 232archive (Repository Manager) 257
CCIDX setup 215–227compatible systems 16
UNIX 16Windows 16
conventions, writing in document 18
Ddatabase tables 296–316de-archive (Repository Manager) 257deleting
notes and action items 232delimiters
UN/EDIFACT 150
Ee*Xchange database structure diagram (1) 315e*Xchange database structure diagram (2) 316e*Xchange Repository Manager 252–266eBusiness Integration Suite 19–22entering
return message information 104error handling in RosettaNet 133, 212ES_COMPANY table 314ES_EXT_DATA table 309ES_EXT_DETAIL table 308ES_EXT_HDR table 307ES_MSG_ASCII table 309ES_MSG_BINARY table 314ES_MSG_SECURITY table 312ES_MSG_STORAGE table 305ES_MTRK_AUDIT table 304ES_MTRK_ERROR table 302ES_MTRK_EXT_DET table 306ES_MTRK_EXT_HDR table 304ES_MTRK_INB table 297
ES_MTRK_INB_DATA table 307ES_MTRK_OUTB table 299ES_MTRK_OUTB_DATA table 303ES_OUT_QUEUE table 306ES_TPCAT table 313ES_TPH table 313ES_TPIC table 310ES_TPTS table 311ES_WAITING_ACK table 301eSecurity Manager 24–29
introduction to 24export (Repository Manager) 253
GGlossary 317
HHIPAA transactions 129–133
Iimport (Repository Manager) 253introducing eSecurity Manager 24
Llimitations, of the Validation Rules Builder 278
Mmessage tracking 235–251
resending a message 244sending a message 244
NNCPDP-HIPAA setup 134–148notes and action items
deleting 232
Ppage size, in Message Tracking Details 239
RRepository Manager 252–266
archive 257de-archive 257export 253import 253
e*Xchange Partner Manager User’s Guide 325
Index
return messagesdefining return messages 104
RosettaNeterror handling 133, 212security 186
RosettaNet setup 185–214
SS/MIME 24security
in the Web interface 66–69Security in RosettaNet 186setup
CIDX 215–227NCPDP-HIPAA 134–148RosettaNet 185–214UN/EDIFACT 149–184X12 105–133
Ttables (database) 296–316
ES_COMPANY 314ES_EXT_DATA 309ES_EXT_DETAIL 308ES_EXT_HDR 307ES_MSG_ASCII 309ES_MSG_BINARY 314ES_MSG_SECURITY 312ES_MSG_STORAGE 305ES_MTRK_AUDIT 304ES_MTRK_ERROR 302ES_MTRK_EXT_DET 306ES_MTRK_EXT_HEADER 304ES_MTRK_INB 297ES_MTRK_INB_DATA 307ES_MTRK_OUTB 299ES_MTRK_OUTB_DATA 303ES_OUT_QUEUE 306ES_TPCAT 313ES_TPH 313ES_TPIC 310ES_TPTS 311ES_WAITING_ACK 301physical data diagram 315
troubleshootingthe Repository Manager 267Validation Rules Builder 292–295Web interface 267–275Web interface with all database types 272, 274Web interface with DB2 UDB 269Web interface with Oracle 270with the Message Tracking feature 235
troubleshooting the Validation Rules Builder 292
UUN/EDIFACT
delimiters 150UN/EDIFACT setup 149–184UNIX 16
VValidation Rules Builder 276–295
installation requirements 279limitations 278running from a command line 289running from command line (graphic) 290troubleshooting 292using 276–295
WWeb interface
B2B protocol, setting up 87changing a password 61company, setting up 72logging in 32message profile, setting up 104, 110, 152, 188, 215Overview and Administration 30–65Profile Management 70–104security 66–69supported browsers 31system administration 38trading partner, setting up 78troubleshooting 267–275user administration 53
Windows 2000 16Windows XP 16
XX12
setup 105–133
e*Xchange Partner Manager User’s Guide 326


![[Nutanix Partner Xchange] · pARTNER XCHANGE .NEXTCONFERENCE Announcing NUTANI PARTNER XCHANGE Connect I Learn I Celebrate 1 NEW ORLEANS, LA ERNEST N MORIAI CONVENTION CENTER](https://img.pdfslide.net/doc/110x75/5be7b78a09d3f246788cedee/nutanix-partner-xchange-partner-xchange-nextconference-announcing-nutani.jpg)