Embed Size (px)
Citation preview
GPK Inc., 535 Floyd Smith Dr., El Cajon, CA 92020, 800-468-8679, 619-593-7381, Fax: 619-593-7514, www.gpk.com
UPPERTONE Exercise Manual
2
Index
Introduction .......................... .................................................................... 3The Major Muscles .................................................................................... 4Definitions of muscle movement terms ...................................................... 4UPPERTONE’s exercises and their benefits .............................................. 5Anterior muscles and their function ........................................................... 6Posterior muscles and their function........................................................... 6Some general guidelines............................................................................. 7Resistance adjustment ................................................................................ 8Deltoid lat pull station adjustment .............................................................. 9Rear height adjustment............................................................................... 10Tri-pin system adjustment .......................................................................... 11Front station height adjustment .................................................................. 12Front station width adjustment ................................................................... 13Palm Down Bicep Curl .............................................................................. 14Palm Up Bicep Curl................................................................................... 16Narrow Grip Chest Press............................................................................ 18Wide Grip Chest Press ............................................................................... 19Deltoid Press.............................................................................................. 20Lat Pull ...................................................................................................... 21Rickshaw .................................................................................................. 22Narrow Grip Rowing ................................................................................. 23Wide Grip Rowing..................................................................................... 24Palm Up Lateral Shoulder Raise................................................................. 25Palm Down Lateral Shoulder Raise............................................................ 26Shoulder External Rotation ........................................................................ 27Shoulder Extensions................................................................................... 28Shoulder Shrugs......................................................................................... 29Tricep Extensions ...................................................................................... 30Wrist Supination ........................................................................................ 31Wrist Pronation.......................................................................................... 33Seated Crunches......................................................................................... 35Weight Chart ............................................................................................. 36
3
Introduction
Thank you for purchasing the UPPERTONE, the only physical therapy, muscle strengtheningand conditioning, system designed for people with quadriplegia.
This manual describes the various exercises that you can perform with the UPPERTONE. Inaddition, the included video-tape and CD provide further detail on each exercise.
However, while the manual describes the various exercises, we strongly suggest that youconsult a physician or physical therapist before beginning any exercise program.
The physician or physical therapist can help you design and develop the most appropriate andSAFE exercise program for your level of injury and needs.
In addition, while we give some general guidelines on proper posture and exercisingmethods, we strongly recommend that you consult a professional to help you develop theexercise habits that will provide the most benefit and least likelihood of injury.
Finally, while we describe all the exercises that people with quadriplegia can do on theUPPERTONE, the particular exercises you will be able to do depend on your level and typeof injury.
4
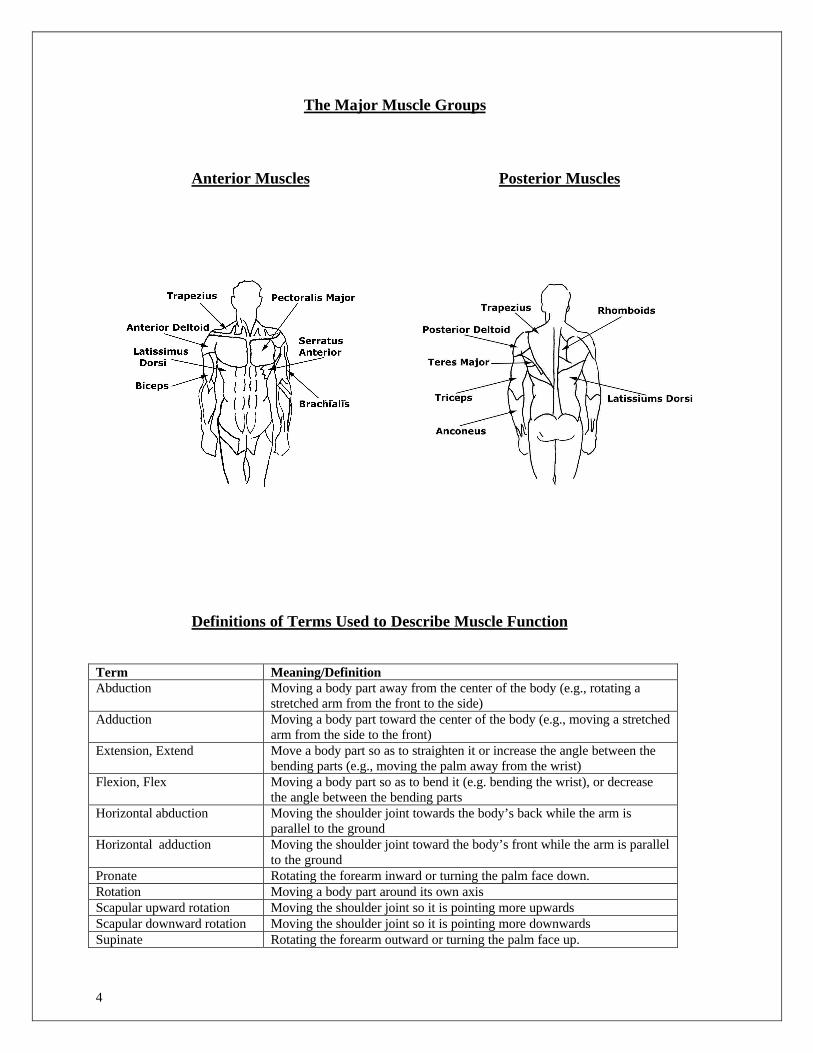
The Major Muscle Groups
Anterior Muscles Posterior Muscles
Definitions of Terms Used to Describe Muscle Function
Term Meaning/DefinitionAbduction Moving a body part away from the center of the body (e.g., rotating a
stretched arm from the front to the side)Adduction Moving a body part toward the center of the body (e.g., moving a stretched
arm from the side to the front)Extension, Extend Move a body part so as to straighten it or increase the angle between the
bending parts (e.g., moving the palm away from the wrist)Flexion, Flex Moving a body part so as to bend it (e.g. bending the wrist), or decrease
the angle between the bending partsHorizontal abduction Moving the shoulder joint towards the body’s back while the arm is
parallel to the groundHorizontal adduction Moving the shoulder joint toward the body’s front while the arm is parallel
to the groundPronate Rotating the forearm inward or turning the palm face down.Rotation Moving a body part around its own axisScapular upward rotation Moving the shoulder joint so it is pointing more upwardsScapular downward rotation Moving the shoulder joint so it is pointing more downwardsSupinate Rotating the forearm outward or turning the palm face up.
5
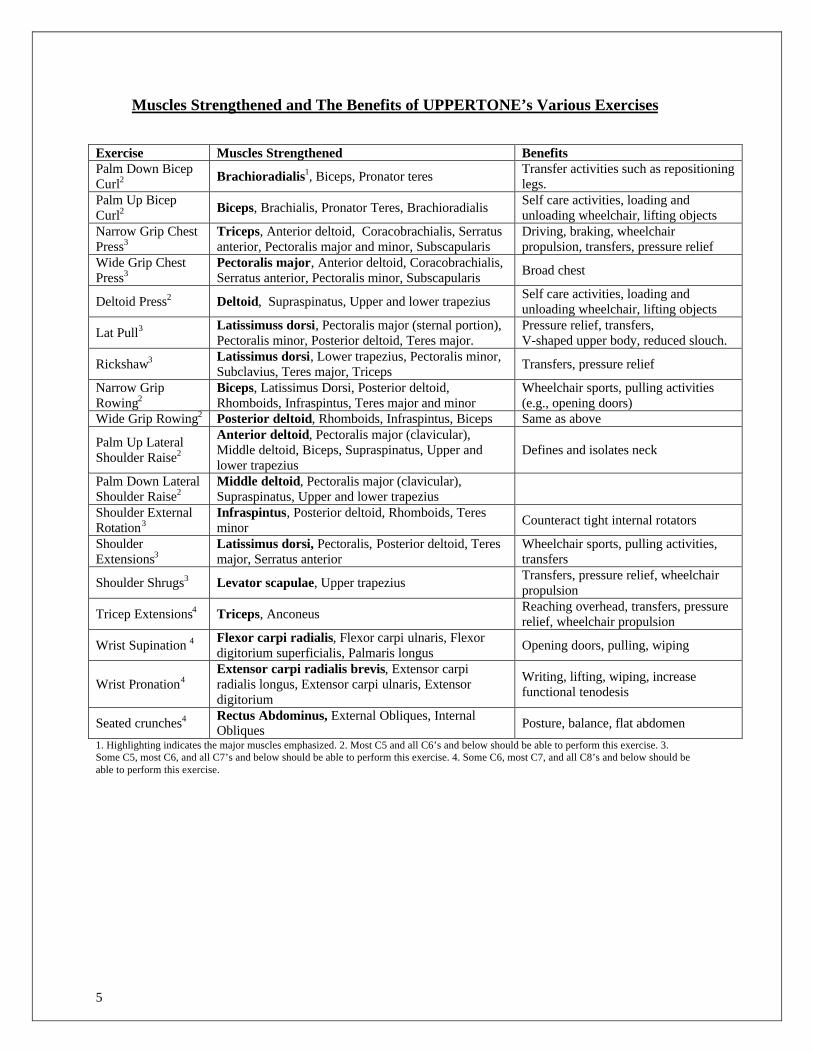
Muscles Strengthened and The Benefits of UPPERTONE’s Various Exercises
Exercise Muscles Strengthened BenefitsPalm Down BicepCurl2 Brachioradialis1, Biceps, Pronator teres Transfer activities such as repositioning
legs.Palm Up BicepCurl2 Biceps, Brachialis, Pronator Teres, Brachioradialis Self care activities, loading and
unloading wheelchair, lifting objectsNarrow Grip ChestPress3
Triceps, Anterior deltoid, Coracobrachialis, Serratusanterior, Pectoralis major and minor, Subscapularis
Driving, braking, wheelchairpropulsion, transfers, pressure relief
Wide Grip ChestPress3
Pectoralis major, Anterior deltoid, Coracobrachialis,Serratus anterior, Pectoralis minor, Subscapularis Broad chest
Deltoid Press2 Deltoid, Supraspinatus, Upper and lower trapezius Self care activities, loading andunloading wheelchair, lifting objects
Lat Pull3 Latissimuss dorsi, Pectoralis major (sternal portion),Pectoralis minor, Posterior deltoid, Teres major.
Pressure relief, transfers,V-shaped upper body, reduced slouch.
Rickshaw3 Latissimus dorsi, Lower trapezius, Pectoralis minor,Subclavius, Teres major, Triceps Transfers, pressure relief
Narrow GripRowing2
Biceps, Latissimus Dorsi, Posterior deltoid,Rhomboids, Infraspintus, Teres major and minor
Wheelchair sports, pulling activities(e.g., opening doors)
Wide Grip Rowing2 Posterior deltoid, Rhomboids, Infraspintus, Biceps Same as above
Palm Up LateralShoulder Raise2
Anterior deltoid, Pectoralis major (clavicular),Middle deltoid, Biceps, Supraspinatus, Upper andlower trapezius
Defines and isolates neck
Palm Down LateralShoulder Raise2
Middle deltoid, Pectoralis major (clavicular),Supraspinatus, Upper and lower trapezius
Shoulder ExternalRotation3
Infraspintus, Posterior deltoid, Rhomboids, Teresminor Counteract tight internal rotators
ShoulderExtensions3
Latissimus dorsi, Pectoralis, Posterior deltoid, Teresmajor, Serratus anterior
Wheelchair sports, pulling activities,transfers
Shoulder Shrugs3 Levator scapulae, Upper trapezius Transfers, pressure relief, wheelchairpropulsion
Tricep Extensions4 Triceps, Anconeus Reaching overhead, transfers, pressurerelief, wheelchair propulsion
Wrist Supination 4 Flexor carpi radialis, Flexor carpi ulnaris, Flexordigitorium superficialis, Palmaris longus Opening doors, pulling, wiping
Wrist Pronation4Extensor carpi radialis brevis, Extensor carpiradialis longus, Extensor carpi ulnaris, Extensordigitorium
Writing, lifting, wiping, increasefunctional tenodesis
Seated crunches4 Rectus Abdominus, External Obliques, InternalObliques Posture, balance, flat abdomen
1. Highlighting indicates the major muscles emphasized. 2. Most C5 and all C6’s and below should be able to perform this exercise. 3.Some C5, most C6, and all C7’s and below should be able to perform this exercise. 4. Some C6, most C7, and all C8’s and below should beable to perform this exercise.
6
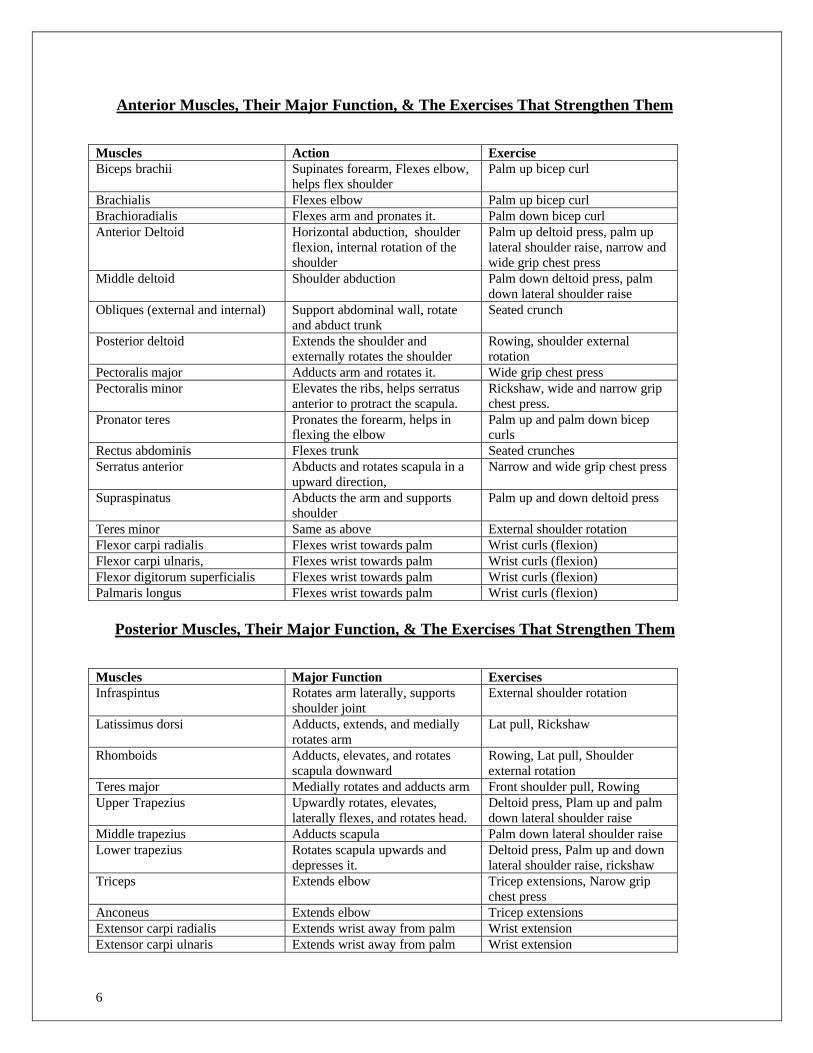
Anterior Muscles, Their Major Function, & The Exercises That Strengthen Them
Muscles Action ExerciseBiceps brachii Supinates forearm, Flexes elbow,
helps flex shoulderPalm up bicep curl
Brachialis Flexes elbow Palm up bicep curlBrachioradialis Flexes arm and pronates it. Palm down bicep curlAnterior Deltoid Horizontal abduction, shoulder
flexion, internal rotation of theshoulder
Palm up deltoid press, palm uplateral shoulder raise, narrow andwide grip chest press
Middle deltoid Shoulder abduction Palm down deltoid press, palmdown lateral shoulder raise
Obliques (external and internal) Support abdominal wall, rotateand abduct trunk
Seated crunch
Posterior deltoid Extends the shoulder andexternally rotates the shoulder
Rowing, shoulder externalrotation
Pectoralis major Adducts arm and rotates it. Wide grip chest pressPectoralis minor Elevates the ribs, helps serratus
anterior to protract the scapula.Rickshaw, wide and narrow gripchest press.
Pronator teres Pronates the forearm, helps inflexing the elbow
Palm up and palm down bicepcurls
Rectus abdominis Flexes trunk Seated crunchesSerratus anterior Abducts and rotates scapula in a
upward direction,Narrow and wide grip chest press
Supraspinatus Abducts the arm and supportsshoulder
Palm up and down deltoid press
Teres minor Same as above External shoulder rotationFlexor carpi radialis Flexes wrist towards palm Wrist curls (flexion)Flexor carpi ulnaris, Flexes wrist towards palm Wrist curls (flexion)Flexor digitorum superficialis Flexes wrist towards palm Wrist curls (flexion)Palmaris longus Flexes wrist towards palm Wrist curls (flexion)
Posterior Muscles, Their Major Function, & The Exercises That Strengthen Them
Muscles Major Function ExercisesInfraspintus Rotates arm laterally, supports
shoulder jointExternal shoulder rotation
Latissimus dorsi Adducts, extends, and mediallyrotates arm
Lat pull, Rickshaw
Rhomboids Adducts, elevates, and rotatesscapula downward
Rowing, Lat pull, Shoulderexternal rotation
Teres major Medially rotates and adducts arm Front shoulder pull, RowingUpper Trapezius Upwardly rotates, elevates,
laterally flexes, and rotates head.Deltoid press, Plam up and palmdown lateral shoulder raise
Middle trapezius Adducts scapula Palm down lateral shoulder raiseLower trapezius Rotates scapula upwards and
depresses it.Deltoid press, Palm up and downlateral shoulder raise, rickshaw
Triceps Extends elbow Tricep extensions, Narow gripchest press
Anconeus Extends elbow Tricep extensionsExtensor carpi radialis Extends wrist away from palm Wrist extensionExtensor carpi ulnaris Extends wrist away from palm Wrist extension
7
Some General Guidelines
1. Consultant a physical therapist or physiatrist to help you develop an exercise program that is mostappropriate for you.
2. Before exercising, warm up by doing some stretching and light cardiovascular exercise (e.g., rapid rowing).3. Control your breathing so that you exhale while exerting force, and inhale while returning to the starting
position.4. Control the movement both while exerting force and returning to the starting position.5. Unless otherwise suggested by a professional, we suggest that you do not exercise more frequently than
every other day. This gives your muscles time to recover between workouts.6. Do not overexert. Stop exercising if you feel faint, dizzy, or weak.7. If you can do so, try and tighten your stomach muscles while exercising. Or you may want to consult your
physical therapist regarding the use of an abdominal binder or support while exercising.8. The particular muscles an exercise strengthens is determined by posture and movement. Consequently,
maintaining the correct posture and movement for each exercise is very important.9. Proper posture and slow controlled movement not only gives the best results, but also prevents injury.10. Proper posture and movement occurs when the only the muscles the exercise is meant to strengthen move.11. Do not slouch or lean forward while exercising.12. Keep your head and back as straight as possible when exercising.13. Use the UPPERTONE’s dual resistance system to correct for any imbalances in strength between the two
sides.14. Other than for the shoulder shrugs, never lock you arms or elbows.15. For each exercise the range of motion should be within the extreme positions. That is, your muscles should
remain under tension during the entire set of repetitions.16. As a general rule, the pushing motion should last about 4 seconds, while the return motion should last about
7 seconds.17. Set the resistance so that you can do 10 to 12 repetitions while maintaining good posture and controlled,
smooth movement.18. Follow proper nutritional guidelines for best results and to minimize injury.19. These are general guidelines and may not meet your particular needs. Consequently it is important that you
consult with a professional who can design an exercise program that meets your needs, and will preventinjury.
8
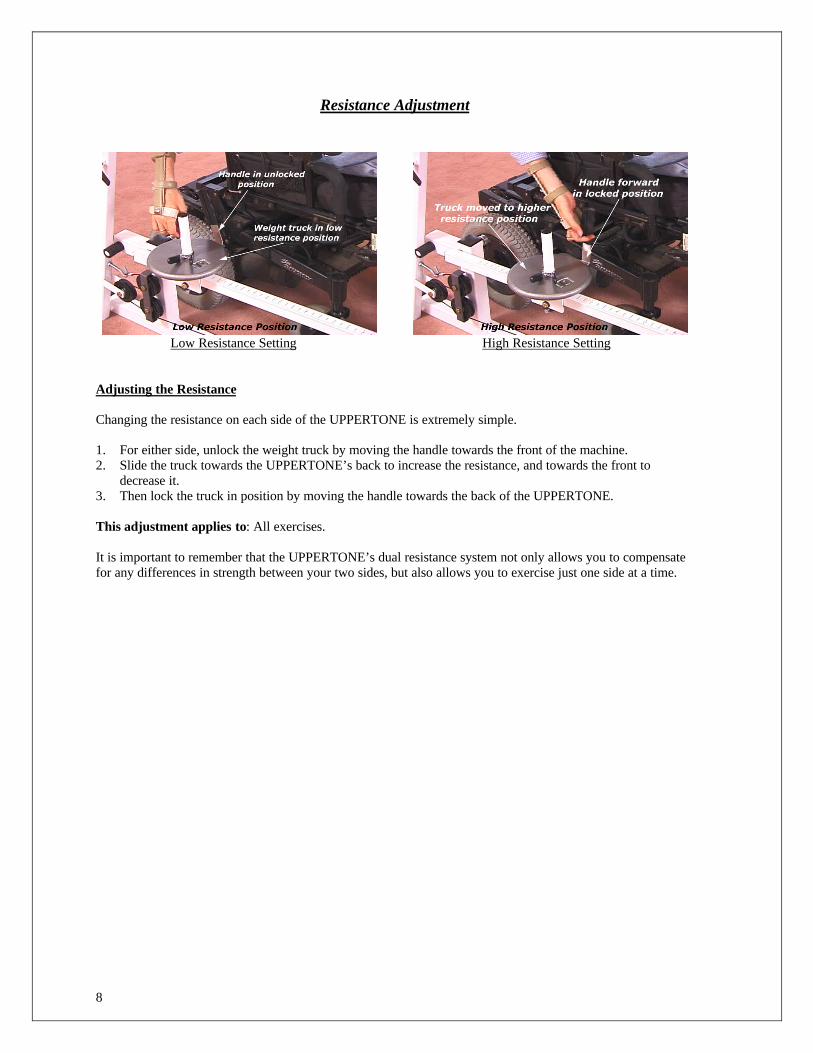
Resistance Adjustment
Low Resistance Setting High Resistance Setting
Adjusting the Resistance
Changing the resistance on each side of the UPPERTONE is extremely simple.
1. For either side, unlock the weight truck by moving the handle towards the front of the machine.2. Slide the truck towards the UPPERTONE’s back to increase the resistance, and towards the front to
decrease it.3. Then lock the truck in position by moving the handle towards the back of the UPPERTONE.
This adjustment applies to: All exercises.
It is important to remember that the UPPERTONE’s dual resistance system not only allows you to compensatefor any differences in strength between your two sides, but also allows you to exercise just one side at a time.
9
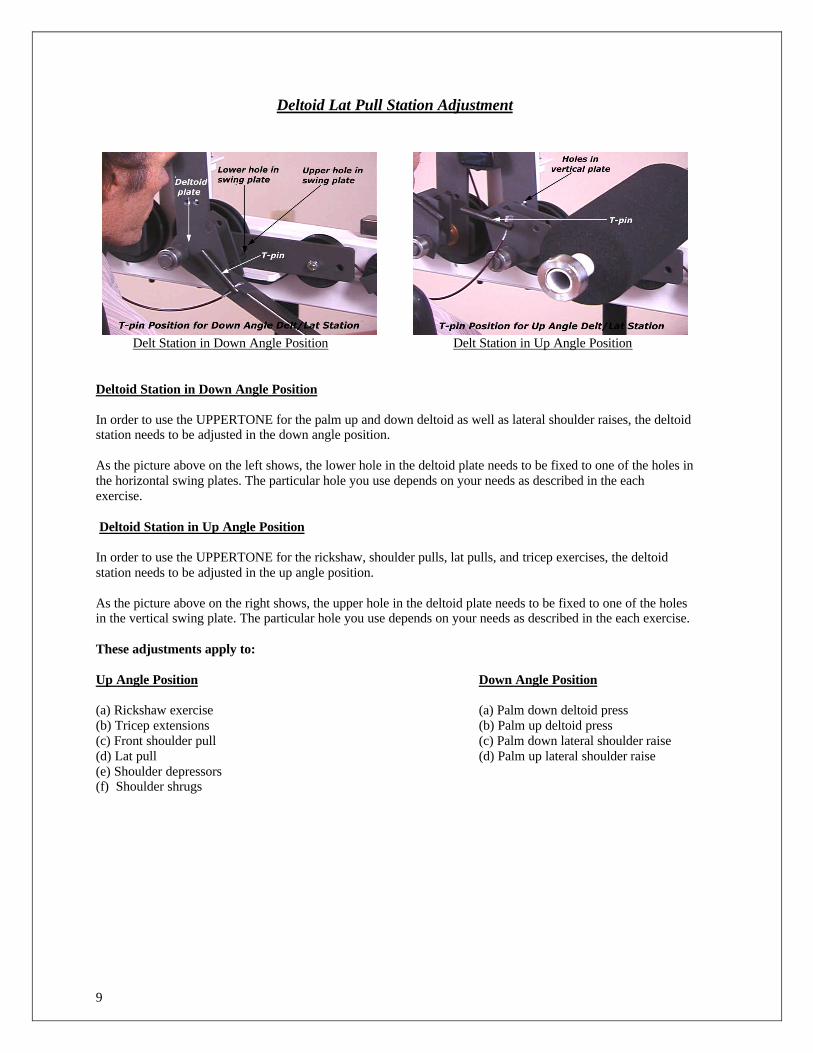
Deltoid Lat Pull Station Adjustment
Delt Station in Down Angle Position Delt Station in Up Angle Position
Deltoid Station in Down Angle Position
In order to use the UPPERTONE for the palm up and down deltoid as well as lateral shoulder raises, the deltoidstation needs to be adjusted in the down angle position.
As the picture above on the left shows, the lower hole in the deltoid plate needs to be fixed to one of the holes inthe horizontal swing plates. The particular hole you use depends on your needs as described in the eachexercise.
Deltoid Station in Up Angle Position
In order to use the UPPERTONE for the rickshaw, shoulder pulls, lat pulls, and tricep exercises, the deltoidstation needs to be adjusted in the up angle position.
As the picture above on the right shows, the upper hole in the deltoid plate needs to be fixed to one of the holesin the vertical swing plate. The particular hole you use depends on your needs as described in the each exercise.
These adjustments apply to:
Up Angle Position Down Angle Position
(a) Rickshaw exercise (a) Palm down deltoid press(b) Tricep extensions (b) Palm up deltoid press(c) Front shoulder pull (c) Palm down lateral shoulder raise(d) Lat pull (d) Palm up lateral shoulder raise(e) Shoulder depressors(f) Shoulder shrugs
10
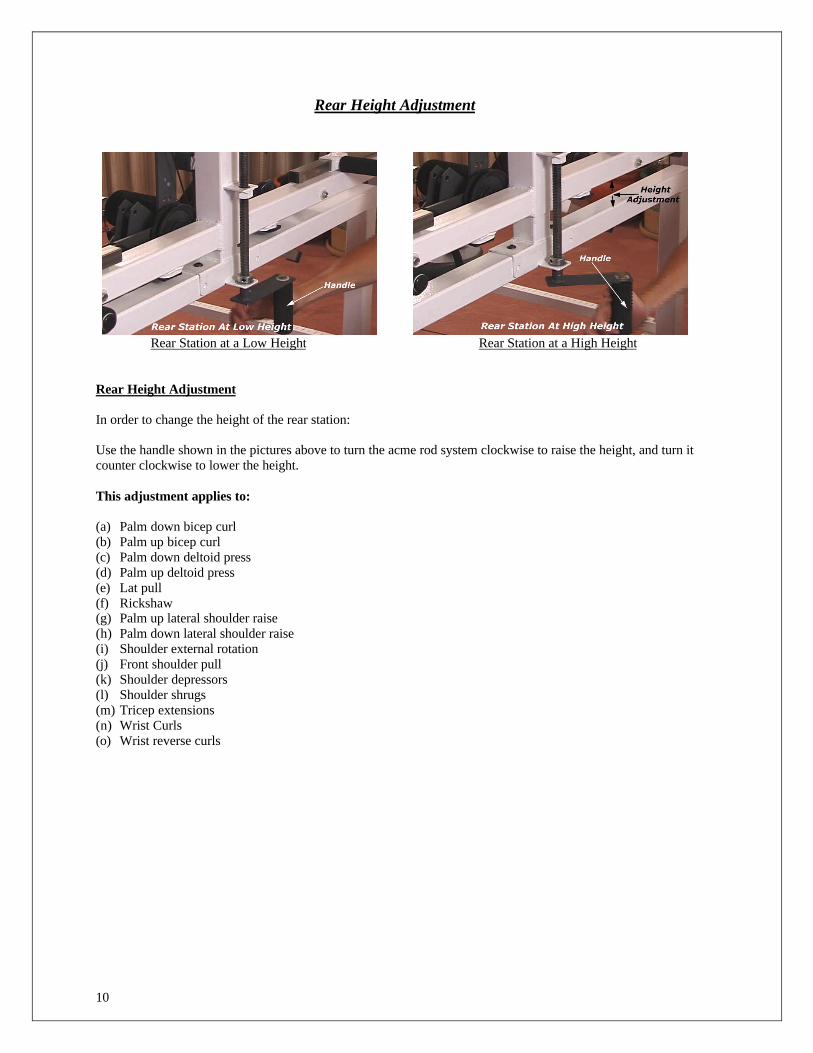
Rear Height Adjustment
Rear Station at a Low Height Rear Station at a High Height
Rear Height Adjustment
In order to change the height of the rear station:
Use the handle shown in the pictures above to turn the acme rod system clockwise to raise the height, and turn itcounter clockwise to lower the height.
This adjustment applies to:
(a) Palm down bicep curl(b) Palm up bicep curl(c) Palm down deltoid press(d) Palm up deltoid press(e) Lat pull(f) Rickshaw(g) Palm up lateral shoulder raise(h) Palm down lateral shoulder raise(i) Shoulder external rotation(j) Front shoulder pull(k) Shoulder depressors(l) Shoulder shrugs(m) Tricep extensions(n) Wrist Curls(o) Wrist reverse curls
11
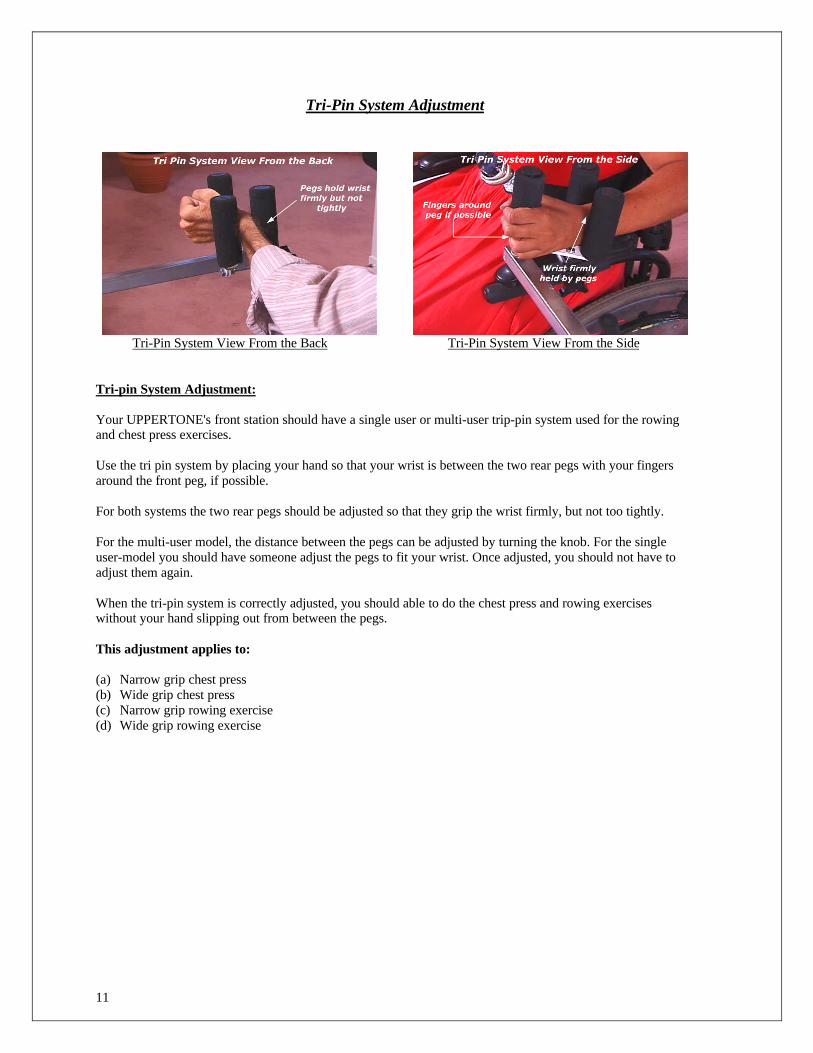
Tri-Pin System Adjustment
Tri-Pin System View From the Back Tri-Pin System View From the Side
Tri-pin System Adjustment:
Your UPPERTONE's front station should have a single user or multi-user trip-pin system used for the rowingand chest press exercises.
Use the tri pin system by placing your hand so that your wrist is between the two rear pegs with your fingersaround the front peg, if possible.
For both systems the two rear pegs should be adjusted so that they grip the wrist firmly, but not too tightly.
For the multi-user model, the distance between the pegs can be adjusted by turning the knob. For the singleuser-model you should have someone adjust the pegs to fit your wrist. Once adjusted, you should not have toadjust them again.
When the tri-pin system is correctly adjusted, you should able to do the chest press and rowing exerciseswithout your hand slipping out from between the pegs.
This adjustment applies to:
(a) Narrow grip chest press(b) Wide grip chest press(c) Narrow grip rowing exercise(d) Wide grip rowing exercise
12
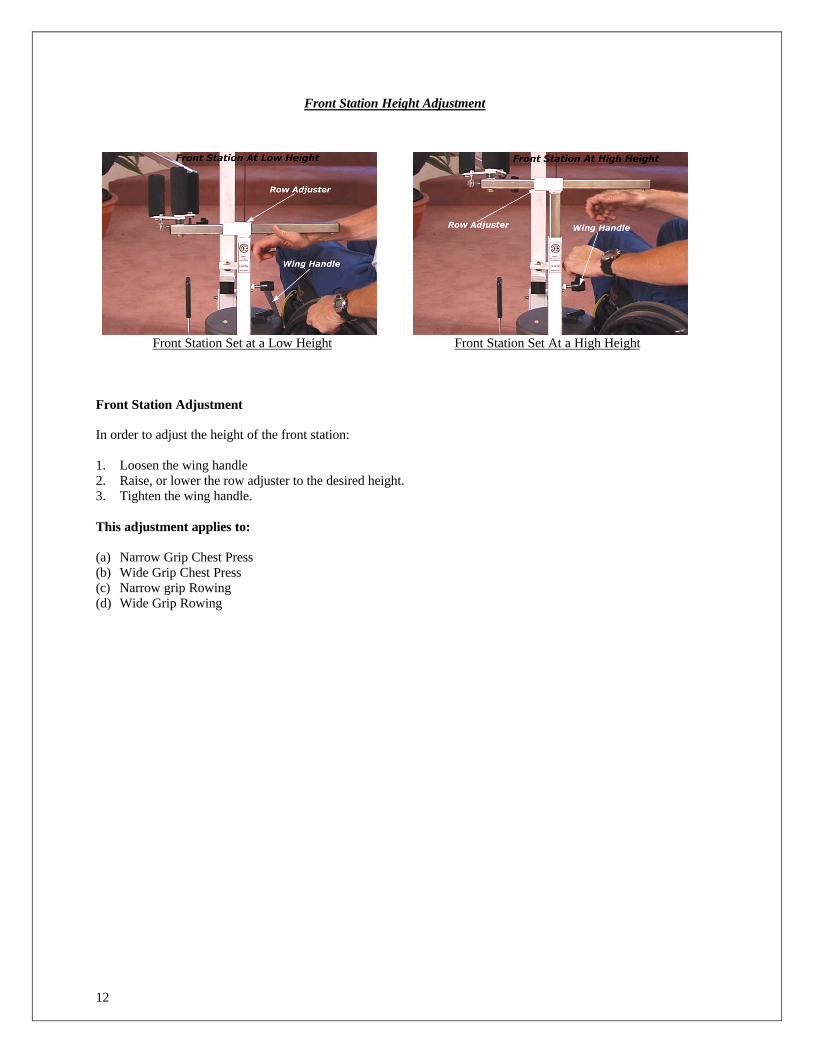
Front Station Height Adjustment
Front Station Set at a Low Height Front Station Set At a High Height
Front Station Adjustment
In order to adjust the height of the front station:
1. Loosen the wing handle2. Raise, or lower the row adjuster to the desired height.3. Tighten the wing handle.
This adjustment applies to:
(a) Narrow Grip Chest Press(b) Wide Grip Chest Press(c) Narrow grip Rowing(d) Wide Grip Rowing
13
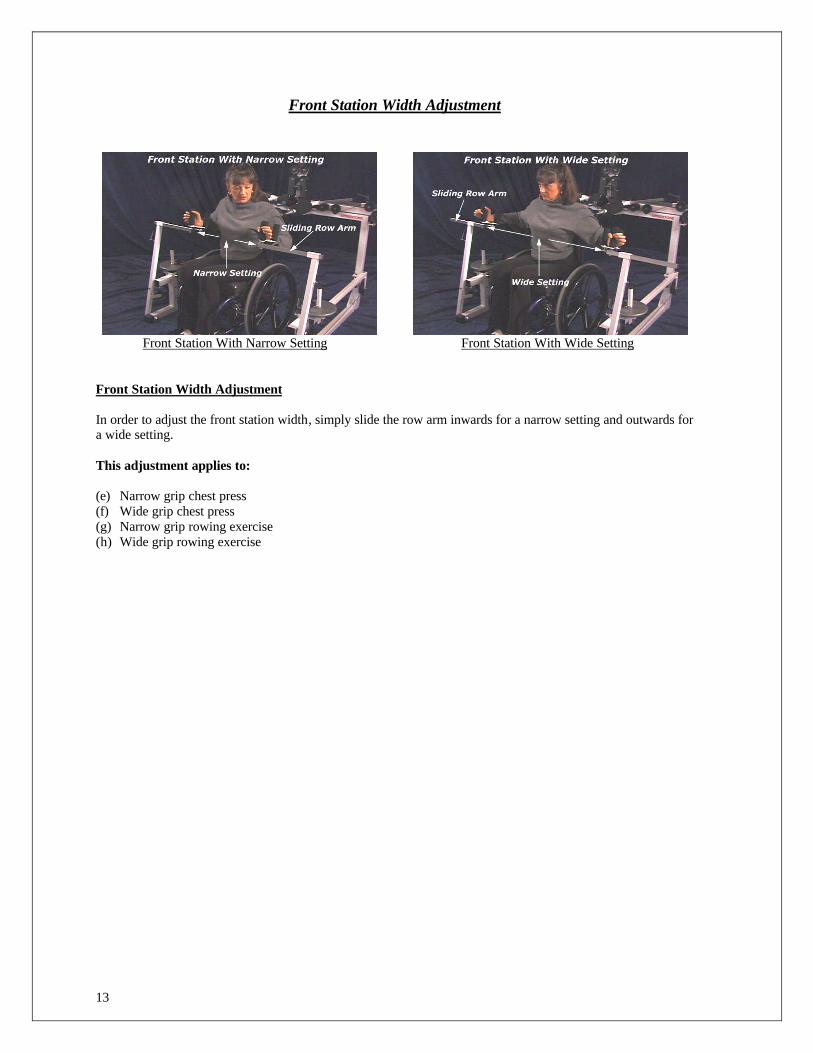
Front Station Width Adjustment
Front Station With Narrow Setting Front Station With Wide Setting
Front Station Width Adjustment
In order to adjust the front station width, simply slide the row arm inwards for a narrow setting and outwards fora wide setting.
This adjustment applies to:
(e) Narrow grip chest press(f) Wide grip chest press(g) Narrow grip rowing exercise(h) Wide grip rowing exercise
14
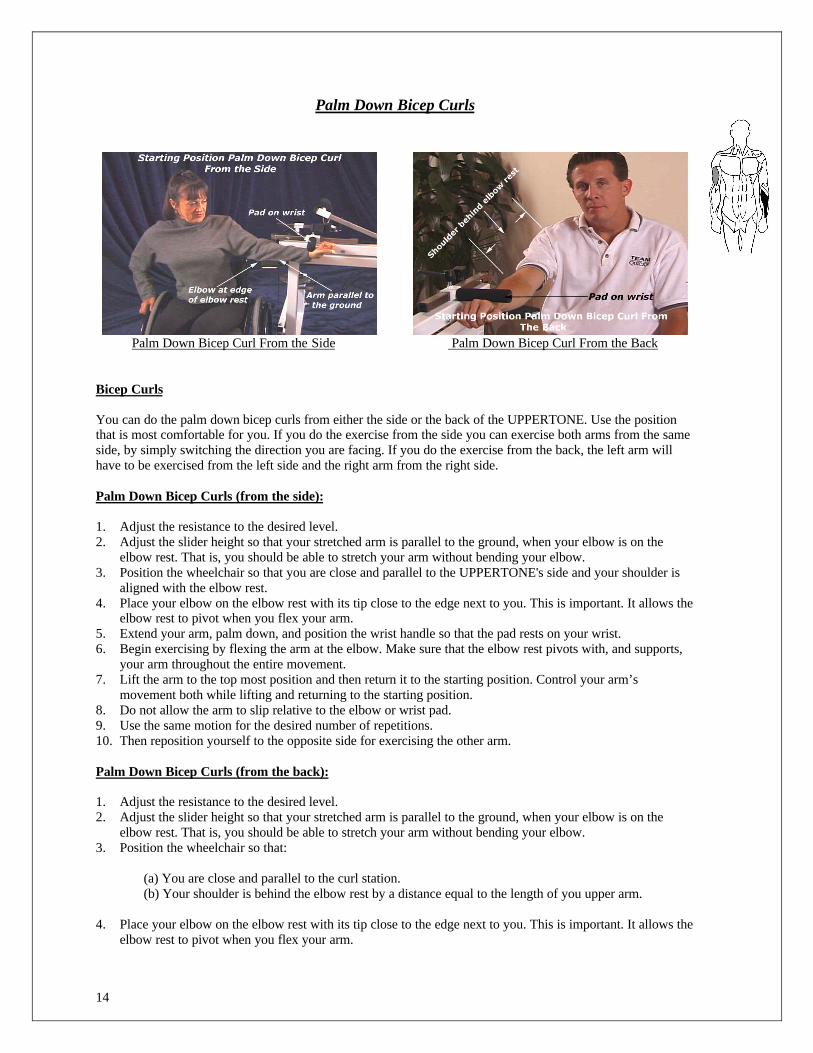
Palm Down Bicep Curls
Palm Down Bicep Curl From the Side Palm Down Bicep Curl From the Back
Bicep Curls
You can do the palm down bicep curls from either the side or the back of the UPPERTONE. Use the positionthat is most comfortable for you. If you do the exercise from the side you can exercise both arms from the sameside, by simply switching the direction you are facing. If you do the exercise from the back, the left arm willhave to be exercised from the left side and the right arm from the right side.
Palm Down Bicep Curls (from the side):
1. Adjust the resistance to the desired level.2. Adjust the slider height so that your stretched arm is parallel to the ground, when your elbow is on the
elbow rest. That is, you should be able to stretch your arm without bending your elbow.3. Position the wheelchair so that you are close and parallel to the UPPERTONE's side and your shoulder is
aligned with the elbow rest.4. Place your elbow on the elbow rest with its tip close to the edge next to you. This is important. It allows the
elbow rest to pivot when you flex your arm.5. Extend your arm, palm down, and position the wrist handle so that the pad rests on your wrist.6. Begin exercising by flexing the arm at the elbow. Make sure that the elbow rest pivots with, and supports,
your arm throughout the entire movement.7. Lift the arm to the top most position and then return it to the starting position. Control your arm’s
movement both while lifting and returning to the starting position.8. Do not allow the arm to slip relative to the elbow or wrist pad.9. Use the same motion for the desired number of repetitions.10. Then reposition yourself to the opposite side for exercising the other arm.
Palm Down Bicep Curls (from the back):
1. Adjust the resistance to the desired level.2. Adjust the slider height so that your stretched arm is parallel to the ground, when your elbow is on the
elbow rest. That is, you should be able to stretch your arm without bending your elbow.3. Position the wheelchair so that:
(a) You are close and parallel to the curl station.(b) Your shoulder is behind the elbow rest by a distance equal to the length of you upper arm.
4. Place your elbow on the elbow rest with its tip close to the edge next to you. This is important. It allows the
elbow rest to pivot when you flex your arm.

15
5. Extend your arm, palm down, and position the wrist handle so that the pad rests on your wrist. Beginexercising by flexing the arm at the elbow. Make sure that the elbow rest pivots with and supports your armthroughout the entire movement.
6. Lift the arm to the top most position and then return it to the starting position. Control your arm’smovement both while lifting and returning to the starting position.
7. Do not allow the arm to slip relative to the elbow or wrist pad.8. Use the same motion for the desired number of repetitions.9. Then reposition yourself to the opposite side for exercising the other arm.
16
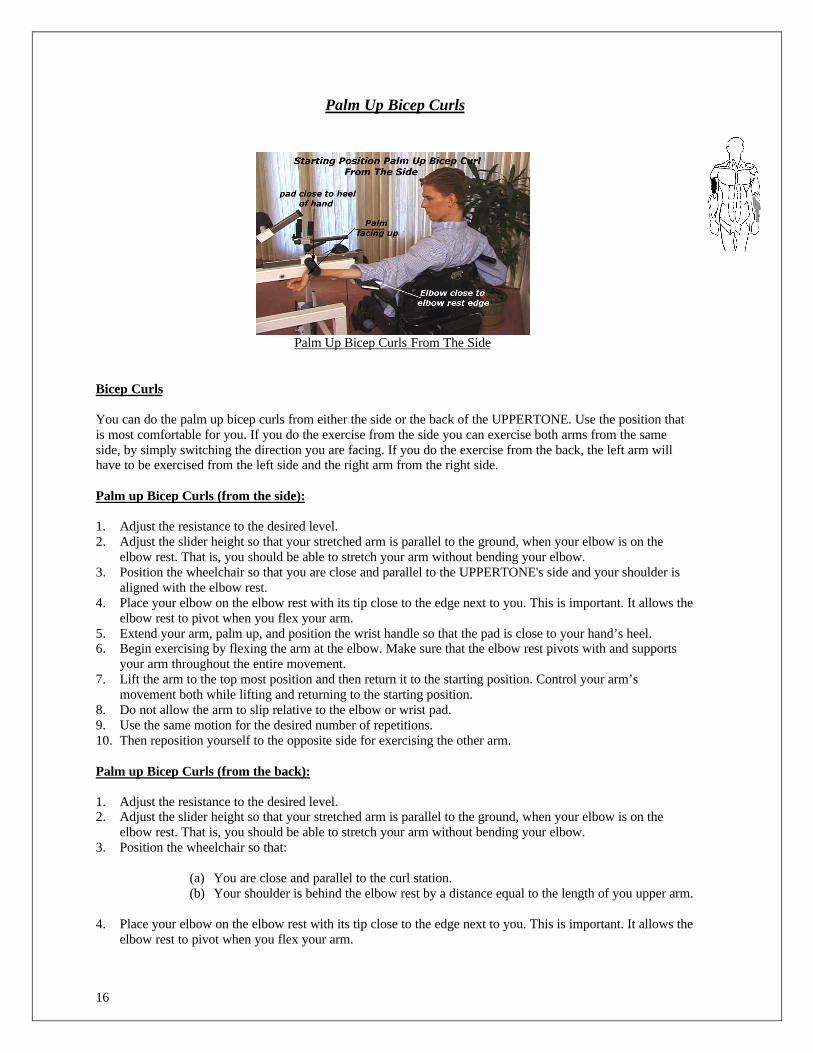
Palm Up Bicep Curls
Palm Up Bicep Curls From The Side
Bicep Curls
You can do the palm up bicep curls from either the side or the back of the UPPERTONE. Use the position thatis most comfortable for you. If you do the exercise from the side you can exercise both arms from the sameside, by simply switching the direction you are facing. If you do the exercise from the back, the left arm willhave to be exercised from the left side and the right arm from the right side.
Palm up Bicep Curls (from the side):
1. Adjust the resistance to the desired level.2. Adjust the slider height so that your stretched arm is parallel to the ground, when your elbow is on the
elbow rest. That is, you should be able to stretch your arm without bending your elbow.3. Position the wheelchair so that you are close and parallel to the UPPERTONE's side and your shoulder is
aligned with the elbow rest.4. Place your elbow on the elbow rest with its tip close to the edge next to you. This is important. It allows the
elbow rest to pivot when you flex your arm.5. Extend your arm, palm up, and position the wrist handle so that the pad is close to your hand’s heel.6. Begin exercising by flexing the arm at the elbow. Make sure that the elbow rest pivots with and supports
your arm throughout the entire movement.7. Lift the arm to the top most position and then return it to the starting position. Control your arm’s
movement both while lifting and returning to the starting position.8. Do not allow the arm to slip relative to the elbow or wrist pad.9. Use the same motion for the desired number of repetitions.10. Then reposition yourself to the opposite side for exercising the other arm.
Palm up Bicep Curls (from the back):
1. Adjust the resistance to the desired level.2. Adjust the slider height so that your stretched arm is parallel to the ground, when your elbow is on the
elbow rest. That is, you should be able to stretch your arm without bending your elbow.3. Position the wheelchair so that:
(a) You are close and parallel to the curl station.(b) Your shoulder is behind the elbow rest by a distance equal to the length of you upper arm.
4. Place your elbow on the elbow rest with its tip close to the edge next to you. This is important. It allows theelbow rest to pivot when you flex your arm.
17
5. Extend your arm, palm up, and position the wrist handle so that the pad is close to your hand’s heel.6. Begin exercising by flexing the arm at the elbow. Make sure that the elbow rest pivots with and supports
your arm throughout the entire movement.7. Lift the arm to the top most position and then return it to the starting position. Control your arm’s
movement both while lifting and returning to the starting position.8. Do not allow the arm to slip relative to the elbow or wrist pad.9. Use the same motion for the desired number of repetitions.10. Then reposition yourself to the opposite side for exercising the other arm.
18
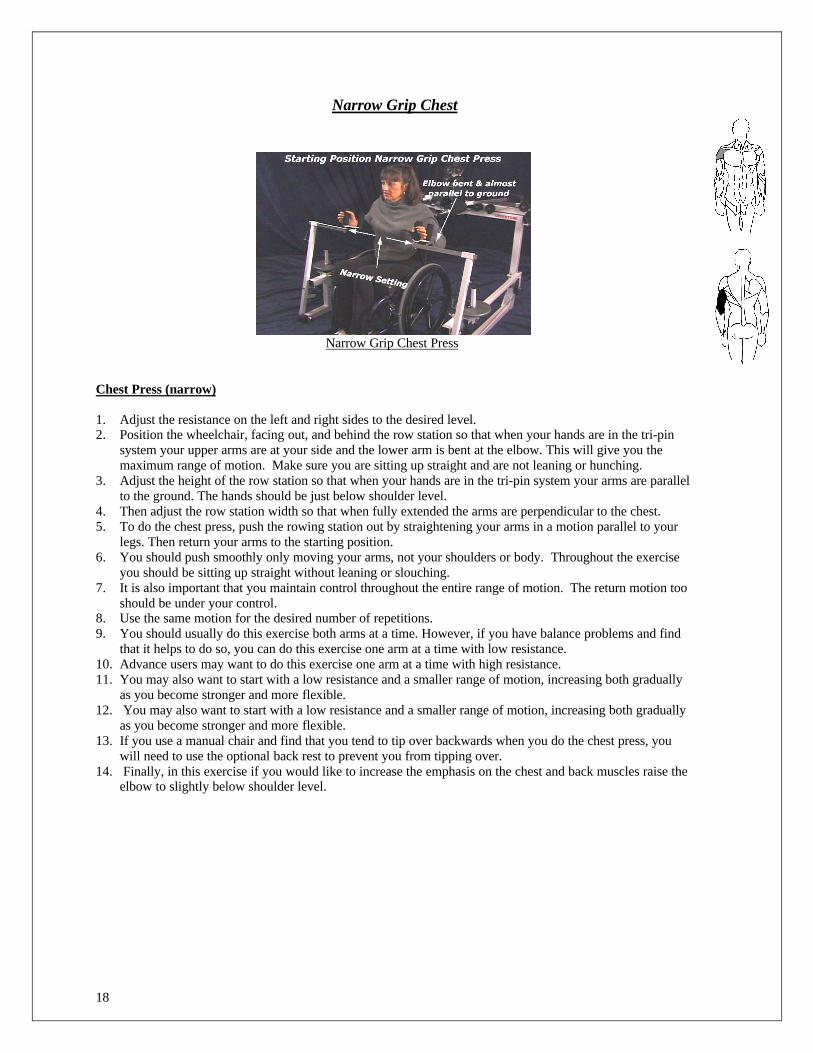
Narrow Grip Chest
Narrow Grip Chest Press
Chest Press (narrow)
1. Adjust the resistance on the left and right sides to the desired level.2. Position the wheelchair, facing out, and behind the row station so that when your hands are in the tri-pin
system your upper arms are at your side and the lower arm is bent at the elbow. This will give you themaximum range of motion. Make sure you are sitting up straight and are not leaning or hunching.
3. Adjust the height of the row station so that when your hands are in the tri-pin system your arms are parallelto the ground. The hands should be just below shoulder level.
4. Then adjust the row station width so that when fully extended the arms are perpendicular to the chest.5. To do the chest press, push the rowing station out by straightening your arms in a motion parallel to your
legs. Then return your arms to the starting position.6. You should push smoothly only moving your arms, not your shoulders or body. Throughout the exercise
you should be sitting up straight without leaning or slouching.7. It is also important that you maintain control throughout the entire range of motion. The return motion too
should be under your control.8. Use the same motion for the desired number of repetitions.9. You should usually do this exercise both arms at a time. However, if you have balance problems and find
that it helps to do so, you can do this exercise one arm at a time with low resistance.10. Advance users may want to do this exercise one arm at a time with high resistance.11. You may also want to start with a low resistance and a smaller range of motion, increasing both gradually
as you become stronger and more flexible.12. You may also want to start with a low resistance and a smaller range of motion, increasing both gradually
as you become stronger and more flexible.13. If you use a manual chair and find that you tend to tip over backwards when you do the chest press, you
will need to use the optional back rest to prevent you from tipping over.14. Finally, in this exercise if you would like to increase the emphasis on the chest and back muscles raise the
elbow to slightly below shoulder level.
19
Wide Grip Chest Press
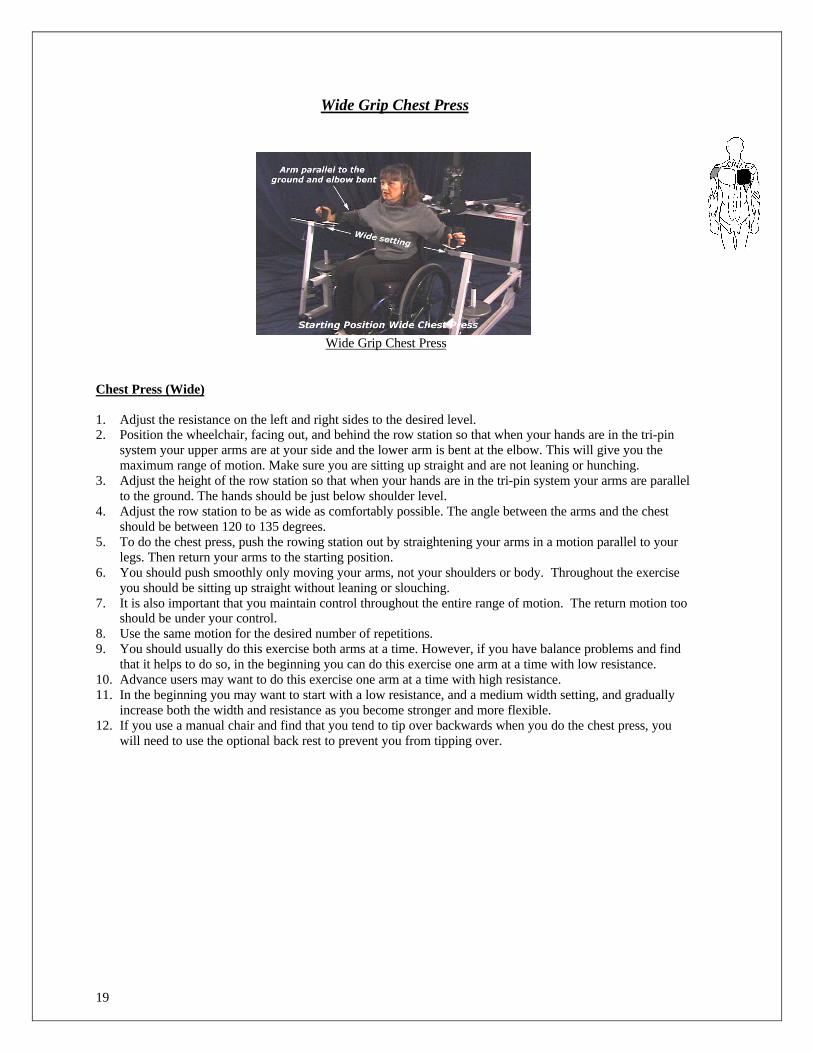
Wide Grip Chest Press
Chest Press (Wide)
1. Adjust the resistance on the left and right sides to the desired level.2. Position the wheelchair, facing out, and behind the row station so that when your hands are in the tri-pin
system your upper arms are at your side and the lower arm is bent at the elbow. This will give you themaximum range of motion. Make sure you are sitting up straight and are not leaning or hunching.
3. Adjust the height of the row station so that when your hands are in the tri-pin system your arms are parallelto the ground. The hands should be just below shoulder level.
4. Adjust the row station to be as wide as comfortably possible. The angle between the arms and the chestshould be between 120 to 135 degrees.
5. To do the chest press, push the rowing station out by straightening your arms in a motion parallel to yourlegs. Then return your arms to the starting position.
6. You should push smoothly only moving your arms, not your shoulders or body. Throughout the exerciseyou should be sitting up straight without leaning or slouching.
7. It is also important that you maintain control throughout the entire range of motion. The return motion tooshould be under your control.
8. Use the same motion for the desired number of repetitions.9. You should usually do this exercise both arms at a time. However, if you have balance problems and find
that it helps to do so, in the beginning you can do this exercise one arm at a time with low resistance.10. Advance users may want to do this exercise one arm at a time with high resistance.11. In the beginning you may want to start with a low resistance, and a medium width setting, and gradually
increase both the width and resistance as you become stronger and more flexible.12. If you use a manual chair and find that you tend to tip over backwards when you do the chest press, you
will need to use the optional back rest to prevent you from tipping over.
20
Deltoid Press
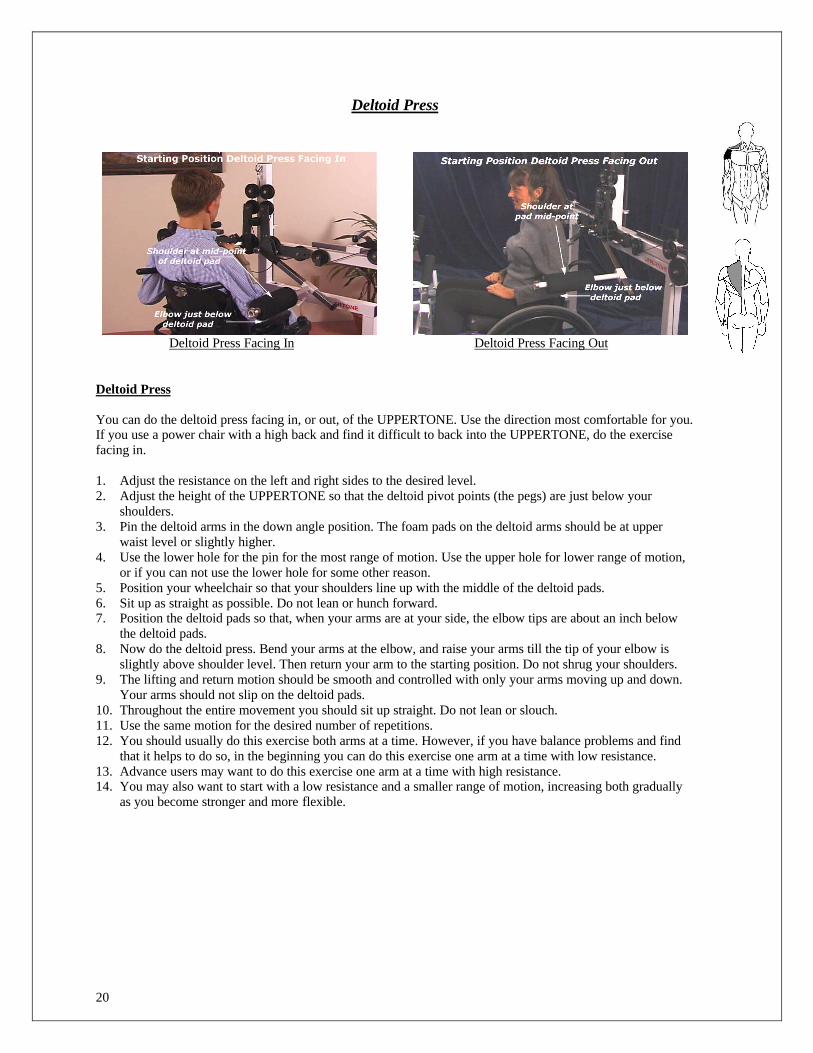
Deltoid Press Facing In Deltoid Press Facing Out
Deltoid Press
You can do the deltoid press facing in, or out, of the UPPERTONE. Use the direction most comfortable for you.If you use a power chair with a high back and find it difficult to back into the UPPERTONE, do the exercisefacing in.
1. Adjust the resistance on the left and right sides to the desired level.2. Adjust the height of the UPPERTONE so that the deltoid pivot points (the pegs) are just below your
shoulders.3. Pin the deltoid arms in the down angle position. The foam pads on the deltoid arms should be at upper
waist level or slightly higher.4. Use the lower hole for the pin for the most range of motion. Use the upper hole for lower range of motion,
or if you can not use the lower hole for some other reason.5. Position your wheelchair so that your shoulders line up with the middle of the deltoid pads.6. Sit up as straight as possible. Do not lean or hunch forward.7. Position the deltoid pads so that, when your arms are at your side, the elbow tips are about an inch below
the deltoid pads.8. Now do the deltoid press. Bend your arms at the elbow, and raise your arms till the tip of your elbow is
slightly above shoulder level. Then return your arm to the starting position. Do not shrug your shoulders.9. The lifting and return motion should be smooth and controlled with only your arms moving up and down.
Your arms should not slip on the deltoid pads.10. Throughout the entire movement you should sit up straight. Do not lean or slouch.11. Use the same motion for the desired number of repetitions.12. You should usually do this exercise both arms at a time. However, if you have balance problems and find
that it helps to do so, in the beginning you can do this exercise one arm at a time with low resistance.13. Advance users may want to do this exercise one arm at a time with high resistance.14. You may also want to start with a low resistance and a smaller range of motion, increasing both gradually
as you become stronger and more flexible.
21
Lat Pulls
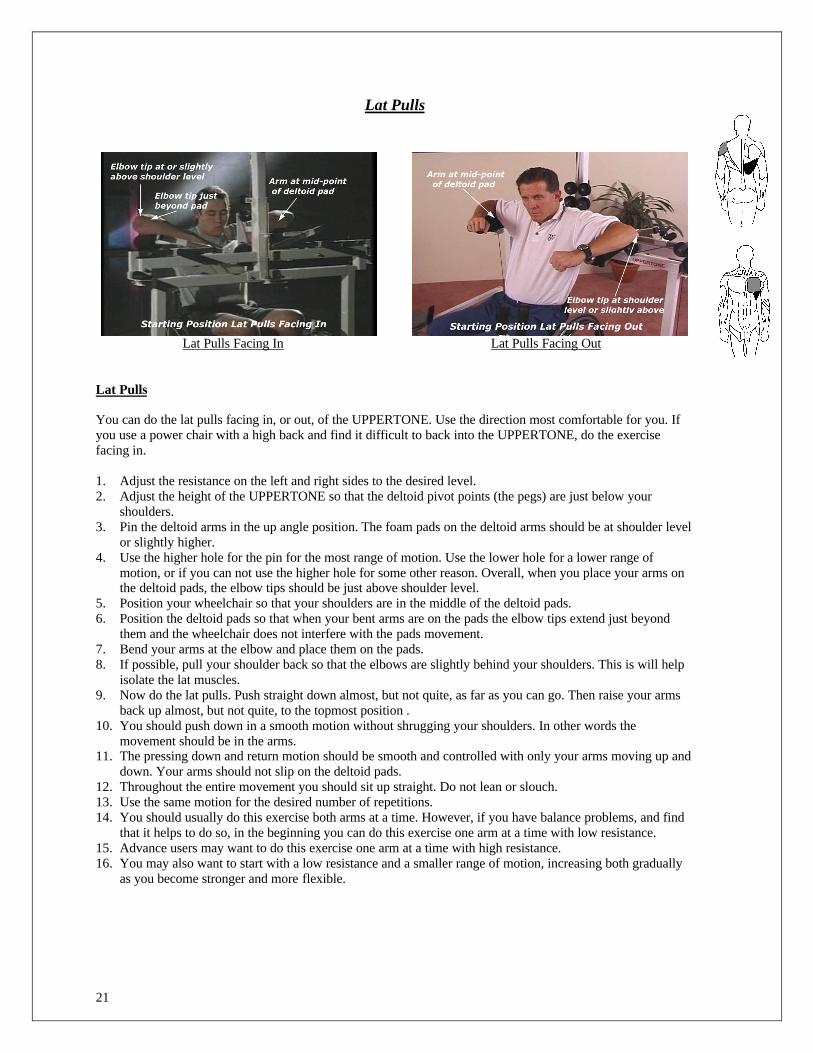
Lat Pulls Facing In Lat Pulls Facing Out
Lat Pulls
You can do the lat pulls facing in, or out, of the UPPERTONE. Use the direction most comfortable for you. Ifyou use a power chair with a high back and find it difficult to back into the UPPERTONE, do the exercisefacing in.
1. Adjust the resistance on the left and right sides to the desired level.2. Adjust the height of the UPPERTONE so that the deltoid pivot points (the pegs) are just below your
shoulders.3. Pin the deltoid arms in the up angle position. The foam pads on the deltoid arms should be at shoulder level
or slightly higher.4. Use the higher hole for the pin for the most range of motion. Use the lower hole for a lower range of
motion, or if you can not use the higher hole for some other reason. Overall, when you place your arms onthe deltoid pads, the elbow tips should be just above shoulder level.
5. Position your wheelchair so that your shoulders are in the middle of the deltoid pads.6. Position the deltoid pads so that when your bent arms are on the pads the elbow tips extend just beyond
them and the wheelchair does not interfere with the pads movement.7. Bend your arms at the elbow and place them on the pads.8. If possible, pull your shoulder back so that the elbows are slightly behind your shoulders. This is will help
isolate the lat muscles.9. Now do the lat pulls. Push straight down almost, but not quite, as far as you can go. Then raise your arms
back up almost, but not quite, to the topmost position .10. You should push down in a smooth motion without shrugging your shoulders. In other words the
movement should be in the arms.11. The pressing down and return motion should be smooth and controlled with only your arms moving up and
down. Your arms should not slip on the deltoid pads.12. Throughout the entire movement you should sit up straight. Do not lean or slouch.13. Use the same motion for the desired number of repetitions.14. You should usually do this exercise both arms at a time. However, if you have balance problems, and find
that it helps to do so, in the beginning you can do this exercise one arm at a time with low resistance.15. Advance users may want to do this exercise one arm at a time with high resistance.16. You may also want to start with a low resistance and a smaller range of motion, increasing both gradually
as you become stronger and more flexible.
22
Rickshaw
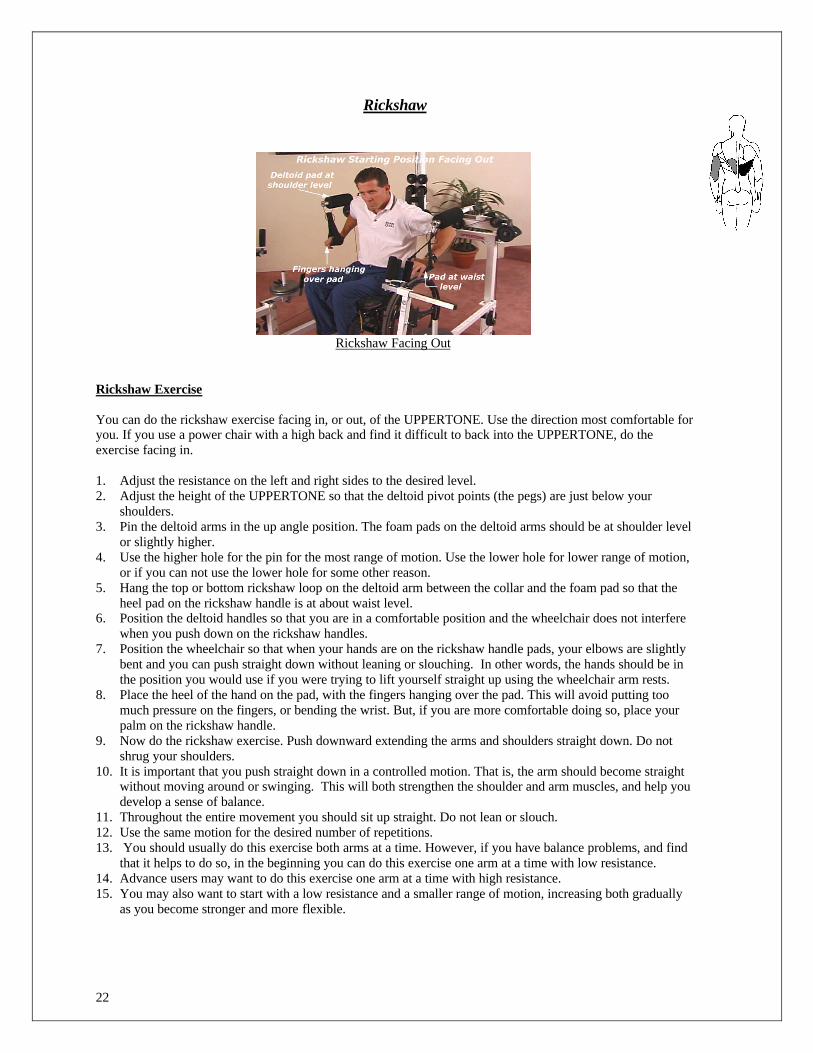
Rickshaw Facing Out
Rickshaw Exercise
You can do the rickshaw exercise facing in, or out, of the UPPERTONE. Use the direction most comfortable foryou. If you use a power chair with a high back and find it difficult to back into the UPPERTONE, do theexercise facing in.
1. Adjust the resistance on the left and right sides to the desired level.2. Adjust the height of the UPPERTONE so that the deltoid pivot points (the pegs) are just below your
shoulders.3. Pin the deltoid arms in the up angle position. The foam pads on the deltoid arms should be at shoulder level
or slightly higher.4. Use the higher hole for the pin for the most range of motion. Use the lower hole for lower range of motion,
or if you can not use the lower hole for some other reason.5. Hang the top or bottom rickshaw loop on the deltoid arm between the collar and the foam pad so that the
heel pad on the rickshaw handle is at about waist level.6. Position the deltoid handles so that you are in a comfortable position and the wheelchair does not interfere
when you push down on the rickshaw handles.7. Position the wheelchair so that when your hands are on the rickshaw handle pads, your elbows are slightly
bent and you can push straight down without leaning or slouching. In other words, the hands should be inthe position you would use if you were trying to lift yourself straight up using the wheelchair arm rests.
8. Place the heel of the hand on the pad, with the fingers hanging over the pad. This will avoid putting toomuch pressure on the fingers, or bending the wrist. But, if you are more comfortable doing so, place yourpalm on the rickshaw handle.
9. Now do the rickshaw exercise. Push downward extending the arms and shoulders straight down. Do notshrug your shoulders.
10. It is important that you push straight down in a controlled motion. That is, the arm should become straightwithout moving around or swinging. This will both strengthen the shoulder and arm muscles, and help youdevelop a sense of balance.
11. Throughout the entire movement you should sit up straight. Do not lean or slouch.12. Use the same motion for the desired number of repetitions.13. You should usually do this exercise both arms at a time. However, if you have balance problems, and find
that it helps to do so, in the beginning you can do this exercise one arm at a time with low resistance.14. Advance users may want to do this exercise one arm at a time with high resistance.15. You may also want to start with a low resistance and a smaller range of motion, increasing both gradually
as you become stronger and more flexible.
23
Narrow Grip Rowing
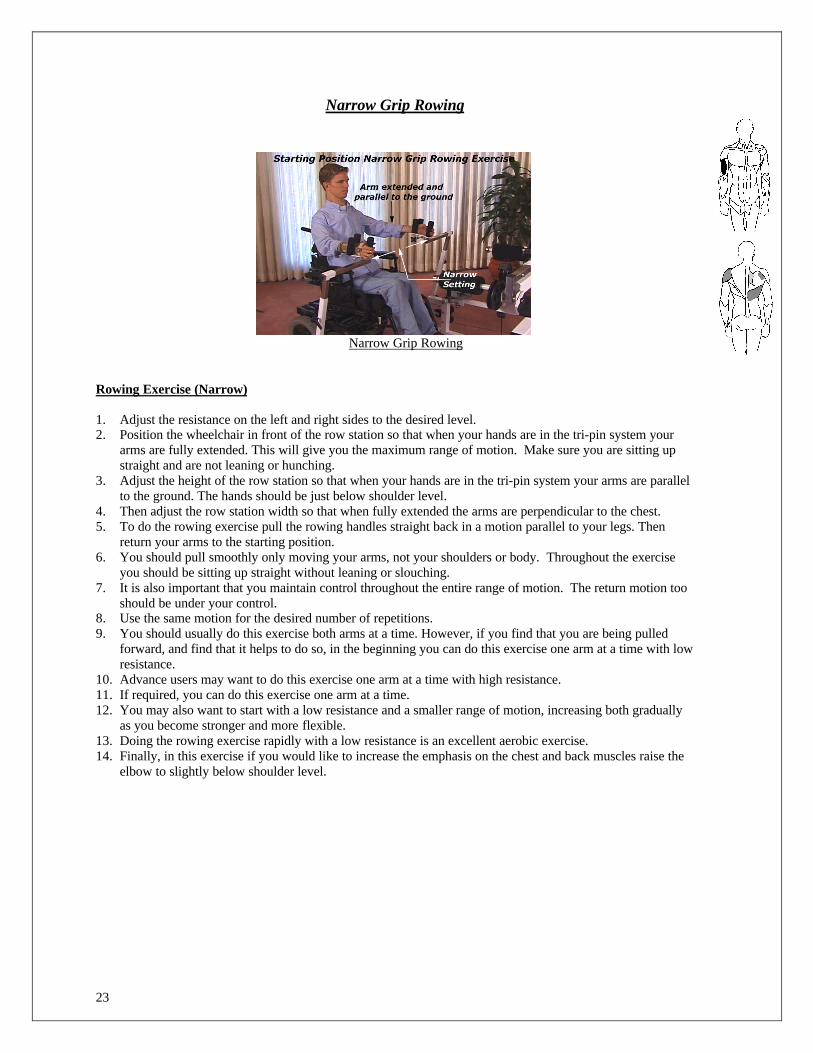
Narrow Grip Rowing
Rowing Exercise (Narrow)
1. Adjust the resistance on the left and right sides to the desired level.2. Position the wheelchair in front of the row station so that when your hands are in the tri-pin system your
arms are fully extended. This will give you the maximum range of motion. Make sure you are sitting upstraight and are not leaning or hunching.
3. Adjust the height of the row station so that when your hands are in the tri-pin system your arms are parallelto the ground. The hands should be just below shoulder level.
4. Then adjust the row station width so that when fully extended the arms are perpendicular to the chest.5. To do the rowing exercise pull the rowing handles straight back in a motion parallel to your legs. Then
return your arms to the starting position.6. You should pull smoothly only moving your arms, not your shoulders or body. Throughout the exercise
you should be sitting up straight without leaning or slouching.7. It is also important that you maintain control throughout the entire range of motion. The return motion too
should be under your control.8. Use the same motion for the desired number of repetitions.9. You should usually do this exercise both arms at a time. However, if you find that you are being pulled
forward, and find that it helps to do so, in the beginning you can do this exercise one arm at a time with lowresistance.
10. Advance users may want to do this exercise one arm at a time with high resistance.11. If required, you can do this exercise one arm at a time.12. You may also want to start with a low resistance and a smaller range of motion, increasing both gradually
as you become stronger and more flexible.13. Doing the rowing exercise rapidly with a low resistance is an excellent aerobic exercise.14. Finally, in this exercise if you would like to increase the emphasis on the chest and back muscles raise the
elbow to slightly below shoulder level.
24
Wide Grip Rowing
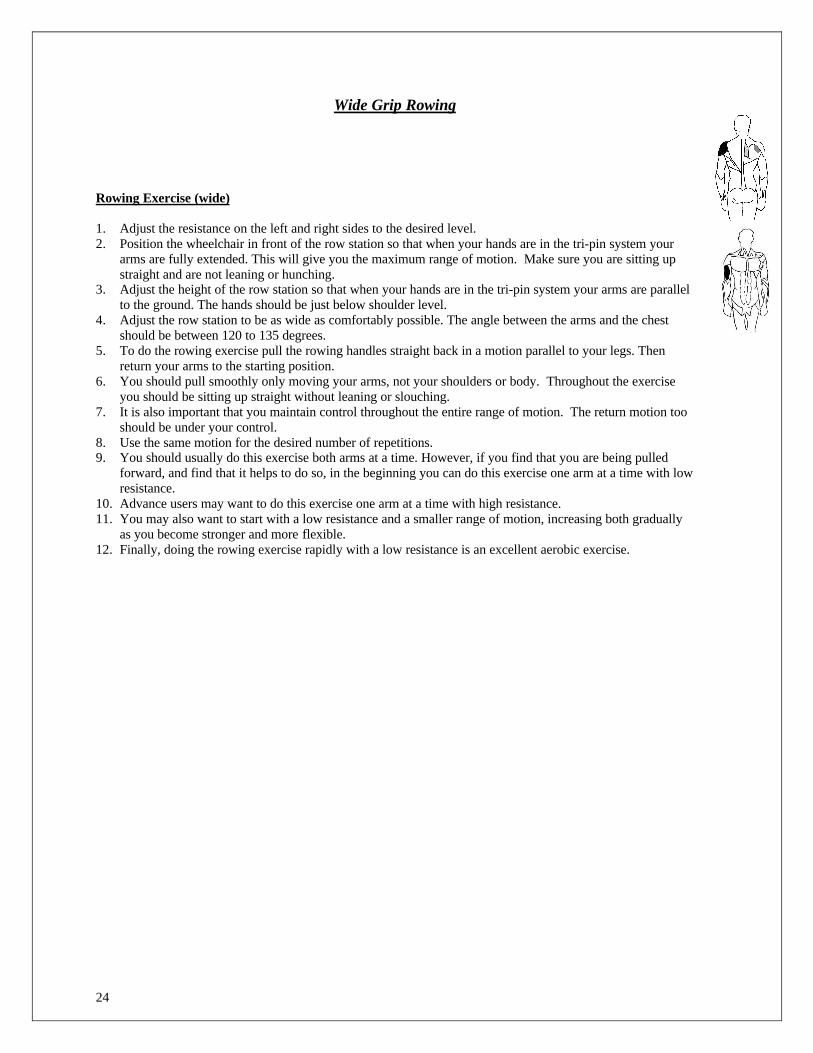
Rowing Exercise (wide)
1. Adjust the resistance on the left and right sides to the desired level.2. Position the wheelchair in front of the row station so that when your hands are in the tri-pin system your
arms are fully extended. This will give you the maximum range of motion. Make sure you are sitting upstraight and are not leaning or hunching.
3. Adjust the height of the row station so that when your hands are in the tri-pin system your arms are parallelto the ground. The hands should be just below shoulder level.
4. Adjust the row station to be as wide as comfortably possible. The angle between the arms and the chestshould be between 120 to 135 degrees.
5. To do the rowing exercise pull the rowing handles straight back in a motion parallel to your legs. Thenreturn your arms to the starting position.
6. You should pull smoothly only moving your arms, not your shoulders or body. Throughout the exerciseyou should be sitting up straight without leaning or slouching.
7. It is also important that you maintain control throughout the entire range of motion. The return motion tooshould be under your control.
8. Use the same motion for the desired number of repetitions.9. You should usually do this exercise both arms at a time. However, if you find that you are being pulled
forward, and find that it helps to do so, in the beginning you can do this exercise one arm at a time with lowresistance.
10. Advance users may want to do this exercise one arm at a time with high resistance.11. You may also want to start with a low resistance and a smaller range of motion, increasing both gradually
as you become stronger and more flexible.12. Finally, doing the rowing exercise rapidly with a low resistance is an excellent aerobic exercise.
25
Palm Up Lateral Shoulder Raise
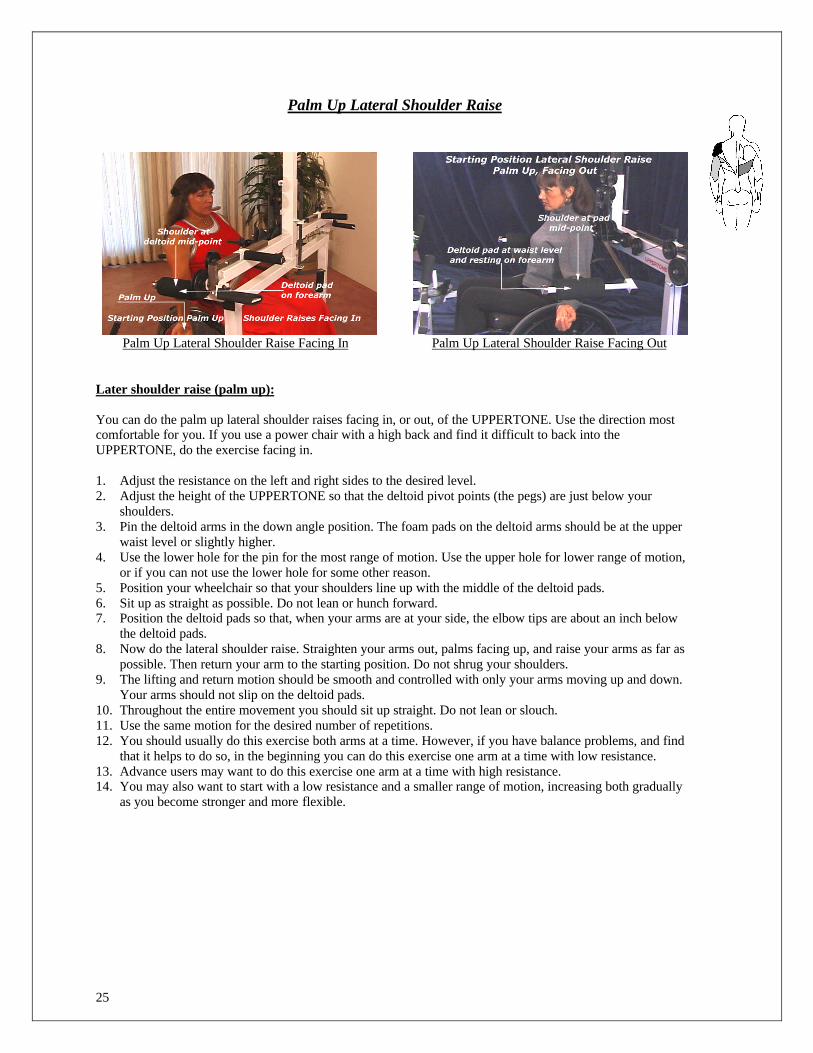
Palm Up Lateral Shoulder Raise Facing In Palm Up Lateral Shoulder Raise Facing Out
Later shoulder raise (palm up):
You can do the palm up lateral shoulder raises facing in, or out, of the UPPERTONE. Use the direction mostcomfortable for you. If you use a power chair with a high back and find it difficult to back into theUPPERTONE, do the exercise facing in.
1. Adjust the resistance on the left and right sides to the desired level.2. Adjust the height of the UPPERTONE so that the deltoid pivot points (the pegs) are just below your
shoulders.3. Pin the deltoid arms in the down angle position. The foam pads on the deltoid arms should be at the upper
waist level or slightly higher.4. Use the lower hole for the pin for the most range of motion. Use the upper hole for lower range of motion,
or if you can not use the lower hole for some other reason.5. Position your wheelchair so that your shoulders line up with the middle of the deltoid pads.6. Sit up as straight as possible. Do not lean or hunch forward.7. Position the deltoid pads so that, when your arms are at your side, the elbow tips are about an inch below
the deltoid pads.8. Now do the lateral shoulder raise. Straighten your arms out, palms facing up, and raise your arms as far as
possible. Then return your arm to the starting position. Do not shrug your shoulders.9. The lifting and return motion should be smooth and controlled with only your arms moving up and down.
Your arms should not slip on the deltoid pads.10. Throughout the entire movement you should sit up straight. Do not lean or slouch.11. Use the same motion for the desired number of repetitions.12. You should usually do this exercise both arms at a time. However, if you have balance problems, and find
that it helps to do so, in the beginning you can do this exercise one arm at a time with low resistance.13. Advance users may want to do this exercise one arm at a time with high resistance.14. You may also want to start with a low resistance and a smaller range of motion, increasing both gradually
as you become stronger and more flexible.
26
Palm Down Lateral Shoulder Raise
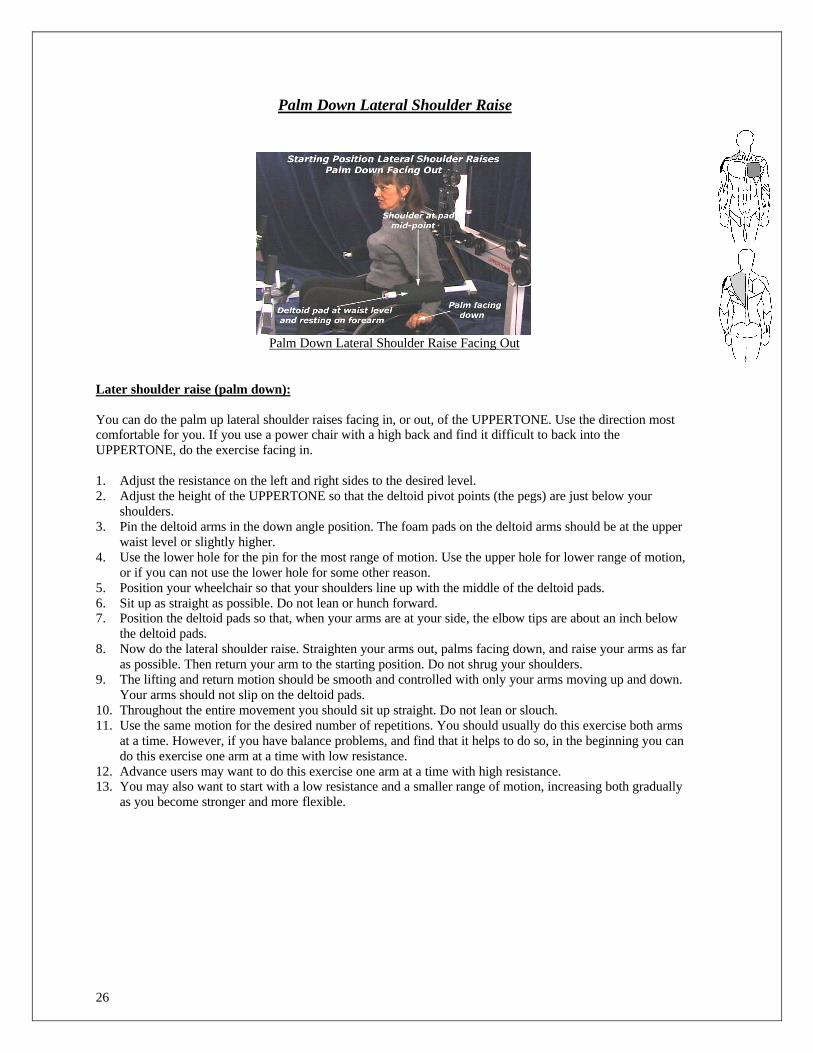
Palm Down Lateral Shoulder Raise Facing Out
Later shoulder raise (palm down):
You can do the palm up lateral shoulder raises facing in, or out, of the UPPERTONE. Use the direction mostcomfortable for you. If you use a power chair with a high back and find it difficult to back into theUPPERTONE, do the exercise facing in.
1. Adjust the resistance on the left and right sides to the desired level.2. Adjust the height of the UPPERTONE so that the deltoid pivot points (the pegs) are just below your
shoulders.3. Pin the deltoid arms in the down angle position. The foam pads on the deltoid arms should be at the upper
waist level or slightly higher.4. Use the lower hole for the pin for the most range of motion. Use the upper hole for lower range of motion,
or if you can not use the lower hole for some other reason.5. Position your wheelchair so that your shoulders line up with the middle of the deltoid pads.6. Sit up as straight as possible. Do not lean or hunch forward.7. Position the deltoid pads so that, when your arms are at your side, the elbow tips are about an inch below
the deltoid pads.8. Now do the lateral shoulder raise. Straighten your arms out, palms facing down, and raise your arms as far
as possible. Then return your arm to the starting position. Do not shrug your shoulders.9. The lifting and return motion should be smooth and controlled with only your arms moving up and down.
Your arms should not slip on the deltoid pads.10. Throughout the entire movement you should sit up straight. Do not lean or slouch.11. Use the same motion for the desired number of repetitions. You should usually do this exercise both arms
at a time. However, if you have balance problems, and find that it helps to do so, in the beginning you cando this exercise one arm at a time with low resistance.
12. Advance users may want to do this exercise one arm at a time with high resistance.13. You may also want to start with a low resistance and a smaller range of motion, increasing both gradually
as you become stronger and more flexible.
27
Shoulder External Rotation
Shoulder External Rotation Elbow Position
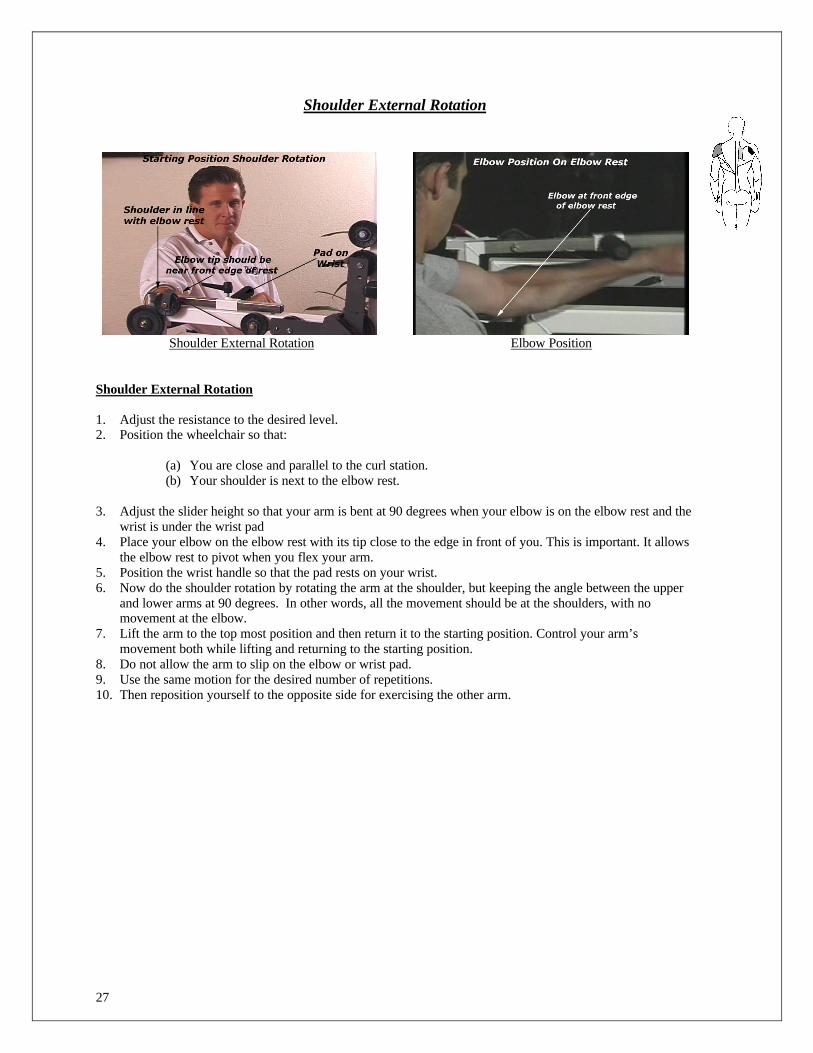
Shoulder External Rotation
1. Adjust the resistance to the desired level.2. Position the wheelchair so that:
(a) You are close and parallel to the curl station.(b) Your shoulder is next to the elbow rest.
3. Adjust the slider height so that your arm is bent at 90 degrees when your elbow is on the elbow rest and thewrist is under the wrist pad
4. Place your elbow on the elbow rest with its tip close to the edge in front of you. This is important. It allowsthe elbow rest to pivot when you flex your arm.
5. Position the wrist handle so that the pad rests on your wrist.6. Now do the shoulder rotation by rotating the arm at the shoulder, but keeping the angle between the upper
and lower arms at 90 degrees. In other words, all the movement should be at the shoulders, with nomovement at the elbow.
7. Lift the arm to the top most position and then return it to the starting position. Control your arm’smovement both while lifting and returning to the starting position.
8. Do not allow the arm to slip on the elbow or wrist pad.9. Use the same motion for the desired number of repetitions.10. Then reposition yourself to the opposite side for exercising the other arm.
28
Shoulder Extensions
Shoulder Extensions
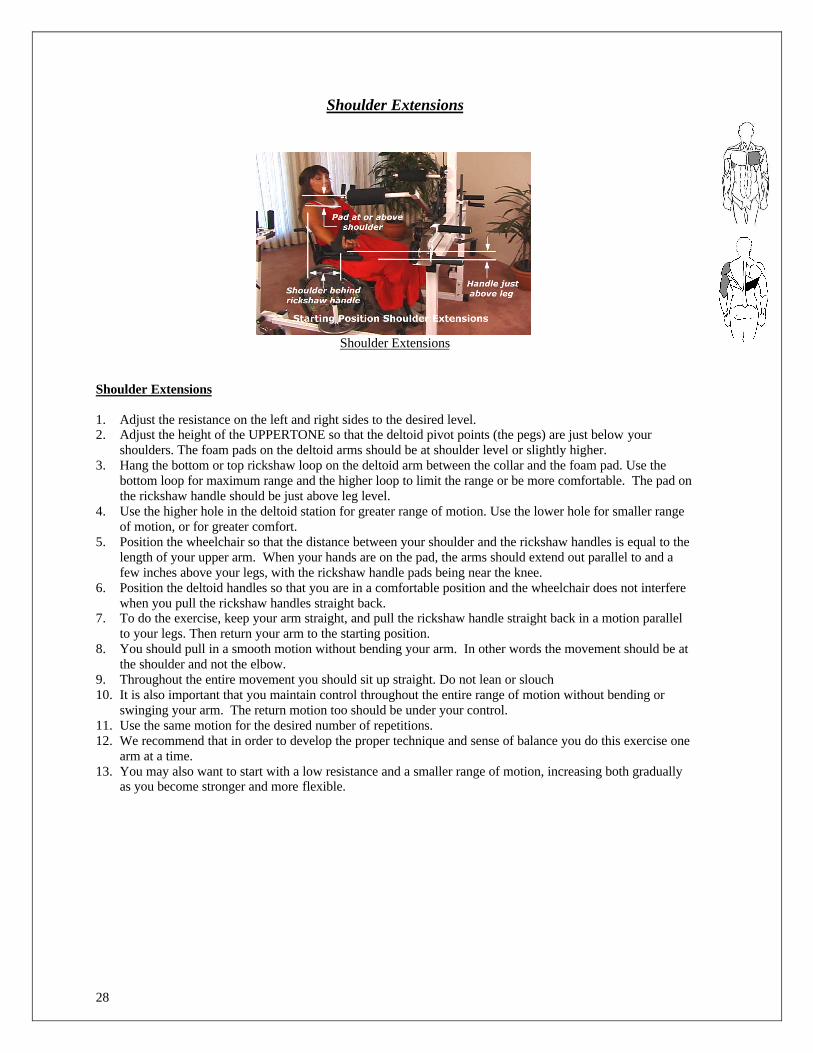
Shoulder Extensions
1. Adjust the resistance on the left and right sides to the desired level.2. Adjust the height of the UPPERTONE so that the deltoid pivot points (the pegs) are just below your
shoulders. The foam pads on the deltoid arms should be at shoulder level or slightly higher.3. Hang the bottom or top rickshaw loop on the deltoid arm between the collar and the foam pad. Use the
bottom loop for maximum range and the higher loop to limit the range or be more comfortable. The pad onthe rickshaw handle should be just above leg level.
4. Use the higher hole in the deltoid station for greater range of motion. Use the lower hole for smaller rangeof motion, or for greater comfort.
5. Position the wheelchair so that the distance between your shoulder and the rickshaw handles is equal to thelength of your upper arm. When your hands are on the pad, the arms should extend out parallel to and afew inches above your legs, with the rickshaw handle pads being near the knee.
6. Position the deltoid handles so that you are in a comfortable position and the wheelchair does not interferewhen you pull the rickshaw handles straight back.
7. To do the exercise, keep your arm straight, and pull the rickshaw handle straight back in a motion parallelto your legs. Then return your arm to the starting position.
8. You should pull in a smooth motion without bending your arm. In other words the movement should be atthe shoulder and not the elbow.
9. Throughout the entire movement you should sit up straight. Do not lean or slouch10. It is also important that you maintain control throughout the entire range of motion without bending or
swinging your arm. The return motion too should be under your control.11. Use the same motion for the desired number of repetitions.12. We recommend that in order to develop the proper technique and sense of balance you do this exercise one
arm at a time.13. You may also want to start with a low resistance and a smaller range of motion, increasing both gradually
as you become stronger and more flexible.
29
Shoulder Shrugs
Shoulder Shrugs Facing Out
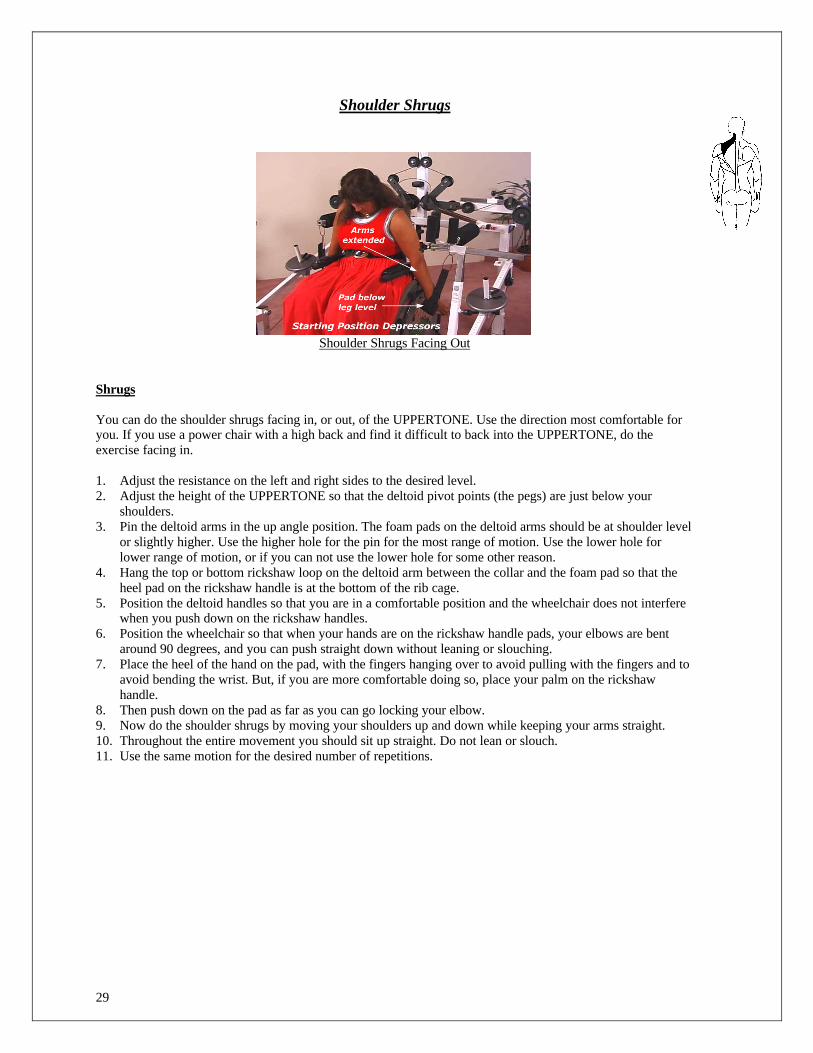
Shrugs
You can do the shoulder shrugs facing in, or out, of the UPPERTONE. Use the direction most comfortable foryou. If you use a power chair with a high back and find it difficult to back into the UPPERTONE, do theexercise facing in.
1. Adjust the resistance on the left and right sides to the desired level.2. Adjust the height of the UPPERTONE so that the deltoid pivot points (the pegs) are just below your
shoulders.3. Pin the deltoid arms in the up angle position. The foam pads on the deltoid arms should be at shoulder level
or slightly higher. Use the higher hole for the pin for the most range of motion. Use the lower hole forlower range of motion, or if you can not use the lower hole for some other reason.
4. Hang the top or bottom rickshaw loop on the deltoid arm between the collar and the foam pad so that theheel pad on the rickshaw handle is at the bottom of the rib cage.
5. Position the deltoid handles so that you are in a comfortable position and the wheelchair does not interferewhen you push down on the rickshaw handles.
6. Position the wheelchair so that when your hands are on the rickshaw handle pads, your elbows are bentaround 90 degrees, and you can push straight down without leaning or slouching.
7. Place the heel of the hand on the pad, with the fingers hanging over to avoid pulling with the fingers and toavoid bending the wrist. But, if you are more comfortable doing so, place your palm on the rickshawhandle.
8. Then push down on the pad as far as you can go locking your elbow.9. Now do the shoulder shrugs by moving your shoulders up and down while keeping your arms straight.10. Throughout the entire movement you should sit up straight. Do not lean or slouch.11. Use the same motion for the desired number of repetitions.
30
Tricep Extensions
Tricep Extensions Facing In
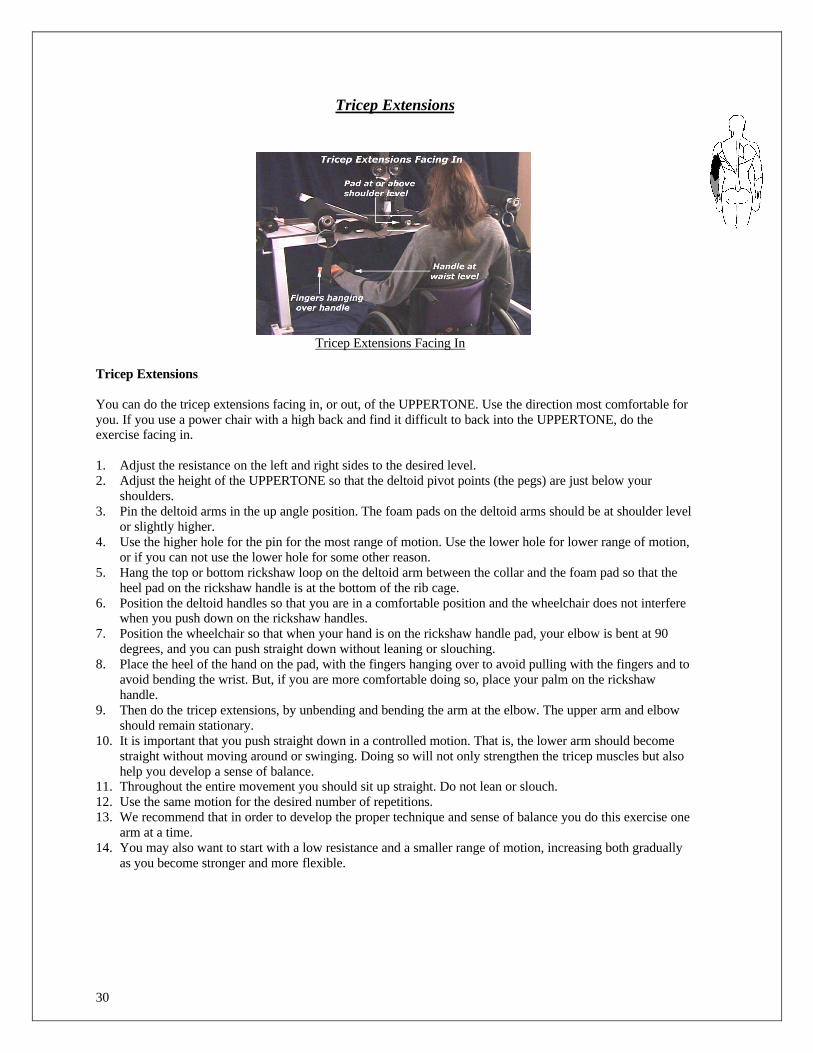
Tricep Extensions
You can do the tricep extensions facing in, or out, of the UPPERTONE. Use the direction most comfortable foryou. If you use a power chair with a high back and find it difficult to back into the UPPERTONE, do theexercise facing in.
1. Adjust the resistance on the left and right sides to the desired level.2. Adjust the height of the UPPERTONE so that the deltoid pivot points (the pegs) are just below your
shoulders.3. Pin the deltoid arms in the up angle position. The foam pads on the deltoid arms should be at shoulder level
or slightly higher.4. Use the higher hole for the pin for the most range of motion. Use the lower hole for lower range of motion,
or if you can not use the lower hole for some other reason.5. Hang the top or bottom rickshaw loop on the deltoid arm between the collar and the foam pad so that the
heel pad on the rickshaw handle is at the bottom of the rib cage.6. Position the deltoid handles so that you are in a comfortable position and the wheelchair does not interfere
when you push down on the rickshaw handles.7. Position the wheelchair so that when your hand is on the rickshaw handle pad, your elbow is bent at 90
degrees, and you can push straight down without leaning or slouching.8. Place the heel of the hand on the pad, with the fingers hanging over to avoid pulling with the fingers and to
avoid bending the wrist. But, if you are more comfortable doing so, place your palm on the rickshawhandle.
9. Then do the tricep extensions, by unbending and bending the arm at the elbow. The upper arm and elbowshould remain stationary.
10. It is important that you push straight down in a controlled motion. That is, the lower arm should becomestraight without moving around or swinging. Doing so will not only strengthen the tricep muscles but alsohelp you develop a sense of balance.
11. Throughout the entire movement you should sit up straight. Do not lean or slouch.12. Use the same motion for the desired number of repetitions.13. We recommend that in order to develop the proper technique and sense of balance you do this exercise one
arm at a time.14. You may also want to start with a low resistance and a smaller range of motion, increasing both gradually
as you become stronger and more flexible.
31
Wrist Supination
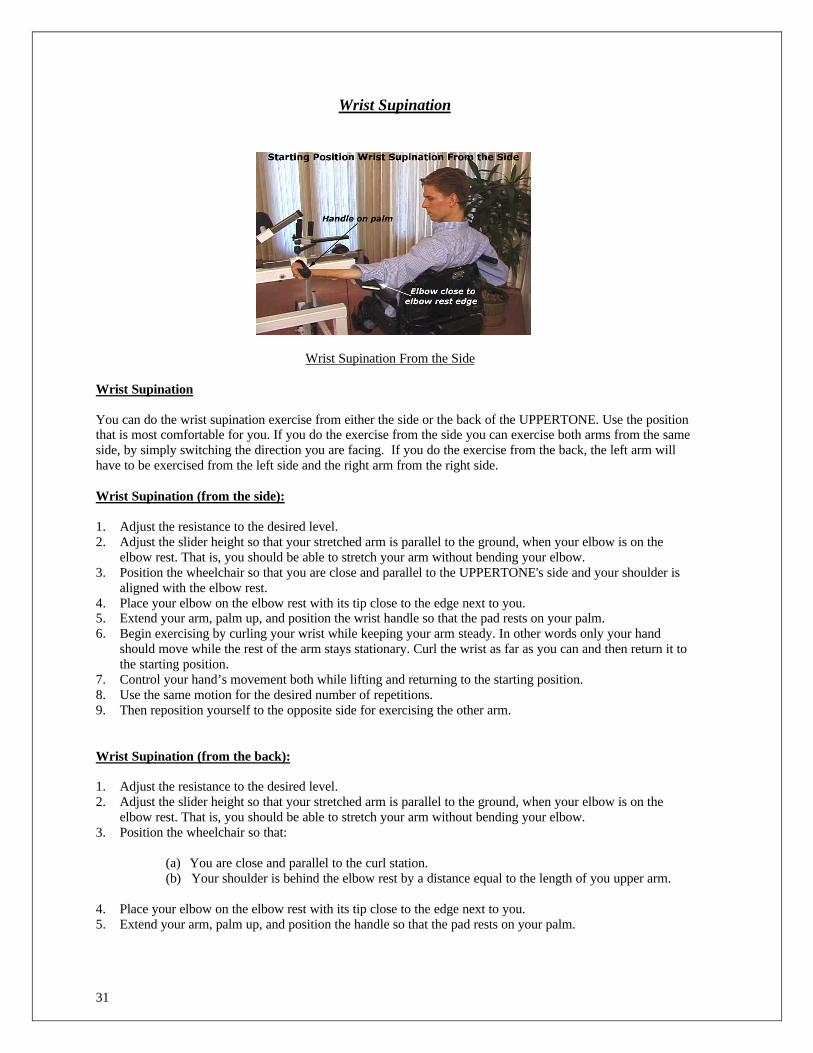
Wrist Supination From the Side
Wrist Supination
You can do the wrist supination exercise from either the side or the back of the UPPERTONE. Use the positionthat is most comfortable for you. If you do the exercise from the side you can exercise both arms from the sameside, by simply switching the direction you are facing. If you do the exercise from the back, the left arm willhave to be exercised from the left side and the right arm from the right side.
Wrist Supination (from the side):
1. Adjust the resistance to the desired level.2. Adjust the slider height so that your stretched arm is parallel to the ground, when your elbow is on the
elbow rest. That is, you should be able to stretch your arm without bending your elbow.3. Position the wheelchair so that you are close and parallel to the UPPERTONE's side and your shoulder is
aligned with the elbow rest.4. Place your elbow on the elbow rest with its tip close to the edge next to you.5. Extend your arm, palm up, and position the wrist handle so that the pad rests on your palm.6. Begin exercising by curling your wrist while keeping your arm steady. In other words only your hand
should move while the rest of the arm stays stationary. Curl the wrist as far as you can and then return it tothe starting position.
7. Control your hand’s movement both while lifting and returning to the starting position.8. Use the same motion for the desired number of repetitions.9. Then reposition yourself to the opposite side for exercising the other arm.
Wrist Supination (from the back):
1. Adjust the resistance to the desired level.2. Adjust the slider height so that your stretched arm is parallel to the ground, when your elbow is on the
elbow rest. That is, you should be able to stretch your arm without bending your elbow.3. Position the wheelchair so that:
(a) You are close and parallel to the curl station.(b) Your shoulder is behind the elbow rest by a distance equal to the length of you upper arm.
4. Place your elbow on the elbow rest with its tip close to the edge next to you.5. Extend your arm, palm up, and position the handle so that the pad rests on your palm.
32
6. Begin exercising by curling your wrist while keeping your arm steady. In other words only your handshould move while the rest of the arm stays stationary.
7. Curl the wrist as far as you can and then return it to the starting position. Control your hand’s movementboth while lifting and returning to the starting position.
8. Use the same motion for the desired number of repetitions.9. Then reposition yourself to the opposite side for exercising the other arm.
33
Wrist Pronation
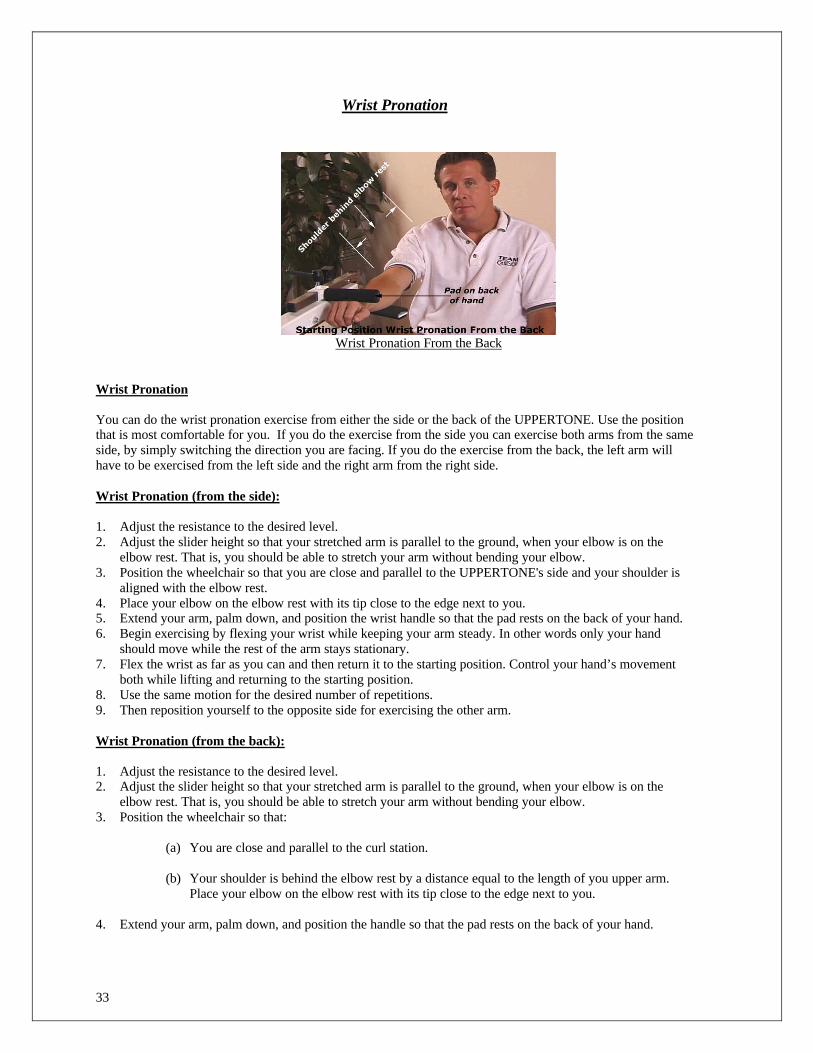
Wrist Pronation From the Back
Wrist Pronation
You can do the wrist pronation exercise from either the side or the back of the UPPERTONE. Use the positionthat is most comfortable for you. If you do the exercise from the side you can exercise both arms from the sameside, by simply switching the direction you are facing. If you do the exercise from the back, the left arm willhave to be exercised from the left side and the right arm from the right side.
Wrist Pronation (from the side):
1. Adjust the resistance to the desired level.2. Adjust the slider height so that your stretched arm is parallel to the ground, when your elbow is on the
elbow rest. That is, you should be able to stretch your arm without bending your elbow.3. Position the wheelchair so that you are close and parallel to the UPPERTONE's side and your shoulder is
aligned with the elbow rest.4. Place your elbow on the elbow rest with its tip close to the edge next to you.5. Extend your arm, palm down, and position the wrist handle so that the pad rests on the back of your hand.6. Begin exercising by flexing your wrist while keeping your arm steady. In other words only your hand
should move while the rest of the arm stays stationary.7. Flex the wrist as far as you can and then return it to the starting position. Control your hand’s movement
both while lifting and returning to the starting position.8. Use the same motion for the desired number of repetitions.9. Then reposition yourself to the opposite side for exercising the other arm.
Wrist Pronation (from the back):
1. Adjust the resistance to the desired level.2. Adjust the slider height so that your stretched arm is parallel to the ground, when your elbow is on the
elbow rest. That is, you should be able to stretch your arm without bending your elbow.3. Position the wheelchair so that:
(a) You are close and parallel to the curl station.
(b) Your shoulder is behind the elbow rest by a distance equal to the length of you upper arm.Place your elbow on the elbow rest with its tip close to the edge next to you.
4. Extend your arm, palm down, and position the handle so that the pad rests on the back of your hand.

34
5. Begin exercising by flexing your wrist while keeping your arm steady. In other words only your handshould move while the rest of the arm stays stationary.
6. Flex the wrist as far as you can and then return it to the starting position. Control your hand’s movementboth while lifting and returning to the starting position.
7. Use the same motion for the desired number of repetitions.8. Then reposition yourself to the opposite side for exercising the other arm.
35
Seated Crunches
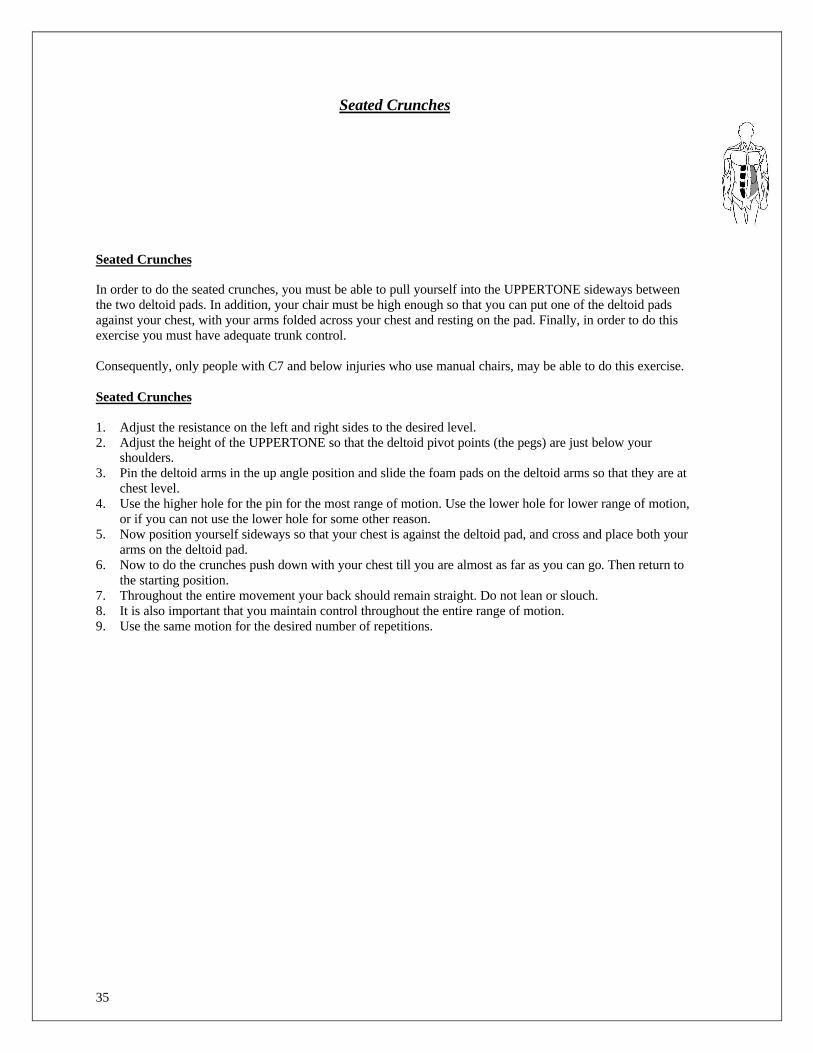
Seated Crunches
In order to do the seated crunches, you must be able to pull yourself into the UPPERTONE sideways betweenthe two deltoid pads. In addition, your chair must be high enough so that you can put one of the deltoid padsagainst your chest, with your arms folded across your chest and resting on the pad. Finally, in order to do thisexercise you must have adequate trunk control.
Consequently, only people with C7 and below injuries who use manual chairs, may be able to do this exercise.
Seated Crunches
1. Adjust the resistance on the left and right sides to the desired level.2. Adjust the height of the UPPERTONE so that the deltoid pivot points (the pegs) are just below your
shoulders.3. Pin the deltoid arms in the up angle position and slide the foam pads on the deltoid arms so that they are at
chest level.4. Use the higher hole for the pin for the most range of motion. Use the lower hole for lower range of motion,
or if you can not use the lower hole for some other reason.5. Now position yourself sideways so that your chest is against the deltoid pad, and cross and place both your
arms on the deltoid pad.6. Now to do the crunches push down with your chest till you are almost as far as you can go. Then return to
the starting position.7. Throughout the entire movement your back should remain straight. Do not lean or slouch.8. It is also important that you maintain control throughout the entire range of motion.9. Use the same motion for the desired number of repetitions.
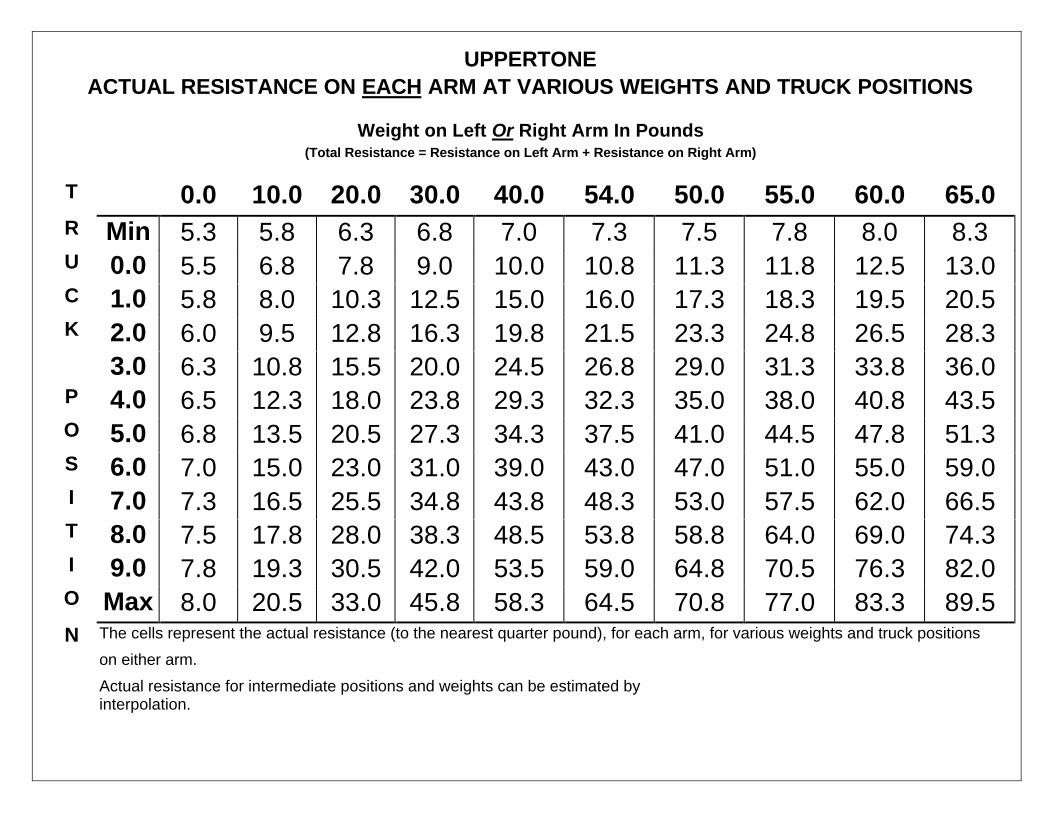
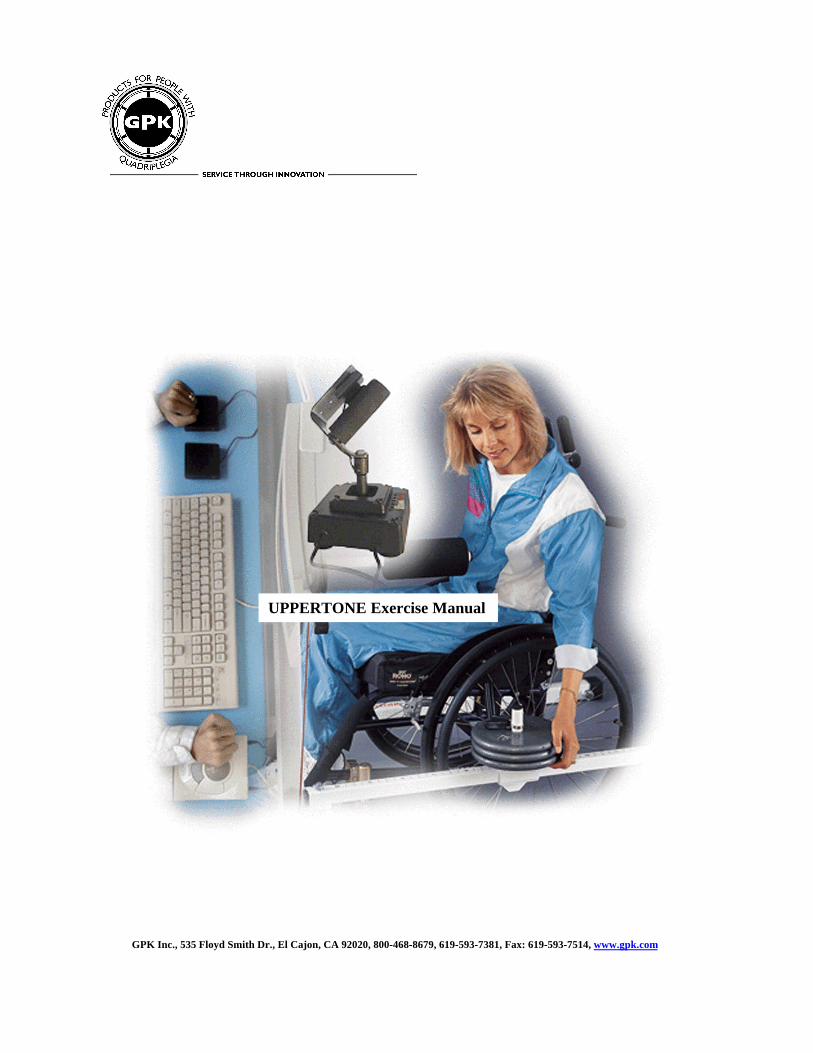
UPPERTONEACTUAL RESISTANCE ON EACH ARM AT VARIOUS WEIGHTS AND TRUCK POSITIONS
Weight on Left Or Right Arm In Pounds(Total Resistance = Resistance on Left Arm + Resistance on Right Arm)
T 0.0 10.0 20.0 30.0 40.0 54.0 50.0 55.0 60.0 65.0R Min 5.3 5.8 6.3 6.8 7.0 7.3 7.5 7.8 8.0 8.3U 0.0 5.5 6.8 7.8 9.0 10.0 10.8 11.3 11.8 12.5 13.0C 1.0 5.8 8.0 10.3 12.5 15.0 16.0 17.3 18.3 19.5 20.5K 2.0 6.0 9.5 12.8 16.3 19.8 21.5 23.3 24.8 26.5 28.3
3.0 6.3 10.8 15.5 20.0 24.5 26.8 29.0 31.3 33.8 36.0P 4.0 6.5 12.3 18.0 23.8 29.3 32.3 35.0 38.0 40.8 43.5O 5.0 6.8 13.5 20.5 27.3 34.3 37.5 41.0 44.5 47.8 51.3S 6.0 7.0 15.0 23.0 31.0 39.0 43.0 47.0 51.0 55.0 59.0I 7.0 7.3 16.5 25.5 34.8 43.8 48.3 53.0 57.5 62.0 66.5T 8.0 7.5 17.8 28.0 38.3 48.5 53.8 58.8 64.0 69.0 74.3I 9.0 7.8 19.3 30.5 42.0 53.5 59.0 64.8 70.5 76.3 82.0O Max 8.0 20.5 33.0 45.8 58.3 64.5 70.8 77.0 83.3 89.5N The cells represent the actual resistance (to the nearest quarter pound), for each arm, for various weights and truck positions
on either arm.
Actual resistance for intermediate positions and weights can be estimated byinterpolation.
37
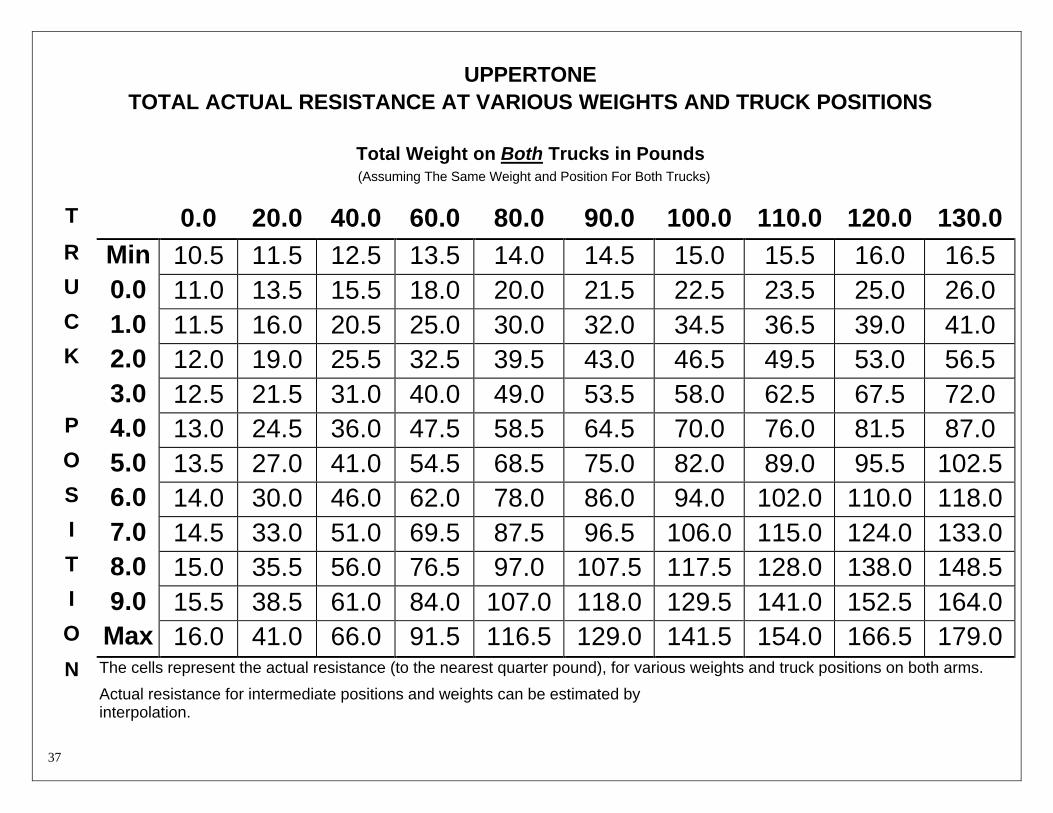
UPPERTONETOTAL ACTUAL RESISTANCE AT VARIOUS WEIGHTS AND TRUCK POSITIONS
Total Weight on Both Trucks in Pounds (Assuming The Same Weight and Position For Both Trucks)
T 0.0 20.0 40.0 60.0 80.0 90.0 100.0 110.0 120.0 130.0R Min 10.5 11.5 12.5 13.5 14.0 14.5 15.0 15.5 16.0 16.5U 0.0 11.0 13.5 15.5 18.0 20.0 21.5 22.5 23.5 25.0 26.0C 1.0 11.5 16.0 20.5 25.0 30.0 32.0 34.5 36.5 39.0 41.0K 2.0 12.0 19.0 25.5 32.5 39.5 43.0 46.5 49.5 53.0 56.5
3.0 12.5 21.5 31.0 40.0 49.0 53.5 58.0 62.5 67.5 72.0P 4.0 13.0 24.5 36.0 47.5 58.5 64.5 70.0 76.0 81.5 87.0O 5.0 13.5 27.0 41.0 54.5 68.5 75.0 82.0 89.0 95.5 102.5S 6.0 14.0 30.0 46.0 62.0 78.0 86.0 94.0 102.0 110.0 118.0I 7.0 14.5 33.0 51.0 69.5 87.5 96.5 106.0 115.0 124.0 133.0T 8.0 15.0 35.5 56.0 76.5 97.0 107.5 117.5 128.0 138.0 148.5I 9.0 15.5 38.5 61.0 84.0 107.0 118.0 129.5 141.0 152.5 164.0O Max 16.0 41.0 66.0 91.5 116.5 129.0 141.5 154.0 166.5 179.0N The cells represent the actual resistance (to the nearest quarter pound), for various weights and truck positions on both arms.
Actual resistance for intermediate positions and weights can be estimated byinterpolation.

GPK Inc.535 Floyd Smith Dr.El Cajon CA 92020
800-468-8679 (US and Canada only)619-593-7381
619-593-7514 (Fax)www.gpk.com
© Copyright GPK Inc.

39