Embed Size (px)
DESCRIPTION
Export Data
Citation preview

Export data from Excel to Table using custom Web ADI Integrator
Case: User needs a function XXFunc in responsiblity XXResp which creates Excel document and allows user to upload data from Excel sheet to custom Table.
Pre-ReqFor Microsoft Excel 2002 or 2003:1.From the Tools menu, select Macro, then Security, and then Security Level.2.In the Security Level tab, select the High option.3.In the Trusted Sources or Trusted Publishers tab, select the Trust access to Visual Basic Project option.
For Microsoft Excel 2007:1.Choose the Microsoft Office button, and then choose Excel Options. In the Trust Center category, choose Trust Center Settings, and then the Macro Settings category.2.Select the Disable all macros except digitally signed macros option.3.Select the Trust access to the VBA project object model option.Set profile option 'BNE Allow No Security Rule' to Yes at user level. The default value is No.Add responsibilities 'Desktop Integration Manager', 'Desktop Integrator' to the current user.
Steps1.Create custom table 'XX_ONT_WEBADI_TEST'. Create custom API 'XX_ONT_WEBADI_TEST_PKG' which validates and inserts data into custom table.2.Create Integrator 'XX ONT ADI Test Integrator'.3.Create Interface 'XX ONT ADI Test Interface' to the above integrator and set custom API 'XX_ONT_WEBADI_TEST_PKG' to the interface.4.Create Contents(Optional).5.Create Layout 'XX ONT ADI Test Layout' and set to integrator 'XX ONT ADI Test Integrator'.6.You can test at this stage from Desktop Integrator responsiblity.
7.Create Function 'XX ONT ADI Test Func' and set integrator to the function. Attach this function to the menu under resposibility.8.Navigate to Resposibility->Menu->XX ONT ADI Test Func. Opens OA Page. Click on Create Document button opens Excel Sheet. Detailed Steps 1.Create custom table 'XX_ONT_WEBADI_TEST'. Create custom API 'XX_ONT_WEBADI_TEST_PKG' which validates and inserts data into custom table. Paremeters in procedure Load_Prc() should be the columns in the table which you want to update using Web ADI integrator.

2.Create Integrator 'XX ONT ADI Test Integrator'. Navigation: Desktop Integration Manager(R)->Create IntegratorEnter name, internal name and application.Must select 'Display In Create Document Page' checkbox which allows current integrator available for creating document(Excel). Click Next.
3.Create Interface 'XX ONT ADI Test Interface' to the above integrator and set custom API 'XX_ONT_WEBADI_TEST_PKG' to the interface. Click Apply.

In next screen, click Select radio button of interface 'XX ONT ADI Test Interface' and wait. This reads API given in the interface and loads procedure parameters as attributes. Click Next.
4.Create Contents(Optional). Click Submit.

5.Create Layout 'XX ONT ADI Test Layout' and set to integrator 'XX ONT ADI Test Integrator'.Navigation: Desktop Integrator(R)->Define Layout
Select integrator 'XX ONT ADI Test Integrator' from dropdown. Click Go.
This screen shows exisitng layouts if there are any. Click on Create button to create one.
Provide layout name as 'XX ONT ADI Test Layout' and select no.of headers 1. Click Next.
This picks integrator attributes as layout fields. Select Placement as 'Line' and provide default values if there are any required. Click Apply.

Layout created successfully.
6.Test from Desktop Integrator responsiblity.Navigation: Desktop Integrator(R)->Create Document
Select integrator as XX ONT ADI Test Integrator. Click Next.

In Review stage, Click Create Document button. This opens popup window to Open/Save a file WebADI.xls. Click Open button.
This opens Excel sheet with format given in layout 'XX ONT ADI Test Layout'. Close Download OA window.

Enter Data into excel sheet. To upload data into table, navigate to Add-Ins(M)->Oracle->Upload from excel sheet menu on top. This opens Upload window. Click on Upload button. Once data is successully uploaded, excel sheet shows green icon for each line indicates no errors in upload.


Check same from backend.

7.Create Function 'XX ONT ADI Test Func' and set integrator to the function. Attach this function to the menu under resposibility.Navigation: Application Developer(R)->Application->Function
Create function as shown in below screens.

In the next screen you need to set form parameter. Modify below string and set correct integrator, layout and content details. bne:page=BneCreateDoc&bne:language=US&bne:reporting=N&bne:viewer=BNE:EXCEL2000,2003,2007&bne:integrator=XXONT:XXGF_TEST1_INTG_INTG&bne:layout=XXONT:XXGF_TEST1_INTG_DFLT&bne:content=XXONT:XXGF_TEST1_INTG_CNT

Add function 'XX ONT ADI Test Func' to menu. Prompt given as 'ADI Test Load'.

8.Navigate to Resposibility->Menu->ADI Test Load. This opens OA page. Click on Create Document button to open new excel sheet with layout.


Method – 2
WEB ADI Creation (using API)
1: Create a table Where WEB ADI will store the data. Table might be created in Custom schema.
2. Create a Package. (It has to be in APPS Schema) In this case XX_TRAVEL_EXPENSE_ADI_PKG package, procedure XX_TRAVEL_EXPENSE_PRC.** Note XX_TRAVEL_EXPENSE_PRC parameters should start with p_(
p_company VARCHAR2, p_vendor_name VARCHAR2, p_invoice_num VARCHAR2, p_inv_currency VARCHAR2, p_invoice_date DATE,
)then only prompt will automatically appear company , vendor_name, invoice_num, inv_currency, invoice_date.
3. Once the database object is created, then create integrator.DECLARE ln_application_id NUMBER; lc_integtr_code VARCHAR2 (50); lx_interface_code VARCHAR2 (50); lx_param_list_code VARCHAR2 (50); ln_application_id NUMBER; ln_ret number; --Create integrator BEGIN bne_integrator_utils.create_integrator (p_application_id => 20003, p_object_code => 'XX_TRAVEL_INV', p_integrator_user_name => 'XX Travel Invoice Upload WEB ADI', p_language => 'US', p_source_language => 'US', p_user_id => -1, p_integrator_code => lc_integtr_code ); DBMS_OUTPUT.put_line ('lc_integtr_code = ' || lc_integtr_code); END;
Check it once it is created
SELECT *
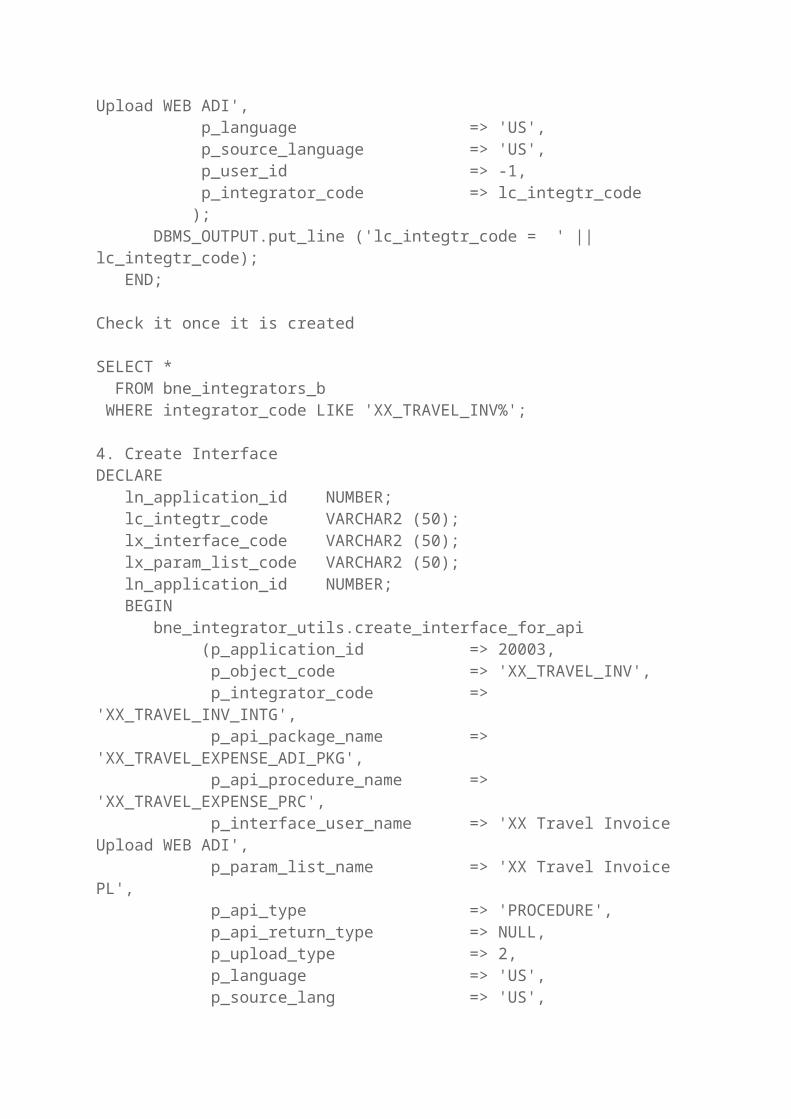
FROM bne_integrators_b WHERE integrator_code LIKE 'XX_TRAVEL_INV%';
4. Create InterfaceDECLARE ln_application_id NUMBER; lc_integtr_code VARCHAR2 (50); lx_interface_code VARCHAR2 (50); lx_param_list_code VARCHAR2 (50); ln_application_id NUMBER; BEGIN bne_integrator_utils.create_interface_for_api (p_application_id => 20003, p_object_code => 'XX_TRAVEL_INV', p_integrator_code => 'XX_TRAVEL_INV_INTG', p_api_package_name => 'XX_TRAVEL_EXPENSE_ADI_PKG', p_api_procedure_name => 'XX_TRAVEL_EXPENSE_PRC', p_interface_user_name => 'XX Travel Invoice Upload WEB ADI', p_param_list_name => 'XX Travel Invoice PL', p_api_type => 'PROCEDURE', p_api_return_type => NULL, p_upload_type => 2, p_language => 'US', p_source_lang => 'US', p_user_id => -1, p_param_list_code => lx_param_list_code, p_interface_code => lx_interface_code ); DBMS_OUTPUT.put_line ('lx_interface_code = ' || lx_interface_code); DBMS_OUTPUT.put_line ('lx_param_list_code = ' || lx_param_list_code); --EXCEPTION -- WHEN OTHERS -- THEN -- DBMS_OUTPUT.put_line ('Error = ' || SQLERRM); END;
Check Interface
SELECT * FROM bne_interface_cols_tl WHERE interface_code LIKE 'XX%' ;
SELECT * FROM bne_interface_cols_vl WHERE interface_code LIKE 'XX%';
SELECT * FROM bne_interface_cols_b WHERE interface_code LIKE 'XX%'

4. Create an ADI function with following values:
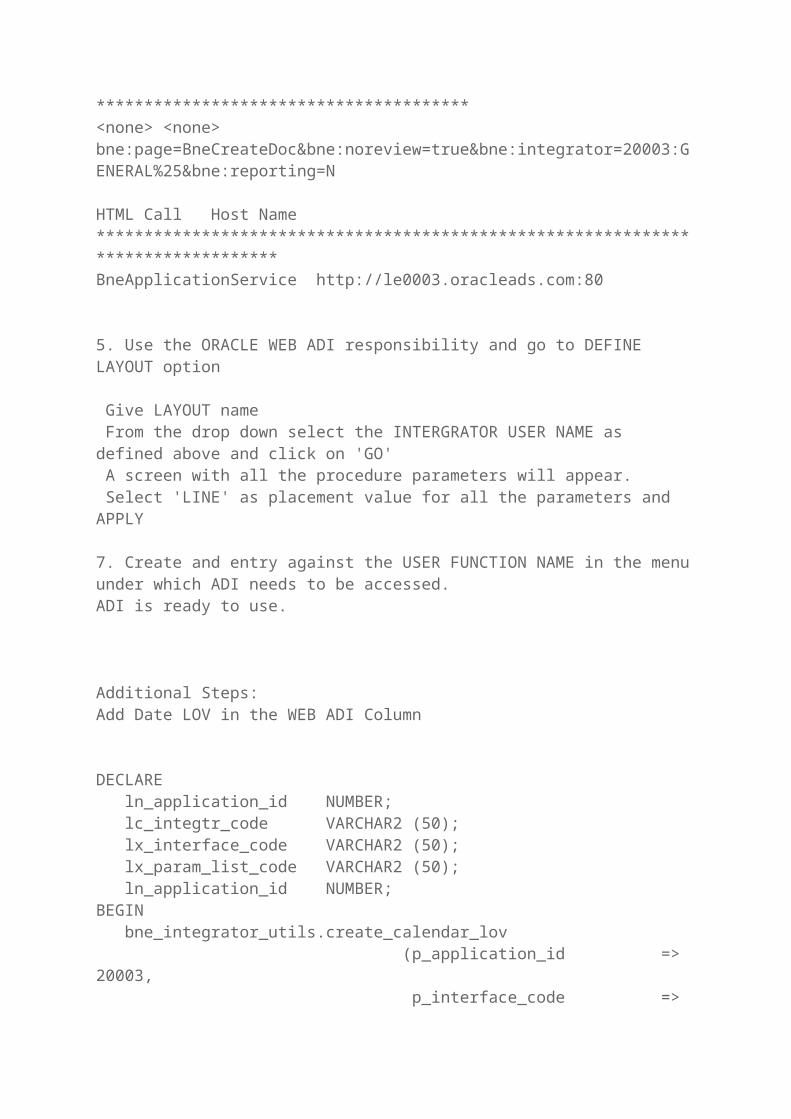
FunctionName UserFunctionName Description Type MaintainanceMode ContextDependence************************************************************************************************************************<User defined> <User defined> <User defined> SSWA servlet function None Responsibility
Form Application *********************************************************************************Parameter***************************************<none> <none> bne:page=BneCreateDoc&bne:noreview=true&bne:integrator=20003:GENERAL%25&bne:reporting=N
HTML Call Host Name*********************************************************************************BneApplicationService http://le0003.oracleads.com:80
5. Use the ORACLE WEB ADI responsibility and go to DEFINE LAYOUT option
Give LAYOUT name From the drop down select the INTERGRATOR USER NAME as defined above and click on 'GO' A screen with all the procedure parameters will appear. Select 'LINE' as placement value for all the parameters and APPLY
7. Create and entry against the USER FUNCTION NAME in the menu under which ADI needs to be accessed.ADI is ready to use.
Additional Steps:Add Date LOV in the WEB ADI Column
DECLARE ln_application_id NUMBER; lc_integtr_code VARCHAR2 (50); lx_interface_code VARCHAR2 (50); lx_param_list_code VARCHAR2 (50); ln_application_id NUMBER;BEGIN bne_integrator_utils.create_calendar_lov (p_application_id => 20003,
p_interface_code => 'XX_TRAVEL_INV_INTF', p_interface_col_name => 'P_INVOICE_DATE',--proc params p_window_caption => 'Select Date', p_window_width => 400, p_window_height => 300, p_table_columns => 'INVOICE_DATE', p_user_id => 10803 );END;
ADD Lov in the fields,
DECLARE ln_application_id NUMBER; lc_integtr_code VARCHAR2 (50); lx_interface_code VARCHAR2 (50); lx_param_list_code VARCHAR2 (50); ln_application_id NUMBER; BEGIN bne_integrator_utils.create_table_lov (p_application_id => 20003, p_interface_code => 'XX_TRAVEL_INV_INTF', p_interface_col_name => 'P_INV_CURRENCY', p_id_col => 'CURRENCY_CODE', p_mean_col => 'CURRENCY_CODE', p_desc_col => 'CURRENCY_CODE',
p_table => 'GL_CURRENCIES', p_addl_w_c => 'NVL (ENABLED_FLAG, ''N'') = ''Y''', p_window_caption => 'Select Currency', p_window_width => 400, p_window_height => 300, p_table_block_size => 10, p_table_sort_order => 'Yes', p_user_id => 0 );END;
Other usefull API:1. Delete IntegratorDECLARE v_value NUMBER;BEGIN v_value := bne_integrator_utils.delete_integrator (20003, 'XX_TRAVEL_INV_INTG'); DBMS_OUTPUT.put_line (v_value);END;

2. delete InterfaceDECLARE v_value NUMBER;BEGIN v_value := bne_integrator_utils.DELETE_INTERFACE (20003, 'XX_TRAVEL_INV_INTF'); DBMS_OUTPUT.put_line (v_value);END;
Change the Prompt lebel,UPDATE bne_interface_cols_tl SET prompt_left = 'Company', prompt_above = 'Company', user_hint = '*List - Text' WHERE prompt_left = 'COMPANY' AND interface_code = 'XX_TRAVEL_INV_INTF' AND LANGUAGE = 'US';
UPDATE bne_interface_cols_tl SET prompt_left = 'Invoice Date', prompt_above = 'Invoice Date', user_hint = '*List - Date' WHERE prompt_left = 'INVOICE_DATE' AND interface_code = 'XX_TRAVEL_INV_INTF' AND LANGUAGE = 'US';

Method – 3
How to Create Custom WebADI IntegratorsNovember 11, 2008 10:40 pm ⋅ 16 Comments ⋅ Marian Crkon
Web Applications Desktop Integrator (Web ADI) is a self-service Oracle application, accessed using a browser. Unlike ADI, the Web ADI software is not installed on individual client machines, as the processing takes place on the server rather than on individual client PCs.
Web ADI generates Microsoft Excel or Word documents on your desktop, and downloads the data you have selected from the application. You can modify the data in the Microsoft Excel or Word documents, working either online or offline, and upload the data using Web ADI. In addition to the Web ADI integrators supplied with Oracle Applications, you can create your own integrators to allow download and upload data from Oracle windows or direct from Web ADI.
Except for HRMS, it seems to me that other Oracle Development teams have not utilized Web ADI to its full potential. There were some discussions in forums and Oracle blogs on whether this approach is even needed. I feel like every available interface and API that let you integrate with legacy or 3rd party applications should come with a standard Web ADI integrator.
Creating Custom Integrators
Thanks to the HRMS Web ADI, you can define your own custom HRMS and non-HRMS integrators and in a combination with the seeded Oracle APIs and interfaces, implement elegant solutions for downloading or uploading data. Examples for frequently used custom integrators include upload of employees, users, POs and requisitions, AP invoices, project events, AR transactions, etc.
Creating custom integrators is done by a system administrator. Let’s define an integrator to create employees to explain how to create custom integrators. Employees and employee assignments can be created using the standard HR_EMPLOYEE_API. Our custom integrator will upload data to this API.
Grant Access to Required Functions
As System Administrator, navigate to Application > Menu, and query up ‘Desktop Integration Menu’. Make sure to include functions required for respective integrators. In case of custom Create Employee integrator, you’ll need to include the following functions (no prompts are necessary):
HR Integrator Setup Integrator HR Maintain Integrator Form Functions Integrator
Create ‘HR Integrator Setup’ Web ADI Document

Log in as Desktop Integration responsibility. Select Create Document from the menu. The Settings page of the Web ADI wizard appears.
In the Settings page, select a spreadsheet viewer in the Viewer field. Keep the Reporting check box unchecked, as this integrator is used to upload data to the database.
In the Integrator page, select the seeded integrator “HR Integrator Setup”. In the Layout page, select the default layout “HR Integrator Setup”. In the Content page, select None. In the Review page, you can see full details of the document that will be created. Choose the
Back button if you want to change any of the information, or choose the Create Document button to continue.
A spreadsheet document is created, containing all the fields you need to enter to create your own integrator.
Define all fields to create your Create Employee integrator and upload it to the database.
Controlling Access to Custom Integrators
Custom integrators, like predefined integrators, must be associated with form functions. Follow the steps below to associate your Create Employee integrator with the functions required to define Web ADI layout and Web ADI document.
Select Create Document from the Web ADI menu. Select a spreadsheet viewer. Leave the Reporting check box unselected to download data for
updating. Select HR Maintain Integrator Form Functions Integrator. Enter the Application Short Name (for example, your custom application name). Optionally,
enter the integrator name. The displayed spreadsheet shows your selected custom integrators, and has a column for
associating form functions. Enter the form function required for controlling access to the integrator.
Upload your changes to the database.

Define Layout of Custom Integrator
Each integrator must have at least one layout specifying the columns to appear in the spreadsheet. To define a layout:
Choose Define Layout from the Web ADI menu. The Layout page appears. Select the integrator for which you want to define the layout, and choose Go. Choose the Define Layout button to define a new layout. In the Define Layout page, enter a unique name for the layout. This appears whenever the
user is required to select the layout, so should clearly indicate the purpose of the layout. Enter a unique key. The key is used internally by the system to identify the mapping. The Field List defaults to the complete list of columns available in the view or API. Choose Continue. In case of Create Employee integrator, the layout is based on the the
HR_EMPLOYEE_API columns. In the next page, you select a subset of these fields to include in your layout.
Create ‘Create Employee’ Spreadsheet

And finally, using the custom integrator and layout defined above, create a new ‘Create Employee’ WebADI upload spreadsheet:
From the Navigator window (Oracle Personal Home Page), click on ‘Desktop Integration’ responsibility. The Settings page of the Web ADI wizard appears.
In the Settings page, select a spreadsheet viewer in the Viewer field. Keep the Reporting check box unchecked, as this integrator is used to upload data to the database.
In the Integrator page, select your new integrator ‘Create Employee’. In the Layout page, select the default layout “Create Employee”. In the Content page, select None. In the Review page, you can see full details of the document that will be created. Choose the
Back button if you want to change any of the information, or choose the Create Document button to continue.
A spreadsheet document is created and ready to use for creating employees. Save a local copy to your PC.