Embed Size (px)
DESCRIPTION
This paper outlines how to extend Oracle E-Business Suite functionality utilizing Oracle Application Express. This paper is a collaboration between both product teams to ensure that any extensions developed following the strategy outlined in this paper are fully supported. Recommended architecture and security considerations are discussed in detail.
Citation preview
An Oracle White Paper
March 2011
Extending Oracle E-Business Suite Release 12 using Oracle Application Express
Extending Oracle E-Business Suite Release 12 using Oracle Application Express
Disclaimer
The following is intended to outline our general product direction. It is intended for information purposes
only, and may not be incorporated into any contract. It is not a commitment to deliver any material, code, or
functionality, and should not be relied upon in making purchasing decisions. The development, release, and
timing of any features or functionality described for Oracle‟s products remains at the sole discretion of
Oracle.
Extending Oracle E-Business Suite Release 12 using Oracle Application Express
Executive Overview ........................................................................... 2
Introduction ....................................................................................... 2
Prerequisites ................................................................................. 3
Concept Overview ............................................................................. 3
Oracle Application Express Architecture ............................................ 4
Recommended Deployment Architecture ...................................... 4
Installing Oracle Application Express ............................................. 5
Oracle Application Express Schemas and Workspaces ................. 6
Oracle Application Express Authentication and Authorization ........ 8
Accessing Oracle E-Business Suite Data .......................................... 9
Updating Oracle E-Business Suite Tables ..................................... 9
Downloading and Installing the Sample Code .............................. 11
Integrating with the Oracle E-Business Suite ................................... 11
Creating an Oracle Application Express Application .................... 12
Defining the Oracle E-Business Suite Profile and Functions ........ 16
Defining Oracle E-Business Suite Menus and Responsibilities .... 18
Configuring the Oracle Application Express Login Process ......... 21
Defining Oracle Application Express Authorizations .................... 24
Installing the Sample Packaged Application ................................ 27
Running the Application Express Extension .................................... 28
Conclusion ...................................................................................... 30
Acknowledgements ..................................................................... 31
Extending Oracle E-Business Suite Release 12 using Oracle Application Express
2
Executive Overview
This paper outlines how to extend Oracle E-Business Suite functionality utilizing Oracle
Application Express. This paper is a collaboration between both product teams to ensure that
any extensions developed following the strategy outlined in this paper are fully supported.
Recommended architecture and security considerations are discussed in detail.
Introduction
Oracle E-Business Suite delivers a wide range of functionality to handle core areas of your
business processing needs. However, there are situations where you want to extend your
information systems beyond the range of Oracle E-Business Suite. Many times these
necessary extensions are meant to handle unique industry conventions, specific customer
requirements, or perhaps to offer some other competitive edge. Sometimes these change
requests are simple enough, but other times more extensive customizations are needed. In
these scenarios, Oracle Application Express, also known as Oracle APEX, provides an easy
way to create supplemental applications that are easily integrated with your Oracle E-Business
Suite and its data.
Oracle Application Express is a rapid web application development tool for the Oracle
database. Oracle Application Express combines the qualities of a personal database
(productivity, ease of use, and flexibility) with the qualities of an enterprise database (security,
integrity, performance, scalability, availability, and built for the web). The browser based
interface, declarative programming framework, and simple wizards make Oracle Application
Express easy to learn and enable you to quickly build robust applications.
Oracle Application Express offers you a quick and highly productive way to extend your Oracle
E-Business Suite environment with almost no impact to your existing implementation. By
moving custom behaviors out of Oracle E-Business Suite and into Oracle Application Express,
you can make Oracle E-Business Suite patching and upgrading much simpler.
You should be able to easily combine your Oracle Application Express applications with your
Oracle E-Business Suite installation using the architecture and techniques described in this
white paper.
Extending Oracle E-Business Suite Release 12 using Oracle Application Express
3
Prerequisites
The prerequisites for the solution given in this paper are:
Oracle E-Business Suite 12.1.3 or above
Oracle E-Business Suite Patch 9659153
{Go to My Oracle Support Patches & Updates:
https://updates.oracle.com/ARULink/PatchSearch/process_form?bug=9659153}
Oracle Database 10.2.0.3 or above
Oracle Application Express 3.2 or above
The examples in this document use Oracle Application Express 4.0.2. The exact steps and screen
shots will be different for earlier versions of Oracle Application Express.
Concept Overview
Oracle Application Express offers you the ability to create reports, charts, and calendars as well as
pages to provide for data review and manipulation. To allow you to create Oracle Application Express
applications that reference Oracle E-Business Suite data, the desired data is exposed through views that
are owned by the APPS schema. 'SELECT' access to those views is then granted to a new schema (for
this document, APEX_EBS). Because direct insert/update/delete of Oracle E-Business Suite data is
unsupported, applications that manipulate Oracle E-Business Suite data will use the public Oracle E-
Business Suite APIs. Reference to these APIs can either be coded into the Oracle Application Express
applications or you can define 'INSTEAD OF' triggers against the new views which call the
appropriate APIs.
The extensions built in Oracle Application Express will appear seamless to your end users because you
can use the same authentication (who can login) and authorization (who can see what) within your
Oracle Application Express applications that are used within your Oracle E-Business Suite installation.
Your new applications can either be stand-alone or fully integrated. Stand-alone applications are
accessed directly but use the same login credentials used for Oracle E-Business Suite access. Fully
integrated applications are registered within the Oracle E-Business Suite so they are available from
within the Oracle E-Business Suite menus. Oracle Application Express contains a pre-configured
Authentication Scheme for Oracle Single Sign-on (OSSO). If your Oracle E-Business Suite instance
uses OSSO, setting up authentication will be very simple. If you are using custom authentication for
Oracle E-Business Suite, you can still achieve seamless integration but you will need to code a function
within the APPS schema that validates the user and then add an authentication scheme to your Oracle
Application Express applications that call that new function.
This document discusses the Oracle Application Express architecture and provides detailed
instructions for creating all the components necessary to extend Oracle E-Business Suite. In support
of the instructions, scripts and a sample packaged application are available for download to ensure that
any developer can quickly replicate the examples.
Extending Oracle E-Business Suite Release 12 using Oracle Application Express
4
Oracle Application Express Architecture
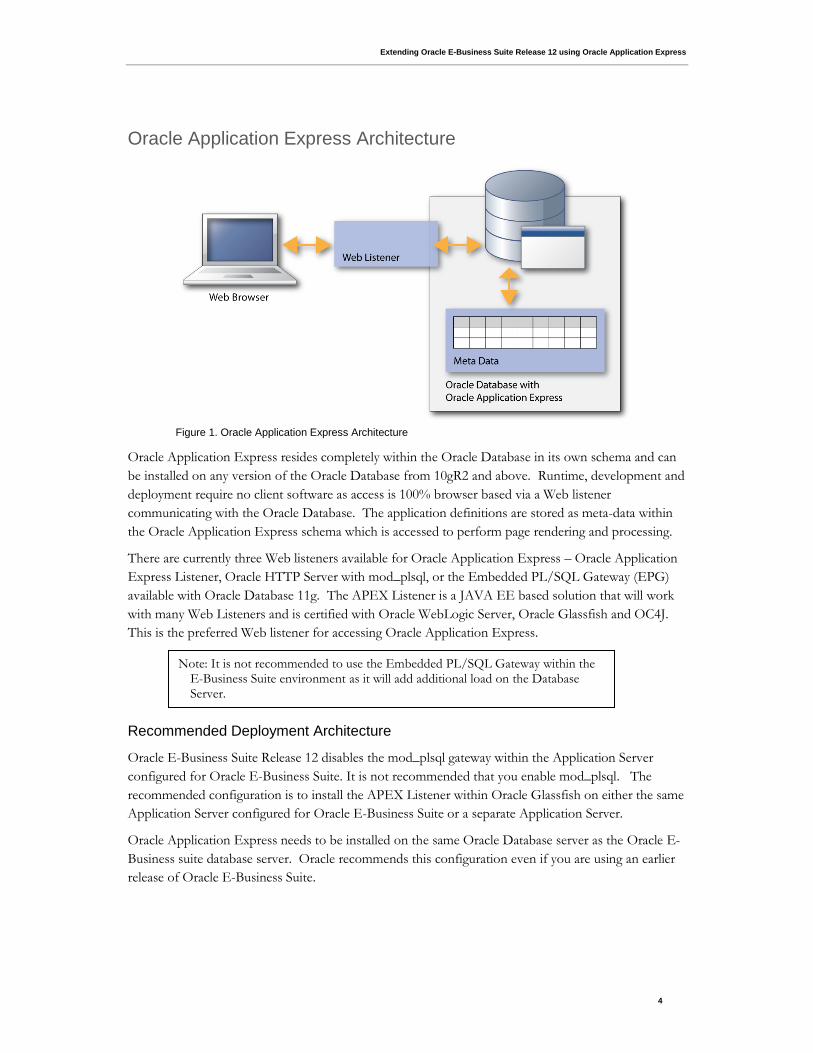
Figure 1. Oracle Application Express Architecture
Oracle Application Express resides completely within the Oracle Database in its own schema and can
be installed on any version of the Oracle Database from 10gR2 and above. Runtime, development and
deployment require no client software as access is 100% browser based via a Web listener
communicating with the Oracle Database. The application definitions are stored as meta-data within
the Oracle Application Express schema which is accessed to perform page rendering and processing.
There are currently three Web listeners available for Oracle Application Express – Oracle Application
Express Listener, Oracle HTTP Server with mod_plsql, or the Embedded PL/SQL Gateway (EPG)
available with Oracle Database 11g. The APEX Listener is a JAVA EE based solution that will work
with many Web Listeners and is certified with Oracle WebLogic Server, Oracle Glassfish and OC4J.
This is the preferred Web listener for accessing Oracle Application Express.
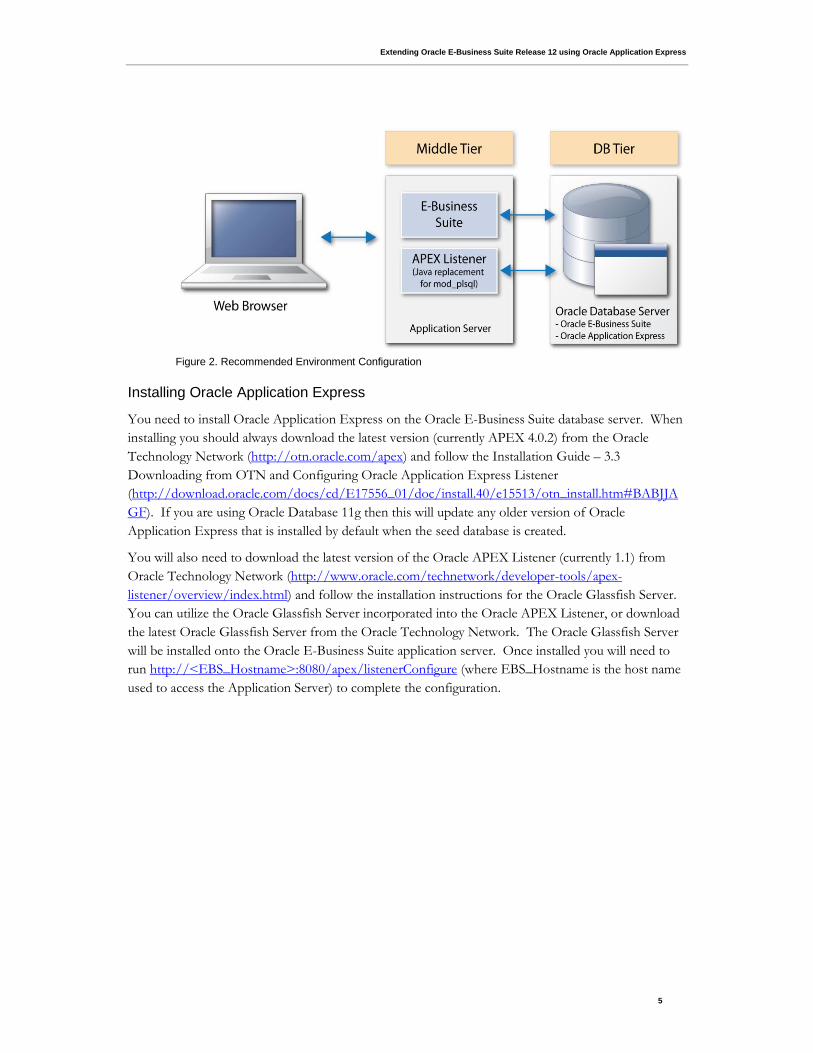
Recommended Deployment Architecture
Oracle E-Business Suite Release 12 disables the mod_plsql gateway within the Application Server
configured for Oracle E-Business Suite. It is not recommended that you enable mod_plsql. The
recommended configuration is to install the APEX Listener within Oracle Glassfish on either the same
Application Server configured for Oracle E-Business Suite or a separate Application Server.
Oracle Application Express needs to be installed on the same Oracle Database server as the Oracle E-
Business suite database server. Oracle recommends this configuration even if you are using an earlier
release of Oracle E-Business Suite.
Note: It is not recommended to use the Embedded PL/SQL Gateway within the E-Business Suite environment as it will add additional load on the Database Server.
Extending Oracle E-Business Suite Release 12 using Oracle Application Express
5
Figure 2. Recommended Environment Configuration
Installing Oracle Application Express
You need to install Oracle Application Express on the Oracle E-Business Suite database server. When
installing you should always download the latest version (currently APEX 4.0.2) from the Oracle
Technology Network (http://otn.oracle.com/apex) and follow the Installation Guide – 3.3
Downloading from OTN and Configuring Oracle Application Express Listener
(http://download.oracle.com/docs/cd/E17556_01/doc/install.40/e15513/otn_install.htm#BABJJA
GF). If you are using Oracle Database 11g then this will update any older version of Oracle
Application Express that is installed by default when the seed database is created.
You will also need to download the latest version of the Oracle APEX Listener (currently 1.1) from
Oracle Technology Network (http://www.oracle.com/technetwork/developer-tools/apex-
listener/overview/index.html) and follow the installation instructions for the Oracle Glassfish Server.
You can utilize the Oracle Glassfish Server incorporated into the Oracle APEX Listener, or download
the latest Oracle Glassfish Server from the Oracle Technology Network. The Oracle Glassfish Server
will be installed onto the Oracle E-Business Suite application server. Once installed you will need to
run http://<EBS_Hostname>:8080/apex/listenerConfigure (where EBS_Hostname is the host name
used to access the Application Server) to complete the configuration.

Extending Oracle E-Business Suite Release 12 using Oracle Application Express
6
Figure 3. Oracle APEX Listener Configuration
After completing the installation steps for both Oracle Application Express (including enabling
Network Services in Oracle Database 11g if necessary) and Oracle APEX Listener, you create a
workspace for your development and then create applications within that workspace. For your
production instance it is highly recommended to run Oracle Application Express in runtime-only
mode to further harden security [See: About the Oracle Application Express Runtime Environment
http://download.oracle.com/docs/cd/E17556_01/doc/install.40/e15513/otn_install.htm#CEGCBB
CJ]
Oracle Application Express Schemas and Workspaces
Workspaces are logical containers within Oracle Application Express that provide functional security.
Workspaces can be associated with one or more database schemas. Each schema associated with an
Oracle Application Express workspace can be used to parse SQL and PL/SQL requests.
Oracle E-Business Suite uses a schema called APPS. For better security, avoid associating the APPS
schema with an Oracle Application Express workspace, because associating the APPS schema allows
Oracle Application Express applications full access to all of the underlying Oracle E-Business Suite
tables, which is a security risk. Instead, create at least one separate schema in the Oracle E-Business
Suite database for developing your Oracle Application Express applications.
Extending Oracle E-Business Suite Release 12 using Oracle Application Express
7
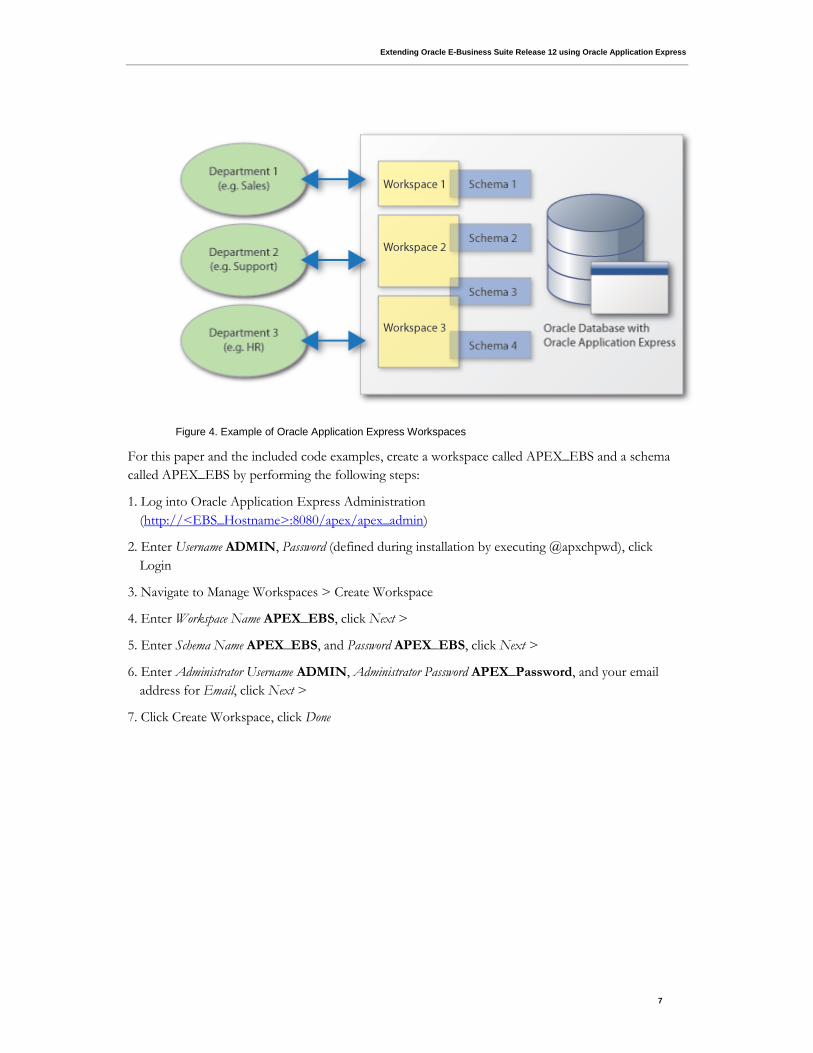
Figure 4. Example of Oracle Application Express Workspaces
For this paper and the included code examples, create a workspace called APEX_EBS and a schema
called APEX_EBS by performing the following steps:
1. Log into Oracle Application Express Administration
(http://<EBS_Hostname>:8080/apex/apex_admin)
2. Enter Username ADMIN, Password (defined during installation by executing @apxchpwd), click
Login
3. Navigate to Manage Workspaces > Create Workspace
4. Enter Workspace Name APEX_EBS, click Next >
5. Enter Schema Name APEX_EBS, and Password APEX_EBS, click Next >
6. Enter Administrator Username ADMIN, Administrator Password APEX_Password, and your email
address for Email, click Next >
7. Click Create Workspace, click Done
Extending Oracle E-Business Suite Release 12 using Oracle Application Express
8
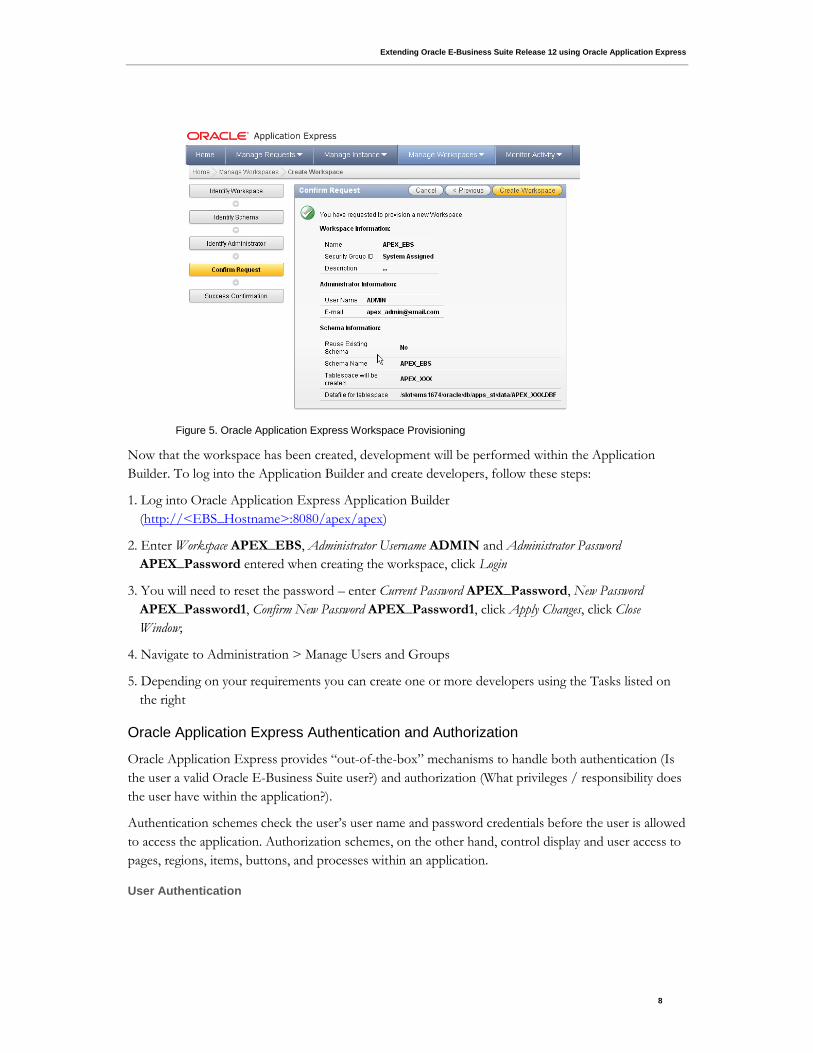
Figure 5. Oracle Application Express Workspace Provisioning
Now that the workspace has been created, development will be performed within the Application
Builder. To log into the Application Builder and create developers, follow these steps:
1. Log into Oracle Application Express Application Builder
(http://<EBS_Hostname>:8080/apex/apex)
2. Enter Workspace APEX_EBS, Administrator Username ADMIN and Administrator Password
APEX_Password entered when creating the workspace, click Login
3. You will need to reset the password – enter Current Password APEX_Password, New Password
APEX_Password1, Confirm New Password APEX_Password1, click Apply Changes, click Close
Window;
4. Navigate to Administration > Manage Users and Groups
5. Depending on your requirements you can create one or more developers using the Tasks listed on
the right
Oracle Application Express Authentication and Authorization
Oracle Application Express provides “out-of-the-box” mechanisms to handle both authentication (Is
the user a valid Oracle E-Business Suite user?) and authorization (What privileges / responsibility does
the user have within the application?).
Authentication schemes check the user‟s user name and password credentials before the user is allowed
to access the application. Authorization schemes, on the other hand, control display and user access to
pages, regions, items, buttons, and processes within an application.
User Authentication
Extending Oracle E-Business Suite Release 12 using Oracle Application Express
9
There are several pre-configured authentication schemes defined within Oracle Application Express
that can be utilized, specifically Oracle Single Sign-On (OSSO) or custom authentication schemes [For
more information see:
http://download.oracle.com/docs/cd/E17556_01/doc/user.40/e15517/sec.htm#BABHIEIA].
Once you have configured either OSSO or a custom authentication, you will be able to log into your
Oracle Application Express applications using any valid OSSO or Oracle E-Business Suite user name
and password.
Accessing Oracle E-Business Suite Data
Oracle Application Express provides numerous wizards to rapidly build application components on
existing Oracle tables or views. However, a prerequisite of many wizards within Oracle Application
Express is that the underlying tables or views contain primary key constraints. Given Oracle E-
Business Suite tables and views do not typically include primary key constraints, it is advisable to define
additional views that incorporate primary key constraints for the Oracle Applications objects you wish
to access. For security purposes, it is recommended Oracle E-Business Suite data is accessed only
through these views. The views can incorporate security, joins, etc., and prevent Oracle Application
Express applications from making any unauthorized changes to the underlying data.
Below is sample code for creating such a view in the APPS schema –
CREATE OR REPLACE VIEW apex_ebs_user
( user_id
, user_name
, start_date
, end_date
, description
, email_address
, user_guid
, person_party_id
, CONSTRAINT apex_ebs_user_pk
PRIMARY KEY (user_id)
RELY DISABLE NOVALIDATE
)
AS
SELECT user_id
, user_name
, start_date
, end_date
, description
, email_address
, user_guid /* Used for Single-Sign On */
, person_party_id /* FK to party information */
FROM fnd_user;
It is then necessary to grant rights to the new schema (APEX_EBS) from within the APPS schema -
GRANT SELECT ON apex_ebs_user TO APEX_EBS;
GRANT SELECT on fnd_responsibility_vl TO APEX_EBS;
The final step is to create a corresponding view within the APEX_EBS schema -
CREATE OR REPLACE VIEW apex_ebs_user AS
SELECT * from apps.apex_ebs_user;
Updating Oracle E-Business Suite Tables
Extending Oracle E-Business Suite Release 12 using Oracle Application Express
10
Although it may be tempting to insert/update/delete records on Oracle E-Business Suite tables
directly, this is unsupported and must be avoided. Please keep in mind that direct updates to Oracle E-
Business Suite tables is not supported unless explicitly documented. Direct updates will bypass
validation, security and business logic which could lead to data corruption or unexpected system
behavior. We recommend that all Oracle E-Business Suite updates are made through calls to public
APIs. The Oracle E-Business Suite Integration Repository provides a searchable list of public APIs for
the system.
Below is sample code for creating a package body within the APPS Schema:
CREATE OR REPLACE PACKAGE BODY apex_integration_sample_apis AS
FUNCTION apex_validate_login ( p_username in varchar2
, p_password in varchar2
) RETURN BOOLEAN
IS
BEGIN
RETURN fnd_user_pkg.validatelogin(p_username, p_password);
END apex_validate_login;
PROCEDURE apex_update_email ( p_username in varchar2
, p_owner in varchar2
, p_email_address in varchar2
)
IS
BEGIN
wf_event.setdispatchmode('async');
fnd_user_pkg.updateuser
( x_user_name => p_username
, x_owner => p_owner
, x_email_address => p_email_address);
END apex_update_email;
END apex_integration_sample_apis;
/
When utilizing the Oracle Application Express wizards on the new views to define applications, DML
automatic row processes will be defined referencing the view specified. These processes can be deleted
and alternate processes written which call the appropriate APIs. An alternative is to create „INSTEAD
OF‟ triggers on these new views which call the API to change the data in the tables. These triggers
only need to be defined once against each view and will allow the standard Oracle Application Express
page processes that are generated as part of the page creation wizards to be utilized.
Below is sample code for creating such a trigger in the new schema. This code is not included in the
sample code provided, as our examples don‟t update the fnd_flex_values records.
CREATE OR REPLACE TRIGGER apex_fnd_flex_values_tr
INSTEAD OF INSERT OR UPDATE ON apex_fnd_flex_values
DECLARE
v_storage_value VARCHAR2(32000);
BEGIN
IF INSERTING THEN
fnd_flex_val_api.create_independent_vset_value
( p_flex_value_set_name => :NEW.flex_value_set_name
, p_flex_value => :NEW.flex_value
, p_description => :NEW.description
, x_storage_value => v_storage_value
Extending Oracle E-Business Suite Release 12 using Oracle Application Express
11
);
ELSIF UPDATING THEN
fnd_flex_val_api.update_independent_vset_value
( p_flex_value_set_name => :NEW.flex_value_set_name
, p_flex_value => :NEW.flex_value
, p_description => :NEW.description
, x_storage_value => v_storage_value
);
ENDIF;
END;
/
Downloading and Installing the Sample Code
The code samples given above are available for download from the Oracle Technology Network
(OTN). To run these scripts, perform the following steps:
1. Download the APPS schema script file from OTN – http://www-
content.oracle.com/ocom/groups/public/@otn/documents/webcontent/329274.sql
2. Save the file as apexebs_apps_setup.sql and upload to your Oracle E-Business Suite Database
server
3. Connect to your Oracle E-Business Suite Database server
4. Run SQL*Plus, connect as APPS and run the script, providing the appropriate APEX Schema name
and SID for the database:
sqlplus “apps/apps_password@EBS_SID” @apexebs_apps_setup APEX_EBS
5. Download the APEX schema script file from OTN – http://www-
content.oracle.com/ocom/groups/public/@otn/documents/webcontent/332106.sql
6. Save the file as apexebs_apex_setup.sql and upload to your Oracle E-Business Suite Database
server
7. Connect to your Oracle E-Business Suite Database server
8. Run SQL*Plus, connect to the APEX schema, and run the script:
sqlplus “apex_ebs/apex_ebs_password@EBS_SID” @apexebs_apex_setup
Integrating with the Oracle E-Business Suite
In order to connect from Oracle E-Business Suite to your new Oracle Application Express
Applications, a secure mechanism is required to hand control from Oracle E-Business Suite to Oracle
Application Express. The following steps need to be implemented:
Create an Oracle Application Express application
Define Oracle E-Business Suite profile and functions
Link functions to menus and responsibility
Configure the Oracle Application Express login process
Define Oracle Application Express authorizations
Extending Oracle E-Business Suite Release 12 using Oracle Application Express
12
Creating an Oracle Application Express Application
Developers define applications within Oracle Application Express as a collection of pages. Pages
generally have one or more regions, buttons, items, computations, processes, branches, dynamic
actions, tabs, lists, and breadcrumbs. Each application within an Oracle Application Express instance
has a unique application ID. For end-users to access an Oracle Application Express application
directly they enter a URL of the form:
http://<APEX_Host>:8080/apex/f?p=<Application_Id>:<Home_Page>
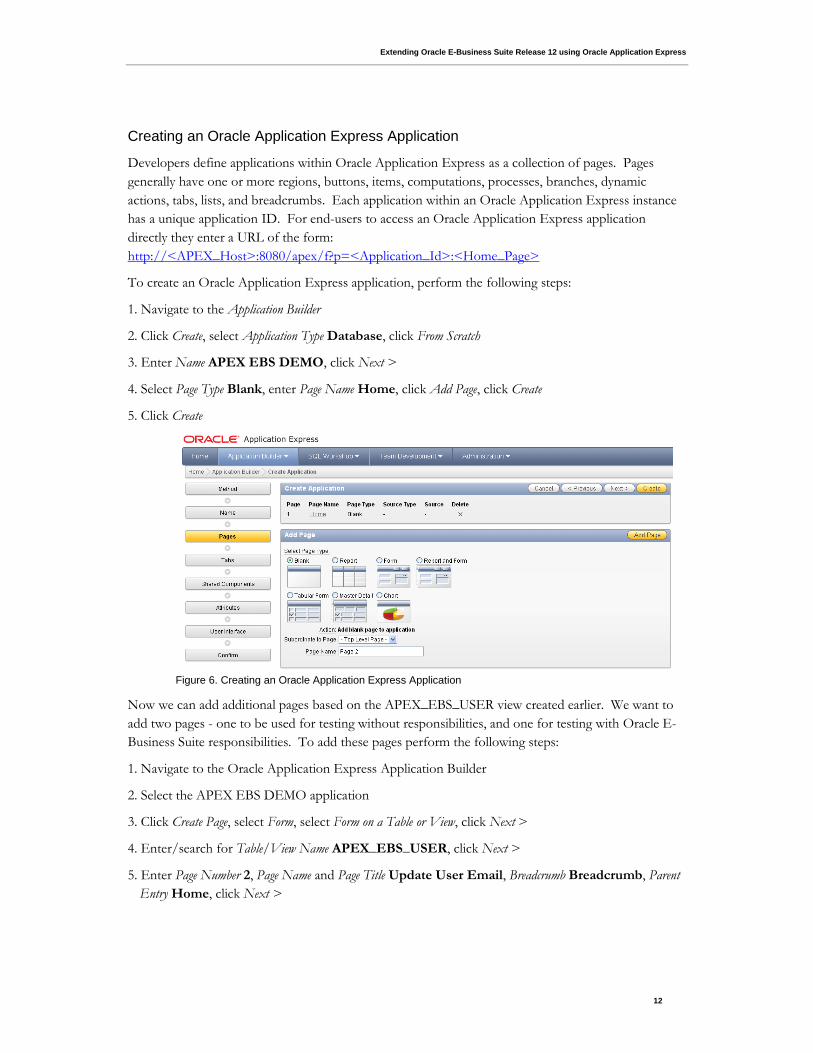
To create an Oracle Application Express application, perform the following steps:
1. Navigate to the Application Builder
2. Click Create, select Application Type Database, click From Scratch
3. Enter Name APEX EBS DEMO, click Next >
4. Select Page Type Blank, enter Page Name Home, click Add Page, click Create
5. Click Create
Figure 6. Creating an Oracle Application Express Application
Now we can add additional pages based on the APEX_EBS_USER view created earlier. We want to
add two pages - one to be used for testing without responsibilities, and one for testing with Oracle E-
Business Suite responsibilities. To add these pages perform the following steps:
1. Navigate to the Oracle Application Express Application Builder
2. Select the APEX EBS DEMO application
3. Click Create Page, select Form, select Form on a Table or View, click Next >
4. Enter/search for Table/View Name APEX_EBS_USER, click Next >
5. Enter Page Number 2, Page Name and Page Title Update User Email, Breadcrumb Breadcrumb, Parent
Entry Home, click Next >
Extending Oracle E-Business Suite Release 12 using Oracle Application Express
13
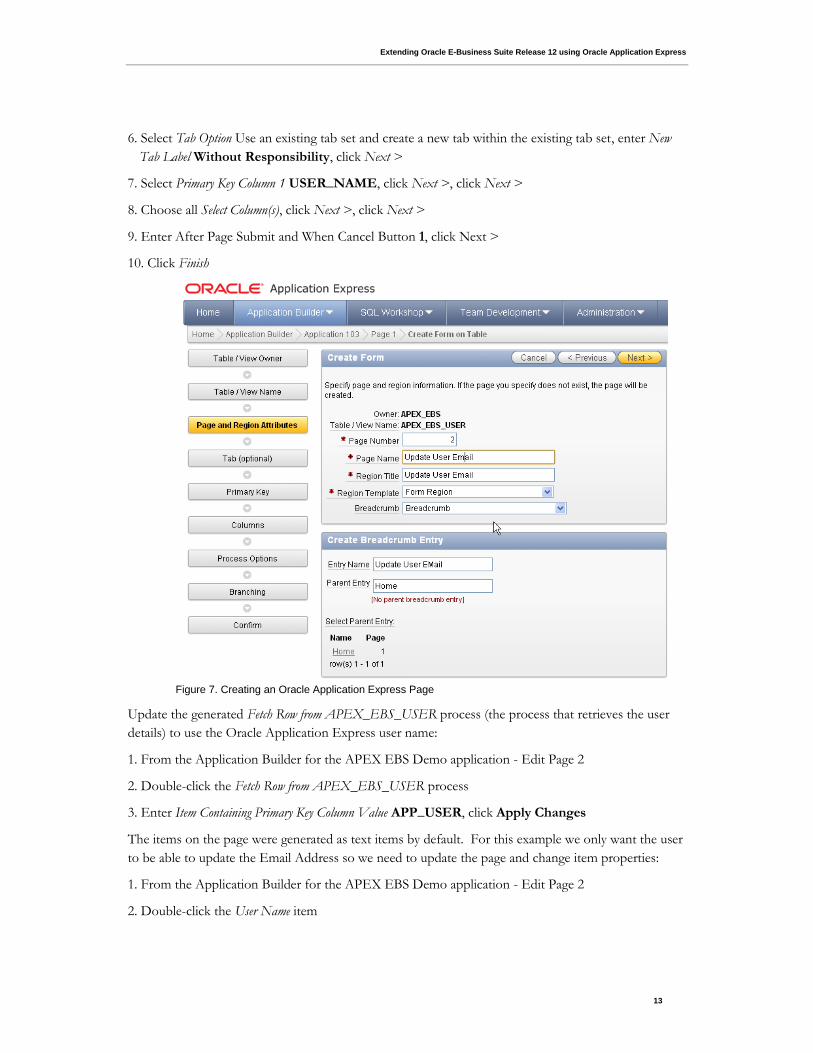
6. Select Tab Option Use an existing tab set and create a new tab within the existing tab set, enter New
Tab Label Without Responsibility, click Next >
7. Select Primary Key Column 1 USER_NAME, click Next >, click Next >
8. Choose all Select Column(s), click Next >, click Next >
9. Enter After Page Submit and When Cancel Button 1, click Next >
10. Click Finish
Figure 7. Creating an Oracle Application Express Page
Update the generated Fetch Row from APEX_EBS_USER process (the process that retrieves the user
details) to use the Oracle Application Express user name:
1. From the Application Builder for the APEX EBS Demo application - Edit Page 2
2. Double-click the Fetch Row from APEX_EBS_USER process
3. Enter Item Containing Primary Key Column Value APP_USER, click Apply Changes
The items on the page were generated as text items by default. For this example we only want the user
to be able to update the Email Address so we need to update the page and change item properties:
1. From the Application Builder for the APEX EBS Demo application - Edit Page 2
2. Double-click the User Name item
Extending Oracle E-Business Suite Release 12 using Oracle Application Express
14
3. Select Display As Display Only, click > {Displays P2_START_DATE}
4. Select Display As Display Only, click > {Displays P2_END_DATE}
5. Select Display As Display Only, click > {Displays P2_DESCRIPTION}
6. Select Display As Display Only, click > {Displays P2_EMAIL_ADDRESS}
7. Click > {Displays P2_PERSON_PARTY_ID}
8. Select Display As Display Only, click Apply Changes
Delete the generated Process Row of APEX_EBS_USER process (the process that updates the user
details) and replace it with a call to the apex_update_email procedure defined earlier:
1. From the Application Builder for the APEX EBS Demo application - Edit Page 2
2. Double-click the Process Row of APEX_EBS_USER process
3. Click Delete, click Ok
4. Right-click on Processes region, click Create
5. Select Category PL/SQL, click Next >
6. Enter Name Update Email, select Point On Submit – After Computations and Validations, click
Next >
7. Enter PL/SQL Page Process
apps.apex_integration_sample_apis.apex_update_email
( p_username => :APP_USER
, p_owner => :APP_USER
, p_email_address => :P2_EMAIL_ADDRESS
);
8. Click Next >
9. Enter Success Message Email updated successfully, Failure Message Email not updated, click Next >
10. Select When Button Pressed SAVE (Apply Changes), click Create Process
Repeat the same steps as above to create another page, Page 3, with the same details except New Tab
Label Using Responsibility. Update the Fetch Row from APEX_EBS_USER process, replace the
Process Row of APEX_EBS_USER with Update Email, and set all Page 3 items to be Display Only
except for P3_USER_ID (Hidden) and P3_EMAIL_ADDRESS (Text Field).
To show the Oracle E-Business Suite responsibility that is going to be passed to Page 3 you must add a
new process, region, and two items, using the following steps:
1. From the Application Builder for the APEX EBS Demo application - Edit Page 3
2. Create a new region – Right click on Body (3), click Create
3. Select Type of Region HTML, click Next >
4. Enter Title Responsibility, click Next >, click Create Region
Extending Oracle E-Business Suite Release 12 using Oracle Application Express
15
5. Create Items – Right click on Responsibility region, click Create Page Item
6. Select Item Type Display Only, enter Item Name P3_RESPONSIBILITY_NAME, click Next >,
click Next >, click Next >,click Create Item
7. Right click on Responsibility region, click Create Page Item
8. Select Item Type Display Only, enter Item Name P3_RESP_DESCRIPTION, click Next >
9. Enter Label Description, click Next >, click Next >,click Create Item
7. Click on Create > Page control on this page, select Control Type Process, select Category PL/SQL, click
Next >
8. Enter Name Fetch Responsibility, Point On Load – Before Header, click Next >
9. Enter PL/SQL Page Process
begin
for c1 in (select responsibility_name
, description
from apps.fnd_responsibility_vl
where application_id = :EBS_APP_ID
and responsibility_id = :EBS_RESP_ID
) loop
:P3_RESPONSIBILITY_NAME := c1.responsibility_name;
:P3_RESP_DESCRIPTION := c1.description;
end loop;
exception
when others then
null;
end;
10. Click Create Process
To further aid navigation on the Home page you can add icons to go to each of the pages:
1. From the Application Builder for the APEX EBS Demo application – go to Shared Components
2. Click Lists, click Create, Name Responsibility, List Template Horizontal Images with Label List,
click Next >
3. Enter two list entries - List Entry Label Without Responsibility, Target Page ID 2; List Entry Label
Using Responsibilities, Target Page ID 3, click Next >, click Create
4. Navigate to Page 1 {in Application Builder}
5. Click Create > Region on this page, select List, enter Title Responsibility, Region Template Region
without Title, click Next >
6. Select List Responsibility, click Create List Region
7. Double-click the Home region, click Delete, click Delete Region
8. Click on Shared Components > Lists, double-click Responsibility
9. Click Without Responsibility, enter Image menu/address_book_bx_128x128.png, click > {Displays
Using Responsibility}
Extending Oracle E-Business Suite Release 12 using Oracle Application Express
16
10. Enter Image menu/addresses_bx_128x128.png, click Apply Changes
At this stage the application is using default Oracle Application Express user credentials. Run the
application and enter the user name and password you defined when creating the APEX_EBS
Workspace earlier:
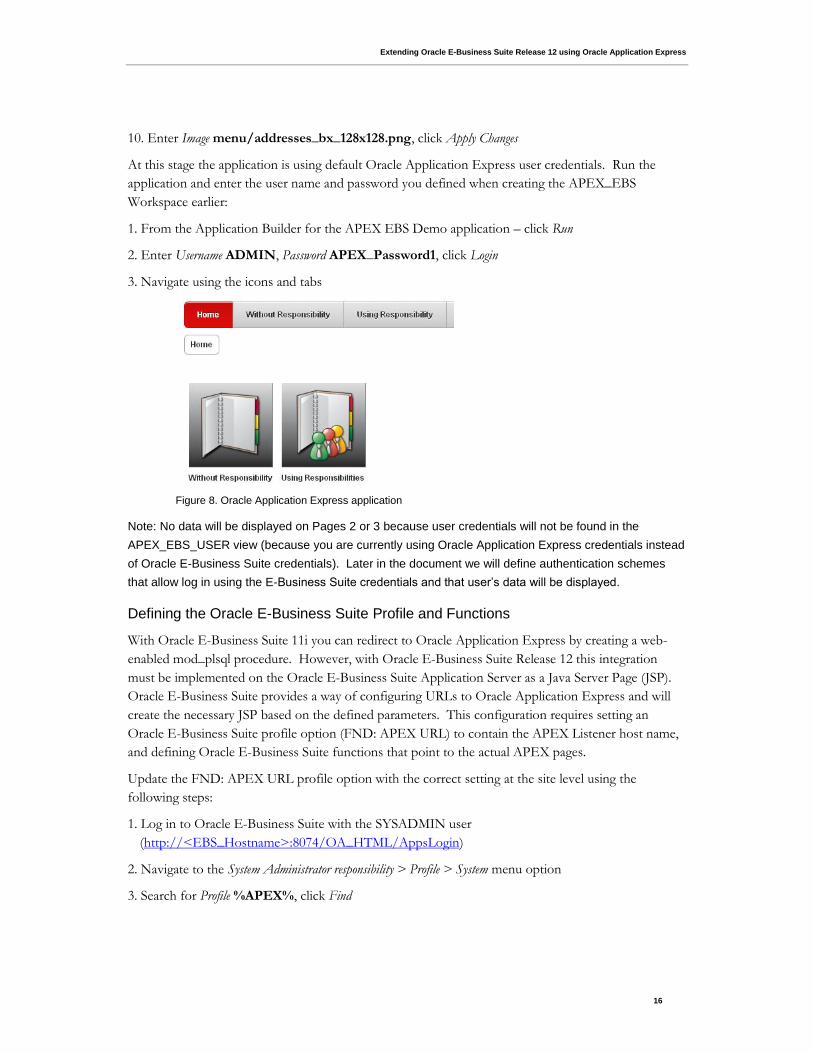
1. From the Application Builder for the APEX EBS Demo application – click Run
2. Enter Username ADMIN, Password APEX_Password1, click Login
3. Navigate using the icons and tabs
Figure 8. Oracle Application Express application
Note: No data will be displayed on Pages 2 or 3 because user credentials will not be found in the
APEX_EBS_USER view (because you are currently using Oracle Application Express credentials instead
of Oracle E-Business Suite credentials). Later in the document we will define authentication schemes
that allow log in using the E-Business Suite credentials and that user’s data will be displayed.
Defining the Oracle E-Business Suite Profile and Functions
With Oracle E-Business Suite 11i you can redirect to Oracle Application Express by creating a web-
enabled mod_plsql procedure. However, with Oracle E-Business Suite Release 12 this integration
must be implemented on the Oracle E-Business Suite Application Server as a Java Server Page (JSP).
Oracle E-Business Suite provides a way of configuring URLs to Oracle Application Express and will
create the necessary JSP based on the defined parameters. This configuration requires setting an
Oracle E-Business Suite profile option (FND: APEX URL) to contain the APEX Listener host name,
and defining Oracle E-Business Suite functions that point to the actual APEX pages.
Update the FND: APEX URL profile option with the correct setting at the site level using the
following steps:
1. Log in to Oracle E-Business Suite with the SYSADMIN user
(http://<EBS_Hostname>:8074/OA_HTML/AppsLogin)
2. Navigate to the System Administrator responsibility > Profile > System menu option
3. Search for Profile %APEX%, click Find
Extending Oracle E-Business Suite Release 12 using Oracle Application Express
17
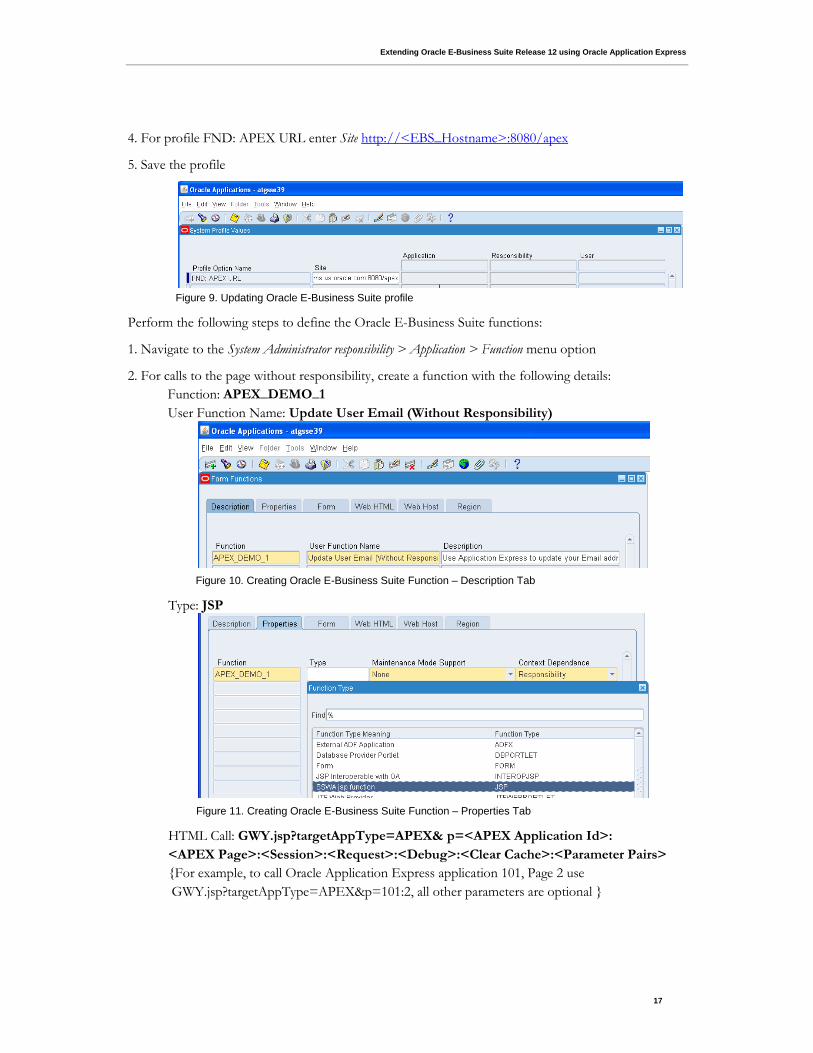
4. For profile FND: APEX URL enter Site http://<EBS_Hostname>:8080/apex
5. Save the profile
Figure 9. Updating Oracle E-Business Suite profile
Perform the following steps to define the Oracle E-Business Suite functions:
1. Navigate to the System Administrator responsibility > Application > Function menu option
2. For calls to the page without responsibility, create a function with the following details:
Function: APEX_DEMO_1
User Function Name: Update User Email (Without Responsibility)
Figure 10. Creating Oracle E-Business Suite Function – Description Tab
Type: JSP
Figure 11. Creating Oracle E-Business Suite Function – Properties Tab
HTML Call: GWY.jsp?targetAppType=APEX& p=<APEX Application Id>:
<APEX Page>:<Session>:<Request>:<Debug>:<Clear Cache>:<Parameter Pairs>
{For example, to call Oracle Application Express application 101, Page 2 use
GWY.jsp?targetAppType=APEX&p=101:2, all other parameters are optional }
Extending Oracle E-Business Suite Release 12 using Oracle Application Express
18
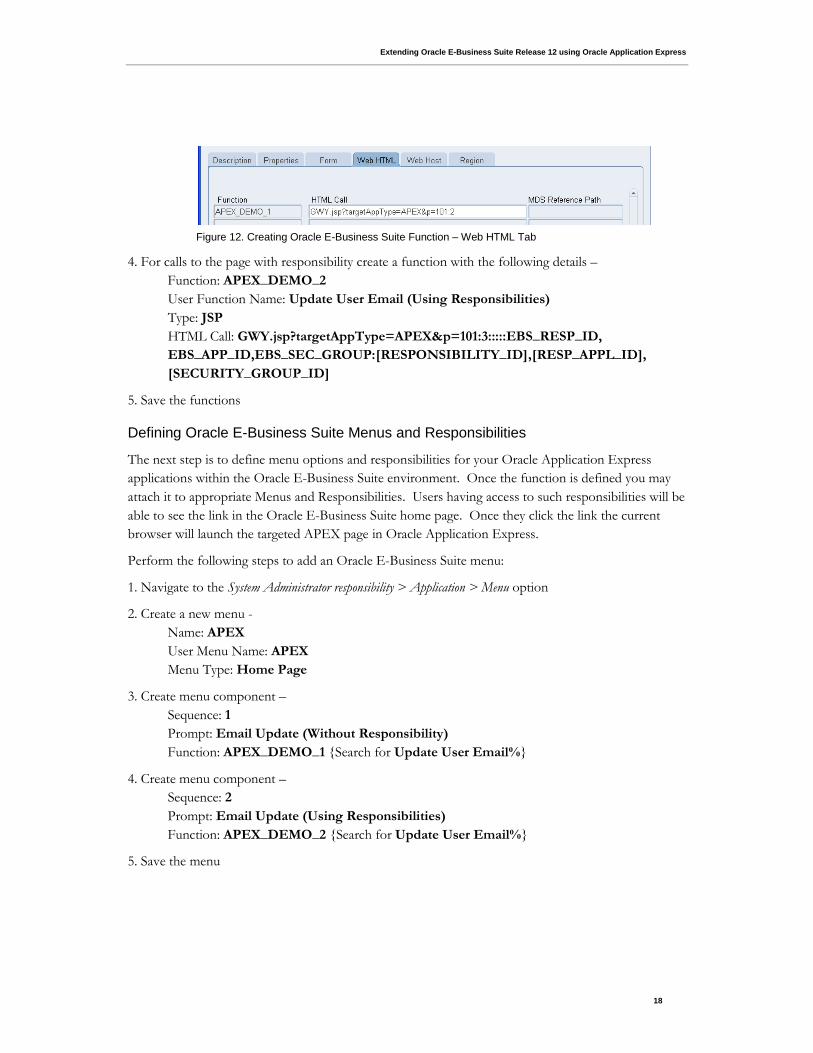
Figure 12. Creating Oracle E-Business Suite Function – Web HTML Tab
4. For calls to the page with responsibility create a function with the following details –
Function: APEX_DEMO_2
User Function Name: Update User Email (Using Responsibilities)
Type: JSP
HTML Call: GWY.jsp?targetAppType=APEX&p=101:3:::::EBS_RESP_ID,
EBS_APP_ID,EBS_SEC_GROUP:[RESPONSIBILITY_ID],[RESP_APPL_ID],
[SECURITY_GROUP_ID]
5. Save the functions
Defining Oracle E-Business Suite Menus and Responsibilities
The next step is to define menu options and responsibilities for your Oracle Application Express
applications within the Oracle E-Business Suite environment. Once the function is defined you may
attach it to appropriate Menus and Responsibilities. Users having access to such responsibilities will be
able to see the link in the Oracle E-Business Suite home page. Once they click the link the current
browser will launch the targeted APEX page in Oracle Application Express.
Perform the following steps to add an Oracle E-Business Suite menu:
1. Navigate to the System Administrator responsibility > Application > Menu option
2. Create a new menu -
Name: APEX
User Menu Name: APEX
Menu Type: Home Page
3. Create menu component –
Sequence: 1
Prompt: Email Update (Without Responsibility)
Function: APEX_DEMO_1 {Search for Update User Email%}
4. Create menu component –
Sequence: 2
Prompt: Email Update (Using Responsibilities)
Function: APEX_DEMO_2 {Search for Update User Email%}
5. Save the menu
Extending Oracle E-Business Suite Release 12 using Oracle Application Express
19
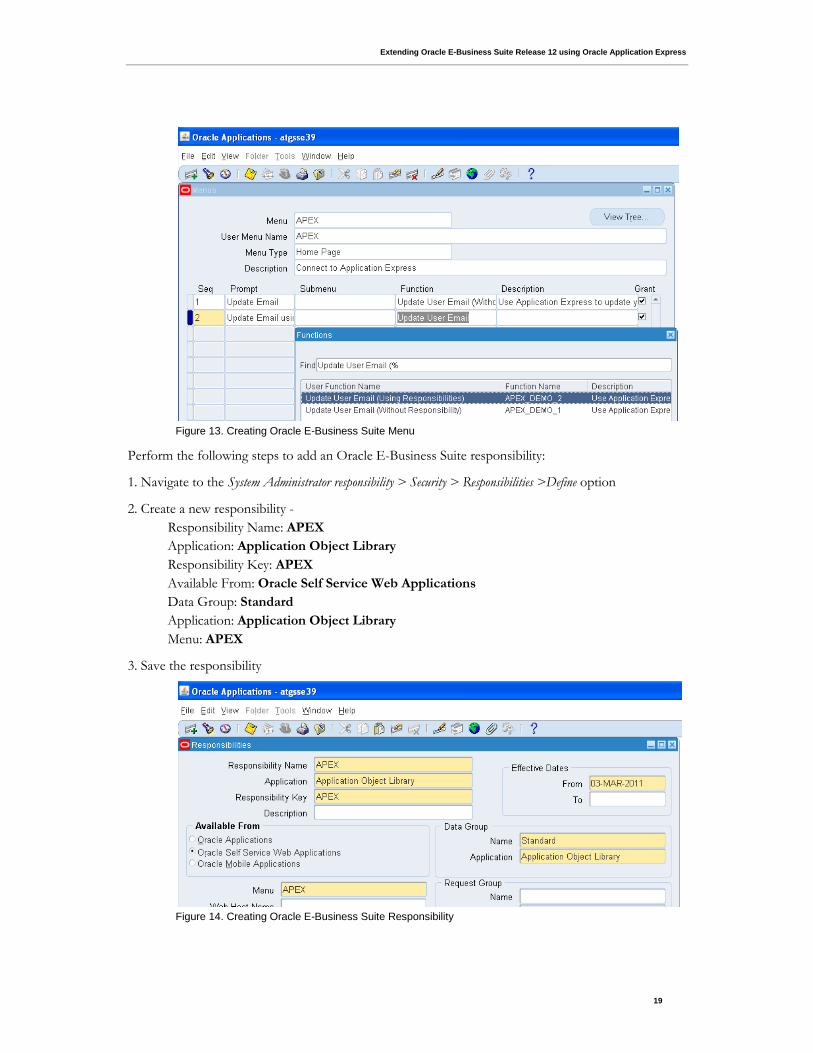
Figure 13. Creating Oracle E-Business Suite Menu
Perform the following steps to add an Oracle E-Business Suite responsibility:
1. Navigate to the System Administrator responsibility > Security > Responsibilities >Define option
2. Create a new responsibility -
Responsibility Name: APEX
Application: Application Object Library
Responsibility Key: APEX
Available From: Oracle Self Service Web Applications
Data Group: Standard
Application: Application Object Library
Menu: APEX
3. Save the responsibility
Figure 14. Creating Oracle E-Business Suite Responsibility
Extending Oracle E-Business Suite Release 12 using Oracle Application Express
20
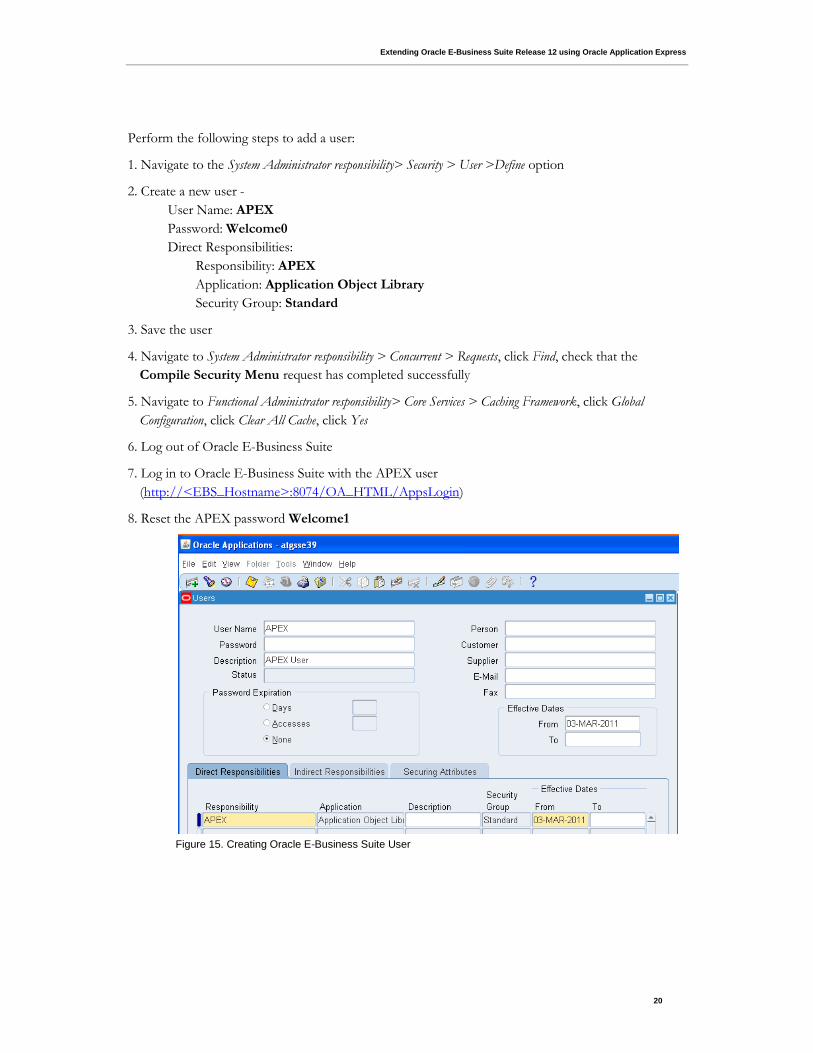
Perform the following steps to add a user:
1. Navigate to the System Administrator responsibility> Security > User >Define option
2. Create a new user -
User Name: APEX
Password: Welcome0
Direct Responsibilities:
Responsibility: APEX
Application: Application Object Library
Security Group: Standard
3. Save the user
4. Navigate to System Administrator responsibility > Concurrent > Requests, click Find, check that the
Compile Security Menu request has completed successfully
5. Navigate to Functional Administrator responsibility> Core Services > Caching Framework, click Global
Configuration, click Clear All Cache, click Yes
6. Log out of Oracle E-Business Suite
7. Log in to Oracle E-Business Suite with the APEX user
(http://<EBS_Hostname>:8074/OA_HTML/AppsLogin)
8. Reset the APEX password Welcome1
Figure 15. Creating Oracle E-Business Suite User
Extending Oracle E-Business Suite Release 12 using Oracle Application Express
21
Configuring the Oracle Application Express Login Process
If using custom authentication, users will not automatically log into Oracle Application Express.
However, if you are using Oracle Single Sign-On (OSSO) then users will not be required to enter their
user credentials when Oracle Application Express is invoked from the Oracle E-Business Suite menu.
Configuring Custom Authentication
If your Oracle E-Business Suite installation does not use Oracle Single Sign-On, you can create a
custom authentication scheme which calls a PL/SQL function within Oracle Application Express to
validate the identity of the user, based on the password sent.
Below is sample code for creating a function to determine if the user if valid –
CREATE OR REPLACE FUNCTION APPS.apex_authenticate
( p_username IN VARCHAR2
, p_password IN VARCHAR2
) RETURN BOOLEAN
AS
BEGIN
RETURN fnd_user_pkg.validatelogin(p_username, p_password);
END apex_authenticate;
Note: This specific code is included in the apexebs_apps_setup.sql file you downloaded and installed
into the APPS schema earlier in this paper. This code is included within that file in Package
apex_integration_sample_apis, Function apex_validate_login. This package function is used below
when defining a custom authentication.
Once you have created this function in your APPS schema you need to define the authentication
scheme within Oracle Application Express. Follow these steps to create your custom authentication:
1. Log into Oracle Application Express Application Builder
(http://<EBS_Hostname>:8080/apex/apex)
2. From the Application Builder for the APEX EBS Demo application – go to Shared Components
3. Click Authentication Schemes, click Create, select From scratch, click Next >
4. Enter Name EBS Custom Login, click Next >, click Next >, click Next >
5. Select Invalid Session Target Page in this application, Page 101 Login, click Next >, click Next >
6. Select Credentials Verification Method Use my custom function to authenticate, enter Authentication
Function RETURN APPS.apex_integration_sample_apis.apex_validate_login, click Next >,
click Next >, click Next >
7. Enter Logout URL
wwv_flow_custom_auth_std.logout?p_this_flow=&APP_ID.&p_next_flow_page_sess=&APP_ID.
:101:&SESSION.:LOGOUT, click Next >, click Create Scheme
8. Click Change Current Tab, select Available Authentication Schemes EBS CUSTOM LOGIN, click Next
>, click Make Current
9. Click Run Application
Extending Oracle E-Business Suite Release 12 using Oracle Application Express
22
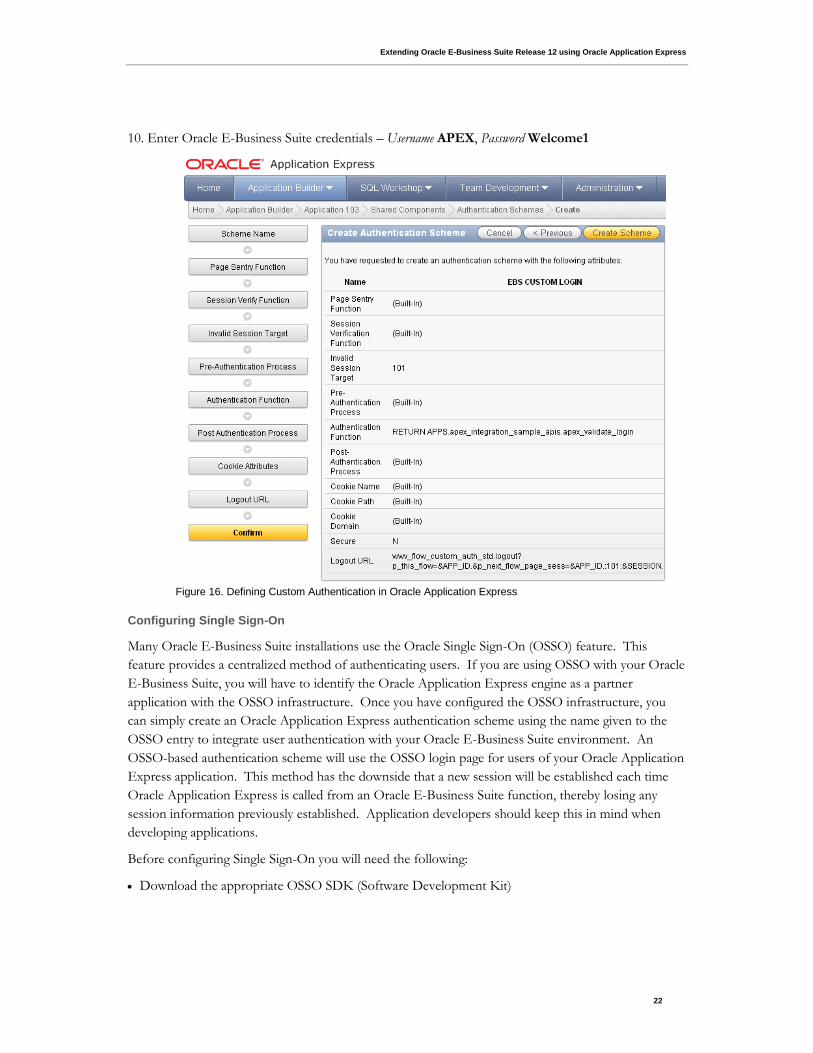
10. Enter Oracle E-Business Suite credentials – Username APEX, Password Welcome1
Figure 16. Defining Custom Authentication in Oracle Application Express
Configuring Single Sign-On
Many Oracle E-Business Suite installations use the Oracle Single Sign-On (OSSO) feature. This
feature provides a centralized method of authenticating users. If you are using OSSO with your Oracle
E-Business Suite, you will have to identify the Oracle Application Express engine as a partner
application with the OSSO infrastructure. Once you have configured the OSSO infrastructure, you
can simply create an Oracle Application Express authentication scheme using the name given to the
OSSO entry to integrate user authentication with your Oracle E-Business Suite environment. An
OSSO-based authentication scheme will use the OSSO login page for users of your Oracle Application
Express application. This method has the downside that a new session will be established each time
Oracle Application Express is called from an Oracle E-Business Suite function, thereby losing any
session information previously established. Application developers should keep this in mind when
developing applications.
Before configuring Single Sign-On you will need the following:
Download the appropriate OSSO SDK (Software Development Kit)
Extending Oracle E-Business Suite Release 12 using Oracle Application Express
23
Details regarding the OSSO Server – Site Id, Site Token, Encryption Key, Single Sign-On URL,
Single Sign-Off URL
A copy of custom_auth_sso_902.sql and custom_auth_sso_902.plb from the Oracle Application
Express installation – apex/core directory
To configure Oracle Application Express as a partner application within OSSO perform the following:
1. Copy the SSO SDK to the Oracle E-Business Suite Database Server
2. Unzip the SSO SDK file
3. Copy custom_auth_sso_902.sql and custom_auth_sso_902.plb to the packages directory
(created when the SSO SDK file was unzipped)
4. Connect to your Oracle E-Business Suite Database server and navigate to the packages directory
5. Run SQL*Plus, connect as SYS AS SYSDBA – sqlplus / AS SYSDBA
(All following statements will be run from the SQL prompt; Replace all passwords with a case
sensitive password which is not the same as the user being altered)
6. alter user APEX_040000 unlock identified by <APEX_04000_Password>;
7. alter user APEX_PUBLIC_USER unlock identified by
<APEX_PUBLIC_USER_Password>;
8. alter user APEX_EBS identified by <APEX_EBS_Password>;
9. connect APEX_EBS/<APEX_EBS_Password>
10. @loadsdk.sql
11. @regapp.sql (The Listener Token will be HTML_DB:<EBS_Hostname>:8080 , specify the
Partner App Name APEX_EBS_SSO; Use the values determined above for Site Id, Site Token, etc.)
12. grant execute on wwsec_sso_enabler_private to APEX_040000;
13. connect APEX_040000/<APEX_040000_Password>
14. @custom_auth_sso_902.sql
15. @custom_auth_sso_902.plb
16. grant execute on wwv_flow_custom_auth_sso to APEX_PUBLIC_USER;
17. connect APEX_PUBLIC_USER/<APEX_PUBLIC_USER_Password>
18. create public synonym wwv_flow_custom_auth_sso for
apex_040000.wwv_flow_custom_auth_sso
19. exit
Once you have configured the Single Sign-On you will now need to define the authentication scheme
within Oracle Application Express. Follow these steps to create your SSO authentication:
Extending Oracle E-Business Suite Release 12 using Oracle Application Express
24
1. Log into Oracle Application Express Application Builder
(http://<EBS_Hostname>:8080/apex/apex)
2. From the Application Builder for the APEX EBS Demo application – go to Shared Components
3. Click Authentication Schemes, click Create, select Based on a pre-configured scheme from the
gallery, click Next >
4. Select Oracle Application Server Single Sign-On (My Application as Partner App), click
Next >
5. Enter Partner Application Name APEX_EBS_SSO, click Next >
6. Enter Name EBS SSO Login, click Create Scheme
7. Click Change Current Tab, select Available Authentication Schemes EBS SSO LOGIN, click Next
>, click Make Current
8. Click Run Application
If correctly configured, when you run the application, you will be redirected to the OSSO Login Page
and can enter your Single Sign-on credentials to log into Oracle Application Express.
Defining Oracle Application Express Authorizations
Authentication schemes only check that the user has a valid Oracle E-Business Suite login, not that the
user is authorized to use an application. Oracle Application Express provides the ability to define
authorization schemes that can be used on every component within an application (for example pages,
regions, buttons, items, validations, etc.) to restrict access [For more information see:
http://download.oracle.com/docs/cd/E17556_01/doc/user.40/e15517/sec.htm#BABEDFGB].
Oracle E-Business Suite includes the concept of responsibilities, which determine what capabilities
and data users are allowed to access. The recommended practice is to create Oracle Application
Express authorization schemes that mimic the necessary Oracle E-Business Suite responsibilities to
define cohesive access plans.
It is very strongly recommended that authorizations are applied to all non-public Oracle Application
Express pages (and those limited by Oracle E-Business Suite responsibilities) rather than just to menu
items. Session state protection should also be defined for the application to prevent users from
accessing pages by manipulating the URL [For more information on Session State Protection see:
http://download.oracle.com/docs/cd/E17556_01/doc/user.40/e15517/sec.htm#CDDGIGJH].
Using Oracle E-Business Suite Responsibilities with Integrated Access
By modifying the function call used to invoke Oracle Application Express from Oracle E-Business
Suite you can pass the parameters required to test the responsibility directly. By defining an Oracle
Application Express authorization scheme which first performs an APPS_INITIALIZE and then
returns the result from FND_FUNCTION.TEST you can use this authorization to prevent
unauthorized access to pages and processes to users without the correct responsibility.
Extending Oracle E-Business Suite Release 12 using Oracle Application Express
25
In order to call APPS procedures and functions from another schema it is necessary to define a
package with DEFINER authorization such that the PL/SQL is run with the privileges of the APPS
schema rather than the privileges of the Oracle Application Express schema.
Below is sample code for creating such a DEFINER Package in the APPS schema –
CREATE OR REPLACE PACKAGE apex_global AUTHID DEFINER AS
PROCEDURE apps_initialize(
user_id IN NUMBER,
resp_id IN NUMBER,
resp_appl_id IN NUMBER,
security_group_id IN NUMBER DEFAULT 0,
server_id IN NUMBER DEFAULT -1);
FUNCTION function_test(function_name IN VARCHAR2) RETURN BOOLEAN;
end;
/
CREATE OR REPLACE PACKAGE BODY apex_global AS
PROCEDURE apps_initialize(
user_id IN NUMBER,
resp_id IN NUMBER,
resp_appl_id IN NUMBER,
security_group_id IN NUMBER DEFAULT 0,
server_id IN NUMBER DEFAULT -1) IS
BEGIN
fnd_global.apps_initialize(user_id, resp_id, resp_appl_id,
security_group_id, server_id);
END;
-- calls FND_FUNCTION.TEST
FUNCTION function_test(function_name IN VARCHAR2) RETURN BOOLEAN IS
BEGIN
RETURN fnd_function.test(function_name);
END;
END;
/
Note: This specific code is included in the apexebs_apps_setup.sql file you downloaded and installed
into the APPS schema earlier in this paper.
You need to create three Oracle Application Express - Application Items to hold the Oracle E-
Business Suite Responsibility Id, Application Id, and Security Group Id parameters that are being
passed by the Oracle E-Business Suite function APEX_DEMO_2. Follow these steps to add
Application Items into Oracle Application Express:
1. Log into Oracle Application Express Application Builder
(http://<EBS_Hostname>:8080/apex/apex)
2. From the Application Builder for the APEX EBS Demo application – go to Shared Components
3. Click Application Items, click Create >, enter Name EBS_RESP_ID, click Create
4. Click Create >, enter Name EBS_APP_ID, click Create
5. Click Create >, enter Name EBS_SEC_GROUP, click Create
Below is sample code for defining an Oracle Application Express authorization –
DECLARE
l_user_id NUMBER DEFAULT 0;
l_resp_id NUMBER DEFAULT 0;
Extending Oracle E-Business Suite Release 12 using Oracle Application Express
26
l_app_id NUMBER DEFAULT 0;
l_sec_group NUMBER DEFAULT 0;
BEGIN
for c1 in (select user_id from apex_ebs_user
where user_name = :APP_USER
) loop
L_user_id := c1.user_id;
end loop;
begin
select nvl(to_number(:EBS_RESP_ID),0) into l_resp_id from dual;
select nvl(to_number(:EBS_APP_ID),0) into l_app_id from dual;
select nvl(to_number(:EBS_SEC_GROUP),0) into l_sec_group from dual;
exception
when others then
l_resp_id := 0;
l_app_id := 0;
l_sec_group := 0;
end;
-- Call Initialize with the User (based on APEX log in) and the
-- Responsibility Id, Account Id, and Security Group if passed from EBS
if l_resp_id <> 0 then
apps.apex_global.apps_initialize( l_user_id, l_resp_id
, l_app_id, l_sec_group);
else
RETURN FALSE;
end if;
-- Check if User has permission on EBS Function
RETURN apps.apex_global.function.test('APEX_DEMO_2');
END;
Follow these instructions to create the Oracle Application Express authentication scheme and restrict
Page 3:
1. From the Application Builder for the APEX EBS Demo application – go to Shared Components
2. Click Authorization Schemes, click Create >, select Create Authorization Scheme From Scratch, click Next
>
3. Enter Name EBS_RESPONSIBILITY, select Schema Type PL/SQL Function Returning Boolean,
copy the SQL code above into Expression 1, enter Identify error message Access Denied – User does not
have Oracle E-Business Suite Responsibility, click Create
4. From the Application Builder for the APEX EBS Demo application - Edit Page 3
5. Double-click Update User Email {Page Title}
6. Select Security > Authorization Scheme EBS_RESPONSIBILITY, click Apply Changes
7. From the Application Builder for the APEX EBS Demo application – go to Page 1
8. Run Application
Extending Oracle E-Business Suite Release 12 using Oracle Application Express
27
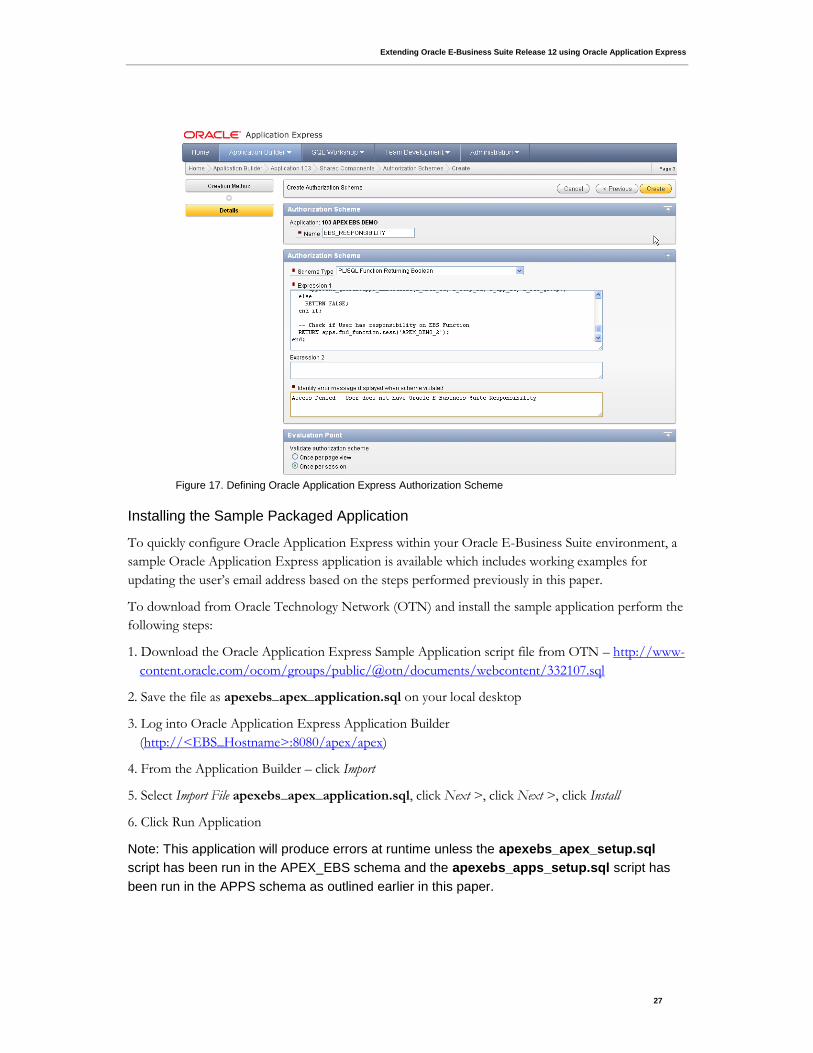
Figure 17. Defining Oracle Application Express Authorization Scheme
Installing the Sample Packaged Application
To quickly configure Oracle Application Express within your Oracle E-Business Suite environment, a
sample Oracle Application Express application is available which includes working examples for
updating the user‟s email address based on the steps performed previously in this paper.
To download from Oracle Technology Network (OTN) and install the sample application perform the
following steps:
1. Download the Oracle Application Express Sample Application script file from OTN – http://www-
content.oracle.com/ocom/groups/public/@otn/documents/webcontent/332107.sql
2. Save the file as apexebs_apex_application.sql on your local desktop
3. Log into Oracle Application Express Application Builder
(http://<EBS_Hostname>:8080/apex/apex)
4. From the Application Builder – click Import
5. Select Import File apexebs_apex_application.sql, click Next >, click Next >, click Install
6. Click Run Application
Note: This application will produce errors at runtime unless the apexebs_apex_setup.sql
script has been run in the APEX_EBS schema and the apexebs_apps_setup.sql script has
been run in the APPS schema as outlined earlier in this paper.
Extending Oracle E-Business Suite Release 12 using Oracle Application Express
28
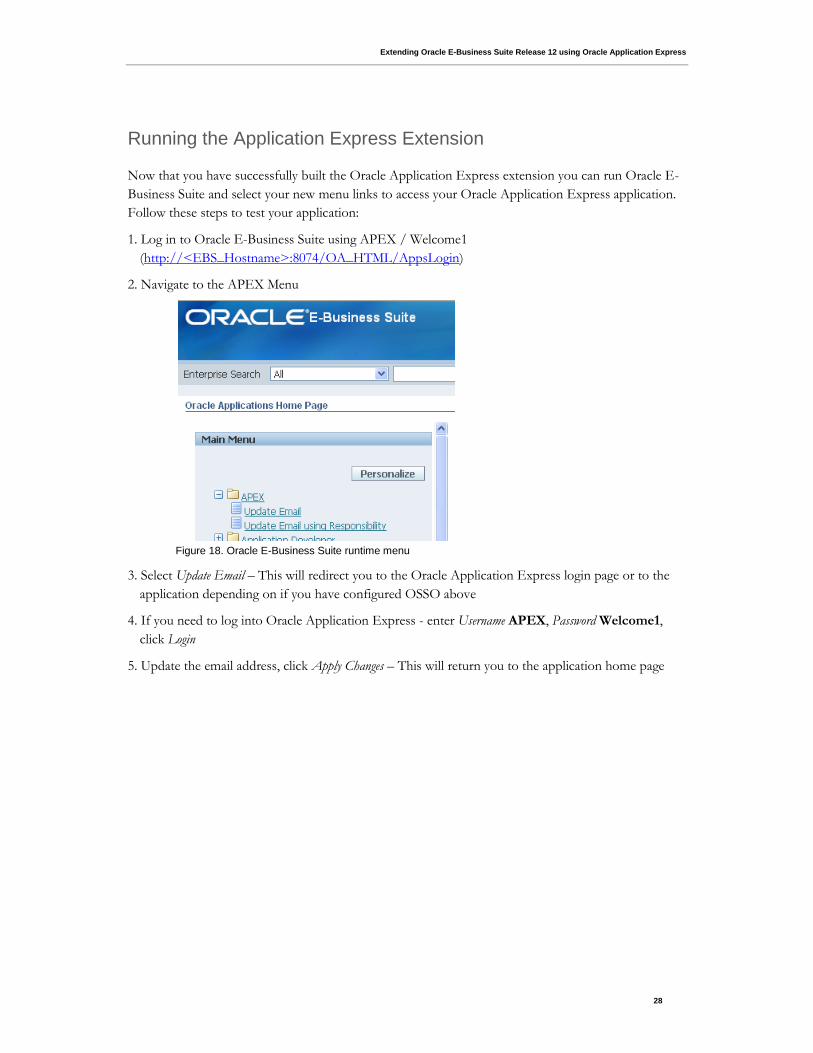
Running the Application Express Extension
Now that you have successfully built the Oracle Application Express extension you can run Oracle E-
Business Suite and select your new menu links to access your Oracle Application Express application.
Follow these steps to test your application:
1. Log in to Oracle E-Business Suite using APEX / Welcome1
(http://<EBS_Hostname>:8074/OA_HTML/AppsLogin)
2. Navigate to the APEX Menu
Figure 18. Oracle E-Business Suite runtime menu
3. Select Update Email – This will redirect you to the Oracle Application Express login page or to the
application depending on if you have configured OSSO above
4. If you need to log into Oracle Application Express - enter Username APEX, Password Welcome1,
click Login
5. Update the email address, click Apply Changes – This will return you to the application home page
Extending Oracle E-Business Suite Release 12 using Oracle Application Express
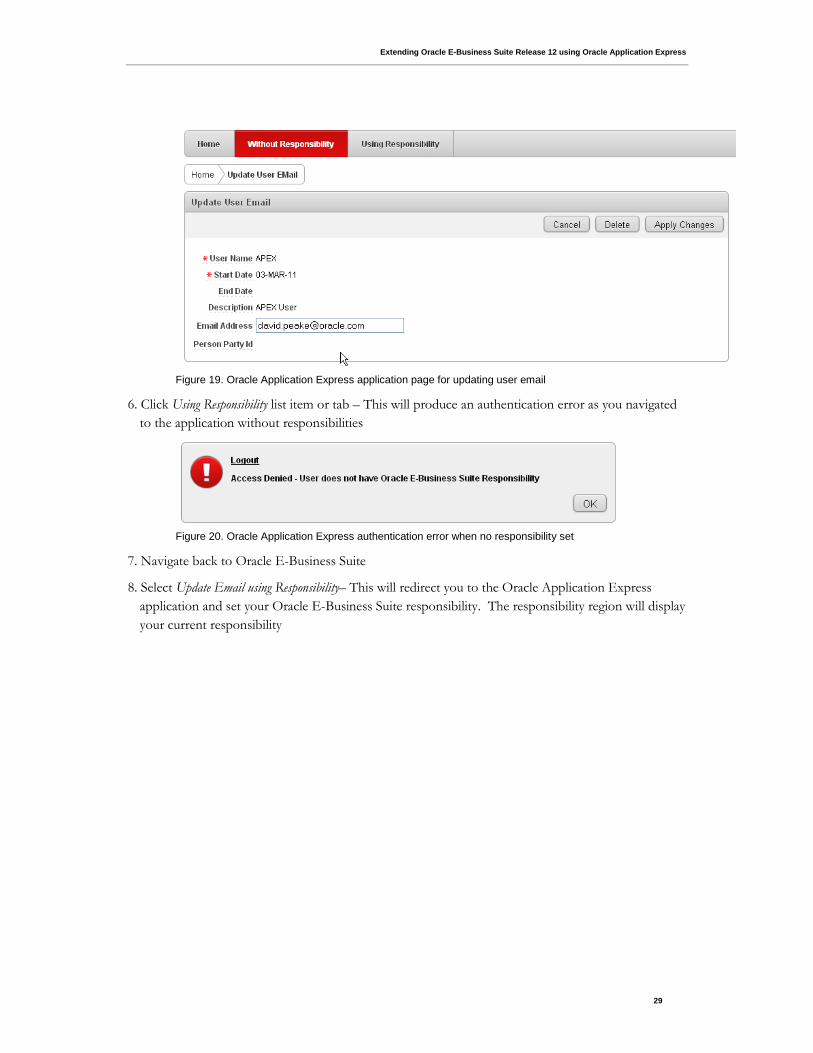
29
Figure 19. Oracle Application Express application page for updating user email
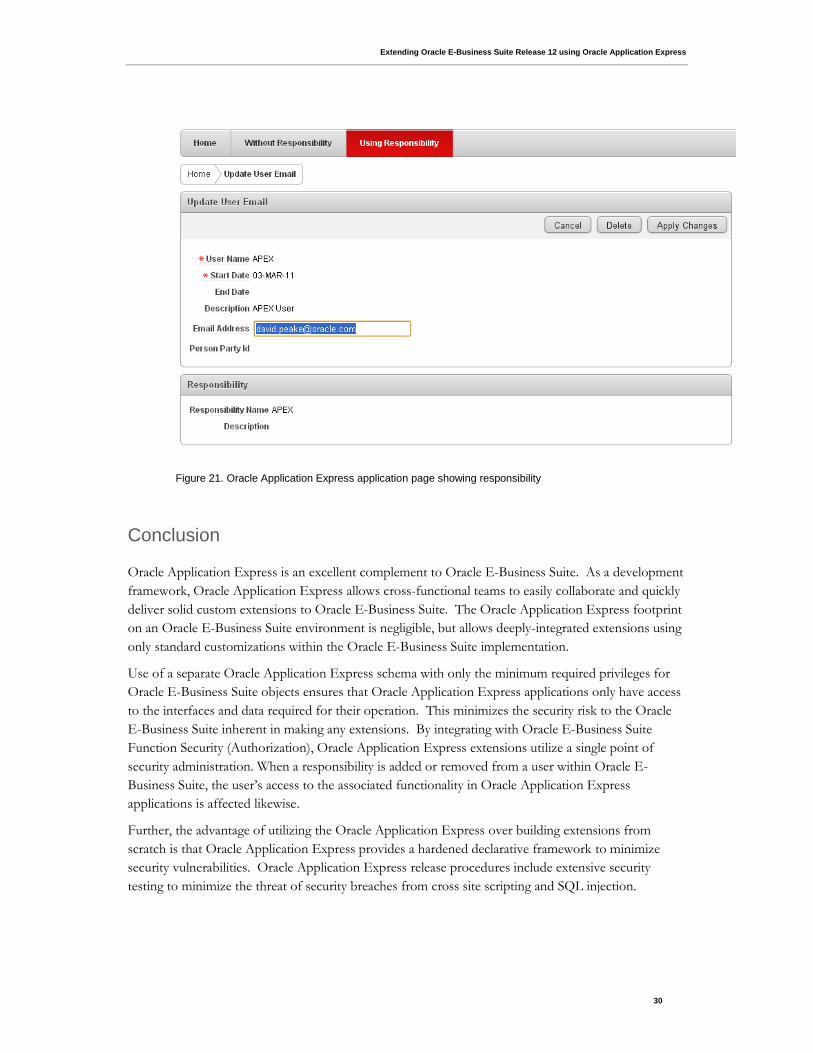
6. Click Using Responsibility list item or tab – This will produce an authentication error as you navigated
to the application without responsibilities
Figure 20. Oracle Application Express authentication error when no responsibility set
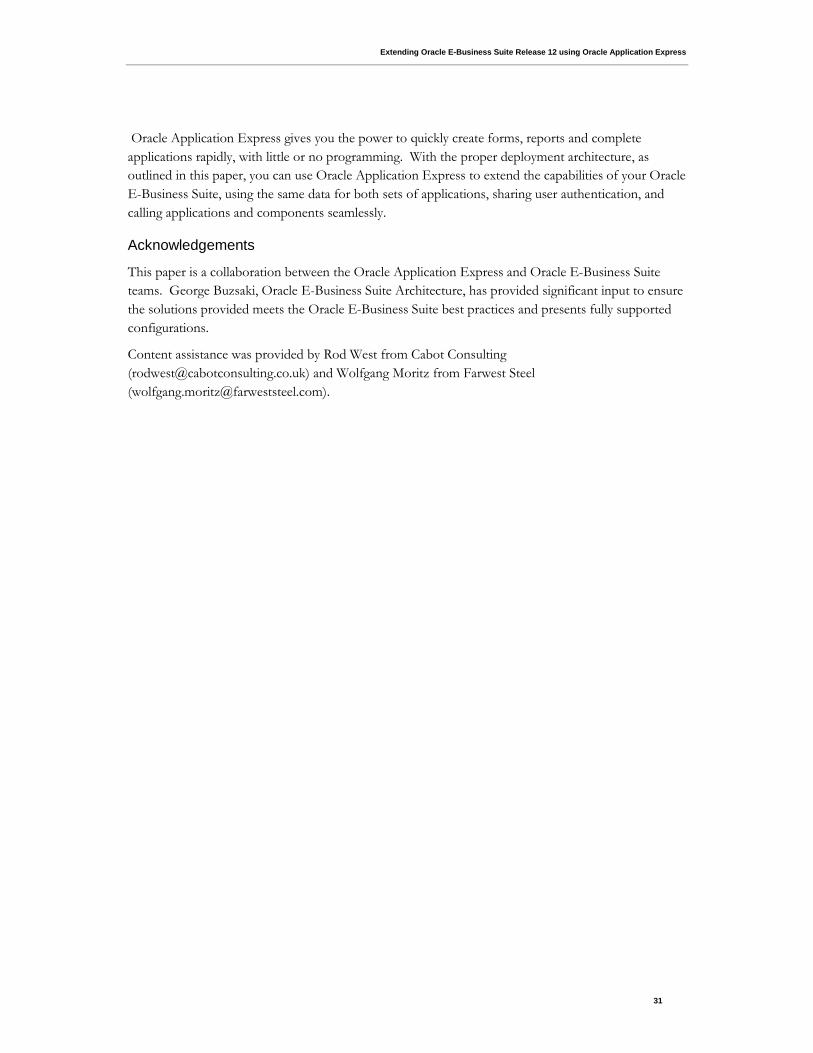
7. Navigate back to Oracle E-Business Suite
8. Select Update Email using Responsibility– This will redirect you to the Oracle Application Express
application and set your Oracle E-Business Suite responsibility. The responsibility region will display
your current responsibility
Extending Oracle E-Business Suite Release 12 using Oracle Application Express
30
Figure 21. Oracle Application Express application page showing responsibility
Conclusion
Oracle Application Express is an excellent complement to Oracle E-Business Suite. As a development
framework, Oracle Application Express allows cross-functional teams to easily collaborate and quickly
deliver solid custom extensions to Oracle E-Business Suite. The Oracle Application Express footprint
on an Oracle E-Business Suite environment is negligible, but allows deeply-integrated extensions using
only standard customizations within the Oracle E-Business Suite implementation.
Use of a separate Oracle Application Express schema with only the minimum required privileges for
Oracle E-Business Suite objects ensures that Oracle Application Express applications only have access
to the interfaces and data required for their operation. This minimizes the security risk to the Oracle
E-Business Suite inherent in making any extensions. By integrating with Oracle E-Business Suite
Function Security (Authorization), Oracle Application Express extensions utilize a single point of
security administration. When a responsibility is added or removed from a user within Oracle E-
Business Suite, the user‟s access to the associated functionality in Oracle Application Express
applications is affected likewise.
Further, the advantage of utilizing the Oracle Application Express over building extensions from
scratch is that Oracle Application Express provides a hardened declarative framework to minimize
security vulnerabilities. Oracle Application Express release procedures include extensive security
testing to minimize the threat of security breaches from cross site scripting and SQL injection.
Extending Oracle E-Business Suite Release 12 using Oracle Application Express
31
Oracle Application Express gives you the power to quickly create forms, reports and complete
applications rapidly, with little or no programming. With the proper deployment architecture, as
outlined in this paper, you can use Oracle Application Express to extend the capabilities of your Oracle
E-Business Suite, using the same data for both sets of applications, sharing user authentication, and
calling applications and components seamlessly.
Acknowledgements
This paper is a collaboration between the Oracle Application Express and Oracle E-Business Suite
teams. George Buzsaki, Oracle E-Business Suite Architecture, has provided significant input to ensure
the solutions provided meets the Oracle E-Business Suite best practices and presents fully supported
configurations.
Content assistance was provided by Rod West from Cabot Consulting
([email protected]) and Wolfgang Moritz from Farwest Steel
Extending Oracle E-Business Suite Release 12
using Oracle Application Express
March 2011
Author: David Peake
Contributing Authors: Sara Woodhull,
Sharon Kennedy
Oracle Corporation
World Headquarters
500 Oracle Parkway
Redwood Shores, CA 94065
U.S.A.
Worldwide Inquiries:
Phone: +1.650.506.7000
Fax: +1.650.506.7200
Copyright © 2011, Oracle and/or its affiliates. All rights reserved. This document is provided for information purposes only and the
contents hereof are subject to change without notice. This document is not warranted to be error-free, nor subject to any other
warranties or conditions, whether expressed orally or implied in law, including implied warranties and conditions of merchantability or
fitness for a particular purpose. We specifically disclaim any liability with respect to this document and no contractual obligations are
formed either directly or indirectly by this document. This document may not be reproduced or transmitted in any form or by any
means, electronic or mechanical, for any purpose, without our prior written permission.
Oracle and Java are registered trademarks of Oracle and/or its affiliates. Other names may be trademarks of their respective owners.
AMD, Opteron, the AMD logo, and the AMD Opteron logo are trademarks or registered trademarks of Advanced Micro Devices.
Intel and Intel Xeon are trademarks or registered trademarks of Intel Corporation. All SPARC trademarks are used under license
and are trademarks or registered trademarks of SPARC International, Inc. UNIX is a registered trademark licensed through X/Open
Company, Ltd. 1010