Embed Size (px)
Citation preview

ezi-dab owners’ manual

1
IntroductionThank you for purchasing a CORD Ezi Dab, DAB+ & FM Radio Module. The Ezi Dab is just one product in our range embracing our philosophy of ‘extraordinary audio visual gear.’
This product has been designed and engineered to give you many years of enjoy-ment. Please ensure you carefully read this manual to gain the maximum benefit from your purchase.
We suggest you keep your original proof of purchase receipt, this manual and the original packaging for future reference, in case you need to move your product, or in the unlikely event that you need to return the product for service.
Product updates, technical info, warranty and service centre details are available on our web site at www.cord-av.com
2
ContentsIntroduction• 1Important Safety Messages• 3What’s in the box• 4Set Up and Controls• 5Connections• 5Remote Control Operation• 6Initial Startup• 7Modes of Operation• 7Listening in DAB+ Mode• 8Listening in FM Radio Mode• 9Playback Information Display• 10Alarm Functions• 11Sleep Function• 12Menu Functions• 12-14Specifications• 14Troubleshooting• 15Warranty• 16-17What Is Not Covered• 17
3
Important Safety MessagesBefore you power on your new CORD product, to ensure safe and efficient operation, please take the time to read the following:
Keep these instructions in a safe place for future reference.• Pay attention to all warnings as these are important to ensure your safety • and the optimum operation of this product. Always use this product in accordance with the instructions.• Do not use this product in or near water or in direct sunlight.• Do not place items full of water on or near this product. • Do not expose this product to rain or moisture of any kind.• Do not use near any cooking, heating, cooling or ventilation appliances.• Do not block any of the ventilation openings on this product.• Turn this appliance off at the mains power switch during times of electrical • storms or when the product will not be used for long periods of time. Only use the power adaptor or exact equivalent, supplied with this product.• Please consult a qualified electrician if the plug does not fit your power • outlet. To ensure your safety, protect the power adaptor from being walked on, • cut, pinched, twisted or otherwise compromised. No user serviceable parts are used in this product. Refer all servicing to • qualified and authorised service personnel. If the product has been damaged in any way - for example; if the power • adaptor, cord or plug is damaged, liquid has been spilled or objects have fallen inside the product, the product has been exposed to rain or moisture, does not operate normally or it has been dropped - refer the product to your nearest authorised service centre.
4
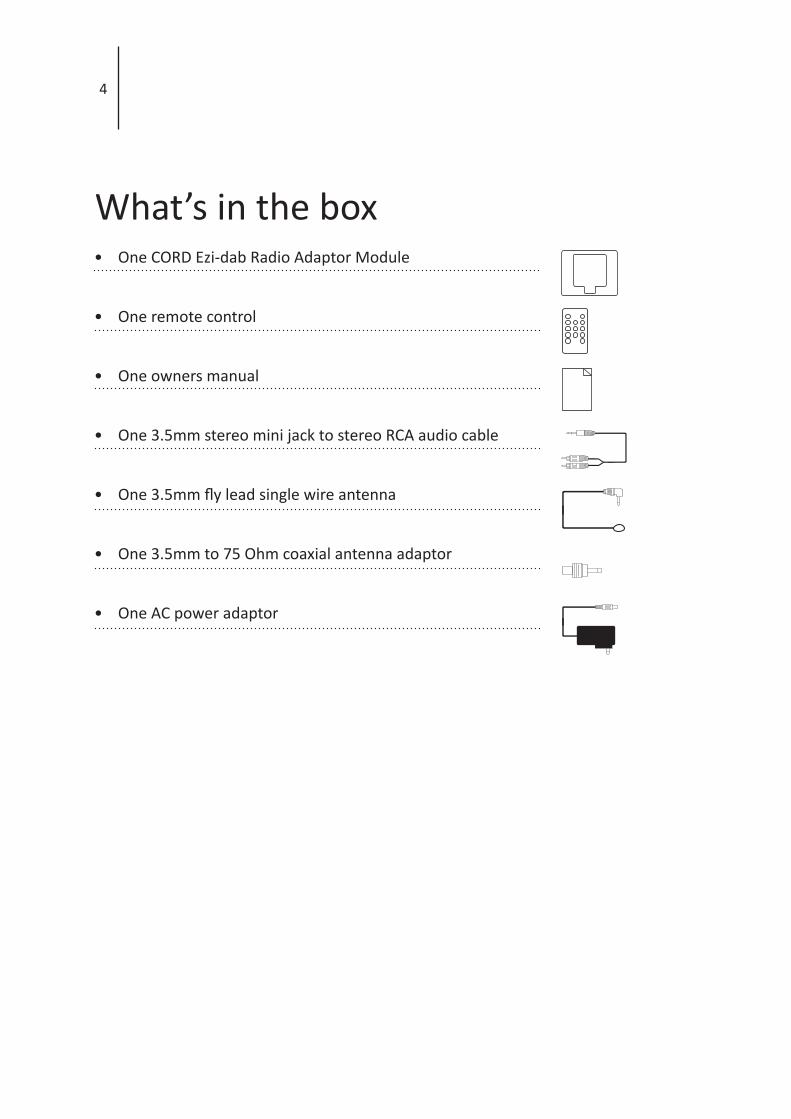
What’s in the boxOne CORD Ezi-dab Radio Adaptor Module•
One remote control•
One owners manual•
One 3.5mm stereo mini jack to stereo RCA audio cable•
One 3.5mm fly lead single wire antenna•
One 3.5mm to 75 Ohm coaxial antenna adaptor•
One AC power adaptor•
5
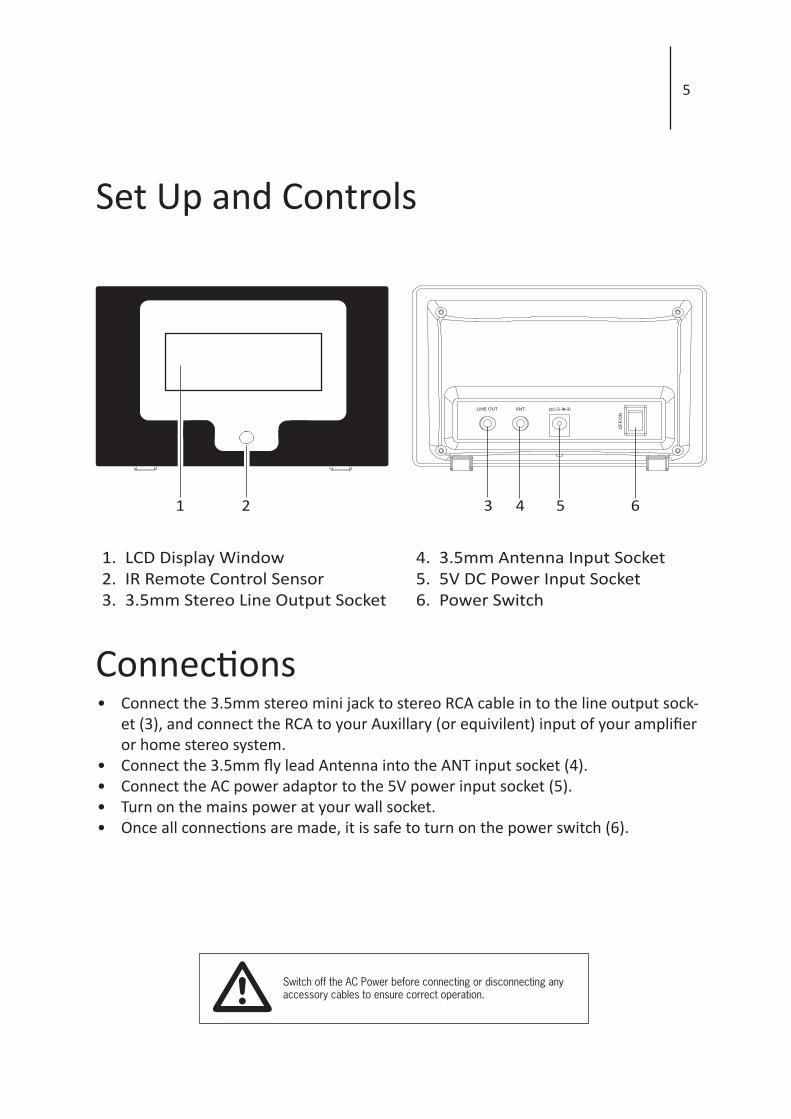
Set Up and Controls
Connect the 3.5mm stereo mini jack to stereo RCA cable in to the line output sock-• et (3), and connect the RCA to your Auxillary (or equivilent) input of your amplifier or home stereo system.Connect the 3.5mm fly lead Antenna into the ANT input socket (4). • Connect the AC power adaptor to the 5V power input socket (5).• Turn on the mains power at your wall socket.• Once all connections are made, it is safe to turn on the power switch (6).•
Connections
1 2 3 4 5 6
1. LCD Display Window2. IR Remote Control Sensor3. 3.5mm Stereo Line Output Socket
4. 3.5mm Antenna Input Socket5. 5V DC Power Input Socket6. Power Switch

6
Remote Control Operation
Power• Mute• Mode• Scan• Info•
Numbers 1 - 10• Alarm 1• Alarm 2• Menu• • q / p •
• Select• CLK Set• Dimmer• Sleep•
Turns the Ezi DAB on or into standby modeAudio mute on and audio mute offChanges the mode from DAB+ to FM or from FM to DAB+Scans for new DAB+ or FM stations, depending on selected modeScrolls between information sent by the broadcaster, (DLS, RDS, Time, Date, etc.)Numeric buttons to store and recall station presetsAccess to alarm function #1Access to alarm function #2Displays menu settingsControls volume up & volume downControls menu navigation or selects previous station frequencyControls menu navigation or selects next station frequencyConfirms menu operationManually set the clockTurn LCD display backlight on or offControls sleep time function
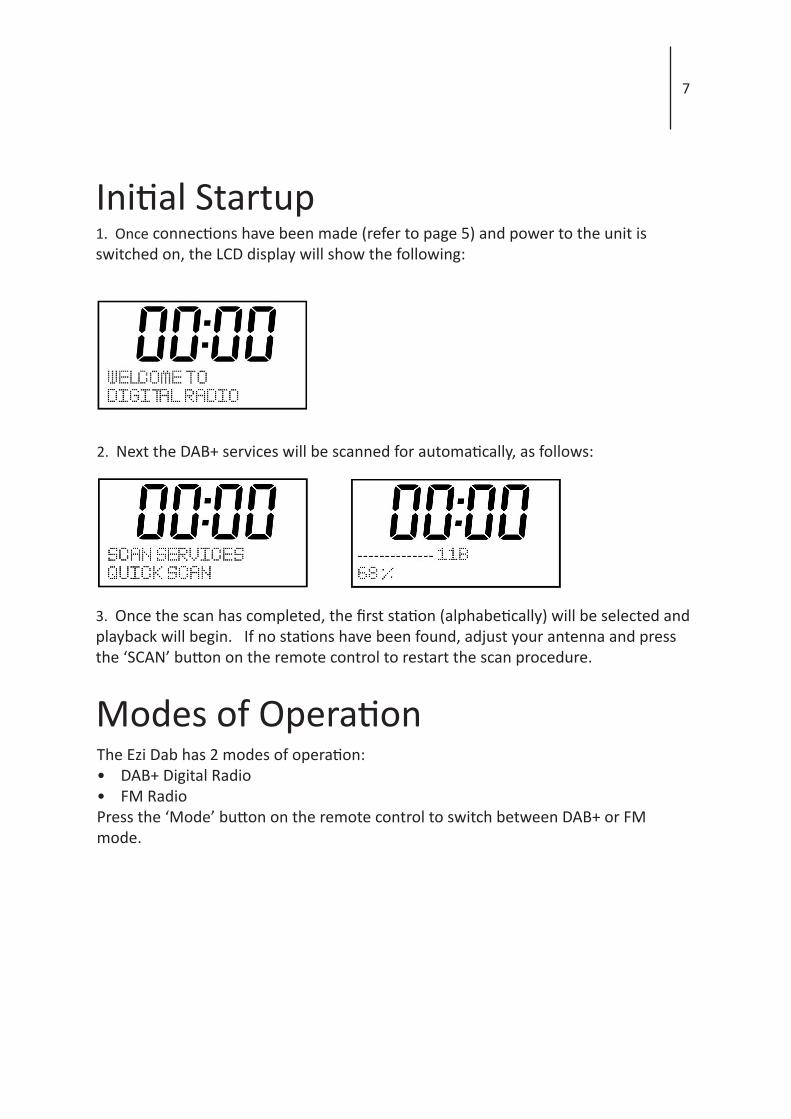
Initial Startup1. Once connections have been made (refer to page 5) and power to the unit is switched on, the LCD display will show the following:
7
3. Once the scan has completed, the first station (alphabetically) will be selected and playback will begin. If no stations have been found, adjust your antenna and press the ‘SCAN’ button on the remote control to restart the scan procedure.
Modes of OperationThe Ezi Dab has 2 modes of operation:
DAB+ Digital Radio• FM Radio •
Press the ‘Mode’ button on the remote control to switch between DAB+ or FM mode.
2. Next the DAB+ services will be scanned for automatically, as follows:
8
Listening to DAB+ ModePress the ‘Mode’ button on the remote control to select ‘DAB’ mode.1. If there are no stations available the Ezi Dab will automatically begin a scan for 2. digital radio stations available in your area.Once the scan has completed, and if stations have been found, the first station 3. listed (alphabetically) will be displayed and begin playing. Stations can be browsed by pressing the or buttons, then press the 4. ‘Select’ button once the desired station is displayed and playback will begin.
Storing Station Presets:Your Ezi Dab can store up to 10 DAB+ stations into memory as follows:
Select desired station and begin playback.1. Press and hold the desired numeric button (1-10) on the remote control until the 2. following is displayed (for example): ‘Preset 1 Stored’.
Recalling Stored Station Presets:Press the numeric button (1-10) on the remote control according to which order it 1. was stored above.
9
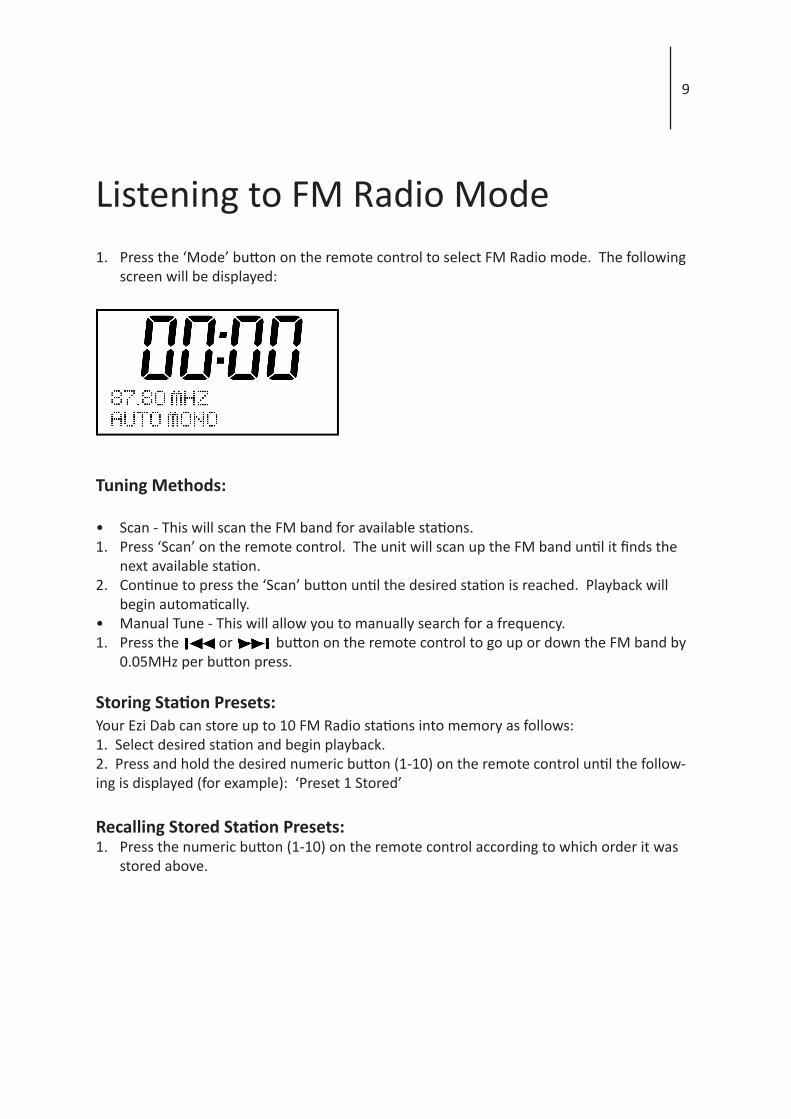
Listening to FM Radio ModePress the ‘Mode’ button on the remote control to select FM Radio mode. The following 1. screen will be displayed:
Tuning Methods:
Scan - This will scan the FM band for available stations.• Press ‘Scan’ on the remote control. The unit will scan up the FM band until it finds the 1. next available station. Continue to press the ‘Scan’ button until the desired station is reached. Playback will 2. begin automatically.Manual Tune - This will allow you to manually search for a frequency.• Press the or button on the remote control to go up or down the FM band by 1. 0.05MHz per button press.
Storing Station Presets:Your Ezi Dab can store up to 10 FM Radio stations into memory as follows:1. Select desired station and begin playback.2. Press and hold the desired numeric button (1-10) on the remote control until the follow-ing is displayed (for example): ‘Preset 1 Stored’
Recalling Stored Station Presets:Press the numeric button (1-10) on the remote control according to which order it was 1. stored above.
10
Playback Information DisplayYour Ezi Dab has the capability to display various pieces of information, specific to the broadcast you are listening to. This Information service is broadcast dependant, so all information may not be available at all times, depending on what you are lis-tening to.
Pressing the ‘Info’ button on the remote control will change the bottom line of dis-play on the LCD screen, and is capable of showing you the following information:
In DAB+ mode:Stereo or Mono audio output mode.• Area (geographically) that you are tuned in to.• Current time and date.• Program type (PTY) - Displays the program type, for example ‘Pop Music’.• Audio format - Stereo or Mono / Bit Rate (Kbps).• Dynamic Lablel Segment (DLS) - Scrolling text information supplied by the broad-• caster. This information can include such things as, but not limited to: Song title, artist, radio presenters name or contact details for the radio station.Channel Frequency (eg: 9A 202.928 MHz).•
In FM Radio mode:Stereo or Mono audio output mode.• Channel Frequency (eg: 107.5 MHz).• Radio Text (RDS) - Scrolling text information supplied by the broadcaster. This • information can include such things as, but not limited to: Song title, artist, radio presenters name or contact details for the radio station.Current time and date.• Program type (PTY) - Displays the program type, for example ‘Pop Music’.•
11
Alarm FunctionsYour Ezi Dab has 2 separate alarm functions. These alarms can be set at specific times, and alarm alerts can be in the form of DAB+ radio playback / FM radio play-back or 2 different types of buzzer (Series of high pitched beeps or low pitched beeps).
To Set the Alarm:Press and hold either the ‘Alarm 1’ button or the ‘Alarm 2’ button on the remote 1. control until ‘ALARM 1 TYPE SET’. You will see the word ‘OFF’ flashing repeatedly.Use the 2. or button on the remote control to select between ‘BUZZER’, ‘FM’, ‘DAB’ or ‘OFF’, then press ‘Select’ on the remote control to confirm your choice. After you select the desired alarm type, you can now choose between the follow-3. ing alarm modes:DAILY - The alarm will go off every day of the week.• WEEK DAY - The alarm will go off only on days Monday to Friday.• WEEKEND - The alarm will go off only on weekend days (Saturday and Sunday).• ONCE - The alarm will only go off on the day that you set it.• Make your selection with the or button then press ‘Select’.•
Choose the time of your alarm with the or buttons, then press the 4. ‘Select’ button. Set the hour, then hit ‘Select’ button to move on to the minute. Again press ‘Select’ after first setting the hour and minute.Choose the desired volume of your alarm with the or buttons, then hit 5. ‘Select’.Choose the desired beep type (Type 1 is 4 high pitched beeps, Type 2 is 4 lower 6. pitched beeps), then press ‘Select’ to confirm. Your alarm is now set and will now show a small bell (numbered #1 for alarm 1, 7. and numbered #2 for alarm 2) in the middle of the left side of the LCD display.
12
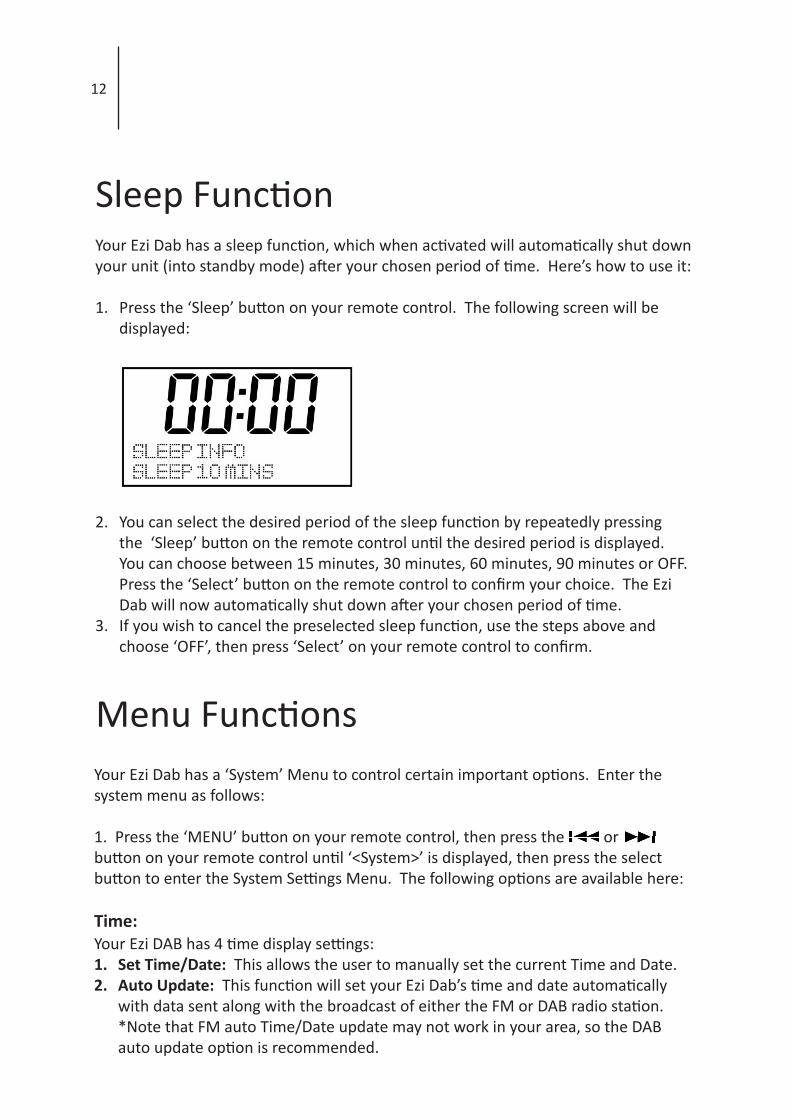
Sleep FunctionYour Ezi Dab has a sleep function, which when activated will automatically shut down your unit (into standby mode) after your chosen period of time. Here’s how to use it:
Press the ‘Sleep’ button on your remote control. The following screen will be 1. displayed:
You can select the desired period of the sleep function by repeatedly pressing 2. the ‘Sleep’ button on the remote control until the desired period is displayed. You can choose between 15 minutes, 30 minutes, 60 minutes, 90 minutes or OFF. Press the ‘Select’ button on the remote control to confirm your choice. The Ezi Dab will now automatically shut down after your chosen period of time.If you wish to cancel the preselected sleep function, use the steps above and 3. choose ‘OFF’, then press ‘Select’ on your remote control to confirm.
Menu FunctionsYour Ezi Dab has a ‘System’ Menu to control certain important options. Enter the system menu as follows:
1. Press the ‘MENU’ button on your remote control, then press the or button on your remote control until ‘<System>’ is displayed, then press the select button to enter the System Settings Menu. The following options are available here:
Time: Your Ezi DAB has 4 time display settings:
Set Time/Date: 1. This allows the user to manually set the current Time and Date.Auto Update:2. This function will set your Ezi Dab’s time and date automatically with data sent along with the broadcast of either the FM or DAB radio station. *Note that FM auto Time/Date update may not work in your area, so the DAB auto update option is recommended.

13
Menu Functions Contd3. Set 12/24 Hour: This option will change the format of your clock to either 12 hour or 24 hour format.4. Set Date Format: Changes the date display format between DD-MM-YYYY / MM-DD-YYYY.
Backlight:Your Ezi DAB has 3 backlight settings:
Timeout:1. This option is used to set the period of time that you wish your display’s backlight to remain lit when your Ezi Dab is in both ON and STANDBY modes. The available options are; On/10 sec/20 sec/30 sec/45 sec/60 sec/90 sec/120 sec/180 sec. Selecting ‘On’ will force your Ezi Dab’s backlight to remain on constantly. If you select a specific time delay, after the selected time period has lapsed the dis-play will dim down under the following two situations:When the radio is turned on and no operation under selected time out period.• When the radio turns off into Standby mode, the backlight will dim down after the • time out period has lapsed. On Level:2. This option will determine how bright the display’s backlight is lit while the Ezi DAB is in ON mode. There are 3 options for this setting; High, Medium & Low. Dim Level: 3. There are 3 brightness levels of the Dimmed backlight available – low/medium/high.
Language: This setting will change the language in which the menu sysyem is dis-played on your Ezi DAB.
Factory Reset:Resets your Ezi Dab back to factory (out of box) state. Once this is option is select-• ed you will need to re-tune and re-program both your DAB+ and FM radio stations and memory presets. You will also lose any alarms you have previously set up.
SW Version:This screen will tell you the software version that your unit is currently running. This • information may be helpful when seeking technical support from an authorised service department.
Specifications Type: DAB+ / FM Radio adaptor• Size: 93mm (H) x 137mm (W) x 40mm (D)• Weight: 0.35Kgs without packaging• Power supply adaptor: 100V-240V AC Input, 5V DC, 1.0A Output• FM tuner section frequency range: 87.5 ~ 108MHz• DAB+ tuner section frequency range: 174.928 MHz (5A) ~ 239.200MHz (13F)•
14
Menu Functions ContdDRC:DRC Stands for Dynamic Range Control. The DRC feature is only available when in DAB mode. By adjusting the compression of the broadcast DAB signal, DRC can make quieter sounds easier to hear when your radio is used in a noisy environment.Your Ezi DAB has 3 DRC settings
DRC High: Maximum compression. 1. DRC Low: Minimum compression.2. DRC Off: No compression.3.
Setting the compression to maximum will “boost” the quiet sounds, whilst keeping the loudest sounds at their original level.
PRUNE: Some DAB services may stop broadcasting or you may not be able toreceive a station any longer. The prune stations function will delete any DAB stations from your station list that can no longer be received, therefore ‘pruning’ your DAB stations list, only showing stations that are within listening range.
15
TroubleshootingIf you experience any difficulties with the operation of your CORD Ezi Dab, please check the table below before contacting an authorised CORD sercive centre:
Problem Possible Cause RemedyNo Power AC Power Cord is out•
AC socket switch is off• Connect the AC cord• Switch ON the AC • socket
Poor Radio Reception No Antenna is con-• nectedThe antenna is not • positioned for the best receptionThe frequency of the • desired station is not tuned in.
Connect the Antenna• Change the position of • the antennaTune in the frequency • of the desired radio sta-tion
Interference to Radio Re-ception
Weak signal or fringe • reception areaNoise related to influ-• ence of an electric ap-plicanceNoice related to a • nearby television set
Install an outdoor exter-• nal antennaTurn off the power to • the interfering appli-anceInstall this unit further • away from the TV set
Continuous or intermittant hissing sound from radio playback
Weak signal or fringe • reception area
Change the position of • the antennainstall an outdoor exter-• nal antenna
Bubbling sound is heard Weak signal or fringe • reception area
Change the position of • the antennainstall an outdoor exter-• nal antenna
Remote Control does not operate
Battery is not loaded • correctly, or has gone flat.
Replace the battery• Remove obstacles from • IR path to unit

Warranty ConditionsLimited Warranty - Australia & New ZealandCORD products are engineered and manufactured with pride for excellent perfor-mance, value and years of trouble free operation. In the unlikely event that you should have trouble with your CORD product we are pleased to offer this warranty. It is important that you read the contents of this warranty and be familiar with your rights and obligations. Our goods come with guarantees that cannot be excluded under the Australian Consumer Law. You are entitled to a replacement or refund for a major failure and for compenstion for any other reasonably forseeable loss or damage. You are also entitled to have the goods repaired or replaced if the goods fail to be of acceptable quality and the failure does not amount to a major failure.The benefits of this warranty are in addition to any rights and remedies imposed by Australian State and Federal legislation that cannot be excluded. Nothing in this war-ranty os to be interpreted as excluding, restricting or modifying any State or Federal legislation applicable to the supply of goods and services which cannot be excluded, restricted or modified.
Scope Of WarrantyCORD warrants to the original retail purchaser that we will repair or replace, at our option, any CORD product which is found to be defective in material and/or work-manship for 12 months from the date of purchase. During the warranty period, an authorised CORD Service Centre will provide both parts and labour free of charge to correct any defect in materials or workmanship, subject to the warranty terms and conditions.
Warranty Terms & ConditionsThis warranty is valid within Australia and New Zealand for CORD products pur-• chased in Australia or New Zealand for domestic home use only and where used in accordance with any instructions provided with or on the product. The warranty shall be void if the serial number is removed, defaced or altered. • You must provide a copy of the original purchase receipt to obtain warranty • repairs. We reserve the right to quote for and or charge for repairs outside the warranty period or where the date of original purchase cannot be verified.Warranty repairs must be undertaken by an authorised CORD Service Centre. Visit • our web site for the location of your nearest CORD Service Centre.No person is authorised to make or give any assertions, statements or undertak-• ings whether expressed or implied about other, or additional to, the terms of this warranty.
16
Warranty Conditions ContdWe reserve the right to make changes or improvements in design or manufacture • without any obligation to change or improve previously manufactured product.CORD shall not be responsible for incidental and or consequential damages or loss.
What Is Not CoveredThe cost of delivery and insurance in transit to the service centre. 1. It is your sole responsibility to arrange for your product to be forwarded to your 2. nearest CORD Service Centre for repair or replacement. Time taken to investigate your warranty claim where the product is found to be in 3. good working order. This includes where you have not followed instructions contained in any manuals provided with the product or where the fault is caused by use with incompatible equipment and or software.Warranty repairs where the product has been tampered with, altered, modified 4. or repaired by an unauthorised person.Misuse, mishandling or abuse to the product including cosmetic imperfections, 5. scratches, Acts of God and or electrical surge.Normal wear & tear and maintenance, cleaning, periodic check-ups or charges 6. for installation, removal or reinstallation of the product. Audio or video data stored on your iPod and or other devices used with or con-7. nected to your CORD product or media of any type.
When You Need ServiceIf you do require warranty service please visit our web site for details of any 1. warranty updates and the location your nearest authorised Service Centre. Alter-natively you may contact our office directly via phone or email. Contact details can be found on the last page of this booklet.Securely pack and send the product to the authorised Service Centre. DO NOT 2. return any accessories with your product unless the accessory is malfunctioning.We strongly suggest transit insurance as we cannot be responsible for products 3. lost and or damaged when in transit to the Service Centre.Include a clear description of the problem you are experiencing with your product 4. and your name, address and daytime contact details.
This warranty gives you specific legal rights and you may have other rights which vary from location to location. This limited warranty does not intend to affect these rights in
any way whatsoever.
17
Ezi Dab July 2013
PROUDLY DISTRIBUTED IN AUSTRALIA AND NEW ZEALAND BY:VOLITION AUSTRALIA PTY LTD
20 Corporate Boulevard, Bayswater VIC 3153 AustraliaPHONE: 03 9729 9300 / SERVICE: 03 9729 7300 / FAX: 03 9729 7900
Email: [email protected]