Embed Size (px)
Citation preview

INSTALLATION INSTRUCTIONS
For installation with a stock equalizer 2
For installation with a MORryde SRE 4000 Suspension 3
For installation with a MORryde LRE Rubber Leaf Suspension 4
Performance Crossmembers by MOR/ryde Factor

CROSS MEMBER INSTALLATION INSTRUCTIONS
The MORryde X Factor crossmember kit is designed to provide added strength and reinforcement to trailer frames. The crossmember can be installed onto a single spring hanger or for added strength and reinforcement onto all of the spring hangers on the frame. The installation instructions for the kit are detailed below. Please note there are specific installation instructions for trailers equipped with a MORryde suspension system.
If the unit has a reinforced frame hanger:*Align bottom edge of cross member end plate to bottom edge of framehanger. Drill out one or both holes as needed in the frame hanger with a5/16” drill bit. Return to step 8 above.
STEP 2
STEP 3
STEP 4
STEP 5
STEP 6
STEP 8
shoulder bolt
Tools required: Torque wrench 11/16” socket & 13/16” wrench 9/16” socket & wrench1/2” socket & wrenchFloor jacksSafety stands
Alternate tools for reinforced frame hanger: 5/16” drill bit & drill
Standard 3” Wide Frame Hanger:STEP 1 Using appropriately rated jacks to support the trailer, jack unit up and support frame with safety stands and support axles with floor jacks.
STEP 2 Remove shoulder bolt from frame hanger.
STEP 3 Replace with wet bolt (shoulder bolt w/ grease zerk) included in installation kit. The bolt should point toward the inside of the trailer. Do not install nut until next step.
STEP 4 Slide cross member half with slots over the end of the wet bolt and thread the nut on without tightening. The open end of the channel should point down.
STEP 5 Repeat steps 2-4 on opposite side of frame for the cross member half with holes.
STEP 6 Make sure the cross member ends are pressed against the frame hanger. Line up holes on both cross members and insert flange bolts (4 on each side) into holes that are furthest from the center in both the top and bottom rows (do not tighten flange bolts at this time).
STEP 7 Tighten wet bolts from step 3 on both sides to 40 ft-lbs. Then tighten flange bolts from step 6 to 40 ft-lbs.*
STEP 8 Insert clamp strap inside frame hanger and bolt to cross member. Tighten to 15 ft-lbs.
STEP 9 Remove jacks and supports from frame and axles.
Parts List: Crossmember half w/ holes, 2nd half w/ slots (2) Clamp strap(8) 3/8-16 x 1 Flange bolt(8) 3/8-16 Flange locknut(4) 5/16-18 x 1 1/2 HHCS(4) 5/16-18 Locknut(2) 7/16-20 x 3.40 wet bolt(2) 7/16-20 Flange locknut

SRE WITH CROSS MEMBER INSTALLATION INSTRUCTIONS
The MORryde X Factor crossmember kit is designed to provide added strength and reinforcement to trailer frames. The crossmember can be installed onto a single spring hanger or for added strength and reinforcement onto all of the spring hangers on the frame. The installation instructions for the kit and the SRE 4000 are detailed below. WARNING: THE SRE SUSPENSION SySTEM WARRANTy IS vOID IF CROSSMEMBER IS NOT INSTALLED.
STEP 8
Tools required: Torque wrench 11/16” socket & 13/16” wrench 9/16” socket & wrench1/2” socket & wrenchFloor jacksSafety stands
Alternate tools for reinforced frame hanger: 5/16” drill bit & drill
Standard 3” Wide Frame Hanger:
STEP 1 Using appropriately rated jacks to support the trailer, jack unit up and support frame with safety stands and support axles with floor jacks.
STEP 2 Remove shoulder bolt from frame hanger and remove shackle links.
STEP 3 Replace stock equalizer with SRE 4000. Reinstall shackle links and tighten shackle link nuts. Replace shoulder bolt with wet bolt (shoulder bolt w/ grease zerk) included in installation kit. The bolt should point toward the inside of the trailer. Do not install nut until next step.
STEP 4 Slide cross member half with slots over the end of the wet bolt and thread the nut on without tightening. The open end of the channel should point down.
STEP 5 Repeat steps 2-4 on opposite side of frame for the cross member half with holes.
STEP 6 Make sure the cross member ends are pressed against the frame hanger. Line up holes on both cross members and insert flange bolts (4 on each side) into holes that are furthest from the center in both the top and bottom rows (do not tighten flange bolts at this time).
STEP 7 Tighten wet bolts from step 3 on both sides to 40 ft-lbs. Then tighten flange bolts from step 6 to 40 ft-lbs.
STEP 8 Insert clamp strap inside frame hanger and bolt to cross member. Tighten to 15 ft-lbs.
STEP 9 Remove jacks and supports from frame and axles.
Parts List: Crossmember half w/ holes, 2nd half w/ slots (2) SRE 4000 Suspension System(2) Clamp strap(8) 3/8-16 x 1 Flange bolt(8) 3/8-16 Flange locknut(4) 5/16-18 x 1 1/2 HHCS(4) 5/16-18 Locknut(2) 7/16-20 x 3.40 wet bolt(2) 7/16-20 Flange locknut
STEP 2
STEP 3
STEP 4
STEP 5
STEP 6
shoulder bolt
STEP 3
STEP 6
STEP 5
STEP 4
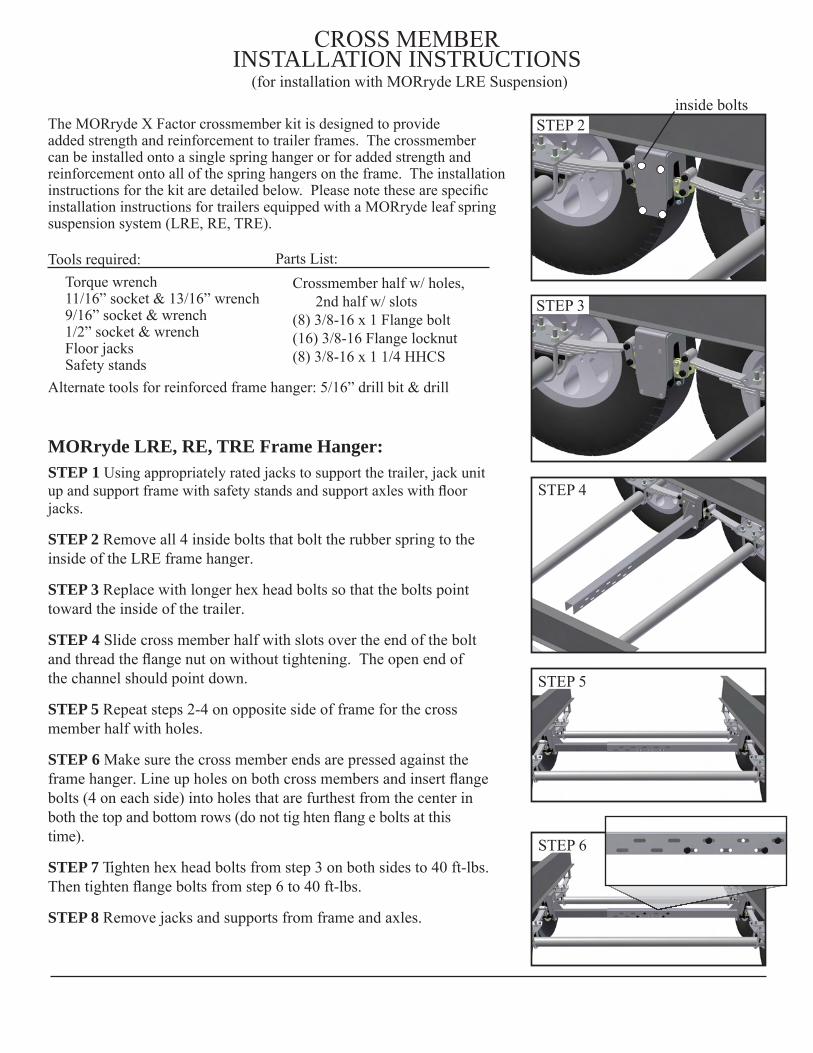
CROSS MEMBER INSTALLATION INSTRUCTIONS
(for installation with MORryde LRE Suspension)
STEP 2inside bolts
The MORryde X Factor crossmember kit is designed to provide added strength and reinforcement to trailer frames. The crossmember can be installed onto a single spring hanger or for added strength and reinforcement onto all of the spring hangers on the frame. The installation instructions for the kit are detailed below. Please note these are specific installation instructions for trailers equipped with a MORryde leaf spring suspension system (LRE, RE, TRE).
Tools required: Torque wrench 11/16” socket & 13/16” wrench 9/16” socket & wrench1/2” socket & wrenchFloor jacksSafety stands
Alternate tools for reinforced frame hanger: 5/16” drill bit & drill
MORryde LRE, RE, TRE Frame Hanger:STEP 1 Using appropriately rated jacks to support the trailer, jack unit up and support frame with safety stands and support axles with floor jacks.
STEP 2 Remove all 4 inside bolts that bolt the rubber spring to the inside of the LRE frame hanger.
STEP 3 Replace with longer hex head bolts so that the bolts point toward the inside of the trailer.
STEP 4 Slide cross member half with slots over the end of the bolt and thread the flange nut on without tightening. The open end of the channel should point down.
STEP 5 Repeat steps 2-4 on opposite side of frame for the cross member half with holes.
STEP 6 Make sure the cross member ends are pressed against the frame hanger. Line up holes on both cross members and insert flange bolts (4 on each side) into holes that are furthest from the center in both the top and bottom rows (do not tig hten flang e bolts at this time).
STEP 7 Tighten hex head bolts from step 3 on both sides to 40 ft-lbs. Then tighten flange bolts from step 6 to 40 ft-lbs.
STEP 8 Remove jacks and supports from frame and axles.
Parts List: Crossmember half w/ holes, 2nd half w/ slots (8) 3/8-16 x 1 Flange bolt(16) 3/8-16 Flange locknut(8) 3/8-16 x 1 1/4 HHCS