Embed Size (px)
Citation preview

Farmers’ Market - Collection #57 The Art of Home Club Members Only Content
Copyright Jacquelynne Steves
1
Quilt sample made by Daniela Durham. Pillow and
place mat samples made by Jacquelynne Steves
and Daniela Durham.
Approximate finished sizes:
• Quilt- 40 1/2” x 48 1/2”
• Place Mat- 18” x 11 1/2”
• Pillow- 19 1/2” x 13
This pattern contains instructions to make a quilt,
pillow, and a set of place mats! There are EIGHT
applique choices and NINE hand embroidery
designs, so you will have LOTS of mix & match
options! I had a lot of fun sketching out the
applique and embroidery patterns- my personal
favorites are the Farm Fresh sign and the radishes!
Imagine how cute a set of place mats will be with
these designs!
The quilt has a repetitive design which reminds me
of plaid and a basketweave, which have that classic
farm feel. The quilt also has only 3 fabrics- so feel
free to swap the colors for ANY season- see our
Tips and Ideas document for ideas. In the photo on
the right, you’ll see a sample where we’ve
swapped the grays for rust- it adds a really pretty
pop of color.
We all need a nice big bag to take to the farmers’
market with us, and these designs are perfect!
Try the bonus Scrappy Mix & Match Tote bonus pattern which can be found on the Club website.
Note- the Farmer’s Market Sign design (shown on the pillow above) is an embroidery only pattern (the pieces are too
small for applique.) For the sample, I used the Dry Brush Fabric Painting technique (tutorial on Club website) then I
outlined it with black floss using a backstitch. You could also use Crayon Tinting (also included on Club website) instead
of the fabric painting, and you will get a similar look. I love it!

Farmers’ Market - Collection #57 The Art of Home Club Members Only Content
Copyright Jacquelynne Steves
2
FABRIC & SUPPLIES:
Quilt: White- 5/8 yard (applique/embroidery backgrounds, pieced blocks)
Dark Gray- 1 1/2 yards (pieced blocks, binding)
Light Gray- 1 yard (pieced blocks)
Batting- 48” x 56”
Backing fabric- 2 3/4 yard (40/42” wide)
Place Mats (set of 4): White- 1/2 yard (applique/embroidery background, pieced blocks)
Dark Gray- 3/8 yard (pieced blocks, border)
Light Gray- 1/4 yard (pieced blocks)
Black- 5/8 yard (borders, binding)
Batting- (4) 13” x 19” for domestic machine (for longarm machine, they can all be grouped onto one large piece)
Backing fabric- 7/8 yard for domestic machine (or for longarm, about 1 3/8 yard to group them together)
Pillow: White- 3/8 yard (applique/embroidery background, pieced blocks)
Dark Gray- 1/4 yard (pieced blocks, borders)
Light Gray- 1/8 yard (or scraps from quilt/place mats)
Black- 1/8 yard or fat quarter (borders)
Batting- 15” x 22”
Fabric for pillow cover back- 1/2 yard
13” x 19” pillow form (it’s really easy & inexpensive to make your own pillow forms! See tutorial here
tinyurl.com/pillowform ) OR, you can just stuff your pillow cover with scrap batting! There’s enough of an overlap of the
backing fabric that your stuffing will not come out.

Farmers’ Market - Collection #57 The Art of Home Club Members Only Content
Copyright Jacquelynne Steves
3
For all projects, depending on technique chosen: Embroidery supplies, including floss in following colors- Light Green, Medium Green, Dark Green, Light Red, Medium
Red, Dark Red, Orange, Yellow, Black, Light Gray, Light Brown, Medium Brown, Dark Brown
Applique supplies, such as fusible web, etc. Fabric scraps in the following colors- Light Green, Medium Green, Dark
Green, Light Red, Medium Red, Dark Red, Orange, Yellow, Black, Light Gray, Light Brown, Medium Brown, Dark Brown
CUTTING INSTRUCTIONS:
Quilt: White
• (4) 10” squares (applique/embroidery backgrounds)
• (6) 1 1/2” x width of fabric strips (strip piecing)
Dark Gray
• (12) 2 1/2” x width of fabric strips. From 1 of these cut:
o (12) 2 1/2” squares
o Set aside remaining 11 strips (6 will be used for strip piecing, 5 will be used for binding)
• (11) 1 1/2” x width of fabric strips
o Cut 2 of the strips to 40 1/2” long (borders)
o Set aside remaining 9 strips (6 will be used for strip piecing, 3 will be used for additional borders)
Light Gray
• (12) 2 1/2” x width of fabric strips. From 6 of these strips cut:
o (94) 2 1/2” squares
o Set aside remaining 6 strips for strip piecing
Place Mat (set of 4): White
• (4) 10” squares (applique/embroidery
backgrounds)
• (64) 1 1/2” squares*
Dark Gray
• (64) 1 1/2” squares*
• (8) 1 1/2” x 9 1/2” (borders)
• (8) 1 1/2” x 18” (borders)
Light Gray
• (64) 1 1/2” squares
Black
• (12) 1” x 8 1/2” (borders)
• (8) 1” x 16” (borders)
• (6) 2 1/4” x width of fabric strips (binding)
Backing fabric- (4) 14” x 20”
Farmers’ Market - Collection #57 The Art of Home Club Members Only Content
Copyright Jacquelynne Steves
4
Pillow White
• (1) 10” square (applique/embroidery
background)
• (16) 1 1/2” squares*
Dark Gray
• (16) 1 1/2” squares*
• (2) 2 1/2” x 9 1/2” (borders)
• (2) 2 1/2” x 20” (borders)
Light Gray
• (16) 1 1/2” squares
Black
• (3) 1” x 8 1/2” (borders)
• (2) 1” x 16” (borders)
Pillow Back
• (2) 13 1/2” x 13”
*If you’ve got some 1 1/2” wide White and Dark Gray strips leftover from making the quilt, you can use those in place of
cutting the individual 1 1/2” squares. Cut the pieced strip units into 1 1/2” wide units as shown in quilt instructions at
the top of page 5.
PROJECT INSTRUCTIONS:
Quilt: When making the quilt, pay attention to quantities of units needed. For example you’ll cut 12 Dark Gray squares but
they will be divided up and used in different parts of the project.
Applique/Embroidery Blocks Applique/embroider designs of choice onto 10” White squares.
Trim blocks to 8 1/2”, centering the designs.
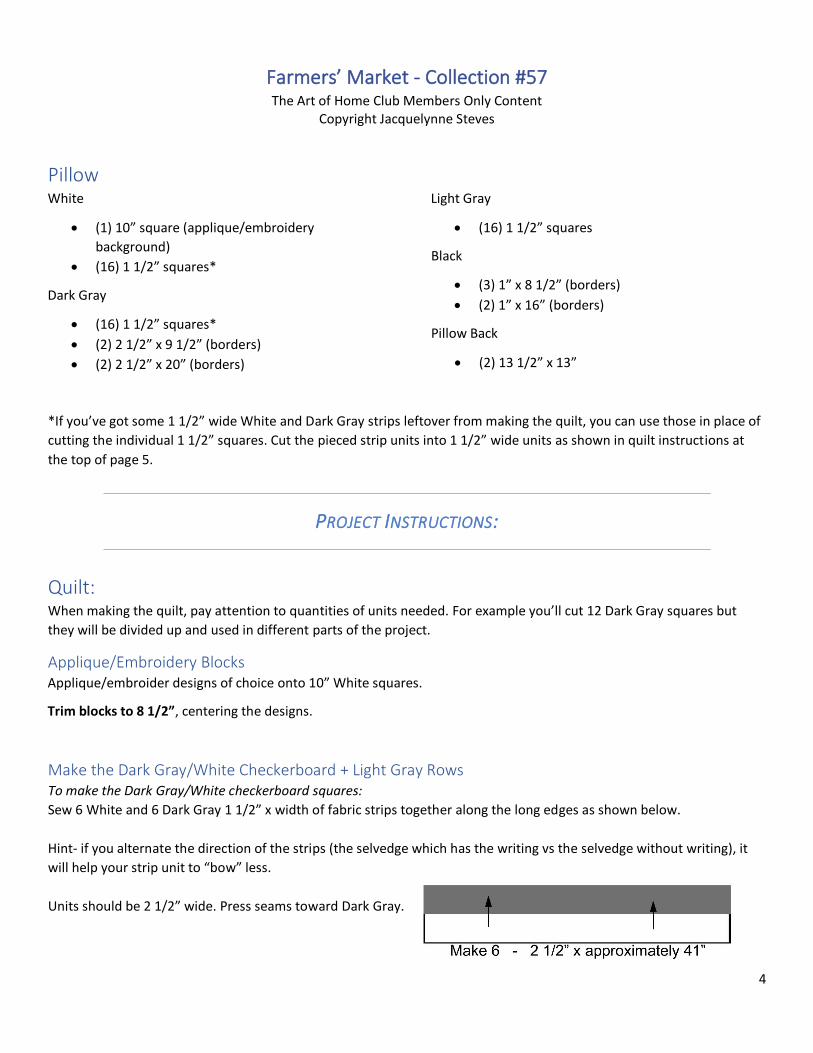
Make the Dark Gray/White Checkerboard + Light Gray Rows To make the Dark Gray/White checkerboard squares:
Sew 6 White and 6 Dark Gray 1 1/2” x width of fabric strips together along the long edges as shown below.
Hint- if you alternate the direction of the strips (the selvedge which has the writing vs the selvedge without writing), it
will help your strip unit to “bow” less.
Units should be 2 1/2” wide. Press seams toward Dark Gray.

Farmers’ Market - Collection #57 The Art of Home Club Members Only Content
Copyright Jacquelynne Steves
5
Trim off the selvedges. Cut each strip into 1 1/2” wide units
for a total of 166 units.
Hint- be sure that the strips are straight when you cut by lining up the seams with the
lines on your cutting mat. You can readjust the strip after every couple of cuts to be
sure it is straight, and just trim off the edge so you get perfectly straight units.
Make 166 units as shown in diagram at right.
Sew the units into pairs, so that you have 83 checkerboard squares.
Press seam allowances open.
To make the rows:
Sew 63 of the checkerboard squares together with 70 of the 2 1/2” Light Gray squares. Press seam allowances as shown
by the arrows.
NOTE that you are NOT using up all of the checkerboard & Light Gray squares for this step, please follow diagram below.

Farmers’ Market - Collection #57 The Art of Home Club Members Only Content
Copyright Jacquelynne Steves
6
Make the Dark Gray/Light Gray Rows Sew 6 Dark Gray and 6 Light Gray 2 1/2” x width of fabric strips
together along the long edges as shown below.
Hint- if you alternate the direction of the strips (the selvedge which
has the writing vs the selvedge without writing), it will help your strip
unit to “bow” less.
Units should be 4 1/2” wide. Press seams toward Light Gray.
Trim off the selvedges. Cut the strip units into 92 sections which are 2 1/2” wide. (Remember to straighten your strips as
described on middle of page 5.)
To make the rows:
Sew 72 of the Dark Gray/Light Gray units together with 8 of the 2 1/2” Dark Gray squares. Press seam allowances toward
Light Gray. NOTE that you are NOT using up all of the squares for this step, please follow diagram below.
Press all seam allowances toward Light Gray, as shown by arrows.
Make the setting blocks Sew remaining Dark Gray/White checkerboard, Dark Gray/ Light Gray pairs, individual 2 1/2” Dark Gray squares and 2
1/2” individual Light Gray squares together as instructed. LABEL your units A, B, and C for easy reference!
Setting Blocks A: Sew squares into rows of 3, then sew those
rows into 6 1/2” x 8 1/2” units as shown in diagram at right.
Press all seam allowances toward Light Gray, as shown by
the arrows.

Farmers’ Market - Collection #57 The Art of Home Club Members Only Content
Copyright Jacquelynne Steves
7
Setting Blocks B: Sew squares together as indicated by
diagram below. Press all seam allowances toward Light Gray
squares.
Setting Blocks C: (NOTE that the only difference between
the B and C blocks is the placement of the small Dark Gray
squares- but it is very important that you place them
correctly!!)
Sew squares together as indicated by diagram below. Press
all seam allowances toward Light Gray squares.
Assemble the Quilt Center When sewing the rows and units together, NOTE the placement
of the colors, especially on the rows with the
applique/embroidery blocks. You will need to rotate your A, B
and C blocks to get the color placement correct.
Press all seam allowances open.

Farmers’ Market - Collection #57 The Art of Home Club Members Only Content
Copyright Jacquelynne Steves
8
Sew the quilt center together as
shown. NOTE how all of the small
Dark Gray squares are in the same
position.
Press seam allowances open.
Borders and Finishing Sew 3 of the 1 1/2” x wof strips together end to end to make one long strip. Tutorial here tinyurl.com/pieced-strips
Cut long strip into two 46 1/2” long strips.
Sew Dark Gray 1 1/2” x 46 1/2” border strips to sides of quilt. Press seam allowances toward borders.
Sew Dark Gray 1 1/2” x 40 1/2” border strips to top & bottom of quilt. Press seam allowances toward borders.
Layer quilt with batting and backing. Quilt as desired. Bind with Dark Gray binding strips.
Place Mat Set and Pillow: The method for making the front/top is the same for both projects, except we will make 4 times the number of units for
the place mats as the pillow. Also, the Dark Gray (outer) borders on the pillow are slightly wider.
Make applique/embroidery blocks Applique/embroider designs of choice to 10” White square(s). (1 square for the pillow, 4 squares for the place mats.)
Trim block(s) to 8 1/2”, centering the designs.

Farmers’ Market - Collection #57 The Art of Home Club Members Only Content
Copyright Jacquelynne Steves
9
Assemble the place mats/pillow front Sew the White, Light Gray and Dark Gray 1 1/2” squares together into rows as shown in
diagram. Press seam allowances open.
Sew the rows into units as shown in diagram.
NOTE the diagonal pattern that the squares make
when you sew the rows together. Press seam
allowances open or to one side (your
preference.)
Sew the row units, appliqued/embroidered square(s), and Black 1” x 8 1/2” strips together as shown. Press all seam
allowances toward Black strips.
Sew Black 1” x 16” strips to long sides of place mats/pillow. Press seam allowances toward Black strips.
To complete place mats: Sew Dark Gray 1 1/2” x 9 1/2” strips to short sides of place
mats. Press seam allowances toward Dark Gray borders.
Sew Dark Gray 1 1/2” x 18” strips to long sides of project.
Press seam allowances toward Dark Gray borders.
Layer top with batting and backing fabric. Quilt as desired. Bind with Black binding strips.

Farmers’ Market - Collection #57 The Art of Home Club Members Only Content
Copyright Jacquelynne Steves
10
To complete pillow: Sew Dark Gray 2 1/2” x 9 1/2” strips to short sides of project. Press seam allowances toward Dark Gray borders.
Sew Dark Gray 2 1/2” x 20” strips to long sides of project. Press seam allowances toward Dark Gray borders.
Your pillow front should measure 20” x 13 1/2”. (See above diagram for adding Dark Gray borders to place mats.)
Quilt the pillow front:
Place the pillow front right side UP on the batting. Pin or spray baste in place. Quilt as desired. Trim away excess batting,
so that pillow front is 13 1/2” x 20”.
(NOTE- You can use a piece of backing fabric such as plain muslin behind the batting if you want, but it’s not necessary
since the back of the pillow front will be inside the pillow cover.)
Make the pillow cover back:
See video tutorial for making a pillow cover here tinyurl.com/video-envelope-pillow-cover
On each rectangle, press down one 13 1/2” edge, about 1/4” towards wrong
side of fabric. Press each folded edge down 1/4” again, then topstitch.
Place one rectangle on top of the other, wrong sides up, so that
the rectangles overlap to make a 13 1/2 x 20” rectangle. Stitch
together at area of overlap, about 1/8” from edge.
Assemble the pillow: Place pillow front and pillow back right sides together and pin
in place. Stitch around all the edges, using a 1/4” seam
allowance. Clip corners. Turn right side out through the
opening in the pillow back. Gently push out the corners. Press.
Insert pillow form through opening in pillow back.