Embed Size (px)
Citation preview

ibm.com/redbooks
Fast Connect for AIXVersion 3.1 Guide
Elton Costa BataginiMariusz Gieparda
KyeongWon Jeong
Install, set up, and customize a Fast Connect for AIX server
Detailed overview of advanced functionality
Step by step problem solving procedures


Fast Connect for AIXVersion 3.1 Guide
September 2001
SG24-5527-01
International Technical Support Organization

© Copyright International Business Machines Corporation 2000, 2001. All rights reserved.Note to U.S Government Users – Documentation related to restricted rights – Use, duplication or disclosure is subjectto restrictions set forth in GSA ADP Schedule Contract with IBM Corp.
Second Edition (September 2001)
This edition applies to AIX 5L for POWER Version 5.1, Program Number 5765-E6, and Fast Connect for AIX Version 3.1, Program Number 5765-E72, and is based on information available in May 2001.
Comments may be addressed to:IBM Corporation, International Technical Support OrganizationDept. JN9B Building 003 Internal Zip 283411400 Burnet RoadAustin, Texas 78758-3493
When you send information to IBM, you grant IBM a non-exclusive right to use or distribute the information in any way it believes appropriate without incurring any obligation to you.
Before using this information and the product it supports, be sure to read the general information in Appendix B, “Special notices” on page 197.
Take Note!

Contents
Figures . . . . . . . . . . . . . . . . . . . . . . . . . . . . . . . . . . . . . . . . . . . . . . . . . . . vii
Tables. . . . . . . . . . . . . . . . . . . . . . . . . . . . . . . . . . . . . . . . . . . . . . . . . . . . .xi
Preface . . . . . . . . . . . . . . . . . . . . . . . . . . . . . . . . . . . . . . . . . . . . . . . . . . . xiiiThe team that wrote this redbook. . . . . . . . . . . . . . . . . . . . . . . . . . . . . . . . . . . xiiiComments welcome. . . . . . . . . . . . . . . . . . . . . . . . . . . . . . . . . . . . . . . . . . . . . xiv
Chapter 1. Introduction to Windows name resolution . . . . . . . . . . . . . . 11.1 Name resolution mechanisms. . . . . . . . . . . . . . . . . . . . . . . . . . . . . . . . 1
1.1.1 The meaning of the 16th byte in NetBIOS names . . . . . . . . . . . . . 21.2 Types of nodes. . . . . . . . . . . . . . . . . . . . . . . . . . . . . . . . . . . . . . . . . . . 3
1.2.1 B node . . . . . . . . . . . . . . . . . . . . . . . . . . . . . . . . . . . . . . . . . . . . . 31.2.2 P node . . . . . . . . . . . . . . . . . . . . . . . . . . . . . . . . . . . . . . . . . . . . . 31.2.3 M node . . . . . . . . . . . . . . . . . . . . . . . . . . . . . . . . . . . . . . . . . . . . . 31.2.4 H node . . . . . . . . . . . . . . . . . . . . . . . . . . . . . . . . . . . . . . . . . . . . . 31.2.5 How to change the node type . . . . . . . . . . . . . . . . . . . . . . . . . . . . 4
1.3 Machine roles in the browsing mechanism . . . . . . . . . . . . . . . . . . . . . . 41.3.1 Non-browser. . . . . . . . . . . . . . . . . . . . . . . . . . . . . . . . . . . . . . . . . 41.3.2 Potential browser . . . . . . . . . . . . . . . . . . . . . . . . . . . . . . . . . . . . . 51.3.3 Backup browser . . . . . . . . . . . . . . . . . . . . . . . . . . . . . . . . . . . . . . 51.3.4 Master browser. . . . . . . . . . . . . . . . . . . . . . . . . . . . . . . . . . . . . . . 51.3.5 Domain master browser . . . . . . . . . . . . . . . . . . . . . . . . . . . . . . . . 5
1.4 Definitions . . . . . . . . . . . . . . . . . . . . . . . . . . . . . . . . . . . . . . . . . . . . . . 51.4.1 What is the LMHOSTS file? . . . . . . . . . . . . . . . . . . . . . . . . . . . . . 51.4.2 What is the HOSTS file?. . . . . . . . . . . . . . . . . . . . . . . . . . . . . . . . 51.4.3 What is the WINS server? . . . . . . . . . . . . . . . . . . . . . . . . . . . . . . 61.4.4 What is the DNS? . . . . . . . . . . . . . . . . . . . . . . . . . . . . . . . . . . . . . 6
1.5 Example of a NetBIOS name resolution process . . . . . . . . . . . . . . . . . 6
Chapter 2. Fast Connect for AIX presentation and installation . . . . . . . 92.1 Fast Connect for AIX overview . . . . . . . . . . . . . . . . . . . . . . . . . . . . . . . 92.2 Fast Connect for AIX requirements. . . . . . . . . . . . . . . . . . . . . . . . . . . 10
2.2.1 Server hardware requirements . . . . . . . . . . . . . . . . . . . . . . . . . . 102.2.2 Server software requirements . . . . . . . . . . . . . . . . . . . . . . . . . . . 112.2.3 Client hardware requirements . . . . . . . . . . . . . . . . . . . . . . . . . . . 112.2.4 Client software requirements . . . . . . . . . . . . . . . . . . . . . . . . . . . 11
2.3 Packaging Information . . . . . . . . . . . . . . . . . . . . . . . . . . . . . . . . . . . . 112.4 Installation . . . . . . . . . . . . . . . . . . . . . . . . . . . . . . . . . . . . . . . . . . . . . 12
2.4.1 Installation of Web server . . . . . . . . . . . . . . . . . . . . . . . . . . . . . . 122.4.2 Installation of Fast Connect for AIX . . . . . . . . . . . . . . . . . . . . . . 15
© Copyright IBM Corp. 2001 iii

Chapter 3. Defining shares . . . . . . . . . . . . . . . . . . . . . . . . . . . . . . . . . . 193.1 Quick start . . . . . . . . . . . . . . . . . . . . . . . . . . . . . . . . . . . . . . . . . . . . . 19
3.1.1 Starting/stopping/checking the Fast Connect for AIX server . . . . 193.1.2 Additional configuration . . . . . . . . . . . . . . . . . . . . . . . . . . . . . . . 26
3.2 Defining file system shares. . . . . . . . . . . . . . . . . . . . . . . . . . . . . . . . . 293.2.1 Adding or changing file system shares . . . . . . . . . . . . . . . . . . . . 293.2.2 Deleting a file system share . . . . . . . . . . . . . . . . . . . . . . . . . . . . 32
3.3 Defining printer share . . . . . . . . . . . . . . . . . . . . . . . . . . . . . . . . . . . . . 333.3.1 Defining printer on AIX . . . . . . . . . . . . . . . . . . . . . . . . . . . . . . . . 333.3.2 Adding or changing printer share . . . . . . . . . . . . . . . . . . . . . . . . 363.3.3 Deleting printer share . . . . . . . . . . . . . . . . . . . . . . . . . . . . . . . . . 38
Chapter 4. Accessing Fast Connect for AIX on Windows 95/98 . . . . . 394.1 Windows configuration . . . . . . . . . . . . . . . . . . . . . . . . . . . . . . . . . . . . 39
4.1.1 Windows 9x . . . . . . . . . . . . . . . . . . . . . . . . . . . . . . . . . . . . . . . . 394.2 Accessing the Fast Connect for AIX server . . . . . . . . . . . . . . . . . . . . 444.3 Locating the Fast Connect for AIX server from Windows 9x . . . . . . . . 454.4 Accessing resources from Fast Connect for AIX server . . . . . . . . . . . 48
4.4.1 Accessing files . . . . . . . . . . . . . . . . . . . . . . . . . . . . . . . . . . . . . . 484.4.2 Accessing printer shares . . . . . . . . . . . . . . . . . . . . . . . . . . . . . . 51
Chapter 5. Accessing Fast Connect for AIX on Windows NT . . . . . . . 575.1 Configuring Windows NT . . . . . . . . . . . . . . . . . . . . . . . . . . . . . . . . . . 575.2 Locating the Fast Connect for AIX server . . . . . . . . . . . . . . . . . . . . . . 605.3 Accessing resources from the Fast Connect for AIX server . . . . . . . . 63
5.3.1 Accessing files . . . . . . . . . . . . . . . . . . . . . . . . . . . . . . . . . . . . . . 635.3.2 Accessing the Fast Connect for AIX printers . . . . . . . . . . . . . . . . 65
Chapter 6. Accessing Fast Connect for AIX on Windows 2000 . . . . . . 696.1 Configuring Windows 2000 . . . . . . . . . . . . . . . . . . . . . . . . . . . . . . . . . 696.2 Locating the Fast Connect for AIX server . . . . . . . . . . . . . . . . . . . . . . 736.3 Accessing resources from the Fast Connect for AIX server . . . . . . . . 76
6.3.1 Accessing files . . . . . . . . . . . . . . . . . . . . . . . . . . . . . . . . . . . . . . 766.3.2 Accessing printers . . . . . . . . . . . . . . . . . . . . . . . . . . . . . . . . . . . 79
Chapter 7. Fast Connect for AIX advanced functions . . . . . . . . . . . . . 837.1 Unicode . . . . . . . . . . . . . . . . . . . . . . . . . . . . . . . . . . . . . . . . . . . . . . . 837.2 Support for Access Control Lists . . . . . . . . . . . . . . . . . . . . . . . . . . . . 84
7.2.1 Editing ACL information with the acledit command . . . . . . . . . . . 857.2.2 Editing ACL information within the CDE . . . . . . . . . . . . . . . . . . . 867.2.3 ACL inheritance . . . . . . . . . . . . . . . . . . . . . . . . . . . . . . . . . . . . . 87
7.3 File locking . . . . . . . . . . . . . . . . . . . . . . . . . . . . . . . . . . . . . . . . . . . . . 887.4 Send File API support . . . . . . . . . . . . . . . . . . . . . . . . . . . . . . . . . . . . 917.5 Mapping file names . . . . . . . . . . . . . . . . . . . . . . . . . . . . . . . . . . . . . . 92
iv Fast Connect for AIX Version 3.1 Guide
7.5.1 Differences in character casing. . . . . . . . . . . . . . . . . . . . . . . . . . 927.5.2 Mapping AIX long file names to DOS file names. . . . . . . . . . . . . 927.5.3 DOS file attributes . . . . . . . . . . . . . . . . . . . . . . . . . . . . . . . . . . . 94
7.6 User name mapping . . . . . . . . . . . . . . . . . . . . . . . . . . . . . . . . . . . . . . 947.7 Guest logon support . . . . . . . . . . . . . . . . . . . . . . . . . . . . . . . . . . . . . . 957.8 Alias names support . . . . . . . . . . . . . . . . . . . . . . . . . . . . . . . . . . . . . . 967.9 Accessing DFS directories . . . . . . . . . . . . . . . . . . . . . . . . . . . . . . . . . 977.10 User sessions. . . . . . . . . . . . . . . . . . . . . . . . . . . . . . . . . . . . . . . . . . 997.11 Messaging to PC clients . . . . . . . . . . . . . . . . . . . . . . . . . . . . . . . . . 1027.12 Share level security support . . . . . . . . . . . . . . . . . . . . . . . . . . . . . . 1037.13 Active directory integration . . . . . . . . . . . . . . . . . . . . . . . . . . . . . . . 107
7.13.1 How to access resources published in Active Directory. . . . . . 1137.14 Windows Terminal Server support . . . . . . . . . . . . . . . . . . . . . . . . . 114
Chapter 8. Authentications models . . . . . . . . . . . . . . . . . . . . . . . . . . . 1158.1 Using Fast Connect for AIX server with non-encrypted passwords . . 115
8.1.1 Modifying the clients to send non-encrypted passwords . . . . . . 1218.2 Using Fast Connect for AIX with encrypted passwords . . . . . . . . . . . 123
8.2.1 Creating Fast Connect for AIX users . . . . . . . . . . . . . . . . . . . . 1268.2.2 Changing Fast Connect for AIX passwords. . . . . . . . . . . . . . . . 1298.2.3 Synchronizing Fast Connect for AIX and AIX passwords . . . . . 132
8.3 Using Fast Connect for AIX in a mixed environment . . . . . . . . . . . . . 1338.4 Fast Connect for AIX server with passthrough authentication . . . . . . 1358.5 Remote password changing . . . . . . . . . . . . . . . . . . . . . . . . . . . . . . . 138
Chapter 9. Using Netlogon . . . . . . . . . . . . . . . . . . . . . . . . . . . . . . . . . 1419.1 Configuration of the Fast Connect for AIX server . . . . . . . . . . . . . . . 141
9.1.1 Preparing the profile scripts . . . . . . . . . . . . . . . . . . . . . . . . . . . 1459.1.2 Configuring the system policy . . . . . . . . . . . . . . . . . . . . . . . . . . 1459.1.3 Configuring NT clients from a different subnetwork. . . . . . . . . . 146
9.2 Configuring the IBM Network Client . . . . . . . . . . . . . . . . . . . . . . . . . 1479.2.1 Configuring IBM Network Client on Windows 2000 Professional1479.2.2 Configuring IBM Network Client on the Windows NT client . . . . 1509.2.3 Using the IBM Network Client . . . . . . . . . . . . . . . . . . . . . . . . . . 152
9.3 Configuring the Microsoft Network Client . . . . . . . . . . . . . . . . . . . . . 153
Chapter 10. Using NetBIOS Name Server . . . . . . . . . . . . . . . . . . . . . . 15710.1 Configuring NBNS . . . . . . . . . . . . . . . . . . . . . . . . . . . . . . . . . . . . . 157
10.1.1 Setting Fast Connect for AIX as an NBNS server . . . . . . . . . . 15710.1.2 Setting Fast Connect for AIX as a WINS client . . . . . . . . . . . . 159
10.2 NBNS table properties . . . . . . . . . . . . . . . . . . . . . . . . . . . . . . . . . . 15910.2.1 Listing the NetBIOS Name Server (NBNS) table . . . . . . . . . . . 16010.2.2 Adding a static name . . . . . . . . . . . . . . . . . . . . . . . . . . . . . . . 16310.2.3 Deleting an entry from the NBNS table . . . . . . . . . . . . . . . . . . 164
v
10.2.4 Backup/restore of the NBNS table . . . . . . . . . . . . . . . . . . . . . 16610.3 WINS Proxy server . . . . . . . . . . . . . . . . . . . . . . . . . . . . . . . . . . . . . 166
10.3.1 First experiment . . . . . . . . . . . . . . . . . . . . . . . . . . . . . . . . . . . 16810.3.2 Second experiment. . . . . . . . . . . . . . . . . . . . . . . . . . . . . . . . . 169
Chapter 11. Fast Connect for AIX troubleshooting . . . . . . . . . . . . . . 17111.1 Protocol levels . . . . . . . . . . . . . . . . . . . . . . . . . . . . . . . . . . . . . . . . 17111.2 The Fast Connect for AIX server environment . . . . . . . . . . . . . . . . 17211.3 Generic TCP/IP utilities . . . . . . . . . . . . . . . . . . . . . . . . . . . . . . . . . 17411.4 Troubleshooting utilities on Windows NT . . . . . . . . . . . . . . . . . . . . 174
11.4.1 TCP/IP configuration . . . . . . . . . . . . . . . . . . . . . . . . . . . . . . . 17411.4.2 NetBIOS over TCP/IP troubleshooting . . . . . . . . . . . . . . . . . . 177
11.5 Troubleshooting utilities on AIX . . . . . . . . . . . . . . . . . . . . . . . . . . . 18111.5.1 TCP/IP configuration checking . . . . . . . . . . . . . . . . . . . . . . . . 18111.5.2 Fast Connect for AIX server troubleshooting. . . . . . . . . . . . . . 18111.5.3 TCP/IP protocol troubleshooting . . . . . . . . . . . . . . . . . . . . . . . 184
11.6 Common problems . . . . . . . . . . . . . . . . . . . . . . . . . . . . . . . . . . . . . 19011.6.1 NetBIOS name resolution . . . . . . . . . . . . . . . . . . . . . . . . . . . . 19011.6.2 Browsing . . . . . . . . . . . . . . . . . . . . . . . . . . . . . . . . . . . . . . . . 19111.6.3 Authentication. . . . . . . . . . . . . . . . . . . . . . . . . . . . . . . . . . . . . 19111.6.4 Netlogon. . . . . . . . . . . . . . . . . . . . . . . . . . . . . . . . . . . . . . . . . 19111.6.5 File system shares . . . . . . . . . . . . . . . . . . . . . . . . . . . . . . . . . 19211.6.6 Printer share. . . . . . . . . . . . . . . . . . . . . . . . . . . . . . . . . . . . . . 192
Appendix A. Additional information . . . . . . . . . . . . . . . . . . . . . . . . . . . . 193
Appendix B. Special notices . . . . . . . . . . . . . . . . . . . . . . . . . . . . . . . . . . 197
Appendix C. Related publications . . . . . . . . . . . . . . . . . . . . . . . . . . . . . . 201C.1 IBM Redbooks . . . . . . . . . . . . . . . . . . . . . . . . . . . . . . . . . . . . . . . . . . . . 201C.2 IBM Redbooks collections . . . . . . . . . . . . . . . . . . . . . . . . . . . . . . . . . . . 201C.3 Other resources . . . . . . . . . . . . . . . . . . . . . . . . . . . . . . . . . . . . . . . . . . . 201C.4 Referenced Web sites . . . . . . . . . . . . . . . . . . . . . . . . . . . . . . . . . . . . . . 202
How to get IBM Redbooks . . . . . . . . . . . . . . . . . . . . . . . . . . . . . . . . . . 203IBM Redbooks fax order form . . . . . . . . . . . . . . . . . . . . . . . . . . . . . . . . . . . . 204
Abbreviations and acronyms . . . . . . . . . . . . . . . . . . . . . . . . . . . . . . . . 205
Index . . . . . . . . . . . . . . . . . . . . . . . . . . . . . . . . . . . . . . . . . . . . . . . . . . . 207
IBM Redbooks review . . . . . . . . . . . . . . . . . . . . . . . . . . . . . . . . . . . . . . 211
vi Fast Connect for AIX Version 3.1 Guide
Figures
1. Finding a computer NetBIOS name with the Find Computer option . . . . . . 62. Login window for Web-based System Manager using Netscape 6 . . . . . . 153. Web-based System Manager main window using Web browser. . . . . . . . 184. Web-based System Manager main window. . . . . . . . . . . . . . . . . . . . . . . . 205. PC Services . . . . . . . . . . . . . . . . . . . . . . . . . . . . . . . . . . . . . . . . . . . . . . . . 206. Menu items by clicking right button . . . . . . . . . . . . . . . . . . . . . . . . . . . . . . 217. Startup options. . . . . . . . . . . . . . . . . . . . . . . . . . . . . . . . . . . . . . . . . . . . . . 218. Successful startup . . . . . . . . . . . . . . . . . . . . . . . . . . . . . . . . . . . . . . . . . . . 229. File share . . . . . . . . . . . . . . . . . . . . . . . . . . . . . . . . . . . . . . . . . . . . . . . . . . 2210. Successful stop . . . . . . . . . . . . . . . . . . . . . . . . . . . . . . . . . . . . . . . . . . . . . 2411. Detailed statistics . . . . . . . . . . . . . . . . . . . . . . . . . . . . . . . . . . . . . . . . . . . . 2512. Server properties window . . . . . . . . . . . . . . . . . . . . . . . . . . . . . . . . . . . . . 2713. Defining shares menu . . . . . . . . . . . . . . . . . . . . . . . . . . . . . . . . . . . . . . . . 2914. Changing file system share . . . . . . . . . . . . . . . . . . . . . . . . . . . . . . . . . . . . 3015. File share options. . . . . . . . . . . . . . . . . . . . . . . . . . . . . . . . . . . . . . . . . . . . 3116. Typing the queue name . . . . . . . . . . . . . . . . . . . . . . . . . . . . . . . . . . . . . . . 3417. Adding new queue and printer . . . . . . . . . . . . . . . . . . . . . . . . . . . . . . . . . . 3418. Checking the printer definition data . . . . . . . . . . . . . . . . . . . . . . . . . . . . . . 3519. Printer and queue definitions completed message . . . . . . . . . . . . . . . . . . 3520. Defining printer share. . . . . . . . . . . . . . . . . . . . . . . . . . . . . . . . . . . . . . . . . 3721. User profiles. . . . . . . . . . . . . . . . . . . . . . . . . . . . . . . . . . . . . . . . . . . . . . . . 4022. Change Windows passwords. . . . . . . . . . . . . . . . . . . . . . . . . . . . . . . . . . . 4123. Network dialog box . . . . . . . . . . . . . . . . . . . . . . . . . . . . . . . . . . . . . . . . . . 4224. WINS configuration . . . . . . . . . . . . . . . . . . . . . . . . . . . . . . . . . . . . . . . . . . 4325. Windows 95/98 identification . . . . . . . . . . . . . . . . . . . . . . . . . . . . . . . . . . . 4426. Select primary network logon. . . . . . . . . . . . . . . . . . . . . . . . . . . . . . . . . . . 4527. Browsing domain in Windows 9x . . . . . . . . . . . . . . . . . . . . . . . . . . . . . . . . 4628. Find: Computer in Windows 9x . . . . . . . . . . . . . . . . . . . . . . . . . . . . . . . . . 4729. Shared resources on Fast Connect for AIX server . . . . . . . . . . . . . . . . . . 4930. Run command window. . . . . . . . . . . . . . . . . . . . . . . . . . . . . . . . . . . . . . . . 5031. Map Network Drive in Windows 9x . . . . . . . . . . . . . . . . . . . . . . . . . . . . . . 5032. Add Printer Wizard in Windows 9x. . . . . . . . . . . . . . . . . . . . . . . . . . . . . . . 5233. Select printer connection window wizard . . . . . . . . . . . . . . . . . . . . . . . . . . 5234. Enter the network printer path . . . . . . . . . . . . . . . . . . . . . . . . . . . . . . . . . . 5335. Select the printer driver window in Windows 9x. . . . . . . . . . . . . . . . . . . . . 5436. Set printer name window . . . . . . . . . . . . . . . . . . . . . . . . . . . . . . . . . . . . . . 5437. Windows NT Identification . . . . . . . . . . . . . . . . . . . . . . . . . . . . . . . . . . . . . 5738. Identification Changes in Windows NT . . . . . . . . . . . . . . . . . . . . . . . . . . . 5839. Protocols . . . . . . . . . . . . . . . . . . . . . . . . . . . . . . . . . . . . . . . . . . . . . . . . . . 5940. WINS addresses . . . . . . . . . . . . . . . . . . . . . . . . . . . . . . . . . . . . . . . . . . . . 60
© Copyright IBM Corp. 2001 vii

41. Browsing domains in Windows NT . . . . . . . . . . . . . . . . . . . . . . . . . . . . . . 6142. Find: Computer in Windows NT . . . . . . . . . . . . . . . . . . . . . . . . . . . . . . . . . 6243. Fast Connect shares . . . . . . . . . . . . . . . . . . . . . . . . . . . . . . . . . . . . . . . . . 6444. Map Network Drive in Windows NT . . . . . . . . . . . . . . . . . . . . . . . . . . . . . . 6445. Connect to printer . . . . . . . . . . . . . . . . . . . . . . . . . . . . . . . . . . . . . . . . . . . 6646. Selecting a port from the Add Printer Wizard. . . . . . . . . . . . . . . . . . . . . . . 6747. Select a printer driver from the Add Printer Wizard . . . . . . . . . . . . . . . . . . 6848. Identification Changes in Windows 2000 . . . . . . . . . . . . . . . . . . . . . . . . . . 6949. Local Area Connection 2 Status . . . . . . . . . . . . . . . . . . . . . . . . . . . . . . . . 7050. Internet Protocol (TCP/IP) Properties . . . . . . . . . . . . . . . . . . . . . . . . . . . . 7151. Advanced TCP/IP Settings . . . . . . . . . . . . . . . . . . . . . . . . . . . . . . . . . . . . 7252. Browsing the Fast Connect for AIX server. . . . . . . . . . . . . . . . . . . . . . . . . 7453. Locating the server with the Search for Computer option . . . . . . . . . . . . . 7554. Fast Connect shared resources. . . . . . . . . . . . . . . . . . . . . . . . . . . . . . . . . 7755. Map Network Drive in Windows 2000 . . . . . . . . . . . . . . . . . . . . . . . . . . . . 7856. Connecting to a printer. . . . . . . . . . . . . . . . . . . . . . . . . . . . . . . . . . . . . . . . 8057. Selecting a port . . . . . . . . . . . . . . . . . . . . . . . . . . . . . . . . . . . . . . . . . . . . . 8158. Add Printer Wizard. . . . . . . . . . . . . . . . . . . . . . . . . . . . . . . . . . . . . . . . . . . 8259. Setting the cultural environment . . . . . . . . . . . . . . . . . . . . . . . . . . . . . . . . 8460. Editing ACL permissions in CDE . . . . . . . . . . . . . . . . . . . . . . . . . . . . . . . . 8661. File Manager permissions editor with Change ACL button . . . . . . . . . . . . 8762. Authorizing DFS access. . . . . . . . . . . . . . . . . . . . . . . . . . . . . . . . . . . . . . . 9863. User sessions . . . . . . . . . . . . . . . . . . . . . . . . . . . . . . . . . . . . . . . . . . . . . 10164. Detailed information about open files. . . . . . . . . . . . . . . . . . . . . . . . . . . . 10265. Global option for share level security . . . . . . . . . . . . . . . . . . . . . . . . . . . . 10466. Local shared level security properties . . . . . . . . . . . . . . . . . . . . . . . . . . . 10567. ADSI edit: Shares container. . . . . . . . . . . . . . . . . . . . . . . . . . . . . . . . . . . 10768. ADSI edit: Shares properties . . . . . . . . . . . . . . . . . . . . . . . . . . . . . . . . . . 10869. Contents of My Network Places. . . . . . . . . . . . . . . . . . . . . . . . . . . . . . . . 11370. Contents of directory . . . . . . . . . . . . . . . . . . . . . . . . . . . . . . . . . . . . . . . . 11371. Shared object in Active Directory. . . . . . . . . . . . . . . . . . . . . . . . . . . . . . . 11472. Authentication process using non-encrypted passwords. . . . . . . . . . . . . 11673. Web-based System Manager interface using Internet browser . . . . . . . . 11774. Fast Connect for AIX connect administration interface . . . . . . . . . . . . . . 11875. Properties option: Non-encrypted passwords . . . . . . . . . . . . . . . . . . . . . 11976. Authentication process using encrypted passwords . . . . . . . . . . . . . . . . 12477. Server properties option: Force encryption . . . . . . . . . . . . . . . . . . . . . . . 12578. User administration: Create user . . . . . . . . . . . . . . . . . . . . . . . . . . . . . . . 12779. User properties . . . . . . . . . . . . . . . . . . . . . . . . . . . . . . . . . . . . . . . . . . . . 12880. User administration: Change user . . . . . . . . . . . . . . . . . . . . . . . . . . . . . . 13081. Change user password . . . . . . . . . . . . . . . . . . . . . . . . . . . . . . . . . . . . . . 13382. Server properties: Negotiate encryption . . . . . . . . . . . . . . . . . . . . . . . . . 13483. Authentication process using passthrough authentication. . . . . . . . . . . . 136
viii Fast Connect for AIX Version 3.1 Guide
84. Server properties: Passthrough authentication . . . . . . . . . . . . . . . . . . . . 13785. Windows change password utility . . . . . . . . . . . . . . . . . . . . . . . . . . . . . . 13986. Fast Connect for AIX properties selection in Web-based System Manager . 14287. Selecting netlogon in the Fast Connect for AIX properties window . . . . . 14388. Local Area Connection Properties window. . . . . . . . . . . . . . . . . . . . . . . . 14889. IBM Network Client Properties menu. . . . . . . . . . . . . . . . . . . . . . . . . . . . 14990. Entire network window . . . . . . . . . . . . . . . . . . . . . . . . . . . . . . . . . . . . . . . 15091. Network Services Properties menu . . . . . . . . . . . . . . . . . . . . . . . . . . . . . 15192. Changed logon screen. . . . . . . . . . . . . . . . . . . . . . . . . . . . . . . . . . . . . . . 15293. Network configuration window in Windows 95. . . . . . . . . . . . . . . . . . . . . 15394. Client for Microsoft networks properties. . . . . . . . . . . . . . . . . . . . . . . . . . 15495. Server properties: NetBIOS name server . . . . . . . . . . . . . . . . . . . . . . . . 15796. NetBIOS name table properties. . . . . . . . . . . . . . . . . . . . . . . . . . . . . . . . 16197. Server properties: Proxy WINS server . . . . . . . . . . . . . . . . . . . . . . . . . . . 16798. Proxy WINS server as NBNS server . . . . . . . . . . . . . . . . . . . . . . . . . . . . 16899. Proxy WINS server . . . . . . . . . . . . . . . . . . . . . . . . . . . . . . . . . . . . . . . . . 170100.Fast Connect for AIX server states . . . . . . . . . . . . . . . . . . . . . . . . . . . . . 172101.The result of ipconfig command . . . . . . . . . . . . . . . . . . . . . . . . . . . . . . . 175102.The result of winipcfg command . . . . . . . . . . . . . . . . . . . . . . . . . . . . . . . 176103.AIX TCP/IP protocol configuration. . . . . . . . . . . . . . . . . . . . . . . . . . . . . . 177
ix

x Fast Connect for AIX Version 3.1 Guide

Tables
1. Fast Connect for AIX packaging information . . . . . . . . . . . . . . . . . . . . . . . 112. Important files for Fast Connect for AIX. . . . . . . . . . . . . . . . . . . . . . . . . . . 173. net config command options . . . . . . . . . . . . . . . . . . . . . . . . . . . . . . . . . . . 914. Sendfile API performance no command option . . . . . . . . . . . . . . . . . . . . . 915. Default encryption mechanisms for Windows operating systems . . . . . . 121
© Copyright IBM Corp. 2001 xi

xii Fast Connect for AIX Version 3.1 Guide
Preface
Fast Connect for AIX allows PC file and print servers to be consolidated into a single larger AIX file and print server for enhanced manageability. Fast Connect for AIX can take advantage of existing and future core benefits including reliability, availability, scalability, open standards, security, systems management, performance, national language support, and IBM worldwide service and support.
This redbook explains how to install and set up an Fast Connect for AIX server, how to declare file and printer shares, and how to choose the best security model that fits your needs.
This redbook also describes how to customize your PC clients running Windows 95, Windows 98, Windows NT, or Windows 2000 to access the Fast Connect for AIX server.
This redbook is a minor revision of the previous version of AIX Fast Connect Functions and Sizing Guideline, SG24-5527.
The team that wrote this redbook
This redbook was produced by a team of specialists from around the world working at the International Technical Support Organization Austin Center.
KyeongWon Jeong is a Senior I/T Specialist at the International Technical Support Organization, Austin Center. He writes extensively on AIX and education materials. Before joining the ITSO three years ago, he worked in IBM Global Learning Services in Korea as a Senior Education Specialist and was a class manager of all AIX classes for customers and interns. He has many years of teaching and development experience.
Elton Costa Batagini is a system analyst and works for IBM in Brazil. He has six years of experience in TCP/IP and SNA Network, and also two years working with RS/6000 and AIX. He works providing network solutions for IBM customers in Brazil and Latin America. Other areas that he works are Windows NT/2000 and Lotus Notes administration.
Mariusz Gieparda is a system analyst and works for ComputerLand S.A., an IBM Business Partner in Poland. He has three years of experience in RS/6000, AIX, and HACMP, and ten years of experience in networking and communications. His areas of expertise include Windows NT/2000, UNIX, TCP/IP, internetworking between different operating systems and network
© Copyright IBM Corp. 2001 xiii

devices, and system and network security including firewall environments. He is an IBM Certified Advanced Technical Expert - RS/6000 AIX V4 and also a Microsoft Certified System Engineer.
Thanks to the following people for their invaluable contributions to this project:
International Technical Support Organization, Austin CenterErnest A. Keenan, Chris Blatchley, Scott Vetter, Steve Hochstetler
IBM AustinRakesh Sharma, Prasad Potluri, Smita Bodepudi, Murali Neralla, Kathleen DeLira
IBM EndicottMargaret Ticknor
IBM SloveniaBorut Znidar
We would also like to thank the authors of the original version of this publication:
Laurent Vanel, Zehire Assila, Yesid Jaramillo, Borut Znidar
Comments welcome
Your comments are important to us!
We want our Redbooks to be as helpful as possible. Please send us your comments about this or other Redbooks in one of the following ways:
• Fax the evaluation form found in “IBM Redbooks review” on page 211 to the fax number shown on the form.
• Use the online evaluation form found at ibm.com/redbooks
• Send your comments in an Internet note to [email protected]
xiv Fast Connect for AIX Version 3.1 Guide

Chapter 1. Introduction to Windows name resolution
The Windows name resolution process is the mechanism used to map the logical name you give a computer to its network address. The naming convention is based on the Network Basic Input/Output System (NetBIOS) protocol. Windows can use NetBIOS over several protocols, such as NetBEUI or TCP/IP. Because it is the protocol used by the Fast Connect for AIX product, in this book we will focus on NetBIOS over TCP/IP (the NetBT interface) as specified on RFCs 1001 and 1002.
The name resolution mechanism varies with the type of node (B, P, M, or H) and the configuration of the local system, so it is necessary to present the network services that are potentially available.
1.1 Name resolution mechanisms
There are different ways to resolve a NetBIOS name, and, depending on the type of node, the system will use these mechanisms or not. The different mechanisms are:
• NetBIOS cache
• NetBIOS name server
• IP subnet broadcast
• LMHOSTS file
• Hosts file
• DNS server
Early implementations only used cache information, IP subnet broadcast, and the Hosts and LMHOSTS files. The latest versions have modifications that add domain suffixes to the NetBIOS names in order to query the DNS. The maximum length of a NetBIOS name is fifteen characters, and the domain suffix is not considered part of the NetBIOS name.
The NetBIOS name of one machine is unique and separate from the DNS name, but it can be the same.
Note
© Copyright IBM Corp. 2001 1

1.1.1 The meaning of the 16th byte in NetBIOS namesWe have just seen that the length for a NetBIOS name was fifteen characters. There is a hidden sixteenth byte used to identify the type of node and the role performed by this node. For instance, in the Fast Connect for AIX server, you can see this sixteenth byte in the /etc/cifs/nbnames.cur file.
The possible meanings of this sixteenth byte are divided into two groups:
Computer names:\00 All registered machines have a unique record of
this type; this is the name referred to as the NetBIOS computer.
\03 Registered on a WINS server-like messenger service on a computer that is a WINS client.
\06 Used to specify Remote Access Server (RAS) service.
\1B Used for the domain master browser. Only the PDC (Primary Domain Controller) can have this record type.
\1F Used to specify Network Dynamic Data Exchange (NetDDE).
\20 Used to specify server names and provide shared resources, such as files or printers.
\21 Used to specify RAS clients.
\BE Used to specify that the network monitor agent is used on the computer.
\BF Used to specify that the network monitor utility is used on the computer.
Group names:\1C Used to specify a domain group name.
\1D Used to specify the master browser.
\1E Used to specify normal group names.
\20 Used to specify special group names.
_MSBROWSE_ Used to periodically announce the domain records of the local subnet by the master browser servers.
2 Fast Connect for AIX Version 3.1 Guide

1.2 Types of nodes
The NetBIOS definition on RFCs 1001 and 1002 specifies different nodes. All these types are supported in a Windows environment, even if some of them are not generally used.
1.2.1 B nodeThe B node uses broadcast messages for the registration and resolution of the names. This type of node may not be adequate in large networks because it significantly increases network traffic.
1.2.2 P nodeThe P node sends broadcast messages to NetBIOS name servers, such as WINS servers, for name registration and resolution. This type of node avoids the network load because the broadcast messages are only sent between the server and the node client (point-to-point) for the registration and resolution process. If there is not an active NetBIOS name server on the network, name resolution fails.
1.2.3 M nodeThe M node is a mix of B and P nodes. The computer first attempts registration and resolution acting as a B node; if this fails, it acts as a P node. The advantage of this type of node is that it can be used across routers and, in theory, should improve network performance.
1.2.4 H nodeThe H node solves problems associated with broadcasts and routed environments. It is also a combination of B and P nodes and can be configured to use the LMHOSTS file.
This type of computer first acts as a P node for name registration and resolution, then as a B node if the first step fails. If none of the Windows native name resolution methods were successful, the machine will check the LMHOSTS file; then, if the DNS server is defined, it will send a query to the DNS server.
If everything fails, the NetBIOS name stays unresolved.
Chapter 1. Introduction to Windows name resolution 3

1.2.5 How to change the node typeThe type of node can be changed by modifying the registry database using the REGEDIT or REGEDT32 tools, which are provided with every version of the Windows products.
All Microsoft Windows operating systems use the B-node as a default, but, if the machine has been configured to use a WINS or NetBIOS Name Server (NBNS), H-node becomes the default node type. If you are changing it, the valid values can be 1, 2, 4, and 8 (B node, P node, M node, and H node).
1.2.5.1 Changing the node type on Windows 2000 or Windows NTTo change the node type on machines with Windows NT installed, it is necessary to modify or create the NodeType value with the Reg_DWord type in the following Key:
HKEY_LOCAL_MACHINE\SYSTEM\CurrentControlSet\Services\Netbt\Parameters
1.2.5.2 Changing the node type on Windows 9xTo change the node type on machines with Windows 9x such as Windows 95 or Windows 98 installed, it is necessary to modify or create the NodeType value with the Reg_DWord type in the following Key:
HKEY_LOCAL_MACHINE\SYSTEM\CurrentControlSet\Services\VxD\MSTCP
1.3 Machine roles in the browsing mechanism
A machine installed with any product of the Windows family can participate in the Windows name resolution and browsing mechanism. The five types of roles possible for a system are described in the following short sections.
1.3.1 Non-browserA computer with this role only does queries to the domain master browser, master browsers, or backup browsers. This role could be useful on laptop computers.
It is not necessary to manually change the type of node. This is done automatically when you configure a new protocol or define a WINS or DNS Server, Hosts, and LMHOSTS files. However, if necessary, it can be manually changed.
Note
4 Fast Connect for AIX Version 3.1 Guide

1.3.2 Potential browser This is a network computer capable of keeping a list of the network resources (called a browse list) and can be elected master browser. A machine with this role can also be a backup browser if it is selected by the master browser.
1.3.3 Backup browserA backup is network computer that the Domain master browser sends a copy of the resource browse list to every 15 minutes or when the backup browser requests it. Any machine running Windows 2000, Windows NT Workstation, Windows 9X, or Windows for Workgroups can be selected to be the backup browser if there are less than three Windows 2000 or Windows NT servers acting as backup browsers.
1.3.4 Master browserThe master browser machine keeps a list of all the network resources on one segment of the network, resolves requests from the clients, and sends a copy of this list to the Domain master browser.
1.3.5 Domain master browserThis machine is always the Primary Domain Controller (PDC) of the domain. It is responsible for collecting information from the master browsers in each of the subnets included in its domain.
1.4 Definitions
In the following sections, we provide brief definitions of some components of the name resolution process.
1.4.1 What is the LMHOSTS file?The LMHOSTS file is used to keep a list of NetBIOS names and their IP addresses. This file was the central point of information, but was replaced by a NetBIOS Name Server, such as WINS server from Microsoft, to simplify the administration of large networks.
1.4.2 What is the HOSTS file?The HOSTS file is used to keep a list of machines names and their IP addresses. This file is still used, but, in some configurations, it is replaced by Domain Name System (DNS), such as the DNS server from Microsoft. Remember, the same machine can have a TCP/IP name different than its
Chapter 1. Introduction to Windows name resolution 5

NetBIOS name. The Hosts file tracks the TCP/IP name, while the LMHOSTS file tracks the NetBIOS name.
1.4.3 What is the WINS server?The WINS server is a service that helps resolve NetBIOS names and maintains a distributed data base with IP addresses and NetBIOS names. It is based on RFCs (1001 and 1002). This service uses a dynamic database and prevents broadcast messages that can heavily load the network. It also provides an advantage in the ease of administration. This service supersedes the use of the LMHOSTS file.
1.4.4 What is the DNS?The Domain Name Server (DNS) service is used to map HOST names to IP addresses. This service is widely used on the Internet, and replaces the use of the HOSTS file.
1.5 Example of a NetBIOS name resolution process
We are going to show what happens on the computer when you use the Find a Computer application. See Figure 1.
Figure 1. Finding a computer NetBIOS name with the Find Computer option
6 Fast Connect for AIX Version 3.1 Guide

We have entered 3c-50 as the NetBIOS name to locate. The process used to resolve this name depends on the node type. The following steps are the sequence to resolve the name:
1. Check if the name has more than fifteen characters; if that is the case, we will first try to resolve the name with the DNS server. If it fails, the NetBIOS resolution fails; go to step 5.
2. Check the type of node. If the node type is H, go to step 3; otherwise, go to step 4.
3. The node type is H. It checks the NetBIOS cache, checks the WINS server, uses broadcast, checks LMHOSTS file, checks the Hosts file, and then uses the DNS. If at any step the answer is negative, the name resolution fails. Go to step 5.
4. The node type is B. It uses the local cache information and a local broadcast. If none of these methods succeed, the name resolution fails. Go to step 5.
5. End the name resolution process.
Chapter 1. Introduction to Windows name resolution 7

8 Fast Connect for AIX Version 3.1 Guide
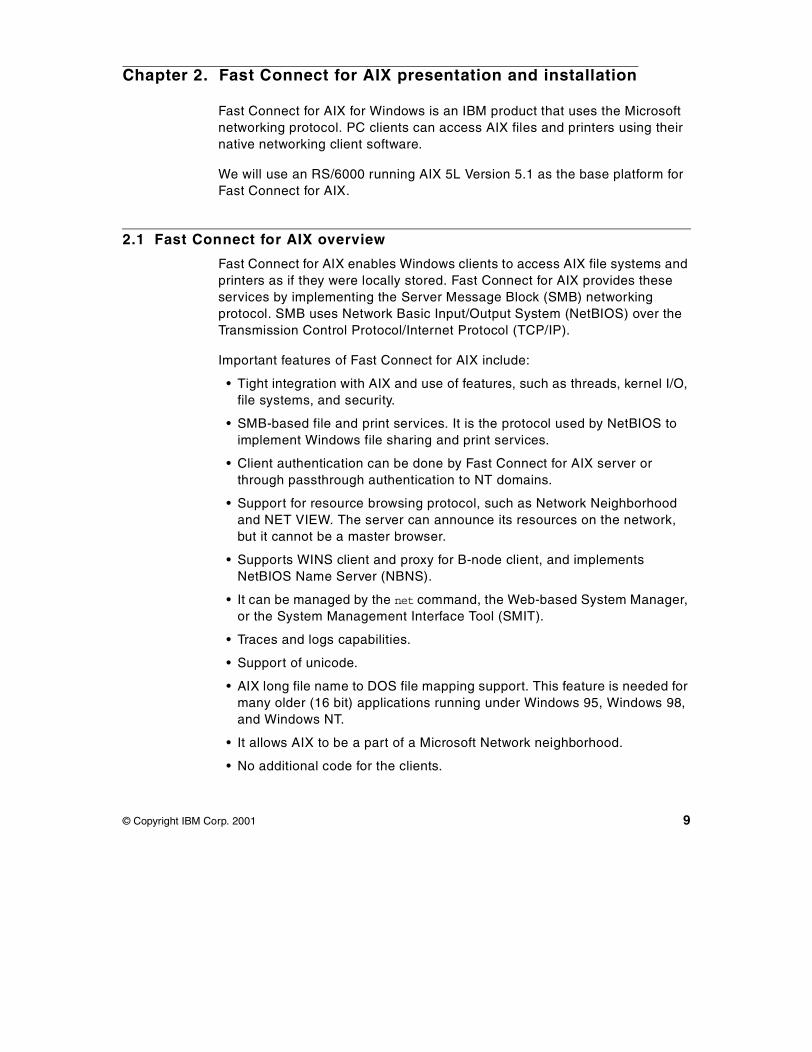
Chapter 2. Fast Connect for AIX presentation and installation
Fast Connect for AIX for Windows is an IBM product that uses the Microsoft networking protocol. PC clients can access AIX files and printers using their native networking client software.
We will use an RS/6000 running AIX 5L Version 5.1 as the base platform for Fast Connect for AIX.
2.1 Fast Connect for AIX overview
Fast Connect for AIX enables Windows clients to access AIX file systems and printers as if they were locally stored. Fast Connect for AIX provides these services by implementing the Server Message Block (SMB) networking protocol. SMB uses Network Basic Input/Output System (NetBIOS) over the Transmission Control Protocol/Internet Protocol (TCP/IP).
Important features of Fast Connect for AIX include:
• Tight integration with AIX and use of features, such as threads, kernel I/O, file systems, and security.
• SMB-based file and print services. It is the protocol used by NetBIOS to implement Windows file sharing and print services.
• Client authentication can be done by Fast Connect for AIX server or through passthrough authentication to NT domains.
• Support for resource browsing protocol, such as Network Neighborhood and NET VIEW. The server can announce its resources on the network, but it cannot be a master browser.
• Supports WINS client and proxy for B-node client, and implements NetBIOS Name Server (NBNS).
• It can be managed by the net command, the Web-based System Manager, or the System Management Interface Tool (SMIT).
• Traces and logs capabilities.
• Support of unicode.
• AIX long file name to DOS file mapping support. This feature is needed for many older (16 bit) applications running under Windows 95, Windows 98, and Windows NT.
• It allows AIX to be a part of a Microsoft Network neighborhood.
• No additional code for the clients.
© Copyright IBM Corp. 2001 9
• User name mapping.
• NT password encryption support offering high levels of security.
• Support of Windows Terminal Server.
• Logon Service to Windows 2000 client using IBM Network Client Version 4.4.
• Support for the AIX Web-based System Manager for both AIX 5L and AIX 4.3.3.
• Directory search caching, which can show significant performance improvements.
• Memory mapped I/O that exploits AIX's memory mapping feature for user files, improving read/write performance.
• Share-level security required by some of the existing AIX Connections customers.
• Windows 2000 Active Directory integration, which allows users to access Fast Connect for AIX shared file systems in graphical mode using the Windows 2000 Network Neighborhood directory browser.
• Capability to send messages to PC clients.
For more information, see the AIX 5L Version 5.1 Base documentation on Fast Connect for AIX in Chapter 11 of System Management Guide: Communication and Networks. You can access this document by selecting Technical publications -> AIX 5L Manuals in the following Web site:
http://www.ibm.com/servers/aix/library/index.html
Fast Connect for AIX is a licensed program product (LPP). There is a unique price for the server, and there is no limit on the number of clients.
An evaluation version of the Fast Connect for AIX product is included in the Bonus Pack for AIX 5L Version 5.1, announced April, 2001.
2.2 Fast Connect for AIX requirements
This section describes hardware and software requirements, both for the AIX server and for its PC clients.
2.2.1 Server hardware requirementsFast Connect for AIX runs on any machine that supports AIX (except diskless and dataless machines). The machine must have a network adapter
10 Fast Connect for AIX Version 3.1 Guide
supporting the TCP/IP protocol. The system must have at least 64 MB of RAM and 50 MB of available disk space.
2.2.2 Server software requirementsThe server software requirements for Fast Connect for AIX is
• AIX Version 4.3.3.0 or higher
2.2.3 Client hardware requirementsEach client must have a network adapter installed and physically connected to the network.
2.2.4 Client software requirementsThe supported operating systems are:
• Windows 2000
• Windows NT 4.0
• Windows 98
• Windows 95 with service pack 1 or higher
• Windows for Workgroups 3.11 or higher
To manage Fast Connect for AIX remotely with the Web-based System Manager tool, a Web browser is needed on the client with Java 1.3 support.
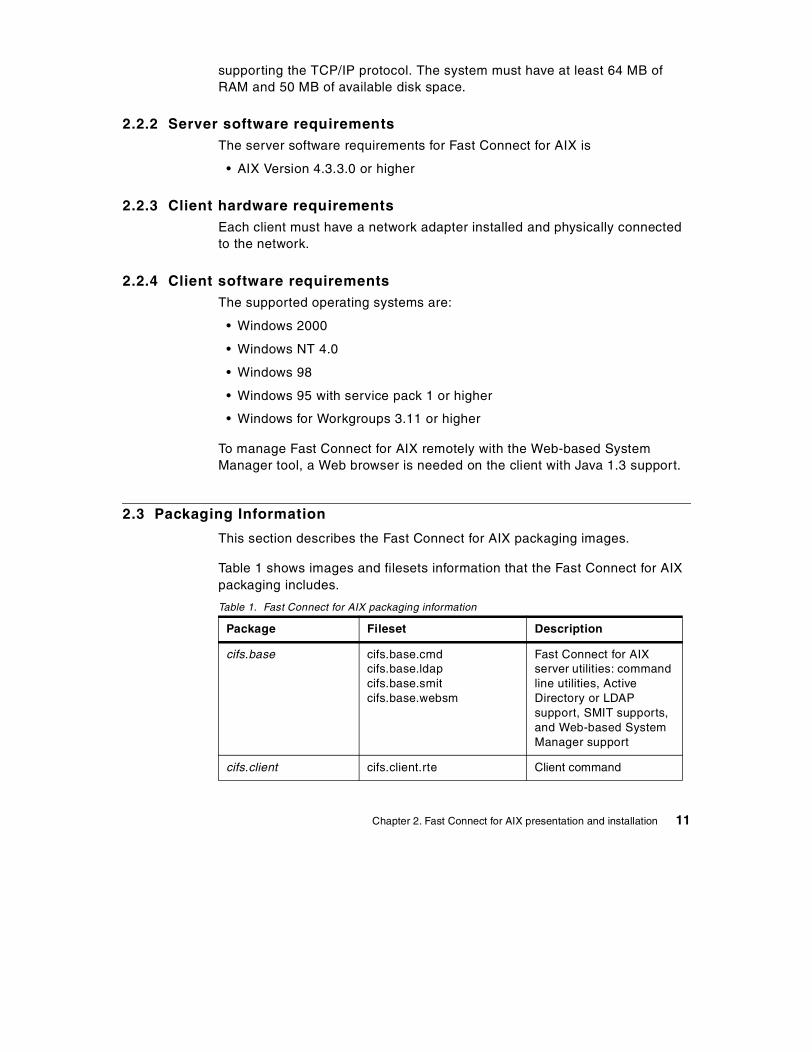
2.3 Packaging Information
This section describes the Fast Connect for AIX packaging images.
Table 1 shows images and filesets information that the Fast Connect for AIX packaging includes.
Table 1. Fast Connect for AIX packaging information
Package Fileset Description
cifs.base cifs.base.cmdcifs.base.ldapcifs.base.smitcifs.base.websm
Fast Connect for AIX server utilities: command line utilities, Active Directory or LDAP support, SMIT supports, and Web-based System Manager support
cifs.client cifs.client.rte Client command
Chapter 2. Fast Connect for AIX presentation and installation 11

The difference between cifs.base.websm and cifs.websm.apps is that cifs.base.websm is for Web-based System Manager fileset (sysmgt.websm.rte) versions lower than 5.0. If yours are 4.3.3, you should install cifs.base.websm fileset, but you don’t need to install the cifs.websm.apps fileset. These two filesets are mutually exclusive. In most cases if you are running AIX 5L Version 5.1, cifs.websm.apps will be installed in your system instead of cifs.base.websm.
The cifs.msg.en_US.compat fileset is also for Web-based System Manager fileset (sysmgt.websm.rte) versions lower than 5.0.
2.4 Installation
This section describes Web-based System Manager installation and configuration as well as the Fast Connect for AIX installation.
We can manage Fast Connect for AIX from Web-based System Manager, the net command, or SMIT. In this book, we will use the Web-based System Manager interface. We will also provide the SMIT fast path and the related net command.
2.4.1 Installation of Web serverTo configure your Web server, perform the following steps:
1. Install the Web server.
We installed IBM HTTP Server powered by Apache Version 1.3.12.2. Other products are supported as well, but we need to know the path of the document directory. For the installation and configuration of the IBM HTTP Server, see the readme file in /usr/HTTPServer/readme directory.
To see if IBM HTTP Server is running, use the following command:
cifs.websm cifs.websm.apps Web-based System Manager 2000
cifs.msg cifs.msg.en_US.basecifs.msg.en_US.websmcifs.msg.en_US.compat(for the en_US language)
Messages
cifs.basicorcifs.advanced-demo
cifs.basic.rteorcifs.advanced-demo.rte
Fast Connect for AIX server files for Windows clients
Package Fileset Description
12 Fast Connect for AIX Version 3.1 Guide

# ps -ef | grep httpd
This should return the /usr/HTTPServer/bin/httpd process if IBM HTTP Server is running.
2. Test the Web server.
Start a browser (for example, Netscape) and go to the URL http://your_host_name. You should see the main page of your Web server software. If you get a problem, see the readme file for the configuration of your Web server.
3. By default, Web-based System Manager should be installed in your system when you install AIX 5L Version 5.1. But you can check it using following command:
# lslpp -h “*websm*”
You should see following filesets. If not, you need to install them:
- sysmgt.help.en_US.websm
- sysmgt.help.msg.en_US.websm
- sysmgt.msg.en_US.websm.apps
- sysmgt.websm.apps
- sysmgt.websm.diag
- sysmgt.websm.framework
- sysmgt.websm.icons
- sysmgt.websm.rte
- sysmgt.websm.webaccess
4. Find the document directory for Web-based System Manager.
You need to know the document directory for your Web server. For IBM HTTP Server 1.3.12.2, the default path is /usr/HTTPServer/htdocs/en_US.
When the Web server is verified as installed and accessible, run the following command:
# /usr/websm/bin/wsmappletcfg -docdir <docdir_of_your_webserver>
For example, for IBM HTTP server, this would be:
# /usr/websm/bin/wsmappletcfg -docdir /usr/HTTPServer/htdocs/en_US
5. Enable the Web-based System Manager by running the following command:
# /usr/websm/bin/wsmserver -enable
Chapter 2. Fast Connect for AIX presentation and installation 13
Now the Web-based System Manager is configured on the system. For more information about Web-based System Manager for AIX 5.1, see /usr/websm/readme.txt or readme.html file. You will need a compatible Web browser that supports Java 1.3. You can download and install Java 2 Runtime Environment (JRE), Standard Edition including Java Plug-in Version 1.3.1 for Microsoft Windows for your Microsoft Windows client systems from the following Web site:
http://java.sun.com/products/plugin/
Also you can install Java130.rte and Java130.ext packages for the Web browser (Netscape) of the server, but this is not mandatory.
6. To access Web-based System Manager from a browser, enter the following URL in your browser:
http://<your_server_name>/wsm.html
You will see the login window for Web-based System Manager in your Web browser of client machine as shown in Figure 2 on page 15. We used the Netscape 6 browser in Windows 2000 system.
14 Fast Connect for AIX Version 3.1 Guide

Figure 2. Login window for Web-based System Manager using Netscape 6
2.4.2 Installation of Fast Connect for AIXTo install Fast Connect for AIX, install the following packages:
• cifs.base
• cifs.client
• cifs.websm
• cifs.msg
• cifs.basicorcifs.advanced-demo (in case of “Try and Buy” or evaluation software)
Type the following smitty fast path:
Chapter 2. Fast Connect for AIX presentation and installation 15

# smitty install_latest
As we described above, if you select all Fast Connect for AIX packages, you may get some failures based on your AIX Version and installed filesets.
• If you got a failure for cifs.base.ldap fileset, that means the prerequisite fileset (ldap.client.rte 3.1.1.5) is not installed in your system. This is optional. If you don’t need ldap clients, you don’t need to install it. If you need it, you can simply install ldap.client.rte 3.2.1.0 fileset from the AIX 5L Version 5.1 CD, and then install cifs.base.ldap fileset.
• If you got a failure for the cifs.base.websm, cifs.websm.apps, or cifs.msg.en_US.compat filesets, refer to the Section 2.3, “Packaging Information” on page 11.
You can check the correct installation of the filesets by entering the following command:
Install Software
Type or select values in entry fields.Press Enter AFTER making all desired changes.
[Entry Fields]* INPUT device / directory for software /dev/cd0* SOFTWARE to install [cifs.advanced-demo > + PREVIEW only? (install operation will NOT occur) no + COMMIT software updates? yes + SAVE replaced files? no + AUTOMATICALLY install requisite software? yes + EXTEND file systems if space needed? yes + OVERWRITE same or newer versions? no + VERIFY install and check file sizes? no + Include corresponding LANGUAGE filesets? yes + DETAILED output? no + Process multiple volumes? yes + ACCEPT new license agreements? no + Preview new LICENSE agreements? no +
F1=Help F2=Refresh F3=Cancel F4=ListF5=Reset F6=Command F7=Edit F8=ImageF9=Shell F10=Exit Enter=Do
When you install Fast Connect for AIX product, you can’t select the cifs.msg package. It will be installed automatically based on which fileset you selected and installed.
Note
16 Fast Connect for AIX Version 3.1 Guide
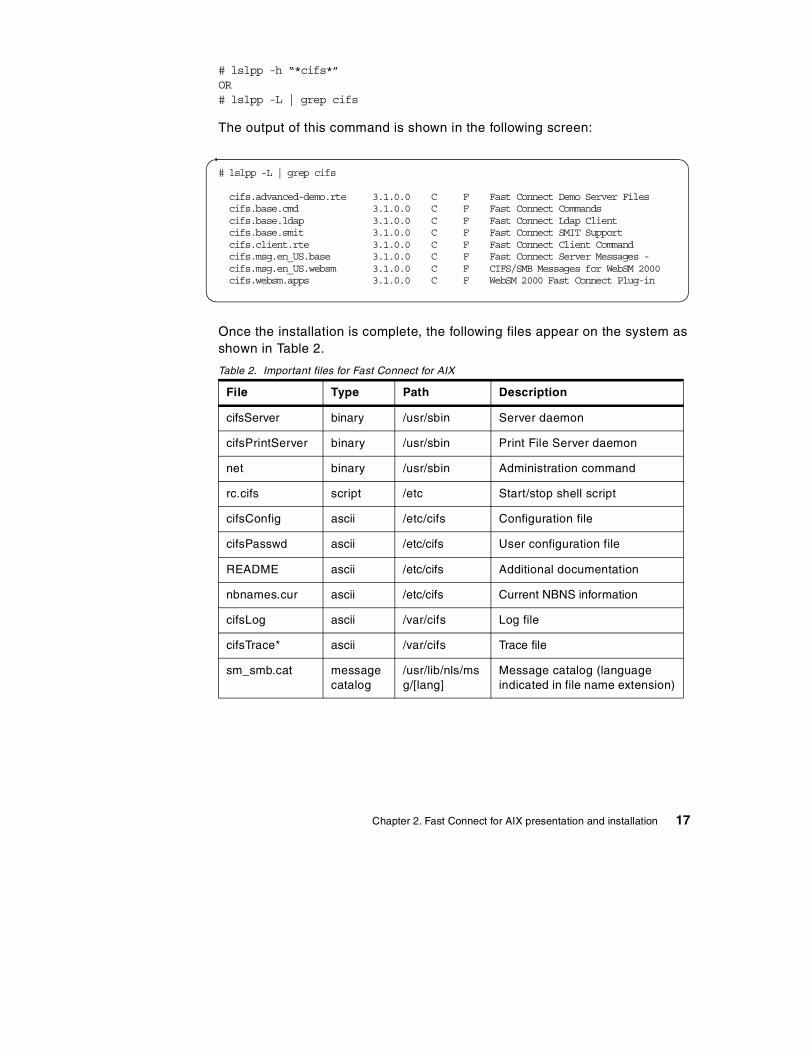
# lslpp -h “*cifs*”OR# lslpp -L | grep cifs
The output of this command is shown in the following screen:
Once the installation is complete, the following files appear on the system as shown in Table 2.
Table 2. Important files for Fast Connect for AIX
File Type Path Description
cifsServer binary /usr/sbin Server daemon
cifsPrintServer binary /usr/sbin Print File Server daemon
net binary /usr/sbin Administration command
rc.cifs script /etc Start/stop shell script
cifsConfig ascii /etc/cifs Configuration file
cifsPasswd ascii /etc/cifs User configuration file
README ascii /etc/cifs Additional documentation
nbnames.cur ascii /etc/cifs Current NBNS information
cifsLog ascii /var/cifs Log file
cifsTrace* ascii /var/cifs Trace file
sm_smb.cat message catalog
/usr/lib/nls/msg/[lang]
Message catalog (language indicated in file name extension)
# lslpp -L | grep cifs
cifs.advanced-demo.rte 3.1.0.0 C F Fast Connect Demo Server Files cifs.base.cmd 3.1.0.0 C F Fast Connect Commands cifs.base.ldap 3.1.0.0 C F Fast Connect Ldap Client cifs.base.smit 3.1.0.0 C F Fast Connect SMIT Support cifs.client.rte 3.1.0.0 C F Fast Connect Client Command cifs.msg.en_US.base 3.1.0.0 C F Fast Connect Server Messages - cifs.msg.en_US.websm 3.1.0.0 C F CIFS/SMB Messages for WebSM 2000 cifs.websm.apps 3.1.0.0 C F WebSM 2000 Fast Connect Plug-in
Chapter 2. Fast Connect for AIX presentation and installation 17
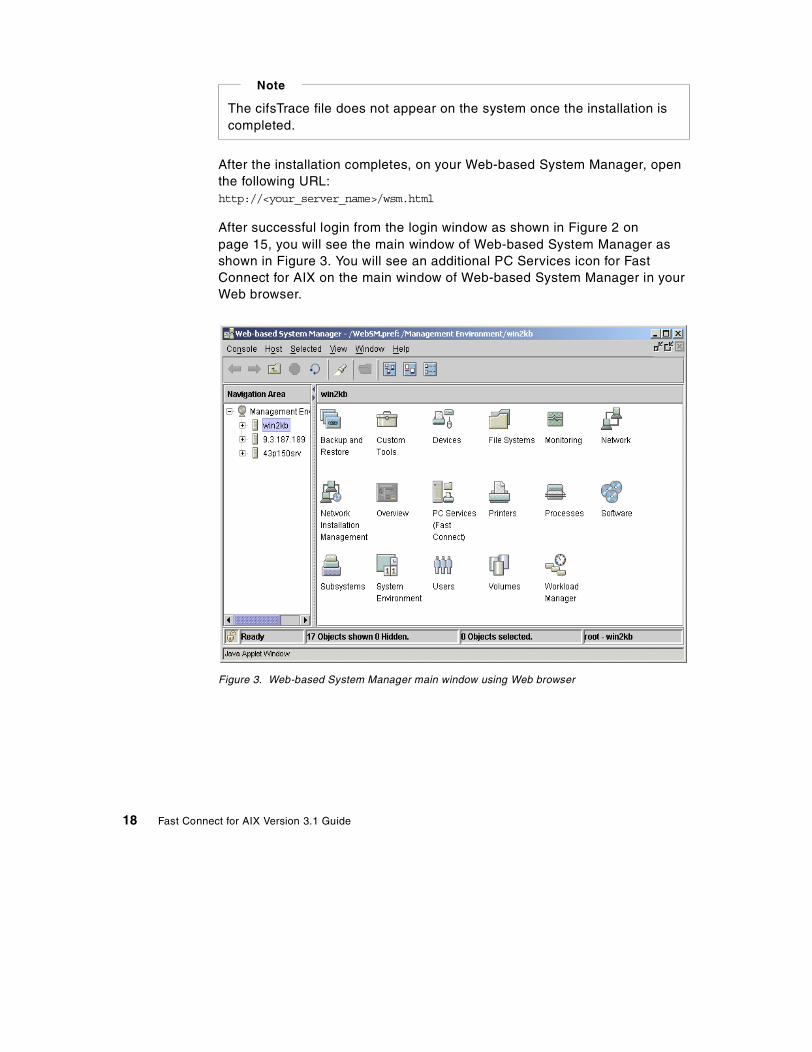
After the installation completes, on your Web-based System Manager, open the following URL:http://<your_server_name>/wsm.html
After successful login from the login window as shown in Figure 2 on page 15, you will see the main window of Web-based System Manager as shown in Figure 3. You will see an additional PC Services icon for Fast Connect for AIX on the main window of Web-based System Manager in your Web browser.
Figure 3. Web-based System Manager main window using Web browser
The cifsTrace file does not appear on the system once the installation is completed.
Note
18 Fast Connect for AIX Version 3.1 Guide

Chapter 3. Defining shares
You can configure Fast Connect for AIX server with the Web-based System Manager, or using the smit or net command. You can set the server properties and define file system and printer shares.
Only the root user is allowed to modify the configuration, but any user can access the configuration menu.
The modification of the most configured parameters (those called dynamic) for shares does not require the server to be stopped and restarted for the changes to become effective, but when you change global options instead of share options, you need to stop and restart the server for the changes to become effective. Refer to the Section “AIX Fast Connect Configurable Parameters for the net Command” in System Management Guide: Communications and Networks for more informations about the dynamic or static parameters. You will see the detailed descriptions of each option in /etc/cifs/cifsConfig files. You can access this document by selecting Technical publications -> AIX 5L Manuals on the following Web site:
http://www.ibm.com/servers/aix/library/index.html
3.1 Quick start
After the installation of the Fast Connect for AIX product, you can start the server without any additional configuration.
3.1.1 Starting/stopping/checking the Fast Connect for AIX serverIn this section, you will see how to start and stop the Fast Connect for AIX server, and check the current status of the Fast Connect for AIX server.
3.1.1.1 How to start the Fast Connect for AIX serverYou have three methods of starting the server; using Web-based System Manager, the SMIT command, and the command line.
Option 1: Using Web-based System ManagerFollow these steps to start Fast Connect for AIX server using Web-based System Manager.
1. In the command prompt, enter the following command to start Web-based System Manager. The panel shown in Figure 4 on page 20 will be displayed.
# wsm
© Copyright IBM Corp. 2001 19
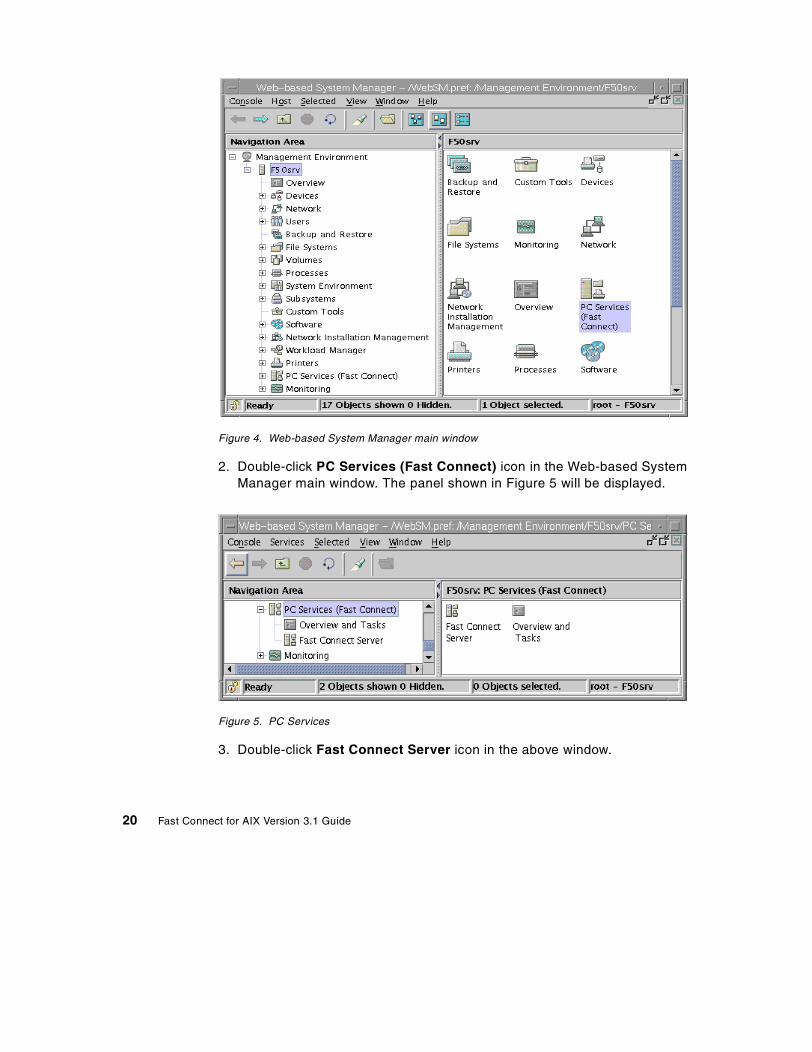
Figure 4. Web-based System Manager main window
2. Double-click PC Services (Fast Connect) icon in the Web-based System Manager main window. The panel shown in Figure 5 will be displayed.
Figure 5. PC Services
3. Double-click Fast Connect Server icon in the above window.
20 Fast Connect for AIX Version 3.1 Guide

4. You will see the Fast Connect for AIX server as shown in Figure 6. The default server name is the AIX TCP/IP hostname. Select the server name (in this example, F50srv).
5. Click right mouse button and then select Start Server Operations as shown in Figure 6, or you can start the server by selecting Selected -> Start Server Operations from the top menu. You can also simply click the small triangle start icon (the ninth icon) in the toolbar as shown in Figure 6.
Figure 6. Menu items by clicking right button
6. Select one of the startup options. The default is immediately and make no permanent changes to the system as shown in Figure 7. Then click OK.
Figure 7. Startup options
7. When finished, you can see the detail messages by clicking the Show Details button as shown in Figure 8 on page 22. Click Close when finished.
Chapter 3. Defining shares 21

Figure 8. Successful startup
8. You will see “Started” in the Status column of the server. When the server is started, a file share, named HOME, is created and loaded by default. Actually, you have three predefined file system shares; HOME, IBMLAN$, and ADMIN$. The last two are used by the server and cannot be accessed by clients.
Figure 9. File share
Option 2: Using SMIT1. Enter the following command with fast path:
# smitty smb
22 Fast Connect for AIX Version 3.1 Guide
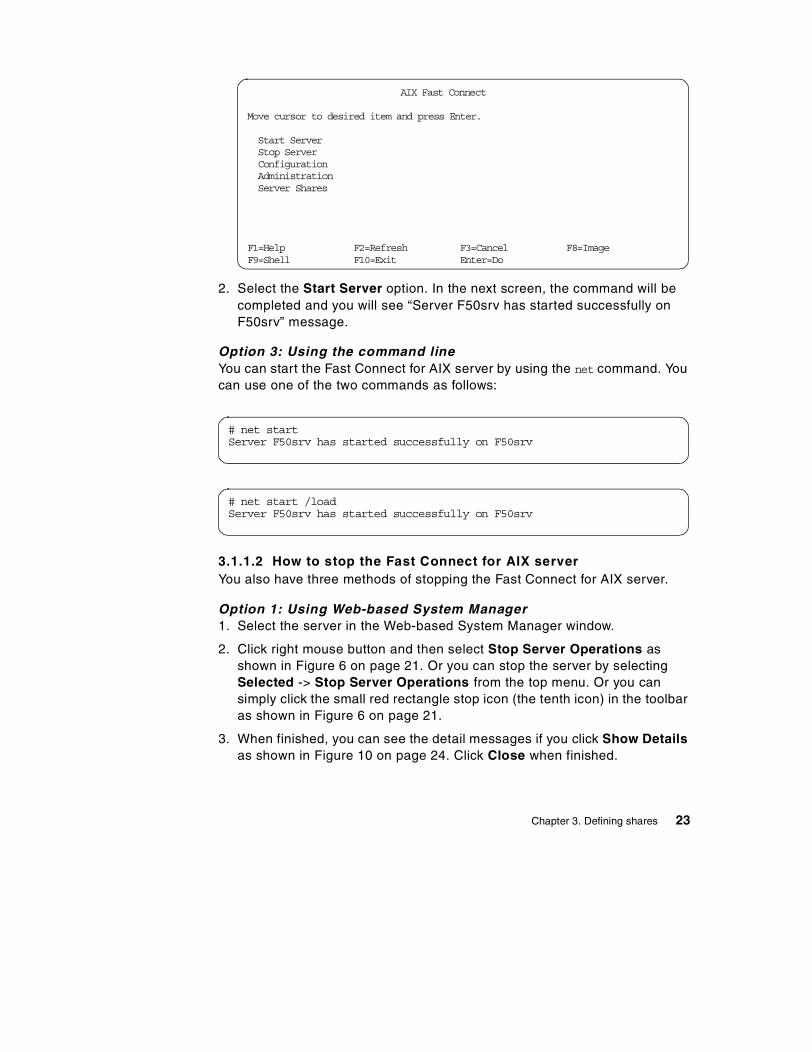
2. Select the Start Server option. In the next screen, the command will be completed and you will see “Server F50srv has started successfully on F50srv” message.
Option 3: Using the command lineYou can start the Fast Connect for AIX server by using the net command. You can use one of the two commands as follows:
3.1.1.2 How to stop the Fast Connect for AIX serverYou also have three methods of stopping the Fast Connect for AIX server.
Option 1: Using Web-based System Manager1. Select the server in the Web-based System Manager window.
2. Click right mouse button and then select Stop Server Operations as shown in Figure 6 on page 21. Or you can stop the server by selecting Selected -> Stop Server Operations from the top menu. Or you can simply click the small red rectangle stop icon (the tenth icon) in the toolbar as shown in Figure 6 on page 21.
3. When finished, you can see the detail messages if you click Show Details as shown in Figure 10 on page 24. Click Close when finished.
AIX Fast Connect
Move cursor to desired item and press Enter.
Start Server Stop Server Configuration Administration Server Shares
F1=Help F2=Refresh F3=Cancel F8=ImageF9=Shell F10=Exit Enter=Do
# net startServer F50srv has started successfully on F50srv
# net start /loadServer F50srv has started successfully on F50srv
Chapter 3. Defining shares 23

Figure 10. Successful stop
Option 2: Using SMIT1. Enter the following command with fast path:
# smitty smb
2. Select Stop Server.
Option 3: Using the command lineYou can stop the Fast Connect for AIX server by using the net command. You can use one of the two commands below:
3.1.1.3 Checking the status of the Fast Connect for AIX serverYou can check the current status of the Fast Connect for AIX server with the following options:
Option 1: Using Web-based System ManagerYou can see that the server is running when the Status label is “Started” as shown in Figure 9 on page 22. If you want to see the details, follow these steps:
1. Select the server in Web-based System Manager window.
# net stopServer F50srv has stopped successfully on F50srv
# net stop /unloadServer F50srv has stopped and its process unloaded successfully on F50srv
24 Fast Connect for AIX Version 3.1 Guide

2. Click right mouse button and then select Show Server Statistics as shown in Figure 6 on page 21. Or you can check the current status by selecting Selected -> Show Server Statistics from the top menu.
3. When finished, you can see the detailed statistics as shown in Figure 11. Click Close.
Figure 11. Detailed statistics
Option 2: Using SMIT1. Enter the following command with fast path:
# smitty smb
2. Select Administration -> Server Status to check whether the server is running or not. If you want to see the statistics, select Administration -> Server Statistics.
Option 3: Using the command lineYou can use the net status command to check the status of the server.
Chapter 3. Defining shares 25

3.1.2 Additional configurationIn this section, we will look at additional parameters that can be modified to make the server operational. Two of the basic names that we can configure are the Fast Connect for AIX server name and the domain name.
• Fast Connect for AIX server name: The name of the Fast Connect server defaults to the TCP/IP hostname of the AIX machine. The server name is the NetBIOS name of the server. This name will be used by the clients to access the server.
• Domain name: The domain name is set to WORKGROUP by default. This is the domain to which this server belongs. The domain name is the name assigned to a group of servers that interoperate to provide resources. This name is used to locate your server in the Network Neighborhood program from client machines.
You can change these attributes, including the Fast Connect for AIX server name and the domain name, by using Web-based System Manager, SMIT, or the command line.
Option 1: Using Web-based System Manager1. Select the server in the Web-based System Manager window.
2. Click the right mouse button, and then select Properties as shown in Figure 6 on page 21. Or you can change it by selecting Selected -> Properties from the top menu. Or you can simply click the small notepad properties icon (the eighth icon) in the toolbar as shown in Figure 6 on page 21.
3. You will see the properties window as shown in Figure 12 on page 27. Click OK when you finish.
# net statusServer F50srv is running on F50srv
26 Fast Connect for AIX Version 3.1 Guide
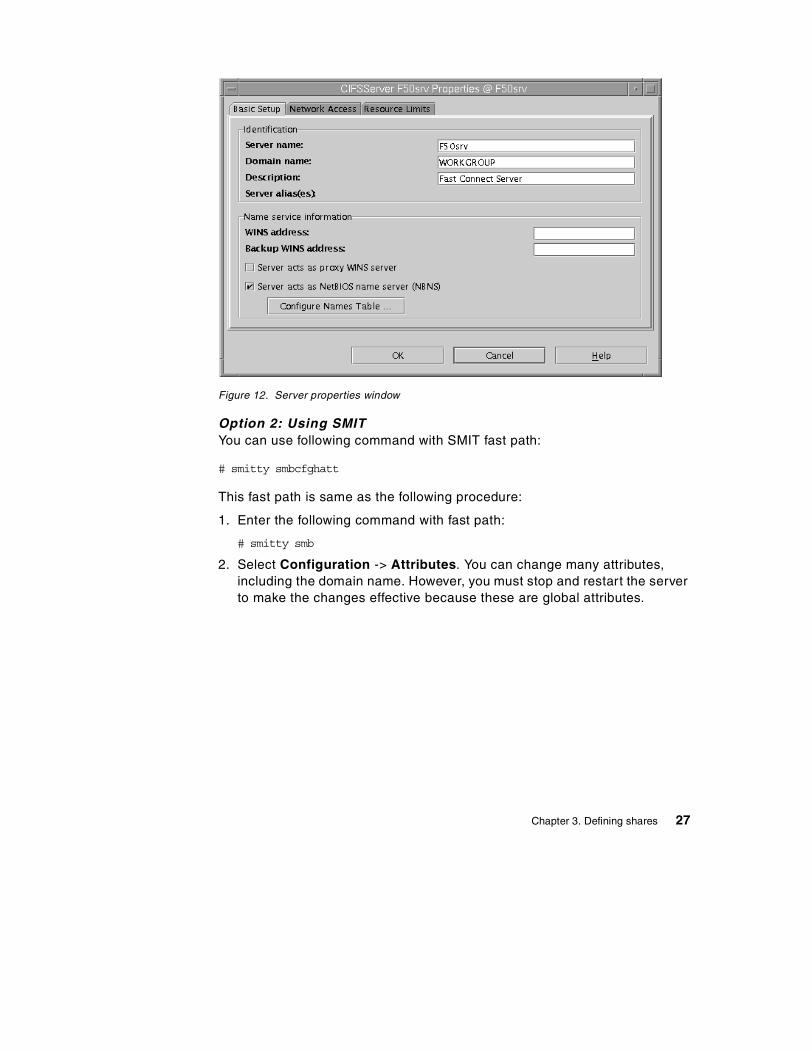
Figure 12. Server properties window
Option 2: Using SMITYou can use following command with SMIT fast path:
# smitty smbcfghatt
This fast path is same as the following procedure:
1. Enter the following command with fast path:
# smitty smb
2. Select Configuration -> Attributes. You can change many attributes, including the domain name. However, you must stop and restart the server to make the changes effective because these are global attributes.
Chapter 3. Defining shares 27
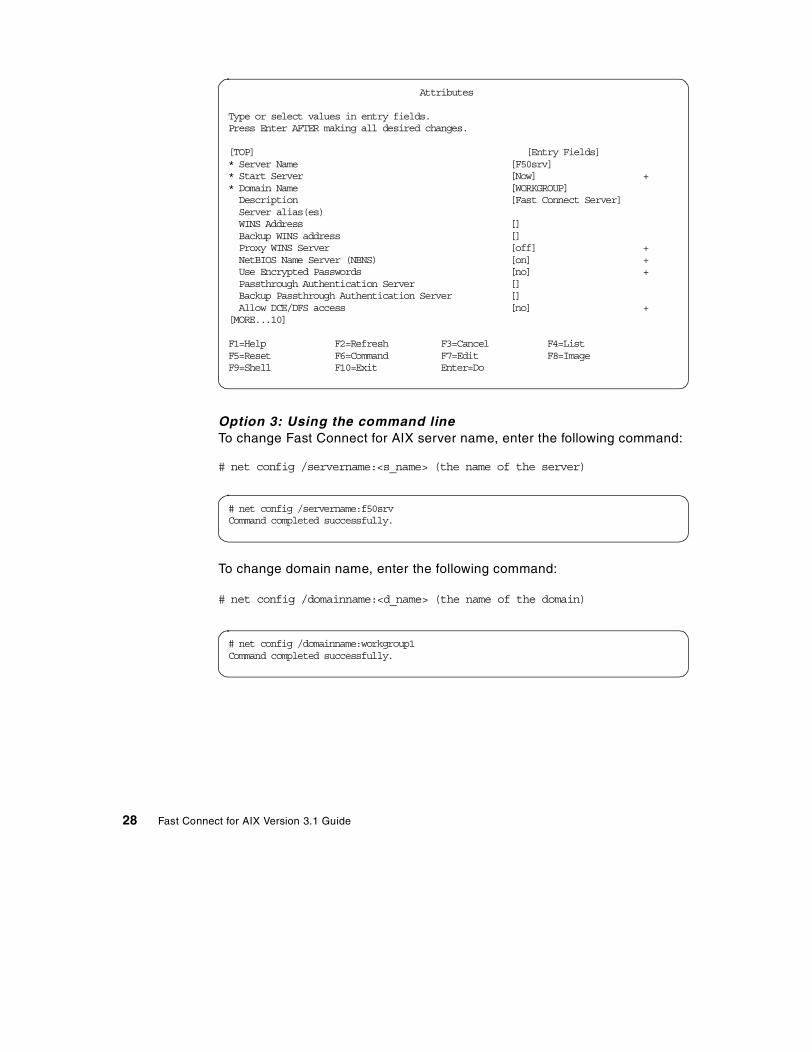
Option 3: Using the command lineTo change Fast Connect for AIX server name, enter the following command:
# net config /servername:<s_name> (the name of the server)
To change domain name, enter the following command:
# net config /domainname:<d_name> (the name of the domain)
Attributes
Type or select values in entry fields.Press Enter AFTER making all desired changes.
[TOP] [Entry Fields]* Server Name [F50srv]* Start Server [Now] +* Domain Name [WORKGROUP] Description [Fast Connect Server] Server alias(es) WINS Address [] Backup WINS address [] Proxy WINS Server [off] + NetBIOS Name Server (NBNS) [on] + Use Encrypted Passwords [no] + Passthrough Authentication Server [] Backup Passthrough Authentication Server [] Allow DCE/DFS access [no] +[MORE...10]
F1=Help F2=Refresh F3=Cancel F4=ListF5=Reset F6=Command F7=Edit F8=ImageF9=Shell F10=Exit Enter=Do
# net config /servername:f50srvCommand completed successfully.
# net config /domainname:workgroup1Command completed successfully.
28 Fast Connect for AIX Version 3.1 Guide
3.2 Defining file system shares
The Fast Connect for AIX server is now started with the correct attributes. Now it is time to define new shares, files shares, and print shares. Let us start with file shares.
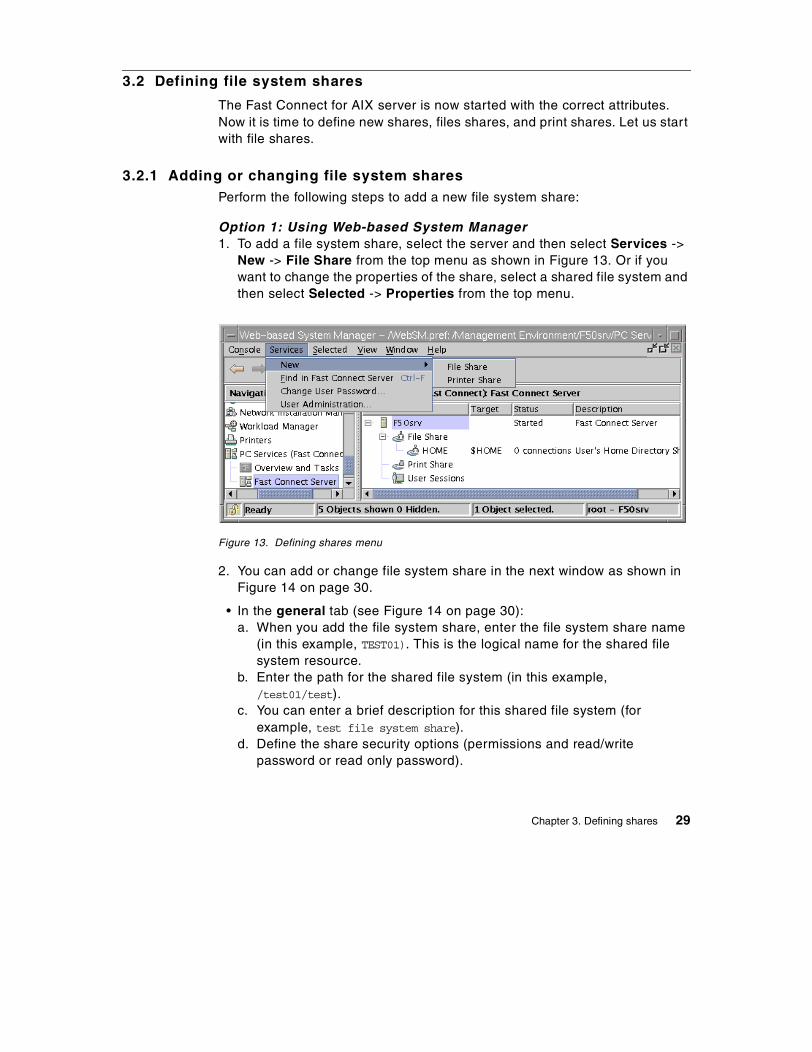
3.2.1 Adding or changing file system sharesPerform the following steps to add a new file system share:
Option 1: Using Web-based System Manager1. To add a file system share, select the server and then select Services ->
New -> File Share from the top menu as shown in Figure 13. Or if you want to change the properties of the share, select a shared file system and then select Selected -> Properties from the top menu.
Figure 13. Defining shares menu
2. You can add or change file system share in the next window as shown in Figure 14 on page 30.
• In the general tab (see Figure 14 on page 30):a. When you add the file system share, enter the file system share name
(in this example, TEST01). This is the logical name for the shared file system resource.
b. Enter the path for the shared file system (in this example, /test01/test).
c. You can enter a brief description for this shared file system (for example, test file system share).
d. Define the share security options (permissions and read/write password or read only password).
Chapter 3. Defining shares 29

Figure 14. Changing file system share
• In the options tab (see Figure 15 on page 31):
a. Enable opportunistic locking: The default is yes and it should be enabled for best possible performance. This configuration option can have a very large impact on file-server performance. Opportunistic locking allows a client to notify the Fast Connect for AIX server that it will not only be the exclusive writer of a file, but will also cache its changes to that file on its own machine (and not on the Fast Connect for AIX server) in order to speed up file access for that client.
b. Enable search caching: This option enables caching of the shared file directories information within the CIFS server. If search caching is needed, this parameter should be enabled as well as the global cache_searches option.
c. Enable send file Application Program Interface (API) support: Enables support to the sendfile API from the Fast Connect for AIX server for Windows. This option will use the built-in Network Buffer Cache system support. If you turn this option on, test with the Network Buffer Cache enabled to see if your file server traffic benefits from this operating system feature. You might find better performance using the sendfile API without the Network Buffer Cache network option enabled. See the no command option for more information on configuring the Network Buffer Cache.
30 Fast Connect for AIX Version 3.1 Guide

3. Click OK.
All changes made to the file system share are immediately available.
Figure 15. File share options
Option 2: Using SMITYou can use the following SMIT fast path to add a file system share:# smitty smbsrvfiladd
This fast path is same as the following procedure:
1. Enter the following command with fast path:
# smitty smb
2. Select Server Shares -> File Systems (Shared Volumes) -> Add File Systems (Shared Columns).
Chapter 3. Defining shares 31
You can use the following SMIT fast path to change a file system share:# smitty smbsrvfilchg
This fast path is same as the following procedure:
1. Enter the following command with fast path:
# smitty smb
2. Select Server Shares -> File Systems (Shared Volumes) -> Change File Systems (Shared Volumes).
Option 3: Using the command lineEnter the following command:
# net share /add /type:file /netname:<share_name> /path:<path_name>
3.2.2 Deleting a file system shareIt is also easy to delete a file system share. The Fast Connect for AIX server provides three methods to do this as follows.
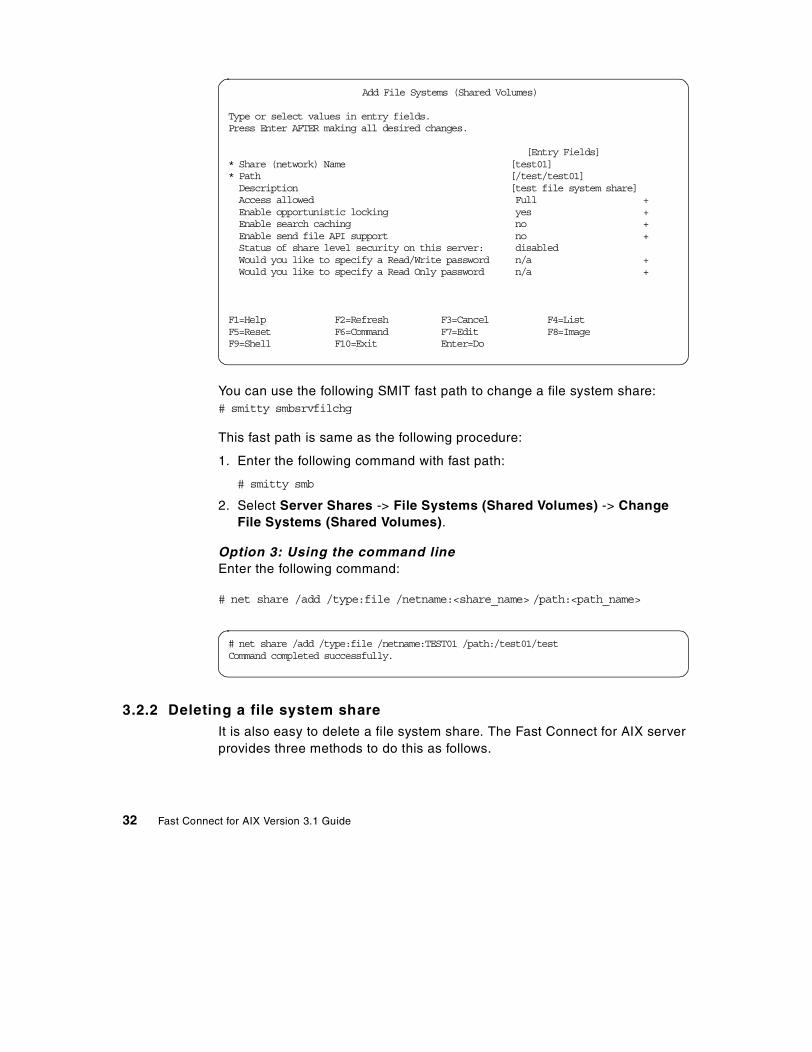
Add File Systems (Shared Volumes)
Type or select values in entry fields.Press Enter AFTER making all desired changes.
[Entry Fields]* Share (network) Name [test01]* Path [/test/test01] Description [test file system share] Access allowed Full + Enable opportunistic locking yes + Enable search caching no + Enable send file API support no + Status of share level security on this server: disabled Would you like to specify a Read/Write password n/a + Would you like to specify a Read Only password n/a +
F1=Help F2=Refresh F3=Cancel F4=ListF5=Reset F6=Command F7=Edit F8=ImageF9=Shell F10=Exit Enter=Do
# net share /add /type:file /netname:TEST01 /path:/test01/testCommand completed successfully.
32 Fast Connect for AIX Version 3.1 Guide

Option 1: Using Web-based System Manager1. Select the share that you want to delete.
2. Select Selected -> Delete from the top menu, or right click the share and select Delete.
Option 2: Using SMITYou can use the following SMIT fast path:# smitty smbsrvfilrm
This fast path is same as the following procedure:
1. Enter the following command with fast path:
# smitty smb
2. Select Server Shares -> File Systems (Shared Volumes) -> Remove File Systems (Shared Volumes).
Option 3: Using the command lineYou can enter the following at the command line:# net share /delete /netname:<share_name>
3.3 Defining printer share
To define printer share in Fast Connect for AIX is also simple. Defining printer is described in the following section.
3.3.1 Defining printer on AIXWe used the Web-based System Manager to define printer shares that will be mapped to the printers on an Fast Connect for AIX server. You can also use SMIT or commands to define printers. We can define print shares for local (connected to the server), remote (connected in other machine), or network (connected in the network) printers by performing the following steps:
Option 1: Using Web-based System Manager1. Select Printers -> All Printer Queues in the Navigation Area.
2. Select Printers -> New -> Queue and Printer (Wizard) or Queue and Printer (Advanced Method) from the top menu. In this example, we selected Queue and Printer (Wizard).
3. Type the queue name (see Figure 16 on page 34) and click Next.
Chapter 3. Defining shares 33

Figure 16. Typing the queue name
4. Choose the type of the destination the queue will send print jobs to (in this example, we used an IBMNetPrinter), and click Next (Figure 17).
Figure 17. Adding new queue and printer
5. Select the manufacturer from the list (in this example IBM), and click Next.
6. Select the type of printer you want to use (in this example, IBM 4312 Network Printer 12), and click Next.
34 Fast Connect for AIX Version 3.1 Guide
7. Select the type of queue (in this example, PCL 5E Emulation), and click Next.
8. Select the options yes or no if you want to make the computer the BOOTP/TFTP server for this queue’s printer and click Next (in this example, no).
9. Type the Hostname (or the Ip address) of the Network Printer Card (in this example, prt), and click Next. If you want to use a hostname, your system should resolve name resolution using either /etc/hosts file or Domain Name Server (DNS).
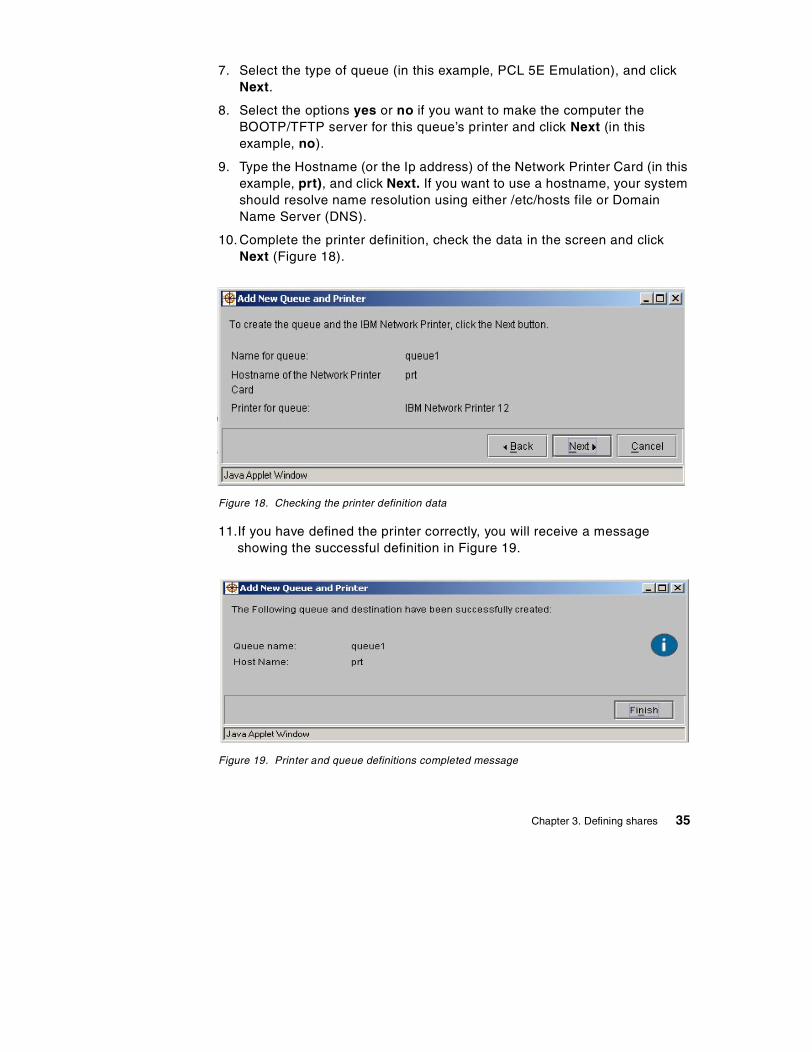
10. Complete the printer definition, check the data in the screen and click Next (Figure 18).
Figure 18. Checking the printer definition data
11.If you have defined the printer correctly, you will receive a message showing the successful definition in Figure 19.
Figure 19. Printer and queue definitions completed message
Chapter 3. Defining shares 35

Before doing these steps, the printer filesets should be installed in your system. You can obtain more informations about printers definition in Printing for Fun and Profit under AIX 5L, SG24-6018.
3.3.2 Adding or changing printer sharePerform the following steps to create or change a printer share on your server:
Option 1: Using Web-based System Manager1. To create a new printer share, select Services -> New -> Printer Share
from the top menu as shown in Figure 13 on page 29. The window in Figure 20 on page 37 will appear.
If you want to modify the properties of a printer queue, select a shared printer queue in the window and then select Selected -> Properties from the top menu.
2. Enter the printer share name (in this example, printer1).
3. Enter an AIX printer queue name (in this example, queue1). This queue can be associated with either a local, remote, or network AIX printer.
4. Optionally, you can enter the description of this share (in this example, IBM 4312 Network Printer). The description can help the client’s users with printer installation if you specify the printer type in the description field.
5. You can also optionally enter some printer options. This is a string field of options passed unmodified to the AIX enq command. This will allow you to provide special treatment to jobs coming from the clients.
6. Click OK.
Any modifications made to the printer share configuration are immediately available.
36 Fast Connect for AIX Version 3.1 Guide

Figure 20. Defining printer share
Option 2: Using SMITYou can use the following SMIT fast path to add: # smitty smbsrvprtadd
This fast path is same as the following procedure:
1. Enter the following command with fast path:
# smitty smb
2. Select Server Shares -> Printer Share -> Add Printer Share.
You can also use the following SMIT fast to change:
# smitty smbsrvprtchg
This fast path is same as the following procedure:
1. Enter the following command with fast path:
# smitty smb
2. Select Server Shares -> Printer Share -> Change Printer Share.
Option 3: Using the command lineEnter the following at the command line:# net share /add /type:printer /printq:<qname>
Chapter 3. Defining shares 37

3.3.3 Deleting printer shareOption 1: Using Web-based System Manager1. Select the printer share that you want to delete.
2. Select Selected -> Delete from the top menu, or right click the share and select Delete.
Option 2: Using SMITYou can use the following SMIT fast path:# smitty smbsrvprtrm
This fast path is same as the following procedure:
1. Enter the following command with fast path:
# smitty smb
2. Select Server Shares -> Printer Share -> Remove Printer Share.
Option 3: Using the command lineEnter the following at the command line:# net share /delete /netname:<q_name>
# net share /add /type:printer /printq:queue1Command completed successfully.
# net share /delete /netname:queue1Command completed successfully
38 Fast Connect for AIX Version 3.1 Guide
Chapter 4. Accessing Fast Connect for AIX on Windows 95/98
Now that we have seen how to start and configure the Fast Connect for AIX server, we can start the client configuration. In this chapter, we will cover how to configure Windows 95 and Windows 98 clients (referred to as Windows 9x in this chapter) to access the server.
4.1 Windows configuration
You will see that it is very easy to configure the windows workstations. Server Message Block (SMB) is Microsoft Windows’ native language for resource sharing on a local area network. It uses TCP/IP to communicate with its clients on the network.
4.1.1 Windows 9xWindows 9x was not designed to have multiple users, so we need to customize it in order to have at least one different profile for each user. Perform the following steps to customize Windows 9x:
1. Click Start -> Settings -> Control Panel and double-click the Passwords icon. You will see the Passwords Properties dialog box shown in Figure 21.
© Copyright IBM Corp. 2001 39

Figure 21. User profiles
2. Select the User profiles tab, then click the lower of the two radio buttons shown in Figure 21 on page 40. With these options selected, you can use your personal settings whenever you login.
3. Now click the Change Passwords tab. You should see the tab as shown in Figure 22. In this tab, you can change the password that you are going to use in the Fast Connect for AIX server. You will see a small window asking for the older password, and the new one and its confirmation. If this tab does not appear, you need to reboot Windows and, when it starts, log on with a user name and password.
40 Fast Connect for AIX Version 3.1 Guide

Figure 22. Change Windows passwords
4. Return to the Control Panel and select the Network icon. You should now see the Network dialog box shown in Figure 23 on page 42.
Chapter 4. Accessing Fast Connect for AIX on Windows 95/98 41

Figure 23. Network dialog box
5. Choose the TCP/IP protocol with the adapter with which you want to access the Fast Connect for AIX server, and click Properties. Select the WINS Configuration tab, and you should now see the dialog box shown in Figure 24 on page 43.
42 Fast Connect for AIX Version 3.1 Guide
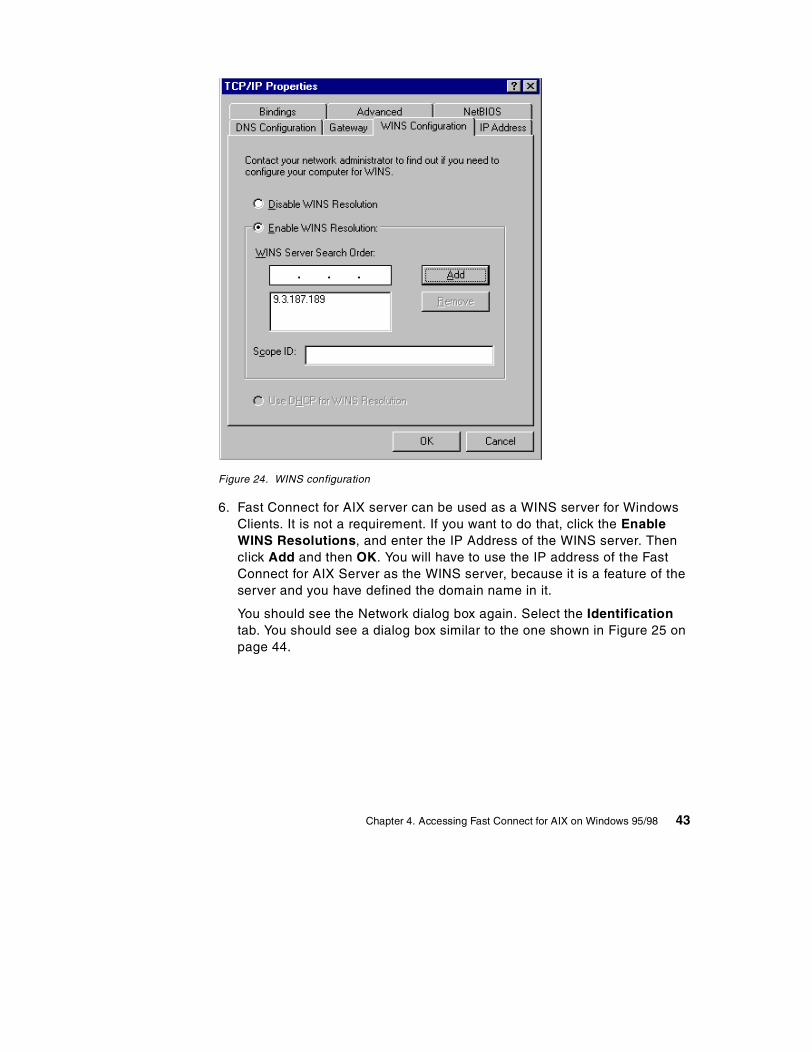
Figure 24. WINS configuration
6. Fast Connect for AIX server can be used as a WINS server for Windows Clients. It is not a requirement. If you want to do that, click the Enable WINS Resolutions, and enter the IP Address of the WINS server. Then click Add and then OK. You will have to use the IP address of the Fast Connect for AIX Server as the WINS server, because it is a feature of the server and you have defined the domain name in it.
You should see the Network dialog box again. Select the Identification tab. You should see a dialog box similar to the one shown in Figure 25 on page 44.
Chapter 4. Accessing Fast Connect for AIX on Windows 95/98 43
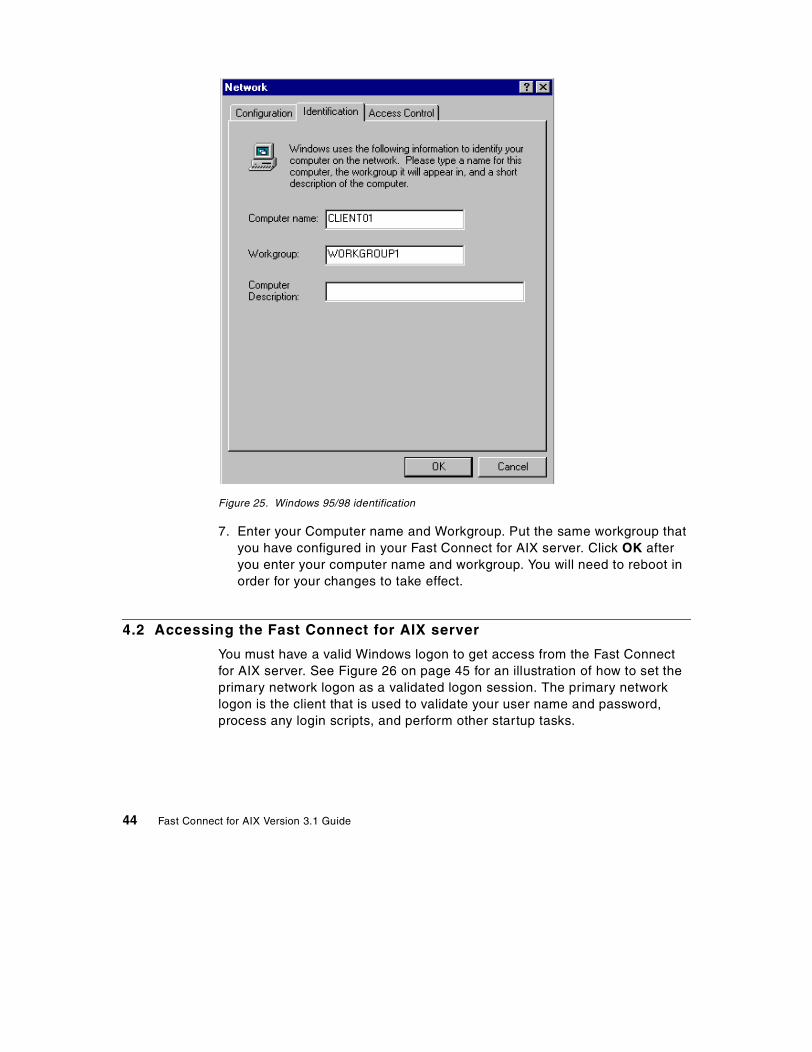
Figure 25. Windows 95/98 identification
7. Enter your Computer name and Workgroup. Put the same workgroup that you have configured in your Fast Connect for AIX server. Click OK after you enter your computer name and workgroup. You will need to reboot in order for your changes to take effect.
4.2 Accessing the Fast Connect for AIX server
You must have a valid Windows logon to get access from the Fast Connect for AIX server. See Figure 26 on page 45 for an illustration of how to set the primary network logon as a validated logon session. The primary network logon is the client that is used to validate your user name and password, process any login scripts, and perform other startup tasks.
44 Fast Connect for AIX Version 3.1 Guide
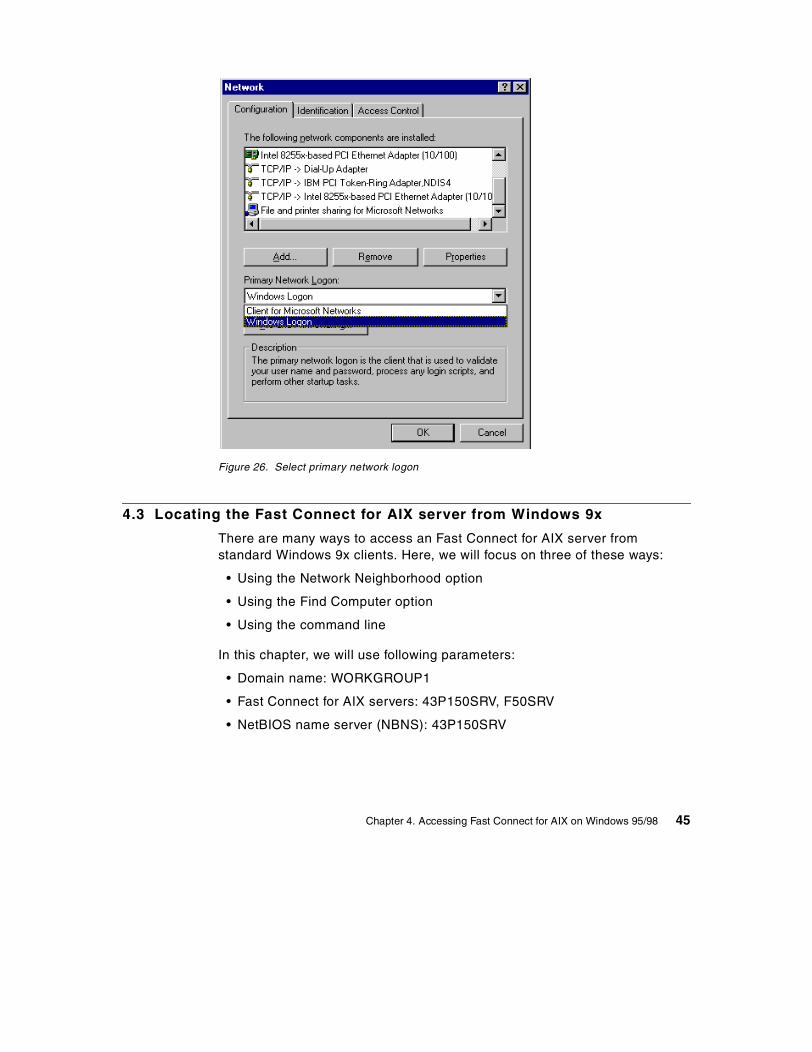
Figure 26. Select primary network logon
4.3 Locating the Fast Connect for AIX server from Windows 9x
There are many ways to access an Fast Connect for AIX server from standard Windows 9x clients. Here, we will focus on three of these ways:
• Using the Network Neighborhood option
• Using the Find Computer option
• Using the command line
In this chapter, we will use following parameters:
• Domain name: WORKGROUP1
• Fast Connect for AIX servers: 43P150SRV, F50SRV
• NetBIOS name server (NBNS): 43P150SRV
Chapter 4. Accessing Fast Connect for AIX on Windows 95/98 45

Option 1: Using the Network Neighborhood optionThe Network Neighborhood option comes standard with all Windows versions. This option is added to the station desktop after the network configuration is done.
Perform the following steps to locate the Fast Connect for AIX server through the Network Neighborhood program:
1. Double-click on the Network Neighborhood icon.
2. Double-click on the Entire Network icon.
3. Double-click on the correct domain name (in this example, WORKGROUP1).
4. You will see the server name (in this example, 43p150srv) and other machines of the same domain as shown in Figure 27.
Figure 27. Browsing domain in Windows 9x
Option 2: Using the Find Computer optionAnother way to locate the Fast Connect for AIX server is by using the Find Computer option. To find the Fast Connect for AIX server (in this example, 43P150srv) using this option, perform the following steps:
1. Select the Find: Computer option from the Find menu located in the Start Menu of Windows 9x (Start -> Find -> Computer).
2. Enter the NetBIOS name of the Fast Connect for AIX server to be located as shown in Figure 28 on page 47.
46 Fast Connect for AIX Version 3.1 Guide

Figure 28. Find: Computer in Windows 9x
3. Select the Find Now option, and the Fast Connect for AIX server will appear.
Option 3: Using the command lineTo locate the Fast Connect for AIX server from the command line interface, use the NET VIEW command in the command line window. The NET VIEW command displays a list of computers in the specified domain or shared resources available on the specified computer.
To find Fast Connect for AIX server using this option, perform the following steps:
1. Open an MS-DOS command line interface by selecting the following steps: Start -> Programs -> Command Prompt.
2. Enter the following command to locate the Fast Connect for AIX server (in this example, 43P150srv), and you will see a list of shared resources on this server:
net view \\<server_name>
Replace <server_name> with the NetBIOS name of the server that you want to locate.
Chapter 4. Accessing Fast Connect for AIX on Windows 95/98 47

Or, enter the following command:
net view /DOMAIN:<domain_name>
Replace <domain_name> with the domain name that you want to locate.
You will see a list of NetBIOS computer names in the network and remarks if you use the net view command without any parameters.
4.4 Accessing resources from Fast Connect for AIX server
This section describes how to access Fast Connect for AIX server resources such as files and printers using Windows 9x clients.
4.4.1 Accessing filesTo access files from shared directories on Fast Connect for AIX server, you can use the GUI interface or the command line interface.
C:\>net view \\43p150srvShared resources at \\43P150SRV
Sharename Type Comment--------------------------------------------AUSRES29 DiskPRINTER1 Print ibm printerTMP DiskThe command was completed successfully.
C:\>net view /DOMAIN:workgroup1Servers available in workgroup WORKGROUP1.Server name Remark-----------------------------------------------\\43P150SRV Fast Connect Server\\CLIENT01\\CLIENT02\\CLIENT03\\CLIENT04\\F50SRV Fast Connect ServerThe command was completed successfully.
Use the Net /? command to see all available options to use with the NET command.
Note
48 Fast Connect for AIX Version 3.1 Guide
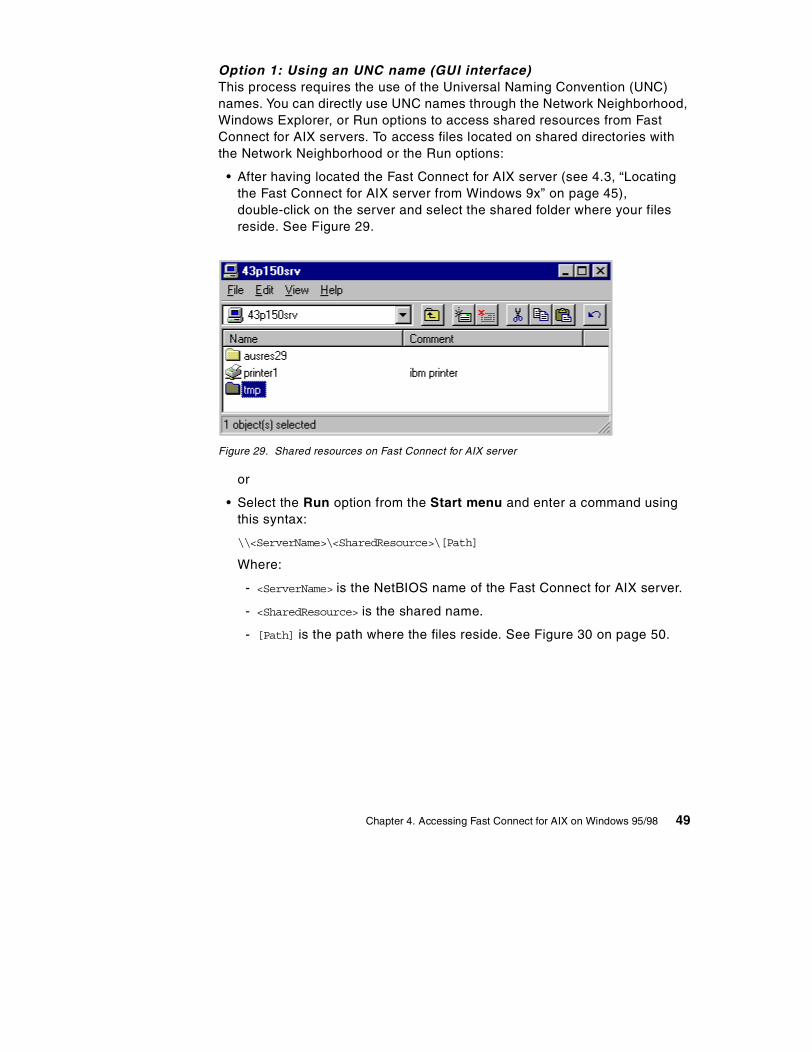
Option 1: Using an UNC name (GUI interface)This process requires the use of the Universal Naming Convention (UNC) names. You can directly use UNC names through the Network Neighborhood, Windows Explorer, or Run options to access shared resources from Fast Connect for AIX servers. To access files located on shared directories with the Network Neighborhood or the Run options:
• After having located the Fast Connect for AIX server (see 4.3, “Locating the Fast Connect for AIX server from Windows 9x” on page 45), double-click on the server and select the shared folder where your files reside. See Figure 29.
Figure 29. Shared resources on Fast Connect for AIX server
or
• Select the Run option from the Start menu and enter a command using this syntax:
\\<ServerName>\<SharedResource>\[Path]
Where:
- <ServerName> is the NetBIOS name of the Fast Connect for AIX server.
- <SharedResource> is the shared name.
- [Path] is the path where the files reside. See Figure 30 on page 50.
Chapter 4. Accessing Fast Connect for AIX on Windows 95/98 49

Figure 30. Run command window
Option 2: Using the option to map network drive (GUI interface)Some applications do not have good performance when using or do not support the use of UNC names to access shared resources. In this case, it is necessary to create logical drives in which the UNC name is mapped to an available drive letter. Perform the following steps to map a network drive:
1. Locate the server and share name where the files reside.
2. Select the shared resource and select the option Map Network Drive from the File menu.
3. Select an available drive letter to which to link the UNC name, and check the Reconnect at Logon option to make this map available every time the machine is restarted. See Figure 31.
Figure 31. Map Network Drive in Windows 9x
Option 2: Using the command line interfaceWith the command line interface, the only way to access shared resources from Fast Connect for AIX server is by mapping the UNC name to a drive letter. To map drives from the command line, use the NET USE command.
50 Fast Connect for AIX Version 3.1 Guide
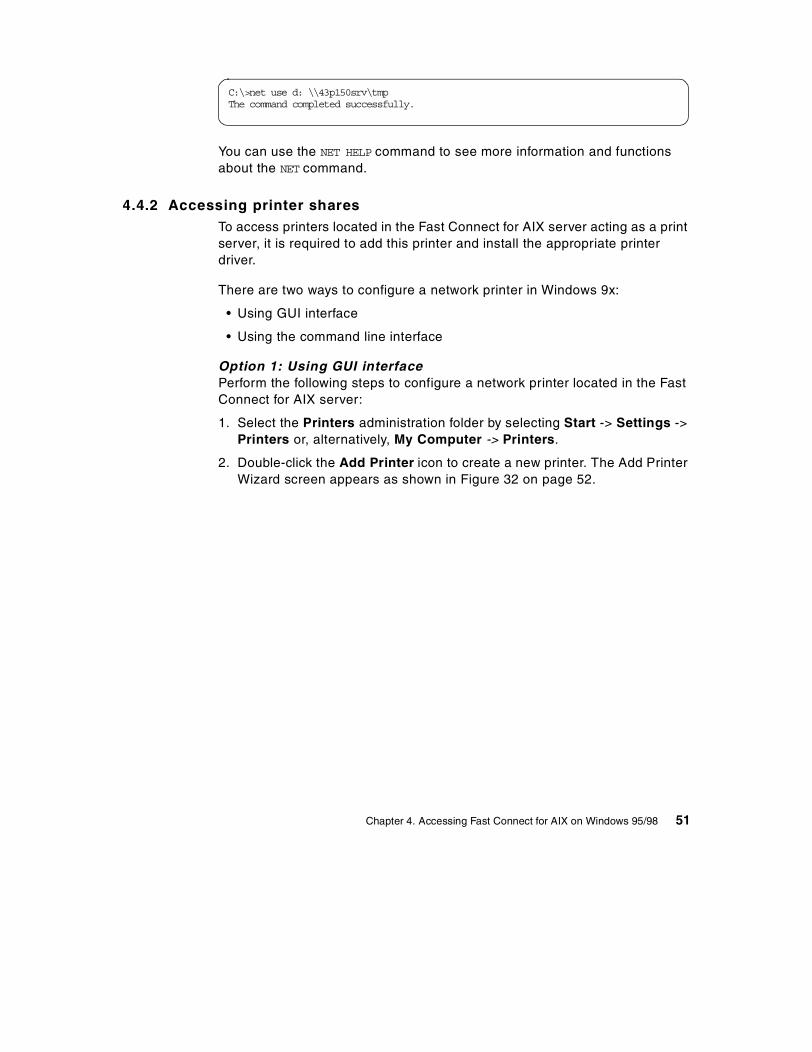
You can use the NET HELP command to see more information and functions about the NET command.
4.4.2 Accessing printer sharesTo access printers located in the Fast Connect for AIX server acting as a print server, it is required to add this printer and install the appropriate printer driver.
There are two ways to configure a network printer in Windows 9x:
• Using GUI interface
• Using the command line interface
Option 1: Using GUI interfacePerform the following steps to configure a network printer located in the Fast Connect for AIX server:
1. Select the Printers administration folder by selecting Start -> Settings -> Printers or, alternatively, My Computer -> Printers.
2. Double-click the Add Printer icon to create a new printer. The Add Printer Wizard screen appears as shown in Figure 32 on page 52.
C:\>net use d: \\43p150srv\tmpThe command completed successfully.
Chapter 4. Accessing Fast Connect for AIX on Windows 95/98 51

Figure 32. Add Printer Wizard in Windows 9x
3. Press the Next button, and select the type of connection with the printer, in this case a Network printer as shown in Figure 33.
Figure 33. Select printer connection window wizard
52 Fast Connect for AIX Version 3.1 Guide

4. Press the Next button, enter the network path where this printer is located (UNC), and select the Yes or No radio button option depending on whether you want to print from MS-DOS-based programs. See Figure 34.
Figure 34. Enter the network printer path
5. Press the Next button, and select the printer driver that will be used with this printer. You may need to provide the CD-ROM containing this driver during this step. See Figure 35 on page 54.
Chapter 4. Accessing Fast Connect for AIX on Windows 95/98 53
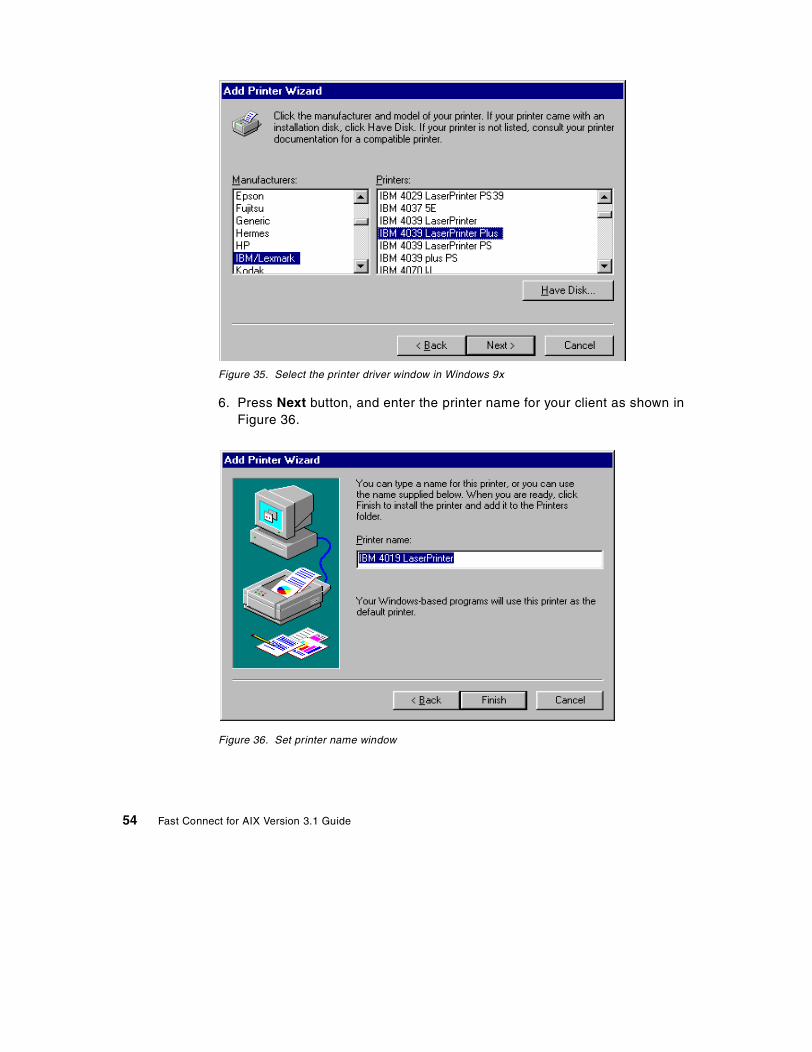
Figure 35. Select the printer driver window in Windows 9x
6. Press Next button, and enter the printer name for your client as shown in Figure 36.
Figure 36. Set printer name window
54 Fast Connect for AIX Version 3.1 Guide
7. Press the Finish button. The printer is now ready to be used from any Windows program.
Option 2: Using the command line interfaceTo access a printer located on the Fast Connect for AIX server from the command line, you must map the UNC name of the printer with an available LPT port. Use the following command to map a network printer from the command line:
net use LPT1: \\43p150srv\printer1
You will then have to follow the steps described in Section “Option 1: Using GUI interface” on page 51, to associate a driver and name to this printer.
Chapter 4. Accessing Fast Connect for AIX on Windows 95/98 55

56 Fast Connect for AIX Version 3.1 Guide

Chapter 5. Accessing Fast Connect for AIX on Windows NT
This chapter will describe how to access shared resources, such as files and printers, from Fast Connect for AIX server using Windows NT client.
5.1 Configuring Windows NT
Before you start to configure Windows NT, make sure that you have installed the Workstation service and the TCP/IP protocol. Make sure that you are logged on as Administrator or at least with a user that is included in the local Administrators group.
Click on Start -> Settings -> Control Panel and double-click on the Network icon. The Network dialog box should appear as shown in Figure 37.
Figure 37. Windows NT Identification
© Copyright IBM Corp. 2001 57

While on the Identification tab, click the Change button, and you will see the dialog box shown in Figure 38.
Figure 38. Identification Changes in Windows NT
First, you should enter your computer name. You will see that you will not be able to change the Workgroup at the same time, so you need to click OK, and then click the Change button again to return to the Identification Changes dialog box. Now, you should click the Workgroup radio button and enter your Workgroup name. Type the same workgroup name that you have set up in your Fast Connect for AIX server. You can make the Computer Name the same as the one you entered in your TCP/IP configuration. Click OK when finished.
Now, you should be back to the Network dialog box. If you have set up your Fast Connect for AIX server to provide NBNS service, you can configure the WINS Address. Click the Protocols tab on the Network dialog box, and you should see a dialog box similar to that shown in Figure 39 on page 59.
58 Fast Connect for AIX Version 3.1 Guide

Figure 39. Protocols
Select TCP/IP Protocol, and click Properties. You should see the TCP/IP dialog box. Select the WINS Address tab, and you will see the dialog box shown in Figure 40 on page 60.
Chapter 5. Accessing Fast Connect for AIX on Windows NT 59

Figure 40. WINS addresses
Enter the IP address of your Fast Connect for AIX server as the Primary WINS Server. Optionally, you can check the Enable DNS for Windows Resolution box. This way, if your client cannot find a name, it will try to use the DNS. Click OK on the WINS Address tab and Close on the Network dialog box. You will need to reboot for the changes to take effect.
5.2 Locating the Fast Connect for AIX server
There are three ways to locate an Fast Connect for AIX server from Windows clients:
• Through the Network Neighborhood icon
60 Fast Connect for AIX Version 3.1 Guide
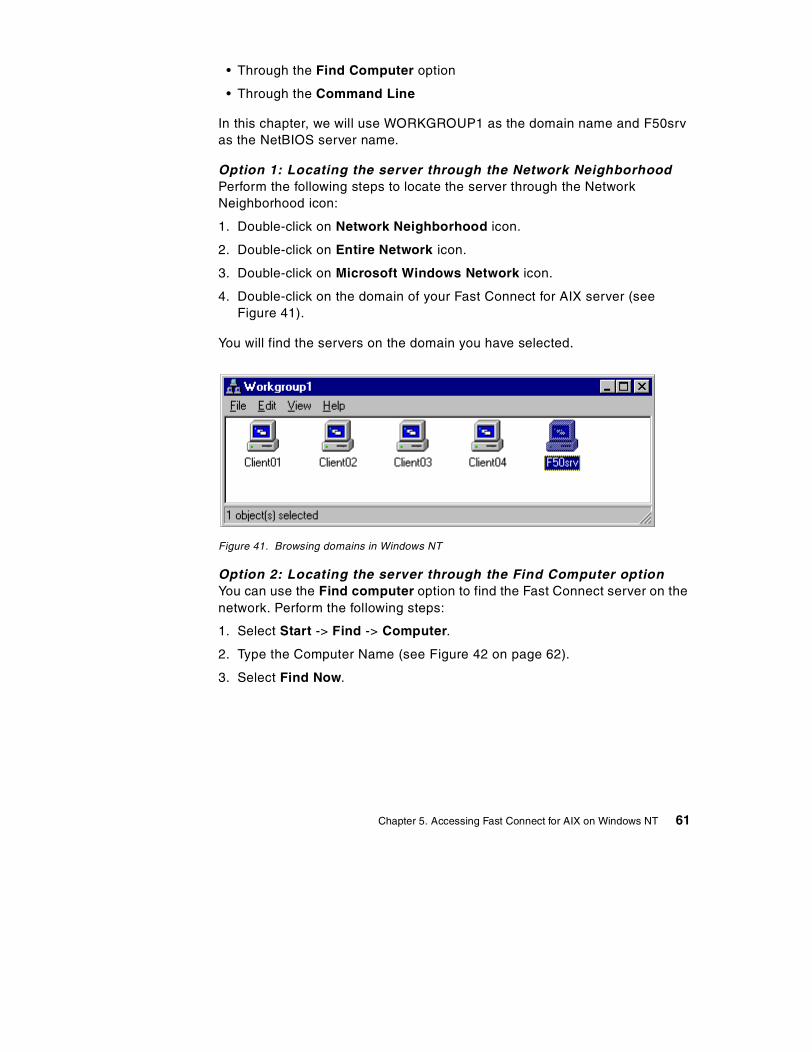
• Through the Find Computer option
• Through the Command Line
In this chapter, we will use WORKGROUP1 as the domain name and F50srv as the NetBIOS server name.
Option 1: Locating the server through the Network NeighborhoodPerform the following steps to locate the server through the Network Neighborhood icon:
1. Double-click on Network Neighborhood icon.
2. Double-click on Entire Network icon.
3. Double-click on Microsoft Windows Network icon.
4. Double-click on the domain of your Fast Connect for AIX server (see Figure 41).
You will find the servers on the domain you have selected.
Figure 41. Browsing domains in Windows NT
Option 2: Locating the server through the Find Computer optionYou can use the Find computer option to find the Fast Connect server on the network. Perform the following steps:
1. Select Start -> Find -> Computer.
2. Type the Computer Name (see Figure 42 on page 62).
3. Select Find Now.
Chapter 5. Accessing Fast Connect for AIX on Windows NT 61

Figure 42. Find: Computer in Windows NT
Option 3: Locating the server from the command lineYou can locate the Fast Connect for AIX server with the NET VIEW command. The NET VIEW command displays a list of computers in the specified domain, or shared resources available on the specified computer.
1. Select Start -> Programs -> Command Prompt.
2. At the command prompt, type the following command:
# net view \\<server_name> (where server_name is the name of the Fast Connect for AIX server whose resources you want to view)
Or type the following command:
# net view /DOMAIN:<domain_name> (where domain_name is the name of the domain of your Fast Connect for AIX server)
62 Fast Connect for AIX Version 3.1 Guide
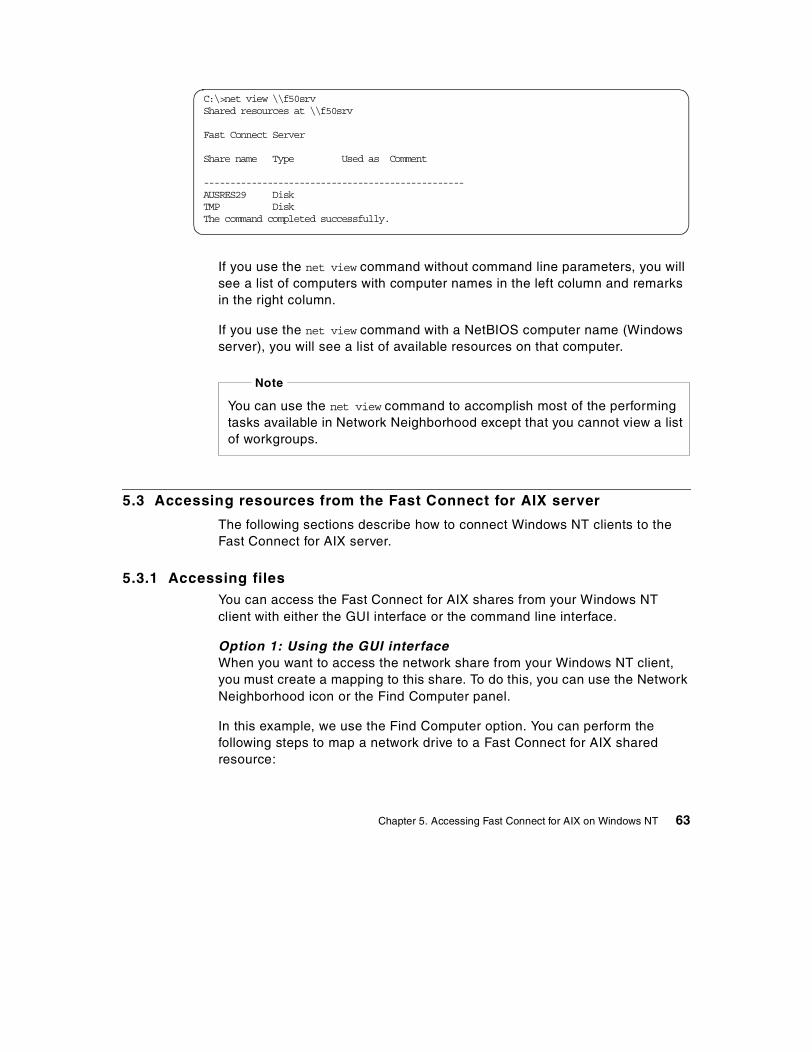
If you use the net view command without command line parameters, you will see a list of computers with computer names in the left column and remarks in the right column.
If you use the net view command with a NetBIOS computer name (Windows server), you will see a list of available resources on that computer.
5.3 Accessing resources from the Fast Connect for AIX server
The following sections describe how to connect Windows NT clients to the Fast Connect for AIX server.
5.3.1 Accessing filesYou can access the Fast Connect for AIX shares from your Windows NT client with either the GUI interface or the command line interface.
Option 1: Using the GUI interfaceWhen you want to access the network share from your Windows NT client, you must create a mapping to this share. To do this, you can use the Network Neighborhood icon or the Find Computer panel.
In this example, we use the Find Computer option. You can perform the following steps to map a network drive to a Fast Connect for AIX shared resource:
C:\>net view \\f50srvShared resources at \\f50srv
Fast Connect Server
Share name Type Used as Comment
-------------------------------------------------AUSRES29 DiskTMP DiskThe command completed successfully.
You can use the net view command to accomplish most of the performing tasks available in Network Neighborhood except that you cannot view a list of workgroups.
Note
Chapter 5. Accessing Fast Connect for AIX on Windows NT 63
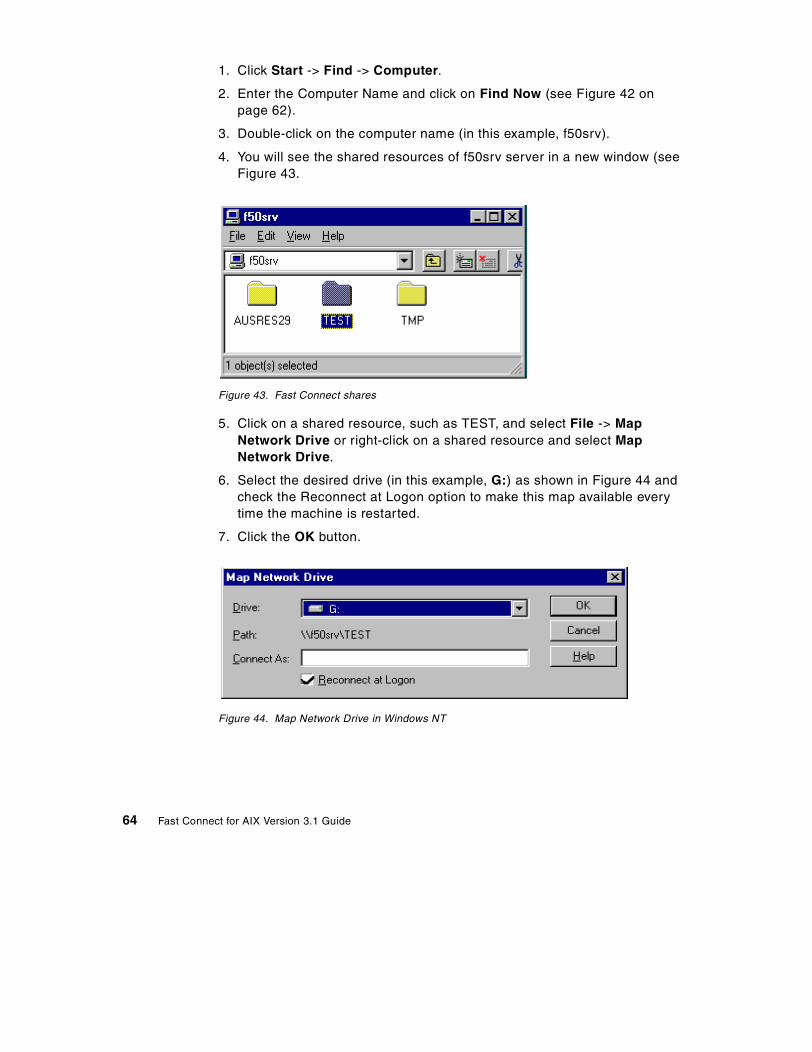
1. Click Start -> Find -> Computer.
2. Enter the Computer Name and click on Find Now (see Figure 42 on page 62).
3. Double-click on the computer name (in this example, f50srv).
4. You will see the shared resources of f50srv server in a new window (see Figure 43.
Figure 43. Fast Connect shares
5. Click on a shared resource, such as TEST, and select File -> Map Network Drive or right-click on a shared resource and select Map Network Drive.
6. Select the desired drive (in this example, G:) as shown in Figure 44 and check the Reconnect at Logon option to make this map available every time the machine is restarted.
7. Click the OK button.
Figure 44. Map Network Drive in Windows NT
64 Fast Connect for AIX Version 3.1 Guide

Option 2: Using the command line interfaceWindows NT will need to define a drive mapping to access the shared resources exported by Fast Connect for AIX. These drive mappings can be done from the DOS command prompt.
You have to use the NET USE command to define mappings between PC drive letters and Fast Connect shared resources:
DOS> net use D: \\F50SRV\test /user:<user_name>
DOS> net help (help information for net command)
DOS> net use D: /delete (delete the drive mapping)
If you use the NET USE command without command-line parameters, you will see the status of network connections, the local name of connections (the mapped drive letters), and the remote name of connections (the server location).
5.3.2 Accessing the Fast Connect for AIX printersIf you want to access an Fast Connect for AIX server printer from Windows NT, you will need to install the appropriate printer driver and map the print resource to a network printer.
You have two ways of configuring a network printer on Windows NT:
• Using the GUI interface
• Using the command line interface
Option 1: Using the GUI InterfaceYou can perform the following steps to configure a network printer from a GUI interface:
1. Select Start -> Settings -> Printers -> Add Printer.
2. Select Network printer server.
3. Select the network printer from a list, or enter its path directly (in this example, \\F50SRV\PRINTER). See Figure 45 on page 66.
c:\>net use d: \\F50SRV\TEST /user:ausres28The command completed successfully.
Chapter 5. Accessing Fast Connect for AIX on Windows NT 65

Figure 45. Connect to printer
4. If the printer driver is not installed in your system, you will see the screen as shown in Figure 47 on page 68. In this case, select the proper windows printer driver from the list (in this example, IBM 4039 LaserPrinter Plus) and install it.
5. Select Yes or No to choose whether this printer will be the default printer. Click Next.
6. Click Finish.
If you want to print from a Windows application, a windows printer driver must be installed and mapped to the network printer. Perform the following steps:
1. Select Start -> Settings -> Printers -> Add Printer.
2. Select My Computer.
3. Click the check box next to the port you want to use (see Figure 46 on page 67).
66 Fast Connect for AIX Version 3.1 Guide

Figure 46. Selecting a port from the Add Printer Wizard
4. Select the proper windows printer driver from the list (in this example, IBM 4039 LaserPrinter Plus) and install it from the windows installation media. See Figure 47 on page 68.
Chapter 5. Accessing Fast Connect for AIX on Windows NT 67

Figure 47. Select a printer driver from the Add Printer Wizard
5. Enter the name of the printer and select Yes or No to choose whether this printer will be the default printer. Click Next.
6. Decide whether to share this printer. If you want to share this printer, you need to enter a share name and select the operating systems of all computers that will be printing to this printer. Click Next.
7. Select Yes or No to print a test. Click Finish.
Option 2: Using the command line interfaceFor DOS application, you can map the network printer to local printer devices, such as LPT1. You can use the following simple device mapping on Windows NT client:
DOS> net use LPT1: \\F50SRV\PRINTER
68 Fast Connect for AIX Version 3.1 Guide
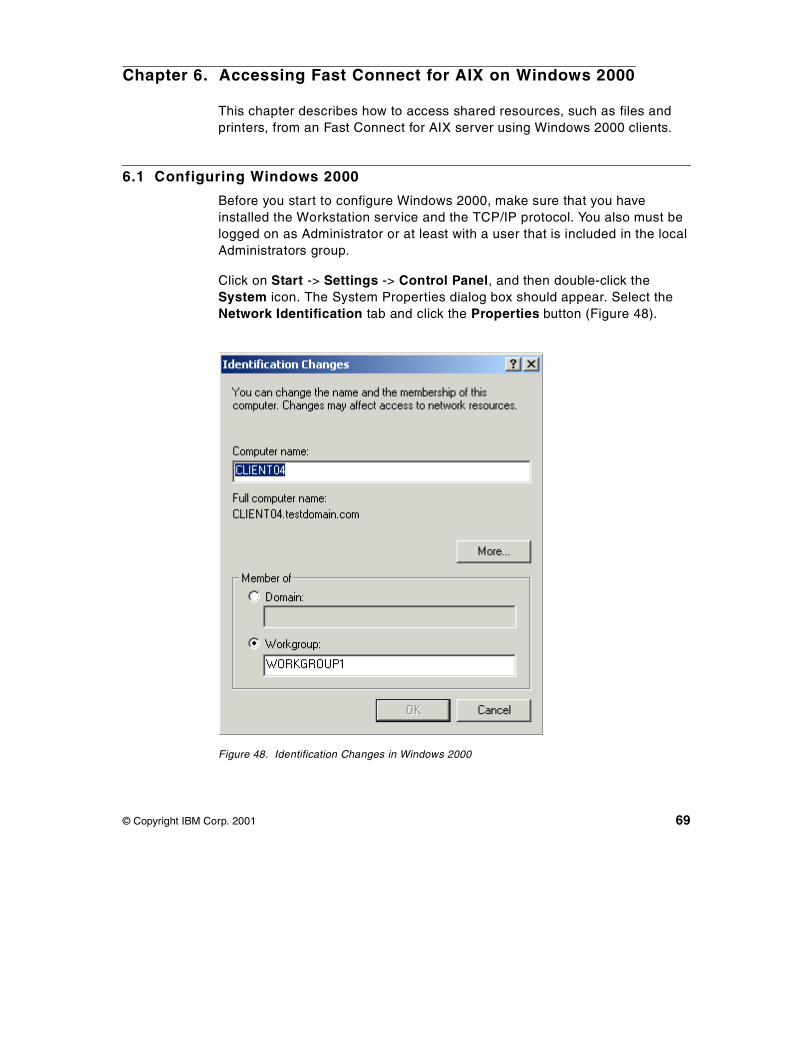
Chapter 6. Accessing Fast Connect for AIX on Windows 2000
This chapter describes how to access shared resources, such as files and printers, from an Fast Connect for AIX server using Windows 2000 clients.
6.1 Configuring Windows 2000
Before you start to configure Windows 2000, make sure that you have installed the Workstation service and the TCP/IP protocol. You also must be logged on as Administrator or at least with a user that is included in the local Administrators group.
Click on Start -> Settings -> Control Panel, and then double-click the System icon. The System Properties dialog box should appear. Select the Network Identification tab and click the Properties button (Figure 48).
Figure 48. Identification Changes in Windows 2000
© Copyright IBM Corp. 2001 69
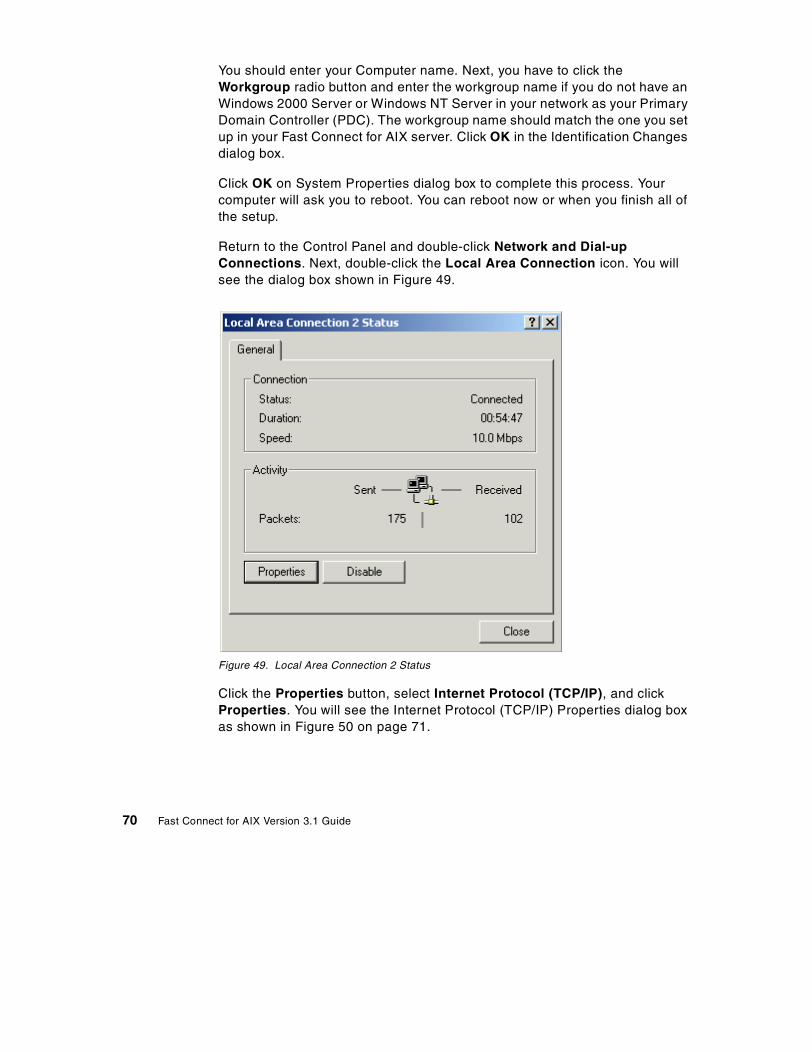
You should enter your Computer name. Next, you have to click the Workgroup radio button and enter the workgroup name if you do not have an Windows 2000 Server or Windows NT Server in your network as your Primary Domain Controller (PDC). The workgroup name should match the one you set up in your Fast Connect for AIX server. Click OK in the Identification Changes dialog box.
Click OK on System Properties dialog box to complete this process. Your computer will ask you to reboot. You can reboot now or when you finish all of the setup.
Return to the Control Panel and double-click Network and Dial-up Connections. Next, double-click the Local Area Connection icon. You will see the dialog box shown in Figure 49.
Figure 49. Local Area Connection 2 Status
Click the Properties button, select Internet Protocol (TCP/IP), and click Properties. You will see the Internet Protocol (TCP/IP) Properties dialog box as shown in Figure 50 on page 71.
70 Fast Connect for AIX Version 3.1 Guide

Figure 50. Internet Protocol (TCP/IP) Properties
Click the Advanced button. You should see the Advanced TCP/IP Settings dialog box. Next, select the WINS tab. You should see a screen like that shown in Figure 51 on page 72.
Chapter 6. Accessing Fast Connect for AIX on Windows 2000 71
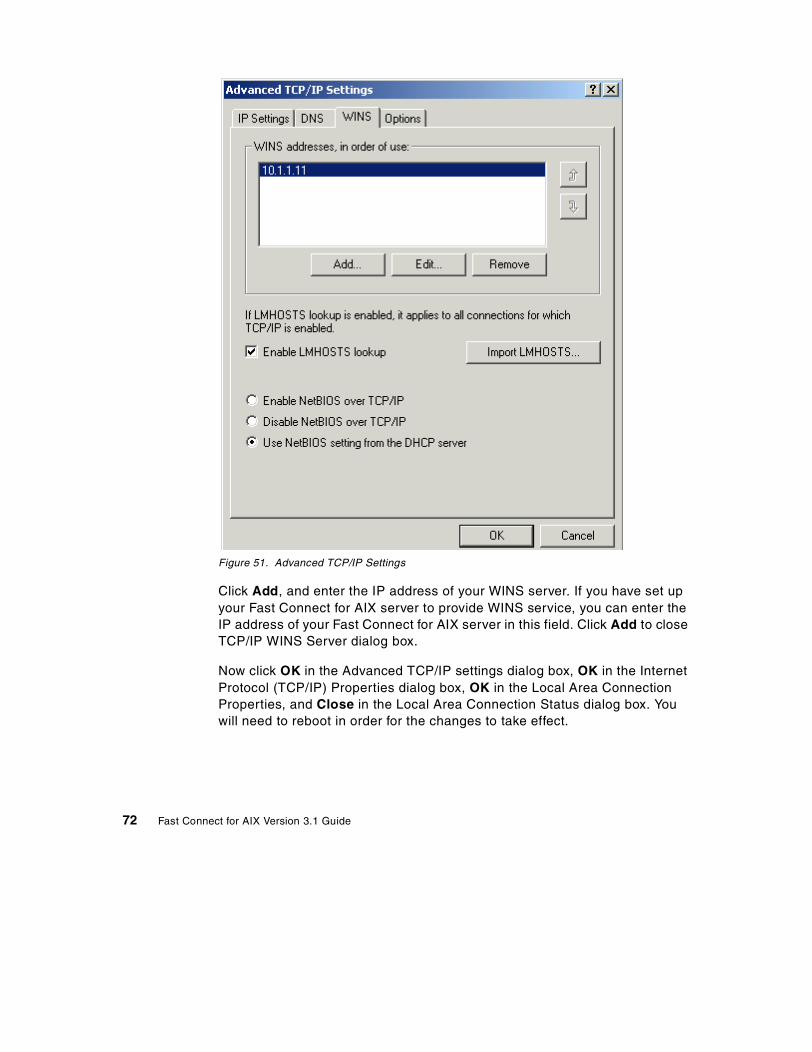
Figure 51. Advanced TCP/IP Settings
Click Add, and enter the IP address of your WINS server. If you have set up your Fast Connect for AIX server to provide WINS service, you can enter the IP address of your Fast Connect for AIX server in this field. Click Add to close TCP/IP WINS Server dialog box.
Now click OK in the Advanced TCP/IP settings dialog box, OK in the Internet Protocol (TCP/IP) Properties dialog box, OK in the Local Area Connection Properties, and Close in the Local Area Connection Status dialog box. You will need to reboot in order for the changes to take effect.
72 Fast Connect for AIX Version 3.1 Guide
6.2 Locating the Fast Connect for AIX server
There are three ways to locate a Fast Connect for AIX server on the Windows 2000 clients. (See Section 8.1.1.5, “Windows 2000” on page 123 to change Windows 2000 security policy.) Sometimes you may want to consider share level security based on your requirements. You should be able to access shares using one of the following three ways:
• The My Network Places icon
• The Find Computer option
• The command line
In this chapter, we use the domain name, WORKGROUP1, and the NetBIOS server name, F50srv.
Option 1: Locating the server with the My Network Places iconTo locate the server with the My Network Places icon, complete the following steps:
1. Double-click the My Network Places icon.
2. Double-click the Entire Network icon.
3. Click the entire contents text.
4. Double-click the Microsoft Windows Network icon.
5. Double-click the domain of your Fast Connect for AIX server.
You can also locate the server with the My Network Places icon, double-clicking My Network Places, then double-click the Computers Near Me icon. You will find the servers on the domain you have selected (see Figure 52 on page 74).
Chapter 6. Accessing Fast Connect for AIX on Windows 2000 73

Figure 52. Browsing the Fast Connect for AIX server
Option 2: Locating the server with the Search for Computer optionYou can use the Find computer option to find the Fast Connect for AIX server on the network. Complete the following steps:
1. Double-click the My Network Places icon.
2. Double-click the Entire Network icon.
3. Click the Search for Computer text.
4. Enter the computer name (see Figure 53 on page 75).
5. Click the Search Now button.
Or you can locate the server by selecting Search -> For Files or Folders and then click Computers in the left bottom area instead of finding files or folders.
74 Fast Connect for AIX Version 3.1 Guide
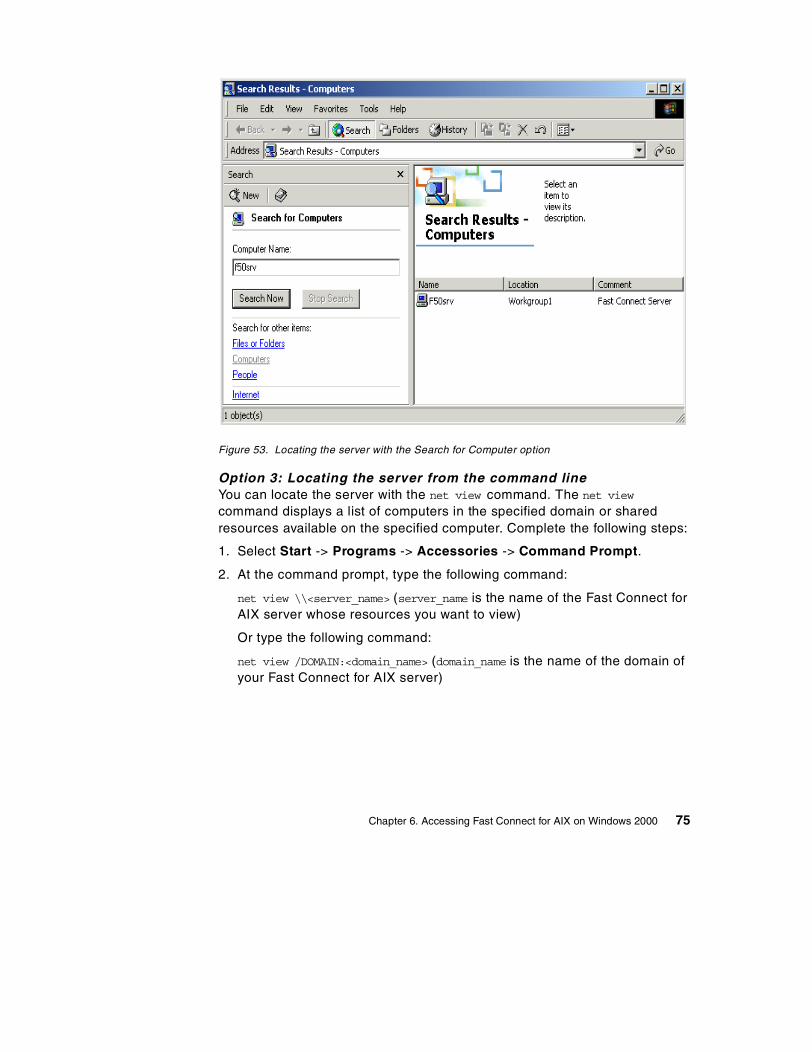
Figure 53. Locating the server with the Search for Computer option
Option 3: Locating the server from the command lineYou can locate the server with the net view command. The net view command displays a list of computers in the specified domain or shared resources available on the specified computer. Complete the following steps:
1. Select Start -> Programs -> Accessories -> Command Prompt.
2. At the command prompt, type the following command:
net view \\<server_name> (server_name is the name of the Fast Connect for AIX server whose resources you want to view)
Or type the following command:
net view /DOMAIN:<domain_name> (domain_name is the name of the domain of your Fast Connect for AIX server)
Chapter 6. Accessing Fast Connect for AIX on Windows 2000 75

If you use the net view command without command line parameters, you will see a list of computers with computer names in the left column and remarks in the right column.
If you use the net view command with a NetBIOS computer name (Windows server), you will see a list of available resources on that computer.
6.3 Accessing resources from the Fast Connect for AIX server
The following sections describe how to connect a Windows 2000 client to an Fast Connect for AIX server.
6.3.1 Accessing filesYou can access the Fast Connect for AIX shares from your Windows 2000 client from the GUI interface or the command line interface.
Option 1: Using the GUI interfaceWhen you want to access the network shared resource from your Windows 2000 client, you can create a mapping to this shared resource. You can use the My Network Places icon or the Search for Computers panel to do this.
C:\>net view \\f50srvShared resources at \\f50srv
Fast Connect Server
Share name Type Used as Comment
-----------------------------------------------AUSRES29 DiskPRINTER PrintTEST DiskTMP DiskThe command completed successfully.
You can use the net view command to accomplish most of the performing tasks available in Network Neighborhood, although that you can not view a list of workgroups.
Note
76 Fast Connect for AIX Version 3.1 Guide

In this example, we use the Search for Computers option. You can follow these steps to map a network drive to Fast Connect for AIX shared resources:
1. Follow the procedure in Section “Option 2: Locating the server with the Search for Computer option” on page 74.
2. In Figure 53 on page 75, double-click the computer name (in this example, F50srv).
3. You will see the shared resources of the F50srv server as shown in Figure 54.
Figure 54. Fast Connect shared resources
4. Click the shared resource (in this example, TEST) and select File -> Map Network Drive or right-click the shared resource and select Map Network Drive.
5. Select the desired drive (in this example, E:).
6. Click in the Reconnect at logon radio button to save this drive map.
7. Click Finish (see Figure 55 on page 78).
Chapter 6. Accessing Fast Connect for AIX on Windows 2000 77
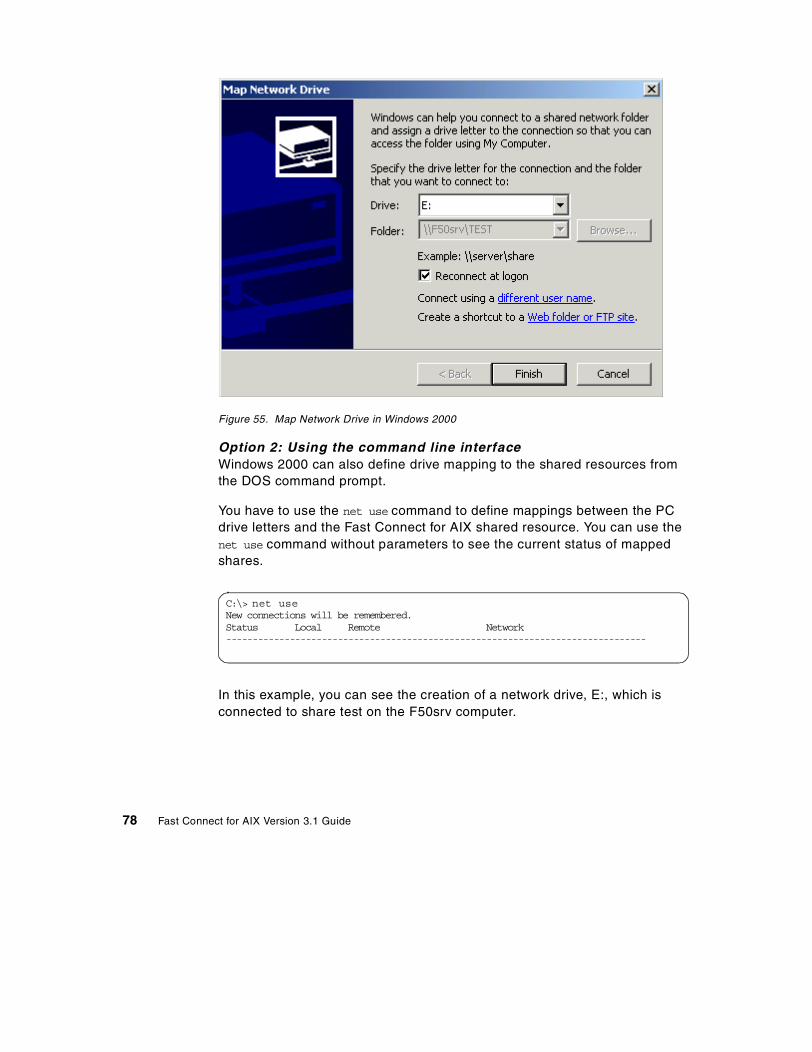
Figure 55. Map Network Drive in Windows 2000
Option 2: Using the command line interfaceWindows 2000 can also define drive mapping to the shared resources from the DOS command prompt.
You have to use the net use command to define mappings between the PC drive letters and the Fast Connect for AIX shared resource. You can use the net use command without parameters to see the current status of mapped shares.
In this example, you can see the creation of a network drive, E:, which is connected to share test on the F50srv computer.
C:\> net useNew connections will be remembered.Status Local Remote Network-------------------------------------------------------------------------------
78 Fast Connect for AIX Version 3.1 Guide
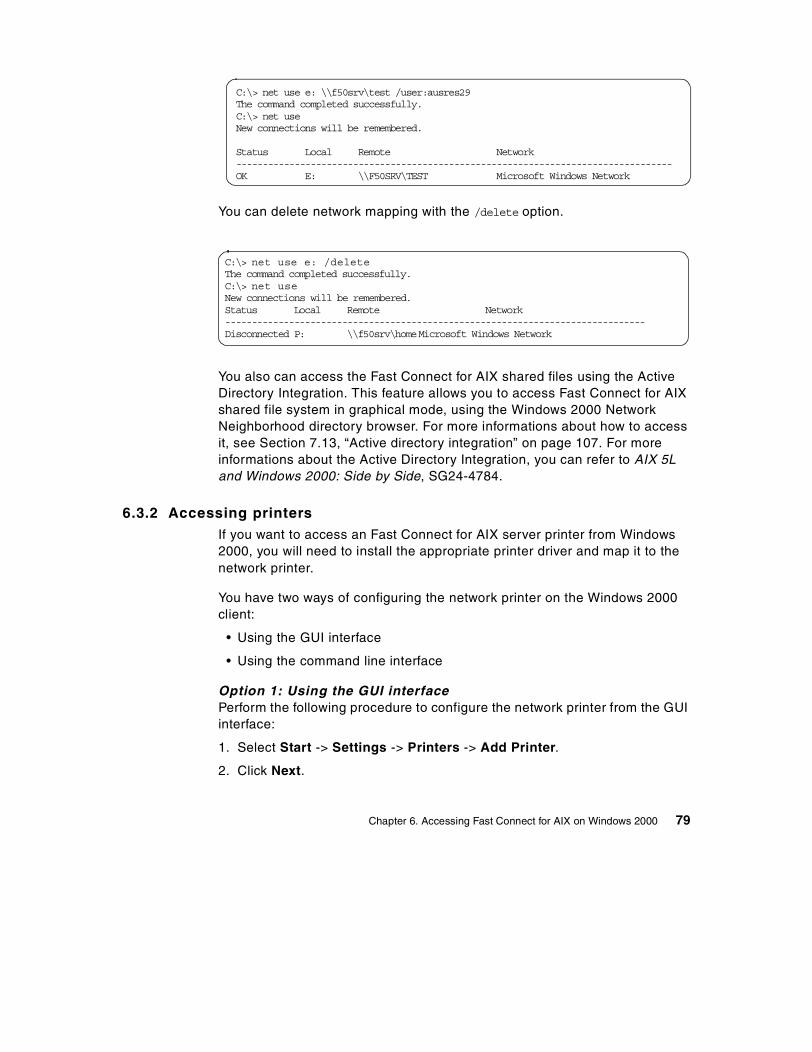
You can delete network mapping with the /delete option.
You also can access the Fast Connect for AIX shared files using the Active Directory Integration. This feature allows you to access Fast Connect for AIX shared file system in graphical mode, using the Windows 2000 Network Neighborhood directory browser. For more informations about how to access it, see Section 7.13, “Active directory integration” on page 107. For more informations about the Active Directory Integration, you can refer to AIX 5L and Windows 2000: Side by Side, SG24-4784.
6.3.2 Accessing printersIf you want to access an Fast Connect for AIX server printer from Windows 2000, you will need to install the appropriate printer driver and map it to the network printer.
You have two ways of configuring the network printer on the Windows 2000 client:
• Using the GUI interface
• Using the command line interface
Option 1: Using the GUI interfacePerform the following procedure to configure the network printer from the GUI interface:
1. Select Start -> Settings -> Printers -> Add Printer.
2. Click Next.
C:\> net use e: \\f50srv\test /user:ausres29The command completed successfully.C:\> net useNew connections will be remembered.
Status Local Remote Network----------------------------------------------------------------------------------OK E: \\F50SRV\TEST Microsoft Windows Network
C:\> net use e: /deleteThe command completed successfully.C:\> net useNew connections will be remembered.Status Local Remote Network-------------------------------------------------------------------------------Disconnected P: \\f50srv\home Microsoft Windows Network
Chapter 6. Accessing Fast Connect for AIX on Windows 2000 79
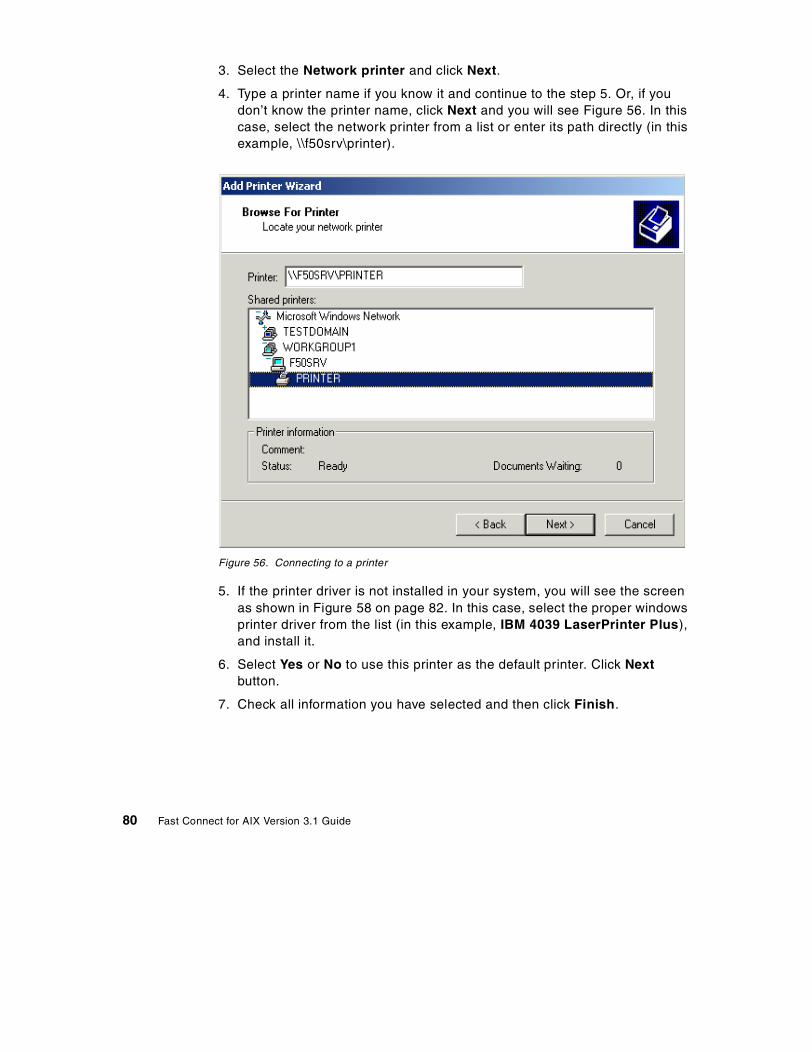
3. Select the Network printer and click Next.
4. Type a printer name if you know it and continue to the step 5. Or, if you don’t know the printer name, click Next and you will see Figure 56. In this case, select the network printer from a list or enter its path directly (in this example, \\f50srv\printer).
Figure 56. Connecting to a printer
5. If the printer driver is not installed in your system, you will see the screen as shown in Figure 58 on page 82. In this case, select the proper windows printer driver from the list (in this example, IBM 4039 LaserPrinter Plus), and install it.
6. Select Yes or No to use this printer as the default printer. Click Next button.
7. Check all information you have selected and then click Finish.
80 Fast Connect for AIX Version 3.1 Guide
If you want to print from a Windows application, a windows printer driver must be installed and mapped to the network printer. You can perform the following steps:
1. Select Start -> Settings -> Printers -> Add Printer.
2. Click Next.
3. Select Local Printer and deselect Automatically detect and install my Plug and Play printer option. Then click Next.
4. Select the port you want to use (see Figure 57), and click Next.
Figure 57. Selecting a port
5. Select the proper windows printer driver from the list (in this example, IBM 4039 LaserPrinter Plus), and install it from the Windows installation media (see Figure 58 on page 82), then click Next.
Chapter 6. Accessing Fast Connect for AIX on Windows 2000 81

Figure 58. Add Printer Wizard
6. Enter the name of the printer and select Yes or No to use this printer as the default printer. Click Next.
7. Decide whether to share this printer. If you want to share this printer, you need to enter a share name. Click Next.
8. Select Yes or No to print a test. Click Next.
9. Check all information you have selected and then click Finish.
Option 2: Using the command line interfaceFor a DOS application, you can map the network printer to local printer devices, such as LPT1. You can use the following simple device mapping on the Windows 2000 client:
net use LPT1: \\f50srv\printer
82 Fast Connect for AIX Version 3.1 Guide
Chapter 7. Fast Connect for AIX advanced functions
The Fast Connect for AIX product offers some additional functions that can help us answer special requirements and improve overall performance.
7.1 Unicode
The Fast Connect for AIX server represents shares, users, files, and directory names internally using Unicode. That means that there is no problem displaying different characters for the non-English languages if a client also supports Unicode.
You must ensure that you have the Unicode feature installed on the AIX server. This is done by installing the corresponding fileset and setting the appropriate language environment. Your current language setting is specified by the LANG environment variable:
For example, if you use the en_US language (ISO8859-1), you should change it to the EN_US language (UTF-8). You can do this with the SMIT or the Web-based System Manager. Use the mle_cc_set_hdr fast path with the first one. If you use Web-based System Manager, select the System Environment -> Settings icon and then Culture (Figure 59 on page 84).
$ echo $LANGen_US
© Copyright IBM Corp. 2001 83

Figure 59. Setting the cultural environment
Clients who use Windows 95 or other clients that do not support the Unicode must ensure that the client and server locales match.
7.2 Support for Access Control Lists
The Fast Connect for AIX server supports the AIX Access Control Lists (ACL). Be careful; even if the name is identical, it is not the same as the Windows ACL. Normal UNIX access control is limited to specifying read/write/execute permissions for the owner, group, and other users. You have more control over a file access with the ACL. You can specify the file permissions, based on a user name or his/her group. You can read more about the ACL in the AIX documentation AIX Version 5L System Management Guide: Operating System and Devices, SC23-2525.
You can see files that are ACL-enabled if you list them with an -e option. Files with the ACL will have a plus sign (+) in the eleventh column. Here is an example of such a listing where you can see one directory (.) and one file (test.txt) with enabled ACL information:
84 Fast Connect for AIX Version 3.1 Guide

You have two ways to change this ACL file information:
• With the acledit command
• With the graphical editor in CDE
7.2.1 Editing ACL information with the acledit commandYou can set the ACL information for the file or directory with the acledit command. The command displays the current access control information and lets the file owner change it with the editor specified by the EDITOR environment variable. Before using it, check that you have defined the EDITOR variable with the full path of the editor:
export EDITOR=/usr/bin/vi
When you run the acledit command, you will see the basic and extended file permissions in the selected editor. You can modify them, save the file, and exit. Answer yes to the question about applying modified ACL. Here is an example of file permissions:
The user, ausres07, could modify the file before ACL extended permissions were applied but not after, as you can see in the following example:
$ ls -elatotal 42587drwxr-xr-x+ 18 ausres06 staff 1024 Feb 14 23:42 .drwxr-xr-x-2356 bin bin 44032 Feb 09 17:37 ..-rwxr--r-x- 1 ausres06 staff 476 Feb 02 13:07 .kshrc-rw-r--r--- 1 ausres06 staff 325 Feb 08 14:05 .profile-rwxr-xr-x+ 1 ausres06 staff 0 Feb 14 23:44 test.txt
attributes:base permissions owner(ausres06): rwx group(staff): rwx others: r-xextended permissions enabled deny rwx u:ausres07~~"/tmp/acledit.72730/acle.dhbEa" 8 lines, 157 characters
Chapter 7. Fast Connect for AIX advanced functions 85
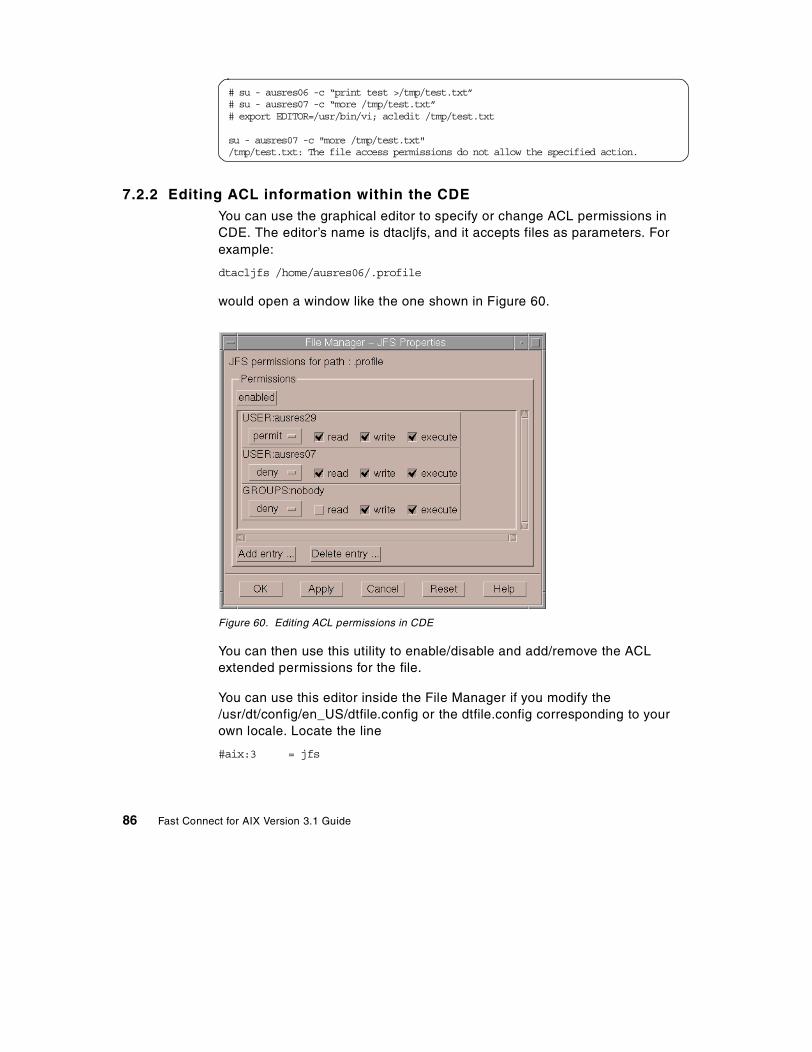
7.2.2 Editing ACL information within the CDEYou can use the graphical editor to specify or change ACL permissions in CDE. The editor’s name is dtacljfs, and it accepts files as parameters. For example:
dtacljfs /home/ausres06/.profile
would open a window like the one shown in Figure 60.
Figure 60. Editing ACL permissions in CDE
You can then use this utility to enable/disable and add/remove the ACL extended permissions for the file.
You can use this editor inside the File Manager if you modify the /usr/dt/config/en_US/dtfile.config or the dtfile.config corresponding to your own locale. Locate the line
#aix:3 = jfs
# su - ausres06 -c “print test >/tmp/test.txt”# su - ausres07 -c “more /tmp/test.txt”# export EDITOR=/usr/bin/vi; acledit /tmp/test.txt
su - ausres07 -c "more /tmp/test.txt"/tmp/test.txt: The file access permissions do not allow the specified action.
86 Fast Connect for AIX Version 3.1 Guide
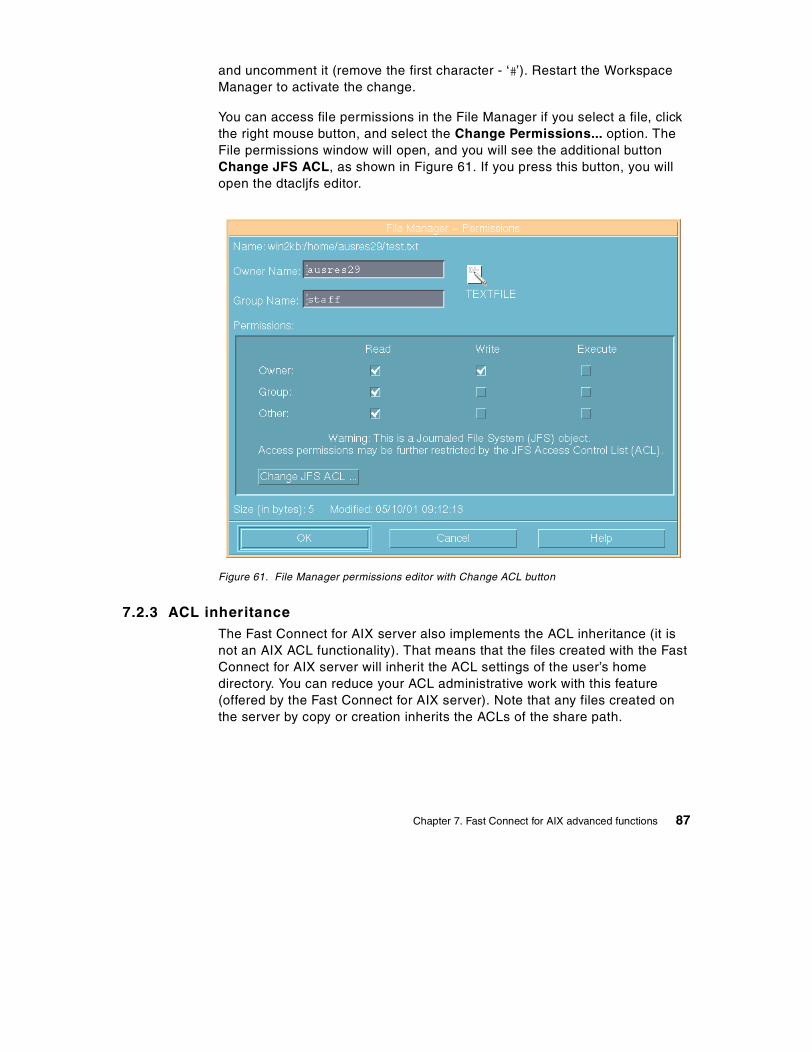
and uncomment it (remove the first character - ‘#’). Restart the Workspace Manager to activate the change.
You can access file permissions in the File Manager if you select a file, click the right mouse button, and select the Change Permissions... option. The File permissions window will open, and you will see the additional button Change JFS ACL, as shown in Figure 61. If you press this button, you will open the dtacljfs editor.
Figure 61. File Manager permissions editor with Change ACL button
7.2.3 ACL inheritanceThe Fast Connect for AIX server also implements the ACL inheritance (it is not an AIX ACL functionality). That means that the files created with the Fast Connect for AIX server will inherit the ACL settings of the user’s home directory. You can reduce your ACL administrative work with this feature (offered by the Fast Connect for AIX server). Note that any files created on the server by copy or creation inherits the ACLs of the share path.
Chapter 7. Fast Connect for AIX advanced functions 87
You must specify the ACL inheritance in the /etc/cifs/cifsConfig file. Locate the line with the string acl_inheritance, and change the value to 1. You must restart the server after this change to the configuration file.
When acl_inheritance is enabled (acl_inheritance=1), then accesscheckinglevel=1 may be desired, also, as otherwise file-attributes and sizes may be improperly reported if the root user does not have access to those files and directories. However, please note that accesscheckinglevel=1 does significantly slow down performance of the Fast Connect for AIX server.
7.3 File locking
The file server must use the file locking for operations on files. This assures that, for example, two users are not writing to the same file at the same time. The Fast Connect for AIX server implements an option to work with the opportunistic locks (oplocks). This is an advanced type of locking, which can significantly improve network performance.
With the oplocks, a client has a mechanism with which to buffer file data locally. One possible scenario is with the data write. The data can be buffered locally if a client knows that no other client is accessing the data. The second possibility is when reading the data. The client can buffer read-ahead data if no other client is writing the data.
The CIFS protocol defines three types of oplocks:
Exclusive oplocks Allows the client to open a file for exclusive access and allows a client to perform arbitrary buffering
Batch oplocks Allows the client to keep a file open on the server even though the client application has closed the file
Level II oplocks Indicates that there are multiple readers of a file and no writers
The Fast Connect for AIX server supports the first two types of oplocks.
If you access the same files both from AIX and the clients at the same time, you must disable this opportunistic locking because the oplocks mechanism is implemented within the Fast Connect server, and doesn’t check the AIX accesses.
Note
88 Fast Connect for AIX Version 3.1 Guide
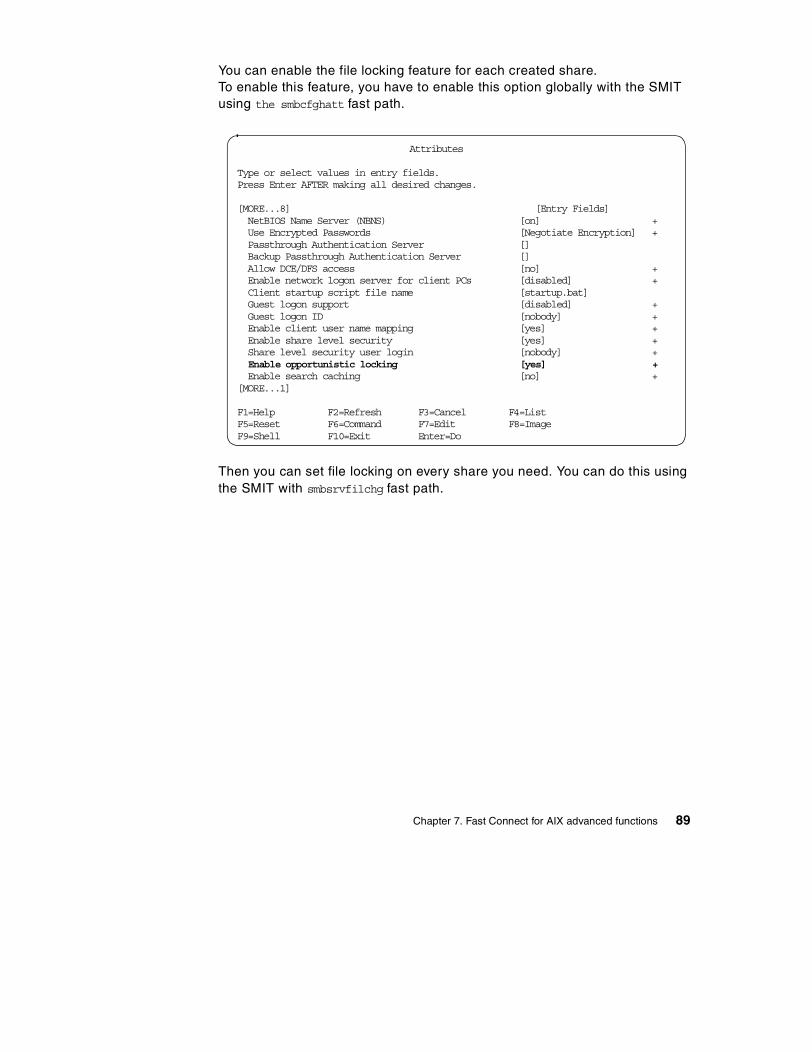
You can enable the file locking feature for each created share. To enable this feature, you have to enable this option globally with the SMIT using the smbcfghatt fast path.
Then you can set file locking on every share you need. You can do this using the SMIT with smbsrvfilchg fast path.
Attributes
Type or select values in entry fields.Press Enter AFTER making all desired changes.
[MORE...8] [Entry Fields] NetBIOS Name Server (NBNS) [on] + Use Encrypted Passwords [Negotiate Encryption] + Passthrough Authentication Server [] Backup Passthrough Authentication Server [] Allow DCE/DFS access [no] + Enable network logon server for client PCs [disabled] + Client startup script file name [startup.bat] Guest logon support [disabled] + Guest logon ID [nobody] + Enable client user name mapping [yes] + Enable share level security [yes] + Share level security user login [nobody] + Enable opportunistic locking [yes] + Enable search caching [no] +[MORE...1]
F1=Help F2=Refresh F3=Cancel F4=ListF5=Reset F6=Command F7=Edit F8=ImageF9=Shell F10=Exit Enter=Do
Chapter 7. Fast Connect for AIX advanced functions 89
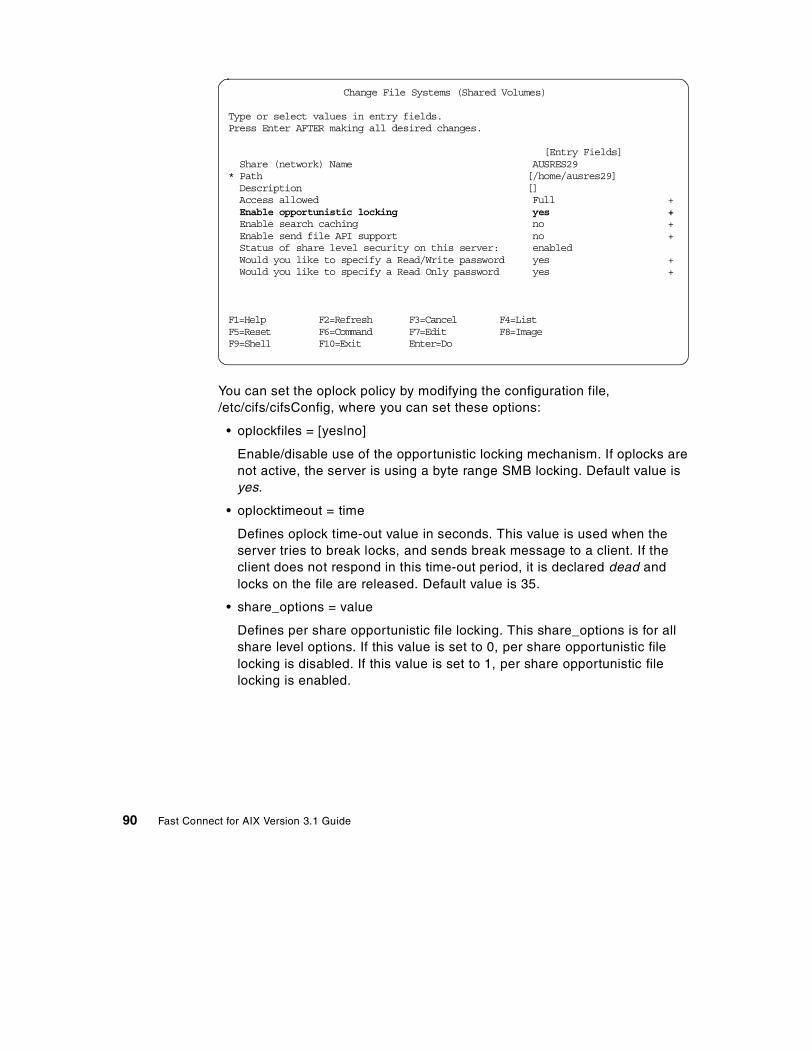
You can set the oplock policy by modifying the configuration file, /etc/cifs/cifsConfig, where you can set these options:
• oplockfiles = [yes|no]
Enable/disable use of the opportunistic locking mechanism. If oplocks are not active, the server is using a byte range SMB locking. Default value is yes.
• oplocktimeout = time
Defines oplock time-out value in seconds. This value is used when the server tries to break locks, and sends break message to a client. If the client does not respond in this time-out period, it is declared dead and locks on the file are released. Default value is 35.
• share_options = value
Defines per share opportunistic file locking. This share_options is for all share level options. If this value is set to 0, per share opportunistic file locking is disabled. If this value is set to 1, per share opportunistic file locking is enabled.
Change File Systems (Shared Volumes)
Type or select values in entry fields.Press Enter AFTER making all desired changes.
[Entry Fields] Share (network) Name AUSRES29* Path [/home/ausres29] Description [] Access allowed Full + Enable opportunistic locking yes + Enable search caching no + Enable send file API support no + Status of share level security on this server: enabled Would you like to specify a Read/Write password yes + Would you like to specify a Read Only password yes +
F1=Help F2=Refresh F3=Cancel F4=ListF5=Reset F6=Command F7=Edit F8=ImageF9=Shell F10=Exit Enter=Do
90 Fast Connect for AIX Version 3.1 Guide
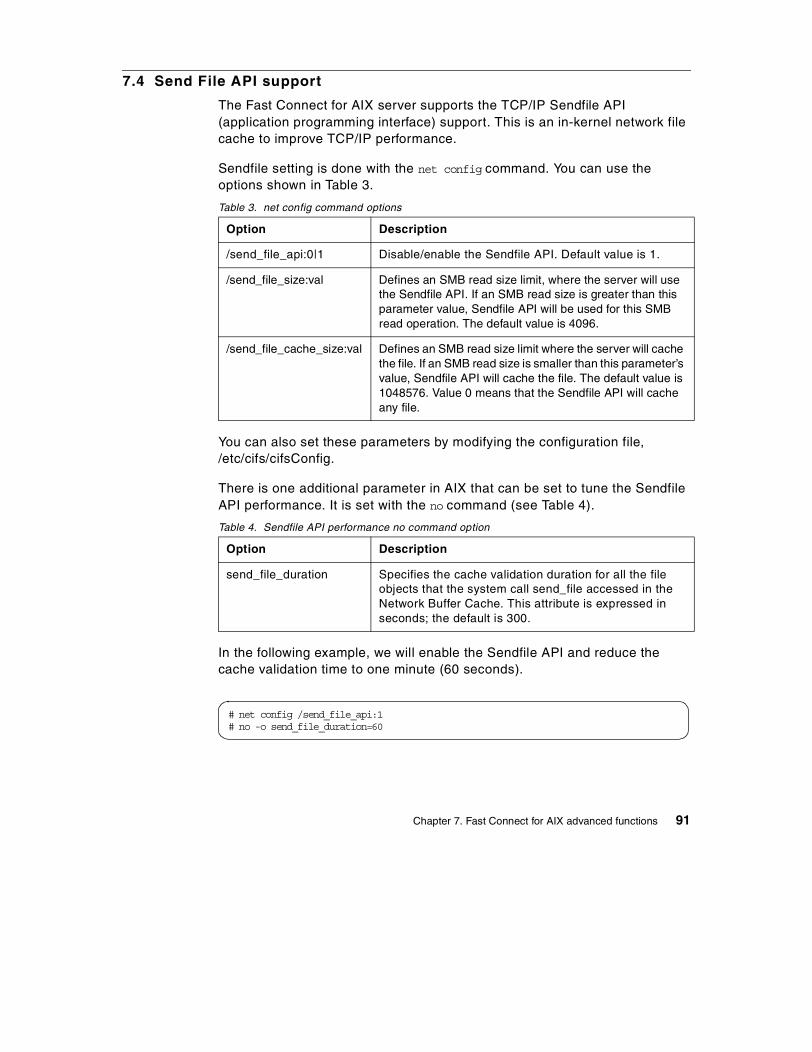
7.4 Send File API support
The Fast Connect for AIX server supports the TCP/IP Sendfile API (application programming interface) support. This is an in-kernel network file cache to improve TCP/IP performance.
Sendfile setting is done with the net config command. You can use the options shown in Table 3.
Table 3. net config command options
You can also set these parameters by modifying the configuration file, /etc/cifs/cifsConfig.
There is one additional parameter in AIX that can be set to tune the Sendfile API performance. It is set with the no command (see Table 4).
Table 4. Sendfile API performance no command option
In the following example, we will enable the Sendfile API and reduce the cache validation time to one minute (60 seconds).
Option Description
/send_file_api:0|1 Disable/enable the Sendfile API. Default value is 1.
/send_file_size:val Defines an SMB read size limit, where the server will use the Sendfile API. If an SMB read size is greater than this parameter value, Sendfile API will be used for this SMB read operation. The default value is 4096.
/send_file_cache_size:val Defines an SMB read size limit where the server will cache the file. If an SMB read size is smaller than this parameter’s value, Sendfile API will cache the file. The default value is 1048576. Value 0 means that the Sendfile API will cache any file.
Option Description
send_file_duration Specifies the cache validation duration for all the file objects that the system call send_file accessed in the Network Buffer Cache. This attribute is expressed in seconds; the default is 300.
# net config /send_file_api:1# no -o send_file_duration=60
Chapter 7. Fast Connect for AIX advanced functions 91

7.5 Mapping file names
The mapping of file names from Windows 95/98/NT to Fast Connect for AIX server and back normally works without problems. But there are special cases when we must be more careful. Two possible problems can arise when you work with the same file from an AIX and Windows client.
7.5.1 Differences in character casingWindows does not distinguish between upper-case and lower-case characters in a file name, so the file names, MyFile.txt and myfile.txt, both define the same file. On the other hand, AIX treats these two as different files. The problem can only arise when you create such files directly on AIX and use them on a Windows client. In this case, some functions will work and others will not.
An example of unexpected behavior is when you create two files in an AIX directory that is also an Fast Connect for AIX share.
You can now see two different files in Windows NT Explorer and you can work with them without any problems, but, from the command prompt, you will get the same output from two files:
You should avoid creating file names that differ only in their casing in shared directories on AIX.
7.5.2 Mapping AIX long file names to DOS file namesOld Windows clients, such as Windows 3.11, do not support long file names. This restriction requires the mapping of long AIX file names (AFN) to DOS file names (DFN). Truncation of names is not enough, because two different long file names can be represented by the same DOS name.
$ print "small" >longfilename.txt$ print "BIG" >LongFileName.txt
C:\> type longfilename.txtsmall
C:\> type LongFileName.txtsmall
92 Fast Connect for AIX Version 3.1 Guide

The Fast Connect for AIX server uses the Windows NT method for mapping from AFN to DFN that ensures file name uniqueness. This method uses a delimiter character in a short name followed by a unique number (for example, the AIX_Fast_Connect_Server file name would be converted to AIX_FA~1). The mapped name is generated whenever the AFN needs to be passed back to a Windows client.
Mappings from AFN to DFN are consistent during the lifetime of the Fast Connect for AIX server. You lose this mapping when the server restarts. For example, consider two files in an exported share, LongFileNameX.txt and LongFileNameY.txt. When the client accesses these files on the share, they would see:
• LONGFI~1.txt for LongFileNameTrue.txt
• LONGFI~2.txt for LongFileNameFalse.txt
For example, if you want to edited LongFileNameTrue.txt, you would open the file LONGFI~1.txt on the client. After you have changed, saved and closed the file and the server shuts down, if someone moved or removed LONGFI~1.txt from the file system, when the server was brought up again, opening LONGFI~1.txt will map to LongFileNameFalse.txt! Therefore, if the network drive is reconnected following server restart, a new file list must be obtained before accessing any mapped names.
You can modify AFN to DFN mapping with the net command:
• net config /listparm /component:smbserver /parameter:dosfilenamemapping
Shows the current setting for long file name mapping
• net config /component:smbserver /dosfilenamemapping:[0|1]
Changes the long file name file mapping on/off
• net config /listparm /component:smbserver /parameter:dosfilenamemapchar
Shows the current delimiter character for long file name mapping. You can select only between ~ and .
• net config /component:smbserver /dosfilenamemapchar:[~|^]
Changes the delimiter character for long file name file mapping
dosfilenamemapping=1 is strongly recommended if 16-bit applications, Windows 3.1, or DOS is being used (dosfilenamemapping=0 can lead to unpredictable results with these environments, and is not recommended).
Chapter 7. Fast Connect for AIX advanced functions 93
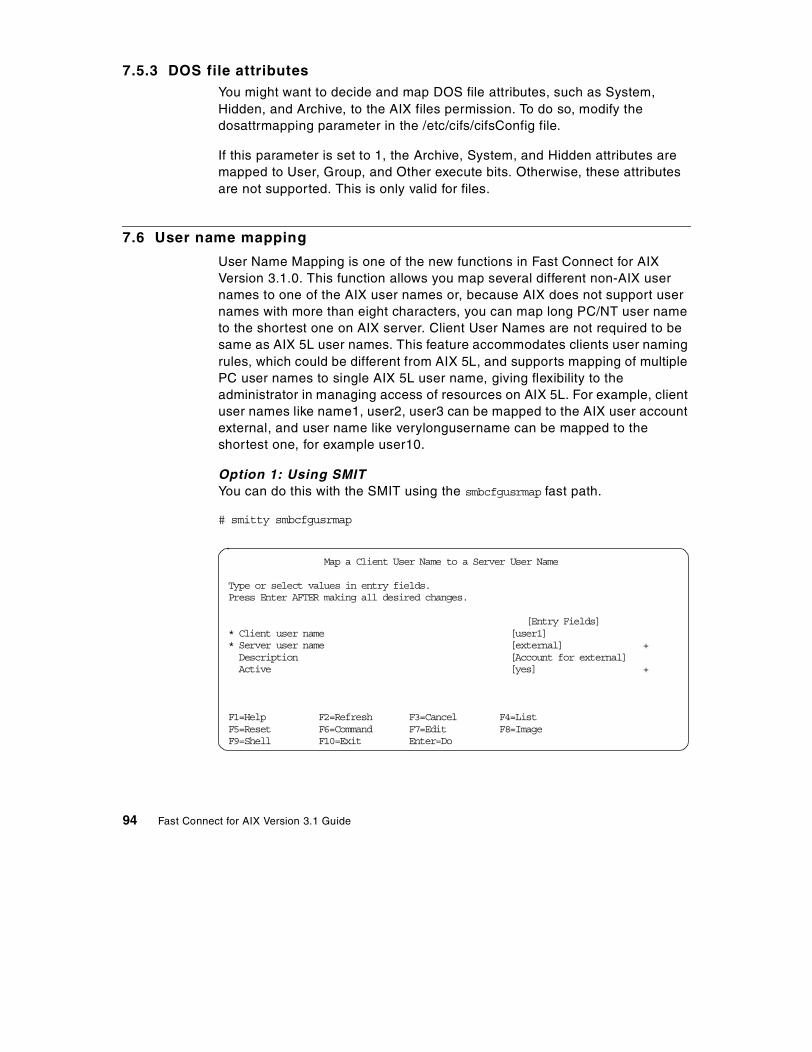
7.5.3 DOS file attributesYou might want to decide and map DOS file attributes, such as System, Hidden, and Archive, to the AIX files permission. To do so, modify the dosattrmapping parameter in the /etc/cifs/cifsConfig file.
If this parameter is set to 1, the Archive, System, and Hidden attributes are mapped to User, Group, and Other execute bits. Otherwise, these attributes are not supported. This is only valid for files.
7.6 User name mapping
User Name Mapping is one of the new functions in Fast Connect for AIX Version 3.1.0. This function allows you map several different non-AIX user names to one of the AIX user names or, because AIX does not support user names with more than eight characters, you can map long PC/NT user name to the shortest one on AIX server. Client User Names are not required to be same as AIX 5L user names. This feature accommodates clients user naming rules, which could be different from AIX 5L, and supports mapping of multiple PC user names to single AIX 5L user name, giving flexibility to the administrator in managing access of resources on AIX 5L. For example, client user names like name1, user2, user3 can be mapped to the AIX user account external, and user name like verylongusername can be mapped to the shortest one, for example user10.
Option 1: Using SMITYou can do this with the SMIT using the smbcfgusrmap fast path.
# smitty smbcfgusrmap
Map a Client User Name to a Server User Name
Type or select values in entry fields.Press Enter AFTER making all desired changes.
[Entry Fields]* Client user name [user1]* Server user name [external] + Description [Account for external] Active [yes] +
F1=Help F2=Refresh F3=Cancel F4=ListF5=Reset F6=Command F7=Edit F8=ImageF9=Shell F10=Exit Enter=Do
94 Fast Connect for AIX Version 3.1 Guide

Option 2: Using the command lineYou can do this using net user command. The syntax is:
net user /map clientUserName serUserName
7.7 Guest logon support
The Fast Connect for AIXFast Connect for AIX can support guest-mode logins when configured for plain-text passwords. (Guest mode is not supported if Fast Connect for AIX is configured for NT-passthrough authentication and DCE/DFS authentication.) To enable guest-mode logins, two parameters must be configured:
net config /guestlogonsupport:1 (enables guest logons)
net config /guestname:GuestID (AIX guestid with null password)
When Guest Logon Support is enabled (guestlogonsupport=1) and the guestname field is set, non-AIX users can connect to the Fast Connect for AIX Server. The credentials for these guest clients will be set to those of the guestname attribute.
The AIX account specified by guestname must have a null AIX password. It is being used for guest-mode access to the AIX file system. This guest account will be able to access all of the file system directories exported by Fast Connect for AIX (as File Shares). Therefore, to simplify access-control, this guest account should probably be in its own unique AIX-group.
Guest access is only given to Usernames that are not standard Fast Connect for AIX users, with Passwords that are not null.
Incoming login-requests are authenticated as follows:
1. If the incoming Username is recognized as a Fast Connect for AIX user, the password is checked. If the Password is valid, standard user-mode access is granted; otherwise, the login-attempt fails.
2. If the incoming Username is not recognized as a Fast Connect for AIX user, the Password is checked. If the Password is non-null, guest-mode access is granted. Otherwise, the login-attempt fails.
Guest Logon Support does cooperate with Network Logon support (networklogon=1). Whenever guest-mode access is granted, the profile, startup scripts, and home directory of the guestname user will be used for the network logon.
Chapter 7. Fast Connect for AIX advanced functions 95
If DCE authentication is enabled (dce_auth=1), Guest Logon Support does not work. Similarly, if passthrough authentication is configured, Guest Logon Support will not work.
To disable Guest Logon Support, use the following command:
net config /guestlogonsupport:0
7.8 Alias names support
The Fast Connect for AIX product supports server name aliases. You can use this in high-availability configurations of the Fast Connect for AIX server (HACMP mutual takeover). You can configure aliases with the net name command. The following options are available:
• /add <alias> [/sub:<val>]
Add new alias for the Fast Connect for AIX server NetBIOS name. /sub defines the NetBIOS name subcode, with values from 00 to FF in hex. If you do not specify sub value or you specify 00 or 20, both 00 and 20 subcodes aliases will be added for that NetBIOS name. You cannot add an alias if someone on the subnet is holding it. If nobody on the subnet is holding the alias name but it exists in the WINS or NBNS, the alias name will only be added to the local name table.
96 Fast Connect for AIX Version 3.1 Guide
• /delete <alias> [/sub:<val>]
Delete the defined alias for the Fast Connect for AIX server NetBIOS name. /sub defines the NetBIOS name subcode, with values from 00 to FF in hex. If you do not specify a sub value or you specify 00 or 20, both 00 and 20 subcodes aliases will be deleted for that NetBIOS name.
• /list
Lists all aliases for the Fast Connect for AIX server NetBIOS name. The subcode for the alias is listed after the name between < and >, unless the alias subcode is 00 and/or 20.
All NetBIOS name aliases will be registered to the WINS or NBNS server if the primary or secondary address of the server is specified in the Fast Connect for AIX configuration.
7.9 Accessing DFS directories
The Fast Connect for AIX Version 3.1 has the ability to export DFS directories. This section explains how to set up AIX and Fast Connect for AIX to allow the clients connected on the PC workstations to access DFS directories. There are two ways to perform this operation
Option 1: Global access to Fast Connect for AIXWith this first method, you set up Fast Connect for AIX so that every connection forces an authentication of the users and passwords within the DCE environment.
The setup of Fast Connect for AIX uses the usual menus. Figure 62 on page 98 shows the attributes to modify to authorize DFS access.
Chapter 7. Fast Connect for AIX advanced functions 97

Figure 62. Authorizing DFS access
Fast Connect for AIX DCE/DFS integration feature now supports encrypted passwords in addition to plain text passwords, which offers higher security and eliminates the need to modify Windows clients to enable plain text passwords.
Fast Connect for AIX DFS access mechanismYou should use this method if all the clients have a DCE logon. There is no local authentication, so clients with only a local user name and password on the AIX machine will not be able to log on. The default HOME share is modified so that instead of the local home directory, the HOME share is now the DCE home directory. The user identifier and group identifier used directory are the DCE ones. You should synchronize the local user identifier with the DCE one to avoid conflicts.
Let us consider a worst-case scenario. You have set up Fast Connect for AIX to allow users to access DFS. You have a Windows user, named matt, with the local AIX user name, fox, a local identifier of 201, a DCE user name of matt, and a DCE identifier of 6401. You also have another user on the local system with the user name, bob, and a local user identifier of 6401. The Windows user, matt, can map his DCE home directory by providing matt as a user name plus his DCE password. However, if this user wants to map a local share, let us say, TEMP (a share that contains the /tmp/directory), every file
98 Fast Connect for AIX Version 3.1 Guide

and folder that matt will create will have the user identifier, 6401, and the local owner of those files will be bob.
To avoid this problem, make sure that the local and DCE identifier and names of your users are synchronized.
Option 2: Using the AIX integrated loginThe previous methods simplify the administration of the users because everything can be done centrally. But if not all users have a DCE account and you want just some of them to be able to access their DCE home directories, using the AIX integrated login can be the answer.
The AIX integrated login is a feature that allows you to modify the login mechanism to bundle the login in the DCE environment with the original AIX login. Refer to the DCE documentation for a complete description of this feature. In a simple environment, installing this integrated login can be summarized by the following steps:
1. Synchronize user names and identifier.
2. Modify the /etc/security/user file, and add a stanza, SYSTEM = dce, for the users that need to access DFS.
3. Synchronize the password between the DCE and the local environment.
The situation you have now, is this:
• The users that do not have an integrated login can log on using the local environment, and will be able to access the local share and the DFS shares as if they where a member of the any_other group.
• The users that have an integrated login can log to the local shares but also to the DFS shares that they are allowed to access with their DCE identifier.
7.10 User sessions
The Fast Connect for AIX Version 3.1 servers are enhanced to provide detailed information about connected sessions, including files open by individual users. An administrator can force a session or even a file to close. This function is supported through the command line. Graphical access to these functions provided through Web-based System Manager.
To obtain information about user sessions, you can use the net session command as follows:
Chapter 7. Fast Connect for AIX advanced functions 99
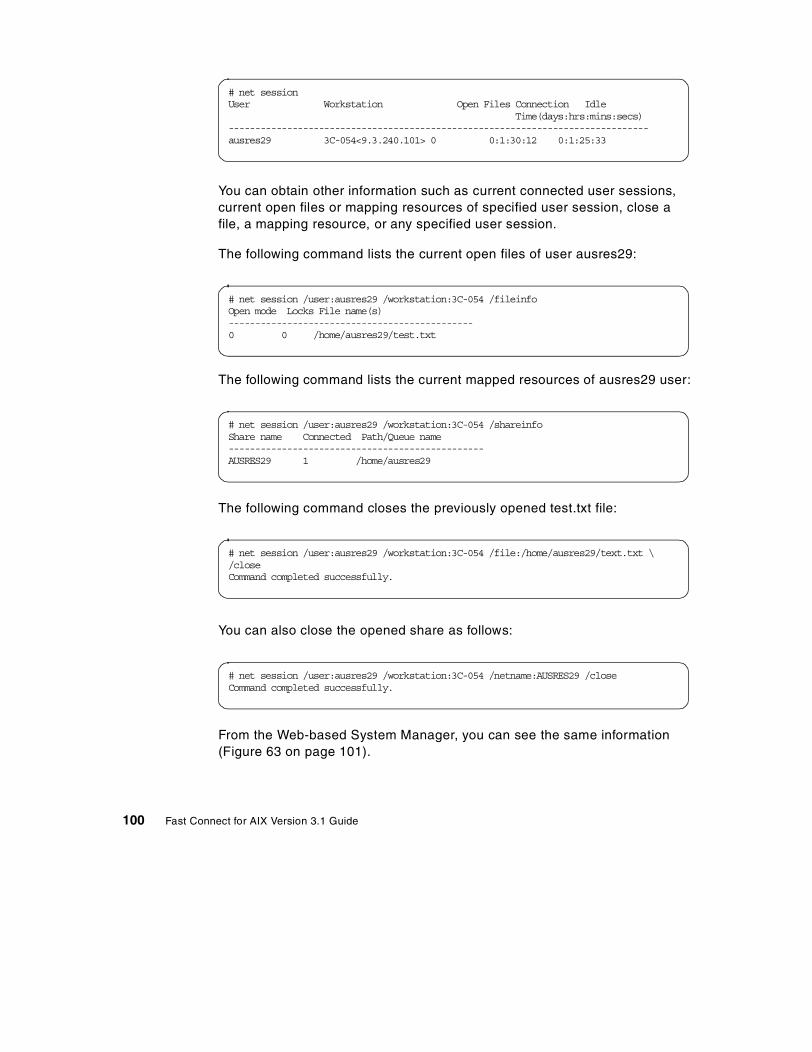
You can obtain other information such as current connected user sessions, current open files or mapping resources of specified user session, close a file, a mapping resource, or any specified user session.
The following command lists the current open files of user ausres29:
The following command lists the current mapped resources of ausres29 user:
The following command closes the previously opened test.txt file:
You can also close the opened share as follows:
From the Web-based System Manager, you can see the same information (Figure 63 on page 101).
# net sessionUser Workstation Open Files Connection Idle Time(days:hrs:mins:secs)-------------------------------------------------------------------------------ausres29 3C-054<9.3.240.101> 0 0:1:30:12 0:1:25:33
# net session /user:ausres29 /workstation:3C-054 /fileinfoOpen mode Locks File name(s)----------------------------------------------0 0 /home/ausres29/test.txt
# net session /user:ausres29 /workstation:3C-054 /shareinfoShare name Connected Path/Queue name------------------------------------------------AUSRES29 1 /home/ausres29
# net session /user:ausres29 /workstation:3C-054 /file:/home/ausres29/text.txt \/closeCommand completed successfully.
# net session /user:ausres29 /workstation:3C-054 /netname:AUSRES29 /closeCommand completed successfully.
100 Fast Connect for AIX Version 3.1 Guide

Figure 63. User sessions
From Web-based System Manager, you can obtain detailed information about user session including open files and share mappings (see Figure 64 on page 102). To open this window, right click on selected user (see Figure 63 on page 101) and select Properties from the menu.
Chapter 7. Fast Connect for AIX advanced functions 101

Figure 64. Detailed information about open files
7.11 Messaging to PC clients
This is also a new function in Fast Connect for AIX Version 3.1. Now you have the capability to send messages to PC clients. For clients running Windows 3.11, Windows 95, or Windows 98, winpopup must be running for messaging to work. For example, you can send broadcast about system shutdown. You can do this by the cifsClient send command. The command syntax is:
102 Fast Connect for AIX Version 3.1 Guide

Here is an example how to use cifsClient command:
7.12 Share level security support
This options allows you define access to AIX shared resources without an individual AIX user account for every connection. The share level security option allows you set access permissions directly on each shared directory. Permissions can be set for read access and for read/write access. First you must enable the global option for share level security and choose an account for share level security. You can do this by Web-based System Manager or SMIT.
Option 1: Using Web-based System ManagerIf you use Web-based System Manager, select the PC Services -> Fast Connect Server -> right click on the server name -> Properties -> Network Access. See Figure 65 on page 104.
cifsClient send { -a | -c <computer> | -d [<domain>] | - u <user> } | [-m <message> | -f <file name>]where: -a send message to all users connected to Fast Connect server. -c computer send message to a computer name. -d [domain] send message to specified domain/workgroup. Default is domain of the Fast Connect server. -u user send message to a user. -m message message text. -f file file contains message text.
If option -m or -f is not specifed, then message is read from the prompt.Ctrl D to exit the prompt.
# net sessionUser Workstation Open Files Connection Idle Time(days:hrs:mins:secs)-------------------------------------------------------------------------------ausres29 3C-054<9.3.240.101> 0 0:0:0:53 0:0:0:49# cifsClient send -u ausres29 -m "please logoff"Message sent to user: 'AUSRES29'.
Chapter 7. Fast Connect for AIX advanced functions 103

Figure 65. Global option for share level security
If you made changes in global server properties, Fast Connect for AIX Server should be restarted.
The second step is to choose the shared resource and set up access permissions and passwords that will be used to restrict access to this share. Choose PC Services -> Fast Connect Server -> open File Share -> choose appropriate shared directory -> right click -> Properties. See Figure 66 on page 105.
104 Fast Connect for AIX Version 3.1 Guide
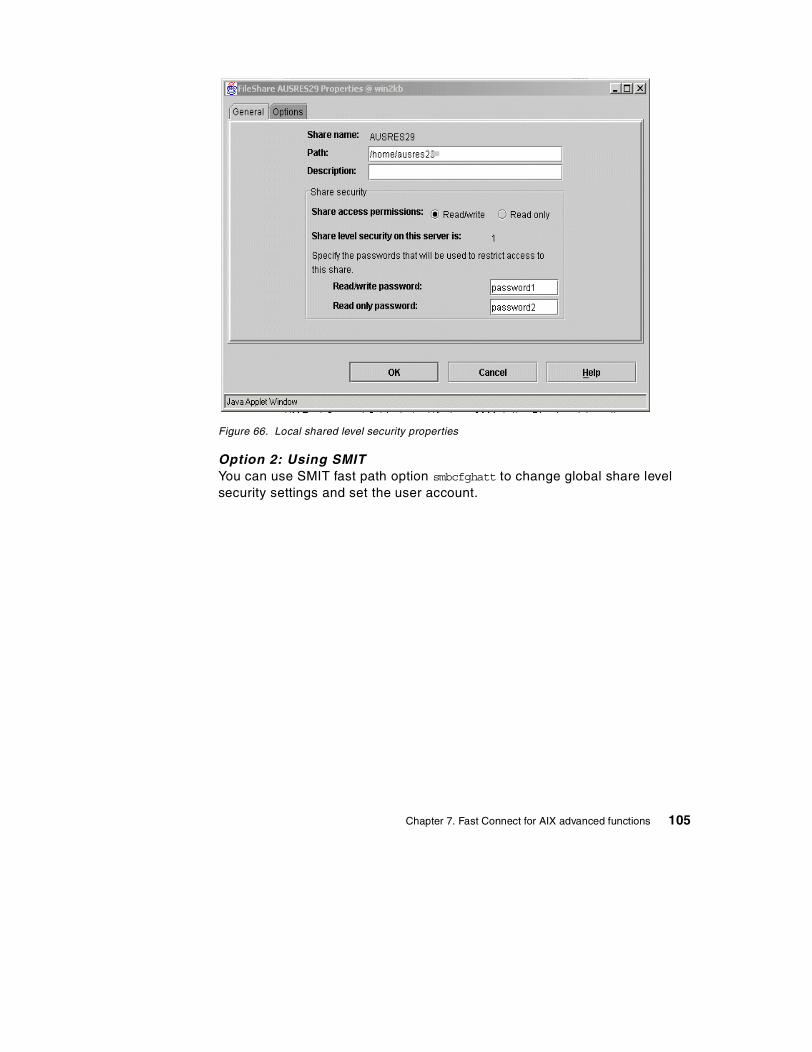
Figure 66. Local shared level security properties
Option 2: Using SMITYou can use SMIT fast path option smbcfghatt to change global share level security settings and set the user account.
Chapter 7. Fast Connect for AIX advanced functions 105

Restart Fast Connect for AIX after changes in global server properties. Then you can use SMIT fast path smbsrvfilchg option to make changes in the appropriate shared resources.
Attributes
Type or select values in entry fields.Press Enter AFTER making all desired changes.
[MORE...9] [Entry Fields] Use Encrypted Passwords [Negotiate Encryption] + Passthrough Authentication Server [] Backup Passthrough Authentication Server [] Allow DCE/DFS access [no] + Enable network logon server for client PCs [disabled] + Client startup script file name [startup.bat] Guest logon support [disabled] + Guest logon ID [guest] + Enable client user name mapping [yes] + Enable share level security [yes] + Share level security user login [guest] + Enable opportunistic locking [no] + Enable search caching [no] + Enable send file API support [no] +[BOTTOM]
F1=Help F2=Refresh F3=Cancel F4=ListF5=Reset F6=Command F7=Edit F8=ImageF9=Shell F10=Exit Enter=Do
Change File Systems (Shared Volumes)
Type or select values in entry fields.Press Enter AFTER making all desired changes.
[Entry Fields] Share (network) Name AUSRES29* Path [/home/ausres29] Description [] Access allowed Full + Enable opportunistic locking yes + Enable search caching no + Enable send file API support no + Status of share level security on this server: enabled Would you like to specify a Read/Write password yes + Would you like to specify a Read Only password yes +
F1=Help F2=Refresh F3=Cancel F4=ListF5=Reset F6=Command F7=Edit F8=ImageF9=Shell F10=Exit Enter=Do
106 Fast Connect for AIX Version 3.1 Guide
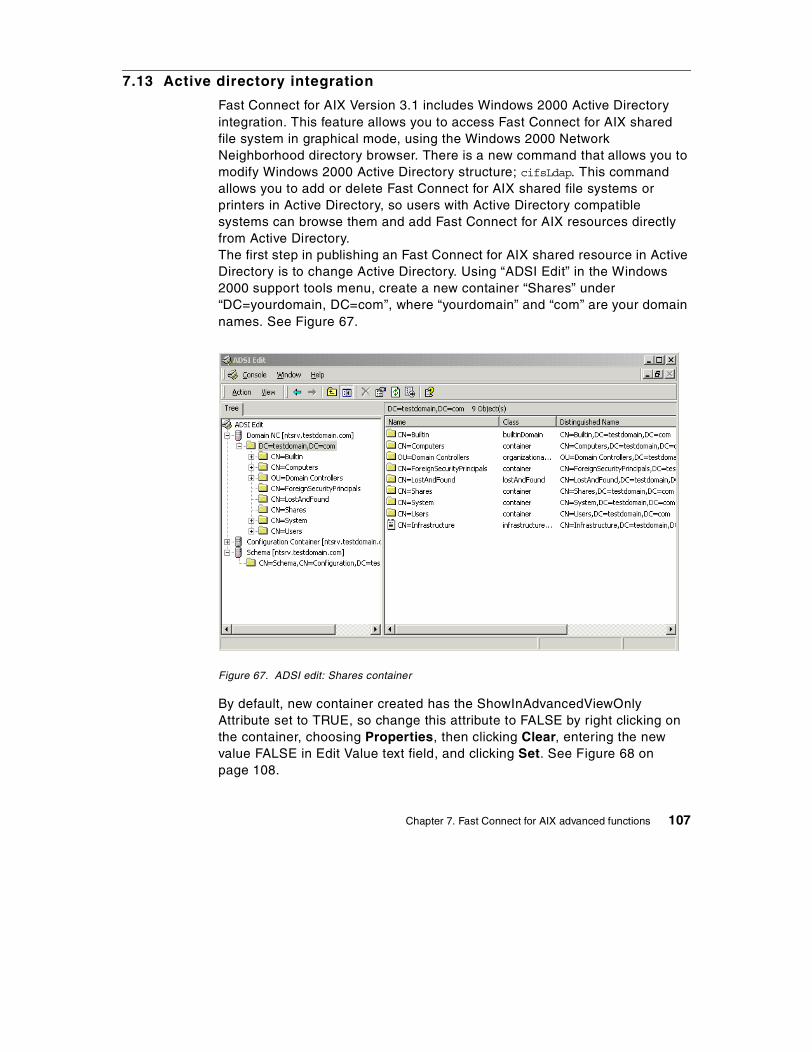
7.13 Active directory integration
Fast Connect for AIX Version 3.1 includes Windows 2000 Active Directory integration. This feature allows you to access Fast Connect for AIX shared file system in graphical mode, using the Windows 2000 Network Neighborhood directory browser. There is a new command that allows you to modify Windows 2000 Active Directory structure; cifsLdap. This command allows you to add or delete Fast Connect for AIX shared file systems or printers in Active Directory, so users with Active Directory compatible systems can browse them and add Fast Connect for AIX resources directly from Active Directory.The first step in publishing an Fast Connect for AIX shared resource in Active Directory is to change Active Directory. Using “ADSI Edit” in the Windows 2000 support tools menu, create a new container “Shares” under “DC=yourdomain, DC=com”, where “yourdomain” and “com” are your domain names. See Figure 67.
Figure 67. ADSI edit: Shares container
By default, new container created has the ShowInAdvancedViewOnly Attribute set to TRUE, so change this attribute to FALSE by right clicking on the container, choosing Properties, then clicking Clear, entering the new value FALSE in Edit Value text field, and clicking Set. See Figure 68 on page 108.
Chapter 7. Fast Connect for AIX advanced functions 107

Figure 68. ADSI edit: Shares properties
If this option is set to TRUE, nobody can see this share in the network environment. Next you can publish AIX shared folders to the Active Directory using the cifsLdap command. The command syntax is:
The easiest way to publish shares in Active Directory is to use the ldif file. You can create this file using vi editor. In this file, you can describe all shared folders and printers to add and you can prepare another file with shares to delete. This allows you use this file many times without typing long command parameters. The name of the ldif file can be specified after -f option in the cifsLdap command.
# cifsLdapAllow adding and deleting fast connect share objects in Active Directory. usage: [options] [-f file] where: options: -h host LDAP server host name -u dn bind dn/administrator dn -r treeDN removes all the fastconnect shares from treeDN -a treeDN add all the fastconnect shares to treeDN -f filename ldf format file where the ldap info is stored
108 Fast Connect for AIX Version 3.1 Guide

ExamplesBelow are several examples of ldif files:
Example 1) ldif file to add a shared volume:
Example 2) ldif file to delete a shared volume:
Example 3) ldif file to add a shared printer:
When you run the cifsLdap command for the first time, the following error message may appear:/tmp/entrymods: No such file or directory.Use a touch command and create this file:# touch /tmp/entrymods
Note
dn:cn=ausres29,CN=Shares,dc=testdomain,dc=comchangetype:addObjectClass:volumeuNCName:\\43P150Srv\ausres29
dn:cn=tmp,CN=Shares,dc=testdomain,dc=comchangetype:addObjectClass:volumeuNCName:\\43P150Srv\tmp
dn:cn=ausres29,CN=Shares,dc=testdomain,dc=comchangetype:delete
dn:cn=tmp,CN=Shares,dc=testdomain,dc=comchangetype:delete
dn:cn=printer1,cn=shares,dc=testdomain,dc=comchangetype:addObjectClass:printQueueserverName:-printerName:-shortServerName:-uNCName:\\43P150Srv\printer1versionNumber:1
Chapter 7. Fast Connect for AIX advanced functions 109

Example 4) ldif file to delete a shared printer:
Example 5) How to add Fast Connect for AIX shared volumes to Shares container in Active Directory:
Example 6) How to delete Fast Connect for AIX shared volumes from Shares container in Active Directory:
Example 7) How to add Fast Connect for AIX shared printer to Shared container in Active Directory:
dn:cn=printer1,cn=shares,dc=testdomain,dc=comchangetype:delete
# cifsLdap -h w2ksrv -u "cn=Administrator,cn=Users,dc=testdomain,dc=com" \-f ./share.addEnter bindDN password:adding new entry cn=ausres29,CN=Shares,dc=testdomain,dc=com
adding new entry cn=tmp,CN=Shares,dc=testdomain,dc=com
# cifsLdap -h w2ksrv -u "cn=Administrator,cn=Users,dc=testdomain,dc=com" \-f ./share.delEnter bindDN password:
deleting entry cn=tmp,CN=Shares,dc=testdomain,dc=comdelete complete
# cifsLdap -h w2ksrv -u "cn=Administrator,cn=Users,dc=testdomain,dc=com" \-f ./printer.addEnter bindDN password:adding new entry cn=printer1,cn=shares,dc=testdomain,dc=com
110 Fast Connect for AIX Version 3.1 Guide

Example 8) How to delete Fast Connect for AIX shared printer from Shared container in Active Directory:
To check changes in Active Directory, use the ldapsearch command:
Here is an example of how to use the ldapsearch command:
# cifsLdap -h w2ksrv -u "cn=Administrator,cn=Users,dc=testdomain,dc=com" \-f ./printer.delEnter bindDN password:deleting entry cn=printer1,cn=shares,dc=testdomain,dc=comdelete complete
# ldapsearchSends a search request to an LDAP server.usage: ldapsearch [-b basedn] [options] filter [attributes...]where: basedn: base dn for search (optional if LDAP_BASEDN set in environment) filter: LDAP search filter (RFC-1558 compliant) attributes: whitespace-separated list of attributes to retrieve (if no attribute list is specified, all are retrieved)options: -h host LDAP server host name -p port LDAP server port number -D dn bind dn -w password bind password -Z use a secure ldap connection (SSL) -K keyfile file to use for keys -P key_pw keyfile password -N key_name private key name to use in keyfile -m mechanism perform SASL bind with the given mechanism -b base_dn base dn for search; LDAP_BASEDN in environment is default -s scope search scope (base, one, or sub) -a deref how to dereference aliases (never, always, search, or find) -l time time limit (in seconds) for search -z size size limit (in entries) for search -f file perform sequence of searches using filters in 'file' -A retrieve attribute names only (no values) -R do not automatically chase referrals -M manage referral objects as normal entries -O maxhops maximum number of referrals to follow in a sequence -V version LDAP protocol version (2 or 3; default is 3) -C charset character set name to use, as registered with IANA -B do not suppress printing of non-ASCII values -L print entries in LDIF format (-B is implied) -F sep print 'sep' between attribute names and values -t write values to files in /tmp -n show what would be done but don't actually do it -e display LDAP library version information and quit -v run in verbose mode -d level set debug level to 'level' in LDAP library
Chapter 7. Fast Connect for AIX advanced functions 111

# ldapsearch -h w2ksrv -D “cn=Administrator,cn=users,dc=testdomain,dc=com” \-w password -b “cn=shares,dc=testdomain,dc=com” -s sub objectclass=*CN=printer1,CN=Shares,DC=testdomain,DC=comcn=printer1instanceType=4distinguishedName=CN=printer1,CN=Shares,DC=testdomain,DC=comobjectCategory=CN=Print-Queue,CN=Schema,CN=Configuration,DC=testdomain,DC=comobjectClass=topobjectClass=leafobjectClass=connectionPointobjectClass=printQueueobjectGUID=NOT ASCIIprinterName=-name=printer1serverName=-shortServerName=-uNCName=\\43P150Srv\printer1uSNChanged=2951uSNCreated=2951versionNumber=1whenChanged=20010521190524.0ZwhenCreated=20010521190524.0Z
CN=ausres29,CN=Shares,DC=testdomain,DC=comcn=ausres29instanceType=4distinguishedName=CN=ausres29,CN=Shares,DC=testdomain,DC=comobjectCategory=CN=Volume,CN=Schema,CN=Configuration,DC=testdomain,DC=comobjectClass=topobjectClass=leafobjectClass=connectionPointobjectClass=volumeobjectGUID=NOT ASCIIname=ausres29uNCName=\\43P150Srv\ausres29uSNChanged=2952uSNCreated=2952whenChanged=20010521191335.0ZwhenCreated=20010521191335.0Z
CN=tmp,CN=Shares,DC=testdomain,DC=comcn=tmpinstanceType=4distinguishedName=CN=tmp,CN=Shares,DC=testdomain,DC=comobjectCategory=CN=Volume,CN=Schema,CN=Configuration,DC=testdomain,DC=comobjectClass=topobjectClass=leafobjectClass=connectionPointobjectClass=volumeobjectGUID=NOT ASCIIname=tmpuNCName=\\43P150Srv\tmpuSNChanged=2953uSNCreated=2953whenChanged=20010521191335.0ZwhenCreated=20010521191335.0Z
112 Fast Connect for AIX Version 3.1 Guide
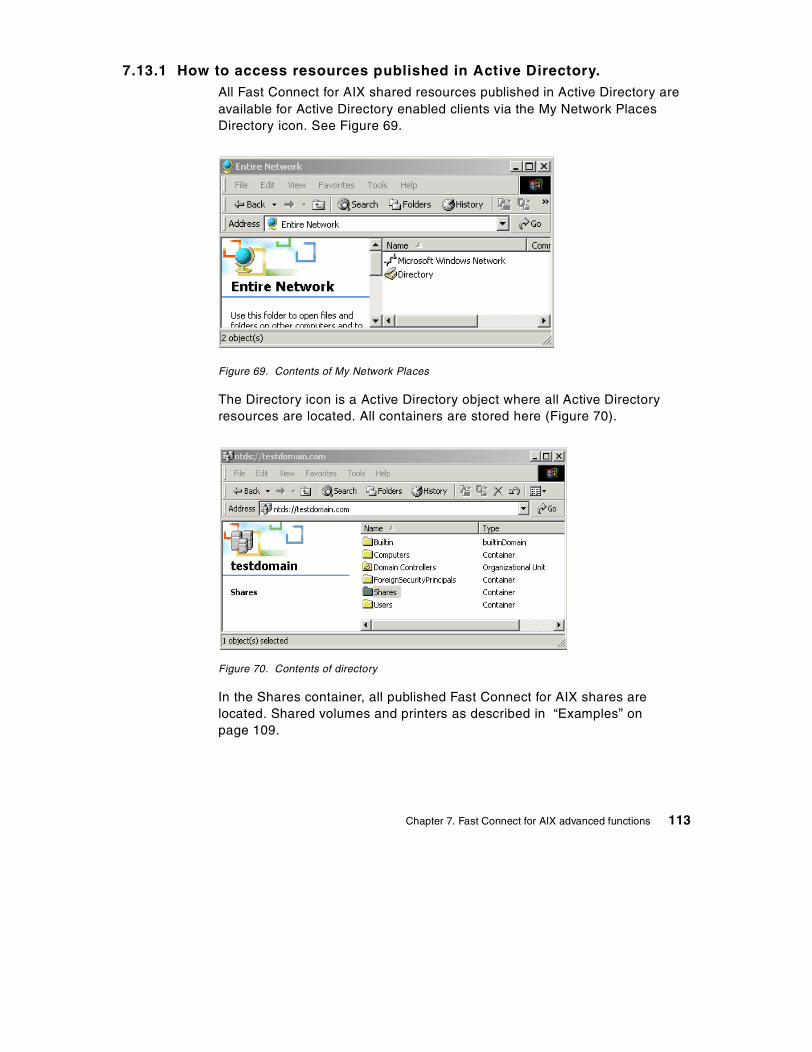
7.13.1 How to access resources published in Active Directory.All Fast Connect for AIX shared resources published in Active Directory are available for Active Directory enabled clients via the My Network Places Directory icon. See Figure 69.
Figure 69. Contents of My Network Places
The Directory icon is a Active Directory object where all Active Directory resources are located. All containers are stored here (Figure 70).
Figure 70. Contents of directory
In the Shares container, all published Fast Connect for AIX shares are located. Shared volumes and printers as described in “Examples” on page 109.
Chapter 7. Fast Connect for AIX advanced functions 113

Figure 71. Shared object in Active Directory
These resources can be mapped as network drivers or printers. See Figure 71.
7.14 Windows Terminal Server support
This is a new function in Fast Connect for AIX Version 3.1. This feature allows you access to Fast Connect for AIX resources by users from Microsoft Windows Terminal Server sessions. You can change in /etc/cifs/cifsConfig file option multiuserlogin = 1 and restart the Fast Connect for AIX server.
Note that if Network Logon support is enabled (networklogon = 1), Windows Terminal Server support does not work. These two options are mutually-exclusive. And if passthrough authentication is enabled, windows Terminal support does not work. These two options are also mutually-exclusive.
114 Fast Connect for AIX Version 3.1 Guide

Chapter 8. Authentications models
This chapter describes the authentication methods supported by an Fast Connect for AIX server to improve the management and security of the system. An Fast Connect for AIX server can use different methods to validate users and give them access to shared resources such as file directories and printers.
Fast Connect for AIX can handle both the DES encryption method used on AIX and the RSA MD4 encryption algorithm used on Windows systems. In this chapter, we will cover the different ways of configuring Fast Connect for AIX to use the various authentication methods supported (non-encryption, encryption, mixed, and passthrough).
8.1 Using Fast Connect for AIX server with non-encrypted passwords
When the Fast Connect for AIX sever is installed, the encrypted password option is disabled. The reason for this is to satisfy the configurations where it is necessary to maintain the compatibility. It is only necessary to keep a unique database for the users and passwords in AIX. The user database used by AIX is located in the /etc/passwd file, and the encrypted passwords database using the DES encryption method is located in the /etc/security/passwd file. With this configuration, the passwords are sent through the network as clear text, which is a security risk because any user monitoring the network could access the passwords.
The flow chart, shown in Figure 72 on page 116, illustrates the authentication process when the non-encryption option is disabled.
© Copyright IBM Corp. 2001 115

Figure 72. Authentication process using non-encrypted passwords
There are several ways to customize the server to use non-encrypted passwords.
Option 1: Using Web-based System Manager The following is the procedure to configure Fast Connect for AIX server to use non-encrypted passwords from Web-based System Manager.
1. Select the PC services icon. A list appears with the Fast Connect for AIX server and the shared resources. See Figure 73 on page 117.
Authentication process using non-encrypted passwords
Start
Client able to send a non encrypted password
Encryption matches /etc/security/passwd
?
Client requests access to the AIX Fast Connect server
Server requests a non encrypted password
Client sends a non encrypted password
Server apply the DES encryption method to the user password..
Fast Connect Grants accessClient request success.
End. Client access failed.
Yes
No
Client process Server process Security database
Yes
No
connectionfails
116 Fast Connect for AIX Version 3.1 Guide
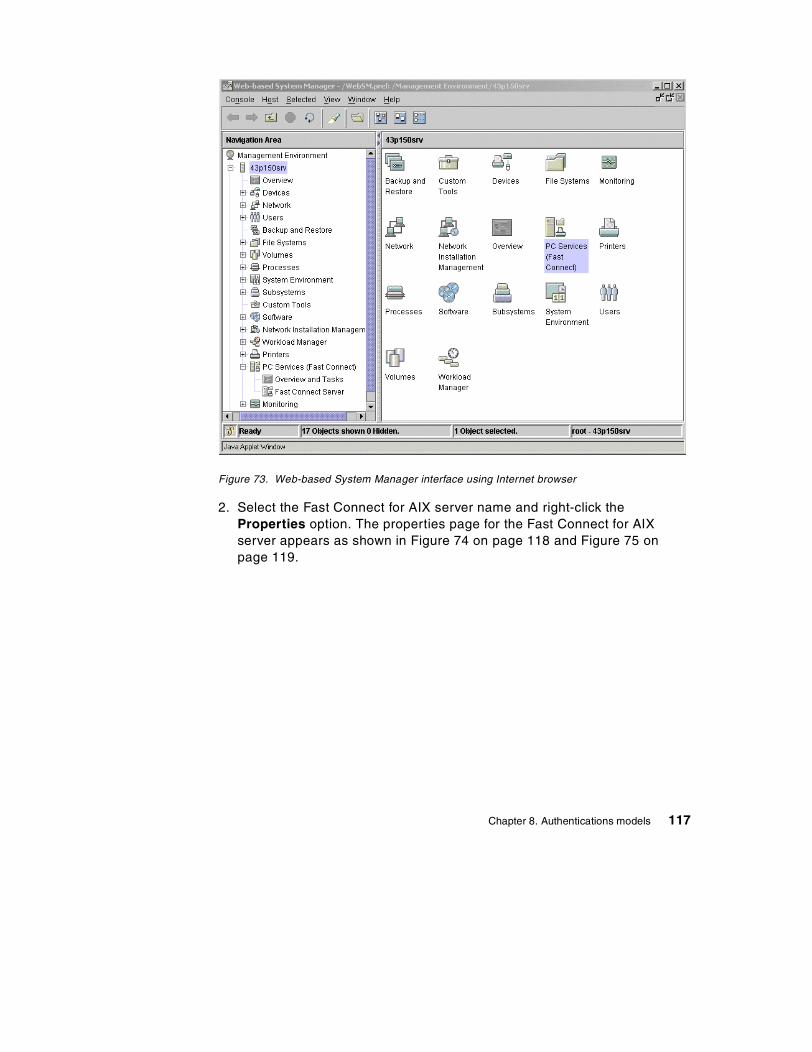
Figure 73. Web-based System Manager interface using Internet browser
2. Select the Fast Connect for AIX server name and right-click the Properties option. The properties page for the Fast Connect for AIX server appears as shown in Figure 74 on page 118 and Figure 75 on page 119.
Chapter 8. Authentications models 117

Figure 74. Fast Connect for AIX connect administration interface
3. Select the Network Access tab and uncheck the Use encrypted passwords option as shown in Figure 75 on page 119.
118 Fast Connect for AIX Version 3.1 Guide

Figure 75. Properties option: Non-encrypted passwords
4. Press OK.
5. Stop and restart Fast Connect for AIX services.
Option 2: Using SMIT Perform the following steps to configure Fast Connect for AIX to use the non-encrypted passwords option using SMIT.
Enter the following command at the system prompt to start SMIT with the fastpath option:
# smitty smbcfghatt
1. Set the Use Encrypted Passwords option to no, and press the Enter key.
Chapter 8. Authentications models 119
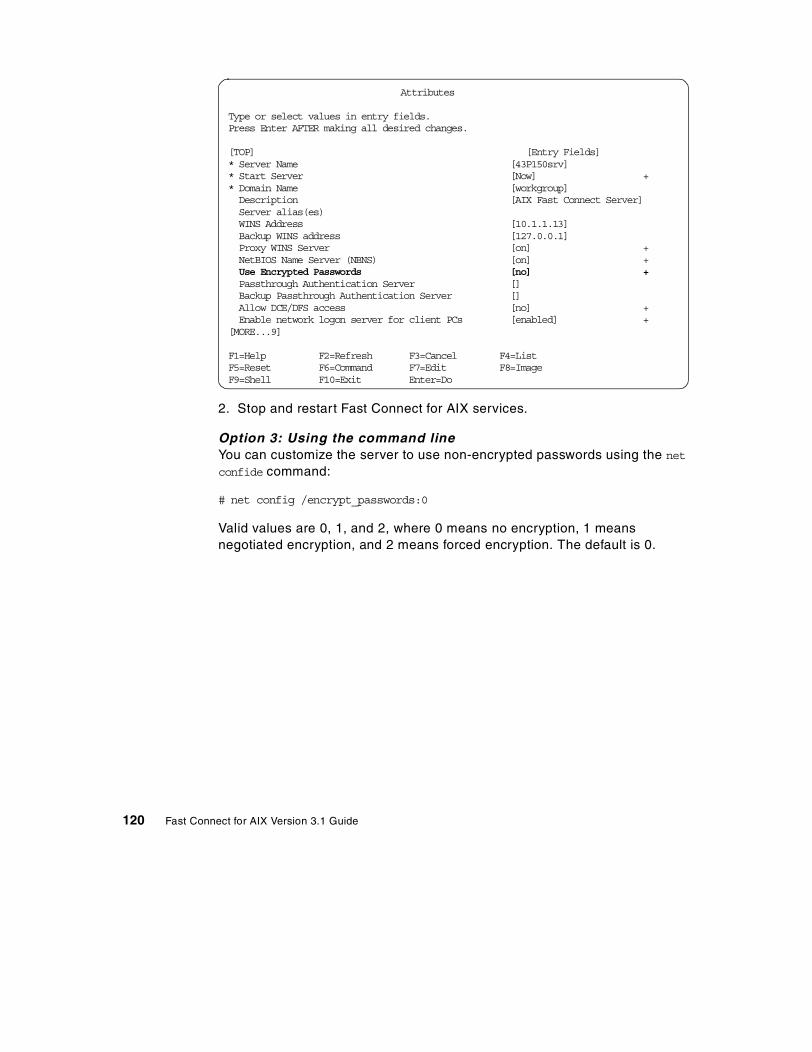
2. Stop and restart Fast Connect for AIX services.
Option 3: Using the command lineYou can customize the server to use non-encrypted passwords using the net confide command:
# net config /encrypt_passwords:0
Valid values are 0, 1, and 2, where 0 means no encryption, 1 means negotiated encryption, and 2 means forced encryption. The default is 0.
Attributes
Type or select values in entry fields.Press Enter AFTER making all desired changes.
[TOP] [Entry Fields]* Server Name [43P150srv]* Start Server [Now] +* Domain Name [workgroup] Description [AIX Fast Connect Server] Server alias(es) WINS Address [10.1.1.13] Backup WINS address [127.0.0.1] Proxy WINS Server [on] + NetBIOS Name Server (NBNS) [on] + Use Encrypted Passwords [no] + Passthrough Authentication Server [] Backup Passthrough Authentication Server [] Allow DCE/DFS access [no] + Enable network logon server for client PCs [enabled] +[MORE...9]
F1=Help F2=Refresh F3=Cancel F4=ListF5=Reset F6=Command F7=Edit F8=ImageF9=Shell F10=Exit Enter=Do
120 Fast Connect for AIX Version 3.1 Guide

8.1.1 Modifying the clients to send non-encrypted passwordsIn some cases, it is necessary to set up the clients to send encrypted or non-encrypted passwords. Table 5 describes the default configuration for common clients.
Table 5. Default encryption mechanisms for Windows operating systems
8.1.1.1 Windows 95The latest versions of Windows 95 only send encrypted passwords through the network. To check the version of your environment, look at the level of these two files:
• vredir.vxd Version 4.00.1114 or later
• vnetsup.vxd Version 4.00.1112 or later
These updates come in the vrdupd.exe file update, and can be obtained from the Microsoft Web site at the following URL:
http://download.microsoft.com/download/win95upg/vredir/1/W95/EN-US/vredrupd.exe
Operating system Can send non-encrypted passwords by default
Comments
Windows 95 with vredir.vxd earlier than 4.00.1114 and vnetsup.vxd earlier than 4.00.1112.
Yes Vrdupd.exe updated file is required and changes on the registry database to solve this security issue.
Windows 95 vredir.vxd version 4.00.1114 or later and vnetsup.vxd 4.00.1112 or later.
No Changes on the registry database are required.
Windows 98 No Changes on the registry database are required.
Windows NT 4.0 and SP < 3
Yes Service pack 3 or newer required to solve this security issue.
Windows NT 4 and SP ≥ 3
No Changes on the registry database are required
Windows 2000 No Changes on security police profile are required.
Chapter 8. Authentications models 121
You must also check whether the following registry entry exists, and whether the value of this entry is set to the correct value. Otherwise create the registry entry and restart the machine:
Registry key:HKEY_LOCAL_MACHINE\System\CurrentControlSet\Services\VxD\VNETSUPType registry entry: DwordRegistry entry: EnablePlainTextPassword = 1(1 = Send non encrypted passwords, 0 = Only send encrypted passwords)
8.1.1.2 Windows 98 and Windows 98 SEThe Windows 98 versions always have the default of sending encrypted passwords through the network. However, in some configurations, it might be necessary to set up the Windows 98 clients to send non-encrypted passwords. In the Windows 98 versions, it is necessary to modify the registry database on the same registry key and entry as Windows 95. The Windows 98 versions have two ways of performing this task:
• If you do not have the Windows 98 SE CDROM, it is necessary to check whether the following registry entry and the value exist, or else modify the registry entry and restart the machine:
Registry key: HKEY_LOCAL_MACHINE\System\CurrentControlSet\Services\VxD\VNETSUPType registry entry: DwordRegistry entry: EnablePlainTextPassword = 1
• If you have the Windows 98 SE CDROM, select the PTXT_ON.INF file from the \tools\mtsutil directory, right-click, select the install option to create the following registry entry, set it to 1, and restart the machine.
Registry key:HKEY_LOCAL_MACHINE\System\CurrentControlSet\Services\VxD\VNETSUPRegistry entry: EnablePlainTextPassword = 1
8.1.1.3 Windows NT 4.0 and Service Pack before V3In Windows NT 4.0 with Service Pack earlier than Version 3, it is not necessary to do anything because these versions use both methods (encrypted and non-encrypted) by default. This is a security risk and is fixed with service pack 3 or later.
8.1.1.4 Windows NT 4.0 and SP 3 or laterWindows NT 4.0 with service pack 3 or later only sends encrypted passwords by default, and so you must change the registry to allow Windows NT 4.0 clients to send non-encrypted passwords if the authentication with encrypted passwords fails. You will have to modify the registry as described in the following and restart the machine:
122 Fast Connect for AIX Version 3.1 Guide
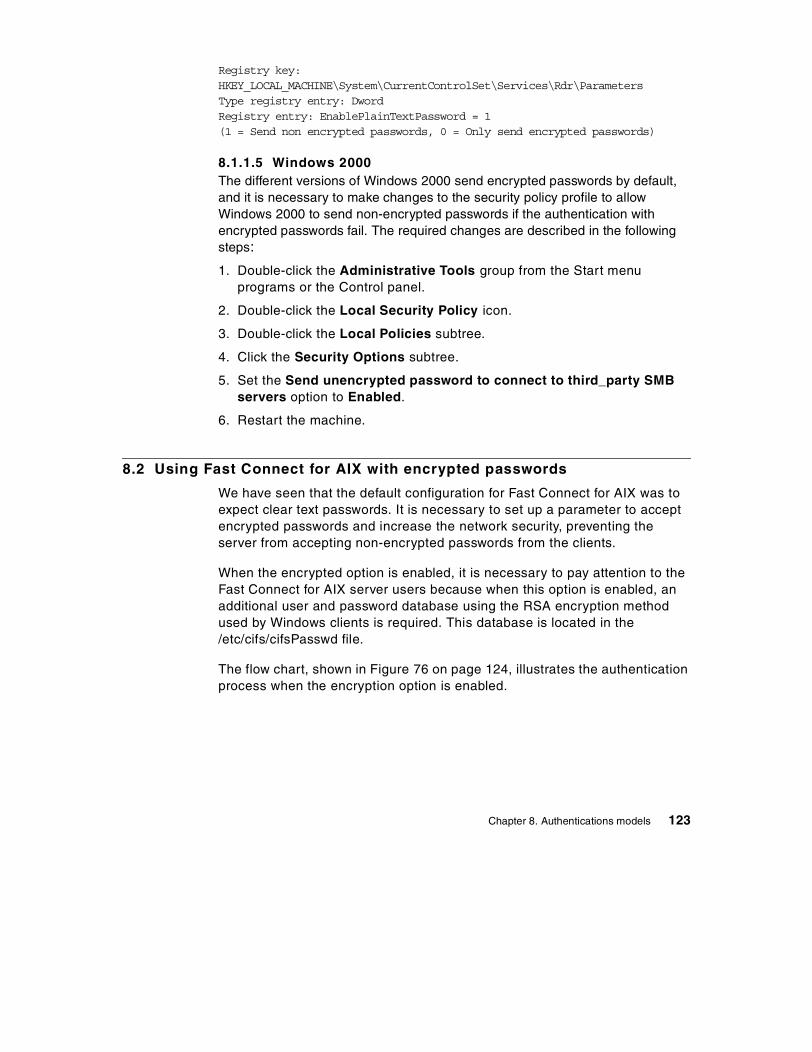
Registry key:HKEY_LOCAL_MACHINE\System\CurrentControlSet\Services\Rdr\ParametersType registry entry: DwordRegistry entry: EnablePlainTextPassword = 1 (1 = Send non encrypted passwords, 0 = Only send encrypted passwords)
8.1.1.5 Windows 2000The different versions of Windows 2000 send encrypted passwords by default, and it is necessary to make changes to the security policy profile to allow Windows 2000 to send non-encrypted passwords if the authentication with encrypted passwords fail. The required changes are described in the following steps:
1. Double-click the Administrative Tools group from the Start menu programs or the Control panel.
2. Double-click the Local Security Policy icon.
3. Double-click the Local Policies subtree.
4. Click the Security Options subtree.
5. Set the Send unencrypted password to connect to third_party SMB servers option to Enabled.
6. Restart the machine.
8.2 Using Fast Connect for AIX with encrypted passwords
We have seen that the default configuration for Fast Connect for AIX was to expect clear text passwords. It is necessary to set up a parameter to accept encrypted passwords and increase the network security, preventing the server from accepting non-encrypted passwords from the clients.
When the encrypted option is enabled, it is necessary to pay attention to the Fast Connect for AIX server users because when this option is enabled, an additional user and password database using the RSA encryption method used by Windows clients is required. This database is located in the /etc/cifs/cifsPasswd file.
The flow chart, shown in Figure 76 on page 124, illustrates the authentication process when the encryption option is enabled.
Chapter 8. Authentications models 123
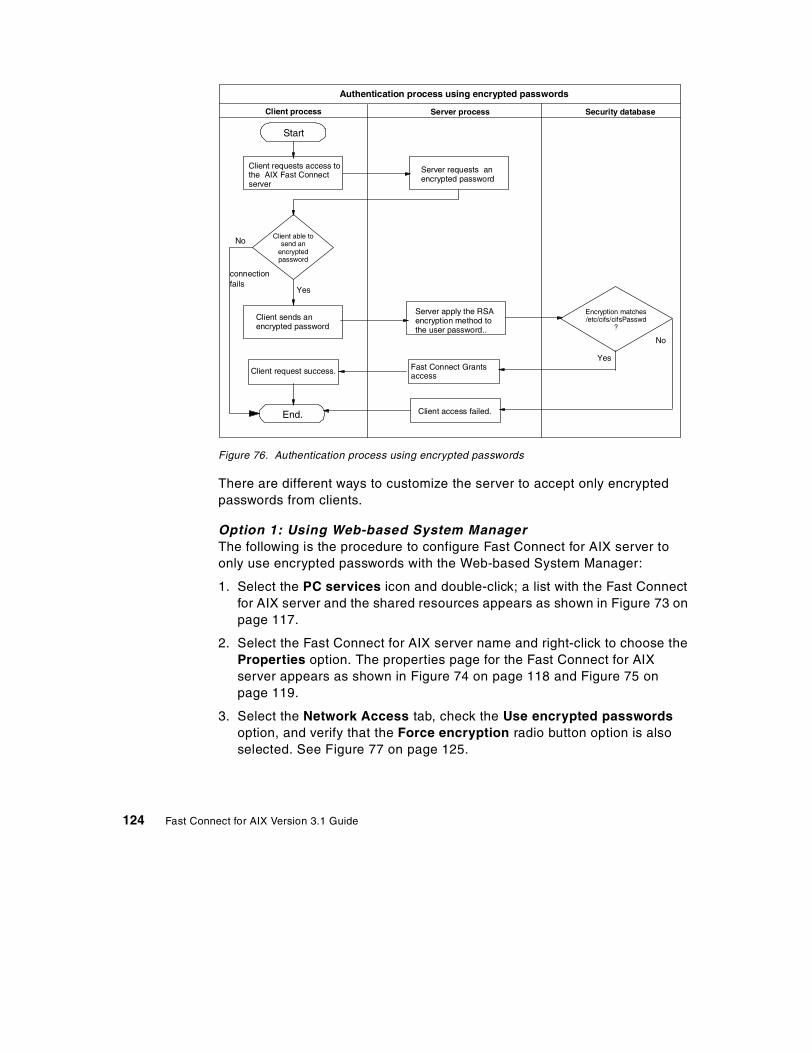
Figure 76. Authentication process using encrypted passwords
There are different ways to customize the server to accept only encrypted passwords from clients.
Option 1: Using Web-based System ManagerThe following is the procedure to configure Fast Connect for AIX server to only use encrypted passwords with the Web-based System Manager:
1. Select the PC services icon and double-click; a list with the Fast Connect for AIX server and the shared resources appears as shown in Figure 73 on page 117.
2. Select the Fast Connect for AIX server name and right-click to choose the Properties option. The properties page for the Fast Connect for AIX server appears as shown in Figure 74 on page 118 and Figure 75 on page 119.
3. Select the Network Access tab, check the Use encrypted passwords option, and verify that the Force encryption radio button option is also selected. See Figure 77 on page 125.
Authentication process using encrypted passwords
Start
Client able to send an
encrypted password
Encryption matches /etc/cifs/cifsPasswd
?
Client requests access to the AIX Fast Connect server
Server requests an encrypted password
Client sends an encrypted password
Server apply the RSA encryption method to the user password..
Fast Connect Grants access
Client request success.
End. Client access failed.
Yes
No
Client process Server process Security database
Yes
No
connectionfails
124 Fast Connect for AIX Version 3.1 Guide

Figure 77. Server properties option: Force encryption
4. Press the OK button.
5. Stop and restart Fast Connect for AIX services.
Option 2: Using SMITFollow the next steps to configure Fast Connect for AIX to use the encrypted passwords option using the SMIT administration tool:
1. Enter the following command at the system prompt to start SMIT with the fastpath option:
# smitty smbcfghatt
Chapter 8. Authentications models 125

2. Set the Use Encrypted Passwords option to Force Encryption, and press Enter.
3. Stop and restart Fast Connect for AIX services.
Option 3: Using the command lineYou can customize the server to use non-encrypted passwords using the net config command:
# net config /encrypt_passwords:2
Valid values are 0, 1, and 2, where 0 means no encryption, 1 means negotiated encryption, and 2 means forced encryption. The default is 0.
8.2.1 Creating Fast Connect for AIX usersAs mentioned previously, a second user database is needed to store the user names and passwords using the Windows-specific encryption method. You can use the Web-based System Manager interface, SMIT tool, or command line options to create Fast Connect for AIX users.
Option 1: Using Web-based System ManagerTo create Fast Connect for AIX users using the Web-based System Manager interface, perform the following steps:
Attributes
Type or select values in entry fields.Press Enter AFTER making all desired changes.
[TOP] [Entry Fields]* Server Name [43P150srv]* Start Server [Now] +* Domain Name [workgroup] Description [AIX Fast Connect Server] Server alias(es) WINS Address [10.1.1.13] Backup WINS address [127.0.0.1] Proxy WINS Server [on] + NetBIOS Name Server (NBNS) [on] + Use Encrypted Passwords [Force Encryption] + Passthrough Authentication Server [] Backup Passthrough Authentication Server [] Allow DCE/DFS access [no] + Enable network logon server for client PCs [enabled] +[MORE...9]
F1=Help F2=Refresh F3=Cancel F4=ListF5=Reset F6=Command F7=Edit F8=ImageF9=Shell F10=Exit Enter=Do
126 Fast Connect for AIX Version 3.1 Guide

1. Start the PC services icon located on the main window of the Web-based System Manager administration tool.
2. Select the AIX Fast Connect server.
3. Select the User Administration option located in the Services submenu, and the AIX Fast Connect User Administration window appears as shown in Figure 74 on page 118.
4. Click the Create User button, and fill the information required to create the user. See Figure 78.
Figure 78. User administration: Create user
5. Input the following fields to create an Fast Connect for AIX user. See Figure 79 on page 128.
• User Name: Specify an existing AIX user name. This user name will be created in the Fast Connect for AIX users database.
• Password: Specify the password for this user, which will be encrypted using the Windows method and stored in the /etc/cifs/cifsPasswd file.
• Confirm password: Specify the password again, this time for confirmation.
Chapter 8. Authentications models 127
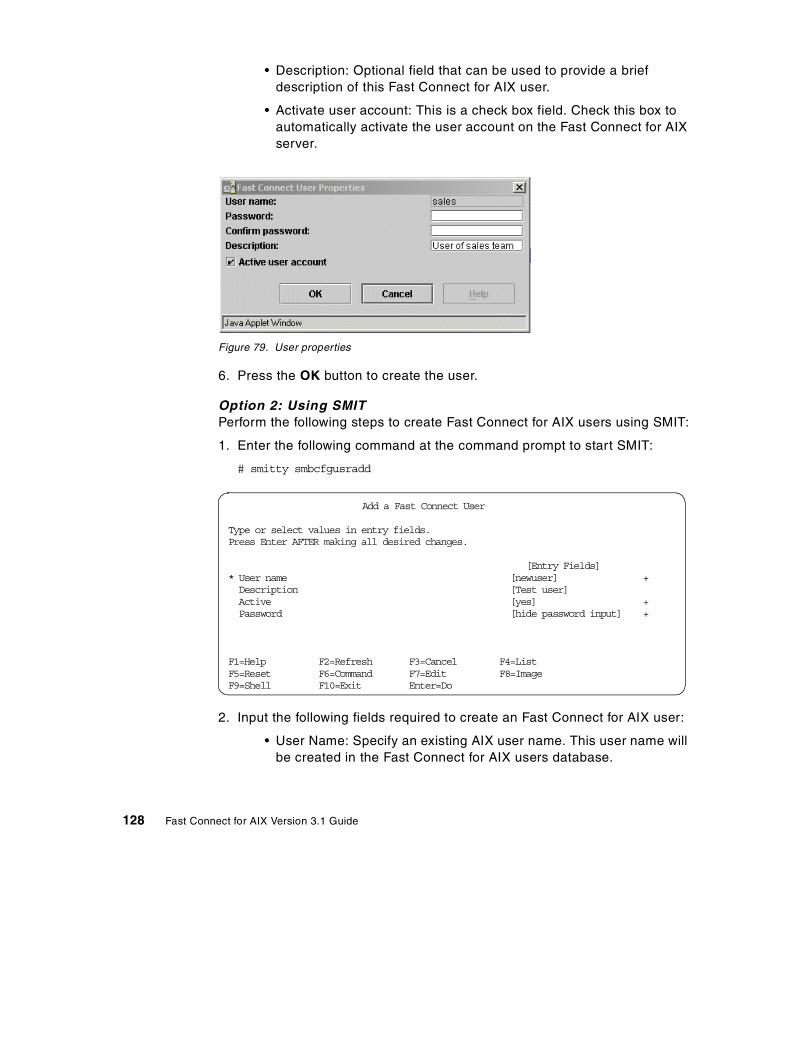
• Description: Optional field that can be used to provide a brief description of this Fast Connect for AIX user.
• Activate user account: This is a check box field. Check this box to automatically activate the user account on the Fast Connect for AIX server.
Figure 79. User properties
6. Press the OK button to create the user.
Option 2: Using SMITPerform the following steps to create Fast Connect for AIX users using SMIT:
1. Enter the following command at the command prompt to start SMIT:
# smitty smbcfgusradd
2. Input the following fields required to create an Fast Connect for AIX user:
• User Name: Specify an existing AIX user name. This user name will be created in the Fast Connect for AIX users database.
Add a Fast Connect User
Type or select values in entry fields.Press Enter AFTER making all desired changes.
[Entry Fields]* User name [newuser] + Description [Test user] Active [yes] + Password [hide password input] +
F1=Help F2=Refresh F3=Cancel F4=ListF5=Reset F6=Command F7=Edit F8=ImageF9=Shell F10=Exit Enter=Do
128 Fast Connect for AIX Version 3.1 Guide
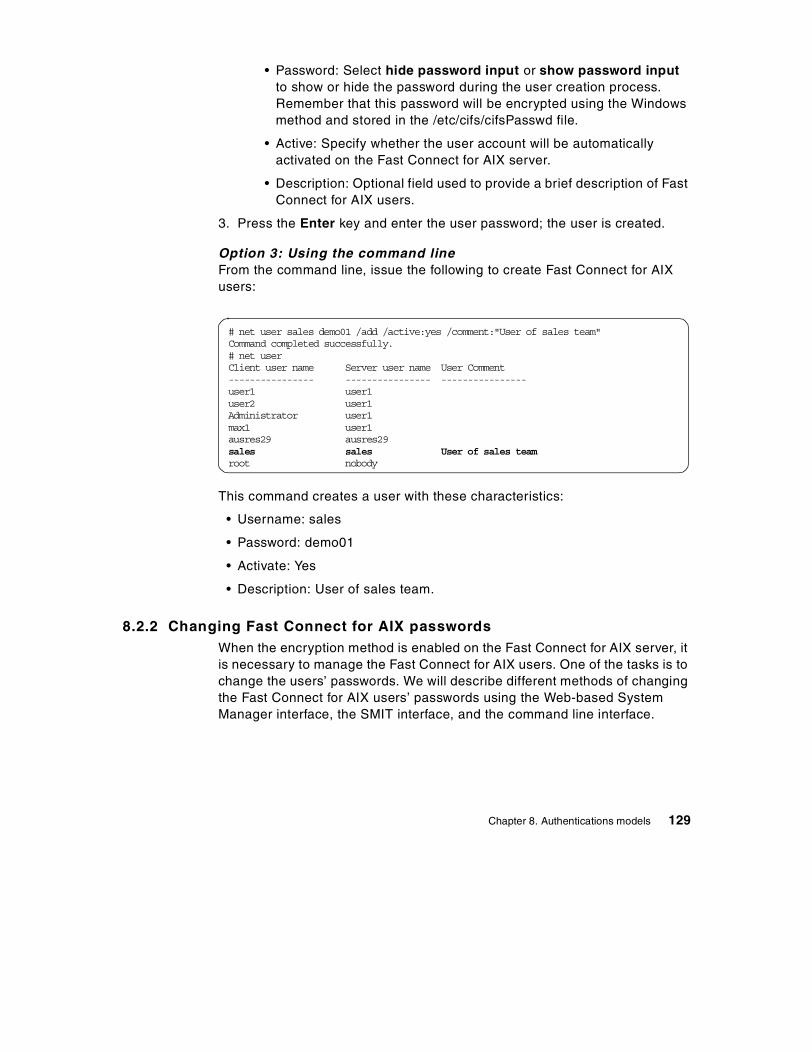
• Password: Select hide password input or show password input to show or hide the password during the user creation process. Remember that this password will be encrypted using the Windows method and stored in the /etc/cifs/cifsPasswd file.
• Active: Specify whether the user account will be automatically activated on the Fast Connect for AIX server.
• Description: Optional field used to provide a brief description of Fast Connect for AIX users.
3. Press the Enter key and enter the user password; the user is created.
Option 3: Using the command lineFrom the command line, issue the following to create Fast Connect for AIX users:
This command creates a user with these characteristics:
• Username: sales
• Password: demo01
• Activate: Yes
• Description: User of sales team.
8.2.2 Changing Fast Connect for AIX passwordsWhen the encryption method is enabled on the Fast Connect for AIX server, it is necessary to manage the Fast Connect for AIX users. One of the tasks is to change the users’ passwords. We will describe different methods of changing the Fast Connect for AIX users’ passwords using the Web-based System Manager interface, the SMIT interface, and the command line interface.
# net user sales demo01 /add /active:yes /comment:"User of sales team"Command completed successfully.# net userClient user name Server user name User Comment---------------- ---------------- ----------------user1 user1user2 user1Administrator user1max1 user1ausres29 ausres29sales sales User of sales teamroot nobody
Chapter 8. Authentications models 129

Option 1: Using Web-based System ManagerTo change the Fast Connect for AIX user password using the Web-based System Manager interface, perform the following steps:
1. Double-click the PC services icon located on the main window of the Web-based System Manager.
2. Double-click Fast Connect Server.
3. Select the User Administration option located in the Services submenu. The AIX Fast Connect User Administration window, shown in Figure 80, will appear.
Figure 80. User administration: Change user
4. Select the user and the Change User button. The Fast Connect for AIX user properties windows appears as shown in Figure 79 on page 128.
5. Enter the new password and confirm the password.
6. Press OK to change the password.
Option 2: Using SMITPerform the following steps to change Fast Connect for AIX user passwords using SMIT:
1. Enter the following command at the system prompt to start SMIT, and select the Change a User’s Password option:
130 Fast Connect for AIX Version 3.1 Guide

# smitty smbcfgusr
2. Select the user who needs a password change.
3. Enter new user’s password, then press Enter. The user’s password will be changed
Option 3: Using the command lineYou can also use the command line to change Fast Connect for AIX user passwords.
The following examples show the command to change the user password:
• Username: sales
• New password: demo
Fast Connect Users
Move cursor to desired item and press Enter.
List All Users Add a User Map a User Change a User +--------------------------------------------------------------------------+ | User Name | | | | Move cursor to desired item and press Enter. | | | | user1 | | user2 | | Administrator | | max1 | | ausres29 | | sales | | root | | | | F1=Help F2=Refresh F3=Cancel | | F8=Image F10=Exit Enter=Do | | /=Find n=Find Next | +--------------------------------------------------------------------------+
COMMAND STATUS
Command: running stdout: no stderr: no
Before command completion, additional instructions may appear below.
Enter sales's password:
Chapter 8. Authentications models 131
Or enter the user’s password directly in the command line:
8.2.3 Synchronizing Fast Connect for AIX and AIX passwordsWhen the encrypted password option is enabled, it is necessary to manage two user password databases. The AIX database is located in the /etc/security/passwd file. The second one is located in the /etc/cifs/cifsPasswd file; this one is used by the Fast Connect for AIX server on the authentication process when the encryption option is enabled.
Option 1: Using Web-based System ManagerTo synchronize the Fast Connect for AIX and AIX user passwords using the Web-based System Manager interface, perform the following steps:
1. Double-click PC services icon located on the main window of the Web-based System Manager administration tool.
2. Double-click the Fast Connect Server icon.
3. Select the Change User Password option located in the Services submenu shown in Figure 74 on page 118.
4. In the Change user password window, enter the new password and confirm the password. For both databases to be synchronized, the Change AIX password to match the one entered above option must be checked as shown in Figure 81 on page 133.
# net user sales -pEnter sales's password:Command completed successfully.
# net user sales demoCommand completed successfully.
132 Fast Connect for AIX Version 3.1 Guide

Figure 81. Change user password
5. Press the OK button to change and synchronize the passwords.
Option 2: Using the command lineTo synchronize passwords from the command line, you have to add the /changeaixpwd:yes option to the usual command for changing the Fast Connect for AIX passwords explained in “Option 3: Using the command line” on page 131.
You can also enter the user password directly in the command line:
8.3 Using Fast Connect for AIX in a mixed environment
In some cases, it is necessary to enable this option to accept some clients that only support non-encrypted passwords and other clients with encrypted passwords. There are several ways to configure the Fast Connect for AIX server to accept both encrypted and non-encrypted passwords.
Option 1: Using Web-based System Manager To configure Fast Connect for AIX server to accept encrypted and non-encrypted passwords using the Web-based System Manager, perform the following steps:
# net user sales -p /changeaixpwd:yessales's New password:Enter the new password again:Command completed successfully.
# net user sales demo01user /changeaixpwd:yesCommand completed successfully.
Chapter 8. Authentications models 133
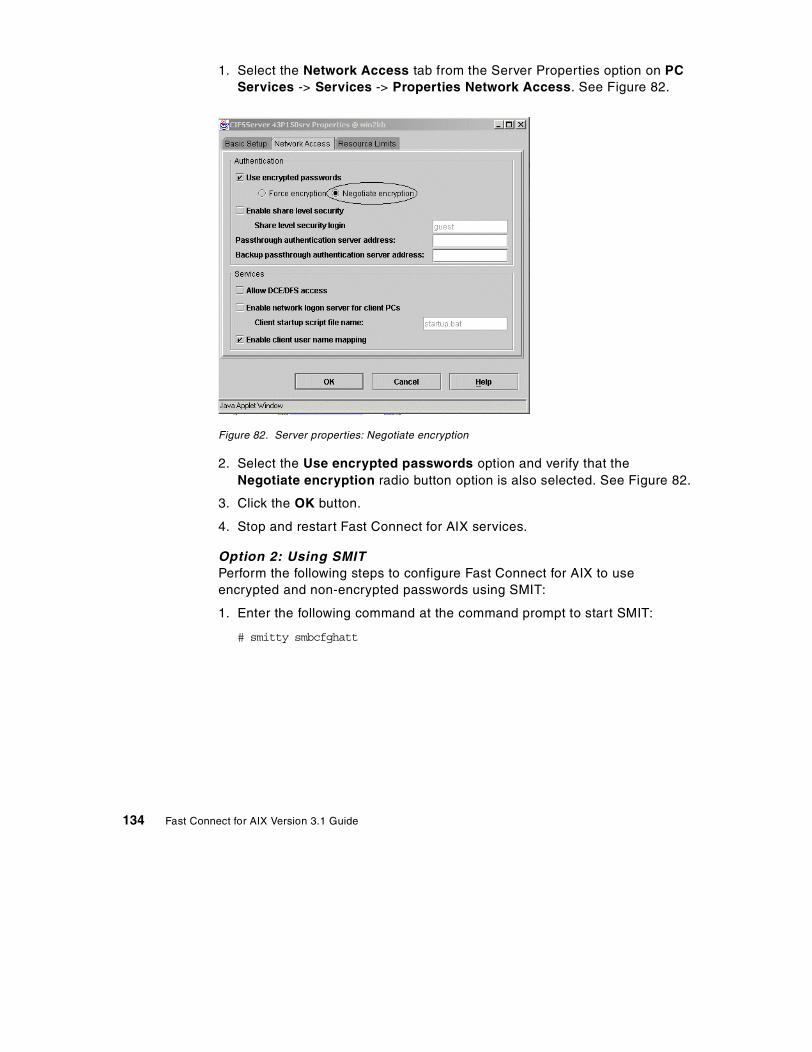
1. Select the Network Access tab from the Server Properties option on PC Services -> Services -> Properties Network Access. See Figure 82.
Figure 82. Server properties: Negotiate encryption
2. Select the Use encrypted passwords option and verify that the Negotiate encryption radio button option is also selected. See Figure 82.
3. Click the OK button.
4. Stop and restart Fast Connect for AIX services.
Option 2: Using SMITPerform the following steps to configure Fast Connect for AIX to use encrypted and non-encrypted passwords using SMIT:
1. Enter the following command at the command prompt to start SMIT:
# smitty smbcfghatt
134 Fast Connect for AIX Version 3.1 Guide

2. Set the Use Encrypted Passwords option to Negotiate Encryption, and press the Enter key.
3. Stop and restart Fast Connect for AIX services.
Option 3: Using command lineYou can customize the server to use non-encrypted passwords using the net config command:
# net config /encrypt_passwords:1
Valid values are 0, 1, and 2, where 0 means no encryption, 1 means negotiated encryption, and 2 means forced encryption. The default is 0.
8.4 Fast Connect for AIX server with passthrough authentication
The passthrough authentication option enables the Fast Connect for AIX server to accept clients that have been validated by a Primary Domain Controller or Backup Domain Controller server on the network. This is an administrative advantage because it is not necessary to manage two databases of users on AIX, and you do not need to manage the Fast Connect for AIX server users anymore. However, it requires you to have a corresponding AIX user (only passwords do not need be managed) for every user validated from the PDC or BDC server.
Attributes
Type or select values in entry fields.Press Enter AFTER making all desired changes.
[TOP] [Entry Fields]* Server Name [F50SRV]* Start Server [Now] +* Domain Name [WORKGROUP] Description [AIX Fast Connect Server] Server alias(es) WINS Address [10.1.1.13] Backup WINS address [127.0.0.1] Proxy WINS Server [off] + NetBIOS Name Server (NBNS) [off] + Use Encrypted Passwords [Negotiate Encryption] + Passthrough Authentication Server [] Backup Passthrough Authentication Server [] Allow DCE/DFS access [no] + Enable network logon server for client PCs [enabled] +[MORE...9]
F1=Help F2=Refresh F3=Cancel F4=ListF5=Reset F6=Command F7=Edit F8=ImageF9=Shell F10=Exit Enter=Do
Chapter 8. Authentications models 135
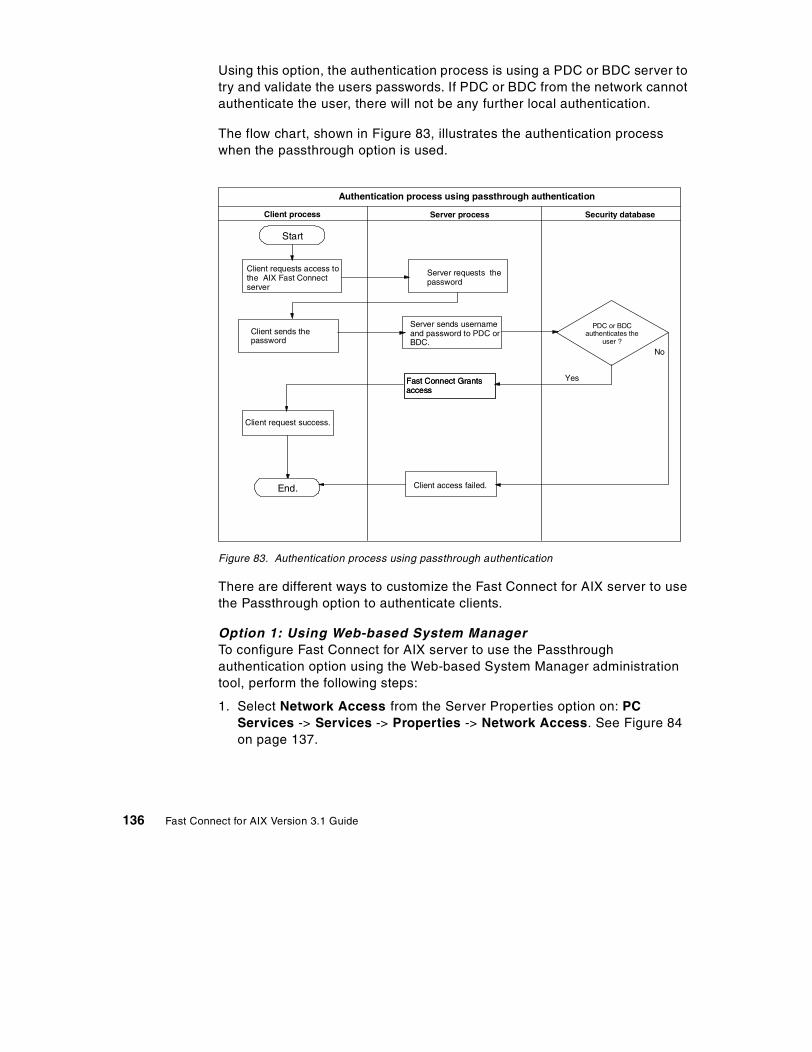
Using this option, the authentication process is using a PDC or BDC server to try and validate the users passwords. If PDC or BDC from the network cannot authenticate the user, there will not be any further local authentication.
The flow chart, shown in Figure 83, illustrates the authentication process when the passthrough option is used.
Figure 83. Authentication process using passthrough authentication
There are different ways to customize the Fast Connect for AIX server to use the Passthrough option to authenticate clients.
Option 1: Using Web-based System ManagerTo configure Fast Connect for AIX server to use the Passthrough authentication option using the Web-based System Manager administration tool, perform the following steps:
1. Select Network Access from the Server Properties option on: PC Services -> Services -> Properties -> Network Access. See Figure 84 on page 137.
Authentication process using passthrough authentication
Start
Client requests access to the AIX Fast Connect server
Server requests the password
Client process Server process Security database
PDC or BDC authenticates the
user ?Client sends the password
Server sends username and password to PDC or BDC.
Fast Connect Grants access
Client request success.
No
End. Client access failed.
YesFast Connect Grants access
136 Fast Connect for AIX Version 3.1 Guide

Figure 84. Server properties: Passthrough authentication
2. Enter the IP address of the PDC server in the Passthrough authentication server address field, and enter the IP address of the BDC server in the Backup passthrough authentication server address field. Note the NETBIOS name does not work for these fields.
3. Click OK.
4. Stop and restart Fast Connect for AIX services.
Option 2: Using SMITPerform the following steps to configure Fast Connect for AIX to use the Passthrough authentication option using SMIT:
1. Enter the following command:
# smitty smbcfghatt
2. Enter the NetBIOS name or IP address of the PDC server on the Passthrough authentication server address field and the NetBIOS name or IP address of the BDC server on the Backup passthrough authentication server address field.
Chapter 8. Authentications models 137

3. Stop and restart Fast Connect for AIX services.
Option 3: Using the command lineYou can use the net config command to add passthrough Authentication Server and Backup Passthrough Authentication Server. The command syntax is as follows:
# net config /passthrough_authentication_server:<psname>
psname -> The name of the passthrough authentication server.
# net config /backup_passthrough_authentication_server:<psname> psname -> The name of the backup passthrough authentication server.
8.5 Remote password changing
Remote password changing is a new feature in Fast Connect for AIX Version 3.1. This option allows you change your Fast Connect for AIX password from a Windows 95/98 workstation. You can do this in two ways:
Attributes
Type or select values in entry fields.Press Enter AFTER making all desired changes.
[TOP] [Entry Fields]* Server Name [F50SRV]* Start Server [Now] +* Domain Name [WORKGROUP] Description [AIX Fast Connect Server] Server alias(es) WINS Address [10.1.1.13] Backup WINS address [127.0.0.1] Proxy WINS Server [off] + NetBIOS Name Server (NBNS) [off] + Use Encrypted Passwords [Negotiate Encryption] + Passthrough Authentication Server [10.1.1.100] Backup Passthrough Authentication Server [10.1.1.200] Allow DCE/DFS access [no] + Enable network logon server for client PCs [enabled] +[MORE...9]
F1=Help F2=Refresh F3=Cancel F4=ListF5=Reset F6=Command F7=Edit F8=ImageF9=Shell F10=Exit Enter=Do
# net config /passthrough_authentication_server:10.1.1.10Command completed successfully.# net config /backup_passthrough_authentication_server:10.1.1.20Command completed successfully.
138 Fast Connect for AIX Version 3.1 Guide
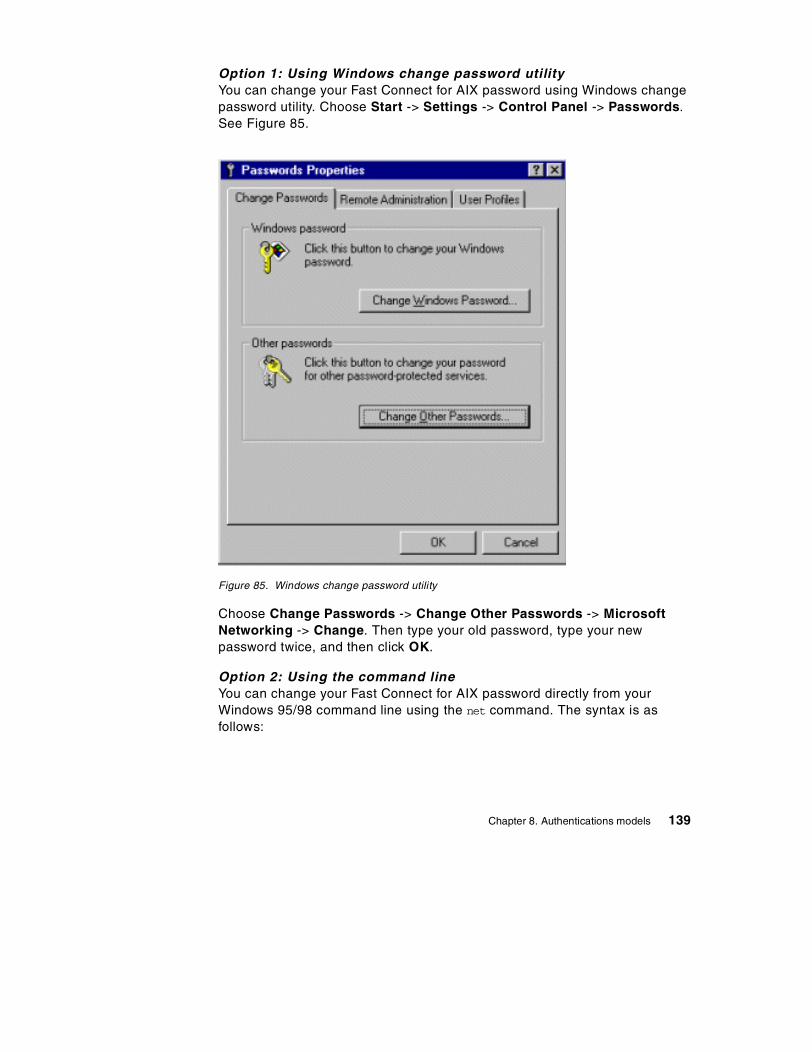
Option 1: Using Windows change password utilityYou can change your Fast Connect for AIX password using Windows change password utility. Choose Start -> Settings -> Control Panel -> Passwords. See Figure 85.
Figure 85. Windows change password utility
Choose Change Passwords -> Change Other Passwords -> Microsoft Networking -> Change. Then type your old password, type your new password twice, and then click OK.
Option 2: Using the command lineYou can change your Fast Connect for AIX password directly from your Windows 95/98 command line using the net command. The syntax is as follows:
Chapter 8. Authentications models 139

Here is an example of how to use net command to change your Fast Connect for AIX password:
c:\>net password /domain:testdomain ausres29 password1 password2
This command changes the password for user ausres29 in the domain named testdomain.
NET PASSWORD [oldpassword [newpassword]]NET PASSWORD \\computer | /DOMAIN:name [user [oldpassword [newpassword]]]
oldpassword Specifies your current password.newpassword Specifies your new password. It can have as many as 14 characters.computer Specifies the Windows NT or LAN Manager server on which you want to
change your password./DOMAIN Specifies that you want to change your password on a Windows NT
or LAN Manager domain.name Specifies the Windows NT or LAN Manager domain on which
you want to change your password.user Specifies your Windows NT or LAN Manager user name
140 Fast Connect for AIX Version 3.1 Guide

Chapter 9. Using Netlogon
The Netlogon feature was integrated with the Fast Connect for AIX product starting with Version 2.1.1. This allows centralized management of the user profiles and system policies. The Fast Connect for AIX product does not support other Domain Controller functions.
Netlogon support in the Fast Connect for AIX server is composed of two features; user profiles and system policy. A user profile is a configuration for a specific user, which covers the user’s environment and preference settings, such as desktop icons, color options, and installed applications. System policy defines the computer resources that can be enabled/disabled by a system administrator. System policy can be assigned to users or groups of users.
9.1 Configuration of the Fast Connect for AIX server
You can define four options with which to modify the location of the Netlogon files on the Fast Connect for AIX server:
• networklogon - Enables or disables netlogon support.
• startup_script - Specifies a startup script to use during the logon. The default value is startup.bat. You can use two meta tags to specify computer name (%U) or user name (%N).
• profiles_path - Specifies a path to the PROFILES share. The default value is /home. Profile data is stored in this directory (in the user’s home directory).
• netlogon_path - Specifies a path to the NETLOGON share. The default value is /var/cifs/netlogon. Startup scripts and policy files are stored in this directory.
To start Netlogon support, you have three options. You can start the Netlogon support from the Web-based System Manager, SMIT, or with the net command. The first two can be used only if you just want to enable/disable netlogon support or set the startup script name. The last one (the net
Network Logon support does not work if Windows Terminal Server support is enabled. See Section 7.14, “Windows Terminal Server support” on page 114.
Note
© Copyright IBM Corp. 2001 141

command) is used to set all four parameters. You must restart the Fast Connect for AIX server after these changes.
Option 1: Using Web-based System ManagerIf you are using Web-based System Manager, open the System Properties window from the main Fast Connect for AIX window. You can do this by selecting the Fast Connect for AIX server line, then clicking Selected -> Properties as shown in Figure 86.
Figure 86. Fast Connect for AIX properties selection in Web-based System Manager
After that you will see the window shown in Figure 87 on page 143, where you can enable/disable netlogon support.
142 Fast Connect for AIX Version 3.1 Guide
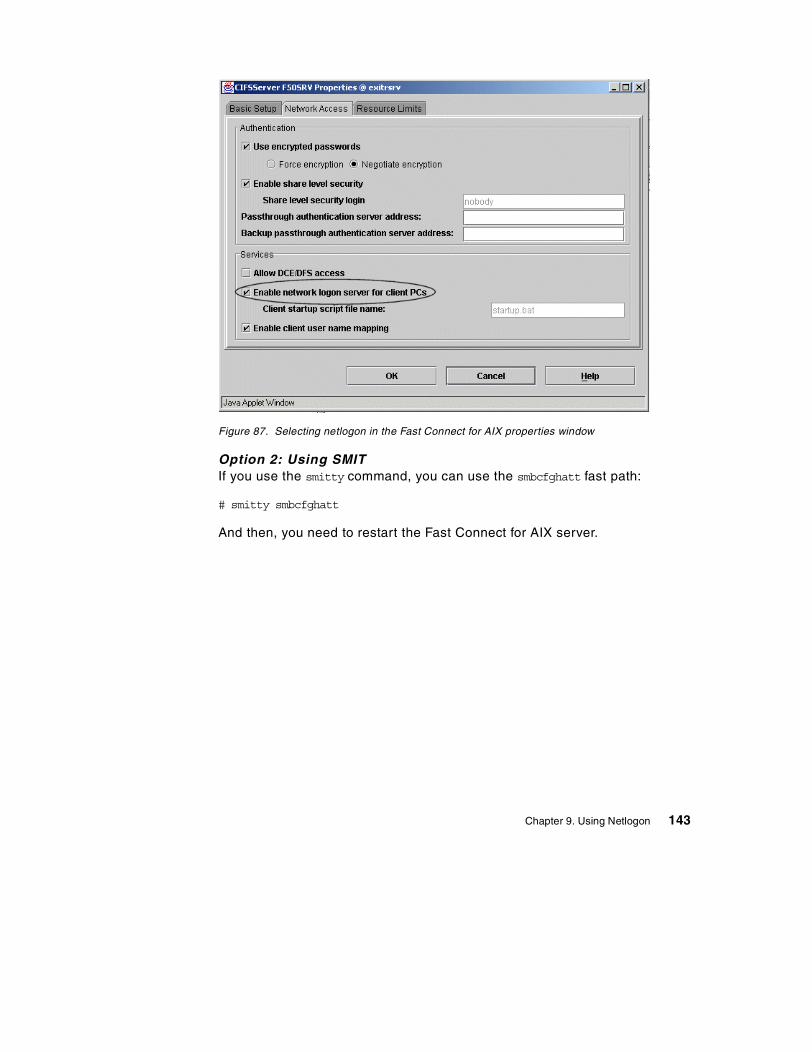
Figure 87. Selecting netlogon in the Fast Connect for AIX properties window
Option 2: Using SMITIf you use the smitty command, you can use the smbcfghatt fast path:
# smitty smbcfghatt
And then, you need to restart the Fast Connect for AIX server.
Chapter 9. Using Netlogon 143

Option 3: Using the command lineYou can set all four parameters for the netlogon support with the net command with the following syntax:
net config [ options ]
You can use the following options:
• /networklogon:0|1 - Disables/enables netlogon support
• /startup_script:script - Specifies a startup script name.
• /profiles_path:path - Specifies a path to the PROFILE share.
• /netlogon_path:path - Specifies a path to the NETLOGON share.
The following is a example of a simple start of the netlogon support from the command line:
Attributes
Type or select values in entry fields.Press Enter AFTER making all desired changes.
[MORE...9] [Entry Fields] Use Encrypted Passwords [no] + Passthrough Authentication Server [] Backup Passthrough Authentication Server [] Allow DCE/DFS access [no] + Enable network logon server for client PCs [enabled] + Client startup script file name [startup.bat] Guest logon support [disabled] + Guest logon ID [nobody] + Enable client user name mapping [yes] + Enable share level security [yes] + Share level security user login [nobody] + Enable opportunistic locking [yes] + Enable search caching [no] + Enable send file API support [no] +[BOTTOM]
F1=Help F2=Refresh F3=Cancel F4=ListF5=Reset F6=Command F7=Edit F8=ImageF9=Shell F10=Exit Enter=Do
# net config /netlogon:1Command completed successfully.
144 Fast Connect for AIX Version 3.1 Guide
9.1.1 Preparing the profile scriptsThe profile scripts are DOS batch files that are executed on the client computer automatically at the logon of the client. The location and the name of these scripts depend on the client type and the logon method used. They must be valid DOS files, so you must add an ‘^M’ character (carriage return) at the end of the line if you are editing them from the AIX. Here is one example of such a script that performs mapping of a computer share:
You can use the pause command in the profile script if you want to stop the execution of the script at any point.
9.1.2 Configuring the system policyWhen you are creating the system policy for a mixed environment with Windows NT/2000 and Windows 95/98 clients, you must create two different configurations; one for each client type.
System policy is located in a NETLOGON share. You must use a System Policy Editor to change the policy settings. Settings must be saved in a NETLOGON share. The file name for the Windows NT system policy is NTconfig.pol, and, for the Windows 95/98 system policy, config.pol. The owner of the system policy file on the Fast Connect for AIX server should be a non-root user.
9.1.2.1 Configuration from the Windows NT clientYou can run the Policy Editor with Start -> Programs -> Administrative Tools (Common) -> System Policy Editor. System policy must be saved on the Fast Connect for AIX machine under the name NTconfig.pol.
9.1.2.2 Configuration from the Windows 95/98 clientBy default, Windows 95 does not have the system policy editor installed. You must install it from the Upgrade or Retail CD, or you can install it from the Windows NT Server v4.0.
Installation from the Windows 95 CD:1. Open the Control Panel and select Add/Remove Programs.
@echo off Mnet use h: \\43p150Srv\home Mecho "H: is now mapped to \\43p150Srv\home M~~~"startup.bat" 3 lines, 95 characters
Chapter 9. Using Netlogon 145
2. Click on the Windows Setup tab and select Have Disk.
3. Select the \Admin\Apptools\Poledit\ directory on the CD.
4. Install Group Policies and System Policy Editor.
5. Now, you can run the Policy Editor with Start -> Run -> poledit.
Installation from the Windows NT v4.0 server:1. Copy Poledit.exe from the base Windows directory on the Windows NT
server (\winnt) to the base Windows directory on the Windows 95 client (\windows)
2. Copy Common.adm and Windows.adm from the subdirectory of the base Windows directory on the Windows NT server (\winnt\inf) to the equivalent directory on the Windows 95 client (\windows\inf).
3. Now, you can run the Policy Editor with Start -> Programs -> Accessories -> System Tools -> System Policy Editor.
The system policy file for Windows 95/98 clients must be saved on the Fast Connect for AIX server in the NETLOGON share with the name config.pol. When you create a new policy file, save it on the local computer and transfer it manually to the Fast Connect for AIX server. Then, you can change the ownership of the file to the responsible (not necessarily root) user.
You can open/change/save an existing config.pol file directly from the System Policy editor.
9.1.3 Configuring NT clients from a different subnetworkYou can configure the Windows NT clients from a different subnetwork to use the netlogon function of the Fast Connect for AIX server. You must use encrypted passwords between these clients and the server. The Fast Connect for AIX server must use a different domain name than the domain controller used by these clients.
If the client is not on the same subnetwork as the logon server, you will need to make some modifications to the name resolution in LmHOSTS file or on the NetBIOS Name Server. You must add an entry that will map domain name with the subcodes, <00> and <1C>, to the Fast Connect for AIX server. Here
Make sure that you have only one Fast Connect for AIX server and no domain controllers with the netlogon support enabled on the subnetwork.
Note
146 Fast Connect for AIX Version 3.1 Guide
is an example of an LMHOST file entry for the Fast Connect for AIX server at the IP address 10.1.1.13:
#PRE indicates that the entry must be preloaded and #DOM maps the server to the specified domain name.
You will also need at least one master browser with the same workgroup name as the Fast Connect for AIX server.
9.2 Configuring the IBM Network Client
Before using the Netlogon, users on the clients must also be configured. Windows NT/2000 can work with the Fast Connect for AIX server using Netlogon if they have installed IBM Network Client. Therefore, if you have Windows NT/2000 and Windows 95/98 in the network, you should probably use the IBM Network Client for all the clients
9.2.1 Configuring IBM Network Client on Windows 2000 ProfessionalYou can download the IBM Network client from the following Web site (but you need a user ID and password to download):
http://techsupport.services.ibm.com/asd-bin/doc/en_us/winntcl2/f-feat.htm
After you extract the directory, run the setup.exe program.The setup program will automatically install IBM Network Client on your computer.
After the installation process is completed, you have to reboot your workstation.
To customize IBM Network Client settings, right-click on the My Network Places icon and select the Properties menu, then right-click on the Local Area Connection icon and select the Properties menu. The Local Area Connection Properties window appears (see Figure 88 on page 148).
10.1.1.13 43p150Srv #PRE #DOM:testdomain10.1.1.13 “43p150Srv \0x00” #PRE10.1.1.13 “43p150Srv \0x1C” #PRE
The netlogon support on Windows NT/2000 requires encrypted passwords.
Note
Chapter 9. Using Netlogon 147
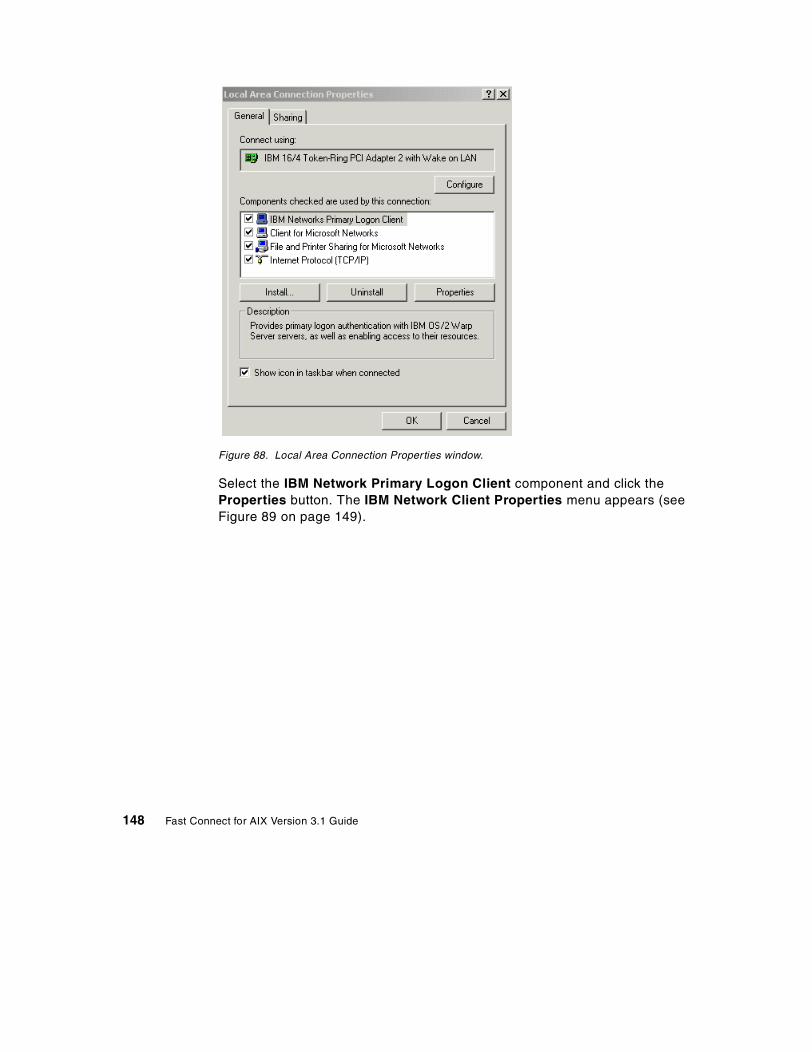
Figure 88. Local Area Connection Properties window.
Select the IBM Network Primary Logon Client component and click the Properties button. The IBM Network Client Properties menu appears (see Figure 89 on page 149).
148 Fast Connect for AIX Version 3.1 Guide

Figure 89. IBM Network Client Properties menu
In the Domain/Cell name field, you can select or type your default domain or workgroup name, which is different than AIX Fast Connect workgroup name.
When the IBM Network Primary Logon Client is installed, you can see the changed logon screen. There is an additional Discover button (see Figure 92 on page 152).
The startup scripts are executed on the client computer automatically at logon time. For more information about startup scripts see Section 9.1.1, “Preparing the profile scripts” on page 145.
If you double-click on the My Network Places icon and then on the Entire Network icon, you can see the IBM Networks Primary Logon Client icon (see Figure 90 on page 150) and the resources from AIX Fast Connect.
Chapter 9. Using Netlogon 149

Figure 90. Entire network window
9.2.2 Configuring IBM Network Client on the Windows NT clientYou can download the IBM Network client from the following Web site (but you need a user ID and password to download):
http://techsupport.services.ibm.com/asd-bin/doc/en_us/winntcl2/f-feat.htm
After you extract the directory, run the setup.exe program. The setup program will automatically install IBM Network Client on your computer. After the installation process is completed, you have to reboot your workstation.
To customize the IBM Network Client settings, right-click on the Network Neighborhood icon and select the Properties menu. Click on the Services tab, select the IBM Network Primary Logon Client, and click the Properties menu. The Local Area Connection Properties window appears (see Figure 91 on page 151).
Select the Identification tab and set the workgroup (not the domain) name to be different from the Fast Connect for AIX server workgroup name, when both client and server are in the same network.
150 Fast Connect for AIX Version 3.1 Guide
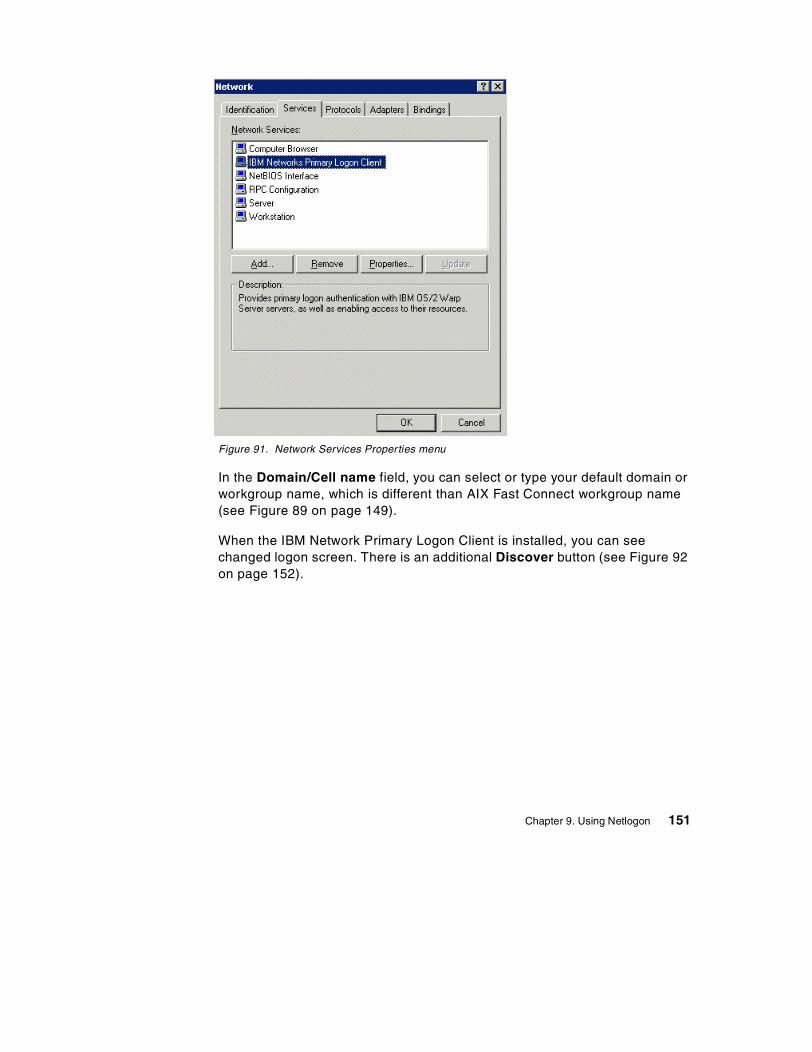
Figure 91. Network Services Properties menu
In the Domain/Cell name field, you can select or type your default domain or workgroup name, which is different than AIX Fast Connect workgroup name (see Figure 89 on page 149).
When the IBM Network Primary Logon Client is installed, you can see changed logon screen. There is an additional Discover button (see Figure 92 on page 152).
Chapter 9. Using Netlogon 151

Figure 92. Changed logon screen.
If you double-click on the Network Neighborhood icon and then the Entire Network icon, you can see the IBM Networks Primary Logon Client icon (see Figure 90 on page 150) and the resources from AIX Fast Connect.
The startup scripts are executed on the client computer automatically at logon time. For more information about startup scripts, see Section 9.1.1, “Preparing the profile scripts” on page 145
9.2.3 Using the IBM Network ClientAfter installation and configuration of the IBM Network Client, you should configure the profile scripts to meet your requirements. They can be executed from two different sources:
• The profile.bat script in the HOME share.
• The startup script, located in the NETLOGON share. Its name is defined in the Fast Connect for AIX server. It can be a global, per-user, or per-computer startup script (see the startup_script parameter in Section 9.1, “Configuration of the Fast Connect for AIX server” on page 141).
You can specify both scripts, and they will both be executed at user logon. The user profile is saved on the Fast Connect for AIX server in the HOME share. Windows 95/98 saves it in the root directory, and Windows NT/2000 saves it in the Profiles subdirectory.
152 Fast Connect for AIX Version 3.1 Guide

9.3 Configuring the Microsoft Network Client
You can use the Fast Connect for AIX netlogon support on Windows 95/98 client without any additional configuration. Microsoft Network Client offers less functionality than the IBM Network Client and does not allow connection of the Windows NT/2000 clients to the Fast Connect for AIX server. If you only have Windows 95/98 on the network and do not require any of the special features provided by IBM Network Client, you can use Microsoft Network Client.
You can enable Microsoft Network Client support with Start -> Settings -> Control Panel -> Network (see Figure 93).
Figure 93. Network configuration window in Windows 95
If you do not see the Client for Microsoft Networks component in the list, you must install it. Press the Add button. Select the Client entry in the list and press the Add button. Select the Microsoft entry from the list of manufacturers and select Client for Microsoft Network from the list of network clients. Press the OK button to install the client.
Chapter 9. Using Netlogon 153

Double-click on the Client for Microsoft Networks to change its properties. The screen shown in Figure 94 appears.
Figure 94. Client for Microsoft networks properties
Check the Log on Windows NT/2000 domain checkbox and enter the name of the domain as defined in the Fast Connect for AIX server. Then, press the OK button to confirm the change.
After the configuration of the Microsoft Network Client, you should configure the profile script to meet your requirements. The startup script is located in the NETLOGON share. Its name is defined in the Fast Connect for AIX server. It can be a global, per-user, or per-computer startup script (see the startup_script parameter in Section 9.1, “Configuration of the Fast Connect for AIX server” on page 141).
You can specify both scripts, and they will both be executed at user logon. The user profile is saved on the Fast Connect for AIX server in the HOME share.
If you want to use the System Policy with Microsoft Network Client and the Fast Connect for AIX server, you must make some modifications to the registry on the Windows 95/98 client machine. Locate the following entry:
\HKEY_LOCAL_MACHINE\System\Current Control Set\Control
154 Fast Connect for AIX Version 3.1 Guide
You must correct two values in this location:
• Update - Change the value to 2. This value defines that the System Policy must be loaded from the NetworkPath location.
• NetworkPath - Enter the network path of the System Policy file on the Fast Connect for AIX server (for example \\43p150Srv\netlogon\config.pol).
Then, select Start -> Settings -> Control Panel -> Passwords and then select User Profiles tab. Check the User can customize box. Changes will be effective after the restart of the client.
Chapter 9. Using Netlogon 155

156 Fast Connect for AIX Version 3.1 Guide
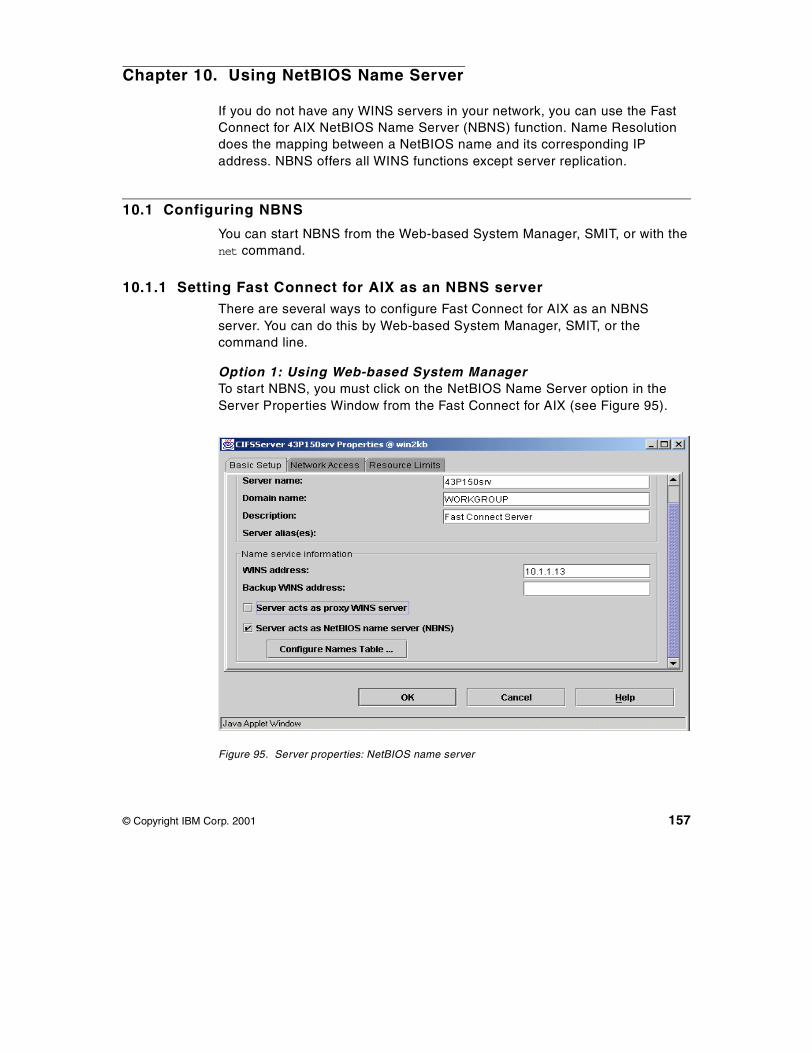
Chapter 10. Using NetBIOS Name Server
If you do not have any WINS servers in your network, you can use the Fast Connect for AIX NetBIOS Name Server (NBNS) function. Name Resolution does the mapping between a NetBIOS name and its corresponding IP address. NBNS offers all WINS functions except server replication.
10.1 Configuring NBNS
You can start NBNS from the Web-based System Manager, SMIT, or with the net command.
10.1.1 Setting Fast Connect for AIX as an NBNS serverThere are several ways to configure Fast Connect for AIX as an NBNS server. You can do this by Web-based System Manager, SMIT, or the command line.
Option 1: Using Web-based System ManagerTo start NBNS, you must click on the NetBIOS Name Server option in the Server Properties Window from the Fast Connect for AIX (see Figure 95).
Figure 95. Server properties: NetBIOS name server
© Copyright IBM Corp. 2001 157

Option 2: Using SMITUse the SMIT fast path # smitty smbcfghatt. You need to enter Server Name, Start Server, and Domain Name fields for your Fast Connect for AIX server.
Set the NetBIOS Name Server (NBNS) option to on. Then stop and restart Fast Connect for AIX server.
Option 3: Using the command lineAt the command line, type the following command and restart Fast Connect for AIX server:
# net config /nbns:1
You can check the NBNS status from the command line by entering the # net nbstatus command.
Attributes
Type or select values in entry fields.Press Enter AFTER making all desired changes.
[TOP] [Entry Fields]* Server Name [43P150srv]* Start Server [Now] +* Domain Name [testdomain] Description [Fast Connect Server] Server alias(es) WINS Address [] Backup WINS address [] Proxy WINS Server [off] + NetBIOS Name Server (NBNS) [on] + Use Encrypted Passwords [Negotiate Encryption] + Passthrough Authentication Server [] Backup Passthrough Authentication Server [] Allow DCE/DFS access [no] + Enable network logon server for client PCs [disabled] +[MORE...9]
F1=Help F2=Refresh F3=Cancel F4=ListF5=Reset F6=Command F7=Edit F8=ImageF9=Shell F10=Exit Enter=Do
# net config /nbns:1Command completed successfully.# net stopServer 43P150srv has stopped successfully on 43p150srv# net start /loadServer 43P150srv has started successfully on 43p150srv
158 Fast Connect for AIX Version 3.1 Guide
You can stop NBNS from Web-based System Manager, SMIT, or at the command line by entering # net config /nbns:0 command.
10.1.2 Setting Fast Connect for AIX as a WINS clientWhen you have one or more Windows NT servers acting as a WINS server, you should avoid using the Fast Connect for AIX NBNS server (the replication to other WINS servers is not supported). You must disable NBNS and set the remote WINS server address to the IP address of Windows NT WINS server.
You should set the IP address of your primary (and secondary) WINS server on the network. Fast Connect for AIX server uses this address to register its NetBIOS server name and resources with the WINS server at server startup. There are several options to set WINS Addresses. You can do this by Web-based System Manager, SMIT, or command line. Remember to restart the Fast Connect for AIX server after making the changes.
Option 1: Using Web-based System ManagerYou can set the WINS Address and Backup WINS Address from the Server Properties window (see Figure 95 on page 157).
Option 2: Using SMITUse the SMIT fast path: # smitty smbcfghatt. You can set the WINS Address and Backup WINS Address from the Attributes menu.
Option 3: Using the command lineYou can enter the following commands in any order:
• # net config /primary_wins_ipaddr:<ipaddr>
• # net config /secondary_wins_ipaddr:<ipaddr>
10.2 NBNS table properties
The NetBIOS names are dynamically loaded in the NBNS table with the following attributes:
• Name type
- unique: This name type is used to identify a particular host. Only one instance of a unique name can exist on any connected network.
# net nbstatusNetBIOS Name Server is running.
Chapter 10. Using NetBIOS Name Server 159
- group: This name type is referred to as a normal group in which addresses of individual members are not stored.
- internet_group: This name type is a user-defined special group that stores up to 25 addresses of group members. The subcode for this type must be set to 0x1c.
- Multihomed: This name type is used by hosts that have more than one interface (IP address). This name is unique to a particular host. A multihomed host can have up to 25 interfaces.
• Name - NetBIOS machine names can be up to 16 characters long. The first 15 characters of a NetBIOS name can be specified by the user or administrator, but the 16th character is reserved (00-FF hex) to specify a resource type. The following are examples of some codes that are used:
- 00: Workstation service (computer) name.
- 1B: Domain master browser name.
- 1C: Domain group name.
- 1D: Master browser name.
- 1E: Normal group name, it is used by the browsers to elect a Master Browser.
- 20: This is the server service name used to provide share point for file or print sharing.
• Node - There are four NetBIOS over TCP/IP name resolution methods; b-node, p-node, m-node, and h-node. For the description of each type of node, see Section 1.2, “Types of nodes” on page 3.
• IP address - This is the IP address of the machine name.
10.2.1 Listing the NetBIOS Name Server (NBNS) tableThe NetBIOS names are registered dynamically to the NBNS table.You can list the NetBIOS names using Web-based System Manager, SMIT, or command line.
Option 1: Using Web-based System ManagerClick on the Configure Names Table button from Server Properties (see Figure 95 on page 157). The window shown in Figure 96 will appear.
160 Fast Connect for AIX Version 3.1 Guide
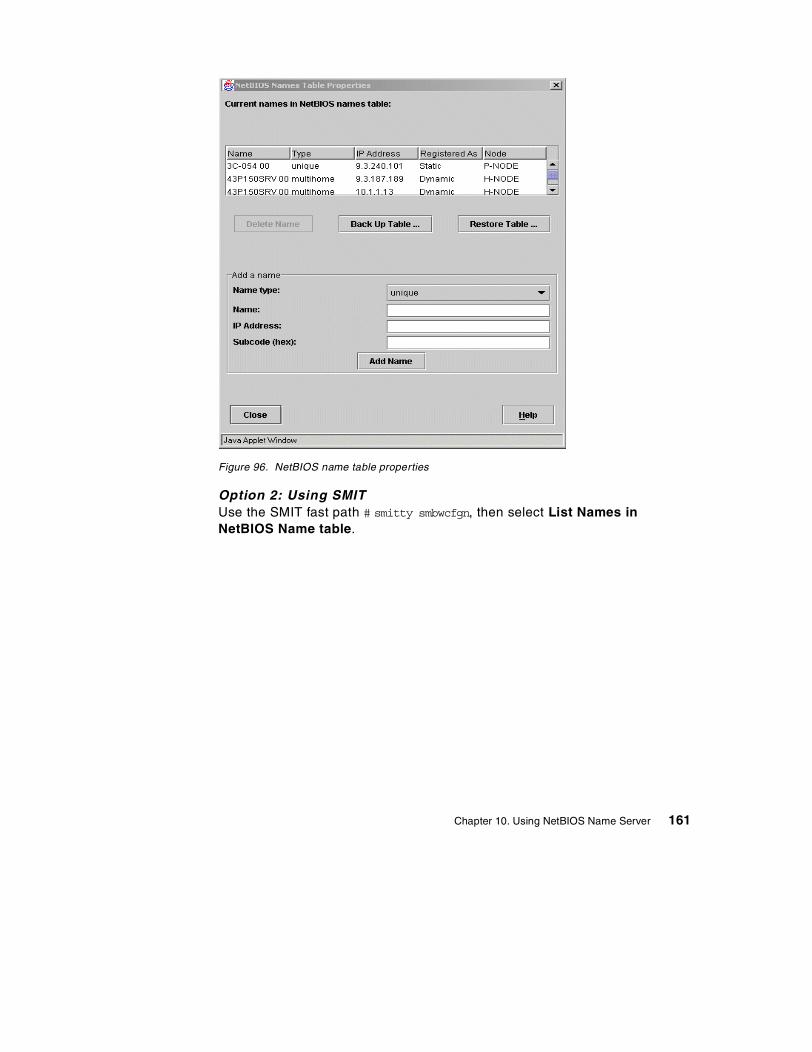
Figure 96. NetBIOS name table properties
Option 2: Using SMITUse the SMIT fast path # smitty smbwcfgn, then select List Names in NetBIOS Name table.
Chapter 10. Using NetBIOS Name Server 161

Option 3: Using the command lineAt the command line, type # net nblistnames.
The NetBIOS names are saved by default in the /etc/cifs/nbnames.cur file.
For example:
COMMAND STATUS
Command: OK stdout: yes stderr: no
Before command completion, additional instructions may appear below.
Name Type Node As IP Address3C-054 \0 unique P-NODE Static 9.3.240.10143P150SRV \0 multihome H-NODE Dynamic 9.3.187.18943P150SRV \0 multihome H-NODE Dynamic 10.1.1.1343P150SRV \20 multihome H-NODE Dynamic 9.3.187.18943P150SRV \20 multihome H-NODE Dynamic 10.1.1.13F50SRV \0 multihome H-NODE Dynamic 9.3.187.186F50SRV \0 multihome H-NODE Dynamic 10.1.1.11F50SRV \20 multihome H-NODE Dynamic 9.3.187.186F50SRV \20 multihome H-NODE Dynamic 10.1.1.11
F1=Help F2=Refresh F3=Cancel F6=CommandF8=Image F9=Shell F0=Exit /=Findn=Find Next
# net nblistnamesName Type Node As IP Address3C-054 \0 unique P-NODE Static 9.3.240.10143P150SRV \0 multihome H-NODE Dynamic 9.3.187.18943P150SRV \0 multihome H-NODE Dynamic 10.1.1.1343P150SRV \20 multihome H-NODE Dynamic 9.3.187.18943P150SRV \20 multihome H-NODE Dynamic 10.1.1.13F50SRV \0 multihome H-NODE Dynamic 9.3.187.186F50SRV \0 multihome H-NODE Dynamic 10.1.1.11F50SRV \20 multihome H-NODE Dynamic 9.3.187.186F50SRV \20 multihome H-NODE Dynamic 10.1.1.11
# cat /etc/cifs/nbnames.cur
44P170SRV \0:unique:1:permanent:10.1.1.1044P170SRV \20:unique:1:permanent:10.1.1.10
162 Fast Connect for AIX Version 3.1 Guide
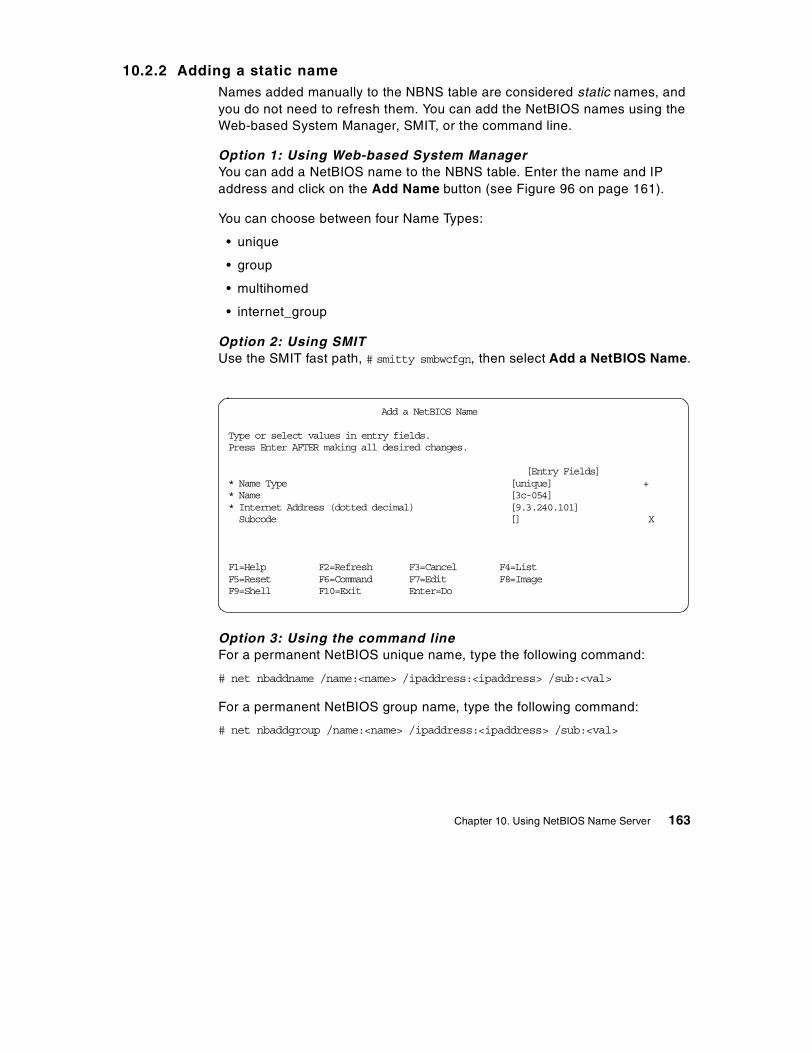
10.2.2 Adding a static nameNames added manually to the NBNS table are considered static names, and you do not need to refresh them. You can add the NetBIOS names using the Web-based System Manager, SMIT, or the command line.
Option 1: Using Web-based System ManagerYou can add a NetBIOS name to the NBNS table. Enter the name and IP address and click on the Add Name button (see Figure 96 on page 161).
You can choose between four Name Types:
• unique
• group
• multihomed
• internet_group
Option 2: Using SMITUse the SMIT fast path, # smitty smbwcfgn, then select Add a NetBIOS Name.
Option 3: Using the command lineFor a permanent NetBIOS unique name, type the following command:
# net nbaddname /name:<name> /ipaddress:<ipaddress> /sub:<val>
For a permanent NetBIOS group name, type the following command:
# net nbaddgroup /name:<name> /ipaddress:<ipaddress> /sub:<val>
Add a NetBIOS Name
Type or select values in entry fields.Press Enter AFTER making all desired changes.
[Entry Fields]* Name Type [unique] +* Name [3c-054]* Internet Address (dotted decimal) [9.3.240.101] Subcode [] X
F1=Help F2=Refresh F3=Cancel F4=ListF5=Reset F6=Command F7=Edit F8=ImageF9=Shell F10=Exit Enter=Do
Chapter 10. Using NetBIOS Name Server 163
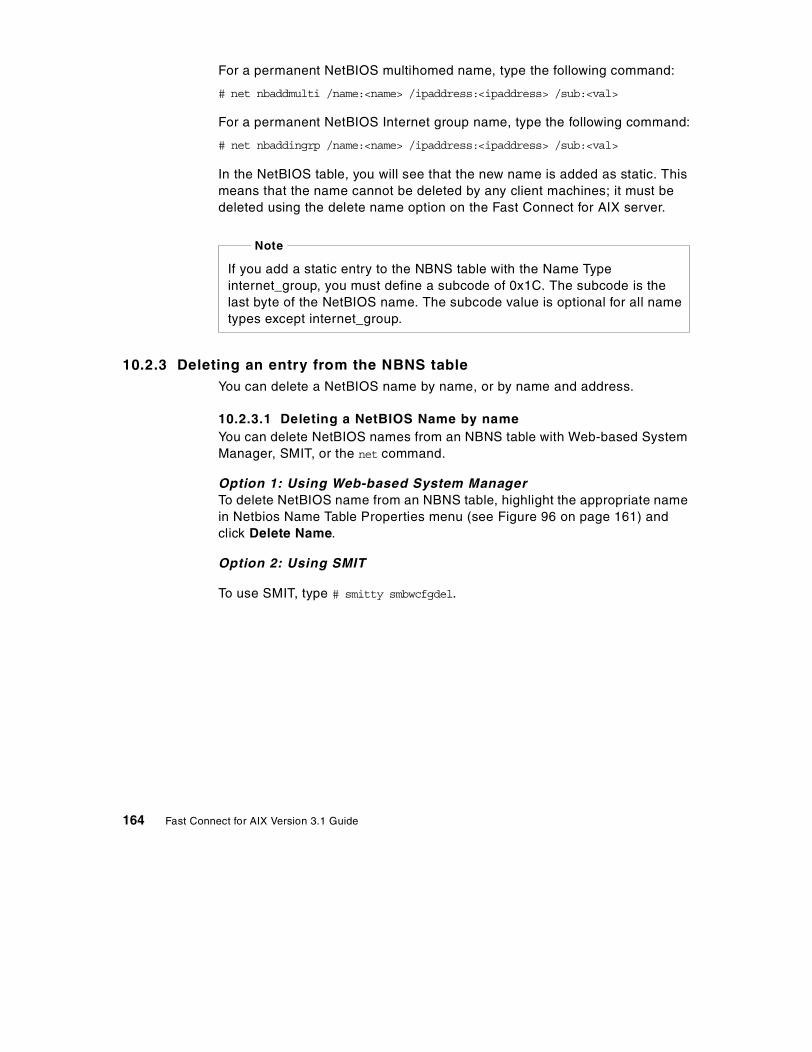
For a permanent NetBIOS multihomed name, type the following command:
# net nbaddmulti /name:<name> /ipaddress:<ipaddress> /sub:<val>
For a permanent NetBIOS Internet group name, type the following command:
# net nbaddingrp /name:<name> /ipaddress:<ipaddress> /sub:<val>
In the NetBIOS table, you will see that the new name is added as static. This means that the name cannot be deleted by any client machines; it must be deleted using the delete name option on the Fast Connect for AIX server.
10.2.3 Deleting an entry from the NBNS tableYou can delete a NetBIOS name by name, or by name and address.
10.2.3.1 Deleting a NetBIOS Name by nameYou can delete NetBIOS names from an NBNS table with Web-based System Manager, SMIT, or the net command.
Option 1: Using Web-based System ManagerTo delete NetBIOS name from an NBNS table, highlight the appropriate name in Netbios Name Table Properties menu (see Figure 96 on page 161) and click Delete Name.
Option 2: Using SMIT
To use SMIT, type # smitty smbwcfgdel.
If you add a static entry to the NBNS table with the Name Type internet_group, you must define a subcode of 0x1C. The subcode is the last byte of the NetBIOS name. The subcode value is optional for all name types except internet_group.
Note
164 Fast Connect for AIX Version 3.1 Guide
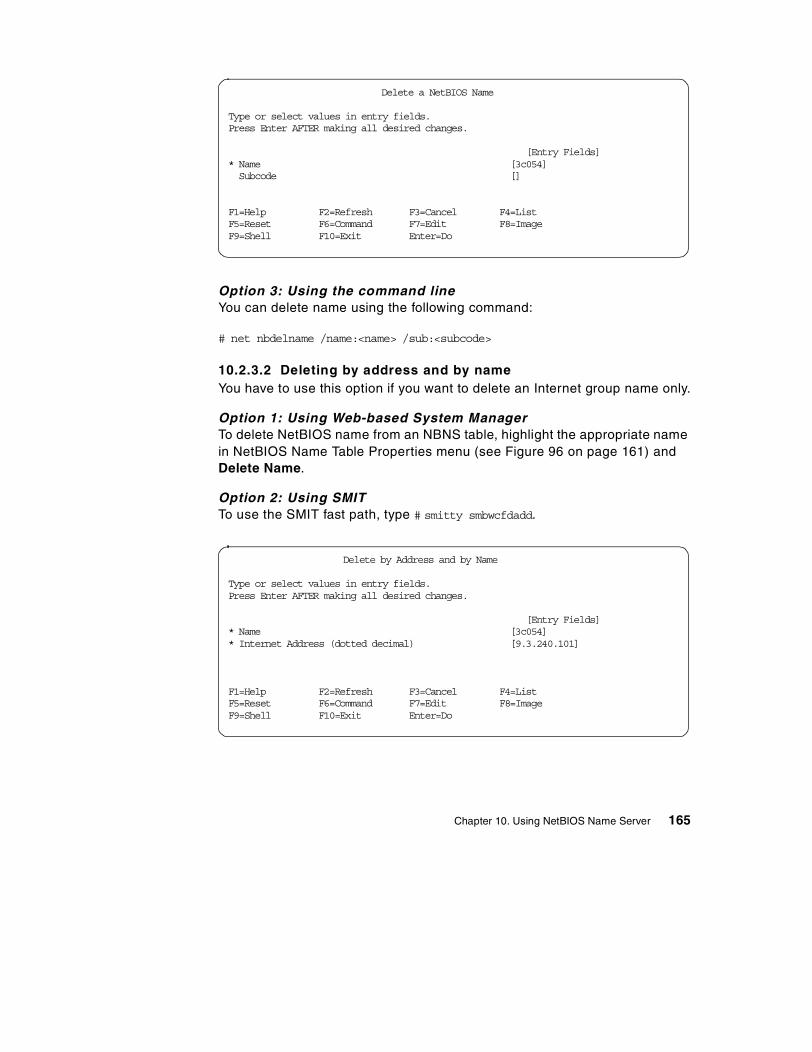
Option 3: Using the command lineYou can delete name using the following command:
# net nbdelname /name:<name> /sub:<subcode>
10.2.3.2 Deleting by address and by nameYou have to use this option if you want to delete an Internet group name only.
Option 1: Using Web-based System ManagerTo delete NetBIOS name from an NBNS table, highlight the appropriate name in NetBIOS Name Table Properties menu (see Figure 96 on page 161) and Delete Name.
Option 2: Using SMITTo use the SMIT fast path, type # smitty smbwcfdadd.
Delete a NetBIOS Name
Type or select values in entry fields.Press Enter AFTER making all desired changes.
[Entry Fields]* Name [3c054] Subcode []
F1=Help F2=Refresh F3=Cancel F4=ListF5=Reset F6=Command F7=Edit F8=ImageF9=Shell F10=Exit Enter=Do
Delete by Address and by Name
Type or select values in entry fields.Press Enter AFTER making all desired changes.
[Entry Fields]* Name [3c054]* Internet Address (dotted decimal) [9.3.240.101]
F1=Help F2=Refresh F3=Cancel F4=ListF5=Reset F6=Command F7=Edit F8=ImageF9=Shell F10=Exit Enter=Do
Chapter 10. Using NetBIOS Name Server 165
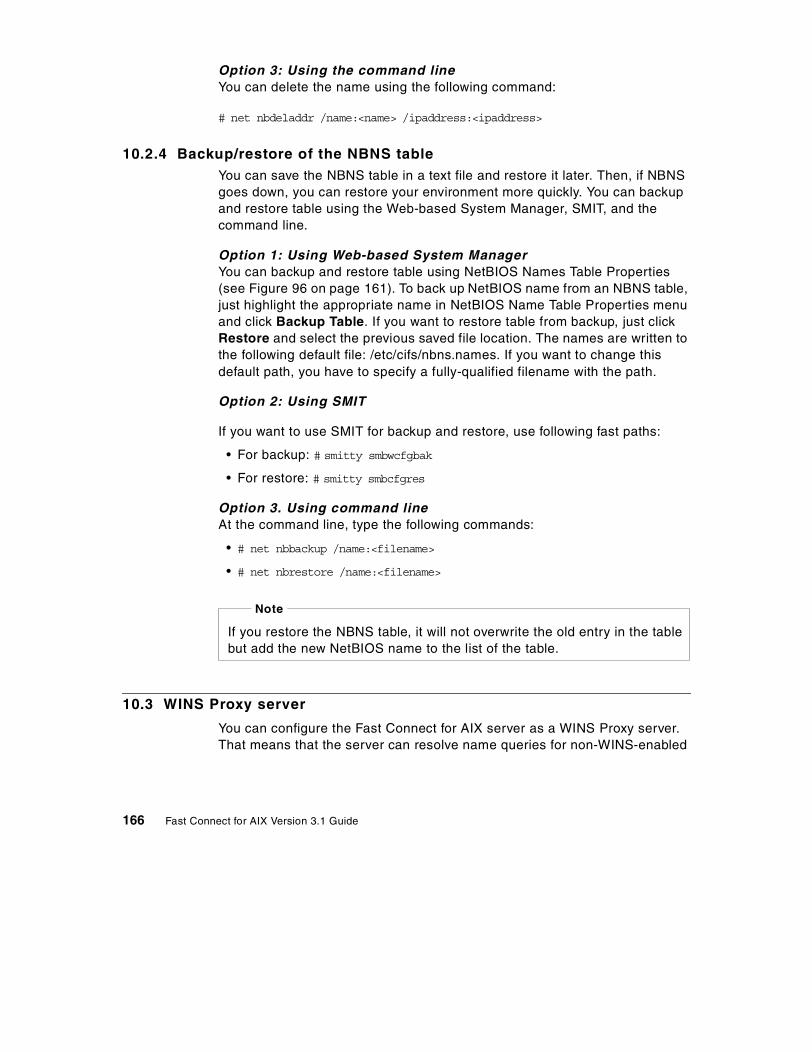
Option 3: Using the command lineYou can delete the name using the following command:
# net nbdeladdr /name:<name> /ipaddress:<ipaddress>
10.2.4 Backup/restore of the NBNS tableYou can save the NBNS table in a text file and restore it later. Then, if NBNS goes down, you can restore your environment more quickly. You can backup and restore table using the Web-based System Manager, SMIT, and the command line.
Option 1: Using Web-based System ManagerYou can backup and restore table using NetBIOS Names Table Properties (see Figure 96 on page 161). To back up NetBIOS name from an NBNS table, just highlight the appropriate name in NetBIOS Name Table Properties menu and click Backup Table. If you want to restore table from backup, just click Restore and select the previous saved file location. The names are written to the following default file: /etc/cifs/nbns.names. If you want to change this default path, you have to specify a fully-qualified filename with the path.
Option 2: Using SMIT
If you want to use SMIT for backup and restore, use following fast paths:
• For backup: # smitty smbwcfgbak
• For restore: # smitty smbcfgres
Option 3. Using command lineAt the command line, type the following commands:
• # net nbbackup /name:<filename>
• # net nbrestore /name:<filename>
10.3 WINS Proxy server
You can configure the Fast Connect for AIX server as a WINS Proxy server. That means that the server can resolve name queries for non-WINS-enabled
If you restore the NBNS table, it will not overwrite the old entry in the table but add the new NetBIOS name to the list of the table.
Note
166 Fast Connect for AIX Version 3.1 Guide
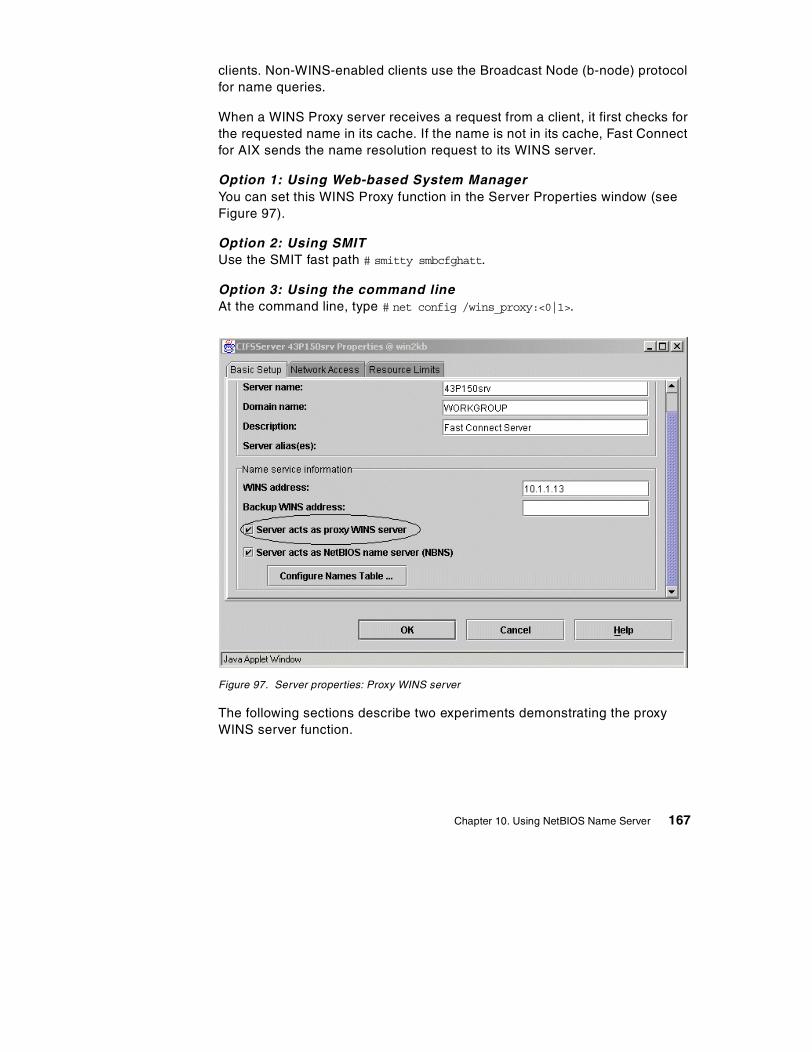
clients. Non-WINS-enabled clients use the Broadcast Node (b-node) protocol for name queries.
When a WINS Proxy server receives a request from a client, it first checks for the requested name in its cache. If the name is not in its cache, Fast Connect for AIX sends the name resolution request to its WINS server.
Option 1: Using Web-based System ManagerYou can set this WINS Proxy function in the Server Properties window (see Figure 97).
Option 2: Using SMITUse the SMIT fast path # smitty smbcfghatt.
Option 3: Using the command lineAt the command line, type # net config /wins_proxy:<0|1>.
Figure 97. Server properties: Proxy WINS server
The following sections describe two experiments demonstrating the proxy WINS server function.
Chapter 10. Using NetBIOS Name Server 167

10.3.1 First experimentWe set up the RISC/6000 43P as a Fast Connect for AIX server to act as a proxy WINS server, and an F50 that acts as a PC client (see Figure 98).
The PC client is not configured for WINS resolution; it acts as b_node. Both F50 and 43P are h_node.
In this example, a NetBIOS application on PC client wishes to communicate with the F50 Fast Connect for AIX server. Normally, this would not be possible, but, by using the 43P as a proxy WINS server in the same LAN as our PC client, the PC client and the F50 can communicate.
The PC client wants access to a shared resource on the F50. The PC client broadcasts a Name Query Request on the local network to obtain the IP address of F50. The F50 does not receive the broadcast request because it cannot cross the router.
The proxy WINS server (43P) sees the name query broadcast for a node on a different subnet. It checks for the requested name in its NBNS cache and finds the IP address of F50. Then, it sends a positive Name Query response containing the IP address of the F50 to the PC client.
The PC client now has the IP address of the F50 and can access the shared resources on the F50 Fast Connect for AIX server. See Figure 98.
Figure 98. Proxy WINS server as NBNS server
PC (Windows NT)client
RS/6000 43P RS/6000 F50
NBNS server Proxy WINS server
ClientRouter9.3.240.230 9.3.240.155 9.3.187.229
168 Fast Connect for AIX Version 3.1 Guide

10.3.2 Second experimentThe PC1 client is not configured for WINS resolution. It acts as b_node. The RISC/6000 43P is configured as a Proxy WINS server, and the F50 is configured for WINS client resolution. The PC2 is configured as a WINS server (see Figure 99 on page 170).
The F50 and 43P are h_node and configured as Fast Connect for AIX servers.
In this example, a NetBIOS application on PC1 wishes to communicate with the F50 Fast Connect for AIX server. Normally, this would not be possible. However by using the 43P as a proxy WINS server in the same local network as the PC1 client, the PC1 client and F50 can communicate.
43P and F50 are registered on the PC2 WINS server. From the PC1 client, we want to access shared resources on F50. PC1 broadcasts a Name Query request on the local network to obtain the IP address of the F50 Fast Connect for AIX server. The F50 does not receive the broadcast because of the router.
The proxy WINS server (43P) sees the name query broadcast for a node on a different subnet. It checks his or her cache table, and the name cannot be found. Then it sends a Name Query request directed datagram to the WINS server (PC2). PC2 returns a positive Name Query Response containing the IP address for F50 client to the proxy server.
Then, the proxy WINS server sends a datagram to PC1 client with the IP address for the F50 Fast Connect for AIX server. PC1 and F50 can now communicate. See Figure 99 on page 170.
Chapter 10. Using NetBIOS Name Server 169
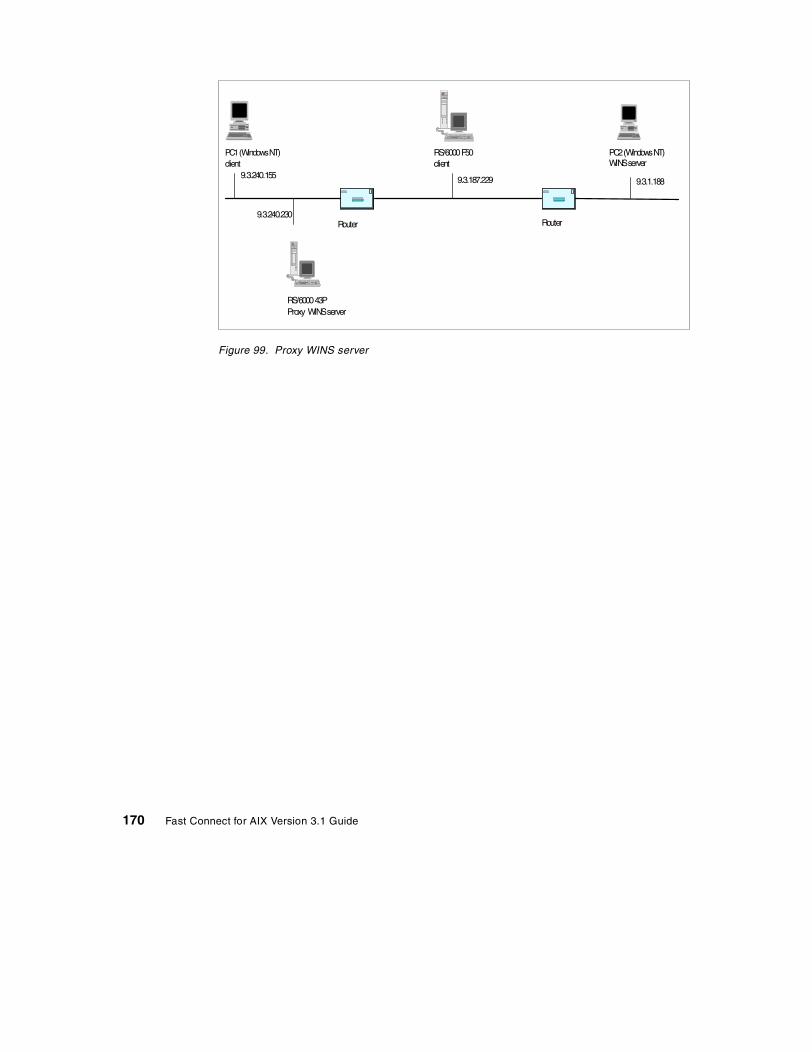
Figure 99. Proxy WINS server
PC1 (Windows NT)client
RS/6000 43PProxy WINS server
RS/6000 F50client
PC2 (Windows NT)WINS server
Router Router
9.3.240.155
9.3.240.230
9.3.187.229 9.3.1.188
170 Fast Connect for AIX Version 3.1 Guide

Chapter 11. Fast Connect for AIX troubleshooting
This section describes the basic tools for locating problems within the Fast Connect for AIX server, clients, and the SMB/CIFS protocol, and how to narrow them down.
11.1 Protocol levels
It is difficult to define, in a very strict way, how to find the problems in a domain as large as the combination of SMB and TCP/IP protocols. The following sections provide some steps and hints that you should remember when troubleshooting the SMB protocol.
TCP/IP is a protocol divided into separated independent levels. This architecture helps us because problems normally occur in only one level. Here is a simplified version of these levels that can help you locate the problem. You should try to locate the lowest network level with the problem. For example, if you have a problem with name resolution, the access to the shares will probably not work.
• TCP/IP protocol
- Address resolution - This is the conversion from the hardware network address (MAC) to the IP address and back. To determine any problems with address resolution, you can use utilities such as arp, ping, and pathping.
- Routing - This is a mechanism for transferring traffic (packets) from one network to another. The utilities are traceroute, route, ping, netstat, tracert, and pathping.
- Name resolution - This is the conversion from the domain name to the IP address. The utilities are nslookup and host.
• SMB protocol
- Name resolution - This is the conversion from the SMB name to the IP address. The utility is nbtstat.
- Browsing - This is the function on the SMB network that provides a list of accessible computers and resources to the clients. The utilities are browstat and smbclient.
- Authentication - This is the verification of the client on the SMB server.
- Access - This is the access of the client to the shared resources.
- Netlogon - This is the network logon feature of the SMB server.
© Copyright IBM Corp. 2001 171

11.2 The Fast Connect for AIX server environment
The Fast Connect for AIX server can be in one of the following four states (see Figure 100):
not running This is the not active state before you load and start the server.
loaded This is the state where the server daemon is loaded, but not started yet.
running The server daemon is loaded and started. This is the active state when the server is accepting connections.
paused This is the state where the server is not accepting connections from new clients. All existing connections are still active.
Figure 100. Fast Connect for AIX server states
If you decide to start the server automatically after reboot, Fast Connect for AIX installation inserts one line into the /etc/inittab:
If you do not want to start the Fast Connect for AIX server automatically after reboot, you should delete (or better yet, comment out) this line from the /etc/inittab file.
You should also use /etc/rc.cifs start instead of net start for a normal (re)start of the server, because the script rc.cifs also sets environmental variables that can improve the performance of the server.
not running loaded running
net start /load
net stop /unload
net stop /unload
paused
net pausenet resume
cifsServercifsUserProc
net start
rccifs:2:wait:/etc/rc.cifs start > /dev/console 2>&1
172 Fast Connect for AIX Version 3.1 Guide

The /etc/rc.cifs script starts the Fast Connect for AIX server. You can then see the following processes running:
Fast Connect for AIX server is a multi-threaded application, so you will see only one cifsServer process all the time. The cifsUserProc process is not multi-threaded, so you will see at least one process and, in addition, one for for each client connection. The printer server is not multi-threaded, so you will see at least one process, and, in addition, one for each print client connection. Through it is named /usr/sbin/cifsPrintServer[DCE], it is linked to /usr/sbin/cifsUserProc to specify that this process is not just for print client.
The configuration files for the server are located in the /etc/cifs directory. The configuration file for the server is a plain text file, cifsConfig, and the encrypted passwords are located in cifsPasswd in a colon-delimited text file. Normally, you do not need to change these files directly, which is not recommended, because you can do almost everything with the net command.
Detailed protocol-related data is saved in the /var/log/cifsLog file, which is useful for advanced troubleshooting of Fast Connect for AIX.
You can check if the server is actually listening on the netbios-ssn port with the netstat -a command:
You should see the LISTEN state for netbios-ssn service (port number 139). That means that the server is running and accepting connections from the client.
$ ps -fel | grep -v grep | grep cifs root 20186 1 0 11:49:56 - 0:00 /usr/sbin/cifsServer root 22904 1 0 11:49:56 - 0:00 /usr/sbin/cifsUserProc
$ grep netbios /etc/servicesnetbios-ns 137/tcp # NETBIOS Name Servicenetbios-ns 137/udp # NETBIOS Name Servicenetbios-dgm 138/tcp # NETBIOS Datagram Servicenetbios-dgm 138/udp # NETBIOS Datagram Servicenetbios-ssn 139/tcp # NETBIOS Session Servicenetbios-ssn 139/udp # NETBIOS Session Service$ netstat -an | grep 13[7-9]tcp4 0 0 *.139 *.* LISTENudp4 0 0 *.137 *.*
Chapter 11. Fast Connect for AIX troubleshooting 173

11.3 Generic TCP/IP utilities
If you know your network organization, use the following tools to check the status of the TCP/IP level of the network. If you do not know the network organization, use the same tools to find it. These utilities are available on AIX and Windows NT. Some of them may be missing on the Windows 95 system. These utilities are:
• ipconfig - This shows the IP configuration on Windows NT machines.
• ping - This checks the IP connectivity. It also tries to ping the localhost (127.0.0.1), local IP address, gateway, and remote computer. Try it with a computer name and IP address.
• traceroute - This checks the route from one computer in a TCP/IP network to another (use tracert on client).
• route - This prints out the routing table. You can also add and delete routes.
• netstat - This shows status information about the network, such as routing table, port allocation, and statistics.
• nslookup - This checks the Domain Name System (DNS) - TCP/IP name resolution. You can find an IP address from the computer name and vice versa.
• arp - This shows and modifies the table for IP addresses to adapter address translation.
Try to find out if the problem is only on the one computer.
11.4 Troubleshooting utilities on Windows NT
This section describes Windows NT tools for TCP/IP and SMB diagnostics.
11.4.1 TCP/IP configuration The TCP/IP configuration of the Windows NT/2000 system can be obtained with the ipconfig command. You can use the /all switch to see detailed information about an IP address, netmask, gateway address, and so forth (Figure 101 on page 175).
174 Fast Connect for AIX Version 3.1 Guide

Figure 101. The result of ipconfig command
On Windows 95/98 systems, you can use the winipcfg command to get similar information (see Figure 102 on page 176).
Windows 2000 IP Configuration
Host Name . . . . . . . . . . . . : 3C-054 Primary DNS Suffix . . . . . . . : Node Type . . . . . . . . . . . . : Hybrid IP Routing Enabled. . . . . . . . : No WINS Proxy Enabled. . . . . . . . : No DNS Suffix Search List. . . . . . : itsc.austin.ibm.com
Token Ring adapter Local Area Connection 4:
Connection-specific DNS Suffix . : itsc.austin.ibm.com Description . . . . . . . . . . . : IBM 16/4 Token-Ring PCI Adapter 2 Physical Address. . . . . . . . . : 00-20-35-C2-17-49 DHCP Enabled. . . . . . . . . . . : Yes Autoconfiguration Enabled . . . . : Yes IP Address. . . . . . . . . . . . : 9.3.240.101 Subnet Mask . . . . . . . . . . . : 255.255.255.0 Default Gateway . . . . . . . . . : 9.3.240.1 DHCP Server . . . . . . . . . . . : 9.3.240.2 DNS Servers . . . . . . . . . . . : 9.3.240.2 Primary WINS Server . . . . . . . : 9.3.1.20 Secondary WINS Server . . . . . . : 9.3.1.22 Lease Obtained. . . . . . . . . . : Wednesday, May 09, 2001 10:41:08 AM Lease Expires . . . . . . . . . . : Thursday, May 10, 2001 4:41:08 AM
Chapter 11. Fast Connect for AIX troubleshooting 175
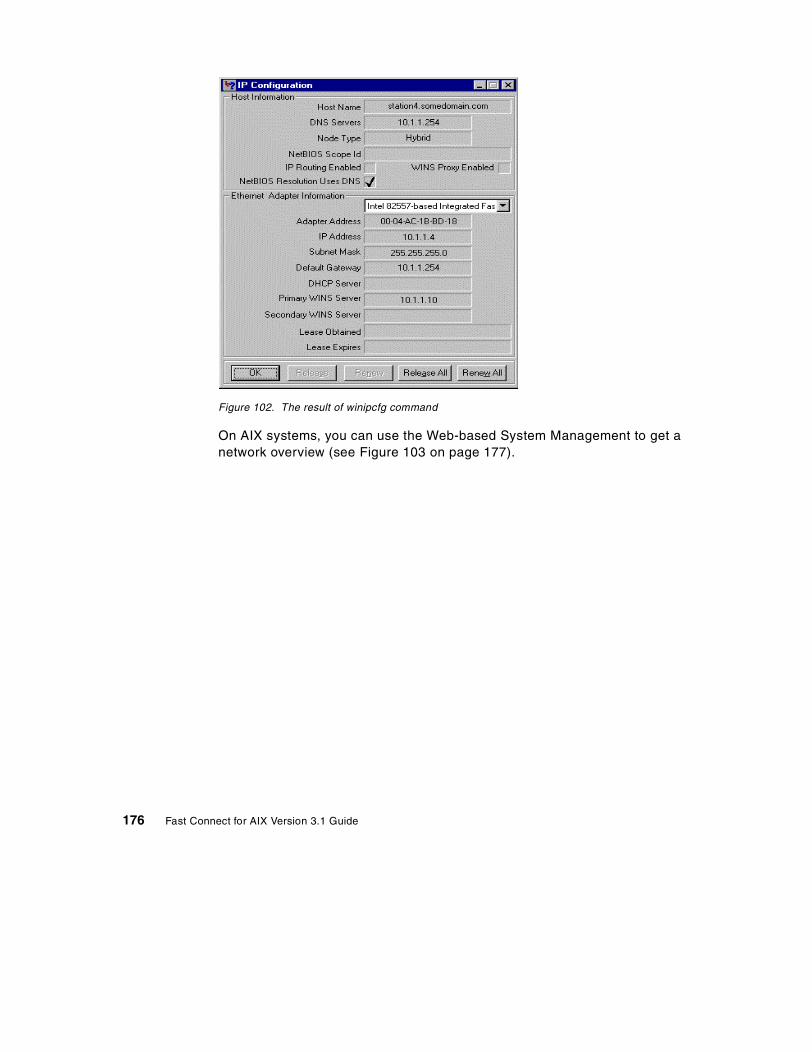
Figure 102. The result of winipcfg command
On AIX systems, you can use the Web-based System Management to get a network overview (see Figure 103 on page 177).
176 Fast Connect for AIX Version 3.1 Guide
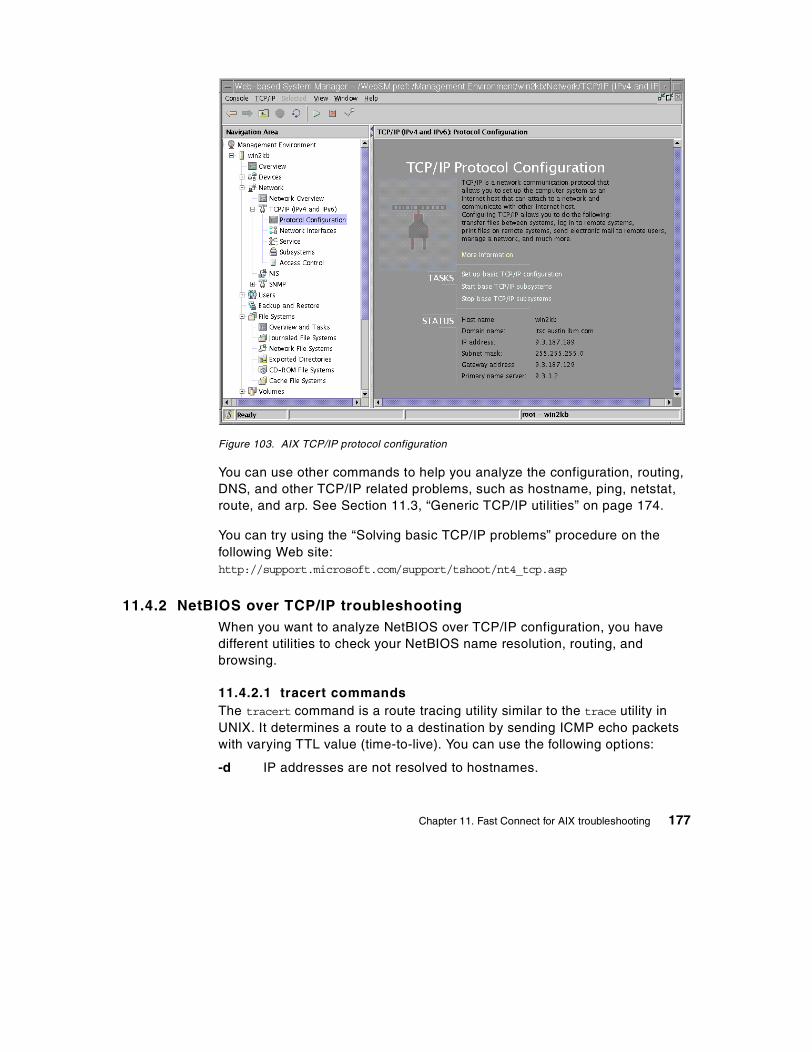
Figure 103. AIX TCP/IP protocol configuration
You can use other commands to help you analyze the configuration, routing, DNS, and other TCP/IP related problems, such as hostname, ping, netstat, route, and arp. See Section 11.3, “Generic TCP/IP utilities” on page 174.
You can try using the “Solving basic TCP/IP problems” procedure on the following Web site:http://support.microsoft.com/support/tshoot/nt4_tcp.asp
11.4.2 NetBIOS over TCP/IP troubleshootingWhen you want to analyze NetBIOS over TCP/IP configuration, you have different utilities to check your NetBIOS name resolution, routing, and browsing.
11.4.2.1 tracert commandsThe tracert command is a route tracing utility similar to the trace utility in UNIX. It determines a route to a destination by sending ICMP echo packets with varying TTL value (time-to-live). You can use the following options:
-d IP addresses are not resolved to hostnames.
Chapter 11. Fast Connect for AIX troubleshooting 177

-h This defines the maximum number of hops to reach the destination.
-j This specifies a loose source route along host-list.
-w This specifies wait time for each reply.
The output shows the steps to reach the destination. Every line shows the hop number, three round-trip times for three attempts, and the hostname (or IP address) of the system that was reached in this hop. An asterisk (*) means that the attempt timed out.
11.4.2.2 nbtstat toolThis tool is used for troubleshooting NetBIOS name resolution. The name resolution on Windows NT client uses one of the following methods; local cache lookup, WINS server, broadcast, DNS, LMHOSTS, or HOSTS lookup. nbtstat can help you analyze name resolution problems with the following options:
-n This lists local registered NetBIOS names.
-a, -A This lists the remote computer’s name table (similar to what option -n does for a local computer).
-c This shows the content of NetBIOS name cache.
C:\>tracert lv3030c
Tracing route to lv3030c.itsc.austin.ibm.com [9.3.187.213]over a maximum of 30 hops:
1 10 ms * <10 ms itso240.itsc.austin.ibm.com [9.3.240.1] 2 <10 ms <10 ms <10 ms lv3030c.itsc.austin.ibm.com [9.3.187.213]
Trace complete.
C:\>nbtstat -n
Node IpAddress: [9.3.240.113] Scope Id: []
NetBIOS Local Name Table
Name Type Status-------------------------------------------AUSRES10 <00> UNIQUE RegisteredITSOAUSNT <00> GROUP RegisteredAUSRES10 <03> UNIQUE RegisteredAUSRES10 <20> UNIQUE RegisteredINet~Services <1C> GROUP RegisteredIS~AUSRES10....<00> UNIQUE RegisteredITSOAUSNT <1E> GROUP Registered
178 Fast Connect for AIX Version 3.1 Guide

-r This shows the name resolution and registration statistics as well as names resolved by broadcast.
-R This clears the local cache and reloads it from the LMHOSTS file.
-s, -S This lists the NetBIOS sessions. The first option will show NetBIOS names and the second one will show IP addresses.
11.4.2.3 browstat utilityThe Microsoft Windows NT Server Resource Kit 4.0 includes the browstat utility, which can be used to analyze the SMB network.
The browstat utility can show you browsers and the domain organization of a network. It is a command line utility. Some options of the command require a transport parameter. You can retrieve it with browstat status (this is part of the output):
You can see two transports, NetBF_Ibmtok51 and Nbf_Ibmtok51, in this example.
Browstat has the following options:
status [ -V ] [ domain ] This shows the status of the domain. The -V switch shows us extended information. You can see basic browsing and domain information in the following sample output:
C:\>nbtstat -s
NetBIOS Connection Table
Local Name State In/Out Remote Host Input Output----------------------------------------------------------------------------LV3030B <00> Connected Out ITSONT00 <20> 105KB 105KBLV3030B <00> Connected Out LV3030C <20> 11KB 1KBLV3030B <03> ListeningLV3030B Connected In AUSRES10 <00> 2MB 1MBADMINISTRATOR <03> Listening
Status for domain ITSOAUSNT on transport \Device\NetBT_Ibmtok51...
Status for domain ITSOAUSNT on transport \Device\Nbf_Ibmtok51...
Chapter 11. Fast Connect for AIX troubleshooting 179

stats [ computer ] This shows browsing statistics of the computer.
getpdc transport domain This shows the NetBIOS name of the primary domain controller for the domain.
getmaster transp. domain This shows the master browser name for the domain.
getblist transport This lists master and backup browser servers.
listwfw domain This lists WFW servers that are running the browser.
view transp. [ srv | dom ] This requests a browse list for the selected transport. You can select the browse list from specific server (srv) or domain (dom). Flags that are used in this list can be seen by entering the browstat command without parameters. Here is an example of the output:
Status for domain ITSOAUSNT on transport \Device\NetBT_Ibmtok51 Browsing is active on domain. Master browser name is: AUSRES05 Master browser is running build 1381 3 backup servers retrieved from master AUSRES05 \\AUSRES05 \\AUSRES08 \\AUSRES06 There are 85 servers in domain ITSOAUSNT on transport \Device\NetBT_Ibmtok51 There are 32 domains in domain ITSOAUSNT on transport \Device\NetBT_Ibmtok51
Status for domain ITSOAUSNT on transport \Device\Nbf_Ibmtok51 Browsing is active on domain. Master browser name is: AUSRES10 Master browser is running build 1381 3 backup servers retrieved from master AUSRES10 \\AUSRES03 \\AUSRES11 \\AUSRES10 There are 42 servers in domain ITSOAUSNT on transport \Device\Nbf_Ibmtok51 There are 2 domains in domain ITSOAUSNT on transport \Device\Nbf_Ibmtok51
180 Fast Connect for AIX Version 3.1 Guide

elect transport domain This forces an election on the selected domain.
tickle This forces a remote master to stop.
11.5 Troubleshooting utilities on AIX
This section describes AIX tools for troubleshooting SMB protocol. SMB is not a native protocol on AIX, so special utilities are not available, but you can still get valuable information from standard TCP/IP tools.
11.5.1 TCP/IP configuration checkingYou can check the TCP/IP configuration on SMB server with the following standard utilities:
• ifconfig
• ping
• arp
• netstat
• route
• nslookup
11.5.2 Fast Connect for AIX server troubleshootingThe following sections describe commands that may help you determine what the trouble is with your server.
Remoting NetServerEnum to \\AUSRES15 on transport \device\netbt_ibmtok51 with flags ffffffff13 entries returned. 13 total. 10 milliseconds
\\AUSRES03 NT 04.00 (W,S,NT,SS,PBR,BBR)\\AUSRES05 NT 04.00 (W,S,NT,SS,PBR,BBR,MBR)\\AUSRES06 NT 04.00 (W,S,NT,SS,PBR,BBR)\\AUSRES08 NT 04.00 (W,S,NT,SS,PBR,BBR)\\AUSRES10 NT 04.00 (W,S,NT,SS,PBR)\\AUSRES11 NT 04.00 (W,S,NT,SS,PBR)\\ISHIIY W95 04.00 (W,S,WFW,PBR,W95)\\ITSONICE NT 04.02 (W,S,PQ,XN,NT,SS) ITSO-Austin Samba Server\\ITSONT00 NT 04.00 (W,S,PDC,NT,BBR,MBR) ITSO Austin NT PDC\\ITSONT01 NT 04.00 (W,S,BDC,PQ,NT,BBR) ITSO Austin NT BDC\\LV3030C NT 01.00 (W,S,PQ,XN,NT,SS) Fast Connect Server\\LV3030D NT 04.02 (W,S,PQ,XN,NT,SS,PBR) Samba2 Server\\VIPER NT 04.00 (W,S,NT,SS,PBR) ITSO Austin CD-ROM Burner system
Chapter 11. Fast Connect for AIX troubleshooting 181
11.5.2.1 The Fast Connect for AIX server net commandThe command line administration program is the net command. This command has a syntax similar to the one you have with Windows systems. The most important options for troubleshooting are:
• help [ command ]
This shows the list of main options or a description of an individual option of the net command.
• status
This shows the server state (see Figure 100 on page 172) and the server NetBIOS and TCP/IP name:
• statistics [/reset]
This shows statistics of the server’s sessions, connections, and errors since the last server start or the last reset of the statistics (option /reset). You should be careful about resetting statistics because you could get less information from net statistics. You can solve this by doing /reset when there is no client connected to the server. You can see additional information about statistics analyzed in Appendix 11.5.2.2, “net statistics command” on page 183.
• user
Show and change user settings. User manipulation is only necessary when you use Fast Connect for AIX authentication. Important options are:
net user [password|-p] [/add] [/active:[0|1]] /changeaixpwd:[yes|no]
Add a user with the specified password and/or (de)activate one. You cannot add a user that is not also an AIX user. If you select -p, you are prompted for the password, and the password is not displayed on the screen. Like all the other changes operated with the net command, only root can change the password of the user. If you want to change both the AIX and Fast Connect for AIX password at the same time, you can use the /changeaixpwd:yes option.
• nbstatus
This shows the status of NBNS (running or not running).
• nblistnames
This lists NetBIOS names from the NetBIOS name table.
$ net statusServer lv3030c has been paused on lv3030c.itsc.austin.ibm.com.
182 Fast Connect for AIX Version 3.1 Guide

11.5.2.2 net statistics commandYou can quickly check for SMB protocol problems with the net statistics command. Output from this command looks like this:
You can see the server name, server startup time, and statistics startup time in the header. Then, you can see the following values:
Sessions started This counts the number of sessions initiated from the clients.
Sessions timed out This counts the number of sessions that were disconnected because of inactivity time (related to the autodisconnect parameter).
Sessions dropped This counts the number of sessions that ended - with or without error.
Password Errors This counts the number of errors because of illegal passwords. It is not necessarily a serious matter if this number is not zero. Maybe a guest account was used or somebody simply mistyped a password. The first step is for the client to send the user’s name and password, which can be rejected (thus the error), and then request guest account, which is accepted.
Permission Errors This counts the number of file permission errors.
Print jobs queued This counts the number of jobs submitted to printer queues.
You can continuously watch net statistics output if you enter:
clear; while (true); do tput home; net statistics; sleep 2; done
Server lv3030c running on lv3030c.itsc.austin.ibm.com sinceFri Feb 5 11:50:21 1999
Server statistics since Fri Feb 5 11:50:21 1999
Sessions started 8Sessions timed out 6Sessions dropped 7Password Errors 7Permission Errors 4Bytes sent low 10649Bytes sent high 0Bytes received low 8042Bytes received high 0Request buffer failures 0Big buffer failures 0Print jobs queued 0
Chapter 11. Fast Connect for AIX troubleshooting 183
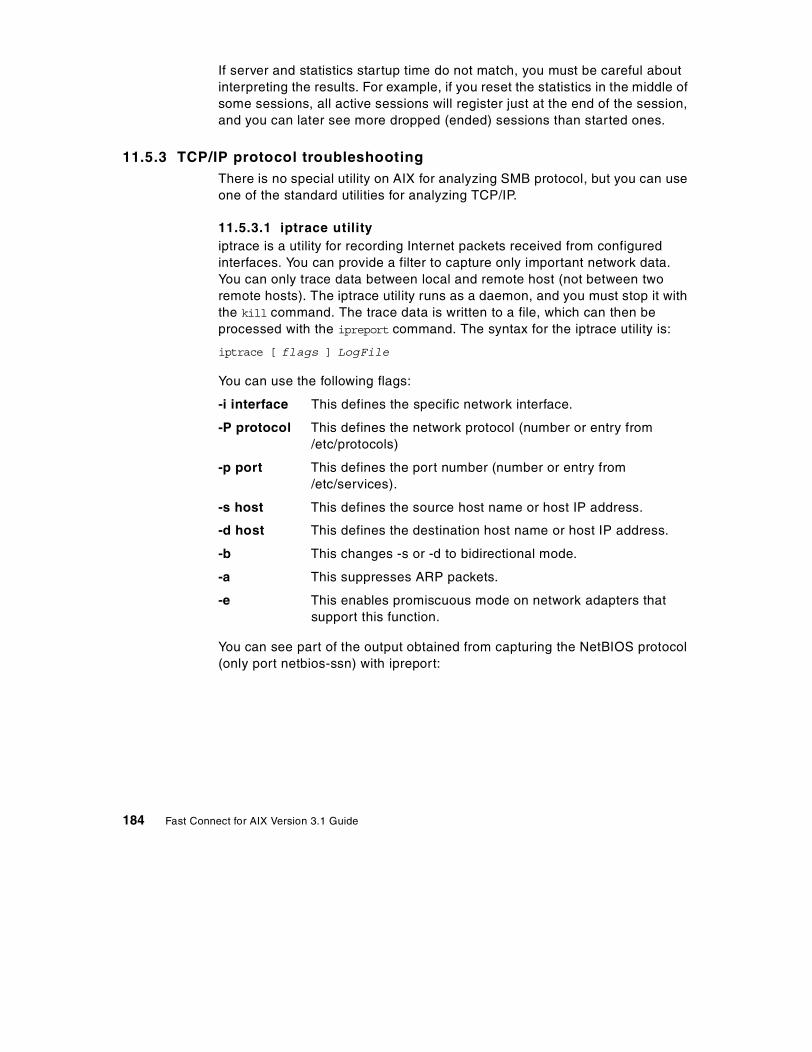
If server and statistics startup time do not match, you must be careful about interpreting the results. For example, if you reset the statistics in the middle of some sessions, all active sessions will register just at the end of the session, and you can later see more dropped (ended) sessions than started ones.
11.5.3 TCP/IP protocol troubleshootingThere is no special utility on AIX for analyzing SMB protocol, but you can use one of the standard utilities for analyzing TCP/IP.
11.5.3.1 iptrace utilityiptrace is a utility for recording Internet packets received from configured interfaces. You can provide a filter to capture only important network data. You can only trace data between local and remote host (not between two remote hosts). The iptrace utility runs as a daemon, and you must stop it with the kill command. The trace data is written to a file, which can then be processed with the ipreport command. The syntax for the iptrace utility is:
iptrace [ flags ] LogFile
You can use the following flags:
-i interface This defines the specific network interface.
-P protocol This defines the network protocol (number or entry from /etc/protocols)
-p port This defines the port number (number or entry from /etc/services).
-s host This defines the source host name or host IP address.
-d host This defines the destination host name or host IP address.
-b This changes -s or -d to bidirectional mode.
-a This suppresses ARP packets.
-e This enables promiscuous mode on network adapters that support this function.
You can see part of the output obtained from capturing the NetBIOS protocol (only port netbios-ssn) with ipreport:
184 Fast Connect for AIX Version 3.1 Guide
11.5.3.2 tcpdump commandThe tcpdump command prints out the headers of packets on a network interface. You can define expressions to select packets that you want to see. The basic syntax of the tcpdump command is:
tcpdump { flags } expression
Important flags are:
-c count This exits after receiving count packets.
-f This prints the foreign Internet address numerically, not symbolically.
-i interface This defines an interface to which to listen. If not defined, tcpdump will select one available interface.
$ iptrace -a -p netbios-ssn -s lv3030b -b trace.out$ kill $(ps -fe | grep iptrace | grep -v grep | cut -c9-16)$ ipreport trace.out
...====( 220 bytes received on interface tr0 )==== 01:42:12.313466462802.5 packet
802.5 MAC header:access control field = 10, frame control field = 40[ src = 00:06:29:b7:24:0c, dst = 00:04:ac:62:c9:80]802.2 LLC header:dsap aa, ssap aa, ctrl 3, proto 0:0:0, type 800 (IP)IP header breakdown: < SRC = 9.3.187.213 > (lv3030c.itsc.austin.ibm.com) < DST = 9.53.195.11 > (ausres10.austin.ibm.com) ip_v=4, ip_hl=20, ip_tos=0, ip_len=198, ip_id=51908, ip_off=0DF ip_ttl=22, ip_sum=3265, ip_p = 6 (TCP)TCP header breakdown: <source port=1932, destination port=139(netbios-ssn) > th_seq=216bef8, th_ack=3a349002 th_off=5, flags<PUSH | ACK> th_win=5836, th_sum=d8ea, th_urp=000000000 0000009a ff534d42 72000000 00000000 |.....SMBr.......|00000010 00000000 00000000 00000000 0000c11d |................|00000020 00000132 00770002 5043204e 4554574f |...2.w..PC NETWO|00000030 524b2050 524f4752 414d2031 2e300002 |RK PROGRAM 1.0..|00000040 4d494352 4f534f46 54204e45 54574f52 |MICROSOFT NETWOR|00000050 4b532033 2e300002 444f5320 4c4d312e |KS 3.0..DOS LM1.|00000060 32583030 32000244 4f53204c 414e4d41 |2X002..DOS LANMA|00000070 4e322e31 00025769 6e646f77 7320666f |N2.1..Windows fo|00000080 7220576f 726b6772 6f757073 20332e31 |r Workgroups 3.1|00000090 6100024e 54204c4d 20302e31 3200 |a..NT LM 0.12. |
====( 141 bytes transmitted on interface tr0 )==== 01:42:12.318337099
Chapter 11. Fast Connect for AIX troubleshooting 185
-I This (uppercase i) specifies immediate packet capture mode without waiting for the buffer to fill up.
-N This omits printing domain part of the host name (for example, lv3030c instead of lv3030c.itsc.austin.ibm.com).
-q This quiets output. Output lines contain less protocol information and are, therefore, shorter.
-t This omits printing a timestamp on each line.
-tt This prints an unformated timestamp on each line.
-v This prints more packet information (TTL and the type of service).
We must define expressions to filter incoming packets. When the expression is true, the packet is accepted. Expressions consists of one or more primitives. The important primitives are:
[ src | dst ] host host This is true if the source or destination is a host with a specified host name. You can limit the selection to only the source or destination host with src and dst qualifiers.
[ src | dst ] net net This is true if the source or destination is a network with a specified net number. You can limit the selection to only the source or destination network with src and dst qualifiers.
[ src | dst ] port port This is true if the source or destination is a port with a specified port number. You can limit selection to only the source or destination port with src and dst qualifiers.
ip broadcast This is true if the packet is an IP broadcast packet.
ip multicast This is true if the packet is an IP multicast packet.
ip, arp, rarp This is true if the packet is of the selected protocol type (ip, arp, or rarp).
tcp, udp, icmp This is true if the packet is of the selected IP protocol type (tcp, udp, or icmp).
You can combine these primitives together with the operators and, or, not, and parentheses (they must be enclosed with the back slash and parentheses characters: ’\)’). The following are some examples of expressions:
186 Fast Connect for AIX Version 3.1 Guide
Show all traffic from/to the lv3030c computer:
host lv3030c
Show traffic from/to a machine with a specified IP address:
ip host 9.3.187.21
Show traffic from lv3030c to ausres10:
srchost lv3030c and dst host ausres10
Show NetBIOS traffic involving host lv3030c:
\( port netbios-ns or port netbios-dgm or port netbios-ssn \) and host
lv3030c
Same as previous example:
\( port 137 or port 138 or port 139 \) and host lv3030c
The important ports for diagnosing the SMB protocol are:
• netbios-ns (port 137) is NetBIOS Name Service.
• netbios-dgm (port 138) is NetBIOS Datagram Service.
• netbios-ssn (port 139) is NetBIOS Session Service.
If you want to see, say, the packet traffic between client and server, when the client runs the net view command, the client output will look like the following:
On an AIX server, you can see the network traffic using the following command:
C:\>net view \\lv3030cShared resources at \\lv3030c
Fast Connect Server
Share name Type Used as Comment
-------------------------------------------------------------------------------FINAL1 Print Lexmark Optra NHOME Disk User's Home Directory ShareTMP Disk X:The command completed successfully.
Chapter 11. Fast Connect for AIX troubleshooting 187

The tcpdump command does not support SMB protocol specifics. An extension to tcpdump source code is known under the name tcpdump-smb. At the time of this writing, no compiled version of this utility was available for the AIX system.
11.5.3.3 traceThe trace facility helps you isolate system problems by monitoring selected system events. You must have the bos.sysmgt.trace package installed. This utility is normally used by IBM specialists. You must specify the system events (called hooks) that you want to catch. Some hooks that are useful for analyzing TCP/IP level of networking are:
251 HKWD NETERR Records TCP/IP network error events
252 HKWD SYSC TCPIP Records socket-type system call events on entry and exit to socket-type subroutines
253 HKWD SOCKET Records TCP/IP socket layer events
25A HKWD TCPDBG Records outgoing and incoming packets on the TCP level
There are also some hooks related to the Fast Connect for AIX server events:
• 2EE CIFS Enter
• 2EF CIFS Exit
• 2F0 CIFS-FSS
• 2F1 CIFS-Logon
• 2F2 CIFS-Net
• 2F3 CIFS-SMB Parser
• 2F4 CIFS-PSS
$ tcpdump -t -N \(port 137 or port 138 or port 139\) and host lv3030cLV3030B.1056 > lv3030c.netbios-ssn: P 841:945(104) ack 662 win 8099 (DF)lv3030c.netbios-ssn > LV3030B.1056: P 662:701(39) ack 945 win 65535lv3030c.netbios-ssn > LV3030B.1056: P 662:701(39) ack 945 win 65535LV3030B.1056 > lv3030c.netbios-ssn: P 945:1060(115) ack 701 win 8060 (DF)lv3030c.netbios-ssn > LV3030B.1056: P 701:992(291) ack 1060 win 65535lv3030c.netbios-ssn > LV3030B.1056: P 701:992(291) ack 1060 win 65535LV3030B.1056 > lv3030c.netbios-ssn: P 1060:1164(104) ack 992 win 7769 (DF)lv3030c.netbios-ssn > LV3030B.1056: P 992:1031(39) ack 1164 win 65535lv3030c.netbios-ssn > LV3030B.1056: P 992:1031(39) ack 1164 win 65535LV3030B.1056 > lv3030c.netbios-ssn: P 1164:1279(115) ack 1031 win 7730 (DF)lv3030c.netbios-ssn > LV3030B.1056: P 1031:1143(112) ack 1279 win 65535lv3030c.netbios-ssn > LV3030B.1056: P 1031:1143(112) ack 1279 win 65535LV3030B.1056 > lv3030c.netbios-ssn: . ack 1143 win 7618 (DF)
188 Fast Connect for AIX Version 3.1 Guide

• 2F5 CIFS-SMS
When you want to use the trace facility, perform the following steps:
1. Enter the trace command where you select all appropriate hooks. If you are not sure which hooks are the right ones, select all of them as shown in the following example:
trace -a -j 251,252,253,25A -o trace_bin_file
2. Recreate the problem with the minimum possible steps.
3. Stop the trace facility with the trcstop command.
4. Create a trace report:
trcrpt trace_bin_file > trace_report_file
An example of a trace report looks like the following screen:
If you have problems with the Fast Connect for AIX server and must collect trace information for analysis, you should trace the following hooks:
$ trace -a -j 2EE,2EF,2F0,2F1,2F2,2F3,2F4,2F5 -o /tmp/cifs.out...$ trcstop$ trcrpt /tmp/cifs.out
Wed May 23 09:28:52 2001System: AIX 43P150srv Node: 5Machine: 000902774C00Internet Address: 0A01010D 10.1.1.13The system contains 1 cpus, of which 1 were traced.Buffering: Kernel HeapThis is from a 32-bit kernel.Tracing only these hooks, 2ee,2ef,2f0,2f1,2f2,2f3,2f4,2f5
trace -a -j 2EE,2EF,2F0,2F1,2F2,2F3,2F4,2F5 -o /tmp/cifs.out
ID ELAPSED_SEC DELTA_MSEC APPL SYSCALL KERNEL INTERRUPT
001 0.000000000 0.000000 TRACE ON channel 0 Wed May 23 09:28:52 20012EE 0.179306413 179.306413 CIFS Enter LS_NBProcNSDGram2F2 0.179355642 0.049229 CIFS-NET data 32804 string 9.3.187.1832F2 0.179364159 0.008517 CIFS-NET data 32818 string ITSOAUSNT ^[2EE 0.930442337 751.078178 CIFS Enter LS_NBProcNSDGram
$ trace -aj 2EE,2EF,2F0,2F1,2F2,2F3,2F4,2F5...$ trcstop$ tar cvf trace.tar -C /var/adm/ras trcfile
Chapter 11. Fast Connect for AIX troubleshooting 189

Normally, you should also add the following information:
• Machine type
• oslevel output
• netstat -an output
• lslpp -a output
• Amount of memory
• Configuration file /etc/cifs/cifsConfig
• Log file /var/cifs/cifsLog
• Information about installed software: lslpp -l
• Error reports: errpt, errpt -a
• Listing of running processes: ps aux, ps -efl
11.6 Common problems
Here is a list of some common problems and hints with the Fast Connect for AIX server.
11.6.1 NetBIOS name resolutionCheck the NetBIOS name resolution (WINS service):
• Use the ping command on the client with its NetBIOS name, its TCP/IP name, and its IP address to see whether the name translation works. If the ping to IP address works but not with the NetBIOS name, you have a name resolution problem.
• Use the ping command with the WINS server IP address to see whether you can reach the WINS server.
• Double check the WINS server settings on the client and the status of your WINS server. You can check the WINS server settings on your client by selecting Start -> Settings -> Control Panel -> Network -> Protocols -> TCP/IP Protocol -> Properties -> WINS Address.On the Windows 2000 client you can check the WINS server settings by selecting Start -> Settings -> Network and Dial-up Connections -> Local Area Connection -> Properties -> Internet Protocol (TCP/IP) -> Properties -> Advanced -> WINS. To find the WINS server status on Windows NT Server, select Start -> Settings -> Control Panel -> Services, and then locate Windows Internet Name Service. If the Status field is Started, WINS is running on the server.
190 Fast Connect for AIX Version 3.1 Guide
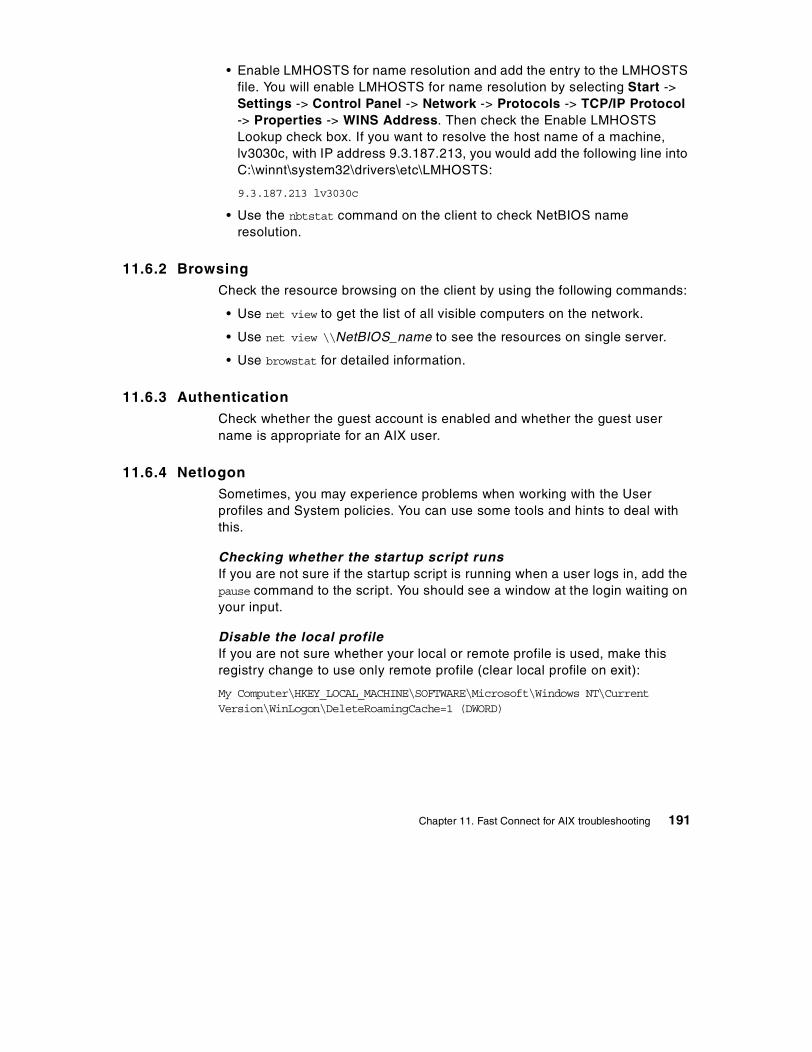
• Enable LMHOSTS for name resolution and add the entry to the LMHOSTS file. You will enable LMHOSTS for name resolution by selecting Start -> Settings -> Control Panel -> Network -> Protocols -> TCP/IP Protocol -> Properties -> WINS Address. Then check the Enable LMHOSTS Lookup check box. If you want to resolve the host name of a machine, lv3030c, with IP address 9.3.187.213, you would add the following line into C:\winnt\system32\drivers\etc\LMHOSTS:
9.3.187.213 lv3030c
• Use the nbtstat command on the client to check NetBIOS name resolution.
11.6.2 BrowsingCheck the resource browsing on the client by using the following commands:
• Use net view to get the list of all visible computers on the network.
• Use net view \\NetBIOS_name to see the resources on single server.
• Use browstat for detailed information.
11.6.3 AuthenticationCheck whether the guest account is enabled and whether the guest user name is appropriate for an AIX user.
11.6.4 NetlogonSometimes, you may experience problems when working with the User profiles and System policies. You can use some tools and hints to deal with this.
Checking whether the startup script runsIf you are not sure if the startup script is running when a user logs in, add the pause command to the script. You should see a window at the login waiting on your input.
Disable the local profileIf you are not sure whether your local or remote profile is used, make this registry change to use only remote profile (clear local profile on exit):
My Computer\HKEY_LOCAL_MACHINE\SOFTWARE\Microsoft\Windows NT\Current Version\WinLogon\DeleteRoamingCache=1 (DWORD)
Chapter 11. Fast Connect for AIX troubleshooting 191
Remove profilesIf you want to remove a complete profile for a user on a single computer, you can use the delprof command. It is located on a Windows NT Server Resource Kit, Version 4.0. The basic syntax for the delprof command is:
delprof [/p] [/c:\\computer]
The flags are:
/p Prompt before deleting profile
/c:\\computer Specify remote computer
Enable logging of user profile actionsYou can use the checked version of UserEnv.dll library, which is located on the Windows NT Device Driver Kit (DDK) or Windows NT Software Development Kit (SDK). The steps to use this library are as follows:
1. Rename %systemroot%\system32\UserEnv.dll to UserEnv.old.
2. Copy the checked version of UserEnv.dll to %systemroot%\system32.
3. Start regedt32, and, in the path
HKEY_LOCAL_MACHINE\SOFTWARE\Microsoft\Windows NT\ CurrentVersion\Winlogon
create a new value, UserEnvDebugLevel (REG_DWORD), with the value 10002.
4. Reboot the computer.
Logging information is recorded in the C:\UserEnv.log.
11.6.5 File system sharesWhen you experience problems with access to the resources:
• Check file and directory owner and access permissions on the server.
• Check the Fast Connect for AIX umask setting on the server.
11.6.6 Printer shareWhen you experience problems with access to the resources:
• Check a direct printing from AIX print queue on the server.
• Check and compare printer definition on both server and client.
• Create a file on the client (using the print to file option), transfer it to server, and try to print directly from there.
192 Fast Connect for AIX Version 3.1 Guide

Appendix A. Additional information
This section describes some considerations, limitations, and updates in Fast Connect for AIX. This is a part of README file (in the /etc/cifs directory) for Fast Connect for AIX Version 3.1. Some limitations have been fixed in the latest version of Fast Connect for AIX.
DBCS and UnicodeFor DBCS and Unicode:
• Share names and Share Descriptions must be in ASCII.
• Environment setting LC_MESSAGES=C@lft does not support multibyte characters. If Fast Connect for AIX is running in a multibyte environment and LC_MESSAGES is set to C@lft, either unset it or set this variable to the correct locale at the beginning of the Fast Connect for AIX program. When /etc/rc.cifs start is used to start the Fast Connect for AIX server, LC_MESSAGES is automatically set to match the LANG environment variable.
• There are four known Japanese characters that are not supported, due to differences in Unicode mapping between IBM cp943 and Microsoft ms932 as follow:
- SJIS code 815C: EM DASH
- SJIS code 8160: WAVE DASH
- SJIS code 8161: DOUBLE VERTICAL LINE
- SJIS code 817C: MINUS SIGN
Password • When encrypted-passwords are disabled (encrypt_passwords=0, and
passthrough authentication is not being used), then the AIX (or DCE or NIS) passwords being used to authenticate each user must contain all uppercase or all lowercase characters. This is required because SMB plain-text passwords are not case-sensitive.
• When encrypted-passwords are enabled (encrypt_passwords=1 or 2, and passthrough authentication is not being used), then those encrypted-passwords can be mixed-case, and may contain any characters
These are now supported with a configurable parameter in Fast Connect for AIX Version 3.1.0.x updates.
Note
© Copyright IBM Corp. 2001 193
supported by AIX passwords. However, Fast Connect does not check the AIX "password restrictions" configured for that AIX user.
Passthrough authentication support • When Fast Connect for AIX is configured for passthrough authentication,
and if the passthrough authentication server is not responding (or is "down"), then authentication will continue with normal authentication on the Fast Connect for AIX server. Depending on the value of the encrypt_passwords option, the Fast Connect for AIX server will try to authenticate that client by using plain-text or encrypted passwords.
• When passthrough authentication is enabled, network logon support will not work. These two options are mutually exclusive.
• When passthrough authentication is enabled, Windows Terminal Server support does not work. These two options are mutually-exclusive.
Guest Logon support • Guest Logon Support currently requires encrypt_passwords=0 (plain-text
passwords).
• If DCE authentication is enabled (dce_auth=1), guest logon is not supported.
• If passthrough authentication is configured, guest logon support does not work. This is a defect that will be fixed soon.
DCE/DFS Support • If Fast Connect is configured to use encrypted passwords, then each Fast
Connect user must be configured by entering the DCE password for that user by using the net user command.
Network Logon • If multiuserlogin=1, Network Logon support does not work. These two
options are mutually-exclusive.
• If the profiles_path parameter is set to a directory on DFS, then the root user will not be able to automatically create sub-directories for each user, when saving user-profiles (User-profiles will not be saved). To work around this problem, each user wishing to save a profile on DFS must manually create a directory named <profiles_path>/<username>/Profiles.
Windows Terminal Server support • To enable Windows Terminal Server support, set multiuserlogin=1.
• When Network Logon support is enabled (networklogon=1), Windows Terminal Server support does not work. These two options are mutually-exclusive.
194 Fast Connect for AIX Version 3.1 Guide
• If passthrough authentication is enabled, Windows Terminal Server support does not work. These two options are mutually-exclusive.
File and share size • The maximum file size is 4GB (Individual files must be less than 4GB).
• Fast Connect for AIX allows file shares to be larger than 4GB, but some client software (for example, Windows for Workgroups 3.11) use older network protocols that use 32-bit "Free Space" values, which causes the client software to report "Free Space" on that share as 4GB (or, in some cases, 2GB).
File and Print Share administration • "Changing" a File or Print Share (including the "share description") causes
that share-definition to be deleted, and then re-added with its new values. This will affect all PC-clients that are connected to that share, when it is re-defined -- these PC-clients may experience "Network error" or "Share not found" errors, until they re-map that share manually, or by re-booting the PC.
• "Hidden" shares (not displayed by Network Neighborhood or by NET VIEW) may be defined by adding a dollar-sign ("$") at the end of the share-name, when creating the share.
Known defects and anomalies • Copying a file from an NT client to the Fast Connect server does not
preserve the file's timestamp. A workaround to this problem is to set nt_dialect=0, forcing the LANMAN2.1 protocol to be used. This workaround does not work for clients that need to use Unicode, because LANMAN2.1 does not support Unicode.
• dosfilenamemapping=1 is strongly recommended if 16-bit applications, Windows 3.1, or DOS is being used. (dosfilenamemapping=0 can lead to unpredictable results with these environments, and is not recommended or supported.)
• When acl_inheritance is enabled (acl_inheritance=1), then accesscheckinglevel=1 may be desired, also. (Otherwise, file-attributes and sizes may be improperly reported, if the root user does not have access to those files and directories. However, please note that accesscheckinglevel=1 does significantly slow down performance of the Fast Connect server.)
This problem is fixed in the latest version of Fast Connect for AIX.
Note
Appendix A. Additional information 195

196 Fast Connect for AIX Version 3.1 Guide
Appendix B. Special notices
This publication is intended to help system engineers, I/T architects, and consultants understand the capabilities of the Fast Connect for AIX. The information in this publication is not intended as the specification of any programming interfaces that are provided by the Fast Connect for AIX product. See the AIX 5L V5.1 System Management Guide: Communications and Networks, for more information about what publications are considered to be product documentation.
References in this publication to IBM products, programs or services do not imply that IBM intends to make these available in all countries in which IBM operates. Any reference to an IBM product, program, or service is not intended to state or imply that only IBM's product, program, or service may be used. Any functionally equivalent program that does not infringe any of IBM's intellectual property rights may be used instead of the IBM product, program or service.
Information in this book was developed in conjunction with use of the equipment specified, and is limited in application to those specific hardware and software products and levels.
IBM may have patents or pending patent applications covering subject matter in this document. The furnishing of this document does not give you any license to these patents. You can send license inquiries, in writing, to the IBM Director of Licensing, IBM Corporation, North Castle Drive, Armonk, NY 10504-1785.
Licensees of this program who wish to have information about it for the purpose of enabling: (i) the exchange of information between independently created programs and other programs (including this one) and (ii) the mutual use of the information which has been exchanged, should contact IBM Corporation, Dept. 600A, Mail Drop 1329, Somers, NY 10589 USA.
Such information may be available, subject to appropriate terms and conditions, including in some cases, payment of a fee.
The information contained in this document has not been submitted to any formal IBM test and is distributed AS IS. The use of this information or the implementation of any of these techniques is a customer responsibility and depends on the customer's ability to evaluate and integrate them into the customer's operational environment. While each item may have been reviewed by IBM for accuracy in a specific situation, there is no guarantee that the same or similar results will be obtained elsewhere. Customers
© Copyright IBM Corp. 2001 197

attempting to adapt these techniques to their own environments do so at their own risk.
Any pointers in this publication to external Web sites are provided for convenience only and do not in any manner serve as an endorsement of these Web sites.
The following terms are trademarks of the International Business Machines Corporation in the United States and/or other countries:
The following terms are trademarks of other companies:
Tivoli, Manage. Anything. Anywhere.,The Power To Manage., Anything. Anywhere.,TME, NetView, Cross-Site, Tivoli Ready, Tivoli Certified, Planet Tivoli, and Tivoli Enterprise are trademarks or registered trademarks of Tivoli Systems Inc., an IBM company, in the United States, other countries, or both. In Denmark, Tivoli is a trademark licensed from Kjøbenhavns Sommer - Tivoli A/S.
C-bus is a trademark of Corollary, Inc. in the United States and/or other countries.
Java and all Java-based trademarks and logos are trademarks or registered trademarks of Sun Microsystems, Inc. in the United States and/or other countries.
Microsoft, Windows, Windows NT, and the Windows logo are trademarks of Microsoft Corporation in the United States and/or other countries.
PC Direct is a trademark of Ziff Communications Company in the United States and/or other countries and is used by IBM Corporation under license.
ActionMedia, LANDesk, MMX, Pentium and ProShare are trademarks of Intel Corporation in the United States and/or other countries.
AFPAS/400Home DirectorLotusNetfinityOS/2RedbooksRS/6000System/390
AIXe (logo)® IBM ®Lotus NotesNotesPC 300Redbooks Logo SPWizard
198 Fast Connect for AIX Version 3.1 Guide

UNIX is a registered trademark in the United States and other countries licensed exclusively through The Open Group.
SET, SET Secure Electronic Transaction, and the SET Logo are trademarks owned by SET Secure Electronic Transaction LLC.
Netbench is a registered trademark of Ziff Davis Publishing Holdings Inc., an affiliate of eTesting Labs Inc., in the United States and other countries.
Other company, product, and service names may be trademarks or service marks of others.
Appendix B. Special notices 199

200 Fast Connect for AIX Version 3.1 Guide
Appendix C. Related publications
The publications listed in this section are considered particularly suitable for a more detailed discussion of the topics covered in this redbook.
C.1 IBM Redbooks
For information on ordering these publications see “How to get IBM Redbooks” on page 203.
• AIX 5L and Windows 2000: Solutions for Interoperability, SG24-6225
• AIX 5L and Windows 2000: Side by Side, SG24-4784
• Printing for Fun and Profit under AIX 5L, SG24-6018
• Understanding IBM RS/6000 Performance and Sizing, SG24-4810
C.2 IBM Redbooks collections
Redbooks are also available on the following CD-ROMs. Click the CD-ROMs button at ibm.com/redbooks for information about all the CD-ROMs offered, updates and formats.
C.3 Other resources
These publications are also relevant as further information sources:
• AIX 5L Version 5.1 System Management Guide: Operating System and Devices, SC23-2525
• AIX 5L Version 5.1 Network Installation Management Guide and Reference
• AIX 5L Version 5.1 Quick Installation and Startup Guide
CD-ROM Title Collection Kit Number
IBM System/390 Redbooks Collection SK2T-2177IBM Networking Redbooks Collection SK2T-6022IBM Transaction Processing and Data Management Redbooks Collection SK2T-8038IBM Lotus Redbooks Collection SK2T-8039Tivoli Redbooks Collection SK2T-8044IBM AS/400 Redbooks Collection SK2T-2849IBM Netfinity Hardware and Software Redbooks Collection SK2T-8046IBM RS/6000 Redbooks Collection SK2T-8043IBM Application Development Redbooks Collection SK2T-8037IBM Enterprise Storage and Systems Management Solutions SK3T-3694
© Copyright IBM Corp. 2001 201

• AIX 5L Version 5.1 System Management Guide: Communications and Networks
C.4 Referenced Web sites
These Web sites are also relevant as further information sources:
• http://service.boulder.ibm.com/asd-bin/doc/en_us/winntcl2/f-feat.htm
• http://service.boulder.ibm.com/asd-bin/doc/en_us/win95cl/f-feat.htm
• http://www.zdnet.com/etestinglabs/filters/benchmarks
• http://support.microsoft.com/download/support/mslfiles/vrdrupd.exe
• http://support.microsoft.com/support/tshoot/nt4_tcp.asp
• http://download.microsoft.com/download/win95upg/vredir/1/W95/EN-US/vredr
upd.exe
• http://www.ibm.com/servers/aix/library/index.html
• http://www.elink.ibmlink.ibm.com/pbl/pbl
• http://java.sun.com/products/plugin
202 Fast Connect for AIX Version 3.1 Guide

How to get IBM Redbooks
This section explains how both customers and IBM employees can find out about IBM Redbooks, redpieces, and CD-ROMs. A form for ordering books and CD-ROMs by fax or e-mail is also provided.
• Redbooks Web Site ibm.com/redbooks
Search for, view, download, or order hardcopy/CD-ROM Redbooks from the Redbooks Web site. Also read redpieces and download additional materials (code samples or diskette/CD-ROM images) from this Redbooks site.
Redpieces are Redbooks in progress; not all Redbooks become redpieces and sometimes just a few chapters will be published this way. The intent is to get the information out much quicker than the formal publishing process allows.
• E-mail Orders
Send orders by e-mail including information from the IBM Redbooks fax order form to:
• Telephone Orders
• Fax Orders
This information was current at the time of publication, but is continually subject to change. The latest information may be found at the Redbooks Web site.
In United States or CanadaOutside North America
e-mail [email protected] information is in the “How to Order” section at this site:http://www.elink.ibmlink.ibm.com/pbl/pbl
United States (toll free)Canada (toll free)Outside North America
1-800-879-27551-800-IBM-4YOUCountry coordinator phone number is in the “How to Order” section at this site:http://www.elink.ibmlink.ibm.com/pbl/pbl
United States (toll free)CanadaOutside North America
1-800-445-92691-403-267-4455Fax phone number is in the “How to Order” section at this site:http://www.elink.ibmlink.ibm.com/pbl/pbl
IBM employees may register for information on workshops, residencies, and Redbooks by accessing the IBM Intranet Web site at http://w3.itso.ibm.com/ and clicking the ITSO Mailing List button. Look in the Materials repository for workshops, presentations, papers, and Web pages developed and written by the ITSO technical professionals; click the Additional Materials button. Employees may access MyNews at http://w3.ibm.com/ for redbook, residency, and workshop announcements.
IBM Intranet for Employees
© Copyright IBM Corp. 2001 203
IBM Redbooks fax order form
Please send me the following:
We accept American Express, Diners, Eurocard, Master Card, and Visa. Payment by credit card notavailable in all countries. Signature mandatory for credit card payment.
Title Order Number Quantity
First name Last name
Company
Address
City Postal code
Telephone number Telefax number VAT number
Invoice to customer number
Country
Credit card number
Credit card expiration date SignatureCard issued to
204 Fast Connect for AIX Version 3.1 Guide

Abbreviations and acronyms
ACL Access Control Lists
AFP Apple File and Print Protocol
AFN AIX File Name
AFS Andrew File System
AIX Advanced Interactive Executive
ANSI American National Standards Institute
API Application Program Interface
AS/U Advanced Server for UNIX
ATM Asynchronous Transfer Mode
BDC Backup Domain Controller
CN Common Names
CPU Central Processing Unit
CSR Customer Service Request
DAP Directory Access Protocol
DDK Windows NT Device Driver Kit
DLPI Data Link Provider Interface
DFN DOS File Name
DNS Domain Name System
DOS Disk Operating System
FAT File Allocation Table
FDDI Fiber Distributed Data Interface
HTML Hypertext Markup Language
© Copyright IBM Corp. 2001
iFOR/LS Information for Operation Retrieval/License System
IBM International Business Machines Corporation
IPF Install Package Facility
IPX Internetwork Packet eXchange
ITSO International Technical Support Organization
JRE Java 2 Runtime Environment
LAN Local Area Network
LANA Local Area Network Adapter
LDAP Lightweight Directory Access Protocol
LPP Licensed Program Products
LPR Line Printer
NBNS NetBIOS Name Server
NCP Network Core Protocol
NCPS Novell Cross-Platform Services
NDS Novell Directory Services
NetBIOS Network Basic Input/Output System
NFS Network File System
NIS Network Information System
NNS Novell Network Services
NPS NetWare Protocol Stack
NTFS NT File System
205

NUC NetWare UNIXClient
NetBEUI NetBIOS Extended User Interface
OEM Original Equipment Manufacturer
PC Personal Computer
PDC Primary Domain Controller
PPA Physical Point of Attachment
RFC Request For Comments
RIP Routing Information Protocol
RS/6000 SP IBM RS/6000 Scalable POWERParallel Systems.
SAM Security Accounts Manager
SANDS Standalone NDS
SAP Service Advertising Protocol
SAPD SAP daemon
SCALE Scalable NDS
SDK Windows NT Software Development Kit
SMB Server Message Block
SMIT System Management Interface Tool
SMP Symmetric Multiprocessor
SNMP Simple Network Management Protocol
SP Scalable POWERParallel
SPX Sequenced Packet eXchange
TAS TotalNET Advanced Server
TCP/IP Transmission Control Protocol/Internet Protocol
TNAS TotalNET Administration Suite
UNC Universal Naming Convention
VMS Virtual Memory System
WINS Windows Internet Name Service
Windows NT Windows New Technology
206 Fast Connect for AIX Version 3.1 Guide

Index
Symbols/etc/cifs 173/etc/cifs/cifsConfig 190/etc/cifs/cifsPasswd 123, 127, 129/etc/cifs/nbnames.cur 162/etc/inittab 172/etc/passwd 115/etc/protocols 184/etc/rc.cifs 172/etc/security/passwd 115, 132/etc/security/user 99/etc/services 184/usr/HTTPServer/htdocs/en_US 13/usr/HTTPServer/readme 12/usr/sbin/cifsPrintServer 173/usr/sbin/cifsServer 173/var/cifs/cifsLog 190/var/log/cifsLog 173
Numerics251 HKWD NETERR 188252 HKWD SYSC TCPIP 188253 HKWD SOCKET 18825A HKWD TCPDBG 1882EE CIFS 1882EF CIFS 1882F0 CIFS 1882F1 CIFS 1882F2 CIFS 1882F3 CIFS 1882F4 CIFS 1882F5 CIFS 189
AAccess 171Access Control List 84accesscheckinglevel 88ACL
disabling 86enabling 86inheritance 87removing 86
acl_inheritance 88acledit 85Active Directory 107, 113
© Copyright IBM Corp. 2001
Address resolution 171ADMIN$ 22Administrative tools 123AIX integrated login 99alias names support 96arp 174authentication 115, 171
Bbackup browser 4Backup Domain Controller 135backup_passthrough_authentication_server 138Bonus Pack 10broadcast 3browser
backup 5domain 5master 5potential 5
browsing 4, 171browstat 171, 179
CCDE 85changeaixpwd 133CIFS 171cifsConfig 88cifsLdap 107
DDCE 97
any_other group 99logon 98
dce_auth 96DES 115DFS 97DNS 1, 3, 5, 6, 7, 178
server 1domain group name 2domain master browser 4DOS 145DOS application 68, 82DOS file attributes 94dtfile.config 86
207

EEnablePlainTextPassword 122, 123encrypt_passwords 120, 126, 135enq 36Entire Network 46entrymods 109errpt 190
FFast Connect password
changing 129synchroninzing 132
Fast Connect serveraccessing the resources 48locating 45modifying 26starting 19stopping 24
Fast Connect useradding 126
file locking 88file name
characters casing 92mapping 9, 92
file shareadding 29defining 29deleting 32
Find Computer 45, 61Force encryption 124
GGeneric TCP/IP utilities
arp 174ipconfig 174netstat 174nslookup 174ping 174route 174traceroute 174
group 160guestlogonsupport 95guestname 95
HHACMP 96HOME 22, 98
hooks 188HOSTS 5, 178
IIBM HTTP Web Server 12IBM Network Client 147IBMLAN$ 22internet_group 160IP address 160ipconfig 174iptrace 184ISO8859-1 83
Kkernel I/O 9
LLANG 83ldapsearch 111LMHOSTS 1, 3, 4, 5, 7, 146, 178Local policies 123lslpp 16, 190
Mmaster browser 2, 4Messaging 102Microsoft Windows Network 46Multihomed 160My Network Places 73
NName resolution 171Name type 159nblistnames 182NBNS 4, 9, 58, 157, 159
adding a static name 163configuring 157deleting an entry 164listing the table 160table backup 166
nbstatus 182nbtstat 171, 178net 9, 19, 24, 28, 32, 37, 141, 164, 182net session 99NET VIEW 47, 62, 76NetBIOS 1, 3, 5, 6, 7, 9, 26, 63, 76, 146, 157, 163
cache 1
208 Fast Connect for AIX Version 3.1 Guide

name server 1NetBIOS over TCP/IP troubleshooting 177NetBT 1NetDDE 2netlogon 141, 171
enabling 142netlogon_path 141, 144netstat 171, 173, 174, 190Network Buffer Cache 30network drive
mapping 50Network Neighborhood 45, 60network resource 5networklogon 141, 144node 160
modifying node type 4type 1, 4type B 3type H 3type M 3
nslookup 171, 174NTconfig.pol 145
Ooplockfiles 90oplocks 88
batch 88exclusive 88level II 88
oplocktimeout 90oslevel 190
Ppassthrough authentication 135, 137passthrough_authentication_server 138password 39
changing 40encrypted 123non encrypted 116, 120, 126, 135synchronizing 132
pathping 171PC services 20, 116, 124ping 171, 174poledit 146Policy Editor 145Primary Domain Controller 2, 5, 135print queue 36printer share
accessing 51changing 36defining 33deleting 38
profilescript 145
profile.bat 152profiles_path 141, 144PTXT_ON.INF 122
Rrccifs 172REGEDIT 4REGEDT32 4registry 122Remote Access Server 2Remote password changing 138requirement
hardware 10software 11
RFC 1001 1RFC 1002 1route 171, 174RSA 115, 123
SSecurity policy 123Send File API 91send_file_api 91send_file_cache_size 91send_file_duration 91send_file_size 91Server Message Block 9Share level security 103share_options 90shares 19
NETLOGON 145printer 33
ShowInAdvancedViewOnly 107SMB 9, 171SMB protocol 171
Access 171Authentication 171Browsing 171Name resolution 171Netlogon 171smbclient 171
smbcfghatt 159
209

smbclient 171smbwcfgn 161smit 19, 24, 31, 32, 37, 83, 94, 119, 125, 141startup_script 141, 144, 152statistics 182status 24Synchronizing passwords 133system policy 141
editor 145
TTCP/IP protocol 171
Address resolution 171Name resolution 171Routing 171
tcpdump 185third_party SMB servers 123thread 9trace 9, 189traceroute 171, 174tracert 171, 177trcrpt 189
UUnicode 9, 83unique 159Universal Naming Convention 49user 182
Fast Connect 127profile 40, 141
user database 115User Name Mapping 94User sessions 99users
Windows 95 39Windows 98 39
UTF-8 83
Vvi editor 108vnetsup.vxd 121vredir.vxd 121
WWeb-based System Manager 9, 11, 19, 33, 83, 99, 124, 142, 157Windows 2000 11, 69, 123
Windows 98 122Windows 98 SE 122Windows NT 57, 122
Service Pack 122winipcfg 175WINS 2, 3, 4, 6, 7, 9, 43, 58, 60, 71, 157, 178, 190
configuration 42proxy 9, 166, 167
WINS resolutionenabling 43
workgroup 26, 58, 70Workspace Manager 87workstation service 57, 69
210 Fast Connect for AIX Version 3.1 Guide
© Copyright IBM Corp. 2001 211
IBM Redbooks review
Your feedback is valued by the Redbook authors. In particular we are interested in situations where a Redbook "made the difference" in a task or problem you encountered. Using one of the following methods, please review the Redbook, addressing value, subject matter, structure, depth and quality as appropriate.
• Use the online Contact us review redbook form found at ibm.com/redbooks • Fax this form to: USA International Access Code + 1 845 432 8264 • Send your comments in an Internet note to [email protected]
Document NumberRedbook Title
SG24-5527-01Fast Connect for AIX Version 3.1 Guide
Review
What other subjects would you like to see IBM Redbooks address?
Please rate your overall satisfaction:
O Very Good O Good O Average O Poor
Please identify yourself as belonging to one of the following groups:
O Customer O Business Partner O Solution DeveloperO IBM, Lotus or Tivoli EmployeeO None of the above
Your email address:The data you provide here may be used to provide you with information from IBM or our business partners about our products, services or activities.
O Please do not use the information collected here for future marketing or promotional contacts or other communications beyond the scope of this transaction.
Questions about IBM’s privacy policy?
The following link explains how we protect your personal information.ibm.com/privacy/yourprivacy/


Fast Connect for AIX Version 3.1 Guide


®
SG24-5527-01 ISBN 073842305X
INTERNATIONAL TECHNICALSUPPORTORGANIZATION
BUILDING TECHNICALINFORMATION BASED ONPRACTICAL EXPERIENCE
IBM Redbooks are developed by the IBM International Technical Support Organization. Experts from IBM, Customers and Partners from around the world create timely technical information based on realistic scenarios. Specific recommendations are provided to help you implement IT solutions more effectively in your environment.
For more information:ibm.com/redbooks
Fast Connect for AIXVersion 3.1 Guide
Install, set up, and customize a Fast Connect for AIX server
Detailed overview of advanced functionality
Step by step problem solving procedures
Fast Connect for AIX, announced with AIX 4.3.2, was IBM’s first step to let PCs take advantage of the performance, scalability, and reliability of AIX. The new version 3.1 adds powerful new features, such as user name mapping and remote password change.
This redbook walks you through the installation and the setup of Fast Connect on your server. It shows how to customize this product by declaring file shares, and print shares. Because security and ease of administration of the password databases on the network are two important tasks for the system administrator, this book describes which security models are available and how to set up your PC clients to communicate with the Fast Connect for AIX server.
For its in depth coverage of the Fast Connect for AIX product, this book is a must-read for I/T specialists who have to recommend a solution for AIX and PC interoperability, as well as system administrators who have to implement such a solution.