Embed Size (px)
Citation preview
February 2006 Colby College ITS
Quick Start Lab

February 2006 Colby College ITS
Before we Start…
• CommonSpot contributors can:– Edit only existing content…or…– Edit and create content only on existing pages…or…– Edit and create pages and content
• Which of these you do determines which tasks you will need to know
• This hands-on tutorial will walk you through all of these functions
• Because we will be doing so many different things, we will start by creating a dummy page and elements
• This page – and any changes we make on it – will be deleted at the end of the tutorial
February 2006 Colby College ITS
Four Things to Remember
Quick Start Lab

February 2006 Colby College ITS
Four Things that will “Get” You
• Pop-up windows
• The Author System
• Logging in
• Author mode

February 2006 Colby College ITS
Pop-Up Blocking
• Pop-Up blocking prevents unwanted pop-up windows
• CommonSpot uses pop-up windows for dialogs
• For CommonSpot to work properly, pop-up blocking must be disabled
• Disabling pop-up blocking for a CommonSpot site will not affect blocking for other web sites

February 2006 Colby College ITS
Authoring System
• www.colby.edu– User view– No access to authoring or publishing
• author.colby.edu– Author view– Access to authoring and publishing
functions

February 2006 Colby College ITS
Logging In
• In order to access the functions you need to edit your CommonSpot pages
• You must be LOGGED IN to the Colby site
• Click LOGIN in the upper right corner of the Colby Banner

February 2006 Colby College ITS
Author Mode
• Three modes in CommonSpot– Read– Edit– Author
• You MUST be in Edit or Author to do anything but “read” your page

February 2006 Colby College ITS
Author System
• Start a browser window
• Enter the authoring system author.colby.edu/[…your page URL…]
• Do you see any icons?
• Login to the Colby site
• Now do you see icons?
• Bookmark this page
February 2006 Colby College ITS
Terms, Screen and Icons
Quick Start Lab

February 2006 Colby College ITS
Terms
1. Icons
2. Ghost text
3. Elements
4. Above the fold
5. Content well
1.
1.
2. 3.
4.
5.

February 2006 Colby College ITS
CommonSpot Screen (1)
1. Title BarThe text ie puts at the top of the browser window
2. Activation Status and BannerWhen you want the page published
3. Breadcrumbs“You are Here…”
4. TitleThe text CS puts at the top of the page
5. Table of ContentsLeft navigation list
6. Content The information on the page goes here
7. IconsFunction menus
1.
2.
3.
4.5.
6.
7.

February 2006 Colby College ITS
CommonSpot Screen (2)
1. Menu Iconsa) Display menu
b) Role menu
c) Page menu
1.
a b c

February 2006 Colby College ITS
Icon Menus
Display Options Role Options Page Mgt. Options
You will usethese the most

February 2006 Colby College ITS
Author Mode
• Click on a text element• Does anything happen?• Click on the Page Management icon• Do you see “Page Properties”?• Click on the Mode icon• Select “Author” mode• Now Click on the Page Management icon• Now click on a text element• Click Cancel

February 2006 Colby College ITS
Creating Pages
Quick Start Lab

February 2006 Colby College ITS
Creating a Dummy Training Page (1)
• Click the Page Mgt. icon– Click on Create
New Page– Click Next to create
the page directly “under” your home page
• Select: Colby | Generic TemplatesOR
• If your department has specific templates listed– Select your
departmental template listing

February 2006 Colby College ITS
Creating a Dummy Training Page (2)
• If you selected Generic Templates– Click on Basic
Template

February 2006 Colby College ITS
Creating a Dummy Training Page (3)
• Name– URL-appropriate– Lowercase, no spaces
• Title– Display name on page
• Click on orange arrow Enter keywords
• Set confidentiality• Optional
– Publication date– Expiration– Reminder
• Click Next
February 2006 Colby College ITS
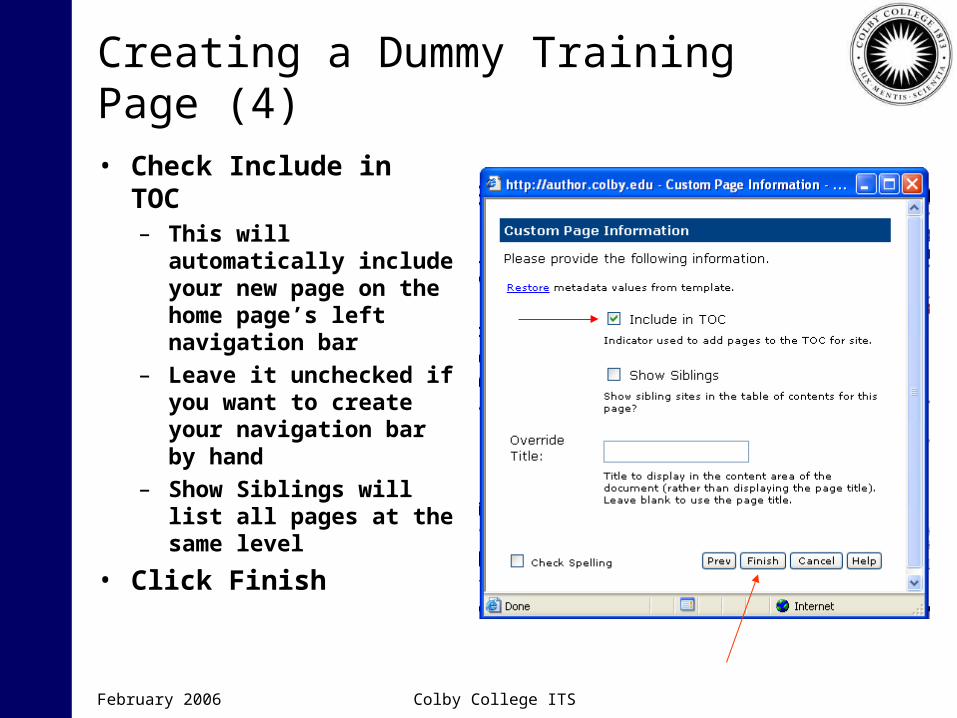
Creating a Dummy Training Page (4)
• Check Include in TOC– This will automatically
include your new page on the home page’s left navigation bar
– Leave it unchecked if you want to create your navigation bar by hand
– Show Siblings will list all pages at the same level
• Click Finish

February 2006 Colby College ITS
Creating a Dummy Training Page (5)
• Your new page is created• Note the green status bar• Uncheck “Activate when published”• Bookmark this page
February 2006 Colby College ITS
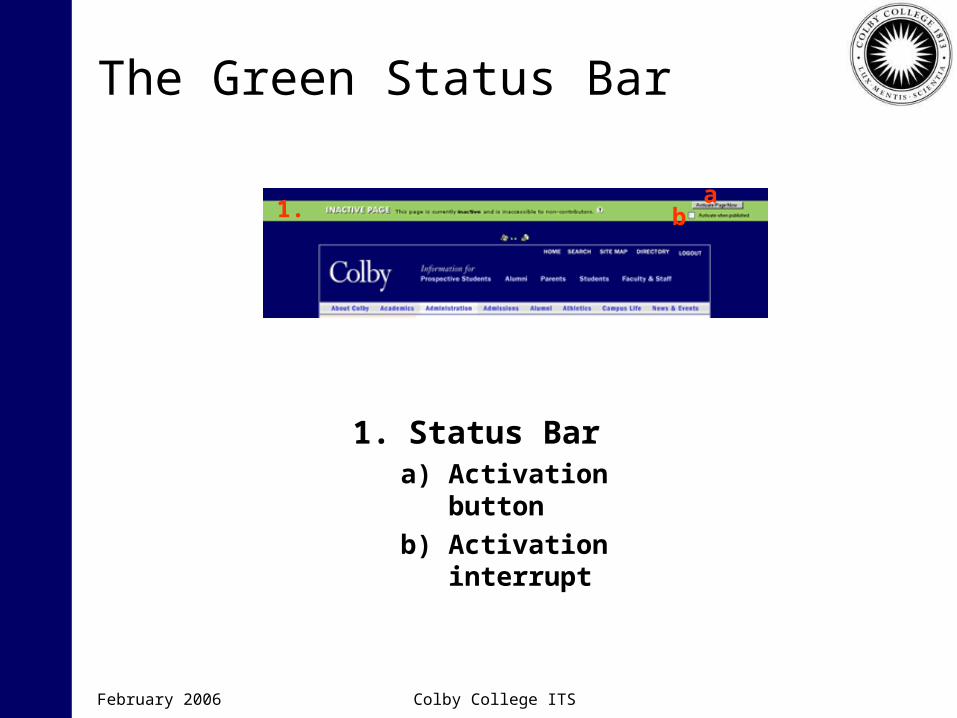
The Green Status Bar
1. Status Bara) Activation button
b) Activation interrupt
1.a
b

February 2006 Colby College ITS
Working with Elements
Quick Start Lab

February 2006 Colby College ITS
Creating Dummy Training Elements (1)
• Return to your department page
• Can you see any icons? What should you do?
• Click on the Mode icon
• Click on Author
• Click on the first element’s Element Properties icon
• Click on Copy Element
• Return to your new page
• Go into Author mode

February 2006 Colby College ITS
Creating Dummy Training Elements (2)
• Click on ghost text “Click to insert new element”
• Click on “Insertthe copiedelement”
• Repeat these steps with different elements until you have 3 or 4 elements on your new page
• You now have a page to work with for this training

February 2006 Colby College ITS
What was Changed?
• Note the change on the page
• Click on Mode icon
• Click on Read
• Are the changes there?
• How do we make them appear?

February 2006 Colby College ITS
Work in Progress Icons
• Yellow circles– Symbol depends on
nature of the element
– They indicate action required in order to “publish”
• Click on the WIP icon next to your new element
• Click on one WIP icon• Select Submit Entire
Page…
• Discard Change would delete all the edits you have done so far
• Click on Mode Icon• Click on Read• Now look at your page
+ – …

February 2006 Colby College ITS
Deleting an Element
• Click on the Element Properties icon on one of your page elements
• Click on Delete Element
• Click OK• Now look at page
• Go into Read mode• Is the element still
there?• Go to Author mode• Click on yellow WIP
icon with minus sign• Now check your
page in Read mode• Return to Author
mode

February 2006 Colby College ITS
Content Well Layout Element
• Click on this icon• Click on Layout
Properties…• Click on Background
Image• Click New• Browse to any image on
your computer• Click Open• Click Next• Click Finish• Look at your page!
• Click on the icon• Click on Layout Properties• Click on “Clear the
background image” icon• Click Finish• Now look at your page
Layout Element

February 2006 Colby College ITS
Element Properties Icon
• Click on this icon for the bottom-most element on your page
• Move this element:– Up– Down– To Top– To Bottom
• Click Element Name• Enter
“bottomelement”• Click Finish
Element Properties

February 2006 Colby College ITS
Edit Content Icon
• Click on this icon for any element on your page
• Click on “Edit…”
• What happens?
• Edit some of the text
• Click Finish
• What does the element look like now?
Edit Content

February 2006 Colby College ITS
Going Directly to Edit
• Click anywhere in/on the element
• What happens
• Make another edit
• Click Finish
February 2006 Colby College ITS
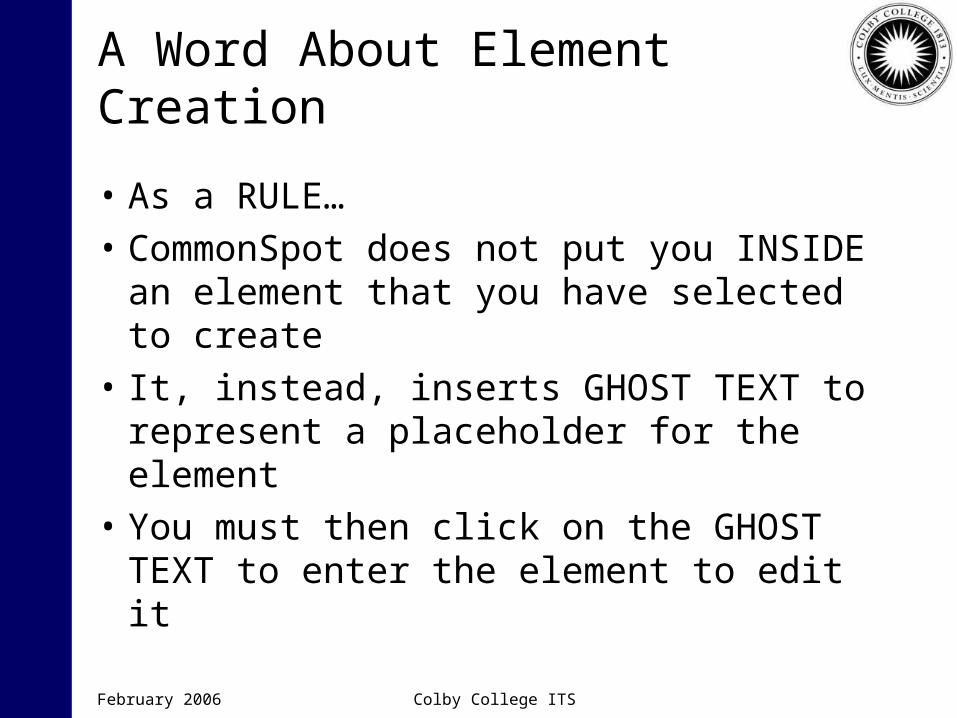
A Word About Element Creation
• As a RULE…
• CommonSpot does not put you INSIDE an element that you have selected to create
• It, instead, inserts GHOST TEXT to represent a placeholder for the element
• You must then click on the GHOST TEXT to enter the element to edit it

February 2006 Colby College ITS
Text Elements
Quick Start Lab
February 2006 Colby College ITS
About Text
• If you need to insert text that is formatted in any way (bold, underlined, linked to some other file, or including an image) – Use one of the “formatted” text elements
• If all you need to do is enter straight text– Use one of the “simple” text elements
February 2006 Colby College ITS
Creating Text Elements
• Click on ghost text “Click to insert new element”
• Click on Text Elements
• We will create– Formatted text block– Formatted text block
(without header)– Simple text block– Simple text block
(without header)
• Creation Loop– Click on each of the
text block types in turn– Click on ghost text to
edit the element– Type text wherever you
can in form– Until you have 4 text
blocks
• Compare elements on the page

February 2006 Colby College ITS
Image Elements
Quick Start Lab

February 2006 Colby College ITS
About Images
• Where to find…– Public gallery, ones your department has
uploaded, ones you have uploaded– Establish a policy for your web pages
• Sizes– Size images BEFORE using them
• Two ways to create:– From a formatted text block– From create element ghost text

February 2006 Colby College ITS
Creating Image Elements (1)
• Element Creation– Click on ghost text
“Click to insert new element”
– Click on Image Elements
• Creation Loop– Click on in turn:
• Single Image• Single Image without
header• Text around an image
• Single Image– Create a single image
element– Click on placeholder
graphic– Click on Gallery– Find your name under
Owner– Click Show Images– Click on image you
uploaded earlier– Click Finish– Click on header to edit it– Click Finish

February 2006 Colby College ITS
Creating Image Elements (2)
• Single Image (without header)– Create a single image
element without header element
– Click on placeholder graphic
• Click New• Browse to an image on
your computer• Click Open• Click Next• Click Finish
• Text around an image– Create a Text around an
image element– Click on placeholder
graphic– Click on Gallery– Find your name under
Owner– Click Show Images– Click on either image
you uploaded earlier– Click Finish
• Compare elements on the page
February 2006 Colby College ITS
Hyperlink Elements
Quick Start Lab

February 2006 Colby College ITS
About Hyperlink Elements
• Two ways:– From a formatted text block– From create element ghost text
• And a whole list of things you can link to– Documents– Other pages– Other places on the same page– eMail addresses

February 2006 Colby College ITS
Creating Hyperlink Elements (1)
• Click on one of the formatted text blocks you created earlier to edit it
• Highlight a word or phrase
• Click on the hyperlink icon

February 2006 Colby College ITS
Creating Hyperlink ElementsExisting External Page
• Click Link to Existing Page, Uploaded Document or URL
• Click Next• Click External URL• Enter
http://www.google.com
• Click Finish 3 times
• Publish your change• Click on linked text• What happens?• Click Cancel• Click on Mode icon• Click on Read• Click on linked text• What happens now?• Return to Author
mode

February 2006 Colby College ITS
Creating Hyperlink ElementsExisting Internal Page
• Click Link to Existing Page, Uploaded Document or URL
• Click Next• Experiment with
Gallery and Page Finder to see what you can find
• Click Jump• Click down arrow next
to No Jump• Click “bottomelement”
• Click Finish 3 times• Publish your changes• Click on linked text• What happens?• Click Cancel• Click on Mode icon• Click on Read• Click on linked text• What happens now?• Return to Author
mode

February 2006 Colby College ITS
Creating Hyperlink ElementsE-Mail Link (1)
• Click on a different element to edit it
• Type in:– Contact: your name
• Highlight your name• Click on Link icon
• Click E-Mail Link• Click Next• Type in your email
address• Publish your
changes• Go into Read mode• Click on link

February 2006 Colby College ITS
Creating Hyperlink ElementsE-Mail Link (2)
• Return to Author mode
• Re-edit same element
• Highlight link text• Click Link icon• Click Next
• After email address type:– ?subject=help
request
• Click Finish twice• Publish the change• Go into Read mode• Click on link• Note subject line

February 2006 Colby College ITS
Creating Hyperlink ElementsNew Uploaded Document
• Return to Author mode
• Edit any element• Enter
– Click here to view document
• Highlight here• Click Link icon• Click Link to New
Uploaded File• Click Next
• Browse to some document on your computer
• Click Open• Enter title and
keyword information• Click Next• Click Finish• Publish the change• Go into Read mode• Click on link
February 2006 Colby College ITS
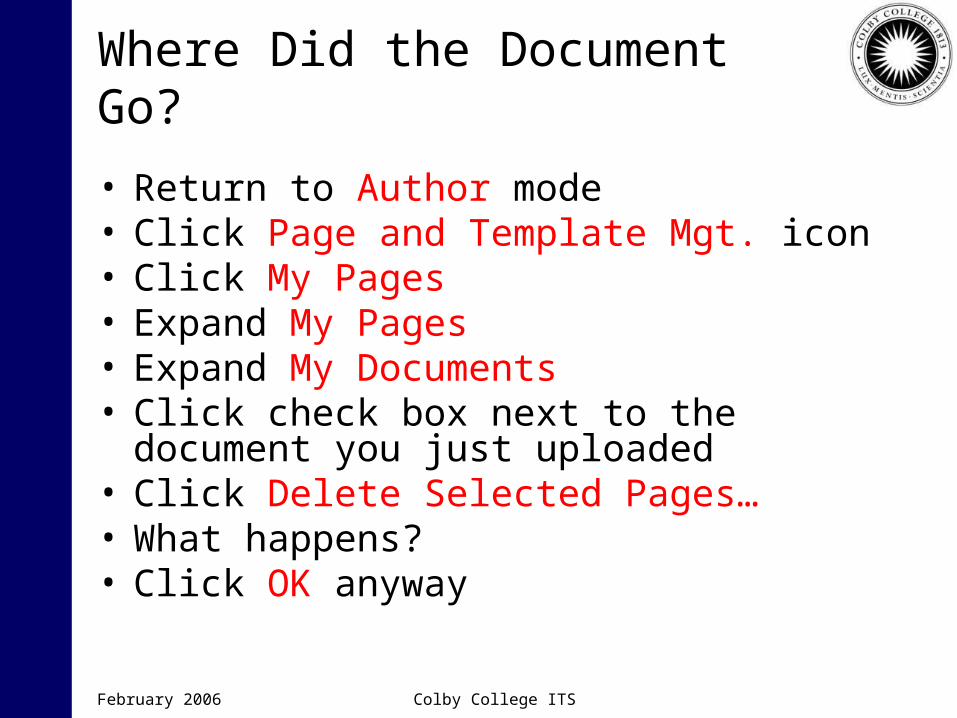
Where Did the Document Go?
• Return to Author mode• Click Page and Template Mgt. icon• Click My Pages• Expand My Pages• Expand My Documents• Click check box next to the document you just
uploaded• Click Delete Selected Pages…• What happens?• Click OK anyway

February 2006 Colby College ITS
Creating Hyperlink ElementsNew Page from Template
• Edit any element• Enter
– Meet our staff here
• Highlight here• Click Link icon• Click Link to New
Page from Template• Click Next 2 times
• Select a basic template or your departmental template
• Complete page creation forms (2)
• Click Finish• Publish the change• Go into Read mode• Click on new link

February 2006 Colby College ITS
Managing Pages
Quick Start Lab
February 2006 Colby College ITS
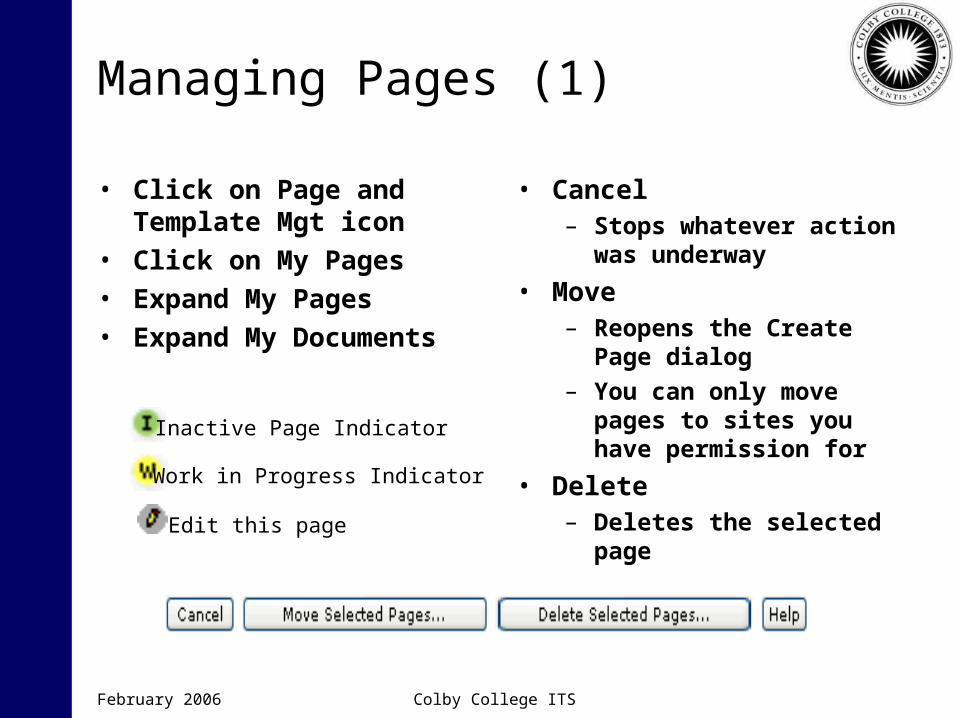
Managing Pages (1)
• Click on Page and Template Mgt icon
• Click on My Pages• Expand My Pages• Expand My Documents
• Cancel– Stops whatever action was
underway
• Move– Reopens the Create Page
dialog
– You can only move pages to sites you have permission for
• Delete– Deletes the selected page
Inactive Page Indicator
Work in Progress Indicator
Edit this page

February 2006 Colby College ITS
Managing Pages (2)
• Check boxes beside all pages and documents you have created for this tutorial
• Click on Delete Selected Pages…• Click OK• Congratulations!
All evidence of your activity has now been removed

February 2006 Colby College ITS
Training Resources
http://author.colby.edu/administration_cs/its/instruction/cstrain/
• Tutorials• Online instructions