Embed Size (px)
Citation preview

FedEx Ship Manager® Shipping Administration User Guide
FedEx Administration User Guide

FedEx Administration User Guide II
The information contained in this publication is confidential and proprietary to FedEx Corporate Services, Inc., and its affiliates (“FedEx”). No part of this publication may be distributed or disclosed in any form to any third party without written permission of FedEx. This publication is provided to you under and its use is subject to the terms and conditions of the FedEx Automation Agreement. Any conflict between the applicable FedEx Service Guide and this publication is controlled by the FedEx Service Guide. © 2000-2017 FedEx Corporate Services, Inc.; FedEx and the FedEx logo are registered service marks of FedEx. All rights reserved. Unpublished.

FedEx Administration User Guide III
Introduction......................................................................................................................................................
Getting Started.................................................................................................................................................
Login.....................................................................................................................................................................
Register.................................................................................................................................................................
Navigation.............................................................................................................................................................
FedEx Accounts................................................................................................................................................
Search...................................................................................................................................................................
View Groups and Users Assigned to an Account.................................................................................................
Add, Edit or Delete Account.................................................................................................................................
Company Settings............................................................................................................................................
Add or Edit Company Settings..............................................................................................................................
Groups..............................................................................................................................................................
Search...................................................................................................................................................................
View Users and FedEx Accounts in a Group........................................................................................................
Add, View, Edit or Delete Groups.........................................................................................................................
Import and Export Groups....................................................................................................................................
Users................................................................................................................................................................
Search...................................................................................................................................................................
Add, View, Edit and Delete Users.........................................................................................................................
Import and Export Users......................................................................................................................................
Reference Fields...............................................................................................................................................
Search...................................................................................................................................................................
Add, View, Edit or Delete References...................................................................................................................
Import and Export References..............................................................................................................................
Add, View, Edit and Delete Reference Lists.........................................................................................................
Shipping Reports..............................................................................................................................................
Create Reports......................................................................................................................................................
Edit or Delete Reports..........................................................................................................................................
Run an Existing Report.........................................................................................................................................
Permissions Screen..........................................................................................................................................
FedEx Express and FedEx Ground.......................................................................................................................
FedEx Freight LTL.................................................................................................................................................
Rate and Transit Times..........................................................................................................................................
Address Book.......................................................................................................................................................
1
2
3
3
4
5
5
5
6
10
10
12
12
12
13
18
21
21
21
27
30
30
31
34
36
39 39
41
44
45
45
46
46
46
Contents

FedEx Administration User Guide IV
Defaults Screen................................................................................................................................................
Shipping Information............................................................................................................................................
Pickup / Drop-off...................................................................................................................................................
Additional Information..........................................................................................................................................
47
47
47
47
Contents (Continued)
FedEx Administration User Guide | 1
The FedEx Administration feature of FedEx Ship Manager® at fedex.com allows any user assigned administrative permissions to centrally manage and control shipments that are processed by multiple individuals shipping from their desktops. Users can be in the same location or dispersed geographically across multiple locations within a company.
With FedEx Administration, an administrator can configure shipping options or restrict services and account access, customize reference information and run reports on the shipping activity of users across the company. The main features of FedEx Administration allow multiple users to have access to FedEx Ship Manager® and prevent unauthorized users from accessing your account on fedex.com.
Through the convenience of the Internet, the Shipping Administrator can:
• Configure a robust set of permissions and defaults that could be assigned to departments and customized at the user level.
• Assign and set up an unlimited number of FedEx Administration domestic and international users within the groups.
• Allow an administrator to add multiple FedEx accounts to FedEx Administration and assign individual users to these accounts.
• Ability to require up to 4 references and set default values for these references at the department and user level. For added control, administrators can configure reference values that cannot be changed by their users.
• Create customized reports to display the shipping activity of users company-wide. Administrative reports can be viewed online, printed, and downloaded.
Potential benefits of using FedEx Ship Manager at fedex.com and the FedEx Administration functions are:
• Enhanced ability to track and control costs through customization, reporting, and visibility.
• Improved efficiency in administration, reporting and the shipping process throughout the company.
• Reduced workload in a centralized mail room through controlled distribution of shipping tasks.
• All the timesaving features of shipping through FedEx Ship Manager at fedex.com.
• Secure information with password protection and account numbers that are invisible to users.
• Access 24-hours-a-day; 7-days a week — with worldwide reach.
Introduction
Introduction

FedEx Administration User Guide | 2
Before you begin the setup process, first determine how you would like to organize and control users who will be using FedEx Administration.
Groups can be set up any way you like. For example, groups can be set up as separate geographical locations or functional groups within your organization that use different FedEx account numbers or cost centers. When users are assigned to a group, they can be assigned to ship from multiple available accounts for that group. In addition, as a member of a group, users by default will inherit the same physical address, permissions, and default settings for that group. These can be customized at the user level for greater flexibility and control. See the Groups and Users sections for more information and detailed instructions.
Log in to FedEx Ship Manager as an administrator, the Admin Home screen displays. Follow these steps to start using FedEx Administration:
• Edit your Company Settings for additional configuration options.
• Add users and assign them to FedEx accounts and (optional) groups.
• Add one or more groups and set service and reference options for each group.
Getting Started
Getting Started
FedEx Administration User Guide | 3
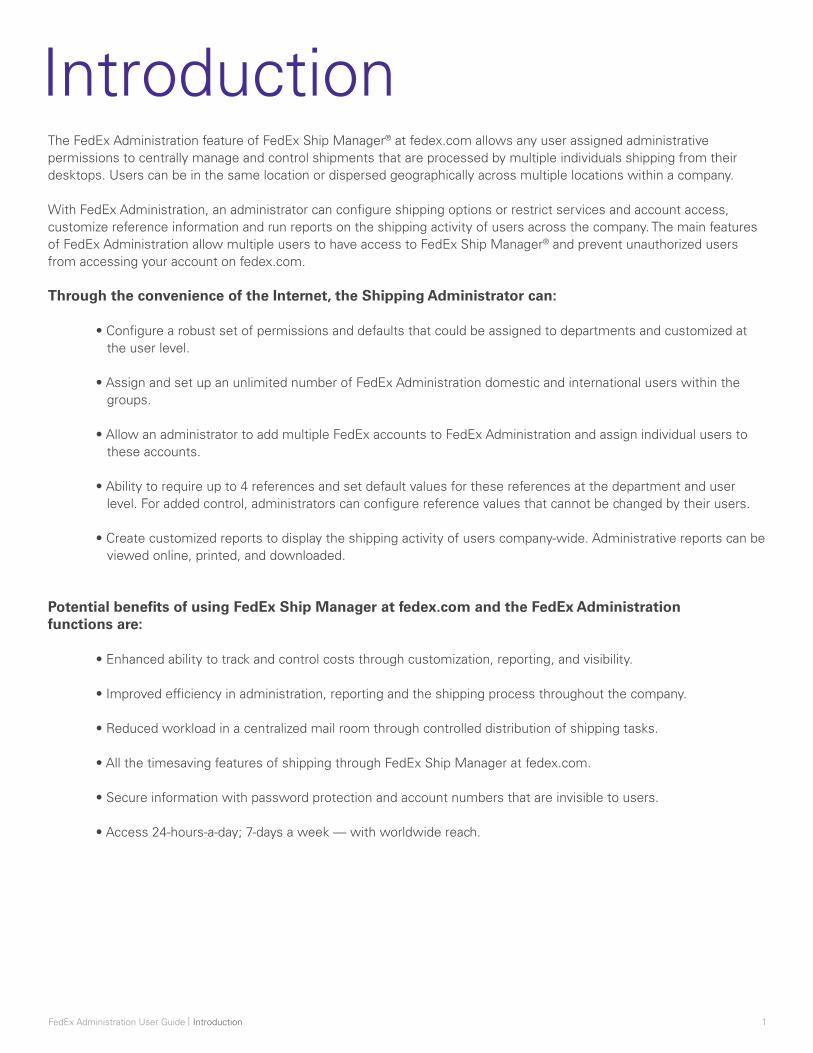
To log in to FedEx Administration, follow these steps:
1. Go to fedex.com and click on the Manage tab.
2. Under Package, Envelope, or Express Freight, click Access FedEx Administration.
3. Enter your login information and click Login. The Admin Home screen will display.
Register
If you are new to fedex.com, you will need to register as a new user.
To register, simply click Register when prompted to log in and fill out your information.
Login1
2
3
Getting Started

FedEx Administration User Guide | 4
Navigation • Admin Home — View and add admins and access shortcuts to create new, import and download FedEx Accounts, Groups and Users as well as create new Shipping Reports.
• FedEx Accounts — View, search, sort, edit, delete and add accounts or import or export FedEx Account lists.
• Company Settings — View and manage basic company information, permissions and defaults.
• Groups — View a list of existing groups, add groups, edit groups, import groups, and export groups.
• Users — View a list of all users, add new users, edit users, import users, and export users.
• Reference Fields — View a list of existing references and reference lists, add references and reference lists, edit references and reference lists, import references, and export references.
• Shipping Reports — Create, edit and run reports to monitor shipping activity by accounts, groups, and users.
Getting Started

FedEx Administration User Guide | 5
Access the Manage FedEx Accounts screen by clicking FedEx Accounts in the navigation.
SearchSearch by keyword
To search for an account, enter key information in the text field. The Manage FedEx Accounts screen displays information based on your text entry.
Sort by
You can sort the columns in ascending or descending order by clicking the Account Number or Account Nickname column headings.
View Groups and Users Assigned to an Account To view groups and users assigned to an account, follow these steps:
1. From the Manage FedEx Accounts screen, click the account you want more information on.
2. The Edit Account screen will display, showing all groups and users assigned to that account.
FedEx Accounts
FedEx Accounts

FedEx Administration User Guide | 6
Add, Edit or Delete an Account Add an Existing Account
2
1
3
FedEx Accounts

FedEx Administration User Guide | 7
To add an existing account, follow these steps:
1. On the Manage FedEx Accounts screen, click Add existing.
2. The Add Account screen will display. Enter information for an existing account associated with the company.
3. Click Save to save the changes or Cancel to discard changes.
Note: The address information entered here must match the billing address that was provided to FedEx for this account.
Edit an Account
1
FedEx Accounts

FedEx Administration User Guide | 8
3
4
2
To edit an account, follow these steps:
1. On the Manage FedEx Accounts screen, select an existing account.
2. The Edit Account screen will display, with the options to edit FedEx Account Details or the Shipping Address.
3. Click Edit, and change the information as needed.
4. Click Save to save the changes or Cancel to discard changes.
Note: Users can edit account profile information, shipping address and billing information.
FedEx Accounts

FedEx Administration User Guide | 9
Delete an Account
1
To delete an account, follow these steps:
1. Find the desired account on the Manage FedEx Accounts screen.
2. Hover your pointer to the right of the account to reveal an X. Click on the X.
3. In the popup, click Delete to confirm the deletion and remove the account from the system.
Note: An account cannot be deleted until all groups and users have been removed from the account.
2
FedEx Accounts

FedEx Administration User Guide | 10
Company SettingsAccess the Company Settings screen by clicking Company Settings in the navigation.
Add or Edit Company Settings
Company Settings
1
2
3
4
5
6

FedEx Administration User Guide | 11
To add or update company settings, follow these steps:
1. Click on Company Settings in the navigation to display the Company Settings screen.
2. From the Profile tab, edit Company Information, Contact Information and Security Controls.
3. Click the Permissions tab to edit permissions for FedEx Express and FedEx Ground, FedEx Freight LTL, Rate and Transit Times (All FedEx Services) and Address Book.
4. Click the Defaults tab to edit shipping defaults for Shipping Information, Pickup/Drop-off and Additional Options.
5. Check, ‘Update all users in the company with Profile changes,’ if you would like to make these changes universal. Omitting this means only users created after this will have these permissions, but existing users will retain whatever permissions they previously had.
6. After you’ve made edits as needed, click Save to save and exit to the Company Settings default Profile tab.
Company Settings
FedEx Administration User Guide | 12
Groups
Groups
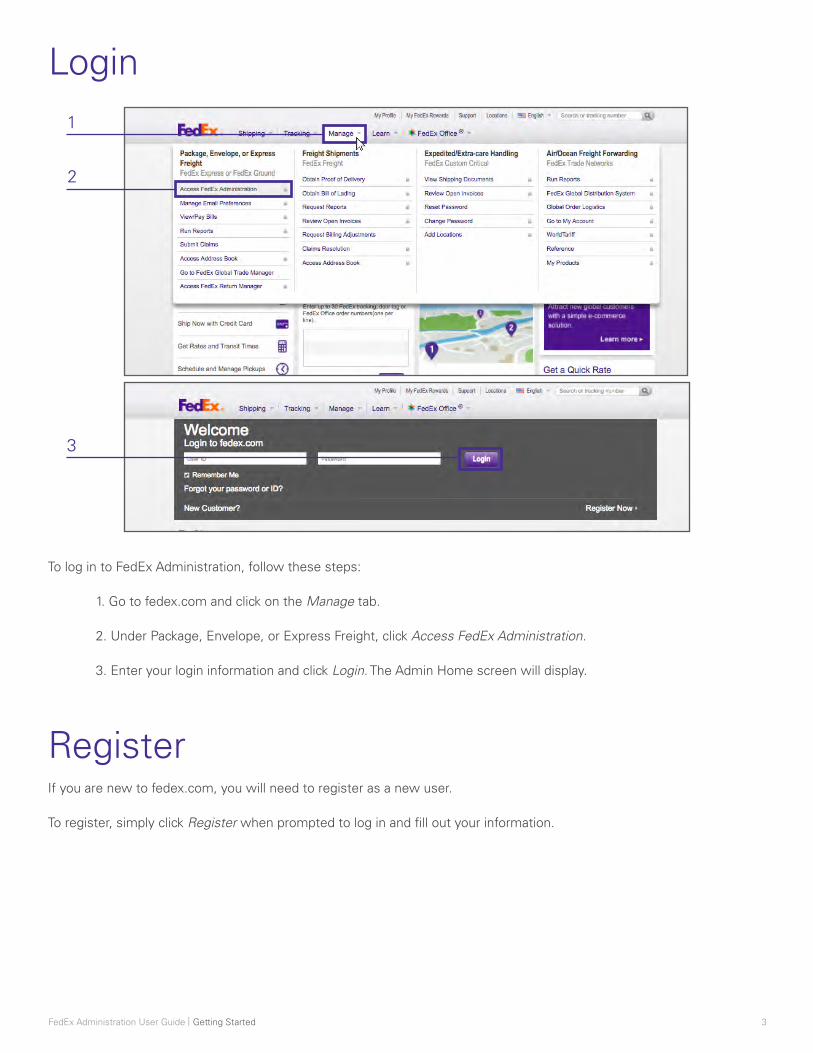
Group users by function, geographical area, or some other means that fits the needs of the company. Members of each group share certain default settings and service restrictions. Groups allow the administrator to centrally manage and control shipments for multiple individuals by assigning default options and service restrictions at the group level, and by running reports on the shipping activity of users by group.
Access the Manage Groups screen by clicking Groups in the navigation.
SearchSearch by keyword
To search for a group, enter key information in the text field. The Manage Groups screen displays information based on your text entry.
Sort by
You can sort the columns in ascending or descending order by clicking on the Group Name, Group ID, Contact Name or No. of Users column heading.
View Users and FedEx Accounts in a GroupTo view users and accounts in a group:
1. On the Manage Groups screen, click the group you’d like to view.
2. The Edit Group screen will display with FedEx Accounts and users associated with the group.

FedEx Administration User Guide | 13
Add, View, Edit or Delete GroupsAdd New Group
1
Groups

FedEx Administration User Guide | 14
2 6
7
3
4
5
8
Groups

FedEx Administration User Guide | 15
To add a new group, follow these steps:
1. From the Manage Groups screen, click Create new.
2. The Create New Group screen displays and defaults to the Profile tab. Complete the Group Information and Contact Information sections.
3. Add an account to the group by clicking Add Account(s).
4. Add a user to the group by clicking Add User(s).
5. Add an administrator to the group by clicking Add Group Admin(s).
6. After completing the Profile tab, click on the Permissions tab to display the Permissions screen which includes FedEx Express and FedEx Ground, FedEx Freight LTL, Rate and Transit Times (All FedEx Services) and Address Book. See the Permissions Screen section for more detailed information.
7. After completing the Permissions screen, click Save. Then click on the Defaults tab to display the Defaults screen which includes Shipping Information, Pickup/Drop-off, and Additional Options. See the Defaults Screen section for more detailed information.
8. Click Save. The group information is saved. You will return to the Groups screen.
Edit Group
1
Groups

FedEx Administration User Guide | 16
2
3
4
5
Groups

FedEx Administration User Guide | 17
1
To edit group information, complete the following steps:
1. From the Manage Groups screen, click the group you want to edit.
2. The Edit Group screen will display, starting on the Profile tab. Add or remove administrators, accounts and users or edit group and contact information.
3. Click the Permissions tab to display the Permissions screen. Edit permissions for FedEx Express and FedEx Ground, FedEx Freight LTL, Rate and Transit Times (All FedEx Services) and Address Book. See the Permissions Screen section for more detailed information.
4. Click the Defaults tab to display the Defaults screen. Edit defaults for Shipping Information, Pickup/Drop-off and Additional Options. See the Defaults Screen section for more detailed information.
5. Click Save to save your edited group information and exit to the Manage Groups screen.
Note: If you are updating the group Permissions or Defaults screens, these changes will also apply to existing users in the group that have permissions and defaults selected.
Delete Group
Groups cannot be deleted unless all users assigned in that group have been removed, moved to another group, or deleted. If there are no users in the group and the group needs to be deleted, follow these steps:
1. Find the desired group on the Manage Groups screen.
2. Hover your pointer to the right of the group to reveal an X. Click on the X.
3. In the popup, click Delete to confirm the deletion and remove the group from the system.
2
Groups

FedEx Administration User Guide | 18
Import and Export GroupsImport Group
1
2
3
4
5
Groups

FedEx Administration User Guide | 19
To import a group, follow these steps:
1. From the Manage Groups screen, click Import.
2. Confirm Groups is selected from the Import type dropdown, then select an action from the dropdown.
3. Under Download Templates, choose whether or not you already have a template. If you do not have a template, choose your permissions and click Download for a blank template. 4. Under Upload File, click Choose File and select your file for upload and click Import.
5. You will get an email when your file has been processed or you can click the Import History tab to check the status of your file. Files with many records may take some time to be processed.
Note: A maximum of 50,000 records can be imported at one time. Therefore, if you need to import more than 50,000 groups or accounts, you will need to create several files before importing them.
Note: The group(s) and account number(s) that you assign to a user must already be set up in FedEx Administration for your company. The user can only be assigned to an account number that has already been added to the group to which they are being assigned.
Export Group
1
3
2
Groups
FedEx Administration User Guide | 20
To export a group, follow these steps:
1. From the Manage Groups screen, click Download.
2. Confirm Groups is selected from the Export type from the dropdown and click Download.
3. You will get an email when your file is ready to view, print or download or you can click the Export History tab to check the status of your file. Export files with many records may take some time to be processed.
Note: When you export files from FedEx Administration, the system defaults to the comma- separated values (csv) format.
Groups
FedEx Administration User Guide | 21
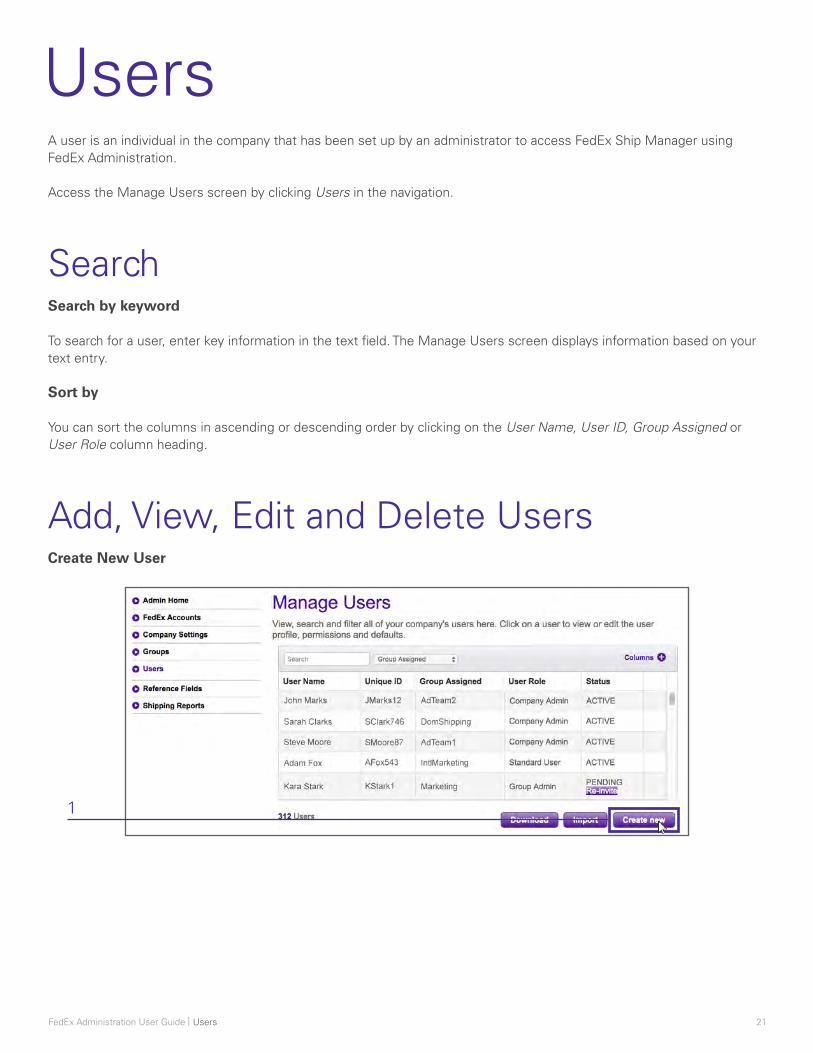
UsersA user is an individual in the company that has been set up by an administrator to access FedEx Ship Manager using FedEx Administration.
Access the Manage Users screen by clicking Users in the navigation.
SearchSearch by keyword
To search for a user, enter key information in the text field. The Manage Users screen displays information based on your text entry.
Sort by
You can sort the columns in ascending or descending order by clicking on the User Name, User ID, Group Assigned or User Role column heading.
Add, View, Edit and Delete UsersCreate New User
Users
1

FedEx Administration User Guide | 22
2
5
3
4
6
7
Users

FedEx Administration User Guide | 23
To add a new user, follow these steps:
1. From the Manage Users screen, click Create new.
2. The Create New User screen displays and defaults to the Profile tab. Complete the user details sections, including User Information, Login Information and Contact Information.
3. Add an account to the user profile by clicking Add Account(s).
4. Assign a role to the user by selecting from the options in the drop down. Users can be assigned as a Standard User, meaning they have no administrative permissions; a Group Administrator, in which case you can assign specific groups that this user can administer; or a Company Administrator, meaning the user can see and administer all groups and users created under the company.
5. Click on the Permissions tab to display the Permissions screen which includes FedEx Express and FedEx Ground, FedEx Freight LTL, Rate and Transit Times (All FedEx Services) and Address Book. See the Permissions Screen section for more detailed information. 6. After completing the Permissions screen, click on the Defaults tab to display the Defaults screen which includes Shipping Information, Pickup/Drop-off, and Additional Options. See the Defaults Screen section for more detailed information.
7. Click Save to save the user information and exit to the Manage Users screen.
View All Users in Company
To view all users, simply click on the Users tab. All users will be displayed on the Manage Users screen. The total number of users will display below the table.
View Users by Group
1
2
Users

FedEx Administration User Guide | 24
To view users by group, follow these steps:
1. From the Manage Users screen, select Group Assigned from the search dropdown.
2. Type the group you’re looking for into the search bar.
3. All users within that group will be displayed in the table below. The total number of users within the group will display below the table.
Edit User
1
Users

FedEx Administration User Guide | 25
2
3
4
5
Users

FedEx Administration User Guide | 26
To edit a user, follow these steps:
1. From the Manage Users screen, click the user you want to edit.
2. The Edit User screen will display, starting on the Profile tab. Add or remove Associated FedEx Accounts, change the user’s role, reassign the user’s group or edit user details.
3. Click the Permissions tab to display the Permissions screen. Edit permissions for FedEx Express and FedEx Ground, FedEx Freight LTL, Rate and Transit Times (All FedEx Services) and Address Book. See the Permissions Screen section for more detailed information.
4. Click the Defaults tab to display the Defaults screen. Edit defaults for Shipping Information, Pickup/Drop-off and Additional Options. See the Defaults Screen section for more detailed information.
5. Click Save to save your edited user information and exit to the Manage Users screen.
Note: If ‘Use group permissions, references and defaults’ is selected, then the permissions, references and defaults settings for the group will be enforced. Also, if a user is reassigned to another group, past shipping activity for that user will display under the old Group ID.
Delete User
1
To delete a user, follow these steps:
1. Find the desired user on the Manage Users screen.
2. Hover your pointer to the right of the user to reveal an X. Click on the X.
3. In the popup, click Delete to confirm the deletion and remove the user from the system.
2
Users

FedEx Administration User Guide | 27
Import and Export UsersImport User
1
2
3
4
5
Users

FedEx Administration User Guide | 28
To import a user, follow these steps:
1. From the Manage Users screen, click Import.
2. Confirm Users is selected from the Import type dropdown, then select an action from the dropdown.
3. Under Download Templates, choose whether or not you already have a template. If you do not have a template, choose your permissions and click Download for a blank template.
4. Under Upload File, click Choose File and select your file for upload and click Import.
5. You will get an email when your file has been processed or you can click the Import History tab to check the status of your file. Files with many records may take some time to be processed.
Note: A maximum of 50,000 records can be imported at one time. Therefore, if you need to import more than 50,000 users, you will need to create several files before importing them.
Note: The groups (s) and account number(s) that you assign to a user must already be set up in FedEx Administration for your company. The user can only be assigned to an account number that has already been added to the group to which they are being assigned.
Export User
1
2
3
Users

FedEx Administration User Guide | 29
To export a user, follow these steps:
1. From the Manage Users screen, click Download.
2. Confirm Users is selected from the Export type from the drop down and click Download.
3. You will get an email when your file is ready to view, print or download or you can click the Export History tab to check the status of your file. Export files with many records may take some time to be processed.
Note: When you download files from FedEx Administration, the system defaults to the comma-separated values (csv) format.
Users
FedEx Administration User Guide | 30
Reference FieldsA reference field is an optional number or a description that appears when creating a shipment. Assigning a reference field allows shippers to add additional information to their shipment that can be tracked through invoicing and reporting. You have the option of configuring up to four default reference codes that will auto-populate the corresponding reference fields on the FedEx Ship Manager screens when FedEx Administration users log on. Defaults can be entered for Your reference, Department no., PO no., and Invoice no.
Reference Lists are optional and create an easy organization that allows users to quickly choose a reference from a list of associated references while shipping.
Information entered in the reference fields will display on your FedEx invoice for FedEx Express and FedEx Ground shipments.
Access the Reference Fields screen by clicking Reference Fields in the navigation.
SearchSearch by keyword
To search for a reference or reference list, enter key information in the text field on the respective tab. The Manage References screen will display information based on your text entry.
Sort by
You can sort any of the columns in ascending or descending order by clicking on the column heading.
Reference Fields

FedEx Administration User Guide | 31
Add, View, Edit and Delete ReferencesAdd New Reference
2
3
4
5
1
Reference Fields

FedEx Administration User Guide | 32
To add a new reference, follow these steps:
1. From the Manage References screen, select the References tab and click Create new. The Create New Reference screen displays.
2. Enter the appropriate information in the Reference ID and Reference description fields. (The maximum number of characters allowed for the Reference ID field is 24. The maximum number of characters allowed for the Reference description field is 35. These fields are case-sensitive. Do not use special characters.)
(References can contain the following characters special characters: Dash “-”, Period “.”, Forward slash “/”, Backslash “\”, Ampersand “&” , Semicolon “;”, Asterisk “*”, Caret symbol “^”, At symbol “@”, Parenthesis “(“ or “)”, Equal Sign “=”, or Plus Sign “+”.) 3. Assign one or more Reference Fields, including Your reference, Department no., PO no. or Invoice no. for FedEx Express and FedEx Ground shipments or Shipper ID1, Shipper ID2, BOL no., or PO no. for FedEx LTL Freight Shipments.
4. Add a reference list to the reference by clicking Add Reference List(s).
5. If you want to save this new reference and add another one, click Save and Add another. If you are finished, click Save and exit to the Manage References screen.
Note: You do not have to create a reference list to access your references. You can keep your references on the References screen and use them from here.
View References
To view references, simply click on Reference Fields in the navigation. All References and Reference Lists will be displayed on the Manage References screen in their respective tabs.
Edit Reference
1
Reference Fields

FedEx Administration User Guide | 33
2
3
4
5
To edit a reference, follow these steps:
1. From the Manage References screen, select the References tab and click the appropriate reference.
2. The Edit References screen displays. Make your changes to the Reference ID and Reference description entries as needed.
3. Make changes to the Reference Fields by selecting or deselecting them. You must select at least 1 Reference Field.
4. Add or remove Associated Reference Lists. Remove by selecting the appropriate lists and clicking Remove. Add by clicking Add Reference List(s).
5. If you want to save this edited reference and add another one, click Save and Add another. If you are finished, click Save and exit to the Manage References screen.
Delete Reference
1
2
Reference Fields

FedEx Administration User Guide | 34
To delete a reference, follow these steps:
1. From the Manage References screen, select the References tab and find the appropriate reference.
2. Hover your pointer to the right of the reference to reveal an X. Click on the X.
3. In the popup, click Delete to confirm the deletion and reference the report from the system.
Import and Export References Import Reference
1
2
3
4
5
Reference Fields

FedEx Administration User Guide | 35
To import a reference, follow these steps:
1. From the Manage References screen, select the References tab and click Import.
2. Confirm References is selected from the Import type dropdown, then select an action from the dropdown.
3. Under Download Templates, choose whether or not you already have a template. If you do not have a template, choose your permissions and click Download for a blank template.
4. Under Upload File, click Choose File and select your file for upload and click Import.
5. You will get an email when your file has been processed or you can click the Import History tab to check the status of your file. Files with many records may take some time to be processed.
Note: A maximum of 50,000 records can be imported at one time. Therefore, if you need to import more than 50,000 references, you will need to create several files before importing them. The maximum number of references allowed is 250,000.
Export Reference
1
2
3
Reference Fields

FedEx Administration User Guide | 36
To export a reference, follow these steps: 1. From the Manage References screen, select the References tab and click Download.
2. Confirm References is selected from the Export type dropdown and click Download.
3. You will get an email when your file is ready to view, print or download or you can click the Export History tab to check the status of your file. Export files with many records may take some time to be processed.
Add, View, Edit and Delete Reference ListsAdd New Reference List
1
2
3
4
Reference Fields

FedEx Administration User Guide | 37
To add a new reference list, follow these steps:
1. From the Manage References screen, select the Reference Lists tab and click Create new. The Create New Reference List screen displays.
2. Enter a reference list identifier in the Reference list ID field and a reference list name in the Reference list name field. The Reference list description field is optional.
3. Add a reference to the reference list by clicking Add Reference(s).
4. Click Save to save the reference list and exit to the Manage References screen.
View Reference List
To view a reference list, simply click Reference Fields in the navigation. All References and Reference Lists will be displayed on the Manage References screen in their respective tabs.
Edit Reference List or Add References
1
2
3
4
Reference Fields

FedEx Administration User Guide | 38
To edit a reference list or add references, follow these steps:
1. From the Manage References screen, select the Reference Lists tab and click the appropriate reference list.
2. The Edit Reference List screen displays. Edit reference list details as needed.
3. Add or remove Associated References. Remove by selecting the appropriate references and clicking Remove. Add by clicking Add Reference(s).
4. Click Save to save. The References list screen displays with the edited list.
Delete Reference List
1
To delete a reference list, follow these steps:
1. From the Manage References screen, select the Reference Lists tab and find the appropriate reference list.
2. Hover your pointer to the right of the reference list to reveal an X. Click on the X. 3. In the popup, click Delete to confirm the deletion and remove the reference list from the system.
2
Reference Fields

FedEx Administration User Guide | 39
Shipping ReportsReports contain shipping information that you can use to monitor shipping activity for your company. These reports only contain shipment information that has been processed within the last 90 days on FedEx Ship Manager at fedex.com by users within your company.
Access the Shipping Reports screen by clicking Shipping Reports in the navigation.
Create Reports
Shipping Reports
1

FedEx Administration User Guide | 40
2
3
4
5
6
Shipping Reports
FedEx Administration User Guide | 41
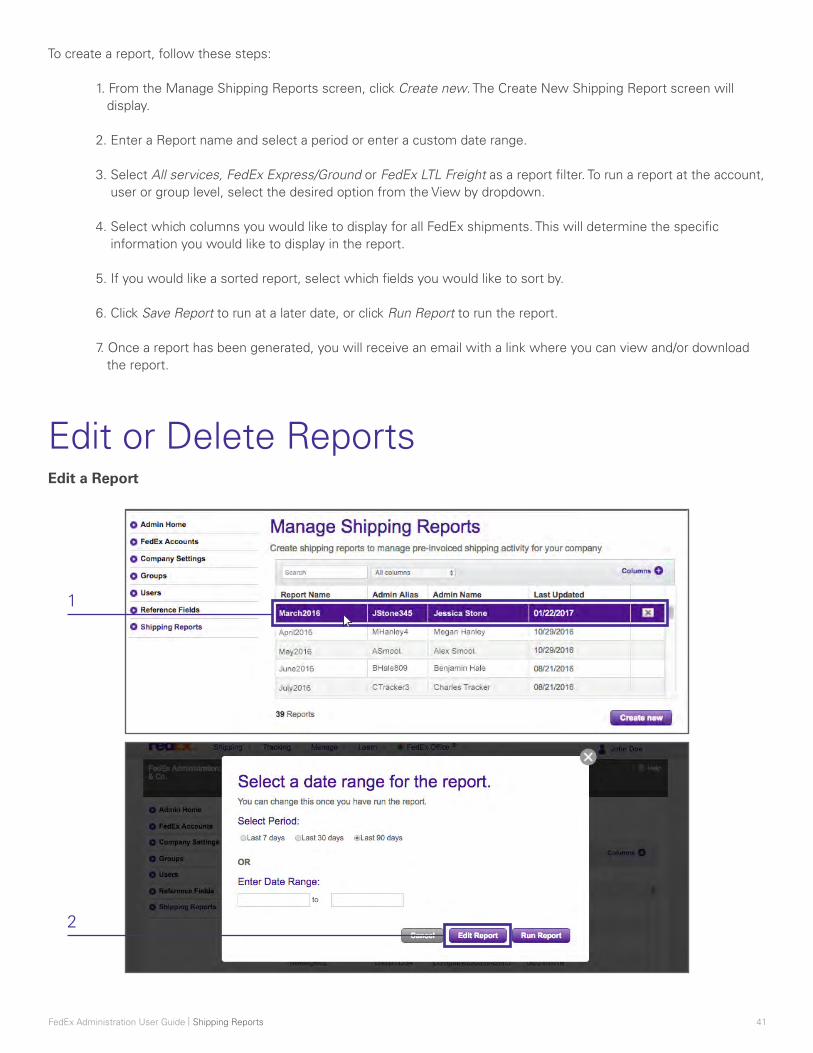
To create a report, follow these steps:
1. From the Manage Shipping Reports screen, click Create new. The Create New Shipping Report screen will display.
2. Enter a Report name and select a period or enter a custom date range.
3. Select All services, FedEx Express/Ground or FedEx LTL Freight as a report filter. To run a report at the account, user or group level, select the desired option from the View by dropdown.
4. Select which columns you would like to display for all FedEx shipments. This will determine the specific information you would like to display in the report.
5. If you would like a sorted report, select which fields you would like to sort by. 6. Click Save Report to run at a later date, or click Run Report to run the report.
7. Once a report has been generated, you will receive an email with a link where you can view and/or download the report.
Edit or Delete ReportsEdit a Report
1
2
Shipping Reports
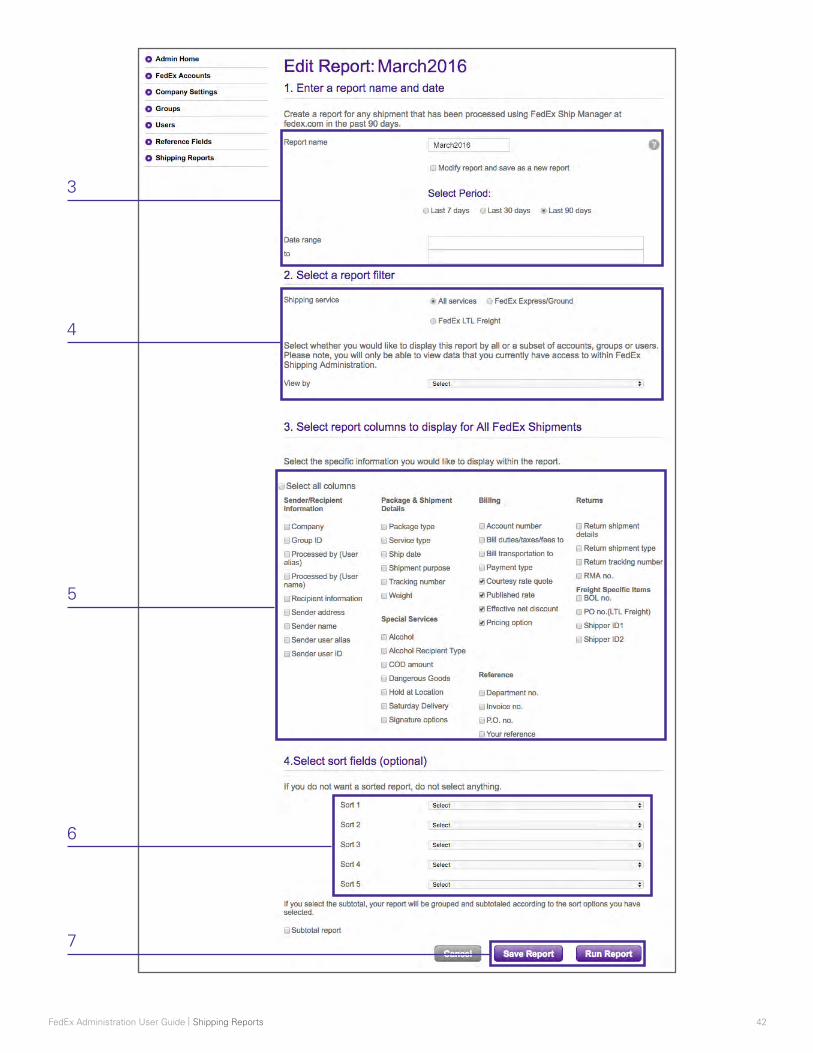
FedEx Administration User Guide | 42
3
4
5
6
7
Shipping Reports

FedEx Administration User Guide | 43
To edit a report, follow these steps:
1. From the Manage Shipping Reports screen, click the desired report.
2. Click Edit Report. The Edit Report screen will display.
3. Make edits to the Report name, as needed, and select a period or enter a custom date range.
4. If you would like to edit the report filters, select All services, FedEx Express/Ground or FedEx LTL Freight. To edit a report to run at the account, user or group level, select the desired option from the View by dropdown.
5. Deselect or select new columns to display for all FedEx shipments, as needed. This will determine the specific information you would like to display in the report. 6. If you would like to make edits to how the report is sorted, select which fields you would like to sort by. This section is optional.
7. Click Save Report to run at a later date, or click Run Report to run an edited report.
Delete a Report
1
To delete a report, follow these steps:
1. Find the desired report on the Manage Shipping Reports screen.
2. Hover your pointer to the right of the report to reveal an X. Click on the X.
3. In the popup, click Delete to confirm the deletion and remove the report from the system.
2
Shipping Reports

FedEx Administration User Guide | 44
Run an Existing Report
1
To run an existing report, follow these steps:
1. From the Manage Shipping Reports screen, click the desired report.
2. Select the data range you would like to cover in this report and then click Run Report.
3. Once a Report has been generated, you will receive an email with a link where you can view and/or download the Report.
2
Shipping Reports

FedEx Administration User Guide | 45
The Permissions screen allows the administrator to give users or groups certain rights and permissions by checking the appropriate boxes. If a box is unchecked, the user or group does not have that permission.
FedEx Express and FedEx GroundFedEx Domestic Shipping Services — Choose which FedEx Domestic Shipping Services a user or group can access.
FedEx International Shipping Services — Choose which FedEx International Shipping Services a user or group can access.
Special Services — Choose which Special Services a user or group can access.
References — Choose permissions for your selected reference fields.
• Not required (text field) — User will view a text entry field on the Ship screen and is not required to enter a reference in order to ship.
• Not required (view list) — User will view a popup screen after clicking Select on the Ship screen. The user has the option to select any entry and then click OK to continue. The selected reference populates the reference field. This option requires the administrator to provide references, which can be done in the Reference Fields section.
• Required (text field) — User will view a text entry field on the Ship screen and must enter an alphanumeric entry in the field in order to continue (ship). No defaults or selections are provided by the administrator.
• Required (view list) — User will view a popup screen after clicking Select on the Ship screen. The user can select any entry and then click OK to continue. The selected reference populates the reference field. This option requires the administrator to provide references, which can be done in the Reference Fields section.
• Default and cannot change — User will view their default reference as text on the Ship screen. The user cannot change the default reference text.
• Required with validation (text field) — User will view a text field on the Ship screen and must enter a reference that matches one in the database or a specifically assigned list to continue (ship). This option requires the administrator to provide references to validate against.
• Required with validation (view list) — User will view a popup screen after clicking Select on the Ship screen. The user can select any entry and then click OK to continue. This option requires the administrator to provide references to validate against, which can be done in the Reference Fields section.
Pickup/Drop-off — Choose pickup and drop-off permissions for a user or group.
Return Shipment Options — Choose return shipment permissions for a user or group.
Pending Shipment Options — Choose pending shipment permissions for a user or group.
Permissions Screen
Permission Screen

FedEx Administration User Guide | 46
FedEx Freight LTLFedEx Domestic LTL Shipping Services — Choose which FedEx Domestic LTL Shipping Services a user or group can access.
FedEx International LTL Shipping Services — Choose which FedEx International LTL Shipping Services a user or group can access.
Special Services — Choose which Special Services a user or group can access.
Delivery Options — Choose which delivery options a user or group can select.
References — Choose permissions for your selected reference fields. See details for this section.
Pickup/Drop-off — Choose pickup and drop-off permissions for a user or group.
Rates and Transit TimesDisplay Rates and Transit Times section on the shipping screen — Select this option to allow a user or group to see the rates and transit time module when preparing a shipment.
Always show this section expanded on the shipping screen — Select this option to show the Rates and Transit Time section expanded each time the user or group creates a shipment.
Do not display rates (display transit times only) — Select this option to hide account specific rates from the user or group while allowing them to see transit times.
Display Standard Rates — Select this option to display the FedEx list rates regardless of whether or not discounts have been applied.
Display discounted rates — Select this option to display all discounts associated with the rate displayed.
Allow user to view Rates and Transit times for all available services — Select this option to show all services that the user or group can access.
Display account based rates sheet — Select this option to show account rate sheets that contain discounts plus pricing.
Address BookContacts — Choose which address books a user or group can access.
Permission Screen

FedEx Administration User Guide | 47
Defaults ScreenThe Defaults screen allows the administrator to set a number of default options that users or groups will see on the FedEx Ship Manager screens. These default configuration options are activated by checking the appropriate boxes. If a box is unchecked, this setting is not automatically enabled. Default settings entered here correspond with the options that are available on the Permissions screen.
FedEx Administration users will be able to edit certain Preference settings if they have been given the appropriate permissions in the Permissions screen.
Shipping InformationService type — Select the default FedEx shipping service that you want users or groups to use from the drop-down list. For a list of service types available using FedEx Ship Manager, view the Permissions screen. For a full description of these services, go to fedex.com.
Package type — Select the default type of packaging that user or groups will use from the dropdown list. If user or groups are shipping via FedEx Express Freight or FedEx Ground, Your packaging is the default.
Unit of Measure — Select the unit of measure used most often from the drop-down menu.
Currency — Select the default currency. Default currency will be USD if another currency is not selected.
Bill transportation to — Select whether transportation will be billed to Sender (Prepaid), Collect, Recipient, or a Third Party FedEx account number.
Bill duties/taxes/fees to — Select whether duties and taxes will be billed to Sender (Prepaid), Recipient, or a Third Party FedEx account number.
Additional handling charges — Select whether additional handling charges will be a Fixed Amount, Variable Amount or No Additional Fee.
Pickup/Drop-offPickup/Drop-off — Select the default pickup or drop-off option that user or groups will use.
Additional OptionsAlways remind user to print pending shipments — Select this option to set a reminder to print any pending shipment labels.
Always show shipment confirmation window — Select this option to have the shipment confirmation screen appear after users or groups complete preparations for each shipment.
Defaults Screen

FedEx Administration User Guide | 48
Display recipient Contact ID Field — Select this option to have the Contact ID field displayed on the main ship screen.
Display pending shipment confirmation — Select this option to display a confirmation window.
Defaults Screen


![Hazardous Materials Shipping Guide - Industrialsafetyhazmattraining.com/images/HazmatShippingGuide[Fedex].pdf · The FedEx Ground Hazardous Materials Shipping Guide is intended](https://img.pdfslide.net/doc/110x75/5a78e7377f8b9a9d218b56b4/hazardous-materials-shipping-guide-industrial-fedexpdfthe-fedex-ground-hazardous.jpg)