Embed Size (px)
Citation preview
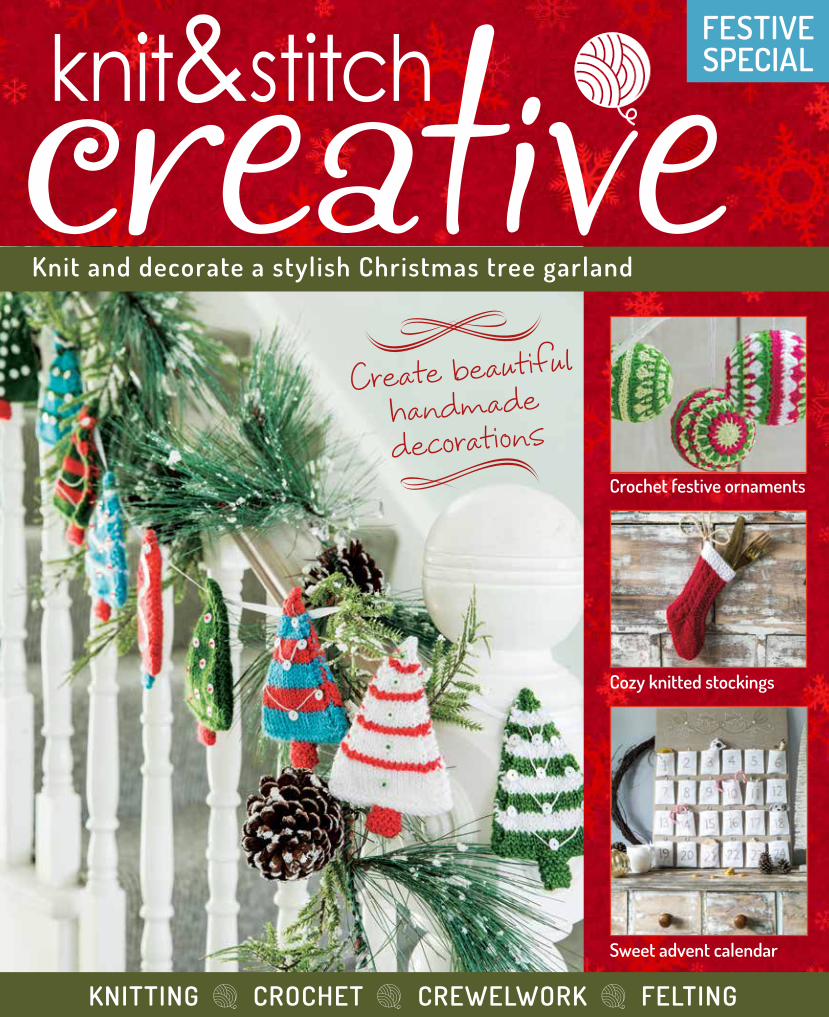
Knit and decorate a stylish Christmas tree garland
creative
Crochet festive ornaments
Sweet advent calendar
Cozy knitted stockings
Knitting CroChet CrewelworK felting
Create beautiful handmade decorations
feStiVe SPeCiAl
Visit our website to subscribe or buy missing issues. You can also find out more about your
patchwork collection.
www.knit-and-stitch.com
Don’t miss an issue
creative
Learn to knit bramble stitch
Pretty votive covers
Customise your projects – with bobbles!
Create a stunning reversible throw square by square
creative
The next two squares
6
A stylish, cosy throw for your home
UK £4.99/EIRE €6.49/AUS/NZ $11.99 (INC.GST)
KNITTING CROCHET CREWELWORK FELTING
Learn to knit moss stitch
Crochet a simple place mat
Customise your projects –
with lace trim!
KNITTING CROCHET CREWELWORK FELTING
Create a stunning reversible throw square by squarecreative
The next two squares
4
Add beautiful textures to your home
UK £4.99/EIRE €6.49/AUS/NZ $11.99 (INC.GST)
© Eaglemoss Inc. 2017 315 West 36th StreetNew York, NY 10018
Publisher: Maggie CalmelsManaging Editor: Becky DavisDesign Editor: Caroline Grimshaw
DON’T MISS AN ISSUETo make sure you receive every issue, take out a subscription.
SUBSCRIPTIONSWhen you subscribe, you will receive exclusive free gifts!To subscribe: Visit our website at knit-and-stitch.com
US CUSTOMER SERVICESCall: 800 261 6998Email: [email protected]
UK CUSTOMER SERVICESCall: 0344 472 5227Email: [email protected]
AustraliaCall: (03) 9872 4000Email: [email protected]
New ZealandCall: (09) 308 2871Fax: (09) 302 7661Email: [email protected]
South AfricaCall: (011) 265 4307Email: [email protected]
MalaysiaCall: (03) 8020 7112Email: [email protected]
SingaporeCall: (65) 6287 7090Email: [email protected]
OVERSEAS BACK ISSUESPlace your order with your local magazine retailer.
Picture Credits:Photography: Lizzie OrmeArtwork illustrations: Coral Mula
knit-and-stitch.com
Yarn care instructions Hand wash only • Do not bleach • Do not iron • Do not tumble dry When washing the finished product, follow the manufacturer’s washing instructions found on the yarn bands.
Not suitable for children under 14 years of age.Keep finished garland away from young children.Made in China
creative
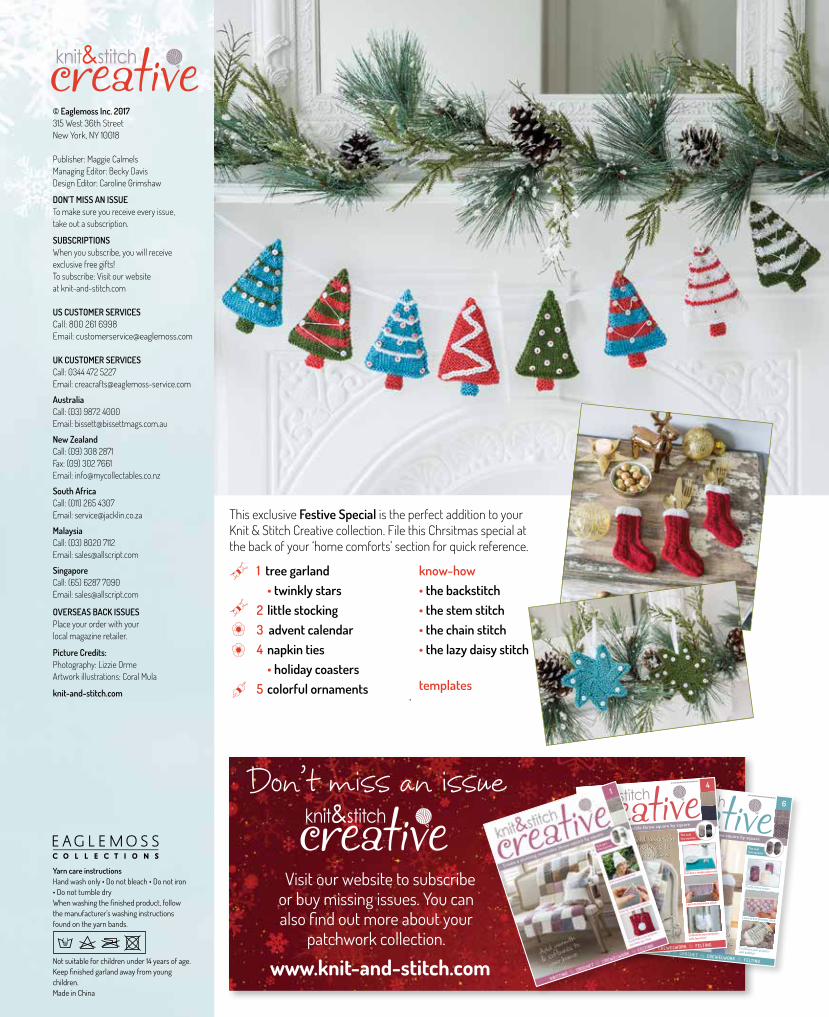
This exclusive Festive Special is the perfect addition to your Knit & Stitch Creative collection. File this Chrsitmas special at the back of your ‘home comforts’ section for quick reference.
1 tree garland • twinkly stars 2 little stocking 3 advent calendar 4 napkin ties • holiday coasters 5 colorful ornaments
know-how• the backstitch• the stem stitch• the chain stitch• the lazy daisy stitch
templates
Festive special 1
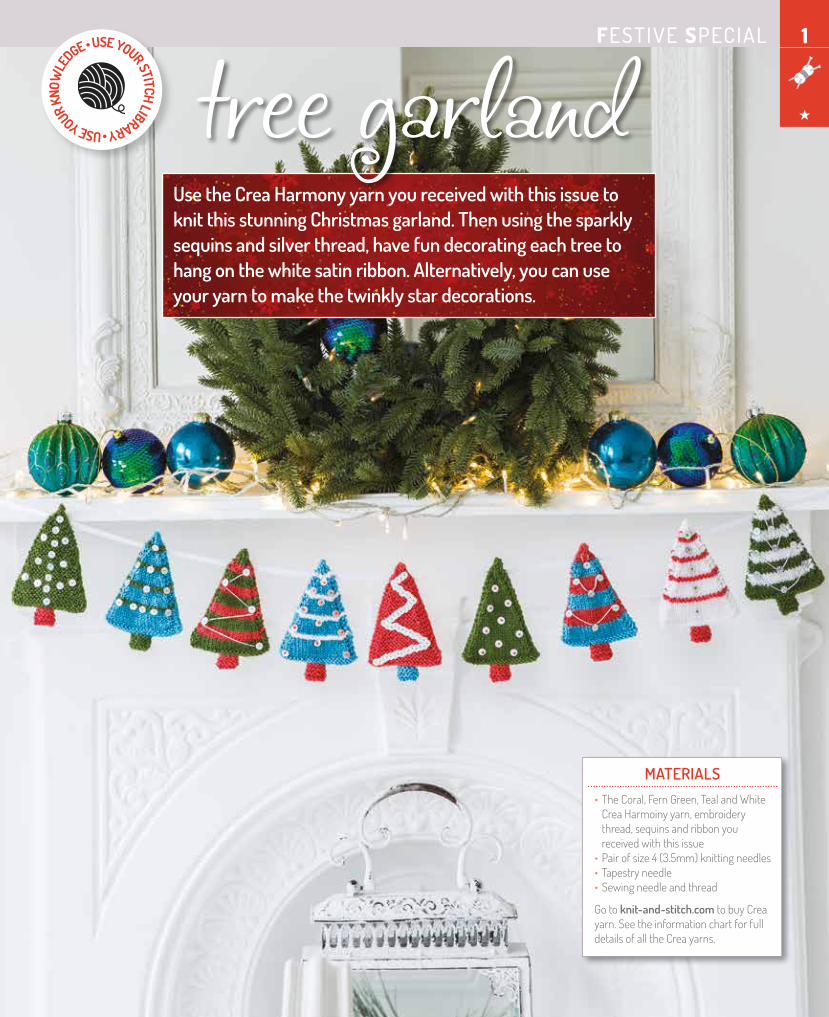
Materials• TheCoral,FernGreen,TealandWhiteCreaHarmoinyyarn,embroiderythread,sequinsandribbonyoureceivedwiththisissue
•Pairofsize4(3.5mm)knittingneedles•Tapestryneedle•Sewingneedleandthread
Gotoknit-and-stitch.comtobuyCreayarn.SeetheinformationchartforfulldetailsofalltheCreayarns.
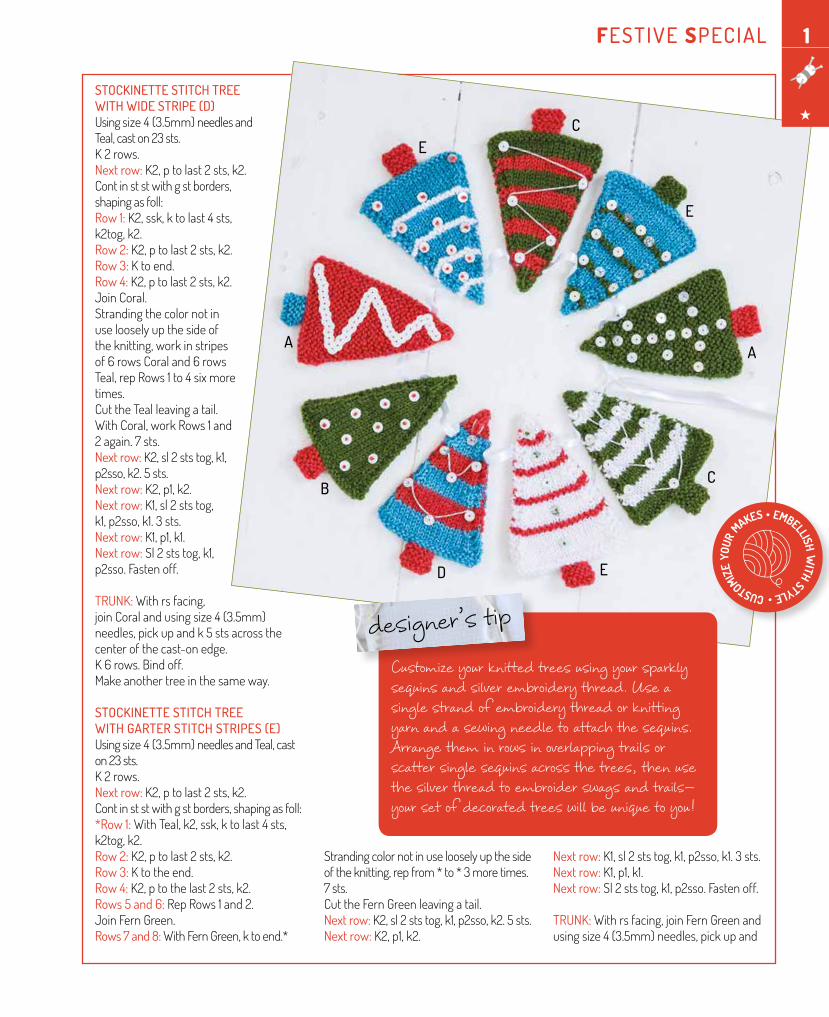
Use the Crea Harmony yarn you received with this issue to knit this stunning Christmas garland. then using the sparkly sequins and silver thread, have fun decorating each tree to hang on the white satin ribbon. alternatively, you can use your yarn to make the twinkly star decorations.
tree garlandUSE YOUR KNO
WLE
DGE • USE YOUR STITCH LIbRaRY •
★
Festive special1
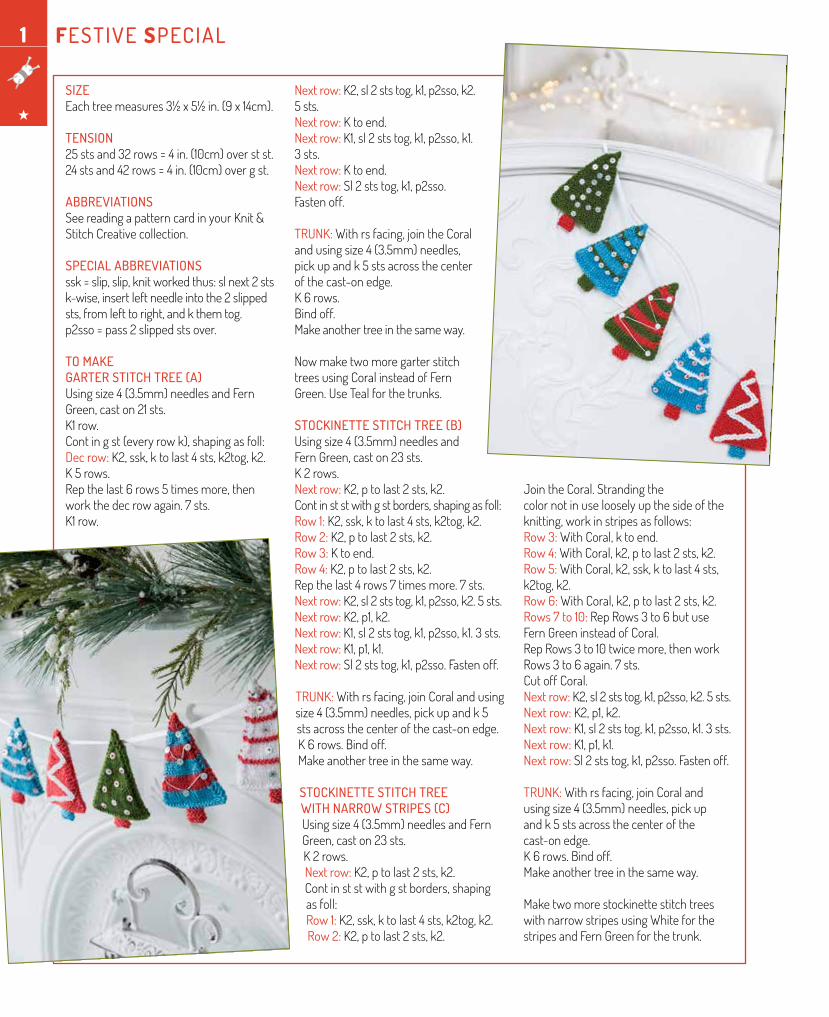
siZeEachtreemeasures3½x5½in.(9x14cm).
teNsiON 25stsand32rows=4in.(10cm)overstst.24stsand42rows=4in.(10cm)overgst.
aBBReviatiONsSeereadingapatterncardinyourKnit&StitchCreativecollection.
special aBBReviatiONsssk=slip,slip,knitworkedthus:slnext2stsk-wise,insertleftneedleintothe2slippedsts,fromlefttoright,andkthemtog.p2sso=pass2slippedstsover.
tO MaKeGaRteR stitcH tRee (a)Usingsize4(3.5mm)needlesandFernGreen,caston21sts.K1row.Contingst(everyrowk),shapingasfoll:Dec row:K2,ssk,ktolast4sts,k2tog,k2.K5rows.Repthelast6rows5timesmore,thenworkthedecrowagain.7sts.K1row.
Next row:K2,sl2ststog,k1,p2sso,k2.5sts.Next row: Ktoend.Next row: K1,sl2ststog,k1,p2sso,k1.3sts.Next row:Ktoend.Next row:Sl2ststog,k1,p2sso.Fastenoff.
TRUNK:Withrsfacing,jointheCoralandusingsize4(3.5mm)needles,pickupandk5stsacrossthecenterofthecast-onedge.K6rows.Bindoff.Makeanothertreeinthesameway.
NowmaketwomoregarterstitchtreesusingCoralinsteadofFernGreen.UseTealforthetrunks.
stOcKiNette stitcH tRee (B)Usingsize4(3.5mm)needlesandFernGreen,caston23sts.K2rows.Next row: K2,ptolast2sts,k2.Continststwithgstborders,shapingasfoll:Row 1:K2,ssk,ktolast4sts,k2tog,k2.Row 2:K2,ptolast2sts,k2.Row 3: Ktoend.Row 4:K2,ptolast2sts,k2.Repthelast4rows7timesmore.7sts.Next row:K2,sl2ststog,k1,p2sso,k2.5sts.Next row: K2,p1,k2.Next row: K1,sl2ststog,k1,p2sso,k1.3sts.Next row: K1,p1,k1.Next row:Sl2ststog,k1,p2sso.Fastenoff.
TRUNK: Withrsfacing,joinCoralandusingsize4(3.5mm)needles,pickupandk5stsacrossthecenterofthecast-onedge.K6rows.Bindoff.Makeanothertreeinthesameway.
stOcKiNette stitcH tRee witH NaRROw stRipes (c)Usingsize4(3.5mm)needlesandFernGreen,caston23sts.K2rows.Next row:K2,ptolast2sts,k2.Continststwithgstborders,shapingasfoll:Row 1:K2,ssk,ktolast4sts,k2tog,k2.Row 2: K2,ptolast2sts,k2.
JointheCoral.Strandingthecolornotinuselooselyupthesideoftheknitting,workinstripesasfollows:Row 3:WithCoral,ktoend.Row 4: WithCoral,k2,ptolast2sts,k2.Row 5:WithCoral,k2,ssk,ktolast4sts,k2tog,k2.Row 6: WithCoral,k2,ptolast2sts,k2.Rows 7 to 10:RepRows3to6butuseFernGreeninsteadofCoral.RepRows3to10twicemore,thenworkRows3to6again.7sts.CutoffCoral.Next row: K2,sl2ststog,k1,p2sso,k2.5sts.Next row:K2,p1,k2.Next row: K1,sl2ststog,k1,p2sso,k1.3sts.Next row:K1,p1,k1.Next row:Sl2ststog,k1,p2sso.Fastenoff.
TRUNK:Withrsfacing,joinCoralandusingsize4(3.5mm)needles,pickupandk5stsacrossthecenterofthecast-onedge.K6rows.Bindoff.Makeanothertreeinthesameway.
MaketwomorestockinettestitchtreeswithnarrowstripesusingWhiteforthestripesandFernGreenforthetrunk.
★
Festive special
stOcKiNette stitcH tRee witH wide stRipe (d)Usingsize4(3.5mm)needlesandTeal,caston23sts.K2rows.Next row:K2,ptolast2sts,k2.Continststwithgstborders,shapingasfoll:Row 1:K2,ssk,ktolast4sts,k2tog,k2.Row 2:K2,ptolast2sts,k2.Row 3: Ktoend.Row 4: K2,ptolast2sts,k2.JoinCoral.Strandingthecolornotinuselooselyupthesideoftheknitting,workinstripesof6rowsCoraland6rowsTeal,repRows1to4sixmoretimes.CuttheTealleavingatail.WithCoral,workRows1and2again.7sts.Next row: K2,sl2ststog,k1,p2sso,k2.5sts.Next row: K2,p1,k2.Next row: K1,sl2ststog,k1,p2sso,k1.3sts.Next row: K1,p1,k1.Next row: Sl2ststog,k1,p2sso.Fastenoff.
TRUNK: Withrsfacing,joinCoralandusingsize4(3.5mm)needles,pickupandk5stsacrossthecenterofthecast-onedge.K6rows.Bindoff.Makeanothertreeinthesameway.
stOcKiNette stitcH tRee witH GaRteR stitcH stRipes (e)Usingsize4(3.5mm)needlesandTeal,caston23sts.K2rows.Next row:K2,ptolast2sts,k2.Continststwithgstborders,shapingasfoll:*Row 1:WithTeal,k2,ssk,ktolast4sts,k2tog,k2.Row 2: K2,ptolast2sts,k2.Row 3: Ktotheend.Row 4: K2,ptothelast2sts,k2.Rows 5 and 6: RepRows1and2.JoinFernGreen.Rows 7 and 8:WithFernGreen,ktoend.*
Strandingcolornotinuselooselyupthesideoftheknitting,repfrom*to*3moretimes.7sts.CuttheFernGreenleavingatail.Next row: K2,sl2ststog,k1,p2sso,k2.5sts.Next row: K2,p1,k2.
Next row: K1,sl2ststog,k1,p2sso,k1.3sts.Next row: K1,p1,k1.Next row:Sl2ststog,k1,p2sso.Fastenoff.
TRUNK: Withrsfacing,joinFernGreenandusingsize4(3.5mm)needles,pickupand
Customize your knitted trees using your sparkly sequins and silver embroidery thread. Use a single strand of embroidery thread or knitting yarn and a sewing needle to attach the sequins. Arrange them in rows in overlapping trails or scatter single sequins across the trees, then use the silver thread to embroider swags and trails—your set of decorated trees will be unique to you!
designer’s tip
CUSTOmIzE
YOUR
m
aKES • EmbELLISH WITH STYLE •
a
B
a
e
e
c
c
d
e
1
★
1
★
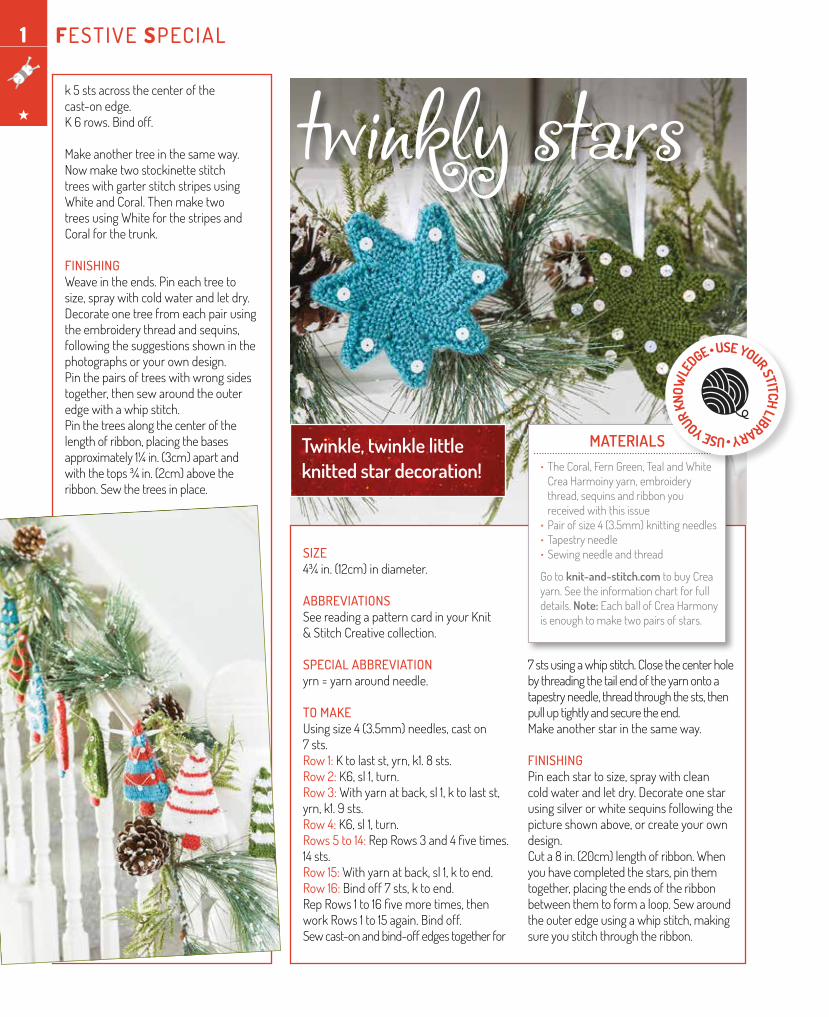
siZe 4¾in.(12cm)indiameter.
aBBReviatiONsSeereadingapatterncardinyourKnit&StitchCreativecollection.
special aBBReviatiONyrn=yarnaroundneedle.
tO MaKeUsingsize4(3.5mm)needles,caston7sts.Row 1:Ktolastst,yrn,k1.8sts.Row 2: K6,sl1,turn.Row 3: Withyarnatback,sl1,ktolastst,yrn,k1.9sts.Row 4: K6,sl1,turn.Rows 5 to 14: RepRows3and4fivetimes.14sts.Row 15: Withyarnatback,sl1,ktoend.Row 16: Bindoff7sts,ktoend.RepRows1to16fivemoretimes,thenworkRows1to15again.Bindoff.Sewcast-onandbind-offedgestogetherfor
7stsusingawhipstitch.Closethecenterholebythreadingthetailendoftheyarnontoatapestryneedle,threadthroughthests,thenpulluptightlyandsecuretheend.Makeanotherstarinthesameway.
FiNisHiNGPineachstartosize,spraywithcleancoldwaterandletdry.Decorateonestarusingsilverorwhitesequinsfollowingthepictureshownabove,orcreateyourowndesign.Cuta8in.(20cm)lengthofribbon.Whenyouhavecompletedthestars,pinthemtogether,placingtheendsoftheribbonbetweenthemtoformaloop.Sewaroundtheouteredgeusingawhipstitch,makingsureyoustitchthroughtheribbon.
Materials• TheCoral,FernGreen,TealandWhiteCreaHarmoinyyarn,embroiderythread,sequinsandribbonyoureceivedwiththisissue
•Pairofsize4(3.5mm)knittingneedles•Tapestryneedle•Sewingneedleandthread
Gotoknit-and-stitch.comtobuyCreayarn.Seetheinformationchartforfulldetails.Note:EachballofCreaHarmonyisenoughtomaketwopairsofstars.
twinkle, twinkle little knitted star decoration!
twinkly starsFestive special
USE YOUR KNO
WLE
DGE • USE YOUR STITCH LIbRaRY •
k5stsacrossthecenterofthecast-onedge.K6rows.Bindoff.
Makeanothertreeinthesameway.NowmaketwostockinettestitchtreeswithgarterstitchstripesusingWhiteandCoral.ThenmaketwotreesusingWhiteforthestripesandCoralforthetrunk.
FiNisHiNGWeaveintheends.Pineachtreetosize,spraywithcoldwaterandletdry.Decorateonetreefromeachpairusingtheembroiderythreadandsequins,followingthesuggestionsshowninthephotographsoryourowndesign.Pinthepairsoftreeswithwrongsidestogether,thensewaroundtheouteredgewithawhipstitch.Pinthetreesalongthecenterofthelengthofribbon,placingthebasesapproximately1¼in.(3cm)apartandwiththetops¾in.(2cm)abovetheribbon.Sewthetreesinplace.
Festive special 2
Materials• 1x2oz.(50g)ballofDropsLimainRed
• 1x2oz.(50g)ballofDropsLimainWhite
• Pairofsize3(3.25mm)knittingneedles
•Cableneedle•Tapestryneedle•Lengthoftwine
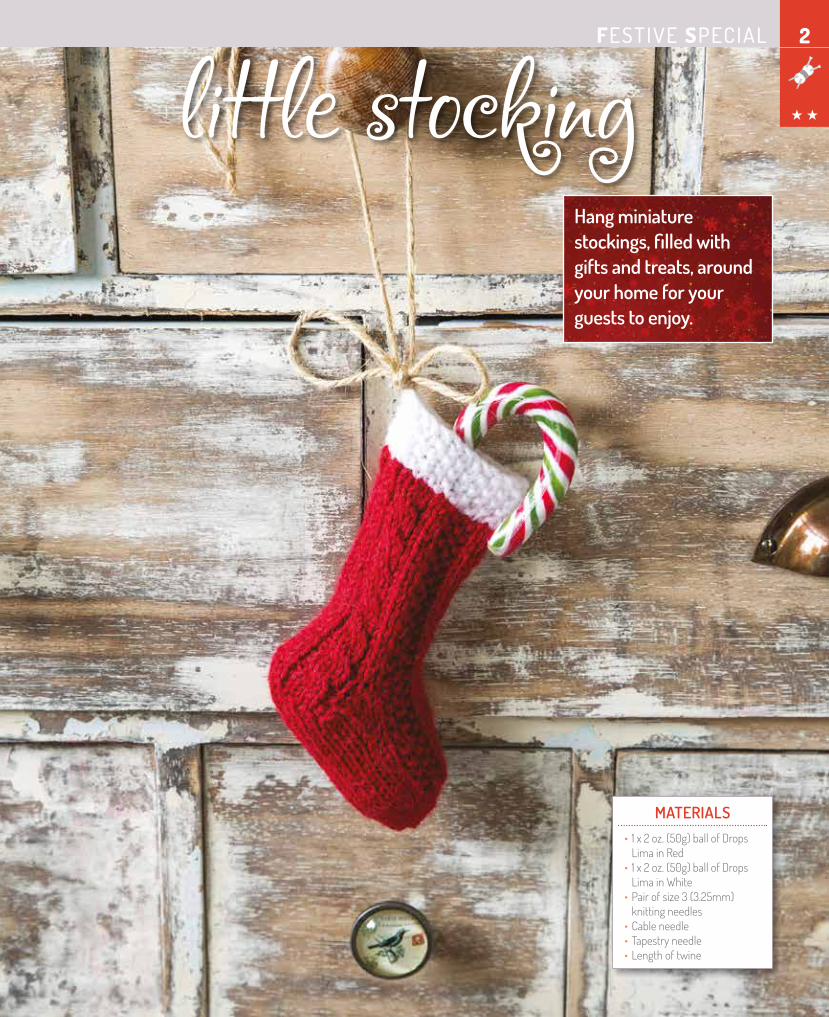
Hang miniature stockings, filled with gifts and treats, around your home for your guests to enjoy.
little stocking ★ ★
Festive special2
siZe4x4¾in.(10x12cm),cufftoheel.
aBBReviatiONsSeereadingapatterncardinyourKnit&StitchCreativecollection.
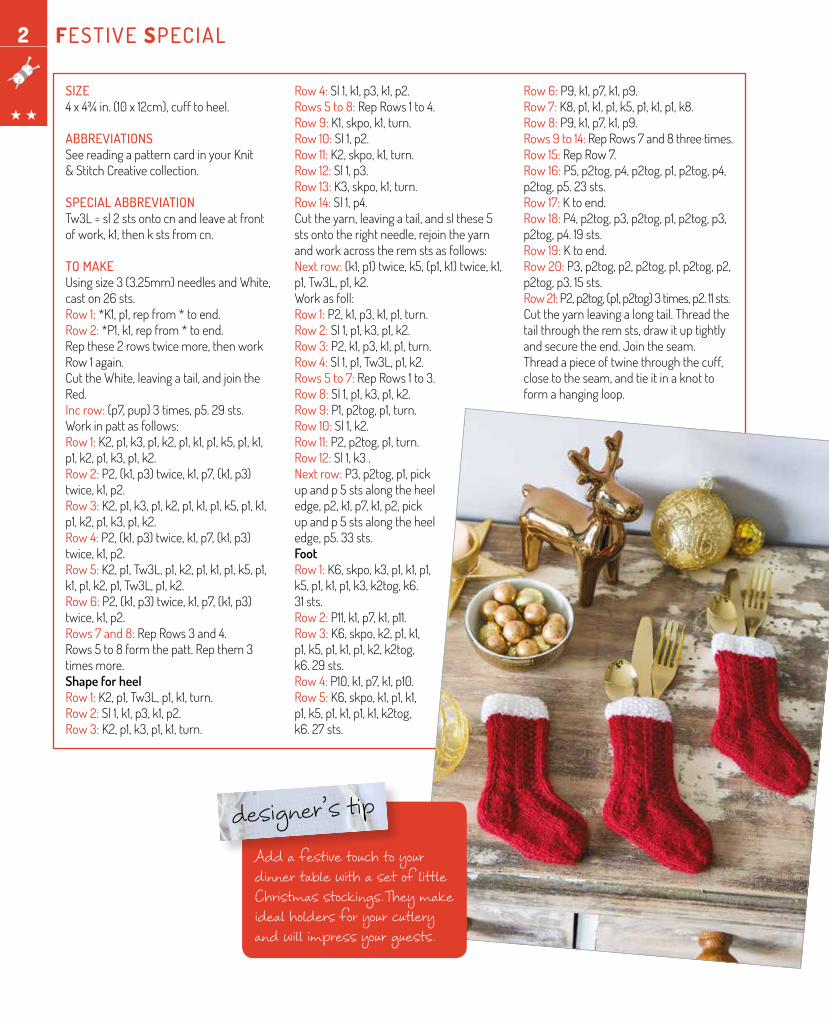
special aBBReviatiONTw3L=sl2stsontocnandleaveatfrontofwork,k1,thenkstsfromcn.tO MaKe Usingsize3(3.25mm)needlesandWhite,caston26sts.Row 1: *K1,p1,repfrom*toend.Row 2: *P1,k1,repfrom*toend.Repthese2rowstwicemore,thenworkRow1again.CuttheWhite,leavingatail,andjointheRed.Inc row:(p7,pup)3times,p5.29sts.Workinpattasfollows:Row 1:K2,p1,k3,p1,k2,p1,k1,p1,k5,p1,k1,p1,k2,p1,k3,p1,k2.Row 2:P2,(k1,p3)twice,k1,p7,(k1,p3)twice,k1,p2.Row 3: K2,p1,k3,p1,k2,p1,k1,p1,k5,p1,k1,p1,k2,p1,k3,p1,k2.Row 4:P2,(k1,p3)twice,k1,p7,(k1,p3)twice,k1,p2.Row 5: K2,p1,Tw3L,p1,k2,p1,k1,p1,k5,p1,k1,p1,k2,p1,Tw3L,p1,k2.Row 6:P2,(k1,p3)twice,k1,p7,(k1,p3)twice,k1,p2.Rows 7 and 8: RepRows3and4.Rows5to8formthepatt.Repthem3timesmore.Shape for heelRow 1:K2,p1,Tw3L,p1,k1,turn.Row 2:Sl1,k1,p3,k1,p2.Row 3: K2,p1,k3,p1,k1,turn.
Row 4:Sl1,k1,p3,k1,p2.Rows 5 to 8:RepRows1to4.Row 9:K1,skpo,k1,turn.Row 10: Sl1,p2.Row 11:K2,skpo,k1,turn.Row 12: Sl1,p3.Row 13: K3,skpo,k1,turn.Row 14:Sl1,p4.Cuttheyarn,leavingatail,andslthese5stsontotherightneedle,rejointheyarnandworkacrosstheremstsasfollows:Next row:(k1,p1)twice,k5,(p1,k1)twice,k1,p1,Tw3L,p1,k2.Workasfoll:Row 1: P2,k1,p3,k1,p1,turn.Row 2: Sl1,p1,k3,p1,k2.Row 3:P2,k1,p3,k1,p1,turn.Row 4: Sl1,p1,Tw3L,p1,k2.Rows 5 to 7: RepRows1to3.Row 8: Sl1,p1,k3,p1,k2.Row 9: P1,p2tog,p1,turn.Row 10:Sl1,k2.Row 11: P2,p2tog,p1,turn.Row 12:Sl1,k3.Next row:P3,p2tog,p1,pickupandp5stsalongtheheeledge,p2,k1,p7,k1,p2,pickupandp5stsalongtheheeledge,p5.33sts.FootRow 1: K6,skpo,k3,p1,k1,p1,k5,p1,k1,p1,k3,k2tog,k6.31sts.Row 2: P11,k1,p7,k1,p11.Row 3:K6,skpo,k2,p1,k1,p1,k5,p1,k1,p1,k2,k2tog,k6.29sts.Row 4: P10,k1,p7,k1,p10.Row 5:K6,skpo,k1,p1,k1,p1,k5,p1,k1,p1,k1,k2tog,k6.27sts.
Row 6: P9,k1,p7,k1,p9.Row 7: K8,p1,k1,p1,k5,p1,k1,p1,k8.Row 8: P9,k1,p7,k1,p9.Rows 9 to 14: RepRows7and8threetimes.Row 15: RepRow7.Row 16: P5,p2tog,p4,p2tog,p1,p2tog,p4,p2tog,p5.23sts.Row 17: Ktoend.Row 18: P4,p2tog,p3,p2tog,p1,p2tog,p3,p2tog,p4.19sts.Row 19: Ktoend.Row 20: P3,p2tog,p2,p2tog,p1,p2tog,p2,p2tog,p3.15sts.Row 21: P2,p2tog,(p1,p2tog)3times,p2.11sts.Cuttheyarnleavingalongtail.Threadthetailthroughtheremsts,drawituptightlyandsecuretheend.Jointheseam.Threadapieceoftwinethroughthecuff,closetotheseam,andtieitinaknottoformahangingloop.
Add a festive touch to your dinner table with a set of little Christmas stockings.They make ideal holders for your cutlery and will impress your guests.
designer’s tip
★ ★
Festive sPeCiAL 3
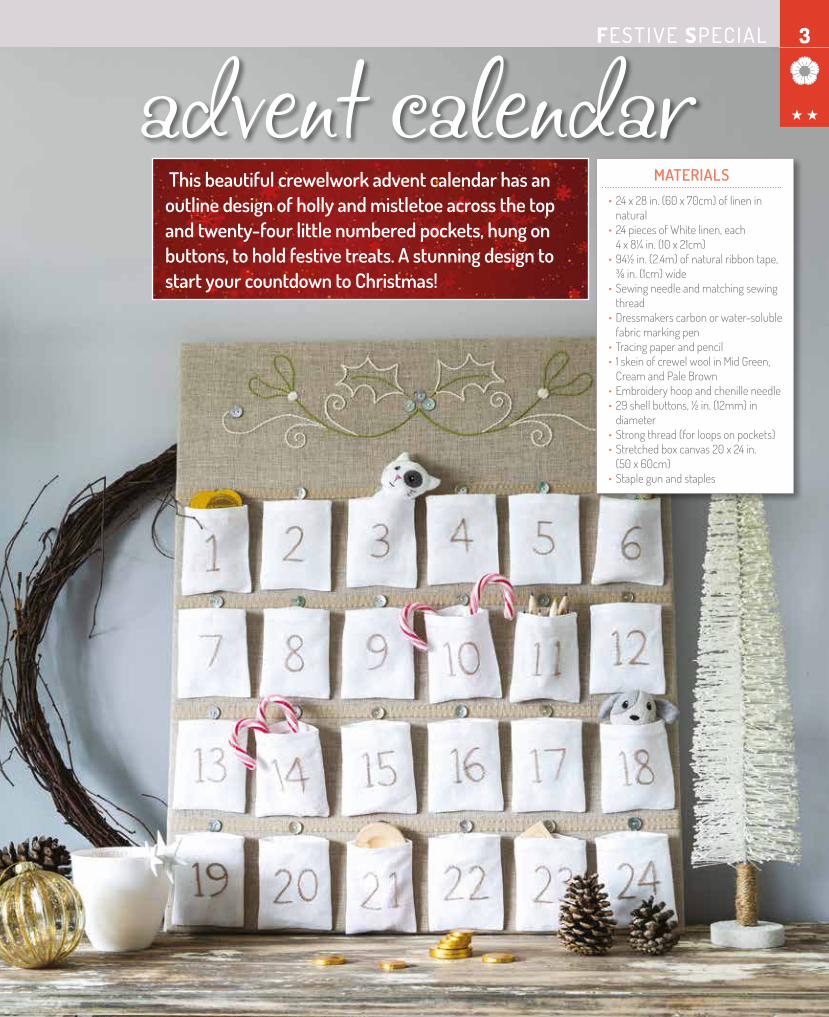
Materials• 24x28in.(60x70cm)oflineninnatural
• 24piecesofWhitelinen,each4x8¼in.(10x21cm)
• 94½in.(2.4m)ofnaturalribbontape,⅜in.(1cm)wide
• Sewingneedleandmatchingsewingthread
• Dressmakerscarbonorwater-solublefabricmarkingpen
•Tracingpaperandpencil• 1skeinofcrewelwoolinMidGreen,CreamandPaleBrown
•Embroideryhoopandchenilleneedle• 29shellbuttons,½in.(12mm)indiameter
•Strongthread(forloopsonpockets)• Stretchedboxcanvas20x24in.(50x60cm)
•Staplegunandstaples
this beautiful crewelwork advent calendar has an outline design of holly and mistletoe across the top and twenty-four little numbered pockets, hung on buttons, to hold festive treats. a stunning design to start your countdown to Christmas!
advent calendar ★ ★

Festive sPeCiAL3
siZe20x24in.(50x60cm).
tO MAKe•Pressthenaturallinenfabric.Tohelpwithdesignplacementandmakingthecalendar,tacka20x24in.(50x60cm)rectangleontothefabric,leavinga2in.(5cm)seamallowance.
•Cuttheribbontapeintofour24in.(60cm)lengths.Placeonelengthacrossthe24in.(60cm)widthofthefabricwiththetopedge4⅜in.(11cm)fromthebottomtackingline,thenspacetheothersapproximately4in.(10cm)apart.Pin,thensewinplacebyhandusingsmallrunningstitches,ormachinesew.
•Useapencilandtracingpapertotracethehollyleafandmistletoedesign—seethetemplateatthebackofthisissue.Transferthedesigntothetopofthelinenpanelusingalightboxandawater-solublemarkingpenordressmaker’scarbon.
•Placethefabricinanembroideryhoop.With2strandsofcrewelwoolandachenilleneedle,stitchthedesignusingthestemstitchforthehollyleavesandtrails,thebackstitchforthemistletoeleavesandhollyveins,andthesatinstitchforthemistletoeberries.Thensewonthreebuttonsbetweenthehollyleavesandonebuttonattheendoftheoutertrails.
•Removeanydesignlines,ifnecessary.Carefullypressthedesignonthewrongside,placingthelinenonatowelwhilepressingsoasnottocrushthestitching.
•Forthepockets,foldeachpieceofwhitelineninhalflengthwisetomarkthecenter.Usingdressmaker’scarbonoralightboxandawater-solublemarkerpen,transferthenumbers(1to24,fromthetemplate),approximately1⅛in.(3cm)upfromthefoldlineofeachpieceandcenteredacrossthewidth.
•With2strandsofPaleBrowncrewelwoolandthechenilleneedle,embroiderthenumbersusingthestemstitch.Foldthepocketpieces,withrightsidestogether,andsewa⅔in.(1.5cm)seambymachineorabackstitchseambyhandoneachsideedge.Toneatentheseams,finishwithazigzagmachinestitchortrimdownbyhalf.
•Turnthepocketsrightsideoutandpresscarefully.Foldthetop¼in.(5mm),then½in.(1cm)tothewrongsideforthehem.Pin,thenstitchinplace.Repeatwithallthepockets.
•Positionthepocketsjustbelowtheribbonbands,withsixpocketsspacedequallyoneachrow.Markthecenterofeachpocketontheribbontoindicatethepositionofthebuttons.Removethepocketsandsewthebuttonsinthemarkedpositionsusingthesewingneedleandthread.
•Usethesewingneedleandstrongthreadtomakeasmalllooponeachpocket.Placetheloopinthecenterofthetophemonthebackofthepocketsandmakeitjustlongenoughtoinsertthebutton.Repeatonallpockets.
•Withpocketsremoved,andusingthetackedoutlineofstitchesasaguide,layoutandstretchthelinenovertheboxcanvasandpininplace,workingaroundallsidesuntilyouarehappywiththeplacement.Tofinish,staplethefabrictothewrongside,closetotheedge,allthewayaroundtosecureit.
•Removethetackingstitchesfromtheedgeofthelinenandplaceallthepocketsinorder.
Work the mistletoe leaves using Mid Green and the backstitch; work the berries in the satin stitch using Cream.
Stitch the holly leaves and outer trails using Cream and the stem stitch.
Use Mid Green and the backstitch for the veins.
Use Mid Green and the stem stitch for the inner trails.
★ ★
Festive sPeCiAL 4
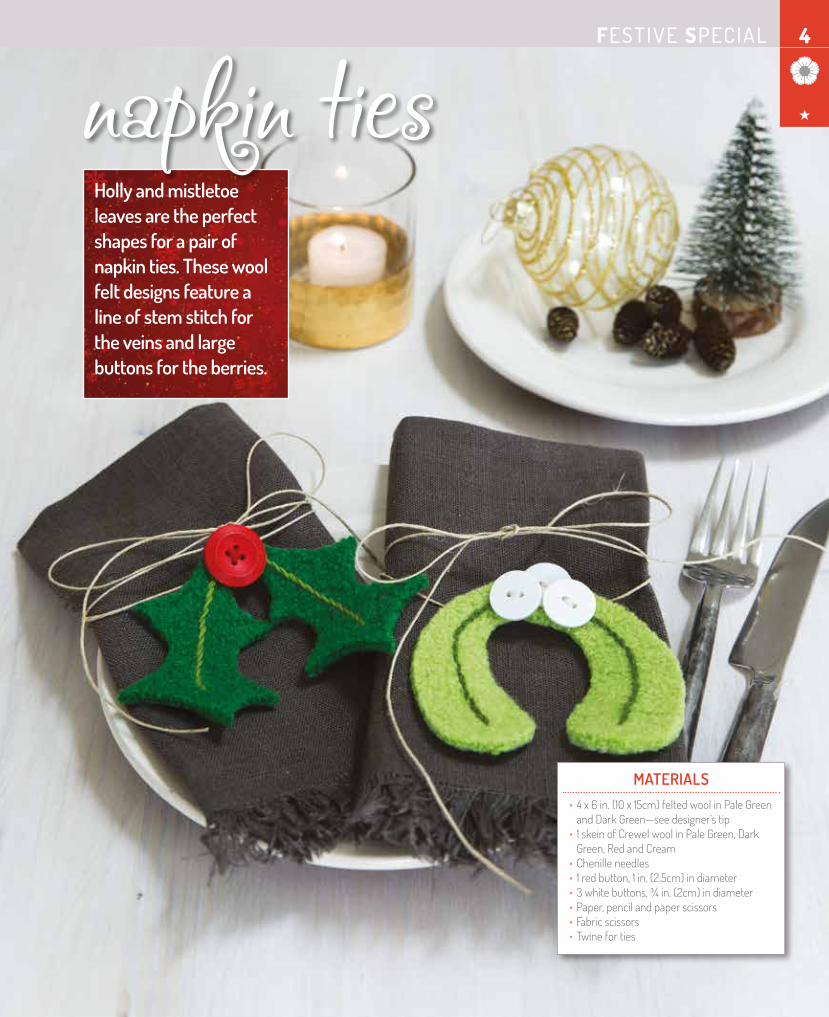
Materials• 4x6in.(10x15cm)feltedwoolinPaleGreenandDarkGreen—seedesigner’stip
• 1skeinofCrewelwoolinPaleGreen,DarkGreen,RedandCream
•Chenilleneedles• 1redbutton,1in.(2.5cm)indiameter•3whitebuttons,¾in.(2cm)indiameter•Paper,pencilandpaperscissors•Fabricscissors•Twineforties
Holly and mistletoe leaves are the perfect shapes for a pair of napkin ties. these wool felt designs feature a line of stem stitch for the veins and large buttons for the berries.
napkin ties ★
Festive sPeCiAL
siZesMistletoe,3½x4¾in.(9x12cm).Holly,3½x6in.(9x15cm).
tO MAKe•Usingapencilandpaper,carefullytracethedesigns—seetheTemplatesatthebackofthisissue.Cutouttheleavesandusethemasatemplate.
•PinthehollytemplatetotheDarkGreenfeltedwoolandthemistletoetemplatetothePaleGreen.Carefullycutouttheleaves.
•Using2strandsofcrewelwoolandachenilleneedle,sewaveininthestemstitchalongthecenterofeachleafusingPaleGreenforthehollyandDarkGreenforthemistletoe.
•Fortheties,usealargechenilleneedleandthetwinetoworkastitchbetweentheleaves,withtheendsonthewrongside.
•Onthehollyleaves,sewtheRedbuttonbetweenthetopoftheleavesusing2strandsofRedcrewelwool.Onthemistletoe,sewthreeWhitebuttonsbetweenthetopoftheleavesusing2strandsofCreamcrewelwoolandoverlappingthebuttonsslightly.
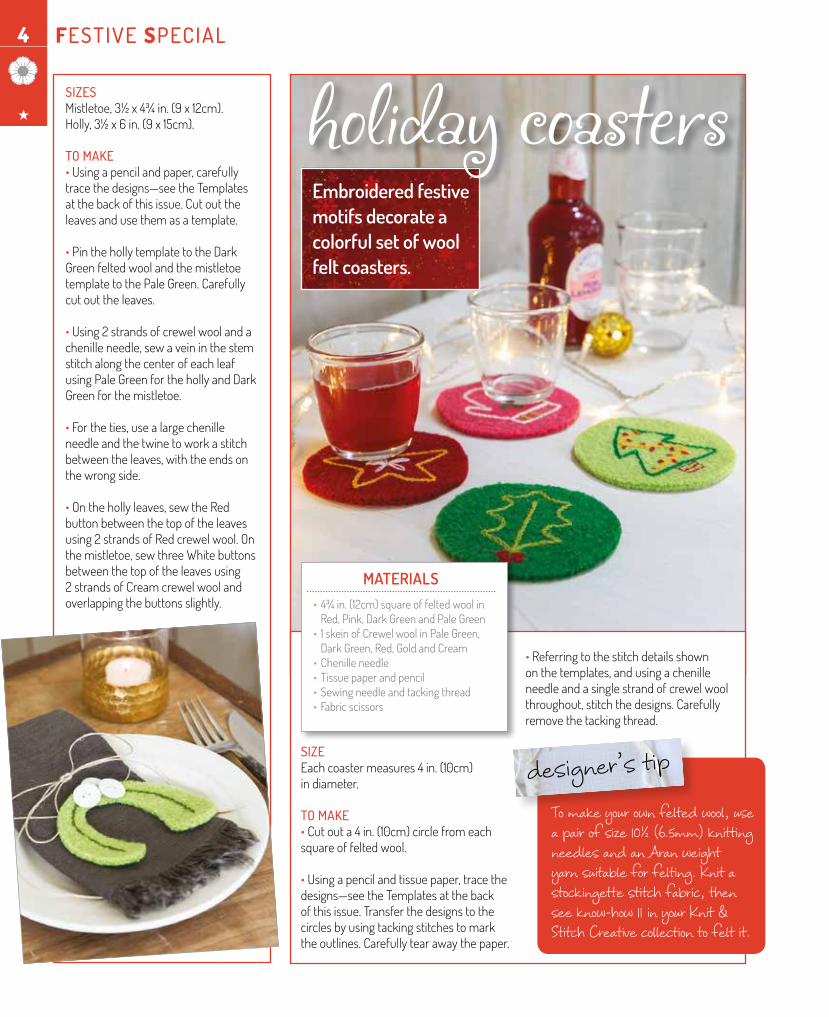
embroidered festive motifs decorate a colorful set of wool felt coasters.
holiday coasters
siZeEachcoastermeasures4in.(10cm)indiameter.
tO MAKe•Cutouta4in.(10cm)circlefromeachsquareoffeltedwool.
•Usingapencilandtissuepaper,tracethedesigns—seetheTemplatesatthebackofthisissue.Transferthedesignstothecirclesbyusingtackingstitchestomarktheoutlines.Carefullytearawaythepaper.
•Referringtothestitchdetailsshownonthetemplates,andusingachenilleneedleandasinglestrandofcrewelwoolthroughout,stitchthedesigns.Carefullyremovethetackingthread.
Materials• 4¾in.(12cm)squareoffeltedwoolinRed,Pink,DarkGreenandPaleGreen
• 1skeinofCrewelwoolinPaleGreen,DarkGreen,Red,GoldandCream
•Chenilleneedle•Tissuepaperandpencil•Sewingneedleandtackingthread•Fabricscissors
4
To make your own felted wool, use a pair of size 10½ (6.5mm) knitting needles and an Aran weight yarn suitable for felting. Knit a stockingette stitch fabric, then see know-how 11 in your Knit & Stitch Creative collection to felt it.
designer’s tip
★
Festive special 5
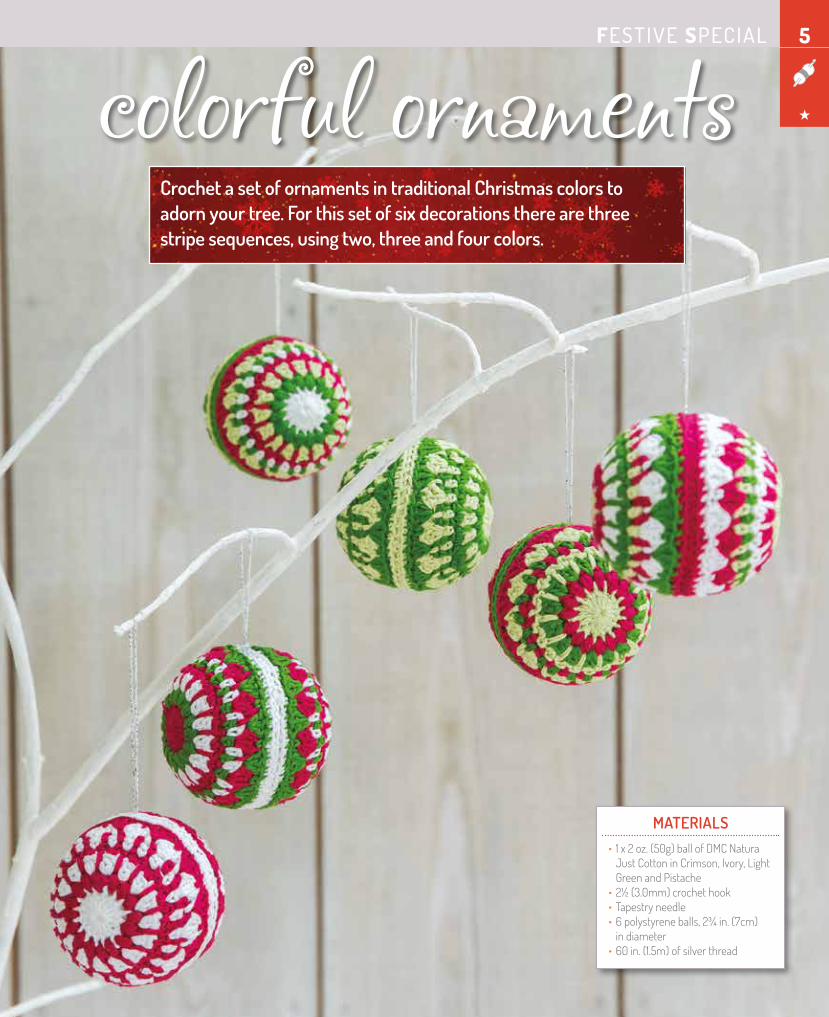
Materials• 1x2oz.(50g)ballofDMCNaturaJustCottoninCrimson,Ivory,LightGreenandPistache
•2½(3.0mm)crochethook•Tapestryneedle• 6polystyreneballs,2¾in.(7cm)indiameter
•60in.(1.5m)ofsilverthread
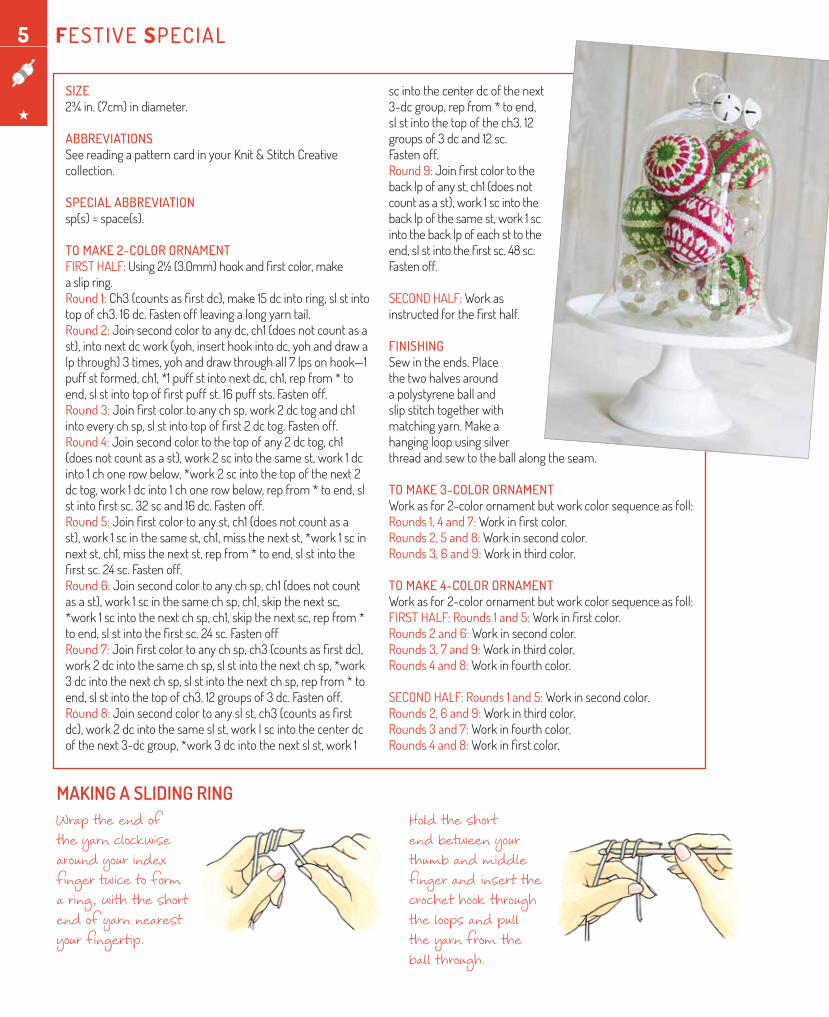
Crochet a set of ornaments in traditional Christmas colors to adorn your tree. For this set of six decorations there are three stripe sequences, using two, three and four colors.
colorful ornaments ★
Festive special5
siZe2¾in.(7cm)indiameter.
aBBReviatiONsSeereadingapatterncardinyourKnit&StitchCreativecollection.
special aBBReviatiONsp(s)=space(s).
tO MaKe 2-cOlOR ORNaMeNtFirst halF:Using2½(3.0mm)hookandfirstcolor,makeaslipring.round 1:Ch3(countsasfirstdc),make15dcintoring,slstintotopofch3.16dc.Fastenoffleavingalongyarntail.round 2: Joinsecondcolortoanydc,ch1(doesnotcountasast),intonextdcwork(yoh,inserthookintodc,yohanddrawalpthrough)3times,yohanddrawthroughall7lpsonhook—1puffstformed,ch1,*1puffstintonextdc,ch1,repfrom*toend,slstintotopoffirstpuffst.16puffsts.Fastenoff.round 3: Joinfirstcolortoanychsp,work2dctogandch1intoeverychsp,slstintotopoffirst2dctog.Fastenoff.round 4:Joinsecondcolortothetopofany2dctog,ch1(doesnotcountasast),work2scintothesamest,work1dcinto1chonerowbelow,*work2scintothetopofthenext2dctog,work1dcinto1chonerowbelow,repfrom*toend,slstintofirstsc.32scand16dc.Fastenoff.round 5: Joinfirstcolortoanyst,ch1(doesnotcountasast),work1scinthesamest,ch1,missthenextst,*work1scinnextst,ch1,missthenextst,repfrom*toend,slstintothefirstsc.24sc.Fastenoff.round 6:Joinsecondcolortoanychsp,ch1(doesnotcountasast),work1scinthesamechsp,ch1,skipthenextsc,*work1scintothenextchsp,ch1,skipthenextsc,repfrom*toend,slstintothefirstsc.24sc.Fastenoffround 7: Joinfirstcolortoanychsp,ch3(countsasfirstdc),work2dcintothesamechsp,slstintothenextchsp,*work3dcintothenextchsp,slstintothenextchsp,repfrom*toend,slstintothetopofch3.12groupsof3dc.Fastenoff.round 8: Joinsecondcolortoanyslst,ch3(countsasfirstdc),work2dcintothesameslst,workIscintothecenterdcofthenext3-dcgroup,*work3dcintothenextslst,work1
scintothecenterdcofthenext3-dcgroup,repfrom*toend,slstintothetopofthech3.12groupsof3dcand12sc.Fastenoff.round 9: Joinfirstcolortothebacklpofanyst,ch1(doesnotcountasast),work1scintothebacklpofthesamest,work1scintothebacklpofeachsttotheend,slstintothefirstsc.48sc.Fastenoff.
second halF:Workasinstructedforthefirsthalf.
FiNishiNgSewintheends.Placethetwohalvesaroundapolystyreneballandslipstitchtogetherwithmatchingyarn.Makeahangingloopusingsilverthreadandsewtotheballalongtheseam.
tO MaKe 3-cOlOR ORNaMeNtWorkasfor2-colorornamentbutworkcolorsequenceasfoll:rounds 1, 4 and 7: Workinfirstcolor.rounds 2, 5 and 8:Workinsecondcolor.rounds 3, 6 and 9:Workinthirdcolor.
tO MaKe 4-cOlOR ORNaMeNtWorkasfor2-colorornamentbutworkcolorsequenceasfoll:First halF: rounds 1 and 5: Workinfirstcolor.rounds 2 and 6:Workinsecondcolor.rounds 3, 7 and 9:Workinthirdcolor.rounds 4 and 8:Workinfourthcolor.
second halF: rounds 1 and 5: Workinsecondcolor.rounds 2, 6 and 9:Workinthirdcolor.rounds 3 and 7:Workinfourthcolor.rounds 4 and 8:Workinfirstcolor.
Making a sliding ring Wrap the end of the yarn clockwise around your index finger twice to form a ring, with the short end of yarn nearest your fingertip.
Hold the short end between your thumb and middle finger and insert the crochet hook through the loops and pull the yarn from the ball through.
★
Know-How
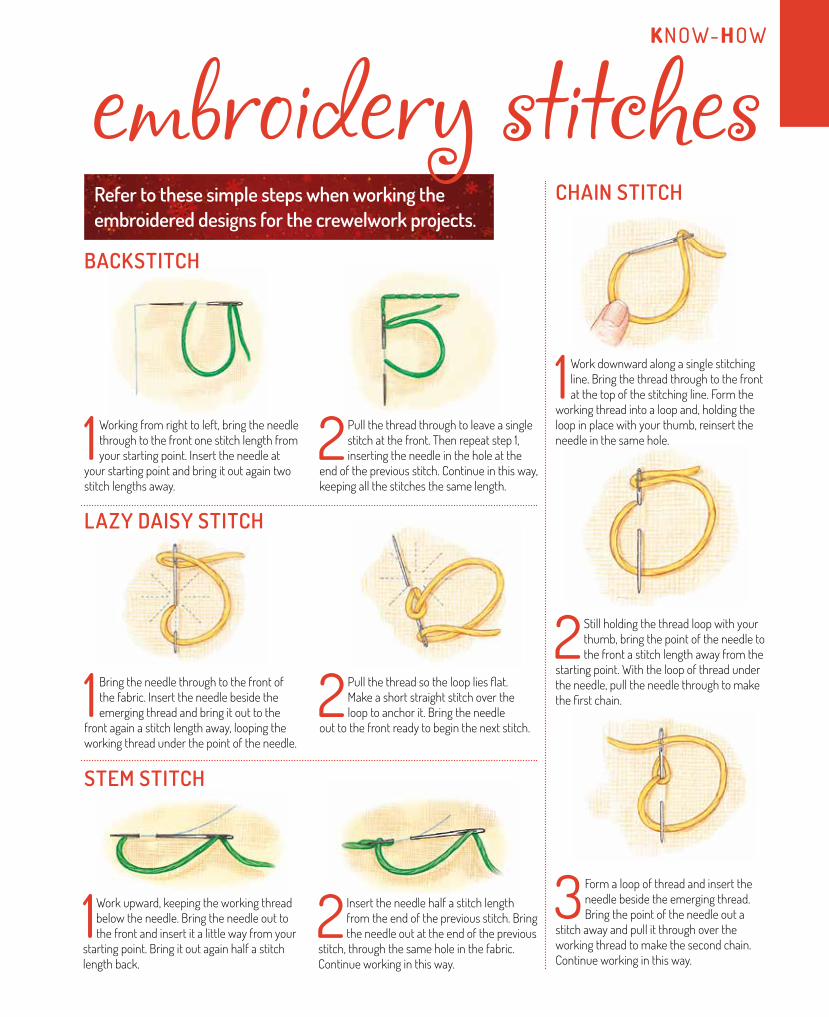
Refer to these simple steps when working the embroidered designs for the crewelwork projects.
embroidery stitcheschain stitch
1 Work downward along a single stitching line. Bring the thread through to the front at the top of the stitching line. Form the
working thread into a loop and, holding the loop in place with your thumb, reinsert the needle in the same hole.
2 Still holding the thread loop with your thumb, bring the point of the needle to the front a stitch length away from the
starting point. With the loop of thread under the needle, pull the needle through to make the first chain.
3 Form a loop of thread and insert the needle beside the emerging thread. Bring the point of the needle out a
stitch away and pull it through over the working thread to make the second chain. Continue working in this way.
lazy daisy stitch
Backstitch
1 Bring the needle through to the front of the fabric. Insert the needle beside the emerging thread and bring it out to the
front again a stitch length away, looping the working thread under the point of the needle.
1 Working from right to left, bring the needle through to the front one stitch length from your starting point. Insert the needle at
your starting point and bring it out again two stitch lengths away.
2 Pull the thread so the loop lies flat. Make a short straight stitch over the loop to anchor it. Bring the needle
out to the front ready to begin the next stitch.
2 Pull the thread through to leave a single stitch at the front. Then repeat step 1, inserting the needle in the hole at the
end of the previous stitch. Continue in this way, keeping all the stitches the same length.
1 Work upward, keeping the working thread below the needle. Bring the needle out to the front and insert it a little way from your
starting point. Bring it out again half a stitch length back.
2 Insert the needle half a stitch length from the end of the previous stitch. Bring the needle out at the end of the previous
stitch, through the same hole in the fabric. Continue working in this way.
stem stitch
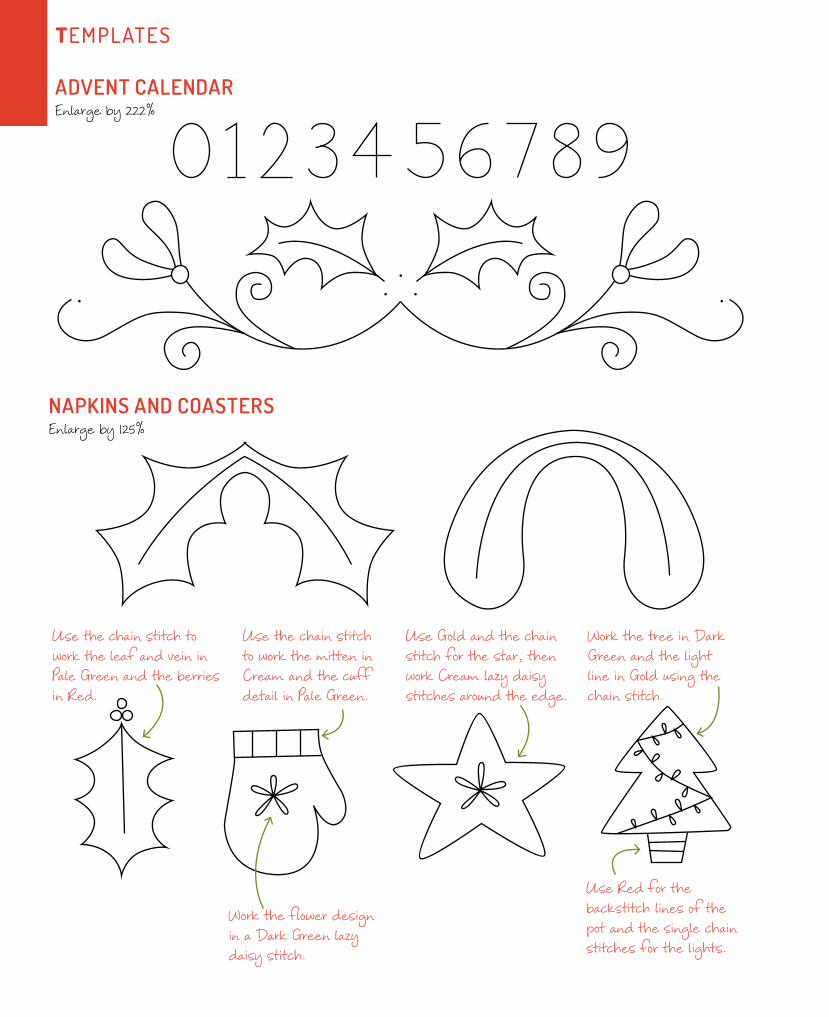
templates
advent calendaREnlarge by 222%
napkins and coasteRsEnlarge by 125%
Use the chain stitch to work the leaf and vein in Pale Green and the berries in Red.
Use the chain stitch to work the mitten in Cream and the cuff detail in Pale Green.
Use Gold and the chain stitch for the star, then work Cream lazy daisy stitches around the edge.
Work the tree in Dark Green and the light line in Gold using the chain stitch.
Use Red for the backstitch lines of the pot and the single chain stitches for the lights.
Work the flower design in a Dark Green lazy daisy stitch.
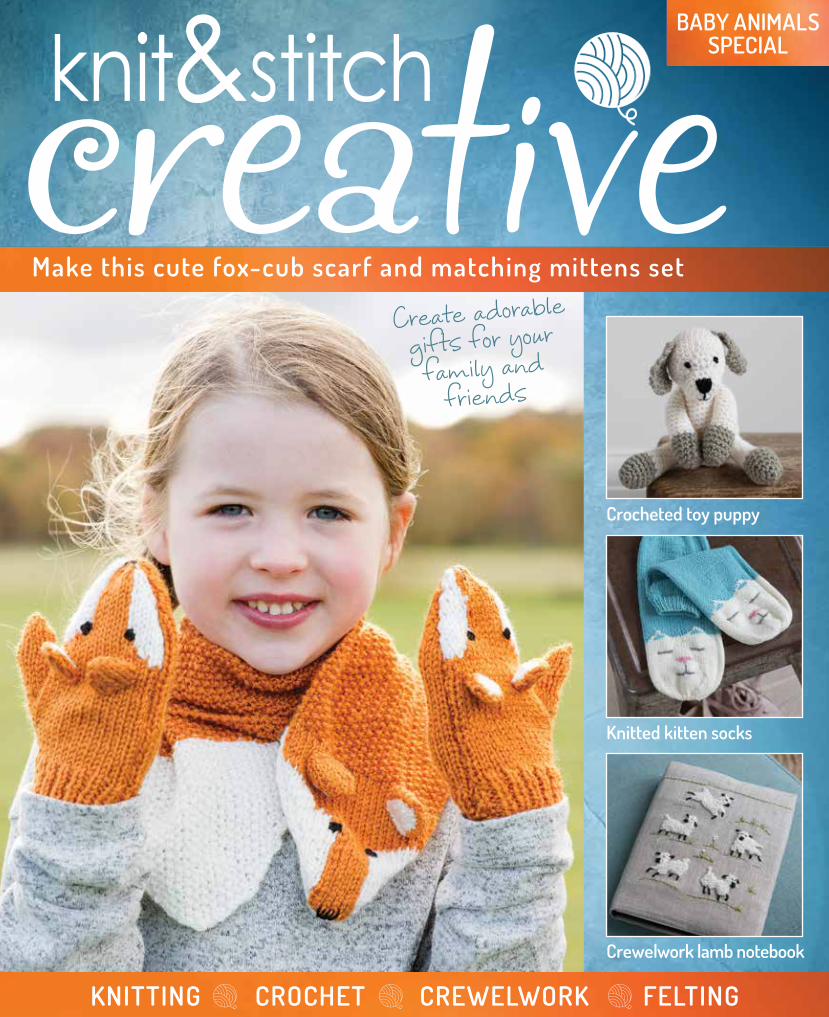
Crocheted toy puppy
Knitted kitten socks
Crewelwork lamb notebook
Knitting CroChet CrewelworK felting
Create adorable gifts for your family and
friends
Make this cute fox-cub scarf and matching mittens set
BaBy aniMals speCialcreative
Visit our website to subscribe or buy missing issues. You can also find out more about your
patchwork collection at
www.knit-and-stitch.com
Don’t miss an issue
creative
Step-by-step instructions
Child’s cute panda hat
Cosy cowl with tassel customisationKNITTING CROCHET CREWELWORK FELTING
Stylish versatile throw
Create a stunning reversible throw square by square
3creative creative
The next two squares
KSC_NAT_03_P01_COVER.indd 1
20/06/2017 14:13
Step-by-step instructions
Knit a cute lamb
Customise your projects
with buttons
KNITTING CROCHET CREWELWORK FELTING
Extra warmth
and style for your bed
Create a stunning reversible throw square by square
2
creative
The next two squares
creative
KSC_02_P01_COVER.indd 1
16/06/2017 16:54
© Eaglemoss Inc. 2018 315 West 36th StreetNew York, NY 10018
Publisher: Maggie CalmelsManaging Editor: Becky DavisDesign Editor: Caroline Grimshaw
DON’T MISS AN ISSUETo make sure you receive every issue, take out a subscription.
SUBSCRIPTIONSWhen you subscribe, you will receive exclusive free gifts!To subscribe: Visit our website at knit-and-stitch.com
US CUSTOMER SERVICESCall: 800 261 6998Email: [email protected]
UK CUSTOMER SERVICESCall: 0344 472 5227Email: [email protected]
AustraliaCall: (03) 9872 4000Email: [email protected]
New ZealandCall: (09) 308 2871Fax: (09) 302 7661Email: [email protected]
South AfricaCall: (011) 265 4307Email: [email protected]
MalaysiaCall: (03) 8020 7112Email: [email protected]
SingaporeCall: (65) 6287 7090Email: [email protected]
OVERSEAS BACK ISSUESPlace your order with your local magazine retailer.
Picture Credits:Photography: Laura AshmanArtwork illustrations: Coral Mula
knit-and-stitch.com
Yarn care instructions Hand wash only • Do not bleach • Do not iron • Do not tumble dry When washing the finished product, follow the manufacturer’s washing instructions found on the yarn bands.
Embroidery Thread: 100% acrylic • Care instructions: wipe clean only• Not suitable for children under 14 years of age • WARNING: This item is for functional use only and should not be used during child’s playMade in China
creative
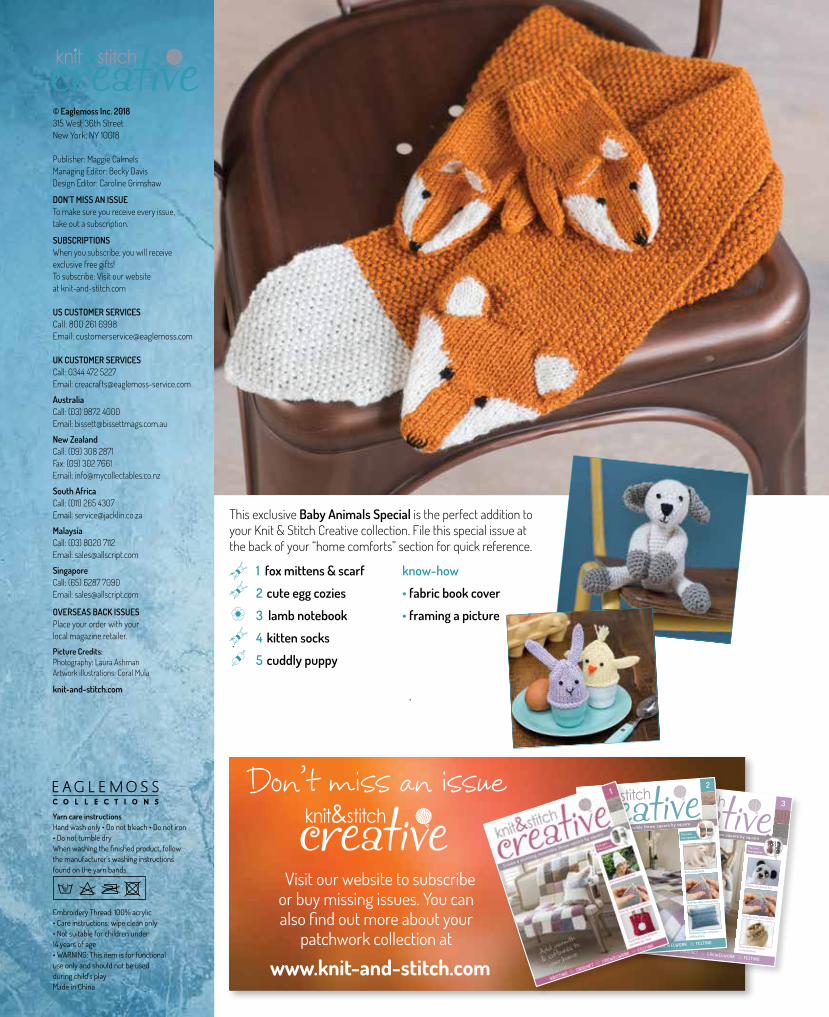
This exclusive Baby Animals Special is the perfect addition to your Knit & Stitch Creative collection. File this special issue at the back of your “home comforts” section for quick reference.
1 fox mittens & scarf
2 cute egg cozies
3 lamb notebook
4 kitten socks
5 cuddly puppy
know-how
• fabric book cover
• framing a picture
Baby Animals 1
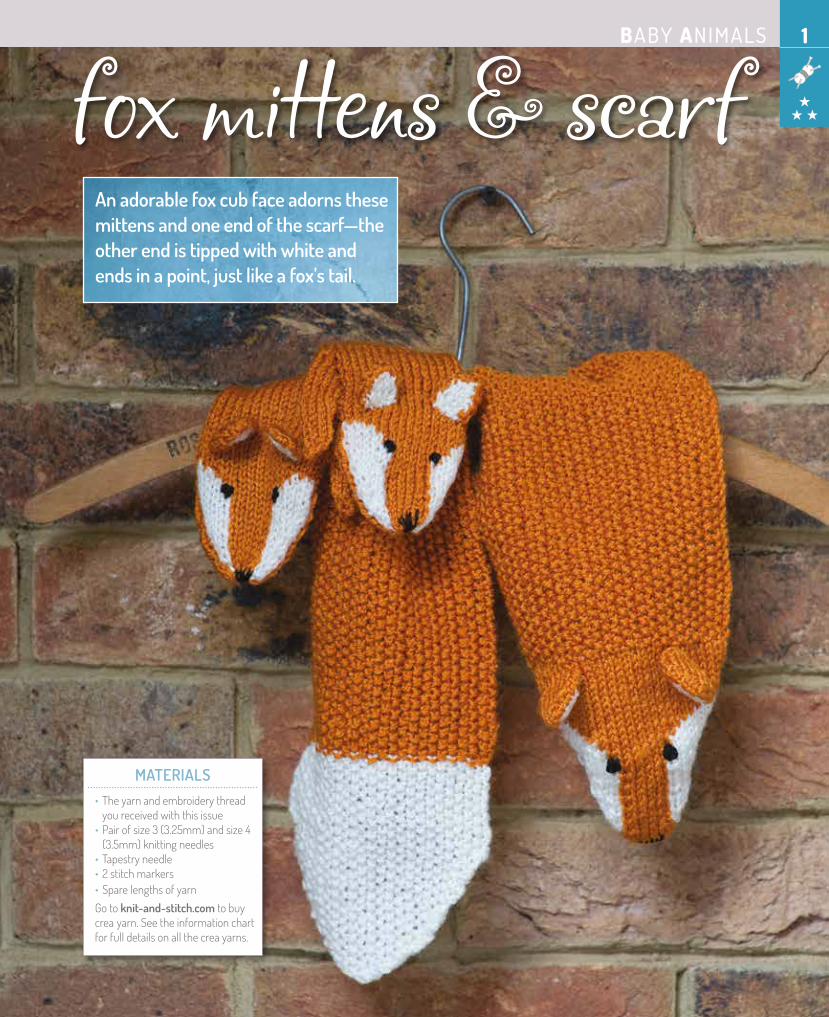
Materials• Theyarnandembroiderythreadyoureceivedwiththisissue
• Pairofsize3(3.25mm)andsize4(3.5mm)knittingneedles
•Tapestryneedle•2stitchmarkers•SparelengthsofyarnGotoknit-and-stitch.comtobuycreayarn.Seetheinformationchartforfulldetailsonallthecreayarns.
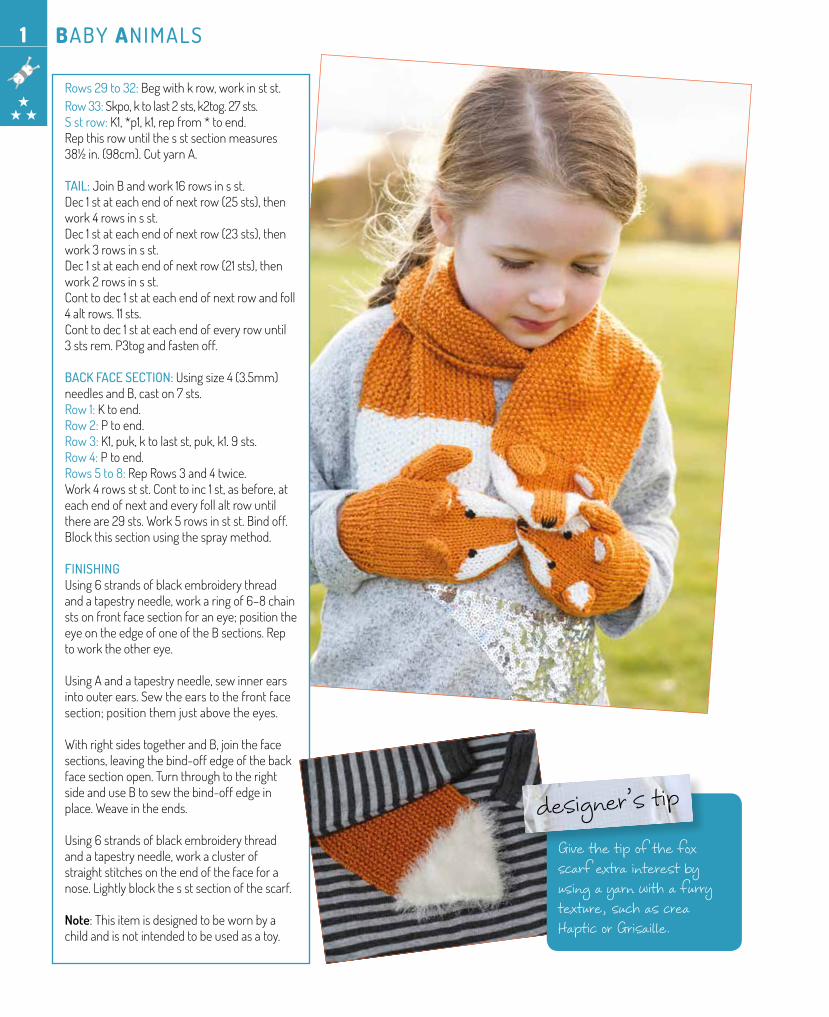
an adorable fox cub face adorns these mittens and one end of the scarf—the other end is tipped with white and ends in a point, just like a fox’s tail.
fox mittens & scarf ★ ★ ★

Baby Animals1
sizeMittens,6in.(15cm)aroundthewidestpartofthehandand6in.(15cm)long.Scarf,47in.(120cm)long.
GauGe23stsand30rows=4in.(10cm)overstst.
abbreviationsSeereadingapatterncardinyourKnit&StitchCreativecollection.
special abbreviationsA=TangerineB=Moonstone
to make mittensriGHt mitten:Usingsize3(3.25mm)needlesandA,caston35sts.Rib row 1:*K1,p1,repfrom*tolastst,k1.Rib row 2: *P1,k1,repfrom*tolastst,p1.Repthese2rowsfor1¼in.(3cm),endingwithRibrow2.Changetosize4(3.5mm)needles.Begwithakrow,work6rowsinstst.Row 7:K17,placemarker,puk,k1,puk,placemarker,k17.37sts.Row 8:Ptoend,slippingmarkers.Row 9: Ktomarker,slmarker,puk,ktomarker,puk,slmarker,ktoend.39sts.Rows 10 to 15:RepRows8and9threetimes.45sts.Row 16:Ptoend,slippingmarkers.Row 17:K17,removemarker,place11stsbeforenextmarkeronscrapyarnforthumb,k17.34sts.
Row 18:Ptoend.**Rows 19 to 34:WorkinststandpattfromChart1.Decwhereindicated.Readodd-numbered(rs)rowsfromrighttoleftandeven-numbered(ws)rowsfromlefttoright.Useseparatesmallballsofyarnforeachareaofcolor;twistyarnstogonwsofworkwhenchangingcolortopreventholesfromforming(seeIntarsiaKnitting,Knit&StitchCreative,Know-How16).Cutyarns,leavingalongtailinA.Useatapestryneedletothreadtheyarnthroughthests,butdonotfastenoffordrawthestitchesuptight.thumb Row 1: Withwsfacing,placestsfromthespareyarnontoasize3(3.25mm)needle.JoinA,ptoend.Row 2:K4,k2tog,k5.10sts.Rows 3 to 5:Begwithprow,workinstst.Row 6:K4,k2tog,k4.9sts.Rows 7 and 8:Workinstst.Row 9:(p2tog)twice,p1,(p2tog)twice.5sts.Cutyarn,leavingalongtail.Useatapestryneedletothreadtheyarnthroughthests,butdonotfastenoffordrawthestitchesuptight.
leFt mitten:Workasforrightmittento**.Rows 19 to 34:WorkasforrightmittenbutfollowChart2.Cutyarns,leavingalongtailinA.Useatapestryneedletothreadtheyarnthroughthests,butdonotfastenoffordrawthestitchesuptight.thumb Workasforthumbofrightmitten.
outer ear (make 4):Usingsize3(3.25mm)needlesandA,caston7sts.Rows 1 to 3:Begwithkrow,workinstst.Row 4:P2tog,p3,p2tog.5sts.Row 5: K2tog,k1,k2tog.3sts.Row 6:Sl1p-wise,p2tog,psso.Fastenoff.
inner ear (make 4):Usingsize3(3.25mm)needlesandB,caston5sts.Rows 1 to 3:Begwithkrow,workinstst.Row 4:P2tog,p1,p2tog.3sts.Row 5: Sl1k-wise,k2tog,psso.Fastenoff.
FinisHinGBlockbothmittensusingthespraymethod.Using6strandsofblackembroiderythreadandatapestryneedle,
Chart 2 - left mitten 34
32
30
28
26
24
22
20
33
31
29
27
25
23
21
19
A, k on rs rows and p on ws rows B, k on rs rows and p on ws rows
No stitch
Chart 1 - right mitten 34
32
30
28
26
24
22
20
33
31
29
27
25
23
21
19
A, k on rs rows and p on ws rows B, k on rs rows and p on ws rows
No stitch
Chart 2 - left mitten 34
32
30
28
26
24
22
20
33
31
29
27
25
23
21
19
A, k on rs rows and p on ws rows B, k on rs rows and p on ws rows
No stitch
Chart 1 - right mitten 34
32
30
28
26
24
22
20
33
31
29
27
25
23
21
19
A, k on rs rows and p on ws rows B, k on rs rows and p on ws rows
No stitch
★ ★ ★

Baby Animals
workaringof4–5chainstsononemittentoformaneye;positiontheeyeontheedgeofoneoftheBsections.Reptoworkasecondeye.Repfortheothermitten.
UsingAandatapestryneedle,sewinnerearsintoouterears.Sewapairofearsontoeachmitten,justabovetheeyes.
Threadthelongyarntailatthetipofonethumbontoatapestryneedle.Drawyarnuptightly,thenusetosewthumbseam.
Threadthelongyarntailatthetopofthesamemittenontoatapestryneedle.Drawyarnuptightly,thenusetosewtheseam.Weaveintheends.
Using6strandsofblackembroiderythreadandatapestryneedle,workaclusterofstraightstitchesontopofmittenforanose.
Completesecondmitteninthesameway.
to make scarFouter ear (make 2): Usingsize3(3.25mm)needlesandA,caston9sts.Rows 1 to 4:Begwithkrow,workinstst.Row 5:K2tog,k5,k2tog.7sts.Row 6: P2tog,p3,p2tog.5sts.Row 7:K2tog,k1,k2tog.3sts.Row 8: Sl1p-wise,p2tog,psso.Fastenoff.
inner ear (make 2):Usingsize3(3.25mm)needlesandB,caston7sts.Rows 1 to 4:Begwithkrow,workinstst.Row 5: K2tog,k3,k2tog.5sts.Row 6: P2tog,p1,p2tog.3sts.Row 7:Sl1k-wise,k2tog,psso.Fastenoff.
Front Face section & boDy: Usingsize4(3.5mm)needlesandA,caston7sts.Rows 1 to 28:Workinststandthepattfromchart3.Incwhereindicated.Readodd-numbered(rs)rowsfromrighttoleftandeven-numbered(ws)rowsfromlefttoright.Useseparatesmallballsofyarnforeachareaofcolorandtwisttheyarnstogonthewswhenchangingcolortopreventholesfromforming(seeIntarsiaKnitting,Knit&StitchCreative,Know-How16).
A, k on rs rows and p on ws rows B, k on rs rows and p on ws rows
Chart 3 - scarf28
26
24
22
20
18
16
14
12
10
8
6
4
2
27
25
23
21
19
17
15
13
11
9
7
5
3
1
1
★ ★ ★
Baby Animals1
★ ★ ★
Rows 29 to 32: Begwithkrow,workinstst.Row 33: Skpo,ktolast2sts,k2tog.27sts.S st row:K1,*p1,k1,repfrom*toend.Repthisrowuntilthesstsectionmeasures38½in.(98cm).CutyarnA.
tail: JoinBandwork16rowsinsst.Dec1stateachendofnextrow(25sts),thenwork4rowsinsst.Dec1stateachendofnextrow(23sts),thenwork3rowsinsst.Dec1stateachendofnextrow(21sts),thenwork2rowsinsst.Conttodec1stateachendofnextrowandfoll4altrows.11sts.Conttodec1stateachendofeveryrowuntil3stsrem.P3togandfastenoff.
back Face section: Usingsize4(3.5mm)needlesandB,caston7sts.Row 1:Ktoend.Row 2:Ptoend.Row 3: K1,puk,ktolastst,puk,k1.9sts.Row 4:Ptoend.Rows 5 to 8: RepRows3and4twice.Work4rowsstst.Conttoinc1st,asbefore,ateachendofnextandeveryfollaltrowuntilthereare29sts.Work5rowsinstst.Bindoff.Blockthissectionusingthespraymethod.
FinisHinGUsing6strandsofblackembroiderythreadandatapestryneedle,workaringof6–8chainstsonfrontfacesectionforaneye;positiontheeyeontheedgeofoneoftheBsections.Reptoworktheothereye.
UsingAandatapestryneedle,sewinnerearsintoouterears.Sewtheearstothefrontfacesection;positionthemjustabovetheeyes.
WithrightsidestogetherandB,jointhefacesections,leavingthebind-offedgeofthebackfacesectionopen.TurnthroughtotherightsideanduseBtosewthebind-offedgeinplace.Weaveintheends.
Using6strandsofblackembroiderythreadandatapestryneedle,workaclusterofstraightstitchesontheendofthefaceforanose.Lightlyblockthesstsectionofthescarf.
Note:Thisitemisdesignedtobewornbyachildandisnotintendedtobeusedasatoy.
Give the tip of the fox scarf extra interest by using a yarn with a furry texture, such as crea Haptic or Grisaille.
designer’s tip
Baby Animals 2
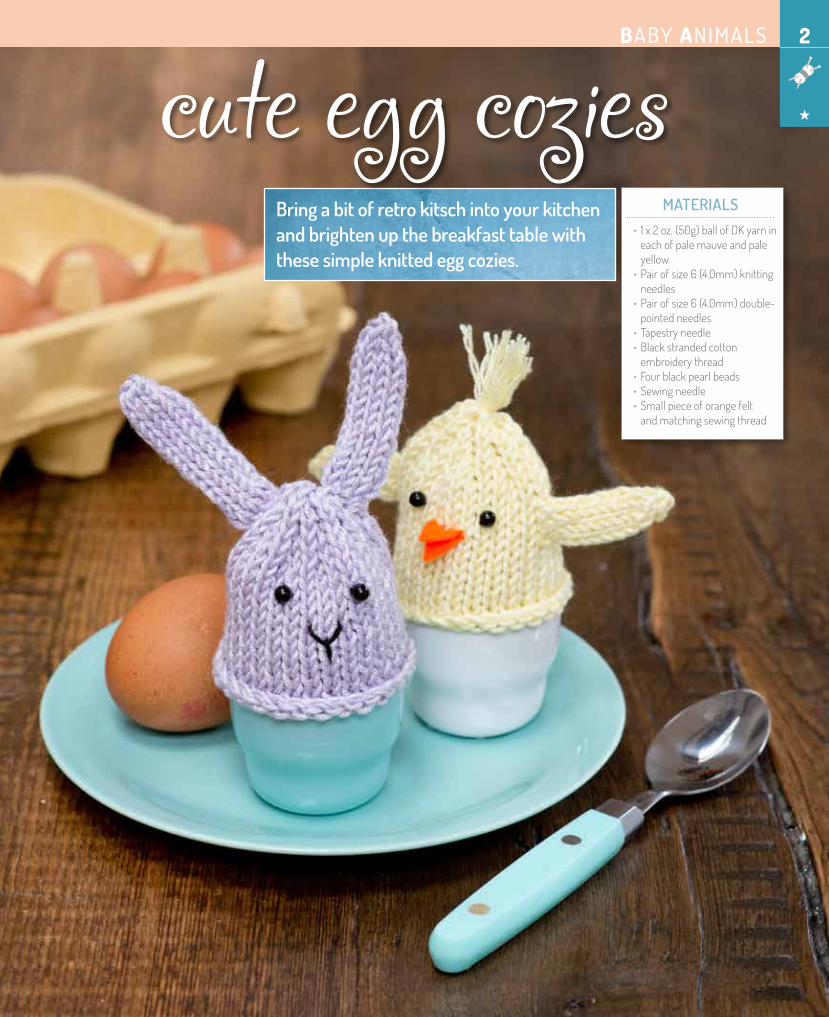
Materials• 1x2oz.(50g)ballofDKyarnineachofpalemauveandpaleyellow
• Pairofsize6(4.0mm)knittingneedles
• Pairofsize6(4.0mm)double-pointedneedles
•Tapestryneedle• Blackstrandedcottonembroiderythread
•Fourblackpearlbeads•Sewingneedle• Smallpieceoforangefeltandmatchingsewingthread
Bring a bit of retro kitsch into your kitchen and brighten up the breakfast table with these simple knitted egg cozies.
cute egg cozies ★
Baby Animals2
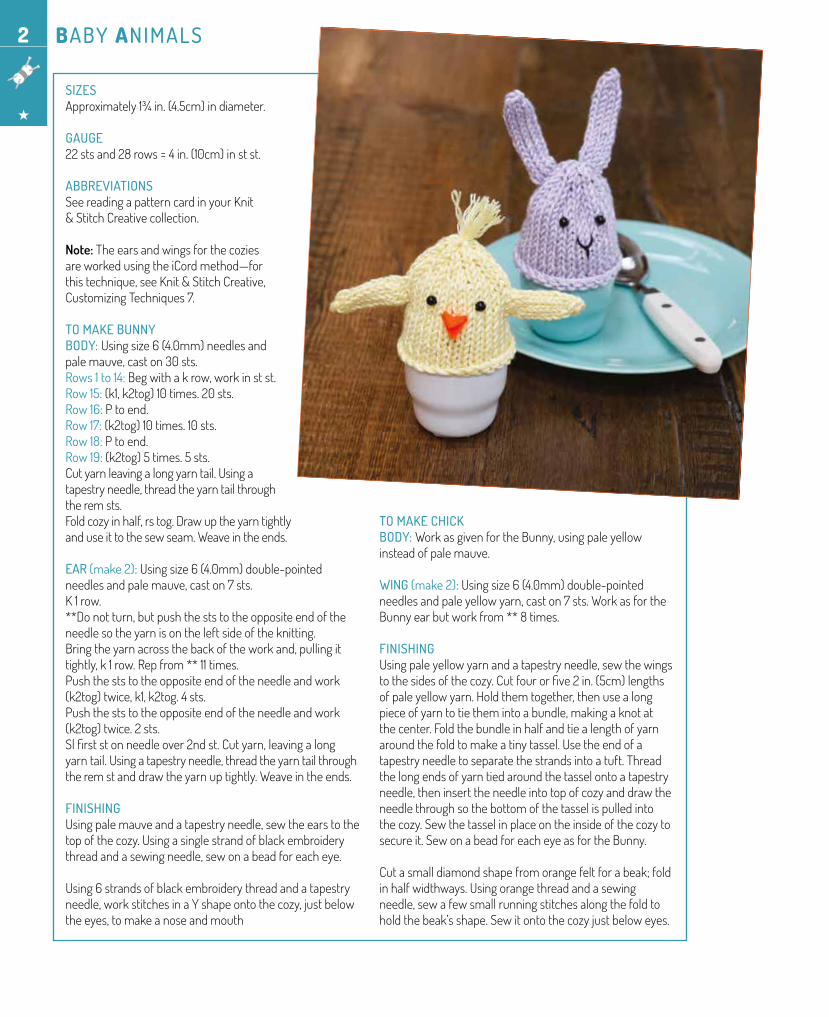
sizesApproximately1¾in.(4.5cm)indiameter.
GauGe22stsand28rows=4in.(10cm)instst.
abbreviationsSeereadingapatterncardinyourKnit&StitchCreativecollection.
Note: TheearsandwingsforthecoziesareworkedusingtheiCordmethod—forthistechnique,seeKnit&StitchCreative,CustomizingTechniques7.
to make bunnybody: Usingsize6(4.0mm)needlesandpalemauve,caston30sts.Rows 1 to 14:Begwithakrow,workinstst.Row 15:(k1,k2tog)10times.20sts.Row 16:Ptoend.Row 17:(k2tog)10times.10sts.Row 18:Ptoend.Row 19:(k2tog)5times.5sts.Cutyarnleavingalongyarntail.Usingatapestryneedle,threadtheyarntailthroughtheremsts.Foldcozyinhalf,rstog.Drawuptheyarntightlyanduseittothesewseam.Weaveintheends.
ear (make 2): Usingsize6(4.0mm)double-pointedneedlesandpalemauve,caston7sts.K1row.**Donotturn,butpushtheststotheoppositeendoftheneedlesotheyarnisontheleftsideoftheknitting.Bringtheyarnacrossthebackoftheworkand,pullingittightly,k1row.Repfrom**11times.Pushtheststotheoppositeendoftheneedleandwork(k2tog)twice,k1,k2tog.4sts.Pushtheststotheoppositeendoftheneedleandwork(k2tog)twice.2sts.Slfirststonneedleover2ndst.Cutyarn,leavingalongyarntail.Usingatapestryneedle,threadtheyarntailthroughtheremstanddrawtheyarnuptightly.Weaveintheends.
FinisHinGUsingpalemauveandatapestryneedle,sewtheearstothetopofthecozy.Usingasinglestrandofblackembroiderythreadandasewingneedle,sewonabeadforeacheye.
Using6strandsofblackembroiderythreadandatapestryneedle,workstitchesinaYshapeontothecozy,justbelowtheeyes,tomakeanoseandmouth
to make CHiCkbody: WorkasgivenfortheBunny,usingpaleyellowinsteadofpalemauve.
WinG (make 2): Usingsize6(4.0mm)double-pointedneedlesandpaleyellowyarn,caston7sts.WorkasfortheBunnyearbutworkfrom**8times.
FinisHinGUsingpaleyellowyarnandatapestryneedle,sewthewingstothesidesofthecozy.Cutfourorfive2in.(5cm)lengthsofpaleyellowyarn.Holdthemtogether,thenusealongpieceofyarntotiethemintoabundle,makingaknotatthecenter.Foldthebundleinhalfandtiealengthofyarnaroundthefoldtomakeatinytassel.Usetheendofatapestryneedletoseparatethestrandsintoatuft.Threadthelongendsofyarntiedaroundthetasselontoatapestryneedle,theninserttheneedleintotopofcozyanddrawtheneedlethroughsothebottomofthetasselispulledintothecozy.Sewthetasselinplaceontheinsideofthecozytosecureit.SewonabeadforeacheyeasfortheBunny.
Cutasmalldiamondshapefromorangefeltforabeak;foldinhalfwidthways.Usingorangethreadandasewingneedle,sewafewsmallrunningstitchesalongthefoldtoholdthebeak’sshape.Sewitontothecozyjustbeloweyes.
★
Baby Animals 3
Materials• 10x17¾in.(25.5x45cm)oflineninnatural
• 2skeinsofcrewelwoolincream• 1skeinofcrewelwoolineachofblackandleafgreen
• Sewingneedleplusbastingthreadandmatchingthread
•Water-solublefabricmarkerpen• Embroideryhoopandchenilleneedle
•A5notebook• 8¾x12¾in.(22.5x32.5cm)lightweightpolyesterbatting
• 10x17¾in.(25.5x45cm)plainwhiteorcreamcottonforlining
• 8¾x12¾in.(22.5x32.5cm)lightweightcardboard
•Fabricadhesive
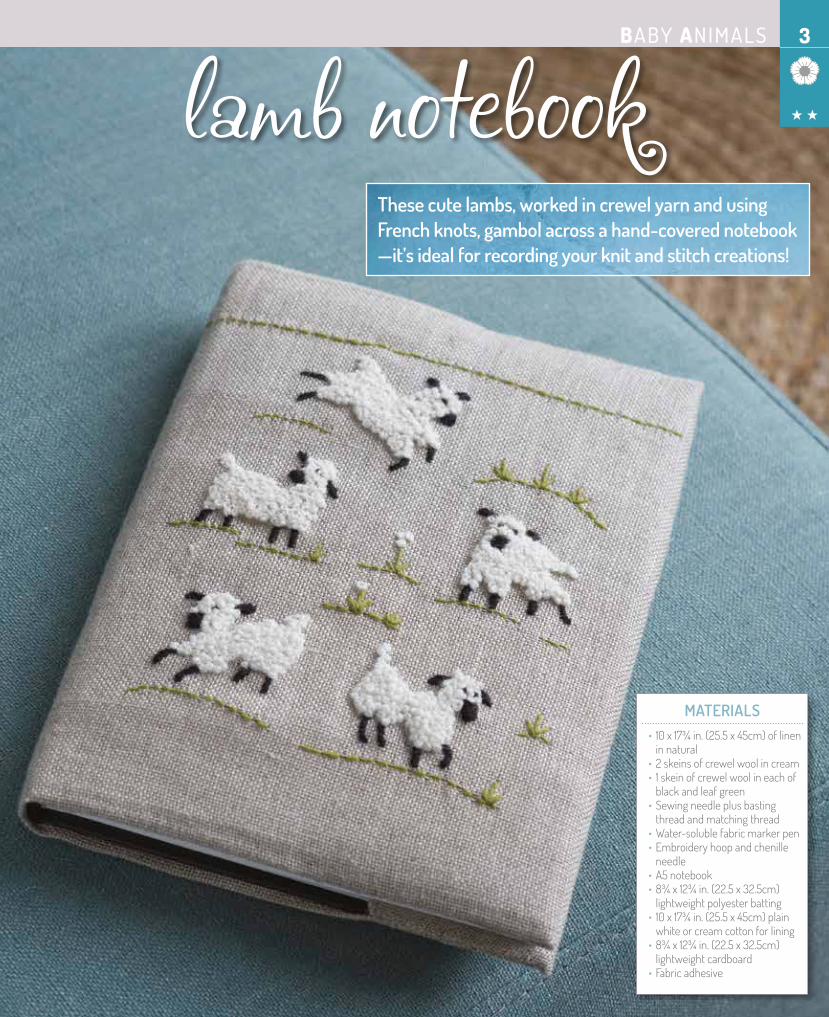
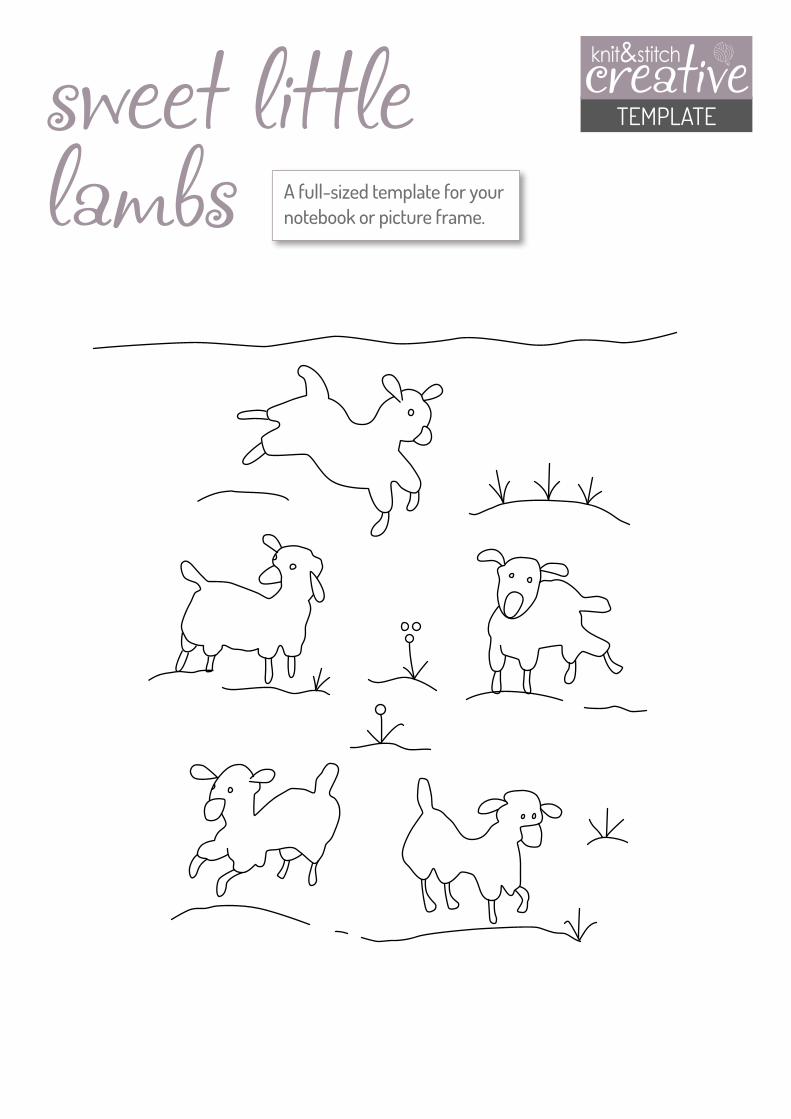
lamb notebookthese cute lambs, worked in crewel yarn and using French knots, gambol across a hand-covered notebook —it’s ideal for recording your knit and stitch creations!
★ ★
Baby Animals3
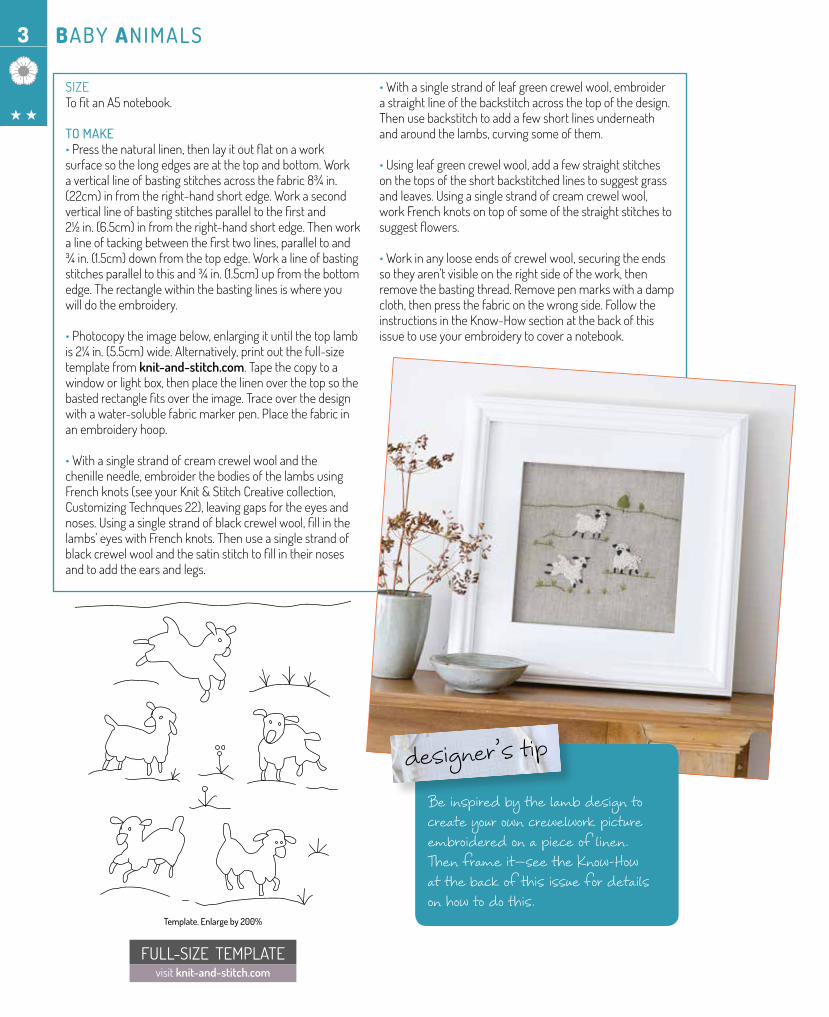
sizeTofitanA5notebook.
to make •Pressthenaturallinen,thenlayitoutflatonaworksurfacesothelongedgesareatthetopandbottom.Workaverticallineofbastingstitchesacrossthefabric8¾in.(22cm)infromtheright-handshortedge.Workasecondverticallineofbastingstitchesparalleltothefirstand2½in.(6.5cm)infromtheright-handshortedge.Thenworkalineoftackingbetweenthefirsttwolines,paralleltoand¾in.(1.5cm)downfromthetopedge.Workalineofbastingstitchesparalleltothisand¾in.(1.5cm)upfromthebottomedge.Therectanglewithinthebastinglinesiswhereyouwilldotheembroidery.
•Photocopytheimagebelow,enlargingituntilthetoplambis2¼in.(5.5cm)wide.Alternatively,printoutthefull-sizetemplatefromknit-and-stitch.com.Tapethecopytoawindoworlightbox,thenplacethelinenoverthetopsothebastedrectanglefitsovertheimage.Traceoverthedesignwithawater-solublefabricmarkerpen.Placethefabricinanembroideryhoop.
•Withasinglestrandofcreamcrewelwoolandthechenilleneedle,embroiderthebodiesofthelambsusingFrenchknots(seeyourKnit&StitchCreativecollection,CustomizingTechnques22),leavinggapsfortheeyesandnoses.Usingasinglestrandofblackcrewelwool,fillinthelambs’eyeswithFrenchknots.Thenuseasinglestrandofblackcrewelwoolandthesatinstitchtofillintheirnosesandtoaddtheearsandlegs.
•Withasinglestrandofleafgreencrewelwool,embroiderastraightlineofthebackstitchacrossthetopofthedesign.Thenusebackstitchtoaddafewshortlinesunderneathandaroundthelambs,curvingsomeofthem.
•Usingleafgreencrewelwool,addafewstraightstitchesonthetopsoftheshortbackstitchedlinestosuggestgrassandleaves.Usingasinglestrandofcreamcrewelwool,workFrenchknotsontopofsomeofthestraightstitchestosuggestflowers.
•Workinanylooseendsofcrewelwool,securingtheendssotheyaren’tvisibleontherightsideofthework,thenremovethebastingthread.Removepenmarkswithadampcloth,thenpressthefabriconthewrongside.FollowtheinstructionsintheKnow-Howsectionatthebackofthisissuetouseyourembroiderytocoveranotebook.
Be inspired by the lamb design to create your own crewelwork picture embroidered on a piece of linen. Then frame it—see the Know-How at the back of this issue for details on how to do this.
designer’s tip
template. enlarge by 200%
full-size templatevisitknit-and-stitch.com
★ ★
Baby Animals 4
Materials• 1x2oz.(50g)ballofDropsBabyMerinoineachoflightturquoiseandoffwhite
• Setoffoursize1(2.25mm)double-pointedneedles
• Setoffour3.0mmdouble-pointedneedles
•Stitchmarkers•Tapestryneedle• Scrapsofpinkandgrayyarnforembroidery
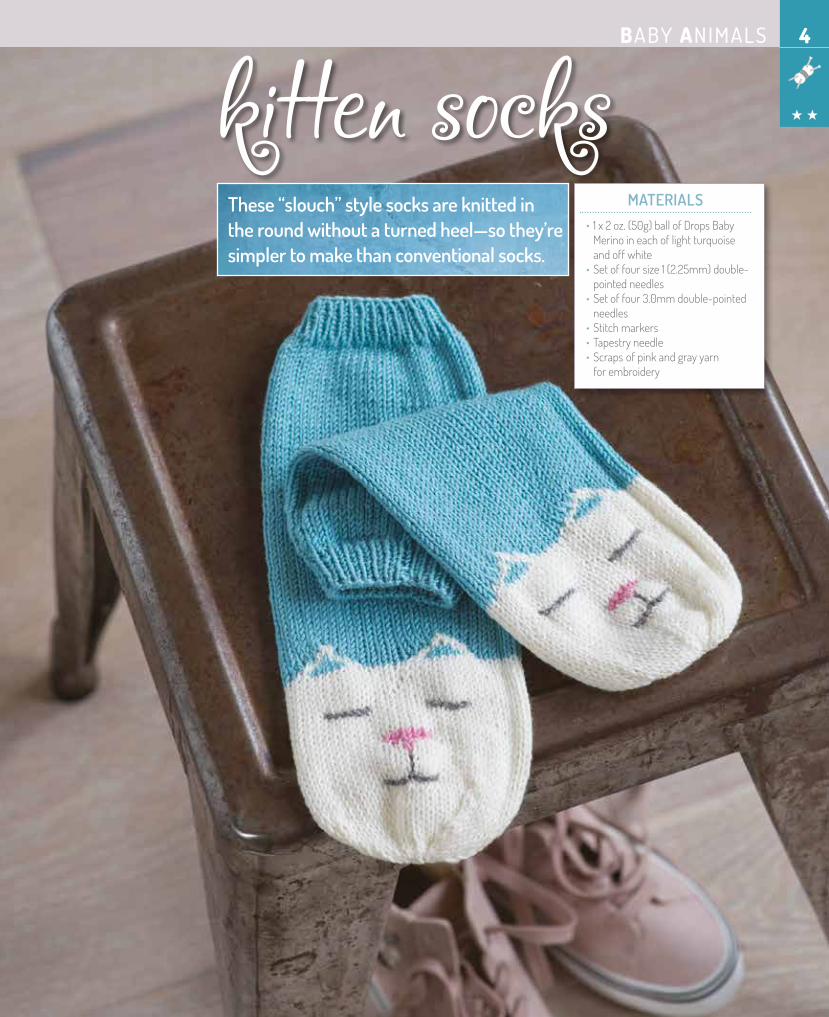
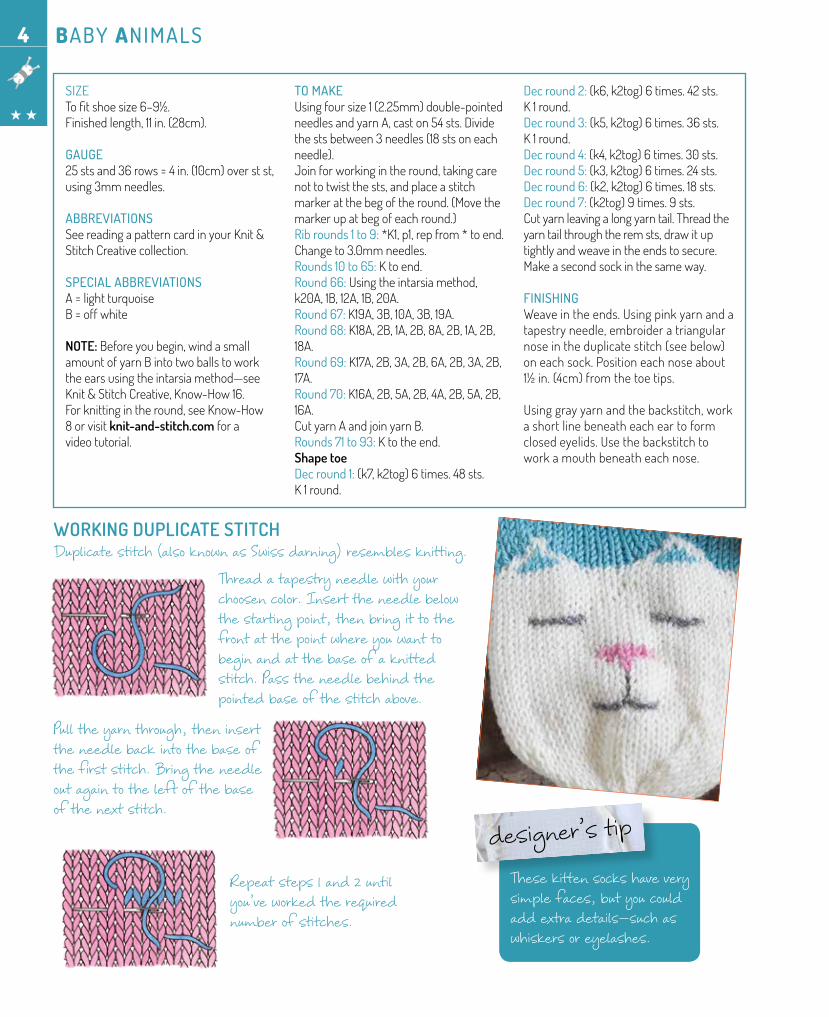
kitten socksthese “slouch” style socks are knitted in the round without a turned heel—so they’re simpler to make than conventional socks.
★ ★
Baby Animals4
sizeTofitshoesize6–9½.Finishedlength,11in.(28cm).
gauge25stsand36rows=4in.(10cm)overstst,using3mmneedles.
abbreviationsSeereadingapatterncardinyourKnit&StitchCreativecollection.
special abbreviationsA=lightturquoiseB=offwhite
NOte: Beforeyoubegin,windasmallamountofyarnBintotwoballstoworktheearsusingtheintarsiamethod—seeKnit&StitchCreative,Know-How16.Forknittingintheround,seeKnow-How8orvisitknit-and-stitch.comforavideotutorial.
to make Usingfoursize1(2.25mm)double-pointedneedlesandyarnA,caston54sts.Dividethestsbetween3needles(18stsoneachneedle).Joinforworkingintheround,takingcarenottotwistthests,andplaceastitchmarkeratthebegoftheround.(Movethemarkerupatbegofeachround.)Rib rounds 1 to 9:*K1,p1,repfrom*toend.Changeto3.0mmneedles.Rounds 10 to 65:Ktoend.Round 66:Usingtheintarsiamethod,k20A,1B,12A,1B,20A.Round 67:K19A,3B,10A,3B,19A.Round 68:K18A,2B,1A,2B,8A,2B,1A,2B,18A.Round 69:K17A,2B,3A,2B,6A,2B,3A,2B,17A.Round 70:K16A,2B,5A,2B,4A,2B,5A,2B,16A.CutyarnAandjoinyarnB.Rounds 71 to 93:Ktotheend.shape toeDec round 1:(k7,k2tog)6times.48sts.K1round.
Dec round 2:(k6,k2tog)6times.42sts.K1round.Dec round 3:(k5,k2tog)6times.36sts.K1round.Dec round 4:(k4,k2tog)6times.30sts.Dec round 5:(k3,k2tog)6times.24sts.Dec round 6:(k2,k2tog)6times.18sts.Dec round 7:(k2tog)9times.9sts.Cutyarnleavingalongyarntail.Threadtheyarntailthroughtheremsts,drawituptightlyandweaveintheendstosecure.Makeasecondsockinthesameway.
Finishing Weaveintheends.Usingpinkyarnandatapestryneedle,embroideratriangularnoseintheduplicatestitch(seebelow)oneachsock.Positioneachnoseabout1½in.(4cm)fromthetoetips.
Usinggrayyarnandthebackstitch,workashortlinebeneatheacheartoformclosedeyelids.Usethebackstitchtoworkamouthbeneatheachnose.
Repeat steps 1 and 2 until you’ve worked the required number of stitches.
WOrkiNg Duplicate stitchDuplicate stitch (also known as Swiss darning) resembles knitting.
Thread a tapestry needle with your choosen color. Insert the needle below the starting point, then bring it to the front at the point where you want to begin and at the base of a knitted stitch. Pass the needle behind the pointed base of the stitch above.
Pull the yarn through, then insert the needle back into the base of the first stitch. Bring the needle out again to the left of the base of the next stitch.
These kitten socks have very simple faces, but you could add extra details—such as whiskers or eyelashes.
designer’s tip
★ ★
Baby Animals 5
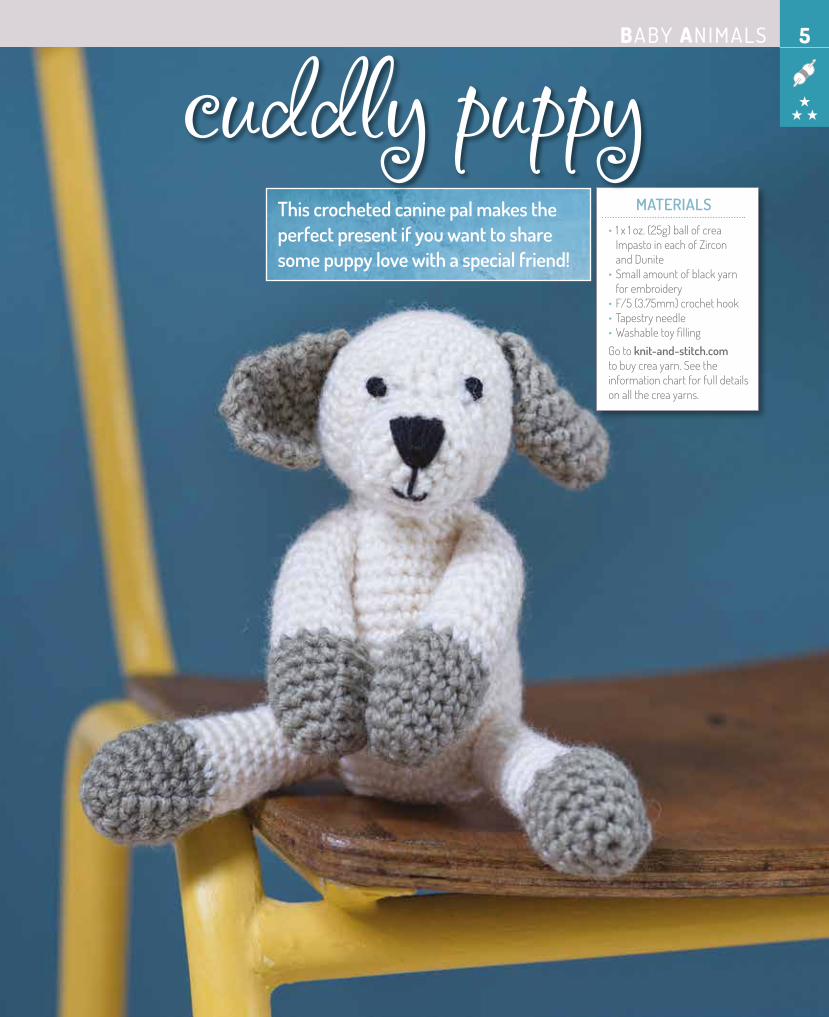
Materials• 1x1oz.(25g)ballofcreaImpastoineachofZirconandDunite
• Smallamountofblackyarnforembroidery
•F/5(3.75mm)crochethook•Tapestryneedle•WashabletoyfillingGotoknit-and-stitch.comtobuycreayarn.Seetheinformationchartforfulldetailsonallthecreayarns.
this crocheted canine pal makes the perfect present if you want to share some puppy love with a special friend!
cuddly puppy ★ ★ ★
Baby Animals5
sizeHeightofseatedpuppy=6in(15cm).
gauge18stsand22rows=4in.(10cm)oversc.
abbreviationsSeereadingapatterncardinyourKnit&StitchCreativecollection.
sPeCial abbreviations A=ZirconB=Dunite
to make body: UsingF/5(3.75mm)hookandA,makeaslidingring.Round1:Ch1(doesnotcountasast),work6scintoring,slstintofirstsc.6sc.Round 2:Ch1,work2scintoeachsc,slstintofirstsc.12sc.Round 3:Ch1,work(1scintonextsc,2scintonextsc)6times,slstintofirstsc.18sc.Round 4:Ch1,work(1scintoeachofnext2sc,2scintonextsc)6times,slstintofirstsc.24sc.Round 5:Ch1,work(1scintoeachofnext3sc,2scintonextsc)6times,slstintofirstsc.30sc.Round 6:Ch1,work(1scintoeachofnext4sc,2scintonextsc)6times,slstintofirstsc.36sc.Round 7:Ch1,work1scintoeachsc,slstintofirstsc.Rounds 8 to 12:RepRound7fivetimes.Round 13:Ch1,work(1scintoeachofnext10sc,(inserthookintonextscanddrawlpthrough)twice,yohanddrawthrough3lpsonhooktodec1sc)3times,slstintofirstsc.33sc.Rounds 14 to 18:RepRound7fivetimes.Round 19:Ch1,work(1scintoeachofnext9sc,dec1sc)3times,slstintofirstsc.30sc.Round 20: RepRound7.Round 21:Ch1,(1scintoeachofnext3sc,dec1sc)6times,slstintofirstsc.24sc.Round 22:Ch1,(1scintoeachofnext2sc,dec1sc)6times,slstintofirstsc.18sc.Round 23:Ch1,(1scintonextsc,dec1sc)6times,slstintofirstsc.12sc.Round 24:Ch1,(dec1sc)6times,slstintofirstsc.6sc.Fastenoff.
Head: WorkasforthebodytotheendofRound4.24sc.Round 5:Ch1,work1scintoeachsc,slstintofirstsc.Round 6:Ch1,work(1scintoeachofnext3sc,2scintonextsc)6times,slstintofirstsc.30sc.Rounds 7 to 12: RepRound5sixtimes.Round 13:Ch1,work(1scintoeachofnext3sc,dec1sc)6times,slstintofirstsc.24sc.Round 14:RepRound5.Round 15:Ch1,work(1scintoeachofnext2sc,dec1sc)6times,slstintofirstsc.18sc.Round 16:Ch1,work(1scintonextsc,dec1sc)6times,slstintofirstsc.12sc.Round 17:Ch1,(dec1sc)6times,slstintofirstsc.6sc.Cutyarnleavingalongyarntail.Fastenoff.
muzzle: WorkasforthebodytotheendofRound3.18sc.Round 4:Ch1,work1scintoeachsc,slstintofirstsc.Fastenoff.
leg (make 4): UsingB,workasforthebodytotheendofRound2.12sc.Round 3:Ch1,work1scintoeachsc,slstintofirstsc.Round 4: Ch1,work(1scintoeachofnext2sc,2scintonextsc)4times,slstintofirstsc.16sc.Rounds 5 to 6: RepRound3twice.Round 7:Ch1,work(1scintoeachofnext2sc,dec1sc)4times,slstintofirstsc.12sc.CutBandjoinA.Rounds 8 to 17: RepRound3tentimes.Round 18:Ch1,work1scintoeachofnext6sc,slstintonextsc.Fastenoff.
ear (make 2): UsingF/5(3.75mm)hookandB,ch4.Row 1:Work1scinto2ndchfromhook,work1scintoeachofnext2ch.Turn.3sc.Rows 2 and 3:Ch1,work1scintoeachsctoend.Turn.Row 4:Ch1,work2scintofirstsc,1scintonextsc,2scintolastsc.Turn.5sc.Rows 5 and 6:Ch1,work1scintoeachsc.Turn.Row 7:Ch1,work2scintofirstsc,1scintoeachofnext3sc,2scintolastsc.Turn.7sc.
Rows 8 and 9:Ch1,work1scintoeachsc.Turn.Row 10:Ch1,dec1sc,work1scintoeachofnext3sc,dec1sc.Turn.5sc.Row 11:Ch1,dec1sc,work1scintonextsc,dec1sc.Turn.3sc.Row 12:(Inserthookintonextscanddrawaloopthrough)3times,yohanddrawthroughall4lpsonhook.Fastenoff.
tail: UsingF/5(3.75mm)hookandB,ch8,slstintofirstchtoformaring.Round 1:Ch1,work1scintoeachch,slstintofirstsc.8sc.Round 2:Ch1,dec1sc,work1scintoeachsc,slstintofirstsc.7sc.Round 3:Ch1,dec1sc,work1scintoeachsc,slstintofirstsc.6sc.Round 4:Ch1,dec1sc,work1scintoeachsc,slstintofirstsc.5sc.Round 5:Ch1,dec1sc,work1scintoeachsc,slstintofirstsc.4sc.Round 6:Ch1,(dec1sc)twice.2sc.Round 7:Dec1sc.Fastenoff.
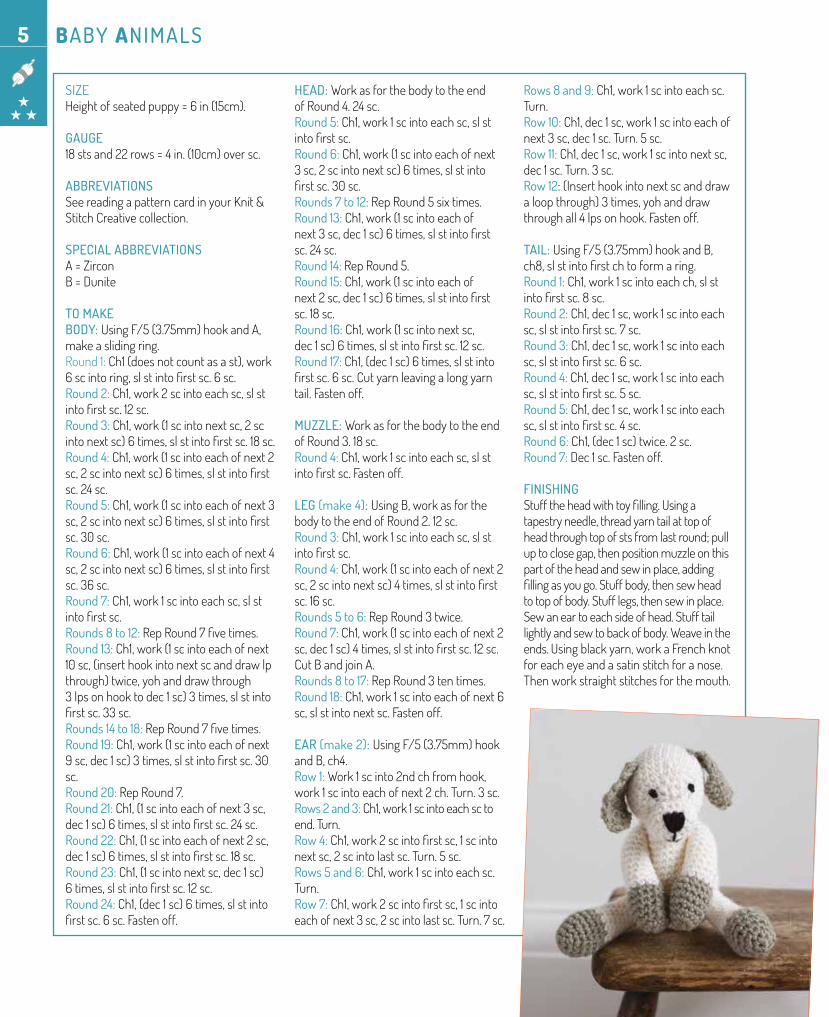
FinisHing Stufftheheadwithtoyfilling.Usingatapestryneedle,threadyarntailattopofheadthroughtopofstsfromlastround;pulluptoclosegap,thenpositionmuzzleonthispartoftheheadandsewinplace,addingfillingasyougo.Stuffbody,thensewheadtotopofbody.Stufflegs,thensewinplace.Sewaneartoeachsideofhead.Stufftaillightlyandsewtobackofbody.Weaveintheends.Usingblackyarn,workaFrenchknotforeacheyeandasatinstitchforanose.Thenworkstraightstitchesforthemouth.
★ ★ ★
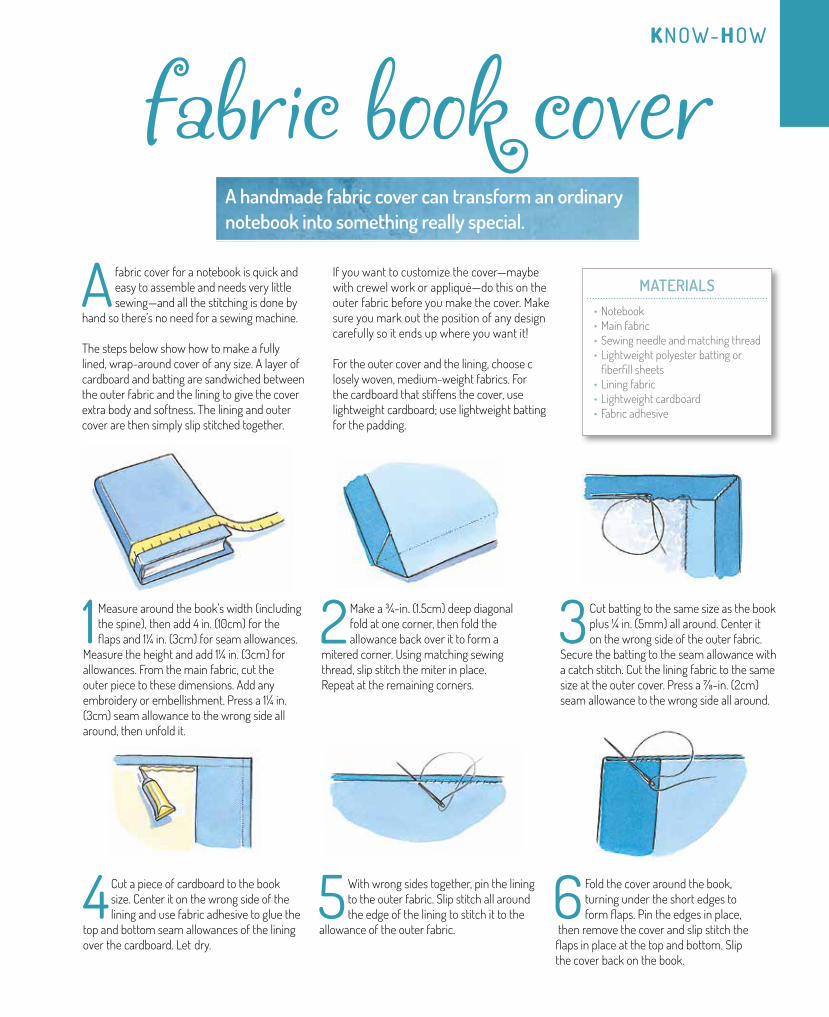
A handmade fabric cover can transform an ordinary notebook into something really special.
Know-How
fabric book coverA fabric cover for a notebook is quick and
easy to assemble and needs very little sewing—and all the stitching is done by
hand so there’s no need for a sewing machine. The steps below show how to make a fully lined, wrap-around cover of any size. A layer of cardboard and batting are sandwiched between the outer fabric and the lining to give the cover extra body and softness. The lining and outer cover are then simply slip stitched together.
If you want to customize the cover—maybe with crewel work or appliqué—do this on the outer fabric before you make the cover. Make sure you mark out the position of any design carefully so it ends up where you want it!
For the outer cover and the lining, choose c losely woven, medium-weight fabrics. For the cardboard that stiffens the cover, use lightweight cardboard; use lightweight batting for the padding.
4 Cut a piece of cardboard to the book size. Center it on the wrong side of the lining and use fabric adhesive to glue the
top and bottom seam allowances of the lining over the cardboard. Let dry.
5 With wrong sides together, pin the lining to the outer fabric. Slip stitch all around the edge of the lining to stitch it to the
allowance of the outer fabric.6 Fold the cover around the book,
turning under the short edges to form flaps. Pin the edges in place,
then remove the cover and slip stitch the flaps in place at the top and bottom. Slip the cover back on the book.
1 Measure around the book’s width (including the spine), then add 4 in. (10cm) for the flaps and 1¼ in. (3cm) for seam allowances.
Measure the height and add 1¼ in. (3cm) for allowances. From the main fabric, cut the outer piece to these dimensions. Add any embroidery or embellishment. Press a 1¼ in. (3cm) seam allowance to the wrong side all around, then unfold it.
2 Make a ¾-in. (1.5cm) deep diagonal fold at one corner, then fold the allowance back over it to form a
mitered corner. Using matching sewing thread, slip stitch the miter in place. Repeat at the remaining corners.
3 Cut batting to the same size as the book plus ¼ in. (5mm) all around. Center it on the wrong side of the outer fabric.
Secure the batting to the seam allowance with a catch stitch. Cut the lining fabric to the same size at the outer cover. Press a ⅞-in. (2cm) seam allowance to the wrong side all around.
MAteriAls• Notebook• Main fabric• Sewing needle and matching thread• Lightweight polyester batting or
fiberfill sheets• Lining fabric• Lightweight cardboard • Fabric adhesive
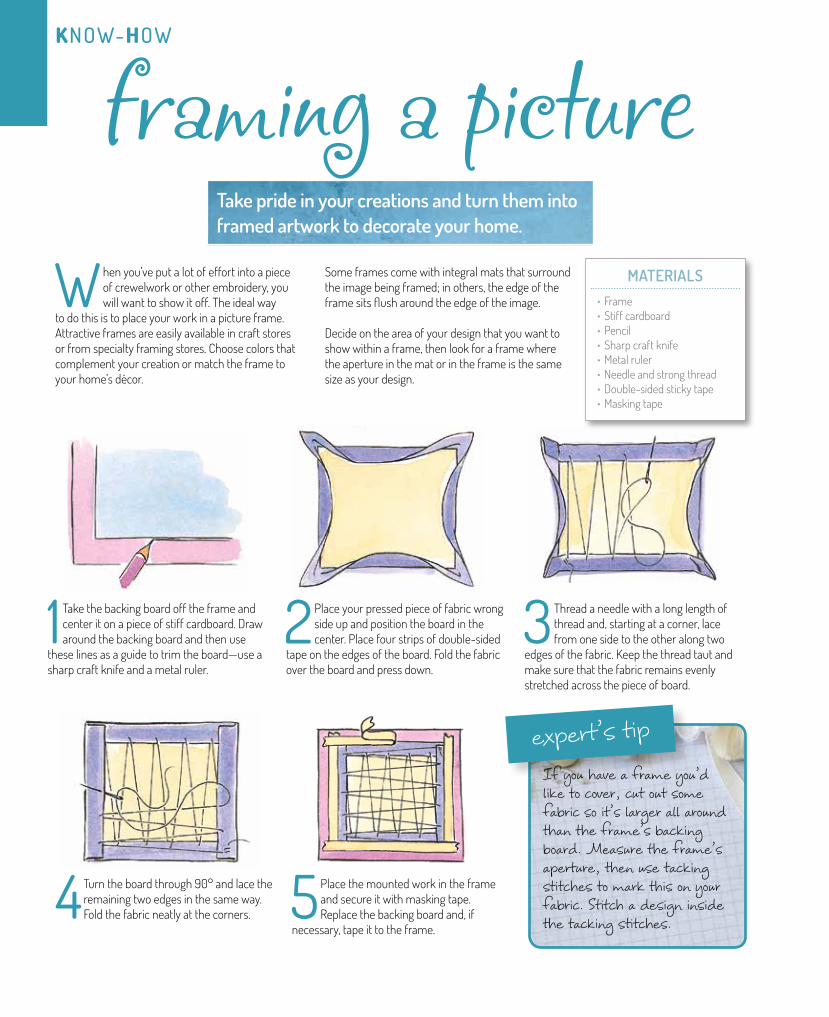
take pride in your creations and turn them into framed artwork to decorate your home.
Know-How
framing a picture
1 Take the backing board off the frame and center it on a piece of stiff cardboard. Draw around the backing board and then use
these lines as a guide to trim the board—use a sharp craft knife and a metal ruler.
2 Place your pressed piece of fabric wrong side up and position the board in the center. Place four strips of double-sided
tape on the edges of the board. Fold the fabric over the board and press down.
3 Thread a needle with a long length of thread and, starting at a corner, lace from one side to the other along two
edges of the fabric. Keep the thread taut and make sure that the fabric remains evenly stretched across the piece of board.
When you’ve put a lot of effort into a piece of crewelwork or other embroidery, you will want to show it off. The ideal way
to do this is to place your work in a picture frame. Attractive frames are easily available in craft stores or from specialty framing stores. Choose colors that complement your creation or match the frame to your home’s décor.
Some frames come with integral mats that surround the image being framed; in others, the edge of the frame sits flush around the edge of the image.
Decide on the area of your design that you want to show within a frame, then look for a frame where the aperture in the mat or in the frame is the same size as your design.
4 Turn the board through 90° and lace the remaining two edges in the same way. Fold the fabric neatly at the corners. 5 Place the mounted work in the frame
and secure it with masking tape. Replace the backing board and, if
necessary, tape it to the frame.
If you have a frame you’d like to cover, cut out some fabric so it’s larger all around than the frame’s backing board. Measure the frame’s aperture, then use tacking stitches to mark this on your fabric. Stitch a design inside the tacking stitches.
expert’s tip
MAteriAls• Frame• Stiff cardboard• Pencil• Sharp craft knife• Metal ruler• Needle and strong thread• Double-sided sticky tape• Masking tape
creative
TemplaTe
A full-sized template for your notebook or picture frame.
sweet little lambs