Embed Size (px)
Citation preview
Field Recorder Workflow Guide
Version 7.2
Copyright
© 2006 Digidesign, a division of Avid Technology, Inc. All rights reserved. This guide may not be duplicated in whole or in part without the express written consent of Digidesign.
Avid, Digidesign, and Pro Tools are either trademarks or registered trademarks of Avid Technology, Inc. in the US and other countries. All other trademarks contained herein are the property of their respective owners.
Product features, specifications, system requirements, and availability are subject to change without notice.
PN 9329-55679-00 REV A 07/06
contents
Chapter 1. Introduction . . . . . . . . . . . . . . . . . . . . . . . . . . . . . . . . . . . . . . . . . . . . . . . . . . . . . . 1
Field Recorder Terminology . . . . . . . . . . . . . . . . . . . . . . . . . . . . . . . . . . . . . . . . . . . . . . . . . 1
Supported Field Recorder Audio Files and Metadata . . . . . . . . . . . . . . . . . . . . . . . . . . . . . . . . 2
Displaying Field Recorder Metadata in Pro Tools . . . . . . . . . . . . . . . . . . . . . . . . . . . . . . . . . . 2
DigiBase Support for Field Recorder Metadata . . . . . . . . . . . . . . . . . . . . . . . . . . . . . . . . . . . . 3
Chapter 2. Field Recorder Workflows . . . . . . . . . . . . . . . . . . . . . . . . . . . . . . . . . . . . . . . . . . 5
Ensuring Metadata of Source Files Have Been Preserved . . . . . . . . . . . . . . . . . . . . . . . . . . . . 5
Receiving Source Files . . . . . . . . . . . . . . . . . . . . . . . . . . . . . . . . . . . . . . . . . . . . . . . . . . . . . 5
Importing Source Files into Pro Tools . . . . . . . . . . . . . . . . . . . . . . . . . . . . . . . . . . . . . . . . . . 6
Displaying Multichannel Files from a Field Recorder in the Region List . . . . . . . . . . . . . . . . . . . 9
Choosing an Alternate Channel for a Specific Region . . . . . . . . . . . . . . . . . . . . . . . . . . . . . . . 9
Appendix A. Overview of Production Workflows . . . . . . . . . . . . . . . . . . . . . . . . . . . . . . . . 11
Terminology . . . . . . . . . . . . . . . . . . . . . . . . . . . . . . . . . . . . . . . . . . . . . . . . . . . . . . . . . . . 11
Film Workflow . . . . . . . . . . . . . . . . . . . . . . . . . . . . . . . . . . . . . . . . . . . . . . . . . . . . . . . . . 13
Video and Fully Non-Linear Workflows . . . . . . . . . . . . . . . . . . . . . . . . . . . . . . . . . . . . . . . . . 15
Contents iii

iv
Field Recorder Workflow Guide
chapter 1
Introduction
Pro Tools 7.2 adds support for importing multi-channel audio files and metadata recorded by field recorders, as well as new post-production workflows for using these files.
Field Recorder TerminologyThis section provides a brief glossary of terms used in this guide.
Metadata
Metadata is used to describe the following:
• Information embedded in a media file. This may include scene, take, sample rate, bit depth, region names, the name of the video-tape from which the media file was captured, and even time code values.
• Information embedded in Pro Tools sessions or other sequences, including what files are used, where they appear in a timeline, and au-tomation.
• For AAF or OMF sequences, information about automation (clip-based gain or key-frame gain).
Digital Field Recorders
A field recorder, also known as a hard disk loca-tion audio recorder, is a device used by a produc-tion sound mixer during a film or video shoot to make a multichannel recording of multiple mi-crophone inputs recorded simultaneously.
Depending on the capabilities and settings of a field recorder, multichannel recordings can in-clude one or more tracks (up to 32) and are saved as monophonic or polyphonic audio files on a hard drive, DVD-RAM, or Flash media.
Multichannel recordings made by a field re-corder should be encoded with start and end time stamps representing SMPTE time code, lin-ear time code (or LTC). Most field recorders also allow manual entry of additional types of meta-data, including Channel Name/Number, Scene, Take, Circled Take, User Bits, and more.
Pro Tools can import monophonic and poly-phonic files and certain types of metadata en-tered on field recorders. (Polyphonic files will be converted to multiple monophonic files.)
Chapter 1: Introduction 1

2
Production Sound Mix
For each multichannel recording made by a field recorder, the production sound mixer may des-ignate a production sound mix comprising either a representative channel or a mixdown of other selected channels in the recording.
The production sound mix is intended to func-tion as a general reference of all audio recorded within an individual multichannel recording, and is typically used by the Avid editor when as-sembling a sequence.
Broadcast WAV Files (BWF)
A WAV file containing a BEXT chunk is known as a Broadcast WAV file (or BWF) while still maintaining a .WAV file extension. Broadcast WAV files can contain both BEXT and iXML chunks, or a BEXT chunk by itself.
BEXT and iXML Chunks
BEXT and iXML chunks are sets of metadata found within a Broadcast WAV file.
Caveats
The following caveats apply to handling of im-ported metadata from field recorders.
• The BEXT specification as described here adds some features that conform to standards used by Avid applications and Pro Tools—specifi-cally, Description metadata is interpreted dif-ferently.
• When you import multiple files in which the same metadata are populated with different values, Pro Tools imports the value that is first present based on the following order:
• Avid OMF-wrapped media or MXF media
• Any iXML chunk metadata in a BWF
• Any BEXT chunk metadata in a BWF
Field Recorder Workflow Guide
Supported Field Recorder Audio Files and MetadataPro Tools supports the following audio files re-corded by field recorders:
• OMF-wrapped media
• MXF
• Broadcast WAV (BWF) files with the following metadata:
• Both BEXT and iXML chunks
• BEXT metadata but no iXML metadata
Displaying Field Recorder Metadata in Pro ToolsYou can enable or disable the display of field re-corder metadata within regions in the Timeline and the Region List.
To enable or disable the display of field recorder metadata in playlists:, do the following
■ From View > Region, select or deselect either of the following options:
• Channel Name
• Scene and Take
To show or hide field recorder metadata in the Region List:
1 Click the Region List pop-up menu, and choose Show.
2 From the Show submenu, select or deselect ei-ther of the following options:
• Channel Name
• Scene and Take
When enabled in the Region List, Scene and Take metadata are added to every region when available in the corresponding audio file.
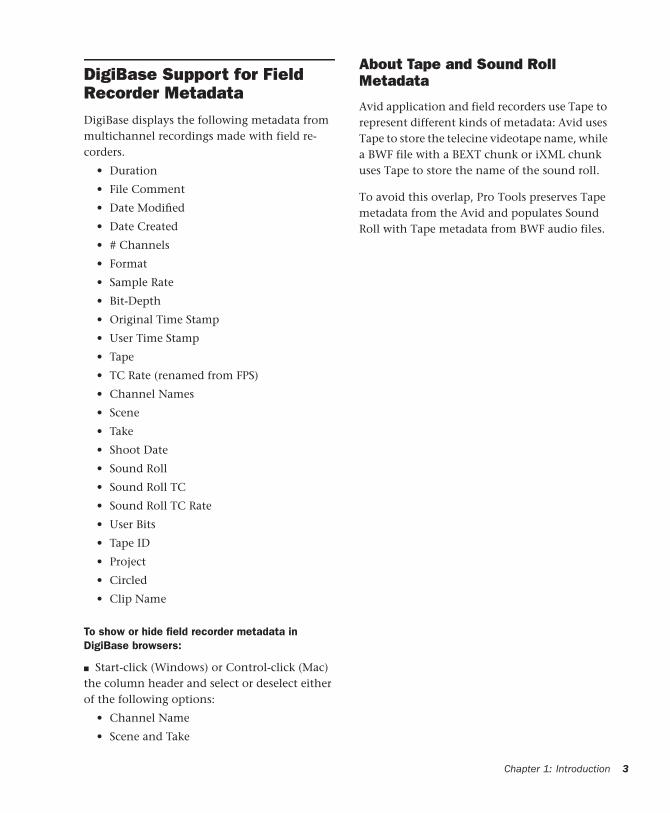
DigiBase Support for Field Recorder MetadataDigiBase displays the following metadata from multichannel recordings made with field re-corders.
• Duration
• File Comment
• Date Modified
• Date Created
• # Channels
• Format
• Sample Rate
• Bit-Depth
• Original Time Stamp
• User Time Stamp
• Tape
• TC Rate (renamed from FPS)
• Channel Names
• Scene
• Take
• Shoot Date
• Sound Roll
• Sound Roll TC
• Sound Roll TC Rate
• User Bits
• Tape ID
• Project
• Circled
• Clip Name
To show or hide field recorder metadata in DigiBase browsers:
■ Start-click (Windows) or Control-click (Mac) the column header and select or deselect either of the following options:
• Channel Name
• Scene and Take
About Tape and Sound Roll Metadata
Avid application and field recorders use Tape to represent different kinds of metadata: Avid uses Tape to store the telecine videotape name, while a BWF file with a BEXT chunk or iXML chunk uses Tape to store the name of the sound roll.
To avoid this overlap, Pro Tools preserves Tape metadata from the Avid and populates Sound Roll with Tape metadata from BWF audio files.
Chapter 1: Introduction 3

4
Field Recorder Workflow Guide
chapter 2
Field Recorder Workflows
Using Pro Tools to work with field recorder files from a film, video, or digital shoot involves the following steps:
1 Before receiving source files, ensure that meta-data have been preserved.
2 Receive source files.
3 Import source files into Pro Tools.
4 Replace edits from the production sound mix with audio from different takes of the same scene.
Ensuring Metadata of Source Files Have Been PreservedBefore you receive source files, it is critical to en-sure that the files have been prepared properly at each phase of the production process so that their original metadata are preserved.
If the original metadata have not been pre-served, you cannot successfully complete the workflows described in this chapter.
For detailed information about preserving metadata during the production process, see Appendix A, “Overview of Production Workflows.”
Receiving Source FilesWhen involved in the audio post-production of edited video sequences, you need both of the following sets of source files:
• AAF or OMF sequence with an edited pro-duction sound mix synced to video (such as referenced QuickTime movies or Avid video)
• Alternate source files representing multi-channel recordings from a field recorder
You will receive these files either separately (from the Avid video editor and production sound mixer) or together as part of an AAF or OMF sequence export including alternate source audio (from the Avid video editor).
Separate Deliveries of Source Files
When you receive an AAF or OMF sequence from the Avid editor and alternate source audio from the production sound mixer, you must im-port them separately before Pro Tools will be able to match them together.
See “Importing an AAF or OMF Sequence into Pro Tools” on page 6 and “Importing Alternate Source Audio Directly into Pro Tools” on page 8.
Chapter 2: Field Recorder Workflows 5
6
Single Delivery of Source Files
When you receive only an AAF or OMF se-quence from an Avid editor, this generally means that the sequence also contains alternate source audio recorded by the field recorder.
There are three methods the Avid editor may use to prepare the files before exporting them:
• Alternate source audio has been auto-synced in the Avid Bin but not placed on the Timeline
• Alternate source audio has been auto-synced in the Avid Bin and placed on the Timeline
• Alternate source audio has not been auto-synced and resides only in the Avid Bin
Alternate Source Audio in Bin Auto-Synced to Ed-ited Production Sound Mix The alternate source audio residing in the Avid Bin has been auto-synced to the edited production sound mix re-siding in the Avid Timeline.
When you import this type of sequence into Pro Tools, the edited video and edited produc-tion sound mix are available to import directly into the Timeline. The alternate source audio does not appear as separate tracks in the Import Session Data dialog, but will import directly into the Region List.
When exporting the edited production sound mix as a sequence, the Avid editor should make sure to also select all of the alternate source au-dio in the Bin.
If you are not sure the AAF or OMF se-quence also contains the alternate source audio, contact the Avid editor to ensure that they were properly included.
Field Recorder Workflow Guide
Alternate Source Audio in Timeline Auto-Synced to Edited Production Sound Mix The alternate source audio in the Avid Bin has been auto-synced to the edited located sound mix, and all audio channels reside in the Avid Timeline.
When you import this type of sequence into Pro Tools, the edited video, edited production sound mix, and all alternate source audio will be available to import directly into the Timeline.
Alternate Source Audio Not Auto-Synchronized to Edited Production Sound Mix In the Avid appli-cation, the alternate source audio has not been auto-synced to the edited production sound mix residing in the Avid Timeline.
Importing Source Files into Pro ToolsThis section describes importing alternate source audio from the following types of files:
• AAF or OMF sequences
• Alternate source audio (if received sepa-rately from the AAF or OMF sequence)
Importing an AAF or OMF Sequence into Pro Tools
To open an AAF (or OMF) sequence as a Pro Tools session:
1 Launch Pro Tools.
2 Choose File > Open Session.
In such a case, the AAF or OMF sequence does not contain or reference the alternate source audio when imported into Pro Tools—the Avid editor must auto-sync the alternate source audio to the edited pro-duction sound mix, then re-deliver the se-quence to you.
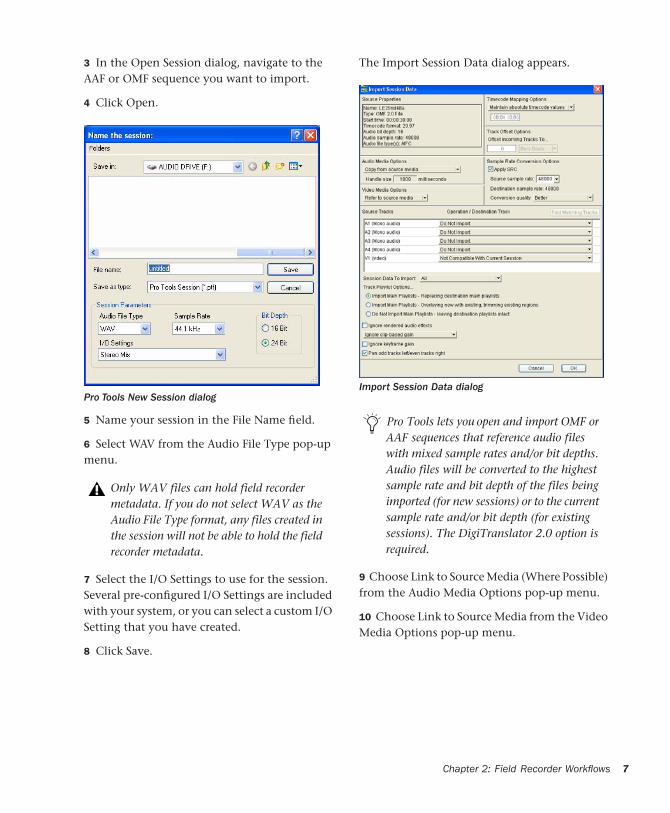
3 In the Open Session dialog, navigate to the AAF or OMF sequence you want to import.
4 Click Open.
5 Name your session in the File Name field.
6 Select WAV from the Audio File Type pop-up menu.
7 Select the I/O Settings to use for the session. Several pre-configured I/O Settings are included with your system, or you can select a custom I/O Setting that you have created.
8 Click Save.
Pro Tools New Session dialog
Only WAV files can hold field recorder metadata. If you do not select WAV as the Audio File Type format, any files created in the session will not be able to hold the field recorder metadata.
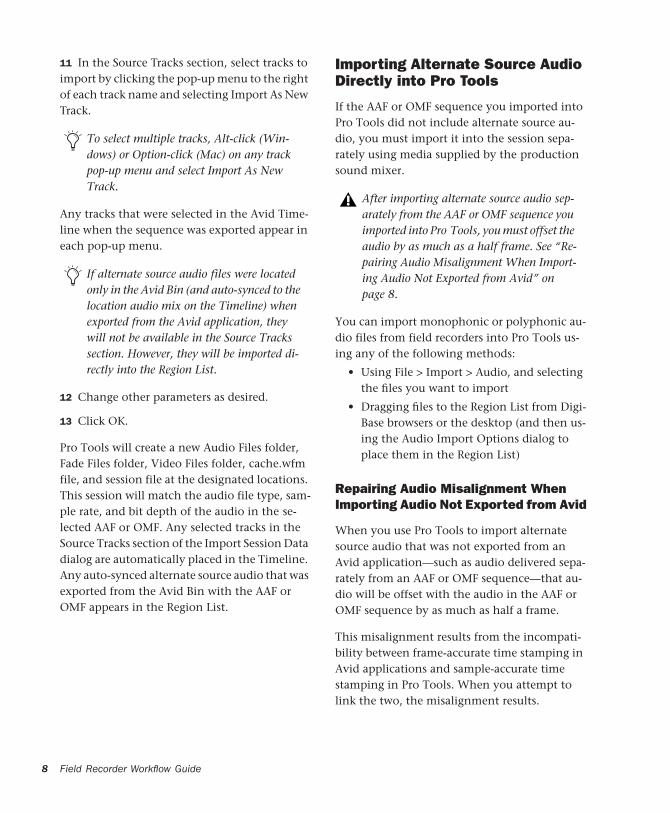
The Import Session Data dialog appears.
9 Choose Link to Source Media (Where Possible) from the Audio Media Options pop-up menu.
10 Choose Link to Source Media from the Video Media Options pop-up menu.
Import Session Data dialog
Pro Tools lets you open and import OMF or AAF sequences that reference audio files with mixed sample rates and/or bit depths. Audio files will be converted to the highest sample rate and bit depth of the files being imported (for new sessions) or to the current sample rate and/or bit depth (for existing sessions). The DigiTranslator 2.0 option is required.
Chapter 2: Field Recorder Workflows 7
8
11 In the Source Tracks section, select tracks to import by clicking the pop-up menu to the right of each track name and selecting Import As New Track.
Any tracks that were selected in the Avid Time-line when the sequence was exported appear in each pop-up menu.
12 Change other parameters as desired.
13 Click OK.
Pro Tools will create a new Audio Files folder, Fade Files folder, Video Files folder, cache.wfm file, and session file at the designated locations. This session will match the audio file type, sam-ple rate, and bit depth of the audio in the se-lected AAF or OMF. Any selected tracks in the Source Tracks section of the Import Session Data dialog are automatically placed in the Timeline. Any auto-synced alternate source audio that was exported from the Avid Bin with the AAF or OMF appears in the Region List.
To select multiple tracks, Alt-click (Win-dows) or Option-click (Mac) on any track pop-up menu and select Import As New Track.
If alternate source audio files were located only in the Avid Bin (and auto-synced to the location audio mix on the Timeline) when exported from the Avid application, they will not be available in the Source Tracks section. However, they will be imported di-rectly into the Region List.
Field Recorder Workflow Guide
Importing Alternate Source Audio Directly into Pro Tools
If the AAF or OMF sequence you imported into Pro Tools did not include alternate source au-dio, you must import it into the session sepa-rately using media supplied by the production sound mixer.
You can import monophonic or polyphonic au-dio files from field recorders into Pro Tools us-ing any of the following methods:
• Using File > Import > Audio, and selecting the files you want to import
• Dragging files to the Region List from Digi-Base browsers or the desktop (and then us-ing the Audio Import Options dialog to place them in the Region List)
Repairing Audio Misalignment When Importing Audio Not Exported from Avid
When you use Pro Tools to import alternate source audio that was not exported from an Avid application—such as audio delivered sepa-rately from an AAF or OMF sequence—that au-dio will be offset with the audio in the AAF or OMF sequence by as much as half a frame.
This misalignment results from the incompati-bility between frame-accurate time stamping in Avid applications and sample-accurate time stamping in Pro Tools. When you attempt to link the two, the misalignment results.
After importing alternate source audio sep-arately from the AAF or OMF sequence you imported into Pro Tools, you must offset the audio by as much as a half frame. See “Re-pairing Audio Misalignment When Import-ing Audio Not Exported from Avid” on page 8.
In order to repair this discrepancy, you must manually offset the alternate source audio after importing it into Pro Tools.
Displaying Multichannel Files from a Field Recorder in the Region ListWhen importing multichannel recordings from a field recorder, Pro Tools saves each channel as a separate region. Regions from the same multi-channel recording are collected into a multi-channel region, which displays as a single item in the Region List. An expand/collapse triangle next to an item in the Region List indicates a multichannel region.
For multichannel audio regions imported from field recorders to be shown as collective regions, both component regions must have the follow-ing properties:
• Same length
• Same region name prefix (such as Audio File or Audio File_01)
• Consecutively-numbered region name suf-fix, from A1 through A8
For example, the regions Audio File_01.A1 and Audio File_01.A2 would be grouped as a multi-channel region in the Region List.
If an existing stereo or multichannel region has been dragged onto multiple mono tracks and edited in such a way that one or more compo-nents are no longer the same length, the stereo display is removed and the regions are displayed as individual regions in the Region List.
See the Pro Tools Reference Guide for de-tailed information on using editing features (such as offsetting audio).
Choosing an Alternate Channel for a Specific Region Once you have imported an AAF or OMF se-quence into the Timeline and alternate source audio into the Region List, you can replace the original production sound mix with an equiva-lent alternate channel while preserving the orig-inal edits.
Choosing an Alternate Channel for a Specific Region
You can replace a mono region (or selected por-tion of a mono region) with a matching seg-ment of an alternate channel that was recorded simultaneously. Any fades performed on the original region are automatically recalculated against the replacement region, and any pre-ex-isting automation on that track is unchanged.
To replace a region with a matching alternate channel:
1 In the Timeline, make a selection that in-cludes or overlaps the region or portion of the region you want to replace.
2 Do one of the following:
If the Import Session Data process imported all alternate source audio directly into the Timeline, this procedure is unnecessary.
Using this feature is especially useful when combining it with duplicating the produc-tion sound mix track. For example, you could replace the audio from a boom micro-phone with the audio from a lavalier micro-phone—while preserving any edits or fades from the original edited production sound mix in the AAF or OMF sequence.
Chapter 2: Field Recorder Workflows 9
10
• With any Edit tool, right-click (Windows or Mac) or Control-click (Mac) the selection you want to replace, then select Matches from the pop-up menu.
– or –
• With the Selector tool, Control-click (Win-dows) or Command-click (Mac) the selec-tion you want to replace.
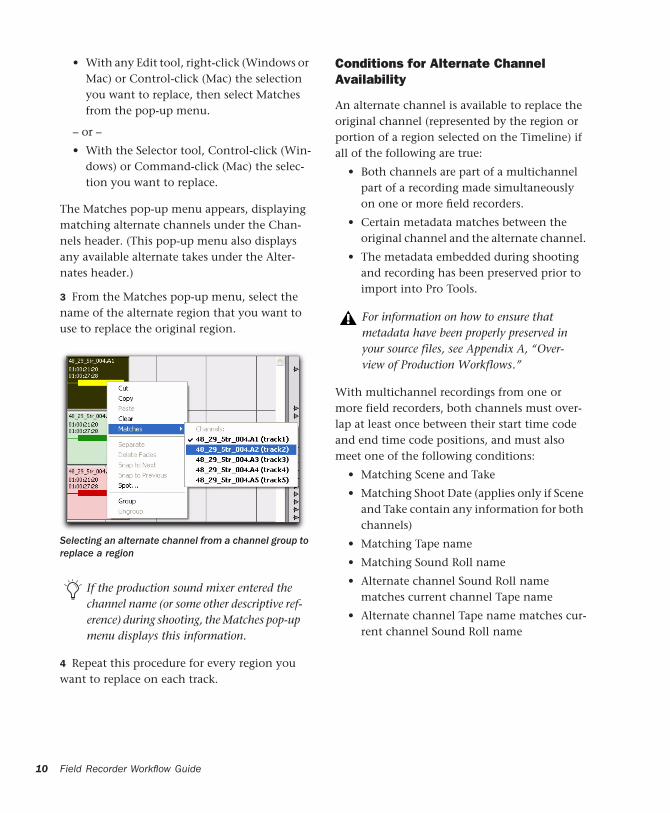
The Matches pop-up menu appears, displaying matching alternate channels under the Chan-nels header. (This pop-up menu also displays any available alternate takes under the Alter-nates header.)
3 From the Matches pop-up menu, select the name of the alternate region that you want to use to replace the original region.
4 Repeat this procedure for every region you want to replace on each track.
Selecting an alternate channel from a channel group to replace a region
If the production sound mixer entered the channel name (or some other descriptive ref-erence) during shooting, the Matches pop-up menu displays this information.
Field Recorder Workflow Guide
Conditions for Alternate Channel Availability
An alternate channel is available to replace the original channel (represented by the region or portion of a region selected on the Timeline) if all of the following are true:
• Both channels are part of a multichannel part of a recording made simultaneously on one or more field recorders.
• Certain metadata matches between the original channel and the alternate channel.
• The metadata embedded during shooting and recording has been preserved prior to import into Pro Tools.
With multichannel recordings from one or more field recorders, both channels must over-lap at least once between their start time code and end time code positions, and must also meet one of the following conditions:
• Matching Scene and Take
• Matching Shoot Date (applies only if Scene and Take contain any information for both channels)
• Matching Tape name
• Matching Sound Roll name
• Alternate channel Sound Roll name matches current channel Tape name
• Alternate channel Tape name matches cur-rent channel Sound Roll name
For information on how to ensure that metadata have been properly preserved in your source files, see Appendix A, “Over-view of Production Workflows.”
appendix a
Overview of Production Workflows
This appendix describes overviews of various workflows for preparing the following media during and after shooting picture:
• Film
• Video
• Non-linear file-based
Distributing this Document to Intended Audiences
The purpose of this appendix is to ensure that the Pro Tools editor receives original source files containing usable metadata that was entered or captured during a shoot, and is therefore written for a broad range of audiences.
It is strongly recommended that the following parties read and understand this appendix:
For film workflows:
• Production sound mixer
• Telecine operator
• Camera assistant
• Camera operator
• Avid editor
• Pro Tools editor
If you are the Pro Tools editor, you should distribute this appendix to the appropriate parties listed below.
For all other workflows:
• Production sound mixer
• Avid editor
• Pro Tools editor
TerminologyThis section provides a glossary of terms involv-ing workflows that occur before files are deliv-ered to Pro Tools editors.
General Terminology
The following terminology applies to all work-flows.
Time Code
There are four types of time code, depending on your production:
Keycode Each frame of film stock is embedded during manufacturing with a unique identify-ing time code position known as keycode.
SMPTE Time Code Also known as LTC or linear time code. The generating clock of this time code can be based on the time of day or can be set to ascend beginning from a certain starting time of day.
Appendix A: Overview of Production Workflows 11
12
Minutes:Seconds Time code based on minutes and seconds.
Wild No time code. Most consumer digital video recorders do not have the ability to generate time code.
Production Sound Mixer
The production sound mixer uses a field re-corder to record multichannel audio during a shoot, and later delivers those source files to one or more parties:
• Telecine operator (film workflow only)
• Avid editor
• Pro Tools editor
Film Terminology
The following terminology applies only to film workflows:
Shootlist
The shootlist is a document in which the cam-era assistant records each scene and take relative to its keycode value on the film stock. It is later used by the telecine operator to synchronize the audio and video together.
Sound Log
The sound log is a document in which the pro-duction sound mixer records each scene and take relative to its beginning time code position.
Field Recorder Workflow Guide
Slate Operator and Clapboard Information
The slate operator holds and labels the slate (also known as a clapboard) for each new scene and take. At the start of each take, the slate op-erator claps the slate, which simultaneously cap-tures the following information:
• The scene, take, and time code information is captured visually on film.
• The sound of the slate clapping is captured by the field recorder, which should be us-ing the same time code as displayed on the slate.
The telecine operator uses all of the information above to synchronize used film stock to the re-corded audio in order to create the telecine vid-eotape.
Telecine and Telecine Videotape
The Telecine is a machine used to transfer film footage and synchronized audio to videotape (referred to as the dailies).
The telecine videotape contains the dailies. The SMPTE time code on the telecine videotape will be different from the time code recorded on lo-cation.
FLEx File
The FLEx file is a text file generated during a te-lecine session that relates film keycode, field re-corder time code, and telecine videotape time code. When the telecine videotape is batch dig-itized in the Avid application, the information in the FLEx file is used to assign the original (lo-cation) time code to the resulting audio and video source files.
Film WorkflowThis section describes the film workflow from shooting to the point where the Avid editor is ready for editing, and is intended for the follow-ing parties:
• Camera assistant
• Camera operator
• Production sound mixer
• Telecine operator
• Pro Tools editor
Overview of Film Workflow
The following describes an overview of the steps necessary to a film workflow:
1 Set up before shooting
2 Shoot
3 Telecine transfer
4 Batch digitize in Avid application
Following these steps ensures that time code metadata are preserved from the moment shoot-ing begins to the final delivery of source files to the Pro Tools editor.
Setting Up Before Shooting
Before each day’s shooting begins, the produc-tion sound mixer should decide on a unique name—preferably ascending by day—and enter that exact name in the Tape BEXT or iXML metadata field inside the Broadcast WAV file.
For example, the production sound mixer might use T001 for the first day’s shooting, T002 for the second day’s shooting, and so forth.
Shooting
1 Shooting proceeds as follows:
• Film camera begins rolling.
• One or more field recorders begin record-ing. The production sound mixer has desig-nated one or two channels as a production sound mix, which is a consolidation of one or more channels in each multichannel re-cording.
2 During shooting, the following time code in-formation is captured:
• The camera captures images to film, each frame of which is embedded during manu-facturing with a unique identifying time code position known as keycode.
• One or more field recorders simultaneously make multichannel recordings that are em-bedded with SMPTE time code based on time of day (or longitudinal time code).
3 During shooting, the following information is noted:
• The camera assistant keeps a written record (called a shootlist) documenting each scene and take with a corresponding keycode po-sition.
• The production sound mixer also keeps a written record (also called a sound log) doc-umenting each scene and take with a corre-sponding time code position.
4 The slate operator claps the slate to indicate the beginning of the take. The field recorder records the audio of the clap, and the film cam-era captures the following images:
• Scene and take number (written on the slate)
• Exact moment the slate closes
• Time code position of the slate closing
5 Shooting ends and the take is complete.
Appendix A: Overview of Production Workflows 13
14
Telecine Transfer
When shooting is complete for the day, the fol-lowing components are delivered to the telecine operator:
• Processed film stock
• Multichannel location audio
• Written shootlist and sound log
The telecine operator generates the dailies (a vid-eotape containing the day’s shots) by transfer-ring the film and audio to a videotape. The shootlists will be used as a guide.
To use a telecine to create dailies:
1 Load film and audio into the telecine.
2 Enter the Tape name or Sound Roll name (whichever was used during the production) character for character into the telecine.
3 Using the camera assistant’s shootlist, locate the film frame representing the first keycode po-sition of the film in the shootlist (which should be just before the slate is clapped).
4 Locate the film to the first frame where the slate clap occurs, and note the time code posi-tion displayed on the slate.
5 Locate the audio to the exact time code posi-tion listed on the slate in the film frame (which lines up the audio with the film).
To ensure that metadata are preserved for the Pro Tools editor, it is critical to enter the Tape name or Sound Roll name character for character. For example, if the metadata was T001 (with two zeroes), enter T001 with two zeroes—not T01 with one zero or T0001 with three zeroes.
Field Recorder Workflow Guide
6 Play back the film and audio to test that they are synchronized. If they are not synchronized, make small manual adjustments as needed until the film and audio are synchronized.
7 Once the film and audio are properly synchro-nized, lock the film and audio in place.
8 Insert a blank videotape into the telecine, and manually assign linear time code (LTC) informa-tion to the videotape relative to the day of shooting.
For example, the first videotape from the first day of shooting starts at 1 hour (01:00:00:00), while the first videotape from the second day of shooting starts at 2 hours (02:00:00:00), and so on. In this way, the time code hour matches the day of shooting, and anybody viewing the dai-lies can easily determine the day of shooting of a videotape from the hour it starts.
9 Begin the telecine capture. During the telecine capture, the following occurs:
• The telecine begins capturing the synchro-nized film and audio to the videotape, with linear time code (LTC) being assigned to the videotape beginning from where you entered the start time code.
• A FLEx file is created, where scene and take information is automatically written and associated to the film keycode and telecine videotape time code relative to audio time code.
10 When the telecine transfer is complete, de-liver the following to the Avid editor:
• Telecine videotape
• FLEx file
• Shootlist
• Sound log
• Location audio media
Batch Digitizing the Telecine Videotape to Digital Files
This phase of the workflow begins after the Avid editor receives the following components from the telecine operator:
• Telecine videotape
• FLEx file
• Shootlist
• Sound log
In a film workflow, the Avid editor batch digi-tizes the telecine videotape to digital video and audio files in order to edit them.
To batch digitize a telecine videotape to digital source files:
1 In the Avid application, import all relevant FLEx files into Avid Log Exchange.
Avid Log Exchange displays a list of all scene and take combinations, with associated film keycode, audio time code, and relative video-tape time code.
2 In Avid Log Exchange, select the items in the FLEx file that represent the scenes and takes you want to batch digitize from the videotape.
3 Process the selected scenes and takes in the FLEx file. Avid Log Exchange sends the selected items to the Avid application, where they are loaded into the Bin as offline media.
In some cases, you may also receive location audio from the production sound mixer.
Any metadata required for matching (such as Tape name) should be visible in the un-digitized clips.
4 In the Avid Bin, select the items you want to capture.
5 Load the telecine videotape into the Avid, and begin the batch digitize.
The Avid automatically batch digitizes the scenes and takes selected in the Avid Bin, and uses the FLEx file to assign each of the digitized video and audio files with the time code infor-mation matching the original keycode and time code information from the shoot.
6 When the batch digitize is complete, use the Avid application to edit audio and video as de-sired.
7 When you are finished editing, export the ed-ited sequence as an AAF or OMF sequence so that it can be imported into Pro Tools.
Video and Fully Non-Linear WorkflowsThis section describes both video and fully non-linear workflows from shooting to the point where the Avid editor is ready for editing, and is intended for the following parties:
• Camera assistant
• Camera operator
• Production sound mixer
• Avid editor
• Pro Tools editor
Appendix A: Overview of Production Workflows 15
16
Overview of Video and Fully Non-Linear Workflows
The following describes an overview of the steps that are necessary in these workflows:
1 Set up before shooting
2 Shoot
3 Digitize video in Avid application (video workflow only) or import digital video files di-rectly into Avid application (fully non-linear workflow only).
Following these steps ensures that time code and other metadata are preserved from the mo-ment shooting begins to the final delivery of source files to the Pro Tools editor.
Setting Up Before Shooting
Before shooting begins, the camera operator and the production sound mixer should ensure the following:
• The field recorder’s audio output feeds the video camera’s audio input.
• Both the field recorder and the video camera should be locked to the same production time code.
Matching Tape Name to Sound Roll Metadata for Video Shoots
Before loading the videotape into the video camera, the camera operator physically labels the videotape with a unique name. The produc-tion sound mixer must enter that exact name in the Tape BEXT or iXML metadata field inside the Broadcast WAV file.
After you import a file containing Tape metadata into Pro Tools, the metadata dis-plays in the Sound Roll field in DigiBase browsers.
Field Recorder Workflow Guide
Matching Tape Name to Sound Roll Metadata for Fully Non-Linear Shoots
After loading the digital video storage into the camera, the camera operator gives it a unique name. The production sound mixer must enter that exact name in the Tape BEXT or iXML metadata field inside the Broadcast WAV file.
Shooting
1 Shooting proceeds as follows:
• Camera begins rolling.
• One or more field recorders begin record-ing. The production sound mixer has desig-nated one or two channels as a production sound mix, which is a consolidation of one or more channels in each multichannel re-cording.
2 During shooting, the following time code in-formation is captured:
• The camera captures images to video or file embedded with SMPTE time code based on time of day (or longitudinal time code).
• One or more field recorders simultaneously make multichannel recordings that are em-bedded with SMPTE time code based on time of day (or longitudinal time code).
3 The slate operator claps the slate to indicate the beginning of the take. The field recorder records the audio of the clap, and the film cam-era captures the following images:
• Scene and take number (displayed on the slate)
• Exact moment the slate closes
To ensure that metadata are preserved for the Pro Tools editor, it is critical to enter the Tape name character for character. For example, if the metadata was T001 (with two zeroes), enter T001 with two zeroes—not T01 with one zero or T0001 with three zeroes.
• Time code position of the slate closing
4 Shooting ends and the take is complete.
Digitizing a Videotape in the Avid Application
(Video Workflow Only)
This phase of the workflow begins after the Avid editor receives the following components from the camera operator and the production sound mixer:
• Videotape
• Multichannel recordings
In a video workflow, the Avid editor digitizes the videotape to digital video and audio files in order to edit them. Before doing so, however, the Avid editor must name the tape.
To digitize a videotape to digital source files:
1 Load the videotape into the Avid system.
2 When prompted to name the videotape, enter the exact Tape name used by the camera opera-tor and the production sound mixer.
3 Digitize the videotape loaded into the Avid.
4 When the digitize is complete, use the Avid application to edit audio and video as desired.
5 When you are finished editing, export the ed-ited sequence as an AAF or OMF sequence so that it can be imported into Pro Tools.
To ensure that metadata are preserved for the Pro Tools editor, it is critical to enter the Tape name character for character. For example, if the metadata was T001 (with two zeroes), enter T001 with two zeroes—not T01 with one zero or T0001 with three zeroes.
Importing Digital Video Directly into the Avid Application
(Fully Non-Linear Workflow Only)
This phase of the workflow begins after the Avid editor receives the following components from the camera operator and the production sound mixer:
• Digital video (on flash card, hard drive, or some other file-based storage)
• Multichannel recordings
In a fully non-linear workflow, the Avid editor simply has to import the video and audio media into the Avid application in order to edit them.
To import video into the Avid application:
1 In the Avid application, create a Bin.
2 Import the video files directly into the Bin.
3 When the Disk Label Import dialog appears, enter the exact Tape name used by the camera operator and the production sound mixer.
4 Use the Avid application to edit audio and video as desired.
5 When you are finished editing, export the ed-ited sequence as an AAF or OMF sequence so that it can be imported into Pro Tools.
To ensure that metadata are preserved for the Pro Tools editor, it is critical to enter the Tape name character for character. For example, if the metadata was T001 (with two zeroes), enter T001 with two zeroes—not T01 with one zero or T0001 with three zeroes.
Appendix A: Overview of Production Workflows 17

18
Field Recorder Workflow Guide
DIGIDESIGN2001 Junipero Serra Boulevard
Daly City, CA 94014-3886 USA
Tel: 650.731.6300
Fax: 650.731.6399
TECHNICAL SUPPORT (USA)Tel: 650.731.6100
Fax: 650.731.6384
PRODUCT INFORMATION (USA)Tel: 650.731.6102
Fax: 800.333.2137
INTERNATIONAL OFFICESVisit our Digidesign Web sitefor contact information
www.digidesign.com