Embed Size (px)
Citation preview

Fiery Hot Folders
16 April 2014

© 2014 Electronics For Imaging. The information in this publication is covered under Legal Notices for thisproduct.
Contents
Fiery Hot Folders . . . . . . . . . . . . . . . . . . . . . . . . . . . . . . . . . . . . . . . . . . . . . . . . . . . . . . . . . . . . . . . . . . . . . . . . . . 5
Fiery Hot Folders Console . . . . . . . . . . . . . . . . . . . . . . . . . . . . . . . . . . . . . . . . . . . . . . . . . . . . . . . . . . . . . . . . . . . . . . 6
Creating a Hot Folder . . . . . . . . . . . . . . . . . . . . . . . . . . . . . . . . . . . . . . . . . . . . . . . . . . . . . . . . . . . . . . . . . . . . . . . . . . 6
Create a new Hot Folder . . . . . . . . . . . . . . . . . . . . . . . . . . . . . . . . . . . . . . . . . . . . . . . . . . . . . . . . . . . . . . . . . . . . . . . 6
Connecting to a Fiery Server . . . . . . . . . . . . . . . . . . . . . . . . . . . . . . . . . . . . . . . . . . . . . . . . . . . . . . . . . . . . . . . . . . . 7
Specify the Job Action for a Hot Folder . . . . . . . . . . . . . . . . . . . . . . . . . . . . . . . . . . . . . . . . . . . . . . . . . . . . . . . . . . 8
Set Hot Folders preferences . . . . . . . . . . . . . . . . . . . . . . . . . . . . . . . . . . . . . . . . . . . . . . . . . . . . . . . . . . . . . . . . . . . 9
Activating Hot Folders . . . . . . . . . . . . . . . . . . . . . . . . . . . . . . . . . . . . . . . . . . . . . . . . . . . . . . . . . . . . . . . . . . . . . . . . . 9
Stop and restart all Hot Folders . . . . . . . . . . . . . . . . . . . . . . . . . . . . . . . . . . . . . . . . . . . . . . . . . . . . . . . . . . . . . . . . 10
Manage Hot Folders . . . . . . . . . . . . . . . . . . . . . . . . . . . . . . . . . . . . . . . . . . . . . . . . . . . . . . . . . . . . . . . . . . . . . . . . . . 10
Edit a Hot Folder . . . . . . . . . . . . . . . . . . . . . . . . . . . . . . . . . . . . . . . . . . . . . . . . . . . . . . . . . . . . . . . . . . . . . . . . . . . . . 10
Duplicate a Hot Folder . . . . . . . . . . . . . . . . . . . . . . . . . . . . . . . . . . . . . . . . . . . . . . . . . . . . . . . . . . . . . . . . . . . . . . . . 10
Rename a Hot Folder . . . . . . . . . . . . . . . . . . . . . . . . . . . . . . . . . . . . . . . . . . . . . . . . . . . . . . . . . . . . . . . . . . . . . . . . . 10
Delete a Hot Folder . . . . . . . . . . . . . . . . . . . . . . . . . . . . . . . . . . . . . . . . . . . . . . . . . . . . . . . . . . . . . . . . . . . . . . . . . . 11
Show or hide the Fiery Hot Folders Console . . . . . . . . . . . . . . . . . . . . . . . . . . . . . . . . . . . . . . . . . . . . . . . . . . . . . 11
Access original job files . . . . . . . . . . . . . . . . . . . . . . . . . . . . . . . . . . . . . . . . . . . . . . . . . . . . . . . . . . . . . . . . . . . . . . . 11
Submitting jobs to a Hot Folder . . . . . . . . . . . . . . . . . . . . . . . . . . . . . . . . . . . . . . . . . . . . . . . . . . . . . . . . . . . . . . . . 11
Submit a job to a Hot Folder . . . . . . . . . . . . . . . . . . . . . . . . . . . . . . . . . . . . . . . . . . . . . . . . . . . . . . . . . . . . . . . . . . . 12
Submit multiple jobs as a folder . . . . . . . . . . . . . . . . . . . . . . . . . . . . . . . . . . . . . . . . . . . . . . . . . . . . . . . . . . . . . . . 12
Submit multi-part jobs in a folder . . . . . . . . . . . . . . . . . . . . . . . . . . . . . . . . . . . . . . . . . . . . . . . . . . . . . . . . . . . . . . . 12
View Status and Log windows . . . . . . . . . . . . . . . . . . . . . . . . . . . . . . . . . . . . . . . . . . . . . . . . . . . . . . . . . . . . . . . . . 12
View Hot Folder job progress . . . . . . . . . . . . . . . . . . . . . . . . . . . . . . . . . . . . . . . . . . . . . . . . . . . . . . . . . . . . . . . . . . 13
View Hot Folder logs . . . . . . . . . . . . . . . . . . . . . . . . . . . . . . . . . . . . . . . . . . . . . . . . . . . . . . . . . . . . . . . . . . . . . . . . . 13
View Hot Folder error details . . . . . . . . . . . . . . . . . . . . . . . . . . . . . . . . . . . . . . . . . . . . . . . . . . . . . . . . . . . . . . . . . . 13
Clear the Log window . . . . . . . . . . . . . . . . . . . . . . . . . . . . . . . . . . . . . . . . . . . . . . . . . . . . . . . . . . . . . . . . . . . . . . . . 13
Job Properties . . . . . . . . . . . . . . . . . . . . . . . . . . . . . . . . . . . . . . . . . . . . . . . . . . . . . . . . . . . . . . . . . . . . . . . . . . . . . . . . 14
Job Properties groups . . . . . . . . . . . . . . . . . . . . . . . . . . . . . . . . . . . . . . . . . . . . . . . . . . . . . . . . . . . . . . . . . . . . . . . . 14
Specify Hot Folder Job Properties . . . . . . . . . . . . . . . . . . . . . . . . . . . . . . . . . . . . . . . . . . . . . . . . . . . . . . . . . . . . . . 14
Using presets . . . . . . . . . . . . . . . . . . . . . . . . . . . . . . . . . . . . . . . . . . . . . . . . . . . . . . . . . . . . . . . . . . . . . . . . . . . . . . . . 15
Create a Local Preset . . . . . . . . . . . . . . . . . . . . . . . . . . . . . . . . . . . . . . . . . . . . . . . . . . . . . . . . . . . . . . . . . . . . . . . . 15
Edit a Local Preset . . . . . . . . . . . . . . . . . . . . . . . . . . . . . . . . . . . . . . . . . . . . . . . . . . . . . . . . . . . . . . . . . . . . . . . . . . . 16
Delete and rename a local preset . . . . . . . . . . . . . . . . . . . . . . . . . . . . . . . . . . . . . . . . . . . . . . . . . . . . . . . . . . . . . . 16
Imposition templates . . . . . . . . . . . . . . . . . . . . . . . . . . . . . . . . . . . . . . . . . . . . . . . . . . . . . . . . . . . . . . . . . . . . . . . . . . 16
Edit imposition templates . . . . . . . . . . . . . . . . . . . . . . . . . . . . . . . . . . . . . . . . . . . . . . . . . . . . . . . . . . . . . . . . . . . . . 16
Fiery Hot Folders
Contents
3
Predefined imposition templates . . . . . . . . . . . . . . . . . . . . . . . . . . . . . . . . . . . . . . . . . . . . . . . . . . . . . . . . . . . . . . . 17
Hot Folder input formats . . . . . . . . . . . . . . . . . . . . . . . . . . . . . . . . . . . . . . . . . . . . . . . . . . . . . . . . . . . . . . . . . . . . . . 20
Output file type . . . . . . . . . . . . . . . . . . . . . . . . . . . . . . . . . . . . . . . . . . . . . . . . . . . . . . . . . . . . . . . . . . . . . . . . . . . . . . 20
Specify input formats . . . . . . . . . . . . . . . . . . . . . . . . . . . . . . . . . . . . . . . . . . . . . . . . . . . . . . . . . . . . . . . . . . . . . . . . 20
Hot Folders filters . . . . . . . . . . . . . . . . . . . . . . . . . . . . . . . . . . . . . . . . . . . . . . . . . . . . . . . . . . . . . . . . . . . . . . . . . . . . . 21
General filters . . . . . . . . . . . . . . . . . . . . . . . . . . . . . . . . . . . . . . . . . . . . . . . . . . . . . . . . . . . . . . . . . . . . . . . . . . . . . . . 21
Color Separated filters . . . . . . . . . . . . . . . . . . . . . . . . . . . . . . . . . . . . . . . . . . . . . . . . . . . . . . . . . . . . . . . . . . . . . . . . 28
Special filters . . . . . . . . . . . . . . . . . . . . . . . . . . . . . . . . . . . . . . . . . . . . . . . . . . . . . . . . . . . . . . . . . . . . . . . . . . . . . . . . 29
JDF Filter . . . . . . . . . . . . . . . . . . . . . . . . . . . . . . . . . . . . . . . . . . . . . . . . . . . . . . . . . . . . . . . . . . . . . . . . . . . . . . . . . . . 31
Preflight . . . . . . . . . . . . . . . . . . . . . . . . . . . . . . . . . . . . . . . . . . . . . . . . . . . . . . . . . . . . . . . . . . . . . . . . . . . . . . . . . . . . . . 31
Set Preflight Settings . . . . . . . . . . . . . . . . . . . . . . . . . . . . . . . . . . . . . . . . . . . . . . . . . . . . . . . . . . . . . . . . . . . . . . . . . 32
Backup and Restore . . . . . . . . . . . . . . . . . . . . . . . . . . . . . . . . . . . . . . . . . . . . . . . . . . . . . . . . . . . . . . . . . . . . . . . . . . . 33
Back up Hot Folders . . . . . . . . . . . . . . . . . . . . . . . . . . . . . . . . . . . . . . . . . . . . . . . . . . . . . . . . . . . . . . . . . . . . . . . . . 33
Back up original files . . . . . . . . . . . . . . . . . . . . . . . . . . . . . . . . . . . . . . . . . . . . . . . . . . . . . . . . . . . . . . . . . . . . . . . . . 34
Restore Hot Folders . . . . . . . . . . . . . . . . . . . . . . . . . . . . . . . . . . . . . . . . . . . . . . . . . . . . . . . . . . . . . . . . . . . . . . . . . . 34
Troubleshooting Hot Folders . . . . . . . . . . . . . . . . . . . . . . . . . . . . . . . . . . . . . . . . . . . . . . . . . . . . . . . . . . . . . . . . . . 35
Fiery Server does not respond . . . . . . . . . . . . . . . . . . . . . . . . . . . . . . . . . . . . . . . . . . . . . . . . . . . . . . . . . . . . . . . . . 35
A Hot Folder cannot connect to a Fiery Server . . . . . . . . . . . . . . . . . . . . . . . . . . . . . . . . . . . . . . . . . . . . . . . . . . . 35
A Hot Folder is missing from the Hot Folders Console . . . . . . . . . . . . . . . . . . . . . . . . . . . . . . . . . . . . . . . . . . . . 36
My original file disappeared . . . . . . . . . . . . . . . . . . . . . . . . . . . . . . . . . . . . . . . . . . . . . . . . . . . . . . . . . . . . . . . . . . . 36
My job failed . . . . . . . . . . . . . . . . . . . . . . . . . . . . . . . . . . . . . . . . . . . . . . . . . . . . . . . . . . . . . . . . . . . . . . . . . . . . . . . . 36
Maintain optimal performance . . . . . . . . . . . . . . . . . . . . . . . . . . . . . . . . . . . . . . . . . . . . . . . . . . . . . . . . . . . . . . . . . 36
Index . . . . . . . . . . . . . . . . . . . . . . . . . . . . . . . . . . . . . . . . . . . . . . . . . . . . . . . . . . . . . . . . . . . . . . . . . . . . . . . . . . . . . . . 37
Fiery Hot Folders
Contents
4
Fiery Hot Folders
The Fiery Hot Folders application provides a quick and automated method of sending files to a Fiery Server withpredefined settings, which eliminates repeatedly setting the same options for multiple jobs or frequently usedlayouts.The application lets you create as many Hot Folders as you want, each with a distinct profile of print settings for aspecific type of output. For each Hot Folder, you assign a Job Action that determines how the Fiery Server handlesthe job, which further streamlines the printing process. Using a Hot Folder, you can send files directly to the FieryServer without starting the application in which the files were created. Because a Hot Folder can be shared on anetwork, it provides an easy way to forward jobs without installing the application on the recipient’s system. Whenyou install Hot Folders on a system, any Hot Folder that you create resides as a special folder on your hard disk andcontains all the files and subfolders that contain information about your jobs.A folder is considered "Hot" when it is:
• Connected to a Fiery Server• Monitored by the Hot Folders application• Configured with predefined print options (optional)• Configured with imposition settings (optional)• Configured with file filters and application-specific formats (optional)
The Hot Folders software process runs in the background, continuously monitoring your active Hot Folders for newjobs to print or process. The Job Action specified for the Hot Folder determines how the Fiery Server handles thejob.The Hot Folders application monitors all Hot Folders created locally on your own system, but does not monitor HotFolders created on other systems.The Hot Folders application includes the following:
• Fiery Hot Folders Console - Provides access to your Hot Folders and overview information about the location,Job Action, and current settings for each Hot Folder.
• Status & Log - Monitor the status of files in progress and allow viewing of the log of all files processed throughyour Hot Folders.
• Job Properties - provides access to the print options, including job presets, and imposition software.• Input Formats - Provides access to filters and application-specific print settings, which you can set through a
Hot Folder without opening or installing the original application.• Preflight Settings- Provides access to Preflight, which can be enabled to check submitted jobs for errors before
printing.• Backup & Restore - Backs up and restores the Hot Folders that reside on your computer.
Fiery Hot Folders
Fiery Hot Folders
5
Fiery Hot Folders Console
The Fiery Hot Folders Console lets you access your Hot Folders and overview information about the location, JobAction, and settings for each Hot Folder.The Fiery Hot Folders Console provides access to Status & Log, which opens a separate window where you canmonitor and track all jobs processed through a Hot Folder.The console includes the following:
• Menus - provides commands to create and manager your Hot Folders, to set preferences and to access Backup& Restore.
• Taskbar - provides quick access to most of the commands in the menus, as well as Status & Log.• Server list - lists all connected Fiery Servers and associated Hot Folders. The server list can be collapsed or
expanded to display or not display the Hot Folders connected to each Fiery Server.• Hot Folder summary - provides information about the configuration of the selected Hot Folder.• Job properties - provides information about a subset of the Job Properties configured for the selected Hot
Folder.
Note: The Fiery Hot Folders Console displays only a subset of Job Properties. To view a complete summary ofJob Properties, see Specify Hot Folder Job Properties on page 14.
Creating a Hot Folder
You can create as many Hot Folders as you want, each with a distinct profile of print settings for a specific type ofoutput.When you create a new Hot Folder, the following apply:
• You connect the Hot Folder to a Fiery Server.• A new Hot Folder cannot have the same name as an existing folder.• You cannot create a Hot Folder on a network drive, such as a common file server.
Each time you create a new Hot Folder, the Hot Folders application automatically creates supporting folders, one ofwhich stores the original files for jobs submitted to the Hot Folder after the jobs have printed. The original filesreceive file names based on the current date and time (YYYYMDHHMMSec).
Create a new Hot Folder
When you create a new Hot Folder, you specify job properties and other settings, determined by the connected FieryServer.1 In the Fiery Hot Folders Console, click New to display the Hot Folders Settings window.
2 Type a name for the Hot Folder in the Folder name field.
3 Optionally, type a description and details about the Hot Folder in the Description field.
4 Click Browse, and then specify the folder location.
5 Click Select to specify and connect to the Fiery Server.For instructions, see Connecting to a Fiery Server on page 7.
Fiery Hot Folders
Fiery Hot Folders
6
6 Choose the Fiery Server queue or action from the Job Action menu.For more information, see Specify the Job Action for a Hot Folder on page 8.
7 Set any of these options:
• To specify Job Properties (print and imposition settings) for the Hot Folder, choose Define in the JobProperties menu.
• To specify Input Formats (filters and application-specific formats), click Edit next to Input Formats.
• To enable a Preflight check of jobs submitted to the Hot Folder, select Preflight.
Note: Preflight is not supported for all Fiery Servers.• To set a time interval between checking for new jobs, click Advanced Settings, then click Custom and type
a new time interval.If you plan to submit multi-part jobs to the Hot Folder, we recommend that you set this interval to 10 secondsor more. For more information, see Submit multi-part jobs in a folder on page 12 .
Connecting to a Fiery Server
The Connect to Server window manages server connections.In the Connect to Server window, you can:
• Specify a Fiery Server by IP address or DNS name• Search for and select from available Fiery Servers• Select a Fiery Server from a Favorite list• Manage the Favorite list
If you type an IP address when you connect to a Fiery Server, the server list initially displays what you typed. Afterthe connection is authenticated, the IP Address switches to the Fiery Server name in the server list.
Connect a Hot Folder to a Fiery Server
You can specify, search for, and select from available Fiery Servers, add them to the Favorite list in the Connect toServer window, and select a Fiery Server from the Favorite list.1 To open the Connect to Server window, click Select to the right of the Server name field in the Hot Folder
Settings window.
2 Do any of the following in the Connect to Server window:
• To specify a Fiery Server by IP address or DNS name, type the IP address or DNS name in the Connect to aServer field. If prompted for a password, type the password and click OK. Click Connect to return to the HotFolder Settings window.If you type an IP address, the server list initially displays what you typed, but once the connection has beenauthenticated, the IP Address switches to the Fiery Server name in the server list.
• To search for and connect to a Fiery Server, click the Search icon ( ) to open the Search window. Select theFiery Server from the search results list, click Add, and then click Connect to return to the Hot FolderSettings window.
Fiery Hot Folders
Fiery Hot Folders
7
• To connect to a Fiery Server you select from the Favorite list, select the Fiery Server name in the list, andthen click Connect to return to the Hot Folder Settings window.
• To add the specified Fiery Server to the Favorite list, click the plus sign ( ).
• To remove a Fiery Server from the Favorite list, select the Fiery Server name in the list and click the minus
sign ( ).
Connect an existing Hot Folder to a different Fiery Server
Each Hot Folder must be connected to a Fiery Server. The connection is set up when you create a new Hot Folder.1 In the Fiery Hot Folders Console, select the Hot Folder and click Deactivate.
2 Click Edit.
3 Click Select to open the Connect to Server window.
4 Specify the Fiery Server.
Specify the Job Action for a Hot Folder
When you connect a Hot Folder to a Fiery Server, you must also specify a Job Action, which determines how theFiery Server handles the job.Some job actions might not be supported on your Fiery Server, or they might be supported but not enabled.
1 Select the Hot Folder in the Fiery Hot Folders Console, and then click Edit.
2 In the Hot Folders Settings window, click one of the following Job Actions:
• Device name hold - Sends a job to the Hold queue, where it is spooled to the Fiery Server hard disk and held inthe queue for printing at a later time.
• Device name print - Sends a job to the Print queue, where it is processed and printed in the order in which itwas received.
• Device name direct - Sends a job to the Direct connection, where it is processed only when the Fiery Server isidle. If the Fiery Server is busy, the job remains in the queue until the Fiery Server is ready. The job is processedas soon as the previous job is finished, before the next queued job is processed.Jobs sent to the Direct connection cannot be selected for reprinting, moving, or deletion, therefore the Directconnection provides a measure of security for sensitive or confidential files. Jobs sent to the Direct connectiondo appear in the Job Log, for accounting purposes.When you choose the Direct connection, Job Properties is disabled and Preflight is not available.
• Process and Hold - Processes a job and then places the processed job in the Hold queue for printing at a latertime.
• Print and Hold - Processes and prints a job, and then places the processed job in the Hold queue forreprinting or later use.
• Print and Delete - Processes and prints a job, and then deletes the processed job. The job will not appear inthe Printed queue.
Fiery Hot Folders
Fiery Hot Folders
8
• Proof Print - Processes and prints one copy of a job. This Job Action is useful for checking the job outputbefore printing the number of copies called for in the job.
• Sequential Print - Processes and prints the job in the order it was received. This Job Action is useful for jobsthat must be printed consecutively.
Set Hot Folders preferences
You can set preferences that apply to all Hot Folders.1 In the Fiery Hot Folders Console, choose Edit > Preferences (Windows) or Fiery Hot Folders >
Preferences (Mac OS).
2 Set one or more of the following preferences:
• Units - If the Fiery Server supports imposition, sets the default unit of measurement for use within FieryImpose.
• Imposition template location - If the Fiery Server supports imposition, sets the default location ofimposition templates.
• Time interval to check for jobs - Sets the default time interval to check for new jobs. Setting a longerinterval can prevent problems that may occur when processing large or multi-part files (such as CT/LW orDCS 2.0 files) through a Hot Folder.
Note: You can override the default time interval in the settings for a specific Hot Folder.• Save original files in - Specifies the location for archiving original files. By default, original files are archived
in the supporting folders that are automatically created inside the Hot Folder. If you specify a differentlocation, all original files from all Hot Folders will be saved in this common location.
• Clear original files - Sets the default time interval to wait before clearing the archived original files.
• Autorefresh Hot Folders linked server presets - Enables Hot Folders to update its display of a serverpreset’s settings (in the Fiery Hot Folders Console) at a specific time interval.
Activating Hot Folders
Active Hot Folders are monitored by the Hot Folders application. Deactivated Hot Folders are not monitored.
The icon in the Fiery Hot Folders Console is in color when the Hot Folder is activated ( ) and gray whendeactivated ( ).When you update the settings or Fiery Server connection, or if you want to delete, edit, or rename a Hot Folder, youmust first deactivate the folder.
Activate or deactivate a Hot Folder
Active Hot Folders are monitored by the Hot Folders application. Deactivated Hot Folders are not monitored.
• Do one of the following:
• To deactivate a Hot Folder, in the Fiery Hot Folders Console, select the Hot Folder and click Deactivate.
• To activate a Hot Folder, in the Fiery Hot Folders Console, select the Hot Folder and click Activate.
Fiery Hot Folders
Fiery Hot Folders
9
Stop and restart all Hot Folders
You can choose to stop monitoring your Hot Folders at any time and then restart them.When you open the Hot Folders application, it continuously monitors your Hot Folders and processes all jobssubmitted to a Hot Folder. When you stop all Hot Folders, processing stops and all Hot Folders are disabled untilyou restart them.
1 Click File > Stop All Hot Folders to stop all Hot Folders.
2 Click File > Start All Hot Folders to restart all Hot Folders.
When you restart all Hot Folders, all Hot Folders return to their previous state (activated or deactivated),
Manage Hot Folders
You can edit, duplicate, rename, and delete a Hot Folder.
Edit a Hot Folder
When you edit a Hot Folder, first deactivate it to take it offline, and then make changes by accessing the Hot FolderSettings window.
Note: You can change the Job Action, Job Properties, Input Formats, and Advanced Settings withoutdeactivating the Hot Folder, but you cannot change other settings.
1 In the Fiery Hot Folders Console, select the Hot Folder you want to edit and click Deactivate in the taskbar.
2 Select the Hot Folder you want to edit and click Edit.
3 Edit the settings as desired.
Any changes take effect immediately and apply to all subsequent jobs processed through the Hot Folder.
Duplicate a Hot Folder
You can duplicate the settings of an existing Hot Folder (activated or deactivated) to create a new Hot Folder.1 In the Fiery Hot Folders Console, select the Hot Folder you want to duplicate and click Duplicate.
2 Change the name of the duplicate Hot Folder (if desired) and click OK.
Rename a Hot Folder
When you rename a Hot Folder, first deactivate the Hot Folder, which takes it offline and prevents changes to a HotFolder that is in use. (A Hot Folder can be shared on a network). You can then rename the Hot Folder within theFiery Hot Folders Console.
Important: Use the Fiery Hot Folders Console to rename a hot folder, not the Windows and Mac OS filerenaming features. If you try to rename a Hot Folder in Windows, you receive an error message, instructing you touse the Fiery Hot Folders Console. If you try to rename a Hot Folder in Mac OS, no error occurs, but the HotFolder becomes invalid.
1 In the Fiery Hot Folders Console, select the Hot Folder to rename and click Deactivate on the taskbar.
Fiery Hot Folders
Fiery Hot Folders
10
2 Double-click the Hot Folder in the Fiery Hot Folders Console.
3 Type the new name in the Folder name field.
Delete a Hot Folder
When you delete a Hot Folder, you first deactivate it. You then delete it, which permanently removes the Hot Folderand its supporting folders.A Hot Folder can be shared on a network, so deactivating a Hot Folder prevents deleting a Hot Folder that is in use.
1 In the Fiery Hot Folders Console, select the Hot Folder you want to delete and click Deactivate.
2 Click the Delete icon.
Important: When you delete a Hot Folder, all files associated with the deleted Hot Folder, such as the job log, FieryServer settings, and any files that have not been sent to the Fiery Server, are deleted.
Show or hide the Fiery Hot Folders Console
You can show or hide the Fiery Hot Folders Console while it is running in the background.• Do one of the following:
• To hide the Fiery Hot Folders Console, choose Window > Hide Console.
• To show the Fiery Hot Folders Console, double-click the Hot Folders icon ( ) in the Windows system tray.
Access original job files
You can access original job files through the Fiery Hot Folders Console.• Do one of the following:
• In the Fiery Hot Folders Console, select the Hot Folder and click Show Original Files.
• From the desktop, double-click the Hot Folder, then double-click [_EFI_HotFolder_], and then double-click[MoveFolder].
Submitting jobs to a Hot Folder
You can submit one or more jobs from the Fiery Hot Folders Console or the desktop. Submitted jobs are sent to thespecified queue or processed according to the specified action.Job Properties settings apply to the jobs submitted to the Hot Folder. If you set Default for Job Properties, jobs areprinted with the default settings of the Fiery Server. If you choose a preset, jobs are printed with the preset settings.For more information, see Job Properties on page 14 .The Preflight check detects potential job errors. You can configure which errors to check for and which action toperform if a critical error is found. Preflight is a feature of Fiery Graphic Arts Package, Premium Edition, which mustbe enabled on the Fiery Server.Certain file formats (CT/LW or DCS 2.0, for example) comprise multiple files, some of which are not visible andwhich contain header and other information. When using a Hot Folder to process multi-part jobs, submit all of the
Fiery Hot Folders
Fiery Hot Folders
11
files for the job within a folder. This ensures that all files (including invisible files) are processed together. We alsorecommend that you set the time interval to check for jobs to 10 seconds or more to ensure that all files are in placebefore processing begins.
Submit a job to a Hot Folder
You can send a job to a Fiery Server through a Hot Folder or from the desktop.• Do one of the following.
• In the Fiery Hot Folders Console, select the Hot Folder and click Download Files on the taskbar. Thenbrowse to the file you want to download, or type the name of the file, and click Select.
• Drag and drop or copy and paste the file to a Hot Folder.When you drag a file onto a Hot Folder that resides on the same disk partition, the file is moved, not copied,because it is on the same partition. When you drag a file onto a Hot Folder that is on a separate partition ordrive, the file is copied, not moved.
• Print to a file from a document’s original application and specify the Hot Folder as the target destination.
Submit multiple jobs as a folder
With certain file formats (JPEG, PDF, or TIFF), you can submit multiple files that are inside an ordinary folder to aHot Folder.
Note: If Merge all files if submitted as a folder is chosen in the Output File Type setting for the particularinput format (JPEG, PDF, or TIFF), the individual files are merged into a single PDF file. Only files of the same type(e.g., all JPEG or all PDF) can be merged into a single file.
• Add the folder to the Hot Folder.
Submit multi-part jobs in a folder
Certain file formats (CT/LW or DCS 2.0, for example) consist of multiple files, some of which are not visible andwhich contain header and other information. A multi-part job requires all these files when you submit the job.Before you begin
Note: We recommend that you set the time interval to check for jobs to 10 seconds or more to ensure that all filesare in place before processing begins (see Advanced Settings under Create a new Hot Folder on page 6).
• When using a Hot Folder to process multi-part jobs, submit all of the files for the job within a folder to ensurethat all required files are processed together.
View Status and Log windows
The Fiery Hot Folders Console shows the progress of current jobs and a log of completed jobs.
• The Status window shows the progress of files being processed through a Hot Folder.• The Log window shows a complete log of all processed jobs.
When processing is complete, the file is transferred to a supporting folder and the job appears in the Log window.
Fiery Hot Folders
Fiery Hot Folders
12
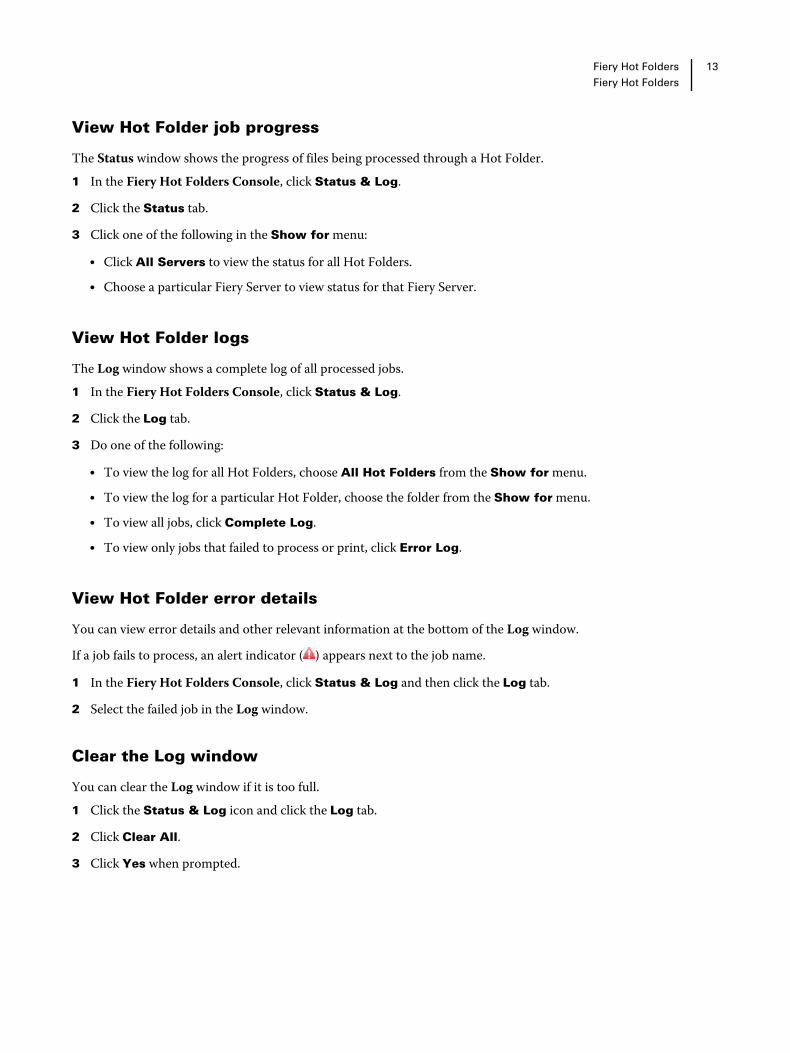
View Hot Folder job progress
The Status window shows the progress of files being processed through a Hot Folder.1 In the Fiery Hot Folders Console, click Status & Log.
2 Click the Status tab.
3 Click one of the following in the Show for menu:
• Click All Servers to view the status for all Hot Folders.
• Choose a particular Fiery Server to view status for that Fiery Server.
View Hot Folder logs
The Log window shows a complete log of all processed jobs.1 In the Fiery Hot Folders Console, click Status & Log.
2 Click the Log tab.
3 Do one of the following:
• To view the log for all Hot Folders, choose All Hot Folders from the Show for menu.
• To view the log for a particular Hot Folder, choose the folder from the Show for menu.
• To view all jobs, click Complete Log.
• To view only jobs that failed to process or print, click Error Log.
View Hot Folder error details
You can view error details and other relevant information at the bottom of the Log window.
If a job fails to process, an alert indicator ( ) appears next to the job name.
1 In the Fiery Hot Folders Console, click Status & Log and then click the Log tab.
2 Select the failed job in the Log window.
Clear the Log window
You can clear the Log window if it is too full.1 Click the Status & Log icon and click the Log tab.
2 Click Clear All.
3 Click Yes when prompted.
Fiery Hot Folders
Fiery Hot Folders
13
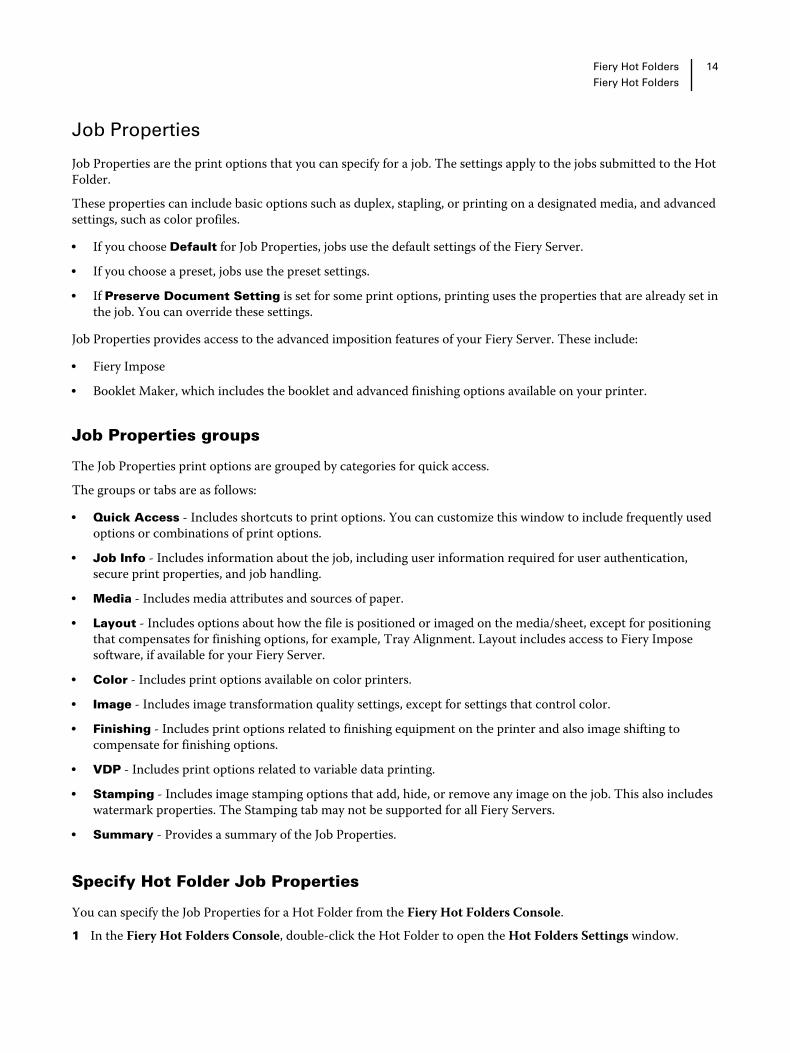
Job Properties
Job Properties are the print options that you can specify for a job. The settings apply to the jobs submitted to the HotFolder.These properties can include basic options such as duplex, stapling, or printing on a designated media, and advancedsettings, such as color profiles.
• If you choose Default for Job Properties, jobs use the default settings of the Fiery Server.• If you choose a preset, jobs use the preset settings.• If Preserve Document Setting is set for some print options, printing uses the properties that are already set in
the job. You can override these settings.
Job Properties provides access to the advanced imposition features of your Fiery Server. These include:
• Fiery Impose• Booklet Maker, which includes the booklet and advanced finishing options available on your printer.
Job Properties groups
The Job Properties print options are grouped by categories for quick access.The groups or tabs are as follows:
• Quick Access - Includes shortcuts to print options. You can customize this window to include frequently usedoptions or combinations of print options.
• Job Info - Includes information about the job, including user information required for user authentication,secure print properties, and job handling.
• Media - Includes media attributes and sources of paper.• Layout - Includes options about how the file is positioned or imaged on the media/sheet, except for positioning
that compensates for finishing options, for example, Tray Alignment. Layout includes access to Fiery Imposesoftware, if available for your Fiery Server.
• Color - Includes print options available on color printers.• Image - Includes image transformation quality settings, except for settings that control color.• Finishing - Includes print options related to finishing equipment on the printer and also image shifting to
compensate for finishing options.• VDP - Includes print options related to variable data printing.• Stamping - Includes image stamping options that add, hide, or remove any image on the job. This also includes
watermark properties. The Stamping tab may not be supported for all Fiery Servers.• Summary - Provides a summary of the Job Properties.
Specify Hot Folder Job Properties
You can specify the Job Properties for a Hot Folder from the Fiery Hot Folders Console.1 In the Fiery Hot Folders Console, double-click the Hot Folder to open the Hot Folders Settings window.
Fiery Hot Folders
Fiery Hot Folders
14
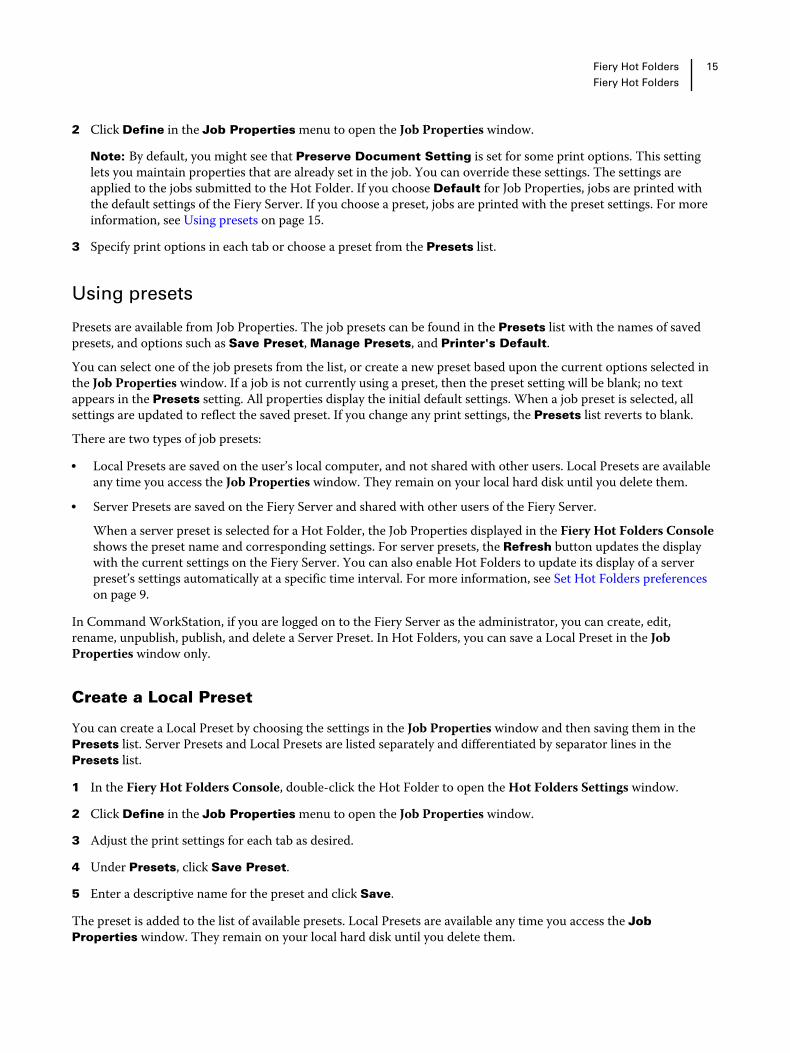
2 Click Define in the Job Properties menu to open the Job Properties window.
Note: By default, you might see that Preserve Document Setting is set for some print options. This settinglets you maintain properties that are already set in the job. You can override these settings. The settings areapplied to the jobs submitted to the Hot Folder. If you choose Default for Job Properties, jobs are printed withthe default settings of the Fiery Server. If you choose a preset, jobs are printed with the preset settings. For moreinformation, see Using presets on page 15.
3 Specify print options in each tab or choose a preset from the Presets list.
Using presets
Presets are available from Job Properties. The job presets can be found in the Presets list with the names of savedpresets, and options such as Save Preset, Manage Presets, and Printer's Default.You can select one of the job presets from the list, or create a new preset based upon the current options selected inthe Job Properties window. If a job is not currently using a preset, then the preset setting will be blank; no textappears in the Presets setting. All properties display the initial default settings. When a job preset is selected, allsettings are updated to reflect the saved preset. If you change any print settings, the Presets list reverts to blank.There are two types of job presets:
• Local Presets are saved on the user’s local computer, and not shared with other users. Local Presets are availableany time you access the Job Properties window. They remain on your local hard disk until you delete them.
• Server Presets are saved on the Fiery Server and shared with other users of the Fiery Server.When a server preset is selected for a Hot Folder, the Job Properties displayed in the Fiery Hot Folders Consoleshows the preset name and corresponding settings. For server presets, the Refresh button updates the displaywith the current settings on the Fiery Server. You can also enable Hot Folders to update its display of a serverpreset’s settings automatically at a specific time interval. For more information, see Set Hot Folders preferenceson page 9.
In Command WorkStation, if you are logged on to the Fiery Server as the administrator, you can create, edit,rename, unpublish, publish, and delete a Server Preset. In Hot Folders, you can save a Local Preset in the JobProperties window only.
Create a Local Preset
You can create a Local Preset by choosing the settings in the Job Properties window and then saving them in thePresets list. Server Presets and Local Presets are listed separately and differentiated by separator lines in thePresets list.
1 In the Fiery Hot Folders Console, double-click the Hot Folder to open the Hot Folders Settings window.
2 Click Define in the Job Properties menu to open the Job Properties window.
3 Adjust the print settings for each tab as desired.
4 Under Presets, click Save Preset.
5 Enter a descriptive name for the preset and click Save.
The preset is added to the list of available presets. Local Presets are available any time you access the JobProperties window. They remain on your local hard disk until you delete them.
Fiery Hot Folders
Fiery Hot Folders
15
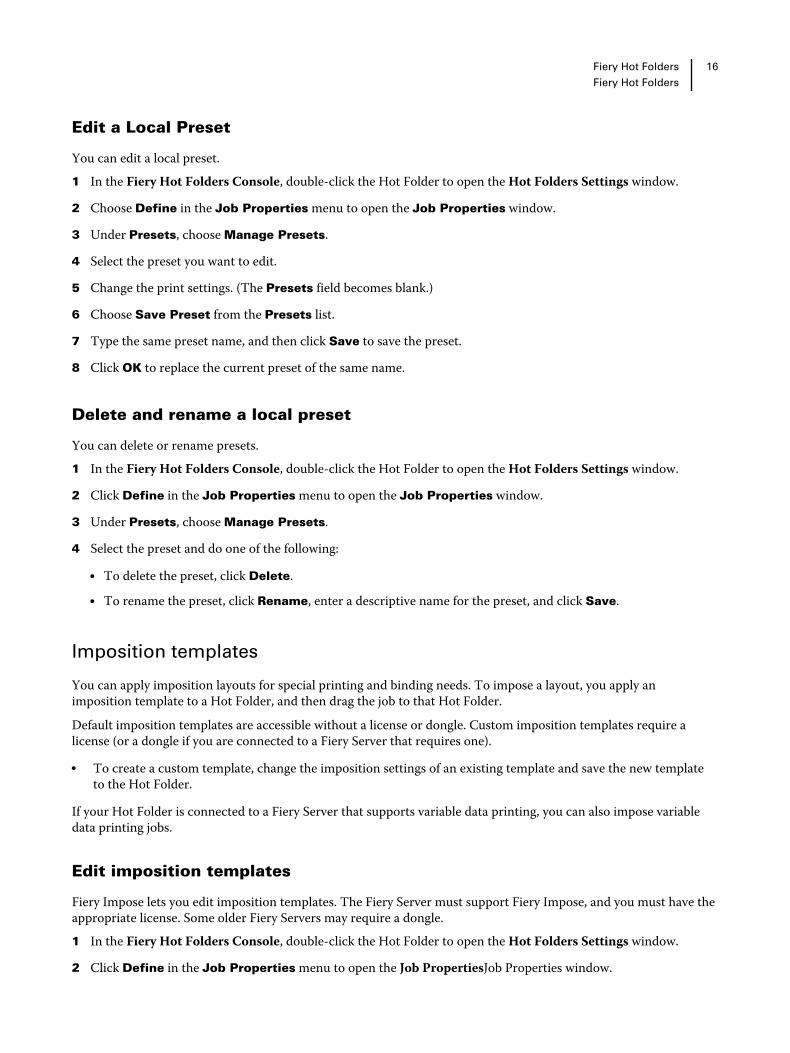
Edit a Local Preset
You can edit a local preset.1 In the Fiery Hot Folders Console, double-click the Hot Folder to open the Hot Folders Settings window.
2 Choose Define in the Job Properties menu to open the Job Properties window.
3 Under Presets, choose Manage Presets.
4 Select the preset you want to edit.
5 Change the print settings. (The Presets field becomes blank.)
6 Choose Save Preset from the Presets list.
7 Type the same preset name, and then click Save to save the preset.
8 Click OK to replace the current preset of the same name.
Delete and rename a local preset
You can delete or rename presets.1 In the Fiery Hot Folders Console, double-click the Hot Folder to open the Hot Folders Settings window.
2 Click Define in the Job Properties menu to open the Job Properties window.
3 Under Presets, choose Manage Presets.
4 Select the preset and do one of the following:
• To delete the preset, click Delete.
• To rename the preset, click Rename, enter a descriptive name for the preset, and click Save.
Imposition templates
You can apply imposition layouts for special printing and binding needs. To impose a layout, you apply animposition template to a Hot Folder, and then drag the job to that Hot Folder.Default imposition templates are accessible without a license or dongle. Custom imposition templates require alicense (or a dongle if you are connected to a Fiery Server that requires one).
• To create a custom template, change the imposition settings of an existing template and save the new templateto the Hot Folder.
If your Hot Folder is connected to a Fiery Server that supports variable data printing, you can also impose variabledata printing jobs.
Edit imposition templates
Fiery Impose lets you edit imposition templates. The Fiery Server must support Fiery Impose, and you must have theappropriate license. Some older Fiery Servers may require a dongle.1 In the Fiery Hot Folders Console, double-click the Hot Folder to open the Hot Folders Settings window.
2 Click Define in the Job Properties menu to open the Job PropertiesJob Properties window.
Fiery Hot Folders
Fiery Hot Folders
16
3 Choose Layout > Impose.
4 Do one of the following:
• Choose an imposition template from the list and click OK.
• Click Edit Impose Template to start Fiery Impose and create a custom template.
Predefined imposition templates
Hot Folders offers several imposition templates: 1-Up Full Bleed, 2-Up Perfect, 2-Up Saddle, 3-Up Trifold Brochure,4-Up Gate Fold, 4-Up Head to Head, and 4-Up Z-Fold.
1-Up Full Bleed
The 1-Up Full Bleed layout lets you print one page per sheet. The printer’s marks indicate where to cut the paper sothat the color content extends to the edge of the paper. This layout has no page number restrictions. It applies thefollowing settings:
• Bleeds• Printer’s Marks (trim marks and job label only)• Scale to Fit• Gang Up Unique
2-Up Perfect
The 2-Up Perfect layout lets you create signatures for a perfect-bound book. Each sheet is folded once and stackedon top of one another.The 2-Up Perfect layout is for jobs that have multiples of four pages, but you can use it with jobs that have anynumber of pages. Additional blank pages are added if necessary. Pages are ordered in groups of four so that, whenfolded, each sheet has four sequential pages. The Creep Adjustment option has no effect on this template.The 2-Up Perfect layout applies the following settings:
• Duplex• Bleeds• Printer’s Marks (fold marks, trim marks, and job label)• Scale to Fit• Perfect Binding
2-Up Saddle
The 2-Up Saddle layout lets you create sheets for a saddle-bound book. All of the sheets are folded together, oneinside the other.The 2-Up Saddle layout is for jobs that have multiples of four pages, but you can use it with jobs that have anynumber of pages. Additional blank pages are added if necessary. Pages are ordered so that, when sheets are foldedand stitched together, the pages are sequential.
Fiery Hot Folders
Fiery Hot Folders
17
The 2-Up Saddle layout applies the following settings:
• Duplex• Bleeds• Printer’s Marks (fold marks, trim marks, and job label)• Scale to Fit• Saddle Binding
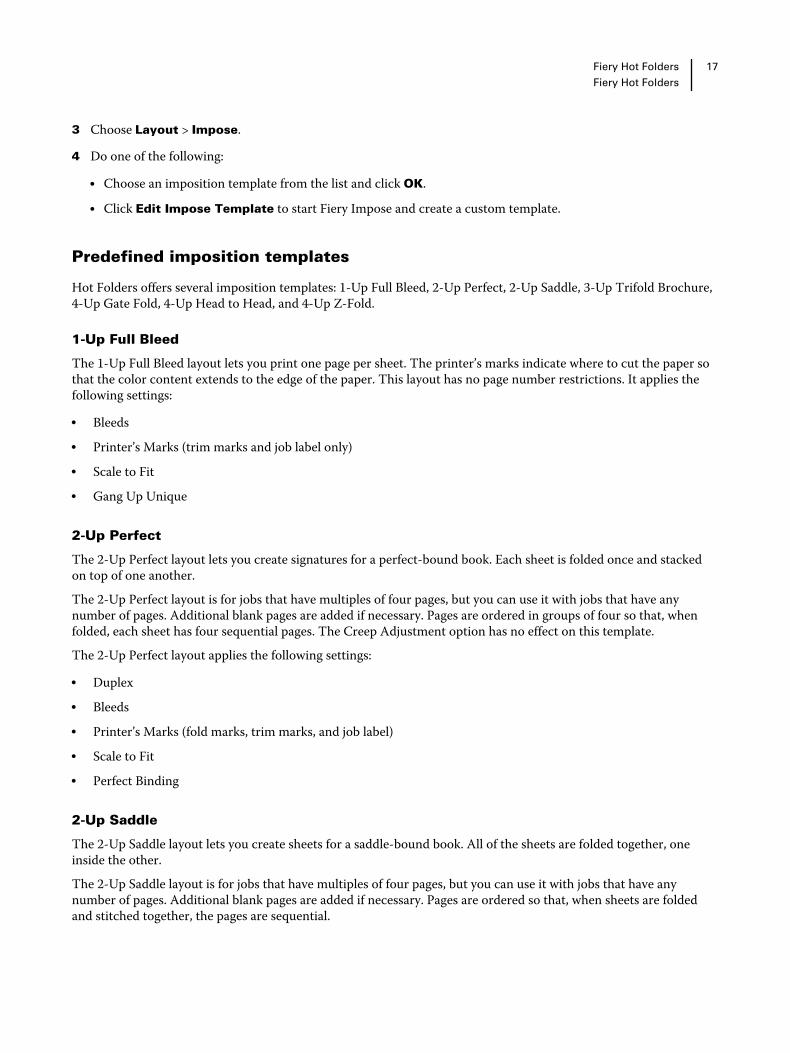
3-Up Trifold Brochure
The 3-Up Trifold Brochure layout is for jobs that have six pages or multiples of six pages, but you can use it with jobsthat have any number of pages. Additional blank pages are added if necessary.The 3-Up Trifold Brochure layout consists of a single sheet folded into three sections. Although the three sectionsare the same width, the space between each section varies so that the leftmost panel can be folded over the other twopanels.The 3-Up Trifold Brochure is usually folded as shown in the following illustration.
The 3-Up Trifold Brochure layout applies the following settings:
• Duplex• Printer’s Marks (fold marks, trim marks, and job label only)• Scale to Fit• Gang Up Unique
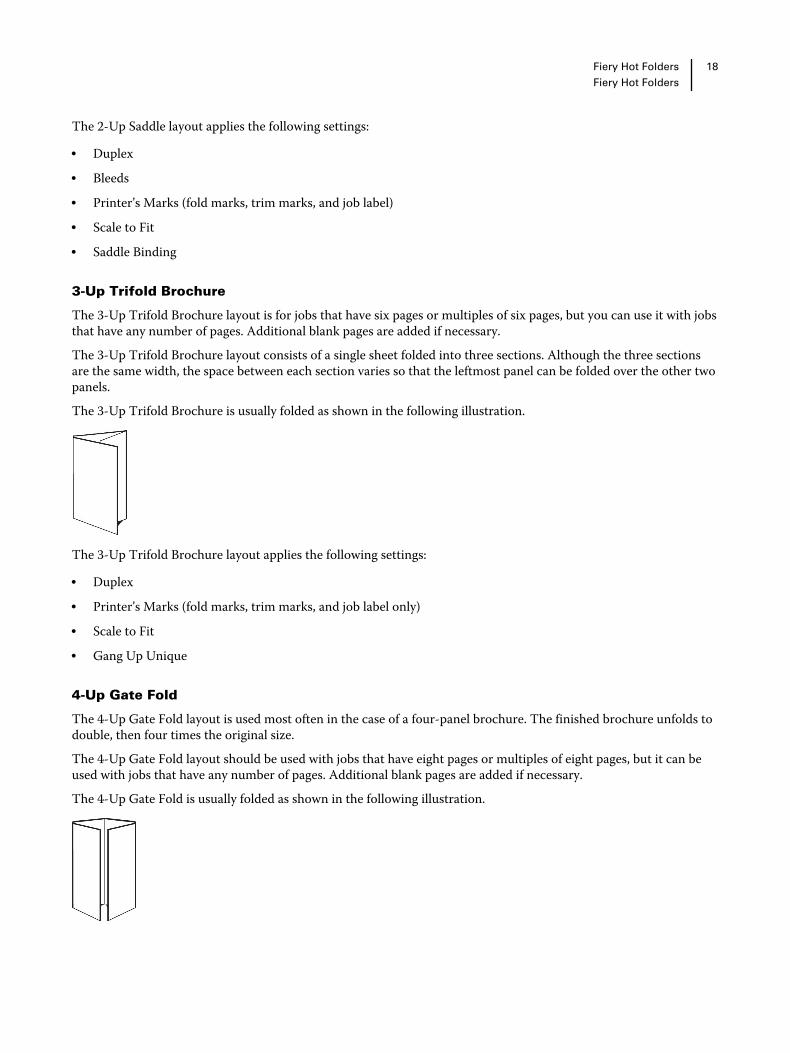
4-Up Gate Fold
The 4-Up Gate Fold layout is used most often in the case of a four-panel brochure. The finished brochure unfolds todouble, then four times the original size.The 4-Up Gate Fold layout should be used with jobs that have eight pages or multiples of eight pages, but it can beused with jobs that have any number of pages. Additional blank pages are added if necessary.The 4-Up Gate Fold is usually folded as shown in the following illustration.
Fiery Hot Folders
Fiery Hot Folders
18
The 4-Up Gate Fold layout applies the following settings:
• Duplex• Bleeds• Printer’s Marks (fold marks, trim marks, and job label only)• Scale to Fit• Gang Up Unique
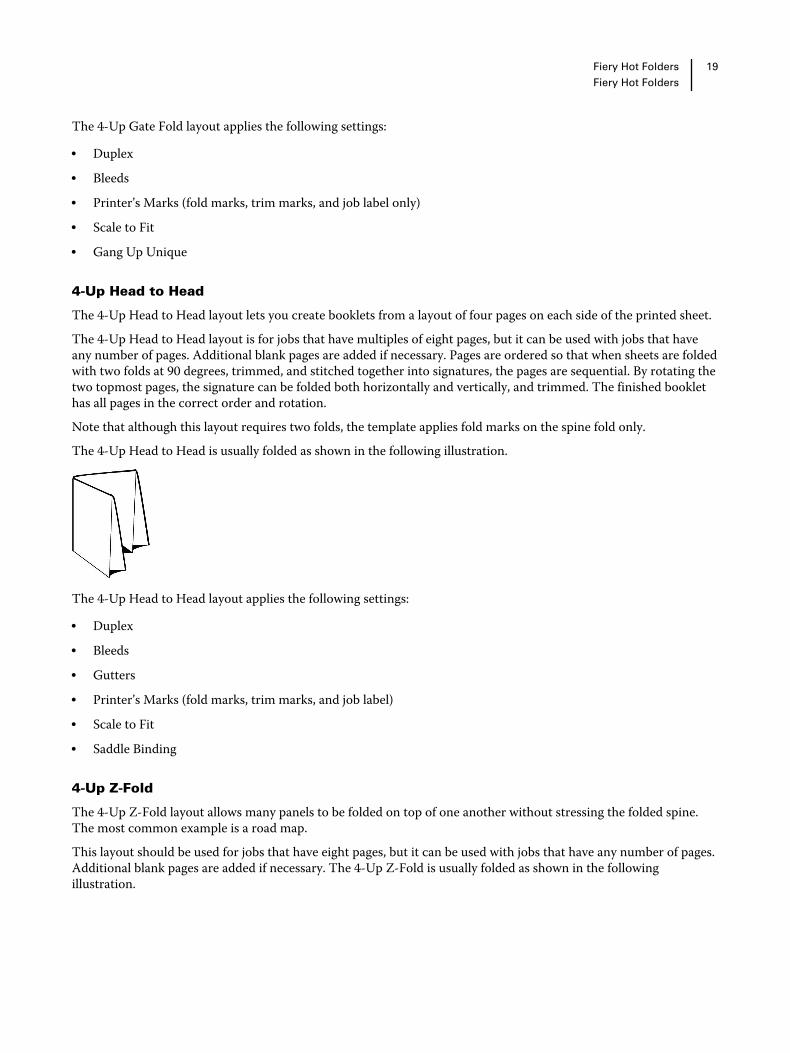
4-Up Head to Head
The 4-Up Head to Head layout lets you create booklets from a layout of four pages on each side of the printed sheet.The 4-Up Head to Head layout is for jobs that have multiples of eight pages, but it can be used with jobs that haveany number of pages. Additional blank pages are added if necessary. Pages are ordered so that when sheets are foldedwith two folds at 90 degrees, trimmed, and stitched together into signatures, the pages are sequential. By rotating thetwo topmost pages, the signature can be folded both horizontally and vertically, and trimmed. The finished booklethas all pages in the correct order and rotation.Note that although this layout requires two folds, the template applies fold marks on the spine fold only.The 4-Up Head to Head is usually folded as shown in the following illustration.
The 4-Up Head to Head layout applies the following settings:
• Duplex• Bleeds• Gutters• Printer’s Marks (fold marks, trim marks, and job label)• Scale to Fit• Saddle Binding
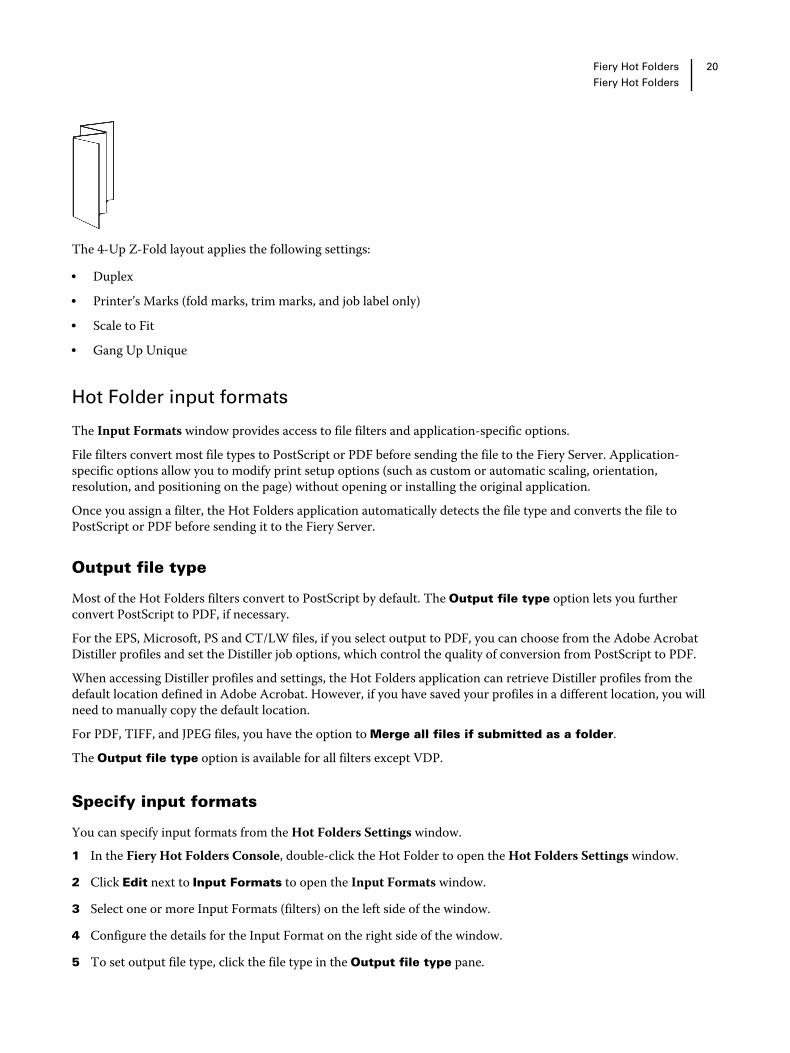
4-Up Z-Fold
The 4-Up Z-Fold layout allows many panels to be folded on top of one another without stressing the folded spine.The most common example is a road map.This layout should be used for jobs that have eight pages, but it can be used with jobs that have any number of pages.Additional blank pages are added if necessary. The 4-Up Z-Fold is usually folded as shown in the followingillustration.
Fiery Hot Folders
Fiery Hot Folders
19
The 4-Up Z-Fold layout applies the following settings:
• Duplex• Printer’s Marks (fold marks, trim marks, and job label only)• Scale to Fit• Gang Up Unique
Hot Folder input formats
The Input Formats window provides access to file filters and application-specific options.File filters convert most file types to PostScript or PDF before sending the file to the Fiery Server. Application-specific options allow you to modify print setup options (such as custom or automatic scaling, orientation,resolution, and positioning on the page) without opening or installing the original application.Once you assign a filter, the Hot Folders application automatically detects the file type and converts the file toPostScript or PDF before sending it to the Fiery Server.
Output file type
Most of the Hot Folders filters convert to PostScript by default. The Output file type option lets you furtherconvert PostScript to PDF, if necessary.For the EPS, Microsoft, PS and CT/LW files, if you select output to PDF, you can choose from the Adobe AcrobatDistiller profiles and set the Distiller job options, which control the quality of conversion from PostScript to PDF.When accessing Distiller profiles and settings, the Hot Folders application can retrieve Distiller profiles from thedefault location defined in Adobe Acrobat. However, if you have saved your profiles in a different location, you willneed to manually copy the default location.For PDF, TIFF, and JPEG files, you have the option to Merge all files if submitted as a folder.The Output file type option is available for all filters except VDP.
Specify input formats
You can specify input formats from the Hot Folders Settings window.1 In the Fiery Hot Folders Console, double-click the Hot Folder to open the Hot Folders Settings window.
2 Click Edit next to Input Formats to open the Input Formats window.
3 Select one or more Input Formats (filters) on the left side of the window.
4 Configure the details for the Input Format on the right side of the window.
5 To set output file type, click the file type in the Output file type pane.
Fiery Hot Folders
Fiery Hot Folders
20

6 Click OK to return to the Hot Folders Settings window.
7 Click OK to save the settings.
Hot Folders filters
Hot Folders filters convert files to PostScript or PDF before sending the file to the Fiery Server.The filters are grouped in four distinct categories:
• General filters (for most graphic arts and production printing applications)• Color Separated filters (for color-separated graphic arts applications)• Special filters• JDF Filter
Most of the filters are non-exclusive: You can apply as many filters as you want to the same Hot Folder, provided thefilters fall within the same category. However, you cannot apply filters from different categories to the same HotFolder.In some cases, not all filters are available. The available filters depend on the options that are installed on the FieryServer that a Hot Folder is connected to.
General filters
General filters include filters for most graphic arts and production printing applications.
EPS filter
The EPS filter converts EPS files and provides options for custom or automatic scaling, orientation, and positioningthe image on the page.The EPS filter is a feature of Fiery Graphic Arts Package, Premium Edition, and Fiery Productivity Package. To applythis filter, the Hot Folder must be connected to a Fiery Server with Fiery Graphic Arts Package, Premium Edition, orFiery Productivity Package enabled.The EPS filter input file type is .eps.
Option Description
Original size Preserves the size of the original image.
Custom size Scales the image to the values you enter for width and height.
Constrain Proportions Maintains the original aspect ratio, so that images are not stretched ordistorted. When selected, you enter only one value (either height or width) andthe other value is automatically defined to preserve the proportions of theoriginal image.
Fiery Hot Folders
Fiery Hot Folders
21
Option Description
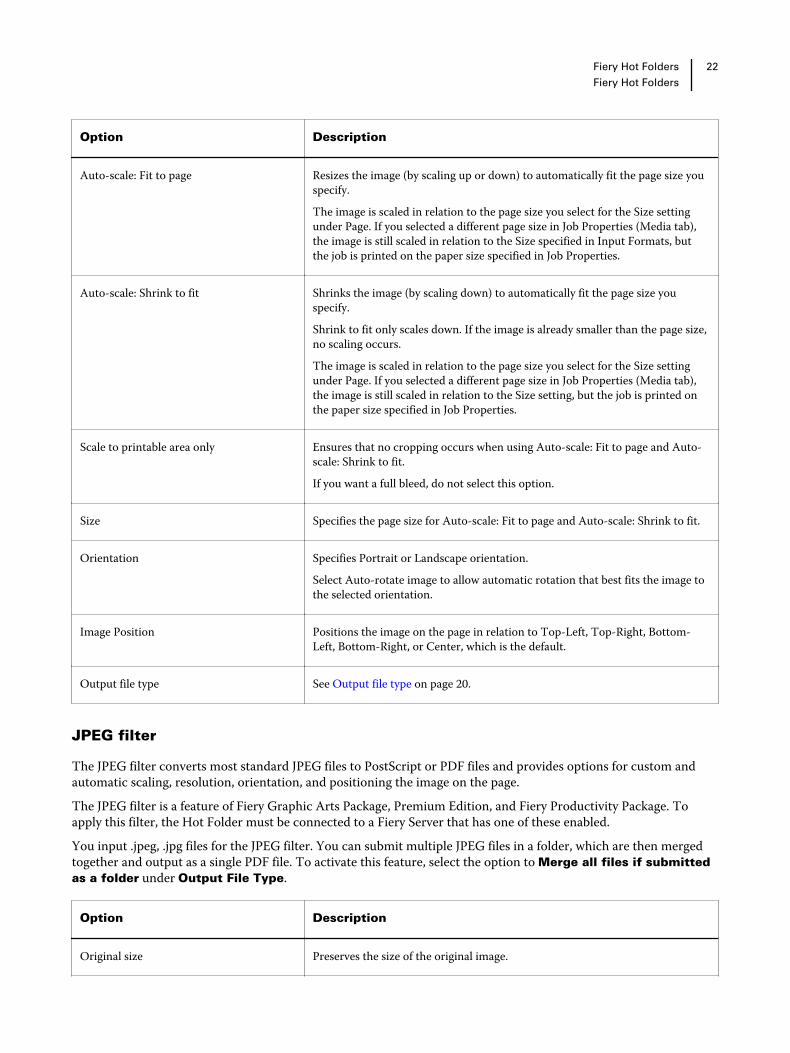
Auto-scale: Fit to page Resizes the image (by scaling up or down) to automatically fit the page size youspecify.The image is scaled in relation to the page size you select for the Size settingunder Page. If you selected a different page size in Job Properties (Media tab),the image is still scaled in relation to the Size specified in Input Formats, butthe job is printed on the paper size specified in Job Properties.
Auto-scale: Shrink to fit Shrinks the image (by scaling down) to automatically fit the page size youspecify.Shrink to fit only scales down. If the image is already smaller than the page size,no scaling occurs.The image is scaled in relation to the page size you select for the Size settingunder Page. If you selected a different page size in Job Properties (Media tab),the image is still scaled in relation to the Size setting, but the job is printed onthe paper size specified in Job Properties.
Scale to printable area only Ensures that no cropping occurs when using Auto-scale: Fit to page and Auto-scale: Shrink to fit.If you want a full bleed, do not select this option.
Size Specifies the page size for Auto-scale: Fit to page and Auto-scale: Shrink to fit.
Orientation Specifies Portrait or Landscape orientation.Select Auto-rotate image to allow automatic rotation that best fits the image tothe selected orientation.
Image Position Positions the image on the page in relation to Top-Left, Top-Right, Bottom-Left, Bottom-Right, or Center, which is the default.
Output file type See Output file type on page 20.
JPEG filter
The JPEG filter converts most standard JPEG files to PostScript or PDF files and provides options for custom andautomatic scaling, resolution, orientation, and positioning the image on the page.The JPEG filter is a feature of Fiery Graphic Arts Package, Premium Edition, and Fiery Productivity Package. Toapply this filter, the Hot Folder must be connected to a Fiery Server that has one of these enabled.You input .jpeg, .jpg files for the JPEG filter. You can submit multiple JPEG files in a folder, which are then mergedtogether and output as a single PDF file. To activate this feature, select the option to Merge all files if submittedas a folder under Output File Type.
Option Description
Original size Preserves the size of the original image.
Fiery Hot Folders
Fiery Hot Folders
22
Option Description
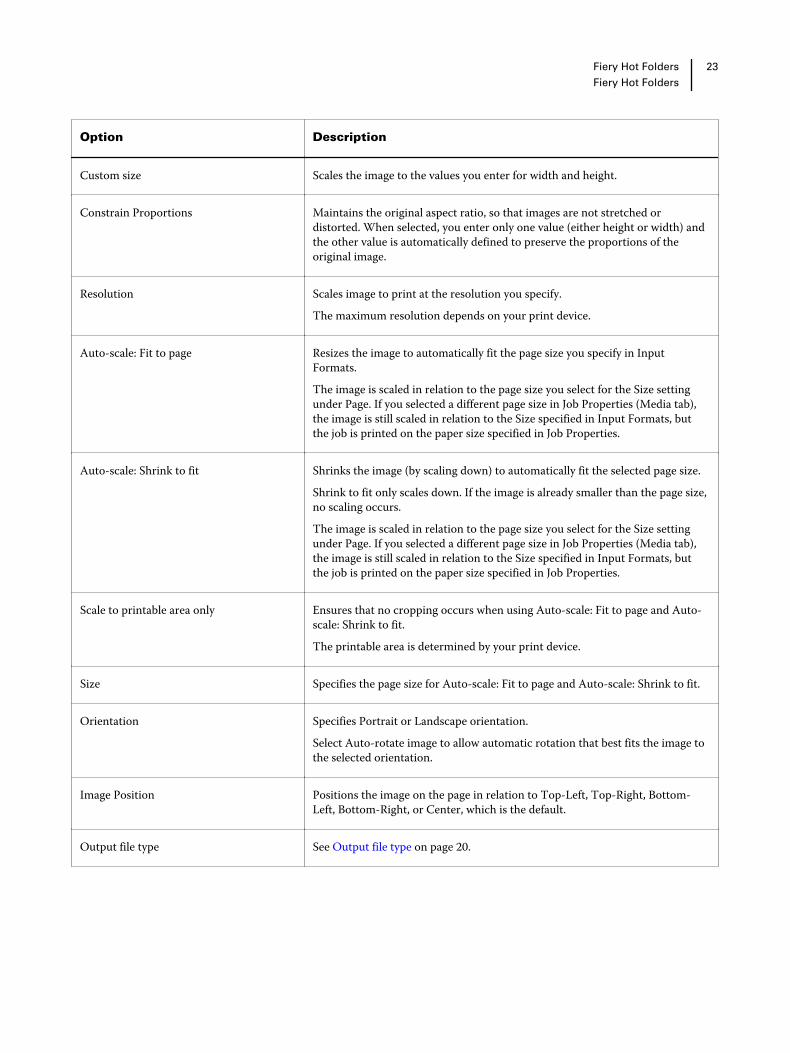
Custom size Scales the image to the values you enter for width and height.
Constrain Proportions Maintains the original aspect ratio, so that images are not stretched ordistorted. When selected, you enter only one value (either height or width) andthe other value is automatically defined to preserve the proportions of theoriginal image.
Resolution Scales image to print at the resolution you specify.The maximum resolution depends on your print device.
Auto-scale: Fit to page Resizes the image to automatically fit the page size you specify in InputFormats.The image is scaled in relation to the page size you select for the Size settingunder Page. If you selected a different page size in Job Properties (Media tab),the image is still scaled in relation to the Size specified in Input Formats, butthe job is printed on the paper size specified in Job Properties.
Auto-scale: Shrink to fit Shrinks the image (by scaling down) to automatically fit the selected page size.Shrink to fit only scales down. If the image is already smaller than the page size,no scaling occurs.The image is scaled in relation to the page size you select for the Size settingunder Page. If you selected a different page size in Job Properties (Media tab),the image is still scaled in relation to the Size specified in Input Formats, butthe job is printed on the paper size specified in Job Properties.
Scale to printable area only Ensures that no cropping occurs when using Auto-scale: Fit to page and Auto-scale: Shrink to fit.The printable area is determined by your print device.
Size Specifies the page size for Auto-scale: Fit to page and Auto-scale: Shrink to fit.
Orientation Specifies Portrait or Landscape orientation.Select Auto-rotate image to allow automatic rotation that best fits the image tothe selected orientation.
Image Position Positions the image on the page in relation to Top-Left, Top-Right, Bottom-Left, Bottom-Right, or Center, which is the default.
Output file type See Output file type on page 20.
Fiery Hot Folders
Fiery Hot Folders
23
Microsoft filters
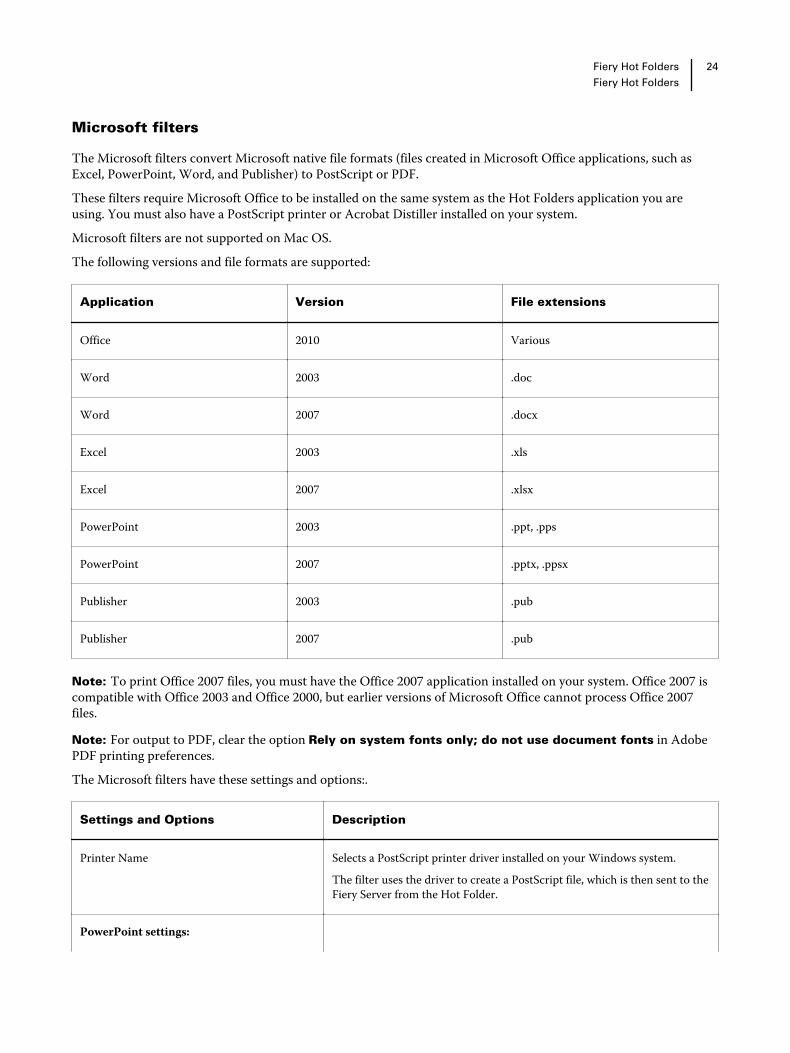
The Microsoft filters convert Microsoft native file formats (files created in Microsoft Office applications, such asExcel, PowerPoint, Word, and Publisher) to PostScript or PDF.These filters require Microsoft Office to be installed on the same system as the Hot Folders application you areusing. You must also have a PostScript printer or Acrobat Distiller installed on your system.Microsoft filters are not supported on Mac OS.The following versions and file formats are supported:
Application Version File extensions
Office 2010 Various
Word 2003 .doc
Word 2007 .docx
Excel 2003 .xls
Excel 2007 .xlsx
PowerPoint 2003 .ppt, .pps
PowerPoint 2007 .pptx, .ppsx
Publisher 2003 .pub
Publisher 2007 .pub
Note: To print Office 2007 files, you must have the Office 2007 application installed on your system. Office 2007 iscompatible with Office 2003 and Office 2000, but earlier versions of Microsoft Office cannot process Office 2007files.
Note: For output to PDF, clear the option Rely on system fonts only; do not use document fonts in AdobePDF printing preferences.The Microsoft filters have these settings and options:.
Settings and Options Description
Printer Name Selects a PostScript printer driver installed on your Windows system.The filter uses the driver to create a PostScript file, which is then sent to theFiery Server from the Hot Folder.
PowerPoint settings:
Fiery Hot Folders
Fiery Hot Folders
24
Settings and Options Description
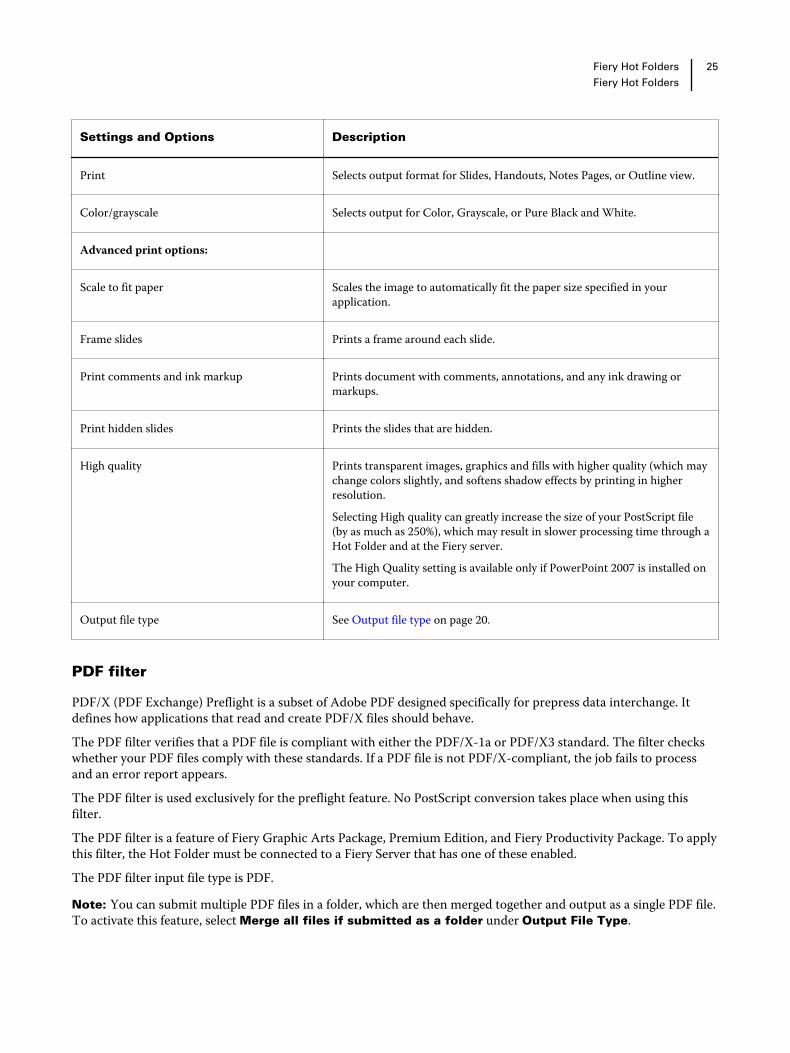
Print Selects output format for Slides, Handouts, Notes Pages, or Outline view.
Color/grayscale Selects output for Color, Grayscale, or Pure Black and White.
Advanced print options:
Scale to fit paper Scales the image to automatically fit the paper size specified in yourapplication.
Frame slides Prints a frame around each slide.
Print comments and ink markup Prints document with comments, annotations, and any ink drawing ormarkups.
Print hidden slides Prints the slides that are hidden.
High quality Prints transparent images, graphics and fills with higher quality (which maychange colors slightly, and softens shadow effects by printing in higherresolution.Selecting High quality can greatly increase the size of your PostScript file(by as much as 250%), which may result in slower processing time through aHot Folder and at the Fiery server.The High Quality setting is available only if PowerPoint 2007 is installed onyour computer.
Output file type See Output file type on page 20.
PDF filter
PDF/X (PDF Exchange) Preflight is a subset of Adobe PDF designed specifically for prepress data interchange. Itdefines how applications that read and create PDF/X files should behave.The PDF filter verifies that a PDF file is compliant with either the PDF/X-1a or PDF/X3 standard. The filter checkswhether your PDF files comply with these standards. If a PDF file is not PDF/X-compliant, the job fails to processand an error report appears.The PDF filter is used exclusively for the preflight feature. No PostScript conversion takes place when using thisfilter.The PDF filter is a feature of Fiery Graphic Arts Package, Premium Edition, and Fiery Productivity Package. To applythis filter, the Hot Folder must be connected to a Fiery Server that has one of these enabled.The PDF filter input file type is PDF.
Note: You can submit multiple PDF files in a folder, which are then merged together and output as a single PDF file.To activate this feature, select Merge all files if submitted as a folder under Output File Type.
Fiery Hot Folders
Fiery Hot Folders
25
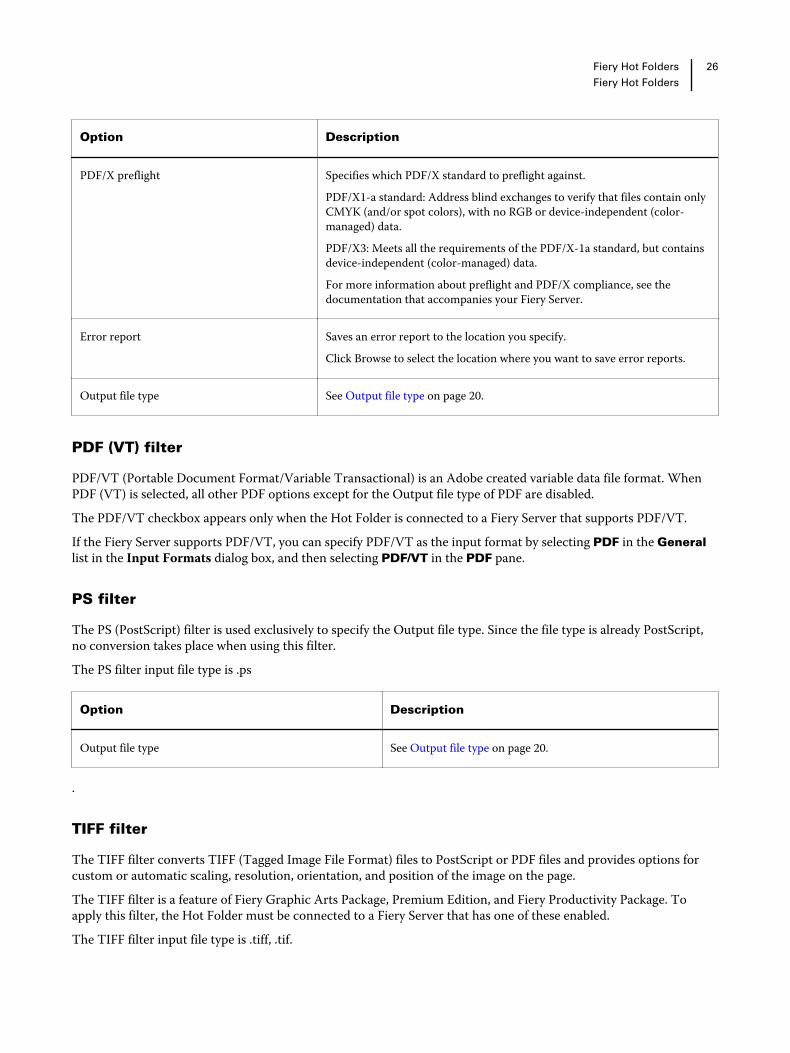
Option Description
PDF/X preflight Specifies which PDF/X standard to preflight against.PDF/X1-a standard: Address blind exchanges to verify that files contain onlyCMYK (and/or spot colors), with no RGB or device-independent (color-managed) data.PDF/X3: Meets all the requirements of the PDF/X-1a standard, but containsdevice-independent (color-managed) data.For more information about preflight and PDF/X compliance, see thedocumentation that accompanies your Fiery Server.
Error report Saves an error report to the location you specify.Click Browse to select the location where you want to save error reports.
Output file type See Output file type on page 20.
PDF (VT) filter
PDF/VT (Portable Document Format/Variable Transactional) is an Adobe created variable data file format. WhenPDF (VT) is selected, all other PDF options except for the Output file type of PDF are disabled.The PDF/VT checkbox appears only when the Hot Folder is connected to a Fiery Server that supports PDF/VT.If the Fiery Server supports PDF/VT, you can specify PDF/VT as the input format by selecting PDF in the Generallist in the Input Formats dialog box, and then selecting PDF/VT in the PDF pane.
PS filter
The PS (PostScript) filter is used exclusively to specify the Output file type. Since the file type is already PostScript,no conversion takes place when using this filter.The PS filter input file type is .ps
Option Description
Output file type See Output file type on page 20.
.
TIFF filter
The TIFF filter converts TIFF (Tagged Image File Format) files to PostScript or PDF files and provides options forcustom or automatic scaling, resolution, orientation, and position of the image on the page.The TIFF filter is a feature of Fiery Graphic Arts Package, Premium Edition, and Fiery Productivity Package. Toapply this filter, the Hot Folder must be connected to a Fiery Server that has one of these enabled.The TIFF filter input file type is .tiff, .tif.
Fiery Hot Folders
Fiery Hot Folders
26
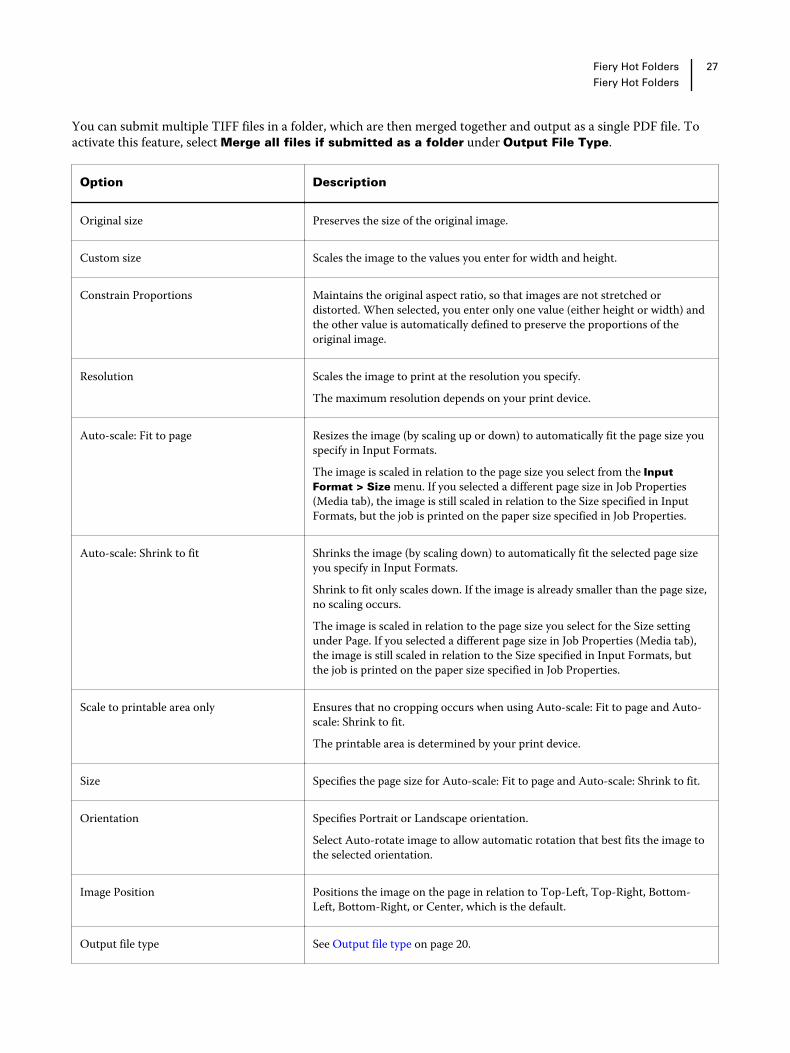
You can submit multiple TIFF files in a folder, which are then merged together and output as a single PDF file. Toactivate this feature, select Merge all files if submitted as a folder under Output File Type.
Option Description
Original size Preserves the size of the original image.
Custom size Scales the image to the values you enter for width and height.
Constrain Proportions Maintains the original aspect ratio, so that images are not stretched ordistorted. When selected, you enter only one value (either height or width) andthe other value is automatically defined to preserve the proportions of theoriginal image.
Resolution Scales the image to print at the resolution you specify.The maximum resolution depends on your print device.
Auto-scale: Fit to page Resizes the image (by scaling up or down) to automatically fit the page size youspecify in Input Formats.The image is scaled in relation to the page size you select from the InputFormat > Size menu. If you selected a different page size in Job Properties(Media tab), the image is still scaled in relation to the Size specified in InputFormats, but the job is printed on the paper size specified in Job Properties.
Auto-scale: Shrink to fit Shrinks the image (by scaling down) to automatically fit the selected page sizeyou specify in Input Formats.Shrink to fit only scales down. If the image is already smaller than the page size,no scaling occurs.The image is scaled in relation to the page size you select for the Size settingunder Page. If you selected a different page size in Job Properties (Media tab),the image is still scaled in relation to the Size specified in Input Formats, butthe job is printed on the paper size specified in Job Properties.
Scale to printable area only Ensures that no cropping occurs when using Auto-scale: Fit to page and Auto-scale: Shrink to fit.The printable area is determined by your print device.
Size Specifies the page size for Auto-scale: Fit to page and Auto-scale: Shrink to fit.
Orientation Specifies Portrait or Landscape orientation.Select Auto-rotate image to allow automatic rotation that best fits the image tothe selected orientation.
Image Position Positions the image on the page in relation to Top-Left, Top-Right, Bottom-Left, Bottom-Right, or Center, which is the default.
Output file type See Output file type on page 20.
Fiery Hot Folders
Fiery Hot Folders
27
VDP filter
The VDP filter processes VDP (Variable Data Printing) jobs, which are sent directly to the Fiery Server.The input file types for the VDP filter are .ppml, .zip, .vps, .ps.Associated VIPP files must be present in XGFC folders.
Color Separated filters
Color Separated filters include DCS filter and TIFF/IT-P1 filter.
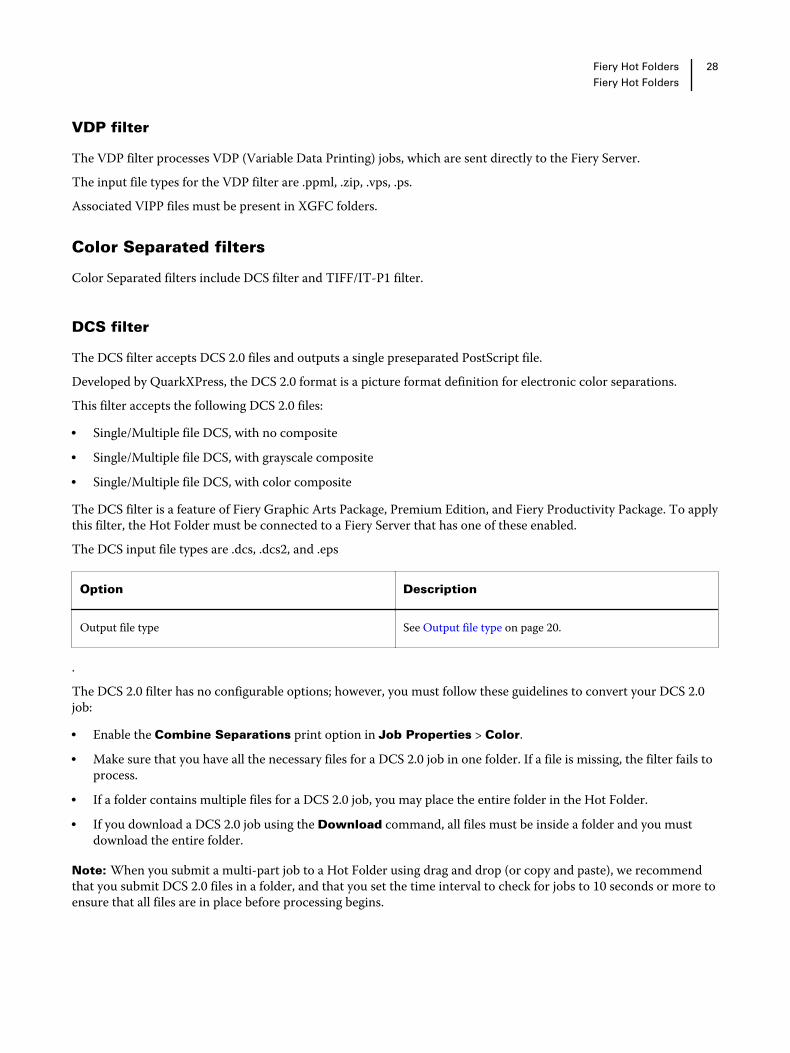
DCS filter
The DCS filter accepts DCS 2.0 files and outputs a single preseparated PostScript file.Developed by QuarkXPress, the DCS 2.0 format is a picture format definition for electronic color separations.This filter accepts the following DCS 2.0 files:
• Single/Multiple file DCS, with no composite• Single/Multiple file DCS, with grayscale composite• Single/Multiple file DCS, with color composite
The DCS filter is a feature of Fiery Graphic Arts Package, Premium Edition, and Fiery Productivity Package. To applythis filter, the Hot Folder must be connected to a Fiery Server that has one of these enabled.The DCS input file types are .dcs, .dcs2, and .eps
Option Description
Output file type See Output file type on page 20.
.The DCS 2.0 filter has no configurable options; however, you must follow these guidelines to convert your DCS 2.0job:
• Enable the Combine Separations print option in Job Properties > Color.• Make sure that you have all the necessary files for a DCS 2.0 job in one folder. If a file is missing, the filter fails to
process.• If a folder contains multiple files for a DCS 2.0 job, you may place the entire folder in the Hot Folder.• If you download a DCS 2.0 job using the Download command, all files must be inside a folder and you must
download the entire folder.
Note: When you submit a multi-part job to a Hot Folder using drag and drop (or copy and paste), we recommendthat you submit DCS 2.0 files in a folder, and that you set the time interval to check for jobs to 10 seconds or more toensure that all files are in place before processing begins.
Fiery Hot Folders
Fiery Hot Folders
28
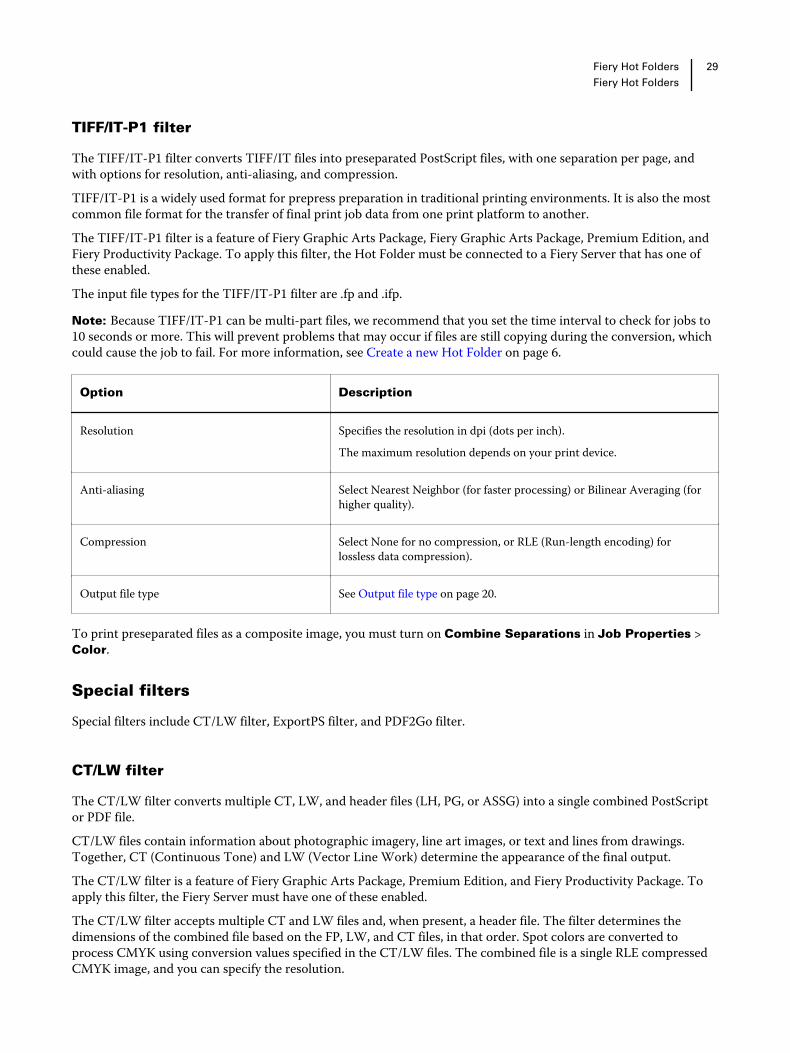
TIFF/IT-P1 filter
The TIFF/IT-P1 filter converts TIFF/IT files into preseparated PostScript files, with one separation per page, andwith options for resolution, anti-aliasing, and compression.TIFF/IT-P1 is a widely used format for prepress preparation in traditional printing environments. It is also the mostcommon file format for the transfer of final print job data from one print platform to another.The TIFF/IT-P1 filter is a feature of Fiery Graphic Arts Package, Fiery Graphic Arts Package, Premium Edition, andFiery Productivity Package. To apply this filter, the Hot Folder must be connected to a Fiery Server that has one ofthese enabled.The input file types for the TIFF/IT-P1 filter are .fp and .ifp.
Note: Because TIFF/IT-P1 can be multi-part files, we recommend that you set the time interval to check for jobs to10 seconds or more. This will prevent problems that may occur if files are still copying during the conversion, whichcould cause the job to fail. For more information, see Create a new Hot Folder on page 6.
Option Description
Resolution Specifies the resolution in dpi (dots per inch).The maximum resolution depends on your print device.
Anti-aliasing Select Nearest Neighbor (for faster processing) or Bilinear Averaging (forhigher quality).
Compression Select None for no compression, or RLE (Run-length encoding) forlossless data compression).
Output file type See Output file type on page 20.
To print preseparated files as a composite image, you must turn on Combine Separations in Job Properties >Color.
Special filters
Special filters include CT/LW filter, ExportPS filter, and PDF2Go filter.
CT/LW filter
The CT/LW filter converts multiple CT, LW, and header files (LH, PG, or ASSG) into a single combined PostScriptor PDF file.CT/LW files contain information about photographic imagery, line art images, or text and lines from drawings.Together, CT (Continuous Tone) and LW (Vector Line Work) determine the appearance of the final output.The CT/LW filter is a feature of Fiery Graphic Arts Package, Premium Edition, and Fiery Productivity Package. Toapply this filter, the Fiery Server must have one of these enabled.The CT/LW filter accepts multiple CT and LW files and, when present, a header file. The filter determines thedimensions of the combined file based on the FP, LW, and CT files, in that order. Spot colors are converted toprocess CMYK using conversion values specified in the CT/LW files. The combined file is a single RLE compressedCMYK image, and you can specify the resolution.
Fiery Hot Folders
Fiery Hot Folders
29

When you drag and drop your CT, LW, or FP files, your output is a single PostScript file.
Option Description
Resolution Specifies the resolution in dpi (dots per inch).The maximum resolution depends on your printer.Choose Auto to resample the file to the default resolution of the printer.
Output file type See Output file type on page 20.
You can drop or download page folders containing the CT, LW, and header files one page at a time, which is therecommended way to submit CT/LW files to a Hot Folder (because it ensures that hidden files are also transmittedto the Fiery Server).
Note: Some CT/LW files may include a "." (period) at the beginning of the file name, which indicates that the filesare hidden. When processing CT/LW files, you can turn on Show Hidden Files in your folder settings to showinvisible files. To copy all files, including hidden files, drop the entire CT/LW page folder that contains all thenecessary files onto the Hot Folder.
ExportPS filter
The ExportPS filter processes an ExportPS file by rendering and resampling it to the resolution of the printer.You can select PostScript or PDF output. ExportPS translates Brisque jobs into portable, raster PostScript or EPSoutput that can be processed on the printer.The ExportPS filter is a feature of Fiery Graphic Arts Package, Premium Edition and Fiery Productivity Package. Toapply this filter, the Hot Folder must be connected to a Fiery Server that has one of these enabled.The input file types for ExportPS filter are .ps and .eps.
Option Description
Resolution Specifies the resolution in dpi (dots per inch).The maximum resolution depends on your print device.Choose Auto to resample the file to the default resolution of the print device.
Output file type See Output file type on page 20.
Note: The ExportPS filter does not require Acrobat Distiller for the conversion to PDF.
PDF2Go filter
The PDF2Go filter processes a PDF2Go file by rendering and re-sampling it to the resolution of the printer. You canselect PostScript or PDF output.PDF2Go is a PDF output that usually contains PDF layers of rasterized (Continuous Tone) and LW (Line Work) jobpages, each with a different resolution, in a single PDF file.
Fiery Hot Folders
Fiery Hot Folders
30
Note: The PDF2Go filter is a feature of Fiery Graphic Arts Package, Premium Edition, and Fiery ProductivityPackage. To apply this filter, the Hot Folder must be connected to a Fiery Server that has one of these enabled.The input file type for PDF2Go is .pdf.
Option Description
Resolution Specifies the resolution in dpi (dots per inch).The maximum resolution depends on your print device.Choose Auto to resample the file to the default resolution of the print device.
Output file type See Output file type on page 20.
Note: The PDF2Go filter does not require Acrobat Distiller for the conversion to PDF.
JDF Filter
Hot Folders supports the JDF (Job Definition Format) workflow. JDF technology is an XML-based open industrystandard for job tickets.JDF jobs from a submitting application can be submitted through Hot Folders to Fiery Servers that have JDFsubmission enabled. The JDF filter is supported on Windows Hot Folders only, not on Mac OS Hot Folders.When you submit a JDF job to a Hot Folder, the Input Formats dialog box displays the JDF option and disables allother options. The JDF filter requires a Fiery Server that supports JDF jobs and has the Fiery JDF feature turned on inConfigure.Setting JDF as an input format disables the job properties and job action selections in Hot Folders. The job usessettings defined in the JDF ticket of the job and any JDF settings configured on the Fiery Server. You can specify thejob action for JDF jobs by choosing a Virtual Printer in the JDF section of Configure.When you submit a JDF job to a Hot Folder, the job goes through the standard JDF workflow on the Fiery Server andis managed through Command WorkStation.You can specify JDF as the input format by selecting JDF in the Input Formats dialog box.
Preflight
Preflight checks jobs submitted to the Hot Folder in the most common areas of error, thus reducing costly printingerrors. Preflight is a feature of Fiery Graphic Arts Package, Premium Edition.For a Preflight check, the Hot Folder must:
• Be connected to a Fiery Server with Fiery Graphic Arts Package, Premium Edition, enabled.• Have Preflight enabled. (If the Hot Folder has Direct connection specified as the Job Action, Preflight is not
available.)
Fiery Hot Folders
Fiery Hot Folders
31
Preflight performs a specified action based on settings you configure for a Hot Folder with Preflight enabled.Preflight checks for the following errors:
• Fonts - Checks for missing fonts and Courier font substitution.• Spot Colors - Checks for missing spot colors. (You can add missing spot colors in Command WorkStation Spot
Colors.)• Image Resolution - Checks for image resolution less than a specified value.• VDP Resources - Checks for missing VDP resources.
You can choose to check a specific number of records. Select this option to avoid a potentially long processingtime for Preflight.
• Hairlines - Checks for line thickness less than a specified value.• Overprint - Checks for overprint.
Preflight supports PostScript, PDF, EPS, PPML, and Creo VPS file formats. Preflight does not support TIFF and PCLfile formats.
Set Preflight Settings
You can set preflight settings to check every job that is submitted to the Hot Folder for errors.1 In the Fiery Hot Folders Console, double-click the Hot Folder to open the Hot Folders Settings window.
2 Do one of the following:
• Select Preflight and click Edit to open the Preflight Settings window.
• Or choose a preset from the Presets menu to automatically select the combination of settings saved in thepreset. If the preset contains all the settings you want, skip to step 6.
3 Specify which errors you want to check for, and set the notification level (Critical or Warning) for that error.
4 If you want Preflight to stop checking for errors when it detects the first critical error, select Stop Preflight onfirst critical error.
5 If you want to use the settings again, choose Save or Save As from the Preset list. To delete a preset, select itand choose Delete from the Preset list.
6 Click OK to return to the Hot Folders Settings window.
7 From the On Critical Error menu, choose an action that Hot Folders performs if it detects at least one criticalerror. Click one of the following:
• Hold - Sends a job to the Hold queue, where it is spooled to the Fiery Server hard disk and held in the queuefor printing at a later time.
• Process and Hold - Processes a job and then places the processed job in the Hold queue for printing at a latertime.
• Proof Print - Processes and prints one copy of a job. This action is useful for checking the job output beforeprinting the number of copies called for in the job.
• Use Job Action - Performs the Job Action configured in the Hot Folders settings.
8 Click OK to save the settings.
Fiery Hot Folders
Fiery Hot Folders
32

Backup and Restore
The Backup and Restore feature lets you create a backup of all the Hot Folders on your system and their settings.Using Backup and Restore, you can:
• Create an individual backup, which you can use to restore your Hot Folders and their settings.• Create a backup archive, which you can use to revert to the Hot Folders and their settings from a specific date.• Copy your Hot Folders and their settings to another system or group of systems. (This is a quick way to set up
Hot Folders with identical settings for users working together or sharing Hot Folders on a network.)
The backup process creates copies of all your Hot Folders in a compressed (.fbf) file that contains all the Hot Folderson your system, saved with the following settings:
• Hot Folder settings (Folder name and Description)• Network setting (Server Name and Job Action)• Job Properties settings (any print or imposition settings configured for the Hot Folder)• Input Format settings (any filters and application-specific formats configured for the Hot Folder)
The backup maintains the Hot Folder status (Activated or Deactivated).After you back up Hot Folders, you can restore the Hot Folders and their settings to your system or to anothersystem. In general, you want to restore your Hot Folders to the same location as the original, otherwise, the HotFolders application creates duplicate Hot Folders with the same name that appear in the Fiery Hot Folders Console.
Important: If you created a backup using the Backup and Restore feature, you can use the backup to restore adeleted Hot Folder that was included in the backup, but not the original files of submitted jobs.
Backup of original files
The Backup does not include the original files inside the Hot Folders supporting folders. By default, this is whereoriginal files are archived.If you want to back up your original files in case the Hot Folder is deleted, you can specify a location that is outside aHot Folder.
Important: If you specify a different location, all original files from all Hot Folders will be saved in this commonlocation.You can specify a different location for archiving original files, instead of the folder automatically generated by HotFolders, by setting the Save original files in option in Preferences. If you specify a different location, all originalfiles from all Hot Folders will be saved in this common location. For more information, see Set Hot Folderspreferences on page 9.
Back up Hot Folders
You access the Backup feature in the Fiery Hot Folders Console. A separate window opens that takes you throughthe process.1 In the Fiery Hot Folders Console, choose File > Backup Restore.
2 Click Backup and then click Next.
Fiery Hot Folders
Fiery Hot Folders
33
3 Specify any of these settings for the backup:
• File Name - Accept the default file name or type a new name for the backup file.
• Location - Set the location where your compressed backup files are saved.If you want to replace an existing backup file rather than create a duplicate, you must set the same location asthe existing file and specify the same file name. Before the backup starts, Hot Folders asks whether to replacethe existing file.
• Add date to file name - Adds the current date to the file name. Use this option to automatically generateunique file names for backup files created on different dates.
4 Click Next.
The Backup summary appears, and provides a hypertext link to the location specified for the backup files. For eachHot Folder, the Backup summary indicates whether the backup succeeded (a green check mark) or failed (a red "x").
Back up original files
Backup does not include original files, so you must save original files to a location outside a Hot Folder if you want toback them up. However, if you specify a different location, all original files from all Hot Folders will be saved in thiscommon location.1 In the Fiery Hot Folders Console, choose Edit > Preferences.
2 Click A common location and navigate to where you want to save the original files.
Restore Hot Folders
You can use the Restore feature to restore the Hot Folders and their settings to your system or to another system.1 In the Hot Folders Console, choose File > Backup Restore.
2 Click Restore, and then click Next.
3 Click Browse and set the Restore Hot Folders to location.
4 If a Hot Folder you are trying to restore has the same name as an existing Hot Folder at the same location and youstill want to restore the Hot Folder, specify a different name for the restored Hot Folder.
Note: For renaming, the Hot Folders application provides a default folder name that is the original folder namewith "Rename" added to the beginning.
5 Click one of the following;
• Click From a specific backup and browse to locate the backup file.
• Click From a recent backup and select from the list.
6 Click Next.
7 Review the Restore summary and do one of the following:
• If the restore for all Hot Folders was successful, click OK.
• If any or all folders failed to be restored, click Retry.The Retry button appears only if a folder failed in the restore process. Retrying restores a new file.
Fiery Hot Folders
Fiery Hot Folders
34
Note: For quick access, the Restore summary window includes a hypertext link to the location of your HotFolders.
Troubleshooting Hot Folders
If you have trouble with the Hot Folders application, there are several troubleshooting options.
Fiery Server does not respond
• Do any of the following to troubleshoot:
• Make sure that the printer is turned on.The printer may have been turned off, or the Power Saver mode function may have engaged.
• Make sure that the printer is connected.If the administrator or operator has selected Suspend Printing, your print job will not resume until ResumePrinting is selected.
• Make sure that the Fiery Server is on the network.For more information, see Connect a Hot Folder to a Fiery Server on page 7.
• Make sure that the Server Name and/or IP address has not changed.If the IP address or Server Name changed, the administrator may need to edit the folder properties andreconnect to the new Server Name or IP address. Alternatively, you can connect to a different Fiery Server. Formore information, see Connect an existing Hot Folder to a different Fiery Server on page 8.
A Hot Folder cannot connect to a Fiery Server
• Check the following:
• Make sure that the Fiery Server is turned on.
• Make sure that the Hot Folder is activated.
• Make sure that Stop All Hot Folders is not enabled.When you choose Stop All Hot Folders, jobs are not processed and all Hot Folders are disabled until yourestart all Hot Folders. Any added Hot Folders are disabled. For more information, see Stop and restart all HotFolders on page 10.
• If the Hot Folder is activated, try to open the connection with another utility, such as Command WorkStation.If no other utilities connect, the problem may be with the Fiery Server. If this happens, make sure theconnection is valid. Open the folder properties, and change the IP address to the Server Name.
• If you are using Mac OS and want to connect by using a DNS name, make sure the Search DNS Names featureis configured on your system. If you do not have the feature configured, use the IP address of the Fiery Server.Contact your network administrator to enable the Search DNS Names feature.
Fiery Hot Folders
Fiery Hot Folders
35
A Hot Folder is missing from the Hot Folders Console
• Make sure you did not rename the Hot Folder from the desktop, rather than in the Fiery Hot Folders Console.For more information, see Rename a Hot Folder on page 10.
My original file disappeared
The original file may have been moved without making a copy. (When you drag a file onto a Hot Folder on the samedisk partition as the source file, the file is moved, not copied.)• Check inside the supporting folders. For more information, see Access original job files on page 11.
My job failed
The folder properties may not match the file and the folder may not support that type of file.1 Access the log to view the status of the file.
2 Make sure the folder properties match your file and that you do not download a file that is not supported by afolder. For example, if you download a JPEG file to a Hot Folder configured for a Color Separated filter, the jobwill fail.
Maintain optimal performance
The Hot Folders application archives your original files in the supporting folders, which can quickly use up diskspace.• Do any of the following:
• Free up disk space by deleting some or all of the archives of your original files in the supporting folders if youdo not need to keep them.By default, supporting folders are created within the Hot Folder, but you can change the location of youroriginal files.
• Set up a regular schedule for deleting original files by setting the Clear original files option in Preferences.
Fiery Hot Folders
Fiery Hot Folders
36

Fiery Hot Folders
Index
37
Index
Pprint settings
deleting saved settings 16


![Ricoh ChinaFiery JobFlow Base Fiery , FS200 Pro _Ei*fic Fiery Fiery Productivity Package Fiery JobFlow E] Fiery Windows Fiery Windows 7, 8, 8.1 s 10 32 fi/64 Google Mozilla Firefox](https://img.pdfslide.net/doc/110x75/611424df97efee38ef5fbef2/ricoh-fiery-jobflow-base-fiery-fs200-pro-eific-fiery-fiery-productivity-package.jpg)