Embed Size (px)
Citation preview
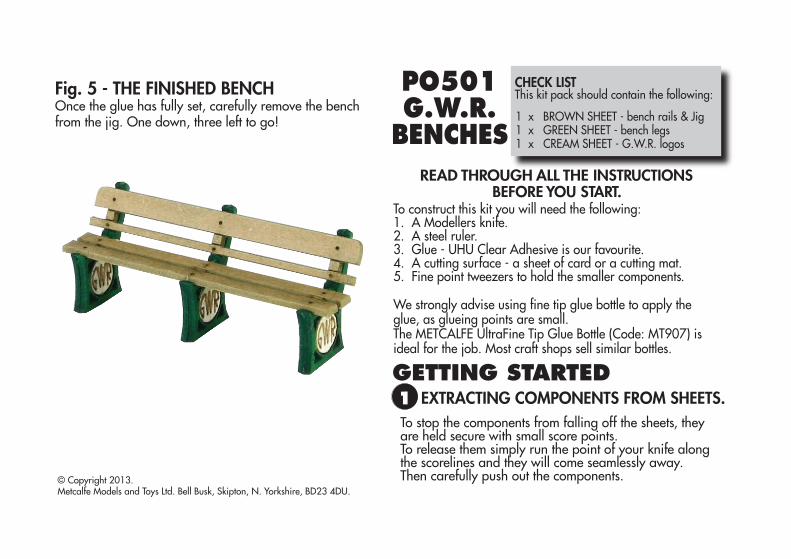
1 x BROWN SHEET - bench rails & Jig1 x GREEN SHEET - bench legs1 x CREAM SHEET - G.W.R. logos
CHECK LIST This kit pack should contain the following:
PO501 G.W.R.
BENCHES
To construct this kit you will need the following:1. A Modellers knife.2. A steel ruler.3. Glue - UHU Clear Adhesive is our favourite. 4. A cutting surface - a sheet of card or a cutting mat.5. Fine point tweezers to hold the smaller components.
We strongly advise using fine tip glue bottle to apply the glue, as glueing points are small. The METCALFE UltraFine Tip Glue Bottle (Code: MT907) is ideal for the job. Most craft shops sell similar bottles.
READ THROUGH ALL THE INSTRUCTIONS BEFORE YOU START.
GETTING STARTED
To stop the components from falling off the sheets, they are held secure with small score points. To release them simply run the point of your knife along the scorelines and they will come seamlessly away.Then carefully push out the components.
1 EXTRACTING COMPONENTS FROM SHEETS.
Fig. 5 - THE FINISHED BENCHOnce the glue has fully set, carefully remove the bench from the jig. One down, three left to go!
© Copyright 2013.Metcalfe Models and Toys Ltd. Bell Busk, Skipton, N. Yorkshire, BD23 4DU.
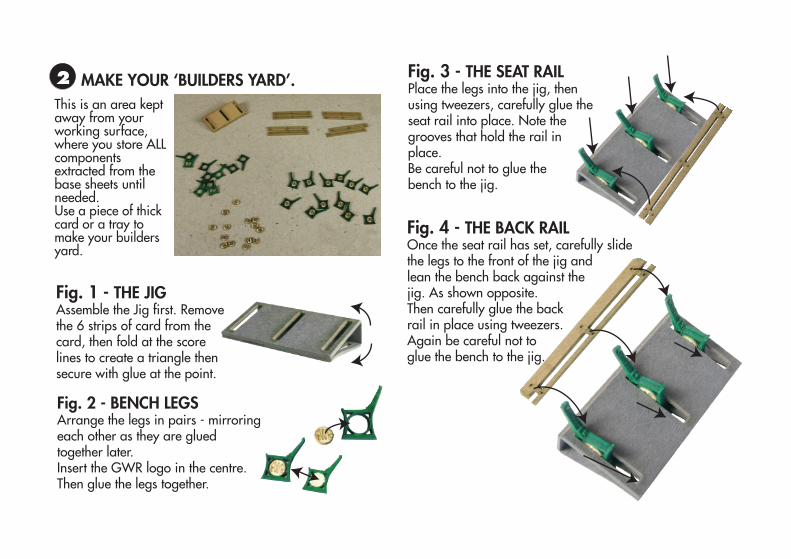
2 MAKE YOUR ‘BUILDERS YARD’.This is an area kept away from your working surface, where you store ALL components extracted from the base sheets until needed.Use a piece of thick card or a tray to make your builders yard.
Fig. 3 - THE SEAT RAILPlace the legs into the jig, thenusing tweezers, carefully glue the seat rail into place. Note the grooves that hold the rail in place. Be careful not to glue the bench to the jig.
Fig. 4 - THE BACK RAILOnce the seat rail has set, carefully slidethe legs to the front of the jig and lean the bench back against thejig. As shown opposite.Then carefully glue the backrail in place using tweezers.Again be careful not toglue the bench to the jig.
Fig. 2 - BENCH LEGSArrange the legs in pairs - mirroring each other as they are glued together later. Insert the GWR logo in the centre.Then glue the legs together.
Fig. 1 - THE JIGAssemble the Jig first. Removethe 6 strips of card from thecard, then fold at the score lines to create a triangle then secure with glue at the point.