Embed Size (px)
Citation preview

TheFinancialEdge™
The Financial Edge Guide for Canada

101111
©2011 Blackbaud, Inc. This publication, or any part thereof, may not be reproduced or transmitted in any form or by any means, electronic, or mechanical, including photocopying, recording, storage in an information retrieval system, or otherwise, without the prior written permission of Blackbaud, Inc.
The information in this manual has been carefully checked and is believed to be accurate. Blackbaud, Inc., assumes no responsibility for any inaccuracies, errors, or omissions in this manual. In no event will Blackbaud, Inc., be liable for direct, indirect, special, incidental, or consequential damages resulting from any defect or omission in this manual, even if advised of the possibility of damages.
In the interest of continuing product development, Blackbaud, Inc., reserves the right to make improvements in this manual and the products it describes at any time, without notice or obligation.
All Blackbaud product names appearing herein are trademarks or registered trademarks of Blackbaud, Inc.
All other products and company names mentioned herein are trademarks of their respective holder.
FE‐FEGuideforCanada‐101111

Contents
WELCOME . . . . . . . . . . . . . . . . . . . . . . . . . . . . . . . . . . . . . . . . . . . . . . . . . . . . . . . . . 1
Blackbaud Solutions and Services . . . . . . . . . . . . . . . . . . . . . . . . . . . . . . . . . . . . . . . . . . . . . . . . . . . . . . . 2
EFT TRANSACTIONS . . . . . . . . . . . . . . . . . . . . . . . . . . . . . . . . . . . . . . . . . . . . . . . . . . 7
Adding EFT Information to the Bank Record . . . . . . . . . . . . . . . . . . . . . . . . . . . . . . . . . . . . . . . . . . . . . . . 8Managing EFT Bank Information . . . . . . . . . . . . . . . . . . . . . . . . . . . . . . . . . . . . . . . . . . . . . . . . . . . . . . . 13Creating an EFT payment . . . . . . . . . . . . . . . . . . . . . . . . . . . . . . . . . . . . . . . . . . . . . . . . . . . . . . . . . . . . . 16
GST IN ACCOUNTS PAYABLE . . . . . . . . . . . . . . . . . . . . . . . . . . . . . . . . . . . . . . . . . . . 21
Accounts Payable Configuration . . . . . . . . . . . . . . . . . . . . . . . . . . . . . . . . . . . . . . . . . . . . . . . . . . . . . . . 22Accounts Payable Records . . . . . . . . . . . . . . . . . . . . . . . . . . . . . . . . . . . . . . . . . . . . . . . . . . . . . . . . . . . . 32WebInvoicing . . . . . . . . . . . . . . . . . . . . . . . . . . . . . . . . . . . . . . . . . . . . . . . . . . . . . . . . . . . . . . . . . . . . . . . 47
GST IN ACCOUNTS RECEIVABLE . . . . . . . . . . . . . . . . . . . . . . . . . . . . . . . . . . . . . . . . . 51
Accounts Receivable Configuration . . . . . . . . . . . . . . . . . . . . . . . . . . . . . . . . . . . . . . . . . . . . . . . . . . . . . 52Accounts Receivable Records . . . . . . . . . . . . . . . . . . . . . . . . . . . . . . . . . . . . . . . . . . . . . . . . . . . . . . . . . . 61
GST IN STUDENT BILLING . . . . . . . . . . . . . . . . . . . . . . . . . . . . . . . . . . . . . . . . . . . . . 75
Student Billing Configuration . . . . . . . . . . . . . . . . . . . . . . . . . . . . . . . . . . . . . . . . . . . . . . . . . . . . . . . . . . 76Student Billing Records . . . . . . . . . . . . . . . . . . . . . . . . . . . . . . . . . . . . . . . . . . . . . . . . . . . . . . . . . . . . . . 85
CHEQUE PROCESSING . . . . . . . . . . . . . . . . . . . . . . . . . . . . . . . . . . . . . . . . . . . . . . . . 95
Printing Cheques and Recording Bank Drafts . . . . . . . . . . . . . . . . . . . . . . . . . . . . . . . . . . . . . . . . . . . . . 96Creating a New One‐Time Cheque . . . . . . . . . . . . . . . . . . . . . . . . . . . . . . . . . . . . . . . . . . . . . . . . . . . . 101Editing Unwritten One‐Time Cheques . . . . . . . . . . . . . . . . . . . . . . . . . . . . . . . . . . . . . . . . . . . . . . . . . . 105Creating Payments from Invoices . . . . . . . . . . . . . . . . . . . . . . . . . . . . . . . . . . . . . . . . . . . . . . . . . . . . . 105
GST REPORTING. . . . . . . . . . . . . . . . . . . . . . . . . . . . . . . . . . . . . . . . . . . . . . . . . . . 109
Accounts Payable Reports . . . . . . . . . . . . . . . . . . . . . . . . . . . . . . . . . . . . . . . . . . . . . . . . . . . . . . . . . . . 110Accounts Receivable Reports . . . . . . . . . . . . . . . . . . . . . . . . . . . . . . . . . . . . . . . . . . . . . . . . . . . . . . . . . 117

INDEX . . . . . . . . . . . . . . . . . . . . . . . . . . . . . . . . . . . . . . . . . . . . . . . . . . . . . . . . . . 133

1chapter
Welcome
Blackbaud Solutions and Services. . . . . . . . . . . . . . . . . . . . . . . . . . . . . . . . . . . . . . . . . . . . . . . . . . . . . . . . . . . . . . . . 2Data Services . . . . . . . . . . . . . . . . . . . . . . . . . . . . . . . . . . . . . . . . . . . . . . . . . . . . . . . . . . . . . . . . . . . . . . . . . . . . . . . . . . . 2Accounting System Consulting . . . . . . . . . . . . . . . . . . . . . . . . . . . . . . . . . . . . . . . . . . . . . . . . . . . . . . . . . . . . . . . . . . . . . 3
How We Can Help . . . . . . . . . . . . . . . . . . . . . . . . . . . . . . . . . . . . . . . . . . . . . . . . . . . . . . . . . . . . . . . . . . . . . . . . . . . . 3Technical Consulting . . . . . . . . . . . . . . . . . . . . . . . . . . . . . . . . . . . . . . . . . . . . . . . . . . . . . . . . . . . . . . . . . . . . . . . . . . . . . 3Training Solutions . . . . . . . . . . . . . . . . . . . . . . . . . . . . . . . . . . . . . . . . . . . . . . . . . . . . . . . . . . . . . . . . . . . . . . . . . . . . . . . 4User Guides . . . . . . . . . . . . . . . . . . . . . . . . . . . . . . . . . . . . . . . . . . . . . . . . . . . . . . . . . . . . . . . . . . . . . . . . . . . . . . . . . . . . 5Blackbaud Forms. . . . . . . . . . . . . . . . . . . . . . . . . . . . . . . . . . . . . . . . . . . . . . . . . . . . . . . . . . . . . . . . . . . . . . . . . . . . . . . . 5Blackbaud Developer Network . . . . . . . . . . . . . . . . . . . . . . . . . . . . . . . . . . . . . . . . . . . . . . . . . . . . . . . . . . . . . . . . . . . . 5
2 CHAPTER
Welcome to the Financial Edge Guide for Canada. This guide details Financial Edge functionality specific to Canada. For example, sales taxes such as the Goods and Services Tax (GST) and the Harmonized Sales Tax (HST) affect the Accounts Payable, Accounts Receivable, and Student Billing programs of The Financial Edge.
If you have the optional module Electronic Funds Transfer, which adds fields and options to areas of Accounts Payable, you can send and receive electronic transfers.
Keep in mind, if you need additional information while working in The Financial Edge, you have access to all the user guides on our website. You can also access the help file from the Help menu, or by clicking F1 from the program. Both help files and user guides contain the same helpful procedures, explanations, and examples.
The information in this guide is organized into seven chapters.
Chapter 1: Welcome. This chapter details the various Blackbaud solutions we offer.Chapter 2: EFT Transactions. This chapter discusses the EFT functionality present in Accounts Payable when
you have the optional module Electronic Funds Transfer.
Chapter 3: GST in Accounts Payable. This chapter explains how sales taxes such as the Goods and Services Tax (GST) and the Harmonized Sales Tax (HST) affect Accounts Payable.
Chapter 4: GST in Accounts Receivable. This chapter explains how sales taxes such as the Goods and Services Tax (GST) and the Harmonized Sales Tax (HST) affect Accounts Receivable.
Chapter 5: GST in Accounts Student Billing. This chapter explains how sales taxes such as the Goods and Services Tax (GST) and the Harmonized Sales Tax (HST) affect Student Billing.
Chapter 6: Cheque Processing. This chapter explains how you can print cheques, record bank drafts, create and edit one‐time cheques, and create manual cheques.
Chapter 7: GST Reporting. In Accounts Payable and Accounts Receivable, you can create Business Activity Statements to view sales tax information quickly and easily.
Blackbaud Solutions and ServicesFor more than two decades, we have provided world‐class technology solutions to the nonprofit community, helping organizations of all sizes and types.
Software plays an important role in the Blackbaud equation for success. Indeed, our products set the standards by which others are measured. However, there is another essential part of the Blackbaud solution — services. As the largest and most experienced provider of services to the nonprofit community, we understand the unique challenges nonprofits face and help them overcome those challenges.
More than 12,000 nonprofit organizations have chosen to partner with us for the peace of mind that comes with one company providing an end‐to‐end solution of software and services. We focus our expertise on meeting your needs — so you can focus your resources on fulfilling your mission.
Data ServicesWe offer a wide range of data services. From database conversion to database consolidation, our staff of programmers and analysts have the experience, technology, and expertise to meet your organization’s needs.
To request a quote for data services or database conversion, please contact our Conversion Coordinator by e‐mail at [email protected] or by phone at 1‐800‐468‐8996 x4200. You can also submit your request from the Data Services page on our website.
Note: Information in this guide is subject to change. Please visit our website to view the most current information. To access our system recommendations, select System Recommendations from the Support menu on our website at www.blackbaud.com.
WELCOME 3
Accounting System ConsultingAccounting System Consulting services help you get the most out of our Financial Edge software by aligning your organization’s systems with its processes and objectives. We partner with you to learn about your organization, identify issues, and plan a solution that is tailored to your needs.
Our consultants offer a unique combination of accounting experience and in‐depth knowledge of our software. Many of our consultants have gained experience by serving as controllers and technical specialists and have worked for Big Five firms, nonprofit organizations, and the Financial Accounting Standards Board (FASB). They can share insight garnered from their work with hundreds of nonprofit organizations. Our accounting consulting team knows the software inside and out and are available to help you make the most of your system.
To learn how your organization can benefit from our Accounting System Consulting services, call 800‐443‐9441 or send an e‐mail to [email protected].
How We Can Help• Evaluate and define historic data to convert to The Financial Edge
• Import accounting information to General Ledger from non‐Blackbaud products
• Assess your organization’s unique reporting requirements
• Design your chart of accounts and account number structure
• Establish system security
• Determine the appropriate fund closing method based on your reporting needs
• Establish a start date for your new system, and determine what data to bring in from prior years’ records
• Review your data entry methods and recommend ways to increase productivity in your business office
• Evaluate job responsibilities to ensure optimal workflow
• Establish an interface between The Raiser’s Edge and General Ledger
• Set up and maximize your use of optional modules, including Projects and Grants, Budget Management, andAllocation Management
• Create initial reports such as a balance sheet and income statements
Technical ConsultingLet our knowledgeable consultants bring their technical expertise to your site and manage the implementation of your Financial Edge products. By entrusting the nuts and bolts of implementation to one of our consultants, you ensure optimal setup of your system while keeping your time and energy focused on fostering your organization’s mission.
Whether it is software installation or a detailed assessment of your current IT capabilities and needs, our team of Microsoft, Cisco, and Oracle certified engineers can help you meet your technical challenges head on.
If you would like to arrange for consulting services, call our Sales Department at 1‐800‐443‐9441. Or send an e‐mail outlining your specific needs to [email protected].
To learn more about our technical consulting offerings, such as technology assessments, diagnostic services, and software installations, you can download the printer‐friendly document “Technical Consulting Services” from our website.

4 CHAPTER
Training SolutionsBecause we understand how important training is, we offer a variety of options to meet your different needs, including specialized classes on The Financial Edge at our home office and in cities across North America. As an alternative, trainers can come to your organization to deliver classroom‐style or individualized instruction.
You may prefer to have our consultants guide you through the implementation process, discuss your system configuration, and tailor the software to meet your specific needs. For information about the best training option for your organization, call your account representative at 1‐800‐443‐9441 or send an e‐mail to [email protected].
Blackbaud University. Offers a variety of classes in historic Charleston, South Carolina. By leaving the distractions of the office behind, clients can devote their energy to effectively learning Financial Edge software. Attendees agree that a key benefit of Blackbaud University is sharing knowledge and ideas with other students from a diverse range of nonprofit organizations.
Regional Training. Now available in more than 30 locations throughout North America. State‐of‐the‐art training facilities provide an ideal setting for developing your knowledge.
On-Site Training. Provides a cost‐effective option for organizations that cannot afford to have staff members away from the office for several days. The Blackbaud instructors can teach standard course curricula or create a special training program to meet your specific needs.
Online Learning Network . Delivers instructor‐led and self‐paced distance training to students via the Internet.
WELCOME 5
User GuidesAll manuals documenting The Financial Edge are available through the Help menu in electronic form.
If you need to access the documents before you install The Financial Edge, use the manuals directory on the CD, the Read User Guides link, or the Blackbaud website — www.blackbaud.com.
Blackbaud FormsBlackbaud Business Forms provides custom checks, student bills, statements, invoices, purchase orders, tax forms, envelopes, and other computer forms that are specifically designed for use with The Financial Edge. Blackbaud forms are guaranteed to align correctly and can be customized to your organization’s specifications, using your logo, special inks, and print styles. Pre‐printed forms from other suppliers are not guaranteed to align properly.
For more information, you can visit the forms section of our website at http://forms.blackbaud.com or send an e‐mail with questions to [email protected]. You can also call 866‐4‐BB‐FORMS (866‐422‐3676).
Blackbaud Developer NetworkThe Blackbaud Developer Network (BDN) is an alliance of development partners, including system integrators, consultants, CPA firms and nonprofit organizations, that work with us to create solutions that expand the capabilities of The Financial Edge. These solutions are additional applications, created specifically for our clients, that work with our software to expand functionality. For example, BDN solutions can include customized tools and plug‐ins that integrate or interact with The Financial Edge to help your organization accomplish more in less time.
Our BDN development partners have been carefully selected. They each possess a distinct understanding of our software products and how nonprofit organizations use them to further their mission. This insight, coupled with technical expertise, provides the basis for creating quality solutions you can use to do more.
To learn more about the Blackbaud Developer Network (BDN), or to view potential software applications that can help your organization, go to http://developer.blackbaud.com.

6 CHAPTER
2chapter
EFT Transactions
Adding EFT Information to the Bank Record . . . . . . . . . . . . . . . . . . . . . . . . . . . . . . . . . . . . . . . . . . . . . . . . . . . . . . . 8Defining Default EFT Options . . . . . . . . . . . . . . . . . . . . . . . . . . . . . . . . . . . . . . . . . . . . . . . . . . . . . . . . . . . . . . . . . . . . . . 9Managing EFT Bank Information. . . . . . . . . . . . . . . . . . . . . . . . . . . . . . . . . . . . . . . . . . . . . . . . . . . . . . . . . . . . . . . . 13Creating an EFT payment. . . . . . . . . . . . . . . . . . . . . . . . . . . . . . . . . . . . . . . . . . . . . . . . . . . . . . . . . . . . . . . . . . . . . . 16

8 CHAPTER
EFT stands for electronic funds transfer, a general banking system in which transactions, such as deposits and bill payments, are made through computer databases and electronic files. Money does not physically change hands; it transfers electronically from one account into another account.
If you have the optional module Electronic Funds Transfer, which adds fields and options to areas of Accounts Payable, you can send and receive electronic transfers.
Adding EFT Information to the Bank RecordThe bank account record stores account, payment, deposit, and adjustment information for a particular bank account. EFT functionality on the bank record includes the location for entering the institution ID, and form options for printing EFT notices.
You can also set EFT default options from the bank record. For more information on setting up EFT default options, see “Defining Default EFT Options” on page 9.
Adding EFT information to the bank record
1. From the Banks page, click Open. The Bank Account record opens to the Bank tab.
2. In the Account description field, enter the name of the bank account.
3. In the Account ID field, enter a unique identification for the bank account. This ID must be unique because it is used to identify each bank account and cannot be used for more than one account. Be accurate when you enter the ID because the way you enter it is how it appears on reports and mailings.
4. In the Account type field, select “Chequing”, “Savings”, or “Other”.
5. In the Account status field, select “Open” or “Closed”. If an account is closed, you can still edit information in the bank account record and use the account to print cheques. However, a closed bank account does not appear on invoice records in Accounts Payable.
6. In the Account number field, enter the account number assigned by the bank.
7. In the Institution ID field, enter the eight‐digit institution ID provided by the bank.
8. In the Minimum balance field, enter the minimum amount the bank requires for you to avoid service charges. If there is no minimum balance requirement, you can leave this field blank.
EFT TRANSACT IONS 9
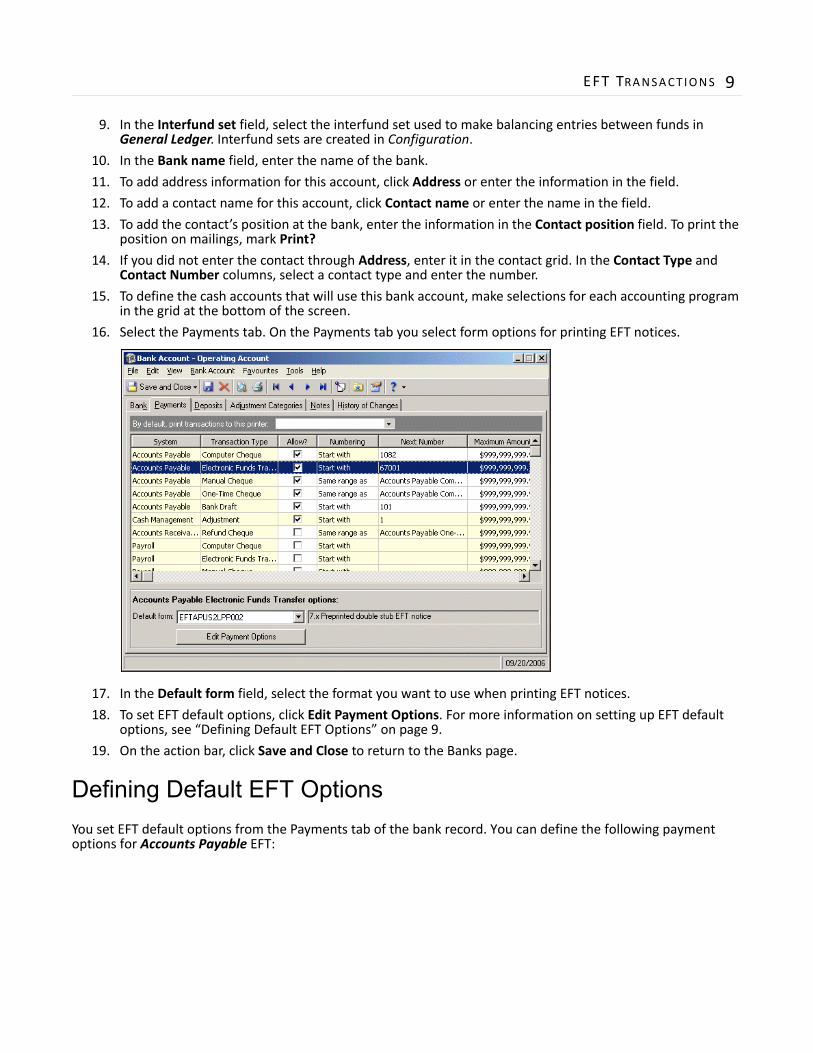
9. In the Interfund set field, select the interfund set used to make balancing entries between funds in General Ledger. Interfund sets are created in Configuration.
10. In the Bank name field, enter the name of the bank.
11. To add address information for this account, click Address or enter the information in the field.
12. To add a contact name for this account, click Contact name or enter the name in the field.
13. To add the contact’s position at the bank, enter the information in the Contact position field. To print the position on mailings, mark Print?
14. If you did not enter the contact through Address, enter it in the contact grid. In the Contact Type and Contact Number columns, select a contact type and enter the number.
15. To define the cash accounts that will use this bank account, make selections for each accounting program in the grid at the bottom of the screen.
16. Select the Payments tab. On the Payments tab you select form options for printing EFT notices.
17. In the Default form field, select the format you want to use when printing EFT notices.
18. To set EFT default options, click Edit Payment Options. For more information on setting up EFT default options, see “Defining Default EFT Options” on page 9.
19. On the action bar, click Save and Close to return to the Banks page.
Defining Default EFT OptionsYou set EFT default options from the Payments tab of the bank record. You can define the following payment options for Accounts Payable EFT:

10 CHAPTER
Cheque Alignment. To define the alignment of cheques on forms, select Cheque Alignment on the left of the Default Payment Options screen.
In the Vertical alignment field, select “Default alignment”, “Move printed information up”, or “Move printed information down”.
If you select “Move printed information up” or “Move printed information down”, you can select the distance to move the information. For example, if you select “Move printed information up” in the Vertical alignment field, enter .02, and select Inches, the information prints .02 inch higher on the cheque.
In the Horizontal alignment field, select “Default alignment”, “Move printed information left”, or “Move printed information right”.
If you select “Move printed information left” or “Move printed information right”, you can select the distance to move the information. For example, if you select “Move printed information left” in the Horizontal alignment field, enter .02, and select Inches, the information prints .02 inch toward the left on the cheque.
Address Alignment. To define the alignment of addresses on forms, select Address Alignment on the left of the Default Payment Options screen.
In the Vertical alignment and Horizontal alignment fields, select “Default alignment”, “Move printed information up”, or “Move printed information down”.
If you select “Move printed information up” or “Move printed information down”, you can select the distance to move the address. For example, if you select “Move printed information up” in the Vertical alignment field and enter 2, the address prints .02 inch higher on the form.

EFT TRANSACT IONS 11
Cheque Stub Information. To select information to print on cheque stubs, select Cheque Stub Information on the left of the Default Payment Options screen.
In the Print this information on the cheque stub box, mark one or both of the checkboxes: Vendor ID or Contact.
In the Print invoices on the cheque stub in this order grid, select how to itemize invoices on the cheque stub. For example, to list invoices by invoice number with the lowest number first, in the Sort By column select Invoice Number. In the Order By column, select Ascending.
To print credit memo applications on the cheque stub, mark Show the application of each credit memo.
To show the discount amount as recorded in the vendor record, leave Show the Discount column marked.
Notes. To print a note on cheques and cheque stubs, select Notes on the left of the Default Payment Options screen.
Note: To sort even further, you can sort by Invoice Date and Invoice Amount.

12 CHAPTER
• To print a note on the cheque, mark Print Note on Cheque. Mark Print the to access a drop down menu of note selections. Mark Print this note to personalize a note on the cheque.
• To print a note on the cheque stub, mark Print Note on Cheque Stub. Mark Print the to access a drop down menu of note selections. Mark Print this note to personalize a note on the cheque stub.
Print Format. To select a printing format, select Print Format on the left of the Default Payment Options screen.
• Select “Total Per Cheque Printing” to print each cheque for the amount of the transactions that can fit on the cheque stub. Additional cheques are created based on the number of transactions fitting on a cheque stub.
• Select “Additional Document Cheque Printing” to print one cheque for the total amount and print all transaction details on a separate sheet regardless of the number of transactions on the cheque stub. Mark Print the transaction detail sheets or Export the transaction detail sheets to print or export transaction details. To print the distribution for the payment, mark Show distribution for these characteristics and mark the checkboxes for the information to appear with the transactions.
• Select “Combination Cheque Printing” to print one cheque for the total amount and print any transactions not fitting on the cheque stub on a separate sheet of paper. Mark Print the transaction detail sheets or Export the transaction detail sheets to print or export transaction details.
EFT General. To make formatting selections for EFTs, select EFT General on the left of the Default Payment Options screen. We recommend you check with your bank to verify these settings and ensure you create a file with the correct file format, originator, and destination ID.
In the Output file name field, enter the path and file name of the EFT file to create or click the ellipses to search for a file.

EFT TRANSACT IONS 13
In the Bank file format field, select the bank format to use for the EFT.
In the Originator ID field, enter the alphanumeric code used to identify your organization.
In the Destination ID field, enter the bank’s five‐digit numeric code.
If you mark Include carriage return/line feed, the program appends a carriage return/line feed to indicate end of line in the EFT file.
Managing EFT Bank InformationFrom the EFT Bank Information tab on the vendor record, you can establish the necessary banking information to perform electronic funds transfers with your vendors. When you add a new vendor bank you can designate the account name, account number, institution ID, and contact address information.
The EFT Bank Information tab appears only if you have the optional module Electronic Funds Transfer.
Adding a new vendor bank to a vendor record
1. From an open vendor record, select the EFT Bank Information tab.
Note: We recommend you check with your bank to verify these settings and ensure you create a file with the correct file format, originator, and destination ID.
14 CHAPTER
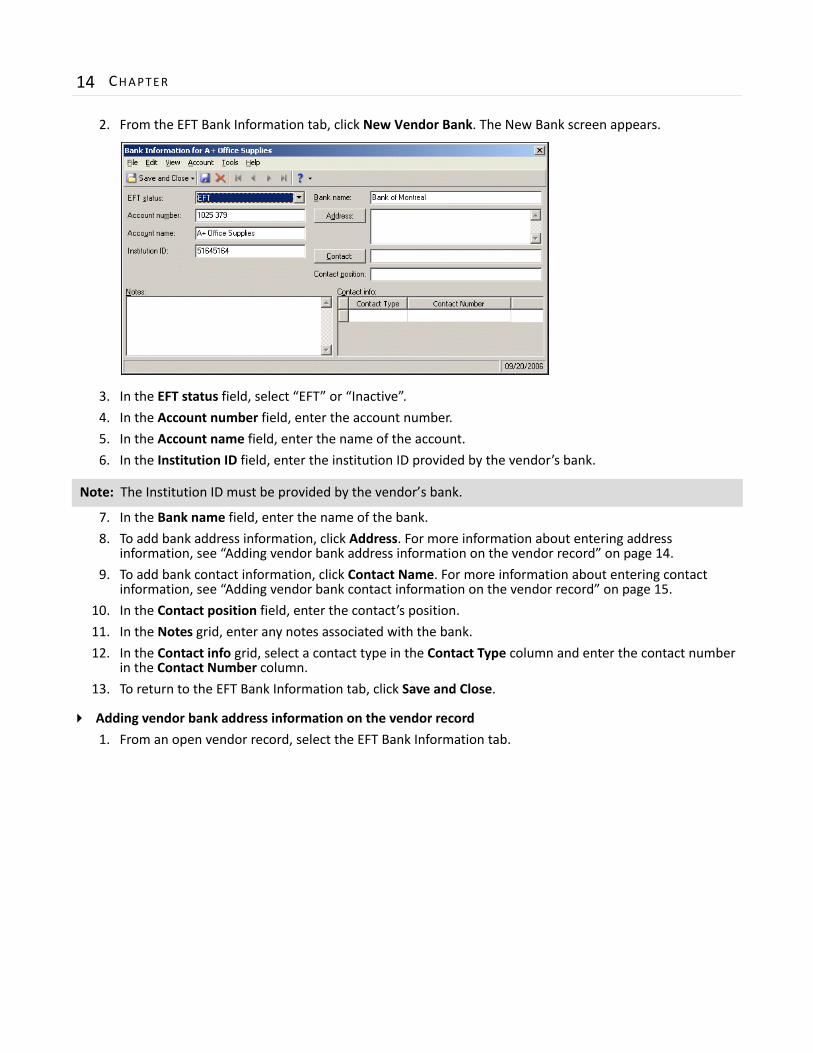
2. From the EFT Bank Information tab, click New Vendor Bank. The New Bank screen appears.
3. In the EFT status field, select “EFT” or “Inactive”.
4. In the Account number field, enter the account number.
5. In the Account name field, enter the name of the account.
6. In the Institution ID field, enter the institution ID provided by the vendor’s bank.
7. In the Bank name field, enter the name of the bank.
8. To add bank address information, click Address. For more information about entering address information, see “Adding vendor bank address information on the vendor record” on page 14.
9. To add bank contact information, click Contact Name. For more information about entering contact information, see “Adding vendor bank contact information on the vendor record” on page 15.
10. In the Contact position field, enter the contact’s position.
11. In the Notes grid, enter any notes associated with the bank.
12. In the Contact info grid, select a contact type in the Contact Type column and enter the contact number in the Contact Number column.
13. To return to the EFT Bank Information tab, click Save and Close.
Adding vendor bank address information on the vendor record
1. From an open vendor record, select the EFT Bank Information tab.
Note: The Institution ID must be provided by the vendor’s bank.
EFT TRANSACT IONS 15
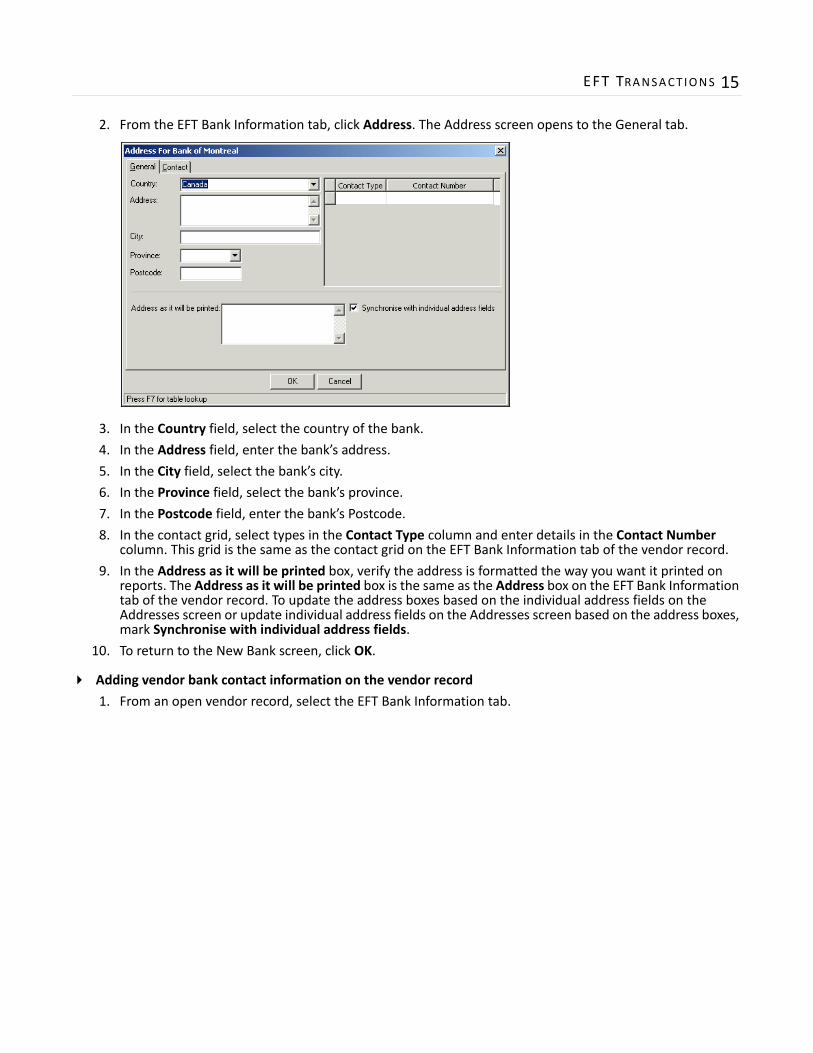
2. From the EFT Bank Information tab, click Address. The Address screen opens to the General tab.
3. In the Country field, select the country of the bank.
4. In the Address field, enter the bank’s address.
5. In the City field, select the bank’s city.
6. In the Province field, select the bank’s province.
7. In the Postcode field, enter the bank’s Postcode.
8. In the contact grid, select types in the Contact Type column and enter details in the Contact Number column. This grid is the same as the contact grid on the EFT Bank Information tab of the vendor record.
9. In the Address as it will be printed box, verify the address is formatted the way you want it printed on reports. The Address as it will be printed box is the same as the Address box on the EFT Bank Information tab of the vendor record. To update the address boxes based on the individual address fields on the Addresses screen or update individual address fields on the Addresses screen based on the address boxes, mark Synchronise with individual address fields.
10. To return to the New Bank screen, click OK.
Adding vendor bank contact information on the vendor record
1. From an open vendor record, select the EFT Bank Information tab.

16 CHAPTER
2. From the EFT Bank Information tab, click Contact. The Address screen opens to the Contact tab.
3. In the Title 1 field, select a primary title for the contact.
4. In the Title 2 field, select a secondary title for the contact.
5. In the First name field, enter the contact’s first name.
6. In the Middle name field, enter the contact’s middle name.
7. In the Last name field, enter the contact’s last name.
8. In the Suffix 1 and Suffix 2 fields, select formal suffixes such as “Jr.” or “Ph.D”.
9. In the Position field, enter the contact’s job title. To print the information entered in the Position field, mark the Print? checkbox.
10. In the Full name field, verify or edit how the contact’s full name should appear. To update the full name based on the individual name fields or update individual name fields based on full name, you can mark Synchronise full name and individual name fields.
Creating an EFT payment
You can make EFT payments from the Banks page by clicking Print cheques and record bank drafts and accessing the Create Payments screen. Keep in mind, to pay an invoice using EFT, you must select “Electronic Funds Transfer” as the Payment method on the invoice record.
Using Print cheques and record bank drafts under Payment tasks, you can record and generate cheques and bank drafts for a series of payments in one payment run.
You can process payments using the default payment options selected for the bank account or make new formatting selections on the Format tab. For more information about default payment options, see “Defining Default EFT Options” on page 9.
Note: To pay an invoice using EFT, you must select “Electronic Funds Transfer” as the Payment method on the invoice record.
EFT TRANSACT IONS 17
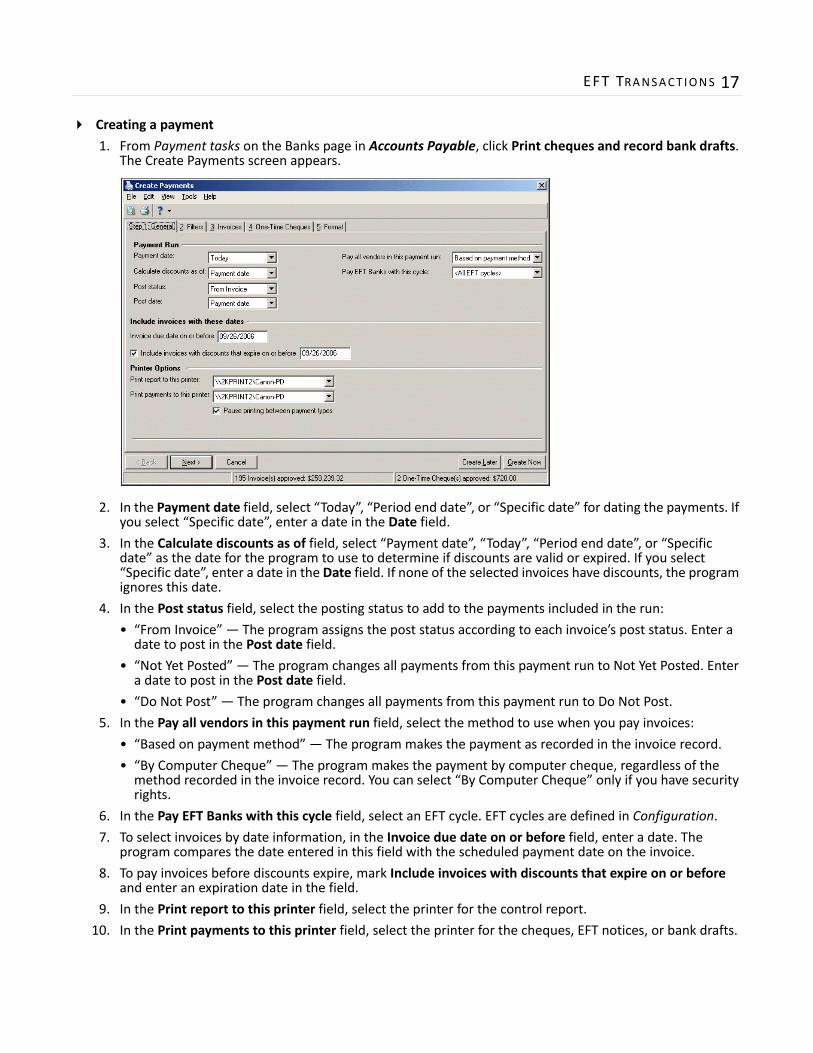
Creating a payment
1. From Payment tasks on the Banks page in Accounts Payable, click Print cheques and record bank drafts. The Create Payments screen appears.
2. In the Payment date field, select “Today”, “Period end date”, or “Specific date” for dating the payments. If you select “Specific date”, enter a date in the Date field.
3. In the Calculate discounts as of field, select “Payment date”, “Today”, “Period end date”, or “Specific date” as the date for the program to use to determine if discounts are valid or expired. If you select “Specific date”, enter a date in the Date field. If none of the selected invoices have discounts, the program ignores this date.
4. In the Post status field, select the posting status to add to the payments included in the run:
• “From Invoice” — The program assigns the post status according to each invoice’s post status. Enter a date to post in the Post date field.
• “Not Yet Posted” — The program changes all payments from this payment run to Not Yet Posted. Enter a date to post in the Post date field.
• “Do Not Post” — The program changes all payments from this payment run to Do Not Post.
5. In the Pay all vendors in this payment run field, select the method to use when you pay invoices:
• “Based on payment method” — The program makes the payment as recorded in the invoice record.
• “By Computer Cheque” — The program makes the payment by computer cheque, regardless of the method recorded in the invoice record. You can select “By Computer Cheque” only if you have security rights.
6. In the Pay EFT Banks with this cycle field, select an EFT cycle. EFT cycles are defined in Configuration.
7. To select invoices by date information, in the Invoice due date on or before field, enter a date. The program compares the date entered in this field with the scheduled payment date on the invoice.
8. To pay invoices before discounts expire, mark Include invoices with discounts that expire on or before and enter an expiration date in the field.
9. In the Print report to this printer field, select the printer for the control report.
10. In the Print payments to this printer field, select the printer for the cheques, EFT notices, or bank drafts.

18 CHAPTER
11. Click Next or select the Filters tab.
12. To select filters, choose “Selected” in the Include column. The Selected <Filters> screen appears so you can select filters for the payment run.
13. Click OK.
14. You return to the Filters tab and filters you selected appear in the Selected Filters column.
15. Click Next or select the Invoices tab.
16. In the Pay? column, mark the checkbox for each invoice you want to pay. To pay all the invoices, click Select All on the action bar.
Note: The bank selected on the Banks page automatically appears as a Banks filter.

EFT TRANSACT IONS 19
17. Click Next or select the Format tab.
18. From the list on the left, select a payment method. The right side of the screen displays the default formatting selections for that payment type as selected on the Payments tab of the bank account record. The payment methods are the payment methods for the current approved invoices.
19. In the Payment format field, select a blank or preprinted form on which to print the payments. If the bank account is set to have multiple payment types use the same numbering series as another payment type, the Starting payment number field displays the first available number for payments using the same range.
20. In the Starting payment number field, enter the first number for the EFT Notice.
21. To print the cheque number on preprinted cheques, mark Print payment number.
22. To make changes to payment options in the bank account record, click Edit Payment Options. For more information about defining payment options, see “Formatting Payment Information” on page 14.
23. To make sure information is aligned properly on cheque forms or paper, click Print Test Alignment Cheque.
24. Select how to sort cheques when printing, in the Sort By and Order By columns in the Print payments in this order frame. For example, to sort cheques by payee name alphabetically, select “Payee name” in the Sort By column. In the Order By column, select “Ascending”.
25. To review a report of the payments to be made before creating the payments, select File, Preview Pre‐Payment Report.
Note: To save changes on the Default Payment Options screen for the bank account, mark Save these changes to the Bank Account.

20 CHAPTER
26. Click Create Now at the bottom of the screen. If you marked View payment summary information before creating payments in Options, the Verify Payment Information screen appears.
27. To process the payments, click Create Payments. The first payment type prints and the Payment Printing Status screen appears for this payment type.
28. If the payments printed unsuccessfully or incorrectly, unmark the checkbox in the Successful? column.
29. The You indicated Computer Cheque printing was not successful frame becomes enabled. To void and purge the unsuccessful payments mark, Void Cheques and Purge voided cheques and enter the range of payment numbers.
30. Click OK. The program processes all other payment types in the order they appeared on the Verify Payment Information screen, and you return to the Banks page.

3chapter
GST in Accounts Payable
Accounts Payable Configuration. . . . . . . . . . . . . . . . . . . . . . . . . . . . . . . . . . . . . . . . . . . . . . . . . . . . . . . . . . . . . . . . 22General Configuration. . . . . . . . . . . . . . . . . . . . . . . . . . . . . . . . . . . . . . . . . . . . . . . . . . . . . . . . . . . . . . . . . . . . . . . . . . . 22Business Rules . . . . . . . . . . . . . . . . . . . . . . . . . . . . . . . . . . . . . . . . . . . . . . . . . . . . . . . . . . . . . . . . . . . . . . . . . . . . . . . . . 23
Invoice Business Rules . . . . . . . . . . . . . . . . . . . . . . . . . . . . . . . . . . . . . . . . . . . . . . . . . . . . . . . . . . . . . . . . . . . . . . . 24Recurring Invoice Business Rules . . . . . . . . . . . . . . . . . . . . . . . . . . . . . . . . . . . . . . . . . . . . . . . . . . . . . . . . . . . . . . 25Credit Memo Business Rules . . . . . . . . . . . . . . . . . . . . . . . . . . . . . . . . . . . . . . . . . . . . . . . . . . . . . . . . . . . . . . . . . . 25Line Items Business Rules . . . . . . . . . . . . . . . . . . . . . . . . . . . . . . . . . . . . . . . . . . . . . . . . . . . . . . . . . . . . . . . . . . . . 26Receipt Business Rules . . . . . . . . . . . . . . . . . . . . . . . . . . . . . . . . . . . . . . . . . . . . . . . . . . . . . . . . . . . . . . . . . . . . . . . 26
Tables Configuration . . . . . . . . . . . . . . . . . . . . . . . . . . . . . . . . . . . . . . . . . . . . . . . . . . . . . . . . . . . . . . . . . . . . . . . . . . . . 27Managing Default Accounts . . . . . . . . . . . . . . . . . . . . . . . . . . . . . . . . . . . . . . . . . . . . . . . . . . . . . . . . . . . . . . . . . . . . . . 29Managing Activity Types. . . . . . . . . . . . . . . . . . . . . . . . . . . . . . . . . . . . . . . . . . . . . . . . . . . . . . . . . . . . . . . . . . . . . . . . . 30Adding Sales Tax Items . . . . . . . . . . . . . . . . . . . . . . . . . . . . . . . . . . . . . . . . . . . . . . . . . . . . . . . . . . . . . . . . . . . . . . . . . . 31Accounts Payable Records. . . . . . . . . . . . . . . . . . . . . . . . . . . . . . . . . . . . . . . . . . . . . . . . . . . . . . . . . . . . . . . . . . . . . 32Adding GST to Products . . . . . . . . . . . . . . . . . . . . . . . . . . . . . . . . . . . . . . . . . . . . . . . . . . . . . . . . . . . . . . . . . . . . . . . . . 33Adding GST to Vendors . . . . . . . . . . . . . . . . . . . . . . . . . . . . . . . . . . . . . . . . . . . . . . . . . . . . . . . . . . . . . . . . . . . . . . . . . . 33Adding GST to Invoices . . . . . . . . . . . . . . . . . . . . . . . . . . . . . . . . . . . . . . . . . . . . . . . . . . . . . . . . . . . . . . . . . . . . . . . . . . 34
Invoice Tab . . . . . . . . . . . . . . . . . . . . . . . . . . . . . . . . . . . . . . . . . . . . . . . . . . . . . . . . . . . . . . . . . . . . . . . . . . . . . . . . 35Distribution Tab . . . . . . . . . . . . . . . . . . . . . . . . . . . . . . . . . . . . . . . . . . . . . . . . . . . . . . . . . . . . . . . . . . . . . . . . . . . . 35
Invoice Adjustments . . . . . . . . . . . . . . . . . . . . . . . . . . . . . . . . . . . . . . . . . . . . . . . . . . . . . . . . . . . . . . . . . . . . . . . . . . . . 37Adjustment Tab . . . . . . . . . . . . . . . . . . . . . . . . . . . . . . . . . . . . . . . . . . . . . . . . . . . . . . . . . . . . . . . . . . . . . . . . . . . . 37New Distribution Tab . . . . . . . . . . . . . . . . . . . . . . . . . . . . . . . . . . . . . . . . . . . . . . . . . . . . . . . . . . . . . . . . . . . . . . . . 38Previous Distribution Tab . . . . . . . . . . . . . . . . . . . . . . . . . . . . . . . . . . . . . . . . . . . . . . . . . . . . . . . . . . . . . . . . . . . . . 40
Adding GST to Recurring Invoices . . . . . . . . . . . . . . . . . . . . . . . . . . . . . . . . . . . . . . . . . . . . . . . . . . . . . . . . . . . . . . . . . 40Recurring Invoice Tab . . . . . . . . . . . . . . . . . . . . . . . . . . . . . . . . . . . . . . . . . . . . . . . . . . . . . . . . . . . . . . . . . . . . . . . . 41Distribution Tab . . . . . . . . . . . . . . . . . . . . . . . . . . . . . . . . . . . . . . . . . . . . . . . . . . . . . . . . . . . . . . . . . . . . . . . . . . . . 41
Adding GST to Credit Memos . . . . . . . . . . . . . . . . . . . . . . . . . . . . . . . . . . . . . . . . . . . . . . . . . . . . . . . . . . . . . . . . . . . . . 43Distribution Tab . . . . . . . . . . . . . . . . . . . . . . . . . . . . . . . . . . . . . . . . . . . . . . . . . . . . . . . . . . . . . . . . . . . . . . . . . . . . 43
Adding GST to Purchase Orders . . . . . . . . . . . . . . . . . . . . . . . . . . . . . . . . . . . . . . . . . . . . . . . . . . . . . . . . . . . . . . . . . . . 45Viewing GST on Receipts . . . . . . . . . . . . . . . . . . . . . . . . . . . . . . . . . . . . . . . . . . . . . . . . . . . . . . . . . . . . . . . . . . . . . . . . 46Editing Sales Tax Information . . . . . . . . . . . . . . . . . . . . . . . . . . . . . . . . . . . . . . . . . . . . . . . . . . . . . . . . . . . . . . . . . . . . . 47WebInvoicing . . . . . . . . . . . . . . . . . . . . . . . . . . . . . . . . . . . . . . . . . . . . . . . . . . . . . . . . . . . . . . . . . . . . . . . . . . . . . . . 47Create Invoice Requests . . . . . . . . . . . . . . . . . . . . . . . . . . . . . . . . . . . . . . . . . . . . . . . . . . . . . . . . . . . . . . . . . . . . . . . . . 48

22 CHAPTER
This chapter explains how sales taxes such as the Goods and Services Tax (GST) and the Harmonized Sales Tax (HST) affect Accounts Payable.
This chapter includes information about managing sales taxes in Configuration, Records, and Reports. For example, in Configuration you can designate GST/HST information, manage activity types, and set up a default receivables account for Public Service Bodies’ Rebates.
Accounts Payable ConfigurationConfiguration is where you set up Accounts Payable to fit the needs of your organization. For example, on the General page, you can designate GST and HST information, including your Business Number, GST rate and tax entity, and whether you are located in an HST province. You can also enter your PSB Activity Code.
On the Product and Billing Items page, you can create different sales tax items, such as the standard GST tax percent, a tax free item for tax‐free products and services, and, if you are in an HST province, an HST percent.
You can also set up accounts to use as the default receivables account for Public Service Bodies’ Rebate values on transactions.
General ConfigurationThe General page is where you enter basic information about your organization.
The address and phone information you enter on this page appears on printed documents and correspondence. You can also enter GST/HST information, your Business Number, and PSB activity code. If you enter this information, it appears automatically, so you will not have to enter the information again later.
For more detailed information about entering information on the General page of Configuration, see the Configuration Guide for Accounts Payable.
Note: You can add or edit sales tax entities on the Tables page. For more information, see “Tables Configuration” on page 27.
GST IN ACCOUNTS PAYABLE 23
GST Rate. In the GST Rate field, enter the current federal tax rate.GST tax entity. In the GST Tax entity field, select a GST entity.HST tax entity. In the HST Tax entity field, select an HST entity.Business Number. In the Business Number field, enter the federal charitable identification number for your
organization.
PSB Activity Code. In the PSB Activity Code field, select an activity type to use as the default. For more information about activity types, see “Managing Activity Types” on page 30.
This organization is located in an HST participating province. Mark this checkbox if your organization is located in an HST participating province.
The organization default Sales Tax ID. In this field, select a default sales tax ID. This field is helpful if you commonly use more than one sales tax type. You can select the sales tax you use most often and that entry appears as the default on records so you do not have to enter it every time. You can change the field entry if necessary.
Business RulesBusiness rules help you customize standard procedures and requirements to suit your organization. For example, by setting invoice business rules, you can designate the functions you use for invoicing. You can select whether to automatically apply open credit to new invoices, to require invoice approval before paying, to exclude Do Not Post as a post status, and whether to change an invoice status to paid when the applied credit reduces the balance to zero.
You can set sales tax business rules for invoice, recurring invoice, credit memo, receipt, and line item records, including an important tax option you can set for data entry. You can choose to “include tax” or “exclude tax” during data entry for the unit price and extended price.
Note: At the time this information was published, HST participating provinces included Nova Scotia, New Brunswick, Ontario, British Columbia, and Newfoundland and Labrador.
Note: Accounts Payable contains several preformatted sales tax IDs, including a GST percent, HST percent, local sales tax, and a zero‐rated sales tax. You can add or edit these items at any time. You can also delete sales tax items if they are not currently used on a record.
Note: The Business Rules link in Configuration is visible only to users with supervisor rights assigned in Security. Business rules affect all users and are usually defined by the system administrator.

24 CHAPTER
To change business rules, from the Configuration page, click Business Rules. The Business Rules page appears.
Invoice Business Rules
With Invoice business rules, you can determine whether displayed invoice transaction amounts include taxes, and you can require including taxes when computing discounts you receive for making early payments.
During data entry, show the. With this rule, you can select whether invoice transaction amounts should include or exclude taxes.
Include tax in discount calculations. Mark this rule to include tax amounts when calculating discounts you receive for early payments.
Note: This guide discusses only business rules related to GST. For detailed information about other business rules, see the Configuration Guide for Accounts Payable.

GST IN ACCOUNTS PAYABLE 25
Recurring Invoice Business RulesWith Recurring Invoice business rules, you can determine whether displayed recurring invoice transaction amounts include taxes.
During data entry, show the. With this rule, you can select whether invoice transaction amounts should include or exclude taxes.
Credit Memo Business Rules
With Credit Memo business rules, you can determine whether displayed credit memo transaction amounts include taxes.
During data entry, show the. With this rule, you can select whether credit memo transaction amounts should include or exclude taxes.
Note: This guide discusses only business rules related to GST. For detailed information about other business rules, see the Configuration Guide for Accounts Payable.
26 CHAPTER
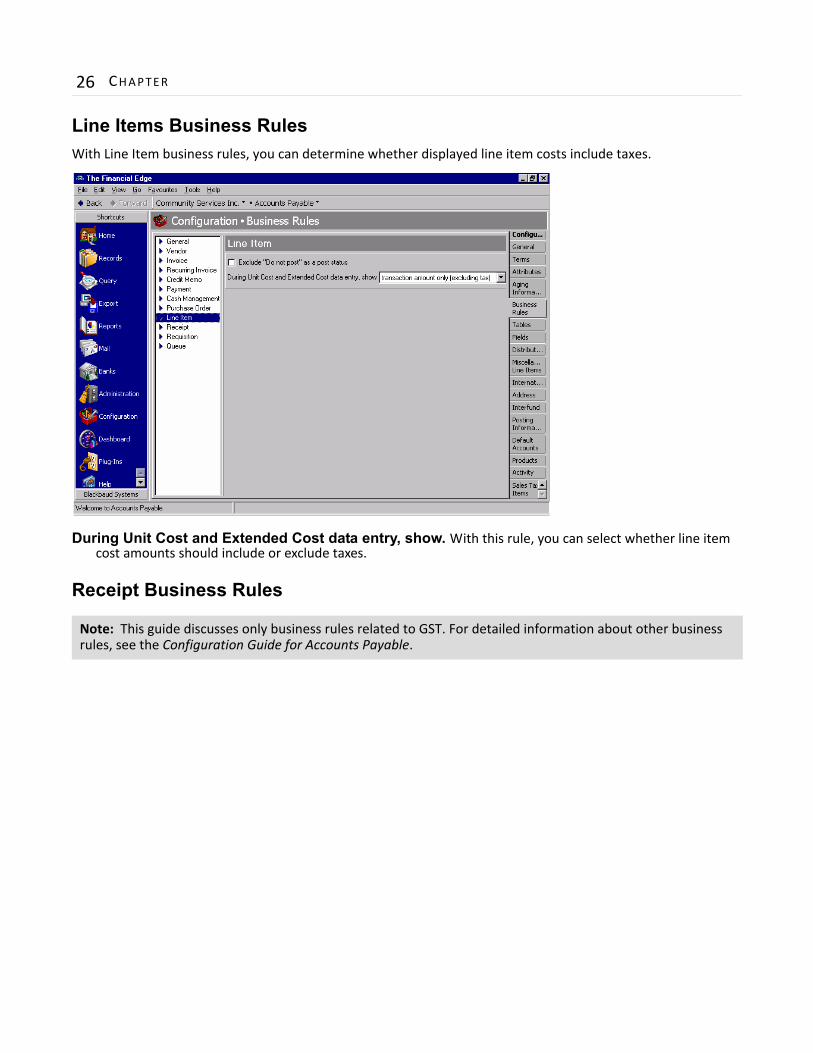
Line Items Business RulesWith Line Item business rules, you can determine whether displayed line item costs include taxes.
During Unit Cost and Extended Cost data entry, show. With this rule, you can select whether line item cost amounts should include or exclude taxes.
Receipt Business Rules
Note: This guide discusses only business rules related to GST. For detailed information about other business rules, see the Configuration Guide for Accounts Payable.
GST IN ACCOUNTS PAYABLE 27
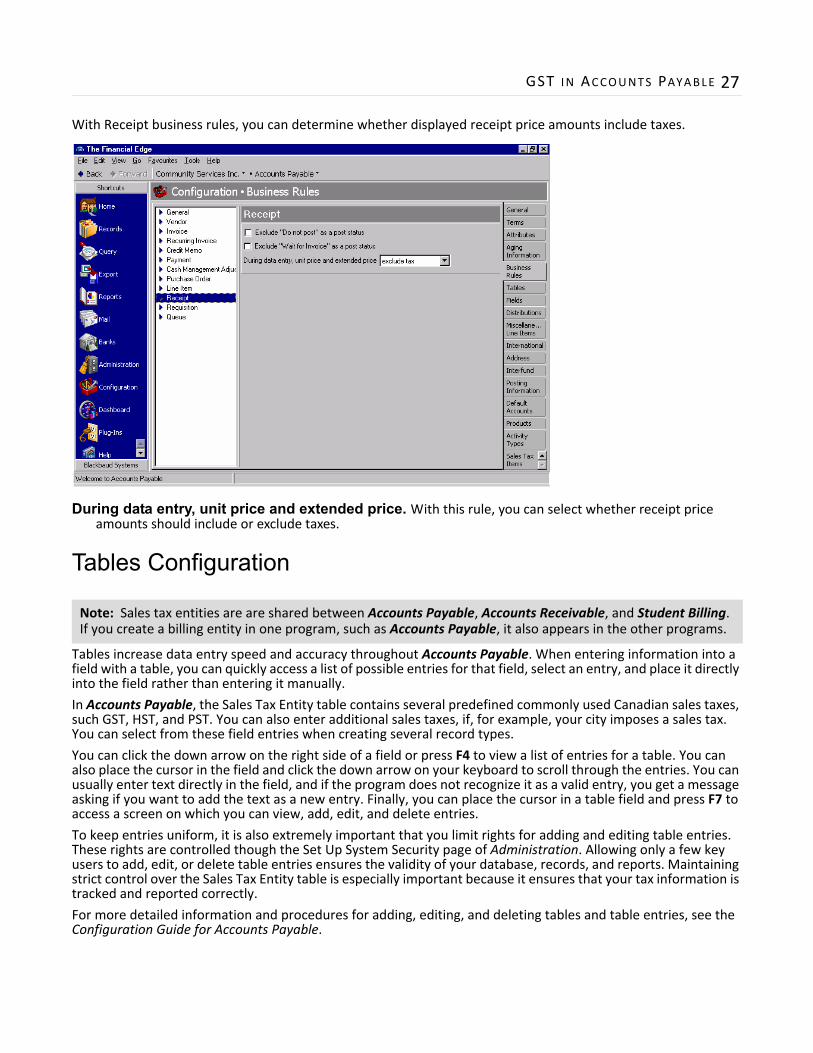
With Receipt business rules, you can determine whether displayed receipt price amounts include taxes.
During data entry, unit price and extended price. With this rule, you can select whether receipt price amounts should include or exclude taxes.
Tables Configuration
Tables increase data entry speed and accuracy throughout Accounts Payable. When entering information into a field with a table, you can quickly access a list of possible entries for that field, select an entry, and place it directly into the field rather than entering it manually.
In Accounts Payable, the Sales Tax Entity table contains several predefined commonly used Canadian sales taxes, such GST, HST, and PST. You can also enter additional sales taxes, if, for example, your city imposes a sales tax. You can select from these field entries when creating several record types.
You can click the down arrow on the right side of a field or press F4 to view a list of entries for a table. You can also place the cursor in the field and click the down arrow on your keyboard to scroll through the entries. You can usually enter text directly in the field, and if the program does not recognize it as a valid entry, you get a message asking if you want to add the text as a new entry. Finally, you can place the cursor in a table field and press F7 to access a screen on which you can view, add, edit, and delete entries.
To keep entries uniform, it is also extremely important that you limit rights for adding and editing table entries. These rights are controlled though the Set Up System Security page of Administration. Allowing only a few key users to add, edit, or delete table entries ensures the validity of your database, records, and reports. Maintaining strict control over the Sales Tax Entity table is especially important because it ensures that your tax information is tracked and reported correctly.
For more detailed information and procedures for adding, editing, and deleting tables and table entries, see the Configuration Guide for Accounts Payable.
Note: Sales tax entities are are shared between Accounts Payable, Accounts Receivable, and Student Billing. If you create a billing entity in one program, such as Accounts Payable, it also appears in the other programs.
28 CHAPTER
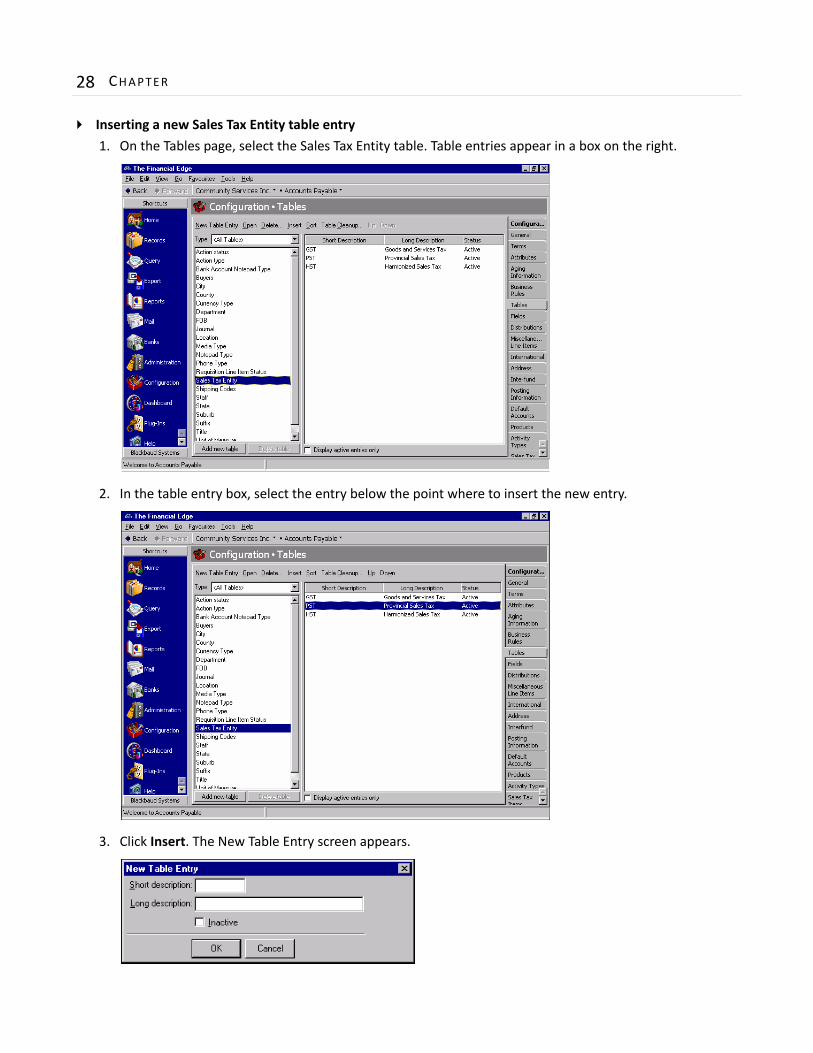
Inserting a new Sales Tax Entity table entry
1. On the Tables page, select the Sales Tax Entity table. Table entries appear in a box on the right.
2. In the table entry box, select the entry below the point where to insert the new entry.
3. Click Insert. The New Table Entry screen appears.

GST IN ACCOUNTS PAYABLE 29
4. In the Short Description field, enter an abbreviation for the new sales tax entity.
5. In the Long description field, enter the full name of the new sales tax entity.
6. To make the new table entry inactive, mark Inactive.
7. To save the new table entry and return to the Tables page, click OK. The new sales tax entity appears above the selected entry.
Managing Default AccountsFrom the Default Accounts page, you can set up accounts to use as the default receivables account when applying rebate values on transactions. You can select default accounts for GST receivables and PST receivables.
Selecting a default account
1. On the Configuration page, click Default Accounts. The Default Accounts page appears.
2. In the box on the left, select GST Receivables. The GST Receivables default account option appears.
3. In the Account field, enter an account number. This is the default federal receivables account used when applying rebate values on transactions. You can use the small binoculars to search for an account segment or use the large binoculars to search for an account number.
4. Next select PST Receivables. The PST Receivables default account option appears.
5. In the Account field, enter an account number. This is the default provincial receivables account used when applying rebate values on transactions. You can use the small binoculars to search for an account segment or use the large binoculars to search for an account number.
If you do not have PST, enter your default GST receivables account in the Account field.
6. When you exit the Default Account page or select another type of account, your changes are saved automatically.
Tip: You can also create activity types to maintain default Public Service Body rebates and receivable accounts. The default accounts you set up here are overridden by the accounts you select for the activity type. For more information, see “Managing Activity Types” on page 30.

30 CHAPTER
Managing Activity TypesYou can maintain the Public Service Bodies’ activity codes and rebates on the Activity Types page. The Activity Type page contains a grid of predefined activity types.
Managing activity information
1. From the Configuration page, click Activity Types. The Activity Types page appears.
2. If the activity type is eligible for a provincial rebate, mark the checkbox in the Provincial Rebate Eligibility column.
3. To open an activity type and edit the information, select it in the grid and click Open.
4. To delete an activity type, select it in the grid and click Delete.
Adding an activity type
1. From the Activity Types page, click New Activity Code. The New Activity Code screen appears.
2. In the Activity Code field, enter a numeric activity code.
3. In the Activity Type field, enter a name or brief description for the activity type.
4. In the GST Rebate Factor field, enter the federal rebate percent. This field is required.
Note: If your organization is located in multiple provinces, you may need to set up custom activity types to represent each province.

GST IN ACCOUNTS PAYABLE 31
5. In the PST Rebate Factor field, enter the provincial rebate percent. If you do not have a provincial tax, this field is not required.
6. If the activity code is eligible for provincial rebate, mark the checkbox.
7. In the GST Receivable account field, select a federal receivable account to use on transactions. To help locate the account, you can use the account or segment search.
8. In the PST Receivable account field, select a provincial receivable account to use on transactions. If you do not have a provincial tax, this field is not required.
9. Click OK to return to the Activity Types page.
Adding Sales Tax Items
The Sales Tax Items page is where you add, edit, and delete sales tax items. You can use these items to track sales taxes for reporting and budgeting purposes or so you can later file for rebates.
If you have vendors from multiple provinces, you may need to create custom sales tax items. For example, create an item called “Ontario” and make the sales tax entity HST with 13%. Create another item call “British Columbia” and make the sales tax entity HST with 12%.
Adding a new sales tax item
1. From the Configuration page, click Sales Tax Items. The Sales Tax Items page appears.
Note: Accounts Payable contains several preformatted sales tax IDs, including a GST percent, HST percent, local sales tax, and a zero‐rated sales tax. You can add or edit these items at any time. You can delete sales tax items if they are not currently used on a record.

32 CHAPTER
2. Click New Sales Tax Item. The New Sales Tax Item screen appears.
3. In the Item ID field, enter a unique ID for the item.
4. In the Status field, select “Active” or “Inactive”.
5. In Description field, enter a description of the sales tax item, for example, “Goods and Services Tax”.
6. In the Sales Tax Entity column, select a sales tax entity previously added to Sales Tax Entity table in Configuration. You can also enter a new entity in the column and you will be prompted to add it to the Sales Tax Entity table.
7. In the Percent column, enter the tax rate for the item. For example, “5.00”.
8. If taxes should be compounded on the first tax entity in the grid, mark When calculating tax for the [] through [] include and select the range. The options available depend on the number of sales tax entities in the grid.
9. In the Comment field, enter any additional information associated with the tax.
10. Click Save and Close to return to the Sales Tax Items page.
Accounts Payable RecordsFrom the Records page of Accounts Payable, you can create vendors, invoices, recurring invoices, and credit memos. Each of these record types can contain information to help you track sales taxes you pay so you can claim deductions or rebates. If you have the optional module Purchase Orders, you can also track sales tax information for purchase orders, products, receipts, and requisitions.
This chapter guides you through available sales tax options and fields, and it explains how they affect your organization. For detailed explanations of other record features, and for detailed procedures for creating new records, see the Records Guide for Accounts Payable.
Before you begin adding sales tax information to records, you should create sales tax items and set business rules in Configuration.
Note: Before you begin adding sales tax information to records, you should create sales tax items and set business rules in Configuration.

GST IN ACCOUNTS PAYABLE 33
Adding GST to Products
If you have the optional module Purchase Orders, you can create product records in Accounts Payable. On the product record, you can specify whether the product is taxable, and you can select a tax identifier you created in Configuration.
Product is taxable. If the product you are purchasing is taxable, mark this checkbox.
GST Tax ID. In the GST Tax ID field, select a tax entity code. If necessary, you can add sales tax entity codes to the Sales Tax Entity table on the Tables page of Configuration.
PSB Activity Code. In the PSB Activity Code field, select a public service bodies activity code for the product’s vendor. You can add activity type codes on the Activity Types page of Configuration.
Adding GST to Vendors
On the Distribution tab of the vendor record, you can assign a GST Tax ID and PSB Activity code. By applying tax IDs and activity codes, you can ensure that every invoice or credit memo created for this vendor contains the appropriate sales tax information. The tax information you enter on the vendor record appears automatically on the other record types.
Tip: To save time, you can add new products from a purchase order line item record.
Note: You can add products from the Products page, the Open screen for products, or by selecting File, New from a product record. You can also add a product from a line item.
Note: For detailed information and procedures for creating a new vendor record, see the Records Guide for Accounts Payable.

34 CHAPTER
The Distribution tab also contains vendor account distribution information. From here, you designate debit accounts for the vendor’s transactions, amounts to distribute to the accounts, and whether to classify distributions using projects, classes, or transaction codes. For more information about vendor distributions, see the Records Guide for Accounts Payable.
GST Tax ID. In the GST Tax ID field, select a sales tax item. If necessary, you can add sales tax items on the Sales Tax Items page of Configuration.
PSB Activity Code. In the PSB Activity Code field, select a public service bodies activity code for this vendor. You can add activity type codes on the Activity Types page of Configuration.
Adding GST/PST to Invoices
In Accounts Payable, you can create two types of invoices: regular and recurring. A regular invoice is a request for payment from a vendor for goods or services rendered, while a recurring invoice is a template you use to create a regular invoice according to a schedule. A recurring invoice is never posted or included in any balance calculation.
You can create both regular and recurring invoices directly from a vendor record or from the Records page. Sales tax options are available on both invoice and recurring invoice records.
If the business rule requiring approval before paying invoices is selected, all invoices must be approved before they can be paid or posted. To approve invoices, you must have security rights.
On the Distribution tab of invoices and recurring invoices, you can create a GST and PST Rebate distribution to track purchases or expenses that qualify for a GST and PST rebates.
Note: For detailed information and procedures for creating a new invoice record, see the Records Guide for Accounts Payable.

GST IN ACCOUNTS PAYABLE 35
Invoice TabOn the Invoice tab, you can edit the sales tax information that appears for the charge amount you enter. You can also designate whether the total amounts include tax, or if the tax amount should be added.
Enter total amount (include tax). Mark this checkbox if you enter a total amount, including sales taxes, in the Invoice amount field. If you do not mark this box, when you enter an invoice amount in the Invoice amount field and select a sales tax, Accounts Payable adds the sales tax automatically.
Edit Tax. To edit the tax settings for this invoice, click Edit Tax. The Edit Sales Tax screen appears. For more information about editing sales tax information, see “Editing Sales Tax Information” on page 47.
Distribution Tab
On the invoice GL Distribution tab, you can create a distribution to track payments and expenses that qualify for GST and PST rebates. Then you can print a Public Sector Bodies GST Report to view a list of all GST transactions and taxes you paid.
Note: For detailed information and procedures for creating a new invoice distribution, see the Records Guide for Accounts Payable.

36 CHAPTER
Creating a GST or PST Rebate distribution
1. From an open invoice record, select the GL Distribution tab.
2. In the field above the grid, select “GST Rebate” or “PST Rebate.”
3. In the PSB Code field, select a code for the public service body. This code applies to both GST and PST. You can add and edit the public service bodies’ activity codes and rebates on the Activity Types page of Configuration. When you select a PSB code, the rebate amount appears in the amount field.
4. To enter distributions by amount, click the $ button. To enter distributions by percent, click the % button.
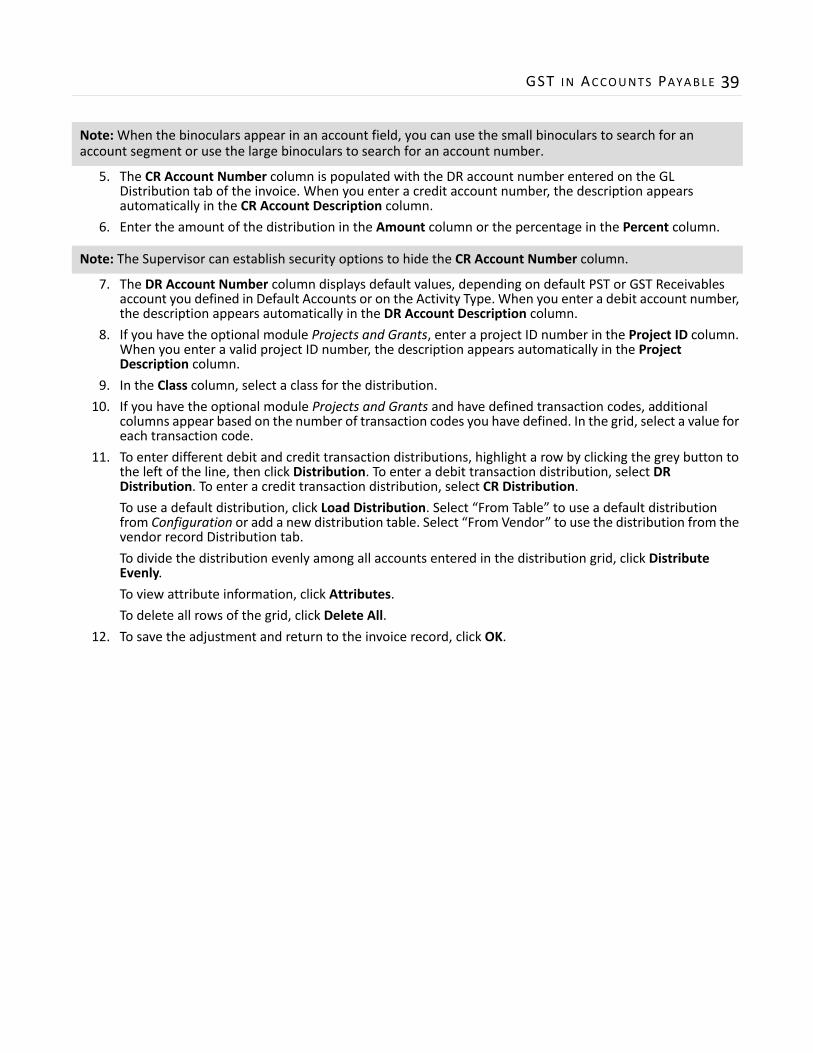
5. The CR Account Number column is populated with the DR account number entered on the GL Distribution tab of the invoice. When you enter a credit account number, the description appears automatically in the CR Account Description column.
6. Enter the amount of the distribution in the Amount column or the percentage in the Percent column.
7. The DR Account Number column displays default values, depending on default PST or GST Receivables account you defined in Default Accounts or on the Activity Type. When you enter a debit account number, the description appears automatically in the DR Account Description column.
8. If you have the optional module Projects and Grants, enter a project ID number in the Project ID column. When you enter a valid project ID number, the description appears automatically in the Project Description column.
9. In the Class column, select a class for the distribution.
10. If you have the optional module Projects and Grants and have defined transaction codes, additional columns appear based on the number of transaction codes you have defined. In the grid, select a value for each transaction code.
Note: When the binoculars appear in an account field, you can use the small binoculars to search for an account segment or use the large binoculars to search for an account number.
Note: The Supervisor can establish security options to hide the CR Account Number column.

GST IN ACCOUNTS PAYABLE 37
11. To enter different debit and credit transaction distributions, highlight a row by clicking the grey button to the left of the line, then click Distribution. To enter a debit transaction distribution, select DR Distribution. To enter a credit transaction distribution, select CR Distribution.
To use a default distribution, click Load Distribution. Select “From Table” to use a default distribution from Configuration or add a new distribution table. Select “From Vendor” to use the distribution from the vendor record Distribution tab.
To divide the distribution evenly among all accounts entered in the distribution grid, click Distribute Evenly.
To view attribute information, click Attributes.
To delete all rows of the grid, click Delete All.
To distribute discounts to the debit accounts from the invoice, mark Distribute discounts to debit (expense) account(s) from invoice. If this box is unmarked, discounts are distributed to the default discount account from the Default Accounts page of Configuration.
12. To save the invoice and return to the Invoice page, click Save and Close.
Invoice AdjustmentsAdjustments are corrections you make to a posted invoice that reverse the incorrect post and then create another post with new distributions. You can change sales tax information on invoice adjustments only if you void a previous partial payment. To make a new adjustment to a posted invoice, from the menu bar, select Invoice, New Adjustment. The New Adjustment Screen Appears. For detailed information and procedures for creating invoice adjustments, see the Records Guide for Accounts Payable.
Adjustment TabOn the invoice Adjustment Tab, you can enter a new transaction amount if the invoice has not been paid, and you can edit the sales tax.
Edit Tax. To edit the tax settings for this invoice, click Edit Tax. The Edit Sales Tax screen appears. For more information about editing sales tax information, see “Editing Sales Tax Information” on page 47. When you select a sales tax item in the Edit Tax field, the tax amount appears automatically.

38 CHAPTER
New Distribution Tab
On the New Distribution tab, you can edit the adjustment distribution, including the GST Rebate distribution. To view the amount of the previous distribution, select the Previous Distribution tab.
Editing a GST Rebate distribution on an invoice adjustment
1. On the New Adjustment screen of an open invoice record, select the New Distribution tab.
2. In the field above the grid, select “GST Rebate”.
3. In the PSB Code field, select a code for the public service body. You can add and edit the public service bodies’ activity codes and rebates on the Activity Types page of Configuration. When you select a PSB code, the rebate amount appears in the amount field.
4. To enter distributions by amount, click the $ button. To enter distributions by percent, click the % button.
Note: For detailed information and procedures for creating invoice distributions, see the Records Guide for Accounts Payable.
GST IN ACCOUNTS PAYABLE 39
5. The CR Account Number column is populated with the DR account number entered on the GL Distribution tab of the invoice. When you enter a credit account number, the description appears automatically in the CR Account Description column.
6. Enter the amount of the distribution in the Amount column or the percentage in the Percent column.
7. The DR Account Number column displays default values, depending on default PST or GST Receivables account you defined in Default Accounts or on the Activity Type. When you enter a debit account number, the description appears automatically in the DR Account Description column.
8. If you have the optional module Projects and Grants, enter a project ID number in the Project ID column. When you enter a valid project ID number, the description appears automatically in the Project Description column.
9. In the Class column, select a class for the distribution.
10. If you have the optional module Projects and Grants and have defined transaction codes, additional columns appear based on the number of transaction codes you have defined. In the grid, select a value for each transaction code.
11. To enter different debit and credit transaction distributions, highlight a row by clicking the grey button to the left of the line, then click Distribution. To enter a debit transaction distribution, select DR Distribution. To enter a credit transaction distribution, select CR Distribution.
To use a default distribution, click Load Distribution. Select “From Table” to use a default distribution from Configuration or add a new distribution table. Select “From Vendor” to use the distribution from the vendor record Distribution tab.
To divide the distribution evenly among all accounts entered in the distribution grid, click Distribute Evenly.
To view attribute information, click Attributes.
To delete all rows of the grid, click Delete All.
12. To save the adjustment and return to the invoice record, click OK.
Note: When the binoculars appear in an account field, you can use the small binoculars to search for an account segment or use the large binoculars to search for an account number.
Note: The Supervisor can establish security options to hide the CR Account Number column.

40 CHAPTER
Previous Distribution TabOn the Previous Distribution tab, you can view the tax distribution for the adjustment, before any changes. Field and grid entries on the Previous Tax Distribution tab are locked and cannot be edited. To change the tax distribution, see “Editing a GST Rebate distribution on an invoice adjustment” on page 38.
Adding GST/PST to Recurring Invoices
Recurring invoices are templates from which you can create regular invoices quickly and easily according to a schedule. They provide basic information such as the vendor name, invoice amount, and payment method, so you do not have to enter the entire invoice from scratch. Although you can pay and post the invoices you create from a recurring invoice, recurring invoices are never posted or included in any balance calculation.
You can create both regular and recurring invoices directly from a vendor record or create the invoice from the File menu of a vendor record and apply it to a vendor. GST options appear on invoice and recurring invoice records.
On the Distribution tab of recurring invoices, you can create a GST Rebate distribution to track purchases or expenses that qualify for a GST rebate.
Note: For detailed information and procedures for creating a new recurring invoice record, see the Records Guide for Accounts Payable.
GST IN ACCOUNTS PAYABLE 41
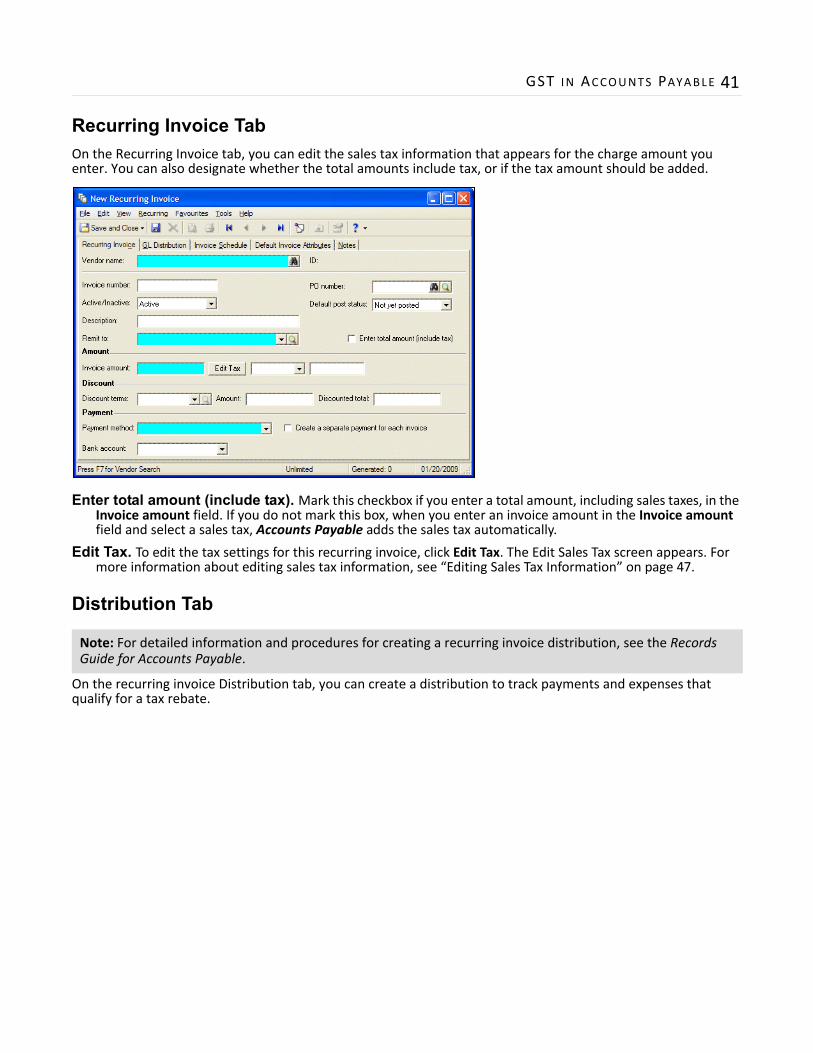
Recurring Invoice TabOn the Recurring Invoice tab, you can edit the sales tax information that appears for the charge amount you enter. You can also designate whether the total amounts include tax, or if the tax amount should be added.
Enter total amount (include tax). Mark this checkbox if you enter a total amount, including sales taxes, in the Invoice amount field. If you do not mark this box, when you enter an invoice amount in the Invoice amount field and select a sales tax, Accounts Payable adds the sales tax automatically.
Edit Tax. To edit the tax settings for this recurring invoice, click Edit Tax. The Edit Sales Tax screen appears. For more information about editing sales tax information, see “Editing Sales Tax Information” on page 47.
Distribution Tab
On the recurring invoice Distribution tab, you can create a distribution to track payments and expenses that qualify for a tax rebate.
Note: For detailed information and procedures for creating a recurring invoice distribution, see the Records Guide for Accounts Payable.

42 CHAPTER
Creating a PST or GST Rebate distribution
1. From an open recurring invoice record, select the GL Distribution tab.
2. In the field above the grid, select “GST Rebate” or “PST Rebate.”
3. In the PSB Code field, select a code for the public service body. You can add and edit the public service bodies’ activity codes and rebates on the Activity Types page of Configuration. When you select a PSB code, the rebate amount appears in the amount field.
4. To enter distributions by amount, click the $ button. To enter distributions by percent, click the % button.
5. The CR Account Number column is populated with the DR account number entered on the GL Distribution tab of the invoice. When you enter a credit account number, the description appears automatically in the CR Account Description column.
6. Enter the amount of the distribution in the Amount column or the percentage in the Percent column.
7. The DR Account Number column displays default values, depending on default PST or GST Receivables account you defined in Default Accounts or on the Activity Type. When you enter a debit account number, the description appears automatically in the DR Account Description column.
8. If you have the optional module Projects and Grants, enter a project ID number in the Project ID column. When you enter a valid project ID number, the description appears automatically in the Project Description column.
9. In the Class column, select a class for the distribution.
10. If you have the optional module Projects and Grants and have defined transaction codes, additional columns appear based on the number of transaction codes you have defined. In the grid, select a value for each transaction code.
11. To enter different debit and credit transaction distributions, highlight a row by clicking the grey button to the left of the line, then click Distribution. To enter a debit transaction distribution, select DR Distribution. To enter a credit transaction distribution, select CR Distribution.
Note: When the binoculars appear in an account field, you can use the small binoculars to search for an account segment or use the large binoculars to search for an account number.
Note: The Supervisor can establish security options to hide the CR Account Number column.

GST IN ACCOUNTS PAYABLE 43
To use a default distribution, click Load Distribution. Select “From Table” to use a default distribution from Configuration or add a new distribution table. Select “From Vendor” to use the distribution from the vendor record Distribution tab.
To divide the distribution evenly among all accounts entered in the distribution grid, click Distribute Evenly.
To view attribute information, click Attributes.
To delete all rows of the grid, click Delete All.
To distribute discounts to the debit accounts from the invoice, mark Distribute discounts to debit (expense) account(s) from invoice. If this box is unmarked, discounts are distributed to the default discount account from the Default Accounts page of Configuration.
12. To save the recurring invoice and return to the Recurring Invoice page, click Save and Close.
Adding GST/PST to Credit Memos
A credit memo is a document issued by a vendor to record an adjustment against an invoice. You can apply a credit memo to one or more invoices to decrease the amount owed. Credit memos negatively impact the amount of GST and PST rebates you qualify for because they effectively reduce the amount of GST you pay.
The credit memo record displays basic credit memo information including number, date, description, post information, and sales tax amount.
Edit Tax. To edit the tax settings for this credit memo, click Edit Tax. The Edit Sales Tax screen appears. For more information about editing sales tax information, see “Editing Sales Tax Information” on page 47.
Distribution Tab
Note: For detailed information and procedures for creating a new credit memo record, see the Records Guide for Accounts Payable.
Note: For detailed information and procedures for creating a new invoice distribution, see the Records Guide for Accounts Payable.

44 CHAPTER
On the credit memo Distribution tab, you can create a PST and GST Rebate distributions. This distribution tracks credits that negatively impact the amount of the PST or GST rebate you can file for. When you print a Public Sector Bodies GST Report, the negative rebate amount is subtracted from the rebate total so you do not claim unqualified deductions.
Creating a GST or PST Rebate distribution
1. From an open credit memo record, select the GL Distribution tab.
2. In the field above the grid, select “GST Rebate” or “PST Rebate.”
3. In the PSB Code field, select a code for the public service body. You can add and edit the public service bodies’ activity codes and rebates on the Activity Types page of Configuration. When you select a PSB code, the rebate amount appears in the amount field.
4. To enter distributions by amount, click the $ button. To enter distributions by percent, click the % button.
5. The CR Account Number column displays default values, depending on default PST or GST Receivables account you defined in Default Accounts or on the Activity Type. When you enter a credit account number, the description appears automatically in the CR Account Description column.
6. Enter the amount of the distribution in the Amount column or the percentage in the Percent column.
7. The DR Account Number column is populated with the CR account number entered on the GL Distribution tab of the invoice. When you enter a debit account number, the description appears automatically in the DR Account Description column.
8. If you have the optional module Projects and Grants, enter a project ID number in the Project ID column. When you enter a valid project ID number, the description appears automatically in the Project Description column.
Note: Credit memos negatively impact the amount of GST and PST rebates you qualify for because they effectively reduce the amount of GST you pay.
Note: When the binoculars appear in an account field, you can use the small binoculars to search for an account segment or use the large binoculars to search for an account number.
Note: The Supervisor can establish security options to hide the CR Account Number column.

GST IN ACCOUNTS PAYABLE 45
9. In the Class column, select a class for the distribution.
10. If you have the optional module Projects and Grants and have defined transaction codes, additional columns appear based on the number of transaction codes you have defined. In the grid, select a value for each transaction code.
11. To enter different debit and credit transaction distributions, highlight a row by clicking the grey button to the left of the line, then click Distribution. To enter a debit transaction distribution, select DR Distribution. To enter a credit transaction distribution, select CR Distribution.
To use a default distribution, click Load Distribution. Select “From Table” to use a default distribution from Configuration or add a new distribution table. Select “From Vendor” to use the distribution from the vendor record Distribution tab.
To divide the distribution evenly among all accounts entered in the distribution grid, click Distribute Evenly.
12. To attach transaction attributes to an account in the distribution, click Attributes at the bottom of the screen. When you finish entering information, click OK to return to the Distribution tab.
To delete all rows of the grid, click Delete All.
13. To save the credit memo and return to the Credit Memos page, click Save and Close.
Adding GST/PST to Purchase Orders
If you have the optional module Purchase Orders, you can create purchase orders and receipts. A purchase order is a record you create to authorize the purchase of goods or services from a specific vendor. Once you create a purchase order record, you can enter line items and General Ledger distributions for each line item. In Accounts Payable you can create three types of purchase orders: regular, blanket, and template.
Once you generate a regular purchase order from a blanket purchase order, you cannot add additional line items to the blanket purchase order. Also, you cannot edit existing line items.
By creating a purchase order from a vendor record, you automatically associate the purchase order with that vendor.
Note: For detailed information and procedures for creating a new purchase order, see the Records Guide for Accounts Payable.
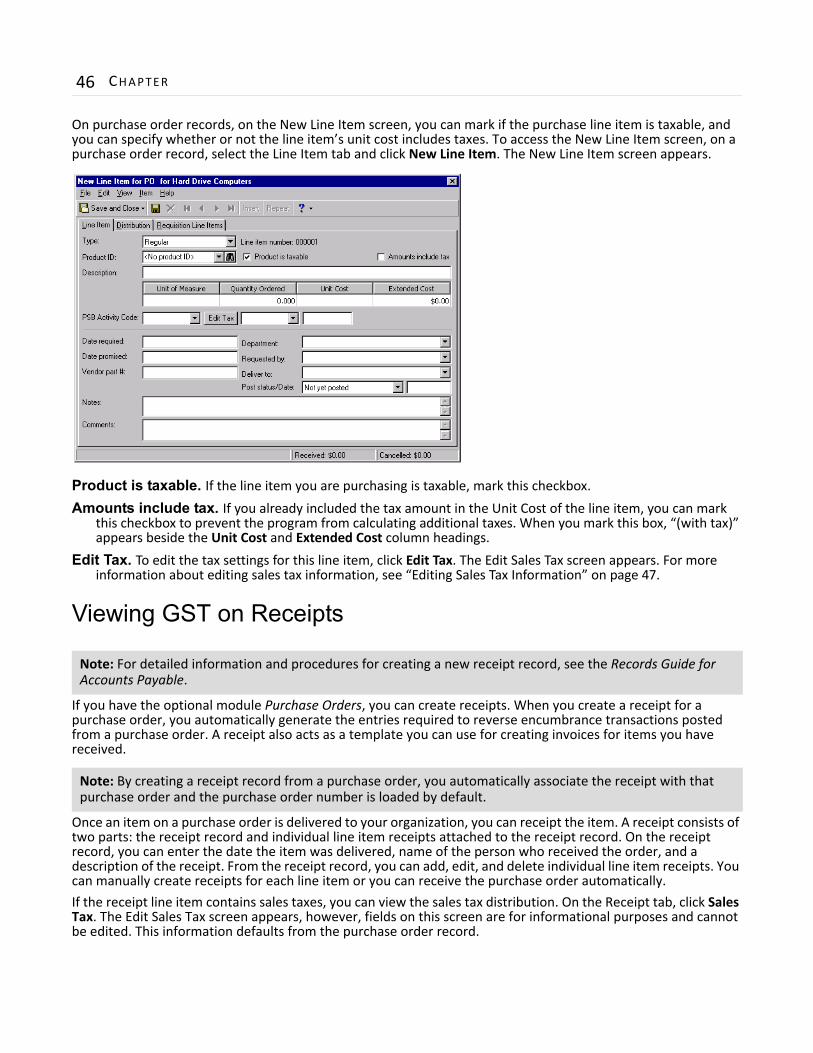
46 CHAPTER
On purchase order records, on the New Line Item screen, you can mark if the purchase line item is taxable, and you can specify whether or not the line item’s unit cost includes taxes. To access the New Line Item screen, on a purchase order record, select the Line Item tab and click New Line Item. The New Line Item screen appears.
Product is taxable. If the line item you are purchasing is taxable, mark this checkbox.
Amounts include tax. If you already included the tax amount in the Unit Cost of the line item, you can mark this checkbox to prevent the program from calculating additional taxes. When you mark this box, “(with tax)” appears beside the Unit Cost and Extended Cost column headings.
Edit Tax. To edit the tax settings for this line item, click Edit Tax. The Edit Sales Tax screen appears. For more information about editing sales tax information, see “Editing Sales Tax Information” on page 47.
Viewing GST on Receipts
If you have the optional module Purchase Orders, you can create receipts. When you create a receipt for a purchase order, you automatically generate the entries required to reverse encumbrance transactions posted from a purchase order. A receipt also acts as a template you can use for creating invoices for items you have received.
Once an item on a purchase order is delivered to your organization, you can receipt the item. A receipt consists of two parts: the receipt record and individual line item receipts attached to the receipt record. On the receipt record, you can enter the date the item was delivered, name of the person who received the order, and a description of the receipt. From the receipt record, you can add, edit, and delete individual line item receipts. You can manually create receipts for each line item or you can receive the purchase order automatically.
If the receipt line item contains sales taxes, you can view the sales tax distribution. On the Receipt tab, click Sales Tax. The Edit Sales Tax screen appears, however, fields on this screen are for informational purposes and cannot be edited. This information defaults from the purchase order record.
Note: For detailed information and procedures for creating a new receipt record, see the Records Guide for Accounts Payable.
Note: By creating a receipt record from a purchase order, you automatically associate the receipt with that purchase order and the purchase order number is loaded by default.
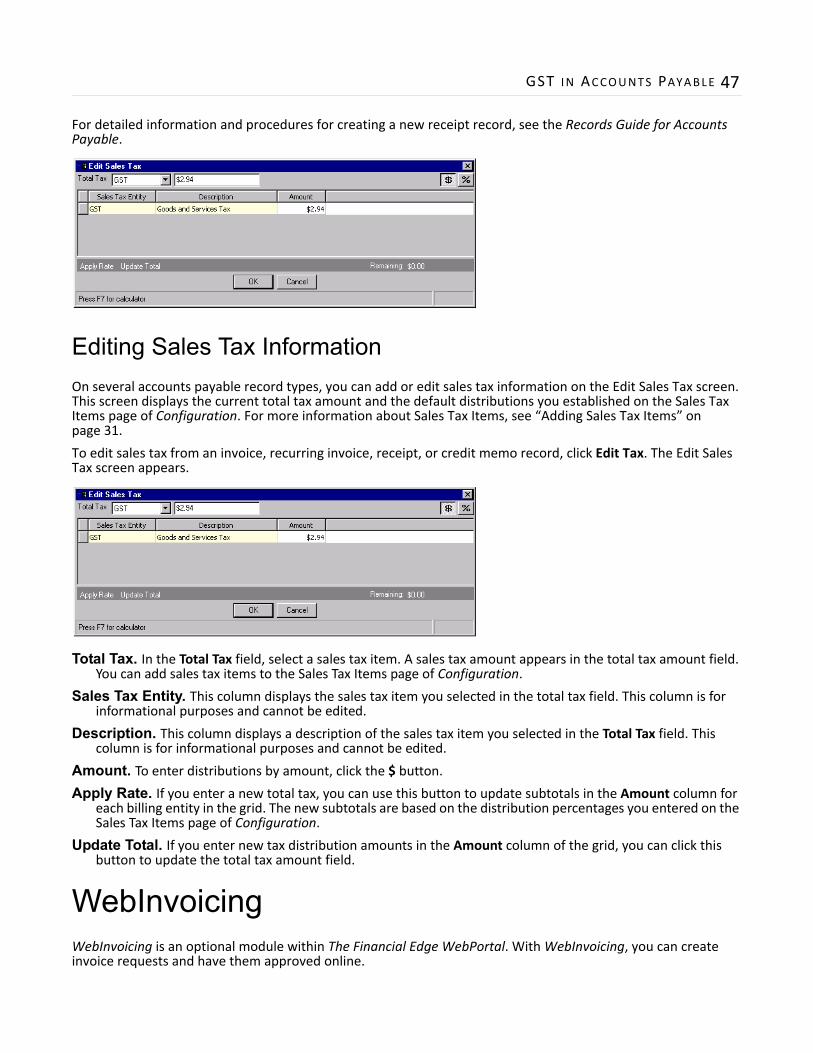
GST IN ACCOUNTS PAYABLE 47
For detailed information and procedures for creating a new receipt record, see the Records Guide for Accounts Payable.
Editing Sales Tax InformationOn several accounts payable record types, you can add or edit sales tax information on the Edit Sales Tax screen. This screen displays the current total tax amount and the default distributions you established on the Sales Tax Items page of Configuration. For more information about Sales Tax Items, see “Adding Sales Tax Items” on page 31.
To edit sales tax from an invoice, recurring invoice, receipt, or credit memo record, click Edit Tax. The Edit Sales Tax screen appears.
Total Tax. In the Total Tax field, select a sales tax item. A sales tax amount appears in the total tax amount field. You can add sales tax items to the Sales Tax Items page of Configuration.
Sales Tax Entity. This column displays the sales tax item you selected in the total tax field. This column is for informational purposes and cannot be edited.
Description. This column displays a description of the sales tax item you selected in the Total Tax field. This column is for informational purposes and cannot be edited.
Amount. To enter distributions by amount, click the $ button.
Apply Rate. If you enter a new total tax, you can use this button to update subtotals in the Amount column for each billing entity in the grid. The new subtotals are based on the distribution percentages you entered on the Sales Tax Items page of Configuration.
Update Total. If you enter new tax distribution amounts in the Amount column of the grid, you can click this button to update the total tax amount field.
WebInvoicingWebInvoicing is an optional module within The Financial Edge WebPortal. With WebInvoicing, you can create invoice requests and have them approved online.
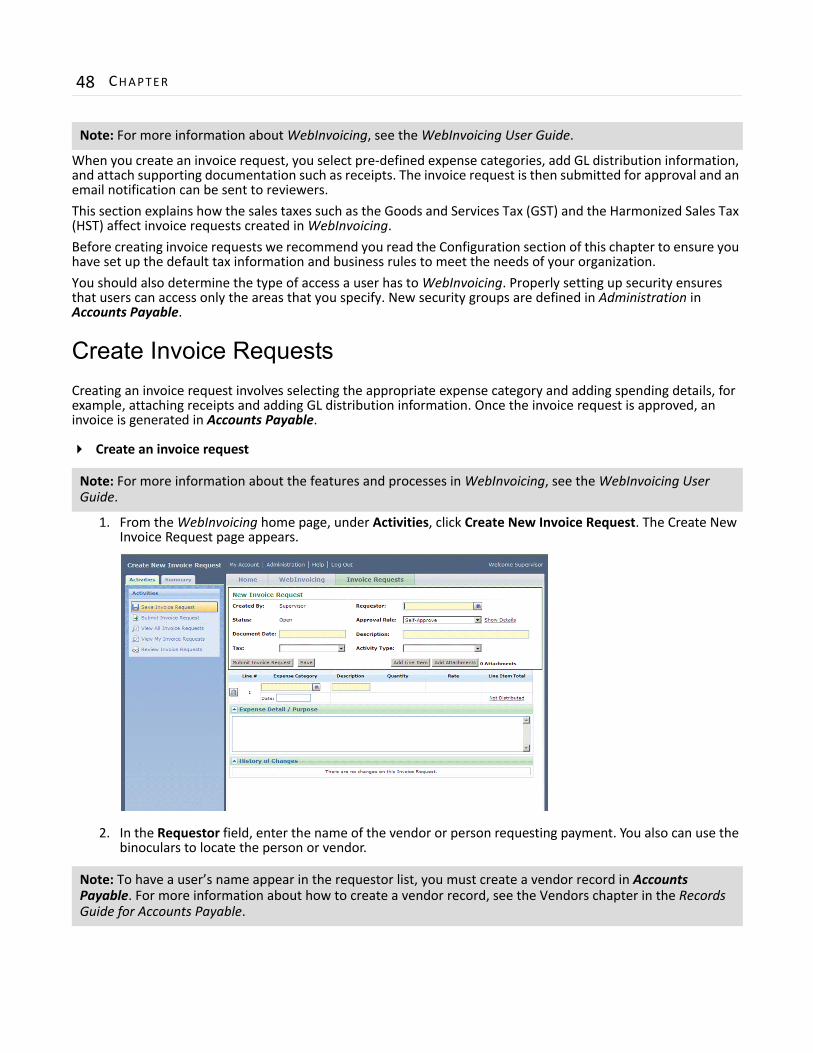
48 CHAPTER
When you create an invoice request, you select pre‐defined expense categories, add GL distribution information, and attach supporting documentation such as receipts. The invoice request is then submitted for approval and an email notification can be sent to reviewers.
This section explains how the sales taxes such as the Goods and Services Tax (GST) and the Harmonized Sales Tax (HST) affect invoice requests created in WebInvoicing.
Before creating invoice requests we recommend you read the Configuration section of this chapter to ensure you have set up the default tax information and business rules to meet the needs of your organization.
You should also determine the type of access a user has to WebInvoicing. Properly setting up security ensures that users can access only the areas that you specify. New security groups are defined in Administration in Accounts Payable.
Create Invoice RequestsCreating an invoice request involves selecting the appropriate expense category and adding spending details, for example, attaching receipts and adding GL distribution information. Once the invoice request is approved, an invoice is generated in Accounts Payable.
Create an invoice request
1. From the WebInvoicing home page, under Activities, click Create New Invoice Request. The Create New Invoice Request page appears.
2. In the Requestor field, enter the name of the vendor or person requesting payment. You also can use the binoculars to locate the person or vendor.
Note: For more information about WebInvoicing, see the WebInvoicing User Guide.
Note: For more information about the features and processes in WebInvoicing, see the WebInvoicing User Guide.
Note: To have a user’s name appear in the requestor list, you must create a vendor record in Accounts Payable. For more information about how to create a vendor record, see the Vendors chapter in the Records Guide for Accounts Payable.
GST IN ACCOUNTS PAYABLE 49
3. In the Approval Rule field, select the approval rule you have rights to use. If you have self approval rights, this field defaults to “Self Approve”, however, you can change the rule. If your expenses exceed your self approval limit, this field becomes blank and you must select a new approval rule. Click Show Details to view more information about the selected approval rule.
4. In the Document Date field, enter the date the invoice request is created.
When you want to check spending on a specific line item against the budget of a GL distribution account, the date entered in this field is used.
5. In the Description field, enter any additional information about the invoice request.
6. In the Tax field, select the sales tax item. Sales tax items are used to track sales taxes for reporting and budgeting purposes, or so you can later file for rebates. This field is optional.
Accounts Payable contains several pre‐formatted sales tax IDs, including a 5 percent GST item, a 15 percent HST item, a local sales tax, and a zero‐rated sales tax. You can add or edit these items at any time from the Sales Tax Items page of Configuration.
7. In the Activity Type field, select an activity type to associate with this invoice request. Activity types are used to identify the PSB codes and rebates you have entered in the program. This field is optional.
You can maintain the Public Service Bodies’ activity codes and rebates on the Activity Types page in Configuration. When using activity types, consider the following:
• Only activity types that have been defined on the Activity Types page in Configuration are available.
• Only activity types having a defined GST Receivable Account appear in the Activity Type drop‐down.
• If you need to change the distribution of the PSB rebate, you must make this change in Accounts Payable after the invoice has been created.
8. To attach receipts, invoices or other documentation to the invoice request, click Add Attachments. The Attachments screen appears.
a. To locate the document you want to attach to the invoice request, click Browse.
b. To attach the document to the invoice request, click Upload. Any attachments added to the request are added to the Invoice Request tab of the invoice record in Accounts Payable. For more information about the invoice record, see the Records Guide for Accounts Payable.
c. To view the documents attached to the invoice request, click View.
d. To close the Attachments screen, click Close.
9. In the line item area, enter detailed information about each expense:
• In the Expense Category field, enter the name of the expense category or use the binoculars to locate the expense category. Based on your expense category selection, the Description field is populated.
• In the Quantity field, you can enter the quantity of an item if Calculate by Rate was marked on the expense category record in Accounts Payable. For example, you drove 50 miles to a conference and your organization reimburses its employees for mileage at $0.42 per mile. You would enter “50” in this field. The $0.42 value appears in the Rate field.
• If Calculate by Rate was not marked on the expense category record, the Quantity field defaults to “1” and is not editable. For more information about defining an expense category, see “Create Expense Categories” on page 10.
• In the Rate field, you can enter the cost for a particular expense, for example, $25 for a meal. However, if an expense category has a set rate, that value automatically appears in that field. For example, your organization reimburses its employees for mileage at $0.42 per mile, that amount appears in the Rate field. The number of miles traveled would be entered in the Quantity field. For more information about defining an expense category, see “Create Expense Categories” on page 10.
Note: The PSB must have a credit account number assigned to it in order for it to appear in the Activity Type drop‐down in WebInvoicing.

50 CHAPTER
• In the Date field, enter the date the expense occurred. If the expense occurred over a date range, follow your organization’s policy, for example, entering the date your credit card was charged.
• The Line Item Total field displays the total amount of the expense.
• The Tax amount field displays the amount of tax for this line item based on the tax item you selected in the Tax field.
10. To add more line items to the invoice request, click Add Line Item.
11. To save the invoice request, click Save. We recommend saving frequently as you add line items to the invoice request. This prevents you from losing information if the browser is closed prior to saving.
12. If necessary, you can delete an invoice request or a line item within the invoice request. To delete the invoice request, click Delete. Only the requestor can delete his own invoice request. To delete a line item within a request, click the trash can next to the specific line item. You cannot delete an invoice request if it has already been submitted.
13. In the Expense Detail\Purpose frame, enter additional information about the expenses in the invoice request.
14. To submit the invoice request for approval, click Submit Invoice Request. A confirmation message appears.
15. Click the Home tab to return to the Home page.
Note: If the user has an account restriction in Security, he cannot save invoice requests for a category that contains that restricted number. Be sure to review the user’s account security restrictions after establishing the account numbers in their Expense Categories.

4chapter
GST in Accounts Receivable
Accounts Receivable Configuration . . . . . . . . . . . . . . . . . . . . . . . . . . . . . . . . . . . . . . . . . . . . . . . . . . . . . . . . . . . . . 52General Configuration. . . . . . . . . . . . . . . . . . . . . . . . . . . . . . . . . . . . . . . . . . . . . . . . . . . . . . . . . . . . . . . . . . . . . . . . . . . 52Business Rules Configuration . . . . . . . . . . . . . . . . . . . . . . . . . . . . . . . . . . . . . . . . . . . . . . . . . . . . . . . . . . . . . . . . . . . . . 53Tables Configuration . . . . . . . . . . . . . . . . . . . . . . . . . . . . . . . . . . . . . . . . . . . . . . . . . . . . . . . . . . . . . . . . . . . . . . . . . . . . 53Products and Billing Items Configuration . . . . . . . . . . . . . . . . . . . . . . . . . . . . . . . . . . . . . . . . . . . . . . . . . . . . . . . . . . . 55
Creating Sales Tax Items . . . . . . . . . . . . . . . . . . . . . . . . . . . . . . . . . . . . . . . . . . . . . . . . . . . . . . . . . . . . . . . . . . . . . 55Adding Sales Taxes to Products and Billing Items . . . . . . . . . . . . . . . . . . . . . . . . . . . . . . . . . . . . . . . . . . . . . . . . . 59
Accounts Receivable Records . . . . . . . . . . . . . . . . . . . . . . . . . . . . . . . . . . . . . . . . . . . . . . . . . . . . . . . . . . . . . . . . . . 61Creating a New Sales Tax Item . . . . . . . . . . . . . . . . . . . . . . . . . . . . . . . . . . . . . . . . . . . . . . . . . . . . . . . . . . . . . . . . . . . . 61Adding Sales Tax to Products and Billing Items. . . . . . . . . . . . . . . . . . . . . . . . . . . . . . . . . . . . . . . . . . . . . . . . . . . . . . . 65
Adding Sales Tax to Products . . . . . . . . . . . . . . . . . . . . . . . . . . . . . . . . . . . . . . . . . . . . . . . . . . . . . . . . . . . . . . . . . . 66Adding Sales Tax to Flat Rate and Per Usage Items . . . . . . . . . . . . . . . . . . . . . . . . . . . . . . . . . . . . . . . . . . . . . . . . 67
Adding Sales Tax Information to Client Records . . . . . . . . . . . . . . . . . . . . . . . . . . . . . . . . . . . . . . . . . . . . . . . . . . . . . . 67Adding Sales Tax to Charges . . . . . . . . . . . . . . . . . . . . . . . . . . . . . . . . . . . . . . . . . . . . . . . . . . . . . . . . . . . . . . . . . . . . . . 68Adding Sales Tax to Credits. . . . . . . . . . . . . . . . . . . . . . . . . . . . . . . . . . . . . . . . . . . . . . . . . . . . . . . . . . . . . . . . . . . . . . . 69Adding Sales Tax to Invoices and Recurring Invoices . . . . . . . . . . . . . . . . . . . . . . . . . . . . . . . . . . . . . . . . . . . . . . . . . . 70
Line Items Tab . . . . . . . . . . . . . . . . . . . . . . . . . . . . . . . . . . . . . . . . . . . . . . . . . . . . . . . . . . . . . . . . . . . . . . . . . . . . . . 72Viewing Sales Tax on Returns . . . . . . . . . . . . . . . . . . . . . . . . . . . . . . . . . . . . . . . . . . . . . . . . . . . . . . . . . . . . . . . . . . . . . 72

52 CHAPTER
This chapter explains how sales taxes such as the Goods and Services Tax (GST) and the Harmonized Sales Tax (HST) affect Accounts Receivable.
Accounts Receivable ConfigurationConfiguration is where you set up Accounts Receivable to fit the needs of your organization. You can designate GST/HST information, manage activity types, and set up a default receivables account for Public Service Bodies’ Rebates.
For example, you can set a business rule specifying if your organization collects sales taxes. Also, on the Products and Billing Items page, you can create different tax items, such as the standard 7 percent GST tax, a 15 percent HST tax, and, if applicable, a local sales tax. You can then select these items to speed data entry when creating new product, flat rate, and per usage billing items.
For more information and procedures for setting the other fields in Configuration, see the Configuration Guide for Accounts Receivable.
General ConfigurationThe General page is where you enter basic information about your organization.
The address and phone information you enter on this page appears on printed documents and correspondence. You can also enter GST/HST information and your Business Number. If you enter this information, it appears automatically on reports so you do not have to enter the information again later.
GST Rate. In the GST Rate field, enter the current tax rate.
GST tax entity. In the GST Tax entity field, select a GST entity.HST tax entity. In the HST Tax entity field, select an HST entity.
Note: At the time this information was published, HST participating provinces included Nova Scotia, New Brunswick, and Newfoundland and Labrador.

GST IN ACCOUNTS RECE IVABLE 53
Business Number. In the Business Number field, enter the federal charitable identification number for your organization.
This organization is located in an HST participating province. Mark this checkbox if your organization is located in an HST participating province.
The organization default Sales Tax ID. In this field, select a default sales tax ID. This field is helpful if you commonly use more than one sales tax type. You can select the sales tax you use most often and that entry will appear as the default on records so you do not have to enter it every time. You can change the field entry if necessary.
Business Rules ConfigurationBusiness rules help you customize standard procedures and requirements to suit your organization. On the General business rules page in Accounts Receivable, you can set a business rule to designate whether your organization collects sales taxes.
Sales tax. In the Sales tax field, if your organization collects goods and services taxes, select “Our Organization collects sales tax.”
Tables Configuration
Note: Accounts Receivable contains several preformatted sales tax IDs, including a 7 percent GST item, a 15 percent HST item, a local sales tax, and a zero‐rated sales tax. You can add or edit these items at any time. You can delete sales tax items if they are not currently used on a record.
Note: Sales tax entities are are shared between Accounts Payable, Accounts Receivable, and Student Billing. If you create a billing entity in one program, such as Student Billing, it also appears in the other programs.

54 CHAPTER
Tables increase data entry speed and accuracy throughout Accounts Receivable. When entering information into a field with a table, you can quickly access a list of possible entries for that field, select an entry, and place it directly into the field rather than entering it manually.
In Accounts Receivable, the Sales Tax Entity table contains several predefined commonly used Canadian sales taxes, such GST, HST, and PST. You can also enter additional sales taxes, if, for example, your city imposes a sales tax. You can select from these field entries when creating several record types.
You can click the down arrow on the right side of a field or press F4 to view a list of entries for a table. You can also place the cursor in the field and click the down arrow on your keyboard to scroll through the entries. You can usually enter text directly in the field, and if the program does not recognize it as a valid entry, you get a message asking if you want to add the text as a new entry. Finally, you can place the cursor in a table field and press F7 to access a screen on which you can view, add, edit, and delete entries.
To keep entries uniform, it is also extremely important that you limit rights for adding and editing table entries. These rights are controlled though the Set Up System Security page of Administration. Allowing only a few key users to add, edit, or delete table entries ensures the validity of your database, records, and reports. Maintaining strict control over the Sales Tax Entity table is especially important because it ensures that your tax information is tracked and reported correctly.
For more detailed information and procedures for adding, editing, and deleting tables and table entries, see the Configuration Guide for Accounts Receivable.
Inserting a new Sales Tax Entity table entry
1. On the Tables page, select the Sales Tax Entity table. Table entries appear in a box on the right.

GST IN ACCOUNTS RECE IVABLE 55
2. In the table entry box, select the entry below the point where to insert the new entry.
3. Click Insert. The New Table Entry screen appears.
4. In the Short Description field, enter an abbreviation for the new sales tax entity.
5. In the Long description field, enter the full name of the new sales tax entity.
6. To make the new table entry inactive, mark Inactive.
7. To save the new table entry and return to the Tables page, click OK. The new sales tax entity appears above the selected entry.
Products and Billing Items Configuration
This section contains information about creating new sales tax items and applying existing sales tax items to products and billing items. For more information about Products and Billing Items, see the Records Guide for Accounts Receivable.
Creating Sales Tax ItemsIf your organization collects sales tax on behalf of government bodies for items or services rendered, you can establish sales tax items. Once you establish sales tax items, you can associate them with subsequent billing item records and transactions.
Note: You must define at least one Product or Billing Item record before adding charges.

56 CHAPTER
Adding a sales tax item
This procedure guides you through adding a sales tax item from the Products and Billing Items page of Configuration in Accounts Receivable. However, you can also add sales tax items, as needed, when adding charges and entering line items on invoices. Additionally, you can add sales tax items from the Records page of Accounts Receivable.
1. From the Products and Billing Items page, click the down arrow next to New Flat Rate Item and select New Sales Tax Item. The New Sales Tax Item screen appears.
2. In the Item ID field, enter a unique ID for the item.
3. In the Status field, select “Active” or “Inactive”.
4. In the Description field, enter a description of the item.
5. In the Dates field, select “Item can be used on any date” or “Item can only be used from” and enter the dates during which the sales tax item can be used.
6. In the Sales Tax Entity column of the grid, select a sales tax entity previously added to Sales Tax Entity table in Configuration. You can also enter a new entity in the column and you will be prompted to add it to the Sales Tax Entity table.
7. In the Percent column, enter the tax rate for the corresponding entity. For example, “7.00”.
8. In the CR Account and DR Account columns, enter the correct account information. You can use the binoculars to search for accounts.
Note: You create product and billing item records from the Products and Billing Items page of Configuration. For increased efficiency, you can also create product and billing item records from the Products and Billing Items page of Records, or to save time, directly from charge or invoice records.
Note: An interfund entry is a balancing entry made to transfer activity between funds and ensure each fund is kept in balance. Interfund entries are used only when you enter a debit account from a fund different from the credit account.
GST IN ACCOUNTS RECE IVABLE 57
9. If you enter debit and credit accounts from different funds, in the Interfund field above the distribution grid, select an interfund set to balance the accounts. If you have not created a balancing interfund set for those accounts in Configuration, you cannot save the distribution. For more information about interfund entries, see the Configuration Guide for Accounts Receivable.
10. If you have the optional module Projects and Grants, enter a project ID number in the Project ID column, or use the binoculars to search for a project ID. When you enter a valid project ID number, the description appears automatically in the Project Description column.
11. In the Class column, select a class for the distribution.
12. If you have the optional module Projects and Grants and have defined transaction codes, additional columns appear based on the number of transaction codes you have defined. In the grid, select a value for each transaction code.
13. If taxes should be compounded on the first tax entity in the grid, mark When calculating tax for the [] through [] include and select the range. The options available in the range drop‐down lists depend on the number of sales tax entities in the grid.
14. You can make the item subject to both finance charges and late fees by marking Item is subject to finance and late charges.
15. In the Comments field, you can enter default comments for the item that will appear on statements.
16. To save the sales tax item and return to the Records page, click Save and Close. To continue adding information for this item, click the Attributes tab. For detailed procedures about entering information on the Attributes tab, see “Adding an attribute to a sales tax item” on page 64.
You can also add notes for the sales tax item. For detailed procedures about adding notes, see “Adding a note to a sales tax item” on page 65.
Adding an attribute to a sales tax item
An attribute is a reporting tool you use to group information based on a common theme. By defining attributes, you can filter information to your specification, which is a useful feature for sorting or filtering items for reports. You can also define the type of data stored for each item. For example, if you have defined an attribute for income categories, you can track products and billing items by income.
Note: If you mark an attribute as required in Configuration, the attribute automatically appears on the item and you must select a description before saving.
Note: Attributes can be edited at any time or deleted if the attribute is not required.

58 CHAPTER
1. From an open sales tax item record, select the Attributes tab.
2. In the Attribute type field, select a specific attribute type or “All Categories”.
3. In the Attribute type column, select an attribute. Attribute types are established in Configuration.
4. In the Description column, select a description of the attribute.
5. In the Date column, enter a date.
6. In the Comments column, enter additional information about the attribute.
7. To close the sales tax item record and return to the Products and Billing Items page, click Save and Close.
Adding a note to a sales tax item
The Notes tab of a sales tax item record is an open text field where you can enter additional information about the sales tax item. You can maintain data such as the purchaser’s name, the delivery date, or other important information.
1. From an open sales tax item record, select the Notes tab.
Note: The Short Description column and the Required checkbox are for informational purposes and are edited only from the Attributes page of Configuration.

GST IN ACCOUNTS RECE IVABLE 59
2. In the text box, enter free‐form text information about the sales tax item.
3. When you exit the Notes tab, your changes are saved automatically.
Adding Sales Taxes to Products and Billing Items
If your organization collects sales taxes, when you create a product, flat rate, or per usage item that is subject to a sales tax, such as GST or HST, mark Item is subject to sales tax. Then, you can select a related sales tax item or create a new item. Selecting an existing sales tax item speeds data entry because Accounts Receivable automatically calculates the sales tax and applies the sales tax item’s default distribution to the product, flat rate, or per usage record so you do not have to reenter that information.
Tip: Notes can be edited or deleted at any time. Just remember that deleted notes cannot be recovered!
Note: You must define at least one Product or Billing Item record before adding charges.
60 CHAPTER
Adding Sales Taxes to ProductsOn the Product tab of a product record, you can specify if the product is taxable, and you can select a sales tax billing item.
Product is subject to sales tax. Mark this checkbox if you must collect sales taxes for this product. In the sales tax field, select the sales tax item you want to apply to this product. You create sales tax items on the Product and Billing Items page. For more information about sales tax items, see “Creating Sales Tax Items” on page 55.
Adding Sales Taxes to Flat Rate and Per Usage ItemsOn the Item tab of flat rate and per usage item records, you can specify if an item is taxable, and you can select a sales tax billing item.
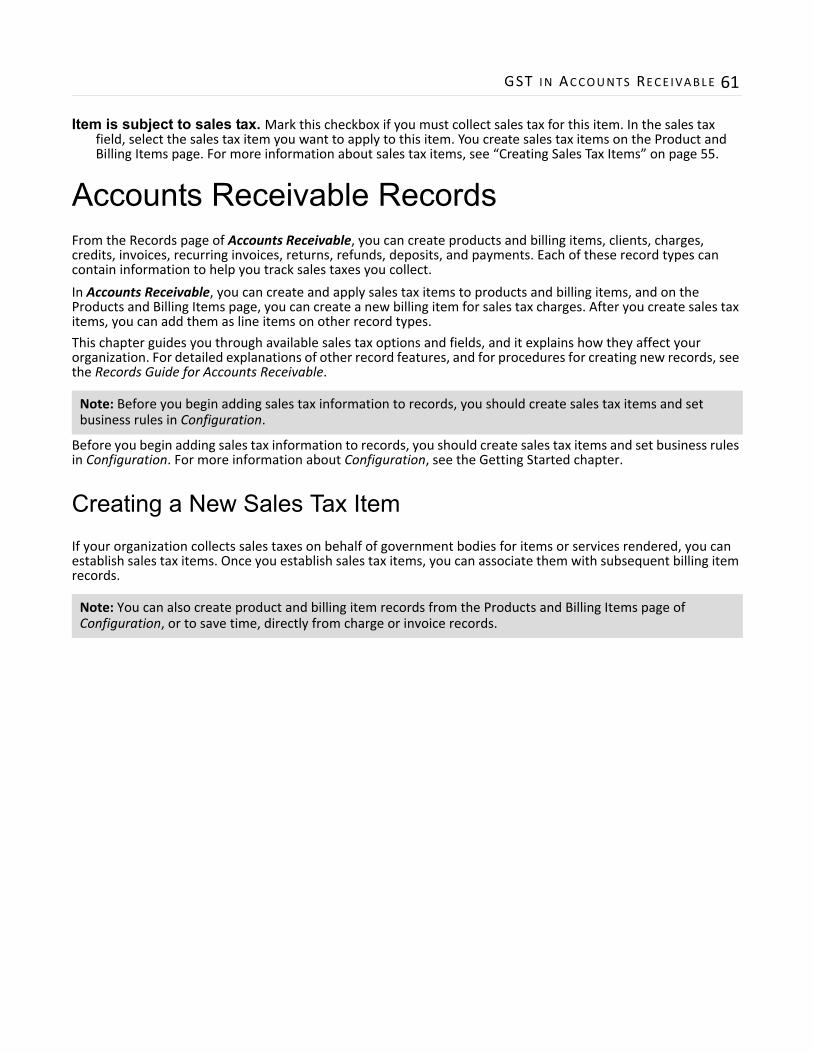
GST IN ACCOUNTS RECE IVABLE 61
Item is subject to sales tax. Mark this checkbox if you must collect sales tax for this item. In the sales tax field, select the sales tax item you want to apply to this item. You create sales tax items on the Product and Billing Items page. For more information about sales tax items, see “Creating Sales Tax Items” on page 55.
Accounts Receivable RecordsFrom the Records page of Accounts Receivable, you can create products and billing items, clients, charges, credits, invoices, recurring invoices, returns, refunds, deposits, and payments. Each of these record types can contain information to help you track sales taxes you collect.
In Accounts Receivable, you can create and apply sales tax items to products and billing items, and on the Products and Billing Items page, you can create a new billing item for sales tax charges. After you create sales tax items, you can add them as line items on other record types.
This chapter guides you through available sales tax options and fields, and it explains how they affect your organization. For detailed explanations of other record features, and for procedures for creating new records, see the Records Guide for Accounts Receivable.
Before you begin adding sales tax information to records, you should create sales tax items and set business rules in Configuration. For more information about Configuration, see the Getting Started chapter.
Creating a New Sales Tax ItemIf your organization collects sales taxes on behalf of government bodies for items or services rendered, you can establish sales tax items. Once you establish sales tax items, you can associate them with subsequent billing item records.
Note: Before you begin adding sales tax information to records, you should create sales tax items and set business rules in Configuration.
Note: You can also create product and billing item records from the Products and Billing Items page of Configuration, or to save time, directly from charge or invoice records.
62 CHAPTER
On the Products and Billing Items page, you can create new sales tax items that you can access from other records to help track information and speed data entry. To create a new sales tax item, on the Products and Billing Items page, click the down arrow next to the New Flat Rate Item button and select New Sales Tax Item. The New Sales Tax Item screen appears.
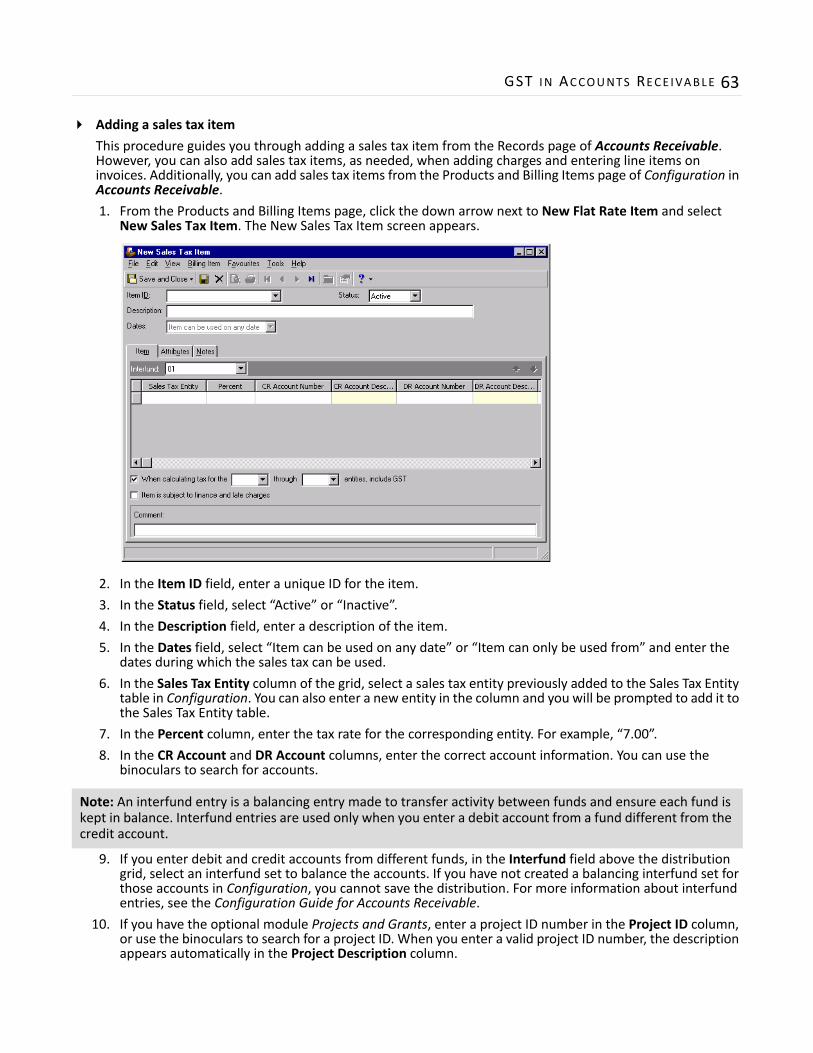
GST IN ACCOUNTS RECE IVABLE 63
Adding a sales tax item
This procedure guides you through adding a sales tax item from the Records page of Accounts Receivable. However, you can also add sales tax items, as needed, when adding charges and entering line items on invoices. Additionally, you can add sales tax items from the Products and Billing Items page of Configuration in Accounts Receivable.
1. From the Products and Billing Items page, click the down arrow next to New Flat Rate Item and select New Sales Tax Item. The New Sales Tax Item screen appears.
2. In the Item ID field, enter a unique ID for the item.
3. In the Status field, select “Active” or “Inactive”.
4. In the Description field, enter a description of the item.
5. In the Dates field, select “Item can be used on any date” or “Item can only be used from” and enter the dates during which the sales tax can be used.
6. In the Sales Tax Entity column of the grid, select a sales tax entity previously added to the Sales Tax Entity table in Configuration. You can also enter a new entity in the column and you will be prompted to add it to the Sales Tax Entity table.
7. In the Percent column, enter the tax rate for the corresponding entity. For example, “7.00”.
8. In the CR Account and DR Account columns, enter the correct account information. You can use the binoculars to search for accounts.
9. If you enter debit and credit accounts from different funds, in the Interfund field above the distribution grid, select an interfund set to balance the accounts. If you have not created a balancing interfund set for those accounts in Configuration, you cannot save the distribution. For more information about interfund entries, see the Configuration Guide for Accounts Receivable.
10. If you have the optional module Projects and Grants, enter a project ID number in the Project ID column, or use the binoculars to search for a project ID. When you enter a valid project ID number, the description appears automatically in the Project Description column.
Note: An interfund entry is a balancing entry made to transfer activity between funds and ensure each fund is kept in balance. Interfund entries are used only when you enter a debit account from a fund different from the credit account.

64 CHAPTER
11. In the Class column, select a class for the distribution.
12. If you have the optional module Projects and Grants and have defined transaction codes, additional columns appear based on the number of transaction codes you have defined. In the grid, select a value for each transaction code.
13. If taxes should be compounded on the first sales tax item in the grid, mark When calculating tax for the [] through [] include and select the range. The options available depend on the number of sales tax items in the grid.
14. You can make the item subject to both finance charges and late fees by marking Item is subject to finance and late charges.
15. In the Comments field, you can enter default comments for the item that will appear on statements.
16. To save the sales tax item record and return to the Records page, click Save and Close. To continue adding information for this item, click the Attributes tab. For detailed procedures about entering information on the Attributes tab, see “Adding an attribute to a sales tax item” on page 64.
You can also add notes for the sales tax item. For detailed procedures about adding notes, see “Adding a note to a sales tax item” on page 65.
Adding an attribute to a sales tax item
An attribute is a reporting tool you use to group information based on a common theme. By defining attributes, you can filter information to your specification, which is a useful feature for sorting or filtering items for reports. You can also define the type of data stored for each item. For example, if you have defined an attribute for income categories, you can track products and billing items by income.
1. From an open sales tax item record, select the Attributes tab.
2. In the Attribute type field, select a specific attribute type or “All Categories”.
3. In the Attribute type column, select an attribute. Attribute types are established in Configuration.
Note: If you mark an attribute as required in Configuration, the attribute automatically appears on the item and you must select a description before saving.
Note: Attributes can be edited at any time or deleted if the attribute is not required.
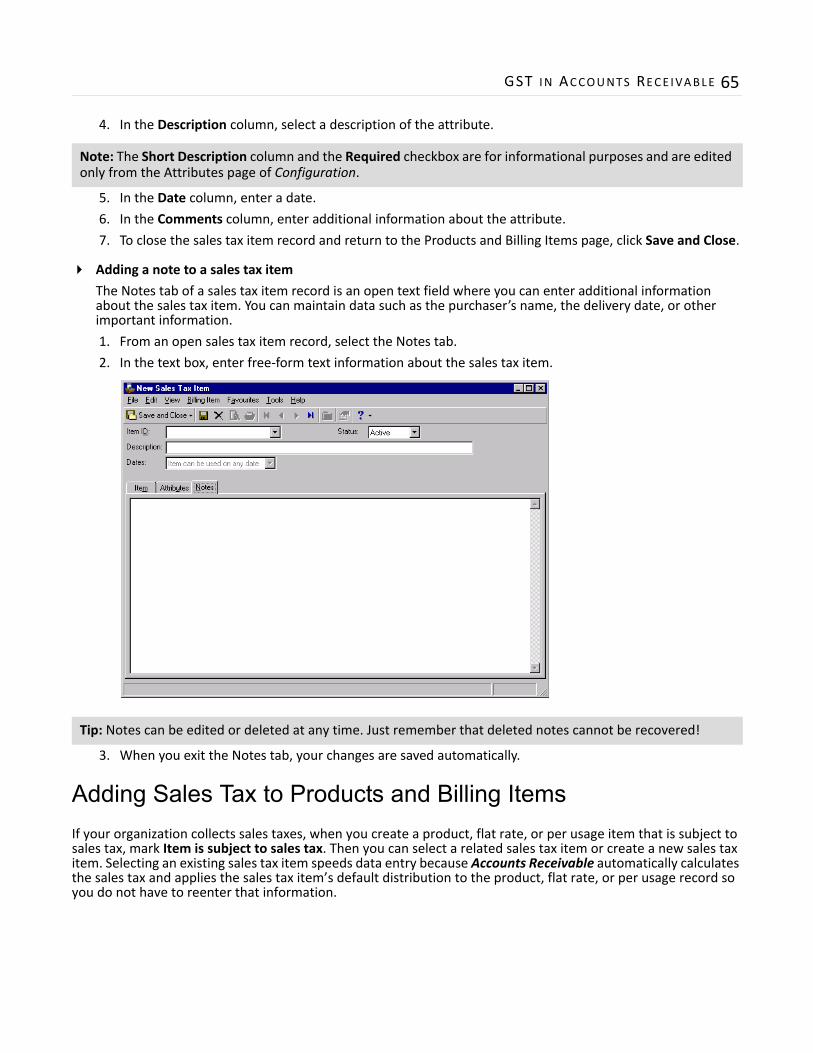
GST IN ACCOUNTS RECE IVABLE 65
4. In the Description column, select a description of the attribute.
5. In the Date column, enter a date.
6. In the Comments column, enter additional information about the attribute.
7. To close the sales tax item record and return to the Products and Billing Items page, click Save and Close.
Adding a note to a sales tax item
The Notes tab of a sales tax item record is an open text field where you can enter additional information about the sales tax item. You can maintain data such as the purchaser’s name, the delivery date, or other important information.
1. From an open sales tax item record, select the Notes tab.
2. In the text box, enter free‐form text information about the sales tax item.
3. When you exit the Notes tab, your changes are saved automatically.
Adding Sales Tax to Products and Billing ItemsIf your organization collects sales taxes, when you create a product, flat rate, or per usage item that is subject to sales tax, mark Item is subject to sales tax. Then you can select a related sales tax item or create a new sales tax item. Selecting an existing sales tax item speeds data entry because Accounts Receivable automatically calculates the sales tax and applies the sales tax item’s default distribution to the product, flat rate, or per usage record so you do not have to reenter that information.
Note: The Short Description column and the Required checkbox are for informational purposes and are edited only from the Attributes page of Configuration.
Tip: Notes can be edited or deleted at any time. Just remember that deleted notes cannot be recovered!

66 CHAPTER
Adding Sales Tax to ProductsOn the Product tab of a product record, you can specify if the product is taxable, and you can select a sales tax item.
Product is subject to sales tax. Mark this checkbox if you must collect sales tax for this product. In the sales tax field, select the sales tax item you want to apply to this product. You create sales tax items on the Product and Billing Items page. For more information about sales tax items, see “Creating a New Sales Tax Item” on page 61”.
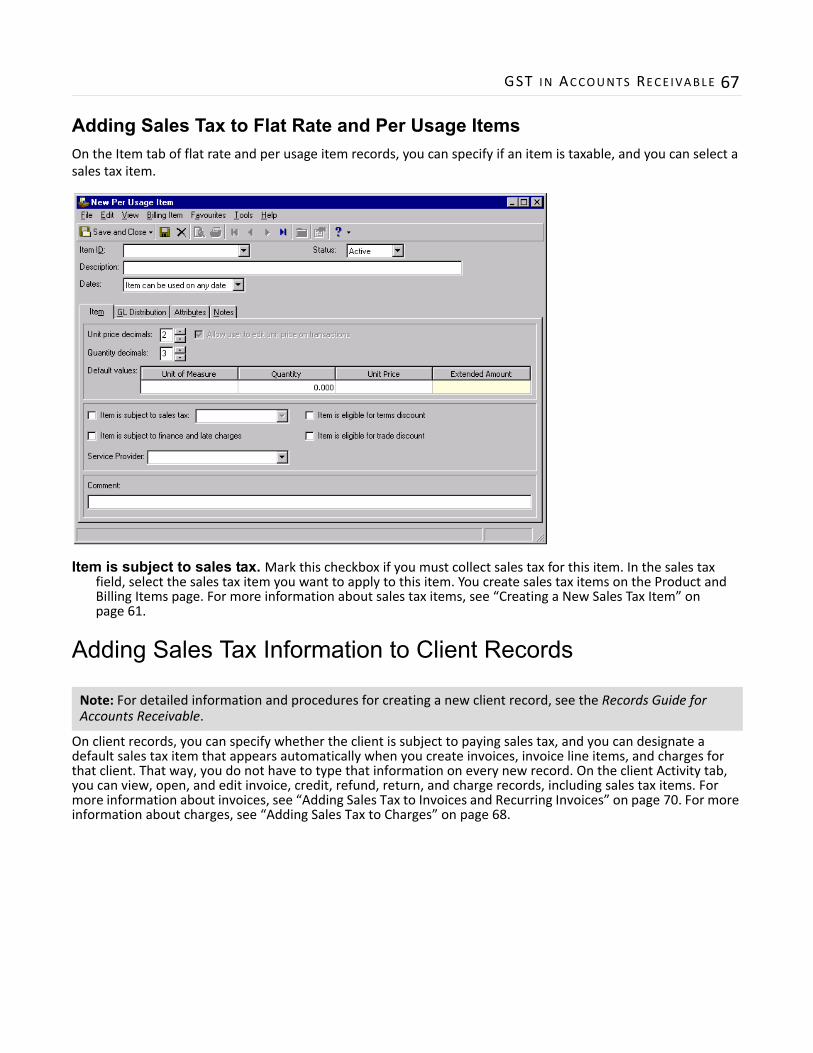
GST IN ACCOUNTS RECE IVABLE 67
Adding Sales Tax to Flat Rate and Per Usage ItemsOn the Item tab of flat rate and per usage item records, you can specify if an item is taxable, and you can select a sales tax item.
Item is subject to sales tax. Mark this checkbox if you must collect sales tax for this item. In the sales tax field, select the sales tax item you want to apply to this item. You create sales tax items on the Product and Billing Items page. For more information about sales tax items, see “Creating a New Sales Tax Item” on page 61.
Adding Sales Tax Information to Client Records
On client records, you can specify whether the client is subject to paying sales tax, and you can designate a default sales tax item that appears automatically when you create invoices, invoice line items, and charges for that client. That way, you do not have to type that information on every new record. On the client Activity tab, you can view, open, and edit invoice, credit, refund, return, and charge records, including sales tax items. For more information about invoices, see “Adding Sales Tax to Invoices and Recurring Invoices” on page 70. For more information about charges, see “Adding Sales Tax to Charges” on page 68.
Note: For detailed information and procedures for creating a new client record, see the Records Guide for Accounts Receivable.
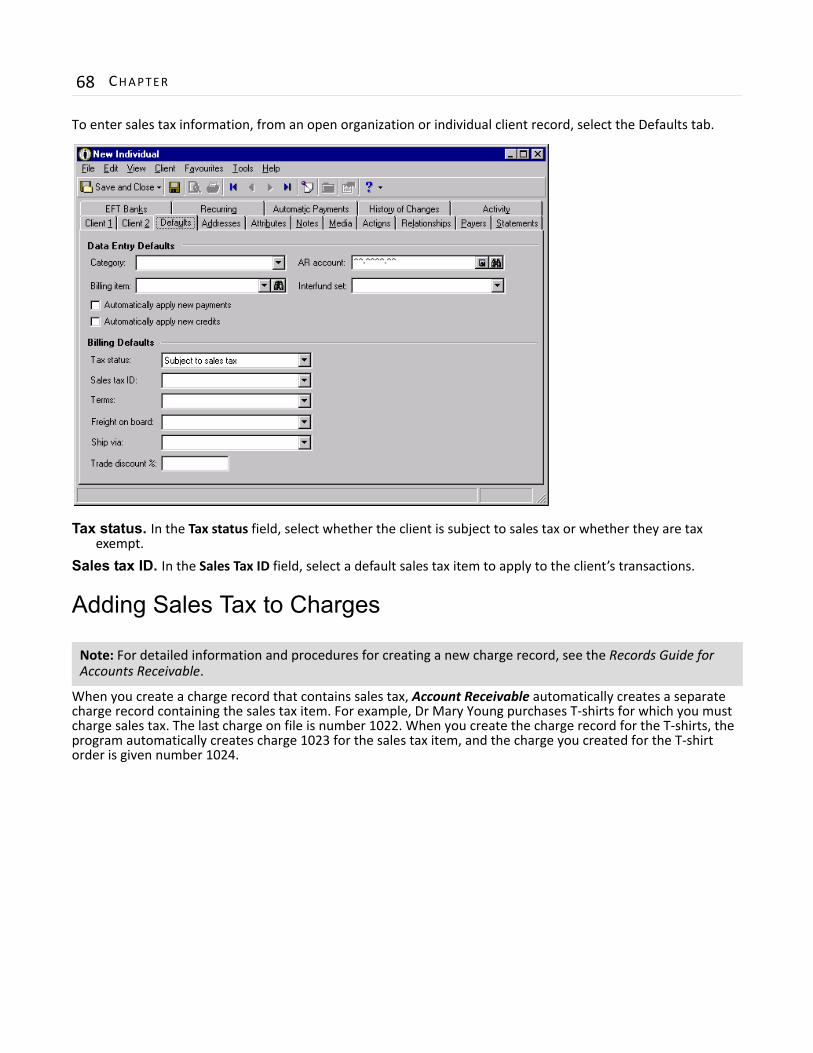
68 CHAPTER
To enter sales tax information, from an open organization or individual client record, select the Defaults tab.
Tax status. In the Tax status field, select whether the client is subject to sales tax or whether they are tax exempt.
Sales tax ID. In the Sales Tax ID field, select a default sales tax item to apply to the client’s transactions.
Adding Sales Tax to Charges
When you create a charge record that contains sales tax, Account Receivable automatically creates a separate charge record containing the sales tax item. For example, Dr Mary Young purchases T‐shirts for which you must charge sales tax. The last charge on file is number 1022. When you create the charge record for the T‐shirts, the program automatically creates charge 1023 for the sales tax item, and the charge you created for the T‐shirt order is given number 1024.
Note: For detailed information and procedures for creating a new charge record, see the Records Guide for Accounts Receivable.

GST IN ACCOUNTS RECE IVABLE 69
On a saved charge record, when you click Edit sales tax, the program opens the sales tax charge record so you can edit the sales tax item description. All other fields are locked and cannot be edited.
Edit sales tax. To edit the tax settings for this charge, click Edit sales tax. A charge record containing the sales tax item appears so you can edit the sales tax item description. All other fields are locked and cannot be edited.
In the sales tax field, select the sales tax item you want to apply to this charge. You create sales tax items on the Product and Billing Items page. For more information about sales tax items, see “Creating a New Sales Tax Item” on page 61.
Adding Sales Tax to CreditsWhen you create a credit record that contains sales tax, Account Receivable automatically creates a separate credit record containing the sales tax item. For example, you create a credit for Dr Mary Young that includes sales tax. The last credit on file is number 517. When you create the new credit record, the program automatically creates credit 518 for the sales tax credit, and the credit you created is given number 519.

70 CHAPTER
When you click Edit sales tax, the program opens the sales tax credit record so you can edit the sales tax item description. All other fields are locked and cannot be edited.
Edit sales tax. To edit the tax settings for this credit, click Edit sales tax. A credit record containing the sales tax item appears so you can edit the sales tax item description. All other fields are locked and cannot be edited.
In the sales tax field, select the sales tax item you want to apply to this credit. You create sales tax items on the Product and Billing Items page. For more information about sales tax items, see “Creating a New Sales Tax Item” on page 61.
Adding Sales Tax to Invoices and Recurring InvoicesInvoices are essential for maintaining information about client bills and tracking outstanding accounts receivable. On invoice and recurring invoice records, you can easily view line items added to the invoice, apply discounts, and view applied payments and credits. You can also edit sales tax information and apply sales tax to the invoice line items. Adding sales tax to invoice line items ensures you can quickly and easily produce an accurate accounting of sales tax you collect.
In Accounts Receivable, you can create two types of invoices: regular and recurring. A regular invoice is a payment request you send to clients for goods or services rendered, while a recurring invoice is a template you use to create a regular invoice according to a schedule. Accounts Receivable invoices are not posted, instead, you post the invoice’s line items. Recurring invoices are also never posted or included in any balance calculation. In Accounts Receivable, recurring invoices are entered, edited, and deleted from the Recurring Invoices page of Records.
Note: In Accounts Receivable, you manage recurring invoices on the Recurring Invoices page of Records. For more information about recurring invoices, see the Records Guide for Accounts Receivable.

GST IN ACCOUNTS RECE IVABLE 71
Sales tax fields are identical on invoice and recurring invoice records.
Sales tax. In the Sales tax field, you can select a sales tax item to use as the default sales tax on invoice line items.
Line Items TabIn Accounts Receivable, you cannot post an invoice, but you can post the invoice’s line items. In other words, invoices are “containers” that hold line items. Invoice line items are individual charges added to a client’s record so you can maintain an accurate accounting of purchases and bill accordingly. The charge records you create when you add an invoice line item can be posted later. For more information about charge records, see the Records Guide for Accounts Receivable.
When you create an invoice line item that contains sales tax, Account Receivable automatically creates a separate charge record containing the sales tax item. For example, you create an invoice when Dr Mary Young purchases T‐shirts for which you must charge sales tax. The last charge on file is number 1022. When you create the charge record for the T‐shirts, the program automatically creates charge 1023 for the sales tax item.
Note: For detailed information and procedures for creating a new invoice or recurring invoice record, see the Records Guide for Accounts Receivable.

72 CHAPTER
On a saved invoice line item, when you click Edit sales tax, the program opens the sales tax charge record so you can edit the sales tax item description. All other fields are locked and cannot be edited.
Edit sales tax. To edit the tax settings for this line item, click Edit sales tax. A charge record containing the sales tax item appears so you can edit the sales tax item description. All other fields are locked and cannot be edited.
In the sales tax field, select the sales tax item you want to apply to this line item. You create sales tax items on the Product and Billing Items page. For more information about sales tax items, see “Creating a New Sales Tax Item” on page 61.
Viewing Sales Tax on Returns
In Accounts Receivable, if you make an error when entering invoices, you can create a return record that reverses all or part of the invoice. The return record then appears on the Payments/Credits tab. You cannot reverse standalone invoices that do not contain line items. To reverse an entire invoice, from the menu bar, select Transaction, Reverse Entire Invoice. To reverse part of an invoice, select Transaction, Reverse Portion of Invoice. For more information about returns, see the Records Guide for Accounts Receivable.
Note: In Configuration, you can set a business rule preventing users from adding invoices and invoice line items if the client record is marked “Inactive” or “On hold”.
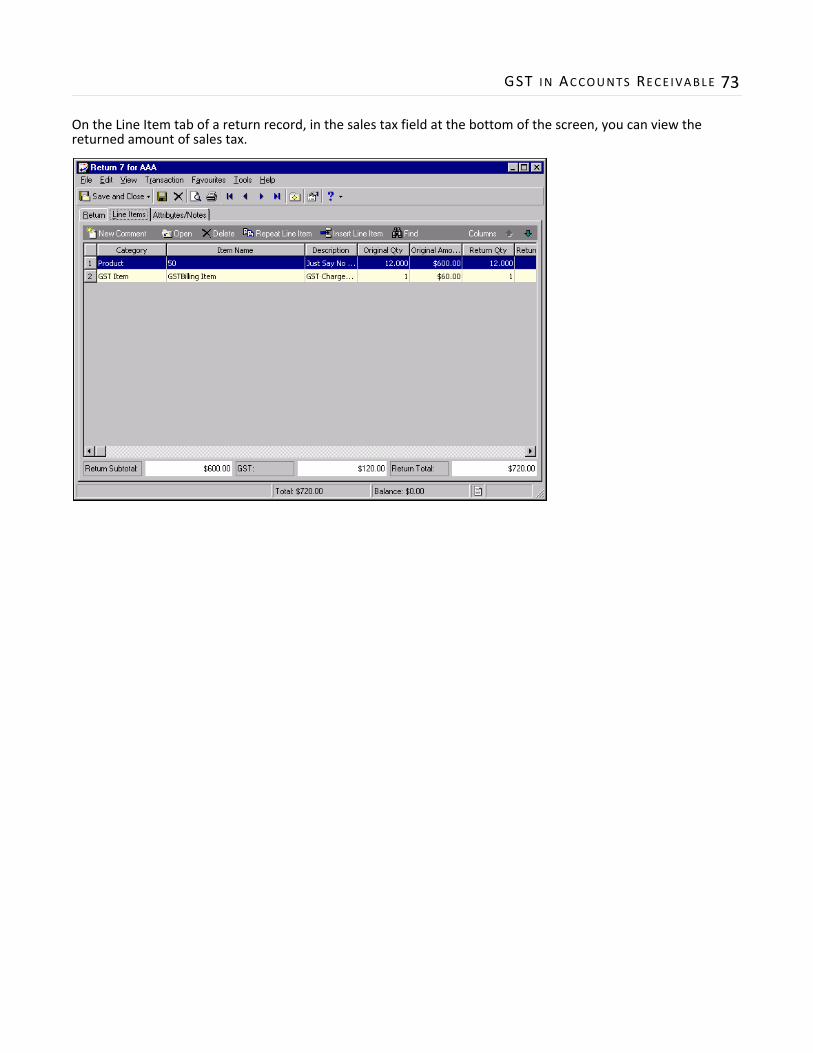
GST IN ACCOUNTS RECE IVABLE 73
On the Line Item tab of a return record, in the sales tax field at the bottom of the screen, you can view the returned amount of sales tax.

74 CHAPTER
5chapter
GST in Student Billing
Student Billing Configuration . . . . . . . . . . . . . . . . . . . . . . . . . . . . . . . . . . . . . . . . . . . . . . . . . . . . . . . . . . . . . . . . . . 76General Configuration. . . . . . . . . . . . . . . . . . . . . . . . . . . . . . . . . . . . . . . . . . . . . . . . . . . . . . . . . . . . . . . . . . . . . . . . . . . 76Business Rules Configuration . . . . . . . . . . . . . . . . . . . . . . . . . . . . . . . . . . . . . . . . . . . . . . . . . . . . . . . . . . . . . . . . . . . . . 77Tables Configuration . . . . . . . . . . . . . . . . . . . . . . . . . . . . . . . . . . . . . . . . . . . . . . . . . . . . . . . . . . . . . . . . . . . . . . . . . . . . 77Products and Billing Items Configuration . . . . . . . . . . . . . . . . . . . . . . . . . . . . . . . . . . . . . . . . . . . . . . . . . . . . . . . . . . . 79
Creating Sales Tax Items . . . . . . . . . . . . . . . . . . . . . . . . . . . . . . . . . . . . . . . . . . . . . . . . . . . . . . . . . . . . . . . . . . . . . 79Adding Sales Taxes to Products and Billing Items . . . . . . . . . . . . . . . . . . . . . . . . . . . . . . . . . . . . . . . . . . . . . . . . . 83
Student Billing Records . . . . . . . . . . . . . . . . . . . . . . . . . . . . . . . . . . . . . . . . . . . . . . . . . . . . . . . . . . . . . . . . . . . . . . . 85Adding a New Sales Tax Item . . . . . . . . . . . . . . . . . . . . . . . . . . . . . . . . . . . . . . . . . . . . . . . . . . . . . . . . . . . . . . . . . . . . . 86Adding Sales Tax to Products and Billing Items. . . . . . . . . . . . . . . . . . . . . . . . . . . . . . . . . . . . . . . . . . . . . . . . . . . . . . . 89
Adding Sales Tax to Products . . . . . . . . . . . . . . . . . . . . . . . . . . . . . . . . . . . . . . . . . . . . . . . . . . . . . . . . . . . . . . . . . . 90Adding Sales Tax to Billing Items . . . . . . . . . . . . . . . . . . . . . . . . . . . . . . . . . . . . . . . . . . . . . . . . . . . . . . . . . . . . . . . 91
Adding Sales Tax to Charges . . . . . . . . . . . . . . . . . . . . . . . . . . . . . . . . . . . . . . . . . . . . . . . . . . . . . . . . . . . . . . . . . . . . . . 91Adding Sales Tax to Credits. . . . . . . . . . . . . . . . . . . . . . . . . . . . . . . . . . . . . . . . . . . . . . . . . . . . . . . . . . . . . . . . . . . . . . . 92
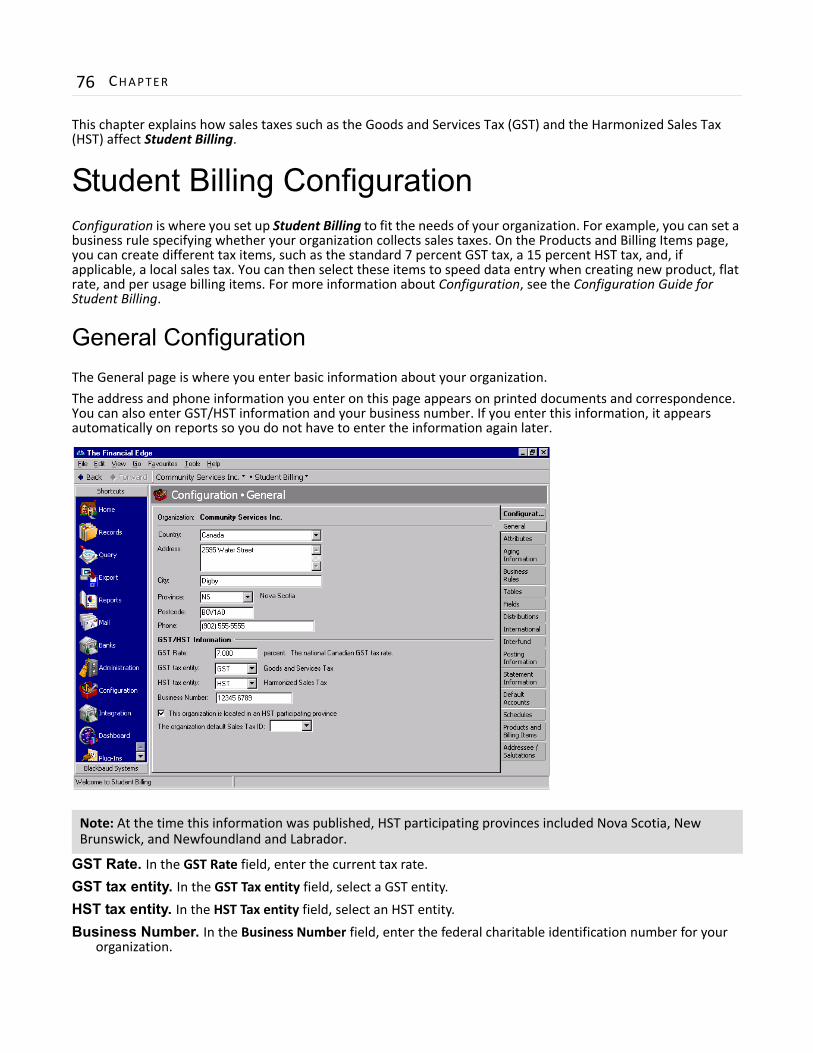
76 CHAPTER
This chapter explains how sales taxes such as the Goods and Services Tax (GST) and the Harmonized Sales Tax (HST) affect Student Billing.
Student Billing ConfigurationConfiguration is where you set up Student Billing to fit the needs of your organization. For example, you can set a business rule specifying whether your organization collects sales taxes. On the Products and Billing Items page, you can create different tax items, such as the standard 7 percent GST tax, a 15 percent HST tax, and, if applicable, a local sales tax. You can then select these items to speed data entry when creating new product, flat rate, and per usage billing items. For more information about Configuration, see the Configuration Guide for Student Billing.
General ConfigurationThe General page is where you enter basic information about your organization.
The address and phone information you enter on this page appears on printed documents and correspondence. You can also enter GST/HST information and your business number. If you enter this information, it appears automatically on reports so you do not have to enter the information again later.
GST Rate. In the GST Rate field, enter the current tax rate.GST tax entity. In the GST Tax entity field, select a GST entity.HST tax entity. In the HST Tax entity field, select an HST entity.Business Number. In the Business Number field, enter the federal charitable identification number for your
organization.
Note: At the time this information was published, HST participating provinces included Nova Scotia, New Brunswick, and Newfoundland and Labrador.
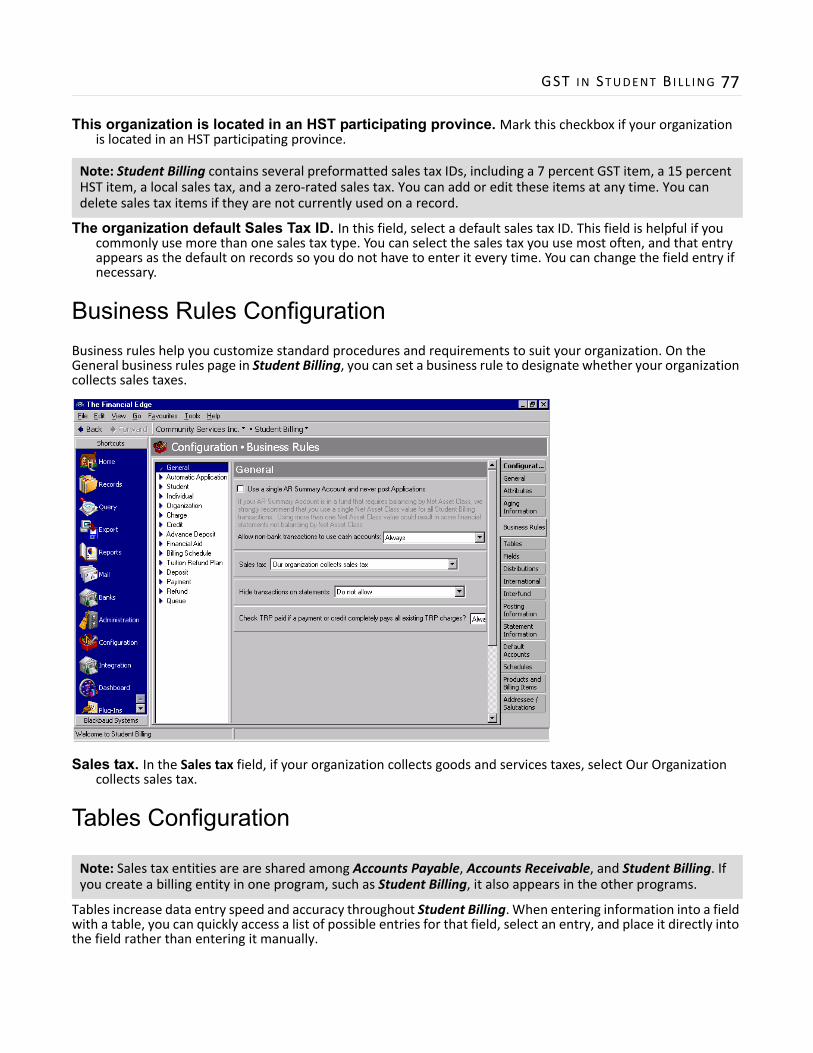
GST IN STUDENT BI LL ING 77
This organization is located in an HST participating province. Mark this checkbox if your organization is located in an HST participating province.
The organization default Sales Tax ID. In this field, select a default sales tax ID. This field is helpful if you commonly use more than one sales tax type. You can select the sales tax you use most often, and that entry appears as the default on records so you do not have to enter it every time. You can change the field entry if necessary.
Business Rules ConfigurationBusiness rules help you customize standard procedures and requirements to suit your organization. On the General business rules page in Student Billing, you can set a business rule to designate whether your organization collects sales taxes.
Sales tax. In the Sales tax field, if your organization collects goods and services taxes, select Our Organization collects sales tax.
Tables Configuration
Tables increase data entry speed and accuracy throughout Student Billing. When entering information into a field with a table, you can quickly access a list of possible entries for that field, select an entry, and place it directly into the field rather than entering it manually.
Note: Student Billing contains several preformatted sales tax IDs, including a 7 percent GST item, a 15 percent HST item, a local sales tax, and a zero‐rated sales tax. You can add or edit these items at any time. You can delete sales tax items if they are not currently used on a record.
Note: Sales tax entities are are shared among Accounts Payable, Accounts Receivable, and Student Billing. If you create a billing entity in one program, such as Student Billing, it also appears in the other programs.

78 CHAPTER
In Student Billing, the Sales Tax Entity table contains several predefined, commonly used Canadian sales taxes, such GST, HST, and PST. You can also enter additional sales taxes, if, for example, your city imposes a sales tax. You can select from these field entries when creating several record types.
You can click the down arrow on the right side of a field or press F4 to view a list of entries for a table. You can also place the cursor in the field and click the down arrow on your keyboard to scroll through the entries. You can usually enter text directly in the field, and if the program does not recognize it as a valid entry, you get a message asking if you want to add the text as a new entry.You can also place the cursor in a table field and press F7 to access a screen on which you can view, add, edit, and delete entries.
To keep entries uniform, we strongly recommend that you limit rights for adding and editing table entries. These rights are controlled though the Set Up System Security page of Administration. Allowing only a few key users to add, edit, or delete table entries ensures the validity of your database, records, and reports. Maintaining strict control over the Sales Tax Entity table is especially important because it ensures that your tax information is tracked and reported correctly. For more information about tables and table entries, see the Configuration Guide for Student Billing.
Inserting a new Sales Tax Entity table entry
1. On the Tables page, select Sales Tax Entity. Table entries appear in the grid on the right.
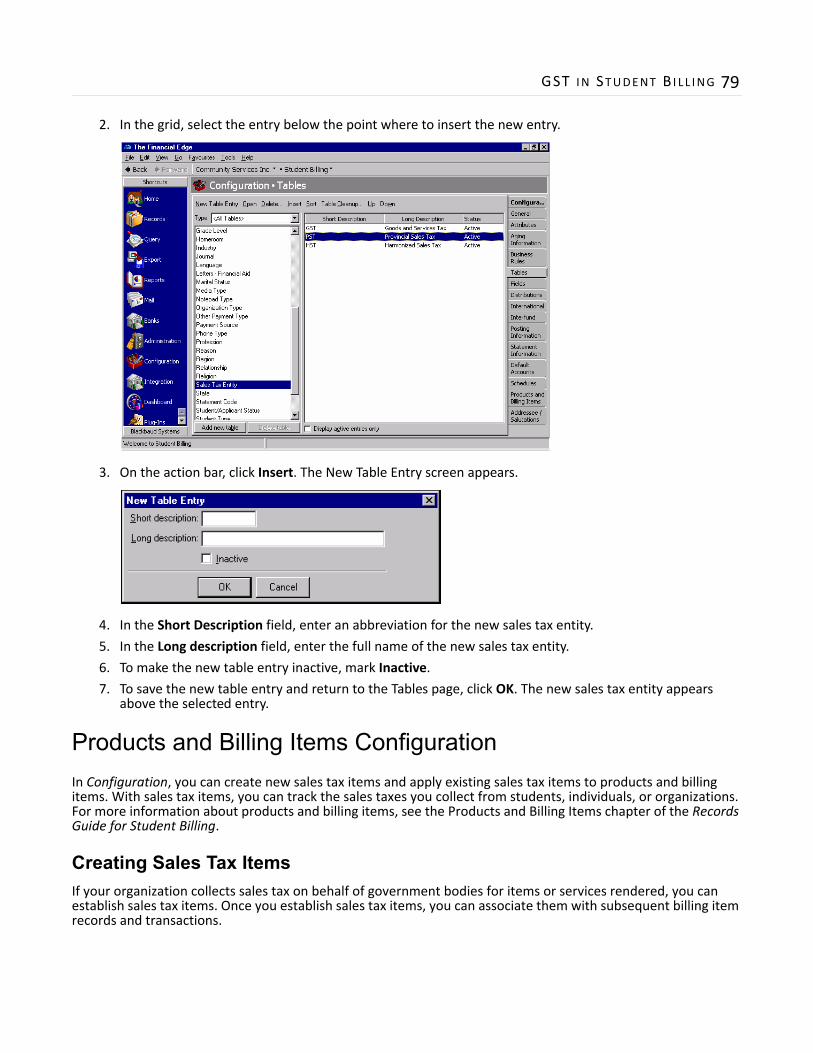
GST IN STUDENT BI LL ING 79
2. In the grid, select the entry below the point where to insert the new entry.
3. On the action bar, click Insert. The New Table Entry screen appears.
4. In the Short Description field, enter an abbreviation for the new sales tax entity.
5. In the Long description field, enter the full name of the new sales tax entity.
6. To make the new table entry inactive, mark Inactive.
7. To save the new table entry and return to the Tables page, click OK. The new sales tax entity appears above the selected entry.
Products and Billing Items ConfigurationIn Configuration, you can create new sales tax items and apply existing sales tax items to products and billing items. With sales tax items, you can track the sales taxes you collect from students, individuals, or organizations. For more information about products and billing items, see the Products and Billing Items chapter of the Records Guide for Student Billing.
Creating Sales Tax ItemsIf your organization collects sales tax on behalf of government bodies for items or services rendered, you can establish sales tax items. Once you establish sales tax items, you can associate them with subsequent billing item records and transactions.
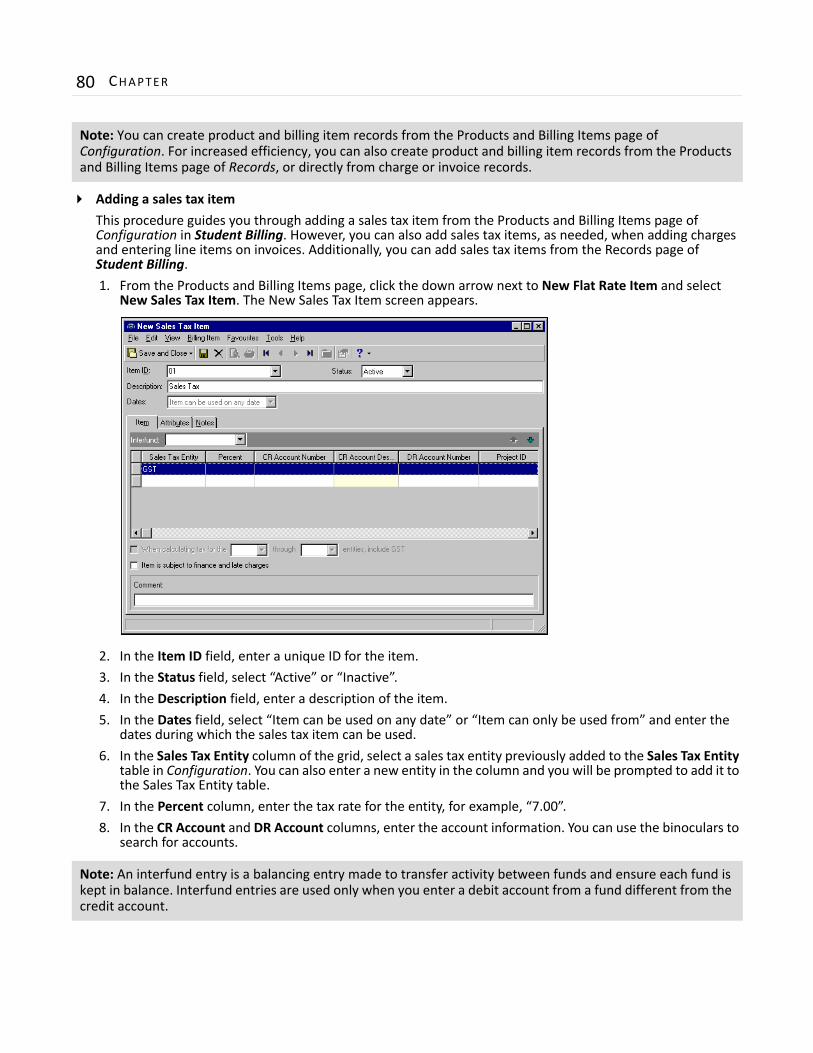
80 CHAPTER
Adding a sales tax item
This procedure guides you through adding a sales tax item from the Products and Billing Items page of Configuration in Student Billing. However, you can also add sales tax items, as needed, when adding charges and entering line items on invoices. Additionally, you can add sales tax items from the Records page of Student Billing.
1. From the Products and Billing Items page, click the down arrow next to New Flat Rate Item and select New Sales Tax Item. The New Sales Tax Item screen appears.
2. In the Item ID field, enter a unique ID for the item.
3. In the Status field, select “Active” or “Inactive”.
4. In the Description field, enter a description of the item.
5. In the Dates field, select “Item can be used on any date” or “Item can only be used from” and enter the dates during which the sales tax item can be used.
6. In the Sales Tax Entity column of the grid, select a sales tax entity previously added to the Sales Tax Entity table in Configuration. You can also enter a new entity in the column and you will be prompted to add it to the Sales Tax Entity table.
7. In the Percent column, enter the tax rate for the entity, for example, “7.00”.
8. In the CR Account and DR Account columns, enter the account information. You can use the binoculars to search for accounts.
Note: You can create product and billing item records from the Products and Billing Items page of Configuration. For increased efficiency, you can also create product and billing item records from the Products and Billing Items page of Records, or directly from charge or invoice records.
Note: An interfund entry is a balancing entry made to transfer activity between funds and ensure each fund is kept in balance. Interfund entries are used only when you enter a debit account from a fund different from the credit account.

GST IN STUDENT BI LL ING 81
9. If you enter debit and credit accounts from different funds, in the Interfund field above the distribution grid, select an interfund set to balance the accounts. If you have not created a balancing interfund set for those accounts in Configuration, you cannot save the distribution. For more information about interfund entries, see the Configuration Guide for Student Billing.
10. If you have the optional module Projects and Grants, enter a project ID number in the Project ID column, or use the binoculars to search for a project ID. When you enter a valid project ID number, the description appears automatically in the Project Description column.
11. In the Class column, select a class for the distribution.
12. If you have the optional module Projects and Grants and have defined transaction codes, additional columns appear based on the number of transaction codes you have defined. In the grid, select a value for each transaction code.
13. If taxes should be compounded on the first tax entity in the grid, mark When calculating tax for the [ ] through [ ] include and select the range. The options available in the range depend on the number of sales tax entities in the grid.
14. To make the item subject to both finance charges and late fees, mark Item is subject to finance and late charges.
15. In the Comments field, you can enter default comments for the item that will appear on statements.
16. To save the sales tax item and return to the Records page, click Save and Close.
To continue adding information for this item, select the Attributes tab. For more information about attributes, see “Adding an attribute to a sales tax item” on page 81.
You can also add notes for the sales tax item. For more information about notes, see “Adding a note to a sales tax item” on page 82.
Adding an attribute to a sales tax item
An attribute is a reporting tool you use to group information based on a common theme. By defining attributes, you can filter information to your specification, which is a useful feature for sorting or filtering items for reports. You can also define the type of data stored for each item. For example, if you have defined an attribute for income categories, you can track products and billing items by income.
Note: If you mark an attribute as required in Configuration, the attribute automatically appears on the item and you must select a description before saving.
Note: Attributes can be edited at any time or deleted if the attribute is not required.

82 CHAPTER
1. From an open sales tax item record, select the Attributes tab.
2. To add an attribute to the sales tax item, in the Attribute type field, select a specific attribute type or “All Categories”.
3. In the Attribute type column, select an attribute. Attribute types are established in Configuration.
4. In the Description column, select a description of the attribute.
5. To make the attribute required, in the Required column, mark the checkbox.
6. In the Date column, enter a date.
7. In the Comments column, enter additional information about the attribute.
8. To close the sales tax item record and return to the Products and Billing Items page, click Save and Close.
Adding a note to a sales tax item
The Notes tab of a sales tax item record is an open text field where you can enter additional information about the sales tax item. You can maintain data such as the purchaser’s name, the delivery date, or other important information.
1. From an open sales tax item record, select the Notes tab.
Note: The Short Description column and the Required checkbox are for informational purposes and are edited only from the Attributes page of Configuration.

GST IN STUDENT BI LL ING 83
2. In the text box, enter free‐form text information about the sales tax item.
3. When you exit the Notes tab, your changes are saved automatically.
Adding Sales Taxes to Products and Billing Items
If your organization collects sales taxes, when you create a product, flat rate, or per usage item that is subject to a sales tax, such as GST or HST, on the product or billing item record, mark Item is subject to sales tax. Then, you can select a related sales tax item or create a new item. Selecting an existing sales tax item speeds data entry because Student Billing automatically calculates the sales tax and applies the sales tax item’s default distribution to the product, flat rate, or per usage record so you do not have to reenter that information.
Tip: Notes can be edited or deleted at any time. Just remember that deleted notes cannot be recovered!
Note: You must define at least one product or billing item record before adding charges.

84 CHAPTER
Adding Sales Taxes to ProductsOn the Product tab of a product record, you can specify whether the product is taxable, and you can select a sales tax billing item.
Product is subject to sales tax. Mark this checkbox if you must collect sales taxes for this product. In the field, select the sales tax item to apply to this product. You create sales tax items on the Product and Billing Items page. For more information about sales tax items, see “Creating Sales Tax Items” on page 79.
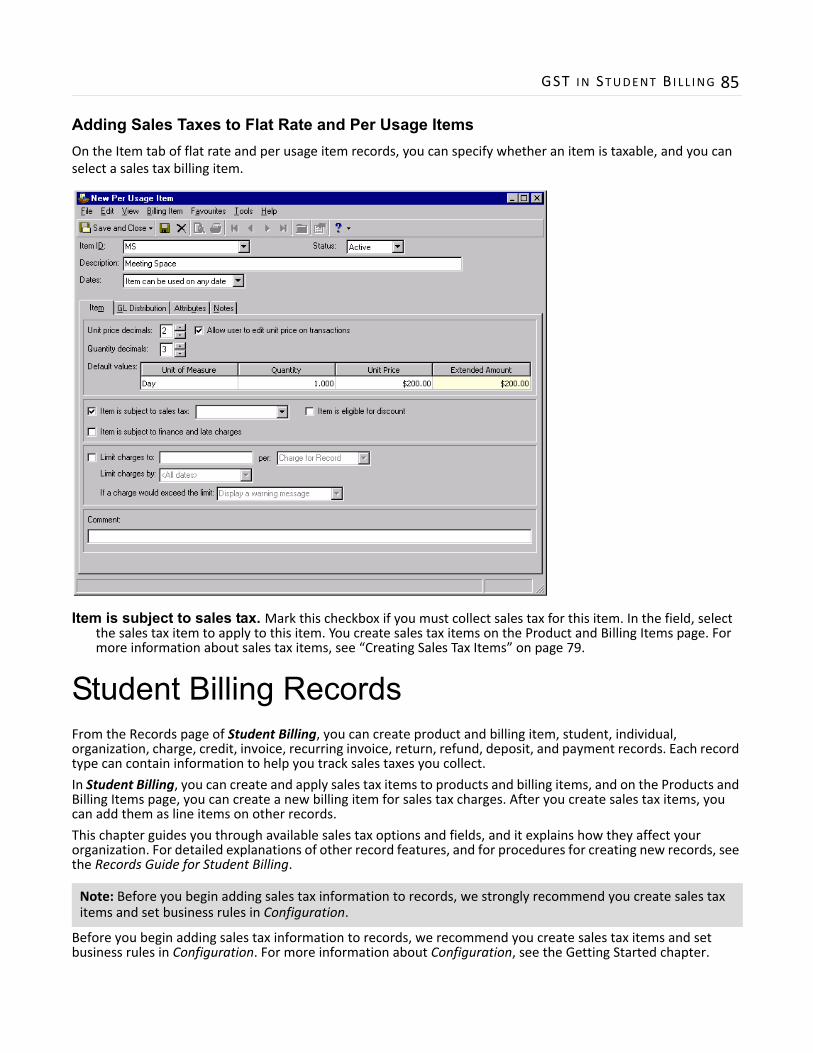
GST IN STUDENT BI LL ING 85
Adding Sales Taxes to Flat Rate and Per Usage ItemsOn the Item tab of flat rate and per usage item records, you can specify whether an item is taxable, and you can select a sales tax billing item.
Item is subject to sales tax. Mark this checkbox if you must collect sales tax for this item. In the field, select the sales tax item to apply to this item. You create sales tax items on the Product and Billing Items page. For more information about sales tax items, see “Creating Sales Tax Items” on page 79.
Student Billing RecordsFrom the Records page of Student Billing, you can create product and billing item, student, individual, organization, charge, credit, invoice, recurring invoice, return, refund, deposit, and payment records. Each record type can contain information to help you track sales taxes you collect.
In Student Billing, you can create and apply sales tax items to products and billing items, and on the Products and Billing Items page, you can create a new billing item for sales tax charges. After you create sales tax items, you can add them as line items on other records.
This chapter guides you through available sales tax options and fields, and it explains how they affect your organization. For detailed explanations of other record features, and for procedures for creating new records, see the Records Guide for Student Billing.
Before you begin adding sales tax information to records, we recommend you create sales tax items and set business rules in Configuration. For more information about Configuration, see the Getting Started chapter.
Note: Before you begin adding sales tax information to records, we strongly recommend you create sales tax items and set business rules in Configuration.
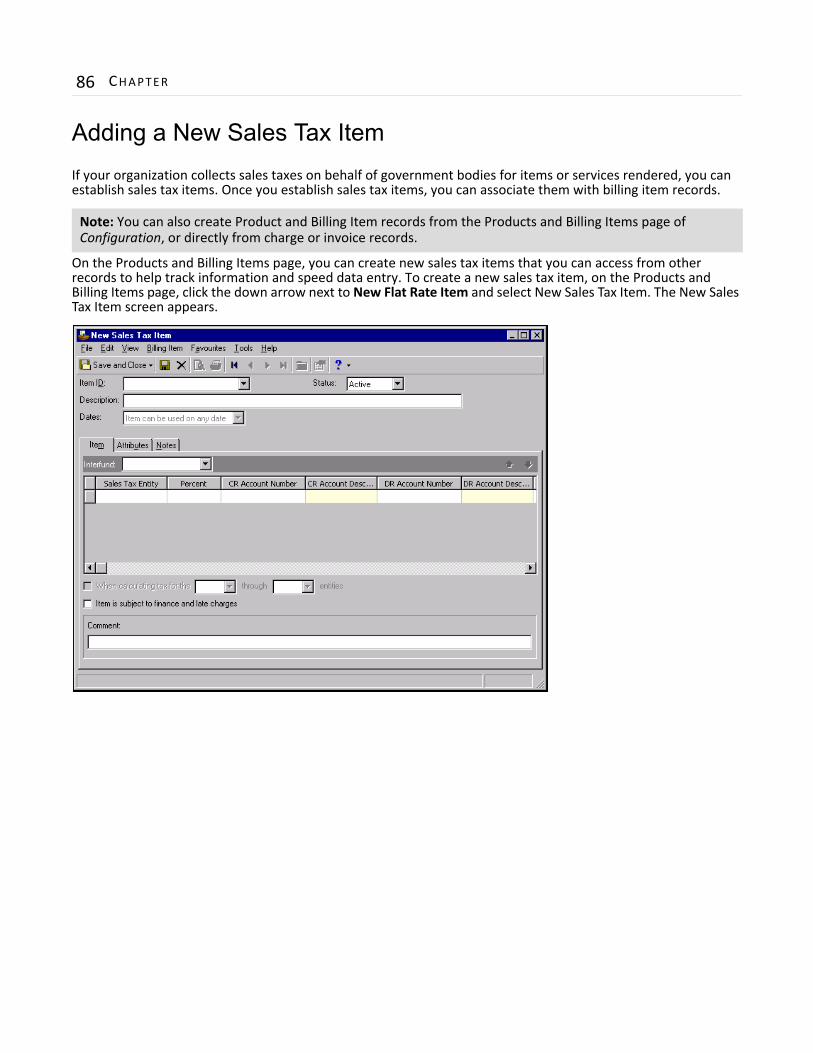
86 CHAPTER
Adding a New Sales Tax Item If your organization collects sales taxes on behalf of government bodies for items or services rendered, you can establish sales tax items. Once you establish sales tax items, you can associate them with billing item records.
On the Products and Billing Items page, you can create new sales tax items that you can access from other records to help track information and speed data entry. To create a new sales tax item, on the Products and Billing Items page, click the down arrow next to New Flat Rate Item and select New Sales Tax Item. The New Sales Tax Item screen appears.
Note: You can also create Product and Billing Item records from the Products and Billing Items page of Configuration, or directly from charge or invoice records.
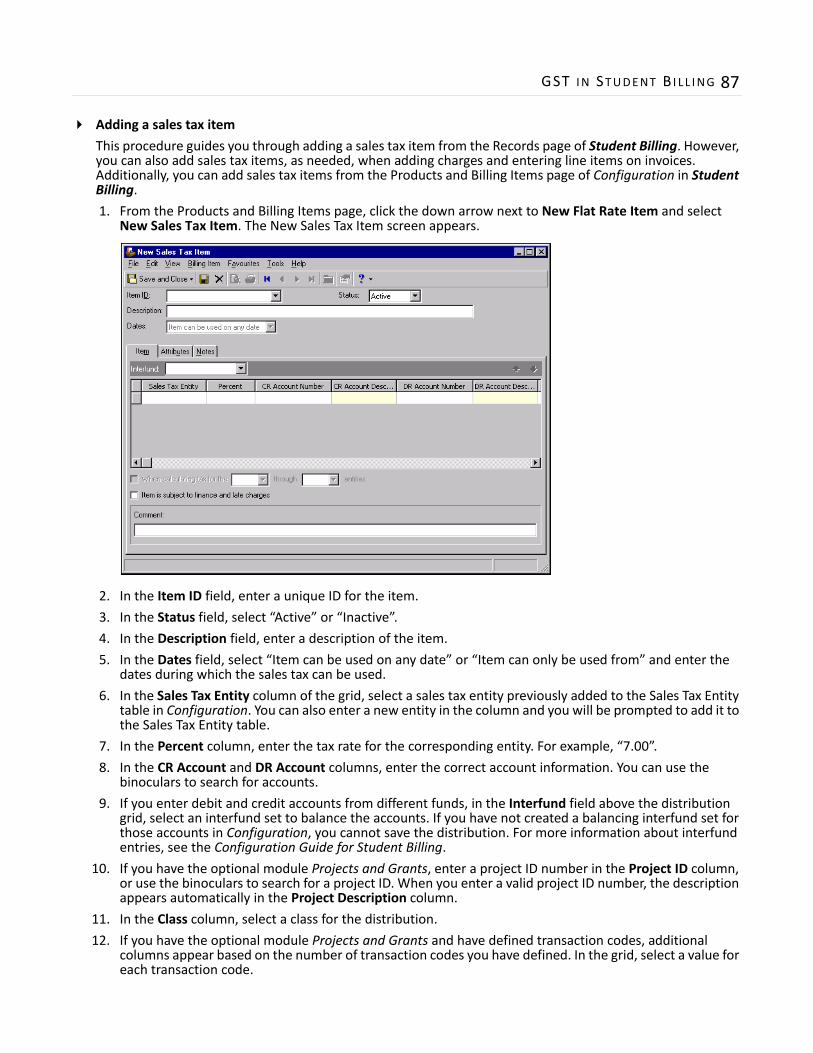
GST IN STUDENT BI LL ING 87
Adding a sales tax item
This procedure guides you through adding a sales tax item from the Records page of Student Billing. However, you can also add sales tax items, as needed, when adding charges and entering line items on invoices. Additionally, you can add sales tax items from the Products and Billing Items page of Configuration in Student Billing.
1. From the Products and Billing Items page, click the down arrow next to New Flat Rate Item and select New Sales Tax Item. The New Sales Tax Item screen appears.
2. In the Item ID field, enter a unique ID for the item.
3. In the Status field, select “Active” or “Inactive”.
4. In the Description field, enter a description of the item.
5. In the Dates field, select “Item can be used on any date” or “Item can only be used from” and enter the dates during which the sales tax can be used.
6. In the Sales Tax Entity column of the grid, select a sales tax entity previously added to the Sales Tax Entity table in Configuration. You can also enter a new entity in the column and you will be prompted to add it to the Sales Tax Entity table.
7. In the Percent column, enter the tax rate for the corresponding entity. For example, “7.00”.
8. In the CR Account and DR Account columns, enter the correct account information. You can use the binoculars to search for accounts.
9. If you enter debit and credit accounts from different funds, in the Interfund field above the distribution grid, select an interfund set to balance the accounts. If you have not created a balancing interfund set for those accounts in Configuration, you cannot save the distribution. For more information about interfund entries, see the Configuration Guide for Student Billing.
10. If you have the optional module Projects and Grants, enter a project ID number in the Project ID column, or use the binoculars to search for a project ID. When you enter a valid project ID number, the description appears automatically in the Project Description column.
11. In the Class column, select a class for the distribution.
12. If you have the optional module Projects and Grants and have defined transaction codes, additional columns appear based on the number of transaction codes you have defined. In the grid, select a value for each transaction code.

88 CHAPTER
13. If taxes should be compounded on the first sales tax item in the grid, mark When calculating tax for the [] through [] include and select the range. The options available depend on the number of sales tax items in the grid.
14. You can make the item subject to both finance charges and late fees by marking Item is subject to finance and late charges.
15. In the Comments field, you can enter default comments for the item that will appear on statements.
16. To save the sales tax item record and return to the Records page, click Save and Close. To continue adding information for this item, click the Attributes tab. For detailed procedures about entering information on the Attributes tab, see “Adding an attribute to a sales tax item” on page 88.
You can also add notes for the sales tax item. For detailed procedures about adding notes, see “Adding a note to a sales tax item” on page 89.
Adding an attribute to a sales tax item
An attribute is a reporting tool you use to group information based on a common theme. By defining attributes, you can filter information to your specification, which is a useful feature for sorting or filtering items for reports. You can also define the type of data stored for each item. For example, if you have defined an attribute for income categories, you can track products and billing items by income.
1. From an open sales tax item record, select the Attributes tab.
2. In the Attribute type field, select a specific attribute type or “All Categories”.
3. In the Attribute type column, select an attribute. Attribute types are established in Configuration.
4. In the Description column, select a description of the attribute.
Note: If you mark an attribute as required in Configuration, the attribute automatically appears on the item and you must select a description before saving.
Note: Attributes can be edited at any time or deleted if the attribute is not required.
Note: The Short Description column and the Required checkbox are for informational purposes and are edited only from the Attributes page of Configuration.

GST IN STUDENT BI LL ING 89
5. In the Date column, enter a date.
6. In the Comments column, enter additional information about the attribute.
7. To close the sales tax item record and return to the Products and Billing Items page, click Save and Close.
Adding a note to a sales tax item
The Notes tab of a sales tax item record is an open text field where you can enter additional information about the sales tax item. You can maintain data such as the purchaser’s name, the delivery date, or other important information.
1. From an open sales tax item record, select the Notes tab.
2. In the text box, enter free‐form text information about the sales tax item.
3. When you exit the Notes tab, your changes are saved automatically.
Adding Sales Tax to Products and Billing ItemsIf your organization collects sales taxes, when you create a product, flat rate, or per usage item that is subject to sales tax, mark Item is subject to sales tax. Then, you can select a related sales tax item or create a new sales tax item. Selecting an existing sales tax item speeds data entry because Student Billing automatically calculates the sales tax and applies the sales tax item’s default distribution to product, flat rate, or per usage record so you do not have to reenter that information.
Note: Notes can be edited or deleted at any time. Just remember that deleted notes cannot be recovered!

90 CHAPTER
Adding Sales Tax to ProductsOn the Product tab of a product record, you can specify if the product is taxable, and you can select a sales tax item.
Product is subject to sales tax. Mark this checkbox if you must collect sales tax for this product. In the sales tax field, select the sales tax item you want to apply to this product. You create sales tax items on the Product and Billing Items page. For more information about sales tax items, see “Adding a New Sales Tax Item” on page 86”.

GST IN STUDENT BI LL ING 91
Adding Sales Tax to Billing ItemsOn the Item tab of flat rate, per usage, TRP, and new automatic billing item records, you can specify if an item is taxable, and you can select a sales tax item.
Item is subject to sales tax. Mark this checkbox if you must collect sales tax for this item. In the sales tax field, select the sales tax item you want to apply to this item. You create sales tax items on the Product and Billing Items page. For more information about sales tax items, see “Adding a New Sales Tax Item” on page 86.
Adding Sales Tax to Charges
When you create a charge record that contains sales tax, Student Billing automatically creates a separate charge record containing the sales tax item. For example, Dr Mary Young purchases T‐shirts for which you must charge sales tax. The last charge on file is number 1022. When you create the charge record for the T‐shirts, the program automatically creates charge 1023 for the sales tax item, and the charge you created for the T‐shirt order is given number 1024.
Note: For detailed information and procedures for creating a new charge record, see the Records Guide for Student Billing.

92 CHAPTER
On a saved charge record, when you click Edit sales tax, the program opens the sales tax charge record so you can edit the sales tax item description. All other fields are locked and cannot be edited.
Edit sales tax. To edit the tax settings for this charge, click Edit sales tax. A charge record containing the sales tax item appears so you can edit the sales tax item description. All other fields are locked and cannot be edited.
In the sales tax field, select the sales tax item you want to apply to this charge. You create sales tax items on the Product and Billing Items page. For more information about sales tax items, see “Adding a New Sales Tax Item” on page 86.
Adding Sales Tax to CreditsWhen you create a credit record that contains sales tax, Account Receivable automatically creates a separate credit record containing the sales tax item. For example, you create a credit for Dr Mary Young that includes sales tax. The last credit on file is number 517. When you create the new credit record, the program automatically creates credit 518 for the sales tax credit, and the credit you created is given number 519.

GST IN STUDENT BI LL ING 93
When you click Edit sales tax, the program opens the sales tax credit record so you can edit the sales tax item description. All other fields are locked and cannot be edited.
Edit sales tax. To edit the tax settings for this credit, click Edit sales tax. A credit record containing the sales tax item appears so you can edit the sales tax item description. All other fields are locked and cannot be edited.
In the sales tax field, select the sales tax item you want to apply to this credit. You create sales tax items on the Product and Billing Items page. For more information about sales tax items, see “Adding a New Sales Tax Item” on page 86.

94 CHAPTER

6chapter
Cheque Processing
Printing Cheques and Recording Bank Drafts . . . . . . . . . . . . . . . . . . . . . . . . . . . . . . . . . . . . . . . . . . . . . . . . . . . . . 96Creating a New One‐Time Cheque . . . . . . . . . . . . . . . . . . . . . . . . . . . . . . . . . . . . . . . . . . . . . . . . . . . . . . . . . . . . . 101Editing Sales Tax . . . . . . . . . . . . . . . . . . . . . . . . . . . . . . . . . . . . . . . . . . . . . . . . . . . . . . . . . . . . . . . . . . . . . . . . . . . . . . 104Editing Unwritten One‐Time Cheques . . . . . . . . . . . . . . . . . . . . . . . . . . . . . . . . . . . . . . . . . . . . . . . . . . . . . . . . . . 105Creating Payments from Invoices . . . . . . . . . . . . . . . . . . . . . . . . . . . . . . . . . . . . . . . . . . . . . . . . . . . . . . . . . . . . . . 105

96 CHAPTER
In Accounts Payable, you can make payments from the Banks page. You can print cheques, record bank drafts, create and edit one‐time cheques, and create manual cheques.
You can pay all invoices associated with a bank account or select payments to make based on a series of filters. For example, you can select invoices for payment based on a due date or a discount expiry date. You can also make payments for one vendor or all vendors.
A one‐time cheque is paid to an individual or business not maintained as a vendor in your database. A manual cheque is a handwritten cheque for which you only record the information in your database.
Printing Cheques and Recording Bank DraftsWhen you click Print cheques and record bank drafts, you access the Create Payments screen where you select the records and set up printing options for the payments. The Create Payments screen has tabs on which you set parameters: General, Filters, Invoices, One‐Time Cheques, and Format.
To move among the tabs, click Next and Back at the bottom of the screen or select the tab itself. On these tabs you specify the records to include in the payment run and how the payments should look. Once you have selected parameters for the payment run, you can make the payments by clicking Create Now at the bottom of the screen. To save the parameters and make the payments later, click Create Later.
Creating a payment
1. From Payment tasks on the Banks page, click Print cheques and record bank drafts. The Create Payments screen opens to the General tab.
2. In the Payment date field, select a date for the payments you are creating. You can select “Today”, “Period end date”, or “Specific date”. If you select “Specific date”, enter the date.
3. In the Pay all vendors in this payment run field, select the method to use when you pay invoices. You can select “By Computer cheque”, or “Based on payment method”.
Note: A one‐time cheque is a direct disbursement to an individual or company not maintained as a vendor in the database.
Note: To stop processing a payment run, click Cancel at the bottom of the screen.

CHEQUE PROCESS ING 97
4. In the Calculate discounts as of field, select a date for the program to use to determine whether discounts are valid or expired. If none of the selected invoices have discounts, the program ignores this date.
5. In the Post status field, select the status the payment should be after it is made.
6. In the Post date field, select a post date. If you select “Specific Date”, enter a date.
7. In the Invoice due date on or before field, enter a date.
8. To pay invoices before discounts expire, mark Include invoices with discounts that expire on or before and enter an expiry date in the field.
9. In the Print report to this printer field, select the printer on which to print the Pre‐payment Report.
10. In the Print payments to this printer field, select the printer on which to print the cheques.
11. If you are making different types of payments or want to change paper during the payment run, mark Pause printing between payment types.
12. To create an output query of the payment run, mark Create an output query of payments.
13. Click Next or select the Filters tab.
14. To access the Selected <Filter> screen, select a filter in the grid and click Open on the action bar. For example, click “Vendors” in the Filters column, click Open, and the Selected Vendors screen appears.
15. To remove filters, click Clear Filters. The Include column displays “All” for every filter.
16. In the Include column, select “All” or “Selected”. If you choose “Selected”, the Selected <Filter> screen opens so you can designate specific filters. The filters you specify appear in the Selected Filters column.
Note: The Filters column lists vendors, invoices, and banks as the filters available for payments. You cannot edit this column.

98 CHAPTER
17. Click Next or select the Invoices tab.
18. To pay all the invoices, click Select All on the action bar. The program marks the checkbox in the Pay? column for all the invoices.
19. To pay only specific invoices, unmark the checkbox in the Pay? column of the invoices you do not want to pay.
20. If you do not want to pay the invoices, click Deselect All on the action bar. The program unmarks the checkbox in the Pay? column for all the invoices.
21. Click Hide Details to hide invoice information displayed at the bottom of the screen. Click Show Details to see invoice information.
Note: On the Invoices tab you can select invoices to be paid in the payment run. You can create or edit the payment schedule for the invoice.

CHEQUE PROCESS ING 99
22. Click Next or select the One‐Time Cheques tab.
23. To create a new one‐time cheque, click New. For more information about creating one‐time cheques, see “Creating a New One‐Time Cheque” on page 101.
24. To include all the one‐time cheques in this payment run, click Select All on the action bar. The program marks the checkbox in the Pay? column for all the cheques.
25. To include only specific one‐time cheques, unmark the checkbox in the Pay? column of the cheques you do not want to pay.
26. If you do not want to include all the one‐time cheques in this payment run, click Deselect All on the action bar. The program unmarks the checkbox in the Pay? column for all the cheques.
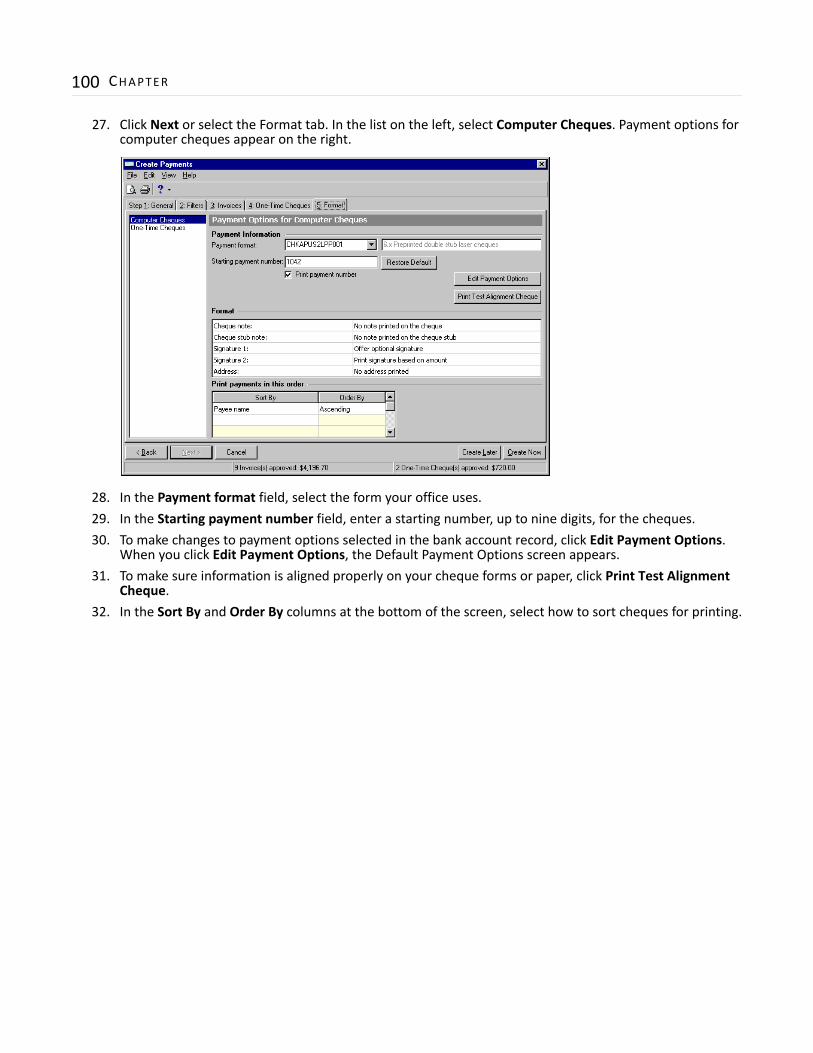
100 CHAPTER
27. Click Next or select the Format tab. In the list on the left, select Computer Cheques. Payment options for computer cheques appear on the right.
28. In the Payment format field, select the form your office uses.
29. In the Starting payment number field, enter a starting number, up to nine digits, for the cheques.
30. To make changes to payment options selected in the bank account record, click Edit Payment Options. When you click Edit Payment Options, the Default Payment Options screen appears.
31. To make sure information is aligned properly on your cheque forms or paper, click Print Test Alignment Cheque.
32. In the Sort By and Order By columns at the bottom of the screen, select how to sort cheques for printing.
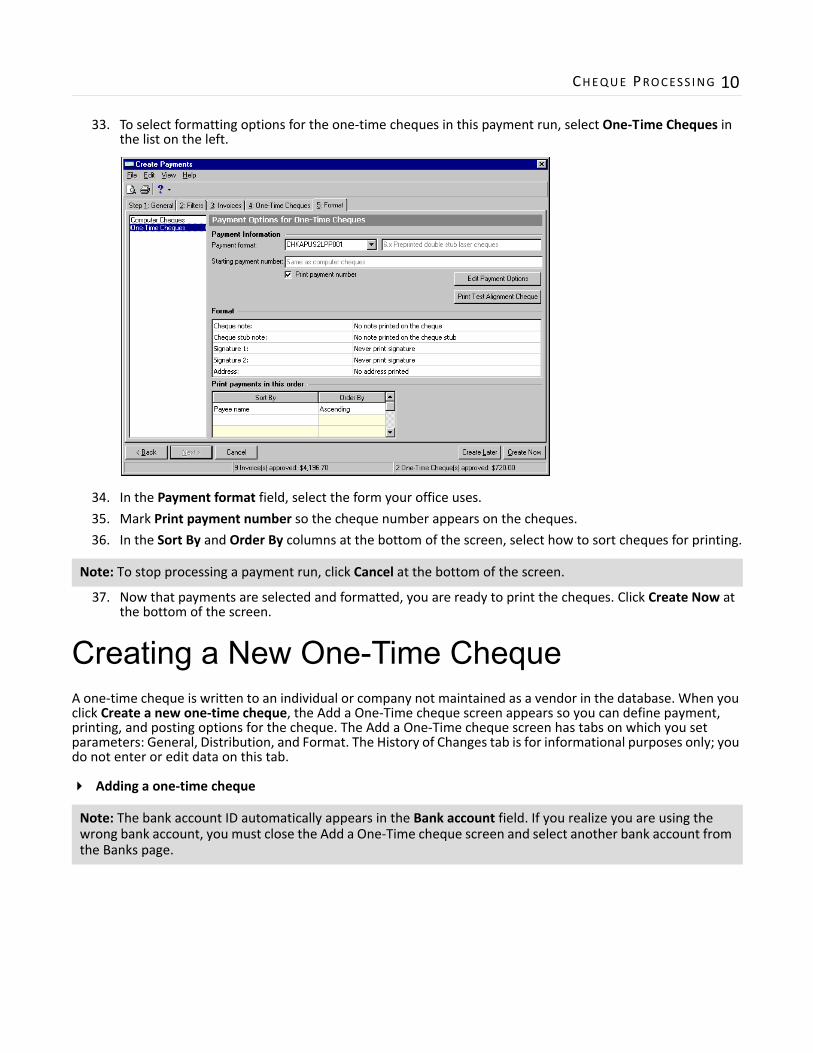
CHEQUE PROCESS ING 10
33. To select formatting options for the one‐time cheques in this payment run, select One‐Time Cheques in the list on the left.
34. In the Payment format field, select the form your office uses.
35. Mark Print payment number so the cheque number appears on the cheques.
36. In the Sort By and Order By columns at the bottom of the screen, select how to sort cheques for printing.
37. Now that payments are selected and formatted, you are ready to print the cheques. Click Create Now at the bottom of the screen.
Creating a New One-Time ChequeA one‐time cheque is written to an individual or company not maintained as a vendor in the database. When you click Create a new one‐time cheque, the Add a One‐Time cheque screen appears so you can define payment, printing, and posting options for the cheque. The Add a One‐Time cheque screen has tabs on which you set parameters: General, Distribution, and Format. The History of Changes tab is for informational purposes only; you do not enter or edit data on this tab.
Adding a one‐time cheque
Note: To stop processing a payment run, click Cancel at the bottom of the screen.
Note: The bank account ID automatically appears in the Bank account field. If you realize you are using the wrong bank account, you must close the Add a One‐Time cheque screen and select another bank account from the Banks page.

102 CHAPTER
1. From Payment tasks on the Banks page, click Create a new one‐time cheque. The Add a One‐Time cheque screen opens to the General tab.
2. Bank account information and today’s date automatically appear in the Bank account and Cheque date fields.
3. Enter the amount and a description of the payment in the Amount and Description fields
4. In the Cheque format field, select a cheque form your office uses.
5. In the Payee name field, enter the name of the business.
6. To edit sales tax information, click Edit Tax. For more information about editing sales tax information on the invoice record, see “Editing Sales Tax” on page 104.
7. Enter the contact information in the Contact field and Contact Type grid.
8. In the Business # field, enter tax identification number for your organization.
9. Select a post status and date for the one‐time cheque in the Post status/date fields. When the cheque clears the bank, you can mark Cleared on and enter the date.
Note: You can create a distribution for the payment on the Distribution tab.

CHEQUE PROCESS ING 10
10. Select the Distribution tab.
11. In the distribution field, select “Distribution” or “Miscellaneous Entries”.
If you select “Distribution”, enter the GST Tax ID field.
If you select “Miscellaneous Entries”, select an interfund entry set in the Interfund field to balance the accounts.
12. In the DR Account Number column, enter the debit fund or account for the distribution. You can use the small binoculars to search for an account segment or the large binoculars to search for an account number.
When you enter a valid debit account number, the description appears automatically in the DR Account Description column.
13. Enter the amount of the distribution in the Amount column or the percentage in the Percent column. You can manually enter amounts or percents for each account or you can click Distribute Evenly to distribute amounts or percents equally among the selected accounts.
14. In the CR Account Number column, enter the credit fund or account for your distribution. You can use the small binoculars to search for an account segment or use the large binoculars to search for an account number.
When you enter a valid credit account number, the description appears automatically in the CR Account Description column.
15. In the Interfund field above the distribution grid, select an interfund set to balance the accounts if you enter debit and credit accounts from different funds. If you have not created a balancing interfund set for those accounts in Configuration, you cannot save the distribution.
16. If you have the optional module Projects and Grants, enter the project ID number in the Project ID column or use the binoculars to search for a project ID. When you enter a valid project ID number, the description appears automatically in the Project Description column.
17. In the Class column, select a class for the distribution.
Note: To delete all of the distributions, click Delete All. To delete one distribution line, select the row to delete by clicking the button to the left of the grid. Select Edit from the toolbar, then Delete Row. The program deletes the selected row.

104 CHAPTER
18. If you have the optional module Projects and Grants and have defined transaction codes, additional columns appear based on the number of transaction codes you have defined. In the grid, select a value for each transaction code.
19. To enter different transaction distributions for the debit and credit accounts in a distribution row, select the distribution row and click Distribution. For a debit account, select DR Distribution. For a credit account, select CR Distribution. The Transaction Distribution screen appears.
You can also use this screen to split transaction distributions among multiple projects, classes, or transaction codes for a single debit or credit account. When you have finished entering information, click OK to return to one‐time cheque Distribution tab.
20. You can click Load Distribution to display a list of all existing account distributions defined in Accounts Payable Configuration.
21. You can click Distribute Evenly to divide the distribution evenly among all accounts entered in the distribution grid.
22. To attach transaction attributes to an account in the distribution, select the account and click Attributes on the action bar below the grid. When you have finished entering information, click OK to return to the one‐time cheque Distribution tab.
23. You can click Delete All to delete all the distributions in the grid.
24. If you have the optional module Budget Management, you can click Budget on the action bar above the grid to check the account or project against its budget.
25. To preview General Ledger debits and credits for the cheque, click DR/CR Entries on the action bar above the grid.
26. Click Print Later and Close on the toolbar so you can print this one‐time cheque in your next payment run. You return to the Banks page.
Editing Sales TaxTo edit sales tax information, click Edit Tax on the one‐time cheque. When you edit the tax amount, the new amount is applied to the tax distribution proportionally.
Editing sales tax from a one‐time cheque
1. From the one‐time cheque, click Edit Tax. The Edit Sales Tax screen appears.
2. In the Total Tax field, select “GST”, “HST”, “LST” or “ZST”.
3. To enter distributions by amount, click the $ button. To enter distributions by percent, click the % button.
4. Click OK to save the edited sales tax.
Note: The History of Changes tab displays an historic record of key changes made to the one‐time cheque. The information provides an audit trail and is for informational purposes only. You cannot add or edit data on the History of Changes tab.

CHEQUE PROCESS ING 10
Editing Unwritten One-Time ChequesWhen you click Edit unwritten one‐time cheques, the Unwritten One‐Time Cheques screen for the selected bank account appears so you can select a cheque and edit payment, printing, and posting options for the cheque. You can also record and print one‐time cheques from this screen.
Editing an unwritten one‐time cheque
1. From Payment tasks on the Banks page, click Edit unwritten one‐time cheques. The Unwritten One‐Time Cheques screen appears.
2. Select a cheque in the grid and click Open on the toolbar. You can enter or edit information on the cheque record before making the payment.
3. To record the cheque as a payment transaction in the bank register, select the cheque in the grid and click Record Cheque on the toolbar.
4. To print the cheque, select it in the grid and click Print Cheque on the toolbar. The Printing Payment Status screen appears so you can assure cheques will print successfully. After cheques print and you return to the Unwritten One‐Time Cheques screen, the cheque no longer appears in the grid.
5. Click Close to return to the Banks page.
Creating Payments from InvoicesFrom the Payments/Credits tab of an invoice record, you can click Pay Now to open the Create a Payment for Invoice screen. This screen is similar to the Add a One‐Time cheque screen in Banks. Here, you create cheques to pay invoices.
Note: To use one‐time cheque information in another software application, click Export on the toolbar.
Note: If the grid contains numerous entries, you can click Find to find a specific one‐time cheque. By using the Find screen, you can quickly find the cheque instead of spending time scrolling through them in the grid.

106 CHAPTER
Creating a payment from an invoice
1. From the Payments/Credits tab of an open invoice record, click Pay Now. The Create a Payment for Invoice screen opens to the General tab.
2. In the Bank account field, select a bank account. The bank account description appears automatically.
3. In the Cheque date field, enter the cheque date.
4. The Amount field is for informational purposes only and displays values from the Invoice amount or Discount amount fields of the invoice.
5. In the cheque type field, select “Computer cheque number” or “Manual cheque number”.
6. In the cheque number field, enter a cheque number.
7. If you select a computer cheque type, in the Cheque format field, select a format.
8. The Payee name, Address, and Tax ID number fields are for informational purposes and display vendor information from the invoice.
9. The Contact field and contacts grid are for informational purposes and display contact information from the invoice.
10. In the Post status/date field, select a current posting status and the date posted to the general ledger. If you select “Specific Date”, enter a date.
11. When the cheque clears, mark Cleared on and enter the date it cleared.
12. The Reversal status/date fields are for informational purposes only and display reversal information from the invoice.
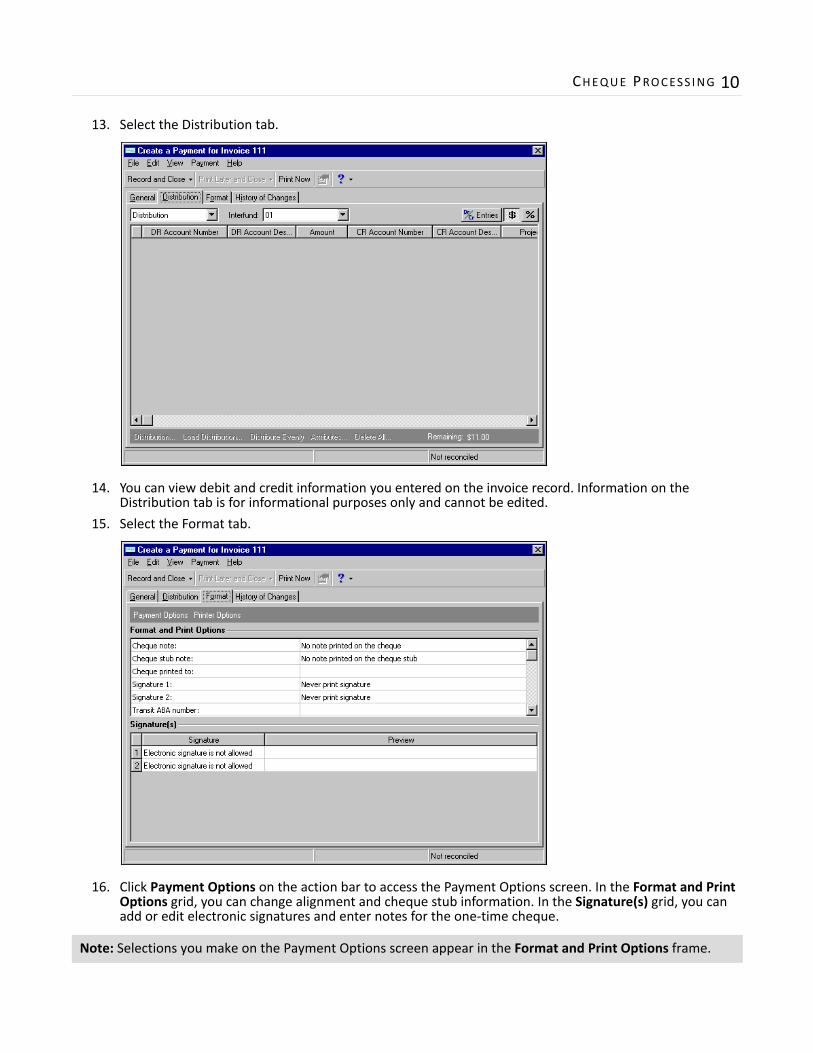
CHEQUE PROCESS ING 10
13. Select the Distribution tab.
14. You can view debit and credit information you entered on the invoice record. Information on the Distribution tab is for informational purposes only and cannot be edited.
15. Select the Format tab.
16. Click Payment Options on the action bar to access the Payment Options screen. In the Format and Print Options grid, you can change alignment and cheque stub information. In the Signature(s) grid, you can add or edit electronic signatures and enter notes for the one‐time cheque.
Note: Selections you make on the Payment Options screen appear in the Format and Print Options frame.
108 CHAPTER
17. Click Printer Options to access the Printer Options screen. From this screen you can select printing information for the payments.
18. To save the payment and return to the invoice record, click Record and Close.

7chapter
GST Reporting
Accounts Payable Reports. . . . . . . . . . . . . . . . . . . . . . . . . . . . . . . . . . . . . . . . . . . . . . . . . . . . . . . . . . . . . . . . . . . . 110Creating a Public Sector Bodies GST Report . . . . . . . . . . . . . . . . . . . . . . . . . . . . . . . . . . . . . . . . . . . . . . . . . . . . . . . . 110Accounts Receivable Reports . . . . . . . . . . . . . . . . . . . . . . . . . . . . . . . . . . . . . . . . . . . . . . . . . . . . . . . . . . . . . . . . . 117Creating a Public Sector Bodies GST Report . . . . . . . . . . . . . . . . . . . . . . . . . . . . . . . . . . . . . . . . . . . . . . . . . . . . . . . . 117Creating a Sales Tax Report . . . . . . . . . . . . . . . . . . . . . . . . . . . . . . . . . . . . . . . . . . . . . . . . . . . . . . . . . . . . . . . . . . . . . 124

110 CHAPTER
In Accounts Payable and Accounts Receivable, you can create Business Activity Statements to view sales tax information quickly and easily. These reports are valuable tools for documenting your sales tax rebates and providing accurate information about the taxes you collect.
The Reports page is the central location for reporting. From the navigation bar, select Reports to access the Reports page. This page contains links to each report category. When you click a link, the program displays a list of the reports making up the category. To access Public Sector Bodies GST Reports in Accounts Payable, click Invoice Reports. To access Public Sector Bodies GST Reports and Sales Tax Reports in Accounts Receivable, click Transaction Reports.
This chapter explains the procedures for creating Public Sector Bodies GST Reports and Sales Tax Reports.
Accounts Payable ReportsIn Accounts Payable, you can create Public Sector Bodies GST Reports to list all your obligations and entitlements as GST amounts. You can use these values to complete the GST portion of your taxes and file for rebates. This section contains detailed procedures for creating a GST report. For detailed information about creating other Accounts Payable reports, see the Reports Guide for Accounts Payable.
Creating a Public Sector Bodies GST ReportThe Public Sector Bodies GST Report shows tax information from Accounts Payable, Accounts Receivable, General Ledger, and the Raiser’s Edge.
The Public Sector Bodies GST Report has four tabs on which you set parameters: General, AP Filters, AR Filters, and Format. To move among the tabs in a report, use Next and Back at the bottom of the screen or select the tab itself. On these tabs you specify the records to include in the report and how the report should look.
Creating a Public Sector Bodies GST Report
Note: The action bar is located above the list of reports and contains links for creating a new report, opening a report, and deleting a report. These links are common to all Reports pages.

GST REPORT ING 11
1. From the Reports page, click Invoice Reports. The Invoice Reports page appears with a list of all invoice reports on the left. In the list, select Public Sector Bodies GST Report.
2. On the action bar, click New. The New Public Sector Bodies GST Report screen opens to the General tab. On this tab, you can set specific parameters and make selections about the information included in the report.
3. In the Date field, select a date range for the report. If you select <Specific range>, you must also enter a start date and end date.
Note: Fields, options, and checkboxes on the General tab vary for each report.

112 CHAPTER
4. In the Include transactions from these systems frame, mark Accounts Payable or Accounts Receivable to include transactions from those programs in the report.
5. To create an output query, mark Create an output query and select “Invoices”.
6. Click Next or select the AP Filters tab. On this tab, you can filter the information appearing in the report.
7. In the Include column, select “All” or “Selected”. If you choose “Selected,” the Selected <Filter> screen opens so you can designate specific filters.
8. To include all the filters listed in the grid, mark All.
9. To view or edit the previous filter without returning to the AP Filters tab, click Previous Filter. To view or edit the next filter without returning to the AP Filters tab, click Next Filter.
Note: Once you highlight a filter in the grid, you can click Open to access the Selected <Filter> screen on which you select specific filters.

GST REPORT ING 11
10. Click OK to return to the AP Filters tab. Your selections appear in the grid.
11. Click Next or select the AR Filters tab.
12. In the Include column, select “All” or “Selected”. If you choose “Selected,” the Selected <Filter> screen opens so you can designate specific filters.
13. To include all the filters listed in the grid, mark All.
14. To view or edit the previous filter without returning to the AR Filters tab, click Previous Filter. To view or edit the next filter without returning to the AR Filters tab, click Next Filter.
15. Click OK to return to the AR Filters tab. Your selections appear in the grid.
Note: You can click Clear All Filters to remove all previously selected filters from the report.
Note: Once you highlight a filter in the grid, you can click Open to access the Selected <Filter> screen on which you select specific filters.

114 CHAPTER
16. Click Next or select the Format tab. On the Format tab, you select how you want the report to appear.
Headings. You can enter a maximum of 60 characters in both the Title and Subtitle fields. The program assigns a name in the Title field based on the record type; in this case, “Public Sector Bodies GST Report”. You can change this title. The title and subtitle appear at the top of the report. You can also select how to align the heading and whether to include your organization’s in the header.
You can include other options in the header, such as the page number and the date, to appear on every page of the report.
Criteria. Select Criteria to print a list of criteria used to create the report. Mark Print these criteria on and select a separate page or the first page. All selected options print in the criteria section of the report.

GST REPORT ING 11
The program automatically selects all criteria. Unmark the checkbox for any you do not want to print with the report.
Detail. Use Detail to select details specific to the report.
Sort. Use Sort to select the order in which information appears on the report. When you select Sort on the Format tab, a grid displays the categories you can sort in the report. Select a sorting category in the Sort by column and select Ascending or Descending in the Order by column.

116 CHAPTER
If you make no selections in the Sort by column in the grid, the program sorts by GST Tax Entity and Transaction Type in ascending order.
Page Footer. You can enter a maximum of 255 characters in the page footer. You can also include other options in the page footer, such as the page number and date.
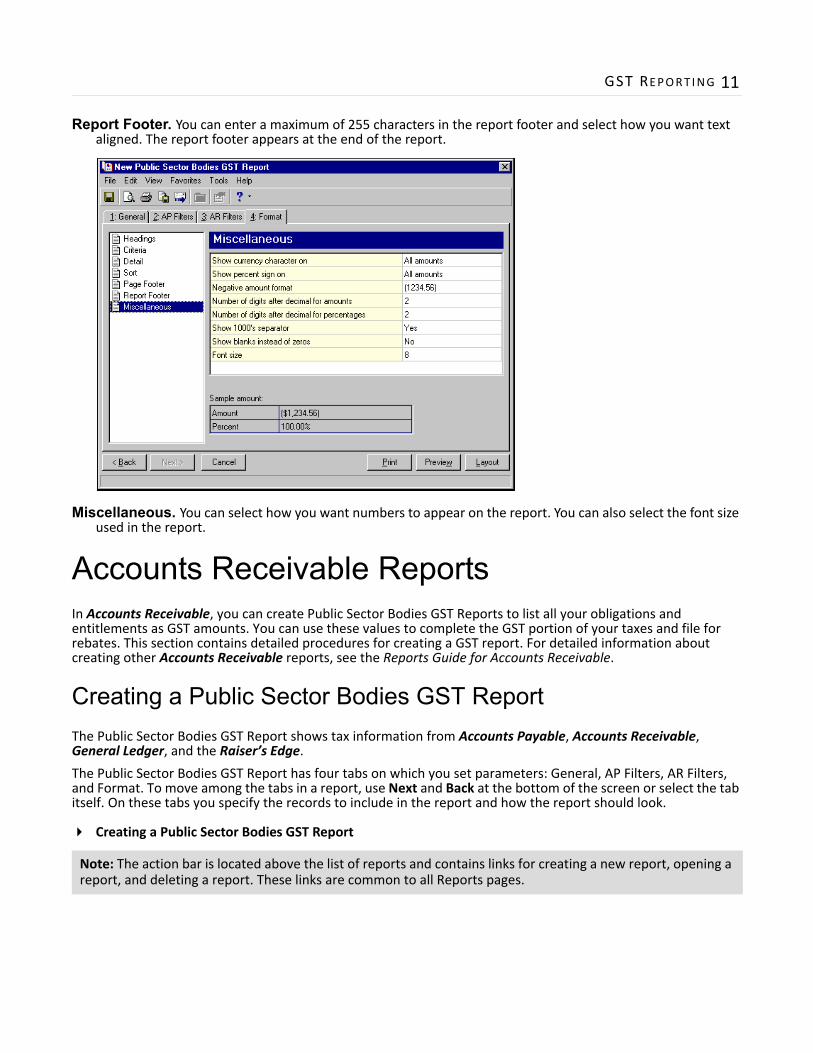
GST REPORT ING 11
Report Footer. You can enter a maximum of 255 characters in the report footer and select how you want text aligned. The report footer appears at the end of the report.
Miscellaneous. You can select how you want numbers to appear on the report. You can also select the font size used in the report.
Accounts Receivable ReportsIn Accounts Receivable, you can create Public Sector Bodies GST Reports to list all your obligations and entitlements as GST amounts. You can use these values to complete the GST portion of your taxes and file for rebates. This section contains detailed procedures for creating a GST report. For detailed information about creating other Accounts Receivable reports, see the Reports Guide for Accounts Receivable.
Creating a Public Sector Bodies GST ReportThe Public Sector Bodies GST Report shows tax information from Accounts Payable, Accounts Receivable, General Ledger, and the Raiser’s Edge.
The Public Sector Bodies GST Report has four tabs on which you set parameters: General, AP Filters, AR Filters, and Format. To move among the tabs in a report, use Next and Back at the bottom of the screen or select the tab itself. On these tabs you specify the records to include in the report and how the report should look.
Creating a Public Sector Bodies GST Report
Note: The action bar is located above the list of reports and contains links for creating a new report, opening a report, and deleting a report. These links are common to all Reports pages.
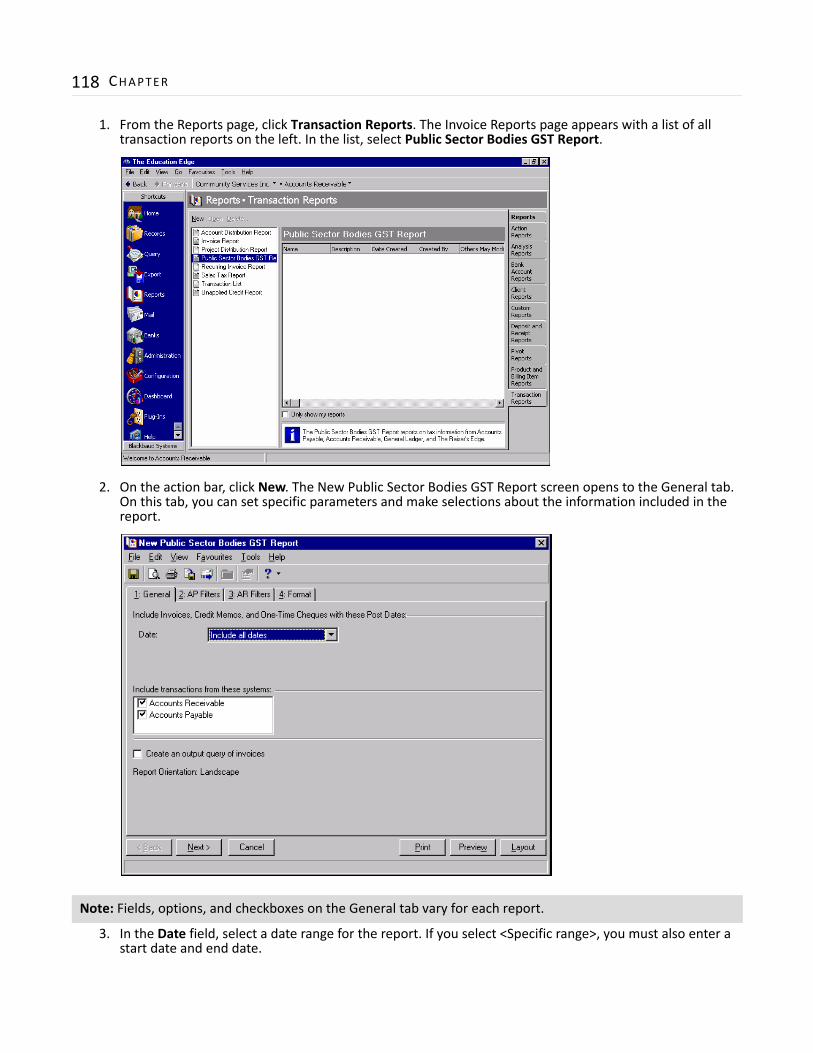
118 CHAPTER
1. From the Reports page, click Transaction Reports. The Invoice Reports page appears with a list of all transaction reports on the left. In the list, select Public Sector Bodies GST Report.
2. On the action bar, click New. The New Public Sector Bodies GST Report screen opens to the General tab. On this tab, you can set specific parameters and make selections about the information included in the report.
3. In the Date field, select a date range for the report. If you select <Specific range>, you must also enter a start date and end date.
Note: Fields, options, and checkboxes on the General tab vary for each report.

GST REPORT ING 11
4. In the Include transactions from these systems frame, mark Accounts Payable or Accounts Receivable to include transactions from those programs in the report.
5. To create an output query of invoices, mark Create an output query of invoices.
6. Click Next or select the AP Filters tab. On this tab, you can filter the information appearing in the report.
7. In the Include column, select “All” or “Selected”. If you choose “Selected,” the Selected <Filter> screen opens so you can designate specific filters.
8. To include all the filters listed in the grid, mark All.
9. To view or edit the previous filter without returning to the AP Filters tab, click Previous Filter. To view or edit the next filter without returning to the AP Filters tab, click Next Filter.
Note: Once you highlight a filter in the grid, you can click Open to access the Selected <Filter> screen on which you select specific filters.
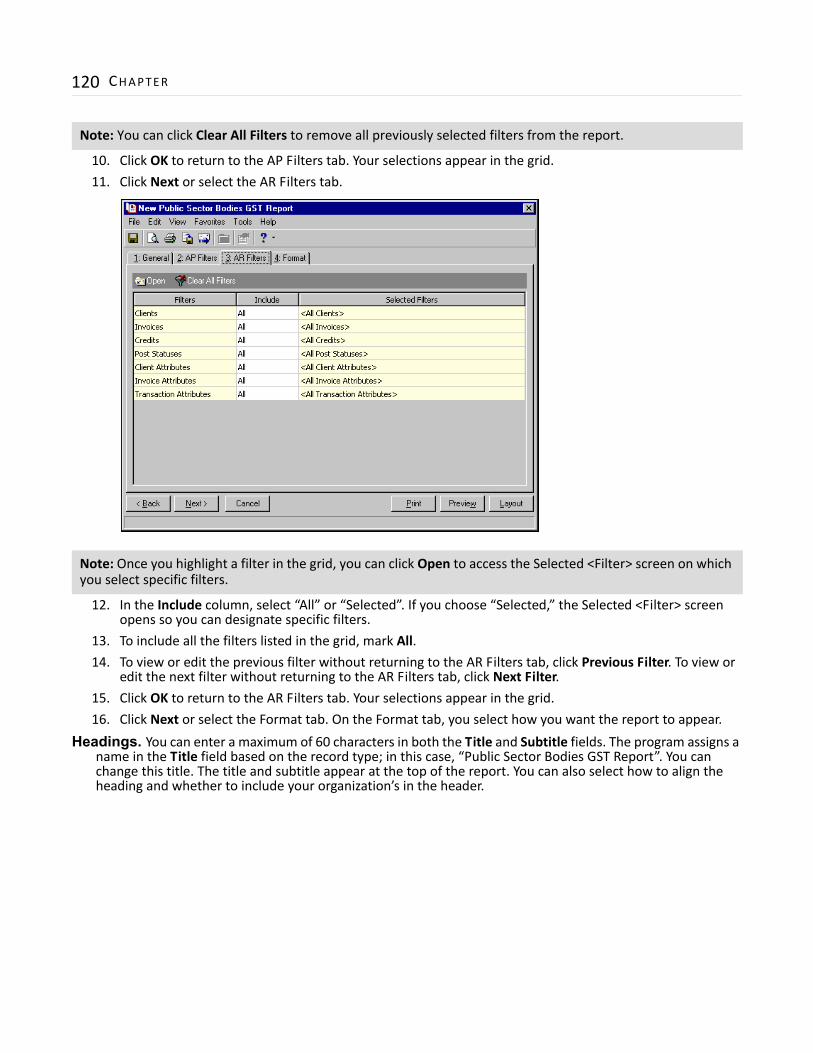
120 CHAPTER
10. Click OK to return to the AP Filters tab. Your selections appear in the grid.
11. Click Next or select the AR Filters tab.
12. In the Include column, select “All” or “Selected”. If you choose “Selected,” the Selected <Filter> screen opens so you can designate specific filters.
13. To include all the filters listed in the grid, mark All.
14. To view or edit the previous filter without returning to the AR Filters tab, click Previous Filter. To view or edit the next filter without returning to the AR Filters tab, click Next Filter.
15. Click OK to return to the AR Filters tab. Your selections appear in the grid.
16. Click Next or select the Format tab. On the Format tab, you select how you want the report to appear.
Headings. You can enter a maximum of 60 characters in both the Title and Subtitle fields. The program assigns a name in the Title field based on the record type; in this case, “Public Sector Bodies GST Report”. You can change this title. The title and subtitle appear at the top of the report. You can also select how to align the heading and whether to include your organization’s in the header.
Note: You can click Clear All Filters to remove all previously selected filters from the report.
Note: Once you highlight a filter in the grid, you can click Open to access the Selected <Filter> screen on which you select specific filters.
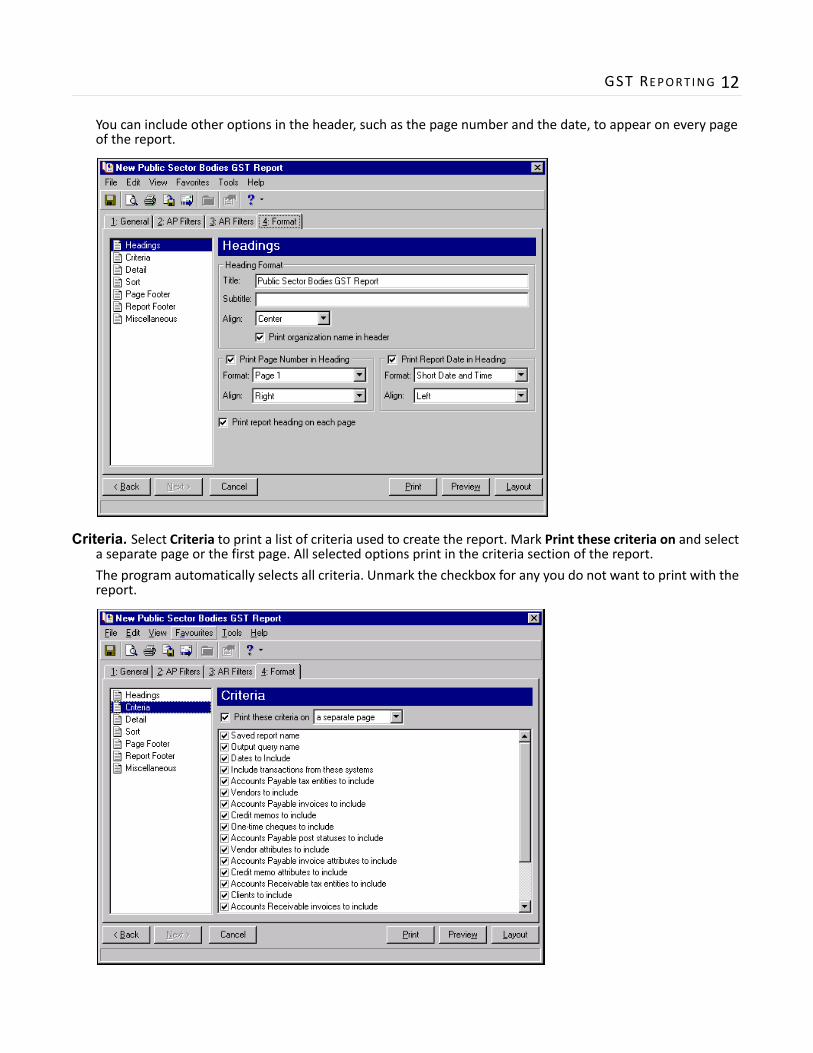
GST REPORT ING 12
You can include other options in the header, such as the page number and the date, to appear on every page of the report.
Criteria. Select Criteria to print a list of criteria used to create the report. Mark Print these criteria on and select a separate page or the first page. All selected options print in the criteria section of the report.
The program automatically selects all criteria. Unmark the checkbox for any you do not want to print with the report.
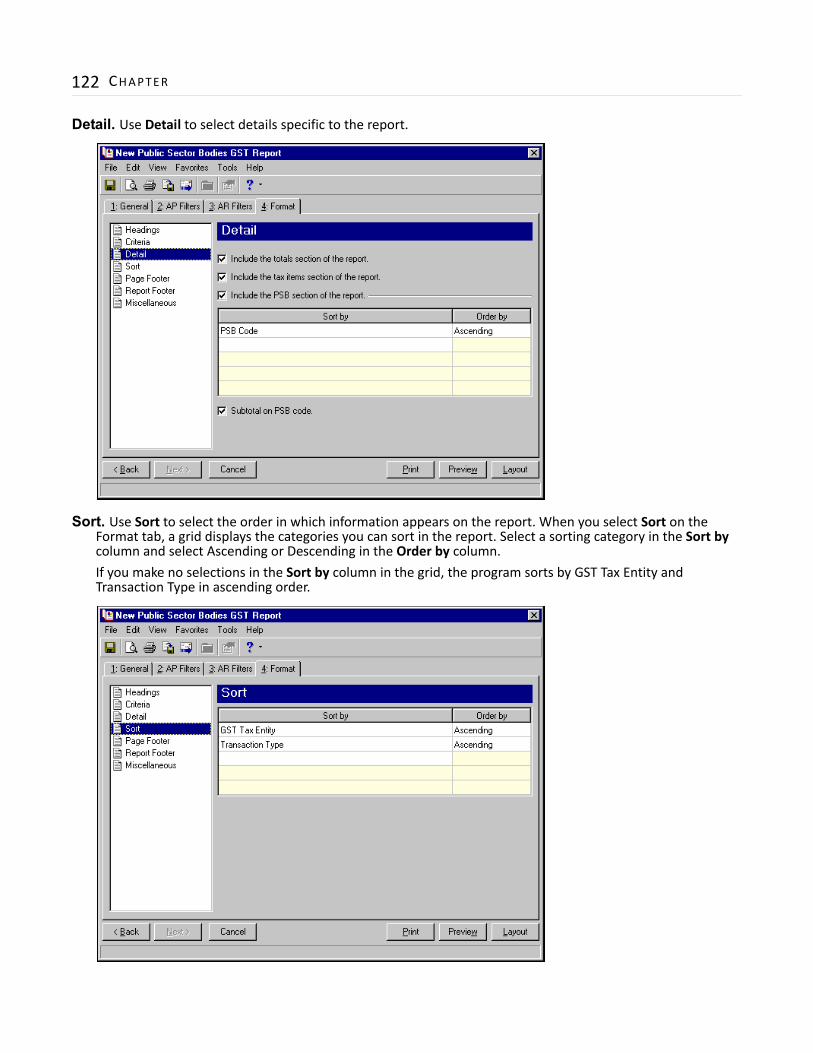
122 CHAPTER
Detail. Use Detail to select details specific to the report.
Sort. Use Sort to select the order in which information appears on the report. When you select Sort on the Format tab, a grid displays the categories you can sort in the report. Select a sorting category in the Sort by column and select Ascending or Descending in the Order by column.
If you make no selections in the Sort by column in the grid, the program sorts by GST Tax Entity and Transaction Type in ascending order.

GST REPORT ING 12
Page Footer. You can enter a maximum of 255 characters in the page footer. You can also include other options in the page footer, such as the page number and date.
Report Footer. You can enter a maximum of 255 characters in the report footer and select how you want text aligned. The report footer appears at the end of the report.

124 CHAPTER
Miscellaneous. You can select how you want numbers to appear on the report. You can also select the font size used in the report.
Creating a Sales Tax ReportBy creating a Sales Tax Report in Accounts Receivable, you can view a breakdown of the sales taxes you collect from or refund to clients. This report lists details such as the client name, source amount, tax amount, and the subtotals by sales tax item.
Creating a sales tax report
1. From the Reports page, click Transaction Reports. The Transaction Reports page appears with a list of all transaction reports on the left.
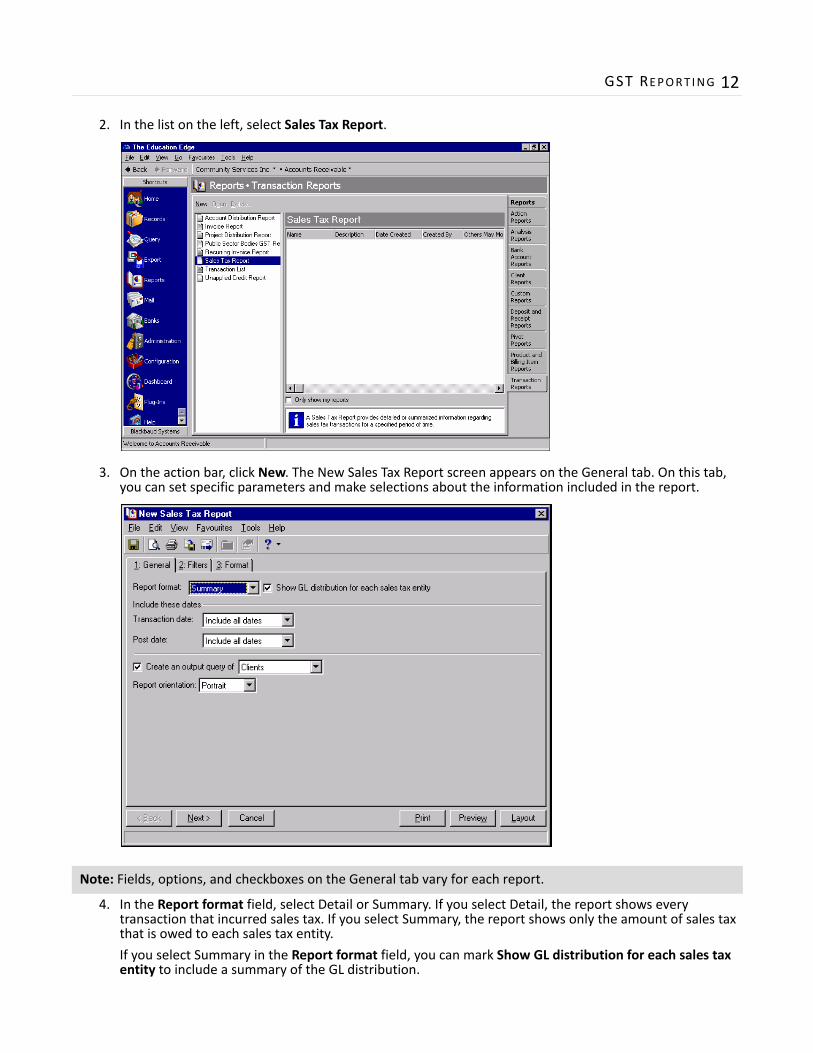
GST REPORT ING 12
2. In the list on the left, select Sales Tax Report.
3. On the action bar, click New. The New Sales Tax Report screen appears on the General tab. On this tab, you can set specific parameters and make selections about the information included in the report.
4. In the Report format field, select Detail or Summary. If you select Detail, the report shows every transaction that incurred sales tax. If you select Summary, the report shows only the amount of sales tax that is owed to each sales tax entity.
If you select Summary in the Report format field, you can mark Show GL distribution for each sales tax entity to include a summary of the GL distribution.
Note: Fields, options, and checkboxes on the General tab vary for each report.

126 CHAPTER
5. In the Transaction date field, select a date or date range for the transactions to include in the report.
If you select <Specific range>, you can specify a start and end date. If the Start date field is blank, all activity is included up to the end date. If the End date field is blank, all activity from the start date forward, including transactions with a date in the future, is included. If both fields are blank, all activity is included.
6. In the Post date field, select a date or date range of post dates of transactions to include in the report.
If you select <Specific range>, you can specify a start and end date. If the Start date field is blank, all activity is included up to the end date. If the End date field is blank, all activity from the start date forward, including transactions with a post date in the future, is included. If both fields are blank, all activity is included.
7. To create an output query, mark the checkbox and select the output query type you want to create.
8. In the Report orientation field, select “Landscape” or “Portrait”.
9. Click Next or select the Filters tab. On this tab, you can filter the information appearing in the report.
Note: Once you select a filter in the grid, you can click Open to access the Selected <Filter> screen on which you select specific filters.

GST REPORT ING 12
10. In the Include column, select “All” or “Selected”. If you choose “Selected,” the Selected <Filter> screen opens so you can designate specific filters. Depending on your selection, different filter screens can appear.
11. To include all of the filters listed in the grid, select All. You can include individual filters by choosing Selected and moving the filter into the Include these gst tax entities box.
12. To view or edit the previous filter without returning to the AP Filters tab, click Previous Filter. To view or edit the next filter without returning to the AP Filters tab, click Next Filter.
13. Click OK to return to the Filters tab.
14. Click Next or select the Format tab. On the Format tab, you select how you want the report to appear. A description of each formatting option is provided.
Headings. You can enter a maximum of 60 characters in both the Title and Subtitle fields. The program assigns a name in the Title field based on the record type; in this case, “Business Activity Statement”. You can change this title. The title and subtitle appear at the top of the report. You can also select how you want the heading aligned and if you want your organisation’s name to appear in the header.
Note: You can click Clear All Filters to remove all previously selected filters from the report.

128 CHAPTER
You can include other options in the header, such as the page number and the date, also select to include the header on every page of the report.
Criteria. Select Criteria to print a list of criteria used to create the report. Mark Print these criteria on and select a separate page or the first page. All selected options print in the criteria section of the report.
The program automatically selects all criteria. Unmark the checkbox for any you do not want to print with the report.

GST REPORT ING 12
Sort/Break. Use Sort/Break to select the order in which information appears on the report. When you select Sort/Break on the Format tab, a grid displays the categories you can sort in the report. Select a sorting category in the Sort by column and select Ascending or Descending in the Order by column.
If you make no selections in the Sort by column in the grid, the program sorts by sales tax entity in ascending order.
You can also create breaks between the sections you have sorted by. In the Text before value and Text after value fields, you can enter up to 30 characters in each field for information you want to print directly before and after the break. If you mark Print count per Sales tax entity or Print count as percentage of total for the selected sort field, the number or percentage for each selected sort option appears in the footer. If you mark Page break on each new Sales tax entity, a new page starts for the highest level break.

130 CHAPTER
Page Footer. You can enter a maximum of 255 characters in the page footer. You can also include other options in the page footer, such as the page number and date.
Report Footer. You can enter a maximum of 255 characters in the report footer and select how you want text aligned. The report footer appears at the end of the report.

GST REPORT ING 13
Miscellaneous. You can select how you want numbers to appear on the report. You can also select the font size used in the report.
Colour Scheme. Use Colour Scheme to select colours for report headings. When you click in the colour checkbox next to the selection, the Colour screen appears so you can select a standard colour or define a custom colour. If you leave the Apply a Colour Scheme checkbox unmarked, the report prints in black and white.

132 CHAPTER
Aaccounting system consulting service 3Accounts Payable
Configuration 22Accounts Receivable
Configuration 52activity
adding activity types 30managing 30
activity typeAccounts Payable 30adding 30
addingactivity types 30attributes
Accounts Receivable 57Student Billing 81
bank drafts 96distributions
to credit memo records 44to invoice records 36, 38, 42, 44
notesAccounts Receivable 58Student Billing 82
notes to products and billing items 65, 89one‐time cheques 101payments
from banks page 96from invoice records 106
public sector bodies GST report 110, 117purchase orders 45reports 110sales tax items
Accounts Payable 31Accounts Receivable 56Student Billing 80
adjustment, invoice 37attribute
addingAccounts Receivable 57Student Billing 81
Bbank draft, <Italic>see paymentbanks page 96billing item
Accounts Receivable 55Student Billing 79
Blackbaud Developer Network 5Blackbaud service
accounting system consulting 3Blackbaud Developer Network 5Blackbaud Forms 5customer support 4data services 2overview 2software maintenance 4technical consulting 3training 4
Blackbaud University 4business form 5business rule
Accounts Payable 23Accounts Receivable 53Student Billing 77
Ccheque, <Italic>see paymentConfiguration, Accounts Payable
activity information 30activity types 30adding
activity types 30sales tax items 31
business rules 23default accounts 29general information 22GST information 22inserting sales tax entity table entries 28overview 22sales tax items 31selecting default accounts 29tables 27
Configuration, Accounts Receivableadding
attributes 57notes 58sales tax items 56
business rules 53general information 52GST information 52inserting sales tax entity table entries 54overview 52
Index
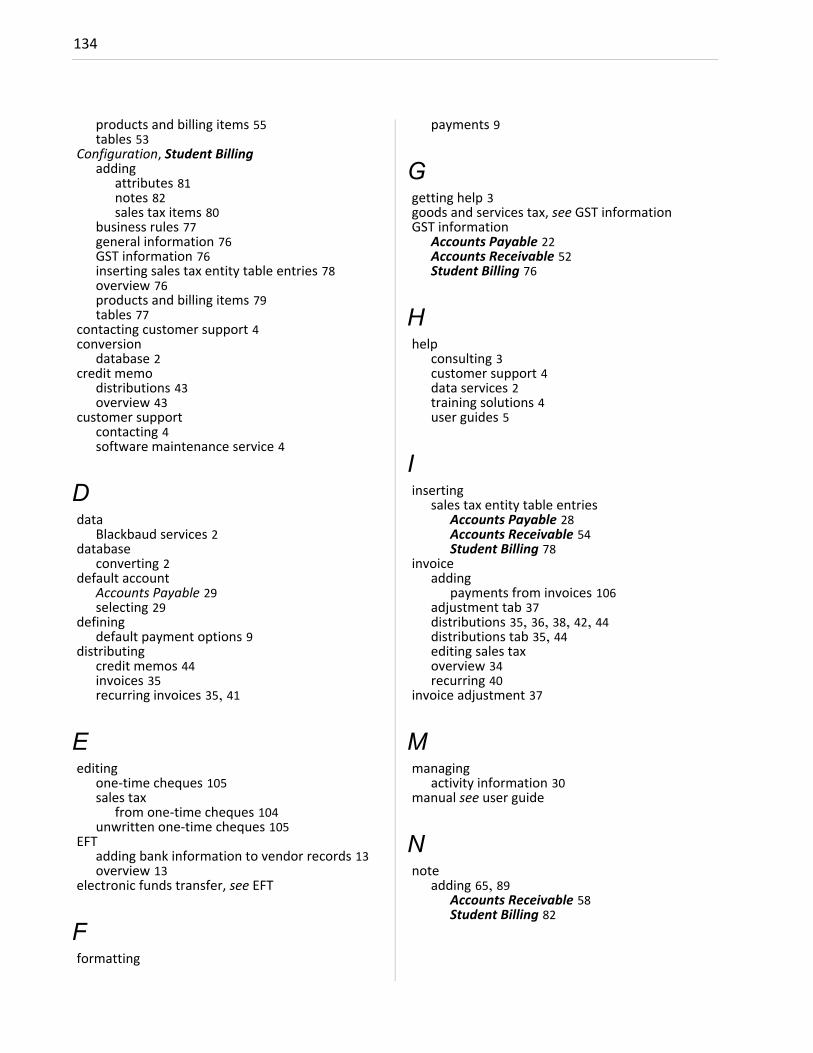
134
products and billing items 55tables 53
Configuration, Student Billingadding
attributes 81notes 82sales tax items 80
business rules 77general information 76GST information 76inserting sales tax entity table entries 78overview 76products and billing items 79tables 77
contacting customer support 4conversion
database 2credit memo
distributions 43overview 43
customer supportcontacting 4software maintenance service 4
Ddata
Blackbaud services 2database
converting 2default account
Accounts Payable 29selecting 29
definingdefault payment options 9
distributingcredit memos 44invoices 35recurring invoices 35, 41
Eediting
one‐time cheques 105sales tax
from one‐time cheques 104unwritten one‐time cheques 105
EFTadding bank information to vendor records 13overview 13
electronic funds transfer, see EFT
Fformatting
payments 9
Ggetting help 3goods and services tax, see GST informationGST information
Accounts Payable 22Accounts Receivable 52Student Billing 76
Hhelp
consulting 3customer support 4data services 2training solutions 4user guides 5
Iinserting
sales tax entity table entriesAccounts Payable 28Accounts Receivable 54Student Billing 78
invoiceadding
payments from invoices 106adjustment tab 37distributions 35, 36, 38, 42, 44distributions tab 35, 44editing sales taxoverview 34recurring 40
invoice adjustment 37
Mmanaging
activity information 30manual see user guide
Nnote
adding 65, 89Accounts Receivable 58Student Billing 82

INDEX 135
Oone‐time cheque
adding 101editing 105editing sales tax 104overview 101
online learning network 4on‐site training 4
Ppayment
addingbank drafts 96cheques 96from banks page 96from invoices 106one‐time cheques 101
defaults 9defining defaults 9editing one‐time cheques 105overview 96printing 96, 101recording bank drafts 96
printing cheques 96product 33
Accounts Receivable 55editing sales tax 33Student Billing 79
public sector bodies GST report 110purchase order
overview 45
Rreceipt
overview 46record
credit memo 43invoice 34product 33purchase order 45receipt 46recurring invoice 40vendor 33
recording bank drafts 96recurring invoice
addingdistributions 36, 38, 42, 44
distributions 35, 41overview 40
regional training 4regular purchase order 45report, public sector bodies GST 110
Ssales tax
on invoices 47on one‐time cheques 104on products 33
sales tax entity table entry, insertingAccounts Payable 28Accounts Receivable 54Student Billing 78
sales tax itemAccounts Payable 31Accounts Receivable 55adding
Accounts Payable 31Accounts Receivable 56Student Billing 80
Student Billing 79selecting default accounts 29service, Blackbaud 2software maintenance service 4Student Billing
Configuration 76
Ttable
Accounts Payable 27Accounts Receivable 53Student Billing 77
tax, sales see sales taxtax, sales<Italic> see sales taxtechnical consulting 3training
Blackbaud University 4online learning network 4on‐site 4regional 4solutions 4
Uunwritten one‐time cheque 105user guide 5
Vvendor
distribution tab 33overview 33
vendor recordadding
bank information 13EFT bank information tab 13

136


![EC-Net: an Edge-aware Point set Consolidation Network...EC-Net: an Edge-aware Point set ConsolidationNetwork Lequan Yu1,3⋆[0000−0002−9315−6527], Xianzhi Li1⋆, Chi-Wing Fu1,3,](https://img.pdfslide.net/doc/110x75/60a6dd92ee83e57f61549374/ec-net-an-edge-aware-point-set-consolidation-network-ec-net-an-edge-aware.jpg)