Embed Size (px)
Citation preview

Page 13
The PeopleSoft Financials System
Introduction . . . . . . . . . . . . . . . . . . . . . . 14Signing In and Out . . . . . . . . . . . . . . . . . . . . 14
Signing In to the System . . . . . . . . . . . . . . 14Signing Out . . . . . . . . . . . . . . . . . . . 17
Navigation Tips & Techniques . . . . . . . . . . . . . . . 19Using the Menu Frame on Financial Pages . . . . . . . 19
Menu Header Icons . . . . . . . . . . . . . . . 19Expanding the Menus . . . . . . . . . . . . . . 20
Standard Page Links. . . . . . . . . . . . . . . . 20Using the Header Bar Navigation Controls . . . . . . . 21Inserting and Deleting Rows . . . . . . . . . . . . . 23Creating ‘Favorite’ Navigation Shortcuts . . . . . . . . 23
PS Financials Menus and Page Groups . . . . . . . . . . . 27Maintaining Requisitions . . . . . . . . . . . . . . 28Maintaining Purchase Orders . . . . . . . . . . . . 29Receiving Shipments . . . . . . . . . . . . . . . 30General Ledger . . . . . . . . . . . . . . . . . . 31Informational Pages . . . . . . . . . . . . . . . . 31
Searching for Records and Values . . . . . . . . . . . . . 32Operators . . . . . . . . . . . . . . . . . . . . 32Using the Find an Existing Value Page. . . . . . . . . 33
Retrieving a Single Record . . . . . . . . . . . . 33Retrieving Multiple Records . . . . . . . . . . . . 34 Working Through a Search List . . . . . . . . . . 37Basic and Advanced Searches . . . . . . . . . . . 38Saving Search Criteria . . . . . . . . . . . . . . 38Using a Saved Search . . . . . . . . . . . . . . 40Deleting Search Criteria . . . . . . . . . . . . . . 40
Using a Lookup Button to Find a Value. . . . . . . . . 40Other Features of the Financials Pages. . . . . . . . . . . . 43
The Notify Button . . . . . . . . . . . . . . . . . 43The Refresh Button . . . . . . . . . . . . . . . . 43
Personalizations. . . . . . . . . . . . . . . . . . . . . 44Profile Information . . . . . . . . . . . . . . . . . . . . 46Keyboard Shortcuts . . . . . . . . . . . . . . . . . . . 48
Action Keys . . . . . . . . . . . . . . . . . . . 48Access Keys . . . . . . . . . . . . . . . . . . . 49
2
Chapter 2: The PeopleSoft Financials System
Page 14 PeopleSoft Financials: Purchasing
Introduction
This chapter provides an introduction to the fundamentals of PeopleSoft Financials. You will learn how to sign onto the system and you will learn about basic PeopleSoft processes, navigation techniques, and search tips.
Signing In and Out
Access to the PeopleSoft Financials system is restricted. Your security administrator has given you access to the PeopleSoft Financials module using your University NetID as your User ID. This user ID, along with your LDAP password, allows you to perform the financial functions required in your position. It is your responsibility to ensure that your password does not become known to anyone else.
Signing In to the SystemThe PeopleSoft Financials system is accessed on the web through a browser. Microsoft Internet Explorer (version 5.5 or higher) is the preferred browser for PCs.
Important! Some people may use more than one PeopleSoft system, such as Financials and Student Administration. Only one PeopleSoft system should be open on your desktop at one time. You must sign off any open PeopleSoft system before you sign into another one.
To sign into the PeopleSoft Financials system:
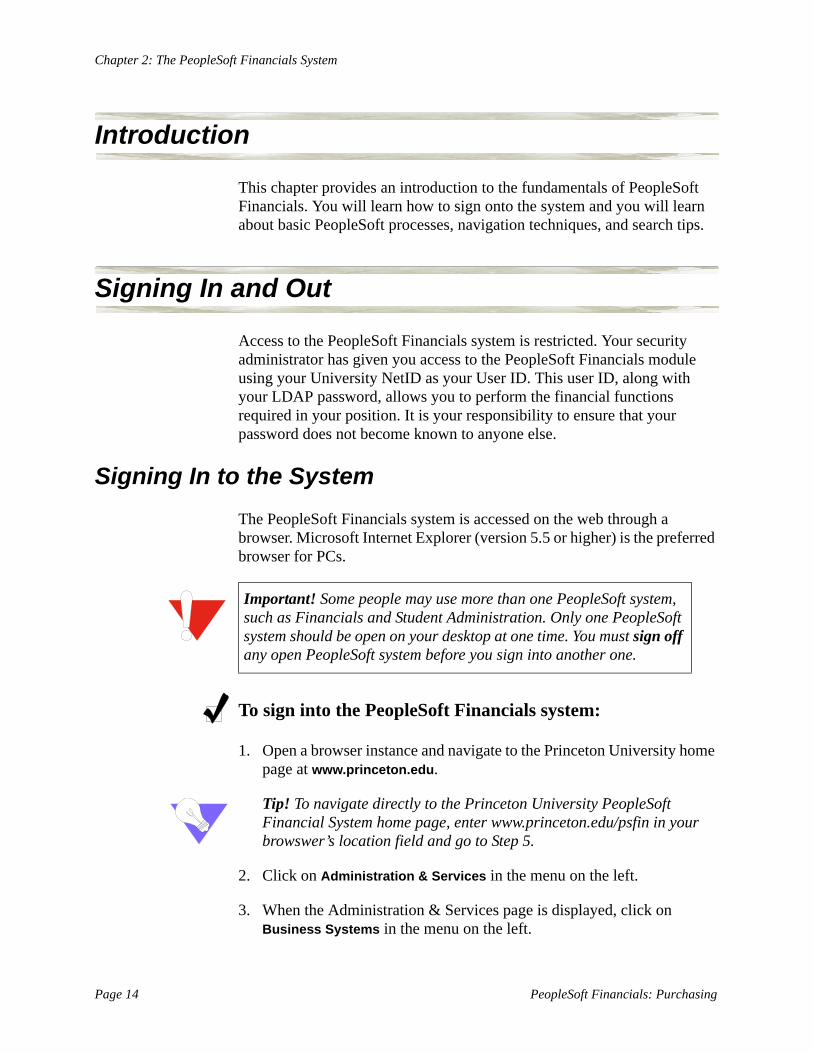
1. Open a browser instance and navigate to the Princeton University home page at www.princeton.edu.
Tip! To navigate directly to the Princeton University PeopleSoft Financial System home page, enter www.princeton.edu/psfin in your browswer’s location field and go to Step 5.
2. Click on Administration & Services in the menu on the left.
3. When the Administration & Services page is displayed, click on Business Systems in the menu on the left.
Signing In and Out
Department User Guide Version 2.0 Page 15
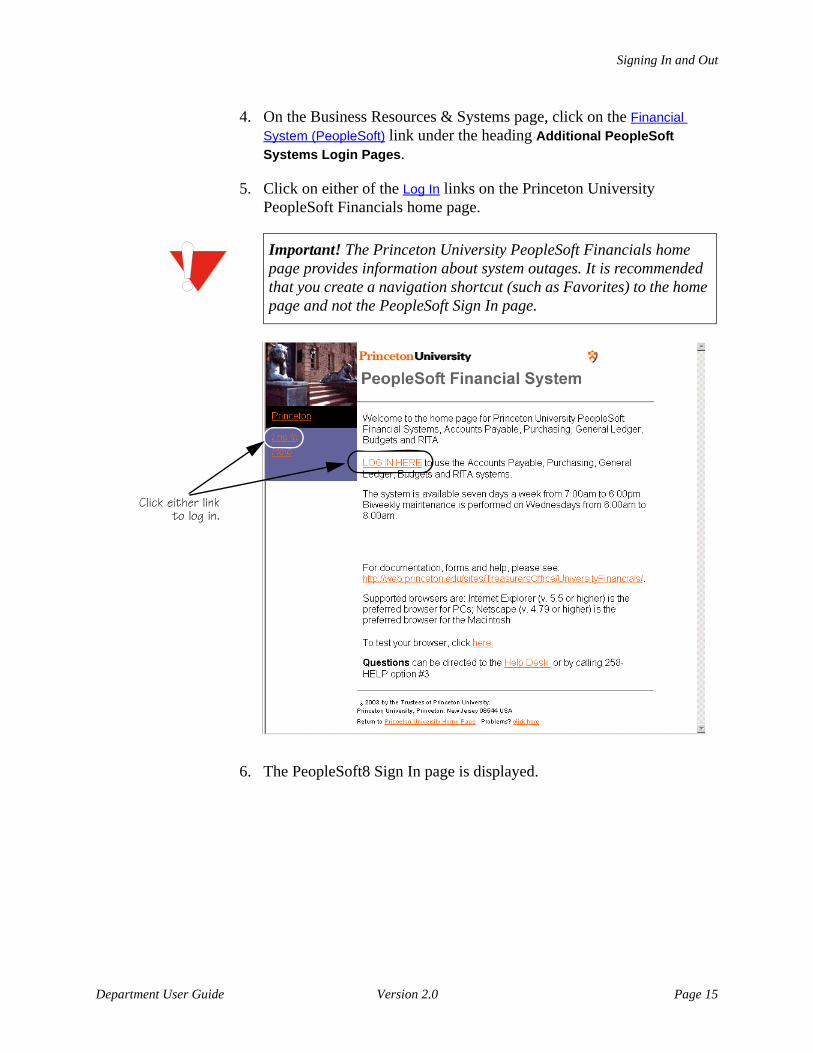
4. On the Business Resources & Systems page, click on the Financial System (PeopleSoft) link under the heading Additional PeopleSoft Systems Login Pages.
5. Click on either of the Log In links on the Princeton University PeopleSoft Financials home page.
Important! The Princeton University PeopleSoft Financials home page provides information about system outages. It is recommended that you create a navigation shortcut (such as Favorites) to the home page and not the PeopleSoft Sign In page.
Click either link to log in.
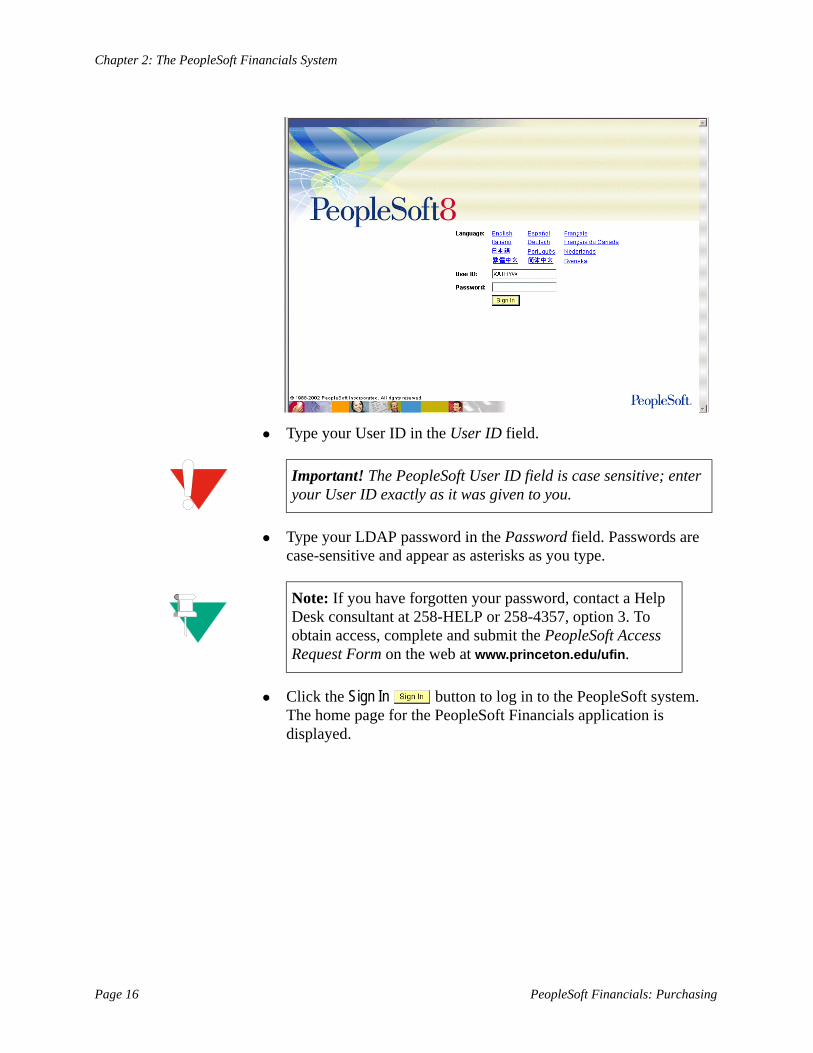
6. The PeopleSoft8 Sign In page is displayed.
Chapter 2: The PeopleSoft Financials System
Page 16 PeopleSoft Financials: Purchasing
Type your User ID in the User ID field.
Important! The PeopleSoft User ID field is case sensitive; enter your User ID exactly as it was given to you.
Type your LDAP password in the Password field. Passwords are case-sensitive and appear as asterisks as you type.
Note: If you have forgotten your password, contact a Help Desk consultant at 258-HELP or 258-4357, option 3. To obtain access, complete and submit the PeopleSoft Access Request Form on the web at www.princeton.edu/ufin.
Click the Sign In button to log in to the PeopleSoft system. The home page for the PeopleSoft Financials application is displayed.
Signing In and Out
Department User Guide Version 2.0 Page 17
Tip! Once in Financials, you may want to resize the browser window to best accommodate the contents of the PeopleSoft page, or press F11 to put the window into full screen mode.
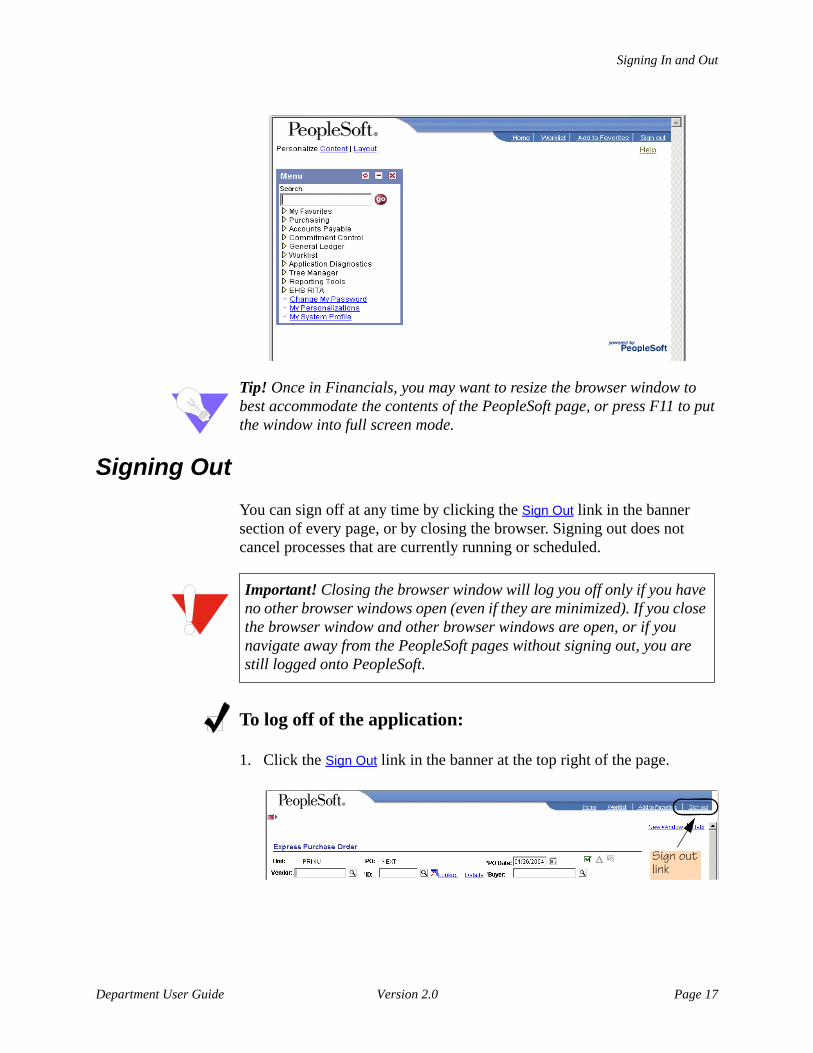
Signing Out You can sign off at any time by clicking the Sign Out link in the banner section of every page, or by closing the browser. Signing out does not cancel processes that are currently running or scheduled.
Important! Closing the browser window will log you off only if you have no other browser windows open (even if they are minimized). If you close the browser window and other browser windows are open, or if you navigate away from the PeopleSoft pages without signing out, you are still logged onto PeopleSoft.
To log off of the application:
1. Click the Sign Out link in the banner at the top right of the page.
Sign out link
Chapter 2: The PeopleSoft Financials System
Page 18 PeopleSoft Financials: Purchasing
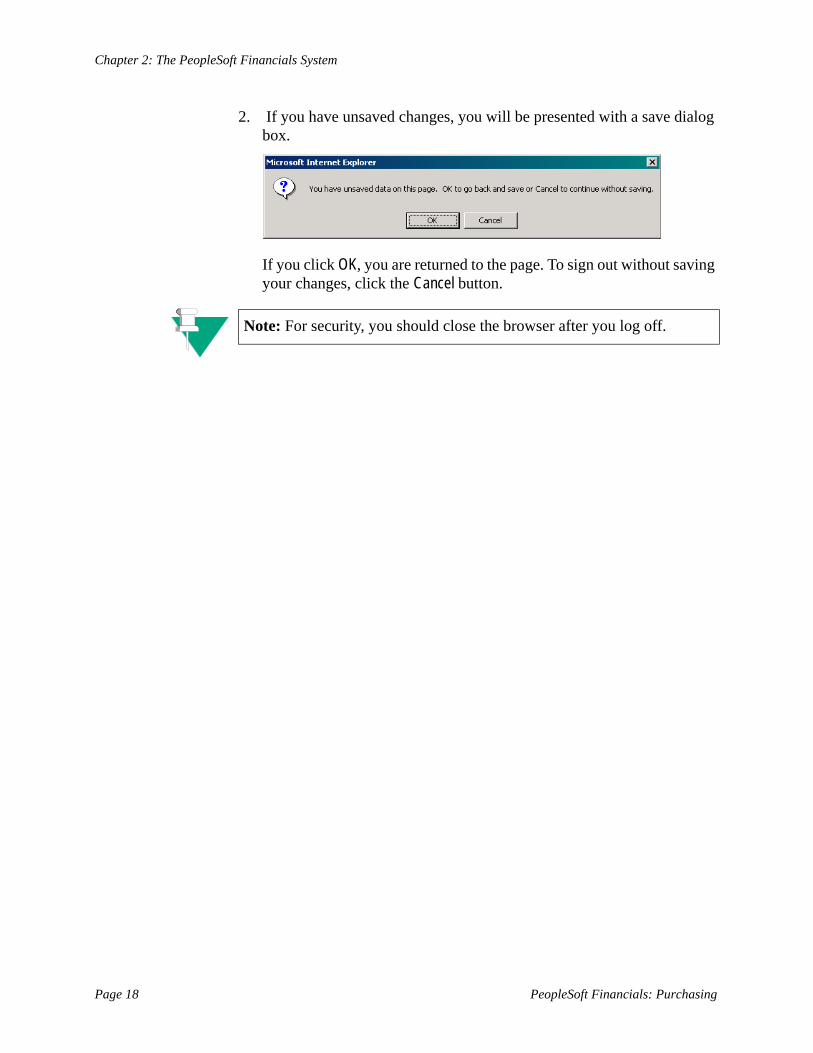
2. If you have unsaved changes, you will be presented with a save dialog box.
If you click OK, you are returned to the page. To sign out without saving your changes, click the Cancel button.
Note: For security, you should close the browser after you log off.
Navigation Tips & Techniques
Department User Guide Version 2.0 Page 19
Navigation Tips & Techniques
The PS Financials system provides several tools and features that enable you to navigate the Financials pages quickly:
Menu frame
Standard page links
Header bar navigation controls
Navigation shortcuts
Each navigation technique is described next.
Using the Menu Frame on Financial PagesYou select your navigation path using the menu items located in the menu frame on the Financials pages. The menu can be shown on the left side of the page at all times, or collapsed to an icon for more room for page fields.
Menu Header Icons
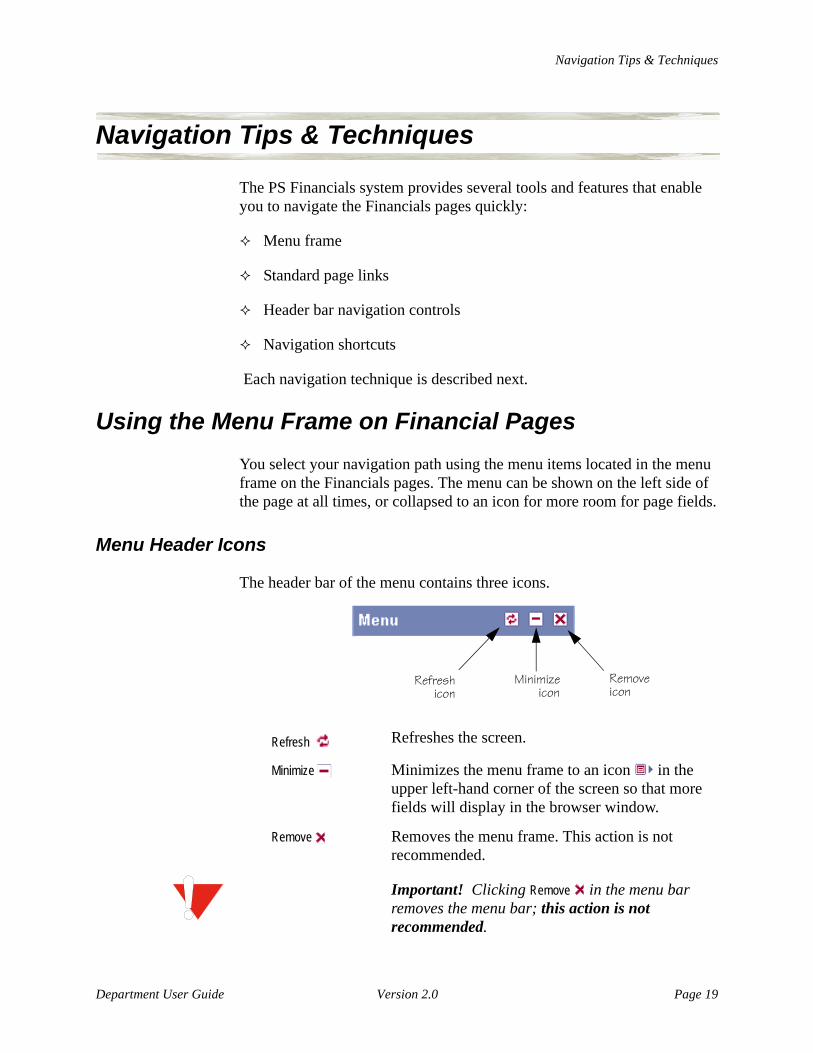
The header bar of the menu contains three icons.
Refresh icon
Minimize icon
Remove icon
Refresh Refreshes the screen.
Minimize Minimizes the menu frame to an icon in the upper left-hand corner of the screen so that more fields will display in the browser window.
Remove Removes the menu frame. This action is not recommended.
Important! Clicking Remove in the menu bar removes the menu bar; this action is not recommended.
Chapter 2: The PeopleSoft Financials System
Page 20 PeopleSoft Financials: Purchasing
Expanding the Menus
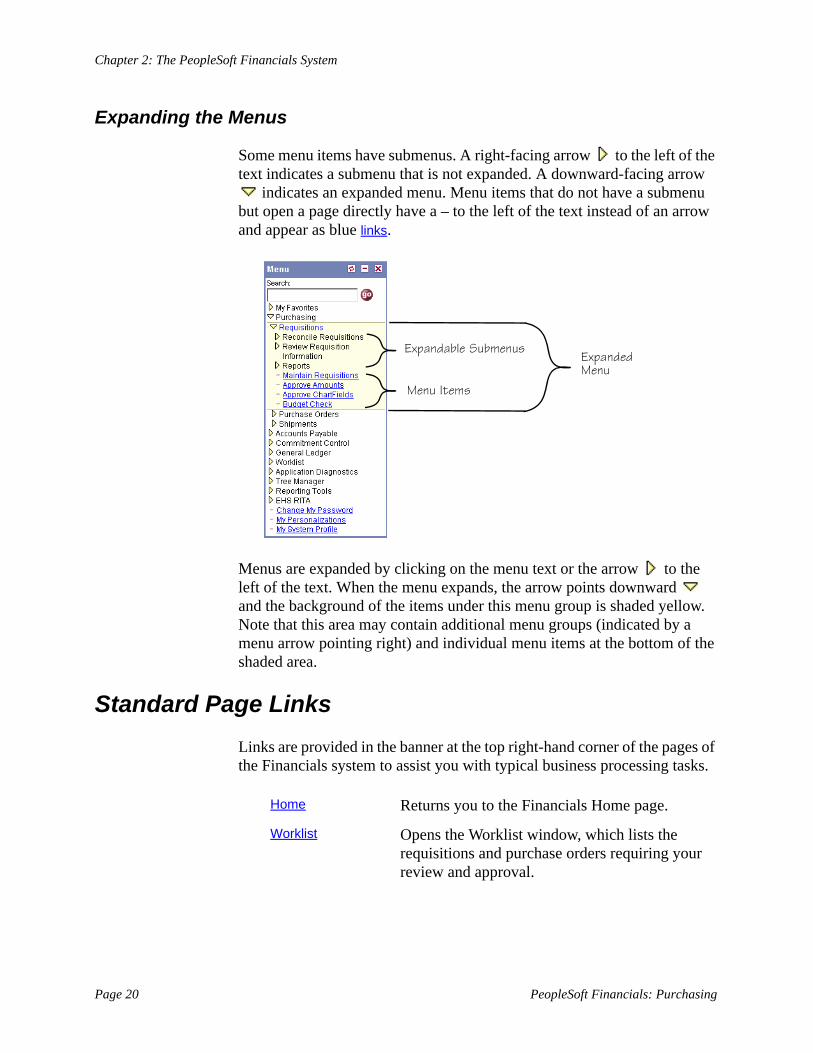
Some menu items have submenus. A right-facing arrow to the left of the text indicates a submenu that is not expanded. A downward-facing arrow
indicates an expanded menu. Menu items that do not have a submenu but open a page directly have a – to the left of the text instead of an arrow and appear as blue links.
Menu Items
Expandable SubmenusExpanded Menu
Menus are expanded by clicking on the menu text or the arrow to the left of the text. When the menu expands, the arrow points downward and the background of the items under this menu group is shaded yellow. Note that this area may contain additional menu groups (indicated by a menu arrow pointing right) and individual menu items at the bottom of the shaded area.
Standard Page LinksLinks are provided in the banner at the top right-hand corner of the pages of the Financials system to assist you with typical business processing tasks.
Home Returns you to the Financials Home page.
Worklist Opens the Worklist window, which lists the requisitions and purchase orders requiring your review and approval.
Navigation Tips & Techniques
Department User Guide Version 2.0 Page 21
There are two additional links just below the banner:
New Window Opens a new browser window with the current page or the Find an Existing Value page for the current page displayed. If necessary, you can navigate to any other page in the Financials system with this new window.
Help Opens the online help created for the Princeton Financials system.
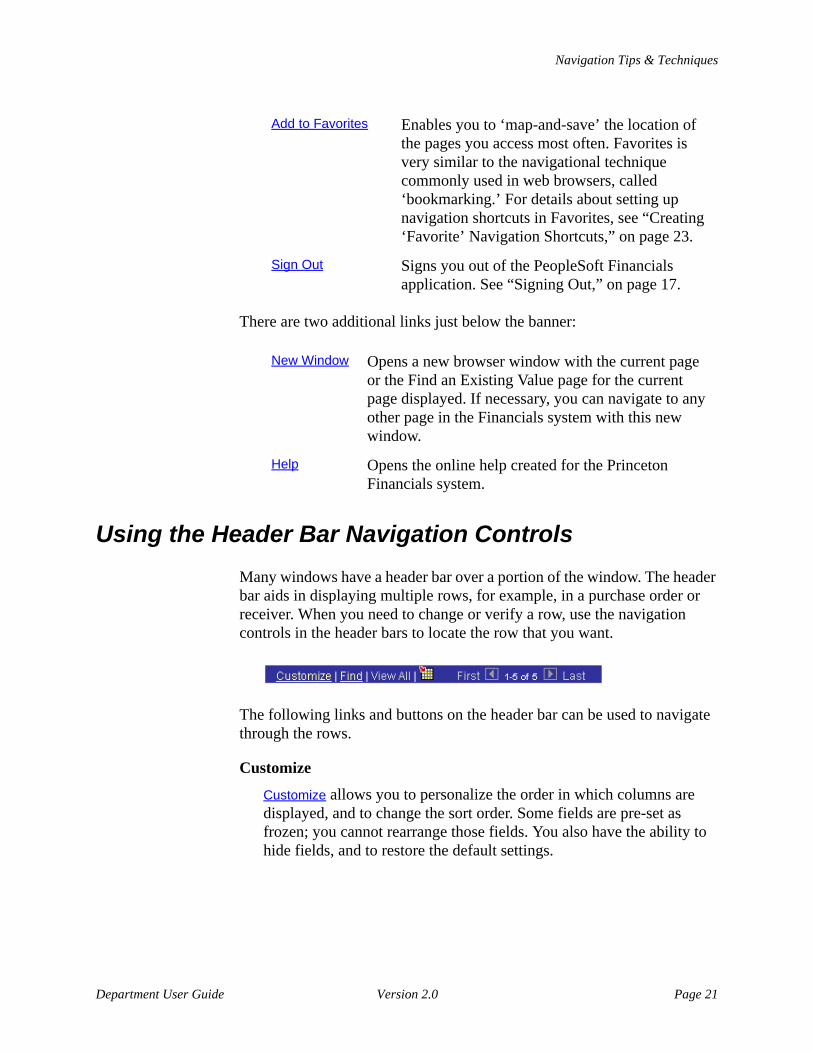
Using the Header Bar Navigation ControlsMany windows have a header bar over a portion of the window. The header bar aids in displaying multiple rows, for example, in a purchase order or receiver. When you need to change or verify a row, use the navigation controls in the header bars to locate the row that you want.
The following links and buttons on the header bar can be used to navigate through the rows.
Customize
Customize allows you to personalize the order in which columns are displayed, and to change the sort order. Some fields are pre-set as frozen; you cannot rearrange those fields. You also have the ability to hide fields, and to restore the default settings.
Add to Favorites Enables you to ‘map-and-save’ the location of the pages you access most often. Favorites is very similar to the navigational technique commonly used in web browsers, called ‘bookmarking.’ For details about setting up navigation shortcuts in Favorites, see “Creating ‘Favorite’ Navigation Shortcuts,” on page 23.
Sign Out Signs you out of the PeopleSoft Financials application. See “Signing Out,” on page 17.
Chapter 2: The PeopleSoft Financials System
Page 22 PeopleSoft Financials: Purchasing
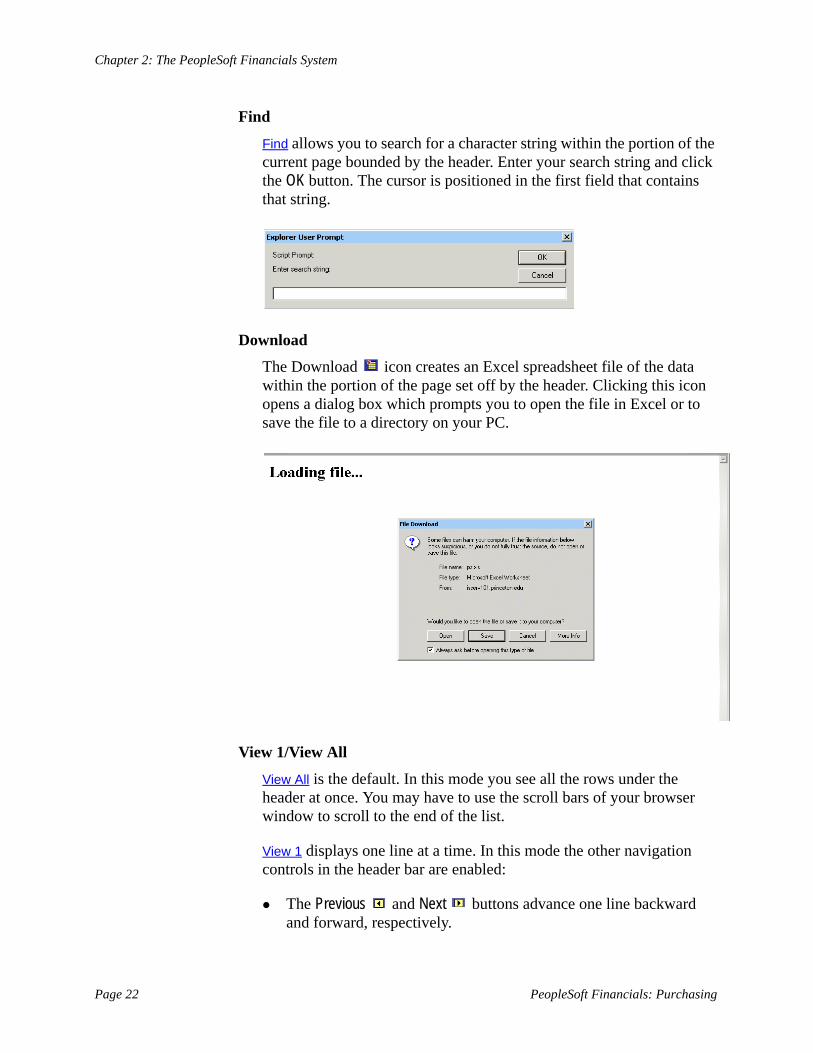
Find
Find allows you to search for a character string within the portion of the current page bounded by the header. Enter your search string and click the OK button. The cursor is positioned in the first field that contains that string.
Download
The Download icon creates an Excel spreadsheet file of the data within the portion of the page set off by the header. Clicking this icon opens a dialog box which prompts you to open the file in Excel or to save the file to a directory on your PC.
View 1/View All
View All is the default. In this mode you see all the rows under the header at once. You may have to use the scroll bars of your browser window to scroll to the end of the list.
View 1 displays one line at a time. In this mode the other navigation controls in the header bar are enabled:
The Previous and Next buttons advance one line backward and forward, respectively.
Navigation Tips & Techniques
Department User Guide Version 2.0 Page 23
The First link displays the first row of data.
The Last link displays the last row of data.
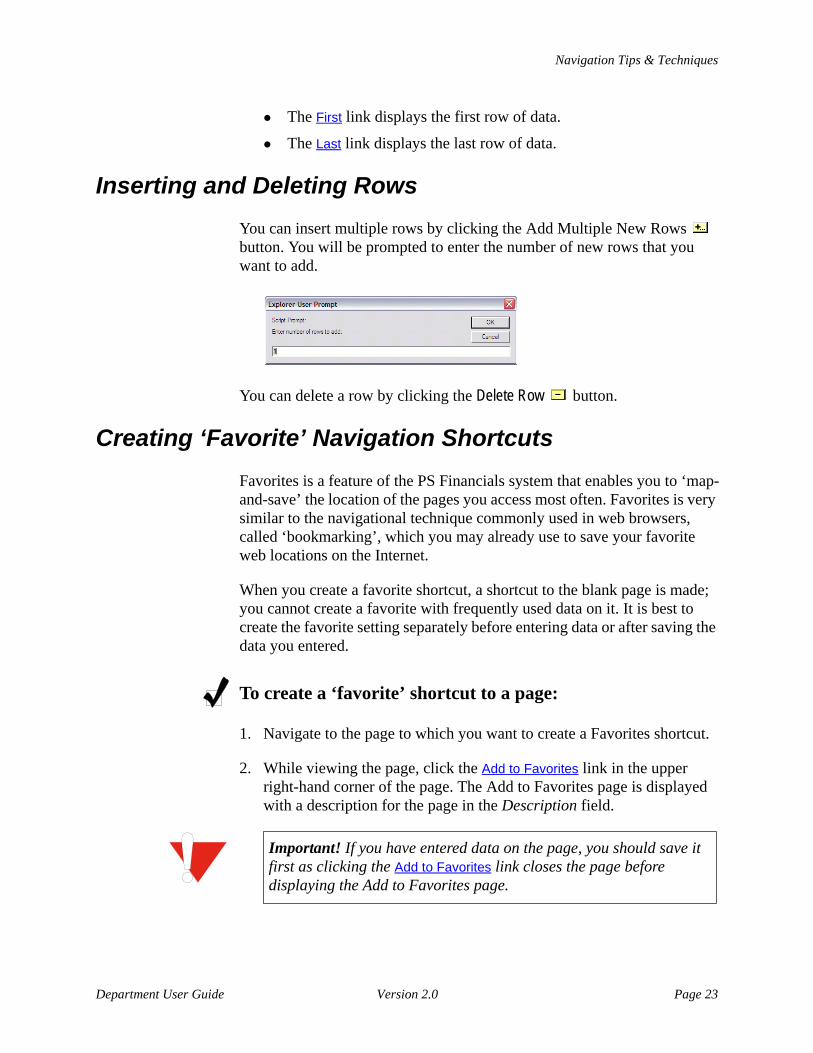
Inserting and Deleting RowsYou can insert multiple rows by clicking the Add Multiple New Rows button. You will be prompted to enter the number of new rows that you want to add.
You can delete a row by clicking the Delete Row button.
Creating ‘Favorite’ Navigation ShortcutsFavorites is a feature of the PS Financials system that enables you to ‘map-and-save’ the location of the pages you access most often. Favorites is very similar to the navigational technique commonly used in web browsers, called ‘bookmarking’, which you may already use to save your favorite web locations on the Internet.
When you create a favorite shortcut, a shortcut to the blank page is made; you cannot create a favorite with frequently used data on it. It is best to create the favorite setting separately before entering data or after saving the data you entered.
To create a ‘favorite’ shortcut to a page:
1. Navigate to the page to which you want to create a Favorites shortcut.
2. While viewing the page, click the Add to Favorites link in the upper right-hand corner of the page. The Add to Favorites page is displayed with a description for the page in the Description field.
Important! If you have entered data on the page, you should save it first as clicking the Add to Favorites link closes the page before displaying the Add to Favorites page.

Chapter 2: The PeopleSoft Financials System
Page 24 PeopleSoft Financials: Purchasing
3. If you want to change the description, overtype or correct the characters in the Description field. By default, the system supplies a name based on the page and action summary information. Whatever you choose, make sure you specify a name that is unique as well as meaningful to you.
4. Click the Add to Favorites button to add the navigation shortcut to your list of favorites.
To access a page using a ‘favorite’ shortcut:
1. Select My Favorites from the menu to view the list of defined shortcuts.
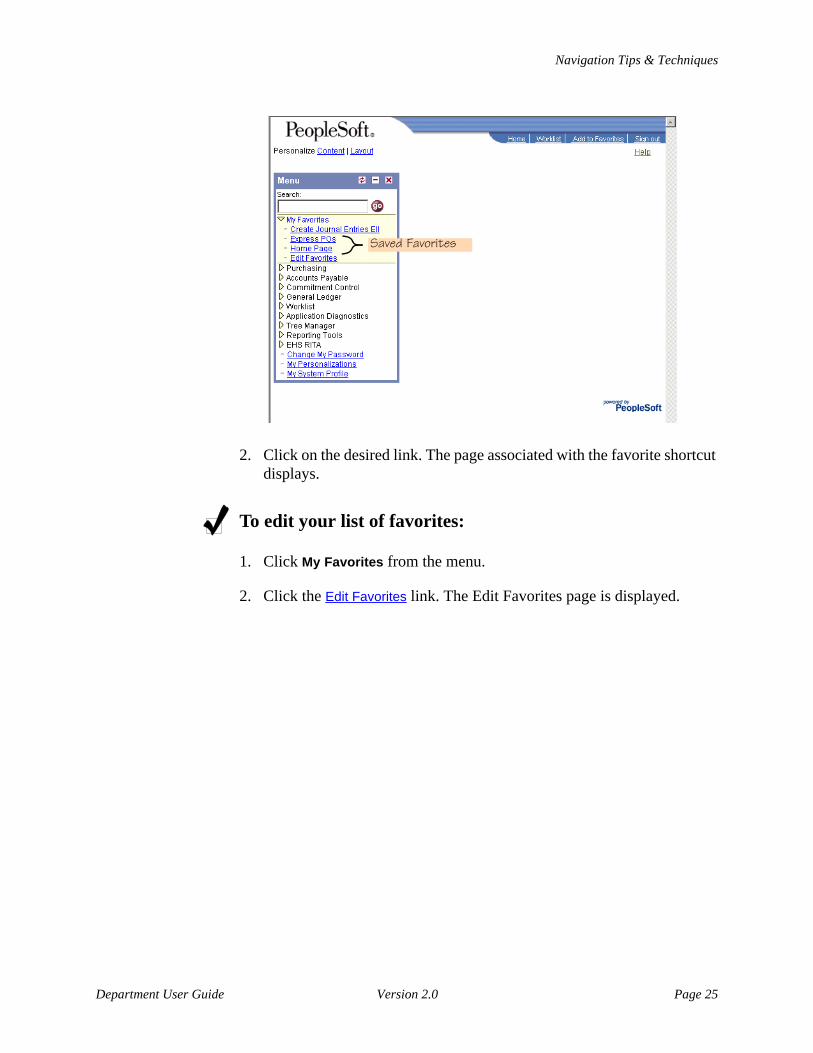
Saved Favorites
Navigation Tips & Techniques
Department User Guide Version 2.0 Page 25
2. Click on the desired link. The page associated with the favorite shortcut displays.
To edit your list of favorites:
1. Click My Favorites from the menu.
2. Click the Edit Favorites link. The Edit Favorites page is displayed.

Chapter 2: The PeopleSoft Financials System
Page 26 PeopleSoft Financials: Purchasing
3. To delete a Favorite, click the Delete button.
4. To change the order in which the favorites are listed on the My Favorites menu, enter numbers in the Sequence Number fields to set the order in which the favorites are listed.
5. When you have completed the changes, click the Save button.
PS Financials Menus and Page Groups
Department User Guide Version 2.0 Page 27
PS Financials Menus and Page Groups
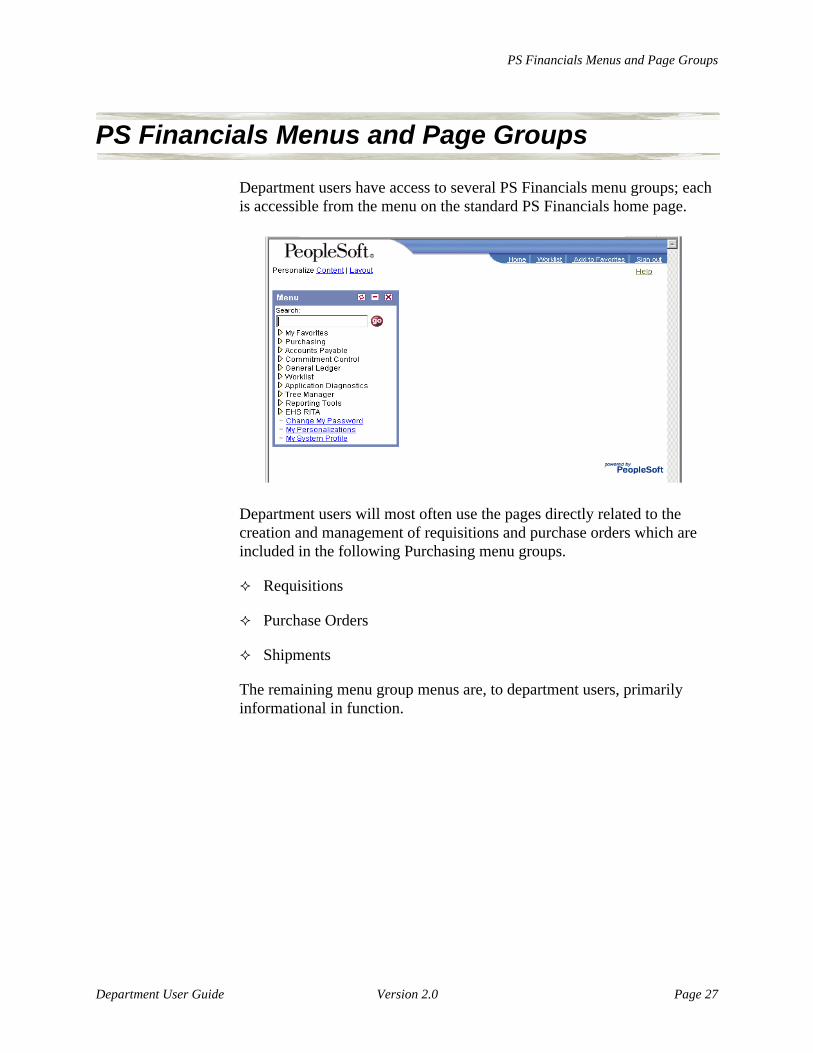
Department users have access to several PS Financials menu groups; each is accessible from the menu on the standard PS Financials home page.
Department users will most often use the pages directly related to the creation and management of requisitions and purchase orders which are included in the following Purchasing menu groups.
Requisitions
Purchase Orders
Shipments
The remaining menu group menus are, to department users, primarily informational in function.
Chapter 2: The PeopleSoft Financials System
Page 28 PeopleSoft Financials: Purchasing
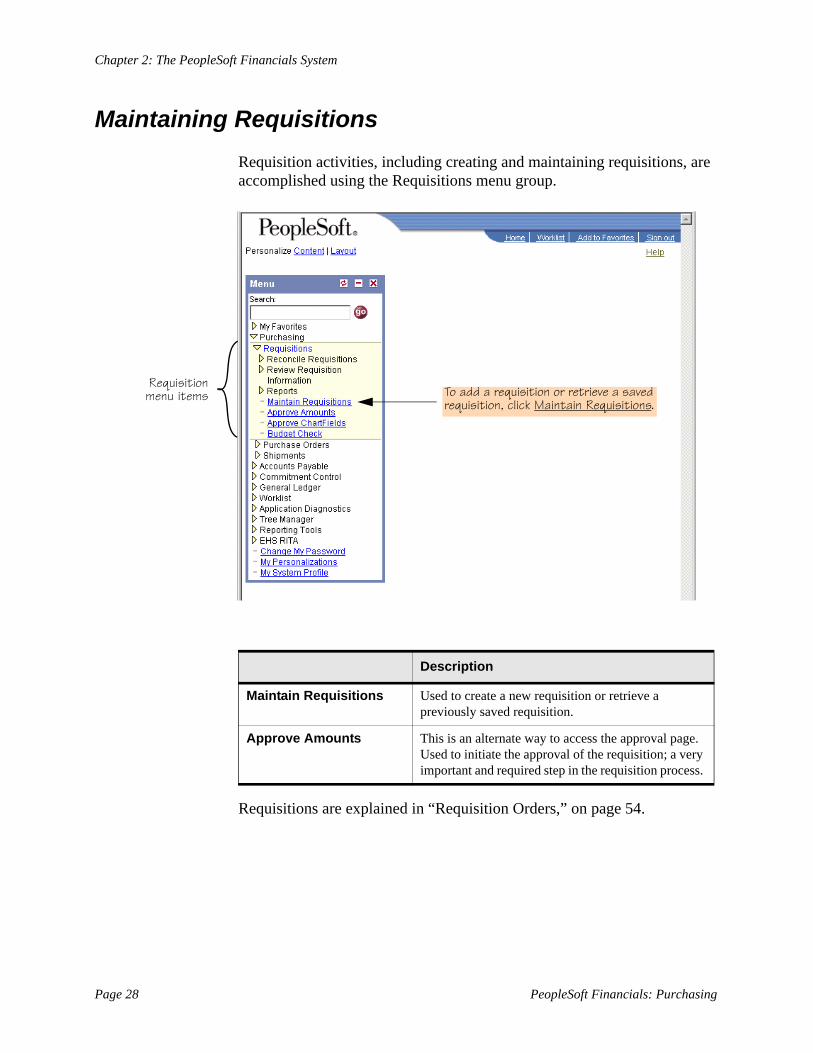
Maintaining RequisitionsRequisition activities, including creating and maintaining requisitions, are accomplished using the Requisitions menu group.
To add a requisition or retrieve a saved requisition, click Maintain Requisitions.
Requisition menu items
Menu Item Description
Maintain Requisitions Used to create a new requisition or retrieve a previously saved requisition.
Approve Amounts This is an alternate way to access the approval page. Used to initiate the approval of the requisition; a very important and required step in the requisition process.
Requisitions are explained in “Requisition Orders,” on page 54.
PS Financials Menus and Page Groups
Department User Guide Version 2.0 Page 29
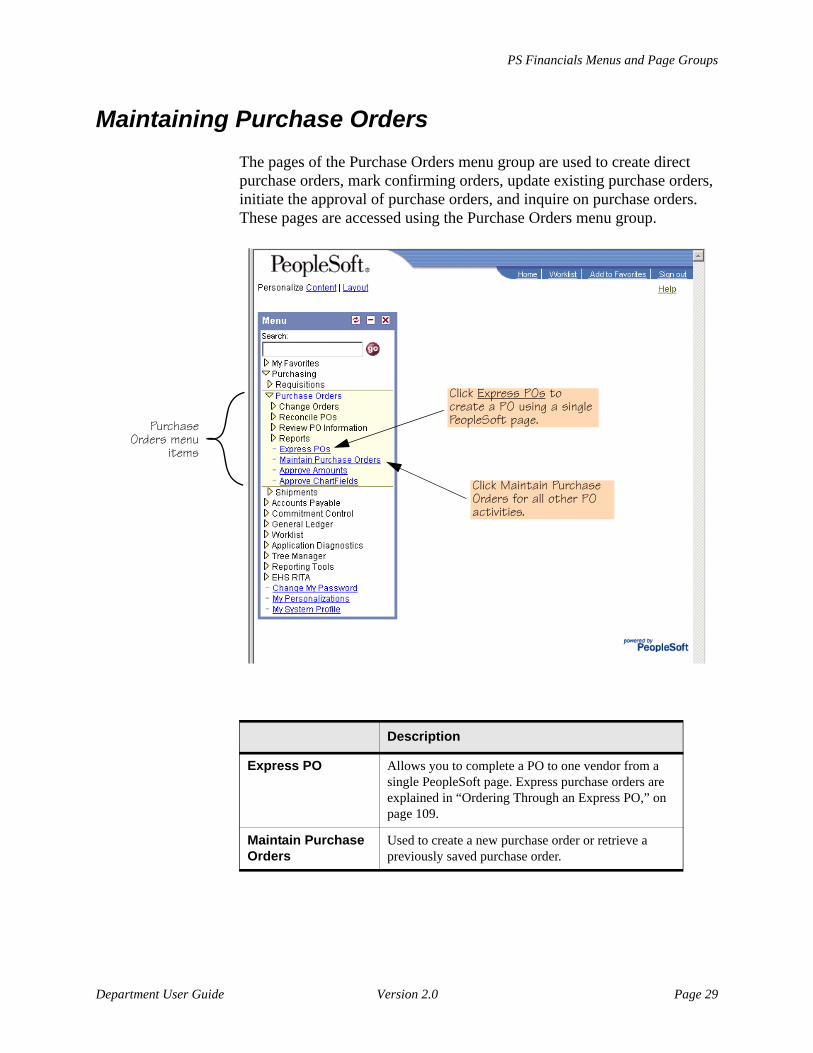
Maintaining Purchase OrdersThe pages of the Purchase Orders menu group are used to create direct purchase orders, mark confirming orders, update existing purchase orders, initiate the approval of purchase orders, and inquire on purchase orders. These pages are accessed using the Purchase Orders menu group.
Click Express POs to create a PO using a single PeopleSoft page.Purchase
Orders menu items
Click Maintain Purchase Orders for all other PO activities.
Menu Item Description
Express PO Allows you to complete a PO to one vendor from a single PeopleSoft page. Express purchase orders are explained in “Ordering Through an Express PO,” on page 109.
Maintain Purchase Orders
Used to create a new purchase order or retrieve a previously saved purchase order.
Chapter 2: The PeopleSoft Financials System
Page 30 PeopleSoft Financials: Purchasing
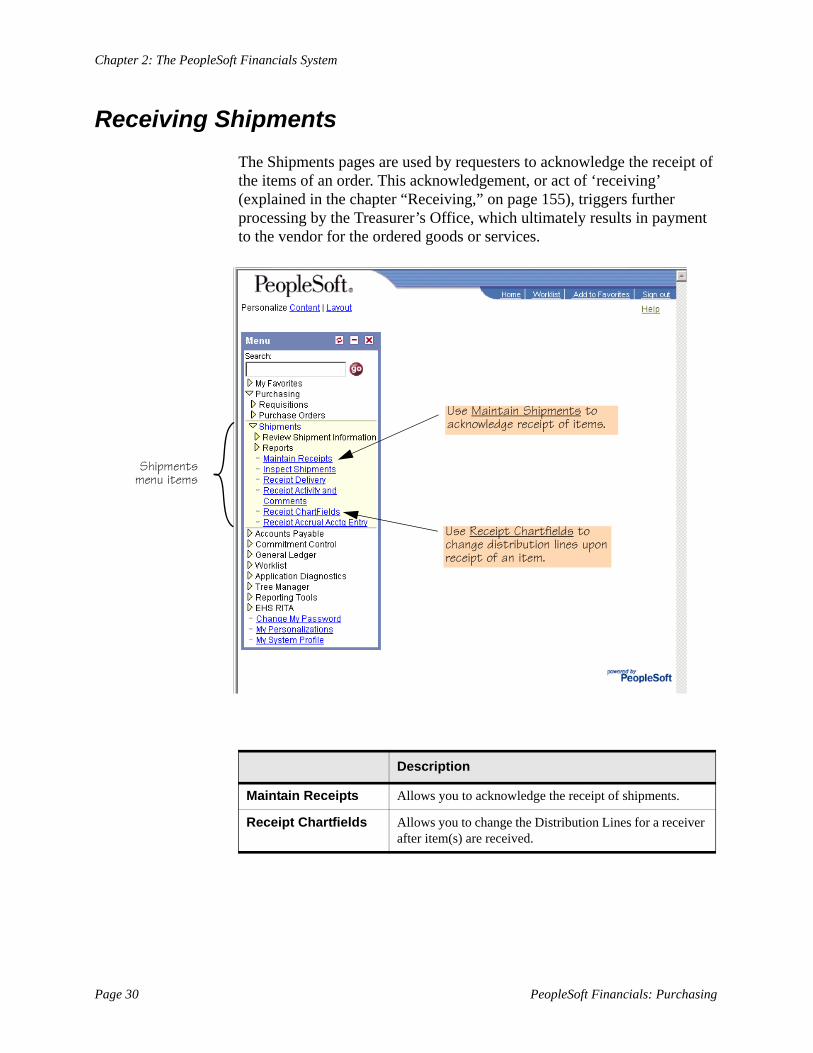
Receiving ShipmentsThe Shipments pages are used by requesters to acknowledge the receipt of the items of an order. This acknowledgement, or act of ‘receiving’ (explained in the chapter “Receiving,” on page 155), triggers further processing by the Treasurer’s Office, which ultimately results in payment to the vendor for the ordered goods or services.
Use Maintain Shipments to acknowledge receipt of items.
Shipments menu items
Use Receipt Chartfields to change distribution lines upon receipt of an item.
Menu Item Description
Maintain Receipts Allows you to acknowledge the receipt of shipments.
Receipt Chartfields Allows you to change the Distribution Lines for a receiver after item(s) are received.
PS Financials Menus and Page Groups
Department User Guide Version 2.0 Page 31
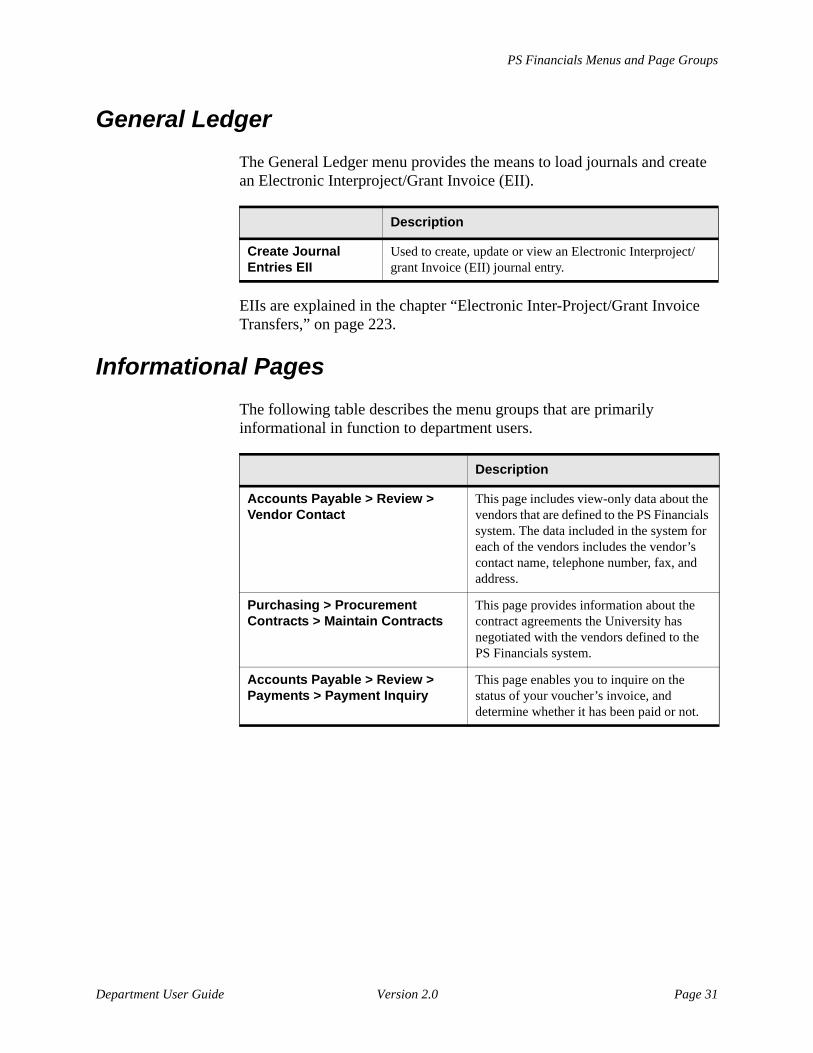
General LedgerThe General Ledger menu provides the means to load journals and create an Electronic Interproject/Grant Invoice (EII).
Menu Item Description
Create Journal Entries EII
Used to create, update or view an Electronic Interproject/grant Invoice (EII) journal entry.
EIIs are explained in the chapter “Electronic Inter-Project/Grant Invoice Transfers,” on page 223.
Informational PagesThe following table describes the menu groups that are primarily informational in function to department users.
Menu Item Description
Accounts Payable > Review > Vendor Contact
This page includes view-only data about the vendors that are defined to the PS Financials system. The data included in the system for each of the vendors includes the vendor’s contact name, telephone number, fax, and address.
Purchasing > Procurement Contracts > Maintain Contracts
This page provides information about the contract agreements the University has negotiated with the vendors defined to the PS Financials system.
Accounts Payable > Review > Payments > Payment Inquiry
This page enables you to inquire on the status of your voucher’s invoice, and determine whether it has been paid or not.
Chapter 2: The PeopleSoft Financials System
Page 32 PeopleSoft Financials: Purchasing
Searching for Records and Values
Although much of your work will involve adding new requisitions, POs, or receiving details, you may need to retrieve existing records from the Financials database. When searching for records, you will usually be using a Find an Existing Value page. When searching for a value, you will use a Lookup page.
OperatorsRegardless of which type of search you are performing, you can use operators to refine or limit the search results. For example, you can specify characters to match in a field, search for a range of values such as PO numbers, or search a range of dates.
The following operators can be used in searches:
Note: Not all operators are available for every field.
begins with Only the results that start with the entered characters are displayed.
contains Only the results that contain the entered characters in any contiguous portion are displayed.
= Only the results that exactly equal the entered data are displayed.
Note: Searches are not case sensitive unless you select ( ) the Case Sensitive checkbox.
not = Only the results that do not equal the entered data are displayed.
< Only the results that are less than the entered numbers are displayed.
< = Only the results that are less than or equal to the entered numbers are displayed.
> Only the results that are greater than the entered numbers are displayed.
Searching for Records and Values
Department User Guide Version 2.0 Page 33
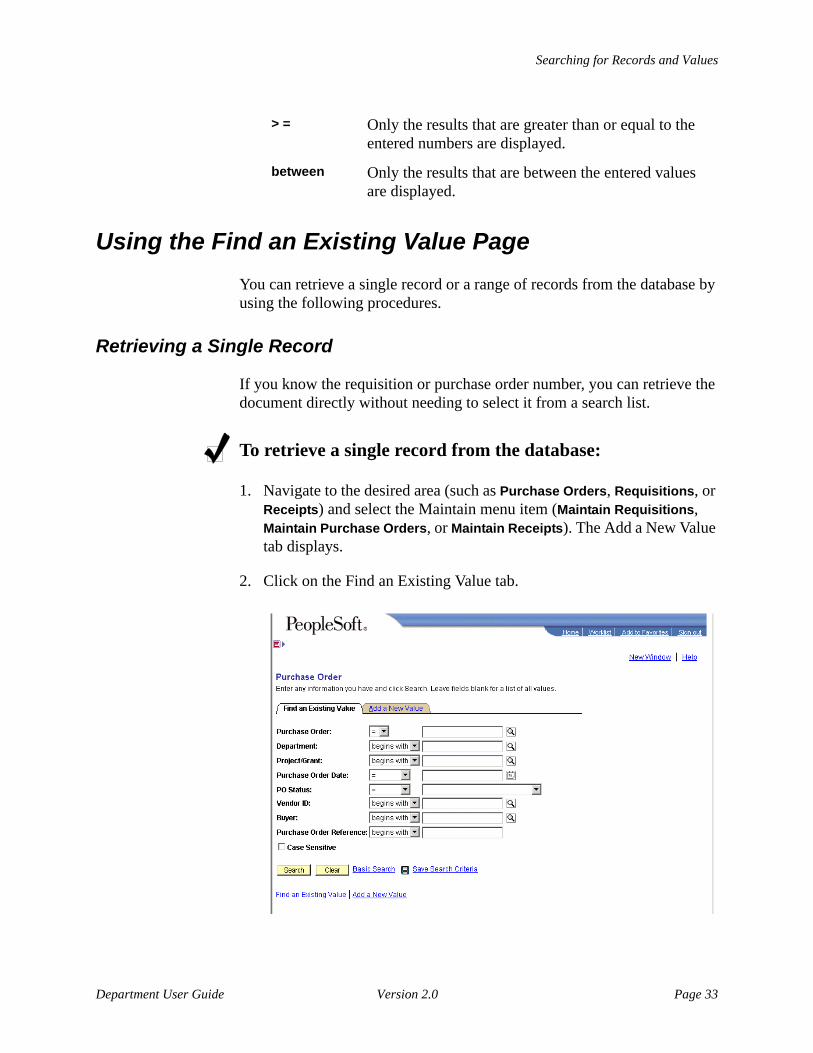
Using the Find an Existing Value PageYou can retrieve a single record or a range of records from the database by using the following procedures.
Retrieving a Single Record
If you know the requisition or purchase order number, you can retrieve the document directly without needing to select it from a search list.
To retrieve a single record from the database:
1. Navigate to the desired area (such as Purchase Orders, Requisitions, or Receipts) and select the Maintain menu item (Maintain Requisitions, Maintain Purchase Orders, or Maintain Receipts). The Add a New Value tab displays.
2. Click on the Find an Existing Value tab.
> = Only the results that are greater than or equal to the entered numbers are displayed.
between Only the results that are between the entered values are displayed.
Chapter 2: The PeopleSoft Financials System
Page 34 PeopleSoft Financials: Purchasing
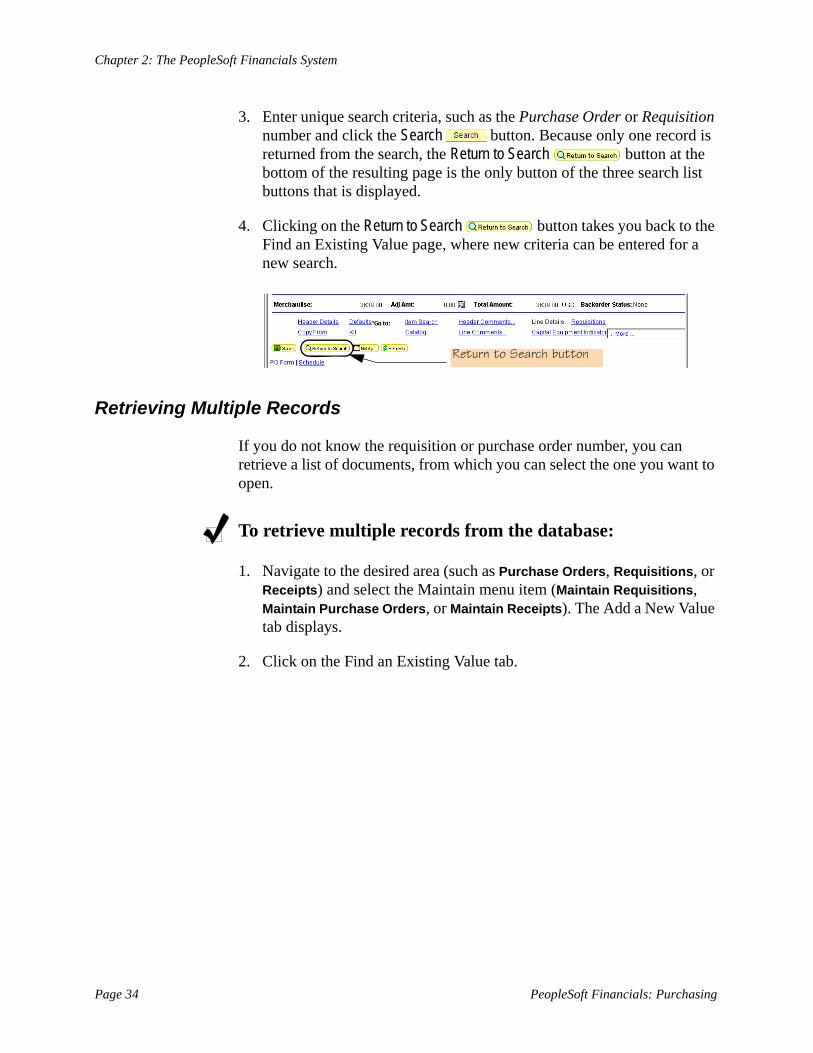
3. Enter unique search criteria, such as the Purchase Order or Requisition number and click the Search button. Because only one record is returned from the search, the Return to Search button at the bottom of the resulting page is the only button of the three search list buttons that is displayed.
4. Clicking on the Return to Search button takes you back to the Find an Existing Value page, where new criteria can be entered for a new search.
Return to Search button
Retrieving Multiple Records
If you do not know the requisition or purchase order number, you can retrieve a list of documents, from which you can select the one you want to open.
To retrieve multiple records from the database:
1. Navigate to the desired area (such as Purchase Orders, Requisitions, or Receipts) and select the Maintain menu item (Maintain Requisitions, Maintain Purchase Orders, or Maintain Receipts). The Add a New Value tab displays.
2. Click on the Find an Existing Value tab.
Searching for Records and Values
Department User Guide Version 2.0 Page 35
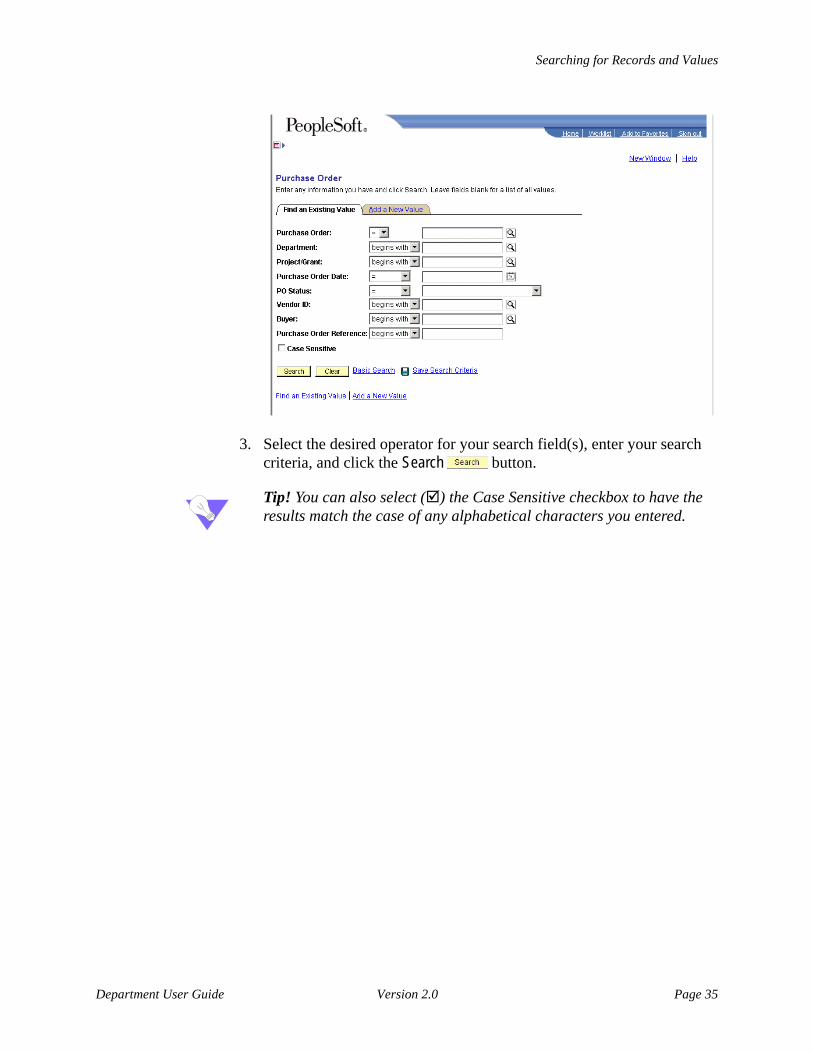
3. Select the desired operator for your search field(s), enter your search criteria, and click the Search button.
Tip! You can also select ( ) the Case Sensitive checkbox to have the results match the case of any alphabetical characters you entered.
Chapter 2: The PeopleSoft Financials System
Page 36 PeopleSoft Financials: Purchasing
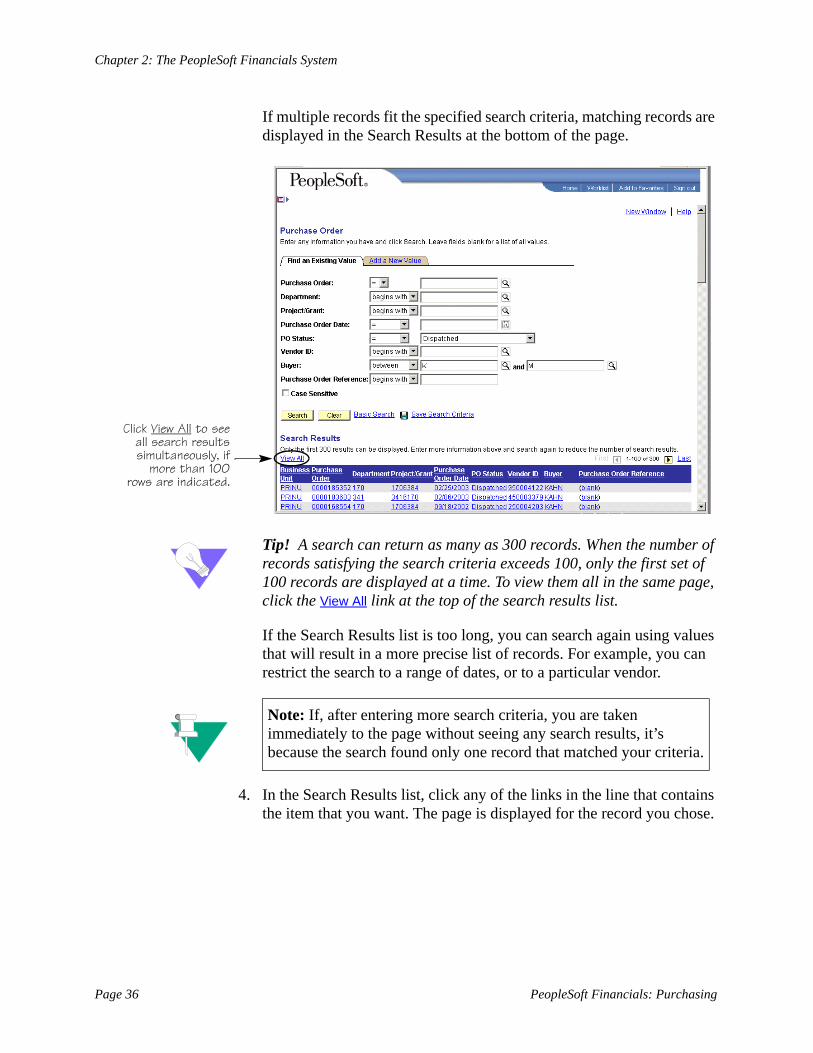
If multiple records fit the specified search criteria, matching records are displayed in the Search Results at the bottom of the page.
Click View All to see all search results simultaneously, if
more than 100 rows are indicated.
Tip! A search can return as many as 300 records. When the number of records satisfying the search criteria exceeds 100, only the first set of 100 records are displayed at a time. To view them all in the same page, click the View All link at the top of the search results list.
If the Search Results list is too long, you can search again using values that will result in a more precise list of records. For example, you can restrict the search to a range of dates, or to a particular vendor.
Note: If, after entering more search criteria, you are taken immediately to the page without seeing any search results, it’s because the search found only one record that matched your criteria.
4. In the Search Results list, click any of the links in the line that contains the item that you want. The page is displayed for the record you chose.

Searching for Records and Values
Department User Guide Version 2.0 Page 37
Working Through a Search List
When you are working with records from a search list, the search list buttons at the bottom of each page become enabled. You can then use the Next in List , Previous in List , and Return to Search
buttons at the bottom of the page to work through the list.
Search List Buttons
These buttons allow you to navigate forward and backward through the retrieved records in the search list:
Next in List Displays the next record in the search list. If this button is disabled, you are viewing the last record in the list.
Previous in List
Displays the previous record in the search list. If this button is disabled, you are viewing the first record in the list.
Return to Search Returns to the search results on the Find an Existing Value page, where you can scroll through the generated list of records, select a particular record in the list, or perform another search.
Chapter 2: The PeopleSoft Financials System
Page 38 PeopleSoft Financials: Purchasing
Basic and Advanced Searches
The Basic Search and Advanced Search links on a Find an Existing Value page toggle between all the fields explained here (advanced search) and a basic search of only the primary value (such as the purchase order number or receiver number).
Saving Search Criteria
If you perform the same type of search regularly, you may save advanced search criteria by clicking the Save Search Criteria link at the bottom of the Find an Existing Value page.
To save search criteria:
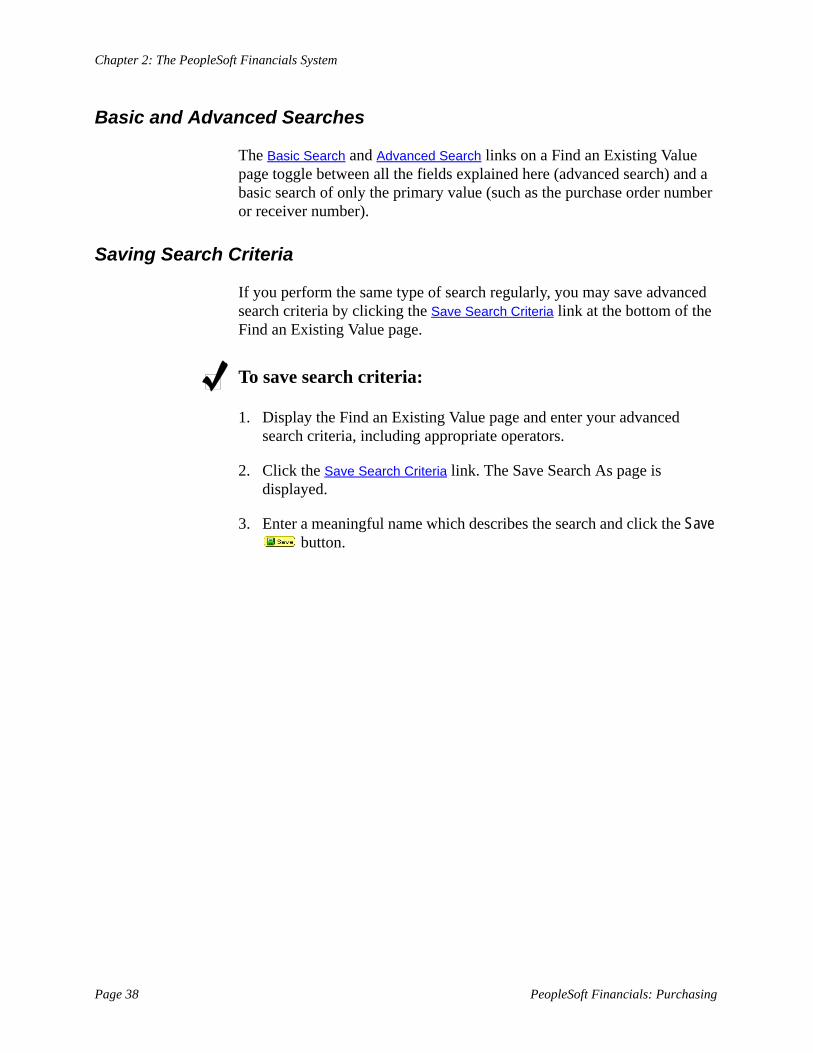
1. Display the Find an Existing Value page and enter your advanced search criteria, including appropriate operators.
2. Click the Save Search Criteria link. The Save Search As page is displayed.
3. Enter a meaningful name which describes the search and click the Save button.
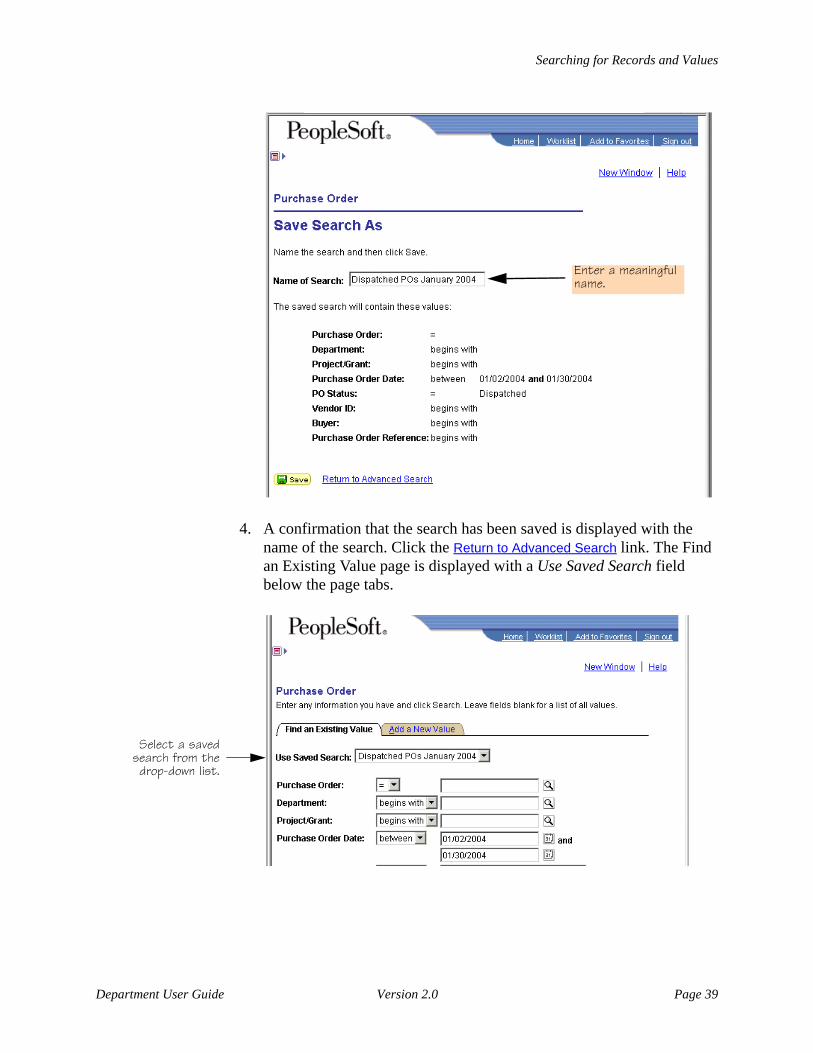
Enter a meaningful name.
Searching for Records and Values
Department User Guide Version 2.0 Page 39
4. A confirmation that the search has been saved is displayed with the name of the search. Click the Return to Advanced Search link. The Find an Existing Value page is displayed with a Use Saved Search field below the page tabs.
Select a saved search from the drop-down list.
Chapter 2: The PeopleSoft Financials System
Page 40 PeopleSoft Financials: Purchasing
Using a Saved Search
Rather than re-entering data for a search each time you do the search, you can re-use a saved set of search values on a Find an Existing Value page.
To use a saved search:
1. If it is not already open, display the Find an Existing Value page.
2. To use a saved search, select a search from the drop down list of the Use Saved Search field.
Tip! If no Use Saved Search field appears, you have not saved any search criteria for this page.
Deleting Search Criteria
If you no longer need a saved set of search values, you can delete the saved search.
To delete a saved search:
1. If it is not already open, display the Find an Existing Value page.
2. Click the Delete Saved Search link.
3. Highlight the search that you want to delete, and click the Delete button.
4. When you have finished deleting saved searches, click the Return to Advanced Search link.
Using a Lookup Button to Find a ValueThe Lookup button located next to many fields will take you to a Lookup page for that field. On the Lookup page, you can search for all values valid for that field. For example if you don’t know the code for a particular field, or if your operator defaults haven’t been set to display them, you can click the Lookup button to display a Lookup page.
Searching for Records and Values
Department User Guide Version 2.0 Page 41
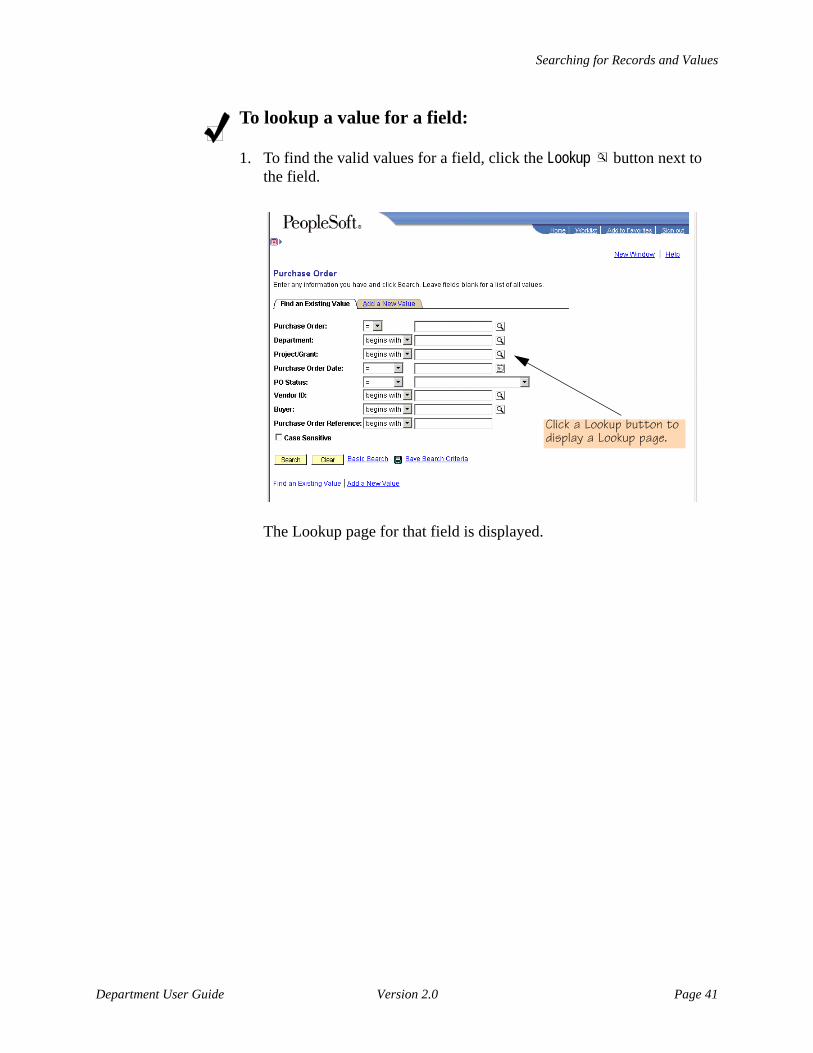
To lookup a value for a field:
1. To find the valid values for a field, click the Lookup button next to the field.
Click a Lookup button to display a Lookup page.
The Lookup page for that field is displayed.
Chapter 2: The PeopleSoft Financials System
Page 42 PeopleSoft Financials: Purchasing
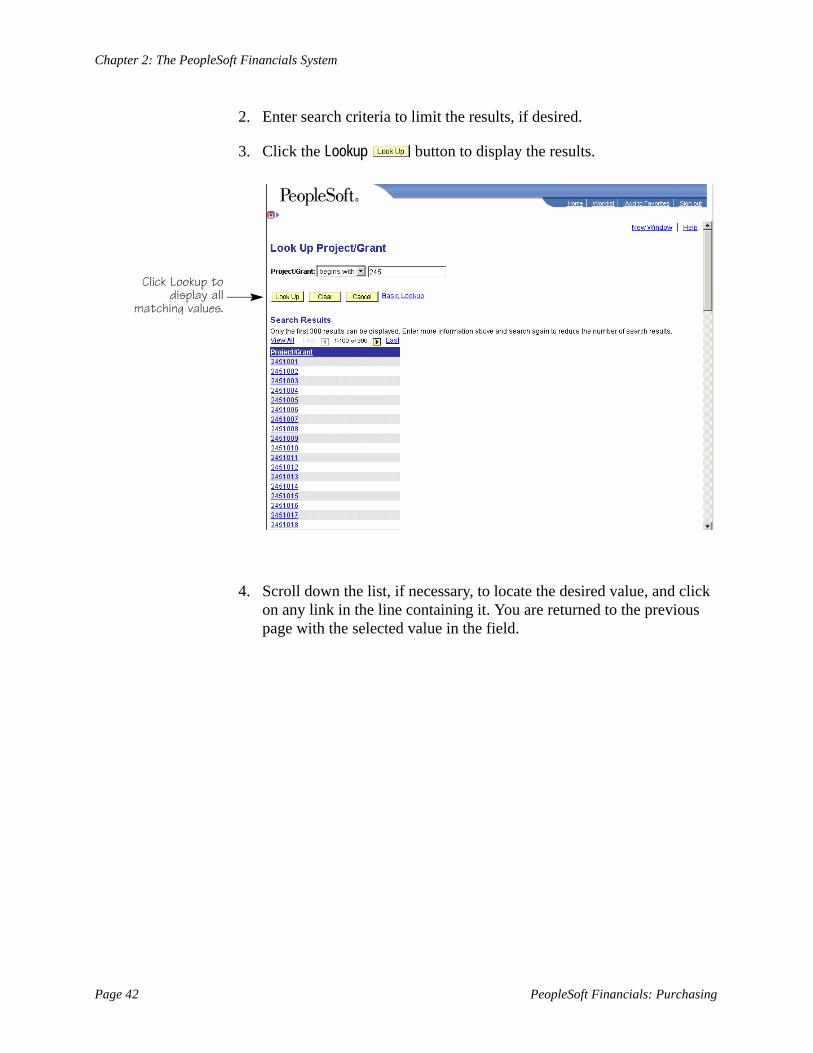
2. Enter search criteria to limit the results, if desired.
3. Click the Lookup button to display the results.
Click Lookup to display all
matching values.
4. Scroll down the list, if necessary, to locate the desired value, and click on any link in the line containing it. You are returned to the previous page with the selected value in the field.
Other Features of the Financials Pages
Department User Guide Version 2.0 Page 43
Other Features of the Financials Pages
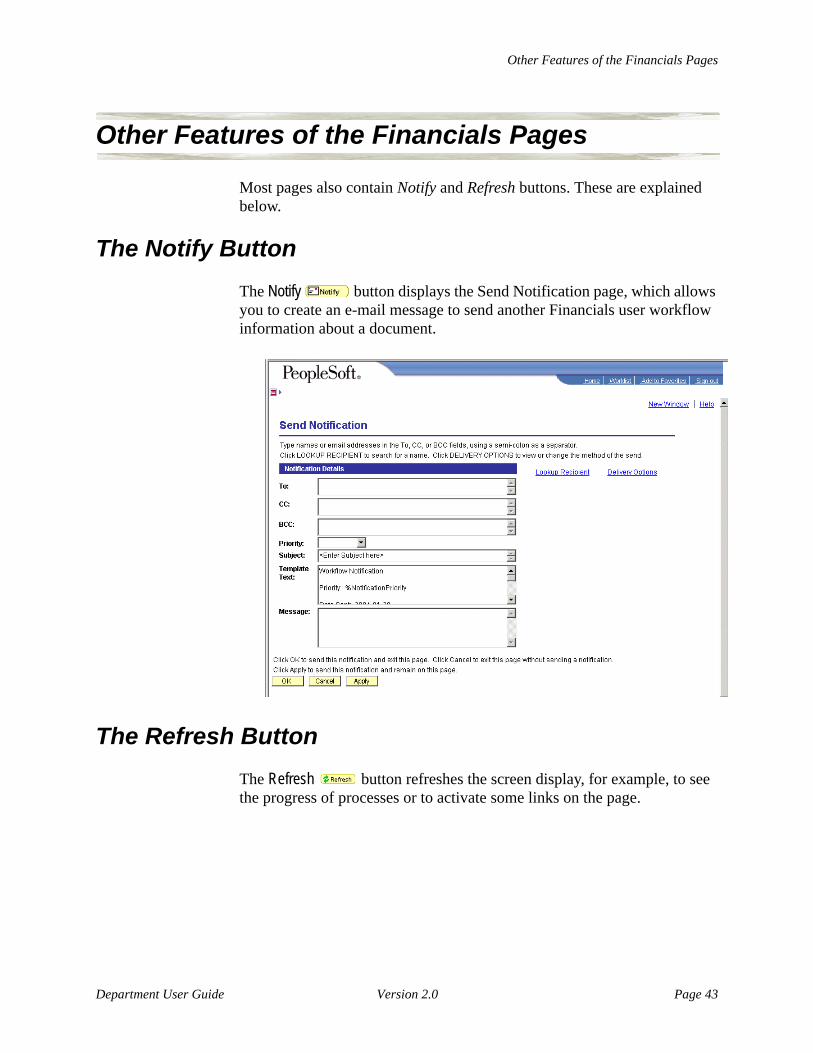
Most pages also contain Notify and Refresh buttons. These are explained below.
The Notify ButtonThe Notify button displays the Send Notification page, which allows you to create an e-mail message to send another Financials user workflow information about a document.
The Refresh ButtonThe Refresh button refreshes the screen display, for example, to see the progress of processes or to activate some links on the page.
Chapter 2: The PeopleSoft Financials System
Page 44 PeopleSoft Financials: Purchasing
Personalizations
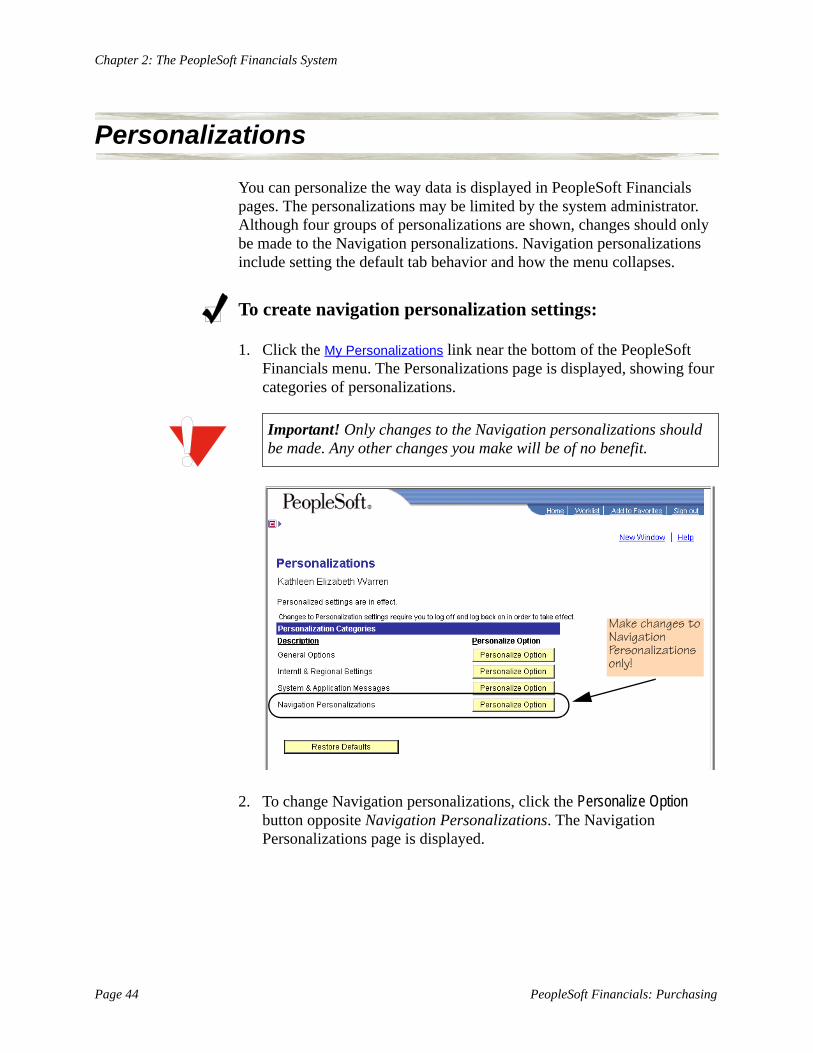
You can personalize the way data is displayed in PeopleSoft Financials pages. The personalizations may be limited by the system administrator. Although four groups of personalizations are shown, changes should only be made to the Navigation personalizations. Navigation personalizations include setting the default tab behavior and how the menu collapses.
To create navigation personalization settings:
1. Click the My Personalizations link near the bottom of the PeopleSoft Financials menu. The Personalizations page is displayed, showing four categories of personalizations.
Important! Only changes to the Navigation personalizations should be made. Any other changes you make will be of no benefit.
Make changes to Navigation Personalizations only!
2. To change Navigation personalizations, click the Personalize Option button opposite Navigation Personalizations. The Navigation Personalizations page is displayed.

Personalizations
Department User Guide Version 2.0 Page 45
3. To view an explanation of a personalization, click the Explain link. An Explanation page is displayed. Click the OK button to return to the Navigation Personalizations page.
4. To override the default value, select a value from the drop-down list of available choices in the Override Value column.
5. To restore default settings, click the Restore Defaults button on the Personalization page, or select a category and click the Restore Category Defaults button on the category page.
6. To save changes to any navigation personalizations, click the OK button at the bottom of a category page. A confirmation page is displayed. Click the Return button to return to the Personalizations page.
Chapter 2: The PeopleSoft Financials System
Page 46 PeopleSoft Financials: Purchasing
Profile Information
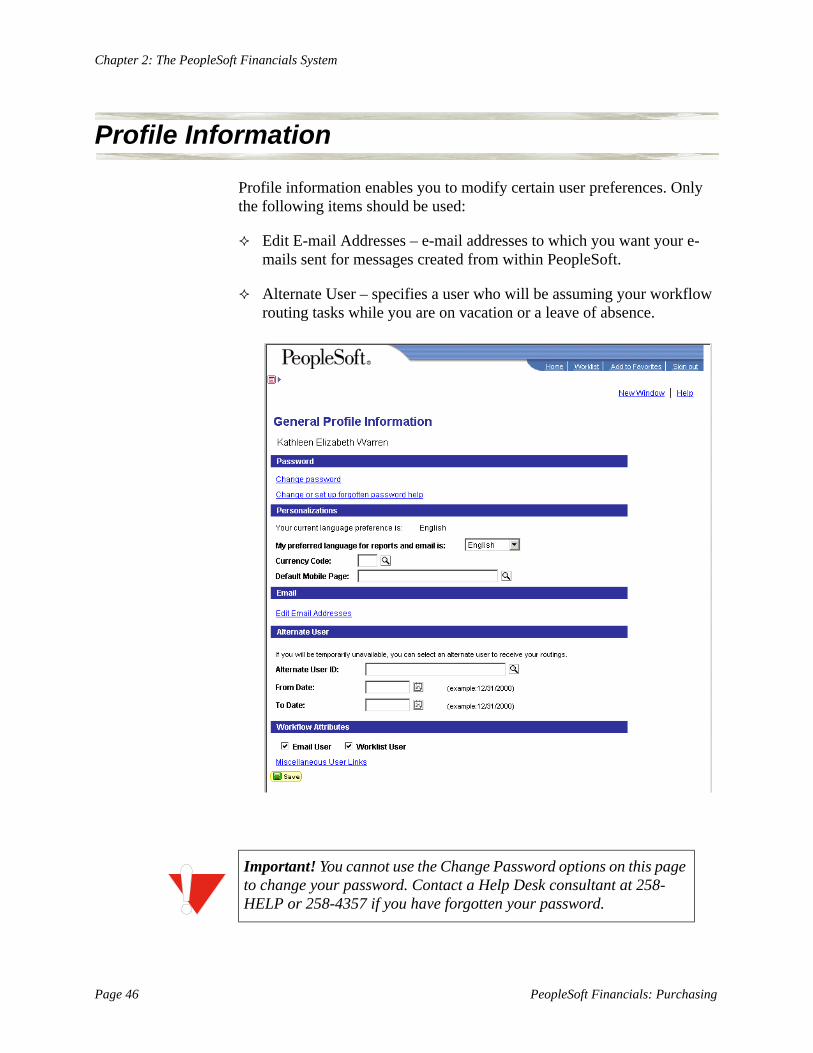
Profile information enables you to modify certain user preferences. Only the following items should be used:
Edit E-mail Addresses – e-mail addresses to which you want your e-mails sent for messages created from within PeopleSoft.
Alternate User – specifies a user who will be assuming your workflow routing tasks while you are on vacation or a leave of absence.
Important! You cannot use the Change Password options on this page to change your password. Contact a Help Desk consultant at 258-HELP or 258-4357 if you have forgotten your password.
Profile Information
Department User Guide Version 2.0 Page 47
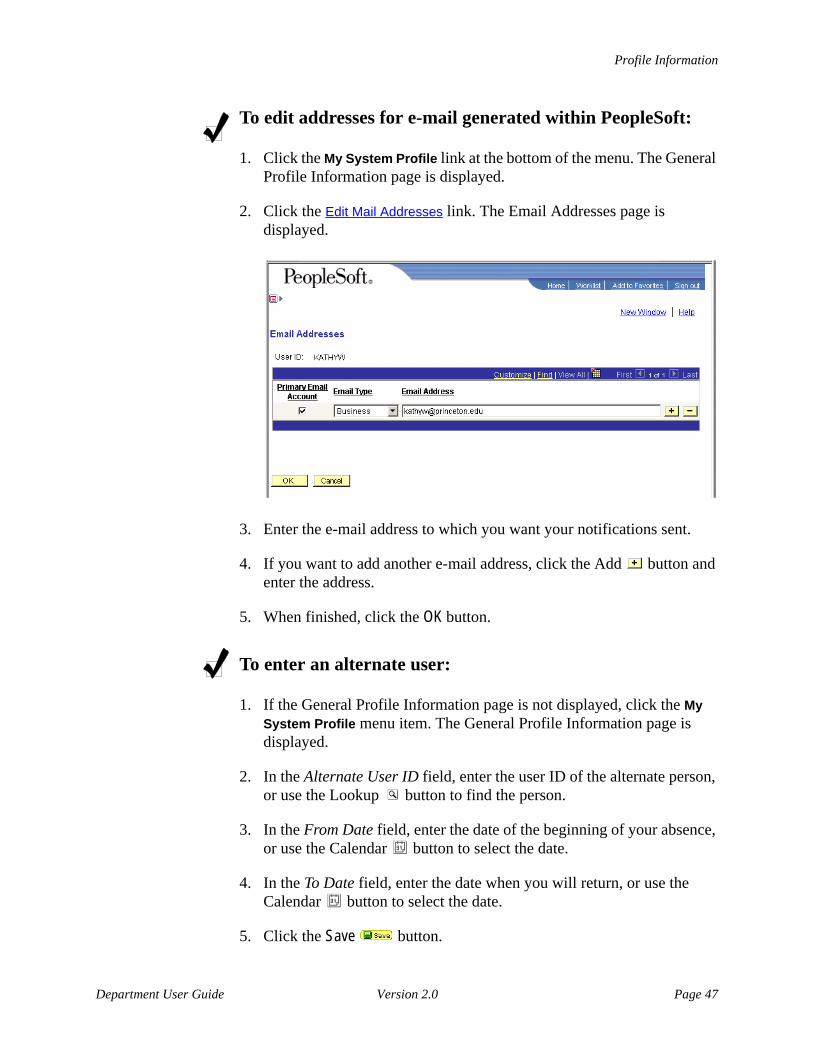
To edit addresses for e-mail generated within PeopleSoft:
1. Click the My System Profile link at the bottom of the menu. The General Profile Information page is displayed.
2. Click the Edit Mail Addresses link. The Email Addresses page is displayed.
3. Enter the e-mail address to which you want your notifications sent.
4. If you want to add another e-mail address, click the Add button and enter the address.
5. When finished, click the OK button.
To enter an alternate user:
1. If the General Profile Information page is not displayed, click the My System Profile menu item. The General Profile Information page is displayed.
2. In the Alternate User ID field, enter the user ID of the alternate person, or use the Lookup button to find the person.
3. In the From Date field, enter the date of the beginning of your absence, or use the Calendar button to select the date.
4. In the To Date field, enter the date when you will return, or use the Calendar button to select the date.
5. Click the Save button.
Chapter 2: The PeopleSoft Financials System
Page 48 PeopleSoft Financials: Purchasing
Keyboard Shortcuts
PeopleSoft provides keyboard shortcuts for many actions you would use the mouse to execute.
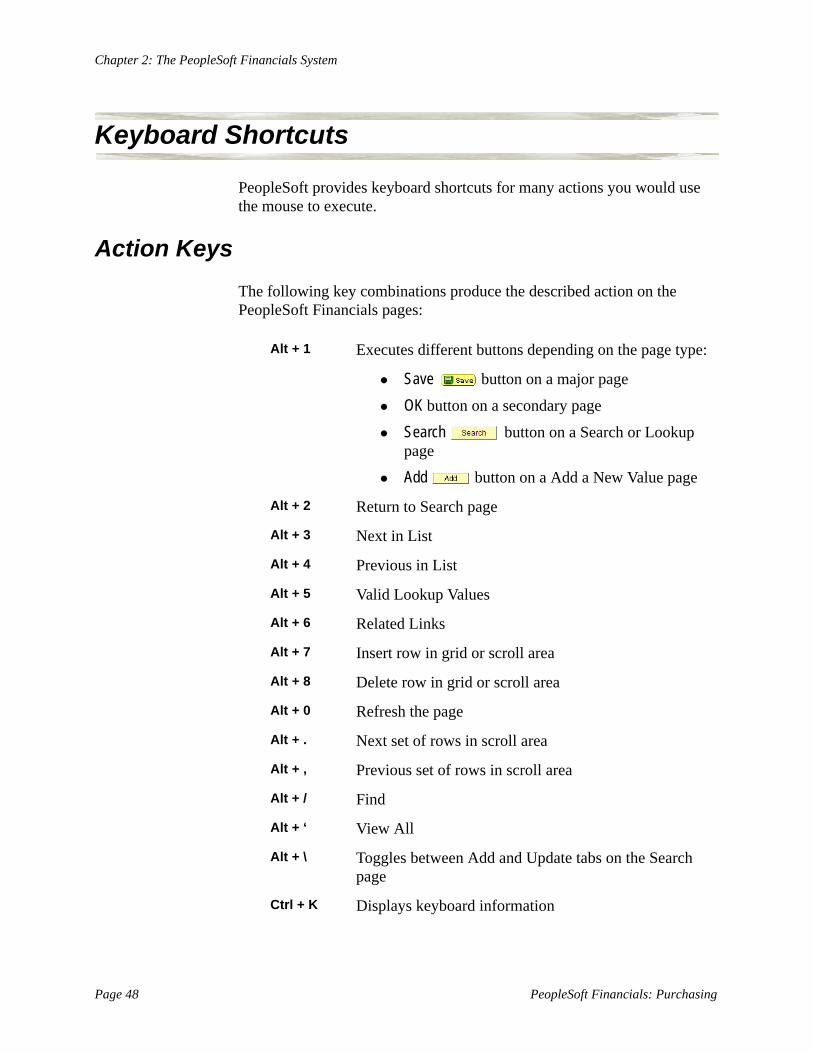
Action KeysThe following key combinations produce the described action on the PeopleSoft Financials pages:
Alt + 1 Executes different buttons depending on the page type:
Save button on a major page
OK button on a secondary page
Search button on a Search or Lookup page
Add button on a Add a New Value page
Alt + 2 Return to Search page
Alt + 3 Next in List
Alt + 4 Previous in List
Alt + 5 Valid Lookup Values
Alt + 6 Related Links
Alt + 7 Insert row in grid or scroll area
Alt + 8 Delete row in grid or scroll area
Alt + 0 Refresh the page
Alt + . Next set of rows in scroll area
Alt + , Previous set of rows in scroll area
Alt + / Find
Alt + ‘ View All
Alt + \ Toggles between Add and Update tabs on the Search page
Ctrl + K Displays keyboard information
Keyboard Shortcuts
Department User Guide Version 2.0 Page 49
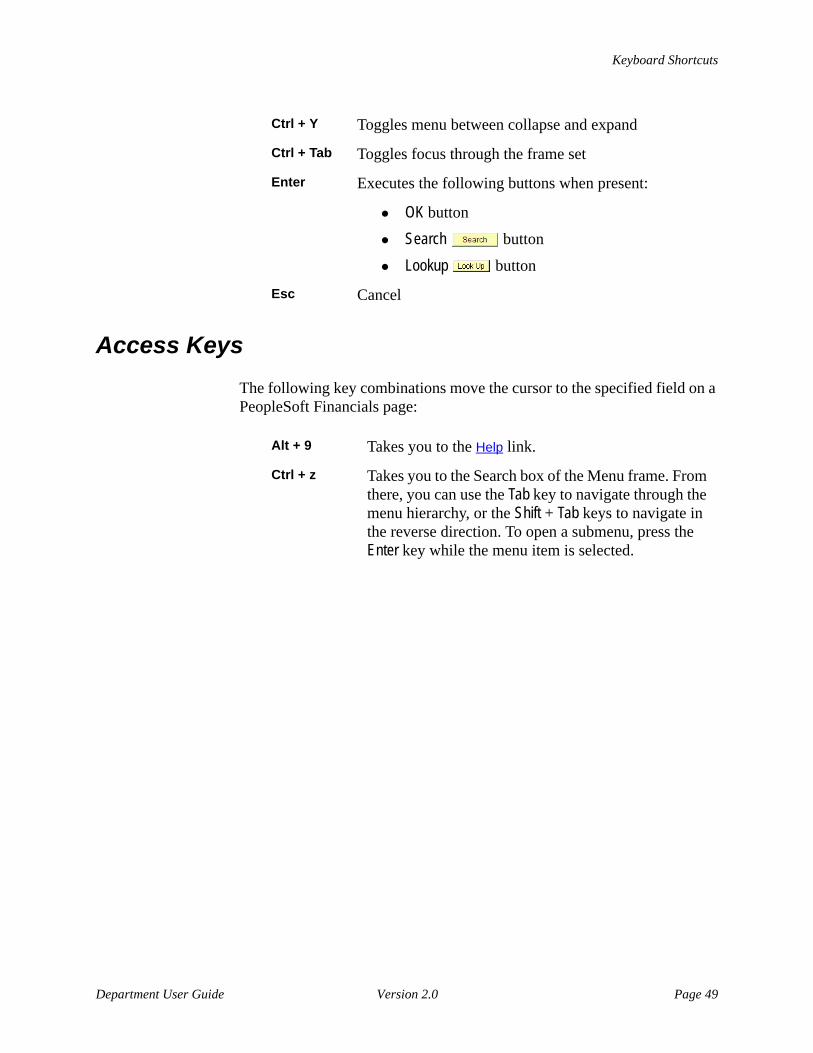
Access KeysThe following key combinations move the cursor to the specified field on a PeopleSoft Financials page:
Alt + 9 Takes you to the Help link.
Ctrl + z Takes you to the Search box of the Menu frame. From there, you can use the Tab key to navigate through the menu hierarchy, or the Shift + Tab keys to navigate in the reverse direction. To open a submenu, press the Enter key while the menu item is selected.
Ctrl + Y Toggles menu between collapse and expand
Ctrl + Tab Toggles focus through the frame set
Enter Executes the following buttons when present:
OK button
Search button
Lookup button
Esc Cancel

Chapter 2: The PeopleSoft Financials System
Page 50 PeopleSoft Financials: Purchasing