Embed Size (px)
Citation preview

1

2
First Edition
Visiosonic Ltd. 21939 U.S. Hwy 19 North Clearwater, FL 33765 www.visiosonic.com [email protected]
Copyright Copyr ight © 1999, 2000, 2001 Vis iosonic Ltd.
Al l Rights Reserved. Trademarks The Logo is a registered trademark of Visiosonic Ltd., PCDJ and
Visiosonic are trademarks of Visiosonic Ltd. Reproduction of this manual is not permitted without express written permission from Visiosonic Ltd.
Windows is a registered trademark of Microsoft Corporation.
Numark, DMC-1 and the Numark logo are t rademarks of Numark Industr ies.
License and Use of the Sof tware is subject to the sof tware . Certain License agreement which must be reviewed during the . Restrictions installation process.
Manual Wri t ten
and Edited b y Joel Bet ter ly & Bob Nahas
Graphics by Joel Bet ter ly & Nik las Åberg
Program Design, & Technica l Layout Jorgen Hedberg, Chr is Skogen, & Chr is Roman D M C-1 Hardware Designer Kent Johansson

3
Table of Contents System Requirements ……………..…………………………….…. 6 Read This First .…………………………………….………………... 7 The PCDJ Blue Program ……………………………………………. 9 Title Bar …………………………………….………………………….. 9
The CFG Button …………………………………..………………. 9 The Info Button ………………………………………………..….. 9 The Standby Button ……………………..……………………….. 9 The Exit Button ……………………………………..…………….. 9 Dual Players (A and B) ………….…………………………………… 10
Progress Bar …………………….………………………………... 10 Player Status ……………….…………………………………….. 10 Elapsed Time ………………….………………………………….. 10 Song Rate ………………………….……………………………… 10 Remaining Time ………………….………………………………. 10
BPM …………………………….…………………………………... 10 Cue Point Indicator ………………….…………………………... 10 Artist and Title ………………………….………………………… 10 Buffer ………………………….…………………………………… 10 Cue Points ………………….…………………………………….. 10
Cue ……………………….………………………………………… 11 Play / Pause ……………………….………………………………. 11 Load / Beat Match ………………….…………………………….. 11 Seek Reverse / Seek Forward ……………….………………… 11 Show Track Info Button / LED VU Meters …………………… 11
Pitch Window Display / Bend Buttons ..…………….……….. 11 Pitch Slide Button ………………… 12 Small Step Up and Down Buttons …………………………….. 11 Reset Button …………………………….…………………..……. 12 The Mixer ……………………………………………………….……… 12
Volume Control …………….……………….……………………. 12 Cue …………………………………….…………………………… 12 Fader .………………………………………………………………. 12 LED VU Meters ..………………………………………………….. 12 Monitor Volume Control ………………………….……………… 12
Main Volume Control ……………………….……………………. 12 The Recordcase ...………………………….………………………… 13 Edit Recordcase Button ……………………………….………… 13

4
Groups Box ..……………………………………….……………… 13 Mini Case Player ………………………………………………….. 13 BPM / Artist Buttons ……………………….…………………….. 13
The Recordcase ..……………..……………..…………………… 13 Subgroup Tabs ..……………………………….…………………. 14 Find, Waitlist, Ripp Buttons ….………………….……………… 14 Edit, wl+, wl-, ^v Buttons ……………………….….……………. 15 Auto Play, Auto Shuffle, Auto Pilot ……………………...……. 15
Message Bar ..…………………………….……………………….. 15 Configuration (CFG) ….…………………………… 16 Hardware .…………………………………..………………………….. 16 Workmode ……………………………………..………………….. 16 Setting Up Soundcards ………………………………………….. 16
External …………………………………...………………………... 16 Software ..………………………….……………………………….. 16 Interface ..……………………………...…………………………… 16 Files & Path ..……………………………...……………………….. 17 Automation ..……………………………………………………….. 17
Ripp / Encoder ...………………………...………………………... 18 CD Recording ....…………………………………………………... 19 Line-in Recording .………………………………………………... 19 Administrat ion …………………………………………….. . . 20 MP3 Encryption Setting ……………………………..………..… 20
Accumulated Information .………………………………………. 20 Licensing the Program .………………………………………….. 21 Track Information …………………………. 22 Cue Information ………………………..…………………………. 23 Automatic Gain Control ….……………………..……………….. 23
The DMC-1 Controller ..…..………………….………………………. 24 Connecting the DMC-1 ….…………………..…………….……... 24 The DMC-1 Controls …………………………………….…………… 24 Inner Jog Wheel ……………………………..……………………. 24 Outer Jog Wheel ………………..………………………………… 24
Load ……………………….………………………………………… 24 Waitlist ………………………………..…………………………….. 25 Shift ……………………………..………………………...………… 25 Cue Memory ……………………..………………………………… 25 Group …………………………..…………………………………… 25

5
Preview ………………………..……………………………………. 25 Match …………………………………..…………………………… 25 Pitch Control Slide …………………………..…………………… 25
Cue ……………………………………..…………………………… 26 Shift + Cue …………………………………………………………. 26 Play ……………………………..…………………………………… 26 Stutter …………………………………..…………………………... 26 Stutter and Continue Playing …………………..………………. 26
Display Window ……………………………..……………………. 26 Time Elapsed/Remaining Toggle …………………..………….. 26 “BPM to Pitch” Toggle ………………………..…………………. 26 More on the DMC-1 …………………………...…………………….... 27 Pitch Bend …………………………………………….…………... 27
Pitch Step ……………………………….………………………… 27 Change Pitch Control Range …………………..…… 27 Cueing ………..……………..…………………………….. 28 Choosing a Position on Cue Point Indicator ……..…………. 28 Set Cue Points with the Jog Wheel ……………………..…….. 28
Mixing Tracks ..……………………………….………….………... 28 Instant Beat Matching ………………… 29 SHORTCUTS ……………………………………..…………………… 30 New Keyboard Shortcuts .………………………………………. 30 PLAYER A ……………………………….………………………… 30
PLAYER B …………………………..……………………………… 31 MIXER …………………………………………..…………………... 32 BPM COUNTER …………………………..……………………….. 32 WAITLIST & TRACK INFO ………………..……………………... 33 OTHER FUNCTIONS ……………………..………………………. 33
DMC – 1 Shortcuts .………………………………………………. 34 Original Keyboard Shortcuts .………………………………….. 34 PLAYER A …………………….……………………… 34 PLAYER B ………………………….……………………………… 35 FEATURES LIST .………………………………..…………………… 36

6
Minimum System Requirements § Intel® Pentium® II 350 Processor or AMD Athlon™ 350 and
above
§ 64 Megs of RAM
§ Direct X Supported Sound Card (Direct Sound, Non-Emulated)
§ 5 Megs of free hard drive space § SVGA Graphics (800 x 600 Minimum @ 16 bit color)
§ CD-ROM
§ 56K MODEM or better (Recommended)
§ Windows 98, 98se, Windows ME and Windows 2000 (NT 4.0 not
supported) § DMC-1 Numark Controller (Recommended)

7
READ THIS FIRST
Products
This guide is for the PCDJ Blue version of the PCDJ Software. This guide does not cover the other versions of the software. If you need a guide for any of these programs, please visit www.pcdj.com under Support for more information. Everything included in this manual comes standard with the PCDJ Blue software. Additional plug-ins can be purchased from local retailers or via the www.pcdj.com web site. Numark DMC-1 Controller
The DMC-1 controller can be purchased separately. You can purchase it from your local music retailer. Visit www.pcdj.com or www.numark.com for more information. Windows Operating System
We are assuming that you know how to navigate and use your Windows operating system. In this guide we will not give detailed instructions on installation or transferring files. If you need more information, then please consult your Windows manual. Some things you should know about “PCDJ” before starting: PCDJ
To keep repetition minimal, the PCDJ Blue Software program will be referred to as “PCDJ”. A full features list, shortcuts for the keyboard and DMC-1 controller can be found at the end of this guide. The Dual Players
The features in both Players “A” & “B” are exactly the same. Close All Other Applications
It is strongly recommended that you close all applications on your computer when using PCDJ as they can interfere with its performance. Hint Dropdown Box
Holding the mouse pointer over most buttons and features in the PCDJ will show a Hint Dropdown Box explaining what you’re pointing to.

8
Your License and the DMC-1 Controller The use of the software requires a license. Your DMC-1 controller when plugged into your computer will automatically license your program. Plug the controller into the computer before running the software. After you run the software with the controller, your software will be licensed. The DMC-1 controller is your license key. If you encounter any problems licensing the program, please contact PCDJ Support at the number or email listed below. Graphics in This Guide Graphics in this guide are marked with numbers that correspond with text to give explanations of what the feature does in the player. You will not see these numbers when the program is running.
Visiosonic Contact Information
PHONE: 727-799-3828
WEB SITE:
www.pcdj.com
SALES: [email protected]
TECHNICAL SUPPORT:

9
The PCDJ Blue Program
Note: To install the program, find the file named “setupblue.exe” and run it. You may have downloaded the file from the Internet or it will be located on the CD that you purchased. If you need help on how to install a program into your computer, please consult your Windows manual. Updates are available at www.pcdj.com.
The player is divided into four sections: Title Bar, Players (A & B), the Mixer and the Recordcase.
Title Bar
The top section is the title bar, which includes a 12 or 24 hour clock and four buttons.
1. The CFG Button: This allows you to enter into the configuration mode of the program so you can change the way the PCDJ works.
2. The Info Button: This tells you what version you have of the software.
3. The Standby Button: This will reduce the PCDJ down to its title bar and allow you to access your Windows desktop.
4. The Exit Button: This closes the program.
Note: If a player is active, the exit button will not work. All players must be stopped before you will be allowed to close the program.

10
Dual Players (A and B)
Note: Players A and B function exactly the same. The only differences between the two players are the shortcut keys they use on the keyboard. Full maps of the shortcuts are included at the end of this guide.
1. Progress Bar: This graph shows you how far along your song has played. You will have blue bars up to 90% of the song and red bars for the final 10%. A small dot below the Progress Bar shows where a Cue Point is stored.
2. Player Status: This tells you what mode the player is in. The modes include; Playing, Stopped (ready), Paused, Paused (Fine Seek Forward), Paused (Fine Seek Reverse) and Play (Edit).
3. Elapsed Time: Shows how much time of the song has been played.
4. Song Rate: Shows the Sample rate and Kilobit of the song that is loaded. 44100 at 192kb is CD quality.
5. Remaining Time: Shows how much time of the song that is yet to be played.
6. BPM: Shows the BPM of the song that is loaded.
Note: You have to enter this in for each song or use the BPM counter in the INFO box of the players.
7. Cue Point Indicator: This tells you the number Cue Point you are on. You can also name cue points using the INFO box on the player. Naming Cue Points will be covered in detail later in this guide.
8. Artist and Title: This shows the artist and title of the song that is loaded.
9. Buffer: This is an indicator of your buffer. Every 10% indicates 1 second. 100% means the buffer is full and will provide 10 seconds of safety buffer.
10. Cue Points: This shows you which Cue Point you are on. A yellow square will show that a Cue Point is available. A bright blue square

11
indicates a Cue Point that is used and shows that you are on that Cue Point. A gray Cue Point indicates that the point is used, but you are not currently using that Cue Point. To remove a Cue Point, double click on the Cue Point you wish to remove and a dialog box will appear asking for confirmation to delete. The buttons below allow you to advance in either direction to move to any Cue Point.
11. Cue: This button acts as both a cueing button and a stop button. Clicking the “CUE” button once advances to a previously set Cue Point selected in the Cue Point Indicator. (You will see the Progress Bar light up to that cue position in the song.) When the song is playing, it stops the song when you click it. This button turns red when in use.
12. Play / Pause: Once a track is loaded into the player, pressing this button will begin to play the track. Pressing this button a second time will cause the player to have a silent pause. While in pause mode, if you search forward or reverse, the player will begin to have a repeating sound. This is used to find a cue point. If you use the “Original” key map, then when you press the play button the second time, you will get a repeating sound.
13. Load/Beat Match/Seek Reverse/Seek Forward: The Load Track button (Blue) is for loading a track (song) into the Player from your Recordcase. You can also load tracks from other sources, such as your hard drive or Explorer, by right mouse clicking on the Load Track button. The Beat Match button (with the equals sign on it) will automatically match the BPM (Beats Per Minute) of the song in one player with a song that has a different BPM in the other player so they can be mixed with precision. You can use this button from Player “A” to Player “B” or from Player “B” to Player “A”. The Seek Reverse button lets you seek (or skip) backwards through a song either in the Play or Pause modes. Th e Seek Forward button lets you skip forward through a song in either the Play or Pause modes.
Note: Using the Forward or Reverse Seek buttons will put the players in the Edit mode. You will not have a safety buffer, so NEVER use these buttons to search through a song when playing live. Use them only to set Cue Points at your gig.
14. Show Track Info Button and LED VU Meters: Clicking on the INFO button will open up the TRACK INFORMATION window which allows you to input specific data about a song, such as the BPM, the Artist and Song Title. The LED VU Meter shows real-time playback levels of the song being played.
15. Pitch Window Display and Bend Buttons: The Pitch window shows a digital display of your current setting of the pitch span. If you move the pitch slider into the negative direction (to slow the song down) a negative number will be shown in the display. The

12
bend buttons are shown right below the pitch window display. The bend buttons will allow you to temporarily bend or change the pitch of a song by speeding it up or slowing it down. When using the mouse, the left button will change the pitch up or down 2.5% and the right mouse button will change the pitch by 5%.
16. Pitch Slide / Small Step Up and Down and Reset Button: This lever allows you to adjust the pitch of a song. The small step up and down buttons gives you the ability to adjust the Pitch Slider in very small and exact increments. At the default setting, each time you click on this button the pitch is raised or lowered .05%. Note: You can adjust the pitch span of the Pitch Control Slide, by holding down the “Ctrl” key and pressing the “5” key (for Player “A”) or the “0” key (for Player “B”). Each time you press “5” or “0”, the percentage increases from 4, 8, 16, 32 to 54 in the Pitch Control Slide.
The Mixer
The PCDJ Mixer for the PCDJ is designed for those who don’t have their own mixer. It allows control of the Main Volume, Monitor Volume and Cross Fade functions.
1. Volume Control: The volume control on the left is for Player A and the one on the right is for Player B.
2. Cue: This is for the DJ to listen to a player in the headphones or monitor speakers in order to cue up the next song for play. The cue is engaged when the green light is lit.
Note: To use this feature, you must be in mode 3 or 4 in the configuration menu.
3. Fader: This slides from side to side and cross fades between Player A and Player B. The slide will affect the volume level of the players when used.
4. LED VU Meters: These are two real-time VU meters that show the output volume levels of each player separately. The left side is for the Player A and the right is for Player B.
5. Monitor Volume Control: This controls the overall output volume for the monitor only. Note: This feature only works in mode 3 or 4.
6. Main Volume Control: This dial runs the overall output to the left and right channels of the PCDJ.
13
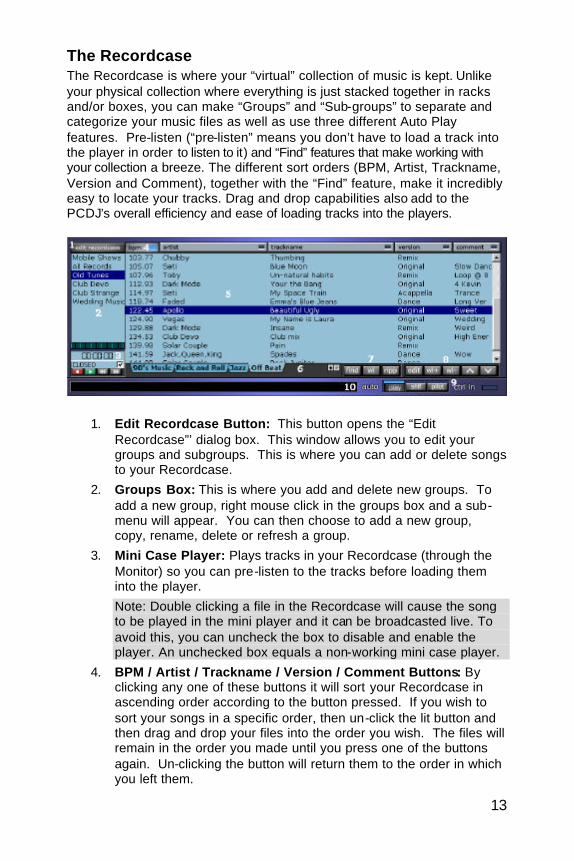
The Recordcase
The Recordcase is where your “virtual” collection of music is kept. Unlike your physical collection where everything is just stacked together in racks and/or boxes, you can make “Groups” and “Sub-groups” to separate and categorize your music files as well as use three different Auto Play features. Pre-listen (“pre-listen” means you don’t have to load a track into the player in order to listen to it) and “Find” features that make working with your collection a breeze. The different sort orders (BPM, Artist, Trackname, Version and Comment), together with the “Find” feature, make it incredibly easy to locate your tracks. Drag and drop capabilities also add to the PCDJ’s overall efficiency and ease of loading tracks into the players.
1. Edit Recordcase Button: This button opens the “Edit Recordcase”’ dialog box. This window allows you to edit your groups and subgroups. This is where you can add or delete songs to your Recordcase.
2. Groups Box: This is where you add and delete new groups. To add a new group, right mouse click in the groups box and a sub-menu will appear. You can then choose to add a new group, copy, rename, delete or refresh a group.
3. Mini Case Player: Plays tracks in your Recordcase (through the Monitor) so you can pre-listen to the tracks before loading them into the player.
Note: Double clicking a file in the Recordcase will cause the song to be played in the mini player and it can be broadcasted live. To avoid this, you can uncheck the box to disable and enable the player. An unchecked box equals a non-working mini case player.
4. BPM / Artist / Trackname / Version / Comment Buttons: By clicking any one of these buttons it will sort your Recordcase in ascending order according to the button pressed. If you wish to sort your songs in a specific order, then un-click the lit button and then drag and drop your files into the order you wish. The files will remain in the order you made until you press one of the buttons again. Un-clicking the button will return them to the order in which you left them.
14
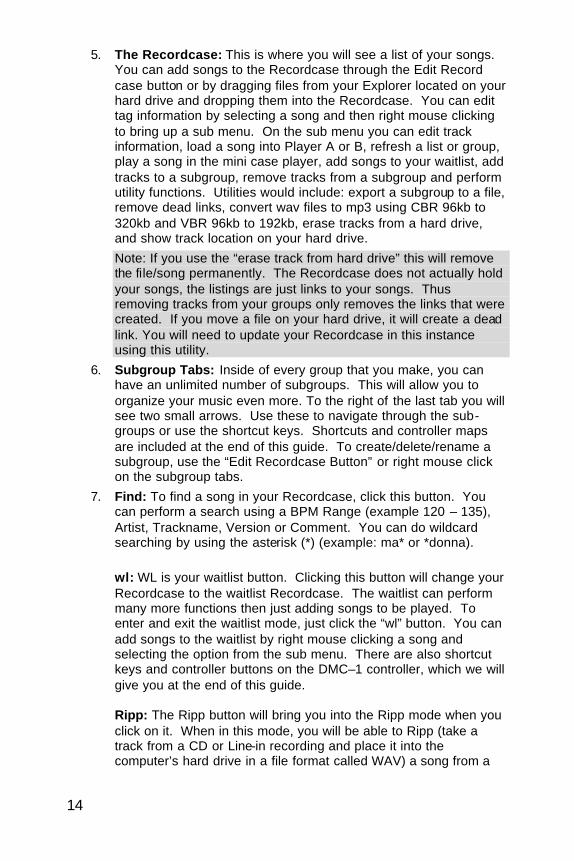
5. The Recordcase: This is where you will see a list of your songs. You can add songs to the Recordcase through the Edit Record case button or by dragging files from your Explorer located on your hard drive and dropping them into the Recordcase. You can edit tag information by selecting a song and then right mouse clicking to bring up a sub menu. On the sub menu you can edit track information, load a song into Player A or B, refresh a list or group, play a song in the mini case player, add songs to your waitlist, add tracks to a subgroup, remove tracks from a subgroup and perform utility functions. Utilities would include: export a subgroup to a file, remove dead links, convert wav files to mp3 using CBR 96kb to 320kb and VBR 96kb to 192kb, erase tracks from a hard drive, and show track location on your hard drive.
Note: If you use the “erase track from hard drive” this will remove the file/song permanently. The Recordcase does not actually hold your songs, the listings are just links to your songs. Thus removing tracks from your groups only removes the links that were created. If you move a file on your hard drive, it will create a dead link. You will need to update your Recordcase in this instance using this utility.
6. Subgroup Tabs: Inside of every group that you make, you can have an unlimited number of subgroups. This will allow you to organize your music even more. To the right of the last tab you will see two small arrows. Use these to navigate through the sub-groups or use the shortcut keys. Shortcuts and controller maps are included at the end of this guide. To create/delete/rename a subgroup, use the “Edit Recordcase Button” or right mouse click on the subgroup tabs.
7. Find: To find a song in your Recordcase, click this button. You can perform a search using a BPM Range (example 120 – 135), Artist, Trackname, Version or Comment. You can do wildcard searching by using the asterisk (*) (example: ma* or *donna).
wl: WL is your waitlist button. Clicking this button will change your Recordcase to the waitlist Recordcase. The waitlist can perform many more functions then just adding songs to be played. To enter and exit the waitlist mode, just click the “wl” button. You can add songs to the waitlist by right mouse clicking a song and selecting the option from the sub menu. There are also shortcut keys and controller buttons on the DMC–1 controller, which we will give you at the end of this guide. Ripp: The Ripp button will bring you into the Ripp mode when you click on it. When in this mode, you will be able to Ripp (take a track from a CD or Line-in recording and place it into the computer’s hard drive in a file format called WAV) a song from a

15
CD or line-in recording. Then the computer will encode the WAV file and turn it into an mp3 file.
Note: If your computer is connected to the Internet, you can use the “db” (database) button in the Ripp mode to automatically input the names of your songs from a CD.
8. Edit: The edit button will allow you to enter track information on a song that is selected in your Recordcase.
wl+: The wl+ button will allow you to add songs to your waitlist. You must be in the Recordcase to add a song to the waitlist using this button. wl-: The wl- button is to remove a song from your waitlist. You must be in the waitlist to remove a song using this button. ^: The “^” button allows you to scroll up in the Recordcase. Note: You can use the up arrow key on your keyboard to scroll up in the Recordcase also. v: The “v” button allows you to scroll down in your Recordcase. Note: You can use the down arrow key on the keyboard to scroll down in the Recordcase also.
9. Auto Play: The Auto Play button works in the play mode and will automatically load players “A” and “B” and plays the songs in the Recordcase or waitlist in the exact order of the list.
Auto Shuffle: The Auto Shuffle (shfl) button will play the songs in your Recordcase or waitlist in random order. Auto Pilot: Auto Pilot was designed with the intention of giving the DJ a little time to find a certain song or to go off and do a quick task while having everything still running smoothly. The Auto Pilot will play the songs in both players and will automatically load the next song that you have listed in your waitlist. If no song is in the waitlist, then the Auto Pilot will only play the songs that are loaded in the Players.
Note: Once a song has been played in the Auto Play or Auto Shuffle mode, the same song will not be played again in that run. The Auto Pilot button will automatically load and play the songs in your waitlist in the order they are listed.
10. Message Bar: The function of this status bar is designed to supply you with information about the players and the Recordcase.
16
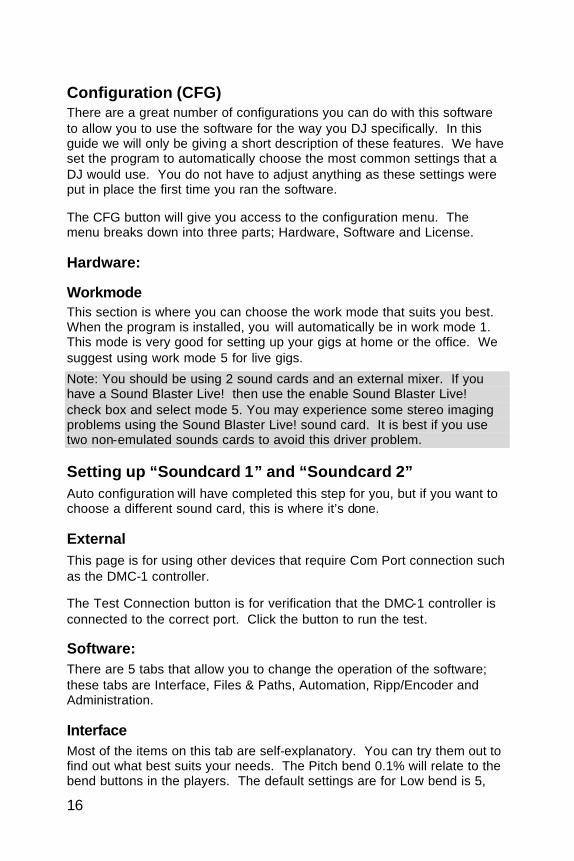
Configuration (CFG)
There are a great number of configurations you can do with this software to allow you to use the software for the way you DJ specifically. In this guide we will only be giving a short description of these features. We have set the program to automatically choose the most common settings that a DJ would use. You do not have to adjust anything as these settings were put in place the first time you ran the software.
The CFG button will give you access to the configuration menu. The menu breaks down into three parts; Hardware, Software and License. Hardware:
Workmode
This section is where you can choose the work mode that suits you best. When the program is installed, you will automatically be in work mode 1. This mode is very good for setting up your gigs at home or the office. We suggest using work mode 5 for live gigs.
Note: You should be using 2 sound cards and an external mixer. If you have a Sound Blaster Live! then use the enable Sound Blaster Live! check box and select mode 5. You may experience some stereo imaging problems using the Sound Blaster Live! sound card. It is best if you use two non-emulated sounds cards to avoid this driver problem. Setting up “Soundcard 1” and “Soundcard 2”
Auto configuration will have completed this step for you, but if you want to choose a different sound card, this is where it’s done. External
This page is for using other devices that require Com Port connection such as the DMC-1 controller. The Test Connection button is for verification that the DMC-1 controller is connected to the correct port. Click the button to run the test. Software:
There are 5 tabs that allow you to change the operation of the software; these tabs are Interface, Files & Paths, Automation, Ripp/Encoder and Administration. Interface
Most of the items on this tab are self-explanatory. You can try them out to find out what best suits your needs. The Pitch bend 0.1% will relate to the bend buttons in the players. The default settings are for Low bend is 5,

17
which equals .5%. The Normal bend is 15, which is 1.5% bend. The High bend is 30, which is 3% bend. You can adjust these to suit your needs. Realize that every 10 would equal 1%. The highest number you can input is 99, which would be 9.9% bend.
Pitch Step buttons are the small buttons located next to the Pitch Control Sliders on each player. They permit you to move the pitch control slider in very small increments. The pitch step setting in the configuration allows you to set the degree of movement of each click of the small step buttons. The higher the number in the pitch step text box, the greater the movement up or down of the pitch control slide with each of the small step buttons. It is designed to allow greater precision of the movement of the Pitch Control Slide.
Pitch Span allows you to control the range or percentage of change in the BPM of a song when using the Pitch Control Slide. The lowest option is 4% and the highest is 52%. It is defaulted at 24%. The left box controls the pitch span for Player A and the right box is for Player B. You can adjust these spans on the fly, which is covered later in this guide. Key mapping allows you to change what shortcuts you wish to use. There are key mappings for the original setup, for use with a Hot F Keys controller or External controller like the DMC-1 and with using a keyboard only. If you are using a DMC-1 controller, then use the External Controller / Alternative setting. We recommend that you use the PC Keyboard shortcuts when you do not have a DMC-1 controller. Files & Path
The “track link” path is used to store data about your mp3 files. If your mp3 files are marked “Read only” by your computer, then PCDJ will make link files and store them to your data directory located in the PCDJ program. The Group folder is used to store data about your Recordcase such as your groups and subgroups. It is not recommended that you change this data or path as it may have an adverse affect on your program. The file name type is used when encoding files; this will save the name of the file either with artist and then title (example: Madonna-HeymrDJ.mp3) or reverse, title and then artist (example: HeymrDJ-Madonna.mp3). You can change the separation character to whatever suits your needs. Automation
The Internet CD info settings should not be altered. These allow you to connect to the CDDB database online. If you are using a firewall or proxy server, you may be required to add some information such as your proxy server and password. You should contact your system administrator to help you with these settings.

18
The Auto Play, Auto Shuffle and Auto Pilot mix on end seconds is a setting that predetermines when a song will auto mix. A negative number would represent a mix that would have the second song start playing before the first song has finished playing. We suggest that you use –4 or –6 for the auto shuffle mode and +1 for auto pilot mode. Auto Cue on stop allows you to skip the silence or low volume introductions of songs. It allows you to cut out the intro portion while restricting any loss of the beat in your existing mix. This way, there is no silence or gap in music from one song to another. Auto Cue silent level allows you to set how much of an Auto Cue you want. The range is from 0 to 300 with 25 being the default. The number is represented in the 10th of a percent. Example: 25=2.5% and 300=30%. The higher you make the number, the more you will filter out. Ripp / Encoder
This tab allows you to adjust the encoding rate of the music. An mp3 recorded at 192kb Constant Bit Rate is very near to CD quality. If you need to conserve space on your hard drive, then choose a lower number.
If you need higher quality and space is not a concern then choose a higher number. We use the Fraunhofer (the company that created and developed the mp3 technology) encoding and decoding. The most practical setting is 192kb CBR; this will give you great sounding music and will be somewhat conservative in space requirements. Whatever rate you choose will be your default encoding rate.
Speed allows you to change the speed in which your CD-ROM reads the CD. If you are having trouble encoding files, try making this number less. The default is 30. The Buffers setting allows you to use your hard drive to cache for your CD-ROM. Try increasing this number if you have trouble encoding. The default is 25.
Readmode allows you to choose how much information the CD-ROM unit reads at one time. The default is set to “normal”.
The setup program automatically chooses the Interface setting. You should not adjust this setting. Encoding quality lets you pick the quality level of how the PCDJ will encode your music. The default is set to “Fast Encode”. If you change it to “Quality Encode”, it will take longer to encode your music files, but they will have a slightly better sound.
Jitter Correction helps the CD-ROM unit read information more efficiently in a way that greatly improves the normal jitter that comes from conventional CD-ROM unit readers. This feature should be left on.

19
CD Recording Ripping is one of the most important features of the PCDJ program. It is very important that you understand how and what this function does for you. You also need to understand what ripping is as opposed to encoding. Ripping is taking a song from a CD or other Line-in inputs and copying it to the hard drive of the computer. It will save the file as a WAV file. Encoding is when you use a program to compress the WAV file in a smaller file like mp3. To use the ripping and encoding function in PCDJ, put a CD in the CD drive and then click the Ripp button. You can then click the DB button to access the online CDDB database. You will need an Internet connection to use the CDDB. Then click either the WAV or mp3 button to either Ripp or encode the file. If you choose the mp3 button, you will then be asked where you want to store the file on your hard drive. Then the file will be ripped, and then encoded. Line-in Recording
To record with line-in, you will need an audio (or audio/video) cable to run from your source to your soundcard.
The specifications of the adapter are: one 1/8” male mini-stereo plug, which splits into two female RCA jacks. (Stereo female jacks will not work.) You can find these cables at electronic or computer stores. Phonographs (or turntables) do not output a strong enough signal by themselves and should never be directly connected to the computer for ripping/ encoding. They require some form of amplification to boost the phono signals.
You can also use a mixer instead of an amplifier. If you have a mixer that you use for your performances, it would be ideal for amplifying your phonograph. There will be more than enough power to produce a clean (quiet) signal. To do a line-in recording, click the “RIPP” button and then click the “Line” button. You will notice a track information window; you will need to fill in the track data. Choose the mode you want, mono or stereo. Then choose your format, WAV or mp3. If you use mp3, then choose the bit rate (192kb recommended). Then choose your Max length. This is the length of time you wish to record. If you are not sure of the time limit, then set the time to zero. This will be an unlimited time and you will be required to stop the player. The software will automatically trim the front and back of the music, so do not worry about dead air time as it will be cut off.
Click the set filename and choose a name for your recording. Click save. You can now play your record or cassette to begin your recording.
20
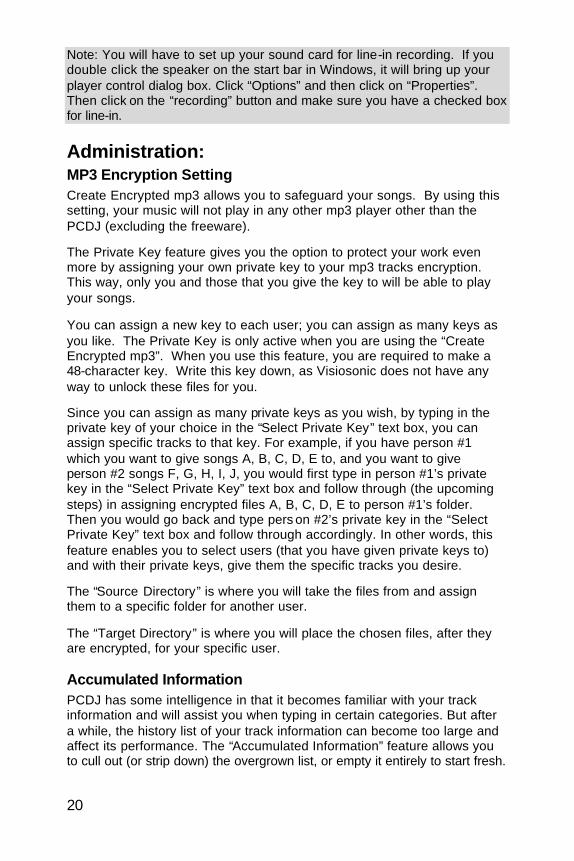
Note: You will have to set up your sound card for line-in recording. If you double click the speaker on the start bar in Windows, it will bring up your player control dialog box. Click “Options” and then click on “Properties”. Then click on the “recording” button and make sure you have a checked box for line-in. Administration:
MP3 Encryption Setting
Create Encrypted mp3 allows you to safeguard your songs. By using this setting, your music will not play in any other mp3 player other than the PCDJ (excluding the freeware).
The Private Key feature gives you the option to protect your work even more by assigning your own private key to your mp3 tracks encryption. This way, only you and those that you give the key to will be able to play your songs. You can assign a new key to each user; you can assign as many keys as you like. The Private Key is only active when you are using the “Create Encrypted mp3”. When you use this feature, you are required to make a 48-character key. Write this key down, as Visiosonic does not have any way to unlock these files for you.
Since you can assign as many private keys as you wish, by typing in the private key of your choice in the “Select Private Key” text box, you can assign specific tracks to that key. For example, if you have person #1 which you want to give songs A, B, C, D, E to, and you want to give person #2 songs F, G, H, I, J, you would first type in person #1’s private key in the “Select Private Key” text box and follow through (the upcoming steps) in assigning encrypted files A, B, C, D, E to person #1’s folder. Then you would go back and type pers on #2’s private key in the “Select Private Key” text box and follow through accordingly. In other words, this feature enables you to select users (that you have given private keys to) and with their private keys, give them the specific tracks you desire.
The “Source Directory” is where you will take the files from and assign them to a specific folder for another user.
The “Target Directory” is where you will place the chosen files, after they are encrypted, for your specific user. Accumulated Information
PCDJ has some intelligence in that it becomes familiar with your track information and will assist you when typing in certain categories. But after a while, the history list of your track information can become too large and affect its performance. The “Accumulated Information” feature allows you to cull out (or strip down) the overgrown list, or empty it entirely to start fresh.

21
Simply click on the down arrow at the right of the text box. Your list will appear in the expanded table. You can click on the name(s) you would like to discard and then click on the “Clear Field History” button, one-by-one. If you would like to clear the complete list, just click on “All” in the expanded table and then click on the “Clear Field History” button.
Note: If you let this list get too long, it can cause the PCDJ program to load very slowly. It is recommended that you clear this list from time to time. Licensing the Program
Licensing works two ways with this program. If you have the DMC-1 controller, simply connect the controller before starting the program and the controller will act as a license key, no license code is necessary. The other method is to use the license code that came with the program. (If you purchased the DMC-1 Controller package, then a license code may not have come with the program). To register the license, simply open the PCDJ program, click CFG and then click the License button. Now type in your 20-digit license code and click the register license button.
Note: The license code that you have will always unlock the program. Please write it down in a secure location, such as the front of the manual, so you will always have access to your program. If you have a problem with your license, please contact support via email at [email protected] or call 727-799-3828.

22
Track Information
There are three ways you can access track information. (1) By clicking on a song in the Recordcase and then right mouse clicking to bring up the sub menu and then clicking Track Information. (2) Click the Edit button. These two ways will give you a simple version of the track info. (3) The third way, which brings you to the advanced mode of track information, is by loading a song into either player and then clicking the “INFO” button. You will get a screen that looks like the graphic below:
In this menu, you will be able to manually add the BPM or the gain of a song. You can also find the BPM of a song manually using the BMP counter on the right side. Simply click the green button on the mini player to start the song. You can use the Red Stop Button or the Forward / Reverse buttons to move to any spot in the song.
Using your “Enter” key on the numeric keypad of your keyboard, tap the beat of the song for 10 beats and you will have calculated the BPM. As you tap the beat, you will hear a “cow bell” sound. You will want to align the “cow bell” sound with the beat of the song. Sometimes you may not get it right on the first try. You can use the “+” or “-“ keys to bend the “cow bell” sound to the beat. You can also use the up or down arrow keys to adjust the BPM. The volume lever is used to lower the sound of the “cow The red square is used to hold the “cowbell”. When released, the “cow
The lock check box is used so that your track information is not accidentally changed or erased. It will also stop anyone from deleting or adding Cue Points to a song. When the lock is in place, you will not be able to advance or reverse through a song when playing it. You will have to unlock the track before you can perform any of these functions.
Note: You can only enter INFO mode on any player one at a time. You will not be able to display the INFO mode on both players at the same time because it is assumed one player will always be in use.

23
Cue Information
The CUE INFORMATION window is for viewing and adjusting your cues graphically. This is where you can also name each of the ten Cue Points that the PCDJ allows you to set. To get to the CUE INFORMATION window from the Player window, first click on the INFO button at the top of the Player, and then click on the CUES button.
To navigate to the other Cue Points, click on the gray Forward or Reverse buttons. The display will show two Cue Points at a time. In each field you can label the Cue Point and the label will show up in your display on the players. If you need to fine-tune the Cue Point, you can adjust the number to the right of the label. This number represents the sample rate of the song. Changing this number makes very, very small changes to the Cue Point. The Graph shows a graphical view of your Cue Point. You can increase the scale from zero to nine in a vertical view or change the view from 128 down to 8 for a horizontal view. You can click on the green Play button to hear the Cue Point. To exit the Cue Information dialog, click the Cues button and then the INFO button. Automatic Gain Control To avoid songs having a louder or softer sound, you can apply a gain control to the files. You should note that the actual mp3 file is not modified; only a notation is made to add or remove gain from a song. To adjust the file automatically, load your songs into the waitlist and click on the Gain Radio button. To analyze the songs just click the Start button. You will know what the gain of the file will be when it is loaded into a player. Look just above the VU Meters on the players and you will see a positive or negative number. This will be the gain applied to the song. If you wish to edit it manually, click the “INFO” button and change the value to whatever you desire. The gain is in 10th of DB. Example: 23=2.3db.

24
DMC-1™ (Digital Media Controller) (optional accessory)
The purpose of the DMC-1 is to give the professional DJ real-world touch control to manipulate the PCDJ.
Connecting the DMC-1
Connect the controller to your computer using the supplied wires. Depending on which serial port you connect the DMC-1 to will determine which COM serial port (COM1, COM2, etc.) you will need to choose in the “Port” text box in configuration.
The DMC-1 Controls
The following list is a compilation of the controls of the DMC-1. Note: The controls on the left side of the DMC-1 are for Player “A” of the PCDJ and the equivalent controls on the right side are for Player ”B”.
1. Inner Jog Wheel: When the Player is not playing a track, the inner wheel of the Jog Wheel will scroll up and down the track list in the Recordcase when you spin it clockwise and counter-clockwise.
When the Player is playing a track, you can temporarily bend the pitch of a song by turning the Inner Jog Wheel clockwise (pitch up) or counter-clockwise (pitch down) when a song is playing in the Player.
2. Outer Jog Wheel: When the Player is not playing a track, when you turn the outer wheel of the Jog Wheel all the way to the left or right, it will scroll through your Subgroups at the bottom of the Recordcase.
When the Player is playing a track, turning the Outer Jog Wheel will cause the play position to swiftly track (or move) through the song. (This is also known as “Seeking”.)
3. Load: This is the Load button. Pressing it in the Stop mode will load the selected track from the Recordcase of the PCDJ. This button is also used, in combination with other buttons, to execute

25
more functions as well.
4. Waitlist: Clicking the Waitlist button will open the Waitlist mode. When in this mode, any tracks that have been placed in the Waitlist will then be shown in the Recordcase. This button is also used, in combination with other buttons, to execute other functions.
To load tracks into the Waitlist with the DMC-1, follow the steps below.
STEP 1. Select a track on the Recordcase (a highlight will show over the chosen track).
STEP 2. Hold down the Shift button and press the Load button.
STEP 3. Repeat steps 1 & 2 until you have built your desired playlist.
5. Shift: The Shift button works like a typical Shift key on a computer keyboard by allowing control (or button) combinations to execute more tasks. For example, holding down the Shift button and pressing the Cue button (Shift + Cue) will cause the Player that is playing a song to slow down to a complete stop (an effect that sounds like a turntable being turned off).
6. Cue Memory: When the Player is not playing, these buttons scroll up or down the Cue Point Indicator (in PCDJ) to choose one of the cue memory positions for storing or playing Cue Points.
7. Group: This is the Group button. Holding it down and pressing the (+) and (–) buttons will scroll up and down the Groups list.
8. Preview: The Preview button plays the highlighted track (from the Recordcase) in the Groupcase Player of the PCDJ. This allows you to pre-listen to a track without having to load it into a Player.
The Preview button also acts as a typical "Shift” key on a computer keyboard, allowing more functions to work by combining itself with another control (or button).
9. Match: The Match button will match the BPM (Beats Per Minute) of a song in one of the Dual Players with the song that is in the other Player.
To further explain this: If the BPM of the track loaded in Player “A” is 128 and the BPM of the track loaded in Player “B” is 137, pressing the Match button of Player “A” would change the BPM of Player “A’s” track to 137. This, of course, would be reversed if
Match button were pressed: Player “B’s” track’s BPM would change to 128 to match Player “A’s” BPM.
10. Pitch Control Slide: This slide allows you to control the Pitch Control Slide of the PCDJ by hand.

26
11. Cue: Clicking the Cue button will stop the Player from playing a track. If there is a Cue Point chosen, the Player will set its playing point back to this cue position instead of returning to the beginning of the song. In this “cued” mode, the red LED light above the Cue button will light up.
(Shift + Cue): Holding down the Shift button and pressing Cue will cause the Player to reset to the beginning of the song when the Player is not playing.
12. Play: The Play button will start the corresponding Player (A or B) when depressed, if the Player has a track loaded in it. The green LED light above the button will light up. If you press the Play button once more, the Player will go into a Pause mode and the green LED light will begin to blink. Pressing the button once again will cause the Player to resume playing from where it left off when it was paused.
Stutter (Stop/Cue + Play) - To create a stutter effect, hold down the Stop/Cue button and tap the Play button as fast or slow as you would like. Stutter and Continue Playing
If you want the song to continue playing after you stutter, hold down the Play button (while still holding down the Stop/Cue button), take your finger off the Stop/Cue button, and then remove your finger from the Play button.
13. Pitch Bend: These two (– and +) buttons will bend the pitch of the song being played in one player. This will speed it up or slow it down to synchronize it with the song in the other player for as long as the button(s) is held down.
14. Display Window: The green window that shows the status of many of the DMC-1’s features.
Time Elapsed / Remaining Toggle
To change the running time dialog in the DMC-1’s Display Window, hold down the Load button and press the Waitlist button. “BPM to Pitch” Toggle
To switch the number in the DMC-1’s Display Window from the Pitch gauge to the BPM (Beats Per Minute) gauge, hold down the Match button and press Shift. Pressing it again will toggle it back to Pitch, etc.
27
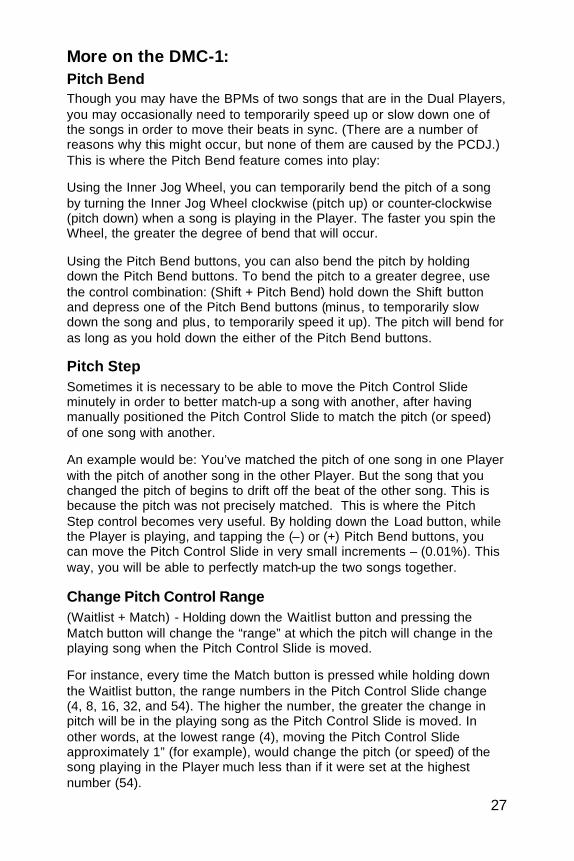
More on the DMC-1:
Pitch Bend
Though you may have the BPMs of two songs that are in the Dual Players, you may occasionally need to temporarily speed up or slow down one of the songs in order to move their beats in sync. (There are a number of reasons why this might occur, but none of them are caused by the PCDJ.) This is where the Pitch Bend feature comes into play: Using the Inner Jog Wheel, you can temporarily bend the pitch of a song by turning the Inner Jog Wheel clockwise (pitch up) or counter-clockwise (pitch down) when a song is playing in the Player. The faster you spin the Wheel, the greater the degree of bend that will occur. Using the Pitch Bend buttons, you can also bend the pitch by holding down the Pitch Bend buttons. To bend the pitch to a greater degree, use the control combination: (Shift + Pitch Bend) hold down the Shift button and depress one of the Pitch Bend buttons (minus, to temporarily slow down the song and plus, to temporarily speed it up). The pitch will bend for as long as you hold down the either of the Pitch Bend buttons. Pitch Step
Sometimes it is necessary to be able to move the Pitch Control Slide minutely in order to better match-up a song with another, after having manually positioned the Pitch Control Slide to match the pitch (or speed) of one song with another.
An example would be: You’ve matched the pitch of one song in one Player with the pitch of another song in the other Player. But the song that you changed the pitch of begins to drift off the beat of the other song. This is because the pitch was not precisely matched. This is where the Pitch Step control becomes very useful. By holding down the Load button, while the Player is playing, and tapping the (–) or (+) Pitch Bend buttons, you can move the Pitch Control Slide in very small increments – (0.01%). This way, you will be able to perfectly match-up the two songs together. Change Pitch Control Range
(Waitlist + Match) - Holding down the Waitlist button and pressing the Match button will change the “range” at which the pitch will change in the playing song when the Pitch Control Slide is moved. For instance, every time the Match button is pressed while holding down the Waitlist button, the range numbers in the Pitch Control Slide change (4, 8, 16, 32, and 54). The higher the number, the greater the change in pitch will be in the playing song as the Pitch Control Slide is moved. In other words, at the lowest range (4), moving the Pitch Control Slide approximately 1” (for example), would change the pitch (or speed) of the song playing in the Player much less than if it were set at the highest number (54).

28
Cueing Pressing Shift + Play will bring you into the Edit mode of the software. When in the Edit mode, you are able to search through a song with sound. For instance, if you want to find a place to set a Cue Point, you can seek forward or backwards with sound (you are able to hear the song skipping forward or backwards like it sounds with a CD player). Choosing a Position on the Cue Point Indicator
Simply press the left or right Cue Memory buttons to scroll up or down the Cue Point Indicator to choose one of the 10 cue memory positions for storing or playing Cue Points. Set Cue Points with the Jog Wheel
STEP 1. Begin by selecting an available cue memory position. STEP 2. Play your track by pressing the Play button.
STEP 3. Press the Shift + Play button at the point where you would like to make a cue point. This will begin a repeating pause and you will be in an edit mode.
STEP 4. Turn the Inner Jog Wheel clockwise to seek forward or counter-clockwise to seek backwards and the Repeating Pause mode is activated so you can hear exactly where your cue position is in the song.
You can also use the Outer Jog Wheel to seek as well. The further you turn it, the faster it will seek through the song.
To fine-tune the cue’s position, hold down the Shift button and turn the Inner Jog Wheel. Holding the Shift button makes the linear movement of the seek function move in very small increments. This allows you to be precise with the positioning of the Cue Point.
STEP 5. Click the Cue/Stop button. You now have saved your cue point. Mixing Tracks
Your ability to mix songs with seamless precision with the PCDJ is simple. Follow the steps below to learn how to use the DMC-1 in mixing, beat matching and more.

29
Instant Beat Matching
Note: The BPM must be set in both of the tracks that are loaded into the Players in order to be able to use this function.
STEP 1. Load both Players with tracks.
STEP 2. If you want the BPM of the track in Player “A” to match the BMP of the track in Player “B”, press the Match button on the left side of the controller. The LED light to the right of the Match button will illuminate to show that the track in that Player has been Beat Matched. You could instead, match the BMP of the track in Player “B” to that of Player “A” by pressing the Match button on the right side of the controller.
At this point, the Reference Player (the one that did not change its BPM) becomes the Master Player. In other words, it takes over the Pitch Control of both Players. When you move the Pitch Control Slide on the controller of the Master Player, you will see both Slides move in Players “A” and “B”. This allows you to manipulate the speed of the songs in unison.
FYI: Move the Pitch Control Slide on the controller of the subordinate player and you will see the white dot located to the right of the Slide’s handle on the PCDJ move. This dot simply shows you the position of the controller’s Pitch Control Slide’s.
The LED light that is illuminated shows that the Player it represents is the subordinate (or slave) Player. If you were to change out the track in the Master Player with a new track, the LED light of the subordinate Player would begin to blink. This means that that Player’s Pitch Control is now independent of the Master Player but is still set to the previous pitch setting made by the Master Player. To reset the subordinate Player’s Pitch Control, you only need to slide the Pitch Control Slide (of the subordinate Player) on the controller to meet the Pitch Control Slide of the PCDJ. The blinking LED light will turn off, and the white dot on the PCDJ will once again move with the Slide and the Control will be delegated back to the Player.
FYI: Another way to reset the Pitch Control back to the subordinate Player is by holding down the Shift button and pressing the Match button.
Note: Resetting the Pitch Control should only be done when the affected Player’s output is in the monitor/headphones because the Pitch of the song would jump as you reset it, causing it to drastically change the speed/pitch of the song.
The exception to this is to move the controller’s Pitch Control Slide very slowly to the position of the PCDJ’s Slide handle. This way, there would be no noticeable change in speed/pitch.
* * *

30
SHORTCUTS New Keyboard Shortcuts
( for “PC Keyboard Only” Set t ing)
PLAYER A KEY FUNCTION
F1 Cue Ctrl + F1 Stop Ctrl + Shift + F1 Delete Cue Point (when Cue is chosen) F2 Play/Pause Shift + F2 Stutter (when Player is playing) Ctrl + F2
Repeating Pause (when Player is playing and Cue Point chosen)
F3 Seek Reverse (normal speed) Shift + F3 Seek Reverse (slow speed) while Player is playing Ctrl + F3 Seek Reverse (fast speed) while Player is playing
F4 Seek Forward
Shift + F4 Seek Forward (slow speed) while Player is playing Ctrl + F4 Seek Forward (fast speed) while Player is playing 1 Cue Point Reverse 2 Cue Point Forward 3 Pitch control -.25% BPM Increments Shft + 3 Pitch control -.01% BPM Increments Ctr l + 3 Pitch control -.1% BPM Increments Ctrl + Shift + 3
Moves both Pitch control Slides Up simultaneously (BPMs required)
4 Pitch control +.25% BPM Increments Shift + 4 Pitch control +.01% BPM Increments Ctr l + 4 Pitch control +.1% BPM Increments Ctrl + Shift + 4
Moves both Pitch control Slides Down simultaneously (BPMs required)
3 Reset pitch to zero Ctrl + 5 Changes Pitch Span ratio Q Beat match to other Player W Bend control (low) E Bend control (low) Shift + W Bend control (normal) Shift + E Bend control (normal) Ctrl + W Bend control (high) Ctrl + E Bend control (high) Keypad 1 Load song to Player A ~ (Tilde) Auto Functions (Play, Shuffle, Pilot)
NOTE: All other key combinations are the same for the PC “Keyboard Only” setting as for the “Original” setting.

31
PLAYER B KEY FUNCTION
F5 Cue Ctrl + Shift + F5 Delete Cue Point (when Cue is chosen) F6 Play/Pause Shift + F6 Stutter (when Player is playing) Ctrl + F6
Repeating Pause (when Player is playing and Cue Point chosen
F7 Seek Reverse (normal speed) Shift + F7
Seek Reverse (slow speed) while Player is playing
Ctrl + F7 Seek Reverse (fast speed) while Player is playing F8 Seek Forward Shift + F8 Seek Forward (slow speed) while Player is playing Ctrl + F8 Seek Forward (fast speed) while Player is playing 6 Cue Point Reverse 7 Cue Point Forward 8 Pitch control -.25% BPM Increments Shift + 8 Pitch control -.01% BPM Increments Ctr l + 8 Pitch control -.1% BPM Increments Ctrl + Shift + 8
Moves both Pitch control Slides Up simultaneously (BPMs required)
9 Pitch control +.25% BPM Increments Shift + 9 Pitch control +.01% BPM Increments Ctr l + 9 Pitch control +.1% BPM Increments Ctrl + Shift + 9
Moves both Pitch control Slides Down simultaneously (BPMs required)
0 Reset pitch to zero Ctrl + 0 Changes Pitch Span ratio R Toggles between Play and Loop Modes Q Beat match to other Player W Bend control (low) E Bend control (low) Shift + U Bend control (normal) Shift + I Bend control (normal) Ctrl + U Bend control (high) Ctrl + I Bend control (high) Keypad 3 Load song to Player B ~ (Tilde) Auto Functions (Play, Shuffle, Pilot)
NOTE: All other key combinations are the same for the PC “Keyboard
Only” setting as for the “Original” setting.

32
MIXER KEY FUNCTION
S Decrease volume on Player A S + Shift Slow Decrease volume on Player A S + Ctrl Fast Decrease volume on Player A D Increase volume on Player A D + Shift Slow Increase volume on Player A D + Ctrl Fast Increase volume on Player A G Move fader to Player A Shi f t + G Small step fade to left Ct r l + G Slams fader to full right position H Reset fader to center position J Move fader to Player B Shi f t + J Small step fade to right Ct r l + J Slams fader to full left position L Decrease volume on Player B ; (Semi Colon) Increase volume on Player B Z Decrease Monitor volume X Increase Monitor volume C Increase Monitor balance to left channel V Reset Monitor balance to center B Increase Monitor balance to right channel N Increase Main balance to left channel M Reset Main balance to center , (Comma) Increase Main balance to right channel . (Pe r iod ) Decrease Main volume / (S lash) Increase Main volume A Turn on Cue for Player A ‘ (Quote) Turn on cue for Player B
BPM COUNTER KEY FUNCTION
* (Numeric Keypad Asterisk) Forward search on mini player - (Numer ic Keypad Minus) Stop mini player + (Numer ic Keypad P lus) Start mini player / (Numer ic Keypad S lash) Reverse search on mini player En te r
Trigger for Metronome (10 beats to activate)
8 (Numer ic Keypad) Increase BPM 2 (Numer ic Keypad) Decrease BPM 4 (Numer ic Keypad) Decrease bend 1.25% 6 (Numer ic Keypad) Increase bend 1.25% 5 (Numer ic Keypad) Hold Metronome ** **release button to reactivate
metronome

33
WAITLIST AND TRACK INFORMATION KEY FUNCTION
Insert Add song to Waitlist De le te Remove song from Waitlist ** Ctr l + Home Bring up Track Information **You must be in the waitlist to remove a song
OTHER FUNCTIONS KEY FUNCTION
Up Arrow Move up one track in Recordcase Down Arrow Move down one track in Recordcase Lef t Ar row Move left one subgroup Right Ar row Move right one subgroup Ctr l + Up Arrow Move up one main group Ctr l + Down Arrow Move down one main group Ctr l + Lef t Arrow
Move left one menu item (find, ripp, WL+ etc)
Ct r l + Right Arrow
Move right one menu item (find, ripp, WL+ etc)
Shi f t + Lef t Ar row Change sort order to next left column Shi f t + Right Arrow Change sort order to next right column Shi f t + Delete Removes link Ctr l+ Shi f t + Delete Deletes file Shift + Home Shows file location Ctr l+ Home Shows track information ~ (Ti lde) Autoplay / Auto pilot / Shuffle toggle

34
DMC – 1 Shortcuts BUTTON FUNCTION
Wait l is t + Load Toggles Elapsed / Remain time Shi f t + Bend Increases degree of bend Sh i f t + Match Locks the Pitch back to the slider Shi f t + Load Adds selected track to the Waitlist Shi f t + Jogwheel
Scrolls faster between the tracks in the Recordcase when selecting tracks (This is only if the player is stopped)
Shi f t + Cue
When stopped, it goes to the beginning of the track
Shif t + Play
When playing and a cue is stored, it goes back to that cue and repeats for edit
Wai t l i s t + Match Pitch Span Waitlist + Bend (+)
When playing (in Player mode) increases pitch by .25%
Waitlist + Bend (–)
When playing (in Player mode) decreases pitch by .25%
Load + Pitch Bend While playing, adjusts pitch (small steps) Waitlist + Pitch Bend Steps 0.25 % pitch when playing Hold down both Waitlist Buttons for 5 seconds
Closes PCDJ program
Original Keyboard Shortcuts
PLAYER A KEY FUNCTION
F1 Cue / Stop F2 Play / Pause F3 Seek Reverse F4 Seek Forward 1 Cue Point Reverse 2 Cue Point Forward 3 Pitch control -.25% BPM Increments 3 + Shift Pitch control -.01% BPM Increments 3 + Ctrl Pitch control – 1% BPM Increments 3 + Shift + Ctrl Pitch lock Decrease (BPM match required) 4 Pitch control +.25% BPM Increments 4 + Shift Pitch control +.01% BPM Increments 4 + Ctrl Pitch control +1% BPM Increments 4 + Shift + Ctrl Pitch lock Increase (BPM match required) 5 Reset pitch to Zero Q Beat match to other Player W Bend control (low) E Bend control (low) Shift + W Bend control (normal)

35
Shift + E Bend control (normal) Ctrl + W Bend control (high) Ctrl + E Bend control (high) Keypad 1 Load song to Player A
PLAYER B KEY FUNCTION
F5 Cue / Stop F6 Play / Pause F7 Seek Reverse F8 Seek Forward 6 Cue Point Reverse 7 Cue Point Forward 8 Pitch control -.25% BPM Increments 8 + Shift Pitch control -.01% BPM Increments 8 + Ctrl Pitch control -1% BPM Increments 8 + Shift + Ctrl Pitch lock Decrease (BPM match required) 9 Pitch control +.25% BPM Increments 9 + Shift Pitch control +.01% BPM Increments 9 + Ctrl Pitch control +1% BPM Increments 9 + Shift + Ctrl Pitch lock Increase (BPM match required) 0 Reset pitch to zero Y Beat match to player U Bend control (low) I Bend control (low) Shift + U Bend control (normal) Shift + I Bend control (normal) Ctrl + U Bend control (high) Ctrl + I Bend control (high) Keypad 3 Load song to Player B

36
FEATURES LIST BLUE RED
PCDJ PCDJ Sync Automix ü Looping ü BPM Calc / Automatic BPM Detection ü BPM Stepping ü Normalization ü ü Brake Function ü Playlist Logging ü Ripping ü ü Recording ü ü Encrypted mp3 ü ü Beat Match ü ü Cue Points 10 20 Visual Cueing ü ü Info Mode ü ü Search ü ü Field History ü ü Auto Cue ü ü Shuffle ü ü Auto Play ü ü Auto Pilot ü ü Plug Ins ü ü Metronome BPM Counter ü ü External Controller Support ü ü Shell Mode ü Case Player ü ü Password Protected Recordcase ü Licensing ü ü