Embed Size (px)
Citation preview

FlashBack 5
User Guide
© Blueberry Software
FlashBack 5 User Guide
2
Contents
Introducing FlashBack ................................................................................. 6
System Requirements ................................................................................... 7
Software Requirements and Restrictions ................................................................... 7 Hardware Requirements .............................................................................................. 8
Licensing ........................................................................................................ 9
Support ......................................................................................................... 10
Contacting Support ..................................................................................................... 10 Troubleshooting FAQ ................................................................................................. 10 Reporting Problems .................................................................................................... 13 Checking for Updates to FlashBack .......................................................................... 13
Buying FlashBack ....................................................................................... 15
Buying a Licence ......................................................................................................... 15
Questions or Problems with licence keys .................................................................. 16 Resellers ....................................................................................................................... 17
Getting Started ............................................................................................ 18
FlashBack Basics ......................................................................................................... 18 Recording movies ........................................................................................................ 20
Playing back movies .................................................................................................... 21 Sharing and Exporting movies .................................................................................. 22
Using FlashBack .......................................................................................... 24
The Recorder ............................................................................................................... 24
Recorder Windows .................................................................................................. 24 The Recorder Main Window ............................................................................. 24 The Recorder Main Menu .................................................................................. 25 The movie file sub-menu .................................................................................... 25
The Recorder Options window .......................................................................... 26 Customising delays ............................................................................................. 27 Adding a Marker while recording ..................................................................... 28 Using Recorder when it is minimized ............................................................... 30
Recorder Features ................................................................................................... 31 About Recorder features .................................................................................... 31 Recording windows and regions ........................................................................ 32
Recording multi monitor systems ...................................................................... 33 Recording Webcam Video .................................................................................. 33 Record modes ...................................................................................................... 34
Recording Sound ..................................................................................................... 36 Troubleshooting Sound Recording .................................................................... 37
FlashBack 5 User Guide
3
Problems recording the Microphone ................................................................ 37
Problems recording PC Sounds ......................................................................... 38 Problems with Audio-Video synchronization ................................................... 40
Capturing Keystrokes ............................................................................................. 40 Limiting the movie file size ..................................................................................... 42 Defining and using hotkeys .................................................................................... 43 Troubleshooting video recording........................................................................... 43 Scheduled Recording .............................................................................................. 45
Record-time Notes ................................................................................................... 46 Windows display options ........................................................................................ 47
The Player .................................................................................................................... 48 The Player window ................................................................................................. 48 The Timeline and Frame bar ................................................................................. 50
Webcam / Picture-in-Picture Video ...................................................................... 53 The Central Toolbar ............................................................................................... 55
The Classic Toolbar ................................................................................................ 57
The File Toolbar .................................................................................................. 57 The Edit toolbar .................................................................................................. 57 The Effects toolbar .............................................................................................. 58
The View toolbar ................................................................................................. 58 The Sound toolbar .............................................................................................. 59
The Objects Toolbar ........................................................................................... 61 The Player Main Menu ........................................................................................... 62
The File menu ...................................................................................................... 62
The Edit menu ..................................................................................................... 63 The Insert menu .................................................................................................. 65
The View menu .................................................................................................... 66 The Movie menu .................................................................................................. 68
The Sound menu ................................................................................................. 70 The Effects menu ................................................................................................ 71 The Tools menu ................................................................................................... 72
The Actions menu ............................................................................................... 73 The Help menu .................................................................................................... 75
Viewing key presses ................................................................................................ 76 Viewing key presses ............................................................................................ 76 The key logging window ..................................................................................... 76
The KeyBar ......................................................................................................... 78 Other Player features ............................................................................................. 80
The Player Options window ............................................................................... 80 Converting AVI files to FlashBack movies ....................................................... 81
Command-line options ....................................................................................... 82 Sharing Movies ............................................................................................................ 83
Sharing Movies with FlashBack Connect ............................................................. 83 Sharing Movies with FlashBack Connect ......................................................... 83 Managing Movies at flashbackconnect.com ..................................................... 85 FlashBack Connect - Things you should know ................................................ 89
FlashBack 5 User Guide
4
Sharing Movies with YouTube .............................................................................. 90
Uploading to FTP and FileCopy ............................................................................ 91 Creating upload profiles ......................................................................................... 92
Sharing screenshots ................................................................................................ 93 Exporting Movies ........................................................................................................ 94
About exporting movies .......................................................................................... 94 Comparison of Export formats .............................................................................. 97 Exporting to Flash ................................................................................................... 98
Exporting to Flash format .................................................................................. 98 Flash export options ............................................................................................ 99 Selecting between Flash Video (FLV) and Standard Flash (SWF) .............. 102 Adjusting the quality and file size of Flash exports ....................................... 103 Customising the Flash playback controls ....................................................... 105
How Flash exports use HTML files ................................................................. 105 Files generated by Flash exports ..................................................................... 106
Flash Player Version Compatibility ................................................................ 108
Displaying Flash Exports on a webpage ......................................................... 108 Flash Player Security Warnings ...................................................................... 112
Exporting to AVI ................................................................................................... 113
Exporting to AVI format .................................................................................. 113 About AVI codecs ............................................................................................. 114
Exporting to QuickTime ....................................................................................... 115 Exporting to QuickTime (H264) ...................................................................... 115 Displaying a QuickTime movie in a web page ............................................... 117
Exporting to Windows Media Video (WMV) ..................................................... 117 Exporting to MPEG4 ............................................................................................ 119
Exporting to GIF ................................................................................................... 120 Exporting to standalone EXE .............................................................................. 121
Exporting to MS Powerpoint ............................................................................... 122 Sound export options ............................................................................................ 123 Batch Exporting .................................................................................................... 123
Editing Movies ........................................................................................................... 124 Working with Frames ........................................................................................... 124
About frames ..................................................................................................... 124 Selecting frames ................................................................................................ 125 Inserting and deleting frames .......................................................................... 127
Merging Frames ................................................................................................ 128 Cropping frames ............................................................................................... 128
Frame rates ........................................................................................................ 129 Removing Inactive Sections ................................................................................. 129
Annotating Movies .................................................................................................... 130 Adding Text boxes ................................................................................................. 130 The Text Box properties window ......................................................................... 132 Adding Images ....................................................................................................... 133 Adding Highlights ................................................................................................. 135 Adding Buttons ...................................................................................................... 137
FlashBack 5 User Guide
5
Adding Arrows ...................................................................................................... 138
Adding a Watermark ............................................................................................ 140 Adding a Blur Effect ............................................................................................. 140
Inserting Video Files ............................................................................................. 140 Adding Pauses ....................................................................................................... 141 Displaying Invisible Keystrokes........................................................................... 142 Using Markers in movies ...................................................................................... 143 Reusing objects with the Gallery ......................................................................... 144
Using the Gallery .............................................................................................. 144 Adding Effects to Movies .......................................................................................... 145
Zoom-Pan Effects .................................................................................................. 145 About Zoom-Pan Effects .................................................................................. 145
Cropping and Autoscrolling ................................................................................. 148
About cropping ................................................................................................. 148 Transitions ............................................................................................................. 149
Start and End Titles .............................................................................................. 150
Magnifier effects .................................................................................................... 151 The Mouse Cursor .................................................................................................... 152
Highlighting the mouse cursor ............................................................................. 152
Smoothing mouse movements .............................................................................. 152 Hiding the mouse cursor ...................................................................................... 153
Mouse action animations ...................................................................................... 153 Putting the mouse in front or behind other objects ........................................... 156 Re-recording the mouse cursor ............................................................................ 156
Working with Sound ................................................................................................. 158 Adding and Recording Sound into a Movie ....................................................... 158
The Sound Options Window ................................................................................ 160 Sound Synchronisation Problems ........................................................................ 161
Changing the Volume of a Track or Clip ........................................................... 162 Removing Noise ..................................................................................................... 162 Fading Sounds In or Out ...................................................................................... 163
Volume Level Processing ...................................................................................... 163 Editing Sound ........................................................................................................ 164
Sound Editing Basics ........................................................................................ 164 Merging and Splitting Clips and Tracks ........................................................ 167 Sound Editing Operations ................................................................................ 169
More About Selecting Sound and Frames ...................................................... 171 Using FlashBack from the Command Line ............................................................ 172
Using FlashBack from the Command Line ........................................................ 172 Password Protecting Movies .................................................................................... 174
Password Protecting Movies ................................................................................ 174 Localization Features ................................................................................................ 175
Localizing FlashBack Movies ............................................................................... 175

FlashBack 5 User Guide
6
Introducing FlashBack
FlashBack is a screen recorder - it makes movies of what you see on your PC screen.
Easy Recording
With only a few clicks of the mouse FlashBack can record everything that happens on
your Windows desktop.
It can also record PC sounds or a commentary if you have a microphone connected.
If you have a webcam connected to your PC, FlashBack can record from that as well, to
give you 'picture in picture' movies.
For more details see FlashBack basics
Powerful Editing Features (Pro and Plus editions only)
FlashBack comes with a powerful editor application that you can use to add annotations
and sound to your movies.
For more details see About editing movies
Easy Sharing
FlashBack makes it easy to share your movies with FlashBack Connect and YouTube.
For more details see Sharing Movies
Publish to Popular Formats
Movies can be exported to Flash, QuickTime (H264), Windows Media Video (WMV),
MPEG4, AVI, GIF, MS Powerpoint or standalone EXE format, so that they can be
viewed by virtually anyone with a PC or Internet Browser.
For more details see About Exporting Movies.
FlashBack 5 User Guide
7
System Requirements
Software Requirements and Restrictions
FlashBack runs on Windows XP and newer. 32 and 64 bit versions supported.
The capture driver (not required for recording, but may give better performance on older
PCs) is certified for 32 and 64 bit versions of XP and Vista. It has been tested but not
certified on Windows 2000, 2003, 7 and 8.
Windows 2000
Users need to apply a hotfix to Windows before FlashBack will run. Go to
http://support.microsoft.com/kb/816542 and click 'View and Request Hotfix Downloads'
near the top of the page to request the hotfix from Microsoft.
Known Issue with Windows 8
When recording Windows 8, on a touch device, touches are not recorded and highlighted
in the movie like mouse clicks.
Terminal Sessions
FlashBack can record in a terminal session, but Capture Driver record mode cannot be
used.
Export to Windows Media Video (WMV)
Windows Media Player 9 or newer needs to be installed in order to export to WMV
format.
Export to QuickTime
QuickTime 7 or newer needs to be installed in order to export to QuickTime format.
FlashBack 5 User Guide
8
Export to MS Powerpoint
MS Office 2000 or newer (including PowerPoint) must be installed in order to export to
PowerPoint format.
Hardware Requirements
Processor speed: 500Mhz minimum, 1Ghz recommended
Memory: 256Mb RAM minimum, 512Mb RAM recommended but when opening
FBR files of 1Gb or more we recommend a minimum of 2Gb RAM
Display: Super VGA (800x600) or higher resolution
Graphics card: 8Mb video memory required, 64Mb and above recommended
FlashBack 5 User Guide
9
Licensing
You can find the end user licence agreement (EULA) for FlashBack in the Licence.rtf file
in the folder FlashBack was installed into.
You can use movies created by FlashBack for all purposes personal or commercial, with
no royalties payable to Blueberry Software.
FlashBack 5 User Guide
10
Support
Contacting Support
First, see if your question is answered by these pages in the Help file:
Troubleshooting FAQ
Troubleshooting Sound Recording
Sound Synchronisation Problems
Troubleshooting Video Recording
To contact Blueberry support:
1. In the Player or Recorder menus go to Help -> Support -> Support for FlashBack
2. Use the contact details shown.
Troubleshooting FAQ
When I start recording I see a message about switching to a basic color scheme
or
I cannot record Windows 7/Vista 'Aero' mode
You are using "Capture driver" record mode which is not compatible with 'Aero' graphics
in Windows Vista or 7.
Open FlashBack Recorder and go to Tools -> Options -> Record Mode. Select GDI or
MPEG record mode.
My system runs extremely slowly when recording.
Try changing the record mode or reducing the frame rate, on the Record Mode tab in the
Recorder Options window or the Record Mode step of the record wizard.
In particular, you may see problems if you use MPEG mode on a non-multi core CPU
(e.g. Intel Pentium 4, Celeron, Atom) or to record a large desktop (larger than 280x1024).
FlashBack 5 User Guide
11
I'm trying to record a DVD or video clip, but it fails or the results are poor.
Take a look at the page Troubleshooting video recording.
What affects the file size of my final movie file?
The file size of your FBR movie file is determined more by the content of your movie,
rather than it's duration in time. A long movie showing only a static desktop is likely to
be much smaller in size than a short movie containing numerous graphics and photos.
Material which will boost movie size considerably includes photos, custom Windows
wallpaper, website images, animations, scrolling windows and Windows graphics effects.
In FlashBack you can switch off graphical wallpaper and Windows graphics effects
automatically while recording. These options can be found in the Recorder Options
dialog, Graphics tab.
A soundtrack will also raise the final size of your movie. To reduce the size added by a
soundtrack you should enable the "MP3 Compression" in the sound recording options
(Recorder Options --> Sound tab) and import MP3 rather than WAV files when adding
sounds in the Player application.
File sizes vary considerably when exporting to another (non-FBR) format. Flash format is
often smaller than AVI, although the codec selected when exporting to AVI is a major
factor in determining the file size.
I cannot hear any sound when replaying my movie.
The first thing is to test whether sound is working in general on your computer. Try
playing a sound file - if you can't hear the music file play, then your system probably
hasn't got sound correctly configured.
If you are using your PC microphone to try and record sound, a good test is to run the
Plus Windows' Sound Recorder program to try and record and replay a test. If you cannot
hear the test, it is likely that your PC is not correctly configured to use the microphone as
a sound recording source. You may need to change the sound source or increase its
volume. Do this via the Edit ' Audio Properties menu item in the Windows Sound
Recorder. Select the correct sound device for sound recording and ensure that its volume
is adjusted ok by recording and playing back a voice recording.
By default you can find the Windows' Sound Recorder program under Start menu -->
Programs --> Accessories --> Entertainment.
If you know that sound is correctly installed on your computer, please go to FlashBack
Recorder --> Options --> Sound tab and check that the "enable sound recording" option is
switched on (if switched off no sound will be captured when recording a movie).

FlashBack 5 User Guide
12
Take a look at the help topic Recording Sound - this will give instructions on how to
record from a microphone or PC speaker sounds.
My licence key is not accepted by the program.
Please note that trial keys are case sensitive and include spaces.
For more help with licence key related problems, see Problems with licence keys?
My FBR movie file will not open in the Player.
If the file is corrupted there is no automatic way of recovering the file and the best option
is to restore from your most recent backup.
I've exported my movie to an AVI file. This plays fine on my PC but not in other
computers.
When you export to AVI, FlashBack prompts you to select a codec from a list of all the
codecs installed on your machine. The selected codec needs to be installed on the playing
computer in order to view your AVI movie.
You should either advise the viewer to either use a movie player like VCL
(www.videolan.org) that has built-in understanding of many codecs or install the relevant
codec. Or you export using another codec or to a different format.
When I export to any format, I get a 'created by' image in the top right corner. Will
this appear when I buy a licence?
No - the 'created by' image only appears in exports made by an unlicensed copy of
FlashBack.
I've exported my movie to Flash but the SWF file appears distorted or low quality.
When exporting to Flash format FlashBack creates both a HTML and a SWF file, both of
which are required to view your movie. You should open the HTML file in order to see
your movie at the correct size and quality.
FlashBack 5 User Guide
13
I record with sound, but when I play back the movie, the sound and video become
more and more out of sync.
This problem can occur with certain sound hardware. Go to the Advanced tab of the
Recorder Options window, and check the Use extra sound synchronisation box.
Reporting Problems
FlashBack enables you to report problems in its execution back to Blueberry. It will
automatically create a log of recent runs, gather information about your PC configuration
and make it easy to add screenshots to the report.
How to report a problem to Blueberry:
1. Reproduce the problem Restart FlashBack (Player or Recorder) and reproduce the problem.
2. Start the report Go to 'Report Problem to Blueberry'.
This is in the Help -> Support menu in Player, and the Support menu in Recorder.
3. Send the report Fill in the description (and the email address if you want us to get back to you)
and click Send.
You can attach screenshots or files to the report by clicking the Change
Attachments button on the Fault Report window.
Checking for Updates to FlashBack
FlashBack can check to see if a newer version of the application is available. If it finds a
newer version than the one you are running, it will give you the option of downloading
and installing it.
The checking and download requires an Internet connection - if none is active and your
Internet settings use dial-up connections, you will be prompted to dial your default
connection.
How to check for updates to FlashBack:
1. Select Check for updates on the Player Help menu or the Recorder main menu.
FlashBack 5 User Guide
14
2. Follow the instructions on the Automatic update wizard to check for a newer
version, and if there is one, download and install it.
Automatic check for updates
FlashBack can also check for updates in the background, while you are working. If it
finds one, it will ask you whether you want to download and install it now.
How to turn on or off automatic update checking in Player or Recorder:
1. Select the Tools -> Options menu item.
2. Go to the Updates and Privacy tab
3. Check or uncheck the Automatically check for updates setting.
FlashBack 5 User Guide
15
Buying FlashBack
Buying a Licence
To continue to use all the features of FlashBack Pro or Plus editions beyond the 30 day
evaluation period, you must upgrade your trial key or purchase a full licence key.
Note: FlashBack Express can be used free forever.
How to upgrade from trial to fully licensed
You can do this in one of two places:
1. When starting FlashBack
You'll see a window showing how many days you have left in your trial. Click the
'Buy Licence' button.
2. When FlashBack is running
Go to Help -> Buying FlashBack -> Buy FlashBack
Either of these options will take you to the online store where you can upgrade your trial
licence to a full one.
When the upgrade is completed, you won't need to enter a new licence key into
FlashBack. Just restart the application to use the new licence.
How to buy a full licence
Go to www.flashbackrecorder.com and select the option Purchase -> Online Store.
When buying a new licence, you'll need to enter it into FlashBack to use it - see the
section on entering a licence into FlashBack.
How to enter a licence into FlashBack
On starting FlashBack you will see a window showing how many days remain in the trial.
Click 'Enter full licence key', and copy - paste the key into the small window that appears
next. You can perform this from Recorder or Player.
FlashBack 5 User Guide
16
Questions or Problems with licence keys
I downloaded the trial, but my licence key did not arrive
When you enter your email address on the download page, it is essential you provide a
valid address - we will send the trial licence key to it. Please note that despite our best
efforts to prevent it, our mails may be caught by spam filters. Be sure to check your spam
folder.
If you still can't find the licence key email, contact us at [email protected] and
we'll help.
I've lost the email containing my licence. Can I see it online?
Yes. If you purchased FlashBack directly from Blueberry (not from a reseller), you can
view your licences online. Login at http://www.flashbackrecorder.com/help then select
the 'Your Profile' link, then "Licences".
Does the licence allow me to use movies I produce with FlashBack for commercial
purposes?
Yes. You own all the movies you create with FlashBack and can use them for any
purpose. No royalties or any other fee is payable to Blueberry Software for these movies.
I'm having problems entering the key into FlashBack
To enter the licence key in FlashBack, start either the Player or Recorder program and
select the 'Manage Licences' item from the Help menu. Then click the 'Add Licence'
button. Enter the Licence Key as it appears in the email from Blueberry, or on our web
site, and click OK.
Other help with key related problems
If you are still having difficulty receiving or entering your licence key, please email
[email protected] or contact your reseller with details of the problem.

FlashBack 5 User Guide
17
Resellers
We have registered resellers in countries across the globe.
If you prefer to use a reseller rather than buying from Blueberry direct, go to our online
resellers list
FlashBack 5 User Guide
18
Getting Started
FlashBack Basics
There are two separate applications in FlashBack: the Recorder and the Player.
The Recorder
Records your desktop
It records what happens on your Windows desktop and saves this as a FlashBack
movie file.
To learn more, see Recording movies.
Records Sound
It also records sound - either the PC sounds, or a commentary if you have a
microphone connected. If you're running Windows Vista, you can record a
commentary and PC sounds at the same time.
To learn more, see Recording sound.
Records Webcam video
If you have a webcam connected, FlashBack can record from that as well, to show
it picture-in-picture in the final movie.
To learn more, see Recording webcam video.
The Player
Plays back movies
It lets you play back, edit and add things to FlashBack movies, and save them as
movie files that can be played by all PC users.
To learn more, see Playing back movies.
Annotates movies with text and images (Pro and Plus editions)
You can add textboxes, images, highlights or buttons to movies.
To learn more, see Adding text boxes, Adding images, Adding highlights and
Adding buttons
Edits movies (Pro edition only)
You can edit video frames and audio side-by-side to remove mistakes with the
editing functions.
To learn more, see About editing movies
FlashBack 5 User Guide
19
Adds effects (Pro and Plus editions)
You can add 'zoom and pan' effects and crop regions to have the movie focus in
on an area of the screen.
See About Zoom-Pan effects and About Cropping
Shares movies
You can share the movie using FlashBack Connect, YouTube or other services.
See Sharing movies
Exports to other file formats
Export to all the major video formats. See About exporting movies.
To get started
1. You can record a movie using FlashBack Recorder. See Recording Movies
2. Once you have recorded a movie you can view and edit it using FlashBack Player.
See Playing back movies
3. When you want to share the movie, use the Share or Export functions in
FlashBack Player. See Sharing movies and About exporting movies.
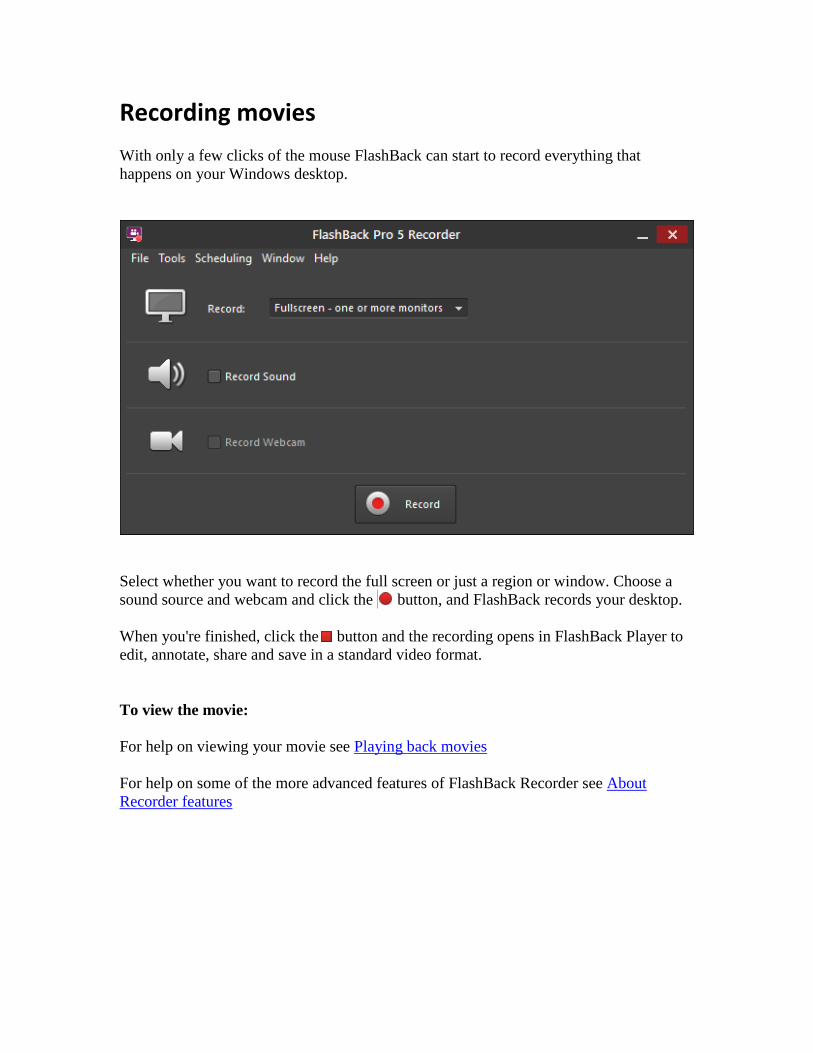
Recording movies
With only a few clicks of the mouse FlashBack can start to record everything that
happens on your Windows desktop.
Select whether you want to record the full screen or just a region or window. Choose a
sound source and webcam and click the button, and FlashBack records your desktop.
When you're finished, click the button and the recording opens in FlashBack Player to
edit, annotate, share and save in a standard video format.
To view the movie:
For help on viewing your movie see Playing back movies
For help on some of the more advanced features of FlashBack Recorder see About
Recorder features

Playing back movies
Open FlashBack Player from the shortcuts on your desktop or Windows Start menu and
play back movies by using the Open item on the File menu or the button on the
toolbar.
From The Welcome Window
Starting either Recorder or Player shows the Welcome window:
Click one of the file names under 'Open a recording' to play a recording.
Playing a movie from Recorder:
On the File menu of the Recorder main window, use the Open or Open Recent
items to open a recording.
When Recorder is minimized to a tray icon or floating controls, show the main
menu (by clicking the icon or clicking the button on the floating controls). Use
the Play item or the recently recorded movies list at the top of the menu.
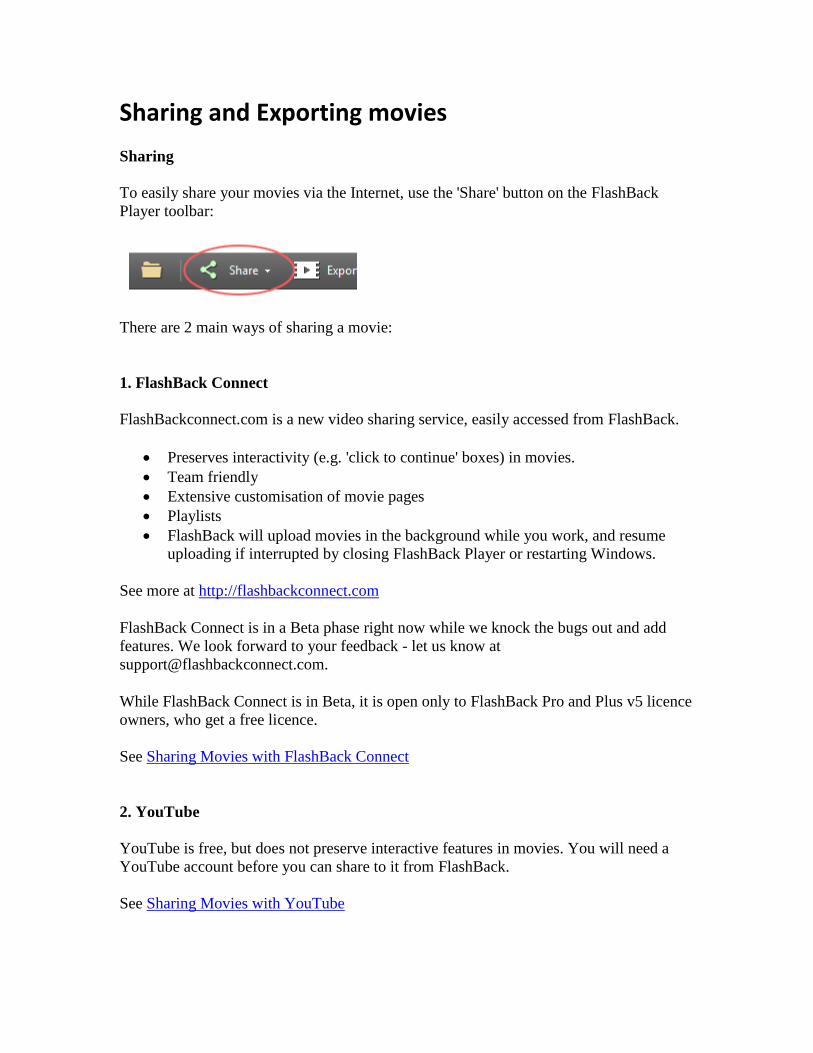
Sharing and Exporting movies Sharing
To easily share your movies via the Internet, use the 'Share' button on the FlashBack
Player toolbar:
There are 2 main ways of sharing a movie:
1. FlashBack Connect
FlashBackconnect.com is a new video sharing service, easily accessed from FlashBack.
Preserves interactivity (e.g. 'click to continue' boxes) in movies.
Team friendly
Extensive customisation of movie pages
Playlists
FlashBack will upload movies in the background while you work, and resume
uploading if interrupted by closing FlashBack Player or restarting Windows.
See more at http://flashbackconnect.com
FlashBack Connect is in a Beta phase right now while we knock the bugs out and add
features. We look forward to your feedback - let us know at
While FlashBack Connect is in Beta, it is open only to FlashBack Pro and Plus v5 licence
owners, who get a free licence.
See Sharing Movies with FlashBack Connect
2. YouTube
YouTube is free, but does not preserve interactive features in movies. You will need a
YouTube account before you can share to it from FlashBack.
See Sharing Movies with YouTube

FlashBack 5 User Guide
23
FlashBack also supports upload to FTP servers, local file servers, the online learning
management system coggno.com and the video hosting services blip.tv and viddler.com.
Exporting Movies
FlashBack can export your movie to the most commonly used video formats, and also
save it as a standalone EXE.
See About exporting movies for more help.
FlashBack 5 User Guide
24
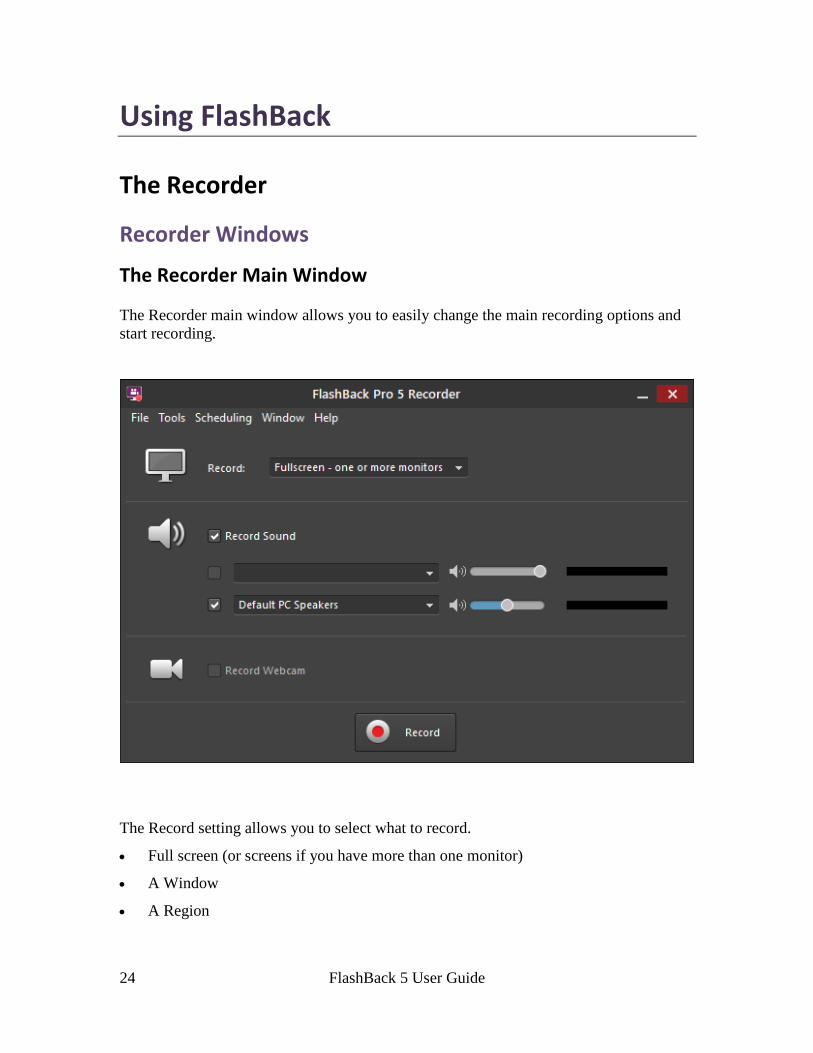
Using FlashBack
The Recorder
Recorder Windows
The Recorder Main Window
The Recorder main window allows you to easily change the main recording options and
start recording.
The Record setting allows you to select what to record.
Full screen (or screens if you have more than one monitor)
A Window
A Region
FlashBack 5 User Guide
25
Turn on the 'Record Sound' setting to record sound. You'll need to select a source, usually
either PC Speakers or the Microphone, and you can set the recording levels. See
Recording Sound for more Help.
Turn on the 'Record Webcam' setting to record from attached webcams. See Recording
Webcam Video.
The Recorder Main Menu
When Recorder is minimized to the icon tray you can show the main menu, by clicking
the tray icon or the 'down arrow' button at the right of the floating toolbar.
The menu items from top to bottom:
Show FlashBack Recorder: un-minimizes the Recorder to show its main
window
Record: Starts recording immediately, using the current settings.
Pause: (only enabled while recording) Pauses recording.
Stop: (only enabled while recording) Stops recording.
Add Marker: (only enabled while recording) Allows the user to add a marker
while recording. Recording is paused and a window is displayed where you
can enter a marker name.
Restart Recording: Starts recording again. Everything recorded up to that
point is discarded.
Help: Shows the help file you are currently viewing.
Minimize to tray: displays the Recorder as an icon in the system tray when
minimized.
Minimize to floating controls: displays Recorder as a floating toolbar when
minimized.
About: Displays the About box. This shows the program version number,
licence key and enables registration and purchasing.
Exit: Closes the Recorder application.
The movie file sub-menu
Each item in the recently recorded movie list has a sub-menu:
The menu items from top to bottom:
Open: Opens the movie in FlashBack Player and automatically plays the selected
movie file.
Attach to new bug report: This option is only visible if you have installed BB
BugReporter. Selecting this option starts up the Bug Reporter application,
creates a new bug report and attaches the selected movie file.
FlashBack 5 User Guide
26
Play Flash: Select this option to play the Flash movie that was previously
exported from this movie file. If there has been no Flash export from the
selected movie, this option will not be displayed.
Export To Flash: Select this option to export to a Flash movie file. For more help
see Exporting to Flash.
Export to AVI: Select this option to export to an AVI movie. For more help see
Exporting to AVI.
Export to WMV: Select this option to export to a WMV movie. For more help
see Exporting to WMV.
Export to Standalone EXE: Select this option to export to standalone EXE
format. For more help see Exporting to EXE.
Export to Powerpoint: Selecting this option to export to a Powerpoint file. For
more help see Exporting to MS Powerpoint.
Send by email: Opens a new message in your default email client and attaches
the movie in the selected format. There are 3 formats to choose from: native
FlashBack FBR file, Macromedia Flash and AVI.
Re-record: Starts to record a new movie with the same name as the selected
movie file. The selected movie file is overwritten and replaced with the new
recording.
Remove from menu: Choose this option to remove the selected movie file from
the recently recorded movies list.
Save As : Choose this option to save the movie to another file name.
Delete: Choose this option to delete the selected movie file and remove it from
the recently recorded movies list.
Explore: Choose this option to open the folder containing the selected movie file
in Windows Explorer.
Copy file path to clipboard: copies the full path and name of the movie file as
text into the clipboard.
The Recorder Options window
Use this window to adjust recording settings, such as display options, sound, webcam and
other more advanced options.
These settings will be used the next time you select Quick Record or Record. The Record
Wizard will take these settings as its defaults.
More settings are available on the Recorder Options window than in the Record Wizard.
To show the Recorder Options window:
1. On the Recorder main window select Options from the Tools menu
The recorder options window has these tabs:
FlashBack 5 User Guide
27
Sound: Use this tab to select when sound will be recorded, and the format and
compression that will be used.
Webcam: select whether to record video from an attached webcam, and the
device and format used. For more help see Recording Webcam Video.
Record mode: Use this tab to change your recording mode or the number of
frames captured per second. For more help see Recording modes and
Performance.
Display: Use this to set the Windows display settings during recording and
how FlashBack windows appear during recording and in the final movie. For
more help see: Windows display options.
Keystrokes: options relating to capturing of keystrokes are set on this tab. For
more help see: capturing keystrokes.
Hotkey: Select this to define a hotkey that can be used to make the recording
controls pop-up window appear during recording. For more help see: Defining
and using hotkeys.
Scheduling: use these settings to have FlashBack record at a set time or when
a certain application runs and closes. For more help see Scheduled Recording.
Updates / Privacy: FlashBack can connect to Blueberry servers to check for
updates and send anonymous usage statistics. You can turn these features on
and off from this tab.
File Size: Use this tab to select options to limit the size of the movie file
produced. For more help see: Limiting the movie file size.
Record-time notes: You can add notes while recording by moving the mouse
to one of the screen edges and typing. See Making notes while recording.
Misc: this tab contain settings relating to startup options and the various
delays that FlashBack inserts between certain operations at the start of
recording. For more help see: Customising delays.
Advanced: this tab contains advanced settings relating mainly to performance
Customising delays
There are two customisable delays that can be set on the FlashBack Recorder options
window.
1. The delay between clicking a button or menu item on FlashBack recorder to
record and the actual start of recording.
2. If you have selected to change the screen display mode during recording,
FlashBack can insert a delay between this change and the start of recording.
During both of these delays, a small ‘initialising’ window is shown.
FlashBack 5 User Guide
28
To change the customisable delays:
1. Open the Recorder Options window and then select the Misc. tab.
2. To set delay 1. above, change the value in the Delay before recording field.
3. To set delay 2. above, change the value in the Delay after changing screen
mode field.
Adding a Marker while recording
While recording is in progress, you can add a marker by using a popup window.
To make the pop-up window appear during recording:
1. Pause recording by selecting Pause from the Recorder main menu or using a
hotkey (if defined - see Defining and using hotkeys).
2. Select 'Add Marker' from the Recorder main menu. Enter a name into the
Marker field and click Add to add the marker at that point in the recording.
Then continue recording by clicking the Continue button.

FlashBack 5 User Guide
29
Using Recorder when it is minimized
FlashBack Recorder can be minimized to the icon tray or to floating controls:
In the icon tray Recorder appears as an icon in the system tray. Access its functions by clicking it
and selecting from its popup menu.
Floating above the desktop Recorder appears as a set of controls floating above the desktop. You can start to
record, or play a movie, by clicking its Record and Play buttons. You can access
the same menu as seen in Tray icon mode by clicking the 'down arrow' button.
The toolbar can be positioned anywhere on the Windows desktop. Position it by
clicking on the FlashBack logo on it left end and dragging.
Change how Recorder minimizes by selecting an option from the Tools menu.
FlashBack 5 User Guide
31
Recorder Features
About Recorder features
Recording sound
FlashBack can record a spoken commentary, via a microphone connected to your PC.
See Recording Sound.
Recording Webcam Video
If you have a webcam attached to your PC, FlashBack will record video from that at the
same time as you record the desktop, and play it back 'picture in picture' style.
See Recording Webcam Video.
Recording windows, regions or full screen
FlashBack can do all three.
See Recording windows and regions.
Recording multi-monitor systems
FlashBack can record from multiple monitors simultaneously into one movie.
See Recording multi-monitor systems.
Setting Windows display options while recording
To reduce the width and height of your movies, FlashBack can set a lower screen
resolution during recording.
Windows graphic effects such as animating or fade-in menus can result in larger file sizes
and slower playback on lower powered PC. These effects can be switched off during
recording.
See Windows display options.
FlashBack 5 User Guide
32
Continuous recording, and limiting the movie file size
FlashBack can record continuously and limit the size of the movie file produced.
See Limiting the movie file size
Recording modes
FlashBack has three different methods of recording screen changes. The best one to use
will depend on your version of Windows and your PC hardware.
See Recording modes and Performance
Setting hotkeys
FlashBack can respond to a hotkey during recording to display a pop-up controls window.
See Defining and using hotkeys.
Recording windows and regions
FlashBack can record either the entire Windows desktop or only a single window or
rectangular region. You choose whether to record the entire desktop or a region on the
Recorder main window.
How to record a single window:
1. Select Window in the Record setting on the Recorder main window.
2. When prompted, click the window you want to record - a red frame will appear
around it. Then click Record.
The recording will be restricted to the area of the selected window.
Note: if you move the selected window the recorded area will not move with it, unless
you turn on the 'Track window position while recording' setting on the Advanced tab of
the Options window.
If you resize the selected window during recording, the size of the movie does not change
from its initial dimensions.
FlashBack 5 User Guide
33
How to record a region:
1. Select Region in the Record setting on the Recorder main window.
2. When prompted, size and position the red frame, then click Record.
The recording will be restricted to the area inside the purple frame.
Note: the size and position of the recorder frame window cannot be changed during
recording.
Recording multi monitor systems
If you are running FlashBack on a multi-monitor system, it allows you to record from
multiple monitors into one movie.
Note: 'capture driver' record mode can only record from the primary monitor.
If you select to record 'One or more monitors' in the Record setting on the main
window, before recording starts you'll be prompted to select the monitors to be
recorded.
If you select to record a window or region, it can span multiple monitors. Areas
that fall outside of all monitors will be blacked out in the recording.
Recording Webcam Video
If you have a webcam attached to your PC, FlashBack lets you record video from it while
recording the screen. You can include the webcam video in your movies and exports.
For more help on viewing webcam video and including it in your exports, see Viewing
webcam video.
How to record video from a Webcam:
1. On the main Recorder window, turn on the 'Record WebCam' setting.
or
On the Recorder Options window, select the WebCam tab and turn on the
'Capture video from webcam' setting.
2. Select the device you want to capture video from.
3. Click the Settings button to change the size of the webcam video and set the
brightness, contrast etc.
FlashBack 5 User Guide
34
Note: You will not see the webcam video on your screen while recording - you will see it
later when playing back the movie in FlashBack Player.
Record modes
Set the record mode on the Record Mode tab of the Recorder Options window. FlashBack
has 3 recording modes.
GDI - this is a general purpose mode that works well on a variety of PCs and
situations, on all versions of Windows.
MPEG - this mode is best at recording moving video. However, lower powered
PCs will struggle to record large desktops at a high frame rate with this mode.
Capture driver - this gives high performance when recording 'normal' Windows
applications that don't contain animation or moving graphics. On older PCs in
particular it may give better performance than other modes. It cannot record
Vista/7 Aero mode.
'Auto' Mode
FlashBack also has an 'auto' mode that tries to pick the best mode for your PC and
situation. If it detects a media player application running, it will select mpeg mode if your
PC is capable of running it at a good frame rate. If no media player is detected, or your
PC isn't powerful enough to run mpeg mode, it selects GDI mode. If your PC isn't
powerful enough to use GDI mode, capture driver mode is selected.
For Vista and Windows 7 users
GDI and MPEG modes can record Vista / 7 'Aero' graphics mode.
Capture Driver mode will force Windows into 'basic' graphics mode during recording, but
may give better performance and smoother movies than GDI mode when recording
Windows 'basic' graphics.
Setting the frames per second
When using GDI or MPEG modes you can adjust the frames recorded per second.
A higher frames per second (FPS) value means the final movie should be smoother, but
may affect the performance of your PC while recording.
A lower FPS value means that your PC will perform better during recording, but
movements in the final movie will be less smooth.

FlashBack 5 User Guide
35
FlashBack will try to set a sensible default FPS value, but the ideal rate depends greatly
on what you are trying to record, so you may achieve better results by experimentation.
Troubleshooting poor performance
See Troubleshooting video recording for more help.
Recording Sound
While recording Windows desktop activity, FlashBack can also record sound via a
microphone attached to your PC. This soundtrack is saved into the movie file.
How to turn on sound recording:
You can check the 'Record sound' box on the Recorder main window, or on the
Sound tab of the Recorder Options window.
The recorder main window gives you access to the main settings, while the Sound tab of
the Recorder Options window enables access to more advanced settings.
FlashBack can record up to two different audio sources at the same time. They will be
added to separate tracks in the movie, so they can be edited separately (in Pro edition).
By default FlashBack will record the default microphone and PC speakers sources. You
can deselect either of these or select other sources by using the controls on the main
Recorder window.
Adjust the recording levels using the blue sliders.
Use the red-green recording level indicators to check that FlashBack is reading the audio
sources ok - you should see the levels change as you talk into the microphone, or play
back music.
Note: when changing the level of the "PC speakers" source, this changes the Windows
sound playback volume.
Windows XP users: recording the PC Speakers and Microphone simultaneously is only
possible if your sound card enables it, and many do not. You should:
Consult any documentation that came with the card
Look at settings in the driver software that installs with the card - this is usually in
the Windows Control Panel, or your desktop icon tray (bottom right of the
desktop by default).
Try selecting the 'Stereo Mix' source which may be listed as an 'Other source' on
the Options window or the main window.
FlashBack 5 User Guide
37
Sound Formats
You can select sound formats on the Options window but not the main window. Selecting
different sound formats will vary the quality of the recording and the amount of space it
occupies in the movie file.
You can select:
1. Sample rate
The higher, the rate the better the sound quality but the more file space the sound
track occupies.
2. Stereo / Mono.
Stereo will give better sound quality than mono, but also produce larger movie
files.
3. MP3 compression
This option should always be selected unless you are experiencing problems or
crashes during recording or export. Deselecting this option may greatly increase
the movie file size.
FlashBack uses a redistribution of the LAME MP3 codec: www.mp3dev.org .
Troubleshooting Sound Recording
We've tried to make it as easy as possible for you to record sound, either from an attached
microphone or the sounds made by the PC.
However, due to the widely varying audio capabilities of different PCs and sound cards,
some users may experience problems.
Problems recording the microphone
Problems recording PC sounds
Problems with audio-video synchronisation
Problems recording the Microphone
If you are having problems trying to record sound from a microphone:
1. Make sure you have a suitable microphone connected to the correct input of your
PC sound card.
FlashBack 5 User Guide
38
2. On the FlashBack sound settings window (go to Tools > Options > Sound tab),
select the 'microphone' radio button.
3. On the same window, set the 'Level' slider up as far as it will go. Now speak into
the microphone. The green and red 'Level' indicator on the right side of the
window should move.
If the level indicator moves, it shows FlashBack Recorder is detecting the sound.
If it does not move, no sound is being detected from your microphone sound
channel and you should follow the steps below to check that the microphone is
operating correctly.
4. Again on the same window, select the PC sounds option and click the Select
sounds to mix button. Make sure that the 'microphone' source is enabled and its
volume slider positioned at the right. Test again by speaking into the microphone
and seeing if the Level indicator moves with the sound volume.
5. Try and record the microphone using the Windows Sound Recorder.
1. Open the recorder from the Windows Start button -> Programs ->
Accessories -> Entertainment -> Sound Recorder.
2. Select the Audio Properties item on the Edit menu.
3. Click the Volume button for the Sound Recording device.
4. Ensure that the 'microphone' source is selected on the Recording Controls
window.
5. Back in the Sound Recorder, click the Record button and speak into the
microphone.
6. Click Stop and the << button, then replay. If you do not hear your
recording, your PC and Windows are not set correctly to allow recording
from the microphone. If you do hear your recording, now try and record
with FlashBack, using the microphone as the sound source.
6. Check that you are able to use the microphone in other applications like Skype
and MSN Messenger. If it works in these, it should work in FlashBack.
If you can use the microphone properly in other Windows applications and still can't
record sound from the microphone in FlashBack, click the TroubleShooting button on the
Recorder Options window Sound tab (FlashBack Recorder > Options > Sound tab). This
will let you send an email to Blueberry Technical Support team. Please give as much
information about the problem as possible, and indicate whether you have gone through
the hints above.
Problems recording PC Sounds
FlashBack 5 User Guide
39
We've tried to make it as easy as possible for you to record sound, either from an attached
microphone or the sounds made by the PC. However, due to the widely varying audio
capabilities of different PCs and sound cards, some users may experience problems.
Dell PC Owners: If you are having trouble recording PC sounds,
this is probably because it has been deliberately disabled on your PC.
This is to prevent copyright violation and is performed by a number
of manufacturers, in particular Dell.
The solution will probably be technical in nature, involving editing
the registry and/or installing new drivers, and may be specific to your
particular PC model.
We recommend searching for "dell --your pc model-- cannot record
sound" and seeing if a solution exists.
If you are having trouble recording the PC sounds:
1. Make sure 'PC Speakers' is the selected sound source On the main Recorder window, make sure the "Speakers" source is one of the
selected sources. The checkbox to the left of the source selector needs to be turn
'on' to record the source. The coloured 'level' indicator on the right should move
when sounds are played back through the PC speakers or headphones.
2. Try 'other sources' In some PCs, particularly on Windows XP, you may need to select a "stereo mix"
or "Wave" source to record the PC sounds. :
3. Update the drivers for your sound card Updating or reinstalling sound card drivers can enable PC sounds recording.
4. Search the internet Sometimes you'll need a fix specific to your PC. Use a search engine to search for
your make and model of laptop or (if you have a desktop PC) sound card, and
"cannot record pc speakers".
5. Some PCs require you to select the Stereo Mix source using a program that is
installed with the sound drivers - FlashBack cannot do it. You will find the sound
utility program in the Windows Control Panel, and it should have a name like
"SoundMax" or "SigmaTel Audio"
6. Still cannot record PC Sounds? Some PCs and laptops cannot record PC sounds by design - it is deliberately
disabled to prevent copyright violation.
FlashBack 5 User Guide
40
You may be able to enable it by making changes to the registry or installing a
different version of the sound card drivers. However, it is impossible to record PC
sounds on some PCs.
This page describes how to download alternative drivers that fix the problem on
Dell Latitude and Inspiron laptops:
http://www.ekhoury.com/2006/08/25/sigmatel-stereo-mix-support-for-dells/
This page describes a fix for Inspiron laptops, but it involves editing the registry.
Be warned: you could disable your sound card or worse if you make a mistake
when editing the registry.
http://forum.notebookreview.com/showthread.php?t=156400
Alternatively, search for your PC model and "cannot record pc speakers" - the
solution may be out there.
Problems with Audio-Video synchronization
Some PCs may encounter problems with audio-video synchronization. These problems
are usually due to high CPU usage during recording.
You may find that reducing the frame rate of the recording, or switching from MPEG to
GDI record mode reduces CPU usage and removes any audio sync issues highly
dependant on the particular sound hardware in your PC.
Capturing Keystrokes
FlashBack can capture keystrokes during recording and display them in the Player
application during playback. This can show the viewer actions performed by the user at
record-time (such as pressing of function keys) which would not be obviously apparent
by just viewing the movie.
Because this feature could inadvertently display the characters used in a password, by
default FlashBack can blank out these password characters with asterisks.
Note: FlashBack cannot 'asterisk-out' passwords entered into password fields in web
pages or in Remote Desktop sessions. The characters are saved into the keystroke log and
can be seen in the KeyLog viewer in FlashBack Player.
FlashBack 5 User Guide
41
How to switch on keystroke recording:
1. In the Recorder Options window, go to the Keystrokes tab
2. Check or uncheck the Capture Keystrokes box accordingly.
Use the Replace Password Characters checkbox to hide or show password characters
when keystrokes are captured.
For help on viewing keystrokes during playback, see Viewing key presses.
Limiting the movie file size
FlashBack can limit the size of the movie file created. By default no limit is set, but you
may wish to enable this option so that FlashBack can record continuously without
gradually filling up all available disk space.
There are 4 modes to select from:
1. Unlimited
FlashBack records normally with no limit on the size of the FBR file it will create.
2. Limit by time
Select this option to have FlashBack create movie files that only contain a set number of
minutes. For example: you select this option and set the maximum minutes recorded to 5,
and then record for 10 minutes. The final movie file will contain the most recent 5
minutes of recording.
To set the number of minutes that FlashBack will record in a single movie file:
1. Open the Recorder Options window and then select the File Size tab.
2. Select the Limit by time radio button.
3. Enter a value into the Limit To entry field. This is the number of minutes that
FlashBack will record into a single movie file.
3. Limit by size
Select this option to have FlashBack create movie files that never exceed a certain size.
For example: you select this option and set the maximum movie file size to 5Mb. The
final movie created will be approximately 5Mb in size or smaller (if you did not record
long enough to reach the limit).
To set the maximum size of a movie file:
Open the Recorder Options window and then select the File Size tab.
Select the Limit by size radio button.
Enter a value into the Limit To entry field. This is the maximum size of a
single movie file.
FlashBack 5 User Guide
43
4. Break the recording into fixed size files
Set this option to have FlashBack record into fixed size files. For example, if you set a
size of 100Mb and create 230Mb of recording, FlashBack will create three files, two
sized 100Mb (or slightly larger) and one 30Mb, named as myrecording1.fbr,
myrecording2.fbr, myrecording3.fbr.
Defining and using hotkeys
FlashBack Recorder will let you define a hotkey combination. This has two uses:
1. During recording, pressing the hotkey will cause the Recording pop-up window
to appear. From this window you can stop, pause or restart the recording.
2. While FlashBack Recorder is running in the system tray but not recording,
pressing the hotkey will cause the Recorder Options window to appear.
To define a hotkey:
1. Open the Recorder Options window and then select the Hotkeys tab.
2. Put the cursor in the Hotkey field and press the key combination that you want
to assign to the hotkey. The Hotkey field will display the combination.
3. Click OK. FlashBack Recorder will now respond to that hotkey.
Troubleshooting video recording
We've worked hard to ensure that FlashBack can record your screen at a good frame rate.
However, because of the widely varying capabilities of different PCs and video cards it is
possible that some users will be unable to make high quality recordings of certain
applications.
If you see poor quality / jerky motion when recording moving video
Ensure you are using MPEG mode, not GDI or capture driver mode.
Record just the movie player window, not the entire desktop.
Experiment with the FPS setting on the Record Mode step of the wizard. You may
actually get a smoother recording by decreasing the FPS because this reduces
CPU load.
On Windows Vista and 7, using a 'Basic' mode instead of 'Aero' can improve
performance.
FlashBack 5 User Guide
44
Recording media/movie player type applications results in a black rectangle in the
recording where the video should be
This is due to the movie player program using 'overlays' - a hardware video acceleration
feature that cannot be recorded.
You will need to force the program to not use overlays by either using a setting in
FlashBack or changing a setting in the movie player itself.
On Windows XP: On the Record Mode step of the Record wizard, click the More
Settings button. On the More Settings window, turn on the 'Disable hardware
acceleration' feature. Before recording starts, FlashBack will prompt you to click
a button and disable hardware acceleration.
Note: to record some media player applications, you will need to start them after
hardware acceleration is disabled, so that they don't try to use overlays. And to
record some movie players (e.g. KM Player) you will need to change their
settings manually so that they do not use overlays, because they do not detect
that use of overlays is disabled.
On Windows Vista or 7: to record the movie player you will need to find a
setting in that application that disables its use of hardware acceleration or
overlays. The name of the setting will vary from application to application.
Capture driver mode is disabled after installation
Sometimes the driver requires Windows to be rebooted before it is available for selection.
If Capture Driver mode is disabled on the Record Mode step or Options window, this
may be the reason.
If you see a message about ASUS software when installing FlashBack and running the
Recorder, FlashBack has detected software that is incompatible with the driver, and not
installed it. See this FAQ entry.
How to email Blueberry technical support:
If you are experiencing difficulties with recording modes and performance, you can email
our technical support team for help.
1. Open the Recorder Options window and select the Record modes tab.
2. Click the Troubleshooting button and select Send email to support.
FlashBack 5 User Guide
45
3. In the wizard, describe your problem as fully as you can. If you want a response
to your report, include your email address.
4. The wizard will send an email directly to our technical support team. Details of
your PC specification are attached, but this does NOT contain any personal
information - just a description of your PC hardware.
Scheduled Recording
FlashBack can start and stop recording at scheduled times. It can also start and stop
recording when a specified application starts and closes.
To start and stop recording at set times:
1. Select the 'Scheduled / Unattended Recording' item in the 'Scheduling' menu.
2. Turn on the 'Use scheduling for the next recording' setting.
3. Set the start time in the 'Start At Time' setting and the stop time in the 'Stop at
time' setting.
4. Exit the Options window and start Recording as normal. After clicking the Record
button you will see a message informing you that the next recording is scheduled.
The Recorder main window will remain open or minimize as usual, and recording
start at the set time.
After making a scheduled recording, the setting is turned off, so the next recording is
made as normal, without scheduling.
To start and stop recording when an application starts and closes:
1. Select the 'Scheduled / Unattended Recording' item in the 'Scheduling' menu.
2. Turn on the 'Use scheduling for the next recording' setting.
3. Turn on the 'If specific application appears' setting. This means FlashBack will
look for the specified application to appear and when it does, start recording. If
the application does not appear before the specified start time, FlashBack starts to
record at that time anyway.
You can specify the application to watch for either by giving some text that will
appear in its title bar, or its executable name (e.g. iexplore.exe for Internet
Explorer).
FlashBack 5 User Guide
46
4. If you turn on the 'Record only this application' setting, the recording has the
dimensions of the entire desktop, but everything except the application being
recorded is blacked out.
Record-time Notes
FlashBack allows you to type notes while recording, and display these Notes in textboxes
in the final movie.
How to turn on Record-time Notes:
1. In the Recorder Options window, go to the Record-time Notes tab and turn on the
'Enable Notes' setting.
2. The Notes settings:
You display the Note window by moving the cursor a side of the screen.
Set which side activates Notes with the 'Show Notes window when mouse
moved to' setting.
Recording can automatically pause while the Note window is displayed, so
its not shown in the movie.
Set this with the 'Pause recording when Notes window appears' setting.
You can save the Note either by moving the mouse cursor out of the Note
window or by clicking a 'Save' button on the window.
Set this with the 'Auto-save note when cursor leaves the window' setting.
Textboxes can be automatically created from your Notes when the
recording is opened in FlashBack Player.
Set this with the 'Auto-generate textboxes when the recording is opened'
setting.
Viewing Notes in FlashBack Player
If you turned on the 'Auto-generate textboxes' setting, you will see your notes as
textboxes in the movie. These are normal textboxes, so they can be edited and moved as
usual.
If 'Auto-generate textboxes' was set off, you can view Notes in a pane to the Left of the
movie. If left side pane has been hidden, you can display it again by going to View ->
Extras Pane -> KeyLog in the Player menus.
FlashBack 5 User Guide
47
Windows display options
FlashBack can change Windows display settings while recording. Changing the settings
may improve performance while recording and produce smaller files.
Improving Performance and Decreasing File Size
There are a number of graphic 'effects' that Windows uses to improve the appearance of
its user interface. Having these effects switched on can affect the performance of your PC
while recording a movie or playing it back. They will also result in a larger movie file.
FlashBack includes options to switch off these effects while recording. They are set back
to their former settings when recording stops.
These effects include:
The drop shadow under the mouse cursor.
Menu and tool tip ‘transition’ effects, like fade-in and expanding menus.
Gradient shading in window title bars.
Smooth scrolling in combo and list boxes.
The ‘slide-open’ effect in combo boxes.
There are also two other Windows settings that FlashBack can temporarily change while
recording to improve performance:
Desktop background bitmaps - FlashBack can set the desktop background to
a single colour.
Display of window contents while moving and resizing - FlashBack can set
Windows to only display the window border while moving and resizing.
To turn off Windows graphic ‘effects’ during recording:
1. On the Recorder main window, select Options from the Tools menu and go
to the Display tab.
or
If Recorder is minimized to a tray icon or floating controls, show the main
menu (click the tray icon, or click the button on the floating controls),
select Options and go to the Display tab.
2. Check the Switch off Windows graphic ‘Effects’ checkbox. FlashBack will
turn off graphic ‘effects’ when recording.
3. To set the background bitmap to a single colour or only show window
borders when resizing, check the relevant boxes.
FlashBack 5 User Guide
48
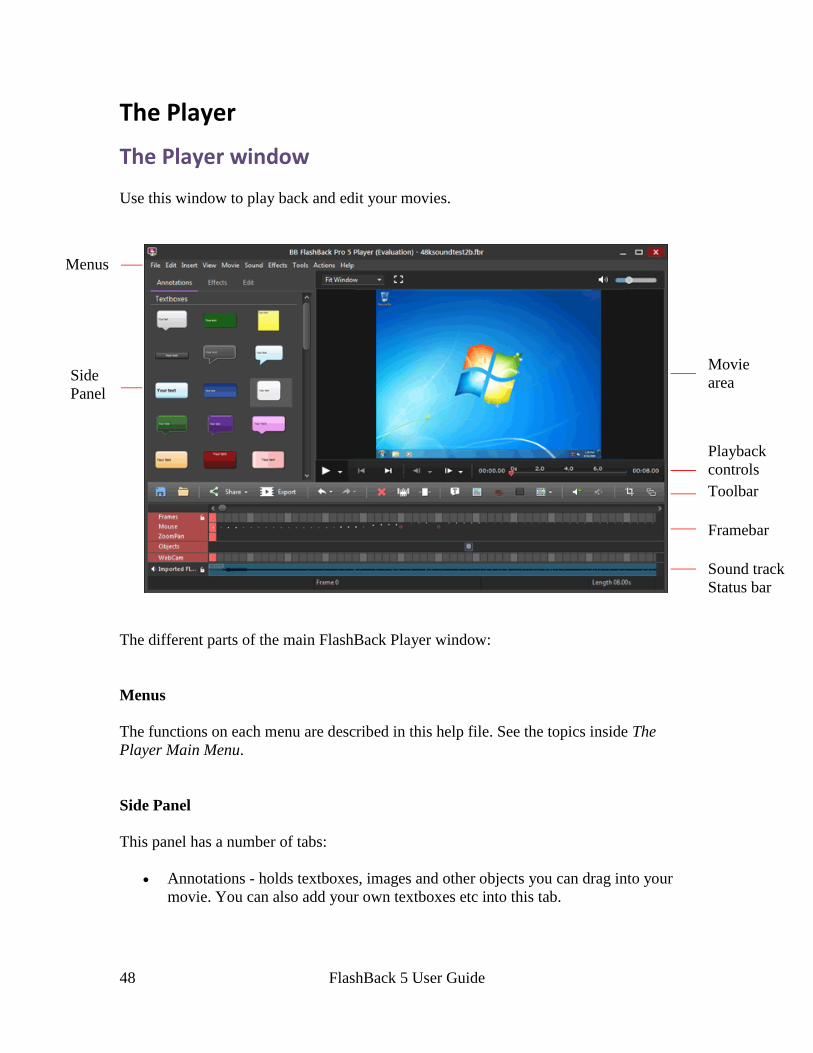
The Player
The Player window
Use this window to play back and edit your movies.
The different parts of the main FlashBack Player window:
Menus
The functions on each menu are described in this help file. See the topics inside The
Player Main Menu.
Side Panel
This panel has a number of tabs:
Annotations - holds textboxes, images and other objects you can drag into your
movie. You can also add your own textboxes etc into this tab.
Menus
Side
Panel
Movie
area
Playback
controls
Toolbar
Framebar
Sound track
Status bar

FlashBack 5 User Guide
49
Effects - commonly used effects functions, like adding Zoompan and Cropping
regions.
Edit - commonly used editing functions.
The Gallery also displays Notes and Key press information.
You can control which tabs are displayed and the visibility of the Side Panel via the View
-> Side Panel menu.
Movie area
The Movie area displays the movie as it is played.
Toolbar
Provides quick access to some of the most commonly used functions.
Framebar and objects
The Framebar shows each frame of the movie as a selectable rectangle. The selected
frame is drawn in red. Selecting a frame causes it to display in the Movie area.
Objects like textboxes and images that you've added to the movie are shown under the
Framebar.
Sound Tracks
If your movie contains sound, each sound track is shown as a bar under the Framebar.
There may be a number of sound tracks.
Status bar
This is divided into four sections.
The right-hand section shows the total length of the movie. The second-from-right section
shows the value of any keys pressed during the recording of the selected frame.
The other two sections display messages to inform a user of the status of FlashBack when
it is engaged in operations that may occupy a noticeable length of time.
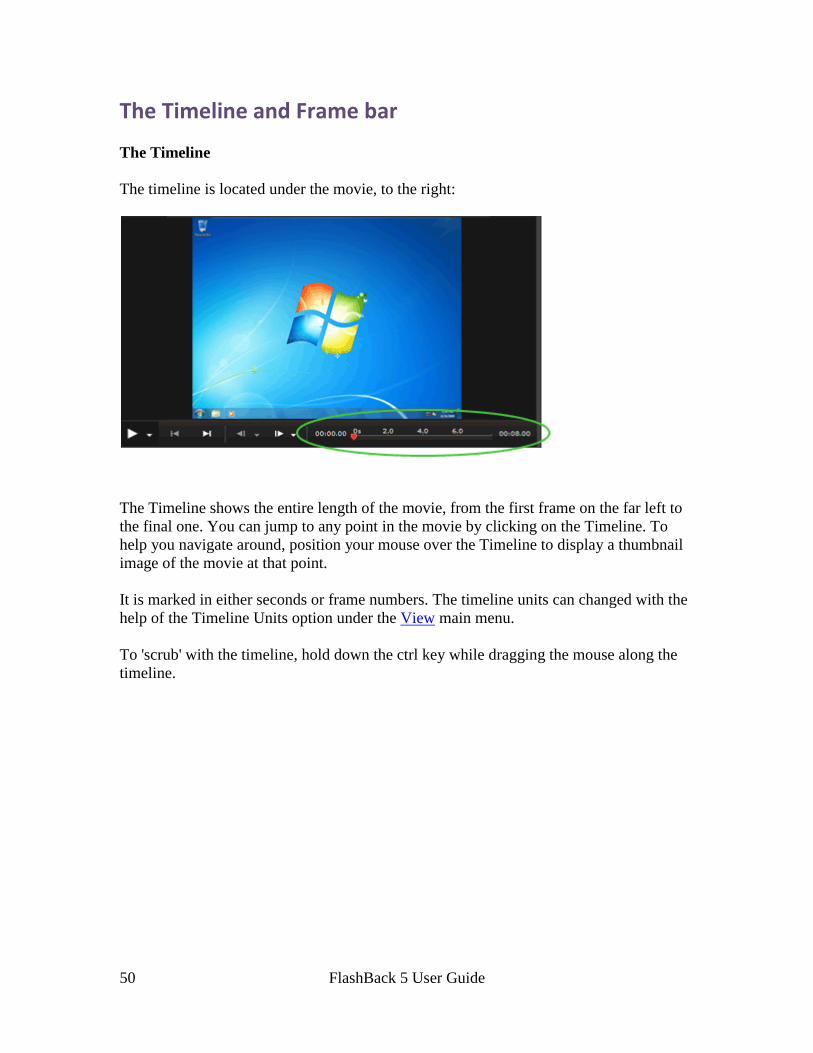
FlashBack 5 User Guide
50
The Timeline and Frame bar
The Timeline
The timeline is located under the movie, to the right:
The Timeline shows the entire length of the movie, from the first frame on the far left to
the final one. You can jump to any point in the movie by clicking on the Timeline. To
help you navigate around, position your mouse over the Timeline to display a thumbnail
image of the movie at that point.
It is marked in either seconds or frame numbers. The timeline units can changed with the
help of the Timeline Units option under the View main menu.
To 'scrub' with the timeline, hold down the ctrl key while dragging the mouse along the
timeline.
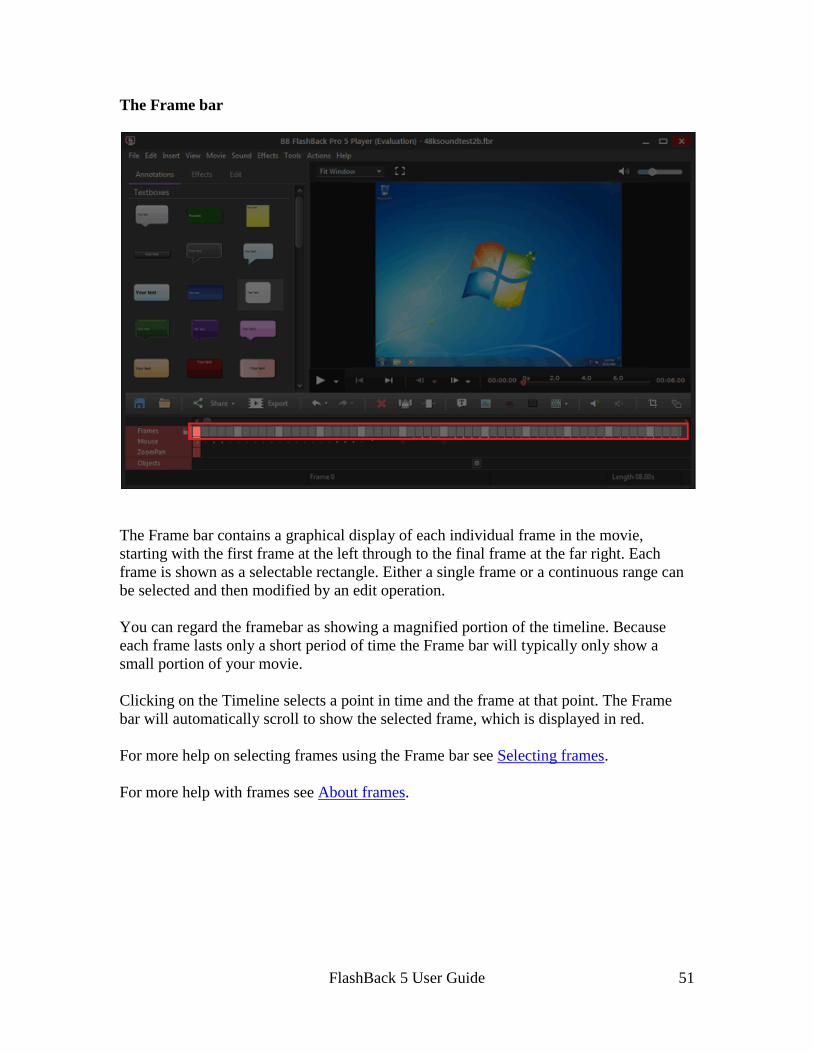
FlashBack 5 User Guide
51
The Frame bar
The Frame bar contains a graphical display of each individual frame in the movie,
starting with the first frame at the left through to the final frame at the far right. Each
frame is shown as a selectable rectangle. Either a single frame or a continuous range can
be selected and then modified by an edit operation.
You can regard the framebar as showing a magnified portion of the timeline. Because
each frame lasts only a short period of time the Frame bar will typically only show a
small portion of your movie.
Clicking on the Timeline selects a point in time and the frame at that point. The Frame
bar will automatically scroll to show the selected frame, which is displayed in red.
For more help on selecting frames using the Frame bar see Selecting frames.
For more help with frames see About frames.
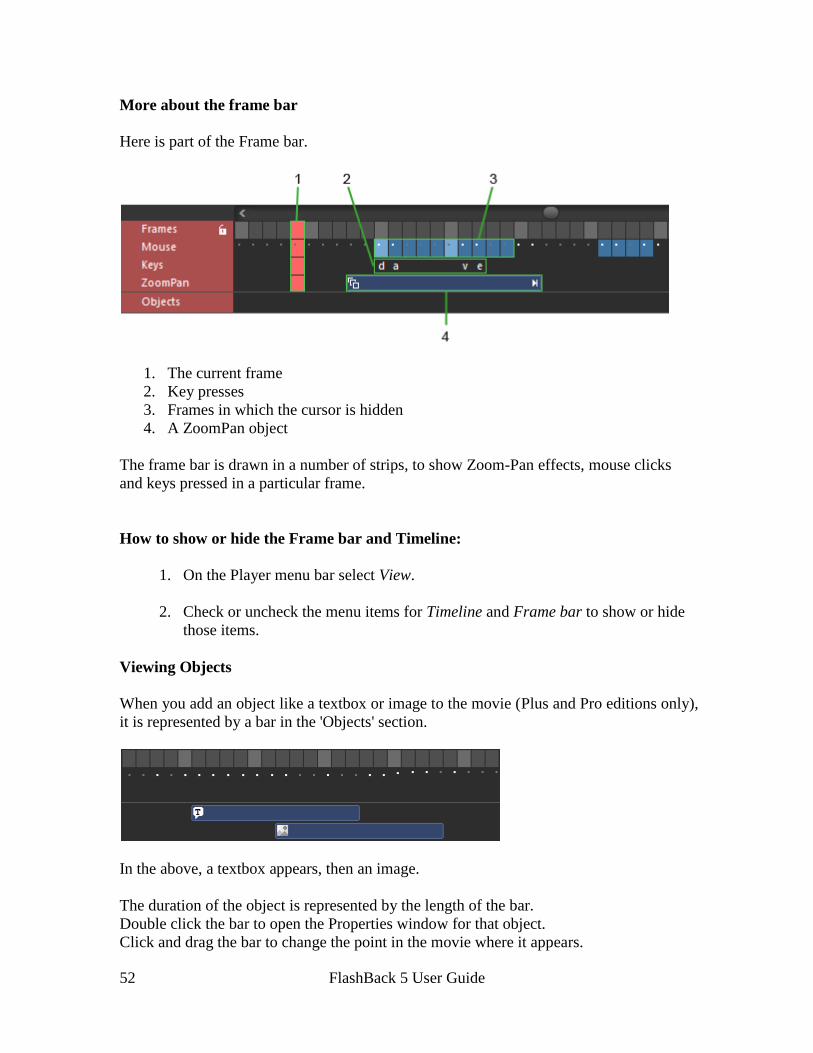
FlashBack 5 User Guide
52
More about the frame bar
Here is part of the Frame bar.
1. The current frame
2. Key presses
3. Frames in which the cursor is hidden
4. A ZoomPan object
The frame bar is drawn in a number of strips, to show Zoom-Pan effects, mouse clicks
and keys pressed in a particular frame.
How to show or hide the Frame bar and Timeline:
1. On the Player menu bar select View.
2. Check or uncheck the menu items for Timeline and Frame bar to show or hide
those items.
Viewing Objects
When you add an object like a textbox or image to the movie (Plus and Pro editions only),
it is represented by a bar in the 'Objects' section.
In the above, a textbox appears, then an image.
The duration of the object is represented by the length of the bar.
Double click the bar to open the Properties window for that object.
Click and drag the bar to change the point in the movie where it appears.

FlashBack 5 User Guide
53
Click and drag the end of the bar to change its duration.
Viewing Zoom-Pan effects
The example image above shows a Zoom-Pan effect. A Zoom-Pan effect looks like this
in the framebar:
The effect starts in the frame marked with a and ends in the frame marked with a .
See About Zoom-Pan effects to learn more about this feature. Zoom-Pan effects can be
added by Pro edition only.
Viewing mouse activity
The middle slice of the frame bar shows mouse activity.
If the frames in this bar are coloured blue, this means that the mouse cursor is hidden in
these frames. For more on hiding the mouse, see Hiding the mouse cursor.
The position of the dot is an indicator of where the mouse pointer is in the frame. The
colour of the dot indicates whether it was moved or clicked:
Gray The mouse was not moved.
Black The mouse was moved.
Red The mouse was clicked.
Viewing key presses
See the help topic Viewing key presses for more information on this feature.
Webcam / Picture-in-Picture Video
FlashBack can show picture-in-picture video within the main screen recording.
You can record an attached webcam while recording the screen, and this webcam video
will appear picture-in-picture when you open the recording in FlashBack Player.
Or, you can import an FLV, AVI or WMV video file to be used as picture-in-picture
video.

FlashBack 5 User Guide
54
For more help on recording webcam video, see Recording webcam video.
How to import a video file as picture-in-picture video
1. Select the frame where you want the video to start.
2. Go to Insert -> WebCam / Picture-in-Picture Video in the menus.
3. Select a video file. It will be imported as picture-in-picture video at the current
frame.
Note: not all AVI files can be imported successfully.
WebCam Video Display Modes
You can display webcam video in the movie in one of two ways:
In its own window In this mode, the webcam video is shown in a window with its own title bar. This
window can be moved anywhere on the desktop, independent of the main
FlashBack Player window.
When in this mode, the webcam video will not be included in exports.
Embedded in the movie In this mode, the webcam video is shown in a frame inside the movie. It cannot be
moved outside of the movie. The frame colour and thickness can be set via the
webcam video properties window.
When in this mode, the webcam video will be included in exports.
Or you can hide the webcam video completely. Use the 'Show webcam video' item on the
View menu to show and hide the webcam video window.
How to set the mode of the webcam video:
1. Double click the webcam video window to show its Properties window.
2. Select a mode on the Properties window.
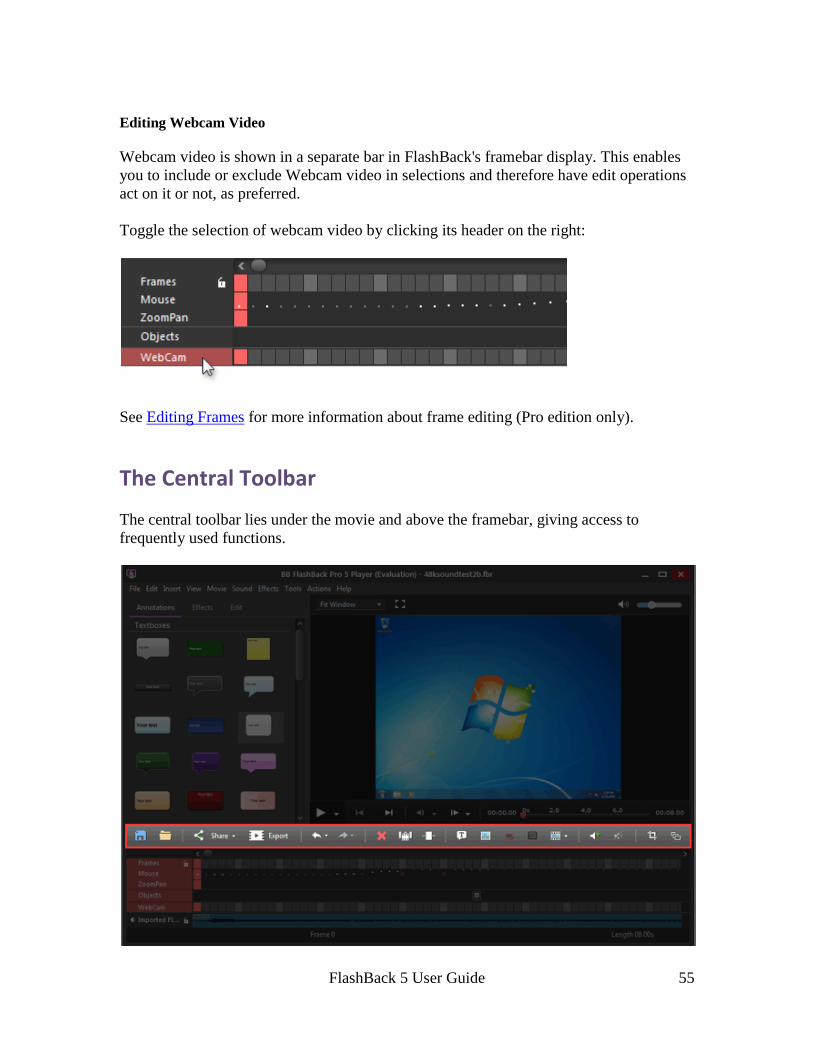
FlashBack 5 User Guide
55
Editing Webcam Video
Webcam video is shown in a separate bar in FlashBack's framebar display. This enables
you to include or exclude Webcam video in selections and therefore have edit operations
act on it or not, as preferred.
Toggle the selection of webcam video by clicking its header on the right:
See Editing Frames for more information about frame editing (Pro edition only).
The Central Toolbar
The central toolbar lies under the movie and above the framebar, giving access to
frequently used functions.
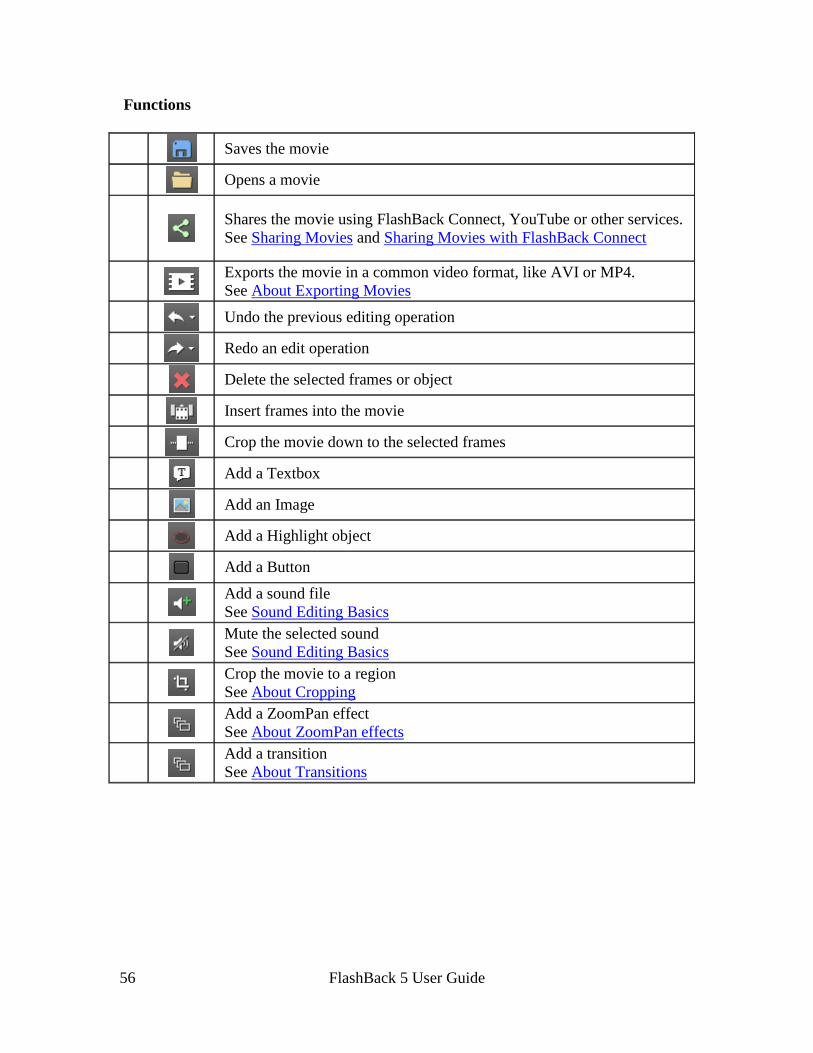
FlashBack 5 User Guide
56
Functions
Saves the movie
Opens a movie
Shares the movie using FlashBack Connect, YouTube or other services.
See Sharing Movies and Sharing Movies with FlashBack Connect
Exports the movie in a common video format, like AVI or MP4.
See About Exporting Movies
Undo the previous editing operation
Redo an edit operation
Delete the selected frames or object
Insert frames into the movie
Crop the movie down to the selected frames
Add a Textbox
Add an Image
Add a Highlight object
Add a Button
Add a sound file
See Sound Editing Basics
Mute the selected sound
See Sound Editing Basics
Crop the movie to a region
See About Cropping
Add a ZoomPan effect
See About ZoomPan effects
Add a transition
See About Transitions
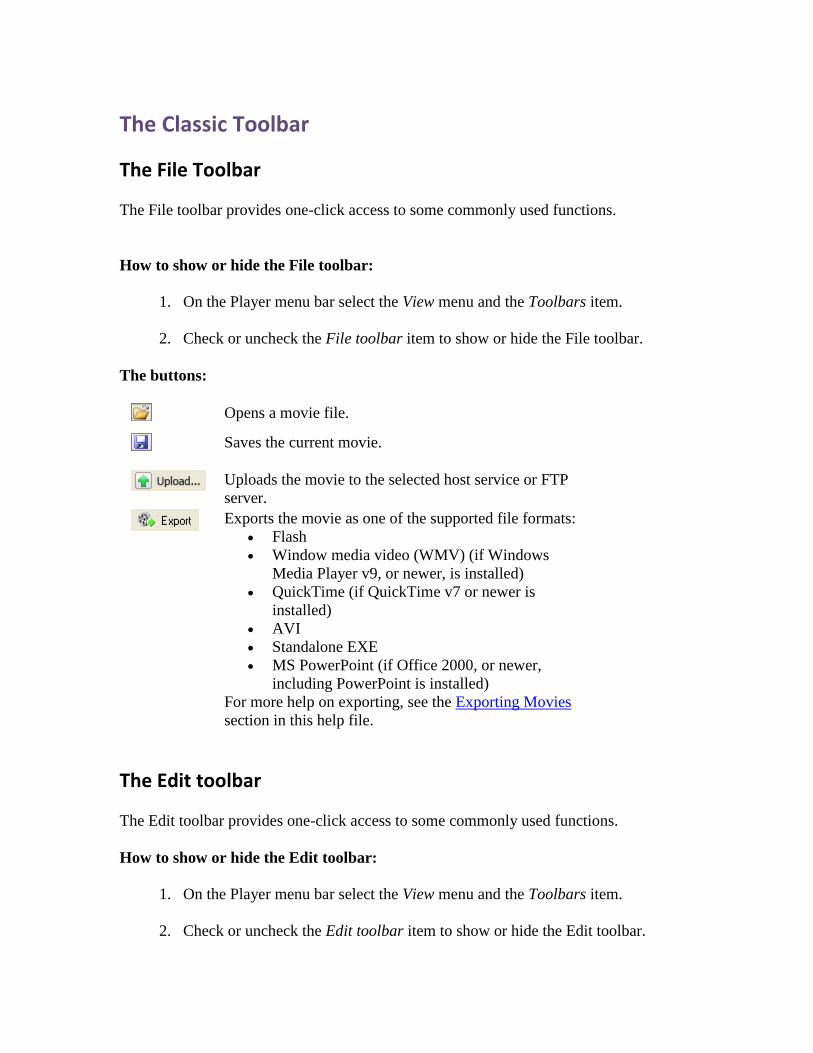
The Classic Toolbar
The File Toolbar
The File toolbar provides one-click access to some commonly used functions.
How to show or hide the File toolbar:
1. On the Player menu bar select the View menu and the Toolbars item.
2. Check or uncheck the File toolbar item to show or hide the File toolbar.
The buttons:
Opens a movie file.
Saves the current movie.
Uploads the movie to the selected host service or FTP
server.
Exports the movie as one of the supported file formats:
Flash
Window media video (WMV) (if Windows
Media Player v9, or newer, is installed)
QuickTime (if QuickTime v7 or newer is
installed)
AVI
Standalone EXE
MS PowerPoint (if Office 2000, or newer,
including PowerPoint is installed)
For more help on exporting, see the Exporting Movies
section in this help file.
The Edit toolbar
The Edit toolbar provides one-click access to some commonly used functions.
How to show or hide the Edit toolbar:
1. On the Player menu bar select the View menu and the Toolbars item.
2. Check or uncheck the Edit toolbar item to show or hide the Edit toolbar.
FlashBack 5 User Guide
58
The buttons:
Undo the previous editing function
Redo the previously undone editing function
Insert new frames before the selected frame.
Delete the selected frame.
Crops the movie down to the selected frames, deleting
all others.
For more help with frame related functions see About
frames, Inserting and deleting frames, Merging
frames, Cropping frames and Splitting frames.
The Effects toolbar
The Effects toolbar provides one-click access to some of the effects functions.
How to show or hide the Effects toolbar:
1. On the Player menu bar select the View menu and the Toolbars item.
2. Check or uncheck the Effects item to show or hide the Effects toolbar.
The buttons:
Edit the cursor highlight or mouse click highlights
Add or edit a ZoomPan effect
Delete the selected ZoomPan effect
Make FlashBack show only the portion of the
movie within the cropping rectangle.
Add Start or End Titles to the movie.
Add a Transition
Apply
Effects
Toggles whether the movie is displayed with
effects applied or with effects in 'editable' mode.
The View toolbar
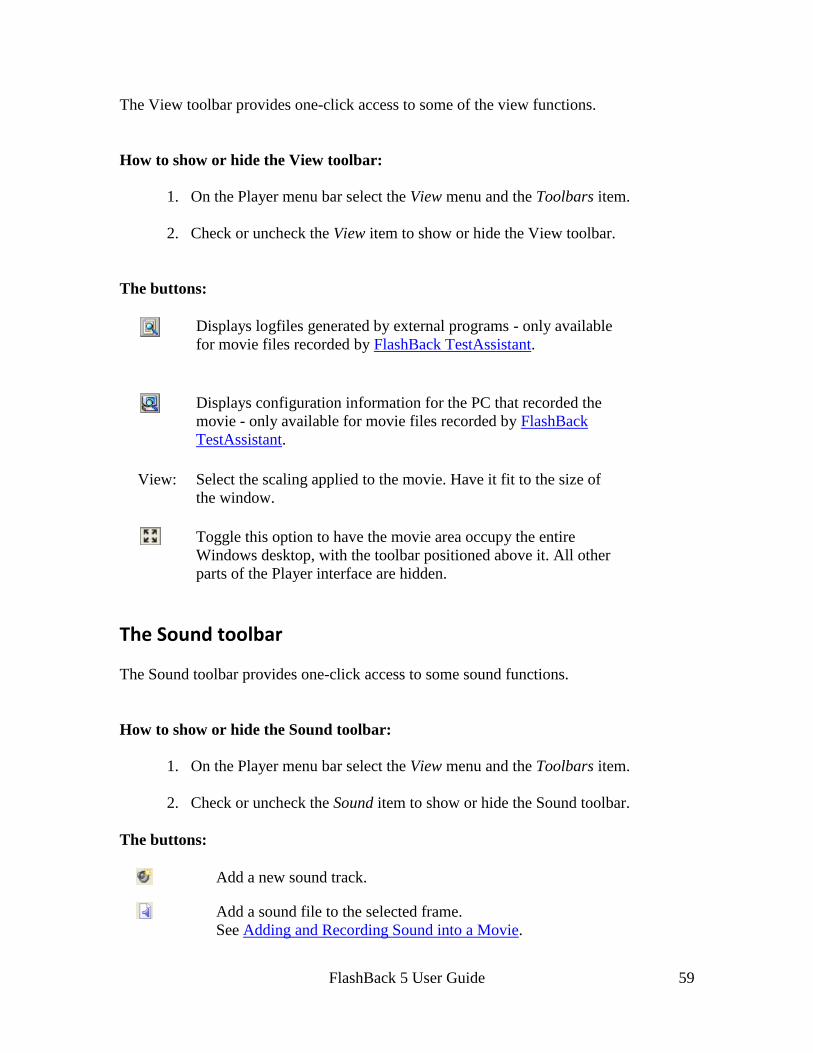
FlashBack 5 User Guide
59
The View toolbar provides one-click access to some of the view functions.
How to show or hide the View toolbar:
1. On the Player menu bar select the View menu and the Toolbars item.
2. Check or uncheck the View item to show or hide the View toolbar.
The buttons:
Displays logfiles generated by external programs - only available
for movie files recorded by FlashBack TestAssistant.
Displays configuration information for the PC that recorded the
movie - only available for movie files recorded by FlashBack
TestAssistant.
View: Select the scaling applied to the movie. Have it fit to the size of
the window.
Toggle this option to have the movie area occupy the entire
Windows desktop, with the toolbar positioned above it. All other
parts of the Player interface are hidden.
The Sound toolbar
The Sound toolbar provides one-click access to some sound functions.
How to show or hide the Sound toolbar:
1. On the Player menu bar select the View menu and the Toolbars item.
2. Check or uncheck the Sound item to show or hide the Sound toolbar.
The buttons:
Add a new sound track.
Add a sound file to the selected frame.
See Adding and Recording Sound into a Movie.

FlashBack 5 User Guide
60
Record sound into the movie.
See Adding and Recording Sound into a Movie.
Mute the selected sound.
Increase the volume of the selected sound
Decrease the volume of the selected sound
Split the clip into 2 clips at the selected point.
See Merging and splitting clips and tracks.
Split the clip into 3, making the current selection into
a new clip.
See Merging and splitting clips and tracks.
Merge selected clips into one.
See Merging and splitting clips and tracks.
Merge selected tracks.
See Merging and splitting clips and tracks.
Copy selected sound.
See Sound editing operations.
Cut selected sound.
See Sound editing operations.
Paste sound.
See Sound editing operations.
Adjusts the sound volume during playback.
Mutes the sound during playback.
Fades the clip in or out.
See Fading Sounds In or Out

The Objects Toolbar
The Objects toolbar provides one-click access to some commonly used functions.
How to show or hide the objects toolbar:
1. On the Player menu bar select the View menu and the Toolbars item.
2. Check or uncheck the Objects toolbar item to show or hide the toolbar.
Shows the properties dialog for the currently selected object.
Deletes the currently selected object.
Inserts a marker at the current frame.
For more help with Markers see Using markers in movies.
Inserts a text box into the current frame.
For more help with text box related functions see Text
boxes.
Inserts an image into the current frame.
For more help with images see Adding images.
Inserts a button into the current frame.
For more help with buttons see Adding Buttons.
Inserts a highlight into the current frame.
For more help see Adding Highlights.
Inserts an arrow into the current frame
For more help see Adding Arrows.
Inserts a blur into the current frame
For more help see Adding a Blur Effect.
FlashBack 5 User Guide
62
The Player Main Menu
The File menu
Items on the File menu:
Record New Movie Shows the Record Wizard to record a new movie.
Open Opens a movie file.
Close Closes the current movie file.
Save Saves changes to the current movie file.
Save As Saves the current movie file to a different name.
Save selected frames as
movie
Saves the selected frames as a new FlashBack
movie file.
Export Exports the movie as one of the supported file
formats. See About Exporting Movies
Batch Export Utility Opens the batch export tool, which enables
exporting of a number of FlashBack movie files
to AVI or Flash formats.
For more help see Batch Exporting.
Screenshot Saves or share the currently displayed frame as a
screenshot.
Share Shares the movie on the internet or copies it to an
FTP or file server.
See Sharing Movies
Manage Sharing
Profiles
Enables creation and editing of upload 'profiles'.
A profile contains a server type and location, and
your login details. See Creating upload profiles
for more help.
View your movies on
flashbackconnect.com
If you've already shared movies using Flashback
Connect, this menu item will open a page that
lists your movies.
FlashBack 5 User Guide
63
Share wth FlashBack
Connect
Uploads the movie to FlashBack Connect and
gets you a shareable URL.
FlashBack Connect
Uploads
View progress on current uploads to FlashBack
Connect and see a history of uploads.
See Sharing Movies with FlashBack Connect
Properties This displays information on the current movie:
screen size, file size, duration and frame rate.
Recently opened movies
Exit Closes the FlashBack Player application.
The Edit menu
Items on the Edit menu:
Undo Undoes the previous edit operation, rolling back to
the state before that edit.
Redo Redoes a previously undone edit operation.
Select frames Enables selection of frames between two frame
numbers.
Select all frames Selects all frames in the movie.
Select inactive frames Selects 'inactive' frames adjacent to the current
frame. Inactive frames are frames with no mouse,
keyboard or screen activity.
Delete Frames Deletes one or more frames.
For more help see Inserting and deleting frames.
Crop Frames Cuts the movie down to the currently selected
frames, deleting all unselected frames.
Insert Frames Inserts a new frame after the currently selected one.
FlashBack 5 User Guide
64
For more help see Inserting and deleting frames.
Merge Frames Merges a number of frames into one. For more help
see Merging frames.
Bring to front Moves the currently selected textbox or image in
front of all other objects in that frame.
Bring forwards Moves the currently selected textbox or image 'up' in
the ordering of objects layered on top of the movie.
Send to back Moves the currently selected textbox or image
behind all other objects in that frame.
Send backwards Moves the currently selected textbox or image
'down' in the ordering of objects layered on top of
the movie.
Copy Object Copies a selected object (textbox, image, highlight
or button) to the FlashBack clipboard.
Select an object by clicking it in the movie area.
Paste Object Pastes any previously Copied object into the current
frame.
Object Properties Edits properties of the currently selected textbox or
image.
Delete Object Deletes the currently selected textbox or image.
Delete WebCam Video Removes the WebCam video stream from the
movie.
Edit ZoomPan Shows the ZoomPan properties dialog on which you
can edit the transition speed.
Enabled if a zoompan object is created in the
selected frame.
Delete ZoomPan Deletes the zoompan.
Enabled if a zoompan object is created in the
selected frame.
FlashBack 5 User Guide
65
Pause Graphic Check this item to have a pause graphic displayed
whenever the movie reaches a pause point, at a
textbox or image.
The sub-items allow you to specify the graphic used
and where it is positioned.
Set Pause Graphics. Allows you to select a
graphic file that will be displayed whenever
the movie is paused during playback.
Set Default Pause Graphics. Sets the pause
graphic back to the default supplied with
FlashBack.
Set Pause Graphics Position. Allows you to
set the position that the pause graphic will
appear in.
Markers Current Markers list: This is a list of all of
the markers in the movie. Selecting a marker
from this list will jump straight to that frame.
Delete: Shows a sub-menu containing the
names of each of the markers in the current
movie.
To delete a marker, select it from this sub-
menu.
The Insert menu
Text Adds a text box, which will appear at the currently
selected frame.
For more help on Text boxes see About Text
boxes .
Marker Adds a marker to the current frame.
For more help on markers see Using Markers in
Movies
Image Adds an image to the current frame.
For more help on images see Adding Images.
Arrow Inserts an arrow into the current frame
For more help see Adding Arrows
FlashBack 5 User Guide
66
Button Adds a button to the current frame.
For more help on buttons see Adding Buttons
Highlight Adds a highlight to the current frame.
For more help see Adding Highlights.
Sound Adds a sound file as a new track, starting at the
current frame.
For more help, see Sound Editing Basics.
Watermark Adds a watermark image to the movie.
For more help see Adding a Watermark
Pause Adds a pause to the current frame.
For more help see Pauses.
WebCam / Picture-in-
picture video
Allows you to import an FLV, AVI or WMV
movie file as a picture-in-picture or WebCam
video.
Video File Inserts a video file into the movie, starting at the
current frame.
For more help see Inserting Video Files
Blur Inserts a blur effect into the movie.
For more help see Adding a Blur Effect
Mouse Clicks Inserts a mouse click event at the selected frame.
The View menu
Side Panel Shows and hides the tabs in the side panel.
Frame bar Shows or hides the Frame bar
Timeline Show Timeline
Unit: select seconds or frames
Thumbnails: sets the size of the thumbnail image that
appears when the mouse is over the timeline or
frame bar.
Status bar Shows or hides the Status bar
Classic Toolbar The classic toolbar shows a toolbar in a similar style to
FlashBack versions 1-4 with many small buttons.
Keystrokes Display Selects between 2 modes of displaying the keystrokes:
FlashBack 5 User Guide
67
Mode Raw: shows every keystroke in the frame it
occurred.
Sentence: groups keystrokes together as words
Movie Size The sub-items on this menu item control the displayed size
of the movie:
25%-100%: By default a movie will be displayed at
100% - the original size. It can be shown at a
smaller size by selecting an option of less than
100%.
Other: This option shows a dialog box where you
can enter any percentage size for the movie to be
displayed at.
Fit Movie to Window: Select this option to increase
or decrease the size of the movie to fit into the
FlashBack Player window as it is currently sized.
Fit Window to Movie: Select this option to increase
or decrease the size of the FlashBack Player
window so that it fits to the current size of the
movie.
Full Screen Selecting this option to have the movie area occupy the
entire Windows desktop, with the toolbar positioned above
it. All other parts of the Player interface are hidden.
Full Screen View Sets which parts of the user interface will be visible in
Fullscreen mode.
By default only the timeline is visible. By checking items in
this submenu, you can make the framebar and toolbars
visible.
FlashBack 5 User Guide
68
Auto-scroll There are 3 options in the Auto Scroll submenu:
None: Select this to turn Auto-scrolling off. If
the movie is larger than the movie area, you may
need to scroll manually to see everything of
interest.
Mouse in center: Select this to have
BBFlashBack scroll the movie area to keep the
mouse in the center.
Mouse near center: Select this to have
FlashBack scroll the movie area to keep the
mouse near the center.
View PC information Movie files recorded by FlashBack TestAssistant include
information about the PC that recorded the movie. Select
this menu item to see that information.
View external log files Displays logfiles generated by external programs - only
available for movie files recorded by FlashBack
TestAssistant.
View Movie in Separate
Window
If you have multiple monitors, select this option to have the
movie shown fullscreen in a non-primary monitor, and the
toolbar, framebar, timeline and other controls on the primary
monitor.
Switch WebCam Mode WebCam can either be shown in a separate window or
embedded in the movie. Use this menu item to switch
between the two modes.
See Viewing and Editing WebCam Video.
Show WebCam Video Use this item to toggle WebCam video visibility.
The Movie menu
The items on this menu are:
Play Starts playback or continues when paused.
Playback Speed Sets playback speed to x4, x2, normal, 1/2 or 1/4
speed.
FlashBack 5 User Guide
69
Forward Moves to the next frame.
Back Moves to the previous frame.
First Frame Moves to the first frame in the movie
Last Frame Moves to the last frame in the movie
Prev Marker Moves to the previous frame containing a marker.
Next Marker Moves to the next frame containing a marker.
Prev Mouse Click Moves to the previous frame containing a mouse
click event.
Next Mouse Click Moves to the next frame containing a mouse click
event.
Loop playback of
selection
Check this option to have the selected frames play
continuously in a loop.
Pause on There are 4 sub-items on this menu item:
Pause on Mouse Clicks: Check this option
to have the movie pause playback on
every frame that contains a mouse click.
Pause on Markers: Check this option to
have the movie pause playback on every
frame that contains a marker.
Pause on Text boxes: check this option to
have the movie pause playback on every
frame that contains the appearance of a
Text box. For more help on Text boxes
see About Text boxes.
Ignore Pauses in Movie: check this option
to ignore any pauses that may already
have been inserted into the movie.
For more information on adding pauses to movies
see Inserting a pause in the movie.
Goto Frame Enables you to jump straight to a particular frame
or point in time in the movie.
Search for Text Use this option to jump to the frame where some
specific text is drawn in the movie. It can be used
to search for the text drawn in window title bars, so

FlashBack 5 User Guide
70
you could use it to find the frame where an
application appears.
The Sound menu
Add New Sound
Track
Add a new sound track.
Add Sound Add a sound file to the selected frame.
See Adding and Recording Sound into a Movie.
Record Sound Record sound into the movie.
See Adding and Recording Sound into a Movie.
Mute Sound Mute the selected sound.
Increase Sound
Volume
Increase the volume of the selected sound
Decrease Sound
Volume
Decrease the volume of the selected sound
Volume Level
Processing
Two functions to equalize volume in a movie:
Make multiple clips have the same loudness
(normalization)
Even out the volume in a clip (Compression)
See Volume Level Processing for more help.
Remove Noise Removes background noise from the audio.
See Removing Noise.
Fade Clip In/Out Fades the volume of the selected clip in and/or out.
See Fading Sounds In or Out.
Split Sound Clip Split the clip into 2 or 3 clips at the selected point.
See Merging and splitting clips and tracks.
Merge Sound Clips Merge selected clips into one.
See Merging and splitting clips and tracks.
Merge Sound
Tracks
Merge selected tracks.
See Merging and splitting clips and tracks.
Copy Sound Copy selected sound.
See Sound editing operations.
Cut Sound Cut selected sound.
FlashBack 5 User Guide
71
See Sound editing operations.
Paste Sound Paste sound.
See Sound editing operations.
Sound Options Sets the default playback device and how MP3 sounds
are edited and exported.
See The Sound Options Window.
The Effects menu
Apply Effects ZoomPan and Cropping effects can either be
unapplied, so you can edit them, or applied, so you
can see how they change the appearance of the
movie.
Add ZoomPan Adds a ZoomPan effect to the current frame.
Add Transition Adds a Transition to the current frame. It will create
a transition from the previous frame to the current
one.
Add Magnifier Adds a magnifier effect.
Cropping & Autoscroll Add Cropping & Autoscroll Region
Toggles the crop/autoscroll region
The next 3 menu items set how the auto
scrolling of the crop region works:
No Autoscroll
Keep Mouse in Center
Keep Mouse Visible
Make Cropping Permanent
Cropping / Autoscroll Region Properties
See About Cropping for more help.
Highlight Cursor Set the mouse cursor highlight properties - the size,
FlashBack 5 User Guide
72
colour and opacity of the circle that surrounds it,
and whether clicks are highlighted with circles.
Display Invisible
Keystrokes
Automatically creates textboxes showing 'invisible'
keystrokes like function keys.
See Displaying Invisible Keystrokes for more help.
Start/End Titles Adds 'titles' - text and/or image on a solid
background at the start or end of the movie.
See Start and End Titles for more help
The Tools menu
Items on the Tools menu:
Player Options Sets the sound playback device, whether
FlashBack automatically checks for updates and
other options.
For more help, see The Player Options window.
Recording Options Shows the Recorder options window.
For more help see The Recorder Options window.
Password Protect
Movie
Password protects the movie, so it can only be
played or edited by entered the required password.
See Password Protecting Movies

FlashBack 5 User Guide
73
Localization Displayed Language
If the movie contains multiple languages,
this menu sets the currently displayed
language.
Export Text to RTF
Exports text from textboxe and button
objects in the movie to an RTF file for
localization.
Import Text from RTF
Imports translated text from an RTF file.
Manage Languages
Set or delete languages in the FBR file.
See Localizing FlashBack Movies for more help
Convert EXE export
to FlashBack Movie
Takes an EXE exported from FlashBack and
extracts and saves the FBR file it was originally
exported from - EXE exports contain the FBR file.
Convert Video file to
FlashBack movie
Opens an AVI movie and converts it to a
FlashBack (.FBR) movie file.
For more help see Converting AVI files to
FlashBack movies.
Save Webcam to
Flash Video (FLV)
If the movie contains webcam video, this function
will save it as an FLV video file.
The Actions menu
Mouse Cursor submenu:
Bring cursor to front Puts the mouse cursor in front of other in-
movie objects such as textboxes and images.
Send cursor to back Put the mouse cursor behind other in-movie
objects.
Hide cursor in selected
frames
Hides the cursor during movie playback for
those selected frames.
Show cursor in selected Shows the cursor in the selected frames if it
FlashBack 5 User Guide
74
frames has previously been hidden.
Re-record mouse cursor Enables you to re-record mouse movements.
In selected frames
For the whole movie
For more help on this function see
Re-recording the mouse cursor.
Smooth Cursor
Movements
Corrects mouse movements for a selection of
frames so that it move smoothly from its
position in the first frame to its position in the
final frame of the selection.
For more help see Smoothing mouse
movements.
Reset mouse action images Uses the default or your own custom
animations in place of mouse action
animations saved in the movie.
See Mouse action animations for more help.
Hide / Show WebCam in
selected frames
Sets webcam visibility in selected
frames.
Movie Speed submenu:
Speed up selected frames Use this option to speed up playback of
part of the movie by a selectable factor.
Slow down selected frames Use this option to slow down playback
of part of the movie by a selectable
factor.
Select Inactivity submenu:
Define Inactivity Allows you to define an 'inactive' section as
the absence of annotation, mouse
movements and/or key presses.
Select Next Inactive
Section
Selects the next inactive section from the
current frame.
FlashBack 5 User Guide
75
Select Previous Inactive
Section
Selects the previous inactive section from
the current frame.
Delete all Inactive Sections Deletes all inactive sections from the
movie.
The Help menu
The items on the Help menu:
FlashBack Help Displays this help file.
Support FlashBack includes functions to allow
you to report problems with the
application to Blueberry Software.
Enable/Disable logging auto-
run - switches on internal
logging for FlashBack.
Report Problem to Blueberry -
displays a wizard which directs
you through the process of
sending a problem report to
Blueberry.
For more help see Reporting Problems.
Buying FlashBack Pro
Not displayed once purchased.
Has 2 subitems:
Buying a licence - displays help
on buying a licence
Buy FlashBack Pro - opens a
page on the Blueberry website
where you can buy a licence
online.
Manage Licences Displays a window where you can add or
remove licences. You should use this
only when directed by FlashBack
support staff.
FlashBack 5 User Guide
76
Check for update Checks for a newer version of
FlashBack. If one is found, you will be
given the option to download and install
it.
About Displays the About box, which displays
the FlashBack version numbers, shows
email and web links for support and
allows you to enter a licence key.
Viewing key presses
Viewing key presses
FlashBack offers two ways of viewing keys pressed during recording of the movie: the
KeyLog tab and the KeyBar.
The Key Log Tab
This shows a display of all keys pressed while the movie was being recorded. You can
search for a specific word and jump to the frame in which it is typed. For more details,
see The Key Logging window.
The KeyBar
This is a section of the Framebar which shows key presses in each frame. For more help
see The KeyBar.
Note: keystrokes are not captured when recording with Windows NT4.
The key logging window
This shows a display of all keys pressed while the movie was being recorded. You can
search for a specific word and jump to the frame in which it is typed.
FlashBack 5 User Guide
77
How to display the Key Logging window:
From the Player, select the KeyLog item from the View menu.
The Key Logging window can either float above the movie area, or be 'docked' to the side
of the movie area. Use the 'Dock' and 'Undock' buttons to select the configuration you
prefer.
Viewing modes
There are two ways that the window can show key press data: "Raw", which shows all
key presses in a sequence and "Sentence" which groups together presses into words and
lines, and is more easily readable.
Sentence mode attempts to simplify the display by showing you the results of edits and
corrections. For example, if a user mistyped "Treasure" as:
Treasire
And then corrected the word by hitting backspace three times and retyping "ure", you
would see in the Key logging window, in Sentence mode:
Treasure
FlashBack has combined the key presses together. However, it can only do this for simple
cases, where the backspace, arrow and delete keys are used.
Additionally, each key press or sentence can be displayed with a "timestamp" - the time,
relative to the start of the movie, that the item was typed.
How to search for a word typed within the movie:
1. On the Key Logging window, type the word or part of a word into the Search for
field.
2. Click the Search button. FlashBack will look through all the key presses in the
movie for that word and jump to the frame where the first letter of that word was
typed.
The Auto-locate feature
If the Auto-locate box is checked, as your cursor moves through the Key Logging
window, FlashBack will always jump to the frame in which the letter at the cursor was
pressed.
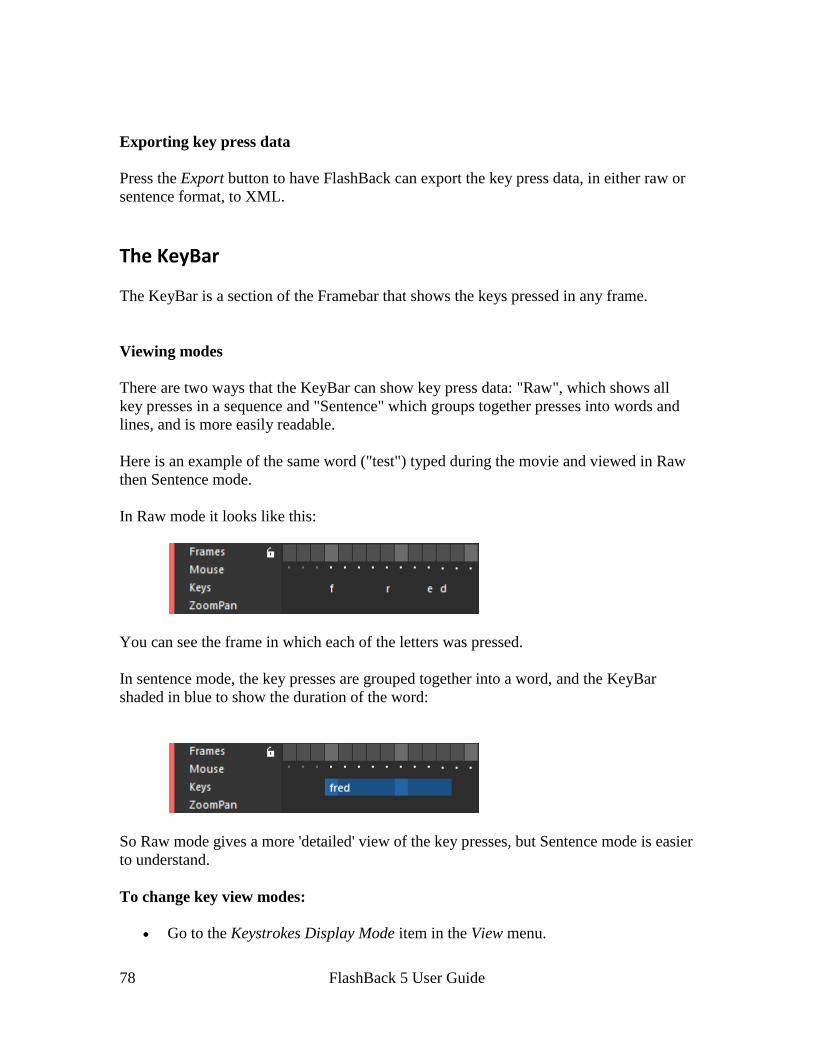
FlashBack 5 User Guide
78
Exporting key press data
Press the Export button to have FlashBack can export the key press data, in either raw or
sentence format, to XML.
The KeyBar
The KeyBar is a section of the Framebar that shows the keys pressed in any frame.
Viewing modes
There are two ways that the KeyBar can show key press data: "Raw", which shows all
key presses in a sequence and "Sentence" which groups together presses into words and
lines, and is more easily readable.
Here is an example of the same word ("test") typed during the movie and viewed in Raw
then Sentence mode.
In Raw mode it looks like this:
You can see the frame in which each of the letters was pressed.
In sentence mode, the key presses are grouped together into a word, and the KeyBar
shaded in blue to show the duration of the word:
So Raw mode gives a more 'detailed' view of the key presses, but Sentence mode is easier
to understand.
To change key view modes:
Go to the Keystrokes Display Mode item in the View menu.
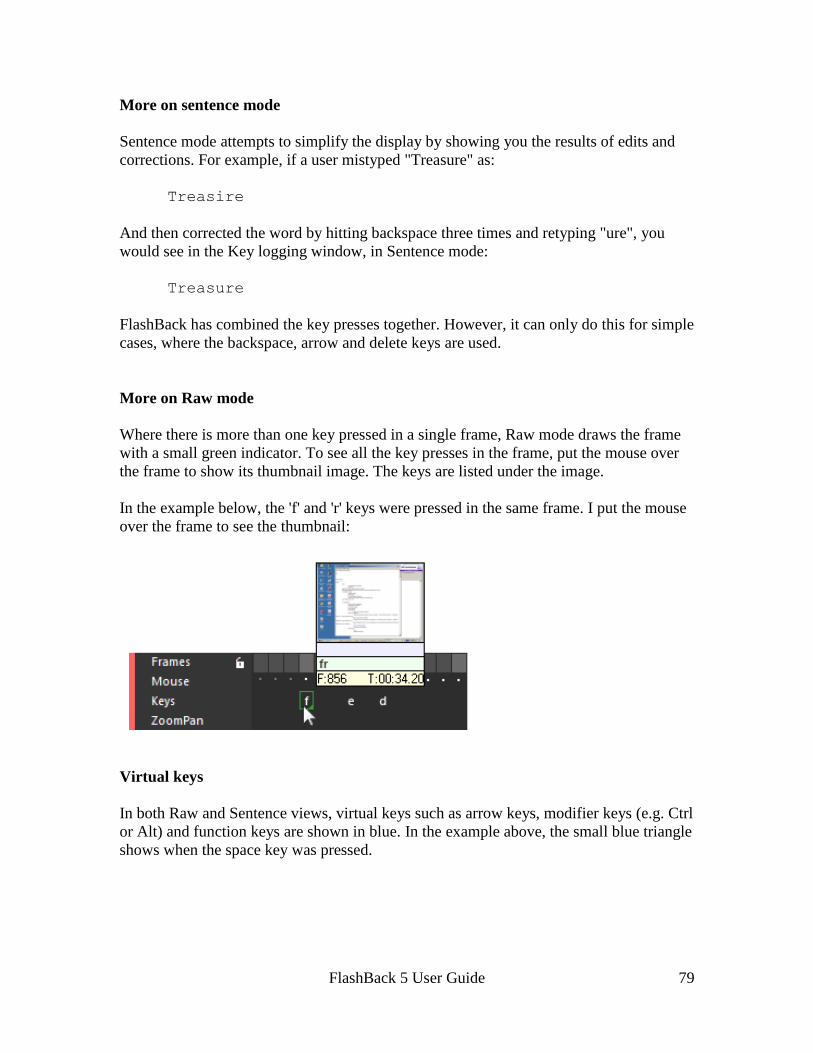
FlashBack 5 User Guide
79
More on sentence mode
Sentence mode attempts to simplify the display by showing you the results of edits and
corrections. For example, if a user mistyped "Treasure" as:
Treasire
And then corrected the word by hitting backspace three times and retyping "ure", you
would see in the Key logging window, in Sentence mode:
Treasure
FlashBack has combined the key presses together. However, it can only do this for simple
cases, where the backspace, arrow and delete keys are used.
More on Raw mode
Where there is more than one key pressed in a single frame, Raw mode draws the frame
with a small green indicator. To see all the key presses in the frame, put the mouse over
the frame to show its thumbnail image. The keys are listed under the image.
In the example below, the 'f' and 'r' keys were pressed in the same frame. I put the mouse
over the frame to see the thumbnail:
Virtual keys
In both Raw and Sentence views, virtual keys such as arrow keys, modifier keys (e.g. Ctrl
or Alt) and function keys are shown in blue. In the example above, the small blue triangle
shows when the space key was pressed.
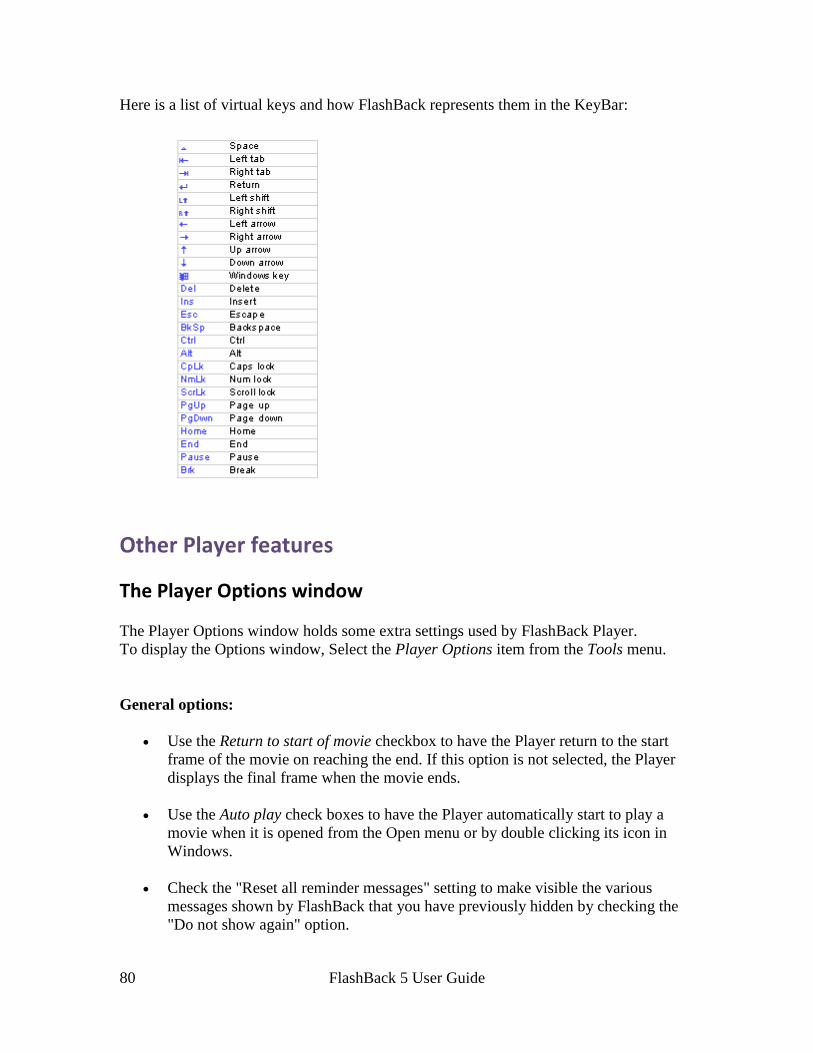
FlashBack 5 User Guide
80
Here is a list of virtual keys and how FlashBack represents them in the KeyBar:
Other Player features
The Player Options window
The Player Options window holds some extra settings used by FlashBack Player.
To display the Options window, Select the Player Options item from the Tools menu.
General options:
Use the Return to start of movie checkbox to have the Player return to the start
frame of the movie on reaching the end. If this option is not selected, the Player
displays the final frame when the movie ends.
Use the Auto play check boxes to have the Player automatically start to play a
movie when it is opened from the Open menu or by double clicking its icon in
Windows.
Check the "Reset all reminder messages" setting to make visible the various
messages shown by FlashBack that you have previously hidden by checking the
"Do not show again" option.
FlashBack 5 User Guide
81
Update options
Select the Automatically check option to have FlashBack check for newer versions
of itself every day. if this option is not selected, you will need to check for
updates manually. See Checking for updates to FlashBack for more details.
Select the Help us improve FlashBack by... option to have FlashBack send back
usage data when it checks for updates.
Note: this information is sent completely anonymously. It's a huge help to us at
Blueberry to know if FlashBack is crashing, which features are being used and
whether there have been installation problems. This data will may well influence
future development.
Sound options:
Select the sound device to be used for sound playback in the Player.
Set the 'common' MP3 compression level used for sound files are added to the
movie via the Insert sound menu item or toolbar button.
Advanced options:
Rendering: this sets how FlashBack draws the movie. By default it is set to
"Software IPP". If you experience high CPU usage when playing back movies, try
changing this to "DirectX". DirectX mode uses less CPU on playback but has
caused textboxes and scaling effects to not be drawn correctly on a few PCs. Use
"GDI" mode if you've experienced problems with IPP and DirectX modes.
Use the Memory usage options to change the amount of memory used by
FlashBack. If it uses more memory, it is faster at seeking to random frames in the
movie when the timeline is clicked during playback.
Converting AVI files to FlashBack movies
FlashBack allows you to convert an AVI video file to a FlashBack format movie (.FBR
file). You can open the converted file in the Player, to add text, sound, edit frames etc. as
normal.
Note: the compression used in FlashBack movie files is optimised for recording normal
Windows applications, not moving video. If you convert an AVI of a TV show, for
example, the resulting FlashBack movie file will probably be much larger than the
original AVI.

FlashBack 5 User Guide
82
Note: this function is only tested and supported for AVI files encoded using these codecs:
Full frames (uncompressed), Huffyuv, DivX 3 & 5, MS Video 1, Techsmith Screen
Capture.
To convert an AVI file to a FlashBack movie file:
1. In Player, select Convert AVI file to FlashBack movie from the Tools menu.
2. Set the AVI filename field to the AVI file that you want to edit in FlashBack.
3. Set the FlashBack filename field to the name of the FlashBack file you want to
create.
4. Check the Open movie after conversion checkbox if you want to open the
converted movie for editing straight after the conversion has completed
Command-line options
The player can be invoked from the command line as follows:
FlashBack Player.exe [/option] <movie name>
Here option is facultative, and movie name is necessary. If no option is provided, the
movie is simply played. You can specify one of the following options:
/e — open for edit.
/f — export to SWF.
/v — export to AVI.
/? or /help — display a list of available options.

FlashBack 5 User Guide
83
Sharing Movies
Sharing Movies with FlashBack Connect
Sharing Movies with FlashBack Connect
Currently, FlashBack Connect is in Beta Test mode. If you purchase a FlashBack
Pro or Plus licence, you will get a free Beta account with FlashBack Connect.
If you are in a free trial of FlashBack and want to try FlashBack Connect, contact
us at [email protected] and ask about a Beta account.
How to Share a Movie with FlashBack Connect
Click the Share button in the central toolbar:
or the Share item in the File menu, and select 'FlashBack Connect' as the sharing service.
You'll need to enter a name and description for the movie, and set its sharing to 'Shared'
which means it can be viewed by anyone with the URL, or 'Private', which means it can
only be viewed by yourself.
After setting these options you'll see the 'FlashBack Connect Uploads' window, which
shows upload progress and when upload is complete, the URL of the movie.
Uploads to FlashBack Connect
Uploading a large movie to FlashBack Connect could take some time. These features
make the process easier:
Uploads run in the background. You can use FlashBack Player as normal and the
uploads will continue while you work.
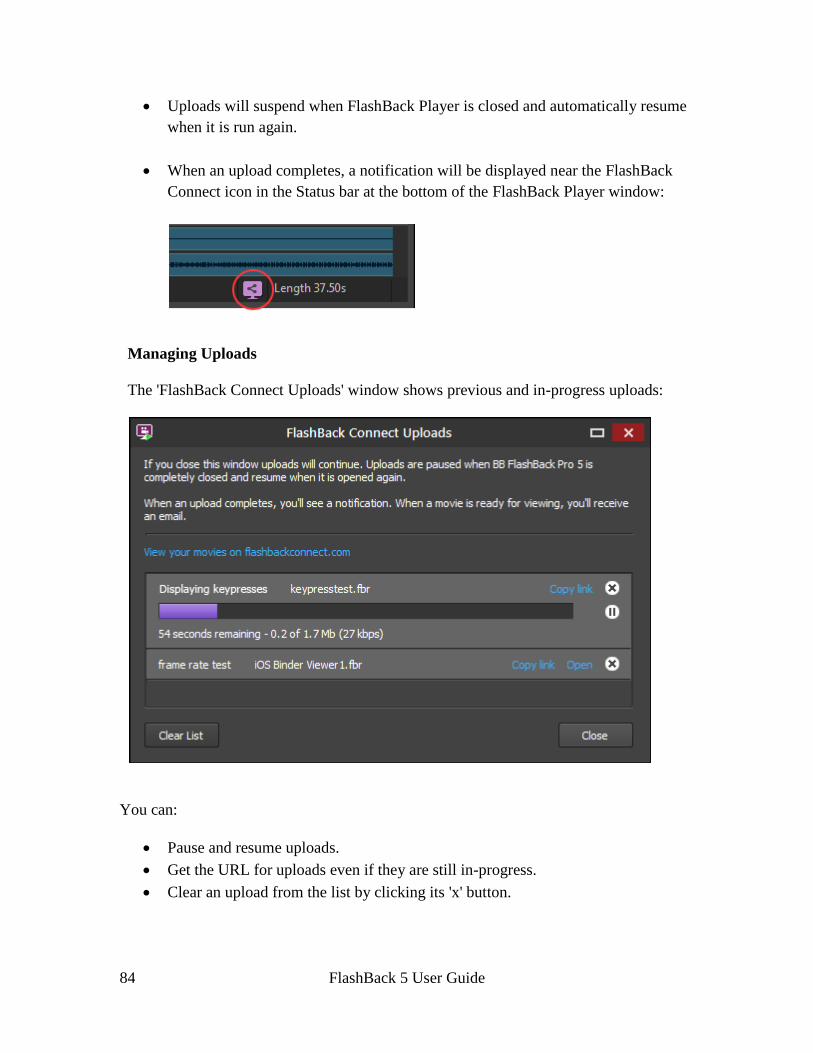
FlashBack 5 User Guide
84
Uploads will suspend when FlashBack Player is closed and automatically resume
when it is run again.
When an upload completes, a notification will be displayed near the FlashBack
Connect icon in the Status bar at the bottom of the FlashBack Player window:
Managing Uploads
The 'FlashBack Connect Uploads' window shows previous and in-progress uploads:
You can:
Pause and resume uploads.
Get the URL for uploads even if they are still in-progress.
Clear an upload from the list by clicking its 'x' button.
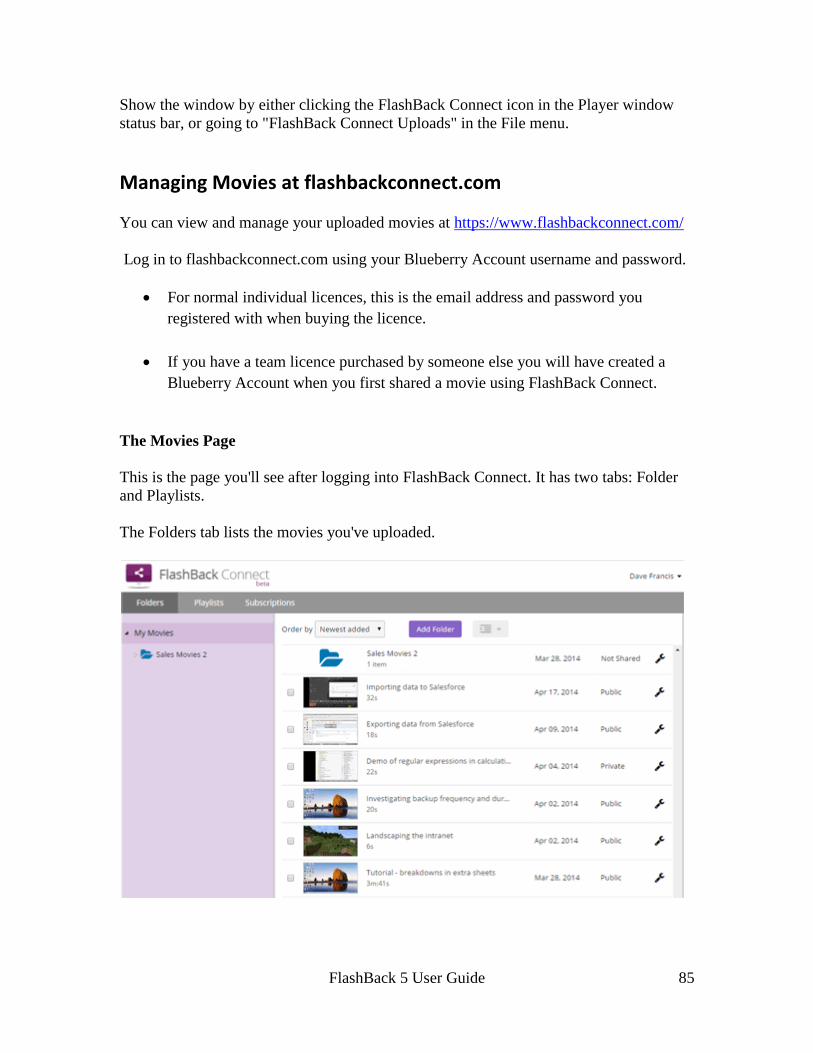
FlashBack 5 User Guide
85
Show the window by either clicking the FlashBack Connect icon in the Player window
status bar, or going to "FlashBack Connect Uploads" in the File menu.
Managing Movies at flashbackconnect.com
You can view and manage your uploaded movies at https://www.flashbackconnect.com/
Log in to flashbackconnect.com using your Blueberry Account username and password.
For normal individual licences, this is the email address and password you
registered with when buying the licence.
If you have a team licence purchased by someone else you will have created a
Blueberry Account when you first shared a movie using FlashBack Connect.
The Movies Page
This is the page you'll see after logging into FlashBack Connect. It has two tabs: Folder
and Playlists.
The Folders tab lists the movies you've uploaded.
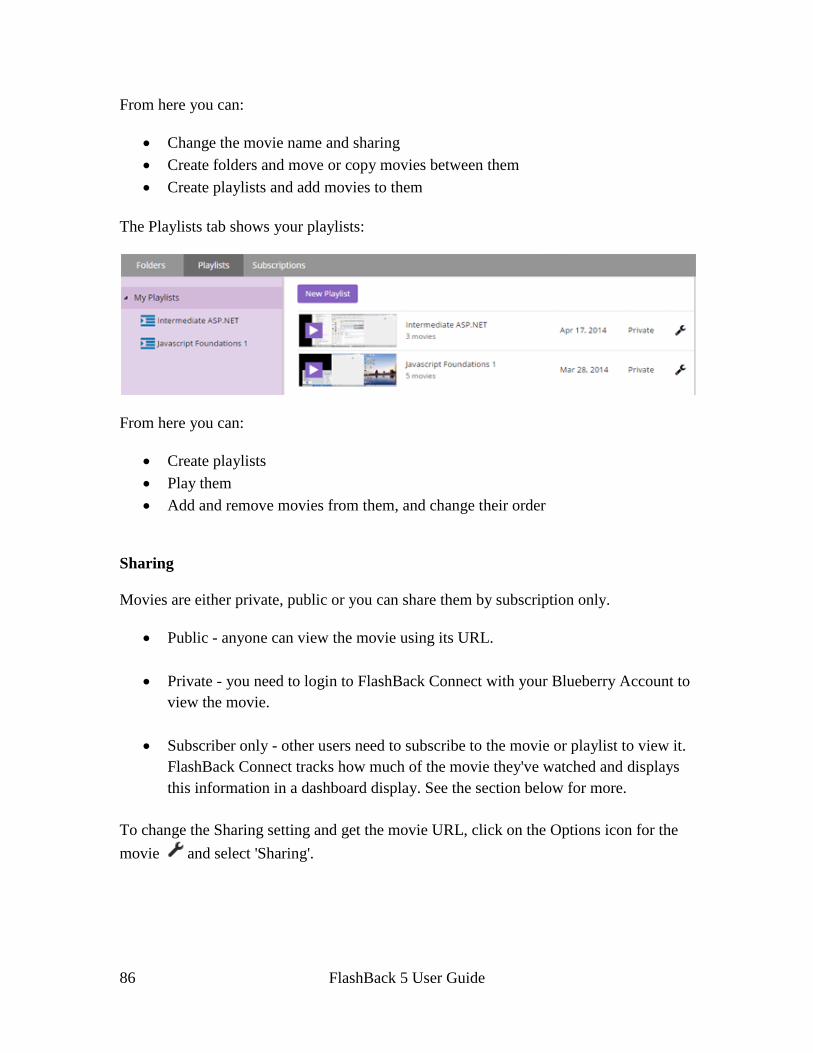
FlashBack 5 User Guide
86
From here you can:
Change the movie name and sharing
Create folders and move or copy movies between them
Create playlists and add movies to them
The Playlists tab shows your playlists:
From here you can:
Create playlists
Play them
Add and remove movies from them, and change their order
Sharing
Movies are either private, public or you can share them by subscription only.
Public - anyone can view the movie using its URL.
Private - you need to login to FlashBack Connect with your Blueberry Account to
view the movie.
Subscriber only - other users need to subscribe to the movie or playlist to view it.
FlashBack Connect tracks how much of the movie they've watched and displays
this information in a dashboard display. See the section below for more.
To change the Sharing setting and get the movie URL, click on the Options icon for the
movie and select 'Sharing'.
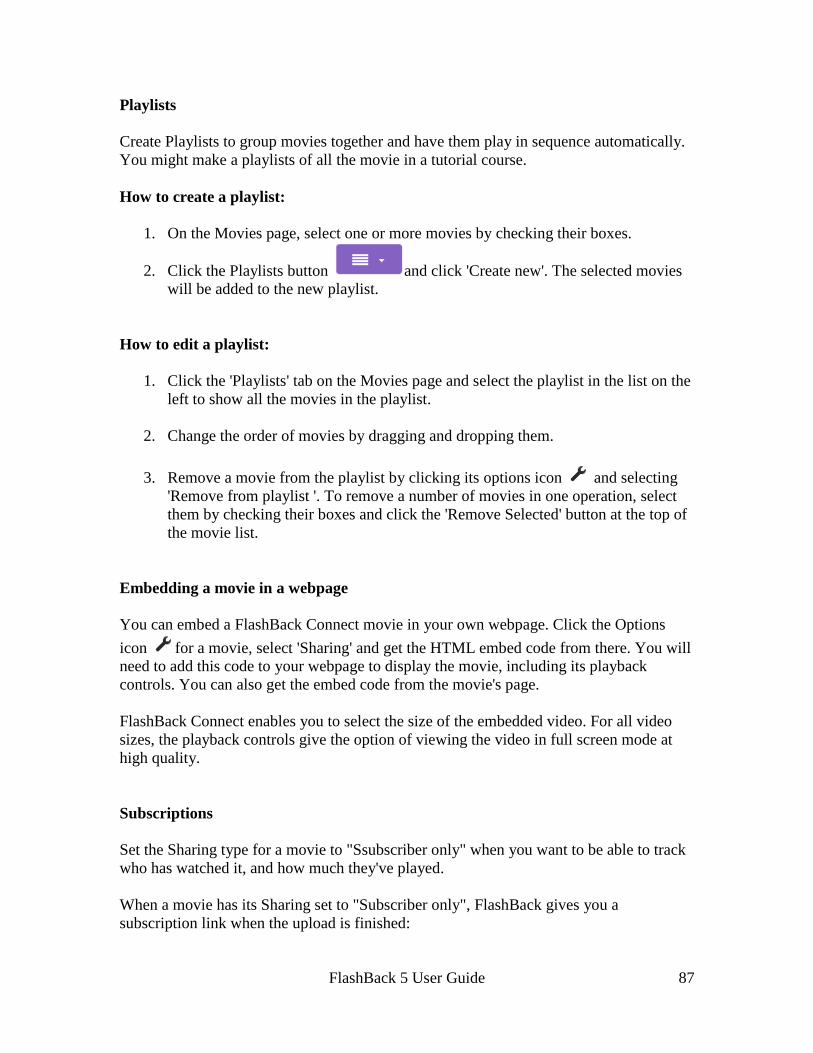
FlashBack 5 User Guide
87
Playlists
Create Playlists to group movies together and have them play in sequence automatically.
You might make a playlists of all the movie in a tutorial course.
How to create a playlist:
1. On the Movies page, select one or more movies by checking their boxes.
2. Click the Playlists button and click 'Create new'. The selected movies
will be added to the new playlist.
How to edit a playlist:
1. Click the 'Playlists' tab on the Movies page and select the playlist in the list on the
left to show all the movies in the playlist.
2. Change the order of movies by dragging and dropping them.
3. Remove a movie from the playlist by clicking its options icon and selecting
'Remove from playlist '. To remove a number of movies in one operation, select
them by checking their boxes and click the 'Remove Selected' button at the top of
the movie list.
Embedding a movie in a webpage
You can embed a FlashBack Connect movie in your own webpage. Click the Options
icon for a movie, select 'Sharing' and get the HTML embed code from there. You will
need to add this code to your webpage to display the movie, including its playback
controls. You can also get the embed code from the movie's page.
FlashBack Connect enables you to select the size of the embedded video. For all video
sizes, the playback controls give the option of viewing the video in full screen mode at
high quality.
Subscriptions
Set the Sharing type for a movie to "Ssubscriber only" when you want to be able to track
who has watched it, and how much they've played.
When a movie has its Sharing set to "Subscriber only", FlashBack gives you a
subscription link when the upload is finished:
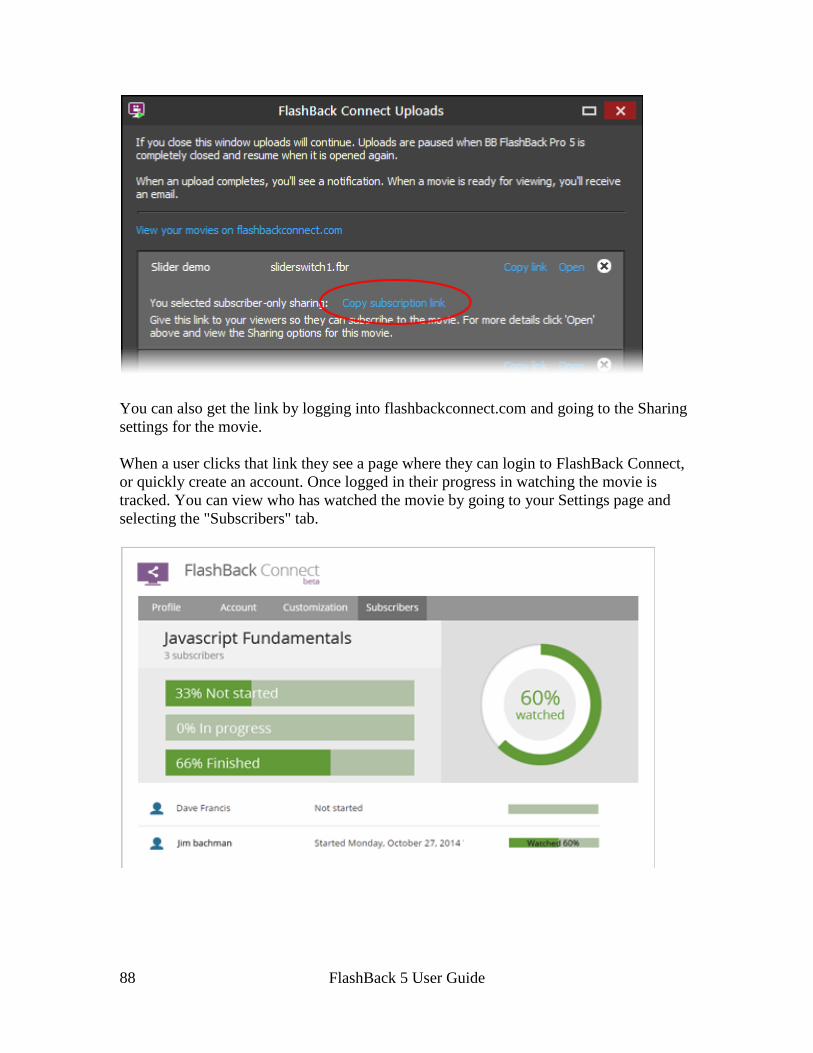
FlashBack 5 User Guide
88
You can also get the link by logging into flashbackconnect.com and going to the Sharing
settings for the movie.
When a user clicks that link they see a page where they can login to FlashBack Connect,
or quickly create an account. Once logged in their progress in watching the movie is
tracked. You can view who has watched the movie by going to your Settings page and
selecting the "Subscribers" tab.

FlashBack 5 User Guide
89
FlashBack Connect - Things you should know
Read about FlashBack Connect here.
The below is a quick summary. The full terms and conditions for FlashBack Connect are
here.
Beta
For now, FlashBack Connect is in 'beta' mode. This means we are still fixing bugs and
working out any teething problems before a full release. We'll do our best to maintain a
stable, reliable service, but will not be held liable for any losses you may suffer due to
data loss or incorrect operation of the service. Use at your discretion.
Charging
While in Beta mode, we will not charge for FlashBack Connect. When its ready for a full
release, we will contact account holders to give them the option of subscribing and
maintaining their account, or deleting their account. We will not charge them for
FlashBack Connect without their approval.
We've no information yet on the types of plans we will offer or how much we will charge
for them.
Quotas
FlashBack Connect accounts have storage and download bandwidth quotas. The storage
quota is the total amount of data that can be stored on our servers by your account. The
download bandwidth quota is the amount of data in a calendar month that can be
downloaded as a result of playback of movies in your account.
If you exceed the storage quota, you will not be permitted to upload more movies until
you delete some and bring your storage use back under the quota.
If you exceed the download bandwidth quota, your movies will not play back for the
remainder of the calendar month - contact us at [email protected] to
discuss increasing your quota.
Privacy
We will not distribute movies stored in the FlashBack Connect service to third parties.

FlashBack 5 User Guide
90
Content Restrictions
We will not permit movies that infringe copyright, contain pornography, depict illegal
acts or extreme violence, etc - see the full Terms and Conditions of the service here.
Sharing Movies with YouTube
FlashBack can easily upload your movies to YouTube. You will need to have a YouTube
account to do this.
How to share a movie on YouTube:
1. Click the Share button on the toolbar: And select the YouTube option.
2. If you've not uploaded to YouTube before, FlashBack will open a web page in
your default browser. In this page you'll need to grant permission to FlashBack to
access your YouTube account. It needs this permission to upload movies to the
account.
Once you've done that, the webpage will display a code that you need to copy to
the clipboard and paste into FlashBack.
When you've completed this process, FlashBack will be free to upload movies to
your account, and you will not need to perform the procedure again.
3. Enter some information about your movie
The title and description you enter here will be seen by users that view
your movie on the web site.
'Tags' are used to help searching. Give your movie tags relevant to its
content.
Some sites allow you to make the movie 'private', which means it will only
be visible to users you specify.
4. Select a display resolution. If your movie is large enough, you will see the
"1080p" and "720p" high definition options. If you don't see these, its because
your movie dimensions are too small.
5. That's it. FlashBack will upload the movie and display its URL when complete.
Note: movies displayed on YouTube can't have interactive elements like 'click to
continue' textboxes and buttons. If you want users to see those, you should consider using
FlashBack 5 User Guide
91
FlashBack Connect, or export to Flash (SWF) and upload the exported files to your
webserver. See Displaying a Flash export on a webpage for more help.
Uploading to FTP and FileCopy
In addition to uploading to YouTube, FlashBack also enables you to upload movies to
FTP servers and to a location on your PC or LAN.
Uploading to an FTP server
On the Upload button in the Player taskbar, select Upload to FTP.
The options on the FTP server details window:
Server address e.g. "ftp.mycompany.com"
Login name and Password Your authentication details for the FTP server.
Home folder This is the folder on the FTP server that the file will be uploaded to, relative to the
default folder for your account.
Download URL Base Some FTP servers will have a public download address for a file that is different
from the server name and folder name you upload to. In order to have FlashBack
show a correct download address to the user when the upload completes, you can
use the 'Download URL Base' setting.
The Download URL Base is the root of the public download address of the file.
Say your FTP server has a public download folder set up so that the download
address of your file is ftp://myserver.com/public/<filename>. You would enter
"ftp://myserver.com/public/" as the Download URL Base. When upload
completes, FlashBack will add the name of the uploaded file and present the
download address as "ftp://myserver.com/public/myfilename.file"
Uploading using the 'FileCopy' profile
The FileCopy profile enables you to copy the FBR movie file, or an export from the file,
to a location on your local network.
When using the FileCopy upload profile, you need only specify the folder to copy files to.
This can be a UNC name or it can contain a drive letter.
FlashBack 5 User Guide
92
Creating upload profiles
FlashBack comes with 6 upload profiles by default: YouTube, Blip.tv, Viddler, FileCopy
and FTP. An upload profile describes to FlashBack how it should upload movies to a
server - the authentication needed (if any), the file format required, the address of the
server and how the server wants files to be delivered to it.
You can create your own upload profiles, so you (or other users) can quickly upload
movies to webservers, FTP servers or local file servers.
FlashBack can have an unlimited number of profiles, so you can create profiles for a
number of different FTP and local file servers.
You decide what information is editable by the user on upload. You can fix login details,
video formats and server addresses, or allow them to be changed when uploading.
How to create an upload profile
1. In FlashBack Player, select the Manage Upload Profiles item in the File menu.
The item is also in the dropdown menu from the Upload button on the toolbar.
2. On the Manage Upload Profiles window, click the Add button.
3. Set the server type and profile name You need to tell FlashBack what type of server it is uploading to, so it can
authenticate and transfer the file successfully.
The profile name is displayed in the File->Upload menu, the dropdown menu for
the Upload button and on the Upload button.
4. Select available video formats FlashBack can upload the movie in one of a number of video file formats. On this
window, you can select which formats are available to be selected when
uploading. Some server types may require files only of a certain format - you
cannot upload FBR files to youTube for example, only WMV, QuickTime, FLV
or AVI.
If only one video format is selected, the user sees no choice when uploading - the
format is selected automatically. If more than one format is selected, the user has
to choose the format to upload.
If the "Allow user to change video format settings" box is checked, the user sees a
window on which they can change video and audio quality settings when
uploading.
If "Allow user to change video format settings" is unchecked, and only one format
FlashBack 5 User Guide
93
is selected, the user sees no choices relating to video file formats when uploading
- they give their login details, movie information and FlashBack immediately
starts the upload.
5. Enter Login and/or Server Details Depending on the type of server, you may need to enter server addresses and/or
login details. You may select not to enter login details at that time and leave the
user to enter their account details when uploading.
You can select to have these details editable by the user when uploading.
Sharing screenshots
You can upload screenshots to FlashBack Connect, and from there you can download
them, share them and get embed code that enables you to add them to a website.
How to upload a screenshot to FlashBack Connect:
1. Click the screenshot button on the central toolbar
or
Select the 'Share Screenshot on FlashBack Connect' item on the File menu.
The screenshot will upload to FlashBack Connect
2. Give the screenshot a name, and copy the link.
You can manage screenshots as you would movies by logging into
http://flashbackconnect.com with your Blueberry Account username and password
(probably the email address and password you registered with when buying the licence).
Currently, FlashBack Connect is in Beta Test mode. If you purchase a FlashBack
Pro or Plus licence, you will get a free Beta account with FlashBack Connect.
If you are in a free trial of FlashBack and want to try FlashBack Connect, contact
us at [email protected] and ask about a Beta account.

FlashBack 5 User Guide
94
Exporting Movies
About exporting movies
If you want to send your movie to non-FlashBack users, you'll need to export it. Here are
the file formats FlashBack can export to:
All editions of FlashBack can export to these formats:
Flash This format is one of the easiest to embed in a web page and includes full
playback controls. A very high percentage of PC and Mac users should be able to
view movies in this format, but Flash is generally not compatible with mobile
devices.
Flash and EXE formats are the only formats that support interactive elements like
'click to continue' textboxes and buttons.
To learn more, see Exporting to Flash
AVI A very popular file format for displaying movies. However, exporting to AVI can
be complicated for less technical users, because you need to pick a codec to
encode the movie. The image quality and filesize is very dependant on the codec
used. If a PC doesn't have the codec you used to encode it, it may not be able to
play back the AVI file, and the codecs you can guarantee are installed on all
Windows PCs may not give good results.
To learn more, see Exporting to AVI
FlashBack Plus edition can also export to:
MPEG4 This format can also achieve low filesize with good quality, and can be embedded
in webpages by using the <video> tag. By default, Windows Media Player can not
play back MPEG4 format video files, so this format may not be a good choice if
you will distribute the video to Windows PCs. However, the format is supported
by Apple Mac OS X and mobile devices.
To learn more see Exporting to MPEG4
QuickTime (H264) QuickTime uses advanced compression to achieve a good balance of quality and
file size. QuickTime movies can be embedded in web pages and streamed to
viewers. They will play back in all Mac's but only PCs that have QuickTime or
FlashBack 5 User Guide
95
iTunes installed.
You need QuickTime 7 or later installed to export to QuickTime format.
To learn more, see Exporting to QuickTime (H264)
Windows Media Video (WMV) As with QuickTime, you can achieve good quality and file size with this format.
WMV files should play back on virtually all PCs, but generally not on Macs or
mobile devices.
You need Windows Media Player 9 or newer to export to WMV format.
To learn more, see Exporting to Windows Media Video.
GIF This format is an animated image file, and is very easy to embed into webpages.
However, it is only suitable for smaller animations, with a low frame rate and
short duration. When embedded in a webpage, it can be played back by all
devices and browsers.
To learn more, see Exporting to GIF
FlashBack Pro edition can also export to:
Standalone EXE FlashBack can export your movie as an executable file (EXE file) that plays the
movie when opened. It has configurable playback controls, 'lossless' quality
images and can achieve very small file size. The EXE file will only play back on
Windows PCs.
EXE and Flash formats are the only formats that support interactive elements like
'click to continue' textboxes and buttons.
To learn more, see Exporting to Standalone EXE.
MS Powerpoint (PPT) FlashBack can save you movie as a Powerpoint file, with the movie embedded in
the first slide.
You need MS Office 2000 or newer, including Powerpoint, to export to this
format.
To learn more, see Exporting to MS Powerpoint.
I want to send it to other FlashBack, FlashBack Express or BB TestAssistant users
Just send them the FlashBack Movie file (FBR file) created by FlashBack - they will be
able to play it, and the FlashBack file is often smaller than other formats.

FlashBack 5 User Guide
96
I want to display the movie on a webpage
Flash, MPEG4, QuickTime and WMV formats can all be embedded on webpages.
See Displaying a Flash export on a webpage for more help with Flash.
I want to include the movie on a CD/DVD
Try exporting to Flash, MPEG4, QuickTime, WMV and EXE formats. The format that
gives best image quality at lowest file size may depend on the content of your movie.
EXE format often gives smallest file sizes if 'normal' Windows applications are recorded.
If your movie contains moving video or lots of photographic images, Flash, MPEG4,
QuickTime and WMV formats may produce smaller exports.

FlashBack 5 User Guide
97
Comparison of Export formats
A quick comparison of formats:
AVI WM
V
QuickTi
me
EXE MPEG
4
GIF Flash-
SWF
Flas
h-
FLV
Quality Depends on
codec
(read
more)
High High Lossless High Low Lossless or JPG
High
Filesize Depends on
codec
(read
more)
Good Good
Depends
on
recordi
ng*
Good
Can be
very
large
Depends on
recordi
ng*
Goo
d
Can
contain
interacti
ve
elements
Embed
in
Webpag
e
Compati
ble on a
wide
range of
PCs
Depends on
codec
(read
more)
Requires
QuickTi
me or
3rd
party
software
to be
installed
Requires
QuickTi
me or
3rd
party
softwar
e to be
installed
(when
embed
ded in
a
webpa
ge)
Compati
ble with
Macs Depen
ds on
codec
(read
more)
Not
playa
ble by
Macs
witho
ut 3rd
party
softw
are
(when
embed
ded in
a
webpa
ge)
In
FlashBa
ck
editions:
All
Pro
and
Plus
Pro and
Plus
Pro
only
Pro and
Plus
Pro and
Plus All All
FlashBack 5 User Guide
98
* The filesize of EXE and Flash-SWF exports may be significantly higher than AVI,
WMV, QuickTime or Flash-FLV if the movie contains movement or animation.
Exporting to Flash
Exporting to Flash format
Flash is a file format commonly used to display movies and animations.
Because Flash movies can easily be viewed on most modern Internet browsers, it is a
good format to use when distributing movies to PC or Macintosh users that do not have
the FlashBack installed.
Flash exports can contain interactive elements like 'click to continue' textboxes and
buttons.
They can be embedded into web pages, and contain playback controls.
How to export a movie to Flash format:
On the Player main menu, select the Export to Flash item on the File menu.
Or, on the File toolbar, click the Export button and select the Flash format.
For more help see Flash export options.
FLV and SWF formats
FlashBack can export the movie as either SWF or Flash Video (FLV) formats. Each have
their advantages and disadvantages.
See Selecting between Flash Video (FLV) and Plus Flash (SWF) for details.
Files generated by Flash exports
Depending on the options selected, FlashBack generates a different bunch of files to
create your Flash export. It can generate a single SWF file, multiple SWF files or an SWF
and FLV file.
See Files generated by Flash exports for more help.
FlashBack 5 User Guide
99
Quality and file size of Flash exports
There are a number of settings you can use to balance file size vs quality.
See Adjusting the quality and file size of Flash exports for more help.
Custom Flash playback controls
If you have Flash authoring skills, you can create your own playback controls and have
FlashBack use them during export, so they are included in the exported movie.
See Customising Flash playback controls for more help.
Restricting third-party use of Flash exports
FlashBack allows you to restrict how your Flash exports are linked to or embedded by
3rd party websites.
See Restricting third-party use of Flash exports for more help.
Flash export options
General Tab
Export Frames - use these controls to export either the entire movie or just a
set of frames. If you selected a set of frames before exporting, this set will be
shown in the 'Selected frames' controls.
Frame rate - a higher frame rate means smoother movement in the movie,
but usually increases file size.
Scaling - use the controls to reduce the dimensions of the Flash movie.
Playback Tab
Starting playback - you can decide whether the movie should start to
download and play automatically, when the webpage it is embedded in is
opened, or whether it should wait until it is clicked.
FlashBack 5 User Guide
100
At movie end - set whether playback should loop continuously back to the
start when it reaches the end.
Preview Image - An image of the first frame of the movie can be displayed
before the movie is downloaded.
Optionally, this preview image can be in a separate SWF file named
"<moviename>_preview.swf", to make it easier for you to customise the
preview image - this is set on the SWF File Generation tab.
Pausing playback - the movie can be set to pause and restart when it is
clicked, and also show a 'paused' overlay on the movie while it is paused.
Preload - Flash movies exported by FlashBack and put on webpages will
'stream' to the end-user. This means that the movie can start playback in their
web browser before it has completely downloaded to the user's PC. Playback
starts when enough has been downloaded to allow the movie to play to the
end without stopping to wait for more to be streamed down.
Setting a value for Preload overrides this default behavior. It starts playback
when a preset % of the movie has been downloaded.
Video Quality Tab
Select Flash Video (FLV) or Plus Flash (SWF). See Selecting between Flash Video
(FLV) and Plus Flash (SWF) for more help.
Depending on whether you select FLV or SWF, there will be different controls to help
you adjust the file size and quality of the export. See Reducing the size of Flash exports
for more help.
Audio Tab
See Sound export options for more help.
Playback Controls Tab
To improve the viewing experience for your audience, FlashBack can add playback
controls to exported Flash movies. This allows the viewer to pause, rewind, adjust the
volume and navigate to different areas of the movie with a media player-type interface.
You can select one of the pre-defined playback control bars that come with FlashBack,
and decide which controls to include on the toolbar.

FlashBack 5 User Guide
101
If you have SWF authoring software and a good knowledge of Flash, you may want to
see Customising the Flash playback controls, for information on how to use your own
playback controls.
HTML Templates Tab
When exporting to Flash, FlashBack creates an HTML file that you should open to view
the Flash movie. It has the same name as the Flash (SWF) file.
If you want to change the default HTML generated, FlashBack lets you create HTML
templates to enable this.
See How Flash exports use HTML files for more help.
SWF File Generation Tab
When exporting as an SWF file, you can either have the movie and playback controls in
the same SWF, or separate SWFs.
Having them in the same SWF means the movie is easier to embed in documents such as
a PDF file. Having them in separate files means you can have 'download on demand' type
functionality where you embed the movie in a webpage, but the movie only downloads
when it is clicked.
See Files generated by Flash exports for more help.
More Tab
Show or Hide the mouse cursor
Colour format - for some movies, reducing the number of colours can result
in a file size reduction.
Preload - you can set how much of the Flash movie should be downloaded
before playback starts automatically. The default is to have the movie only
start when it calculates that playback will be able to proceed to the end if the
current download rate is maintained.

FlashBack 5 User Guide
102
Security Tab
FlashBack can set Flash exports to expire at a certain date or require a password for
viewing. These options only work for exports to a single SWF file.
There are also options to prevent the exported Flash movie from being embedded in third
party webpages. See Restricting third-party use of Flash exports.
Selecting between Flash Video (FLV) and Standard Flash (SWF)
There are two basic types of Flash export: Flash Video (FLV) and Standard Flash (SWF).
The best one to select will depend on the movie you are exporting.
How to select Flash Video (FLV) or Standard Flash (SWF)
Select the Video Quality tab on the Flash Export Options window, then select the export
type.
Advantages of FLV:
Handles moving video better.
FLV should create a smaller file than SWF if your movie contains moving video.
Also, moving objects will not leave 'trails' behind them, which can be the case
with SWF movies.
Has no restriction on length.
SWF has a limit on the number of frames it can contain in one movie. FlashBack
will automatically reduce the frame rate when exporting to SWF if your movie
would exceed this limit, but FLV may be a better choice for longer movies.
Advantages of SWF:
Can be easier to embed in webpages, PDF files and other documents
When FlashBack exports in FLV format, it creates two separate files that contain
the movie and the playback controls: <moviename>_toolbar.swf and
<moviename>.flv (where <moviename> is the name of the .FBR file open in
FlashBack).
If you need to embed the movie in a PDF file, an MS Office document, or embed
it into a webpage using an HTML editor like DreamWeaver, you need the movie
to be all in a single file. FlashBack can create a single SWF file that contains the
movie and playback controls.
FlashBack 5 User Guide
103
See Files generated by Flash exports for details.
Restrictions on the dimensions of FLV Movies
The height and width of FLV movies will always be a multiple of 16. It is a characteristic
of the FLV format that it performs best when movies are sized in this way.
This means that if FLV is selected, the Flash movie you export may have padding on the
left and right, and either the top or bottom (depending on where you choose to have the
playback controls positioned) to make the width and height multiples of 16.
You can select the colour of this padding to match the webpage the movie will be
embedded in.
Adjusting the quality and file size of Flash exports
FlashBack includes a number of options to let you adjust the file size and quality of your
final Flash export.
The video quality options you can access depend on whether you select Flash Video
(FLV) or Plus Flash (SWF) on the Video Quality tab of the Flash Export options dialog.
See Selecting between Flash Video (FLV) and Plus Flash (SWF) for more help.
Video Quality Settings for Flash Video (FLV)
FLV Type H263 should give smaller files, particularly if your movie has moving video.
'ScreenVideo' encoding has been developed specifically for screen recordings. It
will export larger FLV files than H263, but very high quality.
Quality Higher quality values mean better image quality, but larger file sizes.
Bitrate Higher bitrate means higher quality but larger file sizes. The encoder will try to
attain the quality you set at the bitrate specified, but if the quality is higher than
can be achieved at the specified bitrate, it will increase the bitrate to reach the
quality. I.e. quality takes priority over bitrate.
KeyFrames More keyframes usually mean better quality, but larger file sizes.
FlashBack 5 User Guide
104
Video Quality Settings for Plus Flash (SWF)
Compression Select JPEG or Lossless compression.
JPEG should give smaller file sizes, particularly if the movie contains
photo type images. However, moving objects can leave 'trails' or artefacts
behind them due to the nature of JPEG compression.
Lossless gives lossless quality images and no 'trails' behind moving
objects, but larger file sizes.
Quality A higher quality setting means better image quality, but larger file sizes.
Optimise Compression This is an option on JPEG compression. When selected, this analyses all images
in the movie and applies high quality, lossless, compression to images in the
movie that compress well with this technique. Turning this option off may reduce
filesize a little for movies that have lots of photo-type images.
Frame Rate
Higher frame rates usually mean smoother movement, but also larger SWF and FLV files.
Change the frame rate on the General tab of the Flash export options window.
Audio Settings
If your movie contains audio, changing audio settings may result in large changes in the
exported file size.
Go to the Audio tab of the Flash Export Options window to set audio options.
Format If you select a custom fomat: higher Khz values mean better quality, 16 bit is
higher quality than 8 bit. Higher quality means larger files, as usua. Stereo
produces larger files than mono.
MP3 Compression By default FlashBack uses MP3 compression to reduce the file size, but there are
a number of quality settings you can select. As usual, the higher the quality, the
larger the file.
FlashBack 5 User Guide
105
Colour Depth
For some files, typically those that contain few or no photo type images, the size of the
file can be reduced by limiting the number of colours in the exported movie.
How to change the colour depth of the exported movie:
1. Go to the 'More' tab in the Flash export options window.
2. Select a colour depth from the 'Colour depth' drop down list, export the movie and
see whether this results in a reduced file size.
Customising the Flash playback controls
FlashBack is installed with 3 different styles of playback controls. If you want a different
look or added functionality and have Flash authoring skills, you can specify an SWF to
use in place of the supplied templates on the Playback Controls tab of the Flash Export
options window.
FlashBack is installed with .FLA source files, .AS ActionScript files and .FLP project
files for the 3 included playback control templates, in an "SWFControlBars" folder in the
application install folder. These files should be modified to produce the customisations
you need.
For each of the three templates, there are 3 FLA and SWF files.
e.g. for the 'metallic' template:
DefaultControlBar.fla / .swf - multiple SWF export (toolbar and movie in
separate SWF files), or FLV export. Uses ActionScript 2.
DefaultControlBarSingle.fla / .swf - single SWF export (playback controls and
movie in the same SWF file), ActionScript 2
DefaultControlBar3.fla / .swf - FLV export, when the movie contains interactive
objects like 'click to continue' textboxes. Uses ActionScript3.
How Flash exports use HTML files
When FlashBack exports to Flash it generates an HTML file that embeds and displays the
Flash movie. This HTML file demonstrates how to embed the movie in a webpage. This
HTML file has the same name as the SWF file.
FlashBack 5 User Guide
106
Changing the default HTML
The default HTML file is very simple - it just shows the movie against a white
background. You may want to add more to this page, displaying a company logo or
description of the movie, for example. You can just edit the HTML file created by the
export, but if you want to export the changed HTML many times, it may be easier to
make a new Template.
How to add a new HTML template:
1. Go to the 'HTML Template' tab on the Flash export options dialog.
2. Select the 'New' button and give the new template a name.
3. Click the 'Edit' button to enable the HTML to be edited, or click the 'Select' button
to select an HTML file you have already prepared.
4. The HTML can be edited in the dialog. In the exported HTML, the
<SWFOBJECT> tag will be replaced by code that displays the Flash movie.
5. Click 'Save' when the HTML has been changed to your satisfaction.
You can select the new template via the 'Template name' combo box at the top of the
'HTML Template' tab and this HTML will be used in the export.
See also Displaying a Flash export on a webpage.
Files generated by Flash exports
FlashBack generates different files depending on whether you selected SWF or FLV
format, and, for SWF format, whether you want to enable download-on-demand or
embedding in PDF and other documents.
If you want to embed the movie in a PDF file, MS Office document or are having trouble
embedding it in a webpage using DreamWeaver or similar HTML editors, you need to
export the movie as a single SWF file - see details below.
An HTML file that embeds the movie is always generated, regardless of the format
selected and other settings.
FlashBack 5 User Guide
107
FLV Format
Generated files:
<moviename>.html - demonstrating how to embed and display the movie in a
webpage.
<moviename>.flv - the movie
<moviename>_toolbar.swf - the playback controls. This is the file that needs to be
embedded in a webpage or other document to display the movie. It loads the FLV
file.
SWF Format
There are two options.
1. A single SWF that contains the playback controls and the movie.
This means you can embed the movie in PDFs and MS Office docs, and can make
embedding it in a webpage easier, if you use an HTML editor like DreamWeaver.
2. Multiple SWFs, where the playback controls and movie are in separate SWF files.
The advantage of this approach is that the movie can download on-demand - it sits
in the webpage/document showing a preview image and a 'play' icon and only
downloads the full movie when clicked. Otherwise, if you choose to have a single
SWF, the entire movie downloads when the webpage is loaded.
You can select to export single or multiple SWF files on the SWF File Generation tab in
the Flash Export Options window.
Files generated when 'Single SWF' is selected:
<moviename>.html - demonstrating how to embed and display the movie in a
webpage.
<moviename>.swf - contains the playback controls and movie.
Files generated when 'Multiple SWFs' is selected:
<moviename>.html - demonstrating how to embed and display the movie in a
webpage.
<moviename>.swf - the movie
<moviename>_toolbar.swf - the playback controls. This is the file that needs to be
embedded in a webpage or other document to display the movie. It loads the
FlashBack 5 User Guide
108
<moviename>.swf file.
and optionally
<moviename>_preview.swf - this is generated if you have the 'do not download
until clicked' option selected on the Playback tab, and selected to have a preview
image, and selected 'use separate swf file' on the SWF File Generation tab.
Otherwise the preview image is inside the _toolbar.swf file.
Flash Player Version Compatibility
If you export as FLV Flash Player v7 and above is required to view the movie.
If you export as SWF Flash Player v6 and above is required.
Displaying Flash Exports on a webpage
Displaying a Flash export on a webpage
When FlashBack exports to Flash format, it creates a webpage (HTML file) that has the
movie embedded in it.
Embedding the movie in your own webpage requires only a couple of steps - you need to
copy/upload the exported files up to your webserver and add HTML code to your
webpages that refers to the SWF file that displays the movie.
FlashBack generates the HTML code you need for embedding when it does the export.
For example:
I export a movie called mymovie.fbr to Flash, selecting to export as SWF, not FLV. 2
files are generated:
mymovie.html
mymovie.swf
Open mymovie.html. Under the movie are instructions on embedding the movie in a
webpage. Copy the code in the entry field to the clipboard and paste it into your webpage
where you want the movie to appear.
If your webpage and all the exported SWF and FLV files that you uploaded are in the
same folder, the code should work ok and display the movie.
FlashBack 5 User Guide
109
If your webpage and the uploaded files are in different folders you will need to change
the code so it refers to the files ok. Look through the code you copied to your page. In
two places it will refer to a .swf file ("mymovie.swf" or "mymovie_toolbar.swf"). In each
of these places you will need to add a folder path so it refers to the correct location of the
toolbar swf file.
See also: Files generated by Flash exports
Having the movie and toolbar files in separate folders
If you export a movie and the toolbar as two separate files, it is possible to save the movie
into a folder different from where the toolbar is located. To achieve that, open the SWF
File Generation tab, find a setting named Specify path to movie file and check it. In the
URL of movie file text field, enter a path to the movie file; it can be either a relative path
or a URL.
If you didn't export the movie as above but now want to put it into a separate location,
you can use Flashvars. You will need to add the fileName parameter into generated
HTML code.
Changing the controls text (and other movie settings) via HTML and Flashvars
You can override all text strings in the playback controls by specifying Flashvars in the
HTML that embeds the Flash movie. You can also override many of the export settings in
this manner.
For more information on how to use Flashvars, see this article:
http://kb2.adobe.com/cps/164/tn_16417.html.
Supported Flashvars
str1 (string) - an escaped string with the text of the first item in the "FlashBack
Logo" button dropdown. For example: Created%20with%20BB%20FlashBack
str2 (string) - an escaped string with the text of the menu item on "FlashBack
Logo" button dropdown that opens the FlashBack homepage. For example:
Visit%20www.bbFlashBack.com
str3 (string) - an escaped string containing text to be shown to the right of the
'Hide toolbar' toggle control. For example: "Hide"
str4 (string) - the URL that is opened by the link on the "FlashBack Logo"
dropdown
FlashBack 5 User Guide
110
str5 (string) - text that appears if the user's Flash player version is not high
enough to play the movie. By default, this is Flash "Player v9 or above required.
Update your player here:"
showToolbar ('true' or 'false') - sets toolbar visibility
topToolbar ('true' or 'false') - sets toolbar location, bottom for false, top for true
showFullScreen ('true' or 'false') - sets visibility of the full screen button
notScaleInFullScreen ('true' or 'false') - sets whether the movie is scaled in the
full screen mode
autoHide ('true' or 'false') - if set to true, the toolbar will automatically hide itself
showAutoHide ('true' or 'false') - sets visibility of the auto hide button
showTimer ('true' or 'false') - sets visibility of the time elapsed / duration display
showTimeline ('true' or 'false') - sets visibility of the timeline
showNextButton ('true' or 'false') - sets visibility of the next frame button. This
parameter is ignored in the case of FLV movies
showPrevButton ('true' or 'false') - sets visibility of the previous frame button.
This parameter is ignored in the case of FLV movies
showFBLogo ('true' or 'false') - sets visibility of the FlashBack logo button that
shows a dropdown menu with a link to the FlashBack website
showVolumeBar ('true' or 'false') - sets visibility of the volume button
fileName (string) - the file name of the movie that must be displayed and
controlled by the toolbar SWF. For example: test.swf or test.flv
showPausedOverlay ('true' or 'false') - indicates whether user has chosen to have
the Pause symbol shown when the movie is paused
pauseByClickingOnMovie ('true' or 'false') - indicates whether the user has
chosen to allow the movie to be paused or played when a user clicks on the movie
startingPlaybackMode (integer) - indicates the playback mode chosen by the
user. Values are:
0: Only download and play the movie when the 'Play' overlay button is
clicked
1: Automatically download the movie but do not play until it is clicked
2: Automatically download and play the movie
preloadPercent (integer, 0-100) - the percent of the movie that should be loaded
before playback starts. The default of zero means that playback should start
'automatically' - when it is calculated, based on the current download rate and
duration of the movie, that playback should be able to start and complete without
pausing to wait for further downloading.
previewFilename (string) - if this is non-null, it is the name of the 'preview
image' SWF that should be loaded and shown before the main movie is
downloaded and played.
previewMode (integer) - indicates how a preview image will be used. Values are:
FlashBack 5 User Guide
111
0: no preview image
1: Load preview image from an external SWF file. The name of the file
will be passed in the previewFileName parameter.
scaleMode - give this a value of 'noscale' if the movie should not scale when in
fullscreen mode.
dimPreview ('true' or 'false') - set to 'true' to have a darker preview image. Default
= 'false'.
urlParams ('true' or 'false') - set to 'true' to let the SWF file read information from
URL parameters as described below.
Using URL parameters to jump to a frame in the movie (and change other settings)
Instead of specifying Flashvars in HTML, you can pass parameters listed above directly
in URLs, for example: http://mydomain.com/path/movie.html?startingPlaybackMode=0.
Note: Values of URL parameters override values of Flashvars with the same names, if
the latter are present.
In addition, when changing settings in this way, you can use the startFrame parameter.
This parameter defines a specific frame from which playback should start. The feature is
supported by all playback modes. So, to start a movie from the 70th frame, you would use
an URL similar to this one:
http://mydomain.com/path/movie.html?startingPlaybackMode=0&startFrame=70.
Restricting third-party use of Flash exports
If you put your Flash movies into webpages hosted on the internet, it is possible for third
parties to seamlessly embed your Flash movies in their webpages without your consent.
You may want to prevent this, so the Secure Domains and Secure Code settings can be
used to restrict how the exported Flash file can be played back from third party domains,
webpages and other Flash files. The controls are found on the More tab in the Flash
Export Options dialog.
The SecureDomains List
The Secure Domains list determines which domains (in addition to the same domain as
the SWF file itself) can host a Flash movie that embeds your exported movie. It does not
affect how HTML files can display the movie.
If the secure domains list is empty, then your export can only be loaded and played by
SWFs in the same domain.

FlashBack 5 User Guide
112
The SecureCode
The Secure Code further restricts how your Flash exports can be replayed by third party
SWF and HTML files, by requiring a parameter to be passed to the movie object before
playback.
For example, If you export a movie with the Secure Code set to "123", you will need to
do one of two things to enable playback:
When playing the movie from another SWF file, you need actionscript of the
form:
exportedmovie.VerifySecurityCode("123")
exportedmovie.play()
When embedding the movie in HTML, you should pass the secure code as a
parameter called "specialcode" like this:
<object ...>
<param name="FLASHVARS" value="specialcode=123">
...
</object>
or
<embed flashvars="specialcode=123" ... />
Flash Player Security Warnings
When you open a Flash export on your local hard drive to review it, and use a function in
the movie that opens a webpage (like a Button with an Open URL action, or the menu
items under the FlashBack logo button in the playback controls) you may see an "Adobe
Flash Player Security" warning message.
Flash regards an SWF that is on a local hard drive, trying to access a remote webpage, as
a security risk and shows this message.
When the SWF is on a web server, there will be no security warning. So this problem
only exists when the Flash export is being previewed from your local hard drive.
To workaround the warning you can add the folder that the SWF is being run from to a
list of 'trusted' folders. Do this by right clicking the embedded Flash Player, selecting
'Global Settings' and then selecting to change Global Security Settings. Add the folder to
the 'Always trust files in these locations' list.
FlashBack 5 User Guide
113
Exporting to AVI
Exporting to AVI format
The AVI file format is commonly used to display movies and animation. However, files
exported to AVI format will often be larger than the same movie exported to Flash,
QuickTime, EXE or WMV format.
Codecs
When exporting a movie to AVI format, you will need to select a codec - the software
used to compress and play back the AVI file.
The codec used to export the AVI file has a large impact on its file size and image quality.
Because choosing the best codec can require some technical knowledge as well as some
testing, exporting to a Flash, QuickTime, WMV or EXE file may be a simpler option.
For more information on codecs and recommendations on how to select one, see About
AVI Codecs.
The time taken to export and the eventual file size is largely dependent on four things:
1. The length and complexity of the movie.
2. The codec used.
3. The sound format and compression used (if the movie contains sound).
4. The frame rate of the movie - the higher the frame rate, the smoother the movie
but the larger the exported file.
How to export a movie to AVI format:
1. On the Player main menu, select File and Export to AVI.
or
On the File toolbar, click the Export button and select AVI format.
2. Select a codec to use for the compression. See About AVI Codecs for more
information.

FlashBack 5 User Guide
114
3. If required, change the dimensions of the movie that you want to export. The
movie will be shrunk or expanded to this size to create an AVI movie file with
this width and height.
4. Select the frame rate for the export file. The higher the frame rate, the smoother
the playback but the larger the exported file. FlashBack gives you the option of
selecting full frame rate, which gives the smoothest playback and the largest
exported file, or 1/2 and 1/4 frame rate which reduce the frame rate to give a
smaller, but less smooth, AVI file.
5. If required, set the Scaling values to reduce the movie dimensions.
6. If required, change the sound export options. See Sound export options for
details.
7. Click Export.
8. Provide a file name for the new AVI movie file and click Save to save the
movie to that name.
About AVI codecs
A codec is software that is used to generate and play back the AVI movie file. When
exporting a FlashBack movie file to AVI format, you need to select a codec.
The file size and quality of the exported AVI file is very dependant on the codec used to
encode it.
If you are getting poor results from your AVI exports, this is probably due to the codec
you are using.
The complication of selecting a codec often means that other formats like Flash,
Windows Media Video (Pro and Plus editions only) and QuickTime (Pro and Plus
editions only) are a better choice for sharing movies.
Finding a good codec
The codecs that are installed with Windows are not the best for getting a good balance of
file size and image quality. A free codec that gives much better results is XVid. You can
download from here http://www.xvid.org/Downloads.15.0.html and install it on your PC
and select it when exporting a FlashBack movie. You should also get good results from
the DivX codec (www.divx.com)
FlashBack 5 User Guide
115
However, you should be aware that PCs may need the codec installed to play back your
export in Windows Media Player.
Windows default codecs
Windows comes with a small number of codecs installed by default: Intel, Full frames,
Cinepak and Microsoft Video 1. If you choose one of these you can be fairly sure that the
AVI will play back correctly on most Windows PCs.
Intel YUV and Full frames will produce high quality but very large files.
Of Microsoft Video 1 and Cinepak, Video 1 tends to give higher but much larger files
than Cinepak.
Exporting to QuickTime
This topic applies to the Pro and Plus editions only
Exporting to QuickTime (H264)
FlashBack can export your movies to Apple QuickTime format. This format is playable
on all Apple Macs and PCs that have the QuickTime player installed (this is many PCs,
but those in corporate environments are more likely not to have the QuickTime player
installed).
The H264 encoding used in QuickTime exports makes it particularly well suited for
streaming over the internet, but if you are delivering movies via another media on intend
them to be completely downloaded before playing, QuickTime is still capable of
excellent results.
Note: exporting to QuickTime requires that you have QuickTime 7 or newer installed.
Technical Note: QuickTime files exported by FlashBack use H264 video encoding and
the MP4 container format.
How to export to QuickTime format:
1. On the Player main menu, select the Export to QuickTime item on the File menu.
Or
Click the Export button on the File toolbar and select QuickTime format.
FlashBack 5 User Guide
116
2. Set the export options. See below for more details.
3. Give the export file a name and click Save to create the export file.
Setting QuickTime Video Quality and File Size
There are a number of settings you can use to adjust the video quality. Better video
quality generally means larger file size.
Frame Rate
A higher frame rate means smoother motion but larger file sizes.
Set the Frame Rate on the Frame Rate tab of the QuickTime Export Options
window.
Key Frame Rate
More key frames usually mean better quality, but also mean larger file sizes.
Set the Key Frame Rate on the Frame Rate tab of the QuickTime Export Options
window.
Quality
Set a higher value for higher quality video with less 'artefacts', and larger file sizes.
Set the Quality on the Video Quality tab of the QuickTime Export Options
window.
Single / Multi Pass
Using multi pass encoding will give higher quality results, but will take longer.
Select single or multi pass encoding on the Video Quality tab of the QuickTime
Export Options window.
Data Rate
A higher data rate (or bitrate) generally means better quality but larger files. The
data rate needs to take into account how the movie will be viewed - if the movie
will be streamed over the internet, the data rate should be lower than if it will be
played from a CD or hard drive.
Finding the best data rate for your movie will take some experimentation, so you
may want to leave it on the 'automatic' setting and leave the system to pick a rate
based on the dimensions of the movie and the quality setting.
FlashBack 5 User Guide
117
Set the Data Rate on the Video Quality tab of the QuickTime Export Options
window.
This topic applies to the Pro and Plus editions only
Displaying a QuickTime movie in a web page
QuickTime movies can be embedded and displayed in web pages. You will need to copy
the exported movie file to a web server and edit the HTML in the web page to reference
that file.
A quick tutorial:
http://www.oreillynet.com/pub/a/javascript/excerpt/learnwebdesign_chap22/
Full details on the parameters accepted by the QuickTime movie player object, and things
you should know about displaying movies correctly in Internet Explorer.
http://www.apple.com/quicktime/tutorials/embed.html
Exporting to Windows Media Video (WMV)
FlashBack can export to the Windows Media Video (WMV) format. This format can
produce high quality, highly compressed video files that play back on the large majority
of Windows PCs. WMV files can only be played on Macs that have installed third party
video player software.
How to export to WMV format:
1. On the Player main menu, select the Export to WMV item on the File menu.
Or
Click the Export button on the File toolbar and select WMV format.
2. Set the export options. See below for more details.
3. Give the WMV file a name and click Save to create the export file.
WMV Export Options
General Tab
Export Frames. If you've selected a range of frames, FlashBack defaults to
exporting just those frames. Otherwise it exports to exporting the entire movie.

FlashBack 5 User Guide
118
Scaling. Select a value less than 100% to reduce the movie dimensions.
Video Tab
Frame rate. The higher the frame rate the smoother the movie will look.
However, a higher frame rate means that the movie file size will be larger.
Video Quality Tab
Codec. You should nornally select "Windows Media Video 9". The "V8" and
"V7" codecs give better compatibility with older PCs, but the vast majority of PCs
can play back the version 9 codec now. See WMV compatibility with older PCs
for details, if you encounter problems with playback on PCs with older versions
of Windows Media Player.
The Windows Media Video 9 Screen codec was developed by Microsoft
specifically for the purpose of encoding screen capture movies and will usually
give the smallest file size. However, the quality will be lower than that seen with
Windows Media Video 9.
Quality. This is a number from 0-100 which determines the quality of the final
video output. A higher value means higher quality but increased file size.
Passes. Selecting two passes will generally result in higher quality but takes
longer to export.
Variable bit rate. You may want to uncheck this box and encode at constant bit
rate if you are exporting WMV files intended to be streamed over the internet or
are targetting older PCs and devices. Usually a variable bit rate will result in
higher quality.
Bitrate. The bitrate determines the quality of the movie: the higher the bitrate the
better the quality. It can be useful in controlling the export of files intended to be
streamed over the internet.
Note: If your export has 'choppy' playback, or you see the video 'sticking' and not
playing smoothly, and you are exporting with variable bitrate unchecked (i.e.
using constant bitrate), try increasing the bitrate, decreasing the quality, or both.
Audio Tab
Codec. As for the video options, Windows Media Audio series 9 codecs should
give the best results. The older codecs are provided in case you encounter
problems when playing back the movie on PCs with older versions of Windows
Media Player. See WMV compatibility with older PCs for more details.
Format. The sound 'format' is a combination of the sampling rate and whether it
is in mono or stereo. The higher the sampling rate the better the quality but the
FlashBack 5 User Guide
119
larger the exported movie file. Selecting mono instead of stereo will decrease the
movie size but only include one channel of sound instead of two.
Passes. As with the video settings, 2 passes generally results in better quality but
takes longer to export.
Variable bit rate. As for the video settings: using variable bit rate will result in
higher quality for most purposes, but is less compatible with older media players
than constant bit rate encoding.
Bitrate/Quality. A higher value results in better quality but a larger exported
movie file.
More Tab
Add 'created by unregistered copy' message. Select this option to add a bitmap
to the top right corner of the movie that states that the movie was exported by an
unregistered copy of FlashBack.
Exporting to MPEG4
This topic applies to the Pro and Plus editions only
MPEG4 format is particularly useful for delivering video exports to mobile devices,
including those produced by Apple. Exports in this format need no further conversion to
be played back by iPad, iPhone or video capable iPods.
Playback of MPEG4 format is supported on Windows 7 and newer. Versions of Windows
earlier than that may not support it without installing 3rd party software.
Optimizing the Export for an Apple Device
FlashBack allows you to optimize the dimensions of the export for an Apple device (iPad,
iPhone, iPod). You can select a category of device in the 'Optimize for device' setting on
the MPEG4 export options window, and dimensions will be set accordingly.
If you export larger or smaller than the recommended dimensions, the video file will still
play back ok on the Apple device but it will be scaled to the display size. There is
usually nothing to be gained by exporting larger than the display size, but the file size
will be larger. Exporting at dimensions much smaller than the display size can result in
reduced quality. Using the 'Optimize for device' setting means that you will not be
creating unnecessarily large or reduced quality export files.
FlashBack 5 User Guide
120
How to export a movie to MPEG4 format:
1. On the Player main menu, select the Export to MPEG4 item on the File menu.
Or
Click the Export button on the central toolbar and select MPEG4 format.
2. On the dialog that appears, set options for video and audio quality.
3. Click OK to save the movie to an .mp4 file
Exporting to GIF
This topic applies to the Pro and Plus editions only
FlashBack can export to GIF format. A GIF file is very easy to embed in a webpage but is
intended to only show short, small animations at a low frame rate.
It is difficult to give definite limits on frame rate, dimensions etc - they can vary from
browser to browser - but you should be careful to avoid poor performance and large file
sizes when exporting to GIF format.
How to Export to GIF format
1. On the Player main menu, select the Export to GIF item on the File menu.
Or
Click the Export button on the central toolbar and select GIF format.
2. On the dialog that appears, set options for video and audio quality.
3. Note: to set the GIF to loop playback, use the "Loop playback" setting on the
General tab.
4. Click OK to save the movie to a .GIF file
FlashBack 5 User Guide
121
Exporting to standalone EXE
This topic applies to the Pro edition only
FlashBack can export your movie to an executable file that runs under most versions of
Microsoft Windows. To view it, all a user need do is run the file from Windows Explorer,
and the movie will open and play automatically.
The user has access to playback controls similar to those in FlashBack player and Flash
exports, to allow them to jump to any point in the movie, pause and restart playback.
How to export a movie to standalone EXE:
1. On the Player main menu, select the Export to Standalone exe item on the File
menu.
Or
Click the Export button on the central toolbar and select Standalone EXE format.
2. On the dialog that appears, set options for:
The initial size of the movie player.
The toolbar visibility. The toolbar is the set of controls that lets the user
stop, pause, continue playback and jump to any point in the movie. You
may want to hide this. However, the user can still see the toolbar by right
clicking on the movie and selecting 'Show Toolbar'.
The movie menu visibility. Similar to the toolbar, the movie menu lets the
user control playback of the movie.
Cache settings. See the 'cache settings' section below.
The autoscroll function. The autoscroll function ensures that the mouse
cursor is always visible, even if the movie is played back in a window
smaller than the movie size.
3. Ok the options and then provide a file name for the movie to be exported to.
The saved EXE can be zipped and sent to users that do not have an installation of
FlashBack.
Converting exported EXE to an FBR file
Because EXE exports actually contain the FBR file they are exported from, the FBR can
be extracted from the EXE. Use the 'Extract FBR from exported EXE' function in the
Tools menu in FlashBack Player.
FlashBack 5 User Guide
122
Cache Settings
When a user runs the exported EXE and tries to jump to any point in the movie, there is
often a small delay while the movie player 'winds forward' to that point and draws the
frame. This delay can be reduced by changing the cache setting.
Increase the cache size to enable the movie player to jump to random points in the movie
more quickly. The drawback to increasing the cache size is that a larger cache uses more
memory on the user's PC. Only increase the cache size from the default of 'minimum' if
you believe that users are likely to move around the movie by clicking on the 'timeline'
frequently and the movie is quite large (more than 10 minutes).
Select a cache size option in the 'cache' tab of the EXE export dialog.
Exporting to MS Powerpoint
This topic applies to the Pro edition only
FlashBack can export your movie to MS Powerpoint format. The generated PPT file will
automatically play back the movie when opened.
Note: You will only be able to export to Powerpoint format if you have Office 2000 (or
newer) including Powerpoint installed on your PC.
How to export to Powerpoint format:
1. On the Player main menu, select the Export to Powerpoint item on the File
menu.
Or
On the central toolbar, click the Export button then select Powerpoint format.
2. If required, change the export options from the default settings. These are the
same as the settings used in Flash export, so for more help see Flash export
options.
3. Click Export.
4. Provide a file name for the PPT file and click Save to save the movie to that
name.
FlashBack 5 User Guide
123
Sound export options
If the movie you are exporting contains sound, this will also be included in the exported
movie file.
These audio export options determine the size of the exported file and its sound quality:
Format. The sound 'format' is a combination of the sampling rate and whether it
is in mono or stereo. The higher the sampling rate the better the quality but the
larger the exported movie file. Selecting mono instead of stereo will decrease the
movie size but only include one channel of sound instead of two.
MP3 Compression. This option greatly decreases the size of movies exported
with sound. It should only be unchecked if you are experiencing problems with
FlashBack while exporting movies. The MP3 option is not available in WMV
exports.
Note: FlashBack uses a redistribution of the open-source LAME MP3 codec:
www.mp3dev.org.
Batch Exporting
FlashBack includes a batch export tool that enables you to export a number of files in one
operation.
To run it, select Batch Export Utility from the File menu in FlashBack Player
The batch export tool can also be used to convert FlashBack (FBR) movies from old
formats to the newest format via the Convert to new FBR format function. This process
would normally be performed when the movie was opened in FlashBack Player.
How to export movies using the batch export tool
1. Add the FBR movies you want to export to the Movies to Export list. Do this by
clicking the Add button and selecting the files you require. You can remove files
from the export list by selecting them and clicking the Remove button.
2. Select a destination folder. The exported files will be created in here.
3. Select the export format required.

FlashBack 5 User Guide
124
4. Set the export options as you normally would in FlashBack. The options you
choose will be applied to all the files being exported.
5. Click 'Export' and the process will start. You can cancel the file currently being
exported by clicking the Cancel Current button, or cancel the entire process by
clicking Cancel All. The Status list at the bottom of the export tool window shows
whether each file was successfully exported.
Editing Movies
Working with Frames
This topic applies to the Pro edition only
About frames
Just like a conventional movie you might watch at the theatre or on TV, a FlashBack
movie is a series of still frames played in a sequence.
FlashBack's frame editing functions let you fine-tune the movie by removing sections,
adding blank frames to create pauses or tidying up how big changes appear in the movie.
How the framebar and timeline work
The framebar and timeline controls allow you to select single or multiple frames, so an
edit function can operate on them. To learn more see The Timeline and Frame bar and
Selecting Frames.
Deleting frames
Use the Delete frames function to remove mistakes or anything unwanted. See Inserting
and deleting frames.
Creating a pause by inserting frames
Use the Insert Frames function to create pauses and slow down the action. See Inserting
and deleting frames.
FlashBack 5 User Guide
125
Enhancing the appearance by merging frames
The Merge frames function merges all the changes in a series of frames into one. This can
be useful in tidying up sections where Windows was slow to display applications or draw
the contents of a window. See Merging Frames.
Selecting frames
The various edit operations operate on either a single frame or a continuous range of
frames. For example, Add text will add a text box to a single frame and merge frames
combines a range of frames into one.
At any time there is one current frame. This is marked in red on the Frame bar and its
image is shown in the movie area below.
How to select a single frame:
Selecting single frames is simple – just click with the left mouse button on the Framebar
or Timeline to display a frame in the movie area and highlight it in red on the Frame bar.
How to select a range of frames:
There are 2 ways of selecting a range of frames:
1. Hold down the Shift key while clicking the start and end points of the range. You
can click either the framebar or the timeline to define the range in this way.
2. Click the start or end frame in the range and while holding the mouse button down,
drag the cursor across the framebar or timeline to define the range
FlashBack shows the selected frames in red.
You can include selections in the framebar and soundtracks, so an edit operation acts on
the same range across multiple sound tracks and the movie frames.
FlashBack 5 User Guide
126
If your movie includes webcam video, you can also include or exclude that from the
selection by clicking the webcam header.
See More about selecting sound and frames.
How to move the start or end of a range:
Keeping the Shift key pressed down, click on a frame in the Frame bar again. If the frame
you clicked is nearer the start of the range than the end, FlashBack will now make the
range start at that frame. Conversely, if the frame you clicked is nearer to the end of the
range, FlashBack will now make the range end at that frame.
By keeping the Shift key pressed down and clicking on the Frame bar, you can change
the start and end frames of the range.
How to quickly view the start and end frames of a range:
By holding down the Ctrl key and pressing the left and right arrow keys, the current
frame will switch between the start and end of the range. As usual, the current frame is
highlighted in red on the frame bar and shown in the movie area.
This can be useful when merging a range of frames for example, to make sure that the
range starts and ends at exactly the right points.
How to select inactive frames:
If there are a sequence of frames that contain no interesting activity, and you need to
delete, you can use the Select inactive frames function.
Select a frame in the inactive sequence, then select the Select inactive frames menu item
from the Edit menu. This will select all frames with no keyboard, mouse or screen
activity that are adjacent to the current frame.
FlashBack 5 User Guide
127
Inserting and deleting frames
Deleting Frames
To delete frames from a movie:
1. Select either a single frame or a range of frames. For more help on selecting
frames see: Selecting frames.
2. On the Player main menu, select Edit and then Delete Frame(s).
Or
On the central toolbar click the Delete button:
Note: the Delete function also deletes any selected sound. For more on selecting sound
and frames together see More About Selecting Sound and Frames.
Inserting Frames and Pauses
The insert frame function creates one or more duplicates of the currently selected frame.
The effect of this is to create a pause in the movie, which could be used (for example) to
ensure that specific events are synchronised with the appearance and disappearance of
text boxes.
To insert a frame into a movie
1. Select a single frame.
2. On the Player main menu, select Edit and then Insert Frame(s).
Or
On the central toolbar click the Insert Frames button:
3. In the Insert Frame(s) window input the number of new frames to insert or the
length of the pause in 1/1000ths of a second and click ‘Ok’. The duplicate
frames will be inserted after the selected frame.
Note: if you insert a pause at a point where a sound is playing, you will be given a
choice of either inserting silence into the sound (to keep it in sync with later events in
the movie) or leaving the sound unchanged. You indicate this with the 'Insert silence
into sound track' checkbox.
FlashBack 5 User Guide
128
Merging Frames
The merge frames function can be useful in tidying up the appearance of a movie.
An example of how to use the Merge frames function:
An application is recorded starting up, which comprises many separate, complex
windows. In the movie, the individual windows do not seem to appear at the same
moment, but are visibly drawn separately, across a number of frames.
To improve the appearance of the movie and have all the windows appear together in just
one frame, you could merge the range of frames that starts just before the first of the
windows appears and ends just after the last one is fully drawn. Merging means that all of
these frames get combined into one, and the windows all appear together.
Merging does not affect the overall length of the movie. All of the merged frames appear
identically in the resulting movie.
How to merge a range of frames:
1. Select a range of frames. For more help on selecting frames see Selecting
frames.
2. On the Player main menu, select Edit and then Merge Frames.
Cropping frames
FlashBack includes a function to remove all but the selected frames from the movie.
How to crop the movie down to only the selected frames:
1. Select the range of frames that you want the movie to consist of.
2. On the Player main menu, select Cropping frames from the Edit menu.
or
On the Edit toolbar, select the button.
FlashBack 5 User Guide
129
Frame rates
The frame rate of a movie can be set using the Properties dialog. This frame rate is used
in normal playback and is used as the default when exporting movies.
How to set the frame rate of a movie:
1. In Player, select the Properties item from the File menu.
2. On the Frame Rate tab set the frame rate value appropriately. The default is 25
frames per second. There may be occasions when you wish to reduce this
value to improve playback on lower spec PCs.
Removing Inactive Sections
FlashBack allows you to select or delete sections of the movie where there is nothing of
interest happening.
Defining Inactivity
First you need to define what is regarded as an 'inactive' section.
Go to Actions -> Select Inactivity -> Define Inactivity. On this window you can define
'inactivity' as the absence of annotations, mouse movement or key presses, and how long
the absence needs to last before it is regarded as 'inactivity'.
Selecting Inactivity
Use the Select Next Inactive Section and Select Previous Inactive Section menu items in
the Actions -> Select Inactivity menu (or use the shortcut keys: Ctrl-N and Ctrl-P) to
select the next or previous inactive sections from the current frame.
Deleting Inactivity
Use the Delete all Inactive Sections menu item on the Actions -> Select Inactivity menu
to delete all inactive sections from the movie.
FlashBack 5 User Guide
130
Annotating Movies
This topic applies to the Pro and Plus editions only
Adding Text boxes
FlashBack Player can add text boxes to a movie during editing, so that you can add
comments on a particular event.
How to add a text box:
1. Select the frame where you want to add a text box.
2. On the Player main menu, select Text from the Insert menu.
or
On the central toolbar, click the Insert Text button:
3. On the Text box properties window type the words you want to appear, select the
style of the text, the box it appears in, and the length of time you want the text box
to appear in the movie.
How to edit the properties of a text box:
There are a number of ways to show the Text Box properties window for a particular text
box.
Double-click the text box itself, in the movie area.
or
Click the text box in the movie area. A blue line will appear around the box to
indicate it is selected. Then select Text box properties from the Edit menu.
or
Double-click on the blue bar in the Frame bar that represents the start and end of
the textbox
Once the Text Box properties window is visible, the text content and style can be altered.
For more help on this window see The Text box properties window.
FlashBack 5 User Guide
131
Changing text box duration
Text boxes only appear in the movie for a set length of time – the duration that was set in
step 3 above on the Text box properties window.
In the Frame bar you will see an bar indicating the start and end of the textbox. You can
change the duration by dragging the end of the bar.
How to move a text box:
With the mouse over the text box in the FlashBack Player movie area, hold down the left
mouse button. The Cursor will turn into a shape and, keeping the left mouse button
held down, you can drag the text box around the movie area to a new position.
Alternatively, the Position tab of the Text Box properties window allows you to enter the
co-ordinates of the top left corner of the box.
How to resize a text box:
This is done in the same manner as resizing a normal window. In the FlashBack Player
movie area, move the mouse cursor over a corner or side of the text box – the cursor will
change shape to indicate that you can drag that side or corner to resize the box.
Alternatively, the Position tab of the Text Box properties window allows you to enter the
width and height of the text box in pixels.
How to delete a text box:
1. Select the text box by clicking it.
2. On the Player main menu, select Edit and then Delete text.
or
On the Edit toolbar, click the Delete object button:
Pausing the movie at a text box
Movie playback can be automatically paused when a text box appears, giving the viewer
time to read the contents of a text box before allowing the movie to continue. To enable
this feature for a particular text box, bring up the text box properties window and check
the checkbox titled ‘Pause the movie at this text box…’.

FlashBack 5 User Guide
132
The Text Box properties window
The text box properties window is used to change the text shown in a text box, the style
in which it is drawn, the style of the enclosing box and whether the movie will pause at
that box during playback.
There are 5 tabs on this window:
Properties. Enter the text to appear in the text box in the Text entry field. The
font used and style of the box can be set using the controls on this tab. See Text
box styles below for more information on styles.
The length of time that the box will appear during the movie is entered in the Text
Duration entry field.
If you want movie playback to pause when this text box appears, check the Pause
movie at this text box… checkbox.
Appearance - settings that determine the colour, border, drop shadow and opacity
of the textbox.
Styles. Allows you to save the current look of the textbox as a 'style' that you can
apply to other textboxes.
Position. This tab contains controls for the exact positioning of the text box. The
pixel position of the top left corner, and the width and height of the box can be
entered.
Transitions. Have the textbox fade in and out by setting the duration of its
transitions.
Text box styles
When you have a combination of text box properties - the colour, text size, font etc. - that
you like and want to use again, you can save these properties as a style. Then you can
apply this style to any other text box in any of your movies, to get the same appearance.

FlashBack 5 User Guide
133
How to save a style:
1. Get the text box properties as you want them.
2. On the Properties tab of the Text box properties window, click the Save current
style button.
3. Enter a style name and click OK.
FlashBack creates a style with the name you entered. The style name will now appear in
the Select text box style drop down list whenever you edit a text box, in any of your
movies.
To apply this style to a text box, just select the style name from the Select text box style
drop down list.
The size and position of a text box is not saved in the style.
Adding Images
FlashBack can display images in the movie area.
How to add an image file to a movie:
1. On the Frame bar, select the frame where you want to add an image.
2. On the Player main menu, select Image from the Insert menu.
or
On the central toolbar, click the Insert image button:
3. Click on the 'Load Image' button to select an image file. Valid formats
are: .jpg .png .bmp .gif .emf .wmf or .ico files.
How to edit an image:
There are a number of ways to show the Image properties dialog for a particular image.
Double-click the image in the movie area.
or
FlashBack 5 User Guide
134
Click the image in the movie area. A blue line will appear around it to indicate it
is selected. Then select Image Properties from the Edit menu.
or
Double-click the blue bar on the Framebar that represents the image.
The Image properties window allows you to change:
Size and Position. The image can be sized as required, to stretch or shrink the
original image.
Opacity. Sets the opacity of the entire image.
Transparent colour. You can select to have one colour in the image as
transparent: i.e. that colour will not be drawn, and the movie area below will be
visible through that pixels of the image that contain the colour. The 24 bit PNG
and 32 bit (ARGB) BMP image formats can include alpha channel (transparency)
information, so you can select to use that instead of setting a transparent colour.
Duration of display. The image can either be displayed for a set period of time or
the movie can pause when it is displayed.
Transitions. Have the image fade in and out by setting the duration of its
transitions.
How to move an image:
With the mouse over the image box in the movie area, hold down the left mouse button.
The Cursor will turn into a shape and you can drag the text box around the movie area
to a new position.
Alternatively, the position can be set via the Image properties dialog.
How to change how long the image is displayed for:
You can either:
Change the duration in the Image properties window
or
FlashBack 5 User Guide
135
In the Framebar, click and drag the ends of the blue bar that represents the image
How to delete an image:
1. Select the Image by clicking it on the movie area.
2. On the Player main menu, select Edit and then Delete Image.
or
On the Framebar, right click the blue bar that represents the image and select
'Delete Text'
Adding Highlights
FlashBack Player can add highlights to a movie during editing, to draw attention to an
area of the movie.
How to add a highlight:
1. Select the frame where you want to add a highlight box.
2. On the Player main menu, select Highlight from the Insert menu.
or
On the central toolbar, click the Highlight button
3. In the Insert Highlight window, three tabs allow the highlight to be customized.
General tab - type the Name of the highlight; select the Shape of the
highlighted area, its Fill Colour and Outline Colour.
You can also choose the thickness of the highlight in pixels, its opacity
and duration up to a maximum of 1 second. The duration can also be set to
pause the movie until the mouse button is clicked.
Position tab – the Position tab allows you to enter the co-ordinates of the
top left corner of the highlight.
Transitions tab – have the highlight fade in and out by setting the duration
of its transitions.
FlashBack 5 User Guide
136
In the Framebar you will see a blue bar representing the highlight.
How to edit the properties of a highlight:
There are a number of ways to show the highlight properties window for a particular
highlight.
Double-click the highlighted area itself.
or
Right click the highlight in the movie area and select Properties.
Highlights can also be layered in front of or behind other elements on the screen by right
clicking over a highlight and selecting the 'bring forwards' and 'send backwards' type
options from the menu.
How to move a highlight:
The highlight appears by default at the top left of the recorded screen. Click the highlight
and hold the mouse button down to drag it anywhere in the movie area.
Alternatively, the Position tab of the Image Insert properties window allows you to enter
the co-ordinates of the top left corner of the highlight.
How to resize a highlight:
Put the cursor at the edge of the highlight. It will turn into a resize cursor, and you can
click and drag to resize the highlight.
Alternatively click the Position tab in the Image Insert window and entering the width
and height of the highlight in pixels.
How to change how long the highlight is displayed for:
You can either:
Change the duration in the Highlight properties window
or
In the Framebar, click and drag the ends of the blue bar representing the highlight
FlashBack 5 User Guide
137
How to delete a highlight:
1. Select the highlight by clicking it.
2. On the Player main menu, select Edit and then Delete highlight.
or
Right click the mouse over the highlight and select Delete.
Pausing the movie at a highlight
Movie playback can be automatically paused when a highlight appears, giving the viewer
time to view the highlighted area before allowing the movie to continue.
To enable this feature for a particular highlight, bring up the Image Insert window and
check the checkbox titled ‘Pause movie until mouse clicked…’
Adding Buttons
Button objects are interactive objects that allow you to open a web page, jump to any
point in the movie, start or stop playback.
How to add a button:
1. Select the frame where you want to add a button.
2. On the Player main menu, select Button from the Insert menu.
or
On the central toolbar, click the Insert Button button:
3. On the Button properties window:
Type the button caption.
Select the style of the text and the button background
The length of time it should be displayed.
The action. Available actions are:
1. Stop playback
2. Start playback
3. Open a URL. Enter address of the webpage, with or without the
"http://" prefix. When the button is clicked, the web address will
open in the default web browser.
FlashBack 5 User Guide
138
4. Jump to a point in the movie. You can jump to a frame number,
marker or an object, such as a textbox, image, highlight, sound or
button.
5. Execute Javascript. You can enter javascript that will be executed
when the button is clicked. Note that the javascript will not be
executed when playing the movie in FlashBack Player. It is only
executed by the Flash export of the movie.
There is a 400 character limit for the javascript code, but if you
need to execute something more complex than this will allow,
you can make calls to functions in the webpage that embeds the
Flash export.
How to change how long the button is displayed for:
You can either:
Change the duration in the Button properties window
or
In the Framebar, click and drag the ends of the blue bar representing the button.
Adding Arrows
FlashBack can add Arrows to the movie, to help focus attention on a detail.
How to add an Arrow:
1. Select the frame where you want to add an arrow.
2. On the Player main menu, select Arrow from the Insert menu.
or
On the central toolbar, click the Arrow button
Changing the Arrow appearance
To change the properties of an Arrow you can either:
Double-click the Arrow.
or
Right click the Arrow and select Properties.
FlashBack 5 User Guide
139
In the Arrow properties window, you will see these tabs:
Properties
Settings here enable you to change:
The shape at the start and end of the arrow
The width of the tail and head
Its opacity
How long it is displayed for
Appearance
Settings here enable you to change:
The fill type (lineart or gradient) and colour
The border appearance
The shadow appearance
Position
Settings in this tab enable you to change the position and size of the arrow.
Transitions
Here you set how the arrow fades in and out.
Arrows can be layered in front of or behind other elements on the screen by right
clicking over a highlight and selecting the 'bring forwards' and 'send backwards' type
options from the menu.
Changing the arrow position and size
To move the arrow, click and drag its center. To change the position of the tail or head,
click and drag the tail or head. To make the arrow wider or narrower, change the 'Width'
property on the Properties tab of its Properties window.
How to delete an Arrow:
Select the arrow by clicking it.
On the Player main menu, select Edit and then Delete Arrow.
or
Right click the selected arrow and select Delete.
FlashBack 5 User Guide
140
Adding a Watermark
FlashBack allows you to add a watermark image to a movie. This image remains with the
position and size you set for the duration of the movie.
Note: The watermark cannot change its size and position during the movie.
How to add a watermark
In the Insert menu, select Watermark.
Select an image file
To change the position of a watermark, you can click and drag it to anywhere in the
movie area. To change its size, position the cursor over one of its edges or corners, then
click and drag.
Adding a Blur Effect
FlashBack can add a blur effect to obscure details in the movie. You might use this to
obscure sensitive details in a form.
How to add a Blur effect:
1. Select the frame where you want to add the blur.
2. On the Player main menu, select Blur from the Insert menu.
or
On the central toolbar, click the Blur button
You can adjust the strength of the blur by right clicking it, selecting Properties and
changing the 'Blur Radius' setting.
Inserting Video Files
FlashBack can insert a video file into a screen recording.
Note: this may greatly increase the size of the FBR file.
FlashBack 5 User Guide
141
How to insert a video file into a Flash Back movie
1. On the main menu, select Insert then 'Video File'
2. Select a video file.
3. Select how it will be sized to the FlashBack movie
4. Set the 'in' and 'out' transitions (see this page for more about Transitions)
Note: FlashBack may not be able to insert some video files. In general, if Windows
Media Player can play it, FlashBack should be able to add it to your movie.
Adding Pauses
You can pause the movie at any frame by adding a Pause object. A Pause object will
pause playback for a set period of time or until the mouse is clicked. Sounds do not play
while the movie is paused.
How to add a pause object:
Select the frame you want to add the pause to.
In the Insert menu, select Pause.
How to change the settings of a Pause Object
Double click the pause object icon in the framebar to show its settings window.
Pausing while a textbox, image or other object is displayed
In the 'Duration' settings for a textbox, image or other in-movie object, you can set the
movie to pause while the object is displayed. This will create a pause object in the same
frame as the in-movie object. You can set the duration of this pause either from the
'Duration' settings of the in-movie object it was created by, or by double clicking the
pause object icon in the framebar.
Note: Other objects that start in the same frame will be unable to set their duration - they
will take the same duration as the object with the linked pause object.
FlashBack 5 User Guide
142
Displaying a 'Click to continue' image while the movie is paused
If you select the 'Pause until mouse clicked' option for the pause, you can also select the
"Show 'paused' graphic while movie is paused". The default pause graphic appears in the
top left corner of the movie and says "Paused: click to continue". See the help below if
you want to change the appearance or position of the pause graphic.
How to change the pause graphic:
1. On the Player main menu select Pause Graphic -> Set Pause Graphics from the
Edit menu.
2. Select a bitmap file.
The selected bitmap will now appear when the movie reaches an inserted pause.
To revert back to the default pause image, select Pause Graphic -> Set Default Pause
Graphics from the Edit menu.
How to change the position of the pause graphic:
1. On the Player main menu select Pause Graphic -> Set Pause Graphics Position
from the Edit menu. The pause graphic will appear in the movie area.
2. Use the mouse cursor to position the pause graphic. When you are satisfied with
its position, leave it and carry on with any other editing operations.
The pause graphic will appear in the position you selected, when the movie reaches an
inserted pause.
Displaying Invisible Keystrokes
Some keypresses, such as function keys or the Insert, Delete, Home and End keys, often
do not produce visible output. If you want the user to know when these 'invisible' keys
are being pressed, FlashBack can automatically create textboxes to show them.
How to show invisible keystrokes:
1. Select 'Show Invisible Keystrokes' from the Effects -> Display Invisible
Keystrokes menu.
FlashBack 5 User Guide
143
2. Set properties for the textboxes that will show the keystrokes.
This will create textboxes to show any invisible keystrokes in the movie. You can edit the
textboxes as normal in FlashBack Player.
To hide invisible keystrokes, select 'Hide Invisible Keystrokes' from the Effects ->
Display Invisible Keystrokes menu. This will delete all textboxes created by 'Show
Invisible Keystrokes'.
Using Markers in movies
FlashBack places no limits on the size of the movies you can create. Though practically
you are restricted by the amount of free disk space available to your PC, you can easily
create movies that span many minutes, possibly hours.
If there are particular events in a large movie that you need to be able to view again and
again, finding them could prove to be a tiresome operation.
To enable fast access to different points in a movie, FlashBack Player lets you add
markers. Markers are simply a way of labeling a particular frame, so that you can easily
find it later.
How to add or delete a marker:
Markers are added with the Marker item on the Insert menu.
They are deleted by either:
Going to the Markers -> Delete sub menu from the Edit menu, and selecting the
marker you wish to delete.
or
In the framebar, right clicking on the frame containing the marker and selecting
Delete Marker.
How to move to a marker or see the list of markers:
The top items in the Edit -> Marker sub menu are a list of the markers in the current
movie. Selecting one of these will jump straight to the frame that contains the marker.
You can also see the markers listed in the Jump To dropdown list in the Player toolbar.
When viewing the movie in the Player you can move forwards or backwards through
marked frames by using the Next marker and Prev marker items on the Movie menu.

FlashBack 5 User Guide
144
Reusing objects with the Gallery
Using the Gallery
FlashBack enables you to easily reuse textboxes, images and other objects by adding
them to the Gallery. Once in the Gallery, they can be added to any movie just by dragging
them in.
How to add an Object to the Gallery
You can hold down the Ctrl key and drag the object into the Gallery.
or
Right click on the object and select "Add to Gallery" from the menu.
How to copy an object from the Gallery to the movie
Drag the object from the Gallery into the movie.
or
Right click the object in the Gallery and select 'Add to Movie'.
You can edit an object in the gallery by double clicking it.
You can remove an object from the gallery by right clicking it and selecting 'Delete' from
the menu.
FlashBack 5 User Guide
145
Adding Effects to Movies
Zoom-Pan Effects
This topic applies to the Pro edition only
About Zoom-Pan Effects
FlashBack allows you to "zoom in" to any area of the movie, to more clearly show what's
happening on screen.
On this page:
How to zoom in
How to preview your zoom-pan effect
How to change the zoom-pan effect area
How to delete a zoom-pan effect
How to change the transition time
How to zoom back out
How to zoom in
1. Select the frame where you want the zoom effect to occur.
2. Click the Add Zoom-Pan button on the toolbar.
3. On the Zoom-Pan properties dialog, select 'Custom Area' and click OK.
4. You'll see a green rectangle on the movie area. This marks the area that the movie
will zoom into. Or to put it another way, whatever is in the green rectangle will
expand to fill the entire movie area.
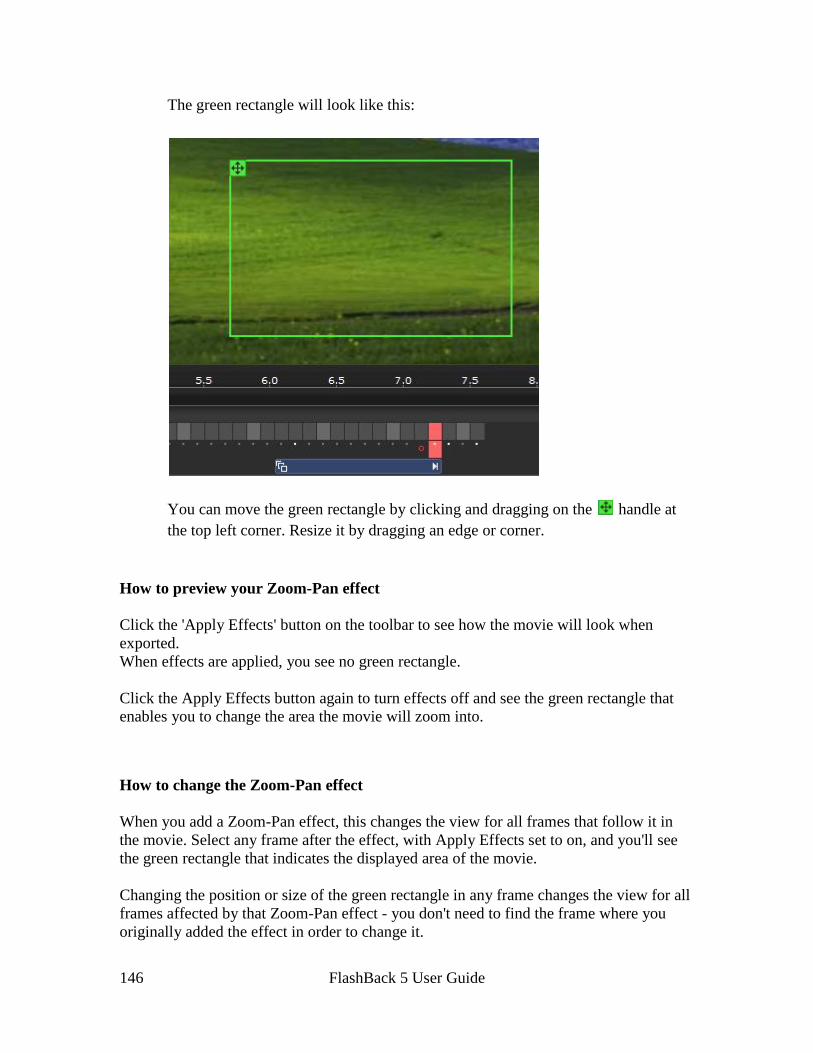
FlashBack 5 User Guide
146
The green rectangle will look like this:
You can move the green rectangle by clicking and dragging on the handle at
the top left corner. Resize it by dragging an edge or corner.
How to preview your Zoom-Pan effect
Click the 'Apply Effects' button on the toolbar to see how the movie will look when
exported.
When effects are applied, you see no green rectangle.
Click the Apply Effects button again to turn effects off and see the green rectangle that
enables you to change the area the movie will zoom into.
How to change the Zoom-Pan effect
When you add a Zoom-Pan effect, this changes the view for all frames that follow it in
the movie. Select any frame after the effect, with Apply Effects set to on, and you'll see
the green rectangle that indicates the displayed area of the movie.
Changing the position or size of the green rectangle in any frame changes the view for all
frames affected by that Zoom-Pan effect - you don't need to find the frame where you
originally added the effect in order to change it.
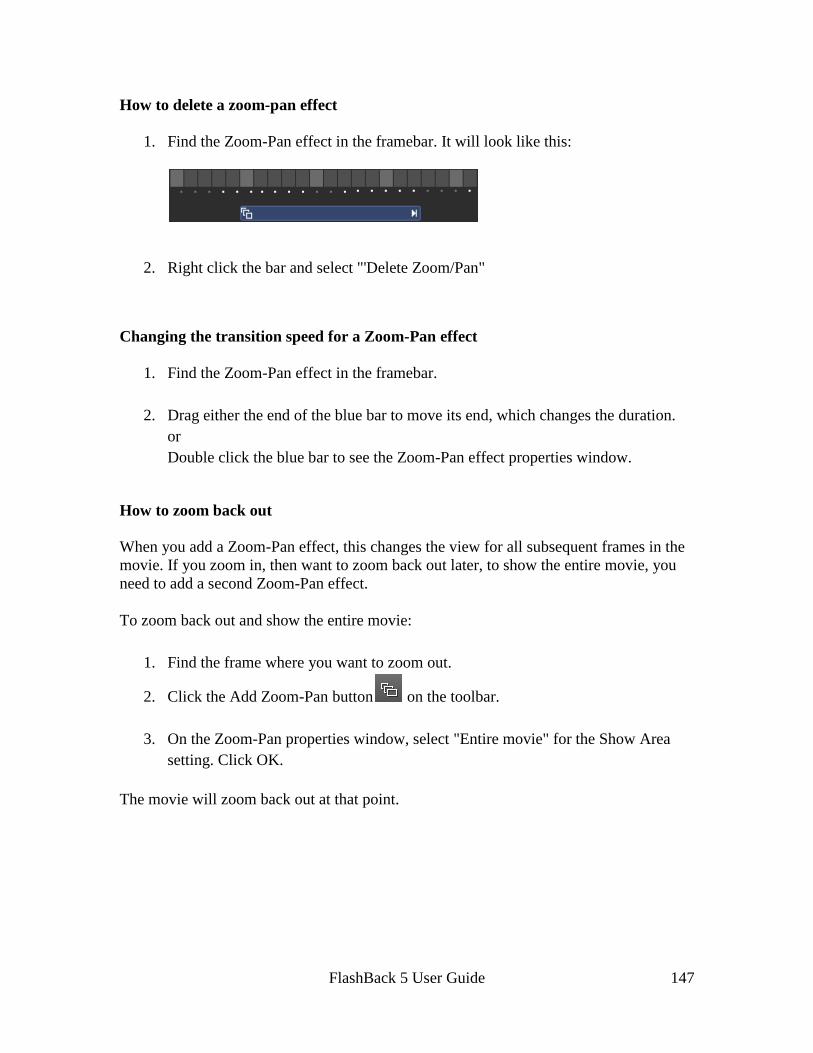
FlashBack 5 User Guide
147
How to delete a zoom-pan effect
1. Find the Zoom-Pan effect in the framebar. It will look like this:
2. Right click the bar and select "'Delete Zoom/Pan"
Changing the transition speed for a Zoom-Pan effect
1. Find the Zoom-Pan effect in the framebar.
2. Drag either the end of the blue bar to move its end, which changes the duration.
or
Double click the blue bar to see the Zoom-Pan effect properties window.
How to zoom back out
When you add a Zoom-Pan effect, this changes the view for all subsequent frames in the
movie. If you zoom in, then want to zoom back out later, to show the entire movie, you
need to add a second Zoom-Pan effect.
To zoom back out and show the entire movie:
1. Find the frame where you want to zoom out.
2. Click the Add Zoom-Pan button on the toolbar.
3. On the Zoom-Pan properties window, select "Entire movie" for the Show Area
setting. Click OK.
The movie will zoom back out at that point.

Cropping and Autoscrolling
This topic applies to the Pro and Plus editions only
About cropping
After recording a movie, you may only wish to show a part of the recorded area in the
final movie.
Use FlashBack's cropping function to cut down the movie to a smaller area and have it
automatically scroll to keep the mouse in view.
How to crop a movie:
1. Open the movie in FlashBack Player and click the cropping button to turn
cropping 'on'.
Or, select "Set Cropping Rectangle" from the Effects menu.
2. You will see a blue rectangle that indicates the size the movie will be cropped
down to.
Resize and position it as required.
To turn cropping off, click the cropping button again.
FlashBack Express owners: you can turn Cropping on and set the size of the
crop region, but you cannot move the region, because it is set to always
follow the mouse.
How to preview the cropped movie:
1. Click the Apply Effects button on the toolbar, or select the "Apply Effects" item
from the Effects menu.
Note: the Apply Effects function also applies any Zoom-Pan effects you've added
- it shows exactly what you will get when you export the movie (apart from any
scaling or other effects you add at export time).
FlashBack 5 User Guide
149
Autoscrolling Cropped Movies
The crop rectangle can follow the mouse to keep it in view. Use options in the Effects ->
Autoscroll Cropping Rectangle menu to have the mouse either in the center or near the
center of the movie.
When autoscrolling is set on the cropping rectangle, any ZoomPan effects you add can
only be resized, not moved, because they will also be automatically positioned to keep
the mouse in view.
Making Cropping Permanent
To decrease the size of the FlashBack movie file (.FBR file) you can make cropping
'permanent', effectively throwing away everything outside of the cropping area.
To do this: on the Effects menu, select "Make Cropping Permanent".
Transitions
This topic applies to the Pro edition only
FlashBack can add 'transition' effects to a movie to provide a more visually appealing
transition from one part of a movie to the next. They can be added automatically when
inserting a video file or FlashBack movie to cover the 'joins' at the start and end of the
inserted movie.
When you insert a transition at a frame, it creates a transition between that frame and the
frame before it.
You can set the type of transition, its duration and whether it pauses in the middle. The 3
types of transition are:
Fade to white - if you add the transition at frame 100, for example, frame 99 will
fade to white and frame 100 will fade in from white.
Fade to black - again, frame 99 fades to black and frame 100 fades in from black
Cross-fade - this fades frame 99 into frame 100
Transitions can be added automatically when you insert a video file or FlashBack movie
into your movie.
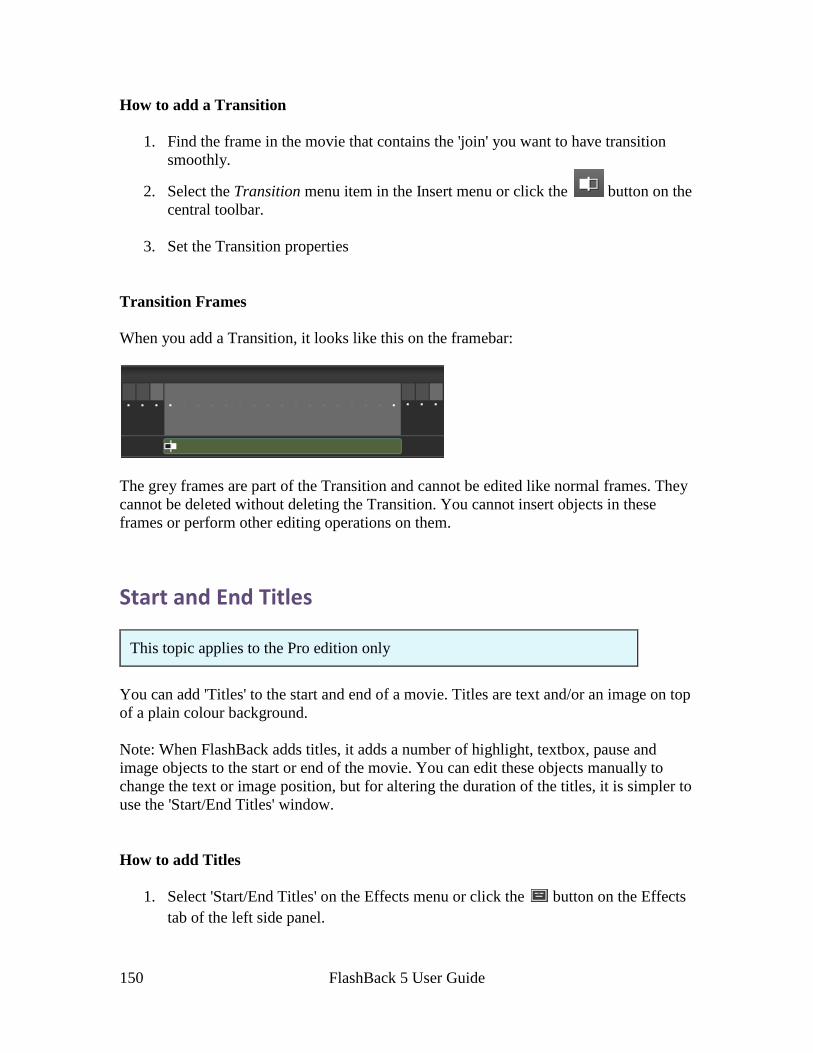
FlashBack 5 User Guide
150
How to add a Transition
1. Find the frame in the movie that contains the 'join' you want to have transition
smoothly.
2. Select the Transition menu item in the Insert menu or click the button on the
central toolbar.
3. Set the Transition properties
Transition Frames
When you add a Transition, it looks like this on the framebar:
The grey frames are part of the Transition and cannot be edited like normal frames. They
cannot be deleted without deleting the Transition. You cannot insert objects in these
frames or perform other editing operations on them.
Start and End Titles
This topic applies to the Pro edition only
You can add 'Titles' to the start and end of a movie. Titles are text and/or an image on top
of a plain colour background.
Note: When FlashBack adds titles, it adds a number of highlight, textbox, pause and
image objects to the start or end of the movie. You can edit these objects manually to
change the text or image position, but for altering the duration of the titles, it is simpler to
use the 'Start/End Titles' window.
How to add Titles
1. Select 'Start/End Titles' on the Effects menu or click the button on the Effects
tab of the left side panel.

FlashBack 5 User Guide
151
2. Set the Title properties - give it some text and/or an image
Changing the Titles Appearance
To change the position of the text or image:
When FlashBack adds titles with text and images, it creates the text or image by adding a
standard textbox or image object to the movie. You will see these at the start or end of the
movie.
Change the position of the text or image by clicking and dragging the textbox or image
object, as you normally would.
To change the size of the image:
See the help for 'To change the position of the text or image'. Change the size of the
image object added by FlashBack when it created the titles.
To change anything else:
Select 'Start/End Titles' from the Effects menu or click the button on the Effects tab of
the left side panel.
You can always alter the titles by editing the image, textbox, pause and highlight objects
added by FlashBack to the start or end of the movie. However, for things like altering the
duration of the movie, it is much easier to use the Titles properties window.
Magnifier effects
You can add a Magnifier to show part of the movie in greater detail.
How to add a Magnifier effect:
1. Select the frame where you want to add the Magnifier.
2. On the Player main menu, select Magnifier from the Effects menu.
or
On the central toolbar, click the Magnifier button:
FlashBack 5 User Guide
152
You can adjust the strength of the magnification and the border around it by double
clicking it, or double clicking its bar in the framebar.
The Mouse Cursor
Highlighting the mouse cursor
By default, FlashBack draws a yellow highlight circle around the mouse cursor. If you
want to change the colour, opacity, size and outlining of this circle, or not show it at all,
use the Highlight Cursor option in the Effects menu.
Note: if you use the 'cursor trails' option in Windows, the highlight circle will not be
visible.
Smoothing mouse movements
This topic applies to the Pro edition only
FlashBack enables you to smooth out the mouse movements in selected frames.
The mouse will move smoothly from its position in the first frame of the selection to its
position in the last frame of the selection, stopping to make any clicks it needs to along
the way.
Use this feature to remove any distracting jumps in mouse movements.
How to smooth mouse movements in a section of the movie:
1. Select the frames in which you want to smooth out the mouse movements.
FlashBack will make the mouse move smoothly from the position in the first
frame of the selection to its position in the last frame of the selection.
2. Select the 'Smooth cursor movements' item from the Actions -> Cursor menu.

FlashBack 5 User Guide
153
Hiding the mouse cursor
This topic applies to the Pro edition only
FlashBack can hide the mouse cursor during playback. You can select a series of frames
and choose to hide the cursor in those frames when the movie is played back.
How to hide the mouse cursor:
1. Select the frames in which you want to hide the mouse.
2. In the Actions menu, select Mouse Cursor -> Hide the mouse cursor
3. The selected frames will be drawn in blue in the frame bar, indicating that the
mouse is hidden in those frames.
To un-hide the cursor in those frames just select the frame and select Actions -> Mouse
Cursor -> Show the mouse cursor.
Mouse action animations
When a mouse button is pressed during recording, FlashBack can show an animation in
the final movie, to indicate the action that occurred. These animations can be customised
by editing the bitmaps used to create them.
How to switch mouse action animations on and off:
In the Effects menu, select Highlight Cursor. Then select or deselect the "Highlight
mouse clicks" setting.
How to use the default animations instead of customised animations saved in a
movie file:
If you play back an FBR file with customised mouse animations but want to use the
default animations or your own customised images, select the Reset mouse action images
item from the Edit menu in FlashBack Player.
FlashBack 5 User Guide
154
How to customise mouse action animations:
The images used in animations are contained in the "custom" folder, which is in the
FlashBack install folder. When Player starts, it loads these images. Take a look in this
folder and you will see a number of .PNG image files called LeftMouseDblClk1.png,
LeftMouseDown1.png etc.
When a mouse action occurs in the movie, FlashBack overlays these images onto the
mouse cursor in a sequence to create the animation. For example, if the right mouse
button was pushed down, it would overlay RightMouseDown1.png, then
RightMouseDown2.png, then RightMouseDown3.png to create the animation effect.
To change the animation seen for a mouse action, you simply need to change the image
files used.
When you change the animations, your customised version is saved into the movie (FBR)
file and also included in all exports you make.
For example: if you wanted to change the right mouse down animation, you could edit
the 3 files called RightMouseDown1.png, RightMouseDown2.png and
RightMouseDown3.png in an image editor application to create a completely different
effect. Each of the images must be the same size.
Supported formats for the image files are: BMP, GIF, PNG, JPG, JPEG and ICO.
If you wanted to use BMP files instead of PNG files for the right mouse down animation,
you would remove the RightMouseDown<frame number>.PNG files from the Custom
folder and replace them with RightMouseDown<frame number>.BMP files.
The actions available for animation are:
Left button down
Left button up
Left button double click
Right button down
Right button up
Right button double click
Middle button down
Middle button up
Middle button double click
Scroll wheel up
Scroll wheel down
No default animation is supplied for middle button actions.
FlashBack 5 User Guide
155
Transparency
The animation images need transparency, or they would completely obscure the mouse
pointer and the movie around it. FlashBack handles transparency in the images in one of
two ways:
1. By treating one colour in the image as 'transparent'
The transparent colour is set by the TransparentColour variable in the custom.cfg
file - see the section More advanced customisation below. If you use normal BMP,
GIF, JPG or 8 bit PNG images you must use this method and specify a colour as
'transparent'.
2. By using transparency information encoded into the image.
This is only available for 32bit 'ARGB' BMP files and 24bit PNG format images.
24bit PNG images can be saved by Adobe Photoshop and other image processing
applications.
More advanced customisation
In the custom folder is another file, custom.cfg which holds details on how Player will
use the animation images. It is a text file and you can edit this to change the number of
frames of animation, speed of animation and the transparent colour in the image files.
The file holds a number of numeric values which relate to the various mouse action
animations. You can change these values to change the animation.
Here is a sample set of lines from custom.cfg which control the left button down
animation. Comments on how you could change the value are on the right.
LeftMouseDownDoDraw=1
Change this value to 0 to not
include this particular
animation (left button down) in
the movie - no animation will
be displayed. LeftMouseDownImagesCount=3
Change this to add more frames
of animation or have less.
Remember, if you changed this
value to 4, for example, you
would need to add an extra
image file:
LeftMouseDown4.bmp LeftMouseDownDuration=500
The time in milliseconds that
each frame of the animation is
displayed for. LeftMouseDownOffsetFromCursorHotspotX=- These two values specify the
FlashBack 5 User Guide
156
12
LeftMouseDownOffsetFromCursorHotspotY=-
12
position of the 'hotspot' in the
image - the position of the end
of the cursor.
To locate the animation exactly
over the end of the mouse
cursor, you may need to change
these values.
LeftMouseDownTransparentColor=0x00FF00FF
The colour in the image that
will be made transparent when
it is overlaid on top of the
movie.
Putting the mouse in front or behind other objects
This topic applies to the Pro and Plus editions only
By default the mouse cursor will move behind other objects, like textboxes, images and
highlights,that you add to the movie.
You may want the mouse cursor to move in front of them, so they appear to be part of the
original recording. FlashBack allows you to do this.
Note: the exception to this is the webcam video window - this always appears in front of
the cursor and other objects added in FlashBack.
How to make the cursor move in front of other presentation objects:
1. Select the 'Bring cursor to front' item from the Actions -> Cursor menu.
If you wanted to send the cursor behind other objects, you would select the 'Send cursor
to back' item from the same menu.
Re-recording the mouse cursor
This topic applies to the Pro edition only
There may be occasions when you want to tidy up or correct mouse movements in the
movie. FlashBack allows you to do this by letting you re-record the mouse for part or all
of the movie.
FlashBack 5 User Guide
157
How to re-record the mouse for a section of the movie:
1. Select the frames in which you want to re-record the mouse.
2. Select the menu item Actions -> Cursor -> Re-record mouse cursor -> At selected
frames. A countdown will be displayed, to allow you to get the mouse into the
correct starting position.
3. When the count down finishes, the movie will play. Move the mouse as you wish
it to be seen in the final movie and FlashBack will record the movements.
To re-record the mouse for the entire movie, just select the Actions -> Cursor -> Re-
record mouse cursor -> For whole movie menu item.
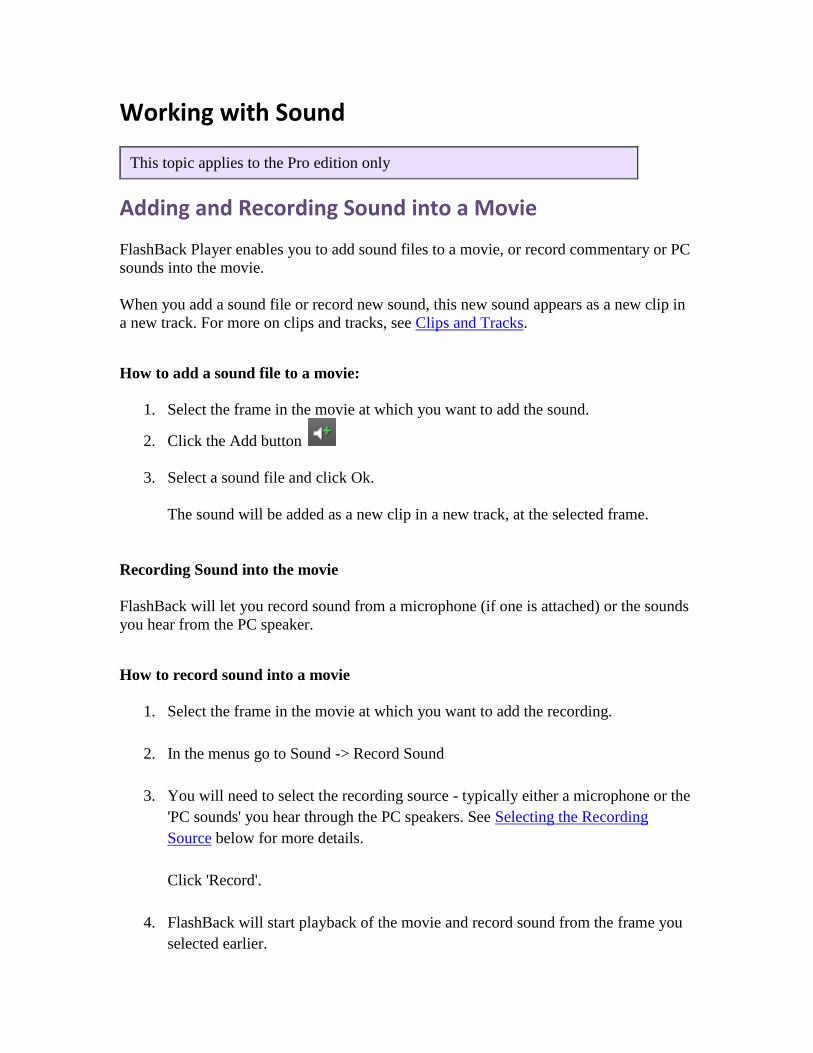
Working with Sound
This topic applies to the Pro edition only
Adding and Recording Sound into a Movie
FlashBack Player enables you to add sound files to a movie, or record commentary or PC
sounds into the movie.
When you add a sound file or record new sound, this new sound appears as a new clip in
a new track. For more on clips and tracks, see Clips and Tracks.
How to add a sound file to a movie:
1. Select the frame in the movie at which you want to add the sound.
2. Click the Add button
3. Select a sound file and click Ok.
The sound will be added as a new clip in a new track, at the selected frame.
Recording Sound into the movie
FlashBack will let you record sound from a microphone (if one is attached) or the sounds
you hear from the PC speaker.
How to record sound into a movie
1. Select the frame in the movie at which you want to add the recording.
2. In the menus go to Sound -> Record Sound
3. You will need to select the recording source - typically either a microphone or the
'PC sounds' you hear through the PC speakers. See Selecting the Recording
Source below for more details.
Click 'Record'.
4. FlashBack will start playback of the movie and record sound from the frame you
selected earlier.
FlashBack 5 User Guide
159
5. Press the Pause button on the toolbar to stop recording and playback.
The sound will be added as a new clip in a new track, at the selected frame.
Selecting the Recording Source
On the Sound Record window, you select the sound source and format to be used by
FlashBack Player when recording.
1. Selecting a sound device
Choose a device from the Sound Device drop-down list. Your PC will typically
have a "default" sound device and one for each sound card or other sound
playback or recording device attached to your PC. Select the device you want to
record sound from.
2. Selecting a sound source
There are 3 options to choose from:
1. Microphone
Select this to record a commentary from an attached microphone.
Use the Level slider and volume indicator on the right of the window to
ensure that your microphone is connected and picking up sound correctly.
If FlashBack does not detect a suitable microphone source attached to your
selected sound device, this option will not be enabled.
2. PC Sounds
Select this option to record what you hear in your PC speakers.
A typical sound device (e.g. a sound card) will have a number of 'sources'
available for recording. Click the Select Sources button to see the sources
that play through your PC speakers. You can select which sources to
record and adjust their relative volumes with the mini-sliders.
Use the 'level' meters to the right of the Window to make sure FlashBack
can 'hear' the sound ok for recording.
3. Other Sounds
Use this to select a sound source that usually does not play back through
your PC speakers.
FlashBack 5 User Guide
160
3. Selecting a sound format
Selecting different sound formats will vary the quality of the recording and the
amount of space it occupies in the movie file.
You need to select:
1. Sampling rate in Khz.
The higher, the rate the better the sound quality but the more file space the
sound track occupies.
2. Stereo / Mono.
Stereo will give better sound quality than mono, but also produce larger
movie files.
3. MP3 compression
This option should always be selected unless you are experiencing
problems or crashes during recording or export. Deselecting this option
may greatly increase the movie file size.
FlashBack uses a redistribution of the LAME MP3 codec:
www.mp3dev.org .
The Sound Options Window
This topic applies to the Pro edition only
Use this window to:
Set the sound output device to be used on playback.
Set options that determine how MP3 sounds are affected by editing and exporting.
The Playback Tab
This sets the sound device used during movie playback.
The Editing and Exporting Tab
The controls on this tab set:
The 'common' MP3 compression level.
When uncompressed sounds are added to a movie, they may need to be converted
to MP3. This 'common' compression level is used to compress the sounds.
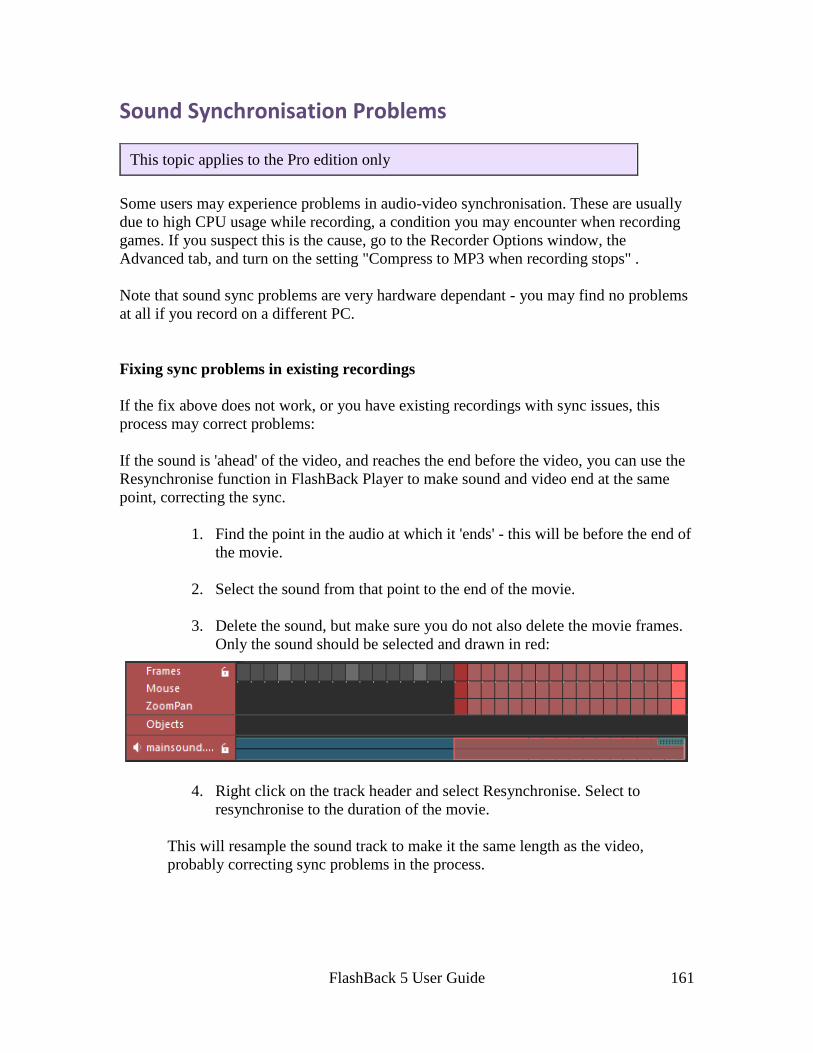
FlashBack 5 User Guide
161
Sound Synchronisation Problems
This topic applies to the Pro edition only
Some users may experience problems in audio-video synchronisation. These are usually
due to high CPU usage while recording, a condition you may encounter when recording
games. If you suspect this is the cause, go to the Recorder Options window, the
Advanced tab, and turn on the setting "Compress to MP3 when recording stops" .
Note that sound sync problems are very hardware dependant - you may find no problems
at all if you record on a different PC.
Fixing sync problems in existing recordings
If the fix above does not work, or you have existing recordings with sync issues, this
process may correct problems:
If the sound is 'ahead' of the video, and reaches the end before the video, you can use the
Resynchronise function in FlashBack Player to make sound and video end at the same
point, correcting the sync.
1. Find the point in the audio at which it 'ends' - this will be before the end of
the movie.
2. Select the sound from that point to the end of the movie.
3. Delete the sound, but make sure you do not also delete the movie frames.
Only the sound should be selected and drawn in red:
4. Right click on the track header and select Resynchronise. Select to
resynchronise to the duration of the movie.
This will resample the sound track to make it the same length as the video,
probably correcting sync problems in the process.

FlashBack 5 User Guide
162
Changing the Volume of a Track or Clip
This topic applies to the Pro edition only
To change the volume of a Track or Clip, select it and then use the Volume control on the
toolbar.
Select the Track or Clip by clicking its drag handle:
Right click the selected clip and use the Increase Volume or Decrease Volume to increase
or decrease the volume.
Removing Noise
This topic applies to the Pro edition only
FlashBack can remove background noise such as hiss or mains hum, from a sound track.
How to remove noise
1. Select a sound clip or track
2. Select 'Remove Noise' from the Sound menu or the right click menu for the clip or
track.
3. Set the noise removal parameters.
The higher the 'Strength' setting, the more noise is removed, but higher values will
adversely affect sound quality - you will need to find the right balance between
noise removal and sound quality.
The 'remove musical artefacts' setting removes distortion added by the noise
removal process. You would normally want this set on, but turning it off can
improve quality in some situations.
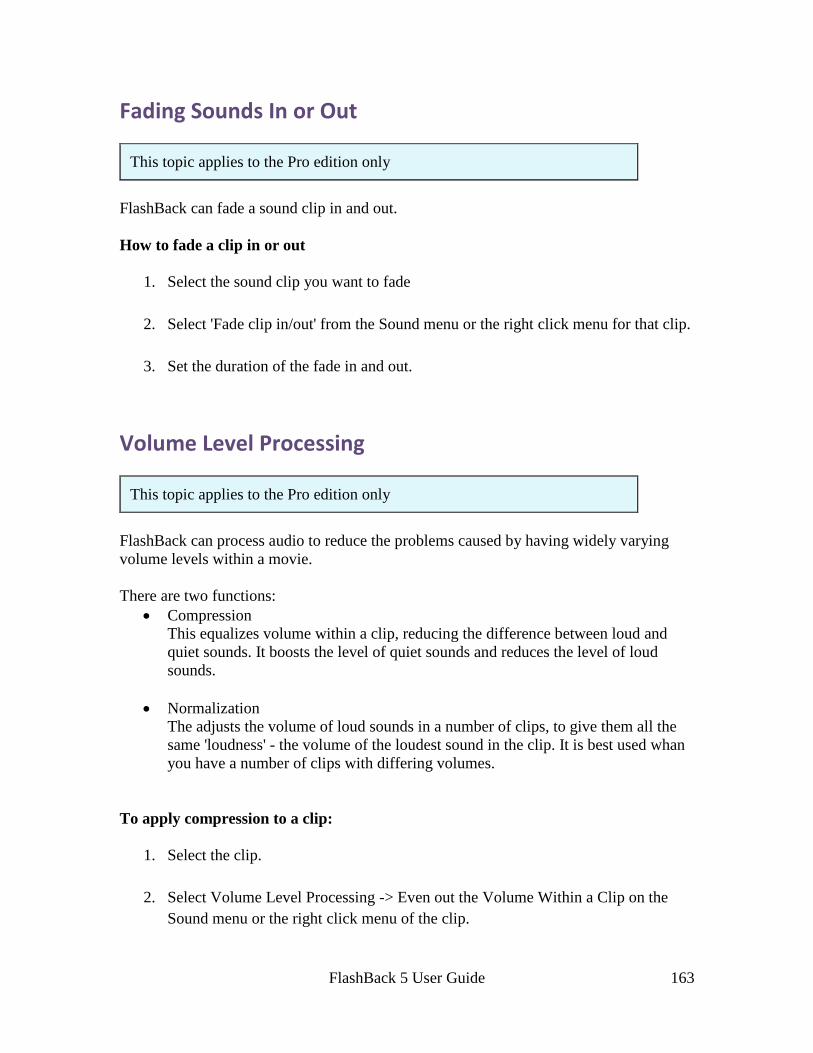
FlashBack 5 User Guide
163
Fading Sounds In or Out
This topic applies to the Pro edition only
FlashBack can fade a sound clip in and out.
How to fade a clip in or out
1. Select the sound clip you want to fade
2. Select 'Fade clip in/out' from the Sound menu or the right click menu for that clip.
3. Set the duration of the fade in and out.
Volume Level Processing
This topic applies to the Pro edition only
FlashBack can process audio to reduce the problems caused by having widely varying
volume levels within a movie.
There are two functions:
Compression
This equalizes volume within a clip, reducing the difference between loud and
quiet sounds. It boosts the level of quiet sounds and reduces the level of loud
sounds.
Normalization
The adjusts the volume of loud sounds in a number of clips, to give them all the
same 'loudness' - the volume of the loudest sound in the clip. It is best used whan
you have a number of clips with differing volumes.
To apply compression to a clip:
1. Select the clip.
2. Select Volume Level Processing -> Even out the Volume Within a Clip on the
Sound menu or the right click menu of the clip.

FlashBack 5 User Guide
164
3. Set the strength of the compression
To apply normalization to a number of clips:
1. Select more than one clip by holding the Shift key and clicking the clip handles.
2. Select Volume Level Processing -> Make Multiple Clips Have the Same
Loudness on the Sound menu or the right click menu of the clip.
3. Set normalization to either use the mean volume of the clips or a custom level.
Editing Sound
This topic applies to the Pro edition only
Sound Editing Basics
FlashBack includes powerful multi-track sound editing capabilities. You can add and edit
extra commentary or sound files to your movie.
This page will cover the basics of editing sound:
Clips and Tracks
Moving a Clip
Selecting Sound
Changing the volume of sound
Muting Sound
See these topics for more advanced features:
Adding and Recording Sound into a movie
Merging and Splitting Clips and Tracks
Sound Editing Operations
More About Selecting Sound and Frames
Clips and Tracks
FlashBack works with sound as clips and tracks.

FlashBack 5 User Guide
165
A clip is a piece of sound that you can move and adjust its volume, independent
of all other sounds.
A number of sound clips together form a track. You could have a track called
'commentary' for example, which contains a number of different commentary
sound clips.
FlashBack shows clips and tracks below the framebar. Each clip is shown as a blue sound
"waveform" image, with drag handles.
In the image below, there are 2 tracks: "PC Sounds" and "Microphone". The Microphone
track contains 2 clips.
A = Tracks
B= Clips
When you add a sound file or record a new commentary, the new sound is added as a new
clip in a new track.
If you recorded sound with your movie, this sound will appear as a single clip in a track
names after the source it was recorded from. The clip will have the same length as the
movie.
Note: stereo tracks are shown as one waveform, rather than two images for the two
separate channels. The track plays back in stereo, but for the purposes of editing and
visualisation, its shown as one image, and edits apply to both left and right channels.
Moving a clip
At the start and end of each clip are drag handles.
Move the start point of a clip in the movie by clicking either handle and dragging to the
left or right. This enables you to position sound effects or sections of speech exactly in
sync with the video.
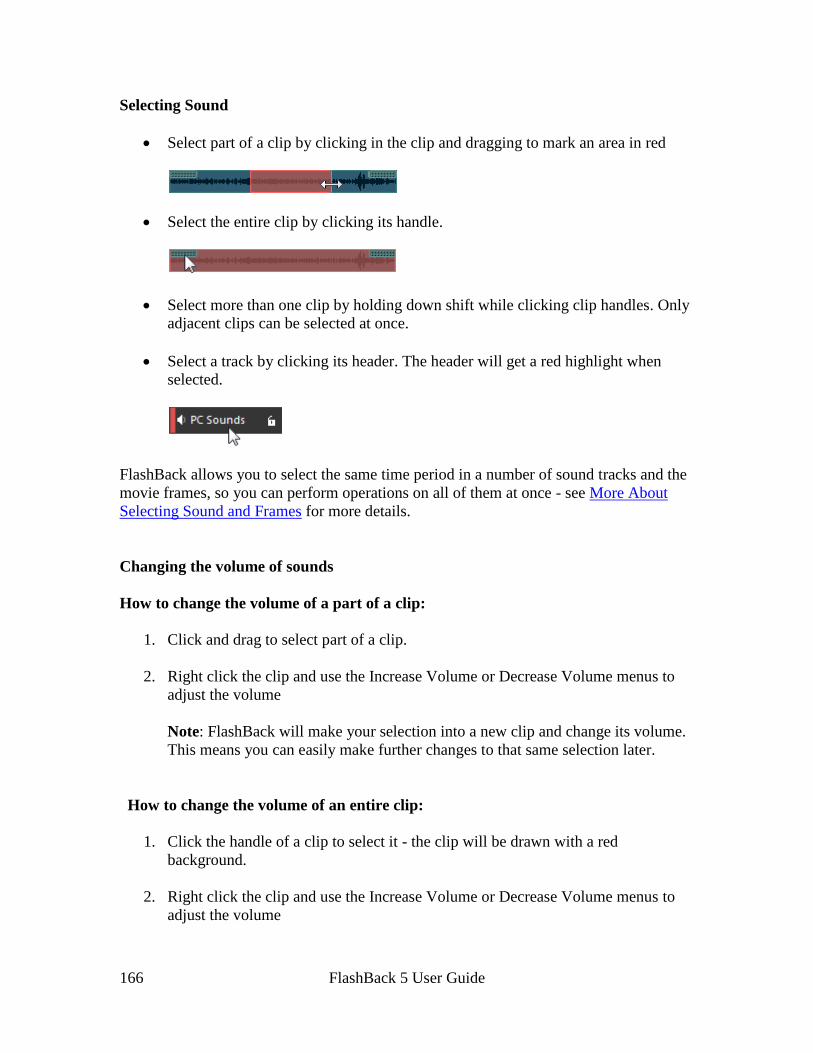
FlashBack 5 User Guide
166
Selecting Sound
Select part of a clip by clicking in the clip and dragging to mark an area in red
Select the entire clip by clicking its handle.
Select more than one clip by holding down shift while clicking clip handles. Only
adjacent clips can be selected at once.
Select a track by clicking its header. The header will get a red highlight when
selected.
FlashBack allows you to select the same time period in a number of sound tracks and the
movie frames, so you can perform operations on all of them at once - see More About
Selecting Sound and Frames for more details.
Changing the volume of sounds
How to change the volume of a part of a clip:
1. Click and drag to select part of a clip.
2. Right click the clip and use the Increase Volume or Decrease Volume menus to
adjust the volume
Note: FlashBack will make your selection into a new clip and change its volume.
This means you can easily make further changes to that same selection later.
How to change the volume of an entire clip:
1. Click the handle of a clip to select it - the clip will be drawn with a red
background.
2. Right click the clip and use the Increase Volume or Decrease Volume menus to
adjust the volume
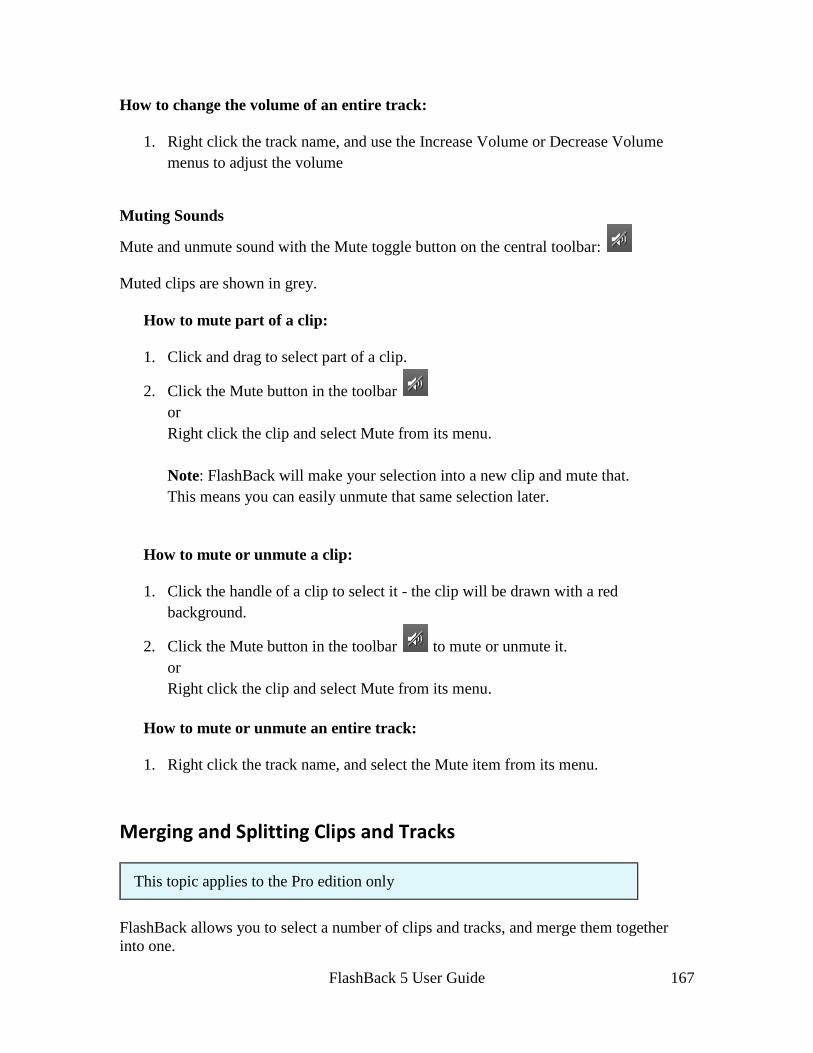
FlashBack 5 User Guide
167
How to change the volume of an entire track:
1. Right click the track name, and use the Increase Volume or Decrease Volume
menus to adjust the volume
Muting Sounds
Mute and unmute sound with the Mute toggle button on the central toolbar:
Muted clips are shown in grey.
How to mute part of a clip:
1. Click and drag to select part of a clip.
2. Click the Mute button in the toolbar
or
Right click the clip and select Mute from its menu.
Note: FlashBack will make your selection into a new clip and mute that.
This means you can easily unmute that same selection later.
How to mute or unmute a clip:
1. Click the handle of a clip to select it - the clip will be drawn with a red
background.
2. Click the Mute button in the toolbar to mute or unmute it.
or
Right click the clip and select Mute from its menu.
How to mute or unmute an entire track:
1. Right click the track name, and select the Mute item from its menu.
Merging and Splitting Clips and Tracks
This topic applies to the Pro edition only
FlashBack allows you to select a number of clips and tracks, and merge them together
into one.
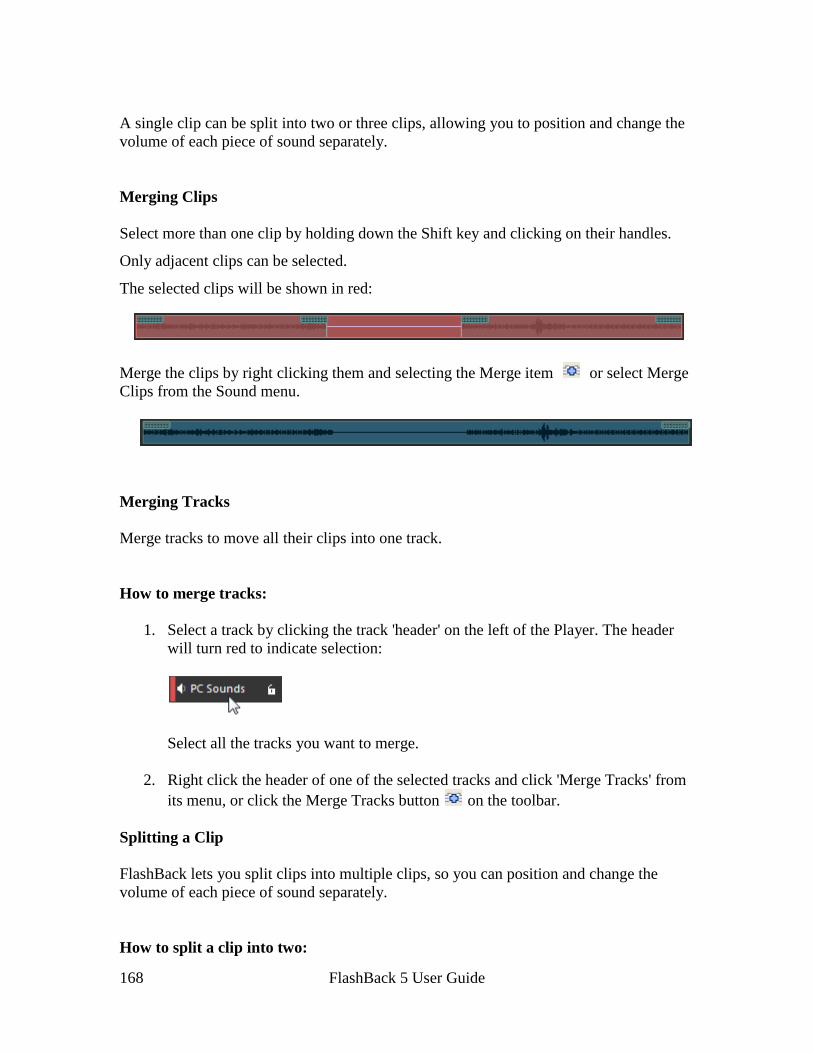
FlashBack 5 User Guide
168
A single clip can be split into two or three clips, allowing you to position and change the
volume of each piece of sound separately.
Merging Clips
Select more than one clip by holding down the Shift key and clicking on their handles.
Only adjacent clips can be selected.
The selected clips will be shown in red:
Merge the clips by right clicking them and selecting the Merge item or select Merge
Clips from the Sound menu.
Merging Tracks
Merge tracks to move all their clips into one track.
How to merge tracks:
1. Select a track by clicking the track 'header' on the left of the Player. The header
will turn red to indicate selection:
Select all the tracks you want to merge.
2. Right click the header of one of the selected tracks and click 'Merge Tracks' from
its menu, or click the Merge Tracks button on the toolbar.
Splitting a Clip
FlashBack lets you split clips into multiple clips, so you can position and change the
volume of each piece of sound separately.
How to split a clip into two:
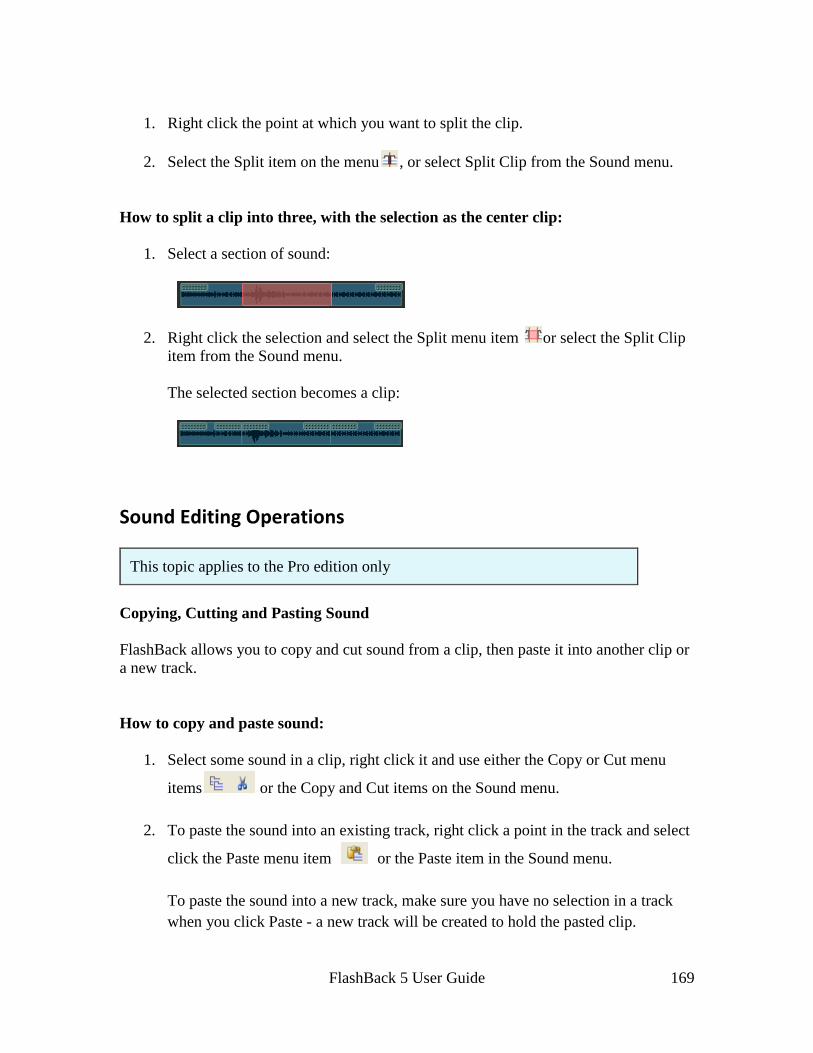
FlashBack 5 User Guide
169
1. Right click the point at which you want to split the clip.
2. Select the Split item on the menu , or select Split Clip from the Sound menu.
How to split a clip into three, with the selection as the center clip:
1. Select a section of sound:
2. Right click the selection and select the Split menu item or select the Split Clip
item from the Sound menu.
The selected section becomes a clip:
Sound Editing Operations
This topic applies to the Pro edition only
Copying, Cutting and Pasting Sound
FlashBack allows you to copy and cut sound from a clip, then paste it into another clip or
a new track.
How to copy and paste sound:
1. Select some sound in a clip, right click it and use either the Copy or Cut menu
items or the Copy and Cut items on the Sound menu.
2. To paste the sound into an existing track, right click a point in the track and select
click the Paste menu item or the Paste item in the Sound menu.
To paste the sound into a new track, make sure you have no selection in a track
when you click Paste - a new track will be created to hold the pasted clip.
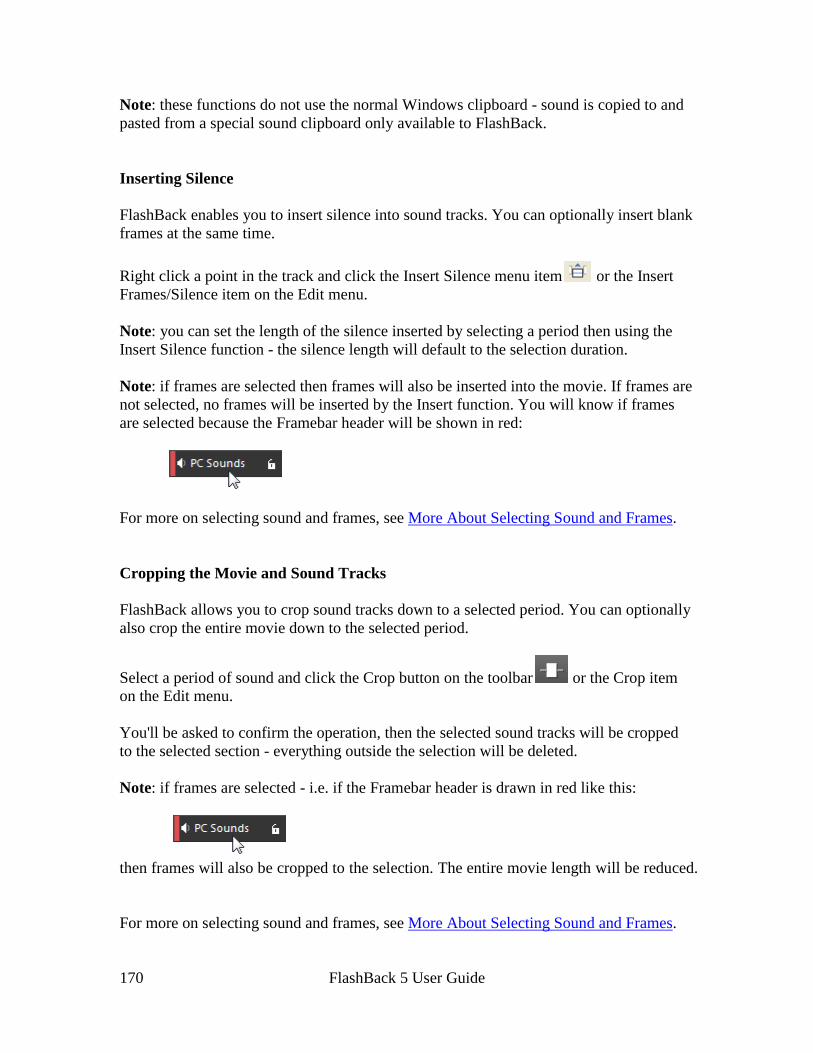
FlashBack 5 User Guide
170
Note: these functions do not use the normal Windows clipboard - sound is copied to and
pasted from a special sound clipboard only available to FlashBack.
Inserting Silence
FlashBack enables you to insert silence into sound tracks. You can optionally insert blank
frames at the same time.
Right click a point in the track and click the Insert Silence menu item or the Insert
Frames/Silence item on the Edit menu.
Note: you can set the length of the silence inserted by selecting a period then using the
Insert Silence function - the silence length will default to the selection duration.
Note: if frames are selected then frames will also be inserted into the movie. If frames are
not selected, no frames will be inserted by the Insert function. You will know if frames
are selected because the Framebar header will be shown in red:
For more on selecting sound and frames, see More About Selecting Sound and Frames.
Cropping the Movie and Sound Tracks
FlashBack allows you to crop sound tracks down to a selected period. You can optionally
also crop the entire movie down to the selected period.
Select a period of sound and click the Crop button on the toolbar or the Crop item
on the Edit menu.
You'll be asked to confirm the operation, then the selected sound tracks will be cropped
to the selected section - everything outside the selection will be deleted.
Note: if frames are selected - i.e. if the Framebar header is drawn in red like this:
then frames will also be cropped to the selection. The entire movie length will be reduced.
For more on selecting sound and frames, see More About Selecting Sound and Frames.
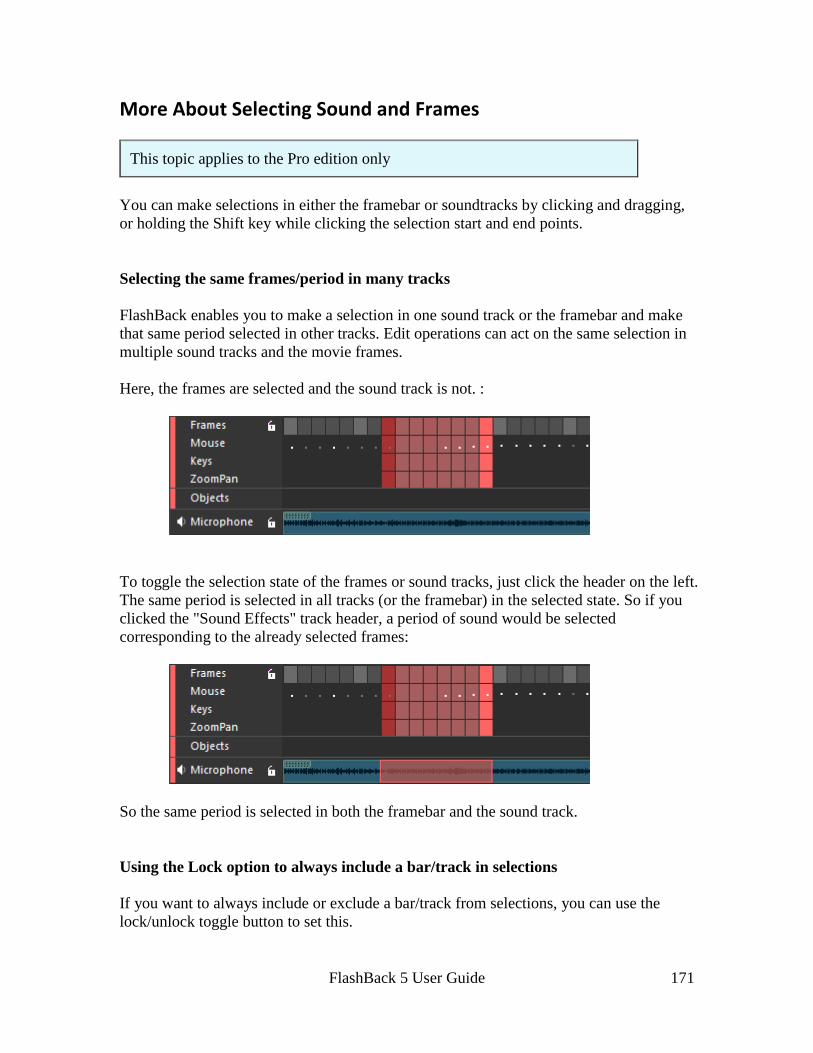
FlashBack 5 User Guide
171
More About Selecting Sound and Frames
This topic applies to the Pro edition only
You can make selections in either the framebar or soundtracks by clicking and dragging,
or holding the Shift key while clicking the selection start and end points.
Selecting the same frames/period in many tracks
FlashBack enables you to make a selection in one sound track or the framebar and make
that same period selected in other tracks. Edit operations can act on the same selection in
multiple sound tracks and the movie frames.
Here, the frames are selected and the sound track is not. :
To toggle the selection state of the frames or sound tracks, just click the header on the left.
The same period is selected in all tracks (or the framebar) in the selected state. So if you
clicked the "Sound Effects" track header, a period of sound would be selected
corresponding to the already selected frames:
So the same period is selected in both the framebar and the sound track.
Using the Lock option to always include a bar/track in selections
If you want to always include or exclude a bar/track from selections, you can use the
lock/unlock toggle button to set this.
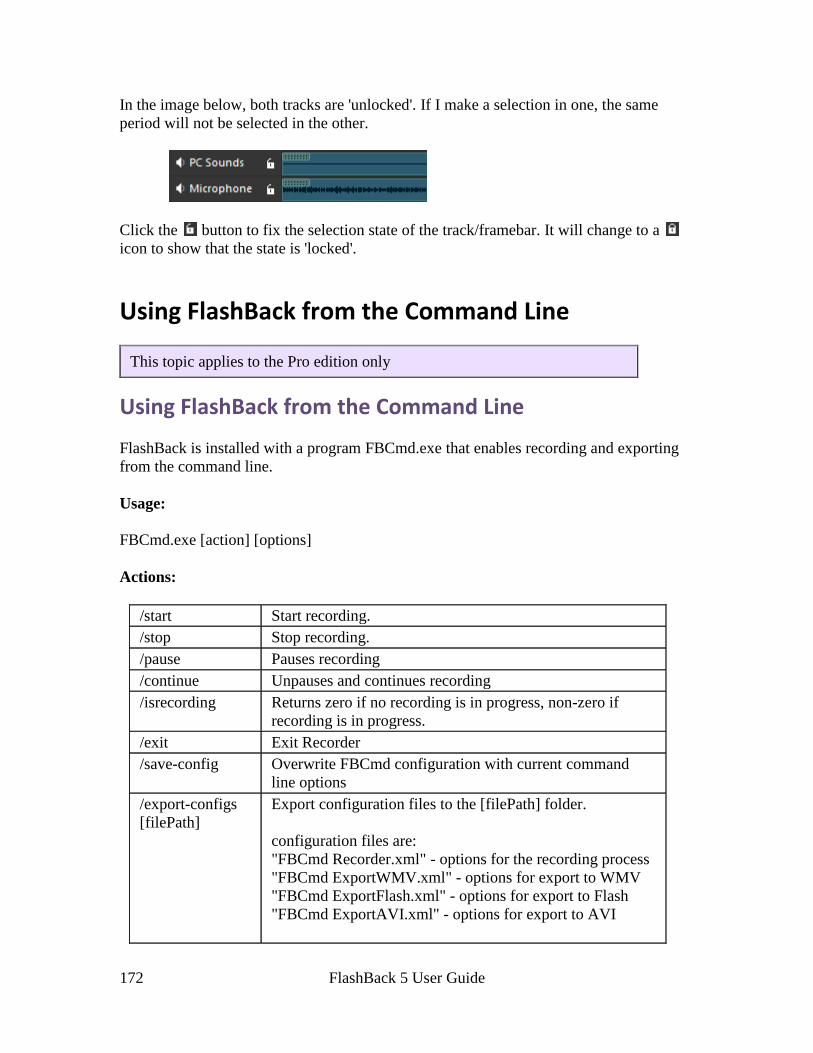
FlashBack 5 User Guide
172
In the image below, both tracks are 'unlocked'. If I make a selection in one, the same
period will not be selected in the other.
Click the button to fix the selection state of the track/framebar. It will change to a
icon to show that the state is 'locked'.
Using FlashBack from the Command Line
This topic applies to the Pro edition only
Using FlashBack from the Command Line
FlashBack is installed with a program FBCmd.exe that enables recording and exporting
from the command line.
Usage:
FBCmd.exe [action] [options]
Actions:
/start Start recording.
/stop Stop recording.
/pause Pauses recording
/continue Unpauses and continues recording
/isrecording Returns zero if no recording is in progress, non-zero if
recording is in progress.
/exit Exit Recorder
/save-config Overwrite FBCmd configuration with current command
line options
/export-configs
[filePath]
Export configuration files to the [filePath] folder.
configuration files are:
"FBCmd Recorder.xml" - options for the recording process
"FBCmd ExportWMV.xml" - options for export to WMV
"FBCmd ExportFlash.xml" - options for export to Flash
"FBCmd ExportAVI.xml" - options for export to AVI
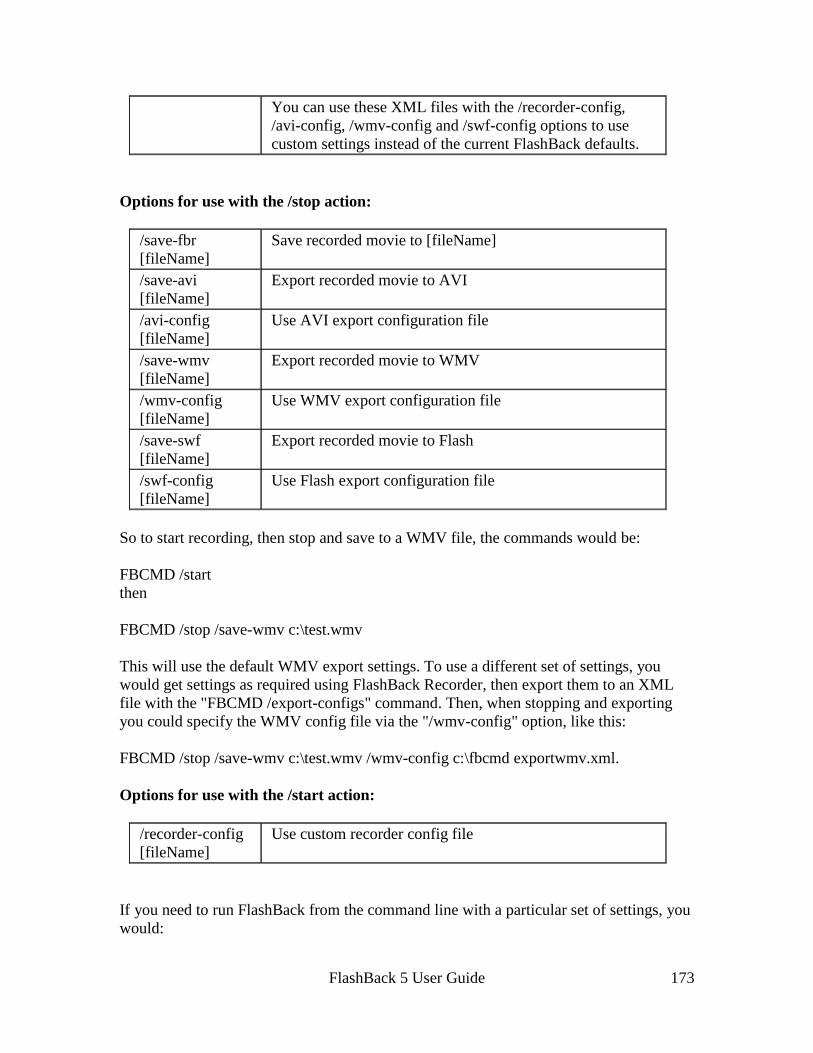
FlashBack 5 User Guide
173
You can use these XML files with the /recorder-config,
/avi-config, /wmv-config and /swf-config options to use
custom settings instead of the current FlashBack defaults.
Options for use with the /stop action:
/save-fbr
[fileName]
Save recorded movie to [fileName]
/save-avi
[fileName]
Export recorded movie to AVI
/avi-config
[fileName]
Use AVI export configuration file
/save-wmv
[fileName]
Export recorded movie to WMV
/wmv-config
[fileName]
Use WMV export configuration file
/save-swf
[fileName]
Export recorded movie to Flash
/swf-config
[fileName]
Use Flash export configuration file
So to start recording, then stop and save to a WMV file, the commands would be:
FBCMD /start
then
FBCMD /stop /save-wmv c:\test.wmv
This will use the default WMV export settings. To use a different set of settings, you
would get settings as required using FlashBack Recorder, then export them to an XML
file with the "FBCMD /export-configs" command. Then, when stopping and exporting
you could specify the WMV config file via the "/wmv-config" option, like this:
FBCMD /stop /save-wmv c:\test.wmv /wmv-config c:\fbcmd exportwmv.xml.
Options for use with the /start action:
/recorder-config
[fileName]
Use custom recorder config file
If you need to run FlashBack from the command line with a particular set of settings, you
would:

FlashBack 5 User Guide
174
Run FB normally, setting all the options you need. This could include setting a
region, window or selected monitors for recording.
Export the settings file, by running
FBCmd.exe /export-configs c:\myfolder
This generates settings file c:\myfolder\FBCmd Recroder.xml
Run FlashBack from the command line and use the settings file:
FBCmd.exe /start /recorder-config c:\myfolder\FBCmd Recorder.xml
This will run FlashBack, displaying no user interface, using the same settings as
previously.
Password Protecting Movies
This topic applies to the Pro edition only
Password Protecting Movies
FlashBack can password protect FBR files, so a password is required to play or edit the
movie.
How to make the movie require a password for playing and editing
1. In FlashBack Player, go to Tools -> Password Protect Movie
2. Select "Password protect movie"
3. Enter the same password in both fields: "password to enable playback and
editing" and "password to enable playback"
When the movie is opened, FlashBack will prompt for a password. If the correct
password is entered, the movie will open as normal.
FlashBack 5 User Guide
175
How to make the movie require a password for editing only
1. In FlashBack Player, go to Tools -> Password Protect Movie
2. Select "Password protect movie"
3. Enter a password in the "password to enable playback and editing" field.
When the movie is opened, FlashBack will prompt for a password to enable editing. If the
correct password is entered, the movie will open as normal. If no password is entered, the
movie will open in read-only mode - it can be played back but not edited.
How to make the movie require a different password for playing and editing
1. In FlashBack Player, go to Tools -> Password Protect Movie
2. Select "Password protect movie"
3. Enter the a different password in both fields: "password to enable playback and
editing" and "password to enable playback"
When the movie is opened, FlashBack will prompt for a password. If the "password to
enable playback" is entered, the movie will open in read-only mode. If the "password to
enable playback and editing" is entered, the movie will open as normal. If no correct
password is entered, the movie will not open.
Localization Features
This topic applies to the Pro edition only
Localizing FlashBack Movies
A FlashBack movie (FBR file) can contain multiple languages for the text in its
textboxes and buttons.
You can export the text from a movie to a rich text (RTF) file, localize it and
import it back into the movie, creating multiple languages for the movie.
FlashBack 5 User Guide
176
When exporting to a video format like Flash, you can specify which languages to
use, and FlashBack will create an export file for each language with textbox and
button text in that language
By default, when you create a movie its 'language' is the language of the FlashBack
edition being used. You can add more languages to an FBR file by importing text files
into it.
How to add a language to an FBR file
1. Go to Tools -> Localization -> Export Text as RTF. This will export Textbox and
Button text from the movie into an RTF file. By default the file is named using the
language code of the currently displayed language.
2. Translate the exported file, and change the language code in the file name to the
new language.
3. Go to Tools -> Localization -> Import Text as RTF. This will import text from the
selected file, creating a new language in the movie. FlashBack will use the
language code in the imported file name to determine the new language.
How to display a language when playing the movie
1. Go to Tools -> Localization -> Displayed Language, and select the language you
want to display.
How to export to a language, from a multi-language FBR file
1. Export as normal
2. After the 'Save As' window where you name the export file, you will see a
window that asks you to select the languages to export. The export will proceed
once for each selected language, naming the exported file using language codes.
How to change the language assigned to text
When you import text, FlashBack assigns it a language using the language code in the file
name. If you've imported text but need to change its language (maybe the language code
was wrong), you can do it like this:

FlashBack 5 User Guide
177
1. Go to Tools -> Localization -> Manage Languages
2. Select the language
3. Click 'Change...' and select the new language.