Embed Size (px)
Citation preview

1
FleetOhio Training Program
Version 3.2
4/26/2010
Today’s Agenda
2
What is FleetOhio?
Accessing the Program
Navigating FleetOhio
Fuel Tickets
Bulk Fuel Receipts
Work Orders
Updating Locations
Advanced Options in FleetOhio
Selecting and Filtering Data
Online Reports
Logging Off
What is FleetOhio?
3
FleetOhio is a computer program used to track the
operational and expense information on the state‟s fleet.

Accessing the ProgramAccess the Program
4
Select the FleetOhio Icon on your desktop.
Enter your User Id and Temporary Password and Select <OK>.

Main Screen after Logon
5
Accessing the ProgramAccess the Program (continued)
6
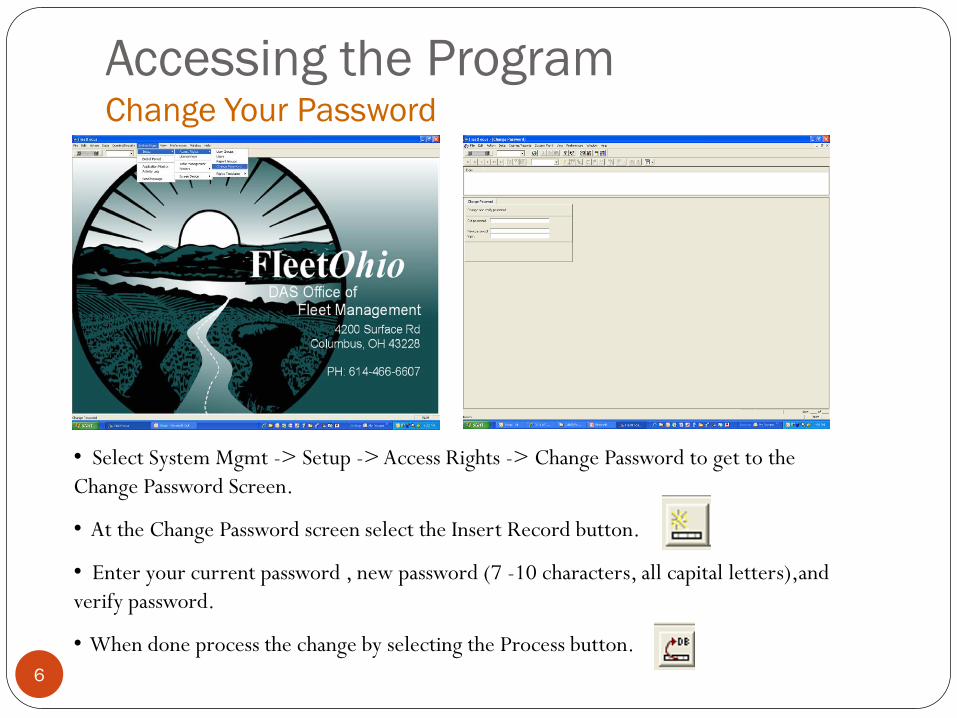
• Select System Mgmt -> Setup -> Access Rights -> Change Password to get to the
Change Password Screen.
• At the Change Password screen select the Insert Record button.
• Enter your current password , new password (7 -10 characters, all capital letters),and
verify password.
• When done process the change by selecting the Process button.
Accessing the ProgramChange Your Password

7
To get back to the Main Screen close
the window by selecting the small
“X” button.
Accessing the ProgramReturning to the Main Screen

Exercise 1: Changing your password
8
Change your temporary password using the steps outlined
previously.
Write down your new password on the sheet provided.
Close the application and log back in using your new
password.
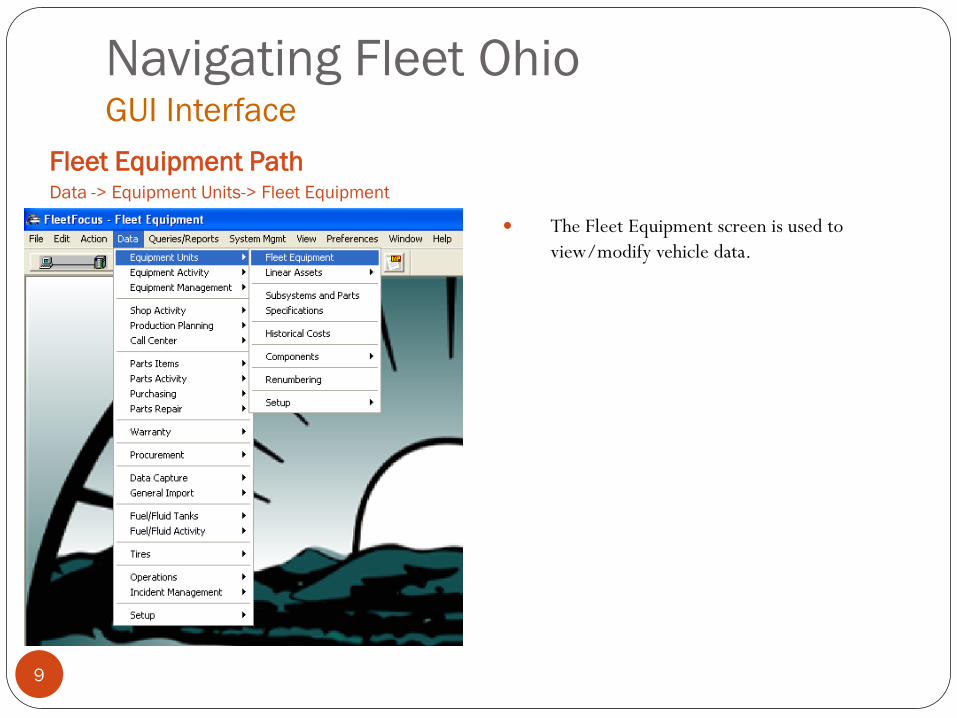
Fleet Equipment PathData -> Equipment Units-> Fleet Equipment
9
The Fleet Equipment screen is used to
view/modify vehicle data.
Navigating Fleet OhioGUI Interface

10
Navigating Fleet OhioGUI Interface (The Screen)
Menu Bar
Communication Indicator
Movement Buttons for the Grid
The Grid
Splitter Bar
The Tabs
Reports Choice List Toolbar Buttons Action Buttons Custom Action Buttons
Status Bar
Look here for successful
Insert or error messages!
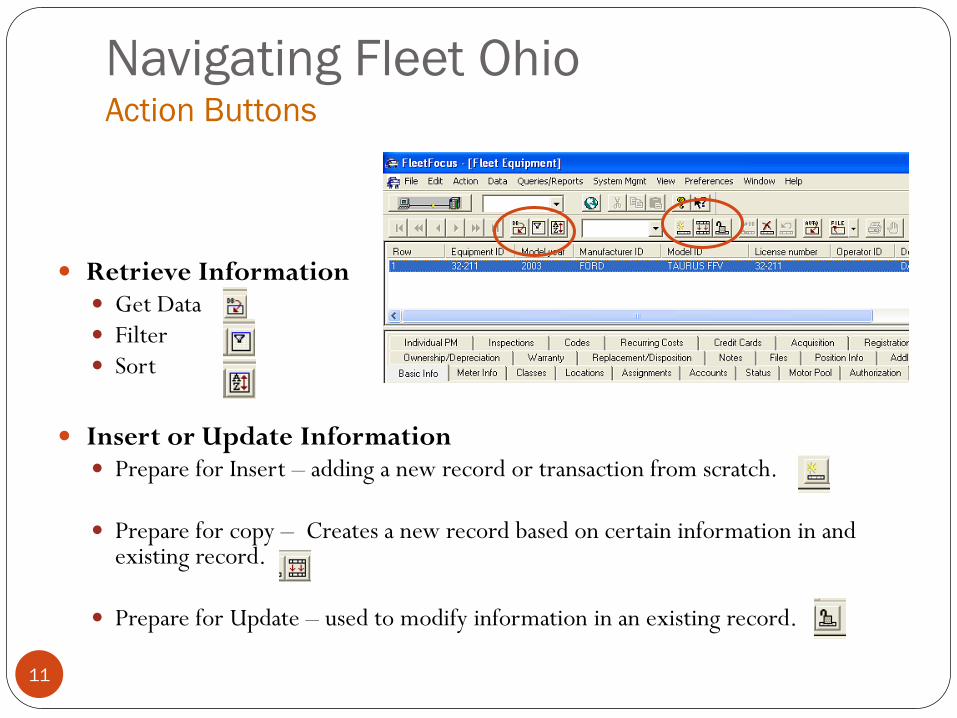
11
Retrieve Information Get Data Filter Sort
Insert or Update Information Prepare for Insert – adding a new record or transaction from scratch.
Prepare for copy – Creates a new record based on certain information in and existing record.
Prepare for Update – used to modify information in an existing record.
Navigating Fleet OhioAction Buttons
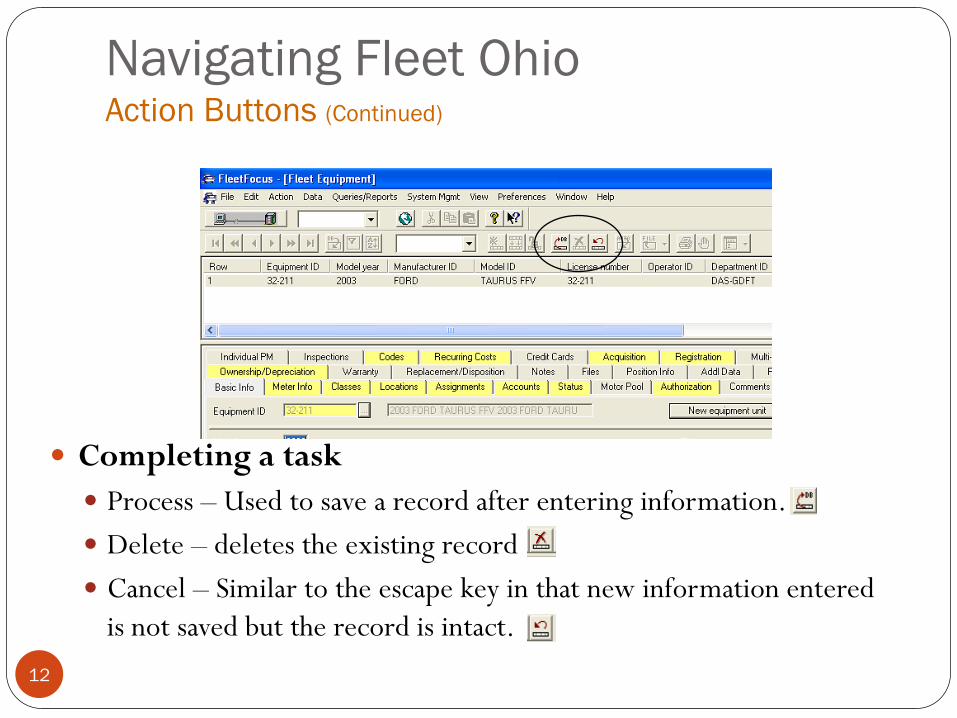
12
Completing a task
Process – Used to save a record after entering information.
Delete – deletes the existing record
Cancel – Similar to the escape key in that new information entered
is not saved but the record is intact.
Navigating Fleet OhioAction Buttons (Continued)

13
Navigating Fleet OhioAction Buttons (Continued)

14
A Voyager receipt, ODOT receipt, or bulk fuel log sheet for a
fuel transaction.
FleetOhio tracks three types of fuel tickets:
Automated
External
Internal
We will be discussing each of these ticket types in detail in a
moment
Each fuel transaction/ticket must be entered into or accounted
for in FleetOhio.
Fuel TicketsWhat is a Fuel Ticket?

15
Retail Fuel Ticket - Voyager
(Automated, Single Transaction)
Fuel TicketsAutomated Fuel Ticket
Automated
A retail fuel receipt that is received
when fuel is paid for with the state fleet
card (currently Voyager). These
receipts are not entered into FleetOhio
as they are automatically uploaded into
FleetOhio.

Bulk Fuel Ticket
(External, Single Transaction)
16
Fuel TicketsExternal Fuel Ticket
External
A retail fuel receipt that is not processed on the State Fleet Card , or a bulk fuel receipt that
is obtained when fueling at another state agency other than your own (i.e. ODOT, DNR,
DMH) or from an “out-of-pocket” (non- purchasing card) expense. The transaction must be
entered into FleetOhio.
“Out-of-Pocket” Ticket
(External, Single Transaction)

Fuel Log (Example OSP Bulk)
(Internal, Multiple Transactions)
17
Fuel TicketsInternal Fuel Ticket
Internal
Bulk fuel dispensed at your
agency‟s fueling facility.
Each transaction must be
entered into FleetOhio.
Multiple vehicles may be
processed at one time.

External Fuel Ticket PathData -> Equipment Activity -> Fueling -> External Fuel Tickets
Data Entry
18
1. Select Insert Button
2. Equipment Id
3. The transaction date and Year-Manufacturer-Model-Meter Readings fields will auto populate to the current date. The transaction date needs to be changed to the date on the ticket
4. Meter 1 reading (Odometer to the whole mile, no tenths)
5. Meter 1 Validation (Select EQ UPD if the meter reading is greater than the meter displayed on the screen.)
6. Fuel Type (01-Unleaded, 05-Diesel, 53-E85, DO-Biodiesel)
7. Fuel Qty. (Gallons with tenths –XX.X)
8. Fuel Cost ($) (Total Cost – not price per gallon)
9. Fluid/Product Type (Optional – If selected, you will need to complete the Fluid Qty. and Misc. Cost entries)
10. Fluid/Product Qty. (Optional-not required by all agencies)
11. Misc. Cost (Optional-not required by all agencies)
12. Vendor Id (Optional-not required by all agencies)
13. Select Process Button
External Fuel Ticket Screen
Fuel TicketsExternal Fuel Ticket Entry

Internal Fuel Ticket Path
Data -> Equipment Activity ->Fueling -> Internal Fuel Tickets
Data Entry
19
1. Select Insert Button
2. Equipment Id
3. The transaction date and Year-Manufacturer-Model-Meter Readings fields will auto populate to the current date. The transaction date needs to be changed to the date on the ticket
4. Meter 1 reading (Odometer to the whole mile, no tenths)
5. Meter 1 Validation (Select EQ UPD if the meter reading is greater than the meter displayed on the screen.)
6. Tank ID
7. Fuel Type (01-Unleaded, 05-Diesel, 53-E85, DO-BIODIESEL) – Value not required if Tank ID is populated.
8. Fuel Qty. (Gallons with tenths – XX.X)
9. Fluid/Product Type (Optional – If selected you will need to complete the Fluid Qty. and Misc. Cost entries)
10. Fluid/Product Qty. (Optional-not required by all agencies)
11. Misc. Cost (Optional-not required by all agencies)
12. Select Process Button
Internal Fuel Ticket Screen
Fuel TicketsInternal Fuel Ticket Entry

Fuel TicketsReversals –After Processing
20
Find Transaction that requires reversal.
Gather required information Equipment Id. Transaction Date Meter Reading Fuel type Fuel Quantity Fuel Cost
We have included a form for recording the required transaction information to process a reversal
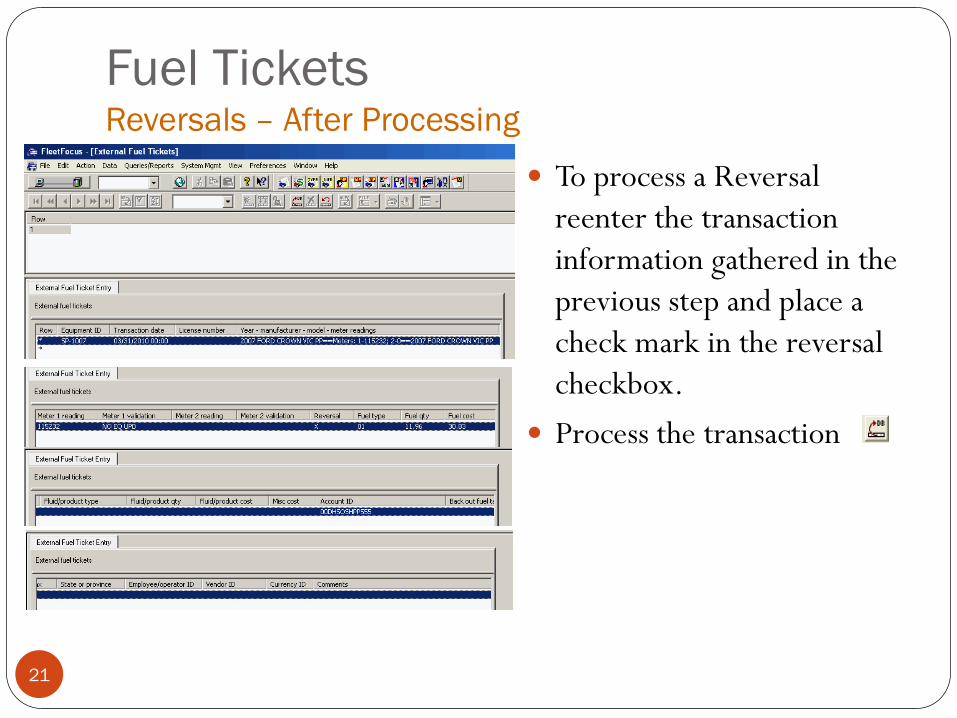
Fuel TicketsReversals – After Processing
21
To process a Reversal
reenter the transaction
information gathered in the
previous step and place a
check mark in the reversal
checkbox.
Process the transaction

Fuel TicketsReversals – After Processing
22
Completed Reversal

Exercise 2: Processing fuel tickets
23
In your packet you have four fuel tickets
Identify the type of fuel transaction for each ticket received.
Enter each ticket into the system and process the transaction.
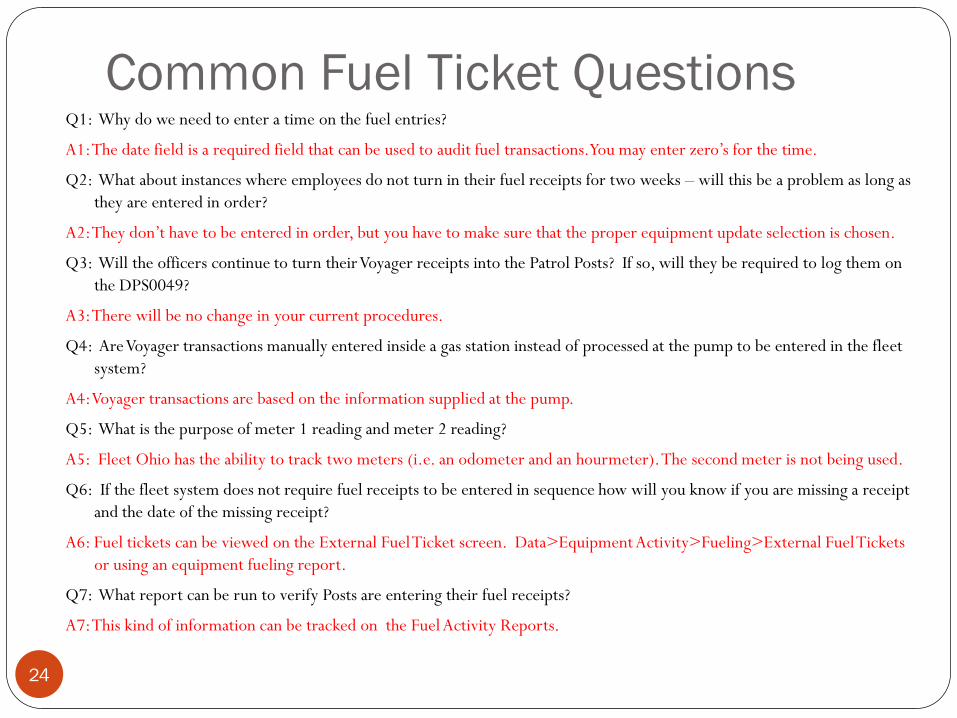
Common Fuel Ticket Questions
24
Q1: Why do we need to enter a time on the fuel entries?
A1: The date field is a required field that can be used to audit fuel transactions. You may enter zero‟s for the time.
Q2: What about instances where employees do not turn in their fuel receipts for two weeks – will this be a problem as long as
they are entered in order?
A2: They don‟t have to be entered in order, but you have to make sure that the proper equipment update selection is chosen.
Q3: Will the officers continue to turn their Voyager receipts into the Patrol Posts? If so, will they be required to log them on
the DPS0049?
A3: There will be no change in your current procedures.
Q4: Are Voyager transactions manually entered inside a gas station instead of processed at the pump to be entered in the fleet
system?
A4: Voyager transactions are based on the information supplied at the pump.
Q5: What is the purpose of meter 1 reading and meter 2 reading?
A5: Fleet Ohio has the ability to track two meters (i.e. an odometer and an hourmeter). The second meter is not being used.
Q6: If the fleet system does not require fuel receipts to be entered in sequence how will you know if you are missing a receipt
and the date of the missing receipt?
A6: Fuel tickets can be viewed on the External Fuel Ticket screen. Data>Equipment Activity>Fueling>External Fuel Tickets
or using an equipment fueling report.
Q7: What report can be run to verify Posts are entering their fuel receipts?
A7: This kind of information can be tracked on the Fuel Activity Reports.

Common Fuel Ticket Questions
25
Q8: How do we know what to enter for cost on bulk fuel deliveries?
A8: The price per gallon is obtained from the same source as it is today.
Q9: Clarify delete vs. reversal.
A9: The delete function can only be carried out by DAS-OFM. The reversal function allows a user to remove data that has been
entered in error from all of the affected database tables.
Q10: If portions of a fuel ticket are illegible how can I use this fleet system to research mileage and SP numbers?
A10: Various reports will be available to assist in these efforts.

26
Invoices received from fuel vendors that represent fuel
deliveries for a bulk tank.
Data needed to process a bulk fuel delivery receipts
Tank Id
Receipt date and time
Fuel/Fluid type
Quantity Received
Unit Price
Vendor ID
Bulk Fuel Delivery ReceiptsWhat are Fuel Receipts?

Fuel Receipts Screen
Fuel Receipts PathData -> Fuel Activity -> Receipts
27
1. Select Prepare for Insert Button
2. Tank Id
3. Receipt date and time (automatically populates with current date, needs to be adjusted to date of invoice)
4. Fuel/Fluid type(automatically populates based on tank selected)
5. Quantity Received in gallons to the nearest tenth (00.0)
6. Unit Price
7. Vendor ID
8. Select Process Button
Bulk Fuel Delivery ReceiptsFuel Entry Receipt (Bulk Tanks)
Data Entry

Tank Reading Path
Data -> Fuel Activity -> Tank Readings
28
1. Select Prepare for Insert Button
2. Select the Tank ID from the drop-
down list
3. Enter the Read date and time (you
may enter 00‟s for the time
4. Enter the reading in gallons to the
nearest tenth (00.0)
5. Select Process Button
Bulk Fuel Delivery ReceiptsTank Readings
Data Entry

29
A document that captures what repair or preventative
maintenance work is performed on a vehicle.
Details on parts, labor, or both is retrieved from vendor invoices,
work orders and crash/repair reports.
Work Orders in FleetOhio are entered using the work order
short form.
Prior to entering a work order verify that you have the vendor in
the your vendor list, a completed invoice, and a completed
DPS0050.
Work OrdersWhat is a Work Order?

Work Order Short Form-Basic Tab
Data Entry
30
1. Work Order Id (3 parts)
Select the location where the work order is being entered
or work performed.
The year(automatic)
The sequential number of the work order (automatic)
Make sure to write the FleetOhio work
order number on the vendor invoice.
2. Job Type – Always Repair
3. Equipment Id
4. Meter1 at time of repair (No tenths)
5. Meter validation (Select EQ UPD if the meter
reading is greater than the meter displayed on the
screen.)
6. Repair Reason (Select from List)
7. Warranty work
8. Date and Time Values on the work order.
Selecting the check boxes will populate the
fields with the current date. These dates need
to be changed to transaction date.
Work OrdersWork Order Data Entry
Work Order Short Form –Data -> Shop Activity->Work Order Short Form

Data Entry
31
1. Date and time in: Automatically populates
with the date and time that the work order is
opened. Must be reset to the date of the
vendor invoice or work order.
2. Date and time finished: Checking the box
for this field will populate the Date and time
finished and the date and time in service but will
not close the work order.
3. Date and time closed: Checking the box for
this field will populate all date and time fields
and will close the work order.
4. Date and time in service: Automatically
populates when the work order is closed.
Date/Time Details –Basic Tab
Work OrdersWork Order Data Entry (Continued)
Notes:
Selecting the checkboxes will populate the date and time with the current value.
Any date and time can be adjusted by unselecting the checkbox and entering the date and time.
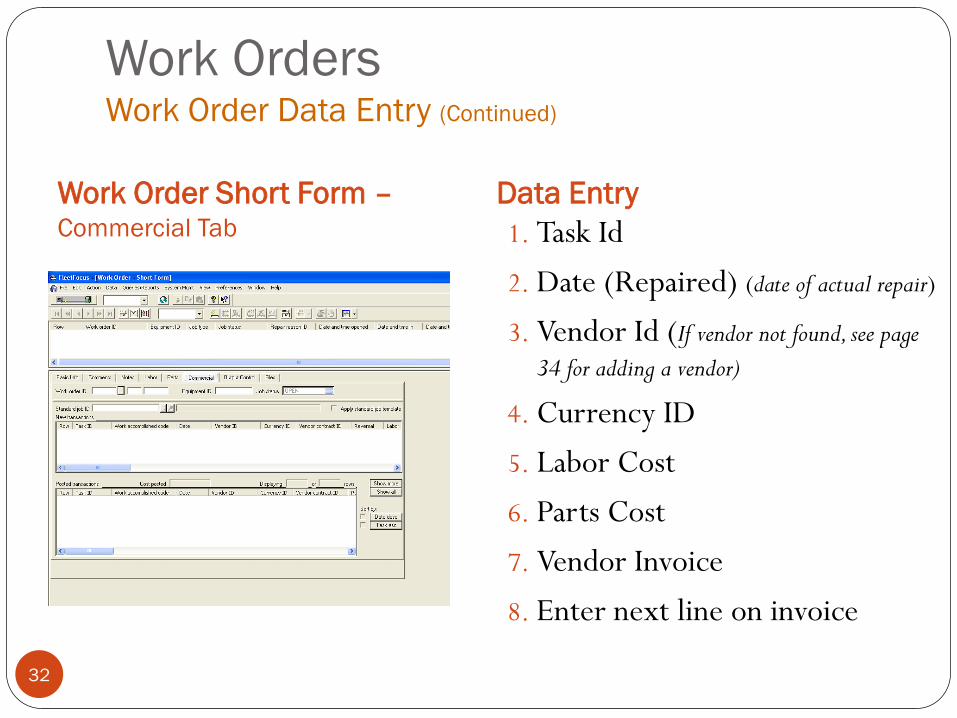
Work Order Short Form –Commercial Tab
Data Entry
32
1. Task Id
2. Date (Repaired) (date of actual repair)
3. Vendor Id (If vendor not found, see page
34 for adding a vendor)
4. Currency ID
5. Labor Cost
6. Parts Cost
7. Vendor Invoice
8. Enter next line on invoice
Work OrdersWork Order Data Entry (Continued)

Work Order Task Id Groups
33
Task ID Description Task ID Description
00 MISCELLANEOUS / OTHER 12 MOTOR / ENGINE
01 TOWING SERVICES 13 POWER TRAIN/TRANSMISSION
02 CHANGE AND REPAIR TIRES 14 IGNITION SYSTEM
03 SUSPENSION SYSTEM 15 COOLING SYSTEM
04 WINDOW / GLASS - VEHICLE 16 FUEL SYSTEM
05 SOFT TRIM AND UPHOLSTERY 17 EMISSION SYSTEM
06 AUTO BODY / CAB BODY 18 EXHAUST SYSTEM
07 ELECTRICAL SYSTEMS 19 FRAME AND CHASSIS
08 BATTERY AND SERVICES 20 BRAKES / PARKING / ABS / AIR
09 LIGHTING SYSTEM 30 ACCESSORIES
10 INSTRUMENTS AND GAUGES 31 MISCELLANEOUS
11 HEATING AND AIR CONDITIONING 85 EXTERNAL MECHANICAL SYSTEMS
Work OrdersWork Order Data Entry (Continued)

Work Order Short Form – Comments Tab Data Entry
34
Comments tab
A brief explanation of the
work performed
Examples
LOF (Lube, Oil, Filter)
Wash
Front Brakes
Tire Repair
Work OrdersWork Order Data Entry (Continued)
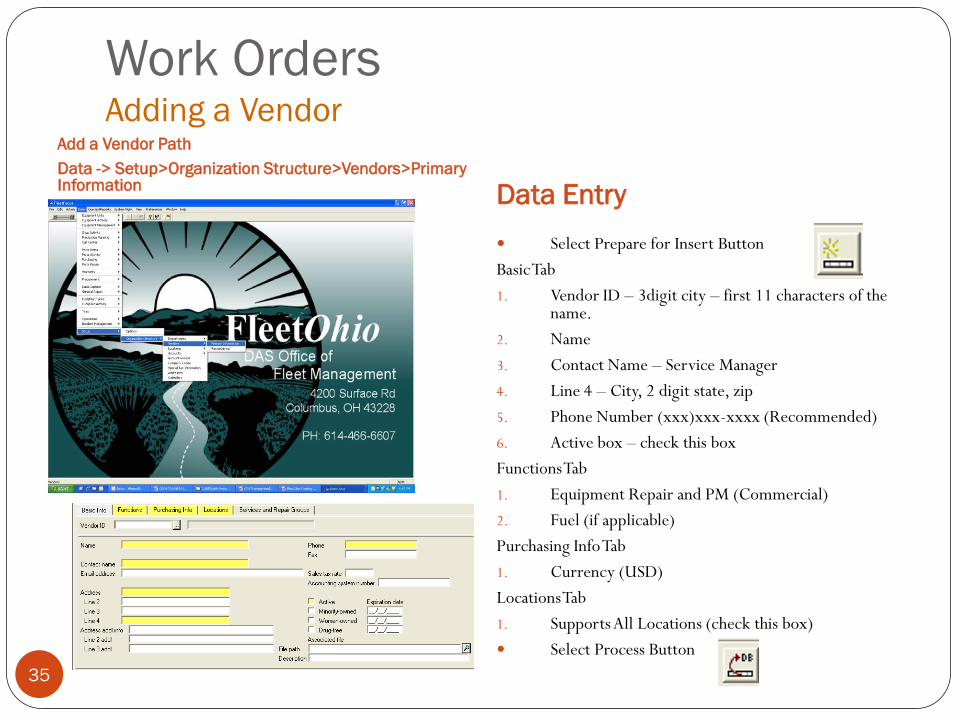
Add a Vendor Path
Data -> Setup>Organization Structure>Vendors>Primary Information
Data Entry
35
Select Prepare for Insert Button
Basic Tab
1. Vendor ID – 3digit city – first 11 characters of the name.
2. Name
3. Contact Name – Service Manager
4. Line 4 – City, 2 digit state, zip
5. Phone Number (xxx)xxx-xxxx (Recommended)
6. Active box – check this box
Functions Tab
1. Equipment Repair and PM (Commercial)
2. Fuel (if applicable)
Purchasing Info Tab
1. Currency (USD)
Locations Tab
1. Supports All Locations (check this box)
Select Process Button
Work OrdersAdding a Vendor
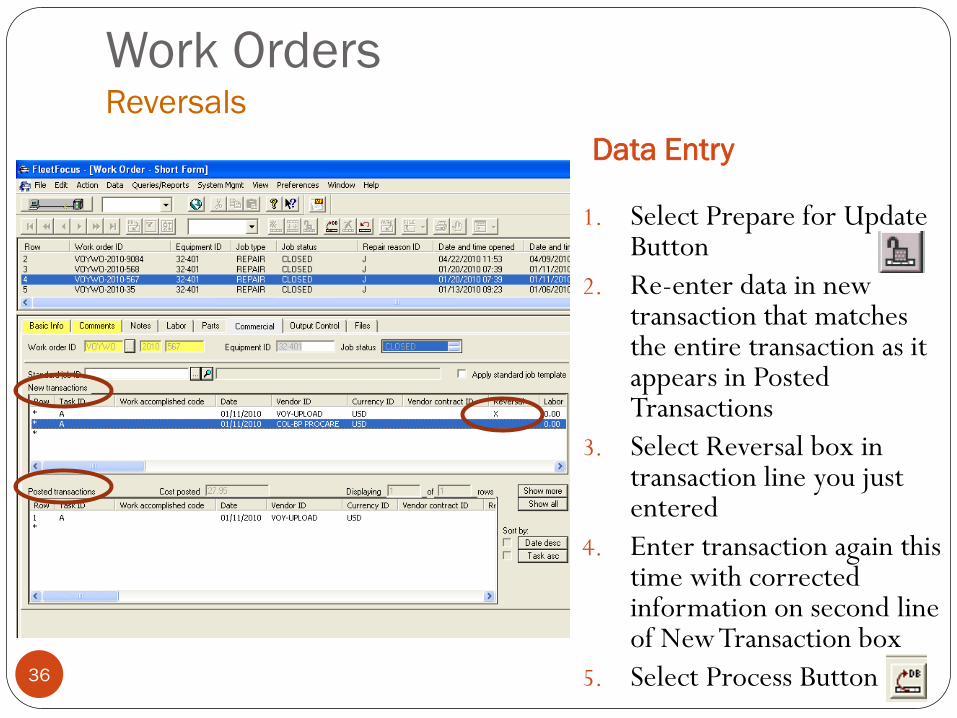
Data Entry
36
1. Select Prepare for Update Button
2. Re-enter data in new transaction that matches the entire transaction as it appears in Posted Transactions
3. Select Reversal box in transaction line you just entered
4. Enter transaction again this time with corrected information on second line of New Transaction box
5. Select Process Button
Work OrdersReversals

Sample Vendor Invoice
37
Work OrdersInvoice Components

Basic Tab
38
Work OrdersSample Work Order – SP-1419

Commercial Tab
39
Work OrdersSample Work Order – SP-1419 (Continued)

Comments Tab
40
Work OrdersSample Work Order – SP-1419 (Continued)

Exercise 3: Create a New Work Order
41
Create a new work order using either one you brought with
you or the one included in your packet.

Common Work Order Questions
42
Q1: What were the four blocks for date & time on the work order short form? Is there anyway to delete what we do not need or
can fields not auto populate where manual entry is necessary?
A1: The first of the four blocks auto populates with the current date and time. This should be changed to Invoice Date and Time
(time can be 00:00). The other three Date/Time fields have check boxes next to them. Check the middle box which will
cause all three fields to populate with current date/time.
Q2: What do you put for the work order ID? Location where work is being done or where the work order is being entered?
A2: Work order ID is to be populated with the location where the work is performed.
Q3: Work orders – what does the „commercial‟ tab mean?
A3: The Commercial tab is used to enter work order data from commercial vendor (Task ID, Cost, etc.).
Q4: On the Commercial screen do we make an entry for each item on the work order?
A4: Yes
Q5: Can open work orders be closed at the end of the month when we receive the end of the month invoice?
A5: Yes
Q6: It was stated a report can be searched for the month it was entered. It seems like it would be more accurate to search by the
service date. Why is by month entered?
A6: The filter screen can retrieve work orders in a number of ways. The search by month was just one possible example, but not
the only way.
Q7: Can we print the work orders once entered?
A7: Yes, work orders will print when they are opened.

Common Work Order Questions
43
Q8: Clarify terminology such as „date done‟. Is this the date the work order is dated or the date the work order is entered in the
fleet system?
A8: Refer to page 30 (date/Time Details)
Q9: Can unneeded work order task IDs be deleted?
A9: No. This system is used state-wide and while DAS may not use certain task IDs, other agencies may.

Data-> Equipment Units -> Fleet
Equipment/Locations
Data Entry
44
Select vehicle for the location update from the grid above.
Select Prepare for update
Four fields to be updated on this screen Assigned PM
Assigned Repair
Station
Access Rights
Clear fields to be updated
Select Assigned PM, Assigned Repair, Access Rights from Choice List (Values selected must match)
Select Station Location from Choice List (if applicable)
Select Process Button
Updating Locations
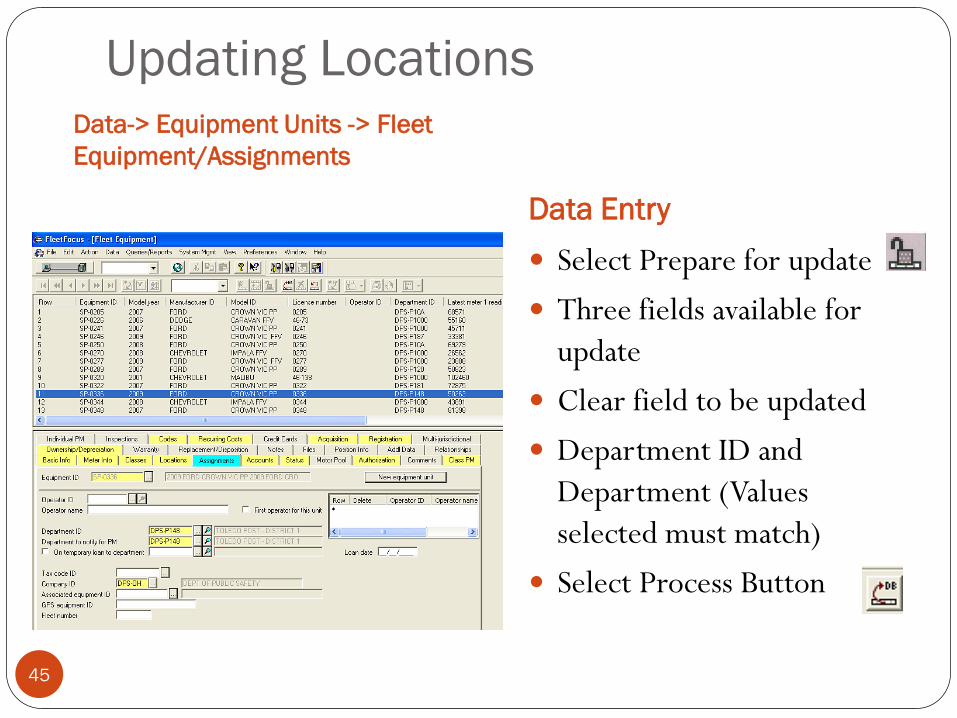
Data-> Equipment Units -> Fleet
Equipment/Assignments
Data Entry
45
Select Prepare for update
Three fields available for
update
Clear field to be updated
Department ID and
Department (Values
selected must match)
Select Process Button
Updating Locations

Data-> Equipment Units -> Fleet
Equipment/Accounts
Data Entry
46
Select Prepare for update
Clear Account ID field
Select a new Account ID
from the choice list
Select Process Button
Updating Locations

Exercise 4: Updating Locations
47
In this exercise retrieve a vehicle from your inventory and
change it‟s location within your district.

48
Navigate to screen in the left pane
Click Add
Remember to Save for the changes to take effect.
Menu Path
Preferences -> Toolbar -> Setup.
Advanced Options in Fleet OhioCreating Toolbar Buttons

49
Select Filter Button
Select Fields
to Filter on
Selecting and Filtering DataSelecting/Filtering Data
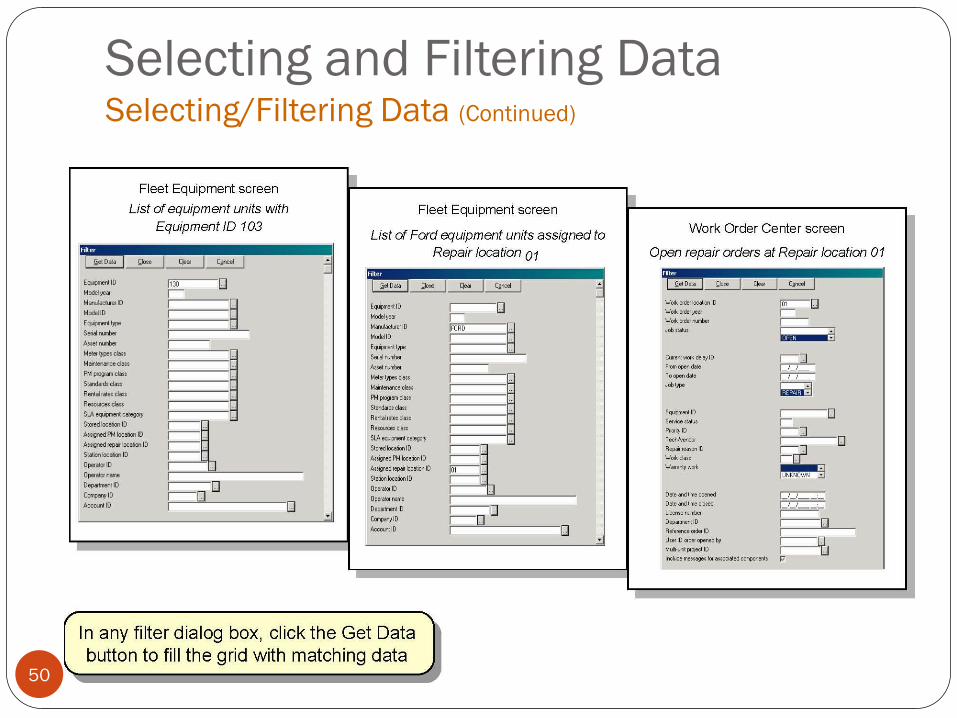
50
Selecting and Filtering Data Selecting/Filtering Data (Continued)

51
Selecting and Filtering Data Selecting/Filtering Data (Continued)

Exercise 5: Filtering Data
52
Complete both filter exercises included in your packet.
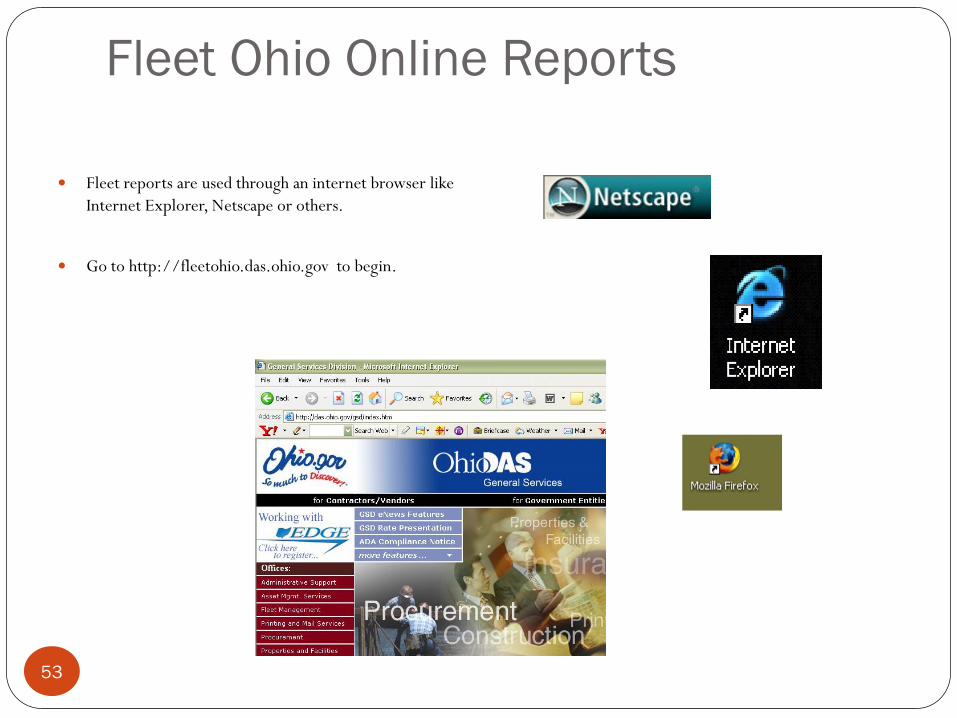
Fleet reports are used through an internet browser like
Internet Explorer, Netscape or others.
Go to http://fleetohio.das.ohio.gov to begin.
53
Fleet Ohio Online Reports

54
Enter FleetOhio User Id and
Password then click “Log In”
Fleet Ohio Online ReportsInfoCenter Home Page

55
Links to useful websites
Click on tabs to use
various InfoCenter tools
- In this case the
Reporting tab.
Fleet Ohio Online ReportsInfoCenter Main Page

56
Reports are divided into
categories. Reports in the selected
category will display
here.
Fleet Ohio Online ReportsReporting Tab
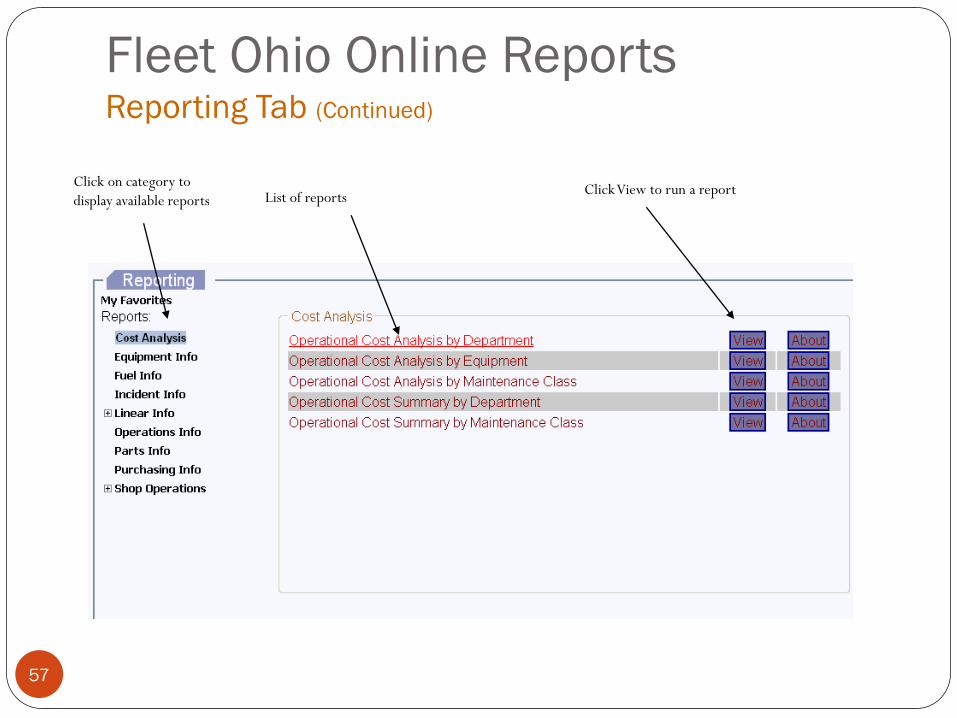
57
Click on category to
display available reports List of reportsClick View to run a report
Fleet Ohio Online ReportsReporting Tab (Continued)
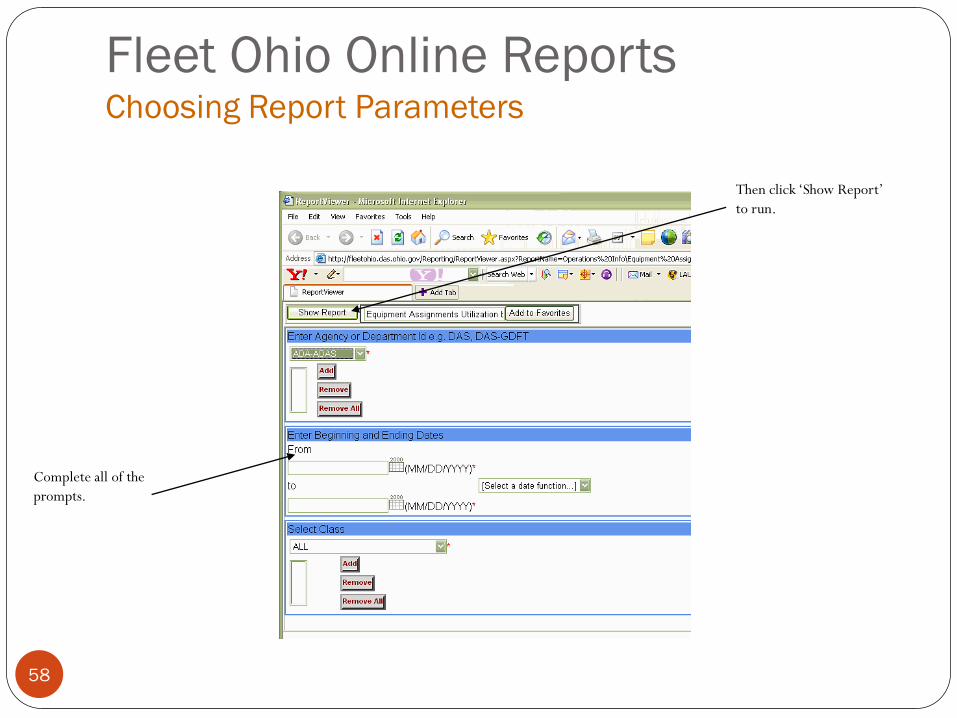
58
Complete all of the
prompts.
Then click „Show Report‟
to run.
Fleet Ohio Online ReportsChoosing Report Parameters

59
Fleet Ohio Online ReportsChoosing Report Parameters (Displayed Report)

60
Like this report? Click
„Add to Favorites‟. The
report will now be
displayed on the Reporting
home page
Click „Show/Hide Group
Tree‟ to display levels of
detail
Click on an individual item
to display just that item
The menu bar has useful buttons for navigating, printing
and exporting
Fleet Ohio Online ReportsMenu Bar (Show/Hide Group Tree)

61
Click „Export‟ to export
the report.
Choose the desired format
and follow the prompts.
Fleet Ohio Online ReportsMenu Bar (Exporting)

62
Click „Print‟ and follow
the instructions to print a
report.
Fleet Ohio Online ReportsMenu Bar (Printing)
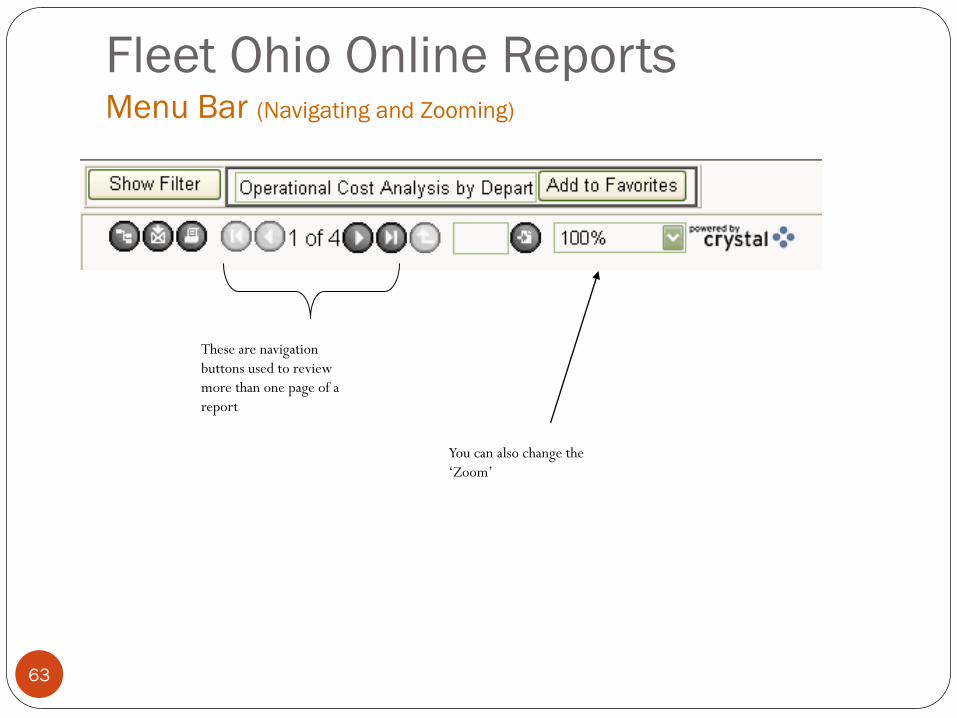
63
These are navigation
buttons used to review
more than one page of a
report
You can also change the
„Zoom‟
Fleet Ohio Online ReportsMenu Bar (Navigating and Zooming)

64
To obtain information
about a report click the
„About‟
Fleet Ohio Online ReportsLearning About Reports

65
To run the report
click „View‟
Click the „Back‟
button to return to
the report list
Fleet Ohio Online ReportsLearning About Reports (Continued)

66
To exit, close the
web browser.
Logging Off