Embed Size (px)
Citation preview

FlexView 3.1.x Getting Started with RealFlex 6

RealFlex 6 - Getting Started
5000-0001-0061-I
2
Notices
• COPYRIGHT COPYRIGHT © 2006 by RealFlex Technologies. All right reserved Note: No part of this publication may be reproduced, transmitted, transcribed, stored in a retrieval system, or translated into any language or computer language, in any form or by any means, electronically, mechanical, magnetic, optical, manual, or otherwise, without prior written permission of RealFlex Technologies.
• DISCLAIMER RealFlex Technologies makes no representation or warranties with respect to the contents hereof and specifically disclaims any implied warranties or merchantability or fitness for any particular purpose. Further, RealFlex Technologies reserves the right to revise this publication and to make changes from time to time in the content hereof without obligation to notify any person of such revision or changes.
• TRADEMARKS Microsoft Windows is a registered trademark of Microsoft Corporation Symbol Factory is a trademark of Reichard Software Corporation
RealFlex Technologies, 2218 Northpark Drive, Suite 202, Kingwood, Texas, 77339, USA Tel: +1 281 348 2341, Fax: +1 281 348 2340 Email: [email protected] http://www.realflex.com/ RealFlex Technologies Ltd, Limerick Business Complex, Raheen Business Park, Limerick, Ireland. Tel: +353 61 308884, Fax +353 61 308883, Email: [email protected] http://www.realflex.com/

RealFlex 6 - Getting Started
5000-0001-0061-I
3
1. Getting Started 1. Getting Started.........................................................................................................................................................3 2. Connectivity Map ....................................................................................................................................................5 3. Conventions, Symbols and Terms Used ..................................................................................................................6
3.1. Installation Guide .............................................................................................................................................7 3.1.1. Starting the Installation..............................................................................................................................8 3.1.2. Install Flex.Win Hardware Key.................................................................................................................8 3.1.3. Install RealFlex 6 Hardware Key...............................................................................................................8 3.1.4. Installing FlexView Software from CD on MS Windows PC ...................................................................9 3.1.5. Upgrading Existing RealFlex 4 System.....................................................................................................9 3.1.6. Installing QNX 6/RealFlex 6 Software on QNX/RealFlex PC................................................................11 3.1.7. Configure RealFlex 6 Network................................................................................................................13 3.1.8. Configure Dual Boot PC..........................................................................................................................15 3.1.9. Restoring a RealFlex 4 Database .............................................................................................................18 3.1.10. Creating a new empty Database.............................................................................................................22 3.1.11. Backing up a RealFlex 6 Database ........................................................................................................22 3.1.12. Restoring a RealFlex 6 Database ...........................................................................................................23 3.1.13. Testing HMI ..........................................................................................................................................24 3.1.14. Importing a Project from RealFlex 6 Server PC....................................................................................27 3.1.15. Making a backup of project files ...........................................................................................................31 3.1.16. Configuring a Failover System..............................................................................................................37 3.1.17. Configuring RealFlex 6 .........................................................................................................................39
4. Connectivity options..............................................................................................................................................43 4.0.1. Connection over LAN..............................................................................................................................43 4.0.2. Direct dial-up connection over telephone network. .................................................................................43 4.0.3. Connection over Internet. ........................................................................................................................44
5. Configuring for Leased Line Modem or Serial Line .............................................................................................45 5.1. Security...........................................................................................................................................................45 5.2. Configuring PPP.............................................................................................................................................46
5.2.1. New Accounts..........................................................................................................................................46 5.2.2. New Scripts .............................................................................................................................................49
5.3. Windows Connection Configuration ..............................................................................................................53 5.4. Windows XP...................................................................................................................................................53
6. Configuring for Dialup Modem.............................................................................................................................59 6.1. Security...........................................................................................................................................................59 6.2. Configuring PPP.............................................................................................................................................60
6.2.1. New Accounts..........................................................................................................................................60 6.2.2. New Scripts .............................................................................................................................................63
6.3. Windows Connection Configuration ..............................................................................................................67 6.4. Windows XP...................................................................................................................................................67
7. Basic troubleshooting. ...........................................................................................................................................72 7.1. Troubleshooting of IP connection ..................................................................................................................72 7.2. Command Line Operation ..............................................................................................................................73
7.2.1. Stopping RealFlex from command line ...................................................................................................75 7.2.2. Starting RealFlex from command line.....................................................................................................75 7.2.3. Display the RealFlex 6 processes running ...............................................................................................75 7.2.4. Display the RealFlex state on the current PC ..........................................................................................76

RealFlex 6 - Getting Started
5000-0001-0061-I
4
7.2.5. Switching Active and Standby Nodes (Failing Over)..............................................................................76 8. Registration of Hardware Keys .............................................................................................................................77 9. Superkeys ..............................................................................................................................................................78
9.1. Disabling a Superkey Procedure for Flex.View .............................................................................................78 9.1.1. Operator function for Superkey ...............................................................................................................79 9.1.2. Superkey interpretation for Flex.View ....................................................................................................80

RealFlex 6 - Getting Started
5000-0001-0061-I
5
2. Connectivity Map
QNX 6 / RealFlex 6 MS Windows PC
Connect Hardware Key marked R to the serial port on the back of the QNX 6 PC
Connect Hardware Key marked W to the printer or USB port on the back of the MS Windows PC
Software • QNX 6 Neutrino • RealFlex 6 Server
Software • Flex.View on CD

RealFlex 6 - Getting Started
5000-0001-0061-I
6
3. Conventions, Symbols and Terms Used Throughout this manual the following conventions are used. • Characters are used to indicate text on screen. • CAPITAL letters are used for the names of options found on the menu strips and to
highlight information such as file names. • Italic characters are used to indicate something you have to type in or select. In the margins you will find the following symbols used to highlight important information. Symbol Meaning A useful tip A warning or cautionary note An example
Term Meaning XXXX is used in this manual to refer to a generic project name. Please replace XXXX
with YOUR project name. Test The example used to generate this manual was a project named Test

RealFlex 6 - Getting Started
5000-0001-0061-I
7
3.1. Installation Guide
This section describes the installation process.
System Requirements The following table outlines the minimum and recommended system requirements for installing and running the software.
RealFlex 6 Server PC Equipment Minimum Recommended Operating system QNX 6 Neutrino 6.2.1 or
above QNX 6 Neutrino 6.3 or above
Computer Pentium II. For initial installation only, a mouse, keyboard and a VGA graphics display
Pentium III, For initial installation only, a mouse, keyboard and a SVGA graphics display
Memory 128MB 256MB Hard Disk 512MB
10GB for Historical and Event Storage
CD ROM Required for installation Required for installation
FlexView HMI PC Equipment Minimum Recommended Operating system Windows 2000 or above Windows 2000 or XP Computer Pentium, a mouse, keyboard
and a VGA graphics displayPentium, a mouse, keyboard and a SVGA graphics display
Memory 32MB 256MB Hard Disk 200MB free space
512MB free space
CD ROM Required for installation Required for installation

RealFlex 6 - Getting Started
5000-0001-0061-I
8
3.1.1. Starting the Installation In all there are 6 or 7 steps to a successful installation, these include: STEP • Install Flex.Win Hardware Key (Note: USB key, install after Flex.View ) • Install RealFlex 6 Hardware Key • Installing Flex.View Software on the Microsoft Windows PC • Backup RealFlex 4 database (if you are upgrading the system) • Installing QNX 6 / RealFlex 6 Server Software on QNX/RealFlex PC • Configure RealFlex 6 • Testing Flex.View
The software is protected using a hardware device, which plugs into the PC.
3.1.2. Install Flex.Win Hardware Key Attach the Hardware key that is labelled with the letter 'W' to the printer port at the back of your Windows PC
If you are using a USB hardware key, insure you do NOT install the key before you install the Flex.View software, as the Flex.View installation installs a driver for the USB key, which is required when the USB key is plugged in.
3.1.3. Install RealFlex 6 Hardware Key Attach the Hardware key that is labelled with the letter 'R' to the serial port at the back of your QNX 6 PC.
NOTE : This Marx hardware key does not act as a pass through device and therefore you can not connect other equipment to the back of this key.
RealFlex 6 - Getting Started
5000-0001-0061-I
9
3.1.4. Installing FlexView Software from CD on MS Windows PC
Insert the Flex.View CD into the PC running Microsoft Windows. If your CD does not automatically start the installation click the Windows Start button and select Run. The Run dialog box appears. In the Open field type: D:\FVSETUP.EXE – or the applicable drive letter that is referring to your CD drive Click OK. The Set-up program starts. Follow Instructions When requested to enter Console Name, this is the name FlexView clients will use to identify this PC to other FlexView users.
3.1.5. Upgrading Existing RealFlex 4 System
If you have an existing QNX 4 and RealFlex 4.3 system and are upgrading to QNX 6 / RealFlex 6, then you will need to do the following steps:
1. Backup existing RealFlex 4 system and store backup data. 2. Install QNX 6 / RealFlex 6 on a new PC or install QNX 6 / RealFlex 6 on the
existing hardisk 3. Restore RealFlex 4 backup 4. Convert RealFlex 4 database to RealFlex 6 database
3.1.5.1. Backup RealFlex 4
There is a special backup script that has to be used to backup a RealFlex 4 database when upgrading to RealFlex 6. This script is located in the RealFlex 6 CD. Place the RealFlex 6 CD in the CD drive of the RealFlex 4 PC. Insure the CD driver is running.
Login as root user # sin –P Iso If “Iso9660fsys“ is displayed, then the driver is running. If the driver is not running then enter the following command # Iso9660fsys & Wait a few seconds until the CD driver is running Insure you exit RealFlex 4 before doing this backup. Enter the following command to backup the data in the RealFlex 4 database

RealFlex 6 - Getting Started
5000-0001-0061-I
10
# /cd0/backup_rf4db DatabaseName (where DatabaseName is any name you choose for the backup)
Begin project backup Do you want to backup the historical data? y/[n]
If you want all the historical data and events backed up and later converted to RealFlex 6 then Enter y and press Return NOTE – Depending on the lifetime for historical and the amount of time the system has been running, there may be a very large backup file and take along time to convert. As this backup file is being created on the QNX 4 hardisk in the /tmp folder, then insure your hardisk is not more that approx 50 % full if you select Y to this request, as it may fill the hardisk otherwise. If you do not want to have the historical data and events backed up and converted to RealFlex 6 then Enter N and press Return When the backup is completed there will be a file called /tmp/ DatabaseName.tar.F (where DatabaseName is any name you choose for the backup) and it will give you an option to save the backup to Floppy disks.
The backup of project is placed to /tmp/ DatabaseName.tar.F Do you want to copy it to floppy? y/[n]
Only use this option if your database is small and you have not backed up the Historical data as it may require a large number of floppy disks. If you do not backup to floppy disks, and you are going to use the same hardisk for RealFlex 6 or you are you are using a new PC for RealFlex 6, then you will need to transfer the backup file to another PC. The easiest way is to transfer this file over the network to the QNX 6 PC or to a Microsoft Windows PC for temporary storage or writing to a CD.

RealFlex 6 - Getting Started
5000-0001-0061-I
11
3.1.6. Installing QNX 6/RealFlex 6 Software on QNX/RealFlex PC
It is possible to install QNX 6 on a hard disk alongside an existing partition if there is a free space not used by the existing partition or it can be installed on an empty hard disk on its own.
• Reboot the PC, which is to be used for QNX 6 and RealFlex 6. • Enter the BIOS setting screen by pressing the appropriate key as instructed on
screen immediately after power up e.g. DEL, F2 e.t.c. • Set the BIOS to boot from CD before the hard disk to allow it install QNX from
the CD • Insert CD and restart the PC • Wait until it asks to “Press F1 to continue” (Install QNX Partition …) • Enter your license key when it asks “Please enter your license key: “ • Press F1 to accept the license agreement • “Choose disk (F1) ?” - Select appropriate disk to install QNX (for single
harddisk press F1) • Press F1 “Allow the QNX partition to be anywhere on the disk “ if your PC is
newer than 1998 • Press F1 if you want QNX 6 to use all the available free partition space on the
hard disk. o Microsoft Windows partition already on Harddisk o If there is a Windows Partition on the harddisk, you will get a choice of
“Installing a QNX partition boot loader”. You MUST Press F3 to “Use your existing boot loader …” as the QNX boot loader will stop your Windows partition from booting
o Press F1 “Make QNX the active partition. You will boot into QNX Neutrino by default”
• “Please choose type of installation :” “Enter choice: [S]” Press Enter to select Standard Bundle
• Read RealFlex License agreement and press F1 to accept. • Wait until it finished copying files to the hard disk. • “Please remove the installation media then press ‘Enter’ to reboot” – Remove the
CD in the drive and press ‘Enter’ to reboot the PC. • When a dialog appears indicating “A new video card has been detected.” Please
select the appropriate Video Driver from the combo box. Try to select at least 1024 x 768 from the Resolution and the best Color Depth possible.
• When complete click on Continue button. • Click on Continue on next dialog to select the new video mode. • Enter the User Name : root and click on Go • Photon now starts

RealFlex 6 - Getting Started
5000-0001-0061-I
12
• The User’s Configuration dialog now appears • Select the appropriate Time Zone and click Apply • Select the appropriate Time Zone and click Apply • Click on the Language tab • Select the appropriate Language and click Apply • Click on the Keyboard tab • Select the appropriate Keyboard Layout and click Apply • Click on Done when completed. • Insure the RealFlex 6 Marx Hardware key in the COM1 or COM2 or some serial
port of the PC. • Restart Photon by clicking on Launch button on bottom left corner • Select Log Out • Select Shut down and reboot • Click OK • Enter the User Name : root and click on Go • When the PC reboots it will start Photon and automatically start RealFlex in
standalone mode with a demo database called DemoRF6-1.05
RealFlex 6 - Getting Started
5000-0001-0061-I
13
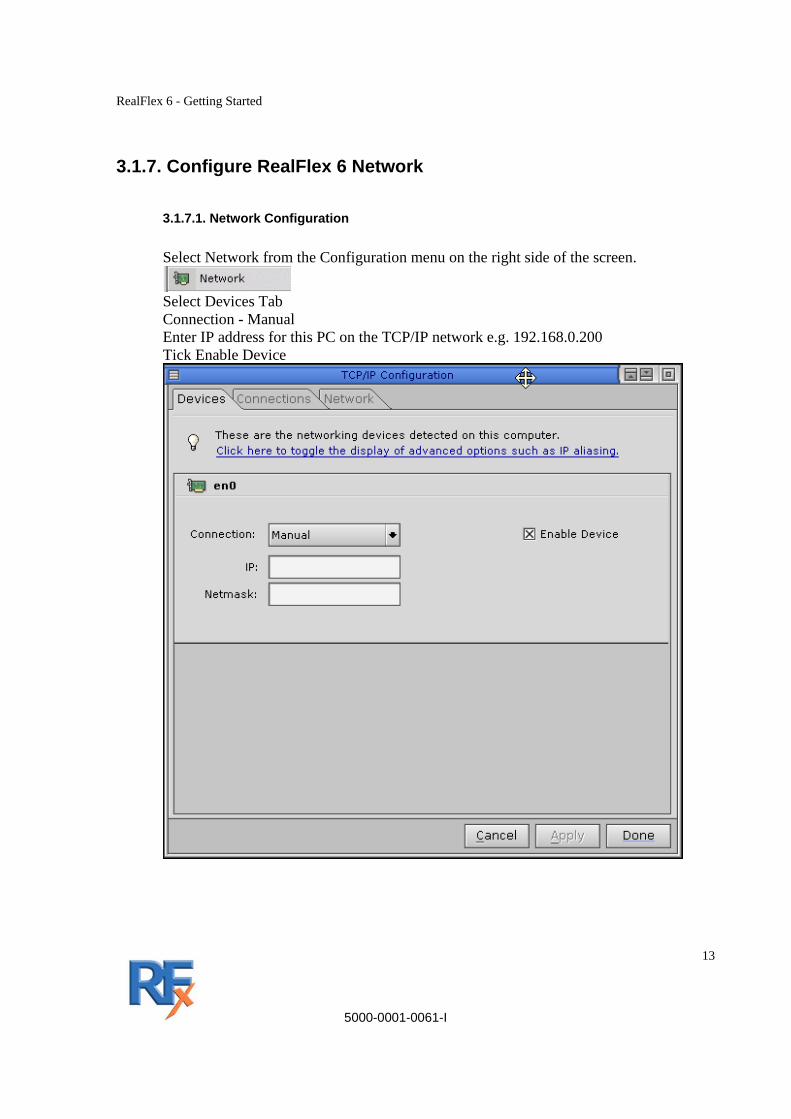
3.1.7. Configure RealFlex 6 Network
3.1.7.1. Network Configuration Select Network from the Configuration menu on the right side of the screen.
Select Devices Tab Connection - Manual Enter IP address for this PC on the TCP/IP network e.g. 192.168.0.200 Tick Enable Device

RealFlex 6 - Getting Started
5000-0001-0061-I
14
Click on Network Tab In General, enter a unique Host Name instead of localhost. e.g Host200 This is the name that will be used by RealFlex to configure Primary and Secondary PC’s in the configuration file. Click on Apply button Click on Done button.

RealFlex 6 - Getting Started
5000-0001-0061-I
15
3.1.8. Configure Dual Boot PC If your hardidsk has a Microsoft Windows partition and also a QNX 6 partition, during the install process you selected to make QNX 6 the active boot partition. Now the system always boots into QNX 6. If you want to have an option to boot into QNX 6 or Microsoft Windows you can do the following
Open a Terminal window by clicking on Terminal on the Toolbar
Use the dd command to create a file needed by the boot loader.
It is necessary to transfer this boot.qnx6 file across to the Microsoft Windows partition. One way is to transfer file from QNX to another PC on the network using ftp
If you do not have a network setup that’s available, you could instead use a floppy disk to transfer this file. # mount -t dos /dev/fd0 /fs/dos # cp /root/boot.qnx6 /fs/dos

RealFlex 6 - Getting Started
5000-0001-0061-I
16
Use fdisk to set Microsoft Windows as the active partition
Select the Microsoft Windows partition
Press B for BOOT

RealFlex 6 - Getting Started
5000-0001-0061-I
17
Press S to SAVE
Press Q to QUIT Restart PC PC will boot into Microsoft Windows Copy previously saved file “boot.qnx6” back onto the PC and place in c:\ Edit the c:\boot.ini file with Notepad and add line at the end as follows [boot loader] timeout=30 default=multi(0)disk(0)rdisk(0)partition(2)\WINDOWS [operating systems] multi(0)disk(0)rdisk(0)partition(2)\WINDOWS="Microsoft Windows XP Professional" /noexecute=optin /fastdetect c:\boot.qnx6="QNX 6.3 SP1" Reboot PC and now you will have an option to boot into Microsoft Windows XP Professional Or QNX 6.3 SP1

RealFlex 6 - Getting Started
5000-0001-0061-I
18
3.1.9. Restoring a RealFlex 4 Database
If you are upgrading from a RealFlex 4.3 system and have already backed up a RealFlex 4 database as described in Section 3.1.5, then you can restore that database on the QNX6 RealFlex 6.x PC as follows: On RealFlex 6 PC stop RealFlex
Click on Main on the RealFlex toolbar and select Stop RealFlex Open a Terminal window by clicking on Terminal on the Toolbar
If you now want to restore a RealFlex 4 database which you previously backed up using “backup_rf4db DatabaseName “, you must get the backed up file DatabaseName.tar.F onto the QNX 6/ RealFlex 6 PC. Example: If you have both RealFlex 4 and RealFlex 6 PC on the same network, you can use ftp to transfer the backup file to the QNX 6 PC ftp xxx.xxx.xxx.xxx where xxx.xxx.xxx.xxx is IP Address of QNX 4 PC Connected to xxx.xxx.xxx.xxx FTP server ready Name : root Password required for root Password : xxxxxxx Where xxxxxxx is the password for the root user
RealFlex 6 - Getting Started
5000-0001-0061-I
19
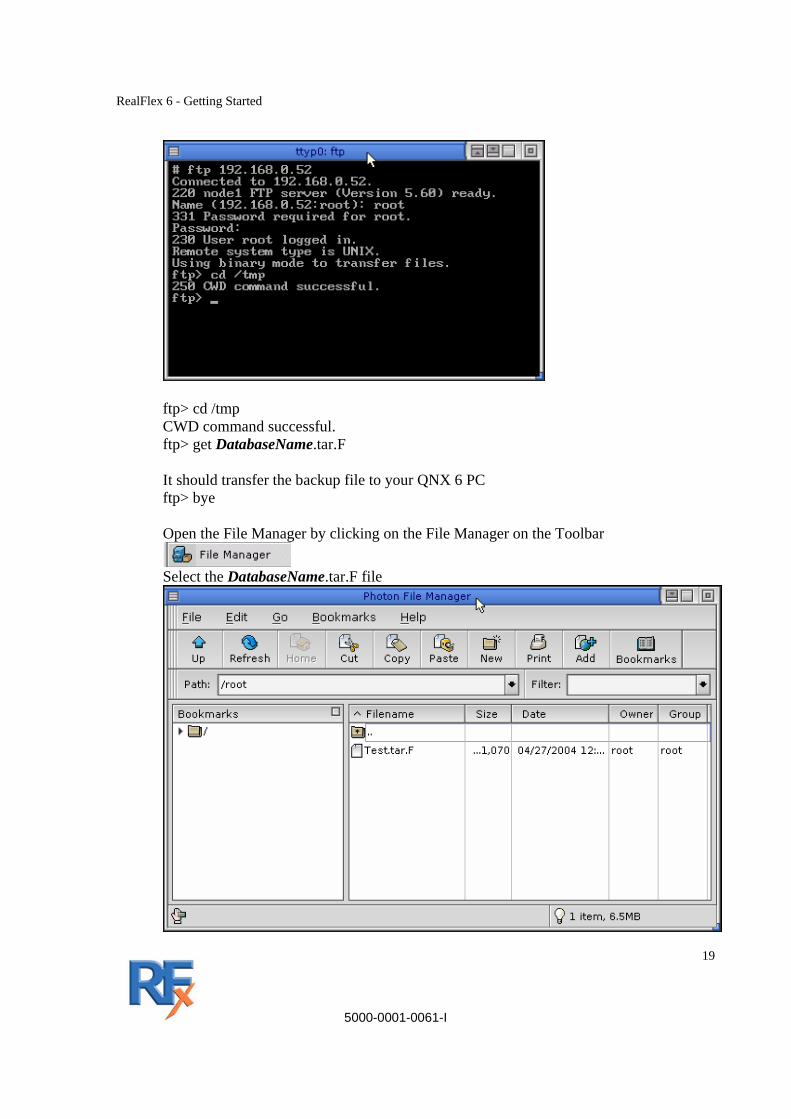
ftp> cd /tmp CWD command successful. ftp> get DatabaseName.tar.F It should transfer the backup file to your QNX 6 PC ftp> bye Open the File Manager by clicking on the File Manager on the Toolbar
Select the DatabaseName.tar.F file

RealFlex 6 - Getting Started
5000-0001-0061-I
20
Right click and select Copy Double click on .. folder Double click on opt folder Double click on rf6 folder Double click on rf4data Click on Paste on File Manager Toolbar

RealFlex 6 - Getting Started
5000-0001-0061-I
21
Go to Terminal Window Enter the following command to restore the RealFlex 4 database
# cd /opt/rf6/rf4data # restore_rf4db DatabaseName (where DatabaseName is any name you choose for the backup) Enter the following command to convert and install the RealFlex 4 database # prjinstall DatabaseName (where DatabaseName is any name you choose for the backup) Note if there are Warnings converting some files e.g the coldstart file When it is complete you can start RealFlex with the new converted database as follows:
Click on Main on the RealFlex toolbar and select Start RealFlex When RealFlex is running it will be indicated on the RealFlex toolbar

RealFlex 6 - Getting Started
5000-0001-0061-I
22
3.1.10. Creating a new empty Database
If you are not restoring a backup of a RealFlex 4 database, but require creating a completely new empty database, then you need to do the following Open a Terminal window by clicking on Terminal on the Toolbar Enter the following command to create a new empty RealFlex 6 database. # initprj_rf DatabaseName (where DatabaseName is any name you choose)
3.1.11. Backing up a RealFlex 6 Database
Open a Terminal window by clicking on Terminal on the Toolbar Enter the following command to create a single file backup of the complete project. # backup_rf6db DatabaseName (where DatabaseName is any name of the database you want to backup) This creates a single backup file /tmp/DatabaseName.tar.gz Alternatively you can backup the project to a single file in the /opt/r6/data/CurrentProject/fw/files folder and this allows a FlexView console to schedule a file transfer of the backup file to the Microsoft Windows PC. # backup_rf6db -f This creates a single backup file /opt/rf6/data/CurrentProject/fw/files/CurrentProject.tar.gz Where CurrentProject is the name of the current project as defined in /opt/rf6/data/startup.ini If you need to schedule an automatic backup to a file then you can add a backup_rf6db –f line to the rptcron file
RealFlex 6 - Getting Started
5000-0001-0061-I
23
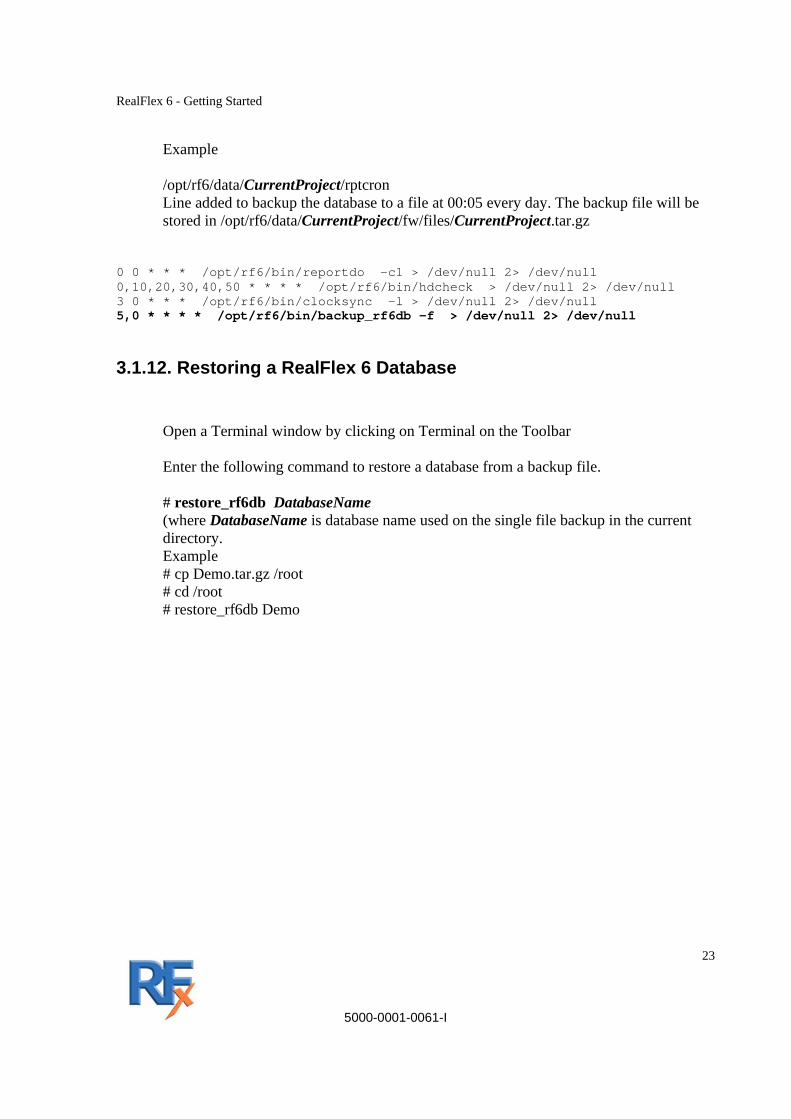
Example /opt/rf6/data/CurrentProject/rptcron Line added to backup the database to a file at 00:05 every day. The backup file will be stored in /opt/rf6/data/CurrentProject/fw/files/CurrentProject.tar.gz
0 0 * * * /opt/rf6/bin/reportdo -c1 > /dev/null 2> /dev/null 0,10,20,30,40,50 * * * * /opt/rf6/bin/hdcheck > /dev/null 2> /dev/null 3 0 * * * /opt/rf6/bin/clocksync -l > /dev/null 2> /dev/null 5,0 * * * * /opt/rf6/bin/backup_rf6db -f > /dev/null 2> /dev/null
3.1.12. Restoring a RealFlex 6 Database
Open a Terminal window by clicking on Terminal on the Toolbar Enter the following command to restore a database from a backup file. # restore_rf6db DatabaseName (where DatabaseName is database name used on the single file backup in the current directory. Example # cp Demo.tar.gz /root # cd /root # restore_rf6db Demo

RealFlex 6 - Getting Started
5000-0001-0061-I
24
3.1.13. Testing HMI
The following is a set of instructions to open the DemoRF6-1.05 project in your Flex.View environment on the Microsoft Windows PC. Start Flex.View by clicking on the Flex.View icon on the desktop
If your system asks for a ‘Product ID’ number go to ‘Basic Troubleshooting’
Click on Cancel in order to configure the correct IP address for the QNX 6 /RealFlex 6 PC Click on Configurations on the Menu
Select Project “DemoRF6-1.05” and Click on Open button to connect to the QNX/Realflex PC.
Select CONFIGURATION – Open Project
RealFlex 6 - Getting Started
5000-0001-0061-I
25
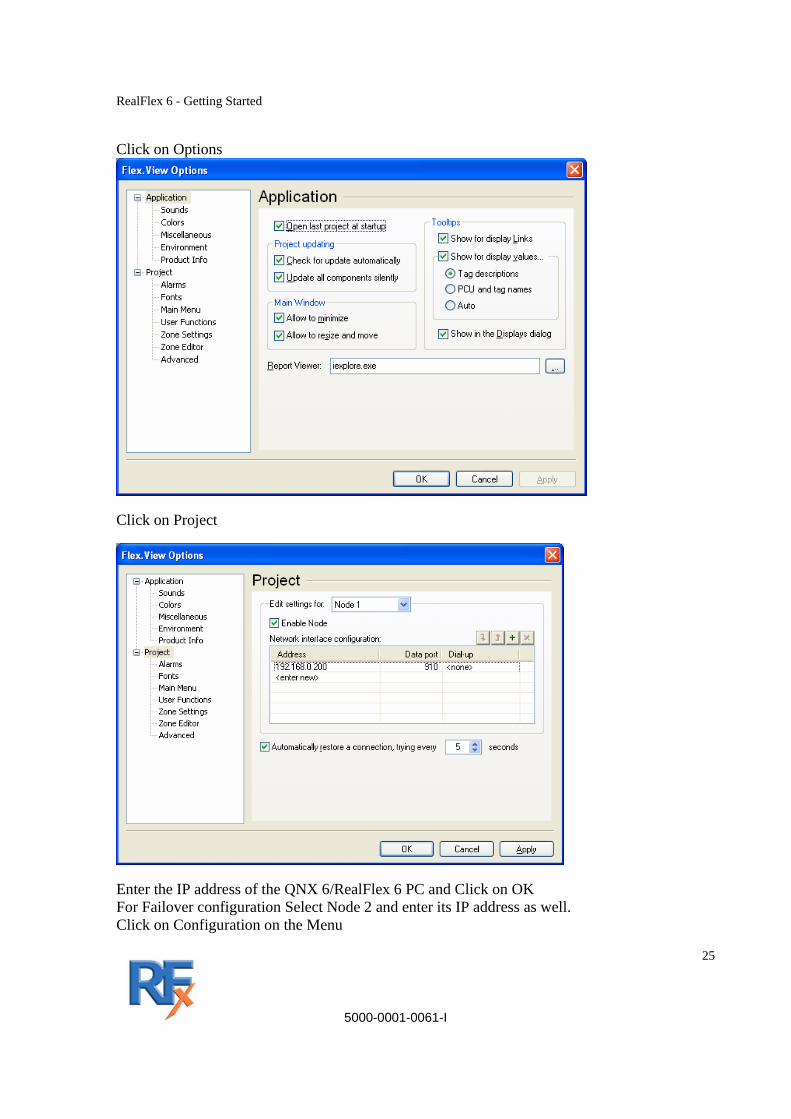
Click on Options
Click on Project
Enter the IP address of the QNX 6/RealFlex 6 PC and Click on OK For Failover configuration Select Node 2 and enter its IP address as well. Click on Configuration on the Menu

RealFlex 6 - Getting Started
5000-0001-0061-I
26
Click on Connect to the Server FlexView HMI now connects to the RealFlex 6 SCADA Server

RealFlex 6 - Getting Started
5000-0001-0061-I
27
3.1.14. Importing a Project from RealFlex 6 Server PC
When a project has been restored from a RealFlex 4 backup, or a new empty project has been created on the RealFlex 6 Server PC, then it is necessary to do a once off, “Import of the Project” from the RealFlex 6 Server to create an associated project on the FlexView PC. Start Flex.View by clicking on the Flex.View icon on the desktop Select Configuration on the Main Menu Select Open Project
Click on the More button
Click on Import button

RealFlex 6 - Getting Started
5000-0001-0061-I
28
If you are asked to enter a User ID for the DemoRF6-1.05 project, enter demo
Enter a Project Name and it should create a Project path with the same name. Click on Next button
Enter the IP address of the Prime node RealFlex 6 Server PC

RealFlex 6 - Getting Started
5000-0001-0061-I
29
If it is a Failover system select Node 2 for the Secondary PC in the combo box and enter its IP address as well.
Click on Next
Click on Import

RealFlex 6 - Getting Started
5000-0001-0061-I
30
Enter the User ID and Password for the RealFlex 6 Project, if requested You need to enter a User ID and Password that has ability to do Database Edit’s on the database. Wait until the process is complete as it may take some time on a large project
When completed it will automatically connect FlexView HMI to the RealFlex 6 SCADA Server.

RealFlex 6 - Getting Started
5000-0001-0061-I
31
3.1.15. Making a backup of project files
1. Open Flex.View – Configuration - Open Project window.
From the list of projects, click on and highlight the project to be backed up. 1. Click on the Backup button. the "Backup Project" window will appear:

RealFlex 6 - Getting Started
5000-0001-0061-I
32
3. In the "Project path:" field, the path of the project will have already been entered. 4. In the "Save as:" field, click on the button on the right of this field. The "Save As"
dialog box will appear.
5. Indicate the location and the name of the file to be saved, the file name can differ from
the original name, then click on the Save button. You will be returned to the "Backup Project" window where the path and file name will now be entered in the "Save as:" field.
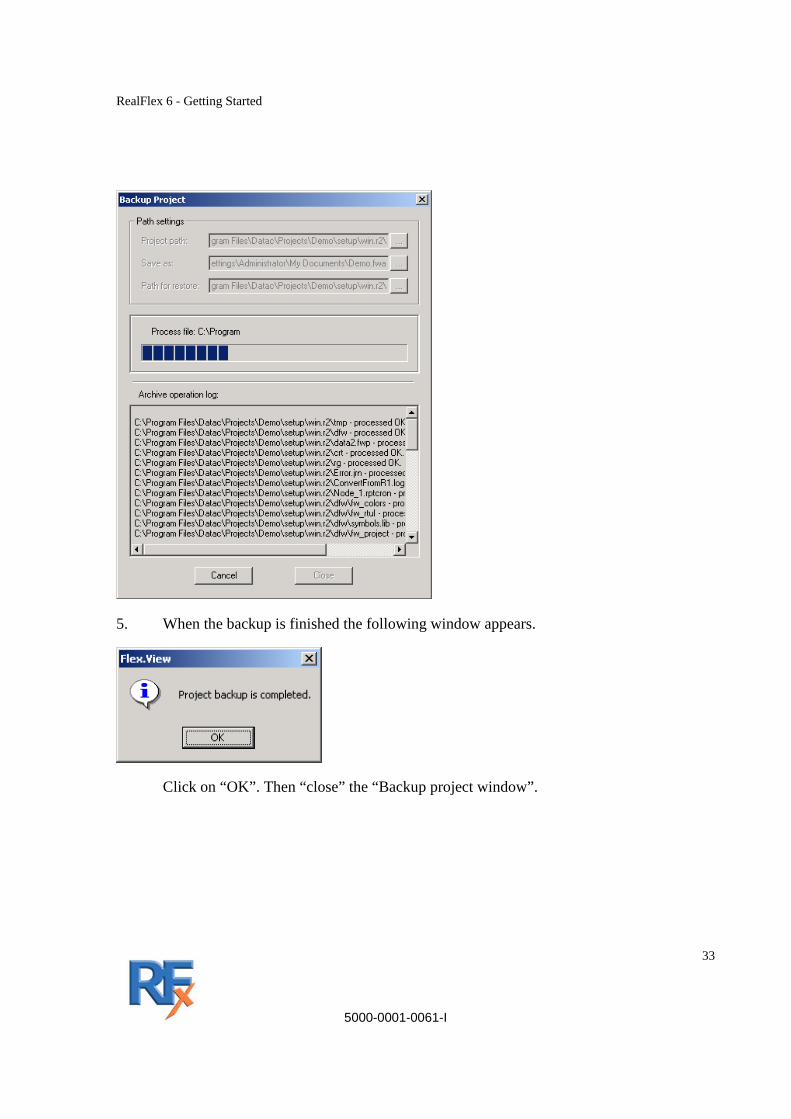
6. Click on the Backup button.
RealFlex 6 - Getting Started
5000-0001-0061-I
33
5. When the backup is finished the following window appears.
Click on “OK”. Then “close” the “Backup project window”.
RealFlex 6 - Getting Started
5000-0001-0061-I
34
3.1.15.1. Restoring project files to a remote FlexView Terminal
1. From the Open Project window, click on the More >> button to display the Project management section.
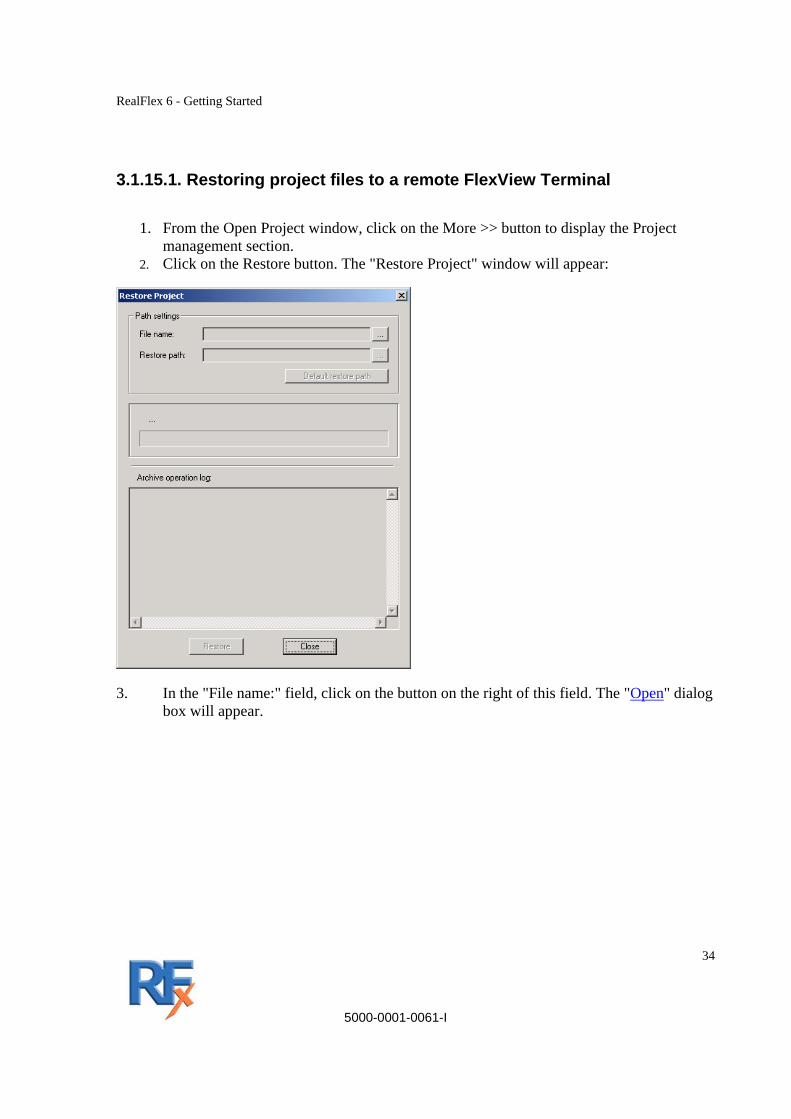
2. Click on the Restore button. The "Restore Project" window will appear:
3. In the "File name:" field, click on the button on the right of this field. The "Open" dialog
box will appear.

RealFlex 6 - Getting Started
5000-0001-0061-I
35
4. Locate the file to be restored, then click on the Open button.
You will be returned to the "Restore Project" window where the path and file name will now be entered in the "File name:" field.

RealFlex 6 - Getting Started
5000-0001-0061-I
36
5. In the "Restore path:" field, the destination path for the restored file, based on where it was when it was backed up, will have been automatically entered.
7. Click on the Restore button.
When the project has been restored the following window appears.
Click on “OK”. Now you will able to open your restored project form this machine.

RealFlex 6 - Getting Started
5000-0001-0061-I
37
3.1.16. Configuring a Failover System
3.1.16.1. RealFlex 6 Failover Configuration If you have a Failover Configuration then you need to configure it as follows: Click on Launch button Select RealFlex Select Configuration Select project.ini Scroll to [FAILOVER] section Remove # at the beginning of the 3 lines [FAILOVER] PRIMARY=Host200 SECONDARY=Host201 On the line with PRIMARY, enter the Host Name used in the Network Configuration of the Primary PC e.g. Host200 On the line with SECONDARY, enter the Host Name used in the Network Configuration of the Secondary PC e.g. Host201 Click on File Select Save Click on File Select Exit Repeat this process on the Secondary PC

RealFlex 6 - Getting Started
5000-0001-0061-I
38
3.1.16.2. FlexView Failover Configuration
Insure both Primary and Secondary Nodes are configured in FlexView.
Click on Configurations on the Menu Click on Options
Click on Project
Enter the IP address of the QNX 6/RealFlex 6 Primary PC and Click on OK On the combo box “Edit Setting for :” select Node 2 , Tick the “Enable Node” check box and enter the IP address of the Secondary QNX 6 PC. Also insure to tick the “Automatically restore a connection, “ Click on OK button.

RealFlex 6 - Getting Started
5000-0001-0061-I
39
3.1.17. Configuring RealFlex 6
3.1.17.1. Database / Project Selection RealFlex 6 stores each Project or Database in different folders The currently Active Project is defined in startup.ini To view or change this you can do the following Click on Launch Button Select RealFlex Select Configuration Select startup.ini The currently active project is the line which does not have a # at the beginning of the line. If there are multiple projects available then you can switch by commenting out one and uncomment another. If you make any changes, then save and close file. Then restart RealFlex for change to take effect.
3.1.17.2. Project Configuration RealFlex 6 allow the user to configure some project options in project.ini To view or change this you can do the following Click on Launch Button Select RealFlex Select Configuration Select project.ini This file contains a number of user modifiable options [STARTUP] #cold start or warm start COLD_START=NO #Set each point as no reply on a cold or a warm start NO_REPLY_RESET=YES #Clear each point's instrument fail flag and unacknowledged flag on a warm start RESET_INSTRUMENT_UNACK=NO #Clear each point's instrument fail flag on a cold or a warm start RESET_INSTRUMENT_FAILURE=NO

RealFlex 6 - Getting Started
5000-0001-0061-I
40
[DATA_PROCESSES] DEAD_BAND= 1.0 ENABLE_ACTION=NO [ALARMS] #Automatically acknowledge any alarm that returns to normal state AUTO_CLEAR=NO #number of alarms to display in alarm banner #max of 10 lines #min of 2 lines ALARM_BANNER_LINES=5 # size of active alarms database ALARM_SIZE=1024 # Enable the action processor by umcommenting the action from /opt/rf6/data/project/startrf. # Set ENABLE_ACTION to YES under [DATA_PROCESSES] #Trigger an action when an alarm is acknowledged. Requires the process 'action' be uncommeted in the file 'startrf' TRIGGER_ACTION=NO # Activate the ACR using the 'beep.control' file ALARM_RELAY_CONTROL=NO ### MAW ### #Active MAW callout in action ACTION_MAW=NO #The console name of the FlexView where MAW resides ACTION_MAW_CONSOLE=BRODGERS #DOS path to MAW ACTION_MAW_DOS_PATH=C:\Program Files\MsgServer #The max number of voice messages to deliver per call out ACTION_MAW_MAX_MSGS=5 [HISTORY] SAMPLES=120 FLUSHTIME=3600 #Make daily files instead monthly hist files. #DAYFILES=YES #Number of days or months to keep files #If daily files, LIFETIME = days. If monthly files, LIFETIME = months. #If using day files and the lifetime is more than 31 days, month files will be automatically be used instead. LIFETIME=5

RealFlex 6 - Getting Started
5000-0001-0061-I
41
#ENDOFDAY is the time of day when the current days history file is moved to the daily/monthy files and a new history file is started. #must be 5 characters and in 24 hr format. ENDOFDAY=00:30 # Dates and Time for Resetting of METER tags # Please remove all entries in rptcron that have reportd0 -m.... [METERRESET] #0 to 23 HOUR=0 #0 to 59 MINUTE=0 #1 to 28, greater than 28 defaults to last day of month DAY=1 # 1 to 12 MONTH=1 # for failover configuration uncoment following section # and set Primary and Secondary hosts names #[FAILOVER] #PRIMARY=Host201 #SECONDARY=Host203 # heart beat settings for failover configuration #[HBPROC] # polling interval in milliseconds - default 200ms #HB_FREQUENCY=200 # timeout interval in milliseconds, if standby does not # receive reply from main within this interval it becomes main # default - 500 ms #HB_TIMEOUT=500 # serial port used for heart beat # default /dev/ser1 #HB_SERIALPORT=/dev/ser1 # baud rate used for heart beat #HB_BAUD # following settings for internal RealFlex usage # do not change them [RFNODE] 16 [ICF] KEEP_DELETED=NO [USERG] KEEP_DELETED=NO [URT] KEEP_DELETED=NO

RealFlex 6 - Getting Started
5000-0001-0061-I
42
3.1.17.3. Customer Configuration RealFlex 6 allow the user to configure drivers, CSL’s or other QNX 6 process in startrf.local This file can be edited from QNX6/RealFlex 6 PC or from the FlexView PC’s using Configuration File Editor To view or change this on QNX 6 you can do the following Click on Launch Button Select RealFlex Select Configuration Select startrf.local This file contains list of process the customer needs to run on the system e.g drivers, CSL’s and any other QNX 6 applications The file is made up of 5 columns PRIO WAIT RESOURCE_NAME TIMEOUT TASK_NAME PRIO is Priority at which the task will run. This ranges from the highest at 9 to the lowest at 5. It is recommended to run drivers at priority 9 and CSL’s at priority 8 e.g 08 0 * * csl –f status.csl –e 09 0 * * modscan –c1 WAIT – If you use 1 then it will wait until this process is completed before continuing with the other processes. 0 is the normal option used to indicate it does not wait. RESOURCE_NAME – Always leave at * TIMEOUT – Always leave at * TASK_NAME – Name of the Process to be run with parameters if needed.

RealFlex 6 - Getting Started
5000-0001-0061-I
43
4. Connectivity options. Flex.View HMI can be connected to RealFlex 6 Server over any TCP/IP network including LAN, Intranet, dial-up, Internet, etc. Described below are the most common connectivity options between Flex.View and RealFlex systems. Before starting Flex.View you need to have TCP/IP configured both on MS Windows and QNX 6 PCs. The only common requirement for all connectivity options is that RealFlex PCs (both main and stand-by) should have predefined IP addresses. Using of dynamically assigned IP addresses (DHCP) is allowed for the Flex.View PC and not for RealFlex.
4.0.1. Connection over LAN. You need to have LAN cards installed on MS Windows and QNX 6 PCs. TCP/IP should be configured for LAN interfaces on both PCs. Fig. 1. Permanent connection over network
4.0.2. Direct dial-up connection over telephone network. Dial-up networking should be installed on MS Windows PC. On QNX PC you need to have TCP/IP installed with PPP protocol configured. Fig. 2. Dial-up connection to a single RealFlex PC If you have RealFlex fail over configuration you will need separate phone numbers and modems for each RealFlex PC. Flex.View will automatically establish an alternative dial-up connection to the stand-by node when it becomes the master node.
Flex.View PC Intranet
QNX 6 PC
TCP/IP network
Flex.View PC Modem
QNX 6 PC Modem
Phone Network
RealFlex 6 - Getting Started
5000-0001-0061-I
44
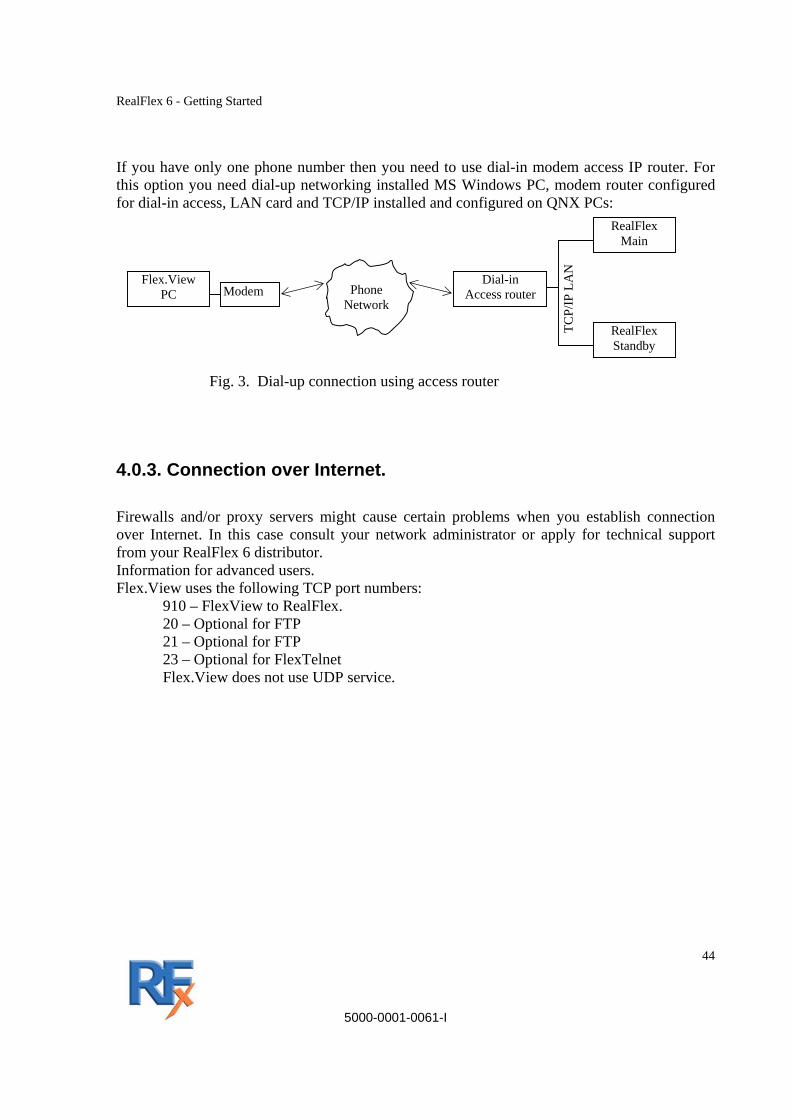
If you have only one phone number then you need to use dial-in modem access IP router. For this option you need dial-up networking installed MS Windows PC, modem router configured for dial-in access, LAN card and TCP/IP installed and configured on QNX PCs: Fig. 3. Dial-up connection using access router
4.0.3. Connection over Internet. Firewalls and/or proxy servers might cause certain problems when you establish connection over Internet. In this case consult your network administrator or apply for technical support from your RealFlex 6 distributor. Information for advanced users. Flex.View uses the following TCP port numbers:
910 – FlexView to RealFlex. 20 – Optional for FTP 21 – Optional for FTP 23 – Optional for FlexTelnet Flex.View does not use UDP service.
Flex.View PC Modem
RealFlex Main
Dial-in Access router
Phone Network
RealFlex Standby
Phone Network
TCP/
IP L
AN

RealFlex 6 - Getting Started
5000-0001-0061-I
45
5. Configuring for Leased Line Modem or Serial Line If it is required to allow FlexWin clients to connect to the RealFlex 6 PC using a leased line modem or serial cable, then it is necessary to configure the QNX 6 PC for PPP and also setup new connection on Windows XP PC. If you are using just a Serial Cable then it should be full null modem cable. If you are using Leased line modems then they should be setup to automatically connect and they should supply DTR and DCD active to the serial port. 5.1. Security When setting up a remote login it is essential that you set a password for the superuser login. Login as a superuser i.e open a shell and login as root login: root <CR> # Set a password for root # passwd # New password: xxx # Retype new password: xxx #

RealFlex 6 - Getting Started
5000-0001-0061-I
46
5.2. Configuring PPP
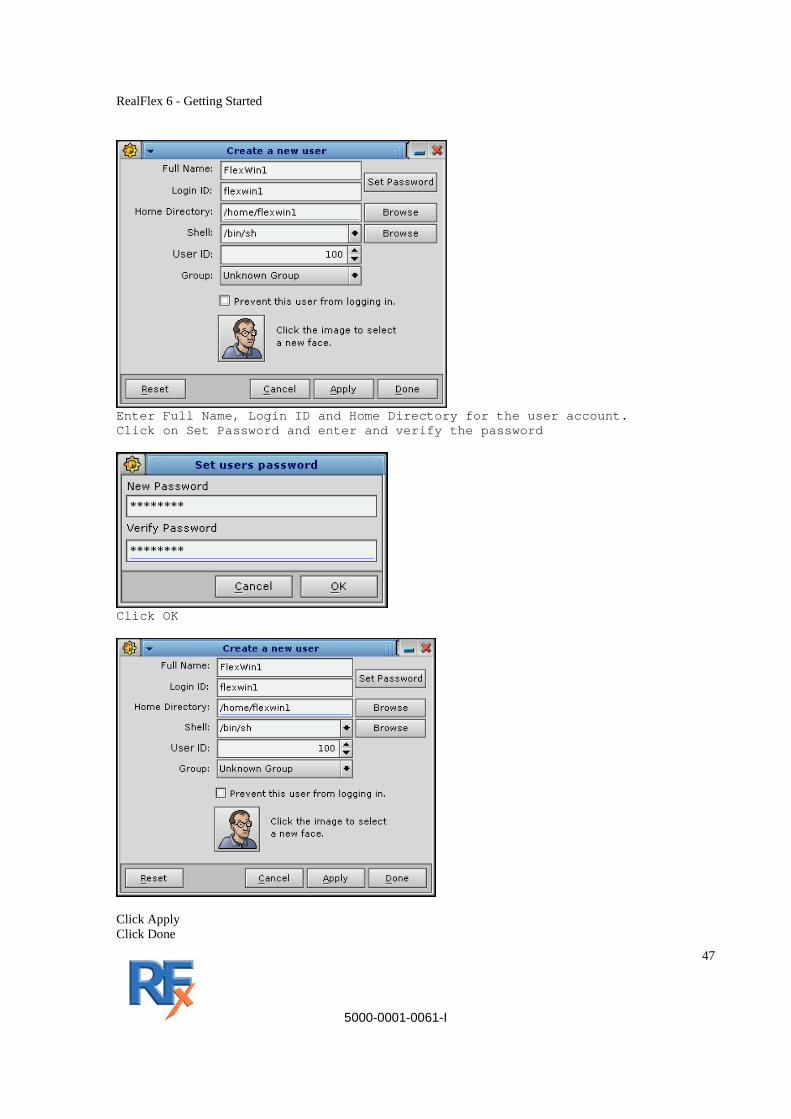
5.2.1. New Accounts Create a new user account for each PPP connection i.e. if you have more than 1 serial port with PPP connections, then you need to create a new user account for each connection e.g. if you have 3 FlexView clients on serial lines or leased line modems which allow 3 simultaneous connections, then you need 3 new accounts e.g. (flexwin1, flexwin2, flexwin3) These are the accounts which FlexView logs into when it connects. i.e. the username and password used on the FlexView PC Select Users from the Configure menu on the right side of the screen.
Click on Advanced
Click on New User
RealFlex 6 - Getting Started
5000-0001-0061-I
47
Enter Full Name, Login ID and Home Directory for the user account. Click on Set Password and enter and verify the password
Click OK
Click Apply Click Done

RealFlex 6 - Getting Started
5000-0001-0061-I
48
You should add a User for each serial port used for PPP. When finished Click Done Click Done

RealFlex 6 - Getting Started
5000-0001-0061-I
49
5.2.2. New Scripts Open the File Manager by clicking on the File Manager on the Toolbar
Go to /etc/ppp folder (If ppp folder does not exist, then create a folder called ppp) Create a /etc/ppp/options file with the following line Create a file called options Right click in options and select Open With Type ped Click Open And add the following lines
Create a /etc/ppp/pap-secrets file with the following line
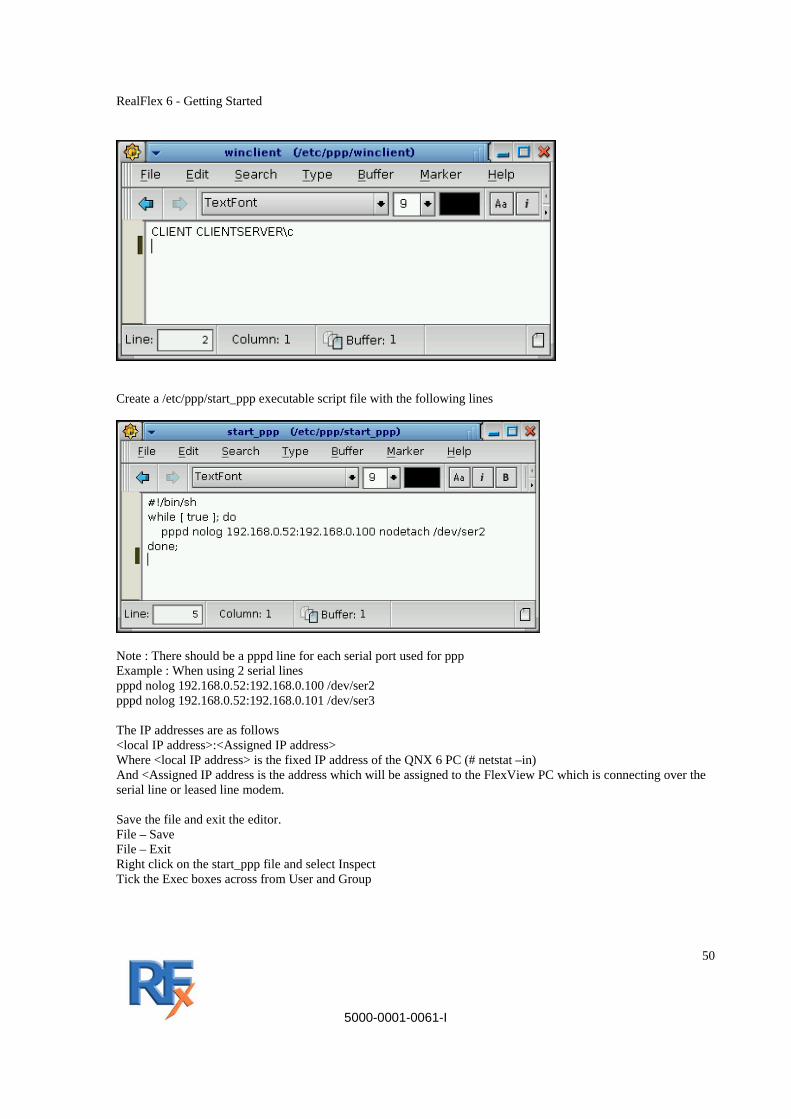
Create a /etc/ppp/winclient file with the following line
RealFlex 6 - Getting Started
5000-0001-0061-I
50
Create a /etc/ppp/start_ppp executable script file with the following lines
Note : There should be a pppd line for each serial port used for ppp Example : When using 2 serial lines pppd nolog 192.168.0.52:192.168.0.100 /dev/ser2 pppd nolog 192.168.0.52:192.168.0.101 /dev/ser3 The IP addresses are as follows <local IP address>:<Assigned IP address> Where <local IP address> is the fixed IP address of the QNX 6 PC (# netstat –in) And <Assigned IP address is the address which will be assigned to the FlexView PC which is connecting over the serial line or leased line modem. Save the file and exit the editor. File – Save File – Exit Right click on the start_ppp file and select Inspect Tick the Exec boxes across from User and Group

RealFlex 6 - Getting Started
5000-0001-0061-I
51
Click on Done
RealFlex 6 - Getting Started
5000-0001-0061-I
52
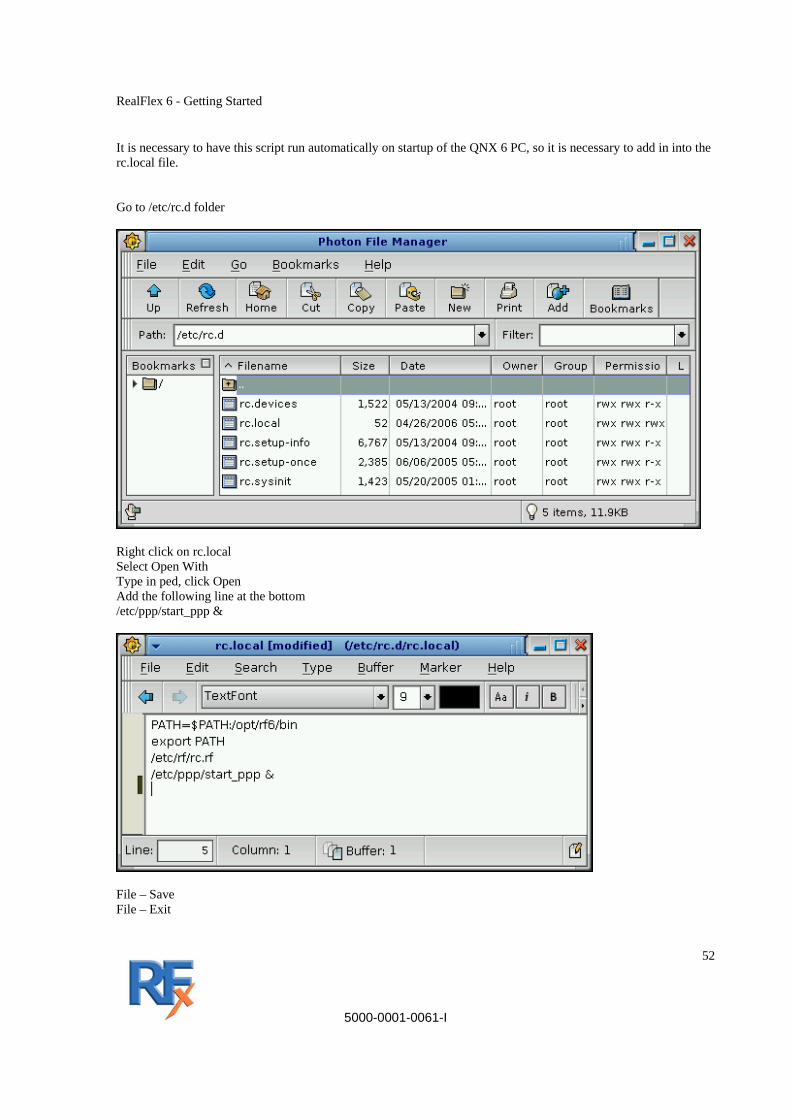
It is necessary to have this script run automatically on startup of the QNX 6 PC, so it is necessary to add in into the rc.local file. Go to /etc/rc.d folder
Right click on rc.local Select Open With Type in ped, click Open Add the following line at the bottom /etc/ppp/start_ppp &
File – Save File – Exit
RealFlex 6 - Getting Started
5000-0001-0061-I
53
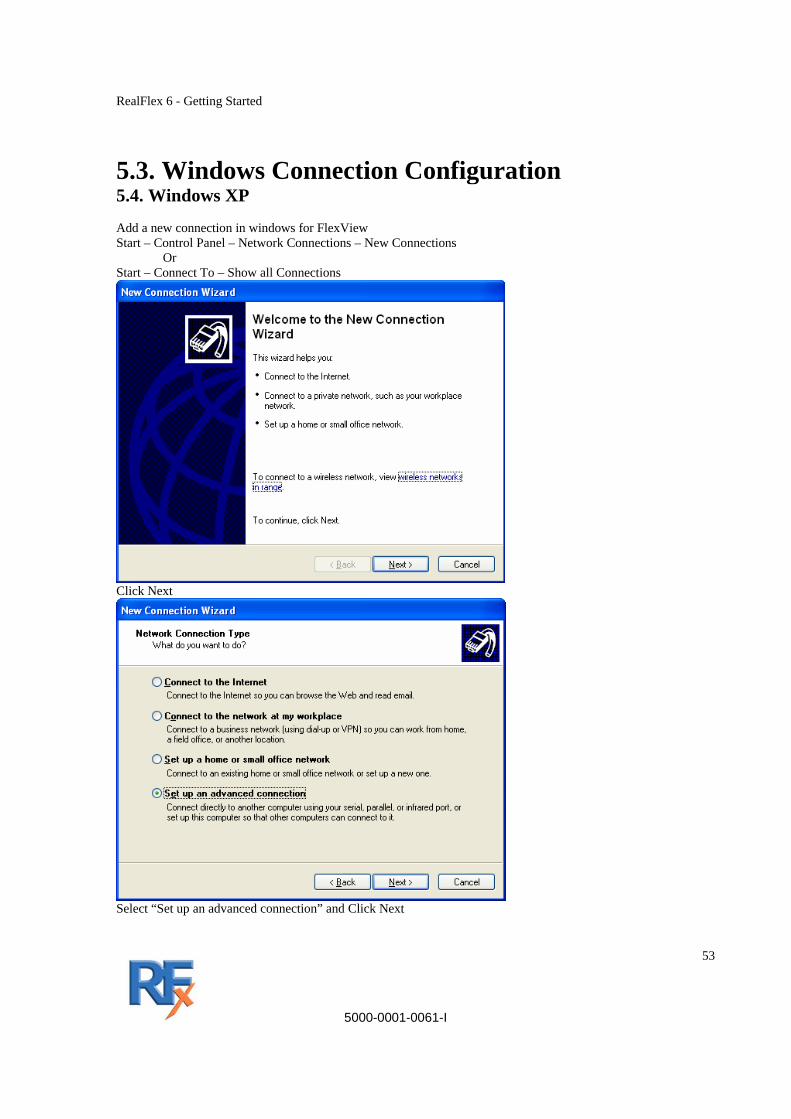
5.3. Windows Connection Configuration 5.4. Windows XP Add a new connection in windows for FlexView Start – Control Panel – Network Connections – New Connections
Or Start – Connect To – Show all Connections
Click Next
Select “Set up an advanced connection” and Click Next
RealFlex 6 - Getting Started
5000-0001-0061-I
54
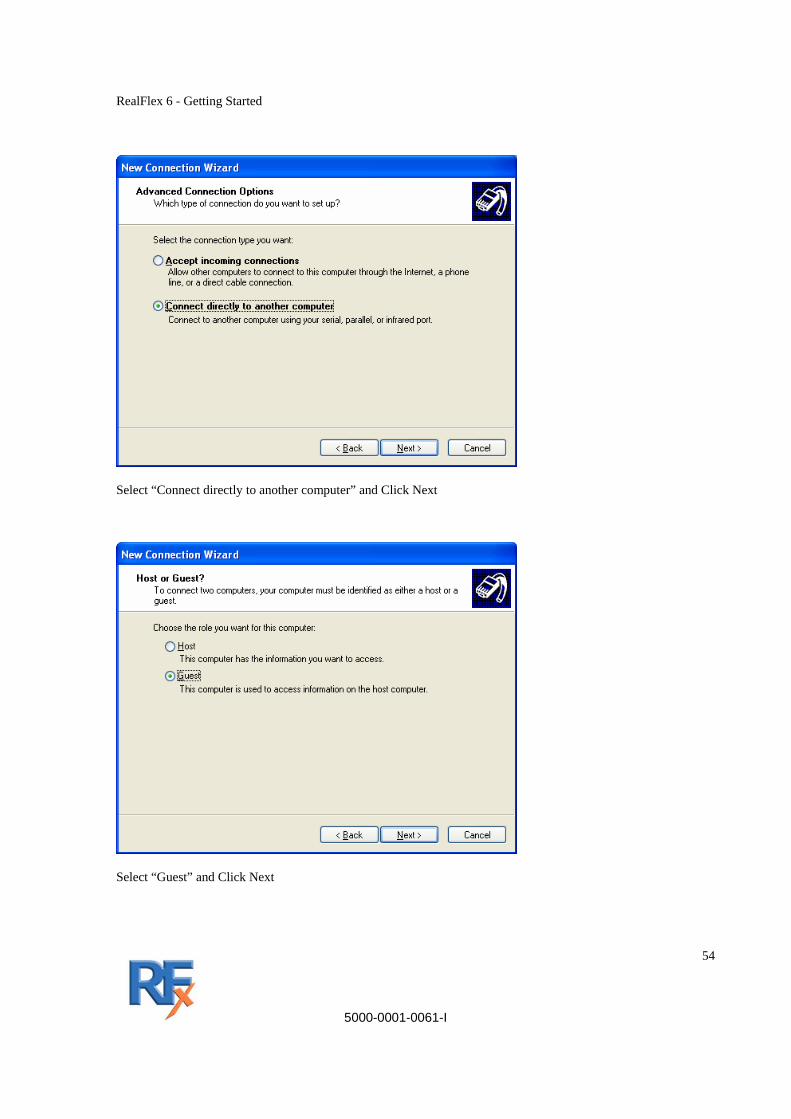
Select “Connect directly to another computer” and Click Next
Select “Guest” and Click Next

RealFlex 6 - Getting Started
5000-0001-0061-I
55
Enter connection name e.g FlexWin1 and Click Next
Select an appropriate serial port and Click Next

RealFlex 6 - Getting Started
5000-0001-0061-I
56
Click Finish

RealFlex 6 - Getting Started
5000-0001-0061-I
57
Enter User name and Password (As used when creating the account on the QNX PC.) Tick the “Save this username and password for the following users) Select the option which is appropriate for the particular setup. Click Properties and Options tab
Click on Configure
Insure the Maximum speed matches the speed of the serial port on the QNX 6 port

RealFlex 6 - Getting Started
5000-0001-0061-I
58
Click on the Options tab
Set “Redial attempts” to 5, “Time between redial attempts” to 5 seconds, and tick the “Redial if line is dropped. Click OK Click Connect and wait to establish a connection, this allows the username and password to be saved by windows.

RealFlex 6 - Getting Started
5000-0001-0061-I
59
6. Configuring for Dialup Modem If it is required to allow FlexWin clients to connect to the RealFlex 6 PC using a dialup modem, then it is necessary to configure the QNX 6 PC for PPP and also setup new connection on Windows XP PC. The modems used at the RealFlex 6 PC, should be setup to not automatically answer incoming calls, should have echo on and verbose responses so that an AT command should be responded with OK ATS0=0 AT&W 6.1. Security When setting up a remote login it is essential that you set a password for the superuser login. Login as a superuser i.e open a shell and login as root login: root <CR> # Set a password for root # passwd # New password: xxx # Retype new password: xxx #

RealFlex 6 - Getting Started
5000-0001-0061-I
60
6.2. Configuring PPP
6.2.1. New Accounts Create a new user account for each PPP connection i.e. if you have more than 1 serial port with a dialup modem, then you need to create a new user account for each connection e.g. if you have 3 FlexView clients that which to simultaneously connect to the RealFlex 6 server, then you need 3 new accounts e.g. (flexwin1, flexwin2, flexwin3) These are the accounts which FlexView logs into when it connects i.e. the username and password used on the FlexView PC Select Users from the Configure menu on the right side of the screen.
Click on Advanced
Click on New User

RealFlex 6 - Getting Started
5000-0001-0061-I
61
Enter Full Name, Login ID and Home Directory for the user account. Click on Set Password and enter and verify the password
Click OK
Click Apply Click Done

RealFlex 6 - Getting Started
5000-0001-0061-I
62
You should add a User for each serial port/modem used for PPP. When finished Click Done Click Done

RealFlex 6 - Getting Started
5000-0001-0061-I
63
6.2.2. New Scripts Open the File Manager by clicking on the File Manager on the Toolbar
Go to /etc/ppp folder (If ppp folder does not exist, then create a folder called ppp) Create a /etc/ppp/options file with the following line Create a file called options Right click in options and select Open With Type ped Click Open And add the following lines
Create a /etc/ppp/pap-secrets file with the following line

RealFlex 6 - Getting Started
5000-0001-0061-I
64
Create a /etc/ppp/DialupServer file with the following line
Create a /etc/ppp/start_ppp executable script file with the following lines
Note : There should be a pppd line for each serial port + modem used for ppp Example : When using 2 serial lines pppd nolog 192.168.0.52:192.168.0.100 /dev/ser2 pppd nolog 192.168.0.52:192.168.0.101 /dev/ser3 The IP addresses are as follows <local IP address>:<Assigned IP address> Where <local IP address> is the fixed IP address of the QNX 6 PC (# netstat –in) And <Assigned IP address is the address which will be assigned to the FlexView PC which is connecting over the dialup modem line. Save the file and exit the editor.

RealFlex 6 - Getting Started
5000-0001-0061-I
65
File – Save File – Exit Right click on the start_ppp file and select Inspect Tick the Exec boxes across from User and Group
Click on Done

RealFlex 6 - Getting Started
5000-0001-0061-I
66
It is necessary to have this script run automatically on startup of the QNX 6 PC, so it is necessary to add in into the rc.local file. Go to /etc/rc.d folder
Right click on rc.local Select Open With Type in ped, click Open Add the following line at the bottom /etc/ppp/start_ppp &
File – Save File – Exit

RealFlex 6 - Getting Started
5000-0001-0061-I
67
6.3. Windows Connection Configuration 6.4. Windows XP Add a new connection in windows for FlexView Start – Control Panel – Network Connections – New Connections
Or Start – Connect To – Show all Connections
Click Next
Select “Connect to the Internet” and Click Next

RealFlex 6 - Getting Started
5000-0001-0061-I
68
Select “Set up my connection manually” and Click Next
Select “Connect using a dial-up modem” and Click Next

RealFlex 6 - Getting Started
5000-0001-0061-I
69
Select the appropriate modem and Click Next
Enter an appropriate name and Click Next

RealFlex 6 - Getting Started
5000-0001-0061-I
70
Enter the phone number of the line connected to the modem at the RealFlex 6 Server and Click Next
Enter the User name and Password of the user you have already setup on the RealFlex 6 PC. See previous section on “New Accounts” Click Next
RealFlex 6 - Getting Started
5000-0001-0061-I
71
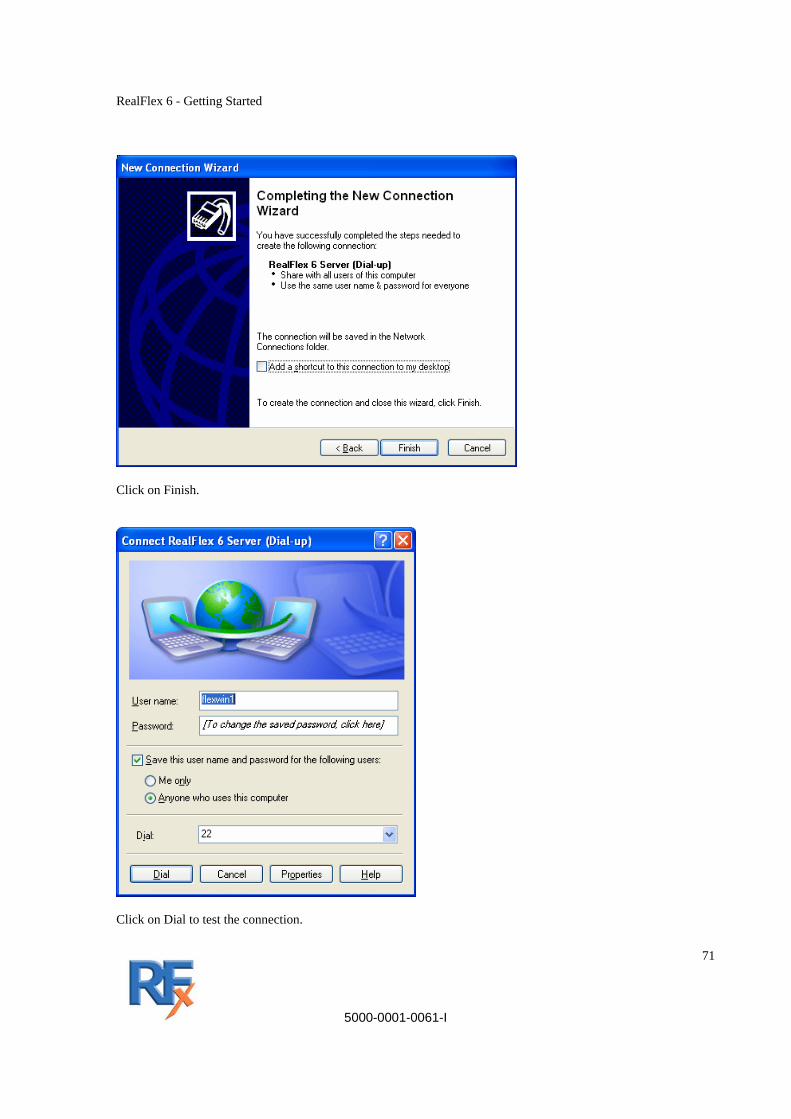
Click on Finish.
Click on Dial to test the connection.

RealFlex 6 - Getting Started
5000-0001-0061-I
72
7. Basic troubleshooting. 7.1. Troubleshooting of IP connection The most common way to check that you have TCP/IP connection to QNX 6 / RealFlex 6 PC properly established is to use ping command from your Flex.View PC. From the Windows 'Run' menu type:
ping <IP address of QNX 6/Realflex 6 PC> <Enter key> You should see a message like this one:
Reply from <IP address>: bytes=32 time=NN ms TTL=xxx
If you don’t have valid connection, you see this message:
Request time out
In this case make sure your network or modem connected and TCP/IP is configured properly. If your IP connection is OK but Flex.View still cannot connect to RealFlex 6 then check the reason why you cannot connect. Click on connectivity icon at the top bar of Flex.View window.

RealFlex 6 - Getting Started
5000-0001-0061-I
73
7.2. Command Line Operation On QNX 6 / RealFlex 6 PC, open a Terminal or use Telnet from FlexView PC There is an “rf” command which can be used to manually start and stop RealFlex and it shows extra information about process starting e.t.c. This can be useful in debugging problems.
7.2.0.1. Help for rf command To get help on the rf command you can use “rf -?” or “rf help” # rf -? Copyright (C) 1996-2005 Datac Technologies, Ltd v6.3.0r9.79 build 195.0.0.1 Registration ID: Not found rf supports following commands: start [-P<PrjName>] [-m] [-N<num>] - Start RF6 stop [-l] [-m] [-N<num>] - Stop RF6 ps - Display the RF6 Process names running in the system check -n <ProcessName> - Check to see if a given realflex procss is running state - Display the current RealFlex state switch - Switch between main and standby nodes version - Display the version of the RealFlex modules help - Show help To display additional information use "rf <command> -?" # To get more detailed help on specific options, use “rf <option> -? # rf start -? Copyright (C) 1996-2005 Datac Technologies, Ltd v6.3.0r9.79 build 195.0.0.1 Registration ID: Not found -P<str> Change default project name (value is <>) -m Enable Monitor Mode -N<num> Node number(1 - current, 2 - remote, 0 - both) (value is 0 ) -p<str> Device name with HW key (value is <>) #
RealFlex 6 - Getting Started
5000-0001-0061-I
74
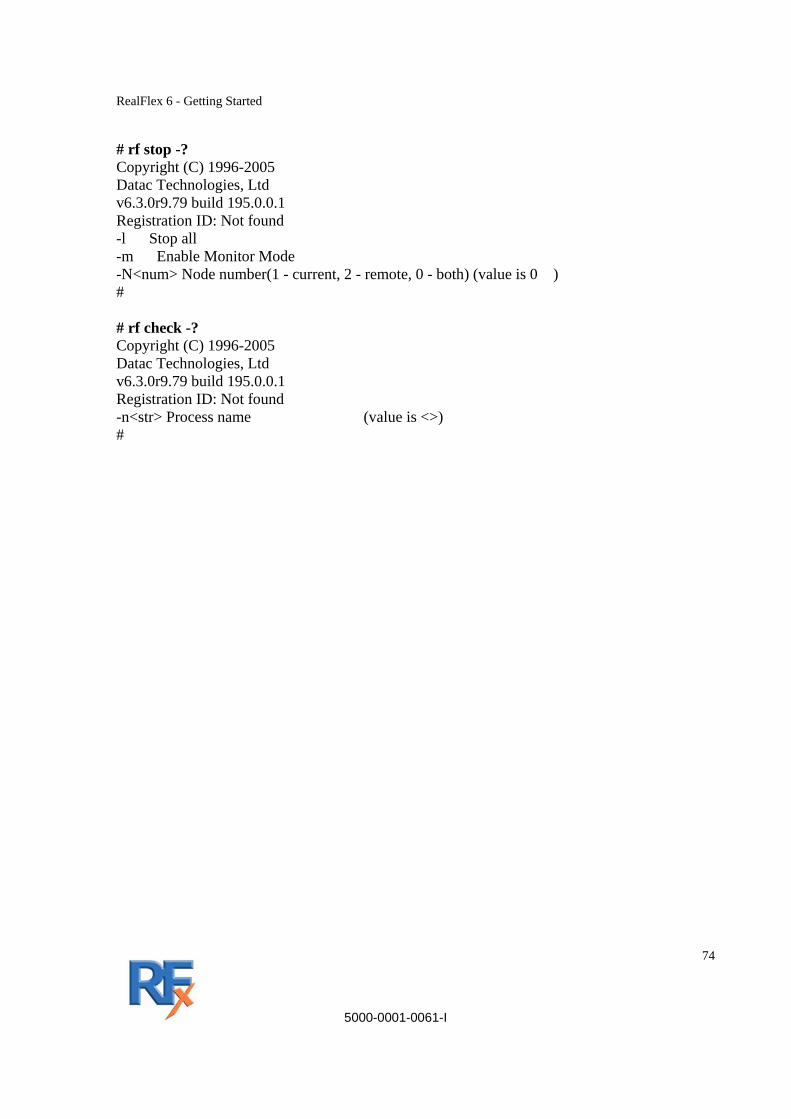
# rf stop -? Copyright (C) 1996-2005 Datac Technologies, Ltd v6.3.0r9.79 build 195.0.0.1 Registration ID: Not found -l Stop all -m Enable Monitor Mode -N<num> Node number(1 - current, 2 - remote, 0 - both) (value is 0 ) # # rf check -? Copyright (C) 1996-2005 Datac Technologies, Ltd v6.3.0r9.79 build 195.0.0.1 Registration ID: Not found -n<str> Process name (value is <>) #

RealFlex 6 - Getting Started
5000-0001-0061-I
75
7.2.1. Stopping RealFlex from command line Stop RealFlex on both Active Node and Standby Nodes # rf stop Stop RealFlex only on the current Node # rf stop –N1 Stop RealFlex only on the remote Node # rf stop –N2
7.2.2. Starting RealFlex from command line Start RealFlex on both Active Node and Standby Nodes (Current Node will be Active Node) # rf start Start RealFlex only on the current Node # rf start –N1 Start RealFlex only on the remote Node # rf start –N2
7.2.3. Display the RealFlex 6 processes running # rf ps Pid Prio Level Flags Name&&Args 2834467 16 20 00000006 syncproc 2834468 10 10 00000006 fileproc 2834469 10 20 00000006 flexserv 2834470 16 10 00000006 hscproc -m 2850856 10 0 00000006 eventwriter 2850857 13 0 00000006 eventproc 2850858 16 0 00000006 dbproc 2850859 13 0 00000002 histproc 2850860 9 0 00000002 histmgr 2850861 13 0 00000006 rawproc 2850862 13 0 00000006 alarmproc 2850863 10 0 00000006 contdo 2850864 14 0 00000006 cntlproc 2850865 14 0 00000006 rupdate 2850866 10 0 00000002 crtproc 2850867 10 0 00000002 symproc

RealFlex 6 - Getting Started
5000-0001-0061-I
76
2850868 13 0 00000006 anaproc 2850869 13 0 00000006 statproc 2850870 13 0 00000006 meterproc #
7.2.4. Display the RealFlex state on the current PC # rf state RealFlex is running in Standby mode. #
7.2.5. Switching Active and Standby Nodes (Failing Over) Switch the Standby Node to being the Active Node and the Active Node to being the Standby Node # rf switch #

RealFlex 6 - Getting Started
5000-0001-0061-I
77
8. Registration of Hardware Keys For security purposes Hardware Keys have to be activated on a product-by-product scenario. If for some reason you product is not enabled, when you open OPC RTU Configurator, the following screen may appear:
Copy the Registration ID by selecting it and paste into your email facility Send email to [email protected] with your details and the Registration ID Upon receiving your request we can validate that you are the correct customer and we will initialize the ‘Product ID’ for you immediately using in-house software. Upon receiving the email from us please enter the details into the relevant section, therefore initializing the product.

RealFlex 6 - Getting Started
5000-0001-0061-I
78
9. Superkeys Not all Superkey procedures in RealFlex are converted properly to Flex.View. For examples superkey procedures, which call the shell function, can execute various proprietary executables on the QNX/RealFlex PC. After conversion this type of superkey is executed on the QNX/RealFlex PC by default. If however you wish to disable these types of superkey procedures on the Flex.View PC’s, it can be done as follows 9.1. Disabling a Superkey Procedure for Flex.View Using the Configuration File Editor to edit the superkey file
superkey Test1 …. …. endkey
Change to this
superkey Test1 ; fw_disabled …. …. endkey
Exit and save the changes
Now Superkey Test1 will show on the tooltip that it is disable and Flex.View users will not be able to use Test1 superkey button.

RealFlex 6 - Getting Started
5000-0001-0061-I
79
9.1.1. Operator function for Superkey If you have a superkey with the operator function we recommend removing the operator statement for the moment until we implement a replacement function. Example
superkey onoff if [rt, PCU1] = PCU_ON operator Turn ON ? if REPLY = YES send[rt, PCU1] = PCU_OFF endif else operator Turn OFF ? if REPLY = YES send[rt, PCU1] = PCU_ON endif endif endkey
change to the following
superkey onoff if [rt, PCU1] = PCU_ON
send[rt, PCU1] = PCU_OFF else send[rt, PCU1] = PCU_ON endif endkey
Now Superkey onoff will operate from a Flex.View PC.
RealFlex 6 - Getting Started
5000-0001-0061-I
80
9.1.2. Superkey interpretation for Flex.View When Flex.View reads a superkey files it interpret the command for execution on the Flex.View PC where the button is pressed. Example
superkey Report1
shell Crg_exec ……….. endkey
When this superkey is executed on the Flex.View PC, it generates the report and send the output to a temporary file and transferred to the Flex.View PC and displays it on the screen using notepad or wordpad.

RealFlex 6 - Getting Started
5000-0001-0061-I
81
RealFlex Technologies Ltd, 2218 Northpark Drive, Suite 202, Kingwood, Texas, 77339, USA
Tel: +1 281 348 2341, Fax: +1 281 348 2340 Email: [email protected] http://www.realflex.com/
or
RealFlex Technologies Ltd, Limerick Business Complex,
Raheen Business Park, Limerick, Ireland. Tel: +353 61 308884, Fax +353 61 308883,
Email: [email protected] http://www.realflex.com/