Embed Size (px)
Citation preview
FLIR Tools + and Report Studio 9/20/2017
©2017, Infrared Training Center. 1
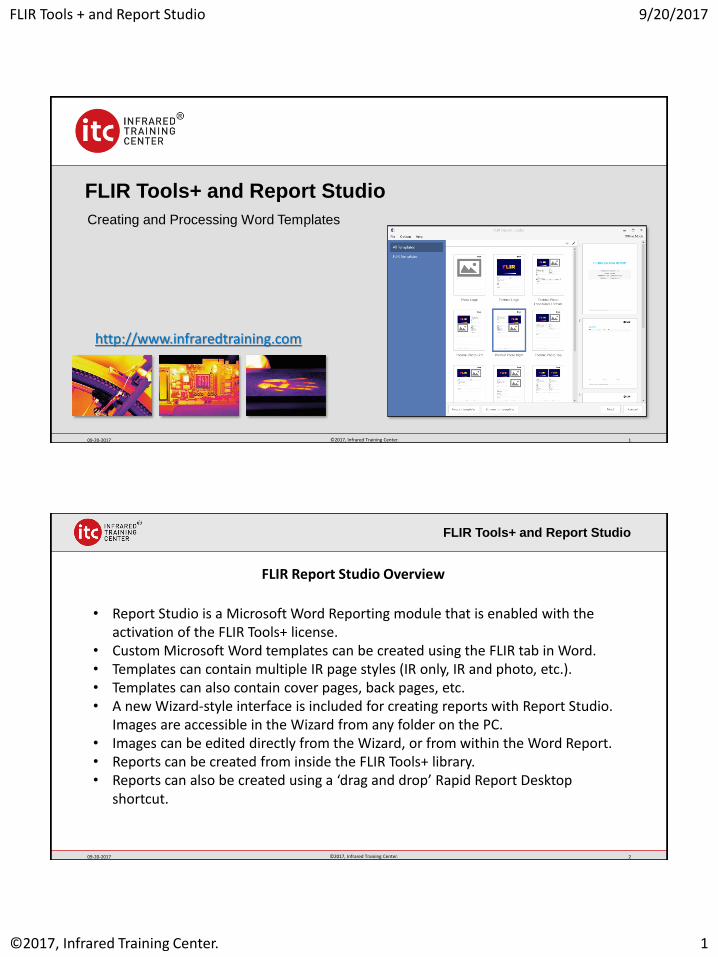
FLIR Tools+ and Report Studio
Creating and Processing Word Templates
09-20-2017 1©2017, Infrared Training Center.
http://www.infraredtraining.com
FLIR Tools+ and Report Studio
09-20-2017 ©2017, Infrared Training Center. 2
• Report Studio is a Microsoft Word Reporting module that is enabled with the activation of the FLIR Tools+ license.
• Custom Microsoft Word templates can be created using the FLIR tab in Word.• Templates can contain multiple IR page styles (IR only, IR and photo, etc.).• Templates can also contain cover pages, back pages, etc. • A new Wizard-style interface is included for creating reports with Report Studio.
Images are accessible in the Wizard from any folder on the PC.• Images can be edited directly from the Wizard, or from within the Word Report.• Reports can be created from inside the FLIR Tools+ library.• Reports can also be created using a ‘drag and drop’ Rapid Report Desktop
shortcut.
FLIR Report Studio Overview
FLIR Tools + and Report Studio 9/20/2017
©2017, Infrared Training Center. 2
FLIR Tools+ and Report Studio
• Demonstrate how to create a new template from the FLIR Tab in Word.• Insert the IR and Photo placeholders.• Use Tables and Fields to show image information.• Display Text Annotations and Notes in a table.• Show how multiple DATA sections can be added to the same template.• Add a Summary Table.• Add a cover page with Report Properties.• Save a new Word template.• Create a report using the Report Studio Wizard.• Create a report from the FLIR Tools Library.• Create a report using the Rapid Report shortcut.• Edit a thermal image in the Word report.
09-20-2017 ©2017, Infrared Training Center. 3
Objectives for this Training Guide
FLIR Tools+ and Report Studio
09-20-2017 ©2017, Infrared Training Center. 4
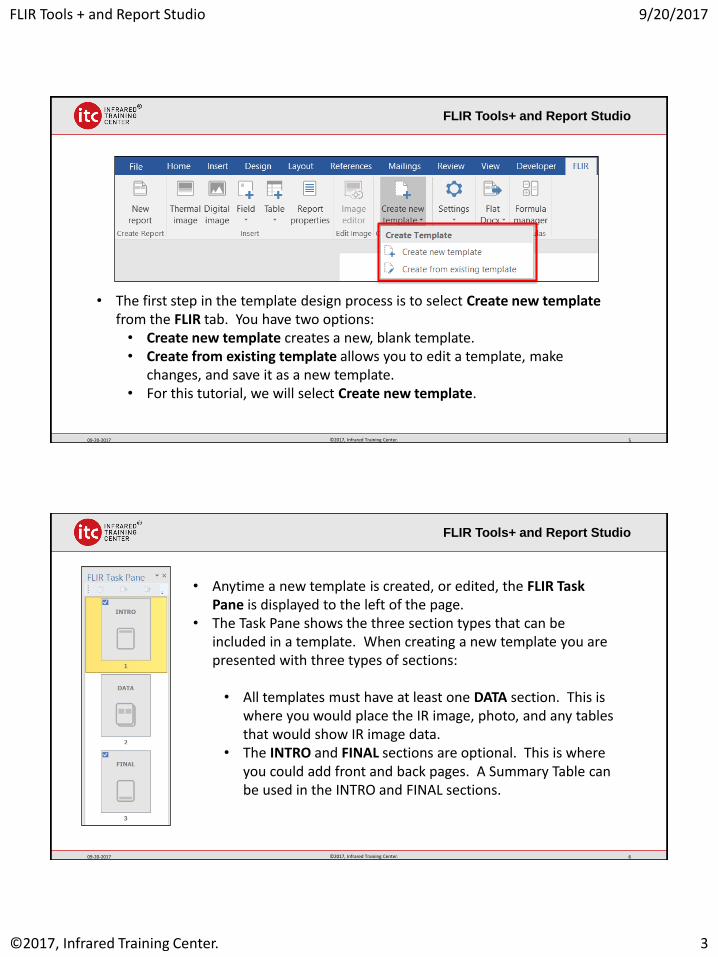
• When FLIR Tools+ is activated, the FLIR Tab is automatically installed in Word.• From this tab you can create a new template and insert images, tables and
other objects onto the page.
FLIR Tab in Word
FLIR Tools + and Report Studio 9/20/2017
©2017, Infrared Training Center. 3
FLIR Tools+ and Report Studio
09-20-2017 ©2017, Infrared Training Center. 5
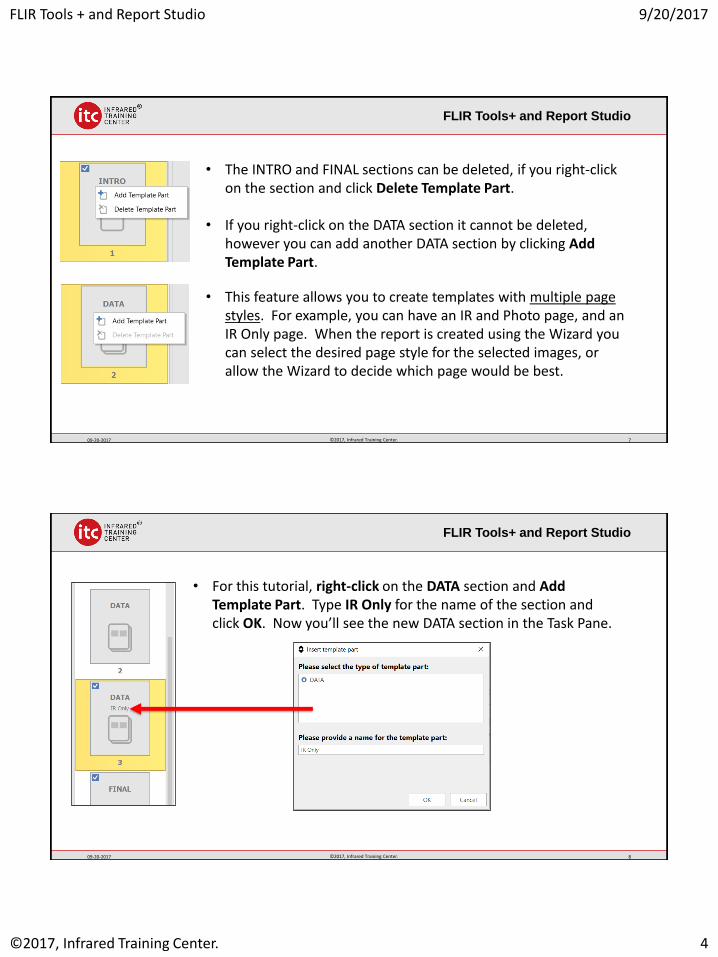
• The first step in the template design process is to select Create new template from the FLIR tab. You have two options:• Create new template creates a new, blank template.• Create from existing template allows you to edit a template, make
changes, and save it as a new template.• For this tutorial, we will select Create new template.
FLIR Tools+ and Report Studio
09-20-2017 ©2017, Infrared Training Center. 6
• Anytime a new template is created, or edited, the FLIR Task Pane is displayed to the left of the page.
• The Task Pane shows the three section types that can be included in a template. When creating a new template you are presented with three types of sections:
• All templates must have at least one DATA section. This is where you would place the IR image, photo, and any tables that would show IR image data.
• The INTRO and FINAL sections are optional. This is where you could add front and back pages. A Summary Table can be used in the INTRO and FINAL sections.
FLIR Tools + and Report Studio 9/20/2017
©2017, Infrared Training Center. 4
FLIR Tools+ and Report Studio
09-20-2017 ©2017, Infrared Training Center. 7
• The INTRO and FINAL sections can be deleted, if you right-click on the section and click Delete Template Part.
• If you right-click on the DATA section it cannot be deleted, however you can add another DATA section by clicking Add Template Part.
• This feature allows you to create templates with multiple page styles. For example, you can have an IR and Photo page, and an IR Only page. When the report is created using the Wizard you can select the desired page style for the selected images, or allow the Wizard to decide which page would be best.
FLIR Tools+ and Report Studio
09-20-2017 ©2017, Infrared Training Center. 8
• For this tutorial, right-click on the DATA section and Add Template Part. Type IR Only for the name of the section and click OK. Now you’ll see the new DATA section in the Task Pane.
FLIR Tools + and Report Studio 9/20/2017
©2017, Infrared Training Center. 5
FLIR Tools+ and Report Studio
09-20-2017 ©2017, Infrared Training Center. 9
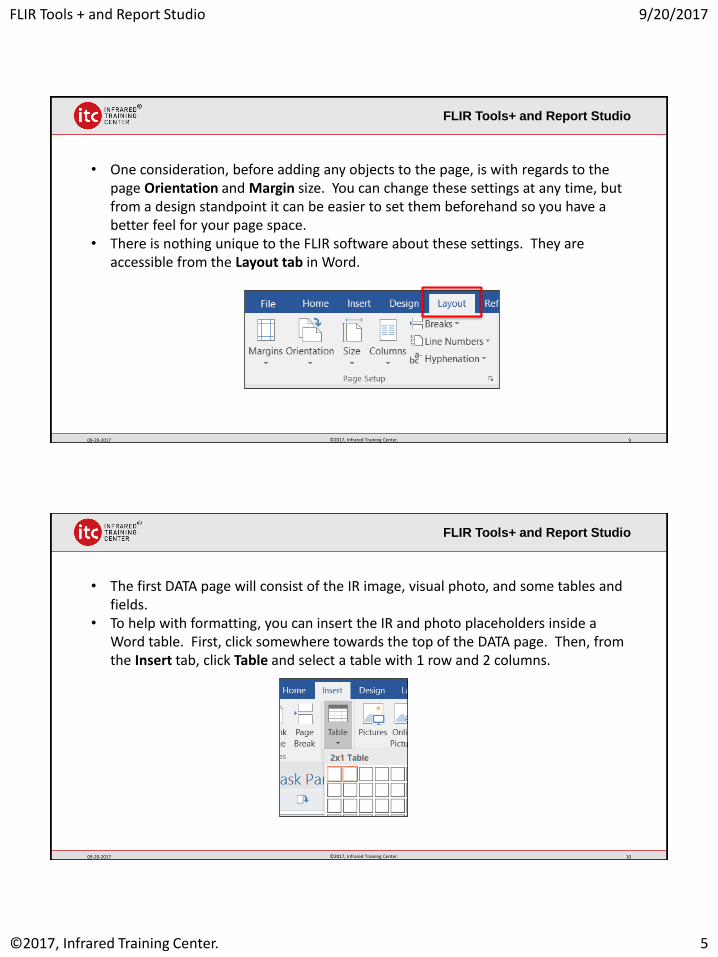
• One consideration, before adding any objects to the page, is with regards to the page Orientation and Margin size. You can change these settings at any time, but from a design standpoint it can be easier to set them beforehand so you have a better feel for your page space.
• There is nothing unique to the FLIR software about these settings. They are accessible from the Layout tab in Word.
FLIR Tools+ and Report Studio
09-20-2017 ©2017, Infrared Training Center. 10
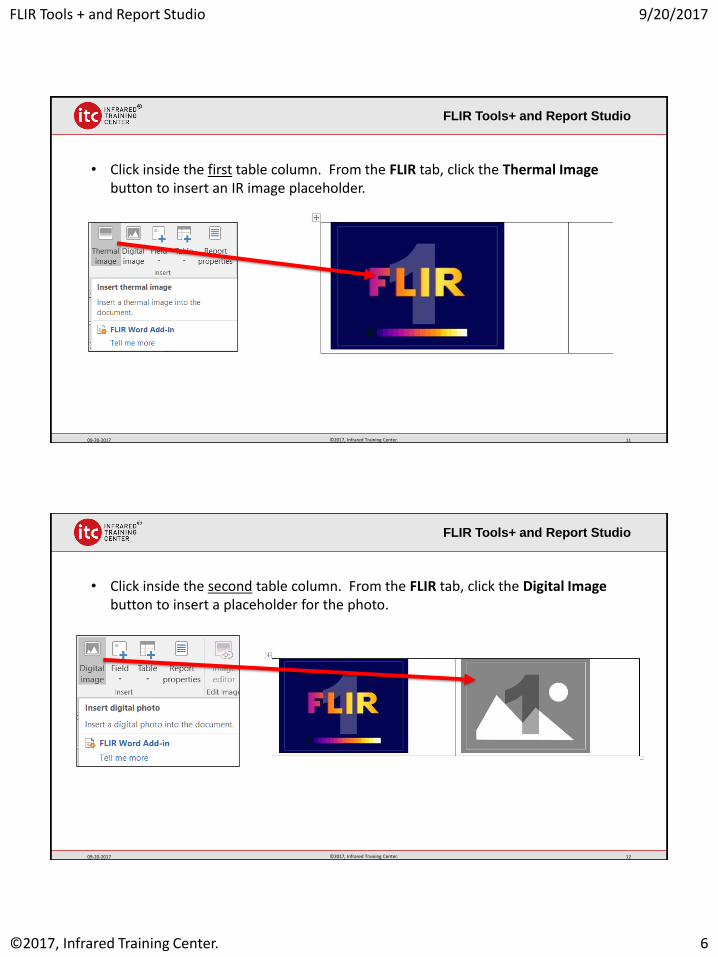
• The first DATA page will consist of the IR image, visual photo, and some tables and fields.
• To help with formatting, you can insert the IR and photo placeholders inside a Word table. First, click somewhere towards the top of the DATA page. Then, from the Insert tab, click Table and select a table with 1 row and 2 columns.
FLIR Tools + and Report Studio 9/20/2017
©2017, Infrared Training Center. 6
FLIR Tools+ and Report Studio
09-20-2017 ©2017, Infrared Training Center. 11
• Click inside the first table column. From the FLIR tab, click the Thermal Image button to insert an IR image placeholder.
FLIR Tools+ and Report Studio
09-20-2017 ©2017, Infrared Training Center. 12
• Click inside the second table column. From the FLIR tab, click the Digital Image button to insert a placeholder for the photo.
FLIR Tools + and Report Studio 9/20/2017
©2017, Infrared Training Center. 7
FLIR Tools+ and Report Studio
09-20-2017 ©2017, Infrared Training Center. 13
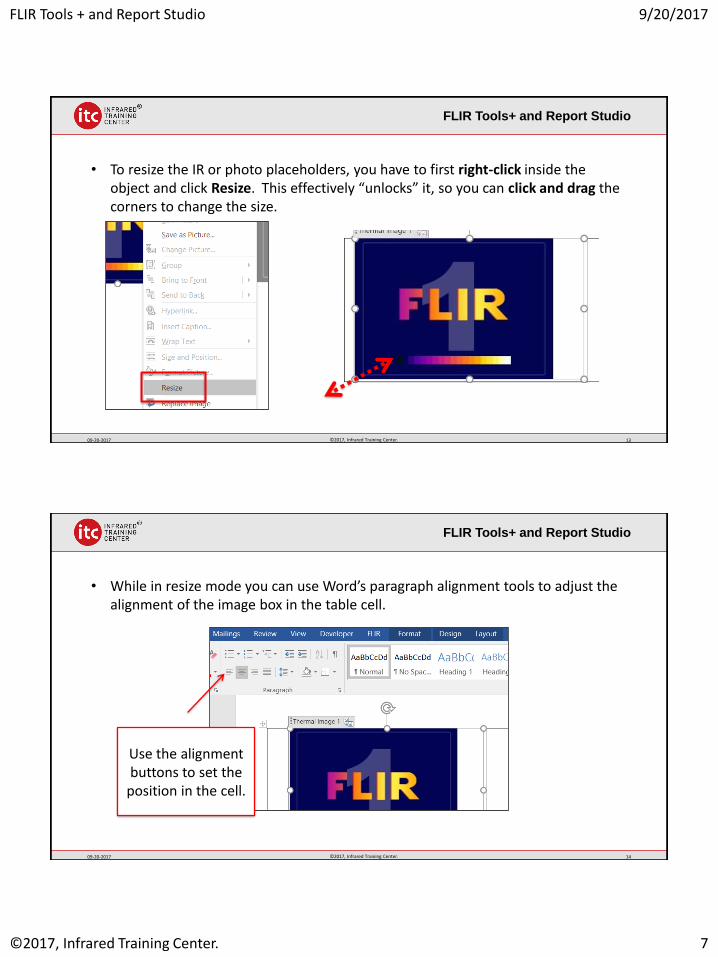
• To resize the IR or photo placeholders, you have to first right-click inside the object and click Resize. This effectively “unlocks” it, so you can click and drag the corners to change the size.
FLIR Tools+ and Report Studio
09-20-2017 ©2017, Infrared Training Center. 14
• While in resize mode you can use Word’s paragraph alignment tools to adjust the alignment of the image box in the table cell.
Use the alignment buttons to set the
position in the cell.
FLIR Tools + and Report Studio 9/20/2017
©2017, Infrared Training Center. 8
FLIR Tools+ and Report Studio
09-20-2017 ©2017, Infrared Training Center. 15
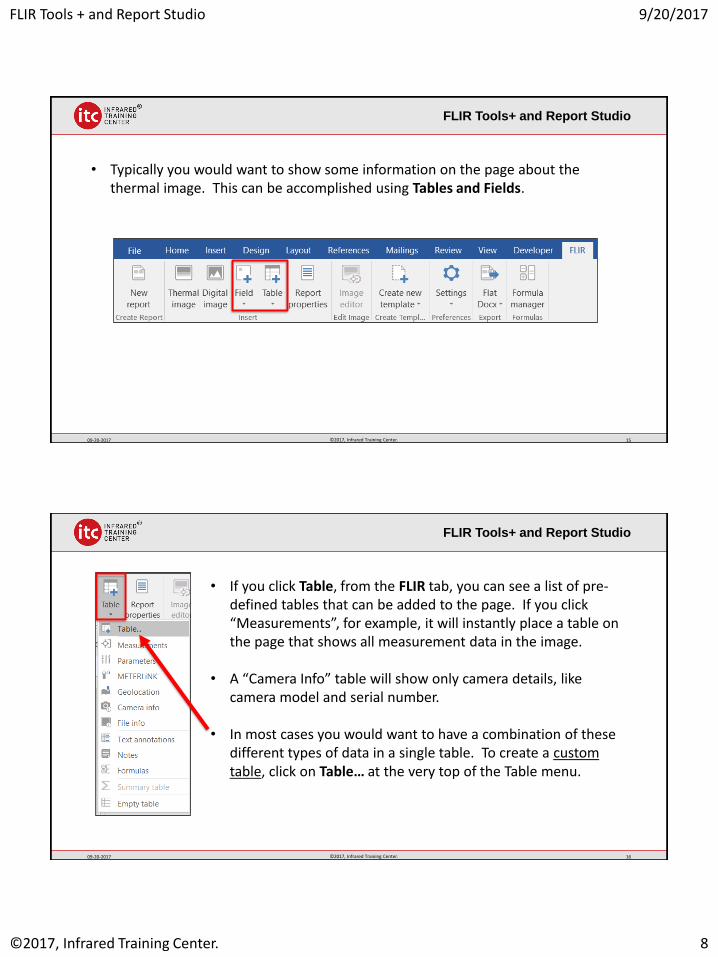
• Typically you would want to show some information on the page about the thermal image. This can be accomplished using Tables and Fields.
FLIR Tools+ and Report Studio
09-20-2017 ©2017, Infrared Training Center. 16
• If you click Table, from the FLIR tab, you can see a list of pre-defined tables that can be added to the page. If you click “Measurements”, for example, it will instantly place a table on the page that shows all measurement data in the image.
• A “Camera Info” table will show only camera details, like camera model and serial number.
• In most cases you would want to have a combination of these different types of data in a single table. To create a custom table, click on Table… at the very top of the Table menu.
FLIR Tools + and Report Studio 9/20/2017
©2017, Infrared Training Center. 9
FLIR Tools+ and Report Studio
09-20-2017 ©2017, Infrared Training Center. 17
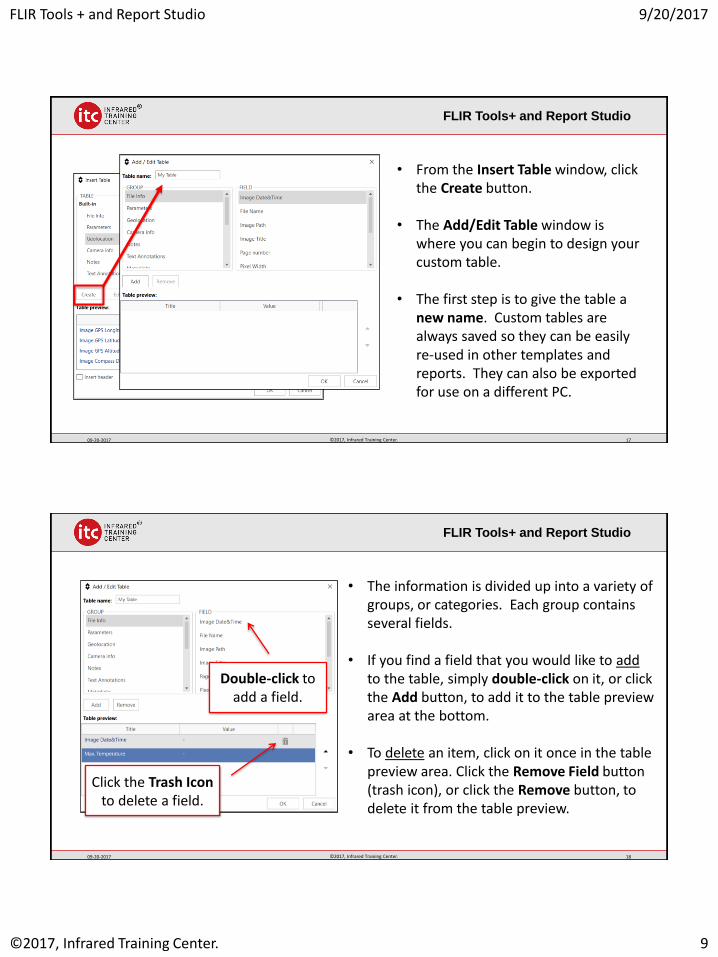
• From the Insert Table window, click the Create button.
• The Add/Edit Table window is where you can begin to design your custom table.
• The first step is to give the table a new name. Custom tables are always saved so they can be easily re-used in other templates and reports. They can also be exported for use on a different PC.
FLIR Tools+ and Report Studio
09-20-2017 ©2017, Infrared Training Center. 18
• The information is divided up into a variety of groups, or categories. Each group contains several fields.
• If you find a field that you would like to addto the table, simply double-click on it, or click the Add button, to add it to the table preview area at the bottom.
• To delete an item, click on it once in the table preview area. Click the Remove Field button (trash icon), or click the Remove button, to delete it from the table preview.
Click the Trash Icon to delete a field.
Double-click to add a field.
FLIR Tools + and Report Studio 9/20/2017
©2017, Infrared Training Center. 10
FLIR Tools+ and Report Studio
09-20-2017 ©2017, Infrared Training Center. 19
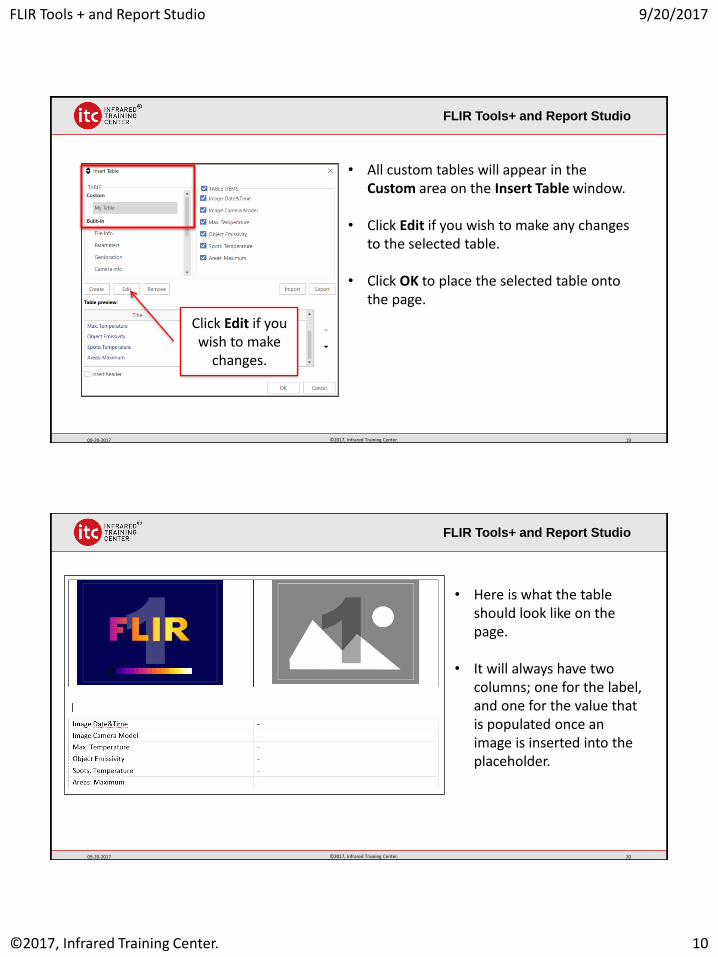
• All custom tables will appear in the Custom area on the Insert Table window.
• Click Edit if you wish to make any changes to the selected table.
• Click OK to place the selected table onto the page.
Click Edit if you wish to make
changes.
FLIR Tools+ and Report Studio
09-20-2017 ©2017, Infrared Training Center. 20
• Here is what the table should look like on the page.
• It will always have two columns; one for the label, and one for the value that is populated once an image is inserted into the placeholder.
FLIR Tools + and Report Studio 9/20/2017
©2017, Infrared Training Center. 11
FLIR Tools+ and Report Studio
09-20-2017 ©2017, Infrared Training Center. 21
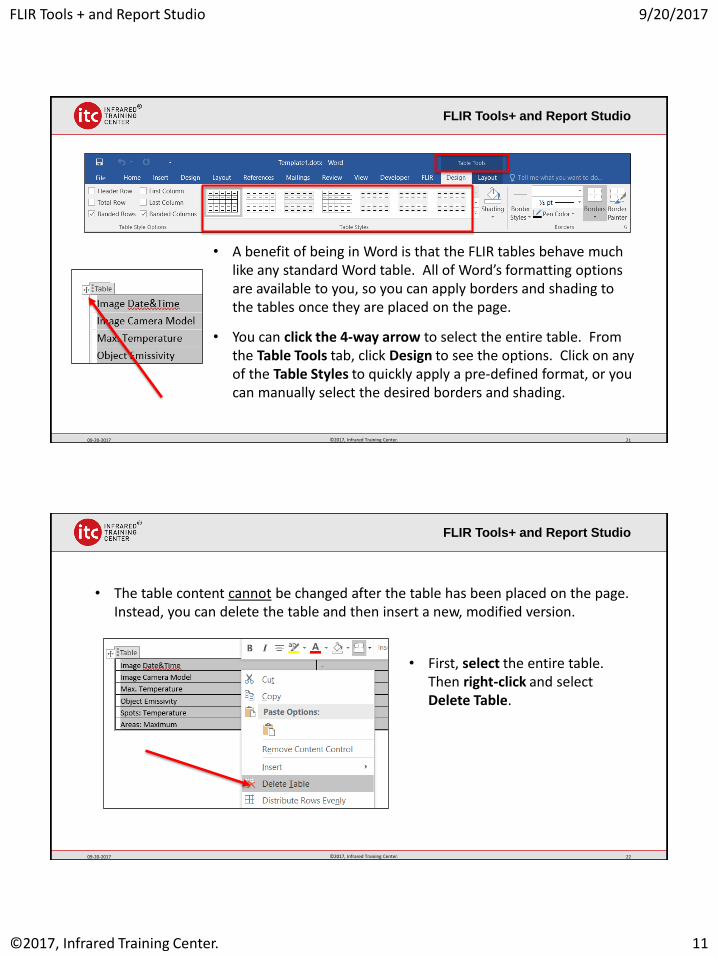
• A benefit of being in Word is that the FLIR tables behave much like any standard Word table. All of Word’s formatting options are available to you, so you can apply borders and shading to the tables once they are placed on the page.
• You can click the 4-way arrow to select the entire table. From the Table Tools tab, click Design to see the options. Click on any of the Table Styles to quickly apply a pre-defined format, or you can manually select the desired borders and shading.
FLIR Tools+ and Report Studio
09-20-2017 ©2017, Infrared Training Center. 22
• The table content cannot be changed after the table has been placed on the page. Instead, you can delete the table and then insert a new, modified version.
• First, select the entire table. Then right-click and select Delete Table.
FLIR Tools + and Report Studio 9/20/2017
©2017, Infrared Training Center. 12
FLIR Tools+ and Report Studio
09-20-2017 ©2017, Infrared Training Center. 23
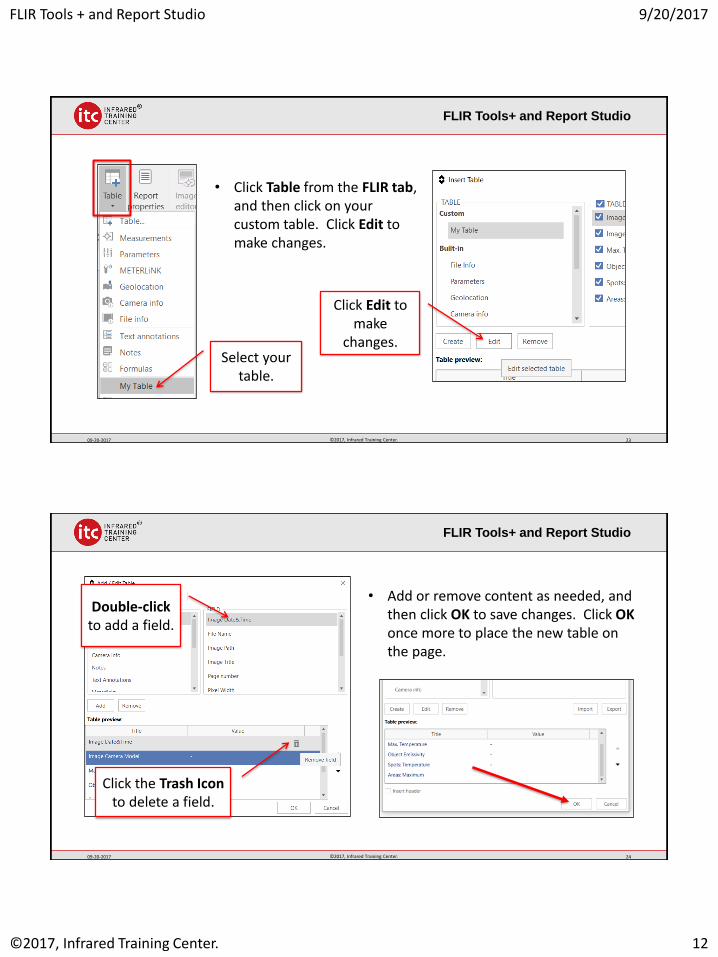
• Click Table from the FLIR tab, and then click on your custom table. Click Edit to make changes.
Select your table.
Click Edit to make
changes.
FLIR Tools+ and Report Studio
09-20-2017 ©2017, Infrared Training Center. 24
• Add or remove content as needed, and then click OK to save changes. Click OKonce more to place the new table on the page.
Double-clickto add a field.
Click the Trash Icon to delete a field.
FLIR Tools + and Report Studio 9/20/2017
©2017, Infrared Training Center. 13
FLIR Tools+ and Report Studio
09-20-2017 ©2017, Infrared Training Center. 25
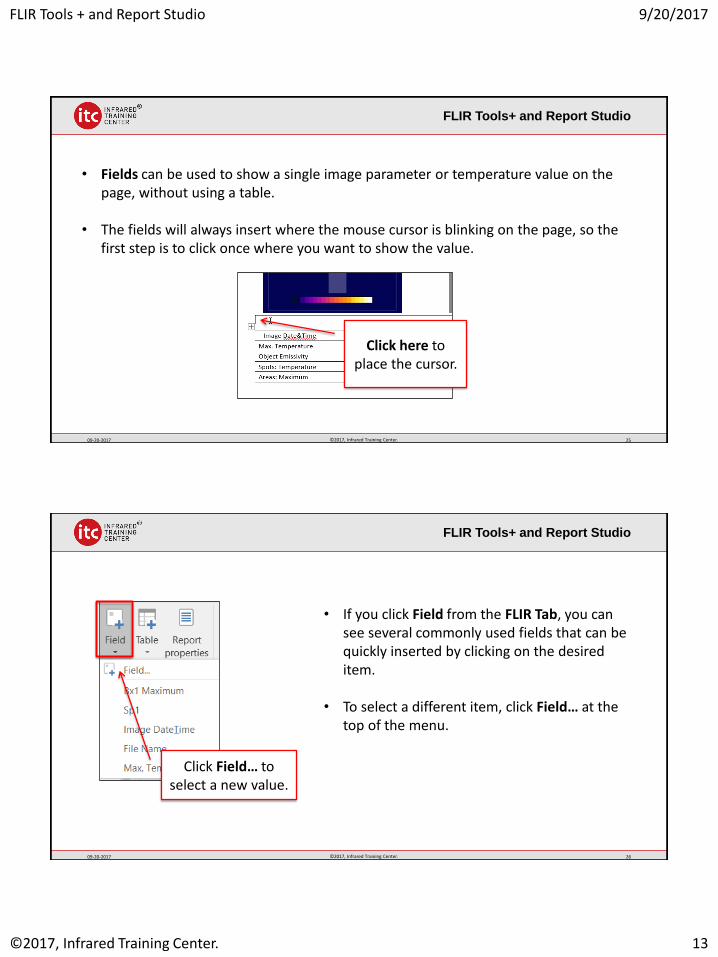
• Fields can be used to show a single image parameter or temperature value on the page, without using a table.
• The fields will always insert where the mouse cursor is blinking on the page, so the first step is to click once where you want to show the value.
Click here to place the cursor.
FLIR Tools+ and Report Studio
09-20-2017 ©2017, Infrared Training Center. 26
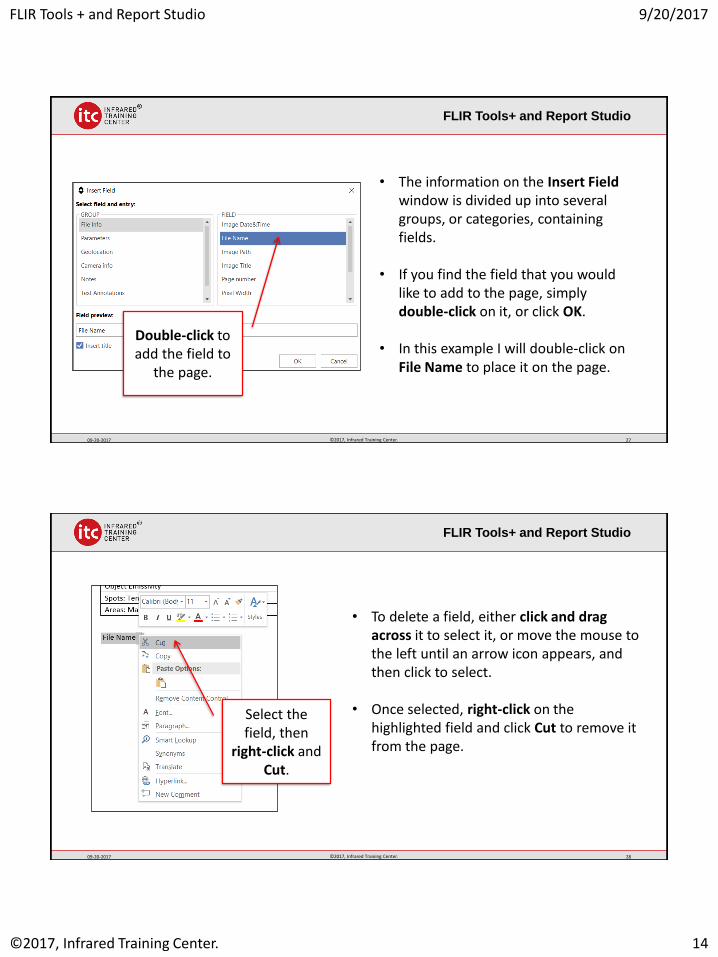
• If you click Field from the FLIR Tab, you can see several commonly used fields that can be quickly inserted by clicking on the desired item.
• To select a different item, click Field… at the top of the menu.
Click Field… to select a new value.
FLIR Tools + and Report Studio 9/20/2017
©2017, Infrared Training Center. 14
FLIR Tools+ and Report Studio
09-20-2017 ©2017, Infrared Training Center. 27
• The information on the Insert Field window is divided up into several groups, or categories, containing fields.
• If you find the field that you would like to add to the page, simply double-click on it, or click OK.
• In this example I will double-click on File Name to place it on the page.
Double-click to add the field to
the page.
FLIR Tools+ and Report Studio
09-20-2017 ©2017, Infrared Training Center. 28
• To delete a field, either click and drag across it to select it, or move the mouse to the left until an arrow icon appears, and then click to select.
• Once selected, right-click on the highlighted field and click Cut to remove it from the page.
Select the field, then
right-click and Cut.
FLIR Tools + and Report Studio 9/20/2017
©2017, Infrared Training Center. 15
FLIR Tools+ and Report Studio
09-20-2017 ©2017, Infrared Training Center. 29
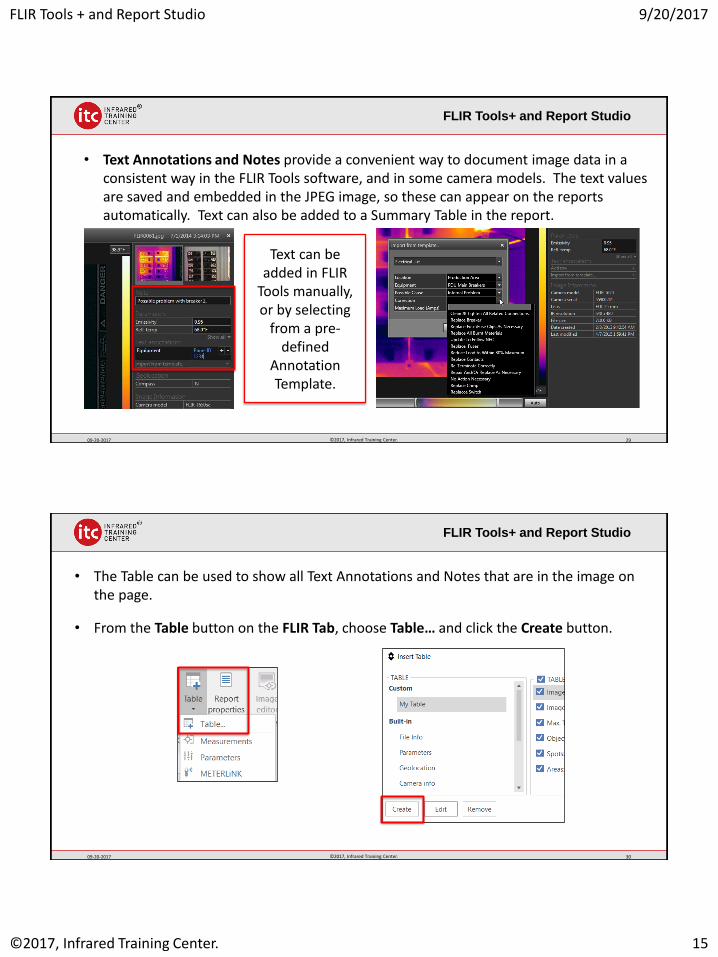
• Text Annotations and Notes provide a convenient way to document image data in a consistent way in the FLIR Tools software, and in some camera models. The text values are saved and embedded in the JPEG image, so these can appear on the reports automatically. Text can also be added to a Summary Table in the report.
Text can be added in FLIR
Tools manually, or by selecting
from a pre-defined
Annotation Template.
FLIR Tools+ and Report Studio
09-20-2017 ©2017, Infrared Training Center. 30
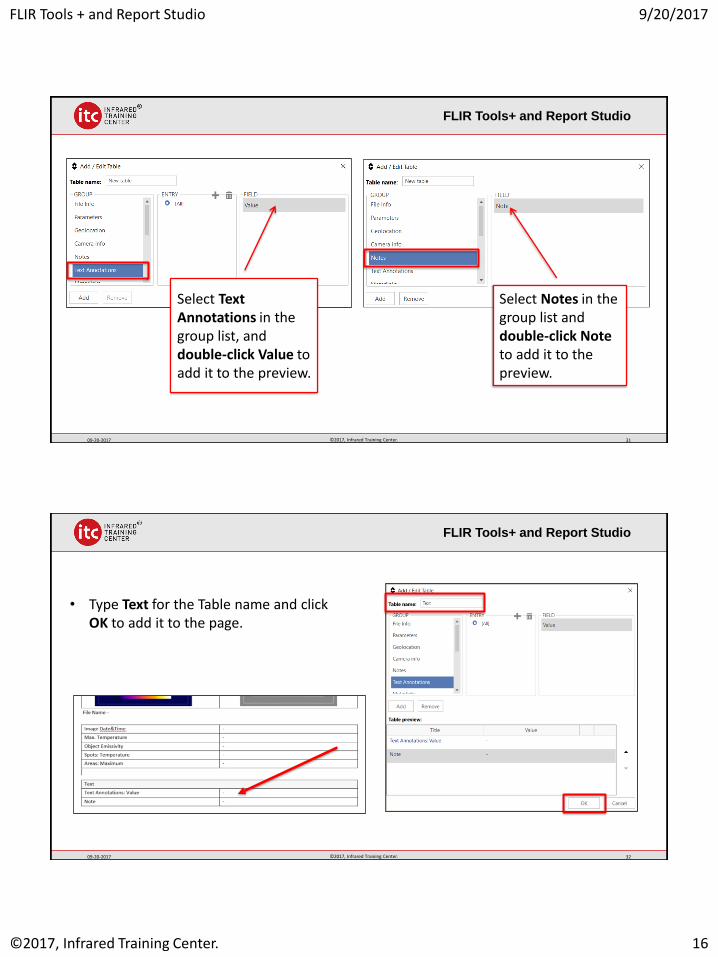
• The Table can be used to show all Text Annotations and Notes that are in the image on the page.
• From the Table button on the FLIR Tab, choose Table… and click the Create button.
FLIR Tools + and Report Studio 9/20/2017
©2017, Infrared Training Center. 16
FLIR Tools+ and Report Studio
09-20-2017 ©2017, Infrared Training Center. 31
Select Text Annotations in the group list, and double-click Value to add it to the preview.
Select Notes in the group list and double-click Note to add it to the preview.
FLIR Tools+ and Report Studio
09-20-2017 ©2017, Infrared Training Center. 32
• Type Text for the Table name and click OK to add it to the page.
FLIR Tools + and Report Studio 9/20/2017
©2017, Infrared Training Center. 17
FLIR Tools+ and Report Studio
09-20-2017 ©2017, Infrared Training Center. 33
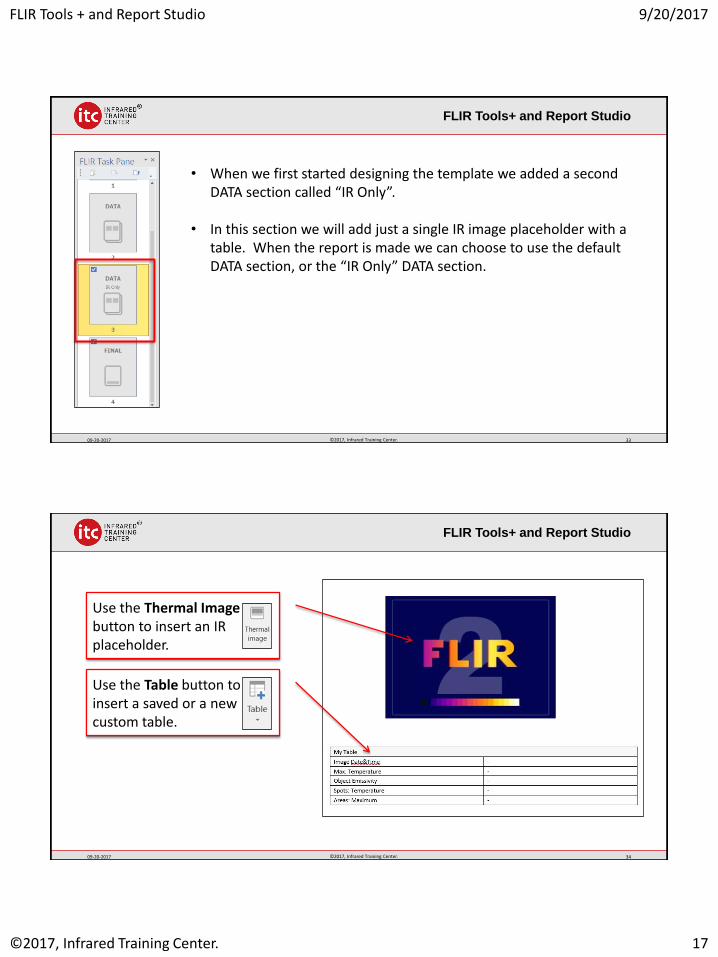
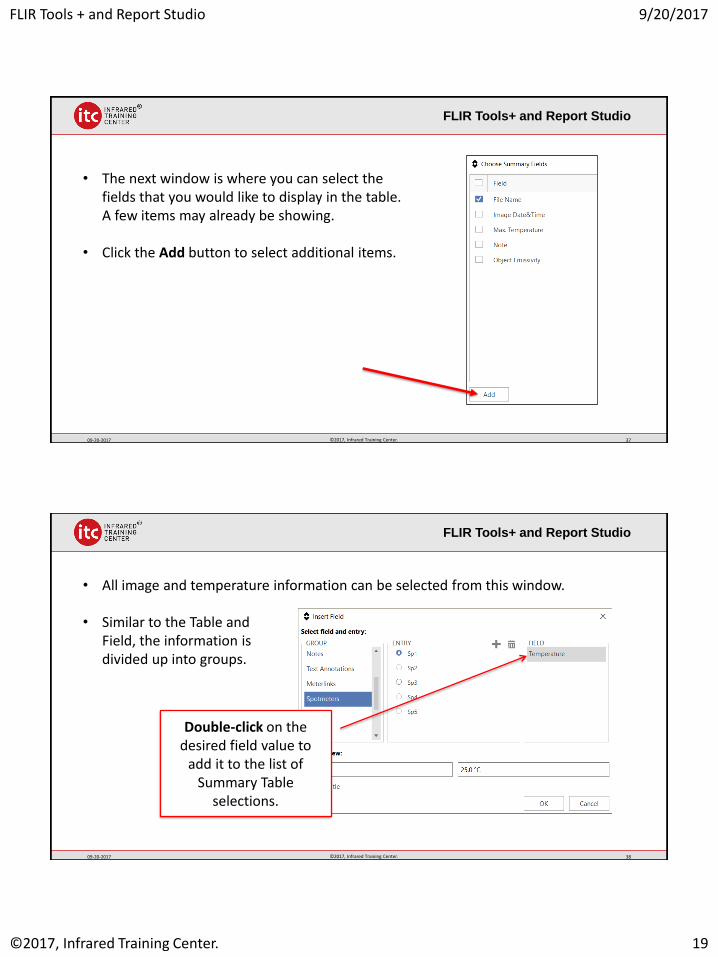
• When we first started designing the template we added a second DATA section called “IR Only”.
• In this section we will add just a single IR image placeholder with a table. When the report is made we can choose to use the default DATA section, or the “IR Only” DATA section.
FLIR Tools+ and Report Studio
09-20-2017 ©2017, Infrared Training Center. 34
Use the Thermal Image button to insert an IR placeholder.
Use the Table button to insert a saved or a new custom table.

FLIR Tools + and Report Studio 9/20/2017
©2017, Infrared Training Center. 18
FLIR Tools+ and Report Studio
09-20-2017 ©2017, Infrared Training Center. 35
• The Summary Table provides a convenient way to create an automatic summary of the images in your report. The columns are chosen when the table is created in the template. The rows are generated when the report is created. Each image page will have its own row. Image file information, temperature data, text and notes can all be added to the summary.
FLIR Tools+ and Report Studio
09-20-2017 ©2017, Infrared Training Center. 36
• The Summary Table can be placed in the INTRO or FINAL section, but not in the DATA sections. For this example, let’s place it in the FINAL section. Click FINAL from the FLIR Task Pane, then click near the top of the page.
• From the FLIR tab, click Table, then Summary Table.
FLIR Tools + and Report Studio 9/20/2017
©2017, Infrared Training Center. 19
FLIR Tools+ and Report Studio
09-20-2017 ©2017, Infrared Training Center. 37
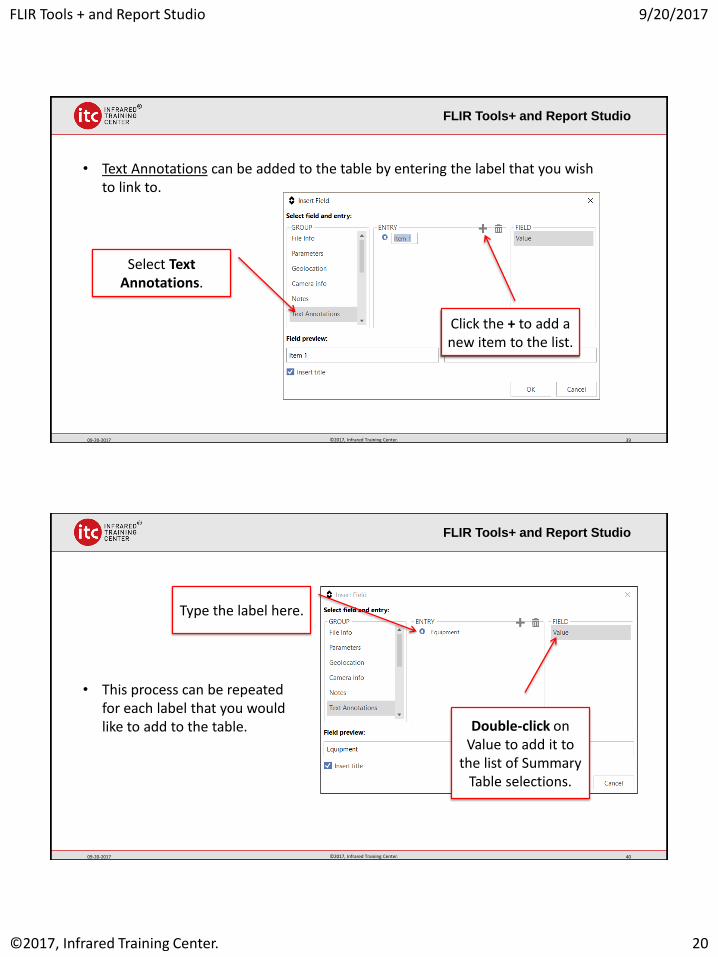
• The next window is where you can select the fields that you would like to display in the table. A few items may already be showing.
• Click the Add button to select additional items.
FLIR Tools+ and Report Studio
09-20-2017 ©2017, Infrared Training Center. 38
• All image and temperature information can be selected from this window.
Double-click on the desired field value to
add it to the list of Summary Table
selections.
• Similar to the Table and Field, the information is divided up into groups.
FLIR Tools + and Report Studio 9/20/2017
©2017, Infrared Training Center. 20
FLIR Tools+ and Report Studio
09-20-2017 ©2017, Infrared Training Center. 39
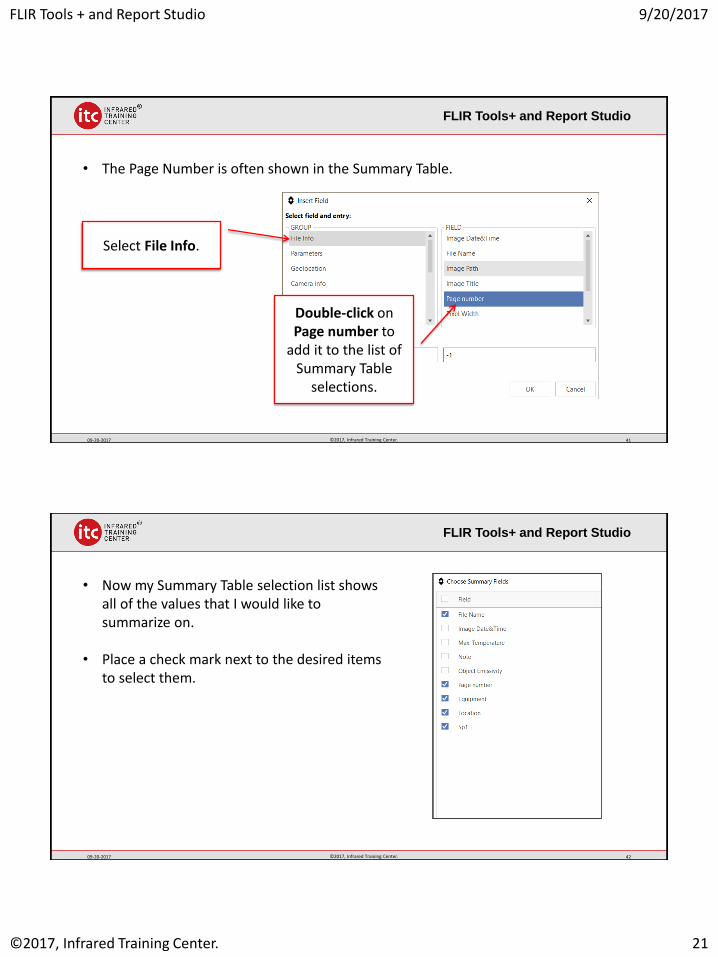
• Text Annotations can be added to the table by entering the label that you wish to link to.
Select Text Annotations.
Click the + to add a new item to the list.
FLIR Tools+ and Report Studio
09-20-2017 ©2017, Infrared Training Center. 40
• This process can be repeated for each label that you would like to add to the table.
Type the label here.
Double-click on Value to add it to
the list of Summary Table selections.
FLIR Tools + and Report Studio 9/20/2017
©2017, Infrared Training Center. 21
FLIR Tools+ and Report Studio
09-20-2017 ©2017, Infrared Training Center. 41
• The Page Number is often shown in the Summary Table.
Select File Info.
Double-click on Page number to
add it to the list of Summary Table
selections.
FLIR Tools+ and Report Studio
09-20-2017 ©2017, Infrared Training Center. 42
• Now my Summary Table selection list shows all of the values that I would like to summarize on.
• Place a check mark next to the desired items to select them.

FLIR Tools + and Report Studio 9/20/2017
©2017, Infrared Training Center. 22
FLIR Tools+ and Report Studio
09-20-2017 ©2017, Infrared Training Center. 43
• Select a row and use the up/down arrows to rearrange the columns. The first item in the list will be the first column in the table.
• When you are satisfied with the order click OK to add it to the page.
FLIR Tools+ and Report Studio
09-20-2017 ©2017, Infrared Training Center. 44
• Here is what the Summary Table will look like in the template. It is always two rows, with the number of columns being defined in the previous steps. When the report is created, a row will be added for each image page.
FLIR Tools + and Report Studio 9/20/2017
©2017, Infrared Training Center. 23
FLIR Tools+ and Report Studio
09-20-2017 ©2017, Infrared Training Center. 45
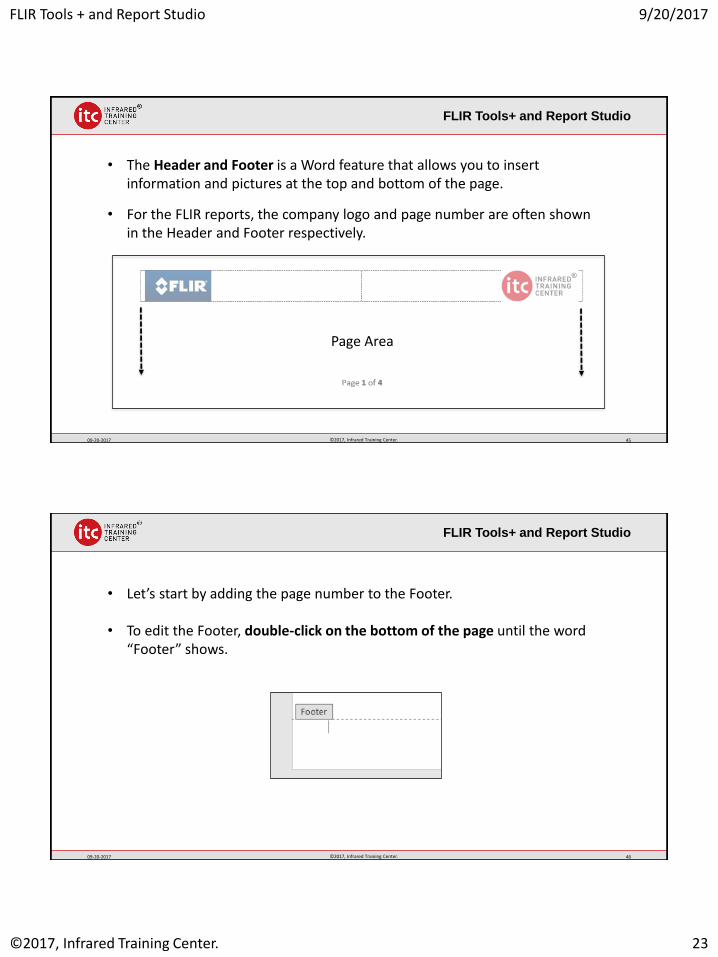
• The Header and Footer is a Word feature that allows you to insert information and pictures at the top and bottom of the page.
• For the FLIR reports, the company logo and page number are often shown in the Header and Footer respectively.
Page Area
FLIR Tools+ and Report Studio
09-20-2017 ©2017, Infrared Training Center. 46
• Let’s start by adding the page number to the Footer.
• To edit the Footer, double-click on the bottom of the page until the word “Footer” shows.
FLIR Tools + and Report Studio 9/20/2017
©2017, Infrared Training Center. 24
FLIR Tools+ and Report Studio
09-20-2017 ©2017, Infrared Training Center. 47
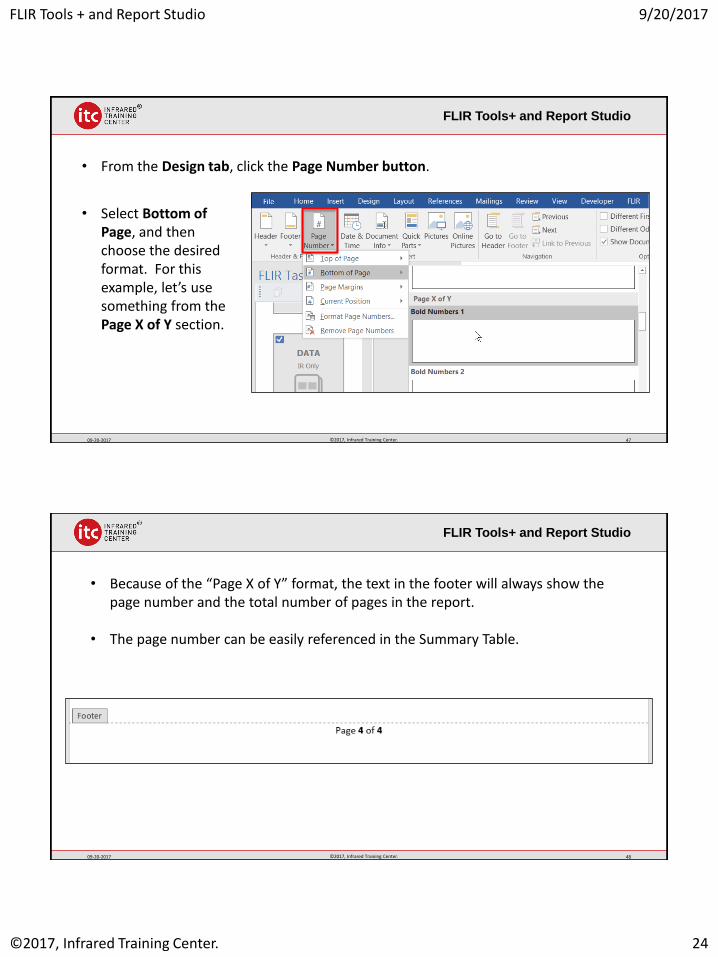
• From the Design tab, click the Page Number button.
• Select Bottom of Page, and then choose the desired format. For this example, let’s use something from the Page X of Y section.
FLIR Tools+ and Report Studio
09-20-2017 ©2017, Infrared Training Center. 48
• Because of the “Page X of Y” format, the text in the footer will always show the page number and the total number of pages in the report.
• The page number can be easily referenced in the Summary Table.
FLIR Tools + and Report Studio 9/20/2017
©2017, Infrared Training Center. 25
FLIR Tools+ and Report Studio
09-20-2017 ©2017, Infrared Training Center. 49
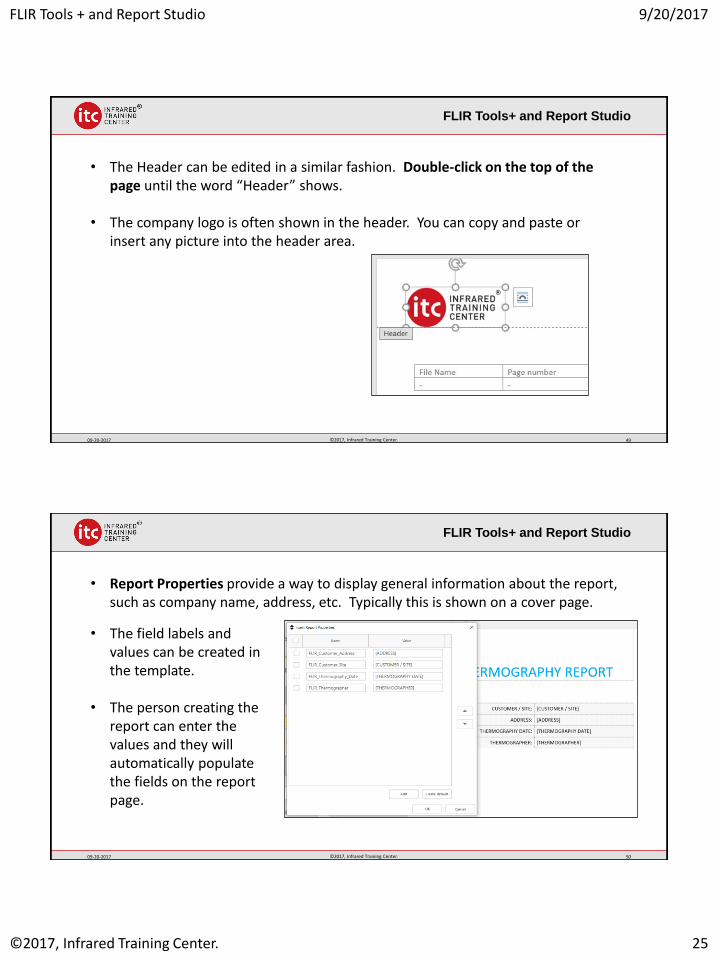
• The Header can be edited in a similar fashion. Double-click on the top of the page until the word “Header” shows.
• The company logo is often shown in the header. You can copy and paste or insert any picture into the header area.
FLIR Tools+ and Report Studio
09-20-2017 ©2017, Infrared Training Center. 50
• Report Properties provide a way to display general information about the report, such as company name, address, etc. Typically this is shown on a cover page.
• The field labels and values can be created in the template.
• The person creating the report can enter the values and they will automatically populate the fields on the report page.
FLIR Tools + and Report Studio 9/20/2017
©2017, Infrared Training Center. 26
FLIR Tools+ and Report Studio
09-20-2017 ©2017, Infrared Training Center. 51
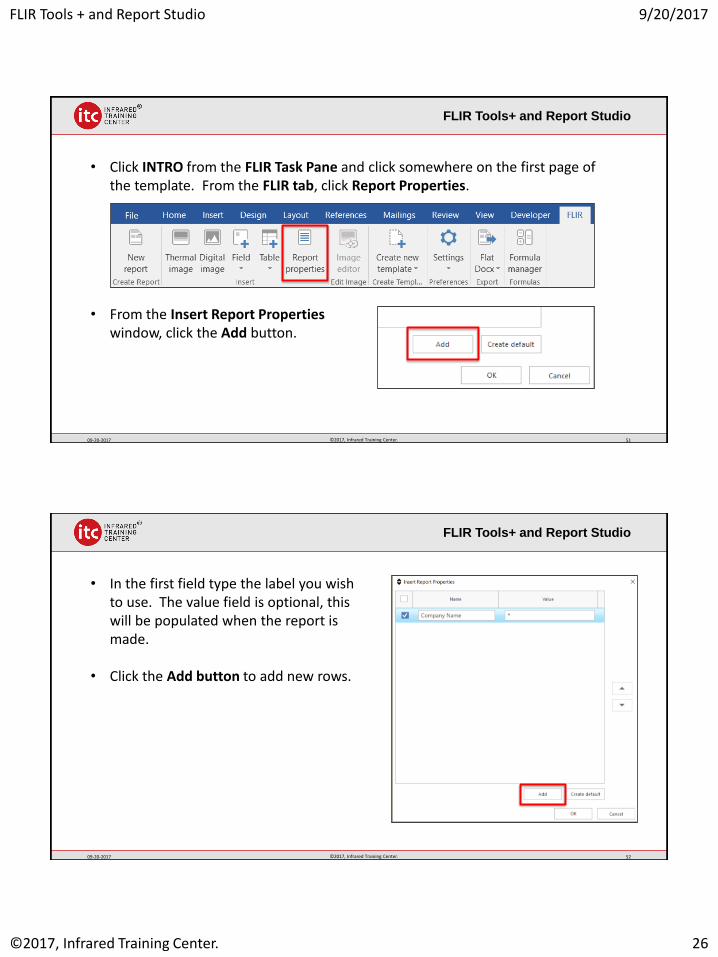
• Click INTRO from the FLIR Task Pane and click somewhere on the first page of the template. From the FLIR tab, click Report Properties.
• From the Insert Report Propertieswindow, click the Add button.
FLIR Tools+ and Report Studio
09-20-2017 ©2017, Infrared Training Center. 52
• In the first field type the label you wish to use. The value field is optional, this will be populated when the report is made.
• Click the Add button to add new rows.
FLIR Tools + and Report Studio 9/20/2017
©2017, Infrared Training Center. 27
FLIR Tools+ and Report Studio
09-20-2017 ©2017, Infrared Training Center. 53
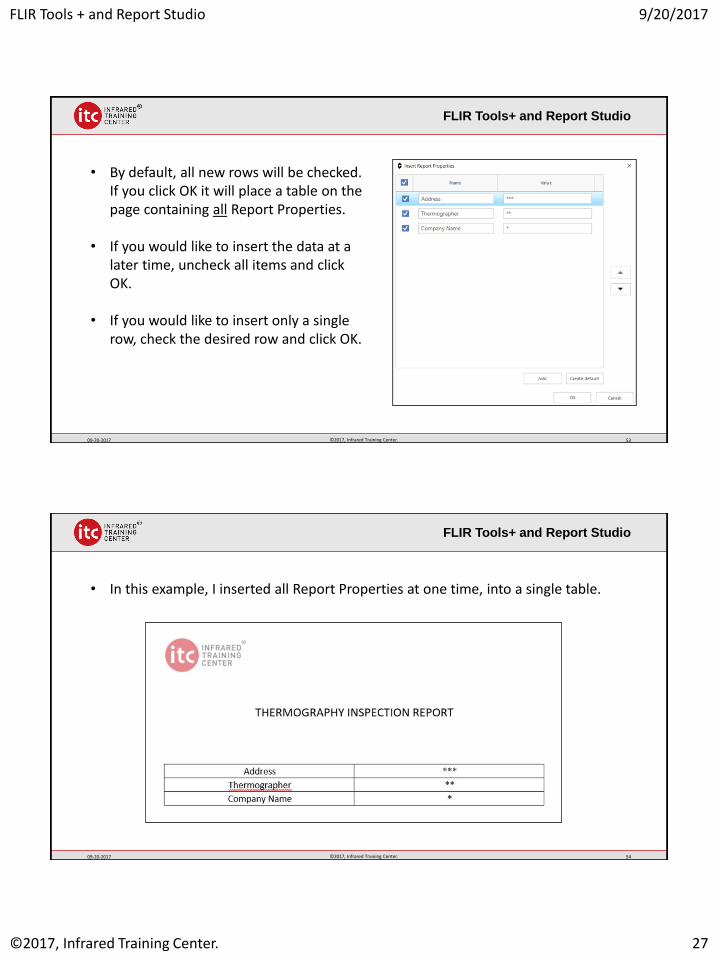
• By default, all new rows will be checked. If you click OK it will place a table on the page containing all Report Properties.
• If you would like to insert the data at a later time, uncheck all items and click OK.
• If you would like to insert only a single row, check the desired row and click OK.
FLIR Tools+ and Report Studio
09-20-2017 ©2017, Infrared Training Center. 54
• In this example, I inserted all Report Properties at one time, into a single table.
FLIR Tools + and Report Studio 9/20/2017
©2017, Infrared Training Center. 28
FLIR Tools+ and Report Studio
09-20-2017 ©2017, Infrared Training Center. 55
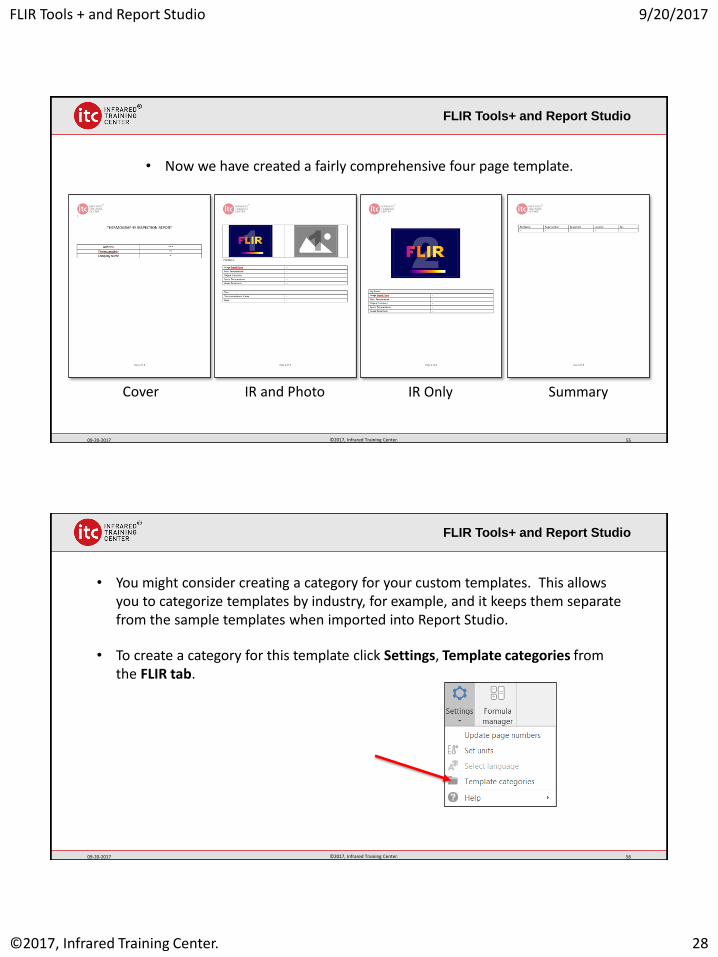
• Now we have created a fairly comprehensive four page template.
Cover IR and Photo IR Only Summary
FLIR Tools+ and Report Studio
09-20-2017 ©2017, Infrared Training Center. 56
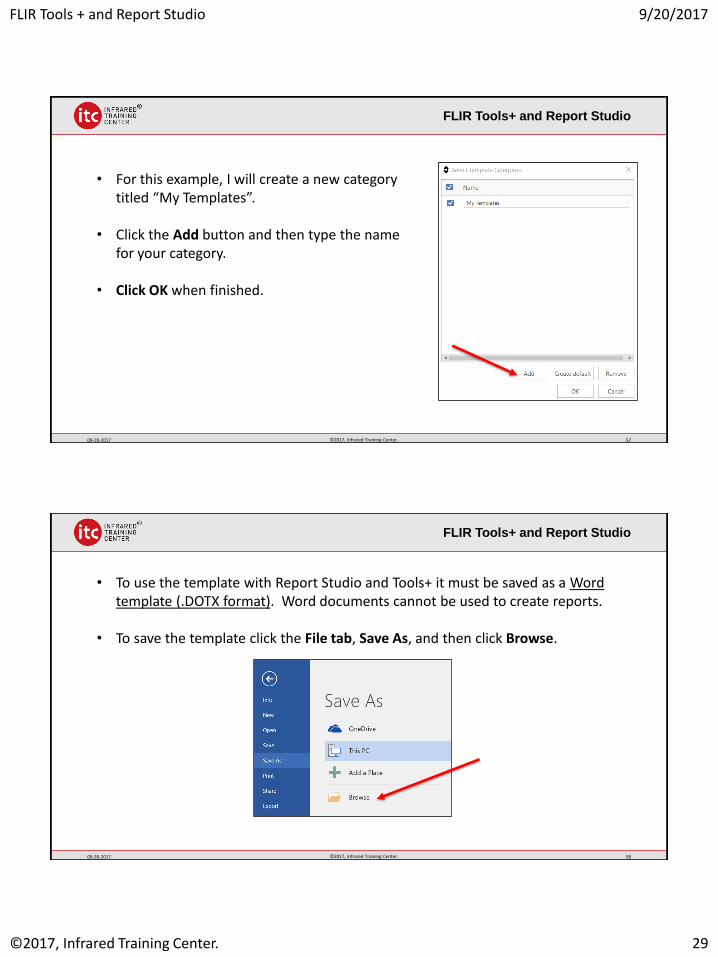
• You might consider creating a category for your custom templates. This allows you to categorize templates by industry, for example, and it keeps them separate from the sample templates when imported into Report Studio.
• To create a category for this template click Settings, Template categories from the FLIR tab.
FLIR Tools + and Report Studio 9/20/2017
©2017, Infrared Training Center. 29
FLIR Tools+ and Report Studio
09-20-2017 ©2017, Infrared Training Center. 57
• For this example, I will create a new category titled “My Templates”.
• Click the Add button and then type the name for your category.
• Click OK when finished.
FLIR Tools+ and Report Studio
09-20-2017 ©2017, Infrared Training Center. 58
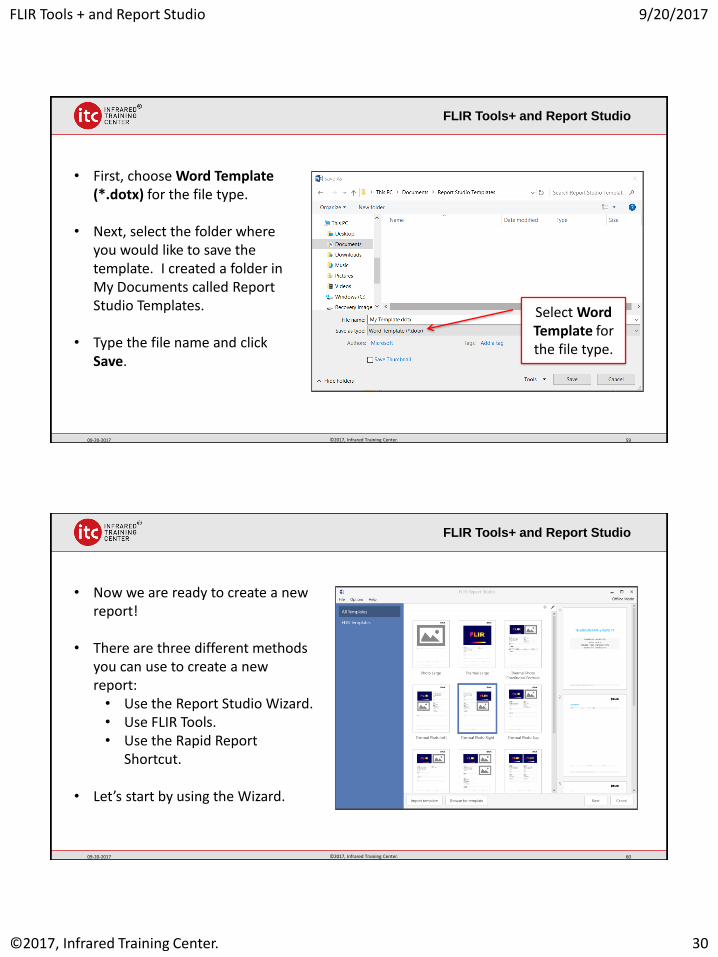
• To use the template with Report Studio and Tools+ it must be saved as a Word template (.DOTX format). Word documents cannot be used to create reports.
• To save the template click the File tab, Save As, and then click Browse.
FLIR Tools + and Report Studio 9/20/2017
©2017, Infrared Training Center. 30
FLIR Tools+ and Report Studio
09-20-2017 ©2017, Infrared Training Center. 59
• First, choose Word Template (*.dotx) for the file type.
• Next, select the folder where you would like to save the template. I created a folder in My Documents called Report Studio Templates.
• Type the file name and click Save.
Select Word Template for the file type.
FLIR Tools+ and Report Studio
09-20-2017 ©2017, Infrared Training Center. 60
• Now we are ready to create a new report!
• There are three different methods you can use to create a new report:• Use the Report Studio Wizard.• Use FLIR Tools.• Use the Rapid Report
Shortcut.
• Let’s start by using the Wizard.
FLIR Tools + and Report Studio 9/20/2017
©2017, Infrared Training Center. 31
FLIR Tools+ and Report Studio
09-20-2017 ©2017, Infrared Training Center. 61
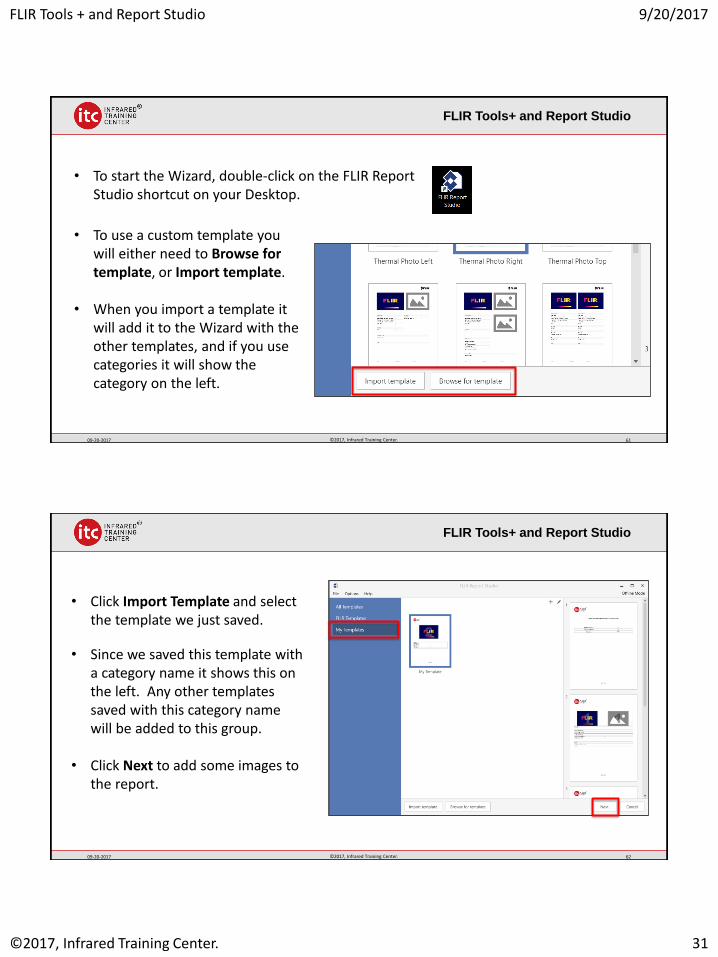
• To start the Wizard, double-click on the FLIR Report Studio shortcut on your Desktop.
• To use a custom template you will either need to Browse for template, or Import template.
• When you import a template it will add it to the Wizard with the other templates, and if you use categories it will show the category on the left.
FLIR Tools+ and Report Studio
09-20-2017 ©2017, Infrared Training Center. 62
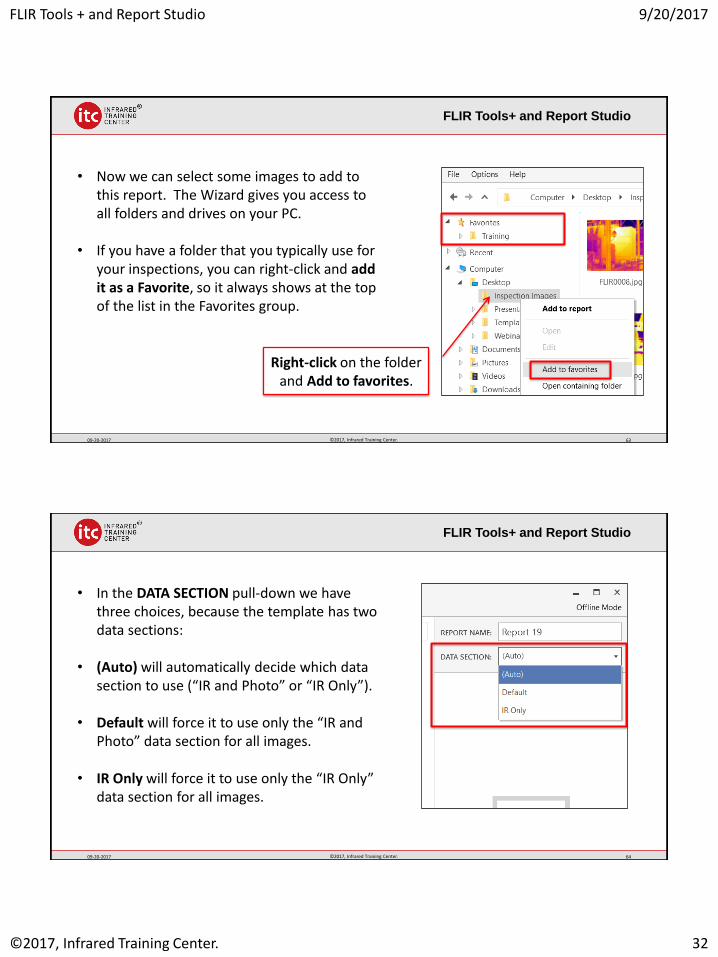
• Click Import Template and select the template we just saved.
• Since we saved this template with a category name it shows this on the left. Any other templates saved with this category name will be added to this group.
• Click Next to add some images to the report.
FLIR Tools + and Report Studio 9/20/2017
©2017, Infrared Training Center. 32
FLIR Tools+ and Report Studio
09-20-2017 ©2017, Infrared Training Center. 63
• Now we can select some images to add to this report. The Wizard gives you access to all folders and drives on your PC.
• If you have a folder that you typically use for your inspections, you can right-click and add it as a Favorite, so it always shows at the top of the list in the Favorites group.
Right-click on the folder and Add to favorites.
FLIR Tools+ and Report Studio
09-20-2017 ©2017, Infrared Training Center. 64
• In the DATA SECTION pull-down we have three choices, because the template has two data sections:
• (Auto) will automatically decide which data section to use (“IR and Photo” or “IR Only”).
• Default will force it to use only the “IR and Photo” data section for all images.
• IR Only will force it to use only the “IR Only” data section for all images.
FLIR Tools + and Report Studio 9/20/2017
©2017, Infrared Training Center. 33
FLIR Tools+ and Report Studio
09-20-2017 ©2017, Infrared Training Center. 65
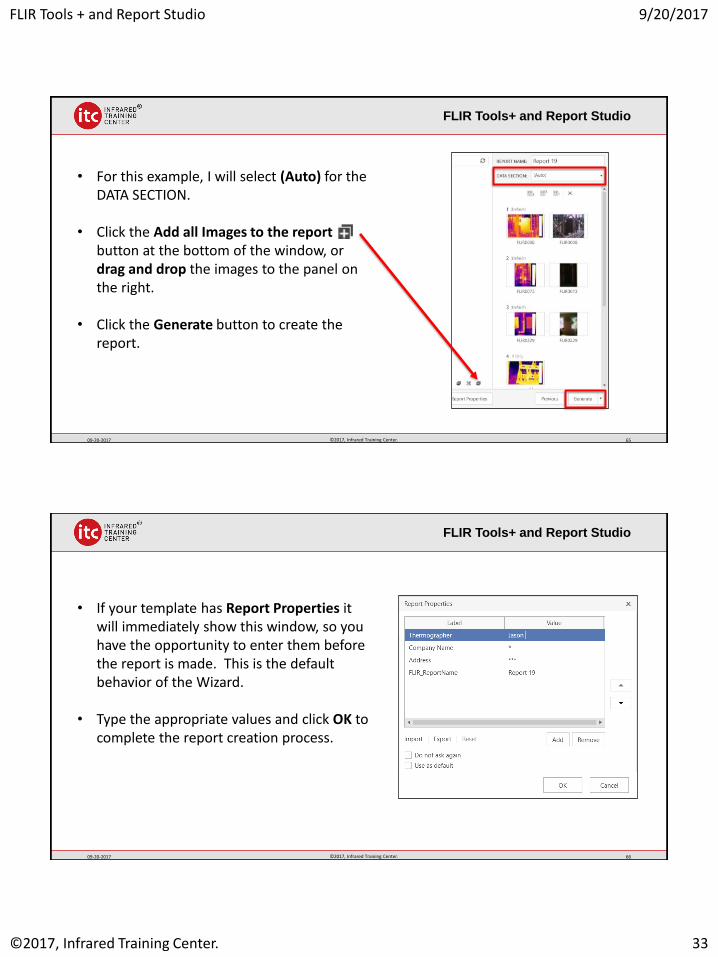
• For this example, I will select (Auto) for the DATA SECTION.
• Click the Add all Images to the report button at the bottom of the window, or drag and drop the images to the panel on the right.
• Click the Generate button to create the report.
FLIR Tools+ and Report Studio
09-20-2017 ©2017, Infrared Training Center. 66
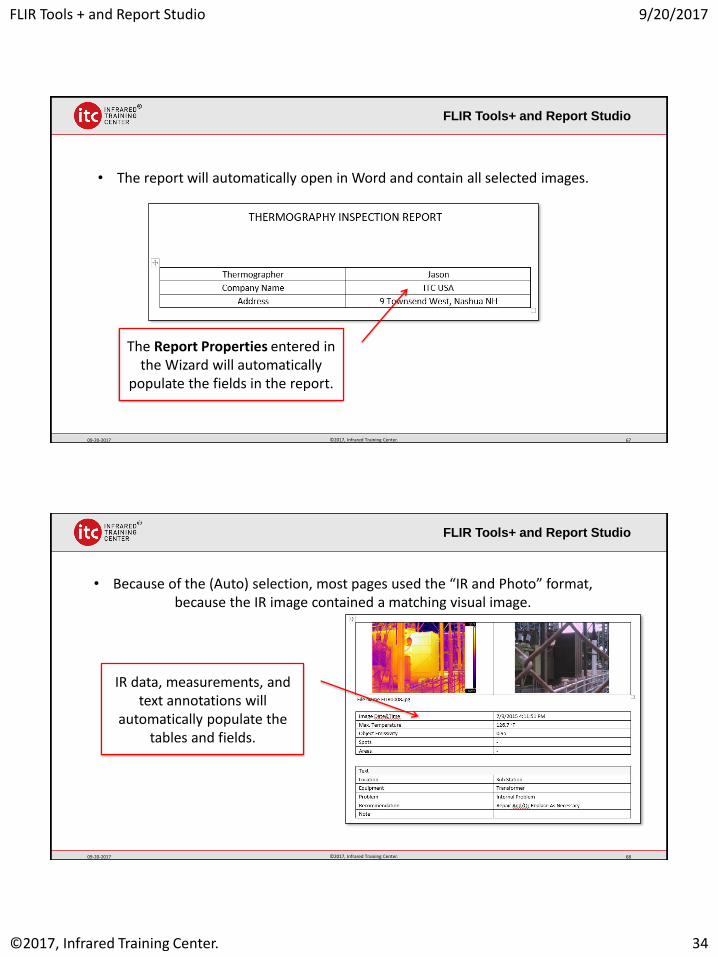
• If your template has Report Properties it will immediately show this window, so you have the opportunity to enter them before the report is made. This is the default behavior of the Wizard.
• Type the appropriate values and click OK to complete the report creation process.
FLIR Tools + and Report Studio 9/20/2017
©2017, Infrared Training Center. 34
FLIR Tools+ and Report Studio
09-20-2017 ©2017, Infrared Training Center. 67
• The report will automatically open in Word and contain all selected images.
The Report Properties entered in the Wizard will automatically
populate the fields in the report.
FLIR Tools+ and Report Studio
09-20-2017 ©2017, Infrared Training Center. 68
• Because of the (Auto) selection, most pages used the “IR and Photo” format, because the IR image contained a matching visual image.
IR data, measurements, and text annotations will
automatically populate the tables and fields.
FLIR Tools + and Report Studio 9/20/2017
©2017, Infrared Training Center. 35
FLIR Tools+ and Report Studio
09-20-2017 ©2017, Infrared Training Center. 69
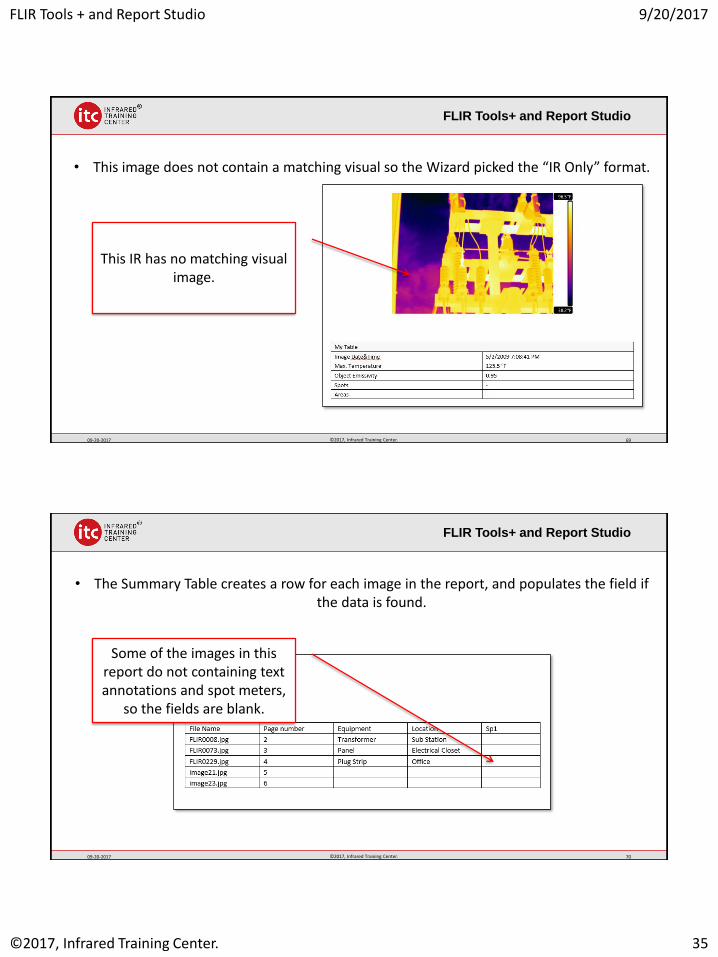
• This image does not contain a matching visual so the Wizard picked the “IR Only” format.
This IR has no matching visual image.
FLIR Tools+ and Report Studio
09-20-2017 ©2017, Infrared Training Center. 70
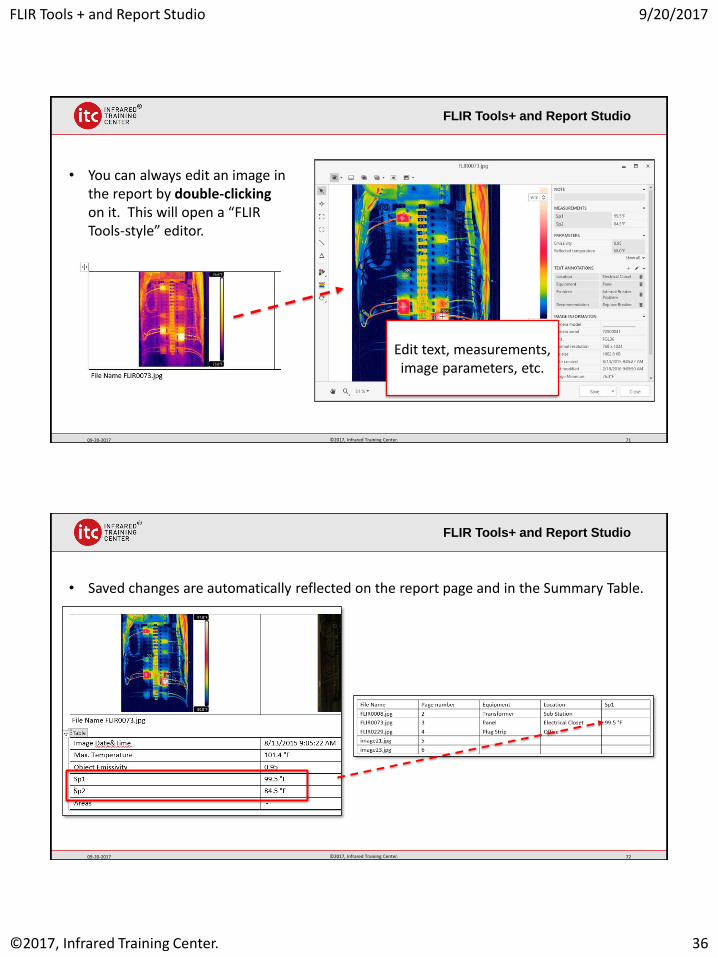
• The Summary Table creates a row for each image in the report, and populates the field if the data is found.
Some of the images in this report do not containing text annotations and spot meters,
so the fields are blank.
FLIR Tools + and Report Studio 9/20/2017
©2017, Infrared Training Center. 36
FLIR Tools+ and Report Studio
09-20-2017 ©2017, Infrared Training Center. 71
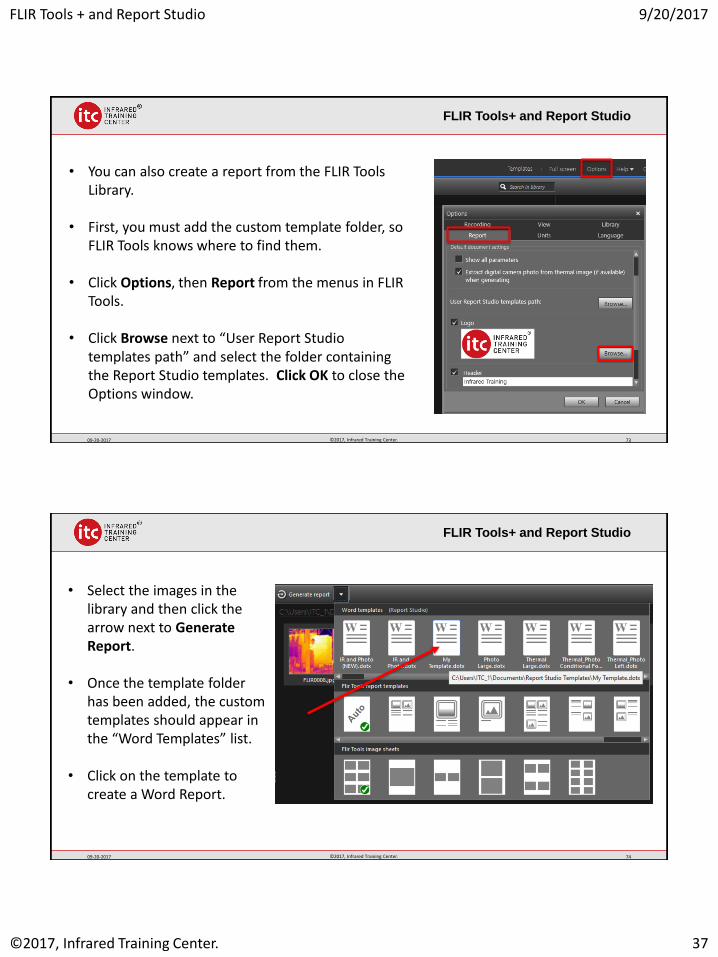
• You can always edit an image in the report by double-clickingon it. This will open a “FLIR Tools-style” editor.
Edit text, measurements, image parameters, etc.
FLIR Tools+ and Report Studio
09-20-2017 ©2017, Infrared Training Center. 72
• Saved changes are automatically reflected on the report page and in the Summary Table.
FLIR Tools + and Report Studio 9/20/2017
©2017, Infrared Training Center. 37
FLIR Tools+ and Report Studio
09-20-2017 ©2017, Infrared Training Center. 73
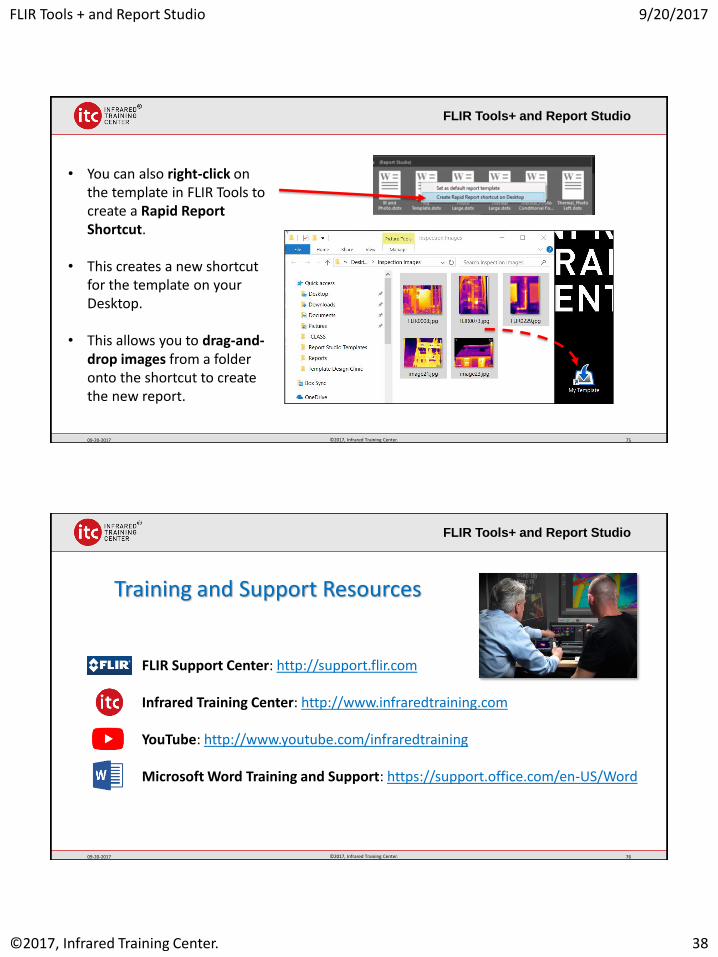
• You can also create a report from the FLIR Tools Library.
• First, you must add the custom template folder, so FLIR Tools knows where to find them.
• Click Options, then Report from the menus in FLIR Tools.
• Click Browse next to “User Report Studio templates path” and select the folder containing the Report Studio templates. Click OK to close the Options window.
FLIR Tools+ and Report Studio
09-20-2017 ©2017, Infrared Training Center. 74
• Select the images in the library and then click the arrow next to Generate Report.
• Once the template folder has been added, the custom templates should appear in the “Word Templates” list.
• Click on the template to create a Word Report.
FLIR Tools + and Report Studio 9/20/2017
©2017, Infrared Training Center. 38
FLIR Tools+ and Report Studio
09-20-2017 ©2017, Infrared Training Center. 75
• You can also right-click on the template in FLIR Tools to create a Rapid Report Shortcut.
• This creates a new shortcut for the template on your Desktop.
• This allows you to drag-and-drop images from a folder onto the shortcut to create the new report.
FLIR Tools+ and Report Studio
09-20-2017 ©2017, Infrared Training Center. 76
Training and Support Resources
• FLIR Support Center: http://support.flir.com
• Infrared Training Center: http://www.infraredtraining.com
• YouTube: http://www.youtube.com/infraredtraining
• Microsoft Word Training and Support: https://support.office.com/en-US/Word