Embed Size (px)
Citation preview
© 2014 Sealed Air Corporation. All Rights Reserved. 28331-CHT90546-en-es (14/351)
Questions: 1-800-558-2332
Wet Floor
60
30
1545
TIME
Plastic Liners
Doodlebugging the Edges
Vacuuming Walk-off Matts
CAUTION CAUTION
WET
FLOORWETFLOOR
Wet FloorWet Floor
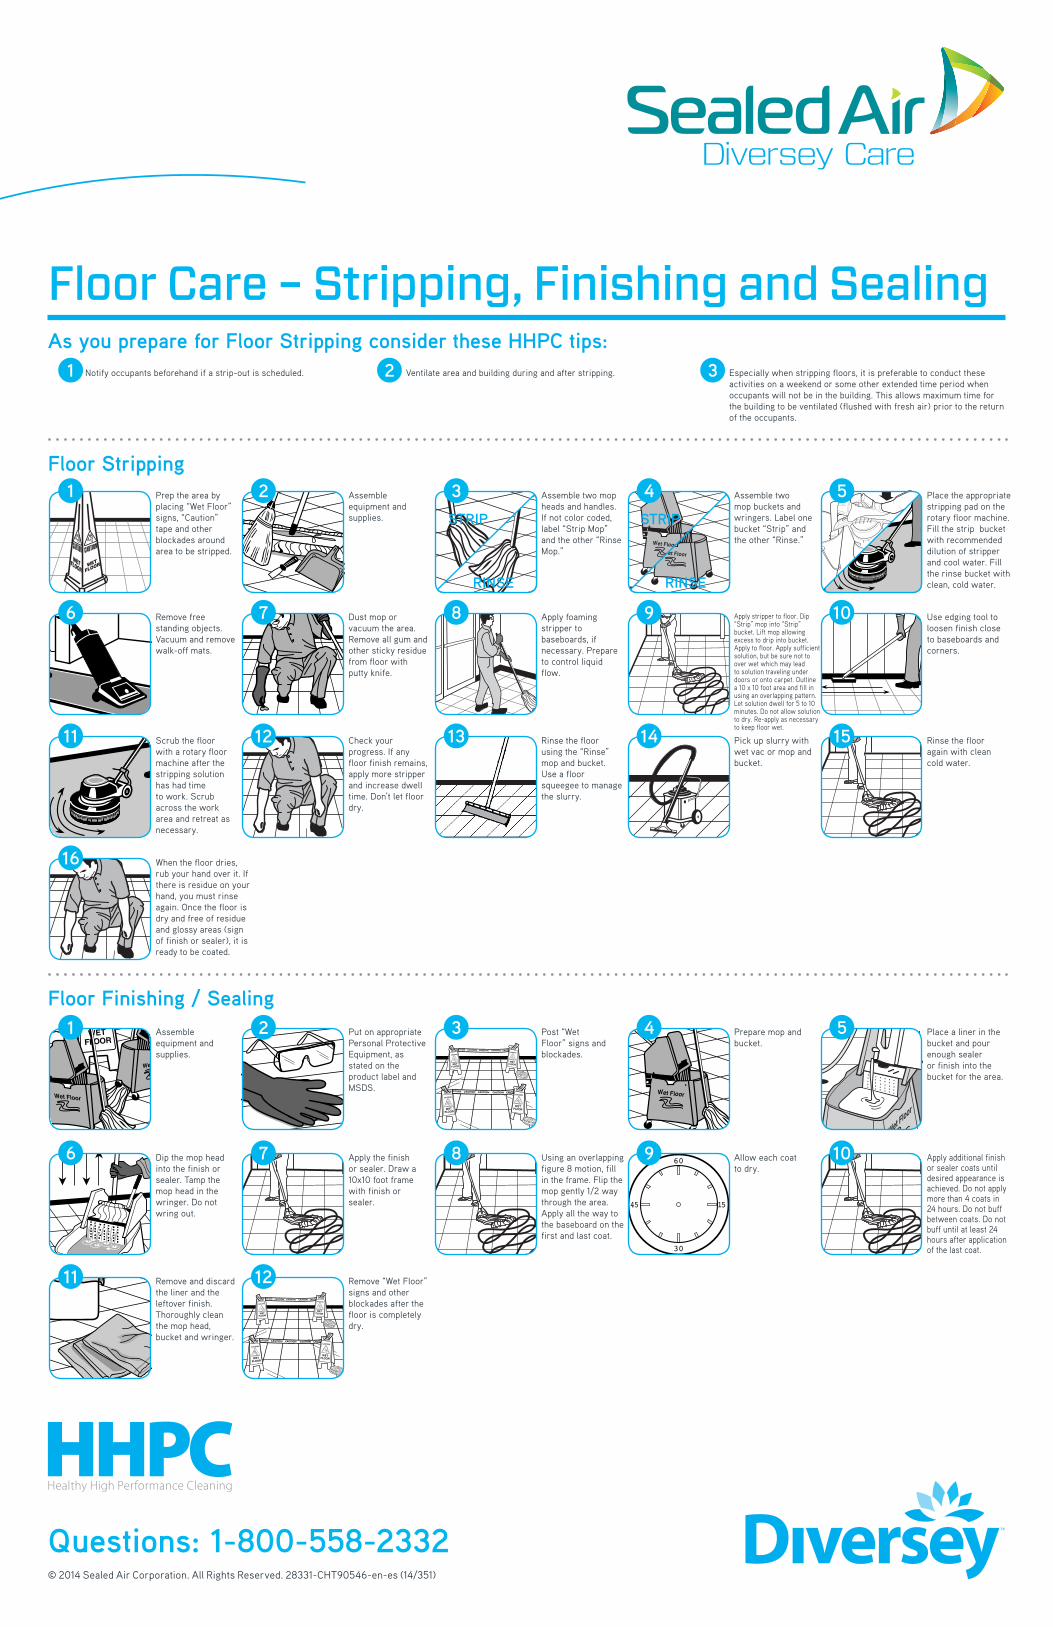
Floor Care – Stripping, Finishing and SealingAs you prepare for Floor Stripping consider these HHPC tips:
Floor Stripping
Notify occupants beforehand if a strip-out is scheduled. Especially when stripping floors, it is preferable to conduct these activities on a weekend or some other extended time period when occupants will not be in the building. This allows maximum time for the building to be ventilated (flushed with fresh air) prior to the return of the occupants.
Ventilate area and building during and after stripping.
STRIP STRIP
RINSE RINSE
Floor Finishing / Sealing
1
1 2 3
1
Prep the area by placing “Wet Floor” signs, “Caution” tape and other blockades around area to be stripped.
Assemble equipment and supplies.
15 Rinse the floor again with clean cold water.
6
6
13
Remove free standing objects. Vacuum and remove walk-off mats.
Dip the mop head into the finish or sealer. Tamp the mop head in the wringer. Do not wring out.
Rinse the floor using the “Rinse” mop and bucket. Use a floor squeegee to manage the slurry.
7
7
14
Dust mop or vacuum the area. Remove all gum and other sticky residue from floor with putty knife.
Apply the finish or sealer. Draw a 10x10 foot frame with finish or sealer.
Pick up slurry with wet vac or mop and bucket.
5
5
12
12
Place the appropriate stripping pad on the rotary floor machine. Fill the strip bucket with recommended dilution of stripper and cool water. Fill the rinse bucket with clean, cold water.
Place a liner in the bucket and pour enough sealer or finish into the bucket for the area.
Check your progress. If any floor finish remains, apply more stripper and increase dwell time. Don’t let floor dry.
Remove “Wet Floor” signs and other blockades after the floor is completely dry.
3
3
Assemble two mop heads and handles. If not color coded, label “Strip Mop” and the other “Rinse Mop.”
Post “Wet Floor” signs and blockades.
4
4
11
11
Assemble two mop buckets and wringers. Label one bucket “Strip” and the other “Rinse.”
Prepare mop and bucket.
Scrub the floor with a rotary floor machine after the stripping solution has had time to work. Scrub across the work area and retreat as necessary.
Remove and discard the liner and the leftover finish. Thoroughly clean the mop head, bucket and wringer.
2
2
16
Assemble equipment and supplies.
Put on appropriate Personal Protective Equipment, as stated on the product label and MSDS.
8 Apply foaming stripper to baseboards, if necessary. Prepare to control liquid flow.
10 Use edging tool to loosen finish close to baseboards and corners.
9 Apply stripper to floor. Dip “Strip” mop into “Strip” bucket. Lift mop allowing excess to drip into bucket. Apply to floor. Apply sufficient solution, but be sure not to over wet which may lead to solution traveling under doors or onto carpet. Outline a 10 x 10 foot area and fill in using an overlapping pattern. Let solution dwell for 5 to 10 minutes. Do not allow solution to dry. Re-apply as necessary to keep floor wet.
8 Using an overlapping figure 8 motion, fill in the frame. Flip the mop gently 1/2 way through the area. Apply all the way to the baseboard on the first and last coat.
10 Apply additional finish or sealer coats until desired appearance is achieved. Do not apply more than 4 coats in 24 hours. Do not buff between coats. Do not buff until at least 24 hours after application of the last coat.
9 Allow each coat to dry.
When the floor dries, rub your hand over it. If there is residue on your hand, you must rinse again. Once the floor is dry and free of residue and glossy areas (sign of finish or sealer), it is ready to be coated.
© 2014 Sealed Air Corporation. Todos los derechos reservados. 28331-CHT90546-en-es (14/351)
Preguntas: 1-800-558-2332
Wet Floor
60
30
1545
TIME
Plastic Liners
Doodlebugging the Edges
Vacuuming Walk-off Matts
CAUTION CAUTION
WET
FLOORWETFLOOR
Wet FloorWet Floor
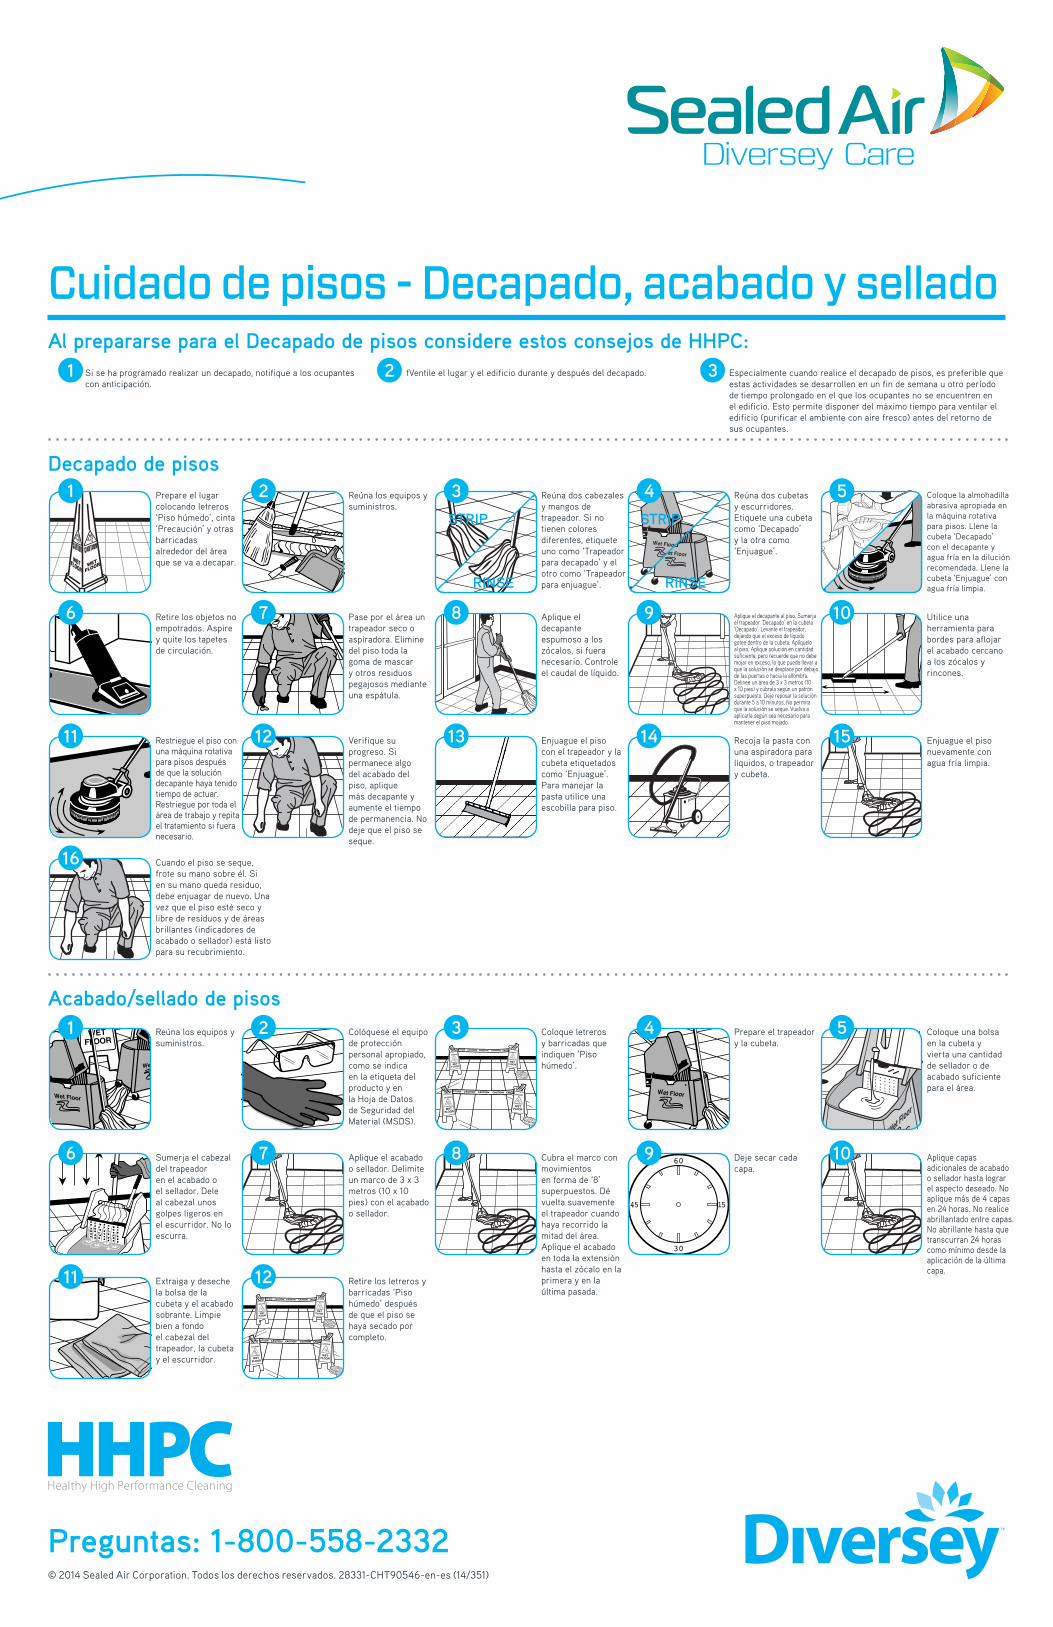
Cuidado de pisos - Decapado, acabado y selladoAl prepararse para el Decapado de pisos considere estos consejos de HHPC:
Decapado de pisos
Si se ha programado realizar un decapado, notifique a los ocupantescon anticipación.
Especialmente cuando realice el decapado de pisos, es preferible que estas actividades se desarrollen en un fin de semana u otro período de tiempo prolongado en el que los ocupantes no se encuentren en el edificio. Esto permite disponer del máximo tiempo para ventilar el edificio (purificar el ambiente con aire fresco) antes del retorno de sus ocupantes.
fVentile el lugar y el edificio durante y después del decapado.
STRIP STRIP
RINSE RINSE
Acabado/sellado de pisos
1
1 2 3
1
Prepare el lugarcolocando letreros‘Piso húmedo’, cinta‘Precaución’ y otrasbarricadas alrededor del área que se va a decapar.
Reúna los equipos ysuministros.
15 Enjuague el pisonuevamente conagua fría limpia.
6
6
13
Retire los objetos noempotrados. Aspirey quite los tapetesde circulación.
Sumerja el cabezaldel trapeadoren el acabado oel sellador. Deleal cabezal unosgolpes ligeros enel escurridor. No loescurra.
Enjuague el pisocon el trapeador y lacubeta etiquetadoscomo ‘Enjuague’.Para manejar lapasta utilice unaescobilla para piso.
7
7
14
Pase por el área untrapeador seco oaspiradora. Eliminedel piso toda lagoma de mascary otros residuospegajosos medianteuna espátula.
Aplique el acabadoo sellador. Delimiteun marco de 3 x 3metros (10 x 10 pies) con el acabado o sellador.
Recoja la pasta conuna aspiradora paralíquidos, o trapeadory cubeta.
5
5
12
12
Coloque la almohadilla abrasiva apropiada en la máquina rotativa para pisos. Llene la cubeta ‘Decapado’ con el decapante y agua fría en la dilución recomendada. Llene la cubeta ‘Enjuague’ con agua fría limpia.
Coloque una bolsaen la cubeta yvierta una cantidadde sellador o deacabado suficientepara el área.
Verifique su progreso. Si permanece algo del acabado del piso, aplique más decapante y aumente el tiempo de permanencia. Nodeje que el piso seseque.
Retire los letreros y barricadas ‘Pisohúmedo’ despuésde que el piso sehaya secado porcompleto.
3
3
Reúna dos cabezales y mangos de trapeador. Si notienen colores diferentes, etiquete uno como ‘Trapeador para decapado’ y el otro como ‘Trapeadorpara enjuague’.
Coloque letrerosy barricadas queindiquen ‘Pisohúmedo’.
4
4
11
11
Reúna dos cubetasy escurridores.Etiquete una cubetacomo ‘Decapado’y la otra como‘Enjuague’.
Prepare el trapeadory la cubeta.
Restriegue el piso con una máquina rotativa para pisos después de que la solución decapante haya tenido tiempo de actuar. Restriegue por toda el área de trabajo y repita el tratamiento si fuera necesario.
Extraiga y deseche la bolsa de la cubeta y el acabado sobrante. Limpie bien a fondo el cabezal del trapeador, la cubeta y el escurridor.
2
2
16
Reúna los equipos ysuministros.
Colóquese el equipode protecciónpersonal apropiado,como se indicaen la etiqueta delproducto y enla Hoja de Datosde Seguridad delMaterial (MSDS).
8 Aplique eldecapanteespumoso a loszócalos, si fueranecesario. Controleel caudal de líquido.
10 Utilice unaherramienta parabordes para aflojarel acabado cercanoa los zócalos yrincones.
9 Aplique el decapante al piso. Sumerja el trapeador ‘Decapado’ en la cubeta ‘Decapado’. Levante el trapeador, dejando que el exceso de líquido gotee dentro de la cubeta. Aplíquelo al piso. Aplique solución en cantidad suficiente, pero recuerde que no debe mojar en exceso, lo que puede llevar a que la solución se desplace por debajo de las puertas o hacia la alfombra. Delinee un área de 3 x 3 metros (10 x 10 pies) y cúbrala según un patrón superpuesto. Deje reposar la solución durante 5 a 10 minutos. No permita que la solución se seque. Vuelva a aplicarla según sea necesario para mantener el piso mojado.
8 Cubra el marco con movimientosen forma de ‘8’superpuestos. Dévuelta suavementeel trapeador cuandohaya recorrido lamitad del área.Aplique el acabadoen toda la extensiónhasta el zócalo en laprimera y en la última pasada.
10 Aplique capasadicionales de acabadoo sellador hasta lograrel aspecto deseado. Noaplique más de 4 capasen 24 horas. No realiceabrillantado entre capas.No abrillante hasta quetranscurran 24 horascomo mínimo desde laaplicación de la últimacapa.
9 Deje secar cadacapa.
Cuando el piso se seque, frote su mano sobre él. Si en su mano queda residuo, debe enjuagar de nuevo. Una vez que el piso esté seco y libre de residuos y de áreas brillantes (indicadores de acabado o sellador) está listo para su recubrimiento.