Embed Size (px)
Citation preview

April 2013
1710 Murray Avenue | Pittsburgh, PA | 412.422.2002 | [email protected]
Fluency Direct Admin Console User Guide

CONFIDENTIALITY DISCLAIMER
All information methods and concepts contained in or disclosed by this document is confidential and proprietary to Multimodal Technologies Inc. By accepting this material, the recipient agrees that this material as well as the information and concepts contained therein will be held in confidence and will not be reproduced in whole or in part without express written permission from Multimodal Technologies, Inc. Client use of M*Modal tools or information (excluding any services or tools provided to the Client that are covered under a separate written agreement) is subject to the terms of a legal agreement between the Client and M*Modal. Inquiries regarding permission for use of material contained in this document should be addressed to: [email protected]
CONTACT INFORMATION
BUSINESS M*Modal Corporate 9009 Carothers Parkway, Ste C-2 Franklin, TN 37067
OVERVIEW ................................................................................................................................................... 1
BENEFITS .......................................................................................................................................... 1 REQUIREMENTS .............................................................................................................................. 1 ABOUT THIS GUIDE ......................................................................................................................... 1 GUIDE CONVENTIONS..................................................................................................................... 2
LOGGING IN ............................................................................................................................................. 3 INITIAL SET-UP ..................................................................................................................................... 3 INTERNET EXPLORER SETUP ........................................................................................................... 3
USER MANAGEMENT ................................................................................................................................. 4
SERVICE TREE ..................................................................................................................................... 4 VIEW .................................................................................................................................................. 4
GROUPS ................................................................................................................................................... 5 WHAT ARE GROUPS? ......................................................................................................................... 5 CREATING GROUPS ............................................................................................................................ 6 MANAGING GROUPS ........................................................................................................................... 6
GROUP SETTINGS TAB ................................................................................................................... 6 DELETING GROUPS ............................................................................................................................ 7
USERS ...................................................................................................................................................... 8 USER TYPES ........................................................................................................................................ 8
USERS TAB ....................................................................................................................................... 8 CREATING USERS ............................................................................................................................... 9 CREATING USERS BY LOCATION .................................................................................................... 10 IMPORT FD USERS ............................................................................................................................ 10 EXPORTING USERS .......................................................................................................................... 10 DELETE FD USERS ............................................................................................................................ 11 MANAGING USERS ............................................................................................................................ 12 USERS - BULK ASSIGN SPECIALTY ................................................................................................ 13
GROUPS ................................................................................................................................................. 14 SETTINGS ........................................................................................................................................... 14
SETTINGS ............................................................................................................................................... 14 VOCABULARY .................................................................................................................................... 15
ADDED WORDS .............................................................................................................................. 15 EXCLUDED WORDS ....................................................................................................................... 16 REPLACEMENT RULES ................................................................................................................. 16 IMPORT VOCABULARY .................................................................................................................. 17 BULK DELETE VOCABULARY ....................................................................................................... 17
COMMANDS ........................................................................................................................................ 18 ADD GROUP .................................................................................................................................... 18 ADD COMMAND .............................................................................................................................. 19 DELETE ........................................................................................................................................... 20
COPY COMMANDS ............................................................................................................................ 20 MICROPHONE SELECTION ............................................................................................................... 21
MICROPHONE ................................................................................................................................. 21 KEYBOARD RECORDING SHORTCUTS ....................................................................................... 22 PHILIPS SPEECH MIKE .................................................................................................................. 22
OPTIONS ............................................................................................................................................. 23 AUDIO REPLAY ..................................................................................................................................... 25
Table of
CONTENTS
THINGS TO REMEMBER WHEN REVIEWING SESSION LOGS...................................................... 26 USER SESSION LOGS .......................................................................................................................... 26 TROUBLESHOOTING ............................................................................................................................ 27
CLOUD DASHBOARD ............................................................................................................................... 28
WHO CAN ACCESS THE CLOUD DASHBOARD? ............................................................................ 28 HOW IS THE CLOUD DASHBOARD ORGANIZED? ......................................................................... 28
CREATING A TOP LEVEL REGION ............................................................................................... 29 CREATING A SUB REGION ............................................................................................................ 29 REMOVING A REGION/SUB REGION ........................................................................................... 29 REGION DETAILS VISUALIZATION ............................................................................................... 30 HOW TO ASSIGN SERVERS TO REGIONS .................................................................................. 30 HOW TO UN-ASSIGN SERVERS FROM REGIONS ...................................................................... 30
VISUALIZATION OF SERVER DETAILS ............................................................................................ 31 SERVER ACTIONS ............................................................................................................................. 32
IMMEDIATE SHUTDOWN ............................................................................................................... 32 SCHEDULED SHUTDOWN ............................................................................................................. 32 ADD RECOGNIZERS DOMAINS .................................................................................................... 32 UPDATE RECOGNIZERS DOMAINS ............................................................................................. 33 CLOUD SERVERS VISIBILITY ........................................................................................................ 33
CLOUD SERVER LOOKUP................................................................................................................. 35 TECHNOLOGY REQUIREMENTS FOR CLOUD DASHBOARD ....................................................... 35
DOWNLOAD ............................................................................................................................................... 36
DOWNLOAD FD INSTALLER ................................................................................................................ 36
Fluency Direct Admin Console - User Guide 1
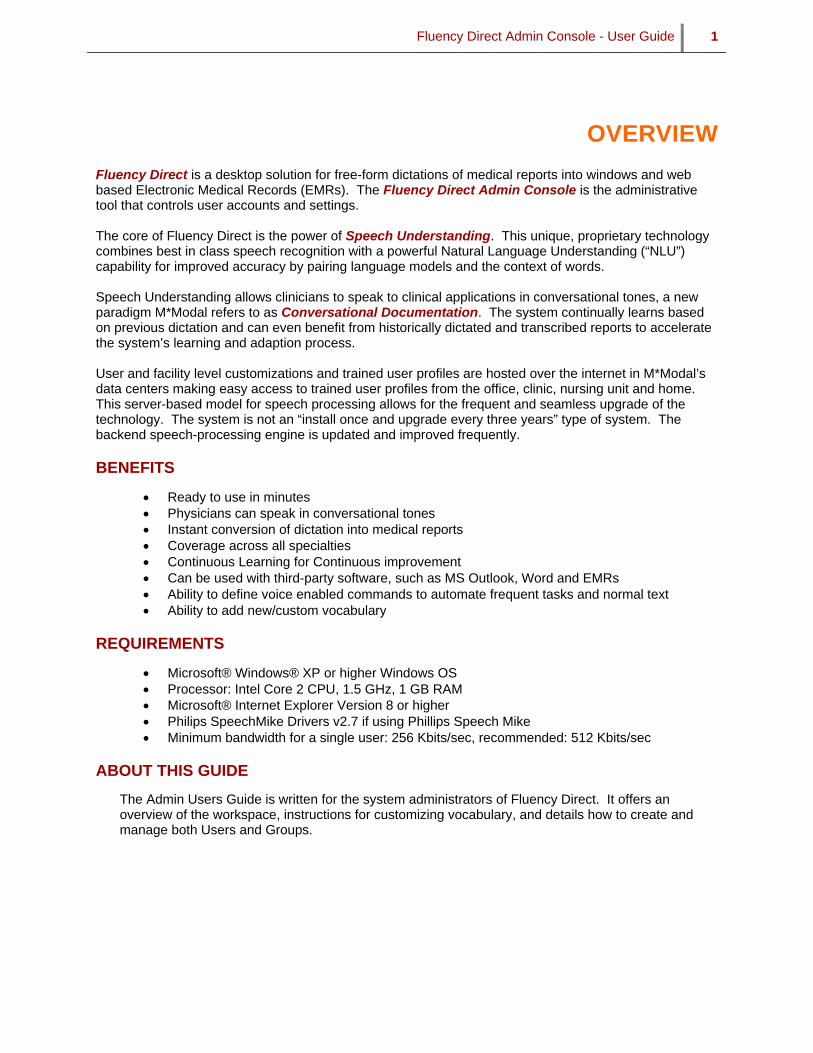
OVERVIEW
Fluency Direct is a desktop solution for free-form dictations of medical reports into windows and web based Electronic Medical Records (EMRs). The Fluency Direct Admin Console is the administrative tool that controls user accounts and settings. The core of Fluency Direct is the power of Speech Understanding. This unique, proprietary technology combines best in class speech recognition with a powerful Natural Language Understanding (“NLU”) capability for improved accuracy by pairing language models and the context of words. Speech Understanding allows clinicians to speak to clinical applications in conversational tones, a new paradigm M*Modal refers to as Conversational Documentation. The system continually learns based on previous dictation and can even benefit from historically dictated and transcribed reports to accelerate the system’s learning and adaption process. User and facility level customizations and trained user profiles are hosted over the internet in M*Modal’s data centers making easy access to trained user profiles from the office, clinic, nursing unit and home. This server-based model for speech processing allows for the frequent and seamless upgrade of the technology. The system is not an “install once and upgrade every three years” type of system. The backend speech-processing engine is updated and improved frequently.
BENEFITS
Ready to use in minutes Physicians can speak in conversational tones Instant conversion of dictation into medical reports Coverage across all specialties Continuous Learning for Continuous improvement Can be used with third-party software, such as MS Outlook, Word and EMRs Ability to define voice enabled commands to automate frequent tasks and normal text Ability to add new/custom vocabulary
REQUIREMENTS
Microsoft® Windows® XP or higher Windows OS Processor: Intel Core 2 CPU, 1.5 GHz, 1 GB RAM Microsoft® Internet Explorer Version 8 or higher Philips SpeechMike Drivers v2.7 if using Phillips Speech Mike Minimum bandwidth for a single user: 256 Kbits/sec, recommended: 512 Kbits/sec
ABOUT THIS GUIDE
The Admin Users Guide is written for the system administrators of Fluency Direct. It offers an overview of the workspace, instructions for customizing vocabulary, and details how to create and manage both Users and Groups.
Fluency Direct Admin Console - User Guide 2
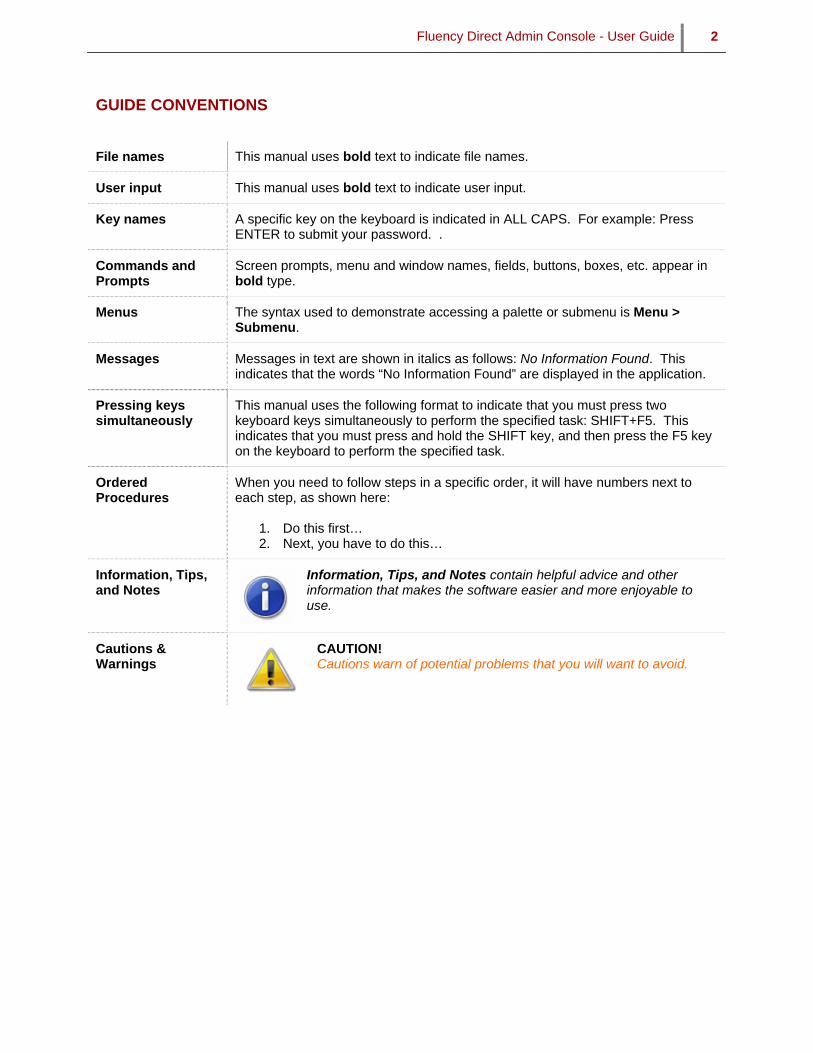
GUIDE CONVENTIONS
File names This manual uses bold text to indicate file names.
User input This manual uses bold text to indicate user input.
Key names A specific key on the keyboard is indicated in ALL CAPS. For example: Press ENTER to submit your password. .
Commands and Prompts
Screen prompts, menu and window names, fields, buttons, boxes, etc. appear in bold type.
Menus The syntax used to demonstrate accessing a palette or submenu is Menu > Submenu.
Messages Messages in text are shown in italics as follows: No Information Found. This indicates that the words “No Information Found” are displayed in the application.
Pressing keys simultaneously
This manual uses the following format to indicate that you must press two keyboard keys simultaneously to perform the specified task: SHIFT+F5. This indicates that you must press and hold the SHIFT key, and then press the F5 key on the keyboard to perform the specified task.
Ordered Procedures
When you need to follow steps in a specific order, it will have numbers next to each step, as shown here:
1. Do this first… 2. Next, you have to do this…
Information, Tips, and Notes
Information, Tips, and Notes contain helpful advice and other information that makes the software easier and more enjoyable to use.
Cautions & Warnings
CAUTION! Cautions warn of potential problems that you will want to avoid.

Fluency Direct Admin Console - User Guide 3
LOGGING IN
From your login screen, enter your username, domain, and password. Click on the login button to login. You will be taken to the Admin Console application. NOTE This application contains Protected Health Information. Accessing or disclosing PHI is regulated by State and Federal law, including HIPAA. If you proceed, you are acknowledging this warning and certifying that you are authorized to do so.
INITIAL SET-UP
Initial setup of the Fluency Admin Service Tree can only be performed by M*Modal Operations, at this time. Updates to the Service Tree can be performed through AnyModal Console.
INTERNET EXPLORER SETUP
When an admin want to view/edit settings such as Vocabulary for a user or a group they must be logged into Fluency Direct. Now, in order for Admin Console to sync up with Fluency Direct the following settings must be ensured in IE. To enable the “Display Mixed Content,” click on Tools > Internet Options. In the Internet Options dialog, click the “Security” tab. Pick the Internet zone and click the “Custom Level” button. In the Settings area, scroll down to the “Miscellaneous” section and modify te area highlighted in the dialog shown. You must choose the option, “Enable.”
Fluency Direct Admin Console - User Guide 4
USER MANAGEMENT
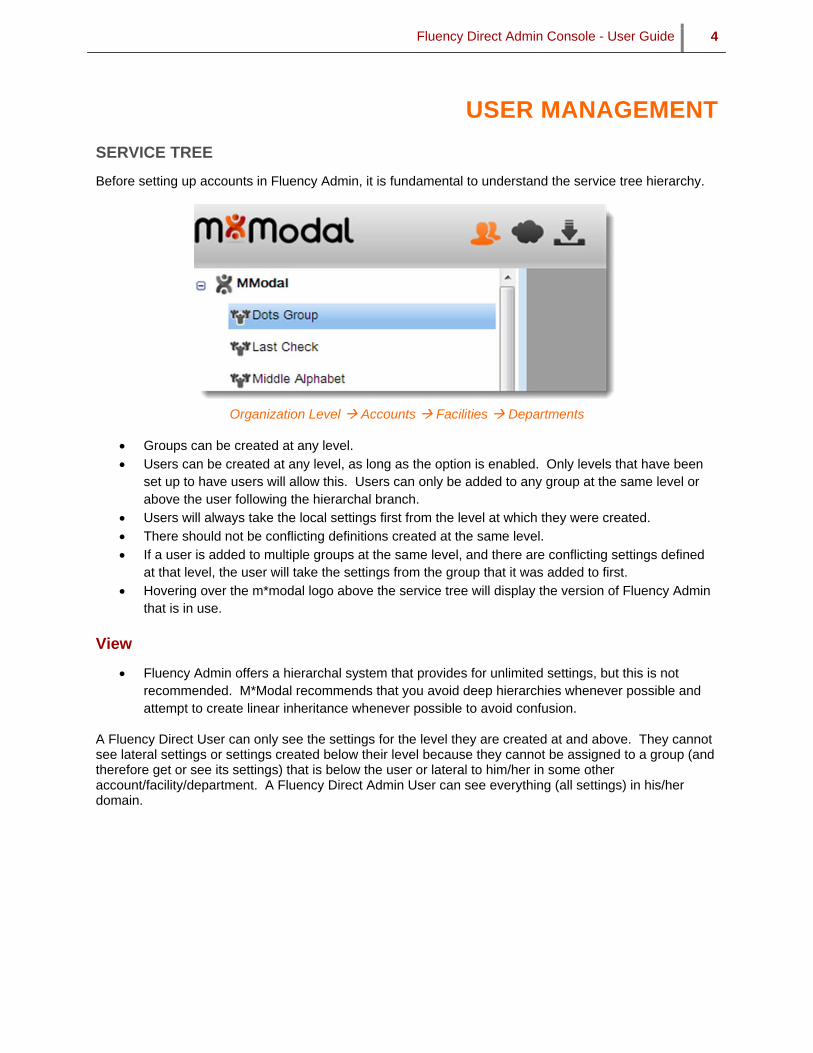
SERVICE TREE
Before setting up accounts in Fluency Admin, it is fundamental to understand the service tree hierarchy.
Organization Level Accounts Facilities Departments
Groups can be created at any level. Users can be created at any level, as long as the option is enabled. Only levels that have been
set up to have users will allow this. Users can only be added to any group at the same level or above the user following the hierarchal branch.
Users will always take the local settings first from the level at which they were created. There should not be conflicting definitions created at the same level. If a user is added to multiple groups at the same level, and there are conflicting settings defined
at that level, the user will take the settings from the group that it was added to first. Hovering over the m*modal logo above the service tree will display the version of Fluency Admin
that is in use.
View
Fluency Admin offers a hierarchal system that provides for unlimited settings, but this is not recommended. M*Modal recommends that you avoid deep hierarchies whenever possible and attempt to create linear inheritance whenever possible to avoid confusion.
A Fluency Direct User can only see the settings for the level they are created at and above. They cannot see lateral settings or settings created below their level because they cannot be assigned to a group (and therefore get or see its settings) that is below the user or lateral to him/her in some other account/facility/department. A Fluency Direct Admin User can see everything (all settings) in his/her domain.
Fluency Direct Admin Console - User Guide 5
GROUPS
WHAT ARE GROUPS?
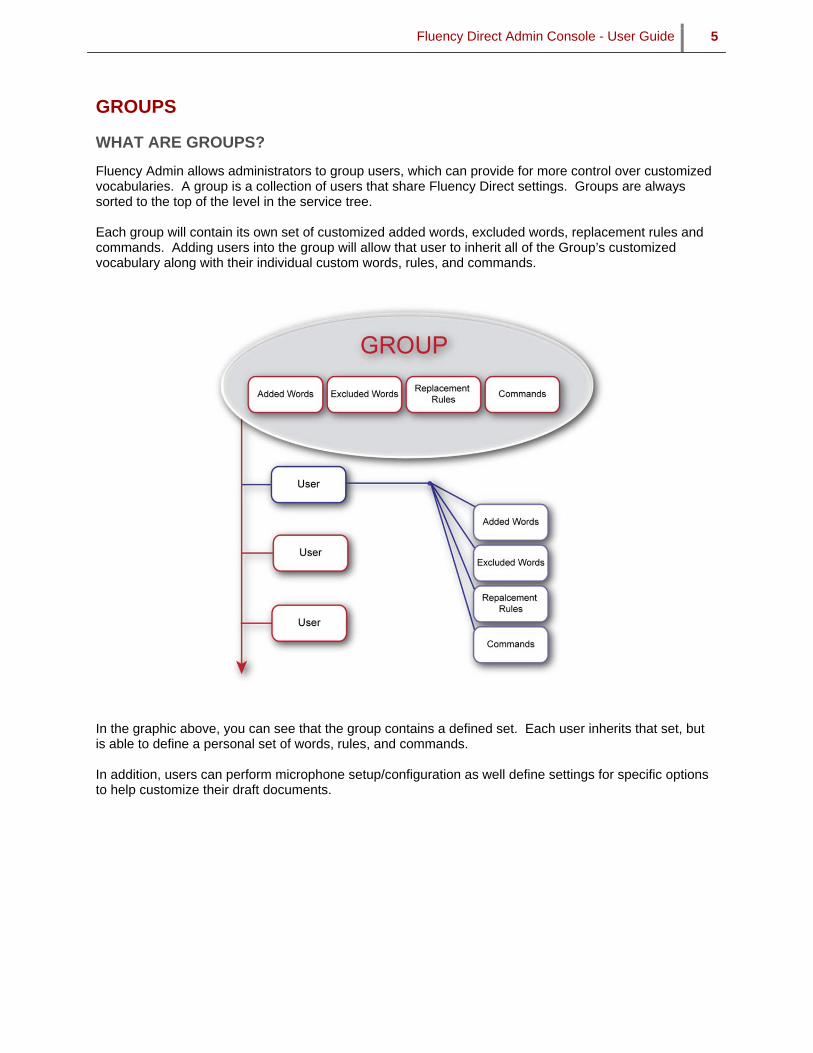
Fluency Admin allows administrators to group users, which can provide for more control over customized vocabularies. A group is a collection of users that share Fluency Direct settings. Groups are always sorted to the top of the level in the service tree. Each group will contain its own set of customized added words, excluded words, replacement rules and commands. Adding users into the group will allow that user to inherit all of the Group’s customized vocabulary along with their individual custom words, rules, and commands.
In the graphic above, you can see that the group contains a defined set. Each user inherits that set, but is able to define a personal set of words, rules, and commands. In addition, users can perform microphone setup/configuration as well define settings for specific options to help customize their draft documents.

Fluency Direct Admin Console - User Guide 6
CREATING GROUPS
Fluency Admin will allow you to create a group at any level in your Service Tree. Groups will always be sorted to the top of each level that they were created at. Creating groups at top level levels (root levels such as a company / account) will allow subsequent creation of users at that level. This is NOT encouraged although allowed. We recommend that you create groups at intermediate/lower levels instead of the top (company/account) level. To create a new group, right click on the Account, Department, or Facility where you want the account to be located at and select Create Group at “Selected Location”.
MANAGING GROUPS
Group Settings Tab
EDIT GROUP Name: The name of the group, this can be changed at any time. Group ID: This field contains the Group OID for the group; this field cannot be edited ; it is used for troubleshooting by Customer Support. Description: Brief description of the group; this can be changed at any time.
Fluency Direct Admin Console - User Guide 7
SETTINGS Administrators can edit the Vocabulary (Added Words, Excluded Words, and Replacement Rules) and Commands for a specific Group or User. Any users assigned to the group will inherit these settings. Users must be logged into Fluency Direct to view and edit settings. Fluency Direct must be initiated with “Run as Administrator”. Please see Settings for more information on defining the available settings for groups. SETTINGS HISTORY Users can review the user’s settings history here. Click Load History and the user’s history will be displayed. You can use the option to Restore to this Version if desired. PARENT GROUPS Add or view the parent groups of the selected group. Settings are inherited from Parent Groups. After clicking the Add button, administrators can create a new group or choose an existing group. CHILD GROUPS Add or view the children of the selected group. These groups will inherit any settings defined in the selected group. After clicking the Add button, administrators can create a new group or choose an existing group.
COPY GROUPS
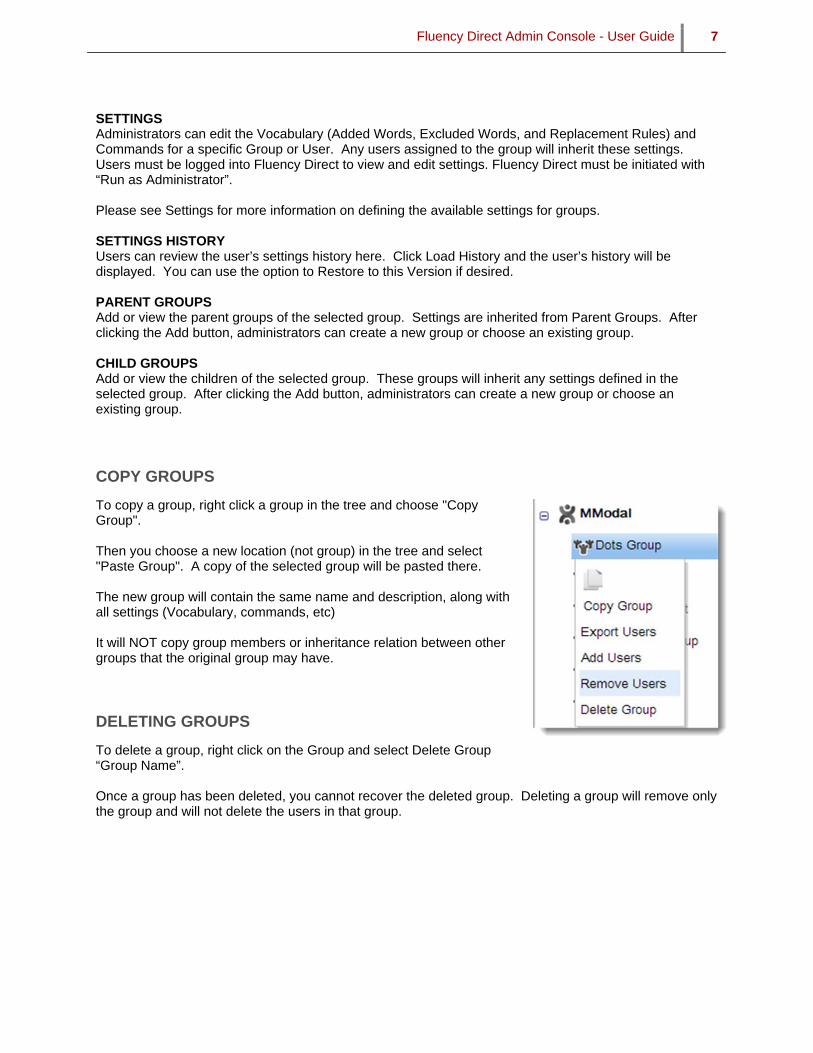
To copy a group, right click a group in the tree and choose "Copy Group". Then you choose a new location (not group) in the tree and select "Paste Group". A copy of the selected group will be pasted there. The new group will contain the same name and description, along with all settings (Vocabulary, commands, etc) It will NOT copy group members or inheritance relation between other groups that the original group may have.
DELETING GROUPS
To delete a group, right click on the Group and select Delete Group “Group Name”. Once a group has been deleted, you cannot recover the deleted group. Deleting a group will remove only the group and will not delete the users in that group.
Fluency Direct Admin Console - User Guide 8
USERS
USER TYPES
Regular Administrator (non-cloud)
Cloud Admininistrator (cloud + regular)
Physician (regular Fluency Direct user, non-admin)
Clinical Support Staff (regular Fluency Direct user, non-admin)
USERS TAB
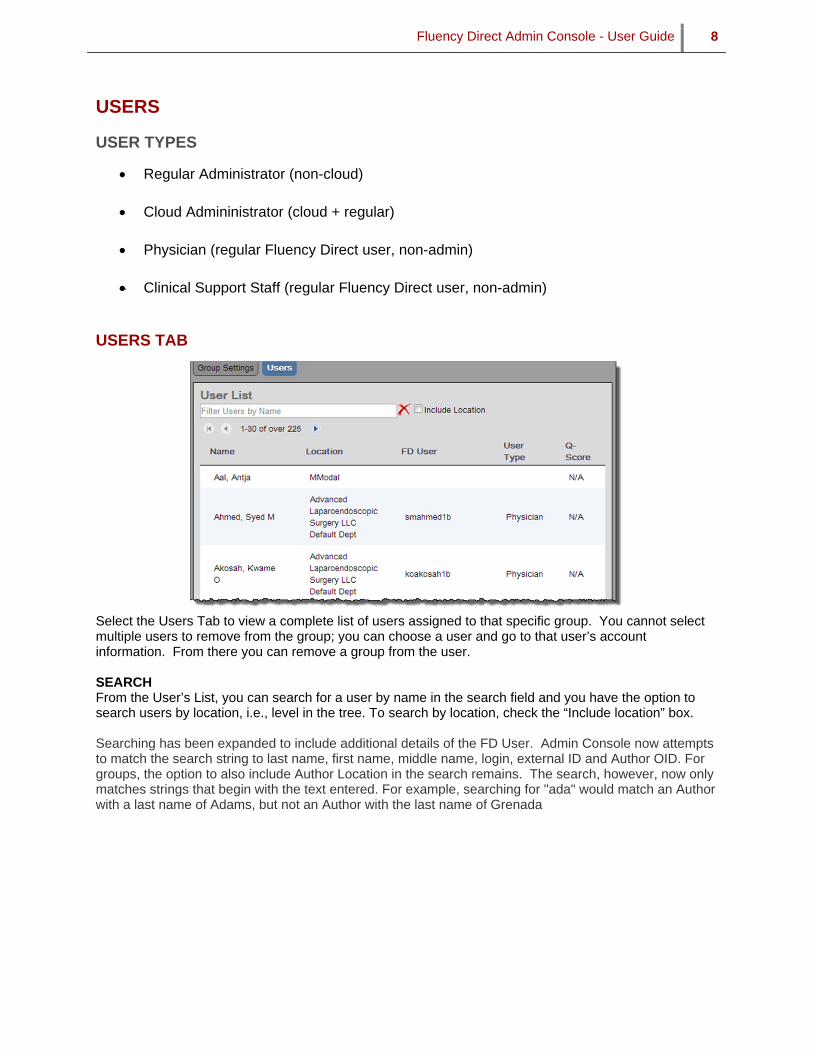
Select the Users Tab to view a complete list of users assigned to that specific group. You cannot select multiple users to remove from the group; you can choose a user and go to that user’s account information. From there you can remove a group from the user. SEARCH From the User’s List, you can search for a user by name in the search field and you have the option to search users by location, i.e., level in the tree. To search by location, check the “Include location” box.
Searching has been expanded to include additional details of the FD User. Admin Console now attempts to match the search string to last name, first name, middle name, login, external ID and Author OID. For groups, the option to also include Author Location in the search remains. The search, however, now only matches strings that begin with the text entered. For example, searching for "ada" would match an Author with a last name of Adams, but not an Author with the last name of Grenada
Fluency Direct Admin Console - User Guide 9
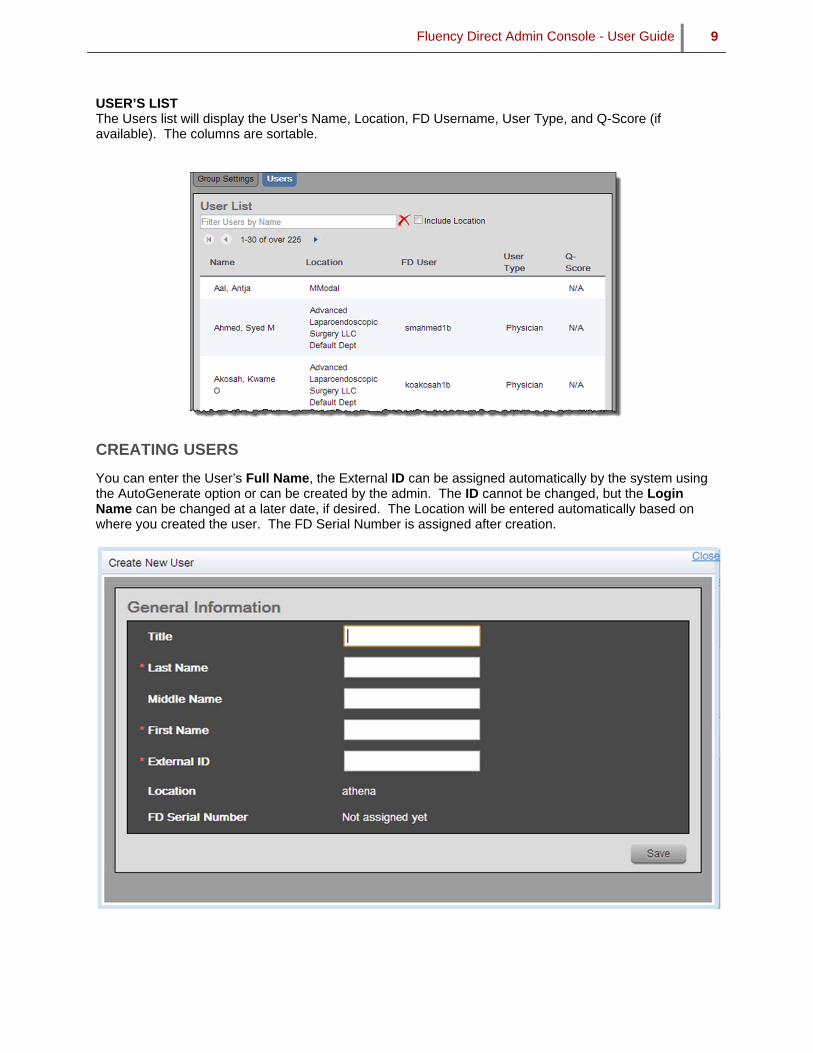
USER’S LIST The Users list will display the User’s Name, Location, FD Username, User Type, and Q-Score (if available). The columns are sortable.
CREATING USERS
You can enter the User’s Full Name, the External ID can be assigned automatically by the system using the AutoGenerate option or can be created by the admin. The ID cannot be changed, but the Login Name can be changed at a later date, if desired. The Location will be entered automatically based on where you created the user. The FD Serial Number is assigned after creation.

Fluency Direct Admin Console - User Guide 10
CREATING USERS BY LOCATION
If you right-click on a Location (Account, Facility, or Department) you can choose to Import or Delete FD Users.
EXPORT USERS
Admin console provides an option to export users either from a selected location or from a selected group. Since administrators are Fluency Direct users they will be included in the export. All users are exported: Authors, Fluency Direct Users, and Administrators. Note that for Authors only, the column login name will contain a value of N/A. When exporting users from a group, the users are grouped by Location Name where a Title before each group indicates the Location Name they belong to. The format of the export file is similar to the import file, except that the column password will not be exported and there is an additional column at the end containing the author OID.
Last Name | First Name | Middle Name | Title | FD Login | External ID | Author OID Last Name This field contains the user’s last name First Name This field contains the user’s first name Middle Name This field contains the user’s middle name; this field can be null but the column must
be present Title This field contains the user’s title; this field can be null but the column must be
present FD Login This field contains the user’s Fluency Direct Login name; without “@” or the domain.
Just the login name portion. If the login is user@domain, you would just enter “user” here.
External ID This field contains the user’s External ID; the external ID can be the same as the login name, if desired
Author OID This field contains the author’s OID Status Enabled/disabled only for FD users Specialty Displays the domain such as Radiology, also for FD users To export users, right click on the Facility, Location, or Group name in the Service Tree and select Export Users. You will be prompted to save the exported file in a location of your choice. The file will be saved in a .csv format.
Fluency Direct Admin Console - User Guide 11
IMPORT FD USERS
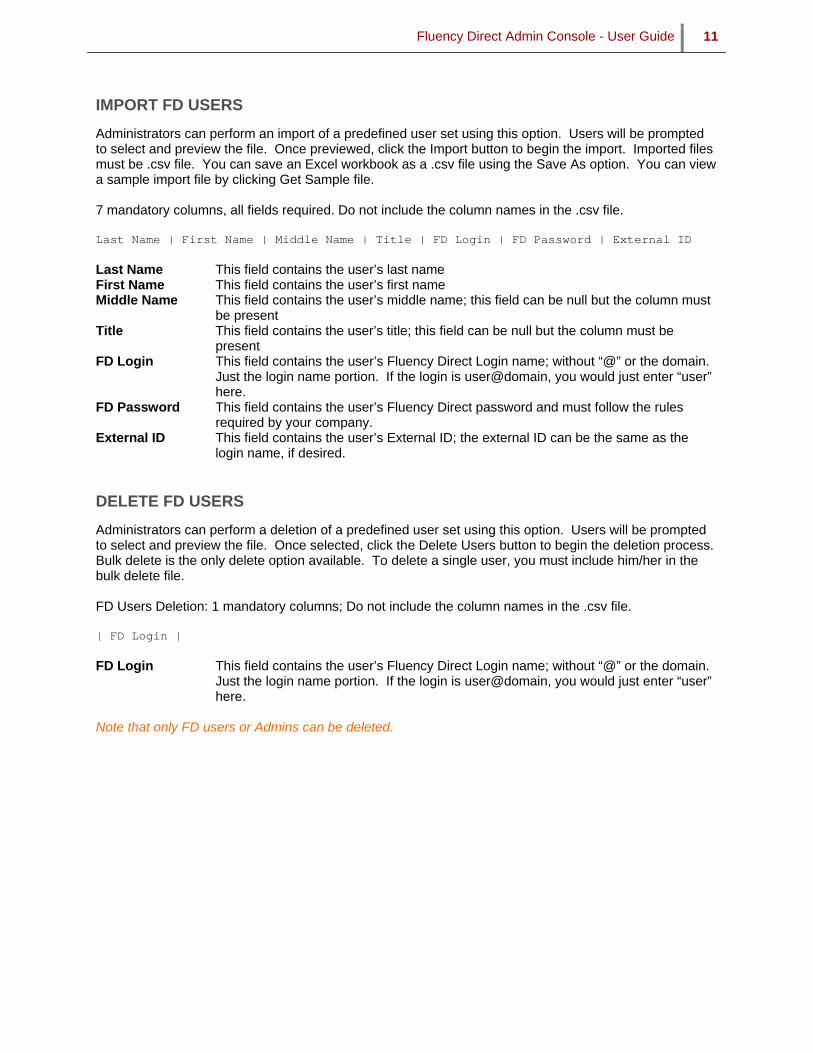
Administrators can perform an import of a predefined user set using this option. Users will be prompted to select and preview the file. Once previewed, click the Import button to begin the import. Imported files must be .csv file. You can save an Excel workbook as a .csv file using the Save As option. You can view a sample import file by clicking Get Sample file. 7 mandatory columns, all fields required. Do not include the column names in the .csv file.
Last Name | First Name | Middle Name | Title | FD Login | FD Password | External ID Last Name This field contains the user’s last name First Name This field contains the user’s first name Middle Name This field contains the user’s middle name; this field can be null but the column must
be present Title This field contains the user’s title; this field can be null but the column must be
present FD Login This field contains the user’s Fluency Direct Login name; without “@” or the domain.
Just the login name portion. If the login is user@domain, you would just enter “user” here.
FD Password This field contains the user’s Fluency Direct password and must follow the rules required by your company.
External ID This field contains the user’s External ID; the external ID can be the same as the login name, if desired.
DELETE FD USERS
Administrators can perform a deletion of a predefined user set using this option. Users will be prompted to select and preview the file. Once selected, click the Delete Users button to begin the deletion process. Bulk delete is the only delete option available. To delete a single user, you must include him/her in the bulk delete file. FD Users Deletion: 1 mandatory columns; Do not include the column names in the .csv file. | FD Login | FD Login This field contains the user’s Fluency Direct Login name; without “@” or the domain.
Just the login name portion. If the login is user@domain, you would just enter “user” here.
Note that only FD users or Admins can be deleted.

Fluency Direct Admin Console - User Guide 12
MANAGING USERS
Once a user has been created, you will have the option to define the settings and preferences for that user. GENERAL
Title The user’s title (Dr., Mr., Mrs., MD, PA, etc.) *not required Last Name: The user’s last name Middle Name The user’s middle name or initial *not required First Name: The user’s first name External ID: The user’s external ID; this can be generated automatically or created by the
admin. Once created, it cannot be changed Location: This field displays the location (Account, Facility, or Department)
ACCOUNT INFORMATION:
User ID: Generated automatically and cannot be changed. Login Name: The user’s login name; and domain. The login name can be edited, but the
domain is static and cannot be changed. FD Recognizer: This field will display the currently active recognizer domain for the selected
author. Administrator: Select Yes or No if the user is a Fluency Direct Administrator; this will give them
permissions to edit through Fluency Admin console. Administrators are automatically assigned as Fluency Direct users as well.
FD User: Select Yes or No if the user is a Fluency Direct user. Creating a user does not automatically enable them to be a Fluency Direct user or admin. These options must be set before the user can dictate using Fluency Direct.

Fluency Direct Admin Console - User Guide 13
USERS - BULK ASSIGN SPECIALTY
Users can be assigned to a specialty in bulk. Right Click on the Group in the Service Tree and select Bulk Assign Specialty. You will be prompted to select the csv file that contains a list of users together with the specialty to be assigned. You can only perform this function one location at a time. A sample input file can be seen by clicking on the help link in the UI for selecting the input file.
Fluency Direct Admin Console - User Guide 14
GROUPS
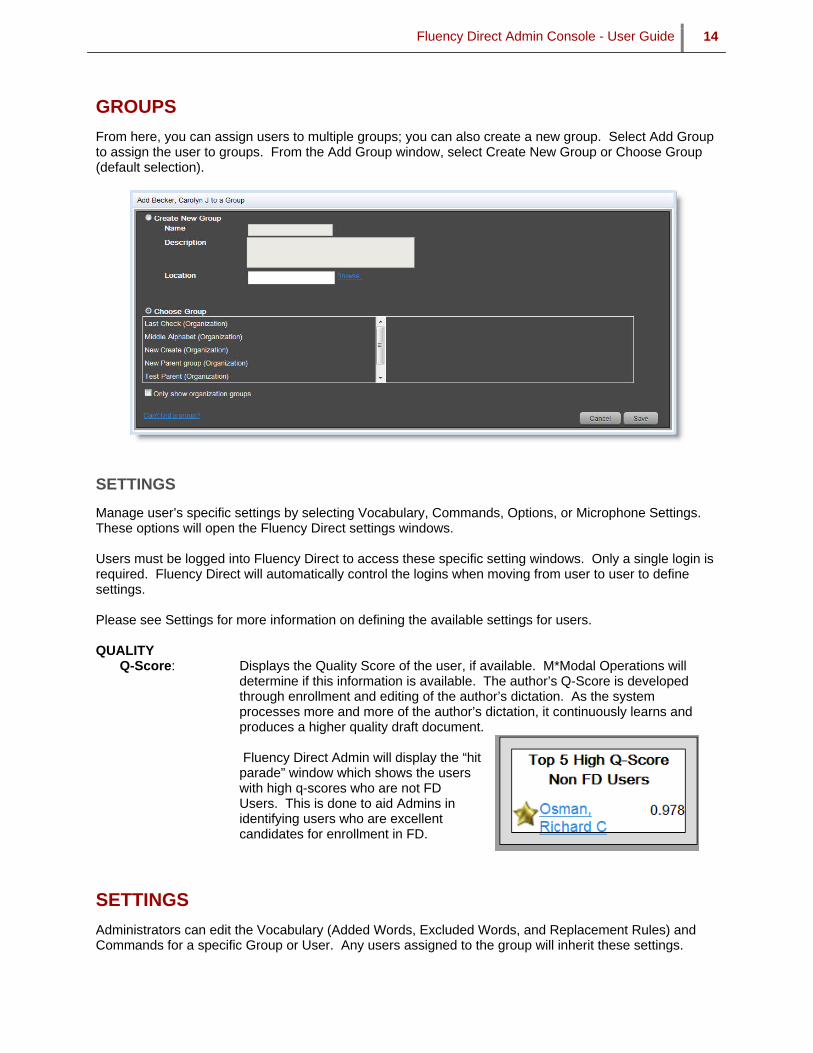
From here, you can assign users to multiple groups; you can also create a new group. Select Add Group to assign the user to groups. From the Add Group window, select Create New Group or Choose Group (default selection).
SETTINGS
Manage user’s specific settings by selecting Vocabulary, Commands, Options, or Microphone Settings. These options will open the Fluency Direct settings windows. Users must be logged into Fluency Direct to access these specific setting windows. Only a single login is required. Fluency Direct will automatically control the logins when moving from user to user to define settings. Please see Settings for more information on defining the available settings for users. QUALITY
Q-Score: Displays the Quality Score of the user, if available. M*Modal Operations will determine if this information is available. The author’s Q-Score is developed through enrollment and editing of the author’s dictation. As the system processes more and more of the author’s dictation, it continuously learns and produces a higher quality draft document. Fluency Direct Admin will display the “hit parade” window which shows the users with high q-scores who are not FD Users. This is done to aid Admins in identifying users who are excellent candidates for enrollment in FD.
SETTINGS
Administrators can edit the Vocabulary (Added Words, Excluded Words, and Replacement Rules) and Commands for a specific Group or User. Any users assigned to the group will inherit these settings.
Fluency Direct Admin Console - User Guide 15
Inheritance is collective meaning that users inherit the settings from all of the groups to which they are assigned as well as the parent groups for each group.
Users must be logged into Fluency Direct to view and edit settings. Fluency Direct must be initiated with “Run as Administrator”.
VOCABULARY
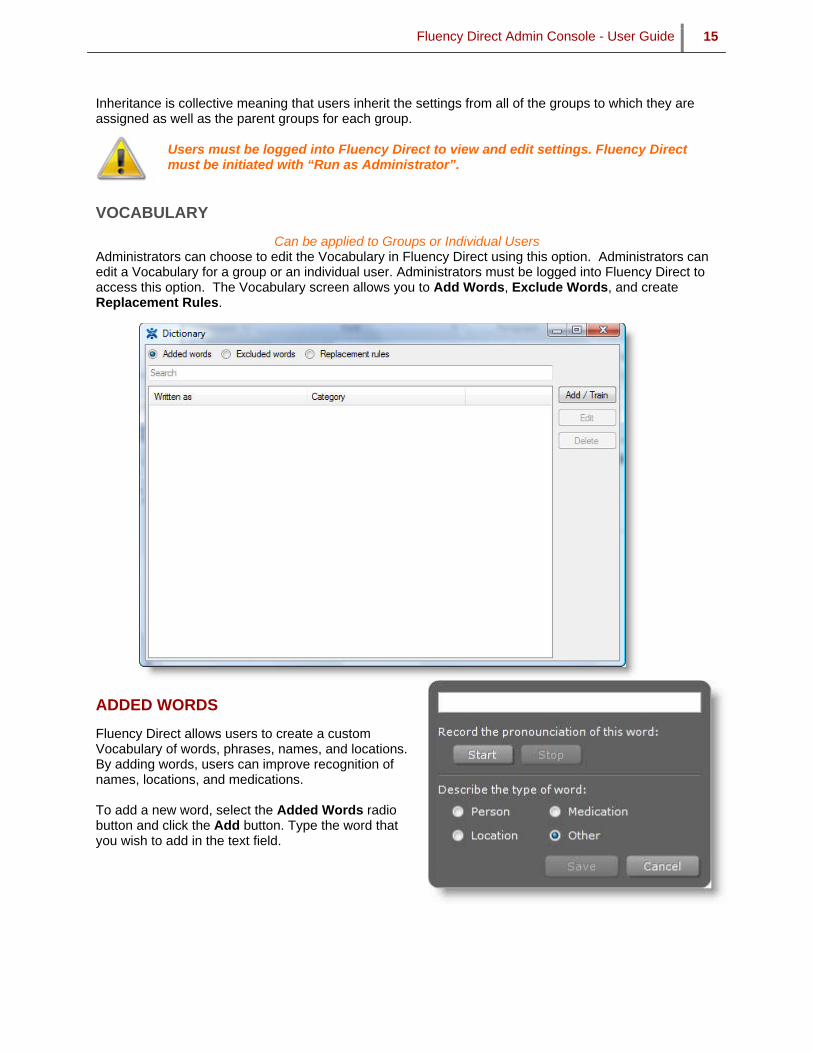
Can be applied to Groups or Individual Users Administrators can choose to edit the Vocabulary in Fluency Direct using this option. Administrators can edit a Vocabulary for a group or an individual user. Administrators must be logged into Fluency Direct to access this option. The Vocabulary screen allows you to Add Words, Exclude Words, and create Replacement Rules.
ADDED WORDS
Fluency Direct allows users to create a custom Vocabulary of words, phrases, names, and locations. By adding words, users can improve recognition of names, locations, and medications. To add a new word, select the Added Words radio button and click the Add button. Type the word that you wish to add in the text field.

Fluency Direct Admin Console - User Guide 16
To improve recognition, record the pronunciation. Since the system stores phonemes, it is fine to record pronunciation for individuals and groups. You can also control how the term is used by defining what it is used like. You can set it as a Person Name, Location Name, or Medication Name.
EXCLUDED WORDS
Fluency Direct allows the user to specify words that he or she may never want to appear in the dictation, for a variety of reasons. To exclude a word, select the Excluded Words radio button and click Add. WRITTEN AS Type the word that you do not wish to see in the dictation and click OK. You can edit or delete the excluded words at any time.
REPLACEMENT RULES
Fluency Direct also allows users to create a collection of words or phrases that will be used to substitute the spoken form. To create a Replacement Rule, select the Replacement Rules radio button and click Add. ORIGINAL WORD Enter the original word in this field (example: cabbage) REPLACE WITH Enter the text that you want to see when that word is spoken (example: CABG)
WARNING! Be careful when using the replacement text; it is not a substitute for training a word that receives poor recognition.
Fluency Direct Admin Console - User Guide 17
IMPORT VOCABULARY
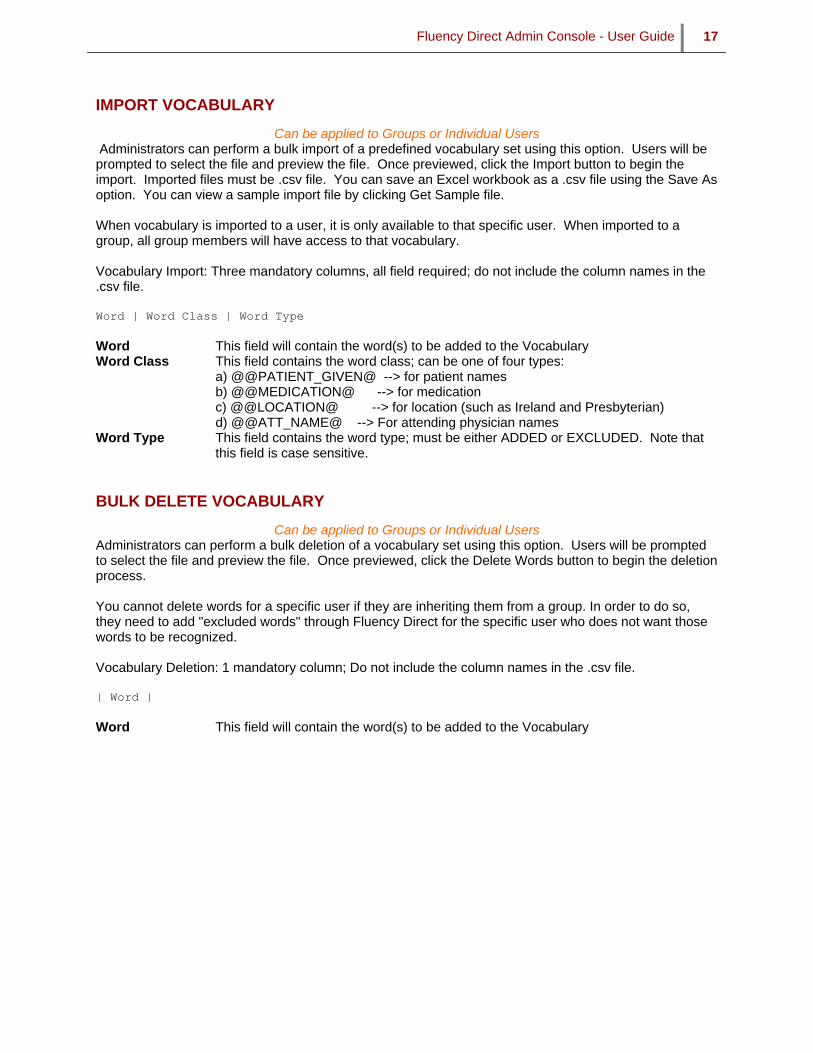
Can be applied to Groups or Individual Users Administrators can perform a bulk import of a predefined vocabulary set using this option. Users will be prompted to select the file and preview the file. Once previewed, click the Import button to begin the import. Imported files must be .csv file. You can save an Excel workbook as a .csv file using the Save As option. You can view a sample import file by clicking Get Sample file. When vocabulary is imported to a user, it is only available to that specific user. When imported to a group, all group members will have access to that vocabulary. Vocabulary Import: Three mandatory columns, all field required; do not include the column names in the .csv file. Word | Word Class | Word Type Word This field will contain the word(s) to be added to the Vocabulary Word Class This field contains the word class; can be one of four types:
a) @@PATIENT_GIVEN@ --> for patient names b) @@MEDICATION@ --> for medication c) @@LOCATION@ --> for location (such as Ireland and Presbyterian) d) @@ATT_NAME@ --> For attending physician names
Word Type This field contains the word type; must be either ADDED or EXCLUDED. Note that this field is case sensitive.
BULK DELETE VOCABULARY
Can be applied to Groups or Individual Users Administrators can perform a bulk deletion of a vocabulary set using this option. Users will be prompted to select the file and preview the file. Once previewed, click the Delete Words button to begin the deletion process. You cannot delete words for a specific user if they are inheriting them from a group. In order to do so, they need to add "excluded words" through Fluency Direct for the specific user who does not want those words to be recognized. Vocabulary Deletion: 1 mandatory column; Do not include the column names in the .csv file. | Word | Word This field will contain the word(s) to be added to the Vocabulary
Fluency Direct Admin Console - User Guide 18
COMMANDS
Can be applied to Groups or Individual Users Administrators can choose to edit the Commands in Fluency Direct using this option. Administrators can edit commands for a group or an individual user.
Administrators must be logged into Fluency Direct to access this option.
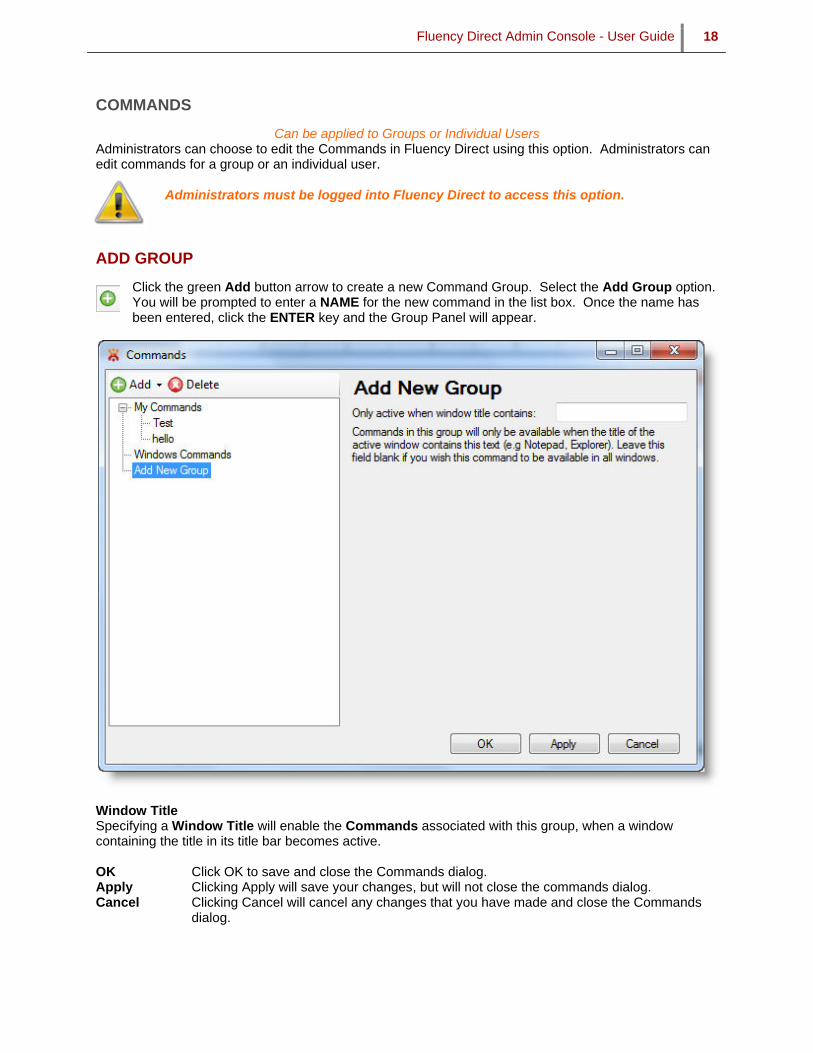
ADD GROUP
Click the green Add button arrow to create a new Command Group. Select the Add Group option. You will be prompted to enter a NAME for the new command in the list box. Once the name has been entered, click the ENTER key and the Group Panel will appear.
Window Title Specifying a Window Title will enable the Commands associated with this group, when a window containing the title in its title bar becomes active. OK Click OK to save and close the Commands dialog. Apply Clicking Apply will save your changes, but will not close the commands dialog. Cancel Clicking Cancel will cancel any changes that you have made and close the Commands
dialog.

Fluency Direct Admin Console - User Guide 19
ADD COMMAND
Highlight the desired Command Group, and then click the green Add button dropdown to create a new command for that group. Select the Add Command option. You will be prompted to enter a NAME for the new command in the list box. Once the name has been entered, click the ENTER
key and the Actions Panel will appear.
NEW ACTION To enter the action for the Command, click the green Add Action button and choose from the following options. A command can contain multiple actions.
Simulate Key Presses This option will capture your keystrokes and record them as the command. If you wish to change a key press, you will need to highlight the key press that you wish to remove, and then press the new keys. If you wish to remove a key press, you will need to highlight the key press, right-click the mouse and select Delete Selection.
Wait This option will cause the system to wait for a specified amount of time before proceeding to the next action.
Script

Fluency Direct Admin Console - User Guide 20
This option will insert a pre-written script of code that will allow you to perform more complicated functions.
Text Snippet This option will insert a snippet of text during dictation when you say the name of the command.
DELETE ACTION To remove an action from the command, select the action in the command and click the red Delete action button.
MOVING ACTION
To move an action up or down in the action list, select the action and click the up or down arrow buttons. For example, you entered the canned text for the command and then added the open mail command; you can add the key presses and move the action to the top of the action list.
DELETE
Click the red Delete button to delete the selected command or group.
COPY COMMANDS
The Copy Commands option will allow you to copy a group of commands from Authors and Groups to another Author or Group. You cannot copy individual commands within groups.
This is a copy only function and does not move the commands. The commands will still be available in the original location.
Because two groups of commands cannot have the same name, if the target contains a group of
commands with the same name, the commands being copied will be automatically renamed with a suffix.
Click Copy Commands to select a group or location. Select your choice and click the Choose button. Click Cancel to exit. The Commands will be copied to the new location and should be available immediately depending on your setup.
Fluency Direct Admin Console - User Guide 21
MICROPHONE SELECTION
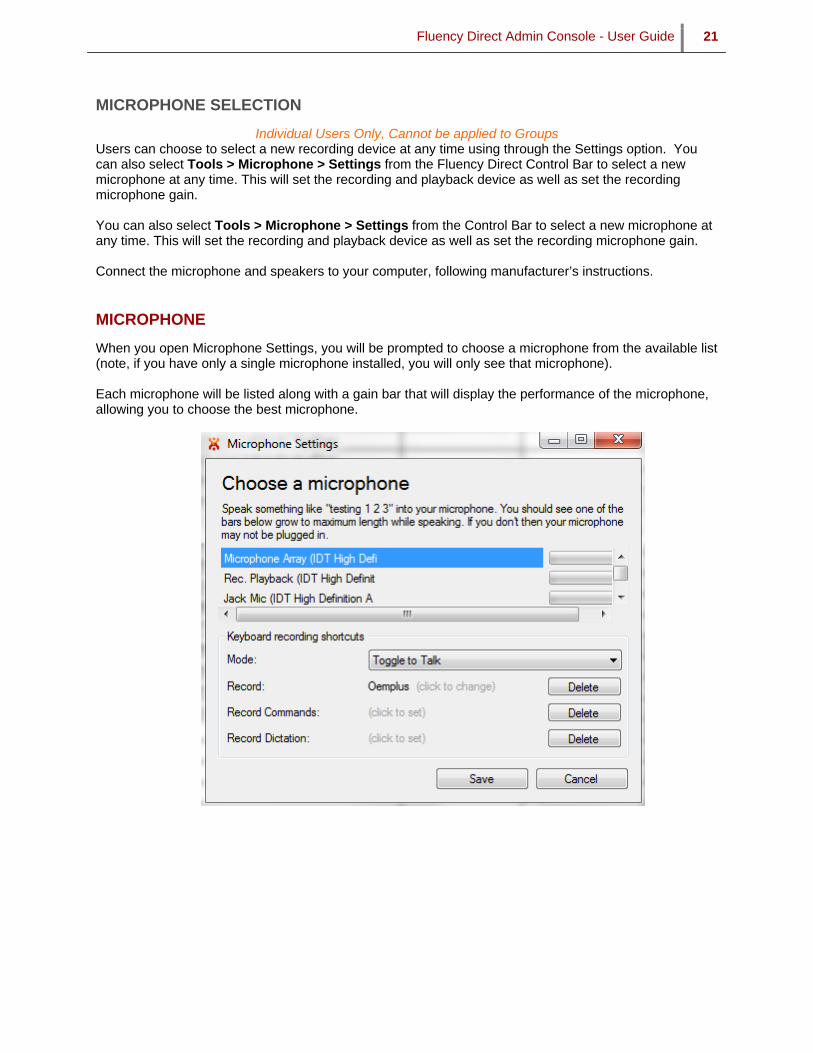
Individual Users Only, Cannot be applied to Groups Users can choose to select a new recording device at any time using through the Settings option. You can also select Tools > Microphone > Settings from the Fluency Direct Control Bar to select a new microphone at any time. This will set the recording and playback device as well as set the recording microphone gain. You can also select Tools > Microphone > Settings from the Control Bar to select a new microphone at any time. This will set the recording and playback device as well as set the recording microphone gain. Connect the microphone and speakers to your computer, following manufacturer’s instructions.
MICROPHONE
When you open Microphone Settings, you will be prompted to choose a microphone from the available list (note, if you have only a single microphone installed, you will only see that microphone).
Each microphone will be listed along with a gain bar that will display the performance of the microphone, allowing you to choose the best microphone.
Fluency Direct Admin Console - User Guide 22
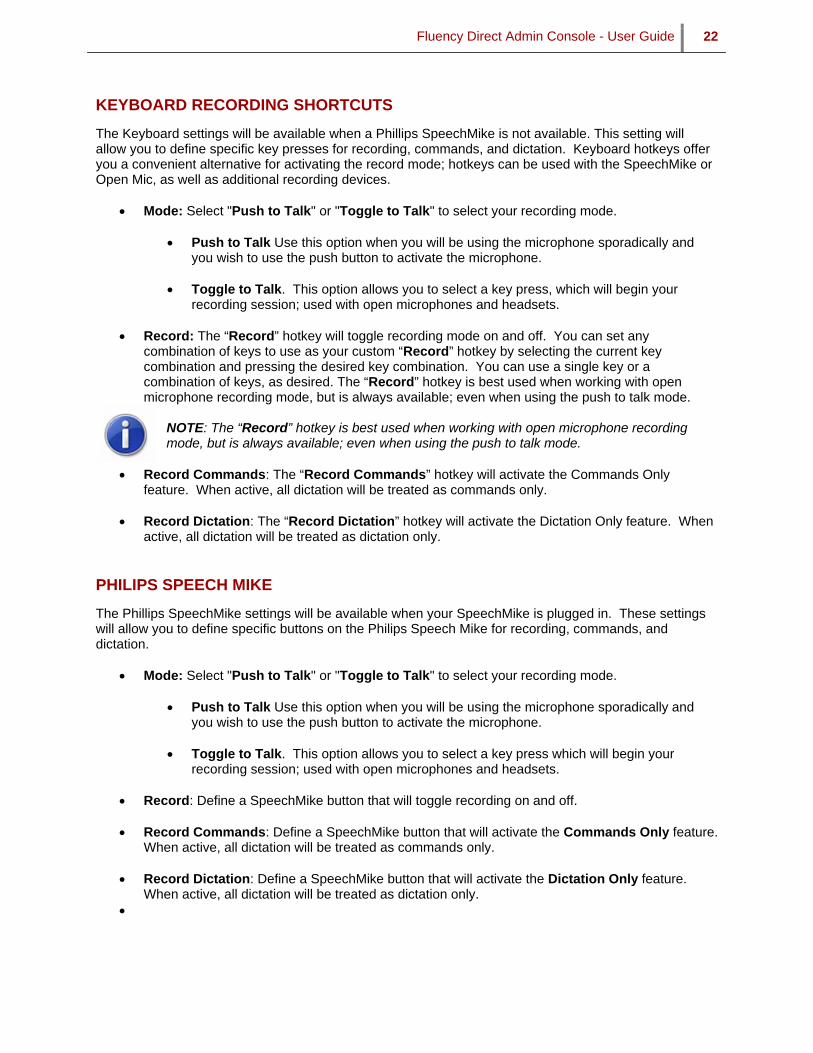
KEYBOARD RECORDING SHORTCUTS
The Keyboard settings will be available when a Phillips SpeechMike is not available. This setting will allow you to define specific key presses for recording, commands, and dictation. Keyboard hotkeys offer you a convenient alternative for activating the record mode; hotkeys can be used with the SpeechMike or Open Mic, as well as additional recording devices.
Mode: Select "Push to Talk" or "Toggle to Talk" to select your recording mode.
Push to Talk Use this option when you will be using the microphone sporadically and you wish to use the push button to activate the microphone.
Toggle to Talk. This option allows you to select a key press, which will begin your recording session; used with open microphones and headsets.
Record: The “Record” hotkey will toggle recording mode on and off. You can set any
combination of keys to use as your custom “Record” hotkey by selecting the current key combination and pressing the desired key combination. You can use a single key or a combination of keys, as desired. The “Record” hotkey is best used when working with open microphone recording mode, but is always available; even when using the push to talk mode.
NOTE: The “Record” hotkey is best used when working with open microphone recording mode, but is always available; even when using the push to talk mode.
Record Commands: The “Record Commands” hotkey will activate the Commands Only feature. When active, all dictation will be treated as commands only.
Record Dictation: The “Record Dictation” hotkey will activate the Dictation Only feature. When
active, all dictation will be treated as dictation only.
PHILIPS SPEECH MIKE
The Phillips SpeechMike settings will be available when your SpeechMike is plugged in. These settings will allow you to define specific buttons on the Philips Speech Mike for recording, commands, and dictation.
Mode: Select "Push to Talk" or "Toggle to Talk" to select your recording mode.
Push to Talk Use this option when you will be using the microphone sporadically and you wish to use the push button to activate the microphone.
Toggle to Talk. This option allows you to select a key press which will begin your recording session; used with open microphones and headsets.
Record: Define a SpeechMike button that will toggle recording on and off.
Record Commands: Define a SpeechMike button that will activate the Commands Only feature.
When active, all dictation will be treated as commands only.
Record Dictation: Define a SpeechMike button that will activate the Dictation Only feature. When active, all dictation will be treated as dictation only.
Fluency Direct Admin Console - User Guide 23
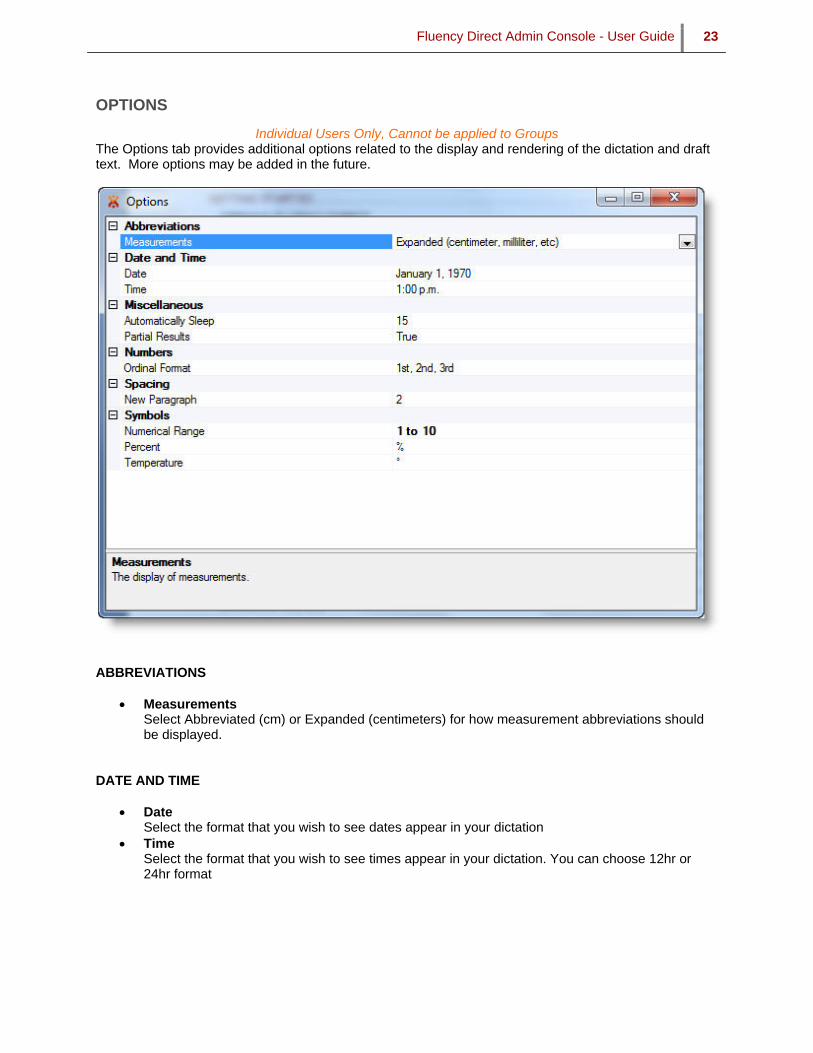
OPTIONS
Individual Users Only, Cannot be applied to Groups The Options tab provides additional options related to the display and rendering of the dictation and draft text. More options may be added in the future.
ABBREVIATIONS
Measurements Select Abbreviated (cm) or Expanded (centimeters) for how measurement abbreviations should be displayed.
DATE AND TIME
Date Select the format that you wish to see dates appear in your dictation
Time Select the format that you wish to see times appear in your dictation. You can choose 12hr or 24hr format
Fluency Direct Admin Console - User Guide 24
MISCELLANEOUS
Automatically Sleep This option will set the number of minutes of recorded silence before the system will automatically go to sleep. Enter “0” to disable this option.
Partial Results Select True to display partial recognition results at the cursor instead of at the bottom-right corner of the screen. Select False to turn off Partial Results
NUMBERS
Ordinal Format Choose 1st, 2nd, 3rd or first, second, third. Note if used at the beginning of a sentence, it will be spelled out and capitalized
SPACING
New Paragraph Set the number of <Return> key presses that will be inserted when you say “New paragraph” Default value is two (2).
SYMBOLS
Numerical Range Select the display of numerical ranges: 1-10, 1 to 10, or one to ten
Percent Choose to display the percent symbol” %” or the text “percent”
Temperature Choose to display the degree symbol “”or the text “degree”
Fluency Direct Admin Console - User Guide 25
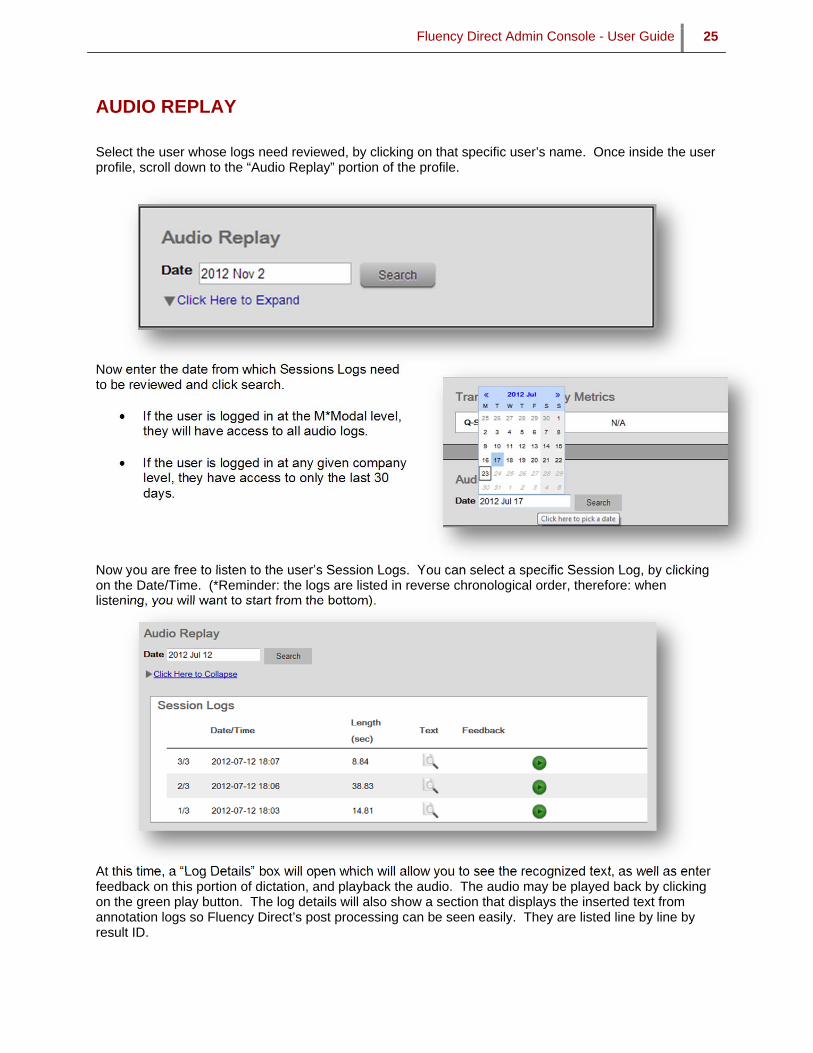
AUDIO REPLAY
Select the user whose logs need reviewed, by clicking on that specific user’s name. Once inside the user profile, scroll down to the “Audio Replay” portion of the profile.
Now enter the date from which Sessions Logs need to be reviewed and click search.
If the user is logged in at the M*Modal level, they will have access to all audio logs.
If the user is logged in at any given company level, they have access to only the last 30 days.
Now you are free to listen to the user’s Session Logs. You can select a specific Session Log, by clicking on the Date/Time. (*Reminder: the logs are listed in reverse chronological order, therefore: when listening, you will want to start from the bottom).
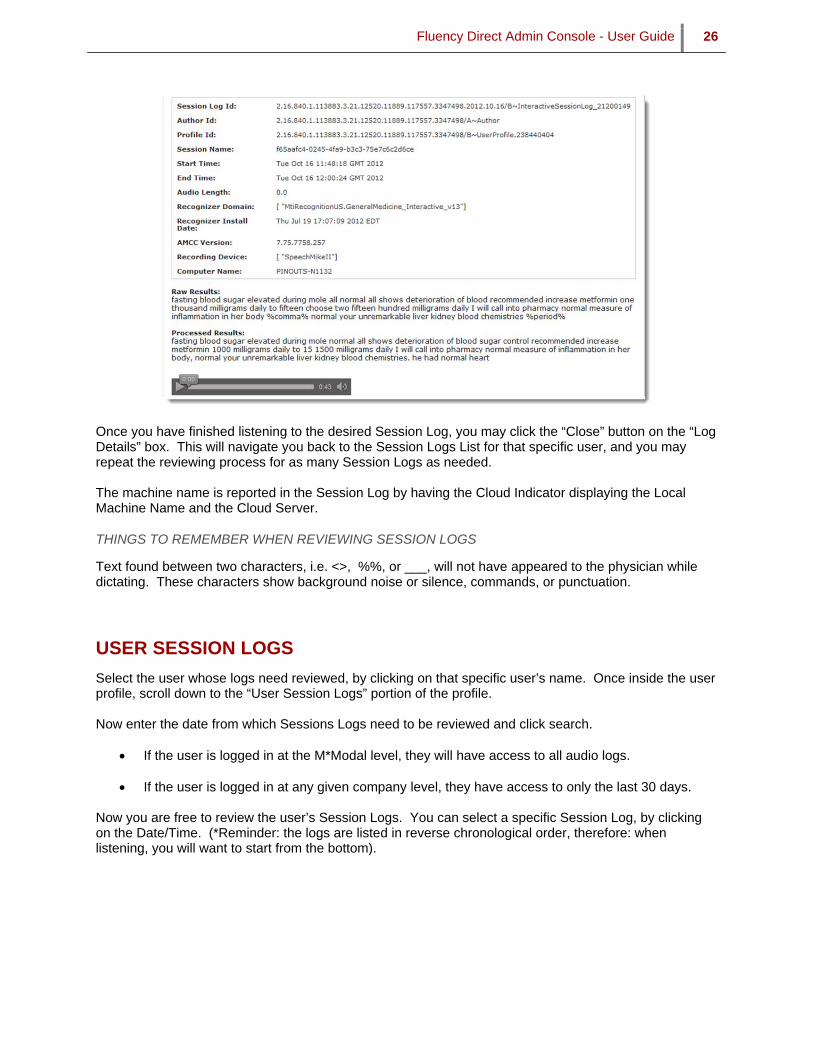
At this time, a “Log Details” box will open which will allow you to see the recognized text, as well as enter feedback on this portion of dictation, and playback the audio. The audio may be played back by clicking on the green play button. The log details will also show a section that displays the inserted text from annotation logs so Fluency Direct’s post processing can be seen easily. They are listed line by line by result ID.
Fluency Direct Admin Console - User Guide 26
Once you have finished listening to the desired Session Log, you may click the “Close” button on the “Log Details” box. This will navigate you back to the Session Logs List for that specific user, and you may repeat the reviewing process for as many Session Logs as needed. The machine name is reported in the Session Log by having the Cloud Indicator displaying the Local Machine Name and the Cloud Server.
THINGS TO REMEMBER WHEN REVIEWING SESSION LOGS
Text found between two characters, i.e. <>, %%, or ___, will not have appeared to the physician while dictating. These characters show background noise or silence, commands, or punctuation.
USER SESSION LOGS
Select the user whose logs need reviewed, by clicking on that specific user’s name. Once inside the user profile, scroll down to the “User Session Logs” portion of the profile.
Now enter the date from which Sessions Logs need to be reviewed and click search.
If the user is logged in at the M*Modal level, they will have access to all audio logs.
If the user is logged in at any given company level, they have access to only the last 30 days. Now you are free to review the user’s Session Logs. You can select a specific Session Log, by clicking on the Date/Time. (*Reminder: the logs are listed in reverse chronological order, therefore: when listening, you will want to start from the bottom).
Fluency Direct Admin Console - User Guide 27
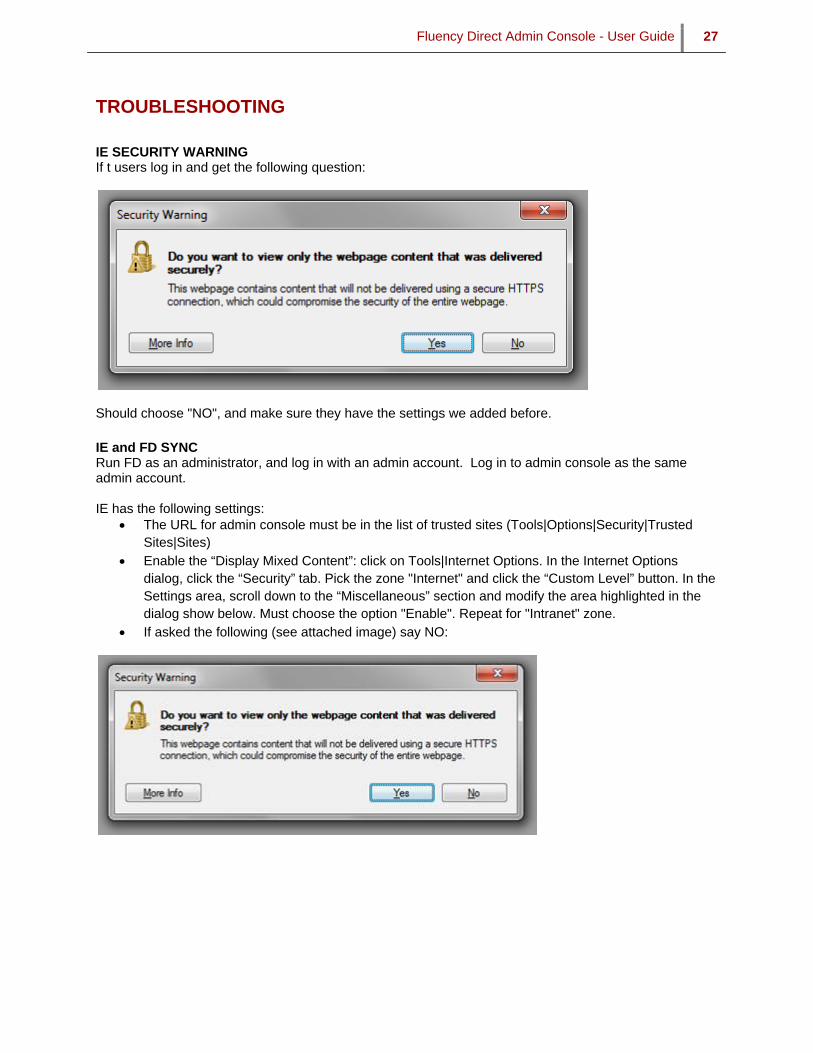
TROUBLESHOOTING
IE SECURITY WARNING If t users log in and get the following question:
Should choose "NO", and make sure they have the settings we added before. IE and FD SYNC Run FD as an administrator, and log in with an admin account. Log in to admin console as the same admin account. IE has the following settings:
The URL for admin console must be in the list of trusted sites (Tools|Options|Security|Trusted Sites|Sites)
Enable the “Display Mixed Content”: click on Tools|Internet Options. In the Internet Options dialog, click the “Security” tab. Pick the zone "Internet" and click the “Custom Level” button. In the Settings area, scroll down to the “Miscellaneous” section and modify the area highlighted in the dialog show below. Must choose the option "Enable". Repeat for "Intranet" zone.
If asked the following (see attached image) say NO:
Fluency Direct Admin Console - User Guide 28
CLOUD DASHBOARD
WHO CAN ACCESS THE CLOUD DASHBOARD?
By default, all the administrators that have access to MModal Fluency Direct System Administration cannot access the cloud dashboard. This is an intended security measure. In order to gain access to cloud dashboard, M*Modal Support should be notified which specific users are to be enabled to use the Cloud Dashboard. Since the functionality offered by it is technical and deployment specific, it is highly recommendable to grant access only to those users closely involved in the cloud deployments. Once a user is granted access to it, the cloud icon should appear in the left part of the application header. See Figure 1.
Figure 1: Cloud Dashboard access icon
HOW IS THE CLOUD DASHBOARD ORGANIZED?
There are few straightforward concepts that rule the cloud management:
Topology: The cloud is modeled through a topology that consists of a hierarchical representation (tree) of regions and its associated servers.
o When clicking a server in the topology tree, only the server header is shown until the uses clicks the recognizer section to load recognizers information on demand.
Cloud Top Level (root): Is the top level of the cloud topology which serves as the starting point to represent the cloud and to create new top-level regions.
Top-level region: It's a logical (and arbitrary) way to group servers and other regions. The criteria for creating regions can vary, but one of the most common cases is modeling company level descriptions. For instance, a top level region for a given Hospital is "hospitalX" (regardless all it's locations and branches).
Sub-region: It's basically the same concept of a region. The only difference is that a sub regions are contained within another region unlike top-level regions. The second-level nodes in the topology tree are top-level regions while their child nodes are sub regions. The naming of sub regions follows the period-separated notation where each portion is period separated and denotes a part of the hierarchy. For instance: hospitalX.North denotes the sub region North under the top-level region hospitalX. This can be used to model the group the servers that are used by all the facilities of Hospital X located in the North of the country.
Server: Represents a physical AMCC cloud server that performs voice recognition tasks requested by the Fluency Direct clients.
Available servers: Represents the "pool" of servers that are currently not assigned to any region. This is because either the server is a new registered server or because it has been returned back from a region to the pool of available servers.
Fluency Direct Admin Console - User Guide 29
Resource: It's the abstract term to denote any supply needed in a server to perform the recognition tasks. For instance: a recognizer is a resource.
Recognizer: It's the piece of software that is used to perform voice recognition tasks for a given medical domain such as General Medicine.
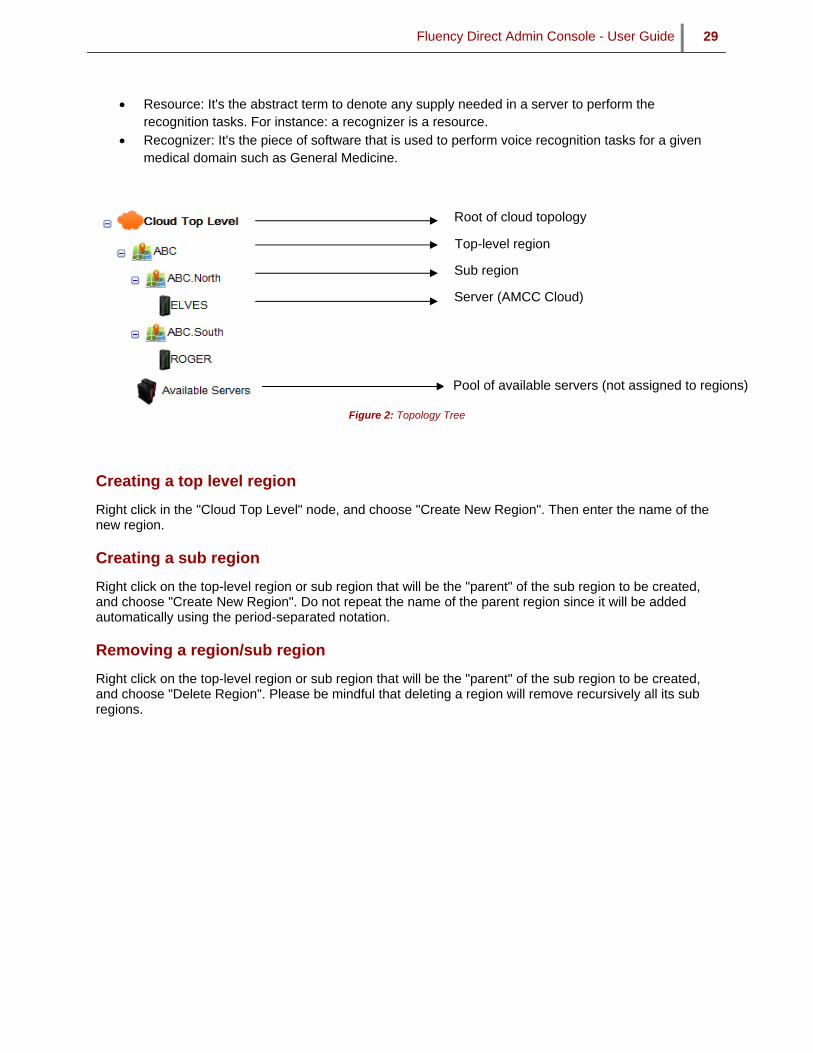
Figure 2: Topology Tree
Creating a top level region
Right click in the "Cloud Top Level" node, and choose "Create New Region". Then enter the name of the new region.
Creating a sub region
Right click on the top-level region or sub region that will be the "parent" of the sub region to be created, and choose "Create New Region". Do not repeat the name of the parent region since it will be added automatically using the period-separated notation.
Removing a region/sub region
Right click on the top-level region or sub region that will be the "parent" of the sub region to be created, and choose "Delete Region". Please be mindful that deleting a region will remove recursively all its sub regions.
Root of cloud topology
Top-level region
Sub region
Server (AMCC Cloud)
Pool of available servers (not assigned to regions)
Fluency Direct Admin Console - User Guide 30
Region Details Visualization
When clicking a region or sub region in the topology tree, a details screen for the selected region is presented. See Figure 3.
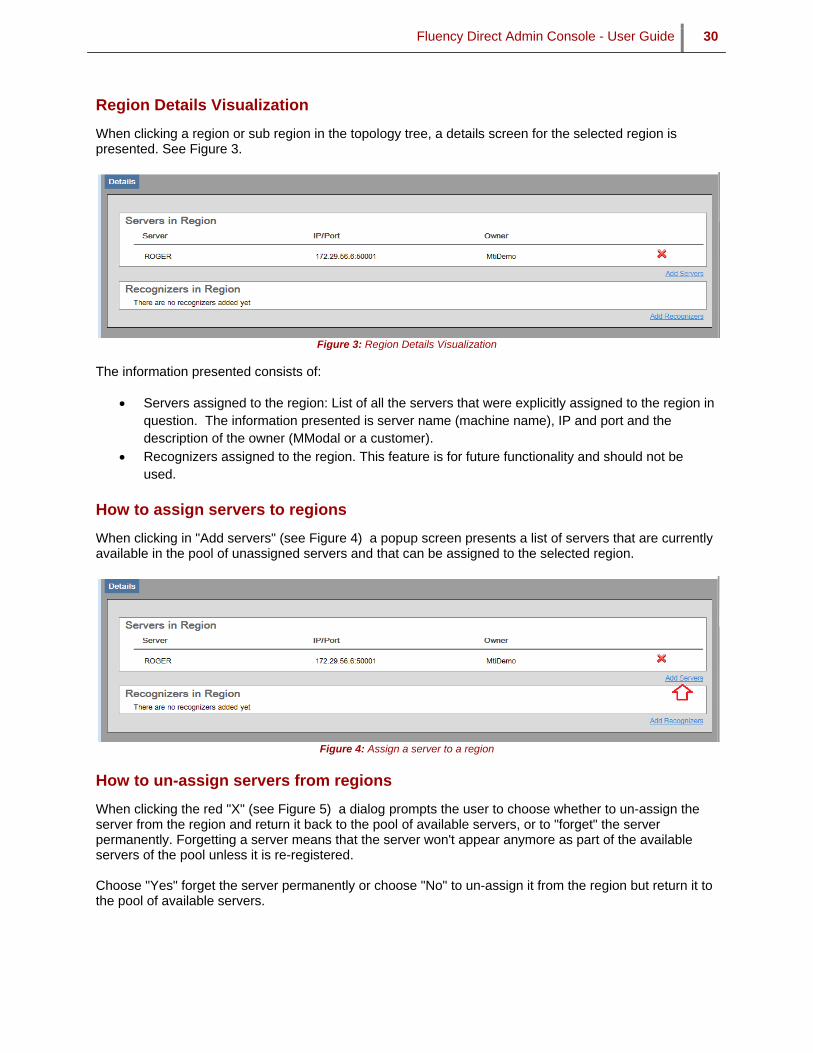
Figure 3: Region Details Visualization
The information presented consists of:
Servers assigned to the region: List of all the servers that were explicitly assigned to the region in question. The information presented is server name (machine name), IP and port and the description of the owner (MModal or a customer).
Recognizers assigned to the region. This feature is for future functionality and should not be used.
How to assign servers to regions
When clicking in "Add servers" (see Figure 4) a popup screen presents a list of servers that are currently available in the pool of unassigned servers and that can be assigned to the selected region.
Figure 4: Assign a server to a region
How to un-assign servers from regions
When clicking the red "X" (see Figure 5) a dialog prompts the user to choose whether to un-assign the server from the region and return it back to the pool of available servers, or to "forget" the server permanently. Forgetting a server means that the server won't appear anymore as part of the available servers of the pool unless it is re-registered. Choose "Yes" forget the server permanently or choose "No" to un-assign it from the region but return it to the pool of available servers.
Fluency Direct Admin Console - User Guide 31
Figure 5: Un-assign a server to a region
VISUALIZATION OF SERVER DETAILS
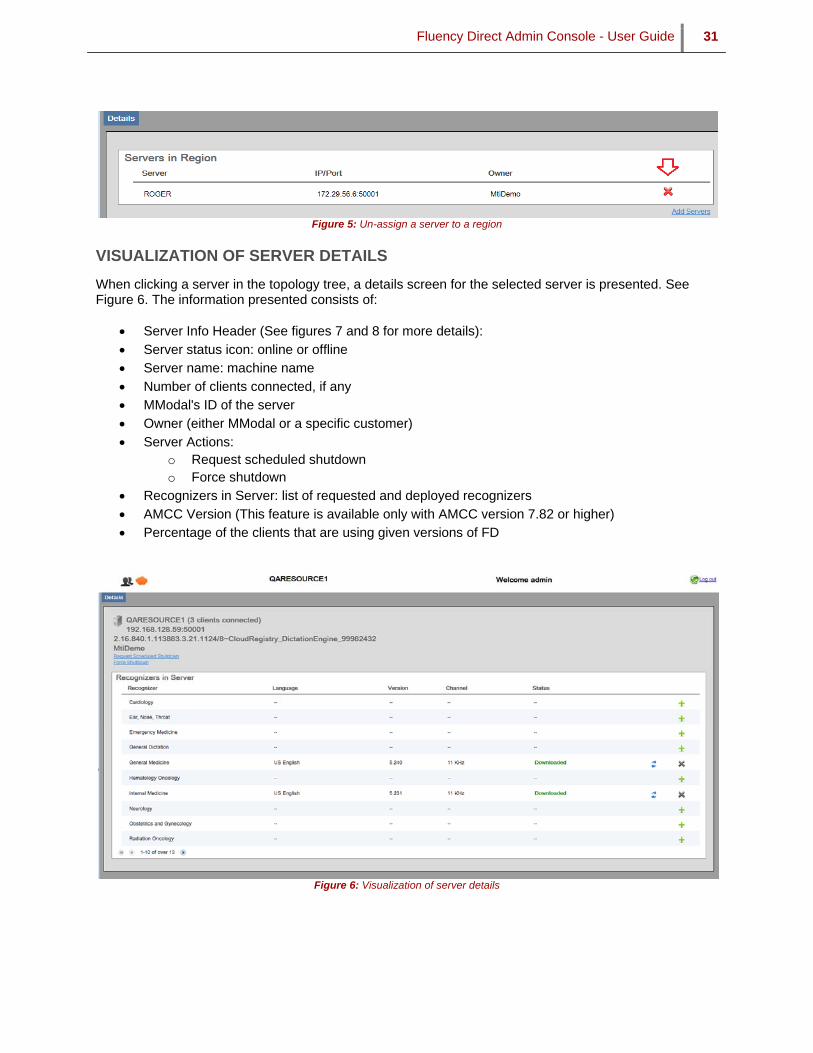
When clicking a server in the topology tree, a details screen for the selected server is presented. See Figure 6. The information presented consists of:
Server Info Header (See figures 7 and 8 for more details): Server status icon: online or offline Server name: machine name Number of clients connected, if any MModal's ID of the server Owner (either MModal or a specific customer) Server Actions:
o Request scheduled shutdown o Force shutdown
Recognizers in Server: list of requested and deployed recognizers AMCC Version (This feature is available only with AMCC version 7.82 or higher) Percentage of the clients that are using given versions of FD
Figure 6: Visualization of server details
Fluency Direct Admin Console - User Guide 32
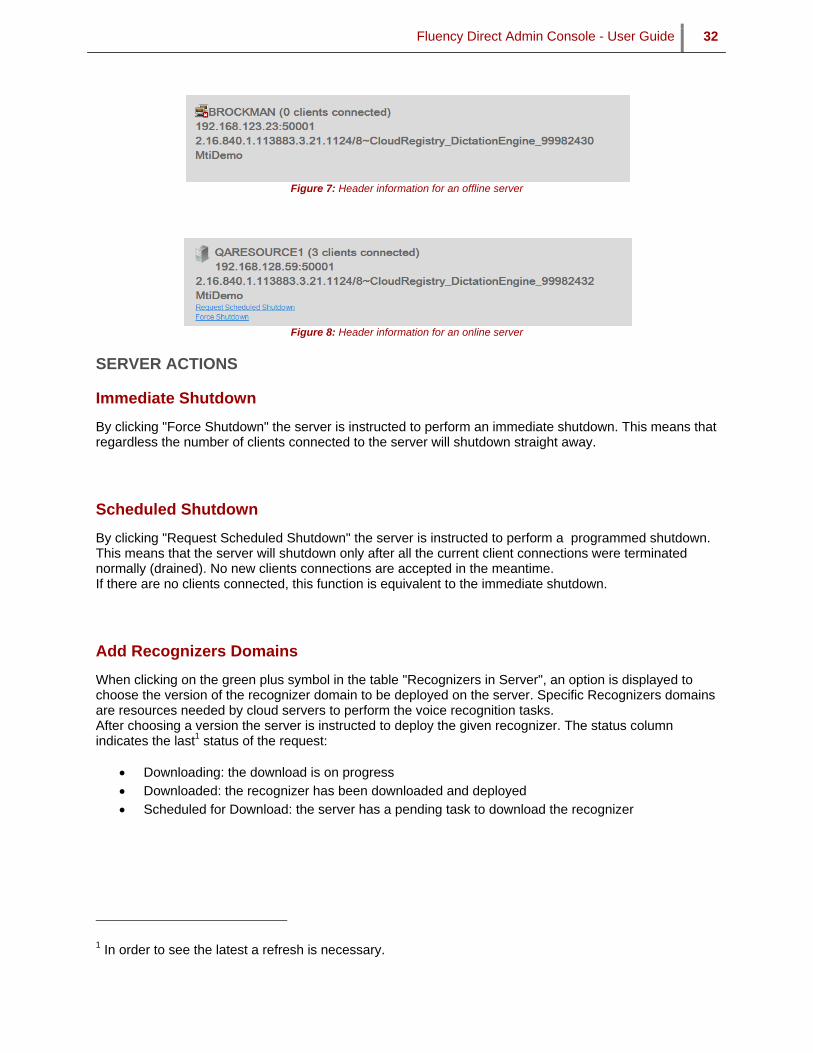
Figure 7: Header information for an offline server
Figure 8: Header information for an online server
SERVER ACTIONS
Immediate Shutdown
By clicking "Force Shutdown" the server is instructed to perform an immediate shutdown. This means that regardless the number of clients connected to the server will shutdown straight away.
Scheduled Shutdown
By clicking "Request Scheduled Shutdown" the server is instructed to perform a programmed shutdown. This means that the server will shutdown only after all the current client connections were terminated normally (drained). No new clients connections are accepted in the meantime. If there are no clients connected, this function is equivalent to the immediate shutdown.
Add Recognizers Domains
When clicking on the green plus symbol in the table "Recognizers in Server", an option is displayed to choose the version of the recognizer domain to be deployed on the server. Specific Recognizers domains are resources needed by cloud servers to perform the voice recognition tasks. After choosing a version the server is instructed to deploy the given recognizer. The status column indicates the last1 status of the request:
Downloading: the download is on progress Downloaded: the recognizer has been downloaded and deployed Scheduled for Download: the server has a pending task to download the recognizer
1 In order to see the latest a refresh is necessary.

Fluency Direct Admin Console - User Guide 33
Update Recognizers Domains
Once a recognizer has been deployed to a server, it shows up with status "Downloaded" and an update icon is enabled (See figure 9). When clicking it two options are displayed:
Choose a Version: allows the user to pick a specific version (currently restricted to the latest)
Request Latest Version: instructs the server to download and deploy the latest version available.
Figure 9: Update recognizer domain
Remove Recognizers
Any downloaded recognizer can be removed. The recognizer must be checked to have disappeared physically from the cloud server.
If there are clients connected, removal will be rejected and the user will be notified.
After successful deletion, the user is warned that CDS may download it again if it has a recognizer for the same domain and channel.
Maintenance mode is not required to delete recognizers. When in maintenance mode, it is still a requirement that no clients are connected to remove a recognizer. Maintenance Mode prevents new user sessions but keeps the existing ones.
Fluency Direct Admin Console - User Guide 34
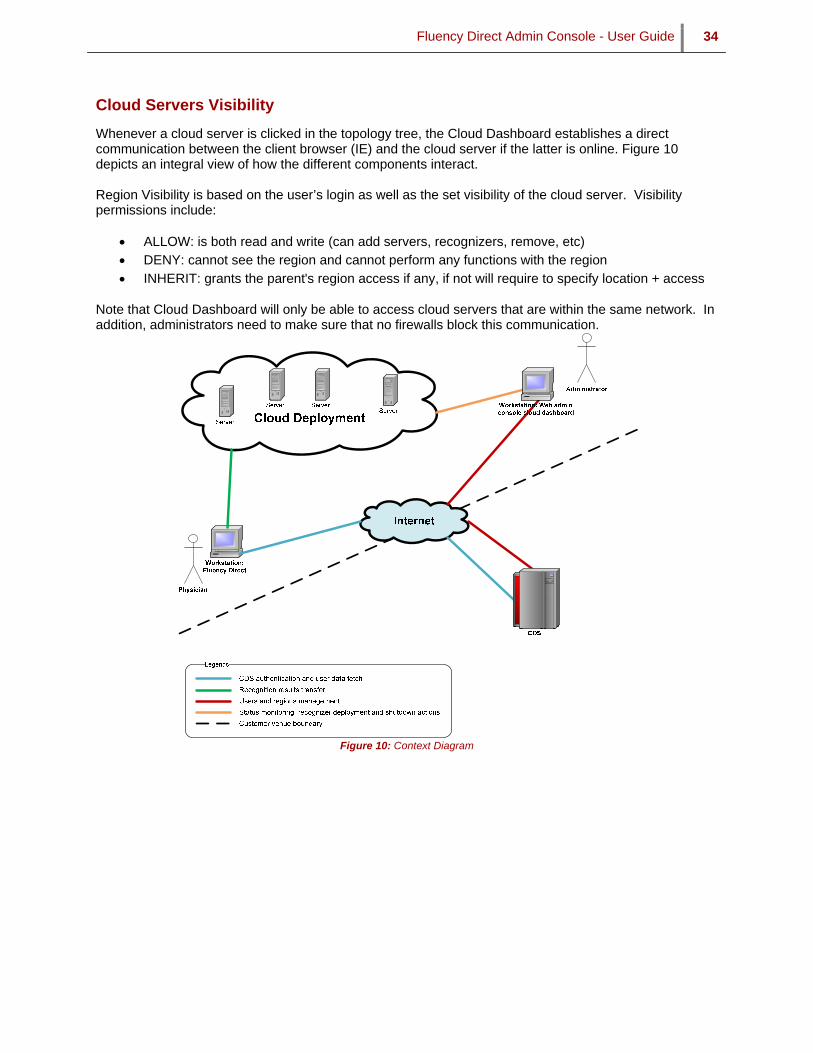
Cloud Servers Visibility
Whenever a cloud server is clicked in the topology tree, the Cloud Dashboard establishes a direct communication between the client browser (IE) and the cloud server if the latter is online. Figure 10 depicts an integral view of how the different components interact. Region Visibility is based on the user’s login as well as the set visibility of the cloud server. Visibility permissions include:
ALLOW: is both read and write (can add servers, recognizers, remove, etc) DENY: cannot see the region and cannot perform any functions with the region INHERIT: grants the parent's region access if any, if not will require to specify location + access
Note that Cloud Dashboard will only be able to access cloud servers that are within the same network. In addition, administrators need to make sure that no firewalls block this communication.
Figure 10: Context Diagram
Fluency Direct Admin Console - User Guide 35
MAINTENANCE MODE
With Maintenance Mode, no new Fluency Direct sessions will be accepted by the Cloud Servers and any current sessions will function as normal and close normally. Maintenance Mode differs from Scheduled Shutdown in that Maintenance Mode does not trigger a shutdown when all sessions are closed. Maintenance Mode can be turned on or off. When turned on, the application will appear in orange and the server icon will show a tool in its place. When turned off, the application will appear normally. NOTE: Maintenance mode persists across sessions and will reset if the server is restarted.
CLOUD LOOKUP
From the Cloud Root, you can search for a cloud server or region by name in the search field. A match is made to the search term if the Name, IP/Port, IP, or Owner begins with the search term. The output can be sorted by any of the columns. The filter is cleared by clicking the red X next to the input box. Clicking on any line in the grid will take you directly to the details of that resource.
TECHNOLOGY REQUIREMENTS FOR CLOUD DASHBOARD
Microsoft Internet Explorer 8 or above

Fluency Direct Admin Console - User Guide 36
DOWNLOAD
DOWNLOAD FD INSTALLER
Admin Console now offers the ability to download Fluency Direct in a three step process in which fdInstaller.bat and FluencyDirect-NNN.msi are downloaded. Select the FD Installer Icon STEP 1: Select your location by clicking the Choose button. It will be inserted into the .bat file that will be downloaded to your machine. STEP 2: Download the .bat file. If the download fails, the content of the .bat file will be displayed. Please copy and paste it into a file named fdInstaller.bat. STEP 3: Download the Fluency Direct MSI Installer. To use the installer, please make sure the .bat file and .msi are located in the same place.

Fluency Direct Admin Console - User Guide 37

![€¦ · Throughout this manual, console keypad keystrokes are enclosed in [ ]. The names of the keys and special console operational modes are shown in capital letters. For example,](https://img.pdfslide.net/doc/110x75/5ebdb9f8c7e014794d5d83e3/throughout-this-manual-console-keypad-keystrokes-are-enclosed-in-the-names.jpg)