Embed Size (px)
Citation preview
Football FrenzyAir Hockey Table Owners Manual
Assembly operation and care instructions.
Version 1.1.08
Weights and Dimensions 1
Table Assembly 2
Side Score Board Assembly 3
PCB Layout and Specification 10
Operator Program Adjustment 14
Care and Maintenence 16
Troubleshooting 17
Index
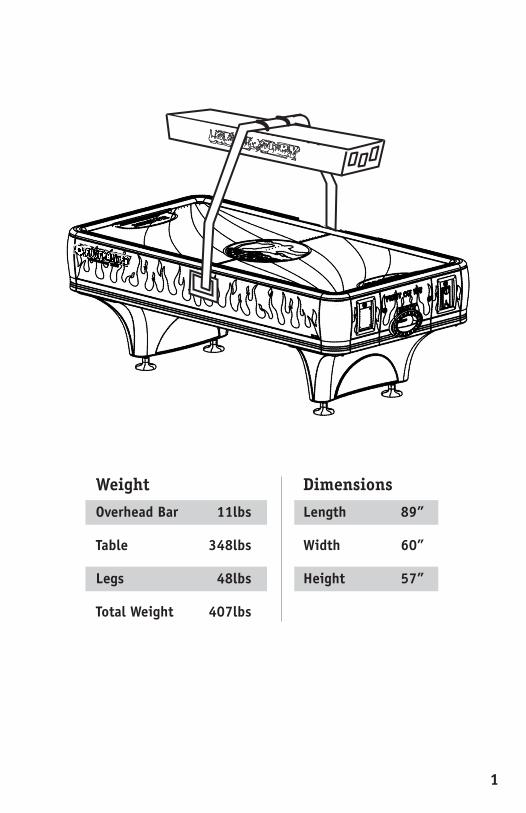
Weight
Overhead Bar 11lbs
Table 348lbs
Legs 48lbs
Total Weight 407lbs
Dimensions
Length 89”
Width 60”
Height 57”
1
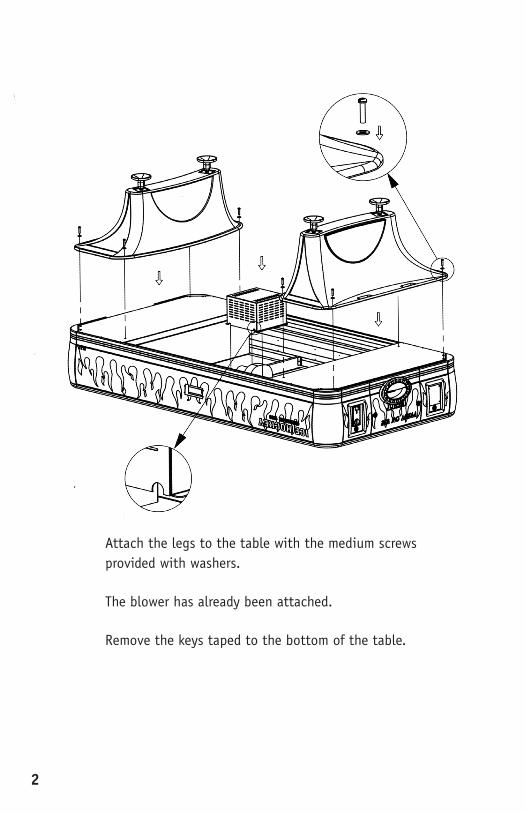
2
Attach the legs to the table with the medium screws provided with washers. The blower has already been attached. Remove the keys taped to the bottom of the table.
3
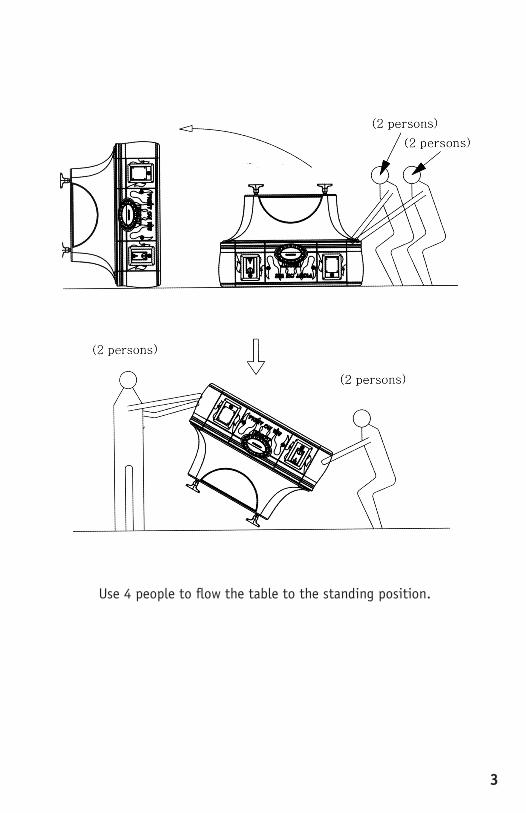
Use 4 people to flow the table to the standing position.
4
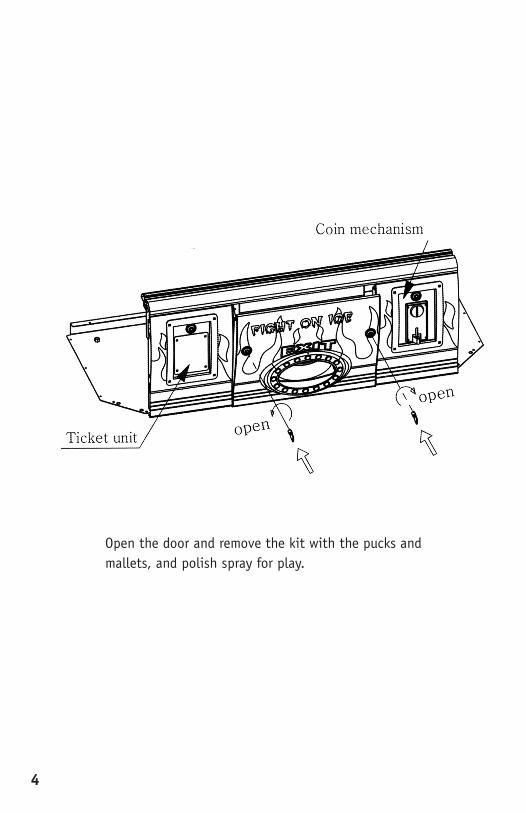
Open the door and remove the kit with the pucks and mallets, and polish spray for play.

5
Lockable Cash Box

6
Connect the corresponding pins from the cable running up the bar to the scoreboard, connecting to the matching color and shape of the pin.
Attach the overhead scoreboard to the bar with two medium screws to the bar.
Two Medium ScrewsOverhead BarBracket
Scoreboard Overhead Bar
Scoreboard Cable
7
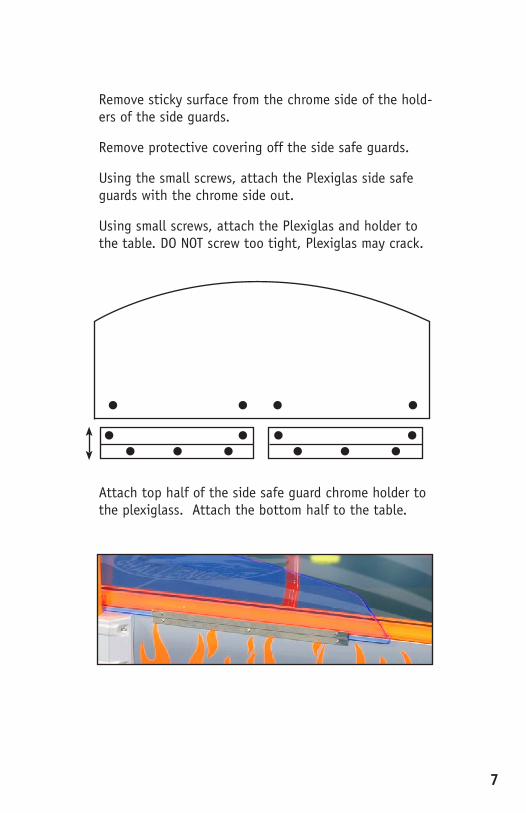
Attach top half of the side safe guard chrome holder to the plexiglass. Attach the bottom half to the table.
Remove sticky surface from the chrome side of the hold-ers of the side guards.
Remove protective covering off the side safe guards.
Using the small screws, attach the Plexiglas side safe guards with the chrome side out.
Using small screws, attach the Plexiglas and holder to the table. DO NOT screw too tight, Plexiglas may crack.
8
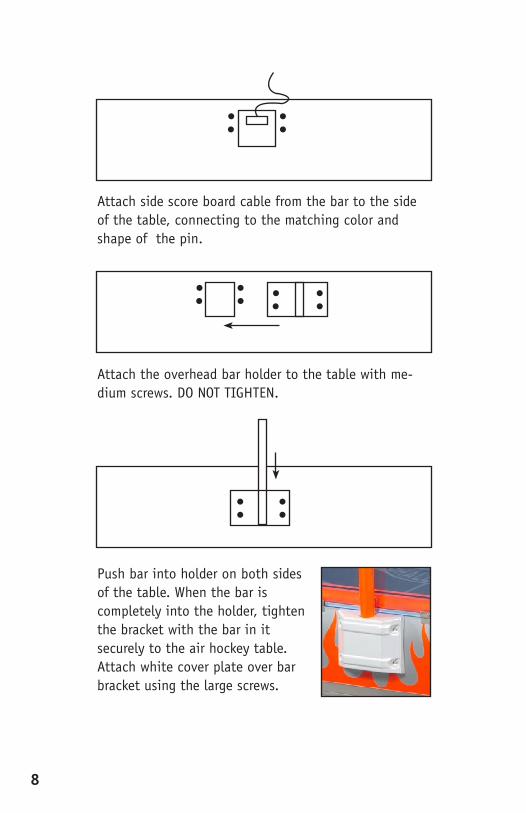
Push bar into holder on both sides of the table. When the bar is completely into the holder, tighten the bracket with the bar in it securely to the air hockey table. Attach white cover plate over bar bracket using the large screws.
Attach the overhead bar holder to the table with me-dium screws. DO NOT TIGHTEN.
Attach side score board cable from the bar to the side of the table, connecting to the matching color and shape of the pin.
9
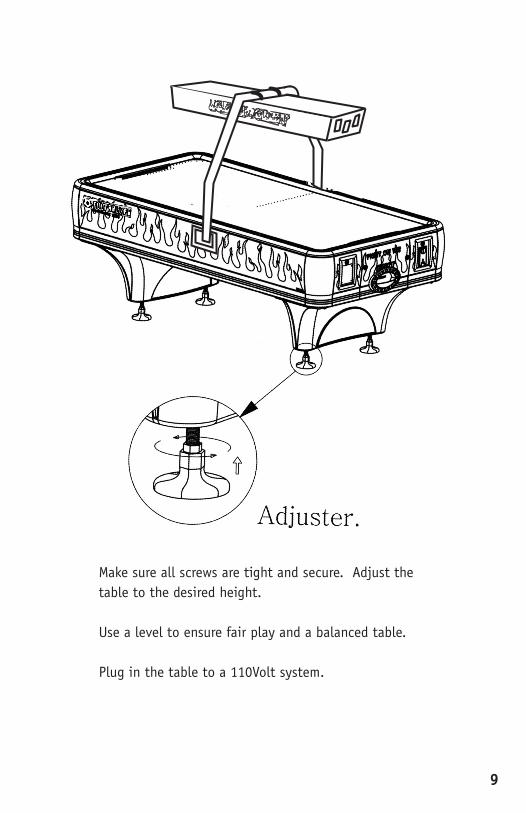
Make sure all screws are tight and secure. Adjust the table to the desired height.
Use a level to ensure fair play and a balanced table.
Plug in the table to a 110Volt system.
10
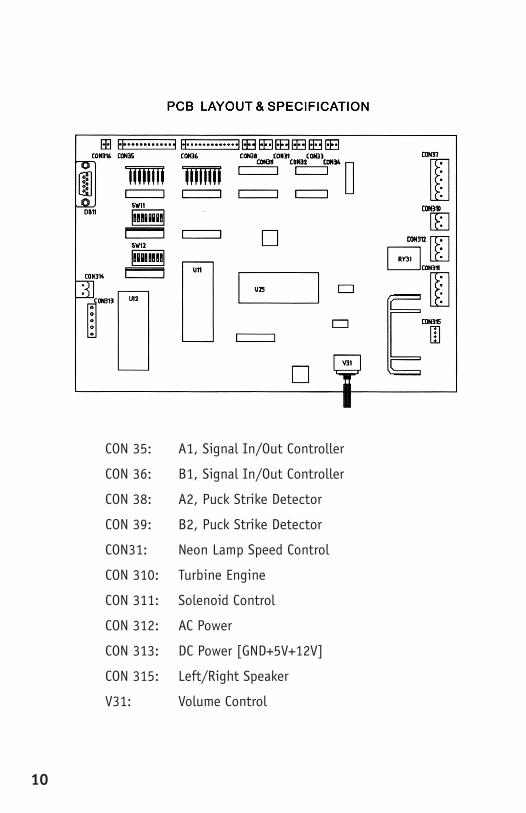
CON 35: A1, Signal In/Out Controller
CON 36: B1, Signal In/Out Controller
CON 38: A2, Puck Strike Detector
CON 39: B2, Puck Strike Detector
CON31: Neon Lamp Speed Control
CON 310: Turbine Engine
CON 311: Solenoid Control
CON 312: AC Power
CON 313: DC Power [GND+5V+12V]
CON 315: Left/Right Speaker
V31: Volume Control
11
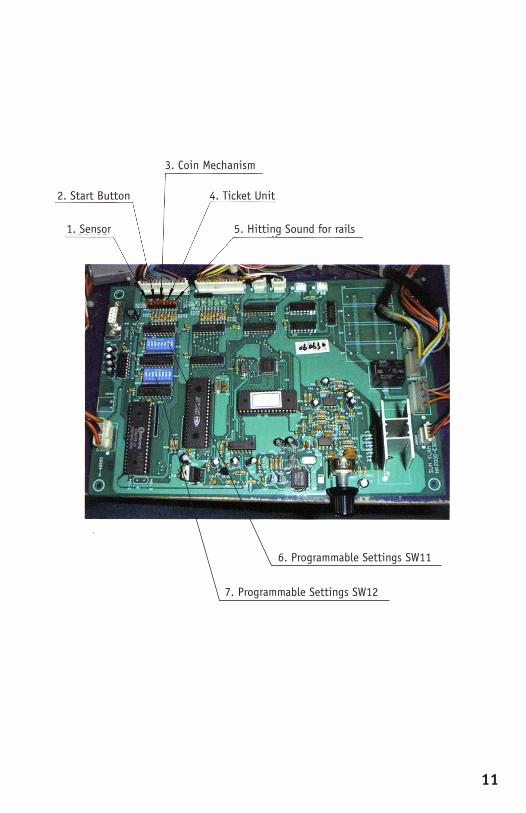
3. Coin Mechanism
2. Start Button
1. Sensor
4. Ticket Unit
5. Hitting Sound for rails
7. Programmable Settings SW12
6. Programmable Settings SW11
12
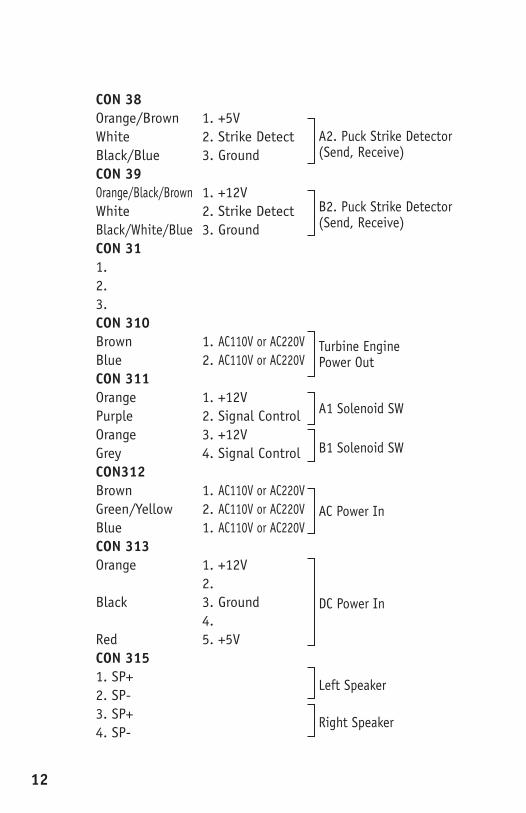
CON 38Orange/Brown 1. +5VWhite 2. Strike DetectBlack/Blue 3. GroundCON 39Orange/Black/Brown 1. +12VWhite 2. Strike DetectBlack/White/Blue 3. GroundCON 311.2.3.CON 310Brown 1. AC110V or AC220VBlue 2. AC110V or AC220VCON 311Orange 1. +12VPurple 2. Signal ControlOrange 3. +12VGrey 4. Signal ControlCON312Brown 1. AC110V or AC220VGreen/Yellow 2. AC110V or AC220VBlue 1. AC110V or AC220VCON 313Orange 1. +12V 2.Black 3. Ground 4.Red 5. +5VCON 3151. SP+ 2. SP-3. SP+4. SP-
A2. Puck Strike Detector (Send, Receive)
B2. Puck Strike Detector (Send, Receive)
Turbine Engine Power Out
AC Power In
DC Power In
A1 Solenoid SW
B1 Solenoid SW
Left Speaker
Right Speaker
13
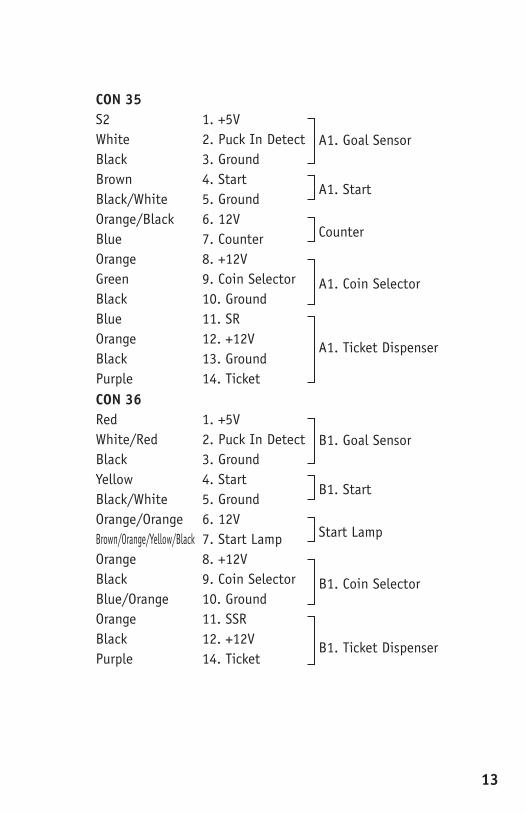
CON 35S2 1. +5VWhite 2. Puck In DetectBlack 3. GroundBrown 4. StartBlack/White 5. GroundOrange/Black 6. 12VBlue 7. CounterOrange 8. +12VGreen 9. Coin SelectorBlack 10. GroundBlue 11. SROrange 12. +12VBlack 13. GroundPurple 14. TicketCON 36Red 1. +5VWhite/Red 2. Puck In DetectBlack 3. GroundYellow 4. StartBlack/White 5. GroundOrange/Orange 6. 12VBrown/Orange/Yellow/Black 7. Start LampOrange 8. +12VBlack 9. Coin SelectorBlue/Orange 10. GroundOrange 11. SSRBlack 12. +12VPurple 14. Ticket
A1. Goal Sensor
B1. Goal Sensor
A1. Start
B1. Start
Counter
Start Lamp
A1. Coin Selector
B1. Coin Selector
A1. Ticket Dispenser
B1. Ticket Dispenser
14
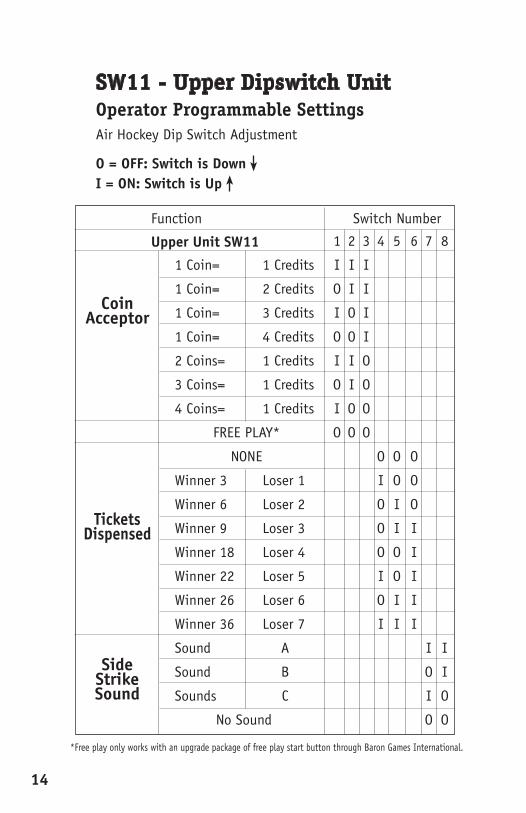
O = OFF: Switch is DownI = ON: Switch is Up
Air Hockey Dip Switch Adjustment
*Free play only works with an upgrade package of free play start button through Baron Games International.
CoinAcceptor
Tickets Dispensed
SideStrikeSound
1 2 3 4 5 6 7 8
1 Coin= 1 Credits I I I
1 Coin= 2 Credits O I I
1 Coin= 3 Credits I O I
1 Coin= 4 Credits O O I
2 Coins= 1 Credits I I O
3 Coins= 1 Credits O I O
4 Coins= 1 Credits I O O
FREE PLAY* O O O
NONE O O O
Winner 3 Loser 1 I O O
Winner 6 Loser 2 O I O
Winner 9 Loser 3 O I I
Winner 18 Loser 4 O O I
Winner 22 Loser 5 I O I
Winner 26 Loser 6 O I I
Winner 36 Loser 7 I I I
Sound A I I
Sound B O I
Sounds C I O
No Sound O O
Upper Unit SW11
Function Switch Number
Operator Programmable SettingsSW11 - Upper Dipswitch Unit
15
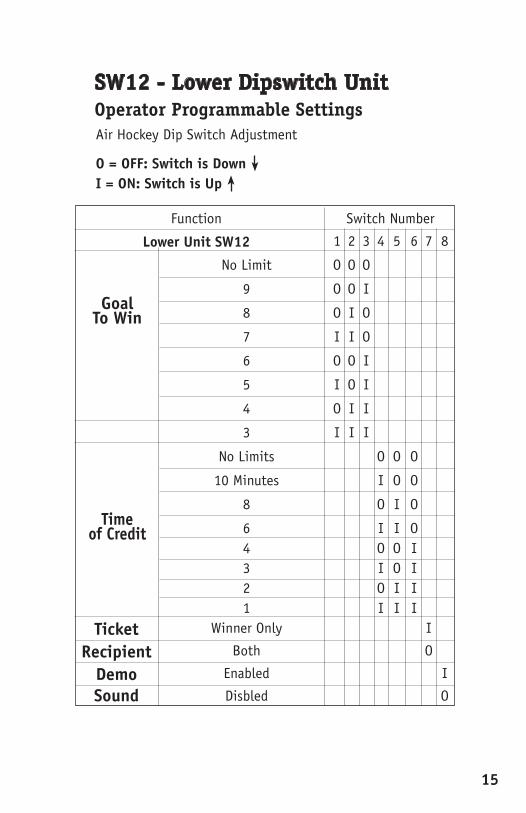
O = OFF: Switch is DownI = ON: Switch is Up
Air Hockey Dip Switch Adjustment
Goal To Win
Time of Credit
TicketRecipient
DemoSound
1 2 3 4 5 6 7 8
No Limit O O O
9 O O I
8 O I O
7 I I O
6 O O I
5 I O I
4 O I I
3 I I I
No Limits O O O
10 Minutes I O O
8 O I O
6 I I O 4 O O I 3 I O I 2 O I I 1 I I I Winner Only I
Both O
Enabled I
Disbled O
Lower Unit SW12
Function Switch Number
Operator Programmable SettingsSW12 - Lower Dipswitch Unit
16
• Turntheadjustablelegboltstocreatealeveled playing field.
• Placepuckinthemiddleofthetable,ifitmovestoa certian side; raise accordingly.
• Avoiddirectsunlightiftableisplacedoutdoors.
• Avoidexposuretowetnesswhenplacedinbasement or wet area.
• Donotshakeordropwhentransporting.
• Replacepuckwhenmovingslowlyduringgameplay. Light sanding of puck can also smooth puck.
• Checkairholesperiodicallytoensuresmoothair hockey play.
• Donotusesharpobjectsonplayfield.
• Keeptablesurfacealwayscleananddustfree.
• Whencleaningtablesurfaceuseasoftdryclothand polishing spray. DO NOT APPLY WATER.
• DONOTAPPLYAMONIABASEDPRODUCTSsuchas window/glass cleaner.
• PolishSray/Waxisprovidedinsidethemalletkit. Contact Barron Games for more if needed.
• Polish Spray/Wax table monthly to ensure best playfield.
• Waxthetablesurfaceperiodicallytoensuresmooth air hockey play.
Care and Maintenance

17
I. PC Board Lights If lights on PC Board are on for coin mechanism and/or ticket dispenser, there is an error for the corresponding light(s).
II. Ticket Dispenser:Flashing light on ticket dispenser means out of tickets.
Restart table if light does not appear with new tickets inserted.
III. Coin Mechanism/AcceptorMake sure to replace the sample plastic coin with the desired number of coins. Coin Acceptor must be on N.O. (normally open) setting.
IV. Puck ReleaseIf puck is getting stuck inside of the release door, the following need to be check for possible errors: 1) Check for debris, shavings, paper and other emains lodged inside the return unit. 2) Puck has chips not allowing it to fall through the return unit. Replace or sand puck. 3) Wire connector to release solenoid has become unplugged/ damaged/stuck/broken. 4) Release solenoid needs to be replaced. Contact Barron Games for spare parts.
V. Push Start SoundIf you hear “PUSH START”, the following need to be checked and corrected. It is an error message. Restart the table after every time changes/new settings are made. ON/OFF switch is underneath the table, next to the power display. 1) Machine is out of tickets. 2) Both coin acceptors and ticket dispensers are properly plugged in and connected. 3) Any damage to connection pins/other wires. 4) Make sure both ticket dispensers are on the following settings N.O. (Normally Open) and not on continuous dispense. 5) Both coin acceptors are on the N.O. (Normal Open) settings. 6) The correct numbers of coins have inserted to play the game.
VI. NOTE: There is no start button located on commercial air hockey machines. You may purchase a start button and faceplate through Barron Games for residential use.
Barron Games International LLC. Tech Support and Parts Service phone number 1(716) 866-0054 USA or email [email protected]. More information/updates can be found at www.barrongames.com.
Troubleshooting
Manufactured by YUAN GONG - Taiwan
4248 Ridge Lea Road Suite 110Amherst, New York 14226, USA
Phone: 1 (716) 866-0054Fax: 1 (716) 992-7077
E-mail: [email protected]: www.barrongames.com
!