Embed Size (px)
Citation preview
THE AVALON HILL GAME COMPANY'S TRADEMARK FOR ITS WWII AERIAL COMBAT GAME
FOR AGES 8 AND UP
nee)
valda Masco ШІ Тһе Avalon Hill Game Company Staarecy |
Queen of the Skies THE AVALON HILL GAME COMPANY'S TRADEMARK FOR ITS WWII AERIAL COMBAT GAME
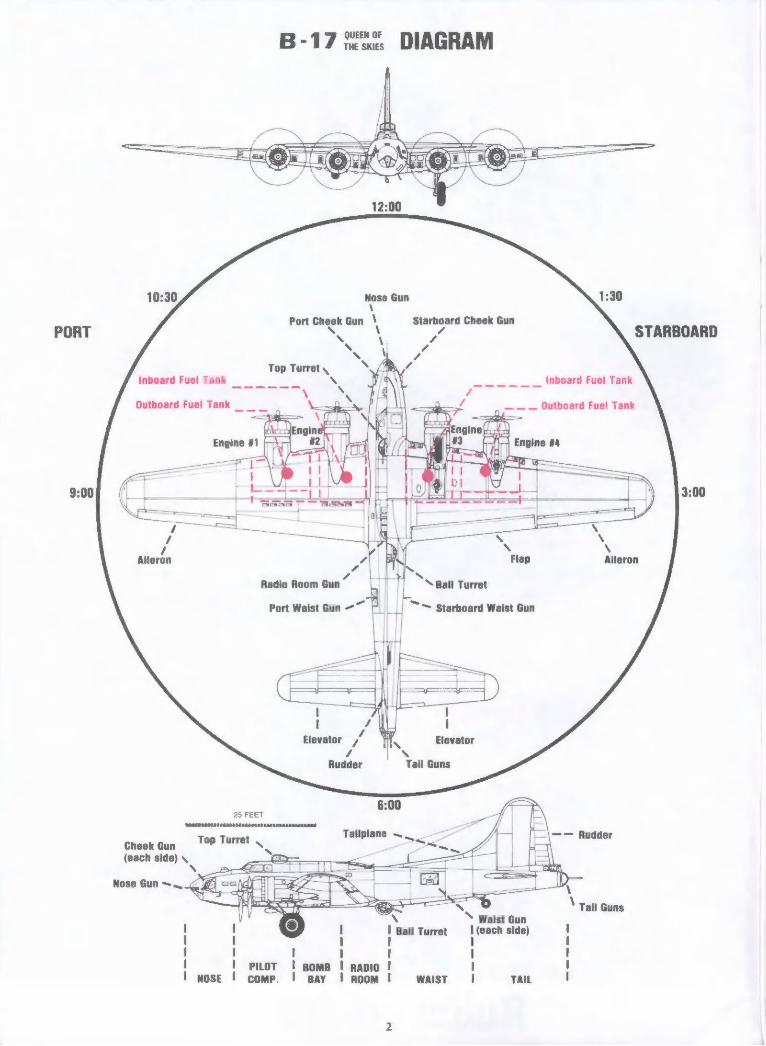
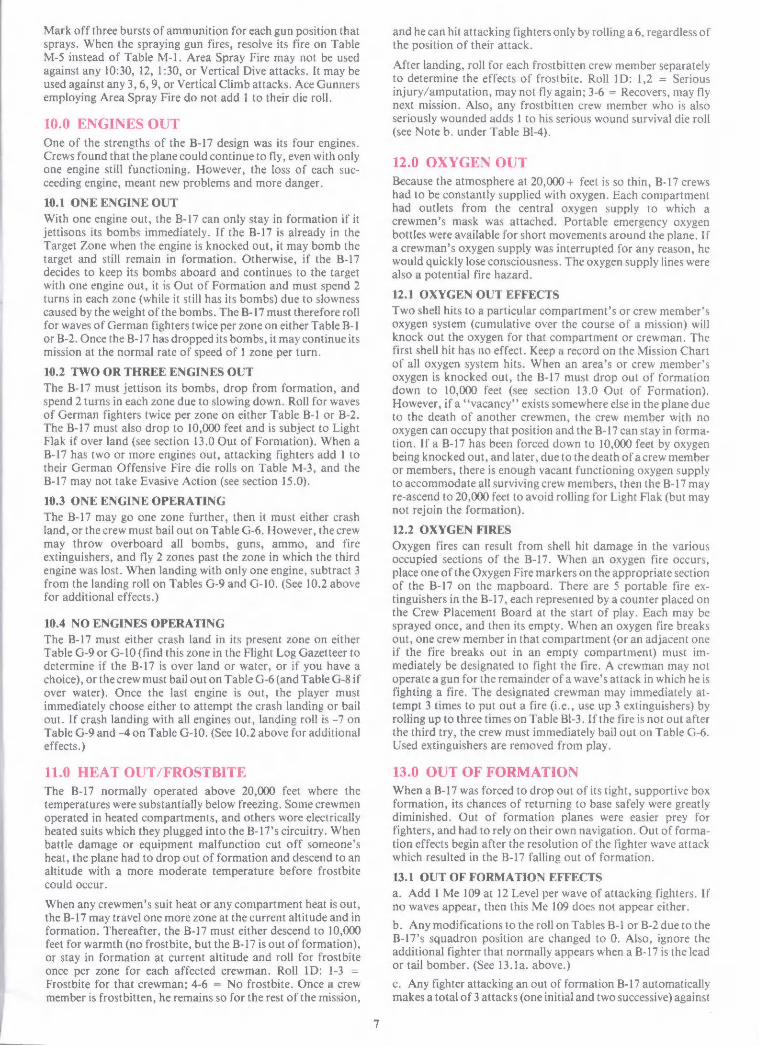
B-17 iesus DIAGRAM
Nose Gun \
Port Cheek Gun \ Starboard Cheek Gun ^ \ ^4 PORT STARBOARD
Top Turret, Inboard Fuel Tank Inboard Fuel Tank _
Outboard Fuel Tank _ _ _
Aileron
А ~ Radio Room Gun N Ball Turret
"> Starboard Waist Gun
|] = ےک )
Са ازا i l І 1 A 1
Elevator , HIN Elevator ^ k
Rudder Tail Guns
Port Waist Gun ^7 |
25 FEET
rd
Top Turret Tailplane -
Cheek Gun (each side) «
“
Nose Gun = ĠO ч
ТЕС;
~ \ Tail Guns N Waist Gun N
l ! | | Ball Turret 1 (еасһ ѕійе) 1 ! l 1 I І 1 l 1 1 1 | 1
! 1 PILOT 1 BOMB | RADIO | 1 1 1 нозе ! comp. | Bay | Room! waist | TAIL І
17: QUEEN OF THE SKIES PART I: RULES OF PLAY
1.0 INTRODUCTION
B-17: QUEEN OF THE SKIES re-creates World War II bombing missions of the famous 8th Air Force Flying Fortresses during the period of November 1942 to May 1943. This was a trial period for the proponents of strategic daylight bombing. The green crews had to prove the value of this concept as well as the fitness of themselves and their equipment. During these early months, both the bombers and their German air defense counterparts were evenly matched, with each side experiment- ing, learning, and looking for an advantage.
B-17 is designed as a solitaire game, with the player acting for the crew of an individual bomber. The actions of the German air defenses and the fate of the bomber and crew are randomly generated by various game aids and tables. Each ‘‘game”’ con- sists of a single bombing mission. The ultimate goal is to safely complete 25 missions thereby earning a ticket home to a relatively safe job. In practice, this is rarely achieved and players should instead try to complete 25 missions with a minimum number of bombers and crewmen lost.
Because of the nature of the solitaire play system, B-17 makes extensive use of game aids and tables as a substitute for a live German air defense player. Before attempting to fly a mission, the player should examine all of the game’s components. Their purpose should be apparent. This rules booklet has been divided into three parts. This first part is the standard game rules which explain in detail how to play. The second part is the step by step description of an actual game mission, which serves as a pro- grammed instruction and example of play. Part III consists of additional notes, bibliography, and credits. New players should read Part I through section 7.0, How to Win, and then read through the sample mission. Experienced game players should find that this will be enough information to get started, and can refer to the detailed rules for special cases. Before starting the 25 mission campaign, it is suggested that a few practice missions be flown to random targets to learn the game system.
2.0 GAME EQUIPMENT
2.1 B-17 MAPBOARD
The principle area of play for B-17 is the 11" 16” mounted mapboard. The top half of the mapboard is a depiction of a B-17 in flight, with a landscape visible below. This part of the board is used to resolve combat between German fighters and the B-17. The lower half of the board displays various tables which will be consulted often during combat.
2.2 B-17 STRATEGIC MOVEMENT BOARD
This map of northwestern Europe shows the area of B-17 bomb- ing missions during the time period covered by the game. Mark- ed on the map are all of the potential target cities, and the 8th Air Force Base in England. The strategic area shown is divided into concentric zones expanding out from the base, each approximately 50 miles apart. Under normal conditions, the B-17 travels one zone per turn. When its speed is reduced by damage, the B-17 may need two turns to travel one zone. (Regardless of damage, a B-17 will never spend more than two turns in a zone.)
2.3 CREW PLACEMENT BOARD
This board displays the interior of the B-17, and shows where the various crew members are placed. During play, the wounds and position changes of crew members will be marked here.
2.4 TABLES AND CHARTS CARDS
The five colored cards display most of the charts and tables
which are used to generate the various random events of a typical bombing mission. The use of the tables is explained in section 3.0, Game Tables in Play.
2.5 GERMAN FIGHTER CARDS There are 16 German fighter cards of three different types: the Messerschmitt 109 (Me 109), Messerschmitt 110 (Me 110), and Focke-Wulf 190 (FW 190). These fighter cards will be placed on the B-17 Mapboard when called for to represent fighters attack- ing the В-17.
2.6 DIE CUT COUNTERSHEET The 88 die cut counters are used in play to mark the position of the B-17 on the Strategic Movement Board, the position of the B-17 crew on the Crew Placement Board, the targets of the various B-17 machine guns, damage to the B-17, damage to the German fighters, and wounds to the B-17 crew.
SAMPLE COUNTERS
= B-17 Position
BOM- BARDIER
Bombardier
BALL $ TURRET Ball Turret MG’s
MG's
Engine Fire
FUEL TANK Fuel Tank Fire FIRE
BAILOUT
Oil Leak
Gas Leak
FIGHTER CON- -1
Fighter Continues Attack TINUES
FCA
FIGHTER | Fighter Breaks Off Attack ша pe S OFF -2
Oxygen Fire
Fire Extinguisher
X Rudder Inoperable
LIGHT Light Wound WOUND
Ace Pilot
Green Pilot GREEN
SPRAY
FIRE Area Spray Fire
2.7 MISSION CHART PAD
The events of each mission are recorded as they unfold on a Mission Chart. The pad in B-17 includes enough charts for 70 missions. An example of how the Mission Chart can be used is included with the sample mission in Part II of this rulebook.
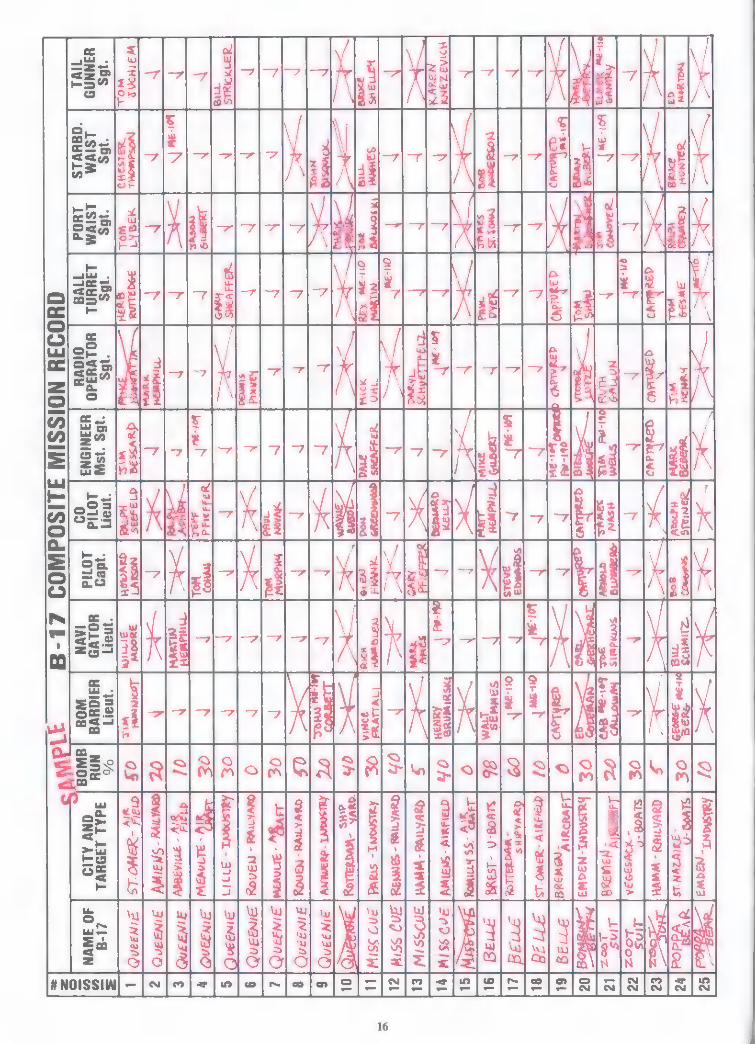
2.8 COMPOSITE MISSION RECORD
At the back of the Mission Chart Pad are two Composite Mission Records. These charts are used to record the results of each of the 25 missions of the Campaign Game. The composite record has space to note personnel changes, bomber losses, and the percentage of bombs on target.
3.0 GAME TABLES IN PLAY
Due to the nature of B-17’s solitaire play system, extensive use of various tables has been necessary to generate the many possible events that could occur during a typical bombing mission. The tables which will be consulted during play are found on the separate colored cards and on the mounted game mapboard.
3.1 LOCATING THE TABLES Each table included in the game has been given a letter-number designation, and a descriptive name. For example, the table which details shell hit damage in the B-17’s Bomb Bay section is labeled P-3 BOMB BAY. The letter half of the designation indicates whether the table is on the mapboard or on a card, as follows:
—M =Mounted mapboard; —O =Orange card; —P =Pink card; —B =Buff card;
—BL =Blue card; —G =Green card;
If the table is on the mapboard or ona card, the number designa- tion is the number of that table on the card or board. For example, Bomb Bay Table P-3 is the third table on the Pink card. A com- plete list of the tables in B-17 is included on the back page of the rulebook.
3.2 USING THE TABLES
The game tables are used by rolling one or two six-sided dice and reading the result generated off of the table. Throughout the game the notation ‘‘1D’’ means roll one die when consulting this table, and the notation **2D'' means roll two dice. Tables G-3 and B-3 are special cases. When rolling **2D"' on these tables, treat the first die as the 10's digit and the second die as the 1’s digit of a 2 digit number. Rolling two dice on these tables will thus generate 36 different random numbers ranging from a low of “11” to a high of “66”.
4.0 PLACING THE GAME EQUIPMENT Before beginning, the player should organize the various game components in front of himself in a manner that will facilitate reference. The Mission Chart, the mounted mapboard, and the Crew Placement Board should be readily accessible. The player will be constantly making notes on the first, and the game counters will be in play on the latter two. The remaining game
counters and fighter cards should also be close enough to be distinguished when needed. The other components do not have to placed where they are readable, but must be within reach.
4.1 FIGHTER CARDS The three different types of German fighter cards should be stacked to the side of the mapboard until called for. When a wave of fighters is generated from Table B-3, bring a fighter of the correct type into play as follows:
—lIf a German fighter is attacking from a high position, place its card on the landscape portion of the mapboard in its designated clock position.
—If the fighter is attacking from a /eve/ position, place its card on the blue border of the mapboard in its designated clock position.
—If the fighter is attacking from a /ow position, place its card just off the edge of the mapboard in its designated clock position.
—If the fighter is attacking from a vertical dive, place its card directly on top of the B-17 on the mapboard.
—1f the fighter is attacking from a vertical climb, place its card on the blue border of the mapboard in the lower left corner marked ** Vertical Climb".
4.2 GAME COUNTERS
At the beginning of the mission, place all crew and fire extinguisher counters in their appropriate places on the Crew Placement Board. The B-17 counter is placed in the 8th Air Force Base space on the Strategic Movement Board.
The remaining counters are placed aside within reach until needed. The FCA and FBOA counters mark damage to enemy fighters. When called for, they are placed directly on top of the damaged fighter's card. Counters detailing damage to the B-17 are placed directly on the B-17 Mapboard on the location of the damage. For example, if a fuel tank on the Port Wing is leaking, a fuel tank leak counter is placed on the Port Wing. The machine gun counters are placed on the fighter which the gun is firing at when defensive fire is allocated. Wound counters are placed on the Crew Placement Board to mark wounded crewmen.
5.0 SEQUENCE OF PLAY
5.1 PRE-MISSION STEPS
a. Be sure the B-17 has a name and full crew recorded on the Composite Mission Record and the Mission Chart. Place all crew counters in the appropriate positions on the Crew Place- ment Board, and have the Strategic Movement Board, game mapboard, playing counters, and all rules and tables at hand.
b. Roll for the mission target city on either Table G-1, G-2, or G-3 (depending on the number of the mission) and record it on the Composite Mission Record and the Mission Chart.
c. Roll for the B-17’s position in its squadron (Lead bomber, tail bomber, or in the middle) on Table G-4 and check the corresponding box on the MC. Note that bombers in the lead or tail positions are attacked by an additional fighter per German fighter wave as indicated on the MC.
d. Roll for the B-17's squadron formation (High, middle, or low squadron) on Table G-4 and check the corresponding box on the Mission Chart. Note any modifications to the rolls for enemy fighters on Tables B-1 and B-2 due to the B-17's squadron formation. (The low squadron was most prone to
German attack, while the middle squadron was least prone to attack.)
e. Examine the Flight Log Gazetteer, Chart G-11, to find the modifications in each zone to the rolls for enemy fighters on Tables B-1 and B-2. Add these modifications with any for the B-17's squadron position and note them on the Mission Chart.
f. Place the B-17 counter on the Strategic Mission Board inside the map square labelled ‘‘8th Air Force Base’’, facing in the direction of the target city. The mission is ready to begin.
5.2 MISSION STEPS
a. Each turn, move the B-17 counter one zone closer to the zone
containing the target (or one zone closer to the base when return- ing after bombing the target).
b. Roll for fighter cover on Table G-5 (either Poor, Fair, or Good) and record the extent of the fighter cover (either P, F, or G) on the Mission Chart when entering Zones 2, 3, and 4.
c. Resolve combat initiated by enemy fighters in each zone entered (both to and from the target) according to the Combat Procedure, section 6.0.
d. When the B-17 enters the Designated Target Zone:
—Roll for weather over the target on Table O-1, and then resolve combat according to the Combat Procedure, taking into
account any weather effects. —Resolve anti-aircraft fire by consulting Tables O-2 through
0-5. —Resolve the Bomb Run by consulting Tables O-6 and O-7.
e. After the Bomb Run is resolved:
—Begin the return flight to England by turning the B-17 counter around and facing it towards the 8th Air Force Base.
—Resolve combat again in this zone, still taking into account any weather effects (roll again on Table B-2).
f. Each subsequent turn of the return flight to base, place the B-17 counter one zone closer to the 8th Air Force Base, and
resolve combat according to the Combat Procedure.
g. When the B-17 re-enters Zone 1:
—Roll for weather at the base on Table O-1. —Place the B-17 counter on the 8th Air Force Base, and roll
for landing on Table G-9 taking into account all weather effects and damage modifiers.
—After landing, roll separately for each seriously wounded crew member according to Note b of Table Bl-4 to determine survival. Also roll for frostbite effects under the rules section Heat Out/Frostbite, if applicable.
h. Record mission results on Composite Mission Record.
6.0 COMBAT PROCEDURE
6.1 DETERMINE ATTACKERS a. Roll for the number of waves of intercepting German fighters on Table B-1 (roll on Table B-2 if the B-17 counter is in the target’s zone).
b. For each separate wave of attackers roll once on Table B-3 to determine the specific fighters encountered and the clock posi- tion of their attack. Record the 2D number of each wave (from Table B-3) on the Mission Record for reference. (When this wave’s attack has been resolved, cross out the number.) Place
the fighters on the game mapboard in the proper clock position of their attack.
6.2 FIGHTER COVER DEFENSE
If the B-17 counter is within Zones 2, 3, or 4, roll on Table M-4 to determine how many of this wave’s fighters are driven off by friendly fighter cover. Immediately remove that many fighters of your choice from the map. If the B-17 is outside of friendly fighter cover (in Zones 5-8) ignore this step.
6.3 B-17 DEFENSIVE FIRE
a. Each available manned MG (machine gun) position may fire at any one fighter within its field of fire as shown on Table M-1. Designate the targets of each MG position with the appropriate counter. Mark off one burst of ammunition for each MG posi- tion firing.
b. Rollonceon Table M-1 for each firing MG position to deter- mine if the target fighter is hit.
c. For each hit a fighter receives, roll once on Table M-2 to determine the damage to the fighter from that hit. Remove destroyed fighters, and place FCA and/or FBOA counters on damaged fighters.
6.4 GERMAN OFFENSIVE FIRE
a. Roll once on Table M-3 for each surviving fighter to deter- mine if that fighter hits the B-17, taking into account any modifiers due to damage. Any fighter which does not hit the B-17 is removed from play (exception: see section 13.1).
b. Whena fighter hits the B-17, roll once on Table B-4 to deter- mine the number of shells which hit the bomber from that fighter.
c. For each shell hit, roll once on Table B-5 under the appropriate clock position of the attacking fighter to determine the section of the B-17 this shell hit. Record all sections hit on the Mission Chart.
d. Roll once on the specific damage tables (P-1 through P-6, Bl-1, and Bl-2) for each hit to determine and resolve damage done. Record all damage and effects of damage on the Mission Chart.
6.5 SUCCESSIVE ATTACKS
a. Any fighter which scores a hit in its initial attack on the B-17 (even if the hit has no effect) attacks the B-17 again. Roll once on Table B-6 for each fighter making a successive attack to deter- mine its new attack position, After all fighters conducting suc- cessive attacks are positioned, remove the number of fighters allowed due to successful fighter cover according to the roll on Table M-4 during the initial attack. Then resolve defensive fire and the fighter attacks normally. Fighters not scoring a hit dur- ра this attack are removed from play (exception: see section 13.1).
b. Fighters which score a hit during their first successive attack conduct a second successive attack as above. After its second successive attack, a fighter is removed from play, even if it scored hits every time. The most attacks any one fighter can make against the B-17 during one wave is three—one initial and two successive attacks.
6.6 2ND AND 3RD WAVES
Resolve any additional wave attacks according to the Combat Procedure described for the Ist Wave above. (Roll again for fighter cover defense on Table M-4 for each additional wave while in Zones 2, 3, and 4.) After all attacks have been resolved completely, continue the mission according to the Mission Steps above.
7.0 HOW TO WIN
A B-17's bombing results and survival determine whether a mis- sion is an 8th Air Force Victory, a German Air Defense Victory, or a draw. The cumulative results over 25 missions determine victory in the Campaign Game. In addition, the survival of an individual bomber or crew member over several missions can be measured as a relative performance rating.
7.1 MISSION VICTORY CONDITIONS A mission is considered an 8th Air Force Victory if the B-17’s Bomb Run was On Target, and the B-17 returned to England not irreparably damaged.
A mission is considered a German Air Defense Victory if either the B-17 was destroyed in combat, crashed outside of England, or was irreparably damaged in combat or while landing.
A Mission is considered a Draw if the B-17 was unable to bomb the target or if the bomb drop was Off Target, but returned to England and was not irreparably damaged either in combat or while landing.
7.2 CAMPAIGN GAME VICTORY CONDITIONS
At the end of the 25 mission campaign, total the number of 8th Air Force Victories and German Air Defense Victories, and ignore the number of draws. The side with the most victories is the winner of the Campaign Game.
7.3 PERFORMANCE RATINGS
B-17 AND CREW MEMBER SURVIVAL RATING Per plane or per crew member.
# OF MISSIONS SURVIVED RATING
1-5 Poor 6-10 Fair 11-17 Good 18-24 Excellent 25 Superb
Notes: a) A B-17 which survives 25 missions may be retired and sent back to the USA for publicity and morale boosting, or it may continue to fly. b) A B-17 may survive 25 or more missions while going through several sets of crews along the way. c) Any crew member who survives 25 missions is sent home to the USA. d) A B-17 may be destroyed, but surviving crew members con- tinue on another plane.
BOMB RUN RESULT RATING Per plane or group of planes (for multi-plane missions).
BOMB RUN PERCENTAGE RATING
5% Poor 5-14% Fair 15-29% Good 30% + Excellent
Note: The Bomb Run performance ratings can be used to rate the bomb drop of a single mission, the average of several planes on the same mission, or the average of a single plane over a complete campaign.
8.0 ABORTING THE MISSION “Aborting a mission” means that the B-17 turns around and heads for home without bombing the target. Historically, the decision to abort or continue was the captain’s, and his word was final. For purposes of this game, players may choose to abort after resolving all combat in any zone. However, the aborted mission counts toward the required 25 missions only if any of the following circumstances arise due to German fighter attacks:
a. Bomb Bay doors, intercom, or Norden bombsight in- operable.
b. Compartment heat or suit heater inoperable for one or more crewmen.
c. Bombardier is seriously wounded or KIA.
d. If the Navigator is seriously wounded or KIA and the B-17 is out of formation, the B-17 must abort.
e. If both the Pilot and Co-pilot are seriously wounded or KIA and the B-17 is out of formation, the B-17 must abort.
f. Out of formation.
g. Oxygen out for one or more crewmen.
h. One or more engines out. (If two or more engines are out, B-17 must abort.) Except where required above to abort, players having the option to abort may choose instead to continue the mission.
9.0 DEFENSIVE FIRE
Begin the Defensive Fire Phase by checking which machine gun positions are manned and finding the counters for those guns. Then examine Table M-1 and the position of the enemy fighters to determine which guns have target fighters in their field of fire. Allocate the fire of the B-17's guns by marking the target fighter with the appropriate counter. For example, if both the Nose
Gun and the Top Turret are firing at a fighter at 12 O'Clock High, the counters for the Nose Gun and Top Turret are placed on that fighter's card. After the gun counters are all placed, mark off one burst of ammunition (one box) for each firing gun on the Mission Chart. Then roll on Table M-1 for each gun to determine if the target fighter is hit. When a fighter is hit by defensive fire, roll on Table M-2 to determine the extent of the damage done. The guns in the Nose section and the Tail Guns have special characteristics. Players may optionally employ Area Spray Fire.
9.1 NOSE SECTION GUNS
Due to the limited compartment space, only two crewmen may be in the Nose section of the B-17. There are three guns in this section, the Nose, the Starboard Cheek, and the Port Cheek. A maximum of two of these three guns may be fired at the same time, including the Nose and either of the cheek guns. The two cheek guns may not be fired simultaneously.
9.2 TAIL GUNS German fighters quickly learned that it was very dangerous to approach a B-17 from the rear, as this put them within range of the twin guns for a relatively long period of time. When attacks from the rear dropped off, tail gunners developed a new techni- que: shooting at fighters attacking from the front as they passed the rear of the B-17.
Accordingly, the Tail Guns may be allocated to any fighter attacking from the 10:30, 12, or 1:30 positions, whether High, Level, or Low. However, this defensive fire is not resolved until after all other defensive fire and all German offensive fire is resolved. Thus the target fighter could be shot down, or the Tail Guns themselves be knocked out, before the Tail Guns get a chance to fire. No ammunition is marked off unless the Tail Guns actually shoot. Tail Guns firing in this manner must roll a **6" to hit, regardless of the position of the fighter. Tail Guns may not fire in this manner if the intercom is out.
9.3 ACE GUNNERS
Once a gunner has shot down 5 or more fighters in his career, he is an Ace Gunner and may add 1 to his defensive fire rolls. Ace Gunners lose this bonus when frostbitten and when wounded. The bonus is retained if the intercom is knocked out. A gunner becomes an Ace at the instant of his 5th kill, and the bonus takes
effect with his next defensive fire.
9.4 MACHINE GUN AMMUNITION
The ammunition available for each machine gun position per mission is shown on the Mission Chart. Each box next to the gun position's name represents one burst of ammunition. Mark off one box when a gun position is allocated to fire. When a gun position runs out of ammunition (all boxes are marked off), it may borrow additional ammunition from another position. Ammunition is transferred in increments of 2 bursts (2, 4, 6, etc., bursts at a time). Mark off the boxes from the gun passing the ammunition, and erase marked off boxes for the gun receiv- ing theammunition. Twin gun mounts (Ball, Top, and Tail posi- tions) may only obtain ammunition from another twin mount. Ammunition may only be exchanged during a turn when no fighter waves are rolled on Tables B-1 or B-2, or after all attack- ing fighters have been driven off either by friendly fighter cover or other B-17s.
9.5 AREA SPRAY FIRE (Optional Rule)
Area Spray Fire represents the ''hosing'' of an area with a long burst of an unaimed spray of bullets. Although usually ineffec- tive as far as hits were concerned, it could drive away a fighter due to the bewildering effect of numerous tracer bullets pepper- ing the sky the fighter was flying into. The technique of spray fire was not favored by experienced gunners because 1) it quickly burned up ammunition, 2) was generally ineffective against good pilots, and 3) could jam the gun.
Area Spray Fire is an optional rule which players may include for additional interest. Place a Spray Fire marker on top of any gun marker that will spray during the Defensive Fire Phase. l
Mark off three bursts of ammunition for each gun position that sprays. When the spraying gun fires, resolve its fire on Table M-5 instead of Table M-1. Area Spray Fire may not be used against any 10:30, 12, 1:30, or Vertical Dive attacks. It may be used against any 3, 6, 9, or Vertical Climb attacks. Ace Gunners employing Area Spray Fire do not add 1 to their die roll.
10.0 ENGINES OUT
One of the strengths of the B-17 design was its four engines. Crews found that the plane could continue to fly, even with only one engine still functioning. However, the loss of each suc- ceeding engine, meant new problems and more danger.
10.1 ONE ENGINE OUT
With one engine out, the B-17 can only stay in formation if it jettisons its bombs immediately. If the B-17 is already in the Target Zone when the engine is knocked out, it may bomb the target and still remain in formation. Otherwise, if the B-17 decides to keep its bombs aboard and continues to the target with one engine out, it is Out of Formation and must spend 2 turns in each zone (while it still has its bombs) due to slowness caused by the weight of the bombs. The B-17 must therefore roll for waves of German fighters twice per zone on either Table B-1 or B-2. Once the B-17 has dropped its bombs, it may continue its mission at the normal rate of speed of 1 zone per turn.
10.2 TWO OR THREE ENGINES OUT
The B-17 must jettison its bombs, drop from formation, and spend 2 turns in each zone due to slowing down. Roll for waves of German fighters twice per zone on either Table B-1 or B-2. The B-17 must also drop to 10,000 feet and is subject to Light Flak if over land (see section 13.0 Out of Formation). When a B-17 has two or more engines out, attacking fighters add 1 to their German Offensive Fire die rolls on Table M-3, and the B-17 may not take Evasive Action (see section 15.0).
10.3 ONE ENGINE OPERATING
The B-17 may go one zone further, then it must either crash land, or the crew must bail out on Table G-6. However, the crew may throw overboard all bombs, guns, ammo, and fire extinguishers, and fly 2 zones past the zone in which the third engine was lost. When landing with only one engine, subtract 3 from the landing roll on Tables G-9 and G-10. (See 10.2 above for additional effects.)
10.4 NO ENGINES OPERATING
The B-17 must either crash land in its present zone on either Table G-9 or G-10 (find this zone in the Flight Log Gazetteer to determine if the B-17 is over land or water, or if you have a choice), or the crew must bail out on Table G-6 (and Table G-8 if over water). Once the last engine is out, the player must immediately choose either to attempt the crash landing or bail out. If crash landing with all engines out, landing roll is -7 on Table G-9 and -4 on Table G-10. (See 10.2 above for additional effects.)
11.0 HEAT OUT/FROSTBITE The B-17 normally operated above 20,000 feet where the temperatures were substantially below freezing. Some crewmen operated in heated compartments, and others wore electrically heated suits which they plugged into the B-17’s circuitry. When battle damage or equipment malfunction cut off someone’s heat, the plane had to drop out of formation and descend to an altitude with a more moderate temperature before frostbite could occur.
When any crewmen’s suit heat or any compartment heat is out, the B-17 may travel one more zone at the current altitude and in formation. Thereafter, the B-17 must either descend to 10,000 feet for warmth (no frostbite, but the B-17 is out of formation), or stay in formation at current altitude and roll for frostbite once per zone for each affected crewman. Roll 1D; 1-3 = Frostbite for that crewman; 4-6 = No frostbite. Once a crew member is frostbitten, he remains so for the rest of the mission,
and he can hit attacking fighters only by rolling a 6, regardless of the position of their attack.
After landing, roll for each frostbitten crew member separately to determine the effects of frostbite. Roll 1D: 1,2 — Serious injury/amputation, may not fly again; 3-6 — Recovers, may fly next mission. Also, any frostbitten crew member who is also seriously wounded adds | to his serious wound survival die roll (see Note b. under Table BI-4).
12.0 OXYGEN OUT Because the atmosphere at 20,000 4- feet is so thin, B-17 crews
had to be constantly supplied with oxygen. Each compartment had outlets from the central oxygen supply to which a crewmen's mask was attached. Portable emergency oxygen bottles were available for short movements around the plane. If a crewman's oxygen supply was interrupted for any reason, he would quickly lose consciousness. The oxygen supply lines were also a potential fire hazard.
12.1 OXYGEN OUT EFFECTS
Two shell hits to a particular compartment's or crew member's oxygen system (cumulative over the course of a mission) will knock out the oxygen for that compartment or crewman. The first shell hit has no effect. Keep a record on the Mission Chart of all oxygen system hits. When an area's or crew member's oxygen is knocked out, the B-17 must drop out of formation down to 10,000 feet (see section 13.0 Out of Formation). However, if a **vacancy"' exists somewhere else in the plane due to the death of another crewmen, the crew member with no oxygen can occupy that position and the B-17 can stay in forma- tion. If a B-17 has been forced down to 10,000 feet by oxygen being knocked out, and later, dueto the death of a crew member or members, there is enough vacant functioning oxygen supply to accommodate all surviving crew members, then the B-17 may re-ascend to 20,000 feet to avoid rolling for Light Flak (but may not rejoin the formation).
12.2 OXYGEN FIRES
Oxygen fires can result from shell hit damage in the various occupied sections of the B-17. When an oxygen fire occurs, place one of the Oxygen Fire markers on the appropriate section of the B-17 on the mapboard. There are 5 portable fire ex- tinguishers in the B-17, each represented by a counter placed on the Crew Placement Board at the start of play. Each may be sprayed once, and then its empty. When an oxygen fire breaks out, one crew member in that compartment (or an adjacent one if the fire breaks out in an empty compartment) must im- mediately be designated to fight the fire. A crewman may not operate a gun for the remainder of a wave's attack in which he is fighting a fire. The designated crewman may immediately at- tempt 3 times to put out a fire (i.e., use up 3 extinguishers) by rolling up to three times on Table BI-3. If the fire is not out after the third try, the crew must immediately bail out on Table G-6. Used extinguishers are removed from play.
13.0 OUT OF FORMATION When a B-17 was forced to drop out of its tight, supportive box formation, its chances of returning to base safely were greatly diminished. Out of formation planes were easier prey for fighters, and had to rely on their own navigation. Out of forma- tion effects begin after the resolution of the fighter wave attack which resulted in the B-17 falling out of formation.
13.1 OUT OF FORMATION EFFECTS
a. Add 1 Me 109 at 12 Level per wave of attacking fighters. If no waves appear, then this Me 109 does not appear either.
b. Any modifications to the roll on Tables B-1 or B-2 due to the B-17’s squadron position are changed to 0. Also, ignore the additional fighter that normally appears when a B-17 is the lead or tail bomber. (See 13.1a. above.)
c. Any fighter attacking an out of formation B-17 automatically makes a total of 3 attacks (one initial and two successive) against
the B-17. The fighter continues to attack 3 times, even if it fails to hit, unless it is first destroyed or takes a “FBOA”” result.
d. Ifoutof formation and at a low altitude (10,000 feet) due to oxygen or heat out, or because it is flying with only 1 or 2 engines working, then the B-17 is within range of light anti-aircraft fire from the ground. Over every zone that is at least partially land (land other than England—see the Flight Log Gazetteer, Chart G-11), roll 2D twice on the Light Flak column of Table O-3 to determine if the B-17 is hit by flak. Resolve any flak hits by con- sulting Tables O-2 through O-5.
13.2 OUT OF FORMATION OPTIONS
a. A B-17 out of formation within fighter cover range uses fighter cover as per the normal mission procedure.
b. Any B-17 which is out of formation prior to the Bomb Run may immediately abort the mission, turn around, and head for home (see section 8.0 Aborting the Mission). An out of forma- tion B-17 may choose to complete its mission and bomb the target, but this is not recommended.
c. If thetarget has not been bombed when a B-17 is forced out of formation, the bombs may be jettisoned to negate the possibilitiy of them exploding if the Bomb Bay is hit. The bombs may be jettisoned at any time. Make a note of the loss on the Mission Chart.
14.0 REPLACING WOUNDED CREWMEN Each member of the crew of the B-17 is represented on the Crew Placement Board by his individual counter. Whenever a crew member is wounded or KIA, mark his counter with a wound marker showing the degree of his injury. When a crew member is seriously wounded or KIA, he can no longer fire any guns or perform any other functions. However, another crew member may take over his position. Simply take the counter of the crew member taking over and place it in the position vacated by the wounded man. Remove KIA men from the Crew Placement Board. (They are assumed to placed in an out of the way section of the plane.) Wounded men must be placed where they have a source of heat and oxygen.
14.1 CREW MOVEMENT
During turns when no waves of attacking fighters appear, or after all fighters are driven off by either friendly fighter cover or other B-17s (by rolling a “Мо Attackers’’ result on Table B-3), crew movements are made with no penalty. These safe turns are the only time crew movements may be made if the intercom system is out. If crew movements are made in a zone where the B-17 is attacked, certain penalties accrue. The moving crew members may not fire any guns from either their old or new position, until the attacks (both initial and successive) of one wave of fighters have been resolved. Crew movements can be made within the same compartment with no penalty. For exam- ple, the Waist Gunners can switch guns during an attack. There is no penalty for moving a wounded man.
14.2 CREW REPLACEMENT EFFECTS
a. A crew member now occupying another wounded man's position on the Crew Placement Board assumes any damage taken by the position. For example, if the Navigator moves up to the Bombardier's position to replace a seriously wounded Bombardier and fire the Nose Gun, any damage from shell hits that would normally affect or wound the Bombardier now affect the Navigator.
b. Gunners moving to a new gun position can only hit fighters by rolling a 6, and lose any ace bonus. (Exception: the Ball and Top gunners may replace each other, and the Waist gunners may replace each other, with no loss of effectiveness.)
c. Any crew member may fly the B-17 if the Pilot and Copilot are both seriously wounded or KIA, but the first one to take over flying must be the Engineer (someone else may take over the Top Turret if tactically desirable). If the Engineer is subse- quently or already seriously wounded or KIA, then anyone else may take over, with approriate modifiers to the landing (see
section 16.0 Landings).
d. Only during an emergency can a single man fly a B-17 for an extended length of time. Therefore,the Pilot and Copilot may not leave their positions to fire guns. If both are still functioning with no worse than a light wound, the Copilot may temporarily vacate his post to fight an oxygen fire. Otherwise, the Pilot and Copilot must stay in their normal positions.
15.0 EVASIVE ACTION
Evasive action is the random dips, dives, banks, and weaves that a pilot could put his plane through attempting to dodge enemy fighter attacks. Flying like this necessarily threw off the aim of the plane's gunners, and wasn't possible if the B-17 was heavily damaged. Due to the proximity of friendly planes and the danger of collision, B-17's in formation may not use evasive action.
15.1 EVASIVE ACTION EFFECTS
Evasive action is only allowed for B-17's flying out of forma- tion, and has the following effect:
a. All fighters attacking a B-17 which is performing evasive action subtract 1 from their attacking die rolls on Table M-3 (a roll of 6 is still a hit, regardless of modifications).
b. All guns firing from a B-17 taking evasive action must roll a6 to hit any attacking fighter, no matter what area of attack it is coming from. Any Ace Gunner bonus is still in effect.
15.2 EVASIVE ACTION RESTRICTIONS
No evasive action is allowed if:
a. The B-17 is still in formation.
b. Two or more engines are out.
c. Control cables are out.
d. The B-17 has accumulated 3 or more negative landing modifiers.
e. Anyone other than the Pilot or Copilot is flying the plane.
f. Any damage previously received specifically disallows taking evasive action.
16.0 LANDINGS
The adage **What goes up, must come down" certainly holds true for the 40,000 pound B-17 and its crew of 10 men. Where and how it comes down will determine whether this particular plane and crew gets to fly another mission or not. In this game, as in reality, an occasional B-17 will unfortunately return to earth as chunks of burning and smoking metal. It is more likely, however, to be landed in one piece under the control of its crew.
There are three types of landings which can occur at the end of a mission. The first is a landing in England, the second is a landing in occupied Europe, and the third is a crash landing (or ditching) into the sea. Landings are accomplished by rolling 2D on either Table G-9 or G-10. Damage received in combat plus cir- cumstances described in the notes to these tables may affect the success of the landing by increasing or decreasing the landing dice roll. An unsuccessful landing can mean destruction of the B-17 and death or injury for the crew. Crews of planes downed in the sea face the additional hazards of drowning and exposure.
16.1 LANDING LOCATIONS
The location of the B-17 counter on the Strategic Movement Board determines where the plane will land. Refer to the Flight Log Gazetteer, Chart G-11, and cross-reference the zone the B-17 now occupies with the Mission Target. The letter notation to the right of the slash mark will detail whether the B-17 is over water, land, or over some of both. For example, a B-17 which must land in Zone3 during a mission to Bremen must land in the water (W). A B-17 which must land in Zone 4 during a mission to Rotterdam has the choice of coming down in the water or in the Netherlands (W-N).

16.2 LANDING IN ENGLAND
A B-17 which reaches Zone 1 is landing in England and is automatically assumed to be landing at an air base. Emergency air strips had been prepared along the coast, and RAF bases were prepared for emergency landings by all types of allied air- craft. Roll for landings in England on Table G-9.
16.3 LANDING IN EUROPE
A B-17 landing in Europe is automatically assumed to be crash landing in some open area, not an airfield. Roll for landings in Europe on Table G-9, subtracting 3 from therollas per Note j of the table. B-17's which land in Europe are considered lost.
16.4 LANDING IN THE SEA
Landing a B-17 in the sea is an act of desperation, and should only occur if the plane is forced out of the sky in a zone totally over water. Ditching in the sea is preferable only to bailing out into the sea. Roll for landings in water on Table G-10. A B-17 landing in the sea is lost. Crewmen rescued from the sea in Zones 2-5 arereturned to England; those rescued from the sea in Zones 6 or 7 are captured.
17.0 POST MISSION DEBRIEFING
The return of the B-17 to earth, regardless of its condition or location, is not quite the end of the mission. Before beginning the next mission, players must resolve the fate of any returning seriously wounded and frostbitten crew members (see Table Bl-4 and section 10.0 Heat Out/Frostbite), then log in the results of the just completed mission on the Composite Mission Record. Note the percentage of bombs dropped on the target in the appropriate column. Destroyed B-17s and crew members who will not be flying again, for one reason or another, are '*x' d" out. Notes can be added to lost crewmen to describe their fate, such as: KIA (killed in action; DOW (died of wounds); LAS (lost at sea); IH (invalided home); and BO-C (bailed out- captured). Also note enemy fighters destroyed during the mission in order to keep a running tally of a gunner's progress towards ace status. When a bomber or crew member is lost, pencil in a new name in preparation for the next mission. A sample completed Composite Mission Record is included
at the end of the Sample Mission in Part II of this rules booklet.
18.0 RANDOM EVENTS (Optional Rule)
Random Events have been included as an option for those experienced players wishing to add more detail to their missions. Random Events come into play when a '*66"' is rolled on Table B-3. Players not wishing to complicate play should treat a roll of “66” as a '*No Attackers (c)'' result instead. To incorporate Random Events, roll on the following table whenever a ‘‘66”’ is rolled on Table B-3, and implement the result.
G-11 RANDOM EVENTS TABLE Roll 2D.
ROLL EVENT
2 Engine failure. (a) 3 Formation casualties. Roll 1D: 1-3 = You are now the lead
bomber; 4-6 = Now tail bomber. (b,h) 4 Loose formation. Roll to determine enemy fighter waves in
zone on Table B-1 or B-2 is +1. (b,i) 5 Aggressive ‘‘Little Friends’. Roll for fighter cover defense on
Table M4 is 4 1 for the remainder of the mission. (b) 5 Tight formation. Roll to determine enemy fighter waves in
zone on Table B-1 or B-2 is -1. (b,j) 7 Rabbit's foot. You may re-roll any one die or dice roll. (c) 8 Tight formation. See result #6 above. 9 Bad Luftwaffe communications. (d)
10 Extreme cold. Roll 1D for each gun positon: 1-5 = No effect; 6 = Gun jammed. (e)
11 Ace for a day. Roll 1D: 1,2 = Engineer; 3,4 = Ball Gunner; 5,6 = Tail Gunner. This gunner +1 to hit on Table M-1 for remainder of the mission. (f)
12 Mid-air accident. (g)
Notes: a) Roll 2D: 2,3,7 = #1 engine out; 4, 10-12 = #2 engine out; 5,6 = #3 engine out; 8,9 = #4 engine out. If this random event is rolled again, the previously failed engine restarts.
b) If this random event is rolled again, ignore and re-roll on the table until another event is rolled.
c) Any roll which you don’t like which occurs after you obtain the rabbit’s foot may be re-rolled. More than one rabbit’s foot may be accumulated during a mission, and they may be carried over to the next mission. Once used, a rabbit’s foot is gone.
d) Remove one fighter of your choice from each wave for the remainder of the mission. A second roll of this event cancels its effects, a third restores them, and so on.
e) See the notes to Table M-5 for repairing jammed guns. If you are out of formation at 10,000 feet, ignore this result and re-roll until another is obtained.
f) It is possible to have more than one '*Ace for a day’’, but if one crewman is rolled twice, ignore the second roll and don't roll again. A legitimate ace is unaffected by this event, and don't roll for another crewman,
g) Roll 2D: 2-8 = Close call but no effect; 9,10 = Shallow dive (B-17 falls out of formation for 1 zone and then regains formation); 11 = Steep dive (B-17 falls violently out of formation, bombs tear through the bottom of plane and are lost if still aboard, and roll 1D once for each wing: 1-5 = Wing holds—6 = Wing rips off, crew must bailout on Table G-7. B-17 must abort mission; 12 = Mid-air collision (B-17 destroyed and crew must bailout on Table G-7). If you are out of forma- tion, treat this result as /2, Engine failure, instead.
h) If you are already the lead or tail plane, ignore this result and re-roll until another result is obtained. If you are out of formation, re-roll also.
i) If you are out of formation, add - 1 to rolls on Tables B-1 and B-2 for the remainder of the mission.
j) If you are out of formation, add -1 to rolls on Tables B-1 and B-2 for the remainder of the mission.
19.0 FLAK BURSTS INSIDE PLANE (BIP)
19.1 COMMENTARY
The word flak comes from the German word fliegerab- wehrkanonen, meaning flieger flyer + abwehr defense + kanonen cannons, or antiaircraft guns. Most potential bombing targets of any value were protected by batteries of flak guns. When bombers were nearing the target, they had to fly straight and level for several minutes to maximize their accuracy. During these minutes, the bombers were most vulnerable to aimed fire and barrages from the flak guns below. Most flak damage con- sisted of near misses which could do some internal damage or throw the B-17’s aim off. Occasionally, a shell would actually explode inside the plane with generally catastrophic conse- quences.
19.2 BIP EFFECTS When a BIP result is rolled on Table O-4, Effect of Flak Hits, it has the following effects:
a. All crewmen in this compartment are KIA.
b. Ifthe area hit is a Wing, the Tail, or the Pilot Compartment, the B-17 dives out of control to the ground and the remaining crewmen immediately bailout according to Table G-7.
c. If the Bomb Bay is hit with the bombs still aboard, the B-17 and crew are destroyed.
d. Ifthe area hit is the Nose, empty Bomb Bay, Radio Room, or Waist, the following occurs:
—The B-17 immediately falls out of formation (see rules sec- tion 13.0).
--Тһе В-17 must spend two turns in each following zone, rolling twice for German fighter waves. (If the zone currently occupied is the target zone and flak over the target inflicted the BIP, the B-17 must spend two turns in the target zone after turn- ing around.)
—The B-17 is assumed to have received every damage result possible on the damage table for that compartment. (Examine the correct damage table and assume each number from 2 to 12 has been rolled.) Record this damage on the MC.
— The landing roll on either Tables G-9 or G-10 is -4. — № evasive action is possible for this plane. —If the B-17 returns safely to England, it is considered to be
irreparably damaged and may not fly further missions.
20.0 GERMAN FIGHTER PILOT STATUS (Optional Rule)
At the expense of extended playing time, players may include this provision for Ace and Green German fighter pilots. During the Combat Procedure after the B-17 has allocated its defensive fire and noted any gun positions which are employing spray fire, roll on Table M-6 for each German fighter on the mapboard to determine if the pilot is an Ace or Green Pilot. Mark Ace or Green Pilots with an appropriate marker. The +1 or -1 modifications to B-17 defensive fire rolls against Green and Ace Pilots, respectively, apply to both Tables M-1, B-17 Defensive Fire, and M-5, B-17 Area Spray Fire.
21.0 TWO PLAYER RULES
These guidelines are included for those players who wish to actively participate as the German air defenses. The German player rolls the dice for all attacking German fighters (Tables B-1, B-2, B-4, B-5, M-3, and M-6) and for Flak (Tables O-2, 3, 4, and 5). However, the B-17 player rolls the dice for damage done by hits to the bomber, and reveals to the German player only such damage as would be readily visible from outside of the plane (for example, leaking fuel tanks, dead engines, etc.). Any wounded crewmen or non-obvious internal damage is not revealed to the German player, as this knowledge would result in an advantage which German fighters would not, in reality, have. The Crew Placement Chart and Mission Chart should be kept out of the German player's sight. During combat, the German player may choose the area of attack for each re- attacking fighter (but may not choose Vertical Dive or Vertical
PARTII B-1
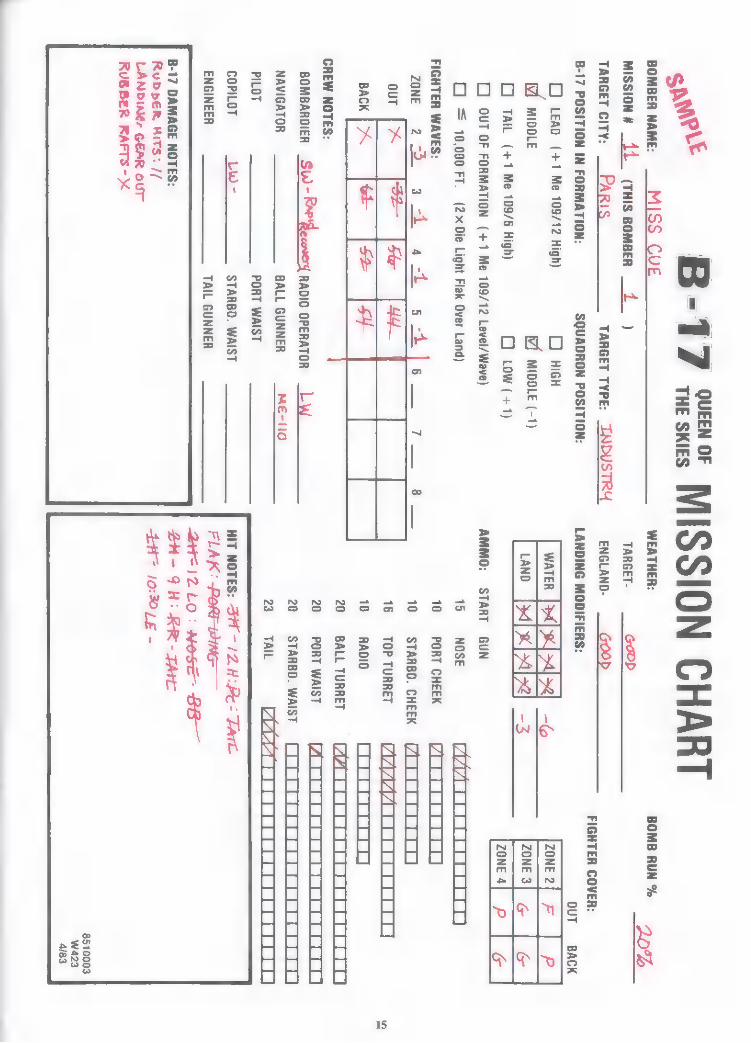
NOTE: The following sample mission has been conducted without the use of any of the optional rules. Numbers bracketed by quotation marks (‘‘2’’) represent either a dice roll result or a net dice roll result after the number rolled has been modified by game circumstances. The complete Mission Chart of the sample mission is included at the end of the sample mission text. Also included is a complete campaign game Composite Mission Record provided as an example. The marks and notations shown on these samples are intended primarily as examples. Any code or notation that you invent to embody the required in- formation is acceptable.
1.0 PRE-MISSION STEPS
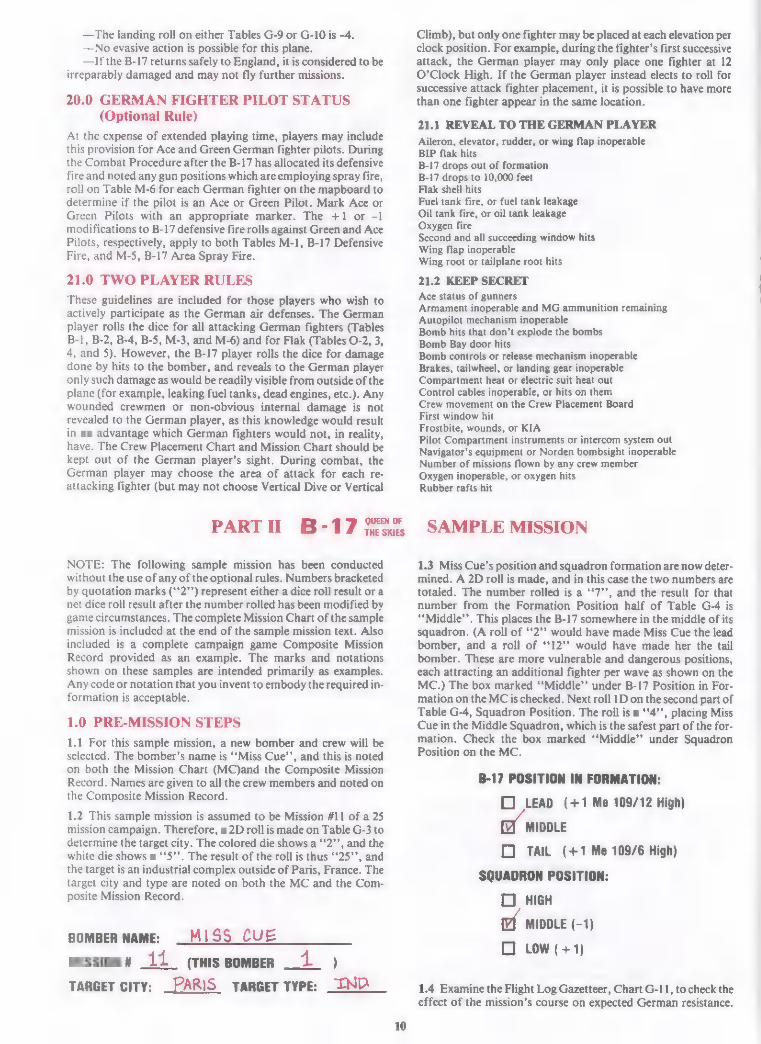
1.1 For this sample mission, a new bomber and crew will be selected. The bomber’s name is ‘‘Miss Cue’’, and this is noted on both the Mission Chart (MC)and the Composite Mission Record. Names are given to all the crew members and noted on the Composite Mission Record.
1,2 This sample mission is assumed to be Mission #11 of a 25 mission campaign. Therefore, a 2D roll is made on Table G-3 to determine the target city. The colored die shows a ‘‘2”’, and the white die shows a ''5''. The result of the roll is thus “25”, and the target is an industrial complex outside of Paris, France. The target city and type are noted on both the MC and the Com- posite Mission Record.
BOMBER NAME: . MISS CUE
mission 4 11 (THIS BOMBER _ 1 ) TARGET city: . PARIS TARGET TYPE: IND —
QUEEN OF THE SKIES
Climb), but only one fighter may be placed at each elevation per clock position. For example, during the fighter’s first successive attack, the German player may only place one fighter at 12 O'Clock High. If the German player instead elects to roll for successive attack fighter placement, it is possible to have more than one fighter appear in the same location.
21.1 REVEAL TO THE GERMAN PLAYER
Aileron, elevator, rudder, or wing flap inoperable BIP flak hits B-17 drops out of formation B-17 drops to 10,000 feet Flak shell hits Fuel tank fire, or fuel tank leakage Oil tank fire, or oil tank leakage Oxygen fire Second and all succeeding window hits Wing flap inoperable Wing root or tailplane root hits
21.2 KEEP SECRET
Ace status of gunners Armament inoperable and MG ammunition remaining Autopilot mechanism inoperable Bomb hits that don’t explode the bombs Bomb Bay door hits Bomb controls or release mechanism inoperable Brakes, tailwheel, or landing gear inoperable Compartment heat or electric suit heat out Control cables inoperable, or hits on them Crew movement on the Crew Placement Board First window hit Frostbite, wounds, or KIA Pilot Compartment instruments or intercom system out Navigator's equipment or Norden bombsight inoperable Number of missions flown by any crew member Oxygen inoperable, or oxygen hits Rubber rafts hit
SAMPLE MISSION
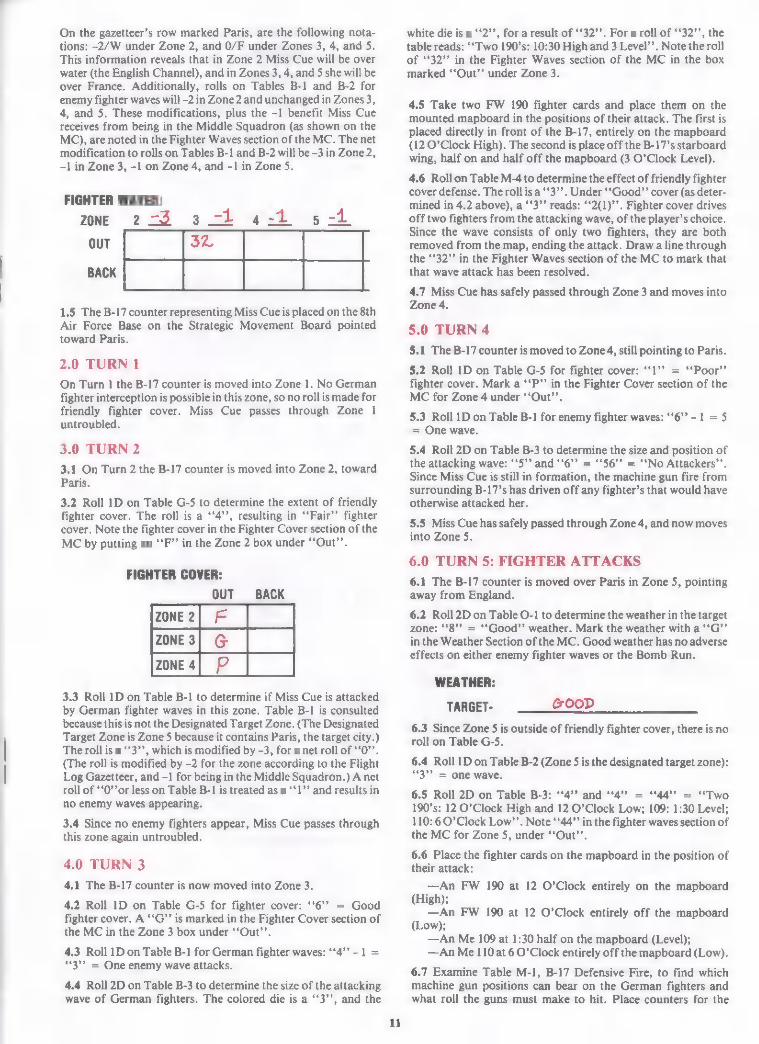
1.3 Miss Cue's position and squadron formation are now deter- mined. A 2D roll is made, and in this case the two numbers are totaled. The number rolled is a ‘‘7’’, and the result for that number from the Formation Position half of Table G-4 is ““Middle”. This places the B-17 somewhere in the middle of its squadron. (A roll of ''2'' would have made Miss Cue the lead bomber, and a roll of ''12'' would have made her the tail bomber. These are more vulnerable and dangerous positions, each attracting an additional fighter per wave as shown on the MC.) The box marked ''Middle'' under B-17 Position in For- mation on the MC is checked. Next roll 1D on the second part of Table G-4, Squadron Position. The roll is a ''4'', placing Miss Cue in the Middle Squadron, which is the safest part of the for- mation. Check the box marked ‘‘Middle’’ under Squadron Position on the MC.
B-17 POSITION IN FORMATION:
OD LEAD (1 Me 109/12 High)
MIDDLE
CO TAIL (+1 Me 109/6 High)
SQUADRON POSITION:
C HIGH
и MIDDLE (-1)
О Low (+1)
1.4 Examine the Flight Log Gazetteer, Chart G-11, to check the effect of the mission’s course on expected German resistance.
On the gazetteer’s row marked Paris, are the following nota- tions: -2/W under Zone 2, and 0/F under Zones 3, 4, and 5. This information reveals that in Zone 2 Miss Cue will be over water (the English Channel), and in Zones 3, 4, and 5 she will be over France. Additionally, rolls on Tables B-1 and B-2 for enemy fighter waves will -2 in Zone 2 and unchanged in Zones 3, 4, and 5. These modifications, plus the -1 benefit Miss Cue receives from being in the Middle Squadron (as shown on the MC), are noted in the Fighter Waves section of the MC. The net modification to rolls on Tables B-1 and B-2 will be -3 in Zone 2, -1 in Zone 3, -1 on Zone 4, and -1 in Zone 5.
FIGHTER WAVES:
ZONEو 223
OUT
1.5 The B-17 counter representing Miss Cue is placed on the 8th Air Force Base on the Strategic Movement Board pointed toward Paris.
2.0 TURN 1
On Turn 1 the B-17 counter is moved into Zone 1. No German fighter interception is possible in this zone, so no roll is made for friendly fighter cover. Miss Cue passes through Zone 1 untroubled.
3.0 TURN 2
3.1 On Turn 2 the B-17 counter is moved into Zone 2, toward Paris.
3.2 Roll 1D on Table G-5 to determine the extent of friendly fighter cover. The roll is a "4", resulting in ‘‘Fair’’ fighter cover. Note the fighter cover in the Fighter Cover section of the MC by putting an ‘‘F”’ in the Zone 2 box under ‘‘Out’’.
FIGHTER COVER:
OUT BACK
3.3 Roll 1D on Table B-1 to determine if Miss Cue is attacked by German fighter waves in this zone. Table B-1 is consulted because this is not the Designated Target Zone. (The Designated Target Zone is Zone 5 because it contains Paris, the target city.) The roll is a **3'*, which is modified by -3, for a net roll of "0", (The roll is modified by -2 for the zone according to the Flight Log Gazetteer, and -1 for being in the Middle Squadron.) A net roll of ‘‘0’’or less on Table B-1 is treated as a ‘‘1’’ and results in no enemy waves appearing.
3.4 Since no enemy fighters appear, Miss Cue passes through this zone again untroubled.
4.0 TURN 3
4.1 The B-17 counter is now moved into Zone 3.
4.2 Roll ID on Table G-5 for fighter cover: '*6" = Good fighter cover. A “G” is marked in the Fighter Cover section of the MC in the Zone 3 box under “Out”.
4.3 Roll 1D on Table B-1 for German fighter waves: **4" - 1 = “3” = One enemy wave attacks.
4.4 Roll2D on Table B-3 to determine the size of the attacking wave of German fighters. The colored die is a ‘‘3’’, and the
11
white die і5 а “2”, Ғога гевшіс оҒ “32”, For a roll of **32"', the table reads: ''Two 190's: 10:30 High and 3 Level'', Note the roll of ''32'' in the Fighter Waves section of the MC in the box marked ““Out”” under Zone 3.
4.5 Take two FW 190 fighter cards and place them on the mounted mapboard in the positions of their attack. The first is placed directly in front of the B-17, entirely on the mapboard (12 O’Clock High). The second is place off the B-17’s starboard wing, half on and half off the mapboard (3 O’Clock Level).
4.6 Rollon Table M-4 to determine the effect of friendly fighter cover defense. The roll is a ‘*3’’. Under ''Good'' cover (as deter- mined in 4.2 above), a “*3’’ reads: ‘‘2(1)’’. Fighter cover drives off two fighters from the attacking wave, of the player’s choice. Since the wave consists of only two fighters, they are both removed from the map, ending the attack. Draw a line through the '*32" in the Fighter Waves section of the MC to mark that that wave attack has been resolved.
4.7 Miss Cue has safely passed through Zone 3 and moves into Zone 4.
5.0 TURN 4
5.1 The B-17 counter is moved to Zone 4, still pointing to Paris.
5.2 Roll 1D on Table G-5 for fighter cover: “1” = “Poor” fighter cover. Mark a ““P” in the Fighter Cover section of the MC for Zone 4 under “Ош”.
5.3 Roll 1D on Table B-1 for enemy fighter waves: “6” -1 = 5 = One wave.
5.4 Roll 2D on Table B-3 to determine the size and position of the attacking wave: ‘“5’’ and "6" = "56" = “No Attackers”. Since Miss Cue is still in formation, the machine gun fire from surrounding B-17’s has driven off any fighter’s that would have otherwise attacked her.
5.5 Miss Cue has safely passed through Zone 4, and now moves into Zone 5.
6.0 TURN 5: FIGHTER ATTACKS
6.1 The B-17 counter is moved over Paris in Zone 5, pointing away from England.
6.2 Roll 2D on Table O-1 to determine the weather in the target zone: “‘8’ = “Good”* weather. Mark the weather with a ““G”* in the Weather Section of the MC. Good weather has no adverse effects on either enemy fighter waves or the Bomb Run.
WEATHER:
TARGET- GOOD
6.3 Since Zone 5 is outside of friendly fighter cover, there is no roll on Table G-5.
6.4 Roll 1D on Table B-2 (Zone 5 is the designated target zone): “3” = one wave.
6.5 Roll 2D on Table B-3: ''4" апа “4” - “44” = “Two 190's: 12 O'Clock High and 12 O'Clock Low; 109: 1:30 Level; 110: 6O'Clock Low’’. Note ‘‘44’’ in the fighter waves section of the MC for Zone 5, under **Out".
6.6 Place the fighter cards on the mapboard in the position of their attack:
—An FW 190 at 12 O'Clock entirely on the mapboard (High);
—An FW 190 at 12 O’Clock entirely off the mapboard (Low);
—An Me 109 at 1:30 half on the mapboard (Level); —An Me 110 at 6 O’Clock entirely off the mapboard (Low).
6.7 Examine Table M-1, B-17 Defensive Fire, to find which machine gun positions can bear on the German fighters and what roll the guns must make to hit. Place counters for the
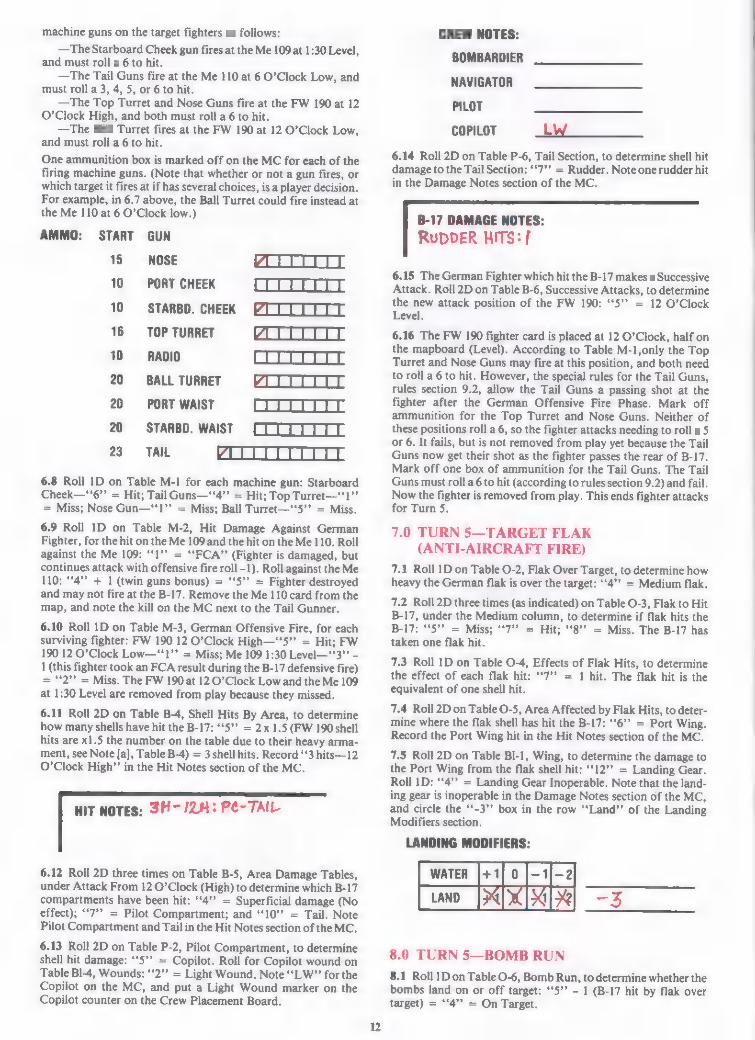
machine guns on the target fighters as follows:
—The Starboard Cheek gun fires at the Me 109 at 1:30 Level, and must roll a 6 to hit.
—The Tail Guns fire at the Me 110 at 6 O’Clock Low, and must roll a 3, 4, 5, or 6 to hit.
—The Top Turret and Nose Guns fire at the FW 190 at 12 O’Clock High, and both must roll a 6 to hit.
—The Ball Turret fires at the FW 190 at 12 O’Clock Low, and must roll a 6 to hit.
One ammunition box is marked off on the MC for each of the firing machine guns. (Note that whether or not a gun fires, or which target it fires at if has several choices, is a player decision. For example, in 6.7 above, the Ball Turret could fire instead at the Me 110 at 6 O'Clock low.)
AMMO: START GUN
15 NOSE
10 PORT CHEEK
10 STARBD. CHEEK
16 TOP TURRET
10 RADIO
20 BALL TURRET
20 PORT WAIST
20 STARBD. WAIST
23 ТАП ИҮГІТІТІПІТІ
6.8 Roll 1D on Table M-1 for each machine gun: Starboard Cheek—‘‘6”” = Hit; Tail Guns—‘‘4”’ = Hit; Top Turret—‘‘1”” 7 Miss; Nose Gun—**1" — Miss; Ball Turret—'*5" = Miss.
6.9 Roll 1D on Table M-2, Hit Damage Against German Fighter, for the hit on the Me 109 and the hit on the Me 110. Roll against the Me 109: “1” = “FCA” (Fighter is damaged, but continues attack with offensive fire roll -1). Roll against the Me 110: “4” + 1 (twin guns bonus) = “5” = Fighter destroyed and may not fire at the B-17. Remove the Me 110 card from the map, and note the kill on the MC next to the Tail Gunner.
6.10 Roll 1D on Table M-3, German Offensive Fire, for each surviving fighter: FW 190 12 O'Clock High—‘‘5”” = Hit; FW 190 12 O’Clock Low—‘‘1’’ = Miss; Me 109 1:30 Level—‘‘3”” — 1 (this fighter took an FCA result during the B-17 defensive fire) - “2” - Miss. The FW 190at 12 O'Clock Low and the Me 109 at 1:30 Level are removed from play because they missed.
6.11 Roll 2D on Table B-4, Shell Hits By Area, to determine how many shells have hit the B-17: **5" — 2x 1.5 (FW 190 shell hits are x1.5 the number on the table due to their heavy arma- ment, see Note [a], Table B-4) = 3 shell hits. Record ‘‘3 hits—12 O'Clock High" in the Hit Notes section of the MC.
HIT NOTES: 3H=/2H: PE-TAIL
6.12 Roll 2D three times on Table B-5, Area Damage Tables, under Attack From 12 O'Clock (High) to determine which B-17 compartments have been hit: “4” = Superficial damage (No effect); 7" = Pilot Compartment; and “10” = Tail. Note Pilot Compartment and Tail in the Hit Notes section of the MC.
6.13 Roll 2D on Table P-2, Pilot Compartment, to determine shell hit damage: '**5" = Copilot. Roll for Copilot wound on Table Bl-4, Wounds: ‘‘2”” = Light Wound. Note ‘‘LW” for the Copilot on the MC, and put a Light Wound marker on the Copilot counter on the Crew Placement Board.
12
CREW NOTES:
BOMBARDIER
NAVIGATOR
PILOT ыа
COPILOT SEW в ыз.
6.14 Roll 2D on Table P-6, Tail Section, to determine shell hit damage to the Tail Section: ‘‘7”” = Rudder. Note one rudder hit in the Damage Notes section of the MC.
B-17 DAMAGE NOTES:
RUDDER HITS: f
6.15 The German Fighter which hit the B-17 makes a Successive Attack. Roll 2D on Table B-6, Successive Attacks, to determine the new attack position of the FW 190: **5" — 12 O’Clock Level.
6.16 The FW 190 fighter card is placed at 12 O'Clock, half on the mapboard (Level). According to Table M-1,only the Top Turret and Nose Guns may fire at this position, and both need to roll a 6 to hit. However, the special rules for the Tail Guns, rules section 9.2, allow the Tail Guns a passing shot at the fighter after the German Offensive Fire Phase. Mark off ammunition for the Top Turret and Nose Guns. Neither of these positions roll a 6, so the fighter attacks needing to roll a 5 or 6. It fails, but is not removed from play yet because the Tail Guns now get their shot as the fighter passes the rear of B-17. Mark off one box of ammunition for the Tail Guns. The Tail Guns must roll a 6 to hit (according to rules section 9.2) and fail. Now the fighter is removed from play. This ends fighter attacks for Turn 5.
7.0 TURN 5—TARGET FLAK (ANTI-AIRCRAFT FIRE)
7.1 Roll 1D on Table O-2, Flak Over Target, to determine how heavy the German flak is over the target: ‘‘4’” = Medium flak.
7.2 Roll 2D three times (as indicated) on Table O-3, Flak to Hit B-17, under the Medium column, to determine if flak hits the B-17: “5” = Miss; “7” = Hit; “8” = Miss. The B-17 has taken one flak hit.
7.3 Roll 1D on Table O-4, Effects of Flak Hits, to determine the effect of each flak hit: “7” = 1 hit. The flak hit is the equivalent of one shell hit.
7.4 Roll 2D on Table O-5, Area Affected by Flak Hits, to deter- mine where the flak shell has hit the B-17: “6” = Port Wing. Record the Port Wing hit in the Hit Notes section of the MC.
7.5 Roll 2D on Table BI-1, Wing, to determine the damage to the Port Wing from the flak shell hit: '*12" — Landing Gear. Roll 1D: **4" = Landing Gear Inoperable. Note that the land- ing gear is inoperable in the Damage Notes section of the MC, and circle the **-3" box in the row *'Land"' of the Landing Modifiers section.
LANDING MODIFIERS:
menuzz Гәш |5454
8.0 TURN 5—BOMB RUN
8.1 Roll 1D on Table 0-6, Bomb Run, to determine whether the bombs land on or off target: ‘5’? - 1 (B-17 hit by flak over target) — ''4'' — On Target.
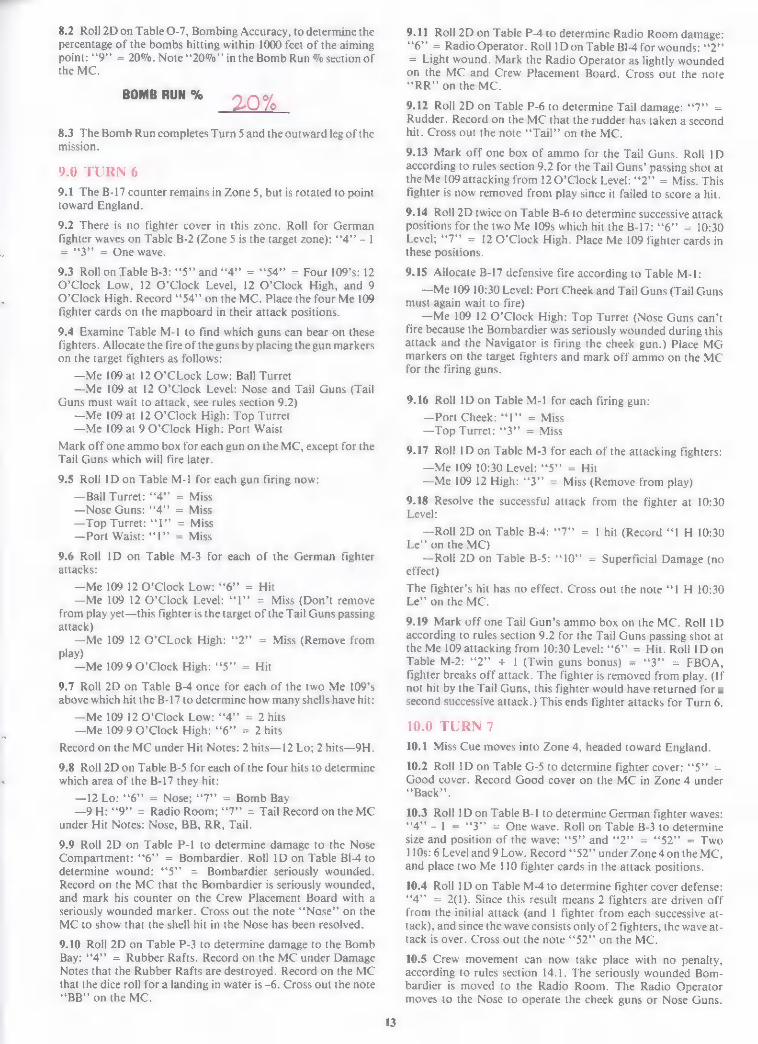
8.2 Roll 2D on Table O-7, Bombing Accuracy, to determine the percentage of the bombs hitting within 1000 feet of the aiming point: “9” = 20%. Note ‘‘20%’’ inthe Bomb Run % section of the MC.
BOMB RUN % 20 To
8.3 The Bomb Run completes Turn 5 and the outward leg of the mission.
9.0 TURN 6
9.1 The B-17 counter remains in Zone 5, but is rotated to point toward England.
9.2 There is no fighter cover in this zone. Roll for German fighter waves on Table B-2 (Zone 5 is the target zone): ‘*4’’ - 1 = “3” = One wave.
9.3 Roll on Table B-3: “5” and “4” = ''s4'' — Four 109's: 12 O’Clock Low, 12 O’Clock Level, 12 O’Clock High, and 9 O'Clock High. Record ''54'' on the MC. Place the four Me 109 fighter cards on the mapboard in their attack positions.
9.4 Examine Table M-1 to find which guns can bear on these fighters. Allocate the fire of the guns by placing the gun markers on the target fighters as follows:
—Me 109 at 12 O’CLock Low: Ball Turret —Me 109 at 12 O’Clock Level: Nose and Tail Guns (Tail
Guns must wait to attack, see rules section 9.2) —Me 109 at 12 O’Clock High: Top Turret —Me 109 at 9 O’Clock High: Port Waist
Mark off one ammo box for each gun on the MC, except for the Tail Guns which will fire later.
9,5 Roll ID on Table M-1 for each gun firing now:
—Ball Turret: ‘‘4’’ = Miss —Nose Guns: ‘‘4’’ = Miss —Top Turret: **1" — Miss — Port Waist: “17” = Miss
9.6 Roll 1D on Table M-3 for each of the German fighter attacks:
—Me 109 12 O'Clock Low: **6" = Hit — Ме 109 12 O'Clock Level: **1'" — Miss (Don't remove
from play yet—this fighter is the target of the Tail Guns passing attack)
—Me 109 12 O'CLock High: *'2" = Miss (Remove from
play) —Me 109 9 O’Clock Нірһ: “5” - Ни
9.7 Roll 2D on Table B-4 once for each of the two Me 109's above which hit the B-17 to determine how many shells have hit:
—Me 109 12 O'Clock Low: “4” = 2 hits —Me 109 9 O'Clock High: "6" = 2 hits
Record on the MC under Hit Notes: 2 hits—12 Lo; 2 hits—9H.
9.8 Roll2D on Table B-5 for each of the four hits to determine which area of the B-17 they hit:
—12 Lo: **6" — Nose; ''7" — Bomb Bay
—9 H: ''9'' — Radio Room; ''7T'' = Tail Record on the MC under Hit Notes: Nose, BB, RR, Tail.
9.9 Roll 2D on Table P-1 to determine damage to the Nose Compartment: **6" — Bombardier. Roll 1D on Table Bl-4 to determine wound: “5” — Bombardier seriously wounded. Record on the MC that the Bombardier is seriously wounded, and mark his counter on the Crew Placement Board with a seriously wounded marker. Cross out the note ‘‘Nose’’ on the MC to show that the shell hit in the Nose has been resolved.
9.10 Roll 2D on Table P-3 to determine damage to the Bomb Bay: ‘4’? = Rubber Rafts. Record on the MC under Damage Notes that the Rubber Rafts are destroyed. Record on the MC that the dice roll for a landing in water is-6. Cross out the note “ВВ” оп ће МС.
13
9.11 Roll 2D on Table P-4 to determine Radio Room damage: “6” = Radio Operator. Roll 1D on Table BI-4 for wounds: ‘‘2”’ = Light wound. Mark the Radio Operator as lightly wounded on the MC and Crew Placement Board. Cross out the note “ВК” on the MC.
9.12 Roll 2D on Table P-6 to determine Tail damage: “7” - Rudder. Record on the MC that the rudder has taken a second hit. Cross out the note “Тай!” оп (ће МС.
9.13 Mark off one box of ammo for the Tail Guns. Roll 1D according to rules section 9.2 for the Tail Guns’ passing shot at the Me 109 attacking from 12 O'Clock Level: *:2" — Miss. This fighter is now removed from play since it failed to score a hit.
9.14 Roll 2D twice on Table B-6 to determine successive attack positions for the two Me 109s which hit the В-17: “6” - 10:30 Level; **7" — 12 O'Clock High. Place Me 109 fighter cards in these positions.
9.15 Allocate B-17 defensive fire according to Table M-1:
—Me 109 10:30 Level: Port Cheek and Tail Guns (Tail Guns must again wait to fire)
—Me 109 12 O’Clock High: Top Turret (Nose Guns can’t fire because the Bombardier was seriously wounded during this attack and the Navigator is firing the cheek gun.) Place MG markers on the target fighters and mark off ammo on the MC for the firing guns.
9.16 Roll ID on Table M-1 for each firing gun:
— Port Cheek: “1” = Miss —Top Turret: ''3'' = Miss
9.17 Roll 1D on Table M-3 for each of the attacking fighters:
—Me 109 10:30 Level: **5** = Hit —Me 109 12 High: ‘*3’? = Miss (Remove from play)
9.18 Resolve the successful attack from the fighter at 10:30 Level:
—Roll 2D on Table B-4: ‘*7’ = 1 hit (Record “1 Н 10:30 Le'' on the MC)
—Roll 2D on Table B-5: **10" = Superficial Damage (no effect)
The fighter’s hit has no effect. Cross out the note ‘tl H 10:30 Le" on the MC.
9.19 Mark off one Tail Gun's ammo box on the MC. Roll ID according to rules section 9.2 for the Tail Guns passing shot at the Me 109 attacking from 10:30 Level: **6" — Hit. Roll IDon Table M-2: *'2" « 1 (Twin guns bonus) — ''3'' — FBOA, fighter breaks off attack. The fighter is removed from plav. (If not hit by the Tail Guns, this fighter would have returned for a second successive attack.) This ends fighter attacks for Turn 6.
10.0 TURN 7
10.1 Miss Cue moves into Zone 4, headed toward England.
10.2 Roll ID on Table G-5 to determine fighter cover: **5" = Good cover. Record Good cover on the MC in Zone 4 under “Back”.
10.3 Roll 1D on Table B-1 to determine German fighter waves: "4" -] = ‘3’? = One wave. Roll on Table B-3 to determine size and position of the wave: **5" and “2” = “52” = Two 110s: 6 Level and 9 Low. Record ‘‘52”’ under Zone 4 on the MC, and place two Me 110 fighter cards in the attack positions.
10.4 Roll 1D on Table M-4 to determine fighter cover defense: 64" = 2(1). Since this result means 2 fighters are driven off from the initial attack (and 1 fighter from each successive at- tack), and since the wave consists only of 2 fighters, the wave at- tack is over. Cross out the note ''52'' on the MC.
10.5 Crew movement can now take place with no penaltv, according to rules section 14.1. The seriously wounded Bom- bardier is moved to the Radio Room. The Radio Operator moves to the Nose to operate the cheek guns or Nose Guns.
Move the crew counters to their new positions on the Crew Placement Board.
10.6 Miss Cue has safely passed through Zone 4, and now enters Zone 3.
11.0 TURN 8
11.1 Miss Cue enters Zone 3, pointed toward England.
11.2 Roll 1D on Table G-5 for fighter cover: ‘*6’’ = Good cover. Record Good cover on the MC in Zone 3 under *“Back””.
11.3 Roll on Table B-1 to determine German fighter waves: “4” -1 = “3” = One wave. Roll 2D on Table B-3 to determine the size and position of the wave: *“6°* and **1** = **61°* = 109: Vertical Dive (d). Place an Me 109 fighter card directly on top of the B-17, and record ''61'' on the MC under Zone 3.
11.4 According to Note (d), Table B-3, Miss Cue's Good fighter cover has no effect on the diving attack. Only the Radio Room and Top Turret Guns may fire defensively. However, the Radio Operator has moved forward to the Nose, and the Radio Room Gun is unmanned (the seriously wounded Bombardier here cannot man the gun). Only the Top Turret may fire, and according to Note (d), it must roll a6 to hit. Mark off one box of ammo for the Top Turret and roll 1D: **4** = Miss.
11.5 Roll 1 D on Table M-3 for the German fighter's attack: *'4" — Miss. Remove the fighter from play. This ends fighter attacks in Zone 3.
11.6 Miss Cue has safely passed through Zone 3, and into Zone 2.
12.0 TURN 9 12.1 Miss Cue enters Zone 2 (over the English Channel),
pointed toward England.
12.2 Roll 1D on Table G-5 for fighter cover: 2" = Poor cover. Record Poor cover on the MC in Zone 2 under ''Back''.
12.3 Roll 1D on Table B-1 to determine German fighter waves:
“37? _3 = ‘0’? = None. No German fighters attack. 12.4 Miss Cue has safely passed through Zone 2, and enters Zone 1.
13.0 TURN 10 13.1 Miss Cue enters Zone 1, and is placed on the 8th Air Force Base.
13.2 Roll 2D on Table O-1 to determine the weather conditions at the base: ''10'' = Good weather. There is no modification to the landing roll due to weather.
13.3 Roll 2D on Table G-9 to resolve Miss Cue*s landing: *“7*' — 3 (landing gear inoperable) = **4** = Crew and B-17 down safely.
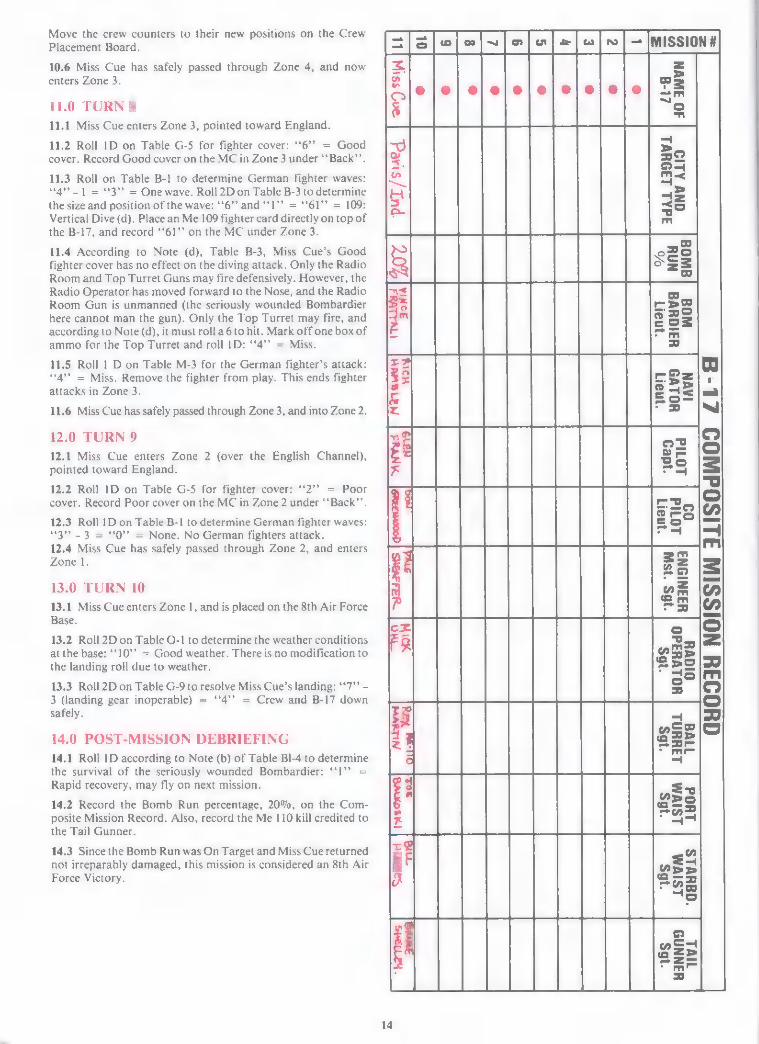
14.0 POST-MISSION DEBRIEFING
14.1 Roll 1D according to Note (b) of Table Bl-4 to determine the survival of the seriously wounded Bombardier: ‘‘1’’ Rapid recovery, may fly on next mission.
14.2 Record the Bomb Run percentage, 20%, on the Com- posite Mission Record. Also, record the Me 110 kill credited to
the Tail Gunner.
14.3 Since the Bomb Run was On Target and Miss Cue returned not irreparably damaged, this mission is considered an 8th Air Force Victory.
еее psss
=> = =0 Ф £e га
11-9 30 ЗИММ
3dAL 139uV1 üNV ALIS
ira теё [энни
“3342095
| |
0Н023Н М015651ІЛІ 31150411402 71
ISIVM J 134HAL J HOLVHIAO
non on
Dreg
14
EC LED
gw
i FATTA
BOMBER NAME:
MISS CUE
mission 4 11
(THISBOMBER. L-)
TARGET
CITY: PARIS
TARGET TYPE:
INDUSTRY
B-17 POSITION IN FORMATION: SOUADRON
POSITION:
C LEAD (+1 Me 109/12 High) C HIGH
Ы
моде
Î
MIDDLE
(-1)
CO
TAIL
(+1
Me
109/6
High)
О
Low
(+1)
[0
OUT OF
FORMATION
(+1 Me
109/12 Level/Wave)
O
=
10,000 FT. (
2x Die Light
Flak Over
Land)
FIGHTER WAVES: ZONE 225
OUT
eke
ұз
i=
6
BACK
CREW
NOTES:
BOMBARDIER
SW-PAP'deoverd
RADIO
OPERATOR
_LW.
o
=ă
NAVI
GATO
R BA
LL
GUNN
ER
ме-п
о PILOT
PORT
WA
IST
COPILOT
Lw-
STARBD.
WAIST
ENGINEER
TAIL
GUNN
ER
B-17 DAMAGE NOTES:
RUDDER
HITS:
//
LANDINE; GEAR OUT
RUBBER
RAFIS-X
1 =
_
8 =
MISSION CHART
WEATHER: TARGET-
ENGLAND-
BOMB
RUN
%
20%
GOOD
т.
224
боор
FIGHTER
COVER:
OUT
BACK
poef e | 2 |
LANDING MODIFIERS:
мез & | |
-(о
[um 14142-57”
AMMO:
START
GUN
15
NOSE
атто 10
PORT
CHEE
K тїтїгї
10
STARBD.
CHEEK
(ТІТІТІТІТІ
16
TOP
TURRET
ГРА
РАРАРА АТА
ИО
10
RADI
O LLIILLIIIILLE]
20
BALL
TURRET
—
CETTTIIIITIIIIIILIIIT]
20
PORT
WA
IST
VCELTEELELRLELLELFELDLELI
20
STARBD.WAIST
[TTTTITITIIITITITLITIIT]
23 ТАП Maer
rrr
HIT NOTES: JH “ZH: Pe TAIL
FLAK: -PoRFA9ING-
21-12
LO:
Nese
BB
БН
- 9 Н: КЕ:
- ТАН
“ЕН? 10:30; -
8510003 W423 4183
15
НЕНА х xdi EN
Mr i 5
JE 3 :
| EI
wa
[13] misscue|waMm-ranvaro | 6 | —+<—
ETNA
Ba TA
Tm | “BOATS —— 1 CITY AND TARGET TYPE
zm T mcm HISS CUE | RENNES - RALYARD Queers
| 50 |
b ная
Ютеми- 3%) 40 | Е |
[11 мисс сие [Pars -twousmy | Зо [Уке |
| 4 Poe [зе ША Бет есе
Гоа је mon] 30 аа ез. о УИС ler | адь
PART III NOTES AND CREDITS
DESIGNER’S NOTES The idea for B-17: QUEEN OF THE SKIES came to me about halfway through a reading of Martin Caidin’s Fly- ing Forts (which was out of character for me because I am much more likely to be reading a book on WW II ar- mor than on airpower). In the middle of a particularly action packed account of fighters attacking a B-17 an ''inspirational flash'' came over me quite unexpectedly, and I realized that a game could be designed to include most of the details of aerial warfare being described. I knew that most of the WW II air power games available were much more strategic in nature. They all dealt with large numbers of planes, and avoided great detail.
I wanted to design a game which would cover the ex-
perience of just one plane in great detail. I decided at the same time to design the game for solitaire play, with the option of two player rules included. I felt that there wasa need for a game you can go out and buy and play without having to invite, and coordinate the arrival of, up toa half-dozen friends. With B-17, you can have it either way.
You can't design a game by reading just one book, so I immediately went out and bought as many books on the B-17 as I could find (see the bibliography). By the time I had finished a few of them, I realized that I would have to limit the time frame of the game. I chose November 1942 to May 1943 because that was the initial period of B-17 operations in the European Theatre, when the B-17 had to prove itself against great odds. Fighter cover for
B-17's at that time extended only about 150 miles from their bases, meaning more danger beyond that range. At the same time, the Germans had not yet learned the best techniques for attacking B-17 formations. I felt that if the game was designed to cover a later part of the war, it would necessarily be unbalanced. For example, if it ac- curately covered the period around the Schweinfurt ball-bearing factory raids, the Germans should come out ahead. If it covered the last year of the war when the Allies were consolidating their domination of the skies, the B-17's should come out ahead. Many B-17 pilots and crew members I talked to who had been in the later period said that they never saw any German fighters, even in 50 missions, due to our vastly improved fighter cover.
I estimate that I spent well over 600 hours in the research and design of B-17, not including playtesting. The system of tables was revised many times, always with the idea of consolidating as much information as possible into one table. I wanted to reduce the number of dice rolls necessary, while still maintaining maximum
realism. I was fortunate in being able to take a tour of an existing B-17 owned by the Experimental Aircraft Association of Wisconsin. This was very helpful in thatI was able to stand or kneel at all of the gun positions and determine the angles of fire for the guns in a much better way than had been possible on my scale model of a B-17. However, using 72nd scale models of both the B-17 and the German fighters was extremely important, expecial- ly in determining what sections of the B-17 could be hit from each angle of attack, and in measuring the percen- tage of the B-17’s surface area exposed to each angle of attack. This allowed me to extrapolate percentages for the dice rolls on the damage tables.
B-17: QUEEN OF THE SKIES is action packed and bloody for both the Americans and the Germans. This does not just provide an exciting game, but reflects the situation
at the time. If you were a B-17 crew member from
17
November 1942 to May 1943, you had only about a 30% chance to survive 25 missions. By the time you finish playing B-17 just once, you should have a feel for what it was like to be a B-17 crew member under attack, with nowhere to duck, hide, or run. You've got to sit there and take what comes, trading bullet for bullet and sweat for Sweat.
My own bias in gaming is toward realism and accuracy, and I have always been dismayed when a designer says he sacrificed realism for playability. In B-17 I tried to maintain both maximum realism and playability. I think that if a designer is willing to take the time, it can be done, and I hope that B-17 has given you both.
Glen Frank
BIBLIOGRAPHY Pilot’s Manual for the B-17 Flying Fortress Bendiner, Elmer The Fall of Fortresses Birdsall, Steve The B-17 Flying Fortress Bowers, Peter Fortress in the Sky Bowyers, Chaz Guns in the Sky Caidin, Martin Flying Forts — —— Black Thursday Coffey, Thomas Decision Over Schweinfurt Copp, Dewitt S. Forged in Fire Freeman, Roger A. B-17 Fortress at War — — Mighty Eighth War Diary Green, William Famous Bombers of the Second World War Jablonski, Edward Airwar, Volume II Peaslee, Budd Heritage of Valor Scutts, Jerry USAAF Heavy Bomber Units ETO and MTO 1942-45 Willmot, H. P. B-17 Flying Fortress
COMPONENTS
11” x 16" Mounted Mapboard Counter Sheet: 88 Pieces 16 Die Cut German Fighter Cards Crew Placement Board Strategic Movement Board Mission Chart Pad Charts and Tables Cards Rulebook 2 Six-Sided Dice
REPLACEMENT PARTS
Foracurrent replacement parts list, send one dollar (US) to: The Avalon Hill Game Company, 4517 Harford Road, Baltimore, Maryland 21214. We will send you our full-catalog describing the many exciting board and microcomputer games, available both by mail and in discriminating retail outlets where better games are sold (consult current Parts List for price).
RULES QUESTIONS Questions on the play of this game will be gladly answered upon receipt, if they are accompanied by a stamped, self-addressed envelope. Questions on the actual design or the evolution of the game itself cannot be answered. This type of information is available only in the pages of our bi-monthly magazine, THE GENERAL. Sorry, but absolutely no game related questions can be answered by phone.
DESIGN CREDITS
ORIGINAL DESIGN AND DEVELOPMENT: Glen Frank AH DEVELOPMENT: Bruce C. Shelley with Dr. Vincent Frattali GRAPHICS: Dale Sheaffer PLAYTESTERS: Jim Conover, Paul Dyer, Chris Frank, Ruth and Bob Gallun, and Scott Puffer; for AH: Dr. Vincent Frattali, Tom Murphy, Dale Sheaffer, Bob Coggins, and Mick Uhl. BOX AND MAP ART: Joe DeMarco PREP DEPT COORDINATOR: Elaine M. Adkins TYPESETTING: Colonial Composition PRINTING: Monarch Services PRODUCTION: Eastern Box
Original Copyright 1981 On Target Games
Copyright 1983 The Avalon Hill Game Company
THE GENERAL Now that you know how to play the game,
the next problem is probably who to play it with. We can help you with that problem and many others only through your subscription to our bi- monthly gaming journal, the GENERAL. In the GENERAL you'll not only read all there is to know about this game, but will also learn about our dozens of other exciting simulation games of skill. Every full color, forty-eight page issue is jammed full of professional articles on the strategy and tactics of gaming. Look and see what the GENERAL offers:
ADVERTISING: Our Opponents-Wanted Column allows you to advertise for opponents, discontinued games, or competition of any sort. Each issue contains hundreds of ads which are read by thousands of readers nationwide. The fastest way to find an opponent for this game, whether it be across the street or the Atlantic Ocean, isinthe pages of the GENERAL.
GAME DESIGN: Wonder why this game was designed the way it was? Read the GENERAL and find out. Our regular DESIGN ANALYSIS column features explanatory treatises by our designers. Only here can you find ready-to-play variations, new scenarios, and perhaps even more counters for this game.
QUESTIONS ANSWERED: In our Question Box you'll find the only official source of rules interpretations and changes for this and our other games.
PRODUCT REVIEWS: Interested in other games by The Avalon Hill Game Company? Check them out in the Reader's Buyers Guide. The RBG is a game review compiled by our subscribers at large—the people who play the games. Realism, complexity, play-balance, and excitement level are only a few of the categories rated inthe RBG.
WHAT'S HAPPENING: Like to know what's going on in the gaming hobby? Each issue contains an installment of “The Avalon Hill Game Company’s Philosophy” where we an- nounce the new games, discuss possible new titles, and generally keep you informed. In addi- tion, the /NFILTRATOR'S REPORT keeps you posted on tournaments, conventions, club news, and unusual happenings.
VALUE: In every issue you'll find a coupon worth $/.00 towards the direct mail purchase of all products by The Avalon Hill Game Company. All of this for just a few dollars. SEE PARTS LIST FOR CURRENT SUBSCRIP- TION COST.
VARIANTS: Past issues of the GENERAL have included all manner of interesting ad- denda for products by The Avalon Hill Game Company including additional scenarios for CROSS OF IRON and SQUAD. LEADER. Don’t miss out on the planned additions for CRESCENDO. Subscribe to the GENERAL today.
Since its inception in 1964, the GENERAL has stood the test of time. Increase your enjoy- ment of this and other games by The Avalon Hill Game Company many-fold with a sub- scription.
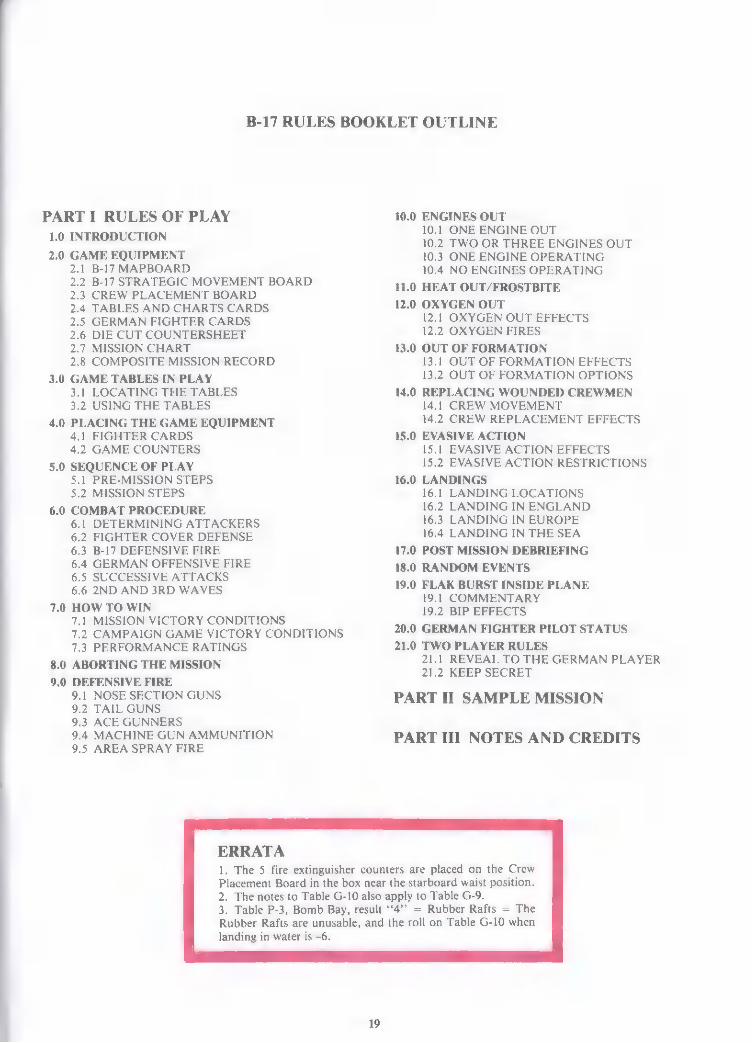
B-17 RULES BOOKLET OUTLINE
PART I RULES OF PLAY 1.0 INTRODUCTION 2.0 GAME EQUIPMENT
2.1 B-17 MAPBOARD 2.2 B-17 STRATEGIC MOVEMENT BOARD 2.3 CREW PLACEMENT BOARD 2.4 TABLES AND CHARTS CARDS 2.5 GERMAN FIGHTER CARDS 2.6 DIE CUT COUNTERSHEET 2.7 MISSION CHART 2.8 COMPOSITE MISSION RECORD
3.0 GAME TABLES IN PLAY 3.1 LOCATING THE TABLES 3.2 USING THE TABLES
4.0 PLACING THE GAME EOUIPMENT 4.1 FIGHTER CARDS 4.2 GAME COUNTERS
5.0 SEOUENCE OF PLAY 5.1 PRE-MISSION STEPS 5.2 MISSION STEPS
6.0 COMBAT PROCEDURE 6.1 DETERMINING ATTACKERS 6.2 FIGHTER COVER DEFENSE 6.3 B-17 DEFENSIVE FIRE 6.4 GERMAN OFFENSIVE FIRE 6.5 SUCCESSIVE ATTACKS 6.6 2ND AND 3RD WAVES
7.0 HOW TO WIN 7.1 MISSION VICTORY CONDITIONS 7.2 CAMPAIGN GAME VICTORY CONDITIONS 7.3 PERFORMANCE RATINGS
8.0 ABORTING THE MISSION
9.0 DEFENSIVE FIRE 9.1 NOSE SECTION GUNS 9.2 TAIL GUNS 9.3 ACE GUNNERS 9.4 MACHINE GUN AMMUNITION 9.5 AREA SPRAY FIRE
ERRATA
10.0 ENGINES OUT 10.1 ONE ENGINE OUT 10.2 TWO OR THREE ENGINES OUT 10.3 ONE ENGINE OPERATING 10.4 NO ENGINES OPERATING
11.0 HEAT OUT/FROSTBITE
12.0 OXYGEN OUT 12.1 OXYGEN OUT EFFECTS 12.2 OXYGEN FIRES
13.0 OUT OF FORMATION 13.1 OUT OF FORMATION EFFECTS 13.2 OUT OF FORMATION OPTIONS
14.0 REPLACING WOUNDED CREWMEN 14.1 CREW MOVEMENT 14.2 CREW REPLACEMENT EFFECTS
15.0 EVASIVE ACTION 15.1 EVASIVE ACTION EFFECTS 15.2 EVASIVE ACTION RESTRICTIONS
16.0 LANDINGS 16.1 LANDING LOCATIONS 16.2 LANDING IN ENGLAND 16.3 LANDING IN EUROPE 16.4 LANDING IN THE SEA
17.0 POST MISSION DEBRIEFING
18.0 RANDOM EVENTS
19.0 FLAK BURST INSIDE PLANE 19.1 COMMENTARY 19.2 BIP EFFECTS
20.0 GERMAN FIGHTER PILOT STATUS
21.0 TWO PLAYER RULES 21.1 REVEAL TO THE GERMAN PLAYER 21.2 KEEP SECRET
PART II SAMPLE MISSION
PART III NOTES AND CREDITS
1. The 5 fire extinguisher counters are placed on the Crew Placement Board in the box near the starboard waist position. 2. The notes to Table G-10 also apply to Table G-9. 3. Table P-3, Bomb Bay, result ‘‘4’’ = Rubber Rafts = The Rubber Rafts are unusable, and the roll on Table G-10 when landing in water is -6.
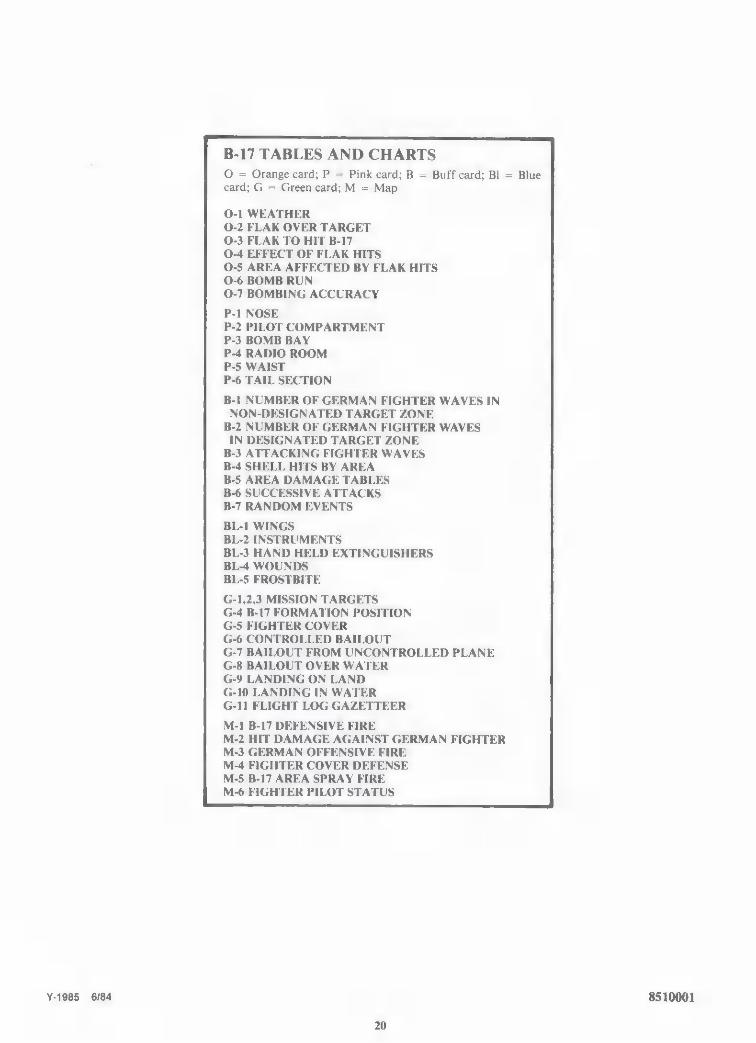
B-17 TABLES AND CHARTS O = Orange card; P = Pink card; B = Buff card; BI = Blue card; G = Green card; M = Map
0-1 WEATHER 0-2 FLAK OVER TARGET 0-3 FLAK TO HIT B-17 0-4 EFFECT OF FLAK HITS 0-5 AREA AFFECTED BY FLAK HITS 0-6 BOMB RUN 0-7 BOMBING ACCURACY
P-1 NOSE P-2 PILOT COMPARTMENT P-3 BOMB BAY P-4 RADIO ROOM P-5 WAIST P-6 TAIL SECTION
B-1 NUMBER OF GERMAN FIGHTER WAVES IN NON-DESIGNATED TARGET ZONE
B-2 NUMBER OF GERMAN FIGHTER WAVES IN DESIGNATED TARGET ZONE
B-3 ATTACKING FIGHTER WAVES B-4 SHELL HITS BY AREA B-5 AREA DAMAGE TABLES B-6 SUCCESSIVE ATTACKS B-7 RANDOM EVENTS
BL-1 WINGS BL-2 INSTRUMENTS BL-3 HAND HELD EXTINGUISHERS BL-4 WOUNDS BL-5 FROSTBITE
G-1,2,3 MISSION TARGETS G-4 B-17 FORMATION POSITION G-5 FIGHTER COVER G-6 CONTROLLED BAILOUT G-7 BAILOUT FROM UNCONTROLLED PLANE G-8 BAILOUT OVER WATER G-9 LANDING ON LAND G-10 LANDING IN WATER G-11 FLIGHT LOG GAZETTEER
M-1 B-17 DEFENSIVE FIRE M-2 HIT DAMAGE AGAINST GERMAN FIGHTER M-3 GERMAN OFFENSIVE FIRE M-4 FIGHTER COVER DEFENSE M-5 B-17 AREA SPRAY FIRE M-6 FIGHTER PILOT STATUS
Y-1985 6/84 8510001
20
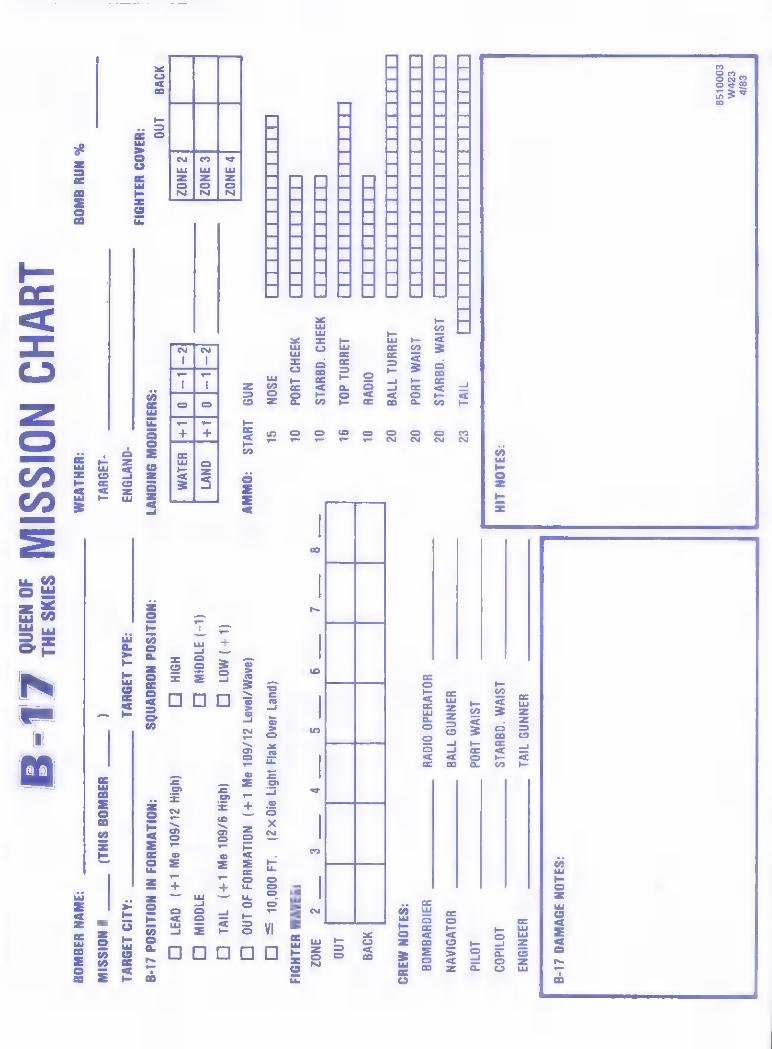
£8/t ETM 5000158
*S31
0N
39VWVO
Z1-8
HINNAI
TIVL
H3
3NID
NA
:SILON
LIH
ISIW
M '0BHWIS
——
—
—
1011402
=.
19мм
1404
о
10118
КЕРНЕР
ЊЕ
ЧЕ
РАЈА
ЕТ
ЕН
ЕЈ)
WL
£2
ی
ی
HINNAI
TIVB
HOLV
IIAV
N ПІІТТТТТТТТТТТТТТТТІПІ
iswm'asuvis
oz
جڪ
تے
0195
340
OlQVH
u3iquvaWog
ДАО
ТЕ
ЈЕ
ЈН
РЈ
ЈЕ
ЕЈ
РЕЈ
ISIV
M 1909
02
'SILON
M3H9
LLITILIILITIHEEKELERFLEH
lauuni
Tiv8
—
02
ВЕРНЕЕ]
oyy
01
Хоув
LIIIITIITITIIITITIIT]
И "7
7 ЛИГИ
110
LLIIIIIIITIJ
3389
ü8HVIS
—
0i
=;
=
=~;
~=;
~;
~;
ST;
ім?
EELEE
CEFER)
X33H9
1804
0
:SJAVM
H31H
914
EEEEEEEEEEEEEEEI
ISON
в (p
ue7
1840
Хы
6
ә0х2)
7140
0001
=
O
мп9
19515
‘OWWY
(OAEM/19A97
ZL/60L
?W
L+)
NOIL
VIWH
O4
40
110.
CI
ШЕН
ШЕШЕГІ
(1+)
мол
О (це
ін 9/
60:
әй 1+
) іі
C]
|
|
a-
naw
O
naw
O
ШЕН
[з
SOE
Ум
нән
П (UĠ
IH ZL/60L
8W
t+)
avn
O жү
й 10
0 :S
H3I4
IGOW
SN
IGNY
T 'N
OILI
SOd
NOHG
WAĠS
:NOLLVWHOJ
NI NOLLISOd
/1-8
:83A
02
U31H914
-QNV19N3
:3dA
L 1398V1
ALIS
1398V1
===
-1394VL
(77
wag8WO8
SIHI
) ^
—
# NO
ISSI
W
% нн
ян
:H3H1V3M
:3AVN
H3HW
OS
1uVHJ
NOISSIIN
5
£L-8
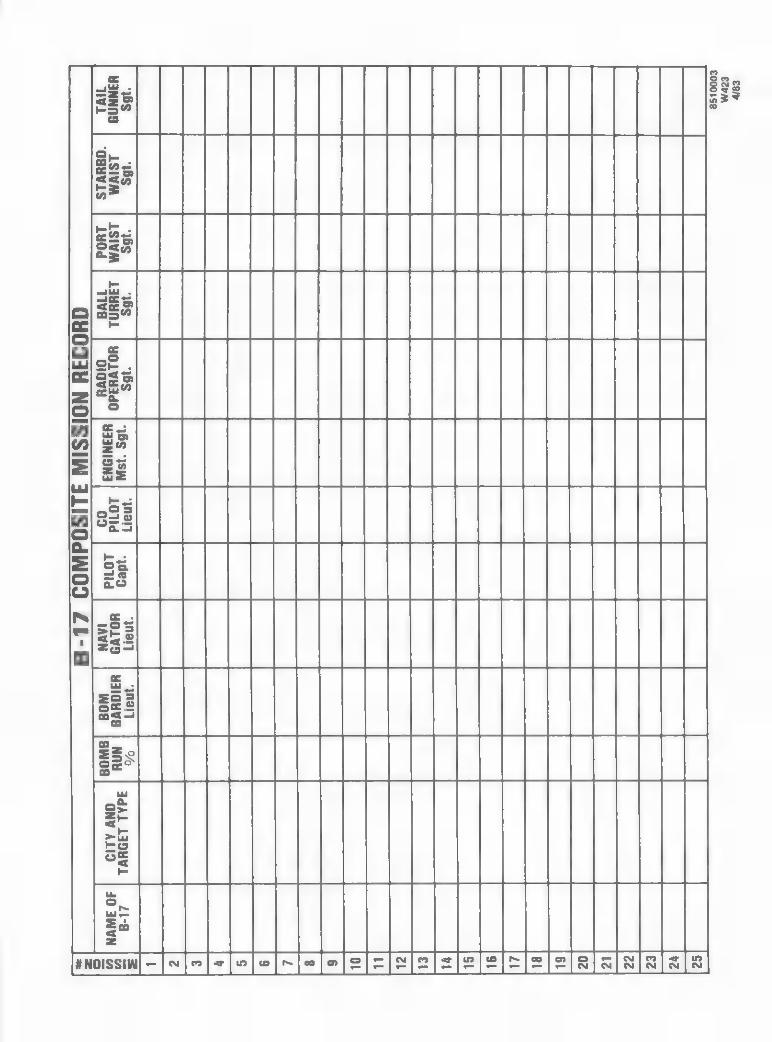
PORT WAIST 541.
ПЕС – |~ | > | | | е | ~] |е е |а| ее ааа
Sgt. RADIO OPERATOR | TURRET
ENGINEER Mst. Sgt.
PILOT Lieut. co
T. Бе 29 аә
= ас © e һы cc
z
e o = = ыы
= N e a. = e e
m =
'
fa
BARDIER | GATOR
CITY AND TARGET TYPE
8510003 W423 4183

B-17 tess GOUNTERSHEET |
y = . | RADIO пат | отат н, 1 u | mor | pae | an | ысын ы ا i el ]
| PORT | STRBD. | TAL | мозе | STREP. | PORT | ТОР | RADIO WAIST | WAIST | Ы) МЕ | CHEEK | CHEEK | TURRET | ROOM GUNNER | GUNNER MG MG MG's MG
|
BALL | PORT | STRBD. | tay | ENGINE | ENGINE | ENGINE | TAEL | ТОПАЕТ | "НТ | ШЕТ! wes | ne | мо | HE | ғ
5 BAILOUT ila __| BAILOUT | |
GAS GAS GAS OIL OIL | OXYGEN | OXYGEN LEAK | LEAK | FIRE FIRE E TEE M xX
4 EXTIN- $ ЕХТІН- EXTIN- EXTIN- EXTIN- EXTIN- LIGHT E | GUISHER GUISHER | GUISHER GUISHER GUISHER GuisHen | WOUND | і |
|
LIGHT LIGHT LIGHT ^4 LIGHT LIGHT | SERIOUS | SERIOUS | SERIOUS | WOUND | WOUND | WOUND | WOUND | WOUND | WOUND | WOUND ; WOUND
L oki ah да ل 4
FIGHTER | FIGHTER | FIGHTER \ FIGHTER | FIGHTER
TINUES | TINUES | TINUES | TINUES | TINUES
FIGHTER BREAKS OFF -2
8510031/32
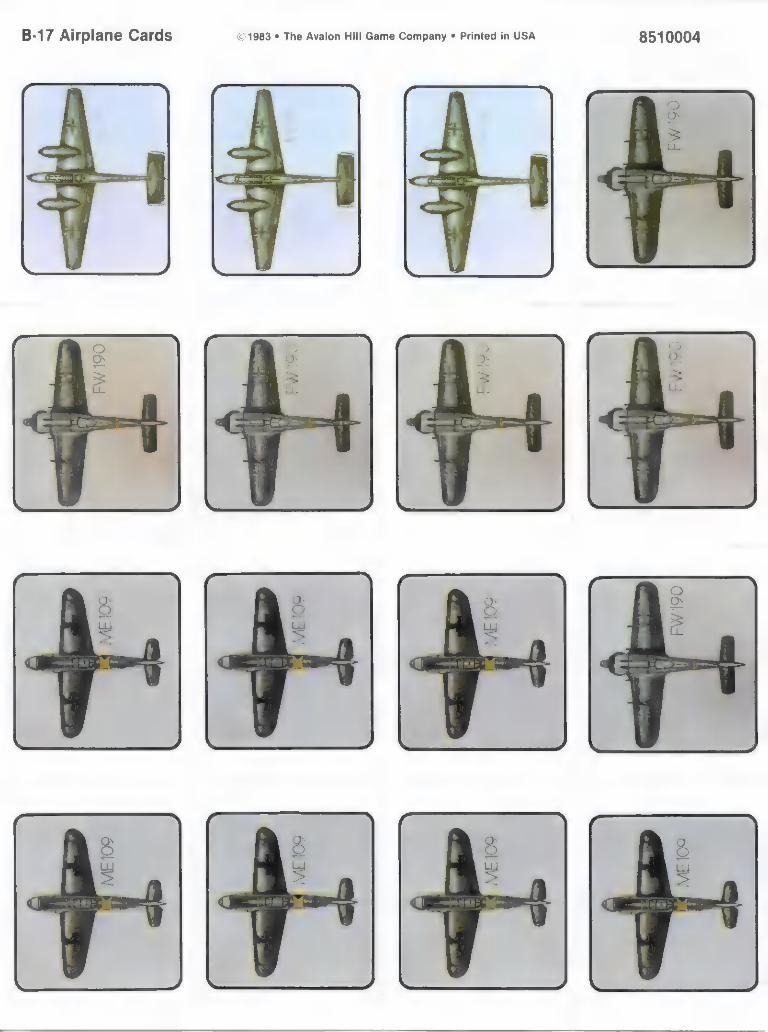
B-17 Airplane Cards ©1983 * The Avalon Hill Game Company * Printed in USA 8510004
FW190
т cal | PIS n vt
fi
| |
m
FW190
ME109
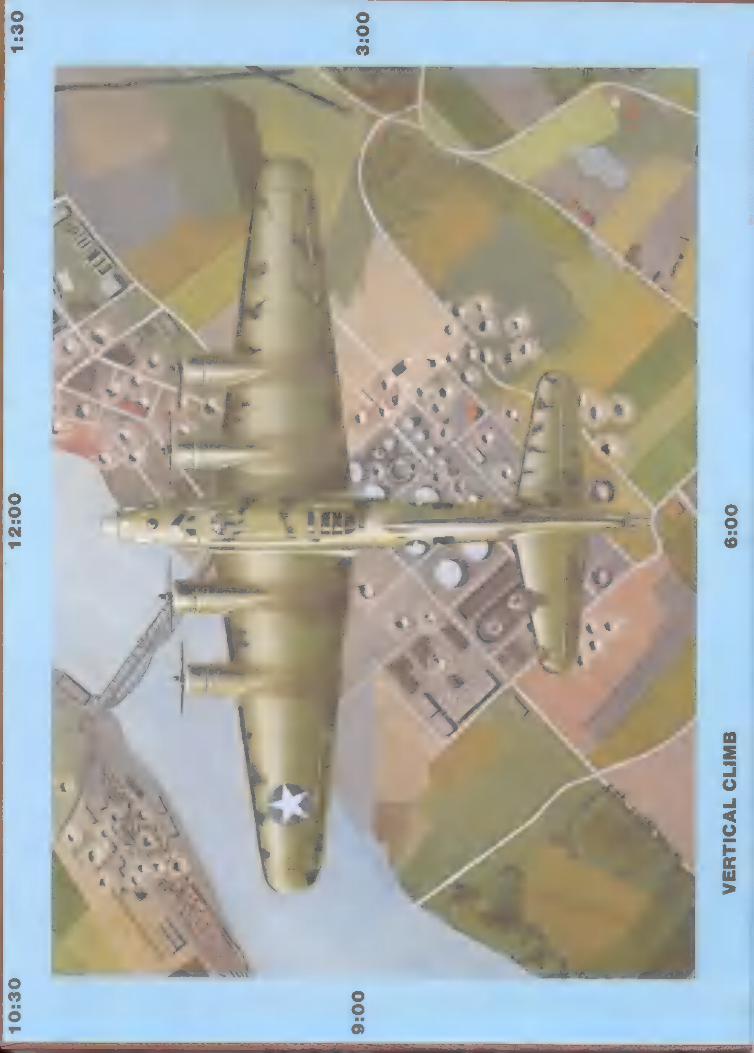
nA >
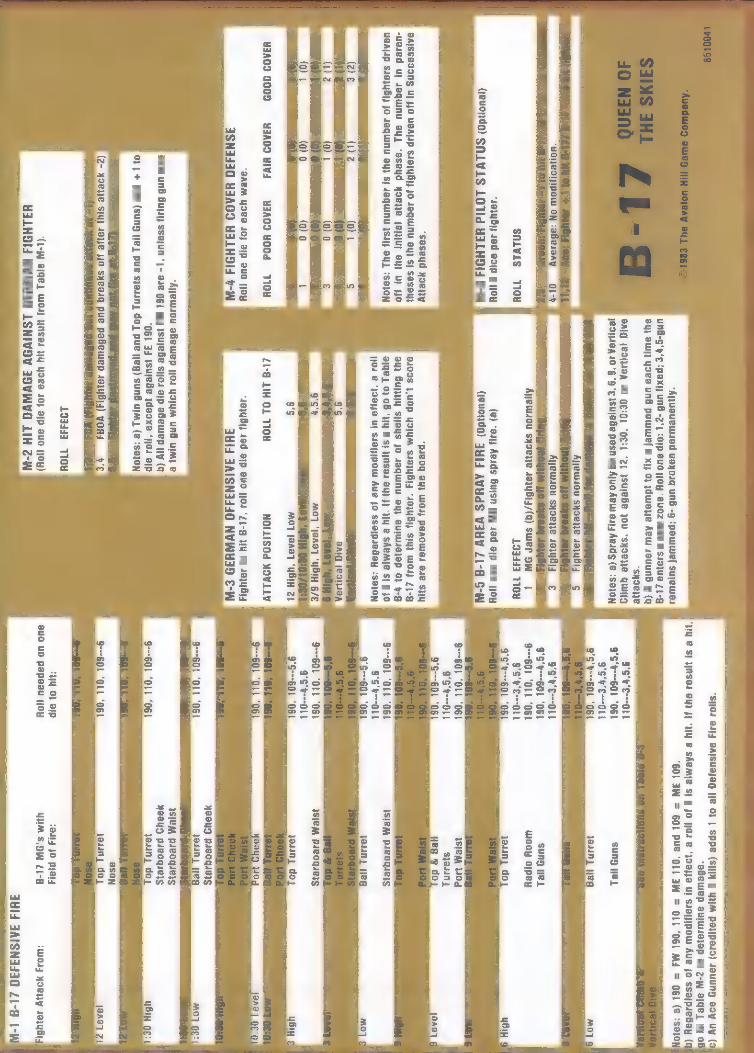
"кивиешлоа џалола ипв -9 :рошше! зшешал un6-‘y‘¢ ‘paxy un6 -2' | :апр зио ||он '2џ02 маџ е 5198 /|-8
ay)
ашп
цэвә
ипв
рашшег
е ху
о} 1йшәце
Аеш
заџипв
у (4
"вузеце эма үгэпләд 10 0:01 '0Е:1 21 1sureBe jou *$ўзеце шиі
821494
10 *6 *9 'c 1sureBe
posn aq Ajuo A
ew aad
Ae4ds (e :S910N
Ajjewuou
syoeye
sajy
bly
£
'SIJ
O1
8414
BAISU3JAQ
пе
01
| зр
ре
(50
5 чи
м ре
џргл
о)
зеџи
пу
гоџ
иџ
(2
‘aBewep әшшләјәр
о] г-и 21981
0) 08) "Wu e 51 упзал
ацу и "иц
е злемје $1 9 JO J104 e ‘193443
LI злеирош Аџе
ј0 з5ојрлеван (9
"801 3
= 601
рие “011
3 =
011 ‘OGL
Md =
O61 (2 ‘salon
а
“ұ--601 “061 sung jiel
6'%'Е-—-011
9'6'v---601
“061
sung iel
snivis 1109 "19148 1ad аојр ; пон
(ieuondo)
Sn1V
1S LOTld
H31H914
9-IN
*seseud Joey
995592206
Ш уо UJAP
SAAB)
JO JAQLUNU
AY)
$1 $9394}
-uaied uy saquinu ayy ‘eseyd yoene jenu Əy} u! 0 UBALJP SJ91UBIJ JO JOQLUNU ац SI JOGUINU 1541) BY) :SA10N 43409 0009 HIAOI HIVI Y43409 400d 71104 "әлем цова 104 AIP auo jjog 3SN3330 H3A02 H31H914 tr-IW
Анешилои здэеце 1934814/(9) зшег OW | 193343 110Н
(e) ‘a4 Ae1ds
Buisn 9i
4ad ajp
әио он (ieuondo) 3813 AyHdS
V3HV
21-8 S-W
"раеод ay) wo. ралошал 31 SUY 91098 1,U0P UJIUM SJ91UB14 3ә}цб; 5! шолу /1-Н
eu)
Buniy
seus
jo
18quinu
ayuj
эшииезэр
0
Y-A
9Iqe1
01 06
"иу
е 5! упзел
241
JI "UY
B SAEMJE
SI 9 JO
1104
‘озна
ш зла1ирош
Aue
jo ssajpaeBag
:sa1oN
“19427 'uBIH 6/£
945
мот
аләт
'UBIH
ZL
11-9
ШН
01
1109
NOILISOd
MOVLIV
‘Защ 199 эр эио 1104 ‘41-8 ИМ 03 2914814 3414 JAISN3440 NVWH39 E-W
'Ajjewou aĠEWEP 1/04 UJJUM unG umy B
‘OLL ‘OGL
%'E---OLL
06
залап
до
‘OLL ‘OGL
зем мод
64--01
saun,
601 ‘06
a 8 do
9-—601 ‘OLL ‘OGL
9'8'w---OLL “G---601
“0
yaan,
JSIEM PABOGIBIS
9---601 "011 “061 8'6'%-—-011
“G---601
'06
Jaani
do
SPM PABOGIBIS 49249 PILOGILIS eg
15ІРМ Р1Р041ғ165
SEM
Un
вишу
з5ај
ип
' | - әле
061
0\4
15$шеВе
504
әр
әВешер
үү
(0
"061
34
isuieBe
1dooxo
*jo1
ә}р
031
+ ppe
(suny
jrej
pue
sja1
inj
do
pue
jeg)
sunB
ui
m,
(e
:sejoN
(z-
xoen
e $14
} эце
по зу
еэла
рие
paBe
urep
1934814)
193443 Т10Н
'(L-IN
SIQEL
шоду
п$
әл
иц
4923
10у
аур
аио
он)
НЗ1Н914
МУЙІНЗЗ
15МІ99У
39/0
LIH
Z-W
9949
PiLO
GALI
S yo
ung
doy
314 o} arp 9uo uo papaau цон
18413 JO pjet4
ЧИМ
5,90
21-8
1044
уоецу
221814
HI
3AIS
N333
0 Z1
-8
1-И
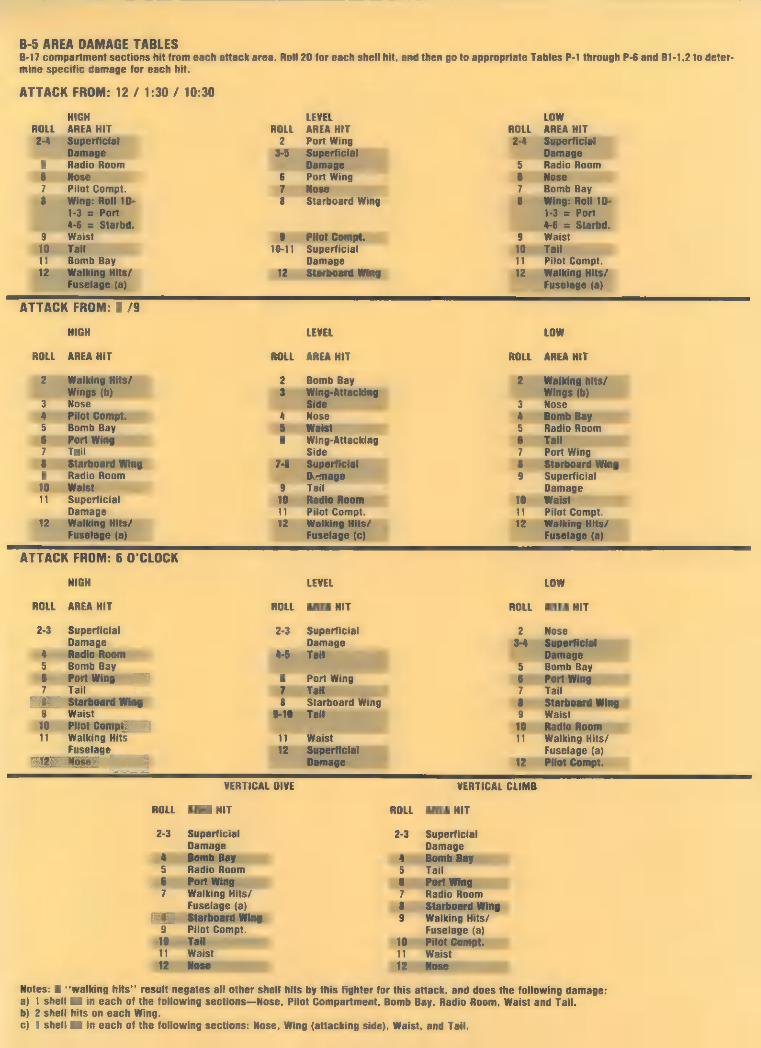
B-5 AREA DAMAGE TABLES B-17 compartment sections hit from each attack area. Roll 2D for each shell hit, and then go to appropriate Tables P-1 through P-6 and B1-1,2 to deter- mine specific damage for each hit.
ATTACK FROM: 12 / 1:30 / 10:30
HIGH
5 Radio Room
7 Pilot Compt.
11 Bomb Bay
ATTACK FROM: 3 /9
HIGH
al
9 Radio Room
11 Superficial Damage
ATTACK FROM: 6 O'CLOCK
HIGH
ROLL AREA HIT
2-3 Superficial Damage
uu" о
TÄ: жар:
кетті ан Fuselage
EN ВЕНЕ
VERTICAL
ROLL AREA HIT
2-3 Superficial Damage
5 Radio Room
7 а! Hits/
Fuselage (a)
P$ hot comp ти ENE
LEVEL
6 Wing-Attacking Side
LEVEL
ROLL AREA HIT
2-3 Superficial
6 Port Wing
8 Starboard Wing
LOW i | = i
LOW
ROLL AREA HIT
2 Nose
|| jalking Fuselage (a)
VERTICAL CLIMB
ROLL AREA HIT
2-3 Superficial Damage
—9À кш
Fuselage (a)
11 Waist
Notes: A ‘‘walking hits’’ result negates all other shell hits by this fighter for this attack, and does the following damage: a) 1 shell hit in each of the following sections—Nose, Pilot Compartment, Bomb Bay, Radio Room, Waist and Tail. b) 2 shell hits on each Wing. с) 1 shell hit in each of the following sections: Nose, Wing (attacking side), Waist, and Tail.
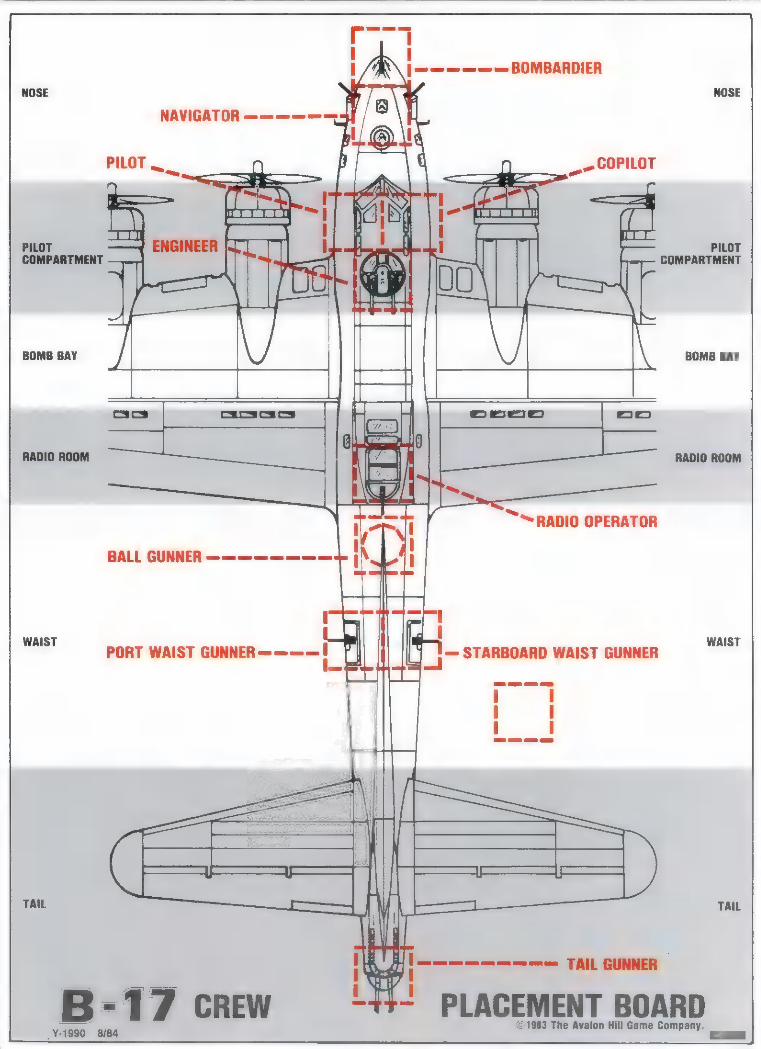
NAVIGATOR
PILOT _
та! PILO COMPARTMENT
ry)
үт) PILOT
COMPARTMENT
BOMB BAY
RADIO ROOM
“RADIO OPERATOR
BALL GUNNER
WAIST PORT WAIST GUNNER _ i i — STARBOARD WAIST GUNNER — "^57
је سا eu Ed ee
Н Fen TA онин
H- PLACEMENT BOARD р £ 3 The Avalon Hill Game Com;
.Y-1990 8/84 oid 8510006

B-1 NUMBER OF GERMAN FIGHTER WAVES IN NON-DESIGNATED TARGET ZONE Roll 1D.
ROLL WAVES
1-2 None 3-5 T 6 2*
*Go to Table B-3
B-2 NUMBER OF GERMAN FIGHTER WAVES IN DESIGNATED TARGET ZONE Roll 1D (a).
ROLL WAVES
0-3 1 (b) 4,5 2(b) 6 3 (b)
Notes: a) Poor or Bad weather over the target zone (from Table 0-1) sub- tracts 1 from this roll. b) Go to Table B-3.
B-3 ATTACKING FIGHTER WAVES Roll 2D for each separate wave from B-1 or B-2.
ROLL
11 12 13 1% 15
16 21
23 24 25 26 31 32 33 34 35 36 41 42 43 44 45 46 51 52 53 54 55 56 61 62 63 64 65
FIGHTER TYPES (a)—AREA OF ATTACK
109 6 High Two 109’s: 1:30 High and 9 Level Three 190's: 12 High, 1:30 High, 3 High Four 109's: 12 High, 10:30 High, 1:30 High, and 12 Level Five 190's: 12 High, 10:30 Level, 9 Level, 6 High, and Vertical Dive (b) NO ATTACKERS (c) One 190: Vertical Dive (а)
Two 110's: 12 Low and 10:30 Low Three 190's: 12 High, 3 Level, and 3 High Four 109's: 12 High, 3 High, 9 High, and 9 Level Five 190's: 12 High, 1:30 High, 3 High, 6 High, and 9 High NO ATTACKERS (c) 110: Vertical Climb (e) Two 190's: 10:30 High and 3 Level Three 109's: 12 Level, 12 High, and 1:30 Level 190: 10:30 High; 110: Vertical Climb (e) Two 190's: 12 Level and 1:30 Low NO ATTACKERS (c) 109: 12 High Two 109's: 12 Level and 1:30 High 190 12 High; Two 109's: 1:30 Level and 3 Level Two 190's: 12 High and 12 Low; 109: 1:30 Level; 110: 6 Low
0:30 Level and 12 Level; 110: 10:30 Low NO ATTACKERS (c) 190: 10:30 High Two 110's: 6 Level and 8 Low Three 110's: 12 Low, 10:30 Level, and 6 Low Four 109's: 12 Low, 12 Level, 12 High. and 9 High 190: 12 Low; Three 109's: 12 Level, 12 High, and 10:30 Level NO ATTACKERS (c) 109: Vertical Dive (d) 109: 3 Low; 110: 1:30 Low Three 190's: 10:30 High, 12 High, and 1:30 High Four 190's: 12 Level, 1:30 Level, 3 Low, and 9 High Five 109's: 12 Level, 3 High, 1:30 High, 6 High, and Vertical Dive (b) RANDOM EVENTS: See rules section Random Events
Notes: a) 109 = Me 109, 110 = Me 110, and 190 = FW 190. b) B-17 cannot fire at this fighter, nor may it be driven off by fighter cover. c) Fighters are driven off by other B-17’s. If out of formation, roll
d) Only the Top Turret or Radio Room guns may fire at this fighter
(both must roll a 6 to hit), and this fighter may not be driven off by fighter cover. e) Only the Ball Turret may fire at this fighter (it must roll a 3-6 to hit), and this fighter may be driven off by fighter cover.
ROLL
Roll 2D.
ROLL
12
B-7 RANDOM EVENTS TABLE
B-4 SHELL HITS BY AREA (a) Roll 2D per successful attacking fighter (b).
12/ 1:30 VERTICAL VERTICAL 10:30 3/9 6 DIVE CLIMB
3 4 6 3 4 2 3 5 2 4
2 3 4 2 3 2 3 3 1 2 1 2 2 1 2 1 1 2 1 1 1 2 2 1 2 2 3 3 1 2 2 3 à 2 3 2 3 5 2 4 a 5 7 4 5
Notes: a) If the attacking fighter is a FW 190, multiply the number of shell hits by 1' (rounding down). If the fighter was a Me 110, add 1 to the number of shell hits. b) After determining the number of shell hits the B-17 takes, go to Table B-5 to find out where the shells hit.
B-6 SUCCESSIVE ATTACKS Roll 2D for each fighter.
ROLL SUCCESSIVE ATTACK AREA
2 6 High 3 6 Level 4 S Level 5 12 Level 6 10:30 Level 7 12 High 8 1:30 Level 9 12 Level
10 3 Level 11 9 High
3 High
EVENT
Engine failure. Formation casualties. Roll 1D: 1-3 = You are now the lead bomber; 4-6 = Now tail bomber. Loose formation. Roll to determine enemy fighter waves in zone on Table B-1 or B-2 is +1. Aggressive ‘‘Little Friends’’. Roll for fighter cover defense on Table M-4 is +1 for the remainder of the mission.
Tight formation. Roll to determine enemy fighter waves in zone on Table B-1 or B-2is —1. Rabbit's foot. You may re-roll any one die or dice roll. Tight formation. See result #6 above. Bad Luftwaffe communications. Extreme cold. Roll 1D for each gun position: 1-5 = No effect; 6 = Gun jammed. Ace for a day. Roll 1D: 1,2 = Engineer; 3,4 = Ball Gunner; 5-6 = Tail Gunner. This gunner +1 to hit on Table M-1 for remainder of the mission. Mid-air accident.
Notes: See rules section Random Events for notes to the above results.
8510006
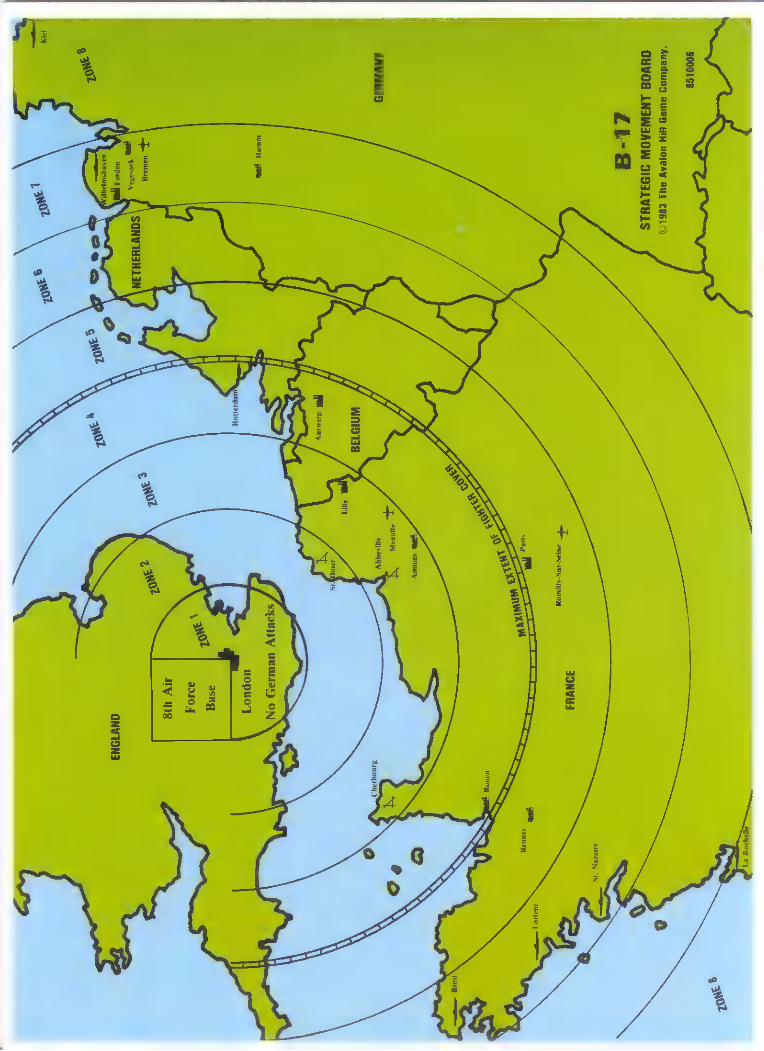
2124904
1
SN
NS
= Qu
*Kueduio
aures
ШН
иојелу
эці
28610
ануоа
LNIWJAOW
219311915
LL-8
9000158
JINVHA
-- suyag-ang-<qsoy
£5 anno
ИТТЕ т
ffe
џешла ON
порнот aseg
32104
ary wg
ee
GNVTONA 72
QN
N
a
S 1
ot S
Py 13%
43%
SN
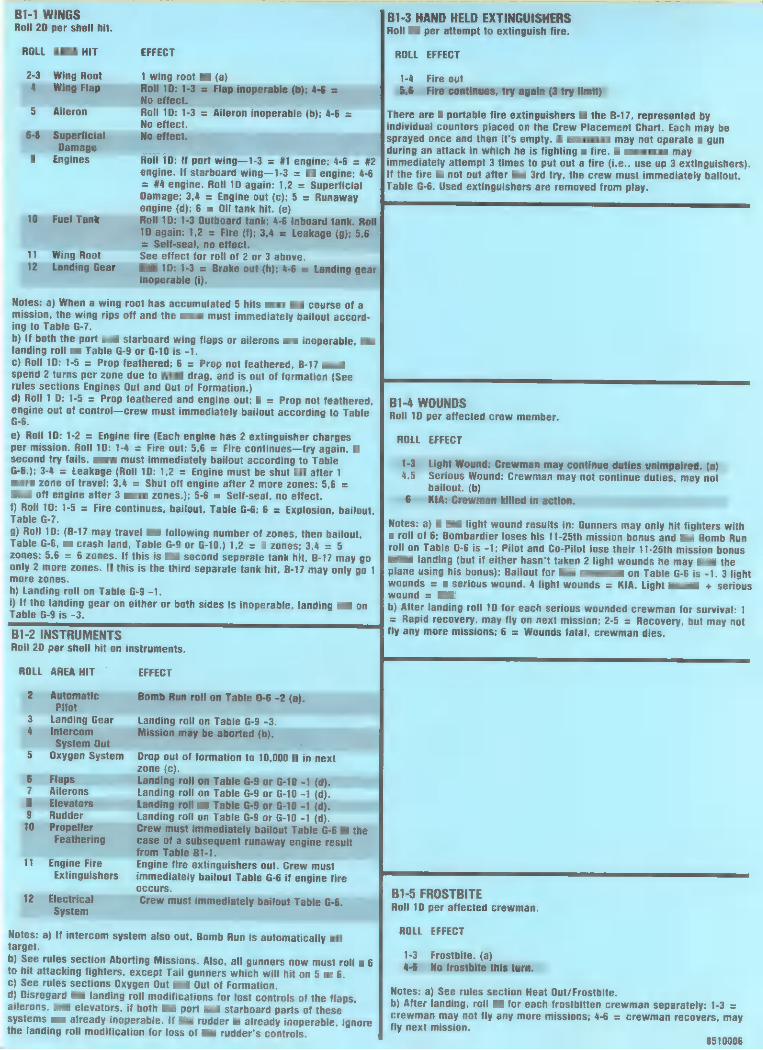
B1-1 WINGS B1-3 HAND HELD EXTINGUISHERS Roll 2D per shell hit. Roll 2D per attempt to extinguish fire.
ROLL AREA HIT EFFEGT ROLL EFFECT
2-3 Wing Root 1 wing root hit (a) l-4 Fire out - 4 Wing Flap Roll 1D: 1-3 = Flap inoperable (b); 4-6 = 5,8 Fire continues, try again (3 try limit)
No effect. 5 | 5 Aileron Roll 1D: 1-3 = Aileron inoperable (b); 4-6 = There are 5 portable fire extinguishers in the B-17, represented by
No effect. individual counters placed on the Crew Placement Chart. Each may be 6-8 Superficial No effect. sprayed once and then it's empty. A crewman may not operate a gun
Damage RS during an attack in which he is fighting a fire. A crewman may 9 Engines Roll 1D: If port wing—1-3 = #1 engine; 4-6 = #2 immediately attempt 3 times to put out a fire (i.e., use up 3 extinguishers).
engine. If starboard wing—1-3 = #3 engine; 4-6 = #4 engine. Roll 1D again: 1,2 = Superficial Damage; 3,4 = Engine out (c); 5 = Runaway engine (d); 6 = Oil tank hit. (e)
10 Fuel Tank Roll 1D: 1-3 Outboard tank; 4-6 Inboard tank. Roll 1D again: 1,2 = Fire (1); 3,4 = Leakage (g); 5,6 = Self-seal, no effect.
If the fire is not out after the 3rd try, the crew must immediately bailout, Table G-6. Used extinguishers are removed from play.
11 Wing Root See effect for roll of 2 or 3 above. 12 Landing Gear Roll 1D: 1-3 — Brake out (h); 4-6 = Landing gear
inoperable (i).
Notes: a) When a wing root has accumulated 5 hits over the course of a mission, the wing rips off and the crew must immediately bailout accord- ing to Table G-7. b) If both the port and starboard wing flaps or ailerons are inoperable, the landing roll on Table G-9 or G-10 is -1. с) Roll 1D: 1-5 = Prop feathered; 6 = Prop not feathered, B-17 must spend 2 turns per zone due to wind drag, and is out of formation (See rules sections Engines Out and Out of Formation.) d) Roll 1 D: 1-5 = Prop feathered and engine out; 6 = Prop not feathered, engine out of control—crew must immediately bailout according to Table G-6.
e) Roll 1D: 1-2 = Engine fire (Each engine has 2 extinguisher charges per mission. Roll 1D: 1-4 = Fire out; 5,6 = Fire continues—try again. If second try fails, crew must immediately bailout according to Table G-6.); 3-4 = Leakage (Roll 1D: 1,2 = Engine must be shut off after 1 more zone of travel; 3,4 = Shut off engine after 2 more zones; 5,6 = Shut off engine after 3 more zones.); 5-6 = Self-seal, no effect. 1) Roll 1D: 1-5 = Fire continues, bailout, Table G-6; 6 = Explosion, bailout, Table G-7. g) Roll 1D; (B-17 may travel the following number of zones, then bailout, Table G-6, or crash land, Table G-9 or G-10.) 1,2 = 4 zones; 3,4 = 5 zones; 5,6 = 6 zones. If this is the second separate tank hit, B-17 may go only 2 more zones. If this is the third separate tank hit, B-17 may only go 1 more zones. h) Landing roll on Table G-9 -1. i) If the landing gear on either or both sides is inoperable, landing roll on Table 6-9 is -3.
B1-2 INSTRUMENTS Roll 2D per shell hit on instruments.
B1-4 WOUNDS Roll 1D per affected crew member.
ROLL EFFECT
1-3 Light Wound: Crewman may continue duties unimpaired. (a) 4,5 Serious Wound: Crewman may not continue duties, may not
bailout. (b) 6 KIA: Crewman killed in action.
Notes: a) A 2nd light wound results in: Gunners may only hit fighters with à roll of 6; Bombardier loses his 11-25th mission bonus and the Bomb Run roll on Table 0-6 is -1; Pilot and Co-Pilot lose their 11-25th mission bonus when landing (but if either hasn't taken 2 light wounds he may land the plane using his bonus); Bailout for this crewman on Table G-6 is -1. 3 light wounds = a serious wound. 4 light wounds = KIA. Light wound + serious wound = KIA. b) After landing roll 1D for each serious wounded crewman for survival: 1 = Rapid recovery, may fly on next mission; 2-5 = Recovery, but may not fly any more missions; 6 = Wounds fatal, crewman dies.
ROLL AREA HIT ` EFFECT
2 панне Bomb Run roll оп Table 0-6 -2 (a). jot
3 Landing Gear Landing roll on Table G-9 -3. 4 Intercom Mission may be aborted (b).
System Out B 5 Oxygen System Drop out of formation to 10,000 ft in next
zone (c). 6 Flaps Landing roll on Table 6-9 ог 6-10 -1 (9). 7 Ailerons Landing roll on Table G-9 or G-10 -1 (d). 8 Elevators - Landing roll on Table G-9 or G-10 -1 (d). 9 Rudder Landing roll on Table G-9 or G-10 -1 (d). 10 Propeller Crew must immediately bailout Table G-6 in the
Feathering case of a subsequent runaway engine result from Table B1-1.
11 Engine Fire Engine fire extinguishers out. Crew must Extinguishers immediately bailout Table G-6 if engine fire
occurs. B1-5 FROSTBITE 12 oe Crew must immediately bailout Table G-6. Roll 1D per affected crewman.
Li Notes: a) If intercom system also out, Bomb Run is automatically off ЕС target. b) See rules section Aborting Missions. Also, all gunners now must roll a 6 to hit attacking fighters, except Tail gunners which will hit on 5 or 6. c) See rules sections Oxygen Out and Out of Formation. d) Disregard the landing roll modifications for lost controls of the flaps, ailerons, and elevators, if both the port and starboard parts of these Systems are already inoperable. If the rudder is already inoperable, ignore the landing roll modification for loss of the rudder's controls.
1-3 Frostbite. (a)
4-6 No frostbite this turn.
Notes: a) See rules section Heat Out/Frostbite. b) After landing, roll 1D for each frostbitten crewman separately: 1-3 = crewman may not fly any more missions; 4-6 = crewman recovers, may fly next mission.
8510006
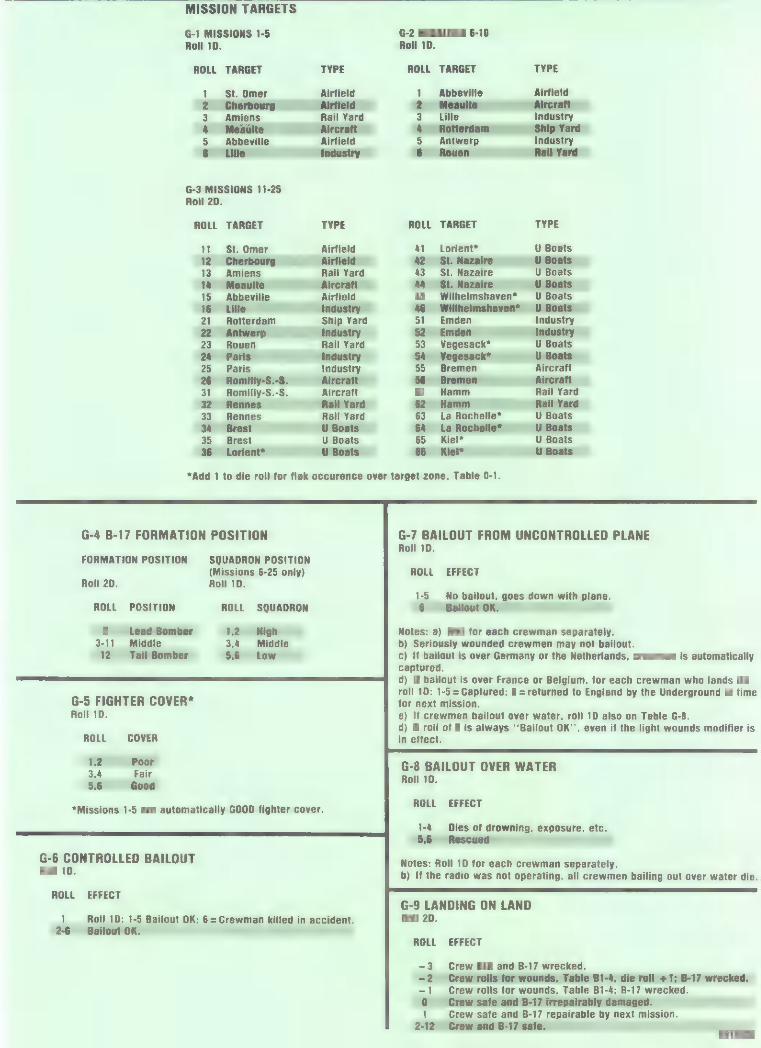
MISSION TARGETS
G-1 MISSIONS 1-5 Roll 1D.
ROLL TARGET
1, St. Omer 22 Cherbourg 5 à E
5 Abbeville 5 Lille
G-3 MISSIONS 11-25 Roll 2D.
ROLL TARGET
11 St. Omer 12-2 u 13 Amiens 1^ Meaulte 15. Abbeville 16 Lille 21 Rotterdam 22 23 Rouen 24 Paris 25 Paris : 26 Romilly-S.-S. 31 Romilly-S.-S. 32 Rennes 33 Rennes 34 Brest 35 Brest =
.36 Lorient*
TYPE
Airfield
Airfield Rail Yard Aircraft Airfield Industry Ship Yard Industry Rail Yard Industry Industry Aircraft Aircraft Rail Yard Rail Yard U Boats
G-2 MISSIONS 6-10
ROLL
1
ROLL
41 42 43 A 45 46 51 52 53 54 55 56 61 62 63 64 65 66
TARGET
TARGET
Lorient* St. Nazaire St. Nazaire St. Nazaire Wilhelmshaven* Willhelmshaven* Emden Emden қ Vegesack*
La Rochelle* La Rochelle* Kiel* Kiel*
*Add 1 to die roll for flak occurence over target zone, Table 0-1.
FORMATION POSITION
Roll 2D.
ROLL POSITION
2 Lead Bomber 3-1 Middle 12 Tail Bomber
G-5 FIGHTER COVER* Roll 1D.
ROLL COVER
12 Poor 3,4 Fair
5.6 Good
G-4 B-17 FORMATION POSITION
SQUADRON POSITION (Missions 6-25 oniv) Roll 1D.
ROLL
1.2 3.4 5,5
High Middle Low
*Missions 1-5 are automatically GOOD fighter cover.
G-6 CONTROLLED BAILOUT Roll 1D.
ROLL EFFECT
SQUADRON
1 Roll 1D: 1-5 Bailout OK; 6 = Crewman killed in accident. 2-6 Bailout OK.
1-5 6
1-4 5,6
-3 -2 -1 0
ROLL
1 2-2
G-7 BAILOUT FROM UNCONTROLLED PLANE Roll 1D.
ROLL EFFECT
Airfield
TYPE
U Boats Industry Industry U Boats U Boats Aircraft Aircraft Rail Yard Rail Yard U Boats U Boats U Boats U Boats
No bailout, goes down with plane. Bailout OK.
ROLL EFFECT
Notes: a) Roll for each crewman separately. b) Seriously wounded crewmen may not bailout. c) If bailout is over Germany or the Netherlands, crewman is automatically captured. d) If bailout is over France or Belgium, for each crewman who lands OK гой 10: 1-5 = Captured; 6 - returned to England by the Underground in time for next mission. e) If crewmen bailout over water, roll 1D also on Table G-8. d) A roll of 6 is always ‘‘Bailout OK'’, even if the light wounds modifier is in effect.
G-8 BAILOUT OVER WATER Roll 1D.
Dies of drowning, exposure, etc.
G-9 LANDING ON LAND Roll 2D.
EFFECT
Notes: Roll 1D for each crewman separately. b) If the radio was not operating, all crewmen bailing out over water die.
Crew KIA and B-17 wrecked. Crew rolis for wounds, Table B1-4, die roll +1; B-17 wrecked. Crew rolls for wounds, Table B1-4; B-17 wrecked. Crew safe and B-17 irrepairably damaged. Crew safe and B-17 repairable by next mission. Crew and B-17 safe.
8510006
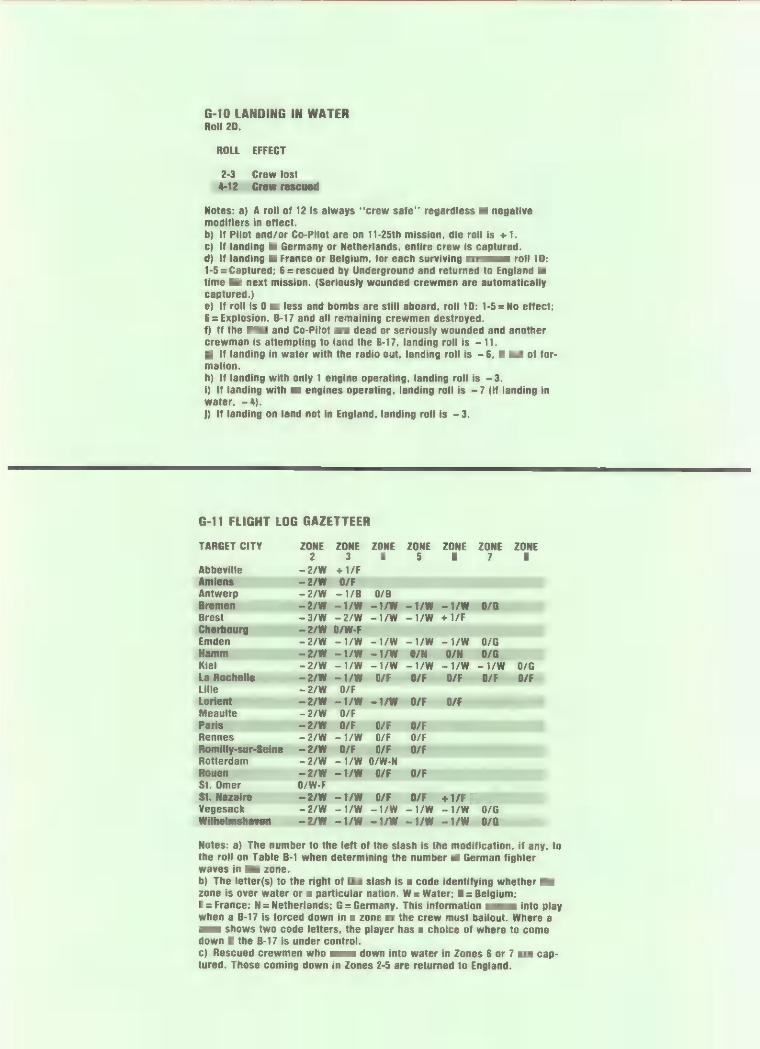
G-10 LANDING IN WATER Roll 2D.
ROLL EFFECT
2-3 Crew lost 4-12 Crew rescued
Notes: a) A roll of 12 is always ''crew safe'' regardless of negative modifiers in effect. b) If Pilot and/or Co-Pilot are on 11-25th mission, die roll is +1. €) If landing in Germany or Netherlands, entire crew is captured. d) If landing in France or Belgium, for each surviving crewman roll 1D: 1-5 = Captured; 6=rescued by Underground and returned to England in time for next mission. (Seriously wounded crewmen are automatically captured.) e) If roll is 0 or less and bombs are still aboard, roll 1D: 1-5 z No effect; 6 = Explosion, B-17 and all remaining crewmen destroyed. f) If the Pilot and Co-Pilot are dead or seriously wounded and another crewman is attempting to land the B-17, landing roll is – 11. g) If landing in water with the radio out, landing roll is —6, if out of for- mation. h) If landing with only 1 engine operating, landing roll is —3. i) If landing with no engines operating, landing roll is —7 (if landing in water, – 4). j) If landing on land not in England, landing roll is —3.
G-11 FLIGHT LOG GAZETTEER
TARGET CITY ZONE ZONE ZONE ZONE ZONE ZONE ZONE 2 3 4 5 6 7 8
Abbeville -2/W 41/F Amiens -2/W 0/F Antwerp -2/W -1/B 0/В Bremen -2/W -1/W -1/W -1/W -1/W 0/G Brest -3/W -2/W -1/W -1/W *l/F Cherbourg |. -2/W 0/W-F Emden -2/W -1/W -1/W -1/W -1/W 0/G Hamm -2/W -1/W -1/W 0/N 0/N 0/6 Kiel -2/W -1/W -1/W -1/W -1/W -1/W 0/6 La Rochelle -2/W -1/W OF OF OF OF OF Lille -2/W O/F Lorient -2/W -1/W -1/W 0/F OF Meaulte -2/W O/F
Paris -2/W МЕ OF OF Rennes -2/W -1/W Q/F 0/F Romilly-sur-Seine -2/W O/F 0/F O/F Rotterdam -2/W -1/W 0/W-N
Rouen -2/W -1/W Q/F OF St. Omer 0/W-F St. Nazaire -2/W -YW Е Е +1/Е | Vegesack -2/W -1/W -1/W -1/W -1/W 0/6 Wilhelmshaven -2/W -1/W -1/W -1/W -1/W 0/G
Notes: a) The number to the left of the slash is the modification, if any, to the roll on Table B-1 when determining the number of German fighter waves in the zone. b) The letter(s) to the right of the slash is a code identifying whether the zone is over water or a particular nation. W = Water; B = Belgium; F = France; N= Netherlands; G= Germany. This information comes into play when a B-17 is forced down in a zone or the crew must bailout. Where a zone shows two code letters, the player has a choice of where to come down if the B-17 is under control. c) Rescued crewmen who come down into water in Zones 6 or 7 are cap- tured. Those coming down in Zones 2-5 are returned to England.
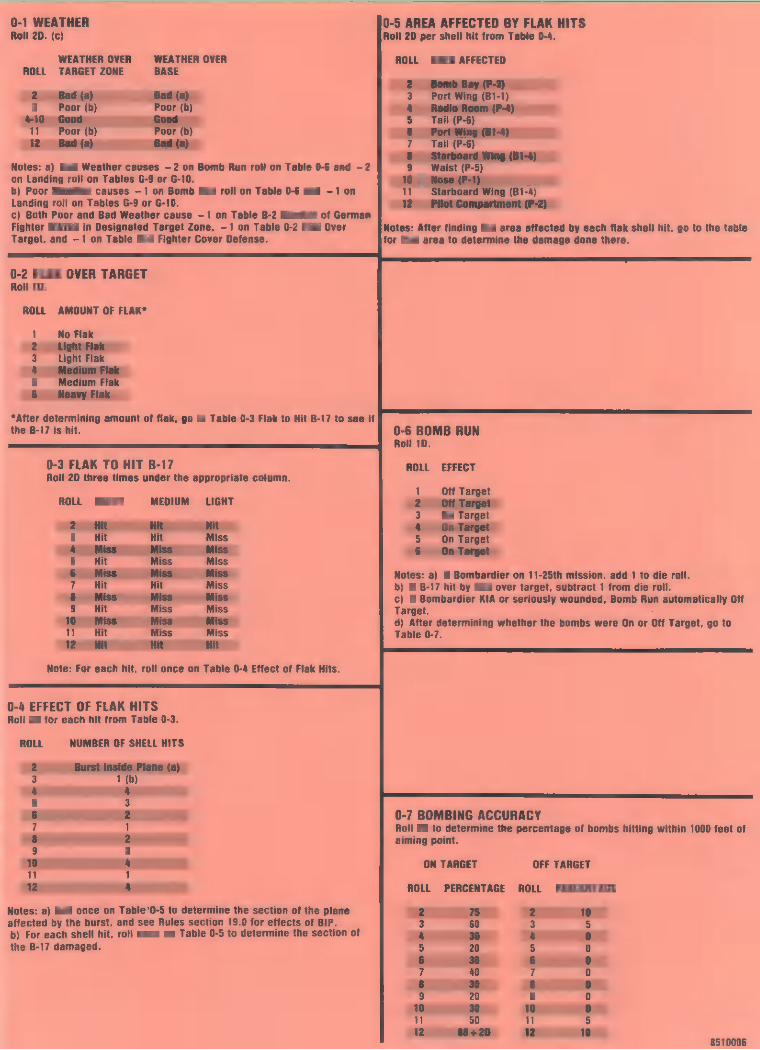
0-1 WEATHER Roll 2D. (c)
0-5 AREA AFFECTED BY FLAK HITS Roll 2D per shell hit from Table 0-4.
WEATHER OVER WEATHER OVER ROLL TARGET ZONE BASE
ROLL AREA AFFECTED
2 Bomb Bay (P-3) 2 Bad(a) Вай (а) 3 Port Wing (B1-1) 3 Poor (b) Poor (b) 4 Radio Room (P-
4-10 Good Е Good 5 Tail (P-6) 11 Poor (b) Poor (b) 6 Port Wing (B1-4) 12 Вай (а) | Bad (а) 7 Тай (Р-6)
8 Starboard Wing (B1-4) Notes: a) Bad Weather causes —2 on Bomb Run roll on Table 0-6 and —2 9 Waist (P-5) on Landing roll on Tables G-9 or G-10. 19 - maU x b) Poor Weather causes —1 on Bomb Run roll on Table 0-6 and —1 on 11 Starboard Wing (B1-4) Landing roll on Tables G-9 or G-10. 12 Pilot Compartment c) Both Poor and Bad Weather cause — 1 on Table B-2 Number of German Fighter Waves in Designated Target Zone, – 1 on Table 0-2 Fiak Over Notes: After finding the area affected by each flak shell hit, go to the table Target, and —1 on Table M-4 Fighter Cover Defense. for that area to determine the damage done there.
0-2 FLAK OVER TARGET Roll 1D.
ROLL AMOUNT OF FLAK*
No Flak
Medium Flak .8 Heavy Flak
“After determining amount of flak, go to Table 0-3 Fiak to Hit B-17 to see if the B-17 is hit.
1 2 цот Flak 3 Light Flak о 5
0-6 BOMB RUN Roll 1D.
0-3 FLAK TO HIT B-17 ROLL EFFECT Roll 2D three times under the appropriate column.
1 Off Target ROLL HEAVY MEDIUM LIGHT 2 off Target
ad | ‹ 3 On Target PITS eee kit 4 On Target 3 Hit Hit Miss 5 On Target 4 Miss Miss. Miss | 6 On at 5 Hit Miss Miss на 6 Miss Miss Miss Notes: a) If Bombardier on 11-25th mission, add 1 to die roll. 7 Hit Hit Miss b) If B-17 hit by flak over target, subtract 1 from die roll. 8 Miss Miss Miss c) If Bombardier KIA or seriously wounded, Bomb Run automatically Off 8 Hit Miss Miss Target. >
10 Miss Miss Miss d) After determining whether the bombs were On or Off Target, go to 11 Hit Miss Miss Table 0-7. 12 Hit Hit Hit
Note: For each hit, roll once on Table 0-4 Effect of Flak Hits.
0-4 EFFECT OF FLAK HITS Roll 2D for each hit from Table 0-3.
ROLL NUMBER OF SHELL HITS
2 Burst Inside Plane (a) 3 1 (b) 4 % 5 3 6 2 0-7 BOMBING ACCURACY 7 1 Roll 2D to determine the percentage of bombs hitting within 1000 feet of
АЁ E aiming point. 9 3 n Y © ON TARGET OFF TARGET
12 % ROLL PERCENTAGE ROLL PERCENTAGE
Notes: a) Roll once on Table'0-5 to determine the section of the plane 2 75 2 10 affected by the burst, and see Rules section 19.0 for effects of BIP. 3 60 3 5 b) For each shell hit, roll once on Table 0-5 to determine the section of % 30 4 E
the B-17 damaged. 5 20 5 0 6 30 6 0 7 40 7 0
8 30 8 2 20 9 0
10 30 10 0 11 50 11 5 12 88-20 12 10
8510006
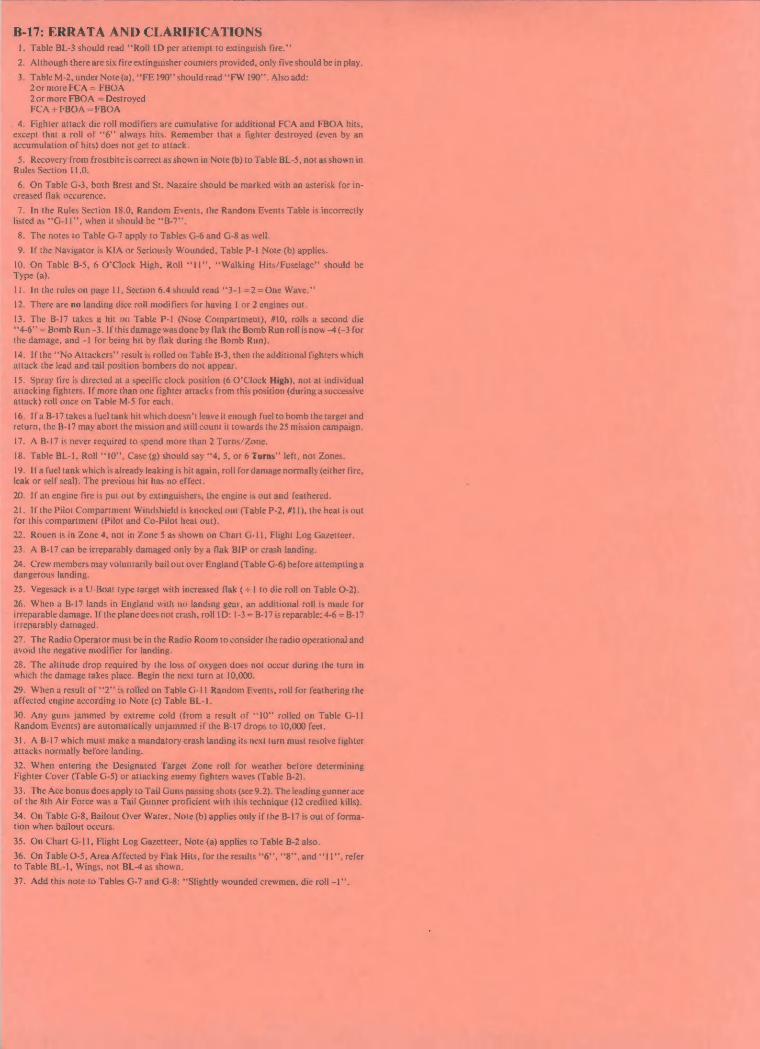
B-17: ERRATA AND CLARIFICATIONS 1, Table BL-3 should read ‘‘Roll 1D per attempt to extinguish fire.""
2. Although thereare six fire extinguisher counters provided, only five should be in play.
3. Table M-2, under Note (a), **FE 190" should read **FW 190"'. Also add: 2ormore FCA = FBOA 2ormore FBOA =Destroyed FCA + FBOA - FBOA
. 4. Fighter attack die roll modifiers are cumulative for additional FCA and FBOA hits, except that a roll of **6'' always hits. Remember that a fighter destroyed (even by an accumulation of hits) does not get to attack.
5. Recovery from frostbite is correct as shown in Note (b) to Table BL-5, not as shown in Rules Section 11.0.
6. On Table G-3, both Brest and St. Nazaire should be marked with an asterisk for in- ereased flak occurence.
7. In the Rules Section 18.0, Random Events, the Random Events Table is incorrectly listed as *'G-11"', when it should be ''B-7'.
8. The notes to Table G-7 apply to Tables G-6 and G-8 as well.
9. If the Navigator is KIA or Seriously Wounded, Table P-1 Note (b) applies.
10. On Table B-5, 6 O'Clock High, Roll 11”, **Walking Hits/Fuselage" should be Type (a).
M. In the rules on page 11, Section 6.4 should read **3-1 22 - One Wave."
12. There are no landing dice roll modifiers for having 1 or 2 engines out.
13. The B-17 takes a hit on Table P-1 (Nose Compartment), /10, rolls a second die “4-6” - Вот Run -3. If this damage was done by flak the Bomb Run roll is now -4 (-3 for the damage, and -1 for being hit by flak during the Bomb Run).
14. If the “No Attackers” result is rolled on Table B-3, then the additional fighters which attack the lead and tail position bombers do not appear.
15. Spray fire is directed at a specific clock position (6 O'Clock High), not at individual attacking fighters. If more than one fighter attacks from this position (during a successive attack) roll once on Table M-5 for each.
16. Ifa B-17takesa fuel tank hit which doesn't leave it enough fuel to bomb the target and return, the B-17 may abort the mission and still count it towards the 25 mission campaign.
17. A B-17 is never required to spend more than 2 Turns/Zone.
18. Table BL-1, Roll ''10'', Case (g) should say ''4, 5, or 6 Turns" left, not Zones.
19. Ifa fuel tank which is already leaking is hit again, roll for damage normally (either fire, leak or self seal). The previous hit has no effect.
20. If an engine fire is put out by extinguishers, the engine is out and feathered.
21. If the Pilot Compartment Windshield is knocked out (Table P-2, #11), the heat is out for this compartment (Pilot and Co-Pilot heat out).
22. Rouen is in Zone 4, not in Zone 5 as shown on Chart G-11, Flight Log Gazetteer.
23. A B-17 can be irreparably damaged only by a flak BIP or crash landing.
24. Crew members may voluntarily bail out over England (Table G-6) before attempting a dangerous landing.
25. Vegesack is a U-Boat type target with increased flak (+ 1 to die roll on Table O-2).
26, When a B-17 lands in England with no landing gear, an additional roll is made for irreparable damage. If the plane does not crash, roll 1D: 1-3 = B-17 is reparable; 4-6 = B-17 irreparably damaged.
27. The Radio Operator must be in the Radio Room to consider the radio operational and avoid the negative modifier for landing.
28. The altitude drop required by the loss of oxygen does not occur during the turn in which the damage takes place. Begin the next turn at 10,000.
29. When a result of *'2"' is rolled on Table G-11 Random Events, roll for feathering the affected engine according to Note (c) Table BL-1.
30. Any guns jammed by extreme cold (from a result of **10" rolled on Table G-11 Random Events) are automatically unjammed if the B-17 drops to 10,000 feet.
31. A B-17 which must make a mandatory crash landing its next turn must resolve fighter attacks normally before landing.
32. When entering the Designated Target Zone roll for weather before determining Fighter Cover (Table G-5) or attacking enemy fighters waves (Table B-2).
33. The Ace bonus does apply to Tail Guns passing shots (see 9.2). The leading gunner ace of the 8th Air Force was a Tail Gunner proficient with this technique (12 credited kills).
34. On Table G-8, Bailout Over Water, Note (b) applies only if the B-17 is out of forma- tion when bailout occurs.
35. On Chart G-11, Flight Log Gazetteer, Note (a) applies to Table B-2 also.
36. On Table O-5, Area Affected by Flak Hits, for the results 6", '8'', and **11"*, refer to Table BL-1, Wings, not BL-4 as shown.
37. Add this note to Tables G-7 and G-8: *‘Slightly wounded crewmen, die roll -1””.

P-5 WAIST Roll 2D per shell hit.
ROLL AREA HIT EFFECT
2 Oxygen Supply Roll 1D: 1,2 = Port Gunner; 3,4 = Starboard Hit Gunner; 5 = Ball Gunner; 6 = Fire, Waist
0x out. Roll to extinguish fire on Table
4,5 e No effect. س
на No effect. i 9 Ball Turret Roll 10: 1,2 = roll wound for gunner on Table
B1-4; 3 = gunner's heat out (b); 4,5 = guns out; 6 = turret mechanism ам (с).
Suit Heaters Roll 1D: 1-3 = Port Gunner heat out; 4-6 = Starboard Gunner heat out. (b)
Notes: a) See rules section Oxygen Out. b) See rules section Heat Out/Frostbite. c) Gunner is trapped in turret, may not fire guns, and may not bail out. If landing gear is inoperable, gunner is automatically KIA on landing.
SS
P-6 TAIL SECTION Roll 2D per shell hit.
ROLL AREA HIT EFFECT
2 Suit Heater Tail Gunner's heat out. (a)
4 Tail Turret Tail A TAA SA PR TEM BIA XE m inoper:
MT ERN No effect.
11 den Supply Roll 1D: 1-5 = 1 oxygen supply hit; 6 = Fire, and Tail oxygen out (d). Roll to extinguish fire on Table B1-3.
Notes: a) See rules section Heat Out/Frostbite. b) If both elevators are inoperable, landing rolls on Tables G-9 and G-10 are -1. 2 If tailplane root accumulates 3 hits during mission, tailplane rips off. If
ine is off, landing rolls on Tables G-9 and G-10 are -1; if both les come off, bailout immediately on Table G-7.
d) See rules section Oxygen Out.

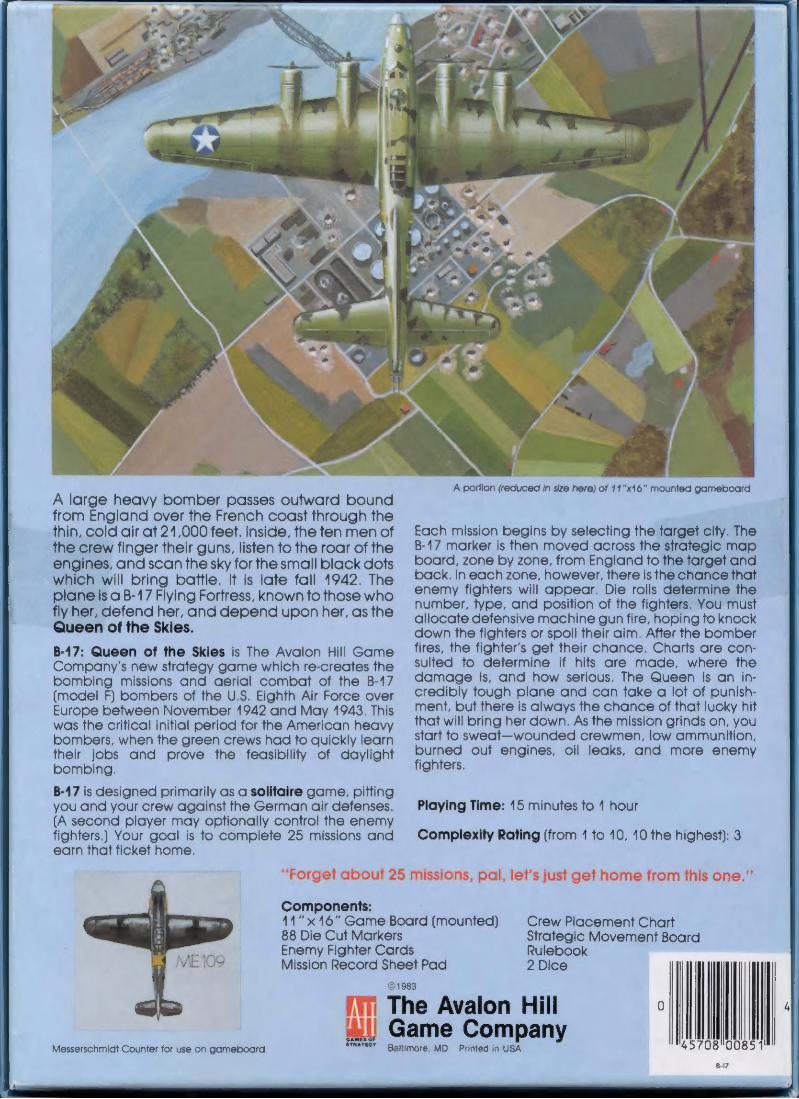
S „_
A large heavy bomber passes outward bound from England over the French coast through the thin, cold air at 24,000 feet. Inside, the ten men of the crew finger their guns, listen to the roar of the engines, and scan the sky for the small black dots which will bring battle. It is late fall 1942. The plane is a B-17 Flying Fortress, known to those who fly her, defend her, and depend upon her, as the Queen of the Skies.
B-17: Queen of the Skies is The Avalon Hill Game Company's new strategy game which re-creates the bombing missions and aerial combat of the B-17 (model F) bombers of the U.S. Eighth Air Force over Europe between November 1942 and May 1943. This was the critical initial period for the American heavy bombers, when the green crews had to quickly learn their jobs and prove the feasibility of daylight bombing.
B-17 is designed primarily as a solitaire game, pitting you and your crew against the German air defenses. (A second player may optionally control the enemy fighters.) Your goal is to complete 25 missions and earn that ticket home.
Components: 11"x16" Game Board (mounted) 88 Die Cut Markers Enemy Fighter Cards Mission Record Sheet Pad
A portion (reduced in size here) of 11"x16" mounted ad
Each mission begins by selecting the target city. The B-17 marker is then moved across the strategic map board, zone by zone, from England to the target and back. In each zone, however, there is the chance that enemy fighters will appear. Die rolls determine the number, type, and position of the fighters. You must allocate defensive machine gun fire, hoping to knock down the fighters or spoil their aim. After the bomber fires, the fighter's get their chance. Charts are con- sulted to determine if hits are made, where the damage is, and how serious. The Queen is an in- credibly tough plane and can take a lot of punish- ment, but there is always the chance of that lucky hit that will bring her down. As the mission grinds on, you start to sweat—wounded crewmen, low ammunition, burned out engines, oil leaks, and more enemy fighters.
Playing Time: 15 minutes to 1 hour
Complexity Rating (from 1 to 10, 10 the highest): 3
Crew Placement Chart Strategic Movement Board Rulebook 2 Dice
©1983
The Avalon Hill Game Company Games OF
STRATEGT Baltimore, MD: Printed in USA Messerschmidt Counter for use on gameboard 45708"00851
8-17