Embed Size (px)
Citation preview
SYSMAC-SE2SYSMAC-TA4L
Automation Software Sysmac Studio
Startup Guide
for Project Version Control Function
P125-E1-02
CopyrightsMicrosoft product screen shots reprinted with permission from Microsoft Corporation.
All rights reserved. No part of this publication may be reproduced, stored in a retrieval system, or transmitted, in any form, or by any means, mechanical, electronic, photocopying, recording, or otherwise, without the prior written permission of OMRON.
No patent liability is assumed with respect to the use of the information contained herein. Moreover, because OMRON is constantly striving to improve its high-quality products, the information contained in this manual is subject to change without notice. Every precaution has been taken in the preparation of this manual. Neverthe-less, OMRON assumes no responsibility for errors or omissions. Neither is any liability assumed for damages resulting from the use of the information contained in this publication.
• Sysmac and SYSMAC are trademarks or registered trademarks of OMRON Corporation in Japan and other countries for OMRON factory automation products.
• Microsoft, Windows, Excel, and Visual Basic are either registered trademarks or trademarks of Microsoft Corpora-tion in the United States and other countries.
• EtherCAT® is registered trademark and patented technology, licensed by Beckhoff Automation GmbH, Germany.
• ODVA, CIP, CompoNet, DeviceNet, and EtherNet/IP are trademarks of ODVA.
• The SD and SDHC logos are trademarks of SD-3C, LLC.
• NVIDIA, the NVIDIA logo, GeForce, and the GeForce logo are the trademarks or registered trademarks of NVIDIA Corporation in the USA and other countries.
• ATITM, RadeonTM is a trademark of Advanced Micro Devices, Inc..
• Celeron, Intel and Intel Core are trademarks of Intel Corporation in the U.S. and / or other countries.
• Git and the Git logo are either registered trademarks or trademarks of Software Freedom Conservancy, Inc., corporate home of the Git Project, in the United States and/or other countries.
Other company names and product names in this document are the trademarks or registered trademarks of their respective companies.
Trademarks
NOTE
1
Sysmac Studio Project Version Control Function Startup Guide (P125)
Table of Contents
INTRODUCTION ································································································ 3
Intended Audience ...................................................................................................... 3
Applicable Products ..................................................................................................... 3
Terms and Conditions Agreement .............................................................................. 3
Safety Precautions ...................................................................................................... 4
Regulations and Standards ......................................................................................... 4
Software Licenses and Copyrights ................................................................. 4
Revision History ........................................................................................................... 4
1 OVERVIEW ····························································································· 5
2 TERMINOLOGY ······················································································· 6
3 SYSTEM CONFIGURATIONS ····································································· 7
3.1 Basic Configuration ........................................................................................ 7
3.2 Configurations to Share the Repository with Multiple Users .......................... 7
3.3 Basic operation of Version Control System .................................................... 10
4 SCOPE OF THE VERSION CONTROL ························································· 11
5 SOFTWARE SETUP AND BASIC SETTINGS ················································ 12
5.1 Installing the Sysmac Studio .......................................................................... 12
5.2 Registering Sysmac Studio Team Development Option ................................ 12
5.3 Installing Git .................................................................................................... 12
5.4 Installing “TortoiseGit” .................................................................................... 18
5.5 Initial Setting of “TortoiseGit” .......................................................................... 21
5.6 Creating the shared folder and remote repository ......................................... 23
5.7 Additional Setting for “TortoiseGit” ................................................................. 25
6 PROJECT RECORD CONTROL ON SYSMAC STUDIO ·································· 27
6.1 Overview of Project Record Control Using the Version Control Function ..... 27
6.2 Operation Example of Record Control Function ............................................ 28
6.3 Preparing for Starting Project Control (Creating a Base Project and Saving It) ........................................................................................................................ 28
6.3.1 Creating a Base Project ..................................................................... 29
6.3.2 Registering the project in the Local Repository ................................. 30
6.3.3 Synchronizing the Local Repository and Remote Repository ........... 33
6.4 Updating the Project ....................................................................................... 37
2
Sysmac Studio Project Version Control Function Startup Guide (P125)
6.4.1 Changing the Project Data ................................................................. 37
6.4.2 Registering Changes to the Local Repository (Commit) ................... 37
6.4.3 Registering the Changes to the Remote Repository (Push).............. 39
6.5 Searching for a Project ................................................................................... 41
6.5.1 Updating the Local Repository ........................................................... 41
6.5.2 Displaying Project Logs ...................................................................... 42
6.5.3 Searching for the Revision ................................................................. 43
6.6 Comparing the Projects .................................................................................. 44
6.7 Reverting the Project ...................................................................................... 45
7 DEVELOPMENT BY MULTIPLE DEVELOPERS AND DERIVED DEVELOPMENT OF SYSMAC STUDIO PROJECT ········································································· 48
7.1 Utilization of version control function in development by multiple developers and derived development ........................................................................................... 48
7.2 Branch and Merge .......................................................................................... 50
7.3 Sysmac Studio Project Development by Multiple Developers ....................... 52
7.3.1 Sharing Edit Works to Concurrently Develop a Project by Multiple Developers ..................................................................................................... 52
7.3.2 Example of Dividing Tasks ................................................................. 53
7.3.3 Operating Procedure .......................................................................... 55
7.4 Derived Development of Sysmac Studio Projects ......................................... 98
7.4.1 An example of derived development .................................................. 98
7.4.2 Operation flow on the version control system .................................... 98
7.4.3 Operating Procedure .......................................................................... 100
3
Sysmac Studio Project Version Control Function Startup Guide (P125)
INTRODUCTION
Thank you for purchasing a Sysmac Studio Team Development Option. This manual contains operating procedure of basic functions of the Sysmac Studio Team Development Option and project version control function. Please read this manual and make sure you understand the operating procedure of the Sysmac Studio Team Development Option before you attempt to use it to build a control system.
Intended Audience
This manual is intended for the following personnel, who must also have knowledge of electrical systems (an electrical engineer or the equivalent). • Personnel in charge of introducing FA systems. • Personnel in charge of designing FA systems. • Personnel in charge of installing and maintaining FA systems. • Personnel in charge of managing FA systems and facilities. For programming, this manual is intended for personnel who understand the programming language specifications in international standard IEC 61131-3 or Japanese standard JIS B 3503.
Applicable Products
This manual covers the following products. • Sysmac Studio Team Development Option Part of the specifications and restrictions for the CPU Units are given in other manuals. Refer to Sysmac Studio Version 1 Operation Manual (Cat.No.W504) and Sysmac Studio Project Version Control Function Operation Manual (Cat.No. W589).
Terms and Conditions Agreement
• WARRANTY • The warranty period for the Software is one year from the date of purchase, unless otherwise
specifically agreed. • If the User discovers defect of the Software (substantial non-conformity with the manual), and return it
to OMRON within the above warranty period, OMRON will replace the Software without charge by offering media or download from OMRON’s website. And if the User discovers defect of media which is attributable to OMRON and return it to OMRON within the above warranty period, OMRON will replace defective media without charge. If OMRON is unable to replace defective media or correct the Software, the liability of OMRON and the User’s remedy shall be limited to the refund of the license fee paid to OMRON for the Software.
• LIMITATION OF LIABILITY
• THE ABOVE WARRANTY SHALL CONSTITUTE THE USER’S SOLE AND EXCLUSIVE REMEDIES AGAINST OMRON AND THERE ARE NO OTHER WARRANTIES, EXPRESSED OR IMPLIED, INCLUDING BUT NOT LIMITED TO, WARRANTY OF MERCHANTABILITY OR FITNESS FOR PARTICULAR PURPOSE. IN NO EVENT, OMRON WILL BE LIABLE FOR ANY LOST PROFITS OR OTHER INDIRECT, INCIDENTAL, SPECIAL OR CONSEQUENTIAL DAMAGES ARISING OUT OF USE OF THE SOFTWARE.
4
Sysmac Studio Project Version Control Function Startup Guide (P125)
• OMRON SHALL HAVE NO LIABILITY FOR DEFECT OF THE SOFTWARE BASED ON MODIFICATION OR ALTERNATION TO THE SOFTWARE BY THE USER OR ANY THIRD PARTY. OMRON SHALL NOT BE RESPONSIBLE AND/OR LIABLE FOR ANY LOSS, DAMAGE, OR EXPENSES DIRECTLY OR INDIRECTLY RESULTING FROM THE INFECTION OF OMRON PRODUCTS, ANY SOFTWARE INSTALLED THEREON OR ANY COMPUTER EQUIPMENT, COMPUTER PROGRAMS, NETWORKS, DATABASES OR OTHER PROPRIETARY MATERIAL CONNECTED THERETO BY DISTRIBUTED DENIAL OF SERVICE ATTACK, COMPUTER VIRUSES, OTHER TECHNOLOGICALLY HARMFUL MATERIAL AND/OR UNAUTHORIZED ACCESS.
• OMRON SHALL HAVE NO LIABILITY FOR SOFTWARE DEVELOPED BY THE USER OR ANY THIRD PARTY BASED ON THE SOFTWARE OR ANY CONSEQUENCE THEREOF.
• APPLICABLE CONDITIONS USER SHALL NOT USE THE SOFTWARE FOR THE PURPOSE THAT IS NOT PROVIDED IN THE ATTACHED USER MANUAL.
• CHANGE IN SPECIFICATION The software specifications and accessories may be changed at any time based on improvements and other reasons.
• ERRORS AND OMISSIONS The information in this manual has been carefully checked and is believed to be accurate; however, no responsibility is assumed for clerical, typographical, or proofreading errors, or omissions.
Safety Precautions
Refer to Sysmac Studio Version 1 Operation Manual (Cat.No.W504) and Sysmac Studio Project Version Control Function Operation Manual (Cat.No. W589).
Regulations and Standards
Software Licenses and Copyrights
This product incorporates certain third party software. The license and copyright information associated with this software is available at http://www.fa.omron.co.jp/nj_info_e/.
Revision History
Revision code appears as a suffix to the catalog number on the front and back covers of the guide.
Revision code Date Revised content
01 October 2017 Original production 02 April 2019 Revised Terms and Conditions Agreement
5
Sysmac Studio Project Version Control Function Startup Guide (P125)
1 OVERVIEW
As the scale of production machines increases, the following problems in the development of production machines are becoming more serious. • The development scale of controller programs has been increased and the development period has become
longer. • The workload of changing controller programs has increased due to the increased variation of production
machines To offer solutions for these issues, new development environment with the following features is now required. • Environment to develop controller programs with multiple developers • Development environment where changes made to the common program can be applied to relevant machines
with minimum operations Sysmac Studio will offer functions to control Sysmac Studio project versions (hereinafter referred to as Version Control Function) as a solution for these issues. The version control function realizes various control capabilities by combining the Sysmac Studio with an open source software version control system commonly used in software development. This document describes the procedures of installing the open source version control system, initial settings on Sysmac Studio, change record management which is the most basic function of the version control, development by multiple developers, and the steps to carry out derived development.

6
Sysmac Studio Project Version Control Function Startup Guide (P125)
2 TERMINOLOGY
This section explains the terms used in this document. Terms Description
Sysmac Studio Version Control Function
The function to control the changes and records of the Sysmac Studio projects. It is referred to as “Sysmac Studio version control function” or “version control function”.
Git™ An open source software used for version control. This works with the Sysmac Studio to control the versions of the Sysmac Studio projects.
“TortoiseGit”*1 Client software used for the version control system. We operate the version control functions using the “TortoiseGit” menus called from the Sysmac Studio.
Repository A location to save the data controlled by Git. The version controlled Sysmac Studio project data and its change records are saved.
Remote repository A repository on the network such as a server, or in a shared folder. Local repository A repository created in the computer of each user.
Development by multiple developers
To develop a project program sharing the program among multiple developers. It is important to manage the change contents and operation timing of each developer.
Derived development
To develop a machine program using a program of another machine according to the machine variation. It is important to reflect all changes made for the program of common functions to all the machines and to manage the changes for a specific machine.
Push Operation to apply the changes in the local repository to the remote repository Pull Operation to apply the changes in the remote repository to the local repository
Change set
Information of accumulated changes in a project. With a Sysmac Studio project, this means the information of changes such as adding a global variable or a ladder rung. The version control function of the Sysmac Studio uses “change set” as a chunk of changes to restore the project data to a certain state or to show the list of changes in the chronological order.
Commit
An operation to register a change set, a chunk of information of changes in the project data in the local repository which is controlled by Git. Sysmac Studio has its Save function but it saves data to the working folder. To register changes to the local repository, perform Commit. When you perform Commit, date/time and user name of the operation are automatically registered besides the change set. You can register comments (log messages) in addition, which makes it easy to search for change content.
Revision
When you perform Commit, a change set is registered in the repository with information that makes it easy to search for a change set. At that time, a revision number (a revision identification number) to uniquely identify the change set is automatically applied. When you revert the project to a specific change set, compare a change set with a project under editing, or branch and merge the project, use this revision number to specify the change set. The revision number used in Git is a hexadecimal value of 40 digits generated by the algorithm of SHA-1.
*1: "TortoiseGit” is open source software and can be downloaded from (https://tortoisegit.org/download/).
7
Sysmac Studio Project Version Control Function Startup Guide (P125)
3 SYSTEM CONFIGURATIONS
3.1 Basic Configuration
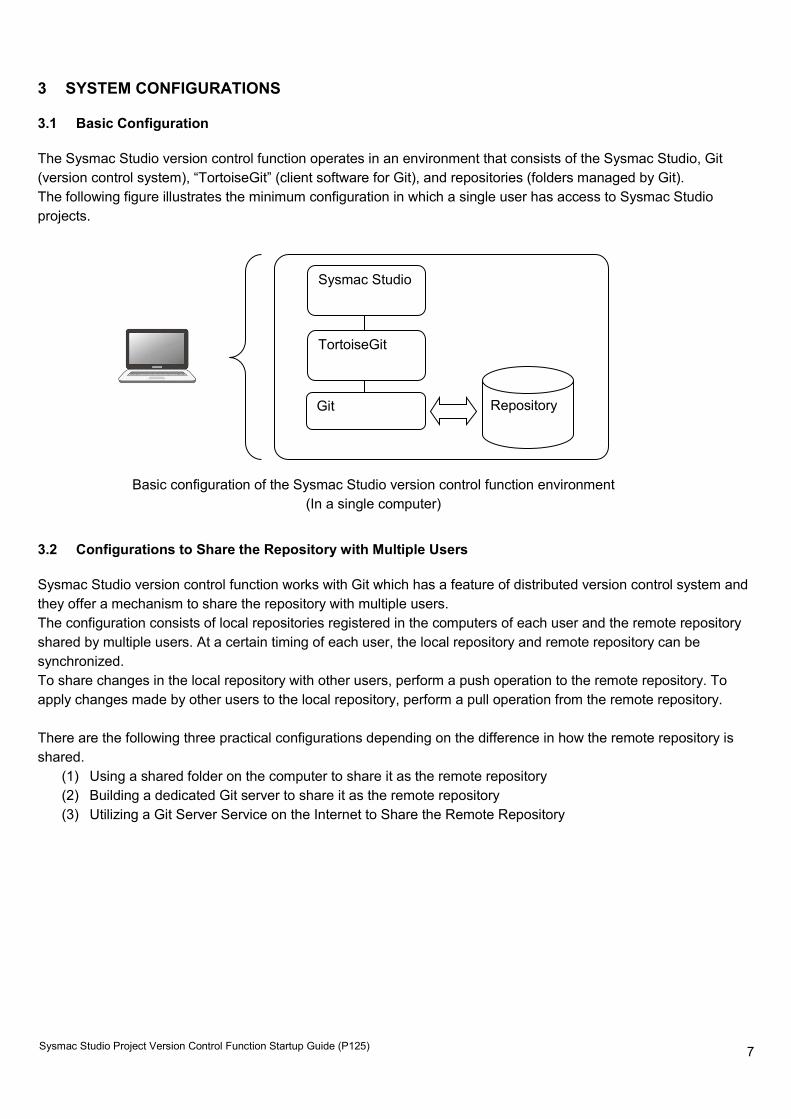
The Sysmac Studio version control function operates in an environment that consists of the Sysmac Studio, Git (version control system), “TortoiseGit” (client software for Git), and repositories (folders managed by Git). The following figure illustrates the minimum configuration in which a single user has access to Sysmac Studio projects.
3.2 Configurations to Share the Repository with Multiple Users
Sysmac Studio version control function works with Git which has a feature of distributed version control system and they offer a mechanism to share the repository with multiple users. The configuration consists of local repositories registered in the computers of each user and the remote repository shared by multiple users. At a certain timing of each user, the local repository and remote repository can be synchronized. To share changes in the local repository with other users, perform a push operation to the remote repository. To apply changes made by other users to the local repository, perform a pull operation from the remote repository. There are the following three practical configurations depending on the difference in how the remote repository is shared.
(1) Using a shared folder on the computer to share it as the remote repository (2) Building a dedicated Git server to share it as the remote repository (3) Utilizing a Git Server Service on the Internet to Share the Remote Repository
Git
TortoiseGit
Sysmac Studio
Repository
Basic configuration of the Sysmac Studio version control function environment (In a single computer)
8
Sysmac Studio Project Version Control Function Startup Guide (P125)
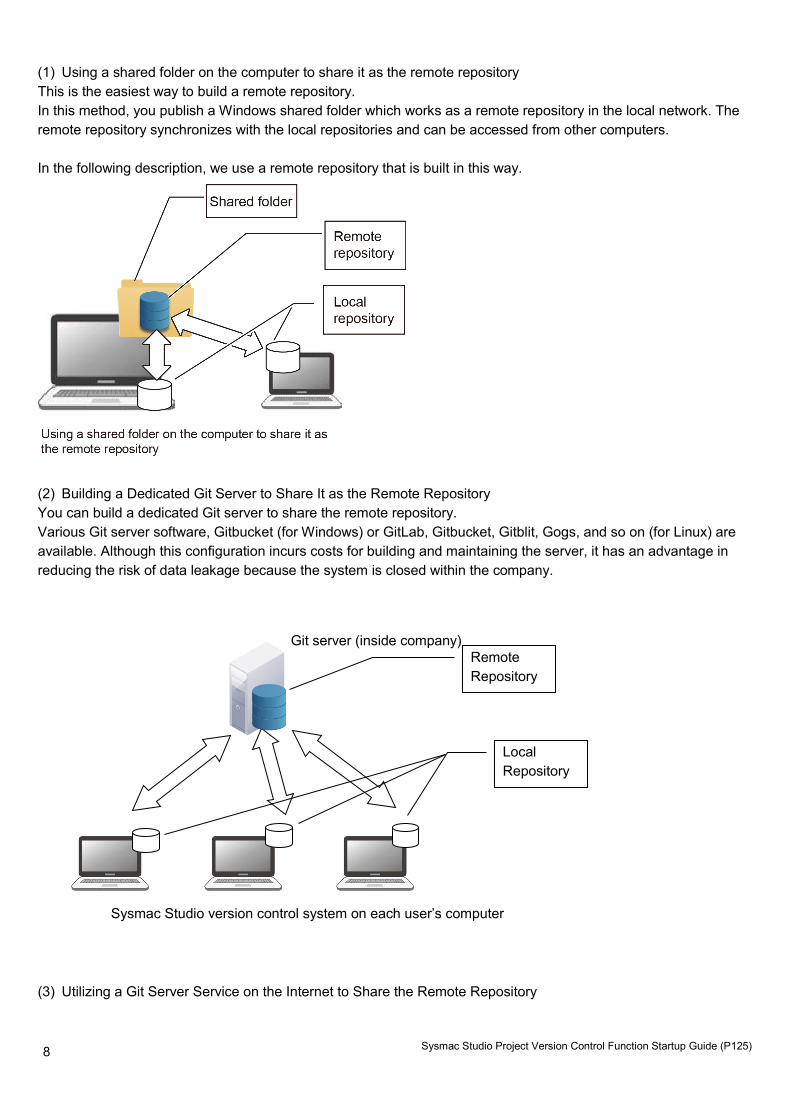
(1) Using a shared folder on the computer to share it as the remote repository This is the easiest way to build a remote repository. In this method, you publish a Windows shared folder which works as a remote repository in the local network. The remote repository synchronizes with the local repositories and can be accessed from other computers. In the following description, we use a remote repository that is built in this way.
(2) Building a Dedicated Git Server to Share It as the Remote Repository You can build a dedicated Git server to share the remote repository. Various Git server software, Gitbucket (for Windows) or GitLab, Gitbucket, Gitblit, Gogs, and so on (for Linux) are available. Although this configuration incurs costs for building and maintaining the server, it has an advantage in reducing the risk of data leakage because the system is closed within the company.
(3) Utilizing a Git Server Service on the Internet to Share the Remote Repository
Sysmac Studio version control system on each user’s computer
Local Repository
Git server (inside company) Remote Repository
9
Sysmac Studio Project Version Control Function Startup Guide (P125)
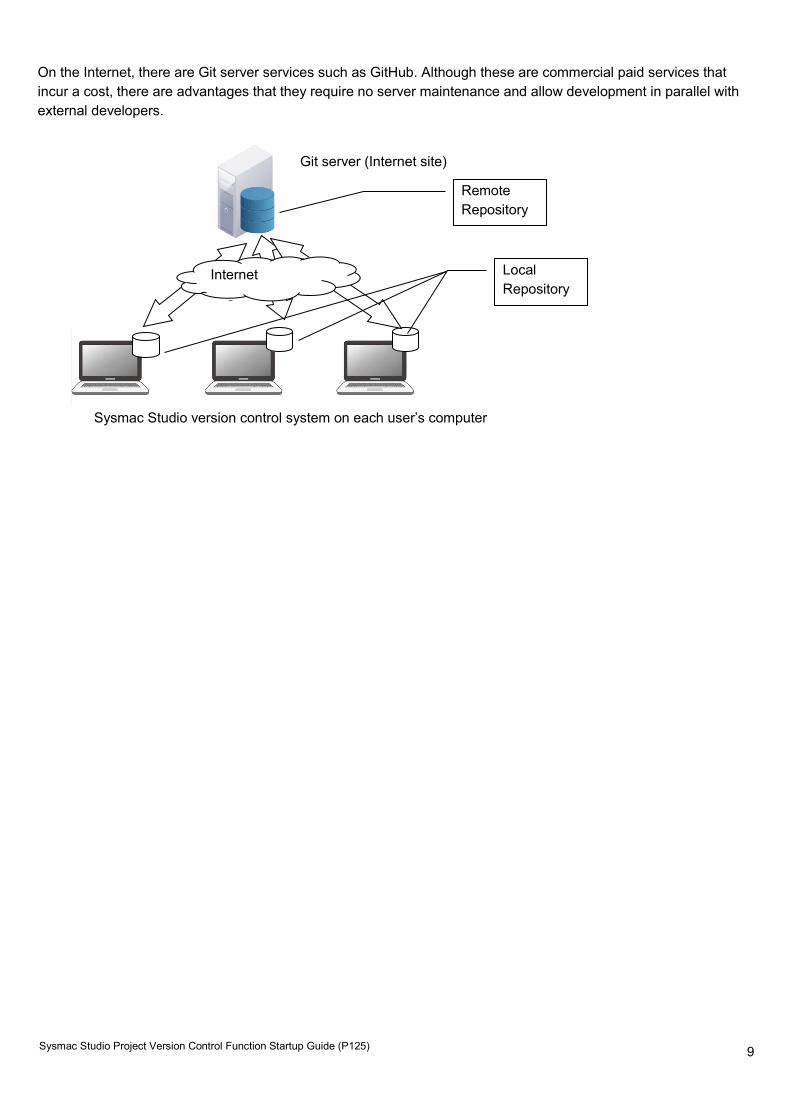
On the Internet, there are Git server services such as GitHub. Although these are commercial paid services that incur a cost, there are advantages that they require no server maintenance and allow development in parallel with external developers.
Git server (Internet site)
Sysmac Studio version control system on each user’s computer
Local Repository
Remote Repository
Internet
10
Sysmac Studio Project Version Control Function Startup Guide (P125)
3.3 Basic operation of Version Control System
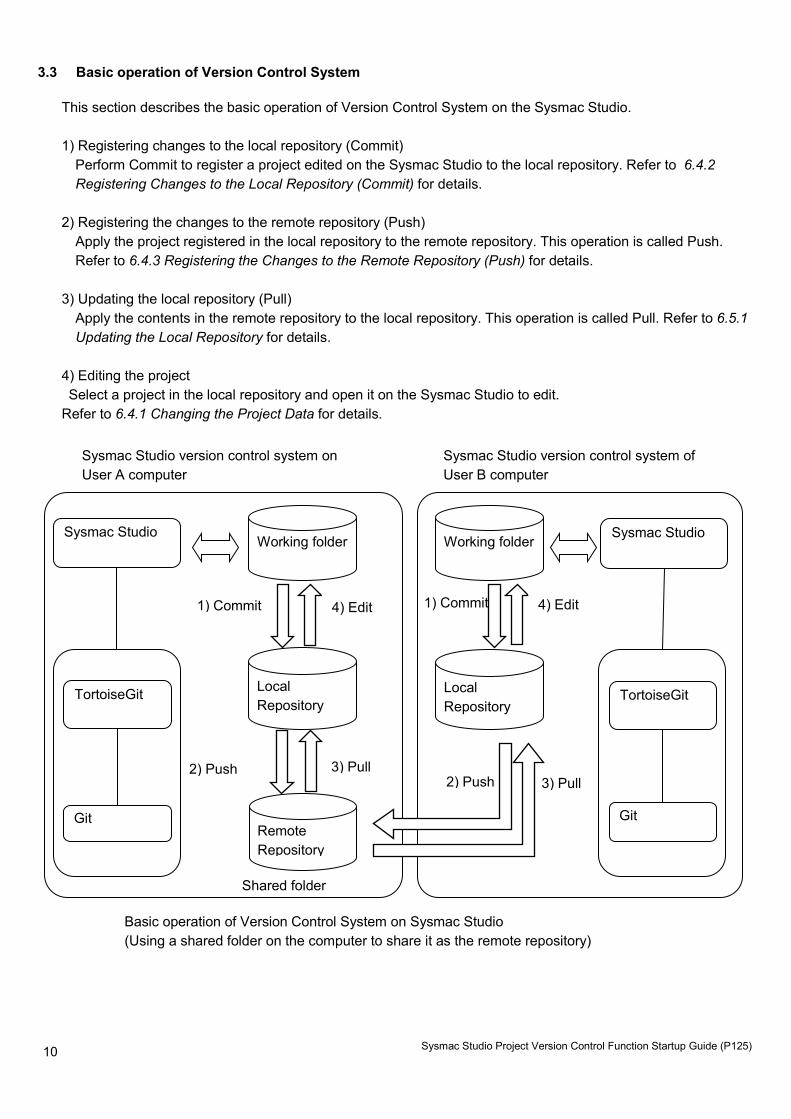
This section describes the basic operation of Version Control System on the Sysmac Studio. 1) Registering changes to the local repository (Commit)
Perform Commit to register a project edited on the Sysmac Studio to the local repository. Refer to 6.4.2 Registering Changes to the Local Repository (Commit) for details.
2) Registering the changes to the remote repository (Push)
Apply the project registered in the local repository to the remote repository. This operation is called Push. Refer to 6.4.3 Registering the Changes to the Remote Repository (Push) for details.
3) Updating the local repository (Pull)
Apply the contents in the remote repository to the local repository. This operation is called Pull. Refer to 6.5.1 Updating the Local Repository for details.
4) Editing the project Select a project in the local repository and open it on the Sysmac Studio to edit.
Refer to 6.4.1 Changing the Project Data for details.
1) Commit
Basic operation of Version Control System on Sysmac Studio (Using a shared folder on the computer to share it as the remote repository)
Sysmac Studio version control system on User A computer
Sysmac Studio version control system of User B computer
Git
TortoiseGit
Sysmac Studio
Local Repository
Remote Repository
Working folder
2) Push 3) Pull
1) Commit 4) Edit
Shared folder
TortoiseGit
Sysmac Studio
Git
Working folder
Local Repository
3) Pull
4) Edit
2) Push
11
Sysmac Studio Project Version Control Function Startup Guide (P125)
4 SCOPE OF THE VERSION CONTROL
The version control function is applicable to devices that are registered in the project, as well as the following data of each device. • Data in Configurations and Setup and lower-level folders in the Multiview Explorer • Depending on the device, however, there is other version-controlled data in addition to the above, or some of
the above data is not version-controlled. Refer to the Sysmac Studio Project Version Control Function Operation Manual (Cat. No. W589) for information on devices with relevant data. Note that display settings for windows, such as the layout of each pane in the main window, are not version-controlled. The function is applicable to Controller unit version 1.16 or later. With the Unit of unit version 1.15 or earlier, version control function cannot be used.
12
Sysmac Studio Project Version Control Function Startup Guide (P125)
5 SOFTWARE SETUP AND BASIC SETTINGS
This section describes the procedure to setup the software and basic settings in a configuration where the remote repository is shared in the shared folder in a computer.
5.1 Installing the Sysmac Studio
Please install the Sysmac Studio Ver.1.20 or later. Refer to the Sysmac Studio Version 1 Operation Manual (Cat. No. W504) for information on installation of the Sysmac Studio.
5.2 Registering Sysmac Studio Team Development Option
To activate the version control function, register the Sysmac Studio Team Development Option license on the Sysmac Studio. For details on the registration procedure of the Sysmac Studio Team Development Option, refer to Sysmac Studio Project Version Control Function Operation Manual (Cat.No. W589).
5.3 Installing Git
1. Please download Git from the following URL site. https://git-scm.com/downloads Depending on the operating system installed on the computer, download the 32-bit or 64-bit edition of the installer.
2. Start the installer.
The Windows Security dialog box is displayed according to the Windows version or user authority. 3. Click the Execute button in the Windows Security dialog box.
The User Account Control dialog box is displayed according to the Windows version or user authority. 4. Click the Yes button in the User Account Control dialog box.
The Setup dialog of Git is displayed.
13
Sysmac Studio Project Version Control Function Startup Guide (P125)
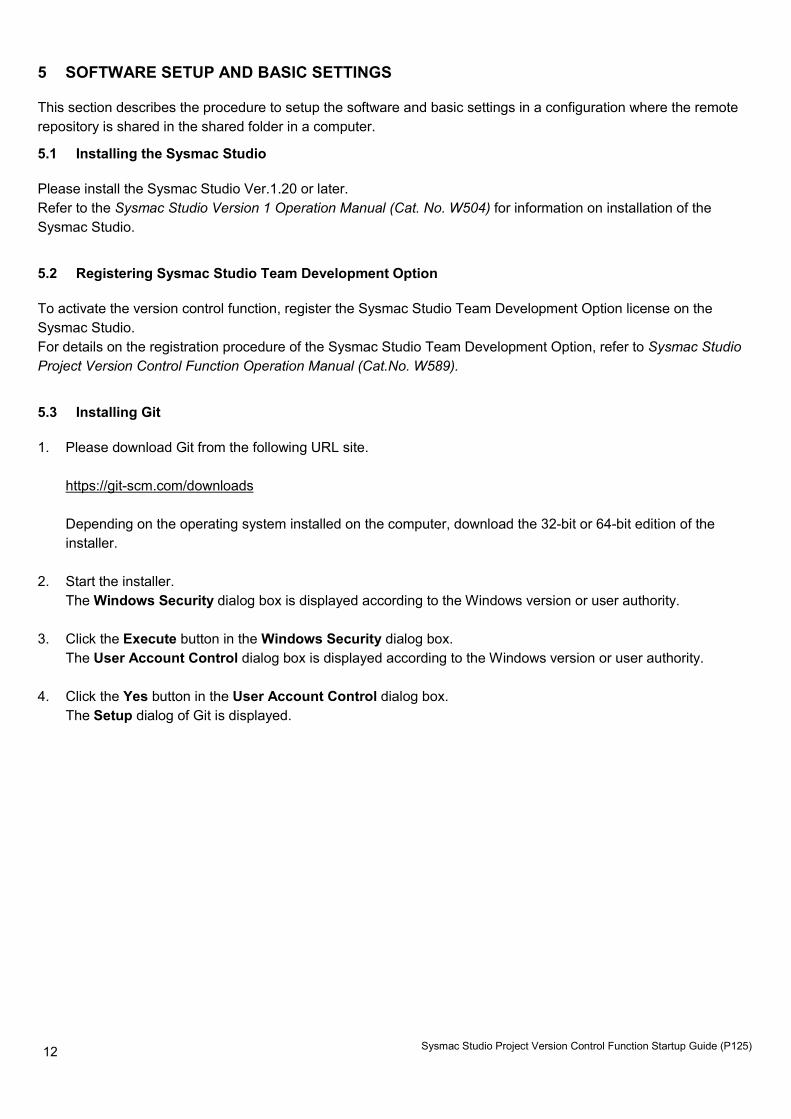
From here, the procedure to install Git 2.14.1 is described as an example.
5. Click the Next button.
The Select Destination Location dialog box is displayed.
6. Select a folder to install Git, and then click the Next button.
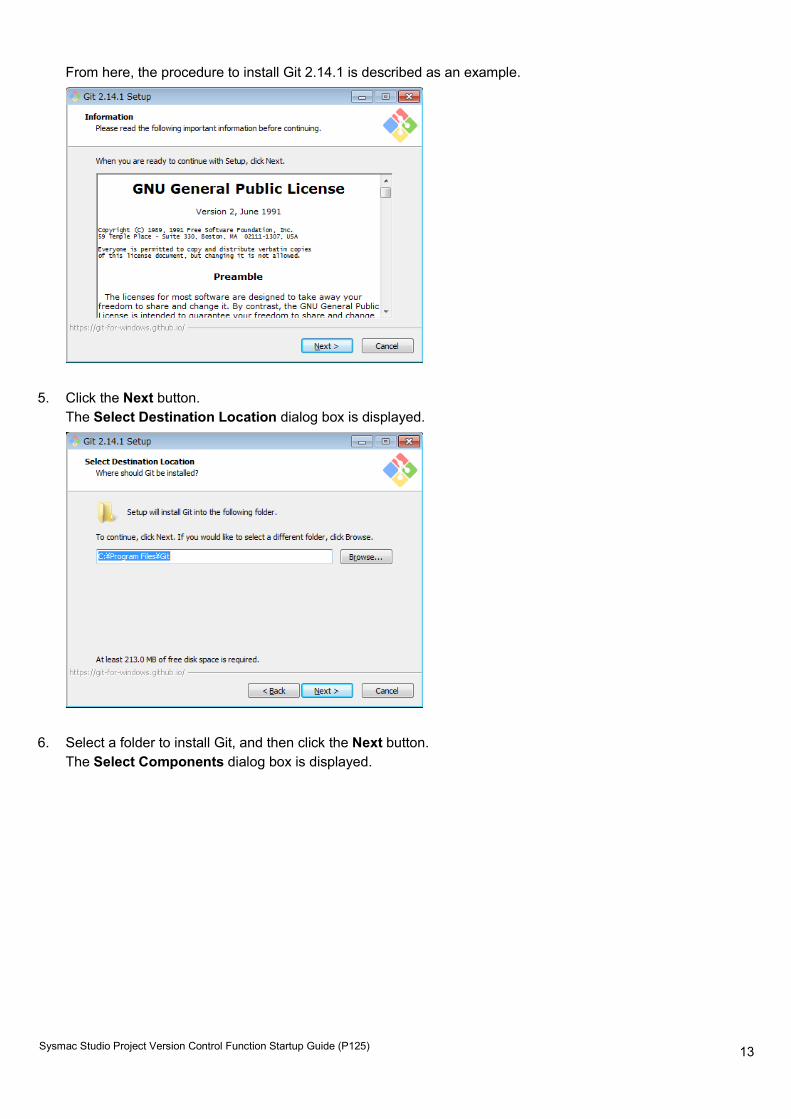
The Select Components dialog box is displayed.
14
Sysmac Studio Project Version Control Function Startup Guide (P125)
To use the Sysmac Studio version control function, you do not have to change the options selected by default.
7. Click the Next button. The Select Start Menu Folder dialog box is displayed.
8. Enter the folder name for the Start menu, and click the Next button.
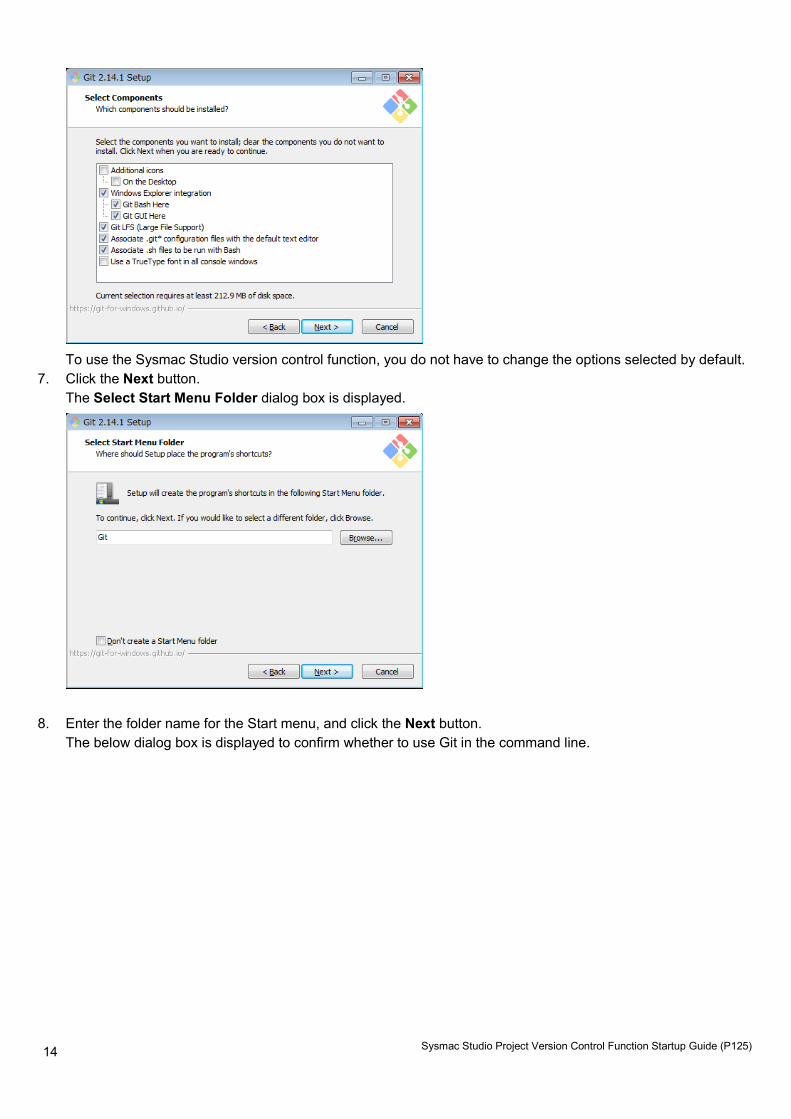
The below dialog box is displayed to confirm whether to use Git in the command line.
15
Sysmac Studio Project Version Control Function Startup Guide (P125)
Here, be sure to select the second option Use Git from the Windows Command Prompt.
9. Click the Next button.
The dialog box to select the library for user authentication is displayed.
If you use a method of sharing the remote repository using the Windows shared folder, you can choose either of them. If you are using Git server, please contact the system administrator of the server. In this example, Use the OpenSSL library is selected.
10. Click the Next button.
The dialog box to select line ending of the text files is displayed.
16
Sysmac Studio Project Version Control Function Startup Guide (P125)
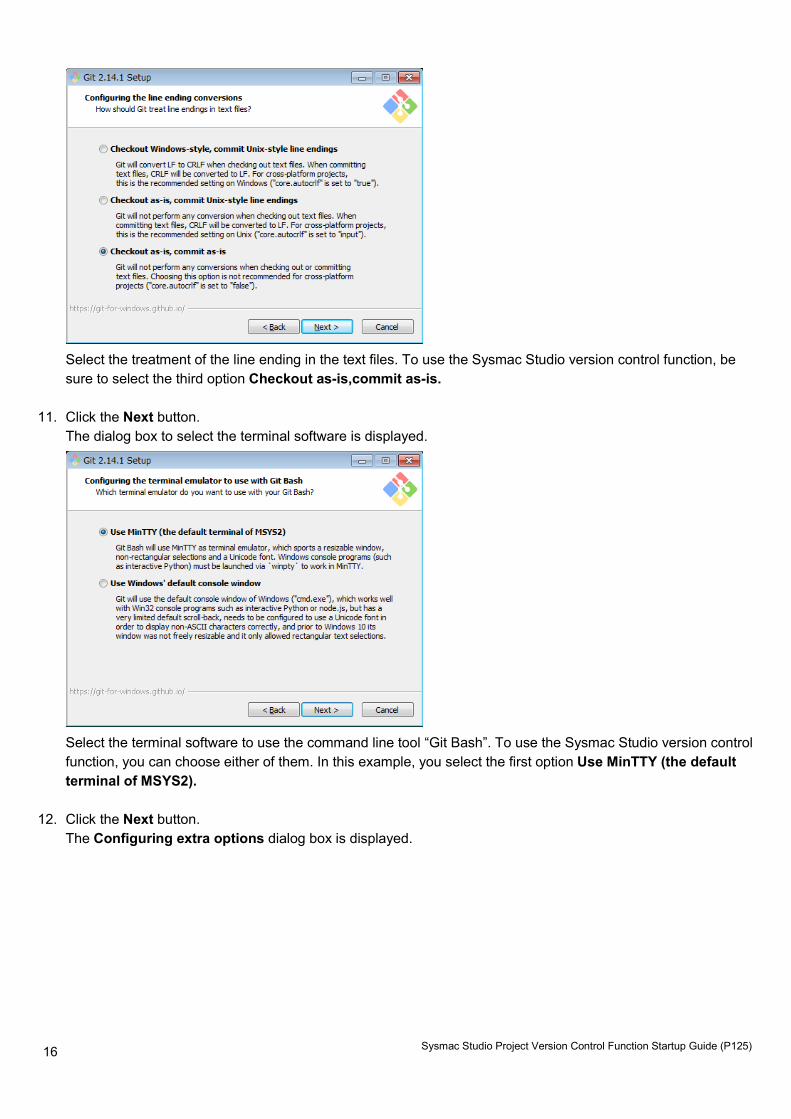
Select the treatment of the line ending in the text files. To use the Sysmac Studio version control function, be sure to select the third option Checkout as-is,commit as-is.
11. Click the Next button.
The dialog box to select the terminal software is displayed.
Select the terminal software to use the command line tool “Git Bash”. To use the Sysmac Studio version control function, you can choose either of them. In this example, you select the first option Use MinTTY (the default terminal of MSYS2).
12. Click the Next button.
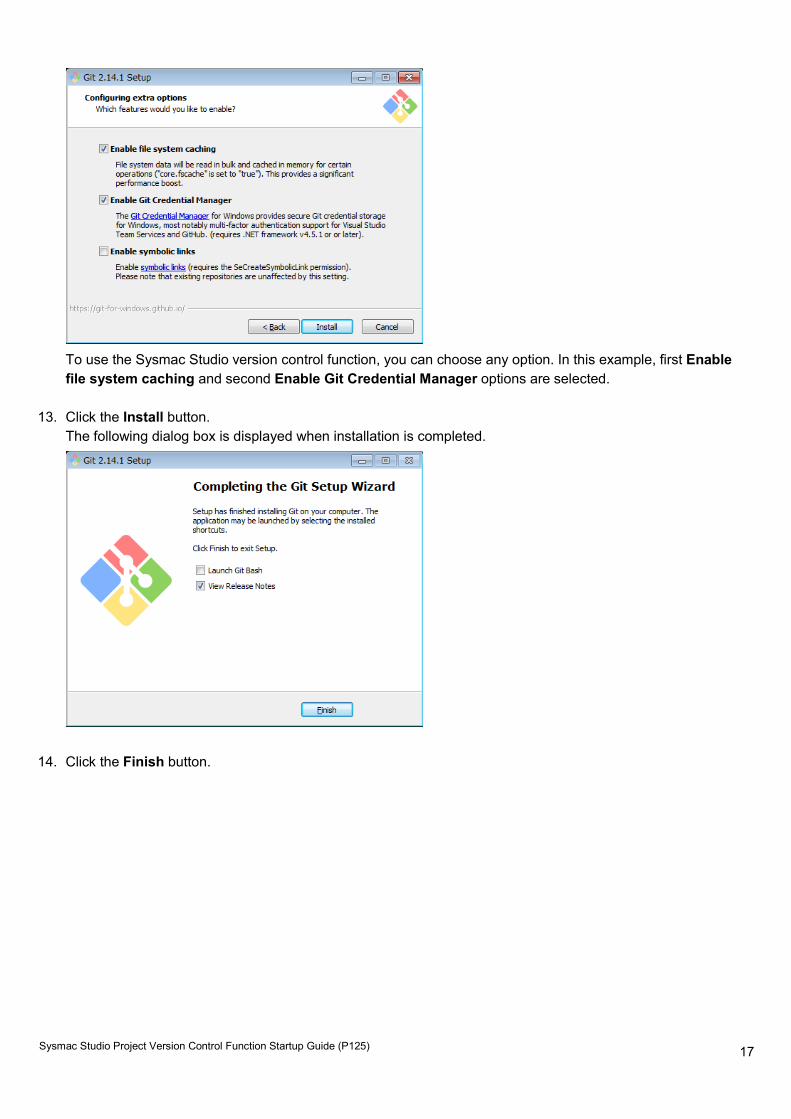
The Configuring extra options dialog box is displayed.
17
Sysmac Studio Project Version Control Function Startup Guide (P125)
To use the Sysmac Studio version control function, you can choose any option. In this example, first Enable file system caching and second Enable Git Credential Manager options are selected.
13. Click the Install button.
The following dialog box is displayed when installation is completed.
14. Click the Finish button.

18
Sysmac Studio Project Version Control Function Startup Guide (P125)
5.4 Installing “TortoiseGit”
1. Please download “TortoiseGit” from the following URL site. https://tortoisegit.org/download/ Depending on the operating system installed on the computer, download the 32-bit or 64-bit edition of the installer. In addition, language packs are also posted on the same URL site. Please download the appropriate one as necessary.
2. Start the installer.
The Windows Security dialog box is displayed according to the Windows version or user authority. 3. Click the Execute button.
The Setup dialog box of “TortoiseGit” is displayed. From here, the procedure to install “TortoiseGit” 2.5.0.0, 64 bit edition is described as an example.
4. Click the Next button.
The Information dialog box is displayed.
19
Sysmac Studio Project Version Control Function Startup Guide (P125)
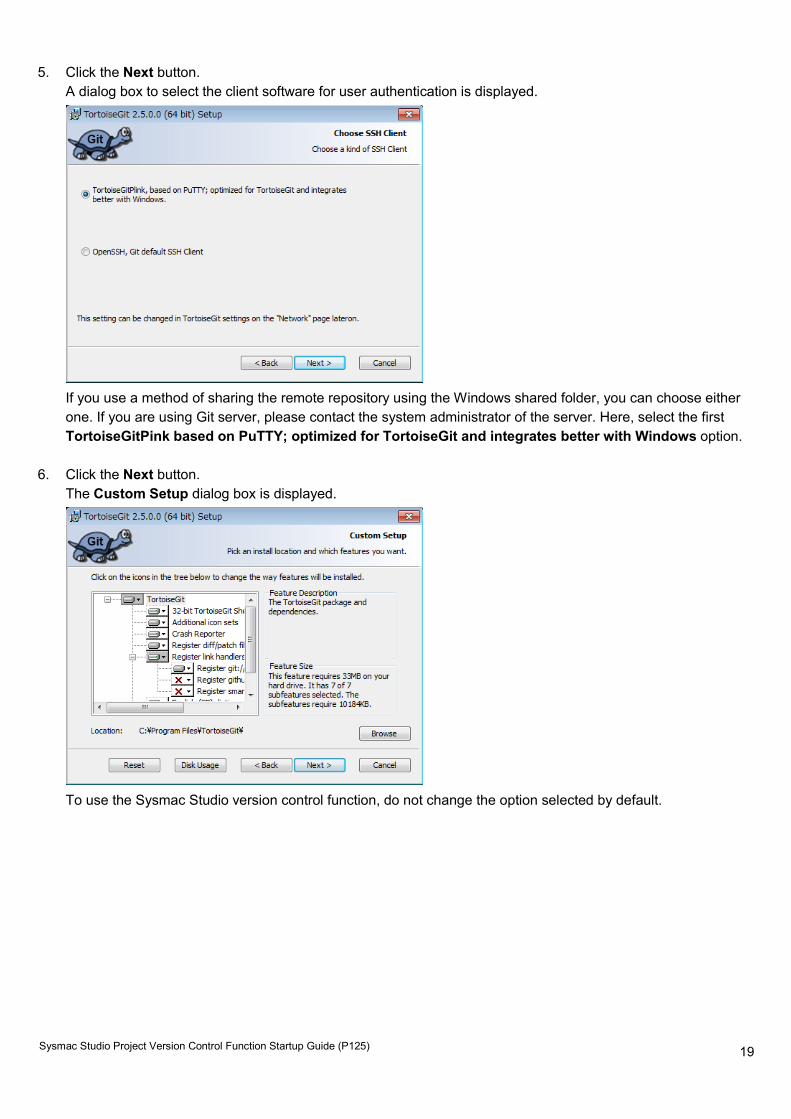
5. Click the Next button. A dialog box to select the client software for user authentication is displayed.
If you use a method of sharing the remote repository using the Windows shared folder, you can choose either one. If you are using Git server, please contact the system administrator of the server. Here, select the first TortoiseGitPink based on PuTTY; optimized for TortoiseGit and integrates better with Windows option.
6. Click the Next button.
The Custom Setup dialog box is displayed.
To use the Sysmac Studio version control function, do not change the option selected by default.
20
Sysmac Studio Project Version Control Function Startup Guide (P125)
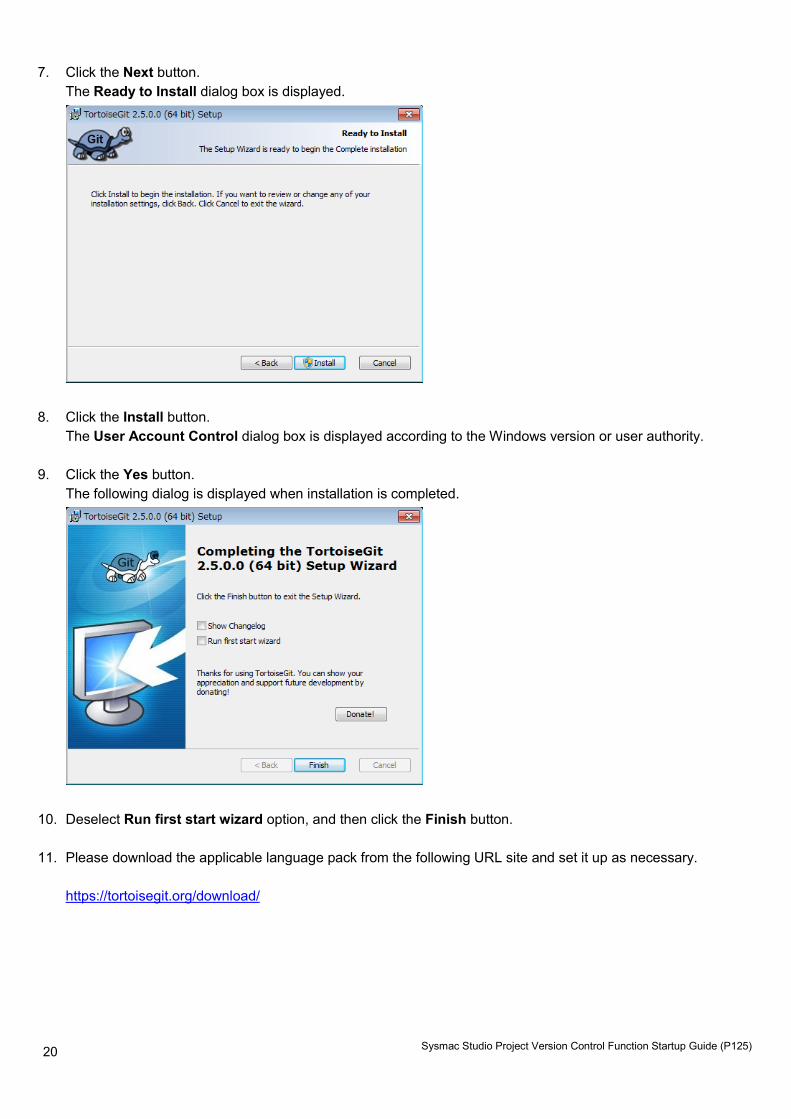
7. Click the Next button. The Ready to Install dialog box is displayed.
8. Click the Install button.
The User Account Control dialog box is displayed according to the Windows version or user authority. 9. Click the Yes button.
The following dialog is displayed when installation is completed.
10. Deselect Run first start wizard option, and then click the Finish button.
11. Please download the applicable language pack from the following URL site and set it up as necessary.
https://tortoisegit.org/download/
21
Sysmac Studio Project Version Control Function Startup Guide (P125)
5.5 Initial Setting of “TortoiseGit”
When installation of the “TortoiseGit” is completed, perform initial settings to use it. 1. In the Settings dialog box of “TortoiseGit”, select General and then Re-run First Start Wizard.
You can open the Settings dialog box by selecting the Start menu, and then All programs - TortoiseGit - Settings.
2. Click the Next button.
22
Sysmac Studio Project Version Control Function Startup Guide (P125)
3. Click the Next button. A dialog box is displayed to configure the path to Git.exe.
Set the path to Git execution module “Git.exe”. If you did not change the install path when installing Git, leave it as default.
4. Click the Next button.
The Configure user information dialog box is displayed.
The user name and email address that you enter here will be used as change record information.
23
Sysmac Studio Project Version Control Function Startup Guide (P125)
5. Enter the user name and email address, and then click the Next button. The Authentication and credential store dialog box is displayed.
6. To use the Sysmac Studio version control function, do not reduce the option selected from default. 7. Click the Finish button.
This completes the initial setting for “TortoiseGit”.
5.6 Creating the shared folder and remote repository
This section utilizes the configuration in which a shared folder on the computer is used as the remote repository as an example. For this configuration, create a shared folder in which to store a remote repository, and then create a folder that serves as the remote repository in the shared folder. 1. Creating a new folder
In Windows Explorer, create a new folder. You can create this folder in any location with any name. Let's assume that it is C:\Git.
2. Settings for the shared folder
Right-click the folder that you created in step 1 and select Properties from the pop-up menu. Then, in the dialog box that is displayed, click the Share tab to perform the sharing settings. Here, you configure the folder to allow full access from other users' computers on which the Sysmac Studio version control function used.
3. Creating a folder to be used as a repository
Create a new folder under the folder created in step1. According to the Git conventions, it is required that you name the folder to use as a Git repository to the repository name followed by ".git". For example, if the repository name is "MachineA," then name the folder
24
Sysmac Studio Project Version Control Function Startup Guide (P125)
"MachineA.git.”
4. Registering the folder as a repository
Right-click the folder created in step 3 and select Git Create repository here from the pop-up menu.
A repository creation option dialog box is displayed.
5. Select the check box on the dialog box and click the OK button.
A repository is created and the following dialog box is displayed.
6. Click the OK button.
This completes the creation of a remote repository. Note that you can control only one Sysmac Studio project per repository. Create a directory for each project to use version control function.
25
Sysmac Studio Project Version Control Function Startup Guide (P125)
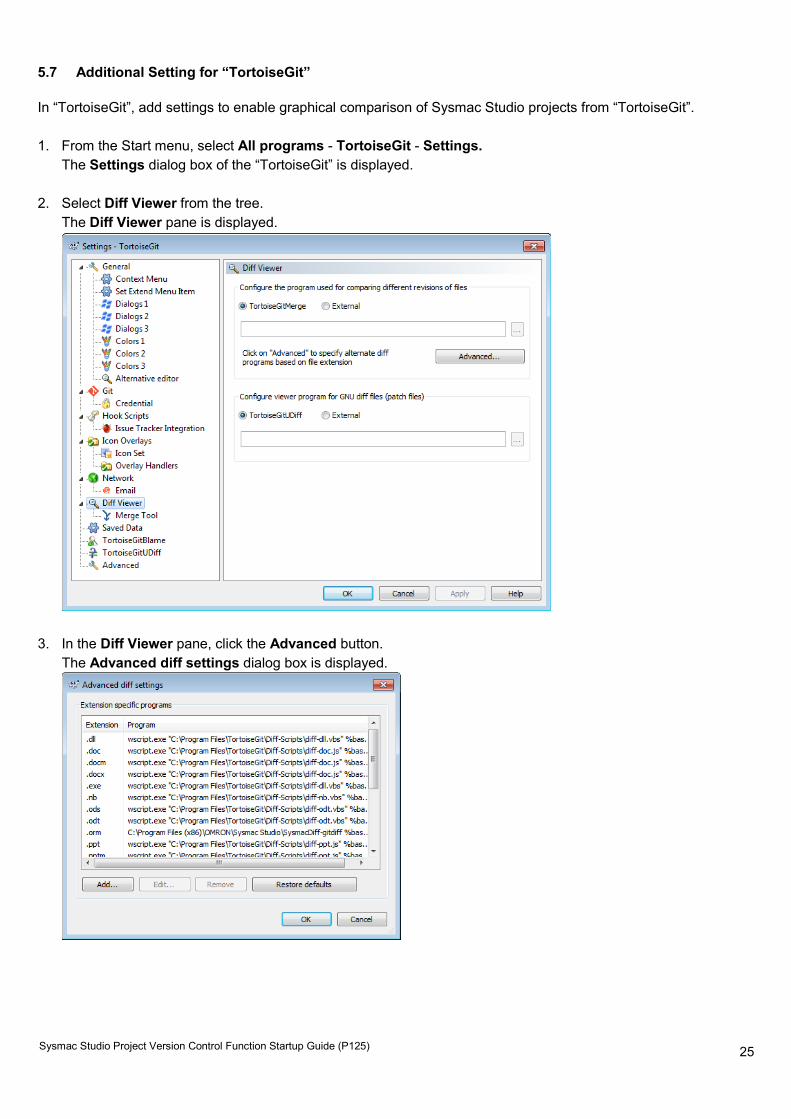
5.7 Additional Setting for “TortoiseGit”
In “TortoiseGit”, add settings to enable graphical comparison of Sysmac Studio projects from “TortoiseGit”. 1. From the Start menu, select All programs - TortoiseGit - Settings.
The Settings dialog box of the “TortoiseGit” is displayed. 2. Select Diff Viewer from the tree.
The Diff Viewer pane is displayed.
3. In the Diff Viewer pane, click the Advanced button.
The Advanced diff settings dialog box is displayed.
26
Sysmac Studio Project Version Control Function Startup Guide (P125)
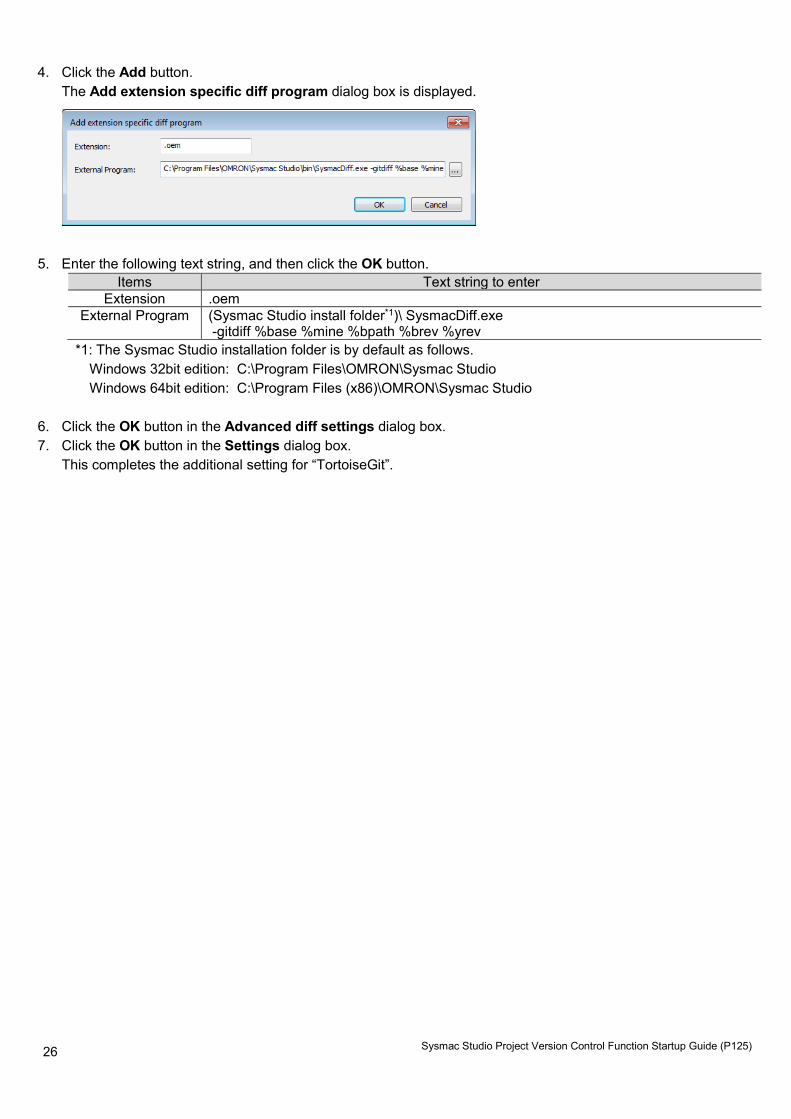
4. Click the Add button. The Add extension specific diff program dialog box is displayed.
5. Enter the following text string, and then click the OK button.
Items Text string to enter Extension .oem
External Program (Sysmac Studio install folder*1)\ SysmacDiff.exe -gitdiff %base %mine %bpath %brev %yrev
*1: The Sysmac Studio installation folder is by default as follows. Windows 32bit edition: C:\Program Files\OMRON\Sysmac Studio Windows 64bit edition: C:\Program Files (x86)\OMRON\Sysmac Studio
6. Click the OK button in the Advanced diff settings dialog box. 7. Click the OK button in the Settings dialog box.
This completes the additional setting for “TortoiseGit”.
27
Sysmac Studio Project Version Control Function Startup Guide (P125)
6 PROJECT RECORD CONTROL ON SYSMAC STUDIO
6.1 Overview of Project Record Control Using the Version Control Function
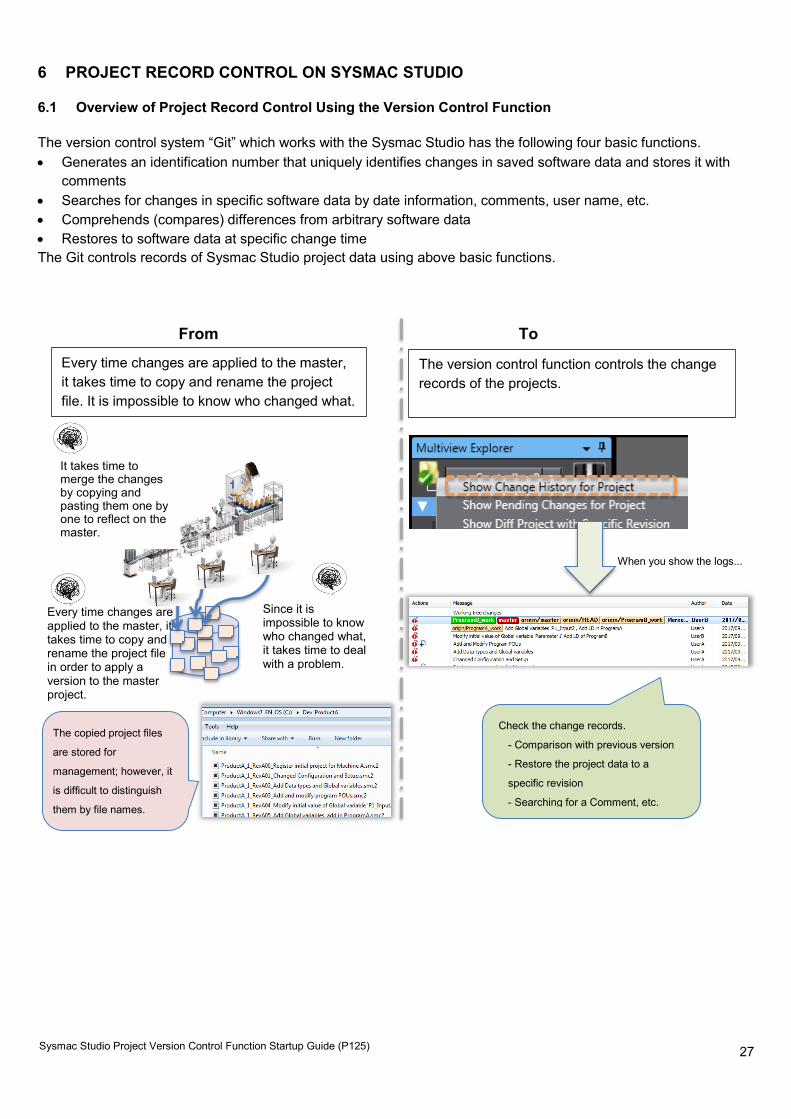
The version control system “Git” which works with the Sysmac Studio has the following four basic functions. • Generates an identification number that uniquely identifies changes in saved software data and stores it with
comments • Searches for changes in specific software data by date information, comments, user name, etc. • Comprehends (compares) differences from arbitrary software data • Restores to software data at specific change time The Git controls records of Sysmac Studio project data using above basic functions.
From To
Since it is impossible to know who changed what, it takes time to deal with a problem.
Every time changes are applied to the master, it takes time to copy and rename the project file. It is impossible to know who changed what.
The version control function controls the change records of the projects.
It takes time to merge the changes by copying and pasting them one by one to reflect on the master.
Every time changes are applied to the master, it takes time to copy and rename the project file in order to apply a version to the master project.
When you show the logs...
Check the change records.
- Comparison with previous version
- Restore the project data to a
specific revision
- Searching for a Comment, etc.
The copied project files
are stored for
management; however, it
is difficult to distinguish
them by file names.
28
Sysmac Studio Project Version Control Function Startup Guide (P125)
6.2 Operation Example of Record Control Function
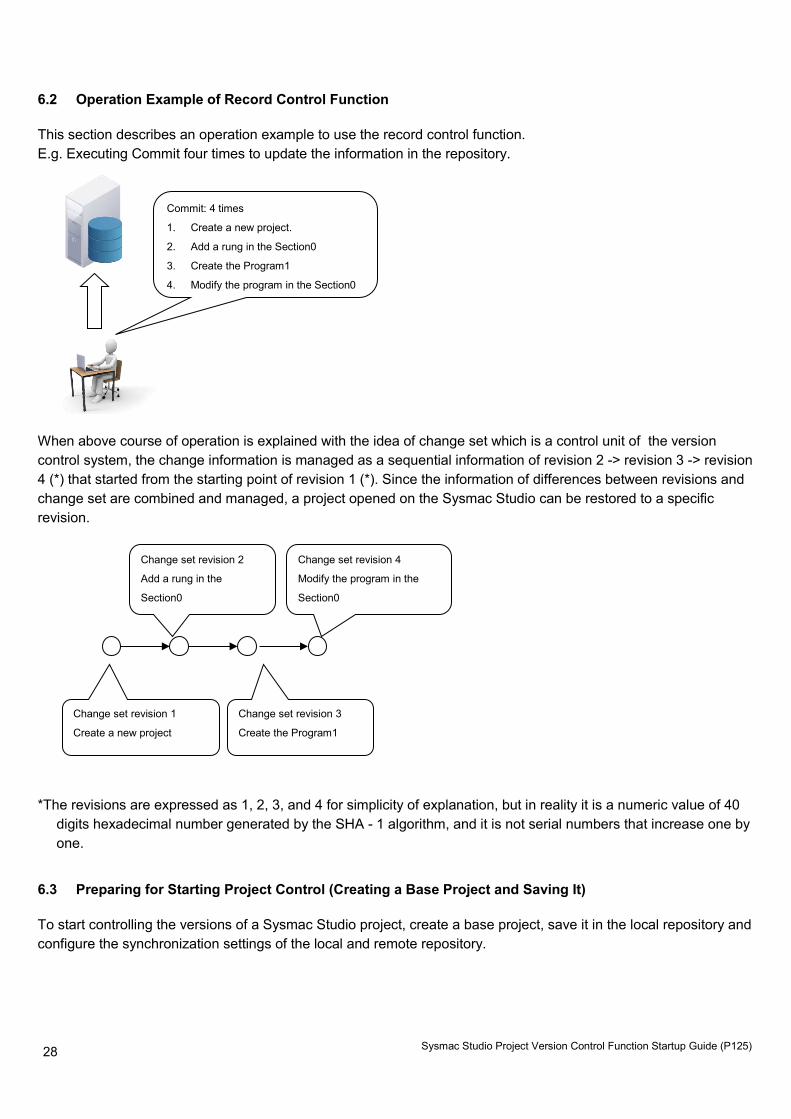
This section describes an operation example to use the record control function. E.g. Executing Commit four times to update the information in the repository.
When above course of operation is explained with the idea of change set which is a control unit of the version control system, the change information is managed as a sequential information of revision 2 -> revision 3 -> revision 4 (*) that started from the starting point of revision 1 (*). Since the information of differences between revisions and change set are combined and managed, a project opened on the Sysmac Studio can be restored to a specific revision.
*The revisions are expressed as 1, 2, 3, and 4 for simplicity of explanation, but in reality it is a numeric value of 40
digits hexadecimal number generated by the SHA - 1 algorithm, and it is not serial numbers that increase one by one.
6.3 Preparing for Starting Project Control (Creating a Base Project and Saving It)
To start controlling the versions of a Sysmac Studio project, create a base project, save it in the local repository and configure the synchronization settings of the local and remote repository.
Commit: 4 times
1. Create a new project.
2. Add a rung in the Section0
3. Create the Program1
4. Modify the program in the Section0
Change set revision 1
Create a new project
Change set revision 2
Add a rung in the
Section0
Change set revision 3
Create the Program1
Change set revision 4
Modify the program in the
Section0
29
Sysmac Studio Project Version Control Function Startup Guide (P125)
6.3.1 Creating a Base Project
1. From the Start menu, select All Programs – OMRON – Sysmac Studio – Sysmac Studio to start the Sysmac Studio. The User Account Control dialog box is displayed according to the Windows version or user authority. Click the Yes button.
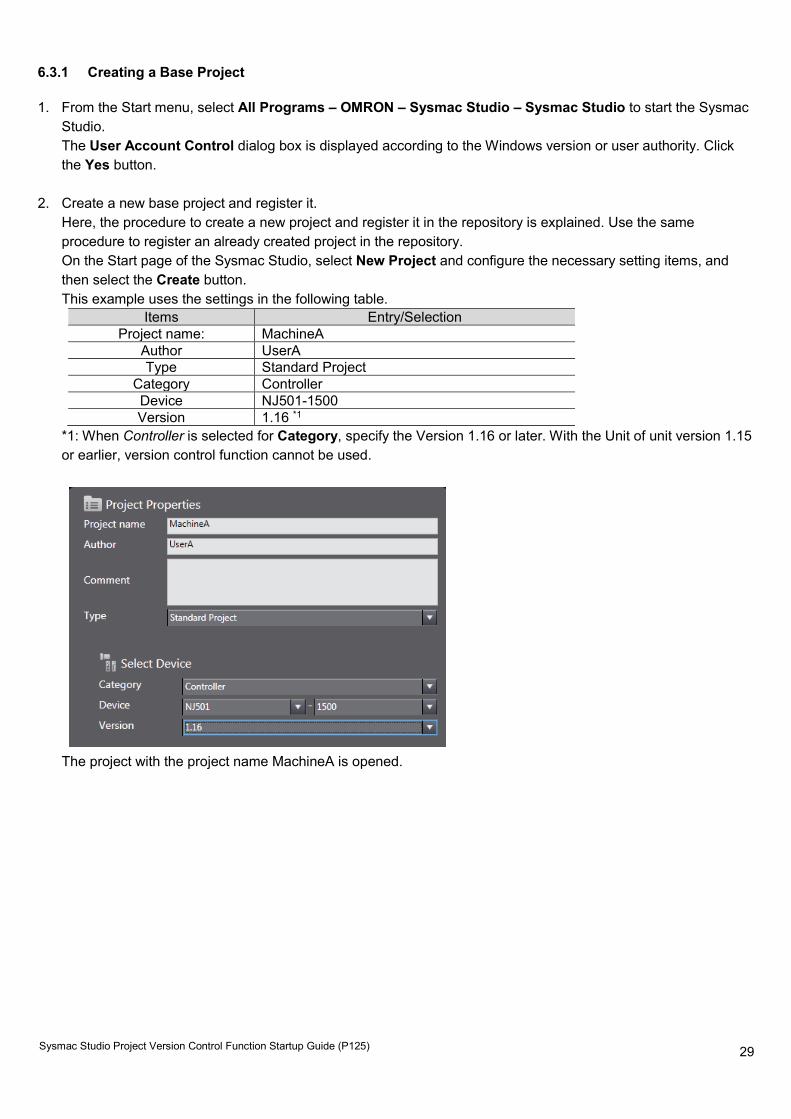
2. Create a new base project and register it. Here, the procedure to create a new project and register it in the repository is explained. Use the same procedure to register an already created project in the repository. On the Start page of the Sysmac Studio, select New Project and configure the necessary setting items, and then select the Create button. This example uses the settings in the following table.
Items Entry/Selection Project name: MachineA
Author UserA Type Standard Project
Category Controller Device NJ501-1500 Version 1.16 *1
*1: When Controller is selected for Category, specify the Version 1.16 or later. With the Unit of unit version 1.15 or earlier, version control function cannot be used.
The project with the project name MachineA is opened.
30
Sysmac Studio Project Version Control Function Startup Guide (P125)
3. From the Main menu, select File - Save to save the project.
4. Select File - Close to close the project. 6.3.2 Registering the project in the Local Repository
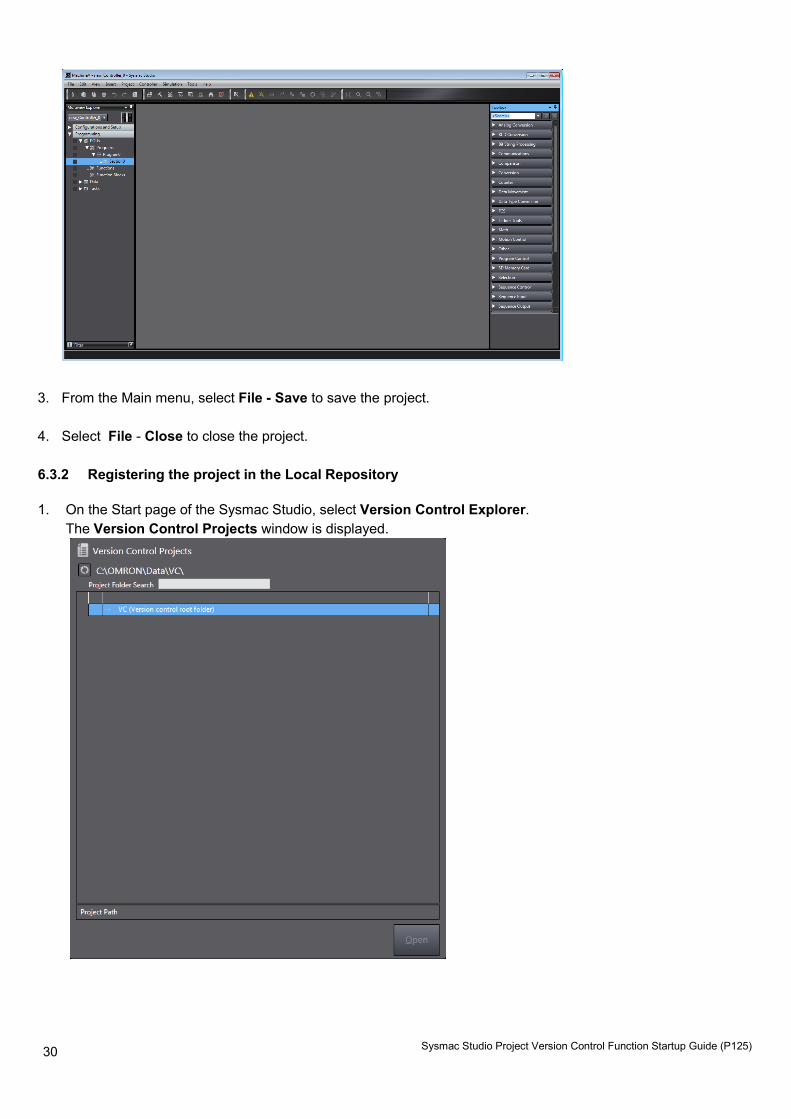
1. On the Start page of the Sysmac Studio, select Version Control Explorer. The Version Control Projects window is displayed.
31
Sysmac Studio Project Version Control Function Startup Guide (P125)
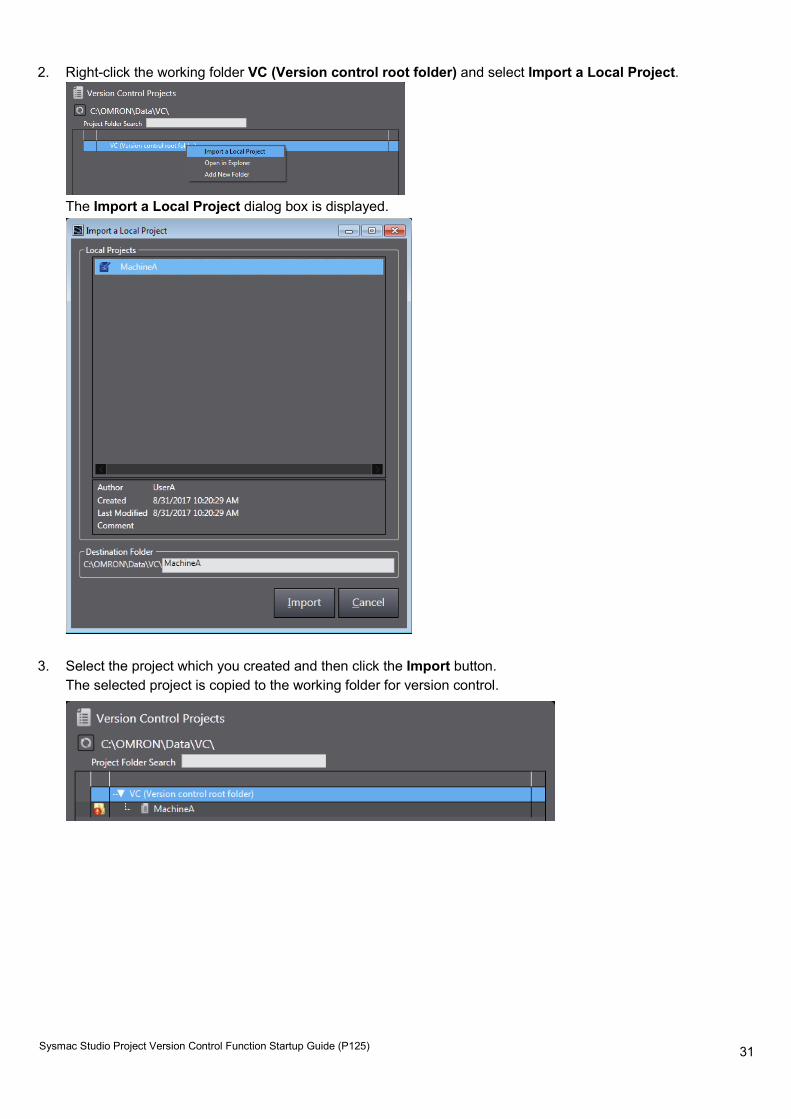
2. Right-click the working folder VC (Version control root folder) and select Import a Local Project.
The Import a Local Project dialog box is displayed.
3. Select the project which you created and then click the Import button.
The selected project is copied to the working folder for version control.
32
Sysmac Studio Project Version Control Function Startup Guide (P125)
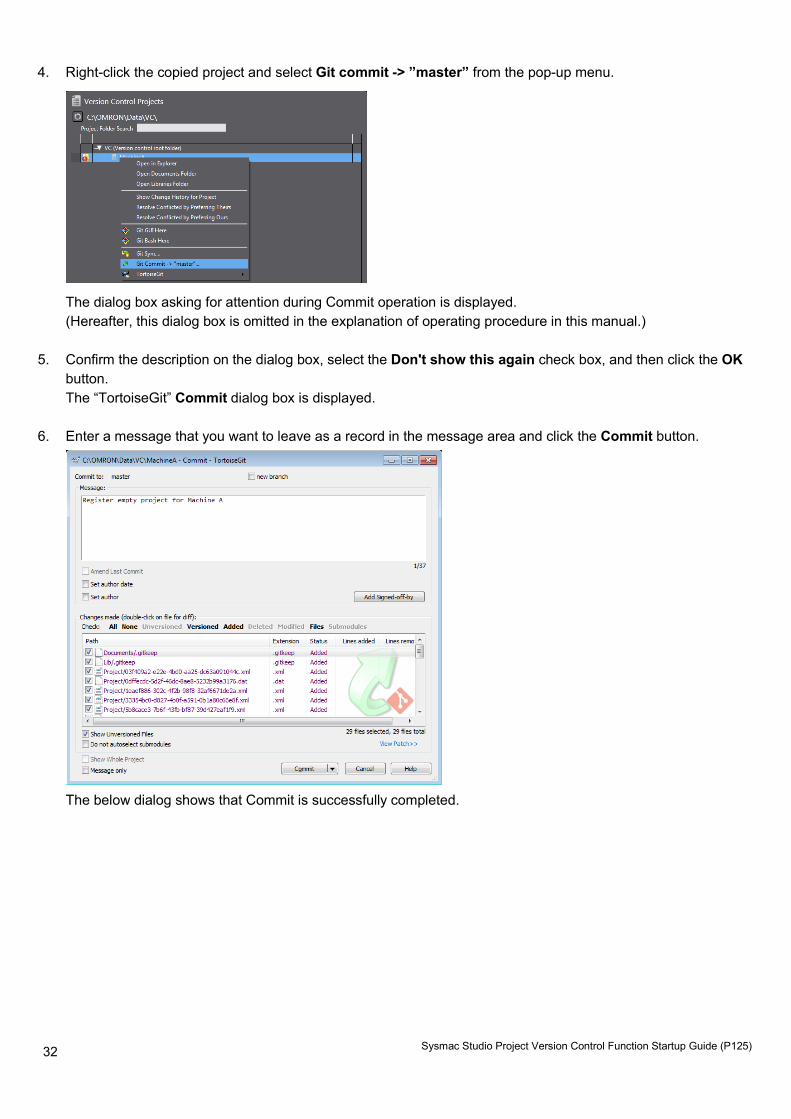
4. Right-click the copied project and select Git commit -> ”master” from the pop-up menu.
The dialog box asking for attention during Commit operation is displayed. (Hereafter, this dialog box is omitted in the explanation of operating procedure in this manual.)
5. Confirm the description on the dialog box, select the Don't show this again check box, and then click the OK button. The “TortoiseGit” Commit dialog box is displayed.
6. Enter a message that you want to leave as a record in the message area and click the Commit button.
The below dialog shows that Commit is successfully completed.
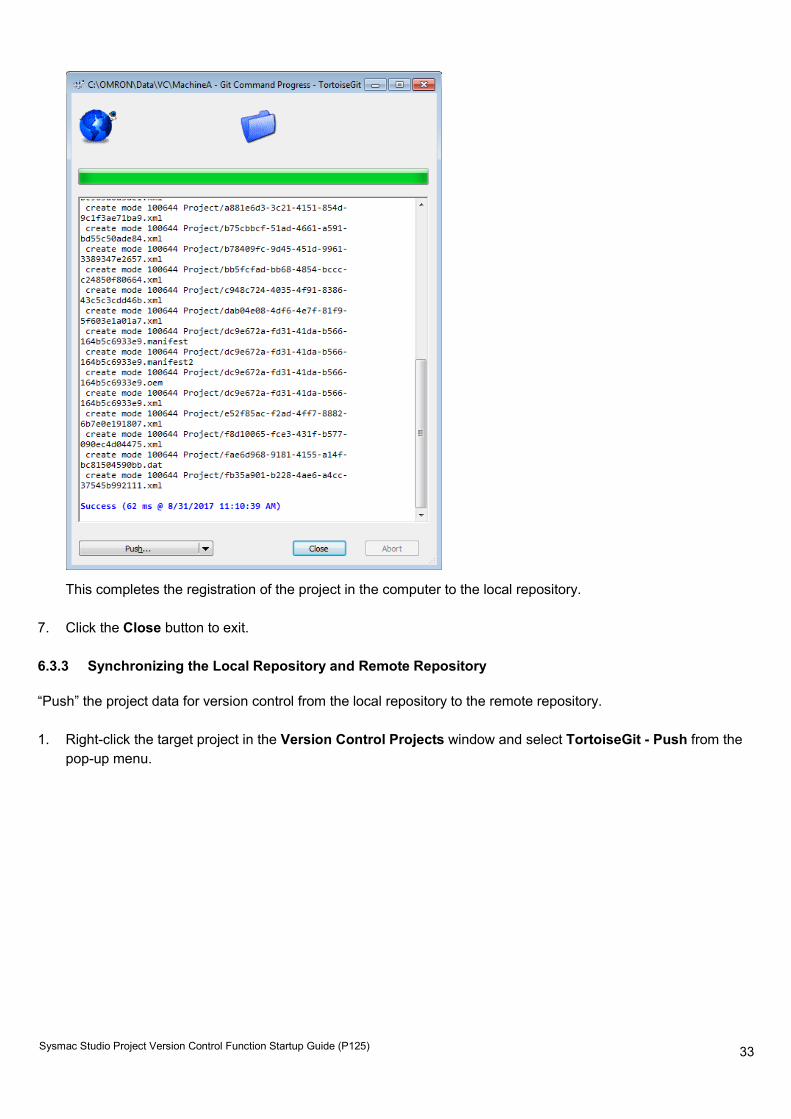
33
Sysmac Studio Project Version Control Function Startup Guide (P125)
This completes the registration of the project in the computer to the local repository.
7. Click the Close button to exit. 6.3.3 Synchronizing the Local Repository and Remote Repository
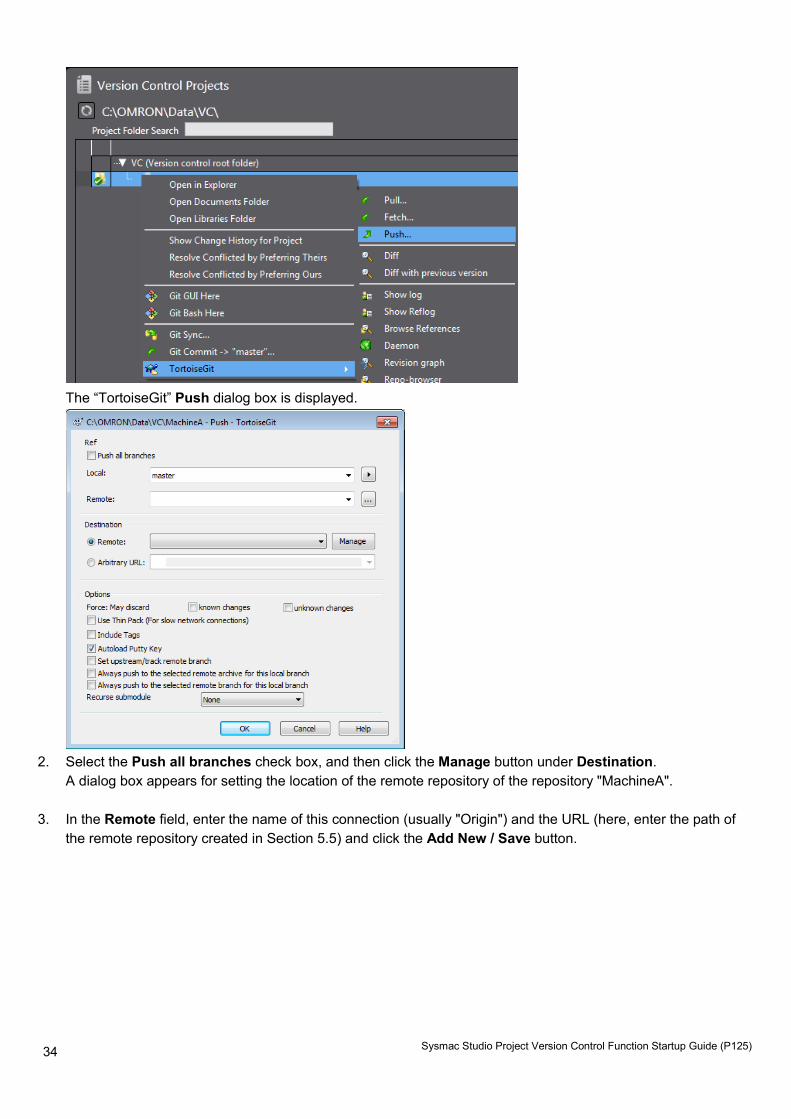
“Push” the project data for version control from the local repository to the remote repository. 1. Right-click the target project in the Version Control Projects window and select TortoiseGit - Push from the
pop-up menu.
34
Sysmac Studio Project Version Control Function Startup Guide (P125)
The “TortoiseGit” Push dialog box is displayed.
2. Select the Push all branches check box, and then click the Manage button under Destination.
A dialog box appears for setting the location of the remote repository of the repository "MachineA". 3. In the Remote field, enter the name of this connection (usually "Origin") and the URL (here, enter the path of
the remote repository created in Section 5.5) and click the Add New / Save button.
35
Sysmac Studio Project Version Control Function Startup Guide (P125)
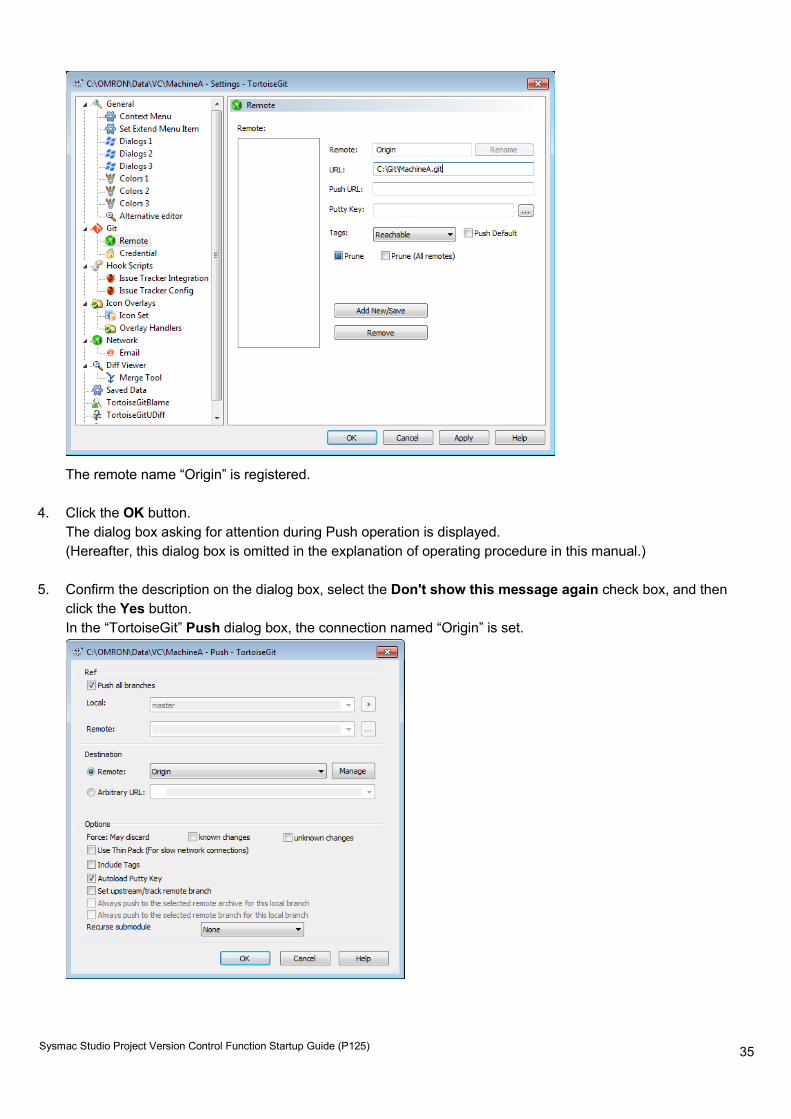
The remote name “Origin” is registered.
4. Click the OK button. The dialog box asking for attention during Push operation is displayed. (Hereafter, this dialog box is omitted in the explanation of operating procedure in this manual.)
5. Confirm the description on the dialog box, select the Don't show this message again check box, and then click the Yes button. In the “TortoiseGit” Push dialog box, the connection named “Origin” is set.

36
Sysmac Studio Project Version Control Function Startup Guide (P125)
6. Click the OK button. The project “MachineA” in the local repository is copied to the remote repository “MachineA.git”.
7. Click the Close button.
37
Sysmac Studio Project Version Control Function Startup Guide (P125)
6.4 Updating the Project
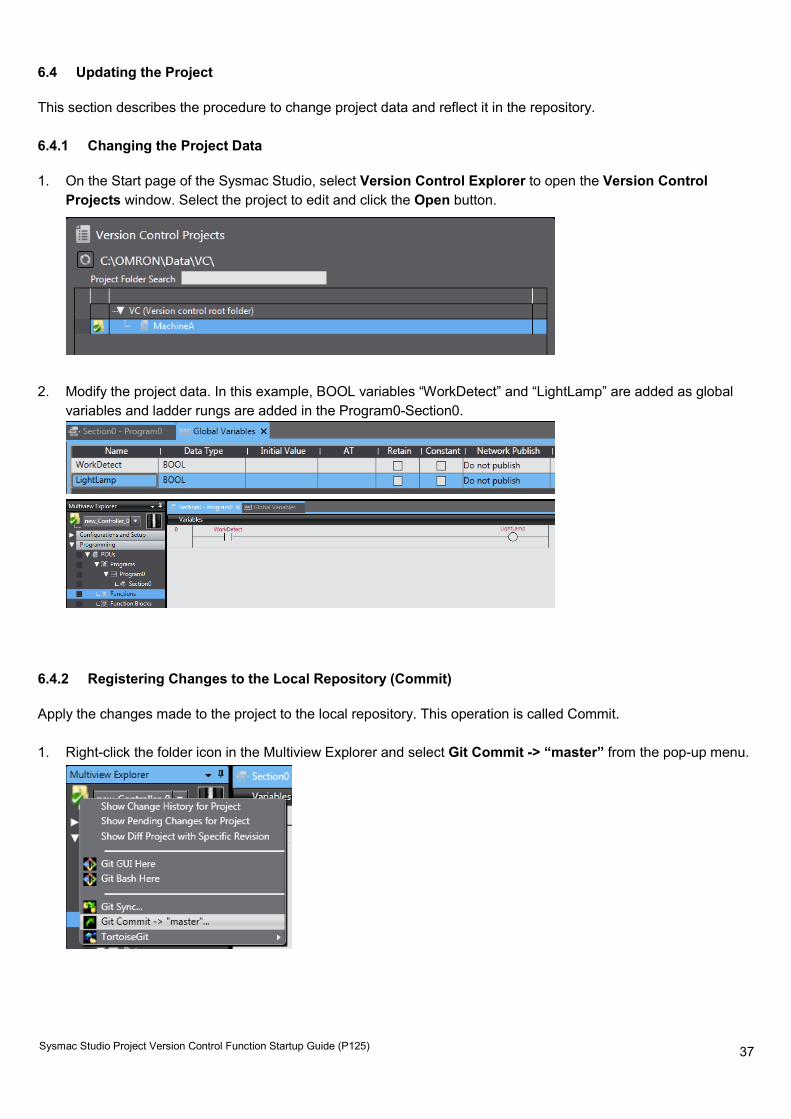
This section describes the procedure to change project data and reflect it in the repository. 6.4.1 Changing the Project Data
1. On the Start page of the Sysmac Studio, select Version Control Explorer to open the Version Control Projects window. Select the project to edit and click the Open button.
2. Modify the project data. In this example, BOOL variables “WorkDetect” and “LightLamp” are added as global
variables and ladder rungs are added in the Program0-Section0.
6.4.2 Registering Changes to the Local Repository (Commit)
Apply the changes made to the project to the local repository. This operation is called Commit. 1. Right-click the folder icon in the Multiview Explorer and select Git Commit -> “master” from the pop-up menu.
38
Sysmac Studio Project Version Control Function Startup Guide (P125)
A dialog box is displayed to ask if you need to save the project.
2. Click the Yes button.
The “TortoiseGit” Commit dialog box is displayed.
3. Enter a message that you want to leave as a record in the message area and click the Commit button.
The below dialog shows that Commit is successfully completed.
39
Sysmac Studio Project Version Control Function Startup Guide (P125)
The changes in the project in the computer were registered in the local repository.
4. Click the Close button. The project under editing is displayed.
6.4.3 Registering the Changes to the Remote Repository (Push)
Apply the changes made to the project in the local directory to the remote repository. This operation is called Push. 1. Right-click the folder icon in the Multiview Explorer and select TortoiseGit - Push from the pop-up menu.
The “TortoiseGit” Push dialog box is displayed.
2. Make sure that the Push all branches check box is selected and Remote item is correctly set (“Origin” is set in
this example), and then click the OK button.
40
Sysmac Studio Project Version Control Function Startup Guide (P125)
This concludes the Push process.
3. Click the Close button.
41
Sysmac Studio Project Version Control Function Startup Guide (P125)
6.5 Searching for a Project
When you made a wrong change while editing a project, you might want to restore the previous project data and resume editing. In that case, you check the change contents of the past projects, change date, person who made changes, and change history information, or open the projects to identify the project revision to return. If you use the version control function, you can search for a revision of the project by the following procedure. 6.5.1 Updating the Local Repository
In a case that data in the remote repository is the master, it is necessary to update the local repository in the computer to the latest state. This section describes the steps to be taken after updating the local repository and remote repository since some changes were made in the same procedure described in 6.4 Updating the Project. 1. Right-click the target project in the Version Control Projects window and select TortoiseGit - Pull from the
pop-up menu.
The “TortoiseGit” Pull dialog box is displayed.
2. Make sure that the registered remote name is correctly set (in this example, “Origin” is set) for the “Remote”
item, and then click the OK button.
42
Sysmac Studio Project Version Control Function Startup Guide (P125)
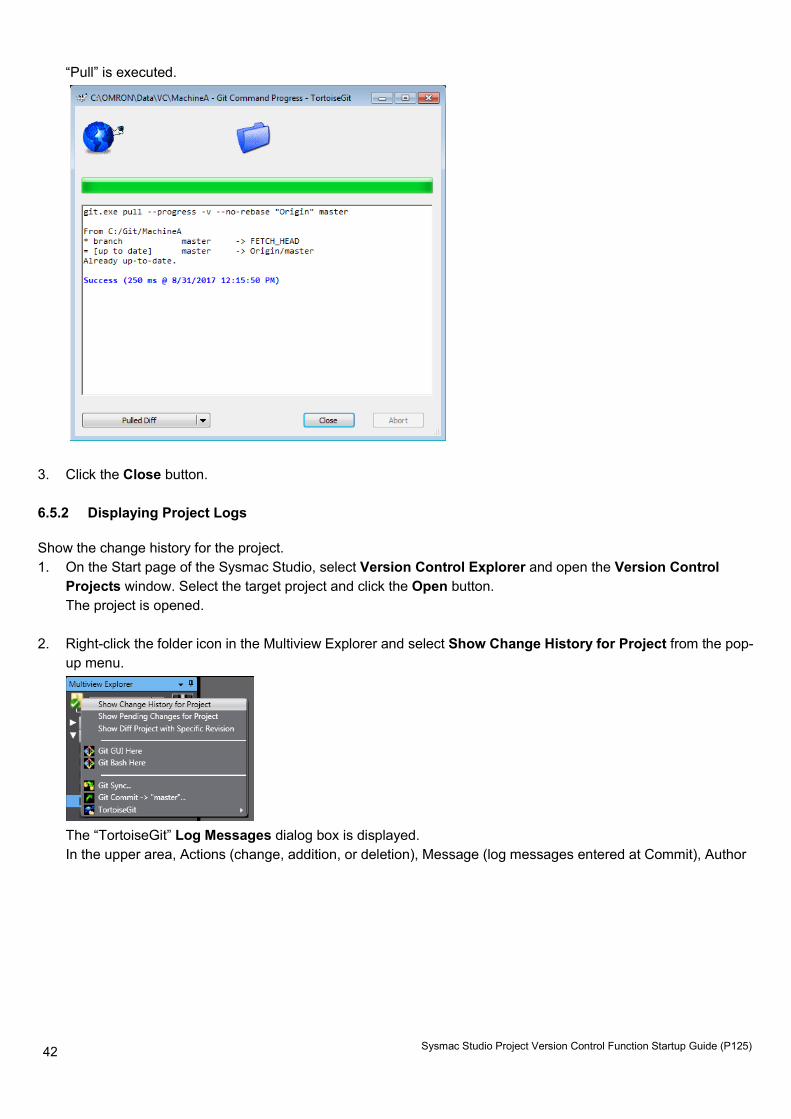
“Pull” is executed.
3. Click the Close button. 6.5.2 Displaying Project Logs
Show the change history for the project. 1. On the Start page of the Sysmac Studio, select Version Control Explorer and open the Version Control
Projects window. Select the target project and click the Open button. The project is opened.
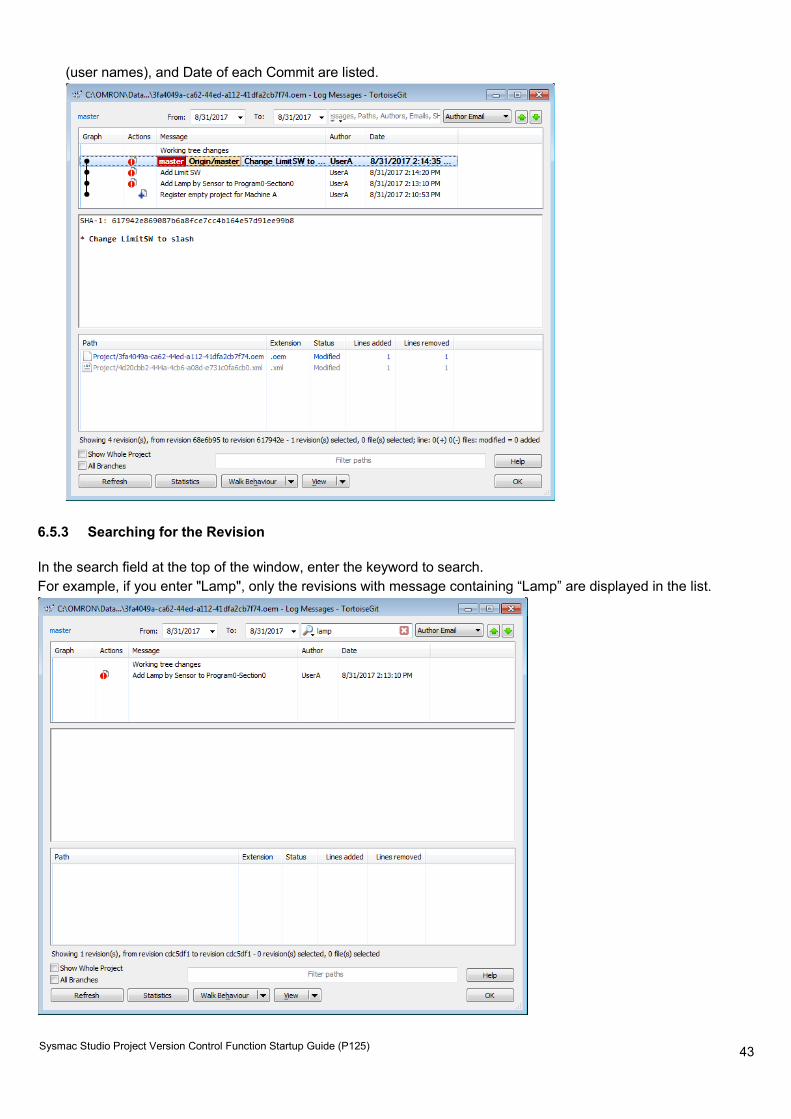
2. Right-click the folder icon in the Multiview Explorer and select Show Change History for Project from the pop-
up menu.
The “TortoiseGit” Log Messages dialog box is displayed. In the upper area, Actions (change, addition, or deletion), Message (log messages entered at Commit), Author
43
Sysmac Studio Project Version Control Function Startup Guide (P125)
(user names), and Date of each Commit are listed.
6.5.3 Searching for the Revision
In the search field at the top of the window, enter the keyword to search. For example, if you enter "Lamp", only the revisions with message containing “Lamp” are displayed in the list.
44
Sysmac Studio Project Version Control Function Startup Guide (P125)
In this way, you can sort and search for the target revision by the character string of messages, date or user name.
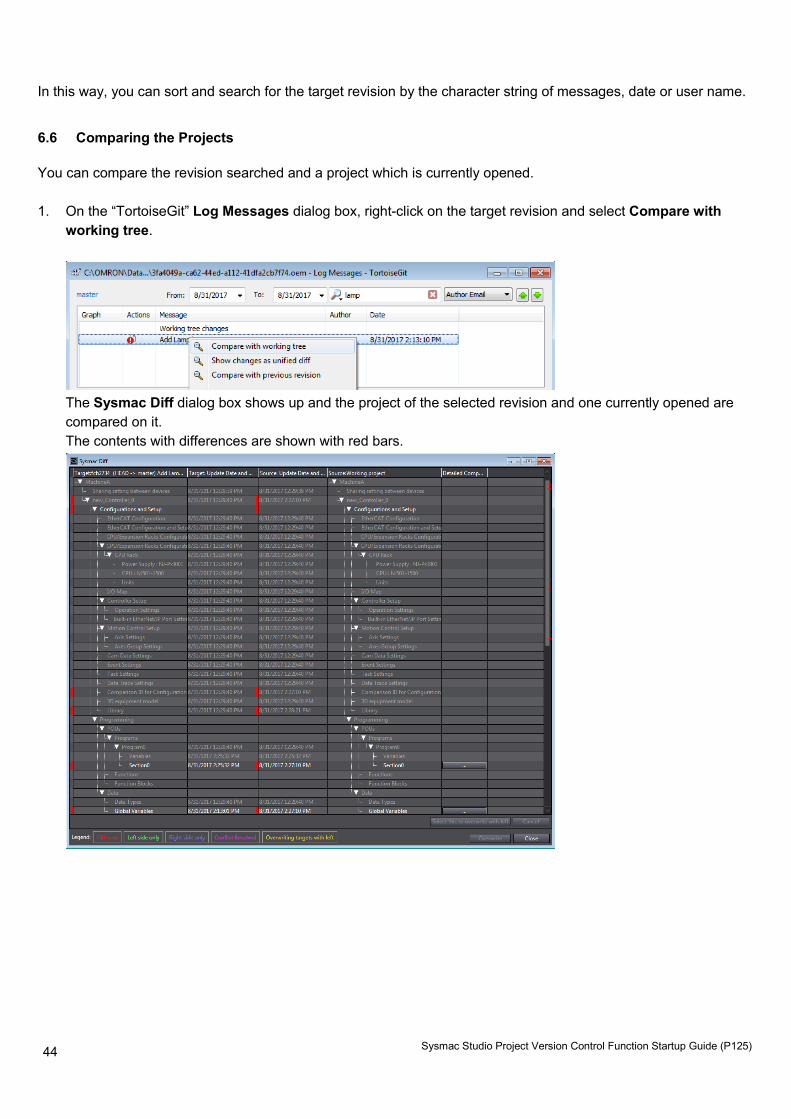
6.6 Comparing the Projects
You can compare the revision searched and a project which is currently opened. 1. On the “TortoiseGit” Log Messages dialog box, right-click on the target revision and select Compare with
working tree.
The Sysmac Diff dialog box shows up and the project of the selected revision and one currently opened are compared on it. The contents with differences are shown with red bars.
45
Sysmac Studio Project Version Control Function Startup Guide (P125)
2. To reference the details, select the ・・・ button in the Detail Compare column.
Then, the ladder diagrams are displayed, and you can grasp the difference between the revisions.
3. After referencing the difference, click the Close button.
6.7 Reverting the Project
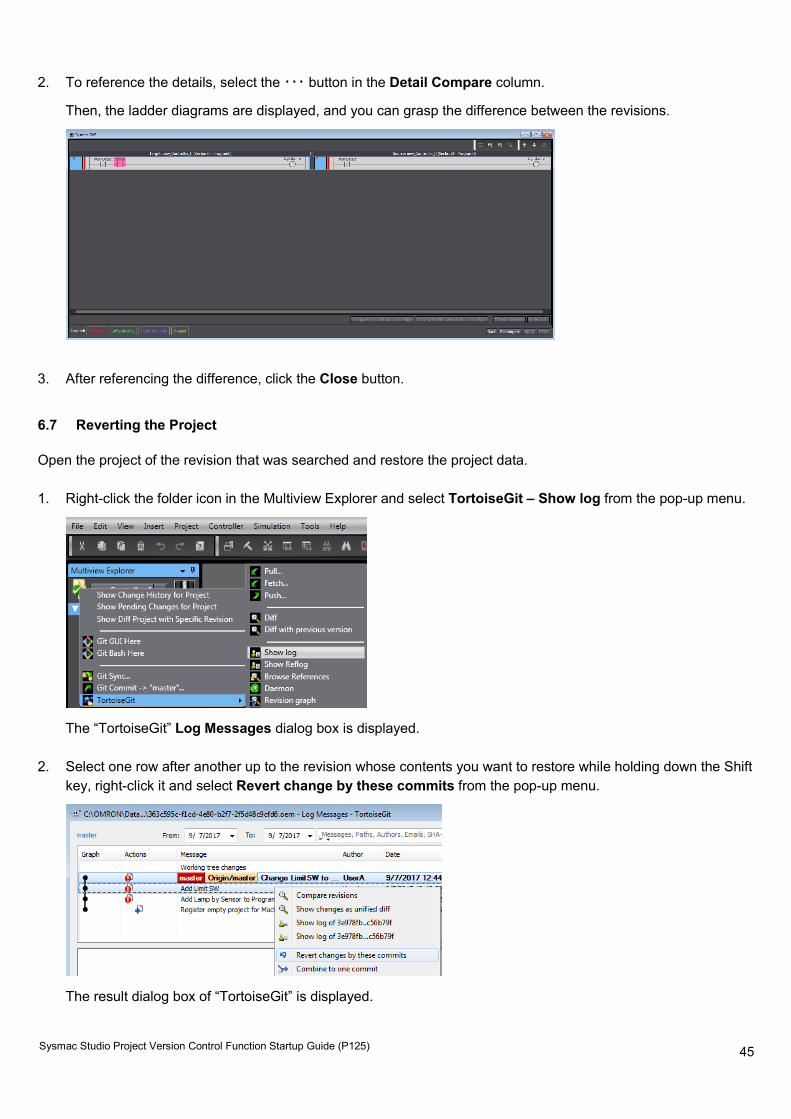
Open the project of the revision that was searched and restore the project data. 1. Right-click the folder icon in the Multiview Explorer and select TortoiseGit – Show log from the pop-up menu.
The “TortoiseGit” Log Messages dialog box is displayed.
2. Select one row after another up to the revision whose contents you want to restore while holding down the Shift key, right-click it and select Revert change by these commits from the pop-up menu.
The result dialog box of “TortoiseGit” is displayed.
46
Sysmac Studio Project Version Control Function Startup Guide (P125)
3. Click the Commit button.
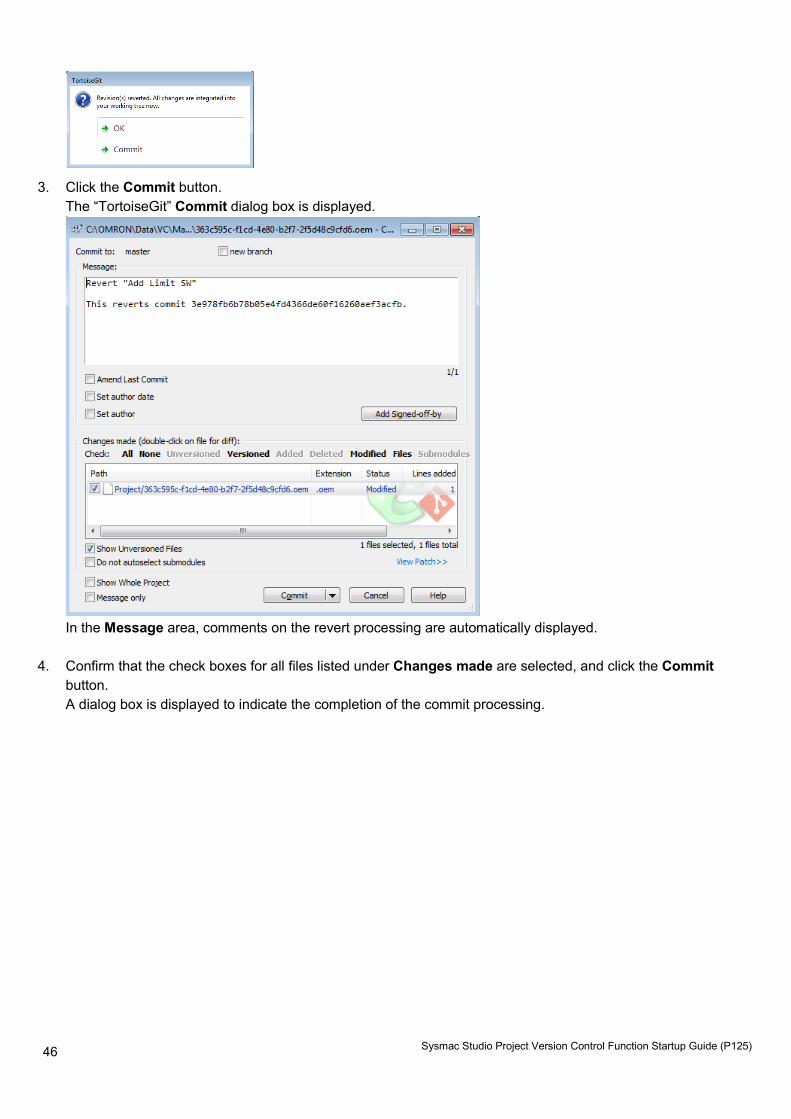
The “TortoiseGit” Commit dialog box is displayed.
In the Message area, comments on the revert processing are automatically displayed.
4. Confirm that the check boxes for all files listed under Changes made are selected, and click the Commit button. A dialog box is displayed to indicate the completion of the commit processing.
47
Sysmac Studio Project Version Control Function Startup Guide (P125)
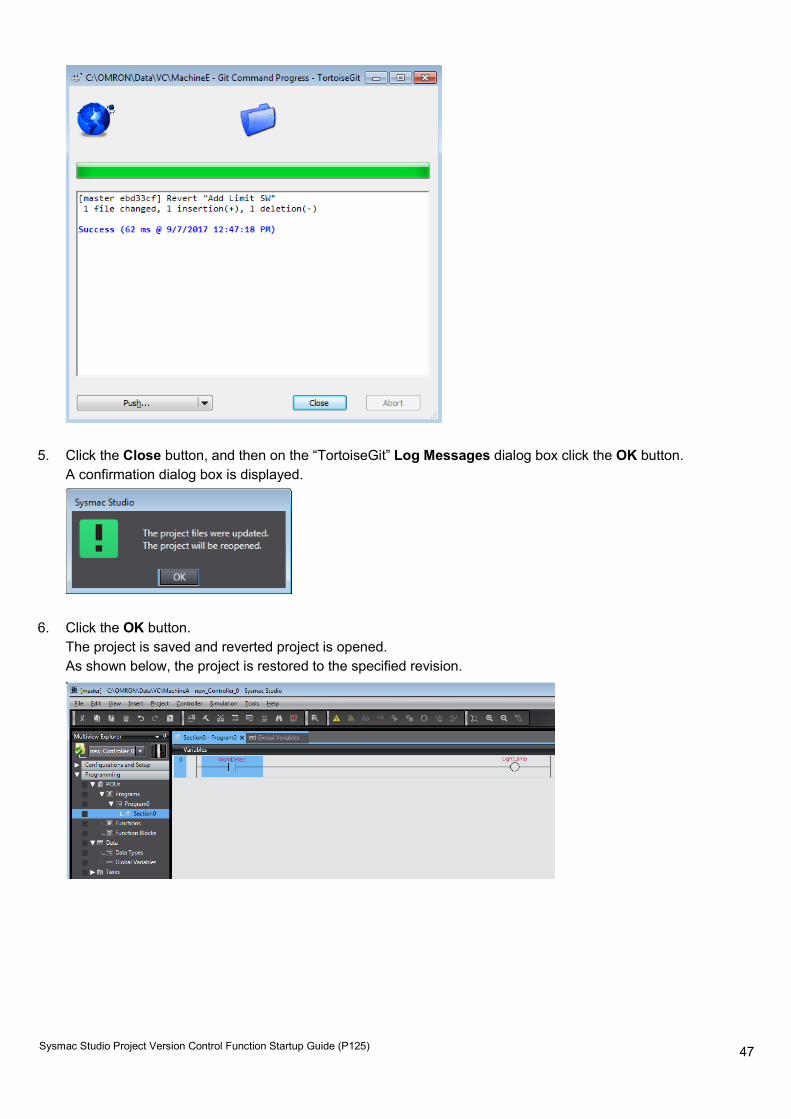
5. Click the Close button, and then on the “TortoiseGit” Log Messages dialog box click the OK button. A confirmation dialog box is displayed.
6. Click the OK button. The project is saved and reverted project is opened. As shown below, the project is restored to the specified revision.
48
Sysmac Studio Project Version Control Function Startup Guide (P125)
7 DEVELOPMENT BY MULTIPLE DEVELOPERS AND DERIVED DEVELOPMENT OF SYSMAC STUDIO PROJECT
In order to shorten the development period of controller systems, some projects are carried out concurrently by multiple developers. This development method is called “development by multiple developers”. In addition, as variations of production machine increase, it is required to develop a common program for derived machines with different hardware configurations. This development method is called “derived development”. This section explains the development by multiple developers and derived development which utilize the version control function of the Sysmac Studio projects. • Utilization of version control function in development by multiple developers and derived development • “Branch” and “Merge” which are essential for development by multiple developers and derived development • Operating procedure of development by multiple developers and derived development
7.1 Utilization of version control function in development by multiple developers and derived development
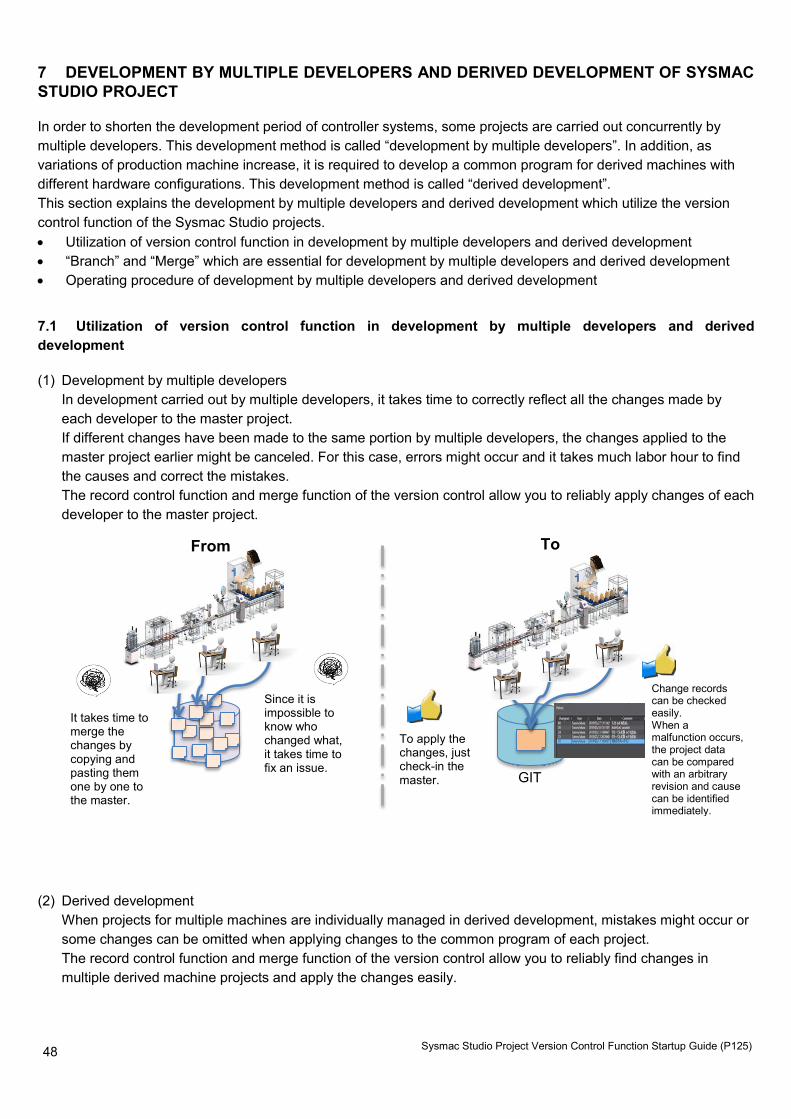
(1) Development by multiple developers In development carried out by multiple developers, it takes time to correctly reflect all the changes made by each developer to the master project. If different changes have been made to the same portion by multiple developers, the changes applied to the master project earlier might be canceled. For this case, errors might occur and it takes much labor hour to find the causes and correct the mistakes. The record control function and merge function of the version control allow you to reliably apply changes of each developer to the master project.
(2) Derived development When projects for multiple machines are individually managed in derived development, mistakes might occur or some changes can be omitted when applying changes to the common program of each project. The record control function and merge function of the version control allow you to reliably find changes in multiple derived machine projects and apply the changes easily.
From To
Since it is impossible to know who changed what, it takes time to fix an issue.
Change records can be checked easily. When a malfunction occurs, the project data can be compared with an arbitrary revision and cause can be identified immediately.
It takes time to merge the changes by copying and pasting them one by one to the master.
To apply the changes, just check-in the master. GIT
49
Sysmac Studio Project Version Control Function Startup Guide (P125)
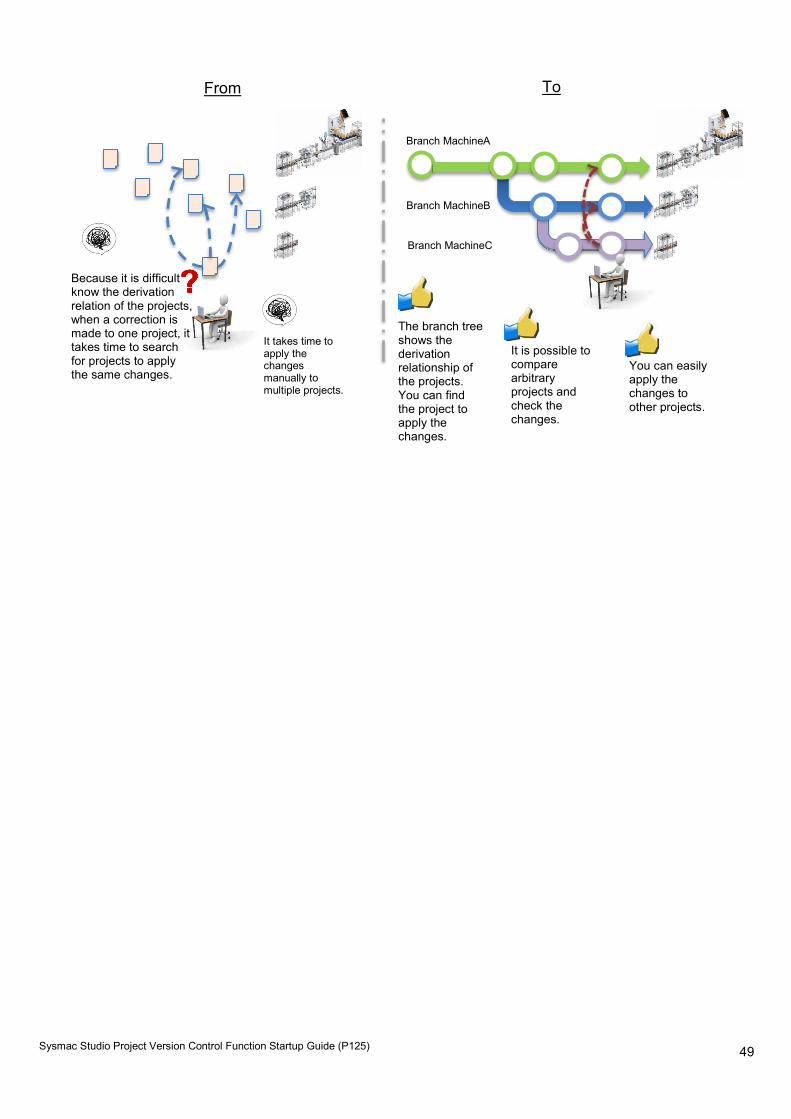
Because it is difficult to know the derivation relation of the projects, when a correction is made to one project, it takes time to search for projects to apply the same changes.
From To
Branch MachineA
Branch MachineB
It takes time to apply the changes manually to multiple projects.
The branch tree shows the derivation relationship of the projects. You can find the project to apply the changes.
It is possible to compare arbitrary projects and check the changes.
You can easily apply the changes to other projects.
Branch MachineC
50
Sysmac Studio Project Version Control Function Startup Guide (P125)
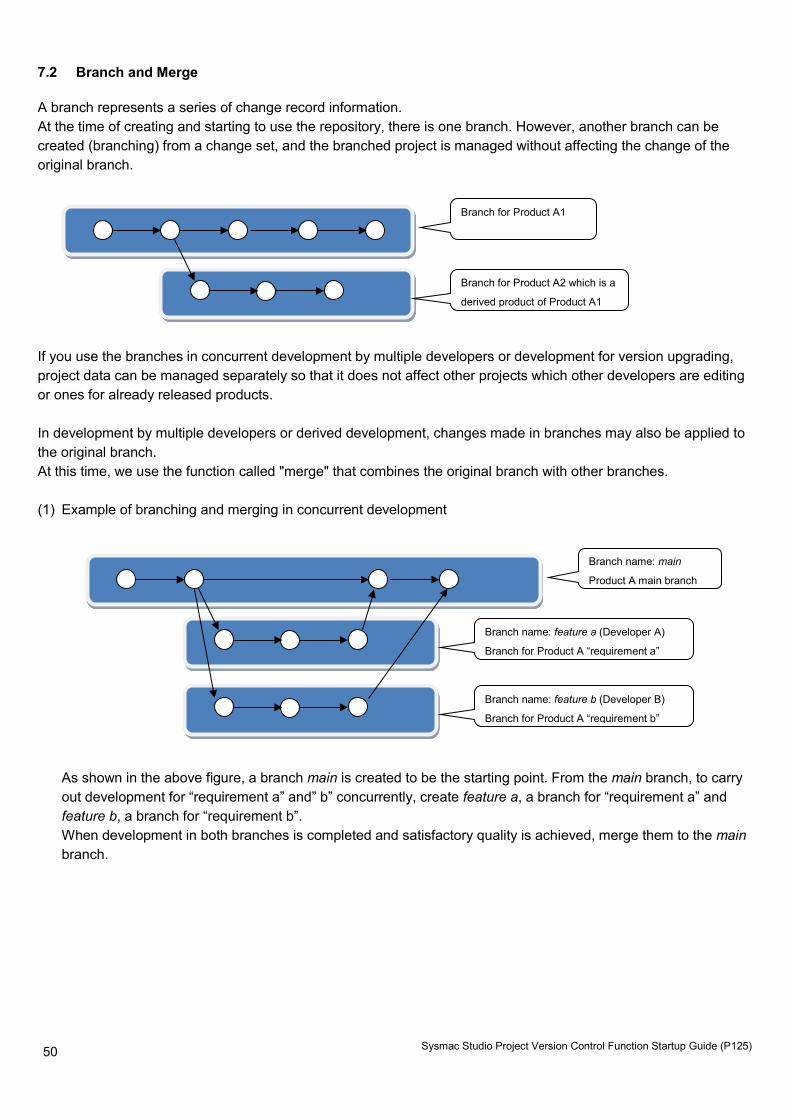
7.2 Branch and Merge
A branch represents a series of change record information. At the time of creating and starting to use the repository, there is one branch. However, another branch can be created (branching) from a change set, and the branched project is managed without affecting the change of the original branch.
If you use the branches in concurrent development by multiple developers or development for version upgrading, project data can be managed separately so that it does not affect other projects which other developers are editing or ones for already released products. In development by multiple developers or derived development, changes made in branches may also be applied to the original branch. At this time, we use the function called "merge" that combines the original branch with other branches. (1) Example of branching and merging in concurrent development
As shown in the above figure, a branch main is created to be the starting point. From the main branch, to carry out development for “requirement a” and” b” concurrently, create feature a, a branch for “requirement a” and feature b, a branch for “requirement b”. When development in both branches is completed and satisfactory quality is achieved, merge them to the main branch.
Branch for Product A1
Branch for Product A2 which is a
derived product of Product A1
Branch name: main
Product A main branch
Branch name: feature a (Developer A)
Branch for Product A “requirement a”
Branch name: feature b (Developer B)
Branch for Product A “requirement b”
51
Sysmac Studio Project Version Control Function Startup Guide (P125)
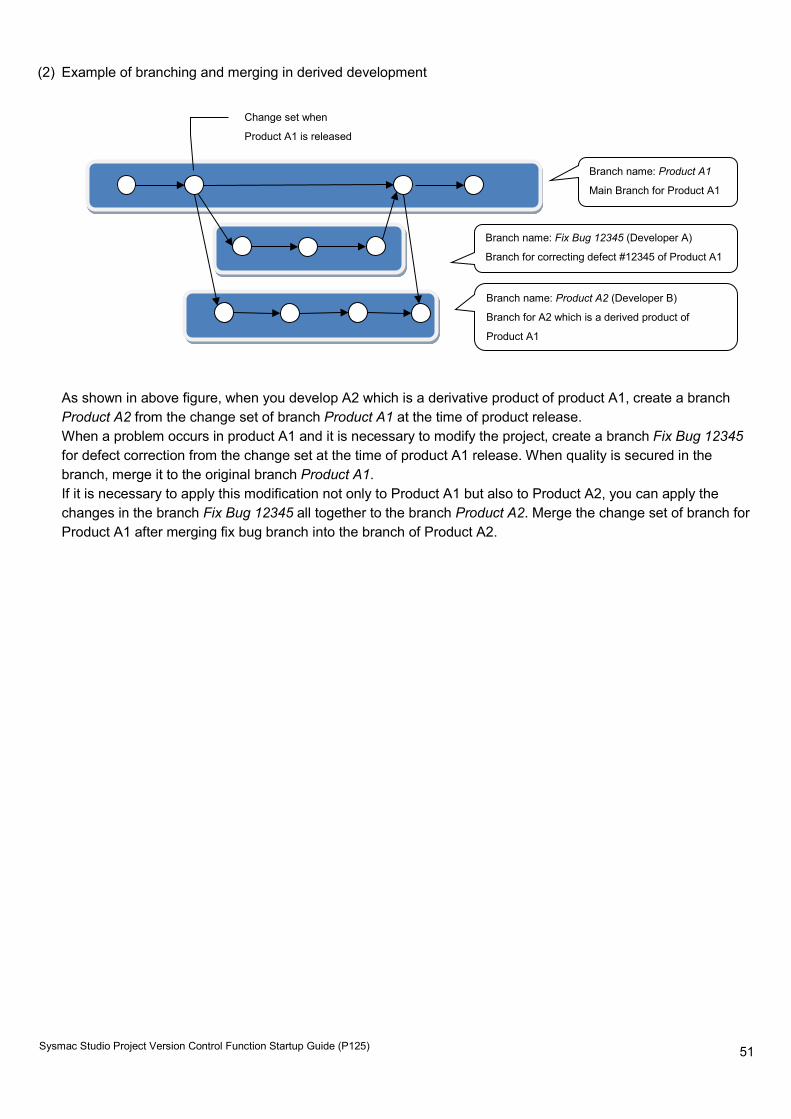
(2) Example of branching and merging in derived development
As shown in above figure, when you develop A2 which is a derivative product of product A1, create a branch Product A2 from the change set of branch Product A1 at the time of product release. When a problem occurs in product A1 and it is necessary to modify the project, create a branch Fix Bug 12345 for defect correction from the change set at the time of product A1 release. When quality is secured in the branch, merge it to the original branch Product A1. If it is necessary to apply this modification not only to Product A1 but also to Product A2, you can apply the changes in the branch Fix Bug 12345 all together to the branch Product A2. Merge the change set of branch for Product A1 after merging fix bug branch into the branch of Product A2.
Branch name: Product A1
Main Branch for Product A1
Branch name: Fix Bug 12345 (Developer A)
Branch for correcting defect #12345 of Product A1
Branch name: Product A2 (Developer B)
Branch for A2 which is a derived product of
Product A1
Change set when
Product A1 is released

52
Sysmac Studio Project Version Control Function Startup Guide (P125)
7.3 Sysmac Studio Project Development by Multiple Developers
This section describes how to develop the Sysmac Studio project concurrently by multiple developers, example of sharing the development works and operation procedure. 7.3.1 Sharing Edit Works to Concurrently Develop a Project by Multiple Developers
The version control function has a feature to help multiple developers to edit one project concurrently and to combine their changes when they “Push” their changes to the remote repository. However, if multiple developers edit the same portion at the same time and try to merge the changes, a conflict occurs and merging fails. To avoid this problem, a specific developer edits the data which does not support the development by multiple developers (“No” in below table), and data which allows multiple developers to edit (“Yes” in below table) can be edited by multiple developers.
Data name Edit by multiple developers EtherCAT No
CPU/Expansion Racks No I/O Map No
Controller Setup No Axis Settings No
Axes Group Settings No Cam Data Settings No
Event Settings No Task Settings No
Programs Yes Functions Yes
Function Blocks Yes Data Types No
Global Variables No
53
Sysmac Studio Project Version Control Function Startup Guide (P125)
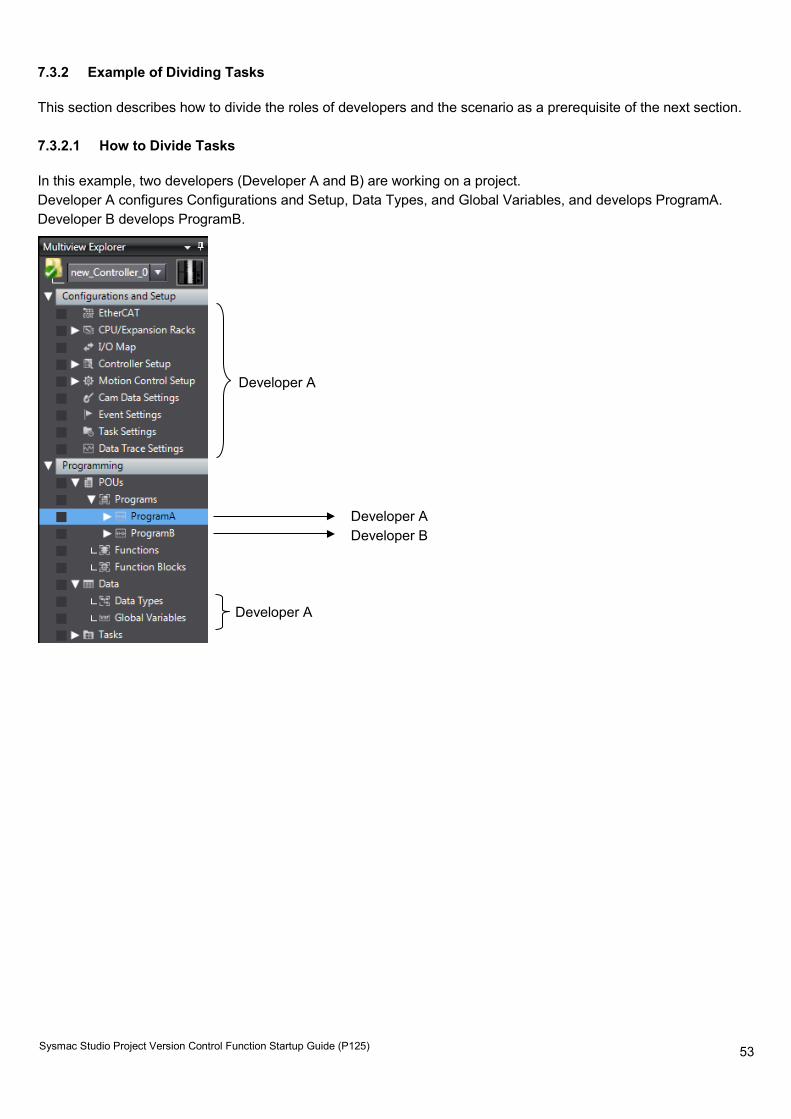
7.3.2 Example of Dividing Tasks
This section describes how to divide the roles of developers and the scenario as a prerequisite of the next section. 7.3.2.1 How to Divide Tasks
In this example, two developers (Developer A and B) are working on a project. Developer A configures Configurations and Setup, Data Types, and Global Variables, and develops ProgramA. Developer B develops ProgramB.
Developer A
Developer A Developer B
Developer A
54
Sysmac Studio Project Version Control Function Startup Guide (P125)
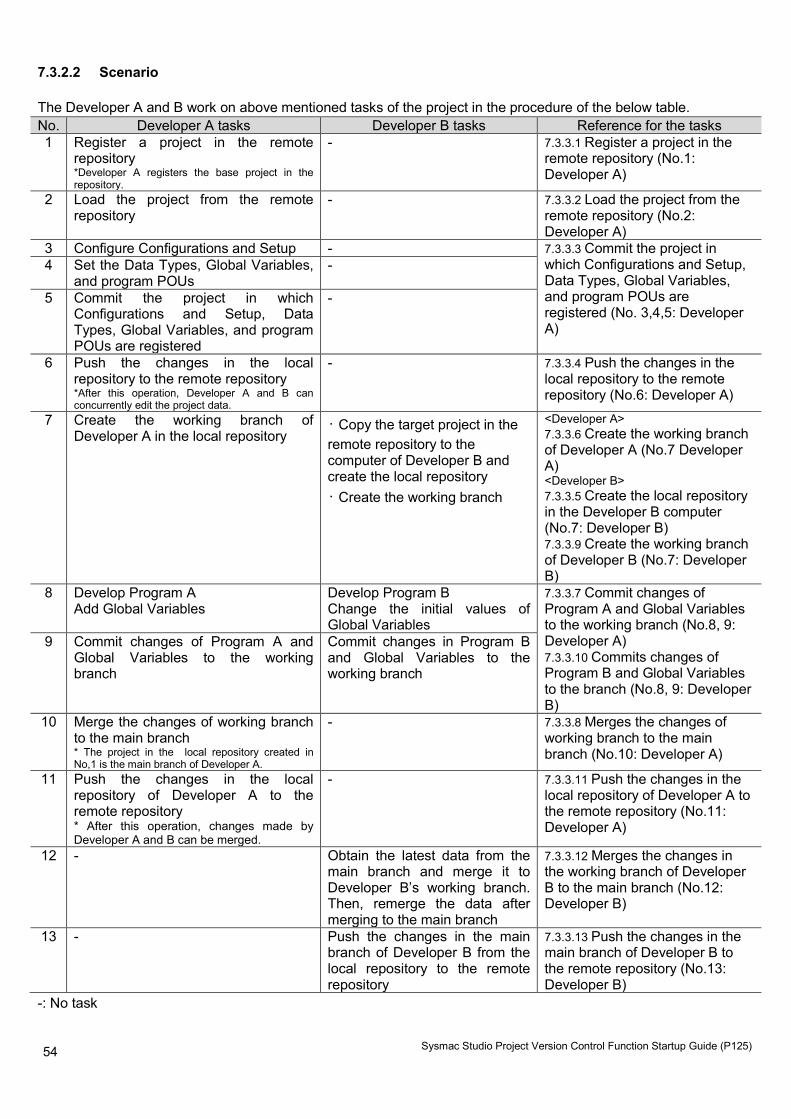
7.3.2.2 Scenario
The Developer A and B work on above mentioned tasks of the project in the procedure of the below table. No. Developer A tasks Developer B tasks Reference for the tasks 1 Register a project in the remote
repository *Developer A registers the base project in the repository.
- 7.3.3.1 Register a project in the remote repository (No.1: Developer A)
2 Load the project from the remote repository
- 7.3.3.2 Load the project from the remote repository (No.2: Developer A)
3 Configure Configurations and Setup - 7.3.3.3 Commit the project in which Configurations and Setup, Data Types, Global Variables, and program POUs are registered (No. 3,4,5: Developer A)
4 Set the Data Types, Global Variables, and program POUs
-
5 Commit the project in which Configurations and Setup, Data Types, Global Variables, and program POUs are registered
-
6 Push the changes in the local repository to the remote repository *After this operation, Developer A and B can concurrently edit the project data.
- 7.3.3.4 Push the changes in the local repository to the remote repository (No.6: Developer A)
7 Create the working branch of Developer A in the local repository
・ Copy the target project in the remote repository to the computer of Developer B and create the local repository ・ Create the working branch
<Developer A> 7.3.3.6 Create the working branch of Developer A (No.7 Developer A) <Developer B> 7.3.3.5 Create the local repository in the Developer B computer (No.7: Developer B) 7.3.3.9 Create the working branch of Developer B (No.7: Developer B)
8 Develop Program A Add Global Variables
Develop Program B Change the initial values of Global Variables
7.3.3.7 Commit changes of Program A and Global Variables to the working branch (No.8, 9: Developer A) 7.3.3.10 Commits changes of Program B and Global Variables to the branch (No.8, 9: Developer B)
9 Commit changes of Program A and Global Variables to the working branch
Commit changes in Program B and Global Variables to the working branch
10 Merge the changes of working branch to the main branch * The project in the local repository created in No,1 is the main branch of Developer A.
- 7.3.3.8 Merges the changes of working branch to the main branch (No.10: Developer A)
11 Push the changes in the local repository of Developer A to the remote repository * After this operation, changes made by Developer A and B can be merged.
- 7.3.3.11 Push the changes in the local repository of Developer A to the remote repository (No.11: Developer A)
12 - Obtain the latest data from the main branch and merge it to Developer B’s working branch. Then, remerge the data after merging to the main branch
7.3.3.12 Merges the changes in the working branch of Developer B to the main branch (No.12: Developer B)
13 - Push the changes in the main branch of Developer B from the local repository to the remote repository
7.3.3.13 Push the changes in the main branch of Developer B to the remote repository (No.13: Developer B)
-: No task
55
Sysmac Studio Project Version Control Function Startup Guide (P125)
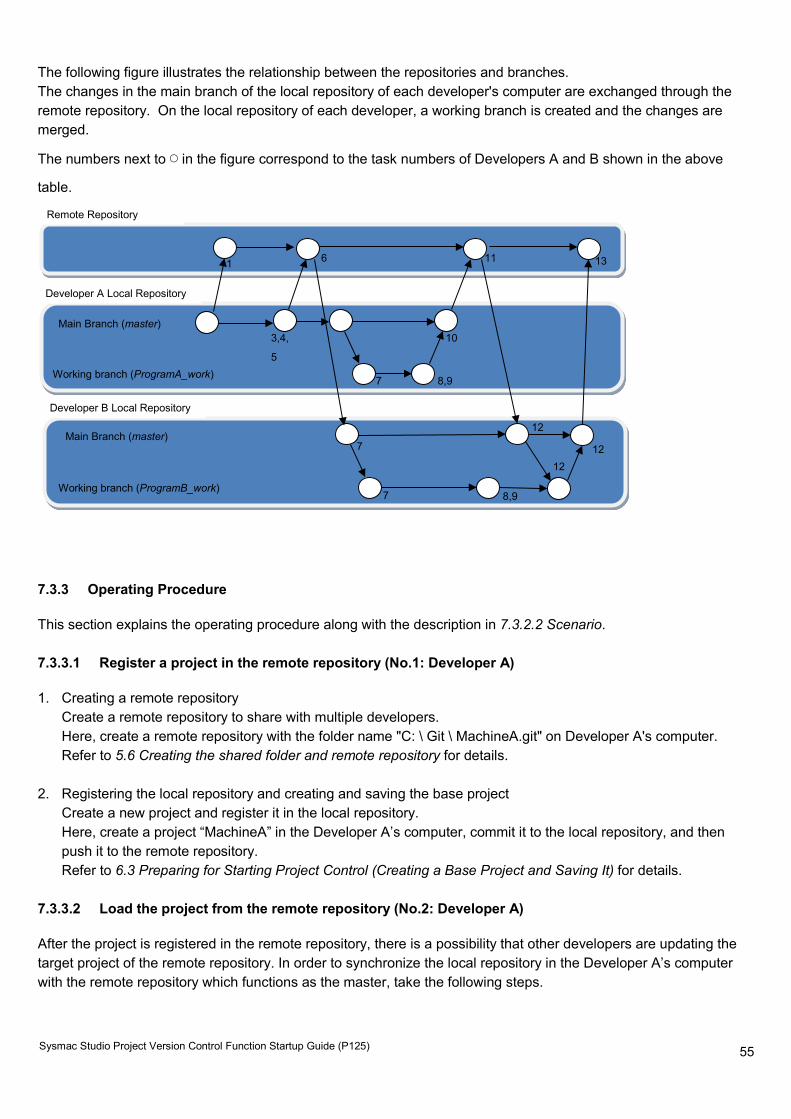
The following figure illustrates the relationship between the repositories and branches. The changes in the main branch of the local repository of each developer's computer are exchanged through the remote repository. On the local repository of each developer, a working branch is created and the changes are merged.
The numbers next to ◯ in the figure correspond to the task numbers of Developers A and B shown in the above
table.
7.3.3 Operating Procedure
This section explains the operating procedure along with the description in 7.3.2.2 Scenario. 7.3.3.1 Register a project in the remote repository (No.1: Developer A)
1. Creating a remote repository Create a remote repository to share with multiple developers. Here, create a remote repository with the folder name "C: \ Git \ MachineA.git" on Developer A's computer. Refer to 5.6 Creating the shared folder and remote repository for details.
2. Registering the local repository and creating and saving the base project Create a new project and register it in the local repository. Here, create a project “MachineA” in the Developer A’s computer, commit it to the local repository, and then push it to the remote repository. Refer to 6.3 Preparing for Starting Project Control (Creating a Base Project and Saving It) for details.
7.3.3.2 Load the project from the remote repository (No.2: Developer A)
After the project is registered in the remote repository, there is a possibility that other developers are updating the target project of the remote repository. In order to synchronize the local repository in the Developer A’s computer with the remote repository which functions as the master, take the following steps.
Remote Repository
Developer A Local Repository
Developer B Local Repository
Main Branch (master)
Working branch (ProgramA_work)
Main Branch (master)
Working branch (ProgramB_work)
1
3,4,
5
7 8,9
10
11
7
7
8,9
12
12
13 6
12
56
Sysmac Studio Project Version Control Function Startup Guide (P125)
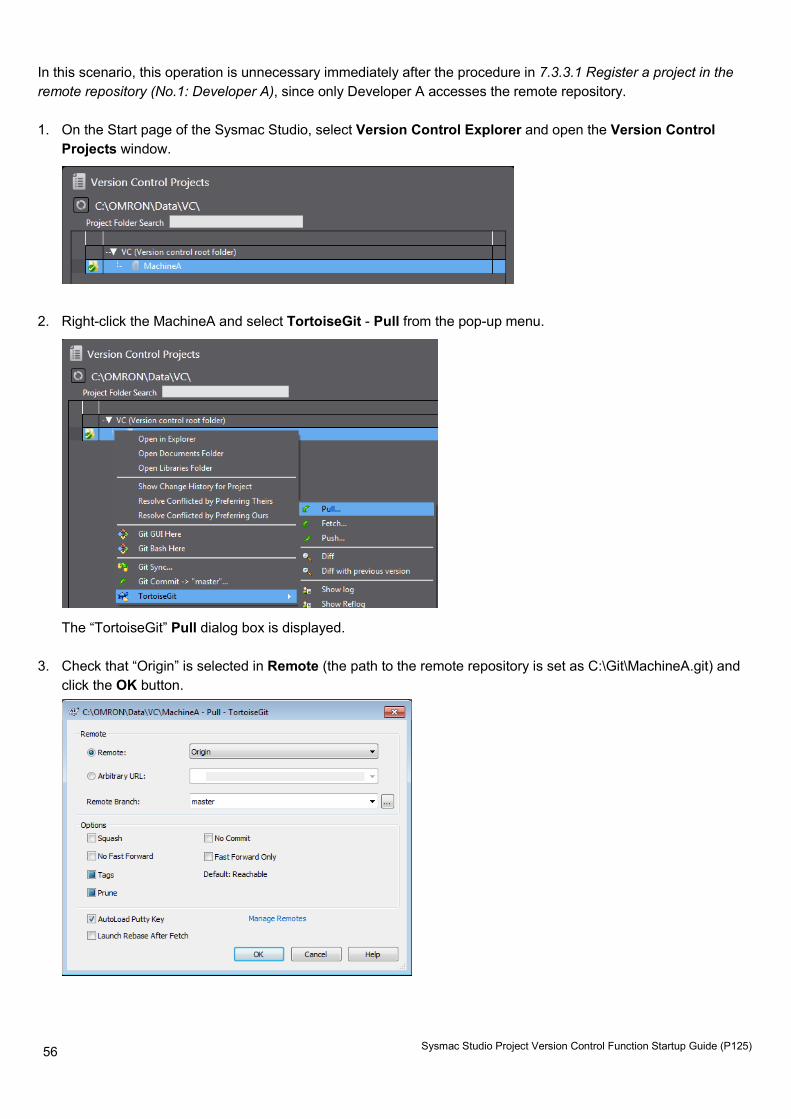
In this scenario, this operation is unnecessary immediately after the procedure in 7.3.3.1 Register a project in the remote repository (No.1: Developer A), since only Developer A accesses the remote repository. 1. On the Start page of the Sysmac Studio, select Version Control Explorer and open the Version Control
Projects window.
2. Right-click the MachineA and select TortoiseGit - Pull from the pop-up menu.
The “TortoiseGit” Pull dialog box is displayed. 3. Check that “Origin” is selected in Remote (the path to the remote repository is set as C:\Git\MachineA.git) and
click the OK button.
57
Sysmac Studio Project Version Control Function Startup Guide (P125)
This completes Pull processing.
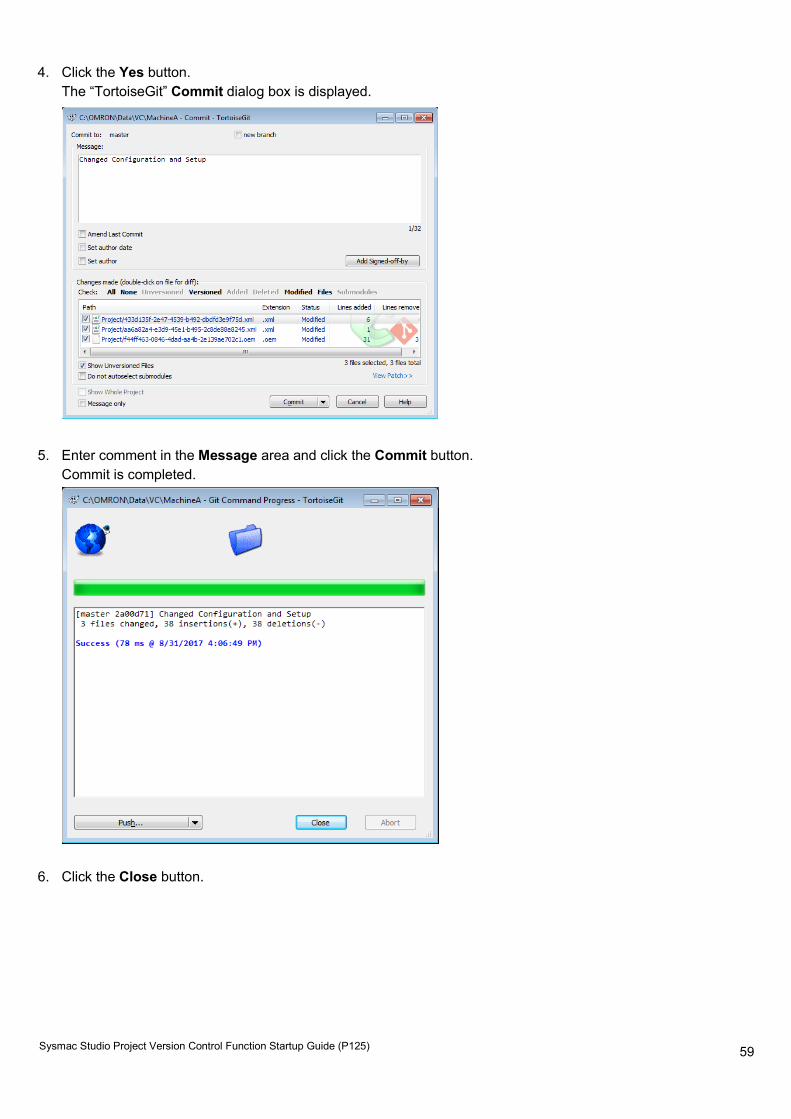
4. Click the Close button. 7.3.3.3 Commit the project in which Configurations and Setup, Data Types, Global Variables, and program POUs are registered (No. 3,4,5: Developer A)
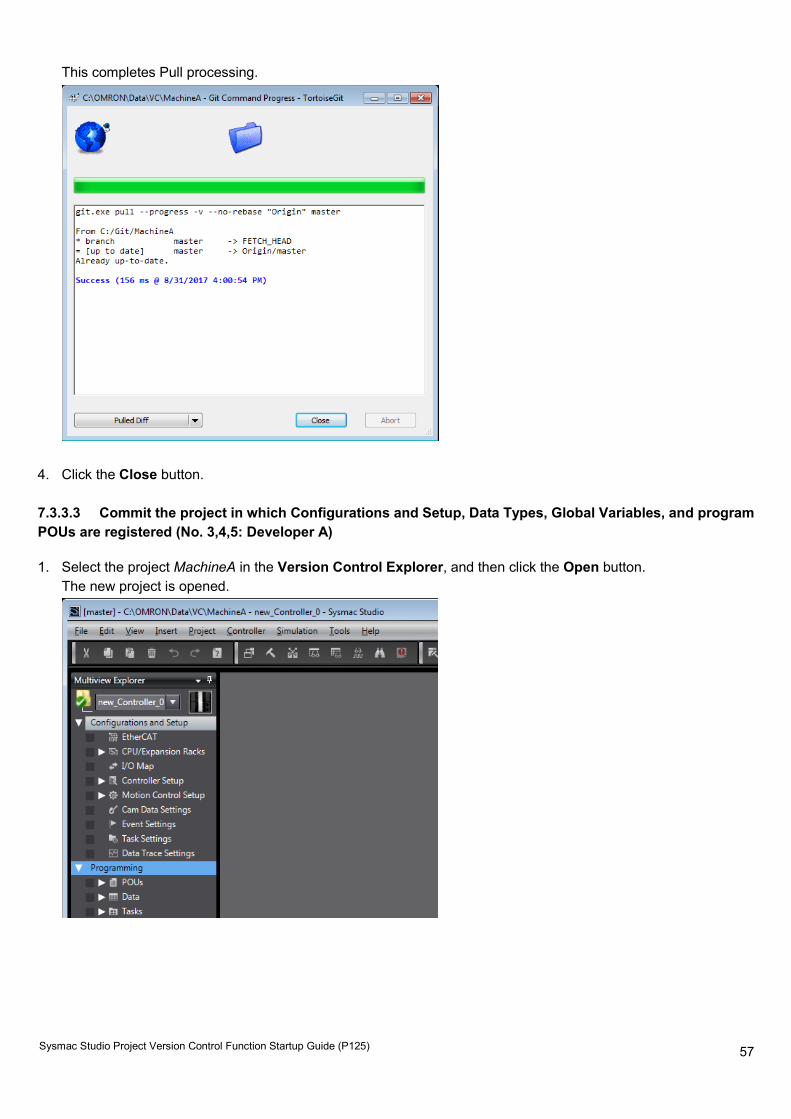
1. Select the project MachineA in the Version Control Explorer, and then click the Open button. The new project is opened.
58
Sysmac Studio Project Version Control Function Startup Guide (P125)
2. Set necessary data for the items in Operation Settings tab.
3. In order to Commit it to the local repository, right-click the folder icon in the Multiview Explorer and select Git
Commit -> “master” from the pop-up menu.
The confirmation dialog box is displayed.
59
Sysmac Studio Project Version Control Function Startup Guide (P125)
4. Click the Yes button. The “TortoiseGit” Commit dialog box is displayed.
5. Enter comment in the Message area and click the Commit button.
Commit is completed.
6. Click the Close button.

60
Sysmac Studio Project Version Control Function Startup Guide (P125)
7. Then, enter the Data Types and Global Variables.
8. In order to Commit them to the local repository, right-click the folder icon in the Multiview Explorer and select Git
Commit -> “master” from the pop-up menu. A confirmation dialog box is displayed.
9. Click the Yes button. The “TortoiseGit” Commit dialog box is displayed.
10. Enter comment in the Message area and click the Commit button.
11. Click the Close button in the Complete Commit dialog box.
61
Sysmac Studio Project Version Control Function Startup Guide (P125)
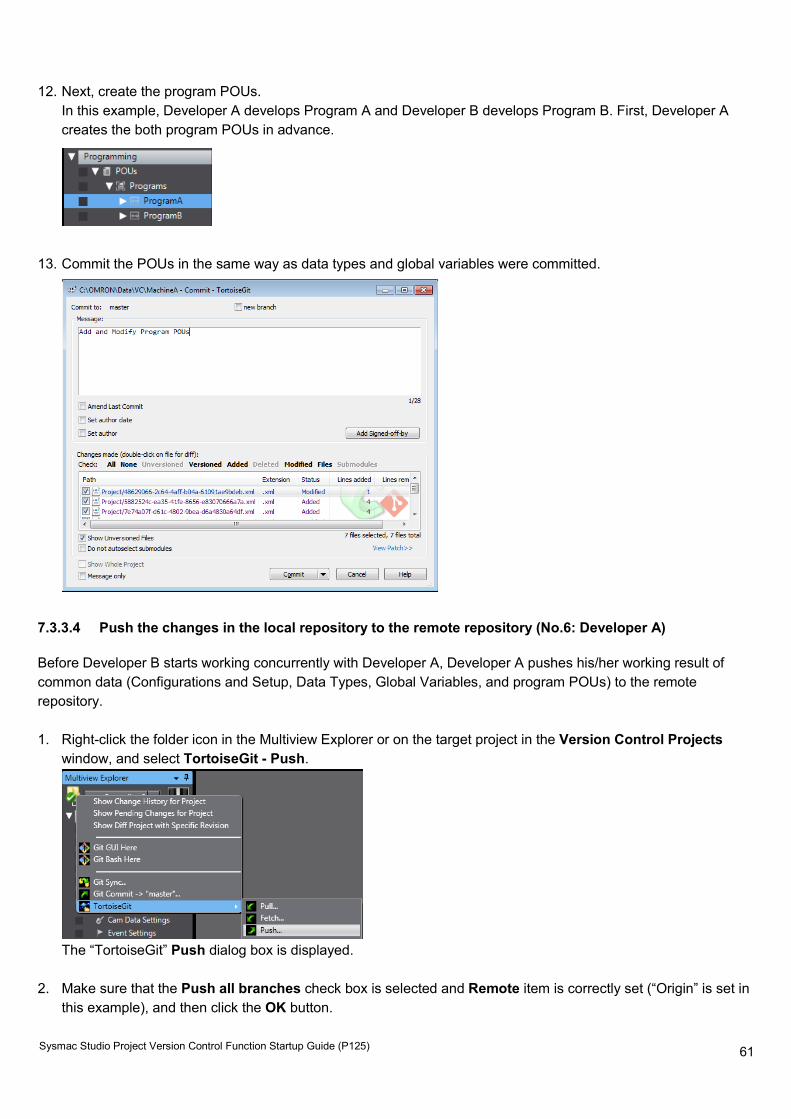
12. Next, create the program POUs.
In this example, Developer A develops Program A and Developer B develops Program B. First, Developer A creates the both program POUs in advance.
13. Commit the POUs in the same way as data types and global variables were committed.
7.3.3.4 Push the changes in the local repository to the remote repository (No.6: Developer A)
Before Developer B starts working concurrently with Developer A, Developer A pushes his/her working result of common data (Configurations and Setup, Data Types, Global Variables, and program POUs) to the remote repository. 1. Right-click the folder icon in the Multiview Explorer or on the target project in the Version Control Projects
window, and select TortoiseGit - Push.
The “TortoiseGit” Push dialog box is displayed.
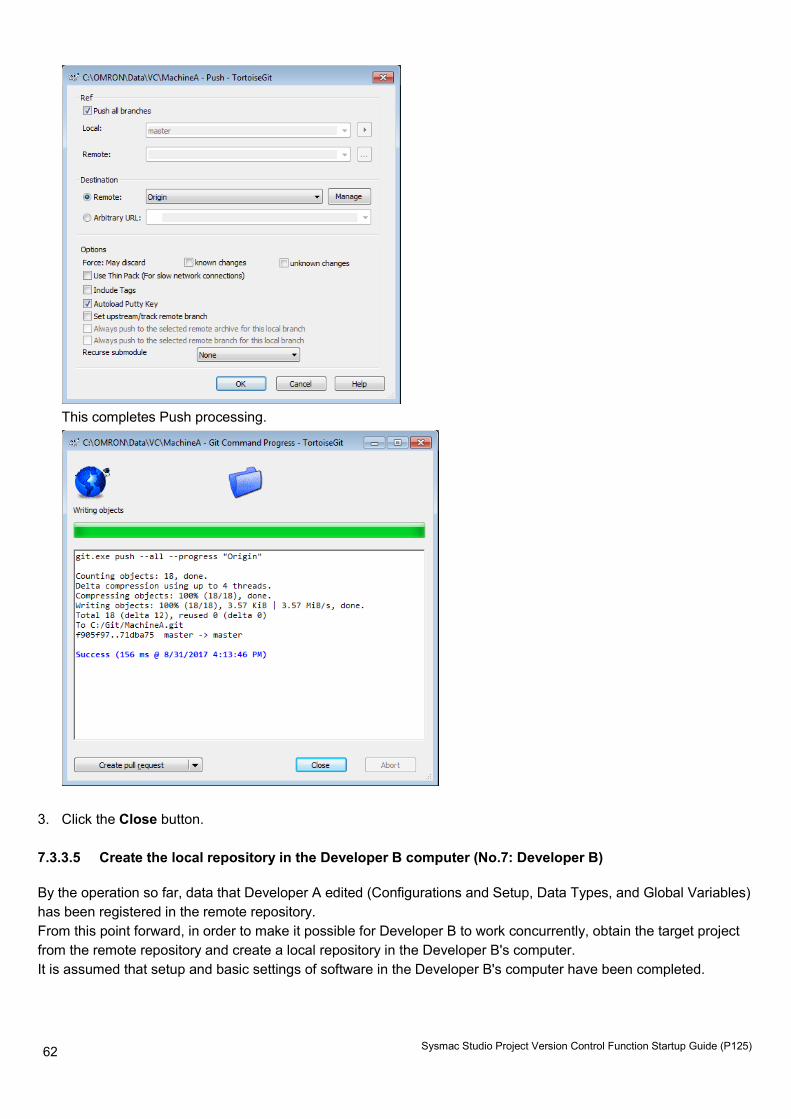
2. Make sure that the Push all branches check box is selected and Remote item is correctly set (“Origin” is set in
this example), and then click the OK button.
62
Sysmac Studio Project Version Control Function Startup Guide (P125)
This completes Push processing.
3. Click the Close button. 7.3.3.5 Create the local repository in the Developer B computer (No.7: Developer B)
By the operation so far, data that Developer A edited (Configurations and Setup, Data Types, and Global Variables) has been registered in the remote repository. From this point forward, in order to make it possible for Developer B to work concurrently, obtain the target project from the remote repository and create a local repository in the Developer B's computer. It is assumed that setup and basic settings of software in the Developer B's computer have been completed.
63
Sysmac Studio Project Version Control Function Startup Guide (P125)
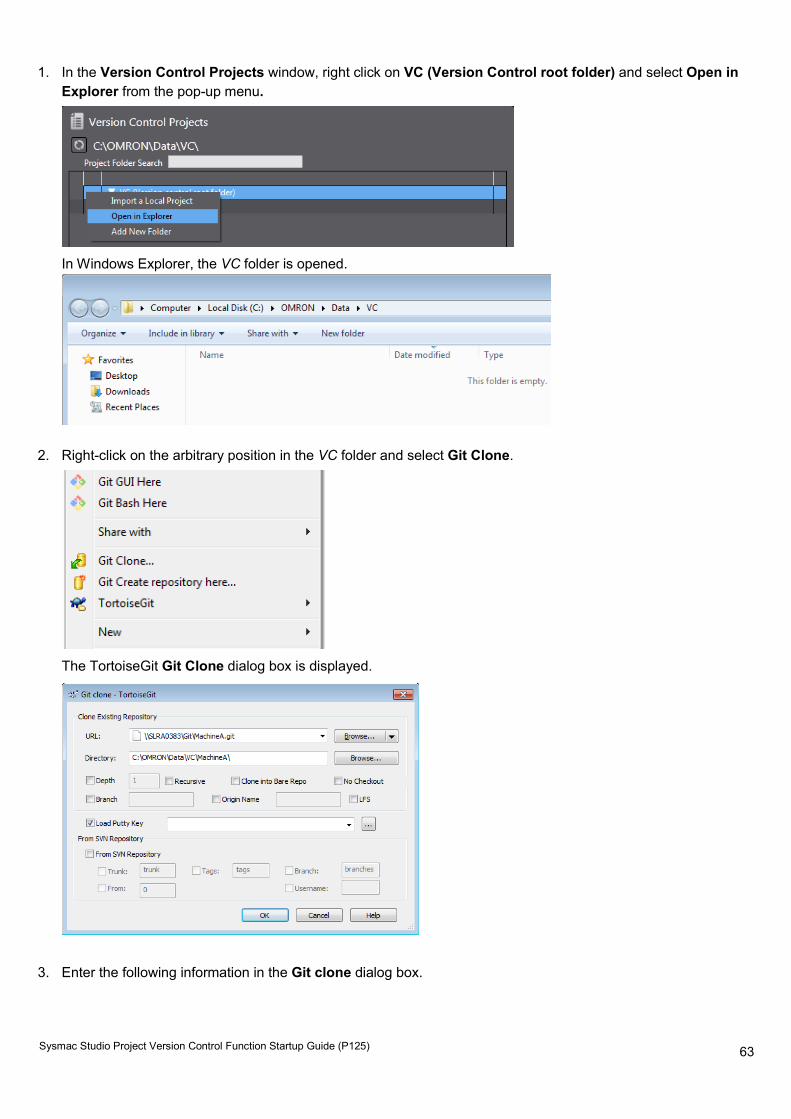
1. In the Version Control Projects window, right click on VC (Version Control root folder) and select Open in Explorer from the pop-up menu.
In Windows Explorer, the VC folder is opened.
2. Right-click on the arbitrary position in the VC folder and select Git Clone.
The TortoiseGit Git Clone dialog box is displayed.
3. Enter the following information in the Git clone dialog box.
64
Sysmac Studio Project Version Control Function Startup Guide (P125)
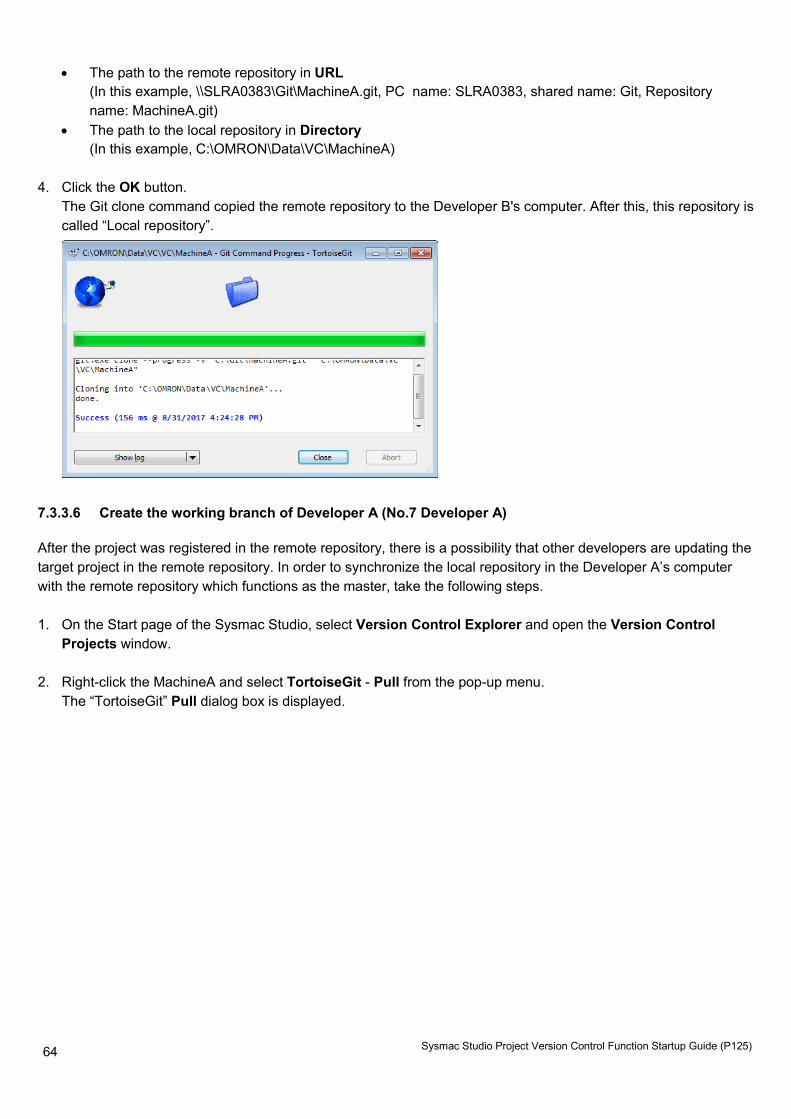
• The path to the remote repository in URL (In this example, \\SLRA0383\Git\MachineA.git, PC name: SLRA0383, shared name: Git, Repository name: MachineA.git)
• The path to the local repository in Directory (In this example, C:\OMRON\Data\VC\MachineA)
4. Click the OK button.
The Git clone command copied the remote repository to the Developer B's computer. After this, this repository is called “Local repository”.
7.3.3.6 Create the working branch of Developer A (No.7 Developer A)
After the project was registered in the remote repository, there is a possibility that other developers are updating the target project in the remote repository. In order to synchronize the local repository in the Developer A’s computer with the remote repository which functions as the master, take the following steps. 1. On the Start page of the Sysmac Studio, select Version Control Explorer and open the Version Control
Projects window. 2. Right-click the MachineA and select TortoiseGit - Pull from the pop-up menu.
The “TortoiseGit” Pull dialog box is displayed.
65
Sysmac Studio Project Version Control Function Startup Guide (P125)
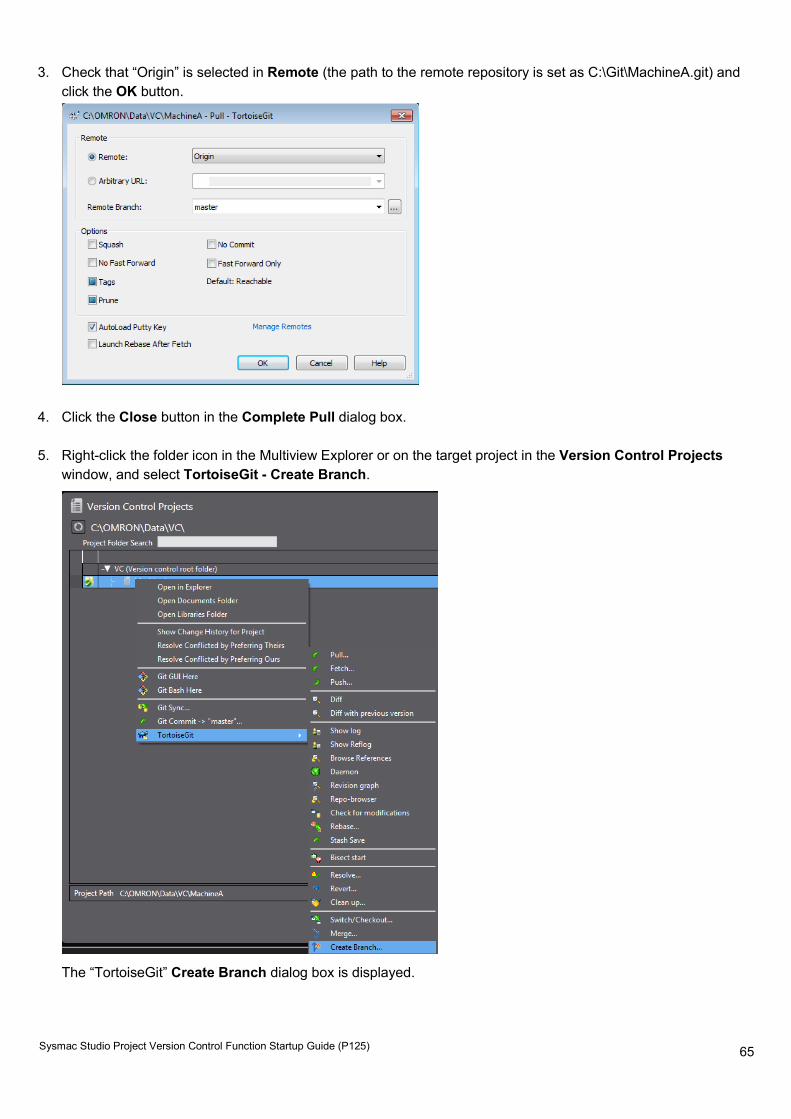
3. Check that “Origin” is selected in Remote (the path to the remote repository is set as C:\Git\MachineA.git) and click the OK button.
4. Click the Close button in the Complete Pull dialog box. 5. Right-click the folder icon in the Multiview Explorer or on the target project in the Version Control Projects
window, and select TortoiseGit - Create Branch.
The “TortoiseGit” Create Branch dialog box is displayed.
66
Sysmac Studio Project Version Control Function Startup Guide (P125)
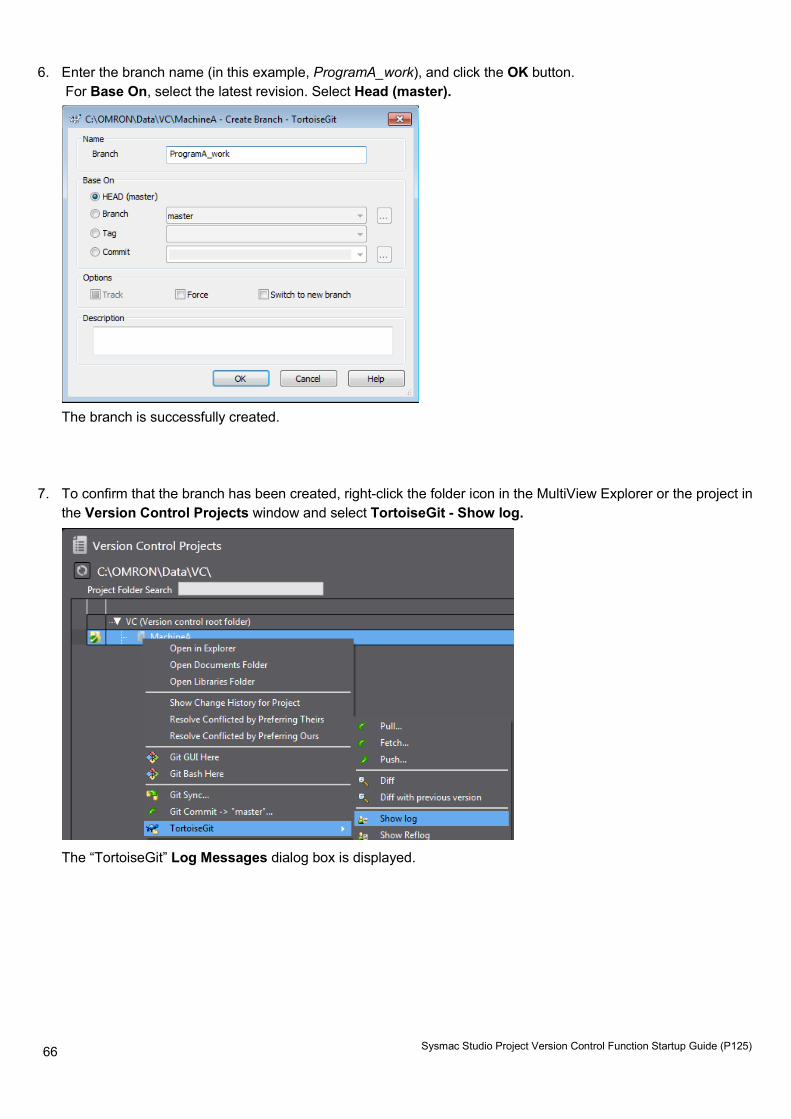
6. Enter the branch name (in this example, ProgramA_work), and click the OK button. For Base On, select the latest revision. Select Head (master).
The branch is successfully created.
7. To confirm that the branch has been created, right-click the folder icon in the MultiView Explorer or the project in the Version Control Projects window and select TortoiseGit - Show log.
The “TortoiseGit” Log Messages dialog box is displayed.
67
Sysmac Studio Project Version Control Function Startup Guide (P125)
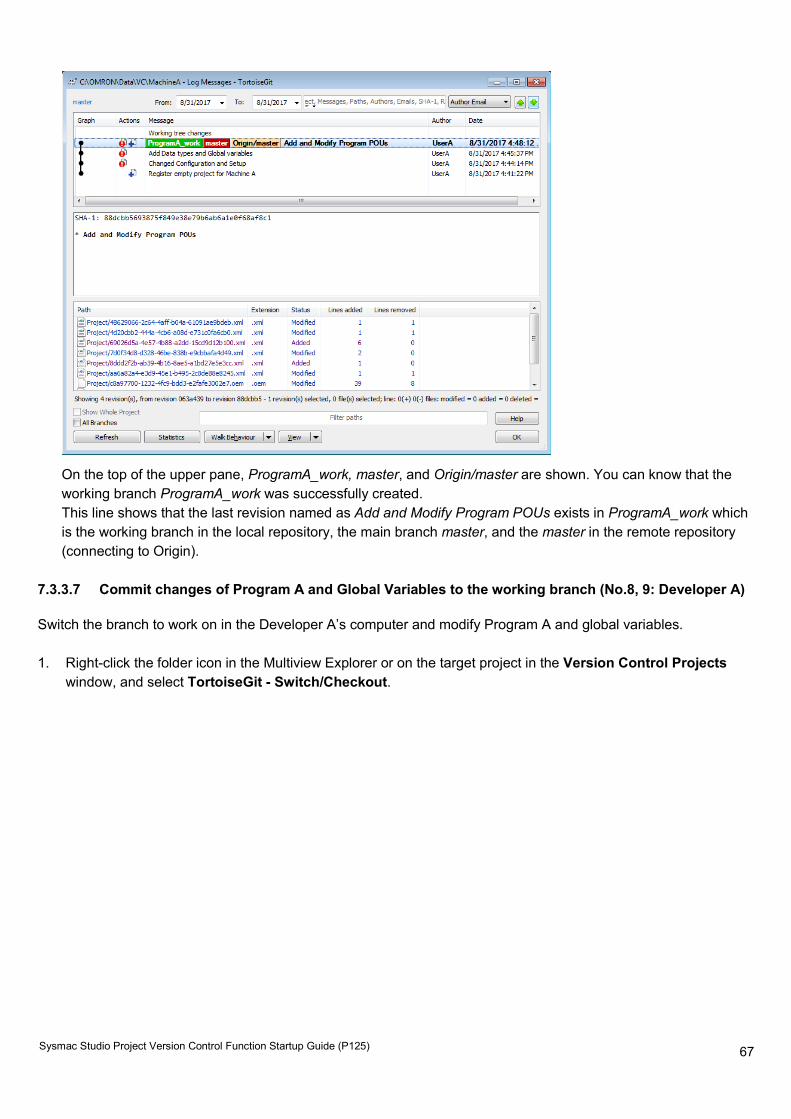
On the top of the upper pane, ProgramA_work, master, and Origin/master are shown. You can know that the working branch ProgramA_work was successfully created. This line shows that the last revision named as Add and Modify Program POUs exists in ProgramA_work which is the working branch in the local repository, the main branch master, and the master in the remote repository (connecting to Origin).
7.3.3.7 Commit changes of Program A and Global Variables to the working branch (No.8, 9: Developer A)
Switch the branch to work on in the Developer A’s computer and modify Program A and global variables. 1. Right-click the folder icon in the Multiview Explorer or on the target project in the Version Control Projects
window, and select TortoiseGit - Switch/Checkout.
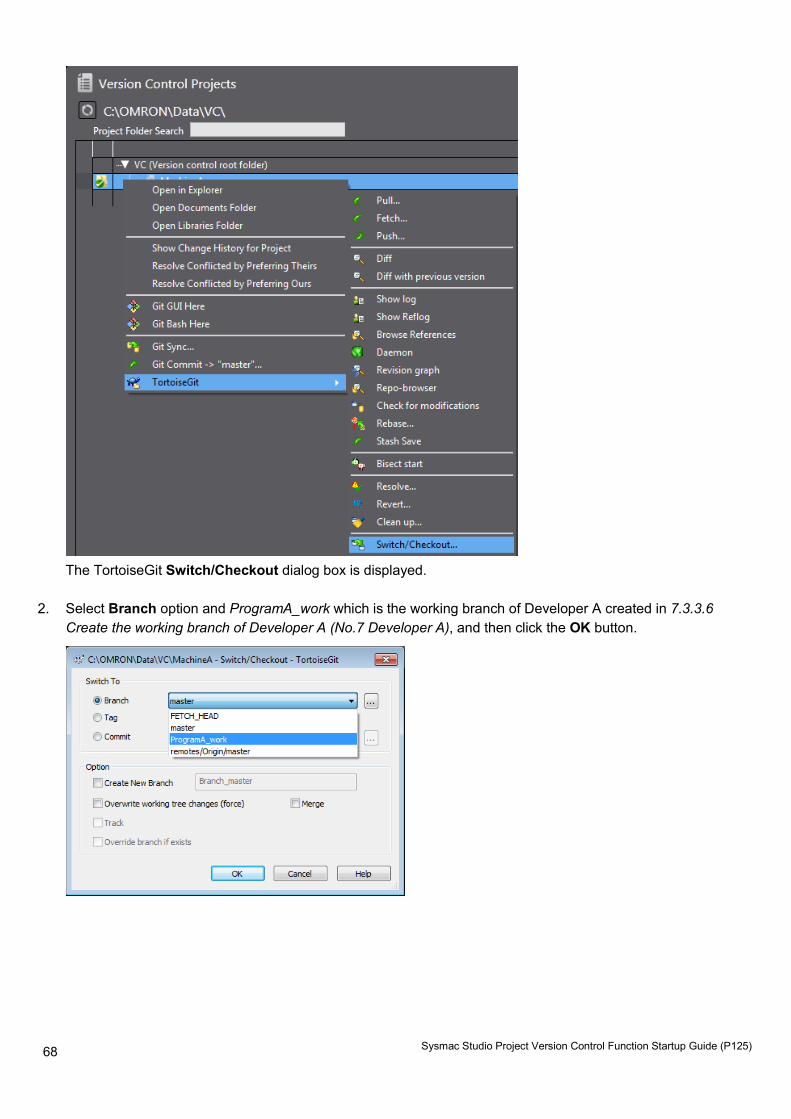
68
Sysmac Studio Project Version Control Function Startup Guide (P125)
The TortoiseGit Switch/Checkout dialog box is displayed.
2. Select Branch option and ProgramA_work which is the working branch of Developer A created in 7.3.3.6
Create the working branch of Developer A (No.7 Developer A), and then click the OK button.
69
Sysmac Studio Project Version Control Function Startup Guide (P125)
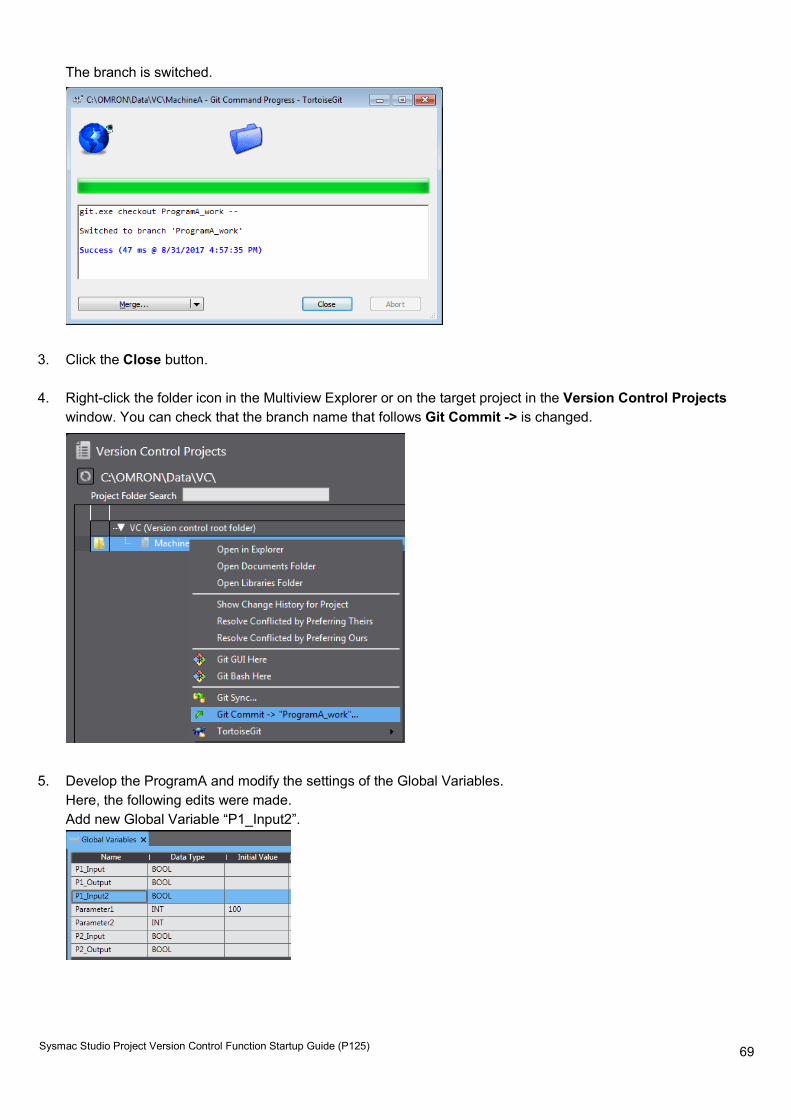
The branch is switched.
3. Click the Close button. 4. Right-click the folder icon in the Multiview Explorer or on the target project in the Version Control Projects
window. You can check that the branch name that follows Git Commit -> is changed.
5. Develop the ProgramA and modify the settings of the Global Variables.
Here, the following edits were made. Add new Global Variable “P1_Input2”.
70
Sysmac Studio Project Version Control Function Startup Guide (P125)
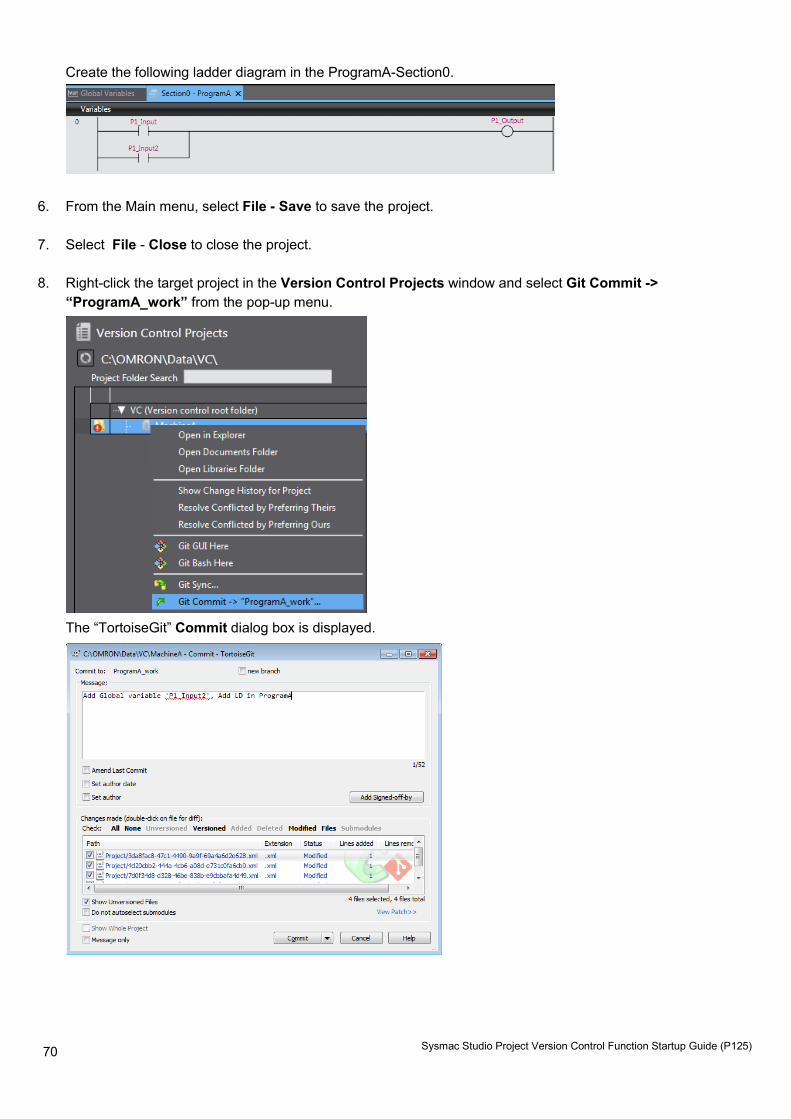
Create the following ladder diagram in the ProgramA-Section0.
6. From the Main menu, select File - Save to save the project.
7. Select File - Close to close the project. 8. Right-click the target project in the Version Control Projects window and select Git Commit ->
“ProgramA_work” from the pop-up menu.
The “TortoiseGit” Commit dialog box is displayed.
71
Sysmac Studio Project Version Control Function Startup Guide (P125)
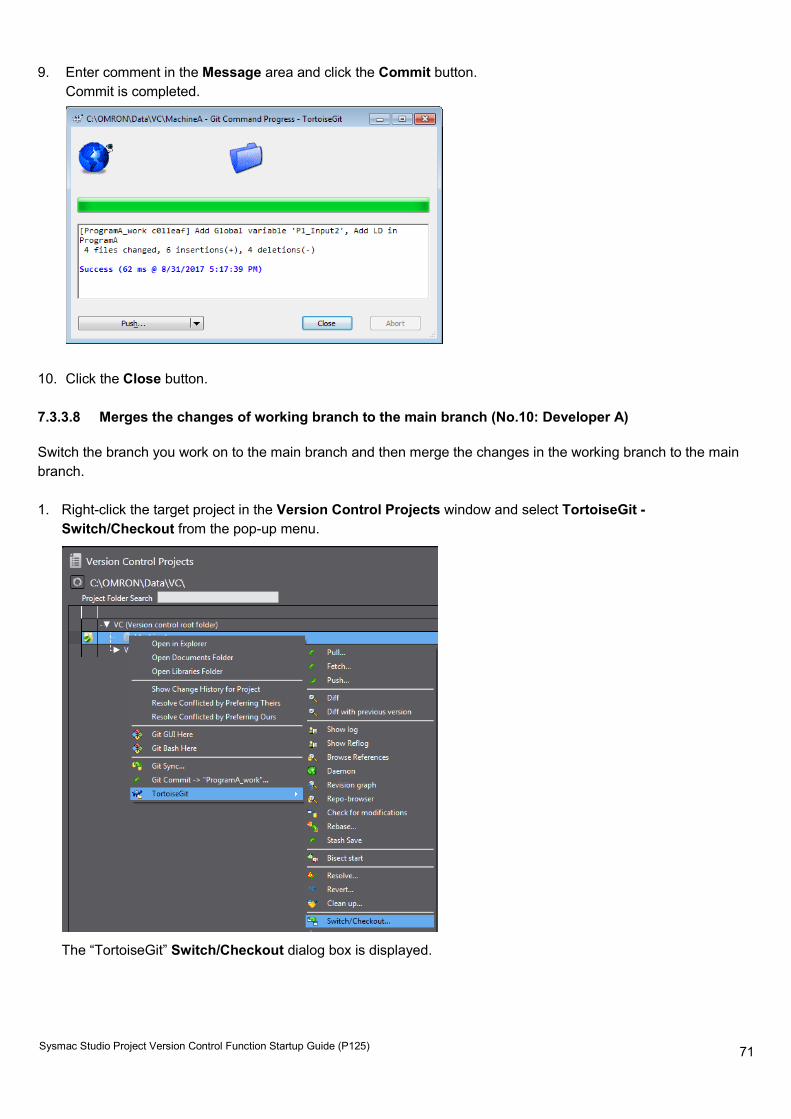
9. Enter comment in the Message area and click the Commit button. Commit is completed.
10. Click the Close button. 7.3.3.8 Merges the changes of working branch to the main branch (No.10: Developer A)
Switch the branch you work on to the main branch and then merge the changes in the working branch to the main branch. 1. Right-click the target project in the Version Control Projects window and select TortoiseGit -
Switch/Checkout from the pop-up menu.
The “TortoiseGit” Switch/Checkout dialog box is displayed.
72
Sysmac Studio Project Version Control Function Startup Guide (P125)
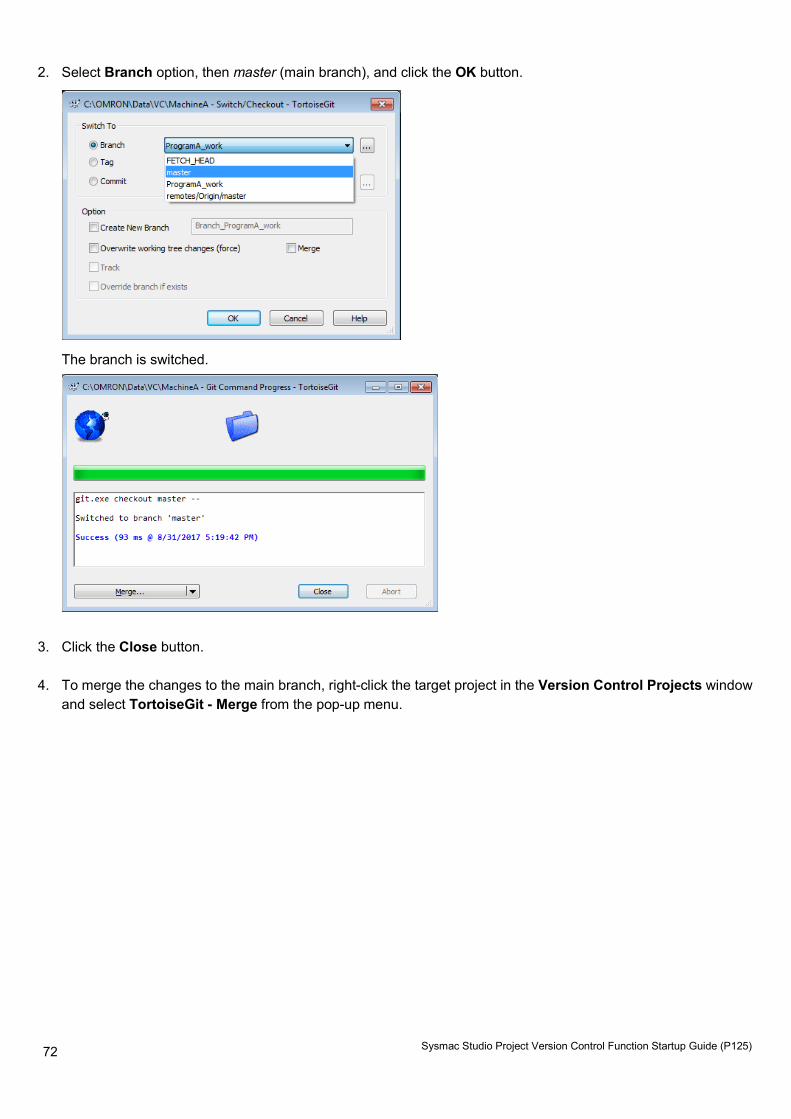
2. Select Branch option, then master (main branch), and click the OK button.
The branch is switched.
3. Click the Close button. 4. To merge the changes to the main branch, right-click the target project in the Version Control Projects window
and select TortoiseGit - Merge from the pop-up menu.

73
Sysmac Studio Project Version Control Function Startup Guide (P125)
The “TortoiseGit” Merge dialog box is displayed.
5. Select Branch option, then the working branch ProgramA_work to merge to the main branch master, and then
click the OK button.
74
Sysmac Studio Project Version Control Function Startup Guide (P125)
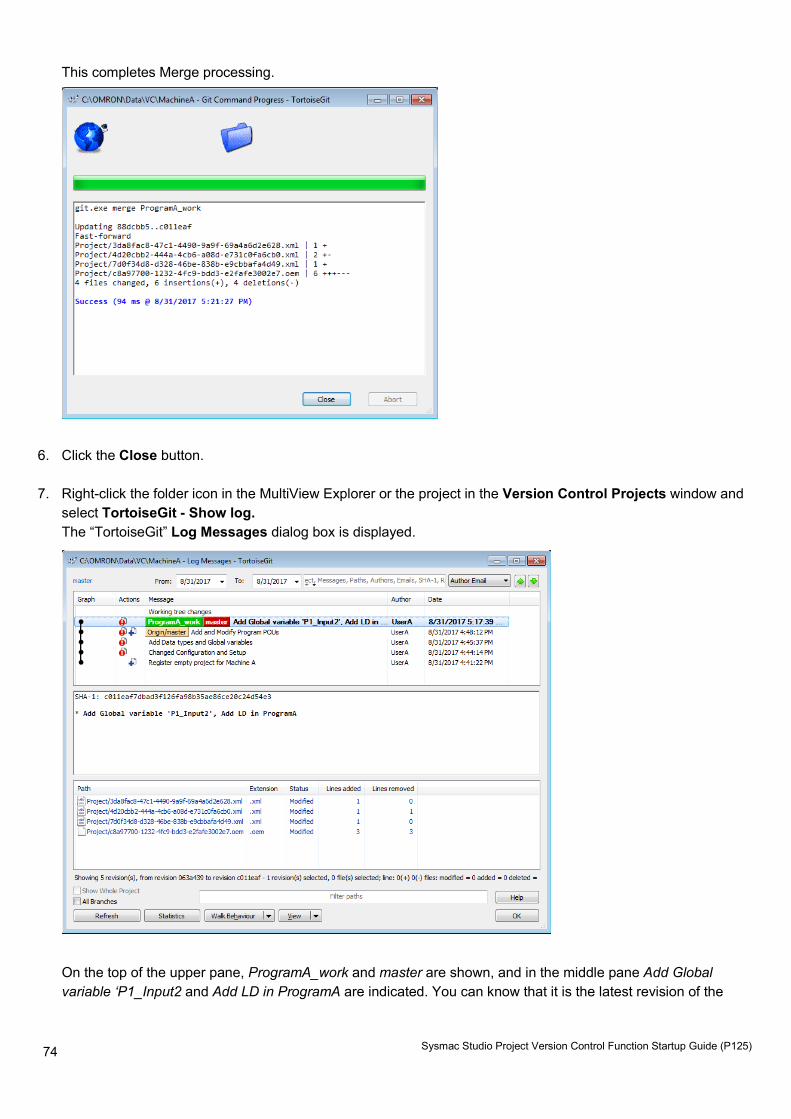
This completes Merge processing.
6. Click the Close button.
7. Right-click the folder icon in the MultiView Explorer or the project in the Version Control Projects window and
select TortoiseGit - Show log. The “TortoiseGit” Log Messages dialog box is displayed.
On the top of the upper pane, ProgramA_work and master are shown, and in the middle pane Add Global variable ‘P1_Input2 and Add LD in ProgramA are indicated. You can know that it is the latest revision of the
75
Sysmac Studio Project Version Control Function Startup Guide (P125)
working branch ProgramA_work, and the main branch master is the same as the working branch ProgramA_work.
7.3.3.9 Create the working branch of Developer B (No.7: Developer B)
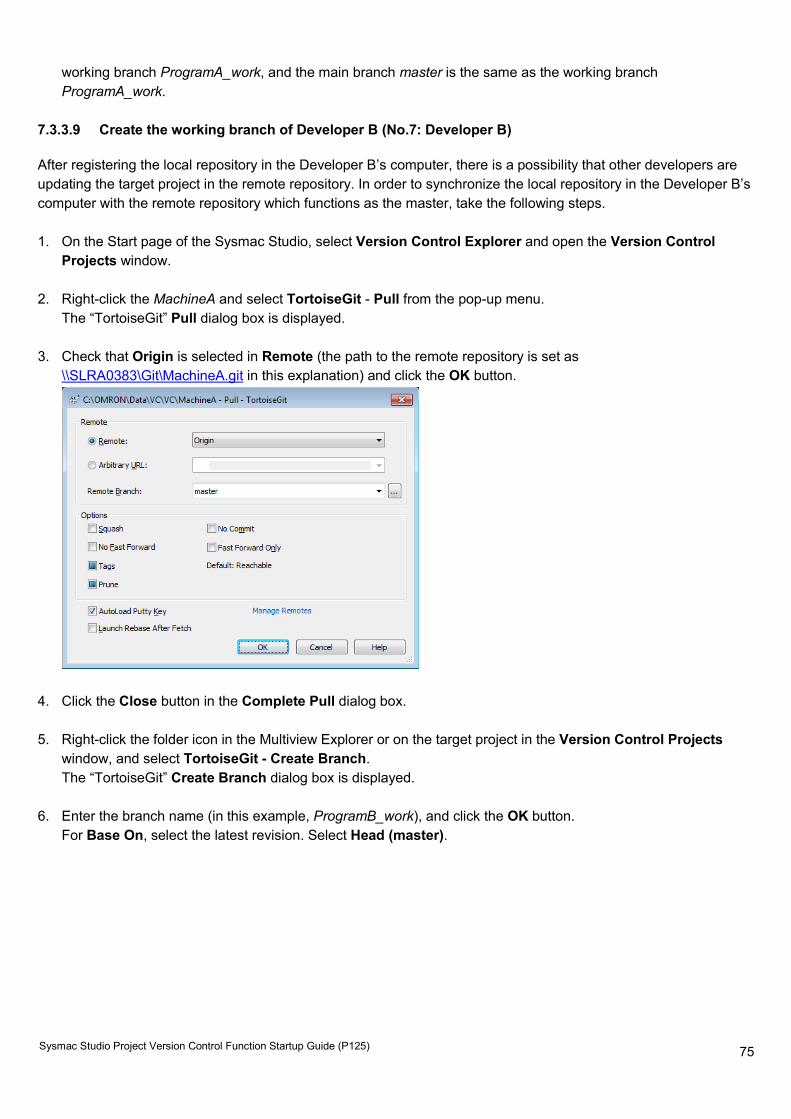
After registering the local repository in the Developer B’s computer, there is a possibility that other developers are updating the target project in the remote repository. In order to synchronize the local repository in the Developer B’s computer with the remote repository which functions as the master, take the following steps. 1. On the Start page of the Sysmac Studio, select Version Control Explorer and open the Version Control
Projects window. 2. Right-click the MachineA and select TortoiseGit - Pull from the pop-up menu.
The “TortoiseGit” Pull dialog box is displayed. 3. Check that Origin is selected in Remote (the path to the remote repository is set as
\\SLRA0383\Git\MachineA.git in this explanation) and click the OK button.
4. Click the Close button in the Complete Pull dialog box.
5. Right-click the folder icon in the Multiview Explorer or on the target project in the Version Control Projects
window, and select TortoiseGit - Create Branch. The “TortoiseGit” Create Branch dialog box is displayed.
6. Enter the branch name (in this example, ProgramB_work), and click the OK button.
For Base On, select the latest revision. Select Head (master).
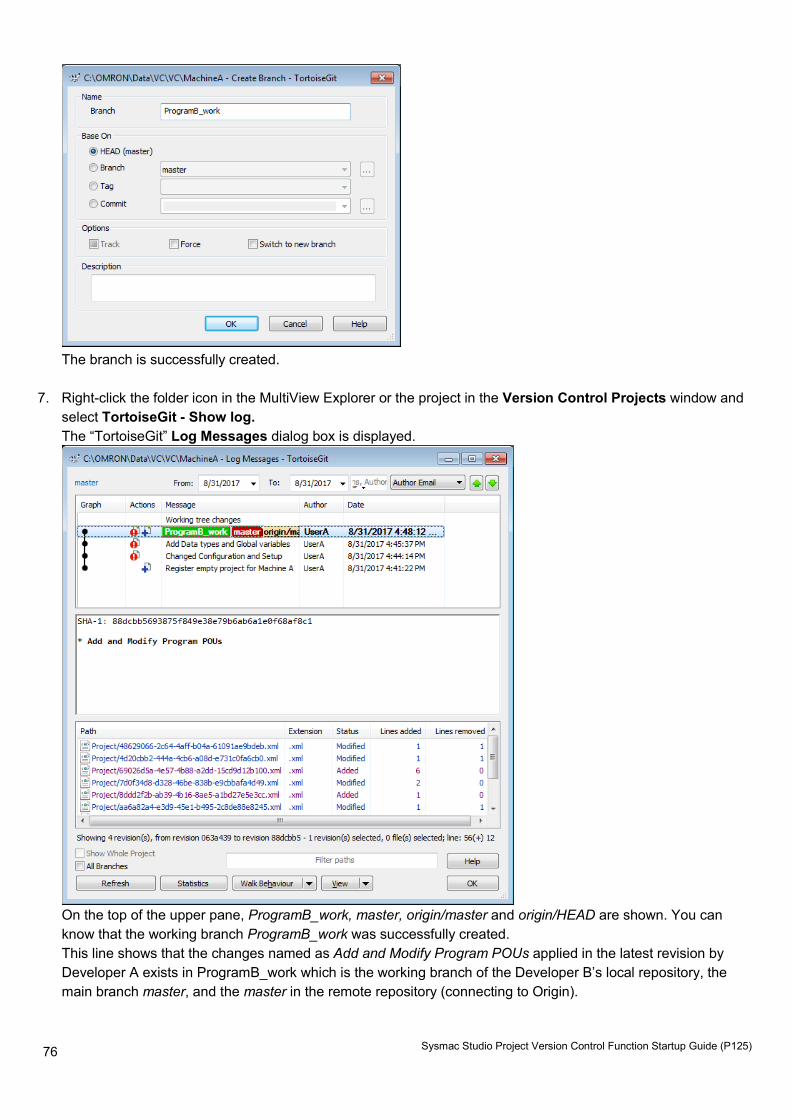
76
Sysmac Studio Project Version Control Function Startup Guide (P125)
The branch is successfully created.
7. Right-click the folder icon in the MultiView Explorer or the project in the Version Control Projects window and
select TortoiseGit - Show log. The “TortoiseGit” Log Messages dialog box is displayed.
On the top of the upper pane, ProgramB_work, master, origin/master and origin/HEAD are shown. You can know that the working branch ProgramB_work was successfully created. This line shows that the changes named as Add and Modify Program POUs applied in the latest revision by Developer A exists in ProgramB_work which is the working branch of the Developer B’s local repository, the main branch master, and the master in the remote repository (connecting to Origin).
77
Sysmac Studio Project Version Control Function Startup Guide (P125)
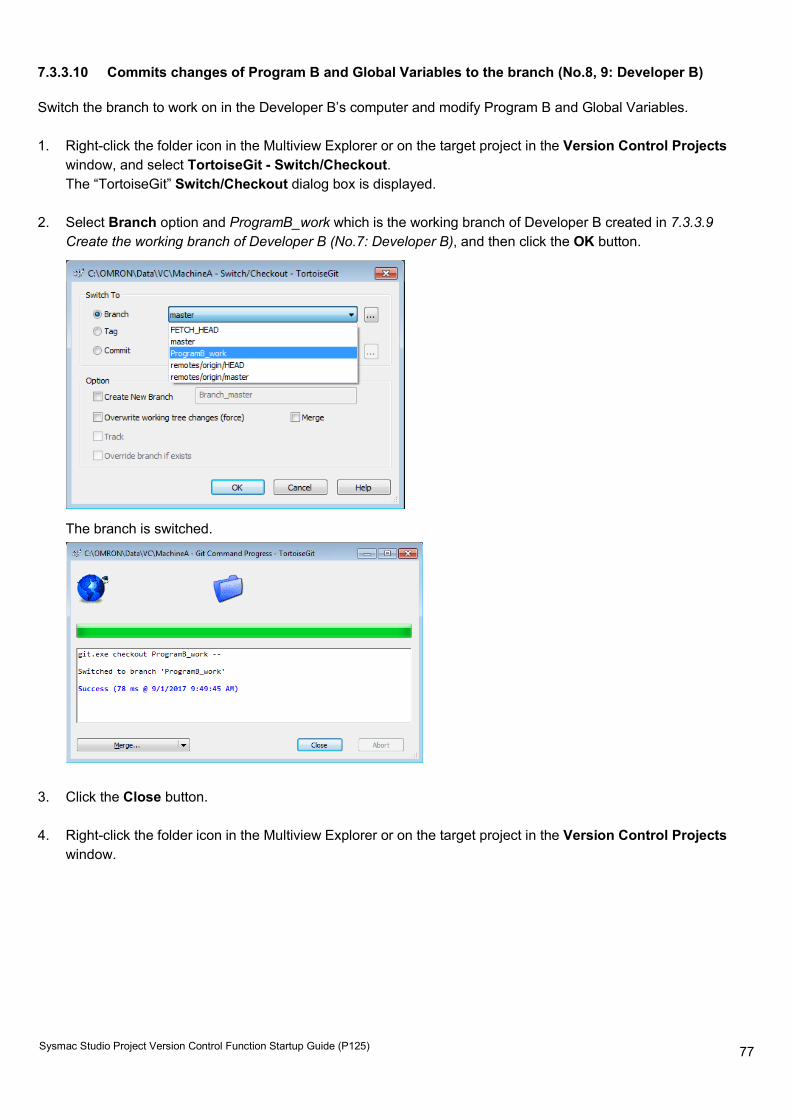
7.3.3.10 Commits changes of Program B and Global Variables to the branch (No.8, 9: Developer B)
Switch the branch to work on in the Developer B’s computer and modify Program B and Global Variables. 1. Right-click the folder icon in the Multiview Explorer or on the target project in the Version Control Projects
window, and select TortoiseGit - Switch/Checkout. The “TortoiseGit” Switch/Checkout dialog box is displayed.
2. Select Branch option and ProgramB_work which is the working branch of Developer B created in 7.3.3.9
Create the working branch of Developer B (No.7: Developer B), and then click the OK button.
The branch is switched.
3. Click the Close button.
4. Right-click the folder icon in the Multiview Explorer or on the target project in the Version Control Projects
window.

78
Sysmac Studio Project Version Control Function Startup Guide (P125)
You can check that the branch name that follows Git Commit -> is changed.
5. Develop the ProgramB and change the Global Variables.
Here, the following edits are made. Change the initial value of Global Variable Parameter1 to 200.
Create the following ladder diagram in the ProgramB-Section0.
6. From the Main menu, select File - Save to save the project.
7. Select File - Close to close the project. 8. Right-click the target project in the Version Control Projects window and select Git Commit ->
“ProgramB_work” from the pop-up menu.
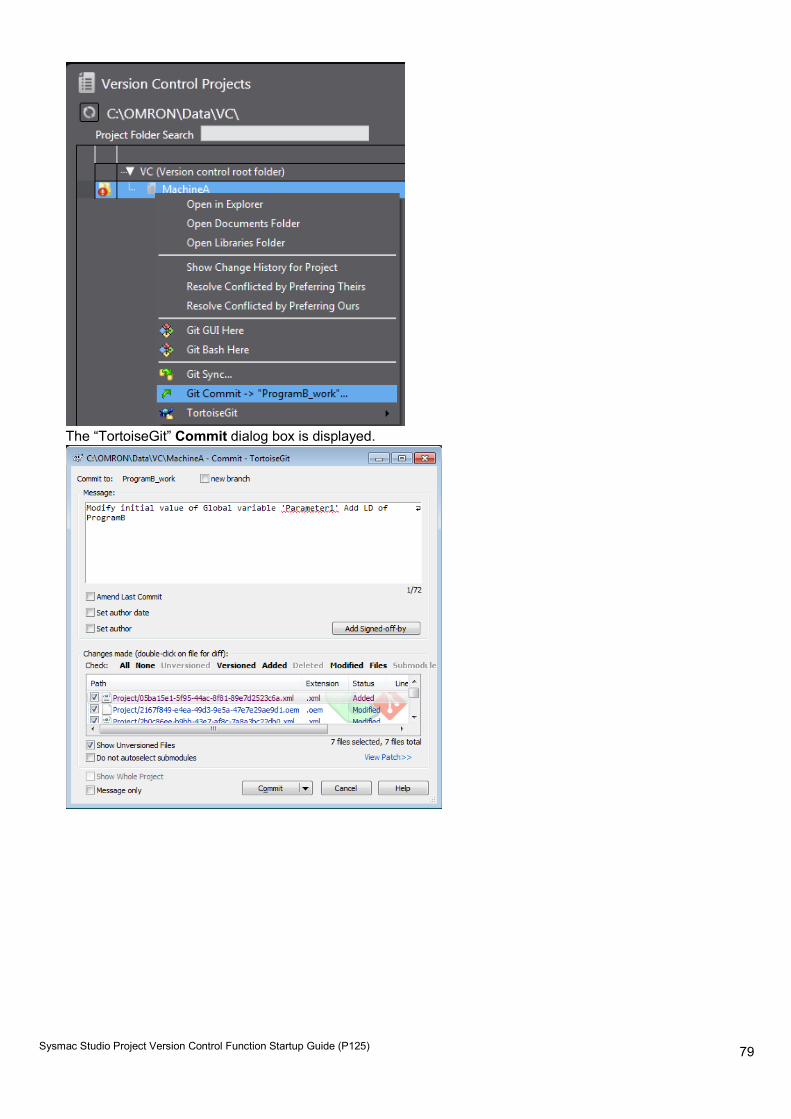
79
Sysmac Studio Project Version Control Function Startup Guide (P125)
The “TortoiseGit” Commit dialog box is displayed.
80
Sysmac Studio Project Version Control Function Startup Guide (P125)
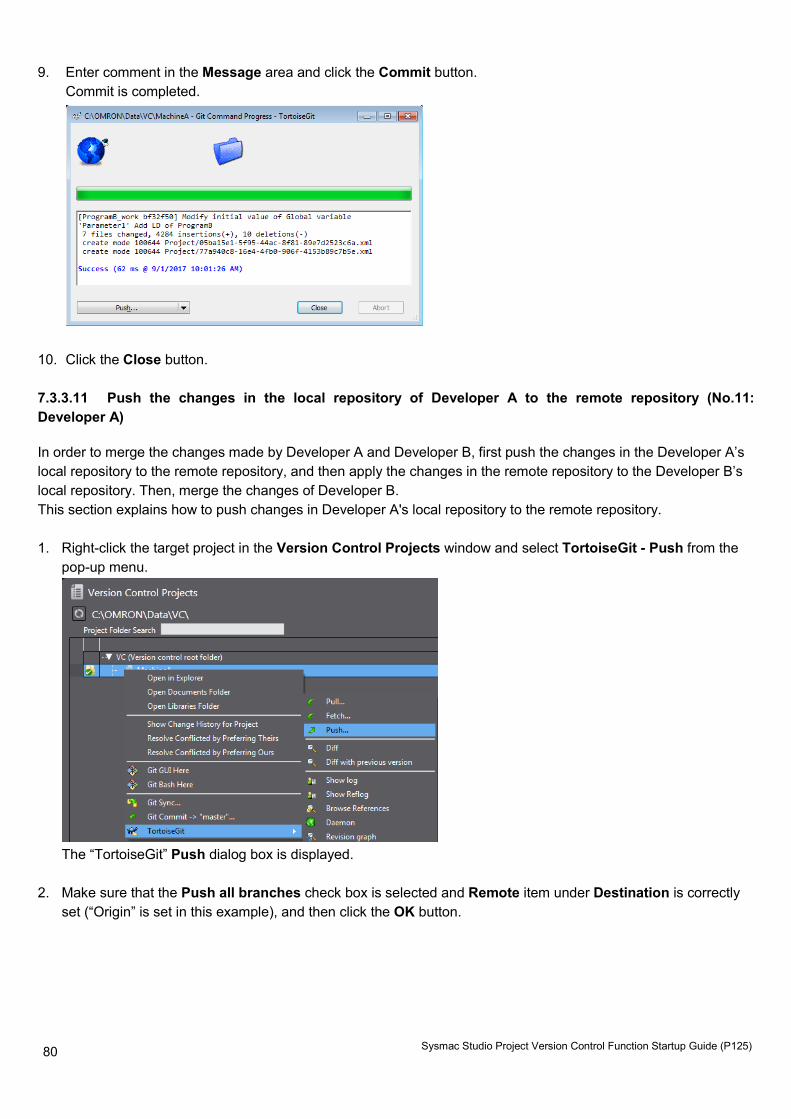
9. Enter comment in the Message area and click the Commit button. Commit is completed.
10. Click the Close button. 7.3.3.11 Push the changes in the local repository of Developer A to the remote repository (No.11: Developer A)
In order to merge the changes made by Developer A and Developer B, first push the changes in the Developer A’s local repository to the remote repository, and then apply the changes in the remote repository to the Developer B’s local repository. Then, merge the changes of Developer B. This section explains how to push changes in Developer A's local repository to the remote repository. 1. Right-click the target project in the Version Control Projects window and select TortoiseGit - Push from the
pop-up menu.
The “TortoiseGit” Push dialog box is displayed.
2. Make sure that the Push all branches check box is selected and Remote item under Destination is correctly
set (“Origin” is set in this example), and then click the OK button.
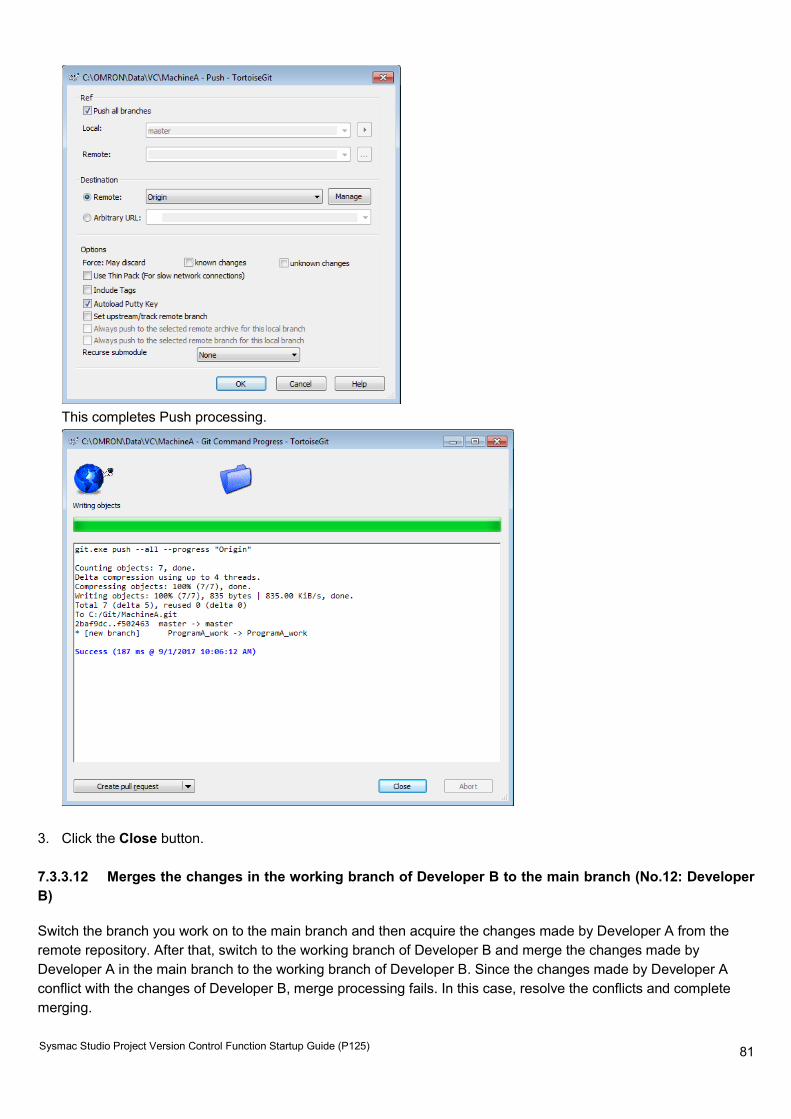
81
Sysmac Studio Project Version Control Function Startup Guide (P125)
This completes Push processing.
3. Click the Close button. 7.3.3.12 Merges the changes in the working branch of Developer B to the main branch (No.12: Developer B)
Switch the branch you work on to the main branch and then acquire the changes made by Developer A from the remote repository. After that, switch to the working branch of Developer B and merge the changes made by Developer A in the main branch to the working branch of Developer B. Since the changes made by Developer A conflict with the changes of Developer B, merge processing fails. In this case, resolve the conflicts and complete merging.
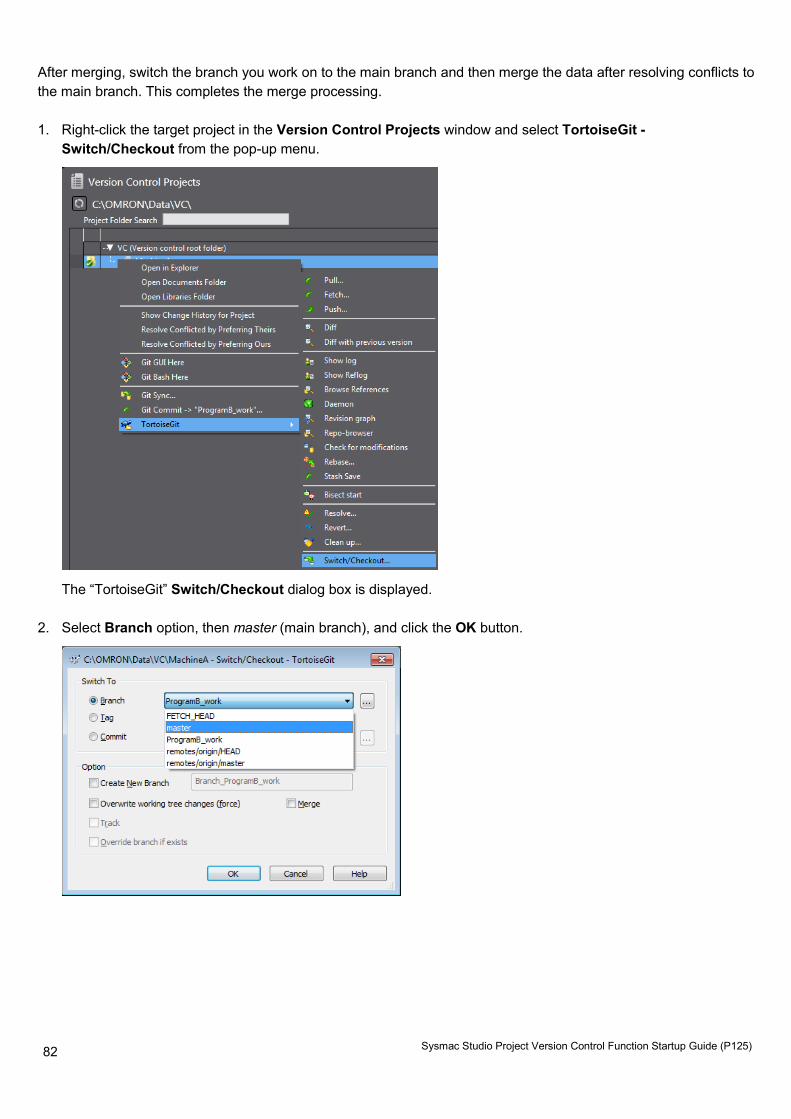
82
Sysmac Studio Project Version Control Function Startup Guide (P125)
After merging, switch the branch you work on to the main branch and then merge the data after resolving conflicts to the main branch. This completes the merge processing. 1. Right-click the target project in the Version Control Projects window and select TortoiseGit -
Switch/Checkout from the pop-up menu.
The “TortoiseGit” Switch/Checkout dialog box is displayed. 2. Select Branch option, then master (main branch), and click the OK button.
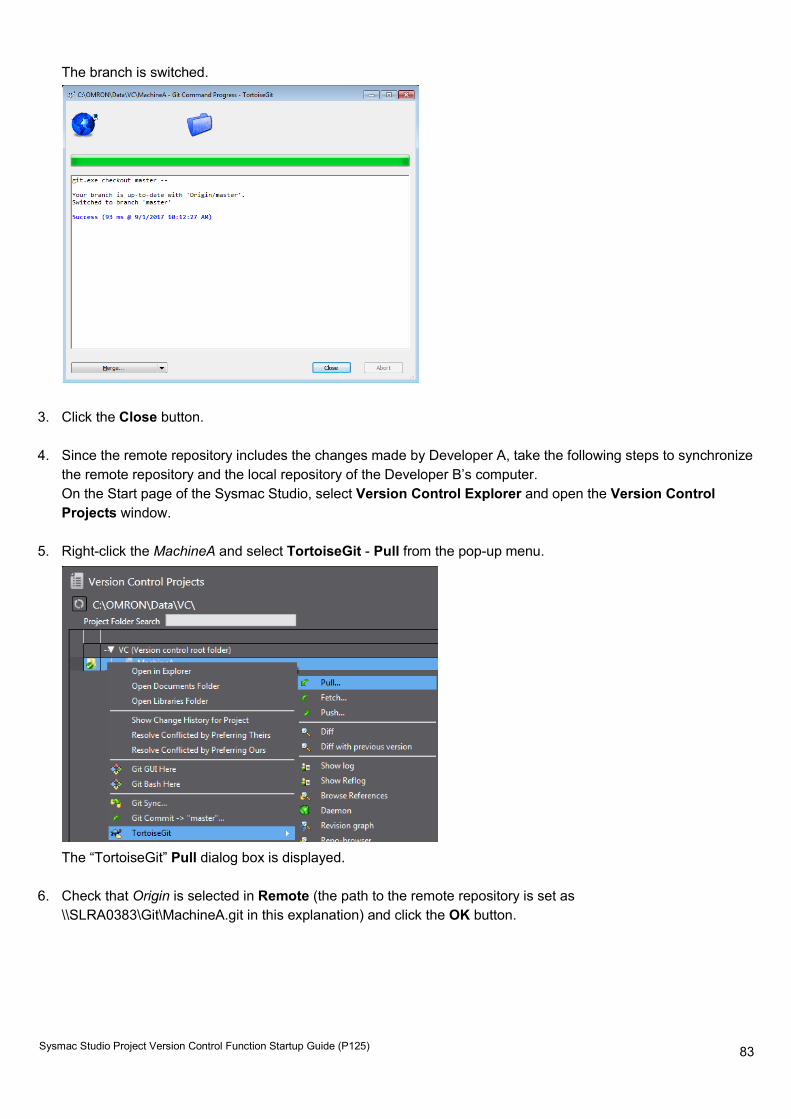
83
Sysmac Studio Project Version Control Function Startup Guide (P125)
The branch is switched.
3. Click the Close button.
4. Since the remote repository includes the changes made by Developer A, take the following steps to synchronize
the remote repository and the local repository of the Developer B’s computer. On the Start page of the Sysmac Studio, select Version Control Explorer and open the Version Control Projects window.
5. Right-click the MachineA and select TortoiseGit - Pull from the pop-up menu.
The “TortoiseGit” Pull dialog box is displayed.
6. Check that Origin is selected in Remote (the path to the remote repository is set as
\\SLRA0383\Git\MachineA.git in this explanation) and click the OK button.
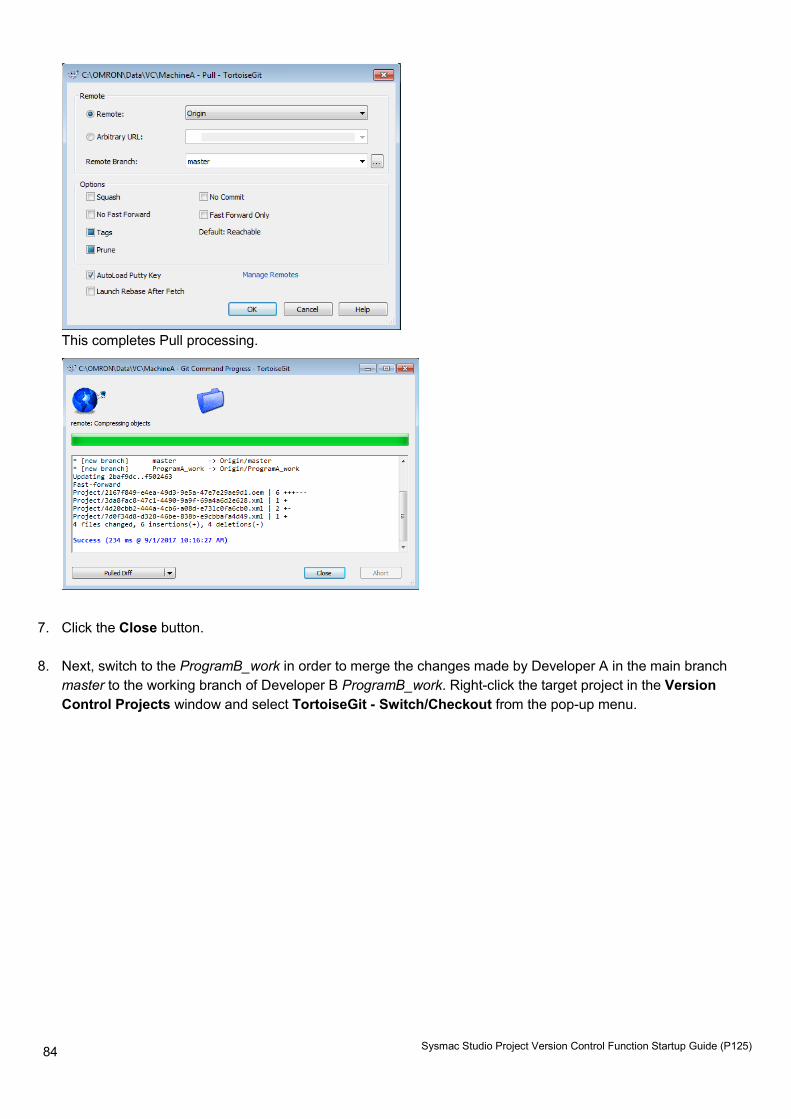
84
Sysmac Studio Project Version Control Function Startup Guide (P125)
This completes Pull processing.
7. Click the Close button. 8. Next, switch to the ProgramB_work in order to merge the changes made by Developer A in the main branch
master to the working branch of Developer B ProgramB_work. Right-click the target project in the Version Control Projects window and select TortoiseGit - Switch/Checkout from the pop-up menu.

85
Sysmac Studio Project Version Control Function Startup Guide (P125)
The “TortoiseGit” Switch/Checkout dialog box is displayed.
9. Select Branch option and ProgramB_work which is the working branch of Developer B, and then click the OK
button.
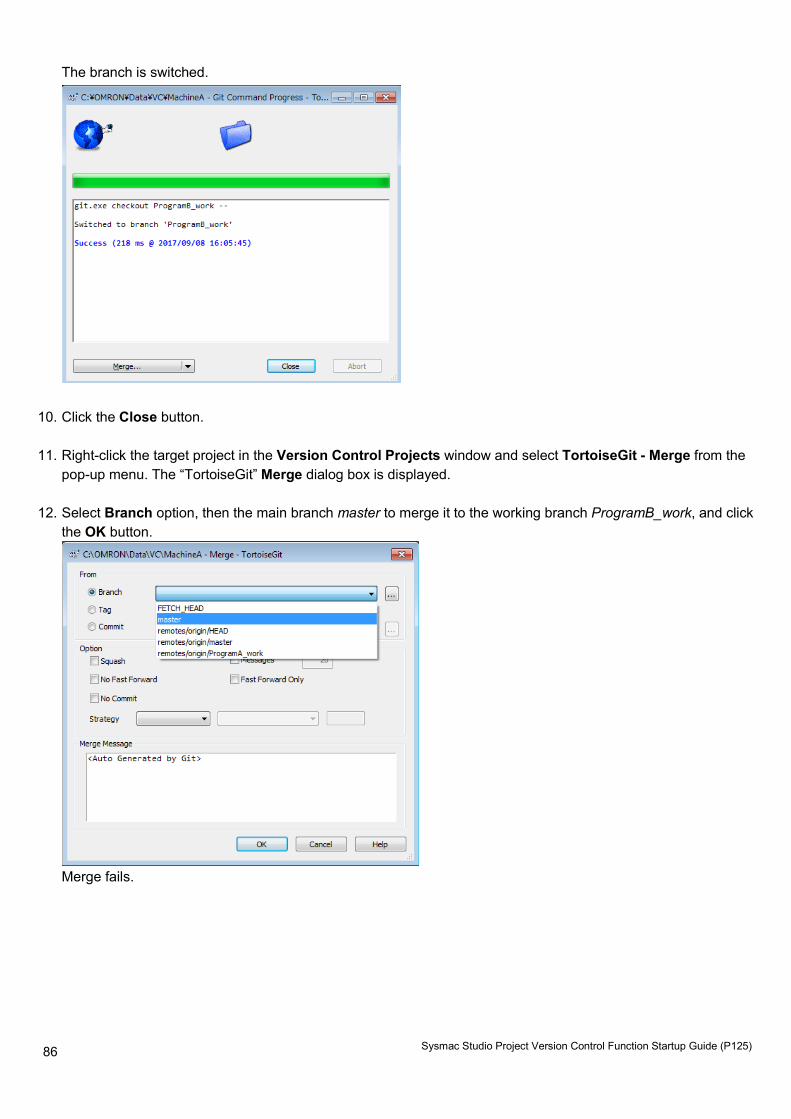
86
Sysmac Studio Project Version Control Function Startup Guide (P125)
The branch is switched.
10. Click the Close button.
11. Right-click the target project in the Version Control Projects window and select TortoiseGit - Merge from the
pop-up menu. The “TortoiseGit” Merge dialog box is displayed. 12. Select Branch option, then the main branch master to merge it to the working branch ProgramB_work, and click
the OK button.
Merge fails.
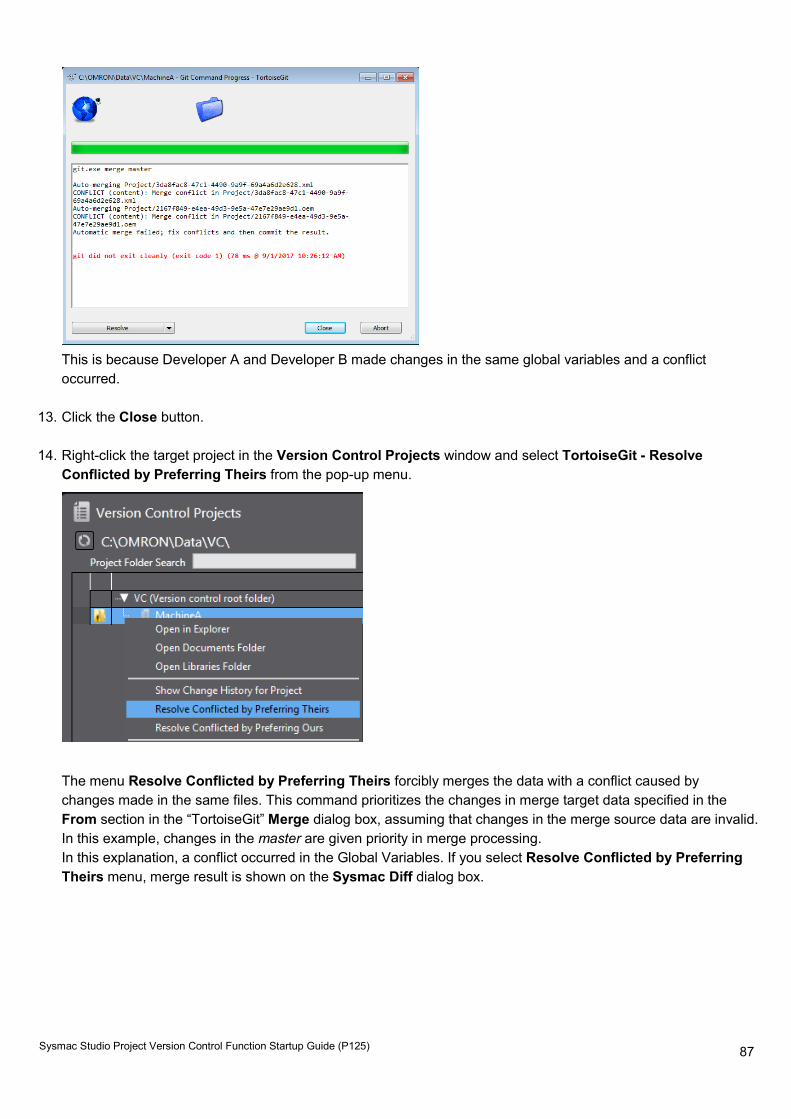
87
Sysmac Studio Project Version Control Function Startup Guide (P125)
This is because Developer A and Developer B made changes in the same global variables and a conflict occurred.
13. Click the Close button. 14. Right-click the target project in the Version Control Projects window and select TortoiseGit - Resolve
Conflicted by Preferring Theirs from the pop-up menu.
The menu Resolve Conflicted by Preferring Theirs forcibly merges the data with a conflict caused by changes made in the same files. This command prioritizes the changes in merge target data specified in the From section in the “TortoiseGit” Merge dialog box, assuming that changes in the merge source data are invalid. In this example, changes in the master are given priority in merge processing. In this explanation, a conflict occurred in the Global Variables. If you select Resolve Conflicted by Preferring Theirs menu, merge result is shown on the Sysmac Diff dialog box.
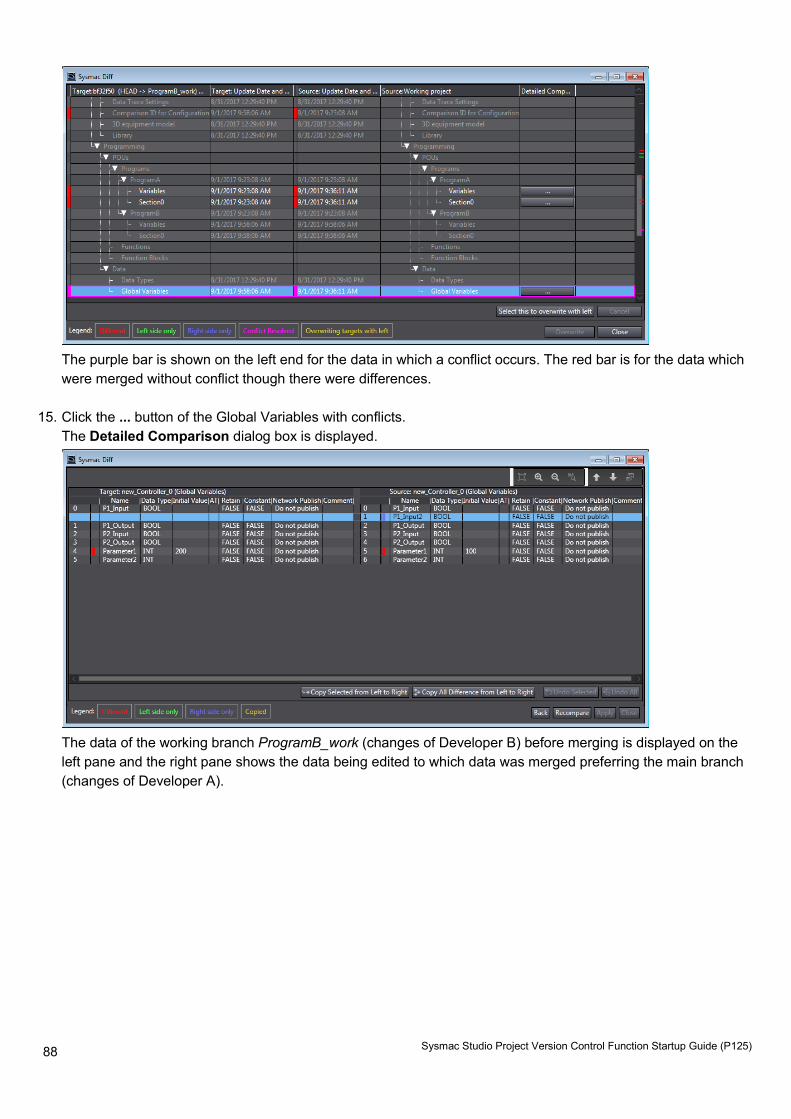
88
Sysmac Studio Project Version Control Function Startup Guide (P125)
The purple bar is shown on the left end for the data in which a conflict occurs. The red bar is for the data which were merged without conflict though there were differences.
15. Click the ... button of the Global Variables with conflicts.
The Detailed Comparison dialog box is displayed.
The data of the working branch ProgramB_work (changes of Developer B) before merging is displayed on the left pane and the right pane shows the data being edited to which data was merged preferring the main branch (changes of Developer A).
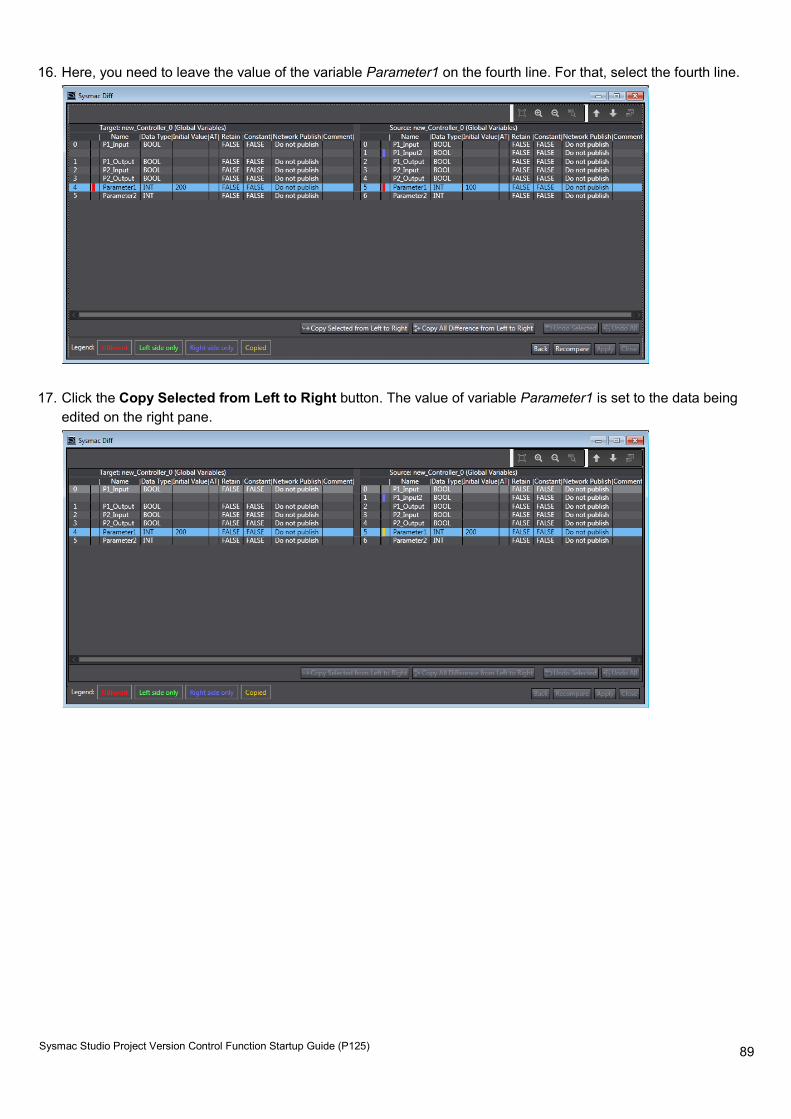
89
Sysmac Studio Project Version Control Function Startup Guide (P125)
16. Here, you need to leave the value of the variable Parameter1 on the fourth line. For that, select the fourth line.
17. Click the Copy Selected from Left to Right button. The value of variable Parameter1 is set to the data being
edited on the right pane.
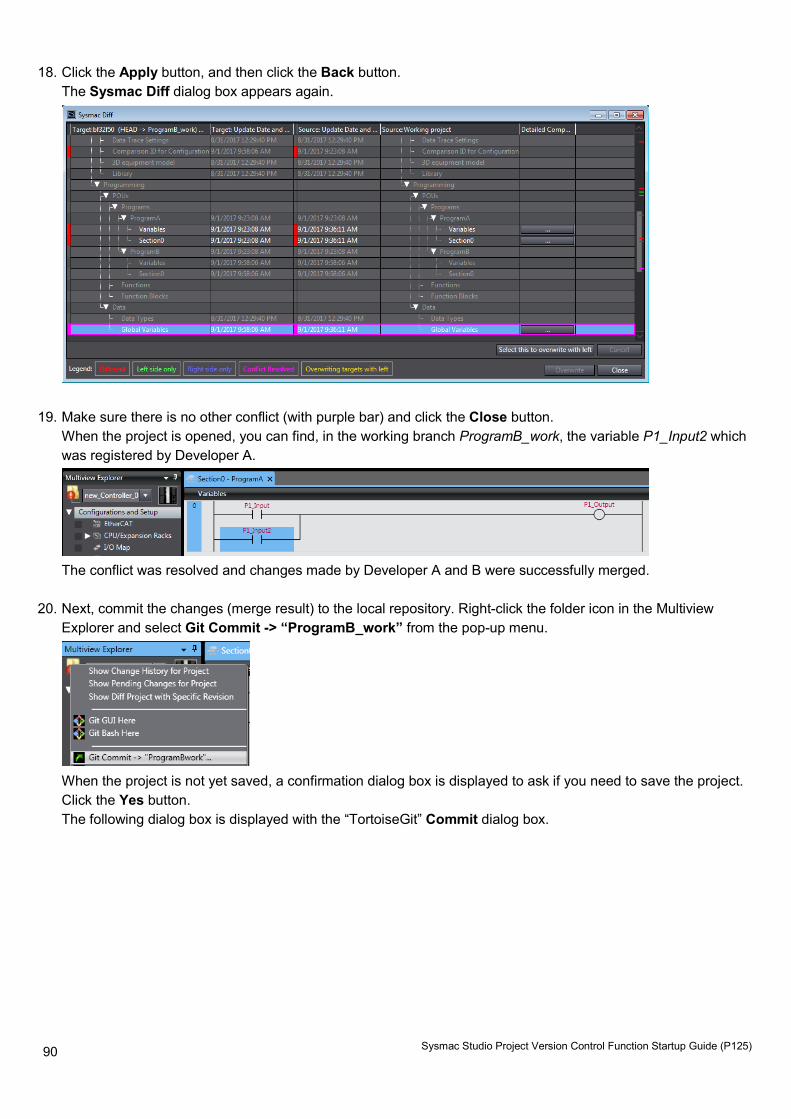
90
Sysmac Studio Project Version Control Function Startup Guide (P125)
18. Click the Apply button, and then click the Back button. The Sysmac Diff dialog box appears again.
19. Make sure there is no other conflict (with purple bar) and click the Close button.
When the project is opened, you can find, in the working branch ProgramB_work, the variable P1_Input2 which was registered by Developer A.
The conflict was resolved and changes made by Developer A and B were successfully merged.
20. Next, commit the changes (merge result) to the local repository. Right-click the folder icon in the Multiview Explorer and select Git Commit -> “ProgramB_work” from the pop-up menu.
When the project is not yet saved, a confirmation dialog box is displayed to ask if you need to save the project. Click the Yes button. The following dialog box is displayed with the “TortoiseGit” Commit dialog box.
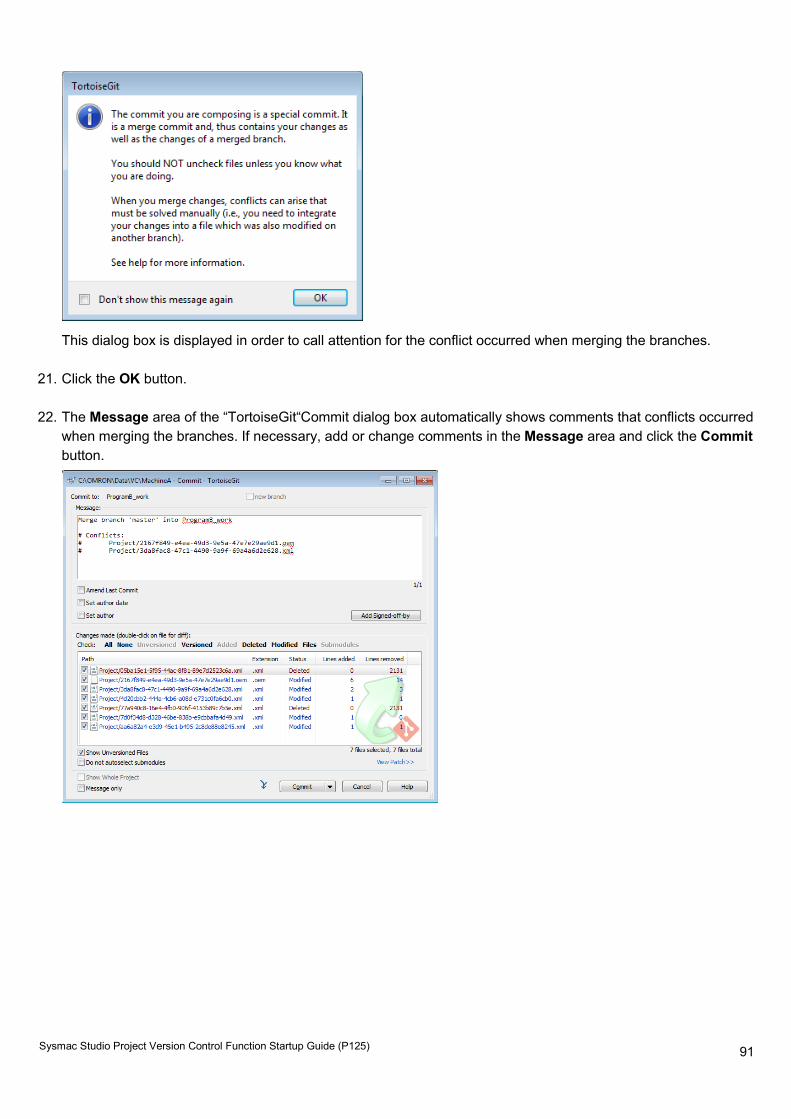
91
Sysmac Studio Project Version Control Function Startup Guide (P125)
This dialog box is displayed in order to call attention for the conflict occurred when merging the branches.
21. Click the OK button. 22. The Message area of the “TortoiseGit“Commit dialog box automatically shows comments that conflicts occurred
when merging the branches. If necessary, add or change comments in the Message area and click the Commit button.
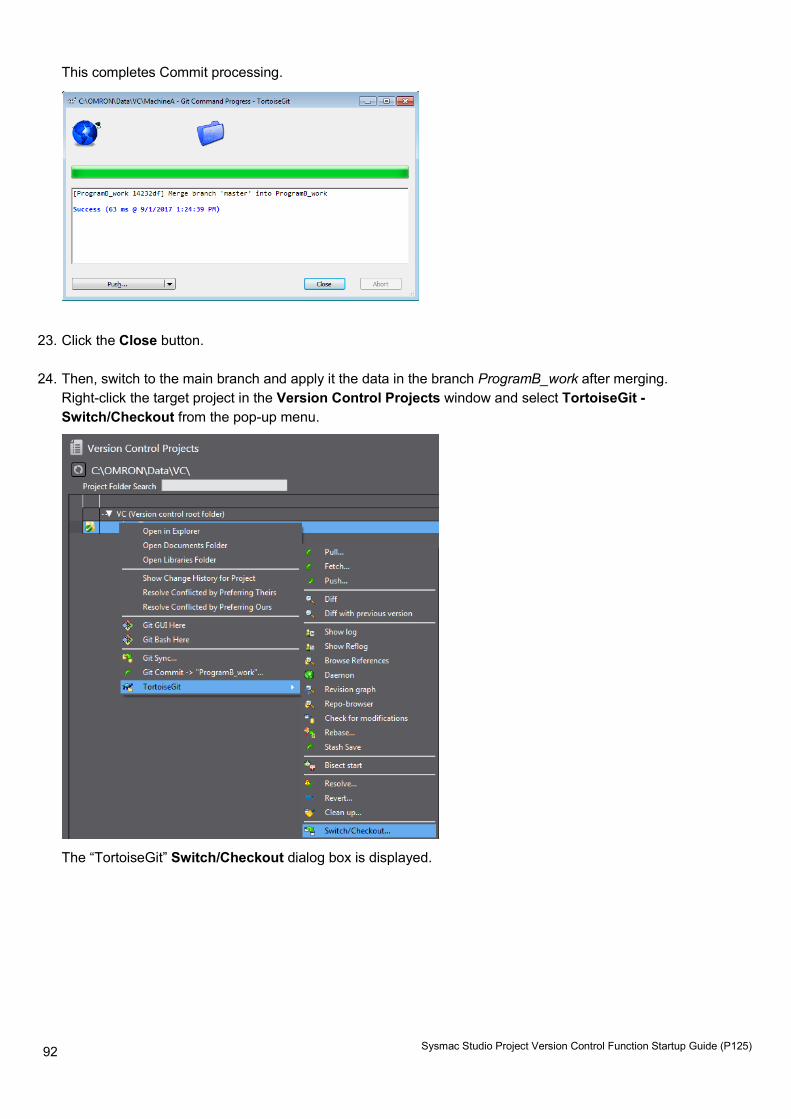
92
Sysmac Studio Project Version Control Function Startup Guide (P125)
This completes Commit processing.
23. Click the Close button.
24. Then, switch to the main branch and apply it the data in the branch ProgramB_work after merging.
Right-click the target project in the Version Control Projects window and select TortoiseGit - Switch/Checkout from the pop-up menu.
The “TortoiseGit” Switch/Checkout dialog box is displayed.
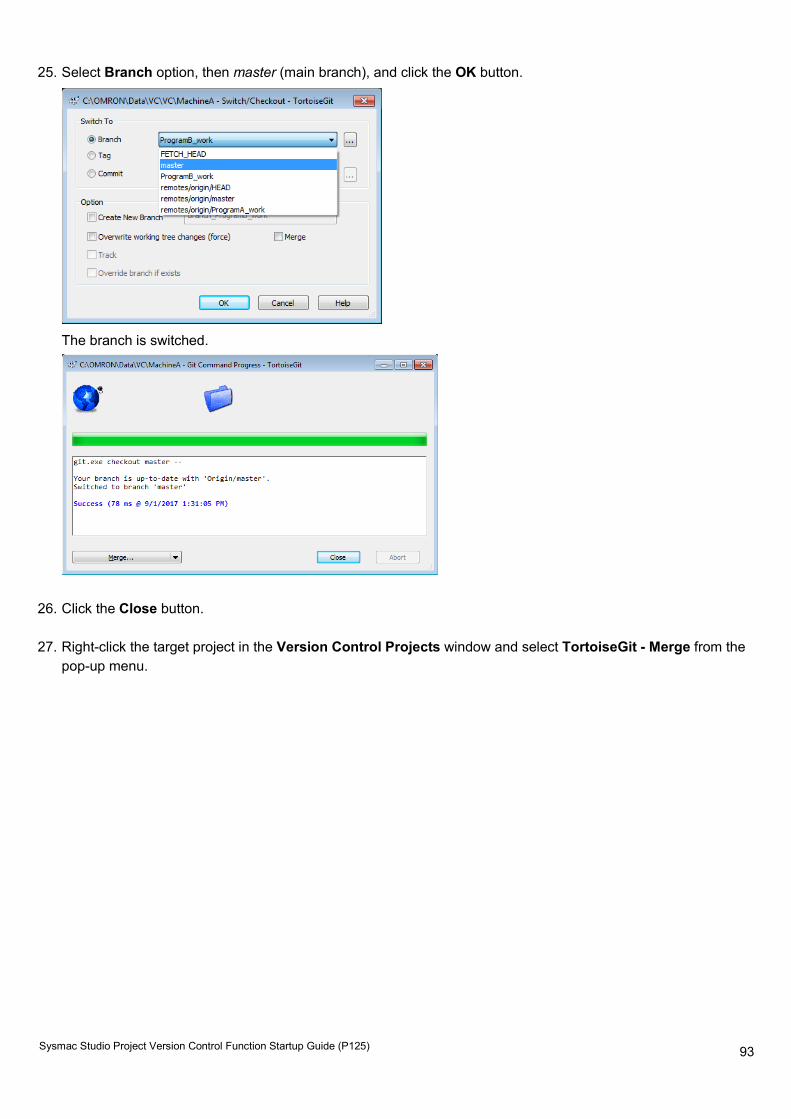
93
Sysmac Studio Project Version Control Function Startup Guide (P125)
25. Select Branch option, then master (main branch), and click the OK button.
The branch is switched.
26. Click the Close button.
27. Right-click the target project in the Version Control Projects window and select TortoiseGit - Merge from the
pop-up menu.
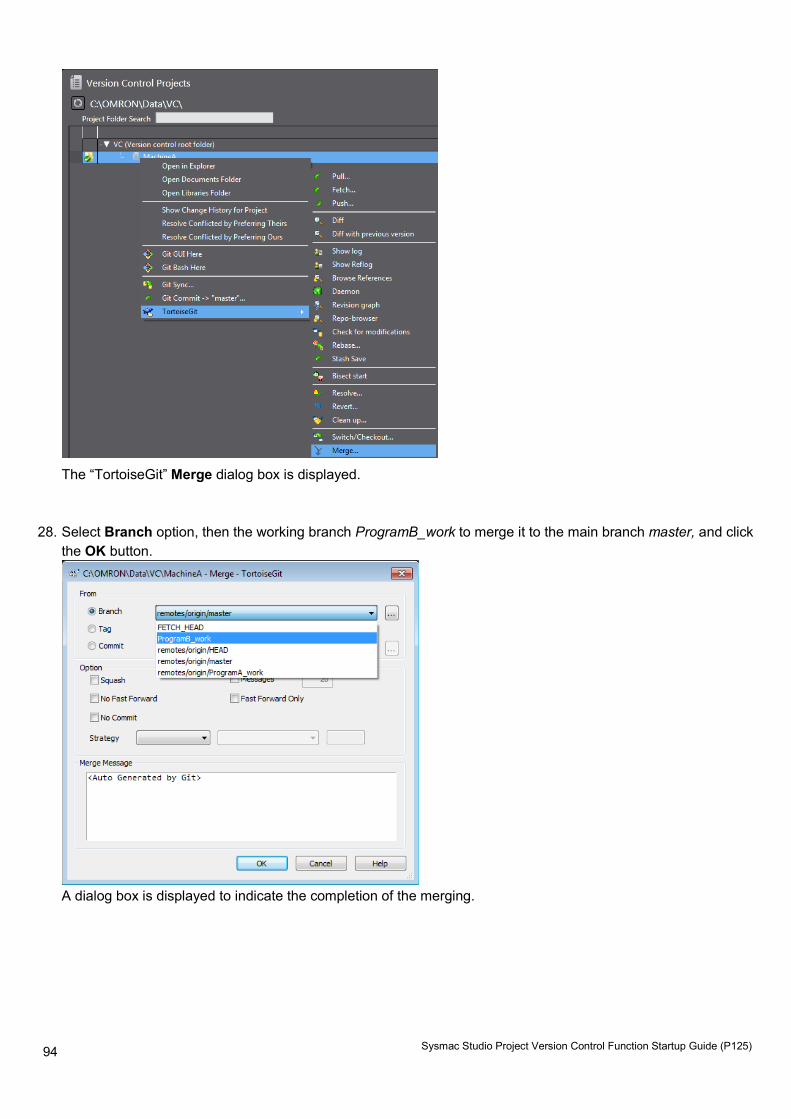
94
Sysmac Studio Project Version Control Function Startup Guide (P125)
The “TortoiseGit” Merge dialog box is displayed.
28. Select Branch option, then the working branch ProgramB_work to merge it to the main branch master, and click
the OK button.
A dialog box is displayed to indicate the completion of the merging.
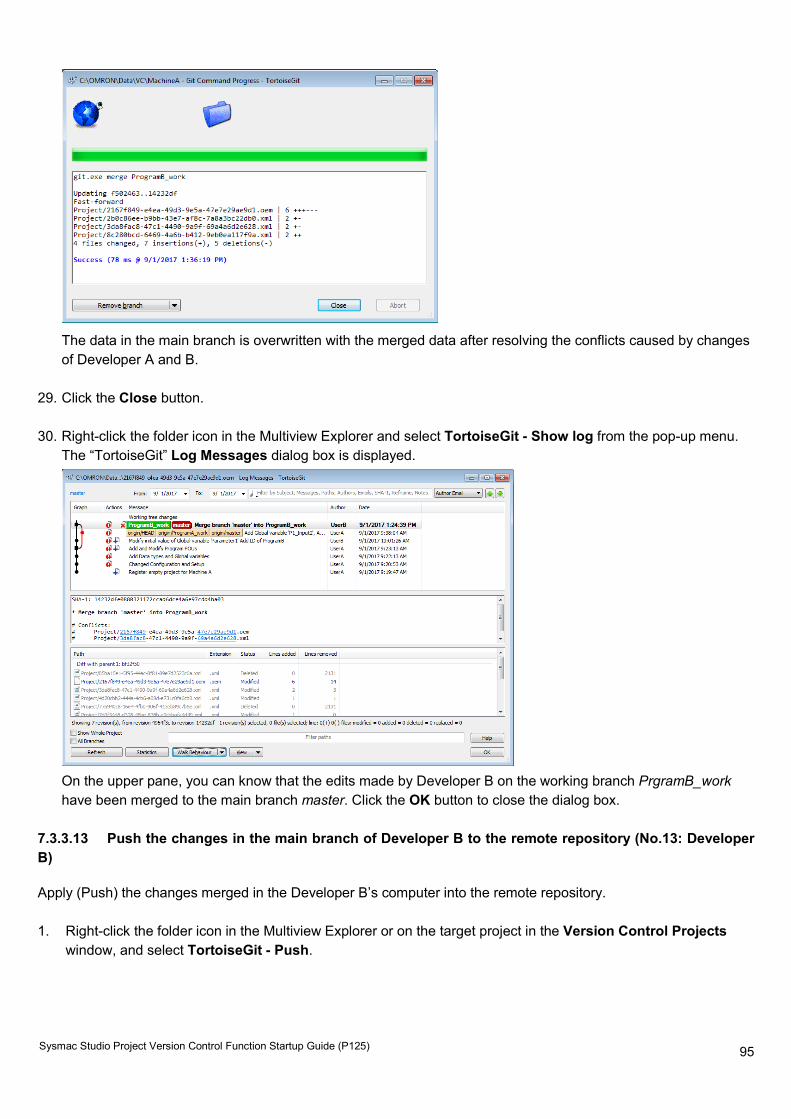
95
Sysmac Studio Project Version Control Function Startup Guide (P125)
The data in the main branch is overwritten with the merged data after resolving the conflicts caused by changes of Developer A and B.
29. Click the Close button.
30. Right-click the folder icon in the Multiview Explorer and select TortoiseGit - Show log from the pop-up menu.
The “TortoiseGit” Log Messages dialog box is displayed.
On the upper pane, you can know that the edits made by Developer B on the working branch PrgramB_work have been merged to the main branch master. Click the OK button to close the dialog box.
7.3.3.13 Push the changes in the main branch of Developer B to the remote repository (No.13: Developer B)
Apply (Push) the changes merged in the Developer B’s computer into the remote repository. 1. Right-click the folder icon in the Multiview Explorer or on the target project in the Version Control Projects
window, and select TortoiseGit - Push.
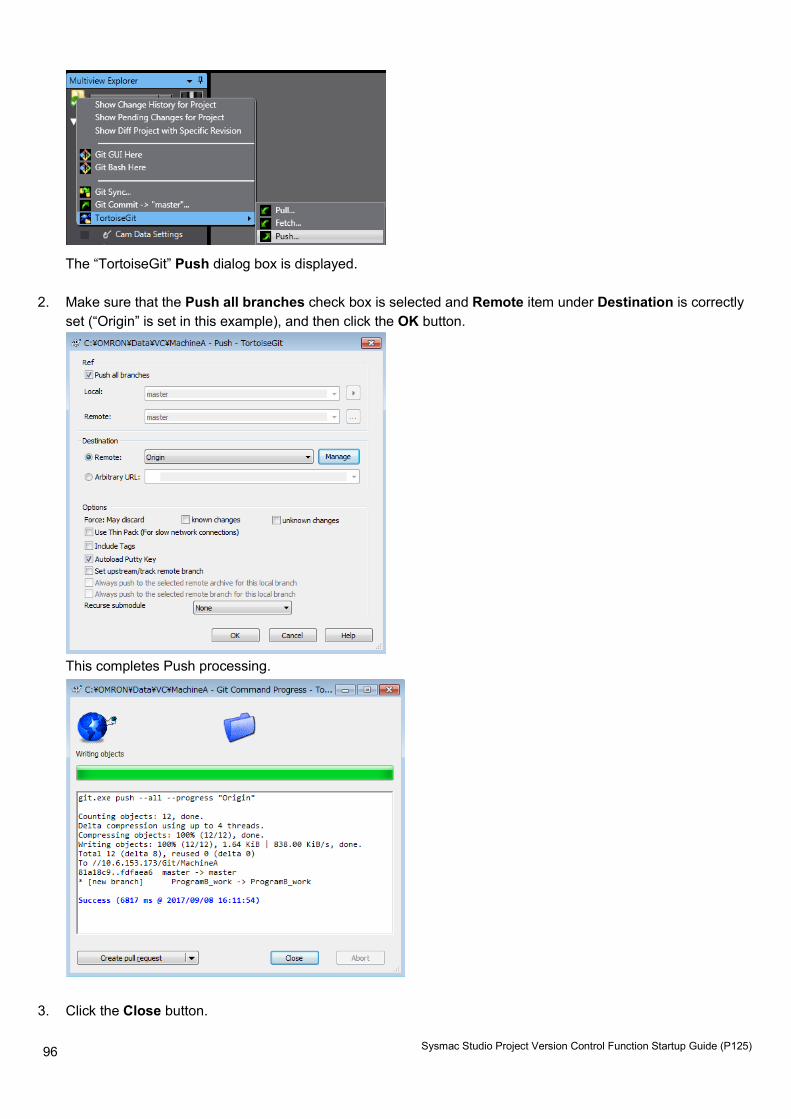
96
Sysmac Studio Project Version Control Function Startup Guide (P125)
The “TortoiseGit” Push dialog box is displayed.
2. Make sure that the Push all branches check box is selected and Remote item under Destination is correctly
set (“Origin” is set in this example), and then click the OK button.
This completes Push processing.
3. Click the Close button.
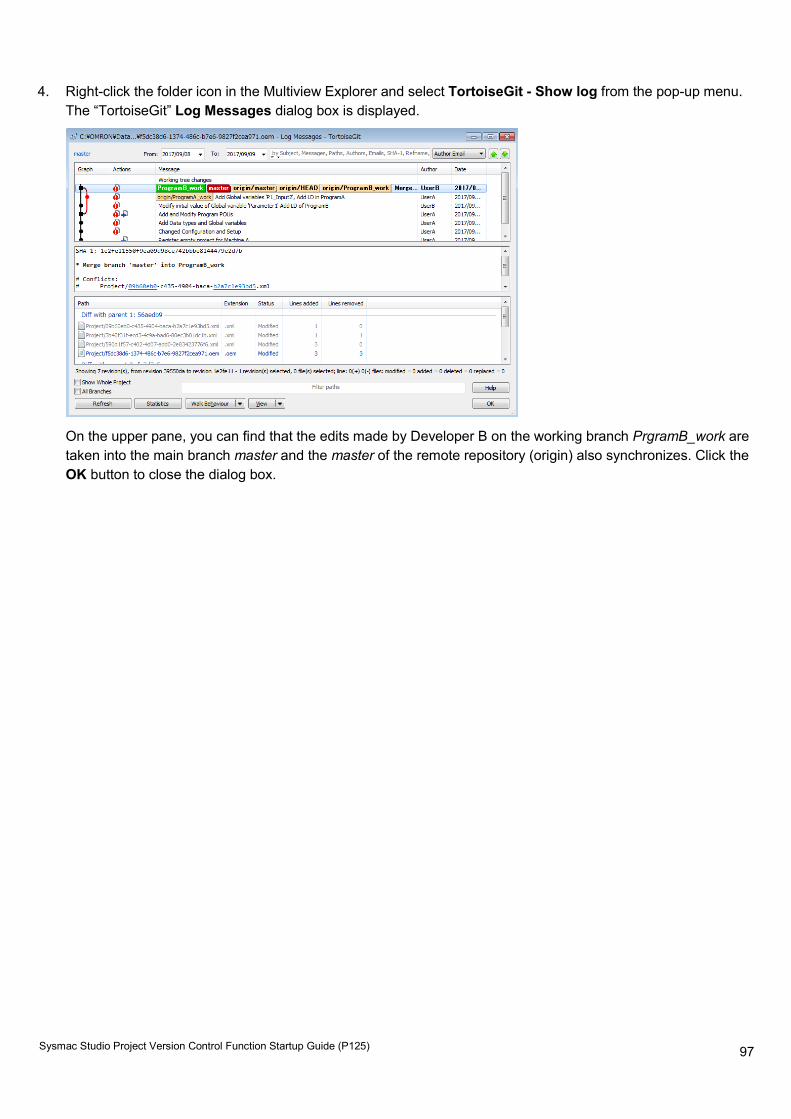
97
Sysmac Studio Project Version Control Function Startup Guide (P125)
4. Right-click the folder icon in the Multiview Explorer and select TortoiseGit - Show log from the pop-up menu.
The “TortoiseGit” Log Messages dialog box is displayed.
On the upper pane, you can find that the edits made by Developer B on the working branch PrgramB_work are taken into the main branch master and the master of the remote repository (origin) also synchronizes. Click the OK button to close the dialog box.
98
Sysmac Studio Project Version Control Function Startup Guide (P125)
7.4 Derived Development of Sysmac Studio Projects
This section describes the operating procedure to promote derived development of Sysmac Studio projects on an example. This example uses a configuration in which the remote repository is shared using the shared folder. 7.4.1 An example of derived development
In this example, Machine B is developed and derived from Machine A. While the Machine B is being developed, defects were found and corrected in the common program of Machine A and Machine B. The correction is applied to the project of Machine B to complete the development. 7.4.1.1 About the Project
It is assumed that, based on the project of Machine A, one developer develops a project of derivative Machine B. ProjectA: the project of Machine A. On the base of this project, the project of the derived Machine B is developed. ProjectB: the project of Machine B derived from Machine A project. It has different configurations and setup. This project utilizes the same program as that of ProjectA. 7.4.1.2 Scenario
Create and manage branches master, ProductA, and ProductB; master is for common program management, ProductA is for Machine A, and ProductB is for Machine B. The common program is modified in the master and the changes are applied to the ProductA and ProductB. 1. In the development of Machine A, create a new project ProjectA and incorporate it into the Machine A as
Ver.1.0. Register this ProjectA to the master as the master project of derivation development. 2. In the development of Machine B, create ProjectB on the base of ProjectA Ver.1.0 and change the settings in
Configurations and Setup. 3. Defects are found in the program of Machine A and the program is modified to fix them. Modify the program in
the master project and apply the corrections to the Machine A as Ver.1.1. 4. In the same way, apply the corrections to the ProjectB which is being developed and incorporate it to the
Machine B as its Ver.1.0. 7.4.2 Operation flow on the version control system
No. Machine A development Machine B development Correction of defects
Reference for the tasks
1 Register a project in the remote repository
- - 7.4.3.1 Register a project in the remote repository (No.1: Machine A development)
2 Create a branch for Machine A in the local repository and push it to the remote repository * The project of Machine A is developed in this branch.
- - 7.4.3.2 Create a branch for Machine A in the local repository and push it to the remote repository (No.2: Machine A development)
3 Create the program of Machine A, commit it, and push it to the remoter repository * The tag as Ver.1.0 is applied to this project and the project is incorporated in the Machine A.
- - 7.4.3.3 Create the program of Machine A, commit it, and push it to the remoter repository (No.3: Machine A development)
4 Merge the changes in the - - 7.4.3.4 Merge the changes in
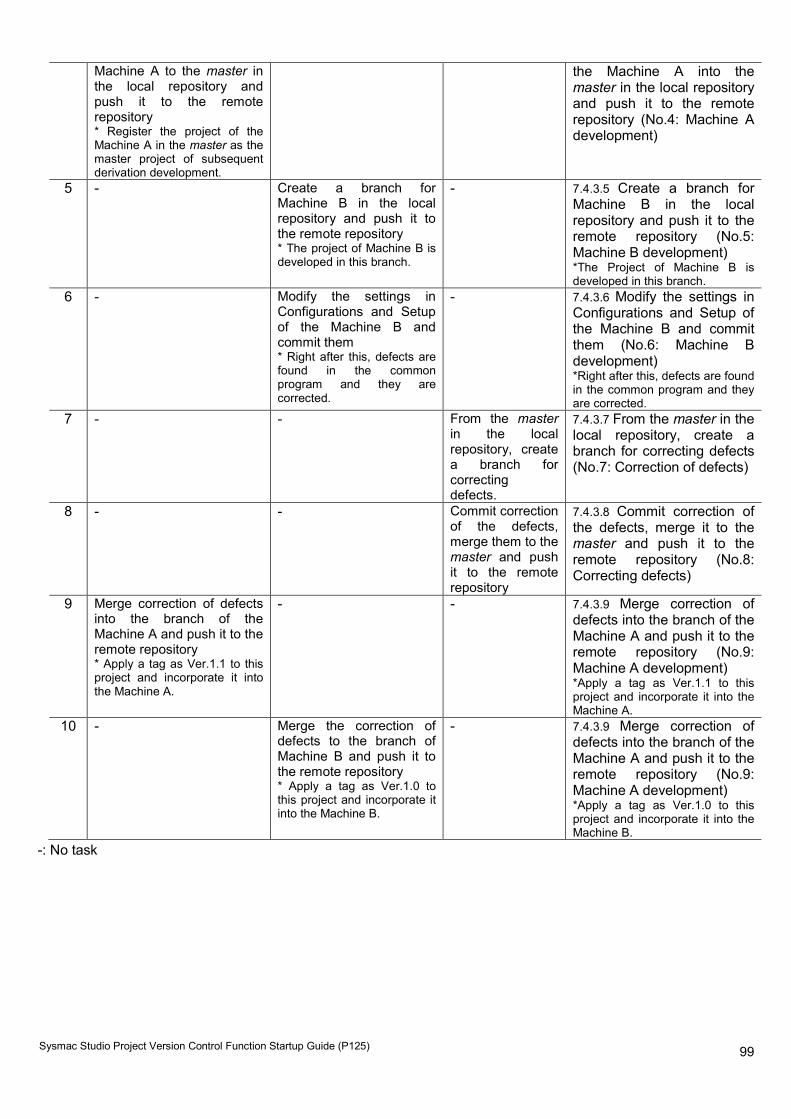
99
Sysmac Studio Project Version Control Function Startup Guide (P125)
Machine A to the master in the local repository and push it to the remote repository * Register the project of the Machine A in the master as the master project of subsequent derivation development.
the Machine A into the master in the local repository and push it to the remote repository (No.4: Machine A development)
5 - Create a branch for Machine B in the local repository and push it to the remote repository * The project of Machine B is developed in this branch.
- 7.4.3.5 Create a branch for Machine B in the local repository and push it to the remote repository (No.5: Machine B development) *The Project of Machine B is developed in this branch.
6 - Modify the settings in Configurations and Setup of the Machine B and commit them * Right after this, defects are found in the common program and they are corrected.
- 7.4.3.6 Modify the settings in Configurations and Setup of the Machine B and commit them (No.6: Machine B development) *Right after this, defects are found in the common program and they are corrected.
7 - - From the master in the local repository, create a branch for correcting defects.
7.4.3.7 From the master in the local repository, create a branch for correcting defects (No.7: Correction of defects)
8 - - Commit correction of the defects, merge them to the master and push it to the remote repository
7.4.3.8 Commit correction of the defects, merge it to the master and push it to the remote repository (No.8: Correcting defects)
9 Merge correction of defects into the branch of the Machine A and push it to the remote repository * Apply a tag as Ver.1.1 to this project and incorporate it into the Machine A.
- - 7.4.3.9 Merge correction of defects into the branch of the Machine A and push it to the remote repository (No.9: Machine A development) *Apply a tag as Ver.1.1 to this project and incorporate it into the Machine A.
10 - Merge the correction of defects to the branch of Machine B and push it to the remote repository * Apply a tag as Ver.1.0 to this project and incorporate it into the Machine B.
- 7.4.3.9 Merge correction of defects into the branch of the Machine A and push it to the remote repository (No.9: Machine A development) *Apply a tag as Ver.1.0 to this project and incorporate it into the Machine B.
-: No task
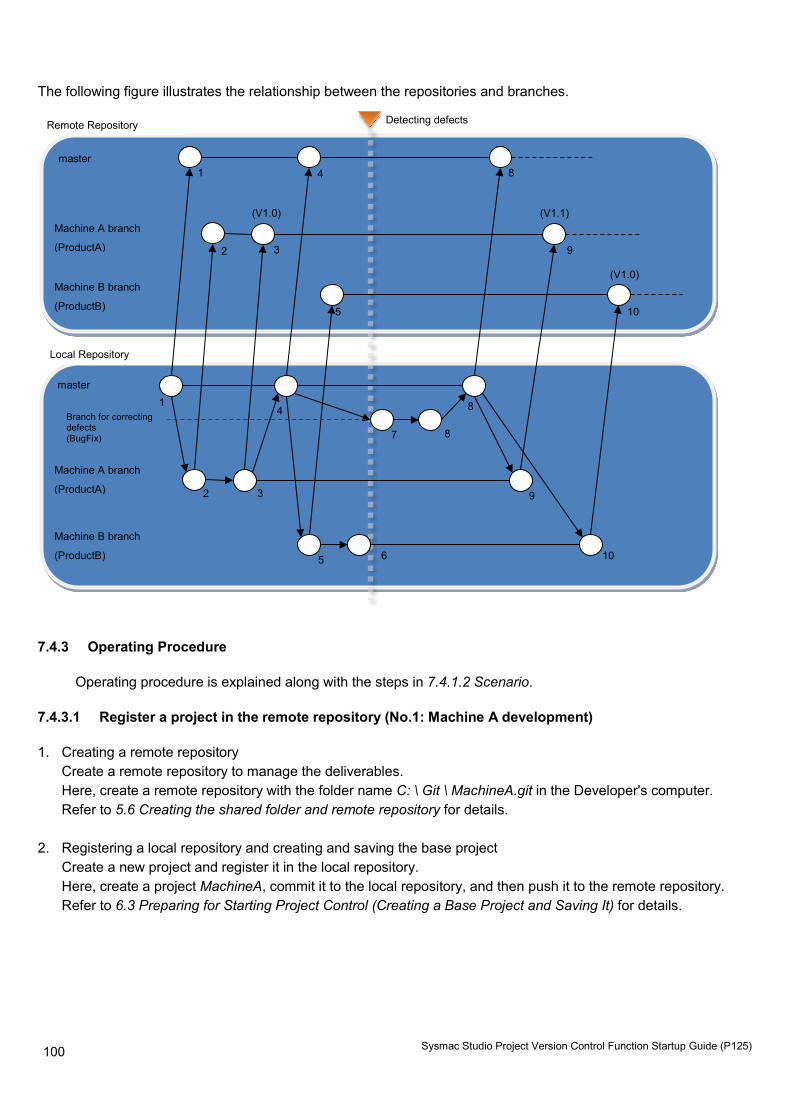
100
Sysmac Studio Project Version Control Function Startup Guide (P125)
The following figure illustrates the relationship between the repositories and branches.
7.4.3 Operating Procedure
Operating procedure is explained along with the steps in 7.4.1.2 Scenario.
7.4.3.1 Register a project in the remote repository (No.1: Machine A development)
1. Creating a remote repository Create a remote repository to manage the deliverables. Here, create a remote repository with the folder name C: \ Git \ MachineA.git in the Developer's computer. Refer to 5.6 Creating the shared folder and remote repository for details.
2. Registering a local repository and creating and saving the base project Create a new project and register it in the local repository. Here, create a project MachineA, commit it to the local repository, and then push it to the remote repository. Refer to 6.3 Preparing for Starting Project Control (Creating a Base Project and Saving It) for details.
Remote Repository
Local Repository
master
Machine A branch
(ProductA)
master
1
Machine B branch
(ProductB)
Branch for correcting defects (BugFix)
Machine A branch
(ProductA)
Machine B branch
(ProductB)
Detecting defects
2
2
3
3
4
4
5
5
6
7 8
8
9
8
9
10
10
(V1.0) (V1.1)
(V1.0)
1
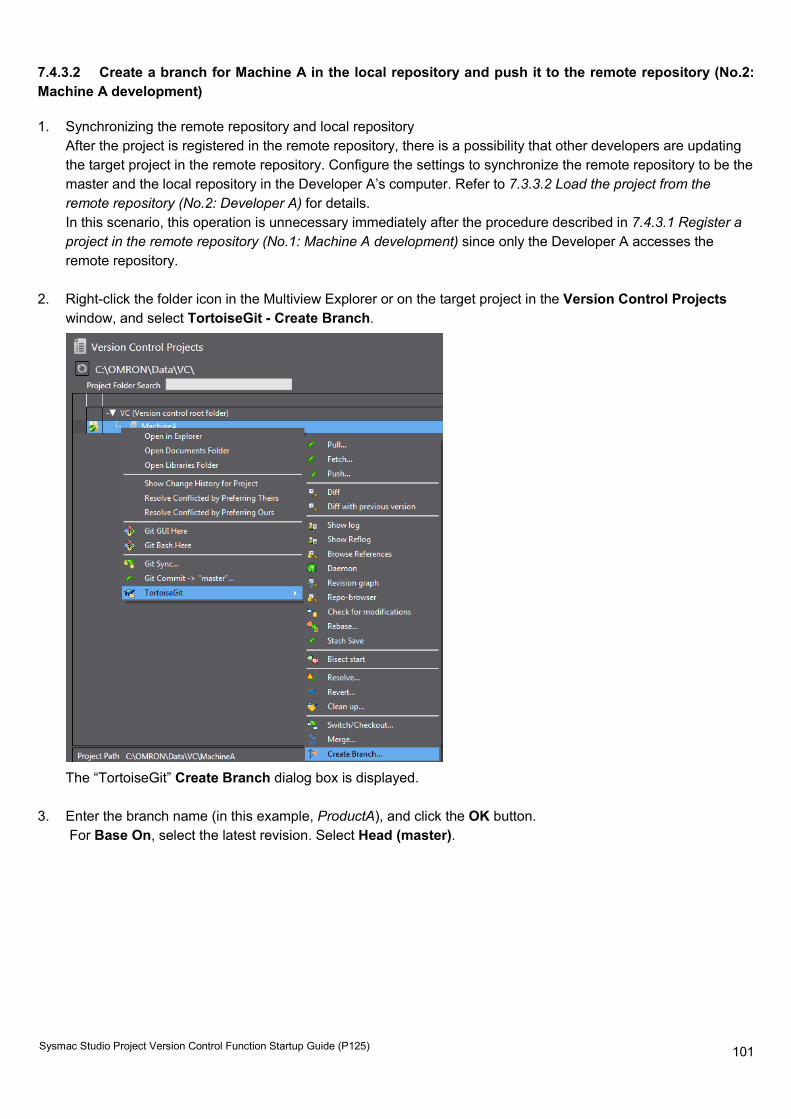
101
Sysmac Studio Project Version Control Function Startup Guide (P125)
7.4.3.2 Create a branch for Machine A in the local repository and push it to the remote repository (No.2: Machine A development)
1. Synchronizing the remote repository and local repository After the project is registered in the remote repository, there is a possibility that other developers are updating the target project in the remote repository. Configure the settings to synchronize the remote repository to be the master and the local repository in the Developer A’s computer. Refer to 7.3.3.2 Load the project from the remote repository (No.2: Developer A) for details. In this scenario, this operation is unnecessary immediately after the procedure described in 7.4.3.1 Register a project in the remote repository (No.1: Machine A development) since only the Developer A accesses the remote repository.
2. Right-click the folder icon in the Multiview Explorer or on the target project in the Version Control Projects
window, and select TortoiseGit - Create Branch.
The “TortoiseGit” Create Branch dialog box is displayed.
3. Enter the branch name (in this example, ProductA), and click the OK button.
For Base On, select the latest revision. Select Head (master).
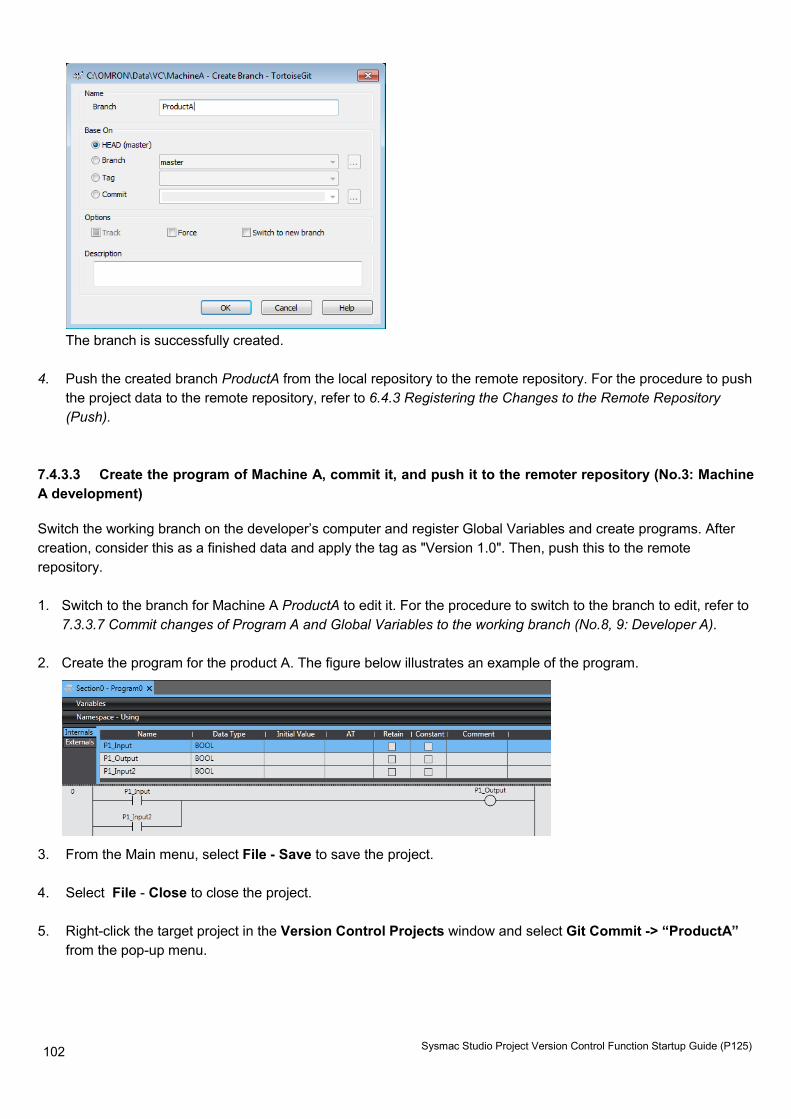
102
Sysmac Studio Project Version Control Function Startup Guide (P125)
The branch is successfully created.
4. Push the created branch ProductA from the local repository to the remote repository. For the procedure to push
the project data to the remote repository, refer to 6.4.3 Registering the Changes to the Remote Repository (Push).
7.4.3.3 Create the program of Machine A, commit it, and push it to the remoter repository (No.3: Machine A development)
Switch the working branch on the developer’s computer and register Global Variables and create programs. After creation, consider this as a finished data and apply the tag as "Version 1.0". Then, push this to the remote repository. 1. Switch to the branch for Machine A ProductA to edit it. For the procedure to switch to the branch to edit, refer to
7.3.3.7 Commit changes of Program A and Global Variables to the working branch (No.8, 9: Developer A).
2. Create the program for the product A. The figure below illustrates an example of the program.
3. From the Main menu, select File - Save to save the project.
4. Select File - Close to close the project.
5. Right-click the target project in the Version Control Projects window and select Git Commit -> “ProductA”
from the pop-up menu.
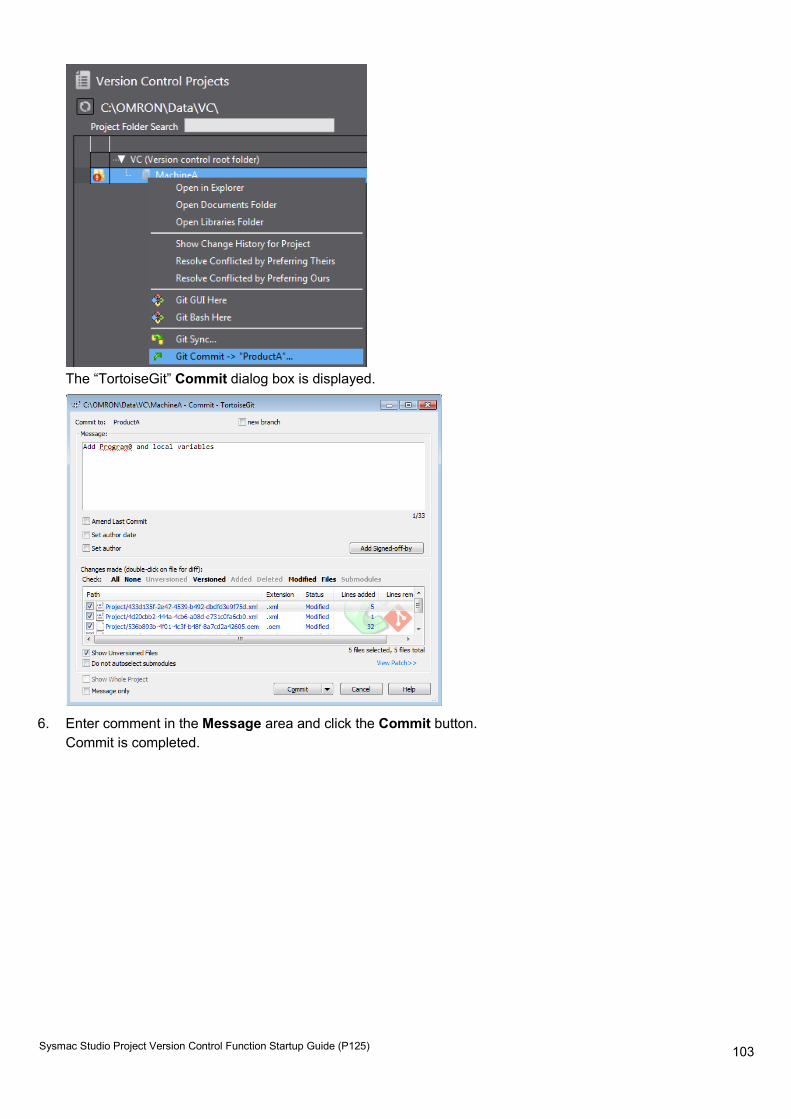
103
Sysmac Studio Project Version Control Function Startup Guide (P125)
The “TortoiseGit” Commit dialog box is displayed.
6. Enter comment in the Message area and click the Commit button.
Commit is completed.
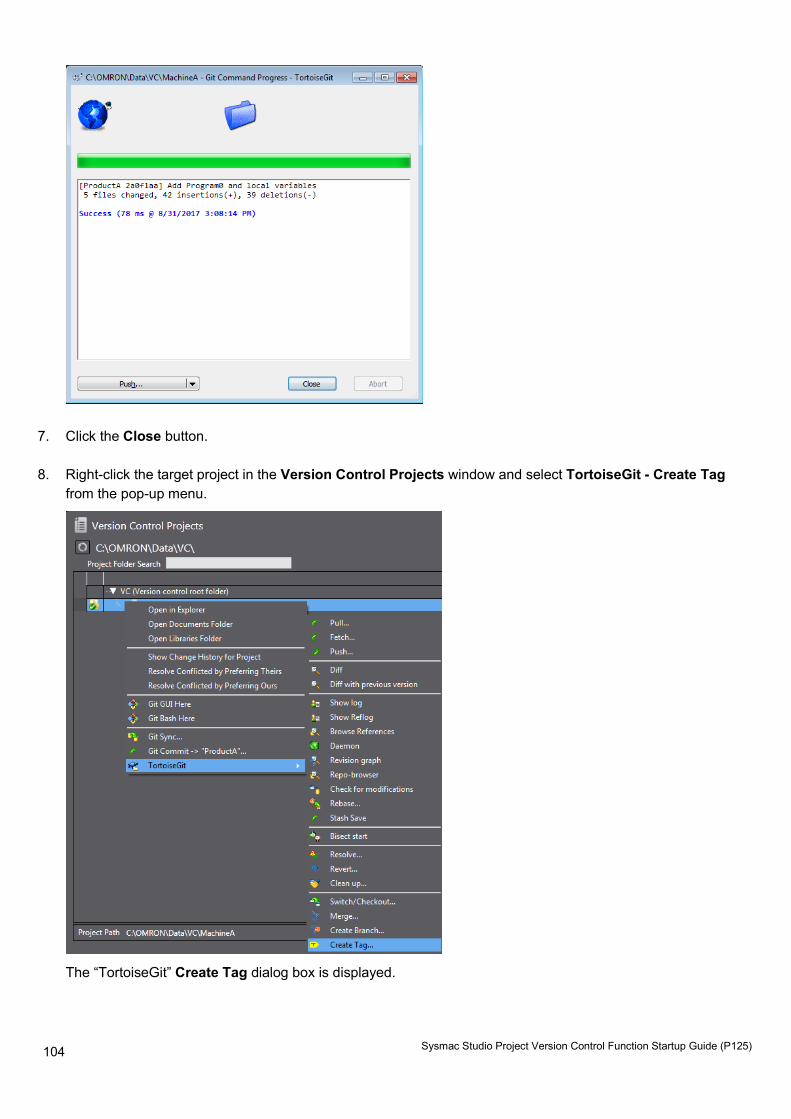
104
Sysmac Studio Project Version Control Function Startup Guide (P125)
7. Click the Close button.
8. Right-click the target project in the Version Control Projects window and select TortoiseGit - Create Tag from the pop-up menu.
The “TortoiseGit” Create Tag dialog box is displayed.
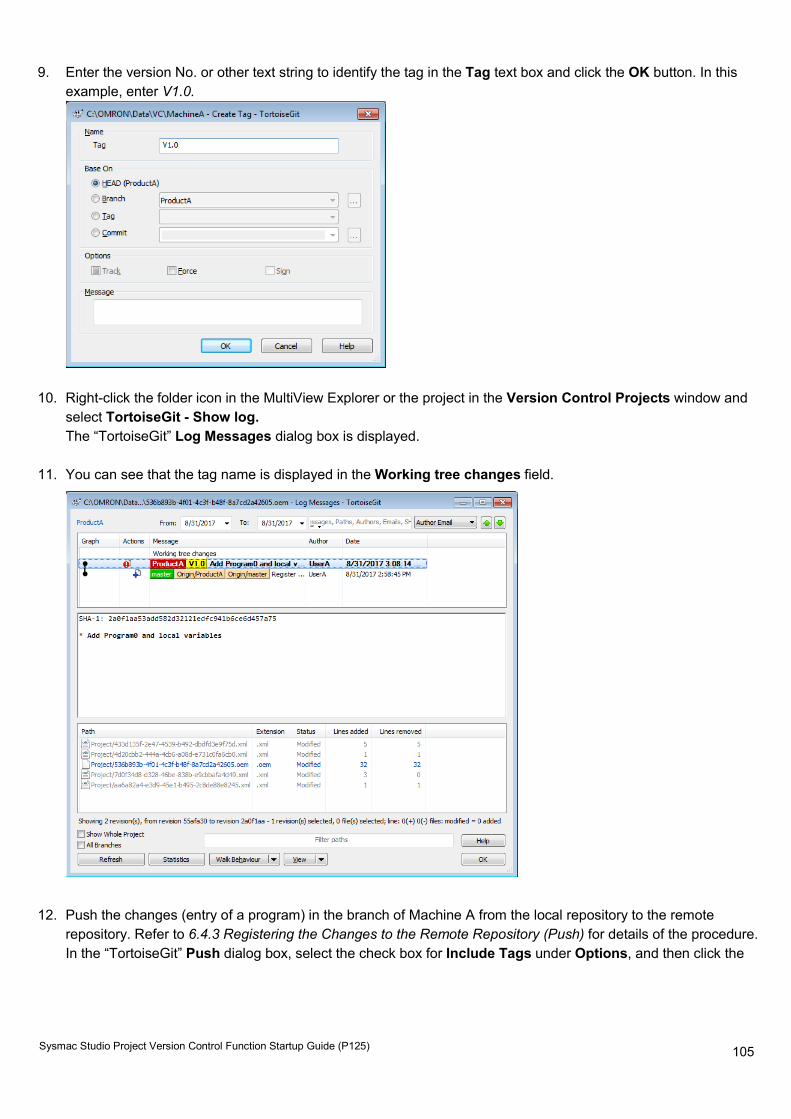
105
Sysmac Studio Project Version Control Function Startup Guide (P125)
9. Enter the version No. or other text string to identify the tag in the Tag text box and click the OK button. In this example, enter V1.0.
10. Right-click the folder icon in the MultiView Explorer or the project in the Version Control Projects window and select TortoiseGit - Show log. The “TortoiseGit” Log Messages dialog box is displayed.
11. You can see that the tag name is displayed in the Working tree changes field.
12. Push the changes (entry of a program) in the branch of Machine A from the local repository to the remote repository. Refer to 6.4.3 Registering the Changes to the Remote Repository (Push) for details of the procedure. In the “TortoiseGit” Push dialog box, select the check box for Include Tags under Options, and then click the
106
Sysmac Studio Project Version Control Function Startup Guide (P125)
OK button.
7.4.3.4 Merge the changes in the Machine A into the master in the local repository and push it to the remote repository (No.4: Machine A development)
Switch to the master branch and then merge the changes in the the Machine A branch ProductA into the master branch. 1. Switch to the master branch to edit it. For the procedure to switch to the branch to edit, refer to 7.3.3.7Commit
changes of Program A and Global Variables to the working branch (No.8, 9: Developer A). 2. To merge the changes to the master branch, right-click the target project in the Version Control Projects
window and select TortoiseGit - Merge from the pop-up menu.
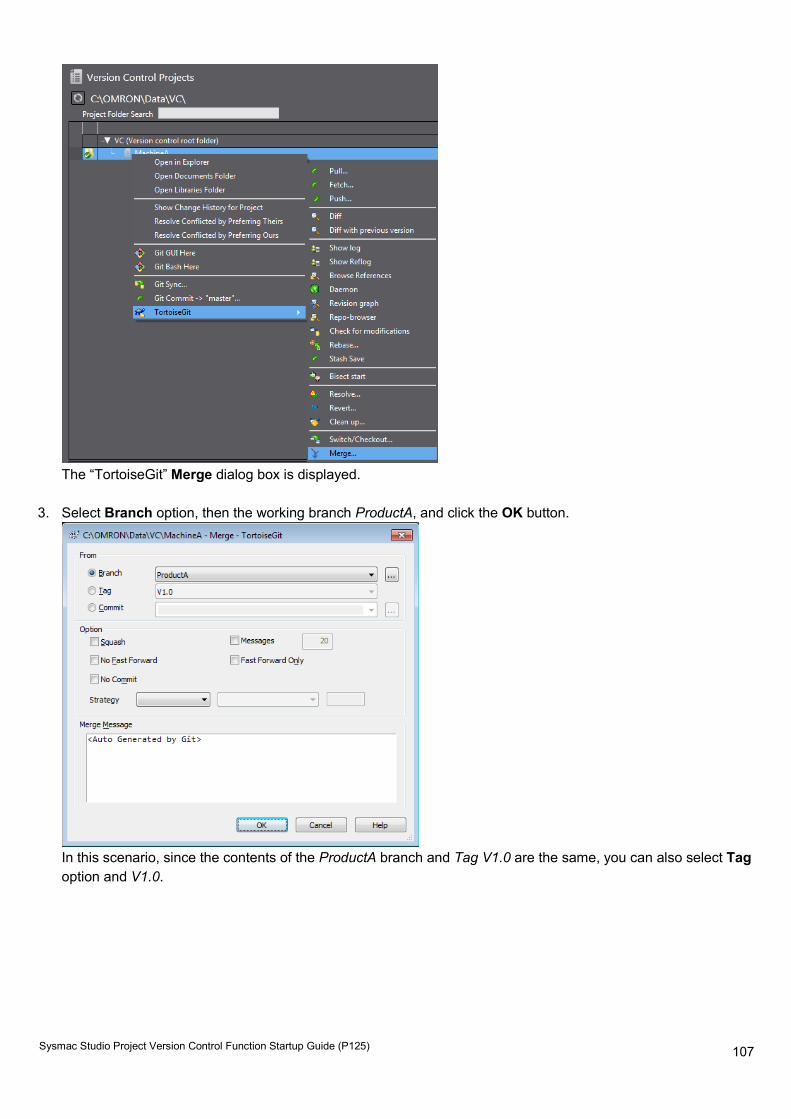
107
Sysmac Studio Project Version Control Function Startup Guide (P125)
The “TortoiseGit” Merge dialog box is displayed.
3. Select Branch option, then the working branch ProductA, and click the OK button.
In this scenario, since the contents of the ProductA branch and Tag V1.0 are the same, you can also select Tag option and V1.0.
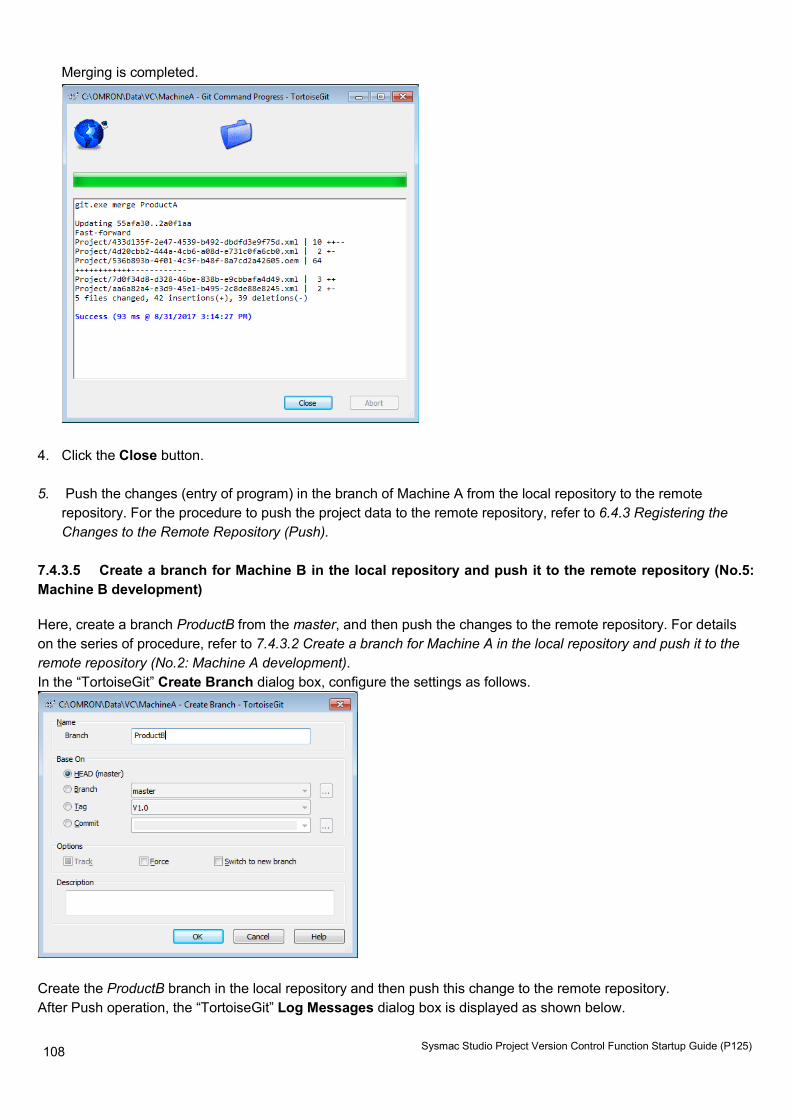
108
Sysmac Studio Project Version Control Function Startup Guide (P125)
Merging is completed.
4. Click the Close button.
5. Push the changes (entry of program) in the branch of Machine A from the local repository to the remote
repository. For the procedure to push the project data to the remote repository, refer to 6.4.3 Registering the Changes to the Remote Repository (Push).
7.4.3.5 Create a branch for Machine B in the local repository and push it to the remote repository (No.5: Machine B development)
Here, create a branch ProductB from the master, and then push the changes to the remote repository. For details on the series of procedure, refer to 7.4.3.2 Create a branch for Machine A in the local repository and push it to the remote repository (No.2: Machine A development). In the “TortoiseGit” Create Branch dialog box, configure the settings as follows.
Create the ProductB branch in the local repository and then push this change to the remote repository. After Push operation, the “TortoiseGit” Log Messages dialog box is displayed as shown below.
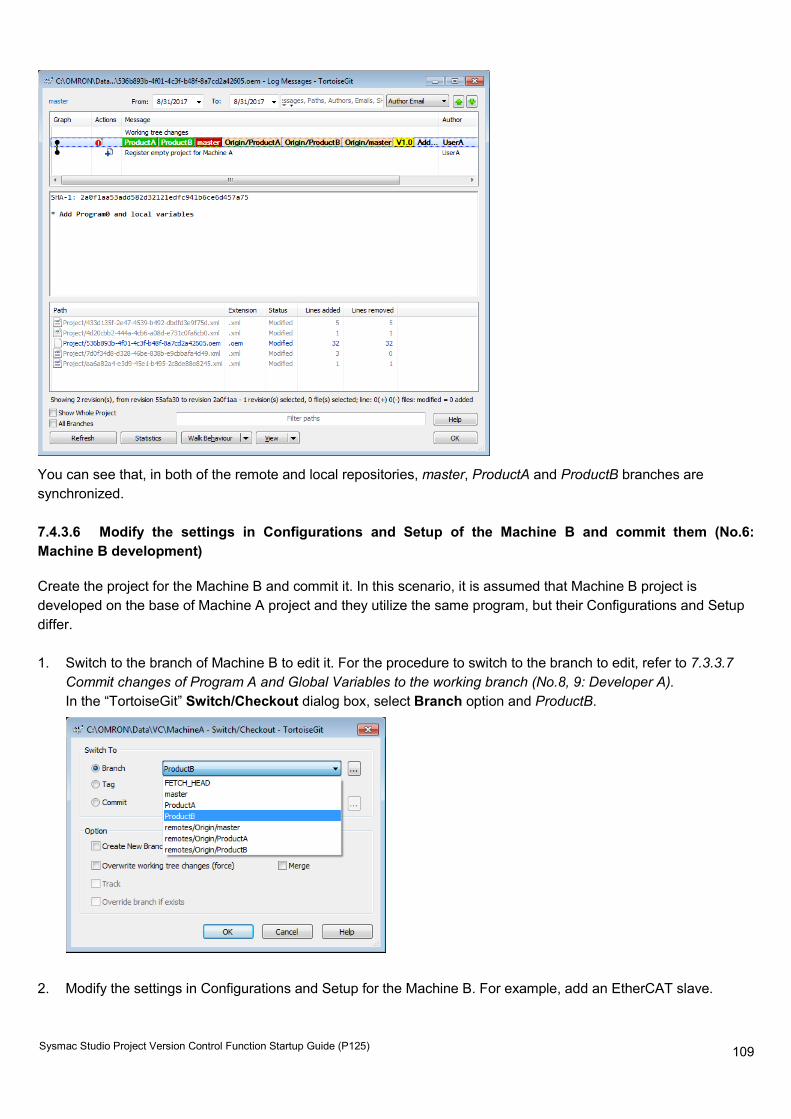
109
Sysmac Studio Project Version Control Function Startup Guide (P125)
You can see that, in both of the remote and local repositories, master, ProductA and ProductB branches are synchronized. 7.4.3.6 Modify the settings in Configurations and Setup of the Machine B and commit them (No.6: Machine B development)
Create the project for the Machine B and commit it. In this scenario, it is assumed that Machine B project is developed on the base of Machine A project and they utilize the same program, but their Configurations and Setup differ. 1. Switch to the branch of Machine B to edit it. For the procedure to switch to the branch to edit, refer to 7.3.3.7
Commit changes of Program A and Global Variables to the working branch (No.8, 9: Developer A). In the “TortoiseGit” Switch/Checkout dialog box, select Branch option and ProductB.
2. Modify the settings in Configurations and Setup for the Machine B. For example, add an EtherCAT slave.
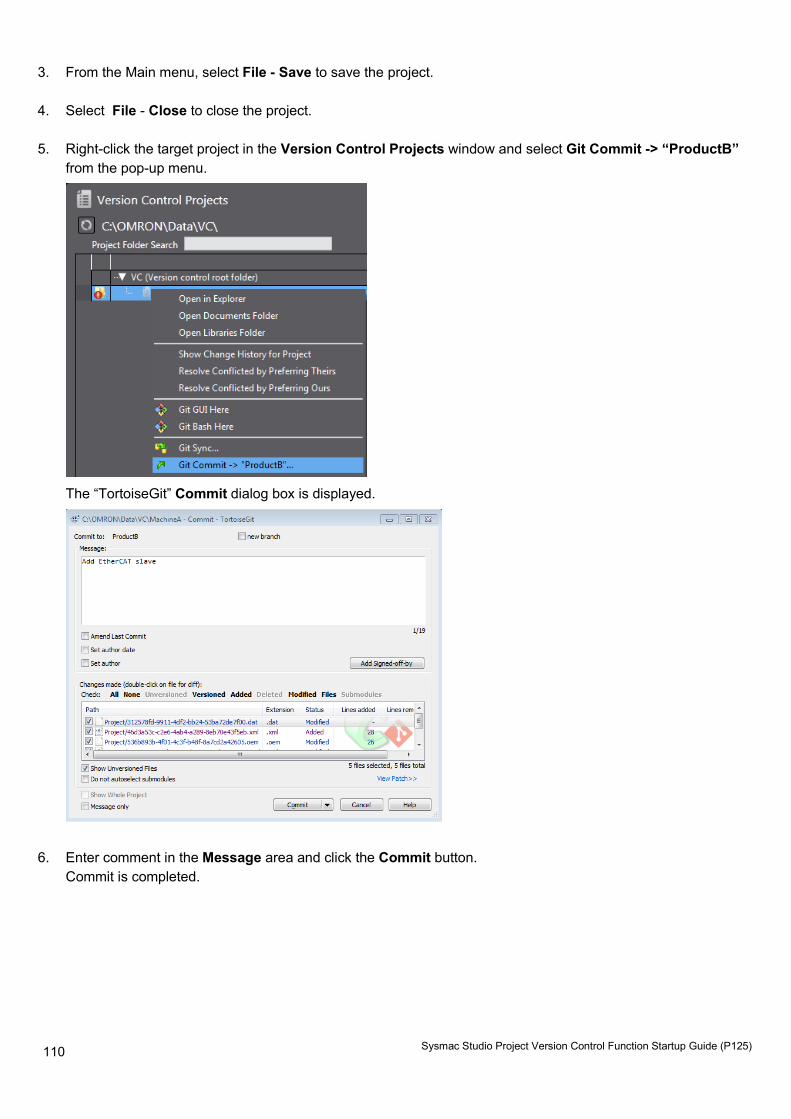
110
Sysmac Studio Project Version Control Function Startup Guide (P125)
3. From the Main menu, select File - Save to save the project.
4. Select File - Close to close the project.
5. Right-click the target project in the Version Control Projects window and select Git Commit -> “ProductB” from the pop-up menu.
The “TortoiseGit” Commit dialog box is displayed.
6. Enter comment in the Message area and click the Commit button. Commit is completed.
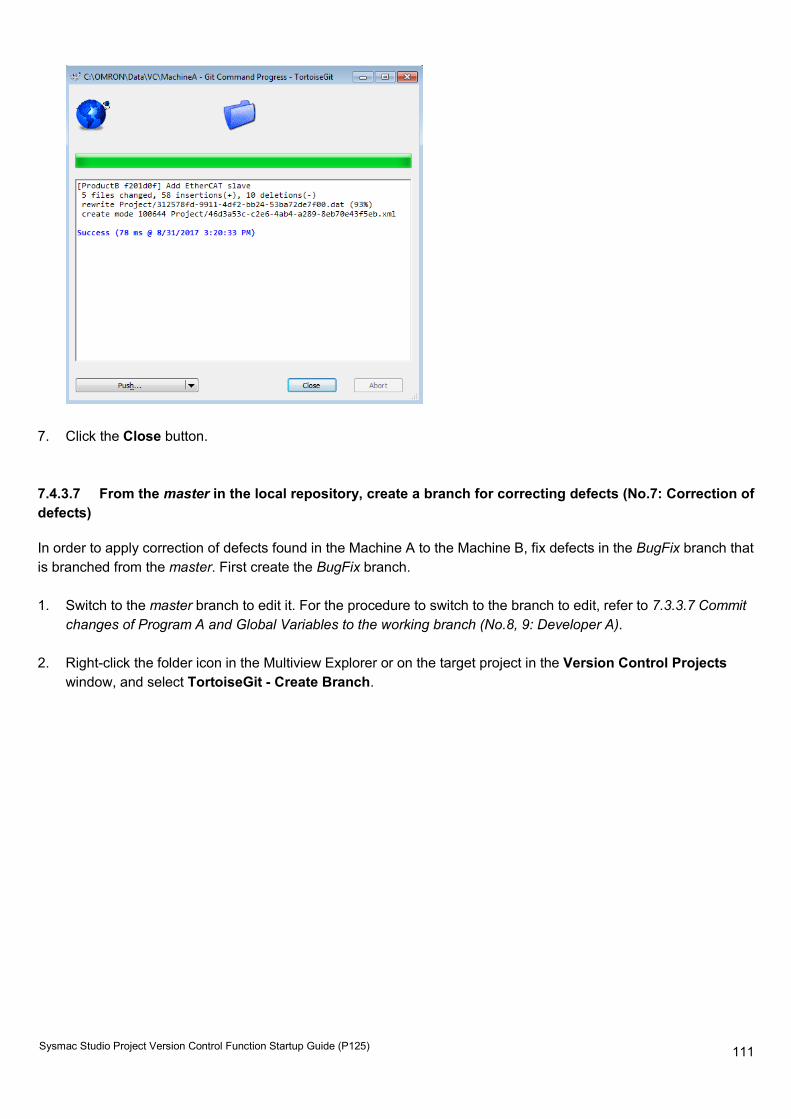
111
Sysmac Studio Project Version Control Function Startup Guide (P125)
7. Click the Close button. 7.4.3.7 From the master in the local repository, create a branch for correcting defects (No.7: Correction of defects)
In order to apply correction of defects found in the Machine A to the Machine B, fix defects in the BugFix branch that is branched from the master. First create the BugFix branch. 1. Switch to the master branch to edit it. For the procedure to switch to the branch to edit, refer to 7.3.3.7 Commit
changes of Program A and Global Variables to the working branch (No.8, 9: Developer A).
2. Right-click the folder icon in the Multiview Explorer or on the target project in the Version Control Projects window, and select TortoiseGit - Create Branch.
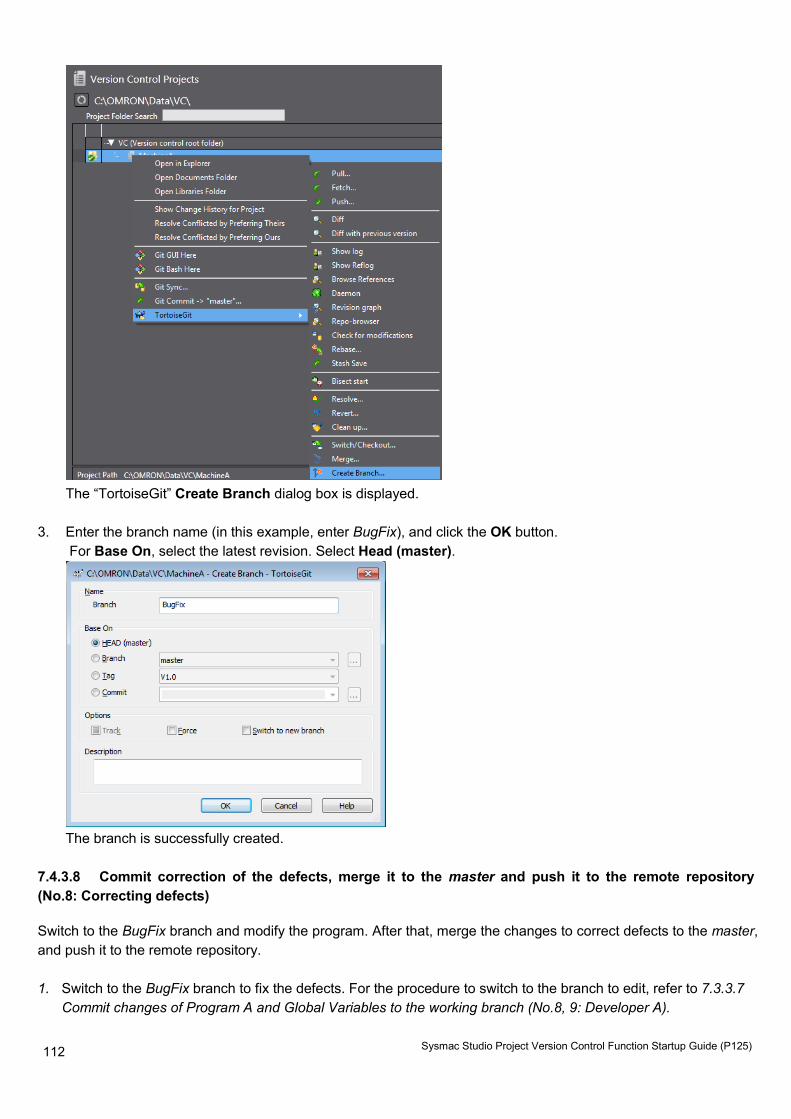
112
Sysmac Studio Project Version Control Function Startup Guide (P125)
The “TortoiseGit” Create Branch dialog box is displayed.
3. Enter the branch name (in this example, enter BugFix), and click the OK button. For Base On, select the latest revision. Select Head (master).
The branch is successfully created.
7.4.3.8 Commit correction of the defects, merge it to the master and push it to the remote repository (No.8: Correcting defects)
Switch to the BugFix branch and modify the program. After that, merge the changes to correct defects to the master, and push it to the remote repository. 1. Switch to the BugFix branch to fix the defects. For the procedure to switch to the branch to edit, refer to 7.3.3.7
Commit changes of Program A and Global Variables to the working branch (No.8, 9: Developer A).
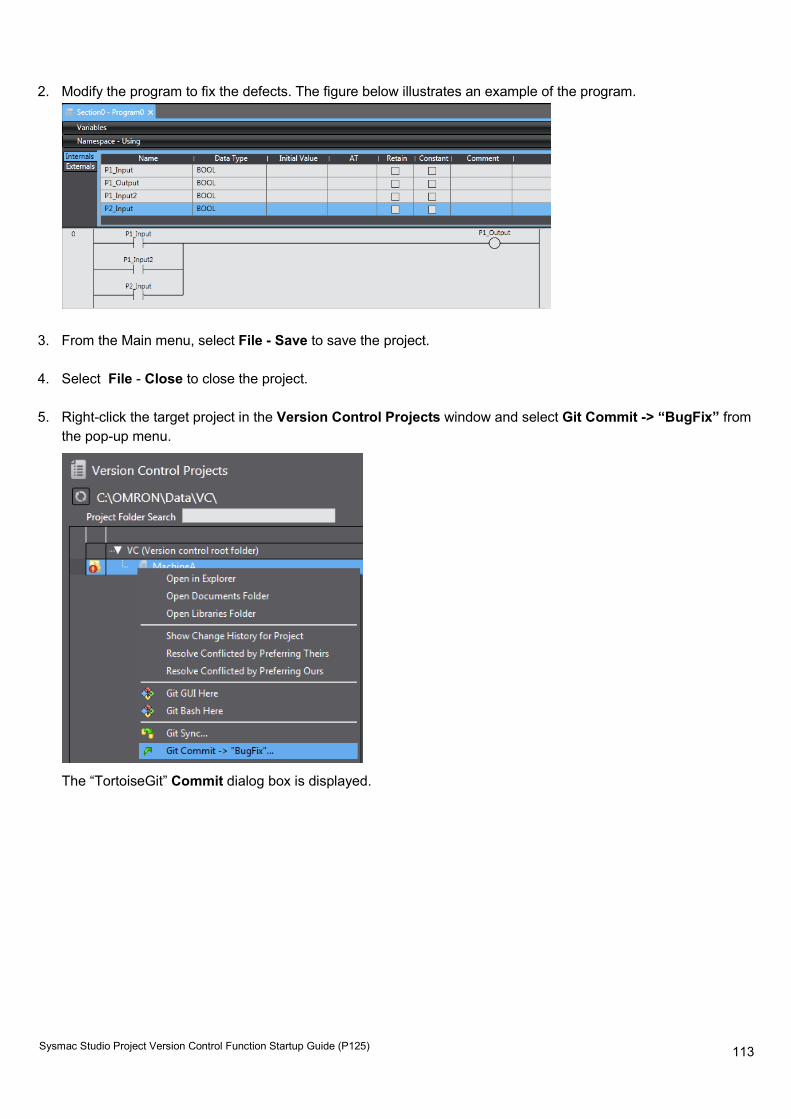
113
Sysmac Studio Project Version Control Function Startup Guide (P125)
2. Modify the program to fix the defects. The figure below illustrates an example of the program.
3. From the Main menu, select File - Save to save the project.
4. Select File - Close to close the project.
5. Right-click the target project in the Version Control Projects window and select Git Commit -> “BugFix” from the pop-up menu.
The “TortoiseGit” Commit dialog box is displayed.
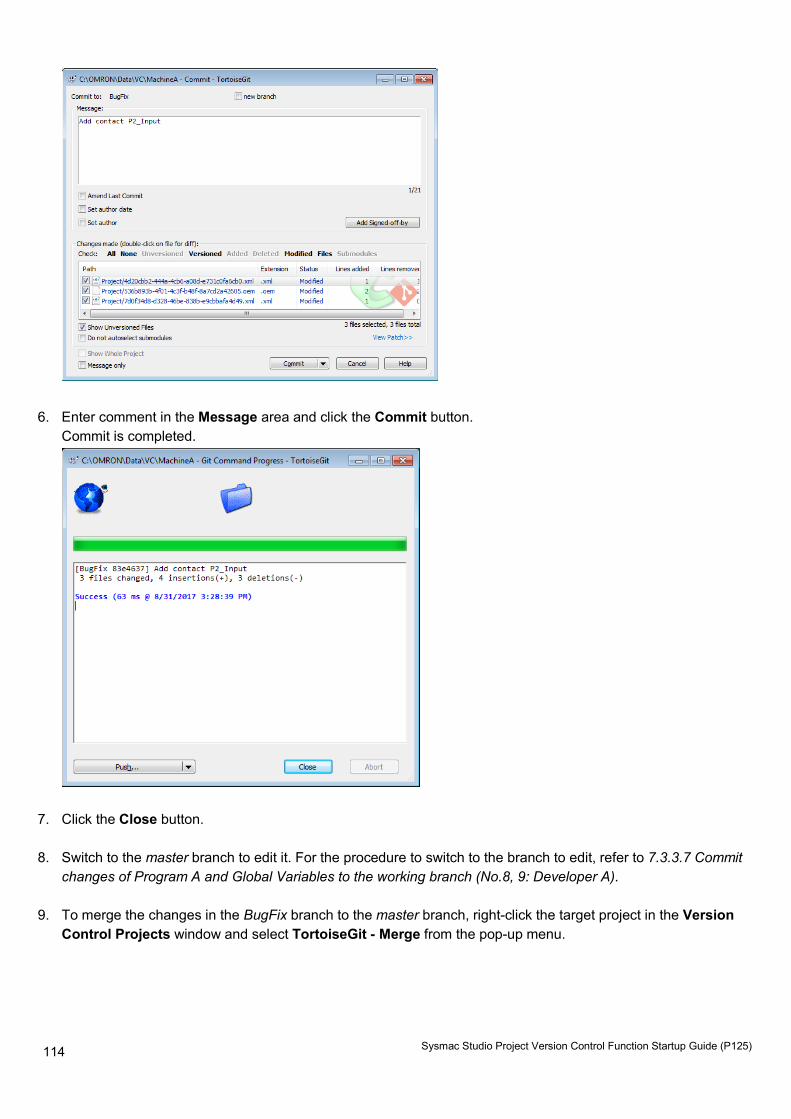
114
Sysmac Studio Project Version Control Function Startup Guide (P125)
6. Enter comment in the Message area and click the Commit button. Commit is completed.
7. Click the Close button.
8. Switch to the master branch to edit it. For the procedure to switch to the branch to edit, refer to 7.3.3.7 Commit changes of Program A and Global Variables to the working branch (No.8, 9: Developer A).
9. To merge the changes in the BugFix branch to the master branch, right-click the target project in the Version Control Projects window and select TortoiseGit - Merge from the pop-up menu.
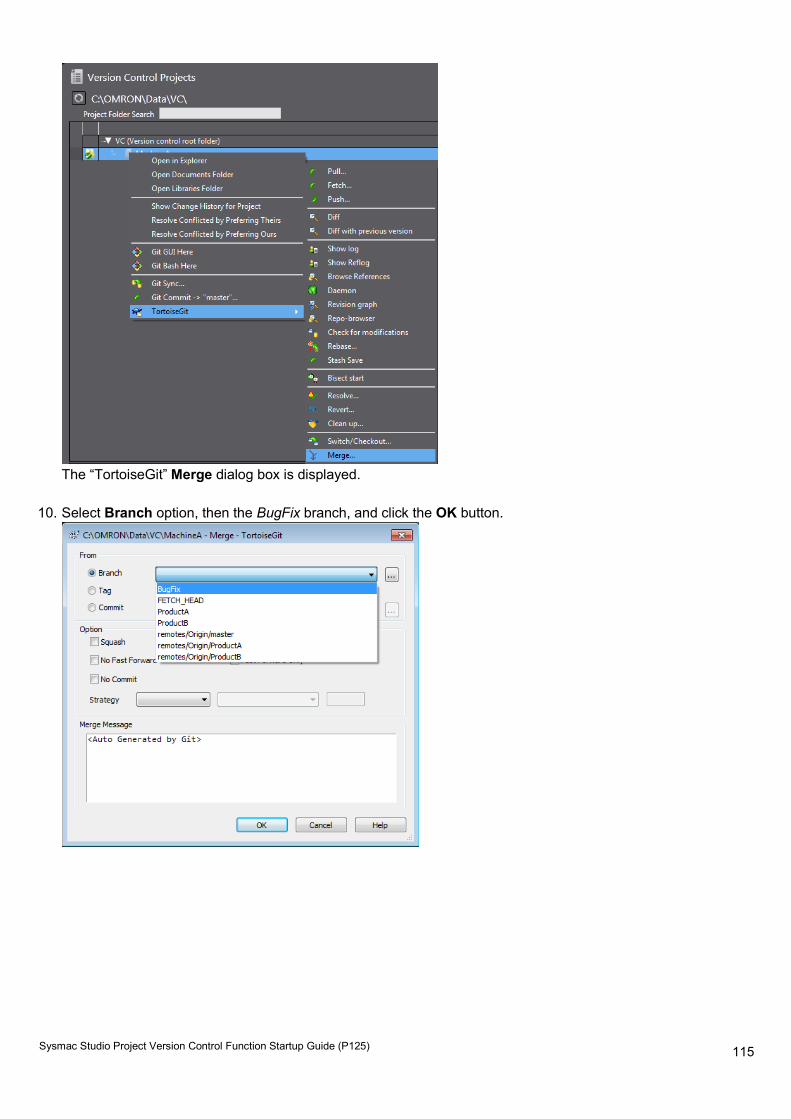
115
Sysmac Studio Project Version Control Function Startup Guide (P125)
The “TortoiseGit” Merge dialog box is displayed.
10. Select Branch option, then the BugFix branch, and click the OK button.
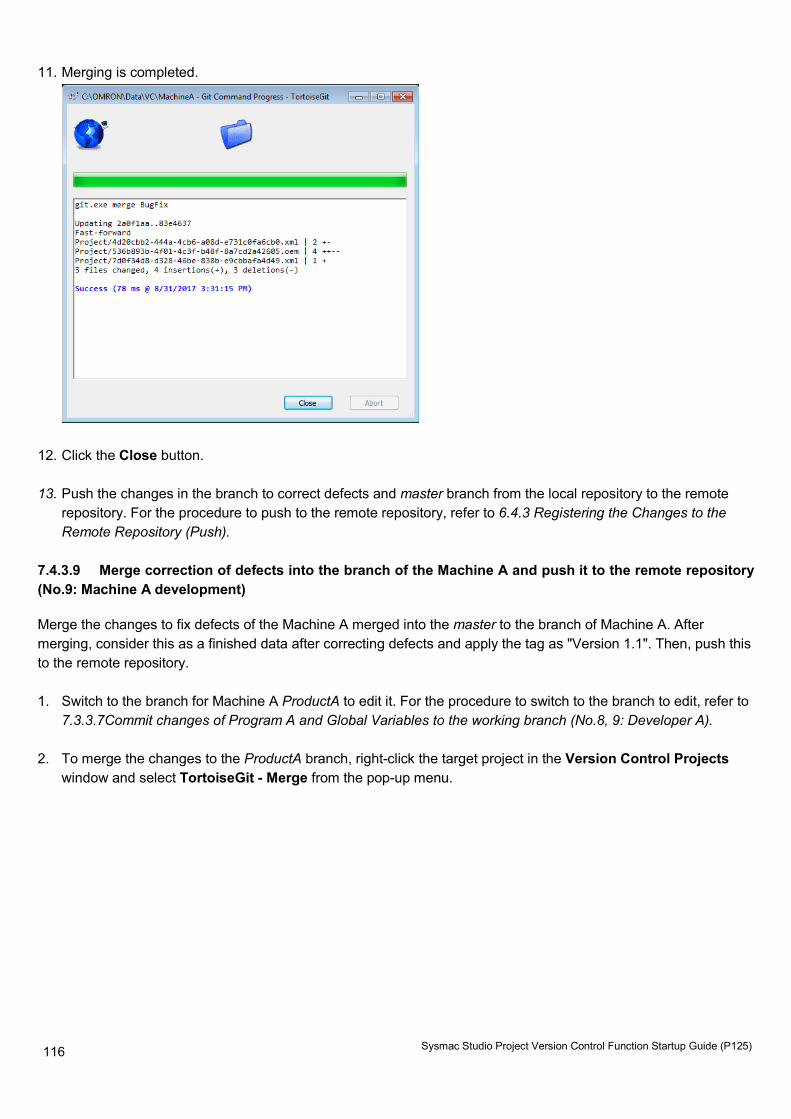
116
Sysmac Studio Project Version Control Function Startup Guide (P125)
11. Merging is completed.
12. Click the Close button.
13. Push the changes in the branch to correct defects and master branch from the local repository to the remote repository. For the procedure to push to the remote repository, refer to 6.4.3 Registering the Changes to the Remote Repository (Push).
7.4.3.9 Merge correction of defects into the branch of the Machine A and push it to the remote repository (No.9: Machine A development)
Merge the changes to fix defects of the Machine A merged into the master to the branch of Machine A. After merging, consider this as a finished data after correcting defects and apply the tag as "Version 1.1". Then, push this to the remote repository. 1. Switch to the branch for Machine A ProductA to edit it. For the procedure to switch to the branch to edit, refer to
7.3.3.7Commit changes of Program A and Global Variables to the working branch (No.8, 9: Developer A).
2. To merge the changes to the ProductA branch, right-click the target project in the Version Control Projects window and select TortoiseGit - Merge from the pop-up menu.
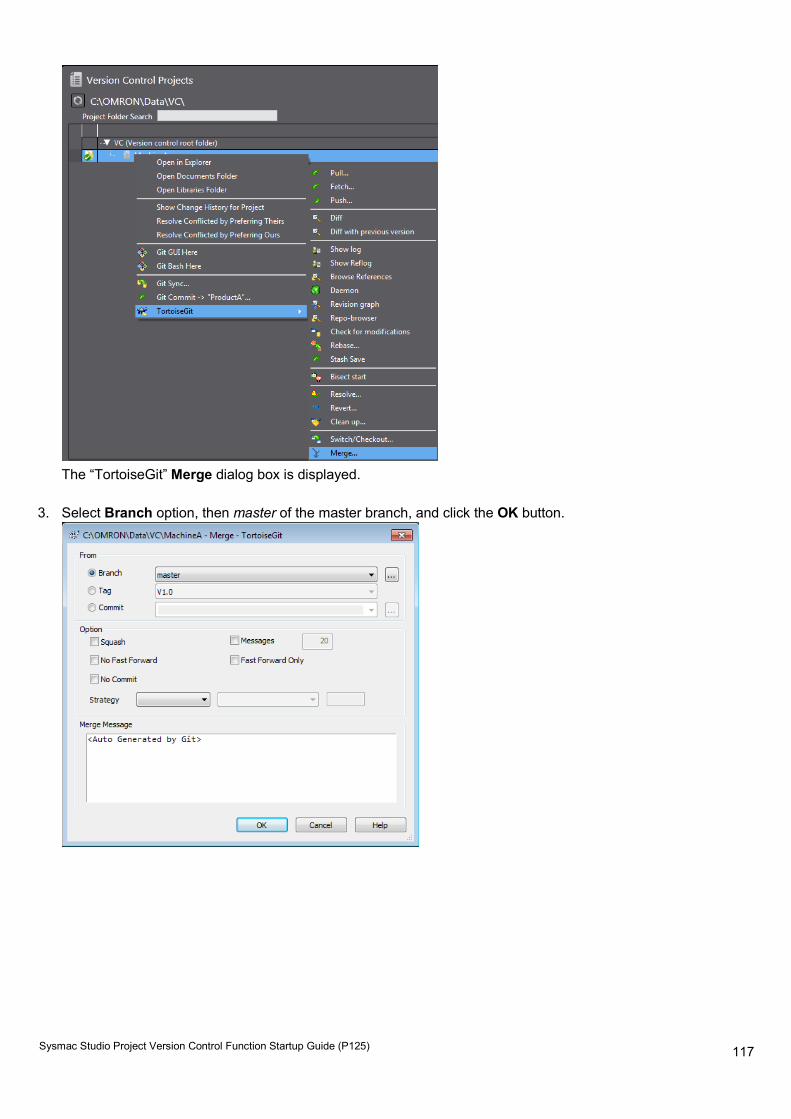
117
Sysmac Studio Project Version Control Function Startup Guide (P125)
The “TortoiseGit” Merge dialog box is displayed.
3. Select Branch option, then master of the master branch, and click the OK button.
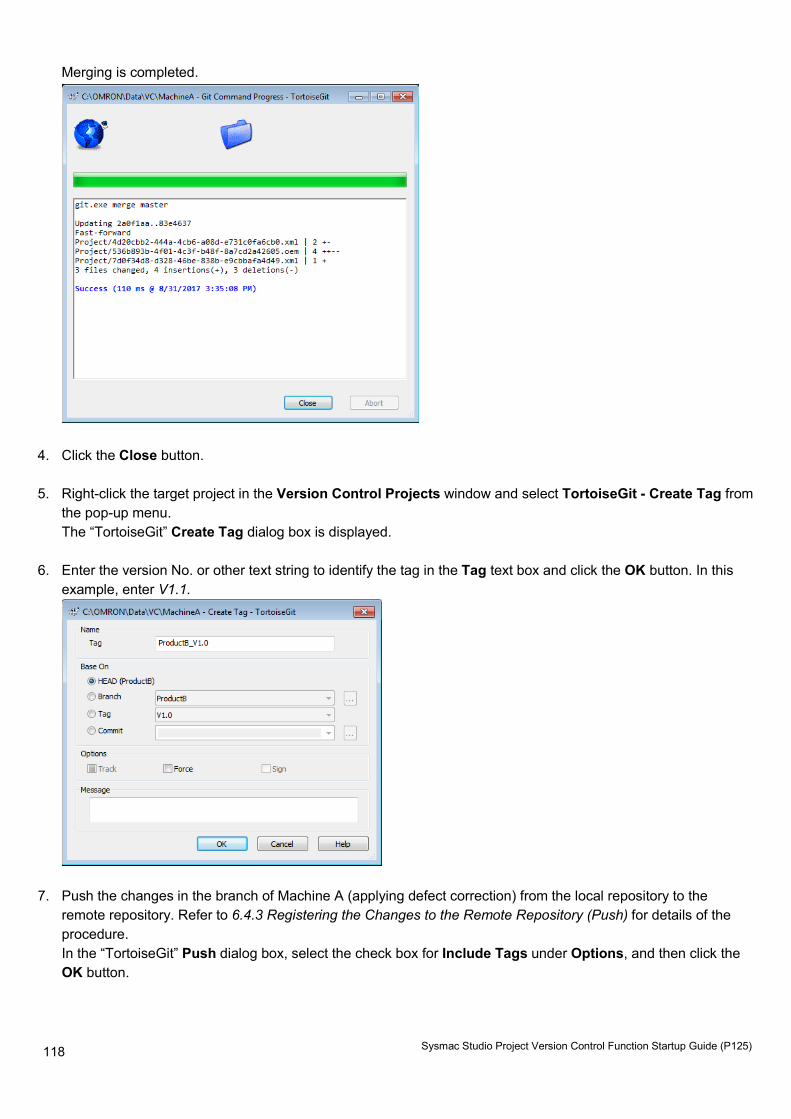
118
Sysmac Studio Project Version Control Function Startup Guide (P125)
Merging is completed.
4. Click the Close button.
5. Right-click the target project in the Version Control Projects window and select TortoiseGit - Create Tag from
the pop-up menu. The “TortoiseGit” Create Tag dialog box is displayed.
6. Enter the version No. or other text string to identify the tag in the Tag text box and click the OK button. In this example, enter V1.1.
7. Push the changes in the branch of Machine A (applying defect correction) from the local repository to the remote repository. Refer to 6.4.3 Registering the Changes to the Remote Repository (Push) for details of the procedure. In the “TortoiseGit” Push dialog box, select the check box for Include Tags under Options, and then click the OK button.
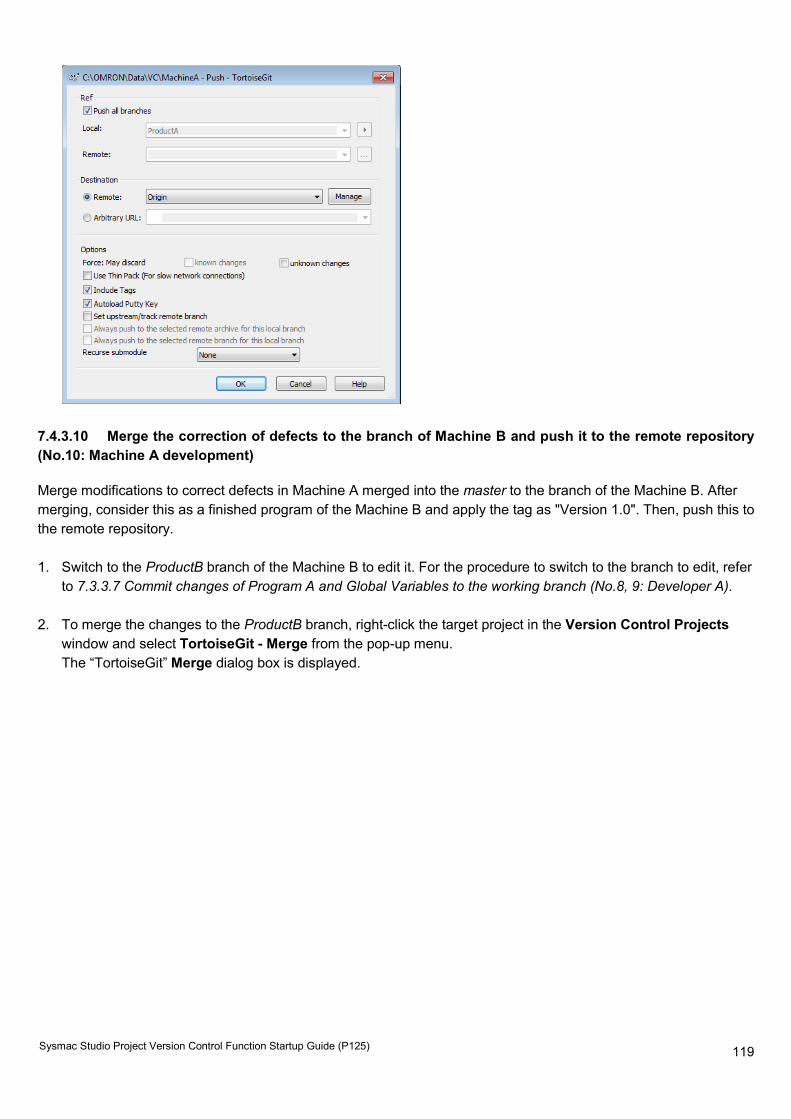
119
Sysmac Studio Project Version Control Function Startup Guide (P125)
7.4.3.10 Merge the correction of defects to the branch of Machine B and push it to the remote repository (No.10: Machine A development)
Merge modifications to correct defects in Machine A merged into the master to the branch of the Machine B. After merging, consider this as a finished program of the Machine B and apply the tag as "Version 1.0". Then, push this to the remote repository. 1. Switch to the ProductB branch of the Machine B to edit it. For the procedure to switch to the branch to edit, refer
to 7.3.3.7 Commit changes of Program A and Global Variables to the working branch (No.8, 9: Developer A).
2. To merge the changes to the ProductB branch, right-click the target project in the Version Control Projects window and select TortoiseGit - Merge from the pop-up menu. The “TortoiseGit” Merge dialog box is displayed.
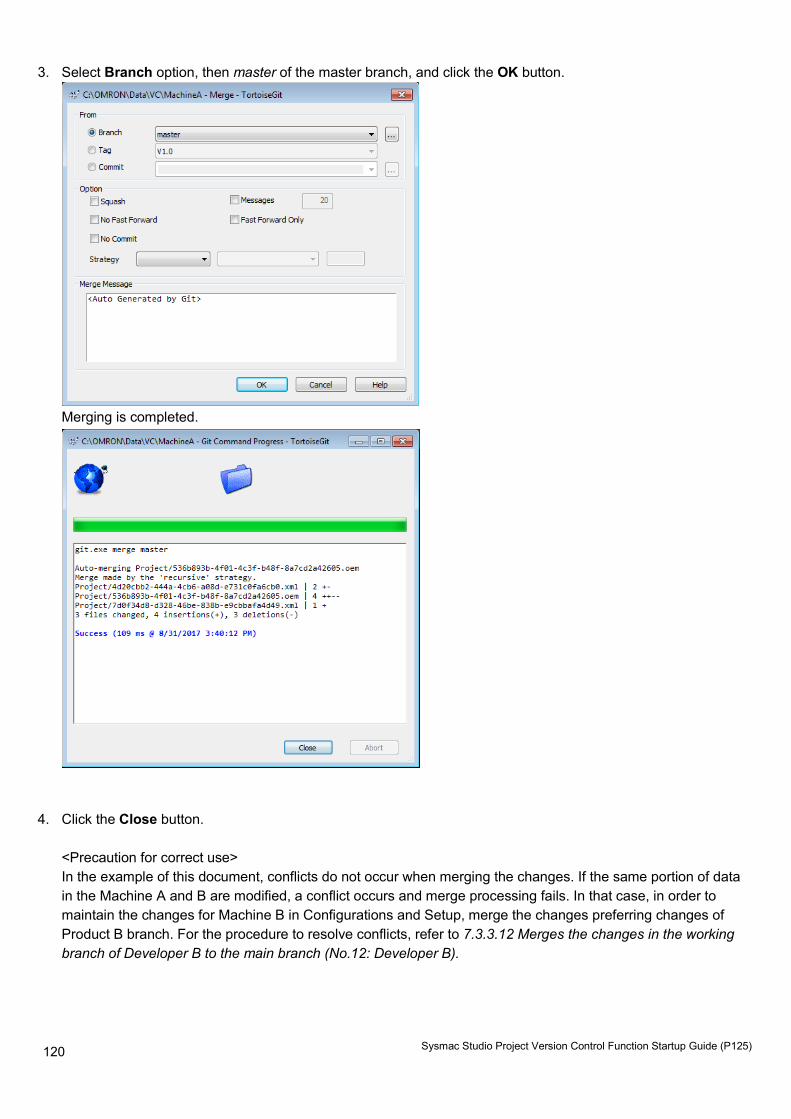
120
Sysmac Studio Project Version Control Function Startup Guide (P125)
3. Select Branch option, then master of the master branch, and click the OK button.
Merging is completed.
4. Click the Close button. <Precaution for correct use> In the example of this document, conflicts do not occur when merging the changes. If the same portion of data in the Machine A and B are modified, a conflict occurs and merge processing fails. In that case, in order to maintain the changes for Machine B in Configurations and Setup, merge the changes preferring changes of Product B branch. For the procedure to resolve conflicts, refer to 7.3.3.12 Merges the changes in the working branch of Developer B to the main branch (No.12: Developer B).
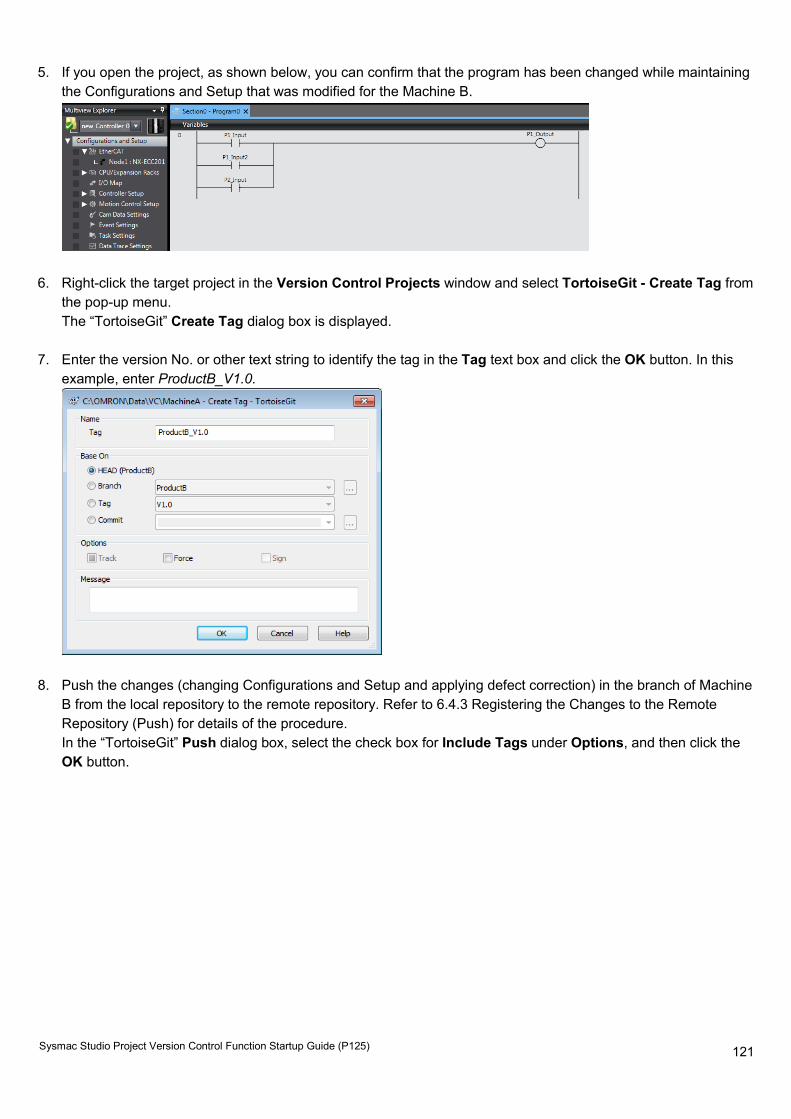
121
Sysmac Studio Project Version Control Function Startup Guide (P125)
5. If you open the project, as shown below, you can confirm that the program has been changed while maintaining the Configurations and Setup that was modified for the Machine B.
6. Right-click the target project in the Version Control Projects window and select TortoiseGit - Create Tag from the pop-up menu. The “TortoiseGit” Create Tag dialog box is displayed.
7. Enter the version No. or other text string to identify the tag in the Tag text box and click the OK button. In this example, enter ProductB_V1.0.
8. Push the changes (changing Configurations and Setup and applying defect correction) in the branch of Machine B from the local repository to the remote repository. Refer to 6.4.3 Registering the Changes to the Remote Repository (Push) for details of the procedure. In the “TortoiseGit” Push dialog box, select the check box for Include Tags under Options, and then click the OK button.
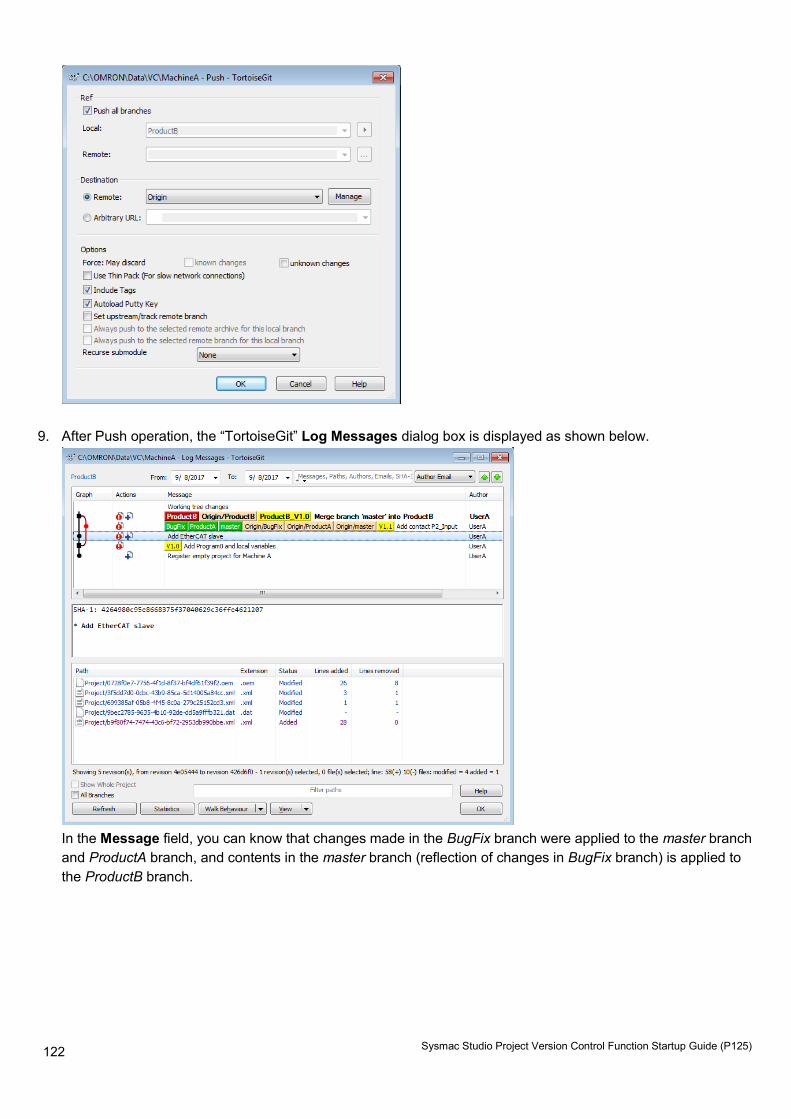
122
Sysmac Studio Project Version Control Function Startup Guide (P125)
9. After Push operation, the “TortoiseGit” Log Messages dialog box is displayed as shown below.
In the Message field, you can know that changes made in the BugFix branch were applied to the master branch and ProductA branch, and contents in the master branch (reflection of changes in BugFix branch) is applied to the ProductB branch.

Authorized Distributor:
In the interest of product improvement, specifications are subject to change without notice.
Cat. No. P125-E1-02 0419
© OMRON Corporation 2017-2019 All Rights Reserved.
OMRON Corporation Industrial Automation Company
OMRON ELECTRONICS LLC2895 Greenspoint Parkway, Suite 200 Hoffman Estates, IL 60169 U.S.A.Tel: (1) 847-843-7900/Fax: (1) 847-843-7787
Regional HeadquartersOMRON EUROPE B.V.Wegalaan 67-69, 2132 JD HoofddorpThe NetherlandsTel: (31)2356-81-300/Fax: (31)2356-81-388
Contact: www.ia.omron.comKyoto, JAPAN
OMRON ASIA PACIFIC PTE. LTD.No. 438A Alexandra Road # 05-05/08 (Lobby 2), Alexandra Technopark, Singapore 119967Tel: (65) 6835-3011/Fax: (65) 6835-2711
OMRON (CHINA) CO., LTD.Room 2211, Bank of China Tower, 200 Yin Cheng Zhong Road, PuDong New Area, Shanghai, 200120, ChinaTel: (86) 21-5037-2222/Fax: (86) 21-5037-2200