Embed Size (px)
Citation preview

Forensic Biology DNA SOP Manual
Forensic Analysis Division

Forensic Biology DNA SOP Manual
Forensic Analysis Division
DNA SOP Manual FAD-FB-DNA-SOP Issued By: Acting Technical Leader Issue Date: May 06, 2016 Uncontrolled When Printed Page 2 of 233
Table of Contents 1. Overview ................................................................................................................................................... 3
2. Quality Assurance ..................................................................................................................................... 8
3. Facilities ................................................................................................................................................... 16
4. Casework Processing ............................................................................................................................... 20
5. Critical Reagents...................................................................................................................................... 31
6. Equipment Quality Control and Maintenance ........................................................................................ 34
7. DNA Extraction ........................................................................................................................................ 42
8. DNA Quantification ................................................................................................................................. 66
9. DNA Amplification ................................................................................................................................... 88
10. Automated Sample Set-up for DNA Quantification and Amplification ................................................ 93
11. Genetic Analyzer Sample Preparation ................................................................................................ 128
12. Automated CE Plate Set-Up ................................................................................................................ 156
13. Analysis and Interpretation of DNA Results ........................................................................................ 171
14. Statistics .............................................................................................................................................. 207
15. Reports ................................................................................................................................................ 215
16. CODIS (Combined DNA Index System) ................................................................................................ 217
Appendix A: QIAcube Loading Chart ......................................................................................................... 231
Appendix B: Instrument Overview ............................................................................................................ 232
Forensic Biology DNA SOP Manual
Forensic Analysis Division
DNA SOP Manual FAD-FB-DNA-SOP Issued By: Acting Technical Leader Issue Date: May 06, 2016 Uncontrolled When Printed Page 3 of 233
1. Overview
1.1. The DNA Standard Operating Procedure (SOP) manual specifies procedures for DNA analyses of biological evidence for human identification. It is approved for use in the DNA section of the laboratory in conjunction with the Biology SOP. It is intended to ensure effective and efficient use of the laboratory facilities with the ultimate goal of detection, solution, and prevention of crime. In addition, it incorporates the quality assurance elements necessary to ensure the reliability and uniformity of analyses and reported conclusions.
1.2. Each approved revision of this manual is version-controlled and archived for retrieval by effective date. Only the current approved version shall be used for DNA analysis.
1.3. It is not possible to anticipate every situation that may arise or to prescribe; a specific course of action for every case; therefore, the examiner must exercise good judgment based on experience and common sense, especially when processing evidence. Any deviation from accepted protocol requires approval of the DNA Technical LeaderTechnical Leader, and must be documented in the case file.
1.4. This SOP is only one part of the policies and procedures that govern all work performed by the
DNA section. These other relevant documents include, but are not limited to, the: • Houston Forensic Science Center rules and regulations • Quality Manual • Safety Manual • Biology Section SOP • DNA Training Manual
1.5. Technical Leader 1.5.1. The Technical Leader is a full-time staff member of the laboratory and shall be accessible
to the laboratory to provide on–site, telephone, or electronic consultation as needed.
1.5.2. Minimum educational requirements: The DNA Technical Leader shall have, at a minimum, a master’s degree in a biology or forensic science-related area and successfully completed 12 semester or equivalent credit hours from a combination of undergraduate and graduate coursework covering the following subject areas: biochemistry, genetics, molecular biology, and statistics or population genetics.
1.5.2.1. The 12 semester or equivalent credit hours shall include at least one graduate-level course registering 3 or more semester or equivalent credit hours.

Forensic Biology DNA SOP Manual
Forensic Analysis Division
DNA SOP Manual FAD-FB-DNA-SOP Issued By: Acting Technical Leader Issue Date: May 06, 2016 Uncontrolled When Printed Page 4 of 233
1.5.2.2. The specific subject areas listed above shall constitute an integral component of any coursework used to demonstrate compliance with this standard.
1.5.2.3. Individuals who have completed coursework with titles other than those noted above shall demonstrate compliance through provision of pertinent materials such as a transcript, syllabus, letter from the instructor, or other document that supports the course content.
1.5.3. Minimum experience requirements: The DNA Technical Leader shall have at least three
years of forensic DNA laboratory experience obtained at a laboratory where forensic DNA testing was conducted for the identification and evaluation of biological evidence in criminal matters. Any newly appointed Technical Leader shall have a minimum of three years of human DNA experience (current or previous) as a qualified analyst on forensic samples. The DNA Technical Leader shall have previously completed or must successfully complete the FBI-sponsored auditor training within one year of appointment.
1.5.4. Responsibilities: The Technical Leader is responsible for overseeing the technical
operations of the laboratory. The Technical Leader has the authority to initiate, suspend, and resume DNA analytical operations of the laboratory or an individual. The Technical Leader works with Forensic Biology Manager, Quality Director, Forensic Analysis Division Director, and other top management concerning operations of the laboratory. The specific responsibilities of the Technical Leader include: • To evaluate and document approval of all validations and methods used by the
laboratory and propose new or modified analytical procedures to be used by analysts. • To review the academic transcripts and training records for newly qualified analysts
and approve their qualifications prior to independent casework analysis. • To approve the technical specifications for outsourcing agreements. • To review internal and external DNA audit documents and, if applicable, approve
corrective action(s) and document such review. • To review, on an annual basis, the procedures of the laboratory and document such
review. • To review and approve the training, quality assurance, and proficiency testing
programs in the laboratory. • To review and approve of all DNA analyses outsource contracts with vendor
laboratories before they are awarded. Approval of such a contract includes acceptance of ownership of the DNA data generated in analysis performed under that contract.

Forensic Biology DNA SOP Manual
Forensic Analysis Division
DNA SOP Manual FAD-FB-DNA-SOP Issued By: Acting Technical Leader Issue Date: May 06, 2016 Uncontrolled When Printed Page 5 of 233
• To review requests by contract staff members for employment by multiple NDIS participating and/or vendor laboratories, and if no potential conflict of interest exists, may approve such requests
1.5.4.1. In addition, newly appointed Technical Leaders shall be responsible for the
documented review of the following: • Validation studies and methodologies currently used by the laboratory; and • Educational qualifications and training records of currently qualified analysts.
1.5.5. Technical Leader Contingency Plan: In the event that the Technical Leader position is
vacated, an Acting Technical Leader will be appointed by top management from current Forensic Biology staff members who meet the requirements outlined above. In the event that the Technical Leader position is vacated and there are no staff members who meet the requirements and will serve as an Acting Technical Leader, the laboratory shall immediately contact the FBI and submit a contingency plan within 14 days to the FBI for its approval. Work in progress by the DNA section may be completed during this 14-day period, but new casework shall not be started until the plan is approved by the FBI.
1.6. Casework CODIS Administrator
1.6.1. The casework CODIS administrator is a staff member of the laboratory.
1.6.2. Minimum educational requirements: The casework CODIS administrator shall meet the educational requirements for a DNA analyst.
1.6.3. Minimum experience requirements: A casework CODIS administrator shall be or have
been a current or previously qualified DNA analyst, with documented mixture-interpretation training.
1.6.4. Minimum CODIS training requirements: The casework CODIS administrator shall
participate in FBI-sponsored training in CODIS software within six months of assuming CODIS casework administrator duties if the administrator had not previously attended such training. The casework CODIS administrator shall successfully complete the FBI-sponsored auditor training within one year of assuming their administrator duties if the administrator had not previously attended such training.
1.6.5. Responsibilities: The casework CODIS administrator is responsible for the following:
• Administering the laboratory’s local CODIS network. • Scheduling and documenting the CODIS computer training of casework analysts.

Forensic Biology DNA SOP Manual
Forensic Analysis Division
DNA SOP Manual FAD-FB-DNA-SOP Issued By: Acting Technical Leader Issue Date: May 06, 2016 Uncontrolled When Printed Page 6 of 233
• Ensuring that the security and quality of data stored in CODIS is in accordance with state and/or federal law and NDIS operational procedures.
• Ensuring that matches are dispositioned in accordance with NDIS operational procedures.
• The casework CODIS administrator shall be authorized to terminate an analyst’s or laboratory’s participation in CODIS until the reliability and security of the computer data can be ensured in the event an issue with the data is identified. This authority shall supersede the technical authority of the DNA Technical Leader, the Laboratory Director, and the parent agency.
1.6.5.1. The DNA section shall not upload DNA profiles to NDIS if the casework CODIS administrator position is unoccupied.
1.7. DNA Analyst
1.7.1. The DNA analyst is a staff member of the laboratory. The laboratory shall retain at least two full-time staff members who are qualified DNA analysts.
1.7.2. Minimum educational requirements: The DNA analyst shall have a bachelor’s (or its
equivalent) or an advanced degree in a biology-, chemistry-, or forensic science-related area and shall have successfully completed courses (graduate- or undergraduate-level) covering the following subject areas: biochemistry, molecular biology, and genetics as it applies to forensic DNA analysis. These specific subject areas shall be an integral component of any coursework for compliance with this Standard. Analysts shall have a minimum of three courses and nine cumulative semester hours or equivalent that covers the required subject areas. Analysts who have completed coursework with titles other than those listed above shall demonstrate compliance with QAS Standard 5.4.1 through a combination of pertinent materials, such as a transcript, syllabus, letter from the instructor, or other document that supports the course content. The analyst shall also have coursework or training in statistics and/or population genetics. The Technical Leader shall document approval of compliance.
1.7.3. Minimum experience requirements: The analyst shall have six (6) months of forensic
human DNA laboratory experience.
1.7.4. Minimum training requirements: DNA analyst training includes completion of the following prior to beginning independent casework: • Analysis of a range of samples routinely encountered in forensic casework prior to
independent work using DNA technology. • A competency test.
Forensic Biology DNA SOP Manual
Forensic Analysis Division
DNA SOP Manual FAD-FB-DNA-SOP Issued By: Acting Technical Leader Issue Date: May 06, 2016 Uncontrolled When Printed Page 7 of 233
1.7.4.1. Analysts enter into the proficiency test program within 6 months of being deemed competent on any portion of casework analysis.
1.7.4.2. Prior forensic human DNA laboratory experience and/or training may be accepted to fulfill training and experience requirements; however, a competency test must be successfully completed prior to beginning casework. Prior experience or training used to fulfill any portion of this requirement shall be documented and approved by the Technical Leader.
1.7.4.3. Because technical reviewers are also qualified DNA analysts, as outlined above, they satisfy QAS Standard 5.5, and all subcategories of QAS Standard 5.5, through the following: • Technical reviewers are staff members of the laboratory • Technical reviewers are currently qualified analysts in methodologies being
reviewed • Technical reviewers have successfully completed a competency test prior to
participating in the technical review of DNA data • Technical reviewers participate in an external proficiency testing program on the
same technology, platform, and typing amplification test kit used to generate the DNA data being reviewed.
1.8. DNA Technician 1.8.1. Staff members who have all academic qualifications for DNA analysts may serve as DNA
technicians. Technicians perform specific portions of the DNA analysis procedure, after they have been trained and deemed competent in the specific procedure, following Quality Manual and sectional training requirements.
1.8.2. Training in a specific DNA technique consists of completing only the section of the DNA analyst training program relevant to the specific procedure; however all reading assignments, practice samples, and competency testing requirements related to that specific procedure must be completed successfully and documented prior to performing the procedure on forensic casework samples. DNA technicians do not interpret DNA data, nor do they issue DNA analytical reports.
1.8.3. DNA technicians participate in proficiency testing to the extent that they perform laboratory analysis following proficiency testing requirements detailed in the Quality Manual.

Forensic Biology DNA SOP Manual
Forensic Analysis Division
DNA SOP Manual FAD-FB-DNA-SOP Issued By: Acting Technical Leader Issue Date: May 06, 2016 Uncontrolled When Printed Page 8 of 233
2. Quality Assurance
2.1. The quality manual prescribes general requirements for the quality assurance program. These requirements are based on current version of ISO/IEC 17025 General Requirements for the Competence of Testing and Calibration Laboratories. In addition to ISO/IEC 17025, the DNA section adheres to the FBI DNA Quality Assurance Standards for DNA Testing Laboratories (QAS). In order to participate in the National DNA Index System (NDIS); the DNA section complies with these QAS standards, the FBI’s NDIS Standards for Acceptance of DNA Data, and the FBI’s prescribed NDIS procedures.
2.2. Quality Control
2.2.1. Staff members keep quality control records as required by the quality manual and DNA SOP. The following controls shall be used in DNA analysis.
2.2.2. For the monitoring of analytical procedures throughout DNA analysis, the following controls and standards are used:
2.2.2.1. An extraction reagent blank is an analytical control sample with each extraction set that contains all reagents used in that extraction process but no template DNA and is used to monitor contamination from extraction to final fragment analysis • Must be extracted concurrently with its associated forensic samples • Must be subjected to the same concentration conditions as required by its
associated forensic sample(s) containing the least amount of DNA • Must be amplified using the same primers and the same instrument model as its
associated forensic samples • Must be amplified using the same concentration conditions as required by the
associated forensic sample(s) containing the least amount of DNA • Must be amplified concurrently with its associated forensic sample(s) if it is not
quantified prior to amplification • Must be typed using the same instrument model • Must be typed using the same injection conditions as required by its associated
forensic sample(s) containing the least amount of DNA 2.2.2.2. A hair shaft negative control shall be analyzed for each hair root analyzed. 2.2.2.3. Quantification standards 2.2.2.4. Quantification negative control
• A quantification negative control is an analytical control sample that is used to detect DNA contamination of the quantification reagents
• Must have an IPC value and less than 5 x 10⁻³ ng/µl of detectable DNA present. 2.2.2.5. Amplification positive controls
• An amplification positive control is an analytical control sample that is used to determine if the PCR was successful

Forensic Biology DNA SOP Manual
Forensic Analysis Division
DNA SOP Manual FAD-FB-DNA-SOP Issued By: Acting Technical Leader Issue Date: May 06, 2016 Uncontrolled When Printed Page 9 of 233
• Must be amplified and typed concurrently in the same instrument with the associated forensic samples, at all loci using the same primers
2.2.2.6. Amplification negative controls • An amplification negative control is an analytical control sample that is used to
detect DNA contamination of the amplification reagents • Must be amplified and typed concurrently in the same instrument with the
associated forensic samples, at all loci using the same primers • Must be subjected to the same injection conditions as required by its associated
forensic sample(s) containing the least amount of DNA 2.2.2.7. Allelic ladders and internal size markers
2.3. Critical reagents
2.3.1. Critical reagents are those that require testing prior to use on evidentiary samples in order to prevent unnecessary loss of sample and must include commercial DNA typing kits. These are itemized in Critical Reagents Section (Section 5) and are quality control tested using the appropriate forms. The human DNA controls, primer sets, and DNA polymerase contained within these kits must be quality control tested as part of the kit testing.
2.3.2. The critical reagent quality control log shall contain reagent quality control worksheets as
well as any necessary corrective action records pertaining to critical reagent testing. The quality control worksheet shall show reagent name(s), lot number(s), expiration date(s), quality control test instructions and evaluation criteria. If a reagent does not meet those criteria, the documentation shall be marked accordingly.
2.3.3. Reagents and supplies that have passed their expiration dates may not be used on
casework samples. Outdated reagents may be used for training purposes only and must be designated as such.
2.4. Validation
2.4.1. The DNA section does not generally develop novel methodology but, if it does, the methodology will undergo full developmental validation in compliance with all relevant standards prior to use in casework. Methodology that has undergone developmental validation elsewhere shall be internally validated in compliance with all relevant standards prior to use in casework. Substantial changes in an existing protocol shall be subjected to an appropriate internal validation evaluation, comparing it to the original procedure, to demonstrate, at a minimum, no loss of reliability, reproducibility, precision, or sensitivity.

Forensic Biology DNA SOP Manual
Forensic Analysis Division
DNA SOP Manual FAD-FB-DNA-SOP Issued By: Acting Technical Leader Issue Date: May 06, 2016 Uncontrolled When Printed Page 10 of 233
2.4.2. No new or modified method, i.e., any method not already described in the SOP, is to be used without the documented approval of the Technical Leader, Quality Director, and Forensic Analysis Division Director.
2.4.3. New software, or software with significant modifications, must be validated prior to its use
in casework.
2.5. Analysis Training 2.5.1. Please refer to the DNA Training Manual. 2.5.2. Continuing education training
2.5.2.1. Continuing education shall be conducted for enhancement of staff members’ skills. The supervisor recommends to management and coordinates training activities for personnel. As part of their continuing education, each staff member approved to perform DNA analyses shall attempt to read at least one current scientific article per month. Section management maintains records of articles that are discussed at section meetings. In addition, the Technical Leader, CODIS Administrator, and DNA analysts shall complete a minimum of eight hours of continuing education annually.
2.5.2.2. The Technical Leader and the Quality Director may identify areas for which remedial training is necessary based on the results of proficiency or competency test results, laboratory audits, or peer review activities.
2.6. Unusual samples
2.6.1. An approved staff member may use a valid procedure for analysis of a body fluid or tissue not encountered during training providing the analyst has previously demonstrated competence in that procedure. Staff members must undergo training and competency testing for extraction of bone and teeth prior to analyzing these samples.
2.7. Review of casework
2.7.1. All case files and laboratory reports must be administratively and technically reviewed prior to release from the laboratory. Reviews must follow the reviewer checklist, and a copy of the completed reviewer checklist must be included in each case file.
2.7.2. Technical reviews shall be conducted by a second DNA analyst qualified (or previously
qualified) and proficient in the DNA platform currently in use in the DNA section. The technical reviewer cannot be the author of any examination documentation within the file (record) being technically reviewed. All reviews of DNA case folders shall include a review of the following: 2.7.2.1. All case notes, worksheets, and electropherograms

Forensic Biology DNA SOP Manual
Forensic Analysis Division
DNA SOP Manual FAD-FB-DNA-SOP Issued By: Acting Technical Leader Issue Date: May 06, 2016 Uncontrolled When Printed Page 11 of 233
2.7.2.2. Raw data for the samples being used for interpretation (all electropherogram plots in the case file must match the electropherogram plots generated during the reviewer’s second read; the reviewer shall indicate agreement with the second read by initialing and dating the GeneMapper project table for each run reviewed in the case folder)
2.7.2.3. DNA types to verify they are supported by the raw or analyzed data, this includes allele calls, edits, and any manual calculations performed by the initial analyst
2.7.2.4. Profiles to verify correct inclusions and exclusions, as well as the appropriate use of “inconclusive”
2.7.2.5. All controls, internal lane standards, and allelic ladders to verify that the expected results were obtained
2.7.2.6. Statistical analysis, if applicable 2.7.2.7. The final report to verify that the results/conclusions are supported by the data as
well as to verify that each tested item is addressed 2.7.2.8. CODIS profiles are be reviewed for:
• Eligibility • Correct type • Correct specimen category
2.7.3. Technical review of cases shall be completed by a qualified analyst in the methodologies,
as defined by the QAS, used during the case. It is possible for a DNA analyst to obtain two types of competency in a methodology, performance competence and review competence. DNA analysts having obtained performance competency through the testing of samples shall be considered review competent and capable of reviewing the methodology. DNA analysts who have not obtained performance competency shall obtain review competence through training as directed by the DNA Technical Leader. This may be obtained through previous experience. Review competence allows a DNA analyst to review the methodology, but they shall not perform the methodology until performance competence is obtained.
2.7.4. Refer to the Quality Manual for further guidance on Technical and Administrative
Reviews. 2.7.5. Administrative reviews must include, at a minimum, a review of the following:
2.7.5.1. The final report for clerical errors 2.7.5.2. The final report for the presence and accuracy of the following elements:
• Case identifier • Description of the evidence examined • Description of the technology used

Forensic Biology DNA SOP Manual
Forensic Analysis Division
DNA SOP Manual FAD-FB-DNA-SOP Issued By: Acting Technical Leader Issue Date: May 06, 2016 Uncontrolled When Printed Page 12 of 233
• Inclusion of loci used for analysis • Results and/or conclusions • A qualitative or quantitative interpretive statement • Date issued • Disposition of evidence • Signature and title of the person accepting responsibility for the content of the
report 2.7.5.3. Chain of custody 2.7.5.4. Disposition of evidence
2.7.6. The analysts and reviewers should typically be able to come to agreement on all issues of
substance in the laboratory report after sufficient discussion. Disagreements of substance shall be brought to the attention of the Technical Leader, whether or not they are resolved at the analyst level. If disagreements of substance between the analysts and a reviewer cannot be resolved, the Technical Leader shall make the final determination. Should the analyst not agree with the Technical Leader, the Quality Director will be consulted.
2.8. Proficiency testing 2.8.1. Proficiency testing and review shall follow the requirements of the quality manual. In
addition, the Quality Division shall maintain a copy of the analysis documentation for each proficiency test. Proficiency tests shall be analyzed and interpreted according to standard operating procedures including technical review. Administrative review may or may not be appropriate to a given test format and is to be performed at the discretion of the DNA section. Proficiency test participants shall be notified of their final test results.
2.8.2. Analysts shall enter into a proficiency test program within 6 months of being deemed
competent on any portion of casework analysis. Proficiency testing shall include each technology to the full extent to which analysts and technicians participate in casework. It is required that if both manual and automated methods are used, the analyst must be proficiency tested in each at least once per year. However, it is recommended that the analyst performs both method types semi-annually. It is required that each technology (STRs, Y-STRs) be proficiency tested semi-annually.
2.8.3. Proficiency work is to follow as closely as possible that of normal casework. In doing so,
DNA results reported to CTS (or other approved external proficiency test provider) should not vary from DNA results included within the case file, as established by the DNA SOPs. For example, notations to distinguish major and minor components in a mixture shall be included in results submitted to the test provider, if applicable. If symbols are used in the

Forensic Biology DNA SOP Manual
Forensic Analysis Division
DNA SOP Manual FAD-FB-DNA-SOP Issued By: Acting Technical Leader Issue Date: May 06, 2016 Uncontrolled When Printed Page 13 of 233
reporting of data to the proficiency testing agency, they must be defined in the results submission form. It is also advisable to include comments in the comments section of the proficiency results form to explain unusual results. For example, when a sample subjected to a differential extraction exhibits incomplete separation via carryover from one fraction to another, the analyst must explain that the alleles in the minor component are from incomplete separation and not suspected contamination.
2.8.4. Only one proficiency results form shall be completed for proficiency tests to ensure that
only the most complete information is submitted to the proficiency testing provider in order to be included in the provider’s published external summary report when submitting by fax or mail. The screening analyst shall complete the proficiency test results form if the test does not proceed to DNA analysis; the DNA analyst shall complete the proficiency test results form if the test does proceed to DNA analysis.
2.8.5. During the case file reviews, the proficiency results form (including the screening data,
DNA data, DNA interpretations, and comments sections), along with the case file, shall be reviewed by both the technical and administrative reviewers to ensure proper transcription of results by the author of the results form.
2.8.6. If the only extraction method for which an analyst is competent in is the differential
extraction method, he/she must perform this extraction method in both proficiency tests in a given year, regardless of whether or not one of the evidence samples is found to be semen-containing. This permits him/her to be proficiency-tested in the differential extraction method semi-annually. If the analyst is competent in other extraction methods, he/she may perform the appropriate extraction method, given the screening results of the proficiency samples, as long as at least one differential is performed in a given year.
2.8.7. If performing quantification for proficiency samples, the analyst must create his/her own
DNA standards.
2.9. Audits 2.9.1. The Quality Director shall plan, arrange, and direct audits according to ISO/IEC 17025 and
QAS requirements. This audit shall be completed once each calendar year, with the intervals between FBI Quality Assurance Audits being no less than 6 months and no more than 18 months. The auditor(s) shall use both the ISO/IEC 17025 and FBI Quality Assurance Audit Documents as a checklist for compliance.
2.10. Personnel records
Forensic Biology DNA SOP Manual
Forensic Analysis Division
DNA SOP Manual FAD-FB-DNA-SOP Issued By: Acting Technical Leader Issue Date: May 06, 2016 Uncontrolled When Printed Page 14 of 233
2.10.1. The Quality Division maintains transcripts, approval memos, proficiency records, continuing education records, and testimony monitoring records for each staff member. The laboratory must maintain the competency notebook, original or copies of training records, and proficiency test files for each staff member. Original training records must be replaced with complete copies prior to separation of an analyst from the Houston Forensic Science Center. The laboratory shall maintain a transcript, approval memos, and testimony monitoring reports for each staff member.
2.11. Chemical and reagent labels
2.11.1. Purchased chemicals and reagents shall be marked on the container with the date received and/or date opened. An expiration date shall be placed on the outer container. In general, the manufacturer’s labeling should be followed to determine expiration dates of purchased chemicals and reagents. If no manufacturer information exists for a purchased reagent, it shall be considered expired 5 years from the received date.
2.11.2. The labels of reagents prepared in-house shall include the reagent name, lot number
(consisting of preparation date and preparer’s initials), and date of expiration. In general, most solutions prepared in the DNA section shall expire 1 year from the date of preparation. However, the expiration date of the overall reagent shall be no later than the expiration date of the individual reagent with the nearest expiration date. Additional information may be documented in a reagent log
2.11.3. Reagents that are subjected to quality control testing prior to use must also be marked
with the “QC date”.
2.12. Equipment 2.12.1. Equipment operation manuals shall be readily available to each staff member approved
to use the equipment. Calibration, maintenance, and repair activities shall be recorded in an equipment calibration and maintenance log, or in a logbook dedicated to that specific piece of equipment. The equipment calibration and maintenance log shall include at a minimum the date, activity, laboratory personnel performing or overseeing the activity, non-HFSC technician(s) performing or overseeing the activity, and a record of quality control checks performed to verify operation prior to returning a piece of equipment to casework use. See Section 6 (Equipment Quality Control and Maintenance) for additional information.
2.13. Contamination documentation
2.13.1. Contamination events, resolved and unresolved, shall be summarized as stated below. Document the details of the contamination event, including the cases involved, the date

Forensic Biology DNA SOP Manual
Forensic Analysis Division
DNA SOP Manual FAD-FB-DNA-SOP Issued By: Acting Technical Leader Issue Date: May 06, 2016 Uncontrolled When Printed Page 15 of 233
of detection, the investigative actions taken, the source of the contamination, if known, and any corrective actions taken.
2.13.2. Unacceptable activity in a reagent blank or negative control that cannot be readily attributed to an artifact must be investigated to determine if it is reproducible contamination. Unacceptable activity includes a pattern of data that can be differentiated from background. A single activity point may not be evidence of contamination. The Technical Leader shall have sole discretion in determining if a single point is acceptable or if it requires further processing. The first course of action is to re-inject the sample on the genetic analyzer to determine if the activity is in the amplified DNA product or if it was perhaps introduced during post-amplification sample set-up. The re-inject plate may be set up again or re-injected from the same plate. If not reproduced upon re-injection, the data from samples associated with the reagent blank or amplification negative control may be used for interpretation. If reproduced upon re-injection, the reagent blank is then re-amplified to determine if the activity is in the DNA extract or if it was introduced during the amplification set-up. If the activity is in the amplification negative control and re-produced upon re-injection the samples associated with the amplification negative control must be re-amplified. If activity in a reagent blank is not reproduced upon re-amplification, the data from samples associated with the reagent blank may be used for interpretation. If reproduced upon re-amplification, the DNA activity is determined to be in the DNA extract and all samples associated with the contaminated reagent blank must be re-extracted because the data from samples associated with that reagent blank may not be used for interpretation due to unacceptable quality controls. Activity that is resolved with re-injections shall be tracked with a contamination log. Activity that is resolved by re-amplification shall be tracked with an HFSC Incident form. Activity that is reproduced upon re-amplification shall be tracked with an HFSC Corrective Action Report form. These tracking measures are guidelines only and can be amended by the Technical Leader or HFSC Quality Division.
2.13.3. It is recommended that any steps taken to investigate potential contamination are
performed by a second technician to establish a transparent exploration.

Forensic Biology DNA SOP Manual
Forensic Analysis Division
DNA SOP Manual FAD-FB-DNA-SOP Issued By: Acting Technical Leader Issue Date: May 06, 2016 Uncontrolled When Printed Page 16 of 233
3. Facilities 3.1. Laboratory security and facility requirements are described in the quality manual. In addition
to procedures and policies in the quality manual, the following policies apply to the DNA section.
3.2. Work Areas 3.2.1. The DNA section shall have designated space for the following activities. These activities
must occur only in these designated areas: • DNA extraction - DNA extraction, purification, and concentration; microscopy may
also be performed in this area. • PCR setup - setup of real-time PCR quantification and PCR amplification reactions. A
laminar flow hood or PCR setup hood dedicated to amplification setup is recommended when manual set-ups are performed.
• Amplified DNA product - generation, analysis, and storage of amplified DNA product. 3.2.2. The extraction of known samples shall be performed at a separate time or location from
the extraction of evidentiary samples to prevent known to unknown sample contamination. Decontamination of work areas shall be performed between set-up of the evidentiary samples and set-up of the known samples.
3.2.3. The DNA extraction area and PCR setup area shall be separate from each other. This is accomplished by maintaining separate physical spaces for each task or by conducting these tasks at separate times. If conducted in the same space at separate times, the space shall be decontaminated between tasks.
3.2.4. The amplified DNA product area shall be physically separate from all other areas. Doors to the amplified product area shall remain closed at all times, except for passage. Once amplified, no samples shall leave the amplified DNA product area unless securely packaged. Equipment, reagents, and supplies in the amplified product area are dedicated and shall not be removed unless properly decontaminated through treatment with UV or thorough wiping with a decontaminant.
3.3. Contamination
3.3.1. Samples can become contaminated with DNA from the environment, from other samples during sample preparation, or from amplified DNA product from a previous amplification. Reagent blanks, negative quantification and amplification blanks, and possible substrate controls are used to detect contamination.
3.3.2. Contamination shall be suspected and investigated when a mixture is obtained in samples expected to be of one source or when a reagent blank or negative control yields peaks above the minimum analysis threshold. If possible peaks below the minimum threshold are observed in reagent blank or negative control, the Technical Leader shall determine if

Forensic Biology DNA SOP Manual
Forensic Analysis Division
DNA SOP Manual FAD-FB-DNA-SOP Issued By: Acting Technical Leader Issue Date: May 06, 2016 Uncontrolled When Printed Page 17 of 233
the event should be further investigated. In addition, contamination may be suspected and investigated under other circumstances at the discretion of the staff member, Technical Leader, or supervisor.
3.3.3. Prevention and Decontamination 3.3.3.1. The following policies are designed to prevent contamination of DNA samples:
3.3.3.1.1. To minimize the potential for contamination from staff and/or visitors, unnecessary traffic into each of the work areas should be avoided.
3.3.3.1.2. Use 10% bleach or DNAway as a decontaminant. Other commercially available decontaminants may be used if they are shown to completely inactivate DNA for the purposes of amplification. UV treatment and/or autoclaving are also acceptable for decontamination. Selection of either bleach or DNAway should take into consideration the potential caustic effects of the surface being decontaminated. For example, DNAway should be used to clean rotors of centrifuges and surfaces of the Tecan robots. Bleach is appropriate for decontaminating writing utensils and bench tops. Ethanol should be used to clean the EZ1 and Tecan instruments
3.3.3.1.3. In general, clean glassware after each use wearing gloves and an appropriate soap (e.g., Liquinox or Alconox) and water. Rinse with deionized or distilled water and allow to air-dry inverted. DNA reagent bottles require sterilization after cleaning. Autoclave or rinse with sterile water prior to use. For glassware in the amplified product area, rinse thoroughly with water after each use, with a final rinse of distilled or deionized water, and invert to air-dry.
3.3.3.1.4. Wear disposable gloves and face masks during all testing (face masks are optional in post-amplification). Change gloves frequently and whenever gloves may have become contaminated. Discard gloves when leaving a work area, except when transporting samples or reagents. Centrifuge all liquid to the bottom of closed microcentrifuge tubes before opening. A de-capper or a clean Kimwipe may be used for opening microcentrifuge tubes. Use sterile, disposable pipet tips and microcentrifuge tubes. Use aerosol-resistant pipet tips while working with any sample that may be subsequently amplified. Change pipet tips between samples. Set up reagents and tools in work space in such a way that used tips do not cross over or near stock reagents or clean tubes/wells.
3.3.3.1.5. In the DNA extraction area, clean work surfaces thoroughly with decontaminant at least at the beginning and the end of each DNA extraction session. Limit talking during sample handling.
3.3.3.1.6. In the PCR setup area, add DNA template last to the PCR setup tubes to minimize inadvertent transfer between setup tubes and stock reagents. Limit talking during sample handling. It is recommended that the lab irradiate work

Forensic Biology DNA SOP Manual
Forensic Analysis Division
DNA SOP Manual FAD-FB-DNA-SOP Issued By: Acting Technical Leader Issue Date: May 06, 2016 Uncontrolled When Printed Page 18 of 233
surfaces and equipment in the PCR setup area with ultraviolet germicidal lamps for 15-20 minutes. Surfaces not irradiated shall be treated with decontaminant. Timers for UV lights are recommended; if operated manually, wear UV protective glasses when turning UV lights on and off.
3.3.3.1.7. In the amplified DNA product area, wear a dedicated disposable lab coat when handling amplified samples. Do not wear the lab coat or gloves outside the amplified DNA product area. These lab coats shall be disposed of when necessary. Clean work surfaces thoroughly with decontaminant after use.
3.3.3.1.8. The DNA profile of each Biology section staff member is determined for all systems currently in use. The DNA profile for other staff and visitors may also be required in order to ensure the detection of contamination. All DNA profiles are be stored by the laboratory.
3.3.3.1.9. Signs may be posted to designate appropriate personal protective equipment (PPE) in certain areas. PPE shall be worn in these areas as indicated.
3.3.4. Detecting and Responding to Possible Contamination Events 3.3.4.1. Any suspected contamination incident must be immediately brought to the
attention of the Technical Leader. The Technical Leader shall define and direct the investigation and corrective action for the event. Qualifying actions shall be documented via the incident reports/correction actions policy detailed in Section 2.13.
3.3.4.2. Investigation and corrective action should be guided by the nature of the specific event and may include the following: • Compare the unknown profile to the staff/visitors database. • Compare the unknown profile to profiles from samples worked with the
contaminated sample. • Work backwards to determine where the contamination occurred:
o Re-inject the sample from the injection tray. o Re-prepare the amplified product (addition of formamide and internal lane
size standard) and re-inject. o Re-amplify and analyze the DNA extract. o Re-extract and analyze the sample (if this may be done without consuming
the sample). • Extract, amplify, and/or inject known samples (to test suspected reagents and/or
equipment). • Discard suspected buffers and prepared reagents and clean reagent bottles. • Clean and decontaminate work areas, glassware, pipets, etc.
3.4. Safety

Forensic Biology DNA SOP Manual
Forensic Analysis Division
DNA SOP Manual FAD-FB-DNA-SOP Issued By: Acting Technical Leader Issue Date: May 06, 2016 Uncontrolled When Printed Page 19 of 233
3.4.1. There are biological and chemical hazards in the laboratory. Each staff member is responsible for familiarity with the HFSC Safety Manual. Any incident or condition that occurs in or under the control of the laboratory that threatens the immediate or future health of any individual must be immediately brought to the attention of the section supervisor and laboratory safety officer. Laboratory management will define corrective action related to health and safety issues.

Forensic Biology DNA SOP Manual
Forensic Analysis Division
DNA SOP Manual FAD-FB-DNA-SOP Issued By: Acting Technical Leader Issue Date: May 06, 2016 Uncontrolled When Printed Page 20 of 233
4. Casework Processing
4.1. Analysis Methods 4.1.1. The DNA section conducts STR analysis. STR analysis using the Identifiler or Identifiler Plus
amplification multiplex produces the DNA profile at the FBI’s 13 core loci (D3S1358, vWA, FGA, D8S1179, D21S11, D18S51, D5S818, D13S317, D7S820, D16S539, TH01, TPOX, and CSF1PO), Amelogenin (a sex marker), and the D2S1338 and D19S433 loci. The section also conducts Y-STR analysis using the Yfiler PCR Amplification Kit which examines the following loci: DSY19, DYS385a/b, DYS389I/II, DYS390, DYS391, DYS392, DYS393, DYS437, DYS438, DYS439, DYS448, DYS456, DYS458, DYS635, and Y GATA H4.
4.1.2. The amount of human DNA must be quantified prior to nuclear DNA amplification.
However, when a reference sample is re-extracted for extraction/exclusion confirmation purposes it is not necessary to also re-quantify the sample. Quantification data from the initial extraction may be used for amplification since the resulting profile is not used for interpretation.
4.1.3. Samples suspected of containing semen shall be processed using a differential extraction
method.
4.1.4. Unknown or suspect profiles developed from evidence are routinely databased in CODIS for searching against other evidentiary profiles and convicted offender profiles at the state and national levels.
4.1.5. Comparisons that yield a probative match between known and questioned items are
evaluated to estimate statistical significance (see Section 14 (Statistics)).
4.2. Case Acceptance and Evaluation 4.2.1. Before a case is accepted for analysis into the DNA section, the case shall be evaluated.
The staff member completing the evaluation should be thoroughly aware of the requested examinations, the reason(s) for the requested analyses, the potential probative value of the evidence, and the quality and quantity of the evidence. Because each case is different, only guidelines can be prescribed. The case evaluation may include consultation with the investigator/prosecutor as necessary to determine what evidentiary items should be analyzed. Fully document conversations related to case evaluation and ask the customer to change analysis requests, as appropriate. A submitting agency offense report may be helpful in assessing the evidentiary material.

Forensic Biology DNA SOP Manual
Forensic Analysis Division
DNA SOP Manual FAD-FB-DNA-SOP Issued By: Acting Technical Leader Issue Date: May 06, 2016 Uncontrolled When Printed Page 21 of 233
4.2.2. If the necessary equipment or expertise is not available to comply with a valid, pertinent request, the submitting officer must be advised. If another non-HFSC laboratory is known to be capable of performing the requested analysis, consider coordinating portions of the analysis or referring the investigator/prosecutor directly to the other laboratory.
4.2.3. Both suspect and non-suspect cases are accepted. The section supervisor may evaluate
unusual submissions for acceptance on an individual basis.
4.2.4. Unused evidence should be returned to the submitting agency once analysis is complete.
4.3. Evidence Evaluation 4.3.1. Evidence is defined as any original item submitted to the laboratory for analysis, related
to a specific incident, and/or any cutting or swabbing taken from that item.
4.3.2. Work product is defined as any derivative item obtained as a result of the analysis of evidence including but not limited to: • Microscopy slides • DNA extracts • PCR amplification products
4.3.3. Before the case is worked, and in an effort to support an efficient laboratory, an
evaluation should be made to determine the quality and quantity of the evidence that is going to be analyzed initially. Emphasis should be placed on items of significant evidentiary value. Additional items/stains may be analyzed at a later date depending on case development and initial DNA analysis results. Decisions have to be made concerning the analytical approach that must be taken to obtain the most useful information. It is often helpful to consult with another qualified examiner, the Technical Leader, and/or the supervisor. Cases must be evaluated to: • Eliminate the loss of potentially valuable information. • Maximize the meaningful information obtained from the evidence. • Determine if the requested examinations can be performed with the submitted
evidence and with the available resources.
4.3.4. Some of the considerations in evaluating the evidence and deciding which items should be analyzed for DNA include: • The age of the evidence, especially when the evidence is biological material. • The storage conditions of the samples prior to submission. • Whether wet samples were dried before submission. • Whether the evidence is moldy and/or putrefied.

Forensic Biology DNA SOP Manual
Forensic Analysis Division
DNA SOP Manual FAD-FB-DNA-SOP Issued By: Acting Technical Leader Issue Date: May 06, 2016 Uncontrolled When Printed Page 22 of 233
• Possible dilution of the samples. • Whether weapons or other objects require fingerprinting or have been fingerprinted. • Whether all pertinent evidence has been submitted. • The availability of suspect, complainant, and/or elimination reference sample. • The analyses that should be run if sample is limited. • Possibility of sample remaining after analysis. • Possibility of cross-contamination.
4.4. Evidence Handling
4.4.1. Please refer to the Quality Manual for the Handling of Evidence (5.8).
4.4.2. Storage of Evidence 4.4.2.1. Biological evidence must be properly stored by the laboratory to preserve
biochemicals assayed in body fluid identifications and DNA typing for current and future analyses. Storage conditions for all types of evidence, including both evidence and work product, must be considered so that none are compromised through sample loss or deleterious change.
4.4.2.2. During the initial analysis of the case, DNA extracts may be stored refrigerated.
After a report has been issued, DNA extracts should be relocated to a freezer for long-term storage. Repeated freezing and thawing of extracts should be minimized. DNA extract tubes must be clearly labeled with the case number and item number and sealed with parafilm prior to long-term storage. DNA extracts may be stored individually with remaining evidence from that case or in “batches” that contain several items from multiple cases that went through the analysis process simultaneously. When stored as “batches”, the storage container must be clearly labeled with a unique batch number. Examination documentation must indicate to which “batch” a sample belongs so that a DNA extract may be easily located at a later time. Documentation of which box(es) the extract(s) are stored in long-term shall be on the extraction worksheet(s).
4.4.2.3. It is not necessary to maintain or store amplified product, amplification controls, or
dilutions of DNA extracts.
4.4.3. Consumption of Evidence 4.4.3.1. The evidence quality and quantity should be preserved as much as possible without
sacrificing the quality of the analyses. Whenever possible, at least half of the evidence sample shall be preserved for possible re-analysis. When this is not

Forensic Biology DNA SOP Manual
Forensic Analysis Division
DNA SOP Manual FAD-FB-DNA-SOP Issued By: Acting Technical Leader Issue Date: May 06, 2016 Uncontrolled When Printed Page 23 of 233
possible, consumption of the evidence may be necessary. Refer to the quality manual for policy and procedures on consumption of evidence.
4.4.4. Documentation 4.4.4.1. Refer to the quality manual for chain-of-custody policies and procedures,
documentation of chain-of-custody, and documentation required in all case records.
4.4.4.2. Documentation must be in such a form that another qualified analyst or supervisor, in the absence of the primary analyst, would be able to evaluate what was done and interpret the data. The reviewer of the case must be able to determine from the notes that sufficient testing, relevant testing, and correct methods of testing were used. To this end, all documentation of procedures, standards and controls used, observations made, results of tests performed, charts, graphs, photographs, sketches, electropherograms, etc. that are used to support the analyst’s conclusions must be preserved as a record. Observations, data, and calculations shall be recorded at the time they are made. The date of an in-house photograph shall be included on the photograph or associated examination documentation. Examination records shall be of a permanent nature. If a written examination record is created (or if original observations are made) on non-traditional media (for example: sticky notes, paper towels, gloves, etc.), then either the original media or an electronic scan/picture of the original media shall be retained in the case record. Once an electronic scan/picture is created, the original hardcopy may be destroyed. Examination documentation shall reflect the name and/or initials of the individual who performed the work.
4.4.4.3. Appropriately completed SOP worksheets shall be used during the analyses.
Examination documents should have notes that help in the identification of the item of evidence. A written description may suffice for some items, whereas others may need a drawing, sketch, or photograph.
4.4.4.4. If an item is submitted for immediate analysis, such as a mobile phone to be
swabbed for possible contact DNA and immediately returned to the submitting party, it is not necessary for the evidence to be sealed and it may not be possible to establish a proper seal and/or to be marked with a unique identifier. However, case record documentation must include identifying information that permits a later identification of the item handled. For example, in the absence of analyst markings on the actual item of evidence, a photograph of the mobile phone’s serial number, along with a photo of the mobile phone, enables later identification of the actual item handled.

Forensic Biology DNA SOP Manual
Forensic Analysis Division
DNA SOP Manual FAD-FB-DNA-SOP Issued By: Acting Technical Leader Issue Date: May 06, 2016 Uncontrolled When Printed Page 24 of 233
4.4.4.5. Items collected at autopsy do not always include the name of the complainant, as it
may be unknown at the time of the autopsy. If morgue evidence is received without the name of the complainant, the evidence should be described using the Medico-Legal number (ML#) and “unknown”. Alternatively, if written notice is provided by the investigator, the complainant name provided by the investigator may be used in the evidence descriptions, in conjunction with the ML#. This written notice must be maintained in the case file and may be referred to in the report.
4.4.4.6. Case records must include documentation of long-term storage of DNA extracts and
reagent blanks (i.e., storage after the completion of analysis) as well as certain quality control documentation including, but not necessarily limited to: • a copy of the standard curve quality parameters used • a copy of amplification results of any reagent blanks associated with the case, • copies of results of positive and negative amplification controls.
4.5. Naming DNA Extracts
4.5.1. Each DNA extract shall be assigned a unique identifier at the beginning of analysis. This identifier is intended to assist the analyst in tracking the extract through the analysis process. The unique identifier shall be indicated on the DNA Extract Log and any subsequent DNA analysis worksheets. Each analyst shall number his or her extracts sequentially from 1 using this format: #initialslasttwodigitsofyear. Each calendar year, every analyst shall start his or her unique identifier-naming scheme at 1. An example of a unique identifier series that was extracted in 2005 follows: 1VN05, 2VN05, 3VN05, etc. Reagent blanks shall be given a unique identifier in sequence with DNA extracts. Alternatively, a LIMS generated item identifier may also be used. LIMS item identifiers include the case #, the item #, and the portion #.
4.5.2. Samples must be marked in such a way to distinguish them throughout processing.
Extract tubes containing the final eluate must include the case # and item # unique to that sample. Labeling can be hand-written or printed (e.g., barcode label).
4.5.3. In the event a sample is re-extracted, efforts should be made to distinguish it from the
original extraction. Whether the unique identifier is LIMS-generated or not, the item # shall include the next sequential number for the portion number, so the item number is not the same. Item # 1, portion # 1 would be 1.1 during the first extraction; it would be 1.2 for the second extraction. When combining DNA extracts, case file documentation must be clear about which samples were combined and naming shall appropriately reflect the extract combination.

Forensic Biology DNA SOP Manual
Forensic Analysis Division
DNA SOP Manual FAD-FB-DNA-SOP Issued By: Acting Technical Leader Issue Date: May 06, 2016 Uncontrolled When Printed Page 25 of 233
4.5.4. When not using a LIMS identifier, extraction confirmations may be marked with the same
original item name and “EC” to distinguish it from the original extraction if it is being re-extracted by the same individual. It is also acceptable to assign a new unique identifier to the extraction confirmation.
4.5.5. In the event a sample is re-amplified, the sample shall retain its original unique identifier
and the designation “RA” shall follow. Thus, a re-amplification of sample 8CDA06 would be identified as 8CDA06RA. Additional re-amplifications of the same sample would be identified using sequential numbers starting from 2. Thus an additional re-amplification of sample 8CDA06RA would be identified as 8CDA06RA2. The sample description in LIMS can be modified to indicate a re-amplification by pressing F9 on the well to add comments, such as “RA”. Samples re-amplified using Y-STRs shall be designated with a “Y” from amplification forward and in a manner similar to the one described above when multiple Y-STR amplifications are warranted. For example, the initial Y-STR amplification of 8CDA06 would be recorded as 8CDA06Y, while its subsequent amplification would be recorded as 8CDA06Y2, and so on.
4.6. Naming Controls
4.6.1. Controls are named using this format: identifierdateinitials. Identifiers for controls are as follows: • RBQ (for questioned stains) • RBK (for known stains) • RBS (for sperm cell fractions) • RBE (for epithelial cell fractions) • RBR (for hair roots) • RBSH (for hair shafts) • POS (for PCR positive controls) • NEG (for PCR negative controls)
4.6.2. For example, the naming of controls for a differential extraction that was extracted on
May 31, 2006 and amplified on June 1, 2006 is as follows: RBS053106VN, RBE053106VN, POS060106VN, and NEG060106VN.
4.6.3. In the event that the analyst performs two extractions or amplifications on the same day,
the two events shall be distinguished (e.g., RBQ010101RDG1, RBQ010101RDG2, POS010101RDG1, POS010101RDG2, etc.).

Forensic Biology DNA SOP Manual
Forensic Analysis Division
DNA SOP Manual FAD-FB-DNA-SOP Issued By: Acting Technical Leader Issue Date: May 06, 2016 Uncontrolled When Printed Page 26 of 233
4.6.4. Alternatively, a LIMS-generated identifier that uses a unique ID # assigned to a particular worksheet may be used for all controls.
4.7. Analytical Approaches
4.7.1. Once the case has been evaluated, the staff member decides on an analytical approach. The staff member must choose a scheme of analysis using recognized, accepted, and internally validated scientific procedures designed to develop the information in a logical sequence. In general, the analysis should enable the staff member to make conclusions regarding the source of the evidence.
4.7.2. Once an approach is chosen, the analyst shall evaluate the results at each step in light of
previous results. A repeat analysis may be indicated when the first analysis has produced inconclusive results. Internal inconsistencies shall be investigated. The opinion of a second qualified staff member or the Technical Leader can be helpful when results are unclear.
4.7.3. Hair comparisons can be made using DNA characteristics or microscopic characteristics.
With any attempt to DNA type a hair root, a result is not assured and, for a hair root in the telogen phase, not expected. DNA STR hair root analysis consumes the sample but may not yield results. Therefore, the evidentiary value of the hair must be carefully evaluated and the potential loss of information weighed before proceeding with DNA analysis. Typically, an evidentiary hair should be analyzed only after a microscopic examination of the hair by a qualified trace analyst and after consultation with the investigator/prosecutor to determine: • What is the significance of the particular hair, e.g., collected by pubic combing vs. car
vacuum? • Is it permissible to destroy part of the evidence? • Are there additional details of the case that may explain the hair? • What is the condition of the hair, e.g., fragment, telogen root, etc.? What is the
likelihood of a DNA typing result? • Is it desirable to postpone DNA typing at this time? • Would mitochondrial DNA analysis by another laboratory be possible?
4.8. Casework Outsourcing
4.8.1. All outsourcing activities shall comply with quality manual policies, the FBI Quality Assurance Standards for Forensic DNA Testing Laboratories, and therefore, the following:
4.8.1.1. Vendor laboratories shall demonstrate compliance with the most current version of the Quality Assurance Standards for Forensic DNA Testing Laboratories and accreditation requirements of federal and state law.

Forensic Biology DNA SOP Manual
Forensic Analysis Division
DNA SOP Manual FAD-FB-DNA-SOP Issued By: Acting Technical Leader Issue Date: May 06, 2016 Uncontrolled When Printed Page 27 of 233
4.8.1.2. The Technical Leader shall approve technical specifications of outsourcing agreements with a vendor laboratory before contracts are awarded.
4.8.1.3. For any work that may be uploaded into or searched in CODIS, vendor laboratories shall not begin analysis of casework before the HFSC DNA section Technical Leader has accepted ownership of DNA data.
4.8.1.4. Per the QAS document, ownership occurs when any of the following criteria are applicable: • The originating laboratory will use any samples, extracts, or materials from the
vendor laboratory for the purposes of forensic testing (i.e., a vendor laboratory prepares an extract that will be analyzed by the originating laboratory);
• The originating laboratory will interpret the data generated by the vendor laboratory;
• The originating laboratory will issue a report on the results of the analysis; or • The originating laboratory will enter or search a DNA profile in CODIS from data
generated by the vendor laboratory. 4.8.1.5. An ownership review is a review of DNA records generated by a vendor laboratory
in accordance with QAS Standard 17 by the NDIS participating laboratory that accepts responsibility for and enters the DNA records into CODIS or uses the data for interpretation or comparison.
4.8.1.6. To determine whether an ownership review is required, DNA reports received from vendor laboratories shall be evaluated for the following:
4.8.1.6.1. CODIS eligibility of any DNA profiles generated • Including profile eligibility and evidence eligibility
4.8.1.6.2. Interpretational value of non-CODIS eligible profiles (i.e. profiles not suitable for CODIS but suitable for further comparison such as data foreign to the complainant)
4.8.1.7. Vendor laboratory reports containing CODIS-eligible profiles or profiles with interpretational value shall undergo an ownership review. The ownership review shall be performed by a staff member who is qualified or previously qualified in the technology, platform, and typing amplification test kit used to generate the data and participates in the laboratory’s proficiency testing program to the full extent in which he or she participates in casework and the review of the outsourced data, including the technology, platform and/or amplification test kit used by the outsourcing laboratory. This ownership review shall include, at a minimum:
4.8.1.7.1. Review of all DNA types to verify that they are supported by the raw and/or analyzed data (electropherograms or images).
4.8.1.7.2. A review of all associated controls, internal lane size standards, and allelic ladders to verify that the expected results were obtained.

Forensic Biology DNA SOP Manual
Forensic Analysis Division
DNA SOP Manual FAD-FB-DNA-SOP Issued By: Acting Technical Leader Issue Date: May 06, 2016 Uncontrolled When Printed Page 28 of 233
4.8.1.7.3. A review of the final report to verify that the results/conclusions are supported by the data. The report shall address each tested item (or its probative fractions) submitted to the vendor laboratory.
4.8.1.7.4. Verification of the DNA types, eligibility, and the correct specimen category for entry into CODIS.
4.8.1.8. A report shall be issued at the completion of the ownership review indicating which profile(s) has/have been entered into CODIS or that no items are suitable for CODIS entry.
4.8.1.9. Vendor laboratory reports containing no CODIS-eligible profiles or profiles with no interpretational value beyond comparisons already made (e.g. existing comparison to complainant) do not require an ownership review because no data is entered into CODIS. A second qualified analyst must verify that the ownership review is not required. Vendor laboratory reports not requiring an ownership review shall be forwarded to the investigating officer or submitting agency with a cover letter. Examples of a profile having no interpretational value include samples with no DNA results and samples for which DNA foreign to the complainant is not obtained.
4.8.1.10. On-site visits of vendor laboratories shall be performed as follows: 4.8.1.10.1. An initial on-site visit shall be conducted prior to the vendor laboratory’s
beginning of casework analysis. 4.8.1.10.2. The Houston Forensic Science Center (HFSC) DNA section Technical Leader, a
delegate of the Technical Leader who is a qualified or previously qualified DNA analyst in the technology, platform, and typing amplification test kit used to generate the DNA data, or another NDIS participating laboratory using the same technology, platform, and typing amplification test kit may perform the on-site visit. Alternatively, a designated FBI employee may perform the on-site visit.
4.8.1.10.3. If the outsource agreement extends beyond one year, annual on-site visits will be conducted every calendar year, at least 6 months and not more than 18 months apart. The HFSC Laboratory may accept subsequent visits by another NDIS participating laboratory using the same technology, platform, and typing amplification test kit, or a designated FBI employee.
4.8.1.10.4. The Technical Leader must document review and acceptance of on-site visits not conducted by the Technical Leader.
4.8.1.10.5. Site visits and site visit preparation may include, but not be limited to, a review or direct observation of the following:
4.8.1.10.5.1. Accreditation certificates 4.8.1.10.5.2. Recent external and internal audit reports 4.8.1.10.5.3. SOPs 4.8.1.10.5.4. Quality Manual

Forensic Biology DNA SOP Manual
Forensic Analysis Division
DNA SOP Manual FAD-FB-DNA-SOP Issued By: Acting Technical Leader Issue Date: May 06, 2016 Uncontrolled When Printed Page 29 of 233
4.8.1.10.5.5. Facilities 4.8.1.10.5.5.1. Security and controlled access 4.8.1.10.5.5.2. Contamination minimized
4.8.1.10.5.6. Validation records 4.8.1.10.5.7. Proficiency records and educational qualifications of analysts 4.8.1.10.5.8. Evidence
4.8.1.10.5.8.1. Unique identifier markings 4.8.1.10.5.8.2. Proper storage 4.8.1.10.5.8.3. Chain of custody
4.8.1.10.5.9. Case files 4.8.1.10.5.9.1. Maintenance of case notes and examination documentation that
support conclusions 4.8.1.10.5.9.2. Documentation of technical and administrative reviews
4.8.1.10.5.10. Contamination or corrective action reports 4.8.1.10.6. Should the outsource lab be an NDIS-participating laboratory that routinely
submits profiles for upload into CODIS as part of their analysis process, ownership and administrative reviews are not required by HFSC personnel upon receipt of the DNA report.
4.9. Abbreviations
4.9.1. Abbreviations common to the Forensic Biology field or found in an American English dictionary may be used in case files without definition. Additional abbreviations defined in Biology SOP Section 12 or defined below are also permissible. Any other abbreviation used must be defined on the page on which it is used.
* Possible alleles below threshold (50-99RFU) NDIS National DNA Index System Autosomal Loci:
** May be attributable to elevated stutter NR no result Amel Amelogenin
( ) Minor allele NRC II National Research Council, An Update: The Evaluation of Forensic DNA Evidence, 1996
CSF CSF1PO
[] Trace allele OL Off-ladder
^ Allele below stochastic threshold OMR Outside Marker Range D2 D2S1338
~ Allele below stochastic threshold, but suitable for RMP
PCI phenol:chloroform:isoamyl alcohol D3 D3S1358
AF alleged father PCR polymerase chain reaction D5 D5S818
AMP amplification PI paternity index D7 D7S820

Forensic Biology DNA SOP Manual
Forensic Analysis Division
DNA SOP Manual FAD-FB-DNA-SOP Issued By: Acting Technical Leader Issue Date: May 06, 2016 Uncontrolled When Printed Page 30 of 233
ASCLD/ LAB
American Society of Crime Laboratory Directors/Laboratory Accreditation Board
POS amplification positive control D8 D8S1179
BLK Black or African American PRO Profiler Plus D13 D13S317
bp base pair PK/ ProK
proteinase K D16 D16S539
C child PU Pull-up D18 D18S51
CAU Caucasian QAS The FBI Quality Assurance Standards Audit for Forensic DNA Testing Laboratories
D19 D19S433
CO COfiler QF Quantifiler D21 D21S11
CODIS Combined DNA Index System
qPCR Quantitative PCR Y-STR Loci:
CPE combined probability of exclusion QUANT quantification 19 DYS19
CPI combined paternity index or combined probability of inclusion
RB reagent blank 385 DYS385
CPU Complex pull-up RCF relative centrifugal force 389-I DYS389-I DAB DNA Advisory Board RE-AMP re-amplification 389-II DYS389-II DB digest buffer RFU relative fluorescence unit 390 DYS390
DTT dithiothreitol SDIS State DNA Index System 391 DYS391
EB Elevated baseline SDS sodium dodecyl sulfate 392 DYS392
EC Exclusion/Extraction confirmation SEB stain extraction buffer 393 DYS393
EDTA ethylenediaminetetraacetic acid SEH Southeast Hispanic 437 DYS437
EF Epithelial Fraction SF Sperm Fraction 438 DYS438
ES Elevated stutter SPEC specimen 439 DYS439
IDF/ID Identifiler® Amplification Kit STD standard 448 DYS448
IDP/ID+ Identifiler® Plus Amplification Kit
STR short tandem repeat 456 DYS456
INJ injection SWH Southwest Hispanic 458 DYS458 KBS Known buccal swabs TE Tris-HCL and EDTA buffer 635 DYS635
KSS Known saliva swabs TECH technical GATA or GATA H4
Y GATA H4
LDIS Local DNA Index System TNE Tris/NaCl/EDTA solution
M mother UNDET Undetermined
MCON Microcon YF Yfiler™ Amplification Kit

Forensic Biology DNA SOP Manual
Forensic Analysis Division
DNA SOP Manual FAD-FB-DNA-SOP Issued By: Acting Technical Leader Issue Date: May 06, 2016 Uncontrolled When Printed Page 31 of 233
5. Critical Reagents 5.1. Extraction Reagents
5.1.1. Each lot of DNA extraction reagent or DNA extraction kit must be quality control tested prior to use on casework to establish both functionality and a lack of contamination. Digestion components not received with or included in a kit but used in conjunction with a kit, such as QIAGEN MTL buffer or additional QIAGEN proteinase K, must also be quality control tested. At least one appropriate sample of known origin and one reagent blank must be incorporated into the quality control test. A sample is considered appropriate if it is similar to samples generally encountered through the use of a particular reagent (i.e., when testing DTT, a semen-containing sample must be used). All documentation generated through the quality control testing should accompany the reagent quality control form (e.g., extraction, quantification, and amplification worksheets, electropherograms, etc.) and be maintained in the laboratory. It is acceptable to quality control test multiple reagents simultaneously but unacceptable results may require individual retesting to troubleshoot appropriately. Acceptable results include results for the known sample that are concordant with previously obtained data and a reagent blank free of contaminating DNA (no activity that cannot readily be attributed to an amplification or electrophoretic artifact). Reagent blank samples must be subjected to the most sensitive volume and injection conditions possible. Questionable results must be brought to the attention of the Technical Leader immediately.
5.1.2. The following extraction reagents are considered critical reagents and must be quality
control tested prior to use on casework samples: • Sterile di water • Buffer G2 • Buffer ATL • DTT, 1M • Ethanol, denatured • EZ1 DNA Investigator Kit (QIAGEN)
o Buffer G2 o Proteinase K o Carrier RNA
• MTL Buffer • Proteinase K, 10 mg/mL • TE Buffer • TNE Buffer
5.2. Quantification Kits

Forensic Biology DNA SOP Manual
Forensic Analysis Division
DNA SOP Manual FAD-FB-DNA-SOP Issued By: Acting Technical Leader Issue Date: May 06, 2016 Uncontrolled When Printed Page 32 of 233
5.2.1. Each lot of a DNA quantification kit must be quality control tested prior to use on casework to establish both functionality and a lack of contamination. All documentation generated through the quality control testing should accompany the reagent quality control form (e.g., quantification worksheets) and be maintained in the laboratory. Questionable results must be brought to the attention of the Technical Leader immediately.
5.2.2. Acceptable results include: • The control DNA must be diluted to make a standard curve according to the procedure
outlined in the sectional SOP. This DNA must then be run in duplicate on a plate. IPC values must be obtained from all points on the curve to ensure the reagents are working correctly and the standard curve must be within acceptable ranges for slope, y-intercept, and r2 values, without having to remove more than 3 points.
• A negative control consisting of master mix and TE buffer or Dilution Buffer (whichever reagent was used to create the standards) must be run on the same plate. This negative control must have an IPC value and less than 5 x 10⁻³ ng/µl of detectable DNA present.
5.3. Amplification Kits 5.3.1. Each lot of a DNA amplification kit must be quality control tested prior to use on casework
to establish both functionality and a lack of contamination. All documentation generated through the quality control testing should accompany this form (e.g., amplification worksheets, electropherograms, etc.). Negative samples must be subjected to the most sensitive volume and injection conditions possible. Questionable results must be brought to the attention of the Technical Leader immediately.
5.3.2. Acceptable results include: • The positive control DNA must be run and the correct profile (as reported by the
manufacturer) must be obtained. • An amplification blank must be run and shown to have no detectable alleles (no
activity that cannot readily be attributed to an amplification or electrophoretic artifact).
• All reagents in the kit must be used. • The allelic ladder must be run to determine that all of the appropriate alleles are
detected.
5.4. Post-Amplification Reagents 5.4.1. Post-amplification reagents, with the exception of allelic ladders and deionized water, are
not considered critical and are tested concurrently with samples. Reagents not performing as expected must be brought to the attention of the Technical Leader. A plan for troubleshooting may be devised or a reagent may be discarded and replaced with a

Forensic Biology DNA SOP Manual
Forensic Analysis Division
DNA SOP Manual FAD-FB-DNA-SOP Issued By: Acting Technical Leader Issue Date: May 06, 2016 Uncontrolled When Printed Page 33 of 233
properly functioning equivalent. No post-amplification reagents are prepared in-house; Genetic Analyzer Buffer 10X w/ EDTA is, however, diluted with water prior to use.
5.4.2. These reagents include the following:
• GeneScan 500 Liz size standard • HiDi formamide • 3130 POP-4 Polymer • Buffer 10X w/ EDTA
Forensic Biology DNA SOP Manual
Forensic Analysis Division
DNA SOP Manual FAD-FB-DNA-SOP Issued By: Acting Technical Leader Issue Date: May 06, 2016 Uncontrolled When Printed Page 34 of 233
6. Equipment Quality Control and Maintenance
6.1. Purpose 6.1.1. In order to provide and maintain the quality of the work provided by the DNA section, it is
necessary to ensure laboratory equipment is in good working order. Routine quality control and maintenance accomplishes this. The calibration intervals listed below are generally considered to be the minimum appropriate in each case, providing that the equipment is of good quality and of proven stability and the laboratory has both the equipment capability and expertise to perform adequate internal checks. More frequent checks are not discouraged. If there is any question concerning the reliability of an instrument or piece of equipment, a maintenance check shall be performed immediately.
6.1.2. Full records must be maintained and be readily available for inspection. Documentation must include the numerical result, date of calibration, analyst’s signature, and any other relevant observations. The section manager is responsible for ensuring all systems are checked annually. Whenever practical, equipment that requires calibration shall be labeled with the date when last calibrated and the date or expiration criteria when recalibration is due.
6.1.3. The following equipment must be maintained and subjected to quality control measures: water baths, dry baths, microcentrifuges, thermometers, genetic analyzers, balances, thermal cyclers (including real-time PCR instruments), hoods, autoclaves, and robots (including extraction, qPCR/PCR, and post-amp set-up automation). Maintenance and quality controls for these instruments is detailed in the HFSC Laboratory SOP – Biology or the quality manual (balances), except for heat blocks, thermomixers, microcentrifuges, hoods, genetic analyzers, thermal cyclers, and DNA automation instruments (QIAGEN BioRobot EZ1 Advanced XLs, TECAN workstations and QIAGEN QIAcube Robotic Workstations).
6.1.4. Details for these instruments are provided below. User manuals may also be referenced for specific instruction.
6.1.5. Each additional or modified critical instrument must be subjected to a performance check prior to its use in casework. Software upgrades without significant software modifications must also be subjected to a performance check prior to its use in casework.
6.2. Equipment 6.2.1. Heat Blocks and Thermomixers
6.2.1.1. Heat blocks and thermomixers are dedicated equipment whose temperature is routinely maintained at 37-100oC for DNA procedures.
6.2.1.2. Observed Temperature 6.2.1.2.1. Observe temperature reading on the thermometer and on the display. Each
day for which a block is used on casework, a temperature must be recorded

Forensic Biology DNA SOP Manual
Forensic Analysis Division
DNA SOP Manual FAD-FB-DNA-SOP Issued By: Acting Technical Leader Issue Date: May 06, 2016 Uncontrolled When Printed Page 35 of 233
(both days should an incubation go overnight). Update the temperature log with the temperature from the block readings. Heat blocks must be within +/- 5°C of the targeted temperature. If not within the acceptable range, discontinue with use on casework samples and use the control knobs to adjust the temperature to the acceptable range, or document the correct setting needed to obtain the correct temperature. Blocks shall not be used on casework until an acceptable temperature reading is obtained. If the temperature is not stable, repair or replace the heat block or thermomixer. Please refer to the equipment manual for specific instructions on temperature adjustment and maintenance.
6.2.2. Microcentrifuges 6.2.2.1. Microcentrifuges are bench top, unrefrigerated centrifuges that have been designed
for centrifugation of 1.5 ml tubes, test tubes, and Microcon tubes. These microcentrifuges are equipped with fixed angle rotors. The maximum speed is specified in the operations manual for each centrifuge. The relative centrifugal force can be determined as outlined in the manufacturer’s instructions, if required.
6.2.2.2. The microcentrifuges shall be cleaned at least one time per year or as needed. Please consult the appropriate equipment manual for specific instructions on maintenance and operation of the microcentrifuge.
6.2.2.3. Centrifuge housing, rotor chamber, and rotor accessories must be cleaned with neutral cleaning agents (pH 7.0), such as DNAway, at least one time per year. All parts must be dry prior to use.
6.2.3. Fume and Laminar Flow Hoods 6.2.3.1. The Laminar Flow hood, when used with proper technique, is effective in reducing
the potential for exposure of both product and personnel to airborne biological agents. The laminar flow hood contains a HEPA filter.
6.2.3.2. The Fume hood, when used with proper technique, is effective in protecting personnel to exposure of chemicals.
6.2.3.3. The hood shall be re-certified at least once a year or maintenance action or at the operator’s discretion. A qualified technician must certify the cabinet.
6.2.3.4. Proper airflow may be checked periodically, as needed, by the safety specialist using a flow meter.
6.2.3.5. No analysis shall be performed on the interior of the cabinet unless the cabinet has been disinfected and expected to be biologically clean.
6.2.3.6. Hoods that have not been certified may be used for sample preparation or handling, as the contained space serves as protection for the samples from the environment.

Forensic Biology DNA SOP Manual
Forensic Analysis Division
DNA SOP Manual FAD-FB-DNA-SOP Issued By: Acting Technical Leader Issue Date: May 06, 2016 Uncontrolled When Printed Page 36 of 233
6.2.4. Genetic Analyzers 6.2.4.1. The Applied Biosystems (AB) genetic analyzer AB 3130xl is a capillary
electrophoresis instrument used to separate DNA fragments based upon size and fluorescent tags. The main parts of the instrument include the CCD camera, laser, pump block with automated polymer delivery, heat block, autosampler, and syringe(s). All of these parts must be working properly to ensure accurate and usable results are obtained. The laboratory has a planned maintenance agreement with Applied Biosystems for the preventative maintenance of these instruments. This plan allows for 1 planned-maintenance visit per year by an Applied Biosystems Field Service Engineer.
6.2.4.2. A new spectral calibration must be made once every 6 months or as needed for each instrument in the laboratory. The AB 3130xl may be run using the current array if 14 or more of the capillaries pass the spectral. If an array is used where some of the capillaries failed the spectral, a note must be attached to the 3130xl indicating which capillary in the array is bad and samples must not be injected on that capillary.
6.2.4.3. The instrument pump block and syringe must be cleaned as needed. The Wizards for the 3130xl Collection Software can be consulted for useful information on how to maintain the 3130xl.
6.2.4.4. Any repair, service, or calibration of the Genetic Analyzers shall require a performance check prior to reintroduction to casework analysis. At a minimum, the performance check shall include the injection of an allelic ladder, a positive control, and a negative control with the appropriate results.
6.2.5. Thermal Cyclers 6.2.5.1. Thermal Cyclers automate the polymerase chain reaction (PCR) for amplifying DNA.
The cycler contains a programmable heating and cooling block that performs repeated temperature cycling profiles on samples contained within the block.
6.2.5.2. The sample block and exterior surfaces shall be cleaned at least once every 6 months. Temperature calibration, temperature uniformity, and diagnostic tests must be performed once every 6 months. The cyclers have established parameters for determining pass or fail; the machine reports a pass or fail result at the end of every test. Any variations outside of established parameters shall necessitate recalibration or repair of the instrument by the manufacturer or a qualified service technician. If the cycler is damaged or not functioning, either the manufacturer or a qualified service technician may repair the instrument.
6.2.5.3. Implementation validation for new cyclers must include: 6.2.5.3.1. Temperature calibration, temperature uniformity, and diagnostic tests. 6.2.5.3.2. Amplification and analysis of the amplification kit positive control for
concordance.

Forensic Biology DNA SOP Manual
Forensic Analysis Division
DNA SOP Manual FAD-FB-DNA-SOP Issued By: Acting Technical Leader Issue Date: May 06, 2016 Uncontrolled When Printed Page 37 of 233
6.2.5.4. Any repair, service, or calibration of the Thermal Cyclers shall require a performance check prior to reintroduction to casework analysis. At a minimum, the performance check of the GeneAmp 9700 thermal cyclers shall include a passing temperature non-uniformity test, a passing calibration verification test, and a passing diagnostic test.
6.2.6. Real-time PCR Thermal Cyclers
6.2.6.1. The 7500 are specialized Thermal Cycler units used to detect amplified product in real-time. These units contain a programmable heating and cooling block, several filters, and a halogen lamp. The units are used in conjunction with quantification kits to estimate the amount of DNA in a given sample.
6.2.6.2. Each month, while in use on case work, the Function test must be performed. 6.2.6.3. Every quarter, while in use on case work, the following maintenance shall be
performed on the 7500: • Background calibration • Block cleaning per the manufacturer’s instructions, as warranted by background calibration results • Performance check post calibration (run a standard curve and negative sample) • The hard drive should be defragmented if necessary
6.2.6.4. Maintenance may be performed before its next scheduled period if there is a concern about the quality of the data.
6.2.6.5. A Region of Interest (ROI) calibration and the Pure Dye Calibration shall be performed for the instrument every 6 months.
6.2.6.6. The analyst shall change the bulb if it is determined to have burned out or weakened. Remember to always wear gloves and avoid direct contact when handling the bulb.
6.2.6.7. The following maintenance must be performed after a bulb change: 6.2.6.7.1. ROI Calibration 6.2.6.7.2. Background and Optical Calibration 6.2.6.7.3. Pure Dye Calibration 6.2.6.7.4. Performance Check
6.2.6.8. Validation of new real-time PCR thermal cyclers shall include at a minimum: 6.2.6.8.1. A precision study determining the quantity of the same DNA sample at least
two times on the same plate. Several plate runs may be used to add data points.
6.2.6.8.2. A reproducibility study using the same series of DNA samples run on at least three different plate runs
6.2.6.9. Any repair, service, or calibration of the Real-Time PCR Thermal Cyclers shall require a performance check prior to reintroduction to casework analysis. At a minimum, the performance check shall include a run with acceptable standard controls.

Forensic Biology DNA SOP Manual
Forensic Analysis Division
DNA SOP Manual FAD-FB-DNA-SOP Issued By: Acting Technical Leader Issue Date: May 06, 2016 Uncontrolled When Printed Page 38 of 233
6.2.7. DNA Automation Instruments
6.2.7.1. QIAGEN BioRobot EZ1 Advanced XLs Regular Maintenance This type of maintenance is required after each run on the EZ1 Advanced XL and must be recorded on the maintenance log. Clean the piercing unit by:
• Making sure that the sample-preparation waste is removed and discarded appropriately. • Close the EZ1 Advanced XL door. • Press “2” in the main menu to select the manual function. • Press “3” to choose the “clean” operation. • Press “Start” and the piercing unit lowers. • Open the EZ1 door and wipe the piercing unit with an alcohol wipe. The piercing unit is SHARP, so
wearing two pairs of gloves is recommended. *DO NOT USE BLEACH ON THE EZ1!* • Follow by wiping the piercing unit with a Kimwipe moistened with diH2O. • Close the EZ1 door and Press “ENT”; the piercing unit returns to its home position. • Press “ESC” to return to the main menu. • Record that the Piercing unit has been cleaned on the daily maintenance log.
Open the EZ1 door and wipe the inside down with an alcohol wipe and repeat with diH2O. *DO NOT USE BLEACH ON THE EZ1!*
U.V. the inside of the EZ1 instrument by: • At the end of a run the option for starting a U.V. decontamination appears. Make sure that the
above steps have been accomplished before starting a U.V. run. • Make sure the door is closed. • In the main menu press “1” to select the UV light function. • Use the keys “0” through “9” to set the duration of the decontamination time. A 20-30 minute
setting is sufficient. • Press “Start” to turn on the “UV” lamp. The door may not be opened until the UV lamp has been
shut off and cooled for ~3 minutes. Weekly Maintenance This shall be performed at the end of every week and recorded as being performed on the weekly maintenance log.
• At the end of every week each instrument must be shut down to cycle the instrument and then restarted before the next run the following week. The ON/OFF switch is located on the back left of each instrument. Examine the drip pans and clean as needed.

Forensic Biology DNA SOP Manual
Forensic Analysis Division
DNA SOP Manual FAD-FB-DNA-SOP Issued By: Acting Technical Leader Issue Date: May 06, 2016 Uncontrolled When Printed Page 39 of 233
Additional Maintenance This shall be performed at least twice a month (weekly if the EZ1 is running at maximum capacity) and be recorded as being performed on the maintenance log. Grease the O-rings by:
• Applying a small amount of silicon grease to the larger opening of a filter-tip with the smaller tip cut off
• Apply the silicon grease to the surface of the O-rings, located in the back portion of the instrument, by placing the top of the filter-tip with the grease onto the pipettor head, and rotate the tip on the pipettor head to distribute the grease evenly. Note: The filter-tips should sit flush against the upper white plastic bar if the O-rings are properly greased. There should not be a gap. Excess or insufficient grease can affect the performance of the EZ1 Advanced XL.
• After applying the grease, take a Kimwipe and wipe below each O-ring to remove any excess grease that has accumulated.
• Record that the O-rings have been greased on the monthly maintenance log. Annual Maintenance Preventative maintenance shall be performed once a year. Any repair, service, or calibration of the QIAGEN BioRobot EZ1 Advanced XLs shall require a performance check prior to reintroduction to casework analysis. At a minimum, the performance check shall consist of a run using a known source of DNA in each EZ1 position.
6.2.8. TECAN Freedom EVO®100 and TECAN Freedom EVO®150 Workstations 6.2.8.1. Refer to the quantification (#8), amplification (#9), and Genetic Analyzer Sample
preparation (#10) Sections for routine TECAN Freedom EVO®100 and TECAN Freedom EVO®150 Workstation maintenance. In addition to the daily and weekly maintenance, annual preventative maintenance by Tecan shall be performed.
6.2.8.2. Any repair, service, or calibration of the TECAN Freedom EVO®100 and TECAN Freedom EVO®150 Workstations shall require a performance check prior to reintroduction to casework analysis. At a minimum, for the TECAN Freedom EVO®150 Workstation, the performance check shall include a quantification set-up if the quant script is edited, an amplification set-up if the amp script is edited, and a quantification set-up for any servicing or changes that are not script-specific (e.g., z-max edits for tubes), including preventative maintenance. For the TECAN Freedom EVO®100, a CE plate must be set-up. All controls must yield acceptable results.
6.2.8.2.1. To help ensure required performance checks are conducted, the following is recommended:

Forensic Biology DNA SOP Manual
Forensic Analysis Division
DNA SOP Manual FAD-FB-DNA-SOP Issued By: Acting Technical Leader Issue Date: May 06, 2016 Uncontrolled When Printed Page 40 of 233
• Automated extraction equipment preventative maintenance should be scheduled around the same time as the TECAN preventative maintenances.
• These service calls should ideally be scheduled weeks before they are due. • A technician will be assigned to each instrument and/or vendor without
casework responsibilities during the service. This ensures there is an available escort and it removes any question as to who is responsible for the performance check.
• As soon as the service representative has completed the preventative maintenance, the technician should begin working on the performance check.
• Samples should be extracted on each extraction instrument and then be moved to the TECAN to be quanted and then amplified. The post-ampTECAN should be used to prepare the capillary electrophoresis plate.
• All generated data should be grouped together and allowing for one sign-off on multiple units.
6.2.9. QIAGEN QIAcube Robotic Workstation
Regular Maintenance - Performed after every run • Empty waste drawer contents into biohazard trash. • Remove all used lab ware from worktable and dispose into biohazard trash. • Replace lids of reagent bottles and close tightly.
Monthly Maintenance • Clean optical sensor and tip adapter with a soft lint-free cloth moistened with water. • Clean the following with DNAway:
o Worktable o Shaker rack o Lab ware tray o Heating adapter o Reagent bottle rack o Waste drawer liner o Inside and outside of QIAcube
Additional Maintenance – As needed • Clean the centrifuge rotor and buckets • Perform tightness test to check pipetting system Annual Maintenance

Forensic Biology DNA SOP Manual
Forensic Analysis Division
DNA SOP Manual FAD-FB-DNA-SOP Issued By: Acting Technical Leader Issue Date: May 06, 2016 Uncontrolled When Printed Page 41 of 233
Preventative maintenance shall be performed once a year. Any repair, service, or calibration of the QIAGEN QIAcube Robotic Workstations shall require a performance check prior to reintroduction to casework analysis. At a minimum, the performance check shall consist of a run using a known source of DNA and a reagent blank control.
6.3. Quality Check of the DNA analysis system through NIST-SRM
6.3.1. A NIST-SRM or a NIST-traceable stain must be extracted, quantified, amplified, and analyzed one time per year, or whenever substantial changes are made to a procedure, to verify the DNA section’s system of analysis as required in the QAS. This sample must type correctly by comparison with the known DNA profile. If the correct profile is not obtained from the NIST-SRM or NIST-traceable stain, the DNA Technical Leader shall be informed and the analyst shall work backwards to determine where any deficiencies in the system exist. If a deficiency in the system is identified then analysis of casework samples in the DNA section shall cease until the NIST-SRM or NIST-traceable stain can be typed correctly.

Forensic Biology DNA SOP Manual
Forensic Analysis Division
DNA SOP Manual FAD-FB-DNA-SOP Issued By: Acting Technical Leader Issue Date: May 06, 2016 Uncontrolled When Printed Page 42 of 233
7. DNA Extraction 7.1. This section details numerous procedures for the extraction of DNA from forensic evidence and
reference samples for the purpose of STR analysis. It is at the discretion of the analyst to determine which of these procedures is most useful for a particular sample. Evidentiary samples must not be extracted along-side reference samples to help avoid potential contamination between what is typically a higher level DNA sample and a lower level DNA sample. If the extraction of evidentiary and reference samples cannot be separated by time, the evidentiary sample must be handled prior to the reference sample and efforts to separate them by location should be made.
7.2. These procedures indicate recommended amounts of sample to be processed. Evidence
samples may be in limited supply. The analyst should add as much evidentiary sample to the tube as possible, up to the quantities specified in the procedure, while retaining sufficient sample for replicate analysis if possible. These amounts are recommendations and the actual amount used for any sample is up to the discretion of the analyst. Examination documentation must reflect the quantity of sample consumed during DNA extraction. Discrepancies must be noted when the amount received for extraction is not consistent with the amount retained at screening.
7.3. Swabs and cuttings should be dissected into pieces of appropriate size. Use a clean cutting
surface for each sample. Sections which are not to be analyzed immediately should be stored frozen.
7.4. When the sample is expected to be limiting, or when quantification indicates that the amount
of DNA is limiting, DNA extracts may be concentrated to as low as 15 µL, to maximize the concentration of DNA in subsequent amplifications.
7.5. Ensure sample is completely submerged prior to incubation. This may require a spin prior to
loading samples onto heat blocks. Alternatively, additional digestion reagents may be added to ensure the sample is submerged. If any additional reagents are added to a sample, the same must be done to the associated reagent blank. This must be noted on the extraction documentation.
7.6. When combining and/or concentrating DNA extracts of separate extractions to attempt a more
complete DNA profile, a witness must be present to observe the proper combination and/or transfer of DNA extracts. The examination documentation must reflect the use of a witness.
7.7. Safety

Forensic Biology DNA SOP Manual
Forensic Analysis Division
DNA SOP Manual FAD-FB-DNA-SOP Issued By: Acting Technical Leader Issue Date: May 06, 2016 Uncontrolled When Printed Page 43 of 233
7.7.1. Body fluids, tissues, and extracts may contain infective agents. Use universal precautions during evidence handling. Follow instructions for reagent preparation. Gloves must be worn during testing. Clothing may protect unbroken skin; broken skin must be covered.
7.8. Standards, Control, and Calibration
7.8.1. One reagent blank must be processed for each extraction batch as a negative control. The extraction method used must be recorded on the DNA extraction worksheet.
7.9. Sample size
7.9.1. Add one of the following to a 1.5 ml microcentrifuge tube: 7.9.2. Blood samples- stains or liquid - 1 cm2 bloodstain, 10 to 50 µl whole blood, or 2 to 10 µL
buffy coat (approximately 105 white blood cells). 7.9.3. Saliva samples- including but not limited to oral swabs, filter paper, stamps, envelope
flaps, cigarette butts, oral contact swab: 1 cm2 stain (including filter paper, stamps, and envelope flaps), 1 cm strip of paper covering end of cigarette butt, or 0.25 to 1 swab.
7.9.4. Hair samples- Approximately 1 cm of root end of hair in one tube and a separate tube for a 1 cm portion of the adjacent shaft of each hair as a control. Hairs should be gently cleaned in sterile distilled water prior to extraction.
7.9.5. Tissue samples- including but not limited to skin, muscle, and body organs. Approximately 3-5 mm2. It is helpful to mince the tissue prior to adding to digest buffer.
7.9.6. Bone and Teeth - One tooth or approximately 2 cm3 of bone (preferably flat bone in adults-i.e. pelvis, sternum, ribs). The exterior surface of each sample must be cleaned thoroughly of all debris. Bones may be sanded using a Dremel tool to remove debris. Teeth may be cleaned with sterile distilled water and bleach unless there are surface fractures in which case only sterile water is used. Bone and teeth samples are prepared by crushing them into a fine powder. This can be achieved by using a hydraulic press with a stainless steel chamber that is cleaned with bleach between each sample or by using a single-use coffee grinder. Approximately 0.5g of sample should be placed into each 1.5 ml tube (this may take several tubes).
7.9.7. Miscellaneous- including but not limited to items containing shed skin cells, sweat or other body fluids that may contain sufficient quantities of recoverable DNA. Amounts used shall be at the analysts’ discretion.
7.10. DNA Extraction - QIAGEN BioRobot EZ1 Advanced XLs
7.10.1. This procedure uses the EZ1 DNA Investigator Kit and the EZ1 Advanced XL to digest and extract DNA. This procedure uses magnetic beads, which are coated with silica and contain grooves. The silica has an affinity for nucleic acids under certain buffer and temperature conditions and the grooves increase the surface area of the beads so they hold more nucleic acids. The EZ1 Advanced XL is an automated instrument that is

Forensic Biology DNA SOP Manual
Forensic Analysis Division
DNA SOP Manual FAD-FB-DNA-SOP Issued By: Acting Technical Leader Issue Date: May 06, 2016 Uncontrolled When Printed Page 44 of 233
programmed to extract DNA from samples using the magnetic beads in the EZ1 DNA Investigator Kit. DNA is isolated from lysates in one step through its binding to the silica surface of the beads in the presence of a chaotropic salt. The beads are separated from the lysates using a magnet and the DNA is then washed and eluted.
7.10.2. Additional Safety Information
7.10.2.1. The reagent cartridges contain ethanol, guanidine hydrochloride, and guanidine thiocyanate, which are highly flammable, harmful, and irritant. The guanidine salts can form highly reactive compounds when combined with bleach.
7.10.3. Equipment, Materials, and Reagents
• Vortex • Water baths or heat blocks at ~56°C • EZ1 DNA Investigator Kit (QIAGEN), containing the following: • Reagent Cartridges • Disposable Tip Holders • Disposable Filter-Tips • Sample Tubes (2ml) • Elution Tubes (1.5ml) • Buffer G2 • Proteinase K • Carrier RNA • MTL Buffer • Sterilized water • TE Buffer • Sample tubes and spin baskets from Fitz Co.
7.10.4. General Instructions
7.10.4.1. Swabs or stains should be dissected into pieces of appropriate size. Use a clean cutting surface for each sample. Sections, which are not to be analyzed immediately, should be stored frozen.
7.10.4.2. Equilibrate samples to room temperature before use. 7.10.4.3. Carrier RNA (cRNA) must be prepared from the EZ1 DNA Investigator kit and
aliquoted prior to use. Carrier RNA comes in the kit as a 310µg solid and a solution of cRNA must be made by:
7.10.4.4. Adding 310µl of water to the tube containing cRNA (310µg) to obtain a solution of 1 µg/µl.
7.10.4.5. Dissolve the cRNA thoroughly 7.10.4.6. Divide it into single use aliquots each containing 20µl of dissolved cRNA.

Forensic Biology DNA SOP Manual
Forensic Analysis Division
DNA SOP Manual FAD-FB-DNA-SOP Issued By: Acting Technical Leader Issue Date: May 06, 2016 Uncontrolled When Printed Page 45 of 233
7.10.4.7. Label with lot # and expiration date and store frozen. The expiration date is whatever is earliest: the expiration date of the EZ1 kit or the water being used.
7.10.4.8. Buffer G2 must be diluted with sterilized water before use with the Tip Dance protocol. This is accomplished by diluting the Buffer G2 in sterilized water using a ratio of 1:1 (i.e. one volume of Buffer G2 to one volume of sterilized water). NOTE: This is done only when using the Tip Dance Protocol. The Trace and Large Volume protocols use neat Buffer G2.
7.10.4.9. Invert the reagent cartridges before loading into the EZ1 instrument to ensure that the beads are mixed up for proper performance. Note that the particles are completely resuspended.
7.10.4.10. Substrates must be removed prior to loading on the instrument in order to prevent jamming. This is performed after digestion and before loading onto the EZ1.
7.10.4.11. When using the Fitz Co. tubes, it is necessary to remove the snap tops completely from the tube before loading it onto the EZ1 instrument.
7.10.4.12. Trace Protocol should be utilized for evidence samples in which the portion of sample taken is 1 swab or less.
7.10.4.13. Tip Dance Protocol should be utilized for reference or high level DNA samples. 7.10.4.14. Large Volume Protocol should be utilized for evidence samples in which the
portion of sample taken is 2 swabs or more. If one sample in a run has to use the Large-Volume than all samples in the run need to use that same protocol.
7.10.5. Procedure
7.10.5.1. Add sample to a 1.5 ml microcentrifuge tube. Use same sample amounts/procedures found in section 7.9.
When using the Trace Protocol (Evidence samples consisting of one swab or less (or the equivalent size of another substrate)): 7.10.5.2. Lyse cells and suspend DNA:
7.10.5.2.1. Place the sample into a 1.5 ml microcentrifuge tube. 7.10.5.2.2. Add 190µl Buffer G2, 10µl Proteinase K, and 1 µl of aliquoted and thawed
cRNA. If the substrate has absorbed some or most of the reagents and is not fully submerged, proceed to the Large-Volume protocol which adds more Buffer G2.
7.10.5.2.3. Mix thoroughly by vortexing and incubate at~56°C for 6 hours to overnight, as recommended for evidence samples (more than 24 hours is not recommended).
7.10.5.2.4. Briefly spin tubes. Transfer the supernatant and substrate to a fresh 2ml Fitz Co. tube containing a basket, or the equivalent (e.g., Costar 2.0ml tubes). Centrifuge the tube 5 minutes at maximum RCF. Discard the substrate and the

Forensic Biology DNA SOP Manual
Forensic Analysis Division
DNA SOP Manual FAD-FB-DNA-SOP Issued By: Acting Technical Leader Issue Date: May 06, 2016 Uncontrolled When Printed Page 46 of 233
spin basket. If using a tube other than a Fitz Co. tube, transfer all of the liquid to an EZ1 sample tube for step 7.10.5.2.5.9.
7.10.5.2.5. EZ1 Advanced XL Setup and Run: 7.10.5.2.5.1. Make sure the Instrument is turned on. 7.10.5.2.5.2. Press “START” to start the protocol set-up. 7.10.5.2.5.3. Press “ESC” to not create a report file. 7.10.5.2.5.4. Press “1” for Trace protocol. 7.10.5.2.5.5. Choose the elution buffer and volume:
• Press “2” to elute in TE. • Press “1” to elute to a final volume of 40µl or “2” to elute to a
final volume of 50µl. A 40µl elution is appropriate in most instances.
7.10.5.2.5.6. Press “ENT” to proceed through the text shown on the display and start the worktable setup below.
7.10.5.2.5.7. Open the Instrument door. 7.10.5.2.5.8. Invert the reagent cartridges and load one cartridge per
sample into the cartridge rack, ensuring that the cartridge clicks into place.
7.10.5.2.5.9. Under an extraction hood, set-up the tip rack as follows: • Load opened elution tubes into the first row (Row 1) of the
tip rack, ensuring that the tube and flip cap are fully seated into position.
• Load the tip holders containing filter-tips into the second row (Row 2) of the tip rack.
• Load opened sample tubes containing digested samples into the back row (Row 4) of the tip rack.

Forensic Biology DNA SOP Manual
Forensic Analysis Division
DNA SOP Manual FAD-FB-DNA-SOP Issued By: Acting Technical Leader Issue Date: May 06, 2016 Uncontrolled When Printed Page 47 of 233
7.10.5.2.5.10. Place the set-up tip rack into the EZ1 instrument and close
the instrument door. 7.10.5.2.5.11. Press “START” to start the purification procedure. 7.10.5.2.5.12. When the protocol ends, open the instrument door, remove
the tip rack and, under an extraction hood, close the elution tubes. Discard the sample preparation waste in the appropriate waste container.
7.10.5.2.5.13. Proceed to step 7.10.5.4.7 below. When using the Tip Dance Protocol (Reference or high level DNA samples):
7.10.5.3. Lyse cells and suspend DNA: 7.10.5.3.1. Place the sample into a 1.5 ml microcentrifuge tube or a 2ml sample tube
from the EZ1 DNA Investigator Kit. 7.10.5.3.2. Add 290µl diluted Buffer G2 and 10µl Proteinase K to the sample. If the
substrate has absorbed some or most of the reagents and is not fully submerged, proceed to the Large-Volume protocol which adds more Buffer G2.
7.10.5.3.3. Mix thoroughly by vortexing and incubate at~56°C for at least 15 min; 6 hours to overnight is recommended for evidence samples (more than 24 hours is not recommended).
7.10.5.3.4. Briefly spin tubes. Transfer the supernatant to an EZ1 tube. 7.10.5.3.5. EZ1 Advanced XL Setup and Run:
7.10.5.3.5.1. Make sure the Instrument is turned on. 7.10.5.3.5.2. Press “START” to start the protocol set-up. 7.10.5.3.5.3. Press “ESC” to not create a report file. 7.10.5.3.5.4. Press “2” for Trace Tip Dance (TD) protocol. 7.10.5.3.5.5. Choose the elution buffer and volume:
• Press “2” to elute in TE. • Press “1” to elute to a final volume of 40µl or “2” to elute to a
final volume of 50µl. A 40µl elution is appropriate in most instances.
7.10.5.3.5.6. Press “ENT” to proceed through the text shown on the display and start the worktable setup below.
7.10.5.3.5.7. Open the Instrument door. 7.10.5.3.5.8. Invert the reagent cartridges and load one cartridge per
sample into the cartridge rack, ensuring that the cartridge clicks into place.

Forensic Biology DNA SOP Manual
Forensic Analysis Division
DNA SOP Manual FAD-FB-DNA-SOP Issued By: Acting Technical Leader Issue Date: May 06, 2016 Uncontrolled When Printed Page 48 of 233
7.10.5.3.5.9. Under an extraction hood, set-up the tip rack as follows: • Load opened elution tubes into the first row (Row 1) of the tip
rack, ensuring that the tube and flip cap are fully seated into position.
• Load the tip holders containing filter-tips into the second row (Row 2) of the tip rack.
• Load opened sample tubes containing digested samples into the back row (Row 4) of the tip rack.
7.10.5.3.5.10. Place the set-up tip rack into the EZ1 instrument and close the instrument door.
7.10.5.3.5.11. Press “START” to start the purification procedure. 7.10.5.3.5.12. When the protocol ends, open the instrument door, remove
the tip rack and, under an extraction hood, close the elution tubes. Discard the sample preparation waste in the appropriate waste container. Proceed to step 7.10.5.4.7 below.
When Using the Large-Volume Protocol (Evidence samples consisting of two or more swabs (or the equivalent size of another substrate)): 7.10.5.4. Lyse cells and suspend DNA:
7.10.5.4.1. Place the sample into a 1.5 ml microcentrifuge tube. 7.10.5.4.2. Add 490µl Buffer G2 to the sample, 10µl Proteinase K, and 1 µl of aliquoted
and thawed cRNA. Check to see if the sample has absorbed some or all of the buffer. If necessary, the sample may be divided between two tubes to ensure complete submersion and combined later with a Microcon

Forensic Biology DNA SOP Manual
Forensic Analysis Division
DNA SOP Manual FAD-FB-DNA-SOP Issued By: Acting Technical Leader Issue Date: May 06, 2016 Uncontrolled When Printed Page 49 of 233
concentration. However, the reagent blank must be subjected to the same manipulations.
7.10.5.4.3. Mix thoroughly by vortexing and incubate at~56°C for 6 hours to overnight as recommended for evidence samples (more than 24 hours is not recommended).
7.10.5.4.4. Briefly spin tubes. Transfer the supernatant and substrate to a fresh 2ml Fitz Co. tube containing a basket, or the equivalent (e.g., Costar 2.0ml tubes). Centrifuge the tube 5 minutes at maximum RCF. Discard the substrate and the spin basket. If using a tube other than a Fitz Co. tube, transfer all of the liquid to an EZ1 sample tube for step 7.10.5.4.6.9.
7.10.5.4.5. Add 400µl of MTL buffer to each sample tube. 7.10.5.4.6. EZ1 Advanced XL Setup and Run:
7.10.5.4.6.1. Make sure the instrument is turned on. 7.10.5.4.6.2. Press “START” to start the protocol set-up. 7.10.5.4.6.3. Press “ESC” to not create a report file. 7.10.5.4.6.4. Press “3” for Large-Volume protocol. 7.10.5.4.6.5. Choose the elution buffer and volume:
• Press “2” to elute in TE. • Press “1” to elute to a final volume of 40µl or “2” to elute to a final
volume of 50µl. A 40µl elution is appropriate in most instances. 7.10.5.4.6.6. Press “ENT” to proceed through the text shown on the display and
start the worktable setup below. 7.10.5.4.6.7. Open the instrument door. 7.10.5.4.6.8. Invert the reagent cartridges and load one cartridge per sample into
the cartridge rack, ensuring that the cartridge clicks into place. 7.10.5.4.6.9. Under an extraction hood, set-up the tip rack as follows:
• Load opened elution tubes into the first row (Row 1) of the tip rack, ensuring that the tube and flip cap are fully seated into position.
• Load the tip holders containing filter-tips into the second row (Row 2) of the tip rack.
• Load opened sample tubes containing digested samples into the back row (Row 4) of the tip rack.
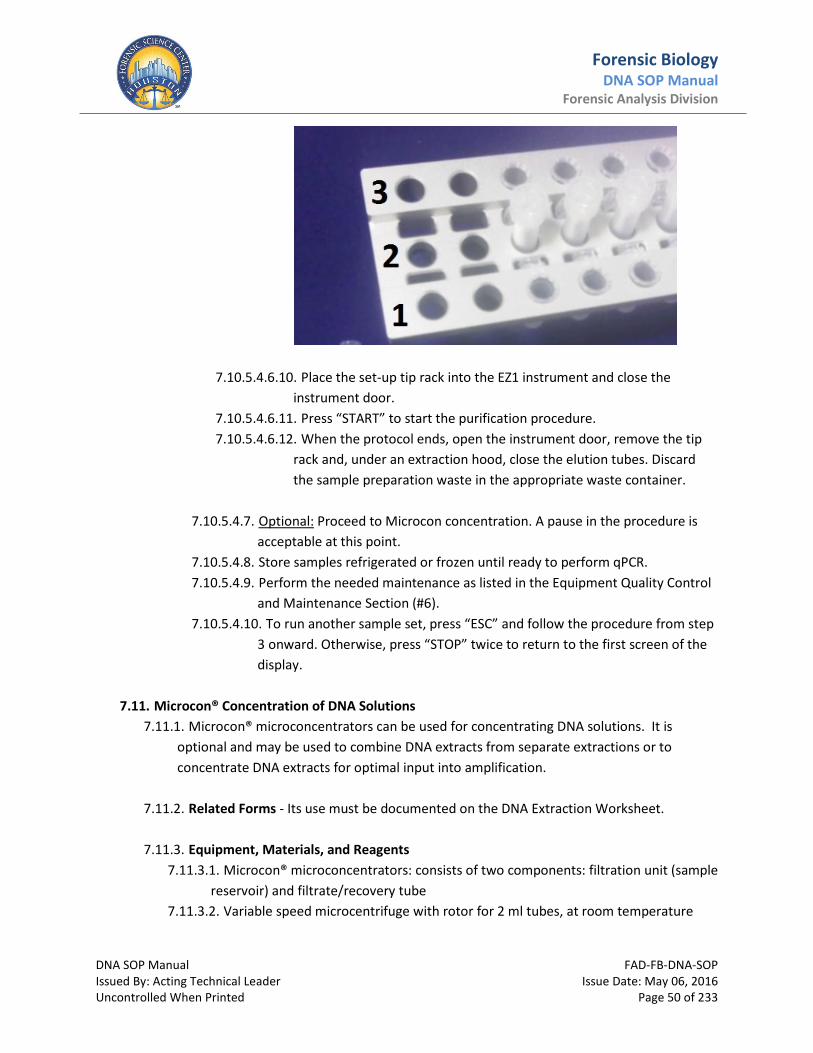
Forensic Biology DNA SOP Manual
Forensic Analysis Division
DNA SOP Manual FAD-FB-DNA-SOP Issued By: Acting Technical Leader Issue Date: May 06, 2016 Uncontrolled When Printed Page 50 of 233
7.10.5.4.6.10. Place the set-up tip rack into the EZ1 instrument and close the instrument door.
7.10.5.4.6.11. Press “START” to start the purification procedure. 7.10.5.4.6.12. When the protocol ends, open the instrument door, remove the tip
rack and, under an extraction hood, close the elution tubes. Discard the sample preparation waste in the appropriate waste container.
7.10.5.4.7. Optional: Proceed to Microcon concentration. A pause in the procedure is
acceptable at this point. 7.10.5.4.8. Store samples refrigerated or frozen until ready to perform qPCR. 7.10.5.4.9. Perform the needed maintenance as listed in the Equipment Quality Control
and Maintenance Section (#6). 7.10.5.4.10. To run another sample set, press “ESC” and follow the procedure from step
3 onward. Otherwise, press “STOP” twice to return to the first screen of the display.
7.11. Microcon® Concentration of DNA Solutions 7.11.1. Microcon® microconcentrators can be used for concentrating DNA solutions. It is
optional and may be used to combine DNA extracts from separate extractions or to concentrate DNA extracts for optimal input into amplification.
7.11.2. Related Forms - Its use must be documented on the DNA Extraction Worksheet.
7.11.3. Equipment, Materials, and Reagents
7.11.3.1. Microcon® microconcentrators: consists of two components: filtration unit (sample reservoir) and filtrate/recovery tube
7.11.3.2. Variable speed microcentrifuge with rotor for 2 ml tubes, at room temperature

Forensic Biology DNA SOP Manual
Forensic Analysis Division
DNA SOP Manual FAD-FB-DNA-SOP Issued By: Acting Technical Leader Issue Date: May 06, 2016 Uncontrolled When Printed Page 51 of 233
7.11.3.3. TE Buffer
7.11.4. General 7.11.4.1. Do not touch filtration membrane with pipet tip or other object. 7.11.4.2. Extended centrifugation can lead to dryness. If this occurs, add at least 10 µl TE
Buffer to the sample reservoir, agitate gently for 30 seconds, and then proceed with recovery.
7.11.4.3. Excessive g-force by centrifugation at >9,300 RCF may result in leakage or damage to the membrane.
7.11.4.4. The associated reagent blank sample must also be subjected to any additional manipulations, such as concentration via the Microcon® microconcentrators
7.11.5. Procedure
7.11.5.1. Using a sterile pipet tip, add up to 500 µl of sample to sample reservoir. If sample volume is less than 500 µl, add TE to bring to a final volume of approximately 500. Seal with attached cap. When combining and/or concentrating extract(s) not generated by the organic extraction method, add TE to dry filter prior to adding DNA extract(s).
7.11.5.2. Centrifuge 10-20 minutes at 500 RCF. Continue to centrifuge if an insufficient amount of filtrate has passed through filter. Discard filtrate and place Microcon back into tube.
7.11.5.3. If sample volume is greater than 500 µl, repeat above steps until all sample has been added to the Microcon.
7.11.5.4. Add 500 µl TE Buffer to sample reservoir to wash DNA and centrifuge as in step 7.14.5.2. Additional TE Buffer washes may be performed to assist in removal of pigments or other contaminants.
7.11.5.5. Invert concentrator into a fresh Microcon tube (discard old tube). It may be necessary to add TE Buffer to the filter prior to inversion.
7.11.5.6. Centrifuge inverted unit for 3 minutes at 500 RCF to recover DNA sample. Discard concentrator. Recovery volume should be 10-40 µl for samples expected to contain low levels of DNA. Samples that are expected to yield high concentrations of DNA, such as the epithelial cell fraction of a vaginal swab, may be eluted at a larger volume, such as 100 µl. The final eluate volume of the reagent blank cannot exceed the volume of any of its associated samples.
7.11.5.7. Store samples refrigerated or frozen until ready to perform qPCR.
7.12. QIAGEN QIAcube Differential Extraction using the QIAamp DNA Investigator Kit 7.12.1. To achieve the best profile results from a biological specimen, it is important to have a
DNA extraction method optimized for forensic processing. The extraction method must be

Forensic Biology DNA SOP Manual
Forensic Analysis Division
DNA SOP Manual FAD-FB-DNA-SOP Issued By: Acting Technical Leader Issue Date: May 06, 2016 Uncontrolled When Printed Page 52 of 233
able to separate DNA molecules from other cellular material and environmental debris. For sexual assault samples, the extraction process must also be able to separate sperm cells from non-sperm cells in a sample. The QIAcube workstation was designed to automate the pipetting and centrifugation steps required to separate sperm cells in sexual assault samples. The automated platform minimizes sample handling and contamination risks and provides more consistent sample to sample results.
7.12.2. The QIAcube can process up to 12 samples (11 samples + 1 reagent blank) simultaneously. Lysis of the initial sample and removal of the substrate is performed manually off-robot. The lysate is then transferred to the QIAcube for separation. The program is broken into two parts, Part A and Part B. Part A removes the epithelial fraction to a new sample tube and performs two washes of the sperm pellet. Part B performs two additional washes of the sperm pellet and then adds sperm digestion buffer to the sample. A total of 4 sperm pellet washes are performed. After separation, samples are purified on the EZ1 using the Trace protocol for the sperm fractions and the Large Volume protocol for the epithelial fractions.
7.12.3. Equipment, Materials, and Reagents • QIAcube • EZ1 Advanced XL • Vortex • Microcentrifuge • Thermomixer and/or heat block
7.12.4. Procedure 7.12.4.1. Buffer Preparation
VENDOR CATALOG # ITEM QIAGEN 19076 BUFFER ATL (200ML) QIAGEN 19112 BUFFER MTL (54ML) QIAGEN 990452 1 ML WIDE BORE TIPS QIAGEN 1014636 BUFFER G2 (260 ML) QIAGEN 19133 PRO K (10ML) QIAGEN 952034 EZ1 DNA INVESTIGATOR KIT (48) QIAGEN 990394 240 DISPOSABLE ROTOR ADAPTERS AND 240 ELUTION TUBES (1.5 ML) QIAGEN 990393 REAGENT BOTTLES QIAGEN 990382 1000 SAMPLE TUBES CB (2 ML NON-SKIRTED SCREW-TOP TUBES)
PROMEGA V1221 DNA IQ SPIN BASKETS 1M DTT

Forensic Biology DNA SOP Manual
Forensic Analysis Division
DNA SOP Manual FAD-FB-DNA-SOP Issued By: Acting Technical Leader Issue Date: May 06, 2016 Uncontrolled When Printed Page 53 of 233
7.12.4.1.1. Carrier RNA (cRNA) must be prepared from the EZ1 DNA Investigator kit and aliquoted prior to use. Carrier RNA comes in the kit as a 310µg solid and a solution of cRNA must be made by:
7.12.4.1.1.1 Adding 310µl of water to the tube containing cRNA (310µg) to obtain a solution of 1 µg/µl. 7.12.4.1.1.2 Dissolve the cRNA thoroughly 7.12.4.1.1.3 Divide it into single use aliquots each containing 20µl of dissolved cRNA. 7.12.4.1.1.4 Label with lot # and expiration date and store frozen. The expiration date is whatever is earliest: the expiration date of the EZ1 kit or the water being used.
7.11.4.1.2. Diluted Buffer ATL 7.12.4.1.2.1 Check that the salt in Buffer ATL is completely in solution (no white
clumps). If not, heat Buffer ATL until solution is clear. 7.12.4.1.2.2 Prepare enough diluted Buffer ATL for entire batch of samples by
diluting stock ATL with TE using 1/3 volume of ATL and 2/3 volume of TE buffer. 7.12.4.1.2.3 Diluted ATL buffer may be used the day it was prepared.
7.12.5. QIAcube Differential Protocol
7.12.5.1. Sample Preparation 7.12.5.1.1. Place the forensic sample in a 1.5mL tube. 7.12.5.1.2. Add 480μL Diluted Buffer ATL to the sample. 7.12.5.1.3. Add 20μL Proteinase K, and mix thoroughly by vortexing for 10
seconds. 7.12.5.1.3.1. OPTIONAL: Diluted Buffer ATL / Proteinase K master mix may be
prepared, 500ul per sample. 7.12.5.1.4. Incubate at 56°C for 2 hours at 900rpm in a thermomixer or at 56°C on
a heatblock. 7.12.5.1.5. Centrifuge the tube briefly to remove drops from inside the lid. 7.12.5.1.6. Briefly spin tubes. Place the substrate and supernatant in a spin
basket in a separate tube. Centrifuge the tube 5 minutes at maximum RCF. Discard the substrate and the spin basket.
7.12.5.1.6.1. The sample volume should be approximately 500μL. The lid hinge may be clipped prior to loading into the rotor adaptor.
7.12.5.2. Separation and Lysis 12 A 7.12.5.2.1. Use the loading chart in Appendix A to determine sample positions
based on number of samples being run.

Forensic Biology DNA SOP Manual
Forensic Analysis Division
DNA SOP Manual FAD-FB-DNA-SOP Issued By: Acting Technical Leader Issue Date: May 06, 2016 Uncontrolled When Printed Page 54 of 233
7.12.5.2.2. Add empty EZ1 2ml sample tubes to appropriate position numbers on the shaker position of the deck. Ensure tubes are seated all the way in the shaker wells.
7.12.5.2.3. These tubes must be labeled with the appropriate epithelial fraction sample names.
7.12.5.2.4. Ensure that a cap plug is located in only the positions containing sample tubes
7.12.5.2.4.1. These cap plugs tell the instrument how many samples are being processed
7.12.5.2.5. Add bottle of Buffer G2 to Position 1 of the Reagent Bottle Rack. Use the table below to add enough reagent based on the number of samples being processed.
7.12.5.2.6. Add 2 ml QIAGEN CB tube of Sperm Lysis Buffer into Tube position A. Use the table below to add enough reagents based on the number of samples being processed.
# Samples Total Volume of
Sperm Lysis Buffer (µl)
Volume of Buffer G2 (µl)
Volume of Proteinase K
(µl)
Volume of 1M DTT (µl)
Volume of cRNA (µl)
2 363 270 18 72 3 3 534 398 27 106 4 4 680 506 34 135 5 5 836 623 42 166 6 6 1007 750 50 200 7
# Samples Volume of Buffer G2 (µl) 2 6620 3 8680 4 10740 5 12800 6 14860 7 16920 8 18980 9 21040
10 23100 12 27220

Forensic Biology DNA SOP Manual
Forensic Analysis Division
DNA SOP Manual FAD-FB-DNA-SOP Issued By: Acting Technical Leader Issue Date: May 06, 2016 Uncontrolled When Printed Page 55 of 233
7 1158 863 58 230 8 8 1309 975 65 260 9 9 1485 1106 74 295 10
10 1636 1219 81 325 11 12 1973 1470 98 392 13
NOTE: The sperm lysis buffer may be prepared during “Separation and Lysis 12 A” and loaded prior to starting “Separation and Lysis 12 B”
7.12.5.2.7. Fill both tip racks with “Disposable Filter-Tips, 1000ul, wide bore” 7.12.5.2.8. Setup rotor adaptors o Load rotor adaptors on rotor adapter holder. If processing less than 12
samples, follow Appendix A loading chart for correct sample positions. o Insert 1.5ml microcentrifuge tube into position 3 of adaptor and fold lid back
into position L3 (see figure below), if the lid hinge has not already been clipped.
o Ensure 1.5 ml microcentrifuge tubes are pushed firmly to the bottom of
appropriate slots. o Transfer fully loaded rotor adaptors to corresponding centrifuge positions. o Start the “Separation and Lysis 12 A” protocol and follow the prompts to
confirm correct deck setup. o After the run is complete, the epithelial fraction is found in the 2 ml tubes on
the QIAcube shaker. These samples can be removed at this point to start purification on the EZ1 or can stay on the instrument until the “Separation and Lysis B” protocol is complete. See section 4 for purification of epithelial fraction using the EZ1.
7.12.5.2.9. Separation and Lysis 12 B
7.12.5.2.9.1. Refill tip racks with Disposable Filter-Tips (1000ul, wide bore) 7.12.5.2.9.2. If sperm lysis buffer was not added to the deck in the previous steps
add the buffer tube to position A now.

Forensic Biology DNA SOP Manual
Forensic Analysis Division
DNA SOP Manual FAD-FB-DNA-SOP Issued By: Acting Technical Leader Issue Date: May 06, 2016 Uncontrolled When Printed Page 56 of 233
7.12.5.2.9.3. Start the “Separation and Lysis 12 B” protocol and follow the prompts to confirm correct deck setup.
7.12.5.2.9.4. After the run is complete, the sperm fraction with ~200μL lysis buffer is found in the 1.5mL tubes in rotor adapter position 3. Remove tubes from rotor adaptors and close cap. Proceed to step 4 for Purification of DNA from the sperm fraction samples.
7.12.5.2.9.5. Perform regular maintenance steps.
7.12.5.2.10. DNA Purification using the EZ1 7.12.5.2.10.1. Epithelial Fraction
7.12.5.2.10.1.1. Add 400 µl of Buffer MTL and 1 µl of cRNA to each sample. 7.12.5.2.10.1.1.1. If Buffer MTL contains precipitate, heat at 70°C to
dissolve particles. 7.12.5.2.10.1.2. Extract on the EZ1 Advanced XL using the Large Volume
Protocol 7.12.5.2.10.2. Sperm Fraction
7.12.5.2.10.2.1. Incubate at 70°C for 10 minutes at 900 rpm in a thermomixer or overnight on a heatblock at 56°C.
7.12.5.2.10.2.2. Extract on the EZ1 Advanced XL using the Trace Protocol
7.13. Hamilton ID STARletDNA Extraction using the Applied Biosystems PrepFiler Kits 7.13.1. The PrepFiler® Extraction Kits contain reagents optimized for use in performing cell
lysis, binding genomic DNA to magnetic particles, removing PCR inhibitors, and eluting concentrated purified DNA. The PrepFiler® Forensic DNA Extraction Kit is designed for common forensic sample types, including body fluid stains and swabs of body fluids. The PrepFiler® BTA Forensic DNA Extraction Kit is designed for challenging forensic sample types such as adhesive-containing substrates including cigarette butts, chewing gum, and tape.
7.13.2. The Hamilton ID STARlet workstation was designed to automate Applied Biosystem’s PrepFiler chemistries. The ID STARlet contains a heater-shaker and a magnet and uses magnetic particles and a series of washes to purify DNA. The automated platform minimizes sample handling and contamination risks. The ID STARlet can process up to 96 samples simultaneously. The PrepFiler extraction programs for forensic casework samples are pre-loaded on the ID STARlet instrument and consist of the following protocols: “Standard Protocol”, “Large Protocol”, and “BTA”. Samples are added to 2 ml QIAGEN Lyse&Spin tubes and Lysis Buffer Master Mix containing PrepFiler Lysis Buffer and 1.0M DTT for Standard and Large volume lysis or PrepFiler BTA Lysis buffer, 1.0M DTT, and Proteinase K for BTA lysis is added to each tube manually. The samples are then spun in a centrifuge and spin baskets

Forensic Biology DNA SOP Manual
Forensic Analysis Division
DNA SOP Manual FAD-FB-DNA-SOP Issued By: Acting Technical Leader Issue Date: May 06, 2016 Uncontrolled When Printed Page 57 of 233
containing substrates are removed. The following is a generalized protocol describing the purification process that the ID STARlet follows once the lysate is added to the deck:
• Bind DNA – Magnetic Particles are added to each sample and mixed. Isopropanol is added to each well of the processing plate. The samples are transferred to the processing plate. The plate is moved to the heater shaker to bind DNA to the Magnetic Particles. The plate is moved to the magnet to move the Magnetic Particles to the sides of the well and the supernatant is removed. • Wash DNA – A series of washes (Wash Buffers A and B) is performed to remove any remaining inhibitors. • Elute DNA – Elution buffer is added to each well and mixed to release DNA from silica membrane.
7.13.3. Equipment, Materials, and Reagents
• Hamilton STARlet ID • Applied Biosystems PrepFiler Automated Forensic DNA Extraction Kit

Forensic Biology DNA SOP Manual
Forensic Analysis Division
DNA SOP Manual FAD-FB-DNA-SOP Issued By: Acting Technical Leader Issue Date: May 06, 2016 Uncontrolled When Printed Page 58 of 233
o Includes: PrepFiler Lysis Buffer (One 500 ml bottle) PrepFiler Magnetic Particles (Thirteen 1 ml tubes) PrepFiler Wash Buffer A Concentrate (One 500 ml bottle) PrepFiler Wash Buffer B Concentrate (One 250 ml bottle) Elution Buffer (One 200 ml bottle)
• Applied Biosystems PrepFiler BTA Forensic DNA Extraction Kit o Includes:
PrepFiler Lysis Buffer (One 35 ml bottle) PrepFiler Magnetic Particles (One 1.5 ml tube) PrepFiler BTA Lysis Buffer (One 25 ml bottle) PrepFiler Wash Buffer A Concentrate (Two 125 ml bottles) PrepFiler Wash Buffer B Concentrate (Two 30 ml bottles) PrepFiler Elution Buffer (One 12.5 ml bottle) Proteinase K (One 0.85 ml tube)
• Ethanol (95%) • Isopropanol (100%) • DL-Dithiothreitol (DTT), 1M • 2.0 ml QIAGEN Lyse&Spin Tubes • 1.5 ml microcentrifuge tubes • Reagent bottles • Hamilton Pipetting tips with filters: 1000 µl, 300 µl, and 50 µl • Eppendorf Thermomixer with 2 ml tube adaptor block • 2 ml tube centrifuge
7.13.4. PROCEDURE
7.13.4.1. Preparation of the Buffers 7.13.4.1.1. Wash Buffer A:
7.13.4.1.1.1. If using the 500 ml bottle of Wash Buffer A Concentrate: Add 740 ml of ethanol (95%) and 260 ml of Wash Buffer A Concentrate to a clean reagent bottle.
7.13.4.1.1.2. If using the 125 ml bottle of Wash Buffer A Concentrate: add 93 ml of ethanol (95%) to the bottle containing Wash Buffer A Concentrate.
7.13.4.1.1.3. Date and initial the bottle. 7.13.4.1.1.4. Diluted Wash Buffer A can be stored at room temperature (15-
25°C) until the expiration date of the buffer or six months, whichever comes first.
7.13.4.1.2. Wash Buffer B:

Forensic Biology DNA SOP Manual
Forensic Analysis Division
DNA SOP Manual FAD-FB-DNA-SOP Issued By: Acting Technical Leader Issue Date: May 06, 2016 Uncontrolled When Printed Page 59 of 233
7.13.4.1.2.1. If using the 250 ml bottle of Wash Buffer B Concentrate: Add 300 ml of ethanol (95%) and 200 ml of Wash Buffer B Concentrate to a clean reagent bottle.
7.13.4.1.2.2. If using the 30 ml bottle of Wash Buffer B Concentrate: add 19.5 ml of ethanol (95%) to the bottle containing Wash Buffer B Concentrate.
7.13.4.1.2.3. Date and initial the bottle. 7.13.4.1.2.4. Diluted Wash Buffer B can be stored at room temperature (15-
25°C) until the expiration date of the buffer or six months, whichever comes first.
7.13.4.2. LYSING SAMPLES and processing on the STARLET ID
7.13.4.2.1. Before starting setup, ensure enough reagents are prepared for the run.
7.13.4.2.1.1. Create a master mix of lysis buffer according to the following table:
Standard Protocol Large Volume Protocol BTA Protocol
Lysis Buffer DTT Lysis Buffer DTT BTA Lysis Buffer DTT Proteinase K
Volume per sample*
300 µl 3 µl 500 µl 5 µl 220 µl 3 µl 7 µl
*Add 1 or 2 to the number of samples to allow for waste, depending on batch size. 7.13.4.2.2. Retrieve sample in tube or place cutting of sample in 2 ml QIAGEN
Lyse&Spin tube. 7.17.4.2.2.1. Add the appropriate amount of lysis master mix to each sample according to the following table:
Standard Protocol Large Volume Protocol BTA Protocol
Volume per sample 300 µl 500 µl 230 µl
7.13.4.2.3. Place each sample tube in the thermomixer at 70°C and 900 rpm.
For reference samples, incubate samples for a minimum of 1 hour. For evidence samples, incubate samples for a minimum of 2 hours.
7.13.4.2.4. Remove each tube from the thermomixer and spin in centrifuge at 20,000 x g for 2 minutes. Check that all lysate has transferred from the spin basket to the bottom of the tube. If necessary, spin for an additional 2 minutes.

Forensic Biology DNA SOP Manual
Forensic Analysis Division
DNA SOP Manual FAD-FB-DNA-SOP Issued By: Acting Technical Leader Issue Date: May 06, 2016 Uncontrolled When Printed Page 60 of 233
7.13.4.2.5. Remove the spin basket from each tube. Note: For BTA protocol samples, check the volume of the lysate. If the volume is less than 180 µl, add enough BTA lysis buffer to bring the volume up to 180 µl.
7.13.4.2.5.1. ID Starlet Worktable Setup and Starting the Run 7.13.4.2.6. Add the same number of tube adaptors as there are samples to the
tube rack(s). Add samples to tube adaptors with lids open and tucked behind prongs on adaptor. Note: There should be no gaps in the carriers and there can be no extra adaptors in the carriers.
7.13.4.2.6.1. Ensure that all tubes are firmly placed all the way to bottom of rack and the lids are securely back and out of the way from tube opening.
7.13.4.2.6.2. Ensure all barcodes are aligned properly and can be read by the barcode reader.
7.13.4.2.7. Add the same number of tube adaptors as there are samples to another set of tube racks. Add elution tubes to tube adaptors with lids open and tucked behind prongs on adaptor.
7.13.4.2.7.1. Ensure that all tubes are firmly placed all the way to bottom of rack and the lids are securely back and out of the way from tube opening.
7.13.4.2.7.2. Ensure all barcodes are aligned properly and can be read by the barcode reader.
7.13.4.2.8. Ensure the STARlet is turned on. 7.13.4.2.9. Open the “Hamilton ID STARlet” program. 7.13.4.2.10. Click “Start Run”. 7.13.4.2.11. Ensure the Extraction information is filled in appropriately:
Input lab ware Tubes Output lab ware Tubes Use work list Yes Work list file (browse to file) Use barcodes Yes Protocol (choose appropriate protocol) Fill in kit lot number, kit expiration date, and user name.
7.13.4.2.12. Click “Start Run”. 7.13.4.2.13. The following message appears on the screen: If the magnetic beads
are stored at 4°C or if the tubes contain precipitate, incubate the

Forensic Biology DNA SOP Manual
Forensic Analysis Division
DNA SOP Manual FAD-FB-DNA-SOP Issued By: Acting Technical Leader Issue Date: May 06, 2016 Uncontrolled When Printed Page 61 of 233
tubes at 37°C for 30 minutes, swirl the tube gently, then centrifuge (100 rpm or less) for 2 seconds (pulse spin). This should never apply as all components of PrepFiler kit must be stored at room temperature. Click “Ok” to continue to loading step.
7.13.4.2.14. Load the samples: 7.13.4.2.14.1. Place input tube carriers in track 7-9, even if not all carriers
are being used. 7.13.4.2.14.2. Click “Ok”.
Note: If there is an error in scanning barcodes, a message appears on the screen. Ensure all barcodes are aligned properly on the tubes. Click “Repeat” and then “Execute” to rescan the barcodes.
7.13.4.2.15. Loading of High Volume Tips: 7.13.4.2.15.1. Ensure the appropriate number of 1000 µl filter tips needed
for the current run are loaded onto the tip carrier. The minimum number is displayed on the screen. Add more if necessary.
7.13.4.2.15.2. Click “Ok”. 7.13.4.2.15.3. The software remembers the position of tips leftover from
the previous run. Especially if something was changed, ensure the appropriate tips are highlighted on the screen. Do this by clicking and dragging to highlight multiple positions, clicking each position individually, or typing the number(s) into the appropriate field(s).
7.13.4.2.15.4. Click “Ok”. 7.13.4.2.16. Loading Labware onto Carrier in Track 16:
7.13.4.2.16.1. Ensure the appropriate number of 50 µl filter tips are loaded into the rack in slot 1 of the carrier. The minimum number is displayed on the screen. Add more if necessary.
7.13.4.2.16.2. Ensure the appropriate number of 300 µl filter tips are loaded into the rack in slot 2 of the carrier. The minimum number is displayed on the screen. Add more if necessary.
7.13.4.2.16.3. Load a clean processing plate (ABI Part Number 4392904) onto slot 3 of the carrier.
7.13.4.2.16.4. Place two tubes of PrepFiler Magnetic Particles into slots 5.1 and 5.2 of the carrier. The screen displays the minimum volume needed in each tube.
7.13.4.2.16.5. Click “Ok”.

Forensic Biology DNA SOP Manual
Forensic Analysis Division
DNA SOP Manual FAD-FB-DNA-SOP Issued By: Acting Technical Leader Issue Date: May 06, 2016 Uncontrolled When Printed Page 62 of 233
7.13.4.2.16.6. The software remembers the position of 50 µl tips leftover from the previous run. Especially if something was changed, ensure the appropriate tips are highlighted on the screen. Do this by clicking and dragging to highlight multiple positions, clicking each position individually, or typing the number(s) into the appropriate field(s).
7.13.4.2.16.7. Click “Ok”. 7.13.4.2.16.8. The software remembers the position of 300 µl tips leftover
from the previous run. Especially if something was changed, ensure the appropriate tips are highlighted on the screen. Do this by clicking and dragging to highlight multiple positions, clicking each position individually, or typing the number(s) into the appropriate field(s).
7.13.4.2.16.9. Click “Ok”. 7.13.4.2.17. Load Output tubes:
7.13.4.2.17.1. Place output tube carriers in slots 13-15, even if not all carriers are being used.
7.13.4.2.17.2. Click “Ok”. 7.13.4.2.18. Load Reagent Carrier (for small troughs):
7.13.4.2.18.1. Ensure a 60 ml trough is loaded into each slot of the carrier in track 22.
7.13.4.2.18.2. Add the appropriate volume of Isopropanol to the trough in slot 1 of the carrier.
7.13.4.2.18.3. Add the appropriate volume of Wash Buffer 1 (A) to the trough in slot 2 of the carrier.
7.13.4.2.18.4. Add the appropriate volume of Wash Buffer 2 (A) to the trough in slot 3 of the carrier.
7.13.4.2.18.5. Add the appropriate volume of Wash Buffer 3 (B) to the trough in slot 4 of the carrier.
7.13.4.2.18.6. Add the appropriate volume of Elution Buffer to the trough in slot 5 of the carrier.
7.13.4.2.18.7. Click “Ok”. Note: The minimum volumes necessary for the current run are displayed on the screen for each reagent.
7.13.4.2.19. Load Reagent Carrier (for large troughs): 7.13.4.2.19.1. Add 1 empty 120 ml trough to slot 3 of the carrier in track 23. 7.13.4.2.19.2. Click “Ok”.

Forensic Biology DNA SOP Manual
Forensic Analysis Division
DNA SOP Manual FAD-FB-DNA-SOP Issued By: Acting Technical Leader Issue Date: May 06, 2016 Uncontrolled When Printed Page 63 of 233
7.13.4.2.19.3. For BTA protocol only: Add the appropriate volume of Lysis Buffer to a 120 ml trough in slot 1 of the carrier. Note: Be sure to add regular Lysis Buffer, NOT BTA Lysis Buffer. The minimum volume necessary for the current run is displayed on the screen.
7.13.4.2.20. Load Labware onto Heater Shaker Carrier 7.13.4.2.20.1. Ensure the 96 well Magnetic-Ring Stand is loaded on to slot 2
of the fixed carrier (to the far right of the deck, track 24). 7.13.4.2.20.2. Load a deep well plate onto slot 3 of the fixed carrier (for
liquid waste). 7.13.4.2.20.3. Load an empty tip rack onto slot 4 of the fixed carrier. 7.13.4.2.20.4. Load a deep well plate into slot 5 of the fixed carrier
(underneath slot 4). The deck looks like this when setup is complete:
7.13.4.2.20.5. Click “Ok.” This starts the protocol. Note: The cover must be CLOSED for the protocol to start and must REMAIN closed until the protocol is finished.
7.13.4.2.21. When the protocol has finished, a message is displayed confirming the samples have been processed. Click “Ok.” The STARlet automatically unloads the carriers and finalizes the output file.
7.13.4.2.22. Cleanup worktable
Forensic Biology DNA SOP Manual
Forensic Analysis Division
DNA SOP Manual FAD-FB-DNA-SOP Issued By: Acting Technical Leader Issue Date: May 06, 2016 Uncontrolled When Printed Page 64 of 233
7.13.4.2.22.1. Remove sample tubes from rack and close caps. Samples are now ready for downstream processing.
7.13.4.2.22.2. Perform daily maintenance. 7.13.4.2.22.3. Turn off instrument.
7.13.5. Hamilton ID STARlet PrepFiler Workflow
7.13.5.1. Once the protocol is started, the following steps take place to process samples:
7.13.5.2. For BTA protocol only: PrepFiler Lysis Buffer is added to each sample. (1000 µl tips, 8 samples at a time, tips are discarded.)
7.13.5.3. Magnetic Particle resin is added to each sample. (50 µl tips, 2 samples at a time, tips are discarded.)
7.13.5.4. Isopropanol is added to each necessary well of the processing plate. (1000 µl tips, 8 samples at a time, the same tips are used for the whole plate and to transfer the first set of samples.)
7.13.5.5. Samples are transferred to the processing plate. (1000 µl tips, 8 samples at a time, tips are discarded.)
7.13.5.6. Processing plate is moved to the heater shaker for 8 minutes. 7.13.5.7. Processing plate is moved to the magnet for 8 minutes. 7.13.5.8. Supernatant (Isopropanol) is removed from each sample and discarded into
the waste trough. (1000 µl tips, 8 samples at a time, tips are discarded.) 7.13.5.9. Wash Buffer 1 is added to each sample. (1000 µl tips, 8 samples at a time, tips
are placed in the holding rack.) 7.13.5.10. Processing plate is moved to the heater shaker for 5 minutes. 7.13.5.11. Processing plate is moved to the magnet for 3 minutes. 7.13.5.12. Supernatant (Wash Buffer 1) is removed from each sample and discarded
into the waste plate. (The tips from step 7 are used, 8 samples at a time, tips are discarded.)
7.13.5.13. Wash Buffer 2 is added to each sample. (1000 µl tips, 8 samples at a time, tips are placed in the holding rack.)
7.13.5.14. Processing plate is moved to the heater shaker for 5 minutes. 7.13.5.15. Processing plate is moved to the magnet for 3 minutes. 7.13.5.16. Supernatant (Wash Buffer 2) is removed from each sample and discarded
into the waste plate. (The tips from step 12 are used, 8 samples at a time, tips are discarded.)
7.13.5.17. Wash Buffer 3 is added to each sample. (8 samples at a time, tips are placed in the holding rack.)
7.13.5.18. Processing plate is moved to the heater shaker for 5 minutes.

Forensic Biology DNA SOP Manual
Forensic Analysis Division
DNA SOP Manual FAD-FB-DNA-SOP Issued By: Acting Technical Leader Issue Date: May 06, 2016 Uncontrolled When Printed Page 65 of 233
7.13.5.19. Processing plate is moved to the magnet for 3 minutes. The heater shaker starts heating to 50°C.
7.13.5.20. Supernatant (Wash Buffer 3) is removed from each sample and discarded to waste plate. (The tips from step 16 are used, 8 samples at a time, tips are discarded.)
7.13.5.21. Processing plate is moved to the heater shaker for 10 minutes for an evaporation step.
7.13.5.22. Processing plate is moved to the magnet and Elution Buffer is added to each sample (300 µl tips, 8 samples at a time, tips are placed in the holding rack.) The heater shaker starts heating to 80°C.
7.13.5.23. Processing plate is moved to the heater shaker for 8 minutes. 7.13.5.24. Processing plate is moved to the magnet for 5 minutes. 7.13.5.25. Samples are transferred to the appropriate elution tube. (The tips from step
21 are used, 8 samples at a time, tips are discarded.) 7.13.6. Deck cleanup: Once the user clicks “Ok”, all carriers are unloaded from the deck.
References Life Technologies. User Guide: PrepFiler and PrepFiler BTA Forensic DNA Extraction Kits. Publication Part Number 4463348 Rev. C. Revised 01/2012. Houston Forensic Science Center. Internal Validation of PrepFiler® Forensic DNA Extraction Kit Using the Hamilton Microlab® ID STARlet. January 2015.

Forensic Biology DNA SOP Manual
Forensic Analysis Division
DNA SOP Manual FAD-FB-DNA-SOP Issued By: Acting Technical Leader Issue Date: May 06, 2016 Uncontrolled When Printed Page 66 of 233
8. DNA Quantification
8.1. Safety 8.1.1. Body fluids, tissues, and extracts may contain infective agents. Use universal precautions
during evidence handling. Follow instructions for reagent preparation. Gloves must be worn during testing. Clothing may protect unbroken skin; broken skin must be covered.
8.2. Instrument Overview - Fluorescence Detection
8.2.1. Detection on the Applied Biosystems 7500 Real-Time PCR System 8.2.1.1. A tungsten-halogen lamp directs light to each well on the reaction plate. The light
excites the fluorescent dyes in each well of the plate. 8.2.1.2. During the run, the CCD camera detects the fluorescence emission. 8.2.1.3. The SDS software obtains the fluorescence emission data from the CCD camera and
applies data analysis algorithms.
8.2.2. Starting the 7500 Real-Time PCR System 8.2.2.1. Overview
8.2.2.1.1. Starting the 7500 Real-Time PCR System involves: • Starting the Computer, if not already on • Powering on the Instrument • Starting the 7500 SDS Software
8.2.3. Starting the Computer
8.2.3.1. Open the laptop computer by pushing in the front center button, holding it, and lifting the lid.
8.2.3.2. Press the power button on the computer.

Forensic Biology DNA SOP Manual
Forensic Analysis Division
DNA SOP Manual FAD-FB-DNA-SOP Issued By: Acting Technical Leader Issue Date: May 06, 2016 Uncontrolled When Printed Page 67 of 233
8.2.3.3. Enter the username associated with the computer, if applicable. 8.2.3.4. If required, type the corresponding password in the password field.
NOTE: Wait for the computer to finish starting up before powering on the 7500 instrument.
8.2.4. Powering on the Instrument 8.2.4.1. Press the power button on the lower right front of the 7500 instrument. 8.2.4.2. The indicator lights on the lower left of the front panel cycle through a power on
sequence. 8.2.4.3. When the green power indicator is lit (not flashing), communication is established
between the computer and the instrument. NOTE: If the green power-on indicator is flashing or the red error indicator is lit, see the Applied Biosystems 7300/7500/7500 Fast Real-Time PCR System Installation and Maintenance Guide (PN 4347828)
8.2.5. Starting the 7500 SDS Software 8.2.5.1. Start the 7500 System Software. 8.2.5.2. The software starts and displays the word "Disconnected" in the status bar on the
bottom-right corner. The status changes to "Connected" only after the New Document Wizard is completed, the software is initialized, and the software is connected to the 7500 instrument. If the connection is successful, the software
displays in the status bar on the bottom-right corner.
8.3. Quantifiler® Duo DNA Quantification

Forensic Biology DNA SOP Manual
Forensic Analysis Division
DNA SOP Manual FAD-FB-DNA-SOP Issued By: Acting Technical Leader Issue Date: May 06, 2016 Uncontrolled When Printed Page 68 of 233
8.3.1. The Quantifiler® Duo DNA Quantification Kit (PN 4387746) is designed to simultaneously quantify the total amount of amplifiable human DNA and human male DNA in a sample. The results obtained using the kit can aid in determining: • The amount of sample to use in STR analysis applications. • The relative quantities of human male and female DNA in a sample that can assist in the selection of the applicable STR chemistry. • If PCR inhibitors are present in a sample that may require additional purification before proceeding to STR analysis.
8.3.2. The Quantifiler® Duo DNA Quantification Kit contains all the necessary reagents for the
amplification, detection, and quantification of a human-specific DNA target and a human male-specific DNA target. The reagents are designed and optimized for use with the Applied Biosystems 7500 Real-Time PCR System and SDS Software v1.2.3.
8.3.3. The DNA quantification assay combines three 5’ nuclease assays:
• A target-specific human DNA assay • A target-specific human male DNA assay • An internal PCR control (IPC) assay
8.3.4. Equipment, Materials, and Reagents
• Quantifiler® Duo DNA Quantification Kit (Part # 4387746) • Vortex • Centrifuge for microtube pulse spins • AB7500 thermocycler, computer, and data collection and analysis software • Computer with “QuantifilerHumanImport” Excel template • 96-well Optical Reaction Plates (AB part # 4306737) • Optical Adhesive Covers (AB part # 4311971) • Centrifuge with plate adaptor • MicroAmp Splash Free Support Base (AB part # 4312063)
8.3.5. Standards, Controls, and Calibration
8.3.5.1. Human DNA standards ranging from 0.023 to 50 ng/µl must be run in duplicate in each plate, to estimate the concentration of human DNA. At least one quantification blank consisting of 23 µl of master mix and 2 µl Dilution Buffer shall be run in one well of each plate as a negative quantification control.
8.3.6. Kit Contents and Storage
8.3.6.1. Each Quantifiler® Duo DNA Quantification Kit contains materials sufficient to perform 400 reactions at a 25-μL reaction volume. Store the entire kit at −15 °C to

Forensic Biology DNA SOP Manual
Forensic Analysis Division
DNA SOP Manual FAD-FB-DNA-SOP Issued By: Acting Technical Leader Issue Date: May 06, 2016 Uncontrolled When Printed Page 69 of 233
−25 °C upon receipt. Store the kit at 2°C to 8°C after first thaw, as described in Table 1-2.
Table 1-2 NOTE: Keep Primer Mix and PCR Reaction Mix protected from direct exposure to light. Excessive exposure to light may affect the fluorescent probes and/or the passive reference dye.
8.3.7. Reaction and Plate Setup Procedure 8.3.7.1. Allow the Quantifiler® Duo kit components to thaw to room temperature. Mix the
Primer Mix by brief vortexing followed by a short centrifuge. Swirl the Quantifiler® Duo PCR Reaction Mix gently before using it. DO NOT VORTEX IT.
8.3.7.2. Make a set of positive standards as described in the following section (entitled "Preparing the DNA Quantification Standards").
8.3.7.3. Prepare a Master Mix consisting of the following reagents and volumes:
Component Volume Per Reaction (µL)

Forensic Biology DNA SOP Manual
Forensic Analysis Division
DNA SOP Manual FAD-FB-DNA-SOP Issued By: Acting Technical Leader Issue Date: May 06, 2016 Uncontrolled When Printed Page 70 of 233
Quantifiler® Duo Primer Mix 11.5
Quantifiler® Duo PCR Reaction Mix 13.8
8.3.7.4. Vortex the Master Mix for 3 to 5 seconds, then briefly centrifuge the tube. 8.3.7.5. Dispense 23 µL of the Master Mix into each reaction well. 8.3.7.6. Add 2 µL of each sample, standard, or control (Dilution Buffer for negative control)
into the applicable wells. 8.3.7.7. Seal the reaction plate with the adhesive cover. 8.3.7.8. Centrifuge the plate at ~1000 rpm for about 20 seconds in a tabletop centrifuge
with plate holders to remove any bubbles. 8.3.7.9. Load the plate into the plate holder of the 7500. Ensure that the plate is correctly
aligned in the holder. 8.3.7.10. Push the tray door to open it.
8.3.7.11. Insert the plate into the plate holder.

Forensic Biology DNA SOP Manual
Forensic Analysis Division
DNA SOP Manual FAD-FB-DNA-SOP Issued By: Acting Technical Leader Issue Date: May 06, 2016 Uncontrolled When Printed Page 71 of 233
8.3.7.12. Load standard 96-well plates with the notched A12 position at the top-right of the tray.
8.3.7.13. Close the tray door.
8.3.8. Preparing the DNA Quantification Standards
8.3.8.1. Make a standard curve dilution series consisting of:
Standard ng/µL
1 50
2 16.7
3 5.56
4 1.85
5 0.62
6 0.21

Forensic Biology DNA SOP Manual
Forensic Analysis Division
DNA SOP Manual FAD-FB-DNA-SOP Issued By: Acting Technical Leader Issue Date: May 06, 2016 Uncontrolled When Printed Page 72 of 233
7 0.068
8 0.023
8.3.8.2. To create this series of standards, perform the following tasks: 8.3.8.2.1. Label eight microcentrifuge tubes A, B, C, D, E, F, G, and H. 8.3.8.2.2. Dispense 30 µL of Quantifiler® Duo DNA Dilution buffer into microcentrifuge
tube A. 8.3.8.2.3. Dispense 20 µL of Quantifiler® Duo DNA Dilution buffer into the other seven
microcentrifuge tubes. 8.3.8.2.4. Prepare Standard A:
8.3.8.2.4.1. Vortex the Quantifiler® Duo DNA Standard 3 to 5 seconds. 8.3.8.2.4.2. Using a new pipette tip, add 10 µL of Quantifiler® Duo DNA Standard to
the tube for Standard A. 8.3.8.2.4.3. Mix the dilution thoroughly
8.3.8.2.5. Prepare Standards B through H: 8.3.8.2.5.1. Using a new pipette tip, add 10 µL of the prepared standard to the tube
for the next standard (e.g. 10 µL of Standard A into the tube for Standard B; the resulting mixture contains 10 µL of the previous standard and 20 µL of Quantifiler® Duo DNA Dilution buffer).
8.3.8.2.5.2. Mix the dilution thoroughly. 8.3.8.2.5.3. Repeat the above steps until the dilution series is complete.
NOTE: Any unused standard can be labeled with the analyst's initials and date of creation (e.g. ABC010101) and stored at 2°C to 8°C for up to two weeks.
8.3.9. Assigning Sample Name and Task, and Quantity to Standards, Unknown Samples, and Non-template Controls
8.3.9.1. (Using the Excel Macro) 8.3.9.1.1. Create the 7500 Import file. 8.3.9.1.2. One method of creating the import file:
8.3.9.1.2.1. Open the "QuantifilerDuoImport" template (an Excel spreadsheet). 8.3.9.1.2.2. Select "Sample Sheet Entry Form" tab and type samples into the sample
sheet. Ensure each standard is present and in duplicate. Print the file for documentation in the case file(s).

Forensic Biology DNA SOP Manual
Forensic Analysis Division
DNA SOP Manual FAD-FB-DNA-SOP Issued By: Acting Technical Leader Issue Date: May 06, 2016 Uncontrolled When Printed Page 73 of 233
8.3.9.1.2.3. After samples have been entered into the Sample Sheet Entry Form, select “Duo Import” tab.
8.3.9.1.2.4. Next click File > Save As… Change “Save as Type:” to “Text (Tab delimited)”.
8.3.9.1.2.5. The file may be saved to a flash drive for transport to the 7500 computer. Alternatively, the file may be saved to the appropriate location on the network (e.g., \BiologyInstruments\TECAN\7500 Import .TXT).
8.3.9.1.2.6. Enter the correct location and file name and click Save. Select OK on the first popup menu to save only the active sheet. Select OK on the second popup menu to keep the current format.
8.3.9.1.2.7. Close Excel without saving changes.
8.3.10. Importing 7500Import file to SDS Software 8.3.10.1. In the Plate Setup tab, import the text file (e.g., click File > Import Sample Setup
and select the 7500Import.txt file from the flash drive or other location of saved text file). Verify sample names and well locations once again and make any appropriate corrections.
8.3.11. Import File and Worksheet Procedure
8.3.11.1. The DNA SOPs provide instruction on creating the quantification worksheet and subsequent file to be exported to the 7500. LIMS can generate the appropriate worksheet, create an export file to be transferred to the 7500, and has the ability to import data back from the 7500, for subsequent amplification worksheet generation. It is acceptable that 7500 worksheets and export files are generated using the instructions provided in the current SOPs or through the use of LIMS.

Forensic Biology DNA SOP Manual
Forensic Analysis Division
DNA SOP Manual FAD-FB-DNA-SOP Issued By: Acting Technical Leader Issue Date: May 06, 2016 Uncontrolled When Printed Page 74 of 233
8.3.12. Setting Thermal Cycler Conditions
8.3.12.1. In the plate document, select the Instrument tab. 8.3.12.2. Change the sample volume to 25 (µL) if it is set to 50 (µL) and select the 9600
Emulation box. NOTE: Selecting the 9600 Emulation box reduces the ramp rate.
8.3.12.3. Assure that the thermal conditions are as follows:
• 50°C for 2 minutes • 95°C for 10 minutes • 40 cycles of:
o 95°C for 15 seconds o 60°C for 1 minute
8.3.12.4. Save the plate document and start the run as described in the following section.
8.3.13. Saving the Plate Document and Starting the Run 8.3.13.1. Save the file. For example:
8.3.13.1.1. e.g., Select File > Save. 8.3.13.1.2. Select the location for the plate document. 8.3.13.1.3. Enter a file name (using the analyst’s initials and date, e.g. abc010101). 8.3.13.1.4. For Save as type, select SDS Document (*.sds)
8.3.13.2. Click Save then Start to start the run.
8.3.14. Data Analysis and Results 8.3.14.1. To analyze a run after it is complete, complete the following steps:
8.3.14.1.1. Launch the 7500 SDS software 8.3.14.1.2. Click File > Open

Forensic Biology DNA SOP Manual
Forensic Analysis Division
DNA SOP Manual FAD-FB-DNA-SOP Issued By: Acting Technical Leader Issue Date: May 06, 2016 Uncontrolled When Printed Page 75 of 233
8.3.14.1.3. Navigate the dialog box to find the run file and click Open (or double-click the run file)
8.3.14.1.4. Alternatively, you can double-click the run file and the software launch. 8.3.14.1.5. Optional: Verify the analysis settings:
8.3.14.1.5.1. On the menu bar, select Analysis > Analysis Settings to open the Analysis Settings dialog box.
8.3.14.1.5.2. Verify that the settings are as shown below, then click OK.
IMPORTANT! If the analysis settings differ from those shown here, change them to match the settings, then click OK. IMPORTANT! Omit the unused wells by selecting the wells and pressing Ctrl-M or by clicking View > Well Inspector (or Ctrl-double click) and selecting the box for "Omit well." Close the Well Inspector dialog box when done.
8.3.14.1.6. On the menu bar, select Analysis > Analyze. NOTE: For routine analysis that doesn't require any change in the analysis settings, click the green arrow on the system software tool bar and ignore step 5.
8.3.15. Examining the Standard Curve
8.3.15.1. In the Results tab, click the Standard Curve tab. 8.3.15.2. In the detector drop-down list, select the applicable detector:
• Duo Human or • Duo Male
8.3.15.3. When verifying the results of the standard curve:

Forensic Biology DNA SOP Manual
Forensic Analysis Division
DNA SOP Manual FAD-FB-DNA-SOP Issued By: Acting Technical Leader Issue Date: May 06, 2016 Uncontrolled When Printed Page 76 of 233
8.3.15.3.1. The slope of the standard curve must be between -3.1 and -3.7 for Quant Duo Human and between -3.0 and -3.7 for Quant Duo Male. (A slope close to -3.3 indicates optimal, 100% PCR amplification efficiency.)
8.3.15.3.2. Y-intercept indicates the expected CT value for a sample with Quantity = 1 (1 ng/μL). For Quant Duo Human, the acceptable y-intercept CT value is between 27.9 and 29.5. For Quant Duo Male, the acceptable y-intercept CT value is between 28.7 and 30.4
8.3.15.3.3. The r2 value must be >0.98. NOTE: A limited number of outlier points may be omitted from the curve to bring these values within acceptable range. If these values are not within range, the procedure must be re-run. Removal of more than 3 data points must be approved by the Technical Leader. The removal of 2 different data points from the standard curve equates to an 87.5% standard curve efficiency, with each data point removed decreasing the reliability of the correct formation of the curve by 6.25%. The Quantifiler® Duo User Manual suggests that the same two data points should not be removed from a single quantification run since this causes the instrument software to extrapolate through the missing points using the best fit curve analysis. However, given the high susceptibility for wide variations in the 0.023 ng standard due to stochastic effects, it may be appropriate to drop both amplifications of standard 8 to achieve a passing standard curve. In the detector drop-down list, select All to view both standard curves at the same time. Only CT values can be viewed with this selection. NOTE: The figure below shows an example of the standard curve plots. The gap between the Duo Human and the Duo Male CT values may vary depending on the relative slopes of the two targets and instrument performance. A 1 CT difference between the human and male curve is typical, given there are two copies of the autosomal human target locus and only one copy of the Y chromosome target locus per genome equivalent. This information can be used to conduct quality assurance testing on different lots of the quantity standard DNA received in each kit. If the average y-intercept value drops one CT value, the standard curve will shift to the left, causing samples that previously quanted at 2 ng/μL to quant at 1 ng/μL. This underestimation may be reflected in an overall two fold increase in RFUs. If the average y-intercept value increases one CT value, the standard curve will shift to the right, causing samples that previously quanted at 1 ng/μL to quant at 2 ng/μL. This overestimation may be reflected in an overall two fold decrease in RFUs.

Forensic Biology DNA SOP Manual
Forensic Analysis Division
DNA SOP Manual FAD-FB-DNA-SOP Issued By: Acting Technical Leader Issue Date: May 06, 2016 Uncontrolled When Printed Page 77 of 233
8.3.16. Viewing the Report 8.3.16.1. In the analyzed plate document, select the Results tab, then select the Report tab. 8.3.16.2. Select the reactions in the 96-well plate representation below the report to display
the results in the report. 8.3.16.3. View the Qty column to determine the quantity of DNA in each sample.
NOTE: The values in the Qty column are calculated by interpolation from the standard curve for a given sample. Quantities are calculated only if quantification standards were run and set up correctly in the software. Otherwise, only CT values are shown.
8.3.16.4. Check the internal PCR control (IPC) CT values for all standards and samples. It should be similar for all samples and controls in the run. A higher value indicates the presence of inhibitors. The absence of an IPC value and a quantification value for a sample indicates either complete inhibition or a failure of the amplification reaction. Samples in which inhibition is suspected may be cleaned by either Qiagen or Microcon and re-quantified. Alternatively, a dilution which would theoretically contain fewer inhibitors may be quantified.
8.3.16.5. Samples in which the concentration exceeds the highest standard shall be interpreted with caution and re-quantified if necessary. Samples in which the concentration is below the lowest standard must be amplified using the maximum volume.
8.3.16.6. The negative control must have less than 5 x 10⁻³ ng/µl of detectable DNA present. If more DNA is detected, the plate must be re-run.
8.3.16.7. Print the report. Place a copy of the standard curve and data report containing the quantification results in the case file.
8.3.16.8. Save a copy of the run in the appropriate month and year folder of \CrimeLab\SHARED\BiologyInstruments\7500PCR.
8.4. Plexor HY Quantification

Forensic Biology DNA SOP Manual
Forensic Analysis Division
DNA SOP Manual FAD-FB-DNA-SOP Issued By: Acting Technical Leader Issue Date: May 06, 2016 Uncontrolled When Printed Page 78 of 233
8.4.1. The Promega Plexor HY kit contains all necessary reagents for the simultaneous real-time PCR amplification, detection, and quantification of human autosomal and human male DNA in a sample. The results can be used to determine the presence of male DNA in samples with overwhelming female DNA.
8.4.2. The DNA quantification assay combines three separate assays:
8.4.2.1. A multicopy human autosomal DNA assay 8.4.2.2. A multicopy human male DNA assay 8.4.2.3. An internal PCR control assay
8.4.3. The kit works with the Applied Biosystems 7500 Real-Time PCR System and SDS Software
v1.2.3 for data collection. Data analysis is accomplished by exporting the data to the Plexor Analysis Software v1.5.6.7.
8.4.4. The Plexor HY kit comes in two sizes, 200 and 800 reactions with a 20 µL reaction volume. Store the entire kit at -15°C to -25°C upon receipt. Store the male genomic DNA standard at 2°C to 8°C after first thaw, continue to store the remaining kit at -15°C to -25°C between uses.
Plexor® HY System 200 reactions Product Size Cat. # DC1001 Includes: • 2 × 1ml Plexor® HY 2X Master Mix • 200μl Plexor® HY 20X Primer/IPC Mix • 150μl Plexor® HY Male Genomic DNA Standard, 50ng/μl • 2 × 1.25ml Water, Amplification Grade Plexor® HY System 800 reactions Product Size Cat. # DC1000 Includes: • 8 × 1ml Plexor® HY 2X Master Mix • 4× 200μl Plexor® HY 20X Primer/IPC Mix • 3 × 150μl Plexor® HY Male Genomic DNA Standard, 50ng/μl • 5 × 1.25ml Water, Amplification Grade
NOTE: Keep Primer/IPC Mix and Master Mix protected from direct exposure to light. Excessive exposure to light may affect the fluorescent dyes.
8.5. Creating a Plexor HY worksheet 8.5.1. Open the "Plexor HY Worksheet" template (an Excel spreadsheet).
Forensic Biology DNA SOP Manual
Forensic Analysis Division
DNA SOP Manual FAD-FB-DNA-SOP Issued By: Acting Technical Leader Issue Date: May 06, 2016 Uncontrolled When Printed Page 79 of 233
8.5.2. Type sample names into the sample sheet. Ensure each standard is present and in duplicate.
8.5.3. Print the file for documentation in the case file(s).
8.5.4. Save the Excel file with initials and date of run (i.e. AB092012) 8.5.5. Close Excel.
8.6. Preparing the DNA Quantification Standards
8.6.1. Make a standard curve dilution series consisting of:
Standard ng/µL
Male Genomic DNA Standard 50
B 10
C 2
D 0.4
E 0.08
F 0.016
G 0.0032
8.6.2. To create this series of standards, perform the following tasks: 8.6.2.1. Label 6 microcentrifuge tubes B, C, D, E, F, and G. 8.6.2.2. Dispense 40 µL of TE into the six microcentrifuge tubes. 8.6.2.3. Vortex the Male Genomic DNA Standard for 3 to 5 seconds
8.6.2.3.1. Allow the male standard to warm to room temperature. 8.6.2.3.2. If this is the first use of the standard, thaw the DNA.

Forensic Biology DNA SOP Manual
Forensic Analysis Division
DNA SOP Manual FAD-FB-DNA-SOP Issued By: Acting Technical Leader Issue Date: May 06, 2016 Uncontrolled When Printed Page 80 of 233
8.6.2.4. Prepare Standards B through G: 8.6.2.4.1. Pipette 10 µL of the Male Genomic DNA Standard to the tube for Standard B. 8.6.2.4.2. Mix the dilution thoroughly. 8.6.2.4.3. Using a new pipette tip, add 10 µL of the prepared standard to the tube for
the next standard (e.g. 10 µL of Standard B into the tube for Standard C; the resulting mixture contains 10 µL of the previous standard and 40 µL of TE).
8.6.2.4.4. Mix the dilution thoroughly. 8.6.2.4.5. Repeat steps 4c and 4d until the dilution series is complete.
NOTE: Any unused standard can be labeled with the analyst's initials and date of creation (e.g. ABC010101) and stored at 2°C to 8°C for up to two weeks.
8.7. Reaction and Plate Setup Procedure 8.7.1. Allow the Plexor HY kit components to thaw to room temperature. Mix the 2X Master
Mix and 20X Primer/IPC Mix by brief vortexing. 8.7.2. Make a set of positive standards as described in the previous section (entitled "Preparing
the DNA Quantification Standards"). 8.7.2.1. If standards exist and are less than two weeks old, you may use them instead of
making new standards. 8.7.3. Prepare a Master Mix consisting of the following reagents and volumes:
8.7.3.1. The “Plexor HY Worksheet” includes the necessary volumes for the master mix. 8.7.3.2. The worksheet includes a correction factor for pipetting loss.
Component Volume Per Reaction (µL)
Plexor HY 2X Master Mix 11
Plexor HY 20X Primer/IPC Mix 1.1
Water, Amplification Grade 7.7
8.7.4. Vortex the Master Mix for 3 to 5 seconds, then briefly centrifuge the tube. 8.7.5. Dispense 18 µL of the Master Mix into each reaction well.
8.7.5.1. Make sure the plate is correctly oriented, A1 is to the top left. 8.7.6. Add 2 µL of each sample, standard, or control (TE for negative control) into the applicable
wells. 8.7.7. Seal the reaction plate with the adhesive cover. 8.7.8. Centrifuge the plate at ~3000 rpm for about 20 seconds in a plate centrifuge with plate
holders to remove any bubbles.

Forensic Biology DNA SOP Manual
Forensic Analysis Division
DNA SOP Manual FAD-FB-DNA-SOP Issued By: Acting Technical Leader Issue Date: May 06, 2016 Uncontrolled When Printed Page 81 of 233
8.7.9. Load the plate into the plate holder of the 7500. Ensure that the plate is correctly aligned in the holder.
8.7.10. See section 8.3.7.10 for loading plate on 7500.
8.8. Creating a Plate Document and Starting the Run 8.8.1. Click File > New 8.8.2. Click Browse below the Template box.
8.8.3. Navigate to the Desktop and select the “Plexor HY” template. 8.8.4. Click Open (or double-click the template file).
NOTE: The following box appears any time you open, close, save, or analyze the file. Always click yes to navigate past the box.
8.8.5. Click File > Save As 8.8.6. Name the run with initials and date (i.e. AB092012). 8.8.7. Save the file to the Desktop. 8.8.8. Click on the Instruments tab and click Start to start the run.

Forensic Biology DNA SOP Manual
Forensic Analysis Division
DNA SOP Manual FAD-FB-DNA-SOP Issued By: Acting Technical Leader Issue Date: May 06, 2016 Uncontrolled When Printed Page 82 of 233
8.8.9. Ensure that the Estimated Time Remaining shows a time before leaving the room.
8.9. Analyzing run and exporting files with 7500 SDS software
8.9.1. When the run is complete the instrument displays a successful run completion message. 8.9.2. Click okay. 8.9.3. Omitting unused wells
8.9.3.1. Select the unused wells according to your worksheet on the Results tab. 8.9.3.2. With the well selected, hit Ctrl + M. 8.9.3.3. The omitted wells now show an “X” through them.
8.9.4. On the menu bar, select Analysis > Analyze. 8.9.4.1. Alternatively the green arrow in the menu can be clicked.
8.9.5. Exporting Files 8.9.5.1. Select File > Export > Delta Rn 8.9.5.2. Save the file with the run name and the suffix “-delta” (i.e. AB092012-delta)
8.9.5.2.1. Save the file to the Desktop with the run file. 8.9.5.3. Select File > Export > Dissociation > Raw & Derivative data 8.9.5.4. Save the file with the run name and the suffix “-diss” (i.e. AB092012-diss).
8.9.5.4.1. Save the file to the Desktop with the run file. 8.9.5.5. Do NOT open the export files. This corrupts them for later use.
8.9.6. Close the 7500 run file and 7500 SDS software. 8.9.6.1. Click Yes to Save if prompted to do so.
8.9.7. Move the three saved files to the appropriate month and year folder of \CrimeLab\SHARED\BiologyInstruments\7500PCR\Plexor HY. 8.9.8. Remove and discard the plate from the 7500. 8.9.9. Turn off the 7500.

Forensic Biology DNA SOP Manual
Forensic Analysis Division
DNA SOP Manual FAD-FB-DNA-SOP Issued By: Acting Technical Leader Issue Date: May 06, 2016 Uncontrolled When Printed Page 83 of 233
8.10. Plexor HY Analysis software Note: The following instructions are suitable on software that has been appropriately initialized.
8.10.1. Software set up and file import 8.10.1.1. Start the Plexor Analysis Software. 8.10.1.2. Select File > Import New Run 8.10.1.3. Fill in the Assay Name with the same name as the 7500 run file (i.e. AB092012). 8.10.1.4. Make sure that the instrument is set to Applied Biosystems 7500 SDS v1.4 & prior. 8.10.1.5. Click Next. 8.10.1.6. Fill in the operator name or initials.
8.10.1.6.1. The remaining fields can be left blank. 8.10.1.7. Click Next. 8.10.1.8. Click the upper Browse button to add the Amplification file. 8.10.1.9. Navigate to the previously saved “Delta Rn” file (i.e. AB092012-delta). 8.10.1.10. Select file and click open. 8.10.1.11. Click the lower Browse button to add the Melt file. 8.10.1.12. Navigate to the previously saved “Raw & Derivative data” file (i.e. AB092012-
diss). 8.10.1.13. Select file and click open. 8.10.1.14. Under the Advanced Options
8.10.1.14.1. Click Edit under Analysis Template 8.10.1.14.2. Select Defaults > Reset to Default
8.10.1.14.2.1. These setting are: Setting FL-Autosomal CO560-Y CR61-IPC Default Amp Threshold 10.0 10.0 10.0 Default Melt Threshold 25.0 25.0 25.0 Expected Target Melt Temperature
80.2 81.6 80.3
Target Tm Upper Bound 1.5 1.5 1.5 Target Tm Lower Bound 1.5 1.5 1.5 Use Second Expected Tm Unchecked Unchecked Unchecked
8.10.1.14.3. Click OK
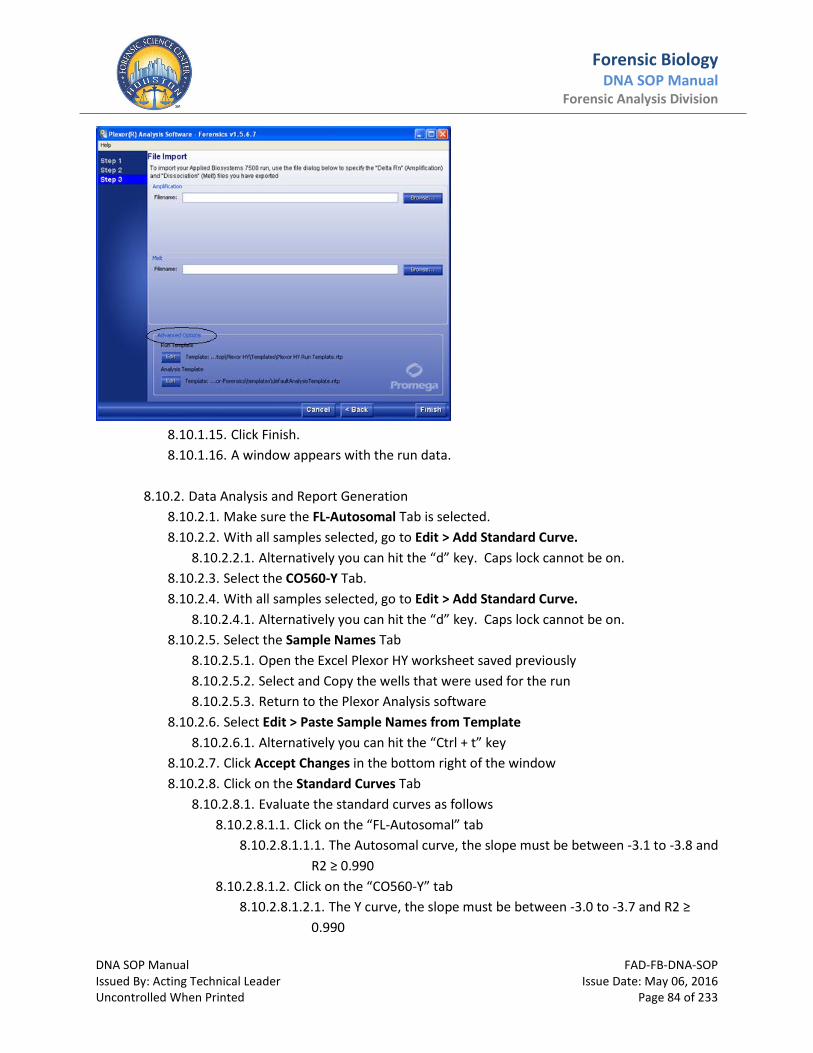
Forensic Biology DNA SOP Manual
Forensic Analysis Division
DNA SOP Manual FAD-FB-DNA-SOP Issued By: Acting Technical Leader Issue Date: May 06, 2016 Uncontrolled When Printed Page 84 of 233
8.10.1.15. Click Finish. 8.10.1.16. A window appears with the run data.
8.10.2. Data Analysis and Report Generation
8.10.2.1. Make sure the FL-Autosomal Tab is selected. 8.10.2.2. With all samples selected, go to Edit > Add Standard Curve.
8.10.2.2.1. Alternatively you can hit the “d” key. Caps lock cannot be on. 8.10.2.3. Select the CO560-Y Tab. 8.10.2.4. With all samples selected, go to Edit > Add Standard Curve.
8.10.2.4.1. Alternatively you can hit the “d” key. Caps lock cannot be on. 8.10.2.5. Select the Sample Names Tab
8.10.2.5.1. Open the Excel Plexor HY worksheet saved previously 8.10.2.5.2. Select and Copy the wells that were used for the run 8.10.2.5.3. Return to the Plexor Analysis software
8.10.2.6. Select Edit > Paste Sample Names from Template 8.10.2.6.1. Alternatively you can hit the “Ctrl + t” key
8.10.2.7. Click Accept Changes in the bottom right of the window 8.10.2.8. Click on the Standard Curves Tab
8.10.2.8.1. Evaluate the standard curves as follows 8.10.2.8.1.1. Click on the “FL-Autosomal” tab
8.10.2.8.1.1.1. The Autosomal curve, the slope must be between -3.1 to -3.8 and R2 ≥ 0.990
8.10.2.8.1.2. Click on the “CO560-Y” tab 8.10.2.8.1.2.1. The Y curve, the slope must be between -3.0 to -3.7 and R2 ≥
0.990

Forensic Biology DNA SOP Manual
Forensic Analysis Division
DNA SOP Manual FAD-FB-DNA-SOP Issued By: Acting Technical Leader Issue Date: May 06, 2016 Uncontrolled When Printed Page 85 of 233
NOTE: A limited number of outlier points may be omitted from the curve to bring these values within acceptable range. If these values are not within range, the procedure must be re-run. Removal of more than 3 data points must be approved by the Technical Leader. Points can be removed by changing the sample type under the “PCR Curves” tab.
8.10.2.9. Select Forensics > Set Normalization and IPC parameters 8.10.2.9.1. Do not change any settings
8.10.2.10. Click Ok on the window that pops up 8.10.2.10.1. Give the software a minute and the window changes to the Forensic report
tab under the Reports tab 8.10.2.11. Check that the first location is A1.
8.10.2.11.1. Click on Location so the samples are sorted by location 8.10.2.12. Select File > Save Analysis File 8.10.2.13. Title the file with initials and run date (i.e. AB092412) 8.10.2.14. Save the file to the appropriate month and year folder of
\CrimeLab\SHARED\BiologyInstruments\7500PCR\Plexor HY
8.10.3. Data interpretation 8.10.3.1. Check that the IPC Status column is “OK” for all samples.
NOTE: A “Check IPC” value indicates the possible presence of inhibitors. For any samples that say “Check IPC”, select that sample and examine the PCR curves under the PCR Curves tab. The absence of an IPC value under the CR610-IPC tab and a quantification value for a sample indicates either complete inhibition or a failure of the amplification reaction. The sample may be rerun. Alternatively, a dilution may be made and run again with Plexor HY. While the dilution would contain fewer inhibitors, it would also contain less DNA and may not be a true negative.
8.10.3.2. Check that the Curve Status column is “OK” for all samples. 8.10.3.2.1. Depending on sample type (standard, non-template control, or sample)
three other options may be displayed depending on sample type 8.10.3.2.1.1. Check STD – displayed for samples designated as standard controls 8.10.3.2.1.2. Check NTC – displayed for samples designated as non-template
controls 8.10.3.2.1.3. Check Melts – displayed for sample designated as unknowns
NOTE: “Check” messages are only displayed on samples that have concentration values. The message indicates that the melt curve needs to be assessed for that sample.
8.10.3.2.2. Examine the melt curves for samples that are NOT “OK”.
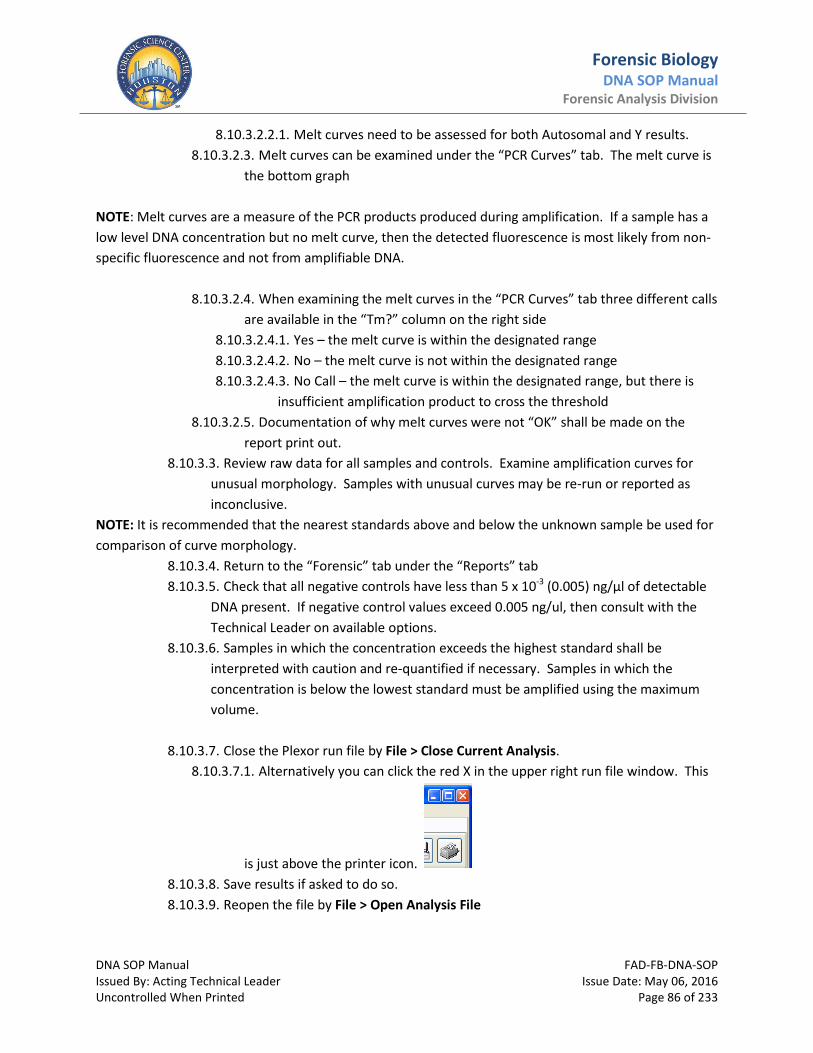
Forensic Biology DNA SOP Manual
Forensic Analysis Division
DNA SOP Manual FAD-FB-DNA-SOP Issued By: Acting Technical Leader Issue Date: May 06, 2016 Uncontrolled When Printed Page 86 of 233
8.10.3.2.2.1. Melt curves need to be assessed for both Autosomal and Y results. 8.10.3.2.3. Melt curves can be examined under the “PCR Curves” tab. The melt curve is
the bottom graph NOTE: Melt curves are a measure of the PCR products produced during amplification. If a sample has a low level DNA concentration but no melt curve, then the detected fluorescence is most likely from non-specific fluorescence and not from amplifiable DNA.
8.10.3.2.4. When examining the melt curves in the “PCR Curves” tab three different calls are available in the “Tm?” column on the right side
8.10.3.2.4.1. Yes – the melt curve is within the designated range 8.10.3.2.4.2. No – the melt curve is not within the designated range 8.10.3.2.4.3. No Call – the melt curve is within the designated range, but there is
insufficient amplification product to cross the threshold 8.10.3.2.5. Documentation of why melt curves were not “OK” shall be made on the
report print out. 8.10.3.3. Review raw data for all samples and controls. Examine amplification curves for
unusual morphology. Samples with unusual curves may be re-run or reported as inconclusive.
NOTE: It is recommended that the nearest standards above and below the unknown sample be used for comparison of curve morphology.
8.10.3.4. Return to the “Forensic” tab under the “Reports” tab 8.10.3.5. Check that all negative controls have less than 5 x 10⁻³ (0.005) ng/µl of detectable
DNA present. If negative control values exceed 0.005 ng/ul, then consult with the Technical Leader on available options.
8.10.3.6. Samples in which the concentration exceeds the highest standard shall be interpreted with caution and re-quantified if necessary. Samples in which the concentration is below the lowest standard must be amplified using the maximum volume.
8.10.3.7. Close the Plexor run file by File > Close Current Analysis.
8.10.3.7.1. Alternatively you can click the red X in the upper right run file window. This
is just above the printer icon. 8.10.3.8. Save results if asked to do so. 8.10.3.9. Reopen the file by File > Open Analysis File
Forensic Biology DNA SOP Manual
Forensic Analysis Division
DNA SOP Manual FAD-FB-DNA-SOP Issued By: Acting Technical Leader Issue Date: May 06, 2016 Uncontrolled When Printed Page 87 of 233
8.10.3.9.1. Alternatively you can click the file icon in the menu bar 8.10.3.10. Navigate to the saved file and select it. Click Open 8.10.3.11. Return to the “Forensic” tab under the “Reports” tab if not already there 8.10.3.12. Make sure all samples are selected, they are highlighted blue.
8.10.3.12.1. All samples can be selected by clicking one sample and hitting Ctrl + A
8.10.3.13. Select the print icon on the right 8.10.3.14. Under Page Setup, change the orientation to Portrait 8.10.3.15. Click Print 8.10.3.16. Close the Plexor run file and software.
8.10.3.16.1. Save any changes if prompted to do so 8.10.3.17. Add any comments to the report that are necessary. Examples include:
8.10.3.17.1. If any points were dropped from the standard curve. 8.10.3.17.2. Results of melt curve investigations
8.10.3.18. Place a copy of the report containing the results in the case file.
8.11. Reporting and Sample Retention 8.11.1. Samples that quant at or greater than 0.001 ng/µl of detectable male DNA are reported
as positive for the presence of male DNA. These samples may proceed to DNA analysis depending on the availability of male DNA positive samples within a particular case.
8.11.2. If more than 0.0 ng/µL of male DNA but less than 0.001 ng/µL of male DNA is detected, DNA testing may be discontinued. These samples are reported as “inconclusive” for the presence of male DNA. (Example conclusion: “Analysis for the presence of male DNA was inconclusive. No further testing was performed on this item.”)
8.11.3. If more than or equal to 0.001 ng/µL of male DNA is detected but a ratio of human to male DNA is greater than or equal to 80, DNA testing may be discontinued. These samples are reported as positive for male DNA but report conclusions indicate an elevated ratio and the discontinuation of testing. (Conclusion Example: “Male DNA was indicated; however, due to the presence of high levels of total human DNA, no further testing was performed on this item.”)
8.11.4. Samples for which no male DNA is detected are reported as negative for the presence of male DNA.
8.12. The decision to cease testing now on a particular sample does not preclude future testing. All
cases for which testing stops because of one of the two “stop at quant” scenarios above shall be evaluated for the potential application of Y-STR DNA analysis.

Forensic Biology DNA SOP Manual
Forensic Analysis Division
DNA SOP Manual FAD-FB-DNA-SOP Issued By: Acting Technical Leader Issue Date: May 06, 2016 Uncontrolled When Printed Page 88 of 233
9. DNA Amplification
9.1. Safety 9.1.1. Body fluids, tissues, and extracts may contain infective agents. Use universal precautions
during evidence handling. Follow instructions for reagent preparation. Gloves must be worn during testing. Clothing may protect unbroken skin; broken skin must be covered.
IMPORTANT! The fluorescent dyes attached to the primers are light sensitive. Protect the primer set from light when not in use. Amplified DNA, AmpFlSTR Allelic Ladders, and Gene Scan-500 LIZ Size Standard must also be protected from light. Keep freeze-thaw cycles to a minimum.
9.2. Equipment, Materials, and Reagents • calculator • microcentrifuge • microcentrifuge tubes, 1.5 ml • microcentrifuge tube rack • pipet tips • pipettors, adjustable • vortex • 96-Well GeneAmp® PCR System 9700 • 0.2 mL reaction tube strips or 0.2 ml 96-well Optical Reaction plate • AmpFlSTR®Identifiler® PCR Amplification Kit, AmpFlSTR®Identifiler® Plus PCR Amplification Kit or AmpFlSTR® Yfiler ™ PCR Amplification Kit • TE Buffer • MicroAmp® 8-Cap Strip
9.3. Standards, Controls, and Calibration
9.3.1. An amplification positive control, consisting of kit Control DNA 9947A (autosomal) or Control DNA 007 (Y-STR), must be included within each amplification.
9.3.2. An amplification negative control must be included within each amplification. This negative control consists of all amplification reagents with TE Buffer added in place of sample DNA.
9.3.3. The QAS requires that reagent blanks are amplified using the same concentration conditions as required by the forensic sample(s) containing the least amount of DNA. However, it is recommended practice that the maximum volume (10 µL) is used to amplify reagent blanks on the initial amplification. This generally ensures that more than 10 µL is not consumed, should a sample need re-amplification using a larger template volume. If the maximum volume of the reaction is not used, the Technical Leader must approve the use of a smaller volume.

Forensic Biology DNA SOP Manual
Forensic Analysis Division
DNA SOP Manual FAD-FB-DNA-SOP Issued By: Acting Technical Leader Issue Date: May 06, 2016 Uncontrolled When Printed Page 89 of 233
9.4. AmpFlSTR®Identifiler® PCR Amplification
9.4.1. The AmpFlSTR® Identifiler® PCR Amplification Kit is a short tandem repeat (STR) multiplex assay that amplifies 15 autosomal STR loci: D3S1358, vWA, FGA, D8S1179, D21S11, D18S51, D5S818, D13S317, D7S820, D16S539, TH01, TPOX, and CSF1PO, D2S1338 and D19S433, and Amelogenin (a sex marker) in a single PCR reaction.
Reaction and Plate Setup Procedure
PCR Instrument
Times and Temperatures for Identifiler kits Initial Incubation Step
28 cycles each Final Extension
Final Step Denature Anneal Extend
9700 95oC 11 min. hold
94oC 1 min.
59oC 1 min.
72oC 1 min.
60oC 60 min. hold
4-25oC hold (forever)
9.4.2. The thermal cycler must be programmed according to the chart above. 9.4.3. Label the reaction plate directly with the appropriate information (e.g., date and initials). 9.4.4. Vortex PCR reaction mix, primer set, and AmpliTaq Gold and spin tubes briefly to
remove any liquid from the caps. 9.4.5. Prepare a Master Mix by adding the following volumes to an appropriately sized tube:
9.4.5.1. 10.5 µl Reaction Mix X # of samples 9.4.5.2. 0.5 µl AmpliTaq Gold X # of samples 9.4.5.3. 5.5 µl Primer Set X # of samples
9.4.6. Mix by vortexing for approximately 5 seconds 9.4.7. Spin briefly to remove liquid from cap. 9.4.8. Dispense 15 µl of Master Mix into each amplification well. 9.4.9. Add approximately 1 ng of sample DNA to the appropriate amplification wells, not to
exceed 10 µl in total sample volume. Addition of more or less sample DNA is acceptable to obtain optimum results. For samples with high concentrations of DNA (i.e. >2 ng/µl), dilute these samples with TE buffer to attain an appropriate concentration. Enough TE must be added to template volume to ensure a total reaction volume of 25 µl.
9.4.10. Set up a positive control (5-10 µl of the Control DNA (9947A)) and a negative control (10 µl of TE buffer) to wells containing the Master Mix.
9.4.11. Place the tray into the Thermal Cycler and start the appropriate program. 9.4.12. After amplification, remove the samples from the Thermal Cycler and store away from
light. Store samples refrigerated short periods, or frozen for longer periods.

Forensic Biology DNA SOP Manual
Forensic Analysis Division
DNA SOP Manual FAD-FB-DNA-SOP Issued By: Acting Technical Leader Issue Date: May 06, 2016 Uncontrolled When Printed Page 90 of 233
9.5. AmpFlSTR® Identifiler® Plus PCR Amplification 9.5.1. The AmpFlSTR® Identifiler® Plus PCR Amplification Kit is a short tandem repeat (STR)
multiplex assay that amplifies 15 autosomal STR loci: D3S1358, vWA, FGA, D8S1179, D21S11, D18S51, D5S818, D13S317, D7S820, D16S539, TH01, TPOX, and CSF1PO, D2S1338 and D19S433, and Amelogenin (a sex marker) in a single PCR reaction.
Reaction and Plate Setup Procedure
PCR Instrument
Times and Temperatures for Identifiler Plus kits Initial Incubation Step
28 cycles each Final Extension
Final Step Denature Anneal/Extend
9700 95oC 11 min. hold
94oC 20 sec.
59 oC 3 min.
60oC 10 min. hold
4-25oC hold (forever)
9.5.2. The thermal cycler must be programmed according to the chart above. 9.5.3. Label the reaction plate directly with the appropriate information (e.g., date and initials). 9.5.4. Vortex PCR reaction mix and primer set for 3 seconds and spin tubes briefly to remove
any liquid from the caps. 9.5.5. Prepare a Master Mix by adding the following volumes to an appropriately sized tube:
9.5.5.1. 10.5 µl Reaction Mix X # of samples 9.5.5.2. 5.5 µl Primer Set X # of samples
9.5.6. Mix by vortexing for approximately 5 seconds. 9.5.7. Spin briefly to remove liquid from cap. 9.5.8. Dispense 15 µl of Master Mix into each amplification well. 9.5.9. Add approximately 0.5 – 1.0 ng of sample DNA to the appropriate amplification wells, not
to exceed 10 µl in total sample volume. Addition of more or less sample DNA is acceptable to obtain optimum results. For samples with high concentrations of DNA (i.e. >2 ng/µl), dilute these samples with TE buffer to attain an appropriate concentration. Enough TE must be added to template volume to ensure a total reaction volume of 25 µl.
9.5.10. Set up a positive control (5-10 µl of the Control DNA (9947A)) and a negative control (10 µl of TE buffer) to wells containing the Master Mix.
9.5.11. Centrifuge the plate at about 1000 rpm for about 20 seconds in a tabletop centrifuge with plate holders to remove any bubbles.
9.5.12. Place the tray into the Thermal Cycler and start the appropriate program.

Forensic Biology DNA SOP Manual
Forensic Analysis Division
DNA SOP Manual FAD-FB-DNA-SOP Issued By: Acting Technical Leader Issue Date: May 06, 2016 Uncontrolled When Printed Page 91 of 233
9.5.13. After amplification, remove the samples from the Thermal Cycler and store away from light. Store samples refrigerated short periods (less than 2 weeks) or frozen for longer periods.
9.6. AmpFlSTR® Yfiler ™ PCR Amplification
9.6.1. The AmpFlSTR® Yfiler ™ PCR Amplification Kit is a short tandem repeat (STR) multiplex assay that amplifies 17 Y-STR loci in a single PCR reaction. The kit amplifies the loci in the: • "European minimal haplotype" (DYS19, DYS385a/b, DYS389I/II, DYS390, DYS391, DYS392, DYS393) • Scientific Working Group-DNA Analysis Methods (SWGDAM)-recommended Y-STR panel (European minimal haplotype plus DYS438 and DYS 439) • Additional highly polymorphic loci (DYS437, DYS448, DYS456, DYS458, DYS635 (Y GATA C4), and Y GATA H4
Reaction and Plate Setup Procedure
PCR Instrument
Times and Temperatures for Yfiler kits Initial Incubation Step
30 cycles each Final Extension
Final Step Denature Anneal Extend
9700 95oC 11 min. hold
94oC 1 min.
61oC 1 min.
72oC 1 min.
60oC 80 min. hold
4oC hold (forever)
9.6.2. The thermal cycler must be programmed according to the chart above. 9.6.3. Label the reaction plate directly with the appropriate information (e.g., date and initials). 9.6.4. Vortex PCR reaction mix, primer set, and AmpliTaq Gold and spin tubes briefly to
remove any liquid from the caps. 9.6.5. Prepare a Master Mix by adding the following volumes to an appropriately sized tube:
9.6.5.1. 10.5 µl Reaction Mix X # of samples 9.6.5.2. 0.5 µl AmpliTaq Gold X # of samples 9.6.5.3. 5.5 µl Primer Set X # of samples
9.6.6. Mix by vortexing for approximately 5 seconds. 9.6.7. Spin briefly to remove liquid from cap. 9.6.8. Dispense 15 µl of Master Mix into each amplification well. 9.6.9. Add approximately 0.5-1.0 ng of male DNA to the appropriate amplification wells, not to
exceed 10 µl in total sample volume. Addition of more or less sample DNA is acceptable to obtain optimum results. For samples with high concentrations of DNA (i.e. >2 ng/µl),

Forensic Biology DNA SOP Manual
Forensic Analysis Division
DNA SOP Manual FAD-FB-DNA-SOP Issued By: Acting Technical Leader Issue Date: May 06, 2016 Uncontrolled When Printed Page 92 of 233
dilute these samples with TE buffer to attain an appropriate concentration. Enough TE must be added to template volume to ensure a total reaction volume of 25 µl.
9.6.10. Set up a positive control (5-10 µl of the Control DNA (007)) and a negative control (10 µl of TE buffer) to wells containing the Master Mix. The developmental and internal validations demonstrate that female DNA does not interfere with the amplification of male DNA, and thusly, a female positive control is not required for each amplification. However, the current TECAN Freedom EVO®150 Workstation script incorporates this female control in Y-STR amplifications, so this control is present on the automated amplification set-up.; Manual set-ups do not require this additional control.
9.6.11. Centrifuge the plate at about 1000 rpm for about 20 seconds in a tabletop centrifuge with plate holders to remove any bubbles.
9.6.12. Place the tray into the Thermal Cycler and start the appropriate program. 9.6.13. After amplification, remove the samples from the Thermal Cycler and store away from
light. Store samples refrigerated short periods (less than 2 weeks), or frozen for longer periods.
9.7. Instrument Overview
9.7.1. 96-Well GeneAmp® PCR System 9700 9.7.1.1. An automated heated sample block applies heating or cooling to samples in the 96-
well plate block 9.7.1.2. The enclosed environment provides the best control over the ambient temperature 9.7.1.3. At the end of the run, the 9700 may ramp down to 4°C to preserve sample life.
9.8. Powering on the Instrument 9.8.1. Press the power button on the lower left front of the 9700 instrument. 9.8.2. The instrument beeps and cycle through a power on sequence. 9.8.3. When the screen prompts the user with potential commands, the instrument is ready for
use.
Forensic Biology DNA SOP Manual
Forensic Analysis Division
DNA SOP Manual FAD-FB-DNA-SOP Issued By: Acting Technical Leader Issue Date: May 06, 2016 Uncontrolled When Printed Page 93 of 233
10. Automated Sample Set-up for DNA Quantification and Amplification 10.1. The HID EVOlution™ - qPCR/STR Setup System automates qPCR and STR PCR reaction setup. It
currently can be used for plate set-ups for protocols including Quantifiler Duo, Identifiler, Identifiler Plus, and Yfiler. Additional scripts can be created and manipulated to better fit the laboratory's changing throughput needs.
10.2. Safety 10.2.1. Body fluids, tissues, and extracts may contain infective agents. Use universal
precautions during evidence handling. Follow instructions for reagent preparation. Gloves must be worn during testing. Clothing may protect unbroken skin; broken skin must be covered.
10.2.2. With any machinery, several warning labels exist on the machine that need to be heeded at all times. Below is a diagram of the TECAN Freedom EVO series with the respective warning labels and where they are affixed on the machine along with a table describing the meaning of the symbols.
Symbol Meaning Explanation
WARNING Generally, the triangular warning symbol indicates the possibility of personal injury or even loss of life if the instructions are not followed.

Forensic Biology DNA SOP Manual
Forensic Analysis Division
DNA SOP Manual FAD-FB-DNA-SOP Issued By: Acting Technical Leader Issue Date: May 06, 2016 Uncontrolled When Printed Page 94 of 233
PINCH POINT, MECHANICAL HAZARD
Pointed tips and other sharp-edged elements, which might cause injuries when you reach into the working are with the safety panel open. ALWAYS be aware of the mechanical hazards.
ATTENTION: Disturbance of functions by electromagnetic RF waves
Electromagnetic RF waves from a cellular phone may affect the function of the liquid detection. Faulty detection of the liquid surface may be the consequence which causes the system to produce incorrect results. Keep a distance of at least 2m from the instrument when using a cellular phone.
WARNING! The machine moves automatically. The parts of the pipetting head are moved with great force. Injuries (crushing and piercing) are possible when you reach into the working area of the pipetting head. Make sure that all safety covers are in place before starting the instrument. DO NOT REACH INTO THE WORKING AREA OF THE INSTRUMENT WHEN IT IS ACTIVE. The label reader is a Class 2 laser product which can cause injury (blindness) if viewed directly. WARNING! Do not stare into beam. WARNING! Adjustments to any of the axes can lead to damage to the instrument. Please exercise extreme caution when making any such adjustments.
10.3. Equipment, Materials, and Reagents • 2.0 mL micro centrifuge tubes • TE Buffer • USA Scientific 5 ml PP storage vial with screw cap (PN 50819830) • LiHa disposable tips, 50ul: Conductive, With Filters, Tecan Pure (PN 30032114) • LiHa disposable tips, 200uL: Conductive, With Filters, Tecan Pure (PN 30000629) • Disposable troughs (PN 10613049) • MicroAmp® Optical 96-Well Reaction Plate (PN N801-0560) • MicroAmp® Optical Adhesive Film (PN 4311971) • MicroAmp® 8-Cap Strip (PN N801-0535) • Degassed water in 50 L carboy (PN 30010530) • 20 L Waste carboy (PN 30010531) • Quantifiler® Duo DNA Quantification kit (PN 4387746) • AmpFlSTR® Identifiler® PCR Amplification kit (PN 4322288) • AmpFlSTR® Identifiler® Plus PCR Amplification kit (PN 4427368) • AmpFlSTR® Yfiler™ PCR Amplification kit (PN 4359513) • Electronic file storage device • STR PCR Reagent block (stored refrigerated when not in use) • 7000 Sequence Detection System

Forensic Biology DNA SOP Manual
Forensic Analysis Division
DNA SOP Manual FAD-FB-DNA-SOP Issued By: Acting Technical Leader Issue Date: May 06, 2016 Uncontrolled When Printed Page 95 of 233
• 7500 Real-Time PCR System • GeneAmp® PCR System 9700 Thermalcycler
10.4. Instrument Overview
10.4.1. qPCR/STR Setup on the TECAN Freedom EVO series 10.4.1.1. Starting the TECAN Freedom EVO involves:
10.4.1.1.1. Starting the computer 10.4.1.1.2. Powering on the instrument 10.4.1.1.3. Starting the EVOware software
10.4.2. Starting the Computer 10.4.2.1. Locate and depress the power button on the front panel of the computer. 10.4.2.2. Enter the username associated with the computer, if applicable. 10.4.2.3. If required, type the corresponding password in the password field.
10.4.3. Powering on the Instrument 10.4.3.1. Press the power button on the lower right front of the Freedom EVO. 10.4.3.2. An indicator light within the power button cycles through a power on sequence
and the system initializes. 10.4.3.3. When the indicator light is steady (not flashing), the EVO is ready to use.
10.4.4. Starting the EVOware software
10.4.4.1. Double click the EVOware Standard icon on the computer's desktop. (Alternatively, you can find the EVOware Standard folder in the computer's Start Menu). See the picture below for the software's icon.

Forensic Biology DNA SOP Manual
Forensic Analysis Division
DNA SOP Manual FAD-FB-DNA-SOP Issued By: Acting Technical Leader Issue Date: May 06, 2016 Uncontrolled When Printed Page 96 of 233
10.4.4.2. The software begins. After its initial startup process, a login screen as the one seen below appears. Enter the username and password as directed and press the green triangle to complete software startup.
10.4.5. Maintenance
10.4.5.1. As necessary, the machine surface can be cleaned with alcohol (70% ethanol or 100% isopropanol (2-Propanol)), water, or a weak detergent such as Liquinox. Strong detergents can dissolve carrier and worktable surface coatings. Upon cleaning, thoroughly dry the work area to prevent residual cleaner remaining on the surface.
10.4.5.2. If the instrument is leaking, switch it off immediately and eliminate the source of leakage.
10.4.5.3. At the beginning of each day when the instrument is in operation, the following maintenance steps shall be completed: • Check the liquid system for leakage • Check the tubing connections and tighten as necessary • Check the syringes and plunger lock screws and tighten, if necessary • Check the disposable tips (DiTi) cones for deposits and clean and tighten as necessary • Check the system liquid container and fill with diH2O as necessary (allow diH2O to degas prior to use, overnight is preferred) • Check the waste liquid container and empty as necessary • Flush the liquid system and check for air bubbles • Replenish DiTis • Ensure the worktable is clean and free of clutter
10.4.5.4. Prior to each application run, the following maintenance steps shall be completed: • Flush the liquid system and check for air bubbles • Clean hardware, carriers, and racks, if needed • Check the DiTi waste bag and empty as necessary

Forensic Biology DNA SOP Manual
Forensic Analysis Division
DNA SOP Manual FAD-FB-DNA-SOP Issued By: Acting Technical Leader Issue Date: May 06, 2016 Uncontrolled When Printed Page 97 of 233
• Clean nested DiTi waste slide if necessary • Double-check the number of available DiTis and replace additional tip racks as necessary • Check system liquid level.
10.4.5.5. At the end of each day when the instrument is in operation, the following
maintenance steps shall be completed: • Clean the worktable, carriers, and racks as necessary • Check the system liquid container and fill with diH2O as necessary • Check the waste liquid container and empty as necessary • Replenish DiTis
10.4.5.6. Weekly, the following maintenance steps shall be completed: • Empty system liquid container and clean, as needed • Empty waste container and clean, as needed • Shut down/Restart instrument computer • Run a weekly flush of the system if the system is not being used on a regular basis
10.4.5.7. Monthly, the following maintenance step shall be completed: 10.4.5.7.1. Use TECAN wrench tool to ensure DiTi gold cone is tight. 10.4.5.7.2. To perform some of the maintenance tasks on the TECAN, the startup screen
provides an option entitled "Run Maintenance" as seen in the picture below:
Protocol Action
Daily Start Up
Cycles through the system start up prompts, flushes the system, removes any DiTis attached to the arm, and moves the liquid handling arm to the home position

Forensic Biology DNA SOP Manual
Forensic Analysis Division
DNA SOP Manual FAD-FB-DNA-SOP Issued By: Acting Technical Leader Issue Date: May 06, 2016 Uncontrolled When Printed Page 98 of 233
10.5. Operating the Instrument 10.5.1. Make sure to read all instrument prompts thoroughly. Ensure that you have addressed
all issued presented before continuing to the next step. 10.5.2. qPCR/STR Protocol setup
10.5.2.1. qPCR/STR Protocol setup on the TECAN requires the following steps: 10.5.2.1.1. Setting up the Reagent Block 10.5.2.1.2. Setting up the Samples in the Sample Racks 10.5.2.1.3. Setting up the Destination & Dilution (if necessary) Plate(s) 10.5.2.1.4. Setting up the TE Buffer Trough 10.5.2.1.5. Running the Protocol in the EVOware Software
The following picture shows the workstation set up for any qPCR reaction setup protocol.
Drop DiTis Moves the arm to the DiTi disposal chute and removes any attached DiTis
Flush Flushes the liquid system
Set 200 tip position Repositions the 200 µL DiTi tip position via user input to the first available tip as its new starting point
Set 50 tip position Repositions the 50 µL DiTi tip position via user input to the first available tip as its new starting point

Forensic Biology DNA SOP Manual
Forensic Analysis Division
DNA SOP Manual FAD-FB-DNA-SOP Issued By: Acting Technical Leader Issue Date: May 06, 2016 Uncontrolled When Printed Page 99 of 233
The following picture shows the workstation set up for any STR reaction setup protocol.
10.5.3. Setting up the Reagent Block
When not in use, the empty aluminum reagent blocks is stored refrigerated. Taq Considerations:
• Accurate liquid detection occurs with a minimum volume of 50 μL • The shape and volume of the Taq tube is not optimal for accurate liquid detection (single tube only contains 50 μL) • The high liquid viscosity requires the use of a 200 μL tip
Therefore, • Combine contents of both tubes to single tube • Place combo tube in position 2 • When the volume is <50 μL, analyst intervention is required. Select “Go to Z-max” when error
message occurs at position 2 (Note: exercise extreme caution when any adjustments to the Z-max are considered)

Forensic Biology DNA SOP Manual
Forensic Analysis Division
DNA SOP Manual FAD-FB-DNA-SOP Issued By: Acting Technical Leader Issue Date: May 06, 2016 Uncontrolled When Printed Page 100 of 233
The picture below shows the proper set up for Quantifiler® Duo. If the instrument is to make the standard dilution, items 1-8 are empty tubes; if the instrument does not need to make the standard dilutions, insert the correct dilution into the correct slot (slot 1 is 50.0, slot 2 is 16.7…slot 8 is 0.023).
The picture below shows the proper set up for AmpFℓSTR® Identifiler®.

Forensic Biology DNA SOP Manual
Forensic Analysis Division
DNA SOP Manual FAD-FB-DNA-SOP Issued By: Acting Technical Leader Issue Date: May 06, 2016 Uncontrolled When Printed Page 101 of 233
The picture below shows the proper set up for AmpFℓSTR® Yfiler®.
The picture below shows the proper set up for Identifiler® Plus.

Forensic Biology DNA SOP Manual
Forensic Analysis Division
DNA SOP Manual FAD-FB-DNA-SOP Issued By: Acting Technical Leader Issue Date: May 06, 2016 Uncontrolled When Printed Page 102 of 233
10.6. Setting up the Samples in the Sample Racks
10.6.1. To set up the samples in the sample racks, it is important to open the samples carefully to reduce the risk of contamination. Vortex and pulse spin tubes prior to opening. Place the samples into their respective sample rack as diagrammed in the following picture. Sample tubes shall be examined for sufficient sample volume prior to loading on the instrument.
10.6.2. Open the samples and push the lids into the lid seat in the rack. Be sure that the lids do
not obstruct the liquid handling arm as it inserts the tip into the sample. Though the first sample does not have to be added to the first position of S1, samples must be added in a sequential fashion. In other words, do not skip places once the first sample has been added. See the picture below for two examples on proper sample addition.
10.6.3. The order and identity of tubes shall be “witnessed”. This can be accomplished by using
barcoded samples or by a second individual. The order and identity of the samples on the machine must match to the order and identity of tubes in the TECAN software. When samples are verified by a second analyst they shall denote their verification on the examination documentation. If barcoded samples are used, then this should be denoted on the paperwork.

Forensic Biology DNA SOP Manual
Forensic Analysis Division
DNA SOP Manual FAD-FB-DNA-SOP Issued By: Acting Technical Leader Issue Date: May 06, 2016 Uncontrolled When Printed Page 103 of 233
10.7. Setting up the Destination & Dilution (if necessary) Plate(s)
10.7.1. To set up the necessary plate(s), refer to the previous worktable setup diagram. Make sure that an empty 96-well plate is located on position 9 (for quantification) or positions 10, 11, and 12 (for amplification) as depicted on the above layout diagram.
10.8. Setting up the TE Buffer Trough
10.8.1. Assure that a filled TE buffer trough is in place (position 7 on the above layout diagrams). This is the middle trough position immediately to the right of the flush position. The TE buffer trough requires a dead volume of at least 5 mL of TE to properly pipette the regent into its respective sample tubes. Ensure that a minimum of 5 mL of TE is in the trough before continuing.
10.9. Running the Protocol in the EVOware Software 10.9.1. Quantifiler Duo
10.9.1.1. Once logged into the EVOware software, a startup screen as seen below displays.
10.9.1.1.1. Choose "Edit an existing script" 10.9.1.1.2. Click the green arrow in the bottom right corner. The existing scripts on the
software displays in a dialog box as seen in the below picture:

Forensic Biology DNA SOP Manual
Forensic Analysis Division
DNA SOP Manual FAD-FB-DNA-SOP Issued By: Acting Technical Leader Issue Date: May 06, 2016 Uncontrolled When Printed Page 104 of 233
NOTE: A pared down version containing the most often used scripts is included in the "Favorites" button. Click it to see the following screen.
10.9.1.1.3. Select the appropriate protocol
• Note the protocols currently in use in the Laboratory are displayed in the image above.
10.9.1.1.4. Click the green arrow in the bottom right corner. This brings you to the edit script page. The following instructions show the necessary steps to start the selected script.
10.9.1.1.5. Click green RUN (triangle at top center of screen) 10.9.1.1.6. Assure that "Run full script?" is still checked

Forensic Biology DNA SOP Manual
Forensic Analysis Division
DNA SOP Manual FAD-FB-DNA-SOP Issued By: Acting Technical Leader Issue Date: May 06, 2016 Uncontrolled When Printed Page 105 of 233
10.9.1.1.7. Click the green RUN arrow on the bottom right of the box.
This dialog box requires the input of the starting point for the tubes and the total number of samples processed.
10.9.1.1.8. Check the appropriate starting labware (S1-S5) 10.9.1.1.9. Change the "Start position of samples in labware" to match the position
number (1-16) of the first sample to be processed 10.9.1.1.10. Change the "Number of samples to process" number to match the total
number of samples processed in this run • The maximum number of samples for Quantifiler Duo, Identifiler Plus, and Yfiler
are 80, 88, and 87 respectively. 10.9.1.1.11. If using barcoded sample tubes leave Scan labware checked. If not, uncheck
Scan labware checkbox. 10.9.1.1.12. Click the green arrow in the bottom right corner of the dialog box
This dialog box allows the user to make the decision whether or not to allow the machine to make the DNA standard dilutions and whether or not to record reagent information.
Forensic Biology DNA SOP Manual
Forensic Analysis Division
DNA SOP Manual FAD-FB-DNA-SOP Issued By: Acting Technical Leader Issue Date: May 06, 2016 Uncontrolled When Printed Page 106 of 233
10.9.1.1.13. If the instrument is to make standards, assure that the "Prepare standards" checkbox is checked
10.9.1.1.14. To record reagent information, click the Record Reagent Information button. The following dialog box displays
• Note: this step is optional.
10.9.1.1.15. Fill out the appropriate information 10.9.1.1.16. Click OK to exit 10.9.1.1.17. Click the green arrow in the main dialog box to continue.
This dialog box double checks the user to determine if all items have been properly loaded.

Forensic Biology DNA SOP Manual
Forensic Analysis Division
DNA SOP Manual FAD-FB-DNA-SOP Issued By: Acting Technical Leader Issue Date: May 06, 2016 Uncontrolled When Printed Page 107 of 233
NOTE: The front panel of the instrument is magnetically locked at this step in the process and does not open without restarting the protocol. Any changes to the worktable must be done through the Front Safety Panel at this time. Clicking on any individual rows highlights the intended position for that item on the picture to the right. See the below picture.
10.9.1.1.18. Assure all items are loaded as requested by the dialog box 10.9.1.1.19. Click the Loaded button on the Status column for each row
• If all items are properly loaded, the user may click the Loaded All button 10.9.1.1.20. Click the green arrow in the main dialog box
The dialog box above allows the user to input the names and positions of the samples to be processed. NOTE: The example above only contains one of the potential tube racks (S1). Processing more than 16 samples presents the option to edit additional tube racks (S2-S5). By clicking on the Edit button, the user opens a new dialog box that allows the manual addition and naming of the samples.

Forensic Biology DNA SOP Manual
Forensic Analysis Division
DNA SOP Manual FAD-FB-DNA-SOP Issued By: Acting Technical Leader Issue Date: May 06, 2016 Uncontrolled When Printed Page 108 of 233
Each set of 16 samples must be entered into the respective S1-S5 rack separately through this dialog box.
10.9.1.1.21. Type in the sample name in the "SampleID" column 10.9.1.1.22. Type in the position on the tube rack where the sample is located 10.9.1.1.23. Click OK once all samples have been added properly 10.9.1.1.24. Continue editing sample names by clicking additional rack Edit buttons, if
necessary 10.9.1.1.25. Once all samples have been named and properly located, click the green
arrow in the main dialog box NOTE: Position numbers can only be 1-16, must be sequential, and cannot be duplicated. Breaking any of those rules results in an error message. If the user wishes to automatically name the samples through the importing of a .csv file:
10.9.1.1.26. Click on the […] button on the "Sample file" line of the main dialog box 10.9.1.1.27. Browse for the proper .csv file to name the samples
10.10. Creating the .csv File for Sample Naming Import
10.10.1. The .csv file can be created either in Excel or a word processor but must be in the following format:
Tuberack,Position,SampleName,Additional,comments,as,necessary NOTE: Only the first three pieces of information are required. However, additional comments can be added to the file as necessary with the addition of commas between each piece of information. IMPORTANT! The names of the samples must match throughout the process. As this is likely the first time the samples are named, be sure that they are spelled correctly and do not contain any extraneous spaces or symbols. The following is an example of a six sample .csv file with the samples properly named. S1,1,Neg010111ABC S1,2,1ABC11 S1,3,2ABC11

Forensic Biology DNA SOP Manual
Forensic Analysis Division
DNA SOP Manual FAD-FB-DNA-SOP Issued By: Acting Technical Leader Issue Date: May 06, 2016 Uncontrolled When Printed Page 109 of 233
S1,4,3ABC11 S1,5,4ABC11 S1,6,5ABC11 …
10.10.2. The listed samples are located in tube rack S1, in positions 1-6, and are named Neg010111ABC & 1-5ABC11. Once the file has been properly uploaded, the software's dialog box changes to contain the following message:
10.10.3. Note the statement "5/5 planned samples present." That message checks the original
input of total number of samples to be processed and checks it against the total number of viable samples input by the file. Be sure that this number matches your total number of samples and controls (negatives) to be processed (minus DNA standard dilutions).
10.10.4. If the numbers match, click the green arrow in the bottom right of the dialog box
10.10.5. The above image shows the results of barcode scanning. If not using barcodes, hit ignore.

Forensic Biology DNA SOP Manual
Forensic Analysis Division
DNA SOP Manual FAD-FB-DNA-SOP Issued By: Acting Technical Leader Issue Date: May 06, 2016 Uncontrolled When Printed Page 110 of 233
IMPORTANT! This starts the instrument protocol and no additional changes are available to the user. Do not click the green arrow until ready to process samples. NOTE: The instrument automatically accounts for the standard curve and reserves the first two columns for those samples. Thus, a maximum number of 80 samples may be processed at any one time (96 total wells with two sets of eight standards each in columns one and two). IMPORTANT! The negative control must be accounted for when setting up the protocol since the instrument’s setup does not account for a negative control. When complete, click the green arrow in the bottom right of the dialog box. While the instrument is running, the following dialog box is displayed:
This dialog box contains information such as the current protocol being run, the current step of the protocol it is currently undergoing, the elapsed time, and the start time. NOTE: By clicking the yellow pause button, the machine completes its current action and halts until instructed to proceed. NOTE: By clicking the red stop button, the machine completes its current action and halts the protocol entirely. When the protocol is complete, hit cancel and unload TECAN deck taking care to recap samples The plate is now complete and can continue on to the 7500. Seal the STR PCR reaction plate with the desired plate cover before loading onto qPCR thermalcycler. IMPORTANT! The TECAN produces an output file to place onto the ABI 7500. IMPORTANT! If the samples are destined for Quantifiler® Duo, complete the following section to convert the output file for ABI 7500 use.

Forensic Biology DNA SOP Manual
Forensic Analysis Division
DNA SOP Manual FAD-FB-DNA-SOP Issued By: Acting Technical Leader Issue Date: May 06, 2016 Uncontrolled When Printed Page 111 of 233
10.11. Running the Identifiler, Identifiler Plus, and Yfiler protocols in the EVOware software 10.11.1. Once logged into the EVOware software, a startup screen as seen below is displayed.
10.11.2. Choose "Edit an existing script" 10.11.3. Click the green arrow in the bottom right corner. The existing scripts on the software
are displayed in a dialog box as seen in the below picture:
NOTE: A pared down version containing the predominate scripts is included in the "Favorites" radio button. Click it to see the following screen.

Forensic Biology DNA SOP Manual
Forensic Analysis Division
DNA SOP Manual FAD-FB-DNA-SOP Issued By: Acting Technical Leader Issue Date: May 06, 2016 Uncontrolled When Printed Page 112 of 233
10.11.4. Select the appropriate protocol
10.11.4.1. Note the protocols currently in use in the Laboratory are displayed in the image above.
10.11.5. Click the green arrow in the bottom right corner. This brings you to the edit script page. The following instructions show the necessary steps to start the selected script.
10.11.6. Click green RUN (triangle at top center of screen) 10.11.7. Assure that "Run full script?" is still checked 10.11.8. Click the green RUN arrow on the bottom right of the box.

Forensic Biology DNA SOP Manual
Forensic Analysis Division
DNA SOP Manual FAD-FB-DNA-SOP Issued By: Acting Technical Leader Issue Date: May 06, 2016 Uncontrolled When Printed Page 113 of 233
This dialog box requires the input of the starting point for the tubes and the total number of samples processed.
10.11.9. Check the appropriate starting labware (S1-S5) 10.11.10. Change the "Start position of samples in labware" to match the position number (1-
16) of the first sample to be processed 10.11.10.1. The maximum number of samples for Quantifiler Duo, Identifiler Plus, and Yfiler
are 80, 88, and 87 respectively. 10.11.11. Change the "Number of samples to process" number to match the total number of
samples processed in this run 10.11.12. If using barcoded sample tubes leave Scan labware checked. If not, uncheck scan
labware checkbox. 10.11.13. Click the green arrow in the bottom right corner of the dialog box.
This dialog box allows the user to make the decision whether or not to record reagent information. NOTE: Not recording reagent information at this point in the software leaves blanks in the report .pdf file produced at the end of the run. This step is optional.

Forensic Biology DNA SOP Manual
Forensic Analysis Division
DNA SOP Manual FAD-FB-DNA-SOP Issued By: Acting Technical Leader Issue Date: May 06, 2016 Uncontrolled When Printed Page 114 of 233
10.11.14. Fill out the appropriate information 10.11.15. Click OK to exit 10.11.16. Click the green arrow in the bottom right of the main dialog box to continue
This dialog box double checks the user to determine if all items have been properly loaded. NOTE: The Load worktable screen does not indicate where to load empty 96 well plates that are used to prepare dilutions of higher quantity DNA samples. Please refer to “Setting up the Destination & Dilution (if necessary) Plate(s)” section for information on where to load dilution plates. NOTE: The front panel of the instrument is magnetically locked at this step in the process and does not open without restarting the protocol. Any changes to the worktable must be done through the Front Safety Panel at this time. Clicking on any individual rows to highlight the intended position for that item on the picture to the right.

Forensic Biology DNA SOP Manual
Forensic Analysis Division
DNA SOP Manual FAD-FB-DNA-SOP Issued By: Acting Technical Leader Issue Date: May 06, 2016 Uncontrolled When Printed Page 115 of 233
Once all items have been loaded properly:
10.11.17. Assure all items are loaded as requested by the dialog box 10.11.18. Click the Loaded button on the Status column for each row
10.11.18.1. If all items are properly loaded, the user may click the Loaded All button 10.11.19. Click the green arrow in the bottom right of the dialog box
The dialog box above allows the user to input the names and positions of the samples to be processed. By clicking on the edit button, the user opens a new dialog box that allows the user to manually insert the names of the samples.
Forensic Biology DNA SOP Manual
Forensic Analysis Division
DNA SOP Manual FAD-FB-DNA-SOP Issued By: Acting Technical Leader Issue Date: May 06, 2016 Uncontrolled When Printed Page 116 of 233
Each set of 16 samples must be entered into the respective S1-S5 rack separately through this dialog box.
10.11.20. Type in the sample name in the "Sample ID" column 10.11.21. Type in the position on the tube rack where the sample is located 10.11.22. Click OK once all samples have been added properly 10.11.23. Continue editing sample names by clicking additional rack Edit buttons, if necessary 10.11.24. Once all samples have been named and properly located, click the green arrow in the
main dialog box NOTE: Position numbers can only be 1-16, must be sequential, and cannot be duplicated. Breaking any of those rules results in an error message. If the user wishes to automatically name the samples through the importing of a .csv file:
10.11.25. Click on the […] button on the "Sample file" line of the main dialog box 10.11.26. Browse for the proper .csv file to name the samples
10.12. Creating the .csv File for Sample Naming Import
10.12.1. The .csv file can be created either in Excel or a word processor but must be in the following format:
Tuberack,Position,SampleName,Additional,comments,as,necessary NOTE: Only the first three pieces of information are required. However additional comments can be added to the file as necessary with the addition of commas between each piece of information. IMPORTANT! The names of the samples must match throughout the process. As this is likely not the first time the samples have been named, be sure that the sample names are spelled correctly and do not contain any extraneous spaces or symbols to match the previous names. The following is an example of a six sample .csv file with the samples properly named. S3,5,Neg010111ABC S3,6,1ABC11

Forensic Biology DNA SOP Manual
Forensic Analysis Division
DNA SOP Manual FAD-FB-DNA-SOP Issued By: Acting Technical Leader Issue Date: May 06, 2016 Uncontrolled When Printed Page 117 of 233
S3,7,2ABC11 S3,8,3ABC11 S3,9,4ABC11 S3,10,5ABC11 … The listed samples are located in tube rack S3, in positions 5-10, and are named Neg010111ABC & 1-5ABC11. Once the file has been properly uploaded, the software's dialog box changes to contain the following message.
10.12.2. Note the statement "66/66 planned samples present." That message checks the
original input of total number of samples to be processed and checks it against the total number of viable samples input by the file. Be sure that this number matches your total number of samples and controls (positives/negatives) to be processed.
10.12.3. If the numbers match, click the green arrow in the bottom right of the dialog box

Forensic Biology DNA SOP Manual
Forensic Analysis Division
DNA SOP Manual FAD-FB-DNA-SOP Issued By: Acting Technical Leader Issue Date: May 06, 2016 Uncontrolled When Printed Page 118 of 233
10.12.4. The above image shows the results of barcode scanning. If not using barcodes, hit ignore.
NOTE: The instrument automatically accounts for the positive and negative controls and reserves a spot for a ladder at each of the following wells: H2, H4, H6, H8, H10, and H12. Likewise, the protocol reserves the F2 and G2 wells for the positive and negative controls for autosomal amplifications. Wells E2, F2, and G2 are reserved for the male positive, the female positive, and the negative controls, respectively. Thus, a maximum number of 88 autosomal samples may be processed at any one time (96 total wells with six ladders, one positive control, and one negative control); a maximum number of 87 Y-STR samples may be processed at any one time, given the additional female positive control. When complete, click the green arrow in the bottom right of the dialog box
10.12.5. Click the Add radio button and the dialog box allows you an option to browse for the file
10.12.6. Import the given converted file. If the samples are entering the Identifiler (Plus) protocol and the proper file is imported, the following changes occur in the dialog box:
The following occurs:
10.12.7. The software does not present an error message 10.12.8. The total number of viable samples found within the file are presented in the bottom
right corner of the dialog box (“80/80 samples from file(s) mapped” noted on the dialog box)
10.12.9. The added file is automatically characterized by its input type (Quantifiler Duo). IMPORTANT! If the sample names of the samples from the qPCR output file and the sample naming file do not match, THEY DO NOT MAP PROPERLY. Look at the mapping message in the bottom right of the dialog box to assure that the data for the total number of expected samples has been imported properly.

Forensic Biology DNA SOP Manual
Forensic Analysis Division
DNA SOP Manual FAD-FB-DNA-SOP Issued By: Acting Technical Leader Issue Date: May 06, 2016 Uncontrolled When Printed Page 119 of 233
If the samples are entering the Yfiler protocol and the proper file is imported, the following changes occur in the dialog box:
10.12.10. The software does not present an error message 10.12.11. The total number of viable samples found within the file are presented in the bottom
right corner of the dialog box (“80/80 samples from file(s) mapped” noted on the dialog box)
10.12.12. The added file is automatically characterized by its input type (Quantifiler Duo). Similar to the above dialog box, the total number of samples found within the file are displayed in the bottom right corner of the dialog box. In the event that multiple quantification output files need to be combined to make a single STR run, they can be added to this dialog box in any order. NOTE: If two samples are named similarly on the multiple uploaded files, the software requires user input to distinguish which file is the correct one. When adding multiple qPCR output files in this dialog box, note the total number of mapped samples matches the expected number from the output file.
The previous dialog box shows the results of the software’s test of DNA quantities from the qPCR output file. The dialog box displays up to three results:
10.12.13. Samples that will be processed 10.12.14. Samples that are lower than the minimum quantity 10.12.15. Samples that are higher than the maximum quantity
NOTE: Any sample that has less than 0.023 ng/µL or greater than 50.0 ng/µL will not be processed unless additional user inputs tell the instrument to process them. IMPORTANT! Do not skip this step as non-template controls such as reagent blanks and negative controls will not process.

Forensic Biology DNA SOP Manual
Forensic Analysis Division
DNA SOP Manual FAD-FB-DNA-SOP Issued By: Acting Technical Leader Issue Date: May 06, 2016 Uncontrolled When Printed Page 120 of 233
Click the View button to perform an additional check of the samples. The following dialog box opens:
Several options can be adjusted appropriately in this dialog box. Samples set to be processed are marked with a green check in the “Status” column. Samples that do not fit into the 0.023-50.0 ng/µL are marked with a red triangle. To continue forward with all samples regardless of status, click the “Process

Forensic Biology DNA SOP Manual
Forensic Analysis Division
DNA SOP Manual FAD-FB-DNA-SOP Issued By: Acting Technical Leader Issue Date: May 06, 2016 Uncontrolled When Printed Page 121 of 233
All” check box and double-check that the “Process” column check boxes for each sample are checked. Once done, click the OK button and proceed forward with STR set-up. NOTE: When setting up a Yfiler Amplification, The detector used needs to be changed from “Duo Human” to “Duo Male” by using the drop-down arrow. See image below for an example.
The “Req. Amt [ng]” column can be user-edited per-sample; it can also be adjusted globally by changing the “Global Req. Amount [ng]” window. Any amount put into this column is what the instrument attempts to target as the total DNA volume in the final destination STR plate. IMPORTANT! The TECAN’s dilution protocol has an inefficiency that needs to be adjusted. In the event that a sample needs to be diluted using the dilution scheme of 1:1.3 or 1.1.8, the “Req. Amt [ng]” column needs to be changed to prevent the instrument from taking additional unnecessary sample. Increase the “Req. Amt [ng]” column until the no dilution is performed on the sample and no more than 10 uL is consumed. IMPORTANT! If using Quantification data obtained from Plexor® HY, the quantification values must be verified by a second individual to ensure that the quant values of samples were transcribed accurately. The original data printed out from the Plexor run must be used. Once adjustments are complete, close the dialog box by clicking OK. If the samples were adjusted properly, the dialog box below is displayed.
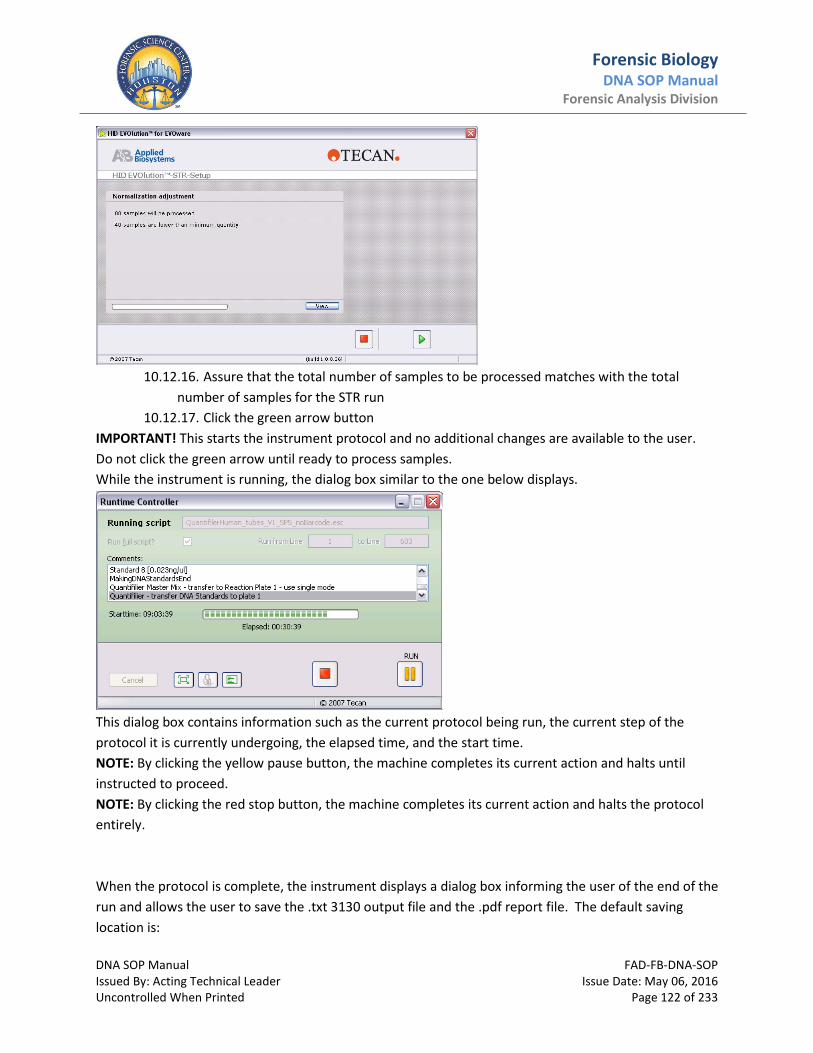
Forensic Biology DNA SOP Manual
Forensic Analysis Division
DNA SOP Manual FAD-FB-DNA-SOP Issued By: Acting Technical Leader Issue Date: May 06, 2016 Uncontrolled When Printed Page 122 of 233
10.12.16. Assure that the total number of samples to be processed matches with the total
number of samples for the STR run 10.12.17. Click the green arrow button
IMPORTANT! This starts the instrument protocol and no additional changes are available to the user. Do not click the green arrow until ready to process samples. While the instrument is running, the dialog box similar to the one below displays.
This dialog box contains information such as the current protocol being run, the current step of the protocol it is currently undergoing, the elapsed time, and the start time. NOTE: By clicking the yellow pause button, the machine completes its current action and halts until instructed to proceed. NOTE: By clicking the red stop button, the machine completes its current action and halts the protocol entirely. When the protocol is complete, the instrument displays a dialog box informing the user of the end of the run and allows the user to save the .txt 3130 output file and the .pdf report file. The default saving location is:

Forensic Biology DNA SOP Manual
Forensic Analysis Division
DNA SOP Manual FAD-FB-DNA-SOP Issued By: Acting Technical Leader Issue Date: May 06, 2016 Uncontrolled When Printed Page 123 of 233
C:\HIDEVOlution_qPCRSTRfiles\AB3130Input The next time that an STR protocol is run, the current files are archived in the HIDEVOlution_qPCRSTRfiles folder; it is named with a timestamp to distinguish individual runs. The plate is now complete and can continue on to the 9700. Seal the STR PCR reaction plate with the desired plate cover before loading onto PCR thermalcycler. NOTE: The 3130 output file produced by the TECAN can be used on the 3130 so that an additional sample name typing is unnecessary.
10.13. Using Plexor® HY DATA for Automated Amplification Set-up 10.13.1. Creating the CSV file that contains sample names and quant information.
10.13.1.1. From Plexor software, open file [Open Analysis File(.aan)]. This file contains sample names and their associated autosomal concentrations [Auto] and Y chromosome concentrations [Y]. Go to Reports tab then to Forensics tab and click on save file in upper right corner. Save as TAB file. This creates a TAB (.tab) file that contains sample names and their associated [Auto] and [Y] and can be opened using Microsoft Excel.
10.13.1.2. Open Plexor HY Template and the TAB (.tab) file from Step 1 in Microsoft Excel.

Forensic Biology DNA SOP Manual
Forensic Analysis Division
DNA SOP Manual FAD-FB-DNA-SOP Issued By: Acting Technical Leader Issue Date: May 06, 2016 Uncontrolled When Printed Page 124 of 233
10.13.1.3. Copy and paste sample names from Plexor TAB file (left panel) into PHY template (right panel). Copy sample names in the field immediately to the right of a well location. The specific well location does not matter. Please see the image below.
10.13.1.4. Copy and paste the [Auto] ng/ul and [Y] ng/ul values from Plexor (left panel) into the appropriate Qty column on the PHY template (right panel). The [Auto] ng/ul

Forensic Biology DNA SOP Manual
Forensic Analysis Division
DNA SOP Manual FAD-FB-DNA-SOP Issued By: Acting Technical Leader Issue Date: May 06, 2016 Uncontrolled When Printed Page 125 of 233
value for a specific sample goes into the Duo Human row for that sample. The [Y] ng/ul value goes into the Duo Male row for that sample. Please see the above image.
NOTE: Negative quant values or “N/A” from the TAB file need to show up as blank fields in the template file
10.13.1.5. After the information for the last sample to be amplified using the TECAN is added to the file, delete remaining wells in the file.
10.13.1.6. Once the template is complete, click file > save as > .CSV (Rename)

Forensic Biology DNA SOP Manual
Forensic Analysis Division
DNA SOP Manual FAD-FB-DNA-SOP Issued By: Acting Technical Leader Issue Date: May 06, 2016 Uncontrolled When Printed Page 126 of 233
10.13.1.7. Find the CSV (.csv) file that you saved in step 10.13.1.6 and right click then click on open with Notepad. It looks like the image below. All commas that are highlighted in the image below need to be deleted.
Once all commas are deleted, the file looks like the image below. Save these changes by clicking file save as and then naming the file and adding (.csv) to the end of the file name.
10.13.1.8. Creating Sample Setup File for import into TECAN 10.13.1.9. Open the TAB file that was created in Step A1 and the Sample Setup Template
and copy the sample names from the TAB file into the Sample Setup Template. The first sample is located in the C1 of the Sample setup file.

Forensic Biology DNA SOP Manual
Forensic Analysis Division
DNA SOP Manual FAD-FB-DNA-SOP Issued By: Acting Technical Leader Issue Date: May 06, 2016 Uncontrolled When Printed Page 127 of 233
10.13.1.10. When the last sample name is added to the sample setup, delete all fields below that sample.
10.13.1.11. Rename the file and save it. You may now proceed to Running the Identifiler, Identifiler Plus, and Yfiler protocols in the EVOware software NOTE: The Quant values must be verified by a second individual to ensure that the quant values of samples were transcribed accurately. The original data printed out from the Plexor run must be used. When loading the 7500 Real Time PCR System, be sure to load standard 96-well plates with the notched A12 position at the top-right of the tray.

Forensic Biology DNA SOP Manual
Forensic Analysis Division
DNA SOP Manual FAD-FB-DNA-SOP Issued By: Acting Technical Leader Issue Date: May 06, 2016 Uncontrolled When Printed Page 128 of 233
11. Genetic Analyzer Sample Preparation
11.1. Amplified samples can be analyzed by injection into a capillary on the Applied Biosystems Genetic Analyzer 3130xl. An internal lane size standard is loaded with each sample to allow for automatic sizing of the PCR products and to normalize differences in electrophoretic mobility between injections. Genemapper ID-X software is then used for automatic analysis and genotyping of alleles in the collected data.
11.2. Safety
11.2.1. Body fluids, tissues, and extracts may contain infective agents. Use universal precautions during evidence handling. Follow instructions for reagent preparation. Gloves must be worn during testing. Clothing may protect unbroken skin; broken skin must be covered.
11.2.2. Exposure to formamide may have chronic health effects and may be toxic to internal organs; avoid ingestion or inhalation.
11.3. Related Forms – 3130 Maintenance, 3130 As-Needed Maintenance
11.4. Equipment, Materials, and Reagents
• Applied Biosystems 3130xl Genetic Analyzer (instrument, computer and appropriate software) • Manual: Applied Biosystems 3130/3130xl Genetic Analyzers: Getting Started Guide • Manual: ABI PRISM® 3100-Avant Genetic Analyzer: User Guide: Rev B • 3130XL & 3100 capillary array 36 cm (PN 4315931) MicroAmp® Optical 96-Well Reaction Plate (PN N801-0560) Plate septa 96-well (PN 4315933) • MicroAmp splash free 96-well base (PN 4312063) • MicroAmp® 8-Cap Strip (PN N801-0535) • Genetic Analyzer Buffer Reservoirs • 3130 & 3100 series reservoir septa (PN 4315932) • AmpFlSTR® Identifiler® PCR Amplification kit ladder (PN 4322288) • AmpFlSTR® Yfiler™ PCR Amplification kit ladder (PN 4359513) • AmpFlSTR® Identifiler® Plus PCR Amplification kit ladder (PN 4427368) • GeneScan 500 Liz size standard (PN 4322682) • Matrix Standard Set DS-33 (P/N 4345833) • HiDi formamide (PN 4311320) 3130 POP-4 Polymer 7ml (PN 4352755) • Buffer 10X w/ EDTA (25ml) (PN 40284) • Deionized water • Genetic Analyzer 4 ml Buffer Vials (P/N 401955) • vortex • microcentrifuge tubes 1.5 ml

Forensic Biology DNA SOP Manual
Forensic Analysis Division
DNA SOP Manual FAD-FB-DNA-SOP Issued By: Acting Technical Leader Issue Date: May 06, 2016 Uncontrolled When Printed Page 129 of 233
• microtube racks • pipets • pipet tips • GeneAmp® PCR System 9700 Thermalcycler
11.5. Standards, Controls, and Calibration
11.5.1. An appropriate allelic ladder, an amplification positive control and amplification negative control shall be included with each Genetic Analyzer run. A “run” refers to the collection of injections that are part of an individual plate record. An internal size standard (GS500 LIZ) shall be added to each sample.
11.6. Instrument Maintenance for the 3130xl Genetic Analyzer
11.6.1. Record all maintenance tasks in the log book each time maintenance is performed on the instrument.
11.7. Starting the AB Prism® 3130xl Genetic Analyzer 11.7.1. Turn on the computer. When the “Log On to Windows” dialog box appears, type
“3130User” in the “User Name” and “3130User” in the “Password:” box. Click OK. Ensure the computer has finished booting up before turning on the AB Prism® 3130xl Genetic Analyzer.
11.7.2. While the computer is logging on, check and ensure the oven door is locked and the instrument doors are closed. Once the main screen appears and the “hour glass” symbol disappears, start the AB Prism® 3130xl Genetic Analyzer by pressing the on/off button on the front left side of the instrument. Ensure the solid green light is on before proceeding.
11.7.3. Start the 3130xl Data Collection Software v 3.0 by either clicking on the shortcut icon on the computer desktop or by selecting Start>All programs>Applied Biosystems>Data Collection>Run 3130xl Data Collection v3.0 (>= then).
11.7.4. The service console appears on the screen. The image turns from a red circle to a green square as each application is activated; the yellow triangle indicates the function is in the process of activating. Those functions include: Messaging Service, Data Service, Instrument Service, and Viewer.
11.7.5. Once all of the applications are activated, the AB Prism® 3130xl Genetic Analyzer operation screen appears.

Forensic Biology DNA SOP Manual
Forensic Analysis Division
DNA SOP Manual FAD-FB-DNA-SOP Issued By: Acting Technical Leader Issue Date: May 06, 2016 Uncontrolled When Printed Page 130 of 233
11.7.6. The Data collection software is based on an Explorer tree format. Click the “+” symbol
next to each folder and subfolder heading on the left tree pane to view all applications associated with the software. Selecting any item in the left side tree allows you to view that operational screen on the right side of the screen.
11.7.7. The instrument and computer are now ready for use. If the computer gives you a blue screen or the AB Prism® 3130xl Genetic Analyzer has a red blinking light at any time during these steps, make a note of the error message before restarting the instrument or the computer.
Note: If the AB Prism® 3130xl Genetic Analyzer freezes, you must restart the instrument and computer.
11.8. Schedule 11.8.1. Daily when the instrument is in use:
11.8.1.1. Replenish 1X buffer and water in reservoirs unless no runs have been performed between weekly maintenance and current run.
11.8.1.2. Inspect block and polymer channels for dried polymer. 11.8.1.3. Remove bubbles if present. 11.8.1.4. Inspect capillary tips in loading-end header. 11.8.1.5. Clean or replace capillary as needed. 11.8.1.6. Inspect volume of polymer in polymer supply bottle to ensure enough is available
for all scheduled runs 11.8.1.7. Check for leaks around all fittings on the pump and lower polymer block 11.8.1.8. Clean 3130xl surfaces.
11.8.2. Weekly when the instrument is in use: 11.8.2.1. Restart the computer. 11.8.2.2. Clean the water and buffer reservoirs. 11.8.2.3. Perform water flush of the pump chamber. 11.8.2.4. Clean drip trays. 11.8.2.5. Check number of injections for the capillary array. Replace as needed.
11.8.3. Every two weeks when the instrument is in use: 11.8.3.1. Replace polymer bottle. Select the Replenish Polymer or Change Polymer Type
Wizard to replace polymer older than one week.

Forensic Biology DNA SOP Manual
Forensic Analysis Division
DNA SOP Manual FAD-FB-DNA-SOP Issued By: Acting Technical Leader Issue Date: May 06, 2016 Uncontrolled When Printed Page 131 of 233
11.8.3.1.1. If data indicates a loss of resolution, then the polymer needs to be changed immediately
11.8.4. As needed: 11.8.4.1. Replace capillary array. 11.8.4.2. Replace blocks. 11.8.4.3. Perform spatial calibration. 11.8.4.4. Perform spectral calibration. 11.8.4.5. Defragment the computer hard drive.
11.9. Daily Preventive Maintenance on the 3130xl for DNA Fragment
Analysis when the instrument is in use Note: Refer to Appendix B for a diagram of the interior of the instrument and an explanation of functions.
11.9.1. Check and make sure that the maintenance log has been filled out for that day. If the daily maintenance log has not been completed, perform the required daily instrument maintenance. Daily maintenance shall be performed by the first person using the AB Prism® 3130xl Genetic Analyzer each day.
11.9.2. With the AB Prism® 3130xl Genetic Analyzer doors closed, press the “Tray” button on the outside of the instrument to bring the autosampler deck to the forward position.
11.9.3. When the autosampler has stopped moving, open the AB Prism® 3130xl Genetic Analyzer doors.
11.9.4. Remove any 96 well optical plates from previous runs and discard or store in the freezer. Note: Do not store HiDi-Formamide re-suspended plates in the refrigerator. Storage in the refrigerator causes the HiDi-Formamide to break down into formic acid, which hydrolyzes to negatively charged formate ions that compete for injection with DNA. If the plate is accidentally stored in the refrigerator, store the plate in the -20ºC freezer for at least 3 hours before re-injecting the samples.
11.9.5. Ensure the polymer supply bottle attached next to the lower anode buffer chamber (see Appendix B) has enough POP4 (fragment analysis) in it. The polymer supply bottle should have at least 1ml of polymer in it (see image below). When the POP4 level is equal with this line, there is approximately 1ml in the bottle.
Note:

Forensic Biology DNA SOP Manual
Forensic Analysis Division
DNA SOP Manual FAD-FB-DNA-SOP Issued By: Acting Technical Leader Issue Date: May 06, 2016 Uncontrolled When Printed Page 132 of 233
• The amount of polymer shall be checked during the daily maintenance as well as before every run.
• One 96 well optical plate equals at least 6 runs on the AB Prism® 3130xl Genetic Analyzer. One run is equal to up to16 samples (16x6=96).
• Approximately 80μl of POP4 to fill the capillary array (16 capillaries) is needed for each run. 11.9.6. If there is sufficient polymer, click the instrument status icon on the left side of the
3130xl data collection software to see the date that polymer was last added. If the polymer is older than 14 days, it needs to be replaced.
11.9.7. If there is not enough polymer (POP4) to run the AB Prism® 3130xl Genetic Analyzer for the number of designated runs and the polymer on the instrument is less than seven days old, add polymer from the same lot to the supply bottle. If the new polymer is from a different lot, then replace the polymer supply bottle.
11.9.8. If polymer needs to be added to the instrument, take a new bottle of polymer out of the refrigerator, loosen the cap and allow the polymer to warm to room temperature (15 minutes). The reason for this is that as the polymer warms up, it lets off gas in the form of bubbles. If degassing occurs within the pumping mechanism, the bubbles cause the AB Prism® 3130xl Genetic Analyzer to arc during a run. Arcing eventually causes the lower buffer chamber electrode to melt, which causes the instrument to stop running and the lower buffer chamber will have to be replaced.
11.9.9. As the polymer is warming up, remove the cathode buffer reservoir as well as the two water reservoirs. Discard the old buffer and water. Wash each reservoir with deionized water and thoroughly dry the inside and outside with a kimwipe.
11.9.10. Refill the water reservoirs with deionized water and the buffer reservoir with 1X Genetic Analyzer buffer with EDTA. Prepare 1x buffer by diluting 10x buffer-1 part buffer to 9 parts water with deionized water. Store 1x buffer at 2-8° C for 1 month or at room temperature for 1 week.
11.9.11. Place the 16 well septa on each reservoir. Ensure the septa are firmly seated and flat with the chamber. If they are not, the capillary may bend or break. If you notice that a capillary is bent or broken, refer to changing out the array in section 11.4. Place the reservoirs back onto the autosampler as seen below.
NOTE: It is critical that each reservoir is returned to its original location. The reservoirs and the position on the autosampler are labeled.

Forensic Biology DNA SOP Manual
Forensic Analysis Division
DNA SOP Manual FAD-FB-DNA-SOP Issued By: Acting Technical Leader Issue Date: May 06, 2016 Uncontrolled When Printed Page 133 of 233
11.9.12. If there is sufficient polymer in the supply bottle, proceed to step 11.10.1.4. If additional polymer is needed in the polymer supply bottle, proceed to step M. If expired polymer needs to be discarded or a different lot of polymer needs to be added to the polymer supply bottle, proceed to step 11.10.1.
11.9.13. To replenish the polymer in the polymer supply bottle: 11.9.13.1. Click on the instrument status icon to pull up the instrument status screen on the
right side of the data collection software. 11.9.13.2. Select the “Wizards” tab from the top of the instrument status window and select
the Replenish Polymer Wizard.
11.9.13.3. Follow the instructions to add new polymer to the supply bottle with the same lot
number. The wizard aids you in removing any air bubbles introduced into the system.
11.9.13.4. At the end of the wizard, it asks if the array needs to be refilled. Choose to fill the array in order for old polymer to be removed from the array.
11.10. Weekly and Quarterly Preventive Maintenance of the 3130xl when the instrument is in use
11.10.1. To install new polymer after 7 days or a different lot of polymer: 11.10.1.1. Select the “Water Wash Wizard.” Follow directions on how to flush the system
with distilled water before adding the new polymer.
11.10.1.2. Select the “Replenish Polymer Wizard.” Follow the instructions to add the new
bottle of polymer and to remove the air bubbles introduced into the system. 11.10.1.3. At the end of the wizard, it asks if the array needs to be filled. Chose to fill the
array to remove the old polymer from the array.

Forensic Biology DNA SOP Manual
Forensic Analysis Division
DNA SOP Manual FAD-FB-DNA-SOP Issued By: Acting Technical Leader Issue Date: May 06, 2016 Uncontrolled When Printed Page 134 of 233
11.10.1.4. Check to see if there are any bubbles present in the pump delivery system (the 5 areas to look at are designated by an “*”).
11.10.1.5. If bubbles are present at any of the positions indicated above, click the “Wizard”
tab and select the “Bubble Remove Wizard.” Follow the instructions on how to remove bubbles from the system.
Note: If the bubble is larger than 0.2mm (about the size of the pointed end of a pin), then remove that bubble from the instrument with the “Bubble Remove Wizard”. The operational software has a voltage tolerance setting that helps with preventing blown blocks, but one should not rely on it.
11.10.2. To flush and fill the water seal trap: 11.10.2.1. Fill the supplied 20 mL, all-plastic Luer lock syringe (in the PDP Cleaning kit) with
deionized water. Expel any bubbles from the syringe. 11.10.2.2. Do not use a syringe smaller than 20 mL. Doing so may generate excessive
pressure within the trap. 11.10.2.3. Attach the syringe to the forward-facing Luer fitting at the top of the pump block.
Hold the fitting with one hand while threading the syringe onto the fitting with the other hand.
11.10.2.4. Open the Luer fitting by grasping the body of the fitting and turning it and the attached syringe approximately one-half turn counterclockwise.
11.10.2.5. Open the exit fitting at the top left side of the pump bock by turning it approximately one-half turn counterclockwise.
11.10.2.6. Hold an empty tube or beaker under the exit fitting to receive approximately 5mL of waste. Flush the trap by pushing steadily on the syringe plunger.

Forensic Biology DNA SOP Manual
Forensic Analysis Division
DNA SOP Manual FAD-FB-DNA-SOP Issued By: Acting Technical Leader Issue Date: May 06, 2016 Uncontrolled When Printed Page 135 of 233
11.10.2.7. Close the fittings in this order by turning each clockwise until the fittings seal against the block: • Luer fitting • Exit fitting • Remove the syringe from the Luer fitting. Hold the fitting with one hand while
turning the syringe counterclockwise with the other hand.
11.11. Dell Personal Computer (PC) and AB Prism® 3130xl Genetic Analyzer 11.11.1. The Dell computer and AB Prism® 3130xl Genetic Analyzer must be re-booted when a
fatal error has occurred as indicated by the red light status. Optional: The computer can be re-booted once a week, preferably on the day of the weekly maintenance.
11.11.2. To reset the instrument, close the doors and turn the instrument off by pressing the on/off button located on the front left side of the instrument. Restart the computer by pressing shutdown from the Start menu and wait until the computer has completely shut down.
11.11.3. To restart the AB Prism® 3130xl Genetic Analyzer, you must first start the computer, wait for the “Log On to Windows” dialog box to appear. In the “User Name” box type “Administrator” and in the “Password” box type “Trouble” and then click OK. Make sure that it has finished booting up before turning the AB Prism® 3130xl Genetic Analyzer on.
11.11.4. While the computer is logging on, check and ensure that the oven door is locked and the instrument doors are closed. Once the main screen appears and the “hour glass” symbol disappears, start the AB Prism® 3130xl Genetic Analyzer by depressing the on/off button on the front left side of the instrument. Ensure that the solid green light is lit before proceeding.
11.11.5. Start 3130xl Data Collection Software v 3.0 by either clicking on the 3130xl Data Collection icon on the desktop or by selecting Start>All programs>Applied Biosystems>Data Collection>Run 3130xl Data Collection v3.0 (>= then) and wait for the 3130xl operation screen to appear.
11.11.6. The Data collection software is based on an Explorer tree format. Select the “+” symbol next to each folder and subfolder heading on the left tree pane to view all applications associated with the software. Selecting any item in the left side tree enables the operational screen on the right side of the screen to be
11.11.7. The instrument and computer are now ready for use. At any time during these steps if the computer exhibits a blue screen or the AB Prism® 3130xl Genetic Analyzer has a red blinking light, make a note of the error message before proceeding. It is important that the error messages are observed before restarting the instrument or the computer.
Note: If the instrument freezes, the instrument and computer must be restarted. 11.12. Dell Personal Computer (PC) Maintenance
11.12.1. Defragmenting the hard drive

Forensic Biology DNA SOP Manual
Forensic Analysis Division
DNA SOP Manual FAD-FB-DNA-SOP Issued By: Acting Technical Leader Issue Date: May 06, 2016 Uncontrolled When Printed Page 136 of 233
Frequency: As needed when the instrument is in use 11.12.1.1. From Windows desktop, right click on My Computer 11.12.1.2. Select Manage 11.12.1.3. Click Computer Management (Local) > Disk Defragmenter 11.12.1.4. Select E Drive 11.12.1.5. Click Defragment
11.12.2. Check Available Disk Space
Frequency: As needed when the instrument is in use. 11.12.2.1. From tree pane of Data Collection software > GA Instruments > Database
Manager. 11.12.2.2. Click on Disc Space Status Window bar to reveal available space. 11.12.2.3. Archive data and delete archived data as needed.
11.12.3. Delete Archived Data from Hard Drive
11.12.3.1. In tree pane of Data Collection Software, select GA Instrument > Database manager.
11.12.3.2. Select Cleanup Processed Plates. 11.12.3.3. Select OK after reading dialog box.
11.13. Annual Preventive Maintenance of the 3130xl when the instrument is in use
11.13.1. An annual calibration performed by an outside vendor is required for the 3130xl Genetic Analyzer. After the calibration is performed, a performance check is required before release back into casework.
11.14. Running the AB Prism® 3130xl Genetic Analyzer 11.14.1. Prior to running the instrument, ensure that the daily preventive maintenance tasks
have been performed according to 11.9 of this manual. 11.14.2. Clean out the drip trays and any crystallized polymer with deionized water. 11.14.3. To flush the instrument and add a new bottle of polymer:
11.14.3.1. Select the “Water Wash Wizard” and follow directions on how to flush the system with distilled water before adding the new polymer. See image from daily maintenance log.
11.14.3.2. Replace the water wash bottle with a new bottle containing POP4 when prompted. Continue with the wizard.
11.14.3.3. At the end of the wizard, it asks you if you would like to fill the array. Choose to fill the array to flush the old polymer out of the array.
11.14.4. Check to see if there are any bubbles present in the pump delivery system (areas to look at designated by *). See image from Weekly and Quarterly Preventive Maintenance.

Forensic Biology DNA SOP Manual
Forensic Analysis Division
DNA SOP Manual FAD-FB-DNA-SOP Issued By: Acting Technical Leader Issue Date: May 06, 2016 Uncontrolled When Printed Page 137 of 233
11.14.5. If bubbles are present at any of the positions noted, select the “Wizard” tab and then the “Bubble Remove Wizard.” Follow the instructions on how to remove bubbles from the system.
11.14.6. The instrument is ready to run the spatial calibration if needed.
11.15. Running a Spatial Calibration on the 3130xl 11.15.1. A spatial calibration must be performed each time a new capillary array is installed, if
the capillary is temporarily removed from the detection block, or if the instrument is moved.
Note: A spatial calibration provides information on each capillary’s fluorescence position for the CCD camera, but does not provide information about the capillary’s performance.
11.15.2. From the left side of the Data collection software, double click on the Spatial Run Scheduler to perform a spatial run.
11.15.3. Under the Protocol drop down, select 3130SpatialFill_1 or 3130SpatialNoFill_1 and
then click the start button. The run takes approximately 2 minutes if not filling the array and 6 minutes if filling the array.
Note: 11.15.4. Always chose 3130SpatialFill_1 when running the spatial the first time after weekly
duties have been performed or when a new capillary has been placed on the instrument. 11.15.5. The 3130SpatialNoFill_1 option is used if it is not a new capillary or if the spatial is
being rerun. 11.15.6. As the spatial is run, the intensity vs. pixel number graph updates until the spatial
calibration is finished. When the spatial calibration is finished, the Accept and Reject buttons are active (lower right).

Forensic Biology DNA SOP Manual
Forensic Analysis Division
DNA SOP Manual FAD-FB-DNA-SOP Issued By: Acting Technical Leader Issue Date: May 06, 2016 Uncontrolled When Printed Page 138 of 233
11.15.7. When evaluating a passed spatial (pictured above), each capillary must have a single sharp peak with small shoulders and the peak heights greater than 2000 relative fluorescence units (RFUs) and similar for all 16 capillaries. There is only one orange cross above the center of each peak. The capillary position (pixels) values between one capillary and the next increases by increments of 14, 15 or 16, with 15 being the theoretical spacing between each capillary. For example, in the profile that passed, capillary one has a position value of 11, capillary two has a position value of 26, and the spacing between capillary one and two is 15.
11.15.8. Make sure that the right and left side spacing for each capillary is 14, 15 or 16, except the left side spacing for capillary one is zero.
11.15.9. After evaluating the profile, click the OK button. The spatial calibration run window appears. Click the OK button to accept the new spatial array and to overwrite the old spatial. The instrument is now ready to run.
11.15.10. If you reject the spatial due to high shouldering or the pixels being less than 15 or 16, re-run the spatial using the 3130SpatialNoFill_1 option. Evaluate the spatial using the guidelines above.
11.15.11. If the spatial has failed a second time, but is better than the first, run the spatial a third time using the 3130SpatialNoFill_1 option again.
11.15.12. If the spatial fails a third time, open the laser detection window and clean the capillary mirror with a kimwipe to remove any dust or fingerprints. Repeat steps A through I.
11.15.13. If the spatial still does not pass, notify the Technical Leader.
11.16. Installing and Removing the Capillary Array on the 3130xl 11.16.1. A capillary array should be changed if any capillary fails multiple times during a single
plate. In addition, if any one of the following conditions is observed before approximately 100 runs based upon AB’s recommendation, a new array should be installed: poor resolution, poor allele calling or decreased signal intensity.
11.16.2. Fill in the appropriate information in the log book: the date, array serial number, and the number of runs (found under the status window in the 3130xl collection software).
11.16.3. Depress the tray button and allow the autosampler to move completely to the forward position before opening the instrument doors.
11.16.4. From the 3130xl data collection software, click on the Instrument Status icon on the left side of the screen and then select the Wizards tab from the top of the Data Collection window and the following dialog box appears.

Forensic Biology DNA SOP Manual
Forensic Analysis Division
DNA SOP Manual FAD-FB-DNA-SOP Issued By: Acting Technical Leader Issue Date: May 06, 2016 Uncontrolled When Printed Page 139 of 233
11.16.5. Click on Install Array Wizard and follow the directions given in the wizard to replace or
install an array. 11.16.6. Once the array has been installed, you must run a spatial calibration. Follow the
Running a Spatial Calibration procedure outlined above.
11.17. Performing Spectral Calibrations on the 3130xl 11.17.1. A spectral calibration must be performed at least once every 6 months or when there is
a need such as excessive pull-up or increased baseline. 11.17.2. Dyes contained within the dye set, G5, are: 6-FAM – blue VIC – green NED – yellow PET – red LIZ – orange
11.17.3. Overview of the Spectral Calibration Procedure: 11.17.3.1. Spectral Calibrations Requirements:
11.17.3.1.1. Spectral Calibrations are required to be performed when the instrument is first installed in the lab, if the capillary array length changes, if the laser has been replaced, if the mirrors or CCD camera is realigned, and if the quality of the data decreases (i.e. elevated baselines, increased pull-up between the color channels).
11.17.3.2. Software Setup: 11.17.3.2.1. Begin the procedure by preparing the instrument and calibration standards.
Next, set up the run using the Plate Manager window of the 3130xl Data Collection software. When prompted during the software setup, select a specific Instrument Protocol: the Dye set (the Spectral parameter file and algorithm to use), Polymer type, Chemistry (matrix Standard), Array length and run module (run conditions). All instrument protocols have been predefined.
11.17.3.3. Standards Calibration: 11.17.3.3.1. During the calibration, dye-labeled DNA fragments are electrophoresed.
During data collection, the fluorescent signals are separated by a diffraction

Forensic Biology DNA SOP Manual
Forensic Analysis Division
DNA SOP Manual FAD-FB-DNA-SOP Issued By: Acting Technical Leader Issue Date: May 06, 2016 Uncontrolled When Printed Page 140 of 233
grating according to their wave lengths and projected onto the CCD camera. Through multicomponent analyses, the instrument generates a spectral calibration that removes the emission overlap between dyes (See figure below).
11.17.3.3.2. Data Analyses:
11.17.3.3.2.1. After the calibration run, the software analyzes the spectral for each capillary and passes the spectral if the fluorescence emission maxima for each dye color is between 750 to 3000 RFUs and the quality (Q-value) and condition (C-value) values are within the defined parameters. If a capillary’s spectral fails, the software automatically replaces the failed spectral with a passed spectral from the next nearest capillary, the left side taking priority over the right side. Even though the instrument has passed a spectral calibration, it does not mean that the calibration data should necessarily be used in data analysis. All 16 spectral calibrations must be evaluated before saving and using them in data analysis. Ideally, each capillary should have its own passed spectral.
11.17.4. Performing Spectral Calibration using default parameters 11.17.4.1. Preparation of DNA AmpFlSTR®-Identifiler Matrix Standard Set D33 (G5 matrix
dyes): 11.17.4.1.1. Ensure that the daily and/or weekly maintenance has been performed
before starting this procedure. 11.17.4.1.2. Obtain the AmpFlSTR®-Identifiler Matrix Standard Set D33 (G5 matrix dyes)
Note: There is instrument-to-instrument variation in the sensitivity of detection. Matrix sample dilutions described here may need to be optimized for each AB Prism® 3130xl Genetic Analyzer.
• Thaw and thoroughly mix the contents of the Matrix Standard Set DS-33 tube, then spin briefly in a microcentrifuge.
• Combine 5 μl of DS-33 and 195 μl of HiDi-Formamide in a 1.5 ml microcentrifuge tube vortex to mix, and spin briefly in a centrifuge.
Note: Matrix sample dilution recipe may be increased as necessary.

Forensic Biology DNA SOP Manual
Forensic Analysis Division
DNA SOP Manual FAD-FB-DNA-SOP Issued By: Acting Technical Leader Issue Date: May 06, 2016 Uncontrolled When Printed Page 141 of 233
11.17.5. Preparation of Spectral Load Plate and Loading on Instrument 11.17.5.1. To load the standards, dispense 10μl of Matrix standard set D-33 into wells A1-
H2 of a 96 well optical plate as seen in the figure below.
11.17.5.2. Cover the wells with a clean 96 well septa, briefly spin down, heat denature the
samples for 3 minutes at 95ºC, and chill in the freezer for 3 minutes.
11.17.5.3. Then place the optical plate into the plate base and cover with the plate retainer. 11.17.5.4. Place the plate assembly onto the autosampler platform. When the plate is on
correctly, the plate indicator in the Plate View window turns yellow. 11.17.5.5. Turn the oven on by clicking the Manual Control icon on the left side of the
screen. In the manual control box select oven and then select oven temp. Type in “60” for STR spectral dyes and click the set button. Next select the set state and turn on, and then click the set button. Click on the instrument status on the left side of the screen and the temperature is highlighted in yellow.
11.17.5.6. Click the Plate Manager on the left side of the 3130xl Data Collection software to go to the Plate Manager View page.
11.17.5.7. Click the “New…” tab to initiate the New Plate Dialog box. 11.17.5.7.1. Name your plate (no spaces or slashes in plate OR sample names). 11.17.5.7.2. Add any comments necessary in the description box. 11.17.5.7.3. Select Spectral Calibration from the Application drop down box. 11.17.5.7.4. Specify the plate as 96-well plate form the Plate Type drop down. 11.17.5.7.5. Type your initials in the owner box and the operator box. 11.17.5.7.6. Click OK.

Forensic Biology DNA SOP Manual
Forensic Analysis Division
DNA SOP Manual FAD-FB-DNA-SOP Issued By: Acting Technical Leader Issue Date: May 06, 2016 Uncontrolled When Printed Page 142 of 233
11.17.5.8. The Spectral Calibration Plate Editor opens :
11.17.5.8.1. Type Spectral for the sample name (wells A1-H2). 11.17.5.8.2. Leave comments blank. 11.17.5.8.3. Priority is 100. 11.17.5.8.4. Select Instrument Protocol: SpectralG5: 11.17.5.8.5. Click OK.
Note: Instrument Protocols are predefined during instrument set up and must not be altered without notifying the Technical Leader or designee. (See representative picture below).
11.17.6. To Link a Plate Record to a Sample Plate

Forensic Biology DNA SOP Manual
Forensic Analysis Division
DNA SOP Manual FAD-FB-DNA-SOP Issued By: Acting Technical Leader Issue Date: May 06, 2016 Uncontrolled When Printed Page 143 of 233
11.17.6.1. To link the Spectral plate record to your spectral sample plate, click the Run Scheduler folder on the 3130xl Data Collection software window to open the Run Scheduler view.
11.17.6.2. On the Run scheduler view: Select your Plate Record, which has a status of
“pending” in the Status column and Spectral Calibration in the Application Column, then select the plate to be linked to the sample sheet.
11.17.6.3. Verify that the plate has been linked. Once the plate has been linked, the plate position indicator for the linked plate becomes green, the Run Instrument button on the toolbar is enabled, and the position A or B is placed next to the sample sheet in the Link column.
11.17.6.4. Select the Instrument Status folder on the left side of the 3130xl Data Collection Software and click the green Run arrow to start the instrument.
Note: The pre-run must be started before the instrument is left unattended to ensure that there are no air bubbles in the array that may cause the instrument to arc. During the pre-run, the EP current should be between 140-160 and stable. If it is fluctuating or dropping quickly, click the stop button on the tool bar and look for bubbles in the instrument. Use the Bubble Remove Wizard to remove bubbles. The sample sheet needs to be edited in the Plate Manager Window to initiate another run for the one that was terminated. This can be done while the plate is linked.
11.17.6.5. At the end of the run, open the Event Log under the Instrument Status folder. In the event status dialog box, the number of capillaries that passed is listed. At least 14 out of 16 capillaries have to pass.

Forensic Biology DNA SOP Manual
Forensic Analysis Division
DNA SOP Manual FAD-FB-DNA-SOP Issued By: Acting Technical Leader Issue Date: May 06, 2016 Uncontrolled When Printed Page 144 of 233
11.17.7. Displaying and Reviewing a Spectral Calibration: 11.17.7.1. To evaluate the spectral calibration, select the Spectral Viewer from the 3130xl
Data collection software. 11.17.7.2. The following data box appears:
Note: The default Dye Set on the screen is the last Dye Set that was run on that instrument.
11.17.7.3. For Dye Set G5 (Matrix Standard D-33):
11.17.7.3.1. Select the G5 from the Dye Set drop down. 11.17.7.3.2. A green square indicates the spectral for that capillary passed; a brown
square indicates that the spectral for that capillary failed. 11.17.7.3.3. Click on the individual capillaries to verify the spectral profile, the Q value,
Condition value, and the raw data. 11.17.7.3.4. Verify order of peaks in spectral viewer: 5-dye: blue-green-yellow-red-
orange.

Forensic Biology DNA SOP Manual
Forensic Analysis Division
DNA SOP Manual FAD-FB-DNA-SOP Issued By: Acting Technical Leader Issue Date: May 06, 2016 Uncontrolled When Printed Page 145 of 233
11.17.7.3.5. Verify peaks in raw data so the spectral profile does not contain gross overlaps, dips or other irregularities.
11.17.7.4. To accept spectral for Dye Set G5 Matrix Dyes 11.17.7.4.1. Q-values above 0.95. 11.17.7.4.2. Condition numbers (C-value) 7-12. 11.17.7.4.3. The fluorescent peaks are pointed at the top of the curve, unlike the blue
channel in the picture above that has a flat peak. If flat peaks occur, dilute the standards further and re-run the spectral.
11.17.7.4.3.1. Re-dilution of standards that generated flat peaks is not empirical but based on the RFUs to the left of the screen and previously generated matrix results.
11.17.7.4.3.2. The initial dilution was 1:40. If the RFUs are less than 1000, a 1:30 dilution should be tried. If the RFUs are greater than 4000 and there is a flattening of the peaks, a 1:50 dilution should be tried.
11.17.7.4.3.3. Further dilutions may be necessary. The better the quality of matrix, the higher quality the data is (less elevated baseline and bleed through).
11.17.7.4.4. If all of the Q-values and C-values are within specifications, and 14 out of 16 capillaries have passed, no further action is required.
11.17.7.4.5. If the Q and C-values are below the acceptable limits or less than 14 capillaries have passed, the spectral calibration has to be re-run starting from the beginning. The same plate for Matrix standard D-33, cannot be used; a new plate must be made.
11.17.8. Activating a Spectral Calibration 11.17.8.1. Click Spectral Viewer 11.17.8.2. In Dye Set drop-down list, select dye set G5 11.17.8.3. In the List of Calibrations for Dye Set drop-down list, select the spectral
calibration you want to activate. 11.17.8.4. Click Set.
11.17.9. Evaluation of the new Spectral Calibration
11.17.9.1. For STR Fragment spectral calibrations: 11.17.9.1.1. It is recommended that a set of allelic ladders or positives be run to
evaluate the Spectral calibration. Results are assessed for baseline integrity, peak resolution and the degree of pull-up between color channels.
11.17.9.1.1.1. Pull up should be approximately 2% of the true allele peak for DNA samples under 2.5 ng. For example, when looking at a 3000 RFU peak, the pull-up into the other color channels should not exceed 60 RFUs.

Forensic Biology DNA SOP Manual
Forensic Analysis Division
DNA SOP Manual FAD-FB-DNA-SOP Issued By: Acting Technical Leader Issue Date: May 06, 2016 Uncontrolled When Printed Page 146 of 233
11.17.9.2. If for any reason, the data is not consistent with previously run spectral calibration data for that instrument, or it does not match results from the validation or performance check of the instrument, the spectral must be re-run.
11.18. Preparing Samples for loading on the 3130xl 11.18.1. Internal size standards and allelic ladders, along with amplification positive and
negative controls, are included in every run on a genetic analyzer. It is advisable that at least two, well-spaced ladders are included on each run. The manufacturer recommends at least one ladder every 16 samples.
11.18.1.1. STR Fragment analysis sample preparation for Identifiler®, Identifiler® Plus, or Yfiler:
11.18.1.1.1. Bring GeneScan-500 LIZ, Identifiler®, Identifiler® Plus, or Yfiler™ Ladder and Hi-Di formamide to room temperature.
11.18.1.1.2. Label the plate. 11.18.1.1.3. Prepare a loading cocktail for Identifiler®, Identifiler® Plus, or Yfiler™
amplification reactions as follows: • (0.15-0.3 μl LIZ_GeneScan500) x (# of samples) • + (8.85-8.7 μl HiDi-Formamide) x (# of samples)
Note: Be sure to include the allelic ladders in the calculations. 11.18.1.1.4. Pipette 9μl of loading cocktail into each well that will contain a sample. Fill
any wells that do not contain a sample with 10μl of HiDi Formamide or extra Master Mix as calculated by the workbook(s). Since 16 capillaries will be injecting DNA simultaneously, an even number of columns must contain liquid (e.g. if 7 columns contain samples, the 8th column must contain HiDi Formamide).
11.18.1.1.5. Add 1μl of amplified product or Allelic Ladder to the appropriate well, place a septa on the plate. Centrifuge the plate briefly. Heat denature for 3 minutes at 95ºC on a 9700, using the “Denature” program. Snap cool the plate in the freezer for 3-5 minutes.
11.18.1.2. To place the plate on the instrument, assemble the plate with the plate base and
the plate retainer as pictured and described below:

Forensic Biology DNA SOP Manual
Forensic Analysis Division
DNA SOP Manual FAD-FB-DNA-SOP Issued By: Acting Technical Leader Issue Date: May 06, 2016 Uncontrolled When Printed Page 147 of 233
11.18.1.2.1. Secure a clean dry septa strip on the sample plate. 11.18.1.2.2. Place the sample plate into the plate base. 11.18.1.2.3. Snap the plate retainer onto the plate and plate base.
11.18.1.3. Ensure the plate retainer holes are aligned with the holes in the septa strip.
11.18.1.4. Select the Run Scheduler option on the left hand tree of the operating software. Press the tray button to bring the autosampler to the front of the instrument. When the autosampler finishes moving, open the door and place the plate assembly on the autosampler as shown below:
Note: There is only one orientation for the plate: the notched end of the 96-well place must be aligned with the notched end of the plate base top when loading samples and the notched end of the plate base bottom must be away from the open door when loaded onto the 3130xl autosampler.
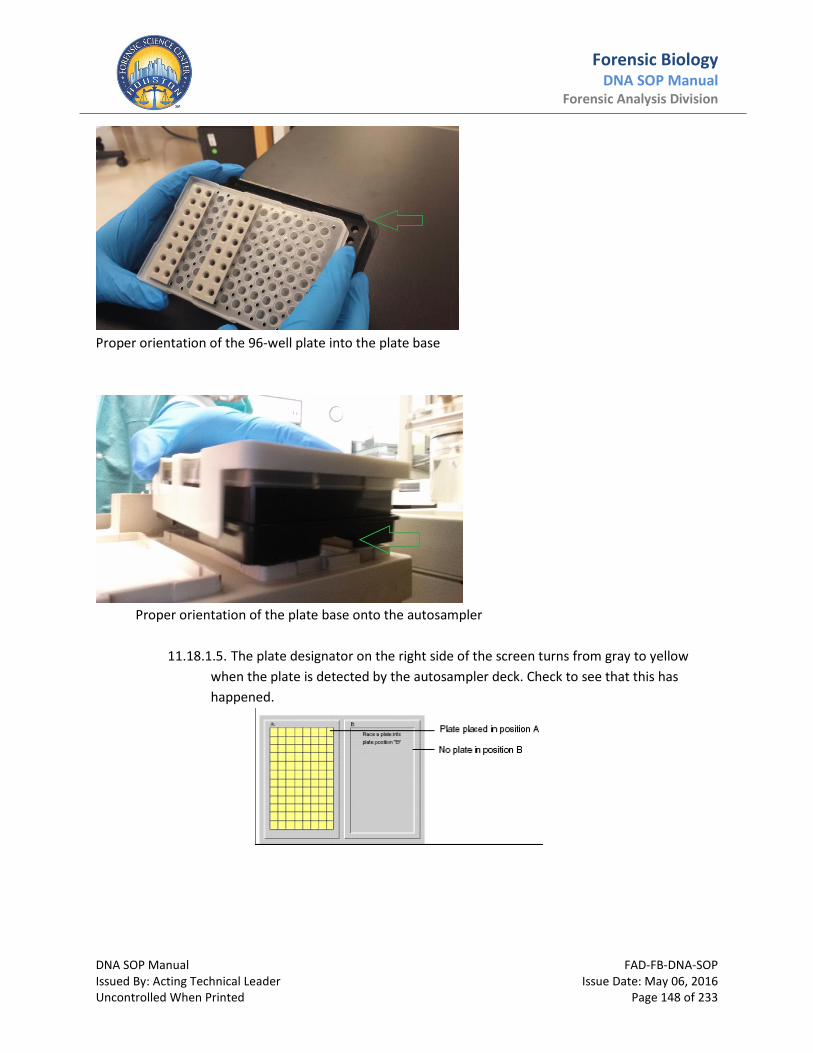
Forensic Biology DNA SOP Manual
Forensic Analysis Division
DNA SOP Manual FAD-FB-DNA-SOP Issued By: Acting Technical Leader Issue Date: May 06, 2016 Uncontrolled When Printed Page 148 of 233
Proper orientation of the 96-well plate into the plate base
Proper orientation of the plate base onto the autosampler
11.18.1.5. The plate designator on the right side of the screen turns from gray to yellow when the plate is detected by the autosampler deck. Check to see that this has happened.

Forensic Biology DNA SOP Manual
Forensic Analysis Division
DNA SOP Manual FAD-FB-DNA-SOP Issued By: Acting Technical Leader Issue Date: May 06, 2016 Uncontrolled When Printed Page 149 of 233
11.18.1.6. Close the instrument doors.
11.19. Creating an STR Fragment Analysis Plate Record 11.19.1. Click the Plate Manager on the left side of the 3130xl Data Collection software to go to
the Plate Manager View page.

Forensic Biology DNA SOP Manual
Forensic Analysis Division
DNA SOP Manual FAD-FB-DNA-SOP Issued By: Acting Technical Leader Issue Date: May 06, 2016 Uncontrolled When Printed Page 150 of 233
11.19.2. Click the New tab to initiate New Plate Dialog box.
11.19.2.1. Name your plate (no spaces or slashes in plate OR sample names). 11.19.2.2. Add any comments necessary in the description box 11.19.2.3. Select GeneMapper-3130xl (e.g. 3130-Beta) from the Application drop down box. 11.19.2.4. Specify the plate as 96-well plate form the Plate Type drop down. 11.19.2.5. Type your initials in the owner box and the operator box.
11.19.2.6. Click “OK” when finished.
11.19.3. In the GeneMapper-3130xl plate editor spread sheet, complete the plate record spreadsheet for the wells you have loaded.
11.19.3.1. Type the names of all the samples in the Sample Name column. Note: Do not exceed 29 characters. Letters, numbers and dots may be used. Do not use spaces or the “/” or “\.”
11.19.3.2. In the “Comments” section: Notations may be added here. This is optional. 11.19.3.3. For each sample, a priority of 100 is automatically assigned, which means that all
runs have the same priority and injections proceed from A1-H12 in groups of 16 samples. You are able to rank the priority of your runs by lowering the priority value for that sample (the lower the number the higher the priority). However, all 16 samples associated with that run are injected along with that sample.

Forensic Biology DNA SOP Manual
Forensic Analysis Division
DNA SOP Manual FAD-FB-DNA-SOP Issued By: Acting Technical Leader Issue Date: May 06, 2016 Uncontrolled When Printed Page 151 of 233
For example if the sample in well D7 needed to be run first, one could change the priority to 50 for that sample and then wells A7-H8 would be injected first followed in order by A1-H2, A3-H4, A5-H6, A9-H10 etc.
11.19.3.4. Select the correct sample type for each sample from the Sample Type drop-down list:
11.19.3.4.1. For Ladder, choose “Allelic Ladder” 11.19.3.4.2. For all other Samples, choose “Sample”. Amplification positive and
negative controls may be identified accordingly. 11.19.3.5. Select either Identifiler® or Yfiler™ related items from the Size Standard, Panel,
and Analysis Method drop down menus. These can also be left blank as the appropriate settings may be selected in the Genemapper ID software when analyzing data. E.g.:
11.19.3.5.1. Size Standard: CE_G5_HID_GS500 11.19.3.5.2. Panel: Identifiler_v2 11.19.3.5.3. Analysis Method: HPD3130
11.19.3.6. Select/insert the following: 11.19.3.6.1. SNP set: select “none” 11.19.3.6.2. Users Defined 1: indicate the injection seconds 11.19.3.6.3. Users Defined 2: optional: insert identifying information, such as the batch
to which the sample belongs 11.19.3.7. Select the 3130xl_beta or 3130xl_gamma from the Results Group 1 drop down. 11.19.3.8. Select the appropriate Instrument Protocol from the Instrument Protocol 1 drop-
down list. (e.g. 5_Second_Injection, 10_Second_ Injection, or 20_Second_ Injection) Note: Identifiler Plus samples may only use the 5 second or 10 second injection times.
11.19.3.9. Verify that the plate record is correct and then click OK. Note: It may take a while for the new plate record to be saved to the database and added to the Pending Plate Records table.
11.20. Importing a Plate Record for the 3130xl 11.20.1. From the Excel workbook
11.20.1.1. Click the Plate Manager folder on the 3130xl Data Collection software to go to the Plate Manager View page.
11.20.1.2. Click the Import tab on the bottom of the Plate Manger View screen and browse to the desired record. The record is the plate name.
11.20.1.3. Select record, and wait while 3130xl Data Collection software imports the load sheet into the plate manager window. Once imported, all of the other buttons at the bottom of the Plate Manager View window are enabled.

Forensic Biology DNA SOP Manual
Forensic Analysis Division
DNA SOP Manual FAD-FB-DNA-SOP Issued By: Acting Technical Leader Issue Date: May 06, 2016 Uncontrolled When Printed Page 152 of 233
11.20.1.4. Highlight the plate in the Plate Manager Window and then select the edit button to verify that all of your settings and sample names are correct.
11.20.2. To Link a Plate Record to a Sample Plate 11.20.2.1. To link the plate record to your sample plate, click the Run Scheduler folder on
the 3130xl Data Collection software window to open the Run Scheduler view.
11.20.2.2. On the Run scheduler view: Select the Plate Record, which has a status of
“pending” in the status column, and then select the desired plate to link to the sample sheet.
11.20.2.3. Verify that the plate has been linked. Once the plate has been linked, the plate position indicator for the linked plate becomes green, the Run Instrument button on the toolbar is enabled, and the position A or B is placed next to the sample sheet in the Link column.
Note: To unlink a plate, click the Unlink button. Note: To view a scheduled run, click the Run View window to verify runs are scheduled correctly. Select a row for any run and the corresponding wells to be injected for that run are highlighted in the plate diagram.

Forensic Biology DNA SOP Manual
Forensic Analysis Division
DNA SOP Manual FAD-FB-DNA-SOP Issued By: Acting Technical Leader Issue Date: May 06, 2016 Uncontrolled When Printed Page 153 of 233
11.20.2.4. Repeat steps 2 and 3 to link a second plate, if applicable.
11.20.2.5. Select the Instrument Status folder on the left side of the 3130xl Data Collection
Software and click the Green Run Arrow to start the instrument. Note: The pre-run must be started before the AB Prism® 3130xl Genetic Analyzer is left unattended to ensure there are no air bubbles in the array that may cause the instrument to arc. During the pre-run, the EP current should be stable between 140-160. If it is fluctuating or dropping quickly, click the “stop” button on the tool bar and look for bubbles in the instrument. Use the “Bubble Remove Wizard” to remove bubbles. In the “Plate Manager” window, edit the sample sheet to initiate another run for the one that was terminated. This can be done while the plate is linked.
11.21. Instrument Status of the 3130xl 11.21.1. Clicking on Instrument Status allows a person to monitor the status of the instrument
or current run. Under Instrument Status, a person can view EPT Chart and Event Log. Event log itemizes events such as errors and general information for all data collection steps.
11.21.1.1. Capillaries Viewer - Cap/Array Viewer 11.21.1.1.1. Click on Capillaries Viewer to examine the quality of raw data during a run
for several capillaries at once. Select checked boxes of capillaries for which you want electropherograms displayed. An electropherogram is a graph of relative dye concentration against time, plotted for each dye. The raw data displayed has been corrected for spectral overlap.
11.21.1.1.2. To zoom in and out, click on magnifying glass (with a + on it) and then place pointer over area of interest and click to expand view. Click on magnifying glass (with a - on it) to return to full view.

Forensic Biology DNA SOP Manual
Forensic Analysis Division
DNA SOP Manual FAD-FB-DNA-SOP Issued By: Acting Technical Leader Issue Date: May 06, 2016 Uncontrolled When Printed Page 154 of 233
11.21.1.1.3. Click on Cap/Array Viewer to examine quality of your data, which is displayed as color data for entire capillary array. You can view all capillaries (vertical axis) as a function of time/scan numbers (horizontal axis). To zoom in and out, follow preceding paragraph.
Note: Do not leave the capillary viewer on during a run as it may cause the computer to freeze.
11.22. Re-injecting while the instrument is running 11.22.1. If you choose to re-inject a sample from a plate that is running:
11.22.1.1. Click the Plate Manager folder on the 3130xl Data Collection software to go to the Plate Manager View page.
11.22.1.2. Select the correct plate ID. 11.22.1.3. Select Edit>Edit>Add Sample Run (Alt + A) 11.22.1.4. In the “Results Group” for the sample(s) being re-injected, select the appropriate
results group from the dropdown menu. 11.22.1.5. In “Instrument Protocol 2” for the sample(s) being re-injected, select the
appropriate module from the dropdown menu. 11.22.1.6. Select OK.
11.23. Re-injecting from an already created plate and plate ID
11.23.1. To re-inject from a plate that is already made, but the run has completed: 11.23.1.1. Click the Plate Manager folder on the 3130xl Data Collection software to go to the
Plate Manager View page. 11.23.1.2. Select Plate ID that is to be reused. 11.23.1.3. Select Duplicate. 11.23.1.4. Rename the plate accordingly. (If same day, add a suffix to distinguish from
original run; if new date, use the new date in the plate ID name) 11.23.1.5. Select OK. 11.23.1.6. Modify the plate accordingly (e.g., delete rows, change the injection module, etc.) 11.23.1.7. Select OK 11.23.1.8. Return to step 11.20.2.
11.24. Loading Sample Files on the 3130xl
11.24.1. When a run is finished, analyzed sample files are extracted into run folder located in: • E:\AppliedBiosystems\UDC\DataCollection\Data\Run Folder Name
11.24.2. After the run has been extracted to sample files, you can use GeneMapper Software to view electropherogram data, both raw and analyzed. Copy the files to your mass storage device and transfer them to a location off the instrument’s computer.
11.25. Transferring run folder

Forensic Biology DNA SOP Manual
Forensic Analysis Division
DNA SOP Manual FAD-FB-DNA-SOP Issued By: Acting Technical Leader Issue Date: May 06, 2016 Uncontrolled When Printed Page 155 of 233
11.25.1. Select and copy the run folder from the data folder desktop shortcut, or E:\AppliedBiosystems\UDC\DataCollection\data. Paste this folder in the appropriate year and month folder at \BiologyInstruments\3130Beta or 3130Gamma.
11.26. Reference:
3130/3130xl Getting Started Guide by Applied Biosystems

Forensic Biology DNA SOP Manual
Forensic Analysis Division
DNA SOP Manual FAD-FB-DNA-SOP Issued By: Acting Technical Leader Issue Date: May 06, 2016 Uncontrolled When Printed Page 156 of 233
12. Automated CE Plate Set-Up Please refer to Section #11: Genetic Analyzer Sample Preparation for 3130xl set-up and maintenance.
12.1. Standards, Controls, and Calibration 12.1.1. An appropriate allelic ladder, an amplification positive control and amplification negative
control shall be included with each Genetic Analyzer run. An internal size standard (GS500 LIZ) shall be added to each sample
12.2. Safety 12.2.1. Body fluids, tissues, and extracts may contain infective agents. Use universal
precautions during evidence handling. Follow instructions for reagent preparation. Gloves must be worn during testing. Clothing may protect unbroken skin; broken skin must be covered.
12.2.2. Exposure to formamide may have chronic health effects and may be toxic to internal organs; avoid ingestion or inhalation.
12.2.3. With any machinery, several warning labels exist on the instrument that need to be heeded at all times. Below is a photo of the TECAN Freedom EVO 100. Note the respective warning labels and where they are affixed on the machine; the table below describes the meaning of the symbols.

Forensic Biology DNA SOP Manual
Forensic Analysis Division
DNA SOP Manual FAD-FB-DNA-SOP Issued By: Acting Technical Leader Issue Date: May 06, 2016 Uncontrolled When Printed Page 157 of 233
Symbol Meaning Explanation
WARNING Generally, the triangular warning symbol indicates the possibility of personal injury or even loss of life if the instructions are not followed.
PINCH POINT, MECHANICAL HAZARD
Pointed tips and other sharp-edged elements, which might cause injuries when you reach into the working are with the safety panel open. ALWAYS be aware of the mechanical hazards.
ATTENTION: Disturbance of functions by electromagnetic RF waves
Electromagnetic RF waves from a cellular phone may affect the function of the liquid detection. Faulty detection of the liquid surface may be the consequence which causes the system to produce incorrect results. Keep a distance of at least 2m from the instrument when using a cellular phone.
WARNING! The machine moves automatically. The parts of the pipetting head are moved with great force. Injuries (crushing and piercing) are possible when you reach into the working area of the pipetting head. Make sure that all safety covers are in place before starting the instrument. DO NOT REACH INTO THE WORKING AREA OF THE INSTRUMENT WHEN IT IS ACTIVE. The label reader is a Class 2 laser product which can cause injury (blindness) if viewed directly. WARNING! Do not stare into beam.
12.3. Equipment, Materials, and Reagents • Degassed water in 50 L carboy (PN 30010530) • 20 L Waste carboy (PN 30010531) • Reagent block (stored refrigerated when not in use) • GeneAmp® PCR System 9700 Thermalcycler • MicroAmp® Optical 96-Well Reaction Plate (PN N801-0560) Plate septa 96-well (PN 4315933) • MicroAmp® 8-Cap Strip (PN N801-0535) • AmpFlSTR® Identifiler® PCR Amplification kit ladder (PN 4322288) • AmpFlSTR® Identifiler® Plus PCR Amplification kit ladder (PN 4427368) • AmpFlSTR® Yfiler™ PCR Amplification kit ladder (PN 4359513) • GeneScan 500 Liz size standard (PN 4322682) • Matrix Standard Set DS-33 (P/N 4345833) • HiDi formamide (PN 4311320) • 3130 POP-4 Polymer 7ml (PN 4352755) • vortex • microcentrifuge tubes 1.5 ml • microtube racks

Forensic Biology DNA SOP Manual
Forensic Analysis Division
DNA SOP Manual FAD-FB-DNA-SOP Issued By: Acting Technical Leader Issue Date: May 06, 2016 Uncontrolled When Printed Page 158 of 233
• pipets • pipet tips
12.4. Instrument Overview 12.4.1. CE Setup on the TECAN Freedom EVO 100
12.4.1.1. Starting the TECAN Freedom EVO involves: 12.4.1.1.1. Starting the computer 12.4.1.1.2. Powering on the instrument 12.4.1.1.3. Starting the EVOware software
12.4.2. Starting the Computer 12.4.2.1. Locate and depress the power button on the front panel of the computer. 12.4.2.2. Enter the username associated with the computer, if applicable. 12.4.2.3. If required, type the corresponding password in the password field.
12.4.3. Powering on the Instrument
12.4.3.1. Press the power button on the lower right front of the Freedom EVO. 12.4.3.2. An indicator light within the power button cycles through a power on sequence
and the system initializes. 12.4.3.3. When the indicator light is steady (not flashing), the EVO is ready to use.
12.4.4. Starting the EVOware software
12.4.4.1. Double click the EVOware Standard icon on the computer's desktop. (Alternatively, you can find the EVOware Standard folder in the computer's Start Menu). See the picture below for the software's icon.

Forensic Biology DNA SOP Manual
Forensic Analysis Division
DNA SOP Manual FAD-FB-DNA-SOP Issued By: Acting Technical Leader Issue Date: May 06, 2016 Uncontrolled When Printed Page 159 of 233
12.4.4.2. The software begins. After its initial startup process, a login screen as the one seen below appears. Enter the username and password as directed and press the green triangle to complete software startup.
12.4.5. Maintenance 12.4.5.1. As necessary, the machine surface can be cleaned with alcohol (70% ethanol or
100% isopropanol (2-Propanol)), water, or a weak detergent such as Liqui-Nox. Strong detergents can dissolve carrier and worktable surface coatings. Upon cleaning, thoroughly dry the work area to prevent residual cleaner remaining on the surface. If the instrument is leaking, switch it off immediately and eliminate the source of leakage. Document any maintenance performed.
12.4.5.2. At the beginning of each day when the instrument is in operation, the following maintenance steps shall be completed:
12.4.5.2.1. Perform a daily flush script as described in the following section 12.4.5.2.2. Check the liquid system for leakage 12.4.5.2.3. Check the tubing connections and tighten as necessary 12.4.5.2.4. Check the syringes and plunger lock screws and tighten, if necessary 12.4.5.2.5. Check the system liquid container and fill with diH2O as necessary 12.4.5.2.6. Check the waste liquid container and empty as necessary 12.4.5.2.7. Flush the liquid system and check for air bubbles 12.4.5.2.8. Ensure the worktable is clean and free of clutter
12.4.5.3. Prior to each application run, the following maintenance steps shall be completed: 12.4.5.3.1. Flush the liquid system and check for air bubbles 12.4.5.3.2. Clean hardware, carriers, and racks, if needed 12.4.5.3.3. Check system liquid level, refill as necessary

Forensic Biology DNA SOP Manual
Forensic Analysis Division
DNA SOP Manual FAD-FB-DNA-SOP Issued By: Acting Technical Leader Issue Date: May 06, 2016 Uncontrolled When Printed Page 160 of 233
12.4.5.4. At the end of each day when the instrument is in operation, the following maintenance steps shall be completed:
12.4.5.4.1. Flush the system with system liquid and watch for bubbles and/or leaks 12.4.5.4.2. Check all tubing, tubing connections, and syringes for leakage 12.4.5.4.3. Clean the worktable, carriers, and racks as necessary 12.4.5.4.4. Check the system liquid container and fill with diH2O as necessary 12.4.5.4.5. Check the waste liquid container and empty as necessary
12.4.5.5. Weekly, the following maintenance steps shall be completed: 12.4.5.5.1. Empty system liquid container and clean, as needed 12.4.5.5.2. Empty waste container and clean, as needed 12.4.5.5.3. Shut down/Restart instrument computer
12.4.6. Daily Flush Protocol
12.4.6.1. At the beginning of each day, a daily flush script must be run to check the system for leaks and/or bubbles. Upon logging into the Freedom EVOware 2 software, the following dialog box displays:
12.4.6.2. Choose the “Run an existing script” option and click the MAKE YOUR SELECTION
green arrow in the bottom right corner. The following dialog box displays:
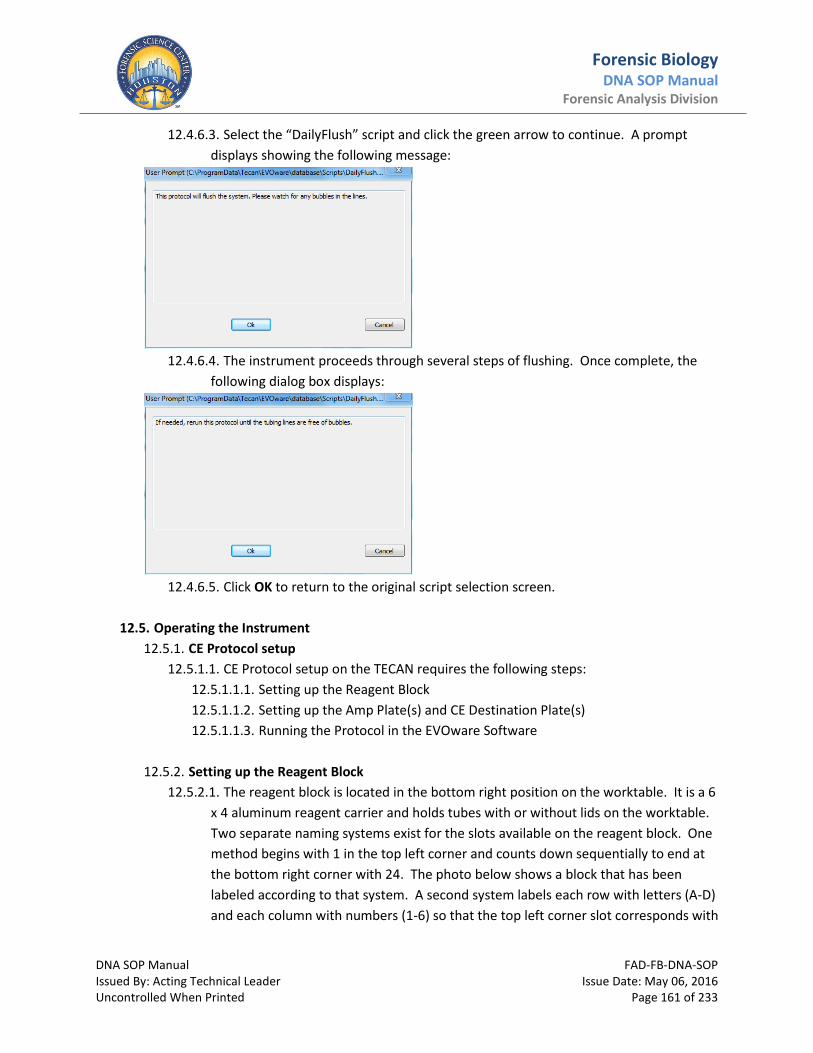
Forensic Biology DNA SOP Manual
Forensic Analysis Division
DNA SOP Manual FAD-FB-DNA-SOP Issued By: Acting Technical Leader Issue Date: May 06, 2016 Uncontrolled When Printed Page 161 of 233
12.4.6.3. Select the “DailyFlush” script and click the green arrow to continue. A prompt displays showing the following message:
12.4.6.4. The instrument proceeds through several steps of flushing. Once complete, the
following dialog box displays:
12.4.6.5. Click OK to return to the original script selection screen.
12.5. Operating the Instrument
12.5.1. CE Protocol setup 12.5.1.1. CE Protocol setup on the TECAN requires the following steps:
12.5.1.1.1. Setting up the Reagent Block 12.5.1.1.2. Setting up the Amp Plate(s) and CE Destination Plate(s) 12.5.1.1.3. Running the Protocol in the EVOware Software
12.5.2. Setting up the Reagent Block
12.5.2.1. The reagent block is located in the bottom right position on the worktable. It is a 6 x 4 aluminum reagent carrier and holds tubes with or without lids on the worktable. Two separate naming systems exist for the slots available on the reagent block. One method begins with 1 in the top left corner and counts down sequentially to end at the bottom right corner with 24. The photo below shows a block that has been labeled according to that system. A second system labels each row with letters (A-D) and each column with numbers (1-6) so that the top left corner slot corresponds with

Forensic Biology DNA SOP Manual
Forensic Analysis Division
DNA SOP Manual FAD-FB-DNA-SOP Issued By: Acting Technical Leader Issue Date: May 06, 2016 Uncontrolled When Printed Page 162 of 233
A1 and the bottom right corner slot corresponds with D6. The photo below has been overlaid with the letter/number system.
12.5.2.2. When not in use, the empty aluminum reagent blocks are stored refrigerated. 12.5.2.3. Based upon the number of samples to be processed, the setup of the reagent
block differs slightly. After ascertaining the total sample number, the script provides prompts to inform the user of exact volumes and locations of reagents on the block.
12.5.3. Setting up the Amp Plate(s) and CE Destination Plate(s) 12.5.3.1. The following worktable setup diagram shows the location of amp and CE
destination plates:
12.5.3.2. The set-up as seen on the actual instrument’s worktable is shown below:

Forensic Biology DNA SOP Manual
Forensic Analysis Division
DNA SOP Manual FAD-FB-DNA-SOP Issued By: Acting Technical Leader Issue Date: May 06, 2016 Uncontrolled When Printed Page 163 of 233
12.5.3.3. If only one CE plate is to be prepared, the front row is used for the amp and
destination plates. If two plates are to be prepared in the same run, the front and middle rows are used for the amp and destination plates.
12.5.4. Running the Protocol in the EVOware Software 12.5.4.1. Once logged into the EVOware software, a startup screen as seen below displays:
12.5.4.1.1. Choose "Run an existing script" 12.5.4.1.2. Click the green arrow in the bottom right corner. The existing scripts on the
software then display in a dialog box as seen in the below picture:

Forensic Biology DNA SOP Manual
Forensic Analysis Division
DNA SOP Manual FAD-FB-DNA-SOP Issued By: Acting Technical Leader Issue Date: May 06, 2016 Uncontrolled When Printed Page 164 of 233
12.5.4.1.3. Select the “CE_SETUP_HoustonPD” protocol 12.5.4.1.4. Click the green arrow in the bottom right corner. This starts the protocol.
The following instructions show the necessary setup steps to complete the instrument's startup.
12.5.4.1.5. This dialog screen allows the user to edit the length of the script to be
processed. Clicking the expand button immediately to the right of the cancel button expands the protocol setup screen to allow the user a better view of the required equipment and reagents for the given protocol. When done, click the same button again to return to the original dialog box.

Forensic Biology DNA SOP Manual
Forensic Analysis Division
DNA SOP Manual FAD-FB-DNA-SOP Issued By: Acting Technical Leader Issue Date: May 06, 2016 Uncontrolled When Printed Page 165 of 233
12.5.4.1.6. Assure that "Run full script?" is still checked 12.5.4.1.7. Click the green RUN arrow on the bottom right of the box.
12.5.4.1.8. The following table contains the continuing set of dialog boxes that appear
before the run begins and the potential interactions required by the user. Dialog box Notes
1.
Input the number of samples to be placed on the CE destination plate from the amp plate. NOTE: Only 90 samples can be placed on the CE plate (6 spots are reserved for ladders).
2.
CE Plate setup requires that the samples on the amp plate do not skip wells. The transfer of amplified product to CE plate proceeds forward, only skipping every 16th well to place a ladder.
3.
Input “yes” if a second plate is to be processed on the same run and go to Step 4. Input “no” if only one plate is to be processed and go to Step 6.

Forensic Biology DNA SOP Manual
Forensic Analysis Division
DNA SOP Manual FAD-FB-DNA-SOP Issued By: Acting Technical Leader Issue Date: May 06, 2016 Uncontrolled When Printed Page 166 of 233
Dialog box Notes
4.
Input the number of samples to be placed on the CE destination plate from the amp plate. NOTE: Only 90 samples can be placed on the CE plate (6 spots are reserved for ladders). NOTE: When the source amp plate is prepared with the Tecan 150, the minimum number to enter is 15. This ensures that the Positive and Negative are loaded onto the CE plate.
5.
Input “yes” if each plate uses the same ladder. Input “no” if each plate has a separate type of ladder.
6.
Assure that the number of plates and number of samples in each plate are correct. Click OK only after verifying those numbers.
7.

Forensic Biology DNA SOP Manual
Forensic Analysis Division
DNA SOP Manual FAD-FB-DNA-SOP Issued By: Acting Technical Leader Issue Date: May 06, 2016 Uncontrolled When Printed Page 167 of 233
8.
Dialog box Notes
9.
If any of the 16 wells in a given injection has a sample in it, all other wells are filled with the Hi-Di Formamide/LIZ Master Mix as well as a ladder placed into the 16th well.
10.
Follow the instructions listed in the dialog box to create the Master Mix. This number changes based upon previously determined total number of samples to process. The Tecan defaults to 0.3 μl LIZ per sample for Master Mix preparation. It is permissible to adjust to an approved volume. Tube color is not as important as the type of tube used.
11.
See the “Setting up the Reagent Block” section for clarification of position nomenclature.

Forensic Biology DNA SOP Manual
Forensic Analysis Division
DNA SOP Manual FAD-FB-DNA-SOP Issued By: Acting Technical Leader Issue Date: May 06, 2016 Uncontrolled When Printed Page 168 of 233
12.
See the “Setting up the Reagent Block” section for clarification of position nomenclature.
Dialog box Notes
13.
If processing two plates in the same run, proceed to Step 14. If processing one plate, proceed to Step 16.
14.
See the “Setting up the Reagent Block” section for clarification of position nomenclature.
15.
16.

Forensic Biology DNA SOP Manual
Forensic Analysis Division
DNA SOP Manual FAD-FB-DNA-SOP Issued By: Acting Technical Leader Issue Date: May 06, 2016 Uncontrolled When Printed Page 169 of 233
17.
If necessary, centrifuge the Master Mix briefly before placing into the reagent block.
Dialog box Notes
18.
If System Liquid is low, additional diH2O needs to be added to the System Liquid container. This liquid needs to be degassed and requires resting after adding to the bottle. IMPORTANT! Do not add diH2O immediately preceding a run without allowing time to degas.
19.
Upon clicking the OK button on this dialog box, the instrument begins processing the tubes. IMPORTANT! Do not click the OK button until absolutely ready to do so.
12.5.4.1.9. Upon completion of the dialog box set, the instrument begins the processes of setting up the CE plate.
12.5.4.1.10. Each step in the process is visible in the “Comments” box while that particular step is being performed.
12.5.4.1.11. Upon completion of the CE plate setup, the following dialog box appears:

Forensic Biology DNA SOP Manual
Forensic Analysis Division
DNA SOP Manual FAD-FB-DNA-SOP Issued By: Acting Technical Leader Issue Date: May 06, 2016 Uncontrolled When Printed Page 170 of 233
12.5.4.1.12. Follow the user prompt’s information and complete the steps of adding
septa, spinning the plate, denaturing the plate, snap cooling the plate, and loading onto the 3130xl. Please refer to Section #11: Genetic Analyzer Sample Preparation for 3130xl set-up and maintenance.

Forensic Biology DNA SOP Manual
Forensic Analysis Division
DNA SOP Manual FAD-FB-DNA-SOP Issued By: Acting Technical Leader Issue Date: May 06, 2016 Uncontrolled When Printed Page 171 of 233
13. Analysis and Interpretation of DNA Results
13.1. Autosomal Analysis and Interpretation Guidelines The AmpFlSTR® Identifiler® and AmpFlSTR® Identifiler® Plus PCR Amplification Kits are short tandem repeat (STR) multiplex assays that amplify 15 tetranucleotide repeat loci and the Amelogenin gender determining marker in a single PCR amplification. The AmpFlSTR® Identifiler® Plus PCR Amplification Kit uses the same primer sequences as the earlier generation AmpFlSTR® Identifiler® PCR Amplification Kit. The Identifiler® Plus kit uses modified PCR cycling conditions for enhanced sensitivity, a new buffer formulation to improve performance with inhibited samples, and an improved process for DNA synthesis and purification of the amplification primers to deliver a much cleaner electrophoretic background. With these modifications, the AmpFISTR® Identifiler® Plus PCR Amplification Kit delivers the same power of discrimination as, better sensitivity than, and better robustness than the earlier generation of the AmpFISTR Identifiler® Kit. The AmpFISTR Identifiler® Plus kit employs the latest improvements in primer synthesis and purification techniques to minimize the presence of dye-labeled artifacts. These improvements result in a much cleaner electropherogram background that enhances the assay’s signal-to-noise ratio and simplifies the interpretation of results. Loci Targeted by AmpFlSTR® Identifiler® and Identifiler® Plus PCR Amplification Kits

Forensic Biology DNA SOP Manual
Forensic Analysis Division
DNA SOP Manual FAD-FB-DNA-SOP Issued By: Acting Technical Leader Issue Date: May 06, 2016 Uncontrolled When Printed Page 172 of 233
13.1.1. Analysis 13.1.1.1. GeneMapper Analysis
13.1.1.1.1. Allele assignment occurs through a three-step process: 13.1.1.1.1.1. Spectral separation: The 4 dyes that Identifiler uses in the STR
amplification are 6-FAM, VIC, NED, and PET. A fifth dye, LIZ, is used in the internal size standard. Although each dye emits its maximum fluorescence at a different wavelength, there is overlap in the emission spectra. Multi-component analysis is the process that separates the five different fluorescent dye colors into distinct spectral components. This analysis occurs automatically after each instrument run.
Note: The precise spectral overlap is determined by separately analyzing DNA fragments labeled with each of the dyes (spectral standards
13.1.1.1.1.2. Peak BP sizing: The internal size standard (GS500 LIZ, for the Identifiler, Identifiler Plus, and Yfiler multiplexes) is used to calculate precise peak bp sizing. The internal size standard is used to normalize injection-to-injection variations. The Local Southern method is used to compare allele peaks with the LIZ peaks and calculate the bp size. See the GeneMapper User Manual for explanation of the Local Southern method.
13.1.1.1.1.3. Allele designations: Allele calls for each peak are made by comparing the bp size of the sample or control peak to the bp sizes of peaks in the allelic ladder. Thus for allele designations to be determined, an allelic ladder must be present and interpretable in each run, and each ladder must have the appropriate alleles present for each locus when analyzed.
13.1.1.2. GeneMapper Procedure
13.1.1.2.1. Login to GeneMapper using the appropriate username and password. 13.1.1.2.2. Add Samples to Project: Browse to appropriate data folders. Select the
Casework folder and click Add To List at the bottom of the screen. Click Add to import the files into the project and close the dialog box. The samples are displayed in the Project window.
13.1.1.2.3. Check that the Sample Type, Analysis Method, Panel, and Size Standard are correctly labeled.
13.1.1.2.3.1. For Identifiler: 13.1.1.2.3.1.1. Sample types: Select the sample type; allelic ladder samples must
be labeled as “Allelic Ladder” 13.1.1.2.3.1.2. Analysis method: Identifiler
• Verify the analysis range is set to exclude the primer peak • Verify the minimum peak threshold is 100 RFU
13.1.1.2.3.1.3. Panel: Identifiler_v1.2X

Forensic Biology DNA SOP Manual
Forensic Analysis Division
DNA SOP Manual FAD-FB-DNA-SOP Issued By: Acting Technical Leader Issue Date: May 06, 2016 Uncontrolled When Printed Page 173 of 233
13.1.1.2.3.1.4. Size standard: CE_G5_HID_GS500
13.1.1.2.3.2. For Identifiler Plus: 13.1.1.2.3.2.1. Sample types: Select the sample type; allelic ladder samples must
be labeled as “Allelic Ladder” 13.1.1.2.3.2.2. Analysis method: Identifiler_Plus_AnalysisMethod_v1X
• Verify the analysis range is set to exclude the primer peak • Verify the minimum peak threshold is 50 RFU
13.1.1.2.3.2.3. Panel: Identifiler_Plus_Panels_v1.2X 13.1.1.2.3.2.4. Size standard: CE_G5_HID_GS500
13.1.1.2.4. Analysis settings are GeneMapper Default settings unless otherwise
documented in this SOP. During analysis of Identifiler samples, the threshold must be lowered to 50 RFU to investigate any potential alleles below the 100 RFU threshold. Note the presence of possible additional alleles with an asterisk at that locus in the allele chart, but do not use these in the interpretation of results.
13.1.1.2.5. Hit the green arrow on the toolbar. 13.1.1.2.5.1. Project files shall be uniquely named, such as with the initials and the
date the run was set up. For example, a run on May 19, 2009 by JD should be named JD051909. Multiple runs on the same day can be put into sequential order utilizing either numbers or letters (e.g. JD051909, JD051909B, PA051909, and PA051909#2). Alternatively, the LIMS-generated 3130 plate number may be used to identify the GeneMapper project.
13.1.1.2.6. Checking Internal Lane Size Standards (ILS):
13.1.1.2.6.1. The use of an internal lane size standard is essential for achieving high precision for sizing DNA fragments by electrophoresis. Without correct ILS calls, sample profiles may be inaccurate. Each peak for an ILS as described below need to be called in order for a sample to be analyzed. If one is not called the GeneMapper software flags it as a size standard failure.
13.1.1.2.6.2. Visually inspect each ILS peak within each sample to ensure it is labeled correctly. Examine peaks for good morphology, similar RFU heights, and peaks at the following base pair sizes: 75, 100, 139, 150, 160, 200, floater (245-250), 300, 340, 350, 400, and 450 bps (GS-500 (LIZ).

Forensic Biology DNA SOP Manual
Forensic Analysis Division
DNA SOP Manual FAD-FB-DNA-SOP Issued By: Acting Technical Leader Issue Date: May 06, 2016 Uncontrolled When Printed Page 174 of 233
NOTE: With GS-500(LIZ), the 250 size standard fragment forms a secondary structure while migrating through polymer that causes the fragment to not migrate as a 250 bp fragment should. Therefore, it is standard to not label the 250 bp fragment.
13.1.1.2.6.3. If a sample results in a size standard failure, the analysis starting and stopping point may be adjusted under the corresponding Analysis Method in GeneMapper™ IDX to account for changes in migration rates. If this does not address the size standard failure, the sample may need to be reinjected onto the analyzer to address the failure. If this measure does not fix the issue the sample can be prepared again and added onto a genetic analyzer. Consult the Laboratory Supervisor or DNA Technical Leader if the aforementioned measures are unsuccessful.
NOTE: Changes to starting and stopping points in an Analysis Method in GeneMapper™ IDX changes these values for all users.
13.1.1.2.7. Examine ladders and all controls and confirm: 13.1.1.2.7.1. Allelic ladders were correctly labeled (see amplification kit User’s
Manual). GeneMapper averages all injections labeled “Allelic Ladder” for the same panel. If any ladders do not exhibit quality data, change the sample type from “Allelic Ladder” to “Sample” so they are not included in the software averaging of ladders.
13.1.1.2.7.2. All positive control peaks are present and labeled correctly. No extra peaks indicating contamination are present. If the amplification positive control fails to amplify/type correctly, all associated samples must be re-amplified.
13.1.1.2.7.3. All negative controls (reagent blanks and amplification negative control) show no labeled peaks indicating contamination. Each reagent blank must have acceptable results for data from the corresponding extraction set to be used. The amplification negative control must have acceptable results for data from the corresponding amplification set to be used. Additionally, each analyzer run must have at least one acceptable negative control. Given there is no data for sizing, negative controls with less than ideal LIZ peaks may be used if it is clear that an injection with stronger LIZ data would not have resulted in allelic designations (e.g., peak morphology weakens towards the end of the injection). However, the Technical Leader must approve the use of such injections.

Forensic Biology DNA SOP Manual
Forensic Analysis Division
DNA SOP Manual FAD-FB-DNA-SOP Issued By: Acting Technical Leader Issue Date: May 06, 2016 Uncontrolled When Printed Page 175 of 233
13.1.1.2.8. Examine all electropherograms for data quality and allele calls. Refer to the discussion below for guidance on evaluating data and editing artifacts and microvariant calls.
13.1.1.2.8.1. It is acceptable to delete/rename artifacts within the GeneMapper project.
13.1.1.2.8.1.1. Right click on the peak or allele to be edited. Choose either to Delete Allele or Rename Allele. After making selection, a dialog box appears asking for a sample comment. You must type in an explanation of the edit.
13.1.1.2.8.1.2. Deleting an allele marks it through with a cross out and allows it to be removed from the plot (i.e. pull up). Renaming an allele leaves the allele but allows for the call to be changed (i.e. microvariant)
13.1.1.2.8.2. GeneMapper tracks changes. When the “track changes” option is on, all alleles, including deleted ones, are displayed. When “track changes” is turned off, only alleles that have not been deleted are displayed, including those that are renamed.
13.1.1.2.8.3. When plots are printed with the “track changes” turned off, the “Label Edit Viewer” entries must be printed. The project must be saved before the table is populated with the latest changes.
13.1.1.2.8.4. To print the “Label Edit Viewer”, first save the project. • Select all samples in the Samples tab • Go to View -> Label Edit Viewer • Select export and save the file • Open the file in excel and print • The table must be labeled with the project name and the date printed • This table must be initialed by both the writing analyst and the technical reviewer.
13.1.1.2.8.5. It is important to understand that when a sample is analyzed, all prior changes are overwritten and returned to the original state. Re-analyze samples only if absolutely necessary and limit to only those samples necessary.
13.1.1.2.9. Upon completion of analysis, save the project. Print plots for all case
samples and associated controls to be included in the case file. Place in each case folder a printout of the complete GeneMapper project list for each run and the electropherograms (all 5 colors) for the positive control, negative control, and all samples and reagent blanks for that case. If an entire run is not
Forensic Biology DNA SOP Manual
Forensic Analysis Division
DNA SOP Manual FAD-FB-DNA-SOP Issued By: Acting Technical Leader Issue Date: May 06, 2016 Uncontrolled When Printed Page 176 of 233
used, it is not necessary to print the plots. However, the injection list must be included in the case file with an explanation as to why data was not used (e.g., no acceptable positive control). Document each time a sample is manipulated including longer or shorter injection times.
13.1.1.2.10. A second analyst must perform the GeneMapper analysis independently
and agree with the allele calls reported by the first analyst on the allele chart by noting their second read on the injection list.
13.1.1.2.11. In order to import GeneMapper allele calls into the allele chart of LIMS
reports: • Select the case-specific samples to be exported in the sample tab (this must be performed for each case) • Go to Tools -> Report Manager • Ensure that LIMS Import Report is selected • Go to File -> Export • Save the file • Go to the allele chart panel in LIMS -> Import • Navigate to location of your saved GeneMapper export file->Open • Select Replace->OK to replace existing data or • Select Append->OK to add to existing table data
13.1.1.2.12. Allele calls may also be manually entered into the LIMS allele chart panel.
13.1.2. Artifacts and unusual results 13.1.2.1. True alleles are defined as any peak that meets established threshold values, which
is clearly visible above baseline noise, is of a size that falls within a defined category as determined by the GeneMapper program, and is not an artifact. Peaks other than true alleles may be detected on the electropherogram and labeled by GeneMapper. The source of these artifacts should be determined where possible. If such a peak can be definitely identified as an artifact and the peak does not interfere with interpretation of the data, then the artifact can be described appropriately and the data can be used for interpretation. The presence of the artifact shall be documented on the plot or the Label Edit Viewer table. A technical reviewer must agree with the analyst’s decision and shall initial the plot to indicate his/her agreement or the Label Edit Viewer. Disagreements between the analyst and technical reviewer must be brought to the Technical Leader for resolution. If an artifact or suspected artifact may interfere with interpretation, the data cannot not

Forensic Biology DNA SOP Manual
Forensic Analysis Division
DNA SOP Manual FAD-FB-DNA-SOP Issued By: Acting Technical Leader Issue Date: May 06, 2016 Uncontrolled When Printed Page 177 of 233
be used; the locus may be called inconclusive or the sample may be re-analyzed (re-inject or re-amplify) to resolve the issue.
It may not always be possible to conclusively attribute labeled activity to either being a true peak or an artifact. For example, in a mixture with minor activity that also exhibits spectral failure (or pull-up), a re-injection may not provide conclusive evidence that a minor peak that could also be pull-up is artifactual or not. In those instances, it may be most appropriate to label a peak as “inconclusive”. Any statistics requiring the inconclusive allele shall not be calculated at this locus.
13.1.2.2. Commonly observed artifacts include:
13.1.2.2.1. Spikes: Spikes are sharp, narrow peaks generally present in all colors and occur at the same location. This is often caused by electrical anomalies. This can also be caused by air bubbles and urea crystals.
13.1.2.2.2. Stutter: A stutter peak is a reproducible minor product peak usually four
bases (1 repeat) shorter than the corresponding main allele peak. Stutter products are the most common source of additional peaks in an STR sample, caused by a slipped-strand mispairing during PCR. Rarely, stutter may be observed at two or three repeats shorter that the true allele, or one repeat greater than the true allele. Peaks in the minus 1 repeat position that fall below the maximum % stutter values (see the Identifiler PCR Amplification Kit’s User’s Manual and the Identifiler Plus internal validation data) may be assumed to be stutter, and GeneMapper does not label these peaks. If an apparent stutter peak exceeds the published maximum stutter percent, the sample must be carefully evaluated to determine if the peak may be a true peak or stutter. In general, for each AmpFISTR® Identifiler® Plus Kit locus, the percent stutter increases with allele length. Forward stutter peaks generally exhibit a much lower percentage difference from the true allele than minus one repeat stutter peaks. Both minus 1 repeat and plus 1 repeat stutter seem to be more common when excessive template DNA is amplified (when one or more of the critical components of the amplification master mix becomes limited or depleted, causing a loss of processivity).
The following conditions generally lead to elevated stutter:
• using low amounts of amplifiable DNA during PCR amplification causing stochastic effects to lead to the increased amount of stutter products relative to the true allele peaks; stutter product generated during the early amplification cycles may be subsequently amplified in later cycles along

Forensic Biology DNA SOP Manual
Forensic Analysis Division
DNA SOP Manual FAD-FB-DNA-SOP Issued By: Acting Technical Leader Issue Date: May 06, 2016 Uncontrolled When Printed Page 178 of 233
with the true allele products, resulting in stutter peak activity that is higher than what is routinely observed in validation studies and casework where more optimal amounts and quality are amplified in the PCR. (see 13.1.4 below for corrective action)
• loading excessive amounts of amplified DNA onto the genetic analyzer causing a phenomenon known as over-subtraction; over-subtraction can cause elevated pull-up, stutter and minus A peaks when the analysis software normalizes the true off-scale peak(s) but does not adjust the artifacts (because they are not off-scale). This may also result in a loss of linearity in RFU increase when injection times are extended. (see 13.1.4 below for corrective action)
• limited or pervasive conditions that affect the production of and amplification of the stutter products relative to the true allele template and products, also known as “preferential amplification”, even when performed under routine and optimal conditions, that may result in an increase in the percentage of the peak height observed for a stutter peak relative to the peak height observed for the true allele.
For mixtures in which minor contributors are determined to be present, a peak in stutter position (generally n-4) may be determined to be 1) a stutter peak, 2) an allelic peak, or 3) indistinguishable as being either an allele or stutter peak. This determination is based principally on the height of the peak in the stutter position and its relationship to the stutter percentage expectations established by the laboratory. Generally, when the height of a peak in stutter position exceeds the laboratory’s stutter expectation for a given locus, that peak is consistent with being of allelic origin and designated as an allele. If a peak is at or below this expectation, it is generally designated as a stutter peak. However, it could also be considered as a possible allelic peak, particularly if the peak height of the potential stutter peak(s) is consistent with (or greater than) the heights observed for any allelic peaks that are conclusively attributed (i.e., peaks in non-stutter positions) to the minor contributor(s).
Caution must be exercised when peaks in stutter position are observed in 1) samples that show no other obvious indications of a second contributor; 2) mixtures from two or more contributors where all of the peaks observed are low or mixtures that can be deconvoluted into major and minor contributors, but the minor peaks also appear in stutter position; and 3) samples with peaks observed in the stutter position with calculated stutter percentage only a few percentage points (1-5%) higher than the maximum percentage used for

Forensic Biology DNA SOP Manual
Forensic Analysis Division
DNA SOP Manual FAD-FB-DNA-SOP Issued By: Acting Technical Leader Issue Date: May 06, 2016 Uncontrolled When Printed Page 179 of 233
filtration. The misidentification of stutter activity as real activity can result in an incorrect increase to the number of contributors to a given profile. Peaks that cannot be conclusively attributed to stutter activity over true activity may be reported as “inconclusive”.
AmpFISTR® Identifiler® Plus Kit
Marker Max Average StdDev Avg + 3 SD GM IDP Panel HFSC Protocol D8S1179 8.74 5.31 1.17 8.82 10.32 10.32 D21S11 8.68 6.72 0.79 9.08 10.67 10.67 D7S820 7.10 4.87 1.00 7.88 9.69 9.69 CSF1PO 6.31 4.49 0.82 6.94 9.20 9.20 D3S1358 12.80 7.29 1.26 11.07 12.27 12.27 TH01 3.95 1.79 0.71 3.91 4.08 4.08 D13S317 8.33 4.01 1.35 8.06 9.93 9.93 D16S539 13.88 5.70 1.99 11.67 10.39 11.67 D2S1338 12.63 7.15 1.29 11.03 12.44 12.44 D19S433 8.98 6.55 0.76 8.82 11.21 11.21 vWA 13.10 7.10 1.28 10.92 12.45 12.45 TPOX 5.57 2.31 0.82 4.76 6.38 6.38 D18S51 15.13 8.27 1.78 13.60 13.68 13.68 D5S818 9.43 5.85 1.28 9.70 10.06 10.06 FGA 17.65 8.46 2.21 15.09 13.03 15.09
Bold values indicate higher percentages than developmental validation and therefore require adjustment to the GeneMapper Panel Manager.
13.1.2.2.3. Incomplete 3’(+A) nucleotide addition/Minus A: PCR amplification results in the addition of a single “A” nucleotide at the 3’ end of double stranded PCR products, resulting in a product that is one bp longer than the actual target DNA sequence. PCR reactions have been optimized to favor this “A” addition, but incomplete “A” addition may occur when excessive amount of target DNA is present, or in other conditions that are less than optimal for the PCR reaction. Incomplete “A” addition, or “minus A” appears as a peak one bp shorter, and typically at a smaller peak height, than the true allele. See the stutter discussion regarding over-subtraction.
13.1.2.2.4. Pull-up/Matrix Failure: Pull-up is the result of the instrument’s inability to
completely separate the spectral components. Pull-up is identified as a smaller peak of the same location as a true allele but in another color. It is the result of either excessive DNA or a faulty spectral. Complex pull-up occurs when a locus

Forensic Biology DNA SOP Manual
Forensic Analysis Division
DNA SOP Manual FAD-FB-DNA-SOP Issued By: Acting Technical Leader Issue Date: May 06, 2016 Uncontrolled When Printed Page 180 of 233
is heterozygous and the two peaks are within one repeat unit of each other. This can cause a single bridge-like peak to be observed in another color channel. See the stutter discussion regarding over-subtraction.
13.1.2.2.5. Dye Blobs: Dye blobs occur when fluorescent dyes come off their respective
primers and migrate independently through the capillary. Dye blob morphology is generally characteristically broad, and not very “peak-like”.
13.1.3. Microvariants
13.1.3.1. Microvariants are true alleles that vary by fewer than 4 bp from the typical repeating unit. The designation of alleles containing an incomplete repeat unit, falling within the range spanned by the ladder alleles includes the number of complete repeats, a decimal point, and then the number of base pairs in the incomplete repeat (e.g. 9.3 for a TH01 allele with 9 full repeats plus three more bps). The determination of the number of additional bp present in a microvariant is made by comparing the bp size of the off ladder peak with the bp size of the flanking alleles in the allelic ladder. If the locus is heterozygous, evaluate the sister allele to help establish whether the off-ladder allele is truly a microvariant, or simply off-ladder due to electrophoretic drift.
If an allele is sized smaller than or larger than the smallest or largest ladder allele at a locus, it shall be designated as greater than or less than the appropriate ladder allele (i.e. > 11 for TH01). Any allele designated as off-ladder by GeneMapper and not determined to be an artifact is verified by reinjection or re-amplification. If the microvariant appears in multiple evidence samples from the same case otherwise having the same profile, it is not necessary to re-inject. Because every measure is be taken to interpret evidence samples prior to reference samples, the presence of a microvariant in an associated known sample does not suffice for confirmation, as the evidence is interpreted before and separate from any associated knowns in the case.
It is recommended that analysts visit http://www.cstl.nist.gov/strbase/var_tab.htm (Variant Allele Reports) for a given off-ladder allele. A printout of the previously observed off-ladder allele may be retained in the case file.
13.1.4. Re-analysis and Additional Analysis
13.1.4.1. Any step in the process with unacceptable controls (as defined in this SOP) must be rerun. Refer to section 2 (Quality Assurance) for instructions on investigation and reanalyzing samples where contamination is detected or is suspected. Data from analysis with unacceptable controls may not be used for interpretation.

Forensic Biology DNA SOP Manual
Forensic Analysis Division
DNA SOP Manual FAD-FB-DNA-SOP Issued By: Acting Technical Leader Issue Date: May 06, 2016 Uncontrolled When Printed Page 181 of 233
13.1.4.2. The analytical threshold is the “minimum height requirement at and above which
detected peaks can be reliably distinguished from background noise”8. Peaks above this threshold are generally not considered noise and are either artifacts or true alleles. The analytical threshold for Identifiler amplifications is 100 RFUs; the analytical threshold for Identifiler Plus amplifications is 50 RFUs. Identifiler data with peaks below the analytical threshold are indicated on allele charts using an “asterisk” to denote activity at or above 50 RFUs but beneath the 100 RFU threshold. The stochastic threshold is the “RFU value above which it is reasonable to assume that, at a given locus, allelic dropout of a sister allele has not occurred8”.
Interpretive caution must be used when activity is observed below 50 RFUs for both Identifiler and Identifiler Plus data. If low levels of DNA provide insufficient data or data below the analytical or stochastic threshold upon initial analysis, the analyst may choose any of the following (as long as relevant maximums specified in the SOP’s are not exceeded):
• Re-amplify the sample with more template DNA (or less template DNA, if inhibition is suspected).
• Re-inject for a longer amount of time (Identifiler samples may be extended to 20 seconds).
13.1.4.3. The associated reagent blank and amplification negative control must also be
subjected to the same concentration and injection conditions as required by the forensic sample(s) containing the least amount of DNA.
13.1.4.4. Samples with excessive RFUs (>~4000 RFUs) must be interpreted with caution.
Excessive template DNA can make data interpretation difficult with a greater propensity for pull-up/matrix failure, as well as possible non-specific amplification. A phenomenon known as over-subtraction could cause elevated pull-up, stutter and minus A peaks when the analysis software normalizes the true off-scale peak(s) but does not adjust the artifacts (because they are not off-scale). This may also result in a loss of linearity in RFU increase when injection times are extended. Re-evaluate the quantification data to ensure the correct amount of template was amplified. The sample may be re-analyzed to obtain suitable data through any of the following:
• Re-inject the sample for a shorter time. • Dilute the amplified product in TE buffer, add 1 µl to the formamide/LIZ
mixture, and re-inject Re-amplify the sample with less template DNA.
Forensic Biology DNA SOP Manual
Forensic Analysis Division
DNA SOP Manual FAD-FB-DNA-SOP Issued By: Acting Technical Leader Issue Date: May 06, 2016 Uncontrolled When Printed Page 182 of 233
13.1.4.4.1. Results with artifacts that interfere with interpretation may be re-analyzed as needed to resolve the issue:
13.1.4.4.1.1. Artifacts resulting from poor electrophoresis may simply be re-injected.
13.1.4.4.1.2. Artifacts resulting from excessive DNA may be reinjected for a shorter time, diluted and re-injected, or re-amplified with less DNA.
13.1.4.4.1.3. Artifacts that are a result of poor amplification, such as excessive –A, are typically resolved best by re-amplification.
13.1.4.4.1.4. Pull-up due to a poor spectral can only be resolved by running a new spectral or performing other instrument maintenance.
13.1.5. Interpretation Guidelines
13.1.5.1. Results and conclusions from DNA analysis must be scientifically supported by the analytical data with appropriate standards and controls. Interpretations are made as objectively as possible and consistently from analyst to analyst. Not every situation can nor should be covered by a specific rule and situations may occur that require an analyst to deviate from stated guidelines. Expectations of alleles per locus, heterozygous peak height ratios, and major/minor ratios are stated below. It is expected that limited variance from these values may occur. Analysts shall utilize their training and experience to address these variances. Both the reporting analyst and reviewer shall agree on all variances that are accepted. If an agreement between the reporting analyst and reviewer cannot be reached, consultation with a more experienced analyst or supervisor may help. If an agreement is still not reached, the variance shall be brought to the attention and decision of the Technical Leader. Case documentation including, but not limited to, any and all assumptions must be sufficient for another experienced analyst to identify and understand the deviation from stated guidelines.
13.1.5.2. Whenever possible, evidentiary samples are completely evaluated prior to the
evaluation of any reference samples that are to be compared, with the exception of intimate samples and the assumed contributor. The decision to attempt to develop a profile further through re-injection or re-amplification is made without knowledge of the known profile for comparison, other than those of assumed contributors.
13.1.5.3. Intimate samples are those in which it is expected that a known contributor may be found on the evidence. These include, but are not limited to, samples contained

Forensic Biology DNA SOP Manual
Forensic Analysis Division
DNA SOP Manual FAD-FB-DNA-SOP Issued By: Acting Technical Leader Issue Date: May 06, 2016 Uncontrolled When Printed Page 183 of 233
in a sexual assault kit, clothing removed from the complainant or suspect, and swabs taken directly from the body of an individual. Conclusive documentation from the submitting agency must exist for a sample to be considered intimate. The medical report contained within a sexual assault kit will suffice for documentation of items collected as part of the sexual assault examination. The Technical Leader must approve all intimate samples other than those listed above.
13.1.5.4. Types of Conclusions
13.1.5.4.1. Three types of conclusions are generally possible when both evidence (questioned) and reference (known) samples are tested and compared:
13.1.5.4.1.1. inclusion: the individual could have contributed to the questioned profile; for a single-source sample, the same genotypes were obtained by an evidentiary sample and a reference sample, with no unexplained differences; for a mixture profile, all of the alleles from the reference sample are accounted for in the mixture profile of an evidentiary item (the loss of an allele due to incomplete (preferential) amplification, stochastic effects, mutation, or other factors must be considered and does not necessarily indicate an exclusion)
13.1.5.4.1.2. exclusion: the individual could not have contributed to the questioned profile; the genotype comparison shows profile differences that can only be explained by the two samples originating from different sources
13.1.5.4.1.3. inconclusive: the data does not support a conclusion; insufficient information exists to support any conclusion. The reason for inconclusive results must be clearly stated in the report.
13.1.5.4.2. Inclusion or exclusion is determined by qualitative and quantitative
evaluation of the entire DNA profile produced at the various loci tested. Inconclusive results, or an uninterpretable profile, may result from, but are not limited to: • Insufficient amounts of template DNA • Degradation • Inhibitors • Mixtures of DNA from multiple donors
13.1.5.4.3. It may be acceptable for an inclusion or exclusion to be determined when
one or more loci yield inconclusive results. An inclusion statement, and any resulting statistical calculations, shall be based only on loci that yield conclusive results. An exclusion statement can be determined if even a single locus produces exclusionary results. However, an exclusion cannot be determined if

Forensic Biology DNA SOP Manual
Forensic Analysis Division
DNA SOP Manual FAD-FB-DNA-SOP Issued By: Acting Technical Leader Issue Date: May 06, 2016 Uncontrolled When Printed Page 184 of 233
technical issues such as the loss of an allele due to incomplete (preferential) amplification, stochastic effects, mutation, or other factors may have caused the non-match.
13.1.5.4.4. It may also be possible to obtain a conclusive result comparing one reference to a questioned sample, but an inconclusive result when comparing a second reference sample to the same questioned sample. This is most commonly observed when interpreting complex mixtures.
13.1.5.5. Types of Profiles 13.1.5.5.1. A number of different types of profiles may be obtained from evidence
samples. The comparisons with references that can be made are determined by the type of profile.
13.1.5.5.2. No profile: No DNA results obtained at all. No comparison can be made to
reference samples.
13.1.5.5.3. Uninterpretable: Data obtained, but insufficient for comparison. This may be due to data at too few loci, data below the stochastic threshold, or when the overall quality of the data is questionable. Indistinguishable mixtures that contain excessive contributors may also be uninterpretable. No comparison can be made to reference samples.
13.1.5.5.4. Single source profile: 13.1.5.5.4.1. It is expected that a single individual should have no more than two
alleles per locus 13.1.5.5.4.1.1. If a sample has a third peak at just a single locus, with no other
indication of a mixture, this may indicate an unusual mutation present in that individual (i.e. tri-allelic). Such a profile may be still considered single-source but must be interpreted with caution. The sample may be re-injected, re-amplified, or re-extracted at the analyst’s discretion.
13.1.5.5.4.2. It is expected that a single individual should exhibit a heterozygous peak height ratio of >60%. The peak height ratio (PHR) is calculated by dividing the peak height of an allele with a lower RFU value by the peak height of an allele with a higher RFU value, then multiplying by 100 to express the PHR as a percentage. Possible contribution of stutter is not subtracted prior to application of this 60% criterion. If a sample has unbalanced peak heights with no other indication of a mixture, the

Forensic Biology DNA SOP Manual
Forensic Analysis Division
DNA SOP Manual FAD-FB-DNA-SOP Issued By: Acting Technical Leader Issue Date: May 06, 2016 Uncontrolled When Printed Page 185 of 233
sample may also be considered single-source but must be interpreted with caution.
13.1.5.5.5. Inclusions with profiles can be made with respective statistics calculated and
reported on probative samples. Without an explained reason, inclusions must account for all alleles present. Exclusions with full profiles can be made if the individual being compared differs from the evidentiary profile at any one locus. If one or few non-matches are observed, evaluate the profiles carefully for evidence of dropout or artifacts that may have resulted in the non-match.
13.1.5.5.6. Partial profiles: Partial profiles exhibit allelic or locus dropout in some loci
tested and can result from insufficient, degraded, or inhibited DNA. Typically, smaller loci amplify better under these conditions and larger loci tend to drop out. Extremely low levels of template DNA may also lead to stochastic effects which may under-represent one allele of a heterozygous locus. Again, care must be taken to ensure that non-matches are not a result of drop-out.
13.1.5.5.7. Mixtures: Evidence samples may contain DNA from more than one
individual. A mixture can consist of full and/or partial profiles from multiple individuals. One or more of the following may indicate the presence of a mixture: • Greater than two alleles at a locus. • A peak at the stutter position of significantly greater RFUs than is typically
observed. • Significantly unbalanced alleles at a heterozygous locus. • Clear evidence of additional allelic activity below analytical threshold.
Caution must be used if only a single example of a mixture is observed.
13.1.5.5.7.1. Number of Contributors
• Generally, the counting of alleles at the locus that exhibits the greatest number of allelic peaks can provide guidance towards determining the minimum number of contributors. For example, if at most five alleles are observed at a locus, then the DNA results are consistent with having arisen from at least three individuals. Proceed with caution when only one allele in the entire sample would lead to an increased number of possible contributors, as stutter, imbalance, and the potential for a tri-allele can complicate mixture interpretation. Loci more likely to exhibit a tri-allele pattern are D18S51, D21S11, FGA, TPOX, and vWA.

Forensic Biology DNA SOP Manual
Forensic Analysis Division
DNA SOP Manual FAD-FB-DNA-SOP Issued By: Acting Technical Leader Issue Date: May 06, 2016 Uncontrolled When Printed Page 186 of 233
• While counting allele peaks is very useful in determining a minimum number
of contributors, the analyst must also consider allele sharing between individuals and allelic dropout may result in an underestimate of the actual number of contributors.
• Mixtures may be reported as being from “at least” the fewest number of
individuals possible, given the maximum number of alleles detected at a locus.
• Determination of a finite number of contributors may be possible based on
analysis of the data. Number of alleles per locus and peak height balance must be considered.
• Using a known reference to account for alleles in an intimate sample can aid
in determining the number of contributors.
• Alleles that do not meet the stochastic threshold may be used to determine the number of contributors.
• Alleles below analytical threshold may be considered when determining
minimum number of contributors but caution must be used to determine potential allelic activity versus baseline.
• If the number of contributors equals the number of individuals that cannot be
excluded but there is activity foreign to these individuals, the sample interpretation must denote the foreign allelic activity.
• Indistinguishable mixtures of three or more individuals (complex mixtures), or
the minor component of the distinguishable three or more person mixtures, must be interpreted with extreme caution. Allele sharing/stacking of alleles due to sharing creates more uncertainty9. Furthermore, preferential amplification of alleles within a locus attributable to large differences in base pair size, or resource competition in complex mixtures, may result in a loss of allelic activity or even allelic drop-out. Therefore, the use of indistinguishable or minor components of complex mixtures must be approved by the Technical Leader.

Forensic Biology DNA SOP Manual
Forensic Analysis Division
DNA SOP Manual FAD-FB-DNA-SOP Issued By: Acting Technical Leader Issue Date: May 06, 2016 Uncontrolled When Printed Page 187 of 233
• Indistinguishable mixtures of four or more individuals are not be interpreted without approval of the Technical Leader.
13.1.5.5.7.2. Two types of mixtures may be observed: 13.1.5.5.7.2.1. Mixture with Major/Minor Contributors
• Some mixed source profiles may be clearly differentiated into major and minor components. A major component may consist of a single contributor or may be comprised of a mixture of two or more contributors. Major components of a single contributor should abide by the guidelines of a single source profile, including those for inclusion.
• Identification of a major component can be fairly straightforward when it
is two person mixture, the major is a single contributor, and the ratio of individuals is 4:1 or greater. As the ratio moves closer to 1:1, or the number of contributors increases, it can become more difficult to distinguish the major component.
• A major component can be identified by several means. If the highest minor peak is less than ~30% of the height of the shortest major peak in the same locus for Identifiler amplifications and ~ 35% for Identifiler Plus amplifications. The ratio of major/minor components can be considered and be ~4:1 or greater.
• Various combinations of homozygous and heterozygous genotypes of the
major and minor components, along with allelic sharing between contributors, may influence the balance such that the 30% or 35% or 4:1 parameter may be exceeded or insufficient to truly identify a major component. No prior adjustment for stutter is assumed but it is considered as a possibility.
• As RFUs approach the stochastic value, consideration must be given to
greater heterozygous imbalance within a contributor. Imbalance along with allele sharing could create a false major contributor within a locus.
• It is permissible that a major component may not be identified at all loci.
If a major component is not identified at all loci then caution must be used when deciding to consider the profile a major/minor mixture versus an indistinguishable mixture. This is especially true as the

Forensic Biology DNA SOP Manual
Forensic Analysis Division
DNA SOP Manual FAD-FB-DNA-SOP Issued By: Acting Technical Leader Issue Date: May 06, 2016 Uncontrolled When Printed Page 188 of 233
number of contributors increases. In general, a mixture of at least two contributors has a major component at least half of the loci.
• A mixture of three or more must have a major (single or multiple
contributors) at all loci or the approval of the Technical Leader.
• Not all alleles of a minor component to a mixture may be determined since minor component alleles may be masked.
• Consideration must be given to the possibility of the “swapping” of the
major and minor contributors should one of the components exhibit evidence of degradation. If the major component is degraded, what appears to be from the major contributor at the loci of shorter fragments could appear to be from the minor component at the loci of longer fragments.
• Trace alleles may also be detected in a mixture. Trace alleles are minor
to a minor component. They are called when the highest trace allele is less than 35% of the lowest minor allele. An allele that meets this designation may not be a trace allele if the mixture does not appear to be greater than two individuals. Extreme caution must be exercised when trace alleles are observed and they are close to the 35% threshold.
13.1.5.5.7.2.2. Mixtures with indistinguishable contributors (unresolved
mixture) • A mixture must be considered indistinguishable when the major and
minor components cannot be distinguished because of signal intensities. Individuals may still be included or excluded as possible contributors to the mixture. All interpretable loci are used in evaluating whether a person is included or excluded as a possible contributor. When evaluating whether a person should be excluded as a possible contributor, if an allele is not present at a locus, care must be taken to consider whether the allele may be missing due to drop-out. This determination can be difficult to make and consultation with a more experienced analyst or supervisor may be helpful.
13.1.5.5.7.3. Mixture Deconvolution
Forensic Biology DNA SOP Manual
Forensic Analysis Division
DNA SOP Manual FAD-FB-DNA-SOP Issued By: Acting Technical Leader Issue Date: May 06, 2016 Uncontrolled When Printed Page 189 of 233
13.1.5.5.7.3.1. Mixture deconvolution allows for the identification of obligate unknown alleles in a mixture given that a known contributor is present. This deduced profile is then eligible for comparison and statistical analysis as a single source sample.
13.1.5.5.7.3.1.1. It may not be possible to determine a complete genotype for the unknown contributor.
13.1.5.5.7.3.1.2. When a heterozygous genotype cannot be deduced and only a single obligate allele may be determined for the unknown contributor, then consideration must be given to any possible sister alleles. Three common reasons for a single allele may be:
• The unknown contributor is homozygous. • A heterozygous sister allele is masked by the known
contributor. • A heterozygous sister allele has dropped out.
13.1.5.5.7.3.2. Suitable mixtures are two person mixtures from intimate items
with a finite number of contributors with one of the contributors known.
13.1.5.5.7.3.2.1. The major component of a three or more person mixture may be eligible if a finite number of two contributors are identified in the major component and one contributor is known.
13.1.5.5.7.3.3. Steps for deconvolution:
13.1.5.5.7.3.3.1. Identify the alleles in the mixture that are attributed to the known individual.
13.1.5.5.7.3.3.2. Identify the remaining obligate alleles. At this step a full genotype of the unknown contributor has been identified for loci were two obligate alleles remain. Document the deduced genotype for these loci.
13.1.5.5.7.3.3.3. Identify the approximate ratio of the two contributors where a distinct genotype has been established for the unknown contributor.
13.1.5.5.7.3.3.4. Identify loci with one obligate allele above stochastic threshold and are in stutter position.

Forensic Biology DNA SOP Manual
Forensic Analysis Division
DNA SOP Manual FAD-FB-DNA-SOP Issued By: Acting Technical Leader Issue Date: May 06, 2016 Uncontrolled When Printed Page 190 of 233
13.1.5.5.7.3.3.4.1. The maximum allowed stutter at each locus must be
calculated and subtracted from the obligate allele RFU. This modified RFU value is now used to evaluate the obligate allele.
13.1.5.5.7.3.3.5. Identify the loci where the obligate allele is below stochastic and dropout is reasonable to have occurred.
13.1.5.5.7.3.3.5.1. No further deconvolution is permissible at these loci. Document the obligate allele and a dash (--) to indicate that drop out is possible
13.1.5.5.7.3.3.6. Examine the remaining loci with one obligate allele above stochastic threshold. It may be possible to determine a distinct genotype for the unknown contributor.
Examine the RFU values for the alleles of the known contributor to determine if sharing with the foreign contributor could be occurring. Caution must be taken as natural heterozygous imbalance could lead to false deconvolution.
Consideration into the approximate ratio can aid in determining any possible genotypes.
13.1.5.5.7.3.3.7. Document the final genotype of the unknown contributor on the plot. Use a dash (--) with any single allele if the unknown is not being identified as homozygous.
13.2. Interpretation of Forensic Parentage and Relationship Cases 13.2.1. For parentage cases, reference guidelines established by the AABB Relationship Testing
Standards. Greater details of these standards and recommendations can be found in their published Standards for Relationship Testing Laboratories and Guidance for Standards for Relationship Testing Laboratories. The Popstats software (which used these AABB-recommended formulae) is used to calculate parentage statistics.

Forensic Biology DNA SOP Manual
Forensic Analysis Division
DNA SOP Manual FAD-FB-DNA-SOP Issued By: Acting Technical Leader Issue Date: May 06, 2016 Uncontrolled When Printed Page 191 of 233
13.2.2. Paternity analysis can be performed with a reference sample from the child and the alleged father (AF), with or without the biological mother. However, the statistical results of a “not excluded” case are more significant if the mother is included in the testing. Therefore a reference sample from the mother should be obtained when possible. A reference from the mother is required in the following two types of cases:
13.2.2.1. The child’s sample is fetal tissue. For fetal tissue samples, the mother must be typed in order to confirm that the tissue sample is of fetal, not maternal, origin. Failure to test the mother could result in a false exclusion. Note: if the mother is unavailable and the tissue is determined to be from a male, it may be assumed that the tissue is of fetal origin and the results may be used in the paternity analysis.
13.2.2.2. The alleged father is a close biological relative of the biological mother. In this situation, the child is likely to share some alleles with the AF because of the biological relationship between the AF and biological mother. Therefore testing the mother is required in order to take into account this shared relationship.
13.2.3. Definitions
13.2.3.1. Likelihood Ratio: a Bayesian statistical calculation that estimates the likelihood of seeing the evidence in question under two competing hypotheses.
13.2.3.2. Paternity Index (PI): a specialized likelihood ratio estimating the likelihood of seeing the child’s profile if (1) the AF is the biological father versus (2) the AF is unrelated (or another competing hypothesis).
13.2.3.3. Combined Paternity Index (CPI): The product of all individual Paternity Indexes
13.2.3.4. Probability of Paternity: The probability, expressed as a percentage, that the AF is the biological father of the child. This calculation is dependent on the CPI and prior probability assumption.
13.2.3.5. Mutation: A change in DNA resulting from a copying error during DNA replication. In STR analysis, this can result in a non-matching allele between a biological parent and child.
13.2.3.6. Obligate paternal allele: the child’s allele(s) at a locus that must have been inherited from the biological father. If the child is heterozygous at a locus and it cannot be determined which of the two alleles came from the biological father, then both alleles must be considered obligate.
13.2.4. Exclusion

Forensic Biology DNA SOP Manual
Forensic Analysis Division
DNA SOP Manual FAD-FB-DNA-SOP Issued By: Acting Technical Leader Issue Date: May 06, 2016 Uncontrolled When Printed Page 192 of 233
13.2.4.1. An AF shall be excluded as the biological father if in more than two loci, the AF does not share an obligate paternal allele with the child. In this case, no statistical calculations are required.
13.2.4.2. In the event of exclusion, the analyst must evaluate the data for a possible sample
switch between the biological mother and female child, alleged father and male child, and alleged father and other males processed simultaneously, including other alleged fathers. A biological relationship shall be evident between the mother and female child, even if the samples were switched (for example, during collection). A biological relationship shall not be apparent between the mother and male child if the male child and alleged father samples were switched, with the exception of cases where the mother and alleged father are biologically related. In the event of exclusion, re-isolation of the excluded alleged father(s) may be conducted to verify the originally obtained profile(s). Alternatively, strategic sample placement or separate extractions may be used to eliminate the concern of a sample switch. These methods may also be employed regarding the child’s sample in the event of a motherless paternity with an excluded alleged father.
13.2.5. Not Excluded, or Included
13.2.5.1. If the AF shares an obligate paternal allele at all loci, he cannot be excluded as being the biological father of the child. In this case the PI at each locus will be calculated by Popstats using the formulas in section 14 (Statistics).
13.2.6. Inconclusive
13.2.6.1. A comparison may be inconclusive when at two loci the AF does not share an obligate paternal allele with the child. Additionally, a comparison may be inconclusive when at only one locus the AF does not share an obligate paternal allele with the child and a mutation is not suspected.
13.2.7. Mutations
13.2.7.1. Mutations in STR loci typically result in an allele one repeat shorter or longer than the parent allele. These mutations occur at different frequencies in different loci, and typically at a higher frequency in the larger loci. If a non-match is observed in only one or two loci, the possibility of mutational events must be evaluated. Two or more repeat mutations are seen at a lower frequency than single repeat mutations.
13.2.7.2. If a non-match is observed at only one locus, the possibility of a mutation must be
assumed and taken into account in the CPI calculation. At the locus with the

Forensic Biology DNA SOP Manual
Forensic Analysis Division
DNA SOP Manual FAD-FB-DNA-SOP Issued By: Acting Technical Leader Issue Date: May 06, 2016 Uncontrolled When Printed Page 193 of 233
suspected mutation, a mutational PI is calculated for that locus following AABB recommendations. This mutational PI is incorporated into the CPI calculation.
13.2.7.3. If two non-matches are observed after standard laboratory STR (Identifiler) testing,
the results must be considered inconclusive. Supplemental testing, such as additional autosomal STR loci or Y STR analysis, may yield additional information in these cases.
13.2.7.4. When a mutation is assumed and taken into account statistically, the DNA report
must indicate which references were used. An example of wording for the DNA report is:
Note: The AABB Standards for Relationship Testing Laboratories, 10th Edition/Guidance Document was referenced for the mutation rate of locus D21S11. The AmpFlSTR® Identifiler™ PCR Amplification Kit User’s Manual (2005, PN 4323291) was referenced for the probability of paternity exclusion for locus D21S11.
13.3. Y-STR Analysis and Interpretation Guidelines 13.3.1. Loci Targeted by AmpFlSTR® Yfiler PCR Amplification Kit
13.3.1.1. Y-Chromosome STR typing is an additional tool that can be used in concert with autosomal typing for the recovery of male DNA profiles in male:female mixtures and mixtures with an abundance of female DNA, such as with a vasectomized male or a product of conception. Y-STRs may also aid in determining the number of male contributors in a complex mixture.
13.3.1.2. The following table shows the loci amplified by the Yfiler kit and the corresponding dyes used. The AmpFlSTR Yfiler Kit Allelic Ladder is used to genotype the analyzed samples. The alleles contained in the allelic ladder and the genotype of the Control DNA 007 are listed in the table.
Locus Designation Alleles Included in Yfiler Kit Allelic Ladder
Dye Label DNA 007 Genotype
DYS456 13-18
6-FAM™
15
DYS389I 10-15 13
DYS390 18-27 24
DYS389II 24-34 29

Forensic Biology DNA SOP Manual
Forensic Analysis Division
DNA SOP Manual FAD-FB-DNA-SOP Issued By: Acting Technical Leader Issue Date: May 06, 2016 Uncontrolled When Printed Page 194 of 233
DYS458 14-20 VIC©
17 DYS19 10-19 15 DYS385 a/b 7-25 11,14 DYS393 8-16
NED™
13 DYS391 7-13 11 DYS439 8-15 12
DYS635 20-26 24
DYS392 7-18 13 Y GATA H4 8-13
PET©
13 DYS437 13-17 15 DYS438 8-13 12 DYS448 17-24 19
13.3.1.3. The AmpFlSTR® Yfiler® PCR Amplification Kit is a STR multiplex assay that amplifies
17 Y-STR loci in a single PCR amplification reaction. The loci amplified are in the “European minimal haplotype” (DSY19, DYS385a/b, DYS389I/II, DYS390, DYS391, DYS392, and DYS393), the Scientific Working Group-DNA Analysis Methods (SWGDAM) recommended Y-STR panel (European minimal haplotype plus DYS438 and DYS439), and additional highly polymorphic loci (DYS437, DYS448, DYS456, DYS458, DYS635, and GATA H4). DYS392 is a trinucleotide repeat, DYS438 is a pentanucleotide repeat, and DYS448 is a hexanucleotide repeat, while the remaining loci in the AmpFlSTR® Yfiler® PCR Amplification Kit are tetranucleotide repeats. Given that the AmpFlSTR® Yfiler® PCR Amplification Kit uses the same dye chemistry as the AmpFlSTR® Identifiler® PCR Amplification Kit, the GeneMapper® ID Analysis outlined in section 13.1.1 is similar to the GeneMapper® ID Analysis employed for Y-STR data analysis.
13.3.1.4. Allele assignment occurs through the same 3-step process: 13.3.1.4.1. Spectral separation still employs the 4 dyes incorporated during
amplification (6-FAM™, VIC®, NED™, and PET®) as well as the GeneScan™ 500 LIZ® Size Standard (PN 4322682) as the internal size standard. Please refer to section 13.1.1 for more detail.
13.3.1.4.2. Peak BP Sizing still uses GeneScan™ 500 LIZ® Size Standard (PN 4322682) as the internal size standard and the Local Southern Method for sizing of fragments of unknown length. Please see section 13.1.5 for more detail. The size standard chosen for GeneMapper analysis is be CE_G5_HID_GS500.

Forensic Biology DNA SOP Manual
Forensic Analysis Division
DNA SOP Manual FAD-FB-DNA-SOP Issued By: Acting Technical Leader Issue Date: May 06, 2016 Uncontrolled When Printed Page 195 of 233
13.3.1.5. Allele designations are still determined through comparison of peaks of unknown length to peaks of known lengths in the manufacturer-provided allelic ladder in the corresponding dye channel. An allelic ladder must be present and interpretable in each run for comparison. If multiple ladders were injected in a single run, GeneMapper averages samples labeled as “Allelic Ladder” during data analysis. If any ladders do not exhibit quality data, change the sample type from “Allelic Ladder” to “Sample” so they are not included in the software averaging of ladders.
13.3.2. GeneMapper Procedure
13.3.2.1. Exceptions to the GeneMapper analysis procedure outlined in section 13.1.1.2 include:
13.3.2.1.1. Analysis Method: Yfiler • Bin Set: AmpFlSTR _Binset_v3X • The “use marker-specific stutter ratio if available” option must be selected
13.3.2.1.2. Minus Stutter Distances: • Trimeric repeats: from 2.25 to 3.75 • Tetrameric repeats: from 3.25 to 4.75 • Pentameric Repeats: from 4.25 to 5.75 • Hexameric Repeats: from 5.25 to 6.75
13.3.2.1.3. Analysis range: Partial – the lower end of range should be adjusted to
accommodate run conditions, but generally ranges from about 2,400 to 10,000
13.3.2.1.4. Sizing: Partial: 75 – 400 (450 is optional; largest peak approximately 335 bp at DYS392, so the 350 and 400 bp LIZ peaks permits the Local Southern Size Calling Method)
13.3.2.1.5. Peak Amplitude (Analytical) Threshold: 65 RFUs (approximately 3 times the maximum observed peak height in the validation’s minimum threshold study for 20 second injections (21 RFU in yellow dye channel; validation data show that the yellow and red dye channels tend to be the noisiest)).
13.3.2.1.6. Panel: Yfiler_v1.2X
13.3.2.2. After analysis, the data must be examined for the following: 13.3.2.2.1. All of the following peaks are present, of good morphology, and of similar
height in LIZ: 75, 100, 139, 150, 160, 200, floater (approximately 245-250), 300, 340, 350, and 400 (the 450 peak is optional).

Forensic Biology DNA SOP Manual
Forensic Analysis Division
DNA SOP Manual FAD-FB-DNA-SOP Issued By: Acting Technical Leader Issue Date: May 06, 2016 Uncontrolled When Printed Page 196 of 233
13.3.2.2.2. Correct and complete allelic designations on the allelic ladder chosen for analysis (see the AmpFlSTR® Yfiler® PCR Amplification Kit user manual).
13.3.2.2.3. All positive control peaks are present and labeled correctly. Any extraneous peaks must be attributable to a known biology-related or technology-related artifact. Each amplification set and genetic analyzer run must have at least one acceptable positive control. See the table above for the genotype of the male positive control (007).
13.3.2.2.4. All negative controls (amplification negative control and regent blanks) are free of allelic activity that cannot be attributed to a known biology-related or technology-related artifact. Each reagent blank must have acceptable results for data from the corresponding extraction set to be used for interpretation. The amplification negative control must have acceptable results for data from the corresponding amplification set to be used. Additionally, each analyzer run must have at least one acceptable negative control.
13.3.2.2.5. Projects are named in the manner defined in section 13.1.1.2.4.1 or by using the LIMS generated 3130 plate number.
13.3.2.2.6. Electropherograms must be examined for data quality and allele calls. See the discussion below for guidance on evaluating data and editing artifacts and microvariant calls. Verify that the allele edit comment is selected in the alleles tab of the plot window. To change or delete the allele call, click on the peak or allele call to be edited to select it. Right click and either choose Delete Allele or Rename Allele. Explain your edit in the comment box.
13.3.2.2.7. Upon completion of analysis, save the project. With labels to include allele peak calls, allele peak heights, allele peak sizes, and allele edit comments (if applicable), print plots for all case samples and associated controls to be included in the case file. Place in each case folder a printout of the complete GeneMapper project list for each run along with the plots for all associated controls and samples associated with that case. If an entire run is not used, it is not necessary to print the plots. However, the injection list must be included in the case file with an explanation as to why data was not used (e.g., no acceptable positive control). Document each time a sample is manipulated, such as longer or shorter injection times or if amplification product is diluted.
13.3.2.2.8. A second analyst must perform the GeneMapper analysis independently and agree with the allele calls reported by the first analyst on the allele chart by

Forensic Biology DNA SOP Manual
Forensic Analysis Division
DNA SOP Manual FAD-FB-DNA-SOP Issued By: Acting Technical Leader Issue Date: May 06, 2016 Uncontrolled When Printed Page 197 of 233
noting their second read on the injection list. By initialing and dating the injection list, the technical reviewer is agreeing with the allele calls, edits, and any manual calculations performed by the initial analyst.
13.3.2.2.9. In order to import GeneMapper allele calls into the allele chart of LIMS
reports: • Select the case-specific samples to be exported in the sample tab (this must be performed for each case) • Go to Tools -> Report Manager • Ensure that LIMS Import Report is selected • Go to File -> Export • Save the file • Go to the allele chart panel in LIMS -> Import • Navigate to location of your saved GeneMapper export file->Open • Select Replace->OK to replace existing data or • Select Append->OK to add to existing table data
13.3.2.2.10. Allele calls may also be manually entered into the LIMS allele chart panel.
13.3.3. Y-STR Artifacts and Unusual Results 13.3.3.1. Technology-related artifacts that are observed in Identifiler®/Identifiler® Plus data
analysis can be expected in Yfiler® data as well, given the same method of capillary electrophoresis used to obtain Identifiler®/Identifiler® Plus data is used to obtain Yfiler® data. Please see section 13.1.2 for more detail artifacts commonly observed in STR analysis.
13.3.3.2. Biology-related artifacts, or those that result from the PCR, include stutter products and incomplete 3’ (-A) nucleotide addition. In addition to the -4 stutter often observed in tetranucleotide repeats, when performing Yfiler® data analysis, one must consider the possibly of -3 stutter of trinucleotide repeats, -5 stutter of pentanucleotide repeats, and -6 stutter of hexanucleotide repeats, though the increasing number of base pairs in a repeat unit is expected to correlate to a smaller ratio between the artifactual peak and the true peak from which it was created. In addition to minus stutter, plus stutter or forward stutter should be considered a possibility when “extra” peaks are observed in an otherwise single-source sample that occurs in the plus stutter position (typically one repeat unit larger than the true allele). Plus stutter occurs when polymerase slippage occurs during amplification that may lead to a loop forming in the synthesized strand (as opposed to in the template strand, as is suggested for minus stutter). This loss of processivity may be

Forensic Biology DNA SOP Manual
Forensic Analysis Division
DNA SOP Manual FAD-FB-DNA-SOP Issued By: Acting Technical Leader Issue Date: May 06, 2016 Uncontrolled When Printed Page 198 of 233
attributable to critical components of PCR becoming limited or depleted in the later amplification cycles. The internal Yfiler® validation data show that most plus stutter was less than 4% of the main allele peak height. Samples that seemingly exhibit forward stutter must be interpreted with caution, so as not to misinterpret an actual mixture of male DNA.
13.3.3.3. In addition to minus and plus stutter that is one full repeat unit smaller or larger than the true peak, DYS19 has demonstrated, both in the developmental validation and in the internal validation, the propensity for incomplete or partial stutter activity in both the -2 and +2 positions. This may be attributable to the higher degree of secondary structure causing Taq to stall more frequently. This locus was probably retained in the European minimal haplotype for historical reasons, as was TH01 in the core loci used in autosomal analysis.
Stutter Marker Developmental
Validation % Stutter
% bp stutter (plus or minus)
Highest Observed % in Internal Validation, if Greater than Developmental Validation Data
Stutter % Filters to be used at HFSC
DYS456 13.21 - - 13.21 DYS389I 11.79 - - 11.79 DYS390 10.4 - 10.67 10.67 DYS389II 13.85 - - 13.85 DYS458 12.2 - 12.72* 12.2 DYS19 11.04 10.21 (-2 bp) - 11.04(-4bp)/
10.2 (-2bp) DYS385a/b 13.9 - - 13.9 DYS393 12.58 - - 12.58 DYS391 11.62 - 14.26* 11.62 DYS439 11.18 - - 11.18 DYS635 10.75 - - 10.75 DYS392 16.22 7.9 (+3 bp) - 16.22 (-4 bp)/
7.9 (+3 bp) Y GATA H4 11.08 - 13.86* 11.08 DYS437 8.59 - - 8.59 DYS438 4.28 - - 4.28 DYS448 4.96 - - 4.96 *Observed in a sample for which the RFU activity far exceeded the “sweet spot” of 1000-3000 RFUs; most alleles were >8000 RFUs (Non-probative #19, 10 seconds)

Forensic Biology DNA SOP Manual
Forensic Analysis Division
DNA SOP Manual FAD-FB-DNA-SOP Issued By: Acting Technical Leader Issue Date: May 06, 2016 Uncontrolled When Printed Page 199 of 233
13.3.3.4. Other artifacts, published or observed during internal validation: 13.3.3.4.1. Published (observed in developmental validation):
• ~88 bp in VIC® (green channel) • ~80 bp in NED™ (yellow channel) • ~95 bp in NED™ (yellow channel) • ~80 bp in PET® (red channel)
13.3.3.4.2. Observed in internal validation:
• ~95 bp in VIC® (green channel) • ~118 bp in VIC® (green channel) • ~98-100 bp in NED™ (yellow channel) (95 bp published artifact) • ~205 bp in PET® (red channel) • ~215 bp in PET® (red channel)
13.3.4. Microvariants
13.3.4.1. Please see section 13.1.3 for additional information on and naming instructions of microvariants. Given the inclusion of trinucleotide repeats, pentanucleotide repeats, and hexanucleotide repeats, along with tetranucleotide repeats in Yfiler®, one must consider the size of the repeat unit when assessing the possibility to microvariants (not just 4 bps as indicated in section 13.1.3). To ensure that a microvariant is truly off-ladder and not just the result of electrophoretic drift, suspected microvariants must be re-injected for confirmation, with one exception. If the microvariant appears in multiple evidence samples from the same case otherwise having the same Y-STR profile, it is not necessary to re-inject. Because every measure is be taken to interpret evidence samples prior to reference samples, the presence of a microvariant in an associated known sample does not suffice for confirmation, as the evidence is interpreted before and separate from any associated knowns in the case.
13.3.5. Y-STR Re-analysis and Additional Analysis 13.3.5.1. Please see section 13.1.4 for more detail. The steps taken to investigate
unacceptable controls, to optimize data, and to resolve artifacts that may interfere with allelic designations when performing Identifiler®/Identifiler® Plus data analysis are also employed accordingly with Yfiler® data analysis.
13.3.6. Y-STR Interpretation Guidelines
13.3.6.1. Given Y chromosome markers are passed down from generation to generation without changing (except for mutational events), a match between an evidentiary item and a known sample only suggests that the individual could have contributed to

Forensic Biology DNA SOP Manual
Forensic Analysis Division
DNA SOP Manual FAD-FB-DNA-SOP Issued By: Acting Technical Leader Issue Date: May 06, 2016 Uncontrolled When Printed Page 200 of 233
the evidentiary sample, along with any relative from his paternal lineage. A match could also result from unrelated individuals. As with autosomal analysis, mutations must be considered in comparisons that include multiple generations (e.g., alleged father and product of conception).
13.3.6.2. Results and conclusions from DNA analysis must be scientifically supported by the analytical data with appropriate standards and controls. Interpretations are made as objectively as possible and consistently from analyst to analyst. Not every situation can nor should be covered by a specific rule and situations may occur that require an analyst to deviate from stated guidelines. Expectations of alleles per locus and major/minor ratios are stated below. It is expected that limited variance from these values may occur. Analysts shall utilize their training and experience to address these variances. Both the reporting analyst and reviewer shall agree on all variances that are accepted. If an agreement between the reporting analyst and reviewer cannot be reached, consultation with a more experienced analyst or supervisor may help. If an agreement is still not reached, it shall be brought to the attention and decision of the Technical Leader. Case documentation including, but not limited to any and all assumptions, must be sufficient for another experienced analyst to identify and understand the deviation from stated guidelines.
13.3.6.3. Whenever possible, evidentiary samples are be completely evaluated prior to the
evaluation of any reference samples that are to be compared. The decision to attempt to develop a profile further through re-injection or re-amplification is be made without knowledge of the known profile for comparison, other than those of assumed contributors.
13.3.7. Types of Conclusions
13.3.7.1. Three types of conclusions are generally possible when both evidence (questioned) and reference (known) samples are tested and compared:
13.3.7.1.1. inclusion: the individual could have contributed to/been a source of the questioned profile;
13.3.7.1.2. exclusion: the individual could not have contributed to/been a source of the questioned profile; the genotype comparison shows profile differences that can only be explained by the two samples originating from different sources
13.3.7.1.3. inconclusive: the data does not support a conclusion; insufficient information exists to support any conclusion. The reason for inconclusive results must be clearly stated in the report.

Forensic Biology DNA SOP Manual
Forensic Analysis Division
DNA SOP Manual FAD-FB-DNA-SOP Issued By: Acting Technical Leader Issue Date: May 06, 2016 Uncontrolled When Printed Page 201 of 233
13.3.7.1.4. Inclusion or exclusion is determined by qualitative and quantitative
evaluation of the entire DNA profile produced at the various loci tested. Inconclusive results or an uninterpretable profile may result from but are not limited to: • Insufficient amounts of template DNA • Degradation • Inhibitors • Mixtures of DNA from multiple donors
It may be acceptable for an inclusion or exclusion to be determined when one or more loci yield inconclusive results. An inclusion statement and any resulting statistical calculations are to be based only on loci that yield conclusive results. An exclusion statement can be determined if even a single locus produces exclusionary results. However an exclusion shall not be determined if technical issues such as the loss of an allele due to incomplete (preferential) amplification, stochastic effects, mutation, or other factors may have caused the non-match.
13.3.7.2. Types of Profiles
13.3.7.2.1. A number of different types of profiles may be obtained from evidence samples. The comparisons with references that can be made are determined by the type of profile.
13.3.7.2.2. No profile: No DNA results obtained at all. No comparison can be made to
reference samples.
13.3.7.2.3. Uninterpretable: Data obtained but insufficient for comparison. This may be due to data at too few loci, data below the stochastic threshold, or when the overall quality of the data is questionable. No comparison can be made to reference samples.
13.3.7.2.4. Single source profile: Unlike with autosomal analysis, because of the haplotype
(combination of allelic states of a set of polymorphic markers lying on the same DNA molecule) nature of Y-STR analysis, a sample is considered single-source when not more than one peak (as opposed to two in autosomal analysis) is observed at any of the loci, except for DYS385 a/b.

Forensic Biology DNA SOP Manual
Forensic Analysis Division
DNA SOP Manual FAD-FB-DNA-SOP Issued By: Acting Technical Leader Issue Date: May 06, 2016 Uncontrolled When Printed Page 202 of 233
DYS385 a/b is a duplicated (or multi-copy) marker in which one primer binds at two separate locations on the Y chromosome. The duplicated regions are 40,775 bp apart and facing away from one another. If the locus is duplicated exactly, only one allele is observed at this marker. However, it is very common to see two alleles at this locus. This makes this marker very informative, which made it an ideal selection for inclusion in the European minimal haplotype. Two alleles at DYS385 a/b but only one allele at all other loci should not be interpreted as a mixture of DNA. Duplicate repeats should be typed as a genotype (e.g. DYS385 – 11, 14; 16, 16). The order that the alleles are listed (typically from the smallest to the largest) does not imply assignation to one or the other of the two alternative chromosomal locations.10 Most duplications result in alleles that differ in size by 1 repeat unit.10 Based on validation data, a stochastic threshold of 300 RFU can be applied to DYS385 a/b. If a single allele is detected below 300 RFU, then the locus may not be used for statistics and be interpreted with caution.
Unlike DYS385 a/b which is two separate locations, DYS389 I and DYS389 II (DYS389 I/II) are actually a single region, but produce two PCR products because the forward primer binds twice. DYS389 II represents the fragment that results from the forward primer binding further away from the reverse primer. It is longer than 389 I, occurring from about 250 bp to 295 bp, in the blue channel. The fragment that is assigned to the DYS389 I locus results from the forward primer that binds nearer the reverse primer. This fragment is generally about 140 bp to 165 bp, also occurring in the blue channel.
It is possible to observe multiple peaks at loci other than DYS385 a/b in a single-source sample. This is likely the result of the entire region of the Y-chromosome being duplicated and then diverging. Peak heights are expected to be similar and peaks are expected to be no more than one repeat unit apart. A duplication event on the Y-chromosome is considered when a sample is seemingly single-source but some loci have two alleles, especially when loci are located near one another. However, this is not expected to be a common event. As with any sample exhibiting more than one peak at a locus other than DYS385 a/b, extreme caution must be exercised during interpretation to ensure actual mixtures of male DNA are not mistaken for singles-source male DNA. DYS437, DYS439, and DYS389I/II are closely spaced, as are DYS391, DYS439, and DYS635.10
13.3.7.2.5. Mixtures: Evidence samples may contain DNA from more than one individual. A
mixture can consist of full and/or partial profiles from multiple individuals. Generally, a sample is considered to have originated from more than one male

Forensic Biology DNA SOP Manual
Forensic Analysis Division
DNA SOP Manual FAD-FB-DNA-SOP Issued By: Acting Technical Leader Issue Date: May 06, 2016 Uncontrolled When Printed Page 203 of 233
individual if two or more alleles are present at two or more single-copy loci. Like autosomal analysis, allelic balance and excessive stutter may be used for consideration when assessing the number of contributors to a DNA profile. Also like autosomal analysis, Yfiler® mixtures can be of two general types: mixtures with major/minor contributors and mixtures with indistinguishable contributors (unresolved).
13.3.7.2.5.1. Mixtures with major/minor contributors
13.3.7.2.5.1.1. The internal validation demonstrated that as the contribution of DNA in a mixture from the donors becomes more similar (e.g. approaches 1:2), it becomes more difficult to distinguish the profiles of the major and minor contributors. Conversely, as the amount of DNA contributed becomes more dissimilar (e.g. approaches 1:19), the ability to distinguish contributors is improved. Validation data indicate that at about a 1:4 ratio the individual contributors can be readily discerned from one another. It is expected that minor peak heights can be ~35% or less than the height of the major peak. Consideration must be given to the possibility of the “swapping” of the major and minor contributors should one of the components exhibit evidence of degradation. If the major component is degraded, what appears to be from the major contributor at the loci of shorter fragments could appear to be from the minor component at the loci of longer fragments.
13.3.7.2.5.1.1.1. For mixtures in which minor contributors are determined
to be present, a peak in stutter position (generally n-4) may be determined to be 1) a stutter peak, 2) an allelic peak, or 3) indistinguishable as being either an allele or stutter peak. This determination is based principally on the height of the peak in the stutter position and its relationship to the stutter percentage expectations established by the laboratory. Generally, when the height of a peak in stutter position exceeds the laboratory’s stutter expectation for a given locus, that peak is consistent with being of allelic origin and is designated as an allele. If a peak is at or below this expectation, it is generally designated as a stutter peak. However, it should also be considered as a possible allelic peak, particularly if the peak height of the potential stutter

Forensic Biology DNA SOP Manual
Forensic Analysis Division
DNA SOP Manual FAD-FB-DNA-SOP Issued By: Acting Technical Leader Issue Date: May 06, 2016 Uncontrolled When Printed Page 204 of 233
peak(s) is consistent with (or greater than) the heights observed for any allelic peaks that are conclusively attributed (i.e., peaks in non-stutter positions) to the minor contributor(s).
13.3.7.2.5.2. Mixtures with indistinguishable contributors (unresolved)
13.3.7.2.5.2.1. Given the mode of inheritance of DNA specific to the Y chromosome, the product rule cannot be employed in statistical analysis. Y-STR data IS completely linked. For this reason, the counting method is used to provide an estimated frequency of a particular haplotype. A database is observed for the presence of the haplotype and the number of times it is observed is counted. At this time, there is no consensus of Y-STR mixture interpretation in the forensic community. Without the ability to provide significance or weight (statistics) to a Y-STR mixture, possible inclusions in a Y-STR mixture in which contributors cannot be distinguished shall not be reported. Individuals can be excluded from an indistinguishable mixture when a finite number of contributors can be assessed.
13.3.7.2.5.3. Minimum Number of Contributors
• Generally, the counting of all alleles at the locus that exhibits the greatest number of allelic peaks may provide guidance towards determining the minimum or finite number of contributors. Proceed with caution when only one allele in the entire sample would lead to an increased number of possible contributors as stutter and peak imbalance can complicate mixture interpretation.
• While counting allele peaks is very useful in determining a minimum number of contributors, the analyst must also consider allele sharing between individuals and allelic dropout may result in an underestimate of the actual number of contributors. For this reason, mixtures may reported as being from “at least” the fewest number of individuals possible, given the maximum number of alleles detected at a locus.
13.3.7.2.5.4. Partial profiles: Partial profiles exhibit allelic dropout in some, but not
all, loci tested and can result from insufficient, degraded, or inhibited DNA. Typically, smaller loci amplify better under these conditions and

Forensic Biology DNA SOP Manual
Forensic Analysis Division
DNA SOP Manual FAD-FB-DNA-SOP Issued By: Acting Technical Leader Issue Date: May 06, 2016 Uncontrolled When Printed Page 205 of 233
larger loci tend to drop out. Care must be taken to ensure that non-matches are not a result of drop-out.
13.3.7.3. Female Control DNA
13.3.7.3.1. The female control DNA sample provided in the AmpFlSTR® Yfiler® PCR Amplification Kit may be used in an amplification, but is not required. Both developmental and internal validations established that not only is female DNA not amplified when primers from the AmpFlSTR® Yfiler® PCR Amplification Kit are applied, but moreover, even in the presence of excessive female DNA (100-fold excess), male DNA can still be successfully amplified, electrophoresed, and typed using the AmpFlSTR® Yfiler® PCR Amplification Kit. Successful typing of the male control DNA (007) demonstrates successful PCR and subsequently successful allelic labeling by the GeneMapper® ID software. The amplification negative control, when it fails to produce allelic activity that cannot be attributed to biology-related or technology-related artifacts, demonstrates that amplification kit components were free of DNA prior to use on the associated samples.
13.4. References: Houston Police Department Validation of the AmpFlSTR® Yfiler® PCR Amplification Kit GeneAmp® PCR System 9700 Thermal Cycler SN 805S1081424 Applied Biosystems 3130 Genetic Analyzer SN 1341-004 Validation Report Notebooks 1, 2, and 3
Houston Police Department AmpFlSTR® Yfiler® PCR Amplification Kit, Quantifiler® Duo DNA Quantification Kit, Applied Biosystems® 7500 Real-Time PCR System SN 275003524, GeneAmp® PCR System 9700 Thermal Cycler SN 805S1081424, Applied Biosystems 3100 Genetic Analyzer SN 1341-004 Validation Training Lecture Material.
AmpFlSTR® Yfiler® PCR Amplification Kit User’s Manual, ©2006, 2010; PN 4358101, Rev. D
User Bulletin GeneMapper® ID Software v3.2.1 Patch, ©2007; PN 4382255 Rev. A
GeneMapper™ ID Software Version 3.1 Human Identification Analysis User Guide, ©2003; PN 4338775 Rev. C
Butler, John M. Fundamentals of Forensic DNA Typing. San Diego: Academic Press, 2010.

Forensic Biology DNA SOP Manual
Forensic Analysis Division
DNA SOP Manual FAD-FB-DNA-SOP Issued By: Acting Technical Leader Issue Date: May 06, 2016 Uncontrolled When Printed Page 206 of 233
Houston Police Department Validation of the AmpFlSTR® Identifiler® Plus PCR Amplification Kit using the GeneAmp® PCR System 9700 Thermal Cyclers SN G96S0243091/805S1081424 and Applied Biosystems 3130xl Genetic Analyzer SN 1341-004 Validation Report Notebooks 1,2, and 3.
SWGDAM Interpretation Guidelines for Autosomal STR Typing by Forensic DNA Testing Laboratories, Approved 1/14/10.
Coble, M. and Butler, J. (September, 2011) “Exploring the Capabilities of Mixture Interpretation Using True Allele Software”. 24th Congress of the International Society for Forensic Genetics, Vienna, Austria.http://www.cstl.nist.gov/strbase/pub_pres/ISFG2011-Coble-TrueAllele.pdf
SWGDAM Interpretation Guidelines for Y-Chromosome STR Typing, Approved 1/9/14.

Forensic Biology DNA SOP Manual
Forensic Analysis Division
DNA SOP Manual FAD-FB-DNA-SOP Issued By: Acting Technical Leader Issue Date: May 06, 2016 Uncontrolled When Printed Page 207 of 233
14. Statistics
14.1. Once a match has been identified and an individual included as a possible source of evidentiary material, the significance of that match is estimated to allow investigators, the legal sector, and ultimately a jury of lay persons to place the appropriate emphasis on the conclusion. Although every locus analyzed is evaluated, some loci may provide no information with regard to a particular comparison. Because it is the significance of the match that is important, only the matching loci can be taken into account in estimating significance and only after the analyst has determined that the profiles match. The different methods of calculating significance, when each is to be applied, and the population data from which they are calculated are addressed in this protocol.
14.2. Significance estimates must be presented in the report for all probative matches. Significance
estimates are not required for non-probative matches. Non-probative matches may be those from intimate samples (see section 13). The Technical leader must approve not reporting non-probative matches other than intimate items.
14.3. The laboratory must perform statistical analysis in support of any inclusion, other than for non-probative matches, regardless of the number of alleles detected and the quantitative value of the statistical analysis. If an individual cannot be excluded but statistics cannot be performed (due to stochastic issues), no conclusions can be rendered for that particular individual.
14.4. For all estimates, statistical significance is expressed as an inverse probability of inclusion.
14.5. Stochastic Threshold
14.5.1. The analytical threshold is the “minimum height requirement at and above which detected peaks can be reliably distinguished from background noise”1. Peaks above this threshold are generally not considered noise and are either artifacts or true alleles. The analytical threshold for Identifiler amplifications is 100 RFUs. The analytical threshold for Identifiler Plus amplifications is 50 RFUs. The stochastic threshold is the “RFU value above which it is reasonable to assume that, at a given locus, allelic dropout of a sister allele has not occurred1”. The validation data support a stochastic threshold for Identifiler Plus samples of 200 RFUs using a 5 or 10 second injection. Analysts must use caution when activity is observed below the analytical threshold, even though all labeled activity is above the stochastic threshold. It may be appropriate to exclude the locus from statistical analyses.
14.5.1.1. References are expected to be single-source. When the data supports that a reference profile is single-source, it is permissible to use evidentiary data that

Forensic Biology DNA SOP Manual
Forensic Analysis Division
DNA SOP Manual FAD-FB-DNA-SOP Issued By: Acting Technical Leader Issue Date: May 06, 2016 Uncontrolled When Printed Page 208 of 233
satisfies stochastic threshold criteria even though the reference may not satisfy stochastic threshold criteria at all loci.
14.6. Single source significance calculation
14.6.1. The random match probability (RMP) is an estimate of the rarity of the observed DNA profile of a single individual, or the chance that a randomly selected individual from a population has an identical STR profile or combination of genotypes at the DNA markers used.6
14.6.2. Random match probability can be applied if the evidentiary profile is determined to be any of the following: • Single source • Major component of a mixture with one contributor • Deduced component of an intimate mixture • Obligate minor component of a two person mixture
14.6.3. RMP is suitable for genotypes that are attributed to a single individual. 14.6.4. The following formulae from NRC II Recommendation is used:
14.6.4.1. For heterozygotes: • f = 2pq (NRC II formula 4.1b).
14.6.4.2. For loci where the genotype is clearly identified as homozygous • f = p2 + p (1-p)θ where θ = 0.01 (NRC II formula 4.4a). • Population substructure is taken into account with the theta correction • θ = 0.01 is a reliable and conservative estimate of population substructure, but case-specific reasons may warrant the adoption of a higher value
14.6.4.3. For loci where the genotype is ambiguous as homozygous or heterozygous • f=2p-p2 • When this option is used it must be selected in the PopStats for each locus
that it applies to. Check the box that says Rec 4.1 for each locus.
14.7. Mixed source significance calculation
14.7.1. The combined probability of inclusion (CPI) is a probability of what fraction of the population would be included as a contributor to a DNA mixture.
14.7.2. For the frequency of each locus, Probability of Inclusion (PI) = (p1 + p2 + p3 + p4 +… + pk)2 where p is the estimated frequency of the allele detected for each allele 1 through k, and k is the number of alleles detected at the locus.
14.7.3. For all loci used to identify the match, CPI = (PI1 x PI2 x PI3 x PI4 x… x PIk), where k is the number of loci.
14.7.4. CPE (combined probability of exclusion) = 1 – CPI 14.7.5. PopStats is configured to use Theta in the Probability of Exclusion/Inclusion Calculations:

Forensic Biology DNA SOP Manual
Forensic Analysis Division
DNA SOP Manual FAD-FB-DNA-SOP Issued By: Acting Technical Leader Issue Date: May 06, 2016 Uncontrolled When Printed Page 209 of 233
14.7.6. PE = 1 – [p2 - θ(1 - p)p], where p = p1 + p2 + … + pk, where θ = 0.01 14.7.7. The CPI calculation does not take into account the number of contributors. It is suitable
for samples with either a finite number of contributors or those with an at least designation.
14.7.8. The main principle of the mixture calculation is to use loci where dropout is unlikely. Only loci with the data from all contributors may be calculated. Use of partial data that excludes some alleles, such as a major component that is a mixture, is permissible.
14.7.9. If a finite number of contributors is not determined for a mixture, then extreme caution must be used to ensure that loci where dropout could have occurred are not used in the CPI calculation
14.7.10. The following process can aid in determining appropriate loci for mixture calculation 14.7.10.1. Exclude loci as follows:
14.7.10.1.1. An Identifiler locus if there is evidence of possible additional alleles below analytical threshold, as determined by alleles called if the analysis minimum threshold is lowered to 50 RFU.
14.7.10.1.2. Identifiler Plus loci with alleles below the stochastic threshold. 14.7.10.1.3. Identifiler Plus loci where data is observed below analytical threshold.
Caution must be exercised in distinguishing baseline from potential allelic activity.
14.7.10.1.4. Identifiler Plus loci where other loci suggest there could be alleles below stochastic threshold
14.7.10.2. Loci may be re-instated as follows: 14.7.10.2.1. Mixtures with an assumption of finite number of contributors where all
data is observed (i.e. four alleles are present or one major and two minor alleles)
14.7.11. Allele sharing/stacking of alleles due to sharing creates more uncertainty.4 An allele may ultimately exceed the stochastic threshold due to the stacking of a true allele with another true allele, or a true allele with an artifact such as stutter. In these instances, the analyst should consider excluding the locus from statistical analysis, despite all alleles exceeding the stochastic threshold. The reason for excluding a locus that is otherwise acceptable must be documented in the case file.
14.7.12. Mixture calculations may not be performed on mixtures believed to contain DNA from related individuals as the calculation assumes unrelated individuals. Indistinguishable mixtures of related individuals may be reported as inconclusive if a statistical analysis is not possible to support the inclusion.
14.7.13. Interpretation of Potential Stutter Peaks in a Mixed Sample1
14.7.13.1. For mixtures in which minor contributors are determined to be present, a peak in stutter position (generally n-4) may be determined to be 1) a stutter peak, 2) an

Forensic Biology DNA SOP Manual
Forensic Analysis Division
DNA SOP Manual FAD-FB-DNA-SOP Issued By: Acting Technical Leader Issue Date: May 06, 2016 Uncontrolled When Printed Page 210 of 233
allelic peak, or 3) indistinguishable as being either an allele or stutter peak. This determination is based principally on the height of the peak in the stutter position and its relationship to the stutter percentage expectations established by the laboratory. Generally, when the height of a peak in stutter position exceeds the laboratory’s stutter expectation for a given locus, that peak is consistent with being of allelic origin and is be designated as an allele. If a peak is at or below this expectation, it is generally designated as a stutter peak. However, it should also be considered as a possible allelic peak, particularly if the peak height of the potential stutter peak(s) is consistent with (or greater than) the heights observed for any allelic peaks that are conclusively attributed (i.e., peaks in non-stutter positions) to the minor contributor(s).
14.7.13.2. If filtered minor peaks could be attributed to the minor component then the locus must be excluded from the CPI calculation.
14.7.13.3. It is not advisable to use the peak heights of alleles conclusively attributed to a second or third contributor at larger loci to determine whether a peak(s) at smaller loci may be filtered stutter, particularly if degradation is suspected.
14.8. Minimum and null allele frequencies
14.8.1. Following NRC II recommendations, minimum allele frequencies are calculated using 5/2N where N is the number of individuals in the population database and null allele frequencies are set to 0.
14.9. Off-ladder alleles
14.9.1. Off-ladder alleles that have been confirmed by reinjection (in the case of STR analysis) or appearance in more than one sample are used to determine a match and estimate the significance of that match. The allele frequency is the calculated minimum allele frequency for that locus and population group if not contained in the database.
14.10. Software
14.10.1. The latest available and installable version of the FBI’s PopStats software is configured to use the above formulae and used to calculate significance estimates. The Forensic-Single Sample data input option is used for single source significance calculations. The Forensic Mixture Case data input option and the Mixture Formula is used for mixed source significance calculations.
14.10.2. In PopStats2: 14.10.2.1. The African American (Blk), U.S. Caucasian (Cau), Hispanic (SWH) databases for
the 13 core STR loci were created from data developed by the FBI Forensic Science Research Unit in Quantico, VA. The data are published in the Journal of Forensic Sciences under the title "Population Data on the Thirteen CODIS Core Short Tandem

Forensic Biology DNA SOP Manual
Forensic Analysis Division
DNA SOP Manual FAD-FB-DNA-SOP Issued By: Acting Technical Leader Issue Date: May 06, 2016 Uncontrolled When Printed Page 211 of 233
Repeat Loci in African Americans, U.S. Caucasians, Hispanics, Bahamians, Jamaicans, and Trinidadians", by Bruce Budowle, Ph.D., Tamyra R. Moretti, Ph.D., Anne L. Baumstark, B.S., Debra A. Defenbaugh, B.S., and Kathleen M. Keys, B.S. (J. of Forensic Sci., 1999; 44(6):1277-1286).
14.10.2.2. The African American (Blk), U.S. Caucasian (Cau), Hispanic (SWH), Chamorro, and Filipino databases for D2S1338 and D19S433 were copied from Table 1 and Table 2 of "Population Data on the STR Loci D2S1338 and D19S433" by Bruce Budowle, Patrick J. Collins, Pero Dimsoski, Constance K. Ganong, Lori K. Hennessy, Craig S. Leibelt, Sulekha Rao-Coticone, Farideh Shadravan, and Dennis J. Reeder; Forensic Science Communications, July 2001, Volume 3, Number 3.
14.10.2.3. An erratum was issued in June 2015 correcting some of the data sets listed above. This erratum was necessary since a comparison of the previous data with new STR kits revealed some discrepancies. As stated in the erratum these differences were attributed to “human error, typically due to the limited software capabilities for genotyping with manual data editing and recording, and (ii) technological limitations (e.g., insufficient resolution for distinguishing microvariants by polyacrylamide gel electrophoresis).” Moretti, T. R., Budowle, B. and Buckleton, J. S. (2015), Erratum. J Forensic Sci, 60: 1114–1116. doi:10.1111/1556-4029.12806
14.10.2.4. Population data for other racial groups are available within PopStats as part of published data from the Journal of Forensic Science under the title “CODIS STR Loci Data from 41 Sample Populations” by Budowle, et. al, (J. Forensic Sci. 2001;46(3):453-489).
14.11. Significance Estimation for Forensic Parentage and Relationship Cases
14.11.1. This section refers to paternity calculations, as the vast majority of cases involve questions of the paternity of a child. However the same statistical approach and formulas can be used in significance estimations in maternity cases.
14.11.2. Formulas for Paternity Index Calculations 14.11.2.1. Capital letters refer to the allele(s) present in each individual tested and small
letters refer to the frequency of the allele(s).
M C AF PI BD AB AC 1/2a BC AB AC 1/2a BC AB AB 1/2a BC AB A 1/a B AB AC 1/2a B AB AB 1/2a B AB A 1/a

Forensic Biology DNA SOP Manual
Forensic Analysis Division
DNA SOP Manual FAD-FB-DNA-SOP Issued By: Acting Technical Leader Issue Date: May 06, 2016 Uncontrolled When Printed Page 212 of 233
AB AB AC 1/ [2(a+b)] AB AB AB 1/ (a+b) AB AB A 1/ (a+b) AB A AC 1/2a AB A AB 1/2a AB A A 1/a A A AB 1/2a A A A 1/a Unknown AB AC 1/4a Unknown AB AB (a+b)/4ab Unknown AB A 1/2a Unknown A AC 1/2a Unknown A A 1/a
14.11.2.2. The Combined Paternity Index (CPI) is calculated by multiplying these individual
PIs. The Probability of Paternity is be calculated, using the formula below, which assumes a prior probability of 50%:
14.11.2.3. Probability of paternity = (CPI/(CPI +1)) X 100 14.11.2.4. When a mismatch occurs, PI = µ/PEx, µ is the general locus mutation rate and PEx
is the average probability of exclusion for the locus.7
14.12. Significance Estimation for Y-STR Samples3 14.12.1. Y-STR loci are located on the nonrecombining part of the Y-chromosome and,
therefore, considered linked as a single locus. A haplotype is a set of DNA variations, or polymorphisms, that tend to be inherited together. A haplotype can refer to a combination of alleles or to a set of single nucleotide polymorphisms (SNPs) found on the same chromosome. A Y-STR database must consist of haplotype frequencies rather than allele frequencies. Haplotype frequencies are estimated using the counting method, which involves searching a given haplotype against a database to determine the number of times the haplotype was observed in that database. The frequency of the haplotype in the database is then estimated by dividing the count by the number of haplotypes searched.5
14.12.2. A Y-STR profile probability can be estimated from the observed haplotype frequency by attaching a confidence interval (95%) to the haplotype frequency estimate to capture the effect of the database size. The sampling variance of the profile probability decreases as the database size increases.5 The profile probability is not the same as the match probability, which is the probability of observing a profile given that it has already been observed and depends on the evolutionary history of the population. 5

Forensic Biology DNA SOP Manual
Forensic Analysis Division
DNA SOP Manual FAD-FB-DNA-SOP Issued By: Acting Technical Leader Issue Date: May 06, 2016 Uncontrolled When Printed Page 213 of 233
14.12.3. The Y haplotype frequency (p) is calculated using the p = x/N formula, where x = the number of times the haplotype is observed in a database containing N number of haplotypes.
14.12.4. A consolidated U.S. Y-STR database (http://usystrdatabase.org) has been established and is used for population frequency estimation. At usystrdatabase.org, you may select the STR kit being used for loci rearrangement and easier data input. You may also select the ancestries you wish to search. For each locus that is used statistically, select the allele(s) from the drop-down menu or manually enter alleles in the appropriate cell. Select search.
14.12.5. Tabular results display: • the ancestries selected • number of haplotypes in database having data for the selected loci • number of haplotypes in the database matching the entered haplotype • the haplotype frequency • frequency upper bound (95%, profile probability is estimated by applying a 95% confidence upper bound to the haplotype frequency, using the method described by Clopper and Pearson (1934)) • theta (is based on the number of loci used), and • the match probability (calculated using the formula Pr(A│A) = θ + (1 – θ) pA, where A is the haplotype of interest and Pr(A│A) is the probability of observing haplotype A given that it has already been seen once in another individual of the same subpopulation. pA is the profile probability which can be estimated by the counting method, with sampling uncertainty being accommodated by using the upper confidence limit for the estimate of pA.)
o a match probability of 0.001 means that there is a 1 in 1,000 chance of randomly selecting a second individual with this profile, given it has already been observed once o when the evidence profile is considered to be single-source, the inverse of the match probability is the likelihood ratio; for example, a match probability of 0.001 means that the DNA match is 1000 times more likely to occur if the reference individual (or a paternal relative) is the contributor than if the source of the evidence is a randomly selected individual from the same population
14.12.6. Blue links under “Number of Haplotypes (with Selected Alleles)” gives a pop-up listing of haplotype searched and matching haplotypes from database.
14.12.7. All races must be searched and reported. The database name and access date shall be reported. Any reported database searches must be included in the case file. Statistics shall not be performed with fewer than 5 loci.
14.13. References:

Forensic Biology DNA SOP Manual
Forensic Analysis Division
DNA SOP Manual FAD-FB-DNA-SOP Issued By: Acting Technical Leader Issue Date: May 06, 2016 Uncontrolled When Printed Page 214 of 233
SWGDAM Interpretation Guidelines for Autosomal STR Typing by Forensic DNA Testing Laboratories, Approved 1/14/10. CODIS 7.0 PopStats Ballantyne, J. (March, 2011). “Interpretation of Y STR Mixtures and Statistical Applications”. Presentation at the NFSTC DNA Mixture Interpretation Conference, Largo, FL. Coble, M. and Butler, J. (September, 2011) “Exploring the Capabilities of Mixture Interpretation Using True Allele Software”. 24th Congress of the International Society for Forensic Genetics, Vienna, Austria.
http://www.cstl.nist.gov/strbase/pub_pres/ISFG2011-Coble-TrueAllele.pdf SWGDAM Interpretation Guidelines for Y-Chromosome STR Typing, Approved 1/9/14. Butler, John M. Fundamentals of Forensic DNA Typing. San Diego: Academic Press, 2010. Butler, John M. Advanced Topics in Forensic DNA Typing: Interpretation. San Diego: Academic Press, 2014.

Forensic Biology DNA SOP Manual
Forensic Analysis Division
DNA SOP Manual FAD-FB-DNA-SOP Issued By: Acting Technical Leader Issue Date: May 06, 2016 Uncontrolled When Printed Page 215 of 233
15. Reports
15.1. The goal of DNA analysis is to determine whether a particular person is or is not the source of an item of biological evidence. To accomplish this goal, DNA profiles must be generated for the evidentiary item and for a reference item so that the two DNA profiles can be compared. When profiles are compared, they may match, differ, or lack information to where a result cannot be interpreted. DNA results are issued to the requestor via a DNA report. For some DNA requests a comparison cannot be made because no reference samples are available. In those instances, the DNA report only provides the DNA results of evidentiary items.
15.2. Conclusions made by the examiner must be supported by case notes and other documentation
generated during the analysis process, which are maintained either in hard copy or electronically. The DNA report must communicate both analytical results and conclusions of the analyst conveying the essence of what he or she would say if asked for an expert opinion in court. The DNA report informs counsel during discovery what physical evidence was examined and what its significance may be. Decisions may be made by police officers, attorneys, and the courts based on the report alone without analyst clarification, so the report must be able to stand alone. Therefore, it is important to understand the significance of any DNA result. Case information, analysis results, and reports are only released to authorized individuals according to Houston Forensic Science Center (HFSC) Quality Manual requirements.
15.3. The report must contain the information required in the Quality Manual and the FBI Quality
Assurance Standards (QAS). Specifically, the QAS requires the following: case identifier, description of evidence examined, results and/or conclusions, a qualitative or quantitative interpretive statement, date issued, and signature and title of the responsible person. In addition, QAS requires the following in each DNA report:
• Description of DNA technology • Loci analyzed, if DNA analyzed or the name of kit utilized for testing • Disposition of evidence
15.4. All samples retained in the screening report and/or received by the technicians/analyst shall
be listed in the report. For each sample, report the results obtained or indicate that no analysis was performed. The general types of results are:
15.4.1. A general statement about the profile or if results were not interpretable 15.4.1.1. Whether the profile obtained is from a single source or mixture of DNA and
whether a full or partial profile was obtained. 15.4.1.2. For mixtures, this includes the minimum number of contributors and whether a
male is present.

Forensic Biology DNA SOP Manual
Forensic Analysis Division
DNA SOP Manual FAD-FB-DNA-SOP Issued By: Acting Technical Leader Issue Date: May 06, 2016 Uncontrolled When Printed Page 216 of 233
15.4.2. For mixtures, statements must be included if any of the following apply: 15.4.2.1. If components can be distinguished (i.e. major/minor/trace) 15.4.2.2. A finite number of contributors is assumed 15.4.2.3. If a known contributor is assumed as part of a mixture 15.4.2.4. If a foreign DNA profile is deduced
15.4.3. Whether or not tested/known individuals can be excluded, indicate components as necessary. (Note that sometimes the results are inconclusive as to whether an individual can be excluded.)
15.4.4. The statistical significance of a “not excluded” or “inclusionary” result: 15.4.4.1. For autosomal analysis, this is reported, at a minimum, for Caucasians, Blacks, and
Southwest Hispanics. Statistics are reported to two significant digits. If not all loci are used in the statistical calculation, the loci used must be noted in the report.
15.4.4.2. For parentage cases, both the CPI and Probability of Paternity are reported to two significant digits.
15.4.4.3. For Y-STR cases, all races searched shall be reported statistically, along with the database used for analysis and the date of the database search. The following information generated by http://usystrdatabase.org is reported:
15.4.4.3.1. Number of times the haplotype was observed within each population 15.4.4.3.2. The profile probability (the frequency upper bound)
15.4.5. The reason for inconclusive results must be clearly stated. 15.4.6. Assumptions must be stated, e.g., mutations in paternity analysis or presumed biological
relationships. 15.4.7. If data is observed below analytical threshold that is impacting the number of
contributors, its presence must be noted in the report.
15.5. The analyst shall include the DNA profile(s) in the report in the form of a table. If a locus is inconclusive or not responsive to testing, the profile at that locus shall not be reported and shall not be included in calculations of statistical significance estimations. Inconclusive alleles may not necessarily preclude the use of an entire locus (e.g., in instances of inconclusive minor activity). When a foreign profile is deduced from an intimate sample it must be included as a separate line in the allele table.
15.6. The wording of the conclusions in reports depends on the specific nature of the results. Reference to previous analysis, whether screening or DNA, must be made in each report. When comparing new data to previously reported data, the report must indicate the initial data’s report date and case #, should it be different.

Forensic Biology DNA SOP Manual
Forensic Analysis Division
DNA SOP Manual FAD-FB-DNA-SOP Issued By: Acting Technical Leader Issue Date: May 06, 2016 Uncontrolled When Printed Page 217 of 233
16. CODIS (Combined DNA Index System)
The 1994 Crime Act included provisions establishing the FBI’s Combined DNA Index System, a national DNA database program. As of June 1998, all 50 States require the collection of DNA samples from some or all convicted offenders.
In 1995, the Texas 74th Legislature passed House Bill 40 which provided for the collection of blood or other samples from convicted sex offenders, and for a DNA analysis of those samples, with the DNA data stored in a computer database. In 1999, the Texas 76th Legislature passed House Bill 1188 which expanded the collection of blood or other samples to include persons convicted of murder, aggravated assault, burglary of a habitation, or an offense or conviction of which registration as a sex offender is required.
In June 1998, the FBI announced the establishment of a set of 13 core STR loci for use in the National DNA Index System (NDIS). The set of core loci required for participation in NDIS is as follows: D3S1358, vWA, FGA, D8S1179, D21S11, D18S51, D5S818, D13S317, D7S820, D16S539, TH01, TPOX, and CSF1PO. For HFSC, STR typing with the Profiler Plus, COfiler, Identifiler, or Identifiler Plus PCR Amplification kits satisfies this core loci requirement for CODIS entry.
It is a requirement to follow NDIS guidelines in order to obtain federal financial support for the CODIS system. Refer to the NDIS Procedures Manual for additional information.
16.1. Case Evaluation
All cases containing biological evidence must be evaluated for possible entry into CODIS. An NDIS approved STR amplification kit must be utilized during testing for inclusion into the appropriate index for CODIS. The word “Investigation” in the offense category may preclude the use of CODIS for a particular case. See the Local CODIS Administrator for assistance.
16.1.1. Indexes
• LDIS (Local DNA Index System) - does not require a minimum number of loci for searching. Our Houston Forensic Science Center Database is an LDIS. • SDIS (State DNA Index System) - requires a minimum of 7 loci (not including Amelogenin) for searching, as well as a Match Estimation or Moderate Match Estimator (MME) that meets SDIS guidelines as directed by the SDIS Administrator. D2S1338 and D19S433 are permitted in this calculation. • NDIS (National DNA Index System) - requires that all 13 core loci be attempted and accepts specimens with data for 8 loci (not including Amelogenin, D2S1338, or D19S433) for searching. Additionally, it requires a MME that meets NDIS published guidelines for forensic mixture and forensic partial DNA profiles. D2S1338 and D19S433 are not
Forensic Biology DNA SOP Manual
Forensic Analysis Division
DNA SOP Manual FAD-FB-DNA-SOP Issued By: Acting Technical Leader Issue Date: May 06, 2016 Uncontrolled When Printed Page 218 of 233
permitted in this match estimation. Forensic unknowns do not require a MME. Amelogenin, D2S1338, and D19S433 are accepted at NDIS although not searched.
16.1.2. Specimen Identification Specimen naming policies are up to the laboratory entering the profile. There is no statewide requirement for standardization of naming between laboratories as long as each laboratory can identify their own samples. The only requirement for CODIS is that each DNA profile has a unique specimen ID. The specimen ID for HFSC cases may include the case incident number and individual item number. Additionally, the grant, if applicable, may be referred to in the specimen ID.
16.1.3. Sample Type Eligibility
16.1.3.1. The following criteria and considerations must be met for sample submission to SDIS and NDIS:
16.1.3.1.1. Profiles must be interpretable. 16.1.3.1.2. Forensic profiles must be associated with a crime scene (source of material is
attributable to a putative perpetrator). 16.1.3.1.3. Alleles unambiguously attributed to the victim/complainant, husband,
boyfriend, or individuals other than the suspect shall not be offered to NDIS. 16.1.3.1.4. Victim/complainant and elimination samples shall not be uploaded to NDIS.
Legal samples shall be uploaded to NDIS. 16.1.3.1.5. If taken directly from a suspect, the sample is not “forensic”. 16.1.3.1.6. Reference samples shall be accurate and complete for the CODIS Core Loci.
Good faith efforts shall be made to obtain results for each locus and to enter all of the results as part of the DNA profile.
16.1.3.1.7. Samples with any of the following Low Copy Number techniques employed to analyze limited quality and/or quality DNA template below the stochastic thresholds shall not be submitted to NDIS:
• Additional amplification cycles • Post-amplification purification • Reduced reaction volume • Increased voltage or injection time • Nested PCR
16.1.4. Forensic Unknowns
16.1.4.1. Appropriate evidence profiles that are either single source or a fully deduced profile originating from a mixture may be entered in the “Forensic Unknown” Index. A “Forensic Unknown”, as well as “Forensic Partial” and “Forensic Mixture”, are DNA

Forensic Biology DNA SOP Manual
Forensic Analysis Division
DNA SOP Manual FAD-FB-DNA-SOP Issued By: Acting Technical Leader Issue Date: May 06, 2016 Uncontrolled When Printed Page 219 of 233
profiles obtained from an evidentiary sample relating to a crime scene. All evidence profiles are considered unknown, even when they are consistent with a known reference sample. This category, as well as “Forensic Partial” and “Forensic Mixture”, allow the inclusion of DNA records obtained from forensic samples recovered directly from the victim, sexual assault evidence kit, victim’s clothing, or crime scene which are believed to be attributed to the putative perpetrator. At this time, only one profile from the perpetrator which is the most complete is entered into CODIS. This is done to prevent multiple hits on evidence within the same case during searching. A “Forensic Unknown” profile shall have all 13 core CODIS loci and shall not have more than 3 alleles at one locus while the remaining loci can have up to 2 alleles.
16.1.4.2. If the “Forensic Unknown” profile contains all core loci but does not contain D2
and/or D19, the profile can be entered as a “Forensic Unknown” but “Partial Profile” must be marked as “yes” in the software.
16.1.5. Forensic Partial
16.1.5.1. “Forensic Partial” is a single-source profile or a fully deduced profile originating from a mixture with either locus or allelic dropout at any of the 13 core CODIS loci. “Forensic Partial” profiles shall not have more than 3 alleles at one locus while the remaining loci can have up to 2 alleles. “Forensic Partial” profiles submitted to NDIS shall be reviewed by the submitting agency to ensure the DNA records satisfy a statistical threshold for MME as published by NDIS.
16.1.6. Forensic Mixture
16.1.6.1. An STR profile may be determined to be a mixture based on factors such as more than two alleles at more than one or two loci, imbalance in alleles within a locus, and case-specific information. When considering whether a particular STR mixture profile is suitable for entry in NDIS, the concern is how many potential candidates it will match at moderate stringency every time the particular profile is searched at NDIS. A large number of moderate stringency matches is detrimental to both parties involved in the match. The following rules must be applied to determine suitability:
16.1.6.1.1. A “Forensic Mixture” is a sample with more than one source. 16.1.6.1.2. A “Forensic Mixture” shall not have more than 4 alleles at any one locus. 16.1.6.1.3. An indistinguishable mixture profile from three or more contributors shall
not be entered into LDIS/SDIS/NDIS. 16.1.6.1.4. If the profile of interest can be reliably and completely extracted from a
mixture profile, ONLY that portion of the mixture needs to be entered into

Forensic Biology DNA SOP Manual
Forensic Analysis Division
DNA SOP Manual FAD-FB-DNA-SOP Issued By: Acting Technical Leader Issue Date: May 06, 2016 Uncontrolled When Printed Page 220 of 233
LDIS/SDIS/NDIS. This deduction can be conducted by visual or quantitative interpretation of the alleles in each locus in comparison to the profile of an assumed contributor.
16.1.6.1.4.1. Mixture deduction is typically performed on intimate samples, with indistinguishable mixed profiles of 2 contributors, where one of the contributors is known or can be assumed.
16.1.6.1.4.2. A deduced profile may be a major/minor contributor or a foreign profile where the alleles from the expected contributor are subtracted out for interpretation purposes. Those obligate foreign alleles may effectively constitute a single-source profile.
16.1.6.1.4.3. Mixtures with a major component of unknown origin: the major contributor may be entered into CODIS as a forensic unknown.
16.1.6.1.4.4. Indistinguishable mixtures should be evaluated wholly for an approximate ratio of contribution between the assumed contributor and the foreign contributor. This may be accomplished by examining loci with 4 alleles to determine the approximate contribution of each contributor and observing any peak height ratio differences between the contributors. Additionally, Amelogenin may be evaluated when the two contributors are not of the same gender. When using Amelogenin, analysts must consider the double contribution of “X” for female contributors.
16.1.6.1.5. Indistinguishable mixtures: 16.1.6.1.5.1. When 4 alleles are present: Identify which alleles are being
contributed by the assumed contributor. The remaining 2 alleles are assumed to belong to the foreign contributor.
16.1.6.1.5.2. When 3 alleles are present and the assumed contributor is homozygous: Identify which allele is being contributed by the assumed contributor. The remaining 2 alleles are assumed to belong to the foreign contributor.
16.1.6.1.5.3. When 3 alleles are present and the assumed contributor is heterozygous: Identify which alleles are being contributed by the assumed contributor. It is possible that the remaining allele is a homozygous peak from the foreign contributor. Alternatively, it may be one of two heterozygous peaks where the other peak is shared with the assumed contributor. Consider an observed profile peak height ratio difference when determining whether the additional allele is homozygous or heterozygous. Further, use the overall ratio to determine which of the assumed contributor’s peaks is paired with the single foreign allele. Refer 16.1.6.1.6 and 16.1.6.1.7 below when deduction is not possible.

Forensic Biology DNA SOP Manual
Forensic Analysis Division
DNA SOP Manual FAD-FB-DNA-SOP Issued By: Acting Technical Leader Issue Date: May 06, 2016 Uncontrolled When Printed Page 221 of 233
16.1.6.1.5.4. When 2 alleles are present and the assumed contributor is homozygous: Identify which allele is being contributed by the assumed contributor. The remaining allele is assumed to belong to the foreign contributor. It is possible that the remaining allele is a homozygous peak from the foreign contributor. Alternatively, it may be one of two heterozygous peaks where the other peak is shared with the assumed contributor. Consider an observed profile peak height ratio difference when determining whether the additional allele is homozygous or heterozygous. Refer 16.1.6.1.6 and 16.1.6.1.7 below when deduction is not possible.
16.1.6.1.5.5. When 2 alleles are present and the assumed contributor is heterozygous: It is possible that the foreign contributor is also heterozygous and shares his/her alleles fully with the assumed contributor. It is also possible that the foreign contributor is homozygous. Consider an observed profile peak height ratio difference when making this determination. Refer to 16.1.6.1.6 and 16.1.6.1.7 below when deduction is not possible.
16.1.6.1.5.6. Considerations: 16.1.6.1.5.6.1. Drop-out: When fewer than 4 alleles are observed, evaluate the
profile for possible drop-out. Causes of drop-out can include low-level activity, degradation, and inhibition.
16.1.6.1.5.6.2. Peak height ratio requirements used for distinguishing a major contributor may be used as a guide (see DNA Section #13). For example, a locus may not qualify for statistical analysis because the peak height ratio criteria for a major contributor are not met, but significant peak imbalance may make a major contributor apparent for CODIS deduction.
16.1.6.1.5.6.3. Peak height ratio requirements used to qualify a sample as single-source (see Section #13) may be used as a guide for assessing possible allele sharing.
16.1.6.1.5.6.4. It may not be possible to deduce all loci for a mixture. 16.1.6.1.5.6.5. Uninterpretable data may not be submitted to CODIS.
16.1.6.1.6. For mixture profiles where a “clean” profile of one individual cannot be determined, all alleles are entered for those loci where the “deduction” cannot be reliably and completely performed. Any alleles that can be unambiguously attributed to the complainant or an elimination reference cannot be entered. The profile is entered into the CODIS “Forensic Mixture” Index and contains single source alleles at some loci and multiple source alleles at other loci.

Forensic Biology DNA SOP Manual
Forensic Analysis Division
DNA SOP Manual FAD-FB-DNA-SOP Issued By: Acting Technical Leader Issue Date: May 06, 2016 Uncontrolled When Printed Page 222 of 233
16.1.6.1.7. Obligate alleles may be designated where appropriate. These are alleles that are foreign to the known profile of the assumed contributor at a locus where more than one allele is present and that the analyst wishes to designate as required for a match. Obligate alleles are only used for mixture profiles where a “clean” profile of one individual cannot be determined. An obligate allele is designated as a “+” to the right of the allele. There can only be one obligate designated per locus and no obligates can be designated for a homozygous locus.
16.1.6.1.8. “Forensic Mixture” profiles submitted to NDIS shall be reviewed by the submitting agency to ensure the DNA records satisfy a statistical threshold for MME as published by NDIS. The “4 x 4” Rule no longer applies.
16.1.7. Legal
16.1.7.1. NDIS allows for the inclusion of reference/known samples legally obtained in the investigation of a crime, under certain circumstances. The law further allows for the inclusion of voluntarily submitted samples.
16.1.7.2. A suspect profile may be entered in the “Legal” index if:
• the sample was obtained legally • it is collected for the investigation of a crime • it a biological sample from a suspect in a criminal investigation (this excludes complainants and elimination samples) • there is evidence in the case probative to the crime that is also analyzed, and • results are obtained at the 13 core STR loci.
16.1.7.3. Any suspect known profile will be expunged from the database if court ordered to
do so. Suspect profiles are identified in the database by the case number and sample designation; the name of the individual is not included. Profiles in the “Legal” specimen category are uploaded during regularly scheduled uploads to NDIS to be searched during regularly scheduled NDIS searches.
16.1.7.4. All suspect profiles remain the property and responsibility of the submitting local laboratory. The records in the CODIS database are confidential and not subject to open records disclosure. A record includes both the profile and the identity of the individual whose profile is in the database. Neither the profile nor the identity of the individual whose profile is in the database are released except: • to a criminal justice agency for law enforcement identification purposes • for a judicial proceeding, if otherwise admissible under law • for criminal defense purposes to a defendant, if related to the case in which the
defendant is charged, or

Forensic Biology DNA SOP Manual
Forensic Analysis Division
DNA SOP Manual FAD-FB-DNA-SOP Issued By: Acting Technical Leader Issue Date: May 06, 2016 Uncontrolled When Printed Page 223 of 233
• to criminal justice agencies, if personally identifiable information is removed, for a population statistics database, for forensic identification, forensic research, and forensic protocol development purposes, or for quality control purposes.
16.2. Case File Documentation
16.2.1. Fill out the CODIS entry form for the case profiles to be entered into CODIS. Forensic unknown/mixture samples that are not obviously attributable to the complainant’s sexual assault kit or clothing may require documentation that the item is associated with the crime scene before the profile may be entered into CODIS.
16.2.2. The technical reviewer reviews the profiles to verify the specimen name, DNA type (alleles), and initial specimen category, and that the profile is CODIS eligible. Discrepancies should be referred to the CODIS Manager.
16.2.3. After review, the analyst enters profiles into CODIS and a copy of the specimen report is printed for the case file. The administrative reviewer checks the specimen report against the CODIS entry form to ensure that the profiles have been entered correctly, the correct database was selected, and that the Match Estimation for SDIS or MME for NDIS have been satisfied.
16.2.4. If profiles have been entered incorrectly, the administrative reviewer and the analyst must notify a CODIS Manager immediately so that corrective actions can be taken.
16.2.5. The entry of a profile into the CODIS system must be documented in a report. This can be accomplished by incorporating the CODIS information into the DNA analysis report.
16.2.6. Uploads
16.2.6.1. Uploads to SDIS should be performed weekly unless no new data has been entered. The upload must occur by Friday at noon for the data to be included in state upload into the national database for the following week and for it to be included in that week’s statewide and nationwide search.
16.2.7. Hits
16.2.7.1. Autosearch, which performs searches within the LDIS database, are run after new profiles are entered into CODIS, or a minimum of weekly if new profiles are entered frequently. The state and national databases are searched weekly.
16.2.7.2. Verification of database matches are ultimately the responsibility of the Local
CODIS Administrator or designee. The Local CODIS Administrator or designee verifies single-source database matches and disposition accordingly. He/she determines if further confirmation is warranted or disposition the database match as a “no match”. The Local CODIS Administrator or designee may forward database matches of mixtures to the reporting DNA analyst for verification. The casework analyst
Forensic Biology DNA SOP Manual
Forensic Analysis Division
DNA SOP Manual FAD-FB-DNA-SOP Issued By: Acting Technical Leader Issue Date: May 06, 2016 Uncontrolled When Printed Page 224 of 233
should make every effort to report back to the Local CODIS Administrator or designee within 48 hours; the casework analyst must inform the Local CODIS Administrator or designee whether further confirmation is warranted or disposition as a “no match”. When the offender is excluded as a contributor to the forensic unknown, the casework laboratory shall disposition the candidate match as a no match and the confirmation process stops. Personally identifiable information relating to the offender shall not be exchanged or released.
16.2.7.3. A candidate match matching all loci at high stringency may be reviewed and
evaluated by an individual who is currently or was previously a qualified DNA analyst. A candidate match matching any loci at less than high stringency shall be reviewed and evaluated by a DNA casework analyst currently or previously qualified in the technology being reviewed.
16.2.7.4. Offender Hits (Case to Offender Hits)
16.2.7.4.1. An offender candidate match occurs when a DNA profile developed from crime scene evidence by a casework laboratory matches an offender’s DNA profile developed by an offender laboratory. A candidate match is not a confirmed match and the personally identifiable information relating to a candidate match shall not be released unless the laboratory has confirmed the match.
16.2.7.4.2. A match report for an offender candidate match(es) produced by a search is
distributed to all laboratories responsible for a DNA record included in the match. A state laboratory associated with a local level laboratory’s match also receives an electronic copy of the match.
16.2.7.4.3. The primary responsibility of the casework laboratory (having the forensic
specimen) includes review and evaluation of the match and contacting the other laboratory to coordinate match follow-up. The secondary responsibility of the casework laboratory includes the following: 1) being prepared to respond to inquiries originating from the other laboratory; 2) making a good faith effort to perform its internal match confirmation process, review its DNA data, and respond to the casework laboratory within 30 business days of receipt of the request for match follow-up; and 3) make a good faith effort to perform a search in the CODIS database at least every two weeks to check for matches with a Candidate Match disposition.
Forensic Biology DNA SOP Manual
Forensic Analysis Division
DNA SOP Manual FAD-FB-DNA-SOP Issued By: Acting Technical Leader Issue Date: May 06, 2016 Uncontrolled When Printed Page 225 of 233
16.2.7.4.4. If the casework laboratory believes the candidate match must be subjected to the confirmation process, the casework laboratory shall retrieve the case file and perform an administrative check to ensure the DNA record is associated with the case. At this point, the casework and offender laboratories begin collaborating. The casework laboratory informs the offender laboratory that the candidate match requires confirmation.
16.2.7.4.5. If the internal match confirmation process can verify the offender’s identity and/or offense, the offender laboratory informs the casework laboratory about the confirmed match and provides the personally identifying information. The casework laboratory shall provide notification of the confirmed match to the submitting law enforcement agency or authorized criminal justice agency. In the interests of public safety, the offender laboratory may also notify appropriate criminal justice agency(ies) of the confirmed match.
16.2.7.4.6. The NDIS participating laboratory shall inform the submitting law
enforcement agency of the need for a legally obtained sample from the offender that documents the chain of custody. The casework laboratory can then perform DNA analysis on the newly obtained known biological sample submitted by the law enforcement agency.
16.2.7.5. Forensic Hits (Case To Case Hits)
16.2.7.5.1. A forensic candidate match occurs when DNA profiles developed from two or more forensic samples submitted by casework laboratories match one another. A candidate match is not a confirmed match and the personally identifiable information relating to a candidate match shall not be released unless the laboratory has confirmed the match.
16.2.7.5.2. A match report for a forensic candidate match(es) produced by a search is
distributed to all laboratories responsible for a DNA record included in the match. Both casework laboratories are equally responsible for the review and evaluation of the match and coordinating the match follow-up. The casework laboratory contacted for match follow-up shall make a good faith effort to review its DNA data and respond to the requesting laboratory within 30 business days of receipt of the request.
16.2.7.5.3. The CODIS Administrators or their designees at each of the casework
laboratories review the match to determine if the candidate match requires

Forensic Biology DNA SOP Manual
Forensic Analysis Division
DNA SOP Manual FAD-FB-DNA-SOP Issued By: Acting Technical Leader Issue Date: May 06, 2016 Uncontrolled When Printed Page 226 of 233
further confirmation; this typically includes considering the number of matching loci and evaluating homozygote vs. heterozygote profiles.
16.2.7.5.4. If both casework laboratories determine that the candidate match is not a
match, the confirmation process stops. The casework laboratories shall disposition the candidate match as a no match. One or both of the casework laboratories may believe the candidate match must be subjected to the confirmation process. If so, both of the casework laboratories review their respective case files and ensure the DNA records are associated with the proper cases. Using information retrieved from the case files, both casework laboratories may contact their respective submitting law enforcement agencies to determine if the case(s) has been solved.
16.2.7.5.5. The casework laboratories begin collaborating. One of the casework
laboratories contacts the other casework laboratory to verify the match and exchange information. Both laboratories are responsible for ensuring the communication occurs.
16.2.7.5.6. When both casework laboratories have confirmed a match, they notify each
other of the existence of a confirmed match and exchange information so that the submitting law enforcement agencies can contact each other. For a solved case matching an unsolved case, the laboratory responsible for the solved case may provide personally identifying information. It is up to each individual jurisdiction to determine, based on applicable laws and rules, whether personally identifying information may be disclosed. Both casework laboratories document the confirmed match.
16.2.7.5.7. At a minimum, both laboratories shall inform their respective submitting law
enforcement agencies or authorized criminal justice agencies of the confirmed match. The submitting agencies can then exchange information about their respective cases.
16.2.7.6. Suspect/Legal Hits
16.2.7.6.1. A match between a suspect or legal profile and a previously unlinked forensic profile provides an investigative lead and may be probable cause for suspicion. Such a match is not to be used as the basis of a final comparison in any case. In order to make a comparison for a final case report, the suspect or legal profile must be verified with a newly collected sample. Follow-up of any match between a suspect profile and a forensic profile, whether identified at the local

Forensic Biology DNA SOP Manual
Forensic Analysis Division
DNA SOP Manual FAD-FB-DNA-SOP Issued By: Acting Technical Leader Issue Date: May 06, 2016 Uncontrolled When Printed Page 227 of 233
or state level, is the responsibility of the local laboratories that submitted the matching profiles and initiated by the laboratory that submitted the forensic profile.
16.2.7.6.2. Once verified, the name and date of birth are released to the submitting law
enforcement agency.
16.2.7.6.3. All suspect and legal profiles remain the property and responsibility of the submitting local laboratory. The records in the database are confidential and not subject to open records disclosure. A record includes both the profile and the identity of the individual whose profile is in the database. Neither the profile nor the identity of the individual whose profile is in the database are released except in one of the following:
16.2.7.6.3.1. to a criminal justice agency for law enforcement identification purposes;
16.2.7.6.3.2. for a judicial proceeding, if otherwise admissible under law; or 16.2.7.6.3.3. for criminal defense purposes to a defendant, if released to the case in
which the defendant is charged.
16.2.7.6.4. For offender hits, forensic hits, and suspect/legal hits, a report is generated in LIMS to document the match or hit. When applicable, this report includes specific case information along with contact information for all investigating officers involved in any of the cases. The prosecuting attorney’s office should be included on any LIMS distributions of reports regarding any follow-up CODIS activity, such as reference confirmations and forensic hits. Emails included in the LIMS distribution list automatically receive a copy of LIMS reports upon completion, including CODIS-related reports.
16.3. Backups
16.3.1. Backups must be performed after entry of new profiles into CODIS or a minimum of weekly if new profiles are entered frequently. Two backup copies must be generated with one copy stored off-site.
16.3.2. Profile Removal/Expunction Procedures
16.3.2.1. Scope
16.3.2.1.1. The Houston Forensic Science Center recognizes the need to remove from CODIS all DNA profiles which may have been improperly included in the database or the DNA profile of an individual who has obtained a court-ordered

Forensic Biology DNA SOP Manual
Forensic Analysis Division
DNA SOP Manual FAD-FB-DNA-SOP Issued By: Acting Technical Leader Issue Date: May 06, 2016 Uncontrolled When Printed Page 228 of 233
expunction. The following procedures are designed to ensure the rights of individuals are protected by allowing for the destruction of any specimen, and the removal of any DNA profile, which does not meet the Texas statutory requirements for inclusion in CODIS as provided in TEXAS GOVERNMENT CODE ANN. § 411.1471(e).
16.3.2.1.2. Federal law requires that the laboratory, as a participant in NDIS, expunge
the DNA records of persons whose qualifying convictions had been overturned. An amendment to the Federal DNA Identification Act in 2001 requires that the laboratory “shall promptly expunge from that index the DNA analysis (DNA profile) of a person included in the index by that state if the responsible agency or official of that state receives, for each conviction of the person of an offense on the basis of which that analysis (profile) was or could have been included in the index, a certified copy of a final court order establishing that such conviction has been overturned.” A court order is not considered “final” for these purposes if time remains for an appeal or application for discretionary review with respect to the order. See Federal DNA Identification Act at 42 U.S.C. §14132(d)(2).
16.3.2.1.3. Amendments made by the DNA Fingerprint Act of 2005 (P. L. 109-162)
require expungements of DNA data of arrestees, indicted persons or similar legal specimens in the event the charge is dismissed or results in an acquittal or no charge was filed within the applicable time period. The laboratory is required to expunge from NDIS the DNA analysis of a person included in NDIS by that State if “the person has not been convicted of an offense on the basis of which that analysis was or could have been included in the index, and the responsible agency or official of that State receives, for each charge against the person on the basis of which the analysis was or could have been included in the index, a certified copy of a final court order establishing that such charge has been dismissed or has resulted in an acquittal or that no charge was filed within the applicable time period.” See 42 U.S.C. § 14132(d)(2)(A)(ii).
16.3.3. Administrative Removal
16.3.3.1. Administrative removal can be requested by letter from the collecting agency and signed by the appropriate Corrections or Probation and Parole official stating a blood or buccal sample was erroneously collected from the individual in question. The letter should further certify that a criminal history check was performed and no qualifying offense exists to justify inclusion in the database. If the letter does not contain this certification, the CODIS Administrator, or designee, ensures a criminal

Forensic Biology DNA SOP Manual
Forensic Analysis Division
DNA SOP Manual FAD-FB-DNA-SOP Issued By: Acting Technical Leader Issue Date: May 06, 2016 Uncontrolled When Printed Page 229 of 233
history check is performed and no qualifying offenses exist. The inadvertently taken sample may be retained if it is determined that there is a different offense that does qualify the individual for CODIS inclusion and no satisfactory sample otherwise exists.
16.3.3.2. The Houston Forensic Science Center Forensic Analysis Division Director, or
designee, can order removal of a DNA profile from the database if it is determined no qualifying offense exists to justify inclusion in CODIS. An individual wishing to petition the Houston Forensic Science Center for removal of his/her DNA profile from CODIS must provide such a request in writing to the Houston Forensic Science Center. If needed, Houston Forensic Science Center Legal Counsel may be contacted to provide a recommended course of action to assure that the Houston Forensic Science Center and CODIS are in compliance with applicable statutes.
16.3.4. Court Ordered Expunction
16.3.4.1. In the event of acquittal or the qualifying offense of an individual whose DNA profile is included in CODIS is overturned or dismissed by the courts, or the adjudication of a juvenile record is sealed, the DNA profile may be expunged from CODIS. The Houston Forensic Science Center must be notified, in writing, of the need to expunge. This may be accomplished by:
16.3.4.2. The District Attorney prosecuting the case stating that the qualifying offense has
been removed. A certified copy of the court order must be provided to the Houston Forensic Science Center. The CODIS Administrator or designee also certifies no other qualifying offense exists justifying inclusion in CODIS.
16.3.4.3. An individual whose conviction has been overturned, or legal counsel thereof, may
request the DNA profile be expunged. Such a request must be in writing. A certified copy of the court order overturning the qualifying offense must accompany the request. The CODIS Administrator or designee verifies that a criminal history check has been performed and no other qualifying offense exists which would justify retention of the individual's profile in CODIS.
16.3.5. Expunction Operations
16.3.5.1. Upon order from the Houston Forensic Science Center Forensic Analysis Division Director, or designee, court order, or receipt of a proper request from the collecting agency or District Attorney’s Office as described above, the CODIS Administrator or designee ensures the expunction or administrative removal of all information related to the DNA profile in question. This includes:

Forensic Biology DNA SOP Manual
Forensic Analysis Division
DNA SOP Manual FAD-FB-DNA-SOP Issued By: Acting Technical Leader Issue Date: May 06, 2016 Uncontrolled When Printed Page 230 of 233
16.3.5.2. Removal, if applicable, of all DNA profile information from all levels of the CODIS DNA database, including the Houston Forensic Science Center sample number assigned to the individual in question.
16.3.6. Notification and Records
16.3.6.1. Notification of removal or expunction is in writing from the CODIS Administrator or designee to the requestor on Official letterhead. The Houston Forensic Science Center may retain documents relating to the administrative removal but shall destroy any records relating to court ordered expunction of a sample.
16.4. References:
National DNA Index System (NDIS) Operational Procedures Manual, FBI Laboratory, Version 1, Effective January 31, 2013. FBI Laboratory Division 2013 Annual Review of DNA Data Accepted at NDIS. CODIS Bulletin #: BT010813, Distributed January 8, 2013 Memo from Ron Urbanovsky, Director, Texas Department of Public Safety, dated February 9, 2000. Memo from Dennis Loockerman, Ph.D., Supervisor, CODIS Section, DPS Headquarters Crime Lab, dated February 14, 2000.

Forensic Biology DNA SOP Manual
Forensic Analysis Division
DNA SOP Manual FAD-FB-DNA-SOP Issued By: Acting Technical Leader Issue Date: May 06, 2016 Uncontrolled When Printed Page 231 of 233
Appendix A: QIAcube Loading Chart

Forensic Biology DNA SOP Manual
Forensic Analysis Division
DNA SOP Manual FAD-FB-DNA-SOP Issued By: Acting Technical Leader Issue Date: May 06, 2016 Uncontrolled When Printed Page 232 of 233
Appendix B: Instrument Overview

Forensic Biology DNA SOP Manual
Forensic Analysis Division
DNA SOP Manual FAD-FB-DNA-SOP Issued By: Acting Technical Leader Issue Date: May 06, 2016 Uncontrolled When Printed Page 233 of 233
Appendix B: (Continued)