Embed Size (px)
Citation preview
Forensics Laboratory Manual

A Glencoe Program
Student Edition
Teacher Wraparound Edition
Teacher Chapter ResourcesMini Lab WorksheetsPhysics Lab WorksheetsStudy Guide Section QuizzesReinforcementEnrichment Transparency MastersTransparency WorksheetsChapter Assessment
Teacher Classroom ResourcesTeaching Transparencies Laboratory Manual, Student Edition Laboratory Manual, Teacher EditionProbeware Laboratory Manual, Student
EditionProbeware Laboratory Manual, Teacher
EditionForensics Laboratory Manual, Student
Edition
Forensics Laboratory Manual, TeacherEdition
Supplemental ProblemsAdditional Challenge ProblemsPre-AP/Critical Thinking ProblemsPhysics Test Prep: Studying for the
End-of-Course Exam, Student EditionPhysics Test Prep: Studying for the
End-of-Course Exam, Teacher EditionConnecting Math to PhysicsSolutions Manual
TechnologyAnswer Key MakerExamView® ProInteractive ChalkboardMcGraw-Hill Learning NetworkStudentWorks™ CD-ROMTeacherWorks™ CD-ROMphysicspp.com Web site
Copyright © by The McGraw-Hill Companies, Inc. All rights reserved. Permission is granted to reproduce the material contained herein on the condition that such material be repro-duced only for classroom use; be provided to students, teachers, and families without charge; and be used solely in conjunction with the Physics: Principles and Problemsprogram. Any other reproduction, for use or sale, is prohibited without prior written permission of the publisher.
Send all inquiries to:Glencoe/McGraw-Hill8787 Orion PlaceColumbus, Ohio 43240
ISBN 0-07-866559-0
Printed in the United States of America
1 2 3 4 5 6 7 8 9 045 09 08 07 06 05 04
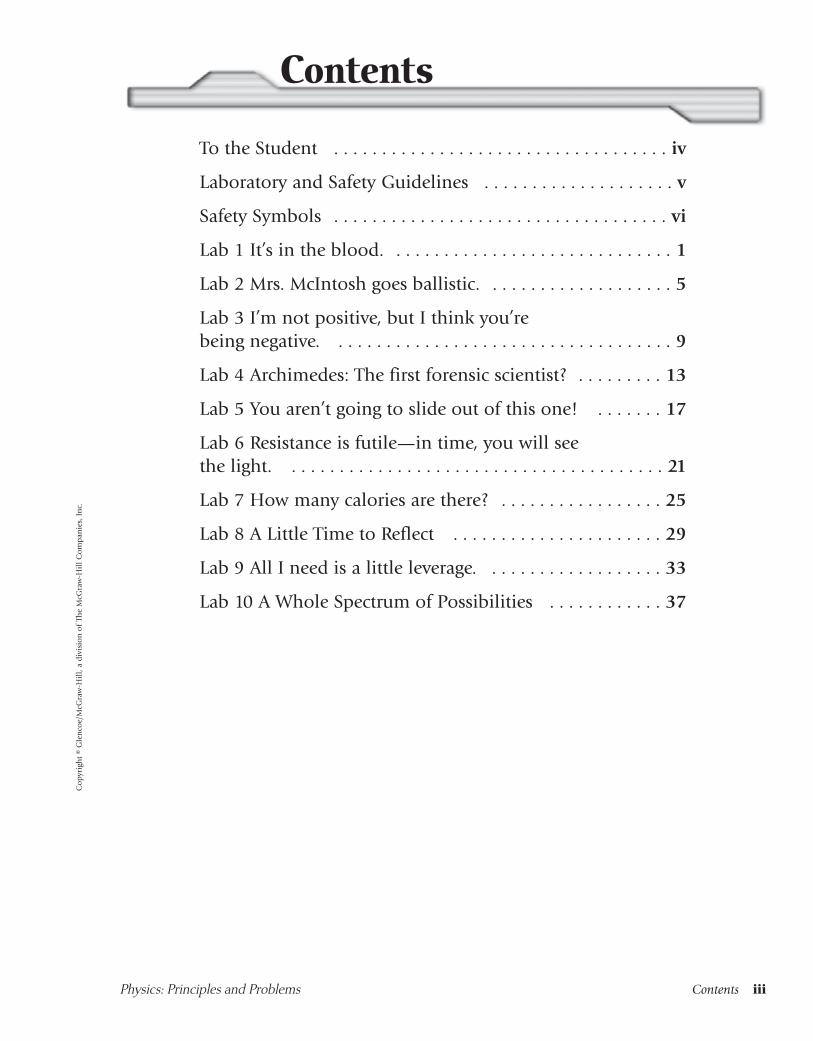
Physics: Principles and Problems Contents iii
To the Student . . . . . . . . . . . . . . . . . . . . . . . . . . . . . . . . . . . iv
Laboratory and Safety Guidelines . . . . . . . . . . . . . . . . . . . . v
Safety Symbols . . . . . . . . . . . . . . . . . . . . . . . . . . . . . . . . . . . vi
Lab 1 It’s in the blood. . . . . . . . . . . . . . . . . . . . . . . . . . . . . . 1
Lab 2 Mrs. McIntosh goes ballistic. . . . . . . . . . . . . . . . . . . . 5
Lab 3 I’m not positive, but I think you’re being negative. . . . . . . . . . . . . . . . . . . . . . . . . . . . . . . . . . . . 9
Lab 4 Archimedes: The first forensic scientist? . . . . . . . . . 13
Lab 5 You aren’t going to slide out of this one! . . . . . . . 17
Lab 6 Resistance is futile—in time, you will see the light. . . . . . . . . . . . . . . . . . . . . . . . . . . . . . . . . . . . . . . . 21
Lab 7 How many calories are there? . . . . . . . . . . . . . . . . . 25
Lab 8 A Little Time to Reflect . . . . . . . . . . . . . . . . . . . . . . 29
Lab 9 All I need is a little leverage. . . . . . . . . . . . . . . . . . . 33
Lab 10 A Whole Spectrum of Possibilities . . . . . . . . . . . . 37
ContentsC
opy
righ
t ©
Gle
nco
e/M
cGra
w-H
ill,
a d
ivis
ion
of
The
McG
raw
-Hil
l C
om
pan
ies,
In
c.
iv To the Student Physics: Principles and Problems
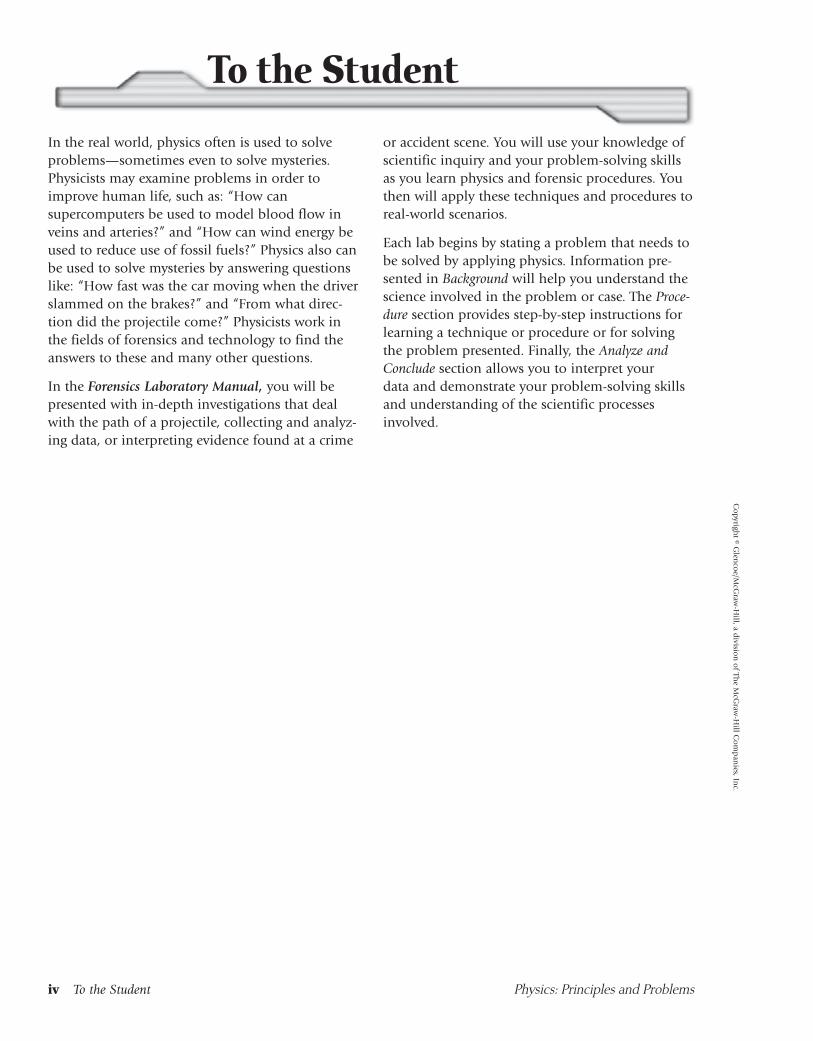
In the real world, physics often is used to solveproblems—sometimes even to solve mysteries.Physicists may examine problems in order toimprove human life, such as: “How can supercomputers be used to model blood flow inveins and arteries?” and “How can wind energy beused to reduce use of fossil fuels?” Physics also canbe used to solve mysteries by answering questionslike: “How fast was the car moving when the driverslammed on the brakes?” and “From what direc-tion did the projectile come?” Physicists work inthe fields of forensics and technology to find theanswers to these and many other questions.
In the Forensics Laboratory Manual, you will bepresented with in-depth investigations that dealwith the path of a projectile, collecting and analyz-ing data, or interpreting evidence found at a crime
or accident scene. You will use your knowledge ofscientific inquiry and your problem-solving skillsas you learn physics and forensic procedures. Youthen will apply these techniques and procedures toreal-world scenarios.
Each lab begins by stating a problem that needs tobe solved by applying physics. Information pre-sented in Background will help you understand thescience involved in the problem or case. The Proce-dure section provides step-by-step instructions forlearning a technique or procedure or for solvingthe problem presented. Finally, the Analyze andConclude section allows you to interpret your data and demonstrate your problem-solving skillsand understanding of the scientific processesinvolved.
To the StudentC
opyrigh
t © Glen
coe/M
cGraw
-Hill, a d
ivision
of Th
e McG
raw-H
ill Co
mp
anies, In
c.

EMERGENCIES
■ Inform the teacher immediately of anymishap—fire, injury, glassware breakage,chemical spills, etc.
■ Know the location of the fire extinguisher,safety shower, eyewash, fire blanket, and firstaid kit. Know how to use this equipment.
■ If chemicals come into contact with your eyesor skin, flush with large quantities of waterand notify your teacher immediately.
PREVENTING ACCIDENTS
■ Do not wear clothing that is loose enough tocatch on anything. Do not wear sandals oropen-toed shoes. Remove loose jewelry—chains or bracelets—while doing lab work.
■ Wear protective safety gloves, goggles, andaprons as instructed.
■ Always wear safety goggles (not glasses) in thelaboratory.
■ Wear goggles throughout the entire activity,cleanup, and handwashing.
■ Keep your hands away from your face whileworking in the laboratory.
■ Remove synthetic fingernails before workingin the lab (these are highly flammable).
■ Do not use hair spray, mousse, or other flam-mable hair products just before or during lab-oratory work where an open flame is used(they can ignite easily).
■ Tie back long hair and loose clothing to keepthem away from flames and equipment.
■ Eating, drinking, chewing gum, applyingmakeup, and smoking are prohibited in thelaboratory.
■ Do not inhale vapors or taste, touch, or smellany chemical substance unless instructed todo so by your teacher.
WORKING IN THE LABORATORY
■ Study all instructions before you begin a labo-ratory or field activity. Ask questions if you donot understand any part of the activity.
■ Work only on activities assigned by yourteacher. Never work alone in the laboratory.
■ Do not substitute other chemicals or sub-stances for those listed in your activity.
■ Do not begin any activity until directed to doso by your teacher.
■ Do not handle any equipment without spe-cific permission.
■ Remain in your own work area unless givenpermission by your teacher to leave it.
■ Do not point heated containers—test tubes,flasks, and so forth—at yourself or anyoneelse.
■ Do not take any materials or chemicals out ofthe classroom.
■ Stay out of storage areas unless you areinstructed to be there and are supervised byyour teacher.
LABORATORY CLEANUP
■ Keep work, lab, and balance areas clean, lim-iting the amount of easily ignitable materials.
■ Turn off all burners, water faucets, probeware,and calculators before leaving the lab.
■ Carefully dispose of waste materials asinstructed by your teacher.
■ With your goggles on, wash your hands thor-oughly with soap and warm water after eachactivity.
Physics: Principles and Problems Laboratory and Safety Guidelines v
Co
pyri
ght
© G
len
coe/
McG
raw
-Hil
l, a
div
isio
n o
f Th
e M
cGra
w-H
ill
Co
mp
anie
s, I
nc.
Laboratory and Safety Guidelines
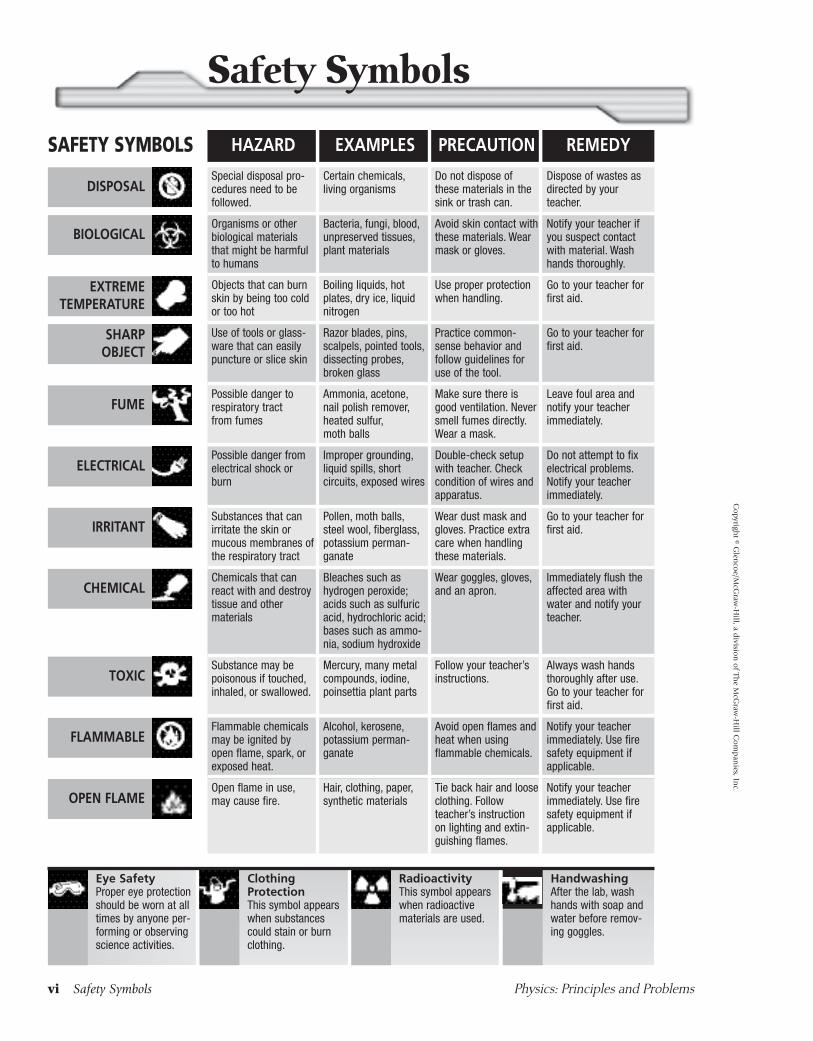
Safety Symbols
Eye SafetyProper eye protectionshould be worn at alltimes by anyone per-forming or observingscience activities.
ClothingProtectionThis symbol appearswhen substancescould stain or burnclothing.
RadioactivityThis symbol appearswhen radioactivematerials are used.
HandwashingAfter the lab, washhands with soap andwater before remov-ing goggles.
Special disposal pro-cedures need to befollowed.
Certain chemicals,living organisms
Do not dispose ofthese materials in thesink or trash can.
Dispose of wastes asdirected by yourteacher.
Objects that can burnskin by being too coldor too hot
Boiling liquids, hotplates, dry ice, liquidnitrogen
Use proper protectionwhen handling.
Go to your teacher forfirst aid.
Organisms or otherbiological materialsthat might be harmfulto humans
Bacteria, fungi, blood,unpreserved tissues,plant materials
Avoid skin contact withthese materials. Wearmask or gloves.
Notify your teacher ifyou suspect contactwith material. Washhands thoroughly.
Use of tools or glass-ware that can easilypuncture or slice skin
Razor blades, pins,scalpels, pointed tools,dissecting probes,broken glass
Practice common-sense behavior andfollow guidelines foruse of the tool.
Go to your teacher forfirst aid.
Possible danger to respiratory tract from fumes
Ammonia, acetone,nail polish remover,heated sulfur,moth balls
Make sure there isgood ventilation. Neversmell fumes directly.Wear a mask.
Leave foul area andnotify your teacherimmediately.
Possible danger fromelectrical shock orburn
Improper grounding,liquid spills, short circuits, exposed wires
Double-check setupwith teacher. Checkcondition of wires andapparatus.
Do not attempt to fixelectrical problems.Notify your teacherimmediately.
Substances that canirritate the skin ormucous membranes ofthe respiratory tract
Pollen, moth balls,steel wool, fiberglass,potassium perman-ganate
Wear dust mask andgloves. Practice extracare when handlingthese materials.
Go to your teacher forfirst aid.
Chemicals that canreact with and destroytissue and other materials
Bleaches such ashydrogen peroxide;acids such as sulfuricacid, hydrochloric acid;bases such as ammo-nia, sodium hydroxide
Wear goggles, gloves,and an apron.
Immediately flush theaffected area withwater and notify yourteacher.
Substance may be poisonous if touched,inhaled, or swallowed.
Mercury, many metalcompounds, iodine,poinsettia plant parts
Follow your teacher’sinstructions.
Always wash handsthoroughly after use.Go to your teacher forfirst aid.
Flammable chemicalsmay be ignited byopen flame, spark, orexposed heat.
Alcohol, kerosene,potassium perman-ganate
Avoid open flames andheat when using flammable chemicals.
Notify your teacherimmediately. Use firesafety equipment ifapplicable.
Open flame in use,may cause fire.
Hair, clothing, paper,synthetic materials
Tie back hair and looseclothing. Followteacher’s instructionon lighting and extin-guishing flames.
Notify your teacherimmediately. Use firesafety equipment ifapplicable.
BIOLOGICAL
EXTREMETEMPERATURE
DISPOSAL
SAFETY SYMBOLS
SHARPOBJECT
FUME
ELECTRICAL
IRRITANT
CHEMICAL
TOXIC
FLAMMABLE
OPEN FLAME
PRECAUTION REMEDYHAZARD EXAMPLES
vi Safety Symbols Physics: Principles and Problems
Co
pyright © G
lenco
e/McG
raw-H
ill, a divisio
n o
f The M
cGraw
-Hill C
om
pan
ies, Inc.
It’s in the blood.ProblemHow does the distance that a drop of blood falls affect the shape and sizeof the splash when it lands?
Objectives■ Observe the effect of the distance and direction of fall on the shape or
size of a droplet of fake blood.
■ Understand the relationship between height of fall and velocity atimpact.
■ Determine earlier events using this relationship.
■ Analyze and review graphical concepts.
BackgroundBlood splatter gives forensic scientists many clues as to what occurred in acrime. Blood can be washed away, but it leaves trace evidence that is verydifficult for a criminal to eliminate. It will adhere to clothing and sur-faces, and although it may not be detectable with the naked eye, bloodcan be easily found by luminescence and chemical tests. By analyzing theshape and size of blood droplets, investigators can begin to reconstructthe events that caused the spilling of blood. This is called bloodstain pat-tern interpretation.
In this experiment, you will investigate the effect of height and direc-tion on the size and shape of a droplet of blood. You will determine thepattern that emerges and use this pattern to interpolate informationabout a drop that you did not make.
Procedure1. Formulate a hypothesis about the relationship between the distance
a drop of blood falls and the size of the splash it makes. Be as spe-cific as possible. For example, do you think that the relationship is alinear one? Record your hypothesis on the lines provided underData and Observations.
2. Obtain a small beaker with artificial blood.
3. Fill dropper with 0.5 mL of fake blood.
4. Hold dropper with open tip 10 cm above the graph paper andrelease one drop onto a clean spot.
5. Measure the diameter of the spot and record it in Table 1.
6. Repeat this process on a clean spot for heights from 20–100 cm, in10-cm increments.
Date Period Name
Physics: Principles and Problems Forensics Laboratory Manual 1
1 Forensics Lab 1C
opy
righ
t ©
Gle
nco
e/M
cGra
w-H
ill,
a d
ivis
ion
of
The
McG
raw
-Hil
l C
om
pan
ies,
In
c.
Materials
• fake blood
• small beaker
• dropper with 0.5 mL graduation
• graph paper (smooth texture, if possible)
• ruler
• meterstick
• unknown droplet splatter
Materials
Safety Precautions
Caution: Fake blood maystain clothing.
7. Repeat steps 2–6 with a clean sheet of graph paper and record the results in Table 2.
8. Place a clean sheet of paper in your work area. (Any type of paper will work.)
9. Lightly squeeze the dropper bulb until a droplet forms but remains attached to the mouth of thedropper.
10. At an angle, gently fling the droplet from the dropper onto the paper. Observe the shape and size,and record your observations in the space provided below.
11. Obtain an unknown splatter sample from your teacher and measure the diameter of the drop tothe nearest half millimeter.
12. Record this value in the space provided under Table 2 below.
Cleanup and DisposalWash the beaker and dropper thoroughly. Clean up your lab area, wiping up any droplets of fake bloodfrom the table, chairs, and floor.
Data and Observations
Hypothesis
continuedForensics Lab 11Name
2 Forensics Laboratory Manual Physics: Principles and Problems
Co
pyright © G
lenco
e/McG
raw-H
ill, a divisio
n o
f The M
cGraw
-Hill C
om
pan
ies, Inc.
Table 1
DropperHeight(cm) 10 20 30 40 50 60 70 80 90 100
DropletDiameter
(mm)
Table 2
DropperHeight(cm) 10 20 30 40 50 60 70 80 90 100
DropletDiameter
(mm)
Effect of angle on shape (step 10):
Unknown droplet diameter (mm):
Conclude and Apply1. Average the Table 1 and Table 2 diameter data for each height and enter the values in Table 3.
Physics: Principles and Problems Forensics Laboratory Manual 3
continued Forensics Lab 1 1Name
Co
pyri
ght
© G
len
coe/
McG
raw
-Hil
l, a
div
isio
n o
f Th
e M
cGra
w-H
ill
Co
mp
anie
s, I
nc.
Table 3
DropperHeight(cm) 10 20 30 40 50 60 70 80 90 100
DropletDiameter
(mm)
2. Make a graph of droplet diameter versus height, using appropriate scaling techniques. Make a best-fit curve for these data points.

3. What information about height and droplet diameter can you determine from your graph? Doesthe graph support your original hypothesis?
4. Using this curve, determine the approximate height from which the unknown droplet wasreleased. Do you think this is a good guess? Why or why not?
5. What did you notice about the shape of droplets when dropped from directly above as comparedto being dropped from an angle?
Analyze and Conclude1. Error Analysis Obtain the height data for the unknown droplet from your teacher. How accurate
was your value? List any errors that may have occurred that would produce a largely inaccurateresult.
2. Observe and Infer How can this type of investigation help forensic scientists reconstruct events;that is, what is the importance of this technique?
continuedForensics Lab 11Name
4 Forensics Laboratory Manual Physics: Principles and Problems
Co
pyright © G
lenco
e/McG
raw-H
ill, a divisio
n o
f The M
cGraw
-Hill C
om
pan
ies, Inc.
Mrs. McIntosh goes ballistic.ProblemHow can physics be used to reconstruct the events of a projectile beingfired?
Objectives■ Observe the trajectory (path) of a projectile.
■ Examine the relationship of angle and muzzle velocity on projectilemotion.
■ Calculate muzzle velocity based on data gathered.
■ Solve a real-world crime using these techniques.
BackgroundMrs. McIntosh called the police to report a case of vandalism. She claimsthat while she was at work, the Johnson boys next door deliberatelylaunched a baseball through her living room window with their automaticpitching machine. An officer took their statement.
“It was an accident, officer,” said 12-year-old Jimmy. “I was setting upthe machine for my brother Chris to bat. When I tried to walk away, myshoestring got caught on this bolt. I tripped and knocked the machinesideways just as the ball launched.”
He went on to state that they knocked on Mrs. McIntosh’s door so thatthey could explain, but when they discovered she wasn’t home, they justwaited to hear from her later. Instead, she called the police. She insists theboys are a rambunctious pair headed for trouble. She believes theirbehavior needs to be stopped and wants to press charges.
The police began an investigation. Upon initial examination of thescene, the officers found the following:
The neighborhood was flat and level. The pitching machine had beenput away in the Johnson’s garage. There were no indentations from thefeet of the machine or dragging tracks in either yard or driveway. Thelocation of the baseball in Mrs. McIntosh’s living room showed roughlythe horizontal angle at which the ball was launched, which correspondedwith the boys’ story. The hole in the window was measured to be 2.43 mabove the ground.
According to the account given by the Johnson boys, the ball launcherwas approximately 15.24 m from Mrs. McIntosh’s window (at the end oftheir driveway). Further examination of the machine showed that there isonly one setting for the pitch. The angle of launch is 30� and the ball exitis 1.21 m above the ground. The exit velocity of the machine is given as
Date Period Name
Physics: Principles and Problems Forensics Laboratory Manual 5
2 Forensics Lab 2C
opy
righ
t ©
Gle
nco
e/M
cGra
w-H
ill,
a d
ivis
ion
of
The
McG
raw
-Hil
l C
om
pan
ies,
In
c.
Materials
• projectile launcher withprojectiles
• carbon paper
• two sheets of clean paper
• tape
• meterstick
• digital timer or stopwatch
Materials
Safety Precautions

64 km/h. The investigators (you) must determine whether the boys’ story could be plausible or if themachine had to be moved closer to (or further from) her window in order to break it.
Ballistics is defined in varying degrees. It is the study of the dynamics of projectiles. It is also thestudy of the functioning of firearms and the firing, flight, and effects of ammunition. To study projec-tiles, we must explore the basic equations of projectiles, given by
y � �yi t � �12
� gt2 (1)
and
x � �x i t, (2)
where y is the height relative to the muzzle opening, x is the distance from the muzzle to the place ofimpact, t is the time it takes from firing to impact, g is the acceleration due to gravity (given as 9.80 m/s),and �i represents muzzle velocity. �yi is the component of muzzle velocity in the y direction, while �xiis the component of muzzle velocity in the x direction. From trigonometry and an understanding ofvectors, we can find the muzzle velocity using the Pythagorean theorem, given by
�i � ��xi2 �� �yi
2� (3)
Procedure1. Tape a clean sheet of paper to the wall or an approved target area.
2. Set up the launcher on the lab table at an appropriate distance from the paper target and adjustthe speed (if variable) to the slowest setting.
3. Set the launcher angle at 30�. Record this value in the appropriate column in Table 3.
4. Check to make sure the projectile will hit the paper somewhere above the center. Make speed anddistance adjustments as necessary so this can be achieved.
5. Have one person prepare to launch the projectile, while another stands close to the wall with astopwatch (away from the path of the projectile).
6. Working together, record the time from launch to impact. This may take a few practice trials.
7. Tape carbon paper over the clean sheet, with the ink side facing the clean sheet.
8. Measure the distance from the ground to the muzzle opening of the launcher. Record this value asyour “zero” height.
9. Measure the distance from the muzzle opening to the wall. Record this value as x in Table 1.
10. Launch the projectile five times in a row, timing its flight each time. Redo a launch if the projectiledoesn’t hit the paper.
11. Remove the carbon paper, leaving the other sheet on the wall.
12. Measure the height from the ground of each of the five marks made on the paper, and record eachof these in Table 1.
13. Move the projectile launcher either toward or away from the target so that the projectile, whenlaunched, will hit the paper below the center.
14. Measure and record this new distance as x in Table 2.
15. Repeat the experiment at this new distance and record your results in Table 2.
continuedForensics Lab 22Name
6 Forensics Laboratory Manual Physics: Principles and Problems
Co
pyright © G
lenco
e/McG
raw-H
ill, a divisio
n o
f The M
cGraw
-Hill C
om
pan
ies, Inc.
Physics: Principles and Problems Forensics Laboratory Manual 7
continued Forensics Lab 2 2Name
Co
pyri
ght
© G
len
coe/
McG
raw
-Hil
l, a
div
isio
n o
f Th
e M
cGra
w-H
ill
Co
mp
anie
s, I
nc.
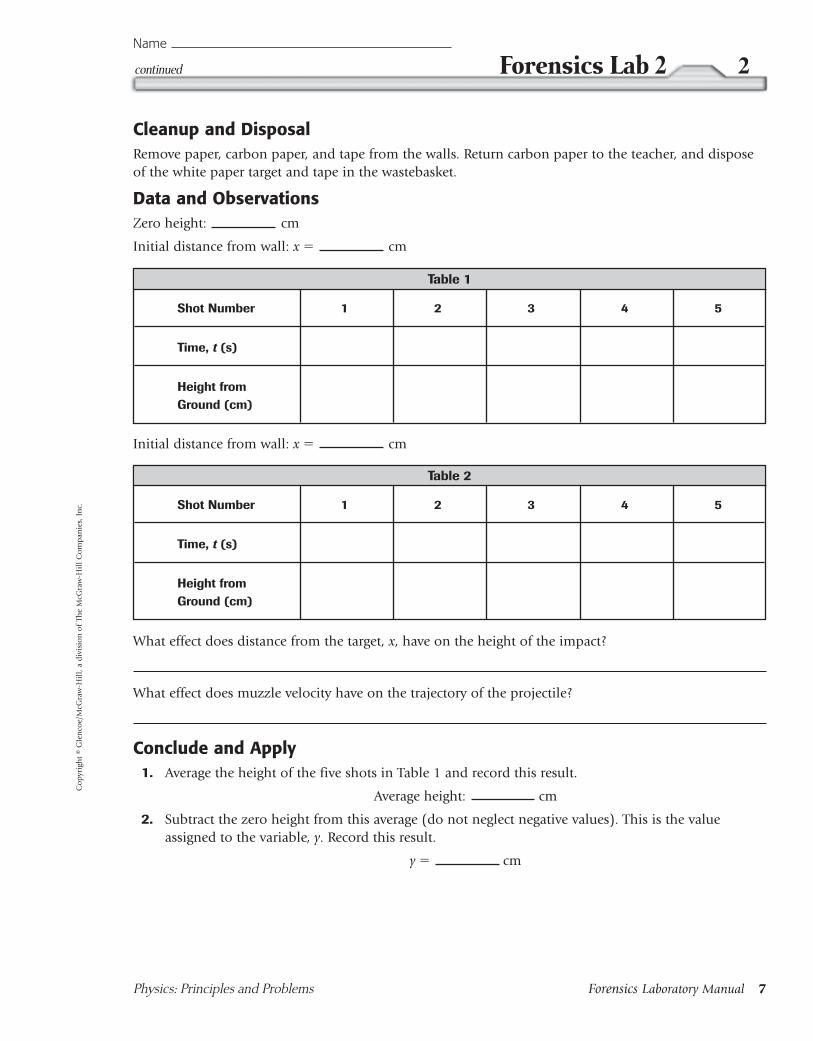
Cleanup and DisposalRemove paper, carbon paper, and tape from the walls. Return carbon paper to the teacher, and disposeof the white paper target and tape in the wastebasket.
Data and ObservationsZero height: cm
Initial distance from wall: x � cm
Initial distance from wall: x � cm
What effect does distance from the target, x, have on the height of the impact?
What effect does muzzle velocity have on the trajectory of the projectile?
Conclude and Apply1. Average the height of the five shots in Table 1 and record this result.
Average height: cm
2. Subtract the zero height from this average (do not neglect negative values). This is the valueassigned to the variable, y. Record this result.
y � cm
Table 1
Shot Number 1 2 3 4 5
Time, t (s)
Height from Ground (cm)
Table 2
Shot Number 1 2 3 4 5
Time, t (s)
Height from Ground (cm)

Results
�y i (cm/s) �xi (cm/s) �i (cm/s)
Table 1
Table 2
3. Repeat these calculations for Table 2.
Average height: cm
y � cm
4. Record the values of all known variables in Table 3 for both trials.
continuedForensics Lab 22Name
8 Forensics Laboratory Manual Physics: Principles and Problems
Co
pyright © G
lenco
e/McG
raw-H
ill, a divisio
n o
f The M
cGraw
-Hill C
om
pan
ies, Inc.
5. Given the acceleration due to gravity, g, is 9.80 m/s2, use equation (1) to determine the value of �yi. Do this separately for each trial and record the values in the results table.
6. Calculate the value of �xi using equation (2) and record the results.
7. Finally, use equation (3) to determine the value of �i for both trials and record the results in thetable below.
Analyze and Conclude1. Collect and Interpret Data How close were the results in each column in the results table?
Should they be the same? What is the reason for your answer?
2. Error Analysis What types of experimental errors could occur that would give unexpected results? Be specific.
3. Draw a Conclusion Using these concepts, determine whether the Johnson boys could be tellingthe truth, or if they are lying about how Mrs. McIntosh’s window was broken. Show your calcula-tions and explain your answer. (Remember, the acceleration due to gravity is 9.80 m/s.)
Table 3
x (cm) y (cm) Launch Angle ( �) t (s)
Table 1
Table 2
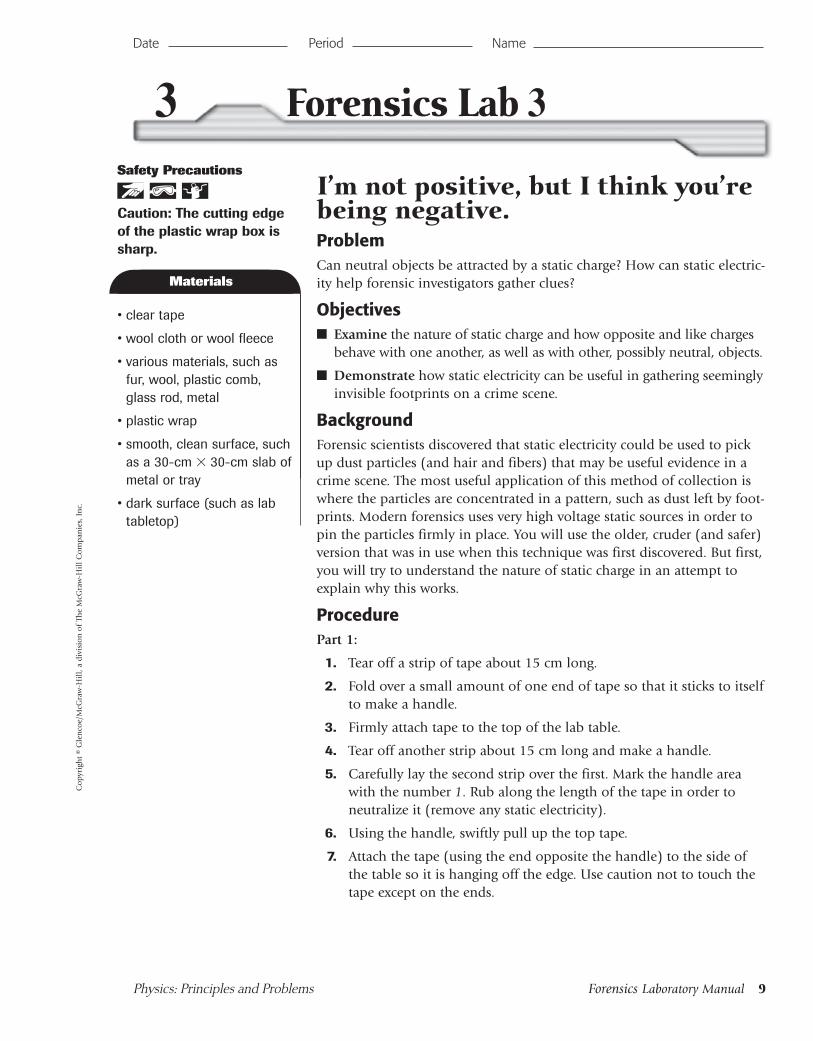
I’m not positive, but I think you’rebeing negative.ProblemCan neutral objects be attracted by a static charge? How can static electric-ity help forensic investigators gather clues?
Objectives■ Examine the nature of static charge and how opposite and like charges
behave with one another, as well as with other, possibly neutral, objects.
■ Demonstrate how static electricity can be useful in gathering seeminglyinvisible footprints on a crime scene.
BackgroundForensic scientists discovered that static electricity could be used to pickup dust particles (and hair and fibers) that may be useful evidence in acrime scene. The most useful application of this method of collection iswhere the particles are concentrated in a pattern, such as dust left by foot-prints. Modern forensics uses very high voltage static sources in order topin the particles firmly in place. You will use the older, cruder (and safer)version that was in use when this technique was first discovered. But first,you will try to understand the nature of static charge in an attempt toexplain why this works.
ProcedurePart 1:
1. Tear off a strip of tape about 15 cm long.
2. Fold over a small amount of one end of tape so that it sticks to itselfto make a handle.
3. Firmly attach tape to the top of the lab table.
4. Tear off another strip about 15 cm long and make a handle.
5. Carefully lay the second strip over the first. Mark the handle areawith the number 1. Rub along the length of the tape in order toneutralize it (remove any static electricity).
6. Using the handle, swiftly pull up the top tape.
7. Attach the tape (using the end opposite the handle) to the side ofthe table so it is hanging off the edge. Use caution not to touch thetape except on the ends.
Date Period Name
Physics: Principles and Problems Forensics Laboratory Manual 9
3 Forensics Lab 3C
opy
righ
t ©
Gle
nco
e/M
cGra
w-H
ill,
a d
ivis
ion
of
The
McG
raw
-Hil
l C
om
pan
ies,
In
c.
Materials
• clear tape
• wool cloth or wool fleece
• various materials, such asfur, wool, plastic comb,glass rod, metal
• plastic wrap
• smooth, clean surface, suchas a 30-cm � 30-cm slab ofmetal or tray
• dark surface (such as labtabletop)
Materials
Safety Precautions
Caution: The cutting edge of the plastic wrap box issharp.

8. Choose three different objects or materials. (Do not charge these objects.) One at a time, slowlymove each object close to the suspended tape. Record your observations in Table 1 (e.g. did theobject attract or repel the tape, or neither?).
9. Tear off another strip of tape, make a handle, attach it to the tape on the tabletop, and neutralize itwith your finger.
10. Mark the handle with the letter B for “bottom tape”.
11. Again, tear off another strip, prepare it as above, placing it on top of Tape B, neutralize it, andmark the handle with the letter T for “top tape”.
12. Swiftly pull both Tape B and Tape T together, as if they were a single strip.
13. Run your finger over the length of the smooth side to ground the tapes.
14. Swiftly pull Tape B and Tape T apart and suspend each one in the same manner as strip 1 (leaveplenty of distance between all three strips).
15. Using the same materials from step 8, perform the same tests on Tape B and Tape T. Record yourobservations in Table 1.
16. Using the handle, detach Tape T from the table, being careful not to neutralize it.
17. Move Tape T close to Tape B. Record your observations in Table 2.
18. Move Tape T close to Tape 1. Record your observations in Table 2.
19. Move Tape B close to Tape 1. Record your observations in Table 2.
Part 2:
1. Have someone step firmly on a clean, smooth surface.
2. Carefully remove a piece of plastic wrap �35–40 cm long and keep it from sticking together (haveone person hold two corners while another holds the other two). Remember that the cutting edgeof the package is very sharp.
3. Have a third person neutralize the plastic wrap by rubbing his or her hand across one side of it.
4. Gently lower the flat film of plastic wrap onto the smooth surface, and hold it as tight andsmoothly as possible.
5. Have a third person carefully, yet completely, rub the surface of the film with wool.
6. Lift the plastic sheet and turn it over and place it on a dark surface.
7. Record your observations in the space provided below Table 2. If nothing happened, try this againwith a different person or shoe.
Cleanup and DisposalReturn plastic wrap to teacher. Pick up any items left on the floor. Detach and throw away all usedpieces of tape and plastic wrap.
continuedForensics Lab 33Name
10 Forensics Laboratory Manual Physics: Principles and Problems
Co
pyright © G
lenco
e/McG
raw-H
ill, a divisio
n o
f The M
cGraw
-Hill C
om
pan
ies, Inc.
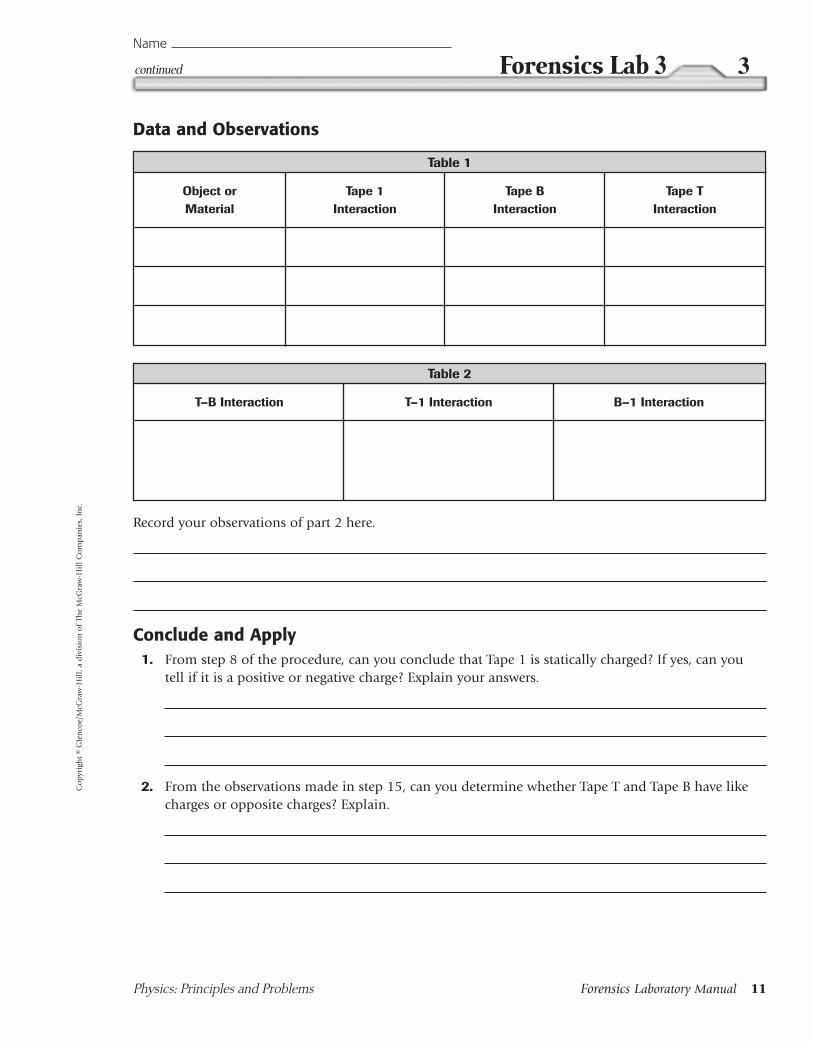
Data and Observations
Physics: Principles and Problems Forensics Laboratory Manual 11
continued Forensics Lab 3 3Name
Co
pyri
ght
© G
len
coe/
McG
raw
-Hil
l, a
div
isio
n o
f Th
e M
cGra
w-H
ill
Co
mp
anie
s, I
nc.
Record your observations of part 2 here.
Conclude and Apply1. From step 8 of the procedure, can you conclude that Tape 1 is statically charged? If yes, can you
tell if it is a positive or negative charge? Explain your answers.
2. From the observations made in step 15, can you determine whether Tape T and Tape B have likecharges or opposite charges? Explain.
Table 1
Object or Tape 1 Tape B Tape TMaterial Interaction Interaction Interaction
Table 2
T–B Interaction T–1 Interaction B–1 Interaction
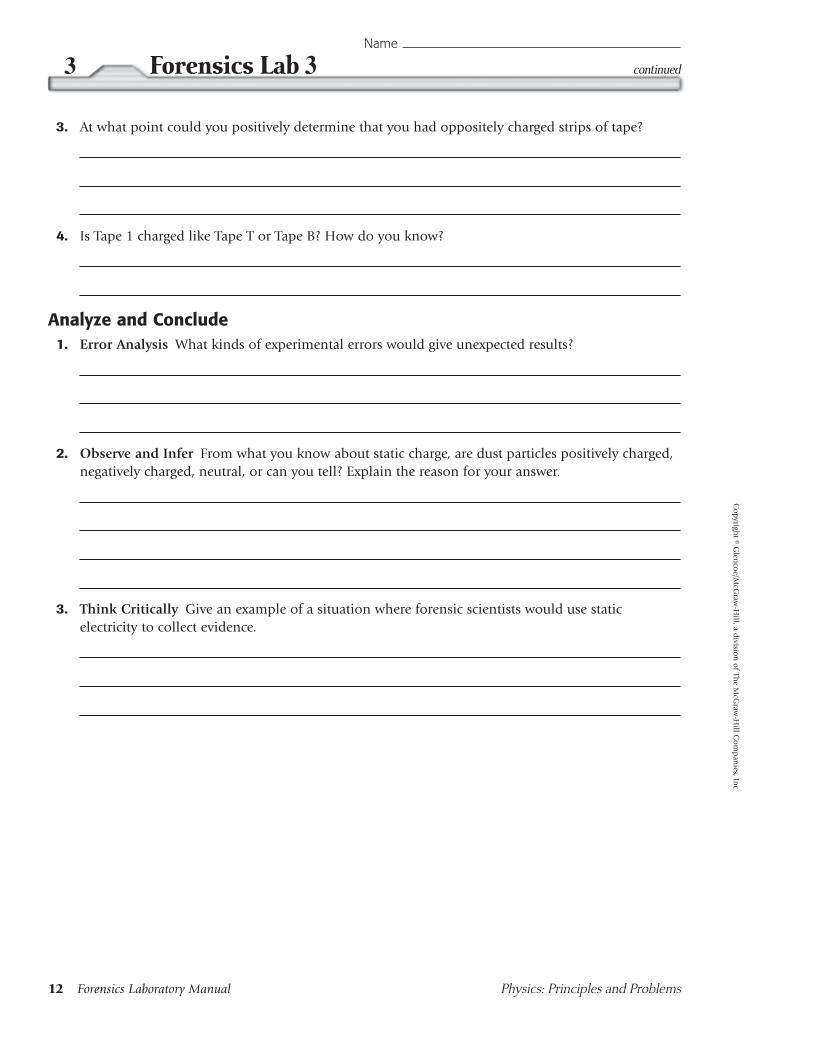
3. At what point could you positively determine that you had oppositely charged strips of tape?
4. Is Tape 1 charged like Tape T or Tape B? How do you know?
Analyze and Conclude1. Error Analysis What kinds of experimental errors would give unexpected results?
2. Observe and Infer From what you know about static charge, are dust particles positively charged,negatively charged, neutral, or can you tell? Explain the reason for your answer.
3. Think Critically Give an example of a situation where forensic scientists would use static electricity to collect evidence.
continuedForensics Lab 33Name
12 Forensics Laboratory Manual Physics: Principles and Problems
Co
pyright © G
lenco
e/McG
raw-H
ill, a divisio
n o
f The M
cGraw
-Hill C
om
pan
ies, Inc.
Archimedes: The first forensicscientist?ProblemHow can investigators determine whether a material is a pure substance,or if it is an alloy or a mixture of substances?
Objectives■ Relate the concepts of mass, volume, and density.
■ Determine the composition of substances using this relationship.
■ Analyze the quality of the experimental method and data.
BackgroundIn the first century B.C. the Roman architect Vitruvius related a story ofhow Archimedes uncovered a fraud in the manufacture of a golden crowncommissioned by Hiero II. Suspecting that the goldsmith might havereplaced some of the gold given to him by an equal weight of silver,Hiero asked Archimedes to determine whether the crown was pure gold.Because the crown was a holy object dedicated to the gods, Archimedescould not disturb it in any way. Vitruvius wrote that while taking a bathin a tub filled with water, Archimedes observed that the water ran outover the tub as his body entered the water. The more he sank, more waterran out. Archimedes reasoned that if the goldsmith had replaced part ofHiero’s crown gold with a less-dense alloy of silver, the volume of thecrown would increase and therefore displace more water than the puregold crown when introduced into a bowl filled to the brim.
Density, D, is simply an object’s mass, m, divided by its volume, V. In standard SI units, it is measured in kg/m3 or, quite commonly, in g/cm3 (g/mL). That is,
D � �mV
�
It is an intrinsic property of a substance, meaning no matter how much of it or what shape of it, a material’s density, at normal temperatures, isconstant. Once density is found, one can refer to a table of standards and match the density of the object to the known density of a particularmaterial, and make a guess as to what the material is. However, this is notso simple for irregularly shaped objects, since measuring volume can bedifficult. So what was it that Archimedes found?
Archimedes made two masses of the same weight as the crown, one ofgold and the other of silver. He filled a large vessel with water to the verybrim, and dropped the mass of silver into it. The amount of water that
Date Period Name
Physics: Principles and Problems Forensics Laboratory Manual 13
4 Forensics Lab 4C
opy
righ
t ©
Gle
nco
e/M
cGra
w-H
ill,
a d
ivis
ion
of
The
McG
raw
-Hil
l C
om
pan
ies,
In
c.
Materials
• graduated beaker or cylinder
• three-beam mass balance
• metal sphere
• pure, metal, odd-shapedobject
• alloy, metal, odd-shapedobject
• ruler or calipers
• paper towels
Materials
Safety Precautions
overflowed was equal in volume to that of the silver mass sunk in the vessel. Archimedes refilled thevessel and dropped the mass of gold into the full vessel. Not as much water overflowed because gold ismore dense than silver, so the same weight takes up less volume. Finally, Archimedes filled the vesselagain and dropped the crown itself into the water. He found that more water overflowed for the crownthan for the mass of gold of the same weight. From this, he reasoned that silver had been mixed withgold, and thus made the theft of the contractor perfectly clear.
You will use a similar experiment to determine the composition of objects. You also will assess yourexperimental methods and data by means of discrepancy calculations.
When there is a known, standard value to compare against an experimentally obtained value, a percent discrepancy can be calculated. This is found by the following equation:
Percent discrepancy � � 100
where St is the standard value, and Ex is the experimental value. The ratio is multiplied by 100 and isrepresented as a percentage. If there is no known standard, or if you wish to compare the closeness ofresults using two different experimental measures, then a relative discrepancy is appropriate. This is given by:
Relative discrepancy � � 100
where Av is the average of the experimental data and Ex is any one of the experimental data.
Results within 10 percent are generally considered good. If a percent discrepancy yields a value within 10 percent, you can assume the object is made of the material you are comparing it to. Relativediscrepancies within 10 percent imply that the different methods of experiment were equally reasonableand yielded nearly the same result.
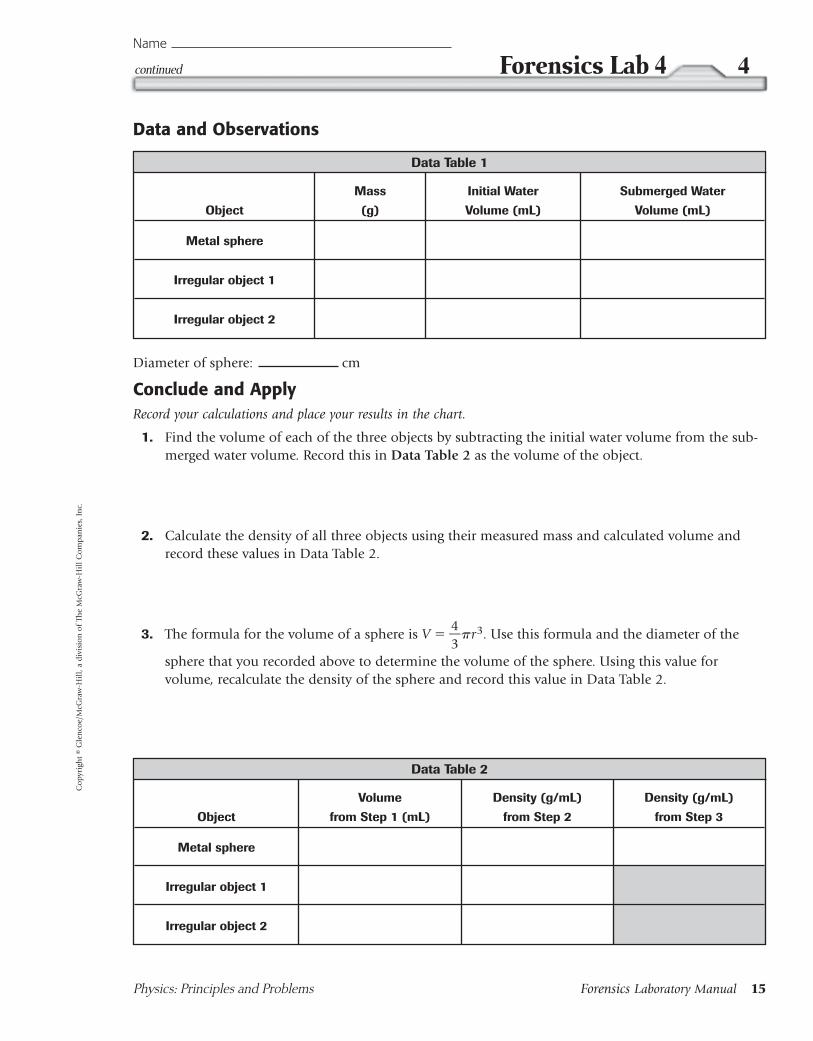
Procedure1. Measure and record the mass of all three objects—one sphere and two irregularly shaped objects—
in Data Table 1 on the next page.
2. Measure and record the diameter of the sphere in Data Table 1 on the next page.
3. Fill the beaker with enough water to fully submerge objects.
4. Record the volume of water in the beaker in Data Table 1.
5. Carefully place one of the objects in the beaker.
6. Measure and record the new volume of water.
7. Remove the object and dry it off.
8. Repeat steps 4–7 for the remaining two objects. (Note: you must repeat step four, as some watermay be lost when you remove the objects)
Cleanup and DisposalDry off all objects. Pour water into sink. Wipe any spilled water off the table. Dispose of paper towels.
�Ex � Av���
Av
�St � Ex��
St
continuedForensics Lab 44Name
14 Forensics Laboratory Manual Physics: Principles and Problems
Co
pyright © G
lenco
e/McG
raw-H
ill, a divisio
n o
f The M
cGraw
-Hill C
om
pan
ies, Inc.
Data and Observations
Diameter of sphere: cm
Conclude and ApplyRecord your calculations and place your results in the chart.
1. Find the volume of each of the three objects by subtracting the initial water volume from the sub-merged water volume. Record this in Data Table 2 as the volume of the object.
2. Calculate the density of all three objects using their measured mass and calculated volume andrecord these values in Data Table 2.
3. The formula for the volume of a sphere is V � �43
��r3. Use this formula and the diameter of the
sphere that you recorded above to determine the volume of the sphere. Using this value for volume, recalculate the density of the sphere and record this value in Data Table 2.
Physics: Principles and Problems Forensics Laboratory Manual 15
continued Forensics Lab 4 4Name
Co
pyri
ght
© G
len
coe/
McG
raw
-Hil
l, a
div
isio
n o
f Th
e M
cGra
w-H
ill
Co
mp
anie
s, I
nc.
Data Table 1
Mass Initial Water Submerged Water
Object (g) Volume (mL) Volume (mL)
Metal sphere
Irregular object 1
Irregular object 2
Data Table 2
Volume Density (g/mL) Density (g/mL)
Object from Step 1 (mL) from Step 2 from Step 3
Metal sphere
Irregular object 1
Irregular object 2
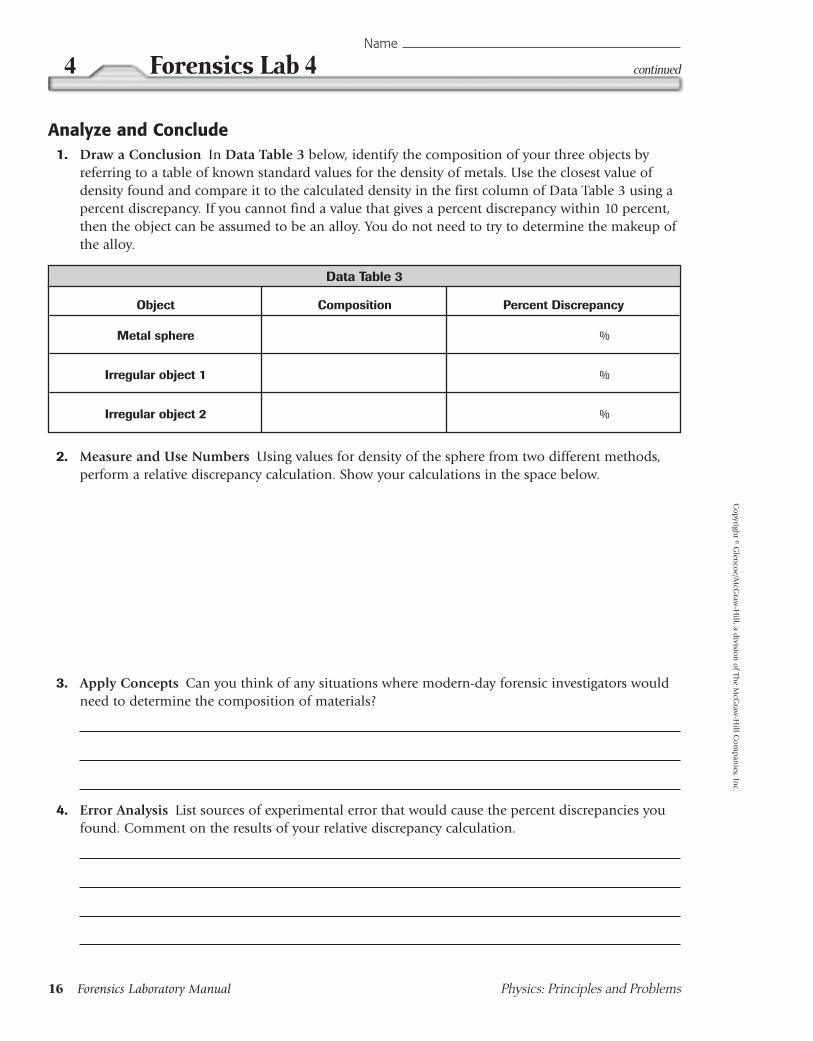
Analyze and Conclude1. Draw a Conclusion In Data Table 3 below, identify the composition of your three objects by
referring to a table of known standard values for the density of metals. Use the closest value ofdensity found and compare it to the calculated density in the first column of Data Table 3 using apercent discrepancy. If you cannot find a value that gives a percent discrepancy within 10 percent,then the object can be assumed to be an alloy. You do not need to try to determine the makeup ofthe alloy.
2. Measure and Use Numbers Using values for density of the sphere from two different methods,perform a relative discrepancy calculation. Show your calculations in the space below.
3. Apply Concepts Can you think of any situations where modern-day forensic investigators wouldneed to determine the composition of materials?
4. Error Analysis List sources of experimental error that would cause the percent discrepancies youfound. Comment on the results of your relative discrepancy calculation.
continuedForensics Lab 44Name
16 Forensics Laboratory Manual Physics: Principles and Problems
Co
pyright © G
lenco
e/McG
raw-H
ill, a divisio
n o
f The M
cGraw
-Hill C
om
pan
ies, Inc.
Data Table 3
Object Composition Percent Discrepancy
Metal sphere %
Irregular object 1 %
Irregular object 2 %
You aren’t going to slide out of this one!ProblemHow can a skid mark left on the pavement help police reconstruct theevents of an accident?
Objectives■ Study accelerated motion.
■ Demonstrate how friction creates negative acceleration (deceleration).
■ Practice skills needed to manipulate standard physics equations.
■ Recognize cause and effect from elements at the scene of a crime.
■ Review unit conversion methods so that numbers become meaningful.
BackgroundA body was found on the roadside, having apparently been struck by avehicle. Coroners can determine the time of death, so that the police maylook for witnesses to the accident. Meanwhile, investigators will attemptto reconstruct the events that led to the pedestrian’s death. Aside from thebody, the only evidence was a skid mark. With this, they can at leastdetermine the speed of the vehicle that hit the victim.
The skid mark was 71.4 m long. Tests on this stretch of concrete showedthat for an average tire, the coefficient of kinetic friction is about 0.7.
When a car has some initial velocity, vi, and the driver slams on thebrakes until they are at a complete stop, inertia carries them forward,while there is a backward acceleration due to friction between the tiresand the road. (This does not apply to cars with antilock brakes.) The onlyforce acting, then, is the force of kinetic (moving) friction, Fk. We willdefine this force as
Fk � �kN
where N is the normal force, the force that the ground exerts upward tooppose the weight of the vehicle. So
N � Mg
with M being the mass of the car, and g, the standard value for accelera-tion due to gravity. So finally,
Fk � �kMg
where �k is the coefficient of kinetic friction. The coefficient of friction isa unitless number that describes the interaction between the two surfacesin contact and is distinct for that interaction. The term kinetic impliesmotion. This number is descriptive for objects that are sliding againsteach other.
Date Period Name
Physics: Principles and Problems Forensics Laboratory Manual 17
5 Forensics Lab 5C
opy
righ
t ©
Gle
nco
e/M
cGra
w-H
ill,
a d
ivis
ion
of
The
McG
raw
-Hil
l C
om
pan
ies,
In
c.
Materials
• wood block with hook onsmallest end
• sliding surface
• pulley with C clamp
• string
• mass hanger and masses(ranging from 1 g to 200 g)
• 500-g mass
• 1000-g mass
• 1500-g mass
Materials
Safety Precautions
From Newton’s second law of motion, the sum of the forces acting on an object is its mass, m, timesits acceleration, a. In the horizontal direction, the only force acting is the force of friction, which leadsus to the following relationship.
F � ma � �kmg, which leads to
a � �kg (1)
This is where the derivation may get a little bit tricky. First, we recall that the displacement, x, is given by
x � vit � �12
�at2 (2)
and
a � . (3)
In these equations, t is the time over which the skidding (acceleration) occurred, and vf represents thefinal velocity. In our case, vf � 0, so equation (3) becomes
a � � . (4)
Since we know acceleration and are interested in finding the initial velocity (how fast the car was goingbefore it slammed on the brakes), we can eliminate t from equation (2). Rearranging equation (3) for t,we get
t � �
Substituting this into (2) and combining like terms gives
x � � �� �Finally, rearranging for vi gives
vi � �2ax�
And substituting (1) for a, we find the initial velocity of the car to be:
vi � �2�kgx�. (5)
We will use the ideas presented above to determine the force and coefficient of kinetic friction for ablock sliding on a surface.
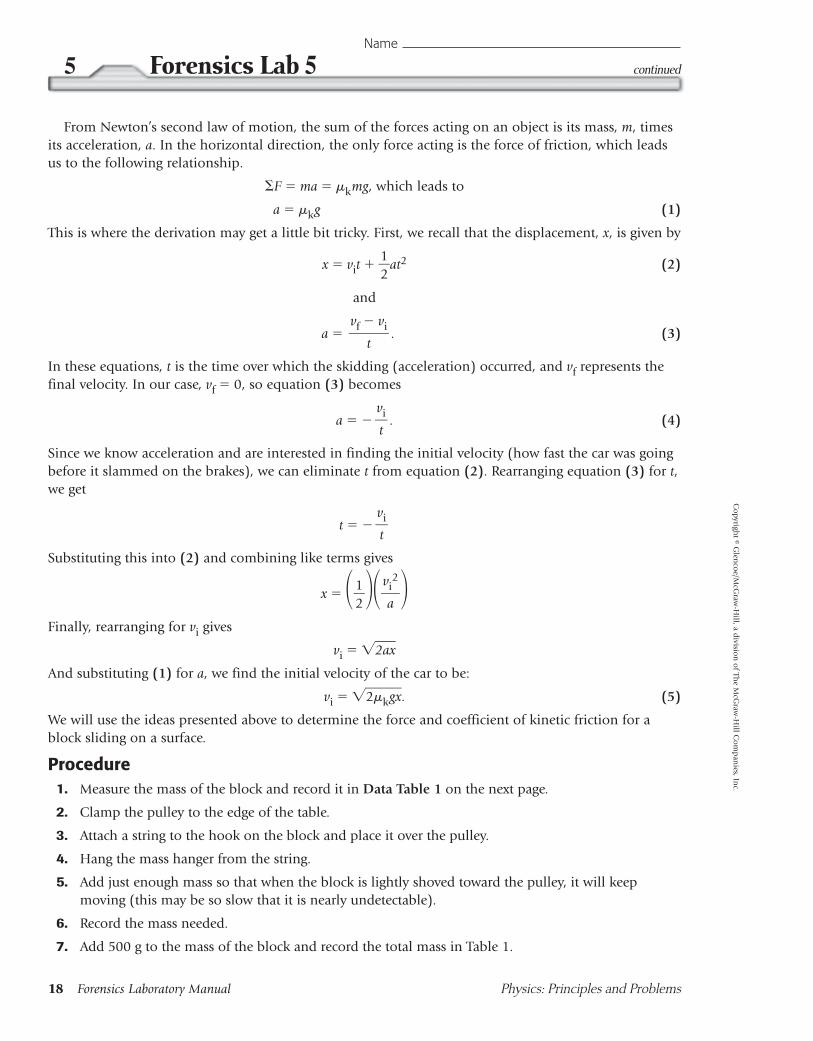
Procedure1. Measure the mass of the block and record it in Data Table 1 on the next page.
2. Clamp the pulley to the edge of the table.
3. Attach a string to the hook on the block and place it over the pulley.
4. Hang the mass hanger from the string.
5. Add just enough mass so that when the block is lightly shoved toward the pulley, it will keep moving (this may be so slow that it is nearly undetectable).
6. Record the mass needed.
7. Add 500 g to the mass of the block and record the total mass in Table 1.
vi2
�a
1�2
vi�t
vi�t
vf � vi�
t
continuedForensics Lab 55Name
18 Forensics Laboratory Manual Physics: Principles and Problems
Co
pyright © G
lenco
e/McG
raw-H
ill, a divisio
n o
f The M
cGraw
-Hill C
om
pan
ies, Inc.
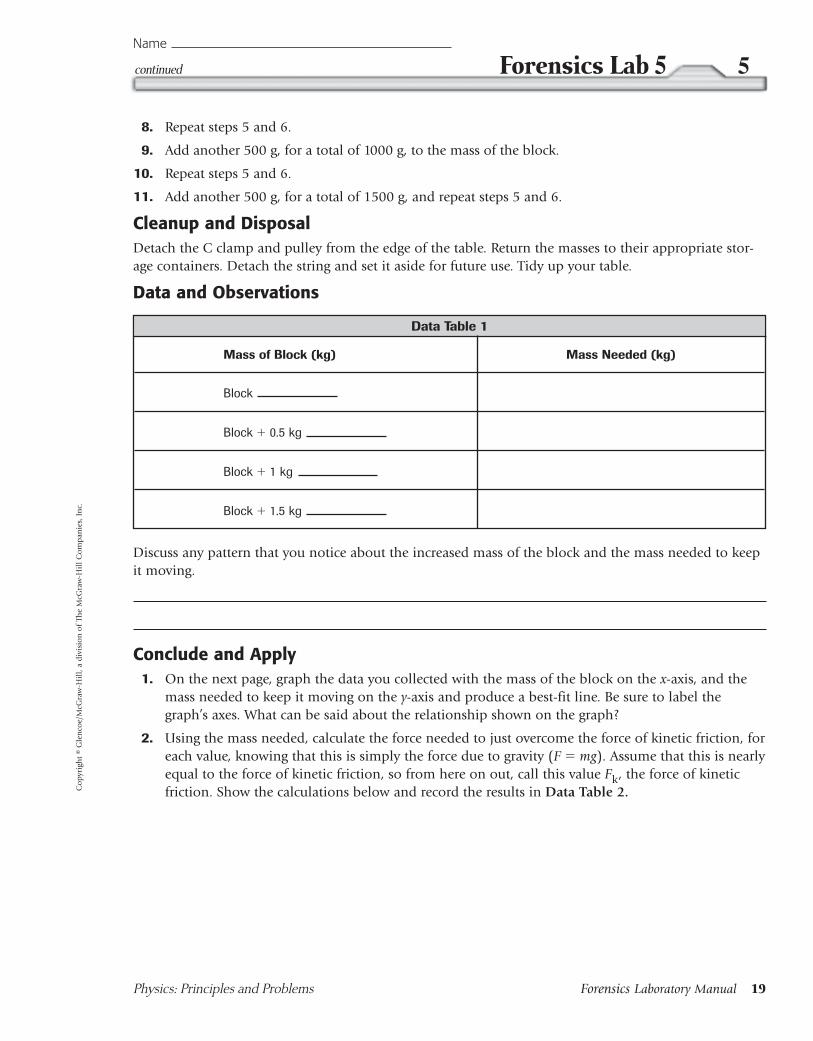
8. Repeat steps 5 and 6.
9. Add another 500 g, for a total of 1000 g, to the mass of the block.
10. Repeat steps 5 and 6.
11. Add another 500 g, for a total of 1500 g, and repeat steps 5 and 6.
Cleanup and DisposalDetach the C clamp and pulley from the edge of the table. Return the masses to their appropriate stor-age containers. Detach the string and set it aside for future use. Tidy up your table.
Data and Observations
Discuss any pattern that you notice about the increased mass of the block and the mass needed to keepit moving.
Conclude and Apply1. On the next page, graph the data you collected with the mass of the block on the x-axis, and the
mass needed to keep it moving on the y-axis and produce a best-fit line. Be sure to label thegraph’s axes. What can be said about the relationship shown on the graph?
2. Using the mass needed, calculate the force needed to just overcome the force of kinetic friction, foreach value, knowing that this is simply the force due to gravity (F � mg). Assume that this is nearlyequal to the force of kinetic friction, so from here on out, call this value Fk, the force of kineticfriction. Show the calculations below and record the results in Data Table 2.
Physics: Principles and Problems Forensics Laboratory Manual 19
continued Forensics Lab 5 5Name
Co
pyri
ght
© G
len
coe/
McG
raw
-Hil
l, a
div
isio
n o
f Th
e M
cGra
w-H
ill
Co
mp
anie
s, I
nc.
Data Table 1
Mass of Block (kg) Mass Needed (kg)
Block
Block � 0.5 kg
Block � 1 kg
Block � 1.5 kg
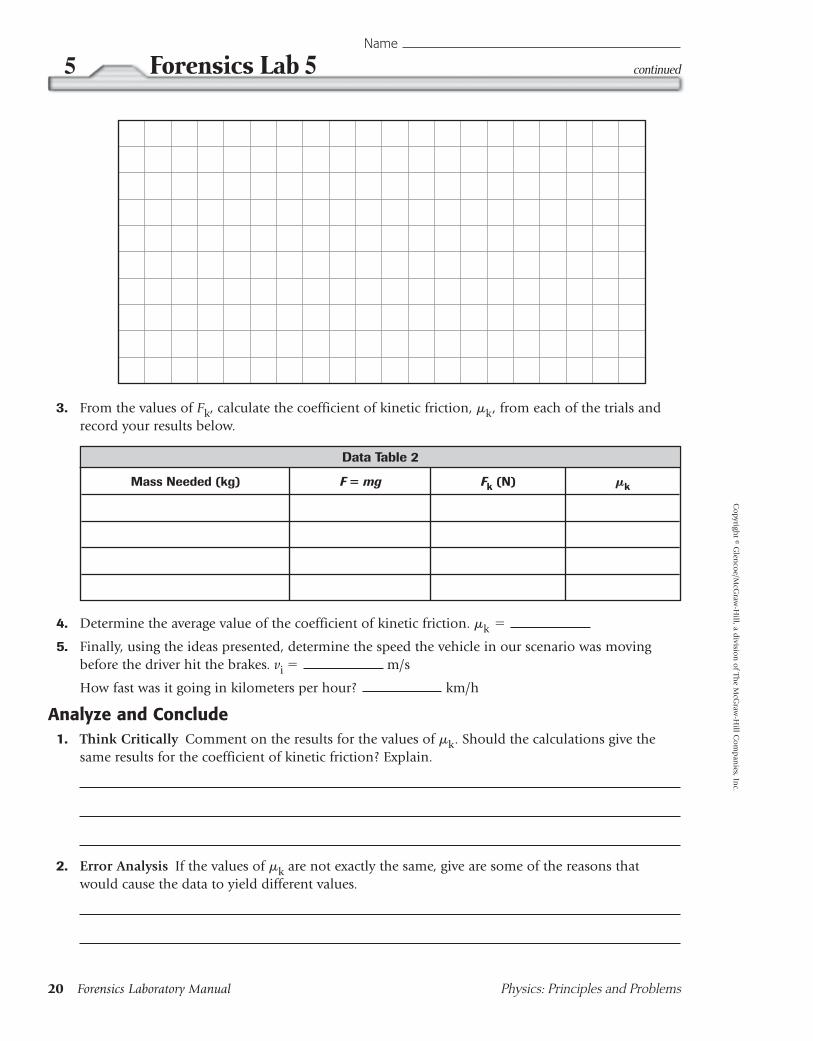
3. From the values of Fk, calculate the coefficient of kinetic friction, �k, from each of the trials andrecord your results below.
4. Determine the average value of the coefficient of kinetic friction. �k �
5. Finally, using the ideas presented, determine the speed the vehicle in our scenario was movingbefore the driver hit the brakes. vi � m/s
How fast was it going in kilometers per hour? km/h
Analyze and Conclude1. Think Critically Comment on the results for the values of �k. Should the calculations give the
same results for the coefficient of kinetic friction? Explain.
2. Error Analysis If the values of �k are not exactly the same, give are some of the reasons thatwould cause the data to yield different values.
continuedForensics Lab 55Name
20 Forensics Laboratory Manual Physics: Principles and Problems
Co
pyright © G
lenco
e/McG
raw-H
ill, a divisio
n o
f The M
cGraw
-Hill C
om
pan
ies, Inc.
Data Table 2
Mass Needed (kg) F � mg Fk (N) �k
Resistance is futile—in time, you will see the light.ProblemHow do different circuit configurations affect the voltages across and cur-rents through the resistors (lightbulbs) in the circuit?
Objectives■ Develop the ability to read a circuit diagram.
■ Create real circuits based on circuit diagrams.
■ Understand the difference between series and parallel circuit configurations.
■ Predict the behavior of lightbulbs in different parts of a circuit.
BackgroundJasmine called the police because she had seen a man standing outsidenear her kitchen window. She had no idea how long he had been there,but had felt he was watching her. She was very scared. Upon arrival, thepolice looked for evidence around the outside of her house. It was dark,but they used flashlights. No window screens had been cut, and theground was frozen hard with no snow, so there were no footprints to befound. Officer Martin, the policeman who usually patrols Jasmine’sneighborhood, suggested that, since it was Christmas time, she mightincrease her personal security by plugging in her Christmas lights eachnight. Surprised that she hadn’t noticed before, Jasmine said she hadplugged them in. So the police inspected to see if the cord had been cut,but it was not. Officer Martin decided they needed to have the crime labtake a look at each individual bulb, because he believed they might getfingerprints from a bulb that was unscrewed. The crime lab did find aloose bulb, lifted prints, and upon investigation of the individual, foundhe was a wanted criminal. The key to this investigation was Officer Mar-tin’s knowledge of the behavior of circuits.
When resistors are placed in a circuit, there is a voltage drop across thatresistor as charges flow through it. The total amount of voltage drop perresistor will depend on how the circuit is put together along with theplacement of a particular resistor. There is also interdependence betweenthe current through a resistor or branch of the circuit, the voltage dropacross the resistor, and the size of the resistance. This interdependence isdetermined, again, by the configuration. The relationship is shown byOhm’s law, which is
V � IR
Date Period Name
Physics: Principles and Problems Forensics Laboratory Manual 21
6 Forensics Lab 6C
opy
righ
t ©
Gle
nco
e/M
cGra
w-H
ill,
a d
ivis
ion
of
The
McG
raw
-Hil
l C
om
pan
ies,
In
c.
Materials
• 12-V variable DC powersupply
• three lightbulbs in fixtures
• six connecting wires
• 12 alligator clips (if needed)
Materials
Safety Precautions
CAUTION: The ends of connecting wires may besharp and could punctureskin. Double-check setupwith the teacher. Checkcondition of wires andapparatus.
where V is voltage in volts, V, I is current in amps, A, and R is resistance in ohms, .
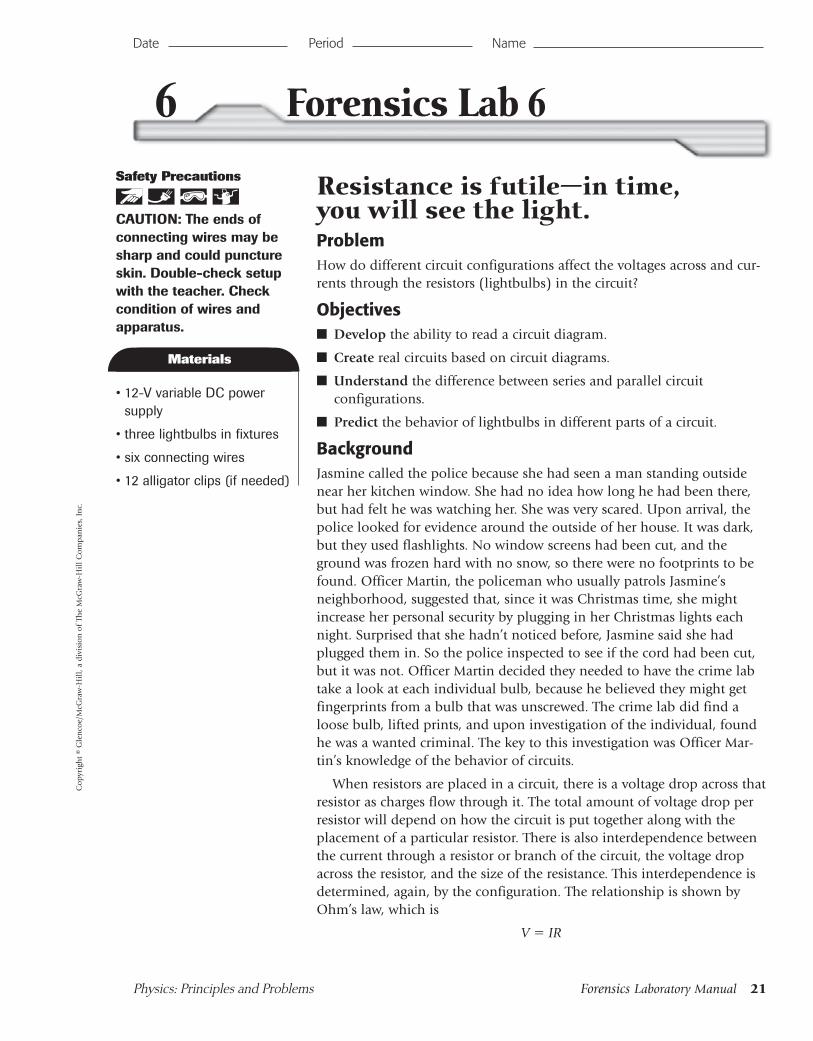
When two resistors are placed in series, the current through them is equal, while the voltage drop dif-fers with the size of each resistor. The individual voltage drops within the circuit add to account for thevoltage across the circuit. Removing one resistor will break the circuit and stop the current.
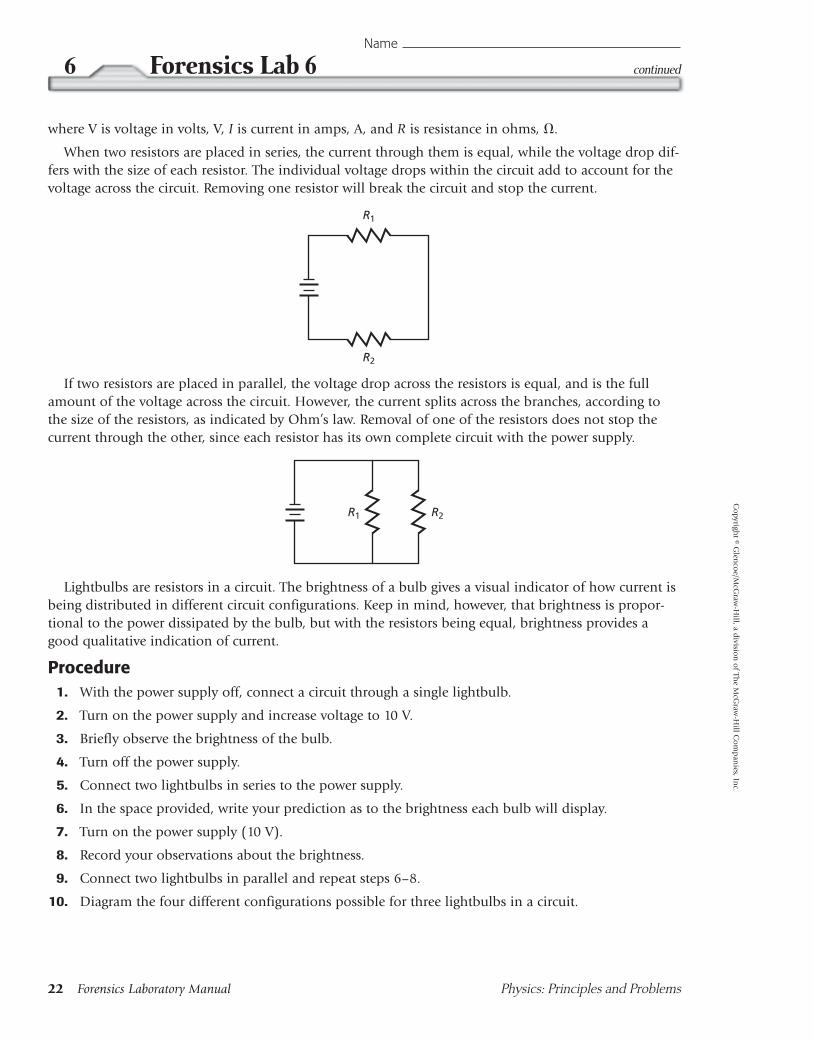
If two resistors are placed in parallel, the voltage drop across the resistors is equal, and is the fullamount of the voltage across the circuit. However, the current splits across the branches, according tothe size of the resistors, as indicated by Ohm’s law. Removal of one of the resistors does not stop thecurrent through the other, since each resistor has its own complete circuit with the power supply.
Lightbulbs are resistors in a circuit. The brightness of a bulb gives a visual indicator of how current isbeing distributed in different circuit configurations. Keep in mind, however, that brightness is propor-tional to the power dissipated by the bulb, but with the resistors being equal, brightness provides agood qualitative indication of current.
Procedure1. With the power supply off, connect a circuit through a single lightbulb.
2. Turn on the power supply and increase voltage to 10 V.
3. Briefly observe the brightness of the bulb.
4. Turn off the power supply.
5. Connect two lightbulbs in series to the power supply.
6. In the space provided, write your prediction as to the brightness each bulb will display.
7. Turn on the power supply (10 V).
8. Record your observations about the brightness.
9. Connect two lightbulbs in parallel and repeat steps 6–8.
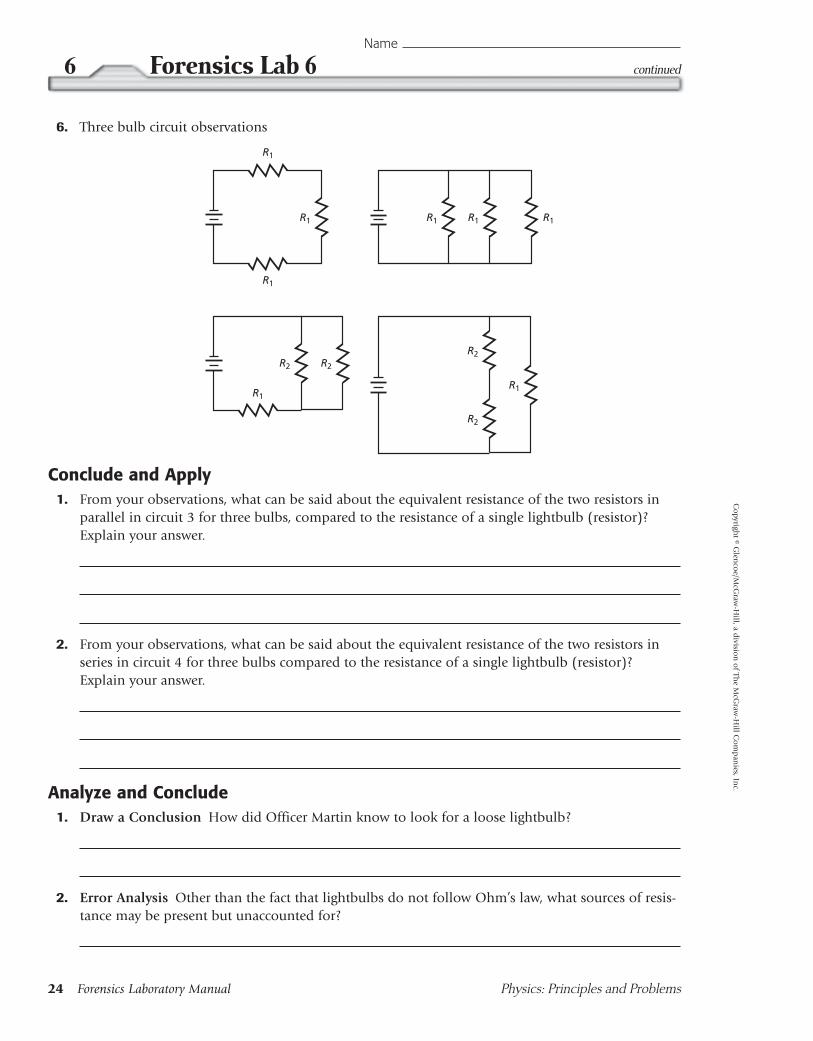
10. Diagram the four different configurations possible for three lightbulbs in a circuit.
R2R1
R1
R2
continuedForensics Lab 66Name
22 Forensics Laboratory Manual Physics: Principles and Problems
Co
pyright © G
lenco
e/McG
raw-H
ill, a divisio
n o
f The M
cGraw
-Hill C
om
pan
ies, Inc.

11. For each configuration, predict the brightness of each bulb by labeling the diagram with numbers,where 1 represents the brightest a bulb will be, and 2 will be the next brightest, and so on. Recordyour predictions in the space provided.
12. Connect each of the circuits, one at a time, and have the teacher check each configuration.
13. Turn on the power supply. If any of the bulbs appear not to be lit, you may need to increase thevoltage by small amounts.
14. Record your observations using the same numbering system.
Cleanup and DisposalUnplug the power supply. Disconnect all wires.
Data and Observations1. Prediction
2. Observation
3. Prediction
4. Observation
5. Three bulb circuits diagrams (with prediction labels)
R1 R1R1
R1
R2
R2
R2R2
R1
R1
R1
R1
Physics: Principles and Problems Forensics Laboratory Manual 23
continued Forensics Lab 6 6Name
Co
pyri
ght
© G
len
coe/
McG
raw
-Hil
l, a
div
isio
n o
f Th
e M
cGra
w-H
ill
Co
mp
anie
s, I
nc.
6. Three bulb circuit observations
Conclude and Apply1. From your observations, what can be said about the equivalent resistance of the two resistors in
parallel in circuit 3 for three bulbs, compared to the resistance of a single lightbulb (resistor)?Explain your answer.
2. From your observations, what can be said about the equivalent resistance of the two resistors inseries in circuit 4 for three bulbs compared to the resistance of a single lightbulb (resistor)?Explain your answer.
Analyze and Conclude1. Draw a Conclusion How did Officer Martin know to look for a loose lightbulb?
2. Error Analysis Other than the fact that lightbulbs do not follow Ohm’s law, what sources of resis-tance may be present but unaccounted for?
R1 R1R1
R1
R2
R2
R2R2
R1
R1
R1
R1
continuedForensics Lab 66Name
24 Forensics Laboratory Manual Physics: Principles and Problems
Co
pyright © G
lenco
e/McG
raw-H
ill, a divisio
n o
f The M
cGraw
-Hill C
om
pan
ies, Inc.
How many calories are there?ProblemHow can conservation of energy be used to help determine the content orpurity of a substance?
Objectives■ Observe the transfer of thermal energy.
■ Separate and control variables to observe conservation of energy.
■ Calculate the specific heat of a material.
■ Identify the nature of a material based on its specific heat.
■ Compare experimental results to well-known standards.
■ Determine whether the crime of counterfeiting has occurred.
BackgroundA new international coin collector had just returned from overseas, wherehe had purchased his first set of ancient silver coins. After he returned, heshowed the coins to several other collectors who were not convinced thatthese were authentic. He began to suspect that he was a victim of fraud.Since this was an international counterfeit coin case, he contacted the FBI.
The federal agents obtained several coins from the dealer and ran asimple experiment to help determine whether the coins were made ofpure silver. The experiment they used was as follows:
After heating up each 28.4-g coin to 120�C, they placed each one in300.0 g of water that was initially 25.0�C. They measured the temperatureof the system until it reached an equilibrium temperature of 25.5�C.
The experiment they used is called calorimetry. It is based on the trans-fer of thermal energy from one substance to another. It relies on the factthat energy is conserved in the system, and that some substances, morereadily than others, change temperature, T, with a transfer of energy. Thecapacity for a substance to change temperature from a transfer of thermalenergy is called the specific heat, and is denoted by the letter C. The spe-cific heat of a substance is a constant for that material and is not affectedby the amount, or mass, m.
Heat transfer is defined by Q � mC�T. When a transfer of heat occurs,the amount of thermal energy gained by one substance is equal to theamount of thermal energy lost by the other. In an isolated system, such asa calorimeter the change in thermal energy is equal to the heat trans-ferred. This leads us to
m1C1�T1 � �m2C2�T2
Date Period Name
Physics: Principles and Problems Forensics Laboratory Manual 25
7 Forensics Lab 7C
opy
righ
t ©
Gle
nco
e/M
cGra
w-H
ill,
a d
ivis
ion
of
The
McG
raw
-Hil
l C
om
pan
ies,
In
c.
Materials
• mass balance
• calorimeter
• stirring rod
• thermometer
• pure water
• hot metal samples (from teacher)
• timer
Materials
Safety Precautions
CAUTION: Be careful not to break thermometers orstirring rods.
Let your teacher handlethe hot metal samples.
In this experiment, our substance gaining heat is pure water, which has a specific heat of 4186 J/kg·�C.This means that it takes 4184 J of energy to raise the temperature of 1 kg of water by 1�C.
We wish to identify the makeup of the unknown pure substance by finding its specific heat. Simplerearrangement of our equation of conservation of energy for heat transfer yields this result:
C2 � �
When there is a known, standard value to compare against an experimentally obtained value, a percentdiscrepancy can be calculated. This is found by the following equation:
Percent discrepancy � � 100
where St is the standard value and Ex is the experimental value. The ratio is multiplied by 100 and isrepresented as a percentage. Results within 10 percent generally are considered good. If a percent dis-crepancy yields a value within 10 percent, you can assume the object is made of the material you arecomparing it to.
Procedure1. Measure and record the mass of the calorimeter, the stirring rod, and the thermometer together.
2. Fill the calorimeter approximately two-thirds full of pure, room-temperature water.
3. Measure and record the mass of the calorimeter, the stirring rod, thermometer, and the watertogether.
4. Record the initial temperature of the water.
5. Have your teacher place a heated metal sample into the calorimeter, and quickly close the lid.Record the initial temperature of the metal.
6. Constantly but gently stir the water in the system.
7. Every 30 s, measure and record the temperature of the system.
8. When you observe the temperature is unchanged for three readings, you can assume the systemhas reached equilibrium, so this will be the final temperature. (Note: If the temperature begins todecrease, then you are losing heat from the system to the environment, and you should use themaximum temperature recorded for that trial.)
9. Measure and record the mass of the entire system with the metal still in it.
10. Return the metal sample to the teacher, and repeat steps 2–9 for a different metal.
Cleanup and DisposalReturn the second metal sample to the teacher. Pour out the water and dry out the calorimeter. Cleanup any spills. Replace the stirring rod and thermometer in their proper holders.
Data and ObservationsA. 1. Mass of calorimeter, stirring rod, and thermometer: kg
2. Mass of calorimeter, stirring rod, thermometer, and water: kg
3. Initial temperature of water: �C
�St � Ex��
St
m1C1�T1��
m2�T2
continuedForensics Lab 77Name
26 Forensics Laboratory Manual Physics: Principles and Problems
Co
pyright © G
lenco
e/McG
raw-H
ill, a divisio
n o
f The M
cGraw
-Hill C
om
pan
ies, Inc.
4. Initial temperature of metal: �C
5. Mass of entire system with metal: kg
B. 1. Mass of calorimeter, stirring rod, and thermometer: kg
2. Mass of calorimeter, stirring rod, thermometer, and water: kg
3. Initial temperature of water: �C
4. Initial temperature of metal: �C
5. Mass of entire system with metal: kg
Conclude and Apply1. For both metal samples, subtract the mass you recorded in Data and Observations 1 from that
recorded in Data and Observations 2 to determine the mass of the water. Record these values inthe Compare Data table on the next page.
2. Subtract the mass recorded in Data and Observations 2 from that in Data and Observations 5 todetermine the mass of the metal. Record this value for both metal samples in the Compare Datatable on the next page.
Physics: Principles and Problems Forensics Laboratory Manual 27
continued Forensics Lab 7 7Name
Co
pyri
ght
© G
len
coe/
McG
raw
-Hil
l, a
div
isio
n o
f Th
e M
cGra
w-H
ill
Co
mp
anie
s, I
nc.
First Metal Sample
Time Temperature
(s) (�C)
30
60
90
120
150
Second Metal Sample
Time Temperature
(s) (�C)
30
60
90
120
150
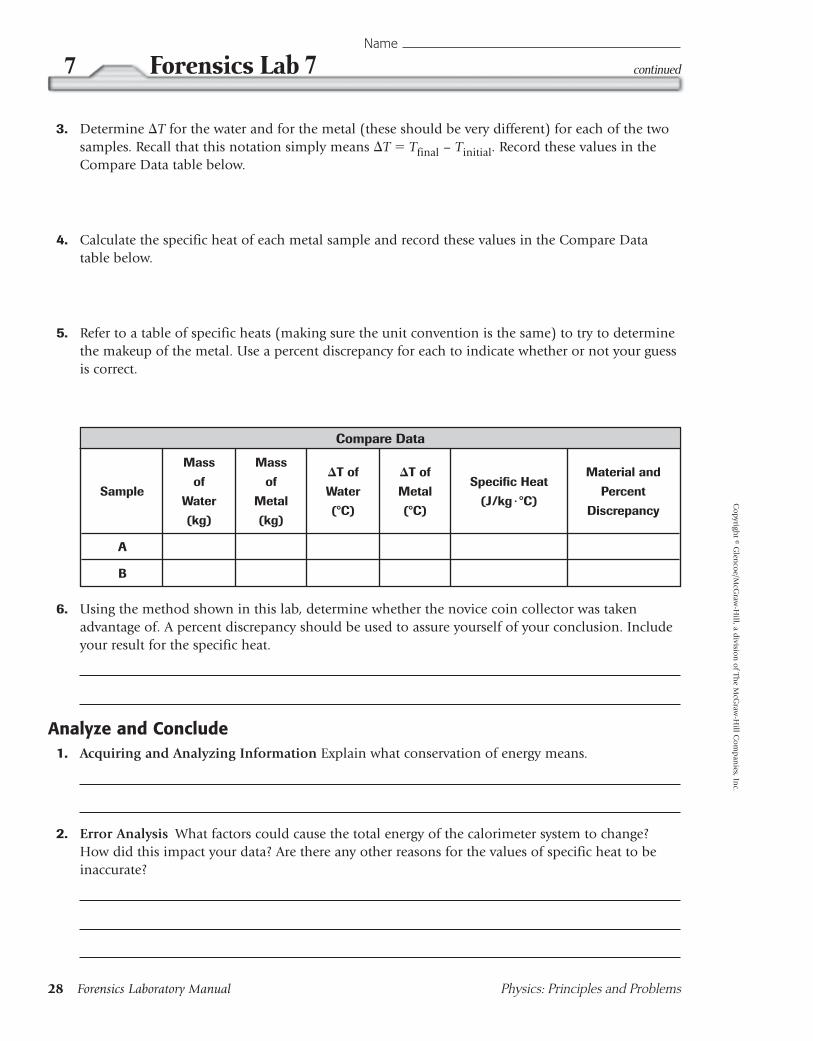
3. Determine �T for the water and for the metal (these should be very different) for each of the twosamples. Recall that this notation simply means �T � Tfinal – Tinitial. Record these values in theCompare Data table below.
4. Calculate the specific heat of each metal sample and record these values in the Compare Datatable below.
5. Refer to a table of specific heats (making sure the unit convention is the same) to try to determinethe makeup of the metal. Use a percent discrepancy for each to indicate whether or not your guessis correct.
6. Using the method shown in this lab, determine whether the novice coin collector was takenadvantage of. A percent discrepancy should be used to assure yourself of your conclusion. Includeyour result for the specific heat.
Analyze and Conclude1. Acquiring and Analyzing Information Explain what conservation of energy means.
2. Error Analysis What factors could cause the total energy of the calorimeter system to change?How did this impact your data? Are there any other reasons for the values of specific heat to beinaccurate?
continuedForensics Lab 77Name
Co
pyright © G
lenco
e/McG
raw-H
ill, a divisio
n o
f The M
cGraw
-Hill C
om
pan
ies, Inc.
Compare Data
Mass Mass�T of �T of Material and
of of Specific HeatSample Water Metal Percent
Water Metal (J/kg·�C)(�C) (�C) Discrepancy
(kg) (kg)
A
B
28 Forensics Laboratory Manual Physics: Principles and Problems
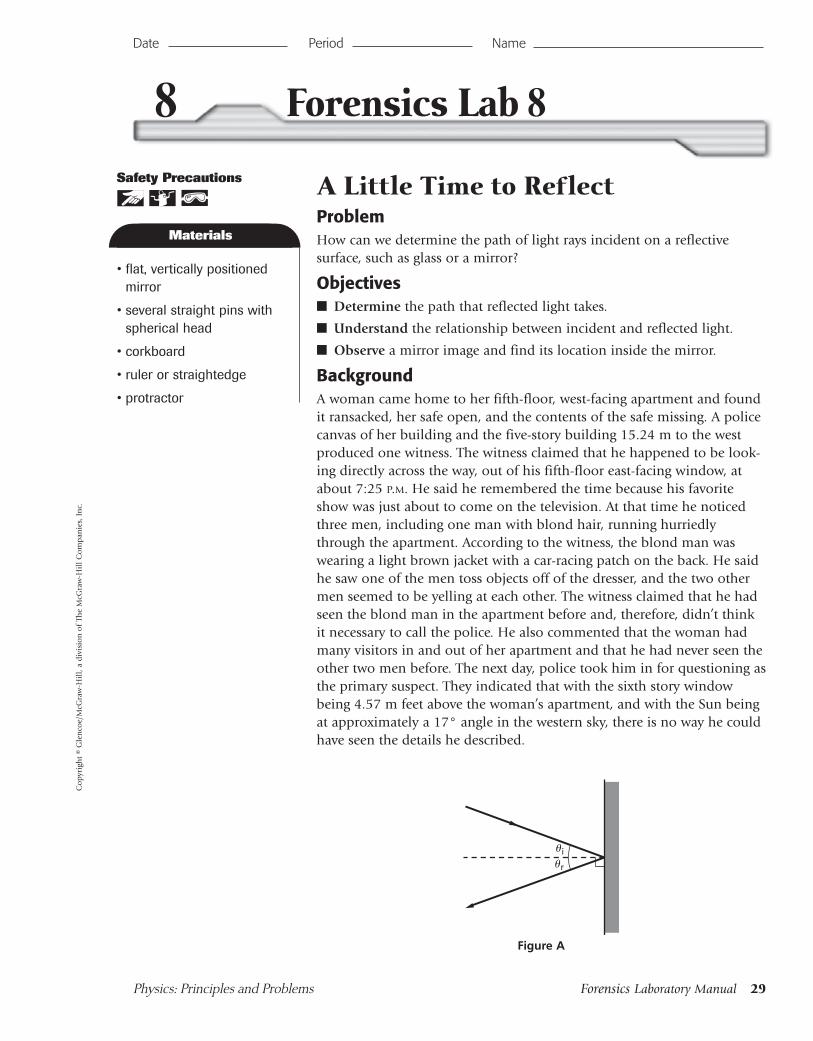
A Little Time to ReflectProblemHow can we determine the path of light rays incident on a reflective surface, such as glass or a mirror?
Objectives■ Determine the path that reflected light takes.
■ Understand the relationship between incident and reflected light.
■ Observe a mirror image and find its location inside the mirror.
BackgroundA woman came home to her fifth-floor, west-facing apartment and foundit ransacked, her safe open, and the contents of the safe missing. A policecanvas of her building and the five-story building 15.24 m to the westproduced one witness. The witness claimed that he happened to be look-ing directly across the way, out of his fifth-floor east-facing window, atabout 7:25 P.M. He said he remembered the time because his favoriteshow was just about to come on the television. At that time he noticedthree men, including one man with blond hair, running hurriedlythrough the apartment. According to the witness, the blond man waswearing a light brown jacket with a car-racing patch on the back. He saidhe saw one of the men toss objects off of the dresser, and the two othermen seemed to be yelling at each other. The witness claimed that he hadseen the blond man in the apartment before and, therefore, didn’t thinkit necessary to call the police. He also commented that the woman hadmany visitors in and out of her apartment and that he had never seen theother two men before. The next day, police took him in for questioning asthe primary suspect. They indicated that with the sixth story windowbeing 4.57 m feet above the woman’s apartment, and with the Sun beingat approximately a 17° angle in the western sky, there is no way he couldhave seen the details he described.
Date Period Name
Physics: Principles and Problems Forensics Laboratory Manual 29
8 Forensics Lab 8C
opy
righ
t ©
Gle
nco
e/M
cGra
w-H
ill,
a d
ivis
ion
of
The
McG
raw
-Hil
l C
om
pan
ies,
In
c.
Figure A
�i
�r
Materials
• flat, vertically positionedmirror
• several straight pins withspherical head
• corkboard
• ruler or straightedge
• protractor
Materials
Safety Precautions
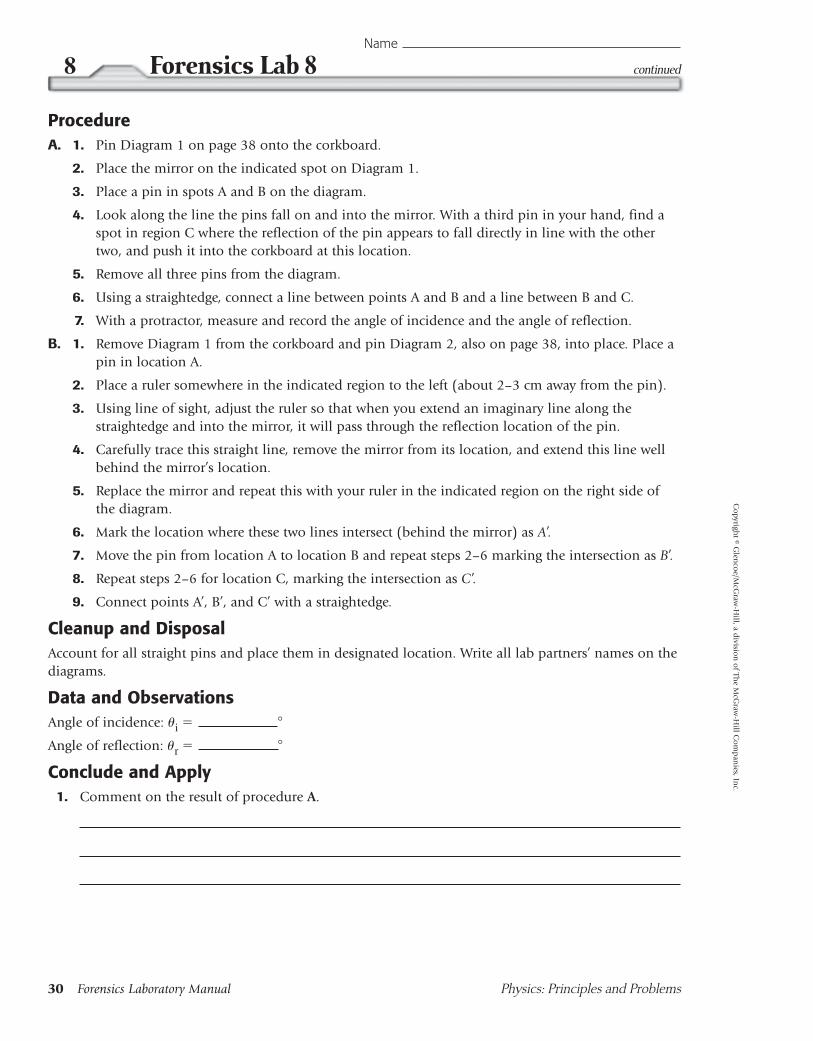
ProcedureA. 1. Pin Diagram 1 on page 38 onto the corkboard.
2. Place the mirror on the indicated spot on Diagram 1.
3. Place a pin in spots A and B on the diagram.
4. Look along the line the pins fall on and into the mirror. With a third pin in your hand, find aspot in region C where the reflection of the pin appears to fall directly in line with the othertwo, and push it into the corkboard at this location.
5. Remove all three pins from the diagram.
6. Using a straightedge, connect a line between points A and B and a line between B and C.
7. With a protractor, measure and record the angle of incidence and the angle of reflection.
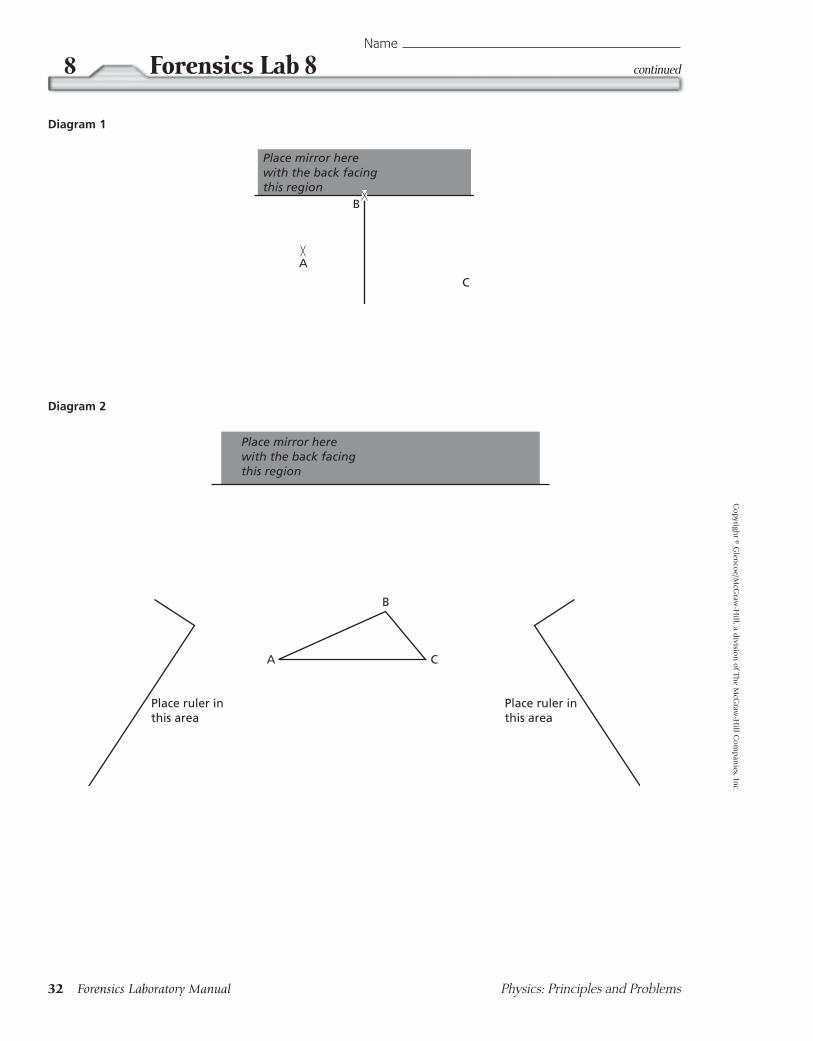
B. 1. Remove Diagram 1 from the corkboard and pin Diagram 2, also on page 38, into place. Place apin in location A.
2. Place a ruler somewhere in the indicated region to the left (about 2–3 cm away from the pin).
3. Using line of sight, adjust the ruler so that when you extend an imaginary line along thestraightedge and into the mirror, it will pass through the reflection location of the pin.
4. Carefully trace this straight line, remove the mirror from its location, and extend this line wellbehind the mirror’s location.
5. Replace the mirror and repeat this with your ruler in the indicated region on the right side ofthe diagram.
6. Mark the location where these two lines intersect (behind the mirror) as A’.
7. Move the pin from location A to location B and repeat steps 2–6 marking the intersection as B’.
8. Repeat steps 2–6 for location C, marking the intersection as C’.
9. Connect points A’, B’, and C’ with a straightedge.
Cleanup and DisposalAccount for all straight pins and place them in designated location. Write all lab partners’ names on thediagrams.
Data and ObservationsAngle of incidence: �i � �
Angle of reflection: �r � �
Conclude and Apply 1. Comment on the result of procedure A.
continuedForensics Lab 88Name
30 Forensics Laboratory Manual Physics: Principles and Problems
Co
pyright © G
lenco
e/McG
raw-H
ill, a divisio
n o
f The M
cGraw
-Hill C
om
pan
ies, Inc.
2. Describe the result of connecting A’, B’, and C’ in Diagram 2 (Note: “mirror image” is not anappropriate response here). Compare the distance of the reflection from the mirror to the distancefrom the mirror of the original triangle ABC.
Analyze and Conclude1. Collect and Interpret Data Draw a small-scale diagram of the scenario that caused the police to
suspect the witness.
2. Draw a Conclusion What justifies the conclusion that the suspect couldn’t have seen what heclaimed to see?
3. Error Analysis What could cause the angle of reflection to appear to be a different size than theangle of incidence in Diagram 1? State the best reason for possibly not being able to produce anexact mirror image of the triangle in Diagram 2.
Physics: Principles and Problems Forensics Laboratory Manual 31
continued Forensics Lab 8 8Name
Co
pyri
ght
© G
len
coe/
McG
raw
-Hil
l, a
div
isio
n o
f Th
e M
cGra
w-H
ill
Co
mp
anie
s, I
nc.
continuedForensics Lab 88Name
32 Forensics Laboratory Manual Physics: Principles and Problems
Co
pyright © G
lenco
e/McG
raw-H
ill, a divisio
n o
f The M
cGraw
-Hill C
om
pan
ies, Inc.
A
C
B
Place mirror herewith the back facingthis region
Diagram 1
Place ruler inthis area
Place ruler inthis area
A C
B
Place mirror herewith the back facingthis region
Diagram 2
All I need is a little leverage.ProblemCan a person use a simple lever to create thousands of pounds of force?
Objectives■ Study the concept of torque.
■ Demonstrate how a lever can reduce the effort needed to create largeforces.
BackgroundThe safe at Art’s Garage was found one morning to have been pried openwith all of the week’s profits gone. The amount missing was enough for acase of grand theft—a felony. The head mechanic, Bob, had stayed latethe night before and admits he may have forgotten to lock the back door.There was no sign of forced entry, so Art assumed that the perpetratormust have entered through an unlocked door. But when the police beganto question Bob, they immediately began to suspect him. The paperworkon the safe said that the door lock could hold under a 2250 kg outwardforce. Art asked if some kind of complicated device was necessary tobreak this lock open. An officer noticed the high-quality titanium crow-bar in Bob’s toolbox, which was locked and undisturbed before the inves-tigation, and suspected that it was used as a simple lever to create thelarge torque necessary. Inspection of the safe showed that whatever wasused to pry the door had only wedged 64 mm into the doorframe. If thecrowbar had been used, microscopic scratch analysis could be performedto prove this; but first, the officers wanted to find out if this could beeliminated as a possibility. Knowing the crowbar was a total of 30.48 cmlong and that Bob was a muscular fellow of about 99 kg, they decided tobring the crowbar into the crime lab for scratch analysis because itseemed physically possible that Bob could have pried the lock.
Torque, �, is the product of applying a perpendicular force, F, at a distance, d, from a pivot point or fulcrum. It is given by the equation
� � Fd.
A lever is a simple machine used to create a balance of torques on eitherside of a fulcrum or to reduce the effort needed on one side of the
Date Period Name
Physics: Principles and Problems Forensics Laboratory Manual 33
9 Forensics Lab 9C
opy
righ
t ©
Gle
nco
e/M
cGra
w-H
ill,
a d
ivis
ion
of
The
McG
raw
-Hil
l C
om
pan
ies,
In
c.
Materials
• strip of wood with evenlyspaced holes (one at themidpoint of the length)
• string
• two support rods
• long rod
• hook collar
• two cross-clamps
• hanging masses
• mass balance
Materials
Safety Precautions
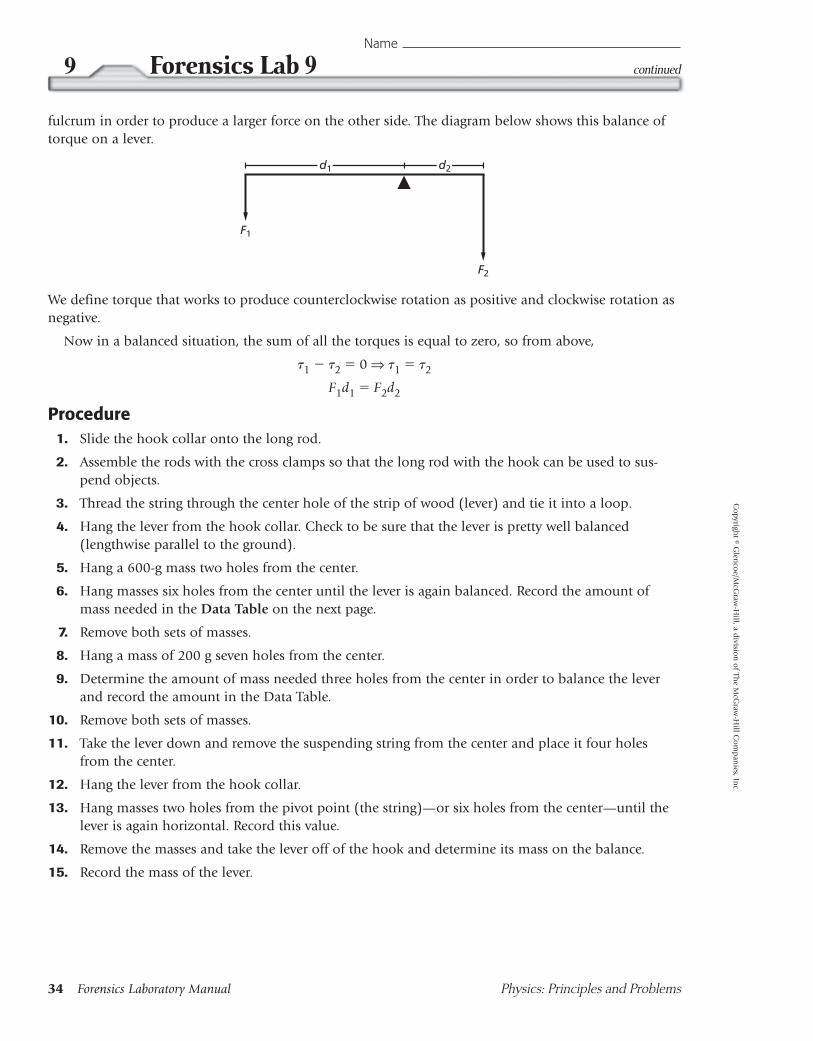
fulcrum in order to produce a larger force on the other side. The diagram below shows this balance oftorque on a lever.
We define torque that works to produce counterclockwise rotation as positive and clockwise rotation asnegative.
Now in a balanced situation, the sum of all the torques is equal to zero, so from above,
�1 � �2 � 0 ⇒ �1 � �2
F1d1 � F2d2
Procedure1. Slide the hook collar onto the long rod.
2. Assemble the rods with the cross clamps so that the long rod with the hook can be used to sus-pend objects.
3. Thread the string through the center hole of the strip of wood (lever) and tie it into a loop.
4. Hang the lever from the hook collar. Check to be sure that the lever is pretty well balanced(lengthwise parallel to the ground).
5. Hang a 600-g mass two holes from the center.
6. Hang masses six holes from the center until the lever is again balanced. Record the amount ofmass needed in the Data Table on the next page.
7. Remove both sets of masses.
8. Hang a mass of 200 g seven holes from the center.
9. Determine the amount of mass needed three holes from the center in order to balance the leverand record the amount in the Data Table.
10. Remove both sets of masses.
11. Take the lever down and remove the suspending string from the center and place it four holesfrom the center.
12. Hang the lever from the hook collar.
13. Hang masses two holes from the pivot point (the string)—or six holes from the center—until thelever is again horizontal. Record this value.
14. Remove the masses and take the lever off of the hook and determine its mass on the balance.
15. Record the mass of the lever.
d1
F1
F2
d2
continuedForensics Lab 99Name
34 Forensics Laboratory Manual Physics: Principles and Problems
Co
pyright © G
lenco
e/McG
raw-H
ill, a divisio
n o
f The M
cGraw
-Hill C
om
pan
ies, Inc.
Cleanup and DisposalReplace masses. Remove the string from the lever and discard the string. Disassemble rods and clamps.
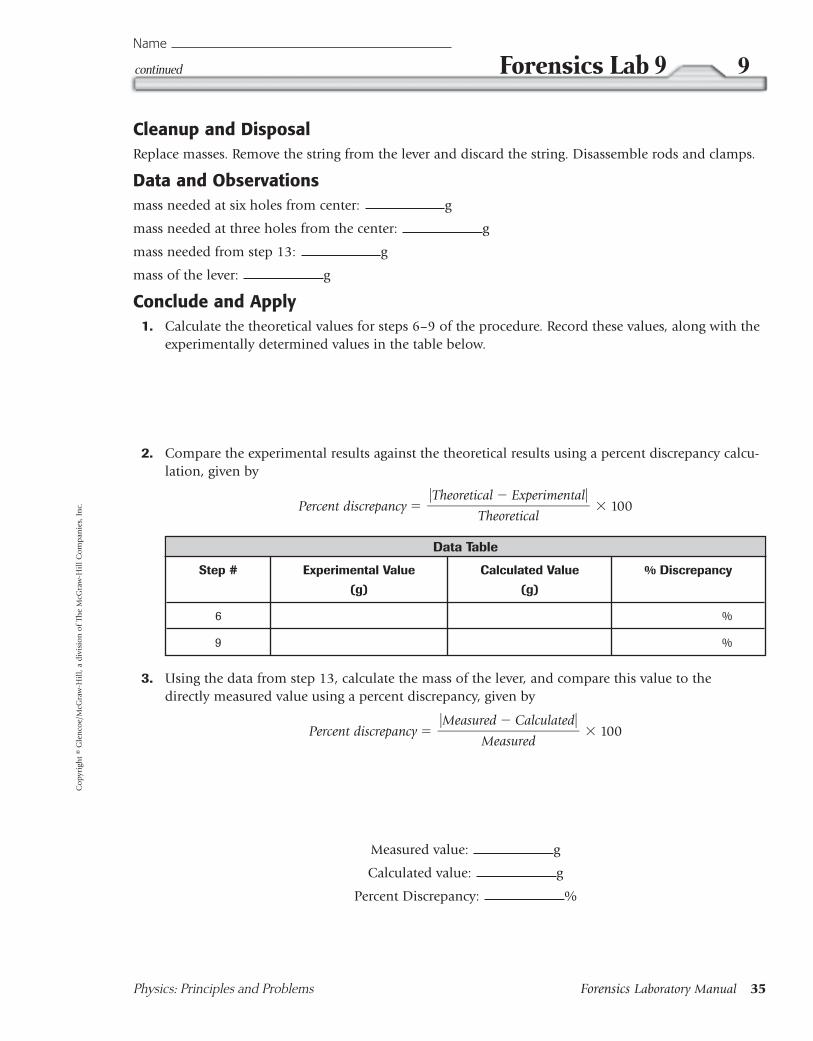
Data and Observationsmass needed at six holes from center: g
mass needed at three holes from the center: g
mass needed from step 13: g
mass of the lever: g
Conclude and Apply1. Calculate the theoretical values for steps 6–9 of the procedure. Record these values, along with the
experimentally determined values in the table below.
2. Compare the experimental results against the theoretical results using a percent discrepancy calcu-lation, given by
Percent discrepancy � � 100
3. Using the data from step 13, calculate the mass of the lever, and compare this value to the directly measured value using a percent discrepancy, given by
Percent discrepancy � � 100
Measured value: g
Calculated value: g
Percent Discrepancy: %
�Measured � Calculated����
Measured
�Theoretical � Experimental����
Theoretical
Physics: Principles and Problems Forensics Laboratory Manual 35
continued Forensics Lab 9 9Name
Co
pyri
ght
© G
len
coe/
McG
raw
-Hil
l, a
div
isio
n o
f Th
e M
cGra
w-H
ill
Co
mp
anie
s, I
nc.
Data Table
Step # Experimental Value Calculated Value % Discrepancy
(g) (g)
6 %
9 %
Analysis and Conclusions 1. Measure and Use Numbers Explain why the data from step 13 should yield the mass of the lever.
2. Acquire and Analyze Information Were the police correct in determining that Bob could havepossibly used his crowbar for leverage and broken into the safe, or should this scenario have beenruled out as a possibility? Explain clearly, using numbers to justify your answer.
3. Error Analysis Comment on the values of percent discrepancy. Were the experimental values close to the expected values? What types of errors in your system or setup could cause you to getunexpected numbers? Be specific.
continuedForensics Lab 99Name
36 Forensics Laboratory Manual Physics: Principles and Problems
Co
pyright © G
lenco
e/McG
raw-H
ill, a divisio
n o
f The M
cGraw
-Hill C
om
pan
ies, Inc.
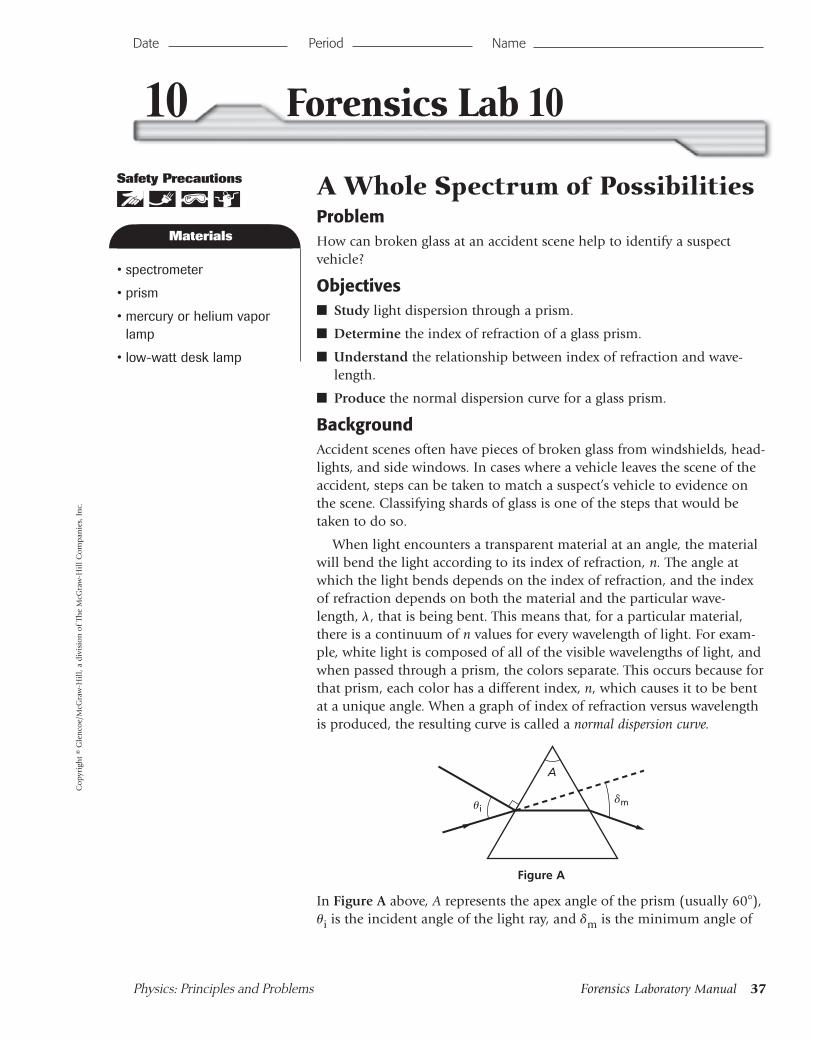
A Whole Spectrum of PossibilitiesProblemHow can broken glass at an accident scene help to identify a suspect vehicle?
Objectives■ Study light dispersion through a prism.
■ Determine the index of refraction of a glass prism.
■ Understand the relationship between index of refraction and wave-length.
■ Produce the normal dispersion curve for a glass prism.
BackgroundAccident scenes often have pieces of broken glass from windshields, head-lights, and side windows. In cases where a vehicle leaves the scene of theaccident, steps can be taken to match a suspect’s vehicle to evidence onthe scene. Classifying shards of glass is one of the steps that would be taken to do so.
When light encounters a transparent material at an angle, the materialwill bend the light according to its index of refraction, n. The angle atwhich the light bends depends on the index of refraction, and the indexof refraction depends on both the material and the particular wave-length, �, that is being bent. This means that, for a particular material,there is a continuum of n values for every wavelength of light. For exam-ple, white light is composed of all of the visible wavelengths of light, andwhen passed through a prism, the colors separate. This occurs because forthat prism, each color has a different index, n, which causes it to be bentat a unique angle. When a graph of index of refraction versus wavelengthis produced, the resulting curve is called a normal dispersion curve.
In Figure A above, A represents the apex angle of the prism (usually 60�), �i is the incident angle of the light ray, and �m is the minimum angle of
�m�i
A
Date Period Name
Physics: Principles and Problems Forensics Laboratory Manual 37
10 Forensics Lab 10C
opy
righ
t ©
Gle
nco
e/M
cGra
w-H
ill,
a d
ivis
ion
of
The
McG
raw
-Hil
l C
om
pan
ies,
In
c.
Figure A
Materials
• spectrometer
• prism
• mercury or helium vaporlamp
• low-watt desk lamp
Materials
Safety Precautions
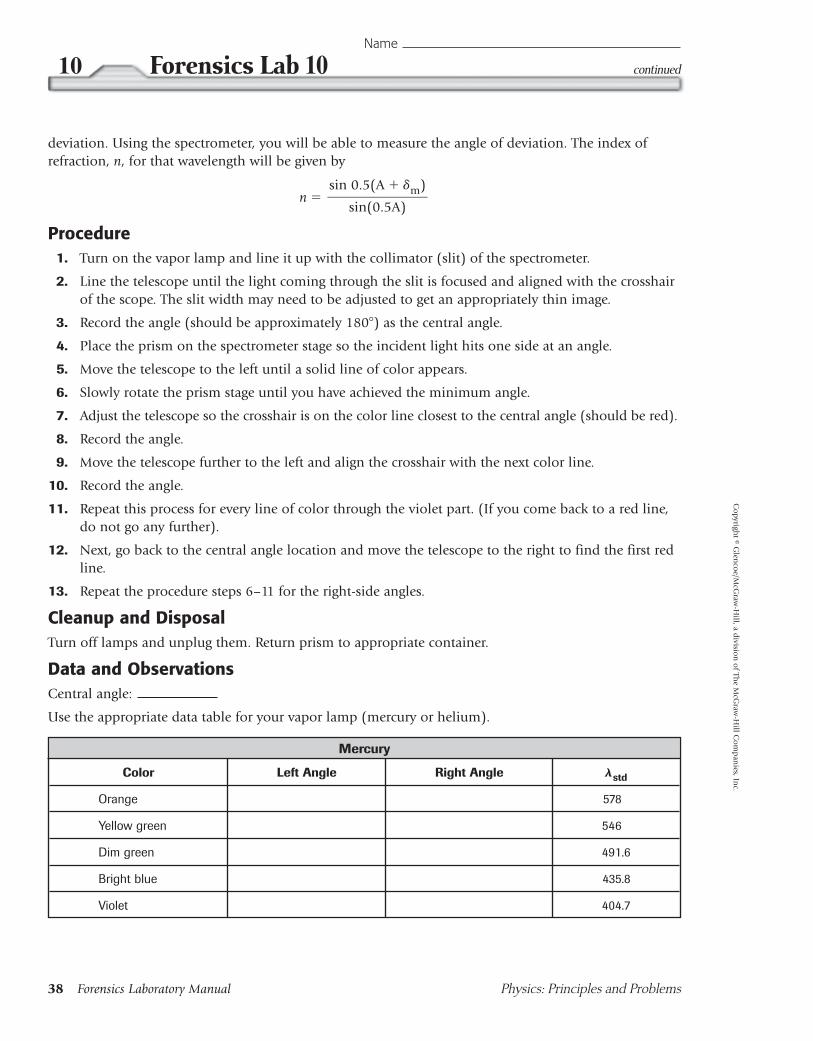
deviation. Using the spectrometer, you will be able to measure the angle of deviation. The index ofrefraction, n, for that wavelength will be given by
n �
Procedure1. Turn on the vapor lamp and line it up with the collimator (slit) of the spectrometer.
2. Line the telescope until the light coming through the slit is focused and aligned with the crosshairof the scope. The slit width may need to be adjusted to get an appropriately thin image.
3. Record the angle (should be approximately 180�) as the central angle.
4. Place the prism on the spectrometer stage so the incident light hits one side at an angle.
5. Move the telescope to the left until a solid line of color appears.
6. Slowly rotate the prism stage until you have achieved the minimum angle.
7. Adjust the telescope so the crosshair is on the color line closest to the central angle (should be red).
8. Record the angle.
9. Move the telescope further to the left and align the crosshair with the next color line.
10. Record the angle.
11. Repeat this process for every line of color through the violet part. (If you come back to a red line,do not go any further).
12. Next, go back to the central angle location and move the telescope to the right to find the first redline.
13. Repeat the procedure steps 6–11 for the right-side angles.
Cleanup and DisposalTurn off lamps and unplug them. Return prism to appropriate container.
Data and ObservationsCentral angle:
Use the appropriate data table for your vapor lamp (mercury or helium).
sin 0.5(A � �m)��
sin(0.5A)
continuedForensics Lab 1010Name
38 Forensics Laboratory Manual Physics: Principles and Problems
Co
pyright © G
lenco
e/McG
raw-H
ill, a divisio
n o
f The M
cGraw
-Hill C
om
pan
ies, Inc.
Mercury
Color Left Angle Right Angle �std
Orange 578
Yellow green 546
Dim green 491.6
Bright blue 435.8
Violet 404.7
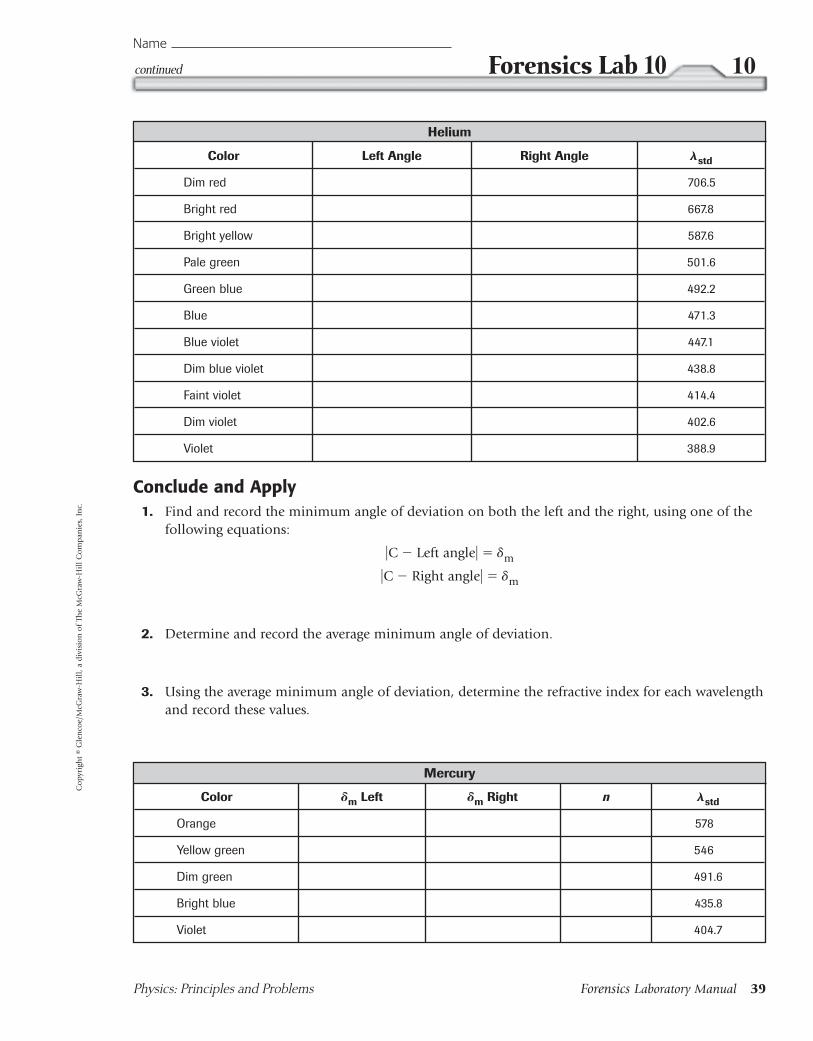
Physics: Principles and Problems Forensics Laboratory Manual 39
continued Forensics Lab 10 10Name
Co
pyri
ght
© G
len
coe/
McG
raw
-Hil
l, a
div
isio
n o
f Th
e M
cGra
w-H
ill
Co
mp
anie
s, I
nc.
Helium
Color Left Angle Right Angle �std
Dim red 706.5
Bright red 667.8
Bright yellow 587.6
Pale green 501.6
Green blue 492.2
Blue 471.3
Blue violet 447.1
Dim blue violet 438.8
Faint violet 414.4
Dim violet 402.6
Violet 388.9
Conclude and Apply1. Find and record the minimum angle of deviation on both the left and the right, using one of the
following equations:
�C � Left angle� � �m
�C � Right angle� � �m
2. Determine and record the average minimum angle of deviation.
3. Using the average minimum angle of deviation, determine the refractive index for each wavelengthand record these values.
Mercury
Color �m Left �m Right n �std
Orange 578
Yellow green 546
Dim green 491.6
Bright blue 435.8
Violet 404.7
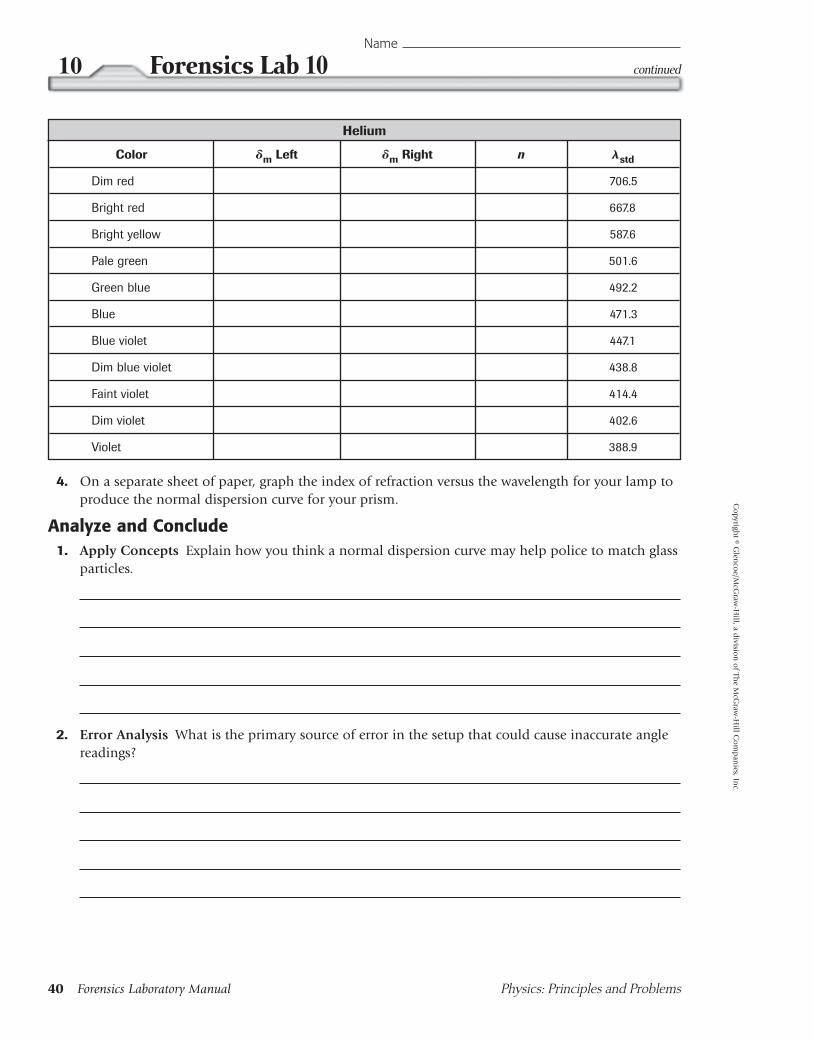
4. On a separate sheet of paper, graph the index of refraction versus the wavelength for your lamp toproduce the normal dispersion curve for your prism.
Analyze and Conclude1. Apply Concepts Explain how you think a normal dispersion curve may help police to match glass
particles.
2. Error Analysis What is the primary source of error in the setup that could cause inaccurate anglereadings?
continuedForensics Lab 1010Name
40 Forensics Laboratory Manual Physics: Principles and Problems
Co
pyright © G
lenco
e/McG
raw-H
ill, a divisio
n o
f The M
cGraw
-Hill C
om
pan
ies, Inc.
Helium
Color �m Left �m Right n �std
Dim red 706.5
Bright red 667.8
Bright yellow 587.6
Pale green 501.6
Green blue 492.2
Blue 471.3
Blue violet 447.1
Dim blue violet 438.8
Faint violet 414.4
Dim violet 402.6
Violet 388.9