Embed Size (px)
Citation preview
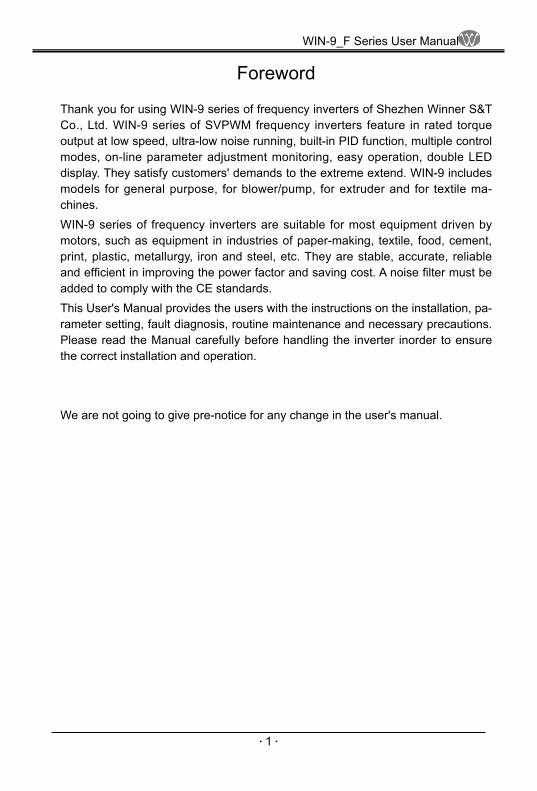
WIN-9_F Series User Manual
● 1 ●
Foreword
Thank you for using WIN-9 series of frequency inverters of Shezhen Winner S&T Co., Ltd. WIN-9 series of SVPWM frequency inverters feature in rated torque output at low speed, ultra-low noise running, built-in PID function, multiple control modes, on-line parameter adjustment monitoring, easy operation, double LED display. They satisfy customers' demands to the extreme extend. WIN-9 includes models for general purpose, for blower/pump, for extruder and for textile ma-chines.WIN-9 series of frequency inverters are suitable for most equipment driven by motors, such as equipment in industries of paper-making, textile, food, cement, print, plastic, metallurgy, iron and steel, etc. They are stable, accurate, reliable and efficient in improving the power factor and saving cost. A noise filter must be added to comply with the CE standards.This User's Manual provides the users with the instructions on the installation, pa-rameter setting, fault diagnosis, routine maintenance and necessary precautions. Please read the Manual carefully before handling the inverter inorder to ensure the correct installation and operation.
We are not going to give pre-notice for any change in the user's manual.
WIN-9_F Series User Manual
● 2 ●
Safety PrecautionsProper transportation, installation, operation and maintenance decide the secure performance of the product. Pay attention to the safety precautions before work-ing on the product.
This sign means that the mal-usage may lead to injury or fatal error.
DANGER!
This sign means that the mal-usage may lead to slight or medium hu-man injury or equipment damage.
NOTE!

WIN-9_F Series User Manual
● 3 ●
CONTENTS
Chapter 1 Check the Product at Acceptance .............7
1.1 Check The Content ...................................................................... 7
1.2 Model Number Designation ......................................................... 7
1.2.1 Nameplate ........................................................................................ 7
1.2.2 Nameplate Description ..................................................................... 8
1.3 Main Structure ............................................................................. 8
Chapter 2 Installation and Wiring ...............................9
2.1 Dimension ( See Appendix 1) ...................................................... 9
2.2 Requirement to The Installation Place ......................................... 9
2.2.1 Installation Place .............................................................................. 9
2.2.2 Ambient Temperature ..................................................................... 10
2.2.3 Prevention ...................................................................................... 10
2.3 Installation Direction .................................................................. 10
2.4 Wiring .........................................................................................11
2.4.1 Control Circuit Terminals .................................................................11
2.4.2 Main Circuit Terminals .....................................................................11
2.4.3 Explanation about Main Circuit Terminals ...................................... 12
2.4.4 The Functions of Main Circuit Terminals Terminal Functions ......... 12
2.4.5 Main Circuit Wiring ......................................................................... 12
2.4.6 Wiring Terminals Of The Control Circuit ......................................... 14
2.4.7 Control Circuit Terminals Functions ................................................ 15
2.5 Standard Wiring ......................................................................... 16
WIN-9_F Series User Manual
● 4 ●
2.6 Wiring Precaution ...................................................................... 17
Chapter 3 Operation .................................................18
3.1 Keypad Functions And Keypad Operation ................................ 18
3.2 OPERATION MODE SELECTION ............................................ 20
3.2.1 Operation Mode Selection .............................................................. 21
3.2.2 Operation state and LED relation ................................................... 21
3.3 Test Running .............................................................................. 21
3.3.1 Check Before Test Running ............................................................ 21
3.3.2 Check During Test Running ............................................................ 22
3.4 Test Running keyboard .............................................................. 22
3.4 1 Operation by Control Circuit Terminal Signal.................................. 22
3.4.2 Operation by Digital Operator ......................................................... 23
3.5 Operation by Control Circuit Terminal Signal ............................. 25
Chapter 4 Parameters ..............................................26
Chapter 5 Enlarged upon the Parameters ................34
5.1 PARAMETER SET-UP & INITIALIZATION ................................ 34
5.2 WIN-9_F OPERATION .............................................................. 34
5.2.1 Automatic Fault Retry (P060) ......................................................... 35
5.2.2 Automatic Restart After Momentary Power Loss (P051) ................ 36
5.2.3 Carrier Frequency (P050) ............................................................... 36
5.2.4 Current Limit (Stall Prevention) ...................................................... 37
5.2.5 DC Injection Braking ....................................................................... 38
5.2.6 Energy Saving Control ................................................................... 39

WIN-9_F Series User Manual
● 5 ●
5.2.7 Energy Saving Control Mode ......................................................... 39
5.2.8 Energy Saving Tuning .................................................................... 40
5.2.9 Frequency Detection (P073) .......................................................... 41
5.2.10 Frequency Meter or Ammeter (P048) ........................................... 42
5.2.11 Frequency Signal Adjustment ....................................................... 43
5.2.12 Jog Operation ............................................................................... 44
5.2.13 Jump Frequencies (P058 to P060) ............................................... 44
5.2.14 MODBUS Communication ............................................................ 45
5.2.15 Motor Overload Detection ............................................................ 46
5.2.16 Multi-Step Speed Selection .......................................................... 48
5.2.17 Phase Loss Protection ................................................................. 49
5.2.18 PID Control ................................................................................... 50
5.2.19 Reverse Run Prohibit (P006) ....................................................... 52
5.2.20 Speed Limit Adjustment ................................................................ 53
5.2.21 Stopping Method (P004) .............................................................. 53
5.2.22 Torque Adjustment (P067) ............................................................ 56
5.2.23 Torque Detection .......................................................................... 56
5.2.24 Tripless Operation ....................................................................... 58
5.2.25 V/f Pattern Adjustment .................................................................. 59
5.2.26 Preset V/f Patterns ....................................................................... 60
5.3 INPUTS & OUTPUTS ................................................................ 61
5.3.1 Multi-function Input Signals (P035 to P039) ................................... 61
5.3.2 Procedure ....................................................................................... 65
5.3.3 Analog Input Signals (P042 to P045) ............................................. 66
5.3.4 Multi-function Output Signals (P040, P041) ................................... 67

WIN-9_F Series User Manual
● 6 ●
Chapter 6 DIAGNOSTICS ........................................69
6.1 Fault Display .............................................................................. 69
6.2 Alarm Display............................................................................. 72
6.3 Motor Faults............................................................................... 73
Chapter 7 Main Circuit Wiring...................................74
7.1 Input Wiring ............................................................................... 74
7.2 Output Wiring............................................................................. 75
Chapter 8 MAINTENANCE & INSPECTION ............77
8.1 Maintenance .............................................................................. 77
8.1.1 Daily Inspection Maintenance ........................................................ 77
8.1.2 Regular Maintenance ..................................................................... 78
8.1.3 Components Which Should Be Changed Regularly ....................... 80
8.2 Storage ...................................................................................... 80
Chapter 9 Warrantee ................................................81
Appendix 1 Installation Dimension .................................................. 83
Appendix 2 WIN-9_F technical specification ................................... 85
Appendix 3 Digital Operator Monitor Display................................... 86

WIN-9_F Series User Manual
● 7 ●
Chapter 1 Check the Product at Acceptance
NOTE!
Do not install defective inverter or uncompleted inverter,otherwise, injury might occur.
Although we check the goods strictly before shipment, you are suggested to check the goods carefully because some unexpected damage may be made dur-ing the transportation.
1.1 Check The Content
Please check the following items when you receive the goods:
What to check? How to Check
Is the model correct? Check the label at the side of the inverter's body.
Is anything damaged? Make an overall inspection.
Are the screws tight? Fasten those loose screws with a screw driver.
Are there user's manual, QC Pass document or other accessories inside the box?
Check if they are in the box.
Please contact your supplier or contact us if there is any thing wrong.
1.2 Model Number Designation
1.2.1 Nameplate
MODEL:
INPUT:
OUTPUT:
S/N:
WIN-9GF-3R7T4
AC 3φ 380V
AC3φ 3.7kW8.0A 0~400 Hz
SHENZHEN WINNER S&T CO., LTD
Nameplate Example

WIN-9_F Series User Manual
● 8 ●
1.2.2 Nameplate Description
WIN - 9GF - 3R7 T4
Product Code Series Code Capacity Voltage Special Notice
WIN 9G general type9P for pumps,blowers
3R7: 3.7kW5R5: 5.5kW011: 11kW……500: 500kW
T4: 380VT6: 660V
Blank: StandardB: With braking FunctionX: Special type
1.3 Main Structure
Keypad
Front Panel
Main

WIN-9_F Series User Manual
● 9 ●
Chapter 2 Installation and Wiring
2.1 Dimension ( See Appendix 1)
2.2 Requirement to The Installation Place
NOTE!
1. Move the inverter by holding the bottom. The inverter might fall onto your feet and hurt you if you hold its cover.2. Please install the inverter onto apyrous material like metal. Fire may happen if it is installed on flammable material.3. Please use cooling fan when install over two inverters in a cabinet. The temperature of the air in-led side should be lower than 40°C. Fire or other accident may happen if it is over heat.
2.2.1 Installation Place
Please install the inverter at the place with the following working conditions:Good ventilation ●
Ambient temperature -10°C to 40 °C ,for naked inverter -10°C to 50 °C ●
Humidity lower than 90% RH. No rain drops. ●
Do not install on flammable material like wood. ●
No direct sun light ●
No flammable and erosive air or liquid ●
No dust, oil dust, floating fiber or fine metal powder ●
The installation base is strong. ●
No vibration. ●
Keep the unit away from electromagnetic interference and the interference ●
source Lower than 1000 meters sea level. Within 1000 meters sea level, the higher the sea level, the lower the rated output. The ambient temperature is al-lowed to decrease by 0.5 C with sea level every 100 meters higher.
WIN-9_F Series User Manual
● 10 ●
Convention
in-led air
< <
<<
2.2.2 Ambient Temperature
Good ventilation ensures the good performance of the inverter. Keep the ambient temperature below 40°C when it is installed in a closed cabinet by using cooling fan or air conditioner.
2.2.3 Prevention
Please cover the inverter against the dust during installation. Prevent the metal powder entering the inverter. Uncover the inverter after the installation is over.
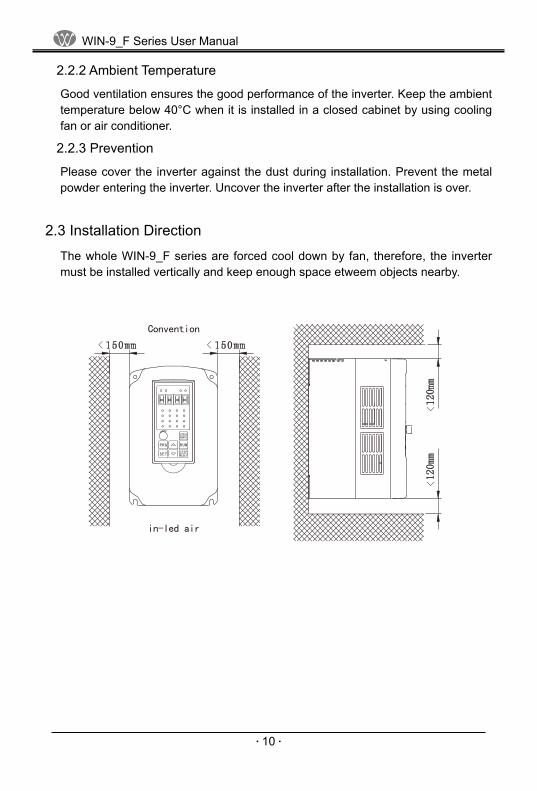
2.3 Installation Direction
The whole WIN-9_F series are forced cool down by fan, therefore, the inverter must be installed vertically and keep enough space etweem objects nearby.
WIN-9_F Series User Manual
● 11 ●
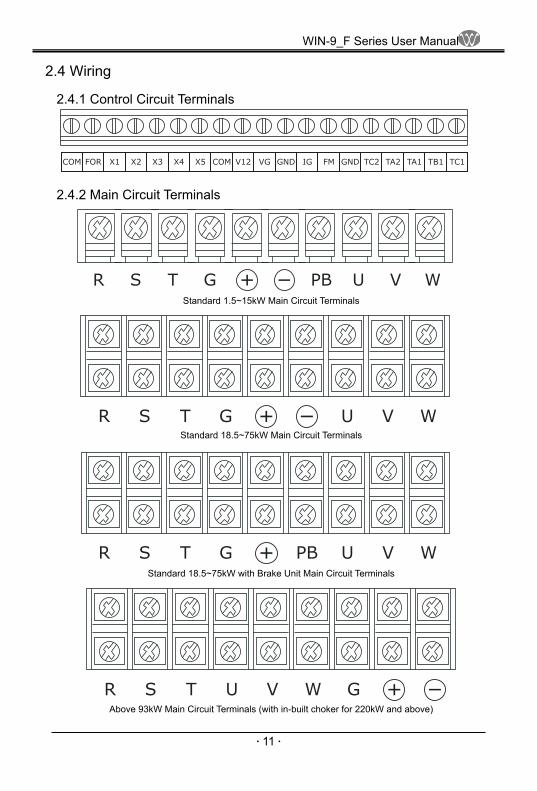
2.4 Wiring
2.4.1 Control Circuit Terminals
COM FOR X1 X2 X3 X4 X5 COM V12 VG GND IG FM GND TC2 TA2 TA1 TB1 TC1
2.4.2 Main Circuit Terminals
R S T G PB U V WStandard 1.5~15kW Main Circuit Terminals
R S T G U V W
R S T G UPB V W
R S T U GV W
Standard 18.5~75kW Main Circuit Terminals
Standard 18.5~75kW with Brake Unit Main Circuit Terminals
Above 93kW Main Circuit Terminals (with in-built choker for 220kW and above)
WIN-9_F Series User Manual
● 12 ●
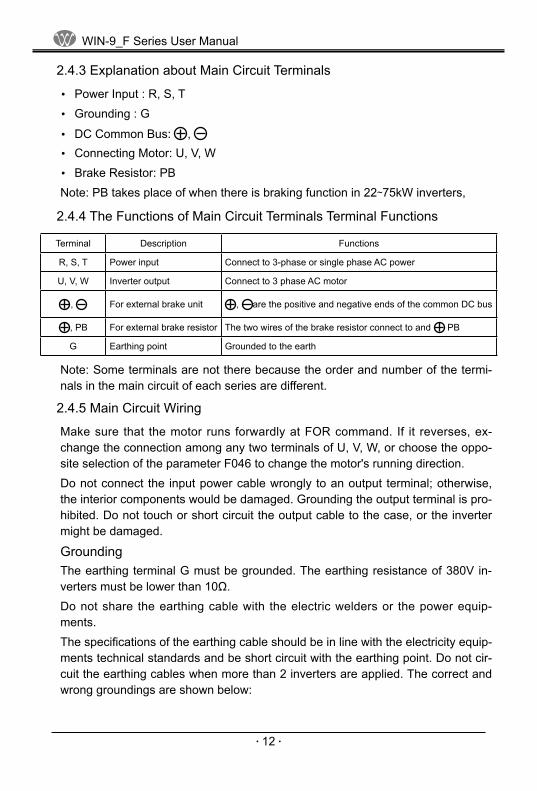
2.4.3 Explanation about Main Circuit Terminals
Power Input : R, S, T ●
Grounding : G ●
DC Common Bus: ● , Connecting Motor: U, V, W ●
Brake Resistor: PB ●
Note: PB takes place of when there is braking function in 22~75kW inverters,
2.4.4 The Functions of Main Circuit Terminals Terminal Functions
Terminal Description Functions
R, S, T Power input Connect to 3-phase or single phase AC power
U, V, W Inverter output Connect to 3 phase AC motor
, For external brake unit , are the positive and negative ends of the common DC bus
, PB For external brake resistor The two wires of the brake resistor connect to and PB
G Earthing point Grounded to the earth
Note: Some terminals are not there because the order and number of the termi-nals in the main circuit of each series are different.
2.4.5 Main Circuit Wiring
Make sure that the motor runs forwardly at FOR command. If it reverses, ex-change the connection among any two terminals of U, V, W, or choose the oppo-site selection of the parameter F046 to change the motor's running direction.Do not connect the input power cable wrongly to an output terminal; otherwise, the interior components would be damaged. Grounding the output terminal is pro-hibited. Do not touch or short circuit the output cable to the case, or the inverter might be damaged.
GroundingThe earthing terminal G must be grounded. The earthing resistance of 380V in-verters must be lower than 10Ω.Do not share the earthing cable with the electric welders or the power equip-ments.The specifications of the earthing cable should be in line with the electricity equip-ments technical standards and be short circuit with the earthing point. Do not cir-cuit the earthing cables when more than 2 inverters are applied. The correct and wrong groundings are shown below:

WIN-9_F Series User Manual
● 13 ●
WIN-9F WIN-9F WIN-9F
WIN-9FWIN-9FWIN-9F
Note: The motor's neutral point in Y connection method cannot be grounded
Phase shift capacitor is prohibitedDo not connect the phase shift capacitor or LC/RC filters to the output circuit, oth-erwise, the inverter might be damaged.Electric magnetic switch between the inverter and the motor is prohibited.Do not connect the electric magnetic switch or magnetic contactor to the output circuit, otherwise, the surge current of the inverter will trigger the OC protection, more seriously, the inner components of the inverter might be damaged.
Protect the inverter against conduction interferenceTo compress the conduction interference from the output side, please install noise filter or lead the output cables to the grounding metal tube. When the distance between the output cables and the signal cables is more than 30cm, the conduc-tion interference decreases obviously.
Protect the inverter against RF interference The input cables, output cables and the inverter give RF interference. If we add noise filter at the input and output sides and screen them with iron utensils, the RF interference will be decreased. The cables connect the inverter with the motor must be as short as possible. See the below sketch, please:
MCCB
9F MNoiseFilter
NoiseFilter
Iron Box Metal Tub

WIN-9_F Series User Manual
● 14 ●
The cable length between the inverter and the motor:The longer the cable, the higher the carrier frequency and the greater the higher harmonics leak current on the cable. The leak current badly affects the inverter and the surrounding equipments so it must be limited to the smallest. The rela-tionship between the cable length and the carrier frequency is:
The cable length between the inverter and motor < 50m < 100m > 100m
The carrier frequency < 8kHz < 4kHz < 2kHz
2.4.6 Wiring Terminals Of The Control Circuit
The control signal cable should be no longer than 50m and be more than 30cm away from the power cable to decrease the interference and attenuation of the control signal. Twisted-pair screen cable should be used to connect the analogue input and output signals.
WIN-9_F Series User Manual
● 15 ●
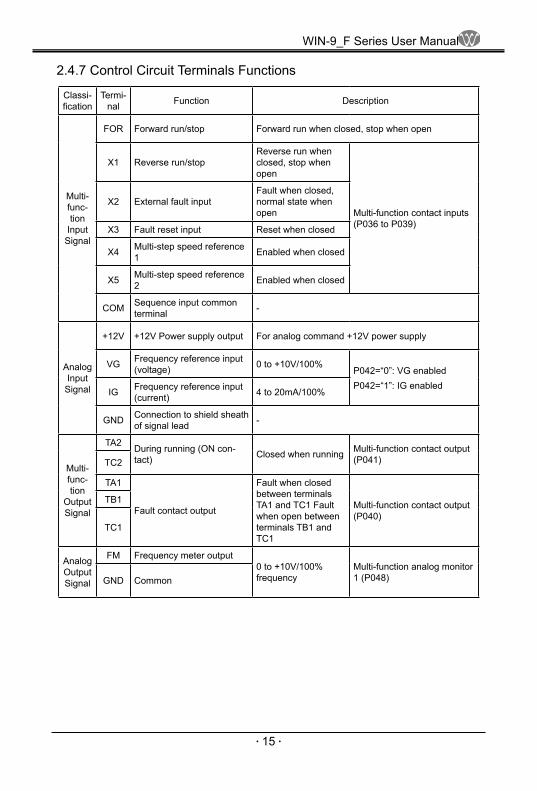
2.4.7 Control Circuit Terminals Functions
Classi-fication
Termi-nal Function Description
Multi-func-tion
Input Signal
FOR Forward run/stop Forward run when closed, stop when open
X1 Reverse run/stop Reverse run when closed, stop when open
Multi-function contact inputs (P036 to P039)
X2 External fault input Fault when closed, normal state when open
X3 Fault reset input Reset when closed
X4 Multi-step speed reference 1 Enabled when closed
X5 Multi-step speed reference 2 Enabled when closed
COM Sequence input common terminal -
Analog Input Signal
+12V +12V Power supply output For analog command +12V power supply
VG Frequency reference input (voltage) 0 to +10V/100%
P042=“0”: VG enabled P042=“1”: IG enabled
IG Frequency reference input (current) 4 to 20mA/100%
GND Connection to shield sheath of signal lead -
Multi-func-tion
Output Signal
TA2 During running (ON con-tact) Closed when running Multi-function contact output
(P041) TC2
TA1
Fault contact output
Fault when closed between terminals TA1 and TC1 Fault when open between terminals TB1 and TC1
Multi-function contact output (P040)
TB1
TC1
Analog Output Signal
FM Frequency meter output 0 to +10V/100% frequency
Multi-function analog monitor 1 (P048) GND Common

WIN-9_F Series User Manual
● 16 ●
MCCB MCPB
W
G/E
V
U
WIN-9F
M
F
R
S
TPowerSource
Motor
Multi-functionalinputterminals
FORX1X2X3X4X5COM
Analogueinput
5K
5K
0~10V
4~20mA
V12VGIGGND
External brake unit
External brake resistor
TC1TA1TB1
TC2
TA2
Relay output 1
Relay output 2
F
GND
MFM output
2.5 Standard Wiring
Note:1.intends to import given voltage or electric current but P042 sets up from the parameter choosing, leave the factory setting up the mA exporting electric current for voltage presets importing 2.the model controls the circuit terminal V12 maximum being 20mA3.multifunctional simulation amounts output ought to be used to monitor appear-ance, but can not be used to couple back system

WIN-9_F Series User Manual
● 17 ●
2.6 Wiring Precaution
Don't install electromagnetic contactor between the frequency converter and ●
motor.To disassemble or replace the motor, the input power supply must be turned ●
off.The motor or power supply can be switched on/off only after the converter ●
stops output.If electromagnetic contactor, relay, etc. Is too near to the frequency converter, ●
a surge absorbing device should be installed to minimize the electromagnetic in-terference.
Use isolation device for inverter's external control lines or use screened cable. ●
Except screened cable, a separate circuit should be used to the input com- ●
mand signal lines. Better to keep the circuit far from the main circuit.To avoid interference, the twisted screen cable is suggested for control circuit ●
cable connection. The distance should be within 50m.Do not touch the screen cable to other signal cables and equipment cases. ●
Wrap the naked screen cable with insulation tapes.If the frequency converter is equipped with peripheral devices (such as filter, ●
reactor), please measure its insulation resistance to the earth with 1000V Mohe-gan meter, and ensure the resistance value is not below 4MΩ.
If start the frequency converter frequently, do not switch off its power supply. ●
Use COM/FOR to start or stop the converter in order to avoid damaging the diode bridge.
In order to prevent unexpected accidents, earth terminal E must be grounded ●
securely, otherwise current leakage will occur.

WIN-9_F Series User Manual
● 18 ●
Chapter 3 Operation
DANGER!
1. Close the terminal block's cover before giving power.Otherwise, electric shock may occur.2. If the inverter is set to pick up after power resumption, leave it awayfrom other machines because it will restart once the power is on.Otherwise, injury may occur.
NOTE!
1. The discharge of the high voltage at each side of the brake resistor will generate heat; therefore, do not touch the brake resistor. Otherwise, electric shock or burn may occur.2. Reaffirm the motor and the machine's application range before they are put into use. Otherwise, injury may occur.3. Do not check the signal during operation. Otherwise, equipments might be damaged.4. Do not change the inverter's settings randomly although many parameters can be changed during running. The parameters have been set properly in the factory.Otherwise, accident may occur because the running status is changed.
3.1 Keypad Functions And Keypad Operation
All models in this series use the same keypad which includes two LED screens of 4 digits and seven segments, keys, analogue potentiometer, running indictors and unit indicators. The user can set parameters, stop/start the inverter and monitor the operation through the keypad.
DIGITAL OPERATOR DISPLAY ●
All functions of the WIN-9_F are accessed using the digital operator. Below are descriptions of the display and keypad sections.

WIN-9_F Series User Manual
● 19 ●
PRG RUN
STOPRESETSET
LOCAL
Fref
RUN STOP SEQ REF
REMOTE
F/R
Vmtr
FLA
Fout
Montr
V/F
PID
lout
Accel
Fgain
kWsav
kWout
Decel
Fbias
PRGM
REMOTE
Mode Indicator LED.s (Re-mote Mode)Lights when selecting input mode from the control circuit terminal or serial communi-cation.SEQ: Lights when selecting run command from the con-trol circuit terminal or serial communication.REF: Lights when selecting frequency reference from the control circuit terminals FV or FI, or serial communi-cation.
DisplayDisplays set values of each function or monitor-ing values such as output frequency and current (4 digits).
Quick-Start LED.s
For details, see the next page
Potentiometer
Enter Key Displays each parameter set value. By depressing this key again, the set value is entered.Number Change Keys Changes set values or parameter numbers. > : Increment key > : Decrement keyOperation Command Keys Operation command keys operate the inverter. STOP/RESET: Red LED lights after depressing STOP key (resets operation after faults;reset is disabled while run command is ON) RUN: Red LED lights after depressing RUN key.Operation Mode Selection Key Alternate between REMOTE and LOCAL (digital operator) operation.Display Selection Key Selects Quick-Start LED.s

WIN-9_F Series User Manual
● 20 ●
LED Description Set/Read during Run
Fref Frequency reference setting/monitoring Available
Fout Output frequency monitor Available
Iout Output current monitor Available
kWout Output power monitor Available
F/R FWD/REV run command selection Available
Montr Monitor selection Available
Accel Acceleration time Available
Decel Deceleration time Available
Vmtr Motor rated voltage Not Available
V/F V/f pattern selection Not Available
Fgain Frequency reference gain Not Available
Fbias Frequency reference bias Not Available
FLA Motor rated current Not Available
PID PID selection Not Available
kWsav Energy saving selection Not Available
PRGM Parameter Number/data Not Available
3.2 OPERATION MODE SELECTION
The WIN-9_f has two operation modes: LOCAL and REMOTE (see table below for description). These two modes can be selected by the digital operator .LO-CAL/REMOTE. key only when operation is stopped.The operation mode selected can be verified by observing the SEQ and REF LED.s on the digital operator (as shown below). The operation mode is set to REMOTE (run by control circuit terminals FV and FI frequency reference and run command from control circuit terminals) prior to shipment. Multi-function contact inputs from control circuit ter-minals S3 to S6 are enabled in both operation modes.LOCAL: Both frequency reference and run command are set by the digital opera-tor. SEQ and REF LED.s go OFF.REMOTE: Master frequency reference and run command can be selected as de-scribed in the table below.KB/TB:While switch SW1 being located in the host control panel is in KB location, that the keyboard potentiometer imports is effective , that the terminal imports simulation amounts is effective when being in TB location.
Content LED details

WIN-9_F Series User Manual
● 21 ●
3.2.1 Operation Mode Selection
Set-ting Operation Method Selection SEQ
LED Reference Selection REF LED
0 Operation by run command from digital operator OFF Master frequency reference from digital
operator OFF
1 Operation by run command from control circuit terminal ON Master frequency reference from digital
operator OFF
2 Operation by run command from digital operator OFF Master frequency reference from control
circuit terminals FV and FI ON
3 Operation by run command from control circuit terminal ON Master frequency reference from control
circuit terminals FV and FI ON
4 Operation by run command from digital operator OFF Master frequency reference set by serial
communication ON
5 Operation by run command from control circuit terminal ON Master frequency reference set by serial
communication ON
6 Operation by run command from serial communication ON Master frequency reference set by serial
communication ON
7 Operation by run command from serial communication ON Master frequency reference from digital
operator OFF
8 Operation by run command from serial communication ON Master frequency reference from control
circuit terminals FV and FI ON
3.2.2 Operation state and LED relation
Running state LED
RUN
Frequency setting
Frequency output
Running state
STOP
ON
ON ONOFF
OFF OFF
ON
ON
Glint
3.3 Test Running
3.3.1 Check Before Test Running
Before test running, please make sure that the main circuit connection is right, the terminal screws are tight, the wiring is correct, the power cable is solid and the load is correct.

WIN-9_F Series User Manual
● 22 ●
3.3.2 Check During Test Running
During test running, please check that the motor runs smoothly in the correct direction without abnormal vibration, it runs smoothly during acceleration and de-celeration, the load is not over current and the display on the keypad correct.
3.4 Test Running keyboard
3.4 1 Operation by Control Circuit Terminal Signal
The diagram below shows a typical operation pattern using the control circuit ter-minal signals.
Power ON
Frequency Setting
Operation
Forward60Hz
Stop
1 2 3
4
Typical Operation ExampleDescription Key Sequence Display
1.Power ONDisplays frequency reference value.LO-CAL mode is preset at the factory.2.Frequency SettingUpper revolution keyboard potentiometer
LOCAL
REMOTE
3.RunningPress RUN key,Startup Inverter
RUN
RUN LED ON
4.Stop
STOPRESET
STOP LED glitter

WIN-9_F Series User Manual
● 23 ●
3.4.2 Operation by Digital Operator
The diagram below shows a typical operation pattern using the digital operator.
Reverse60Hz
Forward20Hz
Stop1 2 3
4 5 6
Reverse RunPowerON
Frequency Setting
Forward Run
Frequency Reference Change
Typical Operation Example by Digital OperatorDescription Key Sequence Display
1.Power ONDisplays frequency reference value.LOCAL mode is preset at the factory.
LOCAL
REMOTEREMOTE LED (SEQ. REF) OFF
(2) Frequency Setting
Change frequency reference ●
value.
Write-in set value. ●
Select output frequency moni- ●
tor display.
SET
PRG
(3) Forward RunForward run (20Hz) ● RUN
RUN LED ON

WIN-9_F Series User Manual
● 24 ●
Description Key Sequence Display
(4) Frequency Reference Value Change (15~60Hz)
Select frequency reference ●
value display.
Change set value. ●
Write-in set value. ●
Select output frequency moni- ●
tor display.
PRG
SET
PRG
(5) Reverse Run
Select reverse run. ●
Write-in set value. ●
Select output frequency moni- ●
tor display.
PRG
SET
PRG
(6) StopDecelerates to stop. ●
STOPRESET

WIN-9_F Series User Manual
● 25 ●
3.5 Operation by Control Circuit Terminal Signal
The diagram below shows a typical operation pattern using the control circuit ter-minal signals.
Power ON
Frequency Setting
Operation
Forward60Hz
Stop
1 2 3
4
Operation Sequence by Control Circuit Terminal Signal
Typical Operation Example by Control Circuit Terminal SignalDescription Key Sequence Display
(1) Power ONDisplays frequency reference ●
value.REMOTE mode is preset at the factory.
PRG
REMOTE LED (SEQ. REF) ON
(2) Frequency SettingInput frequency reference ●
voltage (current) by control cir-cuit terminal FV or FI and verify the input value by the digital operator.
Output Frequency DisplayWrite-in set value. ●
For reference voltage 10V
(3) Forward RunClose between control circuit ●
terminals S1 and SC to perform forward run. RUN LED ON
(4) StopOpen between control circuit ●
terminals S1 and SC to stop operation.
STOP LED ON (RUN LED blink-ing during deceleration)
WIN-9_F Series User Manual
● 26 ●
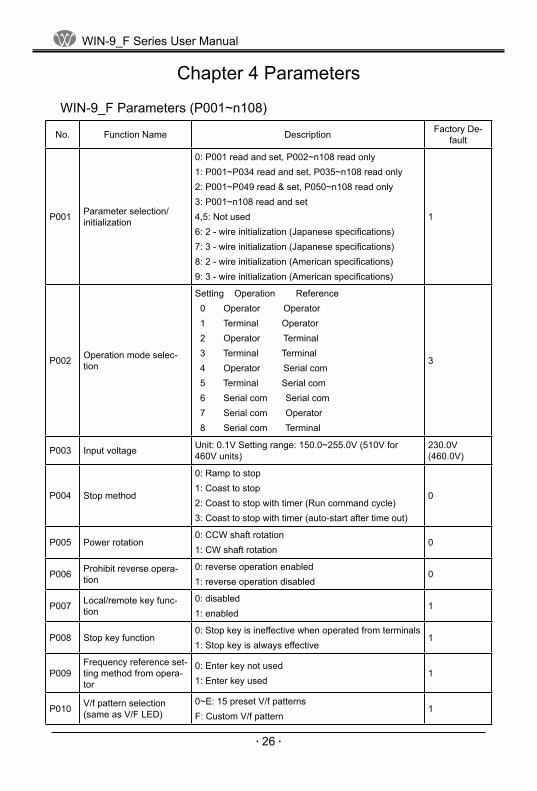
Chapter 4 Parameters
WIN-9_F Parameters (P001~n108)
No. Function Name Description Factory De-fault
P001 Parameter selection/ initialization
0: P001 read and set, P002~n108 read only 1: P001~P034 read and set, P035~n108 read only 2: P001~P049 read & set, P050~n108 read only 3: P001~n108 read and set 4,5: Not used 6: 2 - wire initialization (Japanese specifications) 7: 3 - wire initialization (Japanese specifications) 8: 2 - wire initialization (American specifications) 9: 3 - wire initialization (American specifications)
1
P002 Operation mode selec-tion
Setting Operation Reference 0 Operator Operator 1 Terminal Operator 2 Operator Terminal 3 Terminal Terminal 4 Operator Serial com 5 Terminal Serial com 6 Serial com Serial com 7 Serial com Operator 8 Serial com Terminal
3
P003 Input voltage Unit: 0.1V Setting range: 150.0~255.0V (510V for 460V units)
230.0V (460.0V)
P004 Stop method
0: Ramp to stop 1: Coast to stop 2: Coast to stop with timer (Run command cycle) 3: Coast to stop with timer (auto-start after time out)
0
P005 Power rotation 0: CCW shaft rotation 1: CW shaft rotation
0
P006 Prohibit reverse opera-tion
0: reverse operation enabled 1: reverse operation disabled
0
P007 Local/remote key func-tion
0: disabled 1: enabled
1
P008 Stop key function 0: Stop key is ineffective when operated from terminals 1: Stop key is always effective
1
P009 Frequency reference set-ting method from opera-tor
0: Enter key not used 1: Enter key used
1
P010 V/f pattern selection (same as V/F LED)
0~E: 15 preset V/f patterns F: Custom V/f pattern
1

WIN-9_F Series User Manual
● 27 ●
No. Function Name Description Factory De-fault
P011 Motor rated voltage (same as Vmtr LED)
Unit: 0.1V Setting range: 150.0~255.0V (510V for 460V units)
230.0V (460.0V)
P012 Maximum frequency Unit: 0.1Hz Setting range: 50.0~400.0Hz
60.0Hz
P013 Maximum voltage Unit: 0.1V Setting range: 0.1~255.0V (510V for 460V units)
230.0V
P014 Max. output voltage frequency
Unit: 0.1Hz Setting range: 0.2~400.0Hz
60.0Hz
P015 Mid. output frequency Unit: 0.1Hz Setting range: 0.1~399.9Hz
3Hz
P016 Mid. frequency voltage Unit: 0.1V Setting range: 0.1~255.0V (510V for 460V units)
15.0V
P017 Minimum output frequen-cy
Unit: 0.1Hz Setting range: 0.1~10.0Hz
1.5Hz
P018 Minimum output voltage Unit: 0.1V Setting range: 0.1~50.0V
10.0V
P019 Acceleration time 1 (same as Accel LED)
Unit: 0.1 sec (1 sec for 1000 sec and above) Setting range: 0.0~3600 sec 10.0 sec
P020 Deceleration time 1 (same as Decel LED)
Unit: 0.1 sec (1 sec for 1000 sec and above) Setting range: 0.0~3600 sec 10.0 sec
P021 Acceleration time 2 Unit: 0.1 sec (1 sec for 1000 sec and above) Setting range: 0.0~3600 sec 10.0 sec
P022 Deceleration time 2 Unit: 0.1 sec (1 sec for 1000 sec and above) Setting range: 0.0~3600 sec 10.0 sec
P023 S-curve selection Setting 0 1 2 3 S-curve time No S-curve 0.2 sec 0.5 sec 1.0 sec 1
P024 Display mode Setting 0 1 2~39 40~3999 Display 0.1Hz 0.1% rpm (input # of motor poles) custom 0
P025 Frequency reference 1 (same as Fref LED)
Setting depends on P024 setting. Range: 0~9999
0.0Hz
P026 Frequency reference 2 Setting depends on P024 setting. Range: 0~9999
0.0Hz
P027 Frequency reference 3 Setting depends on P024 setting. Range: 0~9999
0.0Hz
P028 Frequency reference 4 Setting depends on P024 setting. Range: 0~9999
0.0Hz
P029 Jog frequency Setting depends on P024 setting. Range: 0~9999
6.0Hz
P030 Frequency upper limit Unit: 1% Setting range: 0~100%
100%

WIN-9_F Series User Manual
● 28 ●
No. Function Name Description Factory De-fault
P031 Frequency lower limit Unit: 1% Setting range: 0~100%
0%
P032 Motor rated current (same as FLA LED)
Unit: 0.1A Range: 10~200% inverter rated current Unit is 1A, when setting is more than 1,000A
kVA depen-dent
P033 Motor thermal protection (OL1)
Setting Characteristics 0 Protection disabled 1 General-purpose motor (time constant 8 min.) 2 General-purpose motor (time constant 5 min.) 3 Blower-cooled motor (time constant 8 min.) 4 Blower-cooled motor (time constant 5 min.)
1
P034 Stop method selection (OH1) for inverter over-heat pre-alarm
Setting Stop method 0 Ramp to stop - Decel 1 (fault) 1 Coast to stop (fault) 2 Ramp to stop - Decel 2 (fault) 3 Continue operation (alarm)
3
P035 Multi-function input selec-tion (Terminal S2)
0: Reverse run (2-wire sequence) 1: Fwd / Rev command (3-wire sequence) 2: External fault (normally open) 3: External fault (normally closed) 4: Fault reset 5: Remote/local selection 6: Serial com/inverter selection (Fref, RUN command) 7: Stop command using Decel 2 (fast stop) 8: Master freq. ref. selection (FV-open or FI-closed)9: Multi-step speed reference command 1 10: Multi-step speed reference command 2 11: Jog command 12: Accel / Decel time change command 13: External Baseblock (normally open) 14: External Baseblock (normally closed) 15: Speed search from maximum frequency 16: Speed search from set frequency 17: Parameter change enable 18: I value reset (PID) 19: PID control off 20: Timer function 21: OH3 22: Analog reference sample hold command 23: Inertia ride through command (normally open) 24: Inertia ride through command (normally closed)
0
P036 Multi-function input (Ter-minal S3) Set items are same as P035 2

WIN-9_F Series User Manual
● 29 ●
No. Function Name Description Factory De-fault
P037 Multi-function input (Ter-minal S4) Set items are same as P035 4
P038 Multi-function input (Ter-minal S5) Set items are same as P035 9
P039 Multi-function input (Ter-minal S6)
Set items are same as P035 25: Up / Down command 26: Loop test (Modbus)
10
P040 Multi-function output (Terminal MA-MB-MC)
0: Fault 1: During running 2: Speed agree 3: Desired speed agree 4: Frequency detection 1 5: Frequency detection 2 6: Overtorque detection (normally open) 7: Overtorque detection (normally closed) 8: During base block 9: Operation mode 10: Ready 11: Timer function 12: During auto restart 13: OL pre-alarm (80% OL1 or OL2) 14: Frequency reference loss 15: Closed by serial communication (DO function) 16: PID feedback loss 17: OH1 Alarm (set if P034 set to "3")
0
P041 Multi-function output (Terminal M1-M2) Set items are as same as P040 1
P042 Master analog input selec-tion (FV or FI terminal)
0: 0~10V input (FV terminal) 1: 4~20mA input (FI terminal)
0
P043 Aux. analog input selec-tion (FI terminal)
0: 0~10V input (Jumper must be cut) 1: 4~20mA input
1
P044 Frequency reference retention (for Up/Down, sample/hold functions)
0: Retained in frequency reference 1 (P025) 1: Not retained after power-down
0
P045 Operation method for frequency reference loss detection
0: No detection 1: Continue to run at 80% of previous Fref.
0
P046 Frequency gain (same as Fgain LED)
Unit: 1% Setting range: 0~200%
100%
P047 Frequency bias (same as Fbias LED)
Unit: 1% Setting range: -100~100%
0%

WIN-9_F Series User Manual
● 30 ●
No. Function Name Description Factory De-fault
P048 Multi-function analog output (AM)
Setting Monitor 0 Output frequency 1 Output current 2 Output power 3 DC bus voltage
0
P049 Analog monitor gain Unit: 0.01 Setting range: 0.01~2.00
1
P050 Carrier frequency Unit: 1 Setting range: 1~6 (x2.5kHz), 7~9 (custom pattern)
kVA depen-dent
P051 Momentary power loss ride through method
Setting Method 0 Not provided 1 Continuous operation after power recovery
within 2 sec 2 Continuous operation after power recovery
within control logic time (no fault output)
0
P052 Speed search level (de-cel time fixed at 2 sec)
Unit: 1% Setting range: 0~200% 100% = inverter rated current
150%
P053 Minimum baseblock time Unit: 0.1 sec Setting range: 0.5~5.0 sec
kVA depen-dent
P054 V/f reduction level during speed search
Unit : 1% Setting range: 0~100%
kVA depen-dent
P055 Power loss ride through time
Unit: 0.1sec Setting range: 0.0~2.0 sec
kVA depen-dent
P056 Automatic retry attempts Unit: 1 time Setting range: 0~10
0
P057 Fault contact selection during automatic retry
0: Closed during fault retry 1: Open during fault retry
1
P058 Jump frequency 1 Unit: 0.1Hz Setting range: 0.0~400.0Hz
0.0Hz
P059 Jump frequency 2 Unit: 0.1Hz Setting range: 0.0~400.0Hz
0.0Hz
P060 Jump frequency band-width
Unit: 0.1Hz Setting range: 0.0~25.5Hz
1.0Hz
P061 Elapsed timer selection 0: Accumulated time during power on 1: Accumulated time during running
1
P062 Elapsed timer 1 Unit : 1 hour Range: 0~9999
0
P063 Elapsed timer 2 Unit: 10,000 hours Range: 0~27
0

WIN-9_F Series User Manual
● 31 ●
No. Function Name Description Factory De-fault
P064 DC injection current Unit: 1% Setting range: 0~100% 100% = inverter rated current
50%
P065 DC injection time at stop Unit: 0.1 sec Setting range: 0.0~10.0 sec
0.5 sec
P066 DC injection time at start Unit: 0.1 sec Setting range: 0.0~10.0 sec
0.0 sec
P067 Torque compensation gain
Unit: 0.1 Setting range: 0.0~3.0 (normally, no adjustment is nec-essary)
1.0
P068 Motor line to line resis-tance
Unit: 0.001Setting range: 0.000~65.53 (normally, no adjustment is necessary)
kVA depen-dent
P069 Iron loss Unit: 0W Setting range: 0~9999W (normally, no adjustment is necessary)
kVA depen-dent
P070 Stall prevention during deceleration
0: Disabled 1: Enabled
1
P071Current limit/Stall preven-tion level during accelera-tion
Unit: 1% Setting range: 30~200% When level is set to 200%, current limit during accel-eration is disabled.
170%
P072 Current limit/Stall preven-tion level during running
Unit: 1% Setting range: 30~200% When level is set to 200%, current limit during running is disabled.
160%
P073 Desired frequency detec-tion (multi-function output)
Unit: 0.1Hz Setting range: 0.0~400.0Hz
0.0Hz
P074 Overtorque detection (OL3)
Setting Function 0 Detection disabled 1 Detection begins at speed agree Continue run-
ning after detection (alarm) 2 Detection always Continue running after detec-
tion (alarm) 3 Detection begins at speed agree Coast to stop
after detection (fault) 4 Detection always Coast to stop after detection
(fault)
0
P075 Overtorque detection level (OL3)
Unit: 1% Setting range: 30~200% 100% = inverter rated current
160%
P076 Overtorque detection delay time (OL3)
Unit: 0.1 sec Setting range: 0.0~10.0 sec
0.1 sec

WIN-9_F Series User Manual
● 32 ●
No. Function Name Description Factory De-fault
P077 On-delay timer Unit: 0.1 sec Setting range: 0.0~25.5 sec
0.0 sec
P078 Off-delay timer Unit: 0.1 sec Setting range: 0.0~25.5 sec
0.0 sec
P079 dB resistor overheat function (rH)
0: No dB protection calculated or provided 1: Protection provided for installed WINNER resistor only
0
P080 Input phase loss detec-tion level (SPI)
Unit: 1% Setting range: 1~100% When setting is 100%, this function is disabled.
7%
P081 Input phase loss detec-tion delay time (SPI)
Unit: 1 (1.28 sec) Setting range: 2~255 (2.56~326.4 sec)
8 (10.24 s)
P082 Output phase loss detec-tion level (SPO)
Unit:1% Setting range: 0~100% When setting is 0%, this function is disabled.
0%
P083 Output phase loss detec-tion delay time (SPO) Unit: 0.1 sec Setting range: 0.0~2.0 sec 0.2 sec
P084 PID selection (same as PID LED)
0: PID disabled 1: PID enabled 2: PI w/ Feed forward
0
P085 Feedback calibration gain (PID)
Unit: 0.01 Setting range: 0.00~10.00
1.00
P086 Proportional gain (PID) Unit: 0.01 Setting range: 0.0~10.0
1.0
P087 Integral time (PID) Unit: 0.1 sec Setting range: 0.0~100.0 sec
10.0 sec
P088 Derivative time (PID) Unit: 0.01 sec Setting range: 0.00~1.00 sec
0.00 sec
P089 Offset (PID) Unit: 1% Setting range: -109~109%
0%
P090 Limit of (PID) integral value
Unit: 1% Setting range: 0~109%
100%
P091 Output lag filter time (PID)
Unit: 0.1 sec Setting range: 0.0~2.5 sec
0.0 sec
P092 Feedback loss detection (PID)
0: Detection is disabled. 1: Detection is enabled.
0
P093 Feedback loss detection level (PID)
Unit: 1% Setting range: 0~100%
0%
P094 Feedback loss detection delay time (PID)
Unit: 0.1sec Setting range: 0.0~25.5 sec
1.0 sec

WIN-9_F Series User Manual
● 33 ●
No. Function Name Description Factory De-fault
P095 Energy saving selection (same as kWsav LED)
0: Energy saving is disabled. 1: Energy saving is enabled.
0
P096 Energy saving gain K2 Unit: 0.01 Setting range: 0.00~655.0
kVA depen-dent
P097 Energy saving voltage lower limit at 60Hz
Unit: 1% Setting range: 0~120%
50%
P098 Energy saving voltage lower limit at 6Hz
Unit: 1% Setting range: 0~25%
12%
P099 Time of average kW (Energy saving)
Unit: 1 = 25ms Setting range: 1~200
1
n100 Tuning voltage limit (Energy saving)
Unit: 1% Setting range: 0~100%
0%
n101 Tuning step voltage at 100% output voltage (Energy saving)
Unit: 0.1% Setting range: 0.0~10.0%
0.5%
n102 Tuning step voltage at 5% output voltage (En-ergy saving)
Unit: 0.1% Setting range: 0.0~10.0%
0.2%
n103 Modbus time over detec-tion
0: Time over detection is disabled. 1: Time over detection is enabled.
1
n104 MODBUS stop method at communication error (CE)
Setting Stop method 0 Ramp to stop - Decel 1 (fault) 1 Coast to stop (fault) 2 Ramp to stop - Decel 2 (fault) 3 Continue operation (alarm)
1
n105 MODBUS frequency ref-erence unit
Setting Frequency unit 0 0.1Hz / 1 1 0.01Hz / 1 2 100% / 30000 3 0.1% / 1
0
n106 MODBUS slave address Unit: 1 Setting range: 0~31
0
n107 MODBUS BPS selection
Setting BPS rate 0 2400 BPS 1 4800 BPS 2 9600 BPS
2
n108 MODBUS parity selec-tion
Setting Parity 0 No parity 1 Even parity 2 Odd parity
1

WIN-9_F Series User Manual
● 34 ●
Chapter 5 Enlarged upon the Parameters
5.1 PARAMETER SET-UP & INITIALIZATION
Parameter Selection/Initialization (P001)The following table describes data which can be set or read when parameter P001 is set.
Setting Parameters that can be set Parameters that can be read
0 (parameter read-only) P001 P001 to n108
1 (factory default) P001 to P034 P001 to n108
2 P001 to P049 P001 to n108
3 P001 to n108 P001 to n108
4,5 Not used
8 Initialize: 2-wire sequence (American specifications)
9 Initialize: 3-wire sequence (American specifications)
5.2 WIN-9_F OPERATION
Accel/Decel Time Adjustment
OutputFrequency
Accel Time 1(n019)
Decel Time 1 (n020)
Accel Time 2 (n021)Decel Time 2* (n022)
Decel Time 1* (n020)
Time
FWD (REV) Run Command ON OFF ON ON OFF ON
ONAccel/Decel Time Selection ON(Terminals S2 to S6)
* When .deceleration to stop. is selected (P004 = “0”)
Figure 18 Timing Diagram of Accel/Decel Time Adjustment
When any of the multi-function contact input terminal selections (P035, P036, P037, P038 or P039) are set to “12”, accel/decel times can then be selected by

WIN-9_F Series User Manual
● 35 ●
opening or closing the appropriate accel/decel time selection (terminal S2, S3, S4, S5 or S6). At OFF: P019 (accel time 1) P020 (decel time 1)At ON: P021 (accel time 2) P022 (decel time 2)
Parameter No. Name Unit Setting Range Factory Default
P019 Acceleration time 1 0.1 s * 0.0 to 3600 s 10.0 s
P020 Deceleration time 1 0.1 s * 0.0 to 3600 s 10.0 s
P021 Acceleration time 2 0.1 s * 0.0 to 3600 s 10.0 s
P022 Deceleration time 2 0.1 s * 0.0 to 3600 s 10.0 s
* Setting unit is 1 s for 1,000 s and above.
Acceleration time ●
Sets the time necessary for the output frequency to move from 0Hz to maxi-mum output frequency (P012).Deceleration time ●
Set the time necessary for the output frequency to move from maximum output frequency (P012) to 0Hz.
5.2.1 Automatic Fault Retry (P060)
After a fault occurs, the inverter and its fault detection circuit are reset.The number of retry attempts and self-diagnostic tests can be set up to 10 times in parameter P060. The inverter can be set to automatically restart after the fol-lowing faults occur:
Overcurrent (OC) ●
Overvoltage (OV) ●
Undervoltage PUV (UV1) ●
Ground fault (GF) ●
Regenerative transistor fault (rr) ●
The number of retry attempts are cleared to “0” in the following cases:If no other fault occurs within 10 minutes after retry. ●
When the fault reset signal is ON after the fault is detected. ●
Power supply is turned OFF. ●

WIN-9_F Series User Manual
● 36 ●
5.2.2 Automatic Restart After Momentary Power Loss (P051)
When momentary power loss occurs, operation restarts automatically.
Setting Description
0 Not provided (factory default)
1 * Continuous operation after power recovery within 2 seconds
2 ** Continuous operation after power recovery within control logic time (no fault output)
* Holds the operation signal to continue operation after recovery from momentary power loss.** When “2” is selected, operation restarts if power supply voltage returns to its normal level (level before power loss). No fault signal is output.
5.2.3 Carrier Frequency (P050)
This function sets the inverter output transistor switching frequency (carrier fre-quency). This is used to reduce motor noise and leakage current.
Setting Carrier Frequency (kHz) Metallic Noise from Motor Leakage Current
1 2.5 Louder
Inaudible
Smaller
Larger
2 5.0
3 8.0
4 10.0
5 12.5
6 15.0
2.5kHz
1.0kHz
83.3Hz 208.3Hz
fc = 12 foutfout
fc = carrier frequency
2.5kHz
1.0kHz
41.6Hz 104.1Hz
fc = 24 foutfout
fc = carrier frequency
2.5kHz
1.0kHz
27.7Hz 69.4Hz
fc = 36 foutfout
fc = carrier frequency
n050 = “7” n050 = “8”
n050 = “9”
Custom Setting of Carrier Frequency Patterns

WIN-9_F Series User Manual
● 37 ●
5.2.4 Current Limit (Stall Prevention)
This function automatically adjusts the output frequency and thus output current according to the load, to continue operation without tripping the inverter.
Current Limit Level During Acceleration (P071) ●
The current limit level during acceleration can be set in units of 1% (inverter rated current = 100%). Factory setting: 170%A setting of 200% disables current limit during acceleration. During accelera-tion, if the output current exceeds the value set for P071, acceleration stops and frequency is maintained. When the output current goes down to the value set for parameter P071, acceleration restarts.
Motor Current
n071
Time
Output FrequencyTime
Controls the acceleration rate toprevent the inverter from tripping.
Current Limit During AccelerationIn the constant output area [output frequency ≥ max. voltage output frequency (P014)], the current limit level during acceleration is changed by the following equation:
Current Limit Level DuringAccel in Constant Output Area
Current Limit Level DuringAcceleration (n071)
Max. Voltage Output Frequency (n14)Output Frequency
=
Current Limit Level During Running (P072) ●
The current limit level during running can be set in units of 1% (inverter rated current = 100%).Factory setting: 160%A setting of 200% disables current limit during running. During speed agree, if the output current exceeds the value set for parameter P072, then deceleration starts.When the output current exceeds the value set for P072, deceleration contin-ues. When the output current goes down to the value set for parameter P072, acceleration starts, up to the set frequency.

WIN-9_F Series User Manual
● 38 ●
Motor Current
n072
Time
Output FrequencyTime
Decreases frequency to preventthe inverter from tripping.
Current Limit During Running
Stall prevention during deceleration (P070) ●
To prevent overvoltage during deceleration, the inverter automatically extends the deceleration time according to the value of main circuit DC voltage. When using an optional braking resistor for the WIN-9_F, set parameter P070 to“1”.
Setting Stall Prevention During Deceleration
0 Enabled (factory default)
1 Disabled (when optional braking resistor mounted)
Frequency
Set Deceleration Time
Time
Controls the deceleration time toprevent overvoltage fault.
Stall Prevention During Deceleration
5.2.5 DC Injection Braking
DC Injection Braking Current (P064) ●
DC injection braking current can be set in increments of 1%. (inverter rated current = 100%)DC injection Braking Time at Stop (P065) ●
DC injection braking time at stop can be set in increments of 0.1 second. When parameter P065 is set to “0”, DC injection braking is disabled, so the inverter output shuts OFF.

WIN-9_F Series User Manual
● 39 ●
DC injection BrakingTime at Stop
n017Min. Output Frequency
n065
DC Injection Braking Time at Stop
When coast to stop is selected in the stopping method selection (P003),DC injec-tion braking at stop is disabled.
5.2.6 Energy Saving Control
To enable energy saving control, set energy saving selection (P095) to “1”.
Setting Description
0 Energy saving is disabled (factory default).
1 Energy saving is enabled.
Since the parameters used in the energy saving control mode have been preset at the factory to the optimum values, it is not necessary to adjust them under nor-mal operation. If your motor characteristics differ greatly from those of standard induction motors, refer to the following description to adjust the parameters.
5.2.7 Energy Saving Control Mode
Energy Saving Gain K2 (P096) ●
Use this energy saving gain when running in the energy saving control mode to calculate the voltage at which motor efficiency will be greatest, and set it as the output voltage reference. This value is preset at the factory to the standard induction motor value prior to shipment. As the energy saving gain increases, output voltage increases also.Energy Saving Voltage Lower Limit (P097, P098) ●
Sets the output voltage lower limit. If the voltage reference value calculated in the energy saving mode is smaller than the specified lower limit, this lower limit value is output as the voltage reference value. The lower limit value is set in order to prevent stalling at light loads. Set voltage limits at 6Hz and 60Hz; a value obtained by linear interpolation should be set to any limit values other than at 6Hz or 60Hz. Setting is made as a percentage of motor rated voltage.

WIN-9_F Series User Manual
● 40 ●
Voltage
255V*
n097
n098 Lower Limit
Frequency6Hz 60Hz
* This value is doubled for 460V class inverters.
Energy Saving Voltage Lower Limit
5.2.8 Energy Saving Tuning
In the energy saving control mode, the optimum voltage is calculated according to load power, and the voltage is supplied to the load. However, the set parameter may vary due to temperature variations or using various manufacturers. motors; therefore, the optimum voltage may not be supplied in some cases. Automatic tuning controls voltage so that highly efficient operation is maintained.
Tuning Voltage Limit (n100) ●
Limits the range in which voltage is controlled by tuning. Setting is made in a percentage of motor rated voltage. Tuning is disabled when this parameter is set to “0”.Tuning Step Voltage (n100, n101) ●
Sets voltage variation width of one tuning cycle. Setting is made in a percent-age of motor rated voltage. By increasing this value, the rotating speed varia-tion increases. This voltage variation width is set when starting tuning voltage is 100% and motor rated voltage is 5%. Value obtained by linear interpolation are set to any voltage values other than these values.

WIN-9_F Series User Manual
● 41 ●
VoltageVariation Width
n101
n102
5% 100%Output Voltage
Energy Saving Voltage Variation Width
5.2.9 Frequency Detection (P073)
When multi-function contact output selections P040 or P041 are set to “4”or “5”, frequency detection is enabled. This function is activated when the output fre-quency is higher or lower than the frequency detection level (P073).
Output frequency ≤ Frequency detection level ●
Set P040 or P041 to “4”.
ONON
Release Width+2Hz
Output Frequency
Frequency DetectionSignal
Frequency DetectionLevel (Hz)n073
Frequency Detection Example ( Fout ≤ Frequency detection level)
Output frequency ≥ Frequency detection level ●
Set P040 or P041 to “5”.

WIN-9_F Series User Manual
● 42 ●
ON
Release Width-2Hz
Output Frequency
Frequency DetectionSignal
Frequency DetectionLevel (Hz)n073
Frequency Detection Example ( Fout ≥ Frequency detection level)
5.2.10 Frequency Meter or Ammeter (P048)
This function selects between outputting either output frequency or output current to analog output terminals AM and AC for monitoring.
Setting Analog Monitor Output Selection
0 Output frequency (10V/max. frequency) -factory default
1 Output current (10V/inverter rated current)
2 Output power (10V/inverter rated power)
3 DC bus voltage [10V/400VDC (230V class), 10V/800VDC (460V class)]
Frequency Meter or Ammeter Calibration (P049)This function is used to adjust the analog output gain.
n049 AM FM
AC
+ -100%
Factory Setting(n049 = “1.00”)
3V 10VAnalog Output
n049 = “0.30”
Frequency Meter/Ammeter(3V 1mA full-scale)
Max. Output Frequency(inverter rated current)
Frequency Meter/Ammeter CalibrationSet the analog output voltage to 100% of output frequency (or output current).The frequency meter displays 0 to 60Hz at 0 to 10V.

WIN-9_F Series User Manual
● 43 ●
10V n049 setting0.30 = 3V
Output frequency becomes 100% at this value.
.
.
.
5.2.11 Frequency Signal Adjustment
When the frequency reference is given by an analog signal at control circuit ter-minals FV and FI, the relation between analog voltage (or current) and frequency reference can be set.
( ) indicates when currentreference input is selected.
Frequency Reference
Max. Output Frequency
0V 10V(4mA) (20mA)
Gain100
Max. Output FrequencyBias100
Frequency Signal Adjustment
Frequency Reference Gain (P046) ●
The analog input voltage value for the maximum output frequency (P012) can be set in units of 1%, from 0 to 200%.Factory setting: 100%Frequency Reference Bias (P047) ●
The frequency reference provided when the analog input is 0V (4mA) can be set in units of 1%, from -100% to 100%. (P012: maximum output frequency = 100%) Factory setting: 0%Examples ●
To operate the inverter with a frequency reference of 0% to 100% at a 0 to 5V input:

WIN-9_F Series User Manual
● 44 ●
Max. Output
0V 5V 10V
Frequency (100%)
0%
Frequency Signal Adjustment Example - 0 to 5V input
Gain: Parameter P046 = “200”Bias: Parameter P047 = “0”
To operate the inverter with a frequency reference of 50% to 100% at a 0 to 10V input:
Max. Output
0V 10V
Frequency (100%)
50%
Frequency Signal Adjustment Example - 0 to 10V input
Gain: Parameter P046 = “100”Bias: Parameter P047 = “50”
5.2.12 Jog Operation
Set jog frequency reference selection in multi-function contact input terminals S2 to S6. Operation is then enabled at the jog frequency reference set in parameter P029. When multi-step speed references 1 or 2 are input simultaneously with the jog frequency reference, the jog frequency reference has priority.
Name Parameter No. Setting
Jog frequency reference P029 6.0Hz (Factory default)
Multi-function contact input selection (S2 to S6) P035, P036, P037, P038, P039 Set to “11” for any parameter.
5.2.13 Jump Frequencies (P058 to P060)
This function allows the prohibition or .jumping. of critical frequencies so that the motor can operate without resonant vibrations caused by machine systems. This function is also used for deadband control. Setting the value to 0.0Hz disables this function.

WIN-9_F Series User Manual
● 45 ●
Set jump frequency 1 or 2 such that P058 ≤ P059. If this condition is not satisfied, the inverter displays the parameter setting error “OPE6”.
Output Frequency
n059
n058
n060
n060
FrequencyReference
Jump Frequencies
5.2.14 MODBUS Communication
The WIN-9_F can perform serial transmission by using a programmable controller (PLC) and MODBUS communication. MODBUS is composed of one master PLC and 1 to 31 (maximum) slave inverters. In signal transmission between master and slave units, the master unit always starts transmission and the slave units re-spond to it.The master unit performs signal transmission with one slave unit at a time. Hence, address numbers are assigned to each slave unit in advance and the master unit specifies a number to perform signal transmission.The slave unit which receives the command from the master unit executes the function and returns the response to the master unit. Communication Specifica-tions
Interface: ●
RS-485, RS-422 (communication interface card SI-K2/P must be mounted.)Synchronization: ●
AsynchronousTransmission parameter: ●
Baud rate: selectable from 2400, 4800, 9600 BPS (parameter n107) Data length: fixed at 8 bits Parity: parity/no parity, even/odd selectable (parameter n108) Stop bit: fixed at 1 bitProtocol: ●
In accordance with MODBUSMaximum number of units to be connected: ●
31 units (when RS-485 is used) Data to be Sent/Received by Communication

WIN-9_F Series User Manual
● 46 ●
Data to be sent/received by communication are run commands, frequency refer-ence, fault contents, inverter status and parameter setting/reading.
Operation Mode Selection (P002) ●
Select the run command and frequency reference input method in parameter P002. To provide a run command and frequency reference by communication, set this parameter to settings “4” to “8”. Also, without regard to this selection, monitoring of running status, parameter setting/ reading, fault reset and multi-fucntion input commands from the PLC are enabled. The multi-function input command becomes .OR. with the command input from control circuit terminals S2 to S6.MODBUS Frequency Reference Unit (n105) ●
The frequency reference units from the PLC and in the frequency reference and output frequency monitors (by communication) are selected.The output frequency resolution of the WIN-9_F is 0.1Hz. Even if the frequency reference unit is changed to 0.01Hz in parameter n105, the value in the hun-dredth digit of 0.01Hz of the received frequency reference is rounded off inter-nally. When 30,000/100% in units of 0.1% is selected, the value is rounded off in the same way.
MODBUS Slave Address (n106) ●
The slave address number is set. It is necessary to set the address number so that it will not overlap with the address number of another slave unit connected on the same transmission line.Note: To change the values set in parameters n106 to n108 and enable new settings, it is necessary to cycle power.
5.2.15 Motor Overload Detection
The WIN-9_F protects against motor overload with a UL-recognized, built-in elec-tronic thermal overload relay.
Motor Rated Current (P032) ●
Set to the rated current value shown on the motor nameplate.Note: setting to 0.0A disables the motor overload protection function.Motor overload protection selection (P033) ●
Setting Electronic Thermal Characteristics
0 Protection disabled
1 Applied to general-purpose motor, standard rating (Class 20 overload)
2 Applied to general-purpose motor, short time rating (Class 10 overload)
3 Applied to blower-cooled motor, standard rating (Class 20 overload)

WIN-9_F Series User Manual
● 47 ●
4 Applied to blower-cooled motor, short time rating (Class 10 overload)
The electronic thermal overload function estimates motor temperature, based on inverter output current and time, to protect the motor from overheating. When the electronic thermal overload relay is activated, an .oL1. error occurs, shutting OFF the inverter output and preventing excessive overheating in the motor.When operating with one inverter connected to one motor, an external thermal relay is not needed. When operating several motors with one inverter, install a thermal relay on each motor. In this case, set parameter P033 to “0”.General-purpose and Blower-cooled Motors ●
Induction motors are classified as general-purpose or blower-cooled motors, based on their cooling capabilities. Hence, the motor overload detection function operates differently for each of these two motor types.
Cooling Effectiveness Torque Characteristics Electronic Thermal Overload
General-purpose
Effective when operated at 50/60Hz from com-mercial power supply.
3 20 60 120
Load
(%)
60 secShort time
StandardRating
Frequency (Hz)
Base Frequency 60Hz(V/f for 60Hz, 230V Input Voltage)
180
155140
100
80
55
38
0
During continuous operation at low speeds, the load must be limited in
order to limit motor temperature rise.
.OL1. error (motor overload protection is
enabled when motor is continuosly operated at 50/60Hz or less at
100% load).

WIN-9_F Series User Manual
● 48 ●
Blower-cooled
Effective when operated at low speeds (approx.
6Hz).
6 60 120
Load
(%)
60 secShort time
StandardRating
Frequency (Hz)
Base Frequency 60Hz(V/f for 60Hz, 230V Input Voltage)
180
150
100
55
38
0
Use blower-cooled motor for continu-ous operation at low speeds.
Effective when oper-ated at low speeds
(approx. 6Hz).
5.2.16 Multi-Step Speed Selection
This function allows the programming of up to 4 preset speeds, through multi-function contact input function selections.4-step speed selectionP002 = “1” (operation mode selection)P025 = 30.0Hz (factory default)P026 = 40.0Hz (factory default)P027 = 50.0Hz (factory default)P028 = 60.0Hz (factory default)P038 = 9 (multi-function contact input terminal S5)P039 = 10 (multi-function contact input terminal S6)

WIN-9_F Series User Manual
● 49 ●
FWD Run/Stop
REV Run/Stop
External Fault
Fault Reset
Multi-step Speed Ref. 1
Multi-step Speed Ref. 2
Multi-functionContact Input
S1
S2
S3
S4
S5
S6
SC
Multi-step Speed Selection - Control Circuit Terminals
FWD (REV) Run/Stop(Terminal S5)
FrequencyReference
Multi-step Speed Ref. 1
Multi-step Speed Ref. 2(Terminal S6)
(n025)30.0Hz
(n026)40.0Hz
(n027)50.0Hz
(n028)60.0Hz
ON
ON ON
ON
Multi-step Speed Operation - Timing Diagram
5.2.17 Phase Loss Protection
Input Phase Loss Detection (P080, P081) ●
The input phase loss detection circuit monitors the DC bus current ripple and activates when the one of the input phases are lost. The detection circuit calcu-lates the maximum and minimum values of the DC bus voltage in 1.28 second intervals, and compares the difference (ΔV) between these values with the input phase loss detection level (P080). If ΔV ≥ P080, then input phase loss is de-tected; and after the input phase loss detection delay time (P081), an SPI fault occurs, and the motor coasts to stop.
No. Name Description Factory Default

WIN-9_F Series User Manual
● 50 ●
P080 Input phase loss detection level Unit: 1% Setting range: 1 to 100% of input voltage
7%
P081 Input phase loss detection delay time
Unit: 1 (1.28 s)Setting range: 2 to 255 (2.56 to 326.4 s)
8 (10.24 s)
Input phase loss detection is disabled in the following cases:- Parameter P080 is set to .100%..- A Stop command is input.- Magnetic Contactor (MC) shuts OFF.- CPU A/D converter fault (CPF5).- During deceleration.- Output current ≤ 30% of Inverter rated currentOutput Phase Loss Detection (P082, P083) ●
The output phase loss detection circuit monitors the DCCT.s and activates when one of the output phases are lost. The detection circuit calculates the RMS current value (IRMS) and compares it with output phase loss detection level (P082). If IRMS ≤ P082, then output phase loss is detected; and after the output phase loss detection delay time (P083), an SPO fault occurs, and the motor coasts to stop.
No. Name Description Factory Default
P082 Output phase loss detection level Unit: 1% Setting range: 0 to 100% ofinverter rated current
0%
P083 Output phasetime loss detection delay Unit: 0.1 s Setting range: 0.0 to 2.0 s 0.2 s
Output phase loss detection is disabled in the following cases:- Parameter P082 is set to“0%”.- Parameter P083 is set to“0 s”.
5.2.18 PID Control
To enable PID control, set PID selection (P084) to“1”or“2”, according to the de-scription below.
Setting Description
0 PID disabled (factory default)
1 PID enabled (deviation is D-controlled.)
2 PID with feed forward (feedback value is D-controlled)
Then select the PID control intended value setpoint or detected feedback value setpoint as follows:
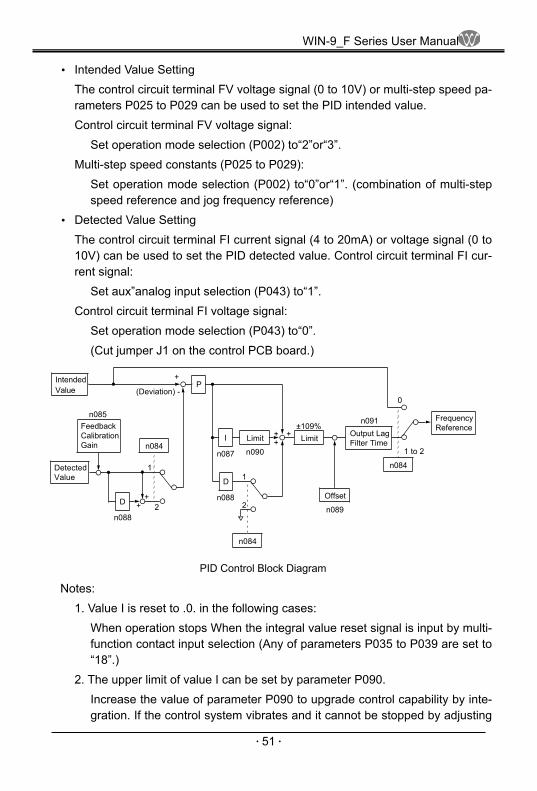
WIN-9_F Series User Manual
● 51 ●
Intended Value Setting ●
The control circuit terminal FV voltage signal (0 to 10V) or multi-step speed pa-rameters P025 to P029 can be used to set the PID intended value.Control circuit terminal FV voltage signal:
Set operation mode selection (P002) to“2”or“3”.Multi-step speed constants (P025 to P029):
Set operation mode selection (P002) to“0”or“1”. (combination of multi-step speed reference and jog frequency reference)
Detected Value Setting ●
The control circuit terminal FI current signal (4 to 20mA) or voltage signal (0 to 10V) can be used to set the PID detected value. Control circuit terminal FI cur-rent signal:
Set aux”analog input selection (P043) to“1”.Control circuit terminal FI voltage signal:
Set operation mode selection (P043) to“0”.(Cut jumper J1 on the control PCB board.)
PID Control Block Diagram
Intended
n085
(Deviation) -
+P
1
2
n084
Value
FeedbackCalibrationGain
DetectedValue
Offset
n084
n084
Output LagFilter Time
FrequencyReference
1 to 2
0
±109%n091
n089
Limit
n090
+++
n087
I Limit
n088
D 1
2n088
D ++
Notes:1. Value I is reset to .0. in the following cases:
When operation stops When the integral value reset signal is input by multi-function contact input selection (Any of parameters P035 to P039 are set to “18”.)
2. The upper limit of value I can be set by parameter P090.Increase the value of parameter P090 to upgrade control capability by inte-gration. If the control system vibrates and it cannot be stopped by adjusting
WIN-9_F Series User Manual
● 52 ●
the integral time, output lag filter time, etc., decrease the set value of pa-rameter P090.
3. PID control can be canceled by a multi-function contact input signal.By setting any of parameters P035 to P039 to .19. and by closing the con-tact during running, PID control is disabled and the intended value signal itself is used as a frequency reference signal.
5.2.19 Reverse Run Prohibit (P006)
A .reverse run disabled. setting does not allow a reverse run command from the control circuit terminal or the digital operator. This setting is used in applications where a reverse run command can cause problems.
Setting Description
0 Reverse run enabled (factory default)
1 Reverse run disabled
5.2.20 Soft-Start Characteristics (P023)
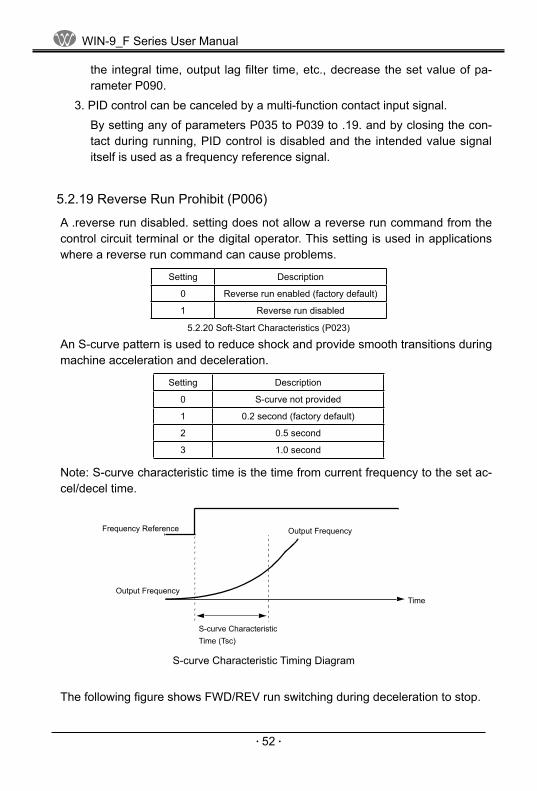
An S-curve pattern is used to reduce shock and provide smooth transitions during machine acceleration and deceleration.
Setting Description
0 S-curve not provided
1 0.2 second (factory default)
2 0.5 second
3 1.0 second
Note: S-curve characteristic time is the time from current frequency to the set ac-cel/decel time.
Output FrequencyFrequency Reference
Output Frequency
S-curve Characteristic
Time
Time (Tsc)
S-curve Characteristic Timing Diagram
The following figure shows FWD/REV run switching during deceleration to stop.
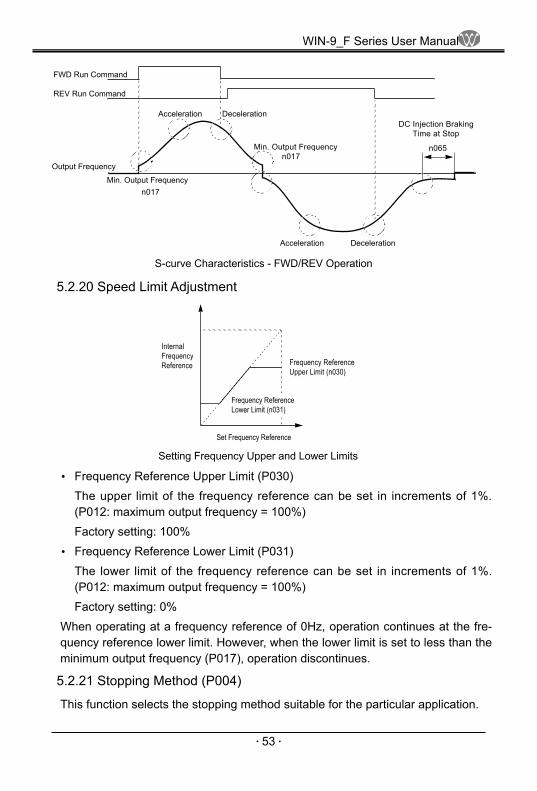
WIN-9_F Series User Manual
● 53 ●
FWD Run Command
REV Run Command
Output Frequency
Acceleration Deceleration
Min. Output Frequencyn017
Min. Output Frequency n017
Acceleration Deceleration
DC Injection Braking Time at Stop
n065
S-curve Characteristics - FWD/REV Operation
5.2.20 Speed Limit Adjustment
Frequency ReferenceUpper Limit (n030)
Set Frequency Reference
InternalFrequencyReference
Frequency ReferenceLower Limit (n031)
Setting Frequency Upper and Lower Limits
Frequency Reference Upper Limit (P030) ●
The upper limit of the frequency reference can be set in increments of 1%. (P012: maximum output frequency = 100%)Factory setting: 100%Frequency Reference Lower Limit (P031) ●
The lower limit of the frequency reference can be set in increments of 1%. (P012: maximum output frequency = 100%)Factory setting: 0%
When operating at a frequency reference of 0Hz, operation continues at the fre-quency reference lower limit. However, when the lower limit is set to less than the minimum output frequency (P017), operation discontinues.
5.2.21 Stopping Method (P004)
This function selects the stopping method suitable for the particular application.

WIN-9_F Series User Manual
● 54 ●
Setting Description
0 Deceleration to stop (factory default)
1 Coast to stop
2 Coast to stop with timer 1 (run command cycle)
3 Coast to stop with timer 2 (auto-start after time out)
Deceleration to Stop (P004 = “0”) ●
Output FrequencyDecel time 1 (n020)
Run CommandON OFF
DC injection Braking Timeat Stop (n065)Factory Default: 0.5 s
Min. Output Frequency (Frequency atDC Injection Braking Start - n017)Factory Default: 1.5Hz
Stopping Method - Deceleration to Stop
Upon removal of the FWD (REV) run command, the motor decelerates at a de-celeration rate determined by the time set in deceleration time 1 (P020) and DC injection braking is applied immediately before stop. If the deceleration time is short or the load inertia is large, an overvoltage fault (OV) may occur during de-celeration. In this case, increase the deceleration time or install an optional brak-ing resistor .Braking torque: w/out braking resistor, approx. 20% of motor rated torquewith braking resistor, approx. 150% of motor rated torque
Coast to Stop (P004 = “1”) ●
Run command ON OFF
Output frequency Inverter output is shut OFFwhen stop command is given.
Stopping Method - Coast to Stop
Upon removal of the FWD (REV) run command, the motor starts to coast.Coast to Stop with Timer 1 (P004 = “2”) ●

WIN-9_F Series User Manual
● 55 ●
Output Frequency
Coasting
Decel Time 1(n020)
Accel Time 1(n019)
Time
ONONONFWD (REV)Run Command
Run Command Disabled
Example of Stopping Method - Coast to Stop w/ Timer 1
A run command is not accepted while the motor decelerates after a stopcommand is given. However, if the time required for the motor to decelerate to stop is shorter than the minimum baseblock time (P053), a run command is not accepted during the baseblock time.
Coast to Stop with Timer 2 (P004 = “3”) ●
Example of Stopping Method - Coast to Stop w/ Timer 2
Output Frequency
Coasting
Decel Time 1(n020)
Accel Time 1(n019)
Time
ONONFWD (REV)Run Command
Operation is disabled while the timer is activated after a stop command isgiven. A run command can be accepted, but operation does not start untilthe timer runs out. However, if the deceleration time is shorter than theminimum baseblock time (P053), the inverter does not operate during thebaseblock time.

WIN-9_F Series User Manual
● 56 ●
5.2.22 Torque Adjustment (P067)
Motor torque can be adjusted by changing the V/f pattern (P010) or by adjusting the torque compensation gain (P067). For details on setting the V/f pattern, see .V/f Pattern Adjustment., on page 74.
Full-range Automatic Torque Boost ●
The motor torque requirement changes according to load conditions.Full-range automatic torque boost adjusts the voltage of the V/f pattern accord-ing to the required torque. The WIN-9_F automatically adjusts the voltage dur-ing constant-speed operation as well as during acceleration.The required torque is calculated by the inverter. This ensures tripless opera-tion and power savings.Output voltage ∝ Torque compensation gain × Required torque
Required torque → Increase voltage
Frequency
Voltage
Torque Characteristics
Normally, no adjustment is necessary for torque compensation gain (P067, fac-tory default: “1.0”). When the wiring distance between the inverter and the motor is long, or when the motor generates vibration, change the torque compensation gain.Increasing torque compensation gain increases motor torque, but an excessive increase may cause the following:
Inverter fault trips due to motor overexcitation ●
Motor overheat or excessive vibration ●
If adjustment is necessary, adjust in 0.1 increments.
5.2.23 Torque Detection
The overtorque detection circuit will activate when the motor load causes the mo-tor current to exceed the overtorque detection level (P075). When the overtorque condition is detected, alarm signals are sent to multi-function output terminals MA, MB and M1.

WIN-9_F Series User Manual
● 57 ●
To output an overtorque detection signal, set multi-function contact input selection P040 or P041 to “6” (N.O. contact) or “7” (N.C. contact).
Torque Characteristics
* Release width (hysteresis) during overtorque detection is 5% of the inverter rated current level.
Inverter Rated Current
n075
Time
ON ON
n076 n076
Multi-function ContactOutput Signal(Overtorque Detection Signal)Terminal MA, MB, M1
**
Motor Current
Overtorque Detection Function Selection (P074) ●
Setting Description
0 Detection disabled (factory default)
1 Detection begins at speed agree. Continue running after detection (alarm).
2 Detection always. Continue running after detection (alarm).
3 Detection begins at speed agree. Coast to a stop after detection (fault).
4 Detection always. Coast to a stop after detection (fault).
Notes:To detect torque during acceleration or deceleration, set to “2” or “4”. ●
To continue operation after overtorque detection, set to “1” or “2”. During de- ●
tection, the digital operator displays .oL3. alarm (blinking).To stop the inverter after an overtorque detection fault, set to “3” or “4”. During ●
detection, the digital operator displays .oL3. fault.Overtorque Detection Level (P075) ●
Sets the overtorque detection current level in units of 1%Inverter rated current: 100%Factory default: 160%
Overtorque Detection Time (P076) ●
The overtorque detection delay time inserts a delay, between the time motor cur-rent exceeds the overtorque detection current level (P075) and when the over-torque detection function is enabled.Factory default: 0.1 secondIf the time during which motor current exceeds the overtorque detection level

WIN-9_F Series User Manual
● 58 ●
(P075) is longer than the overtorque etection time (P076), the overtorque detec-tion function is enabled.
5.2.24 Tripless Operation
When starting into a coasting motor, use the speed search command or DC injec-tion braking at start, to prevent a drive trip and motor burnout.
Speed search ●
This function allows the restart of a coasting motor without the necessity to stop. It is useful during inverter bypass operation, when switching between the motor receiving power directly from the line and from the inverter.Set the multi-function contact input selection (P035 to P039) to .15. (start search command from maximum output frequency) or .16. (start search com-mand from the set frequency).Build a sequence so that the FWD (REV) run command is input at the same time as the search command, or after the search command. If the run com-mand is input before the search command, the search command is not effec-tive. Below is a timing diagram of the search command input:
Search Command Input Timing Diagram
FWD (REV) Run Command
Speed Search Command
Max. Output Frequency orFrequency Reference atRun Command Input
Output Frequency
ON
ON
Min. Baseblock Time (n053) or more
Speed Search Start(Condition: Inverter Output Current ≥ n052 Speed Search Level)
Agree Speed Detection (Condition: Inverter Output Current < n052 Speed Search Level)
Min. BaseblockTime(n053)
Speed SearchOperation
DC Injection Braking at Start (P064, P066) ●
This function restarts a coasting motor after first stopping it. DC injection brak-ing time at start (P066) is set in units of 0.1 second. DC injection braking cur-rent is set in parameter P064 in units of 1%. When parameter P066 is set to “0”, DC injection braking is disabled and acceleration starts from the minimum output frequency.

WIN-9_F Series User Manual
● 59 ●
DC Injection Braking at Starting
n017Min. Output Frequency
n066DC Injection BrakingTime at Start
5.2.25 V/f Pattern Adjustment
Set the V/f pattern using parameter P010 as described below. It may be neces-sary to change the V/f pattern when using a high-speed motor, or when special torque adjustment is required in the application.Set values 0 to E: preset V/f pattern can be selected F: custom V/f pattern can be set
Preset V/f Patterns ●
Preset V/f patterns are automatically scaled by the motor rated voltage value set in parameter P011.Set the V/f pattern according to the applications described in the table on the following page:

WIN-9_F Series User Manual
● 60 ●
5.2.26 Preset V/f Patterns
Specifications n010 V/f Pattern *1 Specifications n010 V/f Pattern *1
Gen
eral
-pur
pose
50Hz 0
Hig
h St
artin
g To
rque
*2
50Hz
LowStartingTorque
8
HighStartingTorque
9
60Hz
60HzSatur-ation
1F
60Hz
LowStartingTorque
A
50HzSatur-ation
2HighStartingTorque
B
72Hz 3
Hig
h Sp
eed
Ope
ratio
n
90Hz C
Var
iabl
e To
rque
50Hz
VariableTorque 1 4
120Hz D
VariableTorque 2 5
60Hz
VariableTorque 3 6
180Hz E
VariableTorque 4 7
(Hz)
(V)230
15100 1 .3 2 .5 5 0
(Hz)0 1 .3 2 .5 5 0
(Hz)0 1 .5 3 5 0 6 0 (Hz)0 1 .5 2 .5 6 0
(Hz)0 1 .5 3 .0 6 0 7 2 (Hz)0 1 .5 3 .0 6 0 9 0
(Hz)0 1 .3 3 2 5 5 0 (Hz)0 1 .3 2 .5 6 0 1 2 0
(Hz)0 1 . 3 2 . 5 2 5 6 0 (Hz)0 1 .3 2 .5 6 0 1 8 0
0
230(V)
25201412
98
1510
2
1F
(V)230 230
(V)
25201812
BA
1510
3
(V)230
1510
C
(V)230
230(V)
5035
108
5
4
?
D
(V)230
230(V)
5 035
108
7
6
1510
E
(V)230
Notes:*1 The following conditions must be considered when selecting a V/f pattern:
The voltage and frequency characteristics of the motor. ●
The maximum speed of the motor. ●
*2 Select a high starting torque V/f pattern only under the following conditions:The wiring distance is long - 492 ft (150m) and above. ●
Large voltage drop at start-up. ●
AC reactor is connected to the inverter.s input or output. ●
A motor rated below the nominal output of the inverter is used. ●

WIN-9_F Series User Manual
● 61 ●
Custom V/f Pattern ●
Set up a custom V/f pattern by setting parameter P010 to .F., and then setting the values in parameters P012 to P018.
Be sure to satisfy the followingconditions for setting parametersn012 to n018:n017 ≤ n015 < n014 ≤ n012
0 n017 n015 n014 n012 Frequency
Voltage
n018
n016
n013
Custom V/f Pattern Setting
Parameter No. Name Unit Setting Range Factory De-
fault
P012 Maximum output frequency 0.1 Hz 50.0 to 400 Hz 60.0 Hz
P013 Maximum voltage 0.1 V 0.1 to 255 V * 230 V *
P014 Maximum voltage output frequency
(base frequency) 0.1 Hz 0.2 to 400 Hz 60.0 Hz
P015 Mid. output frequency 0.1 Hz 0.1 to 399 Hz 3.0 Hz
P016 Mid. output frequency voltage 0.1 V 0.1 to 255 V * 12.0 V *
P017 Minimum output frequency 0.1 Hz 0.1 to 10.0 Hz 1.5 Hz
P018 Minimum output frequency voltage 0.1 V 0.1 to 50.0 V * 12.0 V *
* For 460V class units, the value is twice that of 230V class units.Increasing the voltage in the V/f pattern increases motor torque, however, an ex-cessive increase may cause:
Inverter fault trips as a result of motor overexcitation ●
Motor overheat or excessive vibration ●
Increase voltage gradually while checking the motor current.
5.3 INPUTS & OUTPUTS
5.3.1 Multi-function Input Signals (P035 to P039)
Multi-function contact input terminal S2 to S6 functions can be changed when necessary by setting parameters P035 to P039, respectively. Neither of these pa-rameters can receive a setting common with the other.· Terminal S2 function: set to P035

WIN-9_F Series User Manual
● 62 ●
· Terminal S3 function: set to P036· Terminal S4 function: set to P037· Terminal S5 function: set to P038· Terminal S6 function: set to P039
Set-ting Name Description
0 REV run command (2-wire sequence)Only parameter P035 can be set to this value.
1 FWD/REV run command(3-wire se-quence)
2 External fault (NO contact input) Inverter stops at fault when external fault signal is input. Digital operator displays “EF0”.3 External fault (NC contact input)
4 Fault reset Resets fault. Fault reset is disabled during run com-mand input.
5 LOCAL/REMOTE selection -
6 Serial communication/control circuit terminal selection -
7 Fast stop Decelerates to stop by decel time 2 (P022) when fast stop is input.
8 Master frequency reference inputselec-tion level selection
Master frequency reference input level (voltage input at“open”current input at“closed”) can be selected.
9 Multi-step speed reference 1
-10 Multi-step speed reference 2
11 Jog frequency selection
12 Accel/decel time selection
13 External baseblock (NO contact input) Coasting signal. Motor starts coasting when the signal Digital operator displays “bb” (blinking). 14 External baseblock (NC contact input)
15 Search command from maximum fre-quency Speed search command signals.
16 Search command from set frequency
17 Constant setting enable/disablePermission or prohibition of constant setting from the digital operator or serial communication (setting dis-abled at“closed”, enabled at“open”) can be selected.
18 PID integral value reset-
19 PID control disable
20 Timer function -
21 OH3 (inverter overheat alarm) When this signal is input, the digital opertor displays “OH3” (blinking). Inverter continues operation.
22 Analog reference sample/hold Analog frequency reference is sampled at closed and held at open.
25 UP/DOWN command Only parameter P039 can be set to this value.
26 Loop test Only parameter P039 can be set to this value.
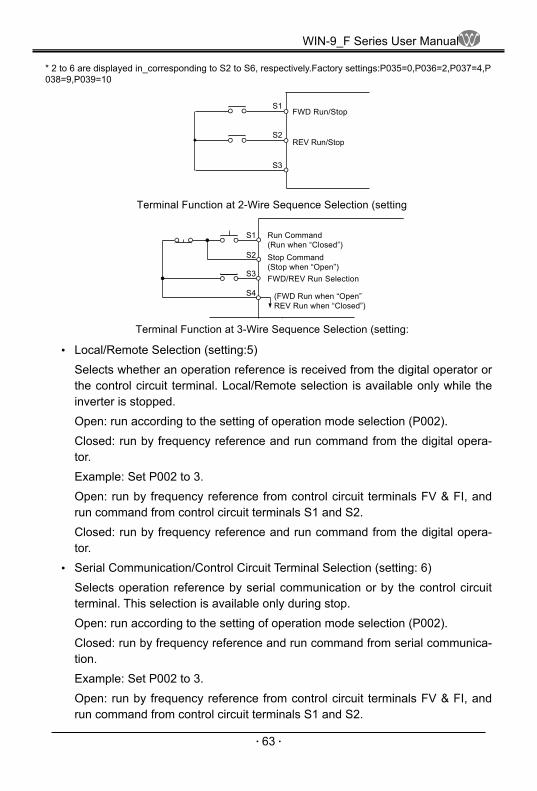
WIN-9_F Series User Manual
● 63 ●
* 2 to 6 are displayed in_corresponding to S2 to S6, respectively.Factory settings:P035=0,P036=2,P037=4,P038=9,P039=10
S1
S2
S3
FWD Run/Stop
REV Run/Stop
Terminal Function at 2-Wire Sequence Selection (setting:“0”)
Terminal Function at 3-Wire Sequence Selection (setting: “1”)
S1
S2
S4
Run Command(Run when “Closed”)Stop Command(Stop when “Open”)FWD/REV Run Selection
(FWD Run when “Open”REV Run when “Closed”)
S3
Local/Remote Selection (setting:5) ●
Selects whether an operation reference is received from the digital operator or the control circuit terminal. Local/Remote selection is available only while the inverter is stopped.Open: run according to the setting of operation mode selection (P002).Closed: run by frequency reference and run command from the digital opera-tor.Example: Set P002 to 3.Open: run by frequency reference from control circuit terminals FV & FI, and run command from control circuit terminals S1 and S2.Closed: run by frequency reference and run command from the digital opera-tor.Serial Communication/Control Circuit Terminal Selection (setting: 6) ●
Selects operation reference by serial communication or by the control circuit terminal. This selection is available only during stop.Open: run according to the setting of operation mode selection (P002).Closed: run by frequency reference and run command from serial communica-tion.Example: Set P002 to 3.Open: run by frequency reference from control circuit terminals FV & FI, and run command from control circuit terminals S1 and S2.

WIN-9_F Series User Manual
● 64 ●
Closed: run by frequency reference and run command from serial communica-tion.Timer Function (setting: 20) ●
When the timer function input is longer than the ON-delay timer (P077), the timer function output closes.When the timer input is open for longer than the OFF-delay timer (P078), the timer function output opens.
Timing Diagram of Timer Function
Multi-function ContactInput: Timer Function
Multi-function ContactOutput: Timer Function
ON
ON
n077 n078 n077 n078
ON ON ONON
ON ON ON
ON
Analog Reference Sample/Hold Selection (setting:22) ●
If input terminal is closed for 100ms or longer, the analog frequency reference is sampled; when it opens, the analog frequency reference is held.
Sample/Hold Selection - Analog Reference
Analog Input
Fref
100ms 100ms
t1 t2 t3
Open
Closed
Note: t1, t3 - Reference is held at 100ms or longer. t2 - Reference is not held at less than 100ms.Up/Down Command (setting: P039 = 25) ●
With the FWD (REV) run command entered, a change in frequency isperformed by inputting the Up or Down signals to control circuit terminals S5 and S6, so that operation can be performed at the desired speed.When Up/Down commands are specified by P039, any function set to P038 becomes disabled; terminal S5 becomes an input terminal for the Up com-mand and terminal S6 an input terminal for the Down command.

WIN-9_F Series User Manual
● 65 ●
Control Circuit Terminal S5 (UP command) Closed Open Open Closed
Control Circuit Terminal S6 (DOWN command) Open Closed Open Closed
Operation Status Accel Decel Hold Hold
Timing Diagram of UP/DOWN Command Input
FWD Run
UP Command S5
DOWN Command S6
Upper Limit Speed
Lower Limit SpeedOutput Frequency
Frequency Agree Signal
D H U H D H U H D D1 H U U1 H D D1 H
U: Up (accelerating) statusD: Down (decelerating) statusH: Hold (constant speed) statusUI: Up status, with clamping at upper limit speedDI: Down status, with clamping at lower limit speed
Notes:When the UP/DOWN command is selected, the upper limit speed is set re-1) gardless of frequency reference.Upper limit speed = Maximum output frequency (P012) × Frequency refer-ence upper limit (P030) /100The lower limit value is either the analog frequency from control circuit ter-2) minals FV or FI, or the frequency reference lower limit (P031), whichever is larger.When the FWD (REV) run command is input, operation starts at the lower 3) limit speed without an UP/DOWN command.If the jog frequency reference is input while the drive is running by the UP/4) DOWN command, the jog frequency reference has priority.
Loop Test (setting: .26.) ●
Checks operation in the serial interface circuit. If a fault occurs, the digital op-erator displays “CE”.
5.3.2 Procedure

WIN-9_F Series User Manual
● 66 ●
1Set multi-function contact input selection (P039) after turning ON the in-1) verter power supply, then turn OFF the inverter power supply.2Short-circuit terminal S6 to terminal SC and connector 2CN pin 1 to pin 2. 2) (Do not short-circuit when connecting the communication interface card SI-K2/P.)Begin the loop test by turning ON the inverter power supply.3)
The digital operator displays the frequency reference after the loop test is com-pleted satisfactorily.
5.3.3 Analog Input Signals (P042 to P045)
Master Analog Input Selection (P042) ●
To input the master frequency reference from the control circuit terminal, select voltage reference (0 to 10V) from terminal FV or current reference (4 to 20mA) from terminal FI, by setting parameter P042.
Setting Master Frequency Reference Terminal Input Level 0 FV (factory default) 0 to 10V input
1 FI 4 to 20mA input
Auxiliary Analog Input Selection (P043) ●
To change the control circuit terminal FI input level from current to voltage, set parameter P043 according to the table below:
Setting Input Level
0 * 0 to 10V input
1 4 to 20mA input (factory default)
*To set parameter P043 to“0”,cut jumper J1 on the inverter control PCB board.Frequency Reference Retention (P044) ●
Effective when UP/DOWN or Sample/Hold commands are selected for multi-function contact inputs. To retain the held frequency reference at power OFF, set parameter P044 to “1”.
Setting Description
0 Held frequency retained in frequency reference 1 - P025 (factory default)
1 Not retained
Operation Method for Frequency Reference Loss Detection (P045) Select op- ●
eration if the frequency reference from the control circuit terminal decreases rap-idly.
Setting Description

WIN-9_F Series User Manual
● 67 ●
0 Detection disabled (factory default)
1 Detection enabled, continue to run at 80% of previous Fref.
If the frequency reference decreases by 90% within 400ms (when detection is en-abled), operation continues at 80% of the reference reached before the rapid de-crease.
5.3.4 Multi-function Output Signals (P040, P041)
Multi-function output terminal MA, MB and M1 functions can be changed when necessary by setting parameters P040 and P041.
Terminal MA and MB functions: set to P040 ●
Terminal M1 functions: set to P041 ●
Set-ting Name Description
0 Fault Closed when inverter fault occurs.
1 During running Closed when either FWD or REV run command is input or when the inverter outputs voltage.
2 Frequency agree -
3 Desired frequency agree -
4 Frequency detection
-
5 -
6 Overtorque detection (N.O. contact) -
7 Overtorque detection (N.C. contact) -
8 During baseblock “Closed” when inverter output shuts OFF.
9 Operation mode “Closed” when run command or frequency reference from digital operator is selected.
10 Inverter operation ready “Closed” when no inverter fault does not occur and the inverter can be operated.
11 Timer function -
12 Automatic restart “Closed” during fault retry operation.
13 OL pre-alarm Outputs an alarm before inverter and motor overload protection are enabled. Pre-alarm level is 150% for 48 sec for the inverter and more than 80% of the overload protection time for the motor.
14 Frequency reference loss
Outputs a contact when detecting a rapid decrease in the frequency reference. The inverter continues operation at 80% of the frequency reference if the reference value is reduced more than 90% within 400ms.
15 Output from serial commu-nication
Activates contact output independently from inverter operation by a command from serial communication (MODBUS).

WIN-9_F Series User Manual
● 68 ●
Set-ting Name Description
16 PID feedback loss
Detects a rapid decrease in feedback and outputs a contact when the PID control mode is set. Detects when the feedback value decreases less than the detection level (P093) for longer than the feedback loss detection delay time (P094); the inverter continues operation.
17 OH1 alarm “Closed” during heat sink overtemperature (digital operator displays“OH1”blinking).
Factory defaults: P040 = “0”, P041 = “1”See Figure 51 below for an example of selecting the frequency agree signal as the function of output terminals MA, MB or M1.
Detection Width ±2Hz
Output Frequency
Frequency Agree Signal ON
Release Width ±4Hz
Frequency Reference
Example of Frequency Agree Signal (setting: “2”)
See Figure 52 below for an example of selecting the desired frequency agree sig-nal as the function of output terminals MA, MB or M1.
Example of Desired Frequency Agree Signal (setting: “3”)
Detection Width ±2Hz
Output Frequency
Desired Frequency Agree Signal ON
Release Width ±4Hz
Desired Frequency DetectionLevel (n073)

WIN-9_F Series User Manual
● 69 ●
Chapter 6 DIAGNOSTICS
6.1 Fault Display
When the WIN-9_F detects a fault, the fault is displayed on the digital opera-tor and activates a fault contact output, after which the motor coasts to a stop. Check the causes listed in the table below and take the corresponding corrective actions. To restart the inverter, remove any run command and turn ON the reset input signal or depress the RESET key on the digital operator, or cycle power to reset the stop status. If taking the corrective actions described does not solve the problem, contact your WINNER representative immediately.
Fault Diagnosis and Corrective ActionsFault
Display Name Description Corrective Action
Uu1 Main circuit undervoltage (PUV)
Undervoltage in the DC main circuit during running.
Check the power supply ●
wiring.Correct the line voltage ●
Uu2 Control circuit undervolt-age (CUV)
Undervoltage in the control circuit during running.
Uu3 MC fault The pre-charge contactor opened during running.
oC Overcurrent (OC) The inverter output current exceed-ed the OC level.
Check the motor coil resis- ●
tance. Extend the accel/decel ●
time.Check the motor insu- ●
lation. Multi-meter check. ●
ou Overvoltage (OV)
The main circuit DC voltage ex-ceeded the OV level.Detection level 230V class: approx. 400VDC or less 460V class: approx. 800VDC or less
Extend the deceleration time, add braking circuit.
GF Ground fault (GF) Inverter output grounding current exceeded 50% of inverter rated cur-rent.
Check that motor insula-tion ●
has not deteriorated.Check that connection ●
between inverter and motor is not damaged.
PUF Main circuit fault (PUF) ·The DC bus fuse is blown.·The output transistors were dam-aged.
Check for damaged transis-tor, load side short circuit, ground-ing, etc.
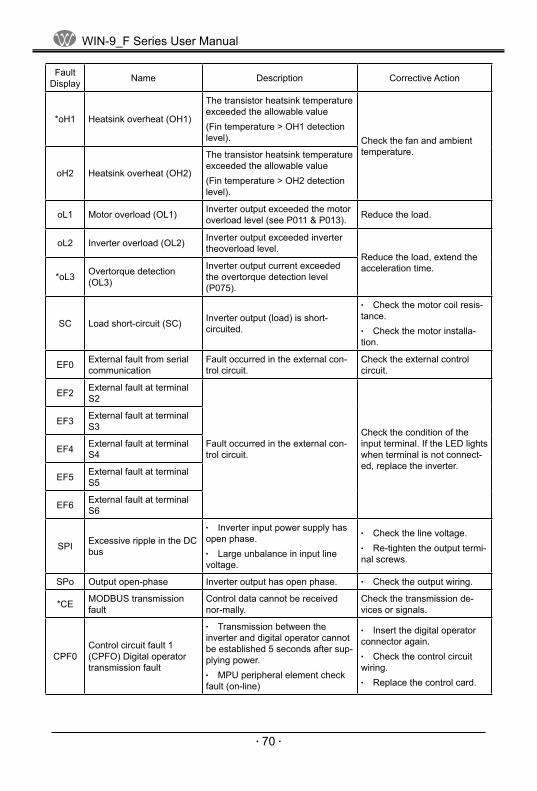
WIN-9_F Series User Manual
● 70 ●
Fault Display Name Description Corrective Action
*oH1 Heatsink overheat (OH1)
The transistor heatsink temperature exceeded the allowable value (Fin temperature > OH1 detection level). Check the fan and ambient
temperature.
oH2 Heatsink overheat (OH2)
The transistor heatsink temperature exceeded the allowable value (Fin temperature > OH2 detection level).
oL1 Motor overload (OL1) Inverter output exceeded the motor overload level (see P011 & P013). Reduce the load.
oL2 Inverter overload (OL2) Inverter output exceeded inverter theoverload level.
Reduce the load, extend the acceleration time.
*oL3 Overtorque detection (OL3)
Inverter output current exceeded the overtorque detection level (P075).
SC Load short-circuit (SC) Inverter output (load) is short-circuited.
Check the motor coil resis- ●
tance.Check the motor installa- ●
tion.
EF0 External fault from serial communication
Fault occurred in the external con-trol circuit.
Check the external control circuit.
EF2 External fault at terminal S2
Fault occurred in the external con-trol circuit.
Check the condition of the input terminal. If the LED lights when terminal is not connect-ed, replace the inverter.
EF3 External fault at terminal S3
EF4 External fault at terminal S4
EF5 External fault at terminal S5
EF6 External fault at terminal S6
SPI Excessive ripple in the DC bus
Inverter input power supply has ●
open phase. Large unbalance in input line ●
voltage.
Check the line voltage. ●
Re-tighten the output termi- ●
nal screws.
SPo Output open-phase Inverter output has open phase. Check the output wiring. ●
*CE MODBUS transmission fault
Control data cannot be received nor-mally.
Check the transmission de-vices or signals.
CPF0 Control circuit fault 1 (CPFO) Digital operator transmission fault
Transmission between the ●
inverter and digital operator cannot be established 5 seconds after sup-plying power.
MPU peripheral element check ●
fault (on-line)
Insert the digital operator ●
connector again.Check the control circuit ●
wiring.Replace the control card. ●

WIN-9_F Series User Manual
● 71 ●
Fault Display Name Description Corrective Action
CPF1 Control circuit fault 2 (CPF1) Digital operator transmission fault
· Transmission between the inverter and digital operator is established once after supplying power, but later trans-mission fault continues for more than 2 seconds. · MPU peripheral element check fault (on-line).
· Insert the digital operator connector again. · Check the digital control circuit wiring. · Replace the control card.
CPF4 EEPROM fault (CPF4) Inverter PCB control board fault. Replace the control card.
CPF5 CPU A/D converter fault (CPF5)
* Stopping method selection is available for these faults.

WIN-9_F Series User Manual
● 72 ●
6.2 Alarm Display
Unlike faults, alarms do not activate fault contact outputs. After the cause of the alarm is corrected, the inverter returns to its former operation status automatically.
Alarm Display and ExplanationsAlarm Display Contents Explanation
Uu (blinking) Undervoltage detection Undervoltage has been detected.
ou (blinking) OV during stop Main circuit DC voltage exceeds the overvoltage detec-tion level while the inverter output is OFF.
oH1 (blinking) Heatsink overheating When heatsink temperature ≥ OH1 detection level, con-tinuous operation at 0H1 detection is selected.
oL3 (blinking) Overtorque detection When inverter output current > P075 (overtorque detec-tion level), continuous operation at overtorque detection is selected.
bb (blinking) External baseblock External baseblock command is input from control circuit terminal.
EF (blinking) Simultaneous forward/re-verse run commands
Both forward and reverse run commands are simulta-neously input for over 500ms.
CALL (blinking) MODBUS transmission waiting
When parameter P002 (operation method selection) is set to “4” or above, the inverter has not received the nor-mal data from serial communication after power ON.
oH3 (blinking) Inverter overheat pre-alarm Inverter overheat pre-alarm signal is input from control circuit terminal.
CE (blinking) MODBUS transmission er-ror
Continuous operation is selected at MODBUS transmis-sion error.
oPE1 Inverter kVA setting fault Inverter kVA setting error.
oPE3 Multi-function contact input setting error
One of the following setting errors occurred in the multi-function contact input selection (P035 to P039).· Two or more of the same values are set. · Both 15 and 16 are set at the same time. · Both 22 and 25 are set at the same time. · Either of P035 to P038 are set to “25” or “26”.
oPE5 V/f data setting error Setting error of P012 to P018 (V/f data)
oPE6 Parameter setting error
One of the following setting errors occurred. · P058 (jump frequency 1) > P059 (jump frequency 2) · P030 (frequency upper limit) < P031 (frequency lower limit) · P032 (motor rated current) < 10% of inverter rated cur-rent, or P032 > 200% of inverter rated current setting
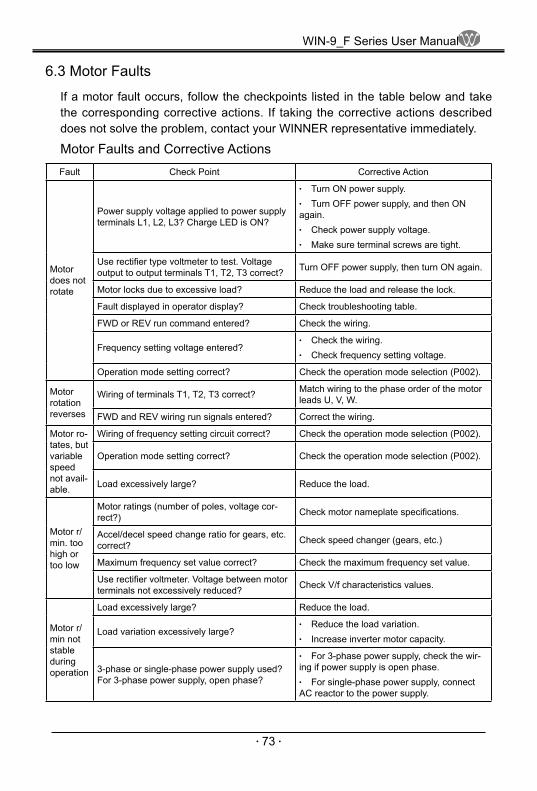
WIN-9_F Series User Manual
● 73 ●
6.3 Motor Faults
If a motor fault occurs, follow the checkpoints listed in the table below and take the corresponding corrective actions. If taking the corrective actions described does not solve the problem, contact your WINNER representative immediately.
Motor Faults and Corrective ActionsFault Check Point Corrective Action
Motor does not rotate
Power supply voltage applied to power supply terminals L1, L2, L3? Charge LED is ON?
Turn ON power supply. ●
Turn OFF power supply, and then ON ●
again.Check power supply voltage. ●
Make sure terminal screws are tight. ●
Use rectifier type voltmeter to test. Voltage output to output terminals T1, T2, T3 correct? Turn OFF power supply, then turn ON again.
Motor locks due to excessive load? Reduce the load and release the lock.
Fault displayed in operator display? Check troubleshooting table.
FWD or REV run command entered? Check the wiring.
Frequency setting voltage entered? Check the wiring. ●
Check frequency setting voltage. ●
Operation mode setting correct? Check the operation mode selection (P002).
Motor rotation reverses
Wiring of terminals T1, T2, T3 correct? Match wiring to the phase order of the motor leads U, V, W.
FWD and REV wiring run signals entered? Correct the wiring.
Motor ro-tates, but variable speed not avail-able.
Wiring of frequency setting circuit correct? Check the operation mode selection (P002).
Operation mode setting correct? Check the operation mode selection (P002).
Load excessively large? Reduce the load.
Motor r/min. too high or too low
Motor ratings (number of poles, voltage cor-rect?) Check motor nameplate specifications.
Accel/decel speed change ratio for gears, etc. correct? Check speed changer (gears, etc.)
Maximum frequency set value correct? Check the maximum frequency set value.
Use rectifier voltmeter. Voltage between motor terminals not excessively reduced? Check V/f characteristics values.
Motor r/min not stable during operation
Load excessively large? Reduce the load.
Load variation excessively large? Reduce the load variation. ●
Increase inverter motor capacity. ●
3-phase or single-phase power supply used? For 3-phase power supply, open phase?
For 3-phase power supply, check the wir- ●
ing if power supply is open phase. For single-phase power supply, connect ●
AC reactor to the power supply.

WIN-9_F Series User Manual
● 74 ●
Chapter 7 Main Circuit Wiring
7.1 Input Wiring3Φ AC
MCCB
MC
ACL
NF
U B
R B
NF
R S T
WIN- 9_FPB
+
-U V W
Ancillary equipment connection layoutMolded-Case Circuit Breaker (MCCB) ●
Be sure to connect MCCB’s or fuses between the AC main circuit power supply and WIN-9_F input terminals L1, L2 and L3, to protect wiring.
Ground Fault Interrupter ●
When connecting a ground fault interrupter to input terminals L1, L2 and L3, se-lect one that is not affected by high frequency.Examples:
NV series by Mitsubishi Electric Co., Ltd. (manufactured in or after 1988), EGSG series by Fuji Electric Co., Ltd. (manufactured in or after 1984).
Magnetic Contactor (MC) ●
Inverters can be used without an MC installed on the power supply side.When the main circuit power supply is shut OFF in the sequence, an MC can be used instead of an MCCB. However, when an MC is switched OFF on the primary side, dynamic braking does not function and the motor coasts to stop.The load can be operated/stopped by opening/closing the MC on the primary

WIN-9_F Series User Manual
● 75 ●
side. However, frequent switching may cause the inverter to malfunction.When using a braking resistor unit, use a sequencer to break the power supply side of the inverter in the event of an overload relay trip contact.If the inverter malfunctions, the braking resistor unit may be burned out.
Terminal Block Connection Sequence ●
Input power supply phases can be connected to any terminal regardless of the order of L1, L2 and L3 on the terminal block.
AC Reactor ●
When connecting an inverter (230V/460V, 25HP or less) to a large capacity pow-er supply transformer (600kVA or more), or when switching a phase-advancing capacitor, excessive peak current flows through the input power supply circuit, which may damage the converter section. In such cases, install a DC reactor (optional) between inverter 1 and 2 terminals, or an AC reactor (optional) on the input side. Installation of a reactor is effective for improvement of power factor on the power supply side.
Surge Suppressor ●
For inductive loads (i.e. magnetic contactors, magnetic relays, magnetic valves, solenoids, magnetic brakes, etc.) connected near the inverter, use a surge sup-pressor.
7.2 Output Wiring
Motor Connection ●
Connect motor lead wires to output terminals T1, T2 and T3. Verify that the motor rotates in the forward direction (CCW: counterclockwise when viewed from the motor load side) with the forward run command. If the motor rotation is incorrect, exchange any two of the motor leads.
Magnetic Starter ●
Do not connect a magnetic starter or a magnetic contactor to the output circuit. If the motor load is connected or disconnected while the inverter is running, the inverter overcurrent protective circuitry will trip.
Thermal Overload Relay ●
An electronic overload protective function is incorporated into the inverter. How-ever, when driving several motors with one inverter, or when switching between multiple windings of a multiple winding motor, connect an external thermal over-load relay. In this case, set parameter P033 to 0. Also, when running at 50Hz, set the same rated current value from the motor nameplate, and at 60Hz, 110% of the rated current value from the motor nameplate.
Wiring Distance Between Inverter and Motor ●

WIN-9_F Series User Manual
● 76 ●
If the total wiring distance between inverter and motor is excessively long and the inverter carrier frequency (IGBT switching frequency) is high, harmonic leakage current from the wiring will adversely affect the inverter and peripheral devices. If the wiring distance is long, reduce the inverter carrier frequency as described be-low. Carrier frequency can be set by parameter P050.
Wiring Distance Between Inverter and MotorWiring Distance between
Inverter and Motor Up to 164 ft.
(50m) Up to 328 ft.
(100m) More than 328 ft.
(100m)
Carrier Frequency(Set value of parameter P050)
15kHz or less (6) 10kHz or less (4) 5kHz or less (2)
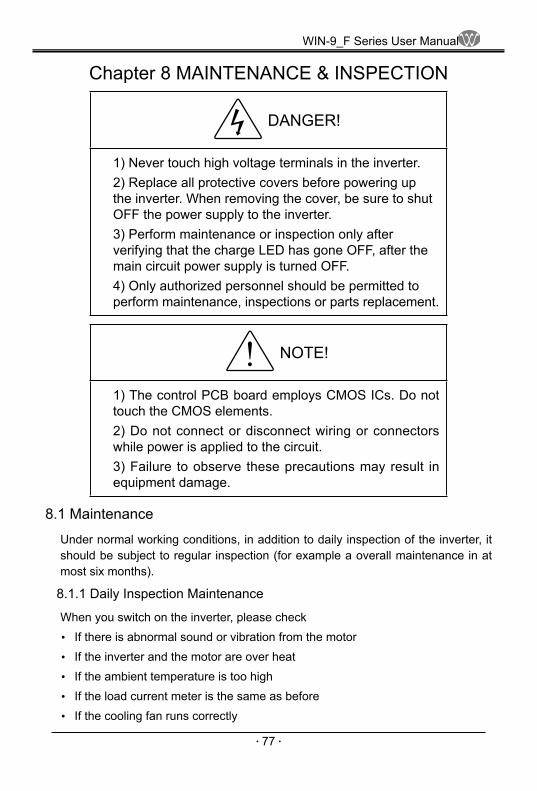
WIN-9_F Series User Manual
● 77 ●
Chapter 8 MAINTENANCE & INSPECTION
DANGER!
1) Never touch high voltage terminals in the inverter.2) Replace all protective covers before powering up the inverter. When removing the cover, be sure to shut OFF the power supply to the inverter.3) Perform maintenance or inspection only after verifying that the charge LED has gone OFF, after the main circuit power supply is turned OFF.4) Only authorized personnel should be permitted to perform maintenance, inspections or parts replacement.
NOTE!
1) The control PCB board employs CMOS ICs. Do not touch the CMOS elements.2) Do not connect or disconnect wiring or connectors while power is applied to the circuit.3) Failure to observe these precautions may result in equipment damage.
8.1 Maintenance
Under normal working conditions, in addition to daily inspection of the inverter, it should be subject to regular inspection (for example a overall maintenance in at most six months).
8.1.1 Daily Inspection Maintenance
When you switch on the inverter, please checkIf there is abnormal sound or vibration from the motor ●
If the inverter and the motor are over heat ●
If the ambient temperature is too high ●
If the load current meter is the same as before ●
If the cooling fan runs correctly ●

WIN-9_F Series User Manual
● 78 ●
Daily check point:
Rf. What to check Where to check How to check Criteria
1 Display LED monitor Any display error? According to the running status
2 Cooling system Cooling fan Is there strange noise? Does it run
smoothly? Normal
3 Body Inside the housing Is there temperature rise, strange noise, or smell? Normal
4 Environment Environment Check the temperature, humidity, dust and poisonous air. Section 2.2
5 Voltage Input, output termi-nals Check the input, output voltage Refer to Specifica-
tion Table
6 Load Motor Is there temperature rise, strange noise, or vibration? Normal
8.1.2 Regular Maintenance
Please cut off the power supply and wait 5-10 minutes after the main circuit in-dictor is off before carrying out regular maintenance. Otherwise, electric shock may occur. Regular check point:
Where to Check What to Check Solution
Screws on the main circuit and control circuit termi-nals
Are they loose Screw them tight
Heat sink Is there dust Blow the dust off with a 4~6kg/cm compressor 2
PCB Is there dust Blow the dust off with a 4~6kg/cm compressor2
Cooling fan Does it run smoothly.Is there strange noise or vibration Change the cooling fan
Power components Is there dust Blow the dust off with a 4~6kg/cm compressor 2
Electrolysis capacitors Is there color change, strange smell, bubble or leak
Change the electrolysis capacitors
During inspection, do not disassemble or shake the components without rea-son, and still less pull off the plug-in-parts at will. Otherwise, the unit will operate wrongly or enter the mode of fault display, even the components might be fault or the main switch components of IGBT module may be damaged.If measure is necessary, please be noted that there may be measurement dif-ference with different measuring instruments. It is recommended that the input voltage be measured with pointer-type voltmeter, output voltage with rectification voltmeter, current input and output with tong-test ammeter and power with electri-

WIN-9_F Series User Manual
● 79 ●
cally driven wattmeter.Please use the oscilloscope whose scan frequency is greater than 40 MHz to test the waveform. Oscilloscope whose scan frequency over 100 MHz is recom-mended for measuring transient waveform. Electric isolation must be done before measure. The Connection method is recommended as below for main circuit measure.
AR
AU
WR
WU
WT
WW
VR
VR
VF
VDC
AT
AW
MAS
AV
Item Input (pow er supply) side Output (motor) side FMterm inal
DC
VoltagemeterV R,S,T
Base wave virtual value
CurrentmeterA R,S,T
Totalvirtualvalue
PowermeterW R,T
Totalvirtualpower
DC voltagemeterV DC
DC voltage
VoltagemeterV U,V,W
Basewavevirtualvalue
CurrentmeterA U,V,W
Totalvirtualvalue
PowermeterW U,V
Totalvirtualpower
Voltagemeter
V F
DCvoltage
Nameof
meter
Para-meter
WF
V
C
VR
VR
VR
VRFM GND
P NR
S
T
U
V
W
Powersupply
Electric insulation test and dielectric test have been made in the factory, so users do not need to test again. These tests will decrease the inverter's insulation level.When perform electrical pressure withstand test to the main circuit, please adopt electrical pressure device whose time and leak current can be adjusted. This test will shorten the life of the inverter. When perform insulation test to the main cir-

WIN-9_F Series User Manual
● 80 ●
cuit, R, S, T, U, V, W, P, N etc. main circuit terminals must be short circuited and be measured by megaohm meter. (250V meter for 220V inverter, 500V for 380V inverter, 1000V for 660V inverter).Do not measure the control circuit with a megaohm meter. Please use the high resistance level of a multi-meter.To 380V inverters, the grounding insulation resistance of main circuit must be no less than 5MΩ and of the control circuit must be no less than 3MΩ.
8.1.3 Components Which Should Be Changed Regularly
To make the inverter run stably for a long term, please maintain and renew some components regularly according their life expectance. Generally, the life expect-ance of components under normal work condition is as the following table:
Part name Life expectance
Cooling fan 2 ~ 3 years
Electrolysis capacitor 4 ~ 5 years
Fuse 10 years
PCB 5 ~ 8 years
8.2 Storage
If the inverter is not put into use immediately and need to be kept well for some time or stored for a long time, the following measurements must be taken:
Keep it in a dry and adequately ventilated place without dust and metal 1) powderat the temperature specified in the specifications.2) If the inverter is not put into use in one year, a charge test should be made, 3) so as to resume the performance of the electrolysis capacitor of main circuit in it. For charging, a voltage regulator should be used to slowly increase the input voltage of the inverter until it reaches the rating, and the charge should last more than 1 ~ 2 hours. This test should be made at least once a year.Repeat the above action at least once a year.4) Don't perform breakdown test at random, for this test will shorten the life of 5) the inverter. The dielectric test must be performed after the insulation resis-tance is measured with a 500 V megohm meter and this value must not be less than 4MΩ.

WIN-9_F Series User Manual
● 81 ●
Chapter 9 Warrantee
The warrantee period for the inverter itself is 12 months from the delivery date and no longer than 24 months since the manufacture date marked on the nameplate.Repair service is charged even in warrantee period if the failure is caused by the following occasion:
Improper operation, repair or alternation without our permission; ●
Apply the inverter exceeding the specification; ●
Rough handing; ●
The work environment does not comply with the requirement on the user’s ●
manualWrong wiring; ●
Earth quake, fire, flood, lightning strike, abnormal voltage or other natural ●
disaster.
We are entitled to ask the third party to repair the defective inverter.The warrantee product used in China
Can be replaced, refunded and repaired within the first month after delivery. ●
Can be replaced and repaired within the first 3 months after delivery. ●
Can be repaired within 12 months. ●
Inverters used in abroad has 3 months warrantee since the day of delivery.
Agreed cost prior to the actual cost.After-sale service can be provided by our distributors, production bases and agents all over the country.
We are irresponsible forAny fault caused by improper operation which doe not follow the user’s manual.Any loss, effect, subsequent damages resulted from the inverter’s failure.
Please keep in mind:This user’s manual is only suitable for this series of products. ●
We are always responsible for our product and provide service for the ap- ●
plication of it.Please inquire us before you apply the product to the equipments which ●
may lead to injury or death, such as:

WIN-9_F Series User Manual
● 82 ●
VehiclesMedical equipmentNuclear, electricity equipmentAviation equipmentSecurity equipmentOther special equipment
Your complaint or suggestion on the design, performance, quality and service about our product will be appreciated.

WIN-9_F Series User Manual
● 83 ●
Hz
PRG REVJOG
A % V RPM MPa
Hz A % V RPM MPa
KEY RUN FOR REV
FOR
SET ESC STOPRESET
WW1
HH1
2-d
2-Φd
-Read the instruntion manal.-Disconnect power and ensure"CHARGE"indicator LED is offbefore performing inspectionor maintenance.
CAUTION
DD1
D2
2-d
WW1
-Read the instruntion manal.-Disconnect power and ensure"CHARGE"indicator LED is offbefore performing inspectionor maintenance.
CAUTION
DD1
Hz
PRG REVJOG
A % V RPM MPa
Hz A % V RPM MPa
KEY RUN FOR REV
FOR
SET ESC STOPRESET
5 0. 0 0
3 8 8
D2
H1
H2
H
2-Φd
LOCAL
REMOTEMENU ESC
JOGREAD
WRITE
REVFWD
RESET
RUN STOP
FWD REV
SEQ
REMOTE
REFDRIVE
4-d
W1W2
-Read the instruntion manal.-Do not open the term inal coverwhile power is applied or for 10minutes after power has beenremoved.
CAUTION
W
1H H
DD1
Hz
PRG REVJOG
A % V RPM MPa
Hz A % V RPM MPa
KEY RUN FOR REV
FOR
SET ESC STOPRESET
5 0. 0 0
3 8 8
D2 D
3
Fig.1 Fig.2
Fig.3 Fig.4
Appendix 1 Installation Dimension

WIN-9_F Series User Manual
● 84 ●
WIN-9_F-T4 Series Wall-hanging typeModel Code W W1 H H1 H2 D D1 D2 d Fig
WIN-9_F - 1R5~3R7T4 150 130 252 205 — 167 175 109 5.5 1
WIN-9_F - 5R5 _ 7R5T4 190 170 290 260 — 187 195 105 5.5 1
WIN-9_F - 011~015T4 / 9P-018T4 245 200 410 390 367 240 245 140 7 2
WIN-9_F - 018~030T4 278 200 550 530 490 250 260 155 10 2
WIN-9_F - 037T4 348 200 550 530 490 250 260 185 10 2
WIN-9_F - 045T4 / 9P-055T4 348 240 700 680 640 335 345 215 10 2
WIN-9_F - 055~075T4 375 300 785 760 717 335 345 240 12 2
WIN-9_F - 093~132T4 / 9P-160T4 530 420 920 890 852 335 345 250 12 2
WIN-9_F - 160~200T4 695 580 1140 1110 1072 335 345 250 14 2
WIN-9_F - 220~400T4 820 600 1334 1300 1260 450 460 240 14 2
WIN-9_F-T4 Series Cabinet typeModel Code W W1 W2 H H1 D D1 D2 D3 d Fig
WIN-9_F - 160~200T4 700 40 620 1800 1760 455 465 40 345 18 3
WIN-9_F - 220~400T4 820 40 690 1800 1760 455 465 40 345 18 3
WIN-9_F - 500T4 1100 75 950 2200 2160 455 465 40 345 18 3
WIN-9_F - 560~800T4 1640 40 720 1800 1760 455 465 40 345 18 4
WIN-9_F - 1000T4 2200 75 950 2200 2160 455 465 40 345 18 4

WIN-9_F Series User Manual
● 85 ●
Appendix 2 WIN-9_F technical specification
Item Specification
Output
Output rated voltage Max. output voltage is the same as the input power supply voltage
Suitable motor power (kW) 1.5 2.2 3.7 5.5 7.5 11 15 18.5 22 30 37 45 55 75 93 110
Output rated current (A) 4.8 6.2 8 14 18 27 34 41 52 65 80 96 128 165 180 224
Suitable motor power (kW) 132 160 185 200 220 245 280 315 355 400 500 560 630 710 800 1000
Output rated current (A) 260 302 340 380 450 470 530 605 660 750 940 1050 1200 1300 1500 1860
Ration 100% continuouseness
Max. overload current G: 150% 1min, 180% 6sec (P series: 120%1min, 140% 18sec)Powersupply
Rated voltage & frequency 3 phase 380V (+10% ~ -15%) 50/60Hz±5%
Controlcharac-ters
Frequency range 0 ~ 400Hz
Frequency accuracy Digital command±0.01%(-10°C ~ +40°C)
Set frequency resolution Digital command 0.1Hz; analogue command 0.1Hz
Output freq. resolution 0.1Hz
Overload durance G series: 150% of output rated current 1min, P series: 120% of output rated current 1min
Frequency set signal 0~+10V (20kΩ) 4~20mA (250Ω)
Accel / Decel feature 0.1~3600sec (Accel/Decel time is set separately)
Brake torque 125% with additional brake resistor
V/f pattern 15 fixed V/F features selectable, any V/F features can be set
Protection Over voltage, Under voltage, Over current, Overload, Electronic thermal relay, Overheat, Over voltage stalling
Envi-ron-ment
Temperature / humidity -10°C ~ +40°C / 20 ~ 90% RH (no dewing)
Installed place In door(no corrosive gas), No higher than 1000m above sea level, with-out dust, corrosive air and direct sunlight
Vibration Lower than 0.2g when below 20Hz
Cooling method Forced air cooling

WIN-9_F Series User Manual
● 86 ●
Appendix 3 Digital Operator Monitor DisplayLED Name Description
Fref Frequency Reference Frequency reference can be monitored/set. ●
Setting/display unit depends on display mode (P024). ●
Fout Output Frequency Output frequency is displayed. ●
Display unit depends on display mode (P024). ●
Iout Output Current Output is displayed in units of 0.1A (1A current for 1,000A and above).
kWout Output Power Output is in units of 0.1kW (1kW for 1,000kW powerand displayed-above).
F/R FWD/REV Run Com-mand
FWD/REV run command can be monitored/set. ●
Setting enabled during run command from digital operator. ●
FWD run displays “For”, REV run displays “rEv”. ●
Accel Acceleration Time 1 Acceleration time 1 (P019) can be set/read in units of 0.1 sec (1 sec for 1,000 sec and above).
Decel Deceleration Time 1 Deceleration time 2 (P020) can be set/read in units of 0.1 sec (1 sec for 1,000 sec and above).
Vmtr Motor Rated Voltage Motor rated voltage (P011) can be set during stop.
V/F V/f Pattern Selection V/f pattern selection (P010) can be set during stop.
Fgain Frequency Reference Gain Frequency reference gain (P046) can be set during stop.
Fbias Frequency Reference Bias Frequency reference bias (P047) can be set during stop.
FLA Motor Rated Current Motor rated current (P032) can be set during stop.
PID PID Selection PID selection (P084) can be set during stop.
kWsav Energy Saving Selec-tion Energy saving selection (P095) can be set during stop.
PRGM PRGM Mode Parameters can be set/read during stop.
Montr Monitor
The following conditions can be monitored.
No. Contents
U-01 Frequency reference (same as Fref)
U-02 Output frequency (same as Fout)
U-03 Output current (same as Iout)
U-04 Output voltage reference is displayed in units of 1V.
U-05 DC voltage is displayed in units of 1V.
U-06 Output power (same as kWout)

WIN-9_F Series User Manual
● 87 ●
LED Name Description
Montr Monitor
U-07
Input terminal status is displayed (terminals S1 to S6).
1: S1 closed1: S2 closed1: S3 closed1: S4 closed1: S5 closed1: S6 closedAlways blank
||||||||
U-08
Inverter status is displayed.
||_|||||1: During run1: Reverse run1: Inverter ready1: Fault1: MODBUS errorAlways blank1: MA-MC output OFF1: M1-M2 output OFF
U-09 Last 4 faults are displayed.
U-10 Last 4 digits of software revision number are displayed.
U-11U-12
Elapsed time is displayed as follows:X X (U-11 first 2 digits)X X X X(U-10 last 4 digits)Elapsed time (in units of 1 hour),279,620 hours maximum
U-13 PID feedback is displayed in units of 0.1Hz.