Embed Size (px)
DESCRIPTION
Security Policies for Fortigate
Citation preview
FortiOS Handbook Security Profiles for FortiOS 5.2

FortiOS Handbook - Security Profiles for FortiOS 5.2
October 23, 2014
01-520-108920-20141023
Copyright© 2014 Fortinet, Inc. All rights reserved. Fortinet®, FortiGate®, FortiCare® and
FortiGuard®, and certain other marks are registered trademarks of Fortinet, Inc., and other
Fortinet names herein may also be registered and/or common law trademarks of Fortinet. All
other product or company names may be trademarks of their respective owners. Performance
and other metrics contained herein were attained in internal lab tests under ideal conditions,
and actual performance and other resultsmay vary. Network variables, different network
environments and other conditions may affect performance results. Nothing herein represents
any binding commitment by Fortinet, and Fortinet disclaims all warranties, whether express or
implied, except to the extent Fortinet enters a binding written contract, signed by Fortinet’s
General Counsel, with a purchaser that expressly warrants that the identified product will
perform according to certain expressly-identified performance metrics and, in such event, only
the specific performance metrics expressly identified in such binding written contract shall be
binding on Fortinet. For absolute clarity, any such warranty will be limited to performance in the
same ideal conditions as in Fortinet’s internal lab tests. Fortinet disclaims in full any covenants,
representations,and guarantees pursuant hereto, whether express or implied. Fortinet reserves
the right to change, modify, transfer, or otherwise revise this publication without notice, and the
most current version of the publication shall be applicable.
Technical Documentation docs.fortinet.com
Knowledge Base kb.fortinet.com
Customer Service & Support support.fortinet.com
Training Services training.fortinet.com
FortiGuard fortiguard.com
Document Feedback [email protected]
Change Log
Date Change Description
2014-10-23 Initial Release of Security Profiles Handbook for FortiOS 5.2
Page 3

Table of Contents
Change Log....................................................................................................... 3
Security Profiles overview ............................................................................. 12
Traffic inspection ................................................................................................... 12
IPS signatures .................................................................................................. 12
Application control ........................................................................................... 13
Content inspection and filtering............................................................................. 13
AntiVirus ........................................................................................................... 14
FortiGuard Web Filtering.................................................................................. 14
Email filter ........................................................................................................ 14
DLP .................................................................................................................. 15
Security Profiles components................................................................................ 15
AntiVirus ........................................................................................................... 15
Intrusion Protection System (IPS) .................................................................... 15
Web filtering ..................................................................................................... 15
Email filtering.................................................................................................... 16
Data Leak Prevention (DLP) ............................................................................. 16
Application Control .......................................................................................... 16
ICAP................................................................................................................. 16
Security Profiles/lists/sensors................................................................................ 16
AntiVirus .......................................................................................................... 18
Antivirus concepts ................................................................................................. 18
Malware Threats .............................................................................................. 18
Scanning Modes .............................................................................................. 20
Antivirus scanning order .................................................................................. 21
Antivirus databases.......................................................................................... 24
Antivirus techniques......................................................................................... 24
FortiGuard Sandbox ........................................................................................ 26
Client Comforting............................................................................................. 26
Oversized files and emails ............................................................................... 27
Archive scan depth .......................................................................................... 28
Scan buffer size ............................................................................................... 28
Windows file sharing (CIFS) ............................................................................. 29
Enabling AntiVirus scanning .................................................................................. 30
Testing your antivirus configuration....................................................................... 32
Page 4
Example Scenerios ................................................................................................ 32
Configuring simple default antivirus profile...................................................... 32
Setting up a basic proxy-based Antivirus profile for email tranffic .................. 34
Adding the profile to a policy ........................................................................... 36
Block files larger than 8 MB............................................................................. 37
Web filter ......................................................................................................... 38
Web filter concepts................................................................................................ 38
Different ways of controlling access ................................................................ 40
Order of web filtering ....................................................................................... 40
Inspections Modes ................................................................................................ 40
Proxy................................................................................................................ 40
Flow-based ...................................................................................................... 40
DNS.................................................................................................................. 41
FortiGuard Web Filtering Service........................................................................... 41
FortiGuard Web Filter and your FortiGate unit................................................. 42
FortiGuard Web Filter usage quotas................................................................ 44
Overriding FortiGuard website categorization ....................................................... 44
The different methods of override.................................................................... 44
Using Alternate Categories .............................................................................. 45
Using Alternate Profiles.................................................................................... 46
SafeSearch ............................................................................................................ 50
Search Keywords............................................................................................. 50
YouTube Education Filter ...................................................................................... 50
Enabling YouTube Education Filter in CLI ....................................................... 51
Static URL Filter..................................................................................................... 51
URL Filter actions............................................................................................. 52
Status............................................................................................................... 54
Configuring a URL filter.................................................................................... 54
Referrer URL .................................................................................................... 54
Web content filter................................................................................................... 55
General configuration steps............................................................................. 55
Creating a web filter content list ...................................................................... 56
Configuring a web content filter list ................................................................. 56
How content is evaluated ................................................................................ 57
Enabling the web content filter and setting the content threshold .................. 58
Table of Contents Page 5 FortiOS Handbook Handbook v5 Security Profiles for FortiOS 5.2
Advanced web filter configurations ....................................................................... 58
Allow websites when a rating error occurs ...................................................... 58
ActiveX filter ..................................................................................................... 58
Block HTTP redirects by rating........................................................................ 58
Block Invalid URLs........................................................................................... 58
Cookie filter ...................................................................................................... 58
Provide Details for Blocked HTTP 4xx and 5xx Errors .................................... 59
HTTP POST action........................................................................................... 59
Java applet filter............................................................................................... 59
Rate Images by URL ........................................................................................ 59
Rate URLs by Domain and IP Address............................................................ 59
Web resume download block .......................................................................... 60
Restrict Google account usage to specific domains ....................................... 60
Configuring Web Filter Profiles .............................................................................. 60
Enabling FortiGuard Web Filter........................................................................ 60
General configuration steps............................................................................. 60
Configuring FortiGuard Web Filter settings ..................................................... 61
To configure the FortiGuard Web Filter categories.......................................... 61
Configuring FortiGuard Category Quotas........................................................ 62
Configure Allowed Blocked Overrides ............................................................. 62
Configure Search Engine Section .................................................................... 63
Configure Static URL Filter .............................................................................. 63
Configure Rating Options ................................................................................ 63
Configure Proxy Options.................................................................................. 64
Web filtering example ............................................................................................ 65
School district .................................................................................................. 65
Application control ......................................................................................... 69
Application control concepts................................................................................. 69
Application Control Actions ................................................................................... 70
Allow ................................................................................................................ 70
Monitor............................................................................................................. 70
Block ................................................................................................................ 70
Reset ................................................................................................................ 70
Traffic Shaping................................................................................................. 70
View Signatures ............................................................................................... 71
Application considerations .................................................................................... 71
IM applications................................................................................................. 71
Skype ............................................................................................................... 71
SPDY................................................................................................................ 72
Working with other FortiOS components .............................................................. 72
WAN Optimization............................................................................................ 72
Application traffic shaping ..................................................................................... 72
Direction of traffic shaping............................................................................... 72
Shaper re-use .................................................................................................. 73
Table of Contents Page 6 FortiOS Handbook Handbook v5 Security Profiles for FortiOS 5.2
Application control monitor ................................................................................... 73
Enable application control ..................................................................................... 74
General configuration steps............................................................................. 74
Creating an application sensor ........................................................................ 74
Adding applications to an application sensor.................................................. 74
Creating a New Custom Application Signature ............................................... 75
Enabling application traffic shaping................................................................. 76
Messages in response to blocked applications............................................... 76
Application control examples ................................................................................ 76
Blocking all instant messaging ........................................................................ 76
Allowing only software updates ....................................................................... 77
Intrusion protection........................................................................................ 79
IPS concepts.......................................................................................................... 79
Anomaly-based defense .................................................................................. 79
Signature-based defense................................................................................. 79
Enable IPS scanning .............................................................................................. 81
General configuration steps............................................................................. 81
Creating an IPS sensor .................................................................................... 81
Adding an IPS filter to a sensor ....................................................................... 82
Updating predefined IPS signatures................................................................ 85
Viewing and searching predefined IPS signatures .......................................... 85
IPS processing in an HA cluster ............................................................................ 85
Active-passive.................................................................................................. 85
Active-active .................................................................................................... 86
Configure IPS options............................................................................................ 86
Hardware Acceleration..................................................................................... 86
Extended IPS Database. .................................................................................. 86
Configuring the IPS engine algorithm .............................................................. 87
Configuring the IPS engine-count.................................................................... 87
Configuring fail-open ....................................................................................... 87
Configuring the session count accuracy ......................................................... 87
Configuring the IPS buffer size ........................................................................ 88
Configuring protocol decoders ........................................................................ 88
Configuring security processing modules ....................................................... 88
IPS signature rate count threshold .................................................................. 89
Enable IPS packet logging..................................................................................... 89
IPS examples ......................................................................................................... 90
Configuring basic IPS protection ..................................................................... 90
Using IPS to protect your web server .............................................................. 91
Create and test a packet logging IPS sensor .................................................. 93
Configuring a Fortinet Security Processing module ........................................ 94
IPS Sensor ....................................................................................................... 95
Table of Contents Page 7 FortiOS Handbook Handbook v5 Security Profiles for FortiOS 5.2
Custom Application & IPS Signatures .......................................................... 97Creating a custom IPS signature ..................................................................... 97
Custom signature syntax and keywords.......................................................... 97
Creating a custom signature to block access to example.com .................... 103
Creating a custom signature to block the SMTP “vrfy” command................ 105
Email filter ..................................................................................................... 107
Email filter concepts ............................................................................................ 107
Inspection Modes ................................................................................................ 107
Proxy.............................................................................................................. 107
Flow-based .................................................................................................... 108
Email filter techniques.......................................................................................... 108
Black white list ............................................................................................... 108
Banned word check....................................................................................... 109
DNS-based Blackhole List (DNSBL) .............................................................. 110
FortiGuard-Antispam Service. ....................................................................... 110
Trusted IP Addresses..................................................................................... 111
MIME header.................................................................................................. 111
HELO DNS lookup ......................................................................................... 111
Return email DNS check................................................................................ 111
Order of spam filtering ......................................................................................... 112
Order of SMTP and SMTPS spam filtering .................................................... 112
Order of IMAP, POP3, IMAPS and POP3S spam filtering ............................. 112
Spam actions ....................................................................................................... 113
Discard.......................................................................................................... 113
Pass ............................................................................................................... 113
Tag................................................................................................................. 113
Email traffic types to inspect ............................................................................... 113
Configuring an Email Filters ................................................................................. 113
Spam detection by protocol .......................................................................... 114
FortiGuard Spam Filtering.............................................................................. 114
Local Spam Filtering ...................................................................................... 114
Email filter examples............................................................................................ 115
Configuring simple antispam protection........................................................ 115
Blocking email from a user ............................................................................ 116
Table of Contents Page 8 FortiOS Handbook Handbook v5 Security Profiles for FortiOS 5.2
Data leak prevention .................................................................................... 117
Data leak prevention concepts ............................................................................ 117
DLP sensor..................................................................................................... 117
DLP filter ........................................................................................................ 117
DLP Filter Actions .......................................................................................... 118
Preconfigured sensors ................................................................................... 118
DLP document fingerprinting......................................................................... 119
Fingerprinting ................................................................................................. 119
File size .......................................................................................................... 121
DLP filtering by specific file types.................................................................. 121
Watermarking................................................................................................. 121
Regular expression ........................................................................................ 123
Encrypted....................................................................................................... 123
Examining specific services........................................................................... 123
DLP archiving....................................................................................................... 123
Enable data leak prevention ................................................................................ 124
General configuration steps........................................................................... 124
Creating/editing a DLP sensor............................................................................. 125
Adding filters to a DLP sensor ....................................................................... 125
DLP examples...................................................................................................... 127
Blocking content with credit card numbers................................................... 127
Blocking emails larger than 15 MB and logging emails from 5 MB to 15 MB 128
Selective blocking based on a finger print..................................................... 129
ICAP............................................................................................................... 133
The Protocol ........................................................................................................ 133
Offloading using ICAP.......................................................................................... 134
Configuration Settings ......................................................................................... 134
Servers ........................................................................................................... 134
Profiles ........................................................................................................... 135
Example ICAP sequence ..................................................................................... 135
Example Scenerio ................................................................................................ 136
Other Security Profiles considerations ...................................................... 138
Security Profiles and Virtual domains (VDOMs)................................................... 138
Conserve mode.................................................................................................... 138
The AV proxy.................................................................................................. 138
Entering and exiting conserve mode ............................................................. 138
Conserve mode effects.................................................................................. 139
Configuring the av-failopen command .......................................................... 140
SSL content scanning and inspection ................................................................. 140
Setting up certificates to avoid client warnings ............................................. 141
Exceptions ..................................................................................................... 142
Configuring packet logging options............................................................... 142
Using wildcards and Perl regular expressions..................................................... 143
Table of Contents Page 9 FortiOS Handbook Handbook v5 Security Profiles for FortiOS 5.2

............................................................................................................................. 146
Index .............................................................................................................. 147
Table of Contents Page 10 FortiOS Handbook Handbook v5 Security Profiles for FortiOS 5.2
This FortiOS Handbook chapter contains the following sections:
Security Profiles overview describes Security Profiles components and their relation to firewall
policies, as well as SSL content scanning and inspection. We recommend starting with this
section to become familiar with the different features in your FortiGate unit.
Client Reputation explains how to track client behavior and report on activities that you
determine are risky or otherwise noteworthy.
AntiVirus explains how the FortiGate unit scans files for viruses and describes how to configure
the antivirus options.
Email filter explains how the FortiGate unit filters email, describes how to configure the filtering
options and the action to take with email detected as spam.
Intrusion protection explains basic Intrusion Protection System (IPS) concepts and how to
configure IPS options; includes guidance and a detailed table for creating custom signatures as
well as several examples.
Web filter and FortiGuard Web Filter The first of these sections describes basic web filtering
concepts, the order in which the FortiGate unit performs web filtering, and configuration. The
second section describes enhanced features of the subscription-based FortiGuard Web
Filtering service and explains how to configure them. We recommend reading both sections if
you are using FortiGuard Web Filtering because settings you configure in one feature may affect
the other.
Data leak prevention describes the DLP features that allow you to prevent sensitive data from
leaving your network and explains how to configure the DLP rules, compound rules, and
sensors.
Application control describes how your FortiGate unit can detect and take action against
network traffic based on the application generating the traffic.
Page 11
Security Profiles overview
Ranging from the FortiGate®-30 series for small businesses to the FortiGate-5000 series for
large enterprises, service providers and carriers, the FortiGate line combines a number of
security features to protect your network from threats. As a whole, these features, when
included in a single Fortinet security appliance, are referred to as Security Profiles. The Security
Profiles features your FortiGate model includes are:
• AntiVirus
• Intrusion Prevention System (IPS)
• Web filtering
• E-mail filtering, including protection against spam and grayware
• Data Leak Prevention (DLP)
• Application Control
• ICAP
Firewall policies limit access, and while this and similar features are a vital part of securing your
network, they are not covered in this document.
The following topics are included in this section:
• Traffic inspection
• Content inspection and filtering
• Security Profiles components
• Security Profiles/lists/sensors
Traffic inspection
When the FortiGate unit examines network traffic one packet at a time for IPS signatures, it is
performing traffic analysis. This is unlike content analysis where the traffic is buffered until files,
email messages, web pages, and other files are assembled and examined as a whole.
DoS policies use traffic analysis by keeping track of the type and quantity of packets, as well as
their source and destination addresses.
Application control uses traffic analysis to determine which application generated the packet.
Although traffic inspection doesn’t involve taking packets and assembling files they are
carrying, the packets themselves can be split into fragments as they pass from network to
network. These fragments are reassembled by the FortiGate unit before examination.
No two networks are the same and few recommendations apply to all networks. This topic
offers suggestions on how you can use the FortiGate unit to help secure your network against
content threats.
IPS signatures
IPS signatures can detect malicious network traffic. For example, the Code Red worm attacked
a vulnerability in the Microsoft IIS web server. Your FortiGate’s IPS system can detect traffic
attempting to exploit this vulnerability. IPS may also detect when infected systems
communicate with servers to receive instructions.
Page 12
IPS recommendations
• Enable IPS scanning at the network edge for all services.
• Use FortiClient endpoint IPS scanning for protection against threats that get into your
network.
• Subscribe to FortiGuard IPS Updates and configure your FortiGate unit to receive push
updates. This will ensure you receive new IPS signatures as soon as they are available.
• Your FortiGate unit includes IPS signatures written to protect specific software titles from
DoS attacks. Enable the signatures for the software you have installed and set the signature
action to Block.
• You can view these signatures by going to Security Profiles > Intrusion Protection and
selecting the [View IPS Signatures] link.
• Because it is critical to guard against attacks on services that you make available to the
public, configure IPS signatures to block matching signatures. For example, if you have a
web server, configure the action of web server signatures to Block.
Network traffic itself can be used as an attack vector or a means to probe a network before an
attack. For example, SYN and FIN flags should never appear together in the same TCP packet.
The SYN flag is used to initiate a TCP session while the FIN flag indicates the end of data
transmission at the end of a TCP session.
The FortiGate unit has IPS signatures that recognize abnormal and suspicious traffic attributes.
The SYN/FIN combination is one of the suspicious flag combinations detected in TCP traffic by
the TCP.BAD.FLAGS signature.
The signatures that are created specifically to examine traffic options and settings, begin with
the name of the traffic type they are associated with. For example, signatures created to
examine TCP traffic have signature names starting with TCP.
Application control
While applications can often be blocked by the ports they use, application control allows
convenient management of all supported applications, including those that do not use set
ports.
Application control recommendations
• Some applications behave in an unusual manner in regards to application control. For more
information, see “Application considerations” on page 71.
• By default, application control allows the applications not specified in the application control
list. For high security networks, you may want to change this behavior so that only the
explicitly allowed applications are permitted.
Content inspection and filtering
When the FortiGate unit buffers the packets containing files, email messages, web pages, and
other similar files for reassembly before examining them, it is performing content inspection.
Traffic inspectionTraff, on the other hand, is accomplished by the FortiGate unit examining
individual packets of network traffic as they are received.
No two networks are the same and few recommendations apply to all networks. This topic
offers suggestions on how you can use the FortiGate unit to help secure your network against
content threats. Be sure to understand the effects of the changes before using the suggestions.
Fortinet Technologies Inc. Page 13 Security Profiles for FortiOS 5.2

AntiVirus
The FortiGate antivirus scanner can detect viruses and other malicious payloads used to infect
machines. The FortiGate unit performs deep content inspection. To prevent attempts to
disguise viruseAns, the antivirus scanner will reassemble fragmented files and uncompress
content that has been compressed. Patented Compact Pattern Recognition Language (CPRL)
allows further inspection for common patterns, increasing detection rates of virus variations in
the future.
AntiVirus recommendations
• Enable antivirus scanning at the network edge for all services.
• Use FortiClient endpoint antivirus scanning for protection against threats that get into your
network.
• Subscribe to FortiGuard AntiVirus Updates and configure your FortiGate unit to receive push
updates. This will ensure you receive new antivirus signatures as soon as they are available.
• Enable the Extended Virus Database if your FortiGate unit supports it.
• Examine antivirus logs periodically. Take particular notice of repeated detections. For
example, repeated virus detection in SMTP traffic could indicate a system on your network is
infected and is attempting to contact other systems to spread the infection using a mass
mailer.
• The builtin-patterns file filter list contains nearly 20 file patterns. Many of the represented
files can be executed or opened with a double-click. If any of these file patterns are not
received as a part of your normal traffic, blocking them may help protect your network. This
also saves resources since files blocked in this way do not need to be scanned for viruses.
• To conserve system resources, avoid scanning email messages twice. Scan messages as
they enter and leave your network or when clients send and retrieve them, rather than both.
FortiGuard Web Filtering
The web is the most popular part of the Internet and, as a consequence, virtually every
computer connected to the Internet is able to communicate using port 80, HTTP. Botnet
communications take advantage of this open port and use it to communicate with infected
computers. FortiGuard Web Filtering can help stop infections from malware sites and help
prevent communication if an infection occurs.
FortiGuard Web Filtering recommendations
• Enable FortiGuard Web Filtering at the network edge.
• Install the FortiClient application and use FortiGuard Web Filtering on any systems that
bypass your FortiGate unit.
• Block categories such as Pornography, Malware, Spyware, and Phishing. These categories
are more likely to be dangerous.
• In the email filter profile, enable IP Address Check in FortiGuard Email Filtering. Many IP
addresses used in spam messages lead to malicious sites; checking them will protect your
users and your network.
Email filter
Spam is a common means by which attacks are delivered. Users often open email attachments
they should not, and infect their own machine. The FortiGate email filter can detect harmful
spam and mark it, alerting the user to the potential danger.
Fortinet Technologies Inc. Page 14 Security Profiles for FortiOS 5.2
Email filter recommendations
• Enable email filtering at the network edge for all types of email traffic.
• Use FortiClient endpoint scanning for protection against threats that get into your network.
• Subscribe to the FortiGuard AntiSpam Service.
DLP
Most security features on the FortiGate unit are designed to keep unwanted traffic out of your
network while DLP can help you keep sensitive information from leaving your network. For
example, credit card numbers and social security numbers can be detected by DLP sensors.
DLP recommendations
• Rules related to HTTP posts can be created, but if the requirement is to block all HTTP
posts, a better solution is to use application control or the HTTP POST Action option in the
web filter profile.
• While DLP can detect sensitive data, it is more efficient to block unnecessary
communication channels than to use DLP to examine it. If you don’t use instant messaging
or peer-to-peer communication in your organization, for example, use application control to
block them entirely.
Security Profiles components
AntiVirus
Your FortiGate unit stores a virus signature database that can identify more than 15,000
individual viruses. FortiGate models that support additional virus databases are able to identify
hundreds of thousands of viruses. With a FortiGuard AntiVirus subscription, the signature
databases are updated whenever a new threat is discovered.
AntiVirus also includes file filtering. When you specify files by type or by file name, the FortiGate
unit will stop the matching files from reaching your users.
FortiGate units with a hard drive or configured to use a FortiAnalyzer unit can store infected and
blocked files for that you can examine later.
Intrusion Protection System (IPS)
The FortiGate Intrusion Protection System (IPS) protects your network against hacking and
other attempts to exploit vulnerabilities of your systems. More than 3,000 signatures are able to
detect exploits against various operating systems, host types, protocols, and applications.
These exploits can be stopped before they reach your internal network.
You can also write custom signatures, tailored to your network.
Web filtering
Web filtering includes a number of features you can use to protect or limit your users’ activity on
the web.
FortiGuard Web Filtering is a subscription service that allows you to limit access to web sites.
More than 60 million web sites and two billion web pages are rated by category. You can
choose to allow or block each of the 77 categories.
URL filtering can block your network users from access to URLs that you specify.
Fortinet Technologies Inc. Page 15 Security Profiles for FortiOS 5.2

Web content filtering can restrict access to web pages based on words and phrases appearing
on the web page itself. You can build lists of words and phrases, each with a score. When a web
content list is selected in a web filter profile, you can specify a threshold. If a user attempts to
load a web page and the score of the words on the page exceeds the threshold, the web page
is blocked.
Email filtering
FortiGuard AntiSpam is a subscription service that includes an IP address black list, a URL
black list, and an email checksum database. These resources are updated whenever new spam
messages are received, so you do not need to maintain any lists or databases to ensure
accurate spam detection.
You can use your own IP address lists and email address lists to allow or deny addresses,
based on your own needs and circumstances.
Data Leak Prevention (DLP)
Data leak prevention allows you to define the format of sensitive data. The FortiGate unit can
then monitor network traffic and stop sensitive information from leaving your network. Rules for
U.S. social security numbers, Canadian social insurance numbers, as well as Visa, Mastercard,
and American Express card numbers are included.
Application Control
Although you can block the use of some applications by blocking the ports they use for
communications, many applications do not use standard ports to communicate. Application
control can detect the network traffic of more than 1000 applications, improving your control
over application communication.
ICAP
This module allows for the offloading of certain processes to a separate server so that your
FortiGate firewall can optimize its resources and maintain the best level of performance
possible.
Security Profiles/lists/sensors
A profile is a group of settings that you can apply to one or more firewall policies. Each Security
Profile feature is enabled and configured in a profile, list, or sensor. These are then selected in a
security policy and the settings apply to all traffic matching the policy. For example, if you create
an antivirus profile that enables antivirus scanning of HTTP traffic, and select the antivirus
profile in the security policy that allows your users to access the World Wide Web, all of their
web browsing traffic will be scanned for viruses.
Because you can use profiles in more than one security policy, you can configure one profile for
the traffic types handled by a set of firewall policies requiring identical protection levels and
types, rather than repeatedly configuring those same profile settings for each individual security
policy.
For example, while traffic between trusted and untrusted networks might need strict protection,
traffic between trusted internal addresses might need moderate protection. To provide the
different levels of protection, you might configure two separate sets of profiles: one for traffic
between trusted networks, and one for traffic between trusted and untrusted networks.
Fortinet Technologies Inc. Page 16 Security Profiles for FortiOS 5.2

The Security Profiles include:
• antivirus profile
• IPS sensor
• Web filter profile
• Email filter profile
• Data Leak Prevention profile
• Application Control list
• VoIP profile
Although they’re called profiles, sensors, and lists, they’re functionally equivalent. Each is used
to configure how the feature works.
Fortinet Technologies Inc. Page 17 Security Profiles for FortiOS 5.2
AntiVirus
This section describes how to configure the antivirus options. From an antivirus profile you can
configure the FortiGate unit to apply antivirus protection to HTTP, FTP, IMAP, POP3, SMTP, and
NNTP sessions. If your FortiGate unit supports SSL content scanning and inspection, you can
also configure antivirus protection for HTTPS, IMAPS, POP3S, SMTPS, and FTPS sessions.
In many cases you can just customize the default antivirus profile and apply it to the security
policy that accepts the traffic to be virus scanned. You can also create custom antivirus profiles
if want to apply different types of virus protection to different traffic.
The following topics are included in this section:
• Antivirus concepts
• Enabling AntiVirus scanning
• Testing your antivirus configuration
• Example Scenerios
Antivirus concepts
The word “antivirus” refers to a group of features that are designed to prevent unwanted and
potentially malicious files from entering your network. These features all work in different ways,
which include checking for a file size, name, or type, or for the presence of a virus or grayware
signature.
The antivirus scanning routines your FortiGate unit uses are designed to share access to the
network traffic. This way, each individual feature does not have to examine the network traffic as
a separate operation, and the overhead is reduced significantly. For example, if you enable file
filtering and virus scanning, the resources used to complete these tasks are only slightly greater
than enabling virus scanning alone. Two features do not require twice the resources.
Antivirus scanning examines files for viruses, worms, trojans, and other malware. The antivirus
scan engine has a database of virus signatures it uses to identify infections. If the scanner finds
a signature in a file, it determines that the file is infected and takes the appropriate action.
Malware Threats
Viruses
Viruses are self replicating code that install copies of themselves into other programs, data files
for boot sectors of storage devices. Virus can often carry a “payload” which performs some
undesirable function. These functions can include but are not limited to:
• Stealing drive space
• Stealing cpu cycles
• Accessing private information
• Corrupting data
• Digital defacement or vandalism
• Spamming contact lists
Page 18

Worms
A worm is a piece of standalone computer code that replicates itself in order to spread to other
computers. It normally uses a computer network to spread itself, using security vulnerabilities
on the target computer or network to propagate. Unlike a virus, it does not attach itself to an
existing file. Even is there is no payload, worms consume resources such as bandwidth and
storage space just through their act of replication.
Trojan horses
A Trojan horse, or Trojan is malware that is defined by its delivery method. Through the use of
social engineering, or some other method, the code is installed on a system by a valid user of
the system and like the original Trojan horse there is something more than advertised within the
software. Trojans, unlike worms or viruses are generally non-self-replicating. The most common
payload of a Trojan is the setting up of a “backdoor” control mechanism to the system that it is
installed on.
Ransomware
Ransomware is a type of malware that, as the name implies, hold the system ransom until
payment of some kind is made. It does this by restricting access to the legitimate owner of the
system either by encrypting files or locking the system. Usually, a message of some kind is
displayed with the demands. Upon payment a utility or key is sent to the user to unlock the
system.
Scareware
Scareware comes in two main flavours; the first tries to convince the user that his computer is
invected with some non-existent malware, scaring the user into purchasing the author’s virus
removal utility. The utility is nonfunctional or some additional form of malware.
The second form tries to convince the user that the computer has been or is being used for an
illegal act such as being part of a bot net or storing child pornography. Again, the objective is to
scare the user into paying to cure something that is not really there.
Spyware
Spyware is used by its authors to collect information about the user and its computer without
the users knowledge. The end result can be as benign as being better able to target adds, to as
criminal as key loggers designed to record account ids and passwords of bank accounts and
forward them off to the authors.
Adware
Adware is not malware per se. It is merely any software that produces advertisements in order
to generate revenue for its author. While a lot of people find this inconvenient or irritating it is not
malware. As such it is not blocked by the antivirus software for being malware. This doesn’t
mean that software that has adware built into it will not be block if it does have malware in it.
Botnets
A botnet is a network of Internet connected computers that have been covertly usurped to
forward transmissions to other computers on the Internet on behalf of a “master”. These
transmission can be merely annoying such as spam or they can critically impact a target as
when used to launch a Distributed Denial of Service attack.
Any such computer is referred to as a zombie - in effect, a computer "robot" or "bot" that serves
the wishes of some master spam or virus originator. Most computers compromised in this way
are home-based.
Fortinet Technologies Inc. Page 19 Security Profiles for FortiOS 5.2
According to a report from Russian-based Kaspersky Labs, botnets -- not spam, viruses, or
worms -- currently pose the biggest threat to the Internet. A report from Symantec came to a
similar conclusion.
Phishing
Phishing is a social engineering technique that is used to obtain sensitive and confidential
information by masquerading as a communication from a trusted entity such as a well known
institution, company or website. Usually, the malware is not in the communication itself but in
the links within the communication.
Grayware
Grayware programs are unsolicited software programs installed on computers, often without
the user’s consent or knowledge. Grayware programs are generally considered an annoyance,
but they can also cause system performance problems or be used for malicious purposes.
Scanning Modes
FortiOS has two different mode of scanning for malware. The reasons for the different modes
are performance and granularity. In just about everything relating to security there is a constant
balancing act going on. As you increase the level of security and comprehensiveness, there is
by necessity a decrease in either convenience or performance, sometimes both. The increase in
processing to scan for more threats requires more resources; resources that are a finite supply
on the hardware. Granularity can sometimes be used to mitigate performance impact by
scanning for a smaller subset of traffic but this is only recommended when that smaller subset
of traffic is the only traffic going through the firewall.
If the the traffic on the device is slight then the impact on the performance will hardly be
noticeable, but it the unit is working close to capacity in terms of traffic and there are a lot of
files coming through then there might be a noticeable decline in the performance.
While both modes offer significant security, Proxy-based is weighted towards being more
thorough and easily configurable, while Flow-based is designed to optimize performance.
Proxy
The most thorough scan requires that the FortiGate unit have the whole file for the scanning
procedure. To achieve this, the antivirus proxy buffers the file as it arrives. Once the
transmission is complete, the virus scanner examines the file. If no infection is present, it is sent
to the destination. If an infection is present, a replacement message is set to the destination.
During the buffering and scanning procedure, the client must wait. With a default configuration,
the file is released to the client only after it is scanned. You can enable client comforting in the
Proxy Options profile to feed the client a trickle of data to prevent them from thinking the
transfer is stalled, and possibly cancelling the download.
Buffering the entire file allows the FortiGate unit to eliminate the danger of missing an infection
due to fragmentation because the file is reassembled before examination. Archives can also be
expanded and the contents scanned, even if archives are nested.
Since the FortiGate unit has a limited amount of memory, files larger than a certain size do not fit
within the memory buffer. The default buffer size is 10 MB. You can use the uncompsizelimit CLI
command to adjust the size of this memory buffer.
Files larger than the buffer are passed to the destination without scanning. You can use the
Oversize File/Email setting to block files larger than the antivirus buffer if allowing files that are
too large to be scanned is an unacceptable security risk.
Fortinet Technologies Inc. Page 20 Security Profiles for FortiOS 5.2
Flow-based
If your FortiGate unit supports flow-based antivirus scanning, you can select it instead of
proxy-based antivirus scanning. The way flow-based antivirus works changed significantly
starting with firmware version 5.2.
As packets of a file come into the FortiGate unit, a copy of the packet is cached locally before
the packet is allowed to pass through to the recipient. When the last packet of the file arrives, it
is also cached but put on hold. Now the entire cached file is delivered to the Antivirus engine for
a full scanning, just as it would be if using the proxy-based method, using what ever antivirus
database has been configured.
If the file is determined to be infected with malware, the last packet will be dropped and the
session is reset. Without all of the packets the file cannot be built by the recipient. When
download a file through an HTTP connection (or HTTPS is SSL scanning is enabled), the
flow-based feature remembers the last virus result so any subsequent attempts to download
the same file will be welcomed by an appropriate blocked message directly, without engaging in
the effort of downloading the file.
By using the same engine as the proxy-based method the detection rate is the same for both
methods. In terms of performance from the end user’s stand point, the performance of the
download will be a lot faster until the last packet and then there will be a slight delay for the
scan, but after the determination is made only one packet has to be sent from the firewall to the
recipient so the overall speed is faster than the proxy based method.
An additional advantage of the flow-based method is that the scanning process does not
change the packets as they pass through the FortiGate unit, while proxy-based scanning can
change packet details such as sequence numbers. The changes made by proxy-based
scanning do not affect most networks.
Antivirus scanning order
The antivirus scanning function includes various modules and engines that perform separate
tasks.
Proxy-based antivirus scanning order
Figure 1 on page 22 illustrates the antivirus scanning order when using proxy-based scanning.
The first check for oversized files/email is to determine whether the file exceeds the configured
size threshold. The uncompsizelimit check is to determine if the file can be buffered for file
type and antivirus scanning. If the file is too large for the buffer, it is allowed to pass without
being scanned. For more information, see the config antivirus service command. The
antivirus scan includes scanning for viruses, as well as for grayware and heuristics if they are
enabled.
File filtering includes file pattern and file type scans which are applied at different stages in the
antivirus process.
Fortinet Technologies Inc. Page 21 Security Profiles for FortiOS 5.2
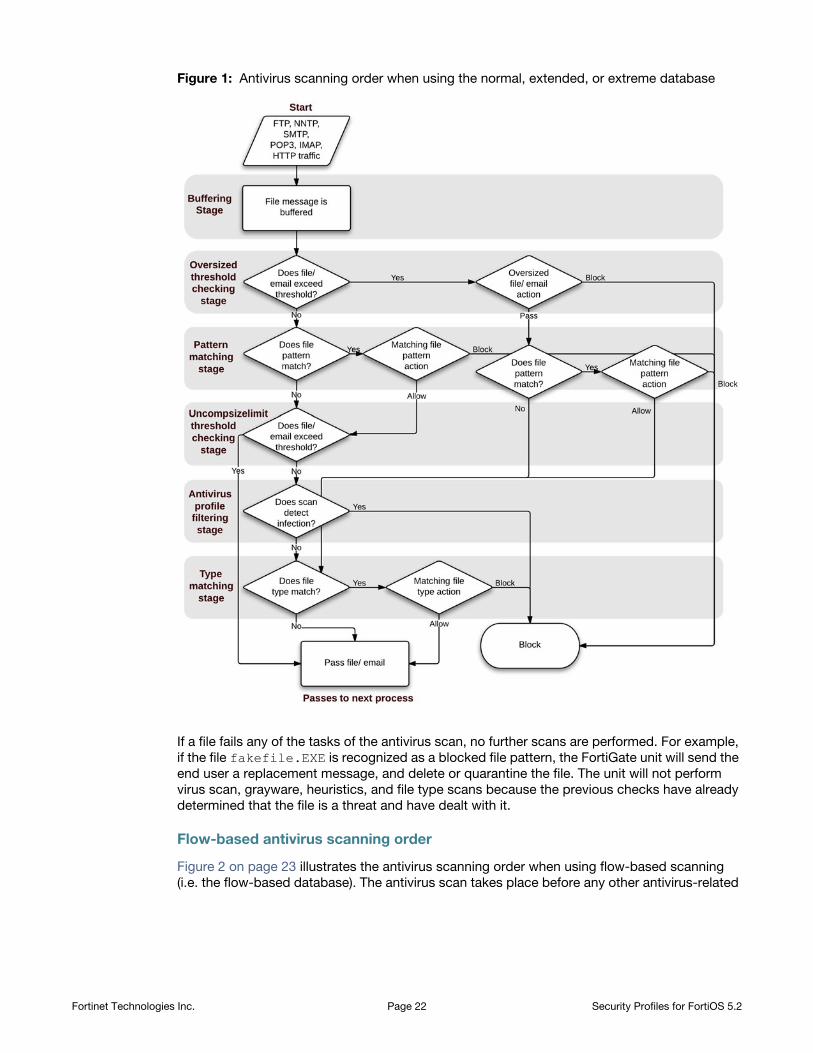
Figure 1: Antivirus scanning order when using the normal, extended, or extreme database
If a file fails any of the tasks of the antivirus scan, no further scans are performed. For example,
if the file fakefile.EXE is recognized as a blocked file pattern, the FortiGate unit will send the
end user a replacement message, and delete or quarantine the file. The unit will not perform
virus scan, grayware, heuristics, and file type scans because the previous checks have already
determined that the file is a threat and have dealt with it.
Flow-based antivirus scanning order
Figure 2 on page 23 illustrates the antivirus scanning order when using flow-based scanning
(i.e. the flow-based database). The antivirus scan takes place before any other antivirus-related
Fortinet Technologies Inc. Page 22 Security Profiles for FortiOS 5.2

scan. If file filter is not enabled, the file is not buffered. The antivirus scan includes scanning for
viruses, as well as for grayware and heuristics if they are enabled.
File filtering includes file pattern and file type scans which are applied at different stages in the
antivirus process.
Figure 2: Antivirus scanning order when using flow-based scanning
Fortinet Technologies Inc. Page 23 Security Profiles for FortiOS 5.2
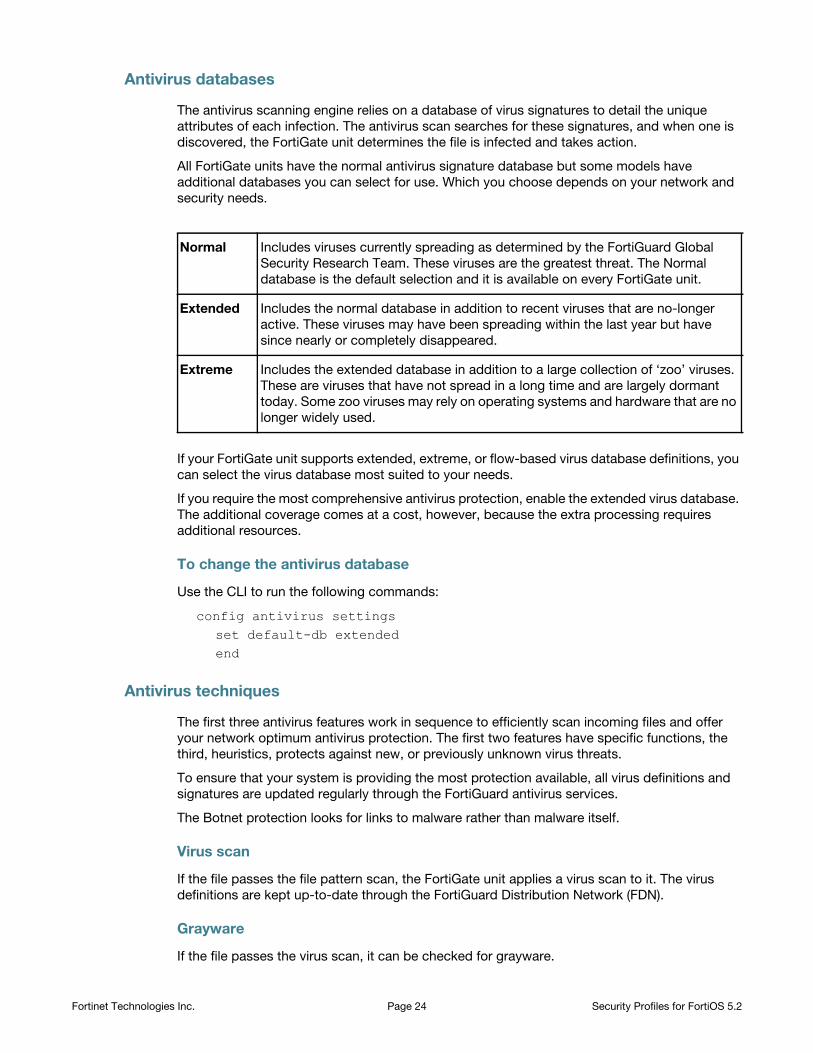
Antivirus databases
The antivirus scanning engine relies on a database of virus signatures to detail the unique
attributes of each infection. The antivirus scan searches for these signatures, and when one is
discovered, the FortiGate unit determines the file is infected and takes action.
All FortiGate units have the normal antivirus signature database but some models have
additional databases you can select for use. Which you choose depends on your network and
security needs.
If your FortiGate unit supports extended, extreme, or flow-based virus database definitions, you
can select the virus database most suited to your needs.
If you require the most comprehensive antivirus protection, enable the extended virus database.
The additional coverage comes at a cost, however, because the extra processing requires
additional resources.
To change the antivirus database
Use the CLI to run the following commands:
config antivirus settingsset default-db extendedend
Antivirus techniques
The first three antivirus features work in sequence to efficiently scan incoming files and offer
your network optimum antivirus protection. The first two features have specific functions, the
third, heuristics, protects against new, or previously unknown virus threats.
To ensure that your system is providing the most protection available, all virus definitions and
signatures are updated regularly through the FortiGuard antivirus services.
The Botnet protection looks for links to malware rather than malware itself.
Virus scan
If the file passes the file pattern scan, the FortiGate unit applies a virus scan to it. The virus
definitions are kept up-to-date through the FortiGuard Distribution Network (FDN).
Grayware
If the file passes the virus scan, it can be checked for grayware.
Normal Includes viruses currently spreading as determined by the FortiGuard Global
Security Research Team. These viruses are the greatest threat. The Normal
database is the default selection and it is available on every FortiGate unit.
Extended Includes the normal database in addition to recent viruses that are no-longer
active. These viruses may have been spreading within the last year but have
since nearly or completely disappeared.
Extreme Includes the extended database in addition to a large collection of ‘zoo’ viruses.
These are viruses that have not spread in a long time and are largely dormant
today. Some zoo viruses may rely on operating systems and hardware that are no
longer widely used.
Fortinet Technologies Inc. Page 24 Security Profiles for FortiOS 5.2
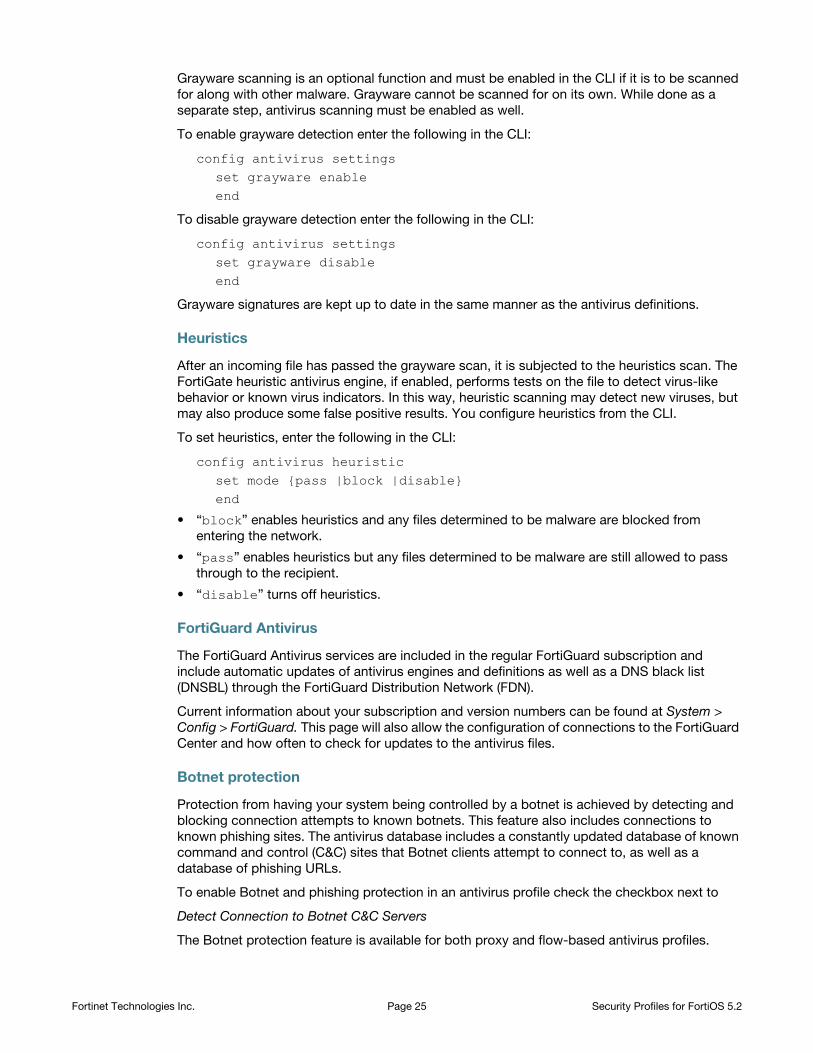
Grayware scanning is an optional function and must be enabled in the CLI if it is to be scanned
for along with other malware. Grayware cannot be scanned for on its own. While done as a
separate step, antivirus scanning must be enabled as well.
To enable grayware detection enter the following in the CLI:
config antivirus settingsset grayware enableend
To disable grayware detection enter the following in the CLI:
config antivirus settingsset grayware disableend
Grayware signatures are kept up to date in the same manner as the antivirus definitions.
Heuristics
After an incoming file has passed the grayware scan, it is subjected to the heuristics scan. The
FortiGate heuristic antivirus engine, if enabled, performs tests on the file to detect virus-like
behavior or known virus indicators. In this way, heuristic scanning may detect new viruses, but
may also produce some false positive results. You configure heuristics from the CLI.
To set heuristics, enter the following in the CLI:
config antivirus heuristicset mode {pass |block |disable}end
• “block” enables heuristics and any files determined to be malware are blocked from
entering the network.
• “pass” enables heuristics but any files determined to be malware are still allowed to pass
through to the recipient.
• “disable” turns off heuristics.
FortiGuard Antivirus
The FortiGuard Antivirus services are included in the regular FortiGuard subscription and
include automatic updates of antivirus engines and definitions as well as a DNS black list
(DNSBL) through the FortiGuard Distribution Network (FDN).
Current information about your subscription and version numbers can be found at System >
Config > FortiGuard. This page will also allow the configuration of connections to the FortiGuard
Center and how often to check for updates to the antivirus files.
Botnet protection
Protection from having your system being controlled by a botnet is achieved by detecting and
blocking connection attempts to known botnets. This feature also includes connections to
known phishing sites. The antivirus database includes a constantly updated database of known
command and control (C&C) sites that Botnet clients attempt to connect to, as well as a
database of phishing URLs.
To enable Botnet and phishing protection in an antivirus profile check the checkbox next to
Detect Connection to Botnet C&C Servers
The Botnet protection feature is available for both proxy and flow-based antivirus profiles.
Fortinet Technologies Inc. Page 25 Security Profiles for FortiOS 5.2
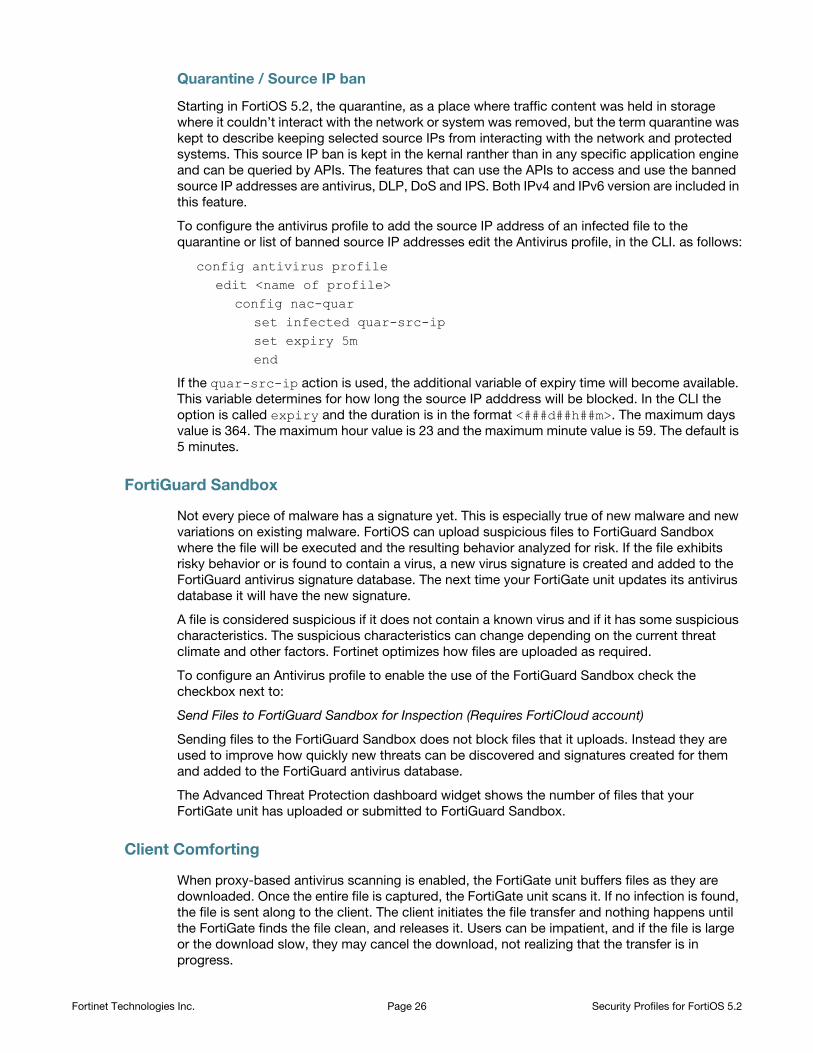
Quarantine / Source IP ban
Starting in FortiOS 5.2, the quarantine, as a place where traffic content was held in storage
where it couldn’t interact with the network or system was removed, but the term quarantine was
kept to describe keeping selected source IPs from interacting with the network and protected
systems. This source IP ban is kept in the kernal ranther than in any specific application engine
and can be queried by APIs. The features that can use the APIs to access and use the banned
source IP addresses are antivirus, DLP, DoS and IPS. Both IPv4 and IPv6 version are included in
this feature.
To configure the antivirus profile to add the source IP address of an infected file to the
quarantine or list of banned source IP addresses edit the Antivirus profile, in the CLI. as follows:
config antivirus profileedit <name of profile>
config nac-quarset infected quar-src-ipset expiry 5mend
If the quar-src-ip action is used, the additional variable of expiry time will become available.
This variable determines for how long the source IP adddress will be blocked. In the CLI the
option is called expiry and the duration is in the format <###d##h##m>. The maximum days
value is 364. The maximum hour value is 23 and the maximum minute value is 59. The default is
5 minutes.
FortiGuard Sandbox
Not every piece of malware has a signature yet. This is especially true of new malware and new
variations on existing malware. FortiOS can upload suspicious files to FortiGuard Sandbox
where the file will be executed and the resulting behavior analyzed for risk. If the file exhibits
risky behavior or is found to contain a virus, a new virus signature is created and added to the
FortiGuard antivirus signature database. The next time your FortiGate unit updates its antivirus
database it will have the new signature.
A file is considered suspicious if it does not contain a known virus and if it has some suspicious
characteristics. The suspicious characteristics can change depending on the current threat
climate and other factors. Fortinet optimizes how files are uploaded as required.
To configure an Antivirus profile to enable the use of the FortiGuard Sandbox check the
checkbox next to:
Send Files to FortiGuard Sandbox for Inspection (Requires FortiCloud account)
Sending files to the FortiGuard Sandbox does not block files that it uploads. Instead they are
used to improve how quickly new threats can be discovered and signatures created for them
and added to the FortiGuard antivirus database.
The Advanced Threat Protection dashboard widget shows the number of files that your
FortiGate unit has uploaded or submitted to FortiGuard Sandbox.
Client Comforting
When proxy-based antivirus scanning is enabled, the FortiGate unit buffers files as they are
downloaded. Once the entire file is captured, the FortiGate unit scans it. If no infection is found,
the file is sent along to the client. The client initiates the file transfer and nothing happens until
the FortiGate finds the file clean, and releases it. Users can be impatient, and if the file is large
or the download slow, they may cancel the download, not realizing that the transfer is in
progress.
Fortinet Technologies Inc. Page 26 Security Profiles for FortiOS 5.2
The client comforting feature solves this problem by allowing a trickle of data to flow to the
client so they can see the file is being transferred. The default client comforting transfer rate
sends one byte of data to the client every ten seconds. This slow transfer continues while the
FortiGate unit buffers the file and scans it. If the file is infection-free, it is released and the client
will receive the remainder of the transfer at full speed. If the file is infected, the FortiGate unit
caches the URL and drops the connection. The client does not receive any notification of what
happened because the download to the client had already started. Instead, the download stops
and the user is left with a partially downloaded file.
If the user tries to download the same file again within a short period of time, the cached URL is
matched and the download is blocked. The client receives the Infection cache message
replacement message as a notification that the download has been blocked. The number of
URLs in the cache is limited by the size of the cache.
Client comforting can send unscanned and therefore potentially infected content to the client.
You should only enable client comforting if you are prepared to accept this risk. Keeping the
client comforting interval high and the amount low will reduce the amount of potentially infected
data that is downloaded.
Client comforting is available for HTTP and FTP traffic. If your FortiGate unit supports SSL
content scanning and inspection, you can also configure client comforting for HTTPS and FTPS
traffic.
Enable and configure client comforting
1. Go to Policy & Objects> Policy > Proxy Options.
2. Select a Proxy Options profile and choose Edit, or select Create New to make a new one.
3. Scroll down to the Common Options section and check the box next to Comfort Clients. This
will set the option on all of the applicable protocols. The ability to set this feature on a
protocol by protocol basis exists in the CLI
4. Select OK or Apply to save the changes.
5. Select this Proxy Options profile in any security policy for it to take effect on all traffic
handled by the policy.
The default values for Interval and Amount are 10 and 1, respectively. This means that when
client comforting takes effect, 1 byte of the file is sent to the client every 10 seconds. You can
change these values to vary the amount and frequency of the data transferred by client
comforting.
Oversized files and emails
Downloaded files can range from a few Kilobytes to multiple Gigabytes. The problem lies in that
a FortiGate doesn’t have the memory to allow for a large number of people downloading large
files. Image the memory required for a team of developers to all download the latest Linux OS
distribution at once, in addition to the normal requirements of the firewall. Everything would
come to a grinding halt the FortiGate tried to store each of those Gibabyte+ files in memory. To
give you some piece of mind, the chances of malware being in a large file like those is much
smaller than in a smaller single Megabyte file, so the threat is somewhat limited, but you will
probably want to use your computers antivirus software to scan those large files after they have
been downloaded.
Therefore a threshold must be set to prevent the resources of the system from becoming
overloaded. By default the threshold is 10 MB. Any files larger than the threshold will not be
scanned for malware. With a maximum file size threshold in place, it must now be determined
what is to be done with the files that are larger than threshold. There are only 2 choices; either
Fortinet Technologies Inc. Page 27 Security Profiles for FortiOS 5.2
the file is passed through without being scanned for malware or the file is blocked. The default
action for oversized files is to pass them through.
If you wish to block the downloading of files over the threshold, this can be set within the Proxy
Option profile found at Policy & Objects > Policy > Proxy Options, under Common Options.
Check Block Oversized File/Email
This will reveal an additional option, Threshold (MB). The threshold of the files is set based upon
the protocol being used to transfer the file. In the CLI and configuration file, the threshold
variable is found in each of the protocol sections within the profile. Changing the value in this
field will change the oversize-limit value for all of the protocols.
If you wish to change the oversize-limit value on all of the protocols covered in a Proxy Option
profile you have two options.
1. You can go into the CLI and change the value manually within each of the protocol sections.
2. You can use the GUI to temporarily block oversized files, and when configuring it change the
threshold to the new value that you want. Apply this setting. Then go back to the profile and
turn off the block setting. If you now go into the CLI you will find that the configuration file
has retained the new oversize-limit value.
The settings can be found in the CLI by going to:
config firewall profile-protocol-optionsedit <the name of the profile>
Archive scan depth
The antivirus scanner will open archives and scan the files inside. Archives within other
archives, or nested archives, are also scanned to a default depth of twelve nestings. You can
adjust the number of nested archives to which the FortiGate unit will scan with the
uncompressed-nest-limit CLI command. Further, the limit is configured separately for each
traffic type.
Configuring archive scan depth
For example, this CLI command sets the archive scan depth for SMTP traffic to 5. That is,
archives within archives will be scanned five levels deep.
config firewall profile-protocol-options
edit “default”config http
set uncompressed-nest-limit 5end
You can set the nesting limit from 2 to 100.
Scan buffer size
When checking files for viruses, there is a maximum file size that can be buffered. Files larger
than this size are passed without scanning. The default size for all FortiGate models is 10
megabytes.
Archived files are extracted and email attachments are decoded before the FortiGate unit
determines if they can fit in the scan buffer. For example, a 7 megabyte ZIP file containing a 12
megabyte EXE file will be passed without scanning with the default buffer size. Although the
archive would fit within the buffer, the uncompressed file size will not.
Fortinet Technologies Inc. Page 28 Security Profiles for FortiOS 5.2
Configuring the uncompression buffer
In this example, the uncompressed-oversize-limit CLI command is used to change the
scan buffer size to 20 megabytes for files found in HTTP traffic:
config firewall profile-protocol-options
edit “default”config http
set uncompressed-oversize-limit 20end
The maximum buffer size varies by model. Enter set uncompressed-oversize-limit ? to
display the buffer size range for your FortiGate unit.
Windows file sharing (CIFS)
FortiOS supports virus scanning of Windows file sharing traffic. This includes CIFS, SMB, and
SAMBA traffic. This feature is applied by enabling SMB scanning in an antivirus profile and then
adding this profile to a security policy that accepts CIFS traffic. CIFS virus scanning is available
only through flow-based antivirus scanning.
FortiOS flow-based virus scanning can detect the same number of viruses in
CIFS/SMB/SAMBA traffic as it can for all supported content protocols.
Note the following about CFIS/SMB/SAMBA virus scanning:
• Some newer version of SAMBA clients and SMB2 can spread one file across multiple
sessions, preventing some viruses from being detected if this occurs.
• Enabling CIFS/SMB/SAMBA virus scanning can affect FortiGate performance.
• SMB2 is a new version of SMB that was first partially implemented in Windows Vista.
• Currently SMB2 is supported by Windows Vista or later, and partly supported by Samba 3.5
and fully support by Samba 3.6.
• The latest version of SMB2.2 will be introduced with Windows 8.
• Most clients still use SMB as default setting.
Configuring CIFS/SMB/SAMBA virus scanning
Use the following command to enable CIFS/SMB/SAMBA virus scanning in an antivirus profile:
config antivirus profileedit <smb-profile>
config smbset options scanend
Then add this antivirus profile to a security policy that accepts the traffic to be virus scanned. In
the security policy the service can be set to ANY, SAMBA, or SMB.
config firewall policyedit 0
set service ANY...set utm-status enableset av-profile <smb-profile>end
Fortinet Technologies Inc. Page 29 Security Profiles for FortiOS 5.2
Enabling AntiVirus scanning
Antivirus scanning is configured in an antivirus profile, but it is enabled in a firewall policy. Once
the use of an antivirus profile is enabled and selected in one or more firewall policies, all the
traffic controlled by those firewall policies will be scanned according to the settings in that
profile.
In the Feature section found by going to System > Config > Features, you can enable or disable
2 aspects of the Antivirus Profile.
1. Antivirus will determine if the option to use Antivirus profiles is available.
2. Multiple Security Profiles will determine if you can configure any Antivirus profiles beyond
the default profile.
The Feature section can sometimes be misunderstood as to its actual effect. The enabling or
disabling of a feature in this section refers to its visibility within the GUI, not whether or not the
feature’s functionality will work. If you were to disable the Antivirus Profile feature it would
disappear from the GUI but not the CLI and configuration file. Since the functionality of the
FortiGate unit is based on the contents of the config file any profile referred to by the policy in
the configuration will be acted upon. The Feature section is primarily for keeping the GUI clean
and uncluttered by features that are not being used by the administrators.
As the use of antivirus these days is practically a minimum standard for security protection the
question left to decide is whether or not you wish to use multiple profiles in your configuration.
Antivirus profiles
From Security Profiles > Antivirus you can edit existing profiles or create and configure new
antivirus profiles that can then be applied to firewall policies. A profile is specific configuration
information that defines how the traffic within a firewall policy is examined and what action may
be taken based on the examination.
You can create multiple antivirus profiles for different antivirus scanning requirements. For
example, you create an antivirus profile that specifies only virus scanning for POP3 which you
then apply to the out-going firewall policy that is designed for users getting their email from the
mail server. You can also choose specific protocols, such as HTTP, that will be scanned and if
blocked, archived by the unit. This option is available only in the CLI.
Whether the mode of the antivirus detection is proxy-based or flow-based is also set within the
profile.
Enable Antivirus steps - GUI based
1. Go to Security Profiles > AntiVirus.
2. Choose whether you want to edit an exiting profile or create a new one.
• The default profile will be the one displayed by default.
• If you are going to edit an existing profile, selecting it can be done by either using the
drop down menu in the upper right hand corner of the window or by selecting the List
icon (the furthest right of the 3 icons in the upper right of the window, if resembles a page
with some lines on it), and then selecting the profile you want to edit from the list.
• If you need to create a new profile you can either select the Create New icon (a plus sign
within a circle) or select the List icon and then select the Create New link in the upper left
of the window that appears.
3. If you are creating a new profile, write a name for it in the Name field.
4. Add or edit the Comments fields to more clearly describe the function.
5. Select the Inspection Mode.
Fortinet Technologies Inc. Page 30 Security Profiles for FortiOS 5.2
6. For the Detect Viruses field, select either Block to prevent infected files from passing
throughout the FortiGate or Monitor to allow infected files to pass through the FortiGate but
to record instances of infection.
7. If you have a FortiCloud account, you can select Send Files to FortiGuard Sandbox for
Inspection (Requires FortiCloud account)
• You can select whether to send All Files to the Sandbox or Suspicious Files Only.
8. If you wish to use the Botnet feature, you can select Detect Connections to Botnet C&C
Servers
• Just like with the viruses, you can select whether to Block or Monitor the files that contain
botnet or phishing connections.
9. Select OK or Apply.
10.Add the Antivirus profile to a firewall security policy.
Enable Antivirus steps - CLI based
You need to configure the scan option for each type of traffic you want scanned.
1. 1.Configure the Antivirus profile
config antivirus profileedit "default"
set comment "scan and delete virus"set replacemsg-group ''set scan-botnet-connections blockset ftgd-analytics suspiciousconfig http
set options scanend
config ftpset options scanend
config imapset options scanend
config pop3set options scanend
config smtpset options scanend
config nntpset options scanend
config smbset options scanend
end
Fortinet Technologies Inc. Page 31 Security Profiles for FortiOS 5.2
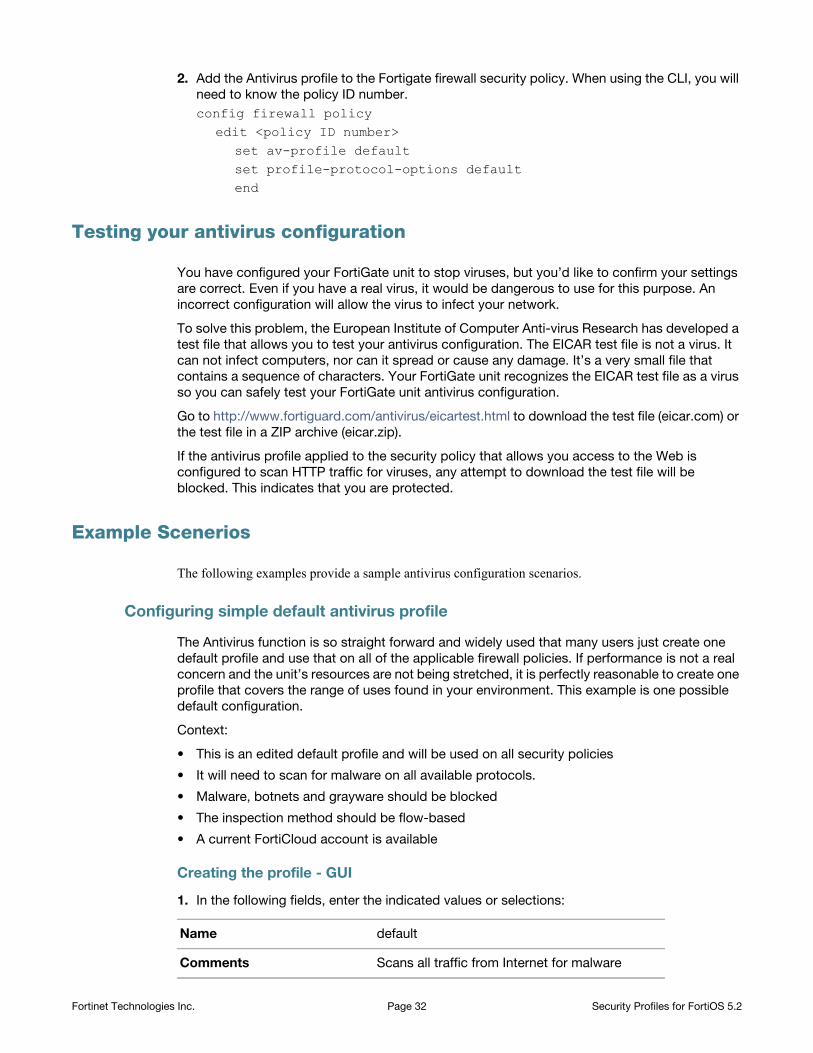
2. Add the Antivirus profile to the Fortigate firewall security policy. When using the CLI, you will
need to know the policy ID number.
config firewall policyedit <policy ID number>
set av-profile defaultset profile-protocol-options defaultend
Testing your antivirus configuration
You have configured your FortiGate unit to stop viruses, but you’d like to confirm your settings
are correct. Even if you have a real virus, it would be dangerous to use for this purpose. An
incorrect configuration will allow the virus to infect your network.
To solve this problem, the European Institute of Computer Anti-virus Research has developed a
test file that allows you to test your antivirus configuration. The EICAR test file is not a virus. It
can not infect computers, nor can it spread or cause any damage. It’s a very small file that
contains a sequence of characters. Your FortiGate unit recognizes the EICAR test file as a virus
so you can safely test your FortiGate unit antivirus configuration.
Go to http://www.fortiguard.com/antivirus/eicartest.html to download the test file (eicar.com) or
the test file in a ZIP archive (eicar.zip).
If the antivirus profile applied to the security policy that allows you access to the Web is
configured to scan HTTP traffic for viruses, any attempt to download the test file will be
blocked. This indicates that you are protected.
Example Scenerios
The following examples provide a sample antivirus configuration scenarios.
Configuring simple default antivirus profile
The Antivirus function is so straight forward and widely used that many users just create one
default profile and use that on all of the applicable firewall policies. If performance is not a real
concern and the unit’s resources are not being stretched, it is perfectly reasonable to create one
profile that covers the range of uses found in your environment. This example is one possible
default configuration.
Context:
• This is an edited default profile and will be used on all security policies
• It will need to scan for malware on all available protocols.
• Malware, botnets and grayware should be blocked
• The inspection method should be flow-based
• A current FortiCloud account is available
Creating the profile - GUI
1. In the following fields, enter the indicated values or selections:
Name default
Comments Scans all traffic from Internet for malware
Fortinet Technologies Inc. Page 32 Security Profiles for FortiOS 5.2
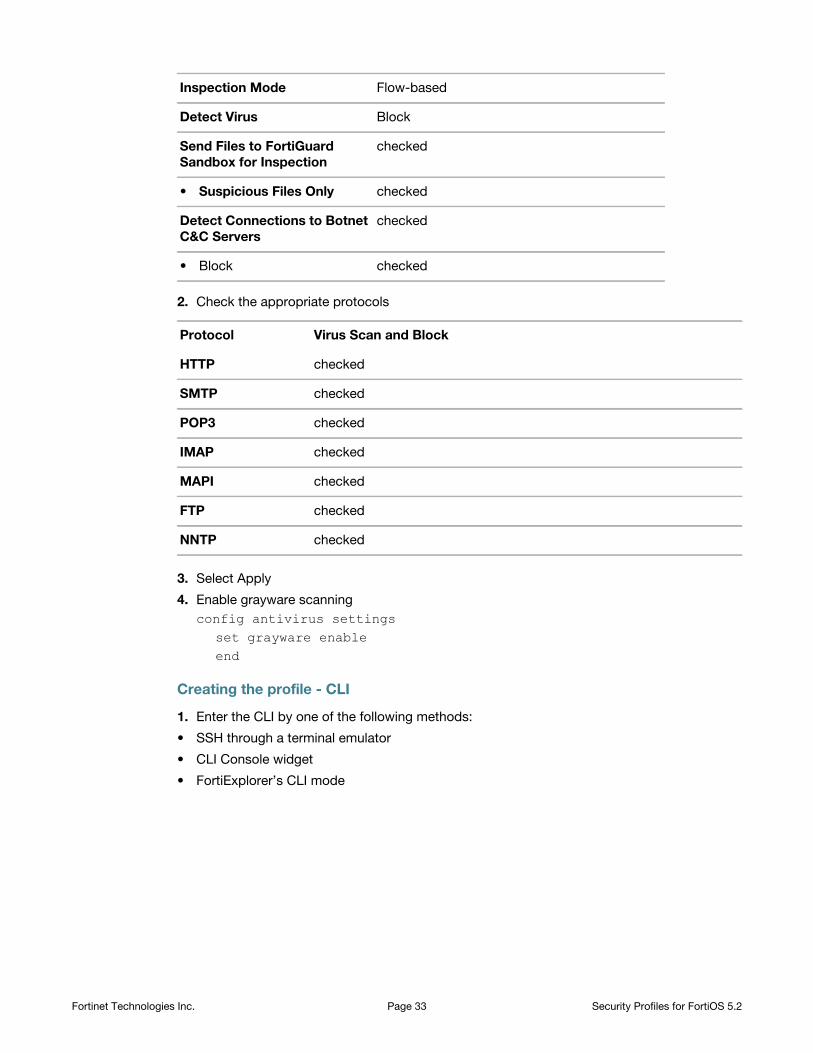
2. Check the appropriate protocols
3. Select Apply
4. Enable grayware scanning
config antivirus settingsset grayware enableend
Creating the profile - CLI
1. Enter the CLI by one of the following methods:
• SSH through a terminal emulator
• CLI Console widget
• FortiExplorer’s CLI mode
Inspection Mode Flow-based
Detect Virus Block
Send Files to FortiGuard
Sandbox for Inspection
checked
• Suspicious Files Only checked
Detect Connections to Botnet
C&C Servers
checked
• Block checked
Protocol Virus Scan and Block
HTTP checked
SMTP checked
POP3 checked
IMAP checked
MAPI checked
FTP checked
NNTP checked
Fortinet Technologies Inc. Page 33 Security Profiles for FortiOS 5.2

2. Enter the following commands:
config antivirus profile edit default
set comment "scan and delete virus"set inspection-mode flow-basedset scan-botnet-connections blockset ftgd-analytics suspiciousconfig http
set options scanend
config ftpset options scanend
config imapset options scanend
config pop3set options scanend
config smtpset options scanend
config nntpset options scanend
config smbset options scanend
end
3. Enable grayware scanning
config antivirus settingsset grayware enableend
Setting up a basic proxy-based Antivirus profile for email tranffic
Small offices, whether they are small companies, home offices, or satellite offices, often have
very simple needs. This example details how to enable antivirus protection on a FortiGate unit
located in a satellite office.
Context:
• The satellite office does not have an internal email server. To send and retrieve email, the
employees connect to an external mail server.
• There is a specific firewall security profile that handles the email traffic from the Internet to
the mail server. The only traffic on this policy will be POP3 and IMAP and SMTP
• The company policy is to block viruses and connections to botnets.
• The FortiGate unit is a small model and the Internet bandwidth is limited so the policy is to
not submit files to the FortiGuard Sandbox.
Fortinet Technologies Inc. Page 34 Security Profiles for FortiOS 5.2
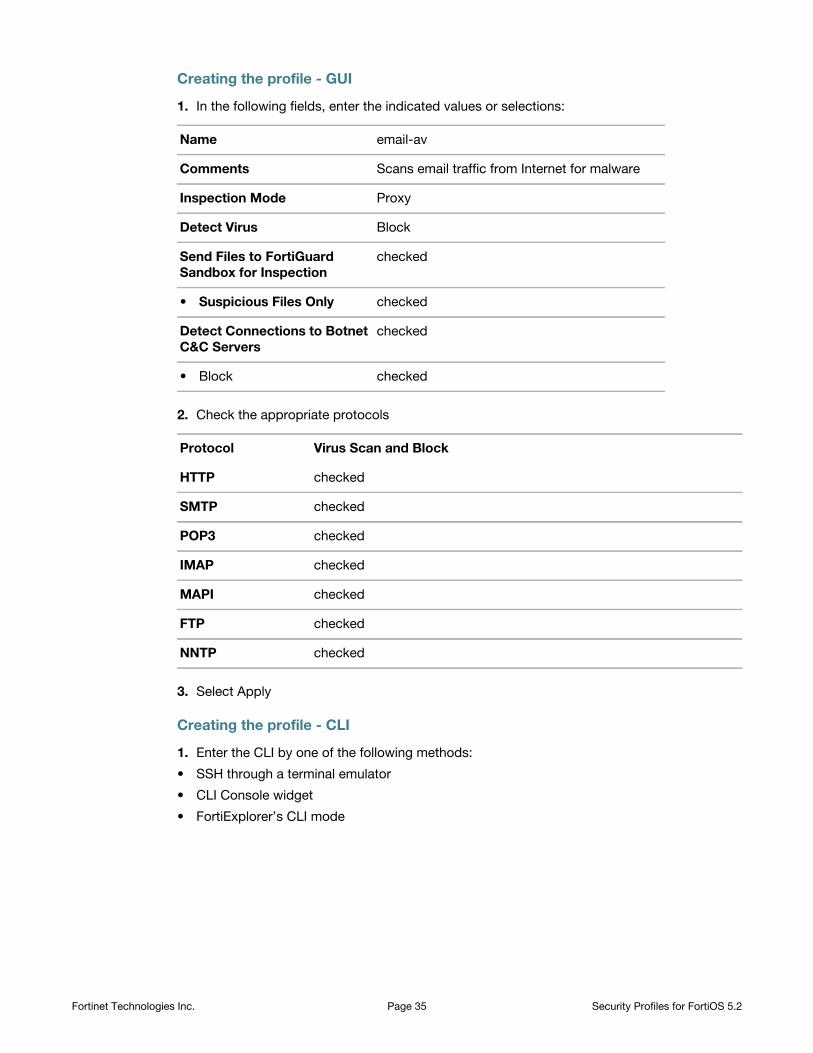
Creating the profile - GUI
1. In the following fields, enter the indicated values or selections:
2. Check the appropriate protocols
3. Select Apply
Creating the profile - CLI
1. Enter the CLI by one of the following methods:
• SSH through a terminal emulator
• CLI Console widget
• FortiExplorer’s CLI mode
Name email-av
Comments Scans email traffic from Internet for malware
Inspection Mode Proxy
Detect Virus Block
Send Files to FortiGuard
Sandbox for Inspection
checked
• Suspicious Files Only checked
Detect Connections to Botnet
C&C Servers
checked
• Block checked
Protocol Virus Scan and Block
HTTP checked
SMTP checked
POP3 checked
IMAP checked
MAPI checked
FTP checked
NNTP checked
Fortinet Technologies Inc. Page 35 Security Profiles for FortiOS 5.2
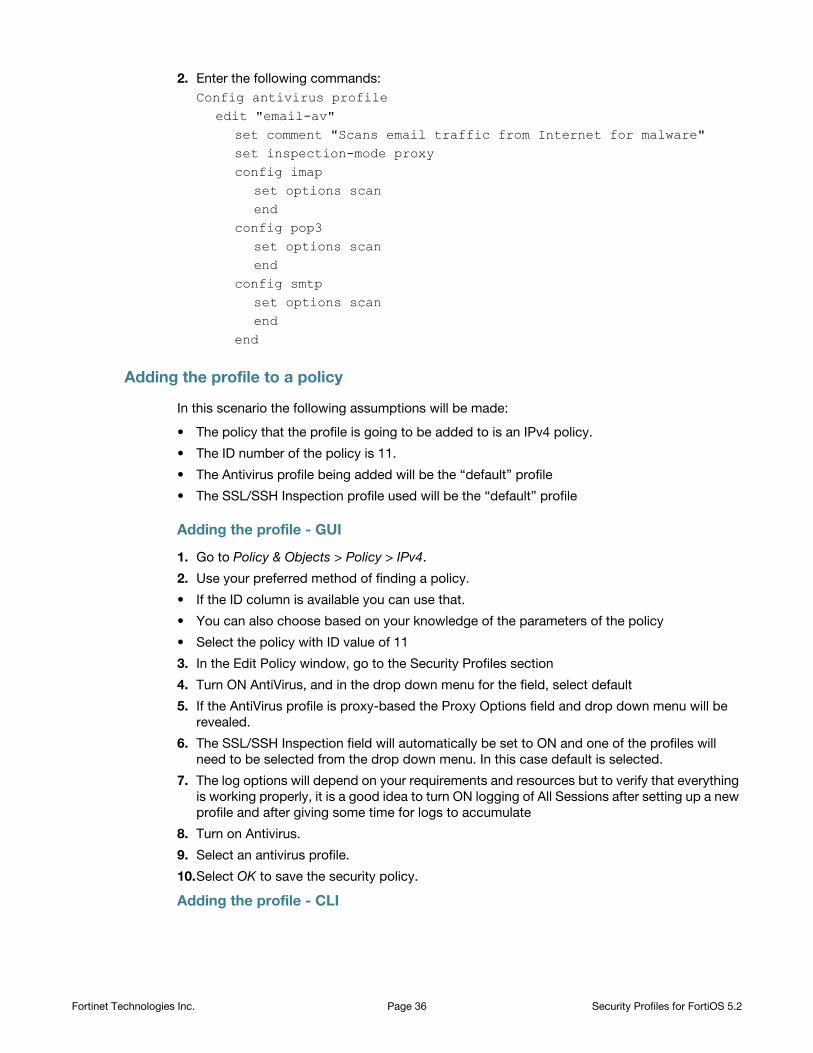
2. Enter the following commands:
Config antivirus profileedit "email-av"
set comment "Scans email traffic from Internet for malware"set inspection-mode proxyconfig imap
set options scanend
config pop3set options scanend
config smtpset options scanend
end
Adding the profile to a policy
In this scenario the following assumptions will be made:
• The policy that the profile is going to be added to is an IPv4 policy.
• The ID number of the policy is 11.
• The Antivirus profile being added will be the “default” profile
• The SSL/SSH Inspection profile used will be the “default” profile
Adding the profile - GUI
1. Go to Policy & Objects > Policy > IPv4.
2. Use your preferred method of finding a policy.
• If the ID column is available you can use that.
• You can also choose based on your knowledge of the parameters of the policy
• Select the policy with ID value of 11
3. In the Edit Policy window, go to the Security Profiles section
4. Turn ON AntiVirus, and in the drop down menu for the field, select default
5. If the AntiVirus profile is proxy-based the Proxy Options field and drop down menu will be
revealed.
6. The SSL/SSH Inspection field will automatically be set to ON and one of the profiles will
need to be selected from the drop down menu. In this case default is selected.
7. The log options will depend on your requirements and resources but to verify that everything
is working properly, it is a good idea to turn ON logging of All Sessions after setting up a new
profile and after giving some time for logs to accumulate
8. Turn on Antivirus.
9. Select an antivirus profile.
10.Select OK to save the security policy.
Adding the profile - CLI
Fortinet Technologies Inc. Page 36 Security Profiles for FortiOS 5.2
To select the antivirus profile in a security policy — CLI
config firewall policyedit 11
set utm-status enableset profile-protocol-options defaultset av-profile basic_antivirusend
Block files larger than 8 MB
Set proxy options profile to block files larger than 8 MB
1. Go to Policy & Objects > Policy > Proxy Options.
2. Edit the default or select Create New to add a new one.
3. Scroll down to the common Options Section and place a check in the box next to
BlockOversized File/Email
4. The sub line Threshold (MB) will appear with a value field. Enter 8.
5. Select OK or Apply.
The proxy options profile is configured, but to block files, you must select it in the firewall
policies handling the traffic that contains the files you want blocked.
To select the Proxy Options profile in a security policy
1. Go to Policy & Objects > Policy > IPv4 (or IPv6, depending).
2. Edit or create a security policy.
3. Select a proxy-based security profile. You will know that there is a proxy component to the
Security Profile because when a Security Profile is Proxy based the Proxy Options field will
be visible (for example, select an Antivirus profile that includes proxy scanning).
4. Beside Proxy Options select the name of the MTU proxy options protocol.
5. Select OK to save the security policy.
6. Once you complete these steps, any files in the traffic subject to Security Profile scanning
handled by this policy that are larger than 8MB will be blocked. If you have multiple firewall
policies, examine each to determine if you want to apply similar file blocking the them as
well.
Fortinet Technologies Inc. Page 37 Security Profiles for FortiOS 5.2

Web filter
This section describes FortiGate web filtering for HTTP traffic. The three main parts of the web
filtering function, the Web Content Filter, the URL Filter, and the FortiGuard Web Filtering
Service interact with each other to provide maximum control over what the Internet user can
view as well as protection to your network from many Internet content threats. Web Content
Filter blocks web pages containing words or patterns that you specify. URL filtering uses URLs
and URL patterns to block or exempt web pages from specific sources. FortiGuard Web
Filtering provides many additional categories you can use to filter web traffic.
The following topics are included in this section:
• Web filter concepts
• Inspections Modes
• FortiGuard Web Filtering Service
• Overriding FortiGuard website categorization
• SafeSearch
• YouTube Education Filter
• Static URL Filter
• Web content filter
• Advanced web filter configurations
• Configuring Web Filter Profiles
• Web filtering example
Web filter concepts
Web filtering is a means of controlling the content that an Internet user is able to view. With the
popularity of web applications, the need to monitor and control web access is becoming a key
component of secure content management systems that employ antivirus, web filtering, and
messaging security. Important reasons for controlling web content include:
• lost productivity because employees are accessing the web for non-business reasons
• network congestion — when valuable bandwidth is used for non-business purposes,
legitimate business applications suffer
• loss or exposure of confidential information through chat sites, non-approved email
systems, instant messaging, and peer-to-peer file sharing
• increased exposure to web-based threats as employees surf non-business-related web sites
• legal liability when employees access/download inappropriate and offensive material
• copyright infringement caused by employees downloading and/or distributing copyrighted
material.
As the number and severity of threats increase on the World Wide Web, the risk potential
increases within a company's network as well. Casual non-business related web surfing has
caused many businesses countless hours of legal litigation as hostile environments have been
created by employees who download and view offensive content. Web-based attacks and
Page 38

threats are also becoming increasingly sophisticated. Threats and web-based applications that
cause additional problems for corporations include:
• spyware/grayware
• phishing
• pharming
• instant messaging
• peer-to-peer file sharing
• streaming media
• blended network attacks.
Spyware, also known as grayware, is a type of computer program that attaches itself to a user’s
operating system. It does this without the user’s consent or knowledge. It usually ends up on a
computer because of something the user does such as clicking on a button in a pop-up
window. Spyware can track the user’s Internet usage, cause unwanted pop-up windows, and
even direct the user to a host web site. For further information, visit the FortiGuard Center.
Some of the most common ways of grayware infection include:
• downloading shareware, freeware, or other forms of file-sharing services
• clicking on pop-up advertising
• visiting legitimate web sites infected with grayware.
Phishing is the term used to describe attacks that use web technology to trick users into
revealing personal or financial information. Phishing attacks use web sites and email that claim
to be from legitimate financial institutions to trick the viewer into believing that they are
legitimate. Although phishing is initiated by spam email, getting the user to access the
attacker’s web site is always the next step.
Pharming is a next generation threat that is designed to identify and extract financial, and other
key pieces of information for identity theft. Pharming is much more dangerous than phishing
because it is designed to be completely hidden from the end user. Unlike phishing attacks that
send out spam email requiring the user to click to a fraudulent URL, pharming attacks require
no action from the user outside of their regular web surfing activities. Pharming attacks succeed
by redirecting users from legitimate web sites to similar fraudulent web sites that have been
created to look and feel like the authentic web site.
Instant messaging presents a number of problems. Instant messaging can be used to infect
computers with spyware and viruses. Phishing attacks can be made using instant messaging.
There is also a danger that employees may use instant messaging to release sensitive
information to an outsider.
Peer-to-peer (P2P) networks are used for file sharing. Such files may contain viruses.
Peer-to-peer applications take up valuable network resources and may lower employee
productivity but also have legal implications with the downloading of copyrighted or sensitive
company material.
Streaming media is a method of delivering multimedia, usually in the form of audio or video to
Internet users. Viewing streaming media impacts legitimate business by using valuable
bandwidth.
Blended network threats are rising and the sophistication of network threats is increasing with
each new attack. Attackers learn from each previous successful attack and enhance and
update attack code to become more dangerous and fast spreading. Blended attacks use a
combination of methods to spread and cause damage. Using virus or network worm techniques
combined with known system vulnerabilities, blended threats can quickly spread through email,
web sites, and Trojan applications. Examples of blended threats include Nimda, Code Red,
Slammer, and Blaster. Blended attacks can be designed to perform different types of attacks,
Fortinet Technologies Inc. Page 39 Security Profiles for FortiOS 5.2
which include disrupting network services, destroying or stealing information, and installing
stealthy backdoor applications to grant remote access.
Different ways of controlling access
The methods available for monitoring and controlling Internet access range from manual and
educational methods to fully automated systems designed to scan, inspect, rate and control
web activity.
Common web access control mechanisms include:
• establishing and implementing a well-written usage policy in the organization on proper
Internet, email, and computer conduct
• installing monitoring tools that record and report on Internet usage
• implementing policy-based tools that capture, rate, and block URLs.
The final method is the focus of this topic. The following information shows how the filters
interact and how to use them to your advantage.
Order of web filtering
The FortiGate unit applies web filters in a specific order:
1. URL filter
2. FortiGuard Web Filter
3. web content filter
4. web script filter
5. antivirus scanning.
If you have blocked a FortiGuard Web Filter category but want certain users to have access to
URLs within that pattern, you can use the Override within the FortiGuard Web Filter. This will
allow you to specify which users have access to which blocked URLs and how long they have
that access. For example, if you want a user to be able to access www.example.com for one
hour, you can use the override to set up the exemption. Any user listed in an override must fill
out an online authentication form that is presented when they try to access a blocked URL
before the FortiGate unit will grant access to it. For more information, see “FortiGuard Web
Filter” on page 133.
Inspections Modes
Proxy
Proxy-based inspection involves buffering the traffic and examining it as a whole before
determining an action. The process of having the whole of the data to analyze allow this process
to include more points of data to analyze than the flow-based or DNS methods.
The advantage of a proxy-based method is that the inspection can be more thorough than the
other methods, resulting in fewer false positive or negative results in the analysis of the data.
Flow-based
The Flow-based inspection method examines the file as it passes through the FortiGate unit
without any buffering. As each packet of the traffic arrives it is process and forwarded without
waiting for the complete file or web page, etc.
Fortinet Technologies Inc. Page 40 Security Profiles for FortiOS 5.2

The advantage of the flow-based method is that the user sees a faster response time for HTTP
requests and there is less chance of a time-out error due to the server at the other end
responding slowly.
The disadvantages of this method are that there is a higher probability of a false positive or
negative in the analysis of the data and that a number of points of analysis that can be used in
the proxy-based method are not available in the flow-based inspection method. There is also
fewer actions available to choose from based on the categorization of the website by
FortiGuard services.
DNS
The DNS inspection method uses the same categories as the FortiGuard Service. It is lightweight in terms of resource usage because it doesn't involve any proxy-based or flow-based inspection.
A DNS request is typically the first part of any new session to a new website. This inspection method takes advantage of that and places the results of the categorization of websites right on the FortiGuard DNS servers. When the FortiGate resolves a URL, in addition to the IP address of the website it also receives a domain rating.
In the same way that the flow-based inspection method had fewer filters and points of analysis
than the proxy-based inspection method, DNS has fewer settings still. All of its inspection is
based on the IP address, the domain name and the rating provided by the FortiGuard DNS
server.
If the DNS mode is chosen, the additional setting of a DNS action must be chosen. The options
are:
• Block - The traffic will be blocked and the session dropped.
• Redirect - The session will be redirected to a message page indicating to the user what is
happening.
FortiGuard Web Filtering Service
FortiGuard Web Filter is a managed web filtering solution available by subscription from
Fortinet. FortiGuard Web Filter enhances the web filtering features supplied with your FortiGate
unit by sorting billions of web pages into a wide range of categories users can allow or block.
The FortiGate unit accesses the nearest FortiGuard Web Filter Service Point to determine the
category of a requested web page, and then applies the security policy configured for that user
or interface.
FortiGuard Web Filter includes over 45 million individual ratings of web sites that apply to more
than two billion pages. Pages are sorted and rated into several dozen categories administrators
can allow or block. Categories may be added or updated as the Internet evolves. To make
configuration simpler, you can also choose to allow or block entire groups of categories.
Blocked pages are replaced with a message indicating that the page is not accessible
according to the Internet usage policy.
FortiGuard Web Filter ratings are performed by a combination of proprietary methods including
text analysis, exploitation of the web structure, and human raters. Users can notify the
FortiGuard Web Filter Service Points if they feel a web page is not categorized correctly, so that
the service can update the categories in a timely fashion.
Before you begin to use the FortiGuard Web Filter options you should verify that you have a
valid subscription to the service for your FortiGate firewall.
Fortinet Technologies Inc. Page 41 Security Profiles for FortiOS 5.2
FortiGuard Web Filter and your FortiGate unit
When FortiGuard Web Filter is enabled in a web filter profile, the setting is applied to all firewall
policies that use this profile. When a request for a web page appears in traffic controlled by one
of these firewall policies, the URL is sent to the nearest FortiGuard server. The URL category is
returned. If the category is blocked, the FortiGate unit provides a replacement message in place
of the requested page. If the category is not blocked, the page request is sent to the requested
URL as normal.
FortiGuard Web Filter Actions
The Possible Actions are:
• Allow permits access to the sites within the category.
• Monitor permits and logs access to sites in the category. You may also enable user quotas
when enabling the monitor action.
• Warning presents the user with a message, allowing them to continue if they choose. For
information about customizing the message, see
• Authenticate requires a user authenticate with the FortiGate unit before being allowed
access to the category or category group.
• Block prevents access to sites within the category. Users attempting to access a blocked
site will receive a replacement message explaining that access to the site is blocked.
The choices of actions available will depend on the mode of inspection.
• Proxy - Allow, Block, Monitor, Warning, Authenticate & Disable.
• Flow-based - Allow, Block & Monitor.
• DNS - Allow, Block & Monitor.
Fortinet Technologies Inc. Page 42 Security Profiles for FortiOS 5.2
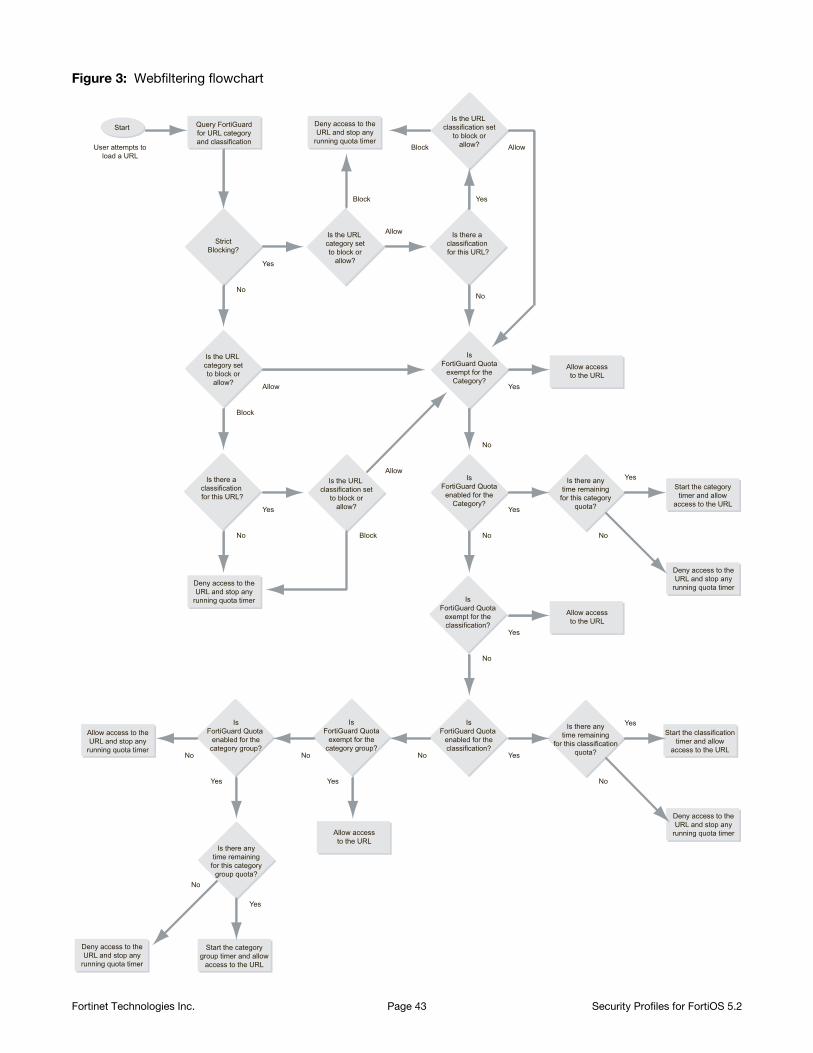
Figure 3: Webfiltering flowchart
Start
User attempts toload a URL
Query FortiGuardfor URL categoryand classification
IsFortiGuard Quotaenabled for the
Category?
Yes
Is there anytime remaining
for this categoryquota?
Start the categorytimer and allow
access to the URL
Deny access to theURL and stop any
running quota timer
IsFortiGuard Quota
enabled for theclassification?
Yes
Is there anytime remaining
for this classificationquota?
Start the classificationtimer and allow
access to the URL
IsFortiGuard Quota
enabled for thecategory group?
Is there anytime remaining
for this categorygroup quota?
Start the categorygroup timer and allow
access to the URL
No
No
Allow access to theURL and stop any
running quota timer
StrictBlocking?
Is the URL category setto block or
allow?
Is there a classification for this URL?
Is the URL classification set
to block orallow?
Allow
Yes
Deny access to theURL and stop any
running quota timer
Block
Block
No
Is the URL category setto block or
allow?
Block Allow
No
Is there a classification for this URL?
No
Deny access to theURL and stop any
running quota timer
Is the URL classification set
to block orallow?
Allow
Block Yes
Yes
IsFortiGuard Quota
exempt for theCategory?
Yes
Allow accessto the URL
No
IsFortiGuard Quota
exempt for theclassification?
Yes
Allow accessto the URL
Yes
Allow accessto the URL
No
Deny access to theURL and stop any
running quota timer
No
Deny access to theURL and stop any
running quota timer
Allow
Yes
Yes
No
Yes
No
No
IsFortiGuard Quota
exempt for thecategory group?
Yes
No
Fortinet Technologies Inc. Page 43 Security Profiles for FortiOS 5.2

FortiGuard Web Filter usage quotas
In addition to using category and classification blocks and overrides to limit user access to
URLs, you can set a daily timed access quota by category, category group, or classification.
Quotas allow access for a specified length of time, calculated separately for each user. Quotas
are reset every day at midnight.
Users must authenticate with the FortiGate unit. The quota is applied to each user individually
so the FortiGate must be able to identify each user. One way to do this is to configure a security
policy using the identity based policy feature. Apply the web filter profile in which you have
configured FortiGuard Web Filter and FortiGuard Web Filter quotas to such a security policy.
The use of FortiGuard Web Filter quotas requires that users authenticate to gain web access.
The quotas are ignored if applied to a security policy in which user authentication is not
required.
When a user first attempts to access a URL, they’re prompted to authenticate with the FortiGate
unit. When they provide their user name and password, the FortiGate unit recognizes them,
determines their quota allowances, and monitors their web use. The category and classification
of each page they visit is checked and FortiGate unit adjusts the user’s remaining available
quota for the category or classification.
Quota hierarchy
You can apply quotas to categories and category groups. Only one quota per user can be active
at any one time. The one used depends on how you configure the FortiGuard Web Filter.
When a user visits a URL, the FortiGate unit queries the FortiGuard servers for the category of
the URL. From highest to lowest, the relative priority of the quotas are:
1. Category
2. Category group
Overriding FortiGuard website categorization
In most things there is an exception to the rule. When it comes to the rules about who is allowed
to go to which websites in spite of the rules or in this case, policies, it seems that there are more
exceptions than to most rules. There are numerous valid reasons and scenarios for exceptions
so it follows that there needs to be a way to accommodate this exceptions.
The different methods of override
There are actually two different ways to override web filtering behavior based on FortiGuard
categorization of a websites. The second method has 2 variations in implementation and each
of the three has a different level of granularity.
Editing the web filter profile resets the quota timers for all users.
Fortinet Technologies Inc. Page 44 Security Profiles for FortiOS 5.2
1. Using Alternate Categories
Rating Override
This method manually assigns a specific website to a different Fortinet category or a
locally created category.
2. Using Alternate Profiles
Administrative Override or Allow Blocked Override
In this method all of the traffic going through the FortiGate unit, using identity based
policies and a Web Filtering profile has the option where configured users or IP addresses
can use an alternative Web Filter profile when attempting to access blocked websites.
Using Alternate Categories
Web Rating Overrides
There are two approached to overriding the FortiGuard Web Filtering. The first is an identity
based method that can be configured using a combination of identity based policies and
specifically designed webfilter profiles. This has been addressed in the Firewall Handbook.
The second method is the system wide approach that locally (on the FortiGate Firewall)
reassigns a URL to a different FortiGuard Category and even subcategory. This is where you
can set assign a specific URL to the FortiGuard Category that you want to you can also set the
URL to one of the Custom Categories that you have created
The Web Rating Overrides option is available because different people will have different criteria
for how they categorize websites. Even is the criteria is the same an organization may have
reason to block the bulk of a category but need to be able to access specific URLs that are
assigned to that category.
A hypothetical example could be that a website, example.com is categorized as being in the
Sub-Category Pornography. The law offices of Barrister, Solicitor and Lawyer do not want their
employees looking at pornography at work so they have used the FortiGuard Webfilter to block
access to sites that have been assigned to the Category “Pornography”. However, the owners
of example.com are clients of the law office and they are aware that example.com is for artists
that specialize in nudes and erotic images. In this case to approaches can be taken. The first is
that the Rating Override function can be used to assign example.com to Nudity and Risque
instead of Pornography for the purposes of matching the criteria that the law office goes by or
the site can be assigned to a Custom Category that is not blocked because the site belongs to
one of their clients and they always want to be able to access the site.
Another hypothetical example from the other side of the coin. A private school has decided that
a company that specializes in the online selling of books that could be considered inappropriate
for children because of their violent subject matter, should not be accessible to anyone in the
school. The categorization by Fortinet of the site example2.com is General Interest - Business
with the subcategory of Shopping and Auction, which is a category that is allowed at the
school. In this case they school could reassign the site to the Category Adult Material which is a
blocked category.
Local or Custom Categories
User-defined categories can be created to allow users to block groups of URLs on a per-profile
basis. The categories defined here appear in the global URL category list when configuring a
web filter profile. Users can rate URLs based on the local categories.
Users can create user-defined categories then specify the URLs that belong to the category.
This allows users to block groups of web sites on a per profile basis. The ratings are included in
the global URL list with associated categories and compared in the same way the URL block list
is processed.
Fortinet Technologies Inc. Page 45 Security Profiles for FortiOS 5.2

The local assignment of a category overrides the FortiGuard server ratings and appear in
reports as “Local” Categories or “Custom” Categories depending on the context.
In the CLI, they are referred to as Local categories.
To create a Local Category:
config webfilter ftgd-local-catedit local_category_1
set id 140end
In the GUI they are referred to as Custom Categories. There is a way to create a new category in
the Web Based Manager.
1. Go to Security Profiles > Advanced > Web Rating Overrides.
2. Instead of creating a new override, you can choose the “Custom Categories” icon in the top
menu bar.
3. From the new window select Create New.
4. A new row will appear at the bottom of the list of categories with a field on the left
highlighted and the message “This field is required”. Enter the name of the custom category
in this field.
5. Select Enter.
Configuring Rating Overrides
1. Go to Security Profiles > Web Filter > Web Rating Overrides.
2. Select Create New
3. Type in the URL field the URL of the Website that you wish to recategorize.
4. Select the Lookup Rating button to verify the current categorization that is being assigned to
the URL.
5. Change the Category field to one of the more applicable options from the drop down menu.
6. Change the Sub-Category field to a more narrowly defined option within the main category.
7. Select OK.
Using Alternate Profiles
Allow Blocked Overrides or Web Overrides
The Administrative Override feature for Web Filtering was added and is found by going to
Security Profiles > Web Filter and then enabling Allow Blocke Override. This opening window
will display a listing of all of the overrides of this type. The editing window referred to the
configuration as an Administrative Override.
The Concept
When a Web filter profile is overridden it does not necessarily remove all control and restrictions
that were previously imposed by the Web Filter. The idea is to replace a restrictive filter with a
different one. In practice, it makes sense that this will likely be a profile that is less restrictive the
It is usually recommended that you choose a category that you know will be addressed in
existing Webfilter profiles so that you will not need to engage in further configuration.
Fortinet Technologies Inc. Page 46 Security Profiles for FortiOS 5.2
the original one but there is nothing that forces this. The degree to which that the alternate
profile is less restrictive is open. It can be as much as letting the user access everything on the
Internet or as little as allowing only one addition website. The usual practice though is to have
as few alternate profiles as are needed to allow approved people to access what they need
during periods when an exception to the normal rules is needed but still having enough control
that the organizations web usage policies are not compromised.
You are not restricted to having only one alternative profile as an option to the existing profile.
The new profile depends on the credentials or IP address making the connection. For example,
John connecting through the "Standard" profile could get the "Allow_Streaming_Video" profile
while George would get the "Allow_Social_Networking_Sites" profile.
The other thing to take into account is the time factor on these overrides. They are not indefinite.
The longest that an override can be enabled is for 1 year less a minute. Often these overrides
are set up for short periods of time for specific reasons such as a project. Having the time
limitation means that the System Administrator does not have to remember to go back and turn
the feature off after the project is finished.
Identity or Address
In either case what these override features do is, for specified users, user groups or IP
addresses, allow sites blocked by Web Filtering profiles to be overridden for a specified length
of time. The drawback of this method of override is that it takes more planning and preparation
than the rating override method. The advantage is that once this has been set up, this method
requires very little in the way of administrative overhead to maintain.
When planning to use the alternative profile approach keep in mind the following: In Boolean
terms, one of the following "AND" conditions has to be met before overriding the Web Filter is
possible
Based on the IP address:
• The Web Filter profile must be specified as allowing overrides
• AND the user's computer is one of the IP addresses specified
• AND the time is within the expiration time frame.
While the conditions are fewer for this situation there is less control over who has the ability to
bypass the filtering configured for the site. All someone has to do is get on a computers that is
allowed to override the Web Filter and they have access.
Based on user group:
• The Web Filter profile must be specified as allowing overrides
• AND the policy the traffic is going through must be identity based
• AND the user's credentials matches the identity credentials specified
• AND the time is within the expiration time frame.
This method is the one most likely to be used as it gives more control in that the user has to
have the correct credential and more versatile because the user can use the feature from any
computer that uses the correct policy to get out on the Internet.
Settings
When using an alternate profile approach to Web Filter overrides the following settings are used
to determine authentication and outcome. Not every setting is used in both methods but
enough of them are common to describe them collectively.
Apply to Group(s)
This is found in the Allow Blocked Overrides configuration. Individual users can not be selected.
You can select one or more of the User Groups that are recognized my the FortiGate unit,
Fortinet Technologies Inc. Page 47 Security Profiles for FortiOS 5.2
whether they are local to the system or from a third part authentication device such as a AD
server through FSSO.
Original Profile
This is found in the Administrative Override configuration. In the Allow Blocked Overrides
setting the configuration is right inside the profile so there was no need to specify which profile
was the original one, but the Administrative Override setup is done separately from the profiles
themselves.
Assign to Profile or New Profile
Despite the difference in the name of the field, this is the same thing in both variations of the
feature. You select from the drop down menu the alternate Web Filter Profile that you wish to set
up for this override.
Scope or Scope Range
When setting up the override in the "Allow Blocked Overrides" variation you are given a drop
down menu next to the field name Scope while in the Administrative Override configuration you
are asked to select a radio button next to the same options. In both cases this is just a way of
selecting which form of credentials will be required to approve the overriding of the existing
Web Filter profile.
When the Web Filter Block Override message page appears it will display a field named
"Scope:" and depending on the selection, it will show the type of credentials used to determine
whether or not the override is allowed. The available options are:
User
This means that the authentication for permission to override will be based on whether or not
the user is using a specific user account.
User Group
This means that the authentication for permission to override will be based on whether on
not the user account supplied as a credential is a member of the specified User Group.
IP
This means that the authentication for permission to override will be based on the IP address
of the computer that was used to authenticate. This would be used with computers that
have multiple users. Example: If Paul logs on to the computer, engages the override using
his credentials and then logs off, if the scope was based on the IP address of the computer,
anybody logging in with any account on that computer would now be using the alternate
override Web Filter profile.
When entering an IP address in the Administrative Override version, only individual IP
addresses are allowed.
Differences between IP and Identity based scope
• Using the IP scope does not require the use of an Identity based policy.
• When using the Administrative Override variation and IP scope, you may not see a
warning message when you change from using the original Web Filter profile to using
the alternate profile. There is no requirement for credentials from the user so, if
allowed, the page will just come up in the browser.
Ask
This option is available only in the "Allowed Blocked Overrides" variation and when used
configures the message page to ask which scope the user wished to use. Normally, when
Fortinet Technologies Inc. Page 48 Security Profiles for FortiOS 5.2
the page appears the scope options are greyed out an not editable, but by using the ask
option the option is dark and the user can choose from the choice of:
• User
• User Group
• IP Address
Duration Mode
This option is available only in the "Allowed Blocked Overrides" variation. The Administrative
Override sets a specified time frame that is always used for that override. The available options
from the drop down menu are:
Constant
Using this setting will mean that what ever is set as the duration will be the length of time
that the override will be in effect. If the Duration variable is set to 15 minutes the length of the
override will always be 15 minutes. The option will be visible in the Override message page
but the setting will be greyed out.
Ask
Uusing this setting will give the person the option of setting the duration to the override when
it is engaged. The duration time which is greyed out if the Constant setting is used will be
dark and editable. The user can set the duration in terms of Day, Hours and or Minutes.
Duration
Duration is on of the areas where the two variations takes a different approach, on two aspects
of the setting. As already indicated the "Administrative Override" only uses a static time frame
there is no option for the user to select on the fly how long it will last. The other way in which the
two variation differ is that the "Allow Blocked Overrides" starts the clock when the user logs in
with his credentials. For example, if the duration is 1 hour and John initiates an override at 2:00
p.m. on January 1, at the end of that hour he will revert back to using the original profile but he
can go back and re-authenticate and and start the process over again. The Administrative
override variation starts the clock from when the override was configured, which is why is
shows an expiration date and time when your are configuring it.
This option, which is available when the Duration Mode is set to Constant is the time in minutes
that the override will last when engaged by the user.
When setting up a constant duration in the Web Based Interface, minutes is the only option for
units of time. To set a longer time frame or to use the units of hours or days you can use the CLI.
config webfilter profileedit <name of webfilter profile>
config overrideset ovrd-dur <###d##h##m> end
When configuring the duration you don't have to set a value for a unit you are not using. If you
are not using days or hours you can use
set ovrd-dur 30m
instead of
set ovrd-dur 0d0h30m
However, each of the units of time variable has their own maximum level
###d cannot be more than 364 ##h cannot be more than 23 ##m cannot be more than 59
Fortinet Technologies Inc. Page 49 Security Profiles for FortiOS 5.2
So the maximum length that the override duration can be set to is 364 days, 23 hours, and 59
minutes(a minute shy of 1 year)
SafeSearch
SafeSearch is a feature of popular search sites that prevents explicit web sites and images from
appearing in search results. Although SafeSearch is a useful tool, especially in educational
environments, the resourceful user may be able to simply turn it off. Enabling SafeSearch for the
supported search sites enforces its use by rewriting the search URL to include the code to
indicate the use of the SafeSearch feature. For example, on a Google search it would mean
adding the string “&safe=active” to the URL in the search.
The search sites supported are:
• Yahoo
• Bing
• Yandex
Enabling SafeSearch — CLI
config webfilter profileedit default
config webset safe-search url
endend
This enforces the use of SafeSearch in traffic controlled by the firewall policies using the web
filter you configure.
Search Keywords
There is also the capability to log the search keywords used in the search engines.
YouTube Education Filter
YouTube for Schools is a way to access educational videos from inside a school network. This
YouTube feature gives schools the ability to access a broad set of educational videos on
YouTube EDU and to select the specific videos that are accessible from within the school
network.
Before this feature can be used an account has to be set up for the school with YouTube. Once
the account is set up a unique ID will be provided. This ID becomes part of the filter that is used
to all access to the educational content of YouTube for use in schools even if YouTube is
blocked by the policy.
More details can be found by going to http://www.youtube.com/schools.
Fortinet Technologies Inc. Page 50 Security Profiles for FortiOS 5.2
Enabling YouTube Education Filter in CLI
config webfilter profileedit default
config webset safe-search url headerset youtube-edu-filter-id ABCD1234567890abcdefend
end
Static URL Filter
You can allow or block access to specific URLs by adding them to the Web Site Filter list. You
add the URLs by using patterns containing text and regular expressions. The FortiGate unit
allows or blocks web pages matching any specified URLs or patterns and displays a
replacement message instead.
URL blocking does not block access to other services that users can access with a web
browser. For example, URL blocking does not block access to ftp:// ftp.example.com. Instead,
use firewall policies to deny ftp connections.
When adding a URL to the URL filter list, follow these rules:
• Type a top-level URL or IP address to control access to all pages on a web site. For
example, www.example.com or 192.168.144.155 controls access to all pages at this
web site.
• Enter a top-level URL followed by the path and file name to control access to a single page
on a web site. For example, www.example.com/news.html or
192.168.144.155/news.html controls access to the news page on this web site.
• To control access to all pages with a URL that ends with example.com, add example.com
to the filter list. For example, adding example.com controls access to www.example.com,
mail.example.com, www.finance.example.com, and so on.
• Control access to all URLs that match patterns using text and regular expressions (or
wildcard characters). For example, example.* matches example.com, example.org,
example.net and so on.
URL formats
When adding a URL to the URL filter list, follow these rules:
How URL formats are detected when using HTTPS
If your unit does not support SSL content scanning and inspection or if you have selected the
URL filtering option in web content profile for HTTPS content filtering mode under Protocol
Recognition, filter HTTPS traffic by entering a top level domain name, for example,
www.example.com. HTTPS URL filtering of encrypted sessions works by extracting the CN
URLs with an action set to exempt or monitor are not scanned for viruses. If users on the
network download files through the FortiGate unit from a trusted web site, add the URL of this
web site to the URL filter list with an action to pass it so the FortiGate unit does not virus scan
files downloaded from this URL.
Fortinet Technologies Inc. Page 51 Security Profiles for FortiOS 5.2
from the server certificate during the SSL negotiation. Since the CN only contains the domain
name of the site being accessed, web filtering of encrypted HTTPS sessions can only filter by
domain names.
If your unit supports SSL content scanning and inspection and if you have selected Deep Scan,
you can filter HTTPS traffic in the same way as HTTP traffic.
How URL formats are detected when using HTTP
URLs with an action set to exempt are not scanned for viruses. If users on the network
download files through the unit from trusted web site, add the URL of this web site to the URL
filter list with an action set to exempt so the unit does not virus scan files downloaded from this
URL.
• Type a top-level URL or IP address to control access to all pages on a web site. For
example, www.example.com or 192.168.144.155 controls access to all pages at this
web site.
• Enter a top-level URL followed by the path and filename to control access to a single page
on a web site. For example, www.example.com/news.html or
192.168.144.155/news.html controls the news page on this web site.
• To control access to all pages with a URL that ends with example.com, add example.com
to the filter list. For example, adding example.com controls access to www.example.com,
mail.example.com, www.finance.example.com, and so on.
• Control access to all URLs that match patterns created using text and regular expressions
(or wildcard characters). For example, example.* matches example.com, example.org,
example.net and so on.
• Fortinet URL filtering supports standard regular expressions.
URL Filter actions
You can select one of four actions for how traffic will be treated as it attempts to reach a site in
the list.
Block
Attempts to access any URLs matching the URL pattern are denied. The user will be presented
with a replacement message.
Allow
Any attempt to access a URL that matches a URL pattern with an allow action is permitted. The
traffic is passed to the remaining antivirus proxy operations, including FortiGuard Web Filter,
web content filter, web script filters, and antivirus scanning.
Allow is the default action. If a URL does not appear in the URL list, it is permitted.
Monitor
Traffic to, and reply traffic from, sites matching a URL pattern with a monitor be allowed through
in the same way as the “Allow” action. The difference with the Monitor action being that a log
message will be generated each time a matching traffic session is established. The requests will
If virtual domains are enabled on the unit, web filtering features are configured globally. To
access these features, select Global Configuration on the main menu.
Fortinet Technologies Inc. Page 52 Security Profiles for FortiOS 5.2

also be subject to all other Security Profiles inspections that would normally be applied to the
traffic.
Exempt
Exempt allows trusted traffic to bypass the antivirus proxy operations, but it functions slightly
differently. In general, if you’re not certain that you need to use the Exempt action, use Monitor.
HTTP 1.1 connections are persistent unless declared otherwise. This means the connections
will remain in place until closed or the connection times out. When a client loads a web page,
the client opens a connection to the web server. If the client follows a link to another page on
the same site before the connection times out, the same connection is used to request and
receive the page data.
When you add a URL pattern to a URL filter list and apply the Exempt action, traffic sent to and
replies traffic from sites matching the URL pattern will bypass all antivirus proxy operations. The
connection itself inherits the exemption. This means that all subsequent reuse of the existing
connection will also bypass all antivirus proxy operations. When the connection times out, the
exemption is cancelled.
For example, consider a URL filter list that includes example.com/files configured with the
Exempt action. A user opens a web browser and downloads a file from the URL
example.com/sample.zip. This URL does not match the URL pattern so it is scanned for
viruses. The user then downloads example.com/files/beautiful.exe and since this URL
does match the pattern, the connection itself inherits the exempt action. The user then
downloads example.com/virus.zip. Although this URL does not match the exempt URL
pattern, a previously visited URL did, and since the connection inherited the exempt action and
was re-used to download a file, the file is not scanned.
If the user next goes to an entirely different server, like example.org/photos, the connection
to the current server cannot be reused. A new connection to example.org is established. This
connection is not exempt. Unless the user goes back to example.com before the connection to
that server times out, the server will close the connection. If the user returns after the
connection is closed, a new connection to example.com is created and it is not exempt until the
user visits a URL that matches the URL pattern.
Web servers typically have short time-out periods. A browser will download multiple
components of a web page as quickly as possible by opening multiple connections. A web
page that includes three photos will load more quickly if the browser opens four connections to
the server and downloads the page and the three photos at the same time. A short time-out
period on the connections will close the connections faster, allowing the server to avoid
unnecessarily allocating resources for a long period. The HTTP session time-out is set by the
server and will vary with the server software, version, and configuration.
Using the Exempt action can have unintended consequences in certain circumstances. You
have a web site at example.com and since you control the site, you trust the contents and
configure example.com as exempt. But example.com is hosted on a shared server with a
dozen other different sites, each with a unique domain name. Because of the shared hosting,
they also share the same IP address. If you visit example.com, your connection your site
becomes exempt from any antivirus proxy operations. Visits to any of the 12 other sites on the
same server will reuse the same connection and the data you receive is exempt from scanned.
Use of the Exempt action is not suitable for configuration in which connections through the
FortiGate unit use an external proxy. For example, you use proxy.example.net for all outgoing
web access. Also, as in the first example, URL filter list that includes a URL pattern of
example.com/files configured with the Exempt action. Users are protected by the antivirus
protection of the FortiGate unit until a user visits a URL that matches the of
example.com/files URL pattern. The pattern is configured with the Exempt action so the
connection to the server inherits the exemption. With a proxy however, the connection is from
Fortinet Technologies Inc. Page 53 Security Profiles for FortiOS 5.2
the user to the proxy. Therefore, the user is entirely unprotected until the connection times out,
no matter what site he visits.
Ensure you are aware of the network topology involving any URLs to which you apply the
Exempt action.
Status
The Web Site Filter has the option to either enable or disable individual web sites in the list. This
allows for the temporary removal of the actions against a site so that it can be later reengaged
without having to rewrite the configuration.
Configuring a URL filter
Each URL filter list can have up to 5000 entries. For this example, the URL www.example*.com
will be used. You configure the list by adding one or more URLs to it.
To add a URL to a URL filter
1. Go to Security Profiles > Web Filter
2. Select a web filter to edit.
3. In the URL filter, select Create New.
4. Enter the URL, without the “http”, for example: www.example*.com.
5. Select a Type: Simple, Wildcard or Regular Expression.
6. In this example, select Wildcard.
7. Select the Action to take against matching URLs: Exempt, Block, Allow, or Monitor.
8. Select Enable.
9. Select OK.
Referrer URL
A new variable has been added to the Static URL Filter, referrer-host. If a referrer is
specified, the hostname in the referer field of the HTTP require will be compared for any entry
that contains the matching URL. If the referer matches, then the specified action will be
performed by proxy.
Configuring in the GUI
The configuration can be done in the GUI but only if advance webfiltering features have been
enabled by entering the following commands in the CLI:
config system globalset gui-webfilter-advanced enableend
After this command is used, a new column will be created in Security Profiles > Web Filter >
Static URL Filter to set the referrer.
Configuring in the CLI
When specifying the URL filter, it needs to be identified by its ID. The URLs are listed under each
entry.
Fortinet Technologies Inc. Page 54 Security Profiles for FortiOS 5.2

To find the ID number:
config webfilter urlfilteredit ?
A list of the current URL filters will be listed with their ID numbers in the left column.
The syntax in the CLI for configuring an entry is:
config webfilter urlfilteredit <ID>
config entriesedit 1
set url <url> set referrer-host <url> set type {simple | regex | wildcard} set action {block | allow | monitor | exempt} set status {enable | disable} end
end end
Web content filter
You can control web content by blocking access to web pages containing specific words or
patterns. This helps to prevent access to pages with questionable material. You can also add
words, phrases, patterns, wild cards and Perl regular expressions to match content on web
pages. You can add multiple web content filter lists and then select the best web content filter
list for each web filter profile.
Enabling web content filtering involves three separate parts of the FortiGate configuration.
• The security policy allows certain network traffic based on the sender, receiver, interface,
traffic type, and time of day.
• The web filter profile specifies what sort of web filtering is applied.
• The web content filter list contains blocked and exempt patterns.
The web content filter feature scans the content of every web page that is accepted by a
security policy. The system administrator can specify banned words and phrases and attach a
numerical value, or score, to the importance of those words and phrases. When the web
content filter scan detects banned content, it adds the scores of banned words and phrases in
the page. If the sum is higher than a threshold set in the web filter profile, the FortiGate unit
blocks the page.
General configuration steps
Follow the configuration procedures in the order given. Also, note that if you perform any
additional actions between procedures, your configuration may have different results.
1. Create a web content filter list.
2. Add patterns of words, phrases, wildcards, and regular expressions that match the content
to be blocked or exempted.
3. You can add the patterns in any order to the list. You need to add at least one pattern that
blocks content. RP: Add info about how exempting has no effect alone. Something must be
blocked for exempting to make sense. A possible exception is if exempting really does
bypass AV scans.
Fortinet Technologies Inc. Page 55 Security Profiles for FortiOS 5.2
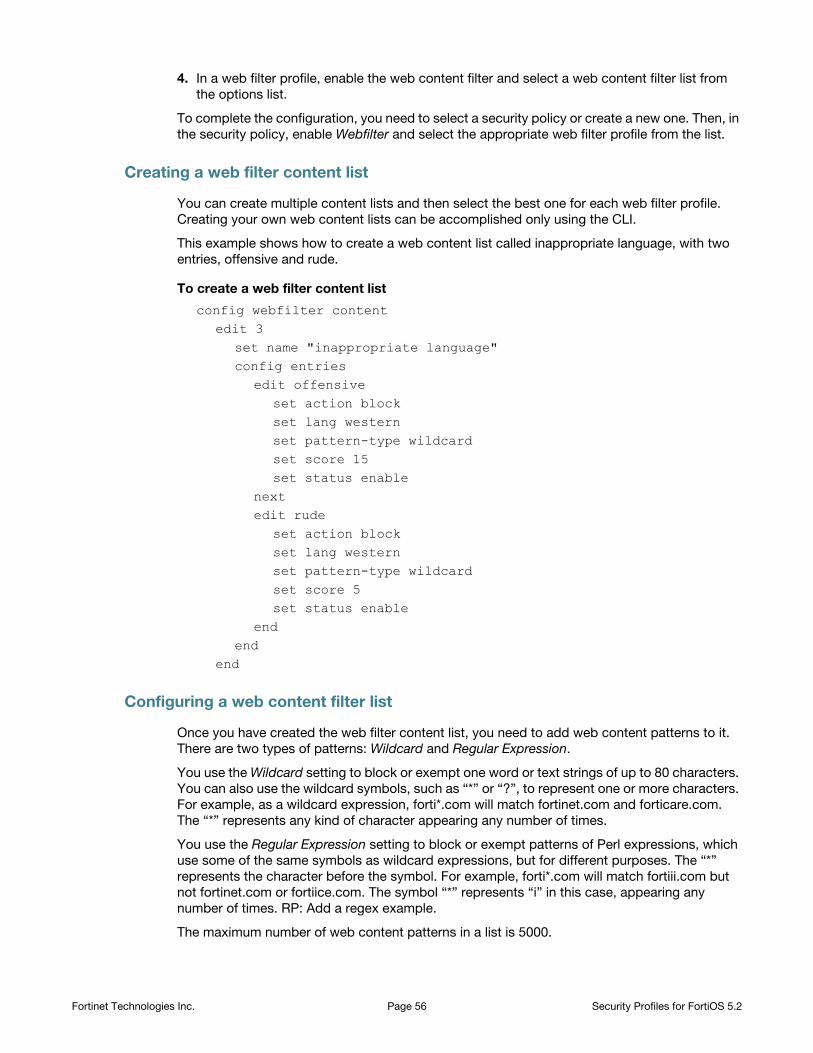
4. In a web filter profile, enable the web content filter and select a web content filter list from
the options list.
To complete the configuration, you need to select a security policy or create a new one. Then, in
the security policy, enable Webfilter and select the appropriate web filter profile from the list.
Creating a web filter content list
You can create multiple content lists and then select the best one for each web filter profile.
Creating your own web content lists can be accomplished only using the CLI.
This example shows how to create a web content list called inappropriate language, with two
entries, offensive and rude.
To create a web filter content list
config webfilter contentedit 3
set name "inappropriate language"config entries
edit offensiveset action blockset lang westernset pattern-type wildcardset score 15set status enable
nextedit rude
set action blockset lang westernset pattern-type wildcardset score 5set status enable
endend
end
Configuring a web content filter list
Once you have created the web filter content list, you need to add web content patterns to it.
There are two types of patterns: Wildcard and Regular Expression.
You use the Wildcard setting to block or exempt one word or text strings of up to 80 characters.
You can also use the wildcard symbols, such as “*” or “?”, to represent one or more characters.
For example, as a wildcard expression, forti*.com will match fortinet.com and forticare.com.
The “*” represents any kind of character appearing any number of times.
You use the Regular Expression setting to block or exempt patterns of Perl expressions, which
use some of the same symbols as wildcard expressions, but for different purposes. The “*”
represents the character before the symbol. For example, forti*.com will match fortiii.com but
not fortinet.com or fortiice.com. The symbol “*” represents “i” in this case, appearing any
number of times. RP: Add a regex example.
The maximum number of web content patterns in a list is 5000.
Fortinet Technologies Inc. Page 56 Security Profiles for FortiOS 5.2
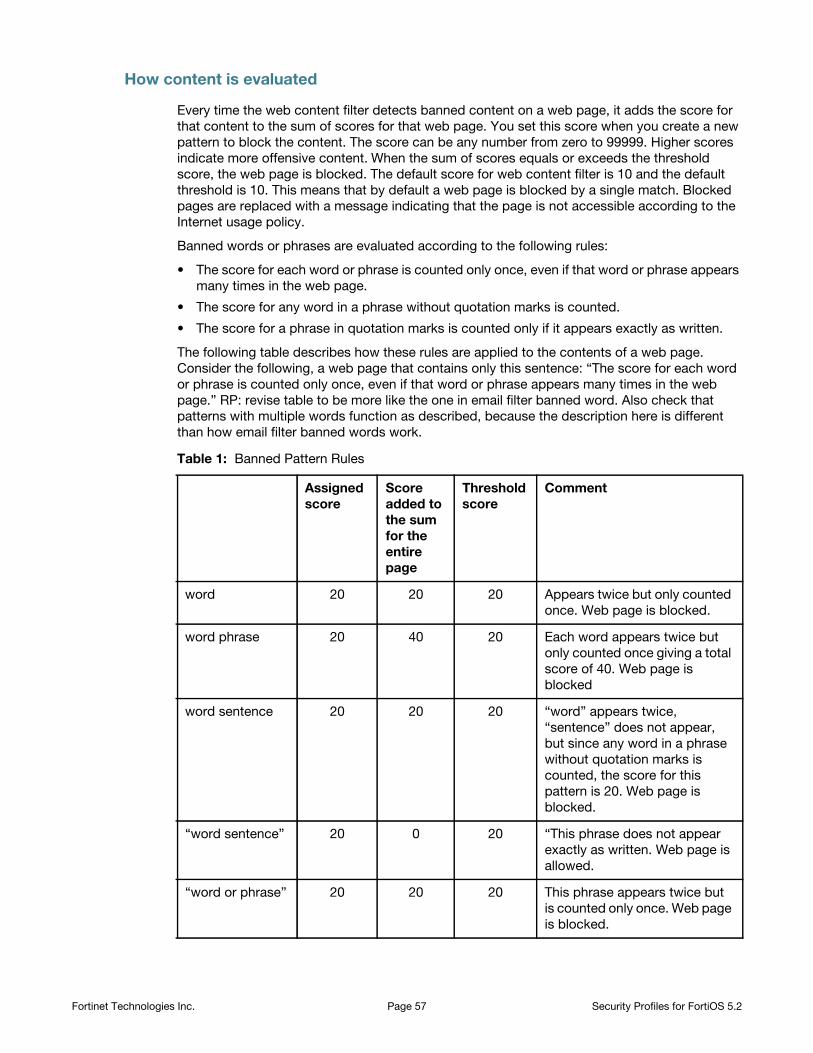
How content is evaluated
Every time the web content filter detects banned content on a web page, it adds the score for
that content to the sum of scores for that web page. You set this score when you create a new
pattern to block the content. The score can be any number from zero to 99999. Higher scores
indicate more offensive content. When the sum of scores equals or exceeds the threshold
score, the web page is blocked. The default score for web content filter is 10 and the default
threshold is 10. This means that by default a web page is blocked by a single match. Blocked
pages are replaced with a message indicating that the page is not accessible according to the
Internet usage policy.
Banned words or phrases are evaluated according to the following rules:
• The score for each word or phrase is counted only once, even if that word or phrase appears
many times in the web page.
• The score for any word in a phrase without quotation marks is counted.
• The score for a phrase in quotation marks is counted only if it appears exactly as written.
The following table describes how these rules are applied to the contents of a web page.
Consider the following, a web page that contains only this sentence: “The score for each word
or phrase is counted only once, even if that word or phrase appears many times in the web
page.” RP: revise table to be more like the one in email filter banned word. Also check that
patterns with multiple words function as described, because the description here is different
than how email filter banned words work.
Banned
pattern
Assigned
score
Score
added to
the sum
for the
entire
page
Threshold
score
Comment
word 20 20 20 Appears twice but only counted
once. Web page is blocked.
word phrase 20 40 20 Each word appears twice but
only counted once giving a total
score of 40. Web page is
blocked
word sentence 20 20 20 “word” appears twice,
“sentence” does not appear,
but since any word in a phrase
without quotation marks is
counted, the score for this
pattern is 20. Web page is
blocked.
“word sentence” 20 0 20 “This phrase does not appear
exactly as written. Web page is
allowed.
“word or phrase” 20 20 20 This phrase appears twice but
is counted only once. Web page
is blocked.
Table 1: Banned Pattern Rules
Fortinet Technologies Inc. Page 57 Security Profiles for FortiOS 5.2
Enabling the web content filter and setting the content threshold
When you enable the web content filter, the web filter will block any web pages when the sum of
scores for banned content on that page exceeds the content block threshold. The threshold will
be disregarded for any exemptions within the web filter list.
Advanced web filter configurations
Allow websites when a rating error occurs
Enable to allow access to web pages that return a rating error from the FortiGuard Web Filter
service.
If your FortiGate unit cannot contact the FortiGuard service temporarily, this setting determines
what access the FortiGate unit allows until contact is re-established. If enabled, users will have
full unfiltered access to all web sites. If disabled, users will not be allowed access to any web
sites.
ActiveX filter
Enable to filter ActiveX scripts from web traffic. Web sites using ActiveX may not function
properly with this filter enabled.
Block HTTP redirects by rating
Enable to block HTTP redirects.
Many web sites use HTTP redirects legitimately but in some cases, redirects may be designed
specifically to circumvent web filtering, as the initial web page could have a different rating than
the destination web page of the redirect.
This option is not supported for HTTPS.
Block Invalid URLs
Select to block web sites when their SSL certificate CN field does not contain a valid domain
name.
FortiGate units always validate the CN field, regardless of whether this option is enabled.
However, if this option is not selected, the following behavior occurs:
• If the request is made directly to the web server, rather than a web server proxy, the
FortiGate unit queries for FortiGuard Web Filtering category or class ratings using the IP
address only, not the domain name.
• If the request is to a web server proxy, the real IP address of the web server is not known.
Therefore, rating queries by either or both the IP address and the domain name is not
reliable. In this case, the FortiGate unit does not perform FortiGuard Web Filtering.
Cookie filter
Enable to filter cookies from web traffic. Web sites using cookies may not function properly with
this enabled.
Fortinet Technologies Inc. Page 58 Security Profiles for FortiOS 5.2
Provide Details for Blocked HTTP 4xx and 5xx Errors
Enable to have the FortiGate unit display its own replacement message for 400 and 500-series
HTTP errors. If the server error is allowed through, malicious or objectionable sites can use
these common error pages to circumvent web filtering.
HTTP POST action
Select the action to take with HTTP POST traffic. HTTP POST is the command used by your
browser when you send information, such as a form you have filled-out or a file you are
uploading, to a web server.
The available actions include:
Comfort
Use client comforting to slowly send data to the web server as the FortiGate unit scans the file.
Use this option to prevent a server time-out when scanning or other filtering is enabled for
outgoing traffic.
The client comforting settings used are those defined in the Proxy Options profile selected in
the security policy.
Block
Block the HTTP POST command. This will limit users from sending information and files to web
sites.
When the post request is blocked, the FortiGate unit sends the http-post-block replacement
message to the web browser attempting to use the command.
Java applet filter
Enable to filter java applets from web traffic. Web sites using java applets may not function
properly with this filter enabled.
Rate Images by URL
Enable to have the FortiGate retrieve ratings for individual images in addition to web sites.
Images in a blocked category are not displayed even if they are part of a site in an allowed
category.
Blocked images are replaced on the originating web pages with blank place-holders. Rated
image file types include GIF, JPEG, PNG, BMP, and TIFF.
Rate URLs by Domain and IP Address
Enable to have the FortiGate unit request the rating of the site by URL and IP address
separately, providing additional security against attempts to bypass the FortiGuard Web Filter.
If the rating determined by the domain name and the rating determined by the IP address defer
the Action that is enforce will be determined by a weighting assigned to the different categories.
The higher weighted category will take precedence in determining the action. This will have the
side effect that sometimes the Action will be determined by the classification based on the
Fortinet Technologies Inc. Page 59 Security Profiles for FortiOS 5.2

domain name and other times it will be determined by the classification that is based on the IP
address.
FortiGuard Web Filter ratings for IP addresses are not updated as quickly as ratings for URLs.
This can sometimes cause the FortiGate unit to allow access to sites that should be blocked, or
to block sites that should be allowed.
An example of how this would work would be if a URL’s rating based on the domain name
indicated that it belonged in the category Lingerie and Swimsuit, which is allowed but the
category assigned to the IP address was Pornography which has an action of Block, because
the Pornography category has a higher weight the effective action is Block.
Web resume download block
Enable to prevent the resumption of a file download where it was previously interrupted. With
this filter enabled, any attempt to restart an aborted download will download the file from the
beginning rather than resuming from where it left off.
This prevents the unintentional download of viruses hidden in fragmented files.
Note that some types of files, such as PDF, fragment files to increase download speed and
enabling this option can cause download interruptions. Enabling this option may also break
certain applications that use the Range Header in the HTTP protocol, such as YUM, a Linux
update manager.
Restrict Google account usage to specific domains
This feature allow the blocking of access to some Google accounts and services while allowing
access to accounts that are included in the domains specified in the exception list.
Configuring Web Filter Profiles
Enabling FortiGuard Web Filter
FortiGuard Web Filter is enabled and configured within web filter profiles by enabling FortiGuard
Categories. The service is engaged by turning on the Web Filter profile and selecting a profile
that has FortiGuard Categories enabled on one or more active policies being run by the firewall.
There is also a system wide setting for the enabling or disabling of FortiGuard Web Filter that is
only in the CLI.
config system fortiguardset webfilter-force-off
The two options on this setting are enable or disable. The syntax of the settings name is
“force-off” so in order to enable FortiGuard Webfilter you have to choose disable for the setting
and enable if you want to turn it off.
General configuration steps
1. Go to Security Profiles > Web Filter.2. Determine if you wish to create a new profile or edit an existing one.3. Select an Inspection Mode.
Fortinet Technologies Inc. Page 60 Security Profiles for FortiOS 5.2
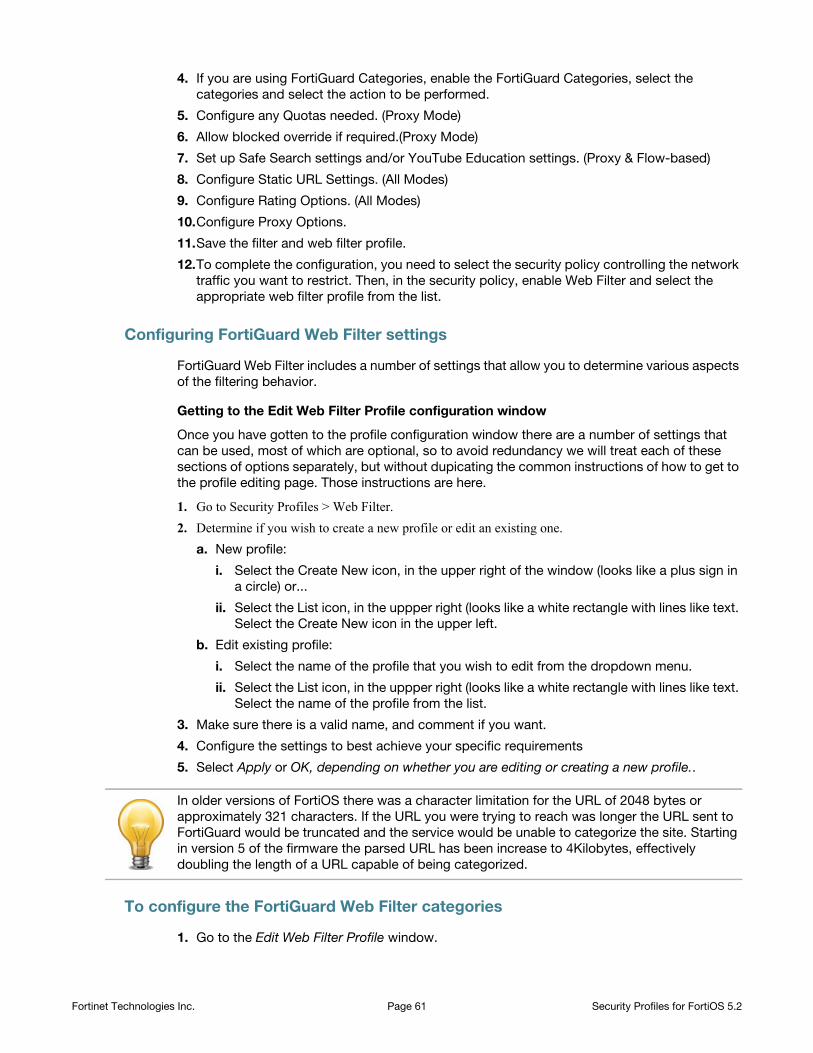
4. If you are using FortiGuard Categories, enable the FortiGuard Categories, select the
categories and select the action to be performed.
5. Configure any Quotas needed. (Proxy Mode)
6. Allow blocked override if required.(Proxy Mode)
7. Set up Safe Search settings and/or YouTube Education settings. (Proxy & Flow-based)
8. Configure Static URL Settings. (All Modes)
9. Configure Rating Options. (All Modes)
10.Configure Proxy Options.
11.Save the filter and web filter profile.
12.To complete the configuration, you need to select the security policy controlling the network
traffic you want to restrict. Then, in the security policy, enable Web Filter and select the
appropriate web filter profile from the list.
Configuring FortiGuard Web Filter settings
FortiGuard Web Filter includes a number of settings that allow you to determine various aspects
of the filtering behavior.
Getting to the Edit Web Filter Profile configuration window
Once you have gotten to the profile configuration window there are a number of settings that
can be used, most of which are optional, so to avoid redundancy we will treat each of these
sections of options separately, but without dupicating the common instructions of how to get to
the profile editing page. Those instructions are here.
1. Go to Security Profiles > Web Filter.2. Determine if you wish to create a new profile or edit an existing one.
a. New profile:
i. Select the Create New icon, in the upper right of the window (looks like a plus sign in
a circle) or...
ii. Select the List icon, in the uppper right (looks like a white rectangle with lines like text.
Select the Create New icon in the upper left.
b. Edit existing profile:
i. Select the name of the profile that you wish to edit from the dropdown menu.
ii. Select the List icon, in the uppper right (looks like a white rectangle with lines like text.
Select the name of the profile from the list.
3. Make sure there is a valid name, and comment if you want.
4. Configure the settings to best achieve your specific requirements
5. Select Apply or OK, depending on whether you are editing or creating a new profile..
To configure the FortiGuard Web Filter categories
1. Go to the Edit Web Filter Profile window.
In older versions of FortiOS there was a character limitation for the URL of 2048 bytes or
approximately 321 characters. If the URL you were trying to reach was longer the URL sent to
FortiGuard would be truncated and the service would be unable to categorize the site. Starting
in version 5 of the firmware the parsed URL has been increase to 4Kilobytes, effectively
doubling the length of a URL capable of being categorized.
Fortinet Technologies Inc. Page 61 Security Profiles for FortiOS 5.2
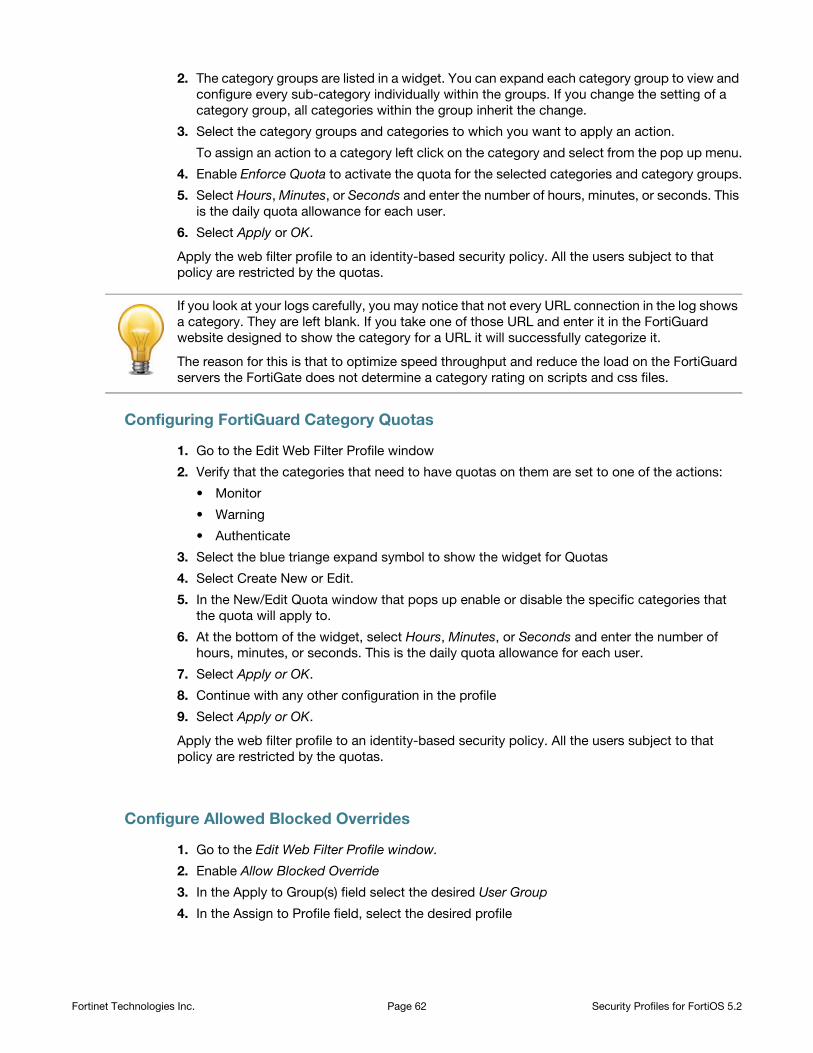
2. The category groups are listed in a widget. You can expand each category group to view and
configure every sub-category individually within the groups. If you change the setting of a
category group, all categories within the group inherit the change.
3. Select the category groups and categories to which you want to apply an action.
To assign an action to a category left click on the category and select from the pop up menu.
4. Enable Enforce Quota to activate the quota for the selected categories and category groups.
5. Select Hours, Minutes, or Seconds and enter the number of hours, minutes, or seconds. This
is the daily quota allowance for each user.
6. Select Apply or OK.
Apply the web filter profile to an identity-based security policy. All the users subject to that
policy are restricted by the quotas.
If you look at your logs carefully, you may notice that not every URL connection in the log shows
a category. They are left blank. If you take one of those URL and enter it in the FortiGuard
website designed to show the category for a URL it will successfully categorize it.
The reason for this is that to optimize speed throughput and reduce the load on the FortiGuard
servers the FortiGate does not determine a category rating on scripts and css files.
Configuring FortiGuard Category Quotas
1. Go to the Edit Web Filter Profile window
2. Verify that the categories that need to have quotas on them are set to one of the actions:
• Monitor
• Warning
• Authenticate
3. Select the blue triange expand symbol to show the widget for Quotas
4. Select Create New or Edit.
5. In the New/Edit Quota window that pops up enable or disable the specific categories that
the quota will apply to.
6. At the bottom of the widget, select Hours, Minutes, or Seconds and enter the number of
hours, minutes, or seconds. This is the daily quota allowance for each user.
7. Select Apply or OK.
8. Continue with any other configuration in the profile
9. Select Apply or OK.
Apply the web filter profile to an identity-based security policy. All the users subject to that
policy are restricted by the quotas.
Configure Allowed Blocked Overrides
1. Go to the Edit Web Filter Profile window.
2. Enable Allow Blocked Override
3. In the Apply to Group(s) field select the desired User Group
4. In the Assign to Profile field, select the desired profile
Fortinet Technologies Inc. Page 62 Security Profiles for FortiOS 5.2
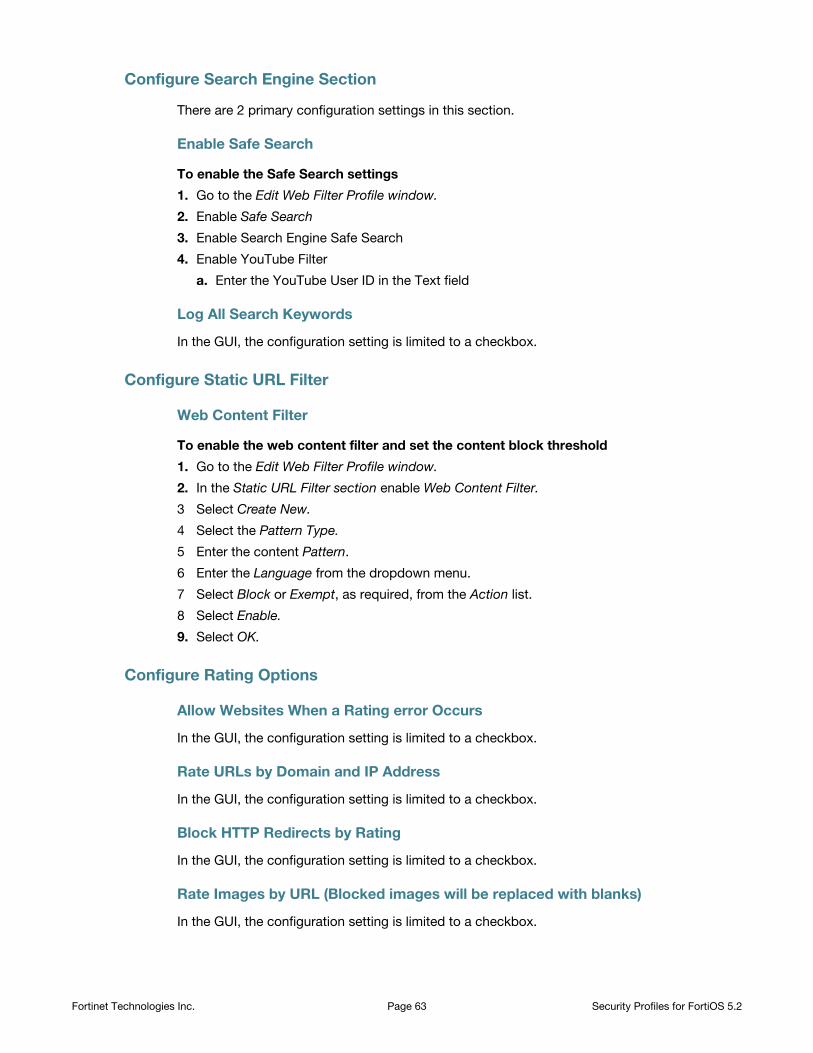
Configure Search Engine Section
There are 2 primary configuration settings in this section.
Enable Safe Search
To enable the Safe Search settings
1. Go to the Edit Web Filter Profile window.
2. Enable Safe Search
3. Enable Search Engine Safe Search
4. Enable YouTube Filter
a. Enter the YouTube User ID in the Text field
Log All Search Keywords
In the GUI, the configuration setting is limited to a checkbox.
Configure Static URL Filter
Web Content Filter
To enable the web content filter and set the content block threshold
1. Go to the Edit Web Filter Profile window.
2. In the Static URL Filter section enable Web Content Filter.
3 Select Create New.
4 Select the Pattern Type.
5 Enter the content Pattern.
6 Enter the Language from the dropdown menu.
7 Select Block or Exempt, as required, from the Action list.
8 Select Enable.
9. Select OK.
Configure Rating Options
Allow Websites When a Rating error Occurs
In the GUI, the configuration setting is limited to a checkbox.
Rate URLs by Domain and IP Address
In the GUI, the configuration setting is limited to a checkbox.
Block HTTP Redirects by Rating
In the GUI, the configuration setting is limited to a checkbox.
Rate Images by URL (Blocked images will be replaced with blanks)
In the GUI, the configuration setting is limited to a checkbox.
Fortinet Technologies Inc. Page 63 Security Profiles for FortiOS 5.2
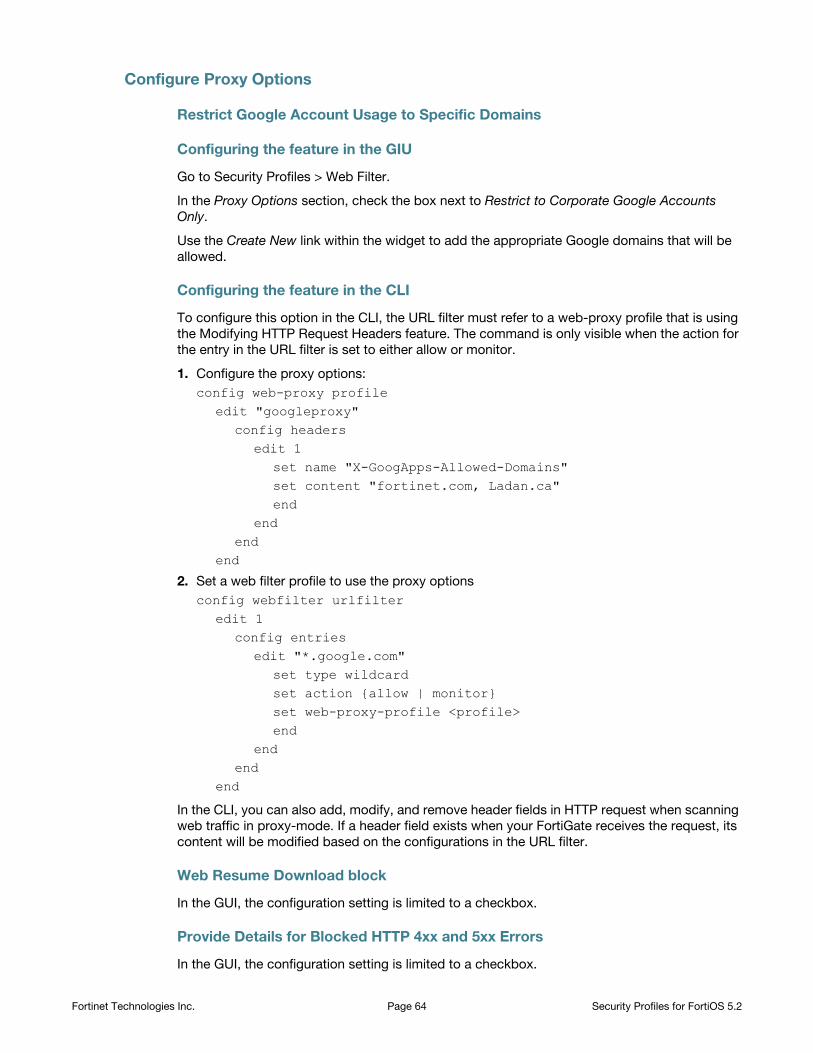
Configure Proxy Options
Restrict Google Account Usage to Specific Domains
Configuring the feature in the GIU
Go to Security Profiles > Web Filter.
In the Proxy Options section, check the box next to Restrict to Corporate Google Accounts
Only.
Use the Create New link within the widget to add the appropriate Google domains that will be
allowed.
Configuring the feature in the CLI
To configure this option in the CLI, the URL filter must refer to a web-proxy profile that is using
the Modifying HTTP Request Headers feature. The command is only visible when the action for
the entry in the URL filter is set to either allow or monitor.
1. Configure the proxy options:
config web-proxy profileedit "googleproxy"
config headersedit 1
set name "X-GoogApps-Allowed-Domains" set content "fortinet.com, Ladan.ca" end
end end
end
2. Set a web filter profile to use the proxy options
config webfilter urlfilteredit 1
config entriesedit "*.google.com"
set type wildcard set action {allow | monitor} set web-proxy-profile <profile> end
end end
end
In the CLI, you can also add, modify, and remove header fields in HTTP request when scanning
web traffic in proxy-mode. If a header field exists when your FortiGate receives the request, its
content will be modified based on the configurations in the URL filter.
Web Resume Download block
In the GUI, the configuration setting is limited to a checkbox.
Provide Details for Blocked HTTP 4xx and 5xx Errors
In the GUI, the configuration setting is limited to a checkbox.
Fortinet Technologies Inc. Page 64 Security Profiles for FortiOS 5.2

HTTP POST Action
Remove Java Applet Filter
In the GUI, the configuration setting is limited to a checkbox.
Remove ActiveX Filter
In the GUI, the configuration setting is limited to a checkbox.
Remove Cookie Filter
In the GUI, the configuration setting is limited to a checkbox.
Web filtering example
Web filtering is particularly important for protecting school-aged children. There are legal issues
associated with improper web filtering as well as a moral responsibility not to allow children to
view inappropriate material. The key is to design a web filtering system in such a way that
students and staff do not fall under the same web filter profile in the FortiGate configuration.
This is important because the staff may need to access websites that are off-limits to the
students.
School district
The background for this scenario is a school district with more than 2300 students and 500
faculty and staff in a preschool, three elementary schools, a middle school, a high school, and a
continuing education center. Each elementary school has a computer lab and the high school
has three computer labs with connections to the Internet. Such easy access to the Internet
ensures that every student touches a computer every day.
With such a diverse group of Internet users, it was not possible for the school district to set
different Internet access levels. This meant that faculty and staff were unable to view websites
that the school district had blocked. Another issue was the students’ use of proxy sites to
circumvent the previous web filtering system. A proxy server acts as a go-between for users
seeking to view web pages from another server. If the proxy server has not been blocked by the
school district, the students can access the blocked website.
When determining what websites are appropriate for each school, the district examined a
number of factors, such as community standards and different needs of each school based on
the age of the students.
The district decided to configure the FortiGate web filtering options to block content of an
inappropriate nature and to allow each individual school to modify the options to suit the age of
the students. This way, each individual school was able to add or remove blocked sites almost
immediately and have greater control over their students’ Internet usage.
In this simplified example of the scenario, the district wants to block any websites with the word
example on them, as well as the website www.example.com. The first task is to create web
content filter lists for the students and the teachers.
Create a Webfilter for the students
1. Go to Security Profiles > Web Filter.2. Select the Create New icon.
3. Enter the name “Students” in the name field.
4. For the Inspection mode, select Proxy.
Fortinet Technologies Inc. Page 65 Security Profiles for FortiOS 5.2
5. Enable FortiGuard Categories
a. Set to block, the categories:
• Potentially Liable
• Adult/Mature Content
• Security Risk
URL Content
6. Check Enable Safe Search
a. Check Search Engine Safe Search - Google, Yahoo!, Bing, Yandex
b. Check YouTube Education Filter and enter the YouTube User ID
7. In the Static URL Filter section, check Enable URL Filter.
a. In the URL Filter widget, Select Create New.
i. In the URL field, enter *example*.*
ii. For the Type field, select Wildcard
iii. For the Action field, select Block
iv. For the Status field, check enable
v. Select OK
Web Content Filter
8. In the Static URL Filter section, check Enable Web Content Filter.
a. In the Web Content Filter widget, select Create New.
b. Enter the name “Teachers” in the name field.
i. For the Pattern Type field, select
ii. In the Pattern field, enter “example”
iii. For the Language field, choose Western
iv. For the Action field, select “Block”
v. For the Status field, check Enable.
vi. Select OK
9. Check Rate URLs by Domain and IP Address
10.Check Block HTTP Redirects by Rating
11.Check Rate Images by URL (Blocked images will be replaced with blanks)
12.Select OK
Create a Webfilter for the Teachers
It might be more efficient if the Teacher Web Content List included the same blocked content as
the student list. From time to time a teacher might have to view a blocked page. It would then
be a matter of changing the Action from Block to Allow as the situation required. The following
filter is how it could be set up for the teachers to allow them to see the “example” content if
needed while keeping the blocking inappropriate material condition.
1. Go to Security Profiles > Web Filter.2. Select the Create New icon.
3. Enter the name “Teachers” in the name field.
4. For the Inspection mode, select Proxy.
Fortinet Technologies Inc. Page 66 Security Profiles for FortiOS 5.2

5. Enable FortiGuard Categories
a. Set to block, the categories:
• Potentially Liable
• Adult/Mature Content
• Security Risk
URL Content
6. Check Enable Safe Search
a. Check Search Engine Safe Search - Google, Yahoo!, Bing, Yandex
b. Check YouTube Education Filter and enter the YouTube User ID
7. In the Static URL Filter section, check Enable URL Filter.
a. In the URL Filter widget, Select Create New.
i. In the URL field, enter *example*.*
ii. For the Type field, select Wildcard
iii. For the Action field, select Excempt
iv. For the Status field, check enable
v. Select OK
Web Content Filter
8. In the Static URL Filter section, check Enable Web Content Filter.
a. In the Web Content Filter widget, select Create New.
b. Enter the name “Teachers” in the name field.
i. For the Pattern Type field, select
ii. In the Pattern field, enter “example”
iii. For the Language field, choose Western
iv. For the Action field, select “Exempt”
v. For the Status field, check Enable.
vi. Select OK
9. Check Rate URLs by Domain and IP Address
10.Check Block HTTP Redirects by Rating
11.Check Rate Images by URL (Blocked images will be replaced with blanks)
12.Select OK
To create a security policy for the students
1. Go to Policy > Policy > IPv4.
2. Select the policy being used to manage student traffic.
3. Enable Web Filter.
4. Select Students from the web filter drop-down list.
5. Select OK.
To create a security policy for Teachers
1. Go to Policy > Policy > IPv4.
2. Select the policy being used to manage teacher traffic.
3. Enable Web Filter.
4. Select Teachers from the web filter drop-down list.
5. Select OK.
Fortinet Technologies Inc. Page 67 Security Profiles for FortiOS 5.2

6. Make sure that the student polic is in the sequence before the teachers’ policy.
Fortinet Technologies Inc. Page 68 Security Profiles for FortiOS 5.2
Application control
Using the application control Security Profile feature, your FortiGate unit can detect and take
action against network traffic depending on the application generating the traffic. Based on
FortiGate Intrusion Protection protocol decoders, application control is a user-friendly and
powerful way to use Intrusion Protection features to log and manage the behavior of application
traffic passing through the FortiGate unit. Application control uses IPS protocol decoders that
can analyze network traffic to detect application traffic even if the traffic uses non-standard
ports or protocols.
The FortiGate unit can recognize the network traffic generated by a large number of
applications. You can create application control sensors that specify the action to take with the
traffic of the applications you need to manage and the network on which they are active, and
then add application control sensors to the firewall policies that control the network traffic you
need to monitor.
Fortinet is constantly increasing the list of applications that application control can detect by
adding applications to the FortiGuard Application Control Database. Because intrusion
protection protocol decoders are used for application control, the application control database
is part of the FortiGuard Intrusion Protection System Database and both of these databases
have the same version number.
You can find the version of the application control database that is installed on your unit, by
going to the License Information dashboard widget and find IPS Definitions version.
You can go to the FortiGuard Application Control List to see the complete list of applications
supported by FortiGuard. This web page lists all of the supported applications. You can select
any application name to see details about the application.
If you enable virtual domains (VDOMs) on the Fortinet unit, you need to configure application
control separately for each virtual domain.
The following topics are included in this section:
• Application control concepts
• Application considerations
• Application traffic shaping
• Application control monitor
• Enable application control
• Application control examples
Application control concepts
You can control network traffic generally by the source or destination address, or by the port,
the quantity or similar attributes of the traffic itself in the security policy. If you want to control
the flow of traffic from a specific application, these methods may not be sufficient to precisely
define the traffic. To address this problem, the application control feature examines the traffic
itself for signatures unique to the application generating it. Application control does not require
knowledge of any server addresses or ports. The FortiGate unit includes signatures for over
1000 applications, services, and protocols.
Updated and new application signatures are delivered to your FortiGate unit as part of your
FortiGuard Application Control Service subscription. Fortinet is constantly increasing the
Page 69
number of applications that application control can detect by adding applications to the
FortiGuard Application Control Database. Because intrusion protection protocol decoders are
used for application control, the application control database is part of the FortiGuard Intrusion
Protection System Database and both of these databases have the same version number.
To view the version of the application control database installed on your FortiGate unit, go to the
License Information dashboard widget and find the IPS Definitions version.
To see the complete list of applications supported by FortiGuard Application Control go to the
FortiGuard Application Control List. This web page lists all of the supported applications. You
can select any application name to see details about the application.
Application Control Actions
Allow
This action allows the targeted traffic to continue on through the FortiGate unit.
Monitor
This action allows the targeted traffic to continue on through the FortiGate unit but logs the
traffic for analysis.
Block
This action prevents all traffic from reaching the application and logs all occurrences.
Reset
This action resets the session or connection between the FortiGate and the initiating node.
Traffic Shaping
This action presents a number of default traffic shaping options:
• guarantee-100kbps
• high-priority
• low-priority
• medium-priority
• shared-1M-pipe
Fortinet Technologies Inc. Page 70 Security Profiles for FortiOS 5.2
View Signatures
This option brings up a window that displays a list of the signatures with the following columns:
• Application Name
• Category
• Technology - Technology is broken down into 3 technology models as well as the more basic
Network-Protocol which would can be used as a catch all for anything not covered by the
more narrowly defined technologies of:
• Browser-Based
• Client-Server
• Peer -to-Peer
• Popularity - Popularity is broken down into 5 levels of popularity represented by stars. 5
stars representing the most popular applications and 1 star representing applications that
are the least popular.
• Risk - The Risk property does not indicate the level of risk but the type of impact that is likely
to occur by allowing the traffic from that application to occur. The Risk list is broken down
into the following
Application considerations
Some applications behave differently from most others. You should be aware of these
differences before using application control to regulate their use.
IM applications
The Application Control function for a number of IM application is not in the Web Based
Manager, in the CLI of the FortiGate unit. These applications are:
• AIM
• ICQ
• MSN
• Yahoo
These applications are controlled by either permitting or denying the users from logging in to the
service. Individual IM accounts are configured as to whether or not they are permitted and then
there is a global policy for how to action unknown users, by the application, and whether to add
the user to the black list or the white list.
The configuration details for these settings can be found in the CLI Reference guide under the
heading of imp2p.
Skype
Based on the NAT firewall type, Skype takes advantage of several NAT firewall traversal
methods, such as STUN (Simple Traversal of UDP through NAT), ICE (Interactive Connectivity
Establishment) and TURN (Traversal Using Relay NAT), to make the connection.
The Skype client may try to log in with either UDP or TCP, on different ports, especially
well-known service ports, such as HTTP (80) and HTTPS (443), because these ports are
normally allowed in firewall settings. A client who has previously logged in successfully could
start with the known good approach, then fall back on another approach if the known one fails.
Fortinet Technologies Inc. Page 71 Security Profiles for FortiOS 5.2
The Skype client could also employ Connection Relay. This means if a reachable host is already
connected to the Skype network, other clients can connect through this host. This makes any
connected host not only a client but also a relay server.
SPDY
SPDY (pronounced speedy, it’s a trademarked name not an acronym) is a networking protocol
developed to increase the speed and security of HTML traffic. It was developed primarily by
Google. The Application Control engine recognises this protocol and its required SSL/TLS
component within Application Control sensors. It is counted as part of application traffic for
Google and other sources that use the protocol.
Working with other FortiOS components
Application Control is not just a modulal that is inserted in to the OS and works independantly of
all of the other components.
WAN Optimization
There is a feature that enables both IPS and Application Control on both non-HTTP WANOpt
traffic and HTTP-tunneled traffic through HTTP CONNECT. The basic idea is that it hooks a
scan connection to a port so that traffic will be redirected to the IPS engine before forwarding to
a different module.
Application traffic shaping
You can apply traffic shaping for application list entries you configure to pass. Traffic shaping
enables you to limit or guarantee the bandwidth available to the application or applications
specified in an application list entry. You can also prioritize traffic by using traffic shaping.
You can create or edit traffic shapers by going to Policy & Objects > Objects > Traffic Shapers.
Per-IP traffic shapers are not available for use in application traffic shaping.
Direction of traffic shaping
When Traffic Shaping is enabled the direction that traffic shaping will be applied must also be
chosen.
Forward direction traffic shaping refers to the direction of the initial connection. This would be
the direction described by the policy that the Application Control Sensor is assigned to. If the
policy has an Incoming Interface of LAN and an Outgoing Interface of wan1 then any Forward
Direction Traffic Shaping profile will apply to network traffic heading in that direction only. If the
connection used by that policy involved a response that included a download of Gigabytes of
traffic the shaper would not be applied to that traffic.
Reverse Direction Traffic Shaping is applied to traffic that is flowing in the opposite direction
indicated by the direction of the policy. If the policy has an Incoming Interface of LAN and an
Outgoing Interface of wan1 then the shaper would only be applied to the traffic that was coming
from the wan1 interface to the LAN interface.
For example, if you find that your network bandwidth is being overwhelmed by streaming HTTP
video, one solution is to limit the bandwidth by applying a traffic shaper to an application control
entry that allows the HTTP.Video application. Your users access the Web using a security policy
that allows HTTP traffic from the internal interface to the external interface. Firewall policies are
required to initiate communication so even though web sites respond to requests, a policy to
Fortinet Technologies Inc. Page 72 Security Profiles for FortiOS 5.2

allow traffic from the external interface to the internal interface is not required for your users to
access the Web. The internal to external policy allows them to open communication sessions to
web servers, and the external servers can reply using the existing session.
If you enable Traffic Shaping and select the Forward Direction shaper in an application sensor
specified in the security policy, the problem will continue. The reason is the shaper you select
for Traffic Shaping is applied only to the application traffic moving in the direction stated in the
security policy. In this case, that is from the internal interface to the external interface. The
security policy allows the user to visit the web site and start the video, but the video itself is
streamed from the server to the user, or from the external interface to the internal interface. This
is the reverse of the direction specified in the security policy. To solve the problem, you must
enable Reverse Direction Traffic Shaping and select the appropriate shaper.
Shaper re-use
Shapers are created independently of firewall policies and application sensors so you are free to
reuse the same shapers in multiple list entries and policies. Shared shapers can be configured
to apply separately to each security policy or across all policies. This means that if a shaper is
configured to guaranteed 1000 KB/s bandwidth, each security policy using the shaper will have
its own 1000 KB/s reserved, or all of the policies using the shaper will share a pool if 1000 KB/s,
depending on how it is configured.
The same thing happens when a shaper is used in application sensors. If an application sensor
using a shaper is applied to two separate policies, how the bandwidth is limited or guaranteed
depends on whether the shaper is set to apply separately to each policy or across all policies. In
fact, if a shaper is applied directly to one security policy, and it is also included in an application
sensor that is applied to another security policy, the same issue occurs. How the bandwidth is
limited or guaranteed depends on the shaper configuration.
If a shaper is used more than once within a single application sensor, all of the applications
using the shaper are restricted to the maximum bandwidth or share the same guaranteed
bandwidth.
For example, you want to limit the bandwidth used by Skype and Facebook chat to no more
than 100 KB/s. Create a shaper, enable Maximum Bandwidth, and enter 100. Then create an
application sensor with an entry for Skype and another entry for Facebook chat. Apply the
shaper to each entry and select the application sensor in the security policy that allows your
users to access both services.
This configuration uses the same shaper for each entry, so Skype and Facebook chat traffic are
limited to no more than 100 KB/s in total. That is, traffic from both applications is added and the
total is limited to 100 KB/s. If you want to limit Skype traffic to 100 KB/s and Facebook chat
traffic to 100 KB/s, you must use separate shapers for each application control entry.
Application control monitor
The application monitor enables you to gain an insight into the applications generating traffic on
your network. When monitor is enabled in an application sensor entry and the list is selected in
a security policy, all the detected traffic required to populate the selected charts is logged to the
SQL database on the FortiGate unit hard drive. The charts are available for display in the
executive summary section of the log and report menu.
Because the application monitor relies on a SQL database, the feature is available only on
FortiGate units with an internal hard drive.
Fortinet Technologies Inc. Page 73 Security Profiles for FortiOS 5.2

While the monitor charts are similar to the top application usage dashboard widget, it offers
several advantages. The widget data is stored in memory so when you restart the FortiGate unit,
the data is cleared. Application monitor data is stored on the hard drive and restarting the
system does not affect old monitor data.
Application monitor allows you to choose to compile data for any or all of three charts: top ten
applications by bandwidth use, top ten media users by bandwidth, and top ten P2P users by
bandwidth. Further, there is a chart of each type for the traffic handled by each security policy
with application monitor enabled. The top application usage dashboard widget shows only the
bandwidth used by the top applications since the last system restart.
Enable application control
Application control examines your network traffic for traffic generated by the applications you
want it to control.
General configuration steps
Follow the configuration procedures in the order given. Also, note that if you perform any
additional actions between procedures, your configuration may have different results.
1. Create an application sensor.
2. Configure the sensor to include the signatures for the application traffic you want the
FortiGate unit to detect.
3. Enable any other applicable options.
4. Enable application control in a security policy and select the application sensor.
Creating an application sensor
You need to create an application sensor before you can enable application control.
To create an application sensor
1. Go to Security Profiles > Application Control.
2. Select the Create New icon in the title bar of the Edit Application Sensor window.
3. In the Name field, enter the name of the new application sensor.
4. Optionally, you may also enter a comment.
Adding applications to an application sensor
Once you have created an application sensor, you need to need to define the applications that
you want to control. You can add applications using categories and/or application overrides.
Categories will allow you to choose groups of signatures based on a category type. Application
overrides allow you to choose individual applications.
To add a category of signatures to the sensor.
1. Go to Security Profiles > Application Control.
Fortinet Technologies Inc. Page 74 Security Profiles for FortiOS 5.2
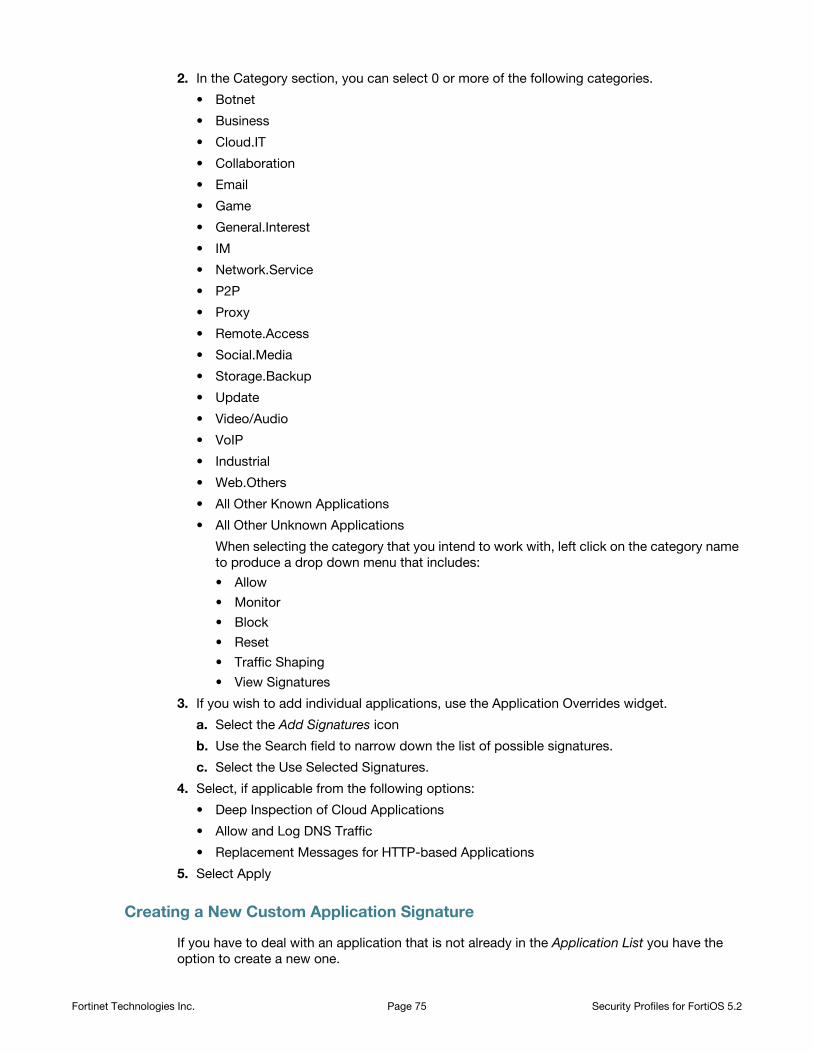
2. In the Category section, you can select 0 or more of the following categories.
• Botnet
• Business
• Cloud.IT
• Collaboration
• Game
• General.Interest
• IM
• Network.Service
• P2P
• Proxy
• Remote.Access
• Social.Media
• Storage.Backup
• Update
• Video/Audio
• VoIP
• Industrial
• Web.Others
• All Other Known Applications
• All Other Unknown Applications
When selecting the category that you intend to work with, left click on the category name
to produce a drop down menu that includes:
• Allow
• Monitor
• Block
• Reset
• Traffic Shaping
• View Signatures
3. If you wish to add individual applications, use the Application Overrides widget.
a. Select the Add Signatures icon
b. Use the Search field to narrow down the list of possible signatures.
c. Select the Use Selected Signatures.
4. Select, if applicable from the following options:
• Deep Inspection of Cloud Applications
• Allow and Log DNS Traffic
• Replacement Messages for HTTP-based Applications
5. Select Apply
Creating a New Custom Application Signature
If you have to deal with an application that is not already in the Application List you have the
option to create a new one.
Fortinet Technologies Inc. Page 75 Security Profiles for FortiOS 5.2
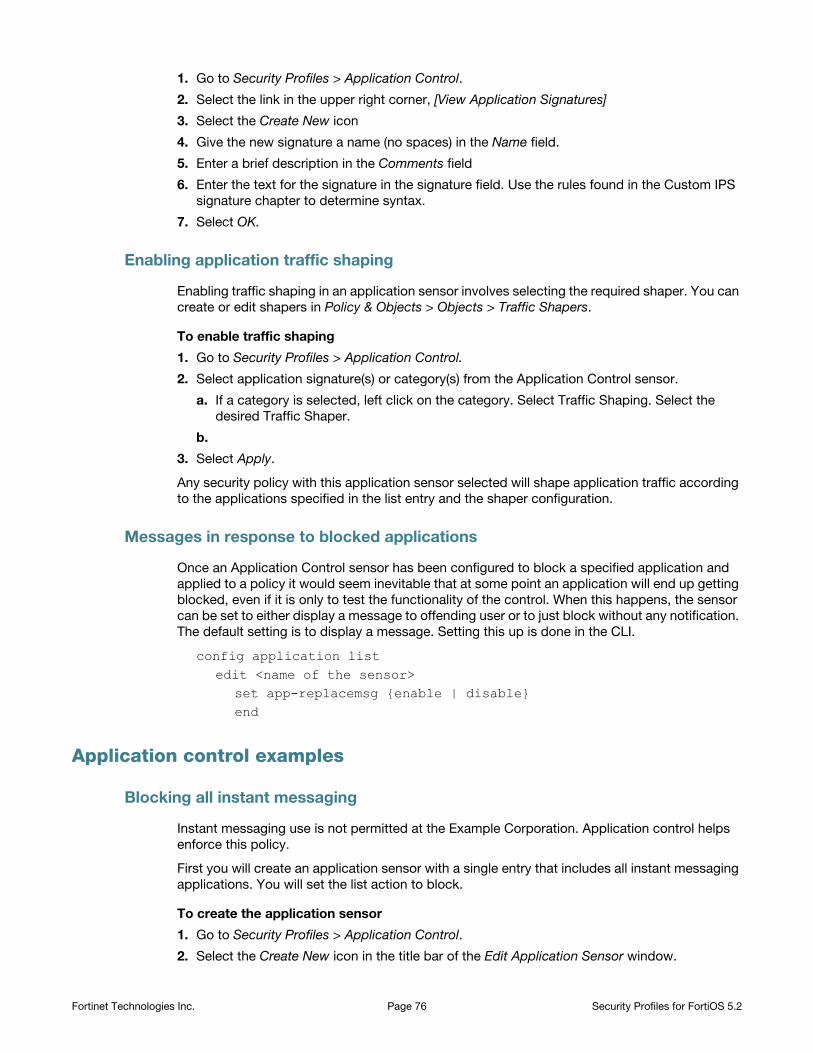
1. Go to Security Profiles > Application Control.
2. Select the link in the upper right corner, [View Application Signatures]
3. Select the Create New icon
4. Give the new signature a name (no spaces) in the Name field.
5. Enter a brief description in the Comments field
6. Enter the text for the signature in the signature field. Use the rules found in the Custom IPS
signature chapter to determine syntax.
7. Select OK.
Enabling application traffic shaping
Enabling traffic shaping in an application sensor involves selecting the required shaper. You can
create or edit shapers in Policy & Objects > Objects > Traffic Shapers.
To enable traffic shaping
1. Go to Security Profiles > Application Control.
2. Select application signature(s) or category(s) from the Application Control sensor.
a. If a category is selected, left click on the category. Select Traffic Shaping. Select the
desired Traffic Shaper.
b.
3. Select Apply.
Any security policy with this application sensor selected will shape application traffic according
to the applications specified in the list entry and the shaper configuration.
Messages in response to blocked applications
Once an Application Control sensor has been configured to block a specified application and
applied to a policy it would seem inevitable that at some point an application will end up getting
blocked, even if it is only to test the functionality of the control. When this happens, the sensor
can be set to either display a message to offending user or to just block without any notification.
The default setting is to display a message. Setting this up is done in the CLI.
config application listedit <name of the sensor>
set app-replacemsg {enable | disable}end
Application control examples
Blocking all instant messaging
Instant messaging use is not permitted at the Example Corporation. Application control helps
enforce this policy.
First you will create an application sensor with a single entry that includes all instant messaging
applications. You will set the list action to block.
To create the application sensor
1. Go to Security Profiles > Application Control.
2. Select the Create New icon in the title bar of the Edit Application Sensor window.
Fortinet Technologies Inc. Page 76 Security Profiles for FortiOS 5.2
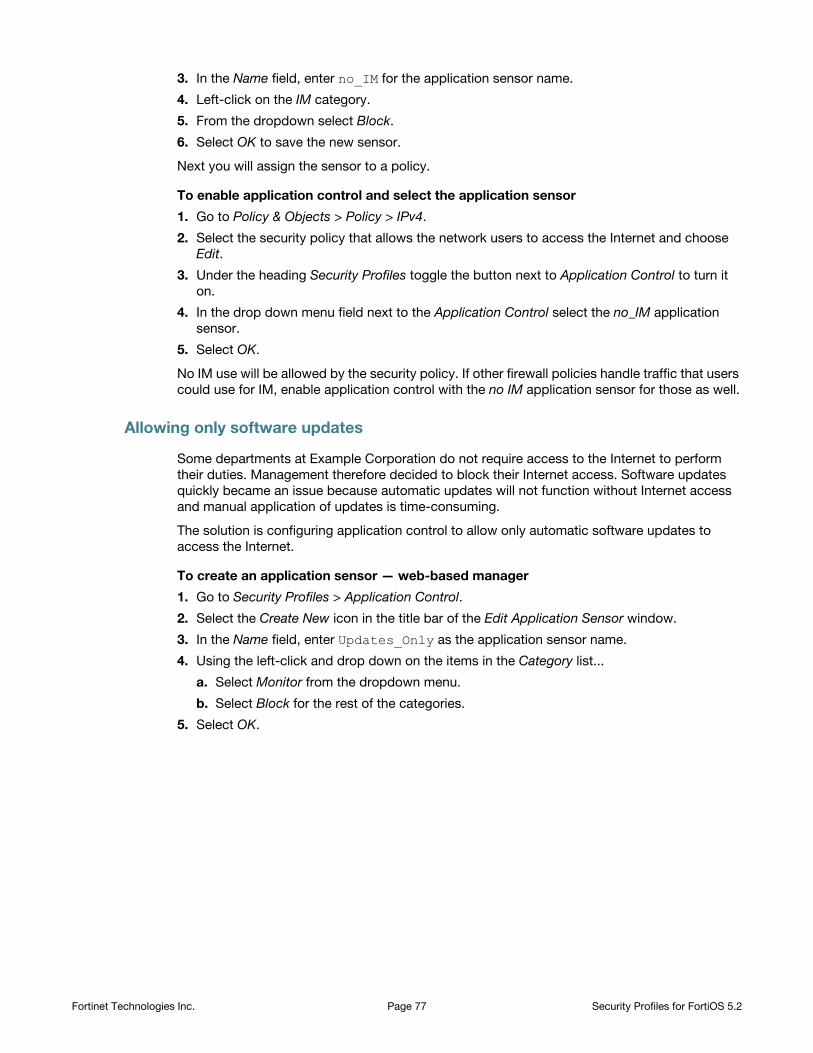
3. In the Name field, enter no_IM for the application sensor name.
4. Left-click on the IM category.
5. From the dropdown select Block.
6. Select OK to save the new sensor.
Next you will assign the sensor to a policy.
To enable application control and select the application sensor
1. Go to Policy & Objects > Policy > IPv4.
2. Select the security policy that allows the network users to access the Internet and choose
Edit.
3. Under the heading Security Profiles toggle the button next to Application Control to turn it
on.
4. In the drop down menu field next to the Application Control select the no_IM application
sensor.
5. Select OK.
No IM use will be allowed by the security policy. If other firewall policies handle traffic that users
could use for IM, enable application control with the no IM application sensor for those as well.
Allowing only software updates
Some departments at Example Corporation do not require access to the Internet to perform
their duties. Management therefore decided to block their Internet access. Software updates
quickly became an issue because automatic updates will not function without Internet access
and manual application of updates is time-consuming.
The solution is configuring application control to allow only automatic software updates to
access the Internet.
To create an application sensor — web-based manager
1. Go to Security Profiles > Application Control.
2. Select the Create New icon in the title bar of the Edit Application Sensor window.
3. In the Name field, enter Updates_Only as the application sensor name.
4. Using the left-click and drop down on the items in the Category list...
a. Select Monitor from the dropdown menu.
b. Select Block for the rest of the categories.
5. Select OK.
Fortinet Technologies Inc. Page 77 Security Profiles for FortiOS 5.2
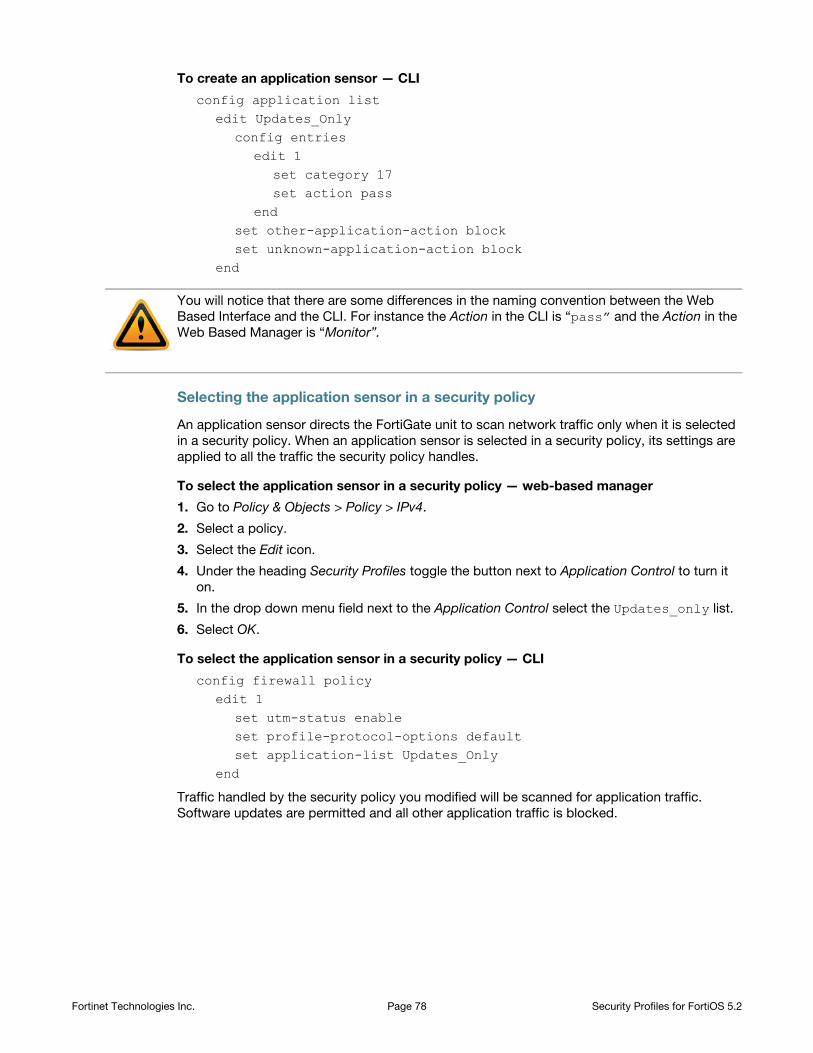
To create an application sensor — CLI
config application listedit Updates_Only
config entriesedit 1
set category 17set action pass
endset other-application-action blockset unknown-application-action block
end
Selecting the application sensor in a security policy
An application sensor directs the FortiGate unit to scan network traffic only when it is selected
in a security policy. When an application sensor is selected in a security policy, its settings are
applied to all the traffic the security policy handles.
To select the application sensor in a security policy — web-based manager
1. Go to Policy & Objects > Policy > IPv4.
2. Select a policy.
3. Select the Edit icon.
4. Under the heading Security Profiles toggle the button next to Application Control to turn it
on.
5. In the drop down menu field next to the Application Control select the Updates_only list.
6. Select OK.
To select the application sensor in a security policy — CLI
config firewall policyedit 1
set utm-status enableset profile-protocol-options defaultset application-list Updates_Only
end
Traffic handled by the security policy you modified will be scanned for application traffic.
Software updates are permitted and all other application traffic is blocked.
You will notice that there are some differences in the naming convention between the Web
Based Interface and the CLI. For instance the Action in the CLI is “pass” and the Action in the
Web Based Manager is “Monitor”.
Fortinet Technologies Inc. Page 78 Security Profiles for FortiOS 5.2
Intrusion protection
The FortiGate Intrusion Protection system combines signature detection and prevention with
low latency and excellent reliability. With intrusion protection, you can create multiple IPS
sensors, each containing a complete configuration based on signatures. Then, you can apply
any IPS sensor to any security policy.
This section describes how to configure the FortiGate Intrusion Protection settings.
If you enable virtual domains (VDOMs) on the FortiGate unit, intrusion protection is configured
separately for each virtual domain.
The following topics are included:
• IPS concepts
• Enable IPS scanning
• Configure IPS options
• Enable IPS packet logging
• IPS examples
IPS concepts
The FortiGate intrusion protection system protects your network from outside attacks. Your
FortiGate unit has two techniques to deal with these attacks: anomaly- and signature-based
defense.
Anomaly-based defense
Anomaly-based defense is used when network traffic itself is used as a weapon. A host can be
flooded with far more traffic than it can handle, making the host inaccessible. The most
common example is the denial of service (DoS) attack, in which an attacker directs a large
number of computers to attempt normal access of the target system. If enough access
attempts are made, the target is overwhelmed and unable to service genuine users. The
attacker does not gain access to the target system, but it is not accessible to anyone else.
The FortiGate DoS feature will block traffic above a certain threshold from the attacker and
allow connections from other legitimate users. The DoS policy configuration information can be
found in the Firewall Handbook.
Signature-based defense
Signature-based defense is used against known attacks or vulnerability exploits. These often
involve an attacker attempting to gain access to your network. The attacker must communicate
with the host in an attempt to gain access and this communication will include particular
commands or sequences of commands and variables. The IPS signatures include these
command sequences, allowing the FortiGate unit to detect and stop the attack.
Signatures
IPS signatures are the basis of signature-based intrusion protection. Every attack can be
reduced to a particular string of commands or a sequence of commands and variables.
Page 79
Signatures include this information so your FortiGate unit knows what to look for in network
traffic.
Signatures also include characteristics about the attack they describe. These characteristics
include the network protocol in which the attack will appear, the vulnerable operating system,
and the vulnerable application.
To view the complete list of signatures, go to Security Profiles > Intrusion Protection > IPS
Signatures. This will include the predefined signatures and any custom signatures that you may
have created.
Protocol decoders
Before examining network traffic for attacks, the IPS engine uses protocol decoders to identify
each protocol appearing in the traffic. Attacks are protocol-specific, so your FortiGate unit
conserves resources by looking for attacks only in the protocols used to transmit them. For
example, the FortiGate unit will only examine HTTP traffic for the presence of a signature
describing an HTTP attack.
IPS engine
Once the protocol decoders separate the network traffic by protocol, the IPS engine examines
the network traffic for the attack signatures.
IPS sensors
The IPS engine does not examine network traffic for all signatures, however. You must first
create an IPS sensor and specify which signatures are included. Add signatures to sensors
individually using signature entries, or in groups using IPS filters.
To view the IPS sensors, go to Security Profiles > Intrusion Protection > IPS Sensor.
IPS filters
IPS sensors contain one or more IPS filters. A filter is a collection of signature attributes that you
specify. The signatures that have all of the attributes specified in a filter are included in the IPS
filter.
For example, if your FortiGate unit protects a Linux server running the Apache web server
software, you could create a new filter to protect it. By setting OS to Linux, and Application to
Apache, the filter will include only the signatures that apply to both Linux and Apache. If you
wanted to scan for all the Linux signatures and all the Apache signatures, you would create two
filters, one for each.
To view the filters in an IPS sensor, go to Security Profiles > Intrusion Protection > IPS Sensor,
select the IPS sensor containing the filters you want to view, and choose Edit.
Custom/predefined signature entries
Signature entries allow you to add an individual custom or predefined IPS signature. If you need
only one signature, adding a signature entry to an IPS sensor is the easiest way. Signature
entries are also the only way to include custom signatures in an IPS sensor.
Another use for signature entries are to change the settings of individual signatures that are
already included in a filter within the same IPS sensor. Add a signature entry with the required
settings above the filter, and the signature entry will take priority.
Policies
To use an IPS sensor, you must select it in a security policy or an interface policy. An IPS sensor
that it not selected in a policy will have no effect on network traffic.
Fortinet Technologies Inc. Page 80 Security Profiles for FortiOS 5.2
IPS is most often configured as part of a security policy. Unless stated otherwise, discussion of
IPS sensor use will be in regards to firewall policies in this document.
Enable IPS scanning
Enabling IPS scanning involves two separate parts of the FortiGate unit:
• The security policy allows certain network traffic based on the sender, receiver, interface,
traffic type, and time of day. Firewall policies can also be used to deny traffic, but those
policies do not apply to IPS scanning.
• The IPS sensor contains filters, signature entries, or both. These specify which signatures
are included in the IPS sensor.
When IPS is enabled, an IPS sensor is selected in a security policy, and all network traffic
matching the policy will be checked for the signatures in the IPS sensor.
General configuration steps
For best results in configuring IPS scanning, follow the procedures in the order given. Also, note
that if you perform any additional actions between procedures, your configuration may have
different results.
1. Create an IPS sensor.
2. Add signatures and /or filters
These can be:
• Pattern based
• Rate based
• Customized
3. Select a security policy or create a new one.
4. In the security policy, turn on IPS, and choose the IPS sensor from the list.
All the network traffic controlled by this security policy will be processed according to the
settings in the policy. These settings include the IPS sensor you specify in the policy.
Creating an IPS sensor
You need to create an IPS sensor before specific signatures or filters can be choosen. The
signatures can be added to a new sensor before it is saved, but it is a good practice to keep in
mind that the sensor and its included filters are separte things, and therefore their creation will
be treated separately.
To create a new IPS sensor
1. Go to Security Profiles > Intrusion Protection.
2. Select the Create New icon in the top of the Edit IPS Sensor window.
3. Enter the name of the new IPS sensor.
4. Optionally, you may also enter a comment. The comment will appear in the IPS sensor list
and serves to remind you of the details of the sensor.
5. Select OK.
A newly created sensor is empty and contains no filters or signatures. You need to add one or
more filters or signatures before the sensor will be of any use.
Fortinet Technologies Inc. Page 81 Security Profiles for FortiOS 5.2

Adding an IPS filter to a sensor
While individual signatures can be added to a sensor, a filter allows you to add multiple
signatures to a sensor by specifying the characteristics of the signatures to be added.
To create a new Pattern Based Signature and Filter
1. Go to Security Profiles > Intrusion Protection.
2. Select the IPS sensor to which you want to add the filter using the drop-down list in the top
row of the Edit IPS Sensor window or by going to the list window.
3. In the Pattern Based Signature and Filter widget, select the Create New icon
4. For Sensor Type chose Filter Based.
5. Configure the filter that you require. Signatures matching all of the characteristics you
specify in the filter will be included in the filter. Select Specify and choose the filter option
that have the appropriate parameters.
Basic
Severity
Refers to the level of threat possed by the attack.
The options include:
• critical
• high
• medium
• low
• info
Target
Refers to the type of device targeted by the attack.
The options include:
• client
• server
OS
Refers to the Operating System affected by the attack.
The options include:
BSD Linux MacOS
Other Solaris Windows
Advanced
Application
Refers to the vendor or or type of application affected by the attack.
The options include:.
Adobe Apache Apple
CGI_app Cisco HP
Fortinet Technologies Inc. Page 82 Security Profiles for FortiOS 5.2
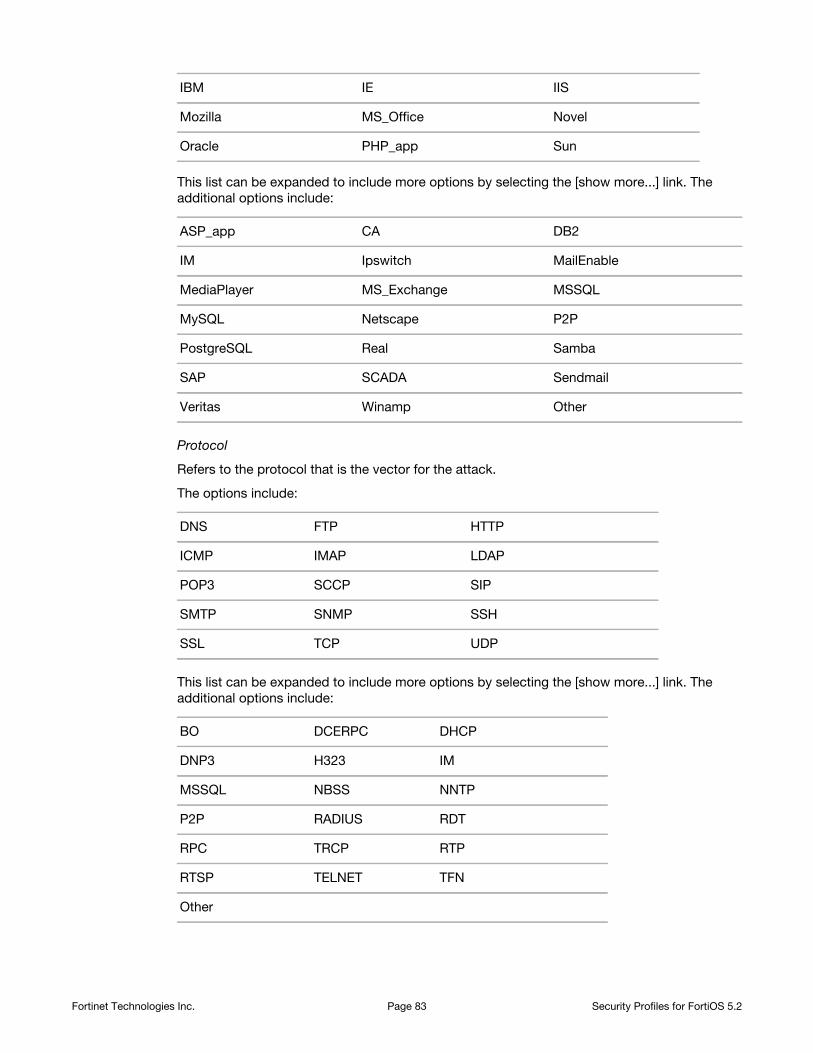
This list can be expanded to include more options by selecting the [show more...] link. The
additional options include:
ASP_app CA DB2
IM Ipswitch MailEnable
MediaPlayer MS_Exchange MSSQL
MySQL Netscape P2P
PostgreSQL Real Samba
SAP SCADA Sendmail
Veritas Winamp Other
Protocol
Refers to the protocol that is the vector for the attack.
The options include:
DNS FTP HTTP
ICMP IMAP LDAP
POP3 SCCP SIP
SMTP SNMP SSH
SSL TCP UDP
This list can be expanded to include more options by selecting the [show more...] link. The
additional options include:
BO DCERPC DHCP
DNP3 H323 IM
MSSQL NBSS NNTP
P2P RADIUS RDT
RPC TRCP RTP
RTSP TELNET TFN
Other
IBM IE IIS
Mozilla MS_Office Novel
Oracle PHP_app Sun
Fortinet Technologies Inc. Page 83 Security Profiles for FortiOS 5.2
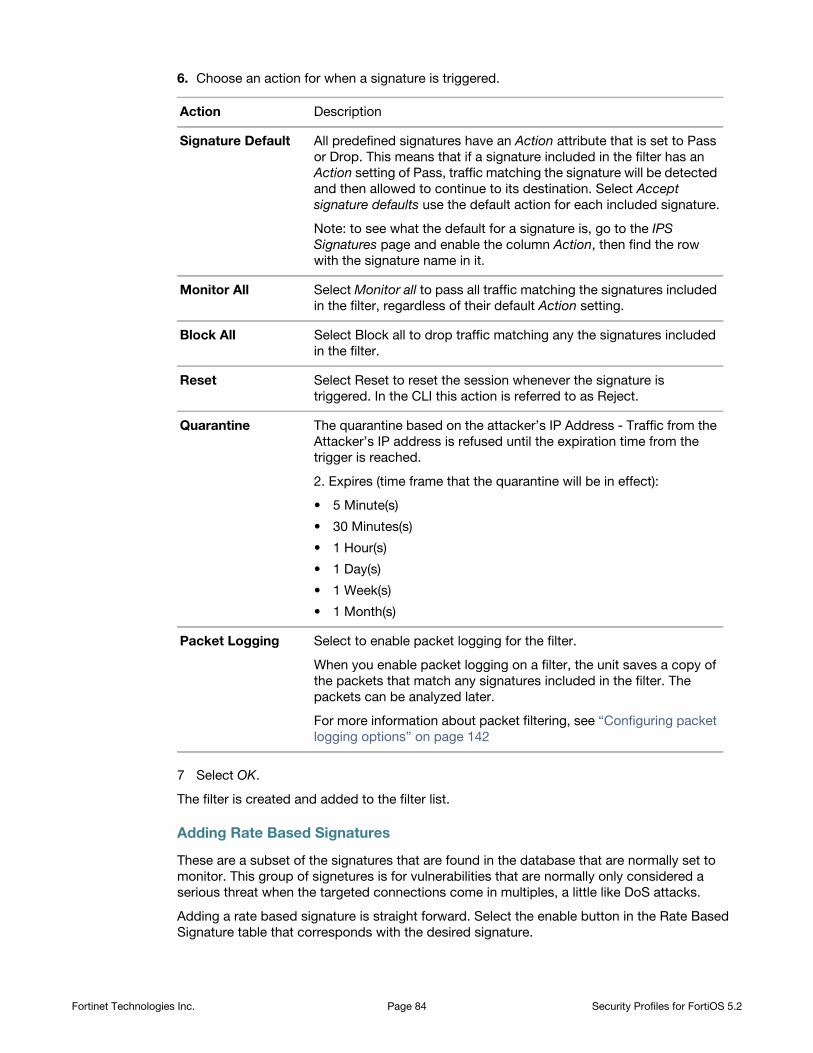
6. Choose an action for when a signature is triggered.
7 Select OK.
The filter is created and added to the filter list.
Adding Rate Based Signatures
These are a subset of the signatures that are found in the database that are normally set to
monitor. This group of signetures is for vulnerabilities that are normally only considered a
serious threat when the targeted connections come in multiples, a little like DoS attacks.
Adding a rate based signature is straight forward. Select the enable button in the Rate Based
Signature table that corresponds with the desired signature.
Action Description
Signature Default All predefined signatures have an Action attribute that is set to Pass
or Drop. This means that if a signature included in the filter has an
Action setting of Pass, traffic matching the signature will be detected
and then allowed to continue to its destination. Select Accept
signature defaults use the default action for each included signature.
Note: to see what the default for a signature is, go to the IPS
Signatures page and enable the column Action, then find the row
with the signature name in it.
Monitor All Select Monitor all to pass all traffic matching the signatures included
in the filter, regardless of their default Action setting.
Block All Select Block all to drop traffic matching any the signatures included
in the filter.
Reset Select Reset to reset the session whenever the signature is
triggered. In the CLI this action is referred to as Reject.
Quarantine The quarantine based on the attacker’s IP Address - Traffic from the
Attacker’s IP address is refused until the expiration time from the
trigger is reached.
2. Expires (time frame that the quarantine will be in effect):
• 5 Minute(s)
• 30 Minutes(s)
• 1 Hour(s)
• 1 Day(s)
• 1 Week(s)
• 1 Month(s)
Packet Logging Select to enable packet logging for the filter.
When you enable packet logging on a filter, the unit saves a copy of
the packets that match any signatures included in the filter. The
packets can be analyzed later.
For more information about packet filtering, see “Configuring packet
logging options” on page 142
Fortinet Technologies Inc. Page 84 Security Profiles for FortiOS 5.2
Customized signatures
Customized signatures must be created before they can be added to the sensor. To get more
details on customized signatures check the IPS Signatures chapter.
Updating predefined IPS signatures
The FortiGuard Service periodically updates the pre-defined signatures and adds new
signatures to counter emerging threats as they appear.
Because the signatures included in filters are defined by specifying signature attributes, new
signatures matching existing filter specifications will automatically be included in those filters.
For example, if you have a filter that includes all signatures for the Windows operating system,
your filter will automatically incorporate new Windows signatures as they are added.
Viewing and searching predefined IPS signatures
Go to Security Profiles > Intrusion Protection. Select [View IPS Signatures] to view the list of
existing IPS signatures. You may find signatures by paging manually through the list, apply
filters, or by using the search field.
Searching manually
Signatures are displayed in a paged list, with 50 signatures per page. The bottom of the screen
shows the current page and the total number of pages. You can enter a page number and press
enter, to skip directly to that page. Previous Page and Next Page buttons move you through the
list, one page at a time. The First Page and Last Page button take you to the beginning or end of
the list.
Applying filters
You can enter criteria for one of more columns, and only the signatures matching all the
conditions you specify will be listed.
To apply filters
1. Go to Security Profiles > Intrusion Protection. Select [View IPS Signatures] .
2. Select column by which to filter.
3. Select the funnel/filter icon and enter the value or values to filter by.
4. Use additional columns as needed to refine search.
The available options vary by column. For example, Enable allows you to choose between two
options, while OS has multiple options, and you may select multiple items together. Filtering by
name allows you to enter a text string and all signature names containing the string will be
displayed.
IPS processing in an HA cluster
IPS processing in an HA cluster is no different than with a single FortiGate unit, from the point of
view of the network user. The difference appears when a secondary unit takes over from the
primary, and what happens depends on the HA mode.
Active-passive
In an active-passive HA cluster, the primary unit processes all traffic just as it would in a
stand-alone configuration. Should the primary unit fail, a secondary unit will assume the role of
Fortinet Technologies Inc. Page 85 Security Profiles for FortiOS 5.2
the primary unit and begin to process network traffic. By default, the state of active
communication sessions are not shared with secondary units and will not survive the fail-over
condition. Once the sessions are reestablished however, traffic processing will continue as
normal.
If your network requires that active sessions are taken over by the new primary unit, select
Enable Session Pick-up in your HA configuration. Because session information must be sent to
all subordinate units on a regular basis, session pick-up is a resource-intensive feature and is
not enabled by default.
Active-active
The fail-over process in an active-active cluster is similar to an active-passive cluster. When the
primary unit fails, a secondary unit takes over and traffic processing continues. The
load-balancing schedule used to distribute sessions to the cluster members is used by the new
primary unit to redistribute sessions among the remaining subordinate units. If session pick-up
is not enabled, the sessions active on the failed primary are lost, and the sessions redistributed
among the secondary units may also be lost. If session pick-up is enabled, all sessions are
handled according to their last-known state.
Configure IPS options
There are a number of CLI commands that influence how IPS functions.
Hardware Acceleration
In order to provide control over the hardware’s processing of IPS there are commands to
configure and control the hardware accelleration of IPS. There are two settings that can be
chosen, one for the network processor and one for the content processor.
Network processor acceleration can be disabled or set to enable basic acceleration.
Content processor acceleration can be disabled or set to either basic or advanced acceleration.
These Settings are only found in the CLI:
config ips globalset np-accel-mode {none | basic}set cp-accel-mode {none | basic | advanced}
end
Extended IPS Database.
Some models have access to an extended IPS Database. The extended database may affect
the performance of the FortiGate unit so depending on the model of the FortiGate unit the
extended database package may not be enabled by default. For example, the D-series Desktop
model have this option disabled by default.
This feature can only be enbled through the CLI.
config ips globalset database extended
end
Fortinet Technologies Inc. Page 86 Security Profiles for FortiOS 5.2
Configuring the IPS engine algorithm
The IPS engine is able to search for signature matches in two ways. One method is faster but
uses more memory, the other uses less memory but is slower. Use the algorithm CLI
command to select one method:
config ips globalset algorithm {super | high | low | engine-pick}
end
Specify high to use the faster more memory intensive method or low for the slower memory
efficient method. The setting super improves the performance for FortiGate units with more
than 4GB of memory. The default setting is engine-pick, which allows the IPS engine to
choose the best method on the fly.
Configuring the IPS engine-count
FortiGate units with multiple processors can run more than one IPS engine concurrently. The
engine-count CLI command allows you to specify how many IPS engines are used at the
same time:
config ips globalset engine-count <int>
end
The recommended and default setting is 0, which allows the FortiGate unit to determine the
optimum number of IPS engines.
Configuring fail-open
If the IPS engine fails for any reason, it will fail open by default. This applies for inspection of all
the protocols inspected by FortiOS IPS protocol decoders, including but not limited to HTTP,
HTTPS, FTP, SMTP, POP3, IMAP, etc. This means that traffic continues to flow without IPS
scanning. If IPS protection is more important to your network than the uninterrupted flow if
network traffic, you can disable this behavior using the fail-open CLI command:
config ips globalset fail-open {enable | disable}
end
The default setting is enable.
Configuring the session count accuracy
The IPS engine can keep track of the number of open session in two ways. An accurate count
uses more resources than a less accurate heuristic count.
config ips globalset session-limit-mode {accurate | heuristic}
end
The default is heuristic.
Fortinet Technologies Inc. Page 87 Security Profiles for FortiOS 5.2

Configuring the IPS buffer size
Set the size of the IPS buffer.
config ips globalset socket-size <int>
end
The acceptable range is from 1 to 64 megabytes. The default size varies by model.
Configuring protocol decoders
The FortiGate Intrusion Protection system uses protocol decoders to identify the abnormal
traffic patterns that do not meet the protocol requirements and standards. For example, the
HTTP decoder monitors traffic to identify any HTTP packets that do not meet the HTTP protocol
standards.
To change the ports a decoder examines, you must use the CLI. In this example, the ports
examined by the DNS decoder are changed from the default 53 to 100, 200, and 300.
config ips decoder dns_decoderset port_list "100,200,300"
end
You cannot assign specific ports to decoders that are set to auto by default. These decoders
can detect their traffic on any port. Specifying individual ports is not necessary.
Configuring security processing modules
FortiGate Security Processing Modules, such as the CE4, XE2, and FE8, can increase overall
system performance by accelerating some security and networking processing on the
interfaces they provide. They also allow the FortiGate unit to offload the processing to the
security module, thereby freeing up its own processor for other tasks. The security module
performs its own IPS and firewall processing, but you can configure it to favor IPS in hostile
high-traffic environments.
If you have a security processing module, use the following CLI commands to configure it to
devote more resources to IPS than firewall. This example shows the CLI commands required to
configure a security module in slot 1 for increased IPS performance.
config system amc-slotedit sw1
set optimization-mode fw-ipsset ips-weight balanced set ips-p2p disableset ips-fail-open enableset fp-disable noneset ipsec-inb-optimization enableset syn-proxy-client-timer 3set syn-proxy-server-timer 3
end
In addition to offloading IPS processing, security processing modules provide a hardware
accelerated SYN proxy to defend against SYN flood denial of service attacks. When using a
security module, configure your DoS anomaly check for tcp_syn_flood with the Proxy action.
The Proxy action activates the hardware accelerated SYN proxy.
Fortinet Technologies Inc. Page 88 Security Profiles for FortiOS 5.2
IPS signature rate count threshold
The IPS signature threshold can allow configuring a signature so that it will not be triggered until
a rate count threshold is met. This provides a more controlled recording of attack activity. For
example, if multiple login attempts produce a failed result over a short period of time then an
alert would be sent and perhaps traffic blocked. This would be a more rational response than
sending an alert every time a login failed.
The syntax for this configuration is as follows:
config ips sensoredit default
config entriesedit <Filter ID number>set rule <*id>
set rate-count <integer between 1 - 65535>set rate-duration <integer between 1 - 65535>
The value of the rate-duration is an integer for the time in seconds.
set rate-mode <continuous | periodical>
The rate-mode refers to how the count threshold is met.
If the setting is “continuous”, and the action is set to block, as soon as the
rate-count is reached the action is engaged. For example, if the count is 10, as
soon as the signature is triggered 10 times the traffic would be blocked.
If the setting is “periodical”, the FortiGate allows up to the value of the rate-count
incidents where the signature is triggered during the rate-duration. For example, if the
rate count is 100 and the duration is 60, the signature would need to be triggered 100
times in 60 seconds for the action to be engaged.
set rate-track <dest-ip | dhcp-client-mac | dns-domain | none | src-ip>
This setting allow the tracking of one of the protocol fields within the packet.
endend
Enable IPS packet logging
Packet logging saves the network packets containing the traffic matching an IPS signature to
the attack log. The FortiGate unit will save the logged packets to wherever the logs are
configured to be stored, whether memory, internal hard drive, a FortiAnalyzer unit, or the
FortiGuard Analysis and Management Service.
You can enable packet logging in the filters. Use caution in enabling packet logging in a filter.
Filters configured with few restrictions can contain thousands of signatures, potentially resulting
in a flood of saved packets. This would take up a great deal of space, require time to sort
through, and consume considerable system resources to process. Packet logging is designed
as a focused diagnostic tool and is best used with a narrow scope.
Although logging to multiple FortiAnalyzer units is supported, packet logs are not sent to the
secondary and tertiary FortiAnalyzer units. Only the primary unit receives packet logs.
Fortinet Technologies Inc. Page 89 Security Profiles for FortiOS 5.2
To enable packet logging for a filter
1. Create a filter in an IPS sensor.
2. Before saving the filter, check the box next to Packet Logging just under the filter action
options.
3. Select the IPS sensor in the security policy that allows the network traffic the FortiGate unit
will examine for the signature.
For information on viewing and saving logged packets, see “Configuring packet logging
options” on page 142.
IPS examples
Configuring basic IPS protection
Small offices, whether they are small companies, home offices, or satellite offices, often have
very simple needs. This example details how to enable IPS protection on a FortiGate unit
located in a satellite office. The satellite office contains only Windows clients.
Creating an IPS sensor
Most IPS settings are configured in an IPS sensor. IPS sensors are selected in firewall policies.
This way, you can create multiple IPS sensors, and tailor them to the traffic controlled by the
security policy in which they are selected. In this example, you will create one IPS sensor.
To create an IPS sensor— web-based manager
1. Go to Security Profiles > Intrusion Protection.
2. Select the Create New icon in the top of the Edit IPS Sensor window.
3. In the Name field, enter basic_ips.
4. In the Comments field, enter IPS protection for Windows clients.
5. Select OK.
6. Select the Create New drop-down to add a new component to the sensor and for the Sensor
Type choose Filter Based.
7. In the Filter Options choose the following:
a. For Severity: select all of the options
b. For Target: select Client only.
c. For OS: select Windows only.
8. For the Action leave as the default.
9. Select OK to save the filter.
10.Select OK to save the IPS sensor.
Fortinet Technologies Inc. Page 90 Security Profiles for FortiOS 5.2
To create an IPS sensor — CLI
config ips sensoredit basic_ips
set comment "IPS protection for Windows clients"config entries
edit 1set location clientset os windows
endend
Selecting the IPS sensor in a security policy
An IPS sensor directs the FortiGate unit to scan network traffic only when it is selected in a
security policy. When an IPS sensor is selected in a security policy, its settings are applied to all
the traffic the security policy handles.
To select the IPS sensor in a security policy — web-based manager
1. Go to Policy > Policy > Policy.
2. Select a policy.
3. Select the Edit icon.
4. Enable the IPS option.
5. Select the basic_ips profile from the list.
6. Select OK to save the security policy.
To select the IPS sensor in a security policy — CLI
config firewall policyedit 1
set utm-status enableset ips-sensor basic_ips
end
All traffic handled by the security policy you modified will be scanned for attacks against
Windows clients. A small office may have only one security policy configured. If you have
multiple policies, consider enabling IPS scanning for all of them.
Using IPS to protect your web server
Many companies have web servers and they must be protected from attack. Since web servers
must be accessible, protection is not as simple as blocking access. IPS is one tool your
FortiGate unit has to allow you to protect your network.
In this example, we will configure IPS to protect a web server. As shown in Figure 4 on page 92,
a FortiGate unit protects a web server and an internal network. The internal network will have its
own policies and configuration but we will concentrate on the web server in this example.
Fortinet Technologies Inc. Page 91 Security Profiles for FortiOS 5.2
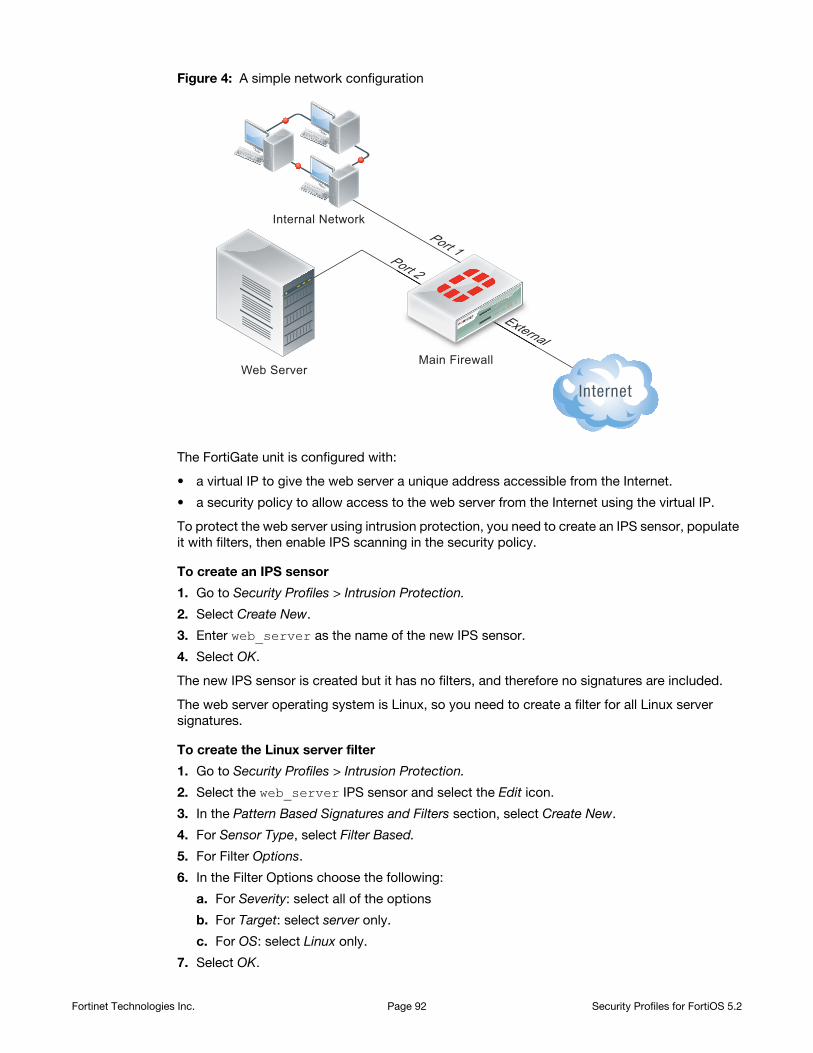
Figure 4: A simple network configuration
The FortiGate unit is configured with:
• a virtual IP to give the web server a unique address accessible from the Internet.
• a security policy to allow access to the web server from the Internet using the virtual IP.
To protect the web server using intrusion protection, you need to create an IPS sensor, populate
it with filters, then enable IPS scanning in the security policy.
To create an IPS sensor
1. Go to Security Profiles > Intrusion Protection.
2. Select Create New.
3. Enter web_server as the name of the new IPS sensor.
4. Select OK.
The new IPS sensor is created but it has no filters, and therefore no signatures are included.
The web server operating system is Linux, so you need to create a filter for all Linux server
signatures.
To create the Linux server filter
1. Go to Security Profiles > Intrusion Protection.
2. Select the web_server IPS sensor and select the Edit icon.
3. In the Pattern Based Signatures and Filters section, select Create New.
4. For Sensor Type, select Filter Based.
5. For Filter Options.
6. In the Filter Options choose the following:
a. For Severity: select all of the options
b. For Target: select server only.
c. For OS: select Linux only.
7. Select OK.
Internal Network
Main Firewall
Port 1
External
Web Server
Port 2
Fortinet Technologies Inc. Page 92 Security Profiles for FortiOS 5.2

The filter is saved and the IPS sensor page reappears. In the filter list, find the Linux Server filter
and look at the value in the Count column. This shows how many signatures match the current
filter settings. You can select the View Rules icon to see a listing of the included signatures.
To edit the security policy
1. Go to Policy > Policy > IPv4 select security policy that allows access to the web server, and
select the Edit icon.
2. Enable IPS option and choose the web_server IPS sensor from the list.
3. Select OK.
Since IPS is enabled and the web_server IPS sensor is specified in the security policy
controlling the web server traffic, the IPS sensor examines the web server traffic for matches to
the signatures it contains.
Create and test a packet logging IPS sensor
In this example, you create a new IPS sensor and include a filter that detects the EICAR test file
and saves a packet log when it is found. This is an ideal first experience with packet logging
because the EICAR test file can cause no harm, and it is freely available for testing purposes.
Create an IPS senor
1. Go to Security Profiles > Intrusion Protection.
2. Select Create New.
3. Name the new IPS sensor EICAR_test.
4. Select OK.
Create an entry
1. Select the Create New.
2. For Sensor Type choose Specify Signatures.
3. Rather than search through the signature list, use the name filter by selecting the search icon
over the header of the Signature column.
4. Enter EICAR in the Search field.
5. Highlight the Eicar.Virus.Test.File signature by clicking on it.
6. Select Block All as the Action.
7. Enable Packet Logging.
8. Select OK to save the IPS sensor.
You are returned to the IPS sensor list. The EICAR test sensor appears in the list.
Add the IPS sensor to the security policy allowing Internet access
1. Go to Policy > Policy > IPv4.
2. Select the security policy that allows you to access the Internet.
3. Select the Edit icon.
4. Turn ON Log Allowed Traffic.
a. Select All Sessions
5. Enable the IPS option.
6. Choose EICAR test from the available IPS sensors.
7. Select OK.
With the IPS sensor configured and selected in the security policy, the FortiGate unit blocks any
attempt to download the EICAR test file.
Fortinet Technologies Inc. Page 93 Security Profiles for FortiOS 5.2
Test the IPS sensor
1. Using your web browser, go to http://www.eicar.org/anti_virus_test_file.htm.
2. Scroll to the bottom of the page and select eicar.com from the row labeled as using the
standard HTTP protocol.
3. The browser attempts to download the requested file and,
• If the file is successfully downloaded, the custom signature configuration failed at some
point. Check the custom signature, the IPS sensor, and the firewall profile.
• If the download is blocked with a high security alert message explaining that you’re not
permitted to download the file, the EICAR test file was blocked by the FortiGate unit antivirus
scanner before the IPS sensor could examine it. Disable antivirus scanning and try to
download the EICAR test file again.
• If no file is downloaded and the browser eventually times out, the custom signature
successfully detected the EICAR test file and blocked the download.
Viewing the packet log
1. Go to Log&Report > Security Log > AntiVirus.
2. Locate the log entry that recorded the blocking of the EICAR test file block. The Message
field data will be tools: EICAR.AV.Test.File.Download.
3. Select the View Packet Log icon in the Packet Log column.
4. The packet log viewer is displayed.
Configuring a Fortinet Security Processing module
The Example Corporation has a web site that is the target of SYN floods. While they investigate
the source of the attacks, it’s very important that the web site remain accessible. To enhance
the ability of the company’s FortiGate-620B to deal with SYN floods, the administrator will
install an ASM-CE4 Fortinet Security Processing module and have all external access to the
web server come though it.
The security processing modules not only accelerate and offload network traffic from the
FortiGate unit’s processor, but they also accelerate and offload security and content scanning.
The ability of the security module to accelerate IPS scanning and DoS protection greatly
enhances the defense capabilities of the FortiGate-620B.
Assumptions
As shown in other examples and network diagrams throughout this document, the Example
Corporation has a pair of FortiGate-620B units in an HA cluster. To simplify this example, the
cluster is replaced with a single FortiGate-620B.
An ASM-CE4 is installed in the FortiGate-620B.
The network is configured as shown in Figure 5.
Network configuration
The Example Corporation network needs minimal changes to incorporate the ASM-CE4.
Interface amc-sw1/1 of the ASM-CE4 is connected to the Internet and interface amc-sw1/1 is
connected to the web server.
Since the main office network is connected to port2 and the Internet is connected to port1, a
switch is installed to allow both port1 and amc-sw1/1 to be connected to the Internet.
Fortinet Technologies Inc. Page 94 Security Profiles for FortiOS 5.2
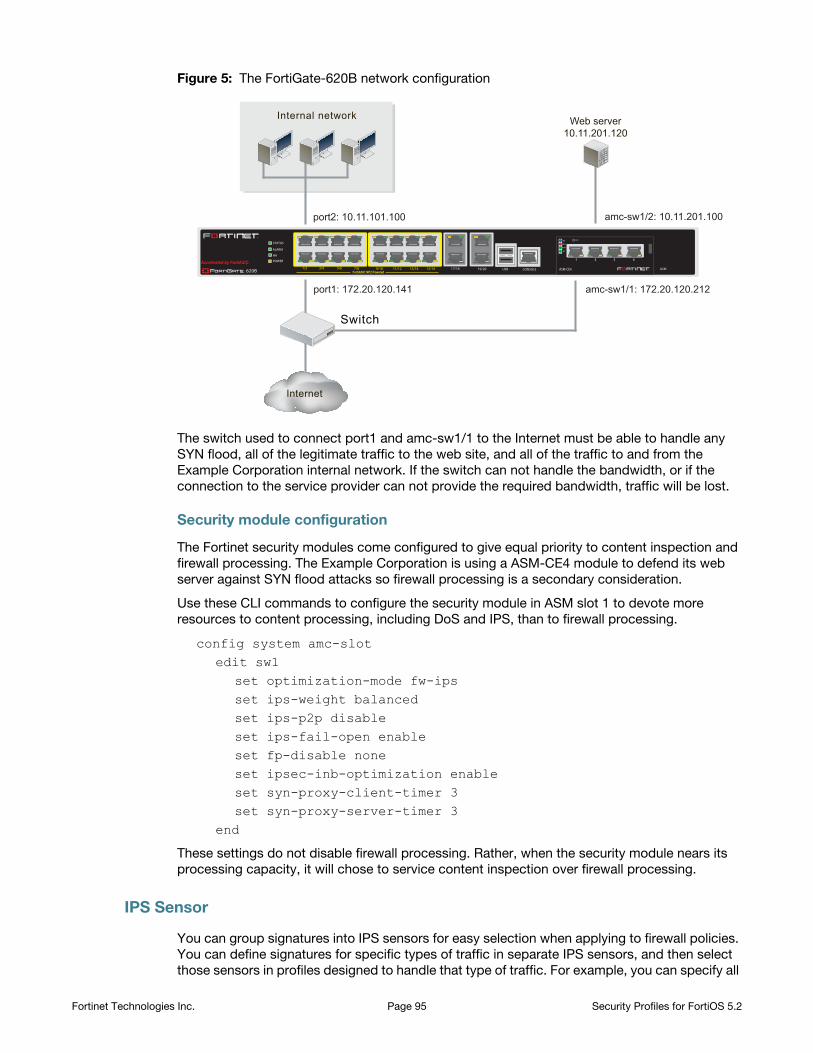
Figure 5: The FortiGate-620B network configuration
The switch used to connect port1 and amc-sw1/1 to the Internet must be able to handle any
SYN flood, all of the legitimate traffic to the web site, and all of the traffic to and from the
Example Corporation internal network. If the switch can not handle the bandwidth, or if the
connection to the service provider can not provide the required bandwidth, traffic will be lost.
Security module configuration
The Fortinet security modules come configured to give equal priority to content inspection and
firewall processing. The Example Corporation is using a ASM-CE4 module to defend its web
server against SYN flood attacks so firewall processing is a secondary consideration.
Use these CLI commands to configure the security module in ASM slot 1 to devote more
resources to content processing, including DoS and IPS, than to firewall processing.
config system amc-slotedit sw1
set optimization-mode fw-ipsset ips-weight balancedset ips-p2p disableset ips-fail-open enableset fp-disable noneset ipsec-inb-optimization enableset syn-proxy-client-timer 3set syn-proxy-server-timer 3
end
These settings do not disable firewall processing. Rather, when the security module nears its
processing capacity, it will chose to service content inspection over firewall processing.
IPS Sensor
You can group signatures into IPS sensors for easy selection when applying to firewall policies.
You can define signatures for specific types of traffic in separate IPS sensors, and then select
those sensors in profiles designed to handle that type of traffic. For example, you can specify all
port1: 172.20.120.141
port2: 10.11.101.100
Switch
Internet
Internal network
amc-sw1/1: 172.20.120.212
amc-sw1/2: 10.11.201.100
Web server10.11.201.120
Fortinet Technologies Inc. Page 95 Security Profiles for FortiOS 5.2
of the web-server related signatures in an IPS sensor, and that sensor can then be applied to a
firewall policy that controls all of the traffic to and from a web server protected by the unit.
The FortiGuard Service periodically updates the pre-defined signatures, with signatures added
to counter new threats. Since the signatures included in filters are defined by specifying
signature attributes, new signatures matching existing filter specifications will automatically be
included in those filters. For example, if you have a filter that includes all signatures for the
Windows operating system, your filter will automatically incorporate new Windows signatures
as they are added.
Each IPS sensor consists of two parts: filters and overrides. Overrides are always checked
before filters.
Each filter consists of a number of signatures attributes. All of the signatures with those
attributes, and only those attributes, are checked against traffic when the filter is run. If multiple
filters are defined in an IPS Sensor, they are checked against the traffic one at a time, from top
to bottom. If a match is found, the unit takes the appropriate action and stops further checking.
A signature override can modify the behavior of a signature specified in a filter. A signature
override can also add a signature not specified in the sensor’s filters. Custom signatures are
included in an IPS sensor using overrides.
The signatures in the overrides are first compared to network traffic. If the IPS sensor does not
find any matches, it then compares the signatures in each filter to network traffic, one filter at a
time, from top to bottom. If no signature matches are found, the IPS sensor allows the network
traffic.
The signatures included in the filter are only those matching every attribute specified. When
created, a new filter has every attribute set to all which causes every signature to be included in
the filter. If the severity is changed to high, and the target is changed to server, the filter includes
only signatures checking for high priority attacks targeted at servers.
Fortinet Technologies Inc. Page 96 Security Profiles for FortiOS 5.2

Custom Application & IPS Signatures
Creating a custom IPS signature
The FortiGate predefined signatures cover common attacks. If you use an unusual or
specialized application or an uncommon platform, add custom signatures based on the security
alerts released by the application and platform vendors.
You can add or edit custom signatures using the web-based manager or the CLI.
To create a custom signature
1. Go to Security Profiles > Intrusion Protection.
2. Select [View IPS Signatures]
3. Select Creat New to add a new custom signature.
4. Enter a Name for the custom signature.
5. Enter the Signature. For information about completing this field, see “Custom signature
syntax and keywords”.
6. Select OK.
Custom signature syntax and keywords
All custom signatures follow a particular syntax. Each begins with a header and is followed by
one or more keywords. The syntax and keywords are detailed in the next two topics.
Custom signature syntax
A custom signature definition is limited to a maximum length of 512 characters. A definition can
be a single line or span multiple lines connected by a backslash (\) at the end of each line.
A custom signature definition begins with a header, followed by a set of keyword/value pairs
enclosed by parenthesis [( )]. The keyword and value pairs are separated by a semi colon (;) and
consist of a keyword and a value separated by a space. The basic format of a definition is
HEADER (KEYWORD VALUE;)
You can use as many keyword/value pairs as required within the 512 character limit. To
configure a custom signature, go to Security Profiles > Intrusion Protection > IPS Signatues,
select Create New and enter the data directly into the Signature field, following the guidance in
the next topics.
Table 2 shows the valid characters and basic structure. For details about each keyword and its
associated values, see “Custom signature keywords” on page 99.
Page 97
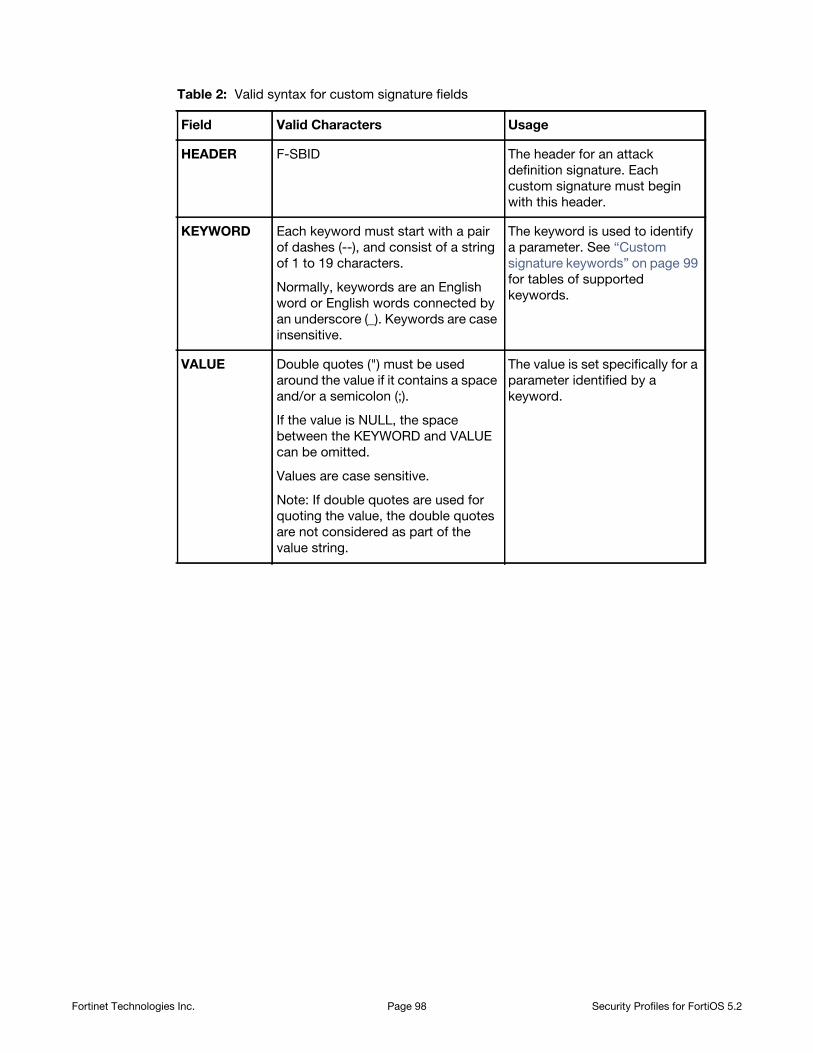
Table 2: Valid syntax for custom signature fields
Field Valid Characters Usage
HEADER F-SBID The header for an attack
definition signature. Each
custom signature must begin
with this header.
KEYWORD Each keyword must start with a pair
of dashes (--), and consist of a string
of 1 to 19 characters.
Normally, keywords are an English
word or English words connected by
an underscore (_). Keywords are case
insensitive.
The keyword is used to identify
a parameter. See “Custom
signature keywords” on page 99
for tables of supported
keywords.
VALUE Double quotes (") must be used
around the value if it contains a space
and/or a semicolon (;).
If the value is NULL, the space
between the KEYWORD and VALUE
can be omitted.
Values are case sensitive.
Note: If double quotes are used for
quoting the value, the double quotes
are not considered as part of the
value string.
The value is set specifically for a
parameter identified by a
keyword.
Fortinet Technologies Inc. Page 98 Security Profiles for FortiOS 5.2
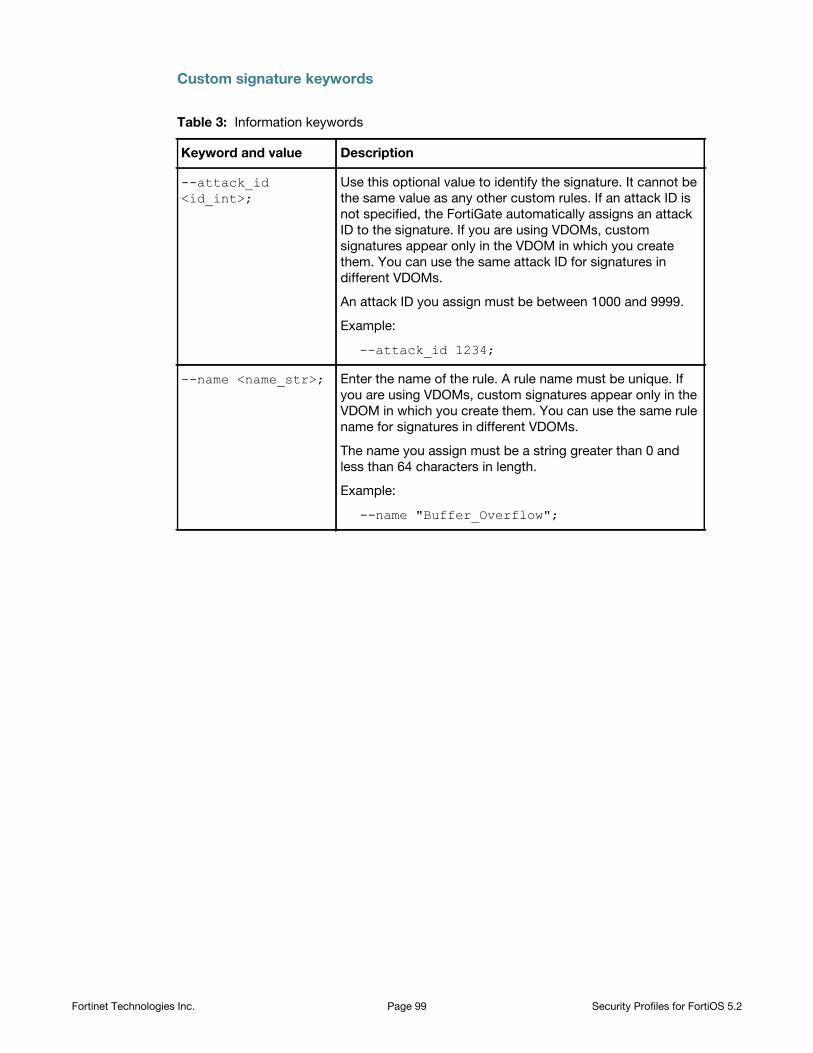
Custom signature keywords
Table 3: Information keywords
Keyword and value Description
--attack_id <id_int>;
Use this optional value to identify the signature. It cannot be
the same value as any other custom rules. If an attack ID is
not specified, the FortiGate automatically assigns an attack
ID to the signature. If you are using VDOMs, custom
signatures appear only in the VDOM in which you create
them. You can use the same attack ID for signatures in
different VDOMs.
An attack ID you assign must be between 1000 and 9999.
Example:
--attack_id 1234;
--name <name_str>; Enter the name of the rule. A rule name must be unique. If
you are using VDOMs, custom signatures appear only in the
VDOM in which you create them. You can use the same rule
name for signatures in different VDOMs.
The name you assign must be a string greater than 0 and
less than 64 characters in length.
Example:
--name "Buffer_Overflow";
Fortinet Technologies Inc. Page 99 Security Profiles for FortiOS 5.2
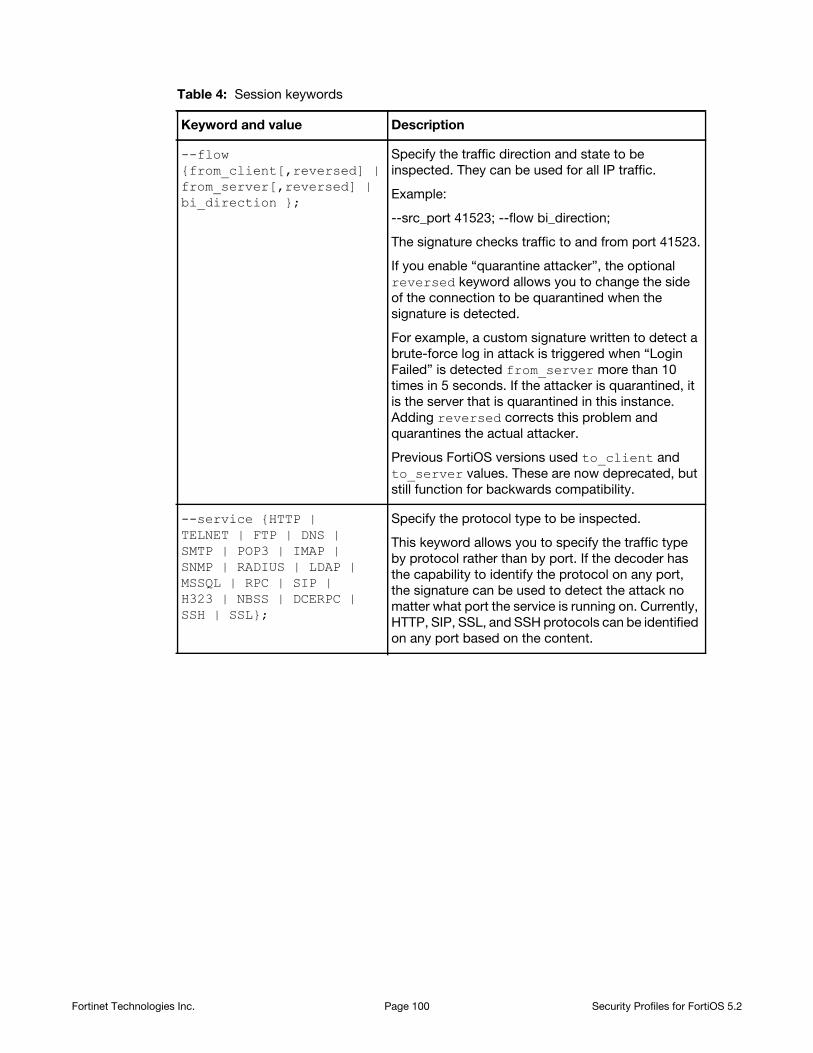
Table 4: Session keywords
Keyword and value Description
--flow {from_client[,reversed] | from_server[,reversed] | bi_direction };
Specify the traffic direction and state to be
inspected. They can be used for all IP traffic.
Example:
--src_port 41523; --flow bi_direction;
The signature checks traffic to and from port 41523.
If you enable “quarantine attacker”, the optional
reversed keyword allows you to change the side
of the connection to be quarantined when the
signature is detected.
For example, a custom signature written to detect a
brute-force log in attack is triggered when “Login
Failed” is detected from_server more than 10
times in 5 seconds. If the attacker is quarantined, it
is the server that is quarantined in this instance.
Adding reversed corrects this problem and
quarantines the actual attacker.
Previous FortiOS versions used to_client and
to_server values. These are now deprecated, but
still function for backwards compatibility.
--service {HTTP | TELNET | FTP | DNS | SMTP | POP3 | IMAP | SNMP | RADIUS | LDAP | MSSQL | RPC | SIP | H323 | NBSS | DCERPC | SSH | SSL};
Specify the protocol type to be inspected.
This keyword allows you to specify the traffic type
by protocol rather than by port. If the decoder has
the capability to identify the protocol on any port,
the signature can be used to detect the attack no
matter what port the service is running on. Currently,
HTTP, SIP, SSL, and SSH protocols can be identified
on any port based on the content.
Fortinet Technologies Inc. Page 100 Security Profiles for FortiOS 5.2

Keyword and Value Description
Specify the destination port number.
You can specify a single port or port range:
Specify the source port number.
You can specify a single port or port range:
Table 5: UDP header keywords
--dst_port [!]{<port_int> | :<port_int> | <port_int>: | <port_int>:<port_int>};
• <port_int> is a single port.
• :<port_int> includes the specified port and all
lower numbered ports.
• <port_int>: includes the specified port and all
higher numbered ports.
• <port_int>:<port_int> includes the two
specified ports and all ports in between.
--src_port [!]{<port_int> | :<port_int> | <port_int>: | <port_int>:<port_int>};
• <port_int> is a single port.
• :<port_int> includes the specified port and all
lower numbered ports.
• <port_int>: includes the specified port and all
higher numbered ports.
• <port_int>:<port_int> includes the two
specified ports and all ports in between.
Table 6: ICMP keywords
Keyword and Value Usage
--icmp_code <code_int>; Specify the ICMP code to match.
--icmp_id <id_int>; Check for the specified ICMP ID value.
--icmp_seq <seq_int>; Check for the specified ICMP sequence value.
--icmp_type <type_int>; Specify the ICMP type to match.
Fortinet Technologies Inc. Page 101 Security Profiles for FortiOS 5.2
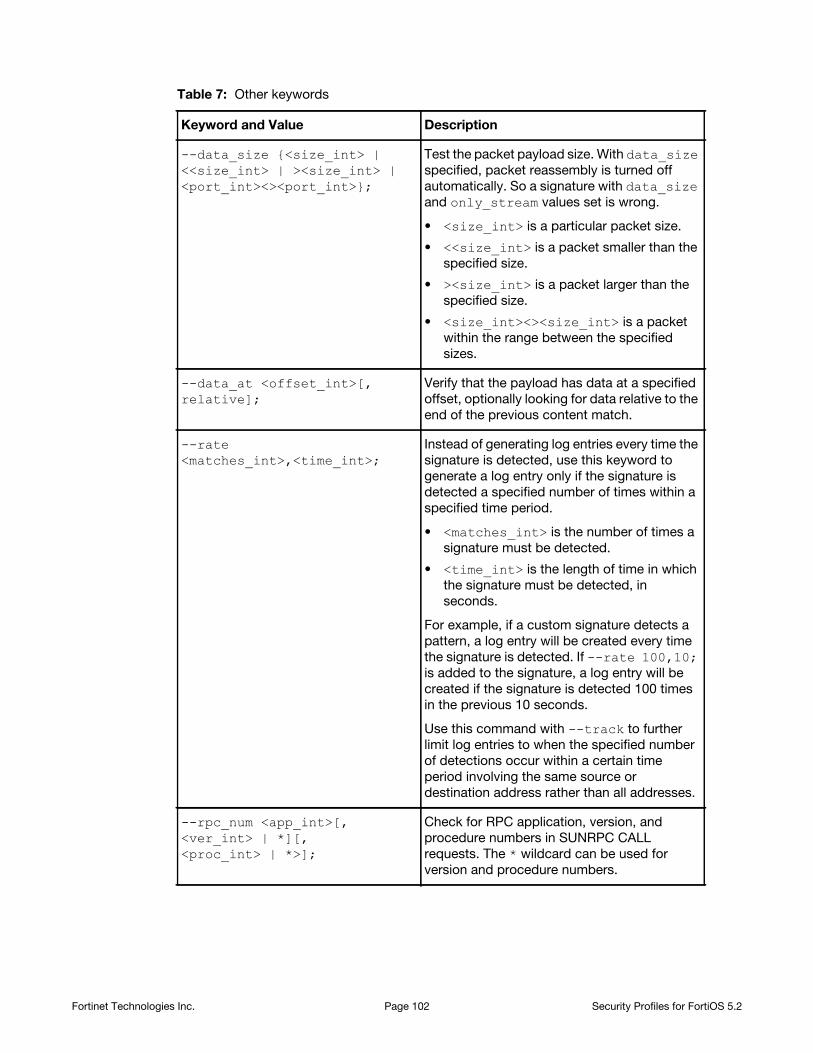
Table 7: Other keywords
Keyword and Value Description
--data_size {<size_int> | <<size_int> | ><size_int> | <port_int><><port_int>};
Test the packet payload size. With data_size
specified, packet reassembly is turned off
automatically. So a signature with data_size
and only_stream values set is wrong.
• <size_int> is a particular packet size.
• <<size_int> is a packet smaller than the
specified size.
• ><size_int> is a packet larger than the
specified size.
• <size_int><><size_int> is a packet
within the range between the specified
sizes.
--data_at <offset_int>[, relative];
Verify that the payload has data at a specified
offset, optionally looking for data relative to the
end of the previous content match.
--rate <matches_int>,<time_int>;
Instead of generating log entries every time the
signature is detected, use this keyword to
generate a log entry only if the signature is
detected a specified number of times within a
specified time period.
• <matches_int> is the number of times a
signature must be detected.
• <time_int> is the length of time in which
the signature must be detected, in
seconds.
For example, if a custom signature detects a
pattern, a log entry will be created every time
the signature is detected. If --rate 100,10;
is added to the signature, a log entry will be
created if the signature is detected 100 times
in the previous 10 seconds.
Use this command with --track to further
limit log entries to when the specified number
of detections occur within a certain time
period involving the same source or
destination address rather than all addresses.
--rpc_num <app_int>[, <ver_int> | *][, <proc_int> | *>];
Check for RPC application, version, and
procedure numbers in SUNRPC CALL
requests. The * wildcard can be used for
version and procedure numbers.
Fortinet Technologies Inc. Page 102 Security Profiles for FortiOS 5.2

Creating a custom signature to block access to example.com
In this first example, you will create a custom signature to block access to the example.com
URL.
This example describes the use of the custom signature syntax to block access to a URL. To
create the custom signature entry in the FortiGate unit web-based manager, see “Creating a
custom IPS signature” on page 97.
1. Enter the custom signature basic format
All custom signatures have a header and at least one keyword/value pair. The header is
always the same:
F-SBID( )
The keyword/value pairs appear within the parentheses and each pair is followed by a
semicolon.
--same_ip; Check that the source and the destination
have the same IP addresses.
--track {client | server}[,block_int];
When used with --rate, this keyword
narrows the custom signature rate totals to
individual addresses.
• client has the FortiGate unit maintain a
separate count of signature matches for
each source address.
• server has the FortiGate unit maintain a
separate count of signature matches for
each destination address.
• block_int has the FortiGate unit block
connections for the specified number of
seconds, from the client or to the server,
depending on which is specified.
For example, if --rate 100,10 is added to
the signature, a log entry will be created if the
signature is detected 100 times in the previous
10 seconds. The FortiGate unit maintains a
single total, regardless of source and
destination address.
If the same custom signature also includes
--track client; matches are totalled
separately for each source address. A log
entry is added when the signature is detected
100 times in 10 seconds within traffic from the
same source address.
The --track keyword can also be used
without --rate. If an integer is specified, the
client or server will be blocked for the
specified number of seconds every time the
signature is detected.
Table 7: Other keywords (continued)
Keyword and Value Description
Fortinet Technologies Inc. Page 103 Security Profiles for FortiOS 5.2

2. Choose a name for the custom signature
Every custom signature requires a name, so it is a good practice to assign a name before
adding any other keywords.
Use the --name keyword to assign the custom signature a name. The name value follows
the keyword after a space. Enclose the name value in double-quotes:
F-SBID( --name "Block.example.com"; )
The signature, as it appears here, will not do anything if you try to use it. It has a name, but
does not look for any patterns in network traffic. You must specify a pattern that the
FortiGate unit will search for.
3. Add a signature pattern
Use the --pattern keyword to specify what the FortiGate unit will search for:
F-SBID( --name "Block.example.com"; --pattern "example.com"; )
The signature will now detect the example.com URL appearing in network traffic. The
custom signature should only detect the URL in HTTP traffic, however. Any other traffic with
the URL should be allowed to pass. For example, an email message to or from example.com
should not be stopped.
4. Specify the service
Use the --service keyword to limit the effect of the custom signature to only the HTTP
protocol.
F-SBID( --name "Block.example.com"; --pattern "example.com"; --service HTTP; )
The FortiGate unit will limit its search for the pattern to the HTTP protocol. Even though the
HTTP protocol uses only TCP traffic, the FortiGate will search for HTTP protocol
communication in TCP, UDP, and ICMP traffic. This is a waste of system resources that you
can avoid by limiting the search further, as shown below.
5. Specify the traffic type.
Use the --protocol tcp keyword to limit the effect of the custom signature to only TCP traffic. This will save system resources by not unnecessarily scanning UDP and ICMP traffic.
F-SBID( --name "Block.example.com"; --pattern "example.com"; --service HTTP; --protocol tcp; )
The FortiGate unit will limit its search for the pattern to TCP traffic and ignore UDP and ICMP
network traffic.
6. Ignore case sensitivity
By default, patterns are case sensitive. If a user directed his or her browser to Example.com,
the custom signature would not recognize the URL as a match.
Use the --no_case keyword to make the pattern matching case insensitive.
F-SBID( --name "Block.example.com"; --pattern "example.com"; --service HTTP; --no_case; )
Unlike all of the other keywords in this example, the --no_case keyword has no value. Only
the keyword is required.
7. Limit pattern scans to only traffic sent from the client
The --flow command can be used to further limit the network traffic being scanned to only
that send by the client or by the server.
F-SBID( --name "Block.example.com"; --pattern "example.com"; --service HTTP; --no_case; --flow from_client; )
Web servers do not contact clients until clients first open a communication session.
Therefore, using the --flow from_client command will force the FortiGate to ignore all
Fortinet Technologies Inc. Page 104 Security Profiles for FortiOS 5.2
traffic from the server. Since the majority of HTTP traffic flows from the server to the client,
this will save considerable system resources and still maintain protection.
8. Specify the context
When the client browser tries to contact example.com, a DNS is first consulted to get the
example.com server IP address. The IP address is then specified in the URL field of the
HTTP communication. The domain name will still appear in the host field, so this custom
signature will not function without the --context host keyword/value pair.
F-SBID( --name "Block.example.com"; --pattern "example.com"; --service HTTP; --no_case; --flow from_client; --context host; )
Creating a custom signature to block the SMTP “vrfy” command
The SMTP “vrfy” command can be used to verify the existence of a single email address or to
list all of the valid email accounts on an email server. A spammer could potentially use this
command to obtain a list of all valid email users and direct spam to their inboxes.
In this example, you will create a custom signature to block the use of the vrfy command. Since
the custom signature blocks the vrfy command from coming through the FortiGate unit, the
administrator can still use the command on the internal network.
This example describes the use of the custom signature syntax to block the vrfy command. To
create the custom signature entry in the FortiGate unit web-based manager, see “Creating a
custom IPS signature” on page 97.
1. Enter the custom signature basic format
All custom signatures have a header and at least one keyword/value pair. The header is
always the same:
F-SBID( )
The keyword/value pairs appear within the parentheses and each pair is followed by a
semicolon.
2. Choose a name for the custom signature
Every custom signature requires a name, so it is a good practice to assign a name before
you add any other keywords.
Use the --name keyword to assign the custom signature a name. The name value follows
the keyword after a space. Enclose the name value in double-quotes:
F-SBID( --name "Block.SMTP.VRFY.CMD"; )
The signature, as it appears here, will not do anything if you try to use it. It has a name, but
does not look for any patterns in network traffic. You must specify a pattern that the
FortiGate unit will search for.
3. Add a signature pattern
Use the --pattern keyword to specify what the FortiGate unit will search for:
F-SBID( --name "Block.SMTP.VRFY.CMD"; --pattern "vrfy"; )
The signature will now detect the vrfy command appearing in network traffic. The custom
signature should only detect the command in SMTP traffic, however. Any other traffic with
the pattern should be allowed to pass. For example, an email message discussing the vrfy
command should not be stopped.
Fortinet Technologies Inc. Page 105 Security Profiles for FortiOS 5.2

4. Specify the service
Use the --service keyword to limit the effect of the custom signature to only the HTTP
protocol.
F-SBID( --name "Block.SMTP.VRFY.CMD"; --pattern "vrfy"; --service SMTP; )
The FortiGate unit will limit its search for the pattern to the SMTP protocol.
Even though the SMTP protocol uses only TCP traffic, the FortiGate will search for SMTP
protocol communication in TCP, UDP, and ICMP traffic. This is a waste of system resources
that you can avoid by limiting the search further, as shown below.
5. Specify the traffic type.
Use the --protocol tcp keyword to limit the effect of the custom signature to only TCP traffic. This will save system resources by not unnecessarily scanning UDP and ICMP traffic.
F-SBID( --name "Block.SMTP.VRFY.CMD"; --pattern "vrfy"; --service SMTP; --protocol tcp; )
The FortiGate unit will limit its search for the pattern to TCP traffic and ignore the pattern in
UDP and ICMP network traffic.
6. Ignore case sensitivity
By default, patterns are case sensitive. If a user directed his or her browser to Example.com,
the custom signature would not recognize the URL as a match.
Use the --no_case keyword to make the pattern matching case insensitive.
F-SBID( --name "Block.SMTP.VRFY.CMD"; --pattern "vrfy"; --service SMTP; --no_case; )
Unlike all of the other keywords in this example, the --no_case keyword has no value. Only
the keyword is required.
7. Specify the context
The SMTP vrfy command will appear in the SMTP header. The --context host
keyword/value pair allows you to limit the pattern search to only the header.
F-SBID( --name "Block.SMTP.VRFY.CMD"; --pattern "vrfy"; --service SMTP; --no_case; --context header; )
Fortinet Technologies Inc. Page 106 Security Profiles for FortiOS 5.2
Email filter
This section describes how to configure FortiGate email filtering for IMAP, POP3, and SMTP
email. Email filtering includes both spam filtering and filtering for any words or files you want to
disallow in email messages. If your FortiGate unit supports SSL content scanning and
inspection, you can also configure spam filtering for IMAPS, POP3S, and SMTPS email traffic.
The following topics are included in this section:
• Email filter concepts
• Enable email filtering
• Configure email traffic types to inspect
• Configure the spam action
• Configure the tag location
• Configure the tag format
• Configuring an Email Filters
• Configure local email filters
• Email filter examples
Email filter concepts
You can configure the FortiGate unit to manage unsolicited commercial email by detecting and
identifying spam messages from known or suspected spam servers.
The FortiGuard Antispam Service uses both a sender IP reputation database and a spam
signature database, along with sophisticated spam filtering tools, to detect and block a wide
range of spam messages. Using FortiGuard Antispam email filter profile settings, you can
enable IP address checking, URL checking, email checksum checking, and spam submission.
Updates to the IP reputation and spam signature databases are provided continuously via the
global FortiGuard Distribution Network.
From the FortiGuard Antispam Service page in the FortiGuard Center, you can find out whether
an IP address is blacklisted in the FortiGuard antispam IP reputation database, or whether a
URL or email address is in the signature database.
Inspection Modes
The processing of the traffic for email inspection can be done by either the Proxy mode or the
Flow-based mode.
Proxy
This mode of inspection takes the entire email message and places it in memory before
scanning the entire message for spam indicators.
Page 107

Flow-based
This mode of inspecdtion scans the message traffic as it comes in. Each packet is scanned as it
comes into the FortiGate. It gets forwarded to its destination without waiting for any of the other
packets that are part of the message to arrive.
Email filter techniques
The FortiGate unit has a number of techniques available to help detect spam. Some use the
FortiGuard Antispam Service and require a subscription. The remainder use your DNS servers
or use lists that you must maintain.
Black white list
These are the types of black white lists available. They include:
• IP/Netmask
The FortiGate unit compares the IP address of the client delivering the email to the
addresses in the IP address black/white list specified in the email filter profile. If a match is
found, the FortiGate unit will take the action configured for the matching black/white list
entry against all delivered email.
The default setting of the smtp-spamhdrip CLI command is disable. If enabled, the
FortiGate unit will check all the IP addresses in the header of SMTP email against the
specified IP address black/white list.
• Email Wildcard
The FortiGate unit compares the sender email address, as shown in the message envelope
MAIL FROM, to the pattern in the patterned field. The wildcard symbol is used in the
patterned to replace the characters in the address that may vary from the pattern. If a match
is found, the FortiGate unit will take the action configured for the matching black/white list
entry.
• Email Regular Expression
The FortiGate unit compares the sender email address, as shown in the message envelope
MAIL FROM, to the pattern in the patterned field. The regular expression that can be used is
much more sophisticated than a simple wildcard variable. If a match is found, the FortiGate
unit will take the action configured for the matching black/white list entry.
Pattern
The pattern field is for entering the identifying information that will enable the filter to correctly
identify the email messages.
• If the type is IP/Netmask the filter will be an IP address with a subnet mask.
• If the type is Email Wildcard the filter will be an email address with a wildcard symbol in
place of the variable characters. For example *.example.com or fred@*.com.
• If the type is Email Regular Expression, regular expression can be used to create a more
granular filter for email addresses. For example,
^[_a-z0-9-]+(\.[_a-z0-9-]+)*@(example|xmple|examp).(com|org|net) could be used filter
based on a number of combinations of email domain names.
Fortinet Technologies Inc. Page 108 Security Profiles for FortiOS 5.2
Action
• Mark as Spam
If this is the selected action, the email will be allowed through but it will be tagged with an
indicator that clearly marks the email as spam.
• Mark as Clear
If this is the selected action, the email will be allowed to go through to its destination on the
assumption that the message is not spam.
• Mark as Reject
If this is the selected action, the email will be dropped at the before reaching its destination.
Status
Indicates whether this particular list is enabled or disabled
Banned word check
When you enable banned word checking, your FortiGate unit will examine the email message
for words appearing in the banned word list specified in the email filter profile. If the total score
of the banned word discovered in the email message exceeds the threshold value set in the
email filter profile, your FortiGate unit will treat the message as spam.
When determining the banned word score total for an email message, each banned word score
is added once no matter how many times the word appears in the message. Use the command
config spamfilter bword to add an email banned word list. Use the command config spamfilter profile to add a banned word list to an email filtering profile.
How content is evaluated
Every time the banned word filter detects a pattern in an email message, it adds the pattern
score to the sum of scores for the message. You set this score when you create a new pattern
to block content. The score can be any number from zero to 99999. Higher scores indicate
more offensive content. When the total score equals or exceeds the threshold, the email
message is considered as spam and treated according to the spam action configured in the
email filter profile. The score for each pattern is counted only once, even if that pattern appears
many times in the email message. The default score for banned word patterns is 10 and the
default threshold is 10. This means that by default, an email message is blocked by a single
match.
A pattern can be part of a word, a whole word, or a phrase. Multiple words entered as a pattern
are treated as a phrase. The phrase must appear as entered to match. You can also use
wildcards or regular expressions to have a pattern match multiple words or phrases.
For example, the FortiGate unit scans an email message that contains only this sentence: “The
score for each word or phrase is counted only once, even if that word or phrase appears many
times in the email message.”
Fortinet Technologies Inc. Page 109 Security Profiles for FortiOS 5.2
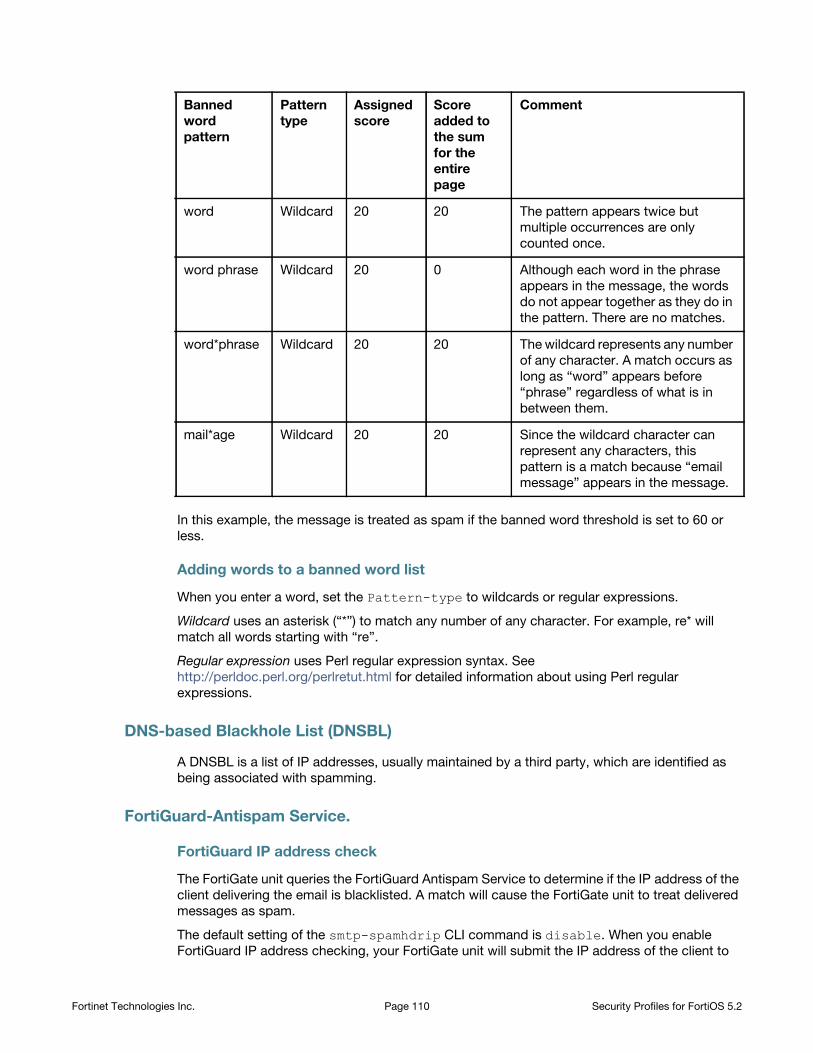
In this example, the message is treated as spam if the banned word threshold is set to 60 or
less.
Adding words to a banned word list
When you enter a word, set the Pattern-type to wildcards or regular expressions.
Wildcard uses an asterisk (“*”) to match any number of any character. For example, re* will
match all words starting with “re”.
Regular expression uses Perl regular expression syntax. See
http://perldoc.perl.org/perlretut.html for detailed information about using Perl regular
expressions.
DNS-based Blackhole List (DNSBL)
A DNSBL is a list of IP addresses, usually maintained by a third party, which are identified as
being associated with spamming.
FortiGuard-Antispam Service.
FortiGuard IP address check
The FortiGate unit queries the FortiGuard Antispam Service to determine if the IP address of the
client delivering the email is blacklisted. A match will cause the FortiGate unit to treat delivered
messages as spam.
The default setting of the smtp-spamhdrip CLI command is disable. When you enable
FortiGuard IP address checking, your FortiGate unit will submit the IP address of the client to
Banned
word
pattern
Pattern
type
Assigned
score
Score
added to
the sum
for the
entire
page
Comment
word Wildcard 20 20 The pattern appears twice but
multiple occurrences are only
counted once.
word phrase Wildcard 20 0 Although each word in the phrase
appears in the message, the words
do not appear together as they do in
the pattern. There are no matches.
word*phrase Wildcard 20 20 The wildcard represents any number
of any character. A match occurs as
long as “word” appears before
“phrase” regardless of what is in
between them.
mail*age Wildcard 20 20 Since the wildcard character can
represent any characters, this
pattern is a match because “email
message” appears in the message.
Fortinet Technologies Inc. Page 110 Security Profiles for FortiOS 5.2
the FortiGuard service for checking. If the IP address exists in the FortiGuard IP address black
list, your FortiGate unit will treat the message as spam.
FortiGuard URL check
When you enable FortiGuard URL checking, your FortiGate unit will submit all URLs appearing
in the email message body to the FortiGuard service for checking. If a URL exists in the
FortiGuard URL black list, your FortiGate unit will treat the message as spam.
FortiGuard email checksum check
When you enable FortiGuard email checksum checking, your FortiGate unit will submit a
checksum of each email message to the FortiGuard service for checking. If a checksum exists
in the FortiGuard checksum black list, your FortiGate unit will treat the message as spam.
Detect phishing URLs in email
When you enable FortiGuard phishing URL detection, your FortiGate unit will submit all URL
hyperlinks appearing in the email message body to the FortiGuard service for checking. If a URL
exists in the FortiGuard URL phishing list, your FortiGate unit will remove the hyperlink from the
message. The URL will remain in place, but it will no longer be a selectable hyperlink.
FortiGuard spam submission
Spam submission is a way you can inform the FortiGuard AntiSpam service of non-spam
messages incorrectly marked as spam. When you enable this setting, the FortiGate unit adds a
link to the end of every message marked as spam. You then select this link to inform the
FortiGuard AntiSpam service when a message is incorrectly marked.
Trusted IP Addresses
A list if IP addresses that are trusted by the FortiGate is created. Any email traffic coming in from
these IP address will be considered to be non-spammers.
If the FortiGate unit sits behind a company’s Mail Transfer Units, it may be unnecessary to
check email IP addresses because they are internal and trusted. The only IP addresses that
need to be checked are those from outside of the company. In some cases, external IP
addresses may be added to the list if it is known that they are not sources of spam.
MIME header
This feature filters by the MIME header. MIME header settings are configured in a separate part
of the command tree but MIME header filtering is enabled within each profile.
HELO DNS lookup
Whenever a client opens an SMTP session with a server, the client sends a HELO command
with the client domain name. The FortiGate unit takes the domain name specified by the client
in the HELO and does a DNS lookup to determine if the domain exists. If the lookup fails, the
FortiGate unit determines that any messages delivered during the SMTP session are spam.
The HELO DNS lookup is available only for SMTP traffic.
Return email DNS check
The FortiGate unit performs a DNS lookup on the If no such record exists, the message is
treated as spam.
Fortinet Technologies Inc. Page 111 Security Profiles for FortiOS 5.2
When you enable return email DNS checking, your FortiGate unit will take the domain in the
reply-to email address and reply-to domain and check the DNS servers to see if there is an A or
MX record for the domain. If the domain does not exist, your FortiGate unit will treat the
message as spam.
Order of spam filtering
The FortiGate unit checks for spam using various filtering techniques. The order in which the
FortiGate unit uses these filters depends on the mail protocol used.
Filters requiring a query to a server and a reply (FortiGuard Antispam Service and
DNSBL/ORDBL) are run simultaneously. To avoid delays, queries are sent while other filters are
running. The first reply to trigger a spam action takes effect as soon as the reply is received.
Each spam filter passes the email to the next if no matches or problems are found. If the action
in the filter is Mark as Spam, the FortiGate unit tags the email as spam according to the settings
in the email filter profile.
For SMTP and SMTPS, if the action is discard, the email message is discarded or dropped.
If the action in the filter is Mark as Clear, the email is exempt from any remaining filters. If the
action in the filter is Mark as Reject, the email session is dropped. Rejected SMTP or SMTPS
email messages are substituted with a configurable replacement message.
Order of SMTP and SMTPS spam filtering
The FortiGate unit scans SMTP and SMTPS email for spam in the order given below. SMTPS
spam filtering is available on FortiGate units that support SSL content scanning and inspection.
1. IP address black/white list (BWL) check on last hop IP
2. DNSBL & ORDBL check on last hop IP, FortiGuard Antispam IP check on last hop IP, HELO
DNS lookup
3. MIME headers check, E-mail address BWL check
4. Banned word check on email subject
5. IP address BWL check (for IPs extracted from “Received” headers)
6. Banned word check on email body
7. Return email DNS check, FortiGuard Antispam email checksum check, FortiGuard Antispam
URL check, DNSBL & ORDBL check on public IP extracted from header.
Order of IMAP, POP3, IMAPS and POP3S spam filtering
The FortiGate unit scans IMAP, POP3, IMAPS and POP3S email for spam in the order given
below. IMAPS and POP3S spam filtering is available on FortiGate units that support SSL
content scanning and inspection.
1. MIME headers check, E-mail address BWL check
2. Banned word check on email subject
3. IP BWL check
4. Banned word check on email body
5. Return email DNS check, FortiGuard Antispam email checksum check, FortiGuard Antispam
URL check, DNSBL & ORDBL check.
Fortinet Technologies Inc. Page 112 Security Profiles for FortiOS 5.2

Spam actions
When spam is detected, the FortiGate unit will deal with it according to the Spam Action setting
in the email filter profile. Note that POP3S, IMAPS and SMTPS spam filtering is available only on
FortiGate units that support SSL content scanning and inspection. POP3, IMAP, POP3S and
IMAPS mail can only be tagged. SMTP and SMTPS mail can be set to Discard or Tagged:
Discard
When the spam action is set to Discard, messages detected as spam are deleted. No
notification is sent to the sender or recipient.
Pass
When the spam action is set to pass, message the spam filter is disabled for this message.
Tag
When the spam action is set to Tagged, messages detected as spam are labelled and delivered
normally. The text used for the label is set in the Tag Format field and the label is placed in the
subject or the message header, as set with the Tag Location option.
Email traffic types to inspect
The FortiGate unit examines IMAP, POP3, and SMTP email traffic. If your FortiGate unit
supports content inspection, it can also examine IMAPS, POP3S, and SMTPS traffic. The
options that you will see in the profile window are IMAP, POP3 and SMTP.
Configuring an Email Filters
FortiGuard email filtering techniques us FortiGuard services to detect the presence of spam
among your email. A FortiGuard subscription is required to use the FortiGuard email filters. To
enable email filtering an email filter needs to be created and then the filter needs to be
associated with a security policy.
The filter can be created as follows:
• Go to Security Profiles > Email Filter.
• Select the Create New icon (a plus symbol in a circle in the upper right hand corner).
• Select the List icon (a page symbol in the upper right hand corner) and in the new window
select Create New.
An existing filter can be edited as follows:
• Go to Security Profiles > Email Filter.
• Select the filter that you wish to edit from the dropdown menu in the upper right corner.
• Select the List icon (a page symbol in the upper right hand corner) and select the filter
that you wish to edit from the list.
Once you are in the proper Edit Email Filter Profile window, you can enter a name in the Name
field if it’s a new filter.
The Comments field is for a discription or other information that will assist in understanding the
function or purpose of the this particular filter.
Fortinet Technologies Inc. Page 113 Security Profiles for FortiOS 5.2
Using the radio buttons for the Inspection Mode field, select either Proxy or Flow-based.
Before any of the other features or options of the filter appear the checkbox next to Enable
Spam Detection and Filtering must be checked.
Spam detection by protocol
This matrix includes 3 rows that represent the email protocols IMAP, POP3 and SMTP.
There are also columns for
Spam Action
For the client protocols, IMAP and POP3 the options are:
• Tag - This action will insert a tag into the email somewhere so that when the recipients
view the email they will be warned that it is likely a spam.
• Pass - This action will allowany emails marked as spam to pass through without change.
If this option is chosen, the Tag comments will be greyed out.
For the tranfer protocol, SMTP, the options are:
• Tag - This action will insert a tag into the email somewhere so that when the recipients
view the email they will be warned that it is likely a spam.
• Discard - The action will drop the email before it reaches its destination.
• Pass - This action will allowany emails marked as spam to pass through without change.
If this option is chosen, the Tag comments will be greyed out.
Tag Location
• Subject - The contents of the Tag Format will be inserted into the subject line. The subject
line is the most commonly used.
• MIME - The contents of the Tag Format will be insterted in with the MIME header header.
Tag Format
The contents of this field will be entered into the tag location specified. The most common tag is
something along the lines of [Spam] or **SPAM**
FortiGuard Spam Filtering
The options in the section are ones that require a FortiGuard subscription.
The options available in this section, to be selected by checkbox are:
• IP Address Check
• URL Check
• Detect Phishing URLs in Email
• Email Checksum Check
• Spam Submission
Local Spam Filtering
The options in the section are ones can be managed on the local device without the need for a
FortiGuard subscription.
Fortinet Technologies Inc. Page 114 Security Profiles for FortiOS 5.2
The options available in this section, to be selected by checkbox are:
• HELO DNS Lookup
• Return Email DNS Check
• Black White List - checking this option will produce a table that can be edited to create a
number of BWL lists that can be separately configured and enabled.
Email filter examples
Configuring simple antispam protection
Small offices, whether they are small companies, home offices, or satellite offices, often have
very simple needs. This example details how to enable antispam protection on a FortiGate unit
located in a satellite office.
Creating an email filter profile
Most email filter settings are configured in an email filter profile. Email filter profiles are selected
in firewall policies. This way, you can create multiple email filter profiles, and tailor them to the
traffic controlled by the security policy in which they are selected. In this example, you will
create one email filter profile.
To create an email filter profile — web-based manager
1. Go to Security Profiles > Email Filter.
2. Select the Create New icon in the Edit Email Filter Profile window title.
3. In the Name field, enter basic_emailfilter.
4. Select Enable Spam Detection and Filtering.
5. Ensure that IMAP, POP3, and SMTP are selected in the header row.
These header row selections enable or disable examination of each email traffic type. When
disabled, the email traffic of that type is ignored by the FortiGate unit and no email filtering
options are available.
6. Under FortiGuard Spam Filtering, enable IP Address Check.
7. Under FortiGuard Spam Filtering, enable URL Check.
8. Under FortiGuard Spam Filtering, enable E-mail Checksum Check.
9. Select OK to save the email filter profile.
To create an email filter profile — CLI
config spamfilter profileedit basic_emailfilter
set options spamfsip spamfsurl spamfschksumend
Selecting the email filter profile in a security policy
An email filter profile directs the FortiGate unit to scan network traffic only when it is selected in
a security policy. When an email filter profile is selected in a security policy, its settings are
applied to all the traffic the security policy handles.
To select the email filter profile in a security policy — web-based manager
1. Go to Policy > Policy > IPv4.
2. Create a new or edit a policy.
Fortinet Technologies Inc. Page 115 Security Profiles for FortiOS 5.2
3. Turn on email filtering.
4. Select the basic_emailfilter profile from the list.
5. Select OK to save the security policy.
To select the email filter profile in a security policy — CLI
config firewall policyedit 1
set utm-status enableset profile-protocol-options defaultset spamfilter-profile basic_emailfilter
end
IMAP, POP3, and SMTP email traffic handled by the security policy you modified will be
scanned for spam. Spam messages have the text “Spam” added to their subject lines. A small
office may have only one security policy configured. If you have multiple policies, consider
enabling spam scanning for all of them.
Blocking email from a user
Employees of the Example.com corporation have been receiving unwanted email messages
from a former client at a company called example.net. The client’s email address is
[email protected]. All ties between the company and the client have been severed, but the
messages continue. The FortiGate unit can be configured to prevent these messages from
being delivered.
To enable Email Filter
1. Go to Security Profiles > Email Filter > Profile.
2. Select the email filter profile that is used by the firewall policies handling email traffic from the
email filter profile drop down list.
3. In the row Tag Location, select Subject for all three mail protocols.
4. In the row Tag Format, enter SPAM: in all three fields.
This means that normal spam will be tagged in the subject line.
5. Select Enable Spam Detection and Filtering.
6. Under Local Spam Filtering, enable Black White List and select Create New.
7. In the Black White List widget, select Create New.
8. Select Email Address Wildcard.
9. Enter [email protected] in the Pattern field.
• If you wanted to prevent everyone’s email from the client’s company from getting through
you could have used *@example.net instead.
10.Set the Action as Mark as Reject
11.Set the Status to Enable
12.Select OK.
Now that the email address list is created, you must enable the email filter in the email filter
profile.
When this email filter profile is selected in a security policy, the FortiGate unit will reject any
email message from an address ending with @example.net for all email traffic handled by the
security policy.
Fortinet Technologies Inc. Page 116 Security Profiles for FortiOS 5.2
Data leak prevention
The FortiGate data leak prevention (DLP) system allows you to prevent sensitive data from
leaving your network. When you define sensitive data patterns, data matching these patterns
will be blocked, or logged and allowed, when passing through the FortiGate unit. You configure
the DLP system by creating individual filters based on file type, file size, a regular expression, an
advanced rule, or a compound rule, in a DLP sensor and assign the sensor to a security policy.
Although the primary use of the DLP feature is to stop sensitive data from leaving your network,
it can also be used to prevent unwanted data from entering your network and to archive some
or all of the content passing through the FortiGate unit.
This section describes how to configure the DLP settings.
The following topics are included:
• Data leak prevention concepts
• Enable data leak prevention
• Fingerprint
• File filter
• DLP archiving
• DLP examples
Data leak prevention concepts
Data leak prevention examines network traffic for data patterns you specify. You define
whatever patterns you want the FortiGate unit to look for in network traffic. The DLP feature is
broken down into a number of parts.
DLP sensor
A DLP sensor is a package of filters. To use DLP, you must enable it in a security policy and
select the DLP sensor to use. The traffic controlled by the security policy will be searched for
the patterns defined in the filters contained in the DLP sensor. Matching traffic will be passed or
blocked according to how you configured the filters.
DLP filter
Each DLP sensor has one or more filters configured within it. Filters can examine traffic for
known files using DLP fingerprints, for files of a particular type or name, for files larger than a
specified size, for data matching a specified regular expression, or for traffic matching an
advanced rule or compound rule.
You can configure the action taken when a match is detected. The actions include:
• None
• Log Only
• Block
• Quarantine IP address
Log Only is enabled by default.
Page 117
DLP Filter Actions
None
No action is taken if filter even if filter is triggered
Log Only
The FortiGate unit will take no action on network traffic matching a rule with this action. The
filter match is logged, however. Other matching filters in the same sensor may still operate on
matching traffic.
Block
Traffic matching a filter with the block action will not be delivered. The matching message or
download is replaced with the data leak prevention replacement message.
Quarantine IP Address/ Source IP ban
Starting in FortiOS 5.2, the quarantine, as a place where traffic content was held in storage
where it couldn’t interact with the network or system was removed, but the term quarantine was
kept to describe keeping selected source IPs from interacting with the network and protected
systems. This source IP ban is kept in the kernal ranther than in any specific application engine
and can be queried by APIs. The features that can use the APIs to access and use the banned
source IP addresses are antivirus, DLP, DoS and IPS. Both IPv4 and IPv6 version are included in
this feature.
If the quarantine-ip action is used, the additional variable of expiry time will become available.
This variable determines for how long the source IP adddress will be blocked. In the GUI it is
shown as a field before minutes. In the CLI the option is called expiry and the duration is in the
format <###d##h##m>. The maximum days value is 364. The maximum hour value is 23 and
the maximum minute value is 59. The default is 5 minutes.
Configure using the CLI
To configure the DLP sensor to add the source IP address of the sender of a protected file to the
quarantine or list of banned source IP addresses edit the DLP Filter, in the CLI. as follows:
config dlp sensoredit <sensor name>
config filteredit <id number of filter>
set action quarantine-ipset expiry 5mend
end
Preconfigured sensors
A number of preconfigured sensors are provided with your FortiGate unit. These can be edited
or added to more closely match your needs.
Fortinet Technologies Inc. Page 118 Security Profiles for FortiOS 5.2
Some of the preconfigured sensors with filters ready to go are:
• Credit-Card - This sensor logs the traffic, both files and messages, that contain credit card
numbers in the formates used by American Express, MasterCard and Visa.
• SSN-Sensor - This sensor logs the traffic, both files and messages, that contain Social
Security Numbers with the exception of those that are WebEx invitation emails.
DLP document fingerprinting
One of the DLP techniques to detect sensitive data is fingerprinting (also called document
fingerprinting). Most DLP techniques rely on you providing a characteristic of the file you want
to detect, whether it’s the file type, the file name, or part of the file contents. Fingerprinting is
different in that you provide the file itself. The FortiGate unit then generates a checksum
fingerprint and stores it. The FortiGate unit generates a fingerprint for all files detected in
network traffic, and it is compared to all of the fingerprints stored in its fingerprint database. If a
match is found, the configured action is taken.
The document fingerprint feature requires a FortiGate unit with internal storage. The document
fingerprinting menu item does not appear on models without internal storage.
Any type of file can be detected by DLP fingerprinting and fingerprints can be saved for each
revision of your files as they are updated.
To use fingerprinting you select the documents to be fingerprinted and then add fingerprinting
filters to DLP sensors and add the sensors to firewall policies that accept the traffic to which to
apply fingerprinting.
Fingerprinting
Fingerprint scanning allows you to create a library of files for the FortiGate unit to examine. It will
create checksum fingerprints so each file can be easily identified. Then, when files appear in
network traffic, the FortiGate will generate a checksum fingerprint and compare it to those in the
fingerprint database. A match triggers the configured action.
You must configure a document source or uploaded documents to the FortiGate unit for
fingerprint scanning to work.
Fingerprinted Documents
The FortiGate unit must have access to the documents for which it generates fingerprints. One
method is to manually upload documents to be fingerprinted directly to the FortiGate unit. The
other is to allow the FortiGate unit to access a network share that contains the documents to be
fingerprinted.
If only a few documents are to be fingerprinted, a manual upload may be the easiest solution. If
many documents require fingerprinting, or if the fingerprinted documents are frequently revised,
using a network share makes user access easier to manage.
These rules affect only unencrypted traffic types. If you are using a FortiGate unit that can
decrypt and examine encrypted traffic, you can enable those traffic types in these rules to
extend their functionality if required.
Before using the rules, examine them closely to ensure you understand how they will affect the
traffic on your network.
Fortinet Technologies Inc. Page 119 Security Profiles for FortiOS 5.2
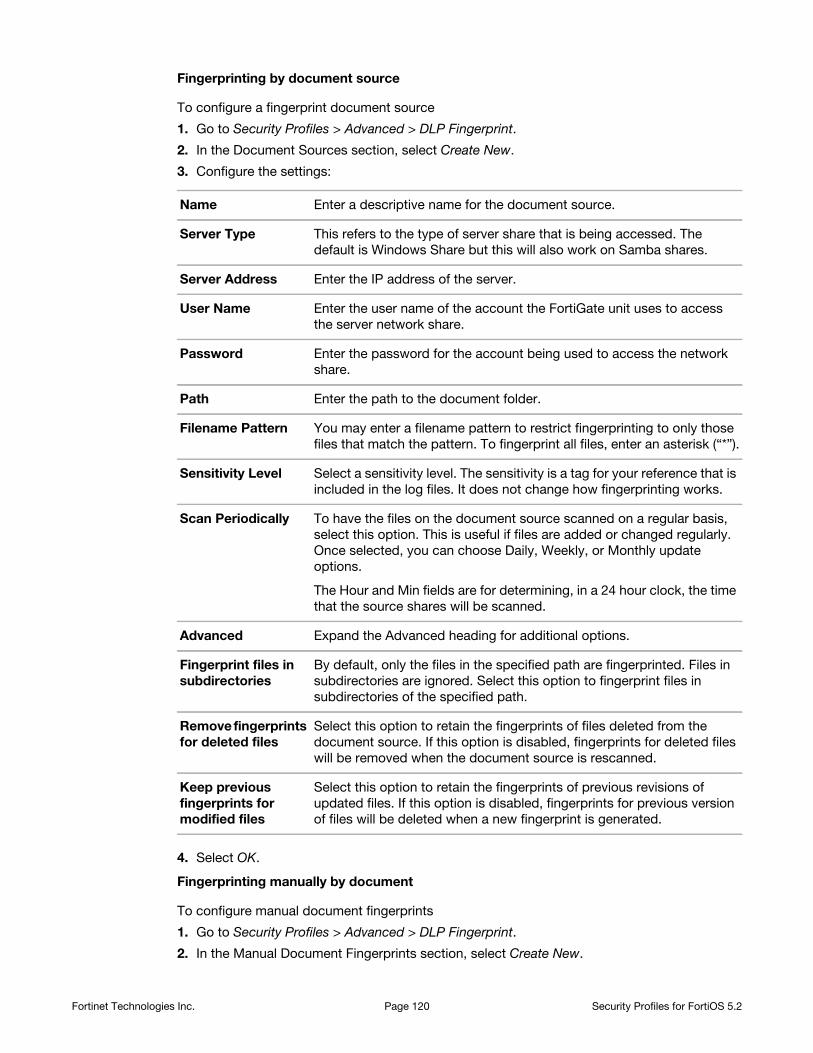
Fingerprinting by document source
To configure a fingerprint document source
1. Go to Security Profiles > Advanced > DLP Fingerprint.
2. In the Document Sources section, select Create New.
3. Configure the settings:
4. Select OK.
Fingerprinting manually by document
To configure manual document fingerprints
1. Go to Security Profiles > Advanced > DLP Fingerprint.
2. In the Manual Document Fingerprints section, select Create New.
Name Enter a descriptive name for the document source.
Server Type This refers to the type of server share that is being accessed. The
default is Windows Share but this will also work on Samba shares.
Server Address Enter the IP address of the server.
User Name Enter the user name of the account the FortiGate unit uses to access
the server network share.
Password Enter the password for the account being used to access the network
share.
Path Enter the path to the document folder.
Filename Pattern You may enter a filename pattern to restrict fingerprinting to only those
files that match the pattern. To fingerprint all files, enter an asterisk (“*”).
Sensitivity Level Select a sensitivity level. The sensitivity is a tag for your reference that is
included in the log files. It does not change how fingerprinting works.
Scan Periodically To have the files on the document source scanned on a regular basis,
select this option. This is useful if files are added or changed regularly.
Once selected, you can choose Daily, Weekly, or Monthly update
options.
The Hour and Min fields are for determining, in a 24 hour clock, the time
that the source shares will be scanned.
Advanced Expand the Advanced heading for additional options.
Fingerprint files in
subdirectories
By default, only the files in the specified path are fingerprinted. Files in
subdirectories are ignored. Select this option to fingerprint files in
subdirectories of the specified path.
Remove fingerprints
for deleted files
Select this option to retain the fingerprints of files deleted from the
document source. If this option is disabled, fingerprints for deleted files
will be removed when the document source is rescanned.
Keep previous
fingerprints for
modified files
Select this option to retain the fingerprints of previous revisions of
updated files. If this option is disabled, fingerprints for previous version
of files will be deleted when a new fingerprint is generated.
Fortinet Technologies Inc. Page 120 Security Profiles for FortiOS 5.2
3. Use the Browse feature for the File field to select the file to be fingerprinted. The selection
will be limited to network resourses
4. Choose a Sensitivity level. The default choices are Critical, Private and Warning, but more
can be added in the CLI.
5. If the file is an archive containing other files, select Process files inside archive if you also
want the individual files inside the archive to have fingerprints generated in addition to the
archive itself.
6. Select OK.
The file is uploaded and a fingerprint generated.
File size
This filter-type checks for files exceeding a configured size. All files larger than the specified size
are subject to the configured action. The value of the field is measured in Kilobytes.
DLP filtering by specific file types
File filters use file filter lists to examine network traffic for files that match either file names or file
types. For example, you can create a file filter list that will find files called secret.* and also all
JPEG graphic files. You can create multiple file filter lists and use them in filters in multiple DLP
sensors as required.
Specify File Types is a DLP option that allows you to block files based on their file name or their
type.
• File types are a means of filtering based on an examination of the file contents, regardless of
the file name. If you block the file type Archive (zip), all zip archives are blocked even if they
are renamed with a different file extension. The FortiGate examines the file contents to
determine what type of file it is and then acts accordingly.
• File Name patterns are a means of filtering based purely on the names of files. They may
include wildcards (*). For example, blocking *.scr will stop all files with an scr file extension,
which is commonly used for Windows screen saver files. Files trying to pass themselves off
as Windows screen saver files by adopting the file-naming convention will also be stopped.
• Files can specify the full or partial file name, the full or partial file extension, or any
combination. File pattern entries are not case sensitive. For example, adding *.exe to
the file pattern list also blocks any files ending with .EXE.
• Files are compared to the enabled file patterns from top to bottom, in list order.
Watermarking
Watermarking is essentially marking files with a digital pattern to mark the file as being
proprietary to a specific company. Fortinet has a utility that will apply a digital watermark to files.
The utility adds a small (approx. 100 byte) pattern to the file that is recognised by the DLP
Watermark filter. the pattern is invisible to the end user.
When watermarking a file it should be verified that the pattern matches up to a category found
on the FortiGate firewall. For example, if you are going to watermark a file with the sensitivity
level of “Secret” you should verify that “Secret” is a sensitivity level that has been assigned in
the FortiGate unit.
File filter does not detect files within archives. You can use file filter to block or allow the
archives themselves, but not the contents of the archives.
Fortinet Technologies Inc. Page 121 Security Profiles for FortiOS 5.2
Watermark Sensitivity
If you are using watermarking on your files you can use this filter to check for watermarks that
correspond to sensitivity categories that you have set up.
The Corporate Identifier is to make sure that you are only blocking watermarks that your
company has place on the files, not watermarks with the same name by other companies.
Software Versions
Before planning on using watermarking software it is always best to verify that the software will
work with your OS. Currently, the only utility available to watermark files is within the
FortiExplorer software and that is only only available for the Windows operating system. There
was an older version of software that is for Linux and is Commandline only, but is has been
discontinued.
File types
The Watermark tool does not work with every file type. The following file types are supported by
the watermark tool:
• .txt
• .doc
• .xls
• .ppt
• .docx
• .pptx
• .xlsx
Currently the DLP only works with Fortinet’s watermarking software.
Using the FortiExplorer Watermark tool
The FortiExplorer software can be downloaded from the Fortinet Support Site.
1. Choose whether to "Apply Watermark To:"
• Select File
• Entire Directory
2. Fill in the fields:
a. Select File
This Field has a browse icon next to it which will allow the user to browse to and select a
single file or directory to apply the water mark to.
b. Sensitivity Level
This field is a drop down menu that lists the available sensitivity levels that the FortiGate
can scan for
c. Identifier
This is a unique identifier string of characters to identify the company that the document
belongs to.
d. Output Directory
This Field has a browse icon next to it which will allow the user to browse to a directory
where the altered file will be placed. If the output directory is the same as the source
directory the original file will be overwritten. If the output directory is different than the
Fortinet Technologies Inc. Page 122 Security Profiles for FortiOS 5.2
source directory then the watermarked version of the file will be place there and the
unaltered original will be left in the source directory.
3. Select Apply Watermark to start the process.
Regular expression
The FortiGate unit checks network traffic for the regular expression specified in a regular
expression filter. The regular expression library used by Fortinet is a variation of a library called
PCRE (Perl Compatible Regular Expressions). A number of these filters can be added to a
sensor making a sort of ‘dictionary’ subset within the sensor.
Some other, more limited DLP implementations, use a list of words in a text file to define what
words are searched for. While the format used here is slightly different than what some people
are used to, the resulting effect is similar. Each Regular Expression filter can be thought of as a
more versatile word to be searched against. In this dictionary (or sensor), the list of words is not
limited to just predefined words. It can include expressions that can accommodate complex
variations on those words and even target phrases. Another advantage of the individual filter
model of this dictionary over the list is that each word can be assigned its own action, making
this implementation much more granular.
Encrypted
This filter is a binary one. If the file going through the policy is encrypted the action is triggered.
Examining specific services
To assist in optimizing the performance of the firewall, the option exists to select which
services/protocol traffic will be checked for the targeted content.This setting gives you a tool to
save the resources of the FortiGate unit by only using processing cycles on the relevant traffic.
Just check the boxes associated with the service / protocol that you want to have checked for
filter triggers.
DLP archiving
DLP is typically used to prevent sensitive information from getting out of your company
network, but it can also be used to record network use. This is called DLP archiving. The DLP
engine examines email, FTP, IM, NNTP, and web traffic. Enabling archiving for rules when you
add them to sensors directs the FortiGate unit to record all occurrences of these traffic types
when they are detected by the sensor.
Since the archive setting is configured for each rule in a sensor, you can have a single sensor
that archives only the things you want.
You can archive Email, FTP, HTTP, IM, and session control content:
• Email content includes IMAP, POP3, and SMTP sessions. Email content can also include
email messages tagged as spam by Email filtering. If your unit supports SSL content
scanning and inspection, Email content can also include IMAPS, POP3S, and SMTPS
sessions.
• HTTP content includes HTTP sessions. If your unit supports SSL content scanning and
inspection HTTP content can also include HTTPS sessions.
• IM content includes AIM, ICQ, MSN, and Yahoo! sessions.
DLP archiving comes in two forms: Summary Only, and Full.
Fortinet Technologies Inc. Page 123 Security Profiles for FortiOS 5.2
Summary archiving records information about the supported traffic types. For example, when
an email message is detected, the sender, recipient, message subject, and total size are
recorded. When a user accesses the Web, every URL the user visits recorded. The result is a
summary of all activity the sensor detected.
For more detailed records, full archiving is necessary. When an email message is detected, the
message itself, including any attachments, is archived. When a user accesses the Web, every
page the user visits is archived. Far more detailed than a summary, full DLP archives require
more storage space and processing.
Because both types of DLP archiving require additional resources, DLP archives are saved to a
FortiAnalyzer unit or the FortiGuard Analysis and Management Service (subscription required).
You can use DLP archiving to collect and view historical logs that have been archived to a
FortiAnalyzer unit or the FortiGuard Analysis and Management Service. DLP archiving is
available for FortiAnalyzer when you add a FortiAnalyzer unit to the Fortinet configuration. The
FortiGuard Analysis server becomes available when you subscribe to the FortiGuard Analysis
and Management Service.
Two sample DLP sensors are provided with DLP archiving capabilities enabled. If you select the
Content_Summary sensor in a security policy, it will save a summary DLP archive of all traffic
the security policy handles. Similarly, the Content_Archive sensor will save a full DLP archive
of all traffic handled the security policy you apply it to. These two sensors are configured to
detect all traffic of the supported types and archive them.
DLP archiving is set in the CLI only.
To set the archive to Full
config dlp sensoredit <name of sensor>
set full-archive-proto smtp pop3 imap http ftp nntp aim icq msn yahoo mapi
end
To set the archive to Summary Only
config dlp sensoredit <name of sensor>
set summary-proto smtp pop3 imap http ftp nntp aim icq msn yahoo mapi
end
Enable data leak prevention
DLP examines your network traffic for data patterns you specify. The FortiGate unit then
performs an action based on the which pattern is found and a configuration set for each filter
trigger.
General configuration steps
Follow the configuration procedures in the order given. Also, note that if you perform any
additional actions between procedures, your configuration may have different results.
1. Create a DLP sensor.
New DLP sensors are empty. You must create one or more filters in a sensor before it can
examine network traffic.
Fortinet Technologies Inc. Page 124 Security Profiles for FortiOS 5.2
2. Add one or more filters to the DLP sensor.
Each filter searches for a specific data pattern. When a pattern in the active DLP sensor
appears in the traffic, the FortiGate unit takes the action configured in the matching filter.
Because the order of filters within a sensor cannot be changed, you must configure DLP in
sequence.
3. Add the DLP sensor to one or more firewall policies that control the traffic to be examined.
Creating/editing a DLP sensor
DLP sensors are collections of filters. You must also specify an action for the filter when you
create it in a sensor. Once a DLP sensor is configured, you can select it a security policy profile.
Any traffic handled by the security policy will be examined according to the DLP sensor
configuration.
To create/edit a DLP sensor
1. Go to Security Profiles > Data Leak Prevention.
2. Choose whether you want to edit an exiting sensor or create a new one.
• The default sensor will be the one displayed by default.
• If you are going to edit an existing sensor, selecting it can be done by either using the
drop down menu in the upper right hand corner of the window or by selecting the List
icon (the furthest right of the 3 icons in the upper right of the window, if resembles a page
with some lines on it), and then selecting the profile you want to edit from the list.
• If you need to create a new sensor you can either select the Create New icon (a plus sign
within a circle) or select the List icon and then select the Create New link in the upper left
of the window that appears.
3. Enter a name in the Name field for any new DLP sensors.
4. Optionally, you may also enter a comment. The comment appears in the DLP sensor list and
can remind you of the details of the sensor.
5. At this point you can add filters to the sensor (see adding filters to a DLP sensor) or select
OK to save the sensor.
Without filters, the DLP sensor will do nothing.
Adding filters to a DLP sensor
Once you have created a DLP sensor, you need to add filters.
1. To add filters to a DLP sensor
2. Go to Security Profiles > Data Leak Prevention.
3. Select the Sensor you wish to edit using the drop down menu or the sensor list window.
4. Within the Edit DLP Sensor window select Create New. A New Filter window should pop up.
5. Select the type of filter. You can choose either Messages or Files. Depending on which of
these two are chosen different options will be available
Message filter will have these configuration options:
• [radio button] Containing: [drop down menu including: Credit Card # or SSN]
Fortinet Technologies Inc. Page 125 Security Profiles for FortiOS 5.2

• [radio button] Regular Expression [input field]
Examine the following Services:
Web Access
• HTTP-POST
• [check box] SMTP
• [check box] POP3
• [check box] IMAP
• [check box] MAPI
Others
• [check box] NNTP
Action [from drop down menu]
• None
• Log Only,
• Block
• Quarantine IP address
Files filter will have these options:
• [radio button] Containing: drop down menu including: Credit Card # or SSN
• [radio button] File Size >= [ ]KB
• [radio button] Specify File Types
File Types: [“Click to add...”drop down menu of File extensions]
File Name Patterns:[“Click to add...”drop down menu]
• [radio button] File Finger Print : [drop down menu]
• [radio button] Watermark Sensitivity: [drop down menu] and Corporate Identifier [id
field]
• [radio button] Regular Expression [input field]
• [radio button] Encrypted
Examine the following Services:
Web Access
• [check box] HTTP-POST
• [check box] HTTP-GET
• [check box] SMTP
• [check box] POP3
• [check box] IMAP
• [check box] MAPI
Others
• [check box] FTP
• [check box] NNTP
Action [from drop down menu]
• None
• Log Only,
• Block
• Quarantine IP address
6. Select OK.
Fortinet Technologies Inc. Page 126 Security Profiles for FortiOS 5.2
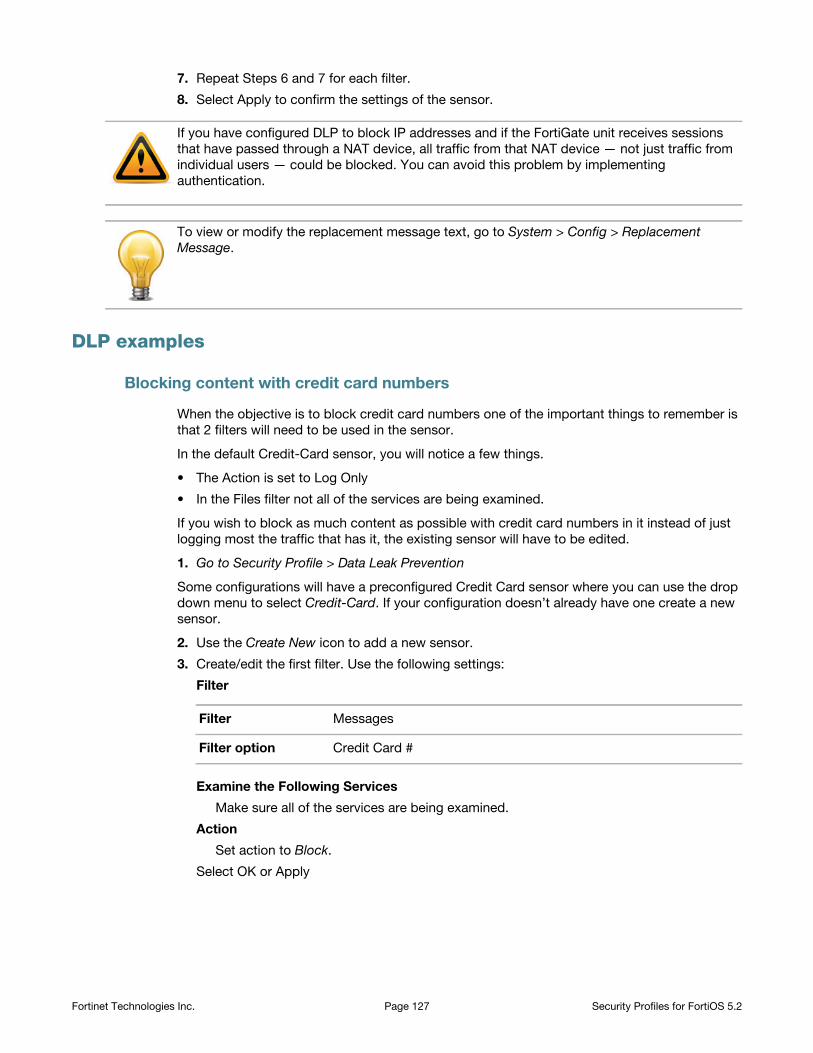
7. Repeat Steps 6 and 7 for each filter.
8. Select Apply to confirm the settings of the sensor.
DLP examples
Blocking content with credit card numbers
When the objective is to block credit card numbers one of the important things to remember is
that 2 filters will need to be used in the sensor.
In the default Credit-Card sensor, you will notice a few things.
• The Action is set to Log Only
• In the Files filter not all of the services are being examined.
If you wish to block as much content as possible with credit card numbers in it instead of just
logging most the traffic that has it, the existing sensor will have to be edited.
1. Go to Security Profile > Data Leak Prevention
Some configurations will have a preconfigured Credit Card sensor where you can use the drop
down menu to select Credit-Card. If your configuration doesn’t already have one create a new
sensor.
2. Use the Create New icon to add a new sensor.
3. Create/edit the first filter. Use the following settings:
Filter
Examine the Following Services
Make sure all of the services are being examined.
Action
Set action to Block.
Select OK or Apply
If you have configured DLP to block IP addresses and if the FortiGate unit receives sessions
that have passed through a NAT device, all traffic from that NAT device — not just traffic from
individual users — could be blocked. You can avoid this problem by implementing
authentication.
To view or modify the replacement message text, go to System > Config > Replacement
Message.
Filter Messages
Filter option Credit Card #
Fortinet Technologies Inc. Page 127 Security Profiles for FortiOS 5.2
4. Create/edit the first filter. Use the following settings:
Filter
Examine the Following Services
Make sure all of the services are being examined.
Action
Set action to Block.
Select OK or Apply
5. Edit the appropriate policies so that under Security Profiles, DLP is turned on and the
Credit-Card sensor is selected.
Blocking emails larger than 15 MB and logging emails from 5 MB to 15 MB
Multiple filters will have to be used in this case and the order that they are used is important.
Because there is no mechanism to move the filters within the sensor the order that they are
added to the sensor is important.
1. Go to Security Profile > Data Leak Prevention.
2. Use the Create New icon to add a new sensor.
Use the following values
Name large_emails
Comment <optional>
Once the Sensor has been created, a new filter will need to be added.
3. Create the filter to block the emails over 15 MB. In the filters table select Create New.
Use the following values
Filter
Examine the Following Services
Make sure all of the Email services are being examined.
Action
Set action to Block.
Select OK.
Filter Files
Filter option Credit Card #
Filter Messages
Filter option File Size >=
KB 15360 (1MB = 1024KB, 15 MB = 15 x 1024KB = 15360KB)
Fortinet Technologies Inc. Page 128 Security Profiles for FortiOS 5.2
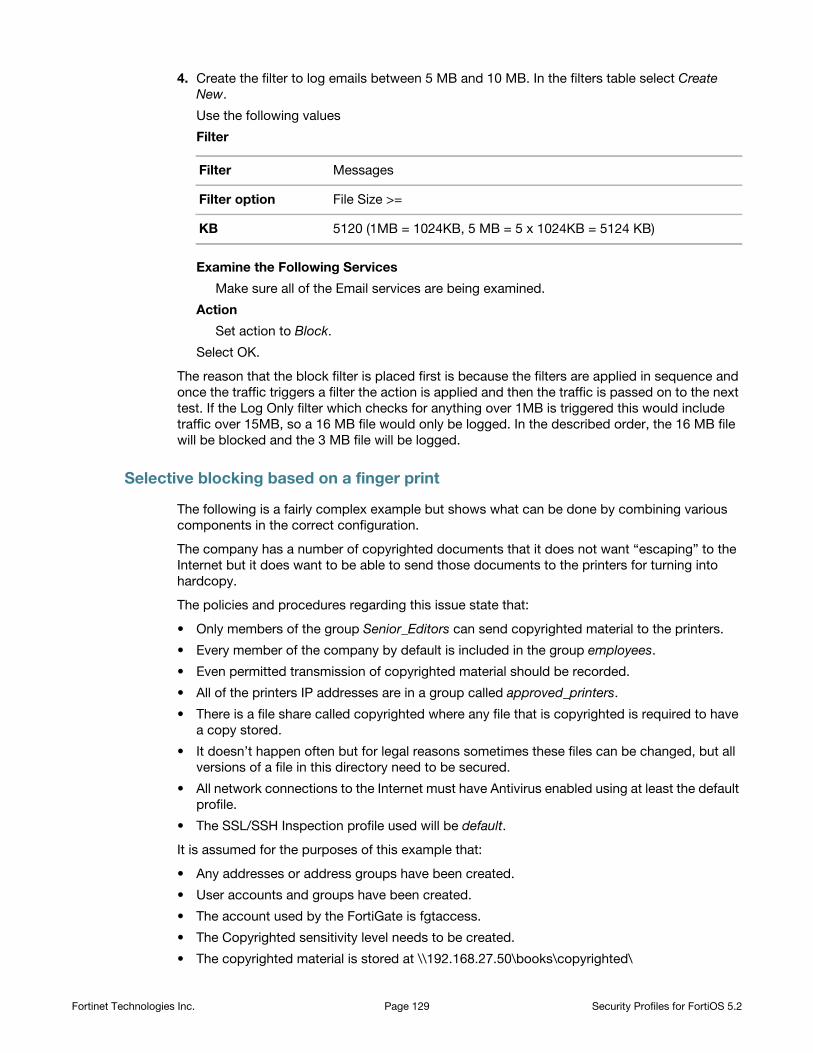
4. Create the filter to log emails between 5 MB and 10 MB. In the filters table select Create
New.
Use the following values
Filter
Examine the Following Services
Make sure all of the Email services are being examined.
Action
Set action to Block.
Select OK.
The reason that the block filter is placed first is because the filters are applied in sequence and
once the traffic triggers a filter the action is applied and then the traffic is passed on to the next
test. If the Log Only filter which checks for anything over 1MB is triggered this would include
traffic over 15MB, so a 16 MB file would only be logged. In the described order, the 16 MB file
will be blocked and the 3 MB file will be logged.
Selective blocking based on a finger print
The following is a fairly complex example but shows what can be done by combining various
components in the correct configuration.
The company has a number of copyrighted documents that it does not want “escaping” to the
Internet but it does want to be able to send those documents to the printers for turning into
hardcopy.
The policies and procedures regarding this issue state that:
• Only members of the group Senior_Editors can send copyrighted material to the printers.
• Every member of the company by default is included in the group employees.
• Even permitted transmission of copyrighted material should be recorded.
• All of the printers IP addresses are in a group called approved_printers.
• There is a file share called copyrighted where any file that is copyrighted is required to have
a copy stored.
• It doesn’t happen often but for legal reasons sometimes these files can be changed, but all
versions of a file in this directory need to be secured.
• All network connections to the Internet must have Antivirus enabled using at least the default
profile.
• The SSL/SSH Inspection profile used will be default.
It is assumed for the purposes of this example that:
• Any addresses or address groups have been created.
• User accounts and groups have been created.
• The account used by the FortiGate is fgtaccess.
• The Copyrighted sensitivity level needs to be created.
• The copyrighted material is stored at \\192.168.27.50\books\copyrighted\
Filter Messages
Filter option File Size >=
KB 5120 (1MB = 1024KB, 5 MB = 5 x 1024KB = 5124 KB)
Fortinet Technologies Inc. Page 129 Security Profiles for FortiOS 5.2
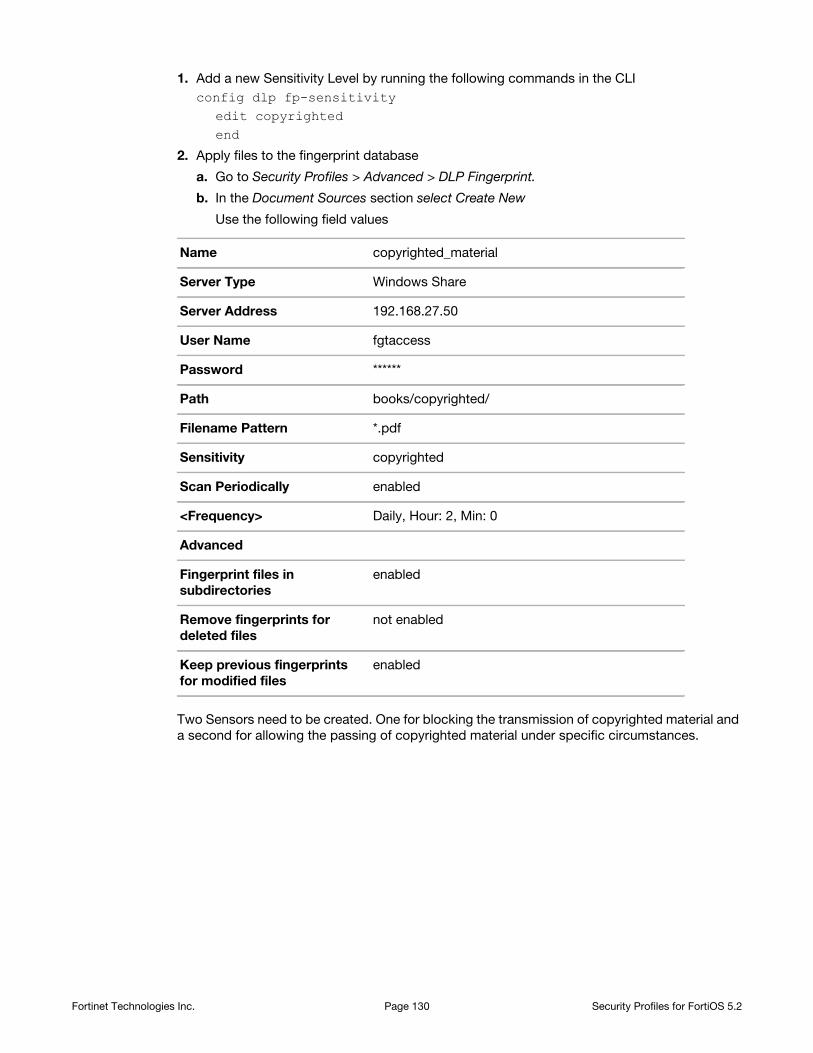
1. Add a new Sensitivity Level by running the following commands in the CLI
config dlp fp-sensitivityedit copyrightedend
2. Apply files to the fingerprint database
a. Go to Security Profiles > Advanced > DLP Fingerprint.
b. In the Document Sources section select Create New
Use the following field values
Two Sensors need to be created. One for blocking the transmission of copyrighted material and
a second for allowing the passing of copyrighted material under specific circumstances.
Name copyrighted_material
Server Type Windows Share
Server Address 192.168.27.50
User Name fgtaccess
Password ******
Path books/copyrighted/
Filename Pattern *.pdf
Sensitivity copyrighted
Scan Periodically enabled
<Frequency> Daily, Hour: 2, Min: 0
Advanced
Fingerprint files in
subdirectories
enabled
Remove fingerprints for
deleted files
not enabled
Keep previous fingerprints
for modified files
enabled
Fortinet Technologies Inc. Page 130 Security Profiles for FortiOS 5.2

3. Create the first DLP Sensor
• Go to Security Profile > Data Leak Prevention.
• Create a new sensor.
Use the following field values:
• In the Filter table, select Create New.
Use the following values
Filter
Examine the Following Services
Make sure all of the services are being examined.
Action
From the drop down menu choose Block
4. Create the second DLP Sensor
• Go to Security Profile > Data Leak Prevention.
• Create a new sensor.
Use the following field values:
• In the Filter table, select Create New.
Use the following values
Filter
Examine the Following Services
Make sure all of the services are being examined.
Action
From the drop down menu choose Log Only
Name block_copyrighted
Comment <optional>
Filter Files
Filter option File Finger Print
Finger print value
from dropdown
“copyrighted”
Name allow_copyrighted
Comment <optional>
Filter Files
Filter option File Finger Print
Finger print value
from dropdown
“copyrighted”
Fortinet Technologies Inc. Page 131 Security Profiles for FortiOS 5.2

5. Create a policy to allow transmission of copyrighted material.
a. Go to Policy & Objects > Policy > IPv4
b. Select Create New
c. Use the following values in the Policy:
This policy should be place as close to the beginning of the list of policies so the it is among the
first tested against.
6. Create a policy to block transmission of copyrighted material.
This will in effect be the default template for all following policies in that they will have to use
the DLP profile that blocks the transmission of the copyrighted material.
a. Go to Policy & Objects > Policy > IPv4
b. Select Create New or Edit an existing policy.
c. Use the following values in the Policy:
The fields should include what ever values you need to accomplish your requirements are
but each policy should include the DLP sensor block_copyrighted or if a different DLP
configuration is required it should include a filter that blocks copyrighted fingerprinted file.
If you need to create a policy that is identity based make sure that there is an Authentication
rule for the group employees that uses the DLP sensor that blocks copyrighted material.
Incoming Interface LAN
Source Address all
Outgoing Interface wan1
Destination Address all
Schedule always
Service all
Action ACCEPT
Enable NAT enabled -- Use Destination Interface Address
Antivirus <ON> default
DLP <ON> Copyrighted
SSL/SSH Inspection <ON> default
Enable this policy <ON>
Fortinet Technologies Inc. Page 132 Security Profiles for FortiOS 5.2
ICAP
ICAP is the acronym for Internet Content Adaptation Protocol The purpose of the feature is to
off load work that would normally take place on the firewall to a separate server specifically set
up for the specialized processing of the incoming traffic. This takes some of the resource strain
off of the FortiGate firewall leaving it to concentrate its resources on things that only it can do.
Off-loading value-added services from Web servers to ICAP servers allows those same web
servers to be scaled according to raw HTTP throughput versus having to handle these extra
tasks.
ICAP servers are focused on a specific function, for example:
• Ad insertion
• Virus scanning
• Content translation
• HTTP header or URL manipulation
• Language translation
• Content filtering
The following topics are included in this section:
• The Protocol
• Offloading using ICAP
• Configuration Settings
• Example ICAP sequence
• Example Scenerio
The Protocol
The protocol is a lightweight member of the TCP/IP suite of protocols. It is an Application layer
protocol and its specifications are set out in RFC 3507. The default TCP that is assigned to it is
1344. Its purpose is to support HTTP content adaptation by providing simple object-based
content vectoring for HTTP services. ICAP is usually used to implement virus scanning and
content filters in transparent HTTP proxy caches. Content Adaptation refers to performing the
particular value added service, or content manipulation, for an associated client
request/response.
Essentially it allows an ICAP client, in this case the FortiGate firewall, to pass HTTP messages
to an ICAP server like a remote procedure call for the purposes of some sort of transformation
or other processing adaptation. Once the ICAP server has finished processing the the content,
the modified content is sent back to the client.
The messages going back and forth between the client and server are typically HTTP requests
or HTTP responses. While ICAP is a request/response protocol similar in semantics and usage
ICAP does not appear by default in the web-based manager. You must enable it in System >
Admin > Settings to display ICAP in the web-based manager.
Page 133

to HTTP/1.1 it is not HTTP nor does it run over HTTP, as such it cannot be treated as if it were
HTTP. For instance ICAP messages can not be forwarded by HTTP surrogates.
Offloading using ICAP
If you enable ICAP in a security policy, HTTP traffic intercepted by the policy is transferred to an
ICAP server in the ICAP profile added to the policy. Responses from the ICAP server are
returned to the FortiGate unit which forwards them to an HTTP client or server.
You can offload HTTP responses or HTTP requests (or both) to the same or different ICAP
servers.
If the FortiGate unit supports HTTPS inspection, HTTPS traffic intercepted by a policy that
includes an ICAP profile is also offloaded to the ICAP server in the same way as HTTP traffic.
When configuring ICAP on the FortiGate unit, you must configure an ICAP profile that contains
the ICAP server information; this profile is then applied to a security policy.
Configuration Settings
There are 2 sections where ICAP is configured:
Servers
Go to Security Profiles > Advanced > ICAP Servers
The available settings to be configured regarding the server are
• Name
• IP Type (in the GUI) or IP address version ( in the CLI)
The options for this field in the GUI are 2 radio buttons labelled “IPv4” and “IPv4”. In the CLI
the approach is slightly different. There is a field “ip-version” that can be set to “4” or “6”.
• IP Address
Depending on whether you’ve set the IP version to 4 or 6 will determine the format that the
content of this field will be set into. In the GUI it looks like the same field with a different
format but in the CLI it is actually 2 different fields named “ip-address” and ip6-address.
• Port
1344 is default TCP port used for the ICAP traffic. The range can be from 1 to 65535.
Maximum Connections
This value refers to the maximum number of concurrent connections that can be made to the
ICAP server. The default setting is 100. This setting can only be configured in the CLI.
The syntax is:
config icap serveredit <icap_server_name>
set max-connections <integer>end
Fortinet Technologies Inc. Page 134 Security Profiles for FortiOS 5.2
Profiles
Name
Just like any other profile each of the ICAP profiles needs to be assigned a name.
Enable Request Processing
Enabling this setting allows the ICAP server to process request messages.
If enabled this setting will also require:
• Server - This is the name of the ICAP server. It is chosen from the drop down menu in the
field. The servers are configure in the Security Profiles > ICAP > Server section.
• Path - This is the path on the server to the processing compent. For instance if the Windows
share name was “Processes” and the directory within the share was “Content-Filter” the
path would be “/Processes/Content-Filter/”
• On Failure - There are 2 options. You can choose by the use of radio buttons either Error or
Bypass.
Enable Response Processing
Enabling this setting allows the ICAP server to process response messages.
If enabled this setting will also require:
• Server - This is the name of the ICAP server. It is chosen from the drop down menu in the
field. The servers are configure in the Security Profiles > ICAP > Server section.
• Path - This is the path on the server to the processing compent. For instance if the Windows
share name was “Processes” and the directory within the share was “Content-Filter” the
path would be “/Processes/Content-Filter/”
On Failure - There are 2 options. You can choose by the use of radio buttons either Error or
Bypass.
Enable Streaming Media Bypass
Enabling this setting allows streaming media to ignore offloading to the ICAP server.
Example ICAP sequence
This example is for an ICAP server performing web URL filtering on HTTP requests
1. A user opens a web browser and sends an HTTP request to connect to a web server.
2. The FortiGate unit intercepts the HTTP request and forwards it to an ICAP server.
3. The ICAP server receives the request and determines if the request is for URL that should be
blocked or allowed.
• If the URL should be blocked the ICAP server sends a response to the FortiGate unit. The
FortiGate unit returns this response to the user’s web browser. This response could be a
message informing the user that their request was blocked.
• If the URL should be allowed the ICAP server sends a request to the FortiGate unit. The
FortiGate unit forwards the request to the web server that the user originally attempted to
connect to.
• When configuring ICAP on the FortiGate unit, you must configure an ICAP profile that
contains the ICAP server information; this profile is then applied to a security policy.
Fortinet Technologies Inc. Page 135 Security Profiles for FortiOS 5.2
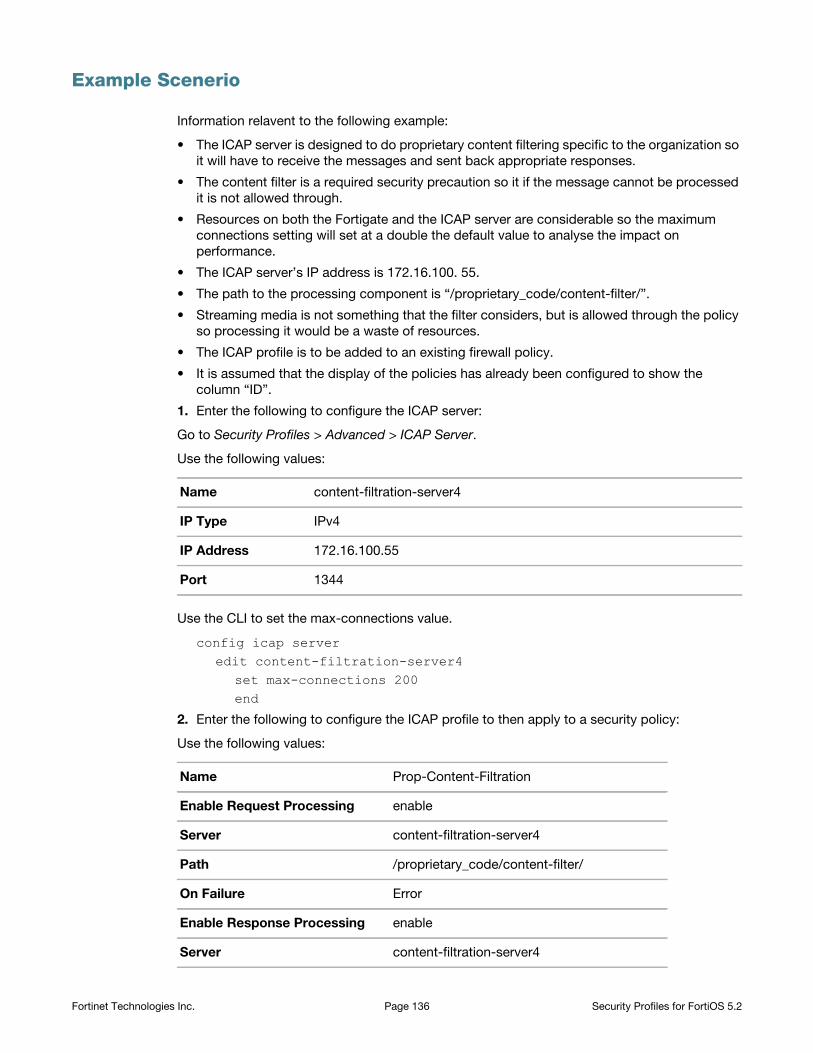
Example Scenerio
Information relavent to the following example:
• The ICAP server is designed to do proprietary content filtering specific to the organization so
it will have to receive the messages and sent back appropriate responses.
• The content filter is a required security precaution so it if the message cannot be processed
it is not allowed through.
• Resources on both the Fortigate and the ICAP server are considerable so the maximum
connections setting will set at a double the default value to analyse the impact on
performance.
• The ICAP server’s IP address is 172.16.100. 55.
• The path to the processing component is “/proprietary_code/content-filter/”.
• Streaming media is not something that the filter considers, but is allowed through the policy
so processing it would be a waste of resources.
• The ICAP profile is to be added to an existing firewall policy.
• It is assumed that the display of the policies has already been configured to show the
column “ID”.
1. Enter the following to configure the ICAP server:
Go to Security Profiles > Advanced > ICAP Server.
Use the following values:
Name content-filtration-server4
IP Type IPv4
IP Address 172.16.100.55
Port 1344
Use the CLI to set the max-connections value.
config icap serveredit content-filtration-server4
set max-connections 200end
2. Enter the following to configure the ICAP profile to then apply to a security policy:
Use the following values:
Name Prop-Content-Filtration
Enable Request Processing enable
Server content-filtration-server4
Path /proprietary_code/content-filter/
On Failure Error
Enable Response Processing enable
Server content-filtration-server4
Fortinet Technologies Inc. Page 136 Security Profiles for FortiOS 5.2
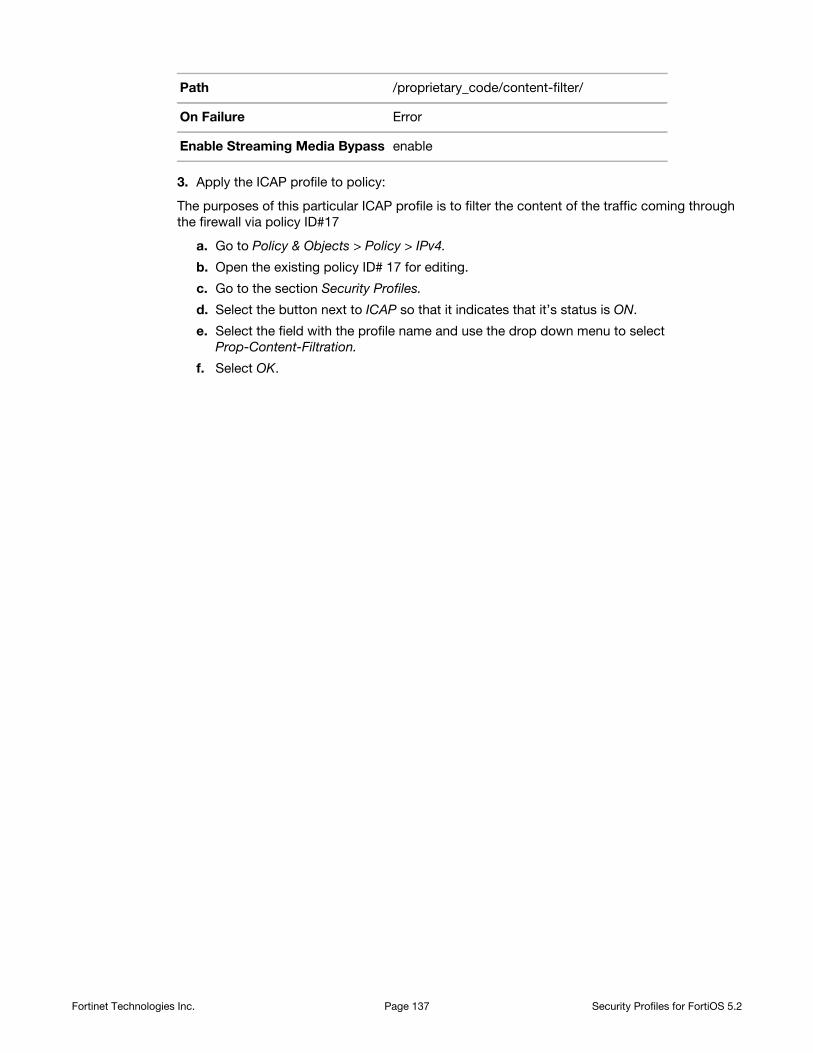
3. Apply the ICAP profile to policy:
The purposes of this particular ICAP profile is to filter the content of the traffic coming through
the firewall via policy ID#17
a. Go to Policy & Objects > Policy > IPv4.
b. Open the existing policy ID# 17 for editing.
c. Go to the section Security Profiles.
d. Select the button next to ICAP so that it indicates that it’s status is ON.
e. Select the field with the profile name and use the drop down menu to select
Prop-Content-Filtration.
f. Select OK.
Path /proprietary_code/content-filter/
On Failure Error
Enable Streaming Media Bypass enable
Fortinet Technologies Inc. Page 137 Security Profiles for FortiOS 5.2
Other Security Profiles considerations
The following topics are included in this section:
• Security Profiles and Virtual domains (VDOMs)
• Conserve mode
• SSL content scanning and inspection
• Using wildcards and Perl regular expressions
Security Profiles and Virtual domains (VDOMs)
If you enable virtual domains (VDOMs) on your FortiGate unit, all Security Profiles configuration
is limited to the VDOM in which you configure it.
While configuration is not shared, the various databases used by Security Profiles features are
shared. The FortiGuard antivirus and IPS databases and database updates are shared. The
FortiGuard web filter and spam filter features contact the FortiGuard distribution network and
access the same information when checking email for spam and web site categories and
classification.
Conserve mode
FortiGate units perform all Security Profiles processing in physical RAM. Since each model has
a limited amount of memory, conserve mode is activated when the remaining free memory is
nearly exhausted or the AV proxy has reached the maximum number of sessions it can service.
While conserve mode is active, the AV proxy does not accept new sessions.
The AV proxy
Most content inspection the FortiGate unit performs requires that the files, email messages,
URLs, and web pages be buffered and examined as a whole. The AV proxy performs this
function, and because it may be buffering many files at the same time, it uses a significant
amount of memory. Conserve mode is designed to prevent all the component features of the
FortiGate unit from trying to use more memory than it has. Because the AV proxy uses so much
memory, conserve mode effectively disables it in most circumstances. As a result, the content
inspection features that use the AV proxy are also disabled in conserve mode.
All of the Security Profiles features use the AV proxy with the exception of IPS, application
control, DoS as well as flow-based antivirus, DLP, and web filter scanning. These features
continue to operate normally when the FortiGate unit enters conserve mode.
Entering and exiting conserve mode
A FortiGate unit will enter conserve mode because it is nearly out of physical memory, or
because the AV proxy has reached the maximum number of sessions it can service. The
memory threshold that triggers conserve mode varies by model, but it is about 20% free
memory. When memory use rises to the point where less than 20% of the physical memory is
free, the FortiGate unit enters conserve mode.
Page 138
The FortiGate unit will leave conserve mode only when the available physical memory exceeds
about 30%. When exiting conserve mode, all new sessions configured to be scanned with
features requiring the AV proxy will be scanned as normal, with the exception of a unit
configured with the one-shot option.
Conserve mode effects
What happens when the FortiGate unit enters conserve mode depends on how you have
av-failopen configured. There are four options:
off
The off setting forces the FortiGate unit to stop all traffic that is configured for content
inspection by Security Profiles features that use the AV proxy. New sessions are not allowed but
current sessions continue to be processed normally unless they request more memory.
Sessions requesting more memory are terminated.
For example, if a security policy is configured to use antivirus scanning, the traffic it permits is
blocked while in conserve mode. A policy with IPS scanning enabled continues as normal. A
policy with both IPS and antivirus scanning is blocked because antivirus scanning requires the
AV proxy.
Use the off setting when security is more important than a loss of access while the problem is
rectified.
pass
The pass setting allows traffic to bypass the AV proxy and continue to its destination. Since the
traffic is bypassing the proxy, no Security Profiles scanning that requires the AV proxy is
performed. Security Profiles scanning that does not require the AV proxy continues normally.
Use the pass setting when access is more important than security while the problem is rectified.
Pass is the default setting.
one-shot
The one-shot setting is similar to pass in that traffic is allowed when conserve mode is active.
The difference is that a system configured for one-shot will force new sessions to bypass the AV
proxy even after it leaves conserve mode. The FortiGate unit resumes use of the AV proxy only
when the av-failopen setting is changed or the unit is restarted.
idledrop
The idledrop setting will recover memory and session space by terminating all the sessions
associated with the host that has the most sessions open. The FortiGate may force this session
termination a number of times, until enough memory is available to allow it to leave conserve
mode.
The idledrop setting is primarily designed for situations in which malware may continue to open
sessions until the AV proxy cannot accept more new sessions, triggering conserve mode. If your
FortiGate unit is operating near capacity, this setting could cause the termination of valid
sessions. Use this option with caution.
Fortinet Technologies Inc. Page 139 Security Profiles for FortiOS 5.2
Configuring the av-failopen command
You can configure the av-failopen command using the CLI.
config system globalset av-failopen {off | pass | one-shot | idledrop}
end
The default setting is pass.
SSL content scanning and inspection
If your FortiGate model supports SSL content scanning and inspection, you can apply antivirus
scanning, web filtering, FortiGuard Web Filtering, and email filtering to encrypted traffic. You can
also apply DLP and DLP archiving to HTTPS, IMAPS, POP3S, and SMTPS traffic. To perform
SSL content scanning and inspection, the FortiGate unit does the following:
• intercepts and decrypts HTTPS, IMAPS, POP3S, SMTPS, and FTPS sessions between
clients and servers (FortiGate SSL acceleration speeds up decryption)
• applies content inspection to decrypted content, including:
• HTTPS, IMAPS, POP3S, and SMTPS Antivirus, DLP, and DLP archiving
• HTTPS web filtering and FortiGuard web filtering
• IMAPS, POP3S, and SMTPS email filtering
• encrypts the sessions and forwards them to their destinations.
Fortinet Technologies Inc. Page 140 Security Profiles for FortiOS 5.2
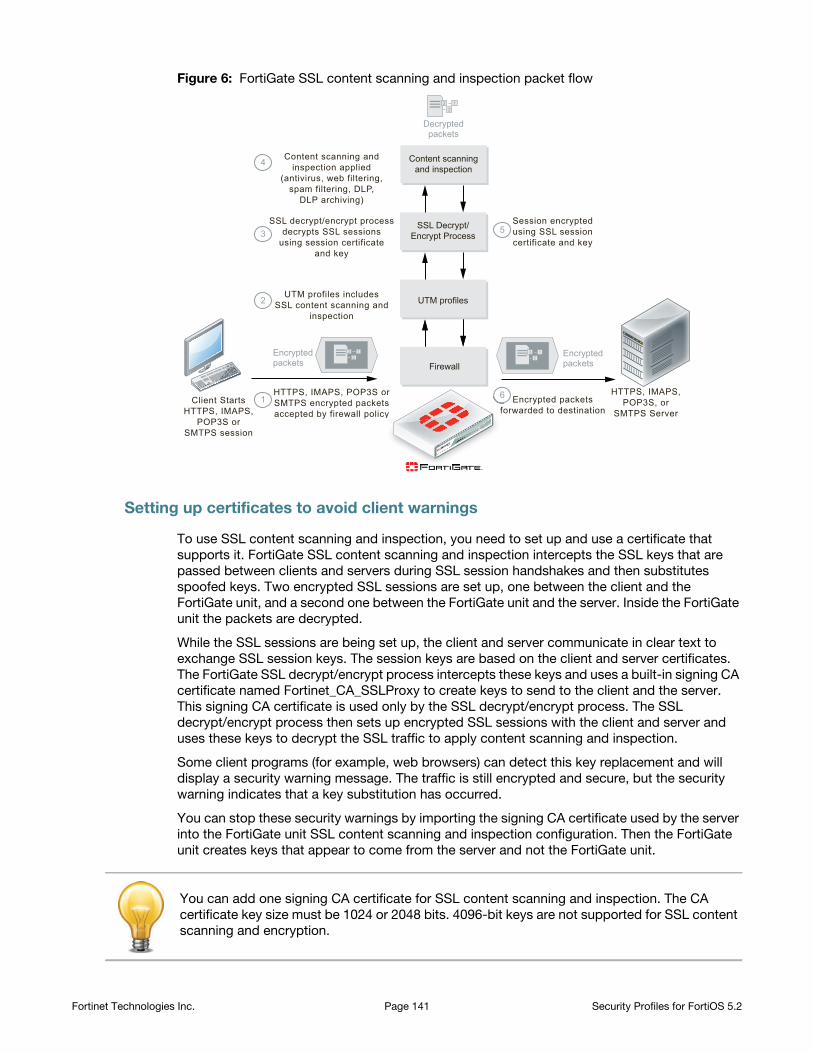
Figure 6: FortiGate SSL content scanning and inspection packet flow
Setting up certificates to avoid client warnings
To use SSL content scanning and inspection, you need to set up and use a certificate that
supports it. FortiGate SSL content scanning and inspection intercepts the SSL keys that are
passed between clients and servers during SSL session handshakes and then substitutes
spoofed keys. Two encrypted SSL sessions are set up, one between the client and the
FortiGate unit, and a second one between the FortiGate unit and the server. Inside the FortiGate
unit the packets are decrypted.
While the SSL sessions are being set up, the client and server communicate in clear text to
exchange SSL session keys. The session keys are based on the client and server certificates.
The FortiGate SSL decrypt/encrypt process intercepts these keys and uses a built-in signing CA
certificate named Fortinet_CA_SSLProxy to create keys to send to the client and the server.
This signing CA certificate is used only by the SSL decrypt/encrypt process. The SSL
decrypt/encrypt process then sets up encrypted SSL sessions with the client and server and
uses these keys to decrypt the SSL traffic to apply content scanning and inspection.
Some client programs (for example, web browsers) can detect this key replacement and will
display a security warning message. The traffic is still encrypted and secure, but the security
warning indicates that a key substitution has occurred.
You can stop these security warnings by importing the signing CA certificate used by the server
into the FortiGate unit SSL content scanning and inspection configuration. Then the FortiGate
unit creates keys that appear to come from the server and not the FortiGate unit.
HTTPS, IMAPS,POP3S, or
SMTPS ServerClient Starts
HTTPS, IMAPS,POP3S or
SMTPS session
HTTPS, IMAPS, POP3S orSMTPS encrypted packetsaccepted by firewall policy
1
UTM profiles includesSSL content scanning and
inspection
2
SSL decrypt/encrypt processdecrypts SSL sessions
using session certificateand key
Content scanning andinspection applied
(antivirus, web filtering,spam filtering, DLP,
DLP archiving)
3Session encryptedusing SSL sessioncertificate and key
Encrypted packetsforwarded to destination
4
5
6
UTM profiles
Firewall
SSL Decrypt/Encrypt Process
Content scanningand inspection
3 12
Encryptedpackets
3 12
Encryptedpackets
3 12
Decryptedpackets
tscy fo
6
You can add one signing CA certificate for SSL content scanning and inspection. The CA
certificate key size must be 1024 or 2048 bits. 4096-bit keys are not supported for SSL content
scanning and encryption.
Fortinet Technologies Inc. Page 141 Security Profiles for FortiOS 5.2
You can replace the default signing CA certificate, Fortinet_CA_SSLProxy, with another signing
CA certificate. To do this, you need the signing CA certificate file, the CA certificate key file, and
the CA certificate password.
To add a signing CA certificate for SSL content scanning and inspection
1. Obtain a copy of the signing CA certificate file, the CA certificate key file, and the password
for the CA certificate.
2. Go to System > Certificates > Local Certificates and select Import.
3. Set Type to Certificate.
4. For Certificate file, use the Browse button to select the signing CA certificate file.
5. For Key file, use the Browse button to select the CA certificate key file.
6. Enter the CA certificate Password.
7. Select OK.
The CA certificate is added to the Local Certificates list. In this example the signing CA
certificate name is Example_CA. This name comes from the certificate file and key file name.
If you want the certificate to have a different name, change these file names.
8. Add the imported signing CA certificate to the SSL content scanning and inspection
configuration. Use the following CLI command if the certificate name is Example_CA.
config firewall ssl setting set caname Example_CA
end
The Example_CA signing CA certificate will now be used by SSL content scanning and
inspection for establishing encrypted SSL sessions.
Exceptions
Periodically, you will come across situations were SSL and certificates will interfer with the
smooth operation of an application or website. For instance, there is a popular application
called Dropbox that does not work when deep SSL inspection is enabled. The reason for this is
that the trusted certificate authority that is recognised by Dropbox is imbedded in the software
and Dropbox cannot be reconfigured to recognise the FortiGate certificates that are used when
deep SSL inspection is implimented.
One way to by-pass the deep inspection for Dropbox is to add dropbox.com to a local category
in webfiltering and add that local category to the ftgd-wf-ssl-exempt list in the webfilter
profile. This way any connections with dropbox.com will be exempt from deep SSL inspection.
Whenever an exception is found, the reason that it causes an issue will have to be determined in
order to figure out a way to accommodate that application or website.
Configuring packet logging options
You can use a number of CLI commands to further configure packet logging.
Limiting memory use
When logging to memory, you can define the maximum amount of memory used to store logged
packets.
config ips settingsset packet-log-memory 256
end
Fortinet Technologies Inc. Page 142 Security Profiles for FortiOS 5.2

The acceptable range is from 64 to 8192 kilobytes. This command affects only logging to
memory.
Limiting disk use
When logging to the FortiGate unit internal hard disk, you can define the maximum amount of
space used to store logged packets.
config ips settingsset ips-packet-quota 256
end
The acceptable range is from 0 to 4294967295 megabytes. This command affects only logging
to disk.
Configuring how many packets are captured
Since the packet containing the signature is sometimes not sufficient to troubleshoot a problem,
you can specify how many packets are captured before and after the packet containing the IPS
signature match.
config ips settingspacket-log-historypacket-log-post-attack
end
The packet-log-history command specifies how many packets are captured before and
including the one in which the IPS signature is detected. If the value is more than 1, the packet
containing the signature is saved in the packet log, as well as those preceding it, with the total
number of logged packets equalling the packet-log-history setting. For example, if
packet-log-history is set to 7, the FortiGate unit will save the packet containing the IPS
signature match and the six before it.
The acceptable range for packet-log-history is from 1 to 255. The default is 1.
Setting packet-log-history to a value larger than 1 can affect the performance of the
FortiGate unit because network traffic must be buffered. The performance penalty depends on
the model, the setting, and the traffic load.
The packet-log-post-attack command specifies how many packets are logged after the
one in which the IPS signature is detected. For example, if packet-log-post-attack is set
to 10, the FortiGate unit will save the ten packets following the one containing the IPS signature
match.
The acceptable range for packet-log-post-attack is from 0 to 255. The default is 0.
Using wildcards and Perl regular expressions
Many Security Profiles feature list entries can include wildcards or Perl regular expressions.
For more information about using Perl regular expressions, see
http://perldoc.perl.org/perlretut.html.
Fortinet Technologies Inc. Page 143 Security Profiles for FortiOS 5.2
Regular expression vs. wildcard match pattern
A wildcard character is a special character that represents one or more other characters. The
most commonly used wildcard characters are the asterisk (*), which typically represents zero or
more characters in a string of characters, and the question mark (?), which typically represents
any one character.
In Perl regular expressions, the ‘.’ character refers to any single character. It is similar to the ‘?’
character in wildcard match pattern. As a result:
• example.com not only matches example.com but also examplea.com, exampleb.com,
examplec.com, and so on.
To match a special character such as '.' and ‘*’ use the escape character ‘\’. For example:
• To match example.com, the regular expression should be: example\.com
In Perl regular expressions, ‘*’ means match 0 or more times of the character before it, not 0 or
more times of any character. For example:
• exam*.com matches exammmm.com but does not match example.com
To match any character 0 or more times, use ‘.*’ where ‘.’ means any character and the ‘*’
means 0 or more times. For example, the wildcard match pattern exam*.com should therefore
be exam.*\.com.
Word boundary
In Perl regular expressions, the pattern does not have an implicit word boundary. For example,
the regular expression “test” not only matches the word “test” but also any word that contains
“test” such as “atest”, “mytest”, “testimony”, “atestb”. The notation “\b” specifies the word
boundary. To match exactly the word “test”, the expression should be \btest\b.
Case sensitivity
Regular expression pattern matching is case sensitive in the web and Email Filter filters. To
make a word or phrase case insensitive, use the regular expression /i. For example, /bad language/i will block all instances of “bad language”, regardless of case.
Perl regular expression formats
Table 8 lists and describes some example Perl regular expressions.
To add a question mark (?) character to a regular expression from the FortiGate CLI, enter
Ctrl+V followed by ?. To add a single backslash character (\) to a regular expression from the
CLI you must add precede it with another backslash character. For example, example\\.com.
Table 8: Perl regular expression formats
Expression Matches
abc “abc” (the exact character sequence, but anywhere in the string)
^abc “abc” at the beginning of the string
abc$ “abc” at the end of the string
a|b Either “a” or “b”
Fortinet Technologies Inc. Page 144 Security Profiles for FortiOS 5.2
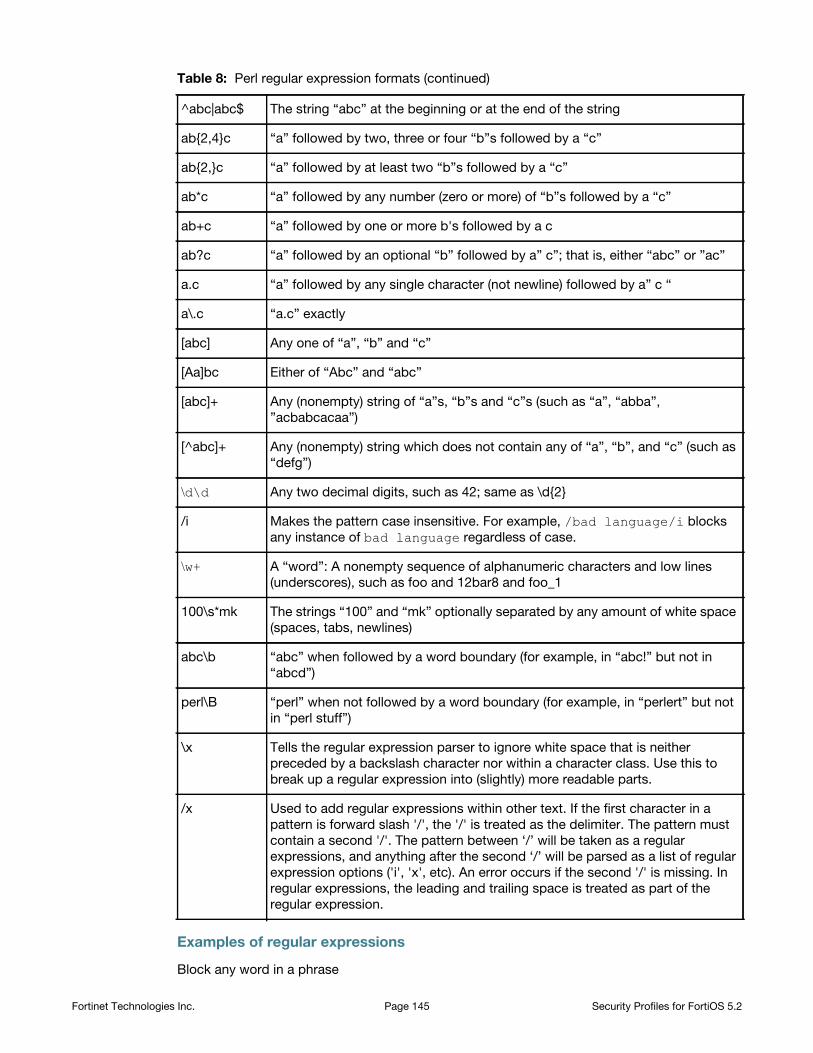
Examples of regular expressions
Block any word in a phrase
^abc|abc$ The string “abc” at the beginning or at the end of the string
ab{2,4}c “a” followed by two, three or four “b”s followed by a “c”
ab{2,}c “a” followed by at least two “b”s followed by a “c”
ab*c “a” followed by any number (zero or more) of “b”s followed by a “c”
ab+c “a” followed by one or more b's followed by a c
ab?c “a” followed by an optional “b” followed by a” c”; that is, either “abc” or ”ac”
a.c “a” followed by any single character (not newline) followed by a” c “
a\.c “a.c” exactly
[abc] Any one of “a”, “b” and “c”
[Aa]bc Either of “Abc” and “abc”
[abc]+ Any (nonempty) string of “a”s, “b”s and “c”s (such as “a”, “abba”,
”acbabcacaa”)
[^abc]+ Any (nonempty) string which does not contain any of “a”, “b”, and “c” (such as
“defg”)
\d\d Any two decimal digits, such as 42; same as \d{2}
/i Makes the pattern case insensitive. For example, /bad language/i blocks
any instance of bad language regardless of case.
\w+ A “word”: A nonempty sequence of alphanumeric characters and low lines
(underscores), such as foo and 12bar8 and foo_1
100\s*mk The strings “100” and “mk” optionally separated by any amount of white space
(spaces, tabs, newlines)
abc\b “abc” when followed by a word boundary (for example, in “abc!” but not in
“abcd”)
perl\B “perl” when not followed by a word boundary (for example, in “perlert” but not
in “perl stuff”)
\x Tells the regular expression parser to ignore white space that is neither
preceded by a backslash character nor within a character class. Use this to
break up a regular expression into (slightly) more readable parts.
/x Used to add regular expressions within other text. If the first character in a
pattern is forward slash '/', the '/' is treated as the delimiter. The pattern must
contain a second '/'. The pattern between ‘/’ will be taken as a regular
expressions, and anything after the second ‘/’ will be parsed as a list of regular
expression options ('i', 'x', etc). An error occurs if the second '/' is missing. In
regular expressions, the leading and trailing space is treated as part of the
regular expression.
Table 8: Perl regular expression formats (continued)
Fortinet Technologies Inc. Page 145 Security Profiles for FortiOS 5.2

/block|any|word/
Block purposely misspelled words
Spammers often insert other characters between the letters of a word to fool spam blocking
software.
/^.*v.*i.*a.*g.*r.*o.*$/i
/cr[eéèêë][\+\-\*=<>\.\,;!\?%&§@\^°\$£€\{\}()\[\]\|\\_01]dit/i
Block common spam phrases
The following phrases are some examples of common phrases found in spam messages.
/try it for free/i
/student loans/i
/you’re already approved/i
/special[\+\-\*=<>\.\,;!\?%&~#§@\^°\$£€\{\}()\[\]\|\\_1]offer/i
Fortinet Technologies Inc. Page 146 Security Profiles for FortiOS 5.2

IndexA
antispam, see email filtering and FortiGuard, AntiSpam
antivirus 18concepts 18databases 24file filtering 15FortiAnalyzer 15scanning order 21
application control 16monitor 73
application monitor 73
archivingDLP 123
B
black list 16
buffer sizeIPS 88
C
CA certificate 141
certificatekey size 141SSL 141
conceptsantivirus 18web filtering 15
conserve mode 138
content scanningSSL 140
D
data leak prevention (DLP), see DLP
DLP 117archiving 123default rules 118, 119
E
EICAR 32
email filtering, see also FortiGuard, AntiSpam 16
engine algorithmIPS 87
engine countIPS 87
F
fail-openIPS 87
file filteringantivirus 15
file pattern 21
file size 21
file type 21
filterIPS 82
FortiAnalyzerantivirus 15
FortiGuardAntiSpam 16Antivirus 25Web Filtering 15
FortiGuard Center 25
FortiGuard Web Filter quota 44
FortiGuard, Distribution Network 24
G
grayware 21, 24
H
HAIPS processing 85
heuristics 21, 25
I
IM 16
inspectionSSL 140
intrusion prevention system, see IPS
intrusion protection system, see IPS
IPSbuffer size 88concepts 79custom signature keywords 99custom signature syntax 97engine algorithm 87engine count 87fail-open 87filter 82in an HA cluster 85overview 15packet logging 89protocol decoders 88scanning 81sensor 81session count accuracy 87
K
key sizecertificate 141
keywordsIPS custom signatures 99
M
monitorapplication control 73
P
P2P 16
Fortinet Technologies Inc. Page 147 Security Profiles for FortiOS 5.2
packet loggingIPS 89settings 142
protocol decoders 88
Q
quotaFortiGuard Web Filter 44
R
regex 143
regular expressions 143
S
scanning orderantivirus 21
security processing modulesconfiguring 88example configuration 94
sensorIPS 81
session count accuracy 87
SSLcertificate 141content inspection 140content scanning 140inspection 140supported FortiGate models 140
syntaxIPS custom signatures 97
U
Unified Threat Management, see UTM
URL filtering 15
URL formats 51
UTMoverview 12VDOM 138
UTM profiles 16
V
VDOMUTM 138
virus scan 21, 24
W
web content filtering 16
web filterhow URL formats are detected, HTTP
52how URL formats are detected,
HTTPS 51quota 44
web filtering 15
wildcards 143
Fortinet Technologies Inc. Page 148 Security Profiles for FortiOS 5.2