Embed Size (px)
Citation preview

�France ‘40
© 2013 GMT Games, LLC
France ‘40
R U L E S O F P L AY�. Introduction . . . . . . . . . . . . . . . . . . . . . . . . . . . . 22. Contents . . . . . . . . . . . . . . . . . . . . . . . . . . . . . . . 23. Sequence of Play Outline . . . . . . . . . . . . . . . . . . 34. Stacking . . . . . . . . . . . . . . . . . . . . . . . . . . . . . . . 45. Zones of Control . . . . . . . . . . . . . . . . . . . . . . . . 46. ZOC Bonds . . . . . . . . . . . . . . . . . . . . . . . . . . . . 47. Movement . . . . . . . . . . . . . . . . . . . . . . . . . . . . . 58. Combat . . . . . . . . . . . . . . . . . . . . . . . . . . . . . . . . 79. Combat Modifiers . . . . . . . . . . . . . . . . . . . . . . . 7�0. Combat Results . . . . . . . . . . . . . . . . . . . . . . . . . 8��. Determined Defense . . . . . . . . . . . . . . . . . . . . . 9�2. Retreats . . . . . . . . . . . . . . . . . . . . . . . . . . . . . . . �0�3. Disruption and Recovery . . . . . . . . . . . . . . . . . . ���4. Advance After Combat . . . . . . . . . . . . . . . . . . . ���5. Overruns . . . . . . . . . . . . . . . . . . . . . . . . . . . . . . �2
T A B L E O F C O N T E N T S16. Fortifications . . . . . . . . . . . . . . . . . . . . . . . . . . . �3�7. Allied HQs . . . . . . . . . . . . . . . . . . . . . . . . . . . . . �3�8. Supply and Isolation . . . . . . . . . . . . . . . . . . . . . �4�9. Reinforcements . . . . . . . . . . . . . . . . . . . . . . . . . �420. Special Rules Common to All Scenarios . . . . . . �52�. Sickle Cut Scenario . . . . . . . . . . . . . . . . . . . . . . �622. Dynamo Scenario . . . . . . . . . . . . . . . . . . . . . . . . �7Counter Abbreviations . . . . . . . . . . . . . . . . . . . . . . . �9Credits . . . . . . . . . . . . . . . . . . . . . . . . . . . . . . . . . . . . �9Extended Example of Play . . . . . . . . . . . . . . . . . . . . 20Designer’s Notes . . . . . . . . . . . . . . . . . . . . . . . . . . . . 2�Historical Situation Maps . . . . . . . . . . . . . . . . . . . . . 23Counter Scans . . . . . . . . . . . . . . . . . . . . . . . . . . . . . . 30Index . . . . . . . . . . . . . . . . . . . . . . . . . . . . . . . . . . . . . 3�Charts and Tables . . . . . . . . . . . . . . . . . . . . . . . . . . . 32
© 20�3 GMT Games, LLC • P.O. Box �308, Hanford, CA 93232-�308 • www.GMTGames.com
Sickle Cut: Guderian’s Drive to the Coast&
Dynamo: Retreat to Victory

2 France ‘40
© 2013 GMT Games, LLC
(2.2.2) Rivers Inside Hexes: Ignore rivers that flow through the middle of a City, Wooded Rough or Marsh hex. The importance of the river as a barrier to movement and an aid to defense has been mitigated by the surrounding terrain.
(2.2.3) Underground Canals: A dashed blue line through the middle of a hex indicates an underground canal. It is shown for interest only and has no effect.
2.3 The Counters(2.3.1) There are two general types of counters: combat units (“units”) and information markers (“markers”). Units represent the combat formations involved in the campaign. Markers are used to track game information, unit status and other assets.
(2.3.2) How to Read the Combat UnitsAttack Strength: The strength of the unit when attacking.Defense Strength: The strength of the unit when defending.Movement Allowance (MA): The maximum number of Movement Points (MPs) the unit may expend for movement and still attack in the Combat Phase.
Sample Combat Unit
1. INTRODUCTION“...even if the operation were to have only a 10% chance of suc-cess, I would stick with it. For only this can lead to the defeat of the enemy.”
—General Halder, Chief of General Staff
France ’40 is a game covering the first three weeks of the German May �940 attack against the French, British and Belgian armies, and includes two separate, single-map scenarios. Sickle’s Cut deals with the crucial week in May �940 when the German army broke the French line on the Meuse and raced to the sea at Abbeville. Dynamo deals with the British withdrawal to Dunkirk and the evacuation.
2. CONTENTS2.1 InventoryA complete game of France ‘40 contains the following:• 2 maps• 2 counter sheets• This rule booklet• Two 6-sided dice• Three player aid cards
2.2 The Map(2.2.1) Each hex represents approximately 4 miles (6.4 kilometers). Consult the Terrain Effects Chart (TEC) for a complete list of the map’s terrain features and how they affect movement and combat. A hexagonal grid overprints the map and regulates movement.
See this Think this
Tank silhouette indicates the unit is eli-gible for the Armor Shift (9.2)
An Attack Strength in a yellow box indi-cates the unit is heavy tanks (9.2.4).
French flag highlights de Gaulle’s division which is immune to the French GQG Marker rule (2�.2.3).
Defense Strength in yellow indicates the unit is eligible for the Reconnaissance rule (20.3).
French North African units are indicated with a black unit type box. This has no effect on play.
Units that have a Low TQ (2.3.2) have the added visual reminder of a light yellow unit type box.
Air Unit Out of Supply(�st turn)
Out of Supply(2nd turn)
Train GQG
TurnMarker
Markers
Dyle LineFortifica-
tions
Disrupted FullRetreat
Movement Allowance in a black box indicates the unit may not move until released (2�.6).
Range (�7.�.�).Box around edge indicates unit has no ZOC (5.�). MA in parenthesis indicates unit may not use Extended Movement (7.3).
AutomaticDefenderDisrupted
Unit I.D.
Turn and Entry Hex
Stacking Points
Unit Size
MovementAllowance (MA)
AttackStrength
DefenseStrength
Defense Strength in red box indicates Elite Troop Quality (TQ)
Defense Strength in white box indi-cates Low Troop Quality.
Units that start the game on their reduced side are indicated with a triangle.

3France ‘40
© 2013 GMT Games, LLC
Stacking Points: A value ranging from 0 to 3 that indicates how much space the unit takes up inside a hex.
Troop Quality (TQ): Units with their Defense Strength in a red box are Elite. Those with their Defense Strength in a white box are of Low quality. All others are normal. This rating is used for the following purposes:• For the TQ Shift on the Combat Result Table (9.5).• As a DRM on the Determined Defense Table (��.0).• As a DRM in an Isolation Attrition die roll (�8.5).• As a DRM in a Combat Zone Recovery die roll (�3.3.2)
Unit I.D.: The actual name or number of the unit.
(2.3.3) Unit SizeII = Battalion XX = DivisionIII = Regiment XXXX = ArmyX = Brigade GP = Group(+) = with added elements, (-) = without some elements
(2.3.4) Unit Type SummaryAll units are either Mechanized or Non-Mechanized. This is impor-tant for determining the cost to move into each hex.
Non-Mechanized Mechanized Infantry* Tank Fortress Infantry* Motorized Infantry* Mountain Infantry* Reconnaissance Cavalry HQ Fort (may not move)
*Infantry-class unit types.
(2.3.5) Unit ColorsThe background color of a unit’s counter denotes its nationality or branch of service.• Beige: British • Gray: German Wehrmacht• Green: Belgian • Black: German Waffen SS• Blue: French • Dark Blue: French Colonial• Orange: Dutch• Blue with black NATO symbol: French North African
(2.3.6) StepsUnits have either �, 2 or 3 steps. 2-step units have a front and back side. Three step units are indicated with a thin stripe across the re-verse side of their counter (units on their last step are indicated with a much thicker stripe). When a 3-step unit takes a second step loss it is replaced with a Remnant (�0.3) of the appropriate type.
RemnantReducedStrength
FullStrength
2.4 AbbreviationsThe following abbreviations are used in these rules:CRT: Combat Result TableDRM: Die Roll ModifierEZOC: Enemy Zone of ControlGQG: Grand Quartier GénéralLOS: Line of SupplyMA: Movement Allowance
MPs: Movement PointsOOS: Out of SupplyTEC: Terrain Effects ChartTQ: Troop Quality
3. SEQUENCE OF PLAYFrance ‘40 is played in a series of Game Turns each representing one day of the campaign. A Game Turn is composed of two Player Turns. Each Player Turn is subdivided into several Phases. Every Game Turn is played in the following order:
A. GERMAN PLAYER TURN1. German Initial Phase The German player flips all Air units from their Used side to their Ready side.
2. German Movement Phase The German player may move all, some or none of his units. German Reinforcements enter at this time (�9.0).
3. German Combat PhaseThe German player conducts all his attacks (8.0).
4. German Recovery PhaseThe German player removes or attempts to remove Disruption markers from his units (�3.3).
5. German Supply Phasea. Check the supply status of all German units (�8.0).b. Roll for Attrition (�8.5) of all German units that are: • Isolated and marked with a red Out of Supply marker (including
those just marked), and • adjacent to an enemy unit.
6. GQG Phase —Sickle Cut Scenario onlyThe German player places the GQG markers currently in the GQG marker Holding Box on Allied stacks containing at least one French unit. He then rolls two dice and removes the GQG markers with those numbers (2�.2.4). Any GQG markers schedule to be removed are removed at this time (2�.2.6).
B. ALLIED PLAYER TURN1. Allied Initial PhaseThe Allied player flips all non-Disrupted HQs from their Used side to their Ready side (Sickle Cut scenario only—see �7.2.�). The Al-lied player flips all RAF units from their Used side to their Ready side (Dynamo scenario only [22.6]).
2. Allied Movement Phase 3. Allied Combat Phase4. Allied Recovery Phase5. Allied Supply PhaseNOTE: The Allied Movement, Combat, Recovery and Supply Phases are identical to the German like phases except switch the term Ger-man with Allied.
C. END PHASE Record the completion of a Game Turn (by advancing the Game Turn marker one box) and proceed to the next turn.
HQ

4 France ‘40
© 2013 GMT Games, LLC
4. STACKING4.1 Stacking LimitsStacking occurs when multiple units are in one hex. The stacking limit for both sides is 7 Stacking Points.
4.2 Stacking PointsStacking Point values are printed on all units and generally follow these guidelines:BATTALIONS = �REGIMENTS, BRIGADES, and REMNANTS = 2DIVISIONS = 3HQs, Fort units and all markers have no stacking value and may freely stack in a hex without limit.
4.3 Stacking Exceptions(4.3.1) Divisional Stacking: Units of the same division stacked together are never valued at more than three Stacking Points. EXAMPLE: The three units of a German Panzer division each have a stacking value of 2, but if stacked together count as only three Stack-ing Points total. The German player can stack up to two Panzer divisions in a hex (6 Stacking Points).
(4.3.2) Tank Support: Every stack is allowed to have one tank unit with a stacking value of 2 or less, even if it would exceed the stacking limit. A stack with two tank units that exceeds the 7 point stacking limit is prohibited. DESIGN NOTE: This rule allows the British tank brigade or a French DLM remnant to stack in a hex with two Allied infantry divisions.
4.4 Stacking RestrictionsThe stacking limit can never be exceeded except during the course of Movement, Retreat, and Advance After Combat. The stacking limit must be strictly observed at the completion of each Movement Phase and after an Advance After Combat. The owning player must correct all stacking violations at these times by eliminating enough units from the hex to satisfy the stacking limit.
5. ZONES OF CONTROL5.1 General RuleThe six hexes immediately surrounding a hex occupied by one or more units constitute the Zone of Control (ZOC) of those units. ZOCs extend across all hexsides except All Sea hexsides. HQs and static Fort units do not have ZOCs—units without a ZOC are indicated with a line around the edge of their counter.
5.2 ZOCs and MovementAll units must stop upon entering an enemy Zone of Control (EZOC). It costs no additional MPs to enter an EZOC; however, units must pay two additional MPs to exit an EZOC. A unit that starts its move in an EZOC may move directly into another EZOC and stop, as long as it does not cross or enter an enemy ZOC Bond (6.0).
5.3 Other Effects of ZOCs• EZOCs and Retreats: see Rules �2.2-�2.4.• EZOCs and Advance After Combat: see Rule �4.4.• EZOCs and Lines of Supply: see Rule �8.3.
6. ZOC BONDS6.1 How to form a ZOC BondAny unit or stack that exerts a ZOC can form a ZOC Bond. When two such units (or stacks) are two hexes apart (with one vacant intervening hex) they create a bond between them that no enemy unit may enter or cross. Due to the pattern of a hex grid, there are two types of ZOC Bonds—Hex Bonds and Hexside Bonds.
6.2 Effects of ZOC Bonds:• Units may not enter an enemy Hex Bond or cross an enemy
Hexside Bond during the Movement Phase.• Units forced to Retreat into an enemy Hex Bond or across an
enemy Hexside Bond are eliminated.• Units may not Advance After Combat into an enemy Hex Bond
Unit
A
EnemyUnit
Unit
G
EnemyUnit
Unit
FUnit
B
Unit
DUnit
EEnemy
Unit
and G still have a ZOC Bond even though it is intersected by the enemy ZOC Bond. Note how unit H has Hexside Bonds with the map edge and the coast.
EXAMPLES OF ZOC BONDS: Black lines indicate friendly ZOC Bonds, red solid lines indicate enemy ZOC Bonds. Note that there is no Hexside Bond between units D and E—it has been negated; likewise the Hex Bond between units E and F. Note that units F
EnemyUnit
Unit
C
EnemyUnit
Major River
Unit
H

5France ‘40
© 2013 GMT Games, LLC
or across an enemy Hexside Bond, unless they are entering the defender’s vacated hex.
• Supply can never be traced into an enemy Hex Bond or across an enemy Hexside Bond.
6.3 Negating ZOC BondsA Hexside Bond is negated when enemy units are located on each side of the intervening hexside (note how there is no bond between units D and E in the diagram on page 4). A Hex Bond is negated when the intervening hex contains an enemy unit (as between units E and F in the same diagram).
6.4 Intersecting ZOC BondsIf both players have intersecting ZOC Bonds, then neither player may cross or enter the other’s ZOC Bond until it is negated.
6.5 Hexside Bonds with the Map Edge and the CoastA unit can form a ZOC Hexside Bond (but not a Hex Bond) with the boundary of the play area. The boundary is the mask that surrounds the hex-grid or a non-playable water hex.EXAMPLE: Unit H in the diagram on the previous page has a ZOC Hexside Bond with the map edge, the sea, and the non-playable hex on the coast.
6.6 ZOC Bonds and TerrainTerrain has no effect on ZOC Bonds. ZOC Bonds can cross Major Rivers and pass through City hexes.
7. MOVEMENT7.1 The Basics(7.1.1) During a friendly Movement Phase, the player may move all, some, or none of his units as desired. Each unit has a Movement Allowance (MA) that is the number of Movement Points (MPs) it may expend for movement. Each hex entered costs a certain num-ber of MPs as determined on the TEC. Movement may be made by individual units or by stack. If units are moved as a stack, they move at the rate of the slowest unit in the stack. A stack may drop off units as it moves, but the units dropped off may not move further that Movement Phase. A unit or stack may not enter a hex occupied by an enemy unit. You must complete the movement of one unit or stack before starting to move another. All unused MPs are lost, they may not be accumulated.(7.1.2) Minimum Movement: A unit that is allowed to move can always move at least one hex, even if it does not have sufficient MPs to do so. However, it still may not enter or cross enemy ZOC Bonds or enter prohibited terrain.
7.2 Exiting the MapUnits that exit the map during the Movement Phase are permanently out of play (but not counted as being eliminated). A unit that is forced off the map by a retreat is considered eliminated.
7.3 Extended MovementUnits may use Extended Movement to increase their MA by 2 MPs.Units that use Extended Movement may not move adjacent to an enemy unit. A unit is allowed to start adjacent to an enemy unit and still use Extended Movement as long as the first hex entered is not
adjacent to that enemy unit.
7.4 Movement and RiversCrossing a non-bridged Major River hexside costs Mechanized units two additional MPs (+2 MPs) and Non-Mechanized units one additional MP (+� MP). There is no cost to cross Minor Rivers for all unit types.
7.5 Roads and BridgesA unit that follows the path of a road may use the reduced rate of the road. Whenever a road enters a Town or City hex, units are as-sumed to be utilizing the road movement rate if following the path of the road.BRIDGES: Whenever a road or rail line crosses a river, a bridge is assumed to exist. However, all bridges on the Sickle Cut map that cross the Meuse River are considered destroyed and may not be used for the entire length of the game. DESIGN NOTE: Even after pontoon bridges have been built, it is assumed traffic jams at such sites will slow movement.
7.6 Restricted HexesWooded Rough and Marsh hexes are collectively called Restricted Hexes. Mechanized units are prohibited from entering these hexes except along roads and non-Mechanized units must stop upon enter-ing unless they entered the hex along a road. See also 2.2.2.
7.7 Rail MovementThis type of movement is helpful in bringing Non-Mechanized units to the front.
(7.7.1) The Allied player may move three friendly units (of any type, including HQs) per turn by rail. The chosen units must be either reinforcements or a unit with a Train marker on it from a previous turn. The units moved by rail may move up to �5 contiguous rail hexes. All rail hexes traversed must be 4 hexes or more from all German units. An entrained unit that finds itself within 4 hexes of an enemy unit at the start of its move must immediately detrain. A unit may not combine rail movement with off rail movement in a single Player Turn.
(7.7.2) Train Marker Effects: A unit under a Train marker has its Defense Strength reduced to 1, receives no Terrain benefits if defend-ing by itself, has no ZOC, and may not be used as a Lead Unit in a Determined Defense. The unit’s TQ is not affected, but tank units under Train markers may not gain or deny the Armor Shift.
(7.7.3) Entraining: Only non-Disrupted units in a Town or City hex that are at least 4 hexes from the nearest enemy unit may entrain; place a Train marker on each such unit that entrains. On the turn a unit entrains it may move up to two hexes to reach the Town or City hex, but it may not move by rail in the same Player Turn it entrains. It may move by rail in the following friendly Movement Phase. Reinforcements may be considered already entrained and may enter the map using rail movement.
(7.7.4) Detraining: To detrain, simply remove the Train marker at the start of the Allied Movement Phase and replace it with a Dis-rupted marker. The Disrupted marker will be removed at the end of the turn but serves to limit the unit’s movement to two hexes, prevent it from entering an EZOC and from attacking. A unit may detrain in any rail hex—it does not need to be in a Town or City.

6 France ‘40
© 2013 GMT Games, LLC
A unit may not move by rail in the same player turn it detrains. Detraining is voluntary—a Train marker can remain on a unit if the Allied player wishes to move the unit again by train. Detraining also occurs immediately if the unit is forced to retreat in combat. A Train marker removed from one unit may be used immediately on a different unit.PLAY NOTE: See rule 19.3.3 for Strategic Rail Movement of Allied Reinforcements.
7.8 Automatic DSDefending units can suffer an Automatic Defender Shattered result during a Movement Phase when the phasing player has moved enough units adjacent to the defender’s hex to ensure �0-� odds against it. Armor and TQ Shifts may be used but not Air or HQ Shifts (which are only allocated in the Combat Phase). At that point the defending unit(s) immediately suffer a DS result and survivors are re-treated 2 or 3 hexes by the defender abiding by the Retreat guidelines (�2.�.3). All units that made the �0-� possible are marked with “Auto DS” markers—they cannot move any further that Movement Phase nor take part in regular combat in the upcoming Combat Phase. The phasing player can move other units into and through the hex where the Automatic Defender Shattered result occurred. The units marked with Auto DS markers may, at any time in the subsequent Combat Phase, conduct their Advance After Combat (at the appropriate DS rate), at which time the markers are removed.
EXAMPLES OF MOVEMENT: Numbers in blue circles indicate Extended Movement, numbers in yellow ovals indicate additional movement cost. Unit A must stop upon entering a Restricted Hex. Mechanized Units B and C must pay +2 MPs to cross the Major
River and 2 MPs per non-road Woods hex. Unit D must pay +2 MPs to exit an EZOC and must stop upon entering an EZOC. Unit E (non-Mechanized) must pay +1 MP to cross the Major River and does not pay extra MPs for Minor Rivers and Forest.
EXAMPLE OF AUTOMATIC DS: At A the German player has brought up enough factors to achieve 10-1 against unit X (8-1 odds plus CRT column shifts for TQ and Armor). The unit is immediately removed from play and the units have an Auto DS marker placed on them. With that unit gone, the Panzer unit at B can now move through and achieve an Auto DS against unit Y (8-1 odds plus two shifts for TQ). The French unit is removed and the German Panzer unit have an Auto DS marker placed on it. The units at C are now free to move into the French rear.

7France ‘40
© 2013 GMT Games, LLC
8. COMBAT8.1 Basic Rules of CombatPhasing units may attack adjacent enemy units in the Combat Phase. Attacking is voluntary; no unit is forced to attack. No unit may at-tack or be attacked more than once per Combat Phase. All defending units in a hex must be attacked as one combined Defense Strength. The attacker may conduct his attacks in any order and need not pre-designate them. A unit may not attack into a hex or across a hexside it is prohibited from entering or crossing in the Movement Phase.
8.2 Multi-Hex Combat• The attacker may attack only one hex
at a time; he may not target two hexes in a single combat.
• A defending unit or stack can be attacked from up to six different adjacent hexes.
• Units in the same hex may attack adjacent defenders in different hexes as long as each attack is conducted separately.
• No unit may split its Attack Strength to attack a second hex in a separate attack.
Unlike some other game systems, attacking units are not required to attack all adjacent defending units.
8.3 Combat ProcedureFollow these steps for each combat:STEP �: Compare the combined Attack Strength of the participating attacking units against the total Defense Strength of the involved defending units and express the comparison as a numerical odds ratio (attacker to defender). Round off the odds ratio downward to conform to one of the odds ratio columns found on the Combat Result Table (CRT).EXAMPLE: A 15 to 4 would be a 3-1. 11 to 12 would be a 1-2.
STEP 2: The attacker must declare whether he will apply Air (9.3) or HQ (9.4) Support to the combat. He also determines if he receives an Armor (9.2) or TQ (9.5) Shift.STEP 3: After taking column shifts into account, a 6-sided die is rolled, and the results are implemented. Players immediately remove any step losses (�0.2), perform Retreats (�2.0), and Advance After Combat (�4.0). If allowed by the combat result the defender may perform a Determined Defense (��.0) to try to cancel the retreat.
8.4 Minimum and Maximum OddsAttacks at odds less than �-3 are not allowed. Combat at odds �0-� or greater is considered an automatic Defender Shattered (DS). At-tacker and defender column shifts are applied before the minimum and maximum restriction. EXAMPLES: 10-1 odds with one shift left would use the 7-1 column. 12-1 odds with one shift left would be a 10-1.
9. COMBAT MODIFIERS9.1 Halving & DoublingEach attacking unit can never be halved more than once and each defending unit can never be doubled more than once. When halving, always halve by individual unit (not stack) and round any fractions up to the next higher whole number. A factor of � that is halved always rounds back up to �. Units are halved for the following reasons:• Attacking across a Major River or Maginot Line hexside.• Attacking out of a Restricted Hex or from one Restricted Hex to
another (units are not halved attacking into such hexes).• Attacking when marked Out of Supply.
EXAMPLES: Two units with an Attack Strength of 5 would have a combined strength of 6 after halving [3 + 3 = 6]). A defender in a City hex defending behind a river is only doubled—not tripled or quadrupled.
9.2 The Armor Shift(9.2.1) Attacker Shift: Terrain permitting, the attacker gains a col-umn shift right on the CRT if he has a tank unit participating in the attack and the defender’s hex contains no tank unit.
(9.2.2) Defender Shift: In Clear terrain (including Clear hexes with Towns), the attacker suffers a column shift left if he has no tank unit participating and the defender does.
(9.2.3) Where the Armor Shift is Prohibited: The Armor Shift cannot be gained if the defender is in a Woods, Wooded Rough, Marsh, City, or any hex containing a Fortification (16.0). Tank units attacking across a River hexside (major or minor), a Marsh hexside or out of a Restricted Hex cannot be used to gain the Armor Shift but their presence is enough to prevent the defender getting the Armor Shift (unless the defender has Heavy Tanks).
(9.2.4) Allied Heavy Tanks: Allied heavy tank units are indicated with their Attack Strength in a yellow box. Terrain permitting, if an Allied heavy tank unit is involved in a combat (attack or defense), the Allied player always receives the Armor Shift—regardless of the presence of German tank units in the combat. Allied heavy tank units must still abide by the terrain restrictions of 9.2.3.DESIGN NOTE: The British 1st Army Tank Brigade had only a few Matilda IIs in the brigade, so only the front side of the British tank brigade is classified as heavy tanks.
EXAMPLES: In the three French attacks shown above the French player would earn the Armor Shift in A and B. Neither player would earn the Armor Shift in C.
9.3 Air SupportAdding an Air unit to a combat gives the attacker a favorable shift of one column to the right on the CRT. No more than one Air unit may be used in each attack with the exception of Turn � of the Sickle Cut scenario (see below). After the Air unit is used it is flipped to its Used side. All Air units are returned to their Ready
EnemyUnit
EnemyUnit A
No
EnemyUnit
EnemyUnit
AB
EnemyUnit
EnemyUnitA
NoNo
EnemyUnitA
B C
D

8 France ‘40
© 2013 GMT Games, LLC
side at the start of each friendly Player Turn. Only Air units on their Ready side may provide support. There are no terrain, range, or other restraints upon the use of an Air unit in an attack—it may be placed anywhere on the map.SPECIAL: On Turn � of the Sickle Cut scenario, the German player may use up to three Air units in a single combat (which would shift the odds three columns), on all following turns the maximum is �.
9.4 Allied HQ SupportOnly the Allied player has HQs. Each HQ may be used once per Allied Combat Phase to provide one shift right on the CRT; see �7.�.� for full details.
9.5 The Troop Quality (TQ) ShiftIn each combat compare the best TQ rating in the attacker’s force, against the best TQ rating in the defending stack. If the attacker has the better rating, then the attacker receives a favorable shift of one column right on the CRT. If the defender has the better TQ rating, then the attacker suffers a column shift left. Award two shifts if one side has one or more Elite units and the other side has only Low TQ units.
EXAMPLES: In the three German attacks above the German player would receive one shift for TQ in A (Elite vs. Regular), two shifts for TQ in B (Elite vs. Low), and no shifts in C.
9.6 River and Marsh Hexsides(9.6.1) Defender Doubled: The defender is doubled if all participat-ing attacking units are attacking across a River hexside (major or minor), a Marsh hexside, out of a Restricted Hex, or any combination of those three. If just one attacking unit is not attacking across one
of those hexsides, the defender is not doubled.
(9.6.2) Major Rivers: All units are halved attacking across a Major River hexside, and this combat effect is cumulative with 9.6.�.
(9.6.3) Marsh Hexsides: Treat Marsh hexsides the same as Major Rivers. Marsh terrain around a Minor River upgrades the hexside to a Major River hexside.
9.7 Restricted Hexes in CombatUnits are halved attacking out of a Restricted Hex or from one Restricted Hex to another. Units are not halved attacking into such hexes. Also see 9.6.� on how the defender can be doubled.
9.8 Miscellaneous Modifiers• See TEC• Defender Disrupted (�3.�) • Attacker is Out of Supply (�8.4)
10. COMBAT RESULTS10.1 Explanation of Combat ResultsThe words “attacker” and “defender” refer only to the units partici-pating in the combat in question—not to the strategic situation.
Retreats: Most results call for the defender to Retreat. When a Re-treat occurs the defender Retreats 2 or 3 hexes (his choice) following the restrictions and guidelines set forth in �2.0. In some situations the defender need only retreat � hex (�2.4).
DS = DEFENDER SHATTERED: Each unit in the defender’s stack loses one step. Surviving defenders must Retreat and are marked in Full Retreat—no Determined Defense (��.0) is possible. The attacker receives a Breakthrough Advance (�4.2).DRM = Defender Retreat Mandatory. The defender must Retreat and becomes Disrupted—no Determined Defense possible. The attacker receives a Bonus Advance (�4.2).D1 = The defender loses one step. Surviving defenders must either Retreat and become Disrupted or conduct a Determined Defense. If the defender Retreats, the attacker receives a Bonus Advance.DR = The defender must either Retreat and become Disrupted or conduct a Determined Defense. If the defender Retreats, the attacker may Advance After Combat at the normal rate.A1/D1 = Each side loses � step. Surviving defenders must either Retreat and become Disrupted or conduct a Determined Defense. If the defender Retreats, the attacker may Advance After Combat at the normal rate.DRX = Each side loses � step—the unit selected is determined by the opposing player. The defender must either Retreat and become Disrupted or conduct a Determined Defense. If the defender retreats, the attacker may Advance After Combat at the normal rate.EX = Exchange: Each side loses � step—the unit selected is deter-mined by the opposing player. No retreat for the defender. If the defender had only � step involved, then the attacker may enter the vacated hex and stop (a normal Advance is not permitted).A1/DR = The attacker loses � step. The defender must either Re-treat and become Disrupted or conduct a Determined Defense. If the defender Retreats, the attacker may Advance After Combat at the normal rate.
EXAMPLES: Units A, B and C attack unit X. Units A and B are halved for attacking across a Major River hexside, while the units in hex C attack at full strength. Unit X is doubled because all attack-ing units are attacking across river hexsides. Odds are 14 to 14 + a TQ Shift = 2-1. Next, units D, E and F attack unit Y. Units D and E are halved attacking across a Major River hexside. Unit Y is NOT doubled because stack F is not attacking across a river hexside. Odds are 14 to 7 + Armor Shift + TQ Shift = 4-1.

9France ‘40
© 2013 GMT Games, LLC
A1 = The attacker loses � step. No Retreat or Advance.D1*, A1/D1*, and DRX* = Same as D�, A�/D� and DRX re-spectively (including the Advance After Combat rate) except no Determined Defense is possible.
10.2 Selecting Step LossesThe owning player selects the unit that will take the step loss un-less he is mandated to take a step loss from his Lead Unit during a Determined Defense (��.0), or if an EX or DRX was rolled. When an EX or DRX result is rolled the opposing player selects the step loss. Whether the owning or opposing player selects the step loss, both must abide by the following two restrictions:• Infantry Remnants may not be selected for a step loss unless there
are no other units remaining. This restriction does not apply to the defender in a DS result when all defending units lose � step.
• Within a German Panzer or Motorized division, a full strength unit must be selected over a reduced unit.
EXAMPLES: When selecting a step loss in the four examples above, the units marked with a red “No” cannot be selected. All other units in each group may. At A, the full strength motorized infantry unit protects the two reduced units within the division. In B, the full strength unit in the Motorized division protects its reduced unit, but does not protect any of the units in the Panzer division. In C, only the Remnant is protected. In D, note that the tank Remnant is not protected—only infantry Remnants are protected.
10.3 Indicating Step Losses and RemnantsFlipping a unit over indicates the unit has suffered a step loss. If it is a 1-step unit, or a 2-step unit that is already flipped, then it is eliminated. Any 3-step unit on its reduced side forms a Remnant when it takes its second step loss. Remove the division from the map and replace it with a Remnant of the appropriate type. All French infantry-class units (Infantry, Mountain, Motorized, Colonial and North African) use the �-2-3 infantry Remnant. The Remnant unit must abide by any Retreats of the CRT result. If there is no Remnant unit available when a division takes a second step loss, then none is created (the step is forfeited).
PROPERTIES: Remnants have a stacking value of 2 and function like any other unit. See also �0.2, �st bullet.
11. DETERMINED DEFENSEA Determined Defense represents a hold-at-all-cost order.
11.1 In General(11.1.1) The defender may attempt to cancel the retreat portion of a DR, A�/D�, D�, DRX and A�/DR CRT result by using the Deter-mined Defense Table provided at least one step survived the combat. A Determined Defense is not allowed on a DS, DRM or a result with an asterisk (*). Step losses from the CRT are implemented before resolving the Determined Defense. A successful result on this table
allows the unit or stack to ignore the Retreat, the Disruption, and the attacker’s advance is cancelled. If there are two or more surviv-ing units in the defending stack, the defender picks one as the Lead Unit. If there is only one unit, then that unit must be the Lead Unit. The Lead Unit determines any DRMs and will be the unit to suffer the step loss if one is called for.
(11.1.2) Ineligible Units: Disrupted units, entrained units, and HQs may not be the Lead Unit in a Determined Defense.(11.1.3) Determine Column to Use: The terrain of the defender’s hex determines the column to use on the table unless the hex contains a static Fort unit and the defender uses that unit as his Lead Unit. Using the Fort unit allows the defender to use the City/Fort column. Use the “Clear” column for units in Clear hexes without Towns. Use the “Other” column for all other hexes, including Towns, Fortified Hexes, Woods, Marsh and Polder.(11.1.4) Summary of Die Roll Modifiers: +� Lead Unit’s TQ is Elite–� Lead Unit’s TQ is Low–� French Collapse (��.�.5)+� Defensive Air Support (��.�.6)All modifiers are cumulative.
(11.1.5) French Collapse: The Allied player suffers a –� to his De-termined Defense die roll if the Lead Unit is French and the unit is Out of Supply at the moment of the Determined Defense. Determine supply at the moment of the die roll and disregard the presence or absence of an Out of Supply marker on the unit.
(11.1.6) Defensive Air Support: The Determined Defense die roll can be modified by Air Support which must be declared be-fore the Determined Defense die is rolled. Only Air units on their ready side may be used. No more than one Air unit may be used in each Determined Defense, so the maximum modifier is +1 for Air Support. After using the Air unit, it must be flipped over. Due to German air superiority, Allied HQs may not be used to provide this +1 modifier.
11.2 Explanation of Results– = The Determined Defense fails, the Retreat and Advance After Combat are not cancelled. However, if this is a “critical” hex the defender may conduct a Desperation Defense (��.3).• = The Determined Defense is successful—the Retreat is cancelled. –1 = Defender’s Lead Unit loses one step.1/1 = Defender’s Lead Unit takes a step loss and any one attacking unit takes a step loss. The attacker selects his own step loss.
SINGLE STEP DEFENDERS: If the defender had only one step, and that step was lost in a successful Determined Defense, the attacker may advance into the defender’s vacated hex (only) and stop.
11.3 Desperation Defense of Critical Hexes(11.3.1) Purpose: A Desperation Defense allows the defender to use the Determined Defense table multiple times after he has failed his first Determined Defense. The cost to the defender for the Despera-tion Defense is one step loss from any unit in the hex (his choice) for each attempt. The defender can continue to do a Desperation Defense (paying the extra step loss for each attempt) until he suc-ceeds or all defending units have been eliminated.
(11.3.2) Critical Hexes: A Desperation Defense is only allowed if all defending units in the hex face elimination if forced to retreat.

�0 France ‘40
© 2013 GMT Games, LLC
(11.3.3) Procedure: The step removed to conduct the Desperation Defense is removed before the Lead Unit is selected (hence, the defender must have two steps to start with). A Desperation Defense is resolved in the same way as a regular Determined Defense. EXAMPLE: A defending stack without a retreat route suffers a D1 result. The defender first removes a step for the D1 and then selects a Lead Unit for the Determined Defense. The attempt fails. He then declares he is making a Desperation Defense and removes a step for the opportunity to use the Determined Defense Table again. The second attempt also fails, so he removes yet another step and tries again. The third attempt is successful but the result is a •–1, which reduces the Lead Unit by one step. The defender lost a total of four steps (one for the D1, two for the two Desperation Defense attempts, and one for the • –1 result).
(11.3.4) Restrictions: Only units that are allowed to do a Determined Defense can do a Desperation Defense. Units that suffer a DS, DRM, or a result with an asterisk (*) may not do a Desperation Defense.
12. RETREATS12.1 Retreat Procedure(12.1.1) The Basics: Retreat results are generated from the CRT and the Overrun Table (�5.3). The defender retreats his own units in CRT results; the attacker retreats defending units on successful Overrun results. When the defender retreats his own units, he is allowed to retreat them between 2 or 3 hexes (his choice). Any unit that retreats becomes Disrupted (�3.0). A retreat can stop after one hex in some situations (�2.4).
(12.1.2) Stacks: A stack of retreating units may split up and retreat to different hexes. Units can retreat through friendly units without disturbing the non-retreating units.
(12.1.3) Retreat Direction Guidelines: All retreats must follow these guidelines. The guidelines are listed in order of priority (#� takes priority over #2, etc.):�. If possible, a unit retreated 2 hexes must end 2 hexes away from
the battle hex and if retreated 3 hexes it must end the retreat 3
hexes away. This rule can only be violated to avoid elimination.2. If possible, the first hex of the retreat should be clear of EZOCs.
Friendly units that have not retreated in the current combat negate EZOCs in the hex they occupy for purposes of this restriction.
3. If possible, retreat to a hex that can trace a LOS (�8.3).4. If possible, avoid ending the retreat in a hex that contains friendly
units that are adjacent to enemy units.5. If possible, avoid ending the retreat in violation of stacking
restrictions (see �2.�.4 for more details).6. Retreat to any hex that does not cause elimination (�2.2).
(12.1.4) Over-Stacking: If there is no other hex to retreat to, then units may end their retreat in violation of stacking restrictions. However, the overstacking must be corrected before the end of the owning player’s next Movement Phase when all units in excess of the limit must be eliminated (4.4). See �2.6 if the overstacked hex is attacked again. If the hex is the target of an Overrun (�5.0) then all units in excess of the stacking limit (defender’s choice) contribute no Defense Strength but must still retreat if the Overrun is successful.
(12.1.5) Attacker Retreats: The attacker never retreats unless he has conducted a successful Disengagement (20.4).
12.2 Elimination Due to a RetreatUnits are eliminated if they retreat:• off the map or into a hex occupied by an enemy unit.• across or into an enemy ZOC Bond.• into a vacant hex in an EZOC other than the first hex of their
retreat.• into a hex or across a hexside they are prohibited from entering
or crossing in the Movement Phase.Important: Units facing elimination if they retreat are eligible for Desperation Defense (��.3).
12.3 Retreating into an Enemy Zone of ControlUnits are eliminated if they retreat into an EZOC after the first hex of their retreat. Friendly units that have not retreated in the current combat negate EZOCs in the hex they occupy for purposes of other friendly units retreating.
12.4 One Hex RetreatsA retreat can end after one hex if the following conditions are met:• The units retreat into a City or a friendly Fortified hex.• The units do not end their retreat in an EZOC unless a friendly
non-Disrupted unit is already in that hex.
12.5 Elimination has No Effect on Advance If the defender is eliminated by the combat result or eliminated during his retreat, the attacker still receives his full Advance After Combat.
12.6 Combat Against Previously Retreated UnitsIf a unit or stack is retreated into a friendly occupied hex and that hex undergoes an attack (not Overrun) in the same Combat Phase, the retreated units do not add their Defense Strength to the combat, may not be selected to satisfy a step loss from the CRT, may not be used in a Determined Defense and if required to retreat again are eliminated.
EXAMPLES OF RETREAT: Both units A and B must retreat two hexes. They cannot retreat across an enemy ZOC Bond nor enter an EZOC after their first hex. Unit A has only one retreat path—into the hex containing unit “c”. This is allowed since unit “c” cancels EZOCs in the hex it occupies for purposes of retreats. In the case of unit B, retreating into a vacant hex must take priority over retreating into the hexes containing unit’s “d” and “e” since those two units are adjacent to enemy units.

��France ‘40
© 2013 GMT Games, LLC
13. DISRUPTION AND RECOVERY13.1 Disruption
Any unit that retreats becomes Disrupted—place a Disrupted marker on the unit or stack. If a unit is Dis-rupted again it goes into Full Retreat (�3.2). Disrupted units are penalized in the following ways:
• MOVEMENT: They may move a maximum of two hexes and may not enter an EZOC. If they start their move in an EZOC, they must move away, if possible. If not possible, they may remain in their hex or move to another hex in an EZOC.
• COMBAT: They may not attack or be the Lead Unit in a Determined Defense (��.�). Disrupted units have their Defense Strength halved (total all Disrupted units before halving and then round factors up, so � factor always rounds back up to �).
ABILITIES: Disrupted units retain their TQ, ZOC and Armor Shift abilities. Other units may enter or pass through friendly Disrupted units without becoming Disrupted.
13.2 Full Retreat(13.2.1) Full Retreat is a form of Disruption that allows units to move their full MA. Units in Full Retreat suf-fer all the penalties of Disruption with the following exceptions:
• They may ignore the 2-hex movement restriction and move their full MA (including Extended Movement).
• They have a Defense Strength of 0. If stacked with other units they contribute nothing to the defense (TQ, Armor or Defense Strength). If not stacked with other units they must immediately Retreat 2 hexes if an enemy unit moves or advances adjacent to it. Follow all retreat guidelines of �2.�.3.
• They take longer to recover (�3.3.�).
(13.2.2) Voluntary Full Retreat: During a friendly Movement Phase (except Turn � of the Sickle Cut scenario), a player may replace any number of Disrupted or GQG markers on his units with Full Retreat markers in order to move those units their full MA. The German player may not replace Halt! markers with Full Retreat markers.
(13.2.3) Involuntary Full Retreat: Units are involuntarily put into Full Retreat for the following reasons:• They suffer a DS result.• They are forced to retreat again while already Disrupted.
13.3 The Recovery Phase(13.3.1) Removing Disrupted Markers: During the phasing player’s Recovery Phase all friendly Disrupted units that are not adjacent to an enemy unit automatically recover one level—Disrupted markers are removed and markers on their Full Retreat side are flipped to their Disrupted side.
(13.3.2) Combat Zone Recovery: If a Disrupted unit is adjacent to an enemy unit (remember, a unit must move away if possible), then the unit must make a Recovery Die Roll. On a modified die roll of 4-6 the unit recovers. On a modified die roll of 1-3 it remains Disrupted. The die roll is modified by the unit’s TQ: +� for Elite TQ units–� for Low TQ units
14. ADVANCE AFTER COMBAT14.1 The BasicsIf the defender is eliminated or retreats, then all the units that par-ticipated in the attack may Advance After Combat. Advance After Combat expends no MPs, you just count the hexes. Stacking limits must be observed at the end of each advance.
14.2 Advance RateThe basic Advance After Combat rate is determined by the CRT result as listed below:• Normal Advance: Reconnaissance and German tank units may
advance 3 hexes, all other units may advance 2 hexes.• Bonus Advance: The advance rate of Non-Mechanized infantry
class units remains at 2 hexes; but the rate of all other unit types goes up by � hex (cavalry, mot. inf, and Allied tank = 3 hexes, reconnaissance and German tank = 4 hexes.
• Breakthrough Advance: All Mechanized units may advance 4 hexes. Non-Mechanized infantry class remains at 2 hexes, cavalry remains at 3 hexes.
Limited Advance: If all defending units are eliminated in an EX result or a successful Determined Defense, then the attacking units may only advance into the defender’s vacated hex and stop.
14.3 Advance in Any DirectionUnits may advance in any direction and are not required to enter the defender’s vacated hex. However, entering the defender’s vacated hex allows advancing units to ignore EZOCs (see �4.4.2).
14.4 Advance and Enemy ZOCs(14.4.1) Enemy ZOC Bonds: These may never be entered or crossed during an Advance After Combat except when entering the defender’s vacated hex.
(14.4.2) EZOCs: Follow these three important cases regarding EZOCs and advancing: • CASE �: Units that do not enter the defender’s vacated hex must
stop their advance upon entering any EZOC.• CASE 2: Advancing from one EZOC directly into another EZOC
of the same enemy unit is only allowed in the first hex of a unit’s advance.
EXAMPLE: The black arrows indicate legal advance paths, the dashed red arrows show illegal paths. Units that enter the defender’s vacated hex do not have to stop when they enter an EZOC.

�2 France ‘40
© 2013 GMT Games, LLC
• CASE 3: Units that enter the defender’s vacated hex may ignore EZOCs throughout their advance as long as Case 2 is observed. This rule allows units to bounce off enemy units—see example above.
14.5 Terrain and Advance• No unit may advance into a hex or across a hexside that is
prohibited to it in normal movement.• Units may only cross a Major River hexside during the first hex
of their advance and must stop after crossing even if a bridge is present.
• Advancing units must stop if they enter a Restricted Hex.NO EFFECT: Minor Rivers, Woods, Cities and Towns, have no effect on an Advance After Combat.
15. OVERRUNS15.1 PurposeOverruns allow units that are advancing after combat to push weak defending units out of the way. DESIGN NOTE: This rule is to discourage players using weak units to block Advance After Combat.
15.2 Procedure(15.2.1) Overruns may only be conducted during Advance After Combat with no more than one stack, and the units must have started their Advance After Combat stacked together. An Overrun attempt costs the advancing units one hex of their advance. If there was more than one attacking stack then each stack may conduct Overruns. Fin-ish advancing one stack before advancing another. Other advancing units may attempt to Overrun the same defending hex. Overruns can target the units that retreated in the regular combat.
(15.2.2) Road Congestion: Units may not conduct an Overrun from a hex containing other friendly units that have already advanced or have yet to advance.
(15.2.3) Restrictions: Only units that enter the defender’s vacated hex may Overrun. Overruns are prohibited across any terrain or into any hex that the units could not normally advance across or
MORE EXAMPLES OF OVERRUNS: The German units in hexes A and B have just forced the retreat of unit Y and can now advance. All German non-Panzer units may advance 2 hexes, the panzer brigade can advance 3 hexes.A) Stack A tries to Overrun unit W at 12-2 odds = 6-1. A die roll of 4 results in success—unit W is retreated 2 hexes, becomes Disrupted and stack A may enter the hex.B) Stack B advances one hex and Overruns unit X at 12 to 1 odds (the Overrun costs stack B one hex of its advance). The Overrun is automatically successful and the French tank bat-talion is retreated 2 hexes and becomes Disrupted. The German stack advances into the vacated hex. The two motorized units have now advanced their limit (2 hexes), but the Panzer brigade can advance a third hex so performs another Overrun against unit Y (the unit that was retreated in the original attack). The odds are 8-2 = 4-1 (note that Disrupted units have their Defense Strength halved). Three shifts for Armor and TQ bring it to a 7-1. A die roll of 5 results in success and forces unit Z to retreat again (pushing it into Full Retreat) and the Panzer brigade can finish its advance into the hex.
EXAMPLES OF OVERRUN: In both A and B the result is a DS which allows the attacker to advance 4 hexes. Stack A could conduct up to three Overruns during its advance. If stack B Overruns into hex Z and does not advanced into the hex, it can only advance 3 hexes (an Overrun cost 1 hex of an advance whether the stack advances or not).
MORE EXAMPLES OF ADVANCE AFTER COMBAT: Attacks at A and B both resulted in the elimination of the defending unit and an advance of 4 hexes. Arrows indicate possible advance paths and green arrows are shown as a reminder that units can advance in any direction. Note that advancing from one EZOC directly into another EZOC of the same enemy unit is prohibited in the cases marked “No.” At X the advancing unit has to stop since it did not enter the defender’s vacated hex and entered an EZOC.
�3France ‘40
© 2013 GMT Games, LLC
into (this includes Major Rivers). Units that advance across a Major River hexside must stop, so may NOT conduct an Overrun after crossing.
(15.2.4) Multiple Overruns: A stack that successfully Overruns can Overrun again if it has hexes remaining in its advance. Its con-ceivable that a stack with an Advance After Combat rate of 4 hexes could Overrun three times.
15.3 The Overrun Table(15.3.1) Procedure: To determine if the Overrun is successful, calculate the odds as you would in a normal combat, except Air and HQ Shifts are not allowed; then roll one die and consult the Over-run Table. Overruns where the final odds are less than 4-1 are not allowed. Overruns at odds �0-� or greater are automatically success-ful. Note that, with the exception of Air and HQ Shifts, all Combat Modifiers apply (including Terrain, TQ and Armor Shifts).
(15.3.2) Failed Overruns: If the result is “–” then the Overrun fails and the units must stop and end their advance.(15.3.3) Combat Result: If the result is [3-�], [4-�], etc., then the attacker immediately rolls on the CRT using the indicated odds column—no column shifts are allowed for either side. Losses are applied normally. If a retreat is called for then the defender may conduct a Determined Defense in the usual way. If the defender retreats, the attacker may enter the defender’s vacated hex and stop, or stop in the hex it attacked from—either way, no further advance is allowed. If the defender does not retreat, then the attacker must stop in the hex it attacked from.
(15.3.4) Successful Overruns: If the result is “Yes” then the de-fending units are retreated two hexes by the defender abiding by all rules of Retreat including becoming Disrupted. The defender may not conduct a Determined Defense. The attacker in a success-ful Overrun may continue its advance. Units may continue their advance from the hex they conducted the Overrun from, or enter the defender’s vacated hex at no cost (for free) and continue the advance from there.
15.4 Overruns Against Previously Retreated UnitsUnlike retreats from Combat (�2.6), units are not eliminated if forced to retreat again from an Overrun. Any unit that retreats a second time goes into Full Retreat (�3.2.3). Once in Full Retreat it may never be attacked and is only eliminated if it has no retreat path.
16. FORTIFICATIONS16.1 Fort Units (or Forts)Fort units have the following effects:• They are considered normal units with an MA of 0.
They are eliminated if forced to retreat. They may be selected for a step loss by the German player on an EX or DRX result and may be selected for a step loss by the Allied player whenever a step loss is required.
• If a Fort unit is the Lead Unit in a Determined Defense then the Allied player may use the City/Fort column of the Determined Defense Table.
• Fort units always receive the benefits (�L) of the Fortified Hex underneath (�6.2).
• Isolated Allied units that can trace a LOS to a Fort unit receive the +2 DRM to their Isolation Attrition die roll (�8.5).
16.2 Fortified HexesAllied units defending in a Fortified Hex (including Fort units) receive the following benefits:• The attacker suffers a column shift left (�L) on the CRT.• The attacker may not gain the Armor Shift (9.2).• Use the “Other” column when conducting a Determined Defense.
Exception: If a Fort unit is the Lead Unit, then use the Fort/City column.
Allied units receive these benefits even after the Fort unit (if one was present) has been eliminated. German units never benefit from Allied Fortified Hexes.
16.3 Maginot Line HexsidesGerman units attacking across a Maginot Line hexside have their At-tack Strength halved. Maginot Line hexsides are ignored (considered destroyed) when the Fort unit in the hex is eliminated.
17. ALLIED HQS17.1 Properties
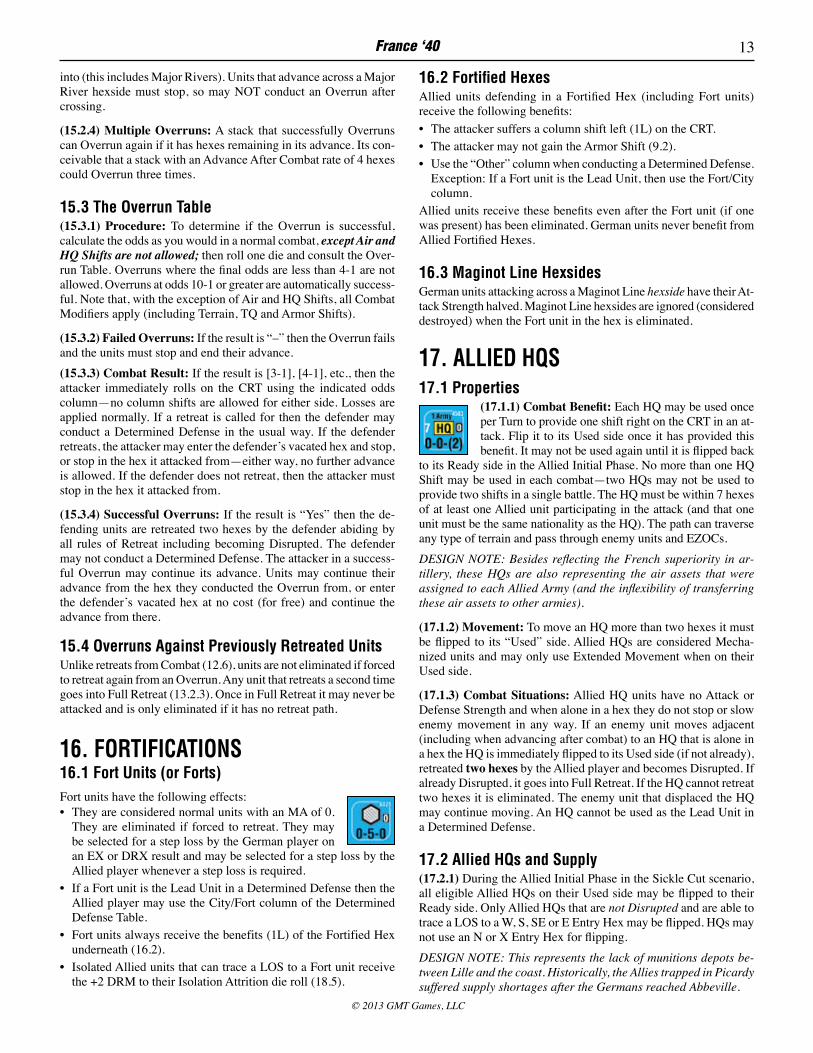
(17.1.1) Combat Benefit: Each HQ may be used once per Turn to provide one shift right on the CRT in an at-tack. Flip it to its Used side once it has provided this benefit. It may not be used again until it is flipped back
to its Ready side in the Allied Initial Phase. No more than one HQ Shift may be used in each combat—two HQs may not be used to provide two shifts in a single battle. The HQ must be within 7 hexes of at least one Allied unit participating in the attack (and that one unit must be the same nationality as the HQ). The path can traverse any type of terrain and pass through enemy units and EZOCs.DESIGN NOTE: Besides reflecting the French superiority in ar-tillery, these HQs are also representing the air assets that were assigned to each Allied Army (and the inflexibility of transferring these air assets to other armies).
(17.1.2) Movement: To move an HQ more than two hexes it must be flipped to its “Used” side. Allied HQs are considered Mecha-nized units and may only use Extended Movement when on their Used side.
(17.1.3) Combat Situations: Allied HQ units have no Attack or Defense Strength and when alone in a hex they do not stop or slow enemy movement in any way. If an enemy unit moves adjacent (including when advancing after combat) to an HQ that is alone in a hex the HQ is immediately flipped to its Used side (if not already), retreated two hexes by the Allied player and becomes Disrupted. If already Disrupted, it goes into Full Retreat. If the HQ cannot retreat two hexes it is eliminated. The enemy unit that displaced the HQ may continue moving. An HQ cannot be used as the Lead Unit in a Determined Defense.
17.2 Allied HQs and Supply(17.2.1) During the Allied Initial Phase in the Sickle Cut scenario, all eligible Allied HQs on their Used side may be flipped to their Ready side. Only Allied HQs that are not Disrupted and are able to trace a LOS to a W, S, SE or E Entry Hex may be flipped. HQs may not use an N or X Entry Hex for flipping.DESIGN NOTE: This represents the lack of munitions depots be-tween Lille and the coast. Historically, the Allies trapped in Picardy suffered supply shortages after the Germans reached Abbeville.

�4 France ‘40
© 2013 GMT Games, LLC
(17.2.2) Attrition: Allied HQs never roll for Isolation Attrition. Instead they are immediately eliminated in any Allied Supply Phase if they cannot trace a LOS to another Allied non-HQ unit (in sup-ply or not). In other words, once all non-HQ units are gone, they are removed.
18. SUPPLY AND ISOLATION18.1 The Supply Phase
Units are checked for supply during the own-ing player’s Supply Phase. Units able to trace a Line of Supply (LOS) to a Supply Source (�8.2) are ‘In Supply.’ If any unit or stack
cannot trace a LOS, it receives an Out of Supply marker. If the unit was already marked Out of Supply from the previous turn, and still cannot trace a LOS, flip the Out of Supply marker over to its red side. If any friendly unit or stack bearing an Out of Supply marker can now trace a LOS, the marker is removed.
18.2 Supply SourcesSupply is available at certain map edge hexsides; see each scenario for a listing of the Supply Sources available in the scenario. SPECIAL: Any Allied unit that can trace to three friendly controlled City hexes is also considered to be in supply. See the Dynamo Scenario instructions for the Supply Sources for that scenario.
18.3 Line Of Supply(18.3.1) Definition: A Line of Supply (LOS) is a path of contigu-ous hexes traced from a unit to a Supply Source. The path can be of any length, but it may not go off road more than 8 hexes. No part of the path may:• cross an all-Sea hexside,• enter a Restricted Hex unless it is occupied by a friendly unit,• enter an enemy occupied hex,• enter a vacant hex in an EZOC (a LOS may enter an EZOC if the
hex is occupied by a friendly unit), or• enter an enemy controlled City hex or a vacant hex adjacent to
an enemy controlled City hex (�8.3.2).
(18.3.2) City Hexes and Supply Paths: An unoccupied City hex blocks an enemy LOS through the city hex plus all vacant hexes
adjacent to the City hex (assume the city is garrisoned by friendly units not represented by a counter). All City hexes are controlled (friendly) to the Allied player unless a German unit occupies it or was the last to pass through the City hex. Indicate German controlled Cities with a German control marker.PLAY NOTE: All other vacant hexes free of ZOCs are friendly to both players when tracing a Line of Supply.
18.4 Out of Supply PenaltiesA unit bearing an Out of Supply marker suffers the following penalties:• COMBAT: The unit’s Attack Strength is halved. Fractions are
rounded up so � halved is still �.• MOVEMENT: The unit may move a maximum of two hexes.
(The restriction applies to hexes and not its MA.)
EXAMPLE: An Out of Supply Mechanized unit could move through two Clear hexes (2 MPs) or two Woods hexes (4 MPs).
ABILITIES: Out of Supply units retain their full Defense Strength, ZOCs, TQ and Armor effects.
18.5 Isolation Attrition(18.5.1) All units with a red Out of Supply marker roll for Isolation Attrition except the following units:• HQ units (�7.2.2)• Units that are not adjacent to an enemy unit.
(18.5.2) Procedure: Roll one die for each applicable unit. If the modified die roll is 1-4 the unit is reduced one step. A modified result of 5 or 6 has no effect. A unit can lose its last remaining step due to Isolation Attrition.
(18.5.3) Die Roll Modifiers:+2 if the unit can trace a LOS (of any length) to a friendly Fort unit
or a friendly controlled City hex (these are not cumulative).+� if the unit does not qualify for the +2 above, but can trace a
LOS of any length to a friendly controlled HQ or Town hex.+� the unit’s TQ is Elite–� the unit’s TQ is Low.EXAMPLE: A German Elite unit (+1) that can trace a LOS to a friendly controlled City hex (+2) would modify its Attrition roll by +3 and so would only lose a step on a die roll of 1.
18.6 Fort Units and AttritionFort units are exempt from Isolation Attrition as long as they are stacked with or adjacent to a non-Fort friendly unit. Once this is no longer applicable, then the Fort unit must roll for Attrition. Forts automatically qualify for the +2 for being able to trace a LOS to a Fort (i.e. to themselves).
19. REINFORCEMENTS19.1 The BasicsReinforcements enter play during the Movement Phase through Entry Hexes by paying the terrain cost of the first hex entered. They may use their full MA on the turn of arrival. Reinforcements may enter the map by moving into an enemy ZOC but must stop and move no farther. If entry is impossible due to the presence of enemy units
EXAMPLE OF LINE OF SUPPLY: Units A, B and C can trace a LOS to a Supply Source. Unit D cannot. Enemy ZOCs block LOS except in hexes containing friendly units.

�5France ‘40
© 2013 GMT Games, LLC
or ZOC Bonds, then the unit’s arrival is delayed until the following turn. This can be repeated indefinitely until the unit can arrive.
19.2 Allied Reinforcements (Sickle Cut scenario only)(19.2.1) Random Entry: All Allied reinforcements, except those listed in �9.2.4, are placed in an opaque cup at the start of the game and are drawn randomly. Starting on Turn 2, the Allied player draws units from the cup for his reinforcements. The number of units drawn is printed on the Turn Record Track.
(19.2.2) Arrival Location: Allied reinforcements arrive at one of five areas (W, N, S, E or SE) as indicated on their counter. They may be placed at any of the Entry Hexes with that code. No more than one unit may be placed on each Entry Hex per turn.
(19.2.3) Strategic Rail Movement: Allied reinforcements that are scheduled to arrive at W, S, SE or E may have their arrival delayed one turn to arrive at any Entry Hex on the West or South map edge (not North or East).
(19.2.4) Scheduled Reinforcements: The following units do not arrive randomly:• The �st NA and the 43rd Division. They arrive on Turn � at the S
Entry Hexes listed on the map. They may use Rail Movement.• The four French reconnaissance units listed on Turns 7-�0.• The 4th DCR arrives on Turn 4 at any S Entry Hex.
19.3 German Reinforcements(19.3.1) Arrival Location: German reinforcements arrive at one of four areas (A, B, C, D) as indicated on their counter. They may be placed at any Entry Hex with that code. No more than one division may be placed on each Entry Hex per turn. A German Mechanized division consisting of 2 or 3 units counts as one division.
(19.3.2) North Edge Entry: The “A” Entry Hexes along the north map edge become available for German “A” reinforcements on the turn indicated in the hex. Before that time those Entry Hexes may not be used.
19.4 Entry Hexes(19.4.1) In General: Entry Hexes are not playable. Reinforcements may not remain in those hexes or attack from them. Reinforcements are placed in the Entry Hex and must move onto the map during that Movement Phase or are returned to the Reinforcement Display to enter the following turn. Units that move or retreat into an Entry Hex are out of play for the rest of the game—but are not considered eliminated.
(19.4.2) Closing an Entry Hex: If one or more enemy units exit the map through an Entry Hex then that Entry Hex is closed for the re-mainder of the game—no reinforcements may enter the map through that Entry Hex. Keep the enemy unit on the Entry Hex to indicate that the Entry Hex is closed. Once all Entry Hexes in a particular entry area are closed, all further reinforcements scheduled to arrive are forfeited or must use Strategic Rail Movement (�9.2.3).
(19.4.3) Insufficient Entry Hexes: If there are not enough Entry Hexes to accommodate all the reinforcements, then those that can’t be placed are returned to the Reinforcement Display (or placed on the Turn Record Track) to arrive in the next turn.
20. SPECIAL RULES COMMON TO ALL SCENARIOS20.1 Allied CooperationFrench, British and Belgian units may stack and defend together but may not participate together in the same attack.
20.2 Rommel and MontgomeryThese two generals, who would later rise to high command, took part in this campaign as division commanders. Rommel commanded the 7th Panzer Division and was extremely energetic in leading his division—often by accompanying the lead tank units. Montgomery commanded the 3rd British Division and ably led his division in the retreat to Dunkirk.Rommel: Rommel is considered to be with the Panzer brigade of the 7th Panzer Division at all times. If this unit is attacking, par-ticipating in an Overrun or conducting a Determined Defense, the German player is allowed one re-roll. When the Panzer brigade is eliminated Rommel is no longer available.Montgomery: If this unit is the Lead Unit in a Determined Defense, the Allied player is allowed one re-roll.Restrictions on re-rolls: If a re-roll is used, it must be taken—the player cannot choose between the two die rolls. Each type of re-roll (combat, Overrun or Determined Defense) is allowed once per turn. Rommel may use all three types in each turn.
20.3 Reconnaissance UnitsReconnaissance units alone in a hex and attacked ignore the step loss requirement (but not the Retreat portion) on a D�, D�* or DS result. EX, DRX, and A�/D� results are applied normally.
20.4 Disengagement (Optional)(20.4.1) During the Combat Phase an attacking unit can do a special type of attack called a Disengagement Attempt. If successful, the unit may be retreated one or two hexes in any direction, following all rules of Retreat with the following two exceptions:• It may not enter an EZOC (hexes occupied by non-retreating
friendly units negate EZOCs in the hex they occupy).• It may end its retreat out of supply.
(20.4.2) Procedure: Any non-Disrupted unit that does not attack in the Combat Phase can attempt Disengagement. Disengagement can be resolved at any time in the friendly Combat Phase (before or after any number of combats). To resolve the attempt, roll one 6-sided die for each unit and consult the Disengagement Table. Odds and shifts are ignored. There are only three modifiers: +� the unit’s TQ is Elite –� the unit’s TQ is Low +� the unit is tank or reconnaissance
(20.4.3) Results: If the modified die roll is 1, the unit loses a step and does not retreat. A “-” result is also a failure, but no step is lost. A “Yes” result allows the unit to retreat one or two hexes in any direction. If the unit retreats it becomes Disrupted, but recovers normally in the upcoming Recovery Phase.PLAY NOTE: This rule is helpful for units attempting to escape a closing pocket—they can try to retreat forward or out of the pocket. It can also be used by advancing units to wiggle by enemy units.

�6 France ‘40
© 2013 GMT Games, LLC
20.5 Reserves (Optional)Any unit that uses no more than 2 MPs in the Movement Phase may be placed in Reserve. Place a Reserve marker on the unit to indicate this. A unit that starts the Movement Phase in an EZOC may be placed in Reserve, however, it will not be able to move since exiting an EZOC cost +2 MPs. A unit in Reserve cannot attack but can Advance After Combat in the subsequent Combat Phase as if it achieved a Breakthrough Advance (DS result). The advance can occur at any time in the Combat Phase. Remove all Reserve markers at the end of each Combat Phase.RESTRICTIONS: The number of friendly stacks that may be placed into reserve each turn is three. A unit that is Out of Supply, Disrupted, or under a GQG marker may not be placed in Reserve.
PLAY NOTE: This rule allows units behind the lines to follow up another Advance After Combat. If these units pass through a defender’s vacated hex created in that Combat Phase, they can conduct Overruns.
21. SICKLE CUT SCENARIO“German triumph in this campaign have caused their military recklessness to be hailed as genius, their dangerous gambles to be thought of as miracles.”—Len Deighton, Blitzkrieg
21.1 Setup and Scenario Data• Game Length: �0 turns. Starts on May �3th and ends on the End
Phase of May 22nd (Turn �0).• First Player: German• Map: Sickle Cut map• Setup: Use the Sickle Cut At Start Cards• Supply Sources: German units trace to any of the Entry Hexes on
the north or east map edge labeled A, B, C or D. Allied units trace supply to all other Entry Hexes (W, S, SE, E, N and X). Belgian units may trace to Allied Entry Hexes or Namur (Hex 5304).”
21.2 GQG MarkersThis rule is an attempt to reflect the sluggish French reaction and the often puzzling lack of counterattacks. All blame is not meant to be directed on the French high command—these markers are also representing Luftwaffe strafing, fog-of-war, harassment bombing and logistic problems.
(21.2.1) Purpose and Effect: The GQG (Grand Quartier Général) markers are placed on Allied units or stacks in an attempt to slow them down and prevent them from attacking. There are six GQG markers. Allied units with a GQG marker suffer the following effects:• May move a maximum of two hexes and may not stop in a hex
containing another GQG marker. Note that the 2-hex limit does not allow units to move 2 hexes
when they normally could not.• May not attack or use the Disengagement Table.• Must remain stacked together and may not split up.• At the end of any Phase (friendly or enemy) any Allied units
stacked with a GQG marker are placed under the GQG marker and suffer all its effects. A unit may pass through a GQG marker without negative effects.
(21.2.2) Abilities: Units under a GQG marker may enter an EZOC, retain their ZOC, TQ and Armor abilities, defend at full strength, and can be the Lead Unit in a Determined Defense.
(21.2.3) Units Exempt: Allied HQ units and the 4th DCR com-manded by Charles de Gaulle are immune to GQG markers and may freely exit and pass through hexes containing the markers without effect. De Gaulle’s DCR is marked with a French flag for easy recognition.
(21.2.4) The GQG Phase: The GQG markers are placed during this phase. On Turn � all six are placed; on the following turns only those markers in the GQG Holding Box are placed. The markers may be placed, a maximum of one per hex, on any stack of Allied units any-where on the map containing at least one French unit. After placement the German player rolls two dice and removes the GQG markers with the ID of those die rolls (for example, if a 2 and a 4 were rolled, he would remove GQG markers numbered 2 and 4). If doubles are rolled, then only one marker is removed. Place the removed GQG marker(s) back into the GQG Marker Holding Box for the next turn.DESIGN NOTE: For those familiar with Ardennes ‘44, the place-ment and removal works exactly like Traffic Markers.
(21.2.5) GQG Marker Removal: Besides the random removal in the GQG Phase, if a stack under a GQG marker is eliminated, Dis-rupted, or sent into Full Retreat the marker is removed and placed back in the Holding Box. The Allied player cannot voluntarily put GQG units into Full Retreat (�3.2.2) on Turn �. (21.2.6) Scheduled Removals: Starting on Turn 3, one GQG marker is removed permanently from play every other turn. Removal occurs during the GQG Phase. Markers must be removed in numerical order (i.e., #1 first, #2 second, and so on).
21.3 Hitler’s Halt OrderOnce per game, the Allied player may use the Halt! markers against German Mechanized units. The markers reflect the “halt orders” that Rundstedt issued on May 16th in response to Hitler’s fear that the Panzer divisions were too far ahead of the infantry divisions.
(21.3.1) When: The Allied player may declare the Halt Order on any turn on or after Turn 5. He may only do it once.
(21.3.2) How: During the Allied player’s Supply Phase he takes the six Halt! markers and places them (one per hex) on any German stack containing one or more Mechanized units. Every unit or stack selected must be further west than all German Non-Mechanized divisions. Additionally, hexes adjacent to such division may not be selected. After placement, the German player rolls two dice and removes those two markers with the ID of those die rolls.
(21.3.3) Effect: The Halt Order last for only one German Player Turn and then the markers are removed from play. A Halt! marker has the same effect on German Mechanized units as the GQG markers has on Allied units—2 hex max and may not attack. A Halt! marker has no effect on German Non-Mechanized units.
21.4 The Dyle LineThe Dyle Line is represented by the three Improved Position (IP) markers that start the game near Namur. The three markers start the game under construction, but can be completed at the end of the Allied Movement Phase of Turn � if at least one Infantry-class unit remains in the hex.

�7France ‘40
© 2013 GMT Games, LLC
EFFECTS: These three IP markers have the same effects as a Forti-fied Hex—they provide one column shift left on the CRT, prevent the Armor Shift, allow �-hex retreats, and units conducting a Determined Defense use the “Other” column.
REMOVAL: An IP marker (whether face-up or under construction) is immediately removed under the following conditions:• All units in the hex are eliminated or forced to retreat, or• The hex contains no friendly units at the end of the owning player’s
Supply Phase.
21.5 Victory ConditionsThe player with the most Victory Points (VPs) at the end of the game wins.
(21.5.1) Allied VPs: At game’s end, the Allied player earns VPs for the following reasons:• � VP per eliminated German unit (unit size does not matter). For
3-step units, the Remnant must be eliminated before the division can be counted as eliminated.
• � VP per “isolated” German Mechanized unit. Isolated in this case is defined as having no LOS of any length.
• �0 VPs if the Allied player can trace a contiguous rail line from one X or N Entry Hexes to an S or W Entry Hex. All rail hexes must be free of German units and German ZOCs. An Allied unit does cancel German ZOCs in the hex it occupies for this purpose.
• 5 VPs if the Allied player is unable to trace a contiguous rail line as described above, but can trace a Supply Line from one X or N Entry Hexes to an S or W Entry Hex. All hexes must be free of German units and German ZOCs, but an Allied unit does cancel German ZOCs in the hex it occupies for this purpose. The path may not pass through, or pass adjacent to, a German controlled City hex.
(21.5.2) German VPs: At game’s end, the German player scores the following VPs:• � VP for each Allied Entry Hex closed (�9.4.2). The S/SE Entry
Hex south of Reims counts as 2 VPs. The German player must be able to trace a LOS from the Entry Hex (at the end of the game) to receive the VP.
• �0 VPs to the German player if the Allied player is unable to earn his �0 VPs for the contiguous rail path. Note, it is possible for both the German player to earn these �0 VPs and the Allied player to earn the 5 VPs for the overland path of hexes.
• � VP per German unit exited off the north map edge through an X Entry Hex. The unit must be able to trace a LOS to a German Supply Source the instant the unit exits the map. This represents German units moving on Boulogne, Calais and Dunkirk.
DESIGN NOTE: The easiest way for the German player to win is to drive across the map to Abbeville to prevent the Allied player from earning his 10 VP award. If he does this and hasn’t lost many Mechanized units, he has a good chance of winning the game.
EXAMPLES OF VICTORY DETERMINATION:• The German player has cut all rail lines to the south (�0 VPs).
The Allied player still has a land connection to a S Entry Hex (5 VPs) plus has eliminated five German units (5 VPs). The game is a tie (�0 to �0).
• The German player has cut all rail and land connections to the south (�0 VPs) plus has closed three Allied Entry Hexes (3 VPs).
The Allied player has eliminated 5 German units. �3 to 5 German victory.
• The German player concentrates on the Allied Entry Hexes and has closed eight (8 VPs). The Allied player still has a rail connec-tion to the south (�0 VPs) and has eliminated two German units (2 VPs). �2 to 8 Allied victory.
21.6 Fortress InfantryThe three units with a black box around their MA may not move until a German unit moves within 2 hexes of their location (i.e., one intervening hex).
21.7 The Extended GameIf both players agree the game can be extended another four turns to May 26th. In this case, victory is determined twice—once at the end of Turn �0 and again at the end of Turn �4. If the player that wins at the end of Turn �4 is different than the player that won at the end of Turn �0, then the composite game is considered a draw.
DESIGN NOTE: This might be an option if one player barely wins the 10-turn game or the player that lost is one or two turns away from turning things around. Players should set the conditions before hand what can trigger extending the game.
22. DYNAMO SCENARIOThis scenario covers the British withdrawal to Dunkirk and the evacuation. One player controls the Allied forces (British, French and Belgian) while the other player controls the German forces. The Allied player tries to evacuate as many British and French units out to sea, while the German player tries to prevent that.
22.1 Setup and Scenario Data• Game Length: �2 turns. Starts on May 24th and ends on the End
Phase of June 4th (Turn �2).• First Player: German• Map: Dynamo map• Setup: Use the Dynamo At Start Cards• Halt! Markers: The Allied player places all 6 markers before the
game begins and rolls two dice to remove 2.• German Supply Sources: Any East or South map edge hex.• Allied Supply Sources: Brugge or any Allied controlled Port.• City Control: The German player controls all City hexes outside
the Allied pocket.
22.2 German May 24th Halt OrderDESIGN NOTE: By May 24th the Panzer divisions had fought for two straight weeks and were exhausted and at approximately half strength in tanks. Rundstedt and Hitler ordered a halt to the Panzer forces in order for them to refit for the coming second phase of the campaign—Case Red. By the third day of the halt it became evident that the Panzer divisions had to be released in order to prevent the British from escaping. In this game, each turn up to two Panzer divisions can disobey the Halt Order and attack.
RULE: Use the Sickle Cut Halt rules (2�.3) with the following changes:• The Halt Order is in effect on Turns �-3. • The markers may only be placed on Panzer divisions. The two
Panzer divisions under May Not Move markers may not be

�8 France ‘40
© 2013 GMT Games, LLC
targeted and the �st Panzer Division may not be targeted until it has cleared Calais of Allied units. Other German units stacked with a Panzer division under a Halt! marker are not effected.
• At the start of the game, before the German player moves, the Allied player places all six markers and then rolls to remove up to two. This is repeated during the Allied Supply Phases of Turn � and Turn 2, but the Allied player may only place those Halt! markers that were removed—he may not reposition those already on the map.
• Important: During the three turns of the Halt Order the component parts of all German Panzer divisions must remain stacked together, even those with no Halt! markers.
• A Panzer division under a Halt! marker that retreats, has its Halt! marker replaced with an appropriate Disruption marker.
22.3 German ReplacementsDuring the German Supply Phase of Turns �-3 each German Pan-zer division under a Halt! marker receives one replacement. The German player may select any reduced unit in the hex and return it to full strength. If all units are already at full strength, the replace-ment is forfeited. Eliminated and Disrupted units may not receive replacements.
22.4 Belgian Units(22.4.1) Belgian Surrender: Belgium surrenders during any Allied Initial Phase where Brugge (hex 32�0) is German controlled, or au-tomatically during the Allied Initial Phase of Turn 5. When Belgium surrenders, immediately remove all Belgian units from the map.
(22.4.2) Belgian Movement Restrictions: Belgian units may not enter France and if forced to retreat into France are eliminated. Belgian units may operate in border hexes containing both Belgian and French territory.
22.5 Allied EvacuationsStarting on Turn 4 (May 27th), during the Initial Phase of each Allied Player Turn, the Allied player may evacuate units from Dunkirk. On Turn 4, evacuation is only allowed through the port. Evacuation from the beach hexes begins on Turn 5. Although there are two beach evacuation hexes, only one die roll is made—the units evacuated across the beaches may come from either of those two hexes.
PROCEDURE: To be evacuated, a unit must be on the Dunkirk port hex or one of the two Beach hexes to the east of Dunkirk at the start of the Allied player turn. Size and Disruption (including Full Retreat) has no effect. The number of units that can evacuate each turn is variable, and is determined by a die roll. The Allied player rolls one die for Dunkirk and one die for the Beaches.
The Evacuation Table Die Roll Dunkirk Beach � � (+2) 2 � (+2) 3 � � 4 2 � 5 2 � 6+ 2 �
Explanation of Results: +2 No evacuation but apply a +2 DRM to the next evacuation at-
tempt die roll for that unit. Place an EVAC +2 marker on the unit to indicate this.
1 One unit is evacuated. 2 Two units are evacuated.DESIGN NOTE: Remnants, brigades, battalions and HQs evacuate the same way as a division—size has no effect. It is assumed that each of those smaller units evacuated is accompanied by essential non-combat units not represented by a counter. Therefore, every unit is important and the weak units should be evacuated first.
EVAC +2 Marker Effects: A unit with this marker defends at full strength, but may not attack. If the unit moves or retreats from the hex the marker is removed. The marker cannot be transferred to a different unit.
German Harassment Fire: If a German unit is adjacent to the Allied unit being evacuated, then the Allied player rolls two dice for the evacuation roll and uses the lower of the two results for that hex.
22.6 The RAFThe Allied player may use the two RAF Air units each turn to provide Offensive (9.3) or Defensive Air Support (��.�.6) in the same way as the German player uses his Air units. The RAF Air units may only support British attacks but may be used for British or French unit when defending. Flip RAF units to their Used side as they are used—they may only perform one mission per turn. All RAF units are flipped back to their Ready side in the Allied Initial Phase.
22.7 Miscellaneous Special Rules• ALLIED HQs: These units start the scenario on their used side
and may not be flipped back over due to the supply shortage inside the pocket. Each counts as � VP when evacuated.
• REINFORCEMENTS: Only the German player has reinforcements, they arrive on the south map edge on the turn indicated on the Turn Record Track. Use any half-hex as an Entry Hex (the units are placed in the half hex and may move their full MA from there).
• AIR UNITS: The German player has only 3 Air units per turn, instead of 5. The Air units may not be used with any German attack involving a Panzer division on the first three turns (during the Halt Order). The Allied player receives 2 Air units per turn as described in 22.6.
• GERMAN MOVEMENT RESTRICTIONS: The 2nd and �0th Panzer Divisions did not take part in the battle—they cannot move or attack but do defend at full strength. The �st Panzer Division may not move from its hex until Calais is cleared of enemy units. It may attack Calais each turn and may advance into Calais when cleared of enemy units. It operates normally after that.
• RAIL MOVEMENT: Rule 7.7 is not used in this scenario.• GERMAN WITHDRAWALS: Starting on Turn 6, the German
player must withdraw the units listed on the Turn Record Track. The units are removed from play during the German Initial Phase regardless of their position on the map. If the unit was eliminated then ignore the withdrawal.
• The GQG markers are not used in this scenario.

�9France ‘40
© 2013 GMT Games, LLC
CREDITSDesign and Development: Mark SimonitchSpecial Assistance: Vincent Lefavrais and Ivano RosaO.B. Research: Tony Curtis and Mark SimonitchPlaytesters: Clayton Baisch, Rob Bottos, Krzysztof Chadaj, John Charbonneau, John Leggatt, Jim Lauffenburger, Brian Moore, Jim Thomas, Preston McMurry, Henrik Reschreiter, David Rohde, Daniel Thorpe, and Dick Whitaker.Art Director, Cover Art & Package Design: Rodger B. MacGowanMap, Counters & Rulebook: Mark SimonitchProofreading: Vincent Lefavrais and Hans KortingProduction Coordination: Tony CurtisProducers: Tony Curtis, Rodger MacGowan, Andy Lewis, Gene Billingsley and Mark Simonitch
COUNTER ABBREVIATIONSGERMANGD = Großdeutschland (Greater Germany)Geb = Gebirgsjäger (Mountain Riflemen)K = Kradschützen (Motorcycle Infantry)LAH = Leibstandarte (Bodyguard) Adolf HitlerM = Motorisierte (Motorized)Pol = Polizei (Police)Sch = Schnelle (Mobile)Tot = Totenkopf (Dead Man’s Head)Verf = Verfügungstruppe (Dispositional Troops)
BELGIANChasAr = Chasseurs Ardennais (Hunters from the Ardenne)PFN = Position Fortifiée de Namur (Namur Fortified Posi-tion)
FRENCHCol = Coloniale (Colonial)DCR = Division Cuirassée de Réserve (Reserve Armored Div.)DLI = Division Légère d’Infanterie (Light Infantry Division)DLM = Division Légère Mécanique (Light Motorized Division)Lest = Lestoquoi (commander’s name)Mor = Marocaine (Moraccan) NA = Nord-Africaine (North African)SFE = Secteur Fortifié de l’Escaut (Scheldt Fortified Sector)SFF = Secteur Fortifié des Flandres (Flanders Fortified Sector) SFM = Secteur Fortifié de Montmédy (Montmédy Fortified Sector)Spahi = Light cavalry recruited from indigenous population of North Africa
BRITISHBEF = British Expeditionary ForceG = GuardsL = LancersT = Tank
22.8 Terrain Found only on the Dynamo Map• POLDER: The Armor Shift is prohibited if the defender is in a
Polder hex. Polder cost all units � MP to enter.• MARSH HEXSIDES: Treat the same as a Major River hexside. • ALL SEA HEXSIDES: No units may move or attack across all
sea hexsides.• FERRY HEXSIDES: Units that spend their entire MA may cross
a Ferry hexside. No combat is allowed across a Ferry hexside.• CAUSEWAY HEX: Cost � MP for all units. Units are doubled
when defending in the Causeway hex.• TIDAL RIVER BRIDGES: Units must spend +� MP to cross a
Tidal River Bridge. Attacking across is prohibited.
22.9 Zero-Strength Remnant UnitsAll British units have one additional “0-0-3” step in the Dynamo scenario. For example, a 1-step unit or a “1-3-6” Remnant would be replaced with a 0-0-3 unit if it took a step loss. 0-strength Remnants have the following properties:• They have a Stacking Point value of �. British units may
voluntarily shed steps in order to become a 0-0-3 unit, but may never gain the steps back. Play Note: An Allied player might do this to fit more units in a shrinking pocket.
• They have no ZOC, no combat ability, may not be the Lead Unit in a Determined Defense, and do not slow the movement of enemy units in any way. If alone in a hex and a German unit moves or advances adjacent to it, the Allied player must immediately retreat it two hexes (or � hex if illegible). If a safe retreat is impossible, it is eliminated.
• If after resolving combat and Determined Defense the only units remaining in the hex are 0-0-3 Remnants, then they must be immediately retreated two hexes by the Allied player. If the 0-0-3 units were defending, then any involved attacking units may advance into the defender’s vacated hex and stop (in the same way that an attacker may advance in an EX result that clears out the defender). Defending German units may not advance if all attacking Allied units become 0-0-3 Remnants.
• They move as Non-Mechanized units and may use Extended Movement.
• No need to place Disrupted markers on these units if they retreat, as they are in a permanent state of Full Retreat.
• They count as � VP if evacuated.
22.10 Victory Conditions(22.10.1) Allied Automatic Victory: The Allied player wins the game immediately if he evacuates or moves off the west or south map edge, �5 or more units. At least �0 of the units must be British.
(22.10.2) End Game Victory: If the Allied player does not win an Automatic Victory then calculate VPs at the end of the game.1 VP for each British or French unit (regardless of size) evacuated or moved off the west or south map edge.1 VP for each French unit still on the map that is in supply.1 VP for each German unit eliminated. German infantry divisions are considered eliminated only if the Remnant is eliminated. –1 VP for each British unit eliminated or still on the map.If the Allied VP total is 15 or more, then the Allied player wins. The German player wins if he prevents that.

20 France ‘40
© 2013 GMT Games, LLC
Air unit to bring it to a 2-�. The Armor Shift is not allowed across river hexsides. A die roll of 3, results in an EX. The German player decides to use the Rommel re-roll and rolls again and gets a 4 which is a DR. The French unit’s Determined Defense roll is a 3 which fails. It is retreated 2 hexes and the German units may advance. Note that units that advance across a Major River hexside must stop.
The situation after the Retreat and Advance After Combat.
COMBAT C: The 6th Panzer Division attacks the 2-4-2 Fortress Infantry unit. Each unit in the Panzer division is halved and the French unit is doubled because of the river. The odds are 6 to 8 (�-2). The German player gets a shift for TQ and uses an Air unit to bring it to a 2-�. A die roll of 4 results in a DR result. The Allied player elects to roll on the Determined Defense Table using the “Other” column and rolls a 5. The result is •�/�, the retreat is cancelled but the Fortress unit and one German unit take a step loss.
COMBAT D: The German player brings all three Panzer divisions plus the Grossdeutschland Regiment to attack the French 55th Re-serve Division (4-6-3). All German units are halved and the French division is doubled. The odds are 20 to �2 (�-�). The German player receives 2 shifts for TQ (Elite vs. Low) and to ensure that he crosses
EXTENDED EXAMPLE OF PLAYThe game starts with the German player’s Movement Phase. All his units may move their full Movement Allowance. The Panzer divi-sions are color coded to indicate the Panzer corps they are attached to, but there are no restrictions on their movement.
The illustrations below show the German units after the Movement Phase is completed and before combat.
COMBAT A: The two Panzer divisions gang up and attack the 3rd DLM. The odds are 24 to 8 = 3-�. The German player gets a shift for TQ. A die roll of 3 results in a DR. The French player elects not to do a Determined Defense and retreats his unit 2 hexes and marks it with a Disrupted marker. The German units may Advance After Combat—2 hexes for the mechanized infantry and 3 hexes for the Panzer brigades.
The situation after the Retreat and Advance After Combat.
COMBAT B: Both Panzer divisions of Hoth’s corps attempt to cross the Meuse near Dinant. All German units are halved and the French unit is doubled. The odds are �3 to �4 (�-2). Elite units attacking a regular unit provides a TQ shift. The German player commits one

2�France ‘40
© 2013 GMT Games, LLC
DESIGNER’S NOTES“We can always recover ground, but never lost time.” —Field-Marshal Graf von Gneisenau
Sickle Cut ScenarioWhy? The genesis of this game is the extraordinary book The Blitz-krieg Legend by Karl-Heinz Frieser. Richly detailed it opened the door for me on what an interesting campaign the battle for France was. What stood out was how uncertain the crossing of the Meuse River was and the risk Guderian took in his dash to the coast. These risks seemed to me were the key elements of the �940 campaign and there was no other game that concentrated on them.
While I’m mentioning books, I would also highly recommend Alistair Horne’s To Lose a Battle and Len Deighton’s Blitzkrieg—these two books and the one mentioned above are an excellent way to learn about the campaign.
Game Scale: The game was preferably to have only one map and be easy to play. After testing what could fit on a 22x34 map sheet, a 4-km per hex map scale was decided upon. Most units would be divisions and each turn would represent one day. Holland and the south of France had to be cropped out.
Focus of the Design: The game starts on the 4th day of the offensive with the Germans on the Meuse. Cropping out the Ardennes and the first three days solved a huge problem—that of having to write rules to force the Allied player to rush up to the Dyle Line and to ignore all those German units moving through the Ardennes for three turns. Cropping out the BEF and French 7th Army sector to the north helped solve the problem of needing rules to force them to remain in their positions and not react to what was happening in the south.
The Order of Battle: Another goal of the design was to show the forces in an unbiased manner. We now know that the German Panzer divisions did amazingly well but nobody on either side expected that. Hitler and Rundstedt were scared to death of French counter-attacks so that had to be part of the design. I tried to avoid making the Panzer divisions so powerful that the German player had little to fear of Allied forces.
The Battle at the Meuse: The French expected the Germans to halt at the Meuse for 3-8 days and bring up their artillery and sup-port units. The immediate attack was a surprise and a big risk for the Germans. That is why on Turn � many of the attacks across the Meuse will be low-odds attacks. Be prepared for a few of them not to work. But make sure you cross at least in one spot—Sedan. At-tacking at 6-� odds at Sedan guarantees getting across, attacking at less than 6-� is too big a risk.
German Reinforcements: It was interesting to discover how many German infantry divisions followed behind the Panzer divisions. The general staff that planned all those maneuvers and march routes deserve as much credit as the commanders of the Panzer formations in the victory. The population of the Ardennes in that week probably saw a non-stop line of German infantry march through their towns 24 hours a day.
No Exploitation Phase: If each turn represented more than one day I would have considered an Exploitation Phase, but with one day turns, I thought it would be more realistic not to have such a phase. The German breakthrough occurred because the French line was stretched too thin and then collapsed. The historical breakthrough occurred on Turn 3, but unless an experienced German player is
the river in this attack uses three Air units to bring the odds to a 6-�. A die roll of 5 is a DS result. The Allied unit loses one step, is retreated 3 hexes and marked with a Full Retreat marker. The Ger-man player may advance after combat but must stop after crossing the Major River hexside.
The situation after the Retreat and Advance After Combat. The GD Regiment is moved north to help slow down reinforcements coming from Charleville.
Since there are no German units Disrupted the Recovery Phase is skipped. Likewise, the Supply Phase can be skipped since all Ger-man units can easily trace 8 hexes to a road and then along the road to a friendly Entry Hex.
The last phase is the GQG Phase. The German player has six GQG markers to place. The German player targets some non-Disrupted French DLM and DCR divisions plus a few other stacks he would like to have a slow reaction (see the two illustrations below). He then rolls two dice and removes those two GQG markers.
The target hexes of the six GQG markers are marked in blue.
This ends the German Player Turn and the extended example. Now the French Player Turn begins and he has plenty to contend with. How he responds will be largely based on which stacks were spared the GQG markers.

22 France ‘40
© 2013 GMT Games, LLC
GERMAN PLAYER: Don’t be dismayed if a few of your Meuse River crossings initially fail. The 6th Army’s assault on the Dyle Line and Hoth’s Panzer corps are just diversions. Guderian’s cross-ing at Sedan is where the game is won or lost. Once across, keep stretching the French line until it snaps. Around Turn 4 or 5 the Allied line should be thinning, at that time look for a hex you can get an Automatic DS against and push through.
ALLIED PLAYER: You have plenty of units in the north and can probably spare to send some to the south. I would also recommend counterattacking when you can—disrupting a Panzer division will put it out of action for a turn.
Dynamo ScenarioThe Dynamo scenario came about due to a suggestion off the Consim folder. I only vaguely remember the statement, but the gentlemen felt that seeing a larger section of France on the map would help put the Sickle Cut scenario in better context. And, if one expanded the map one could include the retreat to Dunkirk operations. Well, he was right, and I did have a desire to see how the forces were positioned for the Dunkirk operation and a strong desire to see if the game system worked in a grinding battle as well as a blitzkrieg. So it was done.
Time Frame: The game starts on May 24th, the day the British high command decided that it was best to abandon the fight in France and head for Dunkirk. The game ends on June 4th—the last day of the evacuation.
The Map: I know including eastern Belgium and part of Holland is unnecessary for the battle of Dunkirk, but I included it anyway to provide even more context for the Sickle Cut campaign. This is the area the British BEF and French 7th Army operated in the initial days of the campaign—the area they thought was the decisive area of the battle. As much as I wanted a scenario to use this area of the map, I could not come up with anything that would work. The British and French forces move up and then they move back—it would take too many “You Must Do This” rules to make it work. I’ve included an image of the starting position of the units on May �3th (and the extra units necessary) for those who want to study it.
The Halt! Markers: Letting the German player move up to two Panzer divisions each turn during the Halt Order is a little generous but its extremely important that the Allied player feels the threat of the Panzer divisions on his flank. Historically, the Allies had no idea that the Panzer divisions had been halted and made their movements assuming the Panzer divisions would attack at any moment.
0-0-3 Remnants: The British left behind all their equipment in the evacuation and these zero strength remnants reflect that. They also help to make the escape of every unit important.
Hints on Play: ALLIED PLAYER: On the first turn you can relax and enjoy your strong defense line, but you better start your retreat by Turn 2 or you might not make it to the beach. When the Panzer divisions wake up on Turn 4 it will get scary. Note that the Panzer divisions withdraw pretty quickly so its not as bad as it looks.GERMAN PLAYER: For the first three turns try to make some headway against the Belgians at the hinge between the Belgian and British lines. Try to expand your bridgehead across the canal at St-Omer, but be careful of British counterattacks.
pitted against an unexperienced Allied player it may take a few more turns in this game. Nonetheless, a late breakthrough can still reach the coast since it will have the benefit of having more German infantry on hand to guard the flanks.
Tank Forces: The Allies had more tanks (and better armored tanks) than the Germans. To help reflect that I included all the French independent tank battalions except those composed of the obsolete FT-�7. Most of the German tanks were Pz Is and Pz IIs which were of little value. The high strength of the Panzer brigades is because each brigade, except the 9th, had four tank battalions instead of the two they would have in �94�.
Allied Reaction: The historical Allied reaction was quite slow which is why I included the GQG markers. But even with these markers the typical Allied player (after he has played the game once) will react better than the historical commanders did. That is fine, I want the Allied player to have a chance to instill fear into the German player—a group of 2 or 3 DLMs and/or DCRs can be a very strong force.
Retreat 2 or 3 Hexes: The Retreat rules allow the defender the choice of retreating 2 or 3 hexes—they are written this way so the Allied player has some leeway when it comes time to retreat in a shrinking Dynamo pocket. But it is often best to retreat Allied units 3 hexes when being pursued by Panzer divisions with a Bonus Advance—so as to avoid the German units catching up and Over-running the Disrupted units.
Advance After Combat: Although not always obvious, the way the Advance After Combat rules are written allows the attacker to wiggle through gaps of 2 hexes. If a unit enters the defender’s vacated hex, he can then bounce off enemy units and keep moving. Just make sure you don’t move from one EZOC directly into another EZOC of the same enemy unit. “The same enemy unit” is the key phrase—units can move from EZOC to EZOC as long as those EZOCs belong to different units.
The Determined Defense Table: Oh what trouble this rule caused me! It worked fine in Normandy ‘44 and so I wanted it to be in this game. But cases of valiant French defenders holding up huge Panzer spearheads was occurring way too often. A simple alteration, late in testing, was to add the asterisks in the high odds CRT column.
5 HQs and 5 Air Units: For this game I wanted the two opposing sides to appear to be equal. If the German player was going to get 5 Air units then the Allied player was going to have the potential of 5 shifts too. Since the Allies had almost twice as much artillery than the German army I decided to put the shifts in the HQs. They can be very useful in a static battle, but not so much in a mobile battle.
The Entry Hexes: The French high command did not know that the Germans were heading for the coast until May �8th (Turn 6). Up until then they were concerned at protecting Paris (the S Entry Hexes) and the rear of the Maginot Line (SE and E Entry Hexes). Putting a VP value to these Entry Hexes insures that Allied player guards those important areas. The German player can win the game without reaching the coast as long as he can grab enough Entry Hexes.
The Trains are Slow: Yes, �5 hexes is not much, but this is not strategic rail movement far behind the lines, but rail movement in the combat zone. The modest rate reflects the effects of the Luft-waffe on the trains and rail yards, plus accounts for delays caused by fog of war.
Hints on Play

23France ‘40
© 2013 GMT Games, LLC
SITUATION MAPSThe situation maps on the following pages are presented for historical interest only.
German Lage West Map for May 13th (Sickle Cut, Turn �). The Germans have reached the Meuse. The image is showing the posi-tion of units probably in the late afternoon or end of the day. The
German map indicates only the Allied units that have been identified and those positions may not be accurate. Note all the question marks on German units whose location is also uncertain.

24 France ‘40
© 2013 GMT Games, LLC
German Lage West Map for May 15th (Sickle Cut, Turn 3). Note that 10th Panzer holds the southern flank at Stonne while the �st and 2nd Panzer head west. The 6th Panzer has broken out
and is heading towards Montcornet. The 5th and 7th Panzer are at Philippeville. North of Namur, the 6th Army has hit the Dyle Line in the Gembloux Gap.

25France ‘40
© 2013 GMT Games, LLC
A French Army map for May 16th (Sickle Cut, Turn 4). The French government fear the Germans are moving on Paris and contemplate evacuation. Churchill flies to Paris on this day and finds out the
French have no strategic reserves. Note the broken line west of Montcornet and how the Germans are through the Dyle Line in the north. The French 9th Army is showing signs of falling apart.

26 France ‘40
© 2013 GMT Games, LLC
German Lage West Map for May 18th (Sickle Cut, Turn 6). At this point the Allied line has collapsed everywhere except at the hinge in the south. Guderian’s and Hoth’s Panzer divisions are across the final
river/canal line at St-Quentin—there are no further river obstacles between there and the coast. Note Rommel’s 7th Panzer heading for Arras and 3rd and 4th Panzer’s movement south.

27France ‘40
© 2013 GMT Games, LLC
German Lage West Map for May 24th (Dynamo, Turn �). The Germans have reached the coast and no French counterattack from the south or north is materializing. The Belgians have lost their capital and are contemplating surrender. It is on this day that the British decide to head for Dunkerque. From viewing the map you would think it was too late. However, the bulk of the British and French divisions inside the pocket are in fairly good shape and the Panzer divisions are exhausted. And most fortunate of all, Hitler
decides to let the infantry divisions of Army Group B reduce the pocket so the Panzer divisions can be refitted for the upcoming Case Red on June 5th. Note how weak the German line is southwest of Amiens, but there really is nothing to oppose them there except a few French reconnaissance battalions. Also note the German infantry divisions that marched through the Ardennes are now manning the southern line.

28 France ‘40
© 2013 GMT Games, LLC
German Lage West Map for May 31st (Dynamo, Turn 8). The end is near at Dunkerque. The Panzer divisions are heading south leaving the Dunkerque battle to the infantry divisions. In the next four days another �00,000 additional French and British troops will
be evacuated. The French line in the south has begun to firm up but a larger number of German divisions face them to the north. Belgium has surrendered. Case Red will start in six days.

29France ‘40
© 2013 GMT Games, LLC
May 13th on the Dynamo Map. This map is provided for those curious about what was happening to the north of the Sickle Cut map on Turn �. The optional counters provided allow players to set units up in their approximate positions and experiment with the situation. The German units shown are those that enter from the east map edge on Turn �. It’s interesting to see that although this is the third day of the campaign, the British are just beginning to move into their positions around Leuven and that half of their army is still back around Lille. The French 7th Army has a few reconnaissance elements on the Belgium-Netherlands border but the bulk of their forces are still approaching Antwerpen. The Belgians are retreating from their initial defense line along the Albert Canal and the Eben Emael-Liege fortification line. The goal of the French 7th Army is to link up with the Dutch around Breda, but the Dutch have abandoned this area of their country (Noord-Brabant) to concentrate in their Fortress Holland positions north of the Waal River. There are a few Dutch units guarding Walcheren Island and Zuid-Beveland.Historically, the 9th Panzer Division will enter the map and link up with the paratroopers holding the Moerdijk Bridge and reach
Rotterdam (just off the north edge of the map) on Turn �. The SS Verfügungstruppe, SS Leibstandarte Adolf Hitler and the infantry divisions of 4th Army will push the Belgian army back to their Antwerpen-Leuven position.NOTES�. The French 68th Division is provided as three regiments because it was split up to guard the coast of Belgium and Vlissingen (on Wal-cheren Island). One regiment is shown on the map, place the second in Ostende and the third anywhere between those two.2. The British 4th, 5th, 42nd, 48th, 50th divisions can be placed within three hexes of Lille. The British �2th and 23rd Divisions are along the supply line back to Cherbourg—place one on each side of Amiens. The 46th Division has not yet arrived. WHAT IF: Gamelin’s decision to send the 7th Army into Holland is often criticized as a factor in the French defeat, and rightly so. To see what would have happened if this army had been kept as a reserve, place all its units from that army (except the 60th and 68th Divisions which were needed along the coast and in the Scheldt) within 5 hexes of Reims and/or St-Quentin at the start of the Sickle Cut scenario.

30 France ‘40
© 2013 GMT Games, LLC

3�France ‘40
© 2013 GMT Games, LLC
INDEXAdvance After Combat . . . . . . . . . . . . . . . . . . . �4.0 Length of Advance . . . . . . . . . . . . . . . . . . �4.2 Advance in any Direction . . . . . . . . . . . . . �4.3 Advance and Enemy ZOCs . . . . . . . . . . . . �4.4 Terrain and Advance . . . . . . . . . . . . . . . . . �4.5Air Units . . . . . . . . . . . . . . . . . . . . . . . . . . . . . . 9.3Allied Cooperation . . . . . . . . . . . . . . . . . . . . . . 20.�Allied Evacuations . . . . . . . . . . . . . . . . . . . . . . 22.5Allied Heavy Tanks . . . . . . . . . . . . . . . . . . . . . . 9.2.4Allied HQs . . . . . . . . . . . . . . . . . . . . . . . . . . . . 9.4, �7.0Armor Shift . . . . . . . . . . . . . . . . . . . . . . . . . . . . 9.2Automatic DS . . . . . . . . . . . . . . . . . . . . . . . . . . 7.8Belgian Units . . . . . . . . . . . . . . . . . . . . . . . . . . 20.�, 22.4 Belgian Surrender . . . . . . . . . . . . . . . . . . . 22.4.�British Units . . . . . . . . . . . . . . . . . . . . . . . . . . . 20.� see also Zero-Strength Remnants . . . . . . . 22.9Causeway Hex . . . . . . . . . . . . . . . . . . . . . . . . . 22.8Combat . . . . . . . . . . . . . . . . . . . . . . . . . . . . . . 8.0Combat Against Previously Retreated Units . . . �2.6Combat Results . . . . . . . . . . . . . . . . . . . . . . . . . �0.0Combat Zone Recovery . . . . . . . . . . . . . . . . . . �3.3.2Critical Hexes . . . . . . . . . . . . . . . . . . . . . . . . . . ��.3.2Defensive Air Support . . . . . . . . . . . . . . . . . . . . ��.�.6Desperation Defense . . . . . . . . . . . . . . . . . . . . . ��.3Determined Defense . . . . . . . . . . . . . . . . . . . . . ��.0Disengagement . . . . . . . . . . . . . . . . . . . . . . . . . 20.4Disruption . . . . . . . . . . . . . . . . . . . . . . . . . . . . . �3.�Dyle Line . . . . . . . . . . . . . . . . . . . . . . . . . . . . . 2�.4Entry Hexes . . . . . . . . . . . . . . . . . . . . . . . . . . . . �9.4Exiting the Map . . . . . . . . . . . . . . . . . . . . . . . . . 7.2Extended Game . . . . . . . . . . . . . . . . . . . . . . . . . 2�.7Extended Movement . . . . . . . . . . . . . . . . . . . . . 7.3Ferry Hexsides . . . . . . . . . . . . . . . . . . . . . . . . . 22.8Fortifications . . . . . . . . . . . . . . . . . . . . . . . . . . . �6.0Fortified Hexes . . . . . . . . . . . . . . . . . . . . . . . . . �6.2Fort Units . . . . . . . . . . . . . . . . . . . . . . . . . . . . . �6.�, �8.6Fortress Infantry . . . . . . . . . . . . . . . . . . . . . . . . 2�.6French Collapse . . . . . . . . . . . . . . . . . . . . . . . . ��.�.5Full Retreat . . . . . . . . . . . . . . . . . . . . . . . . . . . . �3.2GQG Markers . . . . . . . . . . . . . . . . . . . . . . . . . . 2�.2 Halt markers Sickle Cut . . . . . . . . . . . . . . . . . . . . . . . . . 2�.3 Dynamo . . . . . . . . . . . . . . . . . . . . . . . . . . . 22.2Halving and Doubling . . . . . . . . . . . . . . . . . . . . 9.�Heavy Tanks (see Allied Heavy Tanks: 9.2.4)HQs (see Allied HQs: �7.0)Line of Supply . . . . . . . . . . . . . . . . . . . . . . . . . . �8.3Maginot Line Hexsides . . . . . . . . . . . . . . . . . . . �6.3Minimum and Maximum Odds . . . . . . . . . . . . . 8.4Montgomery . . . . . . . . . . . . . . . . . . . . . . . . . . . 20.2Movement . . . . . . . . . . . . . . . . . . . . . . . . . . . . . 7.0
Movement Allowance . . . . . . . . . . . . . . . . . . . . 2.3.2Movement and Rivers . . . . . . . . . . . . . . . . . . . . 7.4Multi-hex Combat . . . . . . . . . . . . . . . . . . . . . . . 8.2Offensive Air and HQ Support . . . . . . . . . . . . . 9.3Out of Supply Penalties . . . . . . . . . . . . . . . . . . �8.4Overruns . . . . . . . . . . . . . . . . . . . . . . . . . . . . . . �5.0Overrun Table . . . . . . . . . . . . . . . . . . . . . . . . . . �5.3Polder . . . . . . . . . . . . . . . . . . . . . . . . . . . . . . 22.8RAF . . . . . . . . . . . . . . . . . . . . . . . . . . . . . . 22.6Rail Movement . . . . . . . . . . . . . . . . . . . . . . . . . 7.7Reconnaissance Units . . . . . . . . . . . . . . . . . . . . 20.3Recovery Phase . . . . . . . . . . . . . . . . . . . . . . . . . �3.3Reinforcements . . . . . . . . . . . . . . . . . . . . . . . . . �9.0 Allied Reinforcements . . . . . . . . . . . . . . . . �9.2 German Reinforcements . . . . . . . . . . . . . . �9.3Remnants . . . . . . . . . . . . . . . . . . . . . . . . . . . . . . �0.3Replacements (German) . . . . . . . . . . . . . . . . . . 22.3Reserves . . . . . . . . . . . . . . . . . . . . . . . . . . . . . . 20.5Restricted Hexes . . . . . . . . . . . . . . . . . . . . . . . . 7.6, 9.7Retreats . . . . . . . . . . . . . . . . . . . . . . . . . . . . . . �2.0 Retreat Guidelines . . . . . . . . . . . . . . . . . . . �2.�.3 Elimination Due to Retreat . . . . . . . . . . . . �2.2 Overstacking in a Retreat . . . . . . . . . . . . . �2.�.4Rivers Inside Hexes . . . . . . . . . . . . . . . . . . . . . 2.2.2River and Marsh Hexsides . . . . . . . . . . . . . . . . 9.6Road Congestion . . . . . . . . . . . . . . . . . . . . . . . . �5.2.2Roads and Bridges . . . . . . . . . . . . . . . . . . . . . . 7.5Rommel . . . . . . . . . . . . . . . . . . . . . . . . . . . . . . 20.2Sequence of Play . . . . . . . . . . . . . . . . . . . . . . . . 3.0Stacking . . . . . . . . . . . . . . . . . . . . . . . . . . . . . . 4.0 Limits. . . . . . . . . . . . . . . . . . . . . . . . . . . . . 4.� Stacking Points . . . . . . . . . . . . . . . . . . . . . 4.2 Stacking Exceptions . . . . . . . . . . . . . . . . . 4.3 Stacking Restrictions . . . . . . . . . . . . . . . . . 4.4Steps . . . . . . . . . . . . . . . . . . . . . . . . . . . . . . 2.3.6 Selecting Step Losses . . . . . . . . . . . . . . . . �0.2 Indicating Step Losses . . . . . . . . . . . . . . . . �0.3Supply and Isolation . . . . . . . . . . . . . . . . . . . . . �8.0Supply Phase . . . . . . . . . . . . . . . . . . . . . . . . . . . �8.�Supply Sources . . . . . . . . . . . . . . . . . . . . . . . . . �8.2, 22.� Belgium Supply Sources . . . . . . . . . . . . . . 22.4.3Tidal River Bridges . . . . . . . . . . . . . . . . . . . . . . 22.8Troop Quality (TQ) Shift . . . . . . . . . . . . . . . . . 9.5Unit Size . . . . . . . . . . . . . . . . . . . . . . . . . . . . . . 2.3.3Unit Types . . . . . . . . . . . . . . . . . . . . . . . . . . . . . 2.3.4Underground Canals . . . . . . . . . . . . . . . . . . . . . 2.2.3Zero-Strength Remnant Units . . . . . . . . . . . . . . 22.9ZOC BONDS . . . . . . . . . . . . . . . . . . . . . . . . . . 6.0, �4.4.�Zones of Control . . . . . . . . . . . . . . . . . . . . . . . . 5.0 ZOCs and Movement . . . . . . . . . . . . . . . . 5.2 ZOCs and Advance After Combat . . . . . . . �4.4 ZOCs and Supply Paths . . . . . . . . . . . . . . . �8.3.�
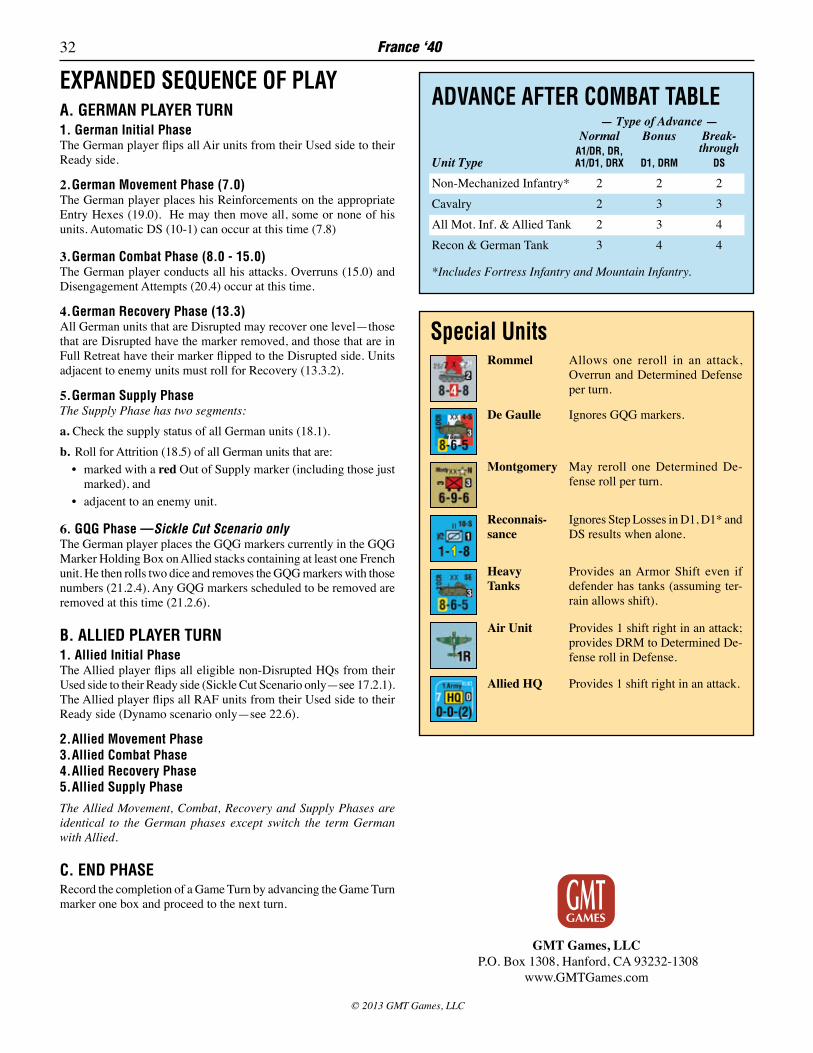
32 France ‘40
© 2013 GMT Games, LLC
EXPANDED SEQUENCE OF PLAYA. GERMAN PLAYER TURN1. German Initial Phase The German player flips all Air units from their Used side to their Ready side.
2. German Movement Phase (7.0)The German player places his Reinforcements on the appropriate Entry Hexes (�9.0). He may then move all, some or none of his units. Automatic DS (�0-�) can occur at this time (7.8)
3. German Combat Phase (8.0 - 15.0)The German player conducts all his attacks. Overruns (�5.0) and Disengagement Attempts (20.4) occur at this time.
4. German Recovery Phase (13.3)All German units that are Disrupted may recover one level—those that are Disrupted have the marker removed, and those that are in Full Retreat have their marker flipped to the Disrupted side. Units adjacent to enemy units must roll for Recovery (�3.3.2).
5. German Supply PhaseThe Supply Phase has two segments:a. Check the supply status of all German units (�8.�).b. Roll for Attrition (�8.5) of all German units that are: • marked with a red Out of Supply marker (including those just
marked), and • adjacent to an enemy unit.
6. GQG Phase —Sickle Cut Scenario onlyThe German player places the GQG markers currently in the GQG Marker Holding Box on Allied stacks containing at least one French unit. He then rolls two dice and removes the GQG markers with those numbers (2�.2.4). Any GQG markers scheduled to be removed are removed at this time (2�.2.6).
B. ALLIED PLAYER TURN1. Allied Initial PhaseThe Allied player flips all eligible non-Disrupted HQs from their Used side to their Ready side (Sickle Cut Scenario only—see �7.2.�). The Allied player flips all RAF units from their Used side to their Ready side (Dynamo scenario only—see 22.6).
2. Allied Movement Phase 3. Allied Combat Phase4. Allied Recovery Phase5. Allied Supply PhaseThe Allied Movement, Combat, Recovery and Supply Phases are identical to the German phases except switch the term German with Allied.
C. END PHASE Record the completion of a Game Turn by advancing the Game Turn marker one box and proceed to the next turn.
ADVANCE AFTER COMBAT TABLE — Type of Advance — Normal Bonus Break- A1/DR, DR, through Unit Type A1/D1, DRX D1, DRM DS
Non-Mechanized Infantry* 2 2 2Cavalry 2 3 3All Mot. Inf. & Allied Tank 2 3 4Recon & German Tank 3 4 4
*Includes Fortress Infantry and Mountain Infantry.
Special UnitsRommel Allows one reroll in an attack,
Overrun and Determined Defense per turn.
De Gaulle Ignores GQG markers.
Montgomery May reroll one Determined De-fense roll per turn.
Reconnais-sance
Ignores Step Losses in D�, D�* and DS results when alone.
HeavyTanks
Provides an Armor Shift even if defender has tanks (assuming ter-rain allows shift).
Air Unit Provides � shift right in an attack; provides DRM to Determined De-fense roll in Defense.
Allied HQ Provides � shift right in an attack.
GMT Games, LLC P.O. Box �308, Hanford, CA 93232-�308
www.GMTGames.com