Embed Size (px)
Citation preview

Life's Good
Z}.., . ,.>9 V7 r'_,,_ _+__,.,)/""q L.....
FRE CH DOORREFRIGERATORPlease read this owner's manual thoroughly beforeoperating and keep it handy for reference at all times.
LFXC24726*
MFL62184478

2 TABLE OF CONTENTS
TABLE OF CONTENTS
3 PRODUCT FEATURES
4 IMPORTANT SAFETY
INSTRUCTIONS
7 COMPONENTS
7 Refrigerator Exterior
8 Refrigerator interior
99
0
1
1
1
2
2
2
4
5
6
7
8
20
21
21
21
21
22
24
25
25
25
INSTALLATION
Installation Overview
Specifications
Unpacking Your Refrigerator
Choosing the Proper Location
- Flooring
- Ambient Temperature
- Measuring the Clearances
Removing/Assembling the RefrigeratorDoor Handles
Removing/Assembling the FreezerDrawer Handle
Removing/Assembling the Doors andDrawers
- Removing the Left Refrigerator Door
- Removing the Right Refrigerator Door
- Assembling the Right Refrigerator Door
- Assembling the Left Refrigerator Door
- Removing the Freezer Drawers
- Assembling the Freezer Drawers
Connecting the Water Line
- Before You Begin
- Water Pressure
- What You Will Need
- Water Line Installation Instructions
Turning On the Power
Leveling and Door Alignment
- Leveling
- Door Alignment
26 HOW TO USE
26 Before Use
27 Control Panel
27 - Control Panet Features
29 In-Door ice Bin
29 - Detaching the In-Door ice Bin
29 - Assembling the In-Door ice Bin
30 Automatic icemaker
30 - Turning the Automatic Icemaker On or Off
31 - When You Should Turn the icemaker Off
31 - Normal Sounds You May Hear
31 - Preparing for Vacation
32 ice and Water Dispenser
32 - Dispenser
32 - Using the Dispenser
32 - Locking the Dispenser
32 - Cleaning the Dispenser Stand
33 Storing Food
33 - Food Preservation Location
34 - Food Storage Tips
34 -Storing Frozen Food
35 Humidity Controlled Crisper andGlide'N'Serve
36 Detaching and Assembling the Storage Bins
37 Adjusting the Refrigerator Shelves
38 MAINTENANCE
38 Cleaning
39 Replacing the Fresh Air Filter
39 Replacing the Water Filter
44 SMART DIAGNOSIS TM
44 Using Smart Diagnosis TM
45 TROUBLESHOOTING
55 WARRANTY

PRODUCT FEATURES 3
PRODUCT FEATURES
* Depending on the model, some of the following functions may not be available.
FILTERED WATER AND ICE DISPENSER
The water dispenser dispenses fresh, chilled water.The ice dispenser dispenses cubed and crushed ice.
#-
DOOR ALARM
The Door Alarm function is designed to prevent refrigerator malfunctioningthat could occur if a refrigerator door or freezer drawer remains open. If arefrigerator door or freezer drawer is left open for more than 60 seconds, awarning alarm sounds at 30 second intervals.
HUMIDITY CONTROLLED CRISPER
The Humidity Controlled Crisper is designed to help keep your fruits andvegetables fresh and crisp. You can control the amount of humidity in thecrisper by adjusting the setting between Low and High.
GLIDE'N'SERVE
Glide'N'Serve provides storage space with a variable temperature controlthat keeps the compartment colder than the refrigerator. It is a convenientplace to store sandwiches or meat to be cooked.
AUTO CLOSING HINGE
The refrigeratordoorsand freezerdrawers closeautomaticallywitha slightpush. (Thedooronlyclosesautomaticallywhen itisopen atan anglelessthan30°.)
ICE PLUS
ice production can be increased by approximately 20 percent when thefreezer section is maintained at the coldest temperature for a 24-hourperiod.

4 IMPORTANT SAFETY INSTRUCTIONS
IMPORTANT SAFETY INSTRUCTIONS
READ ALL INSTRUCTIONS BEFORE USING THE APPLIANCE.
This guide contains many important safety messages. Always read and obey all safety messages.
This is the safety alert symbol. It alerts you to safety messages that inform you ofhazards that can kitl or hurt you or others, or cause damage to the product.
All safety messages will be preceded by the safety alert symbol and the hazardsignal word WARNING or CAUTION. These words mean:
_ WARNING You can be killed or seriously injured if you do not follow instructions.
_ CAUTION indicates an imminently hazardous situation which, if not avoided, may result
in minor or moderate injury, or product damage.
_ WARNING
To reduce the risk of fire, electric shock, or personal injury when using your product, basic safetyprecautions should be followed, including the following:
Power
• NEVER unplug your refrigerator by pulling on the power cord. Always grip the plug firmly and pull itstraight out from the outlet.
• If the supply cord is damaged, it must be replaced by the manufacturer or its service agent or asimilarly qualified person in order to avoid a hazard. Do not use a cord that shows cracks or abrasiondamage along its length or at either the plug or connector end.
• Do not use an uncertified power outlet.
• Unplug the power plug immediately in the event of a blackout or thunderstorm.• Plug in the power plug with the power cord facing downward.
Installation
Contact an authorized service center before you install or relocate the refrigerator,
When moving your refrigerator away from the wall, be careful not to roll over or damage the powercord.
Prior to use, ensure that you are connecting this product to a dedicated, grounded electrical outletrated for use with this product (t 15V, 60Hz, AC only). It is the user's responsibility to replace astandard 2-prong wall outlet with a standard 3-prong wall outlet.
Do not install the refrigerator where there may be a danger of the unit falling.
Use
DO NOT allow children to climb, stand, or hang on the refrigerator doors or on the shelves in therefrigerator. They could damage the refrigerator and seriously injure themselves.Do not hang on to or place heavy objects on the refrigerator's dispenser.
Do not place heavy or dangerous objects (bottles with liquid) on the refrigerator.Do not put live animals inside the refrigerator.
Do not allow children to climb into the product when it is in use.In the event of a gas leak (propane/LPG), ensure adequate ventilation and contact an authorized servicecenter before resuming use. Do not touch or disassemble the electric outlet of the refrigerator.In the event of a refrigerant leak, move flammable objects away from the refrigerator. Ensure adequateventilation and contact an authorized service center.
Do not use or place flammable substances (chemicals, medicine, cosmetics, etc) near the refrigeratoror store them inside the refrigerator. Do not place the refrigerator in the vicinity of flammable gas.Do not overfill or pack items tee tightly into door bins. Doing so may cause damage to the bin orpersonal injury if items are removed with excessive force.

IMPORTANT SAFETY INSTRUCTIONS 5
READ ALL INSTRUCTIONS BEFORE USING THE APPLIANCE.
To reduce the risk of fire, electric shock, or personal injury when using your product, basic safetyprecautions should be followed, including the following:
• This product is not to be used for special purposes such as the storage of medicine or test materialsor for use on ships, etc.
• Unplug the power plug before cleaning or repairing the refrigerator
• When you replace the light bulb in the refrigerator, unplug the refrigerator or turn off the power.
• Do not modify or extend the power cord.
• Do not use a dryer to dry the interior. Do not light a candle to remove interior odors.
• For your safety, this appliance must be properly grounded Have the wall outlet and the circuitchecked by a qualified electrician to make sure the outlet is properly grounded
• Do not use an outlet that can be turned off with a switch Do not use an extension cord It is the
user's responsibility to replace a standard 2-prong wall outlet with a standard 3-prong wall outlet.
• Do not, under any circumstances, cut or remove the third (ground) prong from the power cord.
• Do not use an adapter plug and plug the power plug into a multi-outlet extension cord.
• Disconnect the power cord immediately if you hear a noise, smell a strange odor or detect smokecoming from the appliance.
• Turn the power off if water or dust penetrates into the refrigerator. Call a service agent
• Do not disassemble or modify the refrigerator
• Do not put hands, feet, or metal objects below or behind the refrigerator
• Do not operate the refrigerator or touch the power cord with wet hands
• In refrigerators with automatic icemakers, avoid contact with the moving parts of the ejectormechanism or with the heating element that releases the cubes. Do not place fingers or hands on theautomatic ice-making mechanism while the refrigerator is plugged in
• When dispensing ice from the dispenser, do not use crystal ceramics
• Do not touch the cow surfaces in the freezer compartment with wet or damp hands, when yourrefrigerator is in operation
• Do not put glass containers, glass bottles or soda in the freezer.
• This appliance is not intended for use by persons (including children) with reduced physical, sensoryor mental capabilities, or lack of experience and knowledge, unless they have been given supervisionor instruction concerning the use of the appliance by a person responsible for their safety.
• Do not refreeze frozen food that has thawed completely Doing so may result in a serious healthissue.
• If you are throwing away your old refrigerator, make sure the CFC coolant is removed for properdisposal by a qualified servicer. If you release CFC coolant, you may be fined or imprisoned inaccordance with the relevant environmental law.
• Junked or abandoned refrigerators are dangerous, even if they are sitting for only a few days Whendisposing of the refrigerator, remove the packing materials from the door or take off the doors butleave the shelves in place so that children may not easily climb inside
• If connected to a circuit protected by fuses, use time delay fuse
_ WARNING
This product contains chemicals known to the State of California to cause cancer and birth defectsor other reproductive harm, Wash hands after handling.

6 IMPORTANT SAFETY INSTRUCTIONS
READ ALL INSTRUCTIONS BEFORE USING THE APPLIANCE.
To reduce the risk of fire, electric shock, or personal injury when using your product, basic safetyprecautions should be followed, including the following:
_ CAUTION
Installation
• The refrigerator must be properly installed in accordance with the Installer Instructions that weretaped to the front of the refrigerator.
• Be careful when you unpack and install the refrigerator. Immediately dispose of plastic and otherpacking materials out of reach of children.
• The appliance must be positioned for easy access to a power source.
Use
Close the door carefully when children are around.
Keep fingers out of pinch point areas; clearances between the doors and cabinets arenecessarily small. Be careful closing doors when children are nearby.
If you store food improperly, be aware that it may fall and cause injury.
Do not use aerosols near the refrigerator.
Do not store articles on the top of the appliance.
Maintenance
Do not use strong detergents like wax or thinners for cleaning. Clean with a soft cloth.
Wipe foreign objects (such as dust and water) off the prongs of the power plug and contactareas regularly.
Do not store, disassemble or repair the refrigerator by yourself.
Remove any dust or foreign matter from the power plug pins.
Do not use a wet or damp cloth when cleaning the plug.
If the refrigerator is disconnected from the power supply, you should wait for at least fiveminutes before plugging it back in.
If you notice a chemical or burning plastic smell or see smoke, unplug the refrigeratorimmediately and contact your LG Electronics Service Center.
SAVE THESE INSTRUCTIONS

COMPONENTS 7
COMPONENTS
Use this page to become more familiar with the parts and features of your refrigerator.
*The appearance and specifications of the actual product may differ depending on the model.
Refrigerafor Exferior
Filtered Water and
Ice Dispenser
Dispenses purified water and ice.
LED Display
Displays the refrigerator and
freezer temperature, the waterfilter condition and the dispenserstatus.
Control Panel
Sets the refrigerator and freezertemperatures, the water filter
condition and the dispenser mode.
Ez Handle
EasiJy opens the freezerdoor.
Handle
Opens and dosesthe door.
• RefrigeratorPreserves food.
LED Light
LED lights up whenthe freezer door is
opened.
Freezer
Preserves frozen food.

8 COMPONENTS
Refrigerafor Inferior
Water filter
Purifies water.
_!} NOTE
The filter should be replaced every
6 months, Please refer to the "Replacingthe filter" section in thismanual for details.
This function maynot be available,
depending on themodel.
LED interior lamps
The interior lamps light up the
inside of the refrigerator.
Indoor Ice Bin
Ice cubes are
automatically produced.
Crisper
Controls humidity and °
helps vegetab)es and
fruit to stay crisp.
Fixed Door Bin
Used to preservechilled food or drinks.
Pullout Drawer
Used for extra storage within
the freezer compartment.
Durabase '_ and Durabase '_)Divider
The Durabase Jsa storage space
recommended for the preservation of largefood items. The Durabase Divider is used
to organize the Durabase area into sections.It can be adjusted from side to side toaccommodate items of different sizes.
Dairy Product Bin
Used to preserve dairyproducts.
Adjustable
Refrigerator Shelf
The shelves in yourrefrigerator are adjustableto meet your individual
storage needs.
Guide Divider
The Guide Divider can be
used to organize the drinkor pitcher area.
Modular Door Bin
Interchangeable bins canbe arranged to suit yourstorage needs.
Auto Closing Hinge
The refrigerator doorsand freezer drawers
close automatically when
you push them slightly.
(The door only closes
automatica[Iy when it is
open at an angle of less
than 30°.)
-- Glide'N'Serve
Allows you to store fooditems at a differenttemperature than theregular refrigerator area.
F-Basket
Area in the freezer that
allows you to storesmaller items for quickcooling.

INSTALLATION9
INSTALLATION
Insfallafion Overview
Please read the following installation instructions first after purchasing this product or transportingit to another location.
Unpacking your
refrigerator
2 Choosing the proper
location
3 Disassembling/Assembling
........
4 Connecting the water
supply and water line
5 Leveling and Door
Alignment
_'.) NOTE
onnect to potable water supply only.}

10 INSTALLATION
Specificafions
The appearance and specifications listed in this manual may vary due to constant productimprovements.
Bottom4reezer refrigerator model LFXC24726 _ ................
Description French door refrigerator
Electrical requirements 115 VAC @ 60 Hz
Min. / Max. Water pressure 20 - 120 psi (138 - 827 kPa)
Dimensions 35 3/4" (W) X 30 7/8" (D) X 70 1/4" (H), 42 3/4" (D w/door open)
908 mm (W) X 784 mm (D) X 1782 mm (H), 1085 mm (D w/door open)
Net weight 304 Ib. (138 kg)

INSTALLATION 11
Unpacking Your Refrigerator
_ WARNING
Use two or more people to move andinstall the refrigerator. Failure to do socan result in back or other injury.Your refrigerator is heavy. When movingthe refrigerator for cleaning or service,be sure to protect the floor. Always pullthe refrigerator straight out when movingit. Do not wiggle or walk the refrigeratorwhen trying to move it, as floor damagecould occur.
Keep flammable materials and vapors,such as gasoline, away from therefrigerator. Failure to do so can result infire, explosion, or death.
Remove tape and any temporary labels from your
refrigerator before using. Do not remove any
warning-type labels, the model and serial number
label, or the Tech Sheet that is located under the
front of the refrigerator.
To remove any remaining tape or glue, rub thearea briskly with your thumb. Tape or glue residuecan also be easily removed by rubbing a smallamount of liquid dish soap over the adhesive withyour fingers. Wipe with warm water and dry.
Do not use sharp instruments, rubbing alcohol,flammable fluids, or abrasive cleaners to removetape or glue. These products can damage thesurface of your refrigerator.
Refrigerator shelves are installed in the shippingposition. Please reinstall shelves according toyour individual storage needs.
Choosing the Proper Location
Select a place where a water supply canbe easily connected for the automaticicemaker.
-_) NOTE
The water pressure must be 20 - 120 psior 138 - 827 kPa or 1.4 - 8.4 kgf/cm _. Ifthe refrigerator is installed in an area withlow water pressure (below 20 psi), you ca_install a booster pump to compensate forthe low pressure.
The refrigerator should always be pluggedinto its own individual properly groundedelectrical outlet rated for 115 Volts, 60 Hz,AC only, and fused at 15 or 20 amperes.This provides the best performanceand also prevents overloading housewiring circuits which could cause a firehazard from overheated wires. It is
recommended that a separate circuitserving only this appliance be provided.
-T_ WARNING
o reduce the risk of electric shock, do not
nstall the refrigerator in a wet or damparea.
Flooring
To avoid noise and vibration, the unit must beleveled and installed on a solidly constructedfloor. If required, adjust the leveling legs tocompensate for the unevenness of the floor.The front should be slightly higher than therear to aid in door closing. Leveling legs canbe turned easily by tipping the cabinet slightly.Turn the leveling legs to the left to raise theunit or to the right to lower it. (See Levelingand Door Alignment.)
'_(2 NOTE
Installing on carpeting, soft tile surfacesa platform or weakly supported structur_
is not recommended i

12 INSTALLATION
Ambient Temperature
Install this appliance in an area where thetemperature is between 55°F (13°C) and 110°F(43°C). If the temperature around the applianceis too low or high, cooling ability may beadversely affected.
Measuring the Clearances
Too small of a distance from adjacent itemsmay result in lowered freezing capability andincreased electricity consumption charges.Allow at least 24 inches (61 cm) in front of therefrigerator to open the doors, and at least2 inches (5.08 cm) between the back of therefrigerator and the wall.
24" (61 cm)
i
iIiii
_- 2" (5.08 cm)
Removing/Assembling the
Refrigerator Door Handles
@ NoTE /I When it is necessary to move the JI refrigerator through a narrow opening,I removing the doors is the recommended II procedure. If it is necessary to remove /
(,the handles, follow the directions below._
Removing the Handles
Loosen the set screws D with a s/s2 in.
Allen wrench and remove the handle.
Loosen the mounting fasteners D that
connect to the refrigerator door and handle
using a//4 in. Allen wrench, and remove
the mounting fasteners.
i
Assembling the Handles
1 Assemble the mounting fasteners _ at
both ends of the handle using a/4 in.Alien wrench.
2 Place the handle on the door by fitting
the handle footprints over the mountingfasteners and tightening the set screwswith a s/s2in. Allen wrench.

INSTALLATION 13
Removing/Assembling fheFreezer Drawer Handle
Removing "the Handles
1 Loosen the set screws D located on the
lower side of the handle with a 1/sin. Atlenwrench and remove the handle.
Loosen the mounting fasteners _ thatconnect to thefreezer drawerand handleusing a//4 in.Allen wrench,and remove
the mountingfasteners.
Assembling "the Handles
1 Assemble the mounting fasteners D at
both ends of the handle using a//4 in. Atlenwrench.
Place the handle on the door by fitting
the handle
footprints overthe mountingfasteners and
tightening theset screwswith a//g in.Allen wrench.
Removing/Assembling fheDoors and Drawers
When it is necessary to move the refrigeratorthrough a narrow opening, removing the doorsis the recommended procedure.
F_ WARNING
• If your entrance door is too narrow for therefrigerator to pass through, remove therefrigerator doors and move the refrigeratorsideways through the doorway.
• Use two or more people to remove andinstall the refrigerator doors. Failure to doso can result in back or other injury.
• Disconnect the electrical supply to therefrigerator before installing. Failure to doso could result in serious injury or death.
• Do net put hands, feet or other objects intothe air vents or bottom of the refrigerator.You may be injured or receive an electricalshock.
• Be careful when handling the hinge andstopper, to avoid injury.
° Remove food and bins before detaching thedoors and drawers.
r_ WARNING
When assembling or disassembling thehandle:
• Grasp the handle tightly to avoid dropping it.
• Do not swing the handle into nearby peopleor animals.
• Make sure that the bracket hole of the
handle fits properly into the stopper bolt ofthe door. Assemble the set screws to fix
the handle into place.
• Make sure that there is not a gap betweenthe door and handle after assembling thehandle.
\__J
14 INSTALLATION
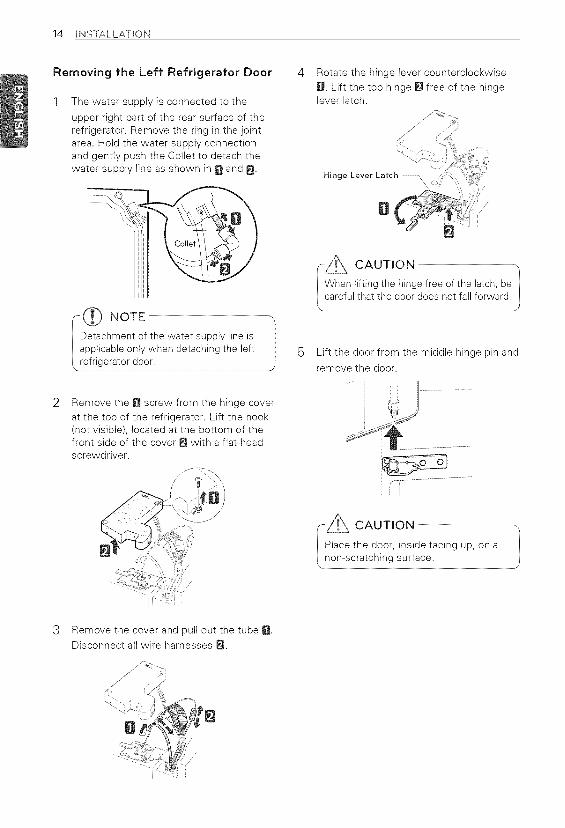
Removing the Left Refrigerator Door
The water supply is connected to the
upper right part of the rear surface of therefrigerator. Remove the ring in the jointarea. Hold the water supply connectionand gently push the Collet to detach thewater supply line as shown in O and _.
@ NoTEDetachment of the water supply line isapplicable only when detaching the leftrefrigerator door.
4
5
Rotate the hinge lever counterclockwiseD. Lift the top hinge Q free of the hingelever latch.
Hinge Lever Latch
D
__ CAUTION 1en lifting the hinge free of the latch, be
careful that the door does not fall forward.
Lift the door from the middle hinge pin and
remove the door.
2 Remove the D screw from the hinge cover
at the top of the refrigerator. Lift the hook(not visible), located at the bottom of thefront side of the cover 0 with a flat-headscrewdriver.
3 Remove the cover and pull out the tube •Disconnect all wire harnesses Q.

INSTALLATION 15
Removing the Right RefrigeratorDoor
Remove the top hinge cover screw O.
Lift the hook (not visible), located at thebottom of the front side of the cover _,with a flat-head screwdriver.
3 Rotate the hinge lever D clockwise.
Lift the top hinge Q free of the hingelever latch.
-- Hinge Lever Latch
D
2 Detach the wire harness D.4
.._ CAUTION ....
When lifting the hinge free of the hinge Ilever latch, be careful that the door /does not fall forward. J
Lift the door from the middle hinge pin and
remove the door.
CAUTION -/Place the door on the floor, inside
.facing up on a non-scratching surface

16 INSTALLATION
Assembling "the Right Refrigerator Door
Install the right-side door first.
1 Make sure that the plastic sleeve is
inserted in the bottom of the door. Lower
the door onto the middle hinge pin asshown in the figure.
3 Connect the wire harness D.
2 Fit the hinge D over the hinge lever latch
and slot it into place. Rotate the levercounterclockwise to secure the hinge.
4 Make sure that the door-switch located
inside the cover is tightly connected.Position the cover in its place. Insert andtighten the cover screw Q.
, ............j- \ _ ,
..... Hinge Lever Larch

INSTALLATION 17
Assembling "the Left RefrigeratorDoor
Install the left refrigerator door after the rightdoor is installed.
1 Make sure that the plastic sleeve is
inserted in the bottom of the door. Install
the refrigerator door onto the middle hinge.
4 Push the water supply tube into the hole
on the top case and pull it through the
backptate.
//
Fit the hinge D over the hinge lever latch
and slot it into place. Rotate the leverclockwise _ and fasten the hinge.
Hinge Lever Latch
:3 Connect all the wire harnesses.
Hold the water supply connection and
gently push in the coiiet to connect thewater supply line as shown in O and _.insert the tube at least 5/8inch (15 mm)into the connector. Assemble the clip tothe joint part for fastening.
6
co,, ....
Make sure that the door-switch located
inside the cover is tightly connected. Placethe cover O in its )osition and tighten thecover screw _.

18 INSTALLATION
,_-_ NOTE
) Gently press the Collet and insert the
tube until only one line shows on the
tube.
(Correct)
(Incorrect)
2) Pull the tube to make sure that thetube is tightly fastened and then insertthe clip.
Removing fhe Freezer Drawers
In the following figures, the Pullout Drawerlocated above the freezer drawer is not shown
for clarity.
_-_ CAUTION -,
Use two or more people to remove andinstall the freezer drawer. Failure to do so
can result in back or other injury.
Do not hold the handle when removingor replacing the drawer. The handle maycome off and it could cause personalinjury.
Be careful of sharp hinges on both sidesof the drawer.
When you lay the drawer down, becareful not to damage the floor.Do not sit or stand on the freezer drawer.
• To prevent accidents, keep childrenand pets away from the drawer. Do notleave the drawer open. If the Durabase ®storage bin is removed from the freezerdrawer, there is sufficient space for asmall child or pet to crawl inside.
(Durabase®)J

INSTALLATION 19
1 Pull the drawer open to full extension.
2 Gently lift and pull out the ice bin.
3 Remove the screws from the rails at bothends.
On the left rail, use a flat blade screwdriverto push in on the tab to release the drawerfrom the rail, as shown below. Once theleft side is loose, push the tab on the rightside with your finger to release the drawer.Lift the front of the drawer up, then pull itstraight out.
4 Grip both sides of the drawer and pull it up to
remove it from the rails.
_ CAUTION
Do not hold the handle when removingor replacing the drawer. The handle may
come off, causing personal injury.
5 Hold both rails and push them in
simultaneously.

20 INSTALLATION
Assembling fhe Freezer Drawers
1 Pull out both rails simultaneously, until both
rails are fully extended.
3 Lower the door into its final position and
tighten the screws located on both sides.
2 Grasp the drawer on each side and hook the
drawer supports into the rail tabs located onboth sides.
4 Insert the drawer into the frame, and push
the drawer back into place until you hear aclick.
-_ CAUTION
Do not hold the handle when removingor replacing the drawer. The handle
may come off, causing personal injury.
5 Insert the lower basket in the rail
assembly.

INSTALLATION 21
Connecting the Wafer Line
Before You Begin
This water line installation is not covered by therefrigerator warranty. Follow these instructionscarefully to minimize the risk of expensive waterdamage.
Water hammer (water banging in the pipes) inhouse plumbing can cause damage to refrigeratorparts and can lead to water leakage or flooding.Call a qualified plumber to correct water hammerbefore installing the water supply line to therefrigerator.
_----_ CAUTION
To prevent burns and product damange,only connect the refrigerator water line toa cold water supply.
If you use your refrigeretor before connecting
the water line, make sure the icemaker powerbutton is turned ofF.
S-_ CAUTION --,
Do not install the icemaker tubing in /areas where temperatures fall belowfreezing.
Water Pressure
The water pressure must be between 20 and120 psi. If the refrigerator is installed in an areawith low water pressure (below 20 psi), you caninstall a booster pump to compensate for the lowpressure.
If a reverse osmosis water filtration system isconnected to your cold water supply, this waterline installation is not covered by the refrigeratorwarranty. Follow the instructions carefully tominimize the risk of expensive water damage.
If a reverse osmosis water filtration system isconnected to your cold water supply, the waterpressure to the reverse osmosis system needsto be a minimum of 40 to 60 psi (276-414 kPa or2.8-4.2 kgf/cm 2, less than 2.0-3.0 sec. to fill a cupof 7 oz or 198 cc capacity).
,-_ CAUTION
Wear eye protection during installationto prevent injury.
If the water pressure from the reverse osmosissystem is less than 20 psi or 138 kPa or 1.4 kgf/cm2 (takes more than 4.0 sec to fill a cup of 7 ozor 198 cc capacity):
• Check to see if the sediment filter in
the reverse osmosis system is blocked.Replace the filter if necessary.
• Allow the storage tank on the reverseosmosis system to refill after heavyusage.
• If the issue concerning water pressurefrom reverse osmosis remains, call alicensed, qualified plumber.
• Atl installations must be in accordancewith local plumbing code requirements.
What You Will Need
Copper Tubing, 1A in. outer diameter, to
connect the refrigerator to the watersupply. Be sure both ends of the tubingare cut square.
/,42
To determine how _"much tubing you need:measure the distancefrom the water valve on the back of
the refrigerator to the water supplypipe. Then, add 8 feet (2.4 m). Be surethere is sufficient extra tubing (about 8feet [2.4 m] coiled into 3 turns of about10 in. [25 cm] diameter) to allow the
refrigerator to move out from the wanafter installation.
Power drill.
* 1/2 in. or adjusfabme
wrench.
®
®
Ra_, blade and PhiHips
head screwdrivers.Two 1/t in. outer
dlarne_er compression
nu_s and 2 ferrumes (sleeves) to connect the
copper tubing to the shutoff valve and
the refrigerator water valve.

22 INSTALLATION
• If your existing copper water line has aflared fitting at the end, you will needan adapter (available at plumbing supplystores) to connect the water line to the
refrigerator OR you can cut off the flaredfitting with a tubecutter and then use a
compression fitting.• Shutoff valve !a
connect I'o the cold water line. The shutoffvalve should have a water inlet with aminimum inside diameter of 5/32 in. atthe point of connection to the COLDWATER LINE. Saddle-type shutoff valvesare included in many water supply kits.Before purchasing,make sure a saddle-
type valve complieswith your localplumbing codes.
._ _) NOTE
A self piercing saddle type water valveshould not be used. #
Water Line Installation Instructions
'_ WARNING
When using any electrical device(such as a power drill) duringinstallation, be sure the device is
battery powered, double insulatedor grounded in a manner that willprevent the hazard of electric shock.
install the shutoff valve on the nearest
frequently used drinking water line.
1 SHUT OFF THE MAIN WATER SUPPLY
Turn on the nearest faucet to relieve thepressure on the line.
2 CHOOSE THE VALVE LOCATION
Choose a location forthe valve that is easily (_(,,_accessible. It is best toconnect into the side of avertical water pipe. Whenit is necessary to connectinto a horizontal waterpipe, make the connection to the top orside, rather than at the bottom, to avoiddrawing off any sediment from the waterpipe.
3 DRILL THE HOLE FOR THE VALVE
Drill a _Ain. hole in
the water pipe usinga sharp bit. Removeany burrs resultingfrom drilling the holein the pipe. Be carefulnot to allow waterto drain into the drill. Failure to drill a _Ain.hole may result in reduced ice productionor smaller cubes.
ida) NOTE ...................................
The hookup line cannot be white, ptastic /
tubing. Licensed plumbers must use Ionly copper tubing (NDA tubing #49595 Ior #49599) or Cross Link Polyethylene I
(PEX) tubing

INSTALLATION 23
4 FASTEN THE SHUTOFF VALVE
Fasten the shutoff valve to the cold water
pipe with the pipe clamp.
Pipe Clamp_
Saddle-Type _ _ _Vertical Cold
Shutoff Valve _ I Water Pipe
r- _) NOTE
Commonwealth of Massachusetts
Plumbing Codes 248CMR shall beadhered to. Saddle valves are illegaland their use is not permitted inMassachusetts. Consult with yourlicensed plumber.
TIGHTEN THE PIPE CLAMP
Tighten the clamp screws until the sealingwasher begins to swell.
NOTE, +Do not overfighten the clamp
or you may crush the tubing.
Pipe Clamp
Clamp Screw
Washer
t Inlet End
ROUTE THE TUBING
Route the tubing between the cold waterline and the refrigerator.
Route the tubing through a hole drilled inthe wall or floor (behind the refrigerator oradjacent base cabinet) as close to the wallas possible.
_ C_ NOTE
Be sure there is sufficient extra tubing
(about 8 feet coiled into 3 turns ofabout 10 in. diameter) to allow therefrigerator to move out from the wall
after installation.
7 CONNECT THE TUBING TO THE VALVE
Place the compression nut and ferrule (sleeve)for copper tubing onto the end of the tubingand connect it to the shutoff valve. Make
sure the tubing is fully inserted into the valve.Tighten the con- )ression nut securely.
Saddle-Type / Compression
Shutoff Valve +_ _ Nut
Packing Nu_m_+_t'__+ _r
Outlet Valve ule (sleeve)
S FLUSH OUT THE TUBING
Turn the main water supply on and flush outthe tubing until the water is clear.
Shut the water off at the __water valve after about
one quart of water hasbeen flushed through thetubing.
9 CONNECT THE TUBING TO THE
REFRIGERATOR
_ WARNING
Before making the connection to therefrigerator, be sure that the refrigeratorpower cord is not plugged into the wall
outlet.
a. Remove the plastic flexible cap from thewater valve.
b. Place the compression nut and ferrule(sleeve) onto the end of the tubing asshown.
c. Insert the end of the copper tubing intothe connection as far as possible. Whileholding the tubing, tighten the fitting.
Tubing Clamp _ 1,4.in+ Tubing
Compression'_IIIIIAX It //Y_/t_tt tl
Nut ....... +......Ferrule _ _ ff
(sleeve) Refrigerator
..... : _1- Connection

24 INSTALLATION
10 TURN THE WATER ON AT THE SHUTOFF
VALVE
Tighten any connections that leak.
Turning On fhe Power
1 Plug in the refrigerator.
CAUT,ON 1Check to see if leaks occur at the waterline connections.
11 PLUG IN THE REFRIGERATOR
Arrange the coil of tubing so that itdoes not vibrate against the back of therefrigerator or against the waN. Push therefrigerator back to the waN.
_-_ CAUTION
• Connect to a rated power outlet.• Have a certified electrician check
the wait outlet and wiring for propergrounding.
• Do not damage or cut off the groundterminal of the power plug.
12 START THE ICEMAKER
Turn the icemaker on at the control panel.
The icemaker wilt not begin to operateuntil it reaches its operating temperatureof 15°F (-9°C) or below. It wilt then beginoperation automatically if the icemaker hasbeen turned on.

INSTALLATION 25
Leveling and Door Alignmenf
Leveling
After installing, ptug the refrigerator's powercord into a 3-prong grounded outlet and pushthe refrigerator into the final position.
Your refrigerator has two front leveling legs--one on the right and one on the left. Adjust thelegs to alter the tilt from front-to-back or side-to-side. If your refrigerator seems unsteady, oryou want the doors to close more easily, adjustthe refrigerator's tilt using the instructionsbelow:
Door Alignment
Both the left and right refrigerator doors havean adjustable nut, located on the bottom hinge,to raise and lower them to align properly.If the space between your doors is uneven,follow the instructions below to align the doorsevenly:
Use the wrench (included with the Owner's
Manual) to turn the nut in the door hinge toadjust the height. Turn it to the right to raise orto the left to lower the height.
Turn the leveling leg to the left to raise
that side of the refrigerator or to the right
to lower it. It may take several turns of the
leveling leg to adjust the tilt of the
refrigerator.
_ NOTE
A flare nut wrench works best, but anopen-end wrench will suffice.Do not over-tighten.
Open both doors again and check to make
sure that they close easily. If the doors donot close easily, tilt the refrigerator slightlymore to the rear by turning both levelinglegs to the left. It may take several moreturns, and you should turn both levelinglegs the same amount.

26 HOWTO USE
HOW TO USE
Before use
Clean the refrigerator.
Clean your refrigerator thoroughly and wipe off all dust that accumulated duringshipping.
t CAUTION
o not scratch the refrigerator with a sharp object or use a detergent thatcontains alcohol, a flammable liquid or an abrasive when removing any tapeor adhesive from the refrigerator,.
Do not peel off the model or serial number label or the technical informationon the rear surface of the refrigerator.
_ @ NOTE
Remove adhesive residue by wiping it off with your thumb or dish detergent.
Connect the power supply.
Check if the power supply is connected before use.Read the "Turning On the Power" section.
Turn off the icemaker if the refrigerator is not yet connected to the
water supply.Turn off the automatic icemaker and then plug the power plug of the refrigeratorinto the grounded electric outlet.
* This is applicable only to certain models.
f-_ CAUTION
Running the automatic icemaker before connecting it to the watersupply may cause the refrigerator to malfunction.
Wait for the refrigerator to cool.Allow your refrigerator to run for at least two to three hours before putting food init. Check the flow of cold air in the freezer compartment to ensure proper cooling.
-_ CAUTION
utting food in the refrigerator before it has cooled could cause thefood to spoil, or a bad odor could linger inside the refrigerator.
The refrigerator makes a loud noise after initial operation.
This is normal. The volume will decrease as the temperature lowers.
Open refrigerator doors and freezer drawers to ventilate the interior.
The inside of the refrigerator may smell like plastic at first. Remove any adhesivetape from inside the refrigerator and open the refrigerator doors and the freezerdrawers for ventilation.

HOWTO USE 27
Confrol Panel
* Depending on the model, some of the following functions may not be available,
Control Panel Features
LED Display
Indicator
Press the Ice Type button to choose either cubedor crushed ice. The cubed or crushed ice icon willilluminate.
Refrigerator Temperature ![c
Indicates the set temperature of the refrigeratorcompartment in Celsius (°C) or Fahrenheit (°F).
_o c|l|l oFreezer Temperature ....QU r
Indicates the set temperature of the freezercompartment in Celsius (°C) or Fahrenheit (°F).
To change the temperature mode from °F to °C(or vice versa) press and hold the Refrigeratorand Freezer temperature buttons simultaneouslyfor approximately five seconds. The temperatureindication on the display window switchesbetween Celsius and Fahrenheit.
NOTE
he displayed temperature is the targetemperature, and not the actual temperaturef the refrigerator. The actual refrigerator
emPerature depends on the food inside the
Control
Button
Fresh Air Filter L_:_J [L_=_ On some ]models)
Power PWR
The Fresh Air Filter helps remove odors from therefrigerator. The Fresh Air Filter has two settings,Auto and Power(PWR). In Auto mode, the Fresh
Air Filter will cycle on and off in increments of tenminutes on and one hundred ten minutes off. Ifset to the Power(PWR) mode, the Fresh Air Filterwill stay on continuously for four hours, cycling onand off in increments of ten minutes on and fiveminutes off. After four hours, the Fresh Air Filterwill switch back to Auto mode.
• Press the Air Filter button once for
Power(PWR) mode.
• Press the Air Filter button again to switchback to Auto mode.

28 HOWTO USE
Control Panel Features (continued)
@ @ %SW]Change Filter [ I
When the Change Filter icon turns on, the airfilter needs to be replaced. After replacing the airfilter, press and hold the Fresh Air Filter button forthree seconds to turn the icon light off. Changingthe air filter approximately every six months isrecommended.
Ice Plus "_
This function increases both ice making andfreezing capabilities.* When you touch the Ice Plus button, the
graphic will illuminate in the display andwill continue for 24 hours. The function will
automatically shut off after 24 hours.
* You can stop this function manually by touchingthe button one more time.
IceOn
Ice On/Off C_Ice Off
Press the Ice On/Off button for three seconds toturn the icemaker on/off.
Light -b-
When you press the Light button, the dispenserlight will turn on and the indicator will appear onthe LED display.
Door Alarm 4))
• When power is connected to the refrigerator,the door alarm is initially set to ON. When youpress the Door Alarm button, the display willchange to OFF and the Door Alarm function willdeactivate.
• When either the refrigerator or the freezerdoor is left open for more than 60 seconds, thealarm tone will sound to let you know that thedoor is open.
• When you close the door, the door alarm willstop.
Lock nEZ:]
The Lock function disables every other buttonon the display.
• When power is initially connected to therefrigerator, the Lock function is off.
• If you want to activate the Lock function to lockother buttons, press and hold the Lock buttonfor three seconds or more. The Lock icon willdisplay and the Lock function is now enabled.
• To disable the Lock function, press and hold theLock button for approximately three seconds.
Power Saving Mode
• When the refrigerator is in the Power SavingMode, the display will remain off until a dooris opened or a button is pressed. Once on, thedisplay will remain on for 20 seconds.
Change Water Filter _°_°_
When the water filter indicator turns on, youneed to change the water filter. After changingthe water filter, press and hold the Change Filterbutton for three seconds to turn the indicatorlight off. You need to change the water filterapproximately every six months.
r _ CAUTION
Display Mode (For Store Use Only)
The Display Mode disables all cooling in therefrigerator and freezer sections to conserveenergy while on display in a retail store, Whenactivated OFF will display on the control paneland the display will remain on for 20 seconds.
To deactivate / activate:
With either refrigerator door opened, pressand hold the Refrigerator and Ice Plus buttonsat the same time for five seconds. The control
panel will beep and the temperature settingswill display to confirm that Display Modeis deactivated. Use the same procedure toactivate the Display Mode.

HOWTO USE 29
In-Door ice Bin
* Depending on the model, some of thefollowing functions may not be available.
_"_ CAUTION
, Keep hands and tools out of the icecompartment door and dispenser chute.Failure to do so may result in damage orpersonal injury.
, The icemaker will stop producing ice whenthe in-door ice bin is full. If you need moreice, empty the ice bin into the extra ice binin the freezer compartment. During use,the ice can become uneven causing theicemaker to misread the amount of ice
cubes and stop producing ice. Shaking theice bin to level the ice within it can reducethis problem.
, Storing cans or other items in the ice bin widamage the icemaker.
, Keep the ice compartment door closedtightly. If the ice compartment door is notclosed tightly, the cold air in the ice bin willfreeze food in the refrigerator compartment.This could also cause the icemaker to stopproducing ice.
, If the Ice On/Off button on the display isset to OFF for an extended period of time,the ice compartment will gradually warmup to the temperature of the refrigeratorcompartment. To prevent ice cubes frommelting and leaking from the dispenser,ALWAYS empty the ice bin when theicemaker is set to OFF for more than a fewhours.
2 To remove the in-door ice bin, grip the
front handle, slightly lift the lower part,and slowly pull out the bin as shown.
Assembling "the In-Door Ice Bin
1 Carefully insert the in-door ice bin while
slightly slanting it to avoid contact with theicemaker.
2 Avoid touching the auto shutoff (feeler
arm) when replacing the ice bin. See thelabet on the ice compartment door fordetails.
Det'aching "the In-Door Ice Bin
1 Gently pull the handle to open the ice
compartment.
_ CAUTION
en handling the ice bin,eep hands away from theemaker tray area to avoid
ersonal injury.

30 HOWTO USE
Automatic Icemaker
* Depending on the model, some of thefollowing functions may not be available.
Ice is made in the automatic icemaker and sent
to the dispenser. The icemaker will produce70-182 cubes in a 24-hour period, dependingon freezer compartment temperature, roomtemperature, number of door openings andother operating conditions.
• It takes about 12 to 24 hours for a newlyinstalled refrigerator to begin making ice. Wait72 hours for full ice production to occur.
• Ice making stops when the in-door ice binis full. When full, the in-door ice bin holdsapproximately 6 to 8 (12-16 oz) glasses of ice.
• Foreign substances or frost on the auto shutoff(feeler arm) can interrupt ice production. Makesure the feeler arm is clean at all times for
proper operation.
• To increase ice production, use the Ice Plusfunction. The function increases both ice
making and freezing capabilities.
-_ WARNING
Personal Injury HazardDO NOT place fingers or hands on theautomatic ice making mechanism while the
refrigerator is plugged in
Jcemaker
Auto shutoff (feeler arm)
Turning the Automatic IcemakerOn or Off
To turn the automatic icemaker On/Off, pressand hold the Ice On/Off button on the controlpanel for three seconds.

HOWTO USE 31
Automatic Icemaker
(continued)
-_ CAUTION
• The first ice and water dispensed mayinclude particles or odor from the watersupply line or the water tank.
• Throw away the first few batches of ice.This is also necessary if the refrigerator hasnot been used for a long time.
• Never store beverage cans or other items inthe ice bin for the purpose of rapid cooling.Doing so may damage the icemaker or thecontainers may burst.
• If discolored ice is dispensed, check thewater filter and water supply. If the problemcontinues, contact a qualified servicecenter. Do not use the ice or water until the
problem is corrected.
• Keep children away from the dispenser.Children may play with or damage thecontrols.
• The ice passage may become blocked withfrost if only crushed ice is used. Remove thefrost that accumulates by removing the icebin and clearing the passage with a rubberspatula. Dispensing cubed ice can also helpprevent frost buildup.
° Never use thin crystal glass or crockery tocollect ice. Such containers may chip orbreak resulting in glass fragments in the ice.
° Dispense ice into a glass before filling itwith water or other beverages. Splashingmay occur if ice is dispensed into a glassthat already contains liquid.
° Never use a glass that is exceptionallynarrow or deep. Ice may jam in the icepassage and refrigerator performance maybe affected.
° Keep the glass at a proper distance fromthe ice outlet. A glass held too close to theoutlet may prevent ice from dispensing.
° To avoid personal injury, keep hands out ofthe ice door and passage.
° Never remove the dispenser cover.
° If ice or water dispenses unexpectedly, turnoff the water supply and contact a qualifiedservice center.
When You Should Turn the
Icemaker Off
* When the water supply will be shut offfor several hours.
* When the ice bin is removed for morethan one or two minutes.
* When the refrigerator will not be usedfor several days.
NOTE -,
he ice bin should be emptied when the
ce On/Off button is turned to the OFF I
.)
Normal Sounds You May Hear
* The icemaker water valve wilt buzz asthe icemaker fills with water. If the
power button has been turned on, theice maker wilt buzz even if it has not yetbeen hooked up to water. To stop thebuzzing, press the power button to turnit off.
'"@ NOTE
Keeping the power turned on to theicemaker before the water line isconnected can damage the icemaker.
° You will hear the sound of cubes
dropping into the bin and water runningin the pipes as the icemaker refills.
Preparing For Vacation
Set the icemaker power button to OFF and
shut off the water supply to the refrigerator.
@ NOTE }The ice bin should be emptied any time
the Ice On/Off button is turned off.
If the ambient temperature will drop belowfreezing, have a qualified technician drainthe water supply system to prevent seriousproperty damage due to flooding caused byruptured water lines or connections.
\

32 HOWTO USE
Ice and Wafer Dispenser
Depending on the model, some of thefollowing functions may not be available.
_ CAUTION
Keep children away from the dispenser.Children may play with or damage thecontrols.
\
Dispenser
Using the Dispenser
To dispense cold water, push on thewater switch with a glass.
To dispense ice, push on the ice switchwith a glass.
_ @ NOTE
If discolored ice is dispensed, checkthe water filter and water suppty. If theproblem continues, contact a qualifiedservice center. Do not use the ice or
water until the problem is corrected.
The dispenser will not operate wheneither of the refrigerator doors are open.
If dispensing water or ice into a containerwith a small opening, place it as close tothe dispenser as possible.
Some dripping may occur afterdispensing. Hold your cup beneaththe dispenser for a few seconds afterdispensing to catch all of the drops.
Incorrect Way €orrect WaY
Water
Ice
CAUTION
row away the first few batches of iceabout 24 cubes). This is also necessary
f the refrigerator has not been used for
Locking the Dispenser
Press and hold the Alarm and Lock buttons
simultaneously for three seconds to lock thedispenser and alt the control panel functions.Follow the same instructions to unlock.
Cleaning the Dispenser Stand
1 Grip the stand with both hands and pull it
out.
2 Wipe out dirty areas with a clean cloth.

HOWTO USE 33
Sforing Food
Food Preservation Location
Each compartment inside the refrigerator is designed to store different types of food.Store your food in the optimal space to enjoy the freshest taste.
y Product BinVegetable storage(Crisper)Preserves vegetables andfruit.
Ice storage bin
If a large amount of ice isneeded, transfer the ice inthe in-door ice bin to the ice
storage bin,
Durabase ¢
Largest storage space inthe freezer,
Adjustable refrigerator shelf
Adjustable shelves to meetyour individual storageneeds.
Modular door binStore drinks such as
juice and soda,as well ascondiments,saladdressingsandother food items.
I Glide'N'ServeProvidesstoragespacewith avariabletemperature control thatkeepsthe compartment at a differenttemperaturethan the refrigerator.It isa convenientplaceto storesandwichesor meat to be cooked.
,-_ CAUTION
• Do not store food with high moisture content towards the top of the refrigerator. The moisturecould come in direct contact with the cold air and freeze.
• Wash food before storing it in the refrigerator. Vegetables and fruit should be washed, and foodpackaging should be wiped down to prevent adjacent foods from being contaminated.
• If the refrigerator is kept in a hot and humid place, frequent opening of the door or storing a lot ofvegetables in the refrigerator may cause condensation to form. Wipe off the condensation with aclean cloth or a paper towel.
• If the refrigerator door or freezer drawer is opened or closed too often, warm air may penetrate therefrigerator and raise its temperature. It can also increase the running costs of the unit.
• Do not overfill or pack items tee tightly into door bins. Doing so may cause damage to the bin orpersonal injury if items are removed with excessive force.
• Do not store glass bottles in the pantry. If they are frozen, they can break and cause personal injury.\
/_ NOTEIf you are leaving home for a short period of time, like a short vacation, the refrigerator shouldbe left on. Refrigerated foods that are able to be frozen will stay preserved longer if stored in thefreezer.
• If you are leaving the refrigerator turned off for an extended period of time, remove all food andunplug the power cord. Clean the interior, and leave the door open to prevent fungi from growingin the refrigerator.

34 HOWTO USE
Food Storage Tips
The following tips may not be applicabledepending on the model.
Wrap or store food in the refrigerator in airtightand moisture-proof material unless otherwisenoted. This prevents food odor and taste transferthroughout the refrigerator. For dated products,check date code to ensure freshness.
Food How to
Butter or Keep opened butter in a coveredMargarine dish or closed compartment.
When storing an extra supply,wrap in freezer packaging andfreeze.
Cheese Store in the original wrappinguntil you are ready to use it.Once opened, rewrap tightly inplastic wrap or aluminum foil.
Milk Wipe milk cartons. For coldestmilk, place containers oninterior shelf.
Eggs Store in original carton oninterior shelf, not on door shelf.
Fruit Do not wash or hull the fruituntil it is ready to be used. Sortand keep fruit in its originalcontainer, in a crisper, or storein a completely closed paperbag on a refrigerator shelf.
LeafyVegetables
Vegetableswith skins(carrots,peppers)
Fish
Remove store wrapping andtrim or tear off bruised anddiscolored areas. Wash in cold
water and drain. Place in plasticbag or plastic container andstore in crisper.
Place in plastic bags or plasticcontainer and store in crisper.
Store fresh fish and shellfish
in the freezer section if theyare not being consumed thesame day of purchase. It isrecommended to consumefresh fish and shellfish the
same day purchased.
Leftovers Cover leftovers with plastic wrapor aluminum foil, or store inplastic containers with tight lids.
Storing Frozen Food
d!)NOTE "/Check a freezer guide or a reliable cookbook Jfor further information about preparing foodJ
.J
Freezing
Your freezer will not quick-freeze a largequantity of food. Do not put more unfrozenfood into the freezer than will freeze within
24 hours (no more than 2 to 3 Ibs. of food percubic foot of freezer space). Leave enoughspace in the freezer for air to circulate aroundpackages. Be careful to leave enough room atthe front so the door can close tightly.
Storage times will vary according to the qualityand type of food, the type of packaging or wrapused (how airtight and moisture-proof) andthe storage temperature. Ice crystals inside asealed package are normal. This simply meansthat moisture in the food and air inside the
package have condensed, creating ice crystals.
NOTE
Allow hot foods to cool at room temperaturefor 30 minutes, then package and freeze.
Cooling hot foods before freezing saves

HOWTO USE 35
Storing Frozen Food (continued)
Packaging
Successful freezing depends on correctpackaging. When you close and seal thepackage, it must not altow air or moisture in orout. If it does, you could have food odor andtaste transfer throughout the refrigerator andcould also dry out frozen food.
Packaging recommendations:
Rigid plastic containers with tight-fittinglids
Straight-sided canning/freezing jars
Heavy-duty aluminum foil
Plastic-coated paper
Non-permeable ptastic wraps
Specified freezer-grade self-sealing plasticbags
Follow package or container instructions forproper freezing methods.
Humidify Confrolled Crisperand Glide'N°Serve
Humidify Cont"rolled Crisper
* Depending on the model, some of thefollowing functions may not be available.
The crispers provide fresher tasting fruitand vegetables by letting you easily controlhumidity inside the drawer.
You can control the amount of humidity inthe moisture-sealed crispers by adjusting thecontrol to any setting between Vegetable andFruit.
Vegetable keeps moist air in thecrisper for best storage of fresh, leafyvegetables.
Fruit lets moist air out of the crisper forbest storage of fruit.
Do not use
Bread wrappers
Non-polyethylene plastic containers
Containers without tight lids
Wax paper or wax-coated freezer wrap
Thin, semi-permeable wrapGlJde'N'Serve
The Glide'N'Serve provides storage spacewith a variable temperature control that cankeep the compartment at a slightly differenttemperature than the refrigerator section. Thisdrawer can be used for large party trays, dellitems and beverages. (This drawer shouldnot be used for vegetables that require highhumidity.)
Press the Select button to choose betweenProduce (Cold), Dell (Colder) and Meat(Coldest).

36 HOWTO USE
Defaching and Assembling fhe
Sforage Bins
Glide'N'Serve and Humidi,,y
Con'trolled Crisper
To remove the Humidity Controlled Crisper andthe Glide'N'Server, pull out the Crisper D andGlide'N'Server _ to full extension, lift the frontup, and pull straight out.
To install, slightly tilt up the front, insert thedrawer into the frame and push it back intoplace.
To Remove "the Glass
(Pantry drawer not shown for clarity)
Lift up the glass under the crisper cover, andpull up and out.
Door Bins
The door bins are removable for easy cleaningand adjustment.
1To remove the bin, simply lift the bin up and
pull straight out.
2 To replace the bin, slide it in above the
desired support and push down until it snapsinto place.
_-{_ NOTE "/
/ Some bins may vary in appearance and
will only fit in one location
s_ CAUTION
• Do not apply excessive force whiledetaching or assembling the storagebins.
• Do not use the dishwasher to clean
the storage bins and shelves.• Regularly detach and wash the
storage bins and shelves; they canbecome easily contaminated by thefood.
J

HOWTO USE 37
Adjusting the RefrigeratorShelves
The shelves in your refrigerator are adjustableto meet your individual storage needs. Yourmodel may have glass or wire shelves.
Adjusting the shelves to fit items of differentheights will make finding the exact item youwant easier. Doing so will also reduce theamount of time the refrigerator door is openwhich will save energy.
Detaching the Shelf
Tilt up the front of the shelf and lift it straightup. Pull the shelf out.
D
Using the Folding Shelf
You can store taller items, such as a galloncontainer or bottles, by simply pushing thefront hatf of the shelf underneath the back halfof the shelf. Pull the front of the shelf toward
you to return to a full shelf.
_--_ CAUTION
. Do not clean glass shelves withwarm water while they are cold.Shelves may break if exposed tosudden temperature changes orimpact.
* Glass shelves are heavy. Use specialcare when removing them.
Assembling the Shelf
Tilt the front of the shelf up and guide the shelfhooks into the slots at a desired height. Then,lower the front of the shelf so that the hooks
drop into the slots.
_,----_ CAUTION
Make sure that shelves are level fromone side to the other. Failure to do so
may result in the shelf failing or spillingfood.
38 MAINTENANCE
MAINTENANCE
Cleaning
• Both the refrigerator and freezer sections defrost automatically; however, clean bothsections about once a month to prevent odors.
Wipe up spills immediately.
Always unplug the refrigerator before cleaning.
General Cbaning Tips
Unplug refrigerator or disconnect power.
Remove all removable parts, such asshelves, crispers, etc.
Use a clean sponge or soft cloth and amild detergent in warm water. Do notuse abrasive or harsh cleaners.
Hand wash, rinse and dry all surfacesthoroughly.
Exterior
Waxing external painted metal surfaces helps
provide rust protection. Do not wax plastic
parts. Wax painted metal surfaces at least
twice a year using appliance wax (or auto paste
wax). Apply wax with a clean, soft cloth.
For products with a stainless steet exterior,use a clean sponge or soft cloth and a milddetergent in warm water. Do not use abrasiveor harsh cleaners. Dry thoroughly with a softcloth.
CAUTION
o not use a roughclothorspongewhen cleaningthe interiorand exteriol
ofthe refrigerator,
Do not placeyourhand on the bottomsurfaceof the refrigeratorwhen
openingand closing.
Inside Wails (allow freezer to warmup so the cloth will not stick)
To help remove odors, you can wash the insideof the refrigerator with a mixture of bakingsoda and warm water. Mix 2 tablespoons ofbaking soda to 1 quart of water (26 g sodato 1 liter water). Be sure the baking soda iscompletely dissolved so it does not scratch thesurfaces of the refrigerator.
Door Liners and Gaskets
Use a clean sponge or soft cloth and a milddetergent in warm water. Do not use cleaningwaxes, concentrated detergents, bleaches,or cleaners containing petroleum on plasticrefrigerator parts.
Plastic Parts (covers and panels)Use a clean sponge or soft cloth and a milddetergent in warm water. Do not use glasscleaners, abrasive cleansers, or flammable
fluids. These can scratch or damage thematerial.
Condenser CoilsUse a vacuum cleaner with an attachment toclean the condenser cover and vents. Do not
remove the panel covering the condenser coilarea.
/_ WARNING '/
se non-flammable cleaner, Failure to do I
o can result in fire, explosion, or death,

MAINTENANCE 39
Replacing the Fresh Air Filter
It is recommended that you replace the air filter:
• Approximately every six months.
• When the CHANGE FILTER light turns on.
Replacing fhe Wafer Filfer
It is recommended that you replace the waterfilter:
• Approximately every six months.
• When the water filter indicator turns on.
• When the water dispenser outputdecreases.
• When the ice cubes are smaller than normal.
Remove the Old Filter
Turn the filter cover to the left to detach
it from the refrigerator waN. The filter islocated on the inside of the filter cover.Remove the filter from the cover and
replace it with a new filter. Before Replacing the Water Filter:
If the top sheif, located below the water filter,is in the highest position, it will need to beremoved prior to replacing the water filter.
To remove any shelf--Tilt up the front of theshelf D and lift it _. Pull the shelf out.
2 Install a NewAir Filter,
Place the new filter inside of the cover
with the side that says "Front" facingoutward. Turn the filter cover to the rightto attach it to the refrigerator wail.
After changing the filter, push and hold theAir Filter button for three seconds to resetthe filter sensor.
40 MAINTENANCE
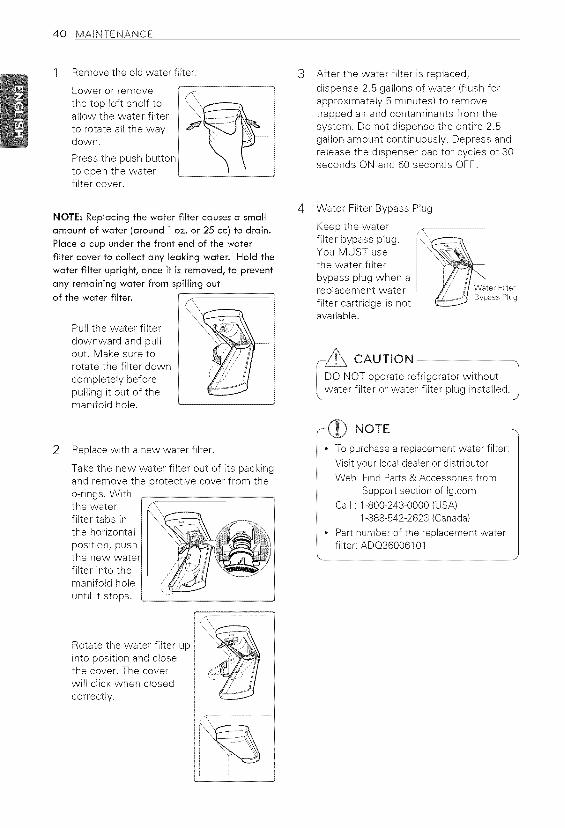
Remove the old water filter.
Lower or remove [ f\the top left shelf toaliow the water filterto rotate all the way ........
down.
Press the push buttonto open the water [.filter cover.
NOTE: Replacing the water filter causes a small
amount of water (around 1 oz. or 25 cc) to drain.
Place a cup under the front end of the water
filter cover to collect any leaking water. Hold the
water filter uprights once it is removed_ to prevent
any remaining water from spilling out
of the water filter.
Pull the water filter
downward and pullout. Make sure torotate the filter down
completely beforepulling it out of themanifold hole.
2 Replace with a new water filter.
Take the new water filter out of its packingand remove the protective cover from theo-rings. Withthe waterfilter tabs inthe horizontal
position, pushthe new waterfilter into themanifold hole
until it stops.
3
4
After the water filter is replaced,dispense 2.5 gallons of water (flush forapproximately 5 minutes) to removetrapped air and contaminants from thesystem. Do not dispense the entire 2.5galton amount continuously. Depress andrelease the dispenser pad for cycles of 30seconds ON and 60 seconds OFF.
Water Filter Bypass Plug
Keep the waterfilter bypass plug.You MUST usethe water filter
bypass plug when areplacement waterfilter cartridge is notavailable.
Water Filter
Bypass Plug
I_N CAUTION
OT operaterefrigeratorwithoutater filter orwater filter plug installed. ]
J
sT'_"_k_ NOTE --,
• To purchase a replacement water filter:
Visit your local dealer or distributorWeb: Find Parts & Accessories from
Support section of Ig.com
Ball: 1-800-243-0000 (USA)1-888-542-2623 (Canada)
Part number of the replacement waterfilter: ADQ36006101
_J
Rotate the water filter upinto position and closethe cover. The coverwilt click when closed
correctly.

MAINTENANCE 41
Performance Data Sheet
Model: LGADQ36006101-S Use ReplacementCartridge:ADQ36006101
The concentration of the indicated substances in water entering the system was reduced to aconcentration less than or equal to the permissible limit for water leaving the system as specified inNSF/ANSI Standard 42 and Standard 53.
System tested and certified by NSF International against NSF/ANSt Standard 42and Standard 53 for the reduction of substances listed below.
i ContaminantReduction
AverageInfluent
AverageNSF specified Avg % Product Water
Challenge ReductionConcentration Concentration
MaxPermissible NSF
ReductionProduct WaterConcentration equirements
Chlorine Taste andOdor
Nominal ParticulateClass I,, _>05 to <
I 0 _lrr_
Asbestos
Atrazine
i Benzene
Carbofuran
i Lindane
P Dichlorobenzene
i Toxapbene
2,4D
Lead pH @65
Lead pH @85
i Mercury @pH 65
Mercury @pH 85
Cyst _
21 mg/L
5,600,000 pts/mL
190 MFL
00094 mg/L
0016 mg/L
008 mg/L
0002 mg/L
022 mg/L
0014 mg/b
0213 mg/L
0 150 mg/b
0150 mg/L
00059 mg/L
00058 mg/L
120,000
cysts/L
20 mg/L ± 10% 972% 006 mg/L
At least 10,000 987% 73,000 pts/m}partic}es/mL
107 to 10s MFL;fibers greater
thai] 10 pm in
length
N/A _>50%
N/A _>85%
>99% < 1MLF
0009 mg/L 947% 000005 mg/L± 10%
0015 mg/L 967% 0005 mg/L± 10%
008 mg/L 981% 0002 mg/L± 10%
0002 mg/L 982% 000004 mg/L± 10%
0225 mg/L 998% 00006 mg/L± 10%
0015 mg/L 93% 0001 mg/L± 10%
0210 mg/L 952% 0009 mg/L± 10%
015 mg/L >993% 0001 mg/L± 10%
015 mg/L >993% 0001 mg/L± 10%
0006 mg/L 961 00002 mg/L± 10%
0006 mg/L 901 00006 mg/L± 10%
Minimum 50,000
cysts/L9999% <1 cyst/L
NSF Test
Report
J00049247
J00049282
x Based on the use of Cryptosporidium parvum oocysts.
0003 mg/L N/A J 00049293
0005 mg/L N/A J 00049300
004 mg/L N/A J 00049294
00002 mg/L N/A J 00051975
0075mg/L N/A J 00049298
00O3mg/L N/A J 00049302
007 mg/L N/A J 00049284
0010 mg/L N/A J 00051974
0010mg/L N/A J 00049277
00O2mg/b N/A J 00053886
0002 mg/L N/A J 00051972
N/A _ 9995% J 00049281
N/A _>99% J 0004928
42 MAINTENANCE
Application Guidelines/Water Supply Parameters
Service Flow 0.5 gpm (1.9 Ipm)
Water Supply Potable Water
Water Pressure 20 -120 psi (138 - 827 kPa)
Water Temperature 33°F - 100°F (0.6°C - 38°C)
It is essential that the manufacturer'srecommended installation, maintenance and
filter replacement requirements be carried outfor the product to perform as advertised.
@ NOTE
While the testing was performed
under standard laboratory conditions,
actual performance may vary.
Replacement Cartridge: ADQ36006101
For estimated costs of replacement etementspiease call USA 1-800-243-0000
CANADA 1-888-LGCANADA (24 hours perday/7 days per week) or visit our website atwww.lg.com
3M is a trademark of 3M Company.NSF is a trademark of NSF international.
@ 2009 3M Company. All rights reserved.
F_ WARNING
To reduce the risk associated with choking:
• Do not allow children under 3 years of ageto have access to small parts during theinstallation of this product.
To reduce the risk associated with theingestion of contaminants:
• Do not use with water that ismicrobiologicaliy unsafe or of unknownquality without adequate disinfection beforeor after the system. Systems certified forcyst reduction may be used on disinfectedwater that may contain filterable cysts. EPAEstablishment # 070595-MEX-001
r---_ CAUTION
To reduce the risk associated with propertydamage due to water leakage:
• Read and follow Use Instructions beforeinstallation and use of this system.
• Installation and use MUST comply with allstate and local plumbing codes.
• Do not install if water pressure exceeds120 psi (827 kPa). If your water pressureexceeds 80 psi, you must install apressure limiting valve. Contact a plumbingprofessional if you are uncertain how tocheck your water pressure.
• Do not install where water hammerconditions may occur. If water hammerconditions exist you must install a waterhammer arrester. Contact a plumbingprofessional if you are uncertain how tocheck for this condition.
• Do not install on hot water supply lines.The maximum operating water temperatureof this filter system is 100°F (37.8°C).
• Protect filter from freezing. Drain filter whentemperatures drop below 40°F (4.4°C).
• The disposable filter cartridge MUST bereplaced every 6 months, at the ratedcapacity or if a noticeable reduction in flowrate occurs.
• Protect from freezing, remove filtercartridge when temperatures are expectedto drop below 33 ° F.
• Do not install systems in areas whereambient temperatures may go above110° F (43.3° C).
• Where a backflow prevention device isinstalled on a water system, a devicefor controlling pressure due to thermalexpansion must be installed.
• Ensure all tubing and fittings are secure andfree of leaks.
N_
Manufactured for LG@Electronics by CUNOIncorporated 400 Research Parkway Meriden,CT 06450 U.S.A Worldwide: 203-237-5541
www,cuno,com

MAgNTENANCE 43
State of California
Depamnent of Public Health
Water Treatment DeviceCertificate Number
09- 2018
Date Issued: December 15, 2009
Trademark/Model Designation
ADQ36006101-S
R_acement Elements
ADQ36006101
Manufacturer: Cuno Inc.
The water treatment device(s) listed on this certificate have met the _esting requirements pursuant to section116830 of the Health and gaiety Code for the following health related contaminants:
Microbiological Contaminants and Turbidity Inor_anie/Radinlogical Contaminants
Cysls
Oroauic Contaminants
Bellzenc
Carbofura_
Lindane
p-Dichlorobenzene
Toxaphene
Rated Service Capacity: 200 ga/ Rated Se_ice Flow: 0.5 gpm
44 SMART DIAGNOSIS
SMART DIAGNOSIS TM
Should you experience any problems withyour refrigerator, it has the capability oftransmitting data via your telephone to the LGservice center. This gives you the capability ofspeaking directly to our trained specialists. Thespecialist records the data transmitted fromyour machine and uses it to analyze the issue,providing a fast and effective diagnosis.
If you experience problems with yourrefrigerator, can 1-800-243-0000. Only use theSmart Diagnosis TM feature when instructedto do so by the LG call center agent. Thetransmission sounds that you will hear arenormal and sound similar to a fax machine.
Smart Diagnosis TM cannot be activated unlessyour refrigerator is connected to power. Ifyour refrigerator is unable to turn on, thentroubleshooting must be done without usingSmart Diagnosis TM.
Using Smart Diagnosis TM
First, can 1-800-243-0000. Only use the SmartDiagnosis TM feature when instructed to do soby the LG call center agent.
1 Lock the display. To lock the display,press and hold the Lock button for threeseconds. (If the display has been lockedfor over five minutes, you must deactivatethe lock and then reactivate it.)
2 Open the right refrigerator door.
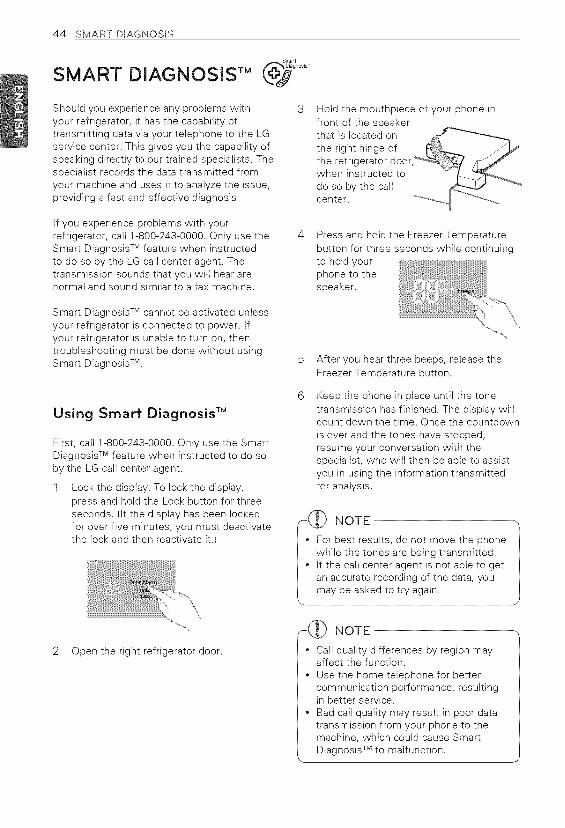
Hold the mouthpiece of your phone infront of the speakerthat is located on
the right hinge ofthe refrigeratorwhen instructed to
do so by the callcenter.
Press and hold the Freezer Temperaturebutton for three seconds while continuingto hold yourphone to thespeaker.
\
After you hear three beeps, release the
Freezer Temperature button.
Keep the phone in place until the tonetransmission has finished. The display willcount down the time. Once the countdown
is over and the tones have stopped,resume your conversation with thespecialist, who will then be abte to assistyou in using the information transmittedfor analysis.
NOTE
For best results, do not move the phonewhile the tones are being transmitted.If the call center agent is not able to getan accurate recording of. the data, you
,-C_ NOTE
• Call quality differences by region mayaffect the function.
• Use the home telephone for bettercommunication performance, resultingin better service.
• Bad call quality may result in poor datatransmission from your phone to themachine, which could cause SmartDiagnosis TM to malfunction.

TROUBLESHOOTING 45
TROUBLESHOOTING
Review the Troubleshooting section before calling for service; doing so will save you both timeand money.
Refrigerator and The refrigerator control is set to Turn the control ON. Refer to the Setting theFreezer section OFF (some models). Controls section for proper temperature settings.are not cooling.
Refrigerator is in the defrostcycle.
Refrigerator was recentlyinstalled.
Refrigerator was recentlyrelocated.
Cooling System Refrigerator is replacing anruns too much. older model.
Refrigerator was recentlyplugged in or power restored.
Door opened often or a largeamount of food / hot food wasadded.
Doors are not closed
completely.
Refrigerator is installed in a hotlocation.
Condenser / back cover isclogged.
i During the defrost cycle, the temperature ofi each compartment may rise slightly. Wait 30minutes and confirm the proper temperature
i has been restored once the defrost cycle hasi completed.
i lt may take up to 24 hours for each compartmenti to reach the desired temperature.
i If the refrigerator was stored for a long period ofi time or moved on its side, it is necessary for thei refrigerator to stand upright for 24 hours beforei connecting it to power.
Modern refrigerators require more operatingtime but use less energy due to more efficienttechnology.
iThe refrigerator will take up to 24 hours to cooli completely.
i Adding food and opening the door warms thei refrigerator, requiring the compressor to runi longer in order to cool the refrigerator backdown. In order to conserve energy, try to get
i everything you need out of the refrigeratori at once, keep food organized so it is easy toifind, and close the door as soon as the food is
removed. (Refer to the Food Storage Guide.)
i Firmly push the doors shut. If they will notshut all the way, see the Doors will not
i close completely or pop open section iniTroubleshooting.
iThe compressor will run longer under warm
conditions. At normal room temperatures (70°F)expect your compressor to run about 40% to80% of the time. Under warmer conditions,expect it to run even more often. The refrigerator
i should not be operated above 1IO°F.
Use a vacuum cleaner with an attachment toclean the condenser cover and vents. Do not
i remove the panel covering the condenser coilarea.

46 TROUBLESHOOTING
Refrigerator or Refrigerator was recently It may take up to 24 hours for each compartmentFreezer section is installed, to reach the desired temperature.too warm.
Air vents are blocked. Rearrange items to allow air to flow throughoutthe compartment. Refer to the Airflow diagram inthe Using Your Refrigerator section.
Doors are opened often or forlong periods of time.
Unit is installed in a hot location.
A large amount of food orhot food was added to eithercompartment.
Doors not closed correctly.
Temperature control is not setcorrectly.
Defrost cycle has recentlycompleted.
When the doors are opened often or for longperiods of time, warm, humid air enters thecompartment. This raises the temperature andmoisture level within the compartment. To lessenthe effect, reduce the frequency and duration ofdoor openings.
The refrigerator should not be operated intemperatures above 11OF.
Adding food warms the compartment requiringthe cooling system to run. Allowing hot food tocool to room temperature before putting it in therefrigerator will reduce this effect.
See the Doors will not close correctly or popopen section in Troubleshooting.
If the temperature is too warm, adjust thecontrol one increment at a time and wait for the
temperature to stabilize. Refer to the Setting theControls section for more information.
During the defrost cycle, the temperature of eachcompartment may rise slightly and condensationmay form on the back wall. Wait 30 minutesand confirm the proper temperature has beenrestored once the defrost cycle has completed.
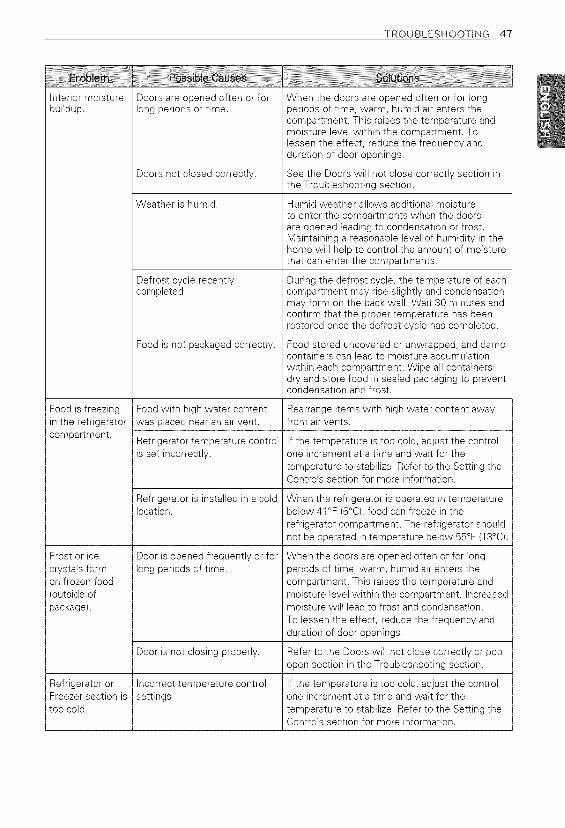
TROUBLESHOOTING 47
Interior moisturebuildup.
Food is freezingin the refrigeratorcompartment.
Frost or ice
crystals formon frozen food(outside of
package).
Doors are opened often or forlong periods of time.
When the doors are opened often or for longperiods of time, warm, humid air enters thecompartment. This raises the temperature andmoisture level within the compartment. Tolessen the effect, reduce the frequency andduration of door openings.
Doors not closed correctly. See the Doors will not close correctly section inthe Troubleshooting section.
Weather is humid.
Defrost cycle recentlycompleted.
Food is not packaged correctly.
Food with high water content
was placed near an air vent.
Refrigerator temperature control
is set incorrectly.
Refrigerator is installed in a coldlocation.
Door is opened frequently or forlong periods of time.
Door is not closing properly.
Refrigerator or Incorrect temperature controlFreezer section is settings.too cold.
Humid weather allows additional moistureto enter the compartments when the doorsare opened leading to condensation or frost.Maintaining a reasonable level of humidity in thehome will help to control the amount of moisturethat can enter the compartments.
During the defrost cycle, the temperature of eachcompartment may rise slightly and condensationmay form on the back wall. Wait 30 minutes andconfirm that the proper temperature has beenrestored once the defrost cycle has completed.
Food stored uncovered or unwrapped, and dampcontainers can lead to moisture accumulationwithin each compartment. Wipe all containersdry and store food in sealed packaging to preventcondensation and frost.
Rearrange items with high water content awayfrom air vents.
If the temperature is too cold, adjust the controlone increment at a time and wait for the
temperature to stabilize. Refer to the Setting theControls section for more information.
When the refrigerator is operated in temperaturebelow 41°F (5°C), food can freeze in therefrigerator compartment. The refrigerator shouldnot be operated in temperature below 55°F (13°C).
When the doors are opened often or for longperiods of time, warm, humid air enters thecompartment. This raises the temperature andmoisture level within the compartment. Increasedmoisture will lead to frost and condensation.
To lessen the effect, reduce the frequency andduration of door openings.
Refer to the Doors will not close correctly or popopen section in the Troubleshooting section.
If the temperature is too cold, adjust the controlone increment at a time and wait for thetemperature to stabilize. Refer to the Setting theControls section for more information.

48 TROUBLESHOOTING
Frostorice Condensationfromfoodwitha Thisisnormalforfooditemswithahighwatercrystalsonfrozenhighwatercontenthasfrozencontent.food(insideof insideofthefoodpackage.sealedpackage).
FoodhasbeenleftinthefreezerDonotstorefooditemswithhighwatercontentforalongperiodoftime. inthefreezerforalongperiodoftime.
Icemakerisnot DemandexceedsicestorageTheicemakerwillproduceapproximately70-182makingenoughcapacity, cubesina24hourperiod.ice.
House water supply is not
connected, valve is not turned
on fully, or valve is clogged.
Water filter has beenexhausted.
Low house water supply
pressure.
Reverse Osmosis filtration
system is used.
Tubing connecting refrigeratorto house supply valve is kinked.
Connect the refrigerator to a cold water supplywith adequate pressure and turn the watershutoff valve fully open.
If the problem persists, it may be necessary tocontact a plumber.
It is recommended that you replace the waterfilter:
• Approximately every six months.• When the water filter indicator turns on.
• When the water dispenser output decreases.• When the ice cubes are smaller than normal.
The water pressure must be between 20 and 120psi on models without a water filter and between40 and 120 psi on models with a water filter.
If the problem persists, it may be necessary tocontact a plumber or install a booster pump tocompensate for the low pressure.
Reverse osmosis filtration systems can reducethe water pressure below the minimum amountand result in icemaker issues.
(Refer to Water Pressure section.)
The tubing can kink when the refrigerator ismoved during installation or cleaning resultingin reduced water flow. Straighten or repair thewater supply line and arrange it to prevent futurekinks.

TROUBLESHOOTING 49
Icemaker is not
making enough
ice (continued).
Dispensing waterslowly.
Doors are opened often or forlong periods of time.
Doors are not dosed
completely.
The temperature setting for thefreezer is too warm.
Water filter has been exhausted.
Reverse osmosis filtration
system is used.
Low house water supplypressure.
If the doors of the unit are opened often, ambientair will warm the refrigerator which will preventthe unit from maintaining the set temperature.Lowering the refrigerator temperature can help,as well as not opening the doors as frequently.
If the doors are not properly closed, iceproduction will be affected. See the Doors willnot close completely or pop open section inTroubleshooting for more information.
The recommended temperature for the freezercompartment for normal ice production is O°F. tfthe freezer temperature is warmer, ice productionwill be affected.
It is recommended that you replace the waterfilter:
• Approximately every six months.• When the water filter indicator turns on.• When the water dispenser output decreases.• When the ice cubes are smaller than normal.
Reverse osmosis filtration systems can reducethe water pressure below the minimum amountand result in icemaker issues.
If the problem persists, it may be necessary to
contact a plumber or install a booster pump to
compensate for the low pressure.
The water pressure must be between 20 and 120psi on models without a water filter and between40 and 120 psi on models with a water filter.
If the problem persists, it may be necessary to
contact a plumber or install a booster pump to
compensate for the low pressure.

50 TROUBLESHOOTING
Not dispensing Doors are not closed Ice will not dispense if any of the refrigeratorice. completely, doors are left open.
Infrequent use of the dispenser.
Icemaker is notmaking ice.
The delivery chute is cloggedwith frost or ice fragments.
Infrequent use of the ice dispenser will causethe cubes to stick together over time, whichwill prevent them from properly dispensing.Check the ice bin for ice cubes clumping!stickingtogether. If they are, break up the ice cubes toallow for proper operation.
Eliminate the frost or ice fragments by removingthe ice bin and clearing the chute with a plasticutensil. Dispensing cubed ice can also helpprevent frost or ice fragment buildup.
The dispenser display is locked. Press and hold the Lock button for three secondsto unlock the control panel and dispenser.
Ice bin is empty.
Refrigerator was recently
installed or icemaker recently
connected.
Icemaker not turned on.
The refrigerator is not connected
to a water supply or the supplyshutoff valve is not turned on.
Icemaker shutoff (feeler arm)obstructed.
Reverse osmosis water filtration
system is connected to your
cold water supply.
It may take up to 24 hours for each compartmentto reach the desired temperature and for theicemaker to begin making ice. Make sure that theshutoff(arm/sensor) is not obstructed.
Once the ice supply in the bin has beencompletely exhausted, it my take up to 90minutes before additional ice is available, andapproximately 24 hours to completely refill thebin.
It may take up to 24 hours for each compartmentto reach the desired temperature and for theicemaker to begin making ice.
Locate the Ice On/Off button and confirm that it isturned on.
Connect refrigerator to the water supply and turn
the water shutoff valve fully open.
If your icemaker is equipped with an ice shutoffarm, make sure that the arm moves freely.If your icemaker is equipped with the electronicice shutoff sensor, make sure that there is a clearpath between the two sensors.
Reverse osmosis filtration systems can reducethe water pressure below the minimum amountand result in icemaker issues.(Refer to the Water Pressure section.)

TROUBLESHOOTING 51
Not dispensingwater.
New installation or water line
recently connected.Dispense 2.5 gallons of water (flush forapproximately 5 minutes) to remove trapped airand contaminants from the system.Do not dispense the entire 2.5 gallon amountcontinuously. Depress and release the dispenserpad for cycles of 30 seconds ON and 60 secondsOFF.
The dispenser panel is locked. Press and hold the Lock button for three secondsto unlock the control panel and dispenser.
The dispenser is not set for The dispenser can be set for ice or water. Makewater dispensing, certain that the control panel is set for the proper
operation. Press the Water button on the controlpanel to dispense water.
Refrigerator or freezer doors are Water will not dispense if any of the refrigeratornot closed properly, doors are left open.
Water filter has been recentlyremoved or replaced.
Tubing connecting refrigeratorto house supply valve is kinked.
The house water supply is notconnected, the valve is notturned on fully, or the valve isclogged.
After the water filter is replaced, dispense 2.5gallons of water (flush for approximately 5minutes) to remove trapped air and contaminantsfrom the system. Do not dispense the entire 2.5gallon amount continuously. Depress and releasethe dispenser pad for cycles of 30 seconds ONand 60 seconds OFF.
The tubing can kink when the refrigerator ismoved during installation or cleaning resulting inreduced water flow. Straighten or repair the watersupply line and arrange it to prevent future kinks.
Connect refrigerator to the water supply and turnthe water shutoff valve fully open.
If the problem persists, it may be necessary tocontact a plumber.

52 TROUBLESHOOTING
Ice has bad tasteor odor.
Water supply contains mineralssuch as sulfur.
A water filter may need to be installed toeliminate taste and odor problems.
NOTE: In some cases, a filter may not help. Itmay not be possible to remove all minerals / odor/ taste in all water supplies.
Discard the first few batches of ice to avoid
discolored or bad tasting ice.
Ice that has been stored for too long will shrink,become cloudy, and may develop a stale taste.Throw away old ice and make a new supply.
Rewrap the food. Odors may migrate to the ice iffood is not wrapped properly.
See the Care and Cleaning section for moreinformation.
Icemaker was recently installed.
Ice has been stored for too
long.
The food has not been stored
properly in either compartment.
The interior of the refrigeratorneeds to be cleaned.
The ice storage bin needs to be Empty and wash the bin (discard old cubes).cleaned. Make sure that the bin is completely dry before
reinstalling it.
Dispensing warm Refrigerator was recently Allow 24 hours after installation for the waterwater, installed, storage tank to cool completely.
The water dispenser has been Depending on your specific model, the waterused recently and the storage storage capacity will range from approximately 20tank was exhausted, to 30 oz.
Dispenser has not been used If the dispenser has not been used for severalfor several hours, hours, the first glass dispensed may be warm.
Discard the first 10 oz.
Refrigerator is connected to thehot water supply.
Water has bad Water supply contains mineralstaste or odor. such as sulfur.
Water filter has been exhausted.
Refrigerator was recentlyinstalled.
Make sure that the refrigerator is connected to acold water pipe.
z_2_.'.,_WARNING: Connecting the refrigerator to a
hot water line may damage the icemaker.
A water filter may need to be installed toeliminate taste and odor problems.
It is recommended that you replace the waterfilter:
• Approximately every 6 months.
• When the water filter indicator turns on.
• When the water dispenser output decreases.• When the ice cubes are smaller than normal.
Dispense 2.5 gallons of water (flush forapproximately 5 minutes) to remove trappedair and contaminants from the system. Donot dispense the entire 2.5 gallon amountcontinuously. Depress and release the dispenserpad for cycles of 30 seconds ON and 60 secondsOFF.

TROUBLESHOOTING53
Icemakeris Icemakershutoff(feelerarm) Emptytheicebin.Ifyouricemakerisequippedmakingtoomuchobstructed, withaniceshutoffarm,makersurethatthearmice. movesfreely.Reinstalltheicebinandwait24
hourstoconfirmproperoperation.Clicking NormalOperationThedefrostcontrolwillclick
whentheautomaticdefrostcyclebeginsandends.Thethermostatcontrol(orrefrigeratorcontrolonsomemodels)willalsoclickwhencyclingonandoff.Rattlingnoisesmaycomefromtheflowofrefrigerant,thewaterlineonthebackoftheunit,oritemsstoredontopoforaroundtherefrigerator.Refrigeratorisnotrestingsolidlyonthefloor.
Rattling NormalOperation
Floorisweakorunevenorlevelinglegsneedtobeadjusted.SeetheDoorAlignmentsection.
Refrigeratorwithlinear NormalOperationcompressorwasjarredwhilerunning.
Whooshing Evaporatorfanmotoris NormalOperationcirculatingairthroughtherefrigeratorandfreezercompartments.Airisbeingforcedoverthe NormalOperationcondenserbythecondenserfan.
Gurgling Refrigerantflowingthroughthe NormalOperationcoolingsystem.
Popping Contractionandexpansionof NormalOperationtheinsidewailsduetochangesintemperature.
Sizzling Waterdrippingonthedefrost NormalOperationheaterduringadefrostcycle.
Vibrating Ifthesideorbackofthe Toeliminatethenoise,makesurethatthesidesrefrigeratoristouchingacabinetandbackcannotvibrateagainstanywallororwall,someofthenormal cabinet.vibrationsmaymakeanaudiblesound.
Dripping WaterrunningintothedrainpanNormalOperationduringthedefrostcycle.
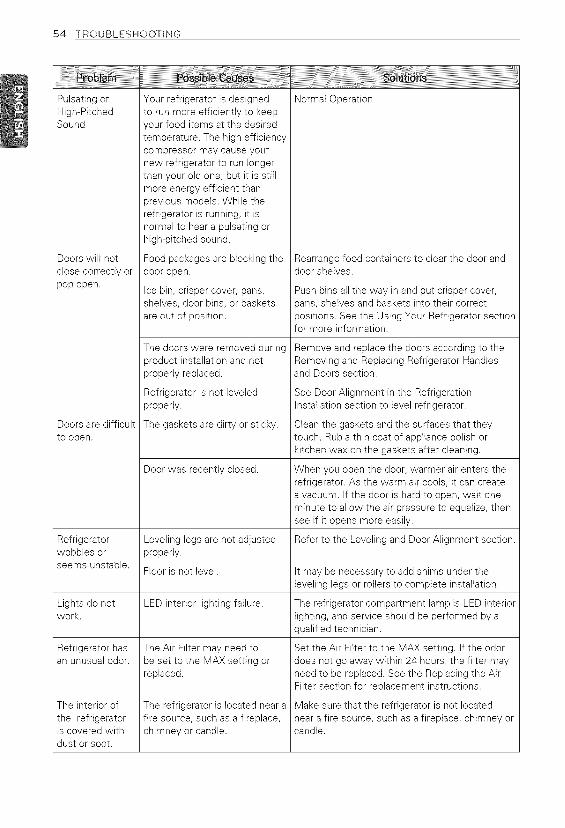
54 TROUBLESHOOTING
Pulsating orHigh-PitchedSound
Your refrigerator is designedto run more efficiently to keepyour food items at the desiredtemperature. The high efficiencycompressor may cause yournew refrigerator to run longerthan your old one, but it is stillmore energy efficient thanprevious models. While therefrigerator is running, it isnormal to hear a pulsating orhigh-pitched sound.
Food packages are blocking thedoor open.
Ice bin, crisper cover, pans,shelves, door bins, or basketsare out of position.
Normal Operation
Doors win not Rearrange food containers to dear the door andclose correctly or door shelves.
pop open. Push bins all the way in and put crisper cover,pans, shelves and baskets into their correctpositions. See the Using Your Refrigerator sectionfor more information.
The doors were removed during Remove and replace the doors according to theproduct installation and not Removing and Replacing Refrigerator Handlesproperly replaced, and Doors section.
Refrigerator is not leveled See Door Alignment in the Refrigerationproperly. Installation section to level refrigerator.
Doors are difficult The gaskets are dirty or sticky. Clean the gaskets and the surfaces that theyto open. touch. Rub a thin coat of appliance polish or
kitchen wax on the gaskets after cleaning.
Door was recently closed. When you open the door, warmer air enters therefrigerator. As the warm air cools, it can createa vacuum. If the door is hard to open, wait oneminute to allow the air pressure to equalize, thensee if it opens more easily.
Refrigerator Leveling legs are not adjusted Refer to the Leveling and Door Alignment section.wobbles or properly.seems unstable.
Floor is not level. It may be necessary to add shims under theleveling legs or rollers to complete insta%tion.
Lights do not LED interior lighting failure. The refrigerator compartment lamp is LED interiorwork. lighting, and service should be performed by a
qualified technician.
Refrigerator has The Air Filter may need to Set the Air Filter to the MAX setting. If the odoran unusual odor. be set to the MAX setting or does not go away within 24 hours, the filter may
replaced, need to be replaced. See the Replacing the AirFilter section for replacement instructions.
The interior of The refrigerator is located near a Make sure that the refrigerator is not locatedthe refrigerator fire source, such as a fireplace, near a fire source, such as a fireplace, chimney oris covered with chimney or candle, candle.dust or soot.

WARRANTY 55
WARRANTY (USA)
Should your LG Refrigerator ("Product") fail due to a defect in materials or workmanship undernormal home use, during the warranty period set forth below, LG will at its option repair or replacethe product. This limited warranty is valid only to the original retail purchaser of the product andapplies only when purchased and used within the United States including U.S. Territories. Proof oforiginal retail purchase is required to obtain warranty service under this limited warranty.
WARRANTY PERIOD
Sealed SystemRefrigerator (Condenser, Dryer, Connecting Tube, Linear Compressor
Refrigerant and Evaporator)
One (1) year from One (1) year from the Seven (7) years from Ten (10) years from thethe date of original date of original retail the date of original date of original retailretail purchase purchase retail purchase purchase
Parts and Labor Parts and Labor Parts only (Consumer Part only (Consumer will(internal/functional will be charged for be charged for labor)parts only) labor)
Noises associated with normal operation and failure to follow instructions found in the use andcare and installation guides or operating the unit in an unsuitable environment will not be coveredunder this warranty.
1_ Replacement products and parts are warranted for the remaining portion of the original warrantyperiod or ninety (90) days, whichever is greater.
1_ Replacement products and parts may be new or remanufactured.
THIS WARRANTY IS IN LIEU OF ANY OTHER WARRANTY, EXPRESS OR IMPLIED,INCLUDING WITHOUT LIMITATION, ANY WARRANTY OF MERCHANTABILITY OR FITNESSFOR A PARTICULAR PURPOSE. TO THE EXTENT ANY IMPLIED WARRANTY IS REQUIRED
BY LAW, IT IS LIMITED IN DURATION TO THE EXPRESS WARRANTY PERIOD ABOVE.NEITHER THE MANUFACTURER NOR ITS U.S. DISTRIBUTOR SHALL BE LIABLE FOR ANY
INCIDENTAL, CONSEQUENTIAL, INDIRECT, SPECIAL, OR PUNITIVE DAMAGES OF ANYNATURE, INCLUDING WITHOUT LIMITATION, LOST REVENUES OR PROFITS, OR ANYOTHER DAMAGE WHETHER BASED IN CONTRACT, TORT, OR OTHERWISE. Some states donot allow the exclusion or limitation of incidental or consequential damages or limitations on howlong an implied warranty lasts, so the above exclusion or limitation may not apply to you. Thiswarranty gives you specific legal rights and you may also have other rights that vary from stateto state.

56 WARRANTY
THIS LIMITED WARRANTY DOES NOT COVER:
1. Service trips to deliver, pick up, install, or repair the product; instruct the customer on operationof the product; repair or replace fuses or correct wiring or plumbing, or correction of unauthorizedrepairs/insta%tion.
2. Failure of product to perform during power failures and interruptions or inadequate electrical service.
3. Damage caused by leaky or broken water pipes, frozen water pipes, restricted drain lines, inadequateor interrupted water supply or inadequate supply of air.
4. Damage resulting from operating the product in a corrosive atmosphere or contrary to theinstructions outlined in the product owner's manual.
5. Damage to the product caused by accidents, pests and vermin, lightning, wind, fire, floods, or acts ofGod.
6. Damage resulting from misuse, abuse, improper insta%tion, repair, or maintenance. Improper repairincludes use of parts not approved or specified by LG.
7. Damage or failure caused by unauthorized modification or alteration, or if it is used for other than theintended purpose, or any water leakage where the unit was not properly installed.
8. Damage or failure caused by incorrect electrical current, voltage, or plumbing codes, commercialor industrial use, or use of accessories, components, or consumable cleaning products that are notapproved by LG.
9. Damage caused by transportation and handling, including scratches, dents, chips, and/or otherdamage to the finish of your product, unless such damage results from defects in materials orworkmanship and is reported within one (1) week of delivery (Call: 1-800-243-0000).
0. Damage or missing items to any display, open box, discounted, or refurbished product.
1. Products with original serial numbers that have been removed, altered, or can not be readilydetermined. Model and Serial numbers, along with original retail sales receipt, are required forwarranty validation.
2. Increases in utility costs and additional utility expenses.
3. Replacement of light bulbs, filters, or any consumable parts.
4. Repairs when your product is used in other than normal and usual household use (e.g. commercialuse, offices, and recreational facilities) or contrary to the instructions outlined in the product owner'smanual.
5. Costs associated with removal of your product from your home for repairs.
6. The removal and reinstallation of the product if it is installed in an inaccessible location or is notinstalled in accordance with published installation instructions, including LG's owner's and insta%tionmanuals.
7. Shelves, door bins, drawers, handles, accessories, and other parts besides those that were originallyincluded with this particular model.
8. Service trips to your home to teach you how to use the product.
9. Replacement of the water filter cartridge due to water pressure that is outside the specifiedoperating range or due to excessive sediment in the water supply.
The cost of repair or replacement under these excluded circumstances shall be borneby the consumer.
For complete warranty details and customer assistance, please call or visit our website:
Call 1-800-243-0000 (24 hours a day, 365 days a year) and select the appropriate option from themenu, or visit our website at http://wvcwJg.eom Or by mail: LG Customer Information Center:P. O. Box 240007, 201 James Record Road Huntsville, Alabama 35813 ATTN: CIC
Write your warranty information below:
Product Registration Information:Model:
Serial Number:
Date of Purchase:
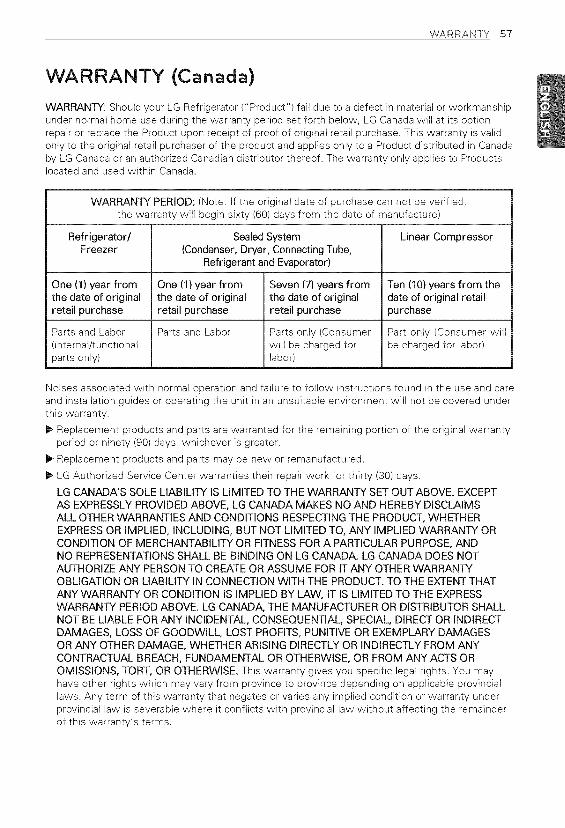
WARRANTY 57
WARRANTY (Canada)
WARRANTY: Should your LG Refrigerator ("Product") fail due to a defect in material or workmanshipunder normal home use during the warranty period set forth below, LG Canada will at its optionrepair or replace the Product upon receipt of proof of original retail purchase. This warranty is validonly to the originat retail purchaser of the product and applies only to a Product distributed in Canadaby LG Canada or an authorized Canadian distributor thereof. The warranty only applies to Productslocated and used within Canada.
WARRANTY PERIOD: (Note: If the original date of purchase can not be verified,the warranty will begin sixty (60) days from the date of manufacture)
Refrigerator/ Sealed System Linear CompressorFreezer (Condenser, Dryer, Connecting Tube,
Refrigerant and Evaporator)
One (1) year from One (1) year from Seven (7) years from Ten (10) years from thethe date of original the date of original the date of original date of original retailretail purchase retail purchase retail purchase purchase
Parts and Labor Parts and Labor Parts only (Consumer Part only (Consumer will(internal/functional will be charged for be charged for labor)parts only) labor)
Noises associated with normal operation and failure to follow instructions found in the use and careand installation guides or operating the unit in an unsuitable environment will not be covered underthis warranty.
Replacement products and parts are warranted for the remaining portion of the original warrantyperiod or ninety (90) days, whichever is greater.
Replacement products and parts may be new or remanufactured.
LG Authorized Service Center warranties their repair work for thirty (30) days.
LG CANADA'S SOLE LIABILITY IS LIMITED TO THE WARRANTY SET OUT ABOVE. EXCEPT
AS EXPRESSLY PROVIDED ABOVE, LG CANADA MAKES NO AND HEREBY DISCLAIMSALL OTHER WARRANTIES AND CONDITIONS RESPECTING THE PRODUCT, WHETHEREXPRESS OR IMPLIED, INCLUDING, BUT NOT LIMITED TO, ANY IMPLIED WARRANTY ORCONDITION OF MERCHANTABILITY OR FITNESS FOR A PARTICULAR PURPOSE, ANDNO REPRESENTATIONS SHALL BE BINDING ON LG CANADA. LG CANADA DOES NOTAUTHORIZE ANY PERSON TO CREATE OR ASSUME FOR IT ANY OTHER WARRANTYOBLIGATION OR LIABILITY IN CONNECTION WITH THE PRODUCT. TO THE EXTENT THAT
ANY WARRANTY OR CONDITION IS IMPLIED BY LAW, IT IS LIMITED TO THE EXPRESSWARRANTY PERIOD ABOVE. LG CANADA, THE MANUFACTURER OR DISTRIBUTOR SHALLNOT BE LIABLE FOR ANY INCIDENTAL, CONSEQUENTIAL, SPECIAL, DIRECT OR INDIRECTDAMAGES, LOSS OF GOODWILL, LOST PROFITS, PUNITIVE OR EXEMPLARY DAMAGESOR ANY OTHER DAMAGE, WHETHER ARISING DIRECTLY OR INDIRECTLY FROM ANYCONTRACTUAL BREACH, FUNDAMENTAL OR OTHERWISE, OR FROM ANY ACTS OROMISSIONS, TORT, OR OTHERWISE. This warranty gives you specific legal rights. You mayhave other rights which may vary from province to province depending on applicable provinciallaws. Any term of this warranty that negates or varies any implied condition or warranty underprovincial law is severable where it conflicts with provincial law without affecting the remainderof this warranty's terms.

58 WARRANTY
THIS LIMITED WARRANTY DOES NOT COVER:
1. Service trips to deliver, pick up, or install the product; instructing a customer on operation ofthe product; repair or replacement of fuses or correction of wiring or plumbing, or correction ofunauthorized repairs/insta%tion.
2. Failure of the product to perform during power failures and interruptions or inadequate electricalservice.
3. Damage caused by leaky or broken water pipes, frozen water pipes, restricted drain lines, inadequateor interrupted water supply or inadequate supply of air.
4. Damage resulting from operating the Product in a corrosive atmosphere or contrary to theinstructions outlined in the Product owner's manual.
5. Damage to the Product caused by accidents, pests and vermin, lightning, wind, fire, floods, or acts ofGod.
6. Damage resulting from the misuse, abuse, improper installation, repair, or maintenance of theProduct. Improper repair includes use of parts not approved or specified by LG Canada.
7. Damage or product failure caused by unauthorized modification or alteration, or use for other than itsintended purpose, or resulting from any water leakage due to improper installation.
8. Damage or Product failure caused by incorrect electrical current, voltage, or plumbing codes,commercial or industrial use, or use of accessories, components, or cleaning products that are notapproved by LG Canada.
9. Damage caused by transportation and handling, including scratches, dents, chips, and/or otherdamage to the finish of your product, unless such damage results from defects in materials orworkmanship and is reported within one (1) week of delivery.
0. Damage or missing items to any display, open box, discounted, or refurbished Product.
1. Products with original serial numbers that have been removed, altered, or cannot be readilydetermined. Model and Serial numbers, along with original retail sales receipt, are required forwarranty validation.
2. Increases in utility costs and additional utility expenses.
3. Replacement of light bulbs, filters, or any consumable parts.
4. Repairs when your Product is used in other than normal and usual household use (including, withoutlimitation, commercial use, in offices or recreational facilities) or contrary to the instructions outlinedin the Product owner's manual.
5. Costs associated with removal of the Product from your home for repairs.6. The removal and reinstallation of the Product if it is installed in an inaccessible location or is not
installed in accordance with published installation instructions, including the Product owner's andinstallation manuals.
7. Shelves, door bins, drawers, handles, and accessories to the Product. Also excluded are partsbesides those that were originally included with the Product.
8. Service trips to your home to teach you how to use the product.
9. Replacement of the water filter cartridge due to water pressure that is outside the specifiedoperating range or due to excessive sediment in the water supply.
All costs associated with the above excluded circumstancesshall be borne by the consumer.
For complete warranty details and customer assistance, please call or visit our website:
Call 1-888-542-2623 (24 hours a day, 365 days a year) and select the appropriate option from themenu, or visit our website at http://wwwJg.com
Write your warranty information below:
Product Registration Information:Model:
Serial Number:
Date of Purchase:

Life's Good
[Or [r'lqH[r[@s or COFF/rT/enTs_
visil www_[g_com or ca[[;
1-800-243-0000 ,s/,,,c.,._,,_,,e,;<_,
1-888-865-3026 ,s/,,,co,_............,,,÷
1-888-542-2623 CAN/,,_>/,,