Embed Size (px)
Citation preview

Free Guide HQH FitnessFoam RollerInnovative Solutionsfor your Foam Roller
www.hqh.com [email protected]

Fast Start Guide forUsing the Foam RollerThe HQH Fitness Foam Roller is designed specifically for optimal spine health. The outer diameter is 100mm by 900mm long, which is the preferred size for lumbar and thoracic mobilisation techniques. It can also be used as a powerful tool to aid stretches, offeringa softer approach to more aggressive movements.
Mobilisation vs.myofascial releaseMost foam rollers on the market today aredesigned specifically for myofascial release.These rollers are large (commonly 150mmdiameter) and made of very dense rubber. This makes them fantastic for easing out aches and pains, but not the best tool for mobilisation as they are too large to mobilise the vertebral joints and in some cases the higher density rubbercan actually be too severe on the spine.
While the HQH Fitness Foam Roller is notdesigned for myofascial release, it can also be used as a softer tool for tight areas such as theIT Band and glutes.
Who can use it?Anyone can use the HQH Fitness foam roller asan aid while performing a stretching routine. However in regards to spinal mobilisation we do recommend approval from a doctor.
For diagnosed back problems such as ankylosing spondylitis, spondilothesis, or disc injuries, do not use the foam roller - particularly techniques such as the Horizontal thoracic mobilisation.
The powerful effects of gravityIt is often helpful to lay on the roller vertically down the spine in the middle or at the end of each day. This allows gravity to stretch theligament in front of your spine to help restoreoptimal spinal curvature. The better youralignment, the better your movement.
When to use it?The beauty of the HQH Fitness Foam Roller isthat it can be used pre, during or post-session,creating added value to the session.
If you offer a class model, you can encourage your clients to lie on a foam roller vertically up their spine and perform breathing exercises until the class is ready to begin.
During a session you can use the foam roller as a holding aid for older clients to give them more confidence with certain exercises, or use it to enhance an exercise for more advanced clients.
Post-session the foam roller offers a perfectfinish. Again the client can lie on a foam roller vertically up their spine and perform breathing exercises, or they can use it to stretch out after the session.
The benefit of the foam roller is that it is a low cost tool, incredibly portable and light, andoffers a unique point of difference to add to your toolbox.
Clients love the feeling of easing out their aches and pains with this foam roller!
Model - Annie Van Den BerghOwner of Whispered Secrets Yoga & Healing Centre
www.whisperedsecrets.co.nz
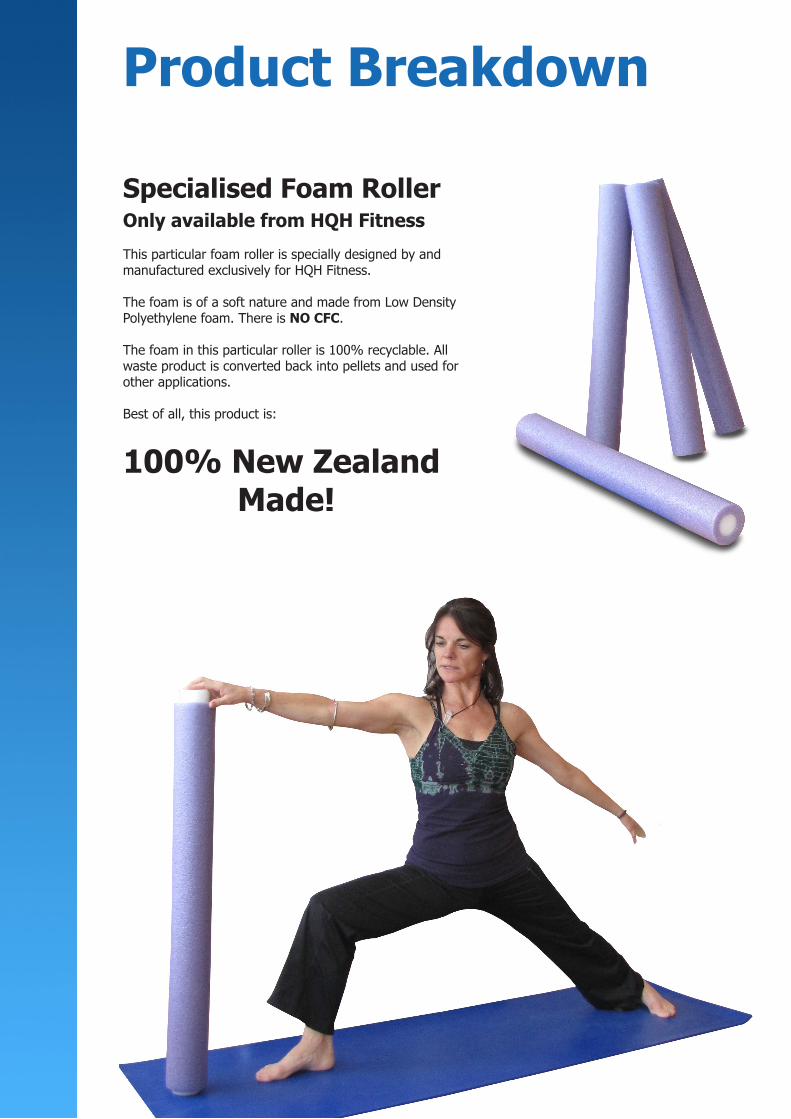
Product Breakdown
Specialised Foam RollerOnly available from HQH Fitness
This particular foam roller is specially designed by and manufactured exclusively for HQH Fitness.
The foam is of a soft nature and made from Low Density Polyethylene foam. There is NO CFC.
The foam in this particular roller is 100% recyclable. All waste product is converted back into pellets and used for other applications. Best of all, this product is:
100% New Zealand Made!

Benefits of our Roller for Spinal HealthUsing the Foam Roller for just ten minutes a day will dramatically improve spinal posture and correct imbalances in the spine due to sedentary lives and desk jobs that involve a lot of computer work.
Other foam rollers on the market are fantastic for Quad and IT Band or balance work. However, they are made of harder, dense foam and are not suitable for fine mobilisation of spinal joints as they most commonly span 5 to 6 vertebrae.
The HQH Fitness roller is 100mm and is able to span just 2 or 3 vertebrae. This aids in effectively and gently mobilising the spine segment by segment which is especiallybeneficial when a user has extreme postural kyphosis of the upper spine.
What is Kyphosis?Kypohosis is a common condition of a curvature of the upper back. It can be a result of:
l Degenerative diseases such as arthritis or disc degenerationl Fractures caused by osteoporosisl Injury (trauma)l Slipping of one vertebra forward on another (spondylolisthesis)l Developmental problems (Scheuermann’s disease)
Other causes can include:
Certain endocrine diseases, Connective tissue dis-orders, Infection (such as tuberculosis), Muscular dystrophy, Neurofibromatosis, Paget’s disease, Polio, Spina bifida, Tumors.
Postural Kyphosis is the most common form of kyphosis and is normally attribute to slouching (poor posture). It can occur in both the old and the young.
In the young, it is reversible by correcting muscular imbalances. In the old, it may be called ‘hyperkyphosis’ or dowager’s hump. About one third of the most severe hyperkyphosis cases have vertebral fractures. Otherwise, the aging body tends towards a loss of musculoskeletal integrity, and kyphosis can develop due to aging alone.
Symptoms include:
l Difficulty breathing (in severe cases)l Fatiguel Mild back painl Round back appearancel Tenderness and stiffness in the spine
How can the HQH Fitness Foam Roller help?The HQH Fitness foam roller is incrediblybeneficial for postural kyphosis as it helps to lengthen and release the spine. Highly recom-mended at ages 30 - 50 when back problems begin to kick in.
Recommended use: 10 - 15 minutes of lying on the foam roller (vertically down the length of the spine) morning and evening. If time does notallow this, 5 - 10 minutes will still be of benefit.
l Ensure your head is on the foam rollerl Focus on deep diaphramatic breathsl Simply relax into the foam rollerl Maintain your natural lumbar curve
PrecautionsAlways see a doctor prior to any form ofstretching or exercise. You must not use the foam roller if you have been diagnosed withserious spinal issues such as ankylosing spondiltis spondylolisthesis or a disc injury.
Right ImageImage shows ahealthy spine vs.a kyphotic spine.
Left: Healthy spine.
Right: Kyphosis ofupper thoracic.
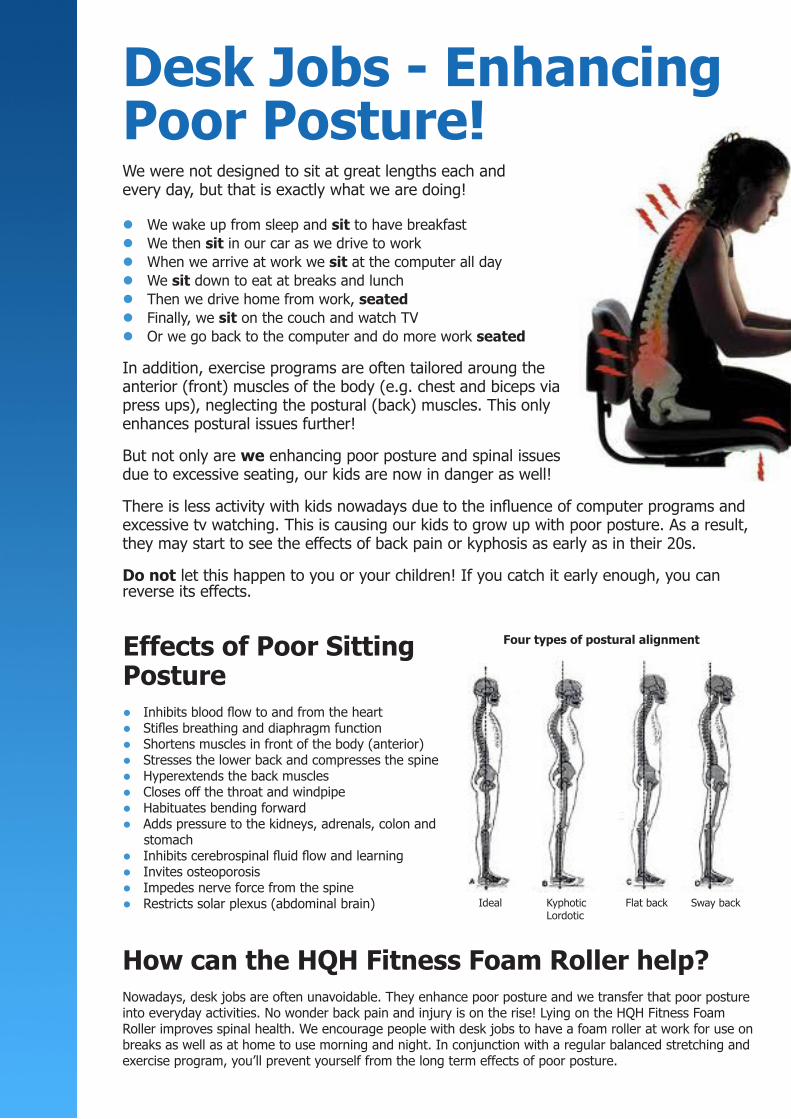
Desk Jobs - Enhancing Poor Posture!We were not designed to sit at great lengths each andevery day, but that is exactly what we are doing!
l We wake up from sleep and sit to have breakfastl We then sit in our car as we drive to workl When we arrive at work we sit at the computer all dayl We sit down to eat at breaks and lunchl Then we drive home from work, seatedl Finally, we sit on the couch and watch TVl Or we go back to the computer and do more work seated
In addition, exercise programs are often tailored aroung theanterior (front) muscles of the body (e.g. chest and biceps viapress ups), neglecting the postural (back) muscles. This onlyenhances postural issues further!
But not only are we enhancing poor posture and spinal issuesdue to excessive seating, our kids are now in danger as well!
There is less activity with kids nowadays due to the influence of computer programs and excessive tv watching. This is causing our kids to grow up with poor posture. As a result, they may start to see the effects of back pain or kyphosis as early as in their 20s.
Do not let this happen to you or your children! If you catch it early enough, you can reverse its effects.
Effects of Poor Sitting Posturel Inhibits blood flow to and from the heartl Stifles breathing and diaphragm functionl Shortens muscles in front of the body (anterior)l Stresses the lower back and compresses the spinel Hyperextends the back musclesl Closes off the throat and windpipel Habituates bending forwardl Adds pressure to the kidneys, adrenals, colon and stomachl Inhibits cerebrospinal fluid flow and learningl Invites osteoporosisl Impedes nerve force from the spinel Restricts solar plexus (abdominal brain) Ideal Kyphotic Flat back Sway back
Lordotic
Four types of postural alignment
How can the HQH Fitness Foam Roller help?Nowadays, desk jobs are often unavoidable. They enhance poor posture and we transfer that poor posture into everyday activities. No wonder back pain and injury is on the rise! Lying on the HQH Fitness Foam Roller improves spinal health. We encourage people with desk jobs to have a foam roller at work for use on breaks as well as at home to use morning and night. In conjunction with a regular balanced stretching and exercise program, you’ll prevent yourself from the long term effects of poor posture.

Primary Mobilisation TechniquesLongitudinal Thoracic Mobilisation
The Longitudinal Thoracic Mobilisationtechnique is an incredibly effective andimportant exercise for optimal spinal health.
This one movement can give great spinal relief and even aid relaxation.
This can be performed at the beginning, in the middle of, or at the end of each day.
1. Place the roller length-ways along the spine from the base of the skull to the tail bone. The knees shoulds always be bent and the feet flat on the floor.
2. To begin with, simply lie on the foam roller and work on your breathing.
3. As you get used to the feeling, begin to rock your upper body from one side to the other, feeling the foam roller work your spine. Make sure that you keep your lower body / pelvis still. From here you can progress to keeping the upper body still, and moving your pelvis from left to right.
Time: Begin with lying five minutes a day. Gradually work up to fifteen minutes a day.

Primary Mobilisation TechniquesHorizontal Thoracic Mobilisation
The Horizontal Thoracic Mobilisationtechnique is a more aggressive but effective way of self-mobilising the thoracic spine. Prior to using this technique get approval from a doctor. Some people have a disease called ankylosing spondylitis, or may have spondiliothesis or a disc injury and must not perform this mobilisation.
1. Place the foam roller perpendicular to the spine at the point slightly below the shoulder blades (or where the restriction is felt). The point of restriction can be identified by raising the arms in the air and having a second person say where there is still a hump in the back. The foam roller should feel as if it is placed between the vertebrae.
2. Cradle the neck with the hands.
3. With the neck supported, begin mobilising by exhaling as you allow yourself to drop backward over the foam roller to the floor. There can be some discomfort when performing these mobilisations so the movement should be performed slowly and only go back as is comfortable.
4. Hold the end point for 3 - 5 seconds beforecoming back up again.
5. Move down the roller into the next space. Each vertebra should be mobilised into extension 3 - 5 times.

Stretches & Movements
Modifi ed Hip Stretch
Reclining Bound Ankle
Release the lower back and increase mobility in the spine.
Lie down, lift your hips up and place thefoam roller under the hips. The key is toget the foam roller right into the ball andsocket joint so you get a massage at thesame time.
Hold the roller so it doesn’t move away and ensure the roller is running acrossthe back of the pelvis, not along thelower back.
With the knees up nice and close, gentlytip from side to side, starting slowly atfi rst connecting into the twist.
As you get comfortable with it, see how far you can progress over.
Exhale as you move to one side, inhale as you come back to central.
A more advanced movement thatstretches around the hip joints andunlocks stiffness in the lower body.
Begin in a seated position with the foam roller positioned under your right buttock and left leg straight behind you.
Gently tiptoe your fi ngers forward and take your chest over your front leg until you are at a position that is not forced. Hold for around 30 - 60 seconds, then tiptoe your fi ngers back and sit up. Change sides.You can progress to longer holds.
Rolling Back Release
An excellent groin and hip-opener.Also effectively opens up the ribcage.
With your sit bones on the ground, placethe foam roller starting at your lower back.Press the feet together so the knees areopen, stretching out the adductors andopening the hips.
Exhale, and gently lower yourself back onto the foam roller, externally rotating the shoulder (if uncomfortable, keep the arms at your side). Take deep diaphragmatic breaths, hold for 1 - 2 minutes.
Note: To come out of this movement, bring the knees together and roll to the side, gently moving off the foam roller.

Modified Bridge Pose
Modified Adductor Stretch This movement takes your adductor stretch to the next level!
Place the foam roller under the hips. Take your legs out to 90 degrees and reach up behind your head (left). If you find thisuncomfortable for the shoulder, only take the arm/s out to a comfortable range.
Modify by moving the legs back and forth to create mobility in the lumbar spine.
From here, you can open up by lowering the legs out to either side (below left).
Emphasise the stretch in the adductors by placing your hands on the inner thighs and gently pressing your legs into the stretch (below right). Do not force the stretch, work to your limit.
Calm the brain, energise tired legs and get the glutes firing!
Feet are hip width apart, knees parallel and hands at your side. Toes slightly in. The upper back naturally moulds to the foam roller. Ensure both the head andbottom are touching the foam roller as it lies vertically up the spine.
Inhale, push into the feet and activate the gluteal muscles. With the core activated, move into hip extension, lifting the chest towards the chin.
Hold for 10 - 15 seconds. Progress to longer holds as you get stronger.
Exhale and slowly lower one vertebrae at a time. Hold here, breathing for 10 - 15 seconds. Repeat 6 - 10 times.
Stretches & Movements

Stretches & Movements
TVA Activation Legs Up
Scissors
Enhance mobility in the spine and stimulate core activation.
Lay on the foam roller vertically with both head and tailbone touching the roller.
Place your hands out to the side, activate your TVA and lift your legs one at a time. Use your hands for stability only, not to hold yourself in position. Take a few deep diaphragmatic breaths whilst in position.
Activate the TVA, then lower the legs one by one. Lay for 10 - 15 secs then repeat.
Advancements include:- Toe taps whilst activating the TVA- Gently rocking from side to side for more of a mobility focus.
A more advanced movement tostimulate and target the core.
Lay on the foam roller vertically with both head and tailbone touching the roller.
Place your hands out to the side, activate your TVA and lift your legs one at a time to 90 degrees.
Inhale, then exhale, activate the TVA and slowly move the legs to oppositedirections (i.e. right towards you, left away from you). Keep a slight bend in the knees at all times.
Inhale, then exhale, activate the TVA and “scissor” the legs to the opposite position.
Continue 8 - 10 times, or until you feel fatigue in the core muscles.
Note: Do not continue past the point where you cannot continue to activate the TVA with the movement.
Use your hands for stability only, not to hold yourself in position.
If you find yourself repeatedly having to use your hands to hold yourself inposition, regress back to the previous movement - TVA Activation Legs Up.
Continue performing that movementregularly until you build enough core strength to perform this exercisesuccessfully.

Use the foam roller to assist your hip flexor stretch.
Lie one leg directly behind you and the front leg at 90 degrees, with the foam roller placed between your legs.
Maintain an upright spine and look directly ahead. With your fingers lightly on the foam roller, gently move it forward as you push into the stretch. Hold for 30 - 60 seconds.
Swap sides and repeat.
The assistance of the foam roller ensures you remain upright and gives you extra stability as you move forward into the stretch.
Advancement: Place your back shin/foot up on a Swiss ball to deepen the stretch.
Hip Flexor Stretch
Pigeon (Glute) Stretch 1
Stretches & Movements
Use the foam roller to enhance your glute stretch for a deeper stretch.
Lie one leg directly behind you. Place your front leg crossways - at 90 degrees and externally rotated at the hip. The foam roller is under your front upper thigh.
Maintain an upright spine and look directly ahead.
Gently lean forward over your front leg, tiptoeing your fingers forward.
The further you go, the more you increase the stretch in your glute muscle.
Note: Only go as far as is comfortable - i.e. to your own personal limit.
Our model is very flexible! So don’t try this if you are not able to!
Swap sides and repeat.
Please note:If you find this uncomfortable to begin with, simply regress to not having the foam roller under you, performing the stretch as is.
Once you gain more flexibility, you can add the foam roller back in.

An all-over, rejuvenating stretch. The foam roller offers an aid to modify and enhance the Downward Dog (Yoga).
This stretch focuses on the upper back and hamstrings, and opens up theshoulders.
Begin with feet wide, toes slightly in and tailbone to the roof. With your hands on the foam roller, gently roll it out until a point of resistance. Keep your base of support strong with your feet “glued” to the ground. You can bend your knees slightly if you feel irritation.You can also modify theDolphin Pose, anotherYoga move (right) byadding in the foam roller.
Stretches & Movements
Modified Downward Dog
Extension-Flexion Movement The foam roller offers support in this under-utilised movement which opens up the ribcage and enhances spinal mobility.
Carefully place the foam roller behind you at the mid-thoracic level (left).
Using your arms as leverage, open up the chest and move your thoracic spine into extension, maintain your lumbar curve. Inhale deeply into this movement, as you look up. Completely open up (left).
From here, move the spine into flexion and hug the foam roller around you, exhaling as you go and tucking your chin to your chest. Feel the difference (bottom left).
Keep alternating between these twomovements for 15 - 30 second intervals.
If this is uncomfortable, it is something you can progress to from the Cat-Camel exercise (below).
Caution: If you feel irritation, slowly reverse the stretch, coming upslowly. For shoulder or neck injuries, keep the knees slightly bent.

Back Roller
Stretches & Movements
This nice and simple movement alters the more common Child’s Pose into a nice dynamic movement using the Foam Roller as an aid.
Kneeling at the base of your Yoga Mat, knees wide and an upright posture, gently place your finger tips on the roller (left).
Inhale, then exhale and allow the roller to roll forward under your arms until youexperience a nice deep stretch in the back.
Take a moment to relax into the stretch, breathing deeply.
Utilise the support of the foam roller to move deeper into the stretch.
To come back up to sitting, simply inhale, then exhale and roll the roller back in towards you, coming back to an upright posture.
This is a great energising movement, or as a “pick me up”!
Modification (below)
Bringing your hands together, create a more dynamic movement incorporating a stretch into the arms.
Stretch out as per above (Step 2), then bend the arms towards the head in a prayer movement (Step 3). To reverse the movement, go from Step 3, to 2, to 1 until you are finally back up in a seated posi-tion (top left).
This stretch gets nice and deep into the shoulders and arms.Modification
Step 1
Step 2
Step 3

Stretches & Movements
Advanced Spinal Twist
The Foam Roller is a fantastic aid forenhancing or supporting stretches.
A traditional side stretch can be aided by a foam roller to add stability to the stretch.
This is especially beneficial for older cli-ents or for clients new to different stretch-ing positions.
It is also incredibly beneficial as asupport tool that a teacher can makeavailable to clients in yoga or Pilates classes.
By giving them the option of the support of the foam roller, they may find it easier to progress, or alternatively create an extra challenge in the stretch.
The traditional spinal twist is given an added boost with mobilityenhancement.
The traditional spinal twist is enhanced by placing the foam roller under the back.
Laying on your back with the foam roller positioned tucked just below theshoulders, take the hands to the ears to support the head.
Bring the knees to 90 degrees.
Inhale, then exhale and gently roll both legs over to one side (left), keeping the knees together.
Ensure the upper body stays in position (should not move) and continue looking up.
Only go as far over as is comfortable. Do not force the position. Stay here for a few breaths.
Inhale, then exhale and gently roll right over to the opposite side, again keeping the knees together, looking up (neutral eye level) and keeping the upper body in position.
Repeat slowly 3 - 4 times, or to the point that is comfortable for you - do not overdo the movement.
Assisted Side Stretch

Spinal Rotator
Modified Back Stretch
Stretches & Movements
Revitalise the body morning and night with this simple movement that will wake up the body and spine.
Standing upright and looking straight ahead, place your fingers on the outer edge of each end of the foam roller, so that you have a good hold of it.
Bring one arm up and keep the other low, taking the foam roller to near-vertical in front of you.
Sweep to the side of the lower arm. (left). Take deep diaphragmatic breaths as you go and maintain a neutral curve in your lower back, activating the TVA.
As you transition to the opposite side, switch the arms so the lower arm comes to the high position and the upper arm goes down to the lower position.
This movement is great for spinal and shoulder mobility and to energise the body.
Repeat 5 - 10 times each side.
An advanced and dynamic movement that gets deep into the back andshoulder muscles.
Standing upright, begin with feet wide, toes slightly in.
Take the foam roller behind your head, arms extended and gently move forward. Take the tailbone to the roof and move the foam roller out until you feel a good stretch (below left).
To return to standing, gently reverse the movement until you are standing upright again.
Note: This is an advanced movement.
Caution: If you have ashoulder injury, low bloodpressure or experience dizzy spells, you may not be able to perform this movement.

Stretches & Movements
Glute Stretch 2 & Reach
Add a tool to your Warrior 2 Pose for assistance or an extra challenge!
This has a slightly different startingposition to the usual Warrior 2. Stand in front of the foam roller, with the right hand gently resting on top, feet facing forward.
Inhale, then exhale and take a deep step back (3 to 4 feet), bending the front knee and ensuring the back foot is facing 90 degrees to the front foot. Take the back arm in the opposite direction to the front arm. Both arms should be strong and parallel to the ground.
Your head and eye-line should beforwards, in the direction of the front hand and foot. Your fingers should only beresting gently on the foam roller.
Repeat on the opposite side.
Assisted Warrior 2 Pose
Use the foam roller to enhance your glute stretch for a deeper stretch.
This is an advancement on the Glute Stretch 1.
Lie one leg directly behind you. Place your front leg crossways - at 90 degrees and externally rotated at the hip. The foam roller is under your front upper thigh.
Maintain an upright spine and look directly ahead.
Gently lean forward over your front leg and bring your body down, facing the side of your forward leg and tucking the op-posite arm underneath you (bottom left), reaching out.
Simply place the other hand on the ground for stability / assistance.
This will give a nice glute stretch as well as in the arms.
Hold for 30 - 60 seconds then swap sides.
Note: Only go as far as is comfortable - i.e. to your own personal limit.

Stretches & Movements
This modified version of a traditional Yoga twist energises the spine and stimulates the digestive fire.
Sit on the floor with the foam roller under your glutes with your knees bent and feet on the floor. Slide the right foot under your left leg, stepping the left foot to the floor outside your right hip, knee to the ceiling.The left hand touches the floor behind you and the right hand is against the left thigh.
Move into the twist towards your left, keeping the body upright and eyes ahead. With every inhalation, lift a little more through the sternum, pushing the fingers against the floor to help.
A simple movement to stretch out the side of the body and elongate the back.
Sit on the floor with the foam roller under your glutes with your legs crossed in front of you.
Take your right arm up, place the left hand on the roller and reach the right arm to the opposite side (left).
Either use the foam roller for stability, or to enhance the stretch by pushing your hand into the roller.
Keep your eyes in neutral position. Hold for 30 - 60 seconds.
Come back up to neutral, then repeat on the opposite side - take the opposite arm (left) over the body in the frontal plane to the right side, using the right hand on the roller for assistance.
A nice way to finish off this movement is to come back up to neutral sitting position, looking straight ahead.
Clasp the hands together and reach up towards the sky, with your eyes following your hands. This is a fantastic release for the upper back.
Assisted “Half Lord of the Fishes”
Twist a little more with every exhalation. Be sure to distribute the twist evenly throughout the entire length of the spine; don’t concentrate it in the lower back. Stay for 30 - 60 seconds, then release with an exhalation, return to starting position, then repeat on the opposite side.
Assisted Side Reach

Stretches & Movements
Mobilise the ribcage while enhancing your back stretch.
Place the foam roller just under the chest and reach your arms out.
Extend your back and use your hands for stability as you move into a backextension. You will not only feel anenhanced back stretch, but you will feel your ribcage mobilise as well. Hold for around 15 seconds before coming back down slowly. Repeat 2 - 5 times.
Assisted Back Extension
Get a nice hamstring stretch by adding one...or two foam rollers!
Option 1 - One Foam Roller
Place the foam roller under the glutes. Straighten the legs in front of you and flex the feet (toes coming towards you).
Gently lean forward only as far as you feel a good stretch in the hamstrings, maintaining an upright back. Look straight ahead. The foam roller will gentlymassage the glute muscles while you stretch.
Hold for 30 - 60 seconds or longer if you feel able to comfortably. Never overstretch or force the position.
Option 1 - Two Foam Rollers
Place one foam roller under the glutes. Place the second foam roller under the knees. This give a bit of release to the stretch.
The legs are straight in front of you and the feet are flexed (toes coming towards you).
Inhale, reach upwards nice and tall, then exhale and reach out to your feet, round-ing your back, looking down towards your legs. Hold for 10 - 15 seconds.
As you come back up to sitting, gently roll up one vertebrae at a time and reach your hands up to the roof again. Repeat 2 - 5 times.
Assisted Hamstring Stretch
Option 1
Option 2

Foam Roller TricksFollowing are some tips and ideas that other customers have shared withus. Warning - some are very creative but these may not be for everyone so be sure to get a doctor’s approval before using any of these with clients.
Dowel Rod down the Middle
Carve out the inner part of the foam roller and add a dowel rod down the middle.
This ensures the foam roller holds its shape and gives an added stiffness and rigidness to the roller while maintaining the integrity of the soft outer foam.
Weight Plate for Added Pressure
For clients who need regular mobility (those without serious back issues), assist them on the foam roller (only with the foam roller in Vertical Mobilisation position) by placing a 10kg, 15kg or 20kg plate on their chest.
The added weight will give them a greater feeling of release and increase themobilisation effects. They can stay here for 2-5 minutes focusing on breathing. It is good to keep the hands on the plate for support.
To finish, always remove the plate for them first, then get them to roll sideways off the roller, taking a moment to recover before standing up again.
Note - If you are doing this by yourself:To get on: Sit down on the foam roller at the end, bringing the weight plate to your chest, then gently roll back and position yourself correctly.To get off: Roll to the side and push off the weight plate, then gently roll off the foam roller. Never sit back up still holding the weight plate.
Large Olympic Bumper Plates -10, 15, 20kg are ideal
Tricks for using the HQH Fitness Foam Roller in Sessions
l When training groups - use as a pre or post workout option they can do themselves.l Use as a postural aid with clients instead of a dowel rod.l Use with older clients as an assisting tool.l Once the roller has been used for a while, the inner core will be looser. You can then remove the inner core for more finer mobilisation techniques, or as an aid/tool as per above .l Purchase wholesale and use as free gifts for clients, or include in a package offer as part of their home maintenance.
The possibilities are endless - so have some fun with it!
Address75 Sunrise Avenue, Murrays Bay, Auckland 0630NEW ZEALAND
PhoneNEW ZEALAND 0800 552 8789AUSTRALIA 1800 552 8789INTERNATIONAL +64 9 478 2111
Fax+64 9 478 9111
EmailINFORMATION [email protected] [email protected]
AboutService. Innovation. Solutions. HQH Fitness is an international company that aims to help improve the health, fitness and wellness of people all over the world. We offer functional fitness equipmentsolutions and personalised service for Studio and Commercial Facility setups. HQH Fitness represents “the Future of Fitness”, offering only the highest quality products available on the market today.
Social facebook.com/HQHFitness twitter.com/HQHFitness youtube.com/HQHMarketing youtube.com/HQHFitness http://hqhblog.com flickr.com/photos/hqhfitness


![VWHPV %LR (QKDQFHG ELR /HQH %LRSODVWLF …€¦ · elr /hqh lv d 6lhuud 5hvlqv 0dvwhuedwfk sro\phu dgglwlyh elr frqfhqwudwh irupxodwhg iru hq]\ph frqvxpswlrq 06, elr /hqh zkhq dgghg](https://img.pdfslide.net/doc/110x75/6008f2b1a20bcb0a8f117777/vwhpv-lr-qkdqfhg-elr-hqh-lrsodvwlf-elr-hqh-lv-d-6lhuud-5hvlqv-0dvwhuedwfk-srophu.jpg)