Embed Size (px)
Citation preview

F R E E Q U I L T P A T T E R N

artgalleryfabrics.com
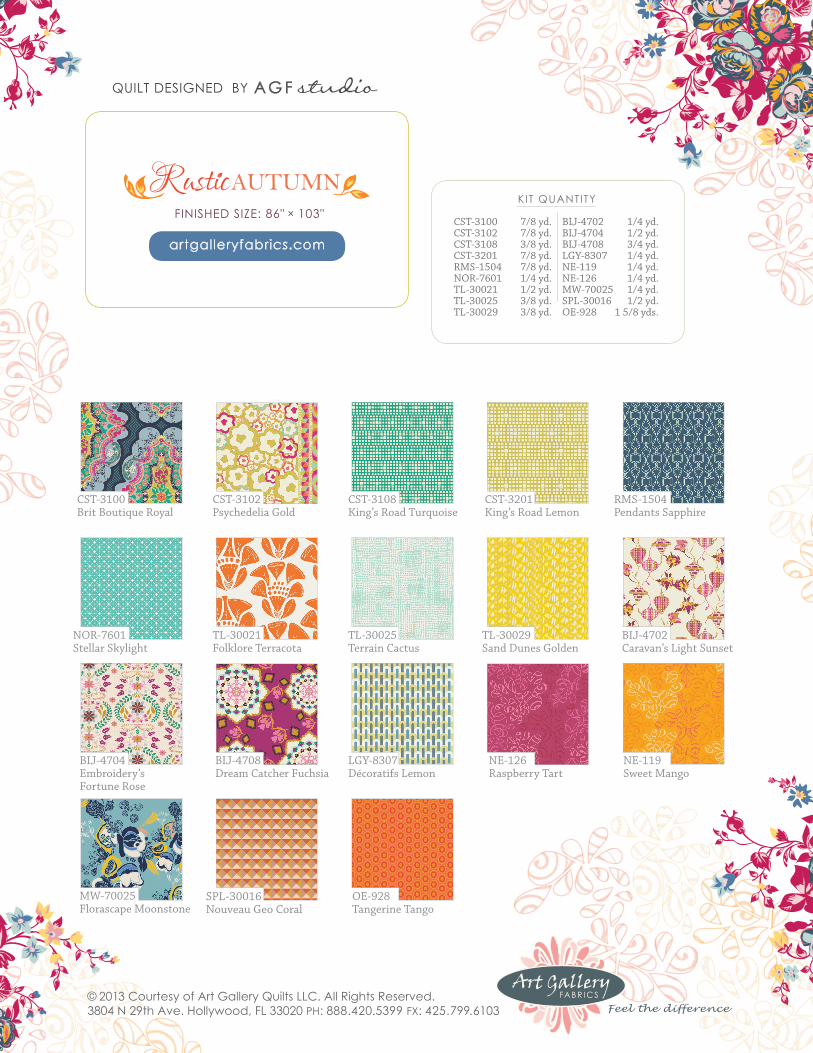
FINISHED SIZE: 86" × 103"
artgalleryfabrics.com
© 2013 Courtesy of Art Gallery Quilts LLC. All Rights Reserved.3804 N 29th Ave. Hollywood, FL 33020 PH: 888.420.5399 FX: 425.799.6103
CST-3100Brit Boutique Royal
BIJ-4704Embroidery’s Fortune Rose
CST-3102Psychedelia Gold
BIJ-4708Dream Catcher Fuchsia
CST-3108King’s Road Turquoise
CST-3201King’s Road Lemon
NE-126Raspberry Tart
TL-30021Folklore Terracota
SPL-30016Nouveau Geo Coral
TL-30025Terrain Cactus
LGY-8307Décoratifs Lemon
OE-928Tangerine Tango
TL-30029Sand Dunes Golden
BIJ-4702Caravan’s Light Sunset
RMS-1504Pendants Sapphire
NE-119Sweet Mango
NOR-7601Stellar Skylight
MW-70025Florascape Moonstone
CST-3100CST-3102CST-3108CST-3201RMS-1504NOR-7601TL-30021TL-30025TL-30029
BIJ-4702BIJ-4704BIJ-4708LGY-8307NE-119NE-126MW-70025SPL-30016OE-928
7/8 yd.7/8 yd.3/8 yd.7/8 yd.7/8 yd.1/4 yd.1/2 yd.3/8 yd.3/8 yd.
1/4 yd.1/2 yd.3/4 yd.1/4 yd.1/4 yd.1/4 yd.1/4 yd.1/2 yd.
1 5/8 yds.
KIT QUANTITY
QUILT DESIGNED BY
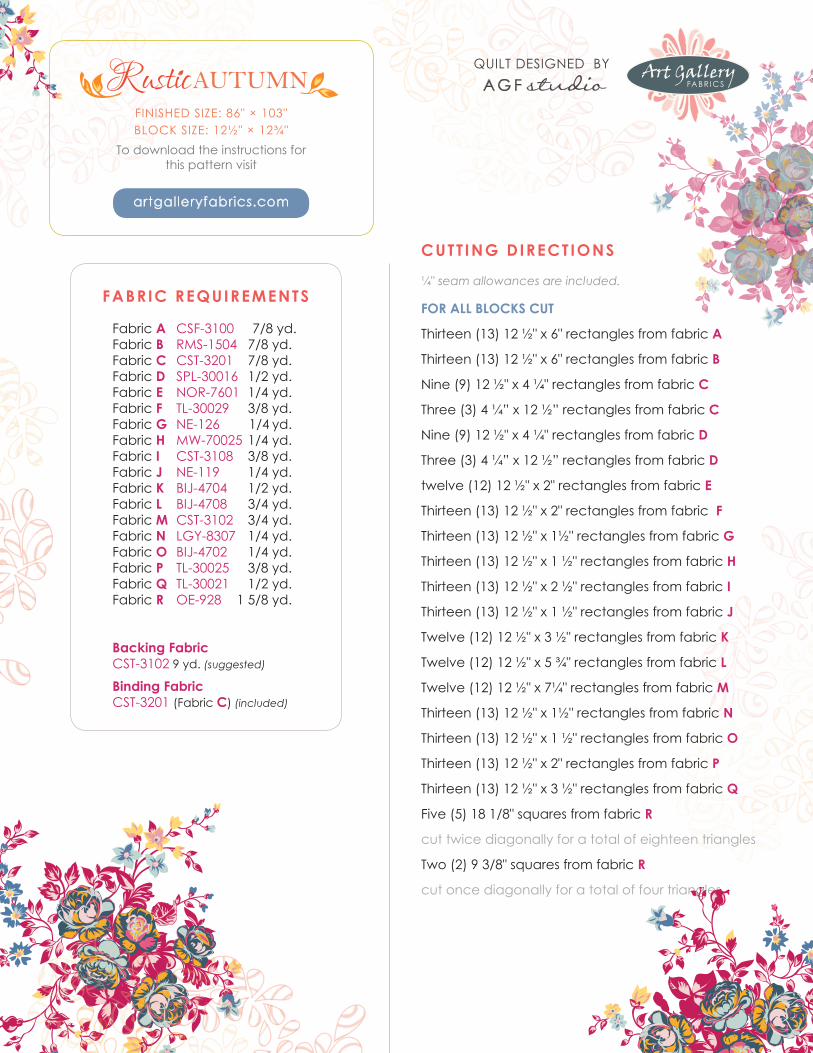
FABRIC REQUIREMENTS
Fabric A CSF-3100 7/8 yd. Fabric B RMS-1504 7/8 yd. Fabric C CST-3201 7/8 yd. Fabric D SPL-30016 1/2 yd.Fabric E NOR-7601 1/4 yd. Fabric F TL-30029 3/8 yd. Fabric G NE-126 1/4 yd. Fabric H MW-70025 1/4 yd.Fabric I CST-3108 3/8 yd.Fabric J NE-119 1/4 yd.Fabric K BIJ-4704 1/2 yd.Fabric L BIJ-4708 3/4 yd.Fabric M CST-3102 3/4 yd.Fabric N LGY-8307 1/4 yd.Fabric O BIJ-4702 1/4 yd.Fabric P TL-30025 3/8 yd.Fabric Q TL-30021 1/2 yd.Fabric R OE-928 1 5/8 yd.
Backing Fabric CST-3102 9 yd. (suggested)
Binding Fabric CST-3201 (Fabric C) (included)
CUTT ING DIRECTIONS
¼" seam allowances are included.
FOR ALL BLOCKS CUT
Thirteen (13) 12 ½" x 6" rectangles from fabric A
Thirteen (13) 12 ½" x 6" rectangles from fabric B
Nine (9) 12 ½" x 4 ¼" rectangles from fabric C
Three (3) 4 ¼” x 12 ½” rectangles from fabric C
Nine (9) 12 ½" x 4 ¼" rectangles from fabric D
Three (3) 4 ¼” x 12 ½” rectangles from fabric D
twelve (12) 12 ½" x 2" rectangles from fabric E
Thirteen (13) 12 ½" x 2" rectangles from fabric F
Thirteen (13) 12 ½" x 1½" rectangles from fabric G
Thirteen (13) 12 ½" x 1 ½" rectangles from fabric H
Thirteen (13) 12 ½" x 2 ½" rectangles from fabric I
Thirteen (13) 12 ½" x 1 ½" rectangles from fabric J
Twelve (12) 12 ½" x 3 ½" rectangles from fabric K
Twelve (12) 12 ½" x 5 ¾" rectangles from fabric L
Twelve (12) 12 ½" x 7¼" rectangles from fabric M
Thirteen (13) 12 ½" x 1½" rectangles from fabric N
Thirteen (13) 12 ½" x 1 ½" rectangles from fabric O
Thirteen (13) 12 ½" x 2" rectangles from fabric P
Thirteen (13) 12 ½" x 3 ½" rectangles from fabric Q
Five (5) 18 1/8" squares from fabric R
cut twice diagonally for a total of eighteen triangles
Two (2) 9 3/8" squares from fabric R
cut once diagonally for a total of four triangles
QUILT DESIGNED BY
FINISHED SIZE: 86" × 103"BLOCK SIZE: 12½" × 12¾"
To download the instructions for this pattern visit
artgalleryfabrics.com
C
L
K
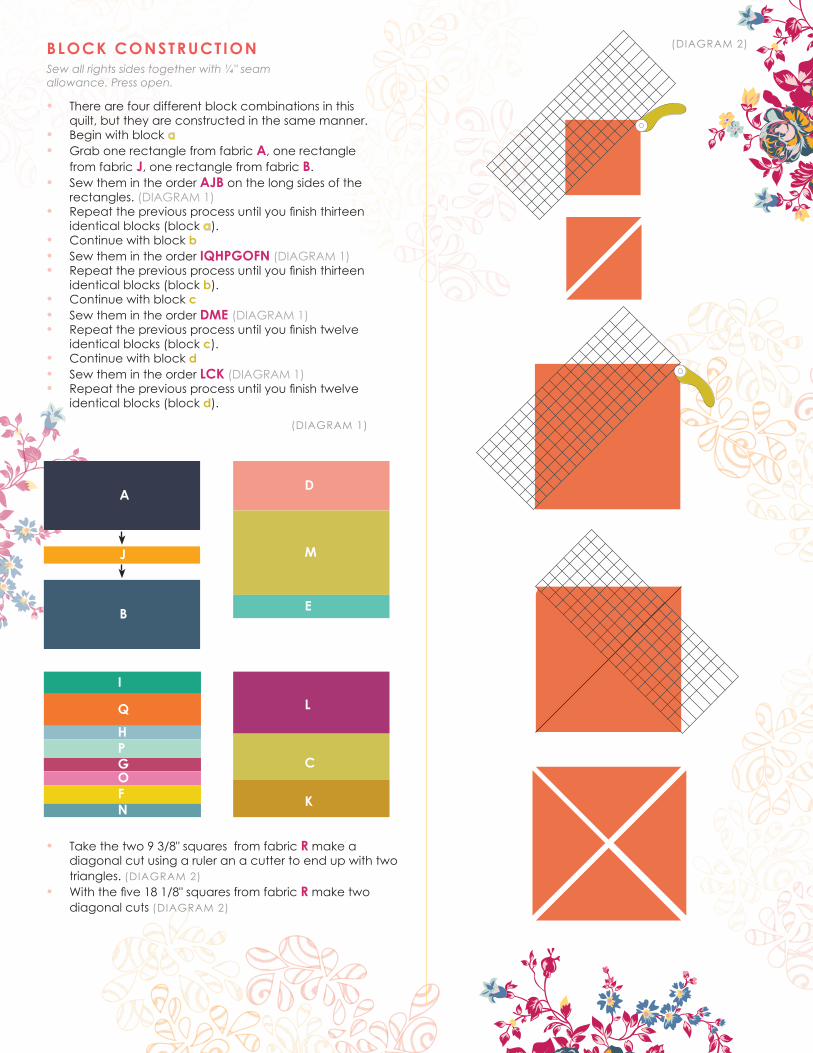
BLOCK CONSTRUCTIONSew all rights sides together with ¼" seam allowance. Press open.
• There are four different block combinations in this quilt, but they are constructed in the same manner.
• Begin with block a • Grab one rectangle from fabric A, one rectangle
from fabric J, one rectangle from fabric B.• Sew them in the order AJB on the long sides of the
rectangles. (DIAGRAM 1)• Repeatthepreviousprocessuntilyoufinishthirteen
identical blocks (block a).• Continue with block b• Sew them in the order IQHPGOFN (DIAGRAM 1)• Repeatthepreviousprocessuntilyoufinishthirteen
identical blocks (block b).• Continue with block c• Sew them in the order DME (DIAGRAM 1)• Repeatthepreviousprocessuntilyoufinishtwelve
identical blocks (block c).• Continue with block d• Sew them in the order LCK (DIAGRAM 1)• Repeatthepreviousprocessuntilyoufinishtwelve
identical blocks (block d).
(DIAGRAM 1)
(DIAGRAM 2)
E
M
D
NF
GPHQ
I
O
A
J
B
• Take the two 9 3/8" squares from fabric R make a diagonal cut using a ruler an a cutter to end up with two triangles. (DIAGRAM 2)
• Withthefive181/8"squaresfromfabricR make two diagonal cuts (DIAGRAM 2)
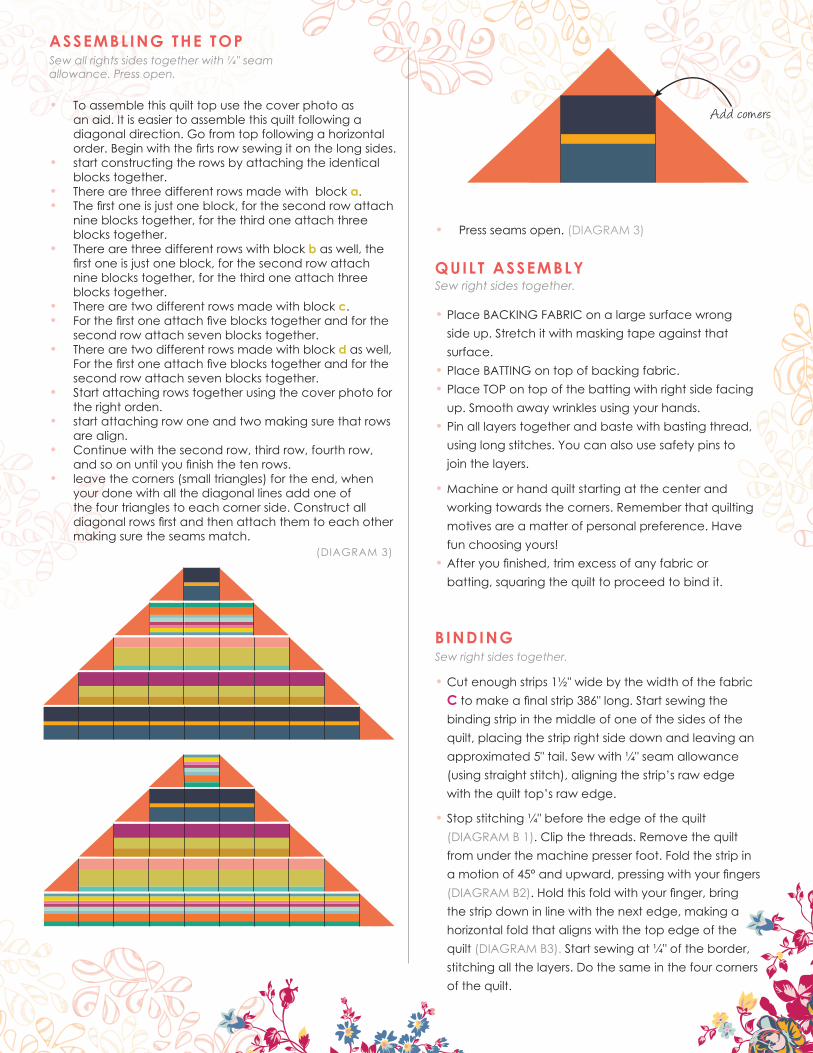
ASSEMBLING THE TOPSew all rights sides together with ¼" seam allowance. Press open.
• To assemble this quilt top use the cover photo as an aid. It is easier to assemble this quilt following a diagonal direction. Go from top following a horizontal order.Beginwiththefirtsrowsewingitonthelongsides.
• start constructing the rows by attaching the identical blocks together.
• There are three different rows made with block a.• Thefirstoneisjustoneblock,forthesecondrowattach
nine blocks together, for the third one attach three blocks together.
• There are three different rows with block b as well, the firstoneisjustoneblock,forthesecondrowattachnine blocks together, for the third one attach three blocks together.
• There are two different rows made with block c.• Forthefirstoneattachfiveblockstogetherandforthe
second row attach seven blocks together.• There are two different rows made with block d as well,
Forthefirstoneattachfiveblockstogetherandforthesecond row attach seven blocks together.
• Start attaching rows together using the cover photo for the right orden.
• start attaching row one and two making sure that rows are align.
• Continue with the second row, third row, fourth row, andsoonuntilyoufinishthetenrows.
• leave the corners (small triangles) for the end, when your done with all the diagonal lines add one of the four triangles to each corner side. Construct all diagonalrowsfirstandthenattachthemtoeachothermaking sure the seams match.
Sew right sides together.
•Place BACKING FABRIC on a large surface wrong side up. Stretch it with masking tape against that surface.
•Place BATTING on top of backing fabric.•Place TOP on top of the batting with right side facing
up. Smooth away wrinkles using your hands.•Pin all layers together and baste with basting thread,
using long stitches. You can also use safety pins to jointhelayers.
QUILT ASSEMBLY
•Machine or hand quilt starting at the center and working towards the corners. Remember that quilting motives are a matter of personal preference. Have fun choosing yours!
•Afteryoufinished,trimexcessofanyfabricorbatting, squaring the quilt to proceed to bind it.
(DIAGRAM 3)
Add corners
•Cut enough strips 1½" wide by the width of the fabric Ctomakeafinalstrip386"long.Startsewingthebinding strip in the middle of one of the sides of the quilt, placing the strip right side down and leaving an approximated 5" tail. Sew with ¼" seam allowance (using straight stitch), aligning the strip’s raw edge with the quilt top’s raw edge.
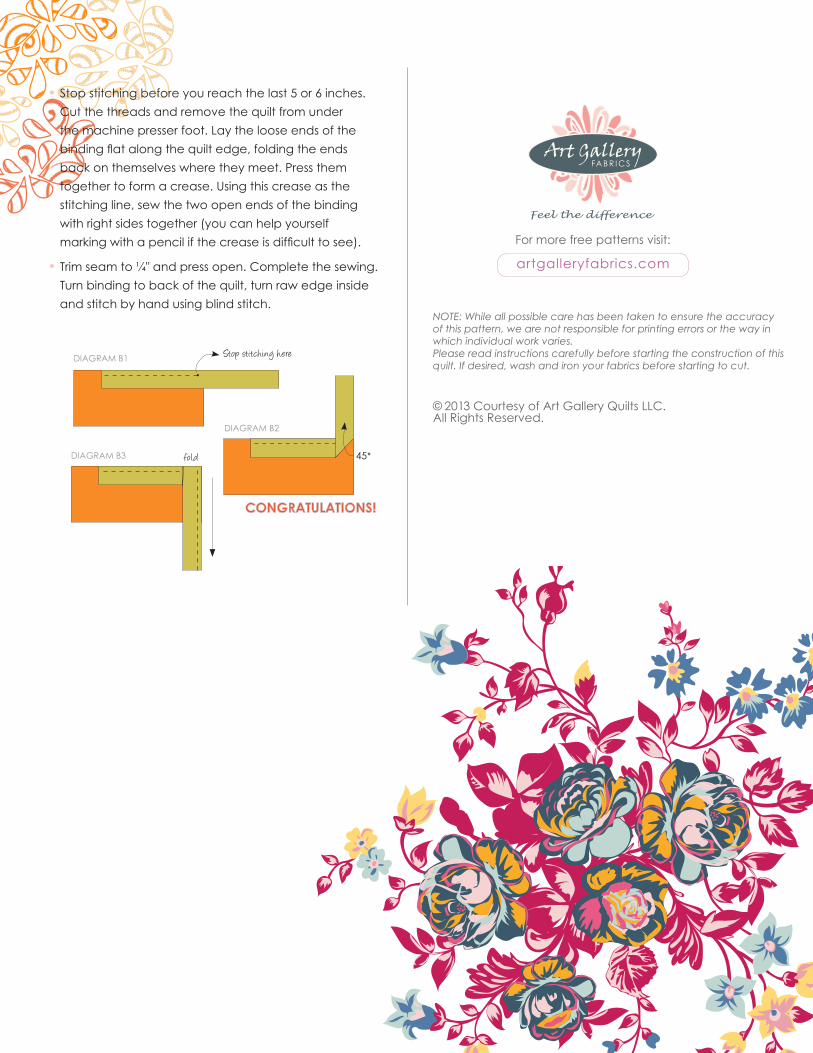
•Stop stitching ¼" before the edge of the quilt (DIAGRAM B 1). Clip the threads. Remove the quilt from under the machine presser foot. Fold the strip in amotionof45°andupward,pressingwithyourfingers(DIAGRAM B2).Holdthisfoldwithyourfinger,bringthe strip down in line with the next edge, making a horizontal fold that aligns with the top edge of the quilt (DIAGRAM B3). Start sewing at ¼" of the border, stitching all the layers. Do the same in the four corners of the quilt.
Sew right sides together.BINDING
• Press seams open. (DIAGRAM 3)
NOTE: While all possible care has been taken to ensure the accuracy of this pattern, we are not responsible for printing errors or the way in which individual work varies.Please read instructions carefully before starting the construction of this quilt. If desired, wash and iron your fabrics before starting to cut.
© 2013 Courtesy of Art Gallery Quilts LLC.All Rights Reserved.
For more free patterns visit:
artgalleryfabrics.com
•Stop stitching before you reach the last 5 or 6 inches. Cut the threads and remove the quilt from under the machine presser foot. Lay the loose ends of the bindingflatalongthequiltedge,foldingtheendsback on themselves where they meet. Press them together to form a crease. Using this crease as the stitching line, sew the two open ends of the binding with right sides together (you can help yourself markingwithapencilifthecreaseisdifficulttosee).
•Trim seam to ¼" and press open. Complete the sewing. Turn binding to back of the quilt, turn raw edge inside and stitch by hand using blind stitch.
45˚
DIAGRAM B2
DIAGRAM B1 Stop stitching here
DIAGRAM B3 fold
CONGRATULATIONS!